

Page 1

INSTRUCTIONS
MECHANICAL LITHOTRIPTOR
BML-3Q-1
BML-4Q-1
USA: CAUTION: Federal law restricts this device to sale by or on the
order of a physician.
0197
Page 2

Page 3

Contents
Symbols
Important Information–Please Read Before Use
Intended Use 2. . . . . . . . . . . . . . . . . . . . . . . . . . . . . . . . . . . . . .
Instruction Manual 2. . . . . . . . . . . . . . . . . . . . . . . . . . . . . . . . .
User Qualifications 2. . . . . . . . . . . . . . . . . . . . . . . . . . . . . . . . .
Instrument Compatibility 3. . . . . . . . . . . . . . . . . . . . . . . . . . . .
Reprocessing and Storage 3. . . . . . . . . . . . . . . . . . . . . . . . . .
Repair and Modification 3. . . . . . . . . . . . . . . . . . . . . . . . . . . . .
Signal Words 4. . . . . . . . . . . . . . . . . . . . . . . . . . . . . . . . . . . . . .
Warnings and Cautions 4. . . . . . . . . . . . . . . . . . . . . . . . . . . . .
Chapter 1 Checking the Package Contents
1.1 Checking the Package Contents 6. . . . . . . . . . . . . . . .
Chapter 2 Instrument
Nomenclature and Specifications
2.1 Nomenclature and Functions 8. . . . . . . . . . . . . . . . . . .
2.2 Specifications 14. . . . . . . . . . . . . . . . . . . . . . . . . . . . . . . .
Contents
Chapter 3 Preparation,
Inspection and Operation
3.1 Preparation 19. . . . . . . . . . . . . . . . . . . . . . . . . . . . . . . . . .
3.2 Inspection 20. . . . . . . . . . . . . . . . . . . . . . . . . . . . . . . . . . .
3.3 Operation 31. . . . . . . . . . . . . . . . . . . . . . . . . . . . . . . . . . . .
Chapter 4 Emergency Treatment
4.1 Emergency Treatment 45. . . . . . . . . . . . . . . . . . . . . . . . .
Chapter 5 Reprocessing
5.1 General Policy 55. . . . . . . . . . . . . . . . . . . . . . . . . . . . . . . .
5.2 Required Reprocessing Equipment 59. . . . . . . . . . . . . .
5.3 Cleaning 61. . . . . . . . . . . . . . . . . . . . . . . . . . . . . . . . . . . . .
5.4 Lubrication 67. . . . . . . . . . . . . . . . . . . . . . . . . . . . . . . . . . .
5.5 Assembly 69. . . . . . . . . . . . . . . . . . . . . . . . . . . . . . . . . . . .
5.6 Sterilization 73. . . . . . . . . . . . . . . . . . . . . . . . . . . . . . . . . .
iMECHANICAL LITHOTRIPTOR
Page 4

Contents
Chapter 6 Storage
6.1 Inspection Before Storage 77. . . . . . . . . . . . . . . . . . . . . .
6.2 Storage 77. . . . . . . . . . . . . . . . . . . . . . . . . . . . . . . . . . . . . .
ii MECHANICAL LITHOTRIPTOR
Page 5
Symbols
Symbols
The meaning(s) of the symbol(s) shown on the package,
the back cover of this instruction manual and/or this
instrument are as follows:
Refer to instructions.
Single use only
Use by (expiration date)
STERILE EO
STERILE LOT
LOT
Sterilized using ethylene oxide
Sterilization lot number
Lot number
Manufacturer
Authorised representative in the
European Community
1MECHANICAL LITHOTRIPTOR
Page 6

Important Information–Please Read Before Use
Important Information–Please
Read Before Use
Intended Use
These instruments have been designed to be used with an
Olympus endoscope for crushing calculi inside the bile
duct. Do not use these instruments for any purpose other
than their intended use.
Instruction Manual
This instruction manual contains essential information on
using this instrument safely and effectively. Before use,
thoroughly review this manual and the manuals of all
equipment which will be used during the procedure and
use the instruments as instructed.
Keep this and all related instruction manuals in a safe,
accessible location.
If you have any questions or comments about any
information in this manual, please contact Olympus.
User Qualifications
The operator of this instrument must be a physician or
medical personnel under the supervision of a physician
and must have received sufficient training in clinical
endoscopic technique. This manual, therefore, does not
explain or discuss clinical endoscopic procedures.
2 MECHANICAL LITHOTRIPTOR
Page 7

Important Information–Please Read Before Use
Instrument Compatibility
Refer to the Table in Section 2.2, “Specifications” to
confirm that this instrument is compatible with the ancillary
equipment being used. Using incompatible equipment can
result in patient injury and/or equipment damage.
Reprocessing and Storage
The Basket Wire was shipped in a sterile condition. Store
it following the instructions in Chapter 6, “Storage”.
Improper storage can present an infection control risk,
cause equipment damage or reduce performance.
The Basket Wire is a single-use, disposable item that is not
to be reprocessed. Do not reuse or attempt to sterilize it.
The Coil Sheath, the Tube Sheath and the BML Handle
were not sterilized before shipment. Before using the Coil
Sheath, the Tube Sheath and the BML Handle for the first
time, reprocess them according to the instructions in
Chapter 5, “Reprocessing”.
After using the Coil Sheath, Tube Sheath and BML Handle,
reprocess and store them according to the instructions in
Chapter 5, “Reprocessing” and Chapter 6, “Storage”.
Improper and/or incomplete reprocessing or storage can
present an infection control risk, cause equipment damage
or reduce performance.
Repair and Modification
This instrument and BML Handle do not contain any
user-serviceable parts. Do not disassemble, modify or
attempt to repair them; patient or user injury and/or
equipment damage can result.
3MECHANICAL LITHOTRIPTOR
Page 8

Important Information–Please Read Before Use
Signal Words
The following signal words are used throughout this
manual:
Indicates a potentially hazardous
situation which, if not avoided, could
result in death or serious injury.
Indicates a potentially hazardous
situation which, if not avoided, may result
in minor or moderate injury. It may also be
used to alert against unsafe practices or
potential equipment damage.
NOTE
Indicates additional helpful information.
Warnings and Cautions
Follow the warning given below when handling this
instrument and the BML Handle. This information is to be
supplemented by the warnings described in each chapter.
S Before use, thoroughly review the
method of use for this instrument and
BML-110A-1 in accordance with the
instruction manuals.
S Do not use this instrument for a
calculus that is assumed impossible to
be crushed by a lithotriptor. The pipe
or the basket wire may break and part
of this instrument may remain in the
body.
S Use this instrument by having the
settings to switch to open surgery and
the hospitalization plan ready in case
the calculus cannot be crushed by
lithotriptor BML-110A-1.
4 MECHANICAL LITHOTRIPTOR
Page 9

Important Information–Please Read Before Use
S A Lithotriptor cannot always crush all
calculi captured in the Basket.
Operation of this instrument is based
on the assumption that open surgery is
to be possible as an emergency
measure. If the calculus is too hard,
there is possibility that the damages
shown in Chapter 4 “Emergency
Treatment” may occur. Use this
instrument by considering that it may
lead to damaging the instrument and
that open surgery may have to take
place.
5MECHANICAL LITHOTRIPTOR
Page 10
Chapter 1 Checking the Package Contents
Chapter 1 Checking the Package
Contents
1.1 Checking the Package Contents
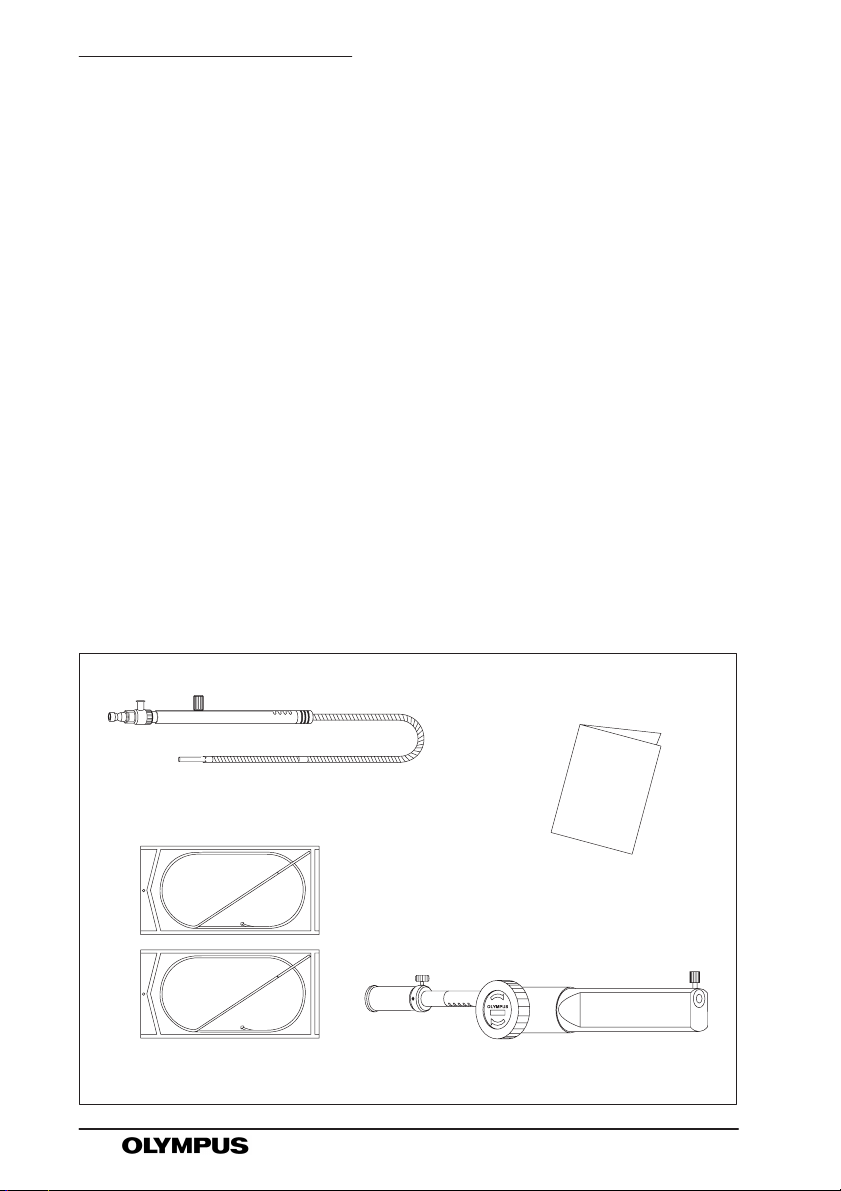
Match all items in the package with the components shown
below. Inspect each item for damage. If the instrument or
the BML Handle is damaged, a component is missing or
you have any questions, do not use the instrument or the
BML Handle; immediately contact Olympus.
The Coil Sheath, the Tube Sheath and the BML Handle
were not sterilized before shipment. Before using the Coil
Sheath, the Tube Sheath and the BML Handle for the first
time, reprocess them according to the instructions in
Chapter 5, “Reprocessing”.
` A set
Coil Sheath and Tube Sheath
(Reusable)
Basket Wire (Sterile, Single use only)
6 MECHANICAL LITHOTRIPTOR
BML Handle (MAJ-440, Reusable)
Instruction Manual
Page 11

Chapter 1 Checking the Package Contents
` B set
Coil Sheath (Reusable, 1 piece)
Tube Sheath (Reusable, 1 piece)
Basket Wire (Sterile, single use only, 2 pieces)
Instruction Manual
` Coil Sheath
Coil Sheath (Reusable, 1 piece)
` Tube Sheath
Tube Sheath (Reusable, 1 piece)
` Basket Wire
Basket Wire (Sterile, single use only, 1 piece)
` BML Handle
BML Handle (MAJ-440, reusable, 1 piece)
7MECHANICAL LITHOTRIPTOR
Page 12
Chapter 2 Instrument Nomenclature and Specifications
Chapter 2 Instrument
Nomenclature and
Specifications
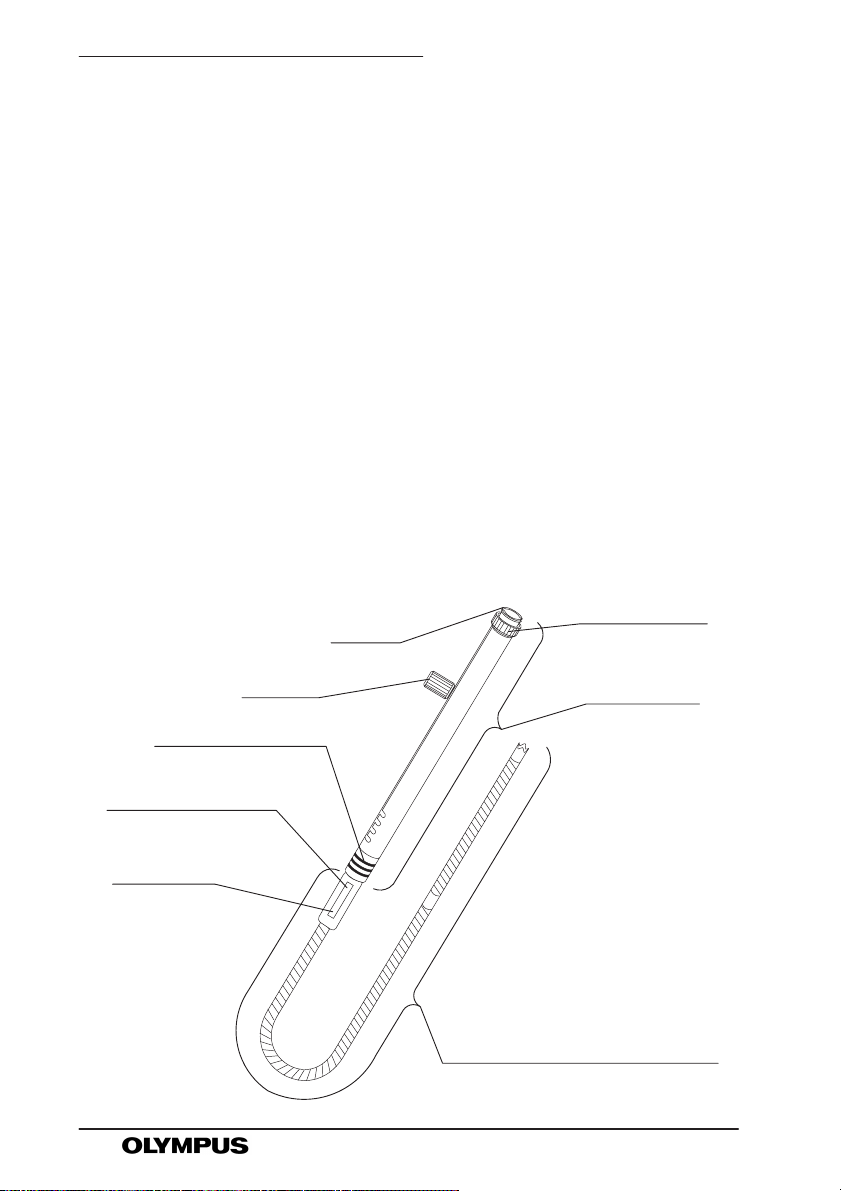
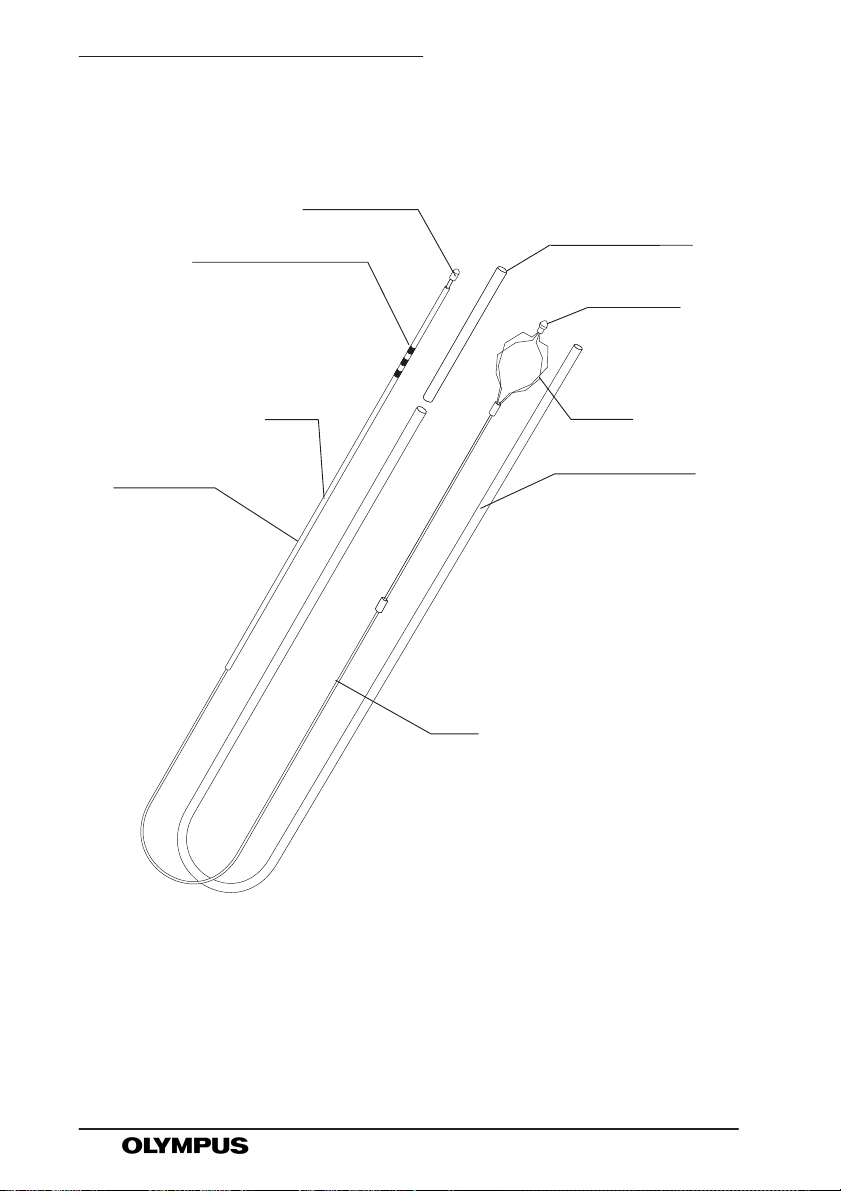
2.1 Nomenclature and Functions
This instrument consists of a Coil Sheath, Tube Sheath
and Basket Wire. The Tube Sheath is inserted into the Coil
Sheath and the Basket Wire is inserted into the Tube
Sheath prior to use.
This instrument must be used in combination with the BML
Handle.
` Coil Sheath (Reusable)
4. Fixing Screw
Notch
3. Knob
2. Identification Mark
1. Model Reference
Label
Lot Number
Insertion Portion/Working Length
8 MECHANICAL LITHOTRIPTOR
Slide Region
Page 13
6. Port
5. Guide Pin
Guide Pipe
Chapter 2 Instrument Nomenclature and Specifications
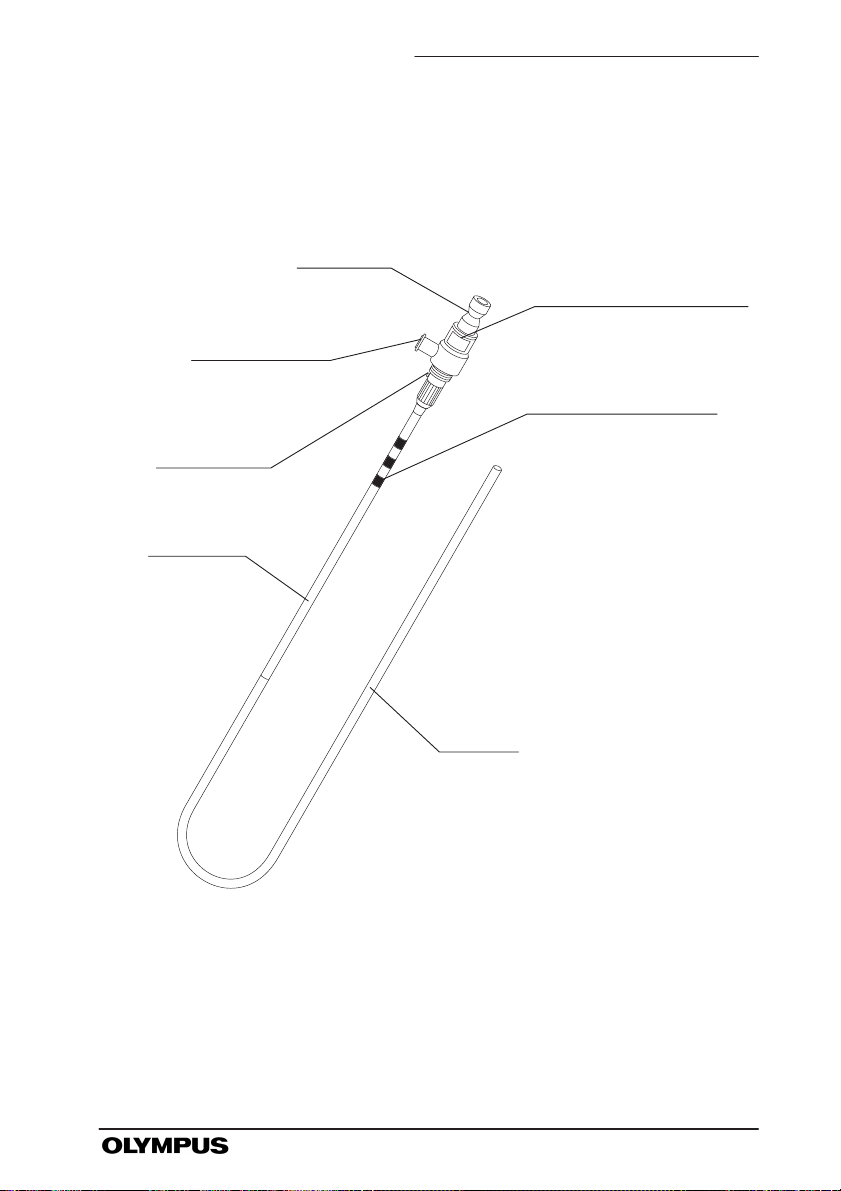
` Tube Sheath (Reusable)
7. Stopper
1. Model Reference Label
2. Identification Mark
8. Tube
9MECHANICAL LITHOTRIPTOR
Page 14
Chapter 2 Instrument Nomenclature and Specifications
` Basket Wire (Sterile, Single use only)
9. Wire Joint
Lot Number
2. Identification Mark
Pipe
Protective Tube
Basket Tip
Basket
Protective Tube
Wire
10 MECHANICAL LITHOTRIPTOR
Page 15
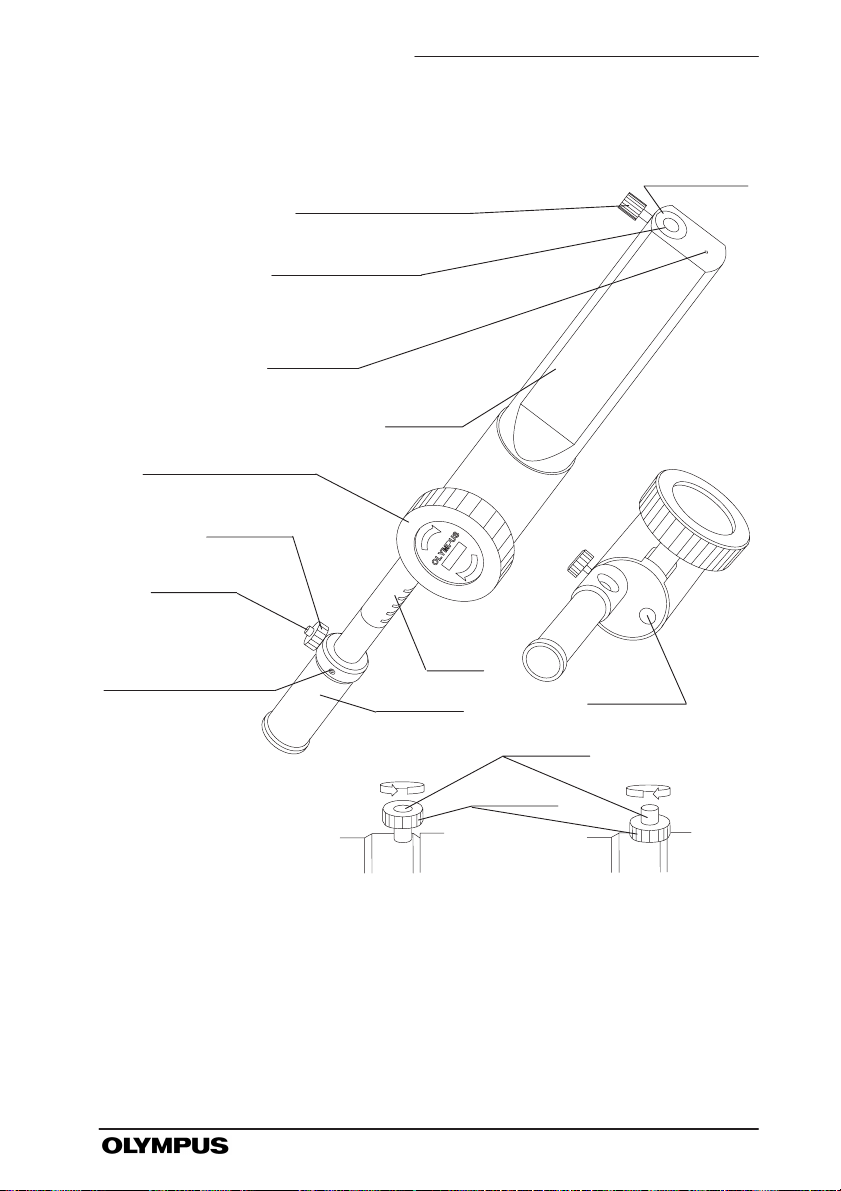
` BML Handle (MAJ-440, Reusable)
15. Insertion Hole
14. Outlet
13. Rotatable Knob
12. Screw
11. Button
Chapter 2 Instrument Nomenclature and Specifications
Lot Number
16. Clamping Screw
Grip
10. Checking Window
Rack
17. Holder
Button Unlocked
14. Outlet
11. Button
12. Screw
Button Locked
11MECHANICAL LITHOTRIPTOR
Page 16
Chapter 2 Instrument Nomenclature and Specifications
1. Model Reference Label
Indicates the product number.
A green reference label indicates that the instrument
is autoclavable.
2. Identification Mark
The Coil Sheath, Tube Sheath and Basket Wire are
marked as follows for each model.
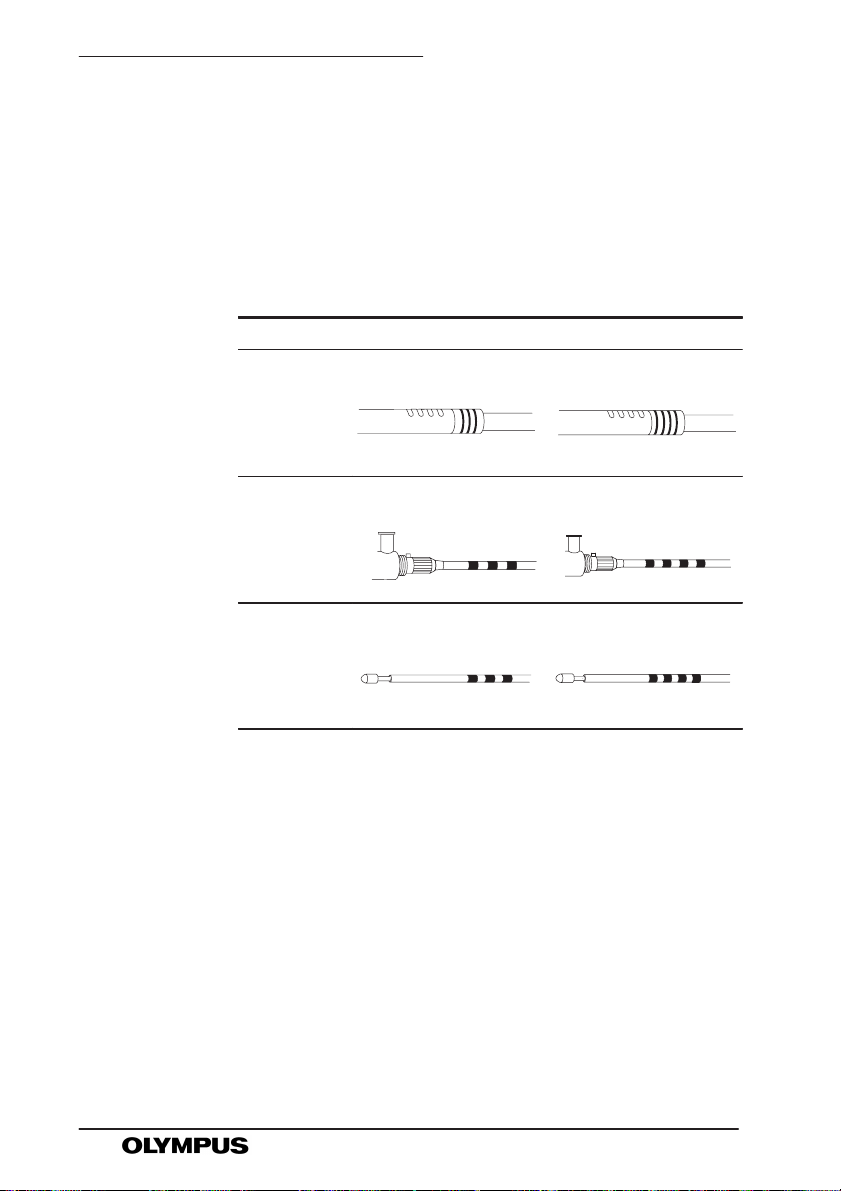
Model BML-3Q-1 BML-4Q-1
Side Region
3 black stripes
Coil Sheath
Side Region
4 black stripes
Guide Pipe
3 black stripes
Tube Sheath
Pipe
3 black stripes
Basket Wire
Guide Pipe
4 black stripes
Pipe
4 black stripes
3. Knob
Used to slide the Coil Sheath. Locks the position of
the Slider Region when tightened.
4. Fixing Screw
Secures the Tube Sheath when tightened.
5. Guide Pin
Aligned with the Notch at the proximal end of the Coil
Sheath to properly align the Coil Sheath with the Tube
Sheath.
6. Port
Attach a syringe here to inject contrast medium
(BML-3Q-1 only) or flush reprocessing chemicals,
water and air through the Tube Sheath when
reprocessing (BML-3Q-1 and BML-4Q-1).
12 MECHANICAL LITHOTRIPTOR
Page 17

Chapter 2 Instrument Nomenclature and Specifications
7. Stopper
Attached to the BML Handle.
8. Tube
On the BML-3Q-1, works as the channel through
which contrast medium is injected during use. It also
works as the channel through which reprocessing
chemicals, water or air are flushed to the distal end
when reprocessing.
9. Wire Joint
Attached to the Holder of the BML Handle. If the Wire
Joint has groove on it, the handling, operating and
maintenance procedures described in this manual are
applicable.
10. Checking Window
Allows user to view the Wire Joint when attaching it to
the Holder of the BML Handle.
11. Button
Secures and releases the Wire Joint of the Basket
Wire.
12. Screw
Turn the Screw to lock and unlock the Button.
13. Rotatable Knob
When turned, the Basket is gradually retracted in
order to crush the calculi.
14. Outlet
Discharge the remaining lubricant from here when
reprocessing.
15. Insertion Hole
The Basket Wire’s Pipe and the Tube Sheath’s
Stopper are inserted here.
16. Clamping Screw
Tightened to secure the Stopper of the Tube Sheath.
17. Holder
Moved back and forth to open and close the Basket
when the BML Handle is connected to the instrument.
13MECHANICAL LITHOTRIPTOR
Page 18

Chapter 2 Instrument Nomenclature and Specifications
2.2 Specifications
The compatible Olympus endoscopes are listed in the
Table on the following page. New endoscopes released
after the introduction of this instrument and BML Handle
may also be compatible for use in combination with this
instrument and BML Handle. For further details, contact
Olympus.
Use this instrument and BML Handle only
in combination with products
recommended by Olympus. If combined
with products not recommended by
Olympus, patient or operator injury,
malfunction and/or equipment damage
may result.
Operating Environment
Ambient Temperature 10 to 40°C (50 to 104°F)
Relative Humidity 30 to 85%
Air Pressure 700 to 1060 hPa
(0.71 to 1.08 kgf/cm
(10.1 to 15.4 psia)
Specifications
The recommended Coil Sheath, Tube Sheath and Basket
Wire combinations for each instrument are as follows:
Do not use the Coil Sheath, Tube Sheath
or Basket Wire in combinations other than
those listed below. An incorrect
combination could cause patient injury
and/or equipment damage.
14 MECHANICAL LITHOTRIPTOR
2
)
Page 19

Chapter 2 Instrument Nomenclature and Specifications
Product Name BML-3Q-1 BML-4Q-1
Coil Sheath MAJ-242 MAJ-245
Tube Sheath MAJ-243 MAJ-246
Basket Wire MAJ-244 MAJ-247
Model BML-3Q-1 BML-4Q-1
Shape of the
Grasping Basket
Maximum Insertion
Portion Diameter (mm)
Working Length (mm) 1950
Opening Length (mm) 30
Model
and
Compatible
Olympus
Endoscopes
(All of the parameters
should be met.)
Compatible
Olympus Handle
Compatible
Olympus
Lithotriptor for
Emergency Use
Length
Channel
Inner
Diameter
(mm)
(Color
Code)
ø 3.7 ø 2.9
Working
Length less
than 1400
mm;
TJF
ø 4.2
(Orange);
ø 5.5
(Pink)
BML Handle: MAJ-440
BML-110A-1
Working
Length less
than 1400
mm;
JF, TJF
ø 3.2
(Yellow);
ø 4.2
(Orange);
ø 5.5
(Pink)
15MECHANICAL LITHOTRIPTOR
Page 20

Chapter 2 Instrument Nomenclature and Specifications
Medical Device
Directive
This device complies with the
requirements of Directive
93/42/EEC concerning medical
0197
devices.
Classification: Class I
16 MECHANICAL LITHOTRIPTOR
Page 21

Chapter 3 Preparation, Inspection and Operation
Chapter 3 Preparation,
Inspection and
Operation
The Basket Wire was shipped in a sterile condition.
The Coil Sheath, the Tube Sheath and the BML Handle
were not sterilized before shipment.
S Do not use the Basket Wire after the
expiration date displayed on the sterile
package. Doing so may pose an
infection control risk and/or cause
tissue irritation.
S When using the instrument and the
BML Handle, always wear appropriate
personal protective equipment,
Otherwise, blood, mucous and other
potentially infectious material from the
patient could pose an infection control
risk. Appropriate personal protective
equipment may include: Eye wear, a
face mask, moisture-resistant clothing
and chemical-resistant gloves, that fit
properly and are long enough so that
your skin is not exposed.
17MECHANICAL LITHOTRIPTOR
Page 22

Chapter 3 Preparation, Inspection and Operation
S Before each case, prepare and inspect
the instrument and the BML Handle as
instructed below. Inspect other
equipment to be used with the
instrument and the BML Handle as
instructed in their respective
instruction manuals.
Should the slightest irregularity be
suspected, do not use the instrument
or the BML Handle; contact Olympus.
Damage or irregularity may
compromise patient or user safety,
since it may pose an infection control
risk, cause tissue irritation, punctures,
hemorrhages or mucous membrane
damage. It may also result in more
severe equipment damage.
S The coil Sheath, the Tube Sheath and
the BML Handle were not sterilized
before shipment. Before using the Coil
Sheath, the Tube Sheath and the BML
Handle for the first time, reprocess and
assemble them according to the
instructions in Chapter 5,
“Reprocessing”.
Do not use an instrument or the BML
Handle that has not been cleaned and
sterilized. This could pose an infection
control risk and/or can cause tissue
irritation.
S Do not coil the Insertion Portion with a
diameter of less than 15 cm. This
could damage the Insertion Portion.
S Never use excessive force to operate
the instrument and the BML Handle.
This could damage the instrument
and/or the BML Handle.
18 MECHANICAL LITHOTRIPTOR
Page 23

3.1 Preparation
Equipment and Personal Protective Equipment
Prepare all equipment and personal protective equipment
which will be used with the instrument and BML Handle in
accordance with their respective instruction manuals.
Appropriate personal protective equipment may include:
Eye wear, a face mask, moisture-resistant clothing and
chemical-resistant gloves.
Spare Instrument and BML Handle
Always have a spare instrument and BML Handle
available.
Sterilized Syringe and Contrast Medium for
Inspection
Chapter 3 Preparation, Inspection and Operation
Prepare a sterile syringe and contrast medium for
inspection.
Reprocessing Equipment
Prepare reprocessing equipment as described in Section
5.2, “Required Reprocessing Equipment” for immediate
reprocessing after use.
19MECHANICAL LITHOTRIPTOR
Page 24

Chapter 3 Preparation, Inspection and Operation
Equipment to be Used in Emergency
Always have pliers ready to cut the Coil Sheath, Tube
Sheath and/or Basket Wire in case lithotripsy cannot be
performed. Also have the Olympus Lithotriptor
BML-110A-1 ready.
3.2 Inspection
Wear the personal protective equipment as specified in the
Table on page 59.
Before each case, always inspect the instrument and the
BML Handle according to the following procedures.
If an abnormality in the instrument or the BML Handle is
detected, use a spare instrument or BML Handle,
inspecting it thoroughly before use.
Inspection of the Sterile Package
Inspect the sterile package for tears, inadequate sealing
or water damage. If the sterile package shows any
irregularities, the sterile condition of the instrument or the
BML Handle may have been compromised. Use a spare
instead.
Appearance Inspection
If any of following steps reveals irregularities, do not use
the instrument or the BML Handle; use a spare instead.
Before use, carefully inspect the entire
coil sheath as instructed in this chapter;
confirm that it is not crushed, bent,
deformed or otherwise damaged. A
damaged coil sheath may not be able to
properly crush a calculus and/or it could
cause the instrument to break.
20 MECHANICAL LITHOTRIPTOR
Page 25
Chapter 3 Preparation, Inspection and Operation
` Inspecting the Instrument
Be sure to inspect the Coil Sheath before
assembly. Never attempt to use the
instrument if you suspect that the Coil
Sheath has an irregularity or is damaged.
If an instrument in this condition is used,
it may malfunction or cause patient injury,
such as punctures, hemorrhages or
mucous membrane damage. Equipment
damage and performance deterioration
may also result.
When pulling the Basket Wire out of the
Protective Tube, take care not to bend the
Pipe of the Basket Wire. This could
damage the Basket Wire.
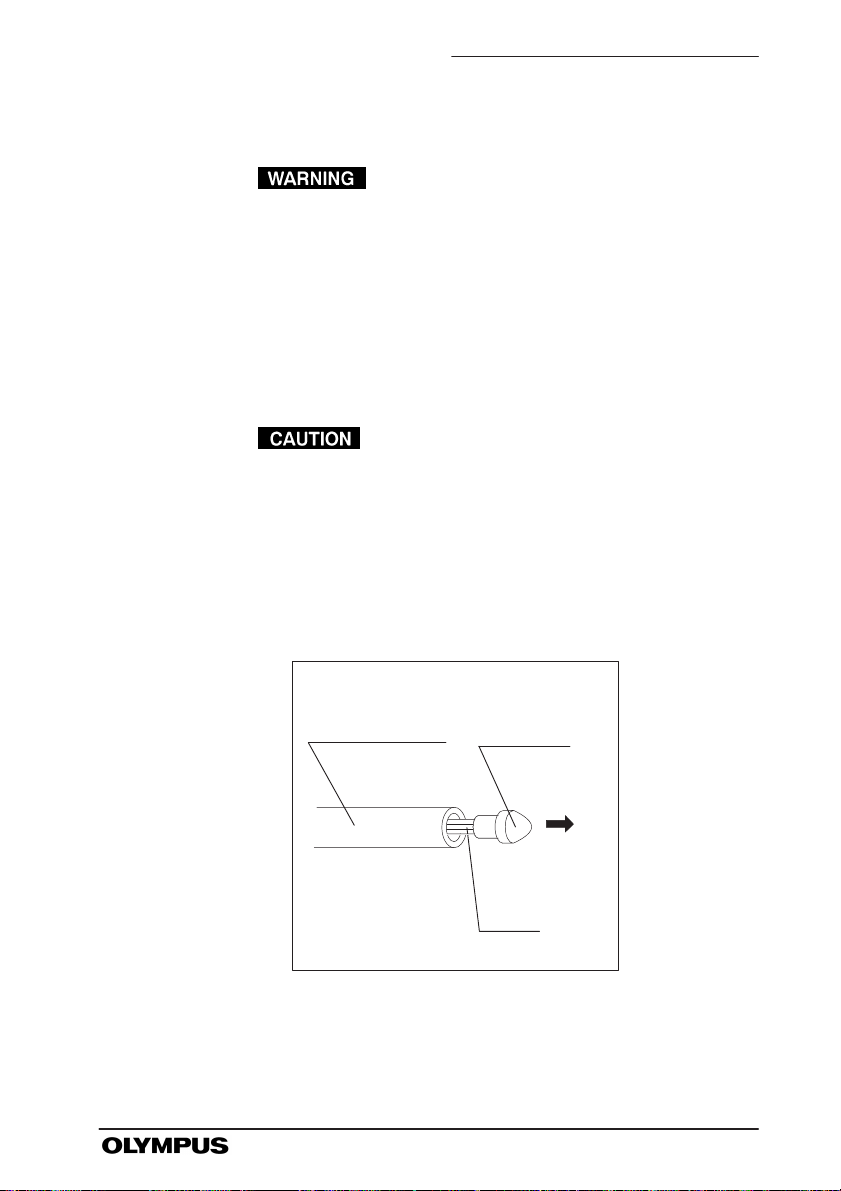
1. Straighten the Protective Tube containing the Basket
Wire. Then, hold the Basket Tip and withdraw the
Basket Wire all the way. Dispose of the Protective
Tube. (See Figure 3.1)
Protective Tube
Figure 3.1
Basket Tip
Basket
21MECHANICAL LITHOTRIPTOR
Page 26

Chapter 3 Preparation, Inspection and Operation
NOTE
Do not withdraw the Basket Wire forcibly
if the Wire Joint catches on the Protective
Tube. Use your fingers to gently extricate
the part of the Basket Wire that is caught
and then withdraw it.
2. Confirm that the Coil Sheath, Tube Sheath and
Basket Wire are free from disconnection or
looseness.
3. Gently run your fingertips over the entire length of the
Coil Sheath and Tube Sheath to check for any
crushed areas, excessive bends, etc..
4. Confirm that there is no unraveled, disconnected or
broken wires, sharp protrusions, sharp edges or any
other apparent abnormalities of the Basket Wire.
` Inspecting the BML Handle
Make sure that there are no cracks on the BML Handle.
Assembling and Inspection
S Do not use excessive force when
assembling the instrument. This could
damage the instrument.
S Be sure to keep the Coil Sheath and
Tube Sheath straight when
assembling the instrument. If the Coil
Sheath or Tube Sheath is not straight,
the instrument could be damaged.
S Move the Basket Wire’s Pipe back and
forth slowly. Fast or abrupt movement
could damage the Pipe.
1. Straighten the Tube Sheath.
2. Insert the Basket Wire into the proximal end of the
Tube Sheath as shown in Figure 3.2.
22 MECHANICAL LITHOTRIPTOR
Page 27

Chapter 3 Preparation, Inspection and Operation
Tube Sheath Wire Joint
Figure 3.2
NOTE
The Basket Wire’s Pipe bends easily. Use
extra care when handling it.
3. Extend the Wire Joint from the Stopper on the
proximal end of the Tube Sheath as shown in Figure
3.3.
Wire Joint
Stopper
Tube Sheath
Figure 3.3
23MECHANICAL LITHOTRIPTOR
Page 28

Chapter 3 Preparation, Inspection and Operation
NOTE
Force is sometimes required to extend the
Wire Joint from the Stopper on the
proximal end of the Tube Sheath. If this
is the case, do not try to insert the Wire
Joint forcibly. Keep the insertion portions
of the Coil Sheath and Tube Sheath as
straight as possible.
4. Withdraw the Pipe from the Stopper until the Basket
is completely closed.
5. While operating the Pipe to open and close the
Basket, confirm that the Basket Wire is free from
disconnection or looseness.
6. Open the Basket. Make sure that there are no
unraveled, disconnected or broken Wires, sharp
protrusions, sharp edges or any other apparent
abnormalities.
7. Make sure that there are no excessive bends, sharp
edges or other apparent deformations in the Pipe of
the Basket Wire.
8. Confirm that the distal end of the Basket Wire appears
exactly as shown in the Table in Section 2.2
“Specifications” and is not damaged.
Making and Inspecting the Connections
S Make sure the screw is tightened. If
not securely tightened, the pipe may
disattach, the basket may not to be
moved, and/or the calculus may not be
crushed.
24 MECHANICAL LITHOTRIPTOR
Page 29

Chapter 3 Preparation, Inspection and Operation
S Make sure to have the stopper and the
BML handle connected. If the
instrument separates from the BML
handle during operation, the pipe may
break or become uncontrollable. Also,
this instrument with calculus engaged
may not be removed from the body.
S Do not hold the BML Handle by the
Holder if the Tube Sheath’s Stopper is
not connected. The weight of the
instrument could bend the Basket
Wire.
S Make sure that the Tube Sheath’s
Stopper is securely attached to the
BML Handle. If the BML Handle’s
Holder is extended when the Handle is
not attached firmly, the instrument
may become detached and the Basket
Wire could be damaged.
S When connecting the BML Handle
with the Wire Joint, fully unlock the
Button on the Handle’s Holder by
turning the Screw. If the Button is
pressed before the Screw is
completely unlocked, the Basket Wire
may come off from the BML Handle,
and it may lead to malfunctioning of the
handle or breakage of the Wire Joint.
NOTE
The Screw on the BML Handle may be
locked so that the Button cannot be
pressed by mistake, which would cause
the Basket Wire to be disconnected.
If any of following steps reveals irregularities, do not use
the instrument or the BML Handle; use a spare instead.
1. Turn the Screw on the BML Handle counterclockwise
to unlock the Button. (See Figure 3.4)
25MECHANICAL LITHOTRIPTOR
Page 30

Chapter 3 Preparation, Inspection and Operation
Button
Screw
Figure 3.4
2. Loosen the Clamping Screw of the BML Handle by
turning it counterclockwise until it stops.
3. Push the Holder of the BML Handle as far as it can go.
4. Insert the Basket Wire’s Pipe into the BML Handle’s
Insertion Hole as far as it can go. (See Figure 3.5)
1. Unlock the Button
2. Press the Button
Clamping
Screw
Grip
Figure 3.5
Wire Joint
Pipe
Insertion Hole
26 MECHANICAL LITHOTRIPTOR
Page 31

Chapter 3 Preparation, Inspection and Operation
5. After completing Step 4., press the Button on the BML
Handle’s Holder (See Figure 3.4). While pressing the
Button, insert the Basket Wire’s Pipe further into the
Insertion Hole until it stops. (See Figure 3.5)
6. Release the Button when the Pipe can be inserted no
further.
7. Confirm that Wire Joint of Basket is visible Wire
through the Slit (See Figure 3.6). Then, push and pull
the Basket Wire’s Pipe to make sure that the Wire
Joint is securely attached to the Holder.
Holder
Figure 3.6
Checking Window
Wire Joint
8. Insert the Tube Sheath’s Stopper as far as possible
into the BML Handle’s Insertion Hole.
(See Figure 3.7)
27MECHANICAL LITHOTRIPTOR
Page 32

Chapter 3 Preparation, Inspection and Operation
Clamping
Screw
Insertion Hole
Figure 3.7
Pipe
Stopper
Tube Sheath
9. Tighten the BML Handle’s Clamping Screw by turning
it clockwise until it stops. (See Figure 3.7)
10. Turn the Screw on the BML Handle clockwise to lock
the Button. (See Figure 3.8)
Button
Screw
Figure 3.8
11. Push and pull the Slide Region of the Coil Sheath to
make sure the Tube Sheath’s Stopper is securely
attached to the BML Handle.
28 MECHANICAL LITHOTRIPTOR
Page 33

Inspection of Operation
After assembly, check that no abnormality
is detected in the action of the handle. If
there is any abnormality, the calculus may
not be crushed and/or the instrument with
stone engaged may not be removed from
the body.
If the instrument does not operate smoothly and as
intended, do not use the instrument or the BML Handle;
use a spare instead.
1. Holding the instrument and the BML Handle as shown
in Figure 3.9, form a loop in the Insertion Portion
approximately 20 cm in diameter.
Chapter 3 Preparation, Inspection and Operation
Close
Slide
Approximately
20 cm.
Figure 3.9
Open
2. Operate the Holder and confirm that the Basket opens
and closes smoothly.
3. Move the Coil Sheath’s Knob back and forth to make
sure that it slides smoothly.
29MECHANICAL LITHOTRIPTOR
Page 34

Chapter 3 Preparation, Inspection and Operation
4. Move the Coil Sheath’s Knob until it sits in the groove
nearest to the Identification Mark. Make sure that the
Tube Sheath does not extend from the distal end of
the Coil Sheath.
Inspecting Irrigation
Perform the following inspection only when using the
BML-3Q-1. Irrigation inspection is not necessary when
using the BML-4Q-1.
NOTE
Do not use the instrument if the contrast medium cannot
be injected or if it leaks from any area other than the distal
end. In this case, use a spare instead.
The BML-4Q-1 is not designed for
injection of a contrast medium.
Use a contrast medium intended for
patient use when inspecting irrigation.
Other fluids may remain inside the
channel and pose an infection control risk
and/or cause tissue irritation.
1. Open the Basket and inject a contrast medium into the
instrument’s Port using a sterile syringe. Confirm that
the contrast medium only comes out of the distal end
of the instrument. (See Figure 3.10)
30 MECHANICAL LITHOTRIPTOR
Page 35

Syringe
Chapter 3 Preparation, Inspection and Operation
Figure 3.10
2. Make sure that the contrast medium does not leak
from any area other than the distal end of the
instrument.
3. Connect a sterile syringe to the instrument’s Port.
Inject air into the Insertion Portion to discharge the
contrast medium.
3.3 Operation
The operator of the instrument and the BML Handle must
be a physician or medical personnel under the supervision
of a physician and must have received sufficient training
in clinical endoscopic technique.
This manual, therefore, does not explain or discuss clinical
endoscopic procedures. It only describes basic operation
and precautions related to the operation of this instrument
and BML Handle.
Grip
Port
Coil Sheath
Tube Sheath
31MECHANICAL LITHOTRIPTOR
Page 36

Chapter 3 Preparation, Inspection and Operation
S Operation of this instrument is based
on the assumption that open surgery is
possible as an emergency measure.
In the course of crushing a hard
calculus, the pipe and/or the basket
wire could break and fall off of the
instrument inside the patient. If the
pipe or basket wire is damaged during
use, immediately stop using the
instrument and follow the appropriate
instruction(s) given in Chapter 4,
“Emergency Treatment”.
S Do not insert the instrument into the
endoscope unless you have a clear
endoscopic field of view. If you cannot
see the distal end of the Insertion
Portion in the endoscopic field of view
or in X-ray images, do not use it. This
could cause patient injury, such as
punctures, hemorrhages or mucous
membrane damage. It may also
damage the endoscope and/or
instrument.
S Do not angulate the Bending Section
of the Endoscope or operate the
Forceps Elevator abruptly while the
distal end of the Insertion Portion is
extended from the Distal End of the
endoscope. This could cause patient
injury, such as punctures,
hemorrhages or mucous membrane
damage.
S Do not force the distal end of the
Insertion Portion against body cavity
tissue. This could cause patient injury,
such as punctures, hemorrhages or
mucous membrane damage.
32 MECHANICAL LITHOTRIPTOR
Page 37

Chapter 3 Preparation, Inspection and Operation
Inserting Into the Endoscope
S Do not insert the instrument into the
endoscope, if the Basket is not
completely retracted into the Insertion
Portion. The distal end of the Insertion
Portion may extend from the Distal
End of the endoscope tip abruptly.
This could cause patient injury, such
as punctures, hemorrhages or
mucous membrane damage. It may
also damage the endoscope and/or
instrument.
S When inserting the instrument into the
endoscope, raise the Forceps
Elevator to its maximum height. If the
Forceps Elevator is down, you will not
be able to see the distal end of the
Insertion Portion in the endoscopic
field of view. This could cause patient
injury, such as punctures,
hemorrhages or mucous membrane
damage.
S When inserting the instrument into the
endoscope, hold the Holder firmly.
Otherwise, the Basket may extend
from the Distal End of the endoscope
abruptly. This could cause patient
injury, such as punctures,
hemorrhages or mucous membrane
damage. It may also damage the
endoscope and/or instrument.
33MECHANICAL LITHOTRIPTOR
Page 38

Chapter 3 Preparation, Inspection and Operation
S Do not force the instrument, if
resistance to insertion is encountered.
Reduce the angulation or lower the
Forceps Elevator of the endoscope
until the instrument passes smoothly.
This could cause patient injury, such
as punctures, hemorrhages or
mucous membrane damage. It may
also damage the endoscope and/or
instrument.
S Do not advance or extend the
instrument abruptly. This could cause
patient injury, such as punctures,
hemorrhages or mucous membrane
damage. It could also damage the
endoscope and/or instrument.
S When inserting the instrument into the
endoscope, hold it close to the Biopsy
Valve and keep it as straight as
possible relative to the Biopsy Valve.
Otherwise, the Insertion Portion could
be damaged.
S Insert the instrument slowly. Abrupt
insertion may damage the endoscope
and/or instrument.
1. Raise the Forceps Elevator to its maximum height.
2. Loosen the Coil Sheath’s Knob by turning it clockwise
and slide the Knob toward the proximal end until it
stops as shown in Figure 3.11. Tighten the Knob to
secure it in position.
34 MECHANICAL LITHOTRIPTOR
Page 39

Chapter 3 Preparation, Inspection and Operation
Knob
Coil Sheath
Tube Sheath
Figure 3.11
3. Retract the Basket into the Tube Sheath.
4. With the Basket retracted, carefully insert the
instrument into the Biopsy Valve of the endoscope.
(See Figure 3.12)
Keep as straight as possible.
Coil Sheath
Hold the Insertion
Portion close to the
Biopsy Valve
Figure 3.12
Biopsy Valve.
5. When the distal end of the Insertion Portion contacts
the Forceps Elevator, lower the Forceps Elevator.
35MECHANICAL LITHOTRIPTOR
Page 40

Chapter 3 Preparation, Inspection and Operation
6. Advance the instrument another 20 mm and raise the
Forceps Elevator. You will see the distal end of the
instrument in the endoscopic field of view.
Inserting Into the Bile Duct
Insert the distal end of the instrument into the bile duct via
the opening in the duodenal papilla.
Do not forcibly insert the Insertion Portion
into the Bile Duct. This could cause
patient injury, such as punctures,
hemorrhages or mucous membrane
damage.
NOTE
Grasping
If resistance is too strong and insertion of
the instrument is difficult, lower the
Forceps Elevator and move the distal end
of the instrument slightly forward. Then
raise the Forceps Elevator.
S Do not withdraw this instrument with
stone engaged from the bile duct
abruptly and/or with excessive force.
This could cause punctures,
hemorrhages, mucous membrane
damage or edema.
S Do not push the Holder abruptly, as it
may cause the Basket to open
abruptly. This could cause patient
injury, such as punctures,
hemorrhages or mucous membrane
damage. It could also damage the
endoscope and/or instrument.
36 MECHANICAL LITHOTRIPTOR
Page 41

Chapter 3 Preparation, Inspection and Operation
S When the lithotriptor’s basket does not
smoothly open or close, do not apply
force but move the forceps elevator or
the scope’s angle back, or move the
position of the basket until the basket
opens or closes with ease. If the
action is forced, the tube may stretch
and cannot be stored inside the coil
sheath. Also, the calculus may not be
crushed, and/or the instrument with
calculus engaged may not be removed
from the body.
S Do not grasp calculi forcibly as this
could deform the distal end of the Tube
Sheath. This could damage the
instrument.
S Do not open and close the Basket too
quickly. Doing so could damage the
instrument.
1. To grasp the target calculi, angulate the endoscope
and/or advance the instrument required distance.
2. Push the Holder to open the Basket.
3. Surround the target calculus, with the open Basket.
4. Pull the Holder to grasp the target calculis.
37MECHANICAL LITHOTRIPTOR
Page 42

Chapter 3 Preparation, Inspection and Operation
Crushing the Calculi
S This instrument will deform and/or
deteriorate by performing lithotripsy.
When lithotripsy is repeated, it will
deform and/or deteriorate
furthermore. By such deformation
and/or deterioration, calculus may not
be crushed and/or the instrument with
calculus engaged may not be removed
from the body. If lithotripsy is required
to be repeated in a single case, make
sure to check each time that no
abnormality is found in action and/or
appearance (e.g. basket wire cut or
worn, tube sheath bent, notable coil
sheath bent or gap etc.). Stop use
when any abnormality is detected.
S If resistance is too great and it is
difficult to slide the Coil Sheath, adjust
the angulation of the endoscope until
the Coil Sheath slides smoothly.
Forcible sliding may cause the distal
end of the Coil Sheath to extend
abruptly. This could cause patient
injury, such as punctures,
hemorrhages or mucous membrane
damage. It may also damage the
endoscope and/or instrument.
S During lithotripsy, keep the portion;
from the coil sheath to the BML
handle, straight in line with the scope’s
biopsy valve, as much as possible. If
not straight, the coil sheath may bend,
calculus may not be crushed, and/or
the instrument with calculus engaged
may not be removed from the body.
38 MECHANICAL LITHOTRIPTOR
Page 43

Chapter 3 Preparation, Inspection and Operation
S Do not rotate the BML handle knob
abruptly. This instrument may break,
and/or calculus may not be crushed.
Also, the instrument with calculus
engaged may not be removed from the
body.
S Lower the endoscope’s forceps
elevator when performing lithotripsy.
If lithotripsy is performed when the
elevator is not lowered, the scope or
the instrument may break and/or the
calculus may not be crushed. Also,
the instrument with calculus engaged
may not be removed from the body.
S Do not forcibly push or pull the
instrument or the BML Handle during
lithotripsy. This could cause patient
injury, such as punctures,
hemorrhages or mucous membrane
damage. It may also damage the
endoscope and/or instrument.
S During lithotripsy, make sure to have
the knob of the coil sheath properly set
in the groove of the slider part. If the
coil sheath moves, the stone may not
be crushed and/or the instrument with
calculus engaged may not be removed
from the body.
S Do not push the BML handle’s holder
forcibly when the basket does not
open after crushing the calculus. As it
may cause the basket to open
abruptly. This could cause patient
injury, such as punctures,
hemorrhages or mucous membrane
damage. It could also damage the
endoscope and/or instrument.
39MECHANICAL LITHOTRIPTOR
Page 44

Chapter 3 Preparation, Inspection and Operation
1. Lower the Forceps Elevator.
2. Loosen the Knob on the Coil Sheath.
3. While gently inserting the Coil Sheath, slowly move
the Knob as shown in Figure 3.13.
S When making the coil sheath slide,
confirm under X-ray image that the
tube sheath is completely covered by
coil sheath. If not completely covered,
the calculus may not be crushed
and/or the instrument with calculus
engaged may not be removed from the
body.
While rotating the Knob, it will generate
resistance in the opposite direction. Do
not loosen your grip because the Knob
could create friction that could hurt your
hand.
Figure 3.13
40 MECHANICAL LITHOTRIPTOR
Page 45

Chapter 3 Preparation, Inspection and Operation
NOTE
The operati on sh own i n Fig ure 3.13
requires coordination between the
operator and assistant. Practice this
operation before actually performing it on
a patient.
4. While observing the X-ray image, move the distal end
of the Coil Sheath in front of the calculus. Cover the
Tube Sheath completely with the Coil Sheath. Then,
set the Knob in the groove nearest possible to the
Identification Marks, and tighten the Knob.
(See Figure 3.14)
Slide Region
Figure 3.14
5. Make sure that the Knob is firmly attached to the Slide
Region.
6. Without releasing the calculus, turn the Rotatable
Knob on the BML Handle in the direction of arrow.
This will cause the Basket to squeeze the calculus,
crushing it.
41MECHANICAL LITHOTRIPTOR
Page 46

Chapter 3 Preparation, Inspection and Operation
NOTE
S The Basket Wire, Coil Sheath and/or
Tube Sheath may become deformed
when strong force is used to crush a
calculus. In this case, replace the
deformed Basket Wire, Coil Sheath or
Tube Sheath
S To prevent damaging the instrument,
the Rotatable Knob on the BML
Handle can be turned even when the
Holder is fully extended. At this point,
the Basket cannot be pulled in any
further. If this condition occurs, stop
turning the Rotatable Knob.
with a spare.
Withdrawing the Instrument From the Endoscope
S Do not withdraw the instrument
abruptly from the bile duct. It could
cause mucous membrane damage or
edema.
S Do not withdraw the instrument from
the endoscope quickly. This could
scatter blood, mucous or other patient
debris and pose an infection control
risk.
S Do not withdraw the instrument from
the endoscope if the Basket is not
completely retracted into the Tube
Sheath. This could damage the
endoscope and/or instrument.
S Do not withdraw the instrument from
the endoscope if the Forceps Elevator
is up. This could damage the
endoscope and/or instrument.
1. Pull the Holder to retract the Basket into the Tube
Sheath.
42 MECHANICAL LITHOTRIPTOR
Page 47

2. Withdraw the instrument from the endoscope.
Detaching
1. Loosen the Clamping Screw on the BML Handle by
2. Turn the Screw on the BML Handle counterclockwise
3. Firmly press the Button on the BML Handle and
4. Straighten the Insertion Portions of the Coil Sheath
Chapter 3 Preparation, Inspection and Operation
Do not pull the Basket Wire from the Tube
Sheath quickly. Do not pull the Tube
Sheath from the Coil Sheath quickly. This
could scatter blood, mucous or other
patient debris and pose an infection
control risk.
turning it counterclockwise and remove the Coil
Sheath and Tube Sheath.
to unlock the Button.
remove the Basket Wire.
and the Tube Sheath. While holding the Basket Tip,
withdraw the Basket Wire from the Tube Sheath.
5. Loosen the Fixing Screw on the Coil Sheath and
withdraw the Tube Sheath from the Coil Sheath
Disposal of Used Basket Wire
S After use, dispose of the Basket Wire
in an appropriate manner. If it is not
properly disposed of, it could pose an
infection control risk.
S Do not reuse the Basket Wire.
Reusing the Basket Wire could pose
an infection control risk, cause tissue
irritation or malfunction.
After using the Basket Wire, dispose of it in an appropriate
manner.
.
43MECHANICAL LITHOTRIPTOR
Page 48

Chapter 3 Preparation, Inspection and Operation
44 MECHANICAL LITHOTRIPTOR
Page 49

Chapter 4 Emergency Treatment
Chapter 4 Emergency Treatment
4.1 Emergency Treatment
If lithotripsy can no longer be performed, follow the
procedures described in this Chapter. If there is little
resistance from the BML Handle’s Rotatable Knob, the
instrument may be damaged and lithotripsy may not be
possible.
If the calculus is too hard and the
Lithotriptor is damaged as described on
pages 46 – 51, it may be necessary to use
the BML-110A-1. In this case, also refer
to the instruction manual for the
BML-110A-1.
1. Loosen the Clamping Screw on the BML Handle by
turning it counterclockwise, and remove the Coil
Sheath and Tube Sheath.
2. Turn the Screw on the BML Handle counterclockwise
to unlock the Button.
3. Firmly press the Button on the BML Handle, and
remove the Basket Wire.
4. Perform the appropriate treatment given on the charts
on Pages 46 through 51.
45MECHANICAL LITHOTRIPTOR
Page 50

Chapter 4 Emergency Treatment
` When the Pipe is Fractured.
When the Pipe is fractured.
Move the Basket back and forth
to release the calculus.
When the Pipe can
be moved.
fractured here.
Cut the Coil Sheath, Tube
fractured here.
When the Pipe cannot
be moved.
Sheath and Basket Wire
using pliers or wire cutters.
Cut
46 MECHANICAL LITHOTRIPTOR
Page 51

Remove the instrument
from the endoscope.
Chapter 4 Emergency Treatment
When the calculus
can be released.
When the calculus
cannot be released.
Cut the Coil Sheath, Tube
Sheath and Basket Wire
using pliers or wire cutters.
Cut.
Withdraw the endoscope.
A certain amount of force is
sometimes required to withdraw
the endoscope.
Dispose of the Basket
Wire and carefully inspect
the Coil Sheath and Tube
Sheath.
Withdraw the Coil Sheath,
Tube Sheath and
endoscope together.
When the Coil Sheath and
Tube Sheath can be moved.
Withdraw the Coil
Sheath and Tube
Sheath.
When the Coil Sheath and Tube
Sheath cannot be moved.
Carry out open
surgery or other
possible treatment.
Use the
Olympus’s
lithotriptor
BML-110A-1 or
carry out open
surgery or
other possible
treatment.
Use the
Olympus’s
lithotriptor
BML-110A-1 or
carry out open
surgery or
other possible
treatment.
47MECHANICAL LITHOTRIPTOR
Page 52

Chapter 4 Emergency Treatment
` When the Pipe is not Fractured.
All four wires on the Basket have
broken and the Basket Tip has
become separated.
When the Pipe is not fractured.
Some of the wires on the Basket
have been broken.
The calculus is not inside the
Basket and the instrument is not
broken.
48 MECHANICAL LITHOTRIPTOR
Page 53

Chapter 4 Emergency Treatment
After retracting the Basket Wire
into the Tube Sheath, withdraw
the instrument.
WARNING
Retract the Basket Wire into the Tube Sheath, then retract Tube Sheath into the
endoscope. Then withdraw the endoscope and instrument together.
If the broken wires of the Basket Wire cannot be retracted into
the Tube Sheath, do not withdraw the instrument and endoscope
with excessive force. This could cause patient injury, such as
punctures, hemorrhages or mucous membrane damage.
WARNING
Carry out open surgery or other
possible treatment.
Do not withdraw the
instrument or its fall-offs
of the instrument from
the bile duct with
excessive force. This
could cause punctures,
hemorrhages, mucous
membrane damage or
edema.
Withdraw the instrument.
Dispose of the Basket
Wire and carefully
inspect the Coil Sheath
and Tube Sheath.
49MECHANICAL LITHOTRIPTOR
Page 54

Chapter 4 Emergency Treatment
` When the Pipe Does not Extend From the
When the Pipe does not extend
from the proximal end of the Tube
Sheath.
Proximal End of the Tube Sheath.
Withdraw the Coil Sheath, Tube
Sheath and endoscope together.
When the Coil Sheath
can be moved forward
or back with respect to
the endoscope.
When the Coil Sheath
cannot be moved forward
or back with respect to
the endoscope.
50 MECHANICAL LITHOTRIPTOR
Cut the Coil Sheath, Tube
Sheath and Basket Wire
using pliers or wire cutters.
Cut
Page 55

Use the
Olympus’s
lithotriptor
BML-110A-1 or
carry out open
surgery or
other possible
treatment.
Chapter 4 Emergency Treatment
Withdraw the endoscope.
A certain amount of force is
sometimes required to withdraw
the endoscope.
When the Coil Sheath and
Tube Sheath can be moved.
Withdraw the Coil
Sheath and Tube
Sheath.
When the Coil Sheath and Tube
Sheath cannot be moved.
Carry out open
surgery or other
possible treatment.
Use the
Olympus’s
lithotriptor
BML-110A-1 or
carry out open
surgery or
other possible
treatment.
51MECHANICAL LITHOTRIPTOR
Page 56

Chapter 4 Emergency Treatment
` When to use the BML-110A-1
S Before use, thoroughly review the
method of use for lithotriptor
BML-110A-1 in accordance with the
instruction manuals.
S Do not use this lithotriptor BML-110A-1
for a calculus that is assumed
impossible to be crushed by this
lithotriptor. The basket wire etc. may
break and part of this lithotriptor may
remain in the body.
S Use this instrument by having the
settings to switch to open surgery and
the hospitalization plan ready in case
the calculus cannot be crushed by
lithotriptor BML-110A-1.
S Operation of Mechanical Lithotriptor
BML-110A-1 is based on the
assumption that open surgery is
possible as an emergency measure.
If the calculus is too hard and the
Basket Wire or Mechanical Lithotriptor
is damaged, lithotripsy cannot be
continued. Use the BML-110A-1 with
the understanding that its could
become damaged Basket Wire and
that open surgery may have to take
place.
52 MECHANICAL LITHOTRIPTOR
Page 57

Chapter 4 Emergency Treatment
If the calculus is too hard, it is possible that the damages
shown below (See Figures 4.1, 4.2 and 4.3) and other
damages may occur. In addition, before using
BML-110A-1, thoroughly review the manual of
BML-110A-1 and use the instruments as instructed.
The Operation Wire is Cut
Figure 4.1
53MECHANICAL LITHOTRIPTOR
Page 58

Chapter 4 Emergency Treatment
All of the Basket Wires are Cut
Figure 4.2
Some of the Basket Wires are Cut
Figure 4.3
54 MECHANICAL LITHOTRIPTOR
Page 59

Chapter 5 Reprocessing
S The Coil Sheath, the Tube Sheath and
the BML Handle were not sterilized
before shipment. Before using the Coil
Sheath, the Tube Sheath and the BML
Handle for the first time, reprocess
them according to the instructions in
this Chapter.
Do not use the BML Handle that has
not been cleaned and sterilized. This
poses an infection control risk and/or
can cause tissue irritation.
S The Basket Wire is single-use,
disposable item that is not to be
reprocessed. Do not reuse or attempt
to sterilize it
an infection control risk and/or cause
tissue irritation.
after use. This could pose
Chapter 5 Reprocessing
5.1 General Policy
S The medical literature reports incidents of patient
cross contamination resulting from improper
cleaning or sterilization. It is strongly
recommended that reprocessing personnel have
a thorough understanding of and follow all national
and local hospital guidelines and policies.
A specific individual or individuals in the
endoscopy unit should be responsible for
reprocessing endoscopic equipment. It is highly
desirable that a trained backup be available should
the primary reprocessing individual(s) be absent.
S All individuals responsible for reprocessing should
thoroughly understand:
55MECHANICAL LITHOTRIPTOR
Page 60

Chapter 5 Reprocessing
S your institution’s reprocessing
procedures
S occupational health and safety
regulations
S all national and local hospital
guidelines and policies
S the instructions in this manual
S the mechanical aspects of endoscopic
equipment
S pertinent germicide labeling
S Failure to properly clean and sterilize
the Coil Sheath, the Tube Sheath and
the BML Handle after each
examination can compromise patient
safety. During use, the instrument
normally comes in contact with intact
mucous membranes. To minimize the
risk of transmitting diseases from one
patient to another, after each
examination the instrument and the
BML Handle must undergo thorough
cleaning followed by sterilization.
S If the Coil Sheath, the Tube Sheath or
the BML Handle is not cleaned
meticulously, effective sterilization
cannot be obtained. Clean the Coil
Sheath, the Tube Sheath and the BML
Handle thoroughly before sterilization
to remove microorganisms or organic
material which can limit the
effectiveness of the sterilization
process.
56 MECHANICAL LITHOTRIPTOR
Page 61

Chapter 5 Reprocessing
S Patient debris and reprocessing
chemicals are hazardous. Wear
personal protective equipment to
guard against dangerous chemicals
and infectious material. During
cleaning and sterilization, always wear
appropriate personal protective
equipment, such as eye wear, a face
mask, moisture-resistant clothing and
chemical-resistant gloves that fit
properly and are long enough so that
your skin is not exposed. Always
remove contaminated protective
clothing before leaving the
reprocessing area.
S The reprocessing procedures
described in this manual should be
completed the same day the Coil
Sheath, the Tube Sheath and the BML
Handle have been used. If
reprocessing is delayed, residual
organic debris will solidify and it may
be difficult to effectively reprocess the
Coil Sheath, the Tube Sheath and/or
the BML Handle.
S With the cleaning and sterilization
methods stated in this instruction
manual, prions, which are considered
to be the pathogenic substance of the
Creutzfeldt-Jakob disease (CJD)
cannot be destroyed or inactivated.
When using this instrument on a
patient with CJD or variant
Creutzfeldt-Jakob disease (vCJD), be
sure to use this product for such
patient only and/or immediately
dispose of this product after use in an
appropriate manner. For methods to
handle CJD, please follow the
respective guidelines in your country.
57MECHANICAL LITHOTRIPTOR
Page 62

Chapter 5 Reprocessing
S This instrument is not durable, or does
not have sufficient durability against
the respective methods stated in the
guidelines of each country for
destroying or inactivating prions. For
information on the durability against
each method, please contact
Olympus. If cleaning and sterilization
methods not stated in this instruction
manual are performed, Olympus
cannot guarantee the effectiveness,
safety and durability of this instrument.
Make sure to confirm that there is no
abnormality before use, and use under
responsibility of a physician. Do not
use if any abnormality is found.
NOTE
Olympus Endo-Therapy Accessories are
compatible with 2.0% to 3.2%
glutaraldehyde solutions. However,
routine biological monitoring is not
feasible with glutaraldehyde and,
therefore, it should not be used to sterilize
reusable medical devices that are
compatible with other methods of
sterilization that can be biologically
monitored, such as steam sterilization.
58 MECHANICAL LITHOTRIPTOR
Page 63

Chapter 5 Reprocessing
5.2 Required Reprocessing Equipment
Wear the personal protective equipment as specified in the
Table on page 59.
1. Prepare the following equipment. The required
amount of detergent solution, lubricant and other
equipment depends on the number of Coil Sheaths,
Tube Sheaths and BML Handles to be reprocessed.
2. Fill an immersion basin with detergent solution and fill
a second immersion basin with lubricant at the
temperatures and concentration recommended by
the manufacturer. Also fill the ultrasonic cleaner with
a detergent solution appropriate for ultrasonic
cleaning.
Equipment Needed for Reprocessing
To perform proper reprocessing, the equipment in the
following table is required. For details on preparation and
directions for use of the following equipment, refer to the
respective instruction manuals or contact the equipment
manufacturer.
Contact Olympus for the names of specific brands of
detergent solutions and lubricants.
Equipment Needed
Protective
Equipment
Immersion Basin
for Detergent
Solution
Appropriate personal protective equipment
may include: eye wear, face mask,
moisture-resistant clothing and
chemical-resistant gloves.
Use a basin with a depth and diameter large
enough to allow complete immersion of the
instrument when the Insertion Portion is coiled
with a diameter of not less than 15 cm.
59MECHANICAL LITHOTRIPTOR
Page 64

Chapter 5 Reprocessing
Detergent Solution
for Immersion
3
10 cm
(10 ml)
Use a neutral pH, low-foaming, medical-grade
detergent solution.
syringe
Ultrasonic Cleaner Use a medical-grade ultrasonic cleaner with a
frequency range of 38 to 47 kHz, and with a
depth and a diameter large enough to allow
complete immersion of the instrument when
the Insertion Portion is coiled with a diameter
of not less than 15 cm.
Compatible ultrasonic cleaner includes
OLYMPUS ULTRASONIC CLEANER KS-2.
Detergent Solution
for Ultrasonic
Use a neutral pH, low-foaming, medical-grade
detergent solution with no abrasive.
Cleaning
Immersion Basin
for Lubricant
Use a basin with a depth and diameter large
enough to allow complete immersion of the
instrument when the Insertion Portion is coiled
with a diameter of not less than 15 cm.
Lubricant Use a medical-grade, water soluble or
low-viscosity emulsion type lubricant. A high
viscosity lubricant will be difficult to inject into
the Port.
Lint-free Cloths
Packages for
Steam Sterilization
Use packages compatible with steam
sterilization (autoclaving). The packages
should be large enough to accommodate the
instrument when the Insertion Portion is coiled
with a diameter of not less than 15 cm.
The packages should be large enough to
contain the BML Handle.
Sealing Device for
Sterile Packages
Sealing the packages may require a device
such as a heat sealer. Prepare an appropriate
sealing device according to the packages to
be used.
Autoclave Use an autoclave that will operate at the
conditions specified in Section 5.6,
“Sterilization”
60 MECHANICAL LITHOTRIPTOR
Page 65

5.3 Cleaning
Immersion
Chapter 5 Reprocessing
When cleaning, avoid exposure to the
fluids discharged from the Insertion
Portion and reprocessing chemicals.
They may pose an infection control risk or
cause skin irritation.
S When reprocessing, do not coil the
Insertion Portion with a diameter of
less than 15 cm. This could damage
the Insertion Portion.
S Never use excessive force to open or
close the Coil Sheath, the Tube
Sheath or the BML Handle. This could
damaged the Coil Sheath, the Tube
Sheath and/or BML Handle.
S Do not withdraw the Tube Sheath from
the Coil Sheath quickly. This could
scatter blood, mucous or other patient
debris and pose an infection control
risk.
S Immerse the Coil Sheath, the Tube
Sheath and the BML Handle in
detergent solution immediately after
use. If the Coil Sheath, the Tube
Sheath or the BML Handle is not
cleaned immediately, it may be difficult
to effectively reprocess, and this could
result in reduced performance.
61MECHANICAL LITHOTRIPTOR
Page 66

Chapter 5 Reprocessing
1. Immerse the Insertion Portion of the Tube Sheath in
the detergent solution.
2. Connect a 10 cm
solution to the Port.
3
(10 ml) syringe filled with detergent
3. Cover the Stopper’s opening with your finger and
3
(10 ml) of detergent solution into the
Inject 10 cm
Insertion Portion. (See Figure 5.1)
If it is not possible to inject the detergent solution or
if it leaks from any areas other than the distal end of
the Insertion Portion, do not use the Tube Sheath.
4. Disconnect the syringe from the Port.
Stopper
Figure 5.1
62 MECHANICAL LITHOTRIPTOR
Page 67

Chapter 5 Reprocessing
5. Fully immerse the BML Handle in the detergent
solution. Make sure that the Rotatable Knob is facing
up. (See Figure 5.2)
6. Immerse the entire the Coil Sheath, the Tube Sheath
and the BML Handle in the detergent solution for the
time specified in manufacturer’s instructions. If no
time is specified, immerse for between 5 minutes and
3 hours.
Rotatable Knob
BML Handle
Figure 5.2
7. Remove the Coil Sheath, the Tube Sheath and the
BML Handle from the detergent solution.
63MECHANICAL LITHOTRIPTOR
Page 68

Chapter 5 Reprocessing
8. Put the Holder of the BML Handle downwards, and
discharge the remaining detergent solution from the
Outlet. Then, push and pull the Holder two or three
times. (See Figure 5.3)
BML Handle
Outlet
Figure 5.3
Holder
64 MECHANICAL LITHOTRIPTOR
Page 69

Ultrasonic Cleaning
Immerse the distal end of the Tube Sheath in the
1.
ultrasonic cleaner containing detergent solution.
2. Connect a 10 cm
solution to the Port.
Chapter 5 Reprocessing
3
(10 ml) syringe filled with detergent
3. Cover the Stopper’s opening with your finger and
3
(10 ml) of detergent solution into the
Inject 10 cm
Insertion Portion. If it is not possible to inject the
detergent solution or if it leaks from any area other
than the distal end of the Tube Sheath, do not use the
Tube Sheath.
NOTE
Even if the same type of detergent
solution is used for both immersion and
ultrasonic cleaning, make sure to inject
detergent solution at this time. Replacing
the detergent solution inside the Insertion
Portion will increase the effectiveness of
cleaning.
4. Disconnect the syringe from the Port.
5. Immerse the entire Coil Sheath, Tube Sheath and
BML Handle in the detergent solution. Make sure the
Rotatable knob is forcing up. (See Figure 5.2)
6. Clean ultrasonically for 30 minutes. For details on
operation of the ultrasonic cleaner, refer to the
instruction manual of the ultrasonic cleaner.
7. Remove the Coil Sheath, the Tube Sheath and the
BML Handle from the detergent solution.
8. Put the Holder of the BML Handle downwards, and
discharge the remaining detergent solution from the
Outlet. Then, push and pull the Holder two or three
times. (See Figure 5.3)
65MECHANICAL LITHOTRIPTOR
Page 70

Chapter 5 Reprocessing
Rinsing
S After ultrasonic cleaning, rinse the Coil
Sheath, the Tube Sheath and the BML
Handle thoroughly to remove residual
detergent. Residual detergent
solution could cause tissue irritation in
the next patient.
S Do not forcefully squeeze, wipe or
scrub the Coil Sheath, the Tube
Sheath and the BML Handle. This
could cause damage to the Coil
Sheath, the Tube Sheath and/or the
BML Handle result in reduced
performance.
1. Connect a 10 cm
water to the Port.
3
(10 ml) syringe filled with clean tap
2. Cover the Stopper’s opening with your finger and
Inject 10 cm
If it is not possible to inject water or if it leaks from any
area other than the distal end of the Tube Sheath, do
not use the Tube Sheath.
3
(10 ml) of water into the Tube Sheath.
3. Disconnect the syringe from the Port.
4. Repeat Steps 1. through 3. to inject a total of 20 cm
(20 ml) of water into the Tube Sheath.
5. Rinse the Coil Sheath, the Tube Sheath and the BML
Handle under clean running tap water.
6. Push and pull the Holder two or three times under
clean running tap water.
7. Confirm that no debris is left on the surfaces of the Coil
Sheath, the Tube Sheath.
8. Push and pull the Holder and confirm that no debris
remains on the other surface of the BML Handle.
9. Connect a 10 cm
Port.
3
(10 ml) syringe filled with air to the
3
66 MECHANICAL LITHOTRIPTOR
Page 71

Chapter 5 Reprocessing
10. Cover the Stopper’s opening with your finger and
Inject 10 cm
11. Disconnect the syringe from the Port.
12. Repeat Steps 9. through 11. until no liquid comes out
of the distal end of the Tube Sheath.
13. Wipe the exterior of the Coil Sheath, the Tube Sheath
and the BML Handle with a clean, dry lint-free cloth.
5.4 Lubrication
1. Immerse the entire Coil Sheath and the BML Handle
in the lubricant for 2 to 3 seconds.
2. Connect a 10 cm
to the Port.
3
(10 ml) of air into the Tube Sheath.
When lubricating, avoid exposure to the
fluids discharged from the Insertion
Portion and lubricant. It may pose an
infection control risk and/or cause skin
irritation.
Do not coil the Insertion Portion with a
diameter of less than 15 cm. This could
damage the Insertion Portion.
3
(10 ml) syringe filled with lubricant
3. Cover the Stopper’s opening with your finger and
inject the lubricant until it comes out of the distal end.
If it is not possible to inject the lubricant or it leaks from
any area other than the distal end of the Tube Sheath,
do not use the Tube Sheath.
4. Disconnect the syringe from the Port.
5. Connect a 10 cm
Port.
3
(10 ml) syringe filled with air to the
6. Cover the Stopper’s opening with your finger and
inject 10 cm
3
(10 ml) of air into the Tube Sheath once.
67MECHANICAL LITHOTRIPTOR
Page 72

Chapter 5 Reprocessing
7. Disconnect the syringe from the Port.
8. Repeat steps 5. through 7. until no lubricant comes
out of the distal end of the Tube Sheath.
9. Loosen the Knob on the Slide Region of the Coil
Sheath. Then move the Knob back and forth to slide
the Slide Region a few times.
10. Remove the BML Handle from the lubricant. Put the
Holder of the BML Handle downwards, and discharge
the remaining lubricant from the Outlet. Then, push
and pull the Holder two or three times.
(See Figure 5.3)
11. Wipe the exterior of the Coil Sheath, the Tube Sheath
and the BML Handle with a clean, dry lint-free cloth
and allow them to air dry.
68 MECHANICAL LITHOTRIPTOR
Page 73

5.5 Assembly
Inspection Before Assembly
Chapter 5 Reprocessing
Be sure to inspect the Coil Sheath and the
Tube Sheath before assembly. Never
attempt to use the instrument if you
suspect that the Coil Sheath and the Tube
Sheath has an irregularity or is damaged.
If an instrument in this condition is used,
it may malfunction or cause patient injury,
such as punctures, hemorrhages or
mucous membrane damage. Equipment
damage and performance deterioration
may also result.
To avoid damaging the Coil Sheath, the
Tube Sheath or the BML Handle, do not
use excessive force when handling them.
Inspect the instrument and the BML Handle according to
the following procedure. If an abnormality is detected, do
not use the instrument or the BML Handle. Use a spare
instead.
1. Confirm that the Coil Sheath and Tube Sheath are
free from disconnection or looseness.
2. Gently run your fingertips over the entire length of the
Coil Sheath and Tube Sheath to check for any
crushed areas, excessive bends, etc..
3. Gently run your fingertips over the entire length of the
Tube Sheath to check for broken areas, etc..
69MECHANICAL LITHOTRIPTOR
Page 74

Chapter 5 Reprocessing
Assembly
S Do not use excessive force when
assembling the Coil Sheath and the
Tube Sheath. This could damage the
Coil Sheath and the Tube Sheath.
S Be sure to keep the Coil Sheath and
Tube Sheath straight when
assembling the Coil Sheath and the
Tube Sheath. If the Coil Sheath or
Tube Sheath is not straight, the Coil
Sheath and the Tube Sheath could be
damaged.
1. Loosen the Knob on the Coil Sheath and slide it as far
as possible toward the proximal end. Then tighten the
Knob to fix the position of the Slide Region.
(See Figure 5.4)
Knob
Coil Sheath
Figure 5.4
2. Straighten the Coil Sheath.
70 MECHANICAL LITHOTRIPTOR
Page 75

Chapter 5 Reprocessing
3. Insert the Tube Sheath into the proximal end of the
Coil Sheath as shown in Figure 5.5.
Coil Sheath
Tube Sheath
Figure 5.5
NOTE
S The Tube Sheath may get caught
inside the Coil Sheath when it is
inserted. If this happens, do not try to
insert the Tube Sheath forcibly.
Instead, pull or turn the Tube Sheath
gently to make it easier to insert.
S The connection of the Guide Pipe and
the Tube of the Tube Sheath is very
fragile. Use extra care when handling
it.
71MECHANICAL LITHOTRIPTOR
Page 76

Chapter 5 Reprocessing
4. Align the guide pin of the Tube Sheath with the Notch
at the proximal end of the Coil Sheath as shown in
Figure 5.6. Tighten the Fixing Screw to secure them.
Guide Pipe
Guide Pin
Notch
Coil Sheath
Tube Sheath
Figure 5.6
Fixing Screw
5. Make sure that the Tube Sheath is extended from the
distal end of the Coil Sheath.
72 MECHANICAL LITHOTRIPTOR
Page 77

5.6 Sterilization
Sealing the Package
1. Before sterilization, the Coil Sheath, the Tube Sheath
and the BML Handle must be thoroughly cleaned and
dried. Residual moisture inhibits sterilization.
2. Coil the Coil Sheath, the Tube Sheath and place it in
the package.
Chapter 5 Reprocessing
S Do not coil the Coil Sheath, the Tube
Sheath with a diameter of less than 15
cm. This could damage the
instrument.
S Seal the Coil Sheath, the Tube Sheath
and the BML Handle in separate
packages. Otherwise, they could be
damaged.
3. Place the BML Handle in a separate package.
4. Seal the packages. For details on sealing, refer to the
instruction manual of the packages and the sealing
device.
Steam Sterilization (Autoclaving)
S Use biological indicators as
recommended by your hospital’s
policy and follow the manufacturer’s
instructions, all national and local
hospital guidelines and policies.
S Always leave space between the
packages in the autoclave. If the
packages are placed too close
together, effective sterilization will not
be possible.
73MECHANICAL LITHOTRIPTOR
Page 78

Chapter 5 Reprocessing
S Allow the sterile packages to dry within
the autoclave using the autoclave’s
drying cycle (if applicable) or by
opening the door of the autoclave and
allowing the packages to air dry.
Handling a wet package can
compromise its sterility.
S The results of sterilization depend on
various factors such as how the
sterilized instrument was packed or
the positioning, method of placing and
loading of the instrument in the
sterilization device. Please verify the
sterilization effects by using biological
or chemical indicators. Also follow the
guidelines for sterilization issued by
medical administrative authorities,
public organizations or the infection
management sections at each
medical facility, as well as the
instruction manual of the sterilization
device.
1. Place the sealed packages containing the Coil
Sheath, the Tube Sheath and the BML Handle in the
autoclave and sterilize in accordance with the
conditions listed below. For details on operation of the
autoclave, refer to the instruction manual for the
autoclave or other manufacturer instructions.
2. After steam sterilization, let the Coil Sheath, the Tube
Sheath and the BML Handle gradually cool down to
room temperature. Sudden changes in temperature
may damage the Coil Sheath, the Tube Sheath and/or
the BML Handle.
74 MECHANICAL LITHOTRIPTOR
Page 79

Chapter 5 Reprocessing
NOTE
Autoclavable products have a green
reference label. Products that do not
have green reference labels are not
autoclavable.
Temperature Exposure Time
Prevacuum 132 to 134°C
(270 to 274°F)
Table 5.1 Recommended Steam Sterilization
(Autoclaving) Conditions
5 minutes
75MECHANICAL LITHOTRIPTOR
Page 80

Chapter 6 Storage
Chapter 6 Storage
S Do not store the Coil Sheath, the Tube
Sheath or BML Handle in a sterile
package that is damaged, wet or
improperly sealed. Otherwise, the
sterility of the Coil Sheath, the Tube
Sheath or BML Handle may be
compromised and pose an infection
control risk and/or cause tissue
irritation.
S Do not store sterile packages
containing the Coil Sheath, the Tube
Sheath or BML Handle in place where
they will be damaged, wet or
improperly sealed. Otherwise, the
sterility of the Coil Sheath, the Tube
Sheath or BML Handle may be
compromised and pose an infection
control risk and/or cause tissue
irritation.
Do not coil the Coil Sheath, the Tube
Sheath with a diameter of less than 15 cm.
This could damage the instrument.
76 MECHANICAL LITHOTRIPTOR
Page 81

6.1 Inspection Before Storage
Prior to storage, inspect the sterile packages as follows:
1. Confirm that the sterile package containing the
Basket Wire is free from tears, inadequate sealing or
water damage. If tears, inadequate sealing or water
damage is detected, do not use the instrument;
contact Olympus.
2. Confirm that the sterile packages containing the Coil
Sheath, the Tube Sheath and the BML Handle are
free from tears, inadequate sealing or water damage.
If tears, inadequate sealing or water damage is
detected, repackage and sterilize again as described
in Section 5.6, “Sterilization”.
6.2 Storage
Chapter 6 Storage
Store the instrument and the BML Handle in the sterile
packages at room temperature in a clean and dry
environment. Do not store it in direct sunlight. Ensure that
the packaged instrument and the BML Handle are not
crushed by surrounding objects during storage. Follow
any additional storage instruction provided by the
manufacturer of the sterile package.
77MECHANICAL LITHOTRIPTOR
Page 82

Page 83

HHHHHHHHHHHHHHHHHHHHHHHHHHHHHHHHHHHHHHHHHHHHHHHHHH
1997 OLYMPUS MEDICAL SYSTEMS CORP. All rights reserved.
No part of this publication may be reproduced or distributed without the
express written permission of OLYMPUS MEDICAL SYSTEMS CORP.
OLYMPUS is a registered trademark of OLYMPUS CORPORATION.
HHHHHHHHHHHHHHHHHHHHHHHHHHHHHHHHHHHHHHHHHHHHHHHHHH
Page 84

Manufactured by
2951 Ishikawa-cho, Hachioji-shi, Tokyo 192-8507, Japan
Fax: (042)646-2429 Telephone: (042)642-2111
Distributed by
3500 Corporate Parkway, P.O. Box 610 Center Valley, PA
Fax: (484)896-7128 Telephone: (484)896-5000
One Corporate Drive, Orangeburg, N.Y. 10962, U.S.A.
Fax: (845)398-9444 Telephone: (845)398-9400
5301 Blue Lagoon Drive, Suite 290 Miami, FL 33126-2097, U.S.A.
Fax: (305)261-4421 Telephone: (305)266-2332
(Premises/Goods delivery) Wendenstrasse 14-18, 20097 Hamburg, Germany
(Letters) Postfach 10 49 08, 20034 Hamburg, Germany Telephone: (040)237730
KeyMed House, Stock Road, Southend-on-Sea, Essex SS2 5QH, United Kingdom
8F, Hyundai Marines Bldg., 646-1, Yeoksam-Dong, Kangnam-Gu, Seoul 135-080 Korea
491B, River Valley Road #12-01/04, Valley Point Office Tower, Singapore 248373
Fax: (01702)465677 Telephone: (01702)616333
117071, Moscow, Malaya Kaluzhskaya 19, bld. 1, fl.2, Russia
Fax: (095)958-2277 Telephone: (095)958-2245
Room 1202, NCI Tower, A21 Jianguomenwai Avenue Chaoyang
Fax: (10)6569-3545 Telephone: (10)6569-3535
Fax: (02)6255-3499 Telephone: (02)1544-3200
31 Gilby Road, Mount Waverley, VIC., 3149, Australia
Fax: (03)9543-1350 Telephone: (03)9265-5400
18034-0610, U.S.A.
District Beijing 100022 PRC
Fax: 6834-2438 Telephone: 6834-0010
GW9544 14
Printed in Japan 20060714 :0000
 Loading...