

Page 1
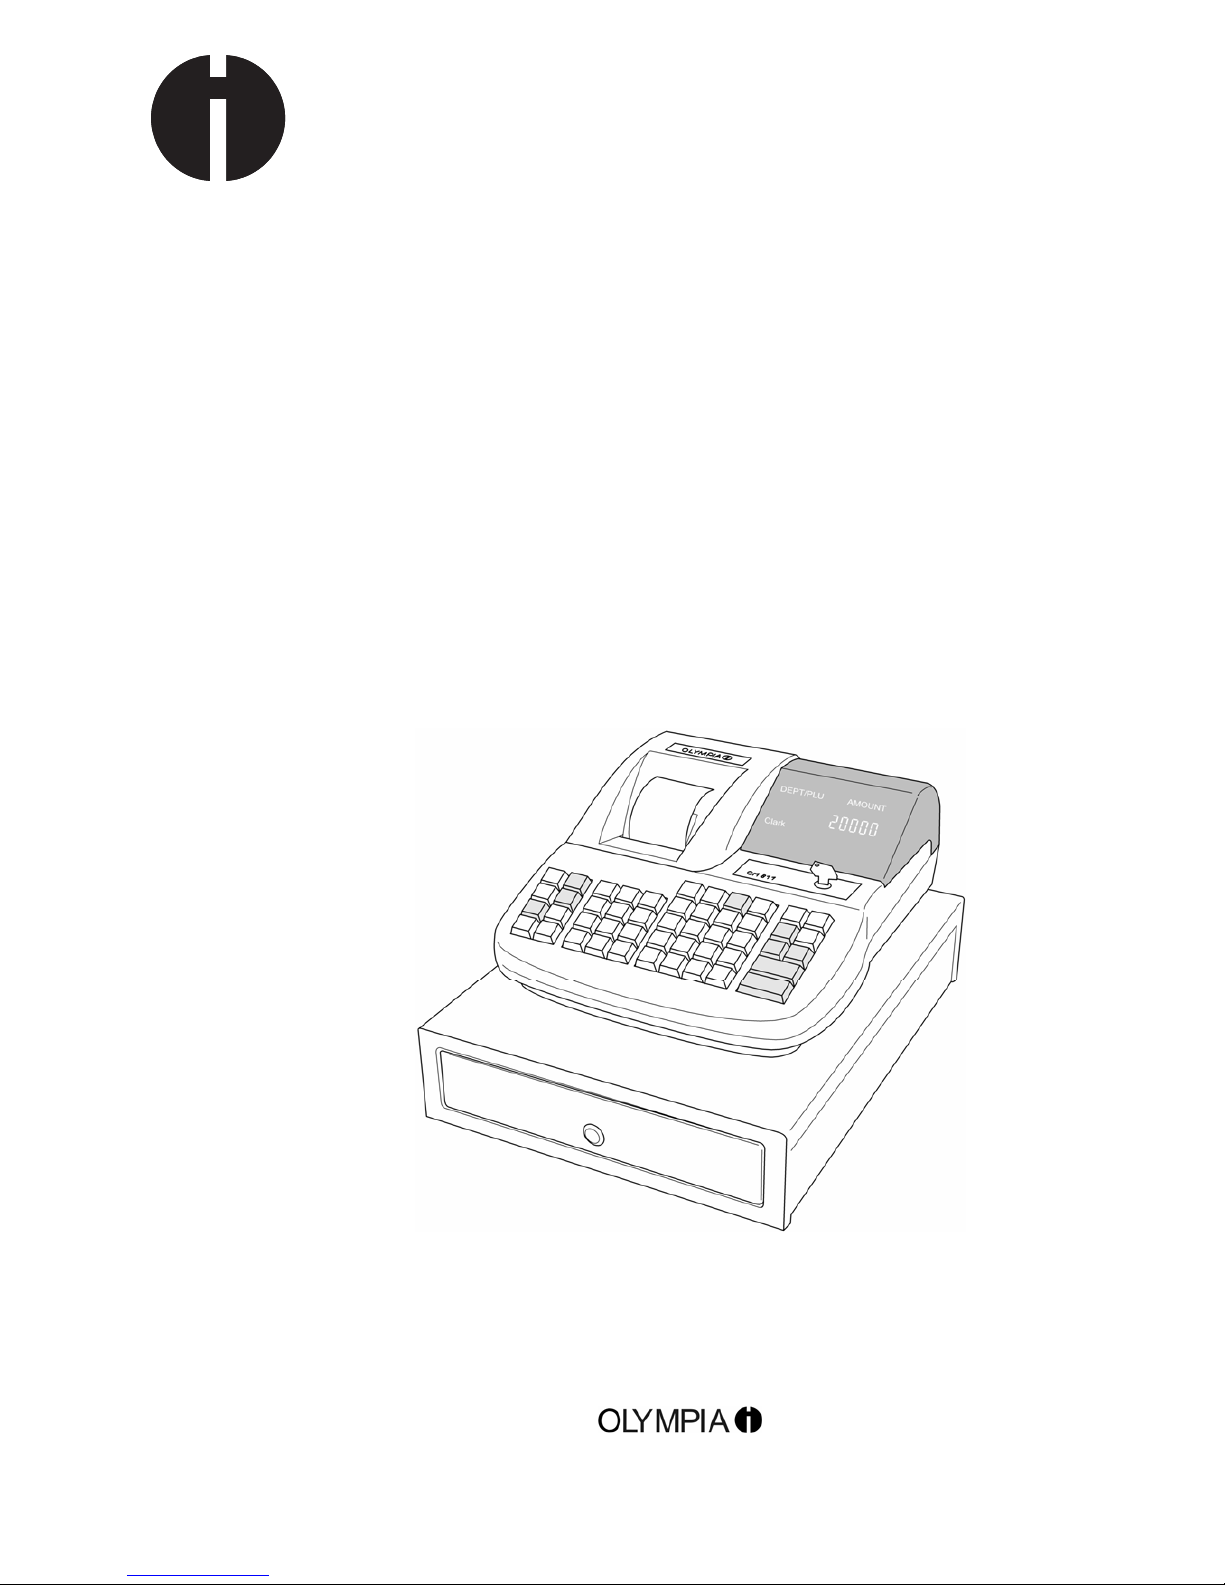
CM 811/812
Quick Reference
O
YL
M
P
I
A
SINCE 1903
www.olympia-vertrieb.de
Page 2
Quick Reference
CM 811/812 Cash Register Quick Reference
Olympia 8.2005 Page 2 All Rights Reserved
Declaration of Conformity
CM 811/812
G
The manufacturer hereby declares
that the equipment complies with the stipulations defined in the following guidelines and standards:
D
Der Hersteller erklärt hiermit,
dass das Gerät mit den Bestimmungen der Richtlinien und Normen übereinstimmt:
F
Le fabricant déclare par la présente que l'appareil est conforme aux règlements et normes en vigueur:
E
Por medio de la presente,
el fabricante declara que este aparato está conforme a lo dispuesto en las directivas y normas vigentes:
n
De fabrikant verklaart hierbij dat het apparaat voldoet aan de bepalingen in de richtlijnen en normen:
P
Pelo presente o fabricante declara
que o dispositivo está de acordo com as determinações das directrizes e das no rmas:
S
Tillverkaren förklarar härmed
att apparaten överensstämmer med bestämmelserna i följande direktiv och normer:
73/23/EEC EN 60950: 2000
89/336/EEC EN 55022: 09.98+A1 :2000+A2 :2003
EN 50024: 09.98+A1 :10 :2001+A2 :01 :2003
EN 61000-3-2: 2000
EN 61000-3-3: 1995+A 1 :2001
OLYMPIA
Olympia Business Systems
August 2005 Heinz Prygoda Managing Director
Page 3

Quick Reference
CM 811/812 Cash Register Quick Reference
Olympia 8.2005 Page 3 All Rights Reserved
Intended use
This cash register is exclusively intended for processing cash register business indoors.
Any other use is considered unintended use.
General information / Safety notes
• Ensure that the local mains power supply corresponds to that specified on the rating plate located on the rear side of
the cash register.
• This cash register is a highly sophisticated piece of equipment. Never attempt to repair it yourself.
If repairs should become necessary, please bring the cash register to an authorised service centre or the sales outlet.
• Never insert metallic objects, such as a screwdriver, paper clip etc., in the cash register. This could damage the cash
register and also exposes you to the risk of an electric shock.
• Always switch the cash register off when it no longer needs to be used.
• Clean any dust from the cash register by wiping it gently with a dry cloth. Never use water or solvents, such as paint
thinner, spirit etc., to clean the cash register.
• To disconnect the power supply fully, disconnect the plug from the power socket.
• Never expose the cash register to extreme temperatures.
• Keep all the transport locks in a safe place for future use. The transport locks must be reinstalled for any future
transportation of the cash register.
Transport locks
Before the cash register can be put into operation, remove any transport locks installed and store them for future use.
Important transport information: In the event of any transport damage, the machine must be returned in the packaging together with the operating manual any accessories.
Connecting to the power supply
Before connecting the cash register to the mains power supply, please check that the voltage and frequency specifications stipulated on the rating plate coincide with the local power supply.
Safety note: The power outlet must be near the cash register and easily accessible.
This means that the cash register can be disconnected from the power supply quickly in an emergency.
Note: All data in the machine is retained when the power supply is disconnected. The batteries ensure the data is retained for approx. 2 months after the cash register has been disconnected from the power supply.
Printer mechanism
Attention: To guarantee long, trouble-free operation, observe the following information:
• Never
− print without any paper installed!
− pull the paper while the printer is operating!
− use poor quality paper!
− insert paper rolls which have already been used!
− tamper with the printer using hard objects or move the drive by hand!
• Pay attention to the markings indicating the end of the paper roll.
Change the paper roll immediately.
• Have the cash register / printer mechanism serviced regularly by an authorised service centre.
Page 4
Quick Reference
CM 811/812 Cash Register Quick Reference
Olympia 8.2005 Page 4 All Rights Reserved
This Quick Reference manual only provides basic information.
More details are available on our Internet site www.olympia-vertrieb.de.
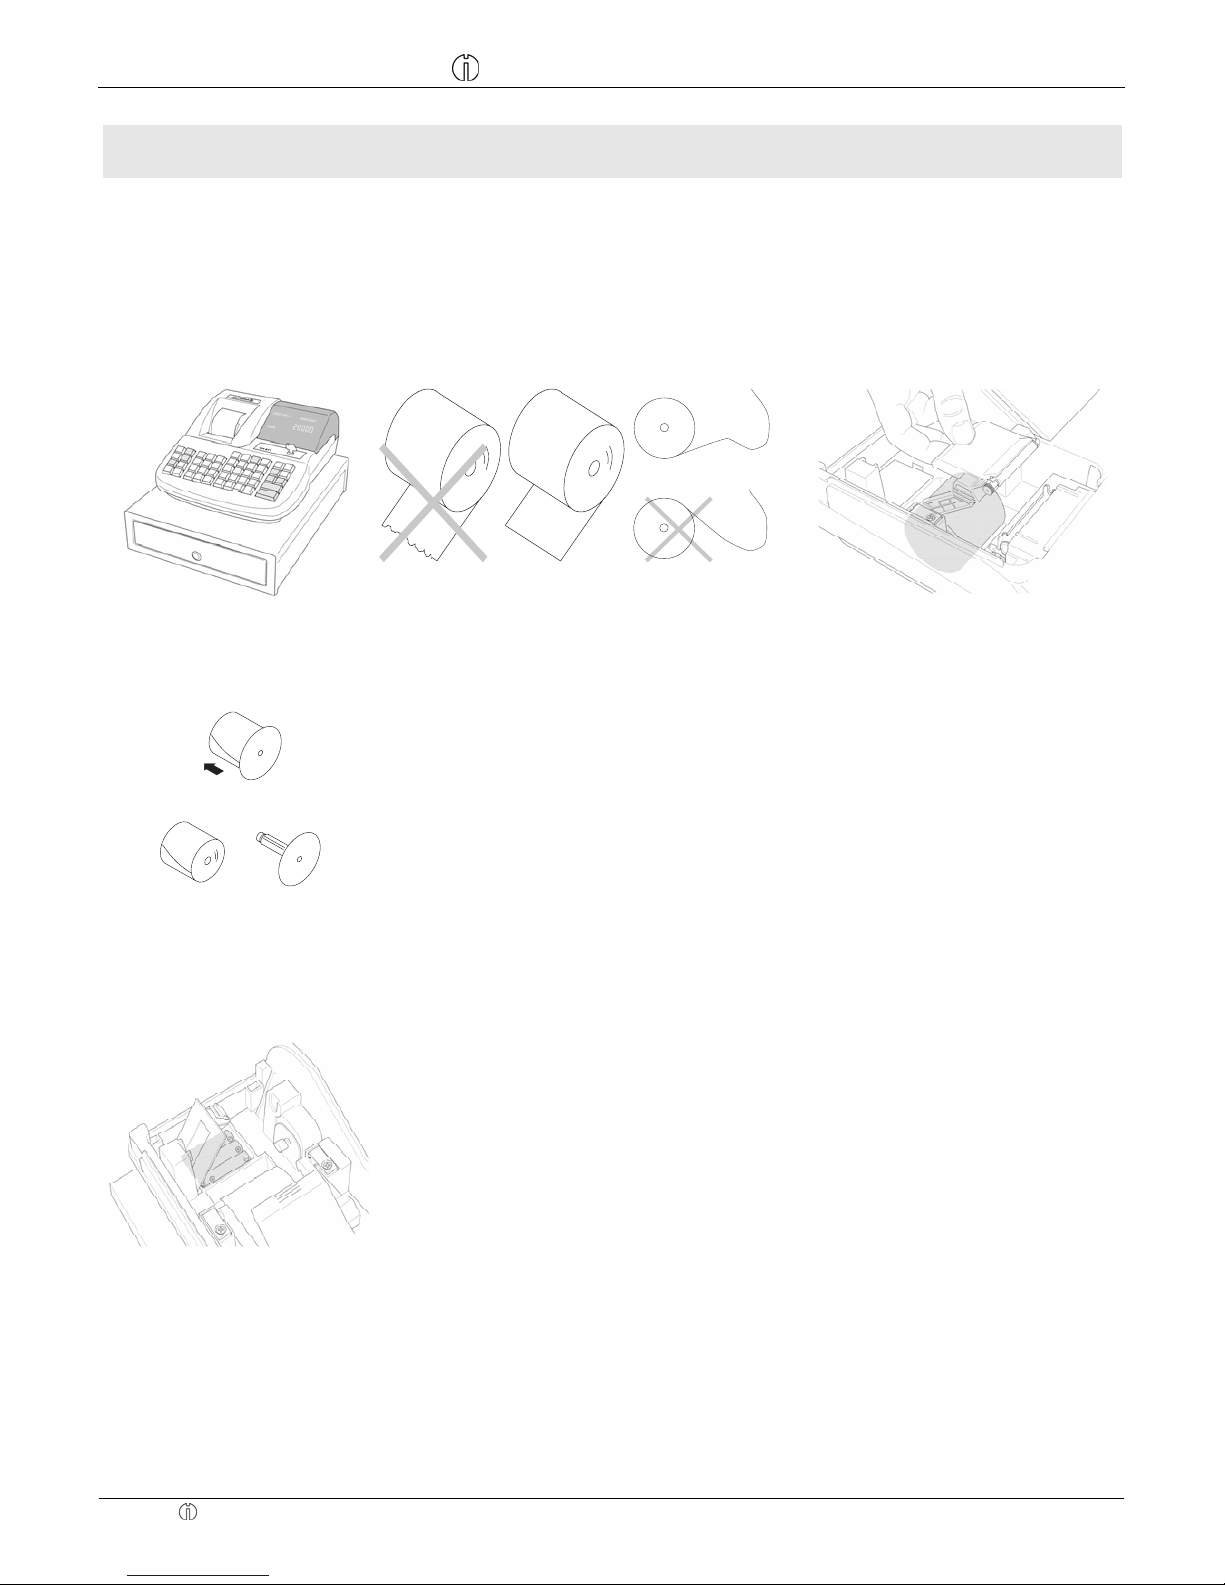
Inserting a paper roll
Remove the printer lid. Pivot the paper transport unit up. Insert a thermal paper roll of 57 mm width and max. 70 mm diameter. Draw the leading edge of the paper over the tear-off edge and pivot the paper transport unit down, locking it in
place. Depending on the required use (bill or journal), either tear off the paper at the tear-off edge of the printer mechanism or feed the paper onto the paper reel. Replace the printer lid.
Paper reel
The paper reel is required when the receipt should be wound onto it.
1. Open the printer lid.
2. Remove the paper reel.
3. Thread the end of the journal paper in the slit in the paper reel.
4. Insert the paper reel in the reel guides provided for it.
5. To remove the journal paper after it has been rolled up on the reel, remove the
paper reel and pull the journal roll off.
6. Reinsert the paper reel.
7. Close the printer lid.
Inserting batteries
Note: Insert batteries to ensure that all the data is retained in the event of a power failure.
1. Open the printer lid.
2. Open the battery compartment cover (black flap) in the paper compartment.
3. Insert 3 AA round cell batteries.
Important: Pay attention to the correct position of the batteries
(refer to diagram and/or identification).
4. Close the battery compartment cover.
5. Close the printer lid.
6. To ensure data retention, replace the batteries once a year with the cash register
switched on.
Page 5
Quick Reference
CM 811/812 Cash Register Quick Reference
Olympia 8.2005 Page 5 All Rights Reserved
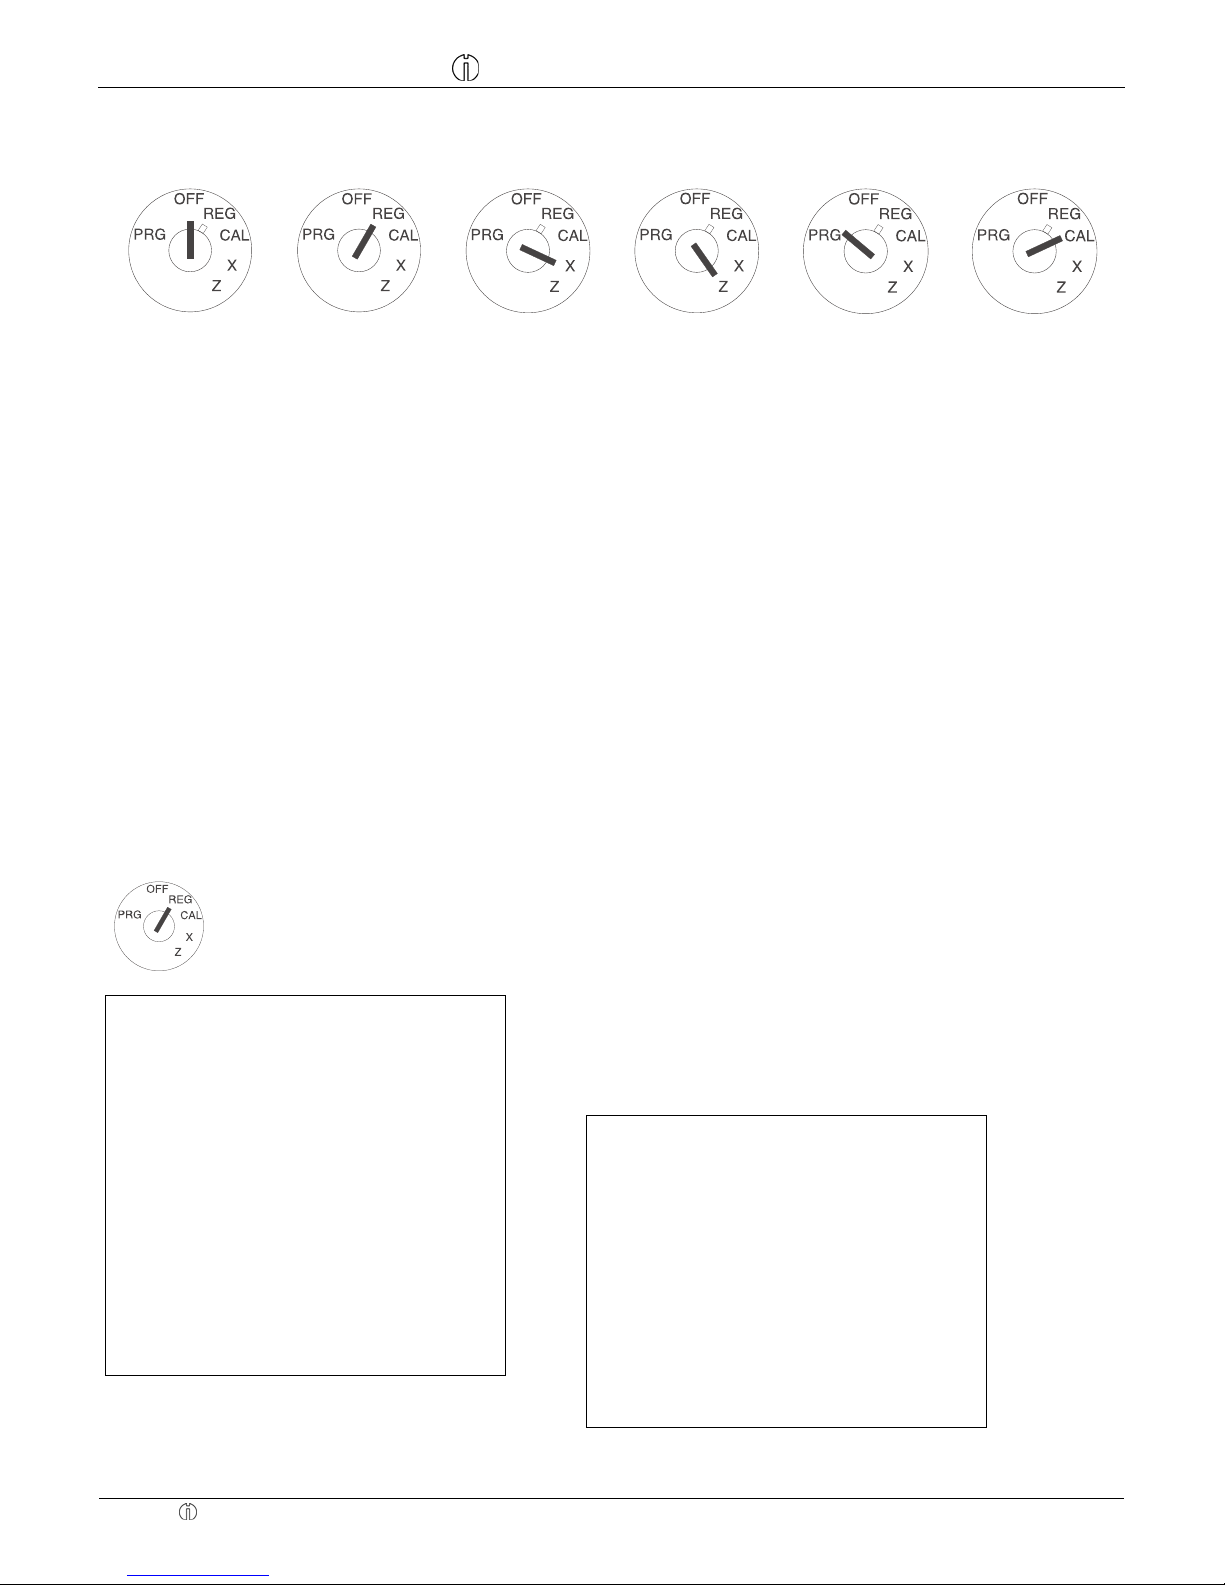
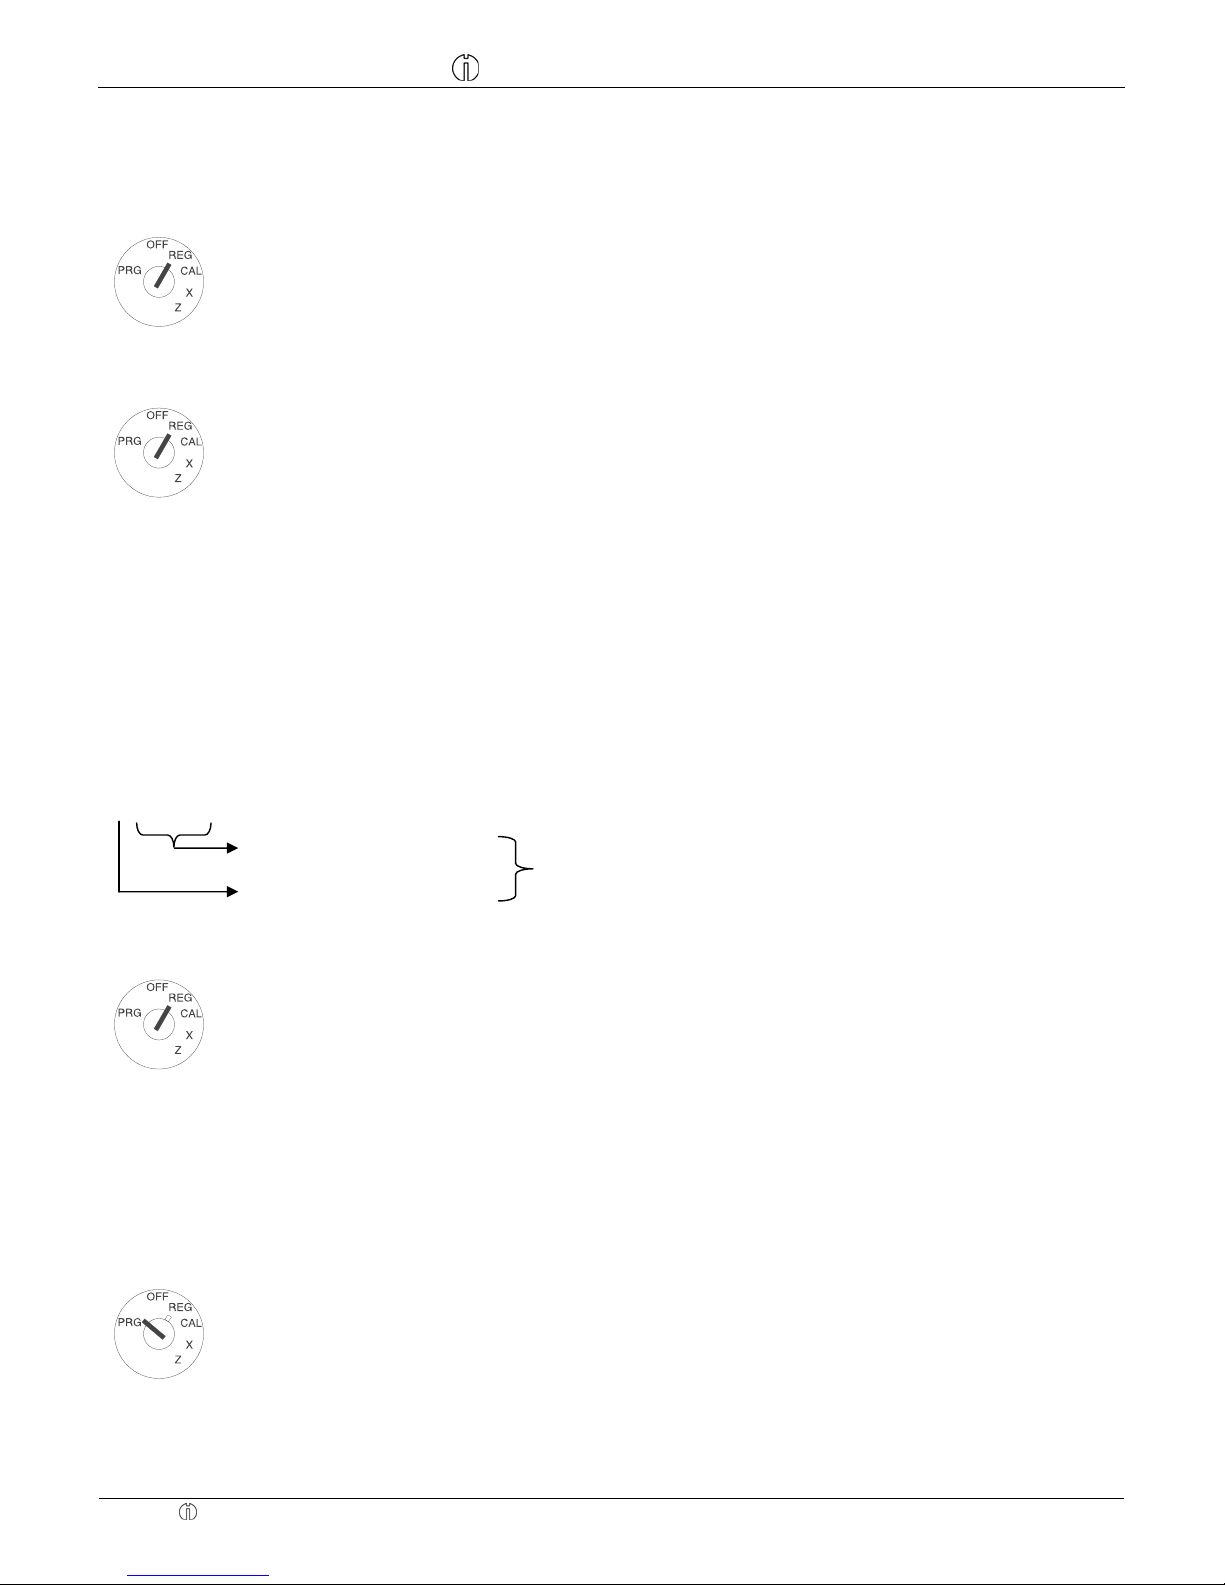
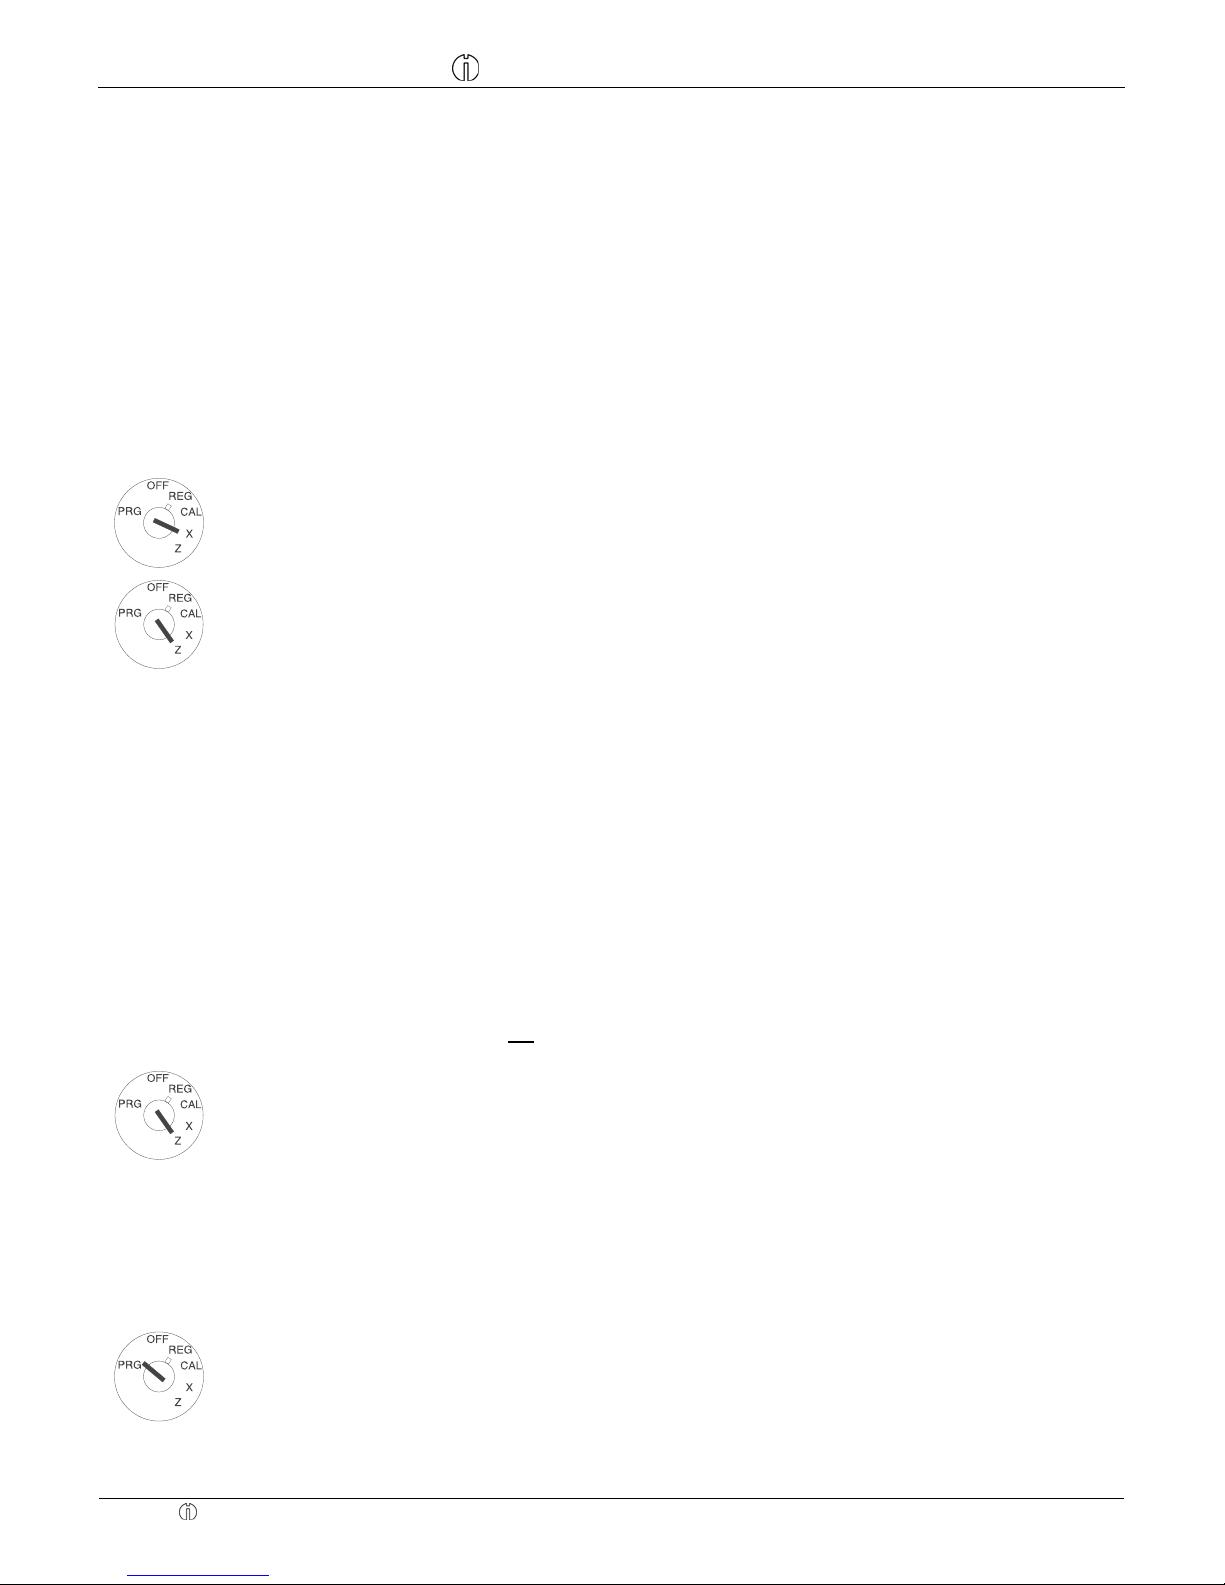
Key-operated switch
The key must be set to position REG for normal operation (registration).
Off
Registration
(normal operation)
X-reports (without
memory deletion)
Z-reports (with
memory deletion)
Programming Calculation
Note: Loss of data and jamming of the cash register are possible in Z and PRG operating modes.
Only use these modes when you are familiar with programming and operating the cash register.
Keypad assignment
QRST jk
ab 789 DHLP lm
cd 456 CGKO no
ef 123 BFJN p
gh 0/. AEIM q
Printing the help list
Set the key to REG. Press the
T key.
Select the number in the help list, enter it and confirm the entry by pressing the T key.
Example: Activate the language table
To print the table, press the
T key.
Help list for CM 811/812
Enter the help no. and press the T key.
Help no. Function
01 Select language
02 Program date (DD/MM/YY)
03 Program time (24-hour clock)
04 Program logo
05 Program tax
06 Program departments
07 Program PLU
08 Print financial report
09 Print text table
01: Select language
110
c
ENGLISH
111
c
FRENCH
112
c
GERMAN
113
c
SPANISH
114
c
DUTCH
115
c
PORTUGUESE
116
c
SWEDISH
Help no. Confirm by pressing
1 T
Page 6

Quick Reference
CM 811/812 Cash Register Quick Reference
Olympia 8.2005 Page 6 All Rights Reserved
To change the settings, set the key to position PRG.
Select the number from the list illustrated above, enter it and confirm the entry by pressing the
c key.
Example: Change the language to ENGLISH
Language no. Confirm entry by pressing
110 c
Printing the system settings
The settings in respect of system options, discount, foreign currency as well as Z-report and clerk password.
Input Display Confirm by pressing
Set the key to PRG
Press
9 6 times
Confirm by pressing
q
999999
9999,99
q
Programming the date
Example: 1 January 2006
Input Display Confirm by pressing
Set the key to PRG
Enter the date as 6 digits
(DDMMYY)
Confirm by pressing
m
010106
0101,06
m
Programming the time
Example: 9:30 a.m.
Input Display Confirm by pressing
Set the key to PRG
Enter the time as 4 digits (hhmm)
Confirm by pressing
h
0930
9,30
h
Programming tax rates
A maximum of four different tax rates can be programmed.
Example: 16% as tax rate 1
Input Display Confirm by pressing
1
0,01
o
Set the key to PRG
The entry of a tax rate (1,2,3 or 4,
corresponds to storage location no.)
Confirm by pressing
o
Enter the tax rate (x 1000)
Confirm by pressing
q
16000
160,00
q
Example: 7% as tax rate 2
Input Display Confirm by pressing
Set the key to PRG
Enter the second tax rate
2
0,02
o
Page 7
Quick Reference
CM 811/812 Cash Register Quick Reference
Olympia 8.2005 Page 7 All Rights Reserved
Input Display Confirm by pressing
2
0,02
o
Confirm by pressing
o
Enter the tax rate (x 1000)
Confirm by pressing
q
7000
70,00
q
Programming departments (DEP)
Example: The name of DEP1 is "Test"
Input Display Confirm by pressing
Step 1: Text input
Set the key to PRG
Press m twice
Text input for DEP name
Confirm by pressing
n
Continue with text input for other
departments
m m
1 x 2
2 x
9
4 x
1
1 x
2
01
T
TE
TES
TEST
n
In order to select a DEP number directly:
Press the DEP key
A to scroll upwards or E to scroll downwards.
End programming by pressing
q
after entering the last department
q
Example 1: DEP1 is an itemised department at tax rate 1 (16%) and without a fixed price.
Input Display Confirm by pressing
001
0,01
n
000
0,00
A
Step 2: Define status
Set the key to PRG
Enter status S1 and S2 as three dig-
its
Enter fixed price or free pricing
Assign settings to DEP1 by
pressing
A
Status S1: 0 = itemised department, 1 = single item department
Status S2: 00 = no tax, 01 = tax rate 1, 02 = tax rate 2, 03 = tax rate 3, 04 = tax rate 4
(For information on tax rates, refer to Section "Programming tax rates“)
000 = DEP operates without fixed price (free pricing); alternatively: enter the fixed price
Example 2: DEP1 is an itemised department at tax rate 2 (7%) and without a fixed price.
Input Display Confirm by pressing
002
0,02
n
000
0,00
B
Step 2: Define status
Set the key to PRG
Enter status S1 and S2 as three dig-
its. Enter fixed price or free pricing
Assign settings to DEP2 by
pressing
B
Input Display Confirm by pressing
888888
8888,88
q
Step 3: Printing
To print a list with the programmed
departments
Press
8 6 times
and conclude by pressing
q.
Page 8
Quick Reference
CM 811/812 Cash Register Quick Reference
Olympia 8.2005 Page 8 All Rights Reserved
Programming Price Look Up (PLU)
PLUs are programmed in 3 steps:
1. Enter the PLU text for all PLUs.
2. Enter the price and department assignment for all PLUs.
3. Enter the status of the PLU and department assignment for all PLUs.
(Not necessary if the PLU is operated with a fixed price.)
Example: The name of PLU123 is "Test".
Input Display Confirm by pressing
m
P001
1. PLU text:
Set the key to PRG
Press
m once
Enter the text for the first PLU using
the 10-key keypad (max. 12 characters)
Proceed in the same way for the
next PLU.
1 x
2
2 x
9
4 x
1
1 x
2
T
TE
TES
TEST
n
In order to select a PLU number directly:
Press the DEP key
A to scroll upwards to the DEP key E to scroll downwards.
Conclude text input by pressing
q
q
Example: PLU123 for 2.50 EUR belongs to department 1.
Input Display Confirm by pressing
h
P001 0,00
2. PLU price and assignment:
Set the key to PRG
Press
h
Enter the required PLU number,
confirm by pressing
f.
123
P123
f
Now enter the PLU fixed price and
the department assignment by
pressing the department key
A.
250
2,50
A
The next PLU automatically appears
in the display. Proceed in the same
way.
P124 0,00
Conclude input by pressing
h
h
Example: PLU123 / DEP1 with free pricing permitted.
Input Display Confirm by pressing
e
P001 0,00
3. PLU status:
Note: This step is only necessary
for PLUs which operate with free
pricing.
Status 0 = fixed price
Status 1 = free pricing
Set the key to PRG
Press
e
Enter the PLU no. to be programmed and confirm by pressing
f.
123
P123 2,50
f
Enter the PLU status, assign by
pressing the corresponding department key and confirm.
1
0,01
A
Page 9
Quick Reference
CM 811/812 Cash Register Quick Reference
Olympia 8.2005 Page 9 All Rights Reserved
The next PLU automatically appears
in the display. Proceed in the same
way.
P124 0,00
Conclude input by pressing
e
e
A list of the programmed PLUs can be printed out.
Confirm by pressing
Set the key to PRG
Send the print job by pressing
f
f
Programming headers and footers
A maximum of 4 header lines and 3 footer lines can be programmed for a receipt.
Each line can have a maximum of 24 characters.
Example: The text in a header should read "Test".
Input Display Confirm by pressing
mmmm
H 01
1 x
2
2 x
9
4 x
1
1 x
2
T
TE
TES
TEST
at the end of the line
n
Programming the header:
Set the key to PRG
Press
m 4 times.
Enter the header text using the numeric keypad.
Conclude the input for each line
(max. 24 characters) by pressing
n.
Proceed in the same way to enter
the next lines (max. 4 header lines).
End programming by pressing
q.
q
Input Display Confirm by pressing
mmmmmm
A 01
Programming the footer:
Set the key to PRG
Press
m 6 times.
Proceed exactly as in programming
the header (see above) (max. 3 footer lines).
Text input, see above
Programming foreign currencies
A maximum of 4 foreign currencies can be programmed.
The following information must be entered for the programming process:
− Foreign currency identification: 1,2,3 or 4
− Decimal places for the exchange rate (EXP): 0 to 8 decimal places are possible
− Decimal places for the foreign currency (D.P.): 0 to 3 decimal places are possible
− Exchange rate (RATE): 6-digit entry from 000001 to 999999
The digits for this setting are programmed in a single sequence without any spaces or interme diate ch aracters between
them: <digit for foreign currency> <digit for EXP> <digit for D.P.> <digits for RATE>
Page 10
Quick Reference
CM 811/812 Cash Register Quick Reference
Olympia 8.2005 Page 10 All Rights Reserved
Example: EURO to US Dollars (1 USD = 0.76494 EURO) as foreign currency no. 1
Input Display
Confirm by pressing
Set the key to PRG
Foreign currency 1 = 1
EXP = 5
D.P. = 2
RATE = 076494
152076494
1520764,94
p
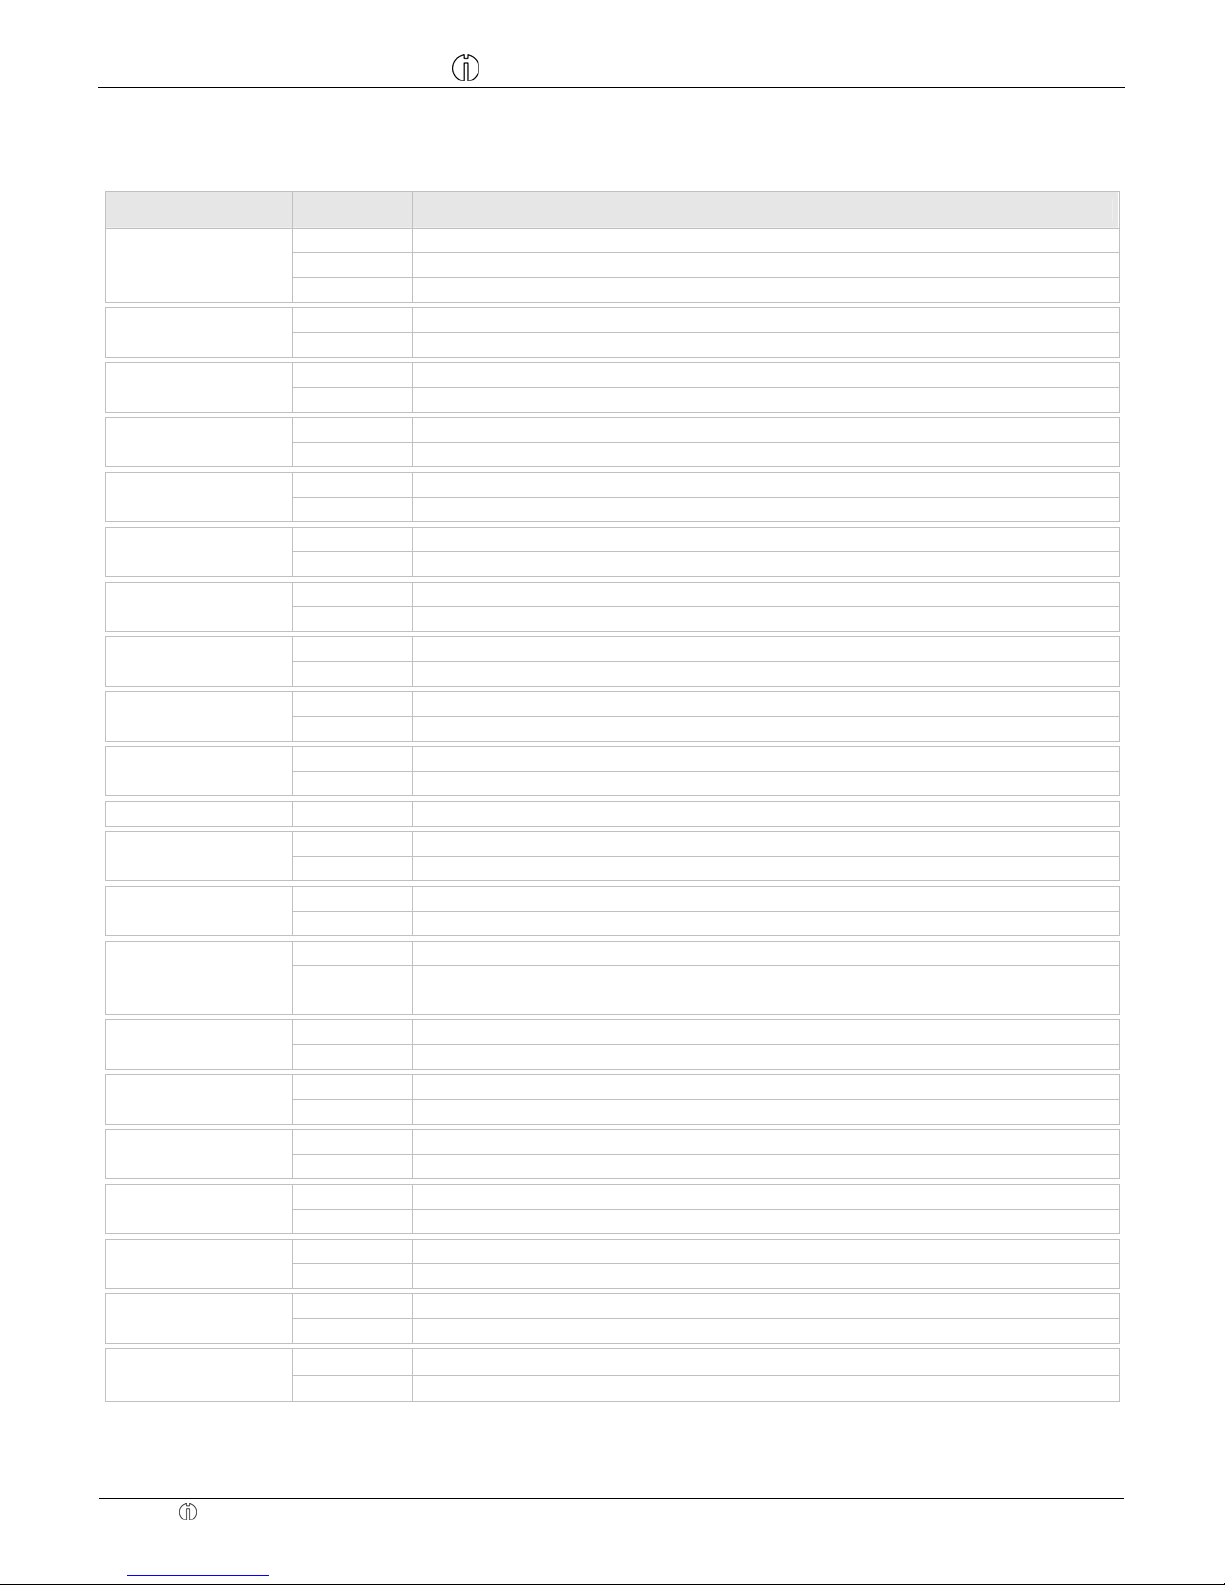
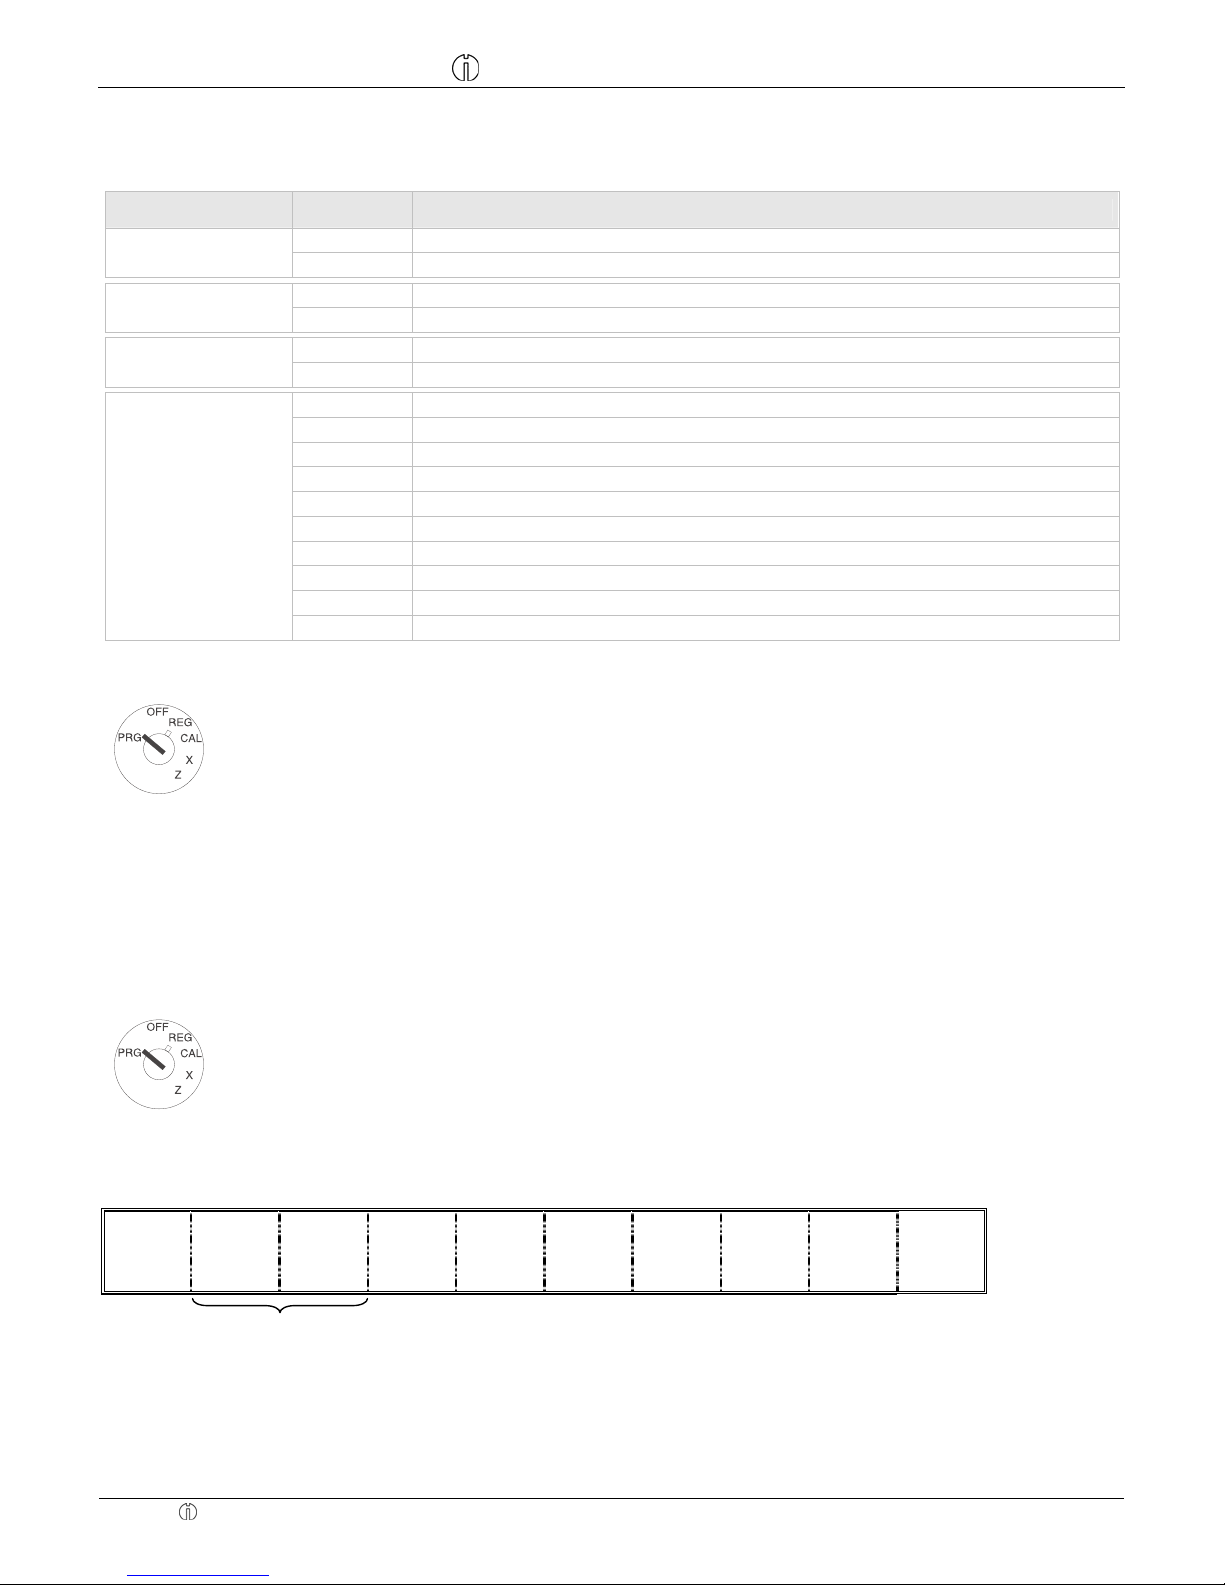
Programming system options
The basic program of the cash register is stored in the system options.
Example: Change the time display to the 24-hour format
Input Display Confirm by pressing
Set the key to PRG
The system options are entered as 2
or 3 digits.
The input is confirmed by pressing
c.
40
40
c
Note: The standard settings appear in bold print.
System option no. Status no. Setting
0 Decimal point position: 0 (no point)
1 Decimal point position: 0.0
2 Decimal point position: 0.00
1
3 Decimal point position: 0.000
2 (reserved)
1 Net price (exclusive of tax)
3
2 Gross price (including tax)
0 Time: 24-hour format
4
1 Time: 12-hour format
0 Print X/Z-report with logo: No print
5
1 Print X/Z-report with logo: Print
6 (reserved)
0 Date format: Month-Day-Year
7
1 Date format: Day-Month-Year
8 (reserved)
9 (reserved)
10 (reserved)
0 Language: English
1 Language: FRENCH
2 Language: GERMAN
3 Language: SPANISH
4 Language: DUTCH
5 Language: PORTUGUESE
11
6 Language: SWEDISH
0 Zero price of a PLU or department not permitted
12
1 Zero price of a PLU or department permitted (default)
0 No special European rounding
1 European rounding: Swiss
2 European rounding: Swedish
13
3 European rounding: Danish
- Continued on next page –
Page 11
Quick Reference
CM 811/812 Cash Register Quick Reference
Olympia 8.2005 Page 11 All Rights Reserved
- Table, continued –
Note: The standard settings appear in bold print.
System option no. Status no. Setting
0 Tax rounding: Rounding
1 Tax rounding: 5/4 commercial rounding
14
2 Tax rounding: Rounding up
0 Printing of an additional bill permitted
15
1 Printing of an additional bill not permitted
0 Zero skip printing for Z-report
16
1 No zero skip printing for Z-report
0 Print total tax amount: No print
17
1 Print total tax amount: Print
0 Print taxable amount for each tax rate: No print
18
1 Print taxable amount for each tax rate: Print
0 Print extra line “Total taxable amount”: No print
19
1 Print extra line “Total taxable amount”: Print
0 Print net total for each tax rate: No print
20
1 Print net total for each tax rate: Print
0 Print extra line “Net total”: No print
21
1 Print extra line “Net total”: Print
0 Print “tax rate“ symbol to the right of the total: No print
22
1 Print “tax rate“ symbol to the right of the total: Print
0 Print time: Print
23
1 Print time: No print
24
(reserved)
0 Print tax totals: Before cash line
25
1 Print tax totals: After cash line
0 Electronic journal is active
26
1 Electronic journal is not active
0 Store all transactions in REG mode in the electronic journal
27
1
Only the sales transactions in REG mode are stored in the electronic journal.
Operations such as Paid Out, Received on Account and No Sale are not stored.
0 Warning signal “E-journal nearly full“ issued at the end of a transaction
28
1 Warning signal “E-journal nearly full“ not issued at the end of a transaction
0 Warning signal “E-journal nearly full“ issued at the start of a transaction
29
1 Warning signal “E-journal nearly full“ not issued at the start of a transaction
0 Receipt counter is not deleted after Z-financial report printout
30
1 Receipt counter is deleted after Z-financial report printout
0 Z1 and Z2 counters are not deleted after Z-financial report printout
31
1 Z1 and Z2 counters are deleted after Z-financial report printout
0 Grand Total is not deleted after Z1 financial report printout
32
1 Grand Total is deleted after Z1 financial report printout
0 Grand Total is not printed on the financial report
33
1 Grand Total is printed on the financial report
0
Basic currency is the local currency (amount ÷ conversion factor)
34
1
Basic currency is foreign currency (amount × conversion factor)
- Continued on next page -
Page 12
Quick Reference
CM 811/812 Cash Register Quick Reference
Olympia 8.2005 Page 12 All Rights Reserved
- Table, continued Note: The standard settings appear in bold print.
System option no. Status no. Setting
0 Refunds are printed on the financial report
35
1 Refunds are not printed on the financial report
0 Clerk logon not active after each transaction
36
1 Clerk logon active after each transaction
0 Calculator mode
40
1 Journal mode
0 Line spacing for receipt printout: 0.5 mm
1 Line spacing for receipt printout: 0.75 mm
2 Line spacing for receipt printout: 1.0 mm
3 Line spacing for receipt printout: 1.25 mm
4 Line spacing for receipt printout: 1.5 mm
5 Line spacing for receipt printout: 1.75 mm
6 Line spacing for receipt printout: 2.0 mm
7 Line spacing for receipt printout: 2.25 mm
8 Line spacing for receipt printout: 2.5 mm
98
9 Line spacing for receipt printout: 2.75 mm
The system options set can be printed out.
Input Display Confirm by pressing
Printing system settings:
Set the key to PRG
Press
9 6 times,
conclude by pressing
q.
999999
9999,99
q
Clerk system
The clerk system is deactivated by default. It can be activated or deactivated;
the status 0 indicates " inactive“, status 1 indicates "active".
Example: Activate the clerk system.
Input Display Confirm by pressing
Set the key to PRG
Press
4 five times
Enter the status
and conclude by pressing
q.
44444
1
444,44
4444,41
q
When the clerk system is activated, the clerk number appears in the display:
C 0 6 0.
0 0
Clerk no. 6
Page 13
Quick Reference
CM 811/812 Cash Register Quick Reference
Olympia 8.2005 Page 13 All Rights Reserved
Using the clerk system without password (default)
This only works when the clerk system is activated (see above). If no password has been programmed for the clerk (default 000), he/she can only log on using their clerk number.
Example: Cashier with clerk number 6 logs on.
Input Display Confirm by pressing
Logging on:
Set the key to REG.
Enter the single digit clerk number
and conclude by pressing
Q.
6
6
Q
Up to 8 clerks can be registered in the system.
Example: A cashier logs off.
Input Display Confirm by pressing
Logging off:
Set the key to REG.
Press
0
and conclude by pressing
Q.
0
0
Q
Clerk system with password
It is possible to protect clerk log on codes by means of a password.
Clerks then log on using their clerk number and associated password.
The password is a 3-digit code (000 to 999).
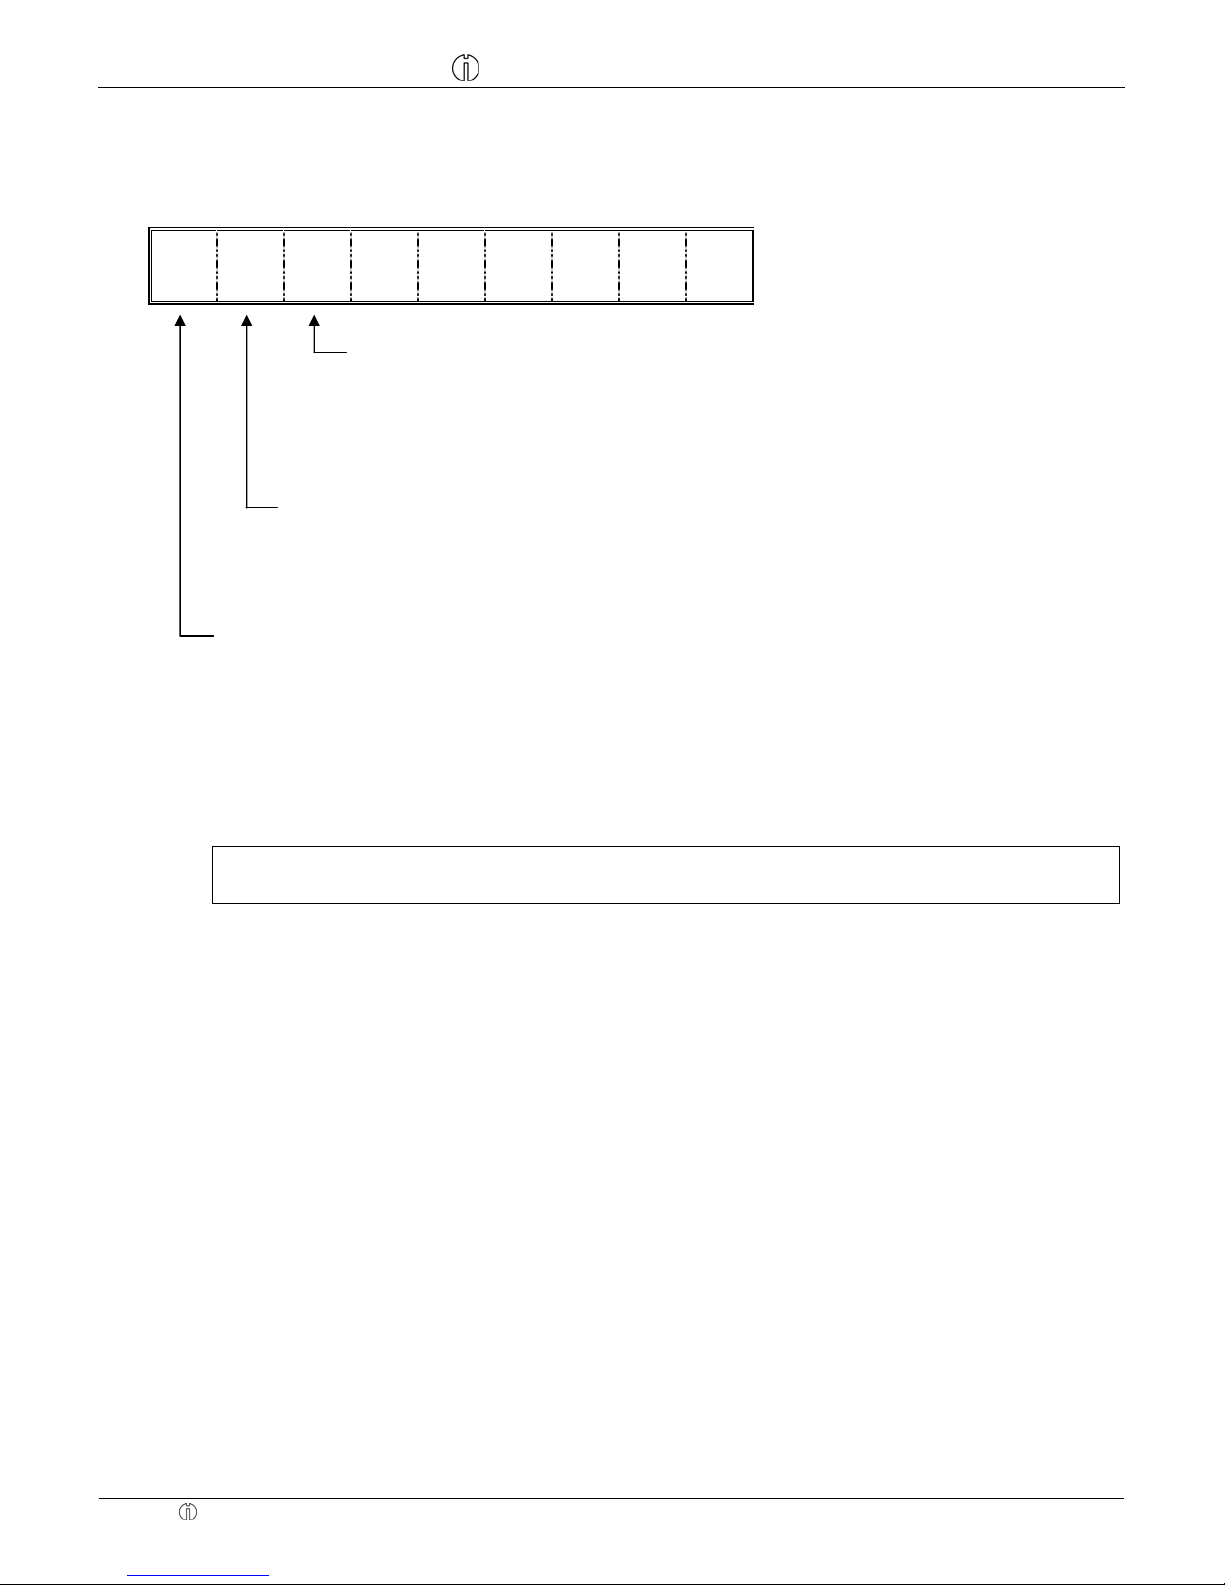
The clerk number and password thus comprise the 4-digit clerk code.
Clerk code structure
1 2 3 4
3-digit password (000-999)
clerk number (1-8)
4-digit clerk code
Example: Clerk no. 1 logs on with his password "456" (clerk code: 1456).
Input Display Confirm by pressing
Logging on:
Set the key to REG.
Enter the single digit clerk number,
enter the 3-digit password directly following and
conclude by pressing Q.
1
456
1
14,56
Q
If an incorrect password is entered, error message E appears in the display.
Clerks remain logged on until they log off properly (see above).
Programming clerk passwords
Example: Programming the passwords for clerk no. 1 (password: 456) and clerk no. 2 (password: 987).
Input Display Confirm by pressing
Set the key to PRG
Activate Programming mode for
clerk passwords:
Press
4 6 times
Confirm by pressing
q
444444
444444
q
Page 14

Quick Reference
CM 811/812 Cash Register Quick Reference
Olympia 8.2005 Page 14 All Rights Reserved
Enter all the passwords in sequence
(max. 8 passwords).
Enter the 4-digit clerk code (1-digit
clerk number
plus 3-digit password)
and conclude by pressing
Q.
1456
2987
14,56
29,87
Q
Q
Exit Programming mode for clerk
passwords:
Press
g.
g
The following message appears on
the receipt:
The entry is not printed.
Clearing errors
Incorrect entries and error status (acoustic signal) can be cleared by pressing g.
Registration according to departments
Enter price without decimal point (max. 7 digits).
Price Department
PPPPPPP
A
Or: If the same PLU should be registered several times:
No. of PLUs Price Department
NN
h
PPPPPPP
A
The sum of NN x PPPPPPP is limited to the maximum capacity of the cash register.
Registration according to PLU numbers
Enter the PLU (max. 3 digits)
PLU number PLU
E.g.
12 f
Or: If the same PLU should be registered several times:
No. of PLUs PLU PLU
NN
h E.g. 12 f
The sum of NN x PLU price is limited to the maximum capacity of the cash register.
Or: When a PLU is being used which has been programmed with free pricing:
PLU no. PLU Price entry PLU
E.g.
12 f
PPPPPPP
f
Or: When a department or PLU should operate with minus:
Price entry Department PLU no. PLU
d
PPPPPPP
A
or
E.g. 12 f
Page 15

Quick Reference
CM 811/812 Cash Register Quick Reference
Olympia 8.2005 Page 15 All Rights Reserved
Conclude receipt
When all the PLUs have been registered, press the p key to display and print the subtotal.
Enter the amount paid without a decimal point and conclude the receipt by pressing
q.
Amount tendered Conclude receipt
p
PPPPPPP
q
Foreign currency payment
When all the PLUs have been registered, press the p key to display and print the subtotal.
Enter the foreign currency identification and press
k. The total is displayed in the foreign currency. After pressing
k again, the local currency is displayed. Enter the amount tendered in the local or foreign currency and conclude the
receipt by pressing
q.
Example: A customer pays a bill amounting to 15.- EUR with 20 US Dollars.
Input Display Confirm by pressing
p
15,00
1
1
k
19,61
2000
20,00
q
0,39
Set the key to REG
After the transactions have been regis-
tered, complete the subtotal.
Enter the foreign currency identification (in
this case: US Dollar = foreign currency
identification 1) and confirm.
Enter the amount received in the foreign
currency mode and conclude the receipt.
When the change amount appears,
press
k to convert the sum to the local
currency.
k
0,30
Example: The customer receives either 30 Euro cents or 39 US cents change.
Error correction and void
Faulty registrations can be corrected immediately after entry or later in the transaction.
Error correction (direct): The last item entered during a registration can be corrected directly.
b
Correction is completed
Void (designated correction): Errors in amounts, PLU prices and department prices in transaction entered previously
can be corrected during the registration.
S
Void function is activated Complete the registration to be cancelled
Correcting refund/returned goods: Registrations via amounts, PLU numbers or department prices which have already
been concluded can be reverted.
d
Refund function is activated Complete the registration to be reverted
q
Page 16
Quick Reference
CM 811/812 Cash Register Quick Reference
Olympia 8.2005 Page 16 All Rights Reserved
Other functions
m
Cash register is opened
e
For cash payments, enter the amount and press the key.
c
For payments received on account, enter the amount and press the key.
l
Following a registration or conclusion of the subtotal, a percentage discount can be entered.
Example: Entry for 5%:
5l
Printing reports
X-reports: Without memory deletion. Z-reports: With memory deletion.
Set the key to X (to print X-reports) or Z (to print Z-reports) as necessary.
Report type: Start printout with:
Day's X and Z-financial report
q
Day's X and Z-PLU report
f
X and Z-clerk report
Q
Monthly X2 and Z2 financial report
99q
X and Z-training report
88q
Electronic journal (X)
p
Electronic journal (Z)
(only when active in system option 26)
p
If the full electronic journal should be printed,
the message
CL appears in the display together with an acoustic signal.
− If the electronic journal should be deleted after printing, press
g.
− If the electronic journal should not
be deleted after printing, press S.
Delete the electronic journal without printing Input Confirm by pressing
Set the key to Z
81 R
CL
in the display: Delete the electronic journal by pressing g.
CL in the display: Do not delete the electronic journal by pressing S.
Training mode
Input Display Confirm by pressing
Start Training mode:
Set the key to PRG
Press
6 6 times, conclude by
pressing
q.
666666
6666,66
q
Page 17
Quick Reference
CM 811/812 Cash Register Quick Reference
Olympia 8.2005 Page 17 All Rights Reserved
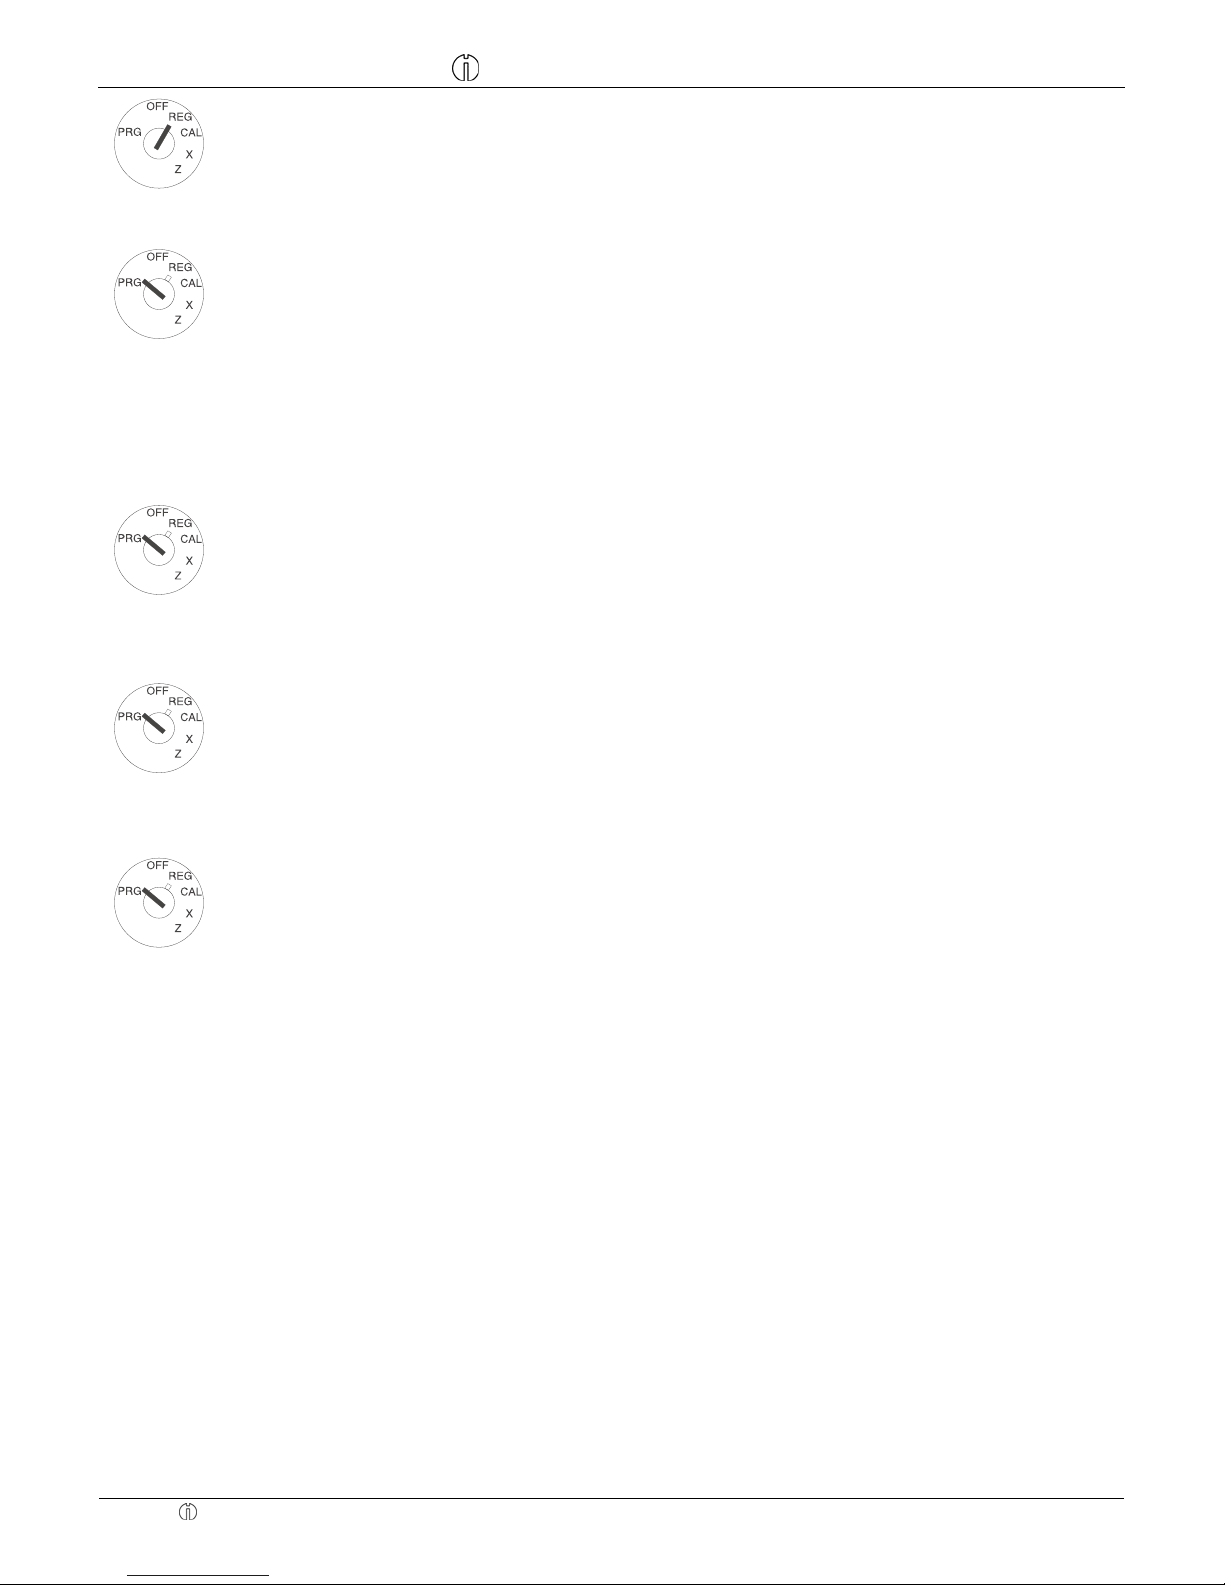
To operate in Training mode:
Set the key to REG
Note: No reports can be printed in Training mode.
Input Display Confirm by pressing
End Training mode:
Set the key to PRG
Press
5 6 times, conclude by
pressing
q.
555555
5555,55
q
Deletion function
Caution: The following steps should only be taken when you are familiar with the programming functions.
Initiate a warm start
A warm start deletes the last malfunction. The programming is retained.
Set the key to PRG. Disconnect the power plug.
Then press the
g and 7 keys simultaneously while reconnecting the power plug.
The cash register prints PARTIAL RESET.
Delete all reports
All sales are deleted. The programming is retained.
Set the key to PRG. Disconnect the power plug. Then press the
g, 7 and 9 keys simultaneously
while reconnecting the power plug.
The cash register prints REPORT RESET.
Delete all data
All programming and sales are deleted. The cash register is reset to its default, factory settings.
Set the key to PRG. Disconnect the power plug. Then press the
g, 3 and 7 keys simultaneously
while reconnecting the power plug.
The cash register prints FULL RESET.
Error messages
Error messages appear in the display in the case of incorrect operation.
Error message Cause Corrective measure
E
Wrong key pressed.
Press
g.
PAPER
End of paper
Insert new paper roll, press
g.
EJFULL
The electronic journal is full. Delete the electronic journal (with or without printout).
SEC-CODE
A password has been programmed
for Z-reports.
Enter the 4-digit password, press
n.
SEC-CODE
A password has been programmed
for the clerk.
Enter the clerk number. Then enter the 3-digit password.
Conclude by pressing
Q.
CL
Request for report printout of the
electronic journal with key in position Z.
Delete the electronic journal by pressing
g.
Or: Clear the error message by pressing
S.
Page 18
Quick Reference
CM 811/812 Cash Register Quick Reference
Olympia 8.2005 Page 18 All Rights Reserved
What to do if the cash register does not print?
In the event the cash register fails to print receipts or reports, check whether a special function has been activated.
Special functions are indicated by a dot in the display:
・ ・ ・
The cash register is in Training mode; no reports can be printed in this mode.
What to do: Deactivate Training mode. To do this, set the key-operated switch to PRG
and press the
5 key 6 times. Conclude by pressing q.
(Also refer to the Section "Training mode".)
The Receipt function has been deactivated on the cash register. There is no paper transport and,
therefore, no receipt is printed.
What to do: Press the
R key to activate the receipt printing function.
The cash register is in Calculator mode; the key-operated switch is set to CAL.
There is no paper transport in Calculator mode. In addition, only the calculation keys are operational.
What to do: Set the key to REG.
Printer malfunction
In the event of a printer error, switch the cash register off immediately and disconnect the power plug. Check whether the
paper roll is inserted correctly or their is a foreign body in the printer mechanism. Remove it, if present.
Caution: Remove the foreign body very carefully. Do not use a knife, screwdriver or anything similar. Never use
force. This could damage the printer mechanism.
Switch the cash register on again and complete a registration.
If the printer error reoccurs, contact the service centre.
 Loading...