

Page 1

OPERATION GUIDE
d-COPIA6500MF/8000MF
GB
Code: 565804en
Page 2

PUBLICATION ISSUED BY:
Olivetti S.p.A.
Gruppo Telecom Italia
Via Jervis, 77 - 10015 Ivrea (ITALY)
www.olivetti.com
Copyright © 2011, Olivetti
All rights reserved
The mark affixed to the product certifies that the
product satisfies the basic quality requir ements.
The manufacturer reserves the right to carry out modifications to the product described in this manual at any time
and without any notice.
ENERGY STAR is a U.S. registered m ark.
The ENERGY STAR program is an energy reduction plan introduced by theUnited States Environm ental Protection
Agency in response to environmental issues and f or the purpose of advancing the development and utilization of
more energy efficient office equipment.
Your attention is drawn to the following actions which could compromise the conformity attested to above, as well as
the characteristics of the product:
• incorrect electrical power supply;
• incorrect installation, incorrect or improper use or use not in compliance with the warnings provided in the
User’s Manual supplied with the product;
• replacement of original components or accessories with others of a type not approved by the manufacturer, or
performed by unauthorised personnel.
All rights reserved. No part of this m aterial may be reproduced or transm itted in any form or by any means,
electronic or mechanical, including photocopying, recording or by any information storage and retrieval
system, without permission in writing from the Publisher.
Page 3

Introduction
Thank you for your purchase of d-Copia 6500MF/d-Copia 8000MF.
This Operation Guide is intended to help you operate the machine correctly, perform routine maintenance and
take a simple troubleshooting action as necessary, so that you can always use the machine in good condition.
Please read this Operation Guide before you start using the machine, and keep it close to the machine for easy
reference.
We recommend the use of our own brand supplies. We will not be liable for any damage caused by the use of
third party supplies in this machine.
In this Operation Guide, d-Copia 6500MF/8000MF are referred to as 65 ppm model, and 80 ppm model respectively.
Included Guides
The following guides are supplied with the machine. Refer to them as necessary.
Quick Guide
Describes the procedures for frequently-used operations.
Safety Guide
Provides safety and cautionary information for the installation and use of the machine. Be sure to read this guide
before using the machine.
Safety Guide (d-Copia 6500MF/d-Copia 8000MF)
Describes the machine installation space, cautionary labels, and other information. Be sure to read this guide
before using the machine.
DVD (Product Library)
• Operation Guide (This Guide) • Network FAX Driver Operation Guide
• FAX Operation Guide • Network Tool for Direct Printing Operation Guide
• Card Authentication Kit (B) Operation Guide • Network Print Monitor User Guide
• Data Security Kit (E) Operation Guide • File Management Utilitiy User Guide
• Embedded Web Server RX Operation Guide
• Printer Driver User Guide
Page 4

Safety Conventions in This Guide
The sections of this guide and parts of the machine marked with symbols are safety war nings meant to pr otect
the user, other individuals and surrounding objects, and ensure correct and safe usage of th e machine. The
symbols and their meanings are indicated below.
WARNING: Indicates that serious injury or even death may result
from insufficient attention to or incorrect compliance with the
related points.
CAUTION: Indicates that personal injury or mechanical damage
may result from insufficient attention to or inc orrect compliance
with the related points.
Symbols
The symbol indicates that the related section includes safety warnings. Specific points of attention are
indicated inside the symbol.
.... [General warning]
.... [Warning of high temperature]
The symbol indicates that the related section includes information on prohibited actions. Specifics of the
prohibited action are indicated inside the symbol.
.... [Warning of prohibited action]
.... [Disassembly prohibited]
The symbol indicates that the related section includes information on actions which must be performed.
Specifics of the required action are indicated ins ide the symb o l.
.... [Alert of required action]
.... [Remove the power plug from the outlet]
[Always connect the machine to an outlet with a ground
....
connection]
Please contact your service representative to order a replacement if the safety warnings in this Operation Guide
are illegible or if the guide itself is missing (fee required).
NOTE: An original which resembles a bank note closely may not be copied properly in some rare cases
because this machine is equipped with a counterfeiting prevention function.
i
Page 5

Contents
Quick Guide . . . . . . . . . . . . . . . . . . . . . . . . . . . . . . . . . . . . . . . . . . . . . . . . . . . . . . . . . . . . . . . . . vi
Menu Map. . . . . . . . . . . . . . . . . . . . . . . . . . . . . . . . . . . . . . . . . . . . . . . . . . . . . . . . . . . . . . . . . . . ix
Environment . . . . . . . . . . . . . . . . . . . . . . . . . . . . . . . . . . . . . . . . . . . . . . . . . . . . . . . . . . . . . . . . xxii
Laser Safety (Europe). . . . . . . . . . . . . . . . . . . . . . . . . . . . . . . . . . . . . . . . . . . . . . . . . . . . . . . . .xxiv
Safety Instructions Regarding the Disconnection of Power . . . . . . . . . . . . . . . . . . . . . . . . . . . .xxv
Legal Restriction on Copying/Scanning . . . . . . . . . . . . . . . . . . . . . . . . . . . . . . . . . . . . . . . . . .xxvi
Legal and Safety Information . . . . . . . . . . . . . . . . . . . . . . . . . . . . . . . . . . . . . . . . . . . . . . . . . . . xxvii
1Part Names
Operation Panel . . . . . . . . . . . . . . . . . . . . . . . . . . . . . . . . . . . . . . . . . . . . . . . . . . . . . . . . . . . . . 1-2
Machine . . . . . . . . . . . . . . . . . . . . . . . . . . . . . . . . . . . . . . . . . . . . . . . . . . . . . . . . . . . . . . . . . . . 1-4
2 Preparation before Use
Check the Accessories . . . . . . . . . . . . . . . . . . . . . . . . . . . . . . . . . . . . . . . . . . . . . . . . . . . . . . . . 2-2
Determining the Connection Method and Preparing Cables. . . . . . . . . . . . . . . . . . . . . . . . . . . . 2-3
Connecting Cables . . . . . . . . . . . . . . . . . . . . . . . . . . . . . . . . . . . . . . . . . . . . . . . . . . . . . . . . . . . 2-5
Power On/Off . . . . . . . . . . . . . . . . . . . . . . . . . . . . . . . . . . . . . . . . . . . . . . . . . . . . . . . . . . . . . . . 2-9
Low Power Mode and Auto Low Power Mode . . . . . . . . . . . . . . . . . . . . . . . . . . . . . . . . . . . . . 2-11
Sleep and Auto Sleep . . . . . . . . . . . . . . . . . . . . . . . . . . . . . . . . . . . . . . . . . . . . . . . . . . . . . . . . 2-12
Adjusting the Operation Panel Angle . . . . . . . . . . . . . . . . . . . . . . . . . . . . . . . . . . . . . . . . . . . . 2-12
Switching the Language for Display [Language]. . . . . . . . . . . . . . . . . . . . . . . . . . . . . . . . . . . . 2-13
Setting Date and Time . . . . . . . . . . . . . . . . . . . . . . . . . . . . . . . . . . . . . . . . . . . . . . . . . . . . . . . 2-14
Network Setup (LAN Cable Connection) . . . . . . . . . . . . . . . . . . . . . . . . . . . . . . . . . . . . . . . . . 2-15
Installing Software. . . . . . . . . . . . . . . . . . . . . . . . . . . . . . . . . . . . . . . . . . . . . . . . . . . . . . . . . . . 2-18
Embedded Web Server RX (Settings for E-mail). . . . . . . . . . . . . . . . . . . . . . . . . . . . . . . . . . . .2-26
Loading Paper. . . . . . . . . . . . . . . . . . . . . . . . . . . . . . . . . . . . . . . . . . . . . . . . . . . . . . . . . . . . . . 2-29
Loading Originals . . . . . . . . . . . . . . . . . . . . . . . . . . . . . . . . . . . . . . . . . . . . . . . . . . . . . . . . . . . 2-46
Contents
3 Basic Operation
Login/Logout. . . . . . . . . . . . . . . . . . . . . . . . . . . . . . . . . . . . . . . . . . . . . . . . . . . . . . . . . . . . . . . . 3-2
Enter key and Quick No. Search key . . . . . . . . . . . . . . . . . . . . . . . . . . . . . . . . . . . . . . . . . . . . . 3-4
Touch Panel Display . . . . . . . . . . . . . . . . . . . . . . . . . . . . . . . . . . . . . . . . . . . . . . . . . . . . . . . . . . 3-5
Original Preview . . . . . . . . . . . . . . . . . . . . . . . . . . . . . . . . . . . . . . . . . . . . . . . . . . . . . . . . . . . . . 3-6
Copying. . . . . . . . . . . . . . . . . . . . . . . . . . . . . . . . . . . . . . . . . . . . . . . . . . . . . . . . . . . . . . . . . . . . 3-7
Sending. . . . . . . . . . . . . . . . . . . . . . . . . . . . . . . . . . . . . . . . . . . . . . . . . . . . . . . . . . . . . . . . . . . 3-22
Confirmation Screen of Destinations . . . . . . . . . . . . . . . . . . . . . . . . . . . . . . . . . . . . . . . . . . . . 3-28
Preparation for sending a document to a PC . . . . . . . . . . . . . . . . . . . . . . . . . . . . . . . . . . . . . . 3-29
Specifying Destination. . . . . . . . . . . . . . . . . . . . . . . . . . . . . . . . . . . . . . . . . . . . . . . . . . . . . . . . 3-39
Using the Document Box . . . . . . . . . . . . . . . . . . . . . . . . . . . . . . . . . . . . . . . . . . . . . . . . . . . . . 3-42
Canceling Jobs . . . . . . . . . . . . . . . . . . . . . . . . . . . . . . . . . . . . . . . . . . . . . . . . . . . . . . . . . . . . . 3-51
Quick Setup Screen . . . . . . . . . . . . . . . . . . . . . . . . . . . . . . . . . . . . . . . . . . . . . . . . . . . . . . . . . 3-52
Program . . . . . . . . . . . . . . . . . . . . . . . . . . . . . . . . . . . . . . . . . . . . . . . . . . . . . . . . . . . . . . . . . . 3-55
Registering Shortcuts (Copy, Send, and Document Box Settings). . . . . . . . . . . . . . . . . . . . . . 3-57
Using the Internet Browser . . . . . . . . . . . . . . . . . . . . . . . . . . . . . . . . . . . . . . . . . . . . . . . . . . . . 3-58
Using Weekly Timer . . . . . . . . . . . . . . . . . . . . . . . . . . . . . . . . . . . . . . . . . . . . . . . . . . . . . . . . . 3-60
Checking Counter . . . . . . . . . . . . . . . . . . . . . . . . . . . . . . . . . . . . . . . . . . . . . . . . . . . . . . . . . . . 3-61
Help Screen . . . . . . . . . . . . . . . . . . . . . . . . . . . . . . . . . . . . . . . . . . . . . . . . . . . . . . . . . . . . . . . 3-61
4 Copying Functions
ii
Page 6

Contents
Original Size . . . . . . . . . . . . . . . . . . . . . . . . . . . . . . . . . . . . . . . . . . . . . . . . . . . . . . . . . . . . . . . . 4-2
Paper Selection. . . . . . . . . . . . . . . . . . . . . . . . . . . . . . . . . . . . . . . . . . . . . . . . . . . . . . . . . . . . . . 4-3
Mixed Size Originals. . . . . . . . . . . . . . . . . . . . . . . . . . . . . . . . . . . . . . . . . . . . . . . . . . . . . . . . . . 4-6
Original Orientation. . . . . . . . . . . . . . . . . . . . . . . . . . . . . . . . . . . . . . . . . . . . . . . . . . . . . . . . . . . 4-9
Fold. . . . . . . . . . . . . . . . . . . . . . . . . . . . . . . . . . . . . . . . . . . . . . . . . . . . . . . . . . . . . . . . . . . . . . 4-11
Paper Output. . . . . . . . . . . . . . . . . . . . . . . . . . . . . . . . . . . . . . . . . . . . . . . . . . . . . . . . . . . . . . . 4-13
Combine . . . . . . . . . . . . . . . . . . . . . . . . . . . . . . . . . . . . . . . . . . . . . . . . . . . . . . . . . . . . . . . . . . 4-14
Margin/Centering . . . . . . . . . . . . . . . . . . . . . . . . . . . . . . . . . . . . . . . . . . . . . . . . . . . . . . . . . . . 4-16
Border Erase. . . . . . . . . . . . . . . . . . . . . . . . . . . . . . . . . . . . . . . . . . . . . . . . . . . . . . . . . . . . . . . 4-18
Booklet . . . . . . . . . . . . . . . . . . . . . . . . . . . . . . . . . . . . . . . . . . . . . . . . . . . . . . . . . . . . . . . . . . . 4-20
Cover . . . . . . . . . . . . . . . . . . . . . . . . . . . . . . . . . . . . . . . . . . . . . . . . . . . . . . . . . . . . . . . . . . . . 4-22
Form Overlay . . . . . . . . . . . . . . . . . . . . . . . . . . . . . . . . . . . . . . . . . . . . . . . . . . . . . . . . . . . . . . 4-23
Page #. . . . . . . . . . . . . . . . . . . . . . . . . . . . . . . . . . . . . . . . . . . . . . . . . . . . . . . . . . . . . . . . . . . . 4-24
Memo Page. . . . . . . . . . . . . . . . . . . . . . . . . . . . . . . . . . . . . . . . . . . . . . . . . . . . . . . . . . . . . . . . 4-26
Image Repeat . . . . . . . . . . . . . . . . . . . . . . . . . . . . . . . . . . . . . . . . . . . . . . . . . . . . . . . . . . . . . . 4-28
Text Stamp . . . . . . . . . . . . . . . . . . . . . . . . . . . . . . . . . . . . . . . . . . . . . . . . . . . . . . . . . . . . . . . . 4-30
Bates Stamp . . . . . . . . . . . . . . . . . . . . . . . . . . . . . . . . . . . . . . . . . . . . . . . . . . . . . . . . . . . . . . . 4-31
EcoPrint . . . . . . . . . . . . . . . . . . . . . . . . . . . . . . . . . . . . . . . . . . . . . . . . . . . . . . . . . . . . . . . . . . 4-33
Sharpness. . . . . . . . . . . . . . . . . . . . . . . . . . . . . . . . . . . . . . . . . . . . . . . . . . . . . . . . . . . . . . . . . 4-34
Background Density Adj.. . . . . . . . . . . . . . . . . . . . . . . . . . . . . . . . . . . . . . . . . . . . . . . . . . . . . . 4-35
Prevent Bleed-thru . . . . . . . . . . . . . . . . . . . . . . . . . . . . . . . . . . . . . . . . . . . . . . . . . . . . . . . . . . 4-36
Continuous Scan. . . . . . . . . . . . . . . . . . . . . . . . . . . . . . . . . . . . . . . . . . . . . . . . . . . . . . . . . . . . 4-37
Auto Image Rotation . . . . . . . . . . . . . . . . . . . . . . . . . . . . . . . . . . . . . . . . . . . . . . . . . . . . . . . . . 4-38
Negative Image. . . . . . . . . . . . . . . . . . . . . . . . . . . . . . . . . . . . . . . . . . . . . . . . . . . . . . . . . . . . . 4-38
Mirror Image . . . . . . . . . . . . . . . . . . . . . . . . . . . . . . . . . . . . . . . . . . . . . . . . . . . . . . . . . . . . . . . 4-39
Job Finish Notice . . . . . . . . . . . . . . . . . . . . . . . . . . . . . . . . . . . . . . . . . . . . . . . . . . . . . . . . . . . 4-40
File Name Entry . . . . . . . . . . . . . . . . . . . . . . . . . . . . . . . . . . . . . . . . . . . . . . . . . . . . . . . . . . . . 4-42
Priority Override . . . . . . . . . . . . . . . . . . . . . . . . . . . . . . . . . . . . . . . . . . . . . . . . . . . . . . . . . . . . 4-42
Repeat Copy. . . . . . . . . . . . . . . . . . . . . . . . . . . . . . . . . . . . . . . . . . . . . . . . . . . . . . . . . . . . . . . 4-43
DP Read Action . . . . . . . . . . . . . . . . . . . . . . . . . . . . . . . . . . . . . . . . . . . . . . . . . . . . . . . . . . . . 4-44
5Printing
Printing - Printing from Applications . . . . . . . . . . . . . . . . . . . . . . . . . . . . . . . . . . . . . . . . . . . . . . 5-2
Using a Job Box . . . . . . . . . . . . . . . . . . . . . . . . . . . . . . . . . . . . . . . . . . . . . . . . . . . . . . . . . . . . . 5-6
6 Sending Functions
Original Size . . . . . . . . . . . . . . . . . . . . . . . . . . . . . . . . . . . . . . . . . . . . . . . . . . . . . . . . . . . . . . . . 6-2
Sending Size. . . . . . . . . . . . . . . . . . . . . . . . . . . . . . . . . . . . . . . . . . . . . . . . . . . . . . . . . . . . . . . . 6-4
Zoom. . . . . . . . . . . . . . . . . . . . . . . . . . . . . . . . . . . . . . . . . . . . . . . . . . . . . . . . . . . . . . . . . . . . . . 6-6
Centering . . . . . . . . . . . . . . . . . . . . . . . . . . . . . . . . . . . . . . . . . . . . . . . . . . . . . . . . . . . . . . . . . . 6-7
Mixed Size Originals. . . . . . . . . . . . . . . . . . . . . . . . . . . . . . . . . . . . . . . . . . . . . . . . . . . . . . . . . . 6-8
2-sided/Book Original . . . . . . . . . . . . . . . . . . . . . . . . . . . . . . . . . . . . . . . . . . . . . . . . . . . . . . . . 6-11
Original Orientation. . . . . . . . . . . . . . . . . . . . . . . . . . . . . . . . . . . . . . . . . . . . . . . . . . . . . . . . . . 6-12
File Format . . . . . . . . . . . . . . . . . . . . . . . . . . . . . . . . . . . . . . . . . . . . . . . . . . . . . . . . . . . . . . . . 6-14
File Separation . . . . . . . . . . . . . . . . . . . . . . . . . . . . . . . . . . . . . . . . . . . . . . . . . . . . . . . . . . . . . 6-15
PDF Encryption Functions . . . . . . . . . . . . . . . . . . . . . . . . . . . . . . . . . . . . . . . . . . . . . . . . . . . . 6-16
Original Image. . . . . . . . . . . . . . . . . . . . . . . . . . . . . . . . . . . . . . . . . . . . . . . . . . . . . . . . . . . . . . 6-18
Density . . . . . . . . . . . . . . . . . . . . . . . . . . . . . . . . . . . . . . . . . . . . . . . . . . . . . . . . . . . . . . . . . . . 6-19
Scan Resolution . . . . . . . . . . . . . . . . . . . . . . . . . . . . . . . . . . . . . . . . . . . . . . . . . . . . . . . . . . . . 6-20
Sharpness. . . . . . . . . . . . . . . . . . . . . . . . . . . . . . . . . . . . . . . . . . . . . . . . . . . . . . . . . . . . . . . . . 6-21
Background Density Adj.. . . . . . . . . . . . . . . . . . . . . . . . . . . . . . . . . . . . . . . . . . . . . . . . . . . . . . 6-22
Color Selection . . . . . . . . . . . . . . . . . . . . . . . . . . . . . . . . . . . . . . . . . . . . . . . . . . . . . . . . . . . . . 6-23
Continuous Scan. . . . . . . . . . . . . . . . . . . . . . . . . . . . . . . . . . . . . . . . . . . . . . . . . . . . . . . .
revent Bleed-thru . . . . . . . . . . . . . . . . . . . . . . . . . . . . . . . . . . . . . . . . . . . . . . . . . . . . . . . . . . 6-25
P
. . . . 6-24
iii
Page 7

Border Erase. . . . . . . . . . . . . . . . . . . . . . . . . . . . . . . . . . . . . . . . . . . . . . . . . . . . . . . . . . . . . . . 6-26
File Name Entry . . . . . . . . . . . . . . . . . . . . . . . . . . . . . . . . . . . . . . . . . . . . . . . . . . . . . . . . . . . . 6-28
E-mail Subject/Body . . . . . . . . . . . . . . . . . . . . . . . . . . . . . . . . . . . . . . . . . . . . . . . . . . . . . . . . . 6-29
WSD Scan . . . . . . . . . . . . . . . . . . . . . . . . . . . . . . . . . . . . . . . . . . . . . . . . . . . . . . . . . . . . . . . . 6-30
(Windows 7, Windows Vista and Windows Server 2008) . . . . . . . . . . . . . . . . . . . . . . . . . . . . . 6-30
Scanning using TWAIN. . . . . . . . . . . . . . . . . . . . . . . . . . . . . . . . . . . . . . . . . . . . . . . . . . . . . . . 6-32
Job Finish Notice . . . . . . . . . . . . . . . . . . . . . . . . . . . . . . . . . . . . . . . . . . . . . . . . . . . . . . . . . . . 6-35
Send and Print . . . . . . . . . . . . . . . . . . . . . . . . . . . . . . . . . . . . . . . . . . . . . . . . . . . . . . . . . . . . . 6-36
Send and Store. . . . . . . . . . . . . . . . . . . . . . . . . . . . . . . . . . . . . . . . . . . . . . . . . . . . . . . . . . . . . 6-36
FTP Encrypted TX . . . . . . . . . . . . . . . . . . . . . . . . . . . . . . . . . . . . . . . . . . . . . . . . . . . . . . . . . . 6-37
Text Stamp . . . . . . . . . . . . . . . . . . . . . . . . . . . . . . . . . . . . . . . . . . . . . . . . . . . . . . . . . . . . . . . . 6-38
Bates Stamp . . . . . . . . . . . . . . . . . . . . . . . . . . . . . . . . . . . . . . . . . . . . . . . . . . . . . . . . . . . . . . . 6-39
Color Type. . . . . . . . . . . . . . . . . . . . . . . . . . . . . . . . . . . . . . . . . . . . . . . . . . . . . . . . . . . . . . . . . 6-41
About Color Profiles . . . . . . . . . . . . . . . . . . . . . . . . . . . . . . . . . . . . . . . . . . . . . . . . . . . . . . . . . 6-41
Scanning with FMU Connection . . . . . . . . . . . . . . . . . . . . . . . . . . . . . . . . . . . . . . . . . . . . . . . . 6-42
7Document Box
Using a Custom Box . . . . . . . . . . . . . . . . . . . . . . . . . . . . . . . . . . . . . . . . . . . . . . . . . . . . . . . . . . 7-2
Job Box. . . . . . . . . . . . . . . . . . . . . . . . . . . . . . . . . . . . . . . . . . . . . . . . . . . . . . . . . . . . . . . . . . . 7-14
Printing Documents Stored in Removable USB Memory . . . . . . . . . . . . . . . . . . . . . . . . . . . . . 7-22
Saving Documents to USB Memory (Scan to USB) . . . . . . . . . . . . . . . . . . . . . . . . . . . . . . . . . 7-24
Removing USB Memory . . . . . . . . . . . . . . . . . . . . . . . . . . . . . . . . . . . . . . . . . . . . . . . . . . . . . . 7-26
Contents
8 Status / Jo b Cancel
Checking Job Status. . . . . . . . . . . . . . . . . . . . . . . . . . . . . . . . . . . . . . . . . . . . . . . . . . . . . . . . . . 8-2
Checking Job History . . . . . . . . . . . . . . . . . . . . . . . . . . . . . . . . . . . . . . . . . . . . . . . . . . . . . . . . . 8-9
Pause and Resumption of Jobs . . . . . . . . . . . . . . . . . . . . . . . . . . . . . . . . . . . . . . . . . . . . . . . . 8-11
Canceling of Jobs . . . . . . . . . . . . . . . . . . . . . . . . . . . . . . . . . . . . . . . . . . . . . . . . . . . . . . . . . . . 8-11
Priority Override for Waiting Jobs . . . . . . . . . . . . . . . . . . . . . . . . . . . . . . . . . . . . . . . . . . . . . . . 8-12
Reordering Print Jobs . . . . . . . . . . . . . . . . . . . . . . . . . . . . . . . . . . . . . . . . . . . . . . . . . . . . . . . . 8-12
Checking the Remaining Amount of Toner and Paper (Paper/Supplies) . . . . . . . . . . . . . . . . . 8-13
Device/Communication. . . . . . . . . . . . . . . . . . . . . . . . . . . . . . . . . . . . . . . . . . . . . . . . . . . . . . . 8-14
9 Default Setting (System Menu)
Common Settings . . . . . . . . . . . . . . . . . . . . . . . . . . . . . . . . . . . . . . . . . . . . . . . . . . . . . . . . . . . . 9-2
Copy . . . . . . . . . . . . . . . . . . . . . . . . . . . . . . . . . . . . . . . . . . . . . . . . . . . . . . . . . . . . . . . . . . . . . 9-40
Send . . . . . . . . . . . . . . . . . . . . . . . . . . . . . . . . . . . . . . . . . . . . . . . . . . . . . . . . . . . . . . . . . . . . . 9-43
Document Box/Removable Memory . . . . . . . . . . . . . . . . . . . . . . . . . . . . . . . . . . . . . . . . . . . . . 9-52
Printer . . . . . . . . . . . . . . . . . . . . . . . . . . . . . . . . . . . . . . . . . . . . . . . . . . . . . . . . . . . . . . . . . . . . 9-54
Report. . . . . . . . . . . . . . . . . . . . . . . . . . . . . . . . . . . . . . . . . . . . . . . . . . . . . . . . . . . . . . . . . . . . 9-61
Adjustment/Maintenance . . . . . . . . . . . . . . . . . . . . . . . . . . . . . . . . . . . . . . . . . . . . . . . . . . . . . 9-65
Date/Timer . . . . . . . . . . . . . . . . . . . . . . . . . . . . . . . . . . . . . . . . . . . . . . . . . . . . . . . . . . . . . . . . 9-72
Edit Destination (Address Book/Adding One Touch Keys) . . . . . . . . . . . . . . . . . . . . . . . . . . . . 9-77
Internet . . . . . . . . . . . . . . . . . . . . . . . . . . . . . . . . . . . . . . . . . . . . . . . . . . . . . . . . . . . . . . . . . . . 9-84
Application . . . . . . . . . . . . . . . . . . . . . . . . . . . . . . . . . . . . . . . . . . . . . . . . . . . . . . . . . . . . . . . . 9-86
System Initialization . . . . . . . . . . . . . . . . . . . . . . . . . . . . . . . . . . . . . . . . . . . . . . . . . . . . . . . . . 9-89
Restart Entire Device . . . . . . . . . . . . . . . . . . . . . . . . . . . . . . . . . . . . . . . . . . . . . . . . . . . . . . . . 9-89
Network. . . . . . . . . . . . . . . . . . . . . . . . . . . . . . . . . . . . . . . . . . . . . . . . . . . . . . . . . . . . . . . . . . . 9-90
Interface Block Setting . . . . . . . . . . . . . . . . . . . . . . . . . . . . . . . . . . . . . . . . . . . . . . . . . . . . . . 9-102
Security Level . . . . . . . . . . . . . . . . . . . . . . . . . . . . . . . . . . . . . . . . . . . . . . . . . . . . . . . . . . . . . 9-103
Document Guard. . . . . . . . . . . . . . . . . . . . . . . . . . . . . . . . . . . . . . . . . . . . . . . . . . . . . . . . . . . 9-103
Data Security . . . . . . . . . . . . . . . . . . . . . . . . . . . . . . . . . . . . . . . . . . . . . . . . . . . . . . . . . . . . . 9-105
Optional Function . . . . . . . . . . . . . . . . . . . . . . . . . . . . . . . . . . . . . . . . . . . . . . . . . . . . . . . . . . 9-107
Accessibility Display (Enlarged Touch Panel Display) . . . . . . . . . . . . . . . . . . . . . . . . . . . . . . 9-108
iv
Page 8

10 Management
User Login Setting . . . . . . . . . . . . . . . . . . . . . . . . . . . . . . . . . . . . . . . . . . . . . . . . . . . . . . . . . . 10-2
Job Accounting Setting . . . . . . . . . . . . . . . . . . . . . . . . . . . . . . . . . . . . . . . . . . . . . . . . . . . . . . 10-20
11 Maintenance
Regular Maintenance . . . . . . . . . . . . . . . . . . . . . . . . . . . . . . . . . . . . . . . . . . . . . . . . . . . . . . . . 11-2
Cleaning . . . . . . . . . . . . . . . . . . . . . . . . . . . . . . . . . . . . . . . . . . . . . . . . . . . . . . . . . . . . . . . . . 11-11
12 Troubleshooting
Solving Malfunctions. . . . . . . . . . . . . . . . . . . . . . . . . . . . . . . . . . . . . . . . . . . . . . . . . . . . . . . . . 12-2
Responding when Error Messages. . . . . . . . . . . . . . . . . . . . . . . . . . . . . . . . . . . . . . . . . . . . . . 12-7
Clearing Paper Jams . . . . . . . . . . . . . . . . . . . . . . . . . . . . . . . . . . . . . . . . . . . . . . . . . . . . . . . 12-21
Appendix
Optional Equipment . . . . . . . . . . . . . . . . . . . . . . . . . . . . . . . . . . . . . . . . . . . . . . . . . . . .Appendix-2
Character Entry Method . . . . . . . . . . . . . . . . . . . . . . . . . . . . . . . . . . . . . . . . . . . . . . . . .Appendix-8
Paper . . . . . . . . . . . . . . . . . . . . . . . . . . . . . . . . . . . . . . . . . . . . . . . . . . . . . . . . . . . . . .Appendix-11
Specifications . . . . . . . . . . . . . . . . . . . . . . . . . . . . . . . . . . . . . . . . . . . . . . . . . . . . . . . .Appendix-19
Glossary . . . . . . . . . . . . . . . . . . . . . . . . . . . . . . . . . . . . . . . . . . . . . . . . . . . . . . . . . . . .Appendix-26
Index. . . . . . . . . . . . . . . . . . . . . . . . . . . . . . . . . . . . . . . . . . . . . . . . . . . . . . . . . . . . . . . . . . .Index-1
Contents
v
Page 9
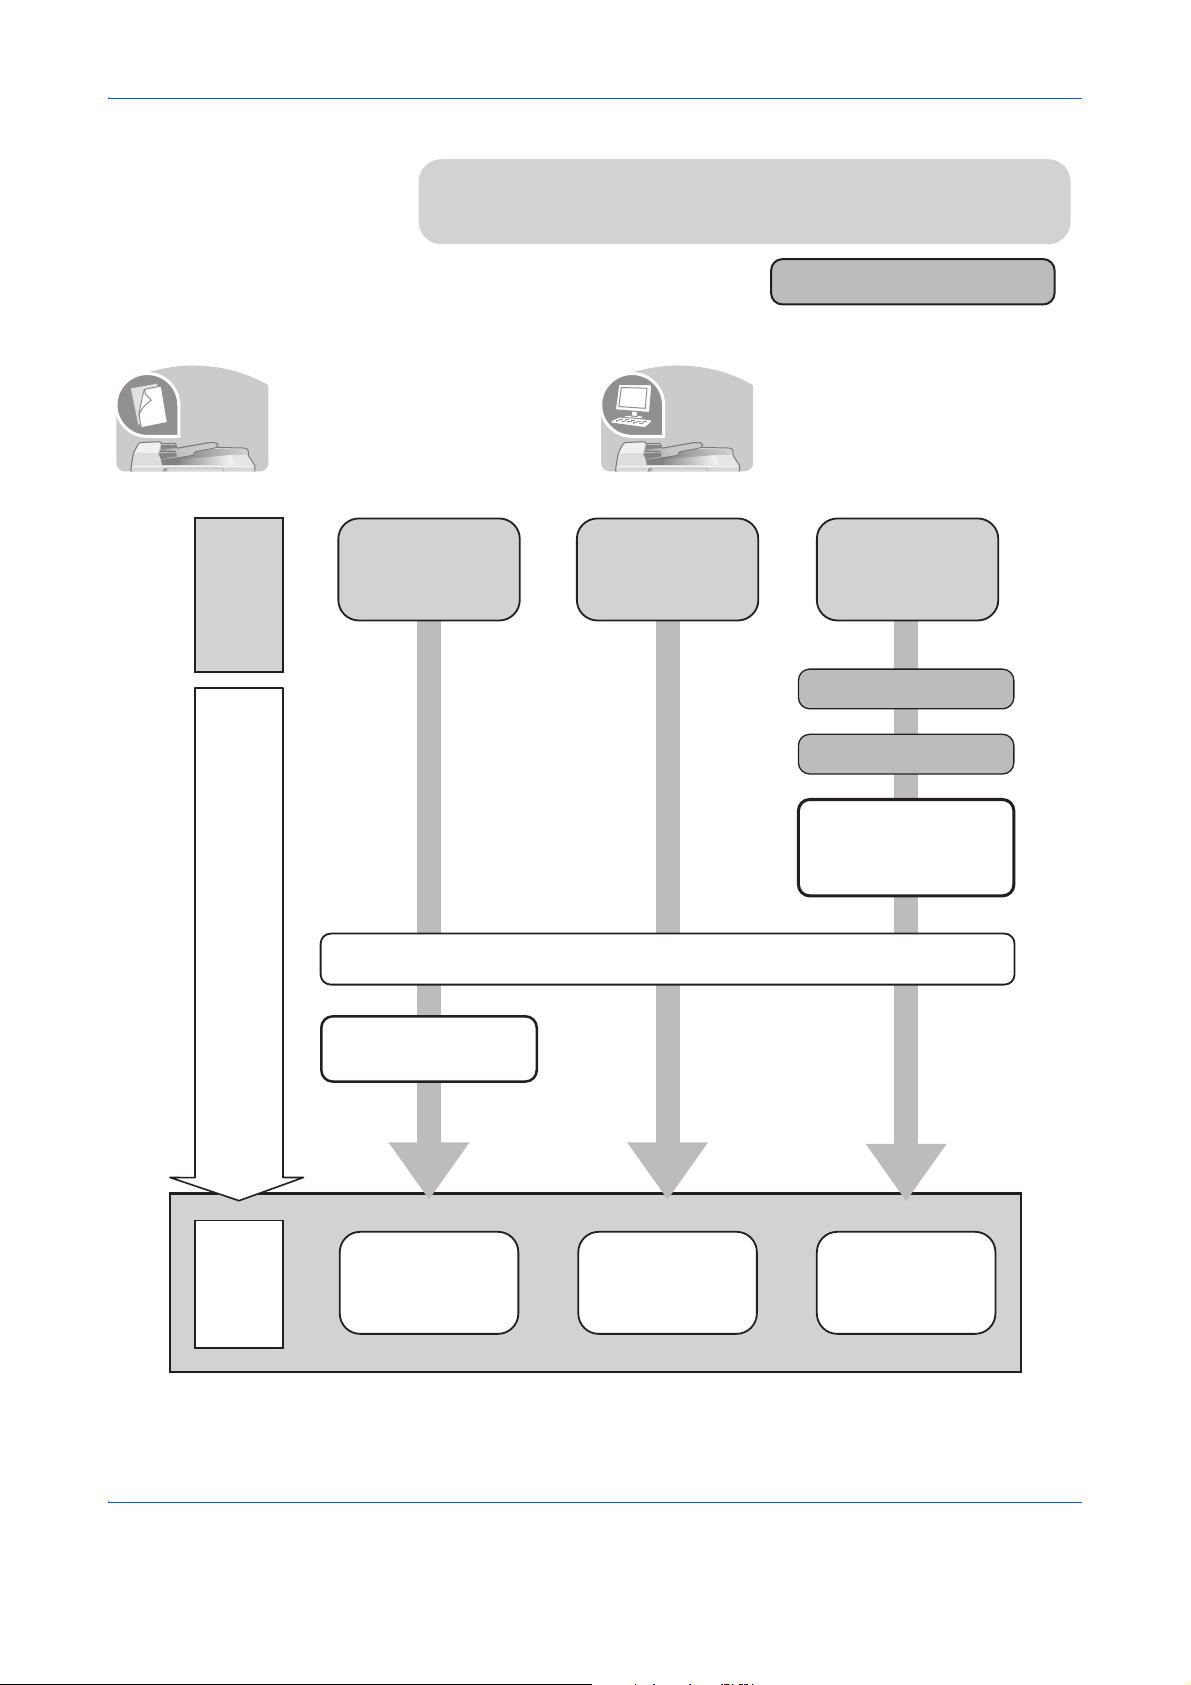
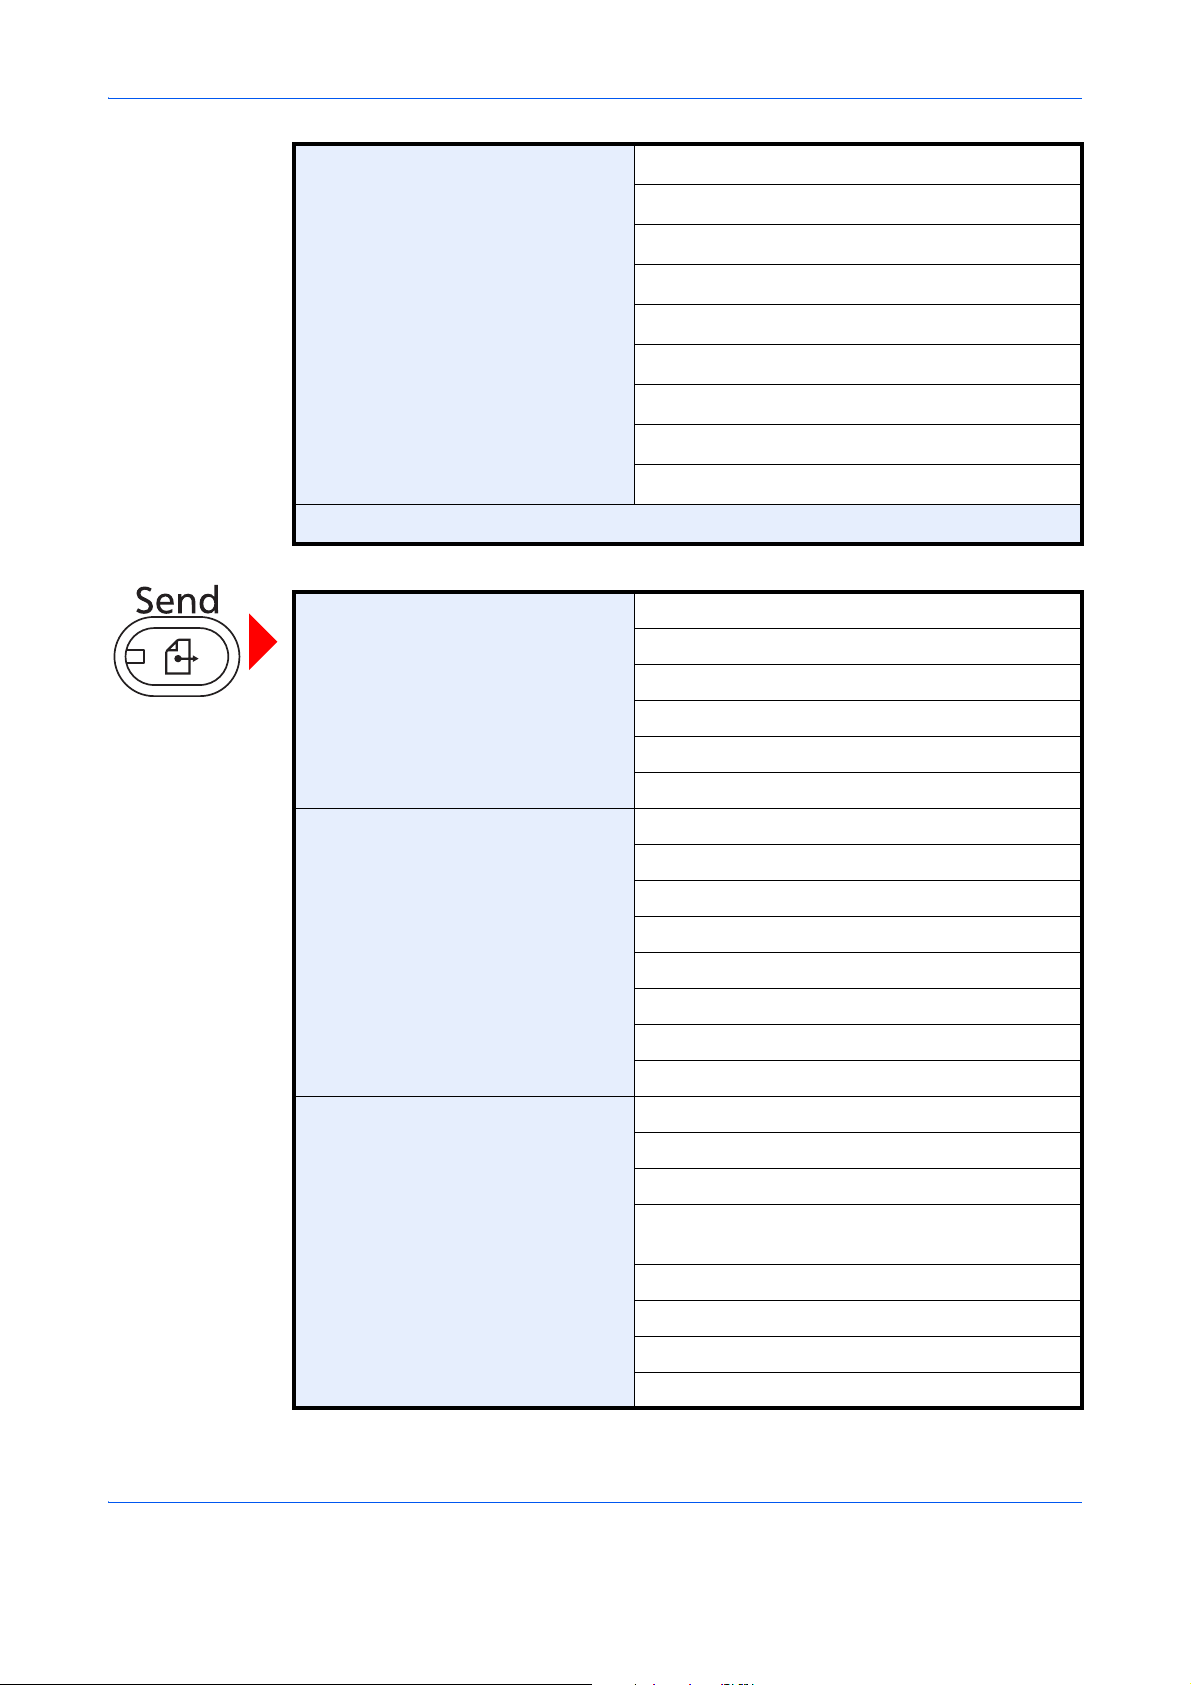
Quick Guide
Be sure to read Legal and Safety Information
before using this machine.
Administrator tasks
It copies.
Copying with
specific
settings
Printing Documents
Stored in Removable
USB Memory
Print
via a
network
Connecting Cables
Network Setup
(LAN Cable Connection)
Install the printer
driver on your
computer *1
What
you want
to do
Setup
Loading Paper...2-29
Copying Functions
...4-1
Printing
Documents Stored
in Removable USB
Memory...
7-22
Operation
Printing -
Printing from
Applications
...5-2
Placing Originals on
the Platen...2-46
To make copies To print
Simply press the Start key to make
copies. You can also fine-tune the
copy settings by changing the
paper size, adjusting the density,
etc.
It prints.
You can print via a network or print
a PDF file directly from USB
memory.
*1: For more information, refer to the Printer Driver User Guide.
vi
Page 10
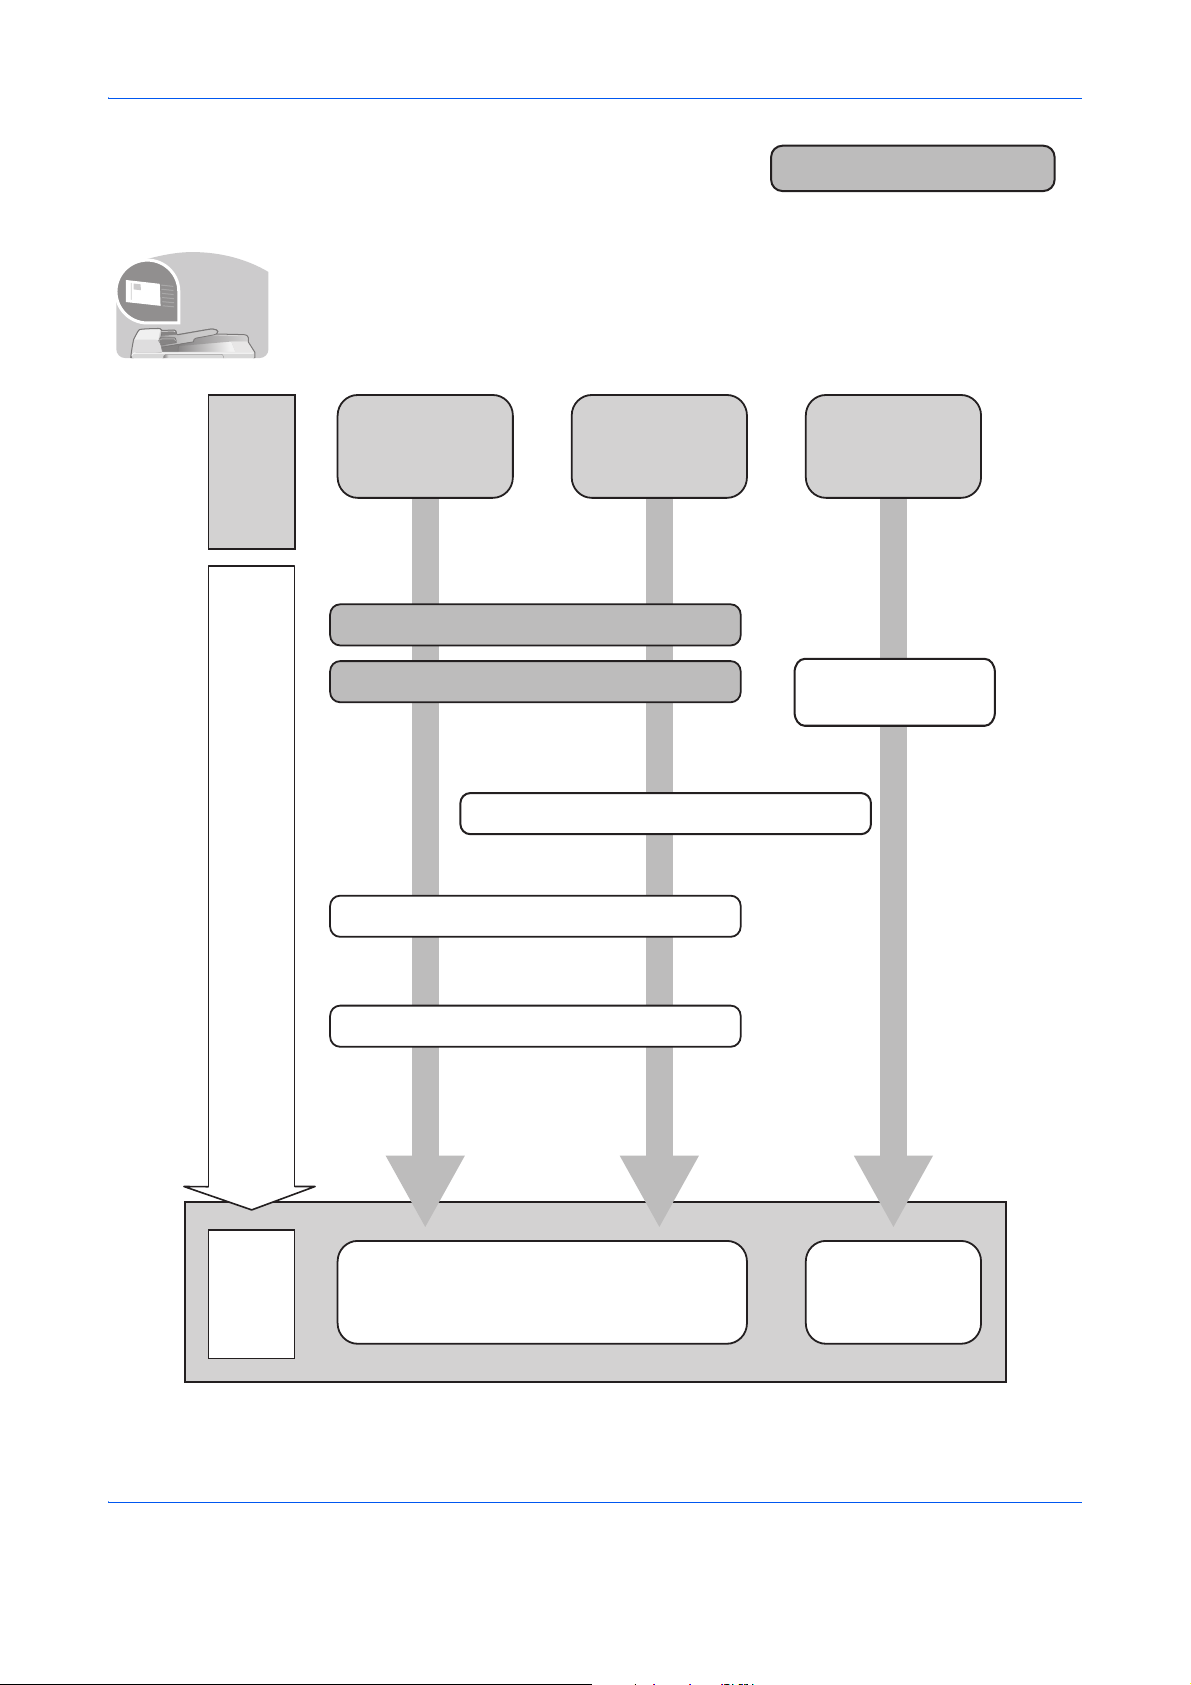
To send documents
It sends.
Connecting Cables
Network Setup (LAN Cable Connection)
Create a shared folder on the destination computer.
Plug in the USB
memory
*1: If the destination is not stored in the address book, you can send by entering the address
directly.
Setup
Send
as
E-mail
Send to
Folder
(SMB)
Saving
Documents to
USB Memory
What
you want
to do
Sending...3-22
Sending Functions...6-1
Operation
Saving Documents
to USB Memory
(Scan to USB)...7-24
Edit Destination (Address Book/Adding One
Touch Keys)...9-77
*1
Placing Originals on the Platen...2-46
You can send scanned images via a network. Or, you can also store scanned images in
USB memory.
Administrator tasks
vii
Page 11
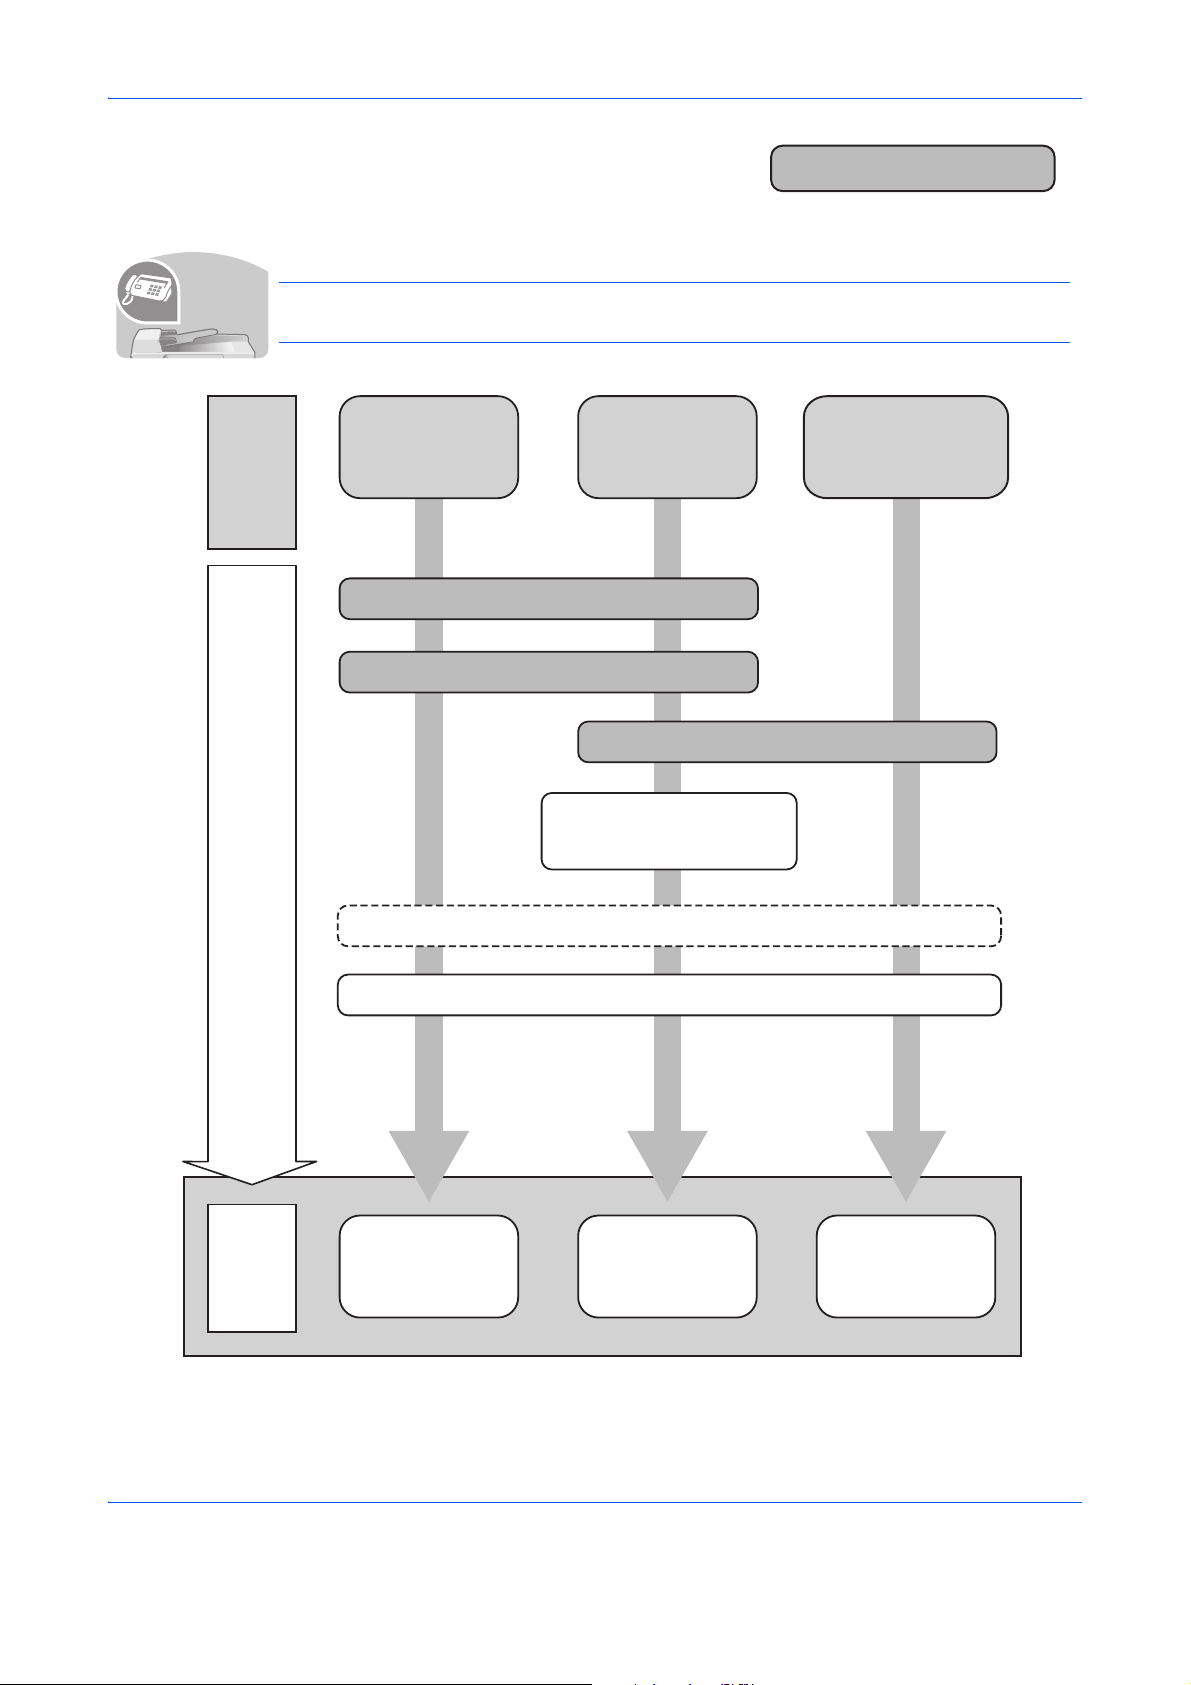
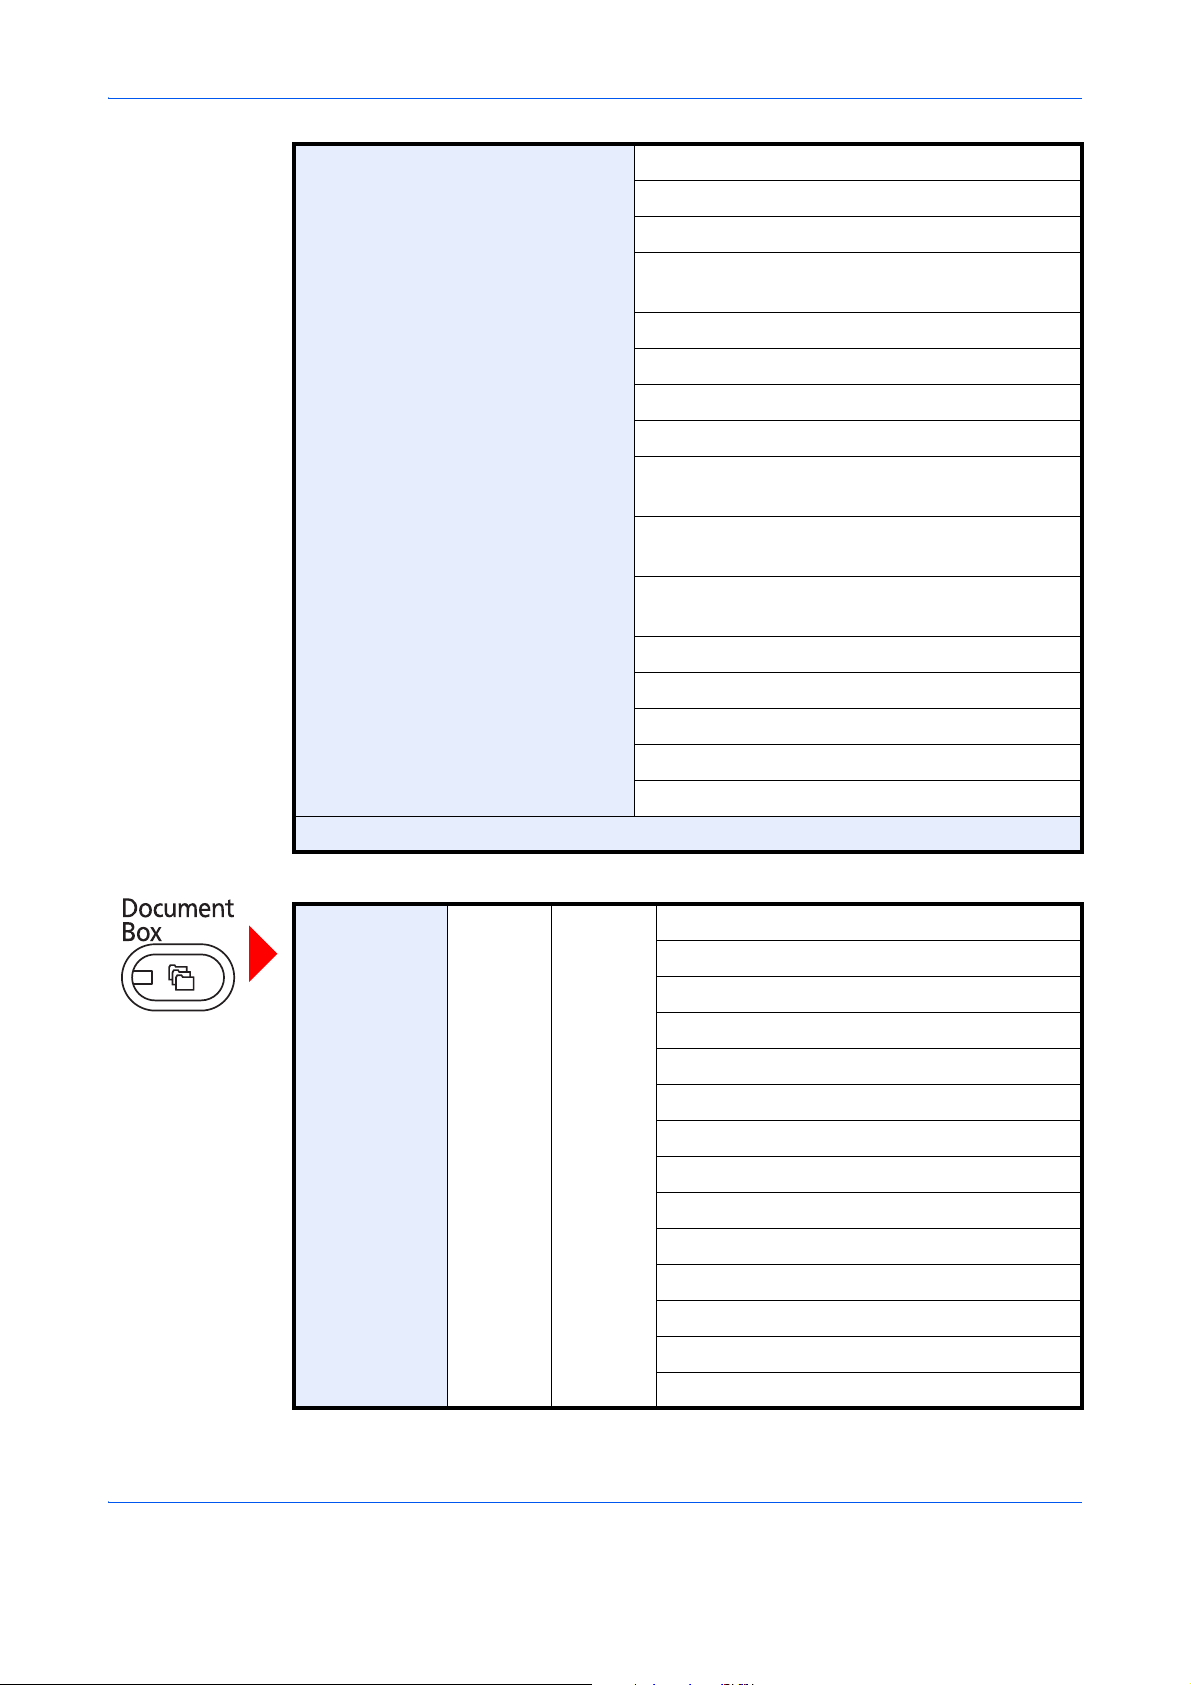
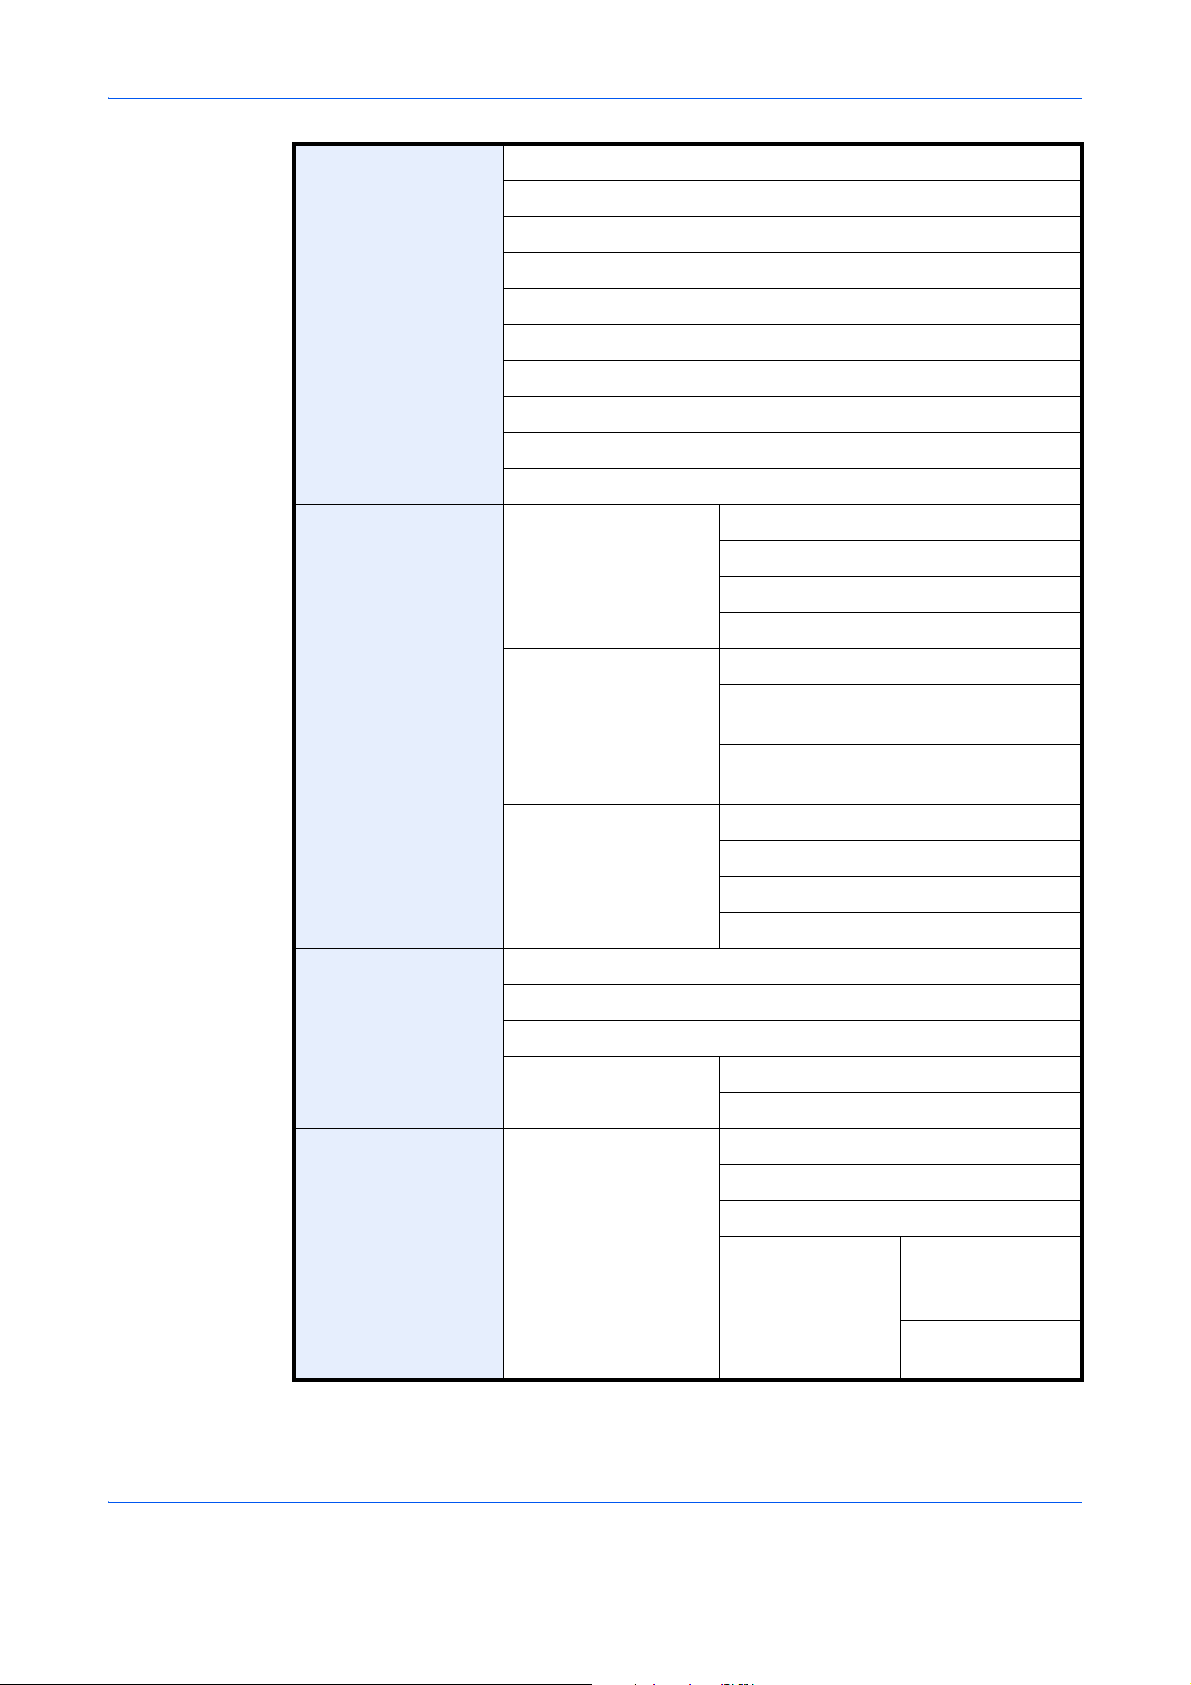
To send a FAX
It faxes.
Using the Address Book...3-17
on the FAX System (V) Operation Guide
Loading Paper...2-29
FAX Operation
(Basic)...3-1
on the FAX System (V)
Operation Guide
Operation
About Network
FAX...9-1
on the FAX System (V)
Operation Guide
Internet Fax (i-FAX)
(Optional)...8-1
on the FAX System (V)
Operation Guide
*2
Administrator tasks
As well as sending a FAX via telephone lines, you can also send a FAX via a network.
NOTE: For more information on setting up and sending a FAX, refer to the FAX System
(V) Operation Guide.
What
you want
to do
Setup
Send a FAX
Connect the modular cord for the
telephone line to this machine.
Selection of Telephone Line
(Inch version only)
FAX directly
from a
computer
Network Setup
(LAN Cable Connection)
Install the Network FAX
Driver on your computer *1
FAX without using the
telephone line
(Internet FAX (i-FAX))
*1:For more information, refer to the Network FAX Driver Operation Guide.
*2: If the destination is not stored in the address book, you can send the FAX by entering the
address directly.
viii
Page 12
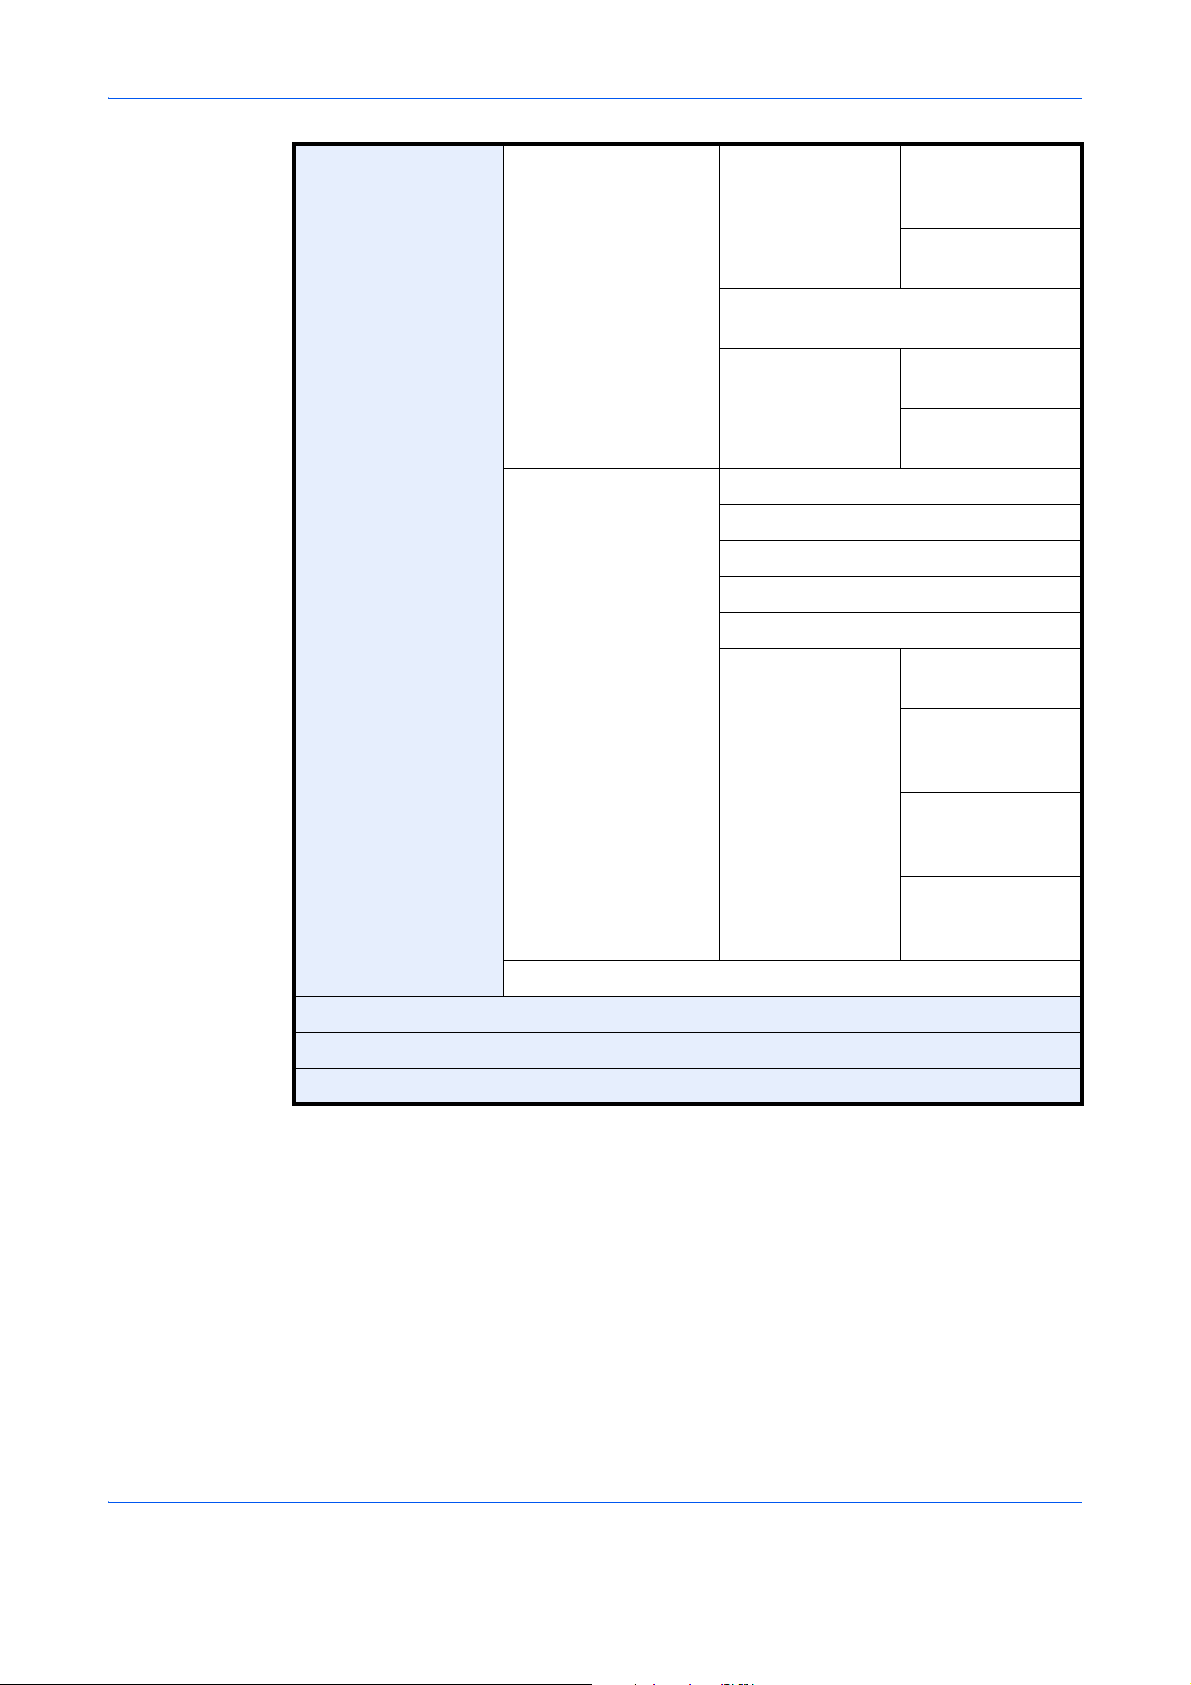
Menu Map
(The names displayed on the touch panel are used here. These may differ from the referenced titles.)
Org./Paper/Finishing Original Size (page 4-2)
Paper Selection (page 4-3)
Mixed Size Originals (page 4-6)
Original Orientation (page 4-9)
Fold (page 4-11)
Collate/Offset (page 3-14)
Staple/Punch Staple
(page 3-18)
Punch
(page 3-20)
Paper Output (page 4-13)
Image Quality Density (page 3-8)
Original Image (page 3-9)
EcoPrint (page 4-33)
Sharpness (page 4-34)
Background Density Adj. (page 4-35)
Prevent Bleed-thru (page 4-36)
Layout/Edit Zoom (page 3-10)
Combine (page 4-14)
Margin/Centering (page 4-16)
Border Erase (page 4-18)
Booklet (page 4-20)
Duplex (page 3-12)
Cover (page 4-22)
Form Overlay (page 4-23)
Page # (page 4-24)
Memo Page (page 4-26)
Image Repeat (page 4-28)
Text Stamp (page 4-30)
Bates Stamp (page 4-31)
ix
Page 13
Advanced Setup Continuous Scan (page 4-37)
Auto Image Rotation (page 4-38)
Negative Image (page 4-38)
Mirror Image (page 4-39)
Job Finish Notice (page 4-40)
File Name Entry (page 4-42)
Priority Override (page 4-42)
Repeat Copy (page 4-43)
DP Read Action (page 4-44)
Program (page 3-55)
Destination Address Book (page 3-39)
E-mail Addr Entry (page 3-23)
Folder Path Entry (page 3-24)
FAX No. Entry (refer to Fax Operation Guide)
i-FAX Addr Entry (refer to Fax Operation Guide)
WSD Scan (page 6-30)
Org./Sending Data Format Original Size (page 6-2)
Mixed Size Originals (page 6-8)
2-sided/Book Original (page 6-11)
Original Orientation (page 6-12)
Sending Size (page 6-4)
File Format (page 6-14)
File Separation (page 6-15)
Long Original (refer to Fax Operation Guide)
Color/Image Quality Density (page 6-19)
Original Image (page 6-18)
Scan Resolution (page 6-20)
FAX TX Resolution
(refer to Fax Operation Guide)
Color Selection (page 6-23)
Sharpness (page 6-21)
Background Density Adj. (page 6-22)
Prevent Bleed-thru (page 6-25)
x
Page 14
Advanced Setup Zoom (page 6-6)
Centering (page 6-7)
Border Erase (page 6-26)
FAX Delayed Transmission
(refer to Fax Operation Guide)
Continuous Scan (page 6-24)
Job Finish Notice (page 6-35)
File Name Entry (page 6-28)
E-mail Subject/Body (page 6-29)
i-FAX Subject/Body
(refer to Fax Operation Guide)
FAX Direct Transmission
(refer to Fax Operation Guide)
FAX Polling RX
(refer to Fax Operation Guide)
Send and Print (page 6-36)
Send and Store (page 6-36)
FTP Encrypted TX (page 6-37)
Text Stamp (page 6-38)
Bates Stamp (page 6-39)
Program (page 3-55)
Custom Box Store File Functions O rig in al Si ze (page 6-2)
Mixed Size Originals (page 6-8)
2-sided/Book Original (page 6-11)
Original Orientation (page 6-12)
Storing Size (page 7-4)
Prevent Bleed-thru (page 6-25)
Density (page 6-19)
Original Image (page 6-18)
Scan Resolution (page 6-20)
Color Selection (page 6-23)
Sharpness (page 6-21)
Background Density Adj. (page 6-22)
Zoom (page 6-6)
Centering (page 6-7)
xi
Page 15

Border Erase (page 6-26)
Continuous Scan (page 6-24)
Job Finish Notice (page 6-35)
File Name Entry (page 6-28)
Open Print Functions Paper Selection (page 4-3)
Collate/Offset (page 3-14)
Staple/Punch Staple
(page 3-18)
Punch
(page 3-20)
Paper Output (page 4-13)
Combine (page 4-14)
Margin/Centering (page 4-16)
Booklet (page 4-20)
Duplex (page 3-12)
Image
Quality
Cover (page 4-22)
Form Overlay (page 7-9)
Page # (page 4-24)
Job Finish Notice (page 4-40)
File Name Entry (page 4-42)
Delete after Printed
(page 7-2)
Priority Override (page 4-42)
EcoPrint (page 4-33)
Zoom (page 6-6)
Fold (page 4-11)
Text Stamp (page 4-30)
Bates St amp (page 4-31)
Density (page 3-8)
Original Image (page 3-9)
Sharpness (page 4-34)
Background Density Adj.
(page 4-35)
Prevent Bleed-thru
(page 4-36)
Send Destination (page 3-39)
xii
Page 16

Functions Sending Size (page 6-4)
File Format (page 6-14)
FAX TX Resolution
(refer to Fax Operation
Guide)
Centering (page 6-7)
FAX Delayed Transmission
(refer to Fax Operation
Guide)
Job Finish Notice (page 6-35)
File Name Entry (page 6-28)
E-mail Subject/Body
(page 6-29)
i-FAX Subject/Body
(refer to Fax Operation
Guide)
FTP Encrypted TX
(page 6-37)
Join (page 7-11)
Move/Copy (page 7-10)
Detail (page 3-45)
Search(Name) (page 3-45)
Search(No.) (page 3-45)
Color/Image
Quality
Delete after Transmitted
(page 7-8)
Zoom (page 6-6)
File Separation (page 6-15)
Text Stamp (page 6-38)
Bates St amp (page 6-39)
Density (page 6-19)
Original Image (page 6-18)
Resolution (page 6-20)
Color Selection (page 6-23)
Sharpness (page 6-21)
Background Density Adj.
(page 6-22)
Prevent Bleed-thru
(page 6-25)
Add/Edit Box (page 7-2)
xiii
Page 17
Job Box
Removable
Memory
Private Print/Stored Job (page 7-14)
Quick Copy/Proof and Hold (page 7-15)
Repeat Copy (page 7-18)
Form for Form Overlay (page 7-20)
Store File Functions Original Size (page 6-2)
Mixed Size Originals (page 6-8)
2-sided/Book Original (page 6-11)
Original Orientation (page 6-12)
Storing Size (page 7-4)
Prevent Bleed-thru (page 6-25)
Density (page 6-19)
Original Image (page 6-18)
Scan Resolution (page 6-20)
Color Selection (page 6-23)
Sharpness (page 6-21)
Background Density Adj. (page 6-22)
Zoom (page 6-6)
Centering (page 6-7)
Border Erase (page 6-26)
Continuous Scan (page 6-24)
Job Finish Notice (page 6-35)
File Name Entry (page 6-28)
File Format (page 6-14)
Text Stamp (page 6-38)
Bates Stamp (page 6-39)
Print Functions Paper Selection (page 4-3)
Collate/Offset (page 3-14)
Staple/Punch Staple
Paper Output (page 4-13)
Duplex (page 3-12)
Job Finish Notice (page 4-40)
(page 3-18)
Punch
(page 3-20)
xiv
Priority Override (page 4-42)
Fold (page 4-11)
Page 18
Text Stamp (page 4-30)
Bates Stamp (page 4-31)
Encrypted PDF Password
JPEG/TIFF Print
XPS Fit to Page
FAX Box (refer to Fax Operation Guide)
Program (page 3-55)
Printing Jobs (page 8-3)
Sending Jobs (page 8-5)
Storing Jobs (page 8-6)
Device/Communication (page 8-14)
Paper/Supplies (page 8-13)
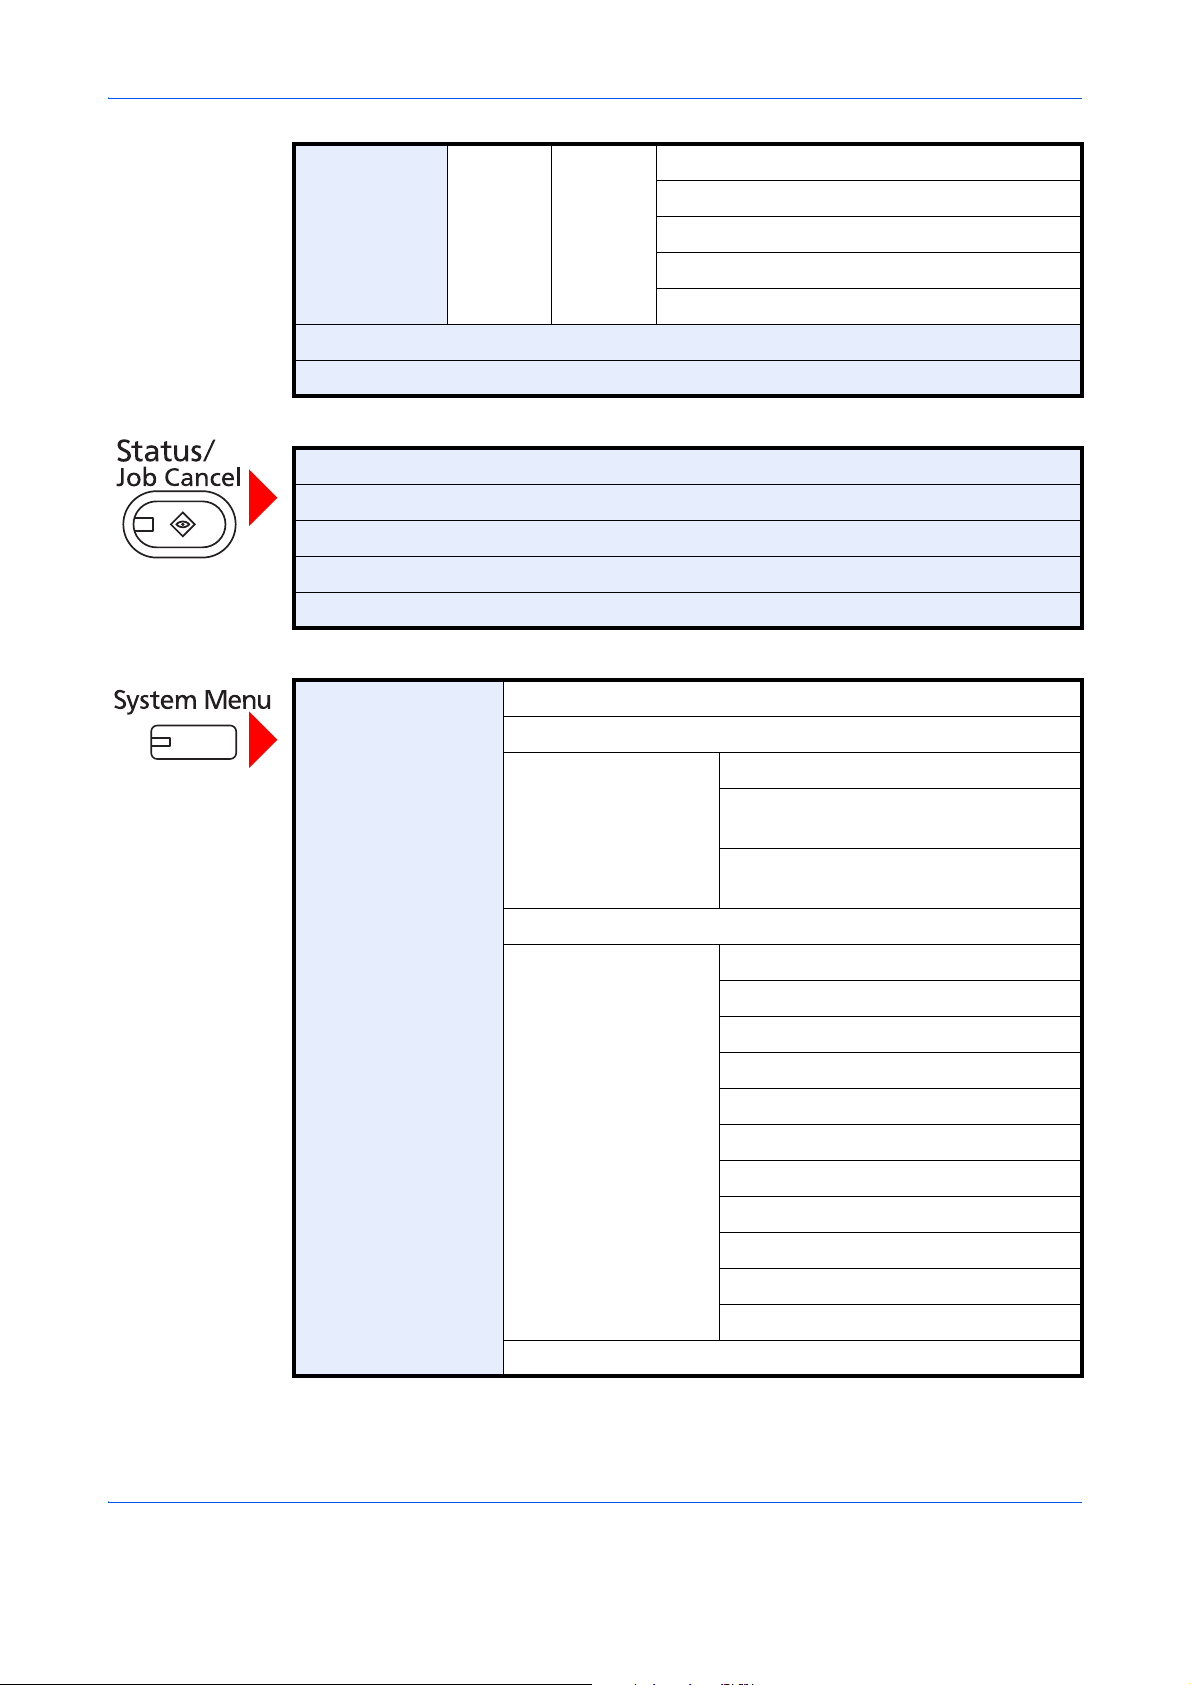
Common Settings Language (page 9-2)
Default Screen (page 9-3)
Sound Buzzer (page 9-4)
(page 7-23)
(page 7-23)
(page 7-23)
FAX Speaker Volume
(refer to Fax Operation Guide)
FAX Monitor Volume
(refer to Fax Operation Guide)
Keyboard Layout (page Appendix-8)
Original / Paper
Settings
Custom Original Size (page 9-4)
Custom Paper Size (page 9-5)
Cassette Setting (page 9-6)
MP Tray Setting (pag e 9-7)
Media Typ e Setting (page 9-8)
Default Paper Source (page 9-9)
Original Auto Detect (page 9-10)
Media for Auto (Color) (page 9-10)
Media for Auto (B & W) (page 9-10)
Paper Source for Cover (page 9-11)
Special Paper Action (page 9-11)
Measurement (page 9-12)
xv
Page 19

Error Handling Duplexing Error (page 9-13)
Finishing Error (page 9-13)
No St aple Error (page 9-13)
Finishing Pages Exceeded
(page 9-13)
Punch Waste Full Error (page 9-14)
Paper Mismatch Error (page 9-14)
Inserted Paper Mismatch (page 9-14)
Paper Jam before Staple (page 9-14)
Paper Output (page 9-15)
Orientation Confirmation (page 9-16)
Function Defaults Or iginal Orientation (page 9-16)
Original Image (Copy) (page 9-17)
Org. Image (Send/Store) (page 9-17)
Scan Resolution (page 9-18)
FAX TX Resolution
(refer to Fax Operation Guide)
Color Selection (page 9-18)
File Format (page 9-18)
File Separation (page 9-19)
Backgrnd Density (Copy) (page 9-19)
BackgrndDens.(Send/Store)
(page 9-20)
Prevent Bleed-thru (Copy) (page 9-20)
Prevent Bleed(Send/Store)
(page 9-20)
Zoom (page 9-21)
Border Erase Default (page 9-21)
Border Erase to Back Page
(page 9-22)
Margin Default (page 9-22)
Auto Image Rotation (page 9-22)
EcoPrint (page 9-23)
xvi
Toner SaveLevel(EcoPrint)
(page 9-23)
High Comp. PDF Image (page 9-24)
Color TIFF Compression (page 9-24)
Page 20
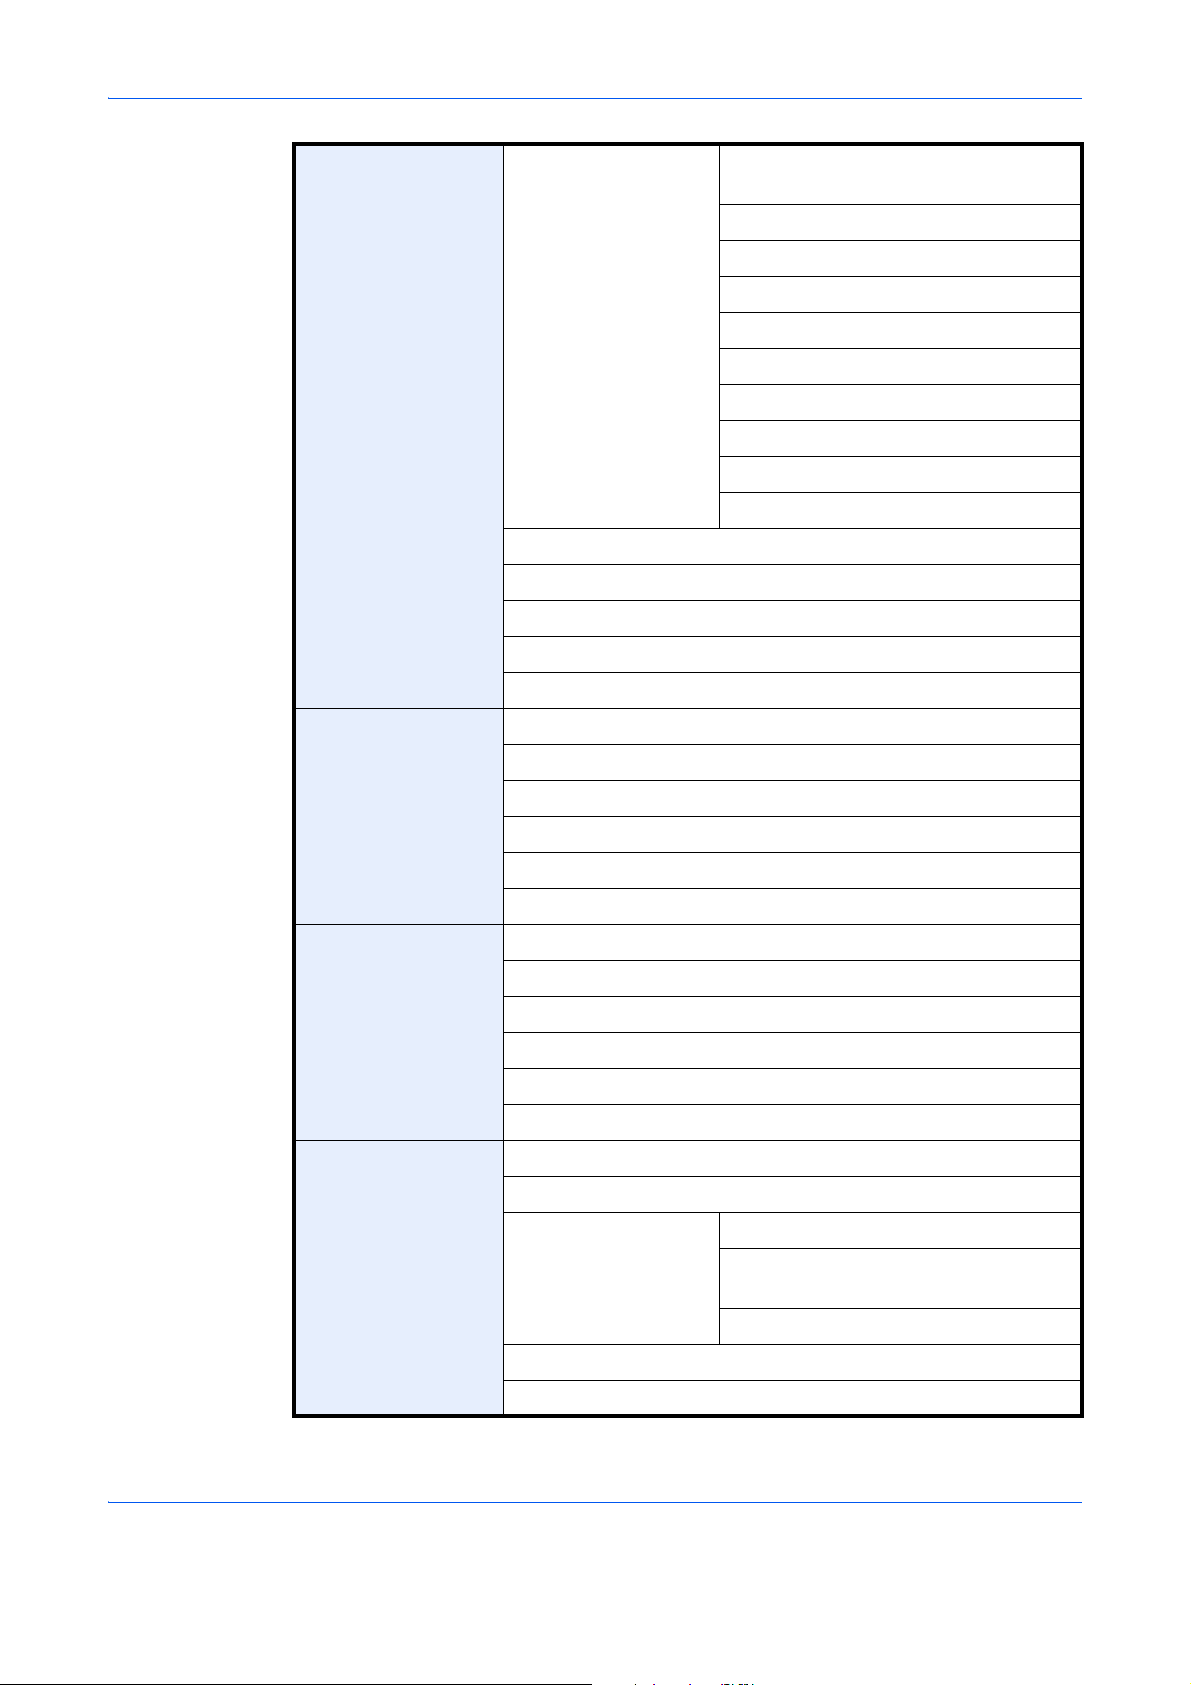
Image Quality (File Format)
(page 9-24)
Collate/Offset (page 9-25)
JPEG/TIFF Print (page 9-25)
XPS Fit to Page (page 9-26)
Continuous Scan (page 9-26)
PDF/A (page 9-26)
File Name Entry (page 9-27)
E-mail Subject/Body (page 9-27)
Repeat Copy (page 9-28)
DP Read Action (page 9-28)
USB Keyboard Type (page 9-29)
System Stamp (page 9-29)
Manual Staple (page 9-38)
Customize Status Display (page 9-39)
Low Toner Alert Level (page 9-39)
Copy Paper Selection (page 9-40)
Auto Paper Selection (page 9-41)
Auto % Priority (page 9-41)
Reserve Next Priority (page 9-42)
Preset Limit (page 9-42)
Quick Setup Registration (page 9-42)
Send Quick Setup Registration (page 9-43)
Dest. Check before Send (page 9-43)
Entry Check for New Dest. (page 9-44)
Color Typ e (page 9-44)
Default Screen (page 9-45)
Send and Forward (page 9-45)
Document Box/
Removable Memory
Custom Box (page 9-52)
FAX Box (refer to Fax Operation Guide)
Job Box Quick Copy Job Retention (page 7-15)
Repeat Copy Job Retention
(page 7-18)
Deletion of Job Retention (page 7-21)
Polling Box
(refer to Fax Operation Guide)
Quick Setup Registration (page 9-53)
xvii
Page 21

FAX (refer to Fax Operation Guide)
Printer Emulation (page 9-54)
EcoPrint (page 9-56)
Toner SaveLevel(EcoPrint) (page 9-56)
Override A4/Letter (page 9-56)
Duplex (page 9-57)
Copies (page 9-57)
Orientation (page 9-58)
Form Feed Timeout (page 9-58)
LF Action (page 9-59)
CR Action (page 9-59)
Job Name (page 9-59)
User Name (page 9-60)
Paper Feed Mode (page 9-60)
KIR (page 9-60)
System Network Host Name (page 9-90)
TCP/IP Setting TCP/IP
(page 9-90)
IPv4 (page 9-91)
IPv6 (page 9-92)
Protocol Detail
(page 9-94)
NetWare (page 9-95)
AppleTalk (page 9-95)
WSD Scan (page 9-96)
WSD Print (page 9-96)
Enhanced WSD (page 9-96)
Enhanced WSD (SSL) (page 9-97)
Secure Protocol SSL (page 9-97)
IPP Security
(page 9-98)
HTTP Security
(page 9-98)
xviii
LDAP Security
(page 9-99)
SMTP Security
(page 9-99)
Page 22
IPSec (page 9-100)
LAN Interface (page 9-101)
Restart Network (page 9-101)
Restart Entire Device (page 9-89)
POP3 Security
(User 1)
(page 9-100)
POP3 Security
(User 2)
(page 9-100)
POP3 Security
(User 3)
(page 9-100)
Interface Block
Setting
Security Level (page 9-103)
Document Guard (page 9-103)
Data Security (page 9-105)
Optional Function (page 9-107)
Date/Timer Date/Time (page 9-72)
Date Format (page 9-72)
Time Zone (page 9-73)
Auto Panel Reset (page 9-73)
Auto Sleep (page 9-74)
Auto Error Clear (page 9-75)
Low Power Timer (page 9-74)
Panel Reset Timer (page 9-73)
Sleep Timer (page 9-75)
USB Host (page 9-102)
USB Device (page 9-102)
Optional Interface 1 (page 9-102)
Optional Interface 2 (page 9-102)
Adjustment/
Maintenance
Interrupt Clear Timer (page 9-76)
Error Job Skip (page 9-76)
Error Clear Timer (page 9-75)
Density Adjustment Copy (page 9-65)
Send/Box (page 9-65)
Background Density
Adj.
Correcting Black Line (page 9-67)
xix
Copy (Auto) (page 9-66)
Send/Box (Auto) (page 9-66)
Page 23
System Initialization (page 9-67)
Display Brightness (page 9-68)
Silent Mode (page 9-68)
Auto Color Correction (page 9-68)
Tone Curve Adjustment (page 9-68)
Drum Refresh1 (page 9-69)
Drum Refresh2 (page 9-70)
Calibration Cycle (page 9-70)
Calibration (page 9-71)
Developer Refresh (page 9-71)
Report Print Report Status Page (page 9-61)
Font List (page 9-61)
Network Status (page 9-62)
Service Status (page 9-62)
Result Report Setting Send Result Report (page 9-62)
FAX RX Result Report
(refer to Fax Operation Guide)
Job Finish Notice Setting
(refer to Fax Operation Guide)
Sending Log History Auto Sending (page 9-63)
Send Log History (page 9-64)
Destination (page 9-63)
Job Log Subject (page 9-64)
Edit Destination Address Book (page 9-77)
One Touch Key (page 9-81)
Print List (refer to Fax Operation Guide)
User Login/Job
Accounting
Address Book
Defaults
User Login Setting User Login (page 10-2)
Sort (page 9-83)
Narrow Down (page 9-83)
Local User List (page 10-5)
Local Authorization (page 10-9)
xx
Group
Authorization Set.
Group
Authorization
(page 10-10)
Group List
(page 10-11)
Page 24
Job Accounting
Setting
Guest
Authorization Set.
Obtain NW User Property
(page 10-15)
Simple Login
Settings
Job Accounting (page 10-20)
Print Accounting Report (page 10-32)
Total Job Accounting (page 10-29)
Each Job Accounting (page 10-29)
Accounting List (page 10-22)
Default Setting Apply Limit
Guest
Authorization
(page 10-12)
Guest Property
(page 10-13)
Simple Login
(page 10-17)
Simple Login Key
(page 10-17)
(page 10-26)
Copy/Printer
Count
(page 10-24)
Unknown ID Job (page 10-10)
User Property(page 10-9)
Application (page 9-107)
Internet (page 9-84)
Default Counter
Limit
(page 10-26)
Count by Paper
Size
(page 10-30)
xxi
Page 25

Environment
The service environmental conditions are as follows:
• Temperature: 50 to 90.5 °F (10 to 32.5 °C)
(But humidity should be 70% or less when temperature is 90.5 °F (32.5 °C).)
• Humidity: 15 to 80%
(But temperature should be 86 °F (30 °C) or less whe n hu m idity is 80%.)
Use coated paper at a temperature of 80.6 °F (27°C) or less and a humidity of 60% or less.
Adverse environmental conditions may affect the image quality. It is recommended to use the machine at a
temperature: around 60.8 to 80.6 °F or less (16 to 27 °C), humidity: around 36 to 65%. In addition, Avoid the
following locations when selecting a site for the machine.
The machine automatically detects and displays the following message when the envir onmental temperature is
too high or too low.
Message: "Warning for high temperature. Adjust the room temperature." or "Warning for low temperature.
Adjust the room temperature."
To use the machine under optimum conditions, adjust the temperature and the humidity of your room if the
message is displayed.
• Avoid locations near a window or with exposure to direct sunlight.
• Avoid locations with vibrations.
• Avoid locations with drastic temperature fluctuations.
• Avoid locations with direct exposure to hot or cold air.
• Avoid poorly ventilated locations.
If the floor is easily damaged by casters, when this machine is moved after installation, the floor material may
be damaged.
During copying, some ozone is released, but the amount does not cause any ill effect to one’s health. If,
however, the machine is used over a long period of time in a poorly ventilated room or when making an
extremely large number of copies, the smell may become unpleasant. To maintain the appropriate environment
for copy work, it is suggested that the room be properly ventilated.
xxii
Page 26

Cautions when handling consumables
CAUTION
Do not attempt to incinerate the toner container or the waste toner box. D angerous sparks may cause
burns.
Keep the toner container and the waste toner box out of the reach of children.
If toner happens to spill from the toner container or the waste toner box, avoid inhalation and ingestion,
as well as contact with your eyes and skin.
• If you do happen to inh ale toner, move to a place with fresh air and gargle thoroughly with a large amount of
water. If coughing develops, contact a physician.
• If you do happen to ingest toner, rinse your mouth with water and drink 1 or 2 cups of water to dilute the
contents of your stomach. If necessary, contact a physician.
• If you do happen to get toner in your eyes, flush them thoroughly with water. If there is any remaining
tenderness, contact a physician.
• If toner does happen to get on your skin, wash with soap and water.
Do not attempt to force open or destroy the toner container or the waste toner box.
Other precautions
Return the exhausted toner container and waste toner box to your dealer or service representative. The
collected toner container and waste toner box will be recycled or disposed in accordance with the relevant
regulations.
Store the machine while avoiding exposure to direct sunlight.
Store the machine in a place where the temperature stays below 40ºC while avoiding sharp changes of
temperature and humidity.
If the machine will not be used for an extended period of time, remove the paper from the cassette and the Multi
Purpose (MP) Tray, return it to its original package and reseal it.
If the optional Fax kit is installed and the main power switch is off, transmitting/receiving Fax is disabled. Do not
turn off the main power switch, but press the Power key on the operation panel to enter Sleep mode.
xxiii
Page 27

Laser Safety (Europe)
Laser radiation could be hazardous to the human body. For this reason, laser radiation emitted inside this
machine is hermetically sealed within the protective housing and external cover. In the normal operation of the
product by user, no radiation can leak from the machine.
This machine is classified as Class 1 laser product under IEC/EN 60825-1:2007.
Caution: Performance of procedu res other than those specified in this manual may result in hazardous radiation
exposure.
These labels are attached to the laser scan ne r unit insid e the m ach in e and ar e no t in a use r ac ce ss ar ea .
The label shown below is attached on the right side of the machine.
xxiv
Page 28

Safety Instructions Regarding the Disconnection of Power
Caution: The power plug is the main isolation device! Other switches on the equipment are only functional
switches and are not suitable for isolating the equipment from the power source.
Attention: Le débranchement de la fiche secteur est le seul moyen de mettre l’appareil hors tension. Les
interrupteurs sur l’appareil ne sont que des interrupteurs de fonctionnement: ils ne mettent pas l’appareil hors
tension.
WARNING
This equipment has been tested and found to comply with the limits for a Class B digital device, pu rsuant to Part 15 of the
FCC Rules. These limits are designed to provide reasonable protection against harmful interference in a residential
installation. This equipment generates, uses and can radiate radio frequency energy and, if not install ed and used in
accordance with the instructions, may cause harmful interference to radio communications. However, there is no guarantee
that interference will not occur in a particular installation. If this equipment does cause harmful interference to radio or
television reception, which can be determined by turning the equipment off and on, the user is encouraged to try to correct
the interference by one or more of the following measures:
• Reorient or relocate the receiving antenna.
• Increase the separation between the equipment and receiver.
• Connect the equipment into an outlet on a circuit different from that to which the receiver is connected.
• Consult the dealer or an experienced radio/TV technician for help.
• The use of a non-shielded interface cable with the referenced device is prohibited.
CAUTION — The changes or modifications not expressly approved by the party responsible for compliance could void the
user’s authority to operate the equipment.
This device contains the module, which complies with Part 15 of FCC Rules and RSS-Gen of IC Rules.
Operation is subject to the following two conditions; (1) this device may not cause interference, and (2) this device must
accept any interference, including in te rference that may cause undesired operation of the device.
Radio Tag Technology
In some countries the radio tag technology used in this equipment to identify the toner container may be subject to
authorization and the use of this equipment may consequently be restricted.
xxv
Page 29

Legal Restriction on Copying/Scanning
It may be prohibited to copy/scan copyrighted material without permission of the copyright owner.
Copying/Scanning the following items is prohibited and may be penalized by law.
It may not be limited to these items. Do not knowingly copy/scan the items that are not to be copied/scanned.
• Paper money
• Bank note
• Securities
•Stamp
•Passport
• Certificate
Local laws and regulations may prohibit or restrict copying/scanning of other items not mentioned above.
EN ISO 7779
Maschinenlärminformations-Verordnung 3. GPSGV, 06.01.2004: Der höchste Schalldruckpegel beträgt 70 dB
(A) oder weniger gemäß EN ISO 7779.
EK1-ITB 2000
Das Gerät ist nicht für die Benutzung im unmittelbaren Gesichtsfeld am Bildschirmarbeitsplatz vorgesehen. Um
störende Reflexionen am Bildschirmarbeitsplatz zu vermeiden, darf dieses Produkt nicht im unmittelbaren
Gesichtsfeld platziert werden.
xxvi
Page 30

Legal and Safety Information
Please read this information before using your machine. This chapter provides information on
the following topics.
• Legal Information............................................................................ xxviii
• Regarding Trade Names................................................................. xxviii
• Energy Saving Control Function......................................................xxxv
• Automatic 2-Sided Copy Function ...................................................xxxv
• Paper Recycling...............................................................................xxxv
• Energy Star (ENERGY STAR®) Program........................................xxxv
• About this Operation Guide ............................................................ xxxvi
xxvii
Page 31

Legal Information
Copying or other reproduction of all or part of this guide without the prior written consent of Olivetti
is prohibited.
Regarding Trade Names
• PRESCRIBE and KPDL are trademarks of Kyocera Corporation.
• Microsoft, Windows, Windows XP, Windows Server 2003, Windows Vista, Windows Server 2008,
Windows 7 and Internet Explorer are registered trademarks or trademarks of Microsoft Corporation in the
U.S.A. and/or other countries.
• PCL is a trademark of Hewlett-Packard Company.
• Adobe Acrobat, Adobe Reader and PostScript are trademarks of Adobe Systems, Incorporated.
• Ethernet is a registered trademark of Xerox Corporation.
• Novell and NetWare are registered trademarks of Novell, Inc.
• IBM and IBM PC/AT are trademarks of International Business Machines Corporation.
• AppleTalk, Bonjour, Macintosh, and Mac OS are trademarks of Apple Inc., registered in the U.S. and other
countries.
• TypeBankG-B, TypeBankM-M and Typebank-OCR are trademarks of TypeBank
• All European language fonts installed in this machine are used under licensing agreement with Monotype
Imaging Inc.
• Helvetica, Palatino and Times are registered trademarks of Linotype GmbH.
• ITC Avant Garde Gothic, ITC Bookman, ITC ZapfChancery and ITC ZapfDingbats are registered
trademarks of International Typeface Corporation.
• UFST™ MicroType
• This machine contains the software having modules developed by Independent JPEG Group.
• This machine contains the NF module developed by
ACCESS Co., Ltd.
• This product contains NetFront Browser of ACCESS CO.,
LTD.
• ACCESS, ACCESS logo and NetFront are trademarks or
registered trademarks of ACCESS CO., LTD.in the United States, Japan and other countries.
• © 2011 ACCESS CO., LTD. All rights reserved.
• Java is a registered trademark of Oracle and/or its affiliates.
®
fonts by Monotype Imaging Inc. are installed in this machine.
®
.
All other brands and product names are registered trademarks or trademarks of their respective
companies. The designations ™ and ® will not be used in this Operation Guide.
xxviii
Page 32

GPL/LGPL
This product contains GPL (http://www.gnu.org/licenses/gpl.html) and/or LGPL (http://www.gnu.org/licenses/
lgpl.html) software as part of its firmware. You can get the source code, and you are permitted to copy,
redistribute and modify it under the terms of GPL/LGPL.
Open SSL License
Copyright (c) 1998-2006 The OpenSSL Project. All rights reserved.
Redistribution and use in source and bina ry forms, with or without modification, are pe rmitted pr ovided that the
following conditions are met:
1 Redistributions of source code must retain the above copyright notice, this list of conditions and the
following disclaimer.
2 Redistributions in binary form must reproduce the above copyright notice, this list of conditions and the
following disclaimer in the documentation and/or other materials provided with the distribution.
3 All advertising materials mentioning features or use of this software must display the following
acknowledgment:
“This product includes software developed by th e Op enSSL Project for use in the OpenSSL Toolkit. (http:/
/www.openssl.org/)”
4 The names “OpenSSL Toolkit” and “OpenSSL Project” must not be used to endorse or promote products
derived from this software without prior written permission.
For written permission, please contact openssl-core@openssl.org.
5 Products derived from this software may not be called “OpenSSL” nor may “OpenSSL” appear in their
names without prior written permission of the OpenSSL Project.
6 Redistributions of any form whatsoever must ret a in the following acknowledgment: “This product includes
software developed by the OpenSSL Project for use in the OpenSSL Toolkit (http://www.openssl.org/)”
THIS SOFTWARE IS PROVIDED BY THE OpenSSL PROJECT “AS IS” AND ANY EXPRESSED OR IMPLIED
WARRANTIES, INCLUDING, BUT NOT LIMITED TO, THE
IMPLIED WARRANTIES OF MERCHANTABILITY AND FITNESS FOR A PARTICULAR PURPOSE ARE
DISCLAIMED. IN NO EVENT SHALL THE OpenSSL PROJECT OR ITS CONTRIBUTORS BE LIABLE FOR
ANY DIRECT, INDIRECT, INCIDENTAL, SPECIAL, EXEMPLARY, OR CONSEQUENTIAL DAMAGES
(INCLUDING, BUT NOT LIMITED TO, PROCUREMENT OF SUBSTITUTE GOODS OR SERVICES; LOSS OF
USE, DATA, OR PROFITS; OR BUSINESS INTERRUPTION) HOWEVER CAUSED AND ON ANY THEORY
OF LIABILITY, WHETHER IN CONTRACT, STRICT LIABILITY, OR TORT (INCLUDING NEGLIGENCE OR
OTHERWISE) ARISING IN ANY WAY OUT OF THE USE OF THIS SOFTWARE, EVEN IF ADVISED OF THE
POSSIBILITY OF SUCH DAMAGE.
xxix
Page 33

Original SSLeay License
Copyright (C) 1995-1998 Eric Young (eay@cryptsoft.com) All rights reserved.
This package is an SSL implementation written by Eric Young (eay@cryptsoft.com). The implementation was
written so as to conform with Netscapes SSL.
This library is free for commercial and non-commercial use as long as the following conditions are aheared to.
The following conditions apply to all code found in this distribution, be it the RC4, RSA, lhash, DES, etc., code;
not just the SSL code. The SSL documentation included with this distribution is covered by the same copyri ght
terms except that the holder is Tim Hudson (tjh@cryptsoft.com).
Copyright remains Eric Young’s, and as such any Copyright notices in the code are not to be removed.
If this package is used in a product, Eric Young should be given attribution as the author of the pa rts of the library
used.
This can be in the form of a textual message at program startup or in documentation (online or textual) pr ovided
with the package.
Redistribution and use in source and bina ry forms, with or without modification, are pe rmitted pr ovided that the
following conditions are met:
1 Redistributions of source code must retain the copyright notice, this list of conditions and the following
disclaimer.
2 Redistributions in binary form must reproduce the above copyright notice, this list of conditions and the
following disclaimer in the documentation and/or other materials provided with the distribution.
3 All advertising materials mentioning features or use of this software must display the following
acknowledgment:
“This product includes cryptographic software written by Eric Young (eay@cryptsoft.com)”
The word ‘cryptographic’ can be left out if the rouines from the library being used are not cryptographic
related :-).
4 If you include any Windows specific code (or a derivative thereof) from the apps directory (application
code) you must include an acknowledgment:
“This product includes software written by Tim Hudson (tjh@cryptsoft.com)”
THIS SOFTWARE IS PROVIDED BY ERIC YOUNG “AS IS” AND ANY EXPRESS OR IMPLIED
WARRANTIES, INCLUDING, BUT NOT LIMIT ED TO, THE IMPLIED WARRANTIES OF MERCHANTABILITY
AND FITNESS FOR A PARTICULAR PURPOSE ARE DISCLAIMED. IN NO EVENT SHALL THE AUTHOR OR
CONTRIBUTORS BE LIABLE FOR ANY DIRECT, INDIRECT, INCIDENTAL, SPECIAL, EXEMPLARY, OR
CONSEQUENTIAL DAMAGES (INCLUDING, BUT NOT LIMITED TO, PROCUREMENT OF SUBSTITUTE
GOODS OR SERVICES; LOSS OF USE, DATA, OR PROFITS; OR BUSINESS INTERRUPTION) HOWEVER
CAUSED AND ON ANY THEORY OF LIABILITY, WHETHER IN CONTRACT, STRICT LIABILITY, OR TORT
(INCLUDING NEGLIGENCE OR OTHERWISE) ARISING IN ANY WAY OUT OF THE USE OF THIS
SOFTWARE, EVEN IF ADVISED OF THE POSSIBILITY OF SUCH DAMAGE.
The licence and distribution terms for any publically available version or derivative of this code cannot be
changed. i.e. this code cannot simply be copied and put under another distribution licence [including the GNU
Public Licence.]
xxx
Page 34

Monotype Imaging License Agreement
1 Software shall mean the digitally encoded, machine readable, scalable outline data as encoded in a
special format as well as the UFST Software.
2 You agree to accept a non-exclusive license to use the Software to reproduce and display weights, styles
and versions of letters, numerals, characters and symbols (Typefaces) solely for your own customary
business or personal purposes at the address stated on th e registration card you return to Monotype
Imaging. Under the terms of this License Agreement, you have the right to use the Fonts on up to three
printers. If you need to have access to the fonts on more than three printers, you need to acquire a multiuser license agreement which can be obtained from Monotype Imaging. Mo notype Imaging retains all
rights, title and interest to the Software and Typefaces and no rights are granted to you other than a
License to use the Software on the terms expressly set forth in this Agreement.
3 To prot ec t prop rie tary rights of Monoty p e Imag ing , yo u ag re e to main tain the Software and othe r
proprietary information concerning the Typefaces in strict confidence and to establish reasonable
procedures regulating access to and use of the Software and Typefaces.
4 You agree not to duplicate or copy the Software or Typefaces, except that you may make one backup
copy. You agree that any such copy shall contain the same proprietary notices as those appearing on the
original.
5 This License shall continue until the last use of the Software and Typefaces, unless sooner terminated.
This License may be terminated by Monotype Imaging if you fail to comply with the terms of this License
and such failure is not remedied within thirty (30) days after notice from Monotype Imaging. When this
License expires or is terminated, you shall either return to Monotype Imaging or destroy all copies of the
Software and Typefaces and documentation as requested.
6 You agree that you will not modify, alter, disassemble, decrypt, reverse engineer or decompile the
Software.
7 Monotype Imaging warrants that for ninety (90) days after delivery, the Software will perform in
accordance with Monotype Imaging-published specifications, and the diskette will be free from defects in
material and workmanship. Monotype Imaging does not warrant that the Software is free from all bugs,
errors and omissions.
The parties agree that all other warranties, expressed or implied, including warranties of fitness for a
particular purpose and merchantability, are excluded.
8 Your exclusive remedy and the sole liability of Monotype Imaging in connection with the Software and
Typefaces is repair or replacement of defective parts, upon their return to Monotype Imaging.
In no event will Monotype Imaging be liable for lost profits, lost data, or any other incidental or
consequential damages, or any damag es cau sed by ab us e or misa pp lica tio n of the So ftware and
Typefaces.
9 Massachusetts U.S.A. law governs this Agreement.
10 You shall not sublicense, sell, le ase, or otherwise transfer th e Sof tware and/or Typefaces without the prior
written consent of Monotype Imaging.
11 Use, duplication or disclosure by the Government is subject to restrictions as set forth in the Rights in
Technical Data and Computer Software clause at FAR 252-227-7013, subdivision (b)(3)(ii) or
subparagraph (c)(1)(ii), as appropria te. Further use, duplication or disclosure is subject to restrictions
applicable to restricted rights software as set forth in FAR 52.227-19 (c)(2).
12 You acknowledge that you have read this Agreement, understand it, and agree to be bound by its terms
and conditions. Neither party shall be bound by any statement or representation not contained in this
Agreement. No change in this Agreement is effective unless written and signed by properly authorized
representatives of each party. By opening this diskette package, you agre e to acce pt the term s an d
conditions of this Agreement.
xxxi
Page 35

Knopflerfish License
This product includes software developed by the Knopflerfish Project.
http://www.knopflerfish.org
Copyright 2003-2010 The Knopflerfish Project. All rights reserved.
Redistribution and use in source and binary forms, with or without modification, are permitted provided that
the following conditions are met:
- Redistributions of source code must retain the above copyright notice, this list of conditions and the following
disclaimer.
- Redistributions in binary form must reproduce the above copyright notice, this list of conditions and the
following disclaimer in the documentation and/or other materials provided with the distribution.
- Neither the name of the KNOPFLERFISH project nor the names of its contributors may be used to endorse
or promote products derived from this software without specific prior written permission.
THIS SOFTWARE IS PROVIDED BY THE COPYRIGHT HOLDERS AND CONTRIBUTORS “AS IS” AND ANY
EXPRESS OR IMPLIED WARRANTIES, INCLUDING, BUT NOT LIMITED TO, THE IMPLIED WARRANTIES
OF MERCHANTABILITY AND FITNESS FOR A PARTICULAR PURPOSE ARE DISCLAIMED. IN NO EVENT
SHALL THE COPYRIGHT OWNER OR CONTRIBUTORS BE LIABLE FOR ANY DIRECT, INDIRECT,
INCIDENTAL, SPECIAL, EXEMPLARY, OR CONSEQUENTIAL DAMAGES (INCLUDING, BUT NOT LIMITED
TO, PROCUREMENT OF SUBSTITUTE GOODS OR SERVICES; LOSS OF USE, DATA, OR PROFITS; OR
BUSINESS INTERRUPTION) HOWEVER CAUSED AND ON ANY THEORY OF LIABILITY, WHETHER IN
CONTRACT, STRICT LIABILITY, OR TORT (INCLUDING NEGLIGENCE OR OTHERWISE) ARISING IN ANY
WAY OUT OF THE USE OF THIS SOFTWARE, EVEN IF ADVISED OF THE POSSIBILITY OF SUCH
DAMAGE.
Apache License (Version 2.0)
Apache License
Version 2.0, January 2004
http://www.apache.org/licenses/
TERMS AND CONDITIONS FOR USE, REPRODUCTION, AND DISTRIBUTION
1 Definitions.
“License” shall mean the terms and conditions for use, reproduction, and distribution as defined by
Sections 1 through 9 of this document.
“Licensor” shall mean the copyright owner or entity authorized by the copyright owner that is granting the
License.
“Legal Entity” shall mean the union of the acting entity and all other entities that control, are controlled by,
or are under common control with that entity. For the purposes of this definition, “control” means (i) the
power, direct or indirect, to cause the direction or management of such entity, whether by contract or
otherwise, or (ii) ownership of fifty percent (50%) or more of the outstanding shares, or (iii) beneficial
ownership of such entity.
“You” (or “Your”) shall mean an individual or Legal Entity exercising per mis sio ns gr an ted by this License.
“Source” form shall mean the preferred form for making modifications, including but not limited to software
source code, documentation source, and configuration files.
“Object” form shall mean any form resulting from mechanical transformation or translation of a Source
form, including but not limited to compiled object code, generated documentation, and conversions to
other media types.
xxxii
Page 36

“Work” shall mean the work of authorship, whether in Source or Object form, made available under the
License, as indicated by a copyright notice that is included in or attached to the work (an example is
provided in the Appendix below).
“Derivative Works” shall mean any work, whether in Source or Object form, that is based on (or derived
from) the Work and for which the editorial revisions, annotations, elaborations, or other modifications
represent, as a whole, an original work of authorship. For the purposes of this License, Derivative Works
shall not include works that remain separable from, or merely link (or bind by name) to the interfaces of,
the Work and Derivative Works thereof.
“Contribution” shall mean any work of authorship, including the original version of the Work and any
modifications or additions to that Work or Derivative Works thereof, that is intentionally submitted to
Licensor for inclusion in the Work by the copyright owner or by an individual or Legal Entity authorized to
submit on behalf of the copyright owner. For the purposes of this definition, “submitted” means any form of
electronic, verbal, or written communication sent to the Licensor or its representatives, including but not
limited to communication on electronic mailing lists, source code control systems, and issue tracking
systems that are managed by, or on behalf of, the Licensor for the purpose of discussing and improving
the Work, but excluding communication that is conspicuously marked or otherwise designated in writing
by the copyright owner as “Not a Contrib ut ion .”
“Contributor” shall mean Licensor and any individual or Legal Entity on behalf of wh om a Contribu tion has
been received by Licensor and subsequently incorporated within the Work.
2 Grant of Copyright License. Subject to the terms and conditions of this License, each Contributor hereby
grants to You a perpetual, worldwide, non-exclusive, no-charge, royalty-free, irrevocable copyright license
to reproduce, prepare Derivative W orks of, publicly display, publicly perform, sublicense, and distribute the
Work and such Derivative Works in Source or Object form.
3 Grant of Patent License. Subject to the terms and conditions of this License, each Contributor hereby
grants to Y ou a perpetual, worldwide, non-exclusive, no-charge, royalty-free, irrevocable (except as stated
in this section) patent license to make, have made, use, offer to sell, sell, import, and otherwise transfer
the Work, where such license applies only to those patent claims licensable by such Contributor that are
necessarily infringed by their Contribution(s) alone or by combination of their Contribution(s) with the Work
to which such Contribution(s) was submitted. If Y ou institute patent litigation against any entity (i ncluding a
cross-claim or counterclaim in a lawsuit) alleging that the Work or a Contribution incorporated within the
Work constitutes direct or contributory patent infringement, then any patent licenses granted to You under
this License for that Work shall terminate as of the date such litigation is filed.
4 Redistribution. You may reproduce and distribute copies of the Work or Derivative Works thereof in any
medium, with or without modifications, and in Source or Object form, provided that You meet the following
conditions:
(a)You must give any other recipients of the Work or Derivative Works a copy of this License; and
(b)You must cause any modified files to carry prominent notices stating that You changed the files; and
(c)You must retain, in the Source form of any Derivative Works that You distribute, all copyright, patent,
trademark, and attribution notices from the Source form of the Work, excluding those notices that do
not pertain to any part of the Derivative Works; and
(d)If the Work includes a “NOTICE” text file as part of its distribution, then any Derivative Works that You
distribute must include a readable copy of the attribution notices contained within such NOTICE file,
excluding those notices that do not pertain to any part of the Derivative Works, in at least one of the
following places: within a NOTICE text file distributed as part of the Derivative Works; within the Source
form or documentation, if provided along with the Derivative Works; or, within a display ge nerated by
the Derivative Works, if and wherever such third-party notices normally appear. The contents of the
NOTICE file are for informational purposes only and d o not modify the License. You may add Y our own
attribution notices within Derivative Works that You distribute, alongside or as an addendum to the
NOTICE text from the Work, provided that such additional attribution notices cannot be construed as
modifying the License.
xxxiii
Page 37

You may add Your own copyright statement to Your modifications and may provide additional or different
license terms and conditions for use, reproduction, or distribution of Your modifications, or for any such
Derivative Works as a whole, provided Your use, reproduction, and distribution of the Work otherwise
complies with the conditions stated in this License.
5 Submission of Contributions. Unless You explicitly state otherwise, any Contribution intentionally
submitted for inclusion in the Work by You to the Licensor shall be under the terms and conditions of this
License, without any additional terms or conditions. Notwithstanding the above, nothing herein shall
supersede or modify the terms of any separate license agreement you may have executed with Licensor
regarding such Contributions.
6 Trademarks. This License does not grant permission to use the trade names, trademarks, service marks,
or product names of the Licensor, except as required for reasonable and customary use in describing the
origin of the Work and reproducing the content of the NOTICE file.
7 Disclaimer of Warranty. Unless required by applicable law or agreed to in writing, Licensor provides the
Work (and each Contributor provides its Contributions) on an “AS IS” BASIS, WITHOUT WARRANTIES
OR CONDITIONS OF ANY KIND, either express or implied, including, without limitation, any warranties or
conditions of TITLE, NON-INFRINGEMENT, MERCHANTABILITY, or FITNESS FOR A PARTICULAR
PURPOSE. You are solely responsible for determining the appropriateness of using or redistributing the
Work and assume any risks associated with Your exercise of permissions under this License.
8 Limitation of Liability. In no event and under no legal theory, whether in tort (including negligence),
contract, or otherwise, unless required by applicable law (such as deliberate and grossly negligent a cts) or
agreed to in writing, shall any Contributor be liable to You for damages, including any direct, indirect,
special, incidental, or consequential damages of any character arising as a result of this License or out of
the use or inability to use the Work (including but not limited to damages for loss of goodwill, work
stoppage, computer failure or malfunction, or any and all other commercial damages or losses), even if
such Contributor has been advised of the possibility of such damages.
9 Accepting Warranty or Additional Liability. While redistributing the Work or Derivative Works thereof, You
may choose to offer, and charge a fee for, acceptance of support, warranty, indemnity, or other liability
obligations and/or rights consistent with this License. Ho wever , in a ccepting such obligations, You may act
only on Your own behalf and on Your sole responsibility, not on behalf of any other Contributor, and only if
You agree to indemnify, defend, and hold each Contributor harmless for any liability incurred by, or claims
asserted against, such Contributor by reason of your accepting any such warranty or additional liability.
END OF TERMS AND CONDITIONS
APPENDIX: How to apply the Apache License to your work.
To apply the Apache License to your work, attach the following boilerplate notice, with the fields enclosed by
brackets “[]” replaced with your own identifying information. (Don't include the brackets!) The text should be
enclosed in the appropriate comment syntax for the file format. We also recommend that a file or class
name and description of purpose be included on the same “printed page” as the copyright notice for easier
identification within third-party archives.
Copyright [yyyy] [name of copyright owner]
Licensed under the Apache License, Version 2.0 (the “License”); you may not use this file except in compliance
with the License. You may obtain a copy of the License at
http://www.apache.org/licenses/LICENSE-2.0
Unless required by applicable law or agreed to in writing, software distributed under the License is distributed
on an “AS IS” BASIS, WITHOUT WARRANTIES OR CONDITIONS OF ANY KIND, either express or implied.
See the License for the specific language governing permissions and limitations under the License.
xxxiv
Page 38

Energy Saving Control Function
The device comes equipped with a Low Power Mode where energy consu mption is reduced after a certain
amount of time elapses since the device was last used, as well as a Sleep where printer and fax functions
remain in a waiting state but power consumption is still reduced to a minimum when there is no activity with the
device within a set amount of time.
Low Power Mode
The device automatically enters Low Power Mode when 2 minutes have passed since the device was last used.
The amount of time of no activity that must pass before Low Power Mode is activated may be lengthened. For
more information refer to Low Power Mode and Auto Low Power Mode on page 2-11.
Sleep
The device automatically enters Sleep when 60 minutes have passed since the device was last used. The
amount of time of no activity that must pass before Sleep is a ctivated may be lengthe ned. For more infor mation
see Sleep and Auto Sleep on page 2-12.
Automatic 2-Sided Copy Function
This device includes 2-sided copying as a standard function. For example, by copying two 1- sided originals onto
a single sheet of paper as a 2-sided copy, it is possible to lower the a mount of paper used. For more informa tion
see Duplex on page 3-12.
Paper Recycling
This device supports the recycled paper which reduces the load on the environment. Your sales or service
representative can provide information about recommended paper types.
Energy Star (ENERGY STAR®) Program
We have determined as a participating company in the International Energy Star Program that
this product is compliant with the standards laid out in the International Energy Star Program.
xxxv
Page 39

About this Operation Guide
This Operation Guide contains the following chapters.
Chapter 1 - Part Names
Identifies machine parts and operation panel keys.
Chapter 2 - Preparation before Use
Explains adding paper, placing originals, connecting the machine, and necessary configurations before first use.
Chapter 3 - Basic Operation
Describes the procedures for basic copying, printing and scanning.
Chapter 4 - Copying Functions
Describes the functions you can use when copying.
Chapter 5 - Printing
Describes the functions you can use when printing originals.
Chapter 6 - Sending Functions
Describes the functions you can use when sending originals.
Chapter 7 - Document Box
Provides a basic guide to using document box es.
Chapter 8 - Status / Job Cancel
Explains how to check the job status and job history and how to cancel jobs being printed or waiting to print.
Also explains how to check the remaining paper and device status and how to cancel fax transmission
Chapter 9 - Default Setting (System Menu)
Describes the System Menu options for general machine operation.
Chapter 10 - Management
Explains user login administration and job accounting.
Chapter 11 - Maintenance
Describes cleaning and toner replacement.
Chapter 12 - Troubleshoot ing
Explains how to handle error messages, paper jams and other problems.
Appendix
Explains how to enter characters, and lists the machine specifications.
Introduces the convenient optional equipment available for this machine.
Provides information on media types and paper sizes. Also includes a glossary of terms.
xxxvi
Page 40

Conventions in This Guide
The following conventions are used depending on the nature of the description.
Convention Description Example
Bold Indicates the operation panel
keys or a computer screen.
[Regular] Indicates the touch panel keys. Press [OK].
Italic Indicates a message displayed
on the touch panel.
Used to emphasize a key word,
phrase or references to
additional information.
Note Indicates supplemental
information or operations for
reference.
Important Indicates items that are required
or prohibited so as to avoid
problems.
Caution Indicates what must be
observed to prevent injury or
machine breakdown and how to
deal with it.
Description of Operation Procedure
Press the Start key.
Ready to copy is displayed.
For more information refer to Sleep and
Auto Sleep on page 2-9.
NOTE:
IMPORTANT:
CAUTION:
In this Operation Guide, continuous operation of the keys on the touch panel is as follows:
Actual procedure
Press [Copy].
Press [Next] of Quick Setup.
Press [ ] twice.
Press [Change] of Original Image.
Press [Copy], [Next] of Quick
Setup, [ ] twice, and then
[Change] of Original Image.
Description in this
Operation Guide
xxxvii
Page 41

Originals and Paper Sizes
Original
Paper
Original
Paper
This section explains the notation used in this guide when referring to sizes of originals or paper sizes.
As with A4, B5 and Letter, which may be used either in the horizontal or vertical direction, horizontal direction is
indicated by an additional letter R in order to indicate the orientation of the original/paper.
Placement direction Indicated size *
Vertical direction A4, B5, A5, B6,
A6, 16K, Letter,
Statement
For the originals/paper, dimension A is longer
than B.
Horizontal direction A4-R, B5-R, A5-R,
B6-R, A6-R, 16KR, Letter-R,
Statement-R
For the originals/paper, dimension A is shorter
than B.
* The size of the original/paper that can be used depends on the
function and source tray. For further details, refer to the page
detailing that function or source tray.
Icons on the Touch Panel
The following icons are used to indicate originals and paper placement directions on the touch panel.
Placement direction Originals Paper
Vertical direction
Horizontal direction
xviii
Page 42

1Part Names
This chapter identifies the machine parts and operation panel keys.
• Operation Panel..................................................................................1-2
• Machine..............................................................................................1-4
1-1
Page 43

Operation Panel
Displays the Copy screen.
Displays the screen for sending.
You can also change this to show the address book screen.
Switches the touch panel display
to enlarged display in the Copy
screen or Send screen.
Displays the Document Box screen.
Displays the Program screen.
Blinks during printing, fax sending and receiving, scan send, and print data receiving.
Displays help guidance.
Displays the Status/Job Cancel screen.
Displays the FAX screen.
Blinks while the machine is accessing the hard disk, fax memory
or USB memory (general-purpose item).
Lights or blinks when an error occurs and a job is stopped.
Ends operation (logs out) on the
Administration screen.
Puts the machine into Low
Power Mode.
Part Names
1-2
Page 44

Part Names
Lit when the machine's main power
is on.
Puts the machine into Sleep Mode.
Recovers from Sleep if in Sleep Mode.
Displays the Interrupt Copy screen.
Returns settings to their default states.
Pauses the printing job in progress.
Starts copying and scanning operations and processing
for setting operations.
Finalizes numeric key entry, and finalizes screen during setting
of functions. Operates linked with the on-screen [OK].
Recalls already registered destinations and programs for sending.
Clears entered numbers and
characters.
Numeric keys. Enter numbers and symbols.
Displays number of sheets printed
and number of pages scanned.
Displays the System Menu.
1
1-3
Page 45

Machine
1
2
3
5
4
6
6-i
6-j
6-e
6-f
6-g
6-b
6-a
6-c
6-c
6-h
Part Names
1 Mailbox (Option)
2 Front Cover
3 Document Finisher (Option)
4 Document Processor
5 Operation Panel
6 Cassette 1 to 7 (5 to 7 are Options)
• 6-a: Cassette 1 • 6-b: Cassette 2 • 6-c: Cassette 3 • 6-d: Cassette 4
• 6-e: Cassette 5 • 6-f: Cassette 6 • 6-g: Cassette 7
• 6-h: Cassette 5 • 6-i: Cassette 6 • 6-j: Cassette 7
1-4
Page 46

Part Names
16
18
12
11
13
89
10
7
15
19
17
20 22
14
21
1
7 Network Interface Connector
8 USB Port (A2)
9 USB Interface Connector (B1)
10 Option Interface
11 Original Size Indicator Plates
12 Platen
13 Slit Glass
14 Clip Holder
15 Toner Container (Black)
16 Lowe r Le ft Tray (Option)
17 Uppe r Le ft Tray (Option)
18 Handles
19 Waste Toner Box
20 Release button
21 Cleaning Brush
22 Toner Container Release Lever
1-5
Page 47

Part Names
35
25
23 24
27
28
34
32
33
30
31
29
26
40
36 37 38 39
23 Pape r Le ng th Guide
24 (Paper Width Guide) Lock
25 Paper Width Adjusting Tab
26 USB Port (A1)
27 Right Tray
28 Right Cover 1
29 Right Cover 1 Lever
30 Right Cover 2 Lever
31 Right Cover 2
32 Paper Width Guide
33 Support Tray Section of the Multi Purpose Tray
34 Multi Pur pose Tray
35 Handle
36 Right Cover 4
37 Right Cover 4 Lever
38 Right Cover 3
39 Right Cover 3 Lever
40 Main Power Switch
1-6
Page 48

2 Preparation before Use
This chapter explains the preparations before using this equipment for the first time as well
as the procedures for loading paper and originals.
• Check the Accessories.......................................................................2-2
• Determining the Connection Method and Preparing Cables...............2-3
• Connecting Cables..............................................................................2-5
• Power On/Off......................................................................................2-9
• Low Power Mode and Auto Low Power Mode..................................2-11
• Sleep and Auto Sleep.......................................................................2-12
• Adjusting the Operation Panel Angle................................................2-12
• Switching the Language for Display [Language]...............................2-13
• Setting Date and Time......................................................................2-14
• Network Setup (LAN Cable Connection)..........................................2-15
• Installing Software.............................................................................2-18
• Embedded Web Server RX (Settings for E-mail).............................2-26
• Loading Paper...................................................................................2-29
• Loading Originals..............................................................................2-46
2-1
Page 49

Preparation before Use
Check the Accessories
Check that the following accessories are included.
• Safety Guide
• Quick Guide
• DVD (Product Library)
• CD-ROM (TWAIN compatible application)*
* This accessory is not included in some countries and regions.
Documents Contained in the Included DVD
The following documents are contained in the included DVD (Product Library). Refer to them as necessary.
Documents
Operation Guide (This Guide)
FAX Operation Guide
Card Authentication Kit (B) Operation Guide
Data Security Kit (E) Operation Guide
Embedded Web Server RX Operation Guide
Printer Driver User Guide
Network FAX Driver Operation Guide
Network Tool for Direct Printing Operation Guide
Network Print Monitor User Guide
File Management Utilitiy User Guide
2-2
Page 50

Preparation before Use
Connecting a scanner to your PC network with a network
cable (1000BASE-T, 100BASE-TX or 10BASE-T)
FAX (Option)
Send FTP
Sends the scanned
image as a data file on
the FTP.
Send E-mail
Sends the image data
of scanned originals to
the desired recipient
as a file attached to an
E-mail message.
Send SMB
Saves the scanned
image as a data file on
your PC.
MFP
FAX
Administrator’s
PC
Embedded Web Server RX
Network settings, Scanner
default settings, User and
destination registration
Network FAX
(Option)
TWAIN Scanning
WIA Scanning
TWAIN and WIA are
standardized interface
for communication
between software
applications and image
acquisition devices.
USB
Network
Network
Printing
Network
Network
Network
Network
Network
Determining the Connection Method and Preparing Cables
Check the method to connect the equipment to a PC or network, and prepare the necessary cables.
Connection Example
Determine the method to connect the equipment to a PC or network by referring to the illustration below.
2
2-3
Page 51

Preparation before Use
Preparing Necessary Cables
The following interfaces are available to connect the equipment to a PC. Prepare the necessary cables
according to the interface you use.
Available Standard Interfaces
Function Interface Necessary Cable
Printer/Scanner
/Network FAX*
Printer USB interface USB2.0 compatible cable
* Function available when using optional fax kit. For details on
Network FAX, refer to the Fax System (V) Operation Guide.
Network interface LAN (10BASE-T or
100BASE-TX, 1000BASE-T
Shielded)
(Hi-Speed USB compliant,
Max. 5.0 m, Shielded)
2-4
Page 52

Connecting Cables
Make sure that lamps
other than this lamp
are off.
Connecting LAN Cable (Optional)
Preparation before Use
Follow the steps below to connect a LAN cable to the machine.
1 When the machine is powered up, first press the
Power key on the operation panel. Check that the
Power indicator, the processing indicator and the
memory indicator are off. After this, turn off the
main power switch.
2
2 Remove the covers from the machine in order from
the top.
2-5
Page 53

Preparation before Use
3 Connect the LAN cable to the network interface
connector located on left side of the body.
4 Insert the cord into the groove.
5 Attach the cove rs in orde r fro m the bot tom , taking
care not to pinch the cord.
6 Connect the other end of the cable to the hub.
7 Power on the machine, and configure the network.
For details, refer to Network Setup (LAN Cable
Connection) on page 2-15.
2-6
Page 54

Connecting USB Cable
Make sure that lamps
other than this lamp
are off.
Follow the steps below to connect a USB cable to the machine.
Preparation before Use
1 When the machine is powered up, first press the
Power key on the operation panel. Check that the
Power indicator, the processing indicator and the
memory indicator are off. After this, turn off the
main power switch.
2 Remove the covers from the machine in order from
the top.
2
2-7
Page 55

Preparation before Use
3 Connect the USB cable to the USB interface
connector (B1) located on the left side of the body.
4 Insert the cord into the groove.
5 Attach the cove rs in orde r fro m the bot tom , taking
care not to pinch the cord.
6 Connect the other end of the cable to the PC.
Connecting the Power Cable
Connect one end of the supplied power cable to the machine and the other end to a power outlet.
IMPORTANT: Only use the power cable that comes with the machine. 120 V specification model uses two
supplied power cables.
2-8
Page 56

Power On/Off
Power On
Preparation before Use
When the main power indicator is lit... (Recovery from sleep)
Press the Power key.
When the main power indicator is off...
Open the main power switch cover and turn the main
power switch on.
2
NOTE: If the optional Data Security Kit is installed, a message might display indicating the security function is
being activated and time may be taken to start up when the power is turned on .
IMPORTANT: When tur ning off the main power switch, do not turn on the main power switch again immediately.
Wait more than 5 seconds, and then turn on the main power switch.
2-9
Page 57

Preparation before Use
Make sure that lamps
other than this lamp
are off.
Power Off
Before turning off the main power switch, press the Power key on the operation panel to off. Make sure that the
Power key, the processing indicator and the memory indicator are off before turning off the main power switch.
If you will not switch of the main power switch, refer to Low Power Mode and Auto Low Power Mode on page 211,
and Sleep and Auto Sleep on page 2-12.
CAUTION: The hard disk may be operating when the Power key, the Processing indicator or Memory indicator
is lit or blinking. Turning off the main power switch while the hard disk is operating may cause damage.
In case of not using the machine for an extended period of time
CAUTION: If this machine will be left unused for an extended period (e.g. overnight), turn it off at the
main power switch. If the machine will not be used for an even longer period of time (e.g. vacation),
remove the power plug from the outlet as a safety precaution. If the optional Fax kit is installed, note that
turning the machine off at the main power switch disables fax transmission and reception.
CAUTION: Remove paper from the cassettes and seal it in the paper storage bag to protect it from humidity.
2-10
Page 58

Low Power Mode and Auto Low Power Mode
Low Power Mode
Preparation before Use
Auto Low Power Mode
To activate Low Power Mode, press the Energy Saver
key. Touch panel and all indicators on the operation
panel will go out to save power except the Energy
Saver, Power, and main power indicators. This status
is referred to as Low Power Mode.
If print data is received during Low Power Mode, the
machine automatically wakes up and starts printing.
Also when fax data arrives while the machine is in Low
Power Mode when using the optional fax, the machine
automatically wakes up and starts printing.
To resume, perform one of the following actions. The
machine will be ready within 30 seconds.
• Press any key on the operation panel.
• Open the document processor.
• Place originals in the document processor.
Note that ambient environmental conditions, such as
ventilation, may cause the machine to respond more
slowly.
2
Auto Low Power Mode automatically switches the machine into Low Power Mode if left idle for a preset time.
The default preset time is 2 minutes.
2-11
Page 59

Sleep and Auto Sleep
Sleep
Auto Sleep
Preparation before Use
To enter Sleep, press the Power key. Touch panel and
all indicators on the operation panel will go out to save
a maximum amount of power except the Main Power
indicator. This status is referred to as Sleep.
If print data is received during Sleep, the print job is
performed while the touch panel remains unlit.
When using the optional fax, received fax data is printed
out while the operation panel also remains unlit.
To resume, press the Power key. The machine will be
ready within 30 seconds.
Note that ambient environmental conditions, such as
ventilation, may cause the machine to respond more
slowly.
Auto Sleep automatically switches the machine into Sleep if left idle for a preset time in the Low Power Mode.
The default preset time is 60 minutes.
Adjusting the Operation Panel Angle
The angle of the operation panel can be adjusted as
shown at left.
2-12
Page 60

Switching the Language for Display [Language]
Common Settings - Language
Set the language to use for the touch panel display.
Status
Cancel OK
English Deutsch Français
Nederlands Ɋɭɫɫɤɢɣ Português
Español Italiano
10/10/2010 10:10
Select the language displayed on the touch panel.
Preparation before Use
Use the procedure below to select the language.
2
1 Press the System Menu key.
2 Press [Common Settings] and then [Change] of
Language.
3 Press the key for the language you want to use.
4 Press [OK].
The touch panel language will be changed.
2-13
Page 61

Preparation before Use
Date/Timer - Time Zone
Set time zone.
Select the location nearest you.
Time Zone
-12:00 International Date Line West
1/13
-11:00 Samoa
-10:00 Hawaii
-09:00 Alaska
-11:00 Universal Coordinated Time-11
-08:00 Baja California
Status
Cancel
OK
10/10/2010 10:10
Date/Timer - Date/Time
Set the date and time.
Off
DayMonthYear
SecondMinuteHour
2010
10 10 31
10 10
Status
Cancel
OK
10/10/2010 10:10
Setting Date and Time
Follow the steps below to set the local date and time at the place of installation.
When you send an E-mail using the transmission function, the date and time as set here will be printed in the
header of the E-mail message. Set the date, time and time difference from GMT of the region where the machine
is used.
NOTE: If user login administration is enabled, you can only change the settings by logging in with
administrator privileges. If user login administration is disabled, the user authentication screen appears. Enter
a login user name and password, and press [Login]. Refer to Adding a User (Local User List) on page 10-5 for
the default login user name and password.
Be sure to set the time difference before setting the date and time.
If you change Date/Time setting, trial functions will be unavailable. For details, refer to Optional Function on
page 9-107.
1 Press the System Menu key.
2 Press [ ], [Date/Timer] and then [Change] of
Time Zone.
3 Select the region.
NOTE: Press [ ] or [ ] to view the next region.
4 Press [Off] or [On] of Summer Time and press [OK].
NOTE: If you select a region that does not utilize
summer time, the summer time setting screen will not
appear.
5 Press [Change] of Date/Time.
6 Set the date and time. Press [+] or [–] in each
setting.
7 Press [OK].
2-14
Page 62

Preparation before Use
System - IPv4
Set TCP/IP (IPv4).
* The setting will be changed after restarting the device or network.
On
Default
Gateway
0.0.0.0
0.0.0.0
0.0.0.0
Off
IP Address
Subnet Mask
Off
BonjourDHCP
Status
Cancel
OK
On
Auto-IP
10/10/2010 10:10
Network Setup (LAN Cable Connection)
The machine is equipped with network interface, which is compatible with network protocols such as TCP/IP
(IPv4), TCP/IP (IPv6), IPX/SPX, NetBEUI, IPSec, and AppleTalk. It enables network printing on the Windows,
Macintosh, UNIX, NetWare and other platfor ms .
This section explains the TCP/IP (IPv4) Setup and AppleTalk Setup procedures. For other network settings,
refer to the Network on 9-90.
• TCP/IP (IPv4) Setup...2-15
• AppleTalk Setup...2-17
NOTE: If user login administration is enabled, you can only change the settings by logging in with
administrator privileges. If user login administration is disabled, the user authentication screen appears. Enter
a login user name and password, and press [Login]. Refer to Adding a User (Local User List) on page 10-5 for
the default login user name and password.
TCP/IP (IPv4) Setup (by Entering IP Addresses)
Set up TCP/IP (IPv4) to connect to the Windows network. Set the IP addresses, subnet masks, and gateway
addresses. The default settings are "TCP/IP Protocol: On, DHCP: On, Bonjour: Off, Auto-IP: On".
2
NOTE: Prior to the IP address entries, obtain permission from the network administrator.
Use the procedure below.
1 Press the System Menu key.
2 Press [System] , [Next] of Network and then [Next]
of TCP/IP Setting.
3 Press [Change] of TCP/IP.
4 Press [On] and then press [OK].
5 Press [Change] of IPv4.
6 Press [DHCP].
7 Press [Off] of DHCP and then press [OK].
8 Press [Bonjour].
9 Press [Off] of Bonjour and then press [OK].
10 Press [IP Address] and enter the address using the
numeric keys.
11 Press [Subnet Mask] and enter the address using
the numeric keys.
12 Press [Default Gateway] and enter the address
using the numeric keys.
2-15
Page 63

13 Check if all the address entries are correct and
press [OK].
14 After changing the setting, restart the network fr om
the system menu, or turn the machine OFF and
then ON.
For detailed information on restartin g the network,
refer to Restart Network on page 9-101.
DHCP Settings
Select whether or not to use the DHCP server. The default setting is On.
Use the procedure below.
1 Press the System Menu key.
2 Press [System] , [Next] of Network and then [Next]
of TCP/IP Setting.
3 Press [Change] of TCP/IP.
Preparation before Use
4 Press [On] and then press [OK].
5 Press [Change] of IPv4.
6 Press [DHCP].
7 Press [On] or [Off] of DHCP and then press [OK].
8 After changing the setting, restart the network from
the system menu, or turn the machine OFF and
then ON.
For detailed information on restartin g the network,
refer to Restart Network on page 9-101.
Bonjour Settings
Select whether or not to use Bonjour. The default setting is Off.
Refer to Bonjour Settings on page 9-91 about the procedures.
2-16
Page 64

Auto-IP Settings
Select whether or not to use Auto-IP. The default setting is On.
Use the procedure below.
1 Press the System Menu key.
2 Press [System] , [Next] of Network and then [Next]
of TCP/IP Setting.
3 Press [Change] of TCP/IP.
4 Press [On] and then press [OK].
5 Press [Change] of IPv4.
6 Press [Auto-IP].
7 Press [On] or [Off] of Auto-IP and then press [OK].
8 After changing the setting, restart the network from
the system menu, or turn the machine OFF and
then ON.
Preparation before Use
2
For detailed information on restartin g the network,
refer to Restart Network on page 9-101.
AppleTalk Setup
Select the Apple Talk network connection. The default setting is On.
Refer to AppleTalk on page 9-95 about the pr oce d ur es .
2-17
Page 65

Preparation before Use
Installing Software
Install appropriate software on your PC from the included Product Li brar y DVD (Pr oduct L ibr ar y) if you want to
use the printer function of this machine or perform TWAIN / WIA transmission or FAX transmission from your PC.
The following softwares are supported:
• KX driver
• KX (XPS) printer driver
• Mini printer driver (PCL/KPDL)
•TWAIN driver
•WIA driver
• Network FAX driver
• File Management Utility
• Network Tool for Direct Printing
• Network Print Monitor
•Font
NOTE: Installation on Windows must be done by a user logged on with administrator privileges.
The optional Fax Kit is required in order to make use of fax functionality.
The WIA driver cannot be installed on Windows XP.
If you are connecting this machine to a Windows PC, follow the next steps to install the software. The example
shows you how to connect your machine to a Windows 7 PC.
Installing Printer Driver in Windows
NOTE: If the Welcome to the Found New Hardware Wizard dialog box displays, select Cancel.
If the autorun screen is displayed, click Run Setup.exe.
If the user account management window appears, click Allow.
You can use either Express Mode or Custom Mode to install the software. Express Mode automatically detects
connected machines and installs the required software. Use Custom Mode if you want to specify the printer port
and select the software to be installed. For details, refer to Custom Installation in the Printer Driver User Guide
on the DVD.
1 Insert the DV D.
2-18
Page 66

Preparation before Use
2 Click View Licen se A greement and read the
License Agreement. Click Accept.
2
3 Click Install Software.
4 Click Express Mode.
5 Select the print system to be installed and click
Next.
NOTE: If the print system detection window appears
and the installer fails to detect the machine, verify that
it is connected to the computer via a network or USB
cable and that it is turned on and click Reload.
2-19
Page 67

Preparation before Use
6 Custo m ize th e pr int syste m name if the print
system is connected via a network and click Next.
7 Click Install.
NOTE: If the Windows security window appears, click
Install this driver software anyway.
This completes the printer driver installation procedure. Follow the on-screen instructions to restart the system,
if required.
The TWAIN driver and WIA driver can be installed if the machine and computer are connected via a network.
You can install the WIA driver using Custom Mode.
If you are installing the TWAIN driver or WIA driver, continue by configuring the Setting TWAIN Driver (page 2-
24) or Setting WIA Driver (page 2-25).
8 A message appears saying that the printer has
been installed successfully. Click Finish.
2-20
Page 68

Preparation before Use
Installing Printer Driver in Macintosh
The machine's printer functionality can be use d by a Macintosh computer.
The example shows you how to connect your machine to a Macintosh running MAC OS X v10.6.
NOTE: When printing from a Macintosh computer, set the machine’s emulation to [KPDL] or [KPDL(Auto)].
For details about the configuration method, refer to Printeron page 9-54.
If connecting by Bonjour, enable Bonjour in the machine's network settings. For details, refer to Bonjour
Settings on page 2-16.
In the Authenticate screen, enter the name and password used to log in to the operating system.
1 Insert the DVD.
Double-click the
OLI_LIB
OLI_LIB
2 Double-click either OS X 10.2 and 10.3 Only, OS X
10.4 Only or OS X 10.4 or higher depending on
your Mac OS version.
DVD icon.
2
OLI_LIB
This completes the printer driver installation.
3 Double-click OS X vx.x.
4 Install the printer driver as directed by the
instructions in the installation software.
2-21
Page 69

Preparation before Use
Next, specify the print settings. If an IP or AppleTalk connection is used, the settings below are required. If a
USB connection is used, the machine is automatically recognized and connected.
5 Open System Preferences and click Print & Fax.
6 Click the plu s sym bol ( +).
7 Click the IP icon for an IP connection or the
AppleTalk icon for an AppleTalk connection and
then enter the IP address and printer name. Click
Add.
NOTE: When using a Bonjour connection, select
[Default] and click the item that appears in "Printer
Name". The driver with the same name as the machine
automatically appears in "Driver".
2-22
Page 70

Preparation before Use
8 Select the options available for the machine and
click Continue
9 The selected machine is added.
2
2-23
Page 71

Setting TWAIN Driver
Register this machine to the TWAIN Driver.
Preparation before Use
1 Select the Start Button of the Windows display, All
Programs, Olivetti and then TWAIN Driver
Setting. TWAIN Driver screen appears.
2 Click Add .
3 Enter the machine name in the Name field.
4 Select this machine from the list. To scan in a
document stored in a custom box, select a model
name with (Box).
5 Enter the machine's IP address or host name in the
Scanner Address.
NOTE: When the machine’s IP address is unknown,
contact the Administrator.
6 When using SSL, select the checkbox beside SSL.
7 When user login administration is enabled, select
the checkbox beside Authentication, and enter a
Login User Name (up to 64 characters) and
Password (up to 64 characters).
To use job accounting, select the checkbox of the
account, enter an Account ID (maximum of 8
digits), and click OK.
8 Click OK.
9 Click Close .
NOTE: Click Delete to delete the added machine.
Click Edit to change names.
2-24
Page 72

Setting WIA Driver
Register this machine to the WIA Driver.
Preparation before Use
The following explanation assumes that Windows 7 is being used.
1 Click the Windows Start button and enter Scanner
in Program and File Search. Click Show
scanners and cameras in the search list. The
Scanners and Cameras screen appears.
2 Select the same name as this machine from WIA
Drivers, and click Properties.
3 Enter the machine name or the host name.
4 When using SSL, select the checkbox beside SSL.
5 When user login administration is enabled, select
the checkbox beside Authentication, and enter a
Login User Name (up to 64 characters) and
Password (up to 64 characters).
2
When job accounting is enabled, select the
checkbox beside Account ID, and enter the
account ID with as many as eight digits.
6 Click OK.
2-25
Page 73

Preparation before Use
Embedded Web Server RX (Settings for E-mail)
Embedded Web Server RX is a tool used for tasks such as verifying the operating status of the machine and
changing the settings for security, network printing, E-mail transmission and advanced networking.
NOTE: Here, information on the FAX settings has been omitted. For more information on using the FAX, refer
to the Fax System (V) Operation Guide.
The optional Fax Kit is required in order to make use of fax functionality.
To change settings in Embedded Web Server RX, you must log in as an administrator of the machine.
The default factory settings are set as shown below.
Login User Name: Admin
Login Password: Admin
The procedure for accessing Embedded Web Server RX is explained below.
1 Launch your Web browser.
2 In the Address or Location bar, enter the machine’s IP address.
e.g.) http://10.183.51.41/
The web page displays basic information about the machine and Embedded Web Server RX as well
as their current status.
Embedded W eb Server RX
3 Select a category from the navigation bar on the left of the screen. The values for each category must be
set separately.
If restrictions have been set for Embedded Web Server RX, enter the correct user name and password
to access pages other than the startup page.
For details, refer to the Embedded Web Server RX Operation Guide.
2-26
Page 74

Preparation before Use
E-mail Setting
Specifying the SMTP settings allows you to send images scanned with this machine as E-mail attachments.
To use this function, this machine must be connected to a mail server using the SMTP protocol.
Before sending images scanned with this machine as E-mail attachments, check the following:
• The network environment used to connect this machine to the mail server
A full-time connection via a LAN is recommended.
• SMTP Settings
Use Embedded Web Server RX to register the IP address or host name of the SMTP server.
• If limits have been set on the size of E-mail messages, it may not be possible to send very large E-mails.
The procedure for specifying the SMTP settings is explained below.
1 Click Settings -> Advanced -> SMTP -> General.
Embedded W eb Server RX
2
2-27
Page 75

Preparation before Use
2 Enter the correct settings in each field.
The settings to be specified in the SMTP settings screen are shown below.
Item Description
SMTP Protocol Enables or disa bles SMTP protocol. To use E-mail, this protocol must be
enabled.
SMTP Port Number Set the SMTP Port Number or use the SMTP default port 25.
SMTP Server Name Enter the SMTP server IP address or its name. The maximum length of the
SMTP server name and IP address is 64 characters. If entering the name, a DNS
server address must also be configured. The DNS server address may be
entered on the TCP/IP General tab.
SMTP Server Timeout Set the amount of time to wait before time-out in seconds.
Authentication
Protocol
Authenticate as Authentication can be set from three POP3 accounts or you can choose a
Login User Name When Other is selected for Authenticate, the login user name set here will be
Login Password When Other is selected for Authenticate, the password set here will be used for
SMTP Security Enables or disables the SMTP Security. When this protocol is enabled, either
POP before SMTP
Timeout
Test This will test if the SMTP connection can be successfully established.
E-mail Size Limit Enter the maximum size of E-mail that can be sent in kilobytes. When the value is
Sender Address Enter the E-mail address of the person responsible for the machine, such as the
Enables or disables the SMTP authentication protocol or sets POP before SMTP
as the protocol. The SMTP authentication supports Microsoft Exchange 2000.
different account.
used for SMTP authentication. The maximum length of the login user name is
64 characters.
authentication. The maximum length of the login password is 64 characters.
SSL/TLS or STARTTLS must be selected. To enable SMTP security, the SMTP
port may have to be changed according to the server settings. Typically, 465 for
SSL/TLS and 25 or 587 for STARTTLS are well-known SMTP ports.
Set the amount of time to wait before time-out in seconds when you have
selected POP before SMTP as the Authentication Protocol.
0, the limitation for E-mail size is disabled.
machine administrator, so that a reply or non-delivery report will go to a person
rather than to the machine. The sender address must be entered correctly for
SMTP authentication. The maximum length of the sender address is
128 characters.
Signature Enter the signature. The signature is free form text that will appear at the end of
the E-mail body. It is often used for further identification of the mach in e. The
maximum length of the signature is 512 characters.
Domain Restriction Enter the domain names that can be permitted or rejected. The maximum length
of the domain name is 32 characters. You can also specify E-mail addresses.
3 Click Submit.
2-28
Page 76

Preparation before Use
Loading Paper
Paper can be loaded in the four standa rd cassette s and the multi pur pose tray. Side feeder s are also available
as an option (refer to Optional Equipment on Appendix-2).
For the paper feed methods for each cassette, refer to the page below.
Cassette Name Page
2
Standard Cassette 1,
Cassette 2
Cassette 3,
Cassette 4
Multi Purpose Tray Multi Purpose Tray 2-38
Option Cassette 5 Side Feeder (3,000-sheet) 2-37
Cassette 6
Cassette 7
* The paper feed method is the same as standard cassettes 1 and 2.
** The paper feed method is the sa me as standard cassettes 3 and 4.
IMPORTANT:
• The number of sheets that can be held varies depending on your environment.
• You should not use inkjet printer paper or any paper with a special surface coating. (Such paper may cause
paper jams or other faults.)
Standard cassettes1 and 2 2-31
Standard cassettes3 and 4 2-34
Side Feeder (500-sheet x 3)* 2-31
Large Capacity Side Feeder
(500*, 1,500-sheet x 2**)
Side Feeder (500-sheet x 3)* 2-31
Large Capacity Side Feeder
(500*, 1,500-sheet x 2**)
2-31
2-34
2-29
Page 77

Preparation before Use
Before Loading Paper
When you open a new package of paper, fan the sheets
to separate them slightly prior to loading in the following
steps.
1 Bend the whole set of sheets to swell them in the
middle.
2 Hold the stack at both ends and stretch it while
keeping the entire stack risen.
3 Raise the right and left hands alternately to create
a gap and feed air between the paper.
4 Finally, align the paper on a level, flat table.
If the paper is curled or folded, straighten it before
loading. Paper that is curled or folded may cause a
jam.
CAUTION: If you copy onto used paper (paper already used for copying), do not use paper that is stapled or
clipped together. This may damage the machin e or caus e po or ima ge quality .
Avoid exposing opened paper to high temperatures and hi gh humidity as dampness can be a cause of problems.
Seal any remaining paper after loading in the multi purpose tray or cassettes back in the paper storage bag.
If the machine will not be used for a prolonged period, protect all paper from humidity by removing it from the
cassettes and sealing it in the paper storage bag.
NOTE: Note that some paper types have a tendency to curl and may jam in the paper eject unit.
If the output paper scatters or stacks unevenly, turn the paper over in the cassette, or change the orientation
(vertical/horizontal) of the paper in the cassette.
If you use special paper such as letterhead, paper with holes or paper with pre-prints like logo or company
name, refer to the Paper on Appendix-11.
2-30
Page 78

Loading Paper in the Cassettes
The standard cassett e 1 and 2
Preparation before Use
The standard cassette 1 and 2 will each hold plain paper, recycled paper or color paper.
2
Cassette 1 and 2 hold up to 500 sheets of plain paper (80 g/m
The following paper sizes are supported: A3 , B4, A4, A4-R, B5, B5-R, A5-R, Le dger, Legal, Oficio II, 12 × 18",
Letter, Letter-R, Statement-R, Folio, 8K, 16K, 16K-R and 216 × 340 mm.
IMPORTANT:
• When using media types other than plain paper (such as recycled or colored paper), always specify the
media type and paper weight settings. ( Refer to Specifying Paper Size and Me dia Type for the Cassettes on
page 2-42, Media Type Setting on page 9-8.)
The cassettes can hold paper with weights up to 256 g/m
and 256 g/m
• Do not load thick paper that is heavier than 256 g/m
that is heavier than 256 g/m
• If you wish to use 330 × 210 mm to 356 × 220 mm paper, contact a service technician.
2
, set the media type to Thick and set the weight of the paper you are using.
2
2
.
in the cassettes. Use the multi purpose tray for paper
) (or up to 550 sheets of 64 g/m2 plain paper).
2
. If you are using a paper weight between 106
1 Pull the cassette out toward you until it stops.
NOTE: Do not pull out more than one cassette at a
time.
2
2 Squeeze the ends of the bottom of the paper length
guide and move the guide to fit the length of the
paper.
NOTE: Paper sizes are marked on the cassette.
2-31
Page 79

Preparation before Use
3 Press the (Paper Width Guide) Lock to release the
lock. Grasp the paper width adjusting t ab and move
the paper width guides to fit the p aper.
4 Align the paper flush against the right side of the
cassette.
After removing new paper from its packaging, fan
the paper before loading it in the cassette.
(Refer to Before Loading Paper on page 2-30)
Be sure that the paper length and width guides rest
securely against the paper. If there is a gap,
readjust the guides to fit the paper.
IMPORTANT:
• Before loading the paper, be sure that it is not
curled or folded. Paper that is curled or folded may
cause paper jams.
• Ensure that the loaded paper does not exceed the
level indicator (see illustration on the left).
• When loading the paper, keep the side that was
closest to the package seal facing up.
• The paper length and width guides must be
adjusted to the paper size. Loading the paper
without adjusting these guides may cause skewe d
feeding and paper jams.
2-32
Page 80

Preparation before Use
5 Press the (Paper Width Guide) Lock to lock.
6 Insert the indication on the sheet so as to match the
size and type of paper to be placed. (The indication
is printed on both sides of the sheet.)
NOTE: Fold the sheet in half and use with the sid e you
want to display as the front side.
2
7 Gently push the cassette back in.
NOTE: If the machine will not be used for a prolonged
period, protect all paper from humidity by removing it
from the cassettes and sealing it in the paper storage
bag.
8 Select the media type (plain, recycled, etc.) loaded
in the cassette. (Refer to Specifying Paper Size
and Media Type for the Cassettes on page 2-42.)
2-33
Page 81

Preparation before Use
The standard cassett e 3 and 4
The standard cassette 3 and 4 will each hold plain paper, recycled paper or color paper.
The standard cassette 3 and 4 hold up to 3,000 sheets ( 1,500-sheet x 2) of plain paper (80 g/m
2
sheets (1,750-sheet x 2) of 64 g/m
plain paper).
2
) (or up to 3,500
The following paper sizes are supported: A4, B5, Letter.
IMPORTANT:
• When using media types other than plain paper (such as recycled or colored paper), always specify the
media type and paper weight settings. ( Refer to Specifying Paper Size and Me dia Type for the Cassettes on
page 2-42,Media Type Setting on page 9-8.)
2
The cassettes can hold paper with weights up to 256 g/m
2
and 256 g/m
, set the media type to Thick and set the weight of the paper you are using.
• Do not load thick paper that is heavier than 256 g/m
2
that is heavier than 256 g/m
.
. If you are using a paper weight between 106
2
in the cassettes. Use the multi purpose tray for paper
1 Pull the cassette out toward you until it stops.
Clamp
2 Rotate the Paper Size Guide (A) clamp and
remove. Pull the Paper Size Guide (A) up and out.
Paper Size Guide (A)
3 Insert the Paper Size Guide (A) into the slot
(bottom of cassette) for the paper size to be used.
Make sure that the top of the paper size guide (A)
matches the paper size to be used, attach the
clamp, and rotate the clamp to lock it.
Gently try moving the Paper Size Guide (A) to
verify that it is fixed.
2-34
Page 82

Paper Size Guide (B)
Preparation before Use
4 With the bottom of the cassette pressed all the way
down, press the hook on the side of the Paper Size
Guide (B) to release it and pull out the Paper Size
Guide (B).
2
5 Adjust the Paper Size Guide (B) to the paper size.
A4
Insert the Paper Size Guide (B) into the slot marked
A4 (on the bottom of the cassette), and lock the
hook (it will make a "click" sound).
Gently try moving the Paper Size Guide (B) to
verify that it is fixed.
B5
Open the Paper Size Guide (B) as shown, insert
into the slot marked B5 (on the bottom of the
cassette), and lock the hook (it will make a "click"
sound).
Gently try moving the Paper Size Guide (B) to
verify that it is fixed.
Letter
The Paper Size Guide (B) is not attached.
2-35
Page 83

Preparation before Use
6 Insert the paper into the cassette.
After removing new paper from its packaging, fan
the paper before loading it in the cassette.
(Refer to Before Loading Paper on page 2-30)
IMPORTANT:
• Before loading the paper, be sure that it is not
curled or folded. Paper that is curled or folded may
cause paper jams.
• Ensure that the loaded paper does not exceed the
level indicator (see illustration below).
• When loading the paper, keep the print side facing
up.
7 Insert the indication on the sheet so as to match the
size and type of paper to be placed. (The indication
is printed on both sides of the sheet.)
NOTE: Fold the sheet in half and use with the sid e you
want to display as the front side.
8 Gently push the cassette back in.
NOTE: If the machine will not be used for a prolonged
period, protect all paper from humidity by removing it
from the cassettes and sealing it in the paper storage
bag.
9 Select the media type (plain, recycled, etc.) loaded
in the cassette. (Refer to Specifying Paper Size
and Media Type for the Cassettes on page 2-42.)
2-36
Page 84

Side Feeder (3,000-sheet) (Option)
The optional side feeder hold up to 3,000 sheets of plain paper (80 g/m
supported: A4, B5, Letter.
Pull the cassette out toward you until it stops and insert
the paper into the cassette. After loading paper, gently
push the cassette back in.
NOTE: The default paper size setting is A4. If you
need the paper size changed to B5 or Letter, contact
your service representative.
IMPORTANT:
• Before loading the paper, be sure that it is not
curled or folded. Paper that is curled or folded may
cause paper jams.
• Ensure that the loaded paper does not exceed the
level indicator (see illustration below).
• When loading the paper, keep the print side facing up.
Preparation before Use
2
). The following paper sizes are
2
2-37
Page 85

Loading Paper in the Multi Purpose Tray
Preparation before Use
The multi purpose tray will hold up to 150sheets of A4 or smaller plain paper (80 g/m2) (or up to 165 sheets of
64 g/m
2
plain paper) or up to 50 sheets o f plain paper (80 g/m2) (or up to 55 sheets of 64 g/m2 plain paper) lager
than A4.
The multi purpose tray accepts paper sizes 12×18" and from A3 to A6-R and Hagaki and from Ledger to
Statement-R, 8K, 16K and 16K-R. Be sure to use the multi purpose tray when you print on any special paper.
IMPORTANT: When using media types other than plain paper (such as recycled or colored paper), always
specify the media type and paper weight settings. (Refer to Specifying Paper Size and Media Type for the Multi
Purpose Tray (MP Tray Setting) on page 2-44, Media T y pe Setting on page 9-8.) If you are using a paper weight
of 106 g/m2 or more, set the media type to Thick and set the weight of the paper you are using.
The capacity of the multi purpose tray is as follows.
• A4 or smaller plain paper (80 g/m
(64 g/m
2
plain paper :165 sheets)
• B4 or larger plain paper (80 g/m
2
(64 g/m
plain paper :55 sheets)
2
), recycled paper or color paper: 150 sheets
2
), recycled paper or color paper: 50 sheets
• Hagaki: 30 sheets
• OHP film: 10 sheets
• Envelope DL, Envelope C4, Envelope C5, Envelope #10 (Commercial #10), Envelope #9 (Commercial #9),
Envelope #6 (Commercial #6), Monarch, Youkei 4, Youkei 2: 10 sheets
• Long documents: 470.1 mm (18.51") to a maximum of 1220.0 mm (48"): 1 sheet
NOTE: When you load custom size paper, enter the paper size by referring to Specifying Paper Size and
Media Type for the Multi Purpose Tray (MP Tray Setting) on page 2-44.
When you use special paper such as transparencies or thick paper, select the media type by referring to
Specifying Paper Size and Media Type for the Multi Purpose Tray (MP Tray Setting) on page 2-44.
1 Open the Multi Purpose tray until it stops.
2 When loading paper sizes 12×18" and from A3 to
B4 and Ledger to Legal, extend the support tray
section of the multi purpose tray until the mark "
is fully appeared.
∆"
2-38
Page 86

Preparation before Use
3 Adjust the paper width guides to the width of the
paper.
After removing new paper from its packaging, fan
the paper before loading it in the multi-purpose tray .
(Refer to Before Loading Paper on page 2-30)
4 Insert the paper along the paper width guides into
the tray until it stops.
IMPORTANT: Keep the print side facing up.
Curled paper must be uncurled before use.
Straighten the top edge if it is curled.
When loading paper into the multi purpose tray, check
that there is no paper left over in the tray from a previous
job before loading the paper. If there is just a small
amount of paper left over in the multi purpose tray and
you want to add more, first remove the left-over paper
from the tray and include it with the new paper before
loading the paper back into the tray.
If there is a gap between the paper and the paper width
guides, readjust the guides to fit the paper in order to
prevent skewed feeding and paper jams.
2
IMPORTANT: Ensure that the loaded paper does not
exceed the level indicator (see illustration).
2-39
Page 87

Loading Envelopes
Up to 10 envelopes may be loaded in the multi purpose tray.
Acceptable envelope sizes are as follows.
Acceptable Envelope Size
Monarch 3 7/8"×7 1/2"
Envelope #10 (Commercial #10) 4 1/8"×9 1/2"
Envelope #9 (Commercial #9) 3 7/8"×8 7/8"
Envelope #6 (Commercial #6) 3 5/8"×6 1/2"
Envelope DL 110×220 (mm)
Envelope C4 229×324 (mm)
Envelope C5 162×229 (mm)
Youkei 2 162×114 (mm)
Preparation before Use
Youkei 4 235×105 (mm)
1 Open the multi purpose tray.
2 Adjust the paper width guides to the width of the
envelope.
2-40
Page 88

3 Insert along the paper width guide all the way in as shown.
When you load envelopes or
cardstock in the multi purpose tray
Load envelopes with the print side facing down.
e.g.) When printing the address.
Open the flap.
Landscape
form
envelopes
Portrait
form
envelopes
Cardstock
(Hagaki)
Return
postcard
(Oufuku
hagaki)
IMPORTANT: Use unfolded return postcard (Oufuku hagaki).
Close
the flap.
Preparation before Use
2
IMPORTANT: How to load envelopes (orientation and facing) will differ depending on the type of envelope. Be
sure to load it in correctly, otherwise printing may be done in the wrong direction or on the wrong face.
NOTE: When you load envelopes in the multi purpose tray , select the envelope type by referring to Specifying
Paper Size and Media Type for the Multi Purpose Tray (MP Tray Setting) on page 2-44.
2-41
Page 89

Preparation before Use
Specifying Paper Size and Media (Cassette Setting)
The default paper size setting for cassettes 1 to 4, for the multi purpose tray and for the optional side feeder
(cassettes 5 to 7) is [Auto], and the default media type setting is [Plain].
To fix the type of paper to be used in cassettes, specify the paper size and media type setting. (Refer to
Specifying Paper Size and Media Type for the Cassettes on page 2-42.)
To fix the type of paper to be used in multi purpose tray, specify the paper size setting. (Refer to Specifying
Paper Size and Media Type for the Multi Purpose Tray (MP Tray Setting) on page 2-44.)
Specifying Paper Size and Media Type for the Cassettes
To fix the type of paper to be used in ca ssettes 1 to 4 or the optional side feeder s (cassettes 5 to 7) , specify the
paper size. Also, if you use a media type other than plain paper, specify the media type setting.
Selection Item Selectable Size/Type
Paper
Size
Auto Paper size is automatically detected and selected. Select whether the
paper is in Metric size or in Inch size.
Standard
Sizes 1*
Select from the standard sizes. Selectable paper sizes are as follows.
Inch models: Ledger, Legal, Letter, Letter-R, St atement-R, 12×18",
Oficio II
Metric models: A3, B4, A4, A4-R, B5, B5-R, A5-R, Folio, 216×340 mm
Standard
Sizes 2*
Select from the standard sizes not included in Standard Sizes 1.
Selectable paper sizes are as follows.
Inch models: A3, B4, A4, A4-R, A5-R, B5, B5-R, Folio, 8K, 16K, 16K-R
Metric models: Ledger, Legal, Letter, Letter-R, Statement-R, 12×18",
Oficio II, 8K, 16K, 16K-R
2
Media Typ e Plain (105 g/m
Recycled, Preprinted***, Bond**, Color**, Prepunched***, Letterhead***,
Thick (106 g/m
* Only A4, Letter, and B5 can be specified in cassettes 6 and 7 when cassettes 3 and 4 and the
optional Large Capacity Side Feeder (500, 1,500-sheet x 2) are used.
** To change to a media type other than Plain, refer to Media Type Setting on page 9-8. When
the paper weight settings shown below are selected, the media indicated for each setting
cannot be selected.
• Rough: Heavy 5 • Vellum: Heavy 5
• Preprinted: Heavy 5 • Color: Heavy 5
• Letterhead: Heavy 5• Thick: Heavy 5
• Custom 1 to 8: Heavy 5, or Extra Heavy
*** To print on preprinted or prepunched paper or on letterhead, refer to Special Paper Action on
page 9-11.
or less), Rough, Vellum** (60 to 105 g/m2 or less),
2
and more)**, High Quality and Custom 1~8**
NOTE: If the optional FAX kit is installed, the available media types for printing received faxes are as shown
below.
Plain, Recycled, Bond, Vellum, Color, Thick, High Quality, Rough and Custom 1 to 8
2-42
Page 90

Preparation before Use
Common Settings - Paper Size
Set cassette paper size.
Standard
Sizes 1
Auto
Status
A3 A4
Standard
Sizes 2
A4 A5
B4 B5 B5
Cancel OK
216x340mm
10/10/2010 10:10
Common Settings - Media Type
Select type of paper in Cassette 1.
VellumPlain
PreprintedRecycled Bond
LetterheadPrepunched
Color
Custom 2Custom 1
High Quality
Custom 3 Custom 4
Custom 7Custom 6
Custom 5
Custom 8
Status
Cancel OK
Thick
Rough
10/10/2010 10:10
1 Press the System Menu key.
2 Press [Common Settings], [Next] of Original /
Paper Settings, [Next] of Cassette Setting.
3 Cassette Setting, select one of [Cassette 1] to
[Cassette 7] and press [Next].
Then press [Change] of Paper Size.
NOTE: [Cassette 5] to [Cassette 7] are shown when
the optional side feeder is installed.
4 For automatic detection of the paper size, press
[Auto] and select [Metric] or [Inch] as the unit.
2
To select the paper size, press [Standard Sizes 1]
or [Standard Sizes 2] and select the paper size.
5 Press [OK]. The previous screen reappears.
6 Press [Change] of Media Type and select the
media type. Then press [OK].
2-43
Page 91

Preparation before Use
Specifying Paper Size and Media Type for the Multi Purpose Tray (MP Tray Setting)
To fix the type of paper to be used in the multi purpose tray, specify the paper size.When using other than a
plain paper, specify the media type.
Item Description
Paper
Size
Auto Paper size is automatically detected and selected. Select whether the
paper is in Metric size or in Inch size.
Standard
Sizes 1
Select from the standard sizes. Selectable paper sizes are as follows.
Inch models: Ledger, Legal, Letter, Letter-R, Statement-R, 12×18",
Oficio II, Executive
Metric models: A3, B4, A4, A4-R, B5, B5-R, A5-R, B6-R, A6-R, Folio,
216×340 mm
Standard
Sizes 2
Select from the standard sizes not included in Standard Sizes 1.
Selectable paper sizes are as follows.
Inch models: A3, B4, A4, A4-R, B5, B5-R, A5-R, B6-R, A6-R, Folio, 8K,
16K, 16K-R
Metric models: Ledger, Legal, Letter, Letter-R, Statement-R, 12×18",
Oficio II, Executive, 8K, 16K, 16K-R
Others Select from special standard sizes and custom sizes.
Selectable paper sizes are as follows.
ISO B5, Envelope #10 (Commercial #10), Envelope #9 (Commercial #9),
Envelope #6 (Commercial #6 3/4), Envelope Monarch, Envelope DL,
Envelope C5, Envelope C4, Hagaki, Oufuku hagaki, Youkei 4, Youkei 2
Size
Entry
Enter the size not included in the standard size.
Selectable paper sizes are as follows.
Inch size
X (Horizontal): 5.83~17.00" (in 0.01" increments),
Y (Vertical): 3.86~11.69" (in 0.01" increments)
Metric size
X (Horizontal): 148~432 mm (in 1mm increments),
Y (Vertical): 98~297 mm (in 1mm increments)
Media Type Selectable media types are as follows.
Plain (105g /m
Vellum (60 to 105 g/m
Cardstock, Color , Prepunched**, Letterhead**, Envelo pe, Thick (106 g/m
2
or less), Rough, Transparency,
2
or less), Labels, Recycled, Preprinted**, Bond,
2
and more), Coated, High Quality and Custom 1~8
* To change to a media type other than Plain, refer to Media Type Setting on page 9-8.
** To print on preprinted or prepunched paper or on letterhead, refer to Special Paper Action on
page 9- 11.
NOTE: If the optional FAX kit is installed and the multi purpose tray is used to print a received FAX, the
available media types are as shown below.
Plain, Labels, Recycled, Bond, Vellum, Color, Coated, Cardstock, Envelope, Thick, High Quality, Rough and
Custom 1 to 8
2-44
Page 92

Preparation before Use
Common Settings - Paper Size
Set the multi-purpose tray paper size.
Standard
Sizes 1
Auto
Standard
Sizes 2
Others
Size Entry
A3 A4 A4 A5
A6 B4 B5 B5
Status
Cancel OK
B6 216x340mm
10/10/2010 10:10
Common Settings - Paper Size
Set the multi-purpose tray paper size.
Standard
Sizes 1
X(148 - 432)
297
Auto
Status
# Keys
Y(98 - 297)
210
# Keys
Standard
Sizes 2
Others
Size Entry
Cancel OK
mm
mm
10/10/2010 10:10
Common Settings - Media Type
Select type of paper in Multi-Purpose Tray.
VellumPlain
PreprintedRecycled Bond
LetterheadPrepunched
Color
Custom 2Custom 1
Coated
Custom 3 Custom 4
Custom 7Custom 6Custom 5 Custom 8
Transparency Labels
Cardstock
ThickEnvelope
Status
Cancel OK
High Quality
Rough
10/10/2010 10:10
1 Press the System Menu key.
2 Press [Common Settings], [Next] of Original /
Paper Settings, [Next] of MP T ray Setting, and then
[Change] of Paper Size.
3 For automatic detection of the paper size, press
[Auto] and select [Metric] or [Inch] as the unit.
To select the paper size, press any of [Standard
Sizes 1], [Standard Sizes 2], [Others] or [Size
Entry] and select the paper size.
2
If you have chosen [Size Entry], press [+] or [–] to
enter X (horizontal) and Y (vertical) sizes. You may
enter the size directly using the numeric keys by
pressing [# Keys].
4 Press [OK]. The previous screen reappears.
5 Press [Change] of Media Type and select the
media type. Then press [OK].
2-45
Page 93

Loading Originals
Follow the steps below to load originals for copying, sending or storing.
Placing Originals on the Platen
You may place books or magazines on the platen in addition to ordinary sheet originals.
1 Open the document processor.
NOTE: Before opening the document processor, be
sure that there are no originals left on the original ta ble
or on the original eject table. Originals left on the
original table or on the original eject table may fall off
when the document processor is opened.
When placing books or magazines on the machine, do
so with the document processor in the open position.
Shadows may be produced around the edges and in the
middle of open-faced originals.
Preparation before Use
2 Place the original. Put the scanning side facedown
and align it flush against the original size indicator
plates with the back left corner as the reference
point.
NOTE:
When placing originals on the platen on page 4-9.
For details on Original Orientation, refer to
2-46
Page 94

Preparation before Use
Original size indicato r pl at es
(Inch models)
(Metric models)
2
3 Close the document processor.
CAUTION: Do not leave the document processor open
as there is a danger of personal injury.
2-47
Page 95

Preparation before Use
(1)
(2)
(3)
(4)
(7)
(5)
(6)
Loading Originals in the Document Processor
The document processor automatically scans each sheet of multiple originals. Both sides of two-sided originals
are scanned.
Part Names of the Document Processor
(1) Original placement indicator
(2) Top cover
(3) Original width guides
(4) Original table
(5) Original eject table
(6) Original stopper
(7) Opening handle
Originals Supported by the Document Processor
The document processor supports the following types of originals.
Document Processor
2
Weight 35 to 220 g/m
(duplex: 50 to 220 g/m2)
Size Maximum A3 to Minimum A5
Maximum Ledger to Minimum Statement-R
2
Capacity Plain paper (80 g/m
Quality: 270 sheets (Mixed size originals: 30 sheets)
Thick paper (157 g/m
Thick paper (120 g/m
), Colored paper, Recycled paper, High
2
): 89 sheets
2
): 116 sheets
Art paper: 1 sheet
Originals Not Supported by the Document Processor
Do not use the document processor for the following types of originals.
• Soft originals such as vinyl sheets
• Transparencies such as OHP film
• Carbon paper
• Originals with very slippe ry surf aces
• Originals with adhesive tape or glue
• Wet originals
• Originals with correction fluid which is not dried
• Irregularly shaped (non-rectangular) originals
• Originals with cut-out sections
• Crumpled paper
• Originals with folds (Straighten the folds before loading. Failure to do so may cause the originals to jam).
• Originals bound with clips or staples (Remove the clips or staples and straighten curls, wrinkles or creases
before loading. Failure to do so may cause the originals to jam).
2-48
Page 96

Preparation before Use
How to Load Originals
IMPORTANT: Before loading originals, be sure that there are no originals left on the original eject table.
Originals left on the original eject table may cause the new originals to jam.
1 Adjust the original width guides.
2 Place the originals. Put the side to be scanned (or
the first side of two-sided originals) face-up. Slide
the leading edge into the document processor as
far as it will go. The original placement indicator will
be lit.
2
NOTE: For details on Original Orientation, refer to
When placing originals on the document processor on
page 4-9.
IMPORTANT: Confirm that the original width guides
exactly fit the originals. If there is a gap, readjust the
original width guides. The gap may cause the originals
to jam.
Ensure that loaded originals do not exceed the
level indicator. Exceeding the maximum level may
cause the originals to jam (see the figure).
Originals with punched holes or perforated lines
should be placed in such a way that the holes or
perforations will be scanned last (not first).
2-49
Page 97

Original placement indicator
Preparation before Use
The original placement indicator is lit or unlit depend ing
on how originals are placed.
Indications and their status are as follows.
• Green lit: Original is placed properly.
• Green blinking: Original is not placed properly.
Remove and place again.
2-50
Page 98

3 Basic Operation
This chapter explains the following operations.
• Login/Logout.......................................................................................3-2
• Enter key and Quick No. Search key..................................................3-4
• Touch Panel Display ...........................................................................3-5
• Original Preview..................................................................................3-6
• Copying...............................................................................................3-7
• Sending.............................................................................................3-22
• Confirmation Screen of Destinations................................................3-28
• Preparation for sending a document to a PC....................................3-29
• Specifying Destination ......................................................................3-39
• Using the Document Box..................................................................3-42
• Canceling Jobs.................................................................................3-51
• Quick Setup Screen..........................................................................3-52
• Program............................................................................................3-55
• Registering Shortcuts (Copy, Send, and Document Box Settings)...3-57
• Using the Internet Browser...............................................................3-58
• Using Weekly Timer..........................................................................3-60
• Checking Counter.............................................................................3-61
• Help Screen......................................................................................3-61
3-1
Page 99

Basic Operation
Login
User Name
Login
Status
Enter login user name and password.
Login
Password
abcdef
********
Login to:
Local
# Keys
ID Card
Login
CancelCheck Counter
# Keys
10/10/2010 10:10
Login/Logout
If user login administration is enabled, it is necessary to enter the login user name and password to use the
machine.
NOTE: You will be unable to login if you forget your login user name or login password. In this event, login with
administrator privileges and change you r log in user nam e or log in password .
If the guest authentication setting is enabled, the Authentication/Logout key must be pressed when logging in.
For details, refer to the Guest Authorization Set. on page 10-12.
Login
1 If the screen shown appears during operations,
press [Login User Name].
Press [# Keys] to enter the login data using the
numeric keys.
2 Enter the login user name and press [OK].
NOTE: Refer to the Character Entry Method on
Appendix-8 for details on entering characters.
3 Press [Login Password].
Press [# Keys] to enter the login data using the
numeric keys.
4 Enter the password and press [OK].
5 Check the login user name and password are
correct, and press [Login].
NOTE: If Network Authentication is selected as the
user authentication method, either Local or Network
can be selected as the authentication type.
3-2
Page 100

Simple Login
Status 10/10/2010 10:10
Select the user to login.
01
No.
Keyboard
Login
A
02
B
03
C
1/2
Logout
Basic Operation
If this screen is displayed during operations, select a
user and log in.
NOTE: If a login password is required, an input screen
will be displayed.
For details, refer to the Simple Login on page 10-17.
To logout from the machine, press the Authentication/
Logout key to return to the login user name/login
password entry screen.
3
Users are automatically logged out in the following circumstances:
• When the machine is put to Sleep by pressing the Power key.
• When the Auto Sleep function is activated.
• When the auto panel reset function is activated.
• When Auto Low Power Mode is activated.
• When the machine is placed in Low Power Mode by pressing the Energy Saver key.
3-3
 Loading...