

Page 1
Quick Start:
Part 1
OKIPAGE
Components
®
24 Series
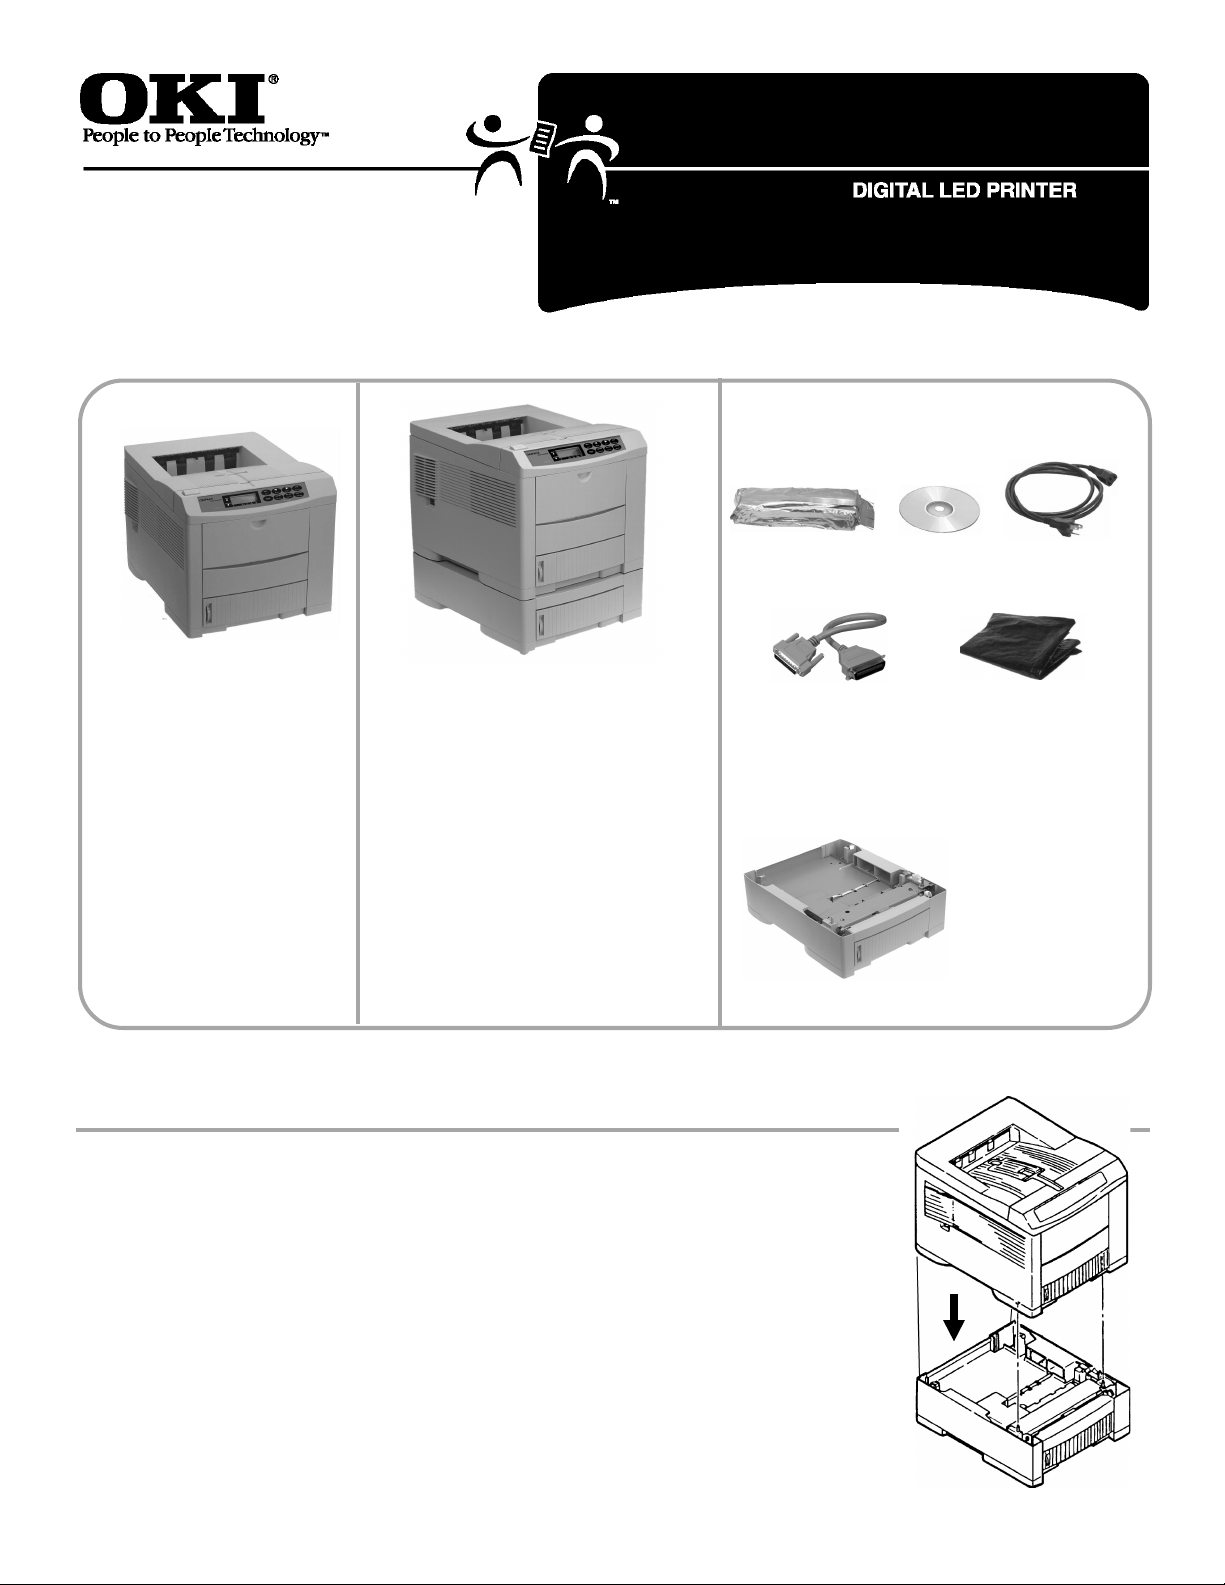
OKIPAGE 24
• Basic model
• 16 MB memory
OKIPAGE 24DX
• Built-in Duplexer
• 16 MB memory
OKIPAGE 24n
• Built-in 10/100 Base-T
Network Print Server
• 32 MB memory
OKIPAGE 24Tn
• Built-in 10/100 Base-T Network
Print Server
• 32 MB memory
• 2nd Paper Tray (must be installed)
OKIPAGE 24DXn
• Built-in Duplexer
• Built-in 10/100 Base-T Network
Print Server
• 32 MB memory
• 2nd Paper Tray (must be installed)
Toner
Pigtail Cable
(Network models
only)
CD(s)
Models furnished with 2nd Paper Tray:
Power Cord
Light-Shield Bag
(Protects image
drum from light
when it is removed
from printer.)
2nd Paper Tray
Mechanism
(Models 24Tn &
24DXn only)
Before proceeding, install the 2nd Paper Tray.
Warning!
To avoid injury to fingers, two people should perform
the installation of the 2nd Paper Tray.
1. Unpack the printer and 2nd Paper Tray.
2. Remove any shipping materials from the 2nd Paper Tray.
3. Lower the printer onto the 2nd Paper Tray, inserting pins on tray
into holes in base of printer.
Make sure the printer is firmly seated on the 2nd Paper Tray.
!
Page 2
All Models:
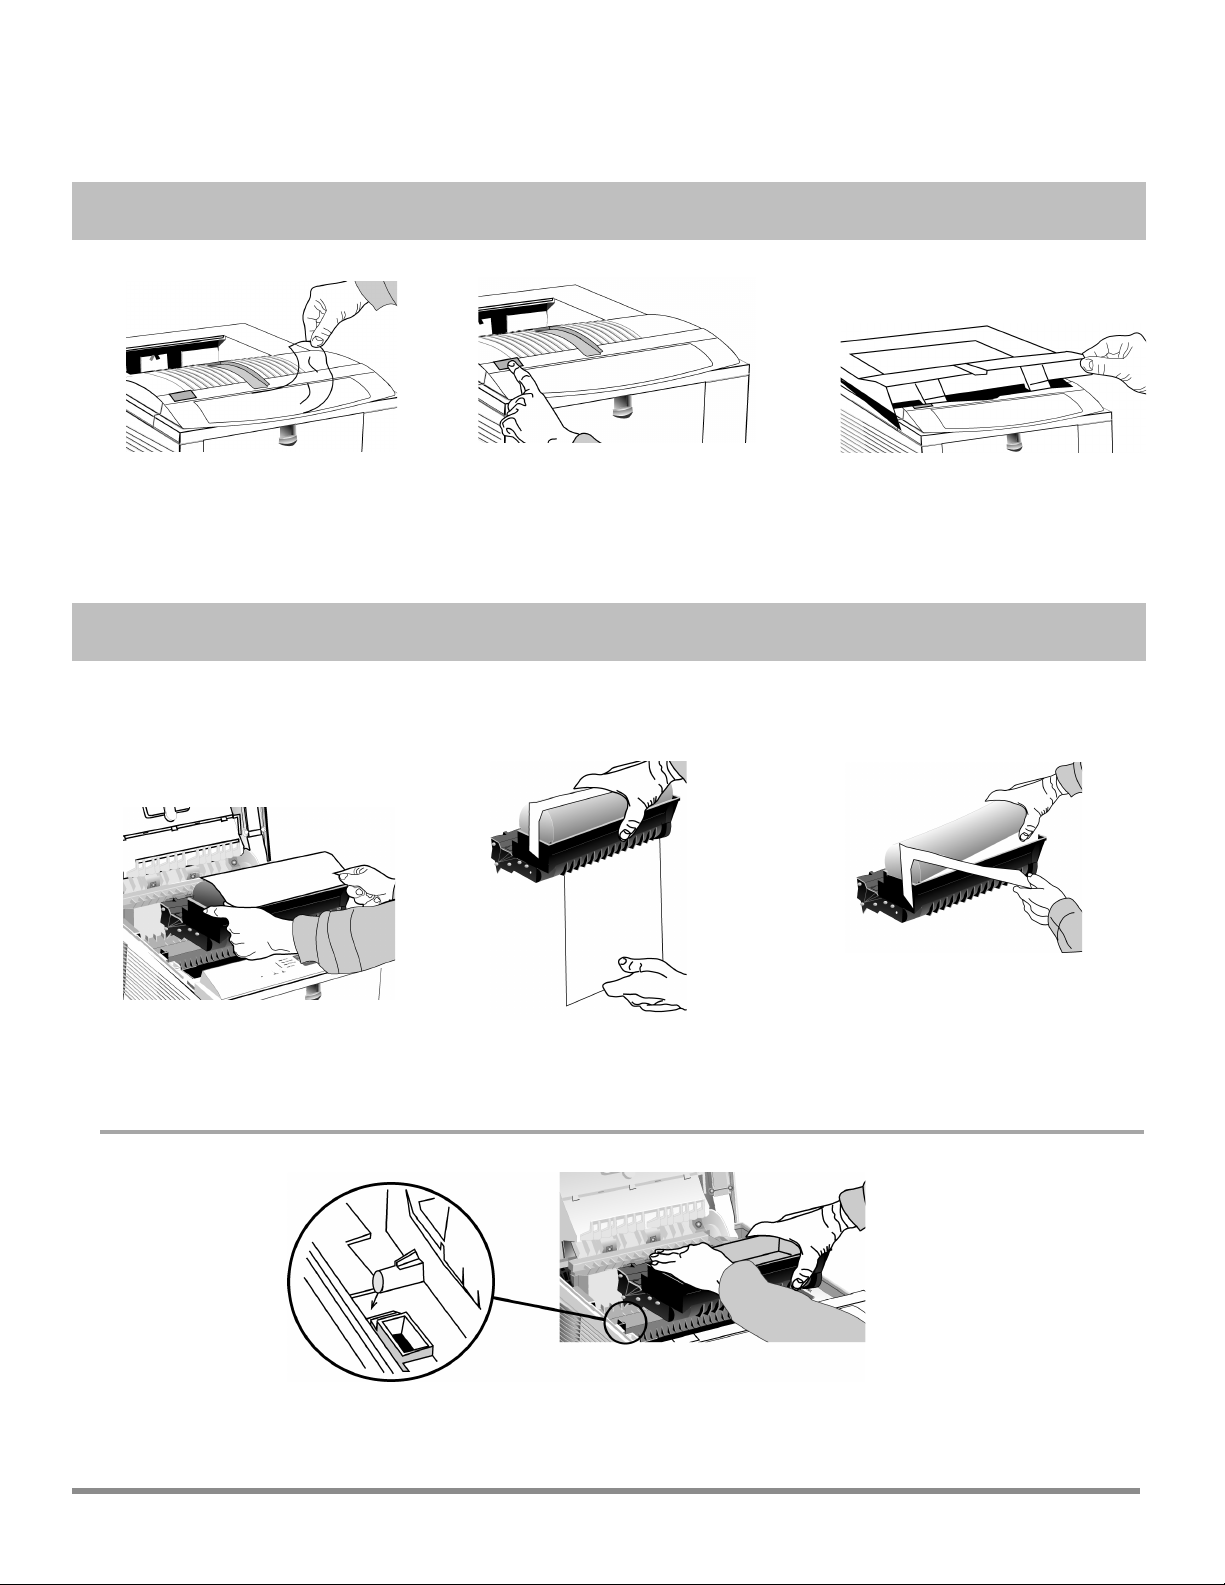
Preliminaries
1
Remove the protective film
and any shipping tape.
Prepare the Image Drum (“Type 7,” OKI P/N 40468701)
2
Caution!
Do not touch the image drum’s green surface!
Lift out the image drum.
Pull out the paper.
Lift the cover.Press OPEN.
Remove tthe tape and sponge.
Careful: the sponge will have some
loose toner on the bottom from
!
factory testing.
Replace the drum.
2
Page 3
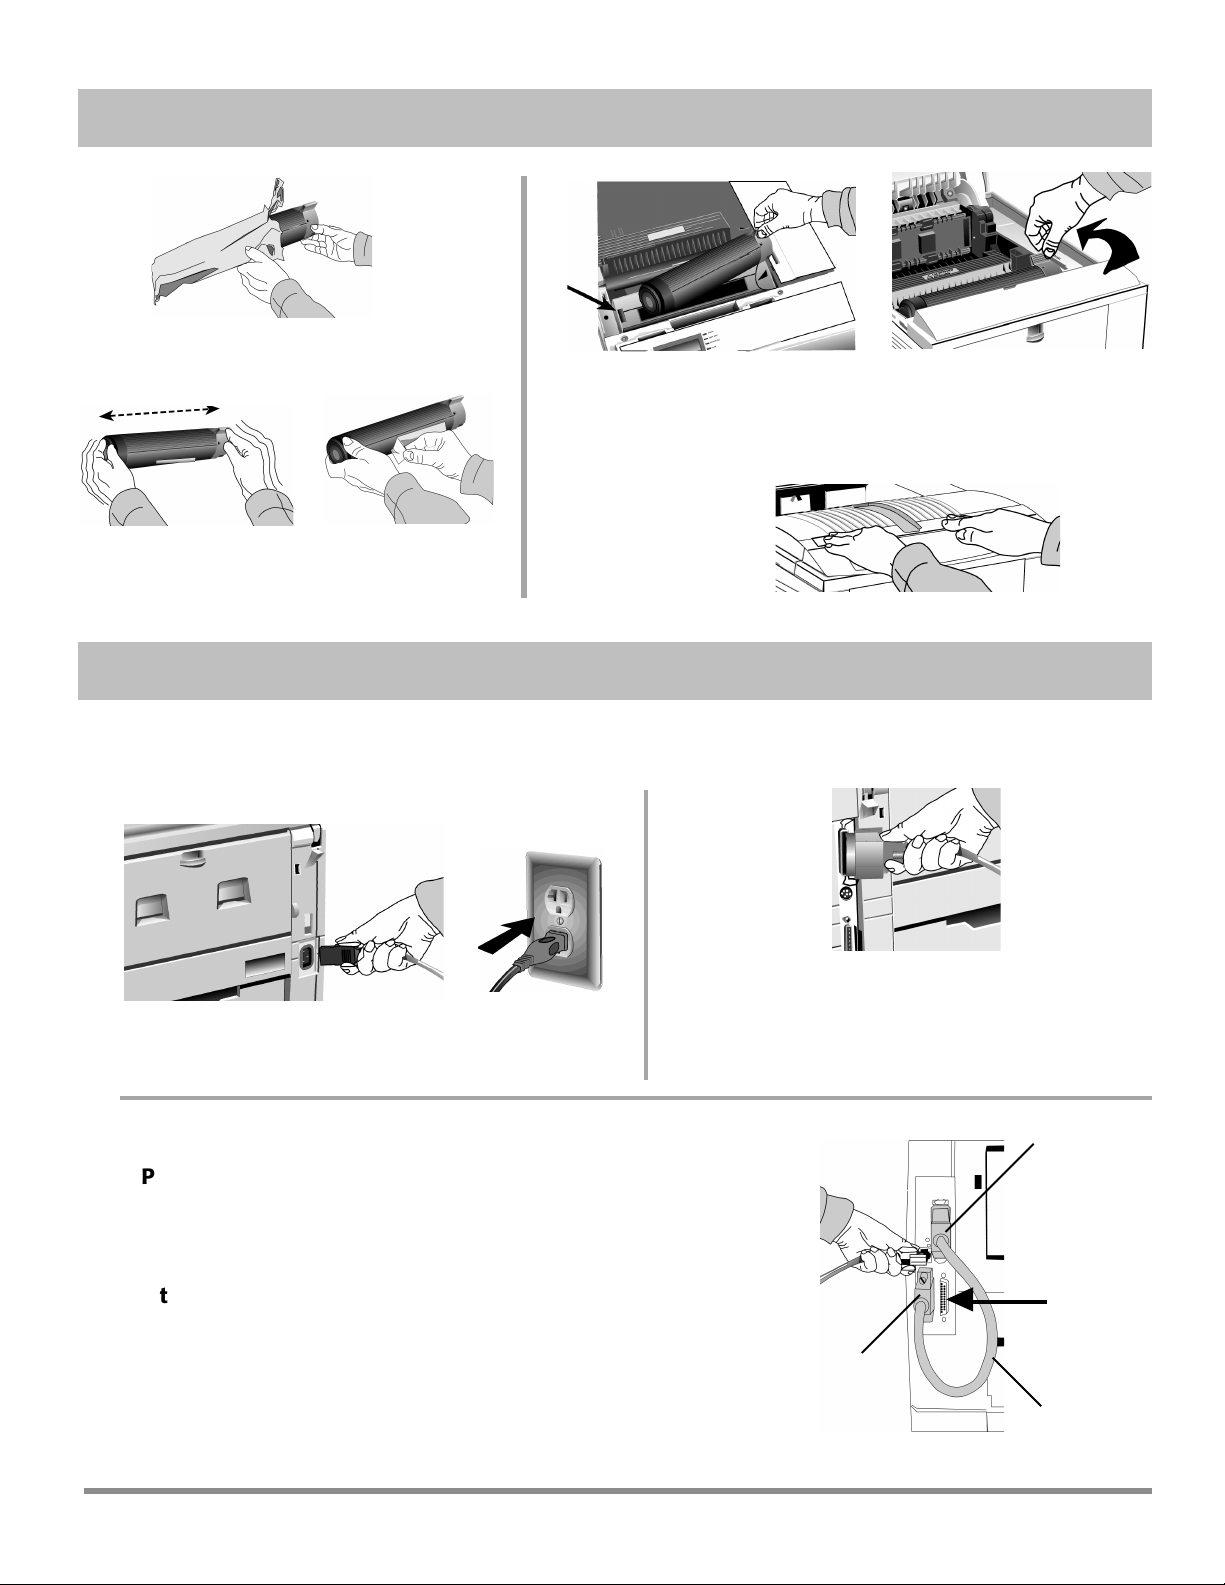
3
back and forth.
4
Install the Toner (“Type 7,” OKI P/N 40468801)
1
Unwrap the toner
cartridge.
Place the black end under the
tab (1), then lower the gray
end into the toner well.
Remove the tape.Shake it
Close the cover.
Push the lock lever toward
the back of the printer as far
as it will go.
Make Connections
For more information, see “Interfacing with the Computer” under Printer Controls in the on-line User’s
Guide.
!
Parallel Port (LPT) Connection
(Non-Network Models)
Power Connection
Plug in the power cord.
Network Connection (Network models Only):
1
Pigtail (supplied with network models):
Attach to the OkiLAN port (2) and to the printer’s parallel
port (3) .
Note! Do not connect to the printer’s serial port.
4 Ethernet Cable, not supplied
Requires a bidirectional parallel printer cable marked
IEEE 1284-compliant; the cable is not supplied.
4
3
Serial Port
PC: Requires Ethernet cable with two twisted wire pairs and an
RJ45 plug.
Macintosh: Requires Ethernet crossover cable with RJ45
connectors at either end.
2
1
3
Page 4
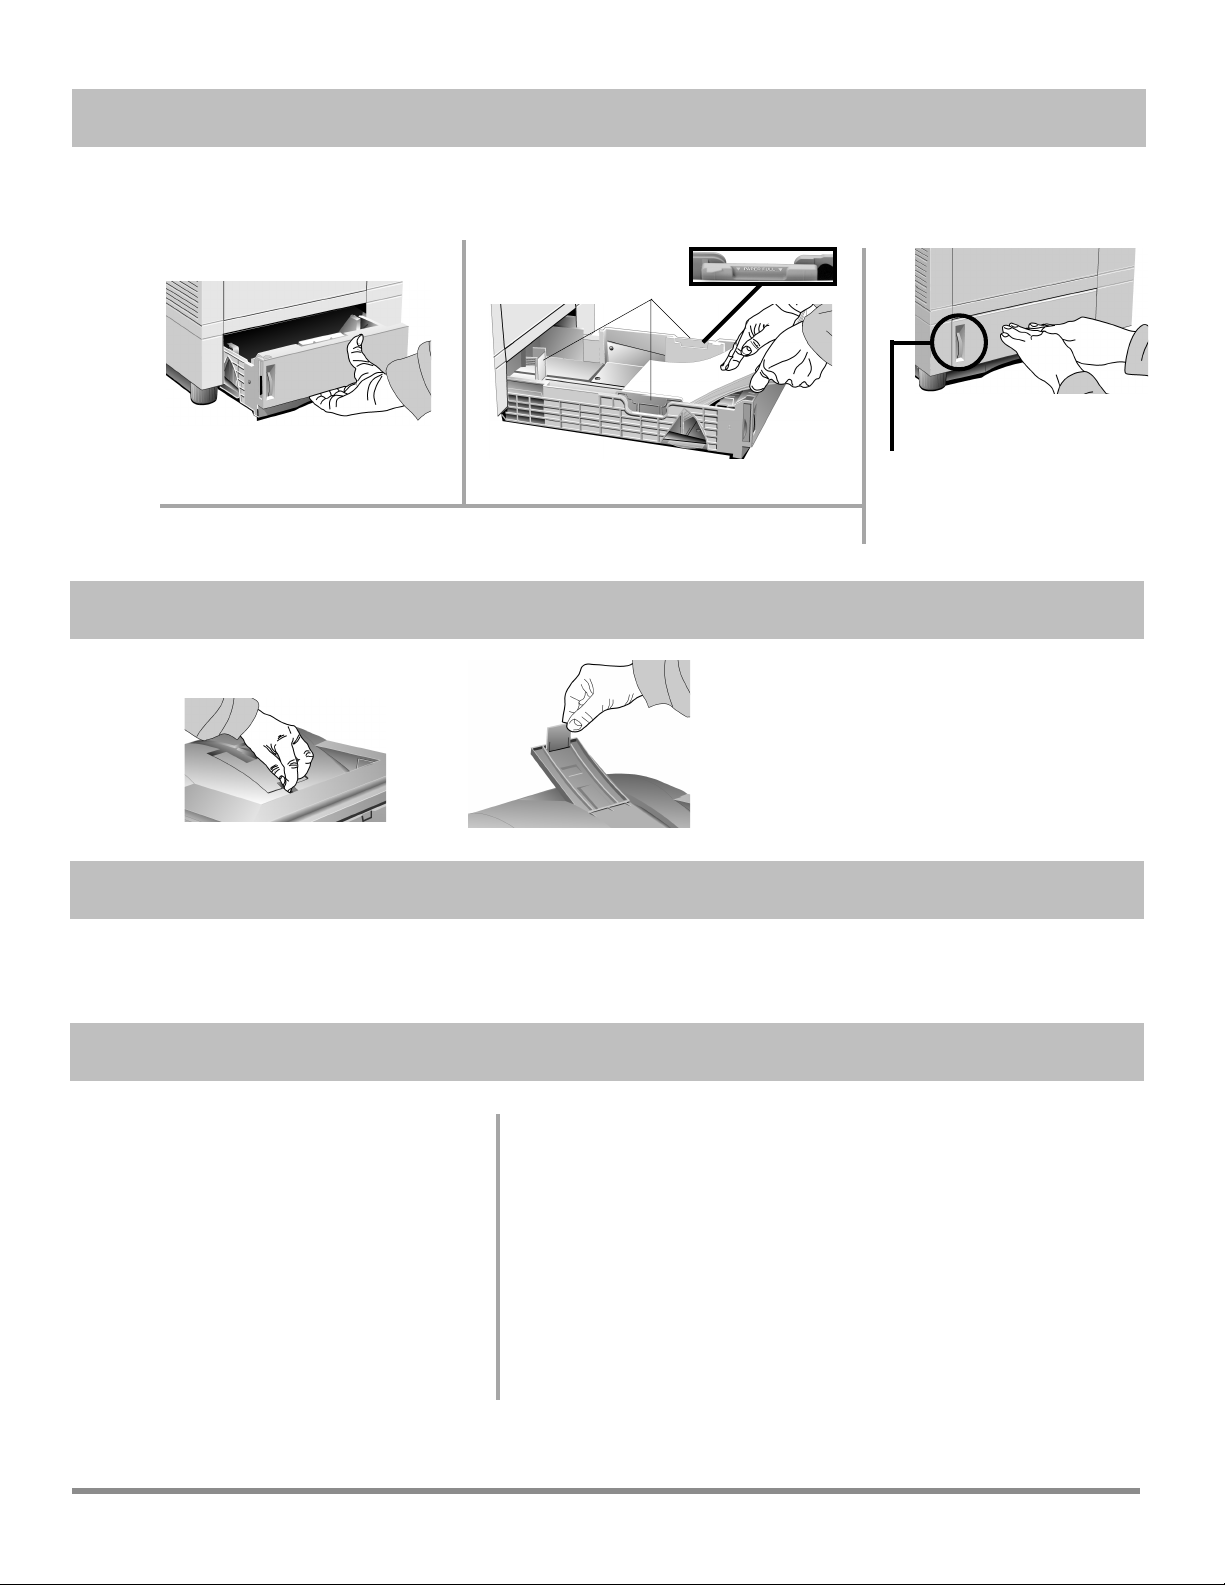
5
Load Paper
The printer comes set for standard, 8½" x 11", 20-lb. paper fed from Tray 1. To change the default to
another print media, size or paper source, see “How do I?” in the on-line User’s Guide.
!
1
Push the tray back in.
6
7
Pull the tray out.
Models 24Tn & 24DXn Only: Load the 2nd Paper Tray in the same manner.
Adjust the guides (1) and load paper.
Open the Top Paper Exit Path.
Open.
Lift.
To print envelopes, transparencies,
labels, etc., use the front feeder and
!
the rear exit path: see “How Do I?”
in the on-line User’s Guide for more
information.
Print the Demo Page.
1 Turn the printer on.
2 Press ON LINE.
3 Hold FORM FEED until PRINT DEMO PAGE appears on the display.
4 Press ENTER, then ON LINE.
Paper Gauge:
Indicates the amount of
paper left in the drawer.
Check the Settings.
8
Models Furnished with 2nd Paper
Tray
The printer is set to print from Tray 1. You
can set the printer to automatically switch
to Tray 2 when Tray 1 is empty, or to make
Tray 2 the default. See “How Do I?” in the
on-line User’s Guide.
Front Panel Display Language
To change the display language, see “Front
Panel” under Printer Controls in the
on-line User’s Guide.
You’re now ready to install the software: see Part 2.
4
Power Save Delay & Quiet Mode Settings
The printer comes with Power Save Delay on.
For the fastest possible time to print, set the Power Save Delay
to Disabled and the Quiet Mode to Off: see “Time to Print”
!
under Printer Controls in the on-line User’s Guide.
Printer Emulation
The printer automatically switches emulations depending on what
driver it detects when it receives a document. To select a specific
emulation, see “Selecting an Emulation” under Printer Controls in
the on-line User’s Guide.
Page 5

OKIPAGE
®
24 Series
Quick Start: Part 2
Windows Operating Systems
Install the Driver
1
To Install the
Windows® 2000 Driver
Have your original Microsoft® Windows 2000 CD
handy. You may be prompted for it during the
!
installation.
□ Close any open applications.
□ Make sure that the printer is connected to the PC and
turned on.
□ Restart the computer and wait for the following
window to appear:
1 Select.
2 Click.
1 Select.
2 Click.
Click.
5
Page 6

□ Insert the “OKIPAGE 24 Drivers, Utilities and Publications for
Windows 2000 and Mac OS 7.0 and higher” CD in your
CD-ROM drive.
Click.
Click.
□ To load the Windows 2000 PCL5e driver, browse to
d:\Win2000\US_Eng\Pcl5e (assuming D is your CD-ROM
drive):
□ Click OK.
□ Click Next.
□ Follow the on-screen instructions until the
Digital Signature Not Found window
appears:
Click.
If the Digital Signature Not Found window
!
appears, but does not offer you the option of
continuing, check with your System
Administrator regarding the Windows 2000
security settings.
□ Finish the installation following the
instructions on your screen.
1
2
3
4
5
□ Or, to load the Windows 2000 Adobe PostScript driver, browse to
d:\Win2000\US_Eng\AdobePs (assuming D is your CD-ROM
drive):
1
2
3
4
5
6
Page 7

To Install the Windows 98 Driver
Have your original Microsoft Windows 98 CD handy.
You may be prompted for it during the installation.
!
□ Close any open applications.
□ Make sure that the printer is connected to the PC and
turned on.
□ Restart the computer and wait for the following
window to appear:
Click.
Click.
□ To load the Windows 98 PCL5e driver, browse to
d:\Win9x\English\Pcl5e (assuming D is your CDROM drive):
5
1
2
3
4
1 Select.
2 Click.
□ Insert the “OKIPAGE 24 Drivers, Utilities and
Publications for Windows 95/98 and NT4.0” CD in
your CD-ROM drive.
Click.
□ Or, to load the Windows 98 Adobe PostScript driver,
browse to d:\Win9x\English\Psdrv (assuming D is
your CD-ROM drive):
5
1
2
3
4
□ Click OK.
□ Click Next.
□ Complete the installation following the instructions on
your screen.
7
Page 8

To Install the Windows 95B
(OSR2) Driver
Have your original Microsoft Windows 95 CD handy.
You may be prompted for it during the installation.
!
□ Insert the “OKIPAGE 24 Drivers, Utilities and
Publications for Windows 95/98 and NT4.0” CD in
your CD-ROM drive.
To determine if you have Windows 95B (OSR2) or
95A (Original 95):
□ Click Start → Settings → Control Panel.
□ Double-click System.
□ On the General tab, look under System. Beneath
“Microsoft Windows 95” a version number appears.
If that number is followed by the letter “B” you have
95B, if not, you have 95A.
To install the Driver:
□ Close any open applications.
□ Make sure that the printer is connected to the PC and
turned on.
□ Restart the computer and wait for the following
window to appear:
Click.
Click.
□ To load the Windows 95B PCL5e driver, browse to
d:\Win9x\English\Pcl5e (assuming D is your CDROM drive):
1
2
3
4
5
□ Or, to load the Windows 95B Adobe PostScript driver,
browse to d:\Win9x\English\Psdrv (assuming D is
your CD-ROM drive):
□ Wait for the following window to appear:
8
1
2
3
4
5
□ Click OK.
□ Click Finish.
Click.
□ Complete the installation following the instructions on
your screen.
Page 9

To Install the Windows 95A
(Original 95) Driver
Have your original Microsoft Windows 95 CD
handy. You may be prompted for it during the
!
installation.
To determine if you have Windows 95 version A,
see “To Install the Windows 95B (OSR2)
!
Driver.”
□ Close any open applications.
□ Make sure that the printer is connected to the PC
and turned on.
□ Restart the computer and wait for the following
window to appear:
□ To load the Windows 95A PCL5e driver, browse to
d:\win9x\english\pcl5e (assuming D is your CD-ROM
drive):
5
1
2
3
4
□ Or, to load the Windows 95A Adobe PostScript driver,
browse to d:\win9x\english\psdrv (assuming D is your CDROM drive):
5
1 Select.
2 Click.
□ Insert the “OKIPAGE 24 Drivers, Utilities and
Publications for Windows 95/98 and NT4.0” CD
in your CD-ROM drive.
Click.
1
2
3
4
□ Click OK.
□ Click Next.
□ Complete the installation following the instructions on your
screen.
9
Page 10

To Install the Windows NT 4.0
Driver
Have your original Microsoft Windows NT 4.0 CD
handy. You may be prompted for it during the
!
installation.
□ Close any open applications.
□ Insert the “OKIPAGE 24 Drivers, Utilities and
Publications for Windows 95/98 and NT4.0” CD in
your CD-ROM drive.
□ Make sure that the printer is connected to the PC and
turned on.
2 Click.
1 Click.
3 Click.
Double-click.
Click.
Click.
□ To load the Windows NT 4.0 PCL5e driver, browse to
d:\WinNT40\US_Eng\Pcl5e (assuming D is your
CD-ROM drive):
1
2
3
4
5
10
1 Select.
2 Click.
1 Select
port.
2 Click.
□ Or, to load the Windows NT 4.0 Adobe PostScript
driver, browse to d:\WinNT40\US_Eng\AdobePs
(assuming D is your CD-ROM drive):
1
2
3
4
5
□ Complete the installation following the instructions on
your screen
Page 11

Windows: Install the Remaining Software
2
All Models:
Install the User’s Guide, Readme
File & Registration Program
The On-Line User’s Guide Includes:
• Ordering & Replacing the Toner Cartridge
• Printing Envelopes, Transparencies, etc.
• Problem Solving, Printer Controls, etc.
Windows Requirements for the User’s
Guide:
• Windows 2000 or 98
• Windows 95B (OSR2) or higher with Microsoft
Internet Explorer 4.0 or higher
• Windows 95A (Original 95) with Microsoft Internet
Explorer 3.02
• Windows NT 4.0 with Microsoft Internet Explorer
4.0 or higher
To View the Readme File
Click Start → Programs → OKIPAGE 24 → Readme.
To Run the Registration Program:
Click Start → Programs → OKIPAGE 24 → Product
Registration.
To View the User’s Guide:
Click Start → Programs → OKIPAGE 24 → User’s Guide:
To Install the User’s Guide, Readme File &
Registration Program
□ Close any open applications and place the “OKIPAGE
24 Drivers, Utilities and Publications for Windows
95/98 and NT4.0” CD in your CD-ROM drive.
□ Click Start → Run.
□ Type d:\install.exe (assuming D is your CD-ROM
drive) and click OK.
□ Click the language of your choice.
The OKI Menu Installer window opens.
□ Click the button beside Additional Software.
□ Follow the on-screen instructions. When you are done
you will be back in the OKI Menu Installer window.
□ If you are installing a network printer, proceed to the
instructions “Install Network Software” on the next
page. Otherwise, close the OKI Menu Installer
window.
11
Page 12

Network Models Only:
Install Network Software
OkiNet Utilities
Used to configure the OKIPAGE 24 print server.
To Install the OkiNet Utilities:
□ In the OKI Menu Installer window, click the button
beside Network Utilities.
□ Click the button beside OkiNet Utilities and follow the
on-screen prompts to load the components of your
choice.
For more information on using the OkiNet Utilities
software, see the OkiLAN
!
®
6100e+ User’s Guide.
OkiView®32 Utility (Windows Only)
Provides network management utilities such as
• View Status
• Manage the Print Queue
• Change Printer Settings, etc.
• Set SNMP Traps, etc.
The OkiView32 management utilities can be used for
larger network environments with multiple printers.
To Install OkiView32:
□ In the OKI Menu Installer window, click the button
beside Network Utilities.
□ Click the button beside OkiView32 and follow the
instructions on your screen.
To Run OkiView32:
Click Start → Programs → OkiView32 Utility →
OkiView32.
• Most settings can be made by selecting Printer
Properties in the
in the
Settings menu.
• For more details, see the OkiView32 on-line Help.
Printer menu or Discovery Preferences
12
Page 13

Macintosh
Install the Driver
1
To Install the Adobe
PostScript® Level 2 Driver
®
□ Open the Mac folder, then the English folder.
□ Click the OKIPAGE 24 PS Installer icon, then click
Continue.
□ If you agree to the terms, select Accept, then click
Install.
□ When prompted, click Restart to complete the
installation.
To Select the Printer
□ Activate the Chooser from the Apple menu.
□ Locate and select the PSPrinter icon.
□ Insert the “OKIPAGE 24 Drivers, Utilities and
Publications for Windows 2000 and Mac OS 7.0 and
higher” CD in your CD-ROM drive.
□ Open the CD icon that appears on the Desktop.
Install the On-Line User’s Guide
2
Requirements
• Microsoft Internet Explorer version 4.0 or higher
®
• Netscape
To Install the User’s Guide
In order to open the User’s Guide, you must have
your Macintosh set to run .htm extension files
!
under your browser.
Communicator version 4.7 or higher
□ Highlight the OKI printer from the printer list, and
click Create.
□ Click your choice of Auto Setup or Select PPD.
□ Follow the instructions on your screen.
To View the User’s Guide
To use the on-line User's Guide, go to the folder where
you placed it and double-click the start_e.htm file.
The Contents window appears:
□ Create a folder in which to store the User's Guide.
□ Place the “OKIPAGE 24 Drivers, Utilities and
Publications for Windows 2000 and Mac OS 7.0 and
higher” CD in your CD-ROM drive.
□ Copy the files from the CD folder
Manual\Html\English to the folder you created.
13
Page 14

Product Registration Options
To register your printer use any of the following options:
• Go to our web site
Product Registration.
• Fill out the enclosed registration form and mail it or fax
it in.
• Windows only: Register via modem using the Product
Registration program (click Start → Programs →
OKIPAGE 24 → Product Registration, then follow the
on-screen prompts to register your printer).
http://www.okidata.com and click
For Support or Service
• See our multilingual web site:
http://www.okidata.com
• Consult the store where you purchased your printer.
• In the U.S. and Canada, call:
- 1-800-OKI-DATA (1-800-654-3282)
24 hours a day, 7 days a week
• In Latin America, call:
- Oki Data de Mexico, S.A. de C.V., (525) 263-8780
- Oki Data do Brasil, Ltda., 5511-5011-1518
14
Page 15

OKI, OKIPAGE, OkiLAN, OkiView: R, Oki Electric Industry
Company, Ltd. Adobe, PostScript: TM, Adobe Systems Inc., may be
registered in certain jurisdictions. Macintosh: TM, Apple Computer,
Inc., registered in the U.S. and other countries. Microsoft, Windows: R
or TM, Microsoft Corporation, U.S. and/or other countries. Netscape,
Netscape Navigator: R, Netscape Communications Corporation, U.S.
and other countries.
Page 16

Oki Data Americas, Inc., 2000 Bishops Gate Blvd., Mt. Laurel, NJ 08054-4620
Tel: (856) 235-2600 FAX: (856) 222-5320 http://www.okidata.com
Oki Data Americas, Inc., 2735 Matheson Blvd. East, Unit 1, Mississauga, Ontario, Canada L4W 4M8
Tel: (800) 654-3282 FAX: (905) 238-4427
Oki Data de Mexico, S.A. de C.V., Mariano Escobedo No. 748 - 8 Piso, Col Anzures, e. p. 11590, Mexico, DF
Tel: (525) 263-8780 FAX: (525) 263-8785
Oki Data do Brasil, Ltda., Av. Leonardo da Vinci, 1178/1182, Jabaquara, Sao Paulo, Brasil
Tel: 5511-5011-1518 FAX: 5511-5012-0267
© 2000 Oki Data Americas, Inc.
59324302
 Loading...