


OKIOFFICE 120 Printer Module
User’s Guide
Preface
EEC compatibility
Every effort has been made to ensure that the information in this document is complete, accurate, and up-todate. Oki assumes no responsibility for the results of errors beyond its control. Oki also cannot guarantee that
changes in software and equipment made by other manufacturers and referred to in this guide will not affect
the applicability of the information in it. Mention of
software products manufactured by other companies
does not necessarily constitute endorsement by Oki.
Copyright 1999 by Oki. All rights reserved.
Microsoft, MS-DOS and Windows are registered trademarks of Microsoft Corporation.
IBM is a registered trademark of International Business
Machines Corporation.
This product complies with the requirements of the Council Directives 89/336/
EEC and 73/23/EEC amended by 93/68/
EEC on the approximation of the laws
relating to electromagnetic compatibility and low voltage.
ii OKIOFFICE 120 Printer Module

Table of contents
English
Preface . . . . . . . . . . . . . . . . . . . . . . . . . . . . . . . . . . . . . ii
EEC compatibility . . . . . . . . . . . . . . . . . . . . . . . . . . . . ii
Table of contents . . . . . . . . . . . . . . . . . . . . . . . . . . . . . iii
Chapter 1: Getting Started . . . . . . . . . . . . . . . . . . . . . . .1
Unpacking. . . . . . . . . . . . . . . . . . . . . . . . . . . . . . . . .1
Connecting to your computer . . . . . . . . . . . . . . . . . .1
Installing to Windows 95 . . . . . . . . . . . . . . . . . . . . .2
Installing to Windows 3.1. . . . . . . . . . . . . . . . . . . . .3
Select the printer . . . . . . . . . . . . . . . . . . . . . . . . . . . .4
Setting up the printer environment . . . . . . . . . . . . . .5
Paper source . . . . . . . . . . . . . . . . . . . . . . . . . . . .6
Paper size . . . . . . . . . . . . . . . . . . . . . . . . . . . . . .6
Transparency film . . . . . . . . . . . . . . . . . . . . . . . .7
Envelopes . . . . . . . . . . . . . . . . . . . . . . . . . . . . . .7
Detail setting . . . . . . . . . . . . . . . . . . . . . . . . . . . .7
Reduction . . . . . . . . . . . . . . . . . . . . . . . . . . . . . .8
B5 (Landscape) . . . . . . . . . . . . . . . . . . . . . . . . . .8
A5 (Landscape) . . . . . . . . . . . . . . . . . . . . . . . . . .8
Orientation. . . . . . . . . . . . . . . . . . . . . . . . . . . . . .8
Copy . . . . . . . . . . . . . . . . . . . . . . . . . . . . . . . . . .8
Resolution . . . . . . . . . . . . . . . . . . . . . . . . . . . . . .8
Reverse printing . . . . . . . . . . . . . . . . . . . . . . . . .8
Option. . . . . . . . . . . . . . . . . . . . . . . . . . . . . . . . . 9
Dither . . . . . . . . . . . . . . . . . . . . . . . . . . . . . . . . . 9
Print density . . . . . . . . . . . . . . . . . . . . . . . . . . . . 9
OHP mode . . . . . . . . . . . . . . . . . . . . . . . . . . . . . 9
Switch to wide screen. . . . . . . . . . . . . . . . . . . . . 9
Printing a test pattern . . . . . . . . . . . . . . . . . . . . . . . 10
Chapter 2: Printing. . . . . . . . . . . . . . . . . . . . . . . . . . . . 11
Printing a document . . . . . . . . . . . . . . . . . . . . . . . . 11
Pausing and resuming printing. . . . . . . . . . . . . . . . 11
Cancelling the printing. . . . . . . . . . . . . . . . . . . . . . 12
Chapter 3: Using the Print Manager . . . . . . . . . . . . . . 15
Status on your computer and printer . . . . . . . . . . . 15
Your system . . . . . . . . . . . . . . . . . . . . . . . . . . . 15
Control option . . . . . . . . . . . . . . . . . . . . . . . . . . . . 16
Background printing. . . . . . . . . . . . . . . . . . . . . 16
Use spooler (jam recovery) . . . . . . . . . . . . . . . 16
Always watch printer status . . . . . . . . . . . . . . . 16
Error message option . . . . . . . . . . . . . . . . . . . . 16
Communication . . . . . . . . . . . . . . . . . . . . . . . . 16
Current status . . . . . . . . . . . . . . . . . . . . . . . . . . 17
Status change . . . . . . . . . . . . . . . . . . . . . . . . . . 17
Tuning . . . . . . . . . . . . . . . . . . . . . . . . . . . . . . . 18
Your printer . . . . . . . . . . . . . . . . . . . . . . . . . . . 18
User’s Guide iii

Current status . . . . . . . . . . . . . . . . . . . . . . . . . . 18
Printer option box. . . . . . . . . . . . . . . . . . . . . . . 19
Your print job. . . . . . . . . . . . . . . . . . . . . . . . . . 19
Chapter 4: Just in case . . . . . . . . . . . . . . . . . . . . . . . . . 21
Removing fax printer driver software . . . . . . . . . . 21
Resetting your machine . . . . . . . . . . . . . . . . . . . . . 23
Error messages. . . . . . . . . . . . . . . . . . . . . . . . . . . . 23
List of error messages . . . . . . . . . . . . . . . . . . . . . . 24
System errors . . . . . . . . . . . . . . . . . . . . . . . . . . . . . 28
iv OKIOFFICE 120 Printer Module
Chapter 1: Getting Started
1
2
4 35
6
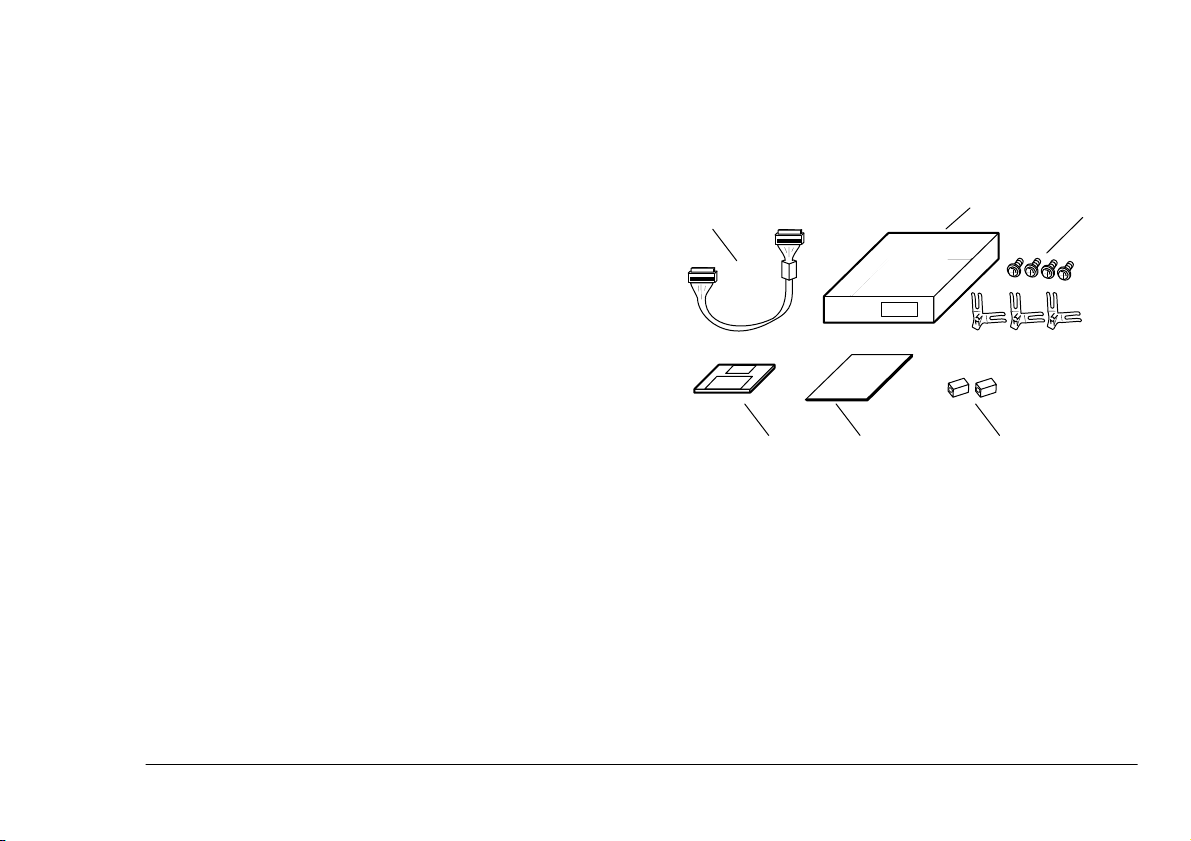
Unpacking
The following items are in the package:
1. Printer Controller Module — Includes the Printer
PCB (printed circuit board)
2. Four screws and three FG-springs*
3. Two ferrite cores*
4. Fax Printer Module operating instructions (this
book!)
5. Fax Printer driver software floppy diskette
6. Connection cable*
English
* These parts may actually be used when your
authorised dealer installs the printer interface
on your fax machine. (One of the ferrite cores
may be attached to your bi-directional parallel
User’s Guide 1
interface cable, see below.)
Be sure to save the module and packing materials for
reshipment.
Connecting to your computer
Do not install the printer module on your
OKIOFFICE 120 machine. Only your authorised dealer should perform the installation.
This section explains how to connect the module to
your computer’s parallel printer port. You will need a
bidirectional parallel interface cable.
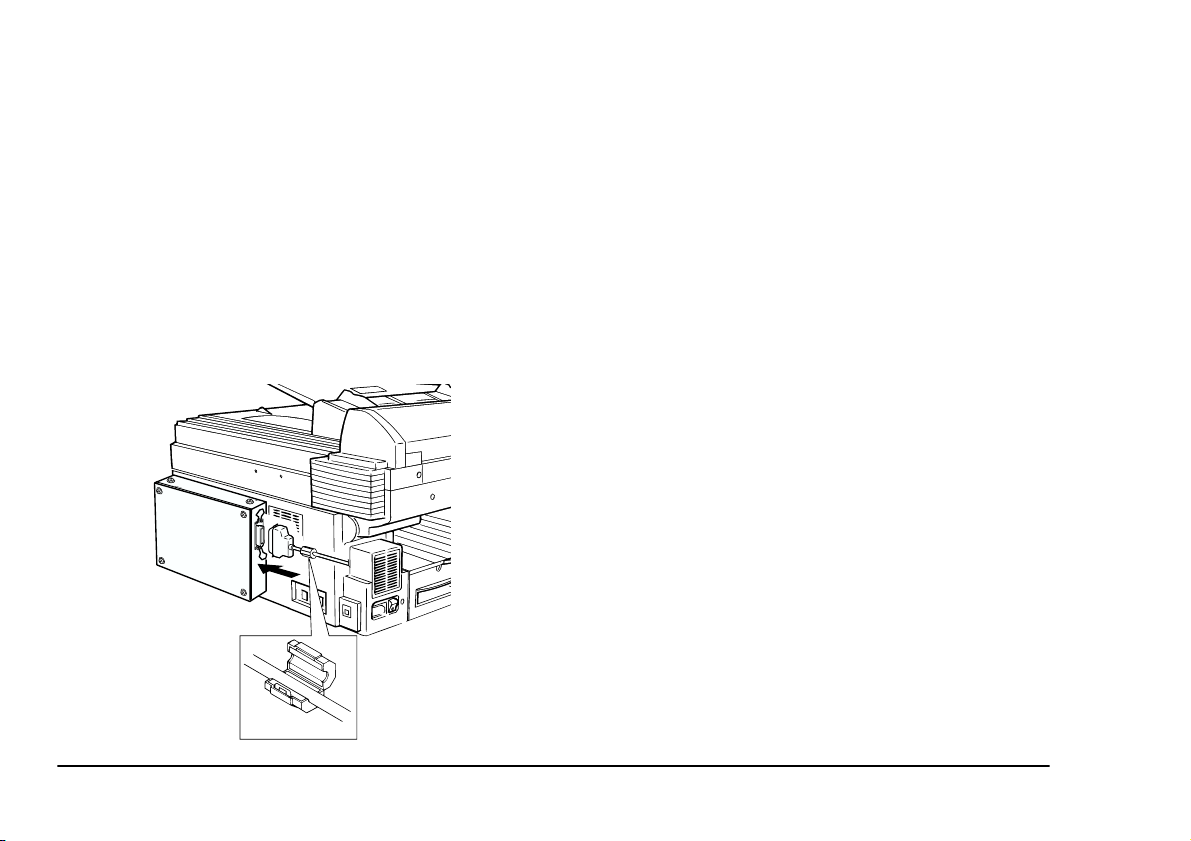
1. Make sure that both your OKIOFFICE 120 and
PC are turned off.
2. Connect the bidirectional parallel interface cable
to your Printer Controller Module’s interface
port.
3. If your cable does not have a ferrite core already
fitted, install the ferrite core included with the
printer module.
4. Snap the plug’s wire clips onto the interface
cable.
5. Connect the other end of the bi-directional parallel interface cable to your computer’s parallel
port.
6. Please see your computer’s operating instructions
if you need help.
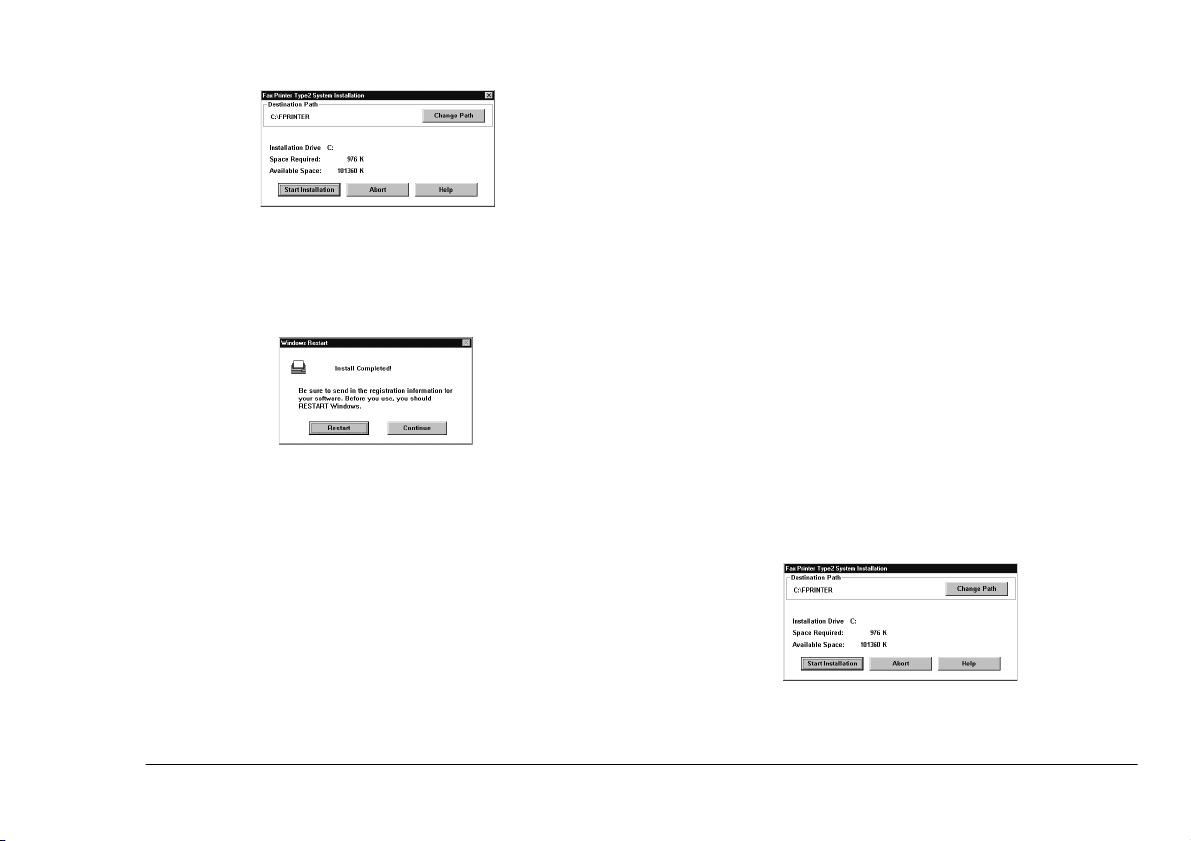
Installing to Windows 95
Setting up your Fax Printer driver is easy and fast,
thanks to the
Add Printer Wizard
set-up program:
1. Start Windows 95, if it is not already running.
2. Insert the Fax Printer driver software disk in a
floppy disk drive.
3. Click the Start button, point to Settings, and then
click (select) Printers.
4. Double-click Add Printer.
5. Click Next > and then follow the instructions
which appear.
6. While installing, you will see the Fax Printer
System Installation window:
, a step-by-step printer
To continue installing, click Start Installation.
Ferrite Core
2 OKIOFFICE 120 Printer Module
English
Note:
To see documents printing (or waiting to print),
and otherwise manage printing, you must use
the Fax Printer Type2 Print Manager (see later).
If, in the future, you install other Oki Fax Printer
software (such as an upgrade), use the same destination path you have chosen here.
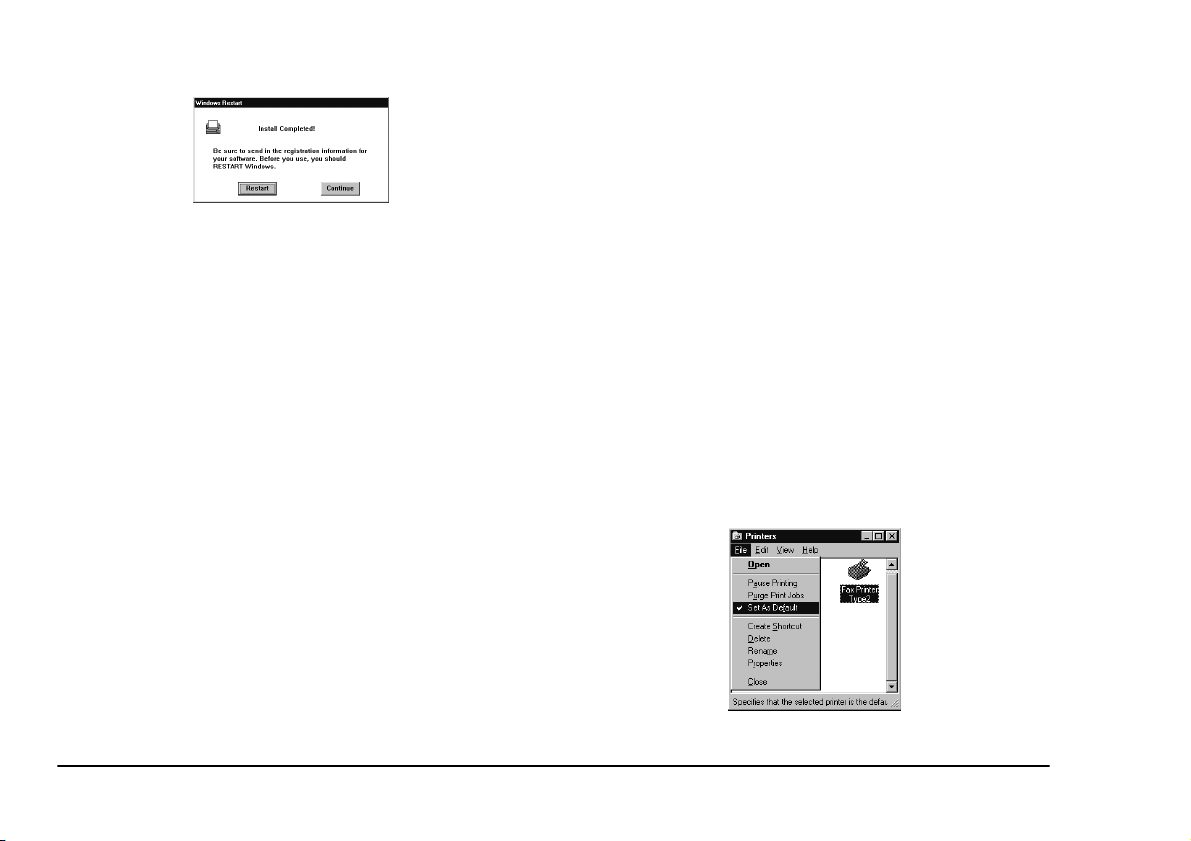
7. When installation is complete, you will see:
To start the Fax Printer software, click Restart.
Note:
If you click
stalled but not yet running. To start the software,
restart Windows 95.
8. When you finish, the icon for the Fax Printer
appears in the Printers folder, and the Fax
Printer Type2 Print Manager button appears on
the taskbar.
User’s Guide 3
Continue
instead, the software is in-
Installing to Windows 3.1
1. If it is not already running, start Windows.
2. Insert the Fax Printer driver software disk in a
floppy disk drive.
3. Click the File menu in the Program Manager,
then click Run.
4. Type a:\setup31.exe (where a: indicates the
floppy drive), and click OK.
5. While installting, you will see the Fax Printer
System Installation window. To continue, click
Start Installation.
6. When installation is complete, you will see:
To start the Fax Printer, click Restart.
If you click Continue instead, the software is
installed but not yet running. To start the software, restart Windows.
7. When you finish, the Fax Printer Type2 Print
Manager icon will appear at the lower edge of
your screen.
Select the printer
If you have previously installed any other printer drivers in your Windows set-up, you should select the Fax
Printer as the
follows:
1. Make the Printers windows appear.
Windows 95:
a Click the Start button on the taskbar.
Default Printer
in the Printers window as
Windows 3.1:
a Double-click the Main icon in the Program
Manager window.
b Double-click the Control Panel icon in the
Main group window.
c Then double-click the Printers icon in the
Control Panel window.
2. In the Printers window, click Fax Printer
Type2.
3. Set the
Windows 95:
aOn the File menu, click Set As Default.
Windows 3.1:
a Click Set As Default Printer.
Fax Printer
as the default printer.
bPoint to Settings. Then click Printers.
4 OKIOFFICE 120 Printer Module

4. Close the Printers window.
Windows 95:
Either…
click File and then click Close
or…
English
b Double-click the Control Panel icon in the
Main group window.
c Then double-click the Printers icon in the
Control Panel window.
2. In the Printers window, click Fax Printer
Ty pe 2.
click the button in the window’s upper-right
corner.
Windows 3.1:
Click Close.
Setting up the printer environment
You can set the printer environment to meet your needs
as follows:
1. Make the Printers windows appear.
Windows 95:
a Click the Start button on the taskbar.
bPoint to Settings. Then click Printers.
Windows 3.1:
a Double-click the Main icon in the Program
Manager window.
User’s Guide 5
3. Windows 95: On the File menu, click Properties.
4. Windows 3.1: Click Set-up, then skip to step 6.
5. Windows 95: The Fax Printer Type 2 Proper-
ties window will appear.
6. Windows 95: Click the Details tab, and then
click Set-up…
7. The Fax Printer Type2 window will appear.
8. Click OK to save any changes you have made to
the existing settings and close the Fax Printer
Settings window.
Click Cancel to close the Fax Printer Settings
window without saving any changes
Click Help for assistance. The Help window
appears.
Paper source
Selects the default paper supply source. You may
choose from either the multipurpose tray or the paper
cassettes. The Auto setting chooses the right paper supply source (Cassette 1, Cassette 2 or Cassette 3) automatically, based on the paper size settings you have
made for each cassette.
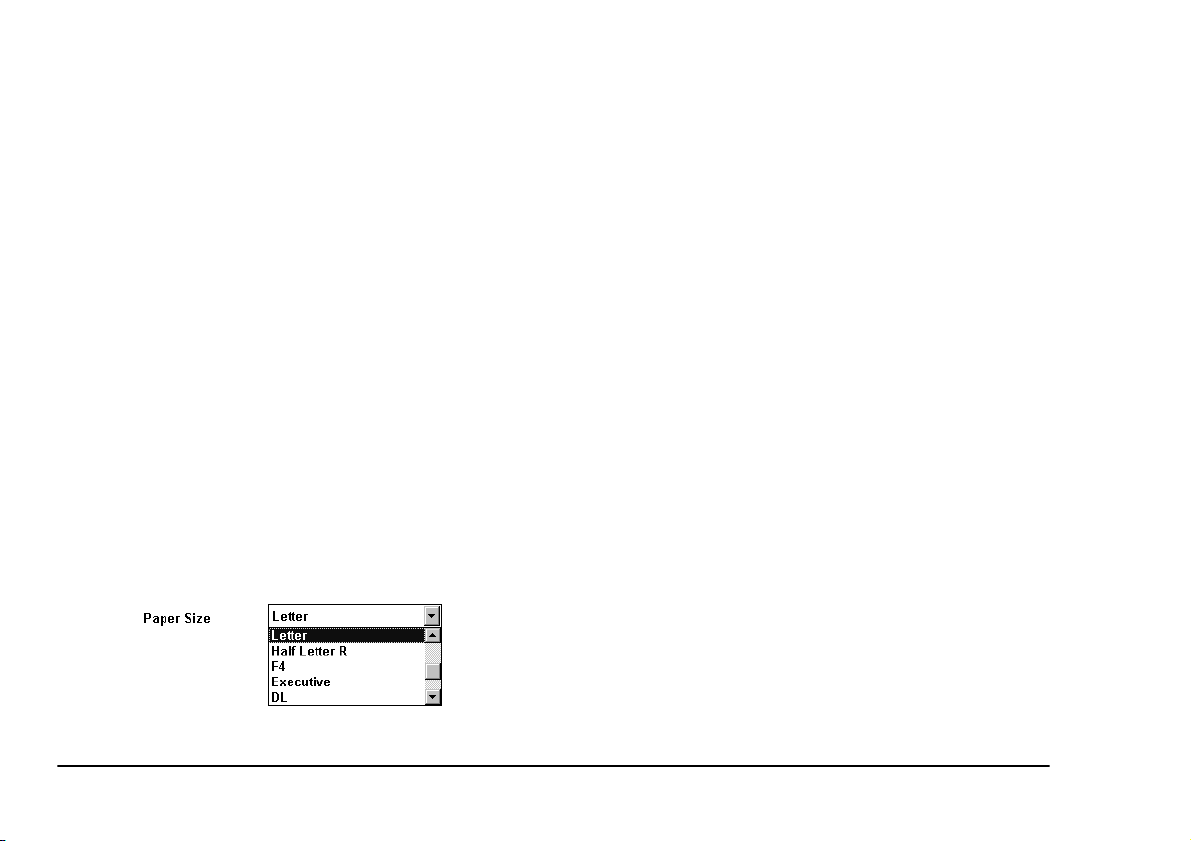
Paper size
Selects the paper size. This driver lets you select from
among 14 paper sizes:
B4 ** 257 x 364mm
A4 210 x 297mm
B5 ** 182 x 257mm
A5 148 x 210mm
A6 * 105 x 148mm
Legal * 215.9 x 355.6mm
Letter * 215.9 x 279.4mm
Half Letter R * 140 x 216mm
F4 * 210 x 330mm
Executive * 184.1 x 266.7mm
DL * 110 x 220mm
COM 10 * 104.8 x 241.3mm
Post Card * 100 x 148mm
Monarch * 98.4 x 190.5mm
These sizes of paper or envelopes cannot be used
*
in the paper cassette. Please use the multipurpose tray
instead.
B4 and B5 (landscape) paper can not used in the
**
multipurpose tray. Please use the paper cassette.
If you use a different paper size from this setting, the
machine will not print. So, if you load differently-sized
paper into your machine, perform this setting again.
In your computer application (such as a word processing or spreadsheet program), be sure to set the paper
size for your document to the same as this setting.
6 OKIOFFICE 120 Printer Module

Please do not use any paper which has been creased,
wrinkled or which may have absorbed any moisture, no
matter how new the paper may be.
When you use B5 (landscape) or A5 (landscape) paper,
you will need to click the landscape check box (see
“Detail Setting” later).
When you select reduction print (see “Detail Setting,”
later), the paper size window shows only the paper
size(s) for the reduction setting you select. If you wish
to select another paper size, select 100% reduction in
the Details Setting.
Insert the envelope
face up
English
.
Transparency film
You can use transparency film (see “OHP mode” later).
Detail setting
Click Detail Setting… to open the Detail Setting window.
Envelopes
Your machine’s multipurpose tray can hold only one
envelope at a time. To use envelope, set the
down and turn the flap side towards the rear of your machine.
Your printer uses a heat fixing method. While the envelope passes through the printer at high temperature
(195
°
C for about one second) and under pressure in the
fuser unit, the glue used in the envelope should not
born, melt, or cause other abnormalities.
User’s Guide 7
flap
side

Reduction
Copy
If you use A4, A5, B4 or B5-sized paper, you can select
reduction printing. Your reduction rate choices are:
100 %
A3 ! B4 86 %
A3 ! A4 70 %
B4 ! A4 81 %
B4 ! B5 70 %
A4 ! B5 86 %
A4 ! A5 70 %
B5 ! A5 81 %
B5 (Landscape)
When you set B5-sized paper sideways in the paper cassette, click this box.
A5 (Landscape)
When you set A5-sized paper sideways in the cassette
or multipurpose tray, click this box.
Orientation
Determines how the document is positioned on the
page, either
portrait
(tall) or
landscape
(wide).
Selects the number of copies printed for each page; you
can select up to 99 copies. Also, sets whether the machine will collate the printed copies.
Be sure to set this setting to the same as in your computer application (such as a word processing or spreadsheet program).
Resolution
Sets the default printing resolution to either 200 or 400
dpi.
Reverse printing
Prints pages in reverse order, beginning with the last
page, but the printing speed is slower.
When Reverse Printing is on, the Print Manager cannot
recover from a jam; you will have to reprint a jammed
print job.
Do not activate this function if you have activated a reverse-print-order function in your computer application; they will cancel each other out.
8 OKIOFFICE 120 Printer Module

Option
English
OHP mode
You can set other printing functions by clicking (from
the Printer Settings box) Option…, which brings up
this dialog box:
Dither
Sets the quality of
coarse, fine or line art.
greyscale
(halftone) printing to
Print density
Sets the print density (the darkness of the printing). You
may choose from: Very Dark, Dark, Normal, Light or
Very Light.
You should set to “ON” only when using transparency
film (OHP film) in your machine. Otherwise, this setting should be set to “OFF”.
When you want to use the transparency (OHP) film, use
the multipurpose tray. You can use A4-sized transparency (OHP) film.
If loading transparency (OHP) film into the multipurpose tray, be sure that the sheet is designed for
printers
does not have a paper backing and/or a leading strip
it does, remove the paper backing and/or strip before inserting.
ing or strip.
Your printer uses a heat fixing method. While a transparency passes through the printer at high temperature
(195°C for about one second) and under pressure in the
fuser unit, the transparency should not melt or curl excessively.
and
not for copiers
Only film should go in, not film with any back-
. Also, be sure that the film
Switch to wide screen
You can change the Fax Printer Type2 window to
wide screen
To change to wide screen from standard mode, click
Switch to Wide-Screen. To return to standard screen,
mode, which shows more settings at a time.
laser
. If
User’s Guide 9

click Switch to Standard-Screen. This feature may
not be useful on a 14” or smaller monitor.
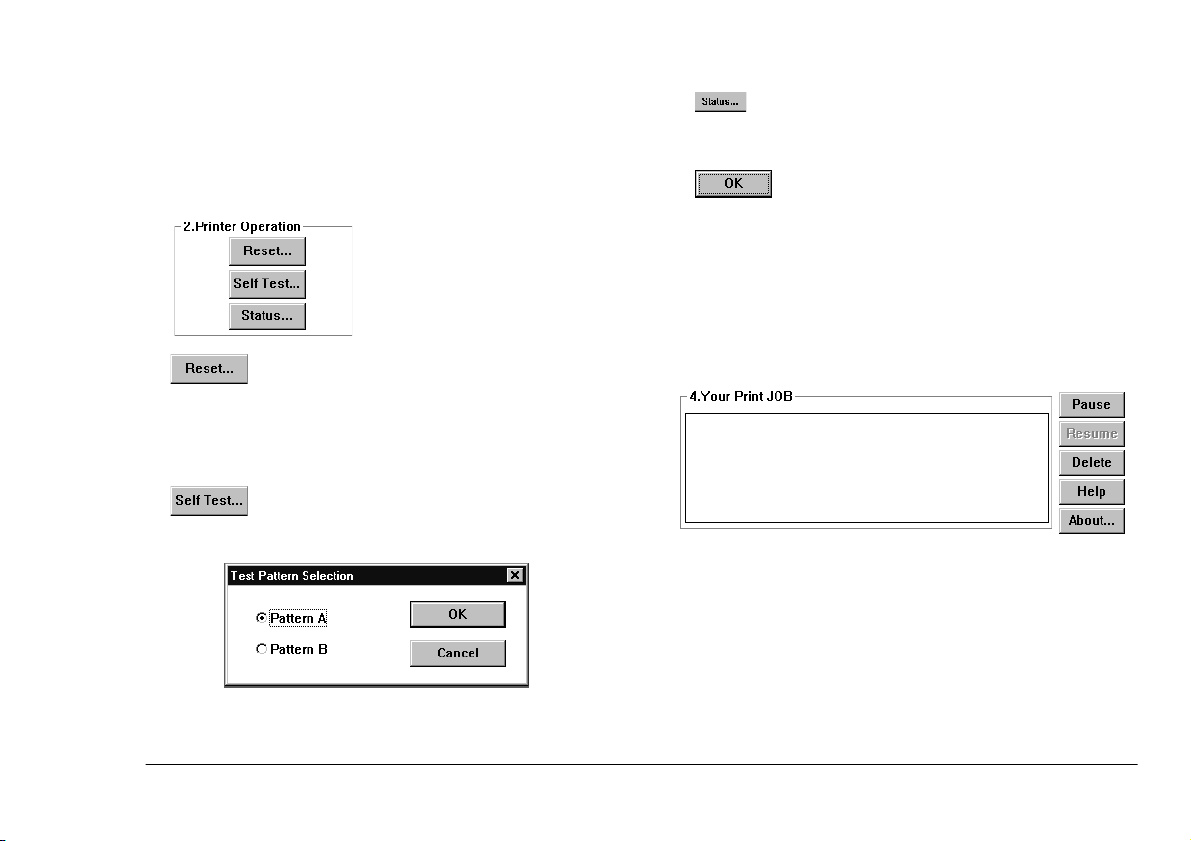
Printing a test pattern
When you have finished installing the Fax Printer and
setting up the printer, check everything by printing a
test pattern:
1. Make sure you have turned on your fax machine’s
power switch, and that the machine has paper
loaded.
2. Open the Printer Manager window.
b Windows 3.1: Double-click the Fax
Printer Type2 Print Manager icon at the
lower edge of your screen.
3. Click Option under Yo u r P r i n t e r to open the
Printer Option window.
a Windows 95: Click Fax Printer Type2
Print Manager on the taskbar.
10 OKIOFFICE 120 Printer Module
4. Click Self Test. The Test Pattern Selection win-
dow will appear:
5. Click either Pattern A (check pattern) or
Pattern B (grid pattern).
6. The test printing will begin.
7. If an error occurs, please refer to “Error Messages,” (see later).

Chapter 2: Printing
English
Printing a document
You can set how other applications run while printing
is occurring:
•
Foreground
trol of Windows and your computer; it’s therefore
said to be “in the foreground.”
•
Background
background,” other applications can run. (See
“Background Printing” in chapter 3.)
In this example, we will print documents from Windows:
1. Windows 95: Click the Start button, point
to Programs, and then click Windows Explorer.
Windows 3.1: Select (and, if necessary,
open) the Main window in the Program Man-
ager, then select the File Manager.
2. In the list of files, click on a file you want to
print.
Of course, there must currently be installed on
your computer an application which can successfully print the file. For this initial demonstration,
— Printing essentially takes con-
While printing runs “in the
—
try a file ending in one of the following extensions —
processing software. From here on, you will usually print from within such applications.
3. Click the File menu, then click Print.
4. The machine starts to print the file.
If you have selected background printing, another
application can run in the foreground.
If you have selected foreground printing, the cursor on your computer changes to a little “coffee
cup” icon, indicating that you might wish to take
a brief break; because, while this appears, another
application cannot run on your computer.
If you want to print in the foreground, go to
“Background printing” (see chapter 3), and then
turn off Background Printing by clearing the “✔”
in its checkbox.
.doc,.txt
or
— to activate your word
.wri
Pausing and resuming printing
Your computer can keep track of the printing of several
separate documents.
User’s Guide 11
It accomplishes this by putting them into a
dered list, and printing them in the order in which it
adds them to the queue every time you give print commands from your computer’s application(s).
You can pause the printing of either all the documents,
or just certain documents, in a queue. Pausing your
printer stops the printing of
queue. Pausing a single document stops only
ument from printing; other documents will print.
1. Open the Fax Printer Type2 Print Manager.
Windows 95: Click the Fax Printer Type2
Print Manager button on the taskbar to open the
Fax Printer Type2 Print Manager.
Windows 3.1: Double-click the Fax Printer
Type2 Print Manager icon at the lower edge of
your screen.
The You r P r i n t JO B box shows the queue of
documents either printing now or waiting to be
printed.
2. To
document and click Pause.
To
document and click Resume.
printing a specific document, select the
pause
printing a specific document, select the
resume
document in the
every
queue
that
, or or-
doc-
Cancelling the printing
You can cancel the printing of a document by deleting
it from the queue.
1. Open the Fax Printer Print Manager.
Windows 95: Click the Fax Printer Type2
Print Manager button on the taskbar to open the
Fax Printer Print Manager.
Windows 3.1: Double-click the Fax Printer
Type2 Print Manager icon at the lower edge of
your screen.
12 OKIOFFICE 120 Printer Module

The You r P r i n t J O B box shows the queue of
documents either printing now or waiting to be
printed.
2. Select the document for which you want to cancel
printing, and then click Delete.
English
To
printing, select the document you want
resume
to resume printing, and then click Resume.
3. In the list of documents, select the documents (or
the printer) you want to cancel, and then click
Delete. A dialog box appears, prompting you to
confirm the deletion.
User’s Guide 13

14 OKIOFFICE 120 Printer Module
Chapter 3: Using the Print Manager
English
Status on your computer and printer
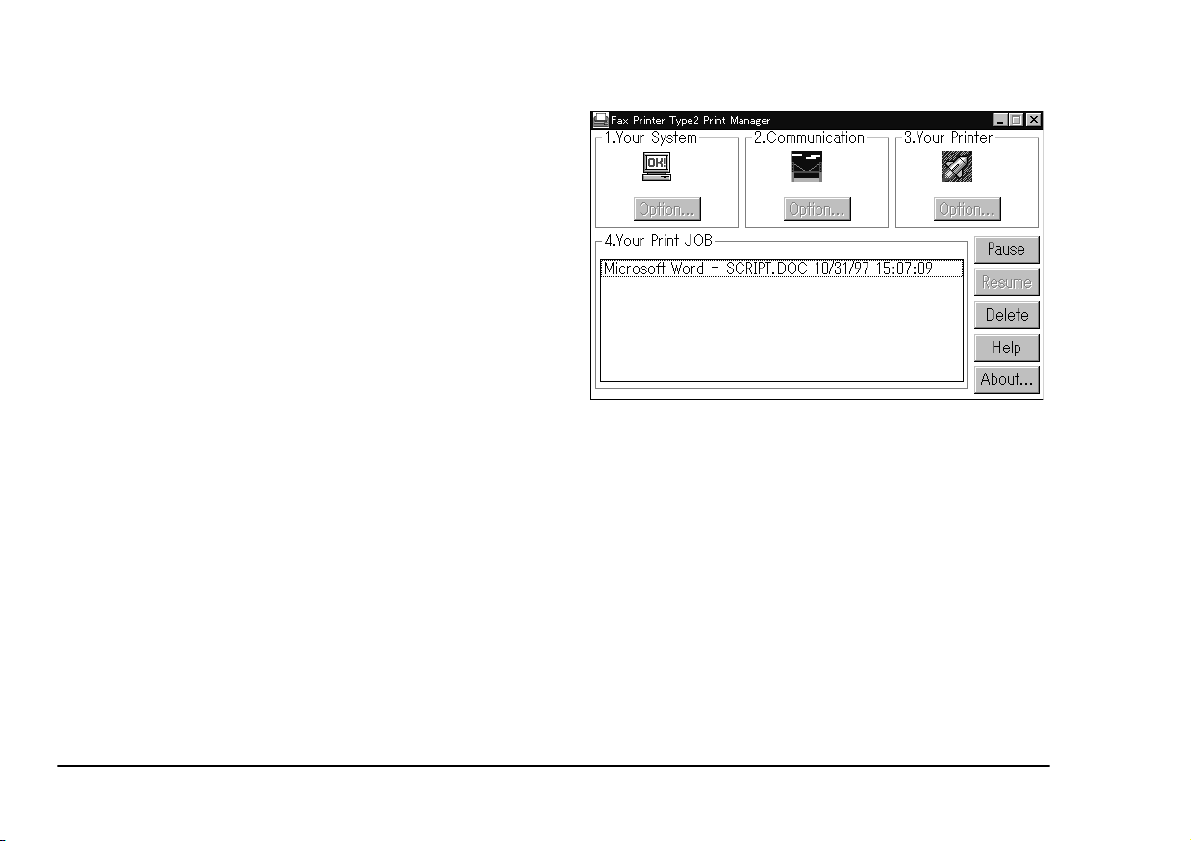
The Fax Printer Type2 Print Manager window
shows the status and environment on the computer and
printer.
Windows 95: Click the Fax Printer Type2 Print
Manager button on the taskbar to open the Fax Printer
Print Manager.
Windows 3.1: Double-click the Fax Printer
Type2 Print Manager icon at the lower edge of your
screen.
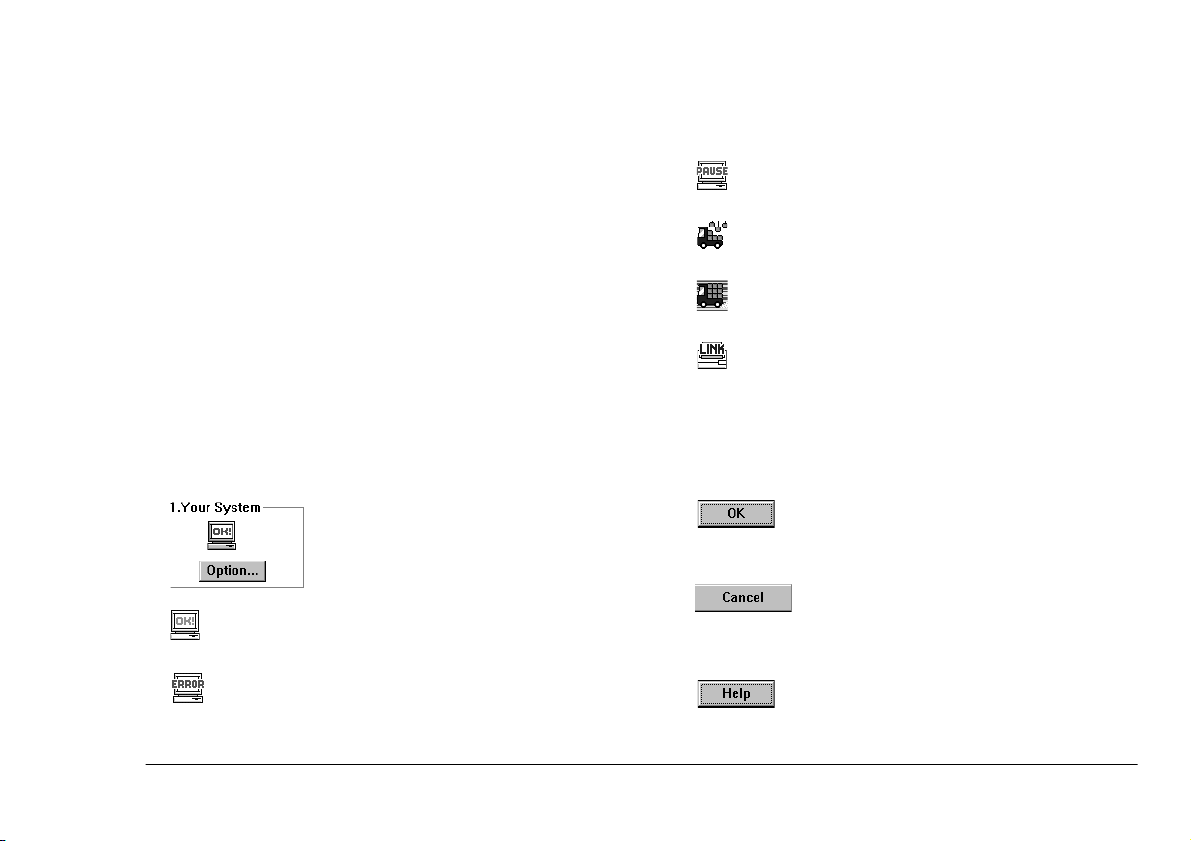
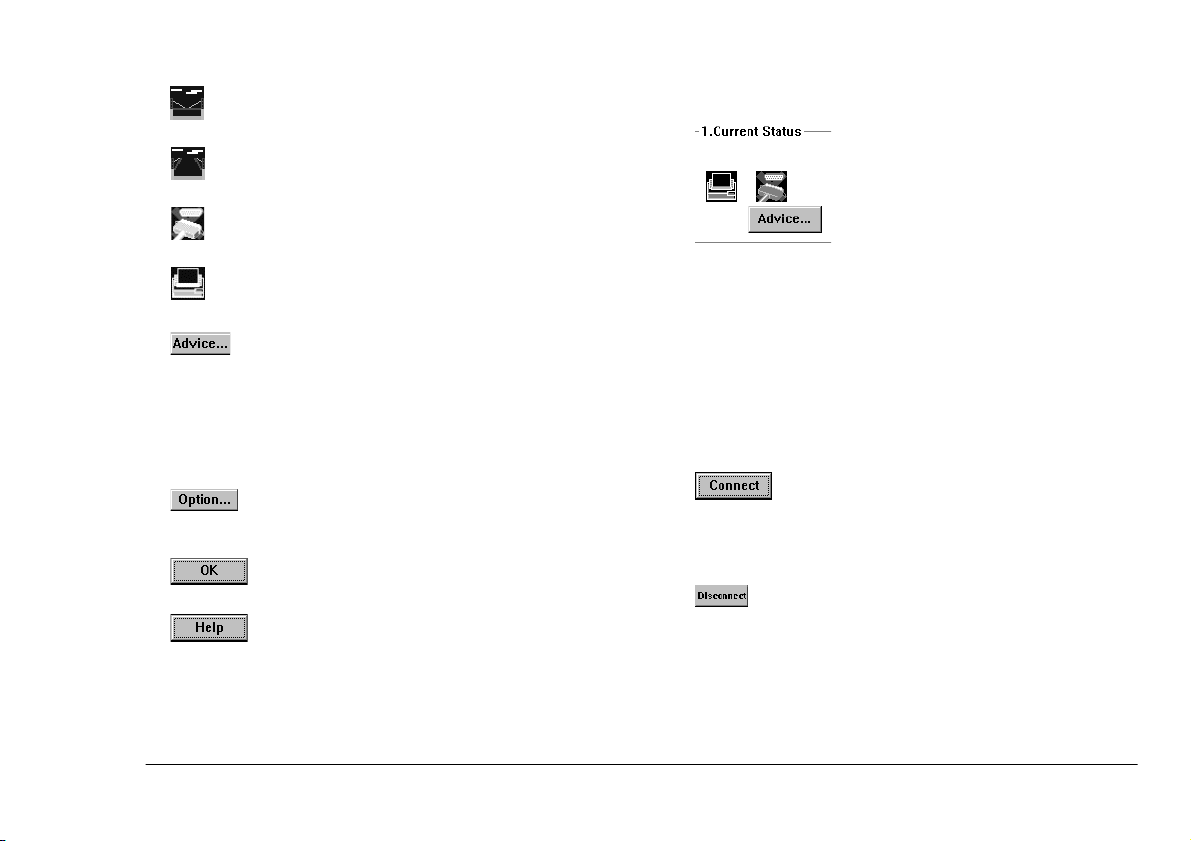
Your system
The Your System box in the Fax
Printer Type2 Print Manager win-
dow shows the current status for the
PC connected to your fax:
The PC is working properly.
An error has occurred on the PC.
The Windows Print Manager has paused.
The printing data is being imaged.
The image data is being transferred to the fax.
The Print Manager is making settings on the fax.
Click Option to open the System Option window. You
can make settings in the Control Option box and/or
Error Message Option box.
Click to save any changes you have
made to the existing settings and close
the System Option window.
Click to close the System Option window (without saving any changes) and
return to the Fax Printer Type2 Print
Manager window.
Click Help if you need assistance. The
Help window appears.
User’s Guide 15

Control option
Always watch printer status
For the Control Option box, your choices include:
Background printing
This lets you keep using the PC while the fax prints “in
the background,” but printing speed is slower. You can
also select the background printing
Your priority choices are High, Medium and Low. The
higher the priority, the PC will work harder to finish the
print job (but, of course, it therefore will allow less other work in the “foreground”).
priority
:
Use spooler (jam recovery)
With this function activated, the Fax Printer Type2
Print Manager
drive. When you print multiple pages, we suggest you
make sure this function is activated, for higher performance. That way, if a paper jam occurs during printing,
you can remove the jammed paper and resume the
printing job from where the jam stopped everything.
the print data onto the PC hard
spools
If this is activated, the Print Manager monitors the
printer status at all times. If it is off, the Print Manager
monitors the printer status only when printing.
Activating this feature may slow other PC work, particularly on slower PCs and/or on Windows 3.x.
Error message option
For Error Message Option, your choices include:
Picture Mode
Error messages appear as an
ment. (See chapter 4)
Dialog Box Mode
Error messages appear as an
(See chapter 4)
Sound Out
An error beep sounds when an error occurs.
illustration
icon
and error state-
and error statement.
Communication
The Communication box in the Fax Printer Type2
Print Manager window displays the communication
status between your computer and your fax. The icon
shows the
PC and fax (including the connecting cable):
of the communication link between the
status
16 OKIOFFICE 120 Printer Module
The link is working fine.
The computer and the fax cannot communicate
with each other.
Either the printer cable is not connected or the fax
is turned off.
English
Current status
This shows you an iconic representation of the current PC/fax status.
If an error occurs, click Advice for
more information of an error.
The fax is not responding.
If there is a problem, click this to open the
Error Message box.
Note:
To learn about clearing an error, see “Error
Messages” in chapter 4.
Status change
Note:
To learn about clearing an error, see “Error
Messages” in chapter 4.
You can monitor and, if necessary, change
the status of the link between your computer
and fax by clicking Option.
Click OK to close this option’s window.
Click Help if you need assistance. The
Help window will appear.
User’s Guide 17
You can change the communication status between
your PC and fax.
When you click this, the Print Manager
monitors printer status. When you print, you
need not click this because the Print Manager automatically connects to the printer.
When you click Disconnect, this disconnects the bi-directional communication between your computer and fax. Clicking this
when you’re not printing will provide a
slight improvement in your PC’s processing
speed.
Tuning
If necessary, click + (plus) or – (minus) to optimise
communication between your PC and fax. The Fax
Printer driver software checks whether the fax can receive data sent at high speed from your PC, and then adjusts internal parameters (as necessary) to send data to
the fax at optimum speed.
Note:
If using an IBM PS/2, please do not make either
of the following settings here: 5 or F.
The fax is printing.
The fax is in its power-save mode. If there is a
problem, you can click Advice to open the Error
Message box.
Note:
To learn about clearing the error, see “Error
Messages” in chapter 4.
Click the Option button to see the current
status and perform certain printer operations.
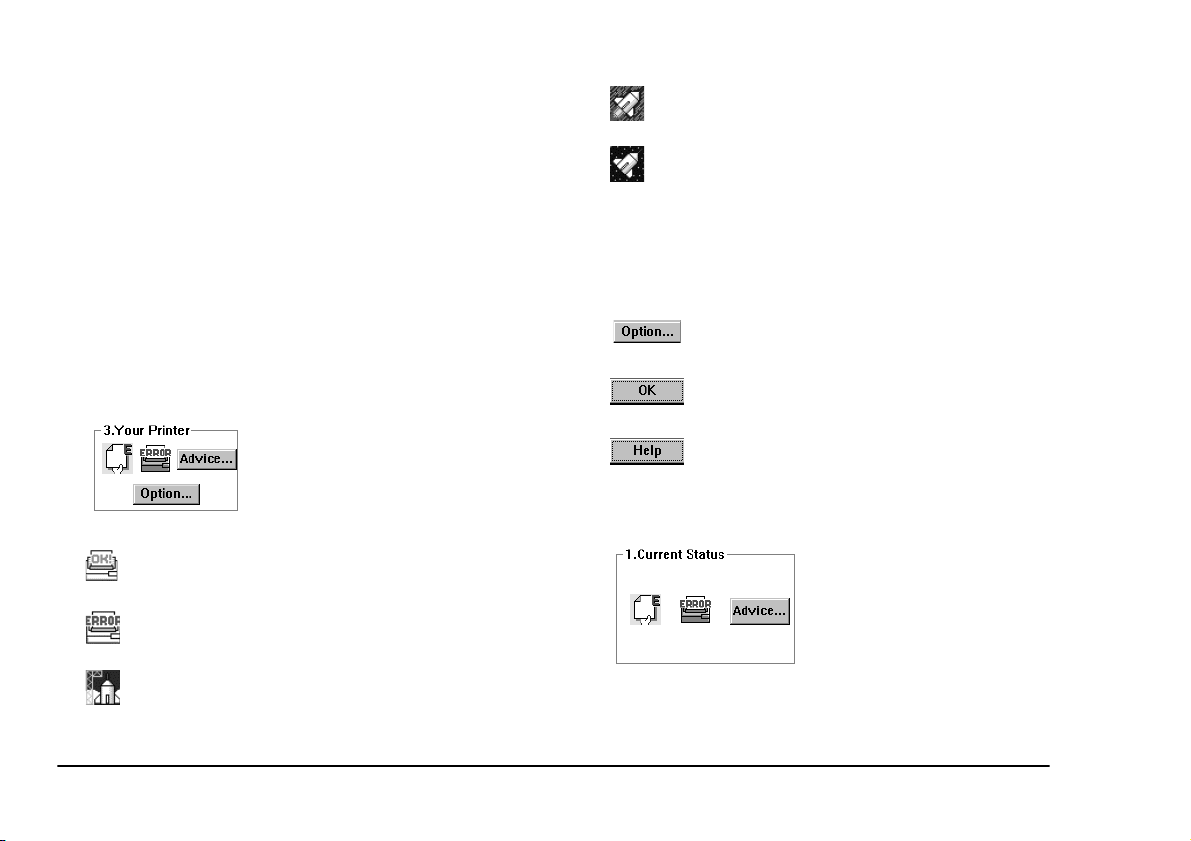
Your printer
The Your Printer box in the Fax
Printer Type2 Print Manager
window shows the messages about
your printer’s (fax’s) status.
Click OK to close this option’s window.
Click Help if you need assistance. The Help
window will appear.
Current status
The fax is working normally.
An error has occurred in the fax.
The fax is warming up.
18 OKIOFFICE 120 Printer Module
In current status box, you will
see an iconic representation of
the fax’s current status as a PC
printer.
If an error has occurred, click
Advice for more information.
Note:
To learn about clearing an error, see “Error
Messages” in chapter 4.
English
This shows basic printing status, RAM size
and any errors your fax has encountered
during the current printing operation.
Printer option box
Click this button to reset your printer module. Use this button only when the fax machine does not respond. If your fax machine
hangs up while printing, please reset it (see
“Reset your fax machine” in chapter 4).
You may print a test pattern on your fax. Select either pattern A (a checkerboard pattern) or pattern B (a grid pattern).
In printer option box, you can
select three printer operations.
Click OK to close the Printer Status window.
Your print job
The Your Print JOB box in the Fax Printer Type2
Print Manager window shows the file name currently
being processed (i. e., prepared by the PC for printing)
and the file names waiting to be processed.
Click Pause to pause the processing of current file.
Click Resume to resume the processing you paused.
Click Delete to delete either the file waiting to be print-
ed or another file you’ve clicked in the queue.
Click Help if you need assistance.
User’s Guide 19

20 OKIOFFICE 120 Printer Module
Chapter 4: Just in case
English
Removing fax printer driver software
If it becomes necessary to remove the Fax Printer
Type2 Print Manager software from your PC, here’s
how to do it.
1. If running Windows 95:
Click the Start button, point to Programs, point
to Fax Printer, then click Fax Printer Unin-
staller.
or…
Insert the Fax Printer driver disk in your disk
drive.
Click the Start button and then click Run…
Ty pe
<drive>:Rmvfpe95
driver disk is in drive A, type
then click OK.
2. If running Windows 3.x:
In Program manager, open the Fax Printer Print
Manager.
Double-click the Fax Printer Uninstaller icon in
the Fax Printer window.
(if the Fax Printer
A:Rmvfpe95
) and
or…
Insert the Fax Printer driver software disk in your
disk drive.
Click the File menu in the Program Manager,
then click Run…
Type
<drive>:Rmvfpe31
driver software drive is in drive A, type
A:Rmvfpe31
3. A window will appear. To begin removing the
software, click OK.
) and then click OK.
(if the Fax Printer
User’s Guide 21

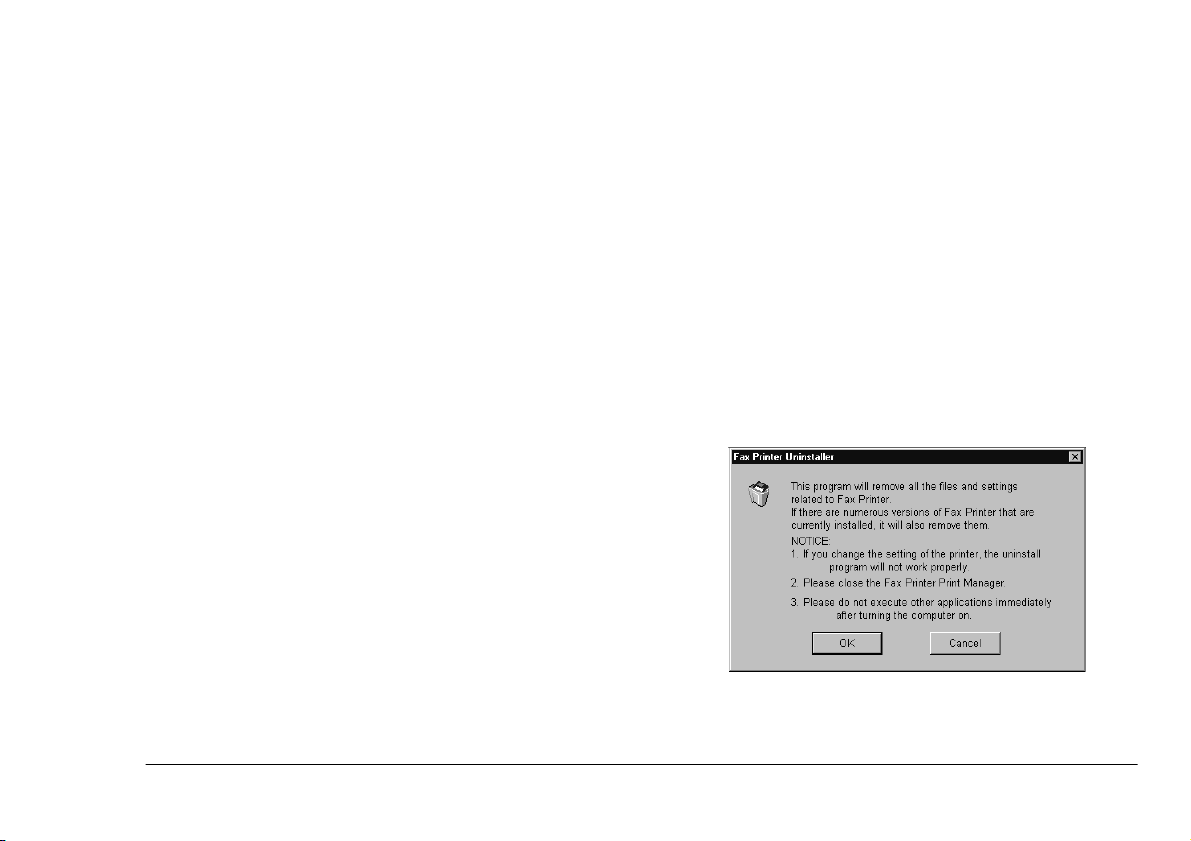
4. Next, this message is displayed. If you are ready
to go ahead and remove the software, click OK.
(If not, click Cancel to abort the operation.)
5. When you see this window, click Fax Printer
Type2.
6. Click Add so that Fax Printer Type2 appears
under
Files that will be removed
. Then click Start
Uninstaller.
7. As the uninstaller works, you will see:
8. When the operation ends, you will see:
9. Click OK to complete this operation.
22 OKIOFFICE 120 Printer Module

Resetting your machine
If your machine does not respond when you attempt to
print, reset it.
1. Press PROGRAM, Q, ENTER. The LCD will
show:
Q Reset Printer Opt.
Program/Enter
2. To reset your machine, press ENTER.
3. If you wish to cancel this operation, press STOP.
English
Dialogue Box Mode
In the Fax Printer Type2 Print Manager window, an
icon indicating the nature of the error appears in either
the Communication box or the Your Printer box. If
you need assistance understanding the error icon, click
Advice to open the Error Message box.
Error messages
If a printer error occurs, an error icon will appear on the
Communication box or Your Printer box in the Fax
Printer Type2 Manager window; also, the Error Mes-
sage box appears.
Click to show the machine’s current
er status (see chapter 3).
Click Help if you need assistance. The
Help window will appear.
Click OK to close the error message box.
PC
print-
You can select whether the error message appears in
mode or
picture
dialogue box
See “Error Message Option” in chapter 3.
mode, as shown below.
Some errors will allow printing to continue. Others will
stop printing and require you to print again.
Picture Mode
User’s Guide 23

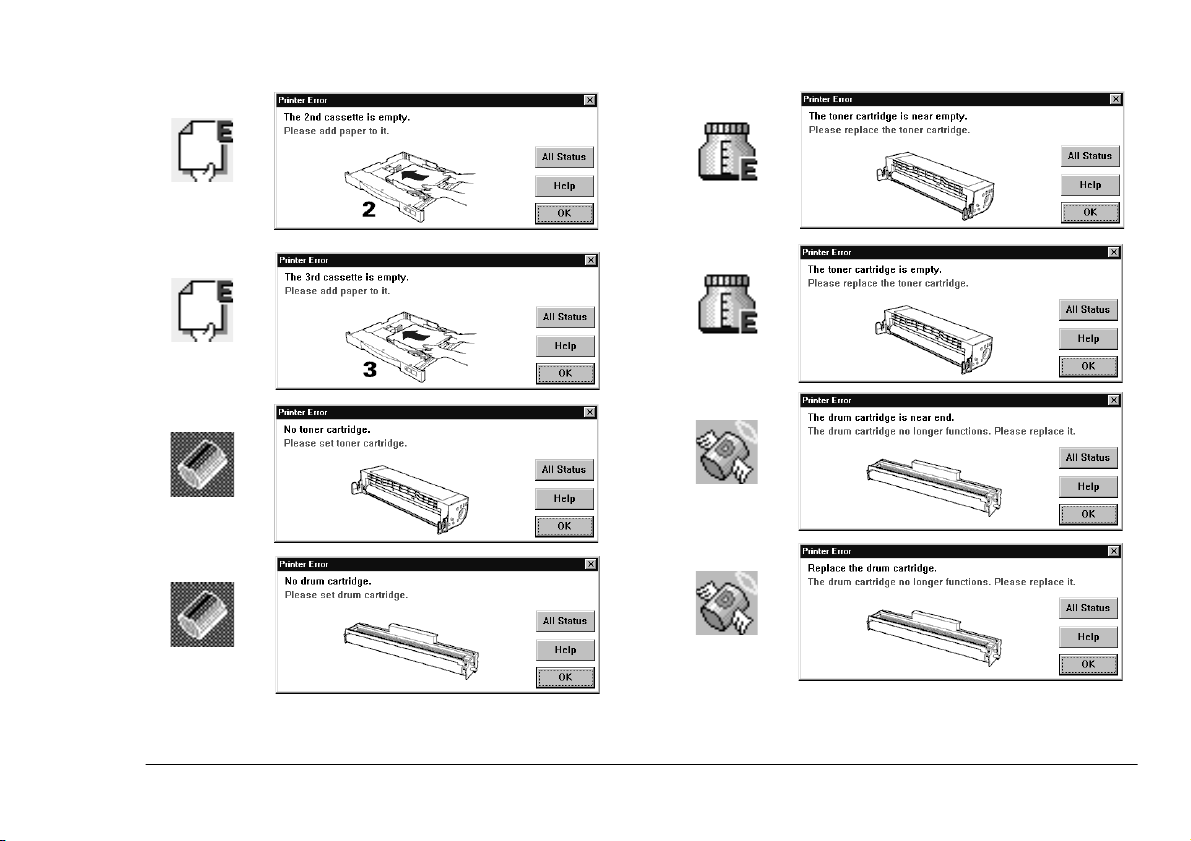
List of error messages
24 OKIOFFICE 120 Printer Module
English
User’s Guide 25

26 OKIOFFICE 120 Printer Module

English
User’s Guide 27

Too little virtual memory
System errors
Incorrect DOS Version
This printer does not support the DOS version
you are using.
version 3.3 or later.
Incorrect Windows Version
This printer does not support the Windows version you are using.
dows 3.0) or later.
Too little computer RAM
Your PC has too little RAM. (A minimum of 4
MB is required.)
sary, consult your PC’s operating instructions or
take the PC to an authorised service provider.)
Your computer must use MS-DOS
Install Windows 3.1 (
Add RAM to your PC. (If neces-
not
Win-
Your PC has too little virtual memory.
dows, increase the virtual memory setting. (If
necessary, consult the operating instructions, or
Windows Help, for the Windows version you are
using.)
Free hard disk space is insufficient
Your PC’s hard disk does not have enough free
space to allow you to install this Fax Printer driver software.
hard disk.
Not running in 386 Enhanced mode
Windows is not running in 386 Enhanced mode.
Reset Windows to run in 386 Enhanced mode. (If
necessary, consult the operating instructions, or
Windows Help, for the Windows version you are
using.)
Installation Error
The Fax Printer driver software has not been
properly installed on your PC’s hard disk.
stall the software (see “Getting Started” in
chapter 1).
Free up at least 5 MB on your PC’s
In Win-
Re-in-
28 OKIOFFICE 120 Printer Module
 Loading...