

Page 1

ML 3310e/3311e
SEL
SEL
MENU
LF
SHIFT TOF
FF/LOAD
Micro Feed
Down
POWER ALARM
Micro Feed
Up
GROUPEXIT
ITEM SET
QUIETPARKTEAR
MENU
PRINT
CHARACTER PITCH
PRINT QUALITY
NLQ
10 12 15
17
English
HSD
UTL
SSD
20 PROP
Read Me First
Page 2

Every effort has been made to ensure that the information in
this document is complete, accurate, and up-to-date. Oki
assumes no responsibility for the results of errors beyond its
control. Oki also cannot guarantee that changes in software
and equipment made by other manufacturers and referred to
in this guide will not affect the applicability of the information
in it. Mention of software products manufactured by other
companies does not necessarily constitute endorsement by
Oki.
First edition March 1996.
Copyright 1997 by Oki. All rights reserved.
Written and produced by the Oki Documentation Dept.
Oki and Microline are registered trademarks of Oki Electric
Industry Company, Ltd.
ENERGY STAR is a trademark of the United States
Environmental Protection Agency.
Epson is a registered trademark of Epson America, Inc.
IBM is a registered trademark of International Business
Machines Corp.
This product complies with the requirements of the
Council Directives 89/336/EEC and 73/23/EEC on
the approximation of the laws of the member states
relating to electromagnetic compatibility and low
voltage.(CE)
As an ENERGY STAR Partner , Oki has determined
that this product meets the ENERGY STAR
guidelines for energy efficiency.
Page 3

Safety Instructions
Your Oki printer has been carefully designed to give you years of
safe, reliable performance. As with all electrical equipment,
however, there are a few basic precautions you should take to
avoid hurting yourself or damaging the printer:
• Read the setup instructions in this handbook carefully. Be
sure to save it for future reference.
• Read and follow all warning and instruction labels on the
printer itself.
• Unplug the printer before you clean it. Use only a damp cloth;
do not use liquid or aerosol cleaners.
• Place your printer on a firm, solid surface. If you put it on
something unsteady, it may fall and be dama ged; if you place
it on a soft surface, such as a rug, sofa, or bed, the vents may
become blocked, causing the printer to overheat.
• To protect your printer from overheating, make sure all
openings on the printer are not blocked. Do not put the printer
on or near a heat source, such as a radiator. Allow enough
room around the printer for adequate ventilation.
• The printhead can get quite hot when it has been printing for
a length of time. Do not touch the printhead until it has had a
chance to cool off.
• Do not use your printer near water, or spill liquid of any kind
into it.
• Be certain that your power source matches the rating listed
on the back of the printer. If you are not sure, check with
your dealer or with your local power company.
• Your printer has an earthed, 3-pin plug as a safety feature,
and it will only fit into an earthed outlet. If you can not plug
it in, chances are you have an older, non-earthed outlet;
contact an electrician to have the outlet replaced. Do not use
an adapter to defeat the earthing.
• To avoid damaging the power cord, do not put anything on it
or place it where it will be walked on. If the cord becomes
damaged or frayed, replace it immediately.
• If you are using an extension cord or power strip with the
printer, make sure that the total of the amperes required by
all the equipment on the extension is less than the extension’s
rating. The total ratings of all equipment plugged into the
outlet should not exceed 15 (10 for Sweden only) amperes.
• The power outlet into which you plug your printer must
remain accessible at all times. (CE)
• Do not poke anything into the ventilation slots on the printer;
you could get a shock or cause a fire.
English
iRead Me First
Page 4

• Aside from the routine maintenance described in this handbook,
do not try to service the printer yourself; opening the cover may
expose you to shocks or other hazards.
• Do not make any adjustments other than those outlined in
the handbook you may cause damage requiring extensive
repair work.
If anything happens that indicates that your printer is not working
properly or has been damaged, unplug it immediately and contact
your dealer.
These are some of the things to look for:
• The power cable or plug is frayed or damaged.
• Liquid has been spilled into the printer, or it has been exposed
to water.
• The printer has been dropped, or the cabinet is damaged.
• The printer does not function normally when you are
following the operating instructions.
ii ML3310/11
Page 5

Contents
Safety .................................................................................. i
Features.............................................................................. 1
Optional Accessories ......................................................... 1
Unpacking.......................................................................... 1
Getting to Know Your Printer ............................................ 2
Removing the Shipping Restraints.................................... 3
Installing the Ribbon Cartridge ........................................ 3
Connecting to the Power ................................................... 5
Loading Paper.................................................................... 5
Loading Continuous Forms (Rear Feed) ........................... 5
Tractor Terms..................................................................... 5
Loading Single Sheets (Top Feed) .................................... 8
Setting the Top of Form (TOF) ......................................... 9
Temporarily Changing the Top of Form Setting ............. 10
Resetting the Top of Form to the Standard Setting ......... 10
Switching Paper Paths ..................................................... 11
Setting the Printhead Gap................................................ 11
Running the Self Tests ..................................................... 12
Font Sample Test ............................................................. 12
ASCII Test ....................................................................... 12
Selecting an Emulation.................................................... 12
Selecting a Printer Driver ................................................ 13
Printer Drivers ................................................................. 13
Index ................................................................................ 15
English
iiiRead Me First
Page 6

iv ML3310/11
Page 7
Features
• Four printing speeds, from super-speed draft printing to
near letter quality printing
• Rear tractor feed for continuous forms
• Top f eed for single sheets
• Zero tear
• Three emulations:
• Epson® FX
• IBM® Proprinter III
• MICROLINE® Standard
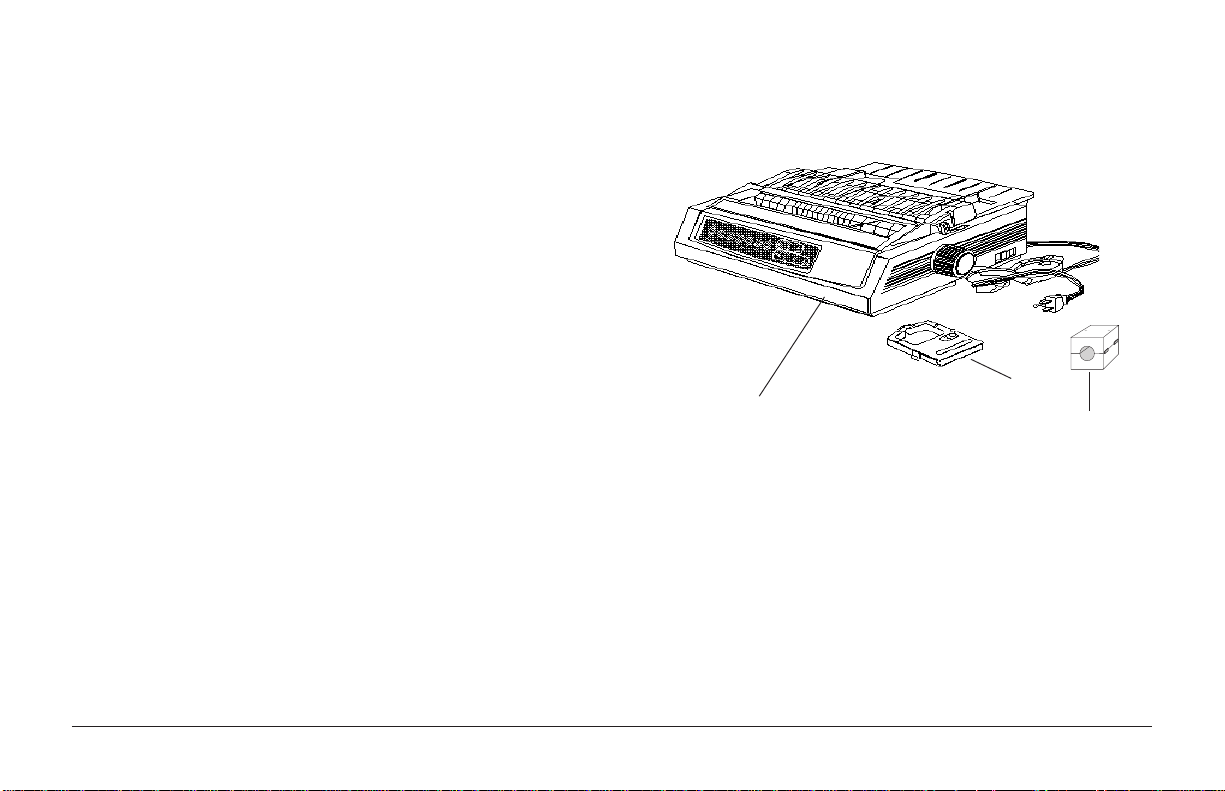
Unpacking
English
Optional Accessories
• Top-Mount Pull Tractor for multipart forms, labels, etc.
• Bottom-Mount Push Tractor
• Single Bin Cut Sheet (up to 100 sheets) Feeder with
Envelope Capability
• Dual Bin Cut Sheet Feeder
• Roll Paper Stand (ML3310 only)
• Metal Tear Bar
• Serial Interface Board
❷
❶
❶ Printer ❷ Ribbon cartridge ❸ In-line filter
Ribbon cartridge missing? Contact your dealer.
❸
1Read Me First
Page 8

Getting to Know Your Printer
Carriage Cover Open
Access Cover
Control Panel
SEL
SEL
MENU
LF
SHIFT TOF
Micro Feed
Down
POWER ALARM
GROUPEXIT
Carriage Cover
FF/LOAD
Micro Feed
Up
ITEM SET
QUIETPARKTEAR
MENU
PRINT
Paper Lever
PRINT QUALITY
CHARACTER PITCH
10 12 15
17
Paper Separator
HSD
UTL
NLQ
SSD
20 PROP
Access Cover
SEL
SEL
MENU
LF
SHIFT
FF/LOAD
Micro Feed
Down
POWER ALARM
Micro Feed
Up
GROUPEXIT
ITEM SET
MENU
Paper
Separator
PRINT QUALITY
QUIETPARKTEAR
HSD
UTL
TOF
NLQ
PRINT
SSD
CHARACTER PITCH
10 12 15
17
20 PROP
On-Off Switch
Paper Guides
On-Off Switch
Platen Knob
Control Panel
Paper Lever
Platen Knob
Set up for Single-Sheet FeedSet up for Rear Feed of Continuous Forms
2 ML3310/11
Page 9

Removing the Shipping Restraints
O
Mi
D
Installing the Ribbon Cartridge
1. Open the access cover and remove the pr inthead shipping
1. Make sure the printer is turned OFF.
English
retainer and the pull-up roller shipping retainer.
2. Centre the printhead (➊).
➊
LF
FF/LOAD
cro Feed
own
Micro Feed
PRINT QUALITY
Up
UP
ITEM SET
QUIETPARKTEAR
HSD
UTL
TOF
MENU
NLQ
PRINT
SSD
CHARACTER PITCH
SEL
SEL
MENU
SHIFT TOF
POWER ALARM
LF
FF/LOAD
Micro Feed
Down
Micro Feed
PRINT QUALITY
Up
GROUPEXIT
ITEM SET
QUIETPARKTEAR
HSD
UTL
MENU
NLQ
PRINT
SSD
CHARACTER PITCH
10 12 15
17
20 PROP
10 12 15
17
20 PROP
2. Remove the pull-up roller, then lift the paper separator
and remove the shipping retainer. Replace the pull-up
roller.
SEL
SEL
MENU
POWER ALARM
LF
SHIFT TOF
FF/LOAD
Micro Feed
Down
Micro Feed
Up
GROUPEXIT
ITEM SET
MENU
PRINT QUALITY
QUIETPARKTEAR
HSD
UTL
NLQ
PRINT
SSD
CHARACTER PITCH
10 12 15
17
20 PROP
3. Unpack the ribbon cartridge.
Ribbon shield
Note: Save the shipping retainers and the packing material
in case you ever need to ship the printer.
M
Grip points
Take-up knob
3Read Me First
Page 10

4. Install the new ribbon cartridge.
5. Turn the knob (➊) in the direction of the ar row to take up
any ribbon slack.
➊
Connecting to the Computer
Note: You must supply a shielded cable for connecting
your printer to your computer.
1. When using the parallel interface cable, it needs
to be fitted with an in-line filter. If your cable
does not have an in-line filter, one has been
supplied for you in your accessory pack.
To fit, carefully open your in-line filter and close it over
the parallel interface cable, as close to the printer end
connector as possible, ensuring that the filter snaps closed.
2. Plug the interface cable into the parallel port (➊) and
secure it with the wire loops.
➊
3. Attach the other end of the cable to your computer.
4 ML3310/11
Page 11

Connecting to the Power
Loading Paper
1. Make sure both the printer and the computer are OFF.
2. Plug the power cable into an earthed (3-pin) outlet.
Note: The printer must be installed near to a power outlet
switch which will remain easily accessible.
Your power outlet socket may not be the same as this
illustration.
3. Turn the printer on.
Loading Continuous Forms (Rear Feed)
We recommend the rear-feed path for printing reports, etc.,
on single-thickness, continuous-form paper. For graphics or
charts, it's best to use the single-sheet path (top feed).
Note: If you have paper in the paper path, be sure to
remove it before installing rear-feed paper.
Tractor Terms
Lock Lever
Tractor Cover
Pins
English
5Read Me First
Page 12
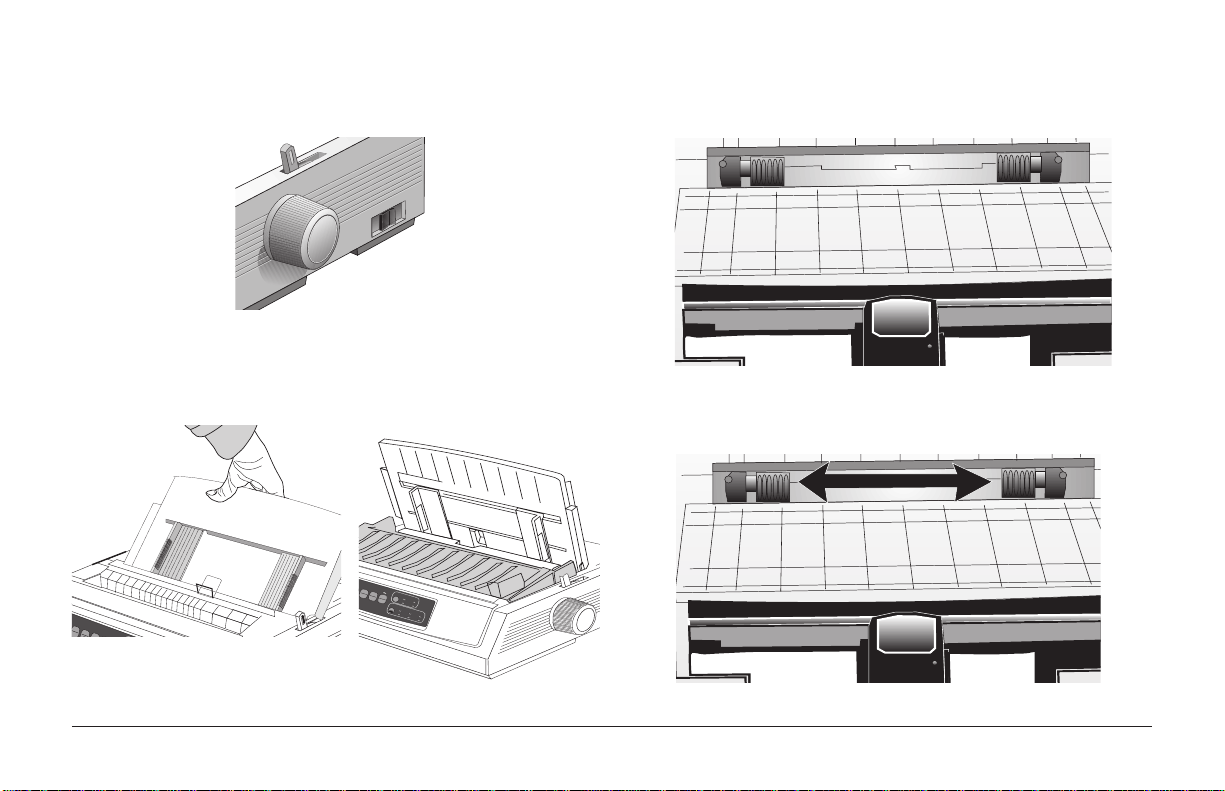
1. Move the paper lever to the position marked “REAR.” 3. Pull up on the lock levers and open the tractor covers.
M
own
2. Grasp the paper separator, lift it slightly, pull back on it,
then swing it forward.
4. Move the right tractor over to fit the width of the paper.
PRINT QUALITY
QUIETPARKTEAR
HSD
SET
UTL
TOF
NLQ
PRINT
SSD
CHARACTER PITCH
10 12 15
17
LF
FF/LOAD
icro Feed
D
20 PROP
6 ML3310/11
Page 13
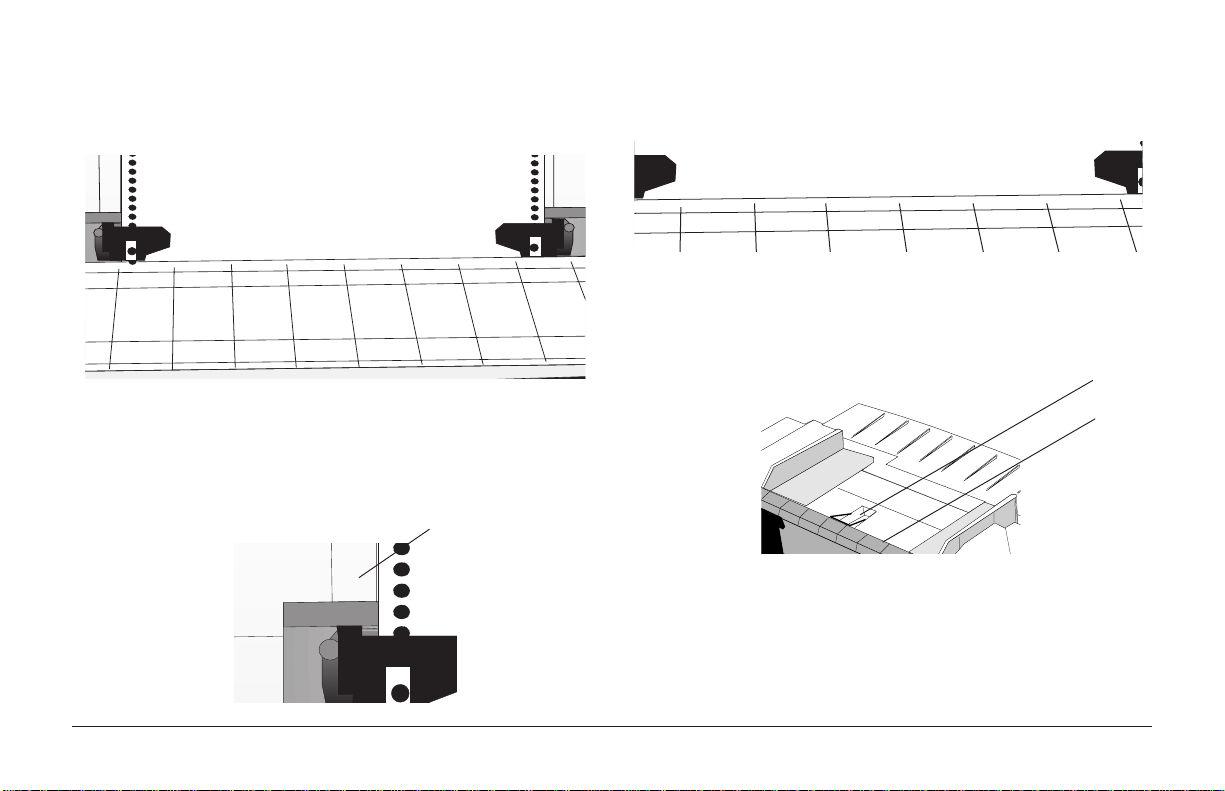
5. Place the first two holes in the paper over the tr actor pins
on either side and close the tractor covers.
7. Adjust the right tractor to centre the paper holes on the
pins, and push back the lock lever.
English
8. Lower the paper separator and place the wire guide (➊)
on the pull-up roller assembly (➋).
➊
6. Move the left tractor to align the edge of the paper with
the appropriate reference mark (➊), and push back the
lock lever.
➊
➋
9. Press FF/LOAD. The paper feeds into the printer.
Note: The standard setting for the Top of Form (where
the printing begins) is 2.54cm down from the top of
the page. To change the setting, see page 9.
7Read Me First
Page 14

Loading Single Sheets (Top Feed)
Use the single-sheet path for letterhead stationery, memos,
and individual envelopes. It is recommended for printing
graphs and charts because it provides the most accurate control
of the paper.
3. Open the carriage cover and lift the paper separator to the
single-sheet position.
Note: If you have continuous-for m paper in the path, press
the PARK button to remove it before loading single
sheets.
SEL
SEL
MENU
SHIFT TOF
Micro Feed
Down
POWER ALARM
GROUPEXIT
LF
FF/LOAD
Micro Feed
PRINT QUALITY
Up
ITEM SET
QUIETPARKTEAR
HSD
UTL
MENU
NLQ
PRINT
SSD
CHARACTER PITCH
10 12 15
17
20 PROP
1. Make sure the printer is on and deselected (SEL light
off).
4. Make sure the wire feed guide (➊) is in the paper separator.
2. Place the paper lever in the position marked “TOP.”
➊
SEL
SEL
ME
NU
LF
SHIFT
FF/LOAD
Micro Feed
EXIT
D
own
Micr
POWER
TEAR
o Feed
PRINT QUALITY
Up
GROUP
ALARM
PARK
ITEM
QUIET
HSD
SET
UTL
TOF
MENU
NLQ
PRINT
SSD
CHARACTER PITCH
10
12
17
15
20
PROP
8 ML3310/11
Page 15

QUIET
5. Adjust the paper feed guides (➊) for the width of the
QUIETPARKTEAR
FF/LOAD
LF
SEL
SEL
POWER ALARM
MENU
GROUPEXIT
ITEM SET
PRINT
MENU
SHIFT TOF
Micro Feed
Up
Micro Feed
Down
paper and place a sheet of paper in the separator. The
paper will feed into the printer.
Setting the Top of Form (TOF)
When setting the Top of Form, use the red line (➊) on the
paper shield as a reference:
English
➊
SEL
SEL
MENU
LF
SHIFT
FF/LOAD
Micro Feed
Down
POWER ALARM
Micro Feed
PRINT QUALITY
Up
GROUPEXIT
ITEM SET
QUIETPARKTEAR
HSD
UTL
TOF
MENU
NLQ
PRINT
SSD
CHARACTER PITCH
10 12 15
17
20 PROP
Note: The standard setting for the Top of Form (where
the printing begins) is 2.54cm down from the top of
the page. T o change the setting, see the next column.
M
PARK
PRINT QUALITY
HSD
➊
1. Make sure the printer is deselected (SEL light off).
2. Press and hold SHIFT (➊), then:
☛ Press LF (➋) to move Top of Form higher on page
☛ Press FF/LOAD (➌) to move Top of Form lower on
page
➋➌➊
9Read Me First
Page 16

LF
GROUP
Micro Feed
Down
3. Press SEL to re-select the printer.
QUIETPARKTEAR
FF/LOAD
LF
SEL
SEL
POWER ALARM
MENU
GROUPEXIT
ITEM SET
PRINT
MENU
SHIFT TOF
Micro Feed
Up
Micro Feed
Down
Resetting the Top of Form to the Standard Setting
SEL
SEL
MENU
1. Turn the printer off.
2. Hold PARK + QUIET/TOF while turning the printer
back on.
Temporarily Changing the Top of Form Setting
To set the Top of Form position lower for one page only:
1. Press SEL to deselect the printer.
SEL
SEL
MENU
2. Press LF to change the position of the Top of Form.
Note: This setting will not apply to any following pages.
10 ML3310/11
Page 17

Switching Paper Paths
Setting the Printhead Gap
To switc h from continuous-forms to single-sheet feed:
1. Tear off any printed pages.
2. Press PARK.
3. Move the paper separator to the single-sheet feed position.
4. Place the wire feed guide in the paper separator.
5. Move the paper lever to the position marked “TOP.”
6. Place a sheet of paper in the paper separator.
To switc h from single-sheet feed to continuous forms:
1. Press FF/LOAD to remove the single-sheet paper.
2. Lower the paper separator into the continuous-forms
position and swing the wire feed guide over onto the
pull-up roller.
3. Move the paper le v er to the position marked “REAR” or
“BOT,” as appropriate.
4. Load continuous-form paper, then press FF/LOAD.
The printhead gap is the distance between the printhead and
the platen. T o adjust the gap , open the access cover and move
the blue lever (➊) to the recommended setting from the table
below.
Note: It is recommended that the printer be switched off
prior to removing the access cover.
➊
Media Setting Media Setting
45-75g/m² paper 1 2-part form (w/carbon) 3-4
75-90g/m² bond paper 2 3-part form (w/carbon) 4- 5
Labels 3-4 4-part form (w/carbon) 5
Envelopes 5
English
11Read Me First
Page 18

LF
GROUP
Micro Feed
Down
Running the Self T ests
QUIETPARKTEAR
FF/LOAD
LF
SEL
SEL
POWER ALARM
MENU
GROUPEXIT
ITEM SET
PRINT
MENU
SHIFT TOF
Micro Feed
Up
Micro Feed
Down
Selecting an Emulation
Font Sample Test
Your printer has three emulations:
• Epson® FX
To run the test: Turn the printer off, then press and hold
LF while turning the printer on.
• IBM® Proprinter III
• MICROLINE® Standard
The printer comes set for the IBM Proprinter III emulation.
To change to one of the other emulations:
1. Make sure paper is loaded.
To stop the test: If you wish to stop the test before it is
complete, press SEL.
ASCII Test
2. Deselect the printer (SEL light off, press SEL key).
3. Press SHIFT + SEL: the printer will enter the Menu
Mode.
To run the test: Turn the printer off, then press and hold
QUIET while turning the printer on.
QUIET
TOF
To stop the test: Press SEL.
12 ML3310/11
Page 19

LF
GROUP
Micro Feed
Down
4. Press LF.
TEAR
SET
Selecting a Printer Driver
The following line will print:
Printer Control Emulation Mode IBM PPR
5. Press TEAR consecutively until the emulation you wish
to select prints in the right-hand column.
6. Press SHIFT + SEL to save your setting and exit the
Menu Mode.
SEL
SEL
MENU
POWER ALARM
SHIFT TOF
LF
Micro Feed
Down
GROUPEXIT
FF/LOAD
Micro Feed
Up
ITEM SET
MENU
PRINT
QUIETPARKTEAR
Before you can use your printer with software, you must enter
the software and select the correct printer driver. If you have
the wrong driver selected, you will see strange characters,
incorrect fonts, etc.
Important! See your software documentation for
information on how to select a printer driver .
Printer Drivers
The drive rs below are listed by decreasing compatibility with
your printer: use one as close to the top of the list as possible.
IBM Proprinter III Epson FX Microline Standard
ML3310/1 IBM ML3310/1 Epson Microline 320/321
IBM Proprinter III Epson FX286e Microline 320/321
IBM Proprinter II Epson FX 850/1050 Microline 320/321
IBM Proprinter Epson FX 86/286 Microline 292/293
IBM Graphics Printer Epson FX Microline 192/193
Epson FX800/1000 Microline 182/183
13Read Me First
English
Page 20

14 ML3310/11
Page 21

Index
A
Access cover ..................................... 2
Accessories ....................................... 1
ASCII test ....................................... 12
C
Carriage cover................................... 2
Computer connection........................ 4
Covers
access............................................ 2
carriage ......................................... 2
tractor ........................................... 5
D
Defaults, resetting........................... 10
Drivers, printer................................ 13
E
Emulations ............................. 1, 12-13
Envelopes, head gap setting............ 11
Epson emulation .................... 1, 12-13
F
Factory setting, top of form............ 10
Font sample test.............................. 12
Forms, head gap settings ................ 11
G
Guides, paper.................................... 2
Guide, wire ................................... 7, 8
H
Head gap settings............................ 11
I
IBM emulation ...................... 1, 12-13
Interface cable................................... 4
K
Knob, platen ..................................... 2
Knob, ribbon take-up........................ 4
L
Labels, head gap setting ................. 11
Loading paper ................................ 5-9
Lock lever ......................................... 5
M
Microline emulation .............. 1, 12-13
P
Paper
guides ........................................... 2
lever.............................................. 2
loading....................................... 5-9
paths, changing........................... 11
separator ....................................... 2
shield ............................................ 9
Parallel port connection .................... 4
Pins, tractor....................................... 5
Platen knob ....................................... 2
Power switch................................. 2, 5
Printer drivers ................................. 13
Printhead gap .................................. 11
English
15Read Me First
Page 22

R
Rear feed paper, loading ................ 5-7
Ribbon installation ........................ 3-4
Rolling ASCII test .......................... 12
S
Self tests ......................................... 12
Setting top of form ........................... 9
Shield, paper ..................................... 9
Shipping restraints ............................ 3
Single sheet paper,
loading .........................................8-9
T
Take-up knob, ribbon.................... 3, 4
Testing the printer........................... 12
Top of form .................................. 9-10
Tractor cover..................................... 5
Tractor pins....................................... 5
U
Unpacking......................................... 1
W
Wire guide .................................... 7, 8
16 ML3310/11
Page 23

English
17Read Me First
 Loading...