

Page 1

MC-860 / CX2633MFP
Service & Troubleshooting Guide
© 2009 OkiData Americas, Inc.
Disclaimer
Every effort has been made to ensure that the information in this document is complete, accurate, and up to date. The
manufacturer assumes no responsibility for the results of errors beyond its control. While all reasonable efforts have been made
to make this document accurate and helpful as possible, we make no warranty of any kind, expressed or implied, as to the
accuracy or completeness of the information contained herein. For the most up-to-date service information available, visit our
website, www.okidata.com
© Okidata Americas, Inc. 2009
Page 2

Chapter 1 Maintenance Procedures – Printer / ADF / Scanner
1.1 Exterior Cleaning
1.2 Cleaning the LED lens array
1.3 Cleaning the Pickup Roller
1.4 Cleaning inside the Printer
1.5 Cleaning the ADF and Scanner
Chapter 2 Service Menus and Adjustments
2.1 How to Enter the Service Menu
2.2 Service Maintenance Menu Overview
2.3 System Maintenance
2.4 Panel Maintenance
2.5 Scanner Maintenance
2.6 Fax Maintenance
2.7 Printer Maintenance
2.7.1 Switch Scan Test
2.7.2 Motor & Clutch Test
2.7.3 Test Print - Monitoring Printer Environmental Conditions
2.7.4 Color Registration Error Correction Test
2.7.5 Density Error Correction Test
2.7.6 Consumable Item Counter Display
2.7.7 Factory/Shipping Mode Switching
2.7.8 Engine Parameter Setting – Fuse Check Method
2.8 Initialization Functions
Chapter 3 Troubleshooting Print Quality
3.1 Print Quality Problems Overview
3.2 Using New Consumable Units for Testing Purposes
3.3 Things to observe when analyzing Test Pages
3.4 Print-Quality Troubleshooting
Chapter 4 Troubleshooting Paper Feeding
4.1 Troubleshooting Paper Feed
4.1.1 Paper Feed Sensor Details
4.1.2 Jam Removal Procedure
Chapter 5 Troubleshooting Error Codes
2
Page 3

Chapter 1 Maintenance Procedures – Printer
1.1 Exterior Cleaning
Clean inside and outside of the printer with a clean dry cleaning cloth and small vacuum cleaner as
required.
Note! Be careful not to touch the image drum terminals, the LED lens array and the LED head
connectors.
1. Turn OFF the power of the MFP.
Select “Setup” then “Shutdown”. Follow the on screen prompts. When shutdown is complete,
turn off the power switch on the printer.
2. Clean the surface of MFP.
Note! Do not use any liquid other than water and neutral detergent.
The MFP requires no lubrication.
Do not lubricate the unit.
Clean the surface of the unit with a clean
cloth wrung out using clean water or
neutral detergent.
Clean surface of the unit with soft clean cloth.
3
Page 4
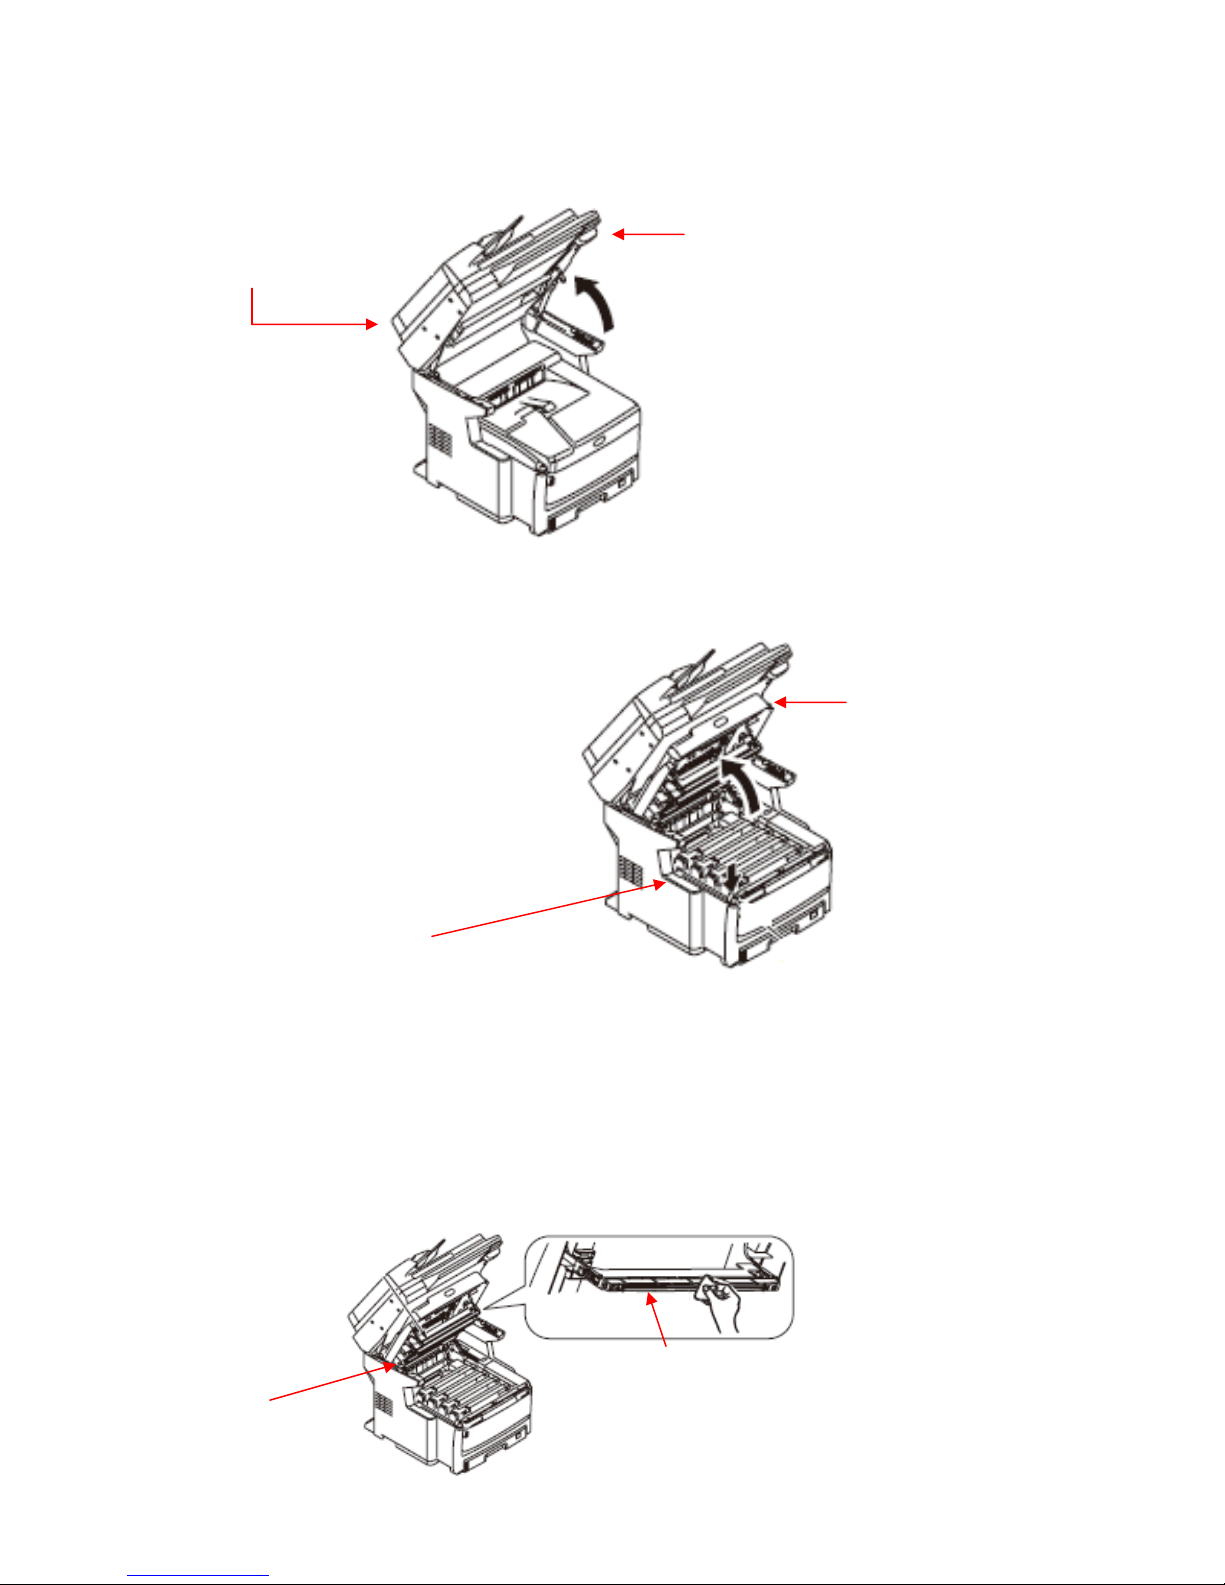
1.2 Cleaning the LED lens array
• Pull the document table lock lever to the front to release the lock, and raise the
document table.
Document Table
• Press the top cover button and open the top cover.
Top Cover Button
Document Table Lock Lever
Top Cover
Caution Failure to proceed with caution may result in burn injury. The fuser unit gets
very hot. Do not touch the surface of the fuser unit.
• Wipe the lens surface (at the four positions) of the LED head with soft tissue paper
gently and lightly.
LED Heads
Lens Surface of the LED Head
4
Page 5

T
T
1.3 Cleaning the Pickup Roller
Note! Clean the pickup roller for tray 2 and tray 3 in the same procedure.
For the MP tray, clean the pickup roller in the same procedure for the feed roller only.
(Pad is not used.)
• Pull out the tray.
• Clean the feeder roller (large) and the feeder roller (small) with a clean cloth wrung
out using clean water
• Clean the pad portion of the tray with a clean cloth wrung out using clean water
Feed Roller (Large)
Feed Roller (Small)
Pad
ray 1
Roller
ray 2, Tray 3
5
Page 6

1.4 Cleaning inside the Printer.
Toner can adhere to the metal shaft that is located in between the fuser and the cyan
image drum cartridge depending on the print pattern. Perform cleaning of the inside of
the MFP if toner has adhered to the metal shaft.
• Turn OFF the power of the MFP.
• Pull the document table lock lever to the front to release the lock, and raise
the document table. Then Press the top cover button and open the top cover.
• Remove the four image drum cartridges from the MFP.
• Cover the removed image drum cartridge with a black paper.
Note! Use caution when handling the image drums. Be very careful not to expose the
image drum to direct sun light or intense light. Do not leave it out under normal
illumination even indoors for 5 minutes or longer.
• Remove the fuser unit from the MFP.
Caution Failure to proceed with caution may result in burn injury. The fuser unit gets
very hot. Do not touch the surface of the fuser unit.
• Raise the fuser unit lock lever (shown in blue) in the direction shown by the
arrow.
Drum Cartridges
6
Page 7

(
)
• Hold the handle of the fuser unit and remove it.
Fuser Unit Lock Lever (Blue)
• Remove the Transfer Belt unit from the MFP.
• Thoroughly clean the interior of the printer and re-install the transfer belt,
Transfer Belt
fuser, and drum units. Inspect all units before re-installation.
Fuser Handle
Transfer Belt
Retaining
Screws
Blue
7
Page 8

1.5 Cleaning the ADF and Scanner
Clean the paper path of the ADF once every month or more in order to maintain high
print quality and to transport the documents smoothly.
• Open the document cover OPEN lever and open the document cover.
Document Cover Open Lever
• Clean the document transport roller.
.
Note! Clean the entire surface of the roller by rotating the roller by hand.
(Some types of rollers can rotate in one direction only.)
• Open the inside cover.
Rollers
• Clean the document retainer roller.
Dial
Inside
top
cover
Inside Cover
Document Cover
Clean surface of the roller with a clean cloth
wrung out using clean water or neutral
detergent.
Clean surface of the roller with a clean cloth
wrung out using clean water or neutral
detergent.
Dial
Clean surface of the roller with a clean cloth
wrung out using clean water or neutral
detergent.
Document
Retainer Roller
8
Page 9

• Open the document table cover.
Clean the surface of the document retaining pad, the platen Glass and the scanning glass
with a clean cloth wrung out using clean water or neutral detergent.
Scanning Glass
Document
Retaining Pad
Platen Glass
9
Page 10

Chapter 2 Service Menus and Adjustments
The service function is to be used for the purposes of MFP maintenance by the experienced
Maintenance / service engineer, and are not open to general users. The respective items of the service
function are contained in the service menu.
2.1 How Enter the Service Menu
Enter the service menu by the following operation.
1. The password entry screen is displayed when the special operation of the hardware keys is operated
while an MFP is running. The MFP enters this condition waiting for password entry.
2. When the password that is entered by maintenance/service engineer matches the specified password,
the service menu is displayed.
Special Operation of the Hardware Keys
The operation procedure to display the password entry screen of the service menu is described as
follows.
1. To display the password entry screen, press the [SETUP] key while an MFP is running.
2. Press the numeric keys in the order of [#] [1] [9] [3] [7].
3. The password entry screen is displayed.
Password Entry Screen
Value Default Display Condition
Enter the password that is required to enter the service menu. (OOOOOO) (Six zeros).
Note! Data entry will appear as
Asterisks.
10
Page 11

Caution! The Password can be changed by the “Change Password” menu of the “System
Maintenance” menu. It is highly recommended that you DO NOT change this password. In the event
that the changed password is lost, the main control board and hard disk drive would need replacement.
This is not a covered expense under any machine warranty and you will incur the cost of the
replacement components.
Operation required to exit the Service Mode Screen
In order to complete operations of the service menu, the [Close] button that is displayed on the service
menu top screen should be pressed.
Note! If any setting change requires reboot of the MFP and the [Close] button is pressed, the MFP will
enter the normal operating condition after the MFP reboots.
11
Page 12

2.2 Service Maintenance Menu – Overview
System Maintenance Screen Panel Maintenance Screen Copy Maintenance Screen
Scan Maintenance Screen Fax Maintenance Screen Printer Maintenance Screen
12
Page 13

Service Maintenance Menu Structure is shown below.
Level 1 Level 2 Level 3 Level 4 Reboot
Process
System
Maintenance
(See Section 2.3)
OKIUSER
Format HDD
Format Flash ROM
Menu Reset
All Reset
Test Print Menu
New Password When Closed
Verify Password When Closed
Side Reg. None FBS
ADF (Front)
ADF (Back)
Echo support None
Modem transmission speed None
Echo support None
Modem transmission speed None
ON period None
Off Period None
Front Edge None
Side Reg. None
Front Edge None
Back Edge None
Side Reg. None
Front Edge None
Back Edge None
Panel
Maintenance
(See Section 2.4)
Copy Maintenance
Scan
Maintenance
(See Section 2.5)
Fax Maintenance
(See Section 2.6)
Change Password
LED Test
LCD Test
OP Key Test
Color Copy
Retrieve Shading Data
Clean RADF Roller
Adjust Scan Position
Country Code
TX
RX
Pulse Make Ratio
MF(Tone) Duration
Calling Timer
Attenuator
MF Attenuator
Relay
Tonal
DTFM
IBM 5577
IBM PPR III XL
EPSON FX
HP-GL/2
Printer
Maintenance
(See Section 2.7)
Line Test
Personality
Peak Control
Engine Diag. Mode
Supplementary Description of “Reboot Process”
When Closed
Reboot when executed Reboot starts automatically when the function is executed.
None Reboot is not executed and the screen moves into the normal operating condition when the [Close] button
Reboot starts automatically when the [Close] button is pressed on the top screen of the service menu.
is pressed on the top screen of the service menu.
When Closed
When Executed
When Executed
None
When Executed
When Closed
None
None
None
When Closed
None
None
When Closed
None
None
None
None
None
None
None
When Closed
When Closed
When Closed
When Closed
When Closed
When Closed
13
Page 14

2.3 System Maintenance
OKIUSER
Sets the MFP for the Destination Country.
Note! Should always be set for ODA (North America). Settings other than ODA may
result in erratic MFP operation. When the screen exits the service menu after this setting
is changed, the MFP reboots automatically.
Format HDD
Initialization of the HDD.
When [Format. HDD] is selected, the following confirmation screen is displayed.
When [Yes] is selected, the screen exits the menu and initialization of the HDD starts.
For details of the HDD initialization, refer to Section 2.8.
Format Flash ROM
Initialization of the Flash ROM.
When [Format Flash ROM] is selected, the following confirmation screen is displayed.
When [Yes] is selected, the screen exits the menu and initialization of the resident
mounted (on-board) Flash device starts.
For details of the Flash ROM initialization, refer to Section 2.8.
14
Page 15

Menu Reset (Administrator Password Reset)
Returns the administrator password to the factory shipment setting (factory default) value.
When [Menu reset] is selected, the following confirmation screen is displayed. When
[Yes] is selected, the administrator password is reset to the factory shipment setting
(factory default) value.
For details of the administrator password reset, refer to Section 2.8.
All Reset
Returns the contents of the EEPROM, FLASH ROM and HDD to the factory shipment
setting (factory default) value. When [All Reset] is selected, the following confirmation
screen is displayed. When [Yes] is selected, the screen exits the menu, and contents of the
EEPROM, FLASH ROM and HDD are reset to the factory shipment setting (factory
default) value.
For details of the reset to the factory shipment setting, refer to Section 2.8.
Test Print Menu
Selects to display or not to display the menu [REPORT] – [PRINT] – [ID Check Pattern]
item, and [Engine Status] item. When [Disable] is selected in this setting, the [ID Check
Pattern] and [Engine Status] items are not displayed all the time. When the screen exits
the service menu after this setting is changed, the MFP reboots automatically.
15
Page 16

Change Password
Note!
Maintenance” menu. It is highly recommended that you DO NOT change this password.
In the event that the changed password is lost, the main control board and hard disk drive
would need replacement. This is not a covered expense under any machine warranty and
you will incur the cost of the replacement components.
The Password can be changed by the “Change Password” menu of the “System
2.4 Panel Maintenance
LED Test
All LED lamps are illuminated to check if any lamp is burned out or not.
Every time when the [SETUP] key is pressed, all LED lamps are turned ON and OFF.
Operating procedure
LED lamp = OFF Red LED lamp = ON
Green LED lamp = ON All LED lamps = ON
When the [Close] button is pressed, the screen returns to the panel maintenance menu.
16
Page 17

LCD Test
Displays the test pattern on the LCD in order to check if there are inactive pixels on the
LCD.
Operating procedure
The following three kinds of test patterns can be displayed. To select the test patterns,
press the [SETUP] key.
Press the [SETUP]
key.
Press the [SETUP]
key.
Press the [SETUP]
key.
17
Page 18

Control Panel Key Test
Checks if the MFP responds normally when the hardware key and the software key on
the control panel is pressed, by observing the LCD screen if the pressed key is displayed
or not on the LCD screen. This test aims at checking all of the keys. Therefore, all keys
should be pressed in the specified order in order to check that all keys have been pressed.
Operating procedure
When this test is selected, the panel key test screen is displayed as shown below. Press all
of the keys in the specified order as shown in the picture below.
When a key is pressed in the specified order, the following messages are displayed.
When a key is pressed in a wrong order, the following messages are displayed.
18
Page 19

2.5 Scanner Maintenance
Shading Data Loading
Shading data of FBS and that of RADF (both-side copy model only) are loaded. This
item should be executed whenever any of the following items is performed.
• When the scanner lamp is replaced *
• When the mirror carriage adjustment is performed *
• When the scanner Main PCB is replaced
Operating procedure
When this item is selected Confirm that the RADF unit is closed.
the following screen is displayed. Then press the [Start] button.
Scanning Roller Cleaning
Operating procedure
When this item is selected, the following screen is displayed.
19
Page 20

Scan Position Adjustment
Side registration adjustment - The separate setting items are prepared for FBS, ADF
(front side) and ADF (back side) independently.
Setting for Flat Bed Scanning (FBS)
Perform adjustment so that the scan start position in the horizontal scanning direction
during FBS Scanning stays within the reference value. Adjustment in increments of 1
item (5/600 dpi = 0.2117 mm) is possible in this setting. When a value is added in the
negative (-) direction, the scan image on a PC moves to the right. When a value is added
in the positive (+) direction, the scan image on a PC moves to the left.
Setting for ADF (front side)
Perform adjustment so that the scan start position in the horizontal scanning direction
during ADF front side scanning stays within the reference value. Adjustment in
increments of 1 item (5/600 dpi = 0.2117 mm) is possible in this setting. When a value is
added in the negative (-) direction, the scan image on a PC moves to the left. When a
value is added in the positive (+) direction, the scan image on a PC moves to the right.
Setting for ADF (rear side)
Perform adjustment so that the scan start position in the horizontal scanning direction
during ADF rear side scanning stays within the reference value. Adjustment in
increments of 1 item (5/600 dpi = 0.2117 mm) is possible in this setting. When a value is
added in the negative (-) direction, the scan image on a PC moves to the left. When a
value is added in the positive (+) direction, the scan image on a PC moves to the right.
Top End Position Adjustment
Perform adjustment so that the scan start position in the vertical scanning direction during
FBS scanning stays within the reference value. If shade is scanned at the top end of a
document, make adjustment in the positive direction. If deficiency occurs at the top end
of a document, make adjustment in the negative direction. Adjustment in increments of 1
item (0.1408 mm) is possible in this setting. When a value is added in the negative (-)
direction, the scan image on a PC moves down. When a value is added in the positive (+)
direction, the scan image on a PC moves up.
Setting for ADF (front side)
Perform adjustment so that the scan start position in the vertical scanning direction during
ADF front side scanning stays within the reference value. If shade is scanned at the top
end of a document, make adjustment in the positive direction. If deficiency occurs at the
top end of a document, make adjustment in the negative direction. Adjustment in
increments of 1 item (0.0619 mm) is possible in this setting. When a value is added in the
negative (-) direction, the scan image on a PC moves down. When a value is added in the
positive (+) direction, the scan image on a PC moves up.
Setting for ADF (back side)
Perform adjustment so that the scan start position in the vertical scanning direction during
ADF rear side scanning stays within the reference value. If shade is scanned at the top
end of a document, make adjustment in the positive direction. If deficiency occurs at the
top end of a document, make adjustment in the negative direction. Adjustment in
increments of 1 item (0.0619 mm) is possible in this setting. When a value is added in the
negative (-) direction, the scan image on a PC moves down. When a value is added in the
positive (+) direction, the scan image on a PC moves up.
20
Page 21

Back End Position Adjustment
Precaution The rear end position adjustment should be executed after the top end
position adjustment is completed. In addition, scanning is stopped before the rear end is
reached if amount of the specified scanning lines are scanned in the copy mode and scan
mode even though the rear end position adjustment is performed.
Setting for ADF (front side)
Perform adjustment so that the rear end scan position in the vertical scanning direction
during ADF front side scanning stays within the reference value. If shade at the rear end
of document is scanned, perform adjustment in the negative (-) direction. If deficiency
occurs at the rear end of a document, make adjustment in the negative direction.
Adjustment in increments of 1 item (0.0619 mm) is possible in this setting. However,
adjustment should be performed in increments of 16 items (1 mm) as a guide line due to
document running at an angle.
Setting for ADF (back side)
Perform adjustment so that the rear end scan position in the vertical scanning direction
during ADF rear side scanning stays within the reference value. If shade at the rear end of
document is scanned, perform adjustment in the negative (-) direction. If deficiency
occurs at the rear end of a document, make adjustment in the negative direction.
Adjustment in increments of 1 item (0.0619 mm) is possible in this setting. However,
adjustment should be performed in increments of 16 items (1 mm) as a guide line due to
document running at an angle.
Mirror Carriage Mode
This item sets Operable/Inoperable of the mirror carriage movement.
During transportation and installation of the MFP, this setting should be changed.
How to enter the mirror carriage communication mode
When the menus of [SETUP] – [Admin Setup] – [User Install] – [Mirror carriage mode]
are selected, the following screen is displayed.
Before transportation of the MFP, select [Yes] to start movement of the mirror carriage to
the specified position. When movement of the mirror carriage is complete, the following
screen is displayed.
21
Page 22
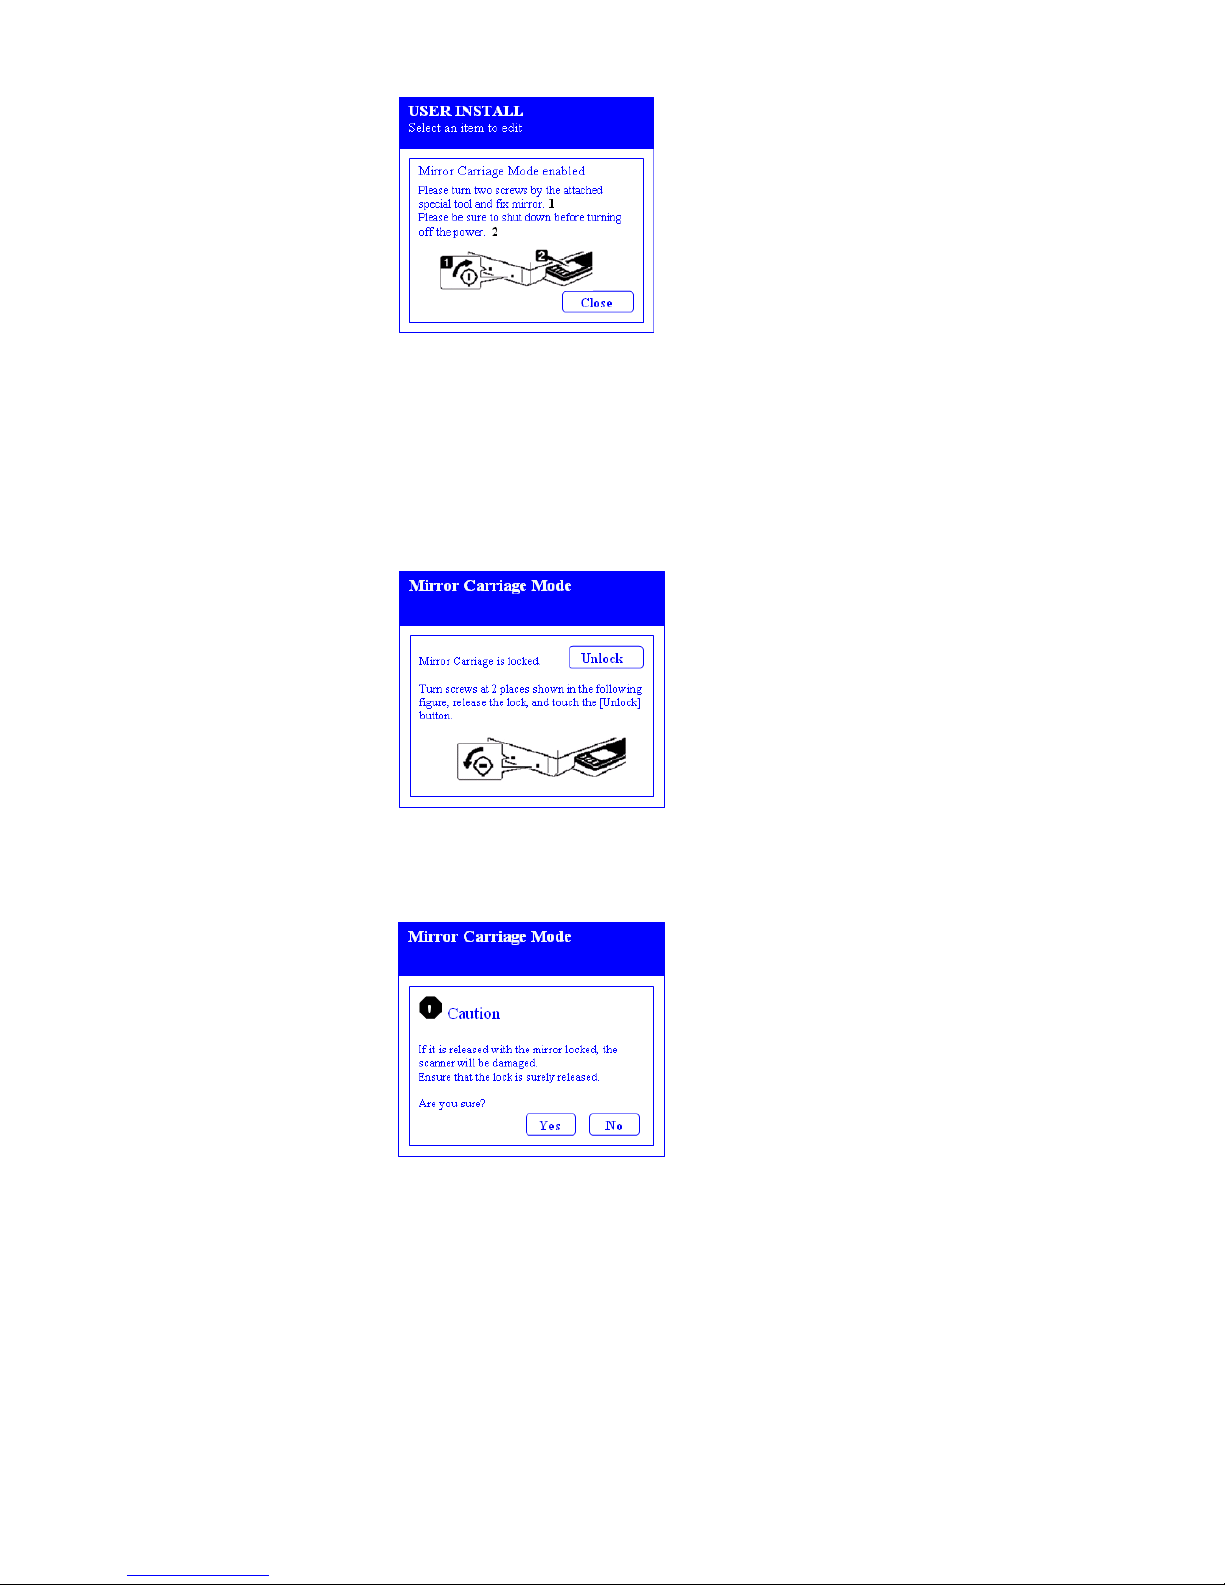
Tighten the screws at the locations as specified in the illustration, and press the [Close]
button. When the mirror carriage is locked in the specified position, select the menus
[SETUP] – [Shutdown] to execute the shutdown operation. Then turn OFF the power.
How to release the mirror carriage mode
When the MFP remains in the mirror carriage mode, the following standby screen is
displayed.
Remove the screws at the locations specified in the illustration, and press the [Cancel]
button. The following screen is displayed.
Confirm that the mirror carriage Fixing screws are removed. Then select [Yes] to release
the mirror carriage mode so that the mirror carriage is returned to the normal operating
condition.
22
Page 23

2.6 Fax Maintenance
Country Code
Select the country in which the MFP is going to be installed. (ODA) North America
In this setting, any country code can be selected regardless of the OKIUSER setting.
When the screen exits the service menu after this setting is changed, the MFP reboots
automatically.
Note! If any country code that is not the country of the MFP installation is selected, it
can infringe on regulations and laws of the respective countries. Be careful of this point.
Tone for Echo
TX (During Transmission)
When set to Enable
• DIS ignore once *1: Enable
• EP tone addition during V29 send *2: Enable
• Wait time between DIS – DCS *3: 1000 ms
When set to Disable
• DIS ignore once *1: Disable
• EP tone addition during V29 send *2: Disable
• Wait time between DIS – DCS *3: 0 ms
This setting is effective during all communications of direct dialing and Abbr. dialing.
DIS ignore once *1:
During the overseas communication, the DIS signal can be ignored once in order to restart the echo suppressor function that has been stopped by the CED signal. The MFP
responds against the second DIS signal and sends out the DCS signal. With this setting,
the MFP can send out the DCS signal under a good line condition with less echo. This
setting is used in the case when the communication error such as T.1.1 occurs due to
adverse effect of echo during the overseas communication.
EP tone addition during V29 send *2:
During the overseas send, reception of the training signal by the destination machine can
be ensured by adding the EP tone before the sending the training signal to avoid line
delay.
The EP tone of 0.5 seconds is added to the training signal of 9600/7200 bits/s +
TCF/training + image information.
The EP tone of 0.5 seconds at 1700 Hz can be destroyed by the group delay of
communication line so that the head portion of the training signal is damaged. In such a
case, reception of the training signal by the destination machine can be ensured by adding
the EP tone before sending the training signal.
Note! Some types of fax machines cannot receive the training signal 9600/7200 bits/s +
TCF with the EP tone. You should be aware of this type of fax machine.
Wait time between DIS – DCS *3:
Time before the DCS signal send start after the DIS signal reception end.
23
Page 24

RX (During Reception)
When set to Enable
Switching time between CED – DIS *4: 1000 ms
When set to Disable
Switching time between CED – DIS *4: 75 ms
Switching time between CED – DIS *4:
When the CED signal at 2100 Hz is sent out during reception of overseas communication,
the echo suppression stops so that the line condition becomes inferior with much echo.
As the countermeasure against the trouble, an interval is inserted after the echo
suppressor is re-started (echo suppressor re-starts after muting of 0.5 seconds) before
sending out the DIS signal upon \completion of the CED signal send-out by creating a
muted period of time. The international telephone line uses the four-wire system in which
signals are sent to the destination machine via the two-wire system –> four-wire system –
> two-wire system. The international telephone switchboard is equipped with the echo
prevention system (special switch circuit that prevents echo) called echo suppressor.
When it detects the tone signal of 2100 Hz, operation of the echo suppressor is stopped
temporarily.
Modem Transmission Speed
TX (During Transmission)
33.6 Kbps
28.8 Kbps
14.4 Kbps
9.6 Kbps
4.8 Kbps
Sets the initial value of the modem transmission speed during fax send. This setting is
effective during all communications of direct dialing and Abbr. dialing. Communication
at 14.4 kbps (V.17) is performed when the menus [Admin Setup] – [User Install] –
[Super G3] is set to OFF and this setting is set to “33.6 kbps”, “28.8 kbps”. When this
setting is “14.4 kbps (V.17)”, “9.6 kbps (V.29)”, “4.8 kbps (V.27ter)”, communication
with this setting is performed regardless of the “Super G3” setting.
RX (During reception)
33.6 Kbps
28.8 Kbps
14.4 Kbps
9.6 Kbps
4.8 Kbps
Sets the initial value of the modem transmission speed during fax receive.
Communication at 14.4 kbps (V.17) is performed when the menus [Admin Setup] – [User
Install] – [Super G3] is set to OFF and this setting is set to “33.6 kbps”, “28.8 kbps”.
When this setting is “14.4 kbps (V.17)”, “9.6 kbps (V.29)”, “4.8 kbps (V.27ter)”,
communication with this setting is performed regardless of the “Super G3” setting.
Default = 33.6 Kbps
Default = 33.6 Kbps
24
Page 25

Pulse Make Ratio Default 40%
Sets the make ratio of DP (10 pps) during call.
MF (Tome) Duration
ON Period Range 0 - 1 ms to 255 ms Default 80ms
Sets the ON period of MF (Tone) Duration send. When the setting value is “0”, the MFP
runs at the initial value of each country. When the set value is except "0", the set value
operates at 1 to 255m second.
OFF Period Range 0 - 1 ms to 255 ms Default 70ms
Sets the OFF period of MF (Tone) Duration send. When the setting value is “0”, the MFP
runs at the initial value of each country. When the set value is except "0", the set value
operates at 1 to 255m second.
Calling Timer Range 0 - 1 second to 255 seconds Default 55 seconds
Sets the Calling Timer. When the setting value is “0”, the MFP runs at the initial value of
each country. When any value other than “0” is set, the Calling Timer can be selected in
the range of 1 to 255 mm.
Attenuator Range 0 dB to -15 dB
Sets the Attenuator. It can be set in units of 1 dB. When the “Country code” is set to
“Japan”, it can be set in the range of 8 to 15 dB.
MF Attenuator Range 0 dB to -15 dB Default 70dB
Sets the MF Attenuator. It can be set in units of 1 dB.
Line Test
When “Line Test” is selected, the following screen is displayed. Select the desired test
item to be implemented.
Relay Test
Implements the relay ON/OFF test.
Relay test procedure
Press the [Relay] button on the "Line Test” screen.
Select the desired relay that is going to receive the ON/OFF test.
When the [Close] button is pressed, the screen returns to the “Line Test” screen.
When the [Reset] key is pressed, screen returns to the top screen of the service menu.
25
Page 26

Tonal Send Test
Tonal test procedure
Press the [Tonal] button on the "Line Test” screen.
Select a signal to test.
When the [Stop] key is pressed, signal send is interrupted.
When the [Close] button is pressed, the screen returns to the “Line test” screen.
When the [Reset] key is pressed, screen returns to the top screen of the service menu.
DTMF Test
Signals of the frequencies that are used by the push-button telephone can be selected for
the send test.
DTMF test procedure
Press the [DTMF] button on the "Line Test” screen.
Select a frequency to send.
When the [Stop] key is pressed, signal send is interrupted.
When the [Close] button is pressed, the screen returns to the “Line test” screen.
When the [Reset] key is pressed, screen returns to the top screen of the service menu.
2.7 Printer Maintenance
Personality
Default setting of the PDL language that is supported by the respective destination
specification can be changed. The PDL language that has been set to” Disable” by the
PDL setting item will not be displayed as the choices on the following menu: [SETUP][Admin Setup] - [Print Setup] . At the same time, when the print data of the PDL
language that has been set to “Disable” is received, a message “”Invalid data is received”
is displayed and the received data is discarded.
IBM 5577 Settings: Enable /Disable Default: Disable
IBM PPR III XL Settings: Enable /Disable Default: Enable
EPSON FX Settings: Enable /Disable Default: Enable
HP-GL/2 Settings: Enable /Disable Default: Disable
Peak Power Control
Set whether or not to support the low peak power control. When the screen exits the
service menu after this setting is changed, the MFP reboots automatically.
Settings: Low / Normal Default: Normal
26
Page 27

Engine Diagnostic Mode (Self-Diagnostic)
How to enter self-diagnostic mode (Level 1)
1. From the service menu, select [Printer Maintenance] and [Engine Diag. Mode] to enter
the self-diagnostic mode.
2. When the screen enters the self-diagnostic mode (Level 1), the "DIAGNOSTIC
MODE” is displayed.
00.06.06 = PU Firmware Version
S-Mode = Shipping Mode
Press either (2) key or (8) key to move to the respective self-diagnostic items.
(Menu item scrolls when either (2) key or (8) key is pressed.)
Press the (6) key to execute the selected test. Exit the test by pressing the (4) key.
27
Page 28

Level 1 Diagnostic Screens
28
Page 29

Item Self-Diagnostic Menu Adjustment Contents
Switch Scan Test
(See section 2.7.1)
Motor Clutch Test
(See section 2.7.2)
Executing Test Print
(See section 2.7.3)
Color Registration
Correction Test
(See section 2.7.4)
Density Correction Test
(See section 2.7.5)
Consumable Item Counter
Display
(See section 2.7.6)
Consumable Item
Accumulative Counter
Display
(See section 2.7.6)
Factory/Shipping
Mode Switching
(See section 2.7.7)
FUSE Status Check
(See section 2.7.7)
Engine Parameter Setting
(See section 2.7.8)
LED Head Serial Number
Display (Not Used)
SWITCH SCAN
MOTOR&CLTCH TEST
TEST PRINT
REG ADJUST TEST
DENS ADJ TEST
CONSUMABLE
STATUS
PRINTER STATUS
FACTORY MODE
SET
SENSOR SETTING
LED HEAD DATA
Input sensor and switch
Check
Motor and clutch
operational test
PU internal test pattern
print and printer
environmental conditions
Color registration error
correction system, normal
or defective
Density error correction
system, normal or defective
Consumable items,
consumption status display
Consumable items,
accumulative consumption
status display
Factory mode or Shipping
mode switching
Status display of respective
Fuses
Sets valid or invalid of error
detection using various
sensors
Display of LED head serial
Number
29
Page 30

30
Page 31

2.7.1 Switch Scan Test
This self-diagnostic menu is used to check the input sensors and switches of the print
engine.
1. Enter the self-diagnostic mode (Level 1) and press the (2) key or (8) key until
"SWITCH SCAN” is displayed in the top of the screen. Press the (6) key to execute.
(The (2) key increments the test item and (8) key decrements the test item.)
31
Page 32

Switch Scan Test
Display Detail
on Printer LCD
Paper R
oute: PU
Toner Sensor
CVO UP_LU_FU
REG L/R_OHP_WG
HT THERMISTER
HUM_TEMP_DEN
BELT_T
ID UP/DOWN
RFID COLOR*1
F-RL FI BL DT-DC
T1 PE_PNE_CVO
T1 CASETTE SIZE*2 Size setting
T2 PE_PNE_CVO_CA Tray 2 paper
T2 HOP_LF_FED
T2 CASETTE SIZE*2 Size setting
T3 PE_PNE_CVO_CA Tray 3 paper
T3 HOP_LF_FED
T3 CASETTE SIZE*2 Size setting
DUP IN_RA_FNT
DUP SK_CVO
Location 1 Location 2 Location 3 Location 4
Sensor
Tested
Entrance
Sensor 1
Toner K Sensor H - Off
Cover Upper H - Closed
Color
registration
error sensor L
Fuser
thermistor,
Upper sensor
Humidity
sensor
Belt thermistor AD value:
RFID
antenna K
Fuser release
sensor
Tray 1 paper
end sensor
switch 1
end sensor
switch 1
end sensor
switch 1
Duplex input
sensor
Duplex bottom
sensor
Display
Condition
H - Absent
L – Present
L - On
Sensor
Tested
Entrance
Sensor 2
Toner Y
Sensor
Display
Condition
H - Absent
L – Present
H - Off
L - On
Sensor
Tested
Write
Sensor
Toner M
Sensor
Display
Condition
H - Absent
L – Present
H - Off
L - On
Sensor
Tested
Unload
(Exit) Sensor
Toner C
Sensor
Display
Condition
H - Absent
L – Present
H - Off
L – On
L – Open
AD value:
***H
AD value:
***H
AD value:
***H
Color
registration
error sensor R
Fuser
thermistor,
Lower
Temperature
sensor
AD value:
***H
AD value:
***H
AD value:
***H
Fuser
thermistor,
AD value:
***H
Heater frame
thermistor
AD value:
***H
Upper sensor,
side
Density
sensor (K)
AD value:
***H
Density sensor
(YMC)
AD value:
***H
***H
UID:
***H
H: ON
L: OFF
H: absent
L: present
Port level
H, L
H: absent
L: present
Port level
H, L
H: absent
L: present
Port level
H, L
H: absent
L: present
H: absent
L: present
RFID
antenna Y
Fuse entrance
sensor
UID:
***H
H: ON
L: OFF
RFID
antenna M
UID:
***H
Size setting
switch 2
Port level
H, L
Size setting
switch 3
Port level
H, L
Size setting
switch 2
Port level
H, L
Tray 2
entrance sensor
Size setting
switch 3
H: absent
L: present
Port level
H, L
Size setting
switch 2
Duplex rear
sensor
Duplex cover
sensor
Port level
H, L
H: absent
L: present
H: Close
L: Open
Tray 3
entrance sensor
Size setting
switch 3
Duplex front
sensor
H: absent
L: present
Port level
H, L
H: absent
L: present
Up Down
sensor
RFID
antenna C
Size setting
switch 4
H: Up
L: Down
UID:
***H
Port level
H, L
Size setting
switch 4
Port level
H, L
Size setting
switch 4
Port level
H, L
32
Page 33

2.7.2 Motor & Clutch Test
This self-diagnostic menu is used to test the motors and clutches of the print engine.
1. Enter the self-diagnostic mode (Level 1) and press the (2) key or (8) key until
[MOTOR & CLUTCH TEST] is displayed in the top of the screen.
Press the (6) key to execute.
The (2) key increments the test item and (8) key decrements the test item.
2. Press the (2) key or the (8) key until the item that corresponds to the unit which is
going to be tested is displayed in the bottom of the screen.
3. When the (6) key is pressed, the test is started. The unit name starts blinking and the
corresponding unit runs for 10 seconds.
Note! After running for 10 seconds, screen returns to the item 2 state. When the
corresponding switch is pressed, the test program restarts.
• The clutch solenoid repeats ON and OFF during the normal print job. (For the model in
which the independent drive is not possible due to mechanism structure, the motor will
run at the same time.) *”ID UP/DOWN” continues running until the (#) key is pressed.
• When the desired motor is selected and the [ENTER] key is pressed for an extended
time (2 seconds), it keeps running.
4. When the (#) key is pressed, the corresponding unit stops running.
(The corresponding unit is kept displayed on the screen.)
5. Repeat items 2 to 4 as required.
6. When the (4) key is pressed, the screen exits the test.
(Screen returns to the item 1 condition.)
33
Page 34

Unit Name Display
ID MOTOR
BELT MOTOR
FUSER MOTOR
FUSER MTR REV
FUSER_RLS
REGIST MOTOR
T1 HOPPING MOTOR
FRONT MOTOR
REGIST SHUTTER
EXIT SOLENOID
DUPLEX MOTOR
DUPLEX CLUTCH
T2 HOPPING MOTOR
T2 FEED CLUTCH
T3 HOPPING MOTOR
T3 FEED CLUTCH
ID UP/DOWN
LV FAN TEST
FUSER FAN TEST
FUSER2 FAN TEST
DUPLEX FAN TEST
PS FAN TEST
Drive Restriction Conditions
Drives when all of the IDs (K/Y/M/C) are
removed.
Drives when all of the IDs (K/Y/M/C) are
removed.
If option installed
If option installed
If option installed
TOP/FRONT covers, closed condition
34
Page 35

2.7.3 Test Print
This self-diagnostic menu is used to print the test pattern contained in the PU. Other test
patterns are contained in the controller.
1. Enter the self-diagnostic mode (Level 1) and press the (2) key or (8) key until
[TEST PRINT] is displayed in the top of the screen.
Press the (6) key to execute.
The (2) key increments the test item and (8) key decrements the test item.
2. The setting items that are applicable to the test print only are displayed in the lower
column of display window. Press the (2) key or the (8) key until the corresponding item
is displayed. (When the setting value for each item is not required [Default setting],
advance to item 2.)
3. Keep pressing the (2) key or the (8) key, and press the (6) key at the item that is set in
item 2. The setup item is displayed in the upper column, and the setting value is displayed
in the lower column of the display window.
(The setting value that is displayed last is applied.)
Pressing the (4) key determines the setting value, and the screen returns to item 2.)
Repeat item 3 as required.
Display Setup Value Function
PRINT EXECUTE
TEST PATTERN
TEST CASSETTE
PAGE
COLOR
DUPLEX
MONO SPEED
0
TRAY1
TRAY2
MPT Tray
0000 Setting the number of test prints.
ON
OFF
2 PAGES STACK
OFF
1PAGES STACK
LOW
HIGH
Pressing the (4) key starts
printing/Pressing the (#) key ends
printing (in page unit).
0 = White paper print
1 to 7 Refer to next page. (Pattern print)
8 to 15 = White paper print
Select the paper feed source.
If TRAY2 is not installed, TRAY2 is not
displayed.
Selecting color or monochrome print.
ON is specified, ON/OFF setting for
each color appears.
Duplex print is executed with two sheets
stack.
Duplex print OFF select
Duplex print is executed with single
sheet stack.
Selecting monochrome print speed.
LOW: 30ppm
HIGH: 34ppm(A4),33ppm(Letter)
35
Page 36

Print Patterns
Pattern 1 Pattern 2 Pattern 3
Pattern 4 Pattern 5 Pattern 6
Pattern 7
Note! If the solid print data (Pattern 7) that is contained in
the local print function is used for test print with 100%
setting of each color, it causes offset. To prevent offset,
select the print setting of each color so that the number of
colors to be printed at the same time should be limited to 2
colors or less.
36
Page 37

Monitoring Printer Environmental Conditions
The following printer environmental conditions can be monitored during generation of
test prints.
The following messages are displayed during test print.
P *** = Number of test prints (unit: sheet)
W*** = Print wait time (unit: sheet)
Pressing the (2) key switches the display. When the (#) key is pressed, the screen exits
the test. (Screen returns to the item 1 condition.)
T =*** = Environment temperature measurement value [unit: °C]
U =*** = Upper heater temperature measurement value. [unit: °C] [###] = target temperature [unit: °C]
H =***% = Environment humidity measurement value [unit: %]
L = *** = Lower thermistor measurement value. [unit: °C] [###] = Lower thermistor AD value [unit: HEX]
Pressing the (2) key switches the display. When the (#) key is pressed, the screen exits
the test. (Screen returns to the item 1 condition.)
KTR, YTR, MTR and CTR are the transfer voltage setting values for each color. (measured in KV)
Pressing the (2) key switches the display. When the (#) key is pressed, the screen exits
the test. (Screen returns to the item 1 condition.)
KR, YR, MR, CR are transfer roller resistance values for each color. [measured in μA]
Pressing the (2) key switches the display. When the (#) key is pressed, the screen exits
the test. (Screen returns to the item 1 condition.)
ETMP: Hopping motor standard speed correction parameter (Environment temperature) [unit: DEC]
37
Page 38

UTMP: Fuser motor standard speed correction parameter (Fuser target temperature) [unit: DEC]
REG: Hopping motor standard speed timer value (I/O setting value) [unit: HEX]
EXT: Fuser motor standard speed timer value (I/O setting value) [unit: HEX]
Pressing the (2) key switches the display. When the (#) key is pressed, the screen exits
the test. (Screen returns to the item 1 condition.)
KID, YID, MID and CID are the standard speed timer values for each ID motor (I/O setting value) [unit: HEX]
Pressing the (2) key switches the display. When the (#) key is pressed, the screen exits
the test. (Screen returns to the item 1 condition.)
BELT: Belt motor standard speed timer value (I/O setting value) [unit: HEX]
FRM: [***] = Frame thermistor read-out AD value [unit: HEX] ( xxx ) = Frame temperature [unit: °C]
Pressing the (2) key switches the display. When the (#) key is pressed, the screen exits
the test. (Screen returns to the item 1 condition.)
DB: Develop voltage setup table ID number [unit: HEX]
Pressing the (2) key switches the display. When the (#) key is pressed, the screen exits
the test. (Screen returns to the item 1 condition.)
TR1: Transfer voltage parameter VTR1 table ID number [unit: HEX]
TR2: Transfer voltage parameter VTR2 table ID number [unit: HEX]
Pressing the (2) key switches the display. When the (#) key is pressed, the screen exits
the test. (Screen returns to the item 1 condition.)
The message is displayed but does not function.
Pressing the (2) key switches the display. When the (#) key is pressed, the screen exits
the test. (Screen returns to the item 1 condition.)
38
Page 39

2.7.4 Color Registration Error Correction Test
This self-diagnostic menu is used for adjustment and to investigate cause of the color
registration error of the MFP.
1. Enter the self-diagnostic mode (Level 1) and press the (2) key or (8) key until
[TEST PRINT] is displayed in the top of the screen.
2. When the (6) key is pressed, the following message is displayed.
Press the (2) key or (8) key until the desired item is displayed.
3. When the (6) key is pressed, test of the item that is being displayed on the panel is
implemented.
<< When REG ADJ EXECUTE is executed >>
• The color registration correction test is implemented. (The [ON LINE] lamp
blinks.)
• When the test is complete, the test result (OK or error name) is displayed in the
upper column of the display window and **** RESULT is displayed in the
lower column of the display window.
When the (2) key is pressed, test results are incremented and displayed in order.
When the (8) key is pressed, test results are decremented and displayed in order.
When the (4) key is pressed, screen returns to the item 2 status.
• When the (#) key is pressed while the test in progress, the test is interrupted (the
[ON LINE] lamp lights) and screen returns to the item 2 status.
<< REG ADJ RESULT is executed >>
The key operations are the same as those above.
<< When BLT REFLECT TEST is executed >>
• The color registration error correction belt reflection test is implemented. (The
[ON LINE] lamp blinks.)
• When the test is complete, the test result (OK or error name) is displayed in the
upper column of the display window and **** RESULT is displayed in the lower
column of the display window.
The key operations are the same as those above.
39
Page 40

<< When BLT REFLECT RSLT is executed >>
The key operations when BLT REFLECT RSLT is executed The key operations are the
same as those above.
When the (4) key is pressed, the screen exits the test. (Screen returns to the item 1 condition.)
Color registration correction test items
Display Details
REG ADJ EXECUTE
REG ADJ RESULT
BLT REFLECT TEST
Execution of color registration error
correction
Referring to the result of color registration
error correction
Execution of color registration error
correction belt reflectance Good/Bad
Judgment
BLT REFLECT RSLT
Referring to the result of color registration
error correction belt reflectance
Good/Bad judgment
2.7.5 Density Error Correction Test
This self-diagnostic menu is used to test the density error correction function of the MFP.
1. Enter the self-diagnostic mode (Level 1) and press the (2) key or (8) key until
[TEST PRINT] is displayed in the top of the screen.
2. When the (6) key is pressed, the following message is displayed.
Press the (2) key or (8) key until the desired item is displayed.
3. When the (6) key is pressed, test of the item that is being displayed on the panel
is implemented.
40
Page 41

<< When DENS ADJ EXECUTE is executed >>
• The Density error correction test is executed. (The [ON LINE] lamp blinks.)
• When the test is complete, the test result (OK or error name) is displayed in the
upper column of the display window and **** RESULT is displayed in the lower
column of the display window.
When the (2) key is pressed, test results are incremented and displayed in order.
When the (8) key is pressed, test results are decremented and displayed in order.
When the (4) key is pressed, screen returns to the item 2 status.
• When the (#) key is pressed while the test in progress, the test is interrupted (the
[ON LINE] lamp lights) and screen returns to the item 2 status.
•
<< When DENS ADJ RESULT is executed >>
The key operations are the same as those above.
<< When DENS ADJ PAR-SET is executed >>
The message is displayed but does not function.
<< AUTO CALIBRATION is executed >>
• Automatic setting of the density sensor sensitivity correction value is executed.
(The [ON LINE] lamp blinks.)
• When the test is complete, the test result (OK or error name) is displayed in the
upper column of the display window and **** RESULT is displayed in the lower
column of the display window.
When the (4) key is pressed, screen returns to the item 2 status.
When the (#) key is pressed while the test in progress, the test is interrupted (the [ON
LINE] lamp lights) and screen returns to the item2 status.
When the (4) key is pressed, the screen exits the test. (Screen returns to the item 1 condition.)
Display Details
DENS ADJ EXECUTE
DENS ADJ PAR-SET
DENS ADJ RESULT
AUTO CALIBRATION
Execution of density correction
The message is displayed but does not
function.
Referring to the result of density correction
Automatic setting of density sensor
sensitivity correction value
41
Page 42

2.7.6 Consumable Item Counter Display
This self-diagnostic menu is used to display the consumption status of the consumable items.
1. Enter the self-diagnostic mode and press the (2) key or (8) key until
[CONSUMABLE STATUS] is displayed on the screen.
Press the (6) key to execute.
The (2) key increments the test item and (8) key decrements the test item.
2. When the (2) key or (8) key is pressed, consumption status of the consumable items
are displayed in order. Pressing the (*) key or the (#) key is invalid.
When the (4) key is pressed, the screen exits the test. (Screen returns to the item 1
condition.)
Display Unit of Measure Details
K-ID UNIT Images
Y-ID UNIT Images
M-ID UNIT Images
C-ID UNIT Images
FUSER UNIT Prints Number of sheets up to the
TR BELT UNIT Images Number of sheets up to the
K-TONER (FULL) Percentage
Y-TONER (FULL) Percentage
M-TONER (FULL) Percentage
C-TONER (FULL) Percentage
M-WASTE TNR CNT Times
C-WASTE TNR CNT Times
K-STC MODE CNT Times
Y-STC MODE CNT Times
M-STC MODE CNT Times
C-STC MODE CNT Times
K OVER RIDE CNT Times
K OVER RIDE CNT Times
K OVER RIDE CNT Times
K OVER RIDE CNT Times
Number of rotations up to the
present time since the new ID
UNIT for each color has been
installed is displayed after
the data is converted to the
equivalent value of A4, 3Page/
Job.
present time since the new
FUSER unit has been installed.
present time since the new Belt
UNIT has been installed.
Amount of consumption of the
respective color toners are
displayed.
Amount of waste toner is
displayed.
* When it reaches 32 times, the
Waste toner FULL is issued.
Number of printed character dot
counts for the respective toners
are displayed. (Accumulative
value since the MFP has started
running.)
Accumulative number of times
of the toner cartridges for
respective colors are displayed.
42
Page 43

Printed Sheets Counter Display
This self-diagnostic menu is used to display the number of printed sheets status of the MFP.
1. Enter the self-diagnostic mode and press the (2) key or (8) key until
[PRINTER STATUS] is displayed on the screen.
Press the (6) key to execute.
The (2) key increments the test item and (8) key decrements the test item.
2. When the (2) key or (8) key is pressed, number status of the printed sheets are
displayed in order. Pressing the (*) key or the (#) key is invalid.
When the (4) key is pressed, the screen exits the test. (Screen returns to the item 1
condition.)
Display Unit of Measure Details
K – IMPRESSIONS
Y – IMPRESSIONS
M – IMPRESSIONS
C – IMPRESSIONS
TOTAL SHEET CNT
2.7.7 Factory/Shipping Mode Switching
This self-diagnostic menu is used to switch the PU PCB from the Factor mode to the
Shipping mode.
1. Enter the self-diagnostic mode (Level 1) and press the (2) key or (8) key until the
following message is displayed.
Images
Images
Images
Images
Prints
Number of printed sheets for each
color are displayed.
Total number of printed sheets
are displayed.
2. When the (6) key is pressed, the following message is displayed.
Press the (2) key or (8) key until the desired item (refer to the table below) is displayed.
3. While desired item to set is being displayed, press the (6) key to enable operator to
select the setting value.
4. While desired item to set is being displayed, press the (6) key for an extended time (3
seconds) to register the display value in EEPROM. Screen returns to the item 2
condition.
When the (4) key is pressed, the screen exits the test. (Screen returns to the item 1
condition.)
43
Page 44

Upper Display Lower Display Function
FACTORY MODE
FUSE INTACT
Note! Indicates whether fuse is
INTACT or BLOWN.
FACTORY MODE
SHIPPING MODE
BELT UNIT ******
FUSE UNIT ******
K-ID UNIT ******
Y-ID UNIT ******
M-ID UNIT ******
C-ID UNIT ******
Sets up the Factory work mode.
This is a production mode.
Note! The unit should always be set
for Shipping mode or erratic
operation may result.
Sets up the Shipping mode for
normal operation.
Checks the FUSE status of the
transfer belt unit.
Checks the FUSE status of the
fuser.
Checks the FUSE status of the
K-ID unit.
Checks the FUSE status of the
Y-ID unit.
Checks the FUSE status of the
M-ID unit.
Checks the FUSE status of the
C-ID unit.
2.7.8 Engine Parameter Setting
This self-diagnostic menu is used to set Enable or Disable of error detections using
various sensors.
This menu enables service engineer to Disable or Enable the error detection temporarily.
When use of this menu is completed, be sure to return the setting values to the default.
1. Enter the self-diagnostic mode (Level 1) and press the (2) key or (8) key until the
following message is displayed.
2. When the (6) key is pressed, the following message is displayed.
Press the (2) key or (8) key until the desired item (refer to the table below) is displayed.
3. When the (6) key is pressed, the setting values that are shown in the lower column of
the display window become selectable.
Pressing the (2) key increments the setting value. Pressing the (8) key decrements the
setting value.
4. While the desired item to set is being displayed, press the (6) key for an extended time
(3 seconds) to register the displayed value in EEPROM. Screen returns to the item 2
condition.
Press the (4) key (excluding the condition of item 4) to exit the menu. (Screen returns to
the item 1 condition.)
44
Page 45

Display Setting Operation Function
ENABLE To detect TONER SENSOR
DISABLE Not to detect
ENABLE To check BELT UNIT
CHECK__ENABLE
DISABLE Not to check
ENABLE To check ID UNIT CHECK
DISABLE Not to check
ENABLE To detect UP/DOWN SENSOR
DISABLE Not to detect
ENABLE To stop REG ADJUST ERROR
DISABLE Not to stop
Stop To prolong life DRUM OVER LIFE
Continuance
LED Head Serial Number Display
Not used for servicing the MFP at this time.
Fuse Check Method
Not to prolong
life
Sets Enable/Disable of
the toner sensor
operation
Sets Enable/Disable of
the belt installation
check job.
Sets Enable/Disable of
the ID installation check
job.
Sets Enable/Disable of
the ID UP/DOWN
sensor operation
Sets Enable/Disable of
the error stop caused by
the color registration
error detected value.
To prolong or not to
prolong the drum life
when it reaches the
lifetime.
45
Page 46

2.8 Initialization Functions
Items that can be initialized by the Administrator
The following table shows the setup items that can be initialized by administrator.
The gray colored items indicate that the data is stored in the CU side.
The white items indicate that the data is stored in the scanner unit side.
The items with the characters “CL” indicate that the registered data will be deleted
when this function is executed.
The items with the characters “FR” indicate that the data will be returned to the default
setting when this function is executed.
46
Page 47

Initialization Functions Admin Page 2
47
Page 48

Initialization Functions Admin Page 3
*1 The group counter – Reset is confidential and menu is not open in FCS.
*4 When HDD Disable is set, only administrator can log on.
(Because the access control mode setup values is stored in Flash, but the user information
is not stored in HDD.)
48
Page 49

Items that can be initialized by the Service Engineer
The initialization operations that can be performed by service engineer are shown below.
The following table shows the setup items that can be initialized by the service engineer.
Descriptions regarding description in the table are added.
The gray colored items indicate that the data is stored in the CU side.
The white items indicate that the data is stored in the scanner unit side.
The items with the characters “CL” indicate that the registered data will be deleted when
this function is executed.
The items with the characters “FR” indicate that the data will be returned to the default
setting when this function is executed.
49
Page 50

Initialization Functions Service Engineer Page 2
50
Page 51

Initialization Functions Service Engineer Page 3
51
Page 52

Initialization Functions Service Engineer Page 4
*2 Only the setups that change their initial values depending on destination or counter
code are initialized.
*3. [Filename (standard)] and [E-mail edit fixed phrase] under the menus [Scanner
function] - [E-mail setting] are initialized.
*4 When HDD Disable is set, only administrator can log on.
(Because the access control mode setup values is stored in Flash, but the user information
is not stored in HDD.)
*5 When destination is changed from Japan (such as "JP1","JPOEM") to overseas (such
as “ODA”), the portions in which Japanese language has been input are cleared. When
the profile name is Japanese language, the parameters excluding character string are
initialized at the same time.
52
Page 53

Chapter 3 Troubleshooting Print Quality
3.1 Print Quality Problems Overview
Print-quality defects can be attributed to printer components, consumables, media,
internal software, external software applications, and environmental conditions. To
successfully troubleshoot print-quality problems, eliminate as many variables as possible.
The first step is to generate prints using printable pages embedded in the printer on paper
from the Supported Media List. Use paper from a fresh, unopened ream that is acclimated
to room temperature and humidity. If the print-quality defect is still present when printing
on approved media, then investigate software applications and environmental conditions.
The printers use separate Imaging Units to develop a latent image for each color where
the colors are combined on the Transfer Unit to form the final image. In most cases,
print-quality defects are the result of one particular component in the print engine, See
the Repeating Defects chart. When a single component of the Imaging Unit is causing a
print quality defect, replace the Imaging Unit.
When analyzing a print-quality defect, first determine if the defect occurs in all colors or
only one color and if it is repeating or random. Continuous defects in the process
direction, such as voids and lines, are the most difficult to diagnose. Inspect the visible
surfaces of all rollers for obvious defects. If no defects are observed, replace the Imaging
Units, Transfer Unit, and Fuser one at a time until the defect is eliminated.
Defects Associated with Specific Printer Components
Some print-quality problems can be associated with specific assemblies, the most
common problems and the associated assemblies are listed below. Also, refer to the
printer’s Troubleshooting Print-Quality Problems pages or a specific print-quality
troubleshooting procedure for more information.
Imaging Unit
• Streaks in Process Direction (in the direction of feed, parallel with paper travel)
• Banding in Scan Direction (across the page, perpendicular to paper travel)
• Uneven Density
• Voids
• Repeating Defects
• Mis-registration
Transfer Unit
• Toner on the back side of the printed page (simplex mode)
• Light Prints
• Repeating Defects
• Mis-registration - only when there is obvious damage to the belt.
Fuser
• Hot or Cold Offsetting
• Repeating Defects
• Dark Streaks in Process Direction
LED Head
• Streaks in the Process Direction
• Uneven Density in the Scan Direction
Test Prints
A variety of test prints are available to aid in determining the quality of output from the
printer and to assist in troubleshooting. See sections 2.7.3 and 2.7.5 for details.
53
Page 54

3.2 Using New Consumable Units for Testing Purposes
The MC-860 / CX2633 will allow you to utilize new consumable units for print quality
diagnosis and troubleshooting purposes.
Note! When using new units (Drum, Transfer Belt, Fuser) to assist in troubleshooting,
you should temporarily set the printer to “Factory Mode” (See Section 2.7.8). Setting
to factory mode will allow you to use brand new units for testing purposes without
cutting the fuse.
Caution! Be sure to reset the printer to “Shipping Mode” when testing is complete.
Leaving the printer in Factory Mode may cause erratic operation of the MFP.
3.3 Things to observe when analyzing Test Pages
• Streaks in Process Direction (in the direction of feed, parallel with paper travel)
• Banding in Scan Direction (across the page, perpendicular to paper travel)
• Uneven Density
• Voids
• Repeating Defects
• Mis-registration
Note: Consult the “Repeating Defect Spacing Chart” below.
Repeating Defects Spacing
Component Defect Spacing Defect Location
Imaging Drum 94.3 mm Imaging Unit
Developer Roller 39.7 mm Imaging Unit
Charge Roller 37.7 mm Imaging Unit
Supply Roller 58.4 mm Imaging Unit
Fuser Belt 125.5 mm Fuser
Heat Roller 87.7 mm Fuser
Transfer Roller 50.3 mm Transfer Unit
54
Page 55

3.4 Print-Quality Troubleshooting
Light Prints in All Colors
The overall image density is too light in all colors. If the image is light in only one color,
see "Light Print in Only One Color".
Initial Actions to Perform
■ Perform Initial Actions from Maintenance Procedures in Chapter 1.
■ Verify the media used is supported by this printer.
■ Verify the media settings are correct at the Control Panel.
■ Print the ID Check Pattern (Reports – Print – ID Check Pattern) and
Demo page (Reports – Information – Demo Page) to see if it is an application problem.
■ Perform isolation Test Prints (Section 2.7.3).
■ Run the Density Error Correction Test in Section 2.7.5.
Areas of the Printer that Apply
■ Imaging Unit
■ LED Head
■ Transfer Unit
■ HVPS
■ PU Board
1. Verify all packaging material has been removed form the toner cartridges
2. Remove the Imaging Units and the Transfer Unit and check for toner contamination on the
high voltage contacts. Are the contacts contaminated?
3. Are the LED Heads dirty? Clean the heads with a clean, lint-free cloth. Did this correct the
problem?
4. Are the wiring harnesses on the LED Heads undamaged, properly routed and seated?
5. Inspect the high-voltage wiring harness. Reseat the wiring Harness. Did this correct the
problem?
Troubleshooting Steps
Yes – Go to Step 2
No - Remove packing material
Yes – Clean the contacts
No - Go to Step 3
Yes – Complete
No - Go to Step 4
Yes – Repair / Replace Harnesses
No - Go to Step 5
Yes – Complete
No - Replace in the following order:
Transfer Unit / Imaging Unit Sensor
Board / HVPS / PU Board
Resolution
55
Page 56

Light Prints in Only One Color
Only one color; yellow, magenta, cyan, or black, is too light on the printed image.
Initial Actions to Perform
■ Perform Initial Actions from Maintenance Procedures in Chapter 1.
■ Print the ID Check Pattern (Reports – Print – ID Check Pattern) and
Demo page (Reports – Information – Demo Page)
■ Perform isolation Test Prints (Section 2.7.3).
■ Check that the Toner Cartridge pull strip is completely removed from the affected color.
■ Run the Density Error Correction Test in Section 2.7.5.
Areas of the Printer that Apply
■ Imaging Unit
■ LED Head
■ Transfer Unit
■ HVPS
■ PU Board
1. Verify all packaging material has been removed form the toner cartridges
2. Print the 100% Solid Fill test print. Can the problem be isolated to one primary color?
3. Remove the Toner Cartridge and check for toner starvation in the Imaging Unit. Is there
evidence of toner starvation
4. Remove the Imaging Units and the Transfer Unit and check for toner contamination on the
high voltage contacts. Are the contacts contaminated?
5. Are the LED Heads dirty? Clean the heads with a clean, lint-free cloth. Did this correct the
problem?
6. Swap the LED Head of the problem color with any other LED Head.
Print a Solid Fill Test Pattern. Has the problem moved with the LED Head?
7. Are the wiring harnesses on the LED Heads undamaged, properly routed and seated?
Troubleshooting Steps
Resolution
Yes – Go to Step 2
No - Remove packing material
Yes – Go to Step 3
Yes – Replace the Toner Cartridge
No - Go to Step 4
Yes – Clean the contacts
No - Go to Step 5
Yes – Complete
No - Go to Step 6
Yes – Replace the LED Head
No - Go to Step 7
Yes – Reseat the wiring Harnesses
No - Replace in the following order:
Transfer Unit / LVPS / PU Board
56
Page 57

Blank Prints
Initial Actions to Perform
■ Perform Initial Actions from Maintenance Procedures in Chapter 1.
■ Perform isolation Test Prints (Section 2.7.3) to isolate the problem between the CU
Board and the PU Board.
Areas of the Printer that Apply
■ Imaging Unit
■ LED Head
■ PU Board
1. Print a 100% Solid Fill Test Print. Is the entire test print blank?
2. Remove the Toner Cartridge and check for toner starvation inside the Imaging Unit. Is
there evidence of toner starvation?
3. Are the LED Heads dirty? Clean the heads with a clean, lint-free cloth.
Did this correct the problem?
4. Are the wiring harnesses on the LED Heads undamaged, properly routed and seated?
5. Inspect the high-voltage wiring harness. Reseat the wiring Harness. Did this correct the
problem?
Troubleshooting Steps
Resolution
Yes – Go to Step 2
No - Have the customer check there
application and printer settings.
Yes – Replace the Toner Cartridge.
No - Go to Step 3
Yes – Complete
No - Go to Step 4
Yes – Repair / Replace Harnesses
No - Go to Step 5
Yes – Complete
No - Replace in the following order:
Transfer Unit / LVPS / Imaging Unit
Sensor Board / HVPS / PU Board
57
Page 58

Mottled or Splotchy Prints
The print image has a mottled appearance.
Note! This defect is known to occur at low humidity, and when printing on heavy weight
media.
Initial Actions to Perform
■ Perform Initial Actions from Maintenance Procedures in Chapter 1.
■ Verify the media used is supported by this printer.
■ Verify the media settings are correct at the Control Panel.
■ Print the ID Check Pattern (Reports – Print – ID Check Pattern) and
Demo page (Reports – Information – Demo Page) to see if it is an application problem.
■ Perform isolation Test Prints (Section 2.7.3).
■ Run the Density Error Correction Test in Section 2.7.5.
Areas of the Printer that Apply
■ Imaging Unit
■ LED Head
■ HVPS
■ PU Board
Troubleshooting Steps
1. Ensure the media is approved and the Control Panel and driver settings match the loaded
media. Try different media to verify consistent, reproducible problem.
2. Print the configuration page to verify the operating environment.
NOTE: Low humidity, less than 20% relative humidity can cause mottling on prints.
3. Check for toner contamination on the high voltage contacts. Remove the Imaging Units
and Transfer Unit. Is there contamination?
4. Check / Replace the Transfer Unit. Is the problem resolved?
Resolution
Yes – Go to Step 2
No - Have the customer load
approved media or correct the
settings.
Yes – Go to Step 3
No - Advise customer regarding the
printer’s environmental
specifications.
Yes – Clean the contacts
No - Go to Step 4
Yes – Complete
No - Replace in the following order:
LVPS / HVPS / PU Board
58
Page 59

Unexpected Colors
The colors produced by the printer are dramatically different from the color expected.
Initial Actions to Perform
■ Perform Initial Actions from Maintenance Procedures in Chapter 1.
■ Verify the media used is supported by this printer.
■ Verify the media settings are correct at the Control Panel.
■ Print the ID Check Pattern (Reports – Print – ID Check Pattern) and
Demo page (Reports – Information – Demo Page) to see if it is an application problem.
■ Perform isolation Test Prints (Section 2.7.3).
■ Run the Density Error Correction Test in Section 2.7.5.
Areas of the Printer that Apply
■ Imaging Unit
■ HVPS
■ PU Board
1. Print the ID Check Pattern / Demo Page and evaluate the colors. Are the colors on the test
pages representative of what the customer expects?
2. Print a configuration page to check the Imaging Unit life remaining. If the Imaging Unit is
reaching it’s maximum image count, this can reduce print-quality.
3. Print the 100% Solid Fill Test pattern and check for any missing colors. Is the problem
with a single color?
4. Is there debris or contamination on the LED Head?
5. Swap the LED Head of the problem color with any other LED Head. Print a Solid Fill Test
Pattern. Has the problem moved with the LED Head?
6. Swap the Imaging Unit of the problem color with any other Imaging Unit.
NOTE: Remove the keys before swapping. Print a Solid Fill Test Pattern to check for defects.
Has the problem color moved with the Imaging Unit?
7. Check for toner contamination on the high voltage contacts. Remove the Imaging Units
and the Transfer Unit and Is there contamination on the contacts?
8. Are the wiring harnesses on the LED heads undamaged, properly routed and seated?
9. Inspect the high-voltage wiring harness.
Troubleshooting Steps
Resolution
Yes – Complete, the problem is with
the Customer application.
No - Go to Step 2.
Yes – replace the Imaging Unit.
No - Go to Step 3.
Yes –Go to Step 4.
No - Go to Step 6
Yes – Clean with a dry, lint free cloth.
No - Go to Step 5
Yes – Replace the defective LED Head
No – Go to Step 6
Yes – Replace the Imaging Unit
No - Go to Step 7.
Yes – Clean the contacts.
No - Go to Step 8.
Yes – Go to Step 9.
No - reseat the wiring harness.
Yes – reseat the wiring harness.
No - Replace in the following order:
Transfer Unit / LVPS / Imaging Unit
Sensor Board / HVPS / PU Board
59
Page 60

Repeating Bands, Lines, Marks, or Spots
This is usually caused by a damaged roller. In some instances, the spots may be dark
instead of white and are repeated.
Initial Actions to Perform
■ Perform Initial Actions from Maintenance Procedures in Chapter 1.
■ Verify the media used is supported by this printer.
■ Verify the media settings are correct at the Control Panel.
■ Print the ID Check Pattern (Reports – Print – ID Check Pattern) and
Demo page (Reports – Information – Demo Page) to see if it is an application problem.
■ Perform isolation Test Prints form Section 2.7.3.
■ Run the Density Error Correction Test in Section 2.7.5.
Areas of the Printer that Apply
■ Imaging Unit
■ Fuser
■ Transfer Unit
Repeating Defects Spacing
Component Defect Spacing Defect Location
Imaging Drum 94.3 mm Imaging Unit
Developer Roller 39.7 mm Imaging Unit
Charge Roller 37.7 mm Imaging Unit
Supply Roller 58.4 mm Imaging Unit
Fuser Belt 125.5 mm Fuser
Heat Roller 87.7 mm Fuser
Transfer Roller 50.3 mm Transfer Unit
Troubleshooting Steps
60
Page 61

Mis-Registration, Color Layers Not Correctly Registered
The image appears blurred and the primary colors are not aligning correctly onto the final image.
Initial Actions to Perform
■ Perform Initial Actions from Maintenance Procedures in Chapter 1.
■ Verify the media used is supported by this printer.
■ Verify the media settings are correct at the Control Panel.
■ Print the ID Check Pattern (Reports – Print – ID Check Pattern) and
Demo page (Reports – Information – Demo Page) to see if it is an application problem.
■ Perform isolation Test Prints (Section 2.7.3).
■ Run the
Areas of the Printer that Apply
■ Imaging Unit
■ LED Heads
■ Color Registration Sensors
■ Transfer Unit
■ HVPS
■ CU Board
■ PU Board
1. Cycle power to the printer. Did this correct the problem?
2. Process Direction: Remove the Imaging Units and Transfer Unit. Inspect the Color
Registration Sensors for dirt, debris or toner build-up. Are the sensors clean?
3. Check the Color Registration Shutter. Run the Service Diagnostics Registration Shutter
test. Is the shutter functioning correctly?
4. Inspect the Transfer Unit for tears or damage on the edges of the belt. Is the belt damaged?
5. Check the Drum drive gears for missing or worn gear teeth. Run the Service Diagnostics
Imaging Unit Motors tests to visually inspect the gears. Are the gears working correctly?
6. Replace the Registration Sensor Board. Did this fix the problem?
7. Replace the PU Board EEPROM. Did this fix the problem?
8. Scan Direction: Use the configuration page to identify the problem color. Remove the
Imaging Unit of the suspect color. Inspect the grounding shaft. Has the shaft shifted?
9. Check the Imaging Unit guides for debris or damage. Are the guides damaged or
obstructed?
10. Check the Color Registration Sensors for dirt or debris. Be sure to check in and around
the registration shutter.
11. Check the Color Registration Shutter. Run the Service Diagnostics Registration Shutter
test. Is the shutter functioning correctly?
Continued on Next Page
Color Registration Error Correction Test (Section 2.7.4)
Troubleshooting Steps
Resolution
Yes – Complete
No - Go to Step 2.
Yes – Go to Step 3.
No - Clean the sensors.
Yes – Go to Step 4.
No - Replace the solenoid or harness.
Yes – Replace Transfer Unit.
No - Go to Step 5.
Yes – Go to Step 6.
No - Replace the Drum Drive Gear.
Yes – Complete.
No - Go to Step 8.
Yes – Complete.
No - Replace the PU Board
Yes – Replace the Imaging Unit.
No - Go to Step 9.
Yes – Clean the guides on the chassis
or replace assembly.
No - Go to Step 10.
Yes – Clean the sensor.
No - Go to Step 11.
Yes – Go to Step 12.
No - Replace the solenoid or harness.
61
Page 62

12. Are the LED Head ribbon cables undamaged, properly routed and seated?
13. Swap the LED Head of the problem color with any other LED Head. Print a
Supplies page. Has the problem moved with the LED Head?
14. Replace the Registration Sensor Board. Did this fix the problem?
15. Replace the PU Board EEPROM. Did this fix the problem?
Yes – Go to Step 13.
No - Reseat, correctly route or
replace the wiring harness.
Yes – Replace the defective LED
Head
No - Go to Step14.
Yes – Complete.
No - Go to Step15.
Yes – Complete.
No - Replace the PU Board
62
Page 63

4.1 Troubleshooting Paper Feed
4.1.1 Paper Feed Sensor Details
Diagram showing paper detection sensors in the print engine
63
Page 64

Paper Jam Code Table for the print engine
Code Number Jam Location Related Sensors
370
371
372
373
380
381
382
383
385
390
391
392
400
Multi-feed in Duplex Unit DUP-B
Feed error at front feeder IN2, WR
Duplex reversal DUP-IN, DUP-R
Duplex input DUP-F, DUP-R
Feed error at Duplex IN1
Feed IN2, WR
Transport IN1, IN2, WR, Fuser-IN, EXIT
Exit EXIT, Fuser-IN
Duplex entry EXIT, DUP-IN, DUP-R
Around Fuser Unit Fuser thermister
Tray1 IN1
Tray2 2nd-IN
Paper size error IN1
Diagram showing paper detection sensors in the RADF
Note! The RADF detects a jam using the sensors shown above. Document jam check
timings are stored in the ROM on the Main PCB to check whether a jam has occurred
according to presence/absence of the document at the relevant sensor position.
There are no jam codes generated for the RADF
64
Page 65

Sensor Location Table for the RADF
Sensor Description
PI 10 Cover open/close sensor
PI 11 Document set sensor
PI 16 Delivery reversal sensor
PI 17 Read sensor
PI 18 Registration paper sensor
4.1.2 Jam Removal Procedure
Front Cover Block (Code: 372, 380, 390, 391, 400)
Open the front cover. If either top end or rear of a jammed paper is visible, draw out the
jammed paper gently with care. When code 400 occurs, jammed paper may be unloaded
automatically sometime. In such a case, open and close the front cover. The MFP can be
recovered from the error.
#1
#2
#3
65
Page 66

Fuser Unit (Code: 381, 382, 383, 385)
Caution! The fuser unit gets very hot. Be very careful not to touch the fuser unit with
your hands.
(1) Raise the scanner and open the top cover.
(2) Raise the fuser unit lock lever (lever shown in blue) in the direction shown by the
arrow.
(3) Hold the handle and remove the fuser unit and place it on a flat workbench.
(4) Raise the jam release levers (at two locations) and draw out the jammed paper in the
direction (direction is strictly specified) shown by the arrow (toward front of a printer)
gently with care.
(5) Hold the handle and return the fuser unit back inside of a printer gently.
66
Page 67

(1) Remove the four image drum cartridges and place them on a flat workbench.
(2) Cover the removed image drum cartridge with a black paper.
(3) Draw out the jammed paper gently with care.
#1
#4
(4) Return the image drum cartridges back to the original positions.
#2
#5
#3
67
Page 68

Duplex Unit (Code: 370, 371, 373)
Note!
(1) Remove the Duplex Unit.
(2) Press the jam release lever of the duplex unit to open the duplex unit cover.
(3) Draw out the jammed paper gently with care.
Before removing the duplex unit, be sure to turn OFF the power of the MFP.
68
Page 69

Second Tray Unit (Option) (Code: 391, 393)
This manual describes the jam clear method using tray 2 as an example. Tray 3 can also
be cleared using the same method.
(1) Remove the paper tray from the second tray unit, and remove the paper.
(2) After the jammed paper is removed, open the MP tray, push up the center lever.
Then the front cover can be opened or closed.
RADF Unit
Note! If the jammed paper cannot be removed easily, do not remove with excessive force.
Rotate the dial until the jammed document can be easily removed. If an attempt is made
to pull out the jammed paper with force, the jammed document may be tear.
(1) Raise the document cover OPEN lever and open the document cover.
69
Page 70

(2) Draw out the jammed paper gently with care. If the jammed paper cannot be removed,
go to step (4).
Note! Do not pull the document out with excessive force.
(3) When the jammed paper is removed, go to step (9).
(4) Open the inside cover.
(5) If top end of the jammed paper is visible, pull it out gently.
If top end of the jammed paper is not visible, close the inside cover and go to step 3.
70
Page 71

(6) When the jammed paper is removed, close the inside cover and go to step 9.
(7) Rotate the dial so that the jammed document is unloaded.
(8) Raise the document tray. Remove the jammed document gently.
(9) Close the document cover.
71
Page 72

Chapter 5 Troubleshooting Error Codes
Troubleshooting Self Diagnostic Codes
Self Diagnostic Error Codes
Code Cause/Description Remedy
002 - 005
020
030
031
040
041
042
051
054
055
056
057
058
070
CPU Exception
CU ROM Hash Check Error
CU Resident RAM Check Error
CU Optional RAM Check Error. Is installation of the
RAM DIMM normal? Does the MFP recover from the
error when the RAMDIMM is replaced?
CU EEPROM Error
CU FLASH Error
CU PCB FLASH ROM Error
File Flash System Error, CU PCB FLASH ROM Error.
Failure to access to the Flash ROM that is directly
soldered to the CU PCB.
CU Fan Error, CPU cooling fan error on CU PCB. Is the
CU fan connector connected normally? Does the MFP
recover from the error when the fan is replaced?
Communication error between the Controller and the
Scanner Unit is detected.
Scanner unit not detected. The CU FW has d etected
that the Scanner Unit cannot be recognized though it
had been recognized when the power was turned ON.
Hard disk drive is not installed. Does the MFP recover
to normal operation after hard disk is installed and the
power is turned OFF once and back ON?
Scanner command communication timeout
Internal error is detected in the scanner controller.
Postscript core error. Error is detected inside the
postscript core.
Power Off/On. If RAM DIMM is installed, remove and
Power OFF/ON.
Re-mount RAM DIMM / Replace RA M DIMM
Replace the CU Board
Power OFF/ON.
Replace the CU PCB
Power OFF/ON.
CU PCB replacement
Re-mount RAM DIMM / Replace RA M DIMM
Replace the CU Board
Re-mount RAM DIMM / Replace RA M DIMM
Replace the CU Board
Replace the CU Board
Replace the CU Board
Re-connect fan. Replace fan. Replace TBM PCB.
If the MFP does not recover even when the power is
turned OFF and back ON, check the connection between
the Scanner and Printer.
If the MFP does not recover even when the power is
turned OFF and back ON, check the connection between
the Scanner and Printer.
Replace Hard Disk Drive.
Replace CU PCB
Replace Scanner Main PCB
Replace CU PCB
Replace Scanner Main PCB
72
Page 73

Self Diagnostic Error Codes
Code Cause/Description Remedy
072
073
074
075
081
104
106
111
112
113
121
122
123
124
126
127
128
Engine I/F Error. I/F error between PU-CU. Is CU
Assembly installed correctly?
Video Error. Error is detected when expanding of the
video data. (Illegal data is received.)
Video Error. Error is detected during expanding of the
image data.
Video Error. Error is detected during expanding of the
image data.
Parameter matching check error. EEPROM or Flash
cannot read/write normally.
Engine EEPROM read/write error is detected.
Engine control logic error.
Duplex unit of another model is detected.
The 2nd tray of another model is detected.
The 3rd tray of another model is detected.
High voltage power supply I/F error. Is the cable
between PU PCB and High voltage power supply
connected normally? Is there defective contact?
Low voltage power supply fan error. Does the fan in
the low voltage power supply (bottom right o n the
front) operate normally? Is the fan connector
connected normally?
Environment humidity abnormal/ Humidity sensor is
not connected.
Environment temperature abnormal
Dew condensation is detected in MFP. It can easily
occur when the MFP is brought indoors directly from
outdoors. Leave the MFP for two hours under normal
room temperature. Then, turn OFF the power and back
ON. Does the error reoccur?
Fixing/ ventilation fan error
05: Fixing unit end cooling fan error.
07: Cooling fan on the side of the power supply block
(side fan) error
Replace the CU Board
Replace the PU Board
Decrease resolution, and execute printing again.
Replace the CU PCB
Decrease resolution, and execute printing again.
Replace the CU PCB
Replace the CU Board
Replace the CU Board
Replace the PU Board
Replace the PU Board
Install the correct Duplex unit.
Install the correct 2nd tray.
Install the correct 3rd tray.
Check for defective contact in the high voltage system.
Replace the High voltage power Supply.
Confirm connection of the fan connector.
Replace fan motor
Replace PU PCB
Power OFF/ON.
Replace the Control panel PCB
Power OFF/ON.
Replace the Control panel PCB
Power OFF/ON.
Replace the Control panel PCB
Confirm connection of the fan connector.
Replace fan motor
Replace PU PCB
Confirm connection of the fan connector.
Replace fan motor
Replace PU PCB
73
Page 74

Self Diagnostic Error Codes
Code Cause/Description Remedy
131 - 134
142
150 - 153
154
155
160 - 163
167 - 169
170 / 171
172 - 177
181 / 182
190
200 - 202
203 – 208
214
209
LED head detection is abnormal.
(131 =Y, 132 = M, 133 = C, 134= K) Is the LED
head installed normally? Is the LED HEAD FUSE blown?
ID Up/Down Position detection error.
ID unit fuse is blown.
(150 = Y, 151 = M, 152= C, 153 = K)
Belt unit fuse is blown.
Fuser unit fuse is blown.
Toner sensor detection is defective.
(160= Y, 161 = M, 162 = C, 163= K).
Is the toner cartridge installed? Is the toner lock lever
set?
Thermistor Slope Error / Compensation Thermistor
Error
Short-circuit or open circuit of the Fuser unit
thermistor is detected.
Fuser unit thermistor detected abnormal temperature.
(High or low temperature)
Option unit I/F error (181 =Duplex Unit, 182 = Option
Tray)
System memory overflow.
PU Firmware Download Error
CU program error. CU program executed illegal pr ocess. Check the connection between CU PCB and PU PCB.
Custom Media Type table download has failed.
Install the LED head unit properly.
Check the LED HEAD FUSE.
Turn OFF the power once and back ON.
Replace LED head unit
For the fuse check method, refer to section 2.7.8.
Reinstall the ID units. Turn OFF the power and back ON.
Replace the ID UP/DOWN sensor.
Reinstall the ID unit. Turn OFF the power and back ON.
Replace ID Unit
Check the cable connection between PRZ PCB and PU
PCB.
Replace PU PCB
Reinstall the Belt unit. Turn O FF the power and back ON.
Check the cable connection
Replace Belt Unit
Replace PU PCB
After cleaning the connectors of the Fuser, re-install it.
Check the cable connection
Replace Fuser
Replace PU PCB
Rotate the toner lock lever that fixes the toner cartridge
to the locking position.
Turn OFF the power and back ON.
Replace the toner sensor Assy.
After cleaning the connectors of the Fuser, re-install it.
Replace Fuser
Replace PU PCB
After cleaning the connectors of the Fuser, re-install it.
Replace Fuser
Replace PU PCB
After cleaning the connectors of the Fuser, re-install it.
Replace Fuser
Replace Low voltage power supply
Replace PU PCB
Turn OFF the power and back ON.
Check connection of the option connector.
Replace the option unit.
Turn OFF the power and back ON.
Install the add-on RAM DIMM
Replace the add-on RAM DIMM
Turn OFF the power and back ON.
Reload PU Firmware
Replace CU PCB
Turn OFF the power and back ON.
Reload Firmware
74
Page 75

Self Diagnostic Error Codes
Code Cause/Description Remedy
231
901 - 904
918
923
928
980
RFID Reader is not installed. RFID read device error
Belt temperature is abnormal.
901: Short circuit.
902: Open circuit.
903: High temperature.
904: Low temperature.
Is the cable between the belt thermistor and high voltage
PCB connected normally?
Duplex FAN Alarm. Duplex internal FAN error.
Black image drum lock error. K ID does not rotate
properly.
Fuser motor lock error. Fuser does not rotate properly.
Media jamming error around the fuser. Media is jammed by
entangling around the fuser.
Check connections of the RFID R/W PCB.
Replace the RFID R/W PCB
Replace the P6X PCB.
Re-connect the cable properly.
Turn OFF the power and back ON.
Replace the Belt thermistor
Check that the Duplex unit is installed properly.
Check that the FAN is connected properly.
Replace the FAN.
Check that the K ID is installed properly.
Replace the K ID unit.
Replace the K ID motor.
Check that the Fuser is installed properly.
Replace the fuser unit.
Replace the fuser motor.
Replace the fuser unit.
75
 Loading...