

Page 1

User’s Manual
TopAccess Guide
User’s Manual
TopAccess Guide
Page 2
Preface
Thank you for purchasing Multifunctional Color LED Printer.
This manual describes remote setup and remote management which operated from the web based management utility
TopAccess.
Read this manual before using your Multifunctional Digital Systems or Multifunctional Digital Color Systems. Keep this
manual within easy reach, and use it to configure an environment that makes the best use of the functions.
Operations on some items are restricted depending on the privileges assigned to the TopAccess user.
This manual supports the following models.
MC760x, MC770x, MC780x, ES7470x MFP, ES7480x MFP, MPS3537mc, MPS4242mc
How to read this manual
Symbols in this manual
In this manual, some important items are described with the symbols shown below. Be sure to read these items before
using this equipment.
Indicates a potentially hazardous situation which, if not avoided, could result in death, serious
injury, or serious damage, or fire in the equipment or surrounding objects.
Indicates a potentially hazardous situation which, if not avoided, may result in minor or moderate
injury, partial damage to the equipment or surrounding objects, or loss of data.
Indicates information to which you should pay attention when operating the equipment.
Other than the above, this manual also describes information that may be useful for the operation of this equipment with
the following signage:
Describes handy information that is useful to know when operating the equipment.
Pages describing items related to what you are currently doing. See these pages as required.
Screens
The details on the touch panel menus may differ depending on how the equipment is used, such as the status of the
installed options.
The illustration screens used in this manual are for paper in the A/B format. If you use paper in the LT format, the
display or the order of buttons in the illustrations may differ from that of your equipment.
About the defaults shown in this manual
The defaults shown in this manual are the values in the standard operating environment. The values may have been
changed from these defaults.
The default for the list item is shown underlined.
Trademarks
The official name of Windows XP is Microsoft Windows XP Operating System.
The official name of Windows Vista is Microsoft Windows Vista Operating System.
The official name of Windows 7 is Microsoft Windows 7 Operating System.
The official name of Windows Server 2003 is Microsoft Windows Server 2003 Operating System.
The official name of Windows Server 2008 is Microsoft Windows Server 2008 Operating System.
Microsoft, Windows, and the brand names and product names of other Microsoft products are trademarks of Microsoft
Corporation in the US and other countries.
Apple, AppleTalk, Macintosh, Mac, Mac OS, Safari, and TrueType are trademarks of Apple Inc. in the US and other
countries.
Adobe, Acrobat, Reader, and PostScript are either registered trademarks or trademarks of Adobe Systems
Incorporated in the United States and/or other countries.
Preface 1
Page 3

Mozilla, Firefox and the Firefox logo are trademarks or registered trademarks of Mozilla Foundation in the U.S. and
other countries.
IBM, AT and AIX are trademarks of International Business Machines Corporation.
NOVELL, NetWare, and NDS are trademarks of Novell, Inc.
TopAccess is a trademark of Toshiba Tec Corporation.
Other company and product names given in this manual or displayed in this software may be the trademarks of their
respective companies.
Security Precautions
To prevent the configuration settings from being changed illegally or similar, change the initial administrator password
at the time of shipping before you use this product. Also, the administrator password should be altered periodically.
Be sure to log out when leaving your computer while changing TopAccess settings for security purposes.
For security purposes, do not access any other site while you are logged in to TopAccess.
2 Preface
Page 4

CONTENTS
Preface....................................................................................................................................... 1
Chapter 1 Overview
TopAccess Overview ............................................................................................................... 8
TopAccess Conditions............................................................................................................. 9
Accessing TopAccess ........................................................................................................... 10
Accessing TopAccess by entering URL .............................................................................. 10
Accessing TopAccess from Network Map
(Windows Vista/Windows 7/Windows Server 2008)............................................................ 12
TopAccess Screen Descriptions........................................................................................... 21
Access Policy Mode ............................................................................................................... 22
Chapter 2 [Device] Tab Page
[Device] Item List.................................................................................................................... 26
Displayed Icons ...................................................................................................................... 27
Chapter 3 [Job Status] Tab Page
[Job Status] Tab Page Overview........................................................................................... 30
[Print Job] Item list ............................................................................................................... 30
[Fax/InternetFax Job] Item list ............................................................................................. 32
[Scan Job] Item list .............................................................................................................. 33
[Job Status] How to Set and How to Operate ...................................................................... 34
Displaying print jobs ............................................................................................................ 34
Deleting jobs........................................................................................................................ 35
Deleting private print jobs and hold print jobs...................................................................... 35
Releasing print jobs ............................................................................................................. 36
Checking recovery information ............................................................................................ 36
Chapter 4 [Logs] Tab Page
[Logs] Tab Page Overview..................................................................................................... 38
[View Logs] Item list............................................................................................................. 38
[Export Logs] Item list <access policy mode> ..................................................................... 44
[Log Settings] Item list <access policy mode>..................................................................... 45
[Logs] How to Set and How to Operate ................................................................................ 47
Displaying job logs............................................................................................................... 47
Exporting logs...................................................................................................................... 48
Chapter 5 [Registration] Tab Page
[Registration] Tab Page Overview ........................................................................................ 50
[Template] Item list .............................................................................................................. 50
[Address Book] Item list....................................................................................................... 76
[Inbound FAX routing] Item list ............................................................................................ 81
[Registration] How to Set and How to Operate.................................................................... 86
Managing templates ............................................................................................................ 86
CONTENTS 3
Page 5

Managing address book ...................................................................................................... 94
Managing mailboxes.......................................................................................................... 100
Chapter 6 [Counter] Tab Page
[Counter] Tab Page Overview ............................................................................................. 104
[Counter] Item list .............................................................................................................. 104
[Counter] How to Set and How to Operate ......................................................................... 111
Viewing counters ............................................................................................................... 111
Chapter 7 [User Management] Tab Page
[User Management] Tab Page Overview ............................................................................ 114
[User Accounts] Item list <access policy mode> ............................................................... 114
[Group Management] Item list <access policy mode>....................................................... 121
[Role Management] Item list <access policy mode> ......................................................... 123
[Department Management] Item list <access policy mode>.............................................. 128
[Export/Import] Item list <access policy mode> ................................................................. 132
Chapter 8 [Administration] Tab Page
[Setup] Item List ................................................................................................................... 136
General settings ................................................................................................................136
Network settings ................................................................................................................143
Copier settings................................................................................................................... 183
Fax settings ....................................................................................................................... 186
Save as File settings ......................................................................................................... 189
Email settings .................................................................................................................... 198
InternetFax settings ........................................................................................................... 200
Printer/e-Filing settings...................................................................................................... 201
Printer settings................................................................................................................... 202
Print Service settings......................................................................................................... 206
ICC Profile settings............................................................................................................210
Print Data Converter settings ............................................................................................ 212
Embedded Web Browser settings ..................................................................................... 213
Off Device Customization Architecture settings ................................................................ 215
Version .............................................................................................................................. 216
[Setup] How to Set and How to Operate............................................................................. 217
Setting up General settings ............................................................................................... 217
Setting up Network settings............................................................................................... 219
SNMP V3 settings ............................................................................................................. 221
Setting up Copier settings ................................................................................................. 227
Setting up Fax settings ...................................................................................................... 229
Setting up Save as file settings ......................................................................................... 231
Setting up E-mail settings.................................................................................................. 233
Setting up InternetFax settings.......................................................................................... 235
Setting up Printer/e-Filing settings..................................................................................... 237
Setting up Printer settings ................................................................................................. 238
Setting up Print Service settings........................................................................................ 241
Setting up ICC Profile settings........................................................................................... 243
Setting up Print Data Converter settings ........................................................................... 250
Configuring the EWB function ........................................................................................... 252
Setting up Off Device Customization Architecture settings ............................................... 254
4 CONTENTS
Page 6

Displaying version information........................................................................................... 255
[Security] Item List ............................................................................................................... 256
Authentication settings ...................................................................................................... 256
Certificate management settings....................................................................................... 266
Password Policy settings ................................................................................................... 270
[Security] How to Set and How to Operate ........................................................................ 273
Installing a device certificate.............................................................................................. 273
Creating/Exporting a client certificate ................................................................................ 280
Installing CA certificate...................................................................................................... 282
[Maintenance] Item List........................................................................................................ 284
Create Clone File settings ................................................................................................. 284
Install Clone File settings................................................................................................... 286
Import settings ................................................................................................................... 287
Export settings................................................................................................................... 289
Delete Files settings .......................................................................................................... 290
Directory Service settings.................................................................................................. 291
Notification settings ...........................................................................................................293
Languages settings ........................................................................................................... 296
System Updates settings................................................................................................... 298
Reboot settings .................................................................................................................299
[Maintenance] How to Set and How to Operate ................................................................. 300
About the maintenance functions ...................................................................................... 300
Deleting the data from local folder..................................................................................... 301
Managing directory service................................................................................................ 302
Setting up notification ........................................................................................................ 304
Importing and exporting..................................................................................................... 306
Rebooting the equipment .................................................................................................. 311
[Registration] ([Administration] tab) Item List................................................................... 312
Public Template settings ................................................................................................... 312
Public Menu....................................................................................................................... 314
Fax Received Forward and InternetFAX Received Forward settings................................ 317
Extended Field Definition................................................................................................... 327
XML Format File ................................................................................................................ 331
[Registration] ([Administration] tab) How to Set and How to Operate ............................ 332
Registering public templates ............................................................................................. 332
Registering Fax and Internet Fax received forward........................................................... 338
Chapter 9 [My Account] Tab Page
[My Account] Tab Page Overview ....................................................................................... 346
[My Account] Item list ........................................................................................................ 346
Chapter 10 Functional Setups
Setting up Meta Scan Function ........................................................................................... 352
Procedure for using Meta Scan......................................................................................... 352
Checking Meta Scan Enabler............................................................................................ 352
Editing XML format file ...................................................................................................... 353
Registering XML format file ............................................................................................... 357
Registering Extended Field Definition ............................................................................... 358
Registering templates for Meta Scan ................................................................................ 361
Meta Scan ......................................................................................................................... 364
CONTENTS 5
Page 7

Checking logs of Meta Scan.............................................................................................. 364
Using the Attribute of the External Authentication as a Role of the MFP ....................... 365
Exporting the role information setting file .......................................................................... 365
Defining the role information setting file ............................................................................ 365
Importing the role information setting file........................................................................... 366
Enabling the role base access setting ............................................................................... 366
Chapter 11 APPENDIX
Installing Certificates for a Client PC ................................................................................. 368
Index..................................................................................................................................................................... 375
6 CONTENTS
Page 8

1
1.Overview
This chapter provides an overview of the TopAccess functions.
TopAccess Overview ............................................................................................................... 8
TopAccess Conditions.............................................................................................................9
Accessing TopAccess ...........................................................................................................10
Accessing TopAccess by entering URL................................................................................................................10
Accessing TopAccess from Network Map (Windows Vista/Windows 7/Windows Server 2008)...........................12
TopAccess Screen Descriptions...........................................................................................21
Access Policy Mode............................................................................................................... 22
Page 9

1 Overview
TopAccess Overview
TopAccess is a management utility that allows you to check device information of this equipment and job status, and to
carry out device setting and maintenance through a web browser.
TopAccess has an "end-user mode" and a "access policy mode".
End-user mode
End users can:
Display general device information, including status, tray/accessory configuration, and paper supply information.
Display and manage the status of print jobs, fax/Internet Fax transmission jobs, and scan jobs submitted by the user.
(The Fax Unit is required to display and manage the fax transmission jobs)
Display the job logs for print, fax/Internet Fax transmission, fax/Internet Fax reception, and scan. (The Fax Unit is
required to display the fax transmission and fax reception job logs.)
Register and modify templates.
Add or modify contacts and groups in the address book.
Register and modify mailboxes. (The Fax Unit is required.)
Display counter logs.
Download client software.
P.10 “Accessing TopAccess”
Access policy mode
Operation privileges and displayed items vary depending on the user account you used to log in to TopAccess.
Details of operations and displays vary depending on the management on roles and departments to where the user
account is assigned.
P.22 “Access Policy Mode”
8 TopAccess Overview
Page 10

1.Overview
TopAccess Conditions
Your device should be connected to the network and TCP/IP is correctly configured to operate TopAccess.
When TCP/IP is correctly configured, you can access TopAccess via a web browser.
Supported browsers
Windows
Internet Explorer 6.0 or later
(Internet Explorer 7.0 or later when IPv6 is used)
Firefox 3.5 or later
Macintosh
Safari 4.0 or later
UNIX
Firefox 3.5 or later
Because TopAccess uses cookies to store information on the user's system, these must be enabled in the browser.
If TopAccess does not display the correct information in any page, delete the cookies and try again.
When using the e-Filing box Web utility from TopAccess, it is necessary to disable the pop-up blocking function of
your Web browser.
1 Overview
TopAccess Conditions 9
Page 11

1 Overview
Accessing TopAccess
You can access TopAccess by entering its URL in the address box of the web browser. To access it under a Windows
Vista/Windows 7/Windows Server 2008 environment, confirm the network connection status on the Network Map with the
LLTD (Link Layer Topology Discovery) feature of Windows Vista/Windows 7/Windows Server 2008, and then click the
displayed icon of this equipment.
P.10 “Accessing TopAccess by entering URL”
P.12 “Accessing TopAccess from Network Map (Windows Vista/Windows 7/Windows Server 2008)”
Accessing TopAccess by entering URL
Launch a web browser and enter the following URL in the address box.
1
http://<IP Address> or http://<Device Name>
For example
When the IP address of your device "10.10.70.120" (when IPv4 used):
http://10.10.70.120
When the IP address of your device is "3ffe:1:1:10:280:91ff:fe4c:4f54" (when IPv6 used):
3ffe-1-1-10-280-91ff-fe4c-4f54.ipv6-literal.net
or
http://[3ffe:1:1:10:280:91ff:fe4c:4f54]
When your device name is "mfp-04998820":
http://mfp-04998820
When SSL for the HTTP network service is enabled, an alert message may appear when you enter the URL in
the address box. In that case, click [Continue to this website (not recommended).] to proceed.
10 Accessing TopAccess
Page 12
1.Overview
The TopAccess website appears.
2
1 Overview
You can also access TopAccess using the TopAccessDocMon link. For instructions on accessing TopAccess
from TopAccessDocMon, refer to the Help for TopAccessDocMon.
Accessing TopAccess 11
Page 13
1 Overview
Accessing TopAccess from Network Map
(Windows Vista/Windows 7/Windows Server 2008)
Confirm the network connection status on the [Network Map] with the LLTD feature of Windows Vista/Windows 7/Windows
Server 2008, and then click the displayed icon of this equipment.
P.12 “With Unidentified Network (Windows Vista)”
P.15 “With Unidentified Network (Windows 7)”
P.18 “Accessing TopAccess from Network Map”
You can install the driver required for web services by right-clicking the icon and selecting [Install]. For the driver
required for web services, refer to the User’s Manual Basic Guide.
Before using the LLTD (Link Layer Topology Discovery) feature, enable the LLTD setting.
P.169 “Setting up LLTD Session”
Before beginning the installation of the driver required for web services, enable the Web Services setting.
P.168 “Setting up Web Services Setting”
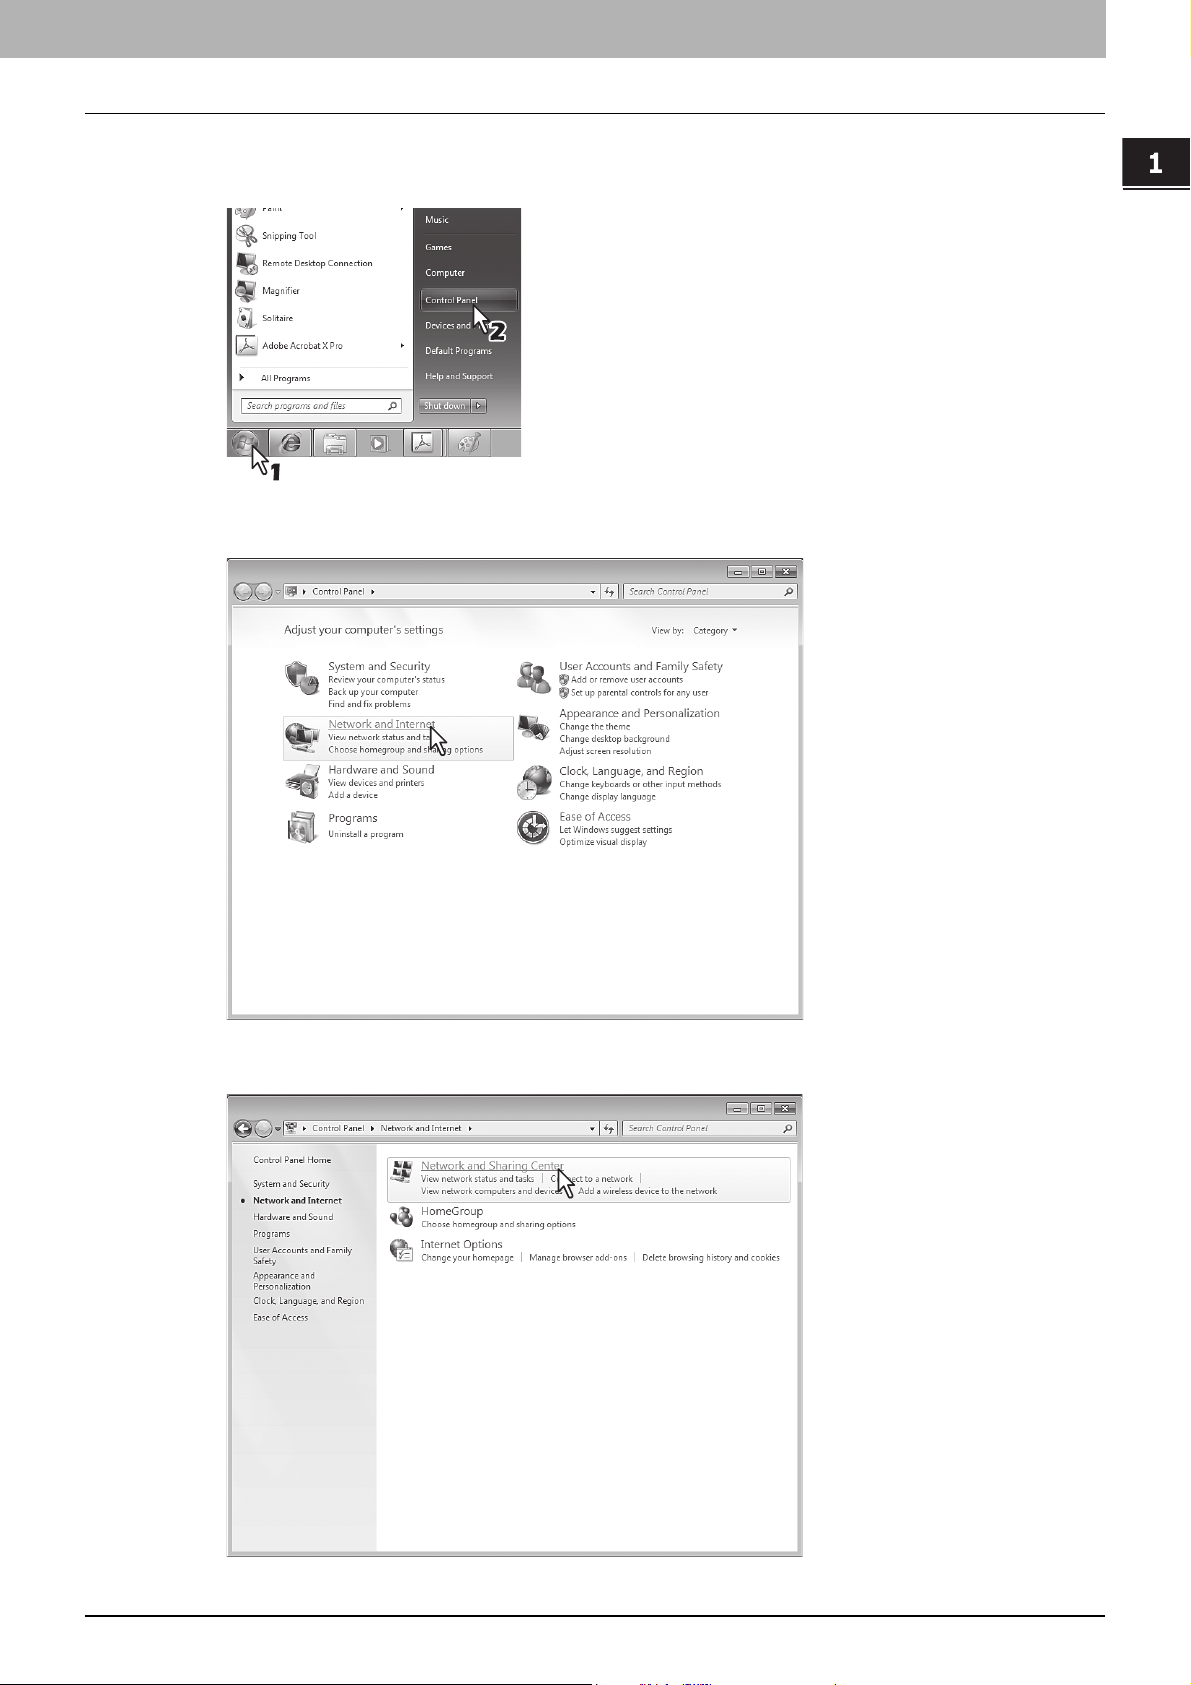
With Unidentified Network (Windows Vista)
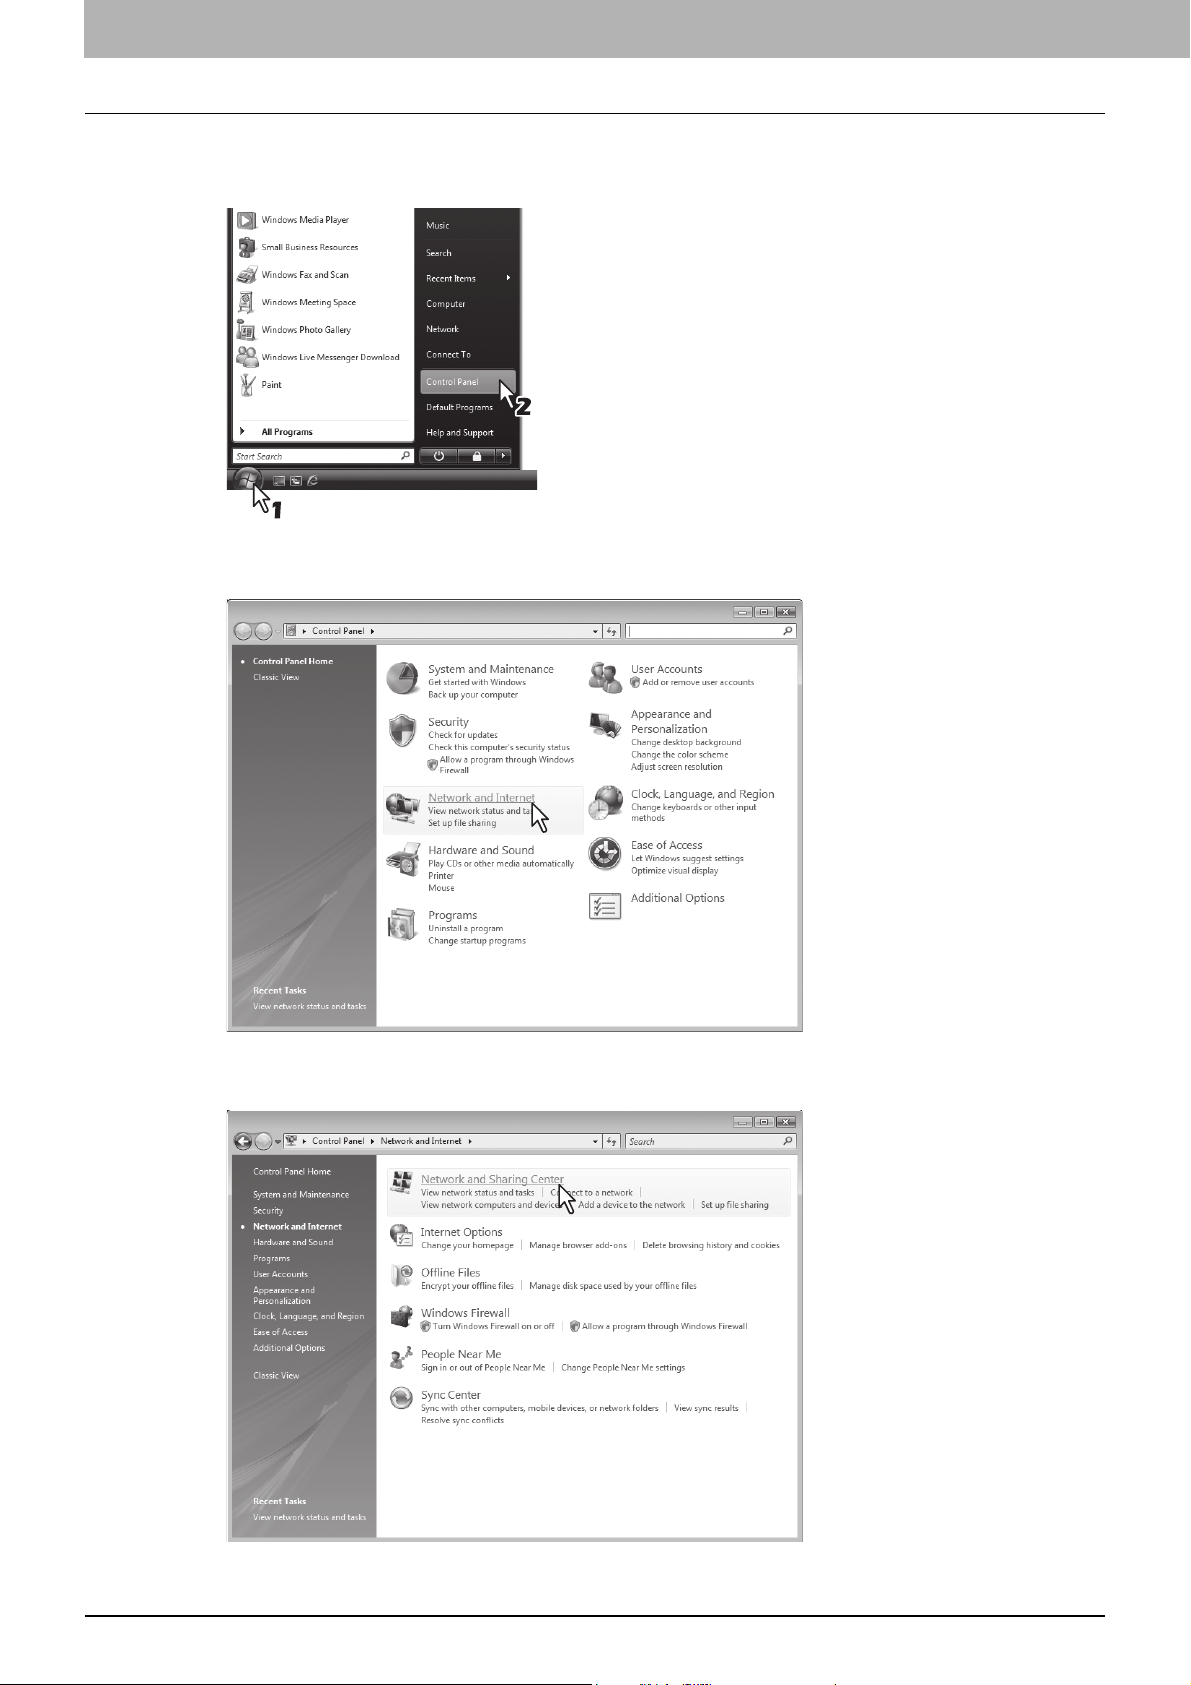
Click the [Start] icon and select [Control Panel].
1
The [Control Panel] window appears.
Click [Network and Internet].
2
The [Network and Internet] window appears.
12 Accessing TopAccess
Page 14
1.Overview
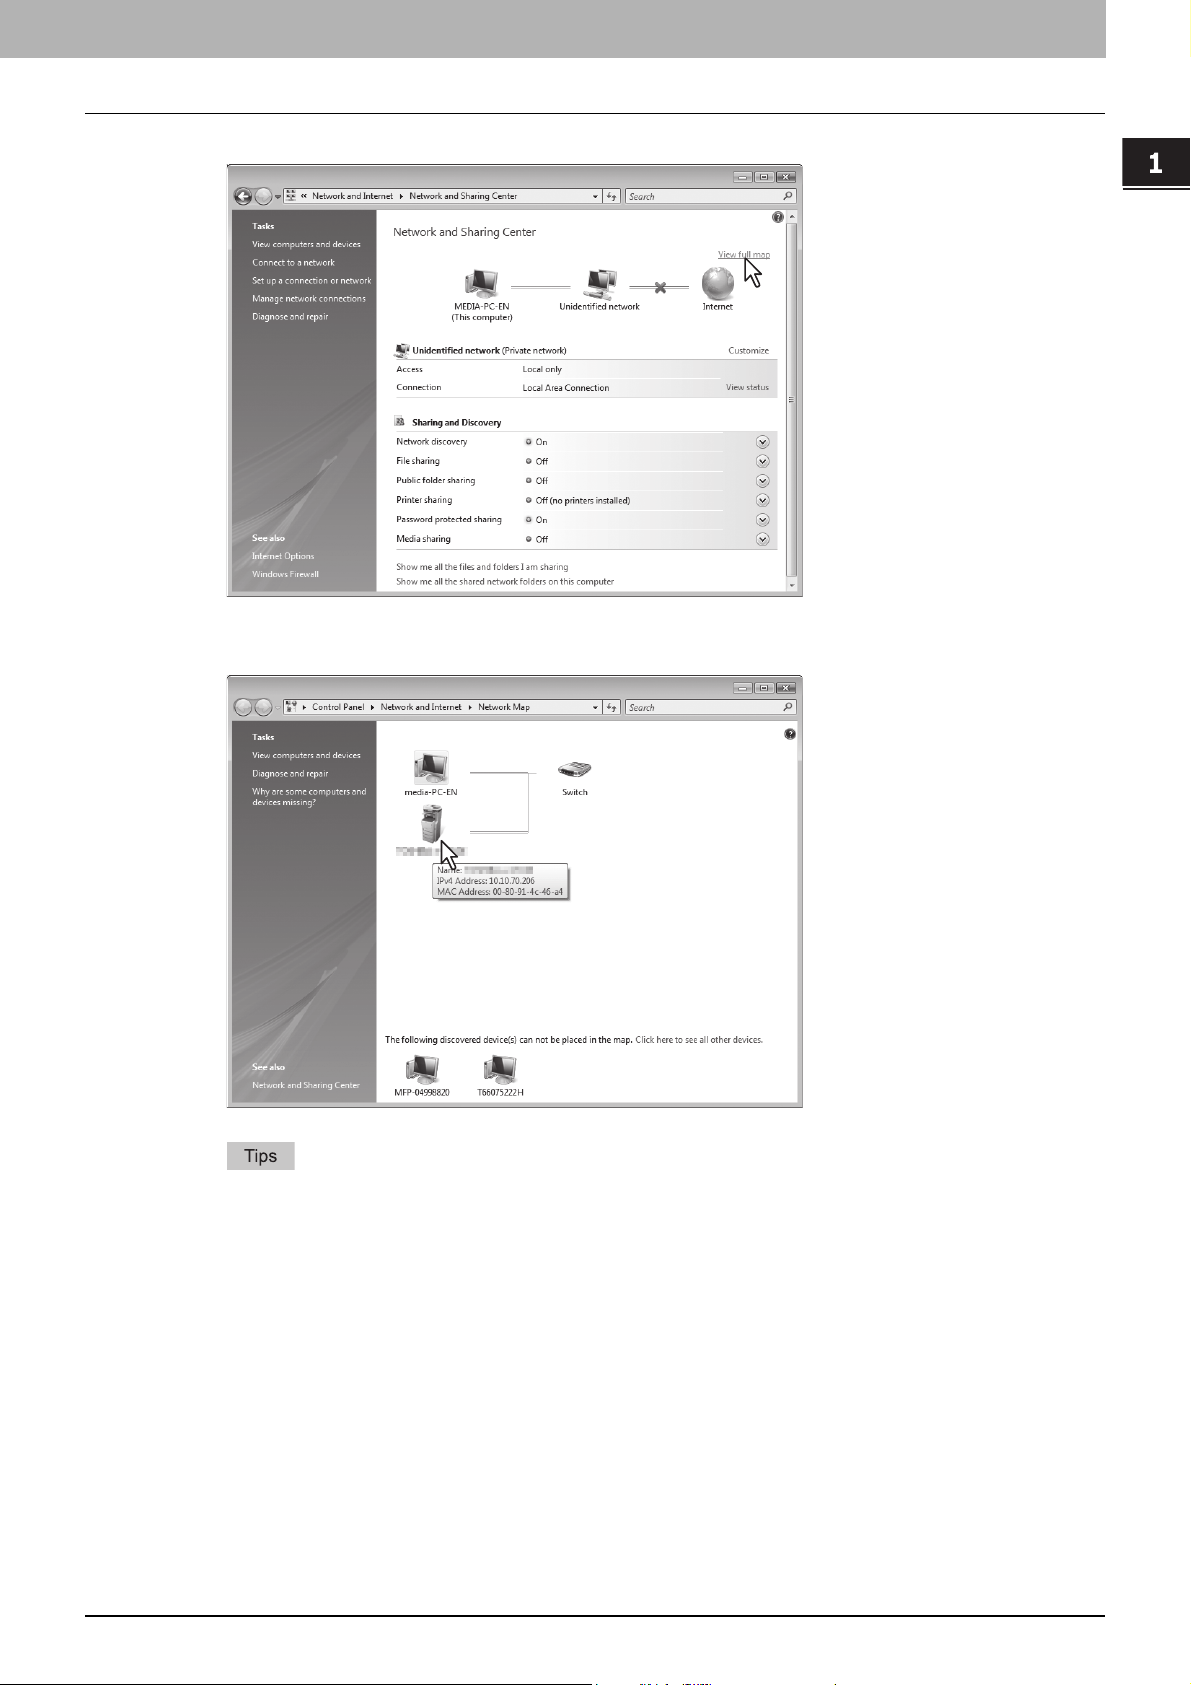
Click [Network and Sharing Center].
3
1 Overview
The [Network and Sharing Center] window appears.
Click [Customize] of [Unidentified network (Public network)].
4
The [Set Network Location] window appears.
Accessing TopAccess 13
Page 15
1 Overview
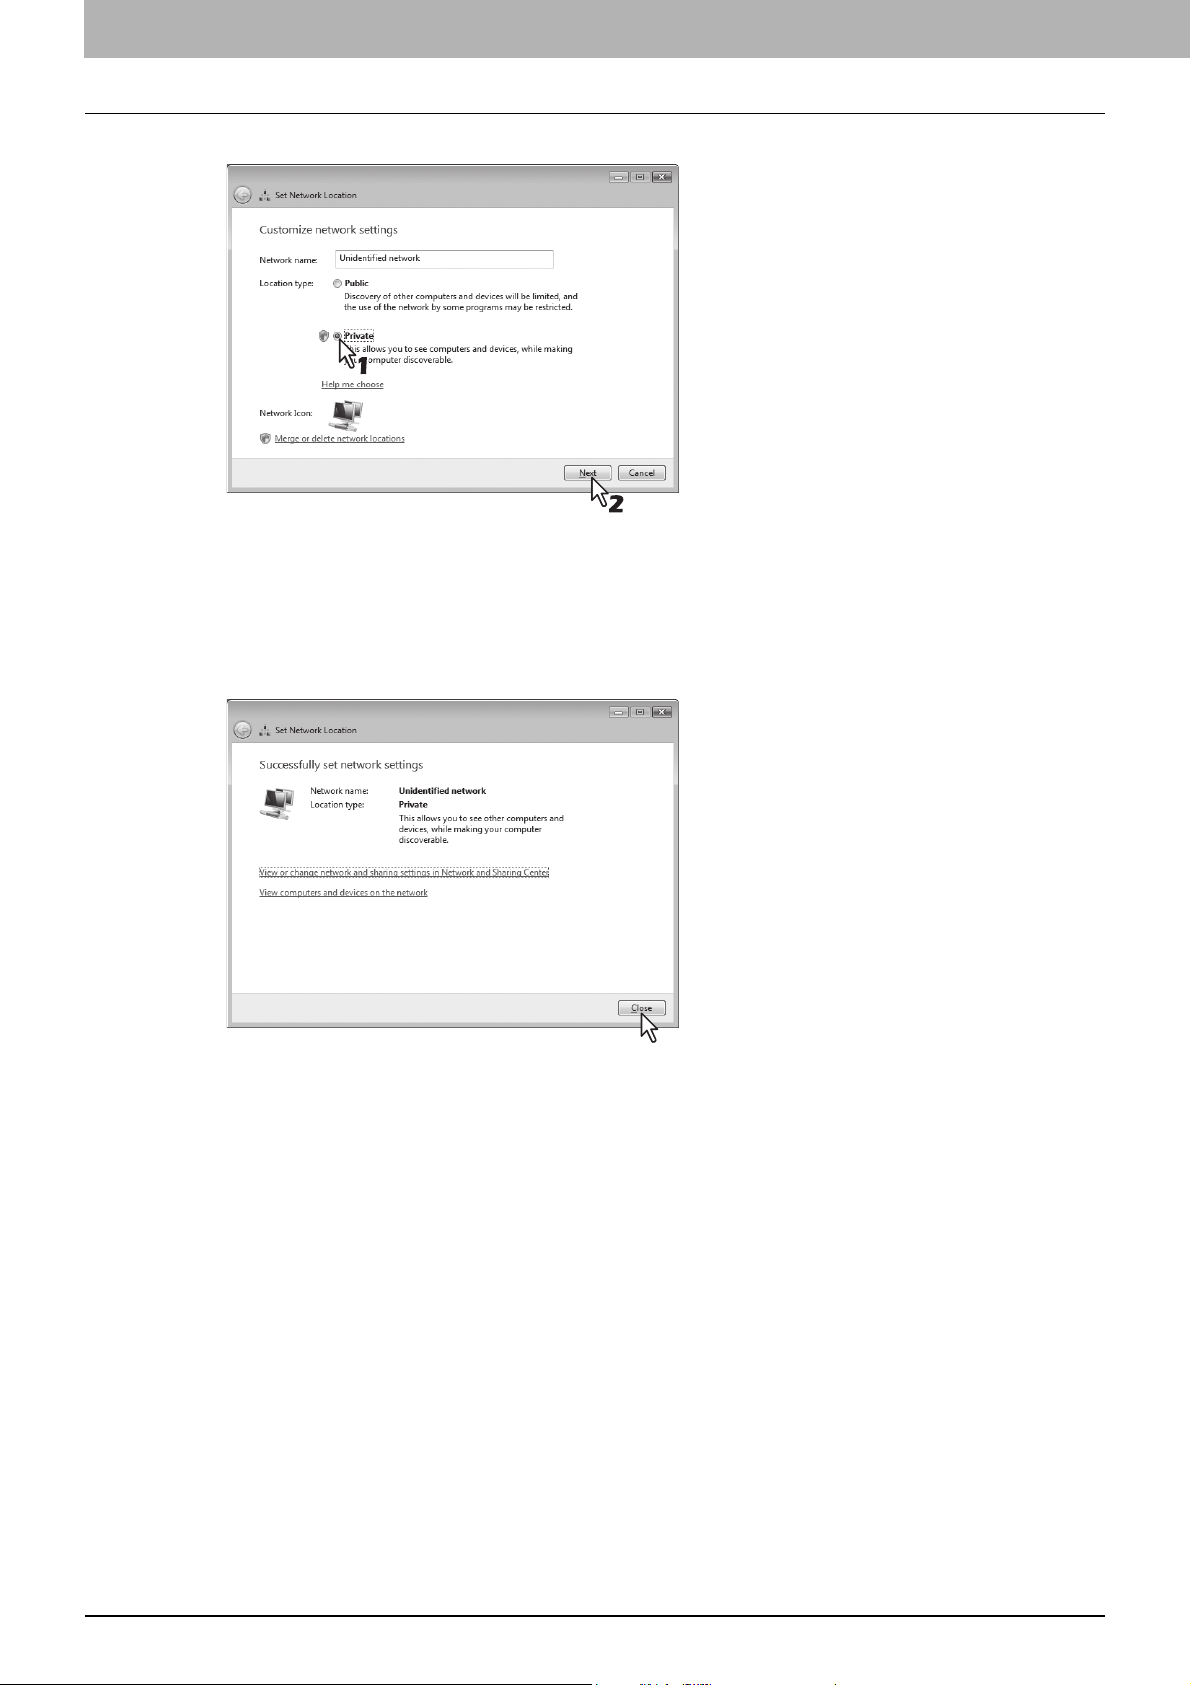
5
Select [Private] of [Location type], and then click [Next].
The [User Account Control] dialog box appears.
If the user account control is disabled, the [Set Network Location - Successfully set network settings] window
appears. Go to step 7.
Click [Continue] in the [User Account Control] dialog box.
6
The [Set Network Location - Successfully set network settings] window appears.
Click [Close].
7
14 Accessing TopAccess
Page 16
1.Overview
With Unidentified Network (Windows 7)
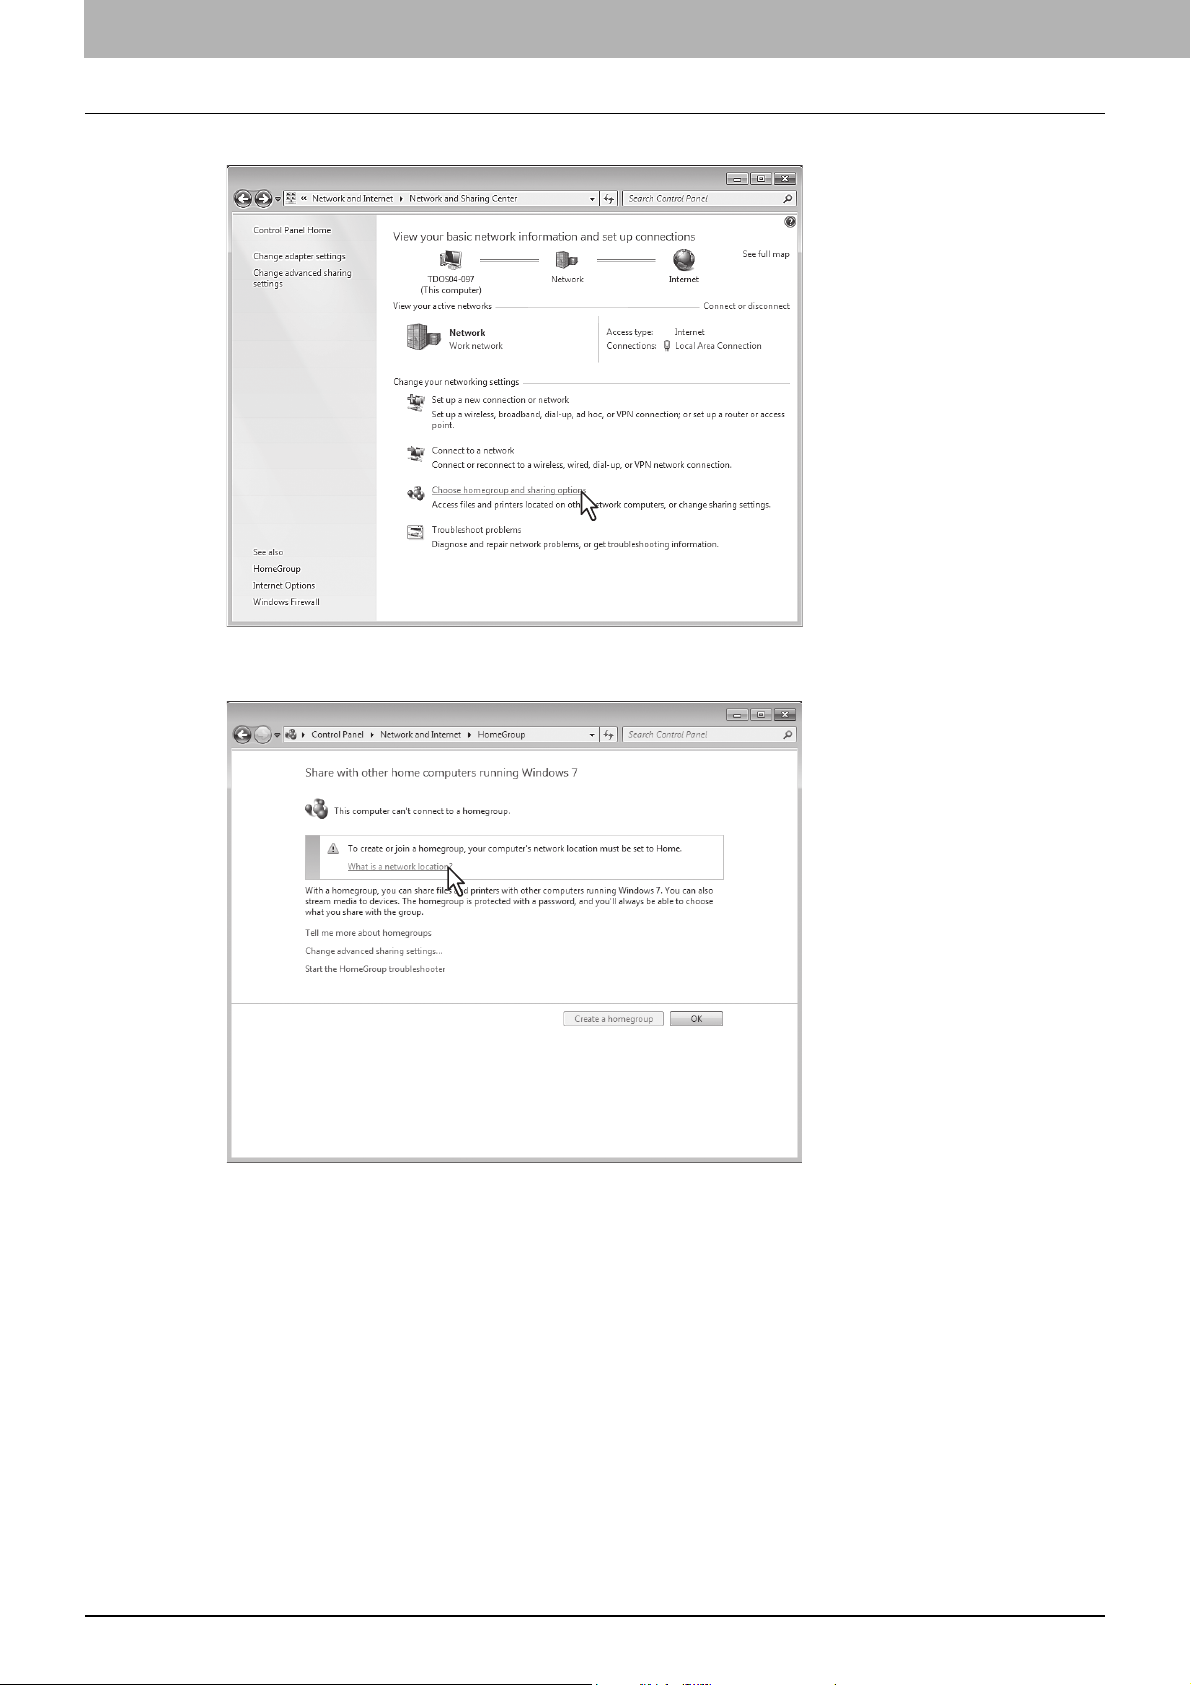
Click the [Start] icon and select [Control Panel].
1
The [Control Panel] window appears.
Click [Network and Internet].
2
1 Overview
The [Network and Internet] window appears.
Click [Network and Sharing Center].
3
The [Network and Sharing Center] window appears.
Accessing TopAccess 15
Page 17
1 Overview
4
Click [Choose homegroup and sharing options].
The [HomeGroup] window appears.
Click [What is a network location?].
5
The [Set Network Location] window appears.
16 Accessing TopAccess
Page 18
1.Overview
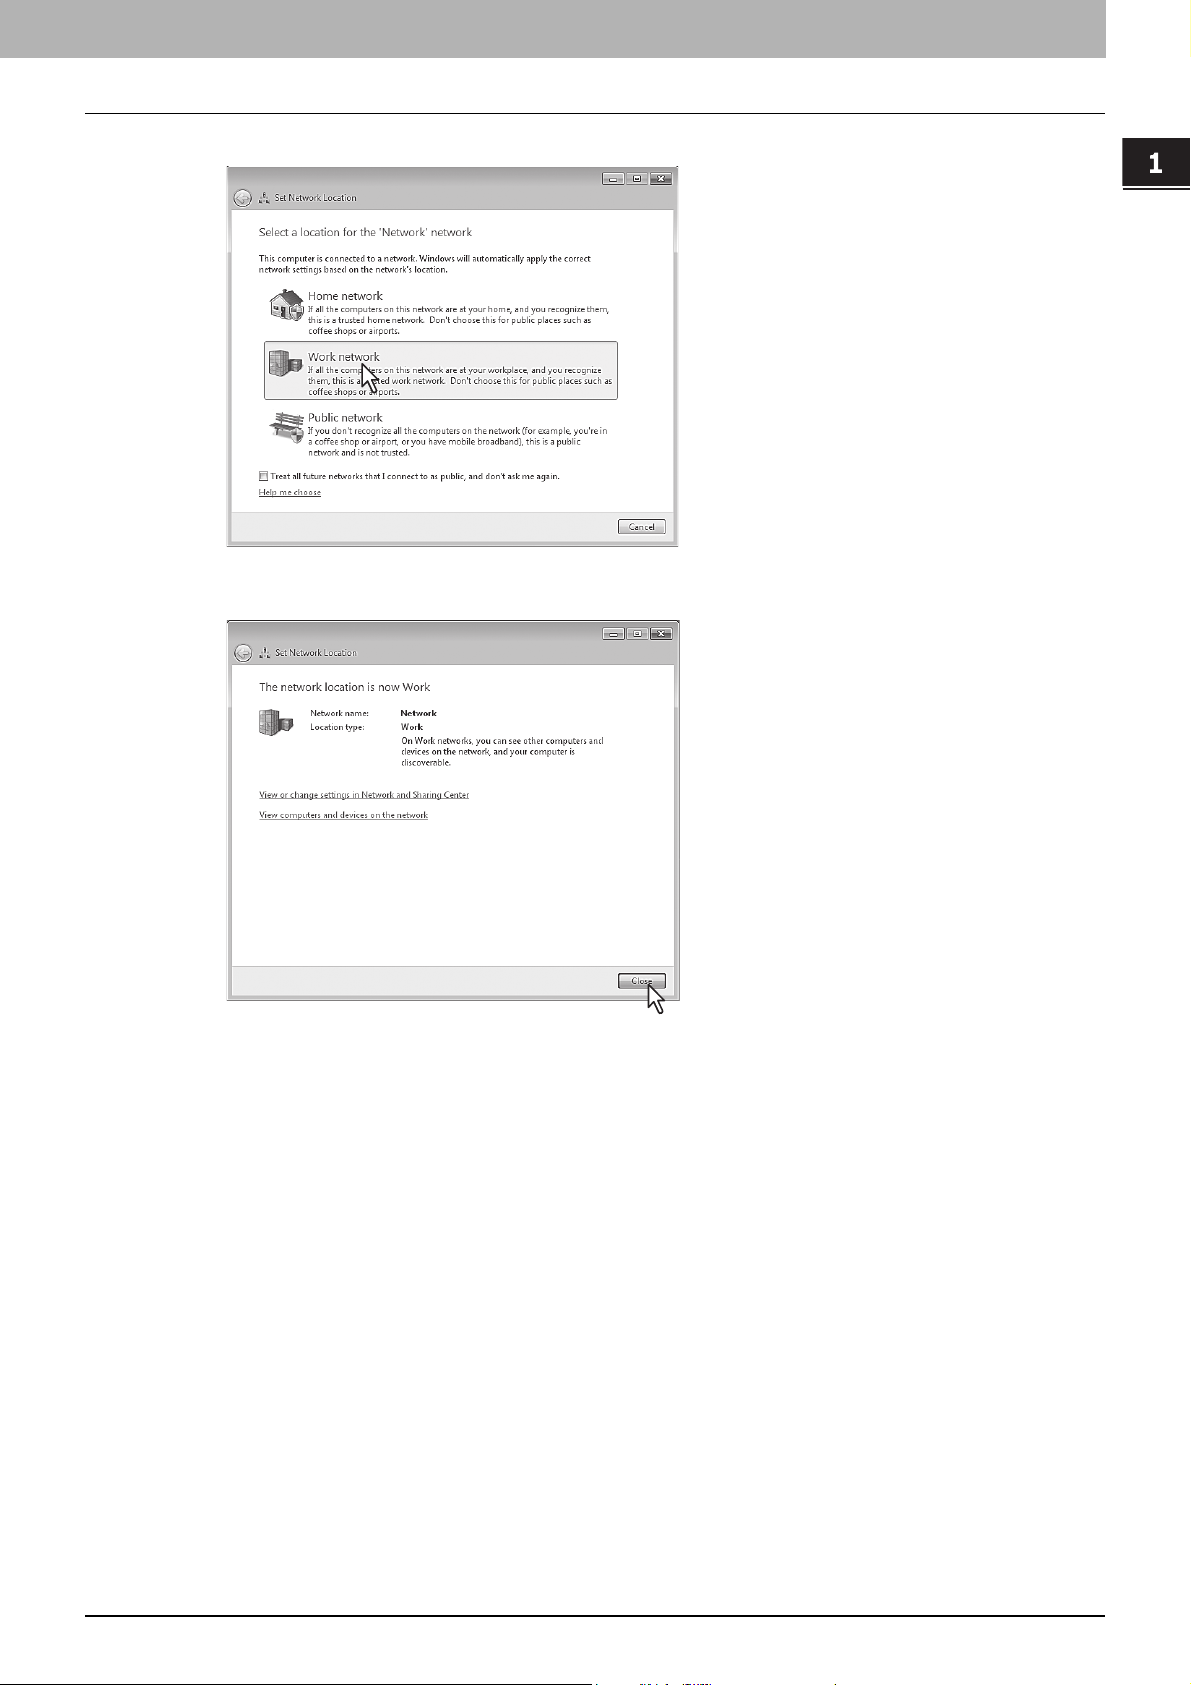
Click [Work network].
6
The [Set Network Location] confirmation window appears.
Click [Close].
7
1 Overview
Accessing TopAccess 17
Page 19
1 Overview
Accessing TopAccess from Network Map
Click the [Start] icon and select [Control Panel].
1
The [Control Panel] window appears.
Click [Network and Internet].
2
The [Network and Internet] window appears.
Click [Network and Sharing Center].
3
The [Network and Sharing Center] window appears.
18 Accessing TopAccess
Page 20
1.Overview
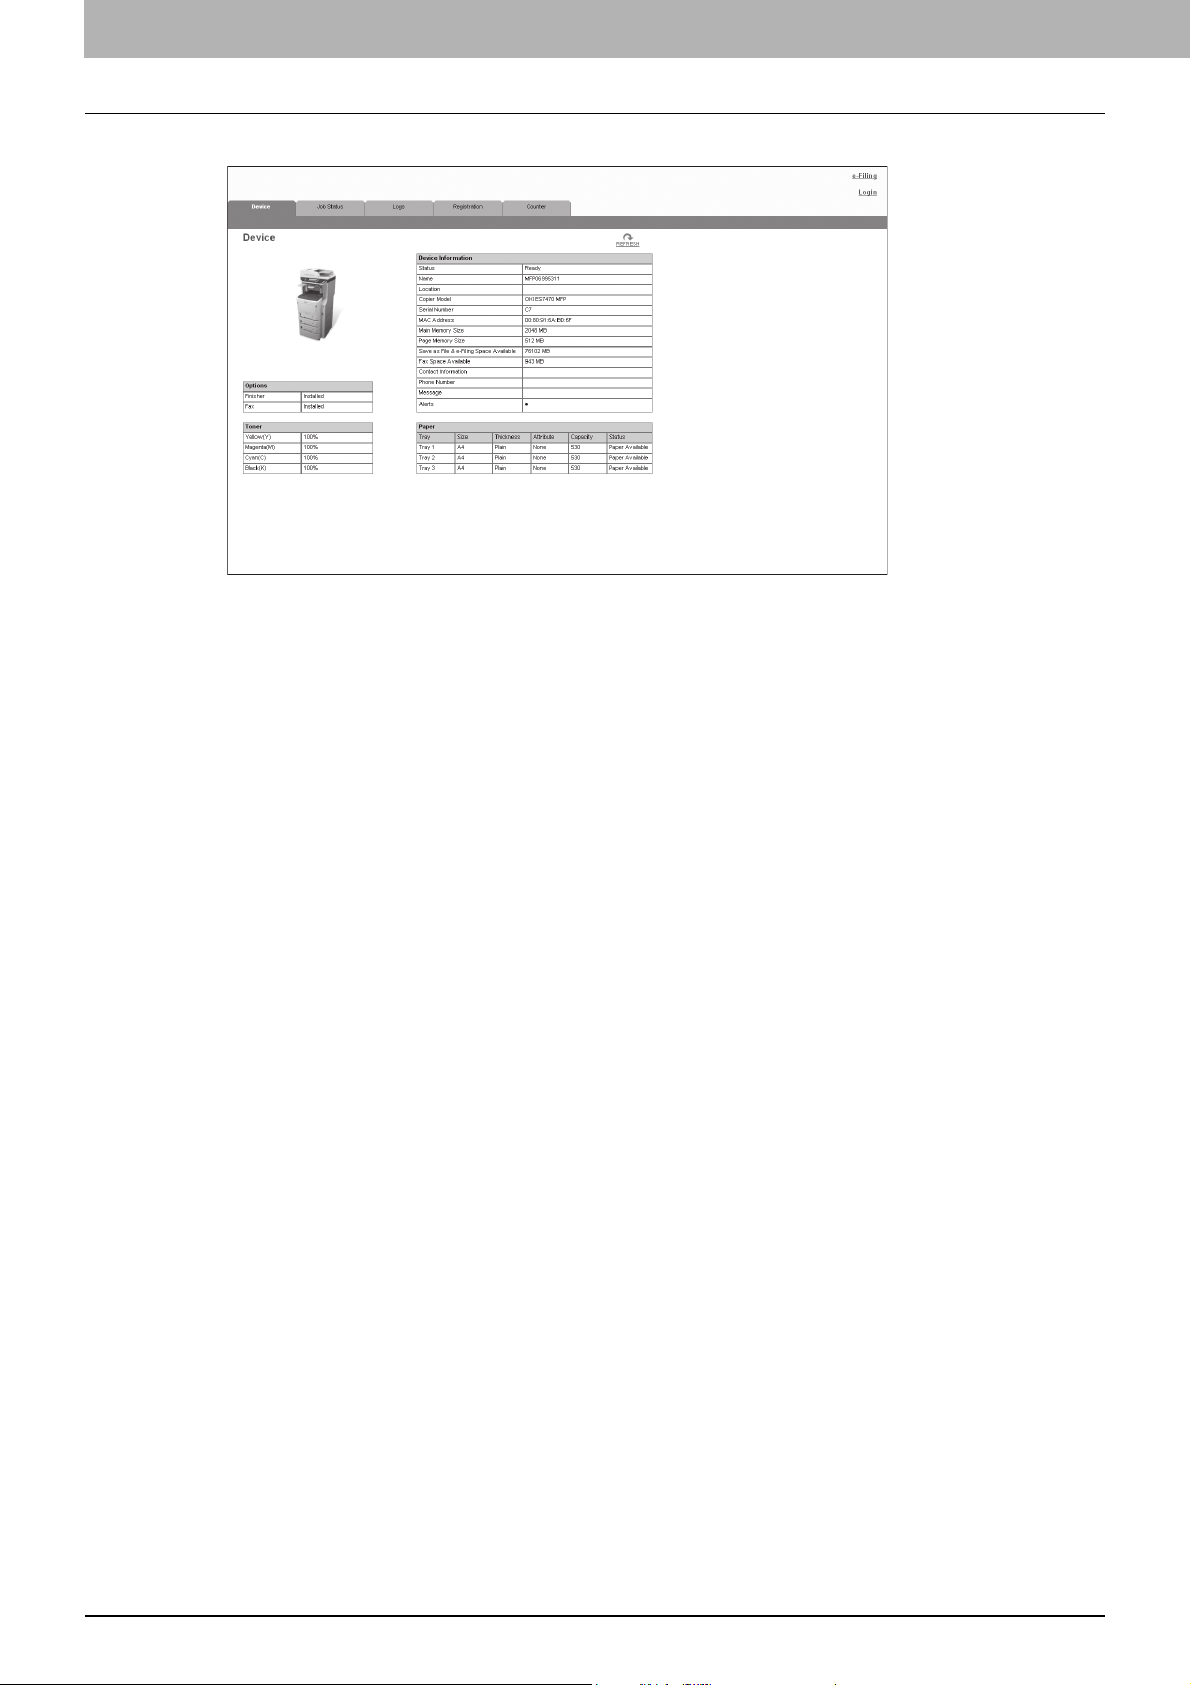
Click [View full map]/[See full map] in the [Network and Sharing Center] window.
4
1 Overview
Mapping of devices connected on the network appears in the [Network Map] window.
Click the icon of this equipment.
5
The name, IP address and MAC address of the devices appear when you place the pointer over each icon.
If the equipment has the Finisher installed, its icon is displayed together with the Finisher icon. If not, it is
displayed by itself.
Accessing TopAccess 19
Page 21
1 Overview
6
The TopAccess website appears.
20 Accessing TopAccess
Page 22
1.Overview
TopAccess Screen Descriptions
1
2
3
1 Overview
4
5
Item name Description
1 Function tab Features are grouped under each tab. This provides access to the main pages of
TopAccess for each function.
2 Menu bar This provides access to each menu page under the selected function tab.
3 Submenu bar This provides access to each submenu page under the selected menu and function tab.
4 Top link Click this to display the top of the page currently displayed.
5 Help link Click this to display Online Help.
TopAccess Screen Descriptions 21
Page 23
1 Overview
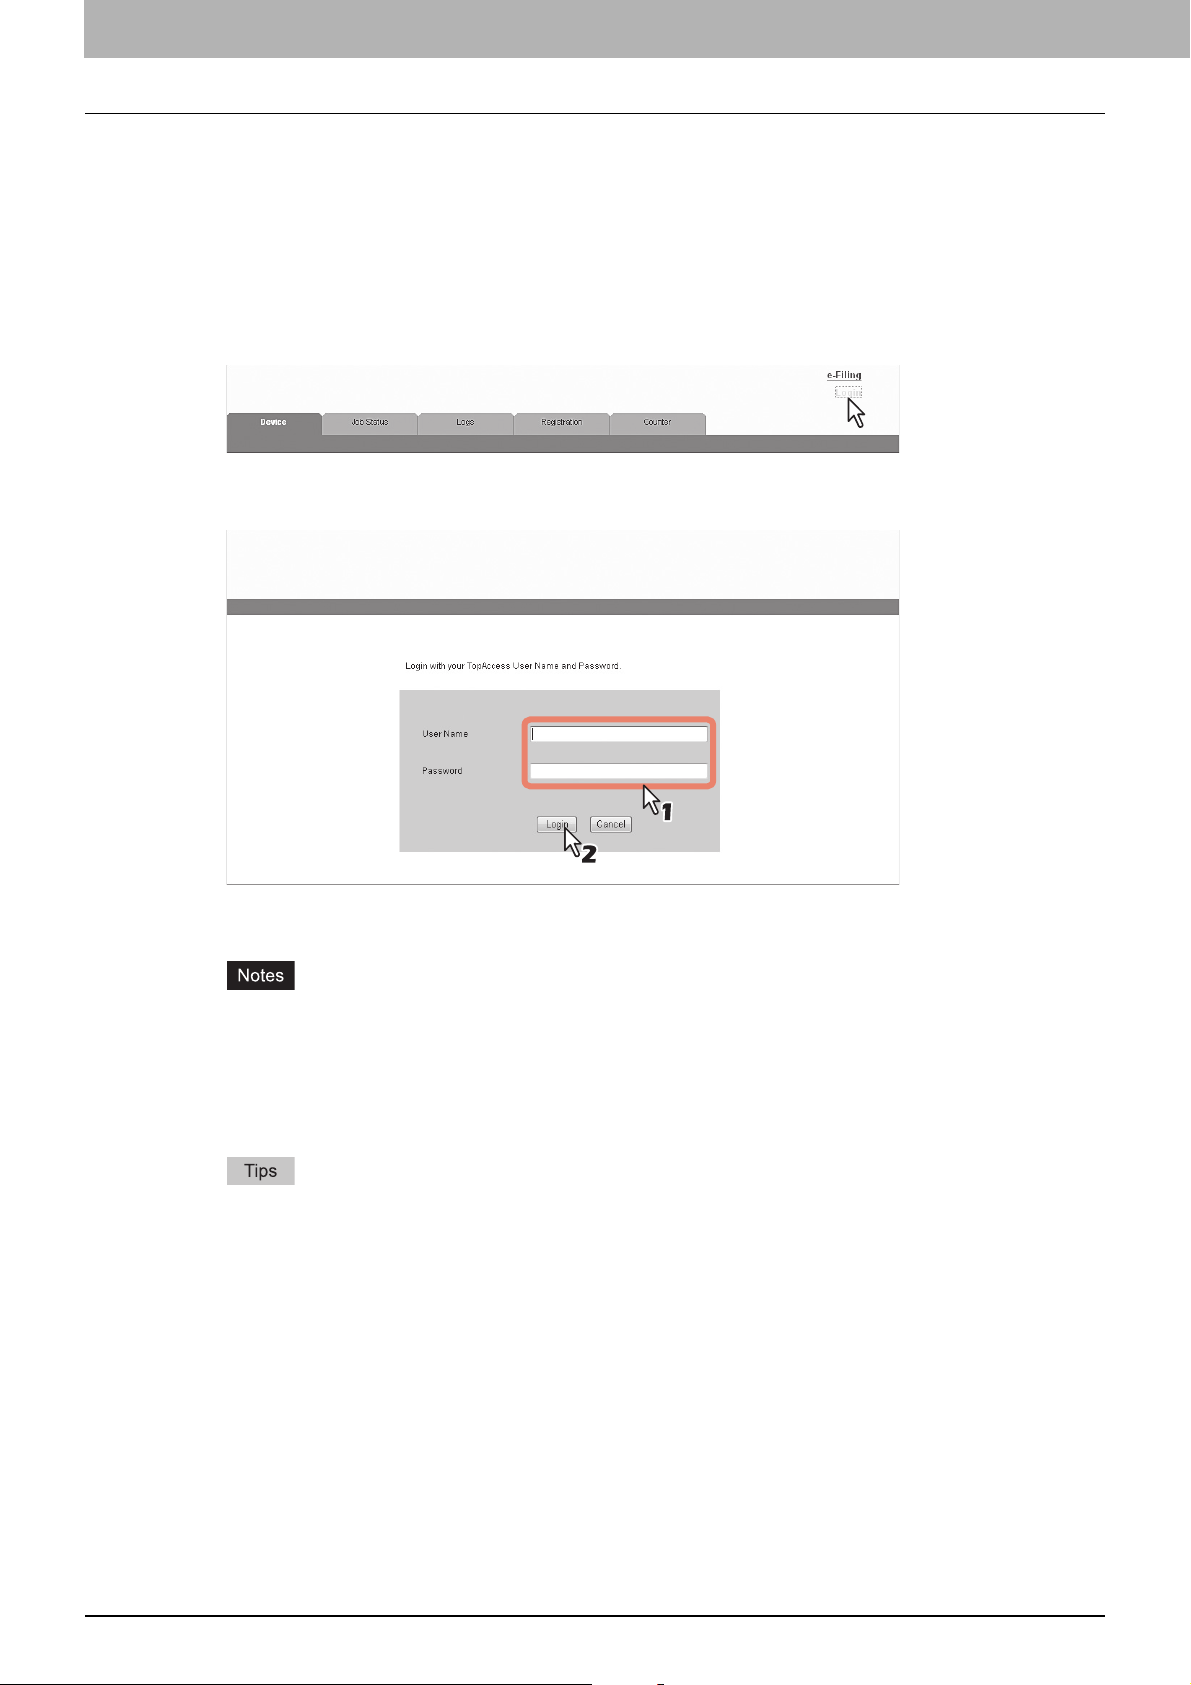
Access Policy Mode
The access policy mode enables different operation privileges and displayed items to be applied depending on the user
account you used to log in to TopAccess.
In the access policy mode, the details of operations and displays differ depending on the roles and department assigned to
the given user account.
Access TopAccess.
1
P.10 “Accessing TopAccess by entering URL”
Click [Login].
2
The Login page is displayed.
Enter the user name and password and click [Login].
3
Enter the user name and password that comply with TopAccess access policies.
The Setup page is displayed.
Failing to enter the correct password for a number of times at login will be considered unauthorized access
and you may not be able to log in for a certain period of time. If you are displayed a “User account is locked”
or “The User Name and Password are not recognized.” message and cannot log in, contact your
administrator.
The password input is displayed in the blank symbols.
After login, you will be automatically logged out when the time specified in the [Session Timer] elapses.
Enter "admin" in User Name and "123456" in Password to log in for the first time.
Lockout setting for user accounts can be set with [Administration] - [Security] - [Password Policy].
P.270 “Password Policy settings”
The [Session Timer] can be set with [Administration] - [Setup] - [General] - [WEB General Setting].
22 Access Policy Mode
Page 24
1.Overview
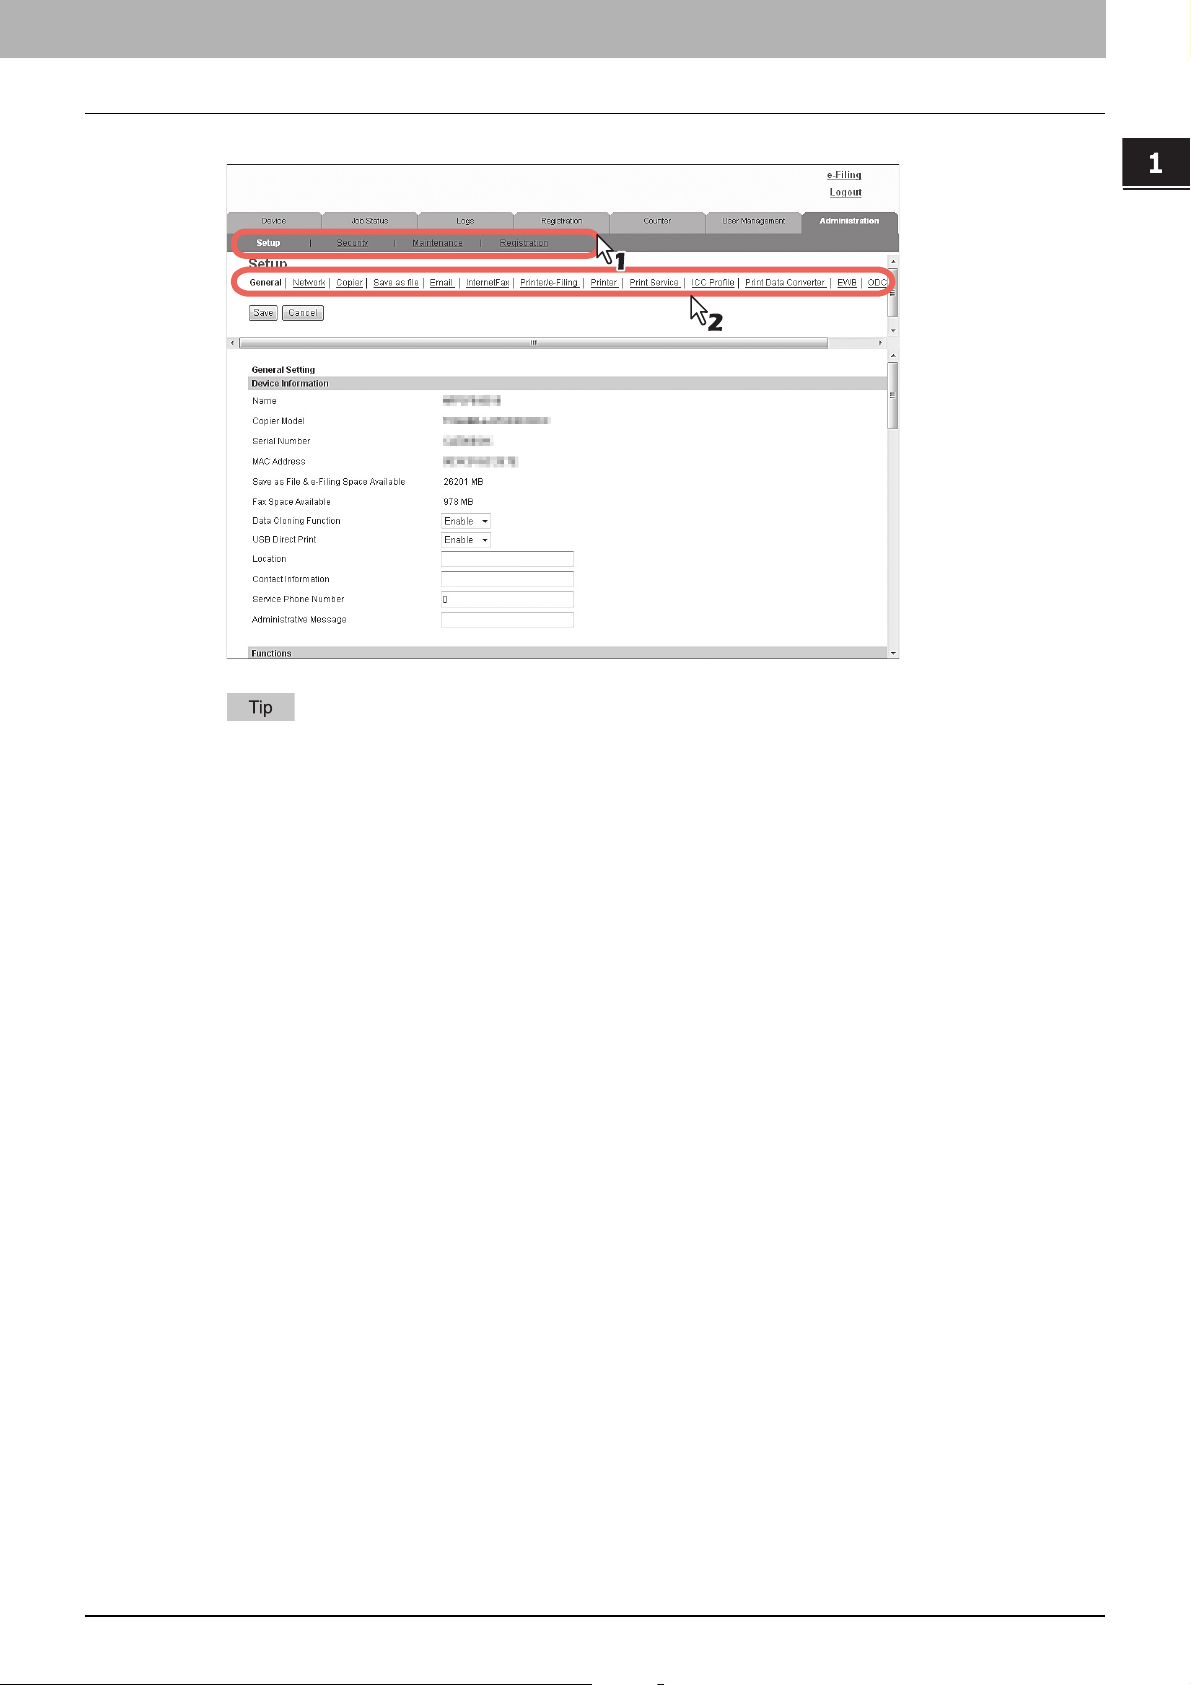
Click the menu and submenu to display the desired page.
4
1 Overview
You can log out by clicking the [Logout] link at the top right of the page.
Access Policy Mode 23
Page 25

1 Overview
24 Access Policy Mode
Page 26

2
2.[Device] Tab Page
This chapter describes the [Device] tab page in the TopAccess end-user mode.
[Device] Item List.................................................................................................................... 26
Displayed Icons...................................................................................................................... 27
Page 27
2 [Device] Tab Page
[Device] Item List
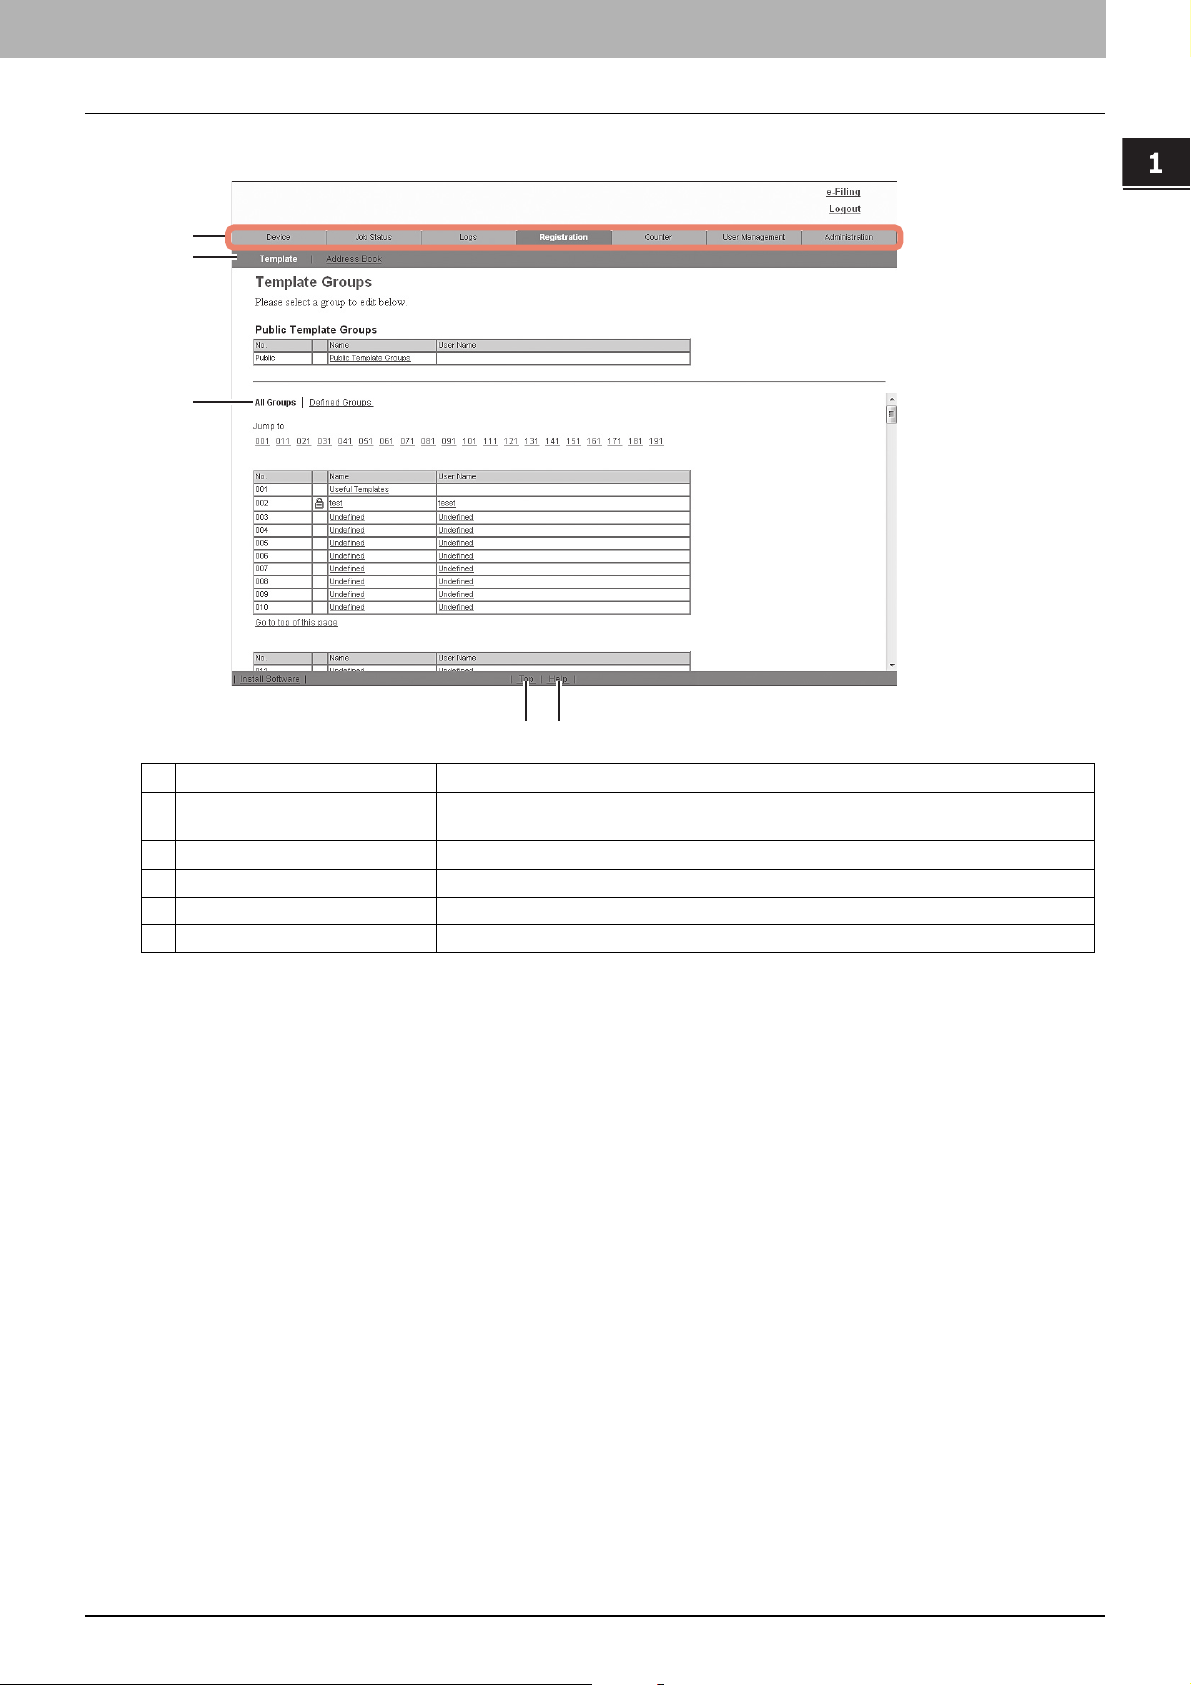
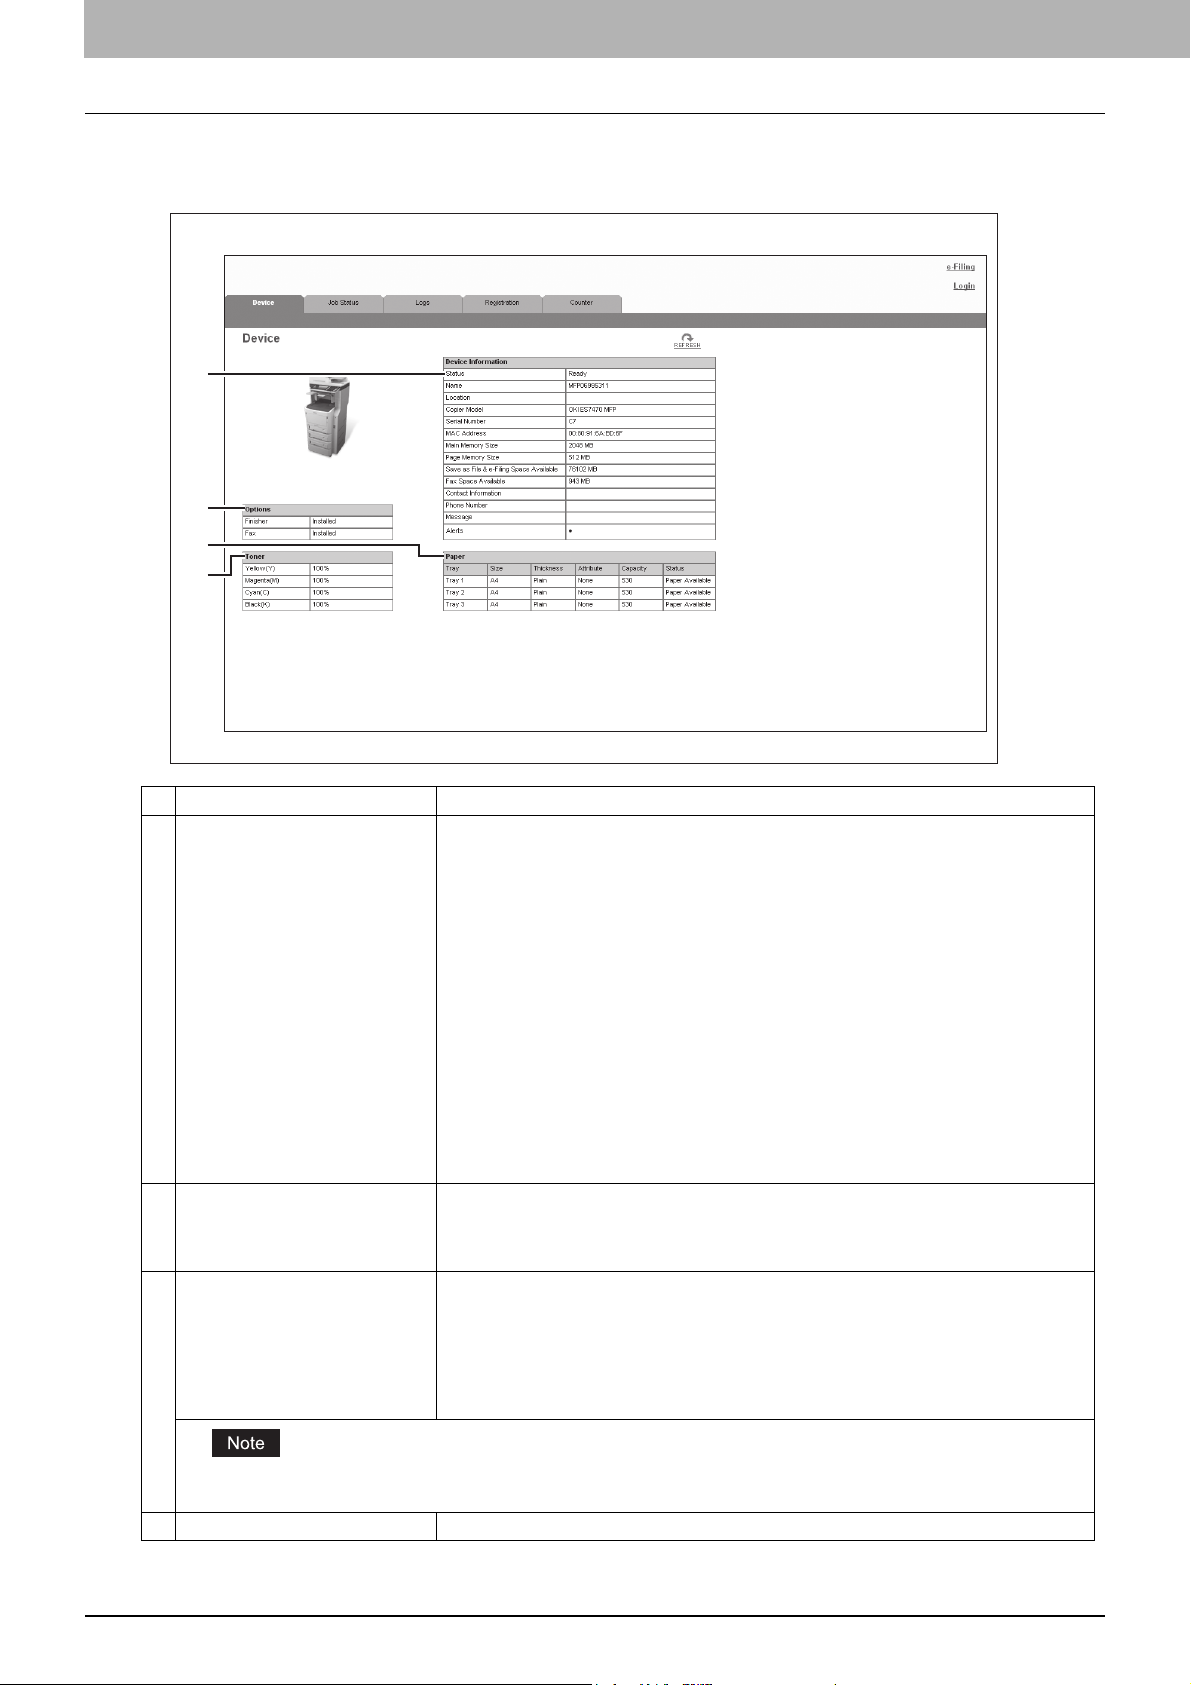
TopAccess opens the [Device] tab which includes a picture indicating the device status. At any time, the end user may
click [REFRESH] to update the TopAccess status information.
This tab shows the following information about the device:
1
2
3
4
Item name Description
1 Device Information The following information is displayed.
2 Options The following information is displayed.
3 Paper The following information is displayed.
Status — Displays the device status.
Name — Displays the name of this equipment.
Location — Displays the equipment's location.
Copier Model — Displays the model name of this equipment.
Serial Number — Displays the serial number of this equipment.
MAC Address — Displays the MAC address of this equipment.
Main Memory Size — Displays the main memory size.
Page Memory Size — Displays the page memory size.
Save as File & e-Filing Space Available — Displays the total available space in the
local folder and e-Filing on your equipment.
Fax Space Available — Displays the available space for sending and receive fax data.
Contact Information — Displays the contact name of the person responsible for
managing this device.
Phone Number — Displays the phone number of the person responsible for managing
this device.
Message — Displays administrative messages.
Alerts — Displays alert messages.
Finisher — Displays whether the Finisher is installed.
Fax — Displays whether the Fax Unit is installed.
Optional Function kit — Displays whether the optional function kit is installed.
Tray — Displays a list of the installed trays.
Size — Displays the paper size set for each tray.
Thickness — Displays the thickness of the paper set in each tray.
Attribute — Displays the purpose of the paper set in each tray.
Capacity — Displays the maximum paper capacity that can be set for each tray.
Status — Displays the remaining amount of paper for each tray.
The paper size for each tray cannot be set from TopAccess. Set it from the touch panel of the equipment. For instructions on
how to set the paper size for each tray, refer to the User’s Manual Basic Guide.
4 Toner Displays the amount of toner remaining in the toner cartridges in the equipment.
26 [Device] Item List
Page 28
2 [Device] Tab Page
Displayed Icons
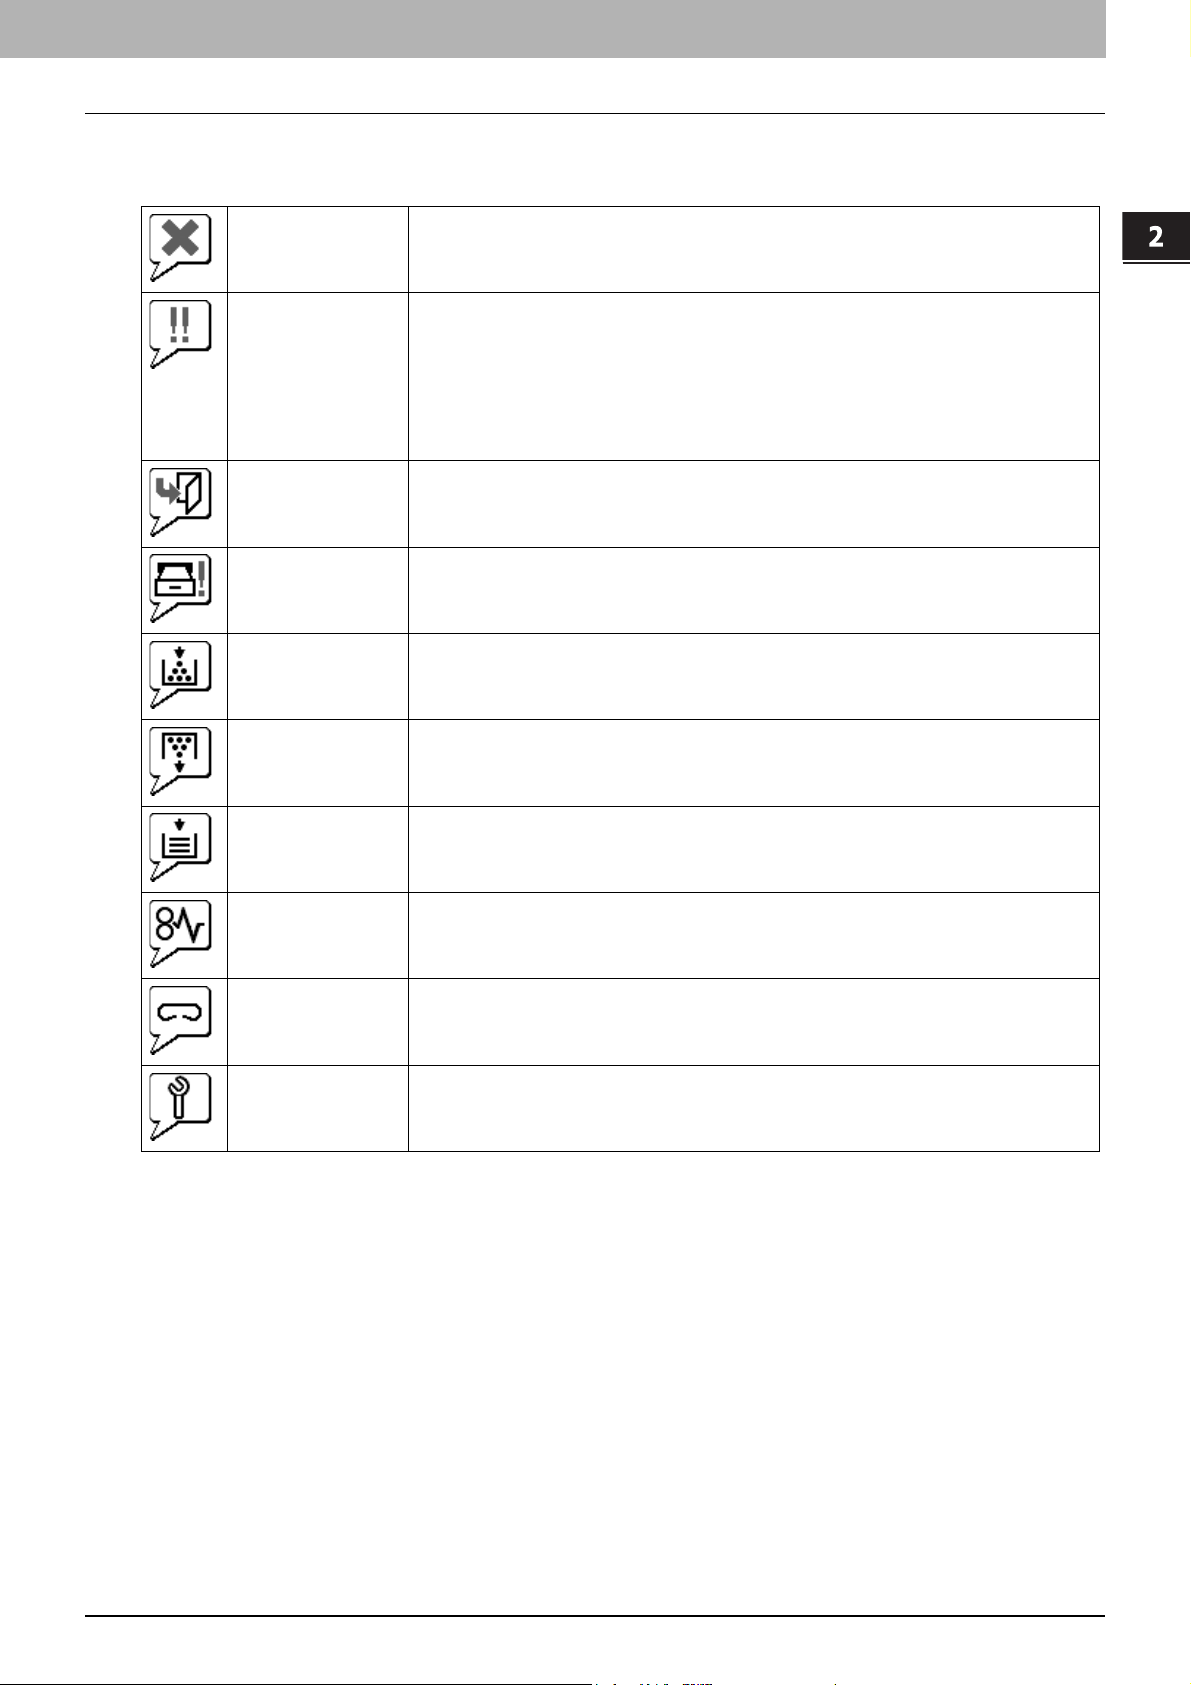
When the equipment requires maintenance or when an error occurs with the equipment, icons indicating the status
information appear near the graphic image of the equipment on the TopAccess [Device] tab. The following are the icons
displayed and their descriptions.
Printer Error 1 This icon indicates that a non-recommended toner cartridge is being used, and that the
equipment has stopped printing. For information on resolving the error, refer to "Replacing a
Toner Cartridge" in the User’s Manual Troubleshooting Guide.
Printer Error 2 This icon indicates one of the following:
Cover Open This icon indicates a cover such as the front cover or Automatic Duplexing Unit Cover is open.
Tray Open This icon indicates the tray is open.
Toner Empty This icon indicates no toner is left. For information on resolving the error, refer to "Replacing the
Waste Toner Full This icon indicates the waste toner box is full and requires replacing. For information on
Paper Empty This icon indicates no paper is left in a tray. For information on resolving the error, refer to the
You need to remove paper from the receiving tray.
You need to remove paper from the Finisher tray.
You need to remove the staples jammed in the Finisher. For information on resolving the
error, refer to "Staple Jam in the Finisher" in the User’s Manual Troubleshooting Guide.
A non-recommended toner cartridge is being used. For information on resolving the error,
refer to "Replacing a Toner Cartridge" in the User’s Manual Troubleshooting Guide.
The equipment cannot eject the paper to the output tray.
Toner Cartridge" in the User’s Manual Troubleshooting Guide.
resolving the error, refer to "Replacing the Waste Toner Box" in the User’s Manual
Troubleshooting Guide.
User’s Manual Setup Guide.
Paper Misfeed This icon indicates a paper misfeed occurred. It also indicates the location of the paper misfeed.
Staples Empty This icon indicates no staples are left in the Finisher. For information on resolving the error, refer
Call for Service Contact your service representative to have the equipment inspected.
For information on resolving the error, refer to "When a Paper Jam Occurs" in the User’s
Manual Troubleshooting Guide.
to "Refilling the Staples" in the User’s Manual Troubleshooting Guide.
Displayed Icons 27
Page 29

2 [Device] Tab Page
28 Displayed Icons
Page 30

3
3.[Job Status] Tab Page
Using TopAccess, end users can display and delete print jobs, fax/internetfax jobs, and scan jobs released by end users.
[Job Status] Tab Page Overview ........................................................................................... 30
[Print Job] Item list................................................................................................................................................30
[Fax/InternetFax Job] Item list ..............................................................................................................................32
[Scan Job] Item list...............................................................................................................................................33
[Job Status] How to Set and How to Operate ...................................................................... 34
Displaying print jobs .............................................................................................................................................34
Deleting jobs.........................................................................................................................................................35
Deleting private print jobs and hold print jobs ......................................................................................................35
Releasing print jobs..............................................................................................................................................36
Checking recovery information.............................................................................................................................36
Page 31

3 [Job Status] Tab Page
[Job Status] Tab Page Overview
You can display and delete print jobs, fax/internetfax jobs, and scan jobs. You can also print print jobs immediately.
When user authentication is enabled, you can operate on jobs associated with the user account you used to log in.
However, a user account with administrator privileges can operate on all jobs.
P.30 “[Print Job] Item list”
P.32 “[Fax/InternetFax Job] Item list”
P.33 “[Scan Job] Item list”
[Print Job] Item list
The Print Job page displays the following information for each print job.
1
2
3
6
7 8
9 10
11
12
13
14
The following screen is displayed if you are logged in with a user account which is granted administrator privileges in the
access policy mode.
1
2
3
4
5
6
Item name Description
1 [Delete] button If the selected print job is owned by a user who is logged in to TopAccess, the job is
2 [Release] button If the selected print job is in the print queue, the job is printed.
3 [Recovery Information] button If the selected print job was skipped while the job skip feature was enabled, the recovery
4 [Delete All Private Print Jobs]
button
5 [Delete All Hold Print Jobs] button This item is displayed if you are logged in with a user account which is granted
7 8
9 10
deleted.
information screen is displayed.
P.31 “[Recovery Information] screen”
P.139 “Setting up Job Skip Control”
This item is displayed if you are logged in with a user account which is granted
administrator privileges in the access policy mode.
You can delete all private print jobs displayed in the list.
administrator privileges in the access policy mode.
You can delete all hold print jobs displayed in the list.
11
12
13
14
30 [Job Status] Tab Page Overview
Page 32

3.[Job Status] Tab Page
6 Document Name Displays the document name of the print job.
7 Date Time Displays the date and time when the print job was released from the client computers.
8 Type Displays the print job set in the printer driver.
9 Status Displays the status of the print job.
10 Paper Displays the paper size of the print jobs.
11 Pages Displays the number of pages of the print job.
12 Sets Displays the number of copies set for the print jobs.
13 User Name Displays the user account name of the owner of the print job.
14 Domain Name/LDAP Server Displays the domain name or LDAP server of the user account who is the owner of the print
3 [Job Status] Tab Page
Item name Description
Document names are displayed using 10 asterisks (*) when the Confidentiality Setting is
enabled.
P.139 “Setting up Confidentiality Setting”
They are displayed using "year, month, day, hour, minute, and second".
For example: 2012/12/24 12:34:56
Possible values of print job are: [Normal Print], [Scheduled Print], [Private Print], [Proof
Print], and [Hold Print].
Possible values of status are: [Paused], [Wait], [Suspend], [Skipped], [Process], [Printing],
and [Scheduled].
job.
Print jobs that have finished being printed are displayed in the [Logs] tab.
Click a table heading item to refresh the page and reorder the print job list in the specified order.
[Recovery Information] screen
The Recovery Information screen displays the conditions for resuming printing.
1
2
3
4
5
6
Item name Description
1 [Close] button Closes the [Recovery Information] screen.
2 Cause Displays the cause of the print interruption.
3 Recovery Condition Displays the procedure for resuming printing.
4 Paper Size Displays the paper size set for the interrupted print job.
5 Paper Type Displays the paper type set for the interrupted print job.
6 Tray Displays the paper source set for the interrupted print job.
[Job Status] Tab Page Overview 31
Page 33

3 [Job Status] Tab Page
[Fax/InternetFax Job] Item list
The Fax/InternetFax Job page displays the following information for each fax transmission job.
1
3 4
2
Item name Description
1 [Delete] button The selected fax job is deleted.
2 File No. Displays the file number (001 to 100) to identify the fax transmission job.
3 TO(Name) Displays the destination name set for the fax transmission job.
4 TO(Fax No./Email) Displays the fax number or E-mail address of the destination.
5 Date Time Displays the date and time when the fax transmission job is released from the touch panel
or client computer using the N/W-Fax driver.
They are displayed using "year, month, day, hour, minute, and second".
For example: 2012/12/24 12:34:56
6 Pages Displays the number of pages of the fax transmission job.
7 Delay Time Displays the delayed time set for the fax transmission job.
8 Status Displays the status of the fax transmission job.
Possible values of status are: [Delayed], [Wait], [Line1], [Line2], and [Network].
9 User Name Displays the user account name of the owner of the fax transmission job.
10 Domain Name/LDAP Server Displays the domain name or LDAP server of the user account who is the owner of the fax
transmission job.
6 7 8 9
5
10
Transmission jobs that have finished their transmission are displayed in the [Logs] tab.
Click a table heading item to refresh the page and reorder the print job list in the specified order.
32 [Job Status] Tab Page Overview
Page 34

3.[Job Status] Tab Page
[Scan Job] Item list
The Scan Job page displays the following information for each scan job.
1
3 [Job Status] Tab Page
2
3 4
5
6 7 8 9
10
Item name Description
1 [Delete] button The selected scan job is deleted.
2 TO(Name) Displays the destination (name) to where the scanned document is sent via an E-mail.
3 TO(Email) Displays the destination (E-mail address) to where the scanned document is sent via an E-
mail.
4 File Name When the job performs the Scan to File or USB or Scan to e-Filing, it displays the document
name to be stored.
File names are displayed using 10 asterisks (*) when the Confidentiality Setting is enabled.
P.139 “Setting up Confidentiality Setting”
5 Agent Displays the agent of the scan job.
6 Date Time Displays the date and time when the scan job is released from the touch panel.
7 Pages Displays the number of pages of the scan job.
8 Status Displays the status of the scan job.
9 User Name Displays the user account name who is the owner of the scan job.
10 Domain Name/LDAP Server Displays the domain name or LDAP server of the user account who is the owner of the
Possible values of agent are: [Email], [Save as file], [Store to e-Filing], and [Store to USB
Media].
They are displayed using "year, month, day, hour, minute, and second".
For example: 2012/12/24 12:34:56
Possible values of status are: [Wait], [Suspended], [Processing], and [Scanning]
scan job.
Scan jobs that have finished being scanned are displayed in the [Logs] tab.
Click a table heading item to refresh the page and reorder the print job list in the specified order.
[Job Status] Tab Page Overview 33
Page 35

3 [Job Status] Tab Page
[Job Status] How to Set and How to Operate
P.34 “Displaying print jobs”
P.35 “Deleting jobs”
P.35 “Deleting private print jobs and hold print jobs”
P.36 “Releasing print jobs”
P.36 “Checking recovery information”
Displaying print jobs
Click the [Job Status] tab and click the [Print Job], [Fax/InternetFax Job], or [Scan Job]
1
menu.
The Job page is displayed.
If jobs are not displayed in the list, click the [REFRESH] icon at the upper right of the
2
page.
See the following for details on displayed items:
P.30 “[Print Job] Item list”
P.32 “[Fax/InternetFax Job] Item list”
P.33 “[Scan Job] Item list”
Completed jobs are displayed in the [Logs] tab.
34 [Job Status] How to Set and How to Operate
Page 36

3.[Job Status] Tab Page
Deleting jobs
Click the [Job Status] tab and click the [Print], [Fax/InternetFax], or [Scan] menu.
1
The Job page is displayed.
Select the check box next to the job that you want to delete.
2
Click [Delete].
3
The selected job is deleted.
3 [Job Status] Tab Page
Click the [REFRESH] icon at the upper right of the page to confirm the deletion.
You cannot use the Print Job page to delete fax/Internet Fax jobs and E-mail reception print jobs.
Deleting private print jobs and hold print jobs
You can delete private print jobs and hold print jobs if you are logged in with a user account which is granted administrator
privileges in the access policy mode.
Click the [Job Status] tab and click the [Print] menu.
1
The Print Job page is displayed.
Click the [Delete All Private Print Jobs] or [Delete All Hold Print Jobs] button.
2
Private print jobs or hold print jobs are deleted.
It may take a while to delete all private or hold jobs.
[Job Status] How to Set and How to Operate 35
Page 37

3 [Job Status] Tab Page
Releasing print jobs
You can print jobs that are stored in the queue.
Private print jobs and hold print jobs cannot be released from TopAccess.
Click the [Job Status] tab and click the [Print] menu.
1
The Print Job page is displayed.
Select the check box next to the job that you want to print.
2
Click [Release].
3
The selected print job is immediately printed.
Checking recovery information
You can check the conditions to restart a print job which has been skipped while the job skip feature was enabled.
For the job skip feature, see the following:
P.139 “Setting up Job Skip Control”
Click the [Job Status] tab and click the [Print] menu.
1
The Print Job page is displayed.
Select the check box next to the print job whose job status is “Skipped”.
2
Click [Recovery Information].
3
The conditions to restart the print job are displayed.
36 [Job Status] How to Set and How to Operate
Page 38

4
4.[Logs] Tab Page
Using TopAccess, end users can display print job logs, transmission journals, reception journals, and scan job logs.
[Logs] Tab Page Overview.....................................................................................................38
[View Logs] Item list..............................................................................................................................................38
[Export Logs] Item list <access policy mode> ......................................................................................................44
[Log Settings] Item list <access policy mode> .....................................................................................................45
[Logs] How to Set and How to Operate................................................................................ 47
Displaying job logs ...............................................................................................................................................47
Exporting logs.......................................................................................................................................................48
Page 39

4 [Logs] Tab Page
[Logs] Tab Page Overview
You can check the job history.
Check the logs periodically to ensure that there is no unauthorized access to the equipment as a result of spoofing.
Logs are recorded from the moment the equipment is turned on until it is shut down. Log recording continues also
after entering the Sleep mode.
Up to 100 logs are displayed in chronological order with the most recent first. You can check up to 5,000 logs in
Print Job Log Export, Fax Transmission Journal Export, Fax Reception Journal Export, and Scan Log Export, and
up to 10,000 logs in Messages Log Export by exporting them. The oldest logs are deleted when the number of logs
exceeds the maximum limit.
The default Administrator and Auditor roles can check all logs. For more information on default roles and privileges,
see the following:
P.123 “Default roles and privileges”
When user authentication is enabled, you can check the logs associated with the user account you used to log in.
Furthermore, a user account to which the default Administrator or Auditor role have been assigned can check all
logs.
P.38 “[View Logs] Item list”
P.44 “[Export Logs] Item list <access policy mode>”
P.45 “[Log Settings] Item list <access policy mode>”
[View Logs] Item list
P.38 “Print Log”
P.39 “Transmission Journal”
P.40 “Reception Journal”
P.41 “Scan Log”
P.43 “Message Log <access policy mode>”
Print Log
The Print Log page displays the following information for each print job log.
1
2
3 4
5
6 7 8 9
Item name Description
1 Document Name Displays the document name of the print job.
2 Date Time Displays the date and time that the print job was released from the client computers.
3 Type Displays the print job type.
4 Paper Displays the paper size of the print jobs.
5 Pages Displays the number of pages of the print job.
6 Sets Displays the number of copies set for print jobs.
38 [Logs] Tab Page Overview
P.139 “Setting up Confidentiality Setting”
Page 40

4.[Logs] Tab Page
Item name Description
7 Status Displays the status of the print log.
8 User Name Displays the user account name of the owner of the print job.
9 Domain Name/LDAP Server Displays the domain name or LDAP server of the user account who was the owner of the
print job.
Click a table heading item to refresh the page and reorder the print log list in the specified order.
Transmission Journal
The Transmission Journal page displays the following information for each transmission journal.
4 [Logs] Tab Page
1 2 3 4 5 6 7 8 9 10 11 12 13
Item name Description
1 No. Displays the serial number of the journals.
2 File No. Displays the file number to identify the received job.
3 Date Time Displays the date and time the transmission job was performed.
4 Duration Displays the time length taken for the transmissions. If it takes more than 1 hour, “59:59” is
5 Pages Displays the number of pages of the transmission job.
6 TO(Name) Displays the destination name set for the transmission job.
7 TO(Fax No./Email) Displays the fax number or E-mail address of the destination for the transmission job.
8 Dept Displays the department code if department management is enabled.
9 Mode
10 Status Displays the result of the transmission.
11 Line Displays the line used.
12 User Name Displays the user account name of the owner of the transmission job.
13 Domain Name/LDAP Server Displays the domain name or LDAP server of the user account who was the owner of the
* The transmission mode is displayed by a combination of a 2-digit letter code, a 3-digit numeric code, and up to a 4-digit supplemental code.
For example: EC 603
2-digit letter code
1st numeric
(Communication
Mode)
EC: ECM
G3: G3
ML: E-mail
0: 2400
1: 4800
2: 7200
3: 9600
4: 12000
5: 14400
6: V.34
indicated.
Displays the transmission mode
transmission job.
code
(bps)
2nd numeric code
(Resolution)
0: 8x3.85
1: 8x7.7
2: 8x15.4
4: 16x15.4
8: 300 dpi
B: 600 dpi
D: 150 dpi
*
.
3rd numeric
0: MH
1: MR
2: MMR
3: JBIG
code
(Mode)
Up to 4 digit
supplemental code
P: Polling
SB: Mailbox
SR/R: Relay mailbox
SF/F: Forward mailbox
ML: Internet Fax
I: N/W-Fax
O: Offramp Gateway
[Logs] Tab Page Overview 39
Page 41

4 [Logs] Tab Page
Click a table heading item to refresh the page and reorder the transmission journal list in the specified order.
Reception Journal
The Reception Journal page displays the following information for each reception journal.
1 2 3 4 5 6 7 8 9 10 11 12 13
Item name Description
1 No. Displays the serial number of the journals.
2 File No. Displays the file number to identify the received job.
3 Date Time Displays the date and time of receiving the job.
4 Duration Displays the time taken for the receptions. If it takes more than 1 hour, “59:59” is indicated.
5 Pages Displays the number of pages of the received job.
6 From(Name) Displays the sender's name of the received job.
7 From(Fax No./Email) Displays the fax number or E-mail address of the sender for the received job.
8 Dept Displays the department code if the department management is enabled.
9 Mode
10 Status Displays the result of the reception.
11 Line Displays the line used.
12 User Name Displays the user account name of the owner of the received job.
13 Domain Name/LDAP Server Displays the domain name or LDAP server of the user account who was the owner of the
* The reception mode is displayed by a combination of a 2-digit letter code, a 3-digit numeric code, and up to a 4-digit supplemental code.
For example: EC 603
2-digit letter code
1st numeric
(Communication
Mode)
EC: ECM
G3: G3
ML: E-mail
0: 2400
1: 4800
2: 7200
3: 9600
4: 12000
5: 14400
6: V.34
Displays the reception mode
received job.
code
(bps)
2nd numeric code
(Resolution)
0: 8x3.85
1: 8x7.7
2: 8x15.4
4: 16x15.4
8: 300 dpi
B: 600 dpi
D: 150 dpi
*
.
3rd numeric
code
(Mode)
0: MH
1: MR
2: MMR
3: JBIG
Up to 4 digit
supplemental code
P: Polling
SB: Mailbox
SR/R: Relay mailbox
SF/F: Forward mailbox
ML: Internet Fax
I: N/W-Fax
O: Onramp Gateway
Click a table heading item to refresh the page and reorder the reception journal list in the specified order.
40 [Logs] Tab Page Overview
Page 42
4.[Logs] Tab Page
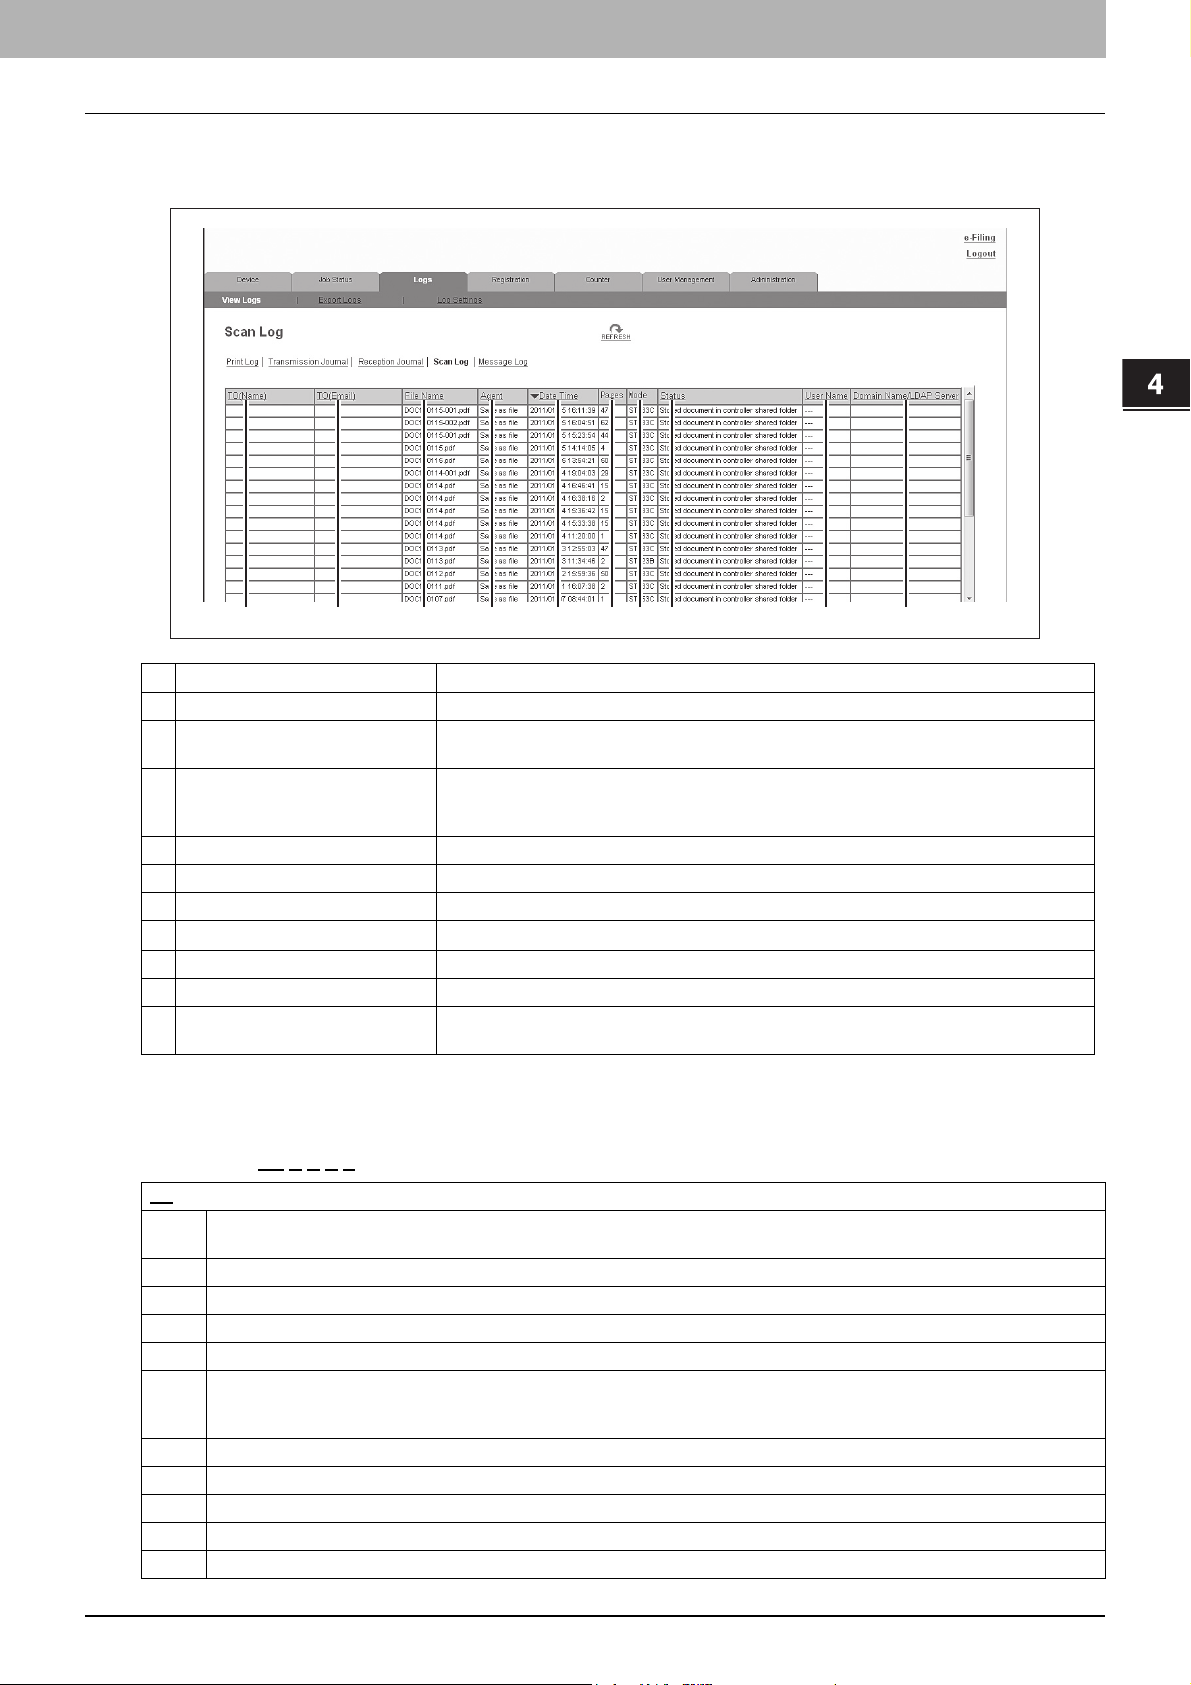
Scan Log
The Scan Log page displays the following information for each scan job log.
4 [Logs] Tab Page
1
2
3 4
6 7 8 9
5
10
Item name Description
1 TO(Name) Displays the destination (name) to where the scanned document was sent via an E-mail.
2 TO(Email) Displays the destination (E-mail address) to where the scanned document was sent via an
E-mail.
3 File Name Displays the file name stored in a shared folder or e-Filing.
This item may not be displayed depending on the access policies.
P.139 “Setting up Confidentiality Setting”
4 Agent Displays the agent of the scan job.
5 Date Time Displays the date and time when the scan job was released from the control panel.
6 Pages Displays the number of pages of the scan job.
7 Mode
8 Status Displays the detailed result status of the scan job.
9 User Name Displays the user account name of the owner of the scan job.
10 Domain Name/LDAP Server Displays the domain name or LDAP server of the user account who was the owner of the
Displays the transmission mode using 6-letter codes
scan job.
*
.
* Codes are displayed in the following format.
Code format: AA
: This describes the job type.
AA
CA Copy and File
Copy and Store to e-Filing
CT Copy to e-Filing (without printing)
FS Relay Mailbox Transmission
FF Fax Received Forward
FE Internet Fax Received Forward
ST Scan to File or USB
FA Fax and Save as File
PA Print and e-Filing
PT Print to e-Filing
IA N/W-Fax and Save as File
BE e-Filing to Email
Scan to e-Filing
Scan to Email
B C D E
[Logs] Tab Page Overview 41
Page 43

4 [Logs] Tab Page
RS Remote Scan or Web Services Scan
MS Meta Scan
EN E-mail notification
: This describes the transmission type.
B
0 e-Filing
1 Email (SMTP)
2FTP
3SMB
4 Save in a local folder
5 NetWare IPX/SPX
6USB
7NetWare TCP/IP
8FTPS
9 Remote Scan or Web Services Scan
: This describes the resolution.
C
0 100 dpi
1 150 dpi
2 200 dpi
3 300 dpi
4 400 dpi
5 600 dpi
A 8 x 3.85 (line/mm) (203 x 98)
B 8 x 7.7 (line/mm) (203 x 196)
C 8 x 15.4 (line/mm) (203 x 391)
D 16 x 15.4 (line/mm) (400 x 391)
: This describes the file format.
D
0 e-Filing
1 TIFF (Multi)
2 TIFF (Single)
3 PDF (Multi) or Encrypted PDF (Multi)
4JPEG
5 PDF (Single) or Encrypted PDF (Single)
6 Slim PDF (Multi)
7 Slim PDF (Single)
8 XPS (Multi)
9 XPS (Single)
ADIB
: This describes the file color mode.
E
BBlack
G Gray Scale
C Color
MMix
The file format is recorded as DIB in the scan log if the data are scanned in BMP, JPEG, TIFF, or PNG format using the
WIA (Windows Image Acquisition) driver.
Click a table heading item to refresh the page and reorder the scan log list in the specified order.
42 [Logs] Tab Page Overview
Page 44

4.[Logs] Tab Page
Message Log <access policy mode>
The Message Log page displays errors which have occurred.
Displays only when you are logged in with a user account which is granted administrator privileges or display
privilege in the access policy mode.
The default Administrator and Auditor roles can check all message logs. For more information on default roles and
privileges, see the following:
P.123 “Default roles and privileges”
4 [Logs] Tab Page
1 2 3 4 5 6
Item name Description
1 Date Time Displays the date and time of the error.
2 Error Level Displays the error level.
Error — Error that user and administrator may not be recoverable.
Warn ing — Error that administrator is recoverable.
Information — Error that end user is recoverable or that event is not error.
3 Message Displays the message if available.
4 Status Displays the error code.
5 User Name Displays the user account name related to the message.
6 Domain Name/LDAP Server Displays the domain name or LDAP server of the user account related to the message.
For details on error codes and error messages, refer to “Checking the Equipment Status with TopAccess” in the User’s
Manual Troubleshooting Guide.
[Logs] Tab Page Overview 43
Page 45

4 [Logs] Tab Page
[Export Logs] Item list <access policy mode>
You can erase logs or export them in a file.
Displays only when you are logged in with a user account which is granted administrator or display privileges in the
access policy mode.
The exported data file can be either CSV format or XML format. [CSV] is set as the default.
You can export up to 5,000 logs in Print Job Log Export, Fax Transmission Journal Export, Fax Reception Journal
Export, and Scan Log Export, and up to 10,000 logs in Messages Log Export. The oldest logs are deleted when the
number of logs exceeds the maximum limit.
1
2
3
4
5
Item name Description
1 Print Job Log Export You can erase print logs or export (download) them in a file.
2 Fax Transmission Journal Export You can erase the transmission journal or export (download) it to a file.
3 Fax Reception Journal Export You can erase the reception journal or export (download) it to a file.
Create New File & Clear Log — Creates a file according to the file format of the export
data. Erases logs after a file has been created. You can display or download by clicking the
created file.
Clear Log — Erases logs.
Create New File — Creates a file according to the file format of the export data.
You can display or download by clicking the created file.
44 [Logs] Tab Page Overview
Page 46
4.[Logs] Tab Page
Item name Description
4 Scan Log Export You can erase scan logs or export (download) them in a file.
Create New File & Clear Log — Creates a file according to the file format of the export
data. Erases logs after a file has been created. You can display or download by clicking the
created file.
Clear Log — Erases logs.
Create New File — Creates a file according to the file format of the export data.
You can display or download by clicking the created file.
5 Messages Log Export You can erase message logs or export (download) them in a file.
Create New File & Clear Log — Creates a file according to the file format of the export
data. Erases logs after a file has been created. You can display or download by clicking the
created file.
Clear Log — Erases logs.
Create New File — Creates a file according to the file format of the export data.
You can display or download by clicking the created file.
[Log Settings] Item list <access policy mode>
P.45 “Log Authentication”
P.46 “Log size”
4 [Logs] Tab Page
Displays only when you are logged in with a user account which is granted administrator or display privileges in the
access policy mode.
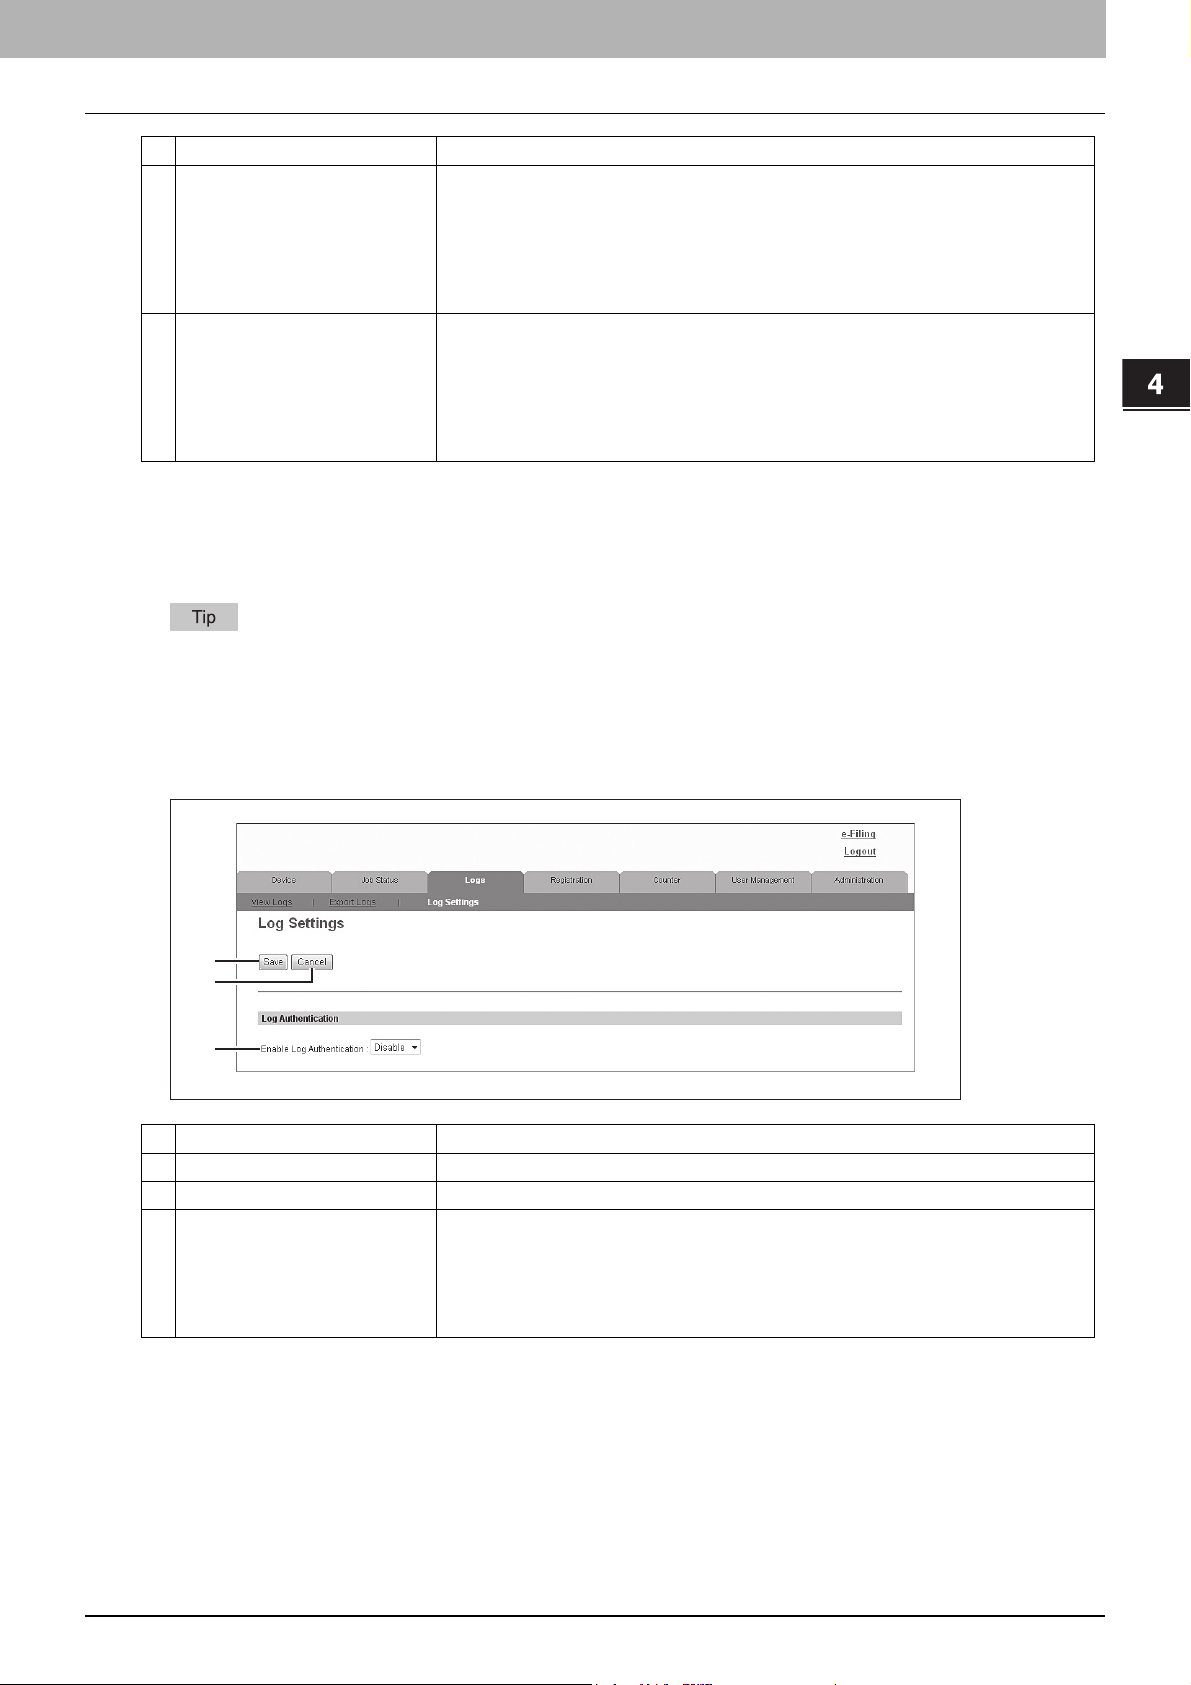
Log Authentication
You can specify whether or not to use log authentication.
1
2
3
Item name Description
1 [Save] button Saves log authentication settings.
2 [Cancel] button Cancels the settings.
3 Enable Log Authentication Enables log authentication.
When log authentication is enabled, the log display for users will be restricted according to
access policies.
Enable — Enables log authentication. Display will be restricted according to access
policies.
Disable — Disables log authentication. Logs for all users will be displayed.
[Logs] Tab Page Overview 45
Page 47

4 [Logs] Tab Page
Log size
Log size displays the log size.
1
2
3
4
5
Item name Description
1 Print Log Displays the log size of print jobs.
2 Transmission Journal Displays the log size of transmission journals.
3 Reception Journal Displays the log size of reception journals.
4 Scan Log Displays the log size of scan jobs.
5 Message Log Displays the log size of message logs.
46 [Logs] Tab Page Overview
Page 48

[Logs] How to Set and How to Operate
P.47 “Displaying job logs”
P.48 “Exporting logs”
Displaying job logs
You can display logs for jobs which are performed on this equipment. Up to 100 logs are displayed in chronological
order with the most recent first. When the number exceeds 100, logs are deleted, beginning with the oldest ones.
Click the [Logs] tab and click the [View Logs] menu.
1
Click [Print Log], [Transmission Journal], [Reception Journal], [Scan Log], or [Message
2
Log].
The log page is displayed.
Click the [REFRESH] icon at the upper right of the page to update the information.
3
4 [Logs] Tab Page
Click a table heading item to refresh the page and reorder the list in the specified order.
[Logs] How to Set and How to Operate 47
Page 49

4 [Logs] Tab Page
Exporting logs
You must be logged in to the access policy mode to export logs.
For information on logs that can be exported, see the following:
P.44 “[Export Logs] Item list <access policy mode>”
Log in to TopAccess in access policy mode.
1
P.22 “Access Policy Mode”
Click the [Logs] tab and then click the [Export Logs] menu.
2
File sizes are displayed in bytes.
Select the file format (CSV/XML) for the log you want to export.
3
Create the file by clicking the [Create New File] button for the log you want to export.
4
Click the file name.
5
Save the log file.
6
Your browser will display a confirmation dialog box. Select the process for saving the log as a file and follow the
displayed instructions.
48 [Logs] How to Set and How to Operate
Page 50

5
5.[Registration] Tab Page
This chapter contains instructions on how to register templates, the address book, and mailboxes.
[Registration] Tab Page Overview ........................................................................................ 50
[Template] Item list ...............................................................................................................................................50
[Address Book] Item list........................................................................................................................................76
[Inbound FAX routing] Item list .............................................................................................................................81
[Registration] How to Set and How to Operate ................................................................... 86
Managing templates.............................................................................................................................................86
Managing address book .......................................................................................................................................94
Managing mailboxes ..........................................................................................................................................100
Page 51

5 [Registration] Tab Page
[Registration] Tab Page Overview
You can register templates, the address book, and inbound fax routing.
P.50 “[Template] Item list”
P.76 “[Address Book] Item list”
P.81 “[Inbound FAX routing] Item list”
[Template] Item list
P.50 “[Template Groups] screen”
P.53 “[Group Properties] screen”
P.54 “[Private Templates] screen”
P.55 “[Change Group Password] screen”
P.56 “[Template Properties] screen”
P.57 “Private template settings”
[Template Groups] screen
You can check the template registration status.
You can save agent settings for copy, fax/Internet Fax, and scan operated from the control panel on your device into a
template. Users can select the template when they copy, fax/Internet Fax, or scan from the control panel, for easy
operation.
Templates are managed in groups and up to 60 templates can be saved in a group.
There can be one public template group, and up to 200 private template groups.
Group type Description
Public Template
Groups
Private Template
Groups
The public template group can be created and maintained only by
users who are granted administrator privileges in the access policy
mode.
Registered templates are available for all users.
Users can create templates in private template groups. Users can
also set passwords on groups and registered templates to restrict the
use of them. Groups and templates without a password are available
to all users.
Max. number
of groups
160
200 60
Max.
templates
saved
50 [Registration] Tab Page Overview
Page 52

5.[Registration] Tab Page
Public Template Groups
1
2
3
5 [Registration] Tab Page
Item name Description
1 No. Displays "Public" for the public template group.
2 Name Displays "Public Template Groups" for the public template group.
3 User Name
You can click to check the registered templates.
P.93 “Displaying public templates”
Templates in the public template group are created and managed by users who are granted administrator privileges in
the access policy mode. See the following description for registering public template groups:
P.332 “Registering public templates”
[Registration] Tab Page Overview 51
Page 53

5 [Registration] Tab Page
Private Template Groups
1
2
3
Item name Description
1 No. Displays the group number.
2 Name Displays the group name.
Click the name of a registered template to check and edit the registered templates.
P.86 “Registering and editing private template groups”
Click [Undefined] to register templates.
P.53 “[Group Properties] screen”
3 User Name Displays the group owner name.
Click the name of a registered user name to check and edit the registered templates.
P.86 “Registering and editing private template groups”
Click [Undefined] to register templates.
P.53 “[Group Properties] screen”
Click [All Groups] or [Defined Groups] to change how private template groups are displayed.
See the following descriptions for how to register private template groups and how to create templates:
P.86 “Registering and editing private template groups”
P.89 “Registering or editing templates”
52 [Registration] Tab Page Overview
Page 54

5.[Registration] Tab Page
[Group Properties] screen
You can register a new private template group.
1
2
3
4
5
6
7
8
Item name Description
1 [Save] button Creates a private template group with the entered data.
2 [Cancel] button Cancels the settings.
3 Number Displays the private group number.
4 Name Enter the name of the private group.
5 User Name Enter the owner name of the private group.
6 Notification Enter the E-mail address to be displayed as the default recipient when notification is
7 Password Enter the password if setting a password to the private group. You can enter up to 20
8 Retype Password Enter the same password again for a confirmation.
5 [Registration] Tab Page
The [Private Templates] screen is displayed and you can edit the template you are
registering.
P.54 “[Private Templates] screen”
enabled in any template. You can select whether notification will be sent or not for each
template.
characters including numbers, sharp marks (#), and asterisks (*).
[Registration] Tab Page Overview 53
Page 55

5 [Registration] Tab Page
[Private Templates] screen
You can edit the template you are registering.
1
2
3
4
5
6
Group Information
Item name Description
1 [Edit] button Allows you to edit the private template group information.
P.53 “[Group Properties] screen”
2 [Change Password] button Allows you to change the password for the private template group.
P.55 “[Change Group Password] screen”
3 [Reset] button Resets registration of the private template group.
4 No. Displays the number of the private template group.
5 Name Displays the name of the private group.
6 User Name Displays the owner of the private template group.
Template list
You can display the template list. You can change the view by clicking [Panel View] or [List View].
Panel View
1
2
Item name Description
1 Image Displays icons of the templates.
2 Name 1/Name 2 Displays the names registered on the touch panel.
54 [Registration] Tab Page Overview
Click [Undefined] to register a new template.
P.53 “[Group Properties] screen”
P.57 “Panel Setting (Private template)”
Page 56

5.[Registration] Tab Page
List View
1
2
3
1 Name Displays the names registered on the touch panel.
2 User Name Displays the user name registered on the panel setting.
3 Agent Displays the agent registered to the template.
5 [Registration] Tab Page
Item name Description
P.57 “Panel Setting (Private template)”
Click [Undefined] to register a new template.
P.53 “[Group Properties] screen”
Click [Undefined] to register a new template.
P.53 “[Group Properties] screen”
Click [Undefined] to register a new template.
P.53 “[Group Properties] screen”
[Change Group Password] screen
You can change the password of a private template group.
1
2
3
4
5
Item name Description
1 [Save] button Saves the new password.
2 [Cancel] button Cancels the password change.
3 Old Password Enter the current password.
4 New Password Enter the new password.
5 Retype Password Enter the same password again for a confirmation.
[Registration] Tab Page Overview 55
Page 57

5 [Registration] Tab Page
[Template Properties] screen
You can set the template you are registering.
1
2
3
4
5
6
7
8
10
9
11
Item name Description
1 [Save] button Saves the template contents.
2 [Cancel] button Cancels the operation.
3 [Select Agent] button Allows you to set the selected agent.
4 Copy You can create a template which copies the document. Select this agent if you want to print
5 Fax / InternetFax You can create a template for fax or Internet Fax transmission. You can also specify the
6 Scan You can create a template for a scan. You need to select either the [Email] agent, [Save as
7 Meta Scan This agent is enabled when the meta scan option is installed.
8 Email You can transmit the document as an E-mail attachment.
9 Save as file You can save the document in a shared folder.
10 Store to e-Filing You can store the document in the e-Filing.
11 Save to USB Media You can save the document in USB media.
You can set the template details when creating a new agent.
P.57 “Private template settings”
a copy when you are sending a document to another destination. You can also specify the
[Save as file] agent or [Store to e-Filing] agent at the same time.
[Save as file] agent at the same time.
file] agent, [Store to e-Filing] agent, or [Save to USB Media] agent at the same time. You can
specify up to two agents for a scan template.
You can create a template for the meta scan option.
Refer to the document provided by the vendor of the application which supports meta scan
option for details.
56 [Registration] Tab Page Overview
Page 58

5 [Registration] Tab Page
1
2
3
4
5
6
7
8
5.[Registration] Tab Page
Private template settings
You can set details of a template.
P.57 “Panel Setting (Private template)”
P.58 “Destination Setting (Private template)”
P.64 “InternetFax Setting (Private template)”
P.64 “Fax Setting (Private template)”
P.66 “Email Setting (Private template)”
P.68 “Save as file Setting (Private template)”
P.71 “Box Setting (Private template)”
P.71 “Store to USB Device Setting (Private template)”
P.73 “Scan Setting (Private template)”
P.75 “Extended Field settings”
P.75 “Extended Field Properties”
P.75 “Password Setting”
Panel Setting (Private template)
In the Panel Setting page, specify how the icon for the template is displayed in the touch panel, and the notification
settings for the template.
Item name Description
1 Picture This indicates the icon that will be displayed in the touch panel. The icon is automatically
2 Caption1 Enter the text that will be displayed next to the icon in the touch panel. You can enter up to
3 Caption2 Enter the text that will be displayed next to the icon in the touch panel. You can enter up to
4 User Name Enter the owner name of the template. You can enter up to 30 alphanumerical characters.
5 Automatic Start Select whether the automatic start function is enabled or disabled. When this is enabled, the
If the user names or passwords of the User Authentication for Scan to E-mail and the User Management Setting are different,
or only the User Authentication for Scan to E-mail is enabled, you need to enter the user name and password of the User
Authentication for Scan to E-mail also when recalling the template with the automatic start function enabled.
6 Notification — Send Email when an
error occurs
7 Notification — Send Email when
job is completed
designated according to the agent that you select.
11 alphanumerical characters.
11 alphanumerical characters.
operation will be automatically started when you press the template button from the
TEMPLATE menu on the touch panel without pressing the [START] button or [SCAN].
Select this to send a notification message to the specified E-mail address when an error
occurs.
Select this to send a notification message to the specified E-mail address when a job is
completed.
[Registration] Tab Page Overview 57
Page 59
5 [Registration] Tab Page
Item name Description
8 Notification — Email to Enter a recipient E-mail address for the notification message. You can either select an
When you enable the Notification setting, make sure to set up the E-mail settings in the [Email] submenu of the [Setup] menu
in the TopAccess access policy mode. For instructions on how to set up the E-mail settings, see the following section:
P.233 “Setting up E-mail settings”
option to send it to the E-mail address set in a private group or specify an E-mail address.
Destination Setting (Private template)
In the Recipient List page, you can specify the destinations to which the Fax, Internet Fax, or Scan to E-mail document will
be sent.
When you are setting up the destinations for the Scan to Email agent, you can only specify the E-mail addresses for the
destinations.
When you are setting up the destinations for the Fax/InternetFax agent, you can specify both fax numbers and E-mail
addresses for the destinations.
When Creating a Fax/Internet Fax agent:
When Creating an Email agent:
The Fax Unit must be installed in this equipment to specify the fax numbers of the destinations.
You can specify the destinations by entering their E-mail addresses or fax numbers manually, selecting destinations from
the address book, selecting destination groups from the address book, or searching for destinations in the LDAP server.
P.59 “Entering the destinations manually”
P.60 “Selecting the destinations from the address book”
P.61 “Selecting the groups from the address book”
P.62 “Searching for destinations in the LDAP server”
P.63 “Removing the contacts from the Recipient List”
58 [Registration] Tab Page Overview
Page 60

5.[Registration] Tab Page
Entering the destinations manually
You can add a destination manually to the Recipient List.
You cannot enter destinations if [Restriction Setting for Destination] is enabled.
P.264 “Restriction Setting for Destination”
Click [Destination Setting] (when creating a Fax/Internet Fax agent) or [TO: Destination
1
Setting] / [CC: Destination Setting] / [BCC: Destination Setting] (when creating an Email
agent) to open the Recipient List page.
Click [New].
2
The Contact Property page is displayed.
5 [Registration] Tab Page
Enter the E-mail address or fax number of the destination, in the [Destination] box.
3
You can specify the fax number for the destination only when the Fax Unit is installed.
Click [OK].
4
The destination is added to the Recipient List page.
Repeat steps 2 to 4 to add all additional destinations that you require.
5
You can remove the destinations you added to the Recipient List before saving the destination settings.
P.63 “Removing the contacts from the Recipient List”
Click [Save].
6
The contacts are added as destinations.
[Registration] Tab Page Overview 59
Page 61
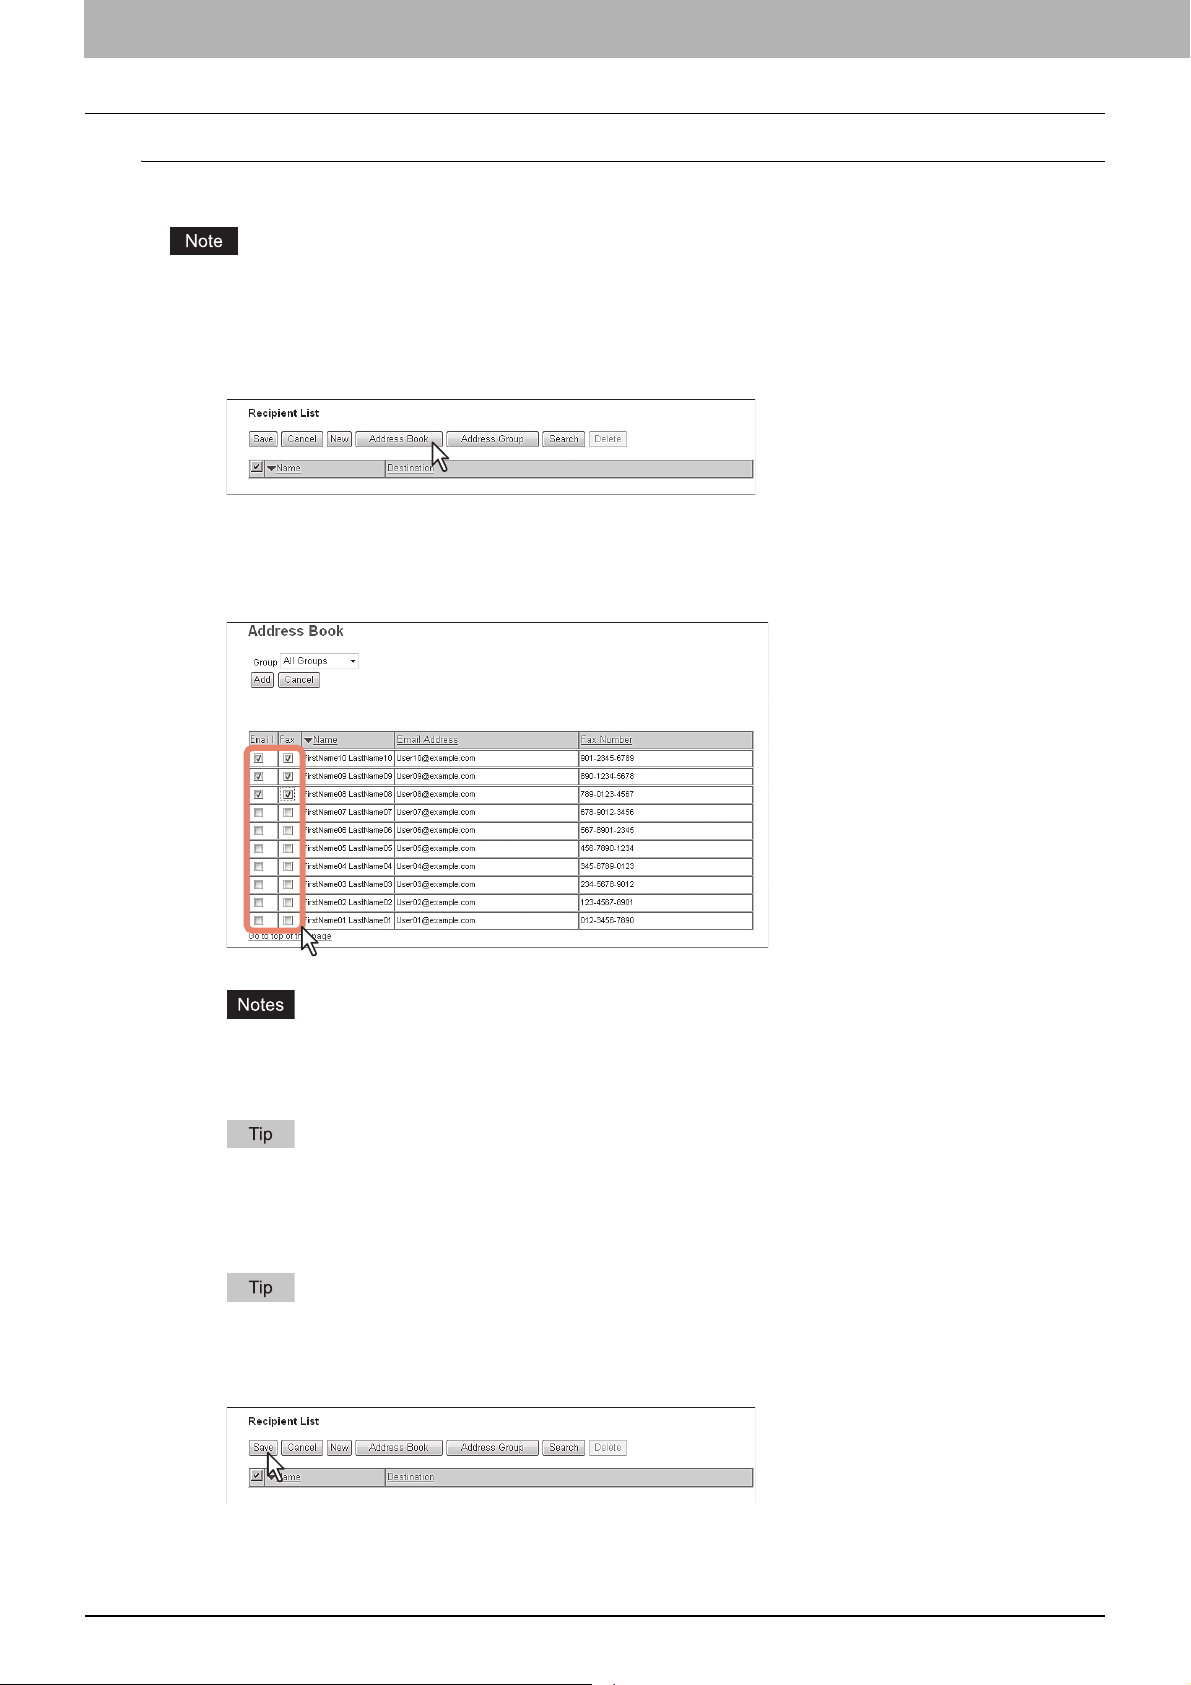
5 [Registration] Tab Page
Selecting the destinations from the address book
You can select destinations from the address book in this equipment.
You cannot select destinations from the address book if [Restriction Setting for Destination] is enabled.
P.264 “Restriction Setting for Destination”
Click [Destination Setting] to open the Recipient List page.
1
Click [Address Book].
2
The Address Book page is displayed.
Select the [Email] check boxes of users you want to add as the E-mail recipients or
3
Internet Fax recipients, and select the [Fax] check boxes of users you want to add as
the Fax recipients.
When you are creating a Scan to E-mail template, only the [Email] check boxes are displayed in the
Address Book page.
You can specify the fax number for the destination only when the Fax Unit is installed.
If you want to sort the Recipient List by a specific group, select the desired group name in the [Group] box.
Click [Add].
4
The selected destinations are added to the Recipient List page.
You can remove the destinations you added to the Recipient List before saving the destination settings.
P.63 “Removing the contacts from the Recipient List”
Click [Save].
5
The contacts are added as destinations.
60 [Registration] Tab Page Overview
Page 62

5.[Registration] Tab Page
Selecting the groups from the address book
You can select groups from the address book.
You cannot select destinations from the address group if [Restriction Setting for Destination] is enabled.
P.264 “Restriction Setting for Destination”
Click [Destination Setting] to open the Recipient List page.
1
Click [Address Group].
2
The Address Group page is displayed.
Select the [Group] check boxes that contain the desired destinations.
3
5 [Registration] Tab Page
Click [Add].
4
All recipients in the selected groups are added to the Recipient List page.
You can remove the destinations you added to the Recipient List before saving the destination settings.
P.63 “Removing the contacts from the Recipient List”
Click [Save].
5
The contacts are added as destinations.
[Registration] Tab Page Overview 61
Page 63

5 [Registration] Tab Page
Searching for destinations in the LDAP server
You can search for destinations in the registered LDAP server and in the address book.
The LDAP server used for the search must be registered by a user who is granted administrator privileges in access
policy mode.
P.302 “Managing directory service”
Click [Destination Setting] to open the Recipient List page.
1
Click [Search].
2
The Search Contact page is displayed.
Select the directory service name that you want to search for in the [Directory Service
3
Name] box, and enter the search terms in the boxes that you want to search.
If you select the model name of this equipment at the [Directory Service Name] box, you can search for
destinations in the address book of this equipment.
TopAccess will search for destinations who match the entries.
Leaving the box blank allows wild-card searching. However, you must specify at least one.
Click [Search].
4
TopAccess will start searching for destinations in the LDAP server and the Search Address List page will display
the results.
Select the [Email] check boxes of users you want to add as the E-mail recipients or
5
Internet Fax recipients, and select the [Fax] check boxes of users you want to add as
Fax recipients.
Click [Research] to return to step 3 so that you can change the search criteria and execute the search again.
You can specify the fax number for the destination only when the Fax Unit is installed.
The value of [company] and [department] will depend on the settings made by the user who is granted
administrator privileges in the access policy mode.
62 [Registration] Tab Page Overview
Page 64

5.[Registration] Tab Page
Click [Add].
6
The selected destinations are added to the Recipient List page.
You can remove the destinations you added to the Recipient List before saving the destination settings.
P.63 “Removing the contacts from the Recipient List”
Click [Save].
7
The contacts are added as destinations.
Removing the contacts from the Recipient List
Click [Destination Setting] to open the Recipient List page.
1
Select the check boxes of the destinations that you want to remove from the Recipient
2
List, and click [Delete].
5 [Registration] Tab Page
The selected destinations are removed from the Recipient List.
[Registration] Tab Page Overview 63
Page 65

5 [Registration] Tab Page
InternetFax Setting (Private template)
In the InternetFax Setting page, you can specify the content of the Internet Fax to be sent.
1
2
3
4
5
6
Item name Description
1 Subject This sets the subject of the Internet Faxes. Select [Scanned from (Device Name) [(Template
2 From Address Enter the E-mail address of the sender. When the recipient replies to a received document,
3 From Name Enter the sender name of the Internet Fax. You can enter up to 64 characters.
4 Body Enter the body message of the Internet Fax. You can enter up to 1000 characters (including
5 File Format Select the file format of the scanned image. Only [TIFF-S] (TIFF-FX (Profile S)) format can
6 Fragment Page Size Select the size of the message fragmentation. [No Fragmentation] is set as the default.
Name)] (Date) (Time)] to automatically apply the subject, or enter the desired subject in the
box. If you enter manually, the subject will be [(Subject) (Date) (Time)].
the message will be sent to this E-mail address. You can enter up to 140 alphanumerical
characters.
spaces).
be selected.
Fax Setting (Private template)
In the Fax Setting page, you can specify how the fax will be sent.
1
2
3
4
5
6
7
8
9
10
11
12
13
14
Item name Description
1 Preview Select whether or not to preview before sending a fax.
ON — Select this to preview.
— Select this not to preview.
OFF
64 [Registration] Tab Page Overview
Page 66

5.[Registration] Tab Page
2 Resolution Select the resolution for sending faxes.
3 Original Mode Select the image quality mode for sending faxes.
4 Exposure Select the exposure for sending faxes.
5 Transmission Type Select the send mode.
Item name Description
Standard
when you are frequently transmitting text documents with normal size characters.
Fine — Select the Fine mode as the normal resolution. This mode is suitable when you
are transmitting documents with small size characters or fine drawings.
Ultra Fine — Select the Ultra Fine mode as the normal resolution. This mode is suitable
when you are transmitting documents with very small size characters or detailed
drawings.
Text
when you are transmitting text documents.
Text/Photo — Select the Text/Photo mode as the normal image quality mode. This
mode is suitable when you are transmitting documents which contain both texts and
photos.
Photo — Select the Photo mode as the normal image quality mode. This mode is
suitable when you are transmitting photo documents.
Select [Auto] to automatically apply the ideal contrast, or adjust the contrast manually in 11
stages.
Memory Transmit
after it has been temporarily stored to memory. This mode is useful if you want to return
original files immediately. You can also send the same originals to two or more remote
faxes.
Direct Transmit — Select the Direct TX mode to send the original as it is being
scanned. This mode is useful if you want confirmation from the remote party. Originals
are not stored to memory, and you can specify only one remote fax at a time.
— Select the Standard mode as the normal resolution. This mode is suitable
— Select the Text mode as the normal image quality mode. This mode is suitable
— Select the Memory TX mode to automatically send the document
5 [Registration] Tab Page
You can select [Direct Transmit] when you have created a template for Fax/InternetFax (not for Saved as file).
When Fax/InternetFax and [Save as file setting] are combined, this item will be unselectable and will not be displayed.
6 ECM Enable or disable the ECM (Error Correction Mode) to automatically resend any portion of
the document affected by phone line noise or distortion.
7 Quality Transmit Select this to send a document in the Quality TX mode. This feature sends a document at a
slower speed than normal so the transmission will be less affected by line conditions.
8 SUB/SEP Enter the SUB number or SEP number if you want to set the mailbox transmission.
9 SID/PWD Enter the password for SUB or SEP if required.
10 Polling Select this to set Polling communications.
(Blank)
Transmission — Select this to perform Polling Reservation that allows users to store
Received — Select this to perform Turnaround Polling that allows users to poll another
You can select [Transmission] when you have created a template for Fax/InternetFax (not to be Saved as file).
When Fax/InternetFax and [Save as file setting] are combined, this item will be unselectable and will not be displayed.
11 Password Enter the 4-digit security code for the document to be stored or received.
12 Fax Number(Security) When you select [Transmission] at the [Polling] box, enter the security fax number that
allows polling of stored document.
When you select [Received] at the [Polling] box, enter the security fax number to poll the
documents from remote faxes.
13 Delayed Transmit If you enable the delayed communications for this agent, enter the day and time to send a
document. Delayed transmission is disabled when the date is set to "0".
14 Priority Transmit Select whether the document will be sent prior to other jobs.
— Select the blank box when you do not want to perform polling.
the document in the memory.
fax after transmitting documents to the remote fax on the same phone call.
[Registration] Tab Page Overview 65
Page 67

5 [Registration] Tab Page
Email Setting (Private template)
In the Email Setting page, you can specify the content of the Scan to Email document to be sent.
1
2
3
4
5
6
7
8
Item name Description
1 Subject This sets the subject of the E-mail.
Use Email Setting in Administration Setting
[Administration] - [Setup] - [Email] as subject.
Send data from (Device Name)[(Template Name)] — Select this to set the [(Template
Name)] data sent from (Device Name) as subject.
<Entry box> — Enter the text to set as subject.
Add the date and time to the Subject — Select this to append date and time to the subject
selected above.
When [Meta Scan] is selected, you can use a variable as the subject.
For more information on variables, see the following:
P.353 “Variables of XML format files”
2 From Address This sets the E-mail address of the sender. When the recipient replies to a received
document, the message will be sent to this E-mail address.
Use From Address Setting set by Administrator — Select this to use the E-mail address
specified in [Administration] - [Setup] - [Email]. When User Authentication or Email
Authentication is enabled, select this to use the E-mail address specified in [Administration]
- [Security] - [Authentication] - [Email Address Setting].
<Entry box> — Specify the sender address using up to 140 alphanumeric characters.
3 From Name This sets the sender name of the E-mail document.
Use From Name Setting set by Administrator — Select this to use the sender name
specified in [Administration] - [Setup] - [Email]. When User Authentication or Email
Authentication is enabled, select this to use the sender name specified in [Administration] [Security] - [Authentication] - [Email Address Setting].
<Entry box> — Specify the sender name using up to 64 characters.
4 Body Enter the body message of the Scan to Email documents. You can enter up to 1000
characters (including spaces).
— Select this to set the subject specified in
66 [Registration] Tab Page Overview
Page 68

5.[Registration] Tab Page
5 File Format Select the file format of the scanned image.
If the Forced Encryption setting is enabled, only the PDF (Multi) and the PDF (Single) are selectable for a file format. For
the Forced Encryption function, refer to the User’s Manual Advanced Guide.
Files saved in an XPS format can be used in Windows Vista/Windows 7/Windows Server 2008 SP1, or Windows XP SP2/
Windows Server 2003 SP1 or later versions with Net Framework 3.0 installed.
6 Encryption Set this for encrypting PDF files if you have selected [PDF (Multi)] or [PDF (Single)] in the
Item name Description
TIFF(Multi)
TIFF(Single) — Select this to save scanned images separately as Single-page TIFF
files.
PDF(Multi) — Select this to save scanned images as a Multi-page PDF file.
PDF(Single) — Select this to save scanned images separately as Single-page PDF
files.
Slim PDF(Multi) — Select this to save scanned images as Multi-page slim PDF files.
Select this when you give priority to minimizing the file size over the quality of the image.
Slim PDF(Single) — Select this to save scanned images separately as Single-page
slim PDF files. Select this when you give priority to minimizing the file size over the
quality of the image.
XPS(Multi)— Select this to save scanned images as a Multi-page XPS file.
XPS(Single) — Select this to save scanned images separately as Single-page XPS
files.
JPEG — Select this to save scanned images as JPEG files.
File Format setting.
Encryption — Select this if you want to encrypt PDF files.
User Password — Enter a password for opening encrypted PDF files.
Master Password — Enter a password for changing PDF encryption settings.
Encryption Level — Select an encryption level.
40-bit RC4 — Select this to set an encryption level to the one compatible with Acrobat
3.0, PDF V1.1.
128-bit RC4 — Select this to set an encryption level to the one compatible with Acrobat
5.0, PDF V1.4.
128-bit AES
7.0, PDF V1.6.
Authority — Select the desired authority items on encrypted PDF files.
Printing — Select this to authorize users to print documents.
Change of Documents — Select this to authorize users to change documents.
Content Copying or Extraction — Select this to authorize users to copy and extract
the contents of documents.
Content Extraction for accessibility — Select this to enable the accessibility feature.
— Select this to save scanned images as a Multi-page TIFF file.
— Select this to set an encryption level to the one compatible with Acrobat
5 [Registration] Tab Page
If the Forced Encryption setting is enabled, you cannot clear the [Encryption] check box. For the Forced Encryption
function, refer to the User’s Manual Advanced Guide.
The user password and the master password are not set at the factory shipment.
Passwords must be from 1 to 32 one-byte alphanumerical characters.
The user password must differ from the master password.
These passwords can be re-entered only by an authorized user. Users cannot change the settings of the [Encryption Level]
box and the [Authority] box noted below if they are not authorized to change the master password. For the details of the
encryption setting, refer to the User’s Manual Advanced Guide. Ask the administrator for resetting these passwords.
7 File Name Select how the scanned file will be named. Select [DocYYMMDD] to name it as described,
When [Meta Scan] is selected, if you select [Add the date and time to a file name] in [File Name], it is also applied to the meta
data file name.
8 Fragment Message Size Select the size of the message fragmentation. [No Fragmentation] is set as the default.
or enter the desired file name in the box.
When you want to add the date and time in the file name, select the [Add the date and time
to a file name] check box.
[Registration] Tab Page Overview 67
Page 69
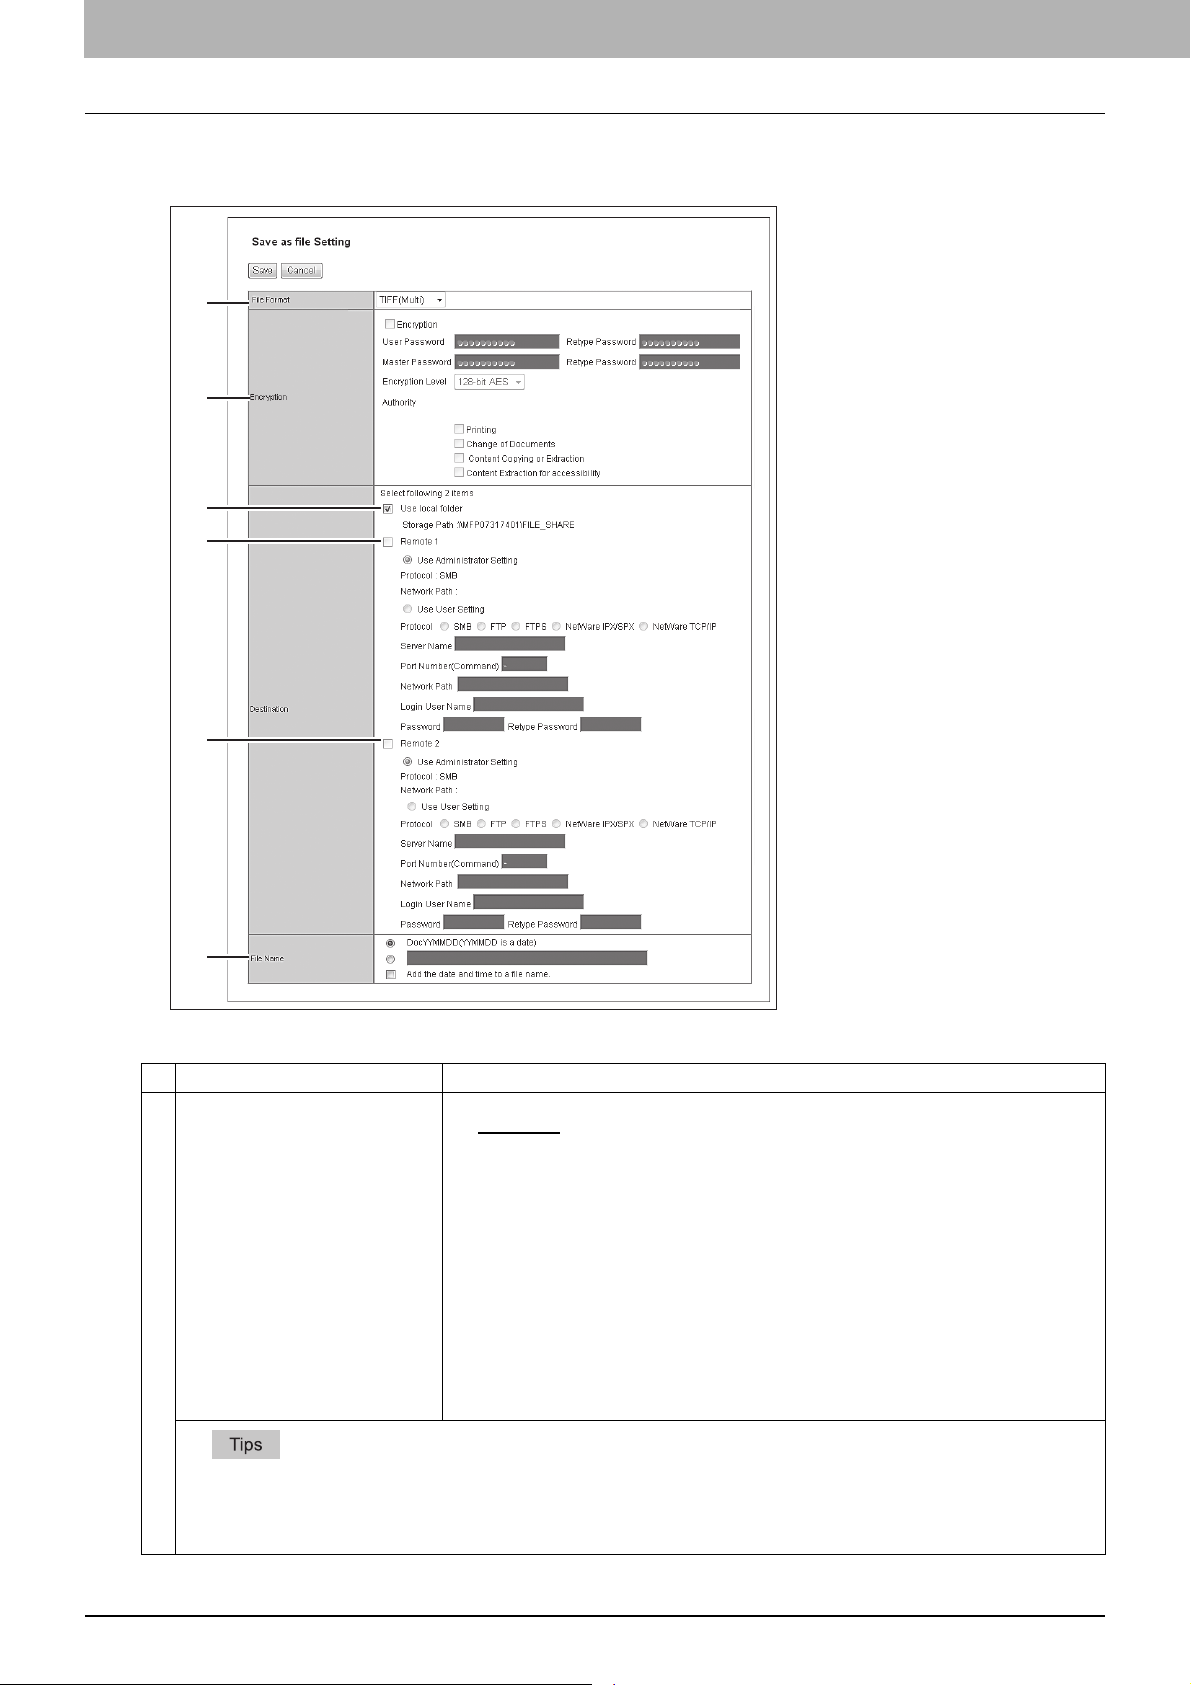
5 [Registration] Tab Page
Save as file Setting (Private template)
In the Save as file Setting page, you can specify how and where a scanned file will be stored.
1
2
3
4
5
6
Item name Description
1 File Format Select the file format for the scanned file to be stored.
TIFF(Multi)
TIFF(Single) — Select this to save scanned images separately as Single-page TIFF
files.
PDF(Multi) — Select this to save scanned images as a Multi-page PDF file.
PDF(Single) — Select this to save scanned images separately as Single-page PDF
files.
Slim PDF(Multi) — Select this to save scanned images as Multi-page slim PDF files.
Select this when you give priority to minimizing the file size over the quality of the image.
Slim PDF(Single) — Select this to save scanned images separately as Single-page
slim PDF files. Select this when you give priority to minimizing the file size over the
quality of the image.
XPS(Multi)— Select this to save scanned images as a Multi-page XPS file.
XPS(Single) — Select this to save scanned images separately as Single-page XPS
files.
JPEG — Select this to save scanned images as JPEG files.
— Select this to save scanned images as a Multi-page TIFF file.
If the Forced Encryption setting is enabled, only the PDF (Multi) and the PDF (Single) are selectable for a file format. For
the Forced Encryption function, refer to the User’s Manual Advanced Guide.
Files saved in an XPS format can be used in Windows Vista/Windows 7/Windows Server 2008 SP1, or Windows XP SP2/
Windows Server 2003 SP1 or later versions with Net Framework 3.0 installed.
68 [Registration] Tab Page Overview
Page 70

5.[Registration] Tab Page
2 Encryption Set this for encrypting PDF files if you have selected [PDF (Multi)] or [PDF (Single)] in the
If the Forced Encryption setting is enabled, you cannot clear the [Encryption] check box. For the Forced Encryption
function, refer to the User’s Manual Advanced Guide.
The user password and the master password are not set at the factory shipment.
Passwords must be from 1 to 32 one-byte alphanumerical characters.
The user password must differ from the master password.
Item name Description
File Format setting.
Encryption — Select this if you want to encrypt PDF files.
User Password — Enter a password for opening encrypted PDF files.
Master Password — Enter a password for changing PDF encryption settings.
Encryption Level — Select an encryption level.
40-bit RC4 — Select this to set an encryption level to the one compatible with Acrobat
3.0, PDF V1.1.
128-bit RC4 — Select this to set an encryption level to the one compatible with Acrobat
5.0, PDF V1.4.
128-bit AES
7.0, PDF V1.6.
Authority — Select the desired authority items on encrypted PDF files.
Printing — Select this to authorize users to print documents.
Change of Documents — Select this to authorize users to change documents.
Content Copying or Extraction — Select this to authorize users to copy and extract
the contents of documents.
Content Extraction for accessibility — Select this to enable the accessibility feature.
— Select this to set an encryption level to the one compatible with Acrobat
5 [Registration] Tab Page
These passwords can be re-entered only by an authorized user. Users cannot change the settings of the [Encryption Level]
box and the [Authority] box noted below if they are not authorized to change the master password. For the details of the
encryption setting, refer to the User’s Manual Advanced Guide. Ask the administrator for resetting these passwords.
3 Destination — Use local folder Select this to save a scanned file to the “FILE_SHARE” folder.
When [Meta Scan] is selected, you can only specify one destination.
[Registration] Tab Page Overview 69
Page 71

5 [Registration] Tab Page
Item name Description
4 Destination — Remote 1 Select this check box to save the scanned file to a network folder. How you can set this item
5 Destination — Remote 2 Select this check box to save the scanned file to a network folder. How you can set this item
depends on how the user with administrator privileges configured Remote 1 in the [Save as
file] submenu under the [Setup] menu.
When you select [Allow the following network folder to be used as a destination], you can
only select [Use Administrator Setting]. The protocol and the network path are displayed
below this item.
When you select [Allow user to select network folder to be used as a destination], you can
select [Use User Setting] and enter the following items to specify where to save the file.
If you are allowed to specify a network folder, select [Use User Setting] and enter the
following items to specify where to save the file.
Protocol
Select the protocol to be used for uploading a scanned file to the network folder.
SMB — Select this to send a scanned file to the network folder using the SMB protocol.
FTP — Select this to send a scanned file to the FTP server.
FTPS
NetWare IPX/SPX — Select this to send a scanned file to the NetWare file server using
NetWare TCP/IP — Select this to send a scanned file to the NetWare file server using
Server Name
When you select [FTP] as the protocol, enter the FTP server name or IP address where a
scanned file will be sent. For example, to send a scanned file to the “ftp://192.168.1.1/user/
scanned” FTP folder in the FTP server, enter “192.168.1.1” in this box.
When you select [NetWare IPX/SPX] as the protocol, enter the NetWare file server name or
Tree/Context name (when NDS is available).
When you select [NetWare TCP/IP] as the protocol, enter the IP address of the NetWare file
server. You can enter up to 64 alphanumerical characters and symbols.
Port Number(Command)
Enter the port number to be used for controls if you select [FTP] as the protocol. Generally “” is entered for the control port. When “-” is entered, the default port number, that is set for
FTP Client by an administrator, will be used. If you do not know the default port number for
FTP Client, ask your administrator and change this option if you want to use another port
number. You can enter a value in the range from 0 to 65535 using numbers and hyphens (-).
Hyphen (-) is set as the default.
Network Path
When you select [SMB] as the protocol, enter the network path to the network folder. For
example, to specify the “users\scanned” folder in the computer named “Client01”, enter
“\\Client01\users\scanned\”.
When you select [FTP] as the protocol, enter the directory in the specified FTP server. For
example, to specify the “ftp://192.168.1.1/user/scanned” FTP folder in the FTP server, enter
“user/scanned”.
When you select “NetWare IPX/SPX” or “NetWare TCP/IP” as the protocol, enter the folder
path in the NetWare file server. For example, to specify the “sys\scan” folder in the NetWare
file server, enter “\sys\scan”.
You can enter up to 128 alphanumerical characters and symbols.
Login User Name
Enter the login user name to access an SMB server, FTP server, or NetWare file server, if
required. When you select [FTP] as the protocol, an anonymous log in is assumed if you
leave this box blank. You can enter up to 32 alphanumerical characters and symbols.
Password
Enter the password to access an SMB server, FTP server, or NetWare file server, if required.
You can enter up to 32 alphanumerical characters, symbols, and spaces. A single space
only can also be entered.
Retype Password
Enter the same password again for a confirmation.
depends on how the user with administrator privileges configured Remote 2 in the [Save as
file] submenu under the [Setup] menu.
If the user with administrator privileges specified Remote 2 to use only the specified network
folder, you can only select [Use Administrator Setting]. The protocol and the network path
are displayed below this item.
If the Remote 2 allows you to specify a network folder, you can specify the network folder
settings. See the description of the Remote 1 option for each item.
— Select this to send a scanned file to the FTP server using FTP over SSL.
the IPX/SPX protocol.
the TCP/IP protocol.
70 [Registration] Tab Page Overview
Page 72

5.[Registration] Tab Page
Item name Description
6 File Name Select how the scanned file will be named. Select [DocYYMMDD] to name it as described,
or enter the desired file name in the box.
When you want to add the date and time in the file name, select the [Add the date and time
to a file name] check box.
When [Meta Scan] is selected, if you select [Add the date and time to a file name] in [File Name], it is also applied to the meta
data file name.
Box Setting (Private template)
In the Box Setting page, you can specify how scanned images will be stored in the Box.
1
2
3
5 [Registration] Tab Page
Item name Description
1 Destination Specify the destination box number for e-Filing.
2 Folder Name Enter the name of the folder where scanned images will be stored. If the specified named
3 Document Name Select how the scanned file will be named. Select [DocYYMMDD] to name it as described,
Box Number — Select the box number to store the scanned image.
Password — Enter the password if the specified box is set with a password.
Retype Password — Enter the same password again for a confirmation.
folder does not exit, the folder will be created automatically. You can enter up to 64
characters.
or enter the desired file name in the box.
Store to USB Device Setting (Private template)
On the Store to USB Setting page, you can set the method for saving templates in USB media.
1
2
3
[Registration] Tab Page Overview 71
Page 73

5 [Registration] Tab Page
Item name Description
1 File Format Select the file format of the scanned image.
TIFF(Multi)
TIFF(Single) — Select this to save scanned images separately as Single-page TIFF
files.
PDF(Multi) — Select this to save scanned images as a Multi-page PDF file.
PDF(Single) — Select this to save scanned images separately as Single-page PDF
files.
Slim PDF(Multi) — Select this to save scanned images as Multi-page slim PDF files.
Select this when you give priority to minimizing the file size over the quality of the image.
Slim PDF(Single) — Select this to save scanned images separately as Single-page
slim PDF files. Select this when you give priority to minimizing the file size over the
quality of the image.
XPS(Multi)— Select this to save scanned images as a Multi-page XPS file.
XPS(Single) — Select this to save scanned images separately as Single-page XPS
files.
JPEG — Select this to save scanned images as JPEG files.
If the Forced Encryption setting is enabled, only the PDF (Multi) and the PDF (Single) are selectable for a file format. For
the Forced Encryption function, refer to the User’s Manual Advanced Guide.
Files saved in an XPS format can be used in Windows Vista/Windows 7/Windows Server 2008 SP1, or Windows XP SP2/
Windows Server 2003 SP1 or later versions with Net Framework 3.0 installed.
2 Encryption Set this for encrypting PDF files if you have selected [PDF (Multi)] or [PDF (Single)] in the
File Format setting.
Encryption — Select this if you want to encrypt PDF files.
User Password — Enter a password for opening encrypted PDF files.
Master Password — Enter a password for changing PDF encryption settings.
Encryption Level — Select an encryption level.
40-bit RC4 — Select this to set an encryption level to the one compatible with Acrobat
3.0, PDF V1.1.
128-bit RC4 — Select this to set an encryption level to the one compatible with Acrobat
5.0, PDF V1.4.
128-bit AES — Select this to set an encryption level to the one compatible with Acrobat
7.0, PDF V1.6.
Authority — Select the desired authority items on encrypted PDF files.
Printing — Select this to authorize users to print documents.
Change of Documents — Select this to authorize users to change documents.
Content Copying or Extraction — Select this to authorize users to copy and extract
the contents of documents.
Content Extraction for accessibility — Select this to enable the accessibility feature.
— Select this to save scanned images as a Multi-page TIFF file.
If the Forced Encryption setting is enabled, you cannot clear the [Encryption] check box. For the Forced Encryption
function, refer to the User’s Manual Advanced Guide.
The user password and the master password are not set at the factory shipment.
Passwords must be from 1 to 32 one-byte alphanumerical characters.
The user password must differ from the master password.
These passwords can be re-entered only by an authorized user. Users cannot change the settings of the [Encryption Level]
box and the [Authority] box noted below if they are not authorized to change the master password. For the details of the
encryption setting, refer to the User’s Manual Advanced Guide. Ask the administrator for resetting these passwords.
3 File Name Select how the scanned file will be named. Select [DocYYMMDD] to name it as described,
When [Meta Scan] is selected, if you select [Add the date and time to a file name] in [File Name], it is also applied to the meta
data file name.
72 [Registration] Tab Page Overview
or enter the desired file name in the box.
When you want to add the date and time in the file name, select the [Add the date and time
to a file name] check box.
Page 74

5 [Registration] Tab Page
5.[Registration] Tab Page
Scan Setting (Private template)
In the Scan Setting page, you can specify how originals are scanned for the Scan to File, Scan to Email, and Scan to
e-Filing agent.
1
2
3
4
5
6
7
8
9
10
11
12
13
14
15
16
Item name Description
1 Preview Select whether to display the scanned image on the control panel after the scanning an
2 Single/2-Sided Scan Select whether to scan one side or both sides of an original. Available only when the
3 Rotation Select how the scanned images will be rotated.
4 Color Mode Select the color mode for scanning.
The [Color Mode] option cannot be set when [Slim PDF (Multi)] or [Slim PDF (Single)] is selected in the [File Format]
option in the Save as File Settings and that in the Email Setting.
When [Auto Color] is selected, you cannot select JPEG or TIFF (Multi) for the file format. Also when [Black] is selected,
JPEG is not allowed.
5 Resolution Select the resolution for scanning.
original.
— Select this not to display the scanned image.
OFF
ON — Select this to display the scanned image.
Reversing Automatic Document Feeder is installed.
Single
Duplex Book — Select this to scan both sides of originals when the pages are printed
Duplex Tablet — Select this to scan both sides of originals with a vertical reversal to be
Black
Gray — Select this to scan in the gray scale mode.
Full Color — Select this to scan in the full color mode.
Auto Color — Select this to scan in the auto color mode.
— Select this to scan one side of an original.
vertically in the same direction and bound along the vertical side of the paper.
bound along the horizontal side of the paper.
— Select this to scan in the black mode.
The [Resolution] option cannot be set when [Slim PDF (Multi)] or [Slim PDF (Single)] is selected in the [File Format] option in
the Save as File Settings and that in the Email Setting.
6 Compression Select the compression for scanning.
This cannot be set when [Black] is selected at the [Color Mode] box.
The [Compression] option cannot be set when [Slim PDF (Multi)] or [Slim PDF (Single)] is selected in the [File Format]
option in the Save as File Settings and that in the Email Setting.
[Registration] Tab Page Overview 73
Page 75

5 [Registration] Tab Page
Item name Description
7 Original Mode Select the document type of the originals.
This cannot be set when [Gray] is selected in the [Color Mode] box.
8 Exposure Select the exposure for scanning.
Select [Auto] to automatically apply the best contrast for the document. You can also
manually adjust the exposure in 11 stages. The farther to the right that you set the value, the
darker the density of the scanned image will become.
[Auto] is not available when [Gray], [Full Color], or [Auto Color] is selected at the [Color Mode] box. In that case, set the
exposure manually.
9 Original Size Select the original size.
If this is set to [Auto], the size is automatically detected. Select [Mixed Original Sizes] to
scan a document with mixed sizes. You can also specify the original size.
10 Background Select the density level of the background of the scanned image. Density can be adjusted in
9 levels. The farther to the right that you set the value, the darker the density of the
background will become.
11 Contrast Select the contrast level of the scanned image. Contrast can be adjusted in 9 levels. The
farther to the right that you set the value, the higher the contrast level will become.
— Select this to set the Text mode as the default original mode.
Text
Text/Photo — Select this to set the Text/Photo mode as the default original mode. This
can be selected only when [Black] is selected in the [Color Mode] box.
Photo — Select this to set the Photo mode as the default original mode.
This is not available when [Black] or [Gray] is selected at the [Color Mode] box.
12 Sharpness Select the sharpness level of the scanned image. Sharpness can be adjusted in 9 levels.
13 Saturation Select the saturation level of the scanned image. Saturation can be adjusted in 7 levels. The
This is not available when [Black] or [Gray] is selected at the [Color Mode] box.
14 RGB Adjustment Select the RGB density level of the scanned image. RGB density can be adjusted in 9 levels
This is not available when [Black] or [Gray] is selected at the [Color Mode] box.
15 Omit Blank Page Select whether to automatically omit a blank page in the scanned image if it is included in
16 Outside Erase Select whether to erase a shade that appears outside of the scanned image when an
The farther to the right that you set the value, the sharper the scanned image will become.
farther to the right you set the value, the more vivid the scanned image will become.
for each color. The farther to the right you set the value, the darker the density of the
selected color will become.
originals.
original is placed on the document glass while the Original Cover is left open. The erased
shade will be whitened.
If you want to erase it, you can select the criteria in 7 levels for judging if it is an area to be
erased. The farther to the right you select, the larger the area that will be erased. [OFF] is
selected by default.
— The blank page is not omitted.
OFF
ON — The blank page is omitted.
74 [Registration] Tab Page Overview
Page 76

5.[Registration] Tab Page
Extended Field settings
You can set extended fields for meta data.
Set the field you have registered in [Administration] - [Registration] - [Extended Field Definition].
1
Item name Description
1 Extended Field Definition No. Allows you to select a registered extended field definition.
5 [Registration] Tab Page
Extended Field Properties
[Extended Field Properties] set under the selected extended field definition are displayed.
Values set in this screen are used as the default values for [Extended Field Properties] displayed on the control panel
when using Meta Scan.
Items with an asterisk (*) attached at the beginning of the [Extended Field Properties] name are mandatory entry fields.
Password Setting
In the Password Setting page, you can set a password for the private template.
1
2
Item name Description
1 Password Enter a password.
2 Retype Password Enter the same password again for a confirmation.
[Registration] Tab Page Overview 75
Page 77
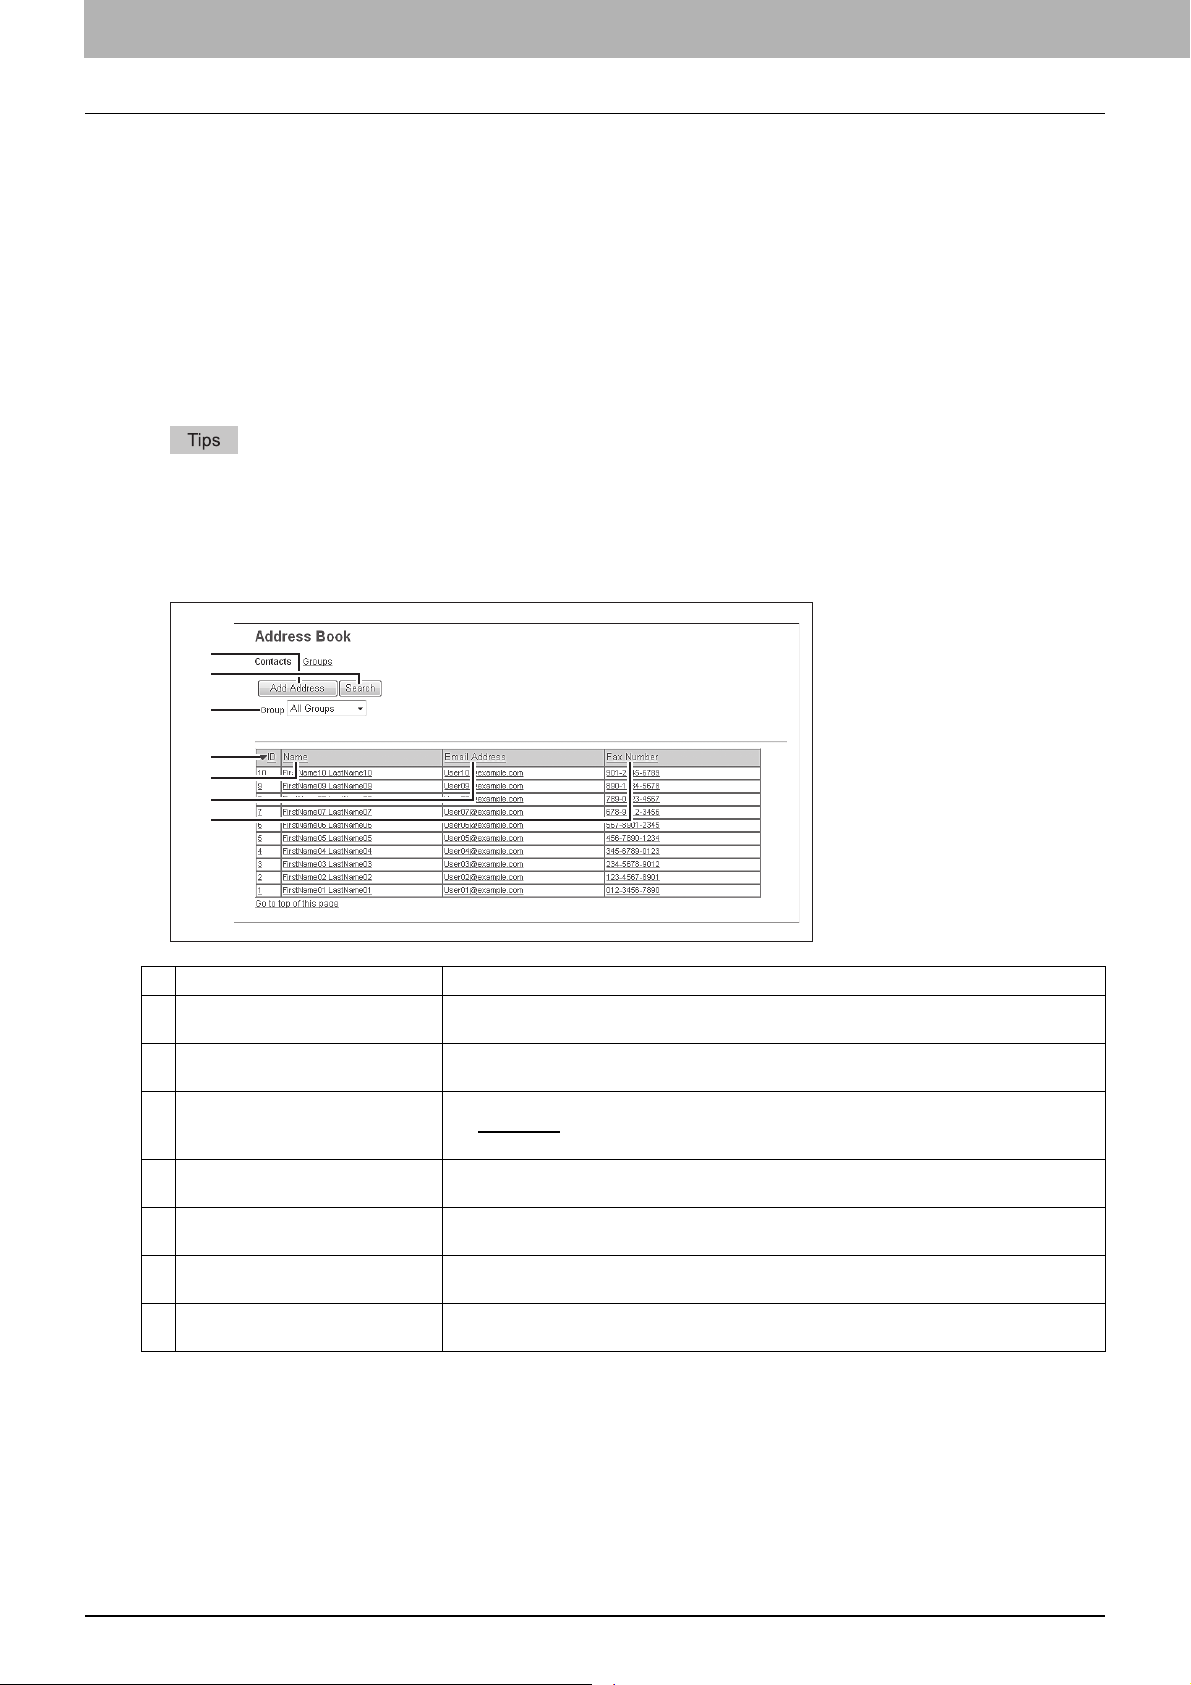
5 [Registration] Tab Page
[Address Book] Item list
P.76 “[Address Book] screen”
P.77 “[Contact Property] screen”
P.78 “[Fax Setting] screen”
P.79 “[Search Contact] screen”
P.79 “[Search Address List] screen”
P.80 “[Group Properties] screen”
[Address Book] screen
You can manage a contact list to be used in E-mail, Internet Fax, and fax transmissions.
Click [Contacts] or [Groups] to switch the display between the list of addresses and the list of groups where
contacts are assigned.
Address Book can be also managed using the control panel. Refer to the User’s Manual Advanced Guide.
Contacts
1
2
3
4
5
6
7
Item name Description
1 [Add Address] button Allows you to add a new contact in the address book.
2 [Search] button Allows you to search a contact from the address book.
3 Group Select a group to display in the address list.
4 ID Displays the registered ID of the contact.
5 Name Displays the name registered to the contact.
6 Email Address Displays the E-mail address registered to the contact.
7 Fax Number Displays the fax number registered to the contact.
P.77 “[Contact Property] screen”
P.79 “[Search Contact] screen”
All Groups
Registered Groups — Displays the registered groups only.
P.77 “[Contact Property] screen”
P.77 “[Contact Property] screen”
P.77 “[Contact Property] screen”
P.77 “[Contact Property] screen”
— Displays all the groups.
76 [Registration] Tab Page Overview
Page 78
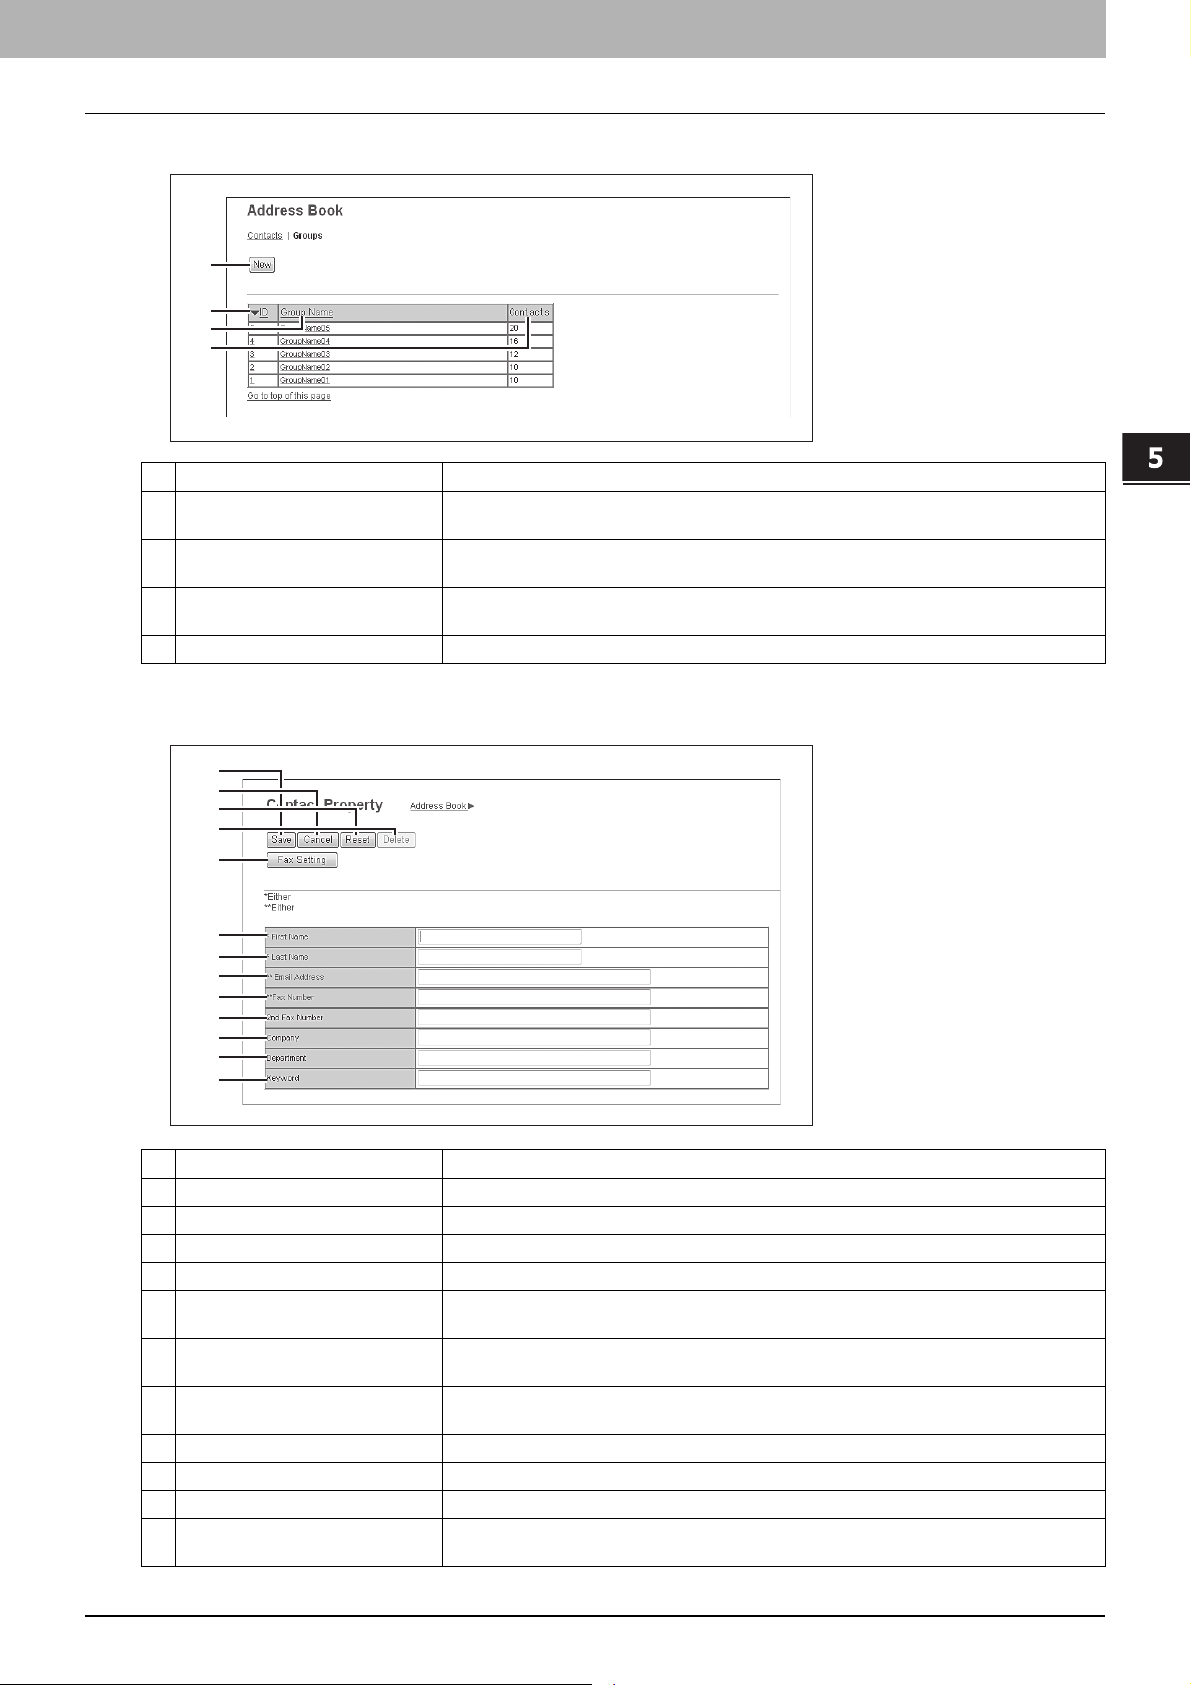
5.[Registration] Tab Page
Group
1
2
3
4
1 [New] button Allows you to add a new group.
2 ID Displays the registered ID of the group.
3 Group Name Displays the registered name of the group.
4 Contacts Displays how many address books are registered in the group.
5 [Registration] Tab Page
Item name Description
P.80 “[Group Properties] screen”
P.80 “[Group Properties] screen”
P.80 “[Group Properties] screen”
[Contact Property] screen
1
2
3
4
5
6
7
8
9
10
11
12
13
Item name Description
1 [Save] button Saves the entered information.
2 [Cancel] button Cancels adding or editing a contract.
3 [Reset] button Erases information entered in the given box.
4 [Delete] button Deletes the displayed contact.
5 [Fax Setting] button Registers the contact for fax transmission.
6 First Name Enter the first name of the contact. You can enter up to 32 characters. Invalid characters are
7 Last Name Enter the last name of the contact. You can enter up to 32 characters. Invalid characters are
8 Email Address Enter the E-mail address of the contact. You can enter up to 192 characters.
9 Fax Number Enter the fax number of the contact. You can enter up to 128 characters.
10 2nd Fax Number Enter the second fax number of the contact. You can enter up to 128 characters.
11 Company Enter the company name of the contact. You can enter up to 64 characters. Invalid
P.78 “[Fax Setting] screen”
replaced with "!".
replaced with "!".
characters are replaced with "!".
[Registration] Tab Page Overview 77
Page 79
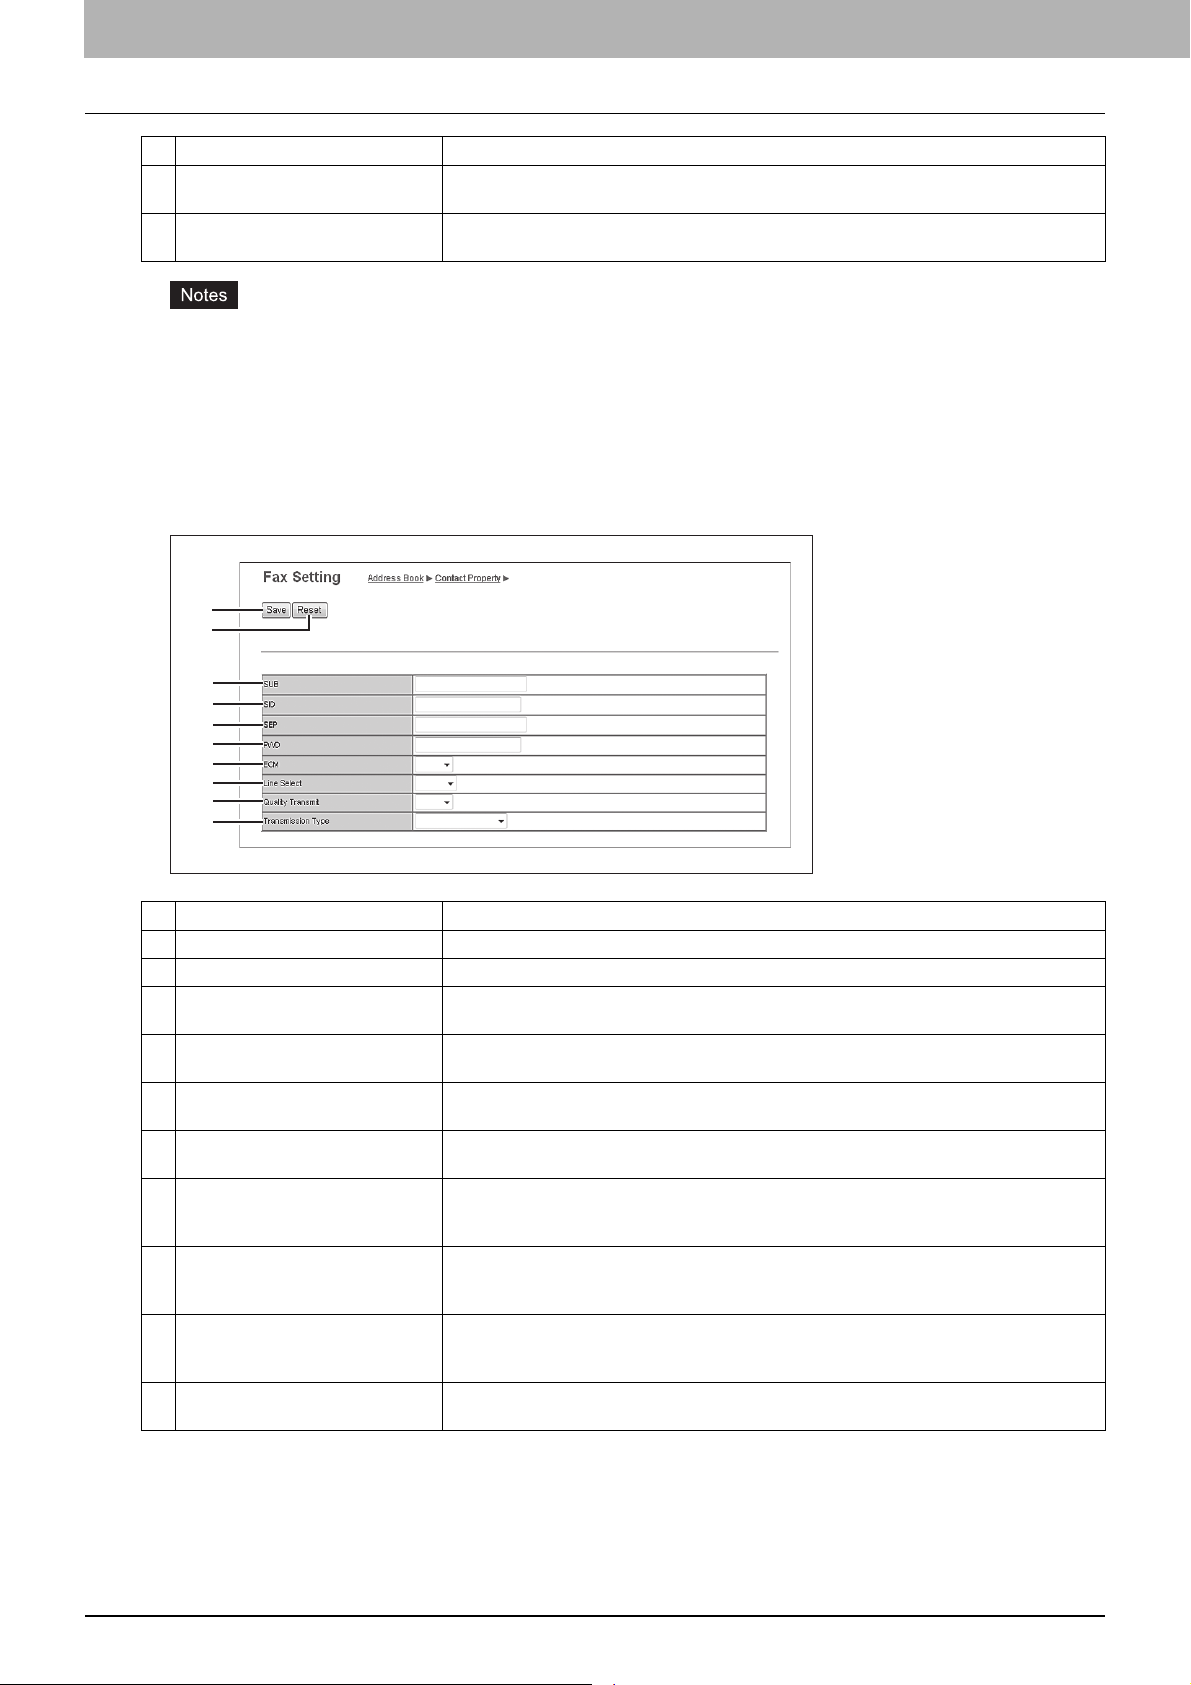
5 [Registration] Tab Page
Item name Description
12 Department Enter the department name of the contact. You can enter up to 64 characters. Invalid
13 Keyword Enter the comments on the contact. You can enter up to 256 characters. Invalid characters
characters are replaced with "!".
are replaced with "!".
You must specify either the [First Name] or [Last Name] box and either the [Email Address] or [Fax Number] box to
register the contact.
If you enter “-” in the [Fax Number] and [2nd Fax Number], a three-second pause is added for dialing the fax
number.
To perform fax transmission, the Fax Unit is required. If the Fax Unit is not installed, you cannot perform the fax
transmission even if you specify the fax number.
[Fax Setting] screen
1
2
3
4
5
6
7
8
9
10
Item name Description
1 [Save] button Saves the entered information.
2 [Reset] button Restores fax settings set for the contact to the default status.
3 SUB Enter the mailbox number if you want to send a fax to the contact's fax mailbox. You can
4 SID Enter the password to send a fax to the contact's fax mailbox. You can enter up to 20
5 SEP Enter the mailbox number if you want to retrieve a document from the contact's fax mailbox.
6 PWD Enter the password to retrieve a document from the contact's fax mailbox. You can enter up
7 ECM Select whether to enable or disable ECM (Error Correction Mode). If [ON] is selected, it
8 Line Select Select whether specifying the line to be used. If this is set to [Auto], this equipment
9 Quality Transmit Select whether to send a document in the Quality TX mode. If [ON] is selected, this
10 Transmission Type Select whether the document will be sent in [Memory Transmit] mode or [Direct Transmit]
enter up to 20 characters using numbers, #, and *.
characters using numbers, #, and *.
You can enter up to 20 characters using numbers, #, and *.
to 20 characters using numbers, #, and *.
facilitates error free communications by automatically resending any portion of the
document affected by phone line noise or distortion.
automatically selects the line to be used. However, [Line 2] can be applicable only when the
2nd Line for Fax Unit is installed.
equipment sends documents at a slower speed than normal so that the transmission will be
less affected by line condition.
mode.
78 [Registration] Tab Page Overview
Page 80

5.[Registration] Tab Page
[Search Contact] screen
You can search for contacts in the LDAP server and add them to the address book.
In order to use the LDAP search, the directory service must be set up by a user who has been granted administrator
privileges in the access policy mode. Before operating the LDAP search, ask your administrator if the Directory Service
has been configured.
1
2
3
4
5
6
7
8
9
5 [Registration] Tab Page
Item name Description
1 [Search] button Searches contacts with the entered conditions.
P.79 “[Search Address List] screen”
2 [Cancel] button Cancels the contact search.
3 Directory Service Name Select the LDAP server for the search.
4 First Name Enter the search condition.
5 Last Name
6 Email Address
7 Fax Number
8 Company
9 Department
If you select [MFP LOCAL] at the [Directory Service Name] box, you can search for destinations in the address
book of this equipment.
TopAccess will search for destinations that contain the text entered in each item.
Leaving the box blank allows wild-card searching. However, you must specify at least one.
[Search Address List] screen
Select from the search address list and add to the address book.
1
2
3
4
5
6
7
8
Item name Description
1 [Add] button Adds the contact selected in the search address list into the address book.
2 [Cancel] button Cancels the search address list display.
[Registration] Tab Page Overview 79
Page 81
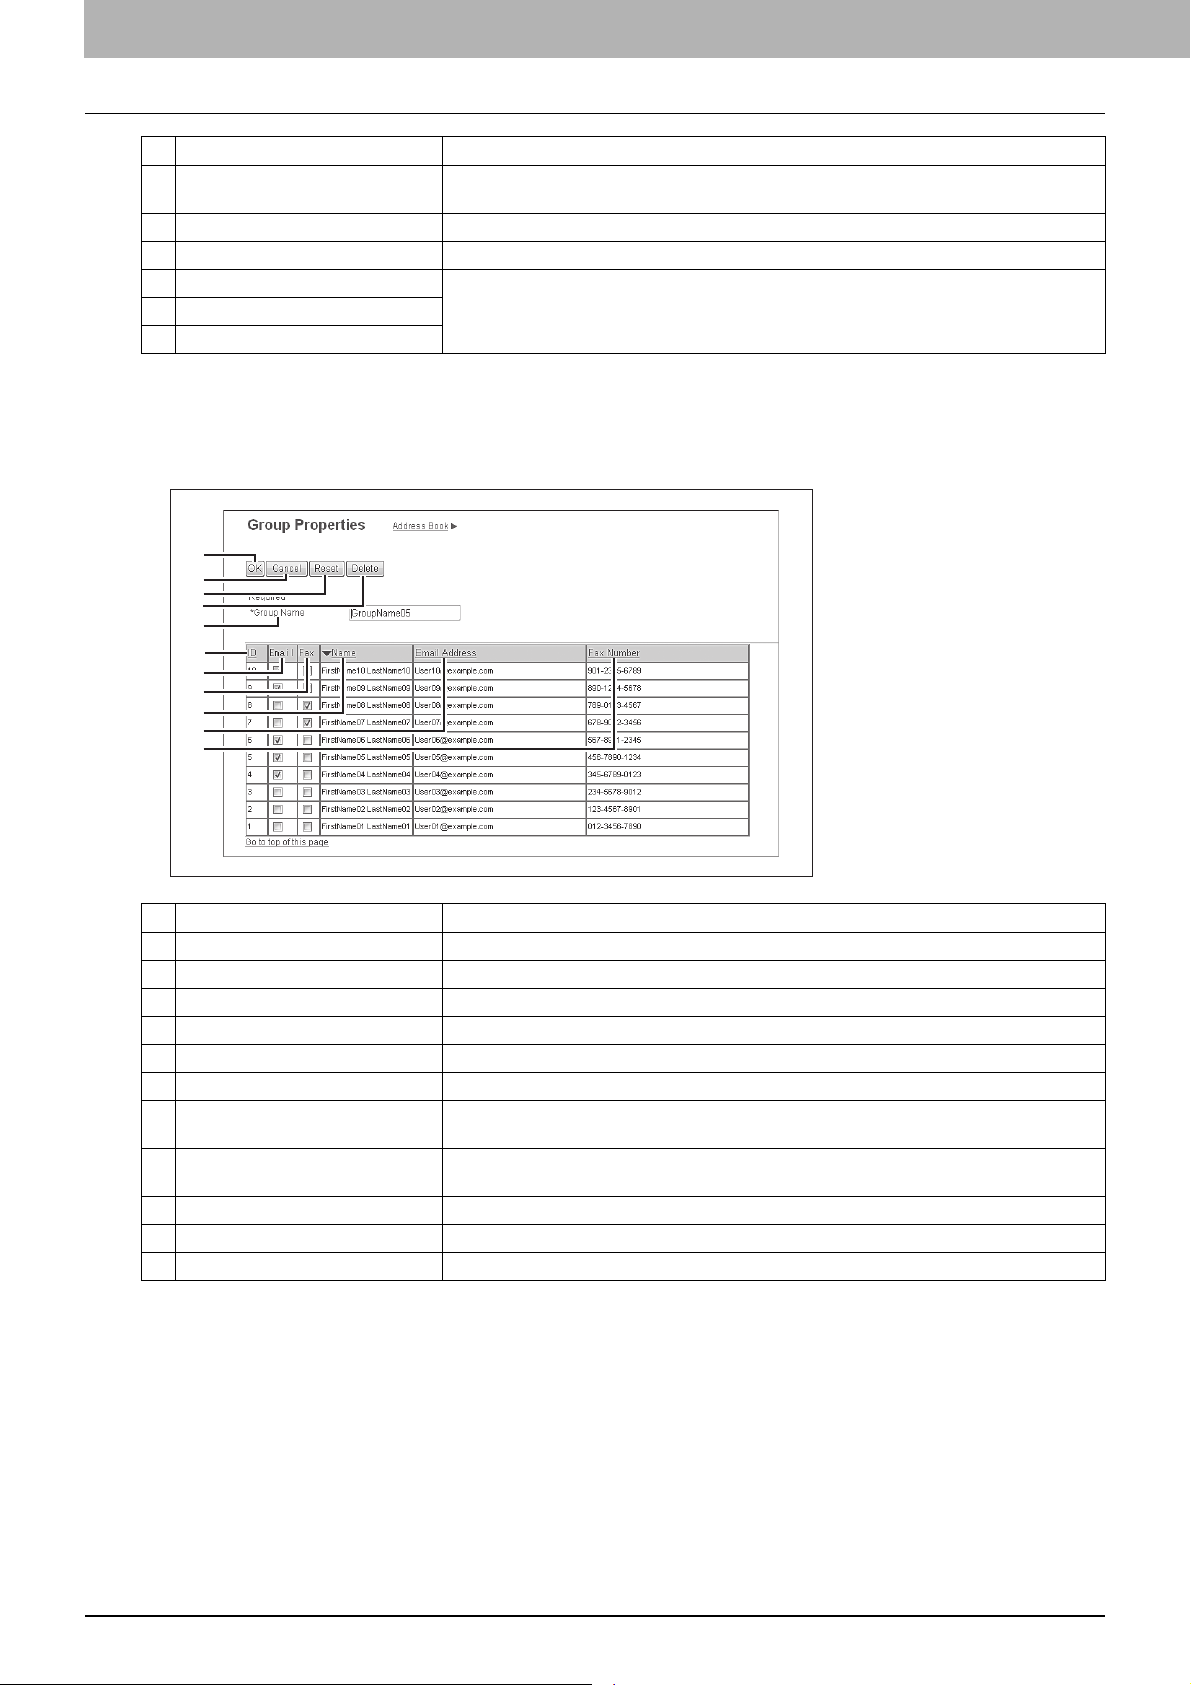
5 [Registration] Tab Page
Item name Description
3 [Research] button Returns to the [Search Contact] screen to change the search criteria and execute the search
4 Number of Search Result Displays the number of found contacts.
5 Check box Select contacts to be registered to the address book.
6 Name Displays the search result.
7 Email Address
8 Fax Number
again.
[Group Properties] screen
You can create groups that contain multiple recipients.
This enables you to specify a group as the destination when sending an E-mail, Internet Fax, or fax to multiple recipients.
1
2
3
4
5
6
7
8
9
10
11
Item name Description
1 [OK] button Registers the selected contacts as a group.
2 [Cancel] button Cancels the group registration.
3 [Reset] button Resets the contents.
4 [Delete] button Deletes the displayed group.
5 Group Name Enter the group name. You can enter up to 20 characters.
6 ID Displays the registered ID of the contact.
7 Email Select the check box to register E-mail address into the group when the contact has E-mail
8 Fax Select the check box to register fax number into the group when the contact has fax number
9 Name Displays the last name and first name registered to the contact.
10 Email Address Displays the E-mail address registered to the contact.
11 Fax Number Displays the fax number registered to the contact.
information.
information.
80 [Registration] Tab Page Overview
Page 82

5 [Registration] Tab Page
5.[Registration] Tab Page
[Inbound FAX routing] Item list
ITU-T communications function between fax devices with ITU-T support and enable fax transmission to and retrieval from
mailboxes.
The type of mailboxes for ITU-T communications must be set in advance to either confidential, bulletin board, or forward.
You can specify a password on any mailbox to secure confidentiality.
Mailboxes can be managed only when the Fax Unit is installed.
The Internet/Fax (Relay) agent cannot be used to forward an inbound fax routed via Inbound FAX Routing.
Mailboxes can be managed using the control panel.
P.81 “[Inbound FAX routing] screen”
P.82 “[MailBox Properties] screen”
P.83 “MailBox Setting (Mailbox)”
P.84 “Destination Setting (Mailbox)”
P.84 “InternetFax Setting (Mailbox)”
P.84 “Relay End Terminal Report (Mailbox)”
P.85 “Save as file Setting (Mailbox)”
P.85 “Email Setting (Mailbox)”
P.85 “Box Setting (Mailbox)”
[Inbound FAX routing] screen
You can manage mailboxes used for ITU-T communications.
1
2
3
4
5
Item name Description
1 [New] button Creates a mailbox for F-code communications.
P.82 “[MailBox Properties] screen”
2 Box Number Displays the registered mailbox number.
3 User Name Displays the user name of the registered mailbox.
4 Agent Displays the agent assigned to the mailbox.
5 Comment Displays the registered comment.
[Registration] Tab Page Overview 81
Page 83

5 [Registration] Tab Page
[MailBox Properties] screen
You can set a mailbox.
1
2
3
4
5
6
7 8 9 10
Item name Description
1 [Save] button Saves the mailbox.
2 [Cancel] button Cancels the mailbox settings.
3 [Select Agent] button Set the agent to apply to the forward mailbox.
4 Confidential Creates a confident mailbox.
5 Bulletin Board Creates a bulletin board mailbox.
6 Forward Creates a multiple transmission relay mailbox. When you select this, select the agent from
7 Internet/Fax(Relay) Creates a multiple transmission relay mailbox for the Internet Fax or fax. This agent can be
The Confidential Box allows a one-time document retrieval from the mailbox. Once a
document is retrieved, it is cleared. If a new document is sent to the same box number
where another document is stored, it is added to the existing box.
P.83 “MailBox Setting (Mailbox)”
The Bulletin Board Box allows multiple document retrievals from the same mailbox. Once a
document is retrieved, it is not cleared. If a new document is sent to the same Box, it
replaces the existing one.
P.83 “MailBox Setting (Mailbox)”
[Internet/Fax(Relay)], [Save as file], [Email], or [Store to e-Filing].
Use the forward mailbox when you want to forward a fax document to specified destinations
automatically.
combined with the Save as file agent or Store to e-Filing agent.
P.83 “MailBox Setting (Mailbox)”
P.84 “Destination Setting (Mailbox)”
P.84 “InternetFax Setting (Mailbox)”
P.84 “Relay End Terminal Report (Mailbox)”
The Internet/Fax (Relay) agent cannot be used to forward an inbound fax routed via Inbound FAX Routing.
8 Save as file Creates a shared folder forwarding mailbox. This agent can be combined with the Internet/
9 Email Creates an E-mail forwarding mailbox. This agent can be combined with the Save as file
10 Store to e-Filing Creates an e-Filing forwarding mailbox. This agent can be combined with the Internet/
82 [Registration] Tab Page Overview
Fax(Relay), Email, or Store to e-Filing agent.
P.83 “MailBox Setting (Mailbox)”
P.85 “Save as file Setting (Mailbox)”
agent or Store to e-Filing agent.
P.83 “MailBox Setting (Mailbox)”
P.85 “Email Setting (Mailbox)”
Fax(Relay) agent, Save as file agent, or Email agent.
P.83 “MailBox Setting (Mailbox)”
P.85 “Box Setting (Mailbox)”
Page 84

5 [Registration] Tab Page
5.[Registration] Tab Page
MailBox Setting (Mailbox)
In the MailBox Setting page, specify the general information of the mailbox such as the box number, password, owner,
comment, and notification.
The [Notification] and [Document Print] options are not available when creating the Confidential mailbox or Bulletin
Board mailbox.
Mailbox communication is disabled if the settings on this equipment and information registered for the destination
do not match. Check how the box number and the fax number of the destination are registered on the journal
before entering the box number.
1
2
3
4
5
6
Item name Description
1 Box Number Enter the box number of the mailbox. You can enter up to 20 characters including numbers,
The Inbound Fax routing is available only for a Forward mailbox. If you select [Confidential] or [Bulletin Board] as an
agent, you cannot specify the fax number.
When a fax is sent from the specified fax number with a box number (or sub address), the Inbound Fax routing will not
apply to the transmission and it is processed according to the specified box number (or sub address) settings.
2 Password Enter the box password if you want to protect the mailbox by the password. You can enter
3 User Name Enter the user name of this mailbox. You can enter up to 30 characters.
4 Comment Enter the comment. You can enter up to 30 characters.
5 Notification This specifies how the notification message will be sent if an error occurs.
sharp marks (#), and asterisks (*).
You can also specify the sender’s fax number to enable the Inbound Fax routing when
registering a Forward mailbox. If you specify the sender’s fax number here, the faxes that
are received from the specified fax number will be routed according to the mailbox settings.
up to 20 characters including numbers, sharp marks (#), and asterisks (*).
Send Email when an error occurs — Transmits a notification message to the specified
E-mail address when an error occurs.
Send Email when job is completed — Transmits a notification message to the specified
E-mail address when a job is completed.
Email Address — Enter the E-mail address for the notification messages. You can enter up
to 192 alphanumerical characters.
When you enable the Notification setting, make sure to set up the E-mail settings in the [Email] submenu of the [Setup] menu
in the TopAccess access policy mode. For instructions on how to set up the E-mail settings, see the following section:
P.233 “Setting up E-mail settings”
6 Document Print Select whether to print a document sent to this mailbox.
Always
ON ERROR — Prints the document if all specified forwarding has failed.
— Always prints documents sent to this mailbox.
[Registration] Tab Page Overview 83
Page 85

5 [Registration] Tab Page
Destination Setting (Mailbox)
In the Recipient List page, you can specify the destinations of the Internet/Fax (Relay), or Email agent.
When you are setting up the destinations for the Email agent, you can only specify the E-mail addresses for the
destinations.
When you are setting up the destinations for the Internet/Fax (Relay) agent, you can specify both fax numbers and E-mail
addresses for the destinations.
You can specify the destinations by entering their E-mail addresses or fax numbers manually, selecting recipients from the
address book, selecting destination groups from the address book, or searching for destinations in the LDAP server.
The methods of entering the destinations manually and searching for the destinations in the LDAP server are not
available if you are setting the destination for the Internet/Fax (Relay) agent.
Operations are the same as the following procedure.
P.58 “Destination Setting (Private template)”
InternetFax Setting (Mailbox)
In the InternetFax Setting page, you can specify the content of the Internet Fax to be sent.
Operations are the same as the following procedure.
P.64 “InternetFax Setting (Private template)”
Relay End Terminal Report (Mailbox)
On the Relay End Terminal Report page, you can specify a destination to which the transmission result list will be sent.
1
2
3
4
5
Item name Description
1 [Add] button Adds settings to transmit the relay end terminal report.
2 [Cancel] button Cancels the settings.
3 [Reset] button Resets the settings.
4 Entry box Enter the E-mail address or fax number of the recipient.
5 Recipient list Displays the registered destinations. Select the E-mail address or fax number of the
destination.
You cannot specify more than 1 destination for the destination of the Relay End Terminal Report.
84 [Registration] Tab Page Overview
Page 86

5 [Registration] Tab Page
5.[Registration] Tab Page
Save as file Setting (Mailbox)
In the Save as file Setting page, you can specify how and where a received fax will be stored.
Instructions on how to do the Save as file setting for the mailbox are the same as for the Save as file setting for a private
template.
Operations are the same as the following procedure.
P.68 “Save as file Setting (Private template)”
You cannot specify USB media as the storage in the Save as file Setting Page.
Email Setting (Mailbox)
In the Email Settings page, you can specify the content of E-mail document to be sent.
Instructions on how to do the E-mail setting for the mailbox are the same as for the E-mail setting for a private template.
Operations are the same as the following procedure.
P.66 “Email Setting (Private template)”
Box Setting (Mailbox)
In the Box Setting page, you can specify how a received fax will be stored in the Box.
Operations are the same as the following procedure.
P.71 “Box Setting (Private template)”
[Registration] Tab Page Overview 85
Page 87

5 [Registration] Tab Page
[Registration] How to Set and How to Operate
P.86 “Managing templates”
P.94 “Managing address book”
P.100 “Managing mailboxes”
Managing templates
P.86 “Registering and editing private template groups”
P.89 “Registering or editing templates”
P.93 “Displaying public templates”
Registering and editing private template groups
Before registering private templates, you have to register the private template group. You can classify the private
templates according to every department, every user, and use by registering the private template groups.
Also each private template group can be protected by a password.
You can define up to 200 private template groups. To define the private template groups, you can specify the group
name, owner, and E-mail notification setting.
The required template may have already been created by a user who is granted administrator privileges in access
policy mode, or other user. Check the existing templates to see if they can be used before creating a new template
or group.
Click the [Registration] tab and the [Template] menu.
1
The Template Groups page is displayed.
Click the [Undefined] group link to create a new private group. Click the defined group
2
name link to edit the group information.
If you select the private template group that has not been defined, the Group Properties page is displayed. Skip
to step 5.
If you select the defined private template group that is not protected by a password, the Private Templates page
is displayed. Skip to step 4.
If you select the defined private template group that is protected by a password, the Input Group Password
page is displayed. Go to the next step.
The page displays all 200 private template groups in default page view. You can display only defined private
template groups by clicking on the [Defined Groups] link.
If you know which private template group you want to define or edit, click the number of the private template
group in the [Jump to] links.
86 [Registration] How to Set and How to Operate
Page 88

5.[Registration] Tab Page
When the Input Group Password page is displayed, enter the password for the selected
3
private template group and click [OK].
The Group Properties page is displayed.
Click [Edit], [Change Password], or [Reset].
4
5 [Registration] Tab Page
If you select [Reset], you can reset the unnecessary private group and restore it to an undefined private group. Skip
to step 7.
If you reset the group information, all private templates registered in the group will be deleted.
Enter the items below as required.
5
You can configure the following settings in this page:
P.53 “[Group Properties] screen”
[Registration] How to Set and How to Operate 87
Page 89

5 [Registration] Tab Page
You can configure the following settings in this page:
P.55 “[Change Group Password] screen”
Click [Save] to apply changes.
6
Click [OK].
7
This step is not required if you have selected [Edit] in step 4.
88 [Registration] How to Set and How to Operate
Page 90

5 [Registration] Tab Page
5.[Registration] Tab Page
Registering or editing templates
In each private template group, you can create up to 60 templates. To define the private template, specify the panel
settings that will be displayed in the control panel and agent settings. Each private template can also be protected by a
password.
Each template can be created in combination of the following agents:
Copy template can be combined with the Save as file or Store to e-Filing agent.
Fax/Internet Fax template can be combined with the Save as file agent.
Scan template can be created with up to two agents in a combination of the Save as file, Email, and Store to e-
Filing agents.
Click the [Registration] tab and the [Template] menu.
1
The Template Groups page is displayed.
Click the group name link where you want to register or edit the private template.
2
If you select the defined private template group that is not protected by a password, the Private Templates page
is displayed. Skip to step 4.
If you select the defined private template group that is protected by a password, the Input Group Password
page is displayed. Go to the next step.
The page displays all 200 private template groups in default page view. You can display only defined private
template groups by clicking on the [Defined Groups] link.
If you know which private template group you want to define or edit, click the number of the private template
group in the [Jump to] links.
[Registration] How to Set and How to Operate 89
Page 91

5 [Registration] Tab Page
When the Input Group Password page is displayed, enter the password for the selected
3
private template group and click [OK].
The Private Templates page is displayed.
From the templates list, click the [Undefined] icon to register a new template, or click
4
defined icon to edit the template.
If the templates list is displayed in the List view, click the [Undefined] template name to register new template,
or click the defined template name to edit the template.
If you select the private template that has not been defined, the Template Properties page to select agents is
displayed. Skip to step 7.
If you select the defined private template that is not protected by a password, the Template Properties page is
displayed. Skip to step 6.
If you select the defined private template that is protected by a password, the Input Template Password page is
displayed. Go to the next step.
You can change the template list view by clicking on either [Panel View] or [List View].
If you know which private template you want to define or edit, click the number of the private template in the
[Jump to] links.
90 [Registration] How to Set and How to Operate
Page 92

5.[Registration] Tab Page
When the Input Template Password page is displayed, enter the password for the
5
selected private template and click [OK].
The Template Properties page is displayed.
On the [Template Properties] page, click either [Edit], [Change Password], or [Reset
6
Template].
5 [Registration] Tab Page
If you select [Reset Template], you can reset an unnecessary private template and restore it to an undefined
template. Skip to step 10.
Enter the items below as required.
7
If you have selected [Edit] in step 6, select the agent and click [Select Agent].
You can configure the following settings in this page:
P.56 “[Template Properties] screen”
[Registration] How to Set and How to Operate 91
Page 93

5 [Registration] Tab Page
If you have selected [Change Password] in step 6, enter the following items and skip to step 9.
You can configure the following settings in this page:
P.55 “[Change Group Password] screen”
Click each button displayed in the page to specify or edit the associated template
8
properties.
[Panel Setting] Specify icon settings of the template.
P.57 “Panel Setting (Private template)”
[Destination Setting] Specify the destination to be sent. This can be set only when creating the Fax/Internet
Fax agent or Scan to Email agent.
P.58 “Destination Setting (Private template)”
[InternetFax Setting] Specify how the Internet Fax is transmitted. This can be set only when creating a Fax/
[Fax Setting] Specify how the documents are faxed. This can be set only when creating a Fax/Internet
[Email Setting] Specify how the documents are transmitted as E-mail messages. This can be set only
[Save as file Setting] Specify how the documents are saved in a shared folder on this equipment, USB media,
[Box Setting] Specify how the documents are saved in e-Filing. This can be set only when creating a
[Store to USB Setting] Specify how the document is saved in USB media.
[Scan Setting] Specify how the documents are scanned. This can be set only when creating the Save as
[Extended Field settings] Set extended field definition information and extended field settings.
[Password Setting] Set a password for the private template.
Internet Fax agent.
P.64 “InternetFax Setting (Private template)”
Fax agent.
P.64 “Fax Setting (Private template)”
when creating a Scan to Email agent.
P.66 “Email Setting (Private template)”
or a network folder. This can be set only when creating a Save as file agent.
P.68 “Save as file Setting (Private template)”
Scan to e-Filing agent.
P.71 “Box Setting (Private template)”
P.71 “Store to USB Device Setting (Private template)”
file agent, Scan to Email agent, and Scan to e-Filing agent.
P.73 “Scan Setting (Private template)”
P.75 “Extended Field settings”
P.75 “Password Setting”
Click [Save].
9
Click [OK].
10
This step is not required if you have selected [Edit] in step 6.
92 [Registration] How to Set and How to Operate
Page 94

5 [Registration] Tab Page
5.[Registration] Tab Page
Displaying public templates
End users can also display the templates list in the public group so that users can see what templates are available.
Displaying templates in the public group
Click the [Registration] tab and the [Template] menu.
1
The Template Groups page is displayed.
Click the group name link for the Public Template Groups list.
2
The templates list in the public group is displayed.
3
You can change the template list view by clicking on either [Panel View] or [List View].
If you know which public template you want to view, click the number of the public template in the [Jump to]
links.
[Registration] How to Set and How to Operate 93
Page 95

5 [Registration] Tab Page
Managing address book
P.94 “Managing contacts in the Address Book”
P.98 “Managing groups in the Address Book”
Managing contacts in the Address Book
There are two ways to manage contacts in the Address Book:
Adding, editing, and deleting contacts manually
P.94 “Adding, editing, and deleting contacts manually”
Add new contact searching for a recipient from the LDAP server.
P.97 “Adding new contacts from the LDAP server”
Adding, editing, and deleting contacts manually
You can add or edit a contact by entering recipient information manually. You can also delete the contact from the Address
Book.
Click the [Registration] tab and the [Address Book] menu.
1
The Address Book page is displayed.
Click [Add Address] and add a new contact. Or click the corresponding link to the
2
contact which you want to edit or delete in the contact list.
The Contact Property page is displayed.
94 [Registration] How to Set and How to Operate
Page 96

5.[Registration] Tab Page
Enter the following items to specify the contact property. Click [Delete] to delete the
3
contact from the address book.
5 [Registration] Tab Page
You can configure the following settings in this page:
P.77 “[Contact Property] screen”
When registering a fax contact, click [Fax Setting]. Otherwise, skip to Step 6.
4
The Fax Settings page is displayed.
Enter the following items according to the capabilities of destination facsimile, and
5
click [Save].
You can configure the following settings in this page:
P.78 “[Fax Setting] screen”
[Registration] How to Set and How to Operate 95
Page 97

5 [Registration] Tab Page
In the Contact Property page, click [Save] to add a new contact.
6
96 [Registration] How to Set and How to Operate
Page 98

5 [Registration] Tab Page
5.[Registration] Tab Page
Adding new contacts from the LDAP server
You can search for contacts in the LDAP server and add them to the Address Book. In order to use the LDAP search, the
directory service must be set up by a user who is granted administrator privileges in the access policy mode. Before
operating the LDAP search, ask your administrator if the Directory Service has been configured.
Add a new contact from the LDAP server.
Click the [Registration] tab and the [Address Book] menu.
1
The Address Book page is displayed.
Click [Search].
2
The Search Contact page is displayed.
Select the directory service name that you want to search for in the [Directory Service
3
Name] box, and enter the search terms in the boxes that you want to search.
If you select the model name of this equipment at the [Directory Service Name] box, you can search for
destinations in the address book of this equipment.
TopAccess will search for destinations that contain the text entered in each item.
Leaving the box blank allows wild-card searching. However, you must specify at least one.
Click [Search].
4
TopAccess will start searching for recipients in the LDAP server and the Search Address List page will display the
results.
[Registration] How to Set and How to Operate 97
Page 99

5 [Registration] Tab Page
Select the check boxes of contacts that you want to add to the Address Book.
5
Click [Research] to return to step 3 so that you can change the search criteria and execute the search again.
You can select all users in the list by clicking on the button.
The value of [company] and [department] will depend on the settings made by the user who is granted
administrator privileges in access policy mode.
Click [Add].
6
Selected contacts are added to the Address Book.
Managing groups in the Address Book
You can create groups that contain the multiple recipients. This enables you to specify the groups for the destinations
instead of specifying each recipient separately when operating Scan to Email, or Fax or Internet Fax transmission. You
can also delete groups.
Click the [Registration] tab and the [Address Book] menu.
1
The Address Book page is displayed.
Click the [Groups] submenu.
2
The groups list is displayed.
Click [New] to add a new group. Or, click the corresponding link to the group which you
3
want to edit or delete in the group list.
The Group Properties page is displayed.
98 [Registration] How to Set and How to Operate
Page 100

5.[Registration] Tab Page
Enter the group name in the [Group Name] column. Click [Delete] to delete the selected
4
group.
5 [Registration] Tab Page
You can clear the entered values in each field by clicking [Reset].
You can cancel adding or editing a group by clicking [Cancel].
Select the [Email] check boxes of users to add Internet Fax recipients, and select the
5
[Fax] check boxes of users to add Fax recipients.
To perform fax transmission, the Fax Unit is required. If the Fax Unit is not installed, you cannot perform the fax
transmission even if you specify the fax number.
Click [OK].
6
The group is created.
[Registration] How to Set and How to Operate 99
 Loading...