

Oki MC760x, MC770x, MC780x, ES7470x MFP, ES7480x MFP Print Data Converter Function Guide
...
MULTIFUNCTIONAL LED PRINTER
Print Data Converter
Function Guide
Rev. 1.00
45984401EE

Trademarks
Microsoft, Windows, Windows NT, and the brand names and product names of other Microsoft products are trademarks of
Microsoft Corporation in the US and other countries.
The official name of Windows XP is Microsoft Windows XP Operating System.
The official name of Windows Vista is Microsoft Windows Vista Operating System.
The official name of Windows 7 is Microsoft Windows 7 Operating System.
The official name of Windows Server 2003 is Microsoft Windows Server 2003 Operating System.
The official name of Windows Server 2008 is Microsoft Windows Server 2008 Operating System.
Apple, AppleTalk, Macintosh, Mac, Mac OS, Safari, and TrueType are trademarks of Apple Inc. in the US and other countries.
Adobe, Adobe Acrobat, Adobe Reader, Adobe Acrobat Reader, and PostScript are trademarks of Adobe Systems Incorporated.
IBM, AT and AIX are trademarks of International Business Machines Corporation.
TopAccess is a trademark of Toshiba Tec Corporation.
Other company names and product names in this manual are the trademarks of their respective companies.
©2014 Oki Data Corporation All rights reserved
Under the copyright laws, this manual cannot be reproduced in any form without prior written permission of Oki Data.
1

CONTENTS
1. OVERVIEW .......................................................................................................................................... 3
1-1. Support Information ................................................................................................................... 3
1-2. What is Print Data Converter? ................................................................................................... 3
1-3. Function Overview...................................................................................................................... 4
1-4. Print Data Converter support target .......................................................................................... 4
2. How to apply Print Data Converter .................................................................................................... 5
2-1. Print Data Converter Application flow ...................................................................................... 5
2-2. Create Print Data Converter XML file ........................................................................................ 5
2-2-1. Sample XML file ................................................................................................................ 5
2-2-2. Overview of XML description .......................................................................................... 6
2-2-3. XML description details ................................................................................................... 6
2-3. Setting up LPR queue ................................................................................................................ 7
2-3-1. Adding an LPR queue via TopAccess ............................................................................ 7
2-3-2. Changing LPR queue on user’s environment ................................................................ 8
2-4. Setting up Print Data Converter XML file from TopAccess ..................................................... 8
2-4-1. Accessing TopAccess in the administrator mode ......................................................... 8
2-4-2. Setting up Print Data Converter ...................................................................................... 9
2-4-3. Import New Converter ...................................................................................................... 9
2-4-4. Enable/Disable Print Data Converter ............................................................................ 10
2-4-5. Export Converter ............................................................................................................ 10
2-4-6. Delete Converter ............................................................................................................ 10
3. Examples ........................................................................................................................................... 11
3-1. [Example] Force Monochrome print and allow Color for specified users ........................... 11
3-2. [Example] Change any Paper Source command to AUTO command .................................. 12
3-3. [Example] Allow printing from AS400/Unix/Linux on NO LIMIT BLACK function ............... 13
Appendix A - WildCard for SearchPattern .......................................................................................... 16
Appendix B - Changeable parameters ................................................................................................ 17
Appendix C - list of major PJL ............................................................................................................. 18
Appendix D - list of major PCL5 command ........................................................................................ 22
Q&A........................................................................................................................................................ 24
2
1. OVERVIEW
This chapter describes the overview of Print Data Converter.
1-1. Support Information
Print Data Converter is supported by MC7 series, MB7 series, MC9 series, and ES and MPS models of those series.
1-2. What is Print Data Converter?
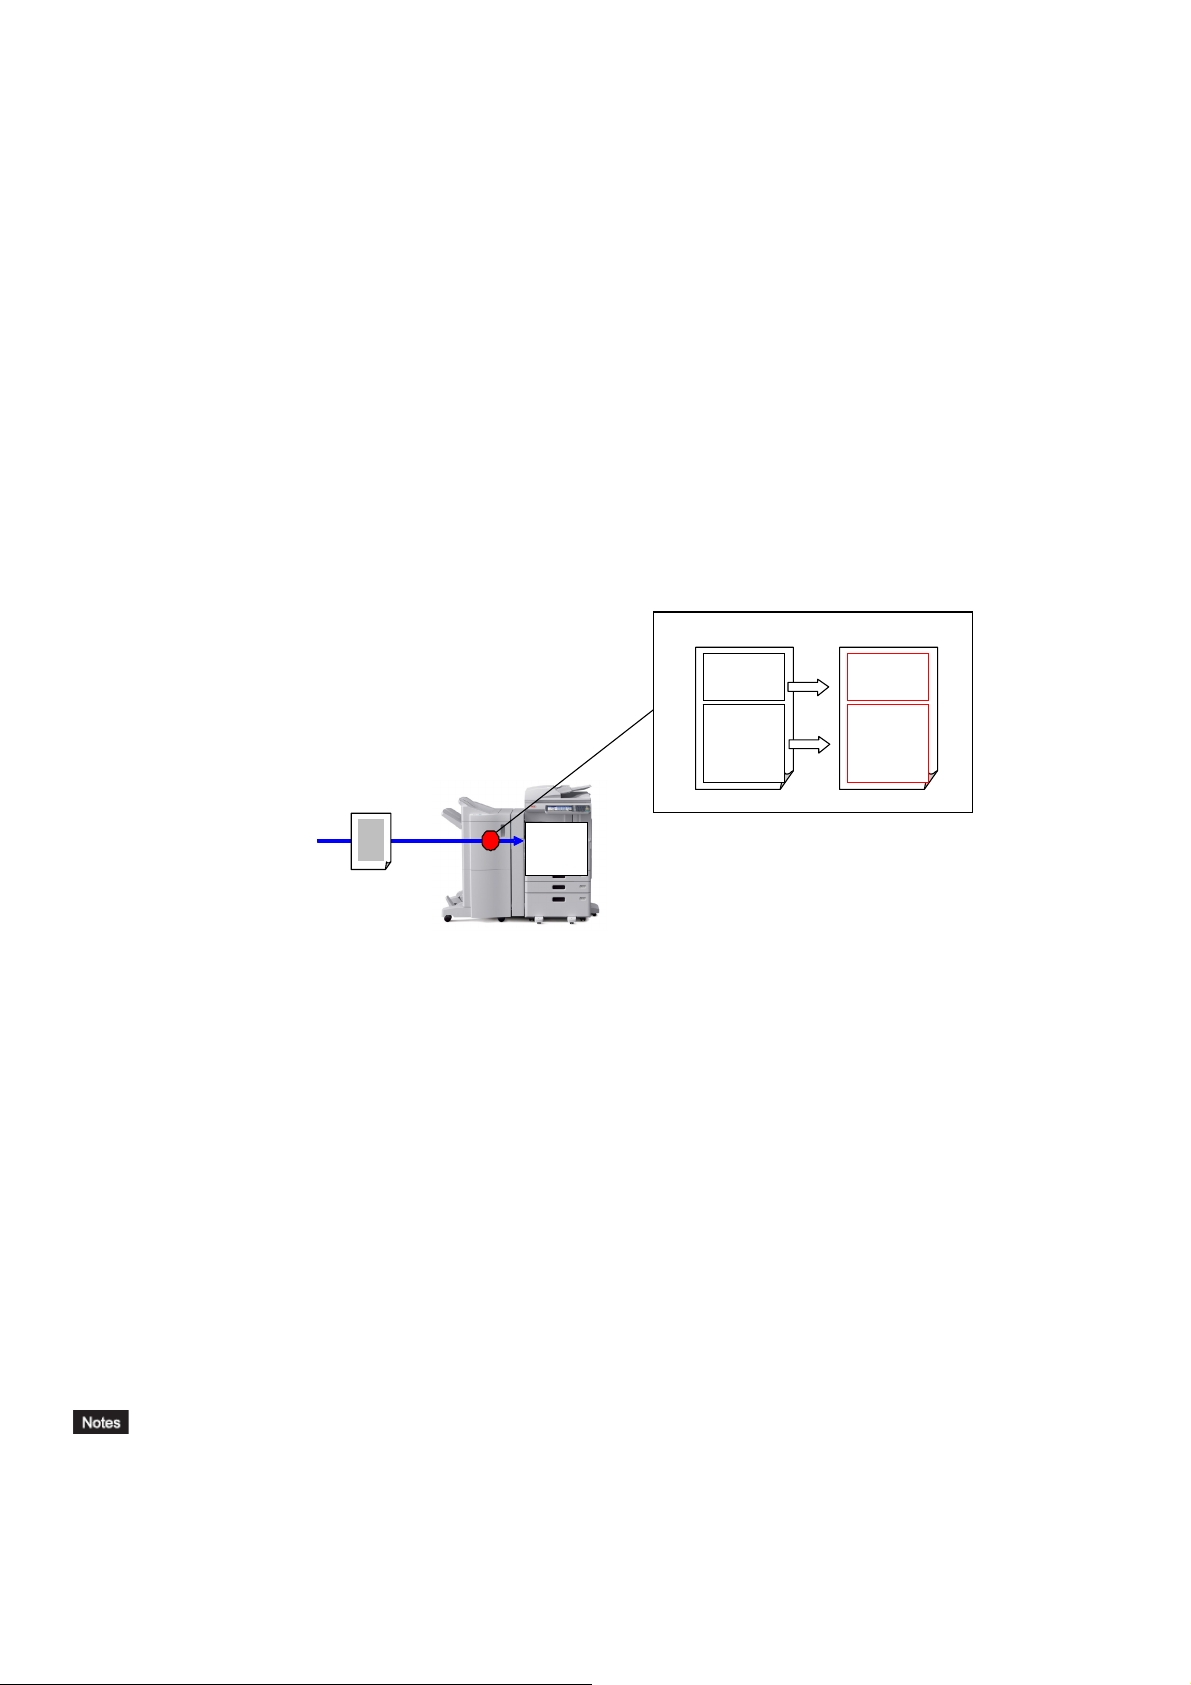
Print Data is composed of PJL (optional) and PDL.
PJL (Printer Job Language) : used for job-level printer control/Printer configuration/etc (e.g. Staple)
PDL (Page Description Language) : used for page-level control/image data/etc (e.g. Page Size)
Print Data Converter is the function that allows MFP to replace/add/remove the PJL and PDL of print job before job processing.
The purpose of this function is:
to fix some print problem tentatively (without ROM update)
to provide some solutions of printing function for the customer demand
Replace/add/remove PJL/PCL5 command
PJL part
(optional)
PJL part
(optional)
PDL part PDL part
Print Job
process
Converting
JOB
Fig.1-1
Usage example:
PJL
- Remove specific string from Job Name which will be shown in Job Log ("Microsoft Word - TEST.doc“ -->”TEST.doc”)
- Force Monochrome print (by changing PJL string - @PJL ....RENDERMODE=COLOR -->GRAYSCALE)
- Force Hold Print (@PJL ....PRINTMODE=NORMAL -->HOLD)
PDL (PCL5 command)
- Repair incorrect command to prevent unexpected output
(Replace incorrect A4 size command - “Ec&(26A” with ”Ec&l26A”)
- Force PaperSource Auto selection (Replace any cassette command “Ec&l#H” with AUTO command ”Ec&l7H”)
- Replace Paper related command - Size / Duplex / Source / etc...
See more details in Appendix B - changeable parameters.
As Print Data Converter changes incoming print data, be aware of the risk that unexpected result may occur. To reduce the
risk, limiting applied users using additional LPR queue is STRONGLY recommended.
(No definition / defining default LPR queue (“Print”) to ‘Queue’ element is not recommended because almost incoming
print data will be converted.)
3
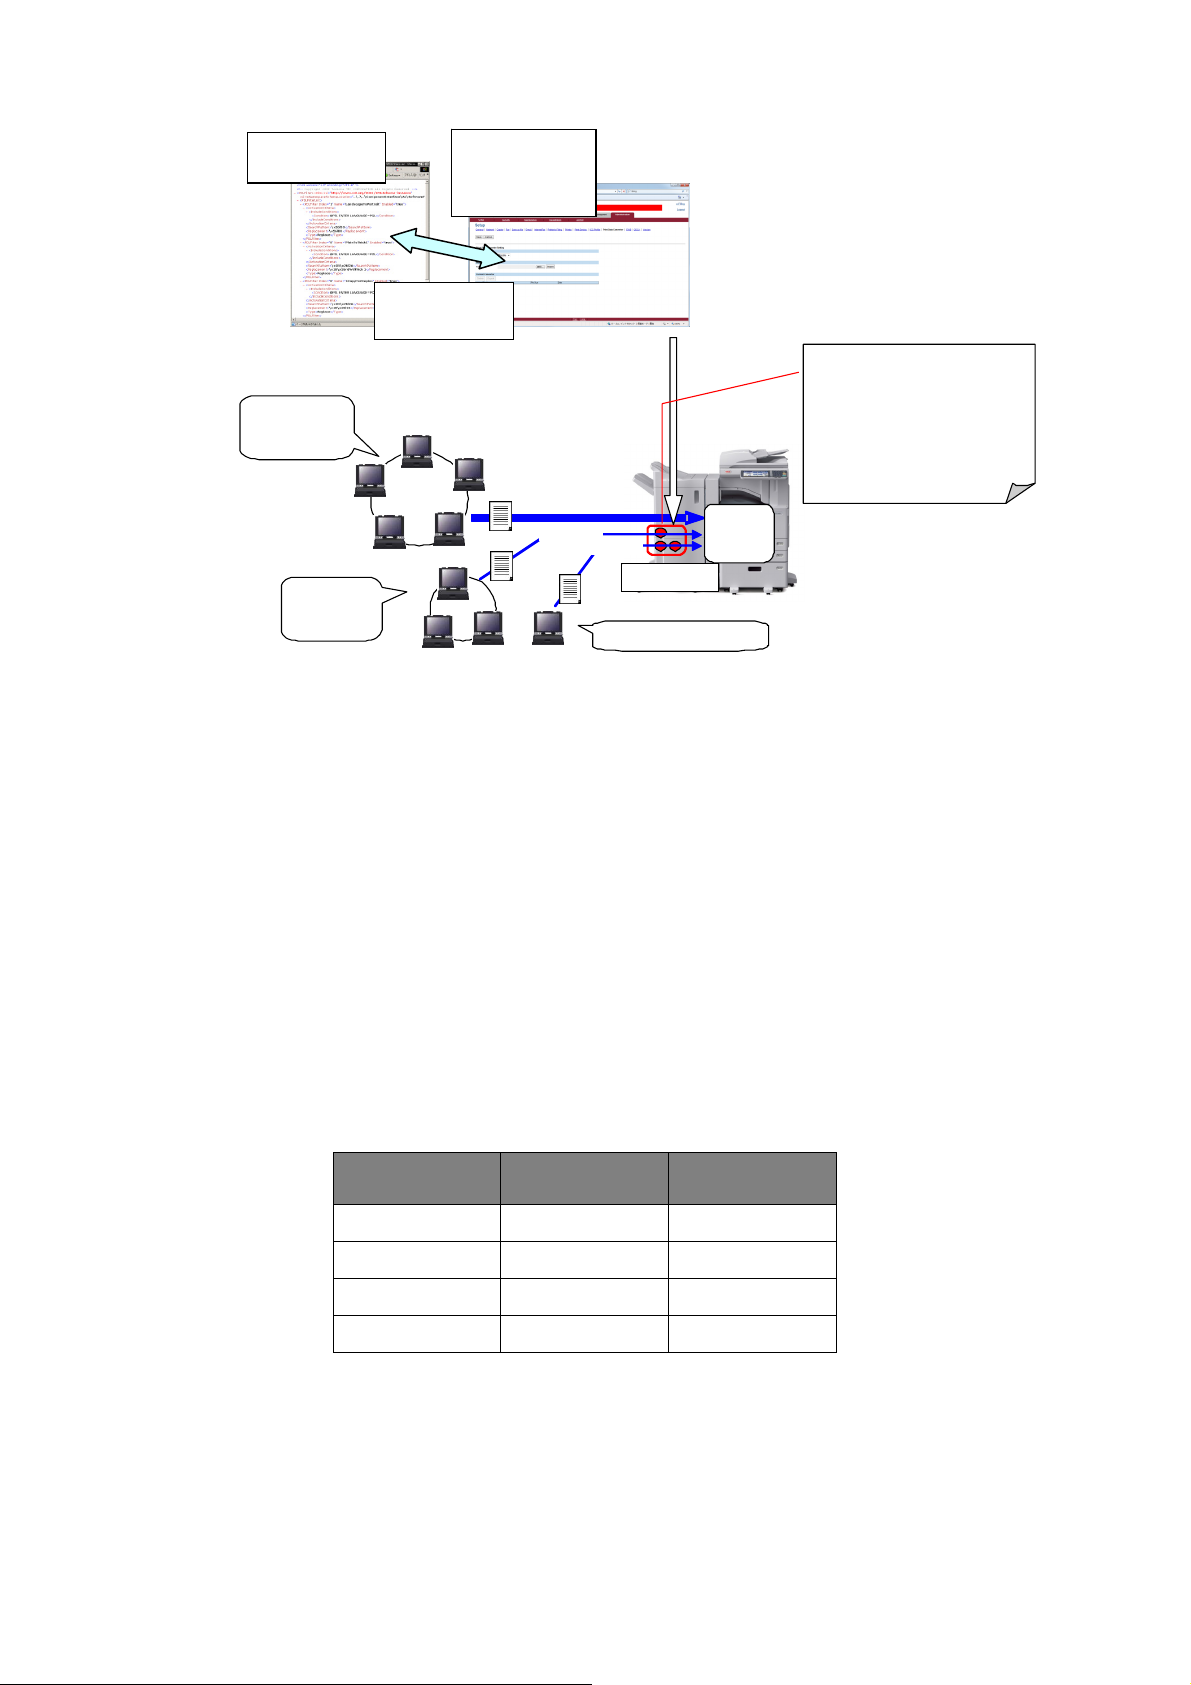
1-3. Function Overview
Converter Setting
(XML based)
"We don't need
any solutions"
"We need
solution A"
management
(Admin-> Setup->
Print Data Converter)
Import/Export/
Delete
TopAccess
Default queue
queue01
queue02
Converting
"I need solution B & C"
"
JOB
process
Different Convert setting
can be defined
for each printer queue
printer queue can be added on
TopAccess - Raw Job Setting
Fig.1-2
- Print Data Converting definition (rule) must be described in XML format.
- Print Data Converter file can be created by Service Technicians.
- Print Data Converter file can be imported/exported/deleted via TopAccess.
- Print Data Converter function can be Enabled/Disabled on TopAccess.
- One MFP can import only one XML file.
- One XML file can include multiple convert definitions.
- Limiting Print Data Converter effect to the specified user(s) is possible using Print queue definition.
1-4. Print Data Converter support target
Print Data Converter supports the following conditions.
Table.1-1
Language of
Print Job
PCL5 / PCL5c Yes Yes
PCL6 Yes No
PJL
Conversion
conversion
PDL
PS Yes No
XPS N/A No
*PCL5/PCL5c is not supported by Printer Driver. Legacy environment is assumed.
*PJL is the optional command. Print Job may not contain PJL. It is depend on print environment.
*Printer Driver always contents PJL command except XPS.
4

2. How to apply Print Data Converter
This chapter describes how to setup and apply Print Data Converter
2-1. Print Data Converter Application flow
1) Analyze user’s issue (problem) / Investigate user’s demand (request)
2) Analyze actual print data
3) Create xml file which will fix the issue / satisfy user’s demand
4) Testing with created xml file
5) Install xml file via TopAccess and setup user’s print environment
Basically 1) to 5) should be done by Service Technician but only 5) is acceptable to be done by User’s Administrator. (TopAccess)
XML file is not installed in MFP by factory default to prevent print data crush by User Administrator’s wrong usage.
2-2. Create Print Data Converter XML file
Print Data Converter XML file can be created using text editor (i.e. Windows NOTEPAD), XML editor (i.e. Microsoft XML Notepad)
and so on.
2-2-1. Sample XML file
Following is the sample of XML file
<?xml version="1.0" encoding="UTF-8"?>
<PDConverters>
<PDConverterList>
<PDConverter Index="0" Name="PJLForceMonochrome" Enabled="true">
<LanguageType>PJL</LanguageType>
<SearchPatterns>
<SearchPattern>@PJL COMMENT DSSC PRINT RENDERMODE=*</SearchPattern>
</SearchPatterns>
<Replacement>@PJL COMMENT DSSC PRINT RENDERMODE=GRAYSCALE</Replacement>
<OperationType>Replace</OperationType>
<AssociatedQueues>
<Queue>MonoPrintQue</Queue>
</AssociatedQueues>
</PDConverter>
<PDConverter Index="1" Name="PCLReplaceLTLDtoA4" Enabled="true">
<LanguageType>PCL</LanguageType>
<SearchPatterns>
<SearchPattern>\x1B\x26l2A</SearchPattern>
<SearchPattern>\x1B\x26l6A</SearchPattern>
</SearchPatterns>
<Replacement>\x1B\x26l26A</Replacement>
<OperationType>Replace</OperationType>
<AssociatedQueues>
<Queue>LTLDtoA4que</Queue>
</AssociatedQueues>
</PDConverter>
</PDConverterList>
</PDConverters>
Above sample XML contents two converter settings. (Red and Blue)
1) Force Monochrome print to the job which is sent via “MonoPrintQue” LPR queue.
2) Change the page size from LT/LD to A4 for PCL5 job which is sent via “LTLDtoA4que” LPR queue
5
2-2-2. Overview of XML description
- One XML file can define MULTIPLE settings (Index starts from 0).
- Each setting can be enabled/disabled in XML file (Enabled=”true”/”false”).
- Need to define PJL or PCL for LanguageType to clarify the target (Controller’s behavior will change depend on this
setting).
- MULTIPLE SearchPattern can be defined.
- Wildcard can be used for SearchPattern (“*” for PJL, “#” for PCL and “?” for both LanguageType).
- Printer Queue can be defined. Limiting the user by Printer Queue will reduce the risk of crash or invalid print result by
unexpected conversion.
- An escape sequence must be entered as a backslash followed by an 8-bit hexadecimal number, e.g. "\x1B" for [ESC] ,
"\x0D" for [CR] or “\x0A” for [LF].
- The ampersand, the left and right angle brackets must be entered as escape sequences "\x26", "\x3C" and "\x3E"
respectively, since they are not allowed as literals in an XML document. (e.g. PCL5 page size A4 command
“Ec&l26A” should be defined as “\x1B\x26l26A”)
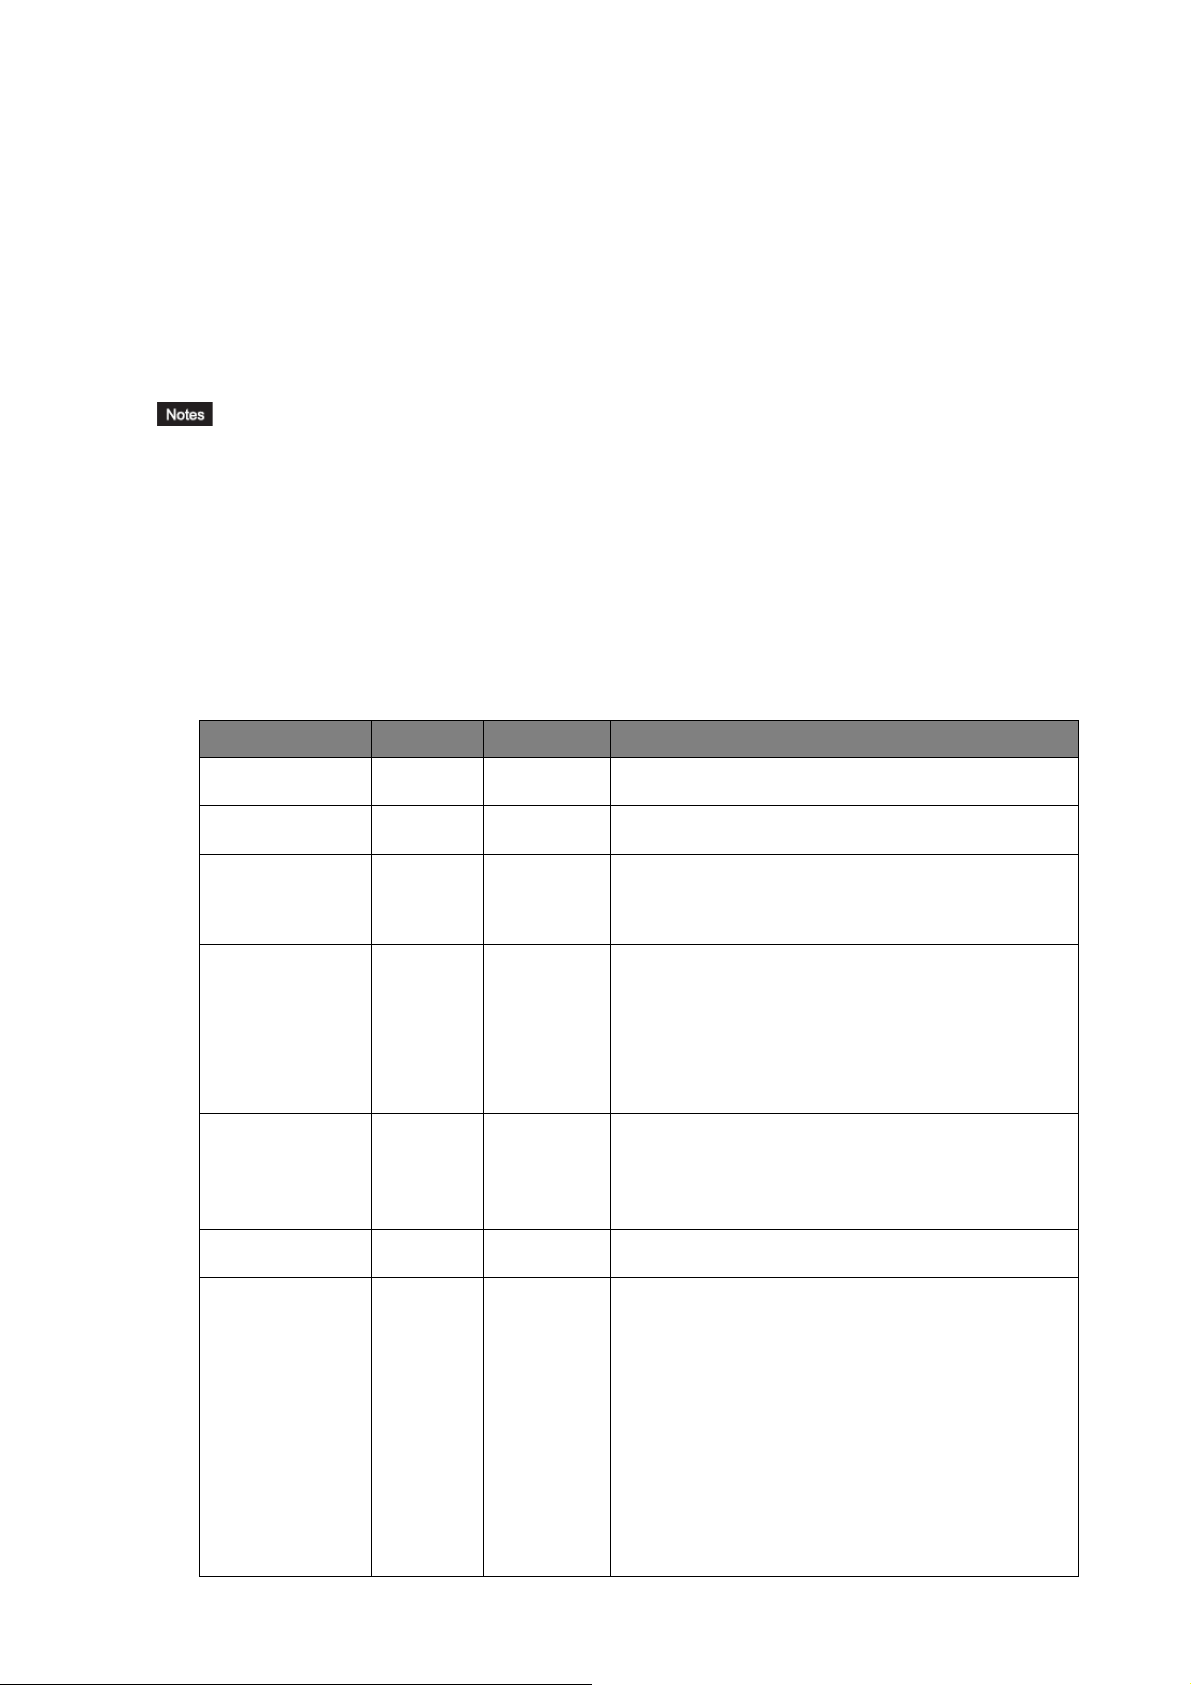
2-2-3. XML description details
Table.2-1
Element/Attribute type comment
Index integer mandatory
Name string optional
Enabled boolean mandatory
LanguageType string mandatory
SearchPattern string optional
Replacement string mandatory
Converter index (should starts from 0)
Converter name
“true” or “false”
If “true”, the setting will be enabled.
If “false”, the setting will be disabled.
“PJL” or “PCL”
Types of language to convert
“PJL”: Select when converting PJL. (Only PJL part will
be the target of converting.)
“PCL”: Select when converting PCL5 command. (PJL
part will be skipped for converting.)
Define the string to search. (PJL or PCL5 command)
Multiple SearchPattern can be defined in
SearchPatterns element.
Wildcard can be used. (see details in Appendix A)
Define the string to convert/newly add.
OperationType string mandatory
“Replace”, “InsertBefore”, “InsertAfter” or
“InsertAtBeginning”
“Replace”: the string defined in “SearchPattern” will be
replaced by the string defined in “Replacement”.
“InsertBefore”: the string defined in “Replacement” will
be inserted before the string defined in “Replacement”.
“InsertAfter” : the string defined in “Replacement” will be
inserted after the string defined in “Replacement”.
“InsertAtBeginning”: the string defined in “Replacement”
will be inserted at the beginning of print data.
6
Element/Attribute type comment
EndSequence string optional
Queue string mandatory
Stop converting when received defined command/string
in the incoming print data stream.
This definition is to reduce the risk of
performance/unexpected converting.
Multiple EndSequence can be defined in
EndSequences element.
Note that an escape sequence cannot be defined as
EndSequence.
Print queues to which the converter is associated.
Apply the converter to any queues if not specified.
At least one queue must be specified when
OperationType=="InsertAtBeginning"
Multiple Queue can be defined in AssociatedQueues
element.
2-3. Setting up LPR queue
This chapter describes how to add LPR queue to the MFP.
As Print Data Converter changes incoming print data, be aware of the risk that unexpected result may occur. To reduce the risk,
limiting applied users using additional LPR queue is STRONGLY recommended. On this understanding, if default queue is preferred
to apply Print Data Converter, define default print queue “Print” in ‘Queue’ element.
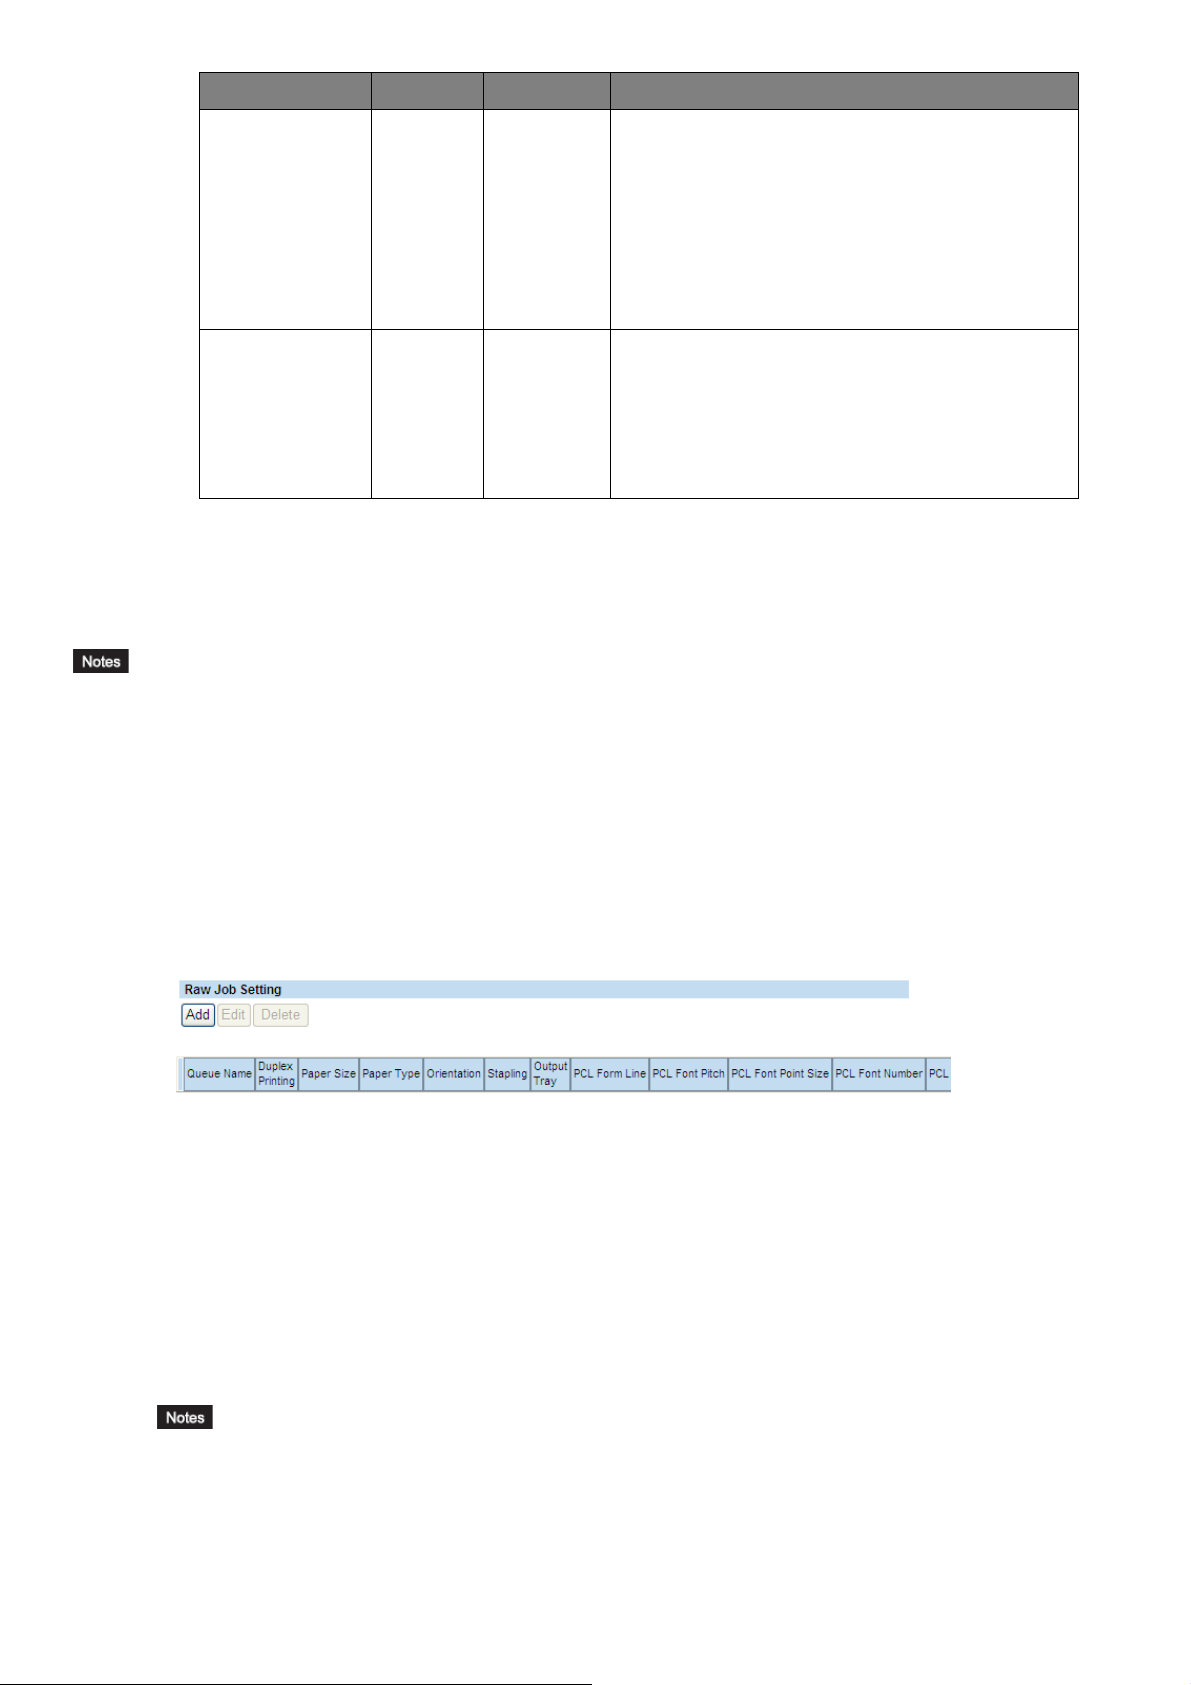
2-3-1. Adding an LPR queue via TopAccess
1) Access TopAccess in the administrator mode.
2) Click the [Setup] menu and [Printer] submenu.
3) To add a new LPR queue, click [Add] in Raw Job Setting.
Fig.2-1
4) Enter the queue name using up to 31 alphanumeric characters. The queue name is case sensitive so that “Queue1”
and “queue1” will be added as different queues.
5) Set up other items (See details in TopAccess Guide - Setting up Raw Job Setting)
6) Click [Save].
For example of sample XML in 2-2-1, two LPR queue should be created, such as “MonoPrintQue” and “LTLDtoA4que”.
In Raw Job Setting,
you can add up to 16 LPR queue names and specify the raw job setting for each queue.
7

2-3-2. Changing LPR queue on user’s environment
To print via created queue from user’s environment, setting up LPR queue is needed on user’s environment.
For example of Windows OS,
1) Open Printer Driver property and select [Ports] tab
2) Click [Configure Port...]
3) Select [LPR] at the [Protocol] group, enter queue name (For example “MonoPrintQue” for sample XML in 2-2-1.) in
the [Queue Name] box at the [LPR Settings] group, and then click [OK].
MonoPrintQue
Fig.2-2
For other environment, please see “Software Installation Guide”
2-4. Setting up Print Data Converter XML file from TopAccess
Print Data Converter XML file can be imported/exported/deleted by TopAccess. This chapter describes how to do it.
2-4-1. Accessing TopAccess in the administrator mode
1) To navigate to TopAccess, enter the following URL on the address box of your Internet browser.
http://<IP Address> or http://<Device Name>
2) The TopAccess web page opens
3) Click the [Administration] tab
4) Enter the Administrator user name and password. Then click [Login]
8

2-4-2. Setting up Print Data Converter
1) Click the [Setup] menu and [Print Data Converter] submenu.
2) In the Print Data Converter submenu page, set the Print Data Converter settings as required.
Fig.2-2
2-4-3. Import New Converter
1) Click [Browse] in [Import New Converter] to select the Converter (xml file), and then click [Import].
2) The Converter is imported. Imported file is shown as “Current Converter”.
Only one Converter can be imported.
If trying to import Converter when Converter is already imported, existing file will be overwritten by new Converter.
(Confirmation dialog will be shown)
Fig.2-3
9

2-4-4. Enable/Disable Print Data Converter
To enable/disable Print Data Converter function, select [Enable] or [Disable] in [Print Data Converter] and click [Save].
[Enable] can be selected when Converter is imported.
If [Disable] is selected, Print Data Converter function does not work even Converter is imported.
2-4-5. Export Converter
1) Click [Export] in [Current Converter].
2) Print Data Converter Export window is shown..
Fig.2-4
3) Click File Name to Export
4) Click Close after Exporting
2-4-6. Delete Converter
1) Click [Delete] in [Current Converter]
2) Click [OK] on confirmation window.
10

3. Examples
This chapter introduces few examples of the solution using Print Data Converter.
3-1. [Example] Force Monochrome print and allow Color for specified users
Situation:
Customer would like to force Monochrome print over a period of time, but they would like to give a permission of color
printing to some people at the same time.
Solution:
To force Monochrome print, change the PJL command of color mode in print data
Actual print data from Windows is like:
Color setting can be changed with the following PJL.
@PJL COMMENT DSSC PRINT RENDERMODE=XXXX
Possible value of XXXX is “AUTO”, “COLOR”, “GRAYSCALE”, “2KR”, “2KG”, ...... (See Appendix C - Table C-04.)
To Force Grayscale, convert any value of above PJL to “GRAYSCALE”. Sample xml file is as follows.
<?xml version="1.0" encoding="UTF-8"?>
<PDConverters>
<PDConverterList>
<PDConverter Index="0" Name="ForceMonoPrint" Enabled="true">
<LanguageType>PJL</LanguageType>
<SearchPatterns>
<SearchPattern>@PJL COMMENT DSSC PRINT RENDERMODE=*</SearchPattern>
</SearchPatterns>
<Replacement>@PJL COMMENT DSSC PRINT RENDERMODE=GRAYSCALE</Replacement>
<OperationType>Replace</OperationType>
<AssociatedQueues>
<Queue>MonoPrintQue</Queue>
</AssociatedQueues>
</PDConverter>
</PDConverterList>
</PDConverters>
Result:
Print Data sent to ‘MonoPrintQueue’ queue will be printed in Grayscale mode.
Print Data sent to other queue will be printed without conversion so Color print is available.
Administrator can enable/disable this solution via TopAccess. (See 2-4-4.)
Limitation:
Print data of MacPPD and XPS cannot be controlled. For PCL5c, need to add PJL to change to Grayscale. (See
Appendix B).
11

3-2. [Example] Change any Paper Source command to AUTO command
Situation:
- Customer uses special application that output PCL5 data
- The application can only output PaperSource=UpperCassette(Drawer1) and PaperSource=BypassTray command
- Customer requires to behave as PaperSource=AUTO
Solution:
PCL5 PaperSource command is Ec&l#H (See Appendix D - Table D-02.)
To solve customer’s issue, replace Ec&l1H (UpperCassette command) and Ec&l2H with Ec&l7H (AUTO)
1B 26 6C 31 48
(Ec&l1H)
1B 26 6C 3748
(Ec&l7H)
Sample xml file is as follows.
<?xml version="1.0" encoding="UTF-8"?>
<PDConverters>
<PDConverterList>
<PDConverter Index="0" Name="PaperSourceAUTO" Enabled="true">
<LanguageType>PCL</LanguageType>
<SearchPatterns>
<SearchPattern>\x1B\x26l1H</SearchPattern>
<SearchPattern>\x1B\x26l2H</SearchPattern>
</SearchPatterns>
<Replacement>\x1B\x26l7H</Replacement>
<OperationType>Replace</OperationType>
<AssociatedQueues>
<Queue>AutoQue </Queue>
</AssociatedQueues>
</PDConverter>
</PDConverterList>
</PDConverters>
Result:
Print Data sent to ‘AutoQue’ queue will be printed with Auto Paper Source selection.
Tips:
ESC code (0x1B) should be described as \x1B and ‘&’ should be described as \x26. (See Notes of 2-2-2.)
Using WildCard for SerchPattern also works as follows.
<SearchPattern>\x1B\x26l#H</SearchPattern>
12

3-3. [Example] Allow printing from AS400/Unix/Linux on NO LIMIT BLACK function
Situation;
Even NO LIMIT BLACK function enabled, print jobs from AS400/Unix/Linux will be treated as invalid job. (Print jobs from
Windows are OK.) Customer requires to allow printing from AS400/Unix/Linux also.
Solution:
NO LIMIT BLACK function is the setting to allow printing Monochrome job even if Department management function
enabled. (See details in MFP Management Guide.)
The setting does not work for the print data from AS400/Unix/Linux because they do not content Color Mode PJL so that
MFP could not detect if it’s a Mono print or not. To solve this issue, add PJL Grayscale command.
<CASE 1>Print Job does not contain PJL command
-->Add UEL (Universal Exit Language: Ec%-12345X) and PJL at the beginning of the job
For CASE 1, Sample xml file is as follows.
<?xml version="1.0" encoding="UTF-8"?>
<PDConverters>
<PDConverterList>
<PDConverter Index="0" Name="AddPJLGrayscale" Enabled="true">
<LanguageType>PJL</LanguageType>
<SearchPatterns>
<SearchPattern></SearchPattern>
</SearchPatterns>
<Replacement>\x1B%-12345X@PJL COMMENT DSSC PRINT RENDERMODE=GRAYSCALE\x0A</Replacement>
<OperationType>InsertAtBeginning</OperationType>
<AssociatedQueues>
<Queue>BlackFreeQue</Queue>
</AssociatedQueues>
</PDConverter>
</PDConverterList>
</PDConverters>
Q&A
Q. Is it necessary to add UEL? How about just adding PJL at the beginning of the job?
A. It will work without UEL. However, adding UEL is preferred as a rule/protocol of a print data which includes PJL.
According to PJL Technical Reference, “All PJL jobs must begin and end with a UEL command
(<ESC>%–12345X).” “The UEL command at the beginning of the job must be immediately followed by the PJL
command prefix (@PJL).”
In case of combined job data, UEL is considered as a keyword of job separator. In almost cases, it works without
UEL but adding UEL will reduce the risk.
13

Q. Is it necessary to add Line Feed (0x0A) after PJL command? How about Carriage Return (0x0D)?
A. According to PJL Technical Reference, it is mandatory to add Line Feed (0x0A) at the end of PJL command.
Carriage Return (0x0D) can be optional command.
OK: @PJL COMMENT DSSC PRINT RENDERMODE=GRAYSCALE<CR><LF>@PJL....
OK: @PJL COMMENT DSSC PRINT RENDERMODE=GRAYSCALE<LF>@PJL....
NG: @PJL COMMENT DSSC PRINT RENDERMODE=GRAYSCALE@PJL....
<CASE 2>Print Job contain PJL command -->Add PJL before/after certain PJL
For example, add @PJL COMMENT DSSC PRINT RENDERMODE=GRAYSCALE<CR><LF> before “@PJL ENTER
LANGUAGE
For CASE 2, Sample xml file is as follows.
<?xml version="1.0" encoding="UTF-8"?>
<PDConverters>
<PDConverterList>
<PDConverter Index="0" Name="AddPJLGrayscale" Enabled="true">
<LanguageType>PJL</LanguageType>
<SearchPatterns>
<SearchPattern>@PJL ENTER LANGUAGE</SearchPattern>
</SearchPatterns>
<Replacement>@PJL COMMENT DSSC PRINT RENDERMODE=GRAYSCALE\x0D\x0A</Replacement>
<OperationType>InsertBefore</OperationType>
<AssociatedQueues>
<Queue>BlackFreeQue</Queue>
</AssociatedQueues>
</PDConverter>
</PDConverterList>
</PDConverters>
Q&A
Q. How about adding PJL at the beginning of the job in this case?
A. Maybe it works but adding PJL before UEL=Universal Exit Language is not preferred because UEL is considered as
a job separator.
Q. How about adding PJL after UEL (Ec%-12345X) using ‘InsertAfter’ for OperationType?
A. It’s risky because UEL exists not only at the beginning of the job but also at the end of the job.
14

Reference:
Typical print job which contents PJL command is as follows.
PCL5 case:
<Esc>%-12345X@PJL xxxxx <CR><LF>
@PJL xxxxx = xxxx <CR><LF>
@PJL xxxxx = xxxx <CR><LF>
@PJL ENTER LANGUAGE = PCL <CR><LF>
<ESC>E . . . . PCL print description . . . . <ESC>E
<ESC>%-12345X
PostScript case:
<ESC>%-12345X@PJL xxxxx <CR><LF>
@PJL xxxxx = xxxx <CR><LF>
@PJL xxxxx = xxxx <CR><LF>
@PJL ENTER LANGUAGE = POSTSCRIPT <CR><LF>
%!PS-ADOBE ... PostScript print description ...
<ESC>%-12345X
15

Appendix A - WildCard for SearchPattern
WildCard can be used only for SearchPattern definition. Usable sign is different depend on LanguageType as below.
LanguageType=PJL : [*] or [?] can be used
LanguageType=PCL : [#] or [?] can be used
The asterisk character ("*") and pound sign (“#”) substitutes for any zero or more characters while question mark ("?")
substitutes for any one character. A pound sign (“#”) should be used for PCL-LanguageType, since asterisk character (“*”)
may be part of a PCL5 command.
The following restrictions apply when performing a pattern search with or without wildcards:
1. Each search operates on data within a single line for PJL-LanguageTyped filters, and within a single command or
single line, whichever comes first, for PCL-LanguageTyped filters. A PCL command begins with an [ESC] (or "\x1B")
whereas a PJL command ends with [CR][LF] ("\x0D\x0A") or [LF] ("\x0A").
2. A wildcard may be included at the end or in the middle, but not at the very beginning of SearchPattern;
3. When OperationType==Replace and SearchPattern ends with a wildcard, the replacement operation will take place
from the non-wildcard part of SearchPattern to the end of the command or the next line terminator, whichever comes
first.
4. For PCL-LanguageTyped filters, if SearchPattern contains a wildcard, [ESC] character can be used only once at the
beginning of SearchPattern.
16

Appendix B - Changeable parameters
(
)
(
)
(
(
)
(
)
)
Attached list shows changeable/addable parameters using Print Data Converter. Unchangeable parameters are grayed out
Table B-01: Changeable parameters by Print Data Converter
Basic functions
Sort/Group PJL PDL
Copies PDL PDL PDL
Inbin PDL PDL PDL PDL PDL
Outbin PJL/PDL PJL
Duplex PDL PDL PDL PDL PDL
MediaType PDL PDL PDL PDL PDL
Page Size PDL PDL PDL PDL PDL
Orientation PDL PDL N/A N/A N/A
Job related
Color
Alternation PJL PJL PJL PJL
Staple PJL PJL PJL PJL
Holepunch PJL PJL PJL PJL
Fold PJL PJL PJL PJL
Print Mode PJL PJL PJL PJL
User Name PJL PJL PJL PJL
Nickname PJL PJL PJL PJL
Color/ImageQuality related
Document Type PJL PJL PJL PJL
Screen Type PJL PJL PJL PJL
Toner Save PJL PJL PJL PJL
Distinguish Thin Lines PJL PJL PJL PJL
PureBlack N/A PJL PJL PJL
PureGray N/A PJL PJL PJL
Color Balance PJL PJL PJL PJL
Sharpness PJL PJL PJL PJL
Brightness PJL PJL PJL PJL
Contrast PJL PJL PJL PJL
Saturation PJL PJL PJL PJL
Background Adjustment PJL PJL PJL PJL
PostScript Overprint N/A N/A PJL PJL
Black Overprint N/A N/A PJL PJL
Smoothing
Resolution N/A N/A PJL PJL
PCL5/PCL5c/raw
AS400/SAP/etc
PJL (sort)
PDL (group)
PJL *2
PJL PJL PJL PJL
PCL6
windows
PJL (sort) *1)
PJL/PDL
PJL PJL PJL
PS
windows
PJL
PS
SAP/etc
PDL
PS
Mac
TSBPrivate
TSBPrivate
TSBPrivate
TSBPrivate
TSBPrivate
TSBPrivate
TSBPrivate
TSBPrivate
TSBPrivate
TSBPrivate
TSBPrivate
TSBPrivate
TSBPrivate
TSBPrivate
TSBPrivate
TSBPrivate
TSBPrivate
TSBPrivate
TSBPrivate
TSBPrivate
TSBPrivate
TSBPrivate
TSBPrivate
TSBPrivate
TSBPrivate
TSBPrivate
Other functions
Do not Print Blank Pages PJL PJL PJL PJL
Letterhead Print Mode TopAccess PDL PDL PDL N/A
*1) controllable only for sort job since pagecopies command (PDL) will be used for group setting
*2) PCL5c (color) job can be changed to Grayscale by adding PJL
Gray strings: Basically legacy systems do not output PJLs. They can be added to the jobs using "Insert" operations
TSBPrivate
17

Appendix C - list of major PJL
Table C-01: Destination (Outbin)
parameter PJL note
Stacker @PJL SET OUTBIN=UPPER *1 Enable when optional Finisher is
Side Stacker (LOWER) @PJL SET OUTBIN=LOWER
Finisher *1 @PJL SET OUTBIN=OPTIONALOUTBIN1
Finisher(Lower) *1 @PJL SET OUTBIN=OPTIONALOUTBIN2
Stacker(Upper) *2 @PJL SET OUTBIN=OPTIONALOUTBIN4
Stacker *2 @PJL SET OUTBIN=OPTIONALOUTBIN5
Table C-02: Sort/Group
parameter PJL note
Sort* @PJL COMMENT DSSC PRINT COLLATE=1
Group @PJL COMMENT DSSC PRINT COLLATE=0
Table C-03: Copies
parameter
@PJL SET COPIES=
PJL note
installed
*2 Enable when optional Job Separator
is installed
@PJL SET COPIES works as job copies.
Ec&l#X works as page copies.
Table C-04: Color
para mete r
AUTO* @PJL COMMENT DSSC PRINT RENDERMODE=AUTO
COLOR @PJL COMMENT DSSC PRINT RENDERMODE=COLOR
Black & White @PJL COMMENT DSSC PRINT RENDERMODE=GRAYSCALE
Twin Color - Red @PJL COMMENT DSSC PRINT RENDERMODE=2KR
Twin Color - Green @PJL COMMENT DSSC PRINT RENDERMODE=2KG
Twin Color - Blue @PJL COMMENT DSSC PRINT RENDERMODE=2KB
Twin Color - Cyan @PJL COMMENT DSSC PRINT RENDERMODE=2KC
Twin Color - Magenta @PJL COMMENT DSSC PRINT RENDERMODE=2KM
Twin Color - Yellow @PJL COMMENT DSSC PRINT RENDERMODE=2KY
Twin Color - White @PJL COMMENT DSSC PRINT RENDERMODE=2KW
Table C-05: Rotated Sort Copies
parameter
Disable* @PJL COMMENT DSSC PRINT ALTERNATION=0
Enable @PJL COMMENT DSSC PRINT ALTERNATION=1
Table C-06: Staple
para me ter
None* @PJL COMMENT DSSC PRINT STAPLE=NONE
Upper Left @PJL COMMENT DSSC PRINT STAPLE=TOPLEFT
Upper Right @PJL COMMENT DSSC PRINT STAPLE=TOPRIGHT
Center Top @PJL COMMENT DSSC PRINT STAPLE=DUALTOP
Middle Left @PJL COMMENT DSSC PRINT STAPLE=DUALLEFT
Center Double @PJL COMMENT DSSC PRINT STAPLE=SADDLESTITCH
PJL note
PJL note
PJL note
Table C-07: Hole Punch
parameter
None* @PJL COMMENT DSSC PRINT PUNCH=NONE
Middle Left @PJL COMMENT DSSC PRINT PUNCH=LEFT
Center Top @PJL COMMENT DSSC PRINT PUNCH=TOP
PJL note
18

Table C-08: Folding
parameter
Off none
On (Center) @PJL COMMENT DSSC PRINT FOLD=CENTER
Table C-09: Print Job Mode
parameter PJL note
Normal Print* @PJL COMMENT DSSC PRINT PRINTMODE=NORMAL
Scheduled Print @PJL COMMENT DSSC PRINT PRINTMODE=SCHEDULE
Private Print @PJL COMMENT DSSC PRINT PRINTMODE=PRIVATE
Hold Print @PJL COMMENT DSSC PRINT PRINTMODE=HOLD
Proof Print @PJL COMMENT DSSC PRINT PRINTMODE=PROOF
Store to e-Filing @PJL COMMENT DSSC PRINT PRINTMODE=BOX
PJL note
To disable this feature, simply remove
the PJL
Scheduled Print @PJL COMMENT DSSC PRINT JOBTYPE_SCHEDULE=TRUE Used for 'Multiple Job Type' to define
Private Print @PJL COMMENT DSSC PRINT JOBTYPE_PRIVATE=TRUE
Hold Print @PJL COMMENT DSSC PRINT JOBTYPE_HOLD=TRUE
Proof Print @PJL COMMENT DSSC PRINT JOBTYPE_PROOF=TRUE
Store to e-Filing @PJL COMMENT DSSC PRINT JOBTYPE_BOX=TRUE
Table C-10: Job Name / User Name
para me ter
Job Name
User Name (login name) @PJL COMMENT DSSC PRINT USERLOGIN=xxxxxx 128 characters maximum
User Name (Alias) @PJL COMMENT DSSC PRINT NICKNAME=xxxxxx
exmaple:
@PJL JOB NAME="Microsoft Word - test.doc"
PJL note
multiple print mode at the same time,
instead of ...PRINTMODE=XXXX.
Job Name should be enclosed in double
quotation mark
User Name (Alias) can be used to
display the owner of stored job on the
panel UI of MFP. If this PJL does not
exist, USERLOGIN will be used.
128 characters maximum.
Table C-11: Image Quality Type
parameter PJL note
General * @PJL COMMENT DSSC PRINT DOCUMENTTYPE=NORMAL
Photograph @PJL COMMENT DSSC PRINT DOCUMENTTYPE=PHOTO
Presentation @PJL COMMENT DSSC PRINT DOCUMENTTYPE=PRESEN
Line Art @PJL COMMENT DSSC PRINT DOCUMENTTYPE=LINART
Advanced @PJL COMMENT DSSC PRINT DOCUMENTTYPE=ADVANCED
Table C-12: Halftone
parameter PJL note
Auto * @PJL COMMENT DSSC PRINT SCREENTYPE=AUTO
Smooth @PJL COMMENT DSSC PRINT SCREENTYPE=SMOOTH
Detail @PJL COMMENT DSSC PRINT SCREENTYPE=DETAIL
Table C-13: Distinguish Thin Lines
parameter
Disable * @PJL COMMENT DSSC PRINT THINLINELIMIT=0
Enable @PJL COMMENT DSSC PRINT THINLINELIMIT=1
PJL note
19

Table C-14: Pure Black
para me ter
OFF @PJL COMMENT DSSC PRINT PUREBLACKEX=8
ON - Auto * @PJL COMMENT DSSC PRINT PUREBLACKEX=0
ON - Text @PJL COMMENT DSSC PRINT PUREBLACKEX=9
ON - Text & Graphic @PJL COMMENT DSSC PRINT PUREBLACKEX=11
ON - Text, Graphic & Image @PJL COMMENT DSSC PRINT PUREBLACKEX=15
Table C-15: Pure Gray
parameter PJL note
OFF @PJL COMMENT DSSC PRINT PUREGRAYEX=8
ON - Auto * @PJL COMMENT DSSC PRINT PUREGRAYEX=0
ON - Text @PJL COMMENT DSSC PRINT PUREGRAYEX=9
ON - Text & Graphic @PJL COMMENT DSSC PRINT PUREGRAYEX=11
ON - Text, Graphic & Image @PJL COMMENT DSSC PRINT PUREGRAYEX=15
Table C-16: Black Overprint
parameter
OFF @PJL COMMENT DSSC PRINT BLACKOVERPRINT=0
ON (Apply to Text & Graphic) @PJL COMMENT DSSC PRINT BLACKOVERPRINT=1
ON (Apply to Text) @PJL COMMENT DSSC PRINT BLACKOVERPRINT=2
PJL note
PJL note
Table C-17: PostScript Overprint
parameter
OFF @PJL COMMENT DSSC PRINT OVERPRINT=0
ON @PJL COMMENT DSSC PRINT OVERPRINT=1
Table C-18: Color Balance
para mete r
Table C-19: Contrast
para me ter
@PJL COMMENT DSSC PRINT CB C=000000
@PJL COMMENT DSSC PRINT CB M=000000
@PJL COMMENT DSSC PRINT CB Y=000000
@PJL COMMENT DSSC PRINT CB K=000000
@PJL COMMENT DSSC PRINT CONTRAST=XX
PJL note
PJL note
PJL note
Color Balance adjustment can be
defined for Low/Middle/High density of
C/M/Y/K. (value is defined as LLMMHH.
min:-4/max:+4)
EX.) To define Low=-4, Middle=0 and
High=+4, PJL should be defined as
below.
@PJL COMMENT DSSC PRINT CB
C=FC0004
-4:"FC" / -3:"FD" / -2:"FE" / -1:"FF" /
0:"00" / +1:"01" / +2:"02" / +3:"03" /
+4:"04"
XX: the value should be defined as
below.
-4:"FC" / -3:"FD" / -2:"FE" / -1:"FF" /
0:"00" / +1:"01" / +2:"02" / +3:"03" /
+4:"04"
20

Table C-20: Brightness
para me ter
@PJL COMMENT DSSC PRINT BRIGHTNESS=XX
Table C-21: Background Adjustment
para me ter
@PJL COMMENT DSSC PRINT BACKGROUND ADJUSTMENT
Table C-22: Saturation
para me ter
@PJL COMMENT DSSC PRINT SATURATION=XX
PJL note
PJL note
PJL note
XX: the value should be defined as
below.
-4:"FC" / -3:"FD" / -2:"FE" / -1:"FF" /
0:"00" / +1:"01" / +2:"02" / +3:"03" /
+4:"04"
XX: the value should be defined as
below.
-4:"FC" / -3:"FD" / -2:"FE" / -1:"FF" /
0:"00" / +1:"01" / +2:"02" / +3:"03" /
+4:"04"
XX: the value should be defined as
below.
-4:"FC" / -3:"FD" / -2:"FE" / -1:"FF" /
0:"00" / +1:"01" / +2:"02" / +3:"03" /
+4:"04"
Table C-23: Sharpness Filter
parameter PJL note
@PJL COMMENT DSSC PRINT SHARPNESS=OFF
XX: the value should be defined as
below.
@PJL COMMENT DSSC PRINT SHARPNESS=XX
Table C-24: Resolution
parameter
600dpi @PJL COMMENT DSSC PRINT XYRESOLUTION=600x600
1200dpi @PJL COMMENT DSSC PRINT XYRESOLUTION=1200x1200
Table C-25: Toner Save
parameter
OFF @PJL COMMENT DSSC PRINT TONERSAVE=0
ON @PJL COMMENT DSSC PRINT TONERSAVE=1
@PJL SET RESOLUTION=600
@PJL SET RESOLUTION=1200
PJL note
PJL note
-4:"FC" / -3:"FD" / -2:"FE" / -1:"FF" /
0:"00" / +1:"01" / +2:"02" / +3:"03" /
+4:"04"
The value of @PJL SET
RESOLUTION=xxx will be applied if
it's conflict with the value of
XYRESOLUTION.
Table C-26: Do not Print Blank Pages
parameter
OFF @PJL COMMENT DSSC PRINT WHITEPAPER=0
ON @PJL COMMENT DSSC PRINT WHITEPAPER=1
Table C-27: Department Code
parameter
Old PJL @PJL COMMENT DSSC PRINT ACCESSCODE=XXXXX 5-digit department code
New PJL (encoded) @PJL COMMENT DSSC PRINT ACCESSCODEEX=XXXXX
PJL note
PJL note
New PJL which encodes department
code. Encode rule is not opened.
21

Appendix D - list of major PCL5 command
Tray
Tray
Tray
Tray
R
)
Table D-01: Page Size
command
PCL5
Ec&l#A
A4 (210 x 297 mm) Ec&l26A
A3 (297 x 420 mm) Ec&l27A
A5 (148 x 210 mm) Ec&l25A
A6 (105 x 248 mm) Ec&l24A
Letter (8½ x 11") Ec&l2A
Ledger (11 x 17") Ec&l6A
Legal (8½ x 14") Ec&l3A
Statement (5½ x 8½") Ec&l15A
Computer (10 1/8 x 14") Ec&l501A
13" LG (8½ x 13") Ec&l10A
8.5" Square (8½ x 8½") Ec&l502A
Folio (210 x 330 mm) Ec&l9A
B4 (257 x 364 mm) Ec&l46A
B5 (182 x 257 mm) Ec&l45A
Postcard (100 x 148 mm) Ec&l71A
16K (195 x 270 mm) Ec&l505A
8K (270 x 390 mm) Ec&l504A
A3-WIDE (304 x 457 mm) Ec&l507A
LD-WIDE (304 x 457 mm) Ec&l508A
320 x 450 mm Ec&l517A
320 x 460 mm Ec&l518A
13 x 19" Ec&l519A
parameter actual command note
Table D-02: Paper Source (inbin)
PCL5
command
Auto Ec&l7H This command can be defined
MPT Ec&l2H
Ec&l#H
External LCF Ec&l20H
Inserter Ec&l30H
Table D-03: Destination (Outbin)
PCL5
command
Ec&l#G
Stacker Ec&l1G If both PJL and PCL5 command
Side Stacker(LOWE
Finisher *1 Ec&l3G
Finisher(Lower) *2 Ec&l4G
Stacker(Upper) *2 Ec&l6G
Stacker *2
parameter actual command note
1 Ec&l1H
2 Ec&l4H
3 / LCF Ec&l5H
4 Ec&l21H
parameter actual command note
Ec&l2G
Ec&l7G
in each page. If no command in
the page, the setting of
previous page should be used.
exists, PCL5 command will be
used.
*1 Enable when optional
Finisher is installed.
*2 Enable when optional Job
Separator is installed.
22

Table D-04: Paper Type (Media Type)
y
y
)
)
)
)
PCL5
command
Ec&n#Wd[String]
Plain Ec&n6WdPlain # = number of data bytes of
Recycled Ec&n9WdRecycled
Thick 1 Ec&n8WdThick 1
Thick 2 Ec&n8WdThick 2
Thick 3 Ec&n8WdThick 3
Thick 4 Ec&n8WdThick 4
Special 1 Ec&n11W dWaterproof 1
Special 2 Ec&n11W dWaterproof 2
Transparenc
Thin Ec&n5WdThin
Plain1 Ec&n7WdPlain1
Plain2 Ec&n7WdPlain2
Thick 1 (Back
Thick 2 (Back
Thick 3 (Back
Thick 4 (Back
Special 1 (Back) Ec&n12W dWaterproof 1b
Special 2 (Back) Ec&n12W dWaterproof 2b
Tab Ec&n4WdTab
Envelope Ec&n9W dEnvelope
parameter actual command note
Ec&n13W dTransparenc
Ec&n9WdThick 1b
Ec&n9WdThick 2b
Ec&n9WdThick 3b
Ec&n9WdThick 4b
the operation [d] + [String]
This command can be defined in
each page.
Table D-05: Copies
PCL5
command
parameter actual command note
Ec&l#X # = Number of copies
Table D-06: Simplex/Duplex
PCL5
command
Simplex Ec&l0S
Ec&l#S
Table D-07: Orientation
Duplex, Long-Edge Binding Ec&l1S
Duplex, Short-Edge Binding Ec&l2S
PCL5
command
Portrait Ec&l0O
Ec&l#O
Landscape Ec&l1O
Reverse Portrait Ec&l2O
Reverse Landscape Ec&l3O
parameter actual command note
parameter actual command note
example: 2copies
Ec&l2X
Ec&l#X can be defined in each
page. If no command in the page,
the setting of previous page is
used.
23

Q&A
Q. How to remove string/command?
A. Define blank as “Replacement” and select “Replacement” as OperationType
Q. When xml file contents multiple settings, is it possible to disable specified setting?
A. Yes. You can enable/disable each setting by changing the value of ‘Enabled’ entry (true/false - See detail in 2-2-3.)
Q. Is it possible to apply multiple converter settings to the same job?
A. Yes. Multiple settings can be applied to the same print queue. In that case,
Q. Is it possible to apply Print Data Converter to the job via Raw protocol?
A. Yes. Defining ‘Print’ (default queue name for MFP) to ‘Queue’ element will apply Print Data Converter to the print data via RAW
protocol. However, please NOTE that it is risky because every incoming print data will be conversion target. Other values except
‘Print’ for ‘Queue’ will not apply Print Data Converter for Raw protocol.
24
 Loading...