

Page 1
User’s Manual
Advanced Guide
Page 2

This manual supports the following models.
MC760x, MC770x, MC780x, ES7470x MFP, ES7480x MFP, MPS3537mc, MPS4242mc
The illustrations of the machine used in this document may be different from what you actually see
on your machine.
Table of contents
1 Printing Operations........................ 6
Uninstalling the Printer Drivers ...............7
Uninstalling Printer Drivers ..................................7
For Windows............................................................7
For Mac OS X ..........................................................8
PRINTING FROM WINDOWS ....................9
Setting Up Print Options ......................................9
How to set up...........................................................9
Print options...........................................................12
Printing With Best Functions for Your Needs.....37
Printing various print job types...............................37
Layout and finishing options in [Basic] tab menu... 43
Layout and finishing options
in [Finishing] tab menu.........................................45
Finishing options in [Paper Handling] tab menu ....49
Finishing options in [Effect] tab menu....................50
Using various types of paper .................................52
Switching equipment to print jobs ..........................53
Splitting a print job across two pieces of equipment
(Tandem Printing)................................................54
PRINTING FROM Macintosh ..................56
Printing From Application...................................56
Page Setup dialog..................................................56
Print dialog.............................................................58
MANAGING PRINT JOBS FROM THE
CONTROL PANEL .................................68
Monitoring the Print Job Status ..........................68
Normal Print / Scheduled Print jobs.......................68
Proof Print jobs ......................................................70
Private Print jobs.................................................... 71
Hold Print jobs........................................................73
Invalid jobs.............................................................76
Printing files from
USB media (USB Direct Printing)........................ 77
Viewing the Print Job Log ..................................80
Checking Supplies .............................................81
Viewing the tray status...........................................81
Checking remaining toner levels............................81
OTHER PRINTING METHODS ................82
FTP Printing .......................................................82
Email Printing .....................................................83
APPENDIX ...............................................84
Internal Fonts List ..............................................84
Internal PCL fonts list.............................................84
Internal PS fonts list............................................... 85
2 Copying Operations .....................86
EDITING FUNCTIONS .............................87
Displaying EDIT Menu .......................................87
Image Shift .........................................................87
Creating top/bottom margin or left/right margin ..... 87
Edge Erase ........................................................88
2IN1 / 4IN1.........................................................89
Magazine Sort Mode ..........................................90
Image Editing .....................................................91
Trimming / Masking ............................................... 91
Mirror image / Negative/positive reversal .............. 92
XY Zoom ............................................................92
Cover Sheet .......................................................94
Sheet Insertion ...................................................95
Time Stamp........................................................97
Page Number .....................................................97
Job Build ............................................................99
Image Direction ................................................101
Book - Tablet....................................................101
ADF -> SADF ...................................................102
Full Image ........................................................103
Omit Blank Page ..............................................103
Outside Erase ..................................................104
IMAGE ADJUSTMENT ..........................106
Displaying IMAGE Menu ..................................106
Using Image Adjustment Functions .................106
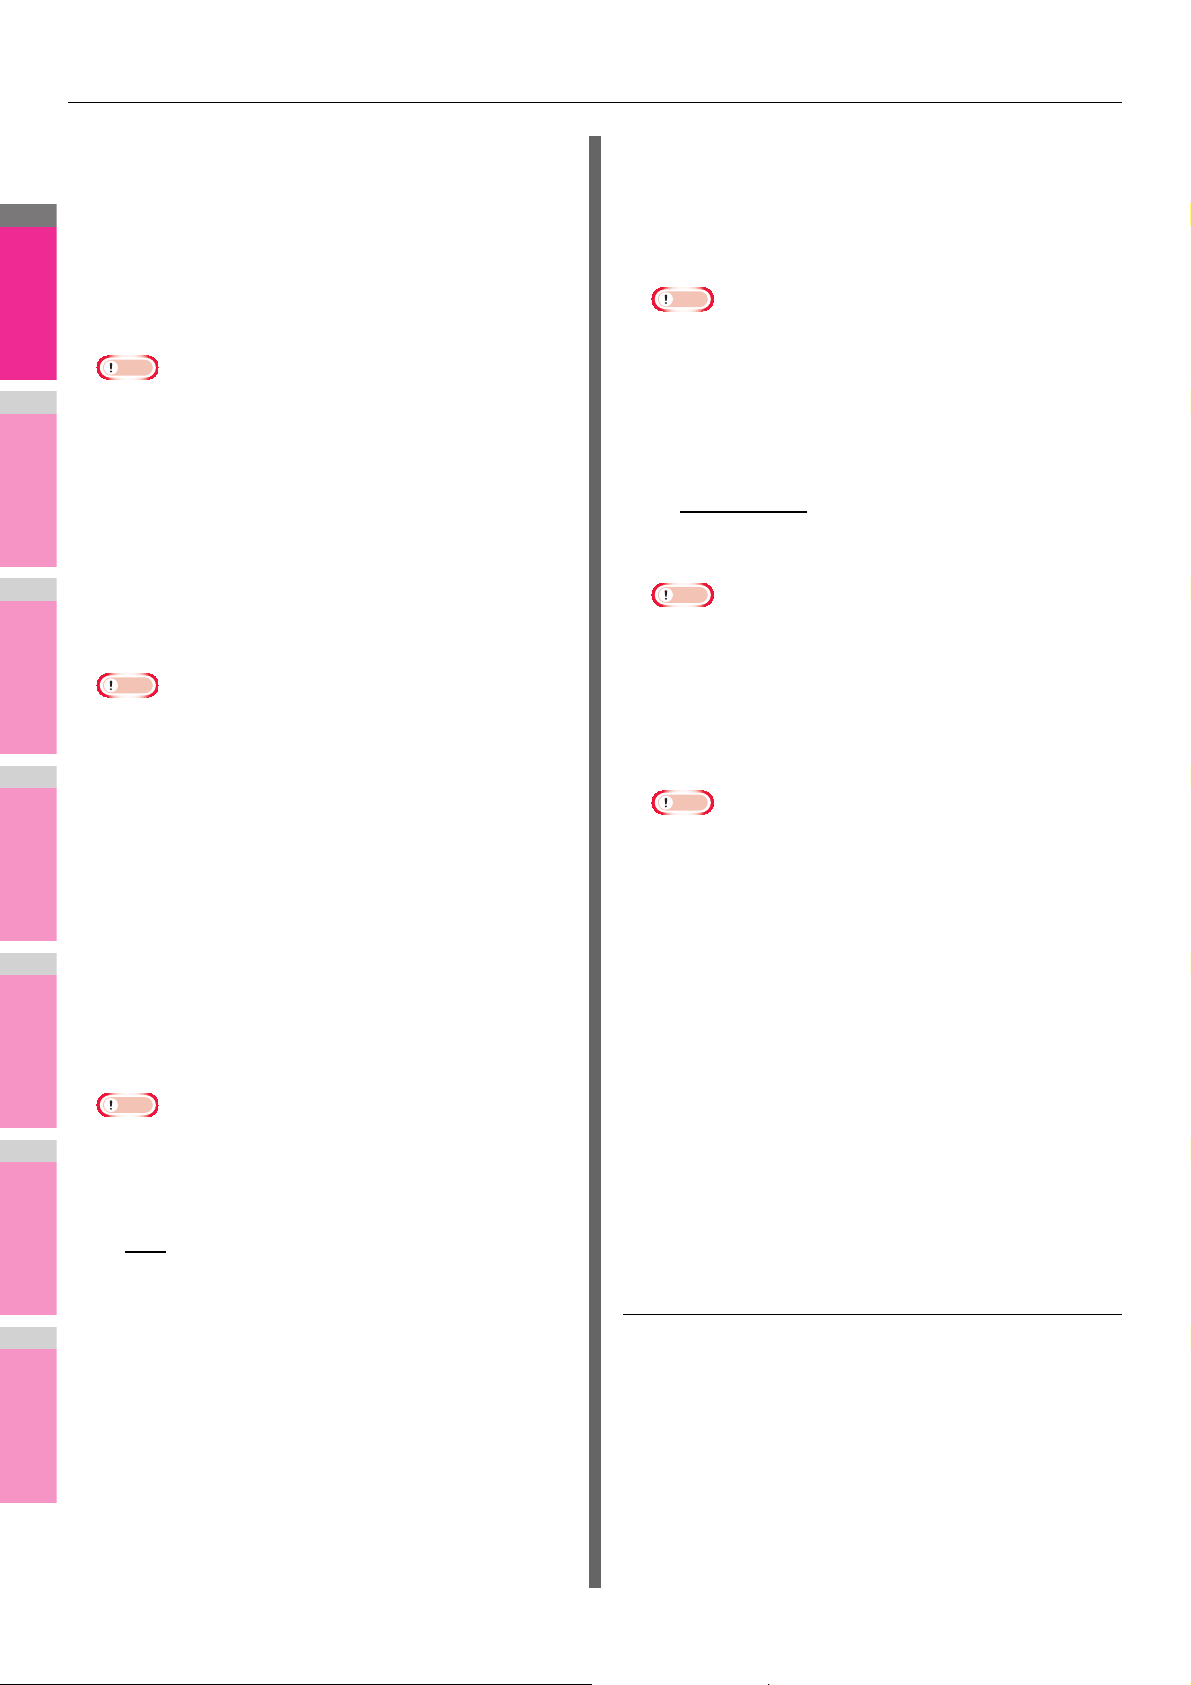
Color balance (YMCK adjustment) ......................106
RGB adjustment .................................................. 107
One-touch adjustment ......................................... 108
Background adjustment....................................... 108
Sharpness............................................................ 109
Twin color copying............................................... 109
Mono color copying..............................................112
- 2 -
Page 3

Table of contents
Hue ......................................................................112
Saturation............................................................. 113
CONFIRMING JOB STATUS .................114
Confirming Copy Job Status ............................114
Confirming jobs in progress or ones in waiting .... 114
Confirming copy job history..................................116
Confirming trays...................................................117
Confirming amount of toner remaining.................117
OTHER INFORMATION .........................118
Continuous Copying Speed .............................118
Copying Function Combination Matrix .............120
Combination matrix 1/2 ........................................120
Combination matrix 2/2 ........................................121
Image Adjustment Function
Combination Matrix ........................................122
Combination matrix 1/2 ........................................122
Combination matrix 2/2 ........................................123
3 FAX Operations .......................... 124
ADVANCED FUNCTIONS......................125
Transmitting 2-Sided Originals.........................125
Priority Transmission .......................................125
Polling Communication ....................................126
Polling transmission.............................................126
Polling reception ..................................................126
Mailbox Transmission ......................................127
Registering/printing/deleting an original...............127
Sending/retrieving an original ..............................129
Creating/modifying/deleting a mailbox.................131
Chain Dial Communication ..............................133
Delayed Transmission Reservation .................133
Recovery Transmission ...................................134
Onramp Gateway .............................................135
Offramp Gateway .............................................136
Save as File .....................................................137
Printing SECURE RECEIVE fax jobs...............138
PRINTING LISTS AND REPORTS ........139
Printing Lists & Reports Manually ....................139
Journal (transmission journal/reception journal)...139
Reservation list ....................................................139
Mailbox/relay box report.......................................140
Printing Lists & Reports Automatically .............140
Lists/Reports Samples .....................................141
Transmission journal............................................141
Reception journal.................................................142
Reservation list ....................................................142
Mailbox/relay box report.......................................143
Memory transmission report ................................ 144
Transmission report............................................. 145
Multi transmission report......................................145
Multi polling report ............................................... 146
Relay TX orig. terminal report..............................146
Relay TX relay station report ...............................147
Relay TX end terminal report...............................147
Relay station report..............................................148
Mailbox reception report ...................................... 148
SETTING ITEMS ....................................149
User Settings ...................................................149
Fax settings ......................................................... 149
Administrator Settings ......................................151
Registering the terminal ID .................................. 151
Setting the initial setup.........................................154
Setting RX printing............................................... 154
Setting recovery transmission.............................. 155
SECURE RECEIVE ............................................. 155
INITIALIZE FAX ...............................................157
Setting the country/region of FAX........................ 157
Initializing FAX settings individually..................... 158
SENDING A N/W FAX............................159
Basic Procedure...............................................159
Specifying Recipients.......................................161
Entering recipients from the keyboard................. 161
Selecting recipients from the address book......... 162
Selecting recipients from the address book (Search
option)................................................................ 163
Removing recipients ............................................ 165
SETTING N/W-Fax DRIVER ..................166
How To Setup ..................................................166
Setting Initial Values of the
N/W-Fax driver options......................................166
Setting print options for each print job ................. 166
Setting up the N/W-Fax Driver Options............166
Setting up the [Layout] tab................................... 166
Setting up the [Send] tab ..................................... 167
Setting up the Cover Sheet.................................. 168
Setting up the SNMP ........................................... 169
Setting up the [Device Settings] tab..................... 170
Setting up LDAP servers ..................................... 171
Sending With Extended Fax Functionality .......171
Saving a fax as a file............................................171
Delayed transmission .......................................... 172
Sending with a cover sheet..................................172
APPENDIX .............................................176
Cover Sheet Samples ......................................176
Standard cover page ........................................... 176
- 3 -
Page 4

Table of contents
Business cover page............................................177
Professional cover page ......................................178
4 Scanning Operations ................. 179
USEFUL FUNCTIONS............................180
Changing Scan Settings ..................................180
Specifying color mode..........................................180
Specifying resolution............................................180
Selecting original mode........................................181
Changing orientation............................................ 181
Scanning 2-sided originals...................................181
Specifying original size ........................................182
Changing compression ratio................................182
Removing blank pages ........................................182
Erasing black frames around images...................183
Adjusting exposure ..............................................183
Adjusting contrast ................................................183
Adjusting background density..............................184
Adjusting sharpness.............................................184
Adjusting color balance........................................184
Previewing Scans ............................................184
Specifying E-mail Addresses ...........................185
Scanning With Dual
Functions (Dual Agents).. ..............................192
Encrypting PDF Files .......................................194
OTHER SCANNING METHODS ............196
Scanning Images
Using the Remote Scan Driver ......................196
Scanning Images Using the WIA Driver...........196
INTERNET FAX......................................197
Precautions for Internet Fax Transmissions ....197
Viewing Touch Panel for Fax Menu .................197
Sending Internet Faxes ....................................198
Sending Internet faxes.........................................198
Saving sent data as a file (Internet fax and file)... 200
Setting advanced functions..................................202
Receiving Internet Faxes .................................204
Available file formats............................................204
Receiving Internet faxes ......................................204
Viewing the Internet Fax Job
Status and Log.. .............................................204
Viewing the Internet fax job status.......................205
Viewing the send log for Internet fax jobs............205
Viewing the receive log for Internet fax jobs ........ 206
Saving contact information to the address book .. 206
5 Registering Functions ............... 207
TEMPLATES..........................................208
Templates ........................................................208
Displaying template menu ................................... 208
Using “Useful Templates” ....................................209
Registering Templates .....................................210
Registering templates
into the public template group ........................... 210
Creating a new private group............................... 211
Registering templates into a private group .......... 212
Recalling Templates ........................................213
Changing Data .................................................214
Changing private group data ............................... 214
Changing template data....................................... 215
Deleting Groups or Templates .........................216
Deleting private groups........................................ 216
Deleting templates............................................... 216
USING TEMPLATES..............................218
Registering Scan Templates ............................218
Using Scan Templates .....................................221
6 Setting Items/Printing................. 228
SETTING ITEMS (USER).......................229
Accessing the User Menu ................................229
GENERAL ........................................................230
Changing the display language ........................... 230
Setting the reversed display ................................ 230
Adjusting the display setting ................................ 230
Setting the calibration..........................................230
COPY...............................................................231
FAX ..................................................................232
SCAN ...............................................................233
E-FILING ..........................................................235
LIST .................................................................236
TRAY ...............................................................237
ADDRESS........................................................237
Managing contacts in address book .................... 238
Managing groups in address book.......................243
CHECK E-MAIL ...............................................249
CHANGE USER PASSWORD .........................249
SETTING ITEMS (ADMIN) .....................250
Accessing the Admin Menu .............................250
GENERAL ........................................................251
Setting the device information ............................. 252
Setting the notification ......................................... 252
Changing the administrator password and resetting
the service password......................................... 253
Setting the clock .................................................. 254
- 4 -
Page 5

Table of contents
Setting the energy saver modes ..........................255
Setting the calibration display level......................257
Setting the calibration ..........................................257
Changing the roughness of print..........................258
Setting the status message..................................258
Setting the auto clear function .............................258
Managing the option licenses ..............................258
Adding or removing display languages................260
Updating your system ..........................................262
Creating or installing clone files ...........................263
Setting the panel calibration................................. 265
Exporting logs ......................................................266
Setting job skip.....................................................266
Changing the keyboard layout .............................266
Setting Print Adjustment ......................................267
Setting the pop-up messages .............................. 268
NETWORK.......................................................268
Setting the TCP/IP protocol (IPv4).......................269
Setting the TCP/IP protocol (IPv6).......................270
Setting the IPX/SPX protocol...............................274
Setting the NetWare settings ............................... 274
Setting the SMB protocol.....................................275
Setting the AppleTalk protocol.............................276
Setting the HTTP network service .......................276
Setting the Ethernet speed ..................................277
Setting the LDAP services, filtering functions and link
down detection................................................... 277
Setting IPsec (IP security)....................................277
Checking the network ..........................................278
COPY...............................................................279
FAX ..................................................................280
Setting the discard and reduction print option for RX
print....................................................................280
FILE .................................................................281
E-MAIL .............................................................281
INTERNET FAX ...............................................282
SECURITY.......................................................283
Managing certificates...........................................283
Setting secure PDF..............................................285
Performing the integrity check .............................286
LIST/REPORT .................................................287
Setting the report .................................................287
Printing lists..........................................................289
PRINTER/e-FILING .........................................289
WIRELESS SETTING ......................................290
Setting Up the Infrastructure Mode...................... 290
Setting up the Ad Hoc Mode ................................299
Disabling Wireless Network.................................303
CHANGE USER PASSWORD.........................304
802.1X SETTINGS...........................................304
Setting IEEE 802.1X authentication..................... 305
Error messages ................................................... 306
FACTORY DEFAULT ......................................307
MANAGING COUNTERS (COUNTER
MENU) ..................................................309
TOTAL COUNTER...........................................309
PRINT OUT TOTAL COUNTER ......................310
DEPARTMENT COUNTER..............................310
DEPARTMENT MANAGEMENT......................312
Logging on as administrator ................................ 312
Printing the department code list ......................... 313
Enabling department codes ................................. 313
Registering a new department code.................... 314
Editing department codes .................................... 315
Deleting department codes..................................316
Resetting the counters for each department........ 317
Setting output limitations for all departments....... 317
Setting the No Limit Black function...................... 318
Setting the registered quota.................................318
Resetting all department counters....................... 318
Deleting all department codes ............................. 319
APPENDIX .............................................320
Setting Letters ..................................................320
On-screen keyboard ............................................320
On-screen numeric keypad.................................. 320
List Print Format...............................................321
TOTAL COUNTER LIST...................................... 321
DEPARTMENT CODE LIST................................ 322
ADDRESS BOOK INFORMATION...................... 323
GROUP NUMBER INFORMATION..................... 324
FUNCTION LIST (User).......................................325
NIC configuration page........................................ 326
FUNCTION LIST (Administrator)......................... 328
PS3 font list.......................................................... 346
PCL font list ......................................................... 347
Specifications .......................................348
Model Number .................................................348
General Specifications .....................................348
Printing Specifications ......................................348
Scanning Specifications ...................................349
Inner Finisher ...................................................349
Fax Specifications ............................................350
7 Index ............................................351
- 5 -
Page 6

1
Printing Operations
Uninstalling the Printer Drivers ·········································· P.7
PRINTING FROM WINDOWS ··············································· P.9
1
2
PRINTING FROM Macintosh·············································· P.56
MANAGING PRINT JOBS FROM THE CONTROL PANEL
··························································································· P.68
OTHER PRINTING METHODS ··········································· P.82
APPENDIX··········································································· P.84
3
4
5
6
7
Page 7
2
1
3
4
5
6
7
Uninstalling the Printer Drivers
● Uninstalling the Printer Drivers
Uninstalling Printer Drivers
For Windows
• To perform uninstallation, you must log onto Windows with
the “Administrator” account. However, even if you have
logged on with a user account other than “Administrator”,
entering an administrator password upon display of the
[User Account Control] dialog box enables you to perform
the uninstallation by temporarily changing the user account.
• Even when you have logged on Windows with the
“Administrator” account, the [User Account Control] dialog
box may appear. In this case, click a button for allowing the
operation, such as [Continue], and then continue.
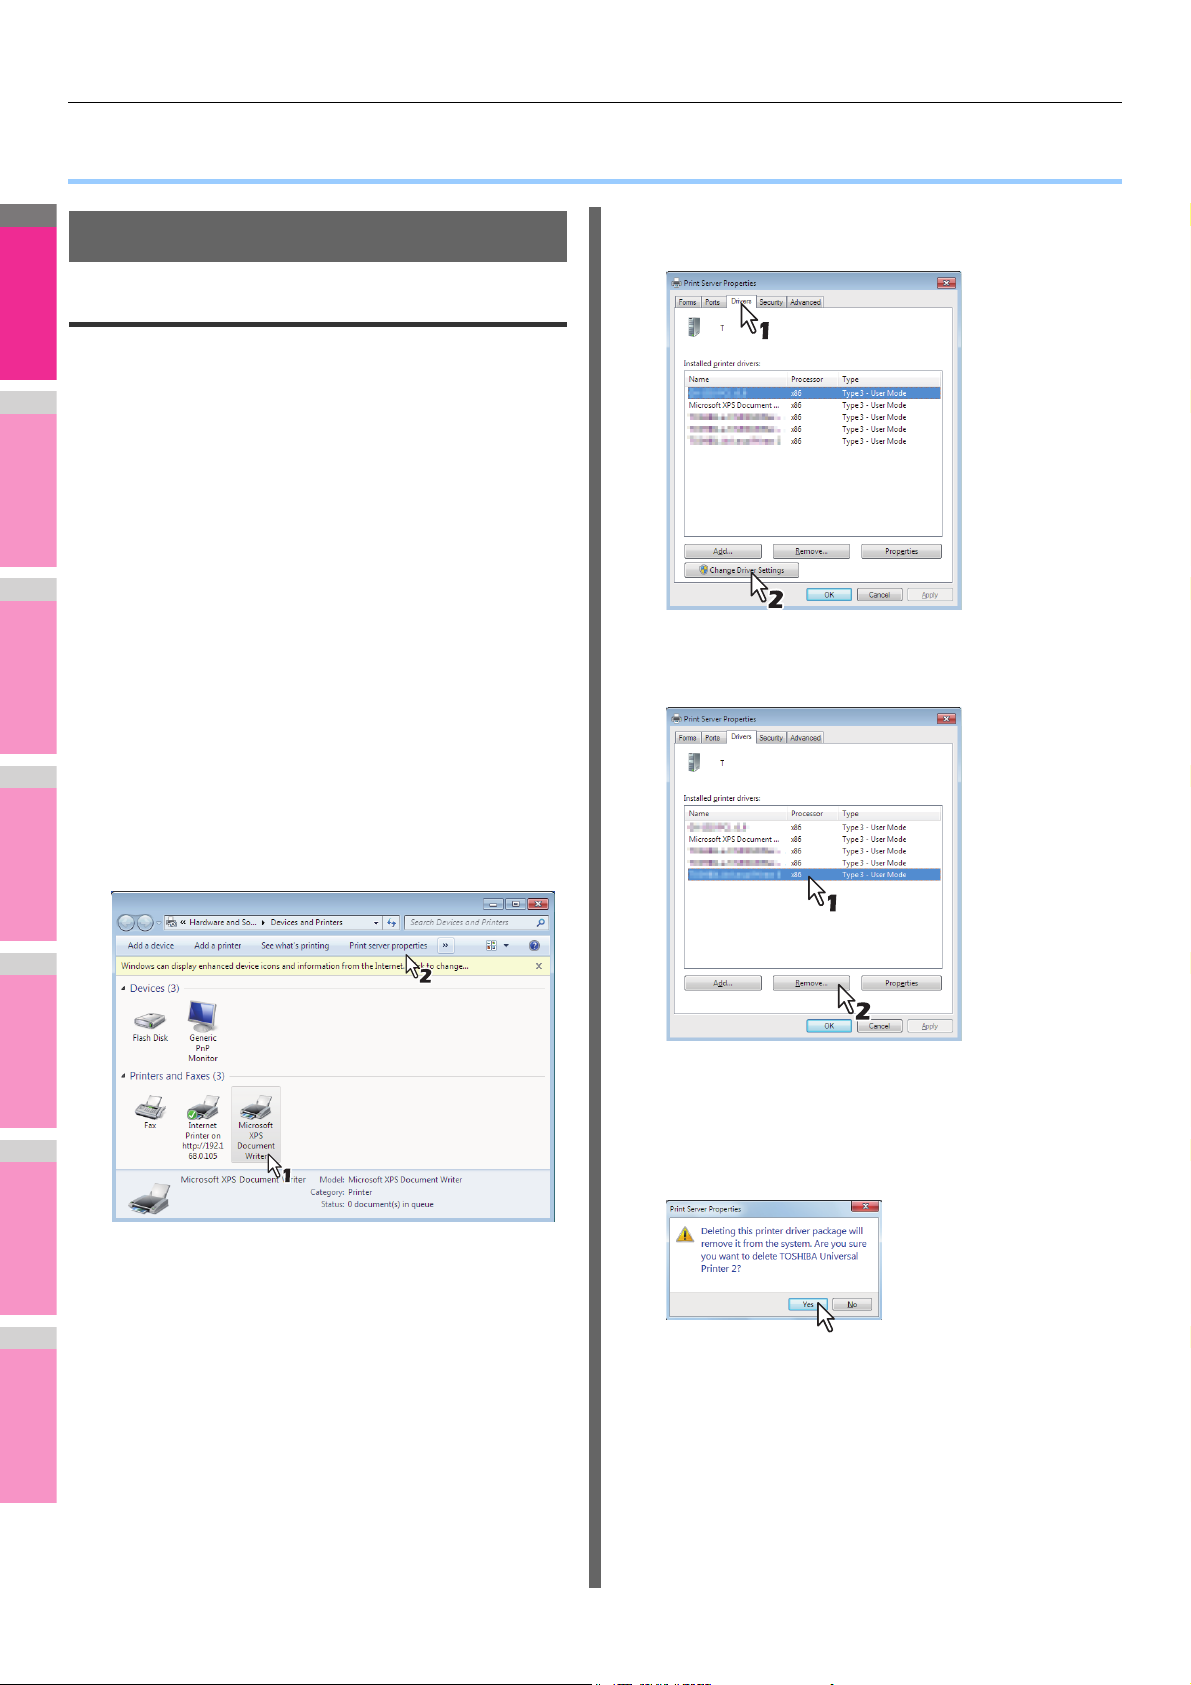
Display the [Drivers] tab and click [Change
4
Driver Settings].
Click [Start] and click [Devices and
1
Printers] to open the [Devices and Printers]
folder.
Right click on the machine to be deleted
2
and select [Remove device] from the menu
displayed.
When the confirmation dialog box for deletion is
displayed, click [Yes].
Select one of the remaining printer icons
3
and click [Print server properties].
Select the printer driver to be deleted and
5
click [Remove].
The [Remove Driver And Package] dialog box appears.
Select [Remove driver and driver package]
6
and click [OK].
The [Print Server Properties] dialog box appears.
The [Remove Driver And Package] dialog box appears.
- 7 -
Page 8
2
1
3
4
5
6
7
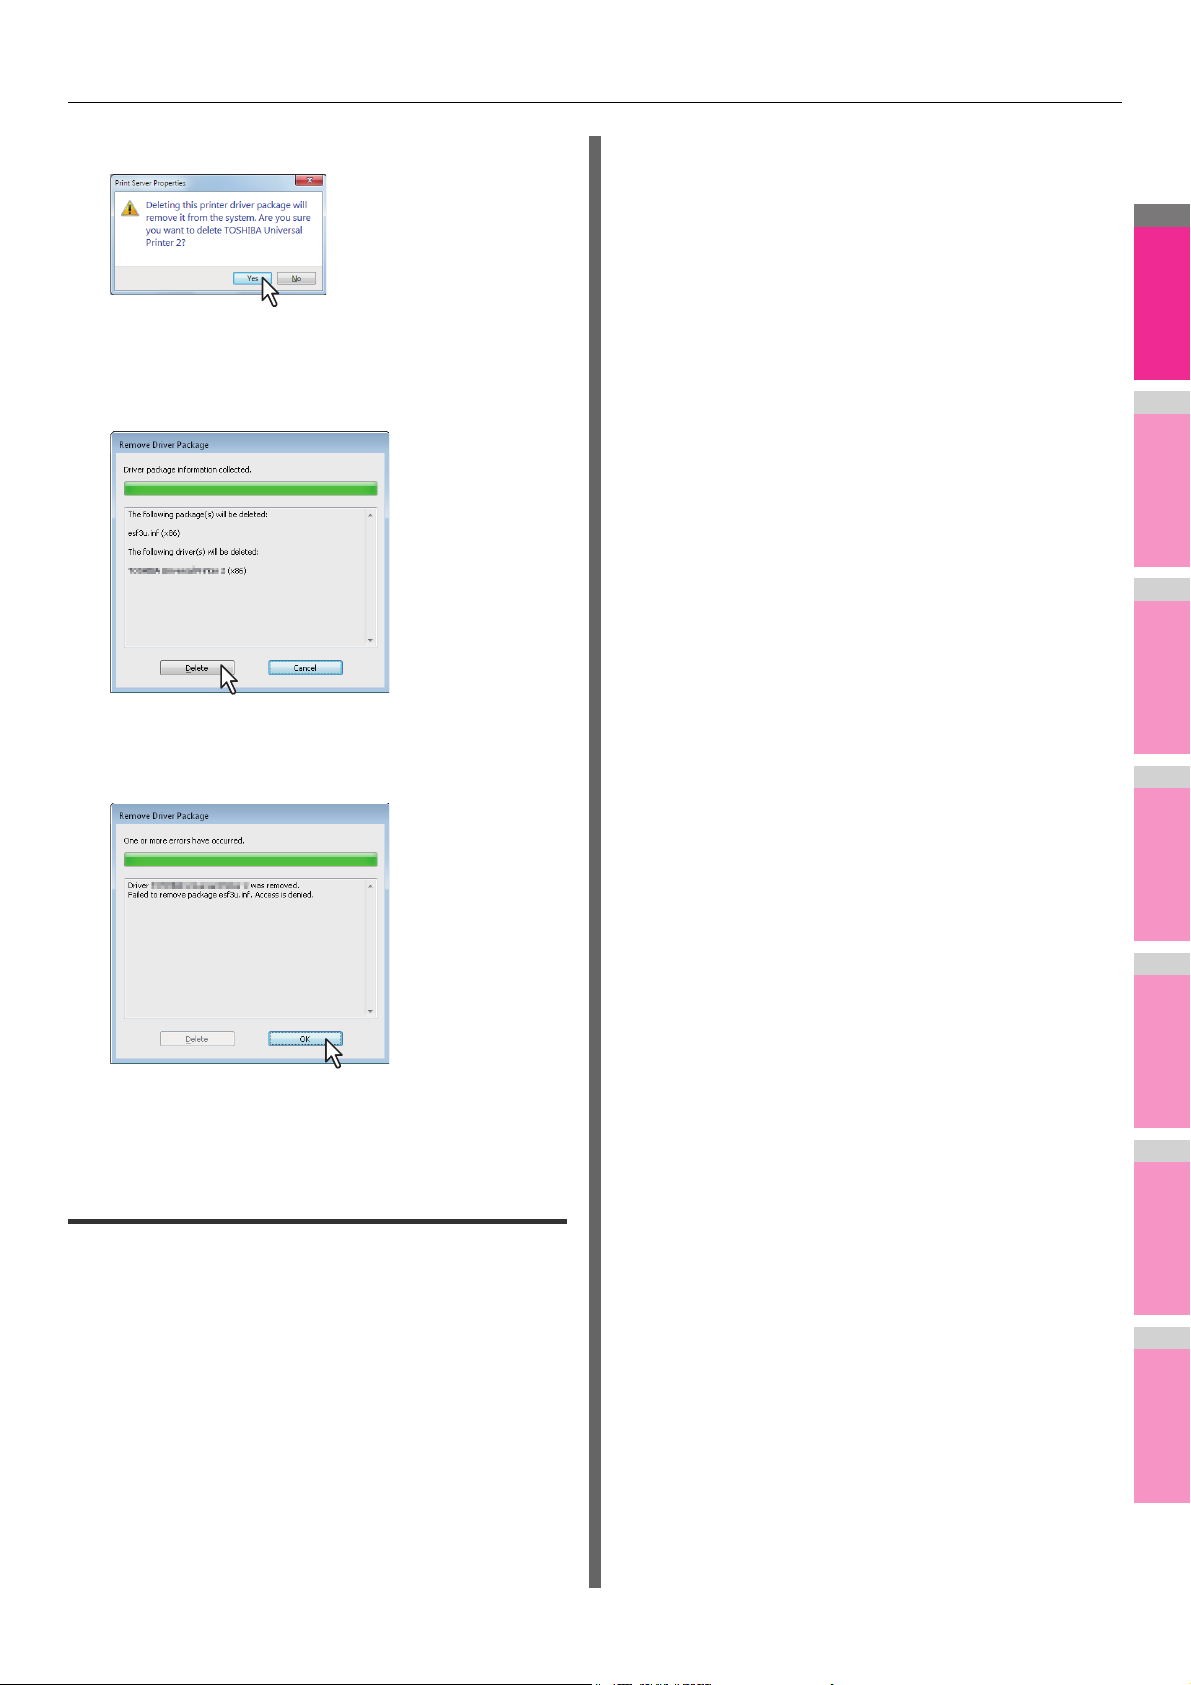
Click [Yes].
7
The “Driver package information collected.” message is
displayed.
Uninstalling the Printer Drivers
Click [Delete].
8
The “Driver package deleted.” message is displayed.
Click [OK].
9
Close the [Print Server Properties] dialog
10
box.
For Mac OS X
In order to uninstall the Macintosh PPD file, delete the PPD file
in the following folder.
Library/Printers/PPDs/Contents/Resources/ja.lproj/
MPS4242mc_ES7480_MFP_MC780_X4.gz
Library/Printers/PPDs/Contents/Resources/ja.lproj/
MPS4242mc_ES7480_MFP_MC780_X7.gz
Library/Printers/Oki/filter
Library/Printers/Oki/Icons
Library/Printers/Oki/PDEs
Library/Receipts
- 8 -
Page 9
2
1
3
4
5
6
7
PRINTING FROM WINDOWS
Memo
Memo
● PRINTING FROM WINDOWS
Setting Up Print Options
Print Options are the attributes you set to define the way a print
job is processed. For example, the private print and proof print
options determine how the copier manages your print job.
• To find the printing instructions for your specific needs, see
the procedures in the following section.
P.37 "Printing With Best Functions for Your Needs"
Setting print options using profiles
Using profiles, you can save the print settings or apply the
saved settings to a print job.
• There are 5 factory default profiles.
- BW, Duplex, Staple & 2in1
- Color Booklet
- Duplex & Staple
- Duplex, Staple & 2in1
- Duplex, Staple & Punch
How to set up
There are several ways to set print options. How the settings
affect printing varies depending on the way you set the options.
The tabs displayed also vary depending on how you display
the printer properties.
Setting initial values of print options
Setting the print options by displaying the printer properties
from the Printers folder within the Windows Start menu will
establish the initial values of the options. For example, the
paper size setting you most commonly use, optional device
settings, user information settings, etc., are settings you will
not want to change every time you print. It is convenient to set
these options as initial values.
How to display
Click the [Start] menu and select [Devices
1
and Printers].
Select the printer driver of your equipment,
2
click the [File] menu and select [Printing
Preferences].
If the [File] menu is not displayed, press [Alt].
In order to print a document using profiles, you must first create
the saved profile.
P.9 "Saving profile"
Once you save a profile, you can apply its settings to a print
job.
P.10 "Loading profile"
You can also delete unnecessary profiles.
P.10 "Deleting profile"
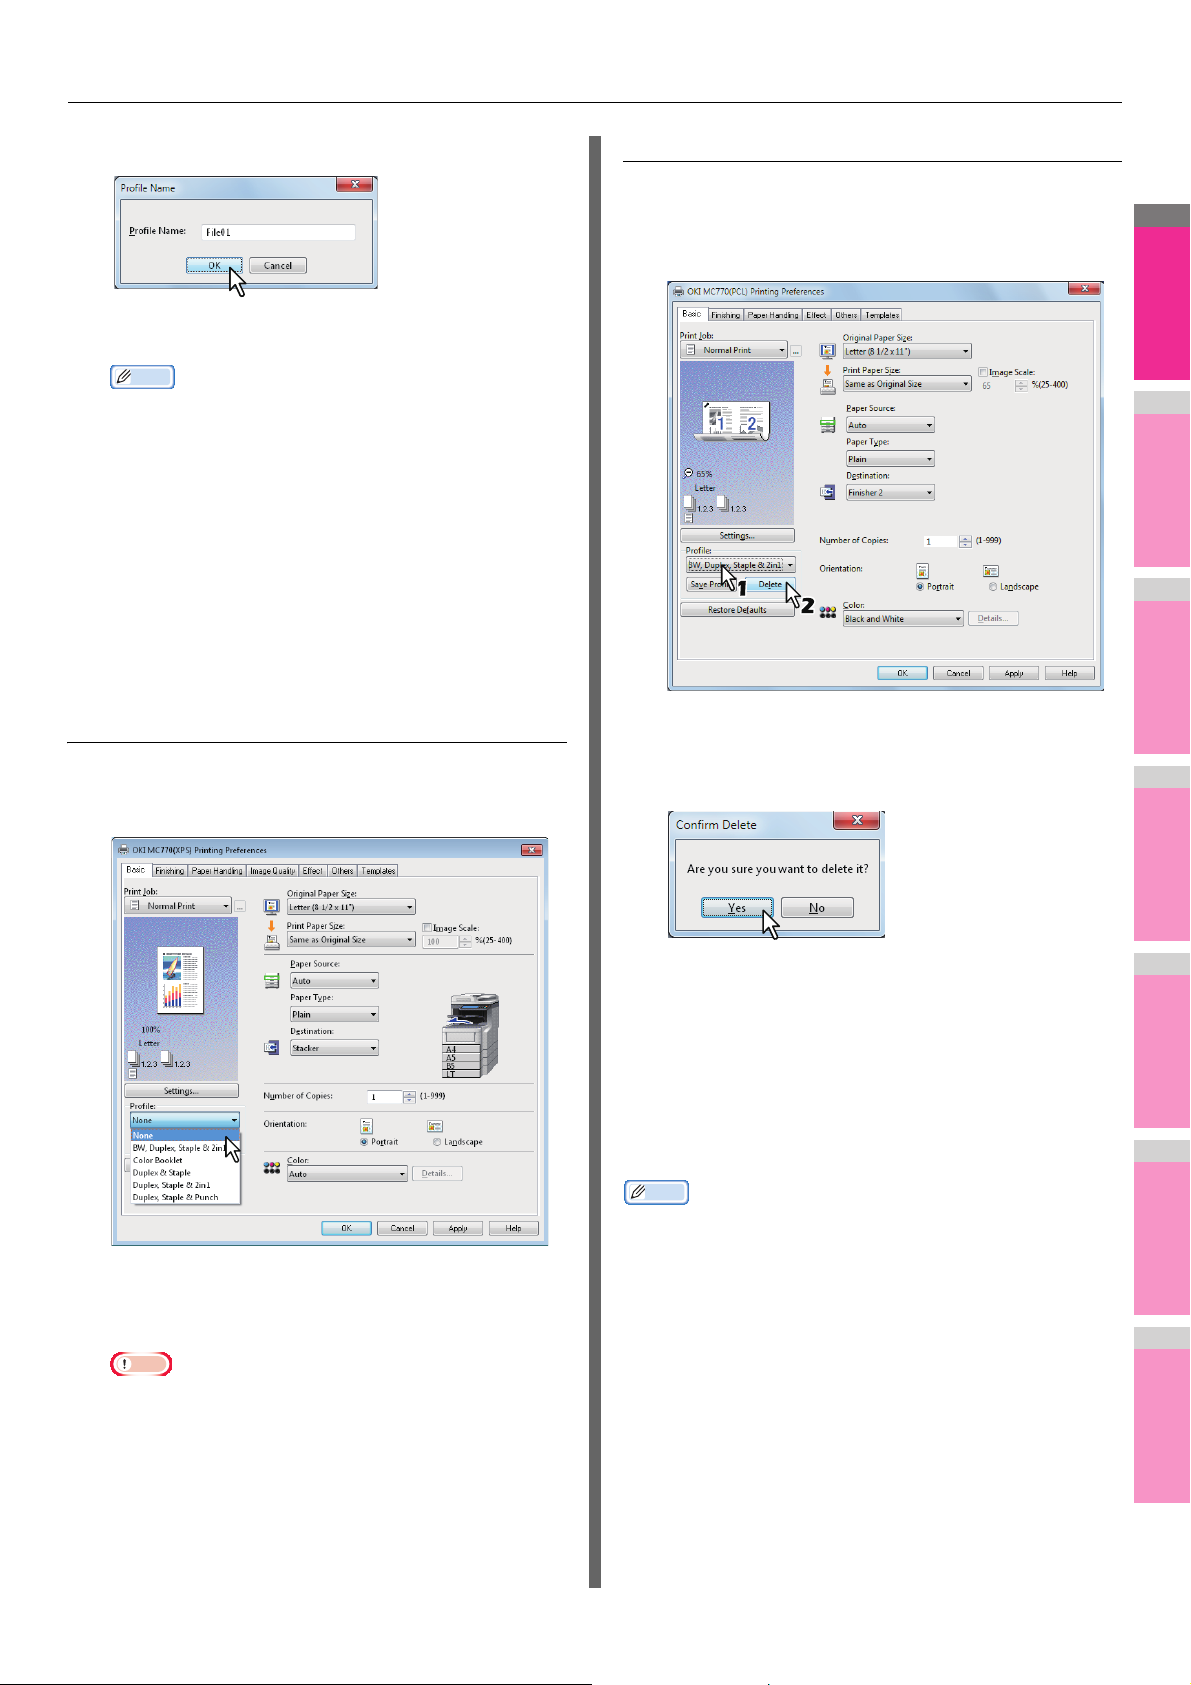
Saving profile
You can register up to 20 profiles (including 5 default profiles)
for each printer driver.
Memo
• You can delete the default profile or overwrite it by changing
its contents and saving it under the same name.
Configure the print options on each tab.
1
Setting the print options varies depending on how you
want to print a document.
P.12 "Print options"
Click [Save Profile] in the Profile group.
2
Setting print options for each print job
The print options that are set in properties dialog box, which
can be accessed from the [Print] dialog box of the application,
are only applied to the current print job, so once you close the
application, the options will be invalid.
How to display:
Click the [File] menu and select [Print] on
1
application.
Select the printer driver of the equipment to
2
be used and click [Preferences].
On some applications, click [Properties].
The [Profile Name] dialog box appears.
- 9 -
Page 10
PRINTING FROM WINDOWS
2
1
3
4
5
6
7
Memo
Enter the profile name and click [OK].
3
The file name must be up to 63 characters long.
• If you enter an existing profile name, you are prompted
to confirm whether you want to overwrite it. If you want,
click [OK].
• If you try to save more than 20 profiles, a dialog box
notifying you that no more can be saved appears, then
the 21st profile is saved as a temporary profile. If you
want to register this temporary profile, delete
unnecessary profiles first, and then select [Temporary
Profile] to recall this profile and click [Save Profile] to
save it.
• You cannot specify [None] for the profile name.
The profile is saved.
4
Deleting profile
Select the profile that you want to delete in
1
the [Profile] box, and click [Delete].
Loading profile
Select a profile in the [Profile] box.
1
The setting options in the profile are reflected on each
tab.
Note
The [Confirm Delete] dialog box appears.
Click [Yes] to delete the selected profile.
2
Setting up print options with Template
Buttons
Once you save a profile to a Template Button, the [Templates]
dialog box automatically appears upon printing, and you can
immediately apply the saved profile to a print job only by
selecting this Template Button.
Memo
• 5 factory default profiles are registered in a Template
Button.
- BW, Duplex, Staple & 2in1
- Color Booklet
- Duplex & Staple
- Duplex, Staple & 2in1
- Duplex, Staple & Punch
• To restore the default settings after you select the
profile, click [Restore Defaults] on each tab. Selecting
[None] on the [Profile] box will not restore them. To
restore the default settings on any tab other than the
[Device Settings] tabs, click [Restore All Defaults] on
the [Others] tab.
To use a Template Button, you must first save a profile to this
button. Also you must set a dialog box for selecting Template
Buttons to appear automatically upon printing.
- 10 -
Page 11
PRINTING FROM WINDOWS
2
1
3
4
5
6
7
Note
Memo
P.11 "Saving a profile to the Template Button"
You can apply the saved profile to a print job by selecting the
Template Button upon printing.
P.11 "Printing with profiles in a Template Button"
You can delete a Template Button if it is no longer required.
P.12 "Deleting a profile saved in a Template Button"
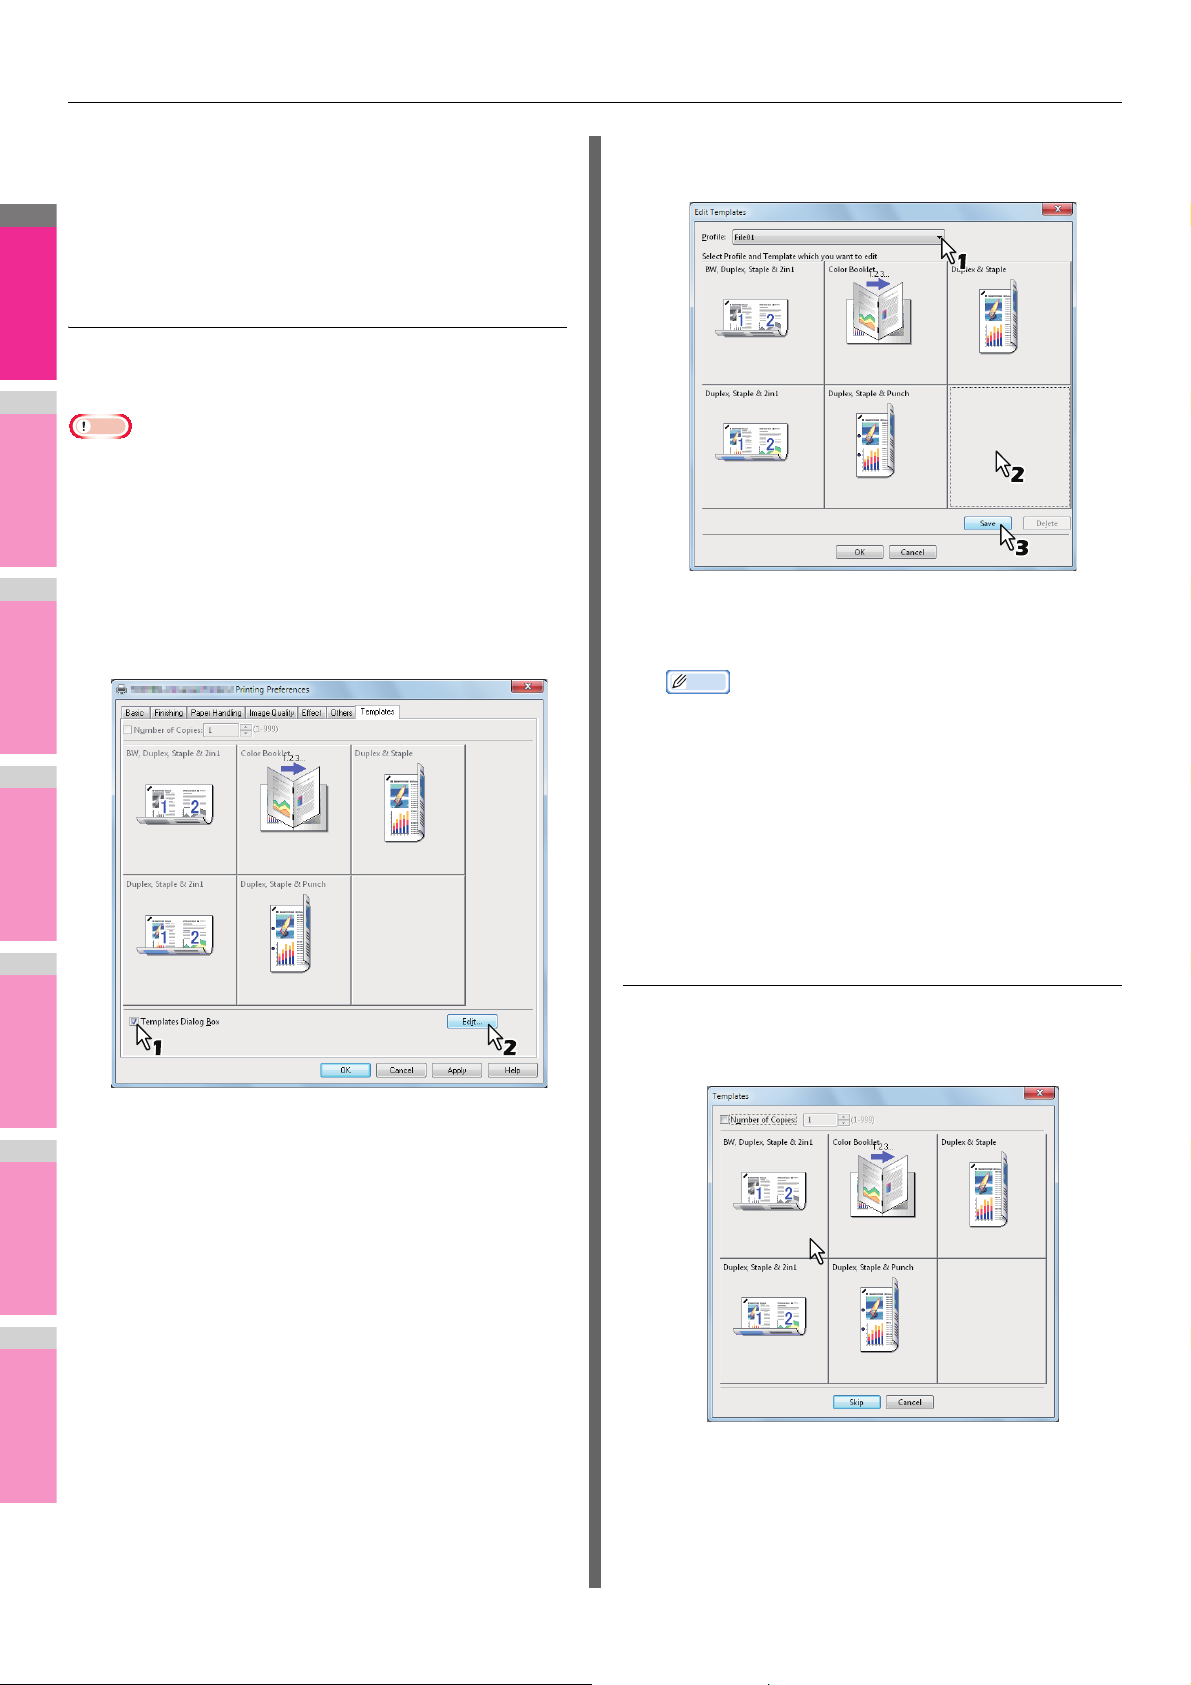
Saving a profile to the Template Button
You can create up to 6 Template Buttons, including 5 default
buttons.
• You can delete any of the default Template Buttons.
Save the desired print options as a profile.
1
P.9 "Saving profile"
Select the [Templates] tab.
2
Select the [Templates Dialog Box] check
3
box.
Select a profile to be saved in the [Profile]
5
box.
Select a Template Button to which the
6
chosen profile is saved.
• If you select a Template Button that is already
registered, the profile saved in this button is replaced
with a new one.
Click [Save] and then [OK].
7
The chosen profile is saved in the selected Template
Button.
Click [OK] on the [Template] tab.
8
The saved profile is registered.
The [Templates] dialog box appears automatically in
printing.
Click [Edit].
4
The [Edit Templates] dialog box appears.
Printing with profiles in a Template Button
The [Templates] dialog box appears
1
automatically when printing is started.
Select a Template Button to be applied.
2
Printing is performed with the profile saved in the selected
Template Button.
- 11 -
Page 12
2
1
3
4
5
6
7
Memo
Print options
1
3
5
7
6
4
2
8 9 10 11
PRINTING FROM WINDOWS
• To set the number of copies, select the [Number of
Copies] check box.
• To print without applying profiles, click [Skip].
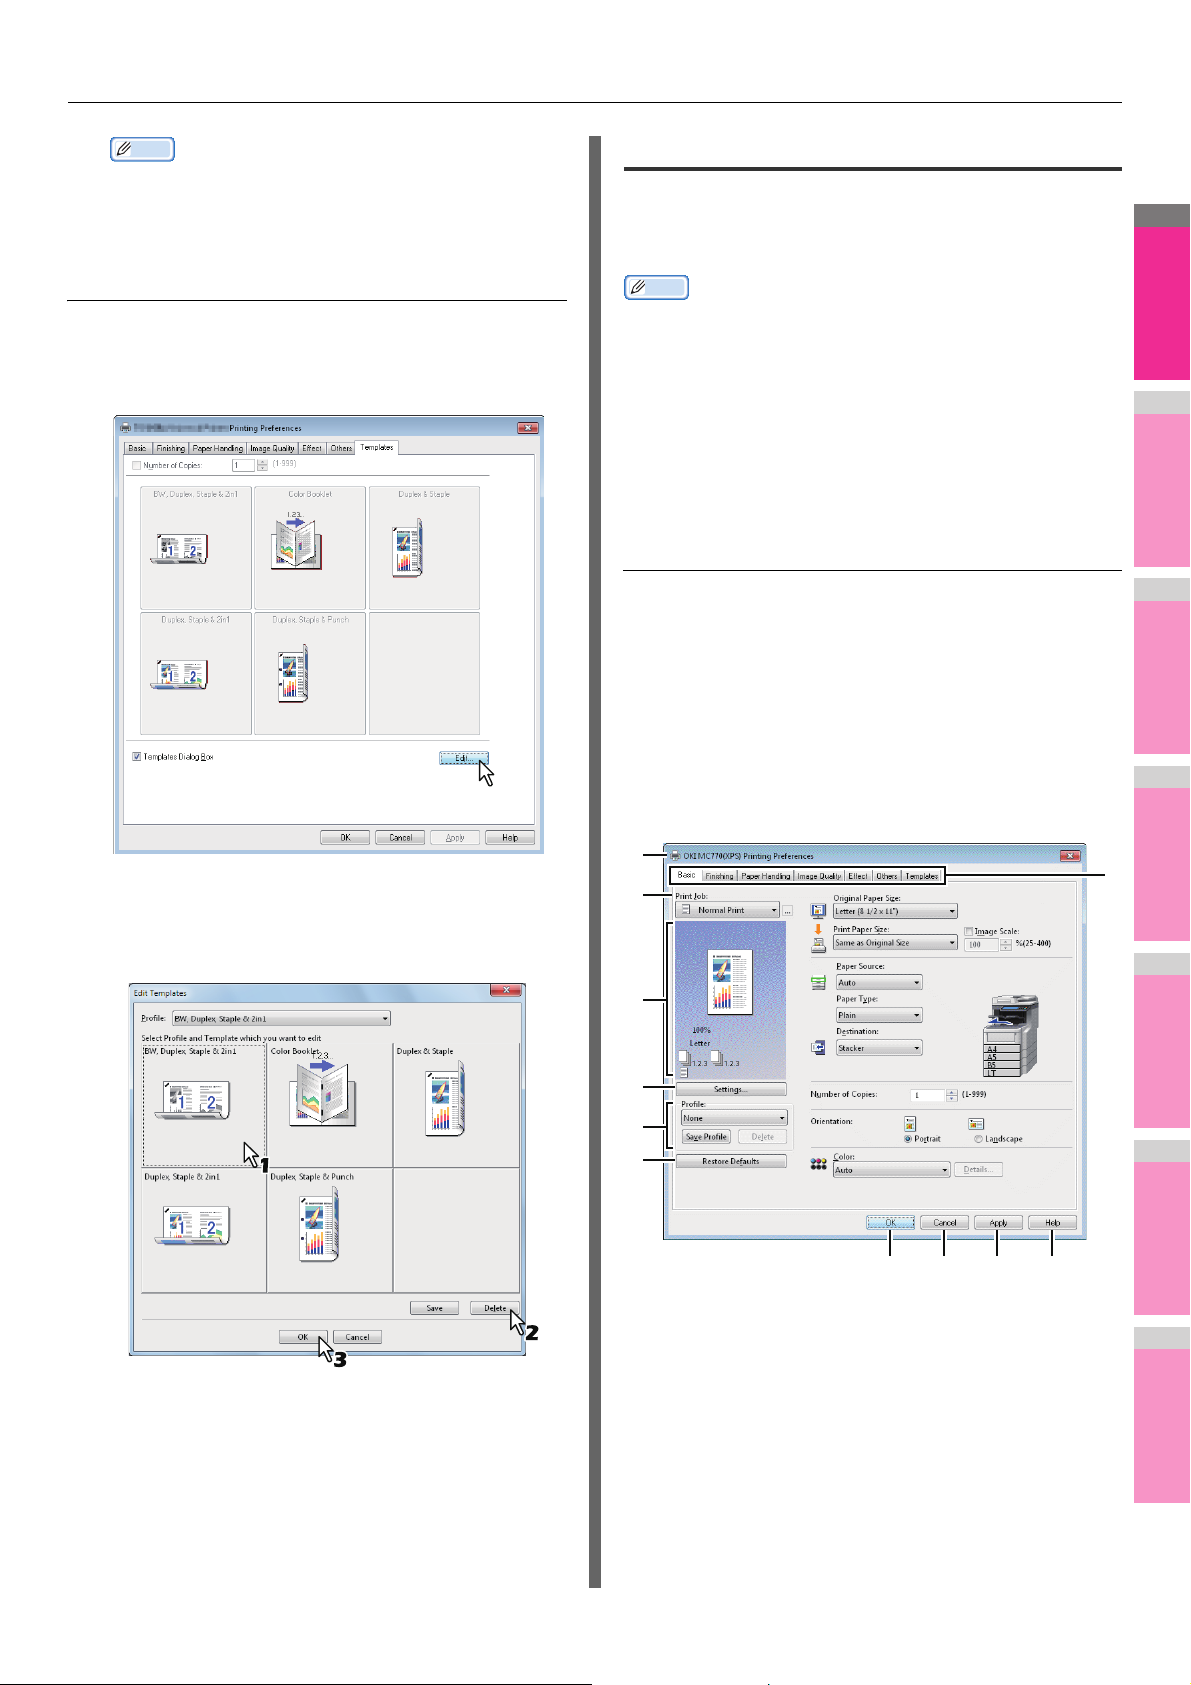
Deleting a profile saved in a Template Button
Select the [Templates] tab.
1
Click [Edit].
2
This section describes print options in each tab of the printer
driver. This section will help you to find the description of
specific print options, or understand their individual functions.
Memo
• The following tabs are the setting items which depend on
the OS. For their setting procedures and details, refer to the
Operator's Manual or the Help of the OS to be used.
- [General] tab
- [Sharing] tab
- [Ports] tab
-[Advanced] tab
- [Color Management] tab
- [Security] tab
How to display:
Click [Start] menu and select [Devices and
1
Printers].
The Printers folder appears.
Select the printer driver of this equipment,
2
and then click [File] menu and select
[Printing Preferences].
• If the [File] menu is not displayed, press [Alt].
• The printing preferences dialog box appears.
The [Edit Templates] dialog box appears.
Select a Template Button whose profile
3
needs to be deleted.
Click [Delete] and then [OK].
4
The profile in the selected Template Button is deleted.
The Template Button is left blank.
1) Printer Name
Displays the name given to the printer driver when it
was installed, or the name it displays on the icon in
the Printer folder.
- 12 -
Page 13
PRINTING FROM WINDOWS
2
1
3
4
5
6
7
Note
2) Menu Tabs
The menu items of the printer driver are displayed as
tabs. Clicking on a tab will display the contents of the
selected tab. The tabs displayed vary depending on
the way the print properties are displayed.
-[Basic] tab
The [Basic] tab contains basic print operation
settings, such as original paper size, print paper
size, paper source, paper type, destination, number
of copies, orientation, and so on.
P.15 "[Basic] tab"
- [Finishing] tab
The [Finishing] tab allows you to enable sort
printing, 2-sided printing, N-up printing, stapling .
P.17 "[Finishing] tab"
- [Paper Handling] tab
The [Paper Handling] tab contains Cover page
printing.
P.19 "[Paper Handling] tab"
- [Image Quality] tab
The [Image Quality] tab allows you to select how
images are printed. You can easily select
appropriate image quality depending on the type of
job being printed.
P.21 "[Image Quality] tab"
- [Effect] tab
The [Effect] tab contains print options that add the
effects to your print jobs such as Watermarks,
Overlay Image printing and so on.
P.25 "[Effect] tab"
-[Others] tab
The [Others] tab contains special features such as
toner save, custom pager size, and so on.
P.28 "[Others] tab"
- [Templates] tab
The [Templates] tab allows you to register print
options frequently used as a template, or recall the
registered print options.
P.35 "[Templates] tab"
- [Device Settings] tab
The [Device Settings] tab allows you to configure
the options. When any optional unit is installed in
this equipment, set the configuration of the
machine on this tab. This tab is only displayed
when the printer properties are accessed from the
Printers folder.
P.32 "[Device Settings] tab"
3) Print Job
This sets the type of print job.
- Normal Print
Select this to print a job normally.
- Scheduled Print
Select this to print a job on a specified date and
time.
When this is selected, click the [...] on the right of
the [Print Job] box to set the date and time to print a
job.
- Private Print
Select this option to print a private job. When you
select this option, enter a password using the
alphanumeric characters and symbol characters
(ASCII code characters between 0x21 to 0x7E) in
the [Password] box that is displayed after the print
settings have been made and the print job is sent.
The password must be between 1 and 63
characters.
The print job, sent as a private job, is saved in the
private job queue on this equipment, and is not
printed until you activate printing from the touch
panel display. This option is useful when you want
to print a confidential document that is secured by a
password. The user has to enter the password to
print the private job when activating printing from
the touch panel display.
- Proof Print
Select this to print the first copy of a multicopy job
and then wait for approval before printing the
remaining copies. If a print job is sent as a proof
job, one copy of the job is printed and the remaining
copies are saved in the proof job queue on this
equipment, which are not printed until you activate
printing from the touch panel display. This option
allows you to check a job’s output before printing
the remaining copies and thereby reduce paper
waste.
Note
• When you want to print multiple copies, each of
which is to be sent as an individual print job by
your application, all the copies, not just one
copy, will be printed even if you set Proof Print.
In such a case, print just one trial copy first, and
then specify the required number of copies on
the touch panel display.
• The [Paper Handling] tab, [Image Quality] tab,
[Effect] tab and [Templates] tab appear only
when each setting is enabled with the Plug-in
feature.
P.34 "Customization: [Plug-in] tab"
- Hold Print
The print job, sent as a hold job, is saved in the
hold job queue on this equipment. To perform
printing, select the desired job on the touch panel
display and press [PRINT]. This option is useful to
prevent you from forgetting to remove printed
sheets.
- 13 -
Page 14
PRINTING FROM WINDOWS
2
1
3
4
5
6
7
Memo
- Print to Overlay File
Select this to save the print job as an overlay file
that is imposed on other documents. When you
select this, click the button on the right and enter
the file name.
For example, if you want to print a master page
image on the background of a document, you can
create an overlay file of the master merge image
using this option. Then you can print a document
using this overlay by specifying this file as an
overlay image in the [Overlay Image] option of the
[Effect] tab.
Note
• If the print job has several pages in the
document, only its first page will be saved as an
overlay file.
• Both the overlay file and the documents on
which you superimpose the overlay image must
be created with the same size and color mode.
- Store to e-Filing
Select this to save a job to e-Filing. When this is
selected, select the box from the box after the print
setting has been finished. When the SNMP
communication is enabled, it detects the available
box numbers and Box name in the box. If not, all
box numbers are listed in the box.
If you select a user box, you may be required to
enter the appropriate password for the selected
box. The job saved to a box can be printed from the
touch panel display at a later time. It can also be
composed with other documents using the e-Filing
web utility.
You can also print a job and save it to a box by
checking on the [Print] option.
Note
• For the detailed instructions on how to print with
the [Print job] setting, see the following page:
P.37 "Printing various print job types"
4) Preview window
In the Preview window, you can preview how a
document will be printed under the current settings of
the printer driver. The image of a page to which the
set print options are applied is displayed.
5) [Settings]
The set print options and their details are displayed in
a list.
6) Profile
Print option settings can be saved on your hard disk.
You can save print option settings by clicking [Save
Profile] and easily load a setting file by selecting a
profile name in the box.
P.9 "Setting print options using profiles"
Memo
• There are 5 factory default profiles.
7) [Restore Defaults]
Click this to restore the settings to the original factory
defaults.
8) [OK]
Click this to enter the input settings and complete the
print option settings.
9) [Cancel]
Click this to cancel the input settings and exit the print
option settings.
10) [Apply]
Click this to enter the input settings without closing the
print option settings. This button is only displayed
when the printer properties are accessed from the
Printers folder. This button remains grayed out until a
setting is changed.
11) [Help]
Click this to browse Help for the printer driver.
• Documents stored in e-Filing are retained with
the best image quality for printing. If you want to
download them into your computer with a higher
image quality, scan the original documents and
store them in e-Filing.
• When you store a document in e-Filing using the
printer driver, the printing image (not the original
document in your computer) will be stored in eFiling.
- Multiple Job Type
The Multiple Job Type feature allows you to
combine any of Scheduled Print, Private Print, Hold
Print, Proof Print, Proof Private Print and Proof
Hold Print, with Store to e-Filing.
For example, you can store a job in the specified eFiling of this equipment and print it at the specified
time by combining Scheduled Print with Store to eFiling.
To use this feature, click [...] on the right of the [Print
Job] box and select the job types to be combined.
• For more information about e-Filing operations,
refer to the e-Filing Guide.
- 14 -
Page 15
PRINTING FROM WINDOWS
2
1
3
4
5
6
7
Note
Note
Memo
Memo
Memo
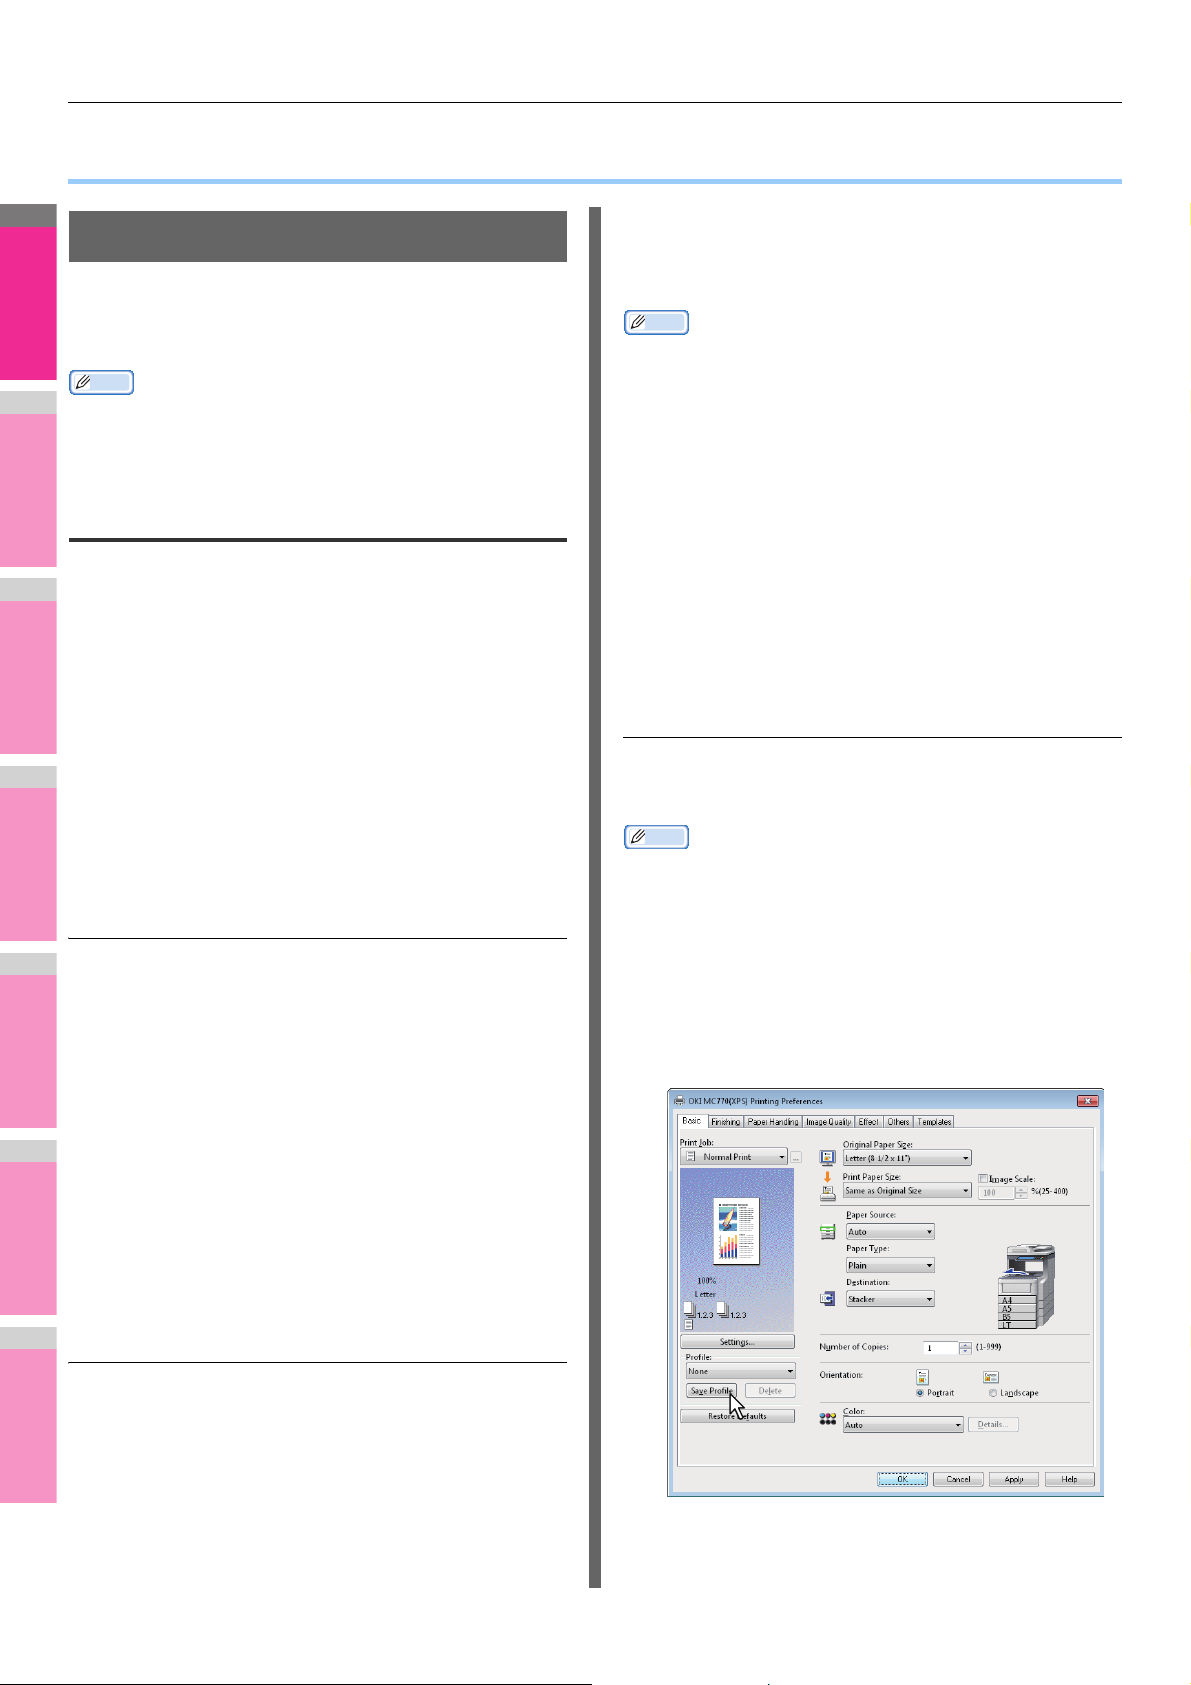
[Basic] tab
The [Basic] tab contains basic print operation settings, such as
the original paper size, print paper size, paper source, paper
type, destination, number of copies, orientation, and so on.
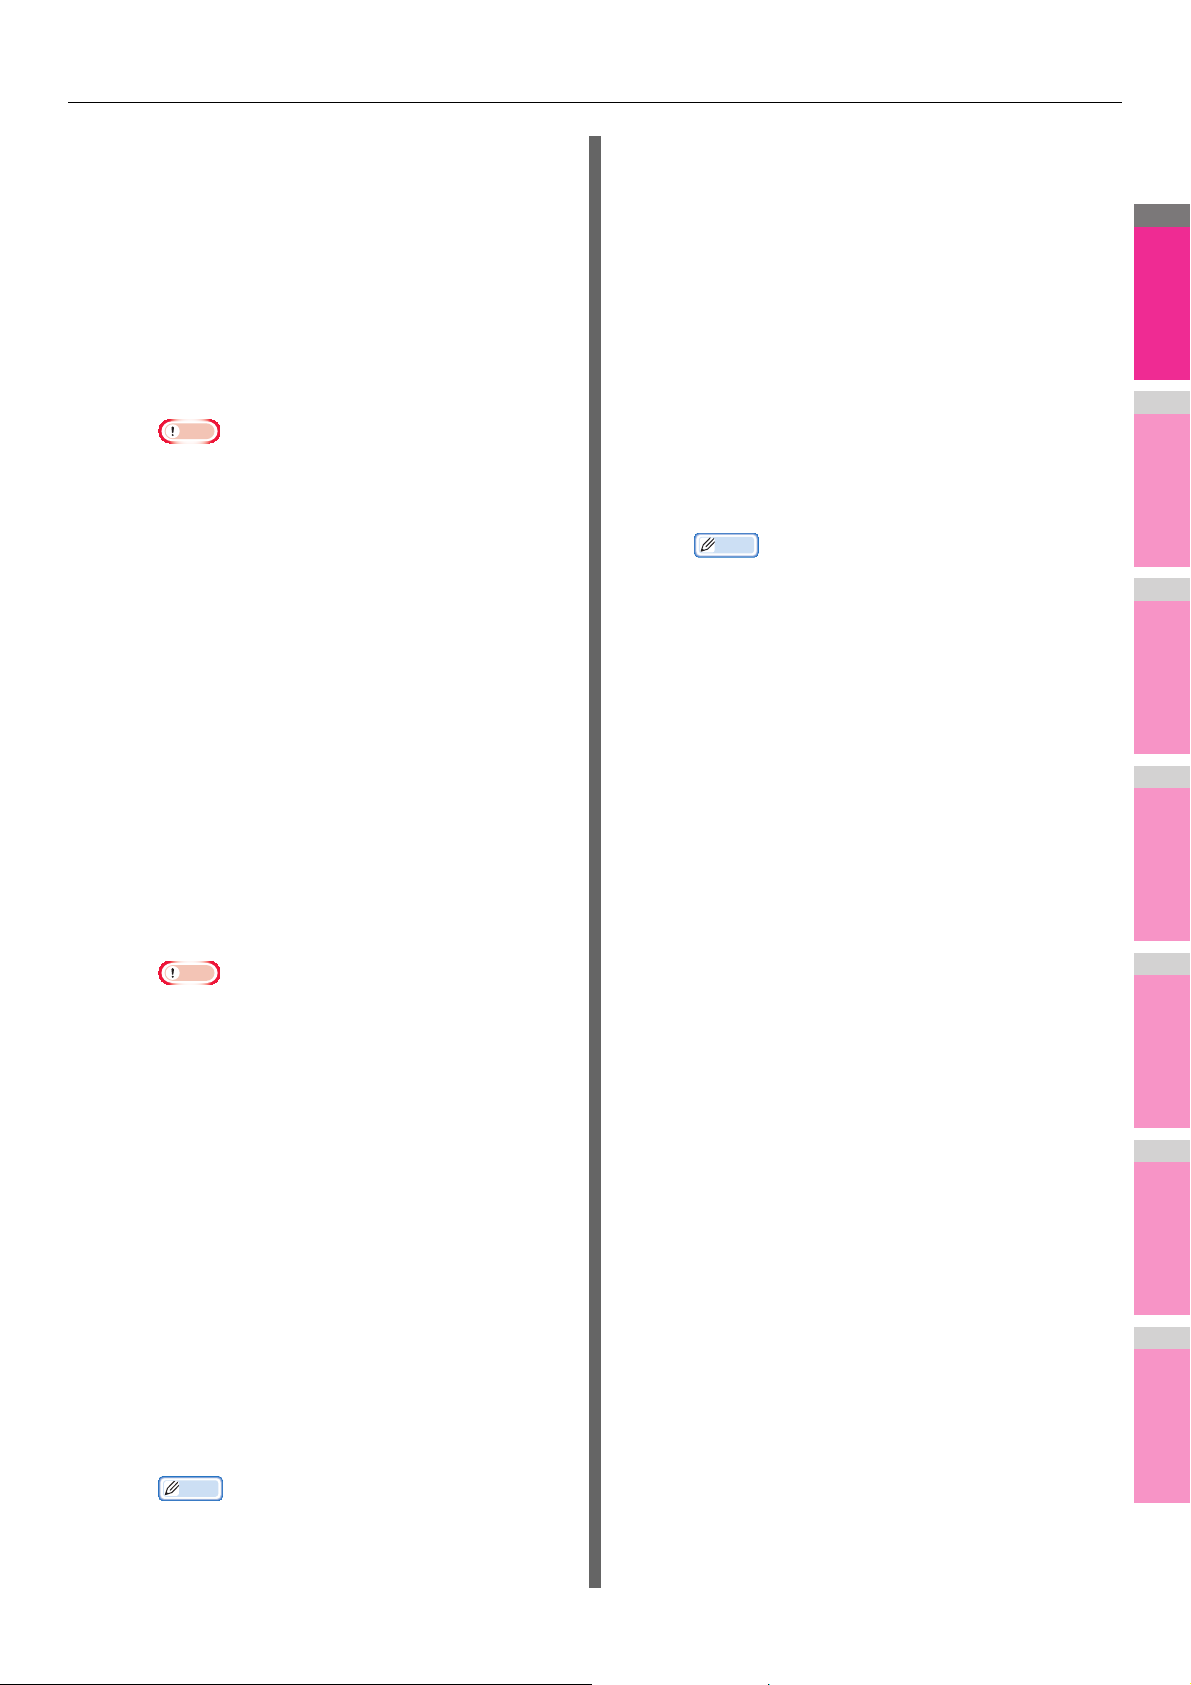
1) Original Paper Size
This selects the size of a document to be printed.
Available original paper sizes are listed below:
• A4 (210 x 297 mm)
• A5 (148 x 210 mm)
• B5 (182 x 257
• Folio (210 x 330 mm)
• A6 (105 x 148mm)
•Postcard
• Letter (8 1/2 x 11")
• Legal (8 1/2 x 14")
•Statement
(5 1/2 x 8 1/2")
• 13"LG (8 1/2 x 13")
• 8.5"SQ (8 1/2 x 8 1/2")
• 16K (195 x 270 mm)
• 13.5"LG (8 1/2 x 13.5")
• IndexCard (3 x 5")
• Executive
(7 1/4 x 10 1/2")
• Env-Com10
(4 1/8 x 9 1/2")
• Env-Com9
(3 7/8 x 8 7/8")
• Env-Monarch
(3 7/8 x 7 1/2")
• Envelope DL
(110 x 220 mm)
• Envelope Cho-3
(120 x 235 mm)
• Envelope You-4
(105 x 235 mm)
• Envelope-C5
(162 x 229mm)
• There are also 40 custom paper sizes in the [Original
Paper Size] box. You can set the custom paper sizes in
the [Others] tab.
P.28 "[Others] tab"
• The default paper size will be [Letter] or [A4] according
to the regional setting in the Windows.
2) Print Paper Size
Select this to enlarge or reduce a page image to fit exactly
in the selected paper size. If you do not wish to enable
enlarge or reduce printing, select [Same as Original Size].
• When you use the custom paper size, you need to select
manually the custom paper size in a tray in advance.
• There are also 40 custom paper sizes in the [Print Paper
Size] box. You can set the custom paper sizes in the
[Others] tab.
3) Image Scale
Select this check box to enter the scale manually to enlarge
or reduce an image. The ratio can be set at between 25
1
2
3
4
5
6
and 400%.
• For detailed instructions on how to print with the [Image
Scale] setting, see the following page:
P.43 "Fitting images within paper size"
4) Paper Source
7
8
9
This selects a paper source to print a job in the most
suitable paper size. The figure on the right indicates the
paper size set for each paper source. When you select a
paper source, the chosen one is indicated with a green
square in the figure.
• Youj can select a paper source by directly clicking on the
figure on the right.
- Auto — Automatically selects the paper set in this
equipment according to the printed document size.
- Tray 1 — Paper is fed from the 1st Tray.
- Tray 2 — Paper is fed from the 2nd Tray.
- Tray 3 — Paper is fed from the 3rd Tray.
- Tray 4 — Paper is fed from the 4th Tray.
- MPT — Paper is fed from the multi-purpose tray (MPT).
When this is selected and print a job, [JOB STATUS] on
the touch panel will blink. Press [JOB STATUS] and
check the paper size of the job. Then set the paper and
press the [START] button to print a job.
Note
• The selectable values vary depending on the optional
devices installed in this equipment and their
configuration on the [Device Settings] tab.
• When paper such as special that needs to be fed from
the multi-purpose tray is set, [MPT] may be
automatically selected in the [Paper Source] box, and
then a confirmation dialog box may appear.
• When the paper size settings on the [Device Settings]
tab differ from those in the equipment, the paper source
setting is ignored and the equipment may prompt to set
the paper in the multi-purpose tray.
5) Paper Type
This sets the media type of the paper.
- Plain (Thin) — Select this when printing on plain thin
paper.
- Plain — Select this when printing on plain paper.
- Thick1 — Select this when printing on thick 1 paper.
- Thick2 — Select this when printing on thick 2 paper.
- Thick3 — Select this when printing on thick 3 paper.
- Thick4 — Select this when printing on thick 4 paper.
- Thick5 — Select this when printing on thick 5 paper.
- Special 1 — Select this when printing on special 1
paper.
- 15 -
Page 16

PRINTING FROM WINDOWS
2
1
3
4
5
6
7
Memo
Memo
Memo
- Special 2 — Select this when printing on special 2
paper.
- Special 3 — Select this when printing on special 3
paper.
- Special 4 — Select this when printing on special 4
paper.
- Special 5 — Select this when printing on special 5
paper.
- Special 6 — Select this when printing on special 6
paper.
- Envelope 1 — Select this when printing on envelope 1.
- Envelope 2 — Select this when printing on envelope 2.
- Envelope 3 — Select this when printing on envelope 3.
- Envelope 4 — Select this when printing on envelope 4.
- USER TYPE 1 — Select this when printing on user type
1 paper.
- USER TYPE 2 — Select this when printing on user type
9) Color
This sets whether a print job is printed in the color or black
mode.
- Auto
— Select this to determine the color mode
automatically. When a print job is a black and white
document, the system automatically prints the
document in the black mode. When a print job is a color
document, it prints the document in the color mode.
- Color — Select this to print a document in the color
mode.
- Black and White — Select this to print a document in
the black mode.
- Twin Color — Select this to print a document in the
twin color mode. When this is selected, click [Details] to
specify the color that the non-black part of document
will be printed in. You can select either [Red], [Green],
[Blue], [Cyan], [Magenta], [Yellow], or [White].
2 paper.
- USER TYPE 3 — Select this when printing on user type
3 paper.
- USER TYPE 4 — Select this when printing on user type
4 paper.
- USER TYPE 5 — Select this when printing on user type
5 paper.
• For instructions on how to print color images with the
[Black and White] or [Twin Color] setting, see the
following pages:
P.44 "Printing color documents in gray scale"
P.45 "Printing color documents in twin colors"
Note
6) Destination
• When [Envelope] is selected at the [Print Paper Size]
box, only [Envelope 1], [Envelope 2], [Envelope 3], and
[Envelope 4] will be displayed and you cannot select
other paper types.
• For more information about the paper types that are
available for this equipment, refer to the Setup Guide.
This selects the tray to which the print job is made to exit.
The figure on the right indicates the destination currently
set with an arrow.
- Stacker — Select this to have paper exit to the face
down/up stacker.
- Finisher — Select this to route the output to the tray of
the Finisher.
Note
• The selectable items differ depending on the option
configuration.
• You can select the tray by directly clicking on the figure
on the right.
7) Number of Copies
This sets the number of printed copies. This can be set at
between 1 and 999.
8) Orientation
This sets the paper printing direction.
- Portrait
direction.
- Landscape — The document is printed in the
landscape direction.
— The document is printed in the portrait
- 16 -
Page 17
PRINTING FROM WINDOWS
2
1
3
4
5
6
7
Note
Memo
Memo
1
2
3
4
6
5
Portrait Landscape
1
2
1
2
Portrait Landscape
1
2
2
1
[Finishing] tab
The [Finishing] tab allows you to enable sort printing, 2-sided
printing, N-up printing, poster printing, stapling.
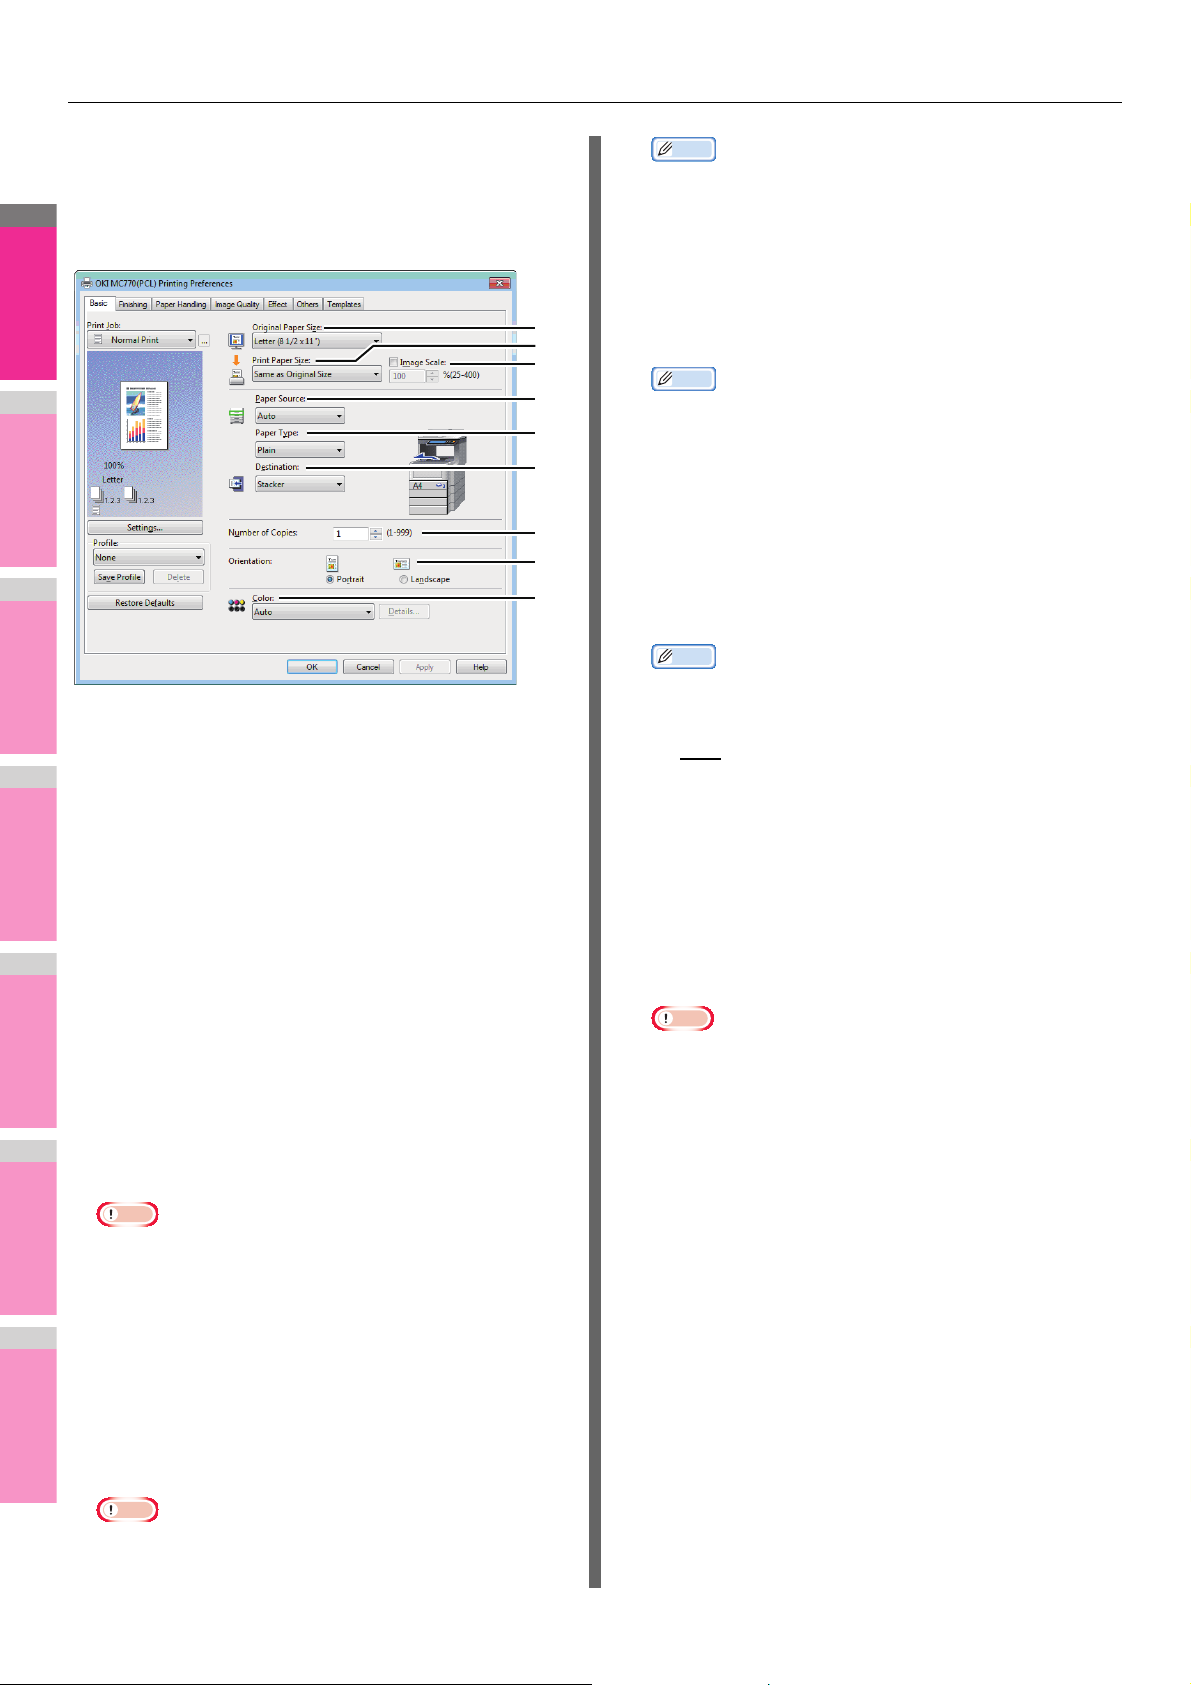
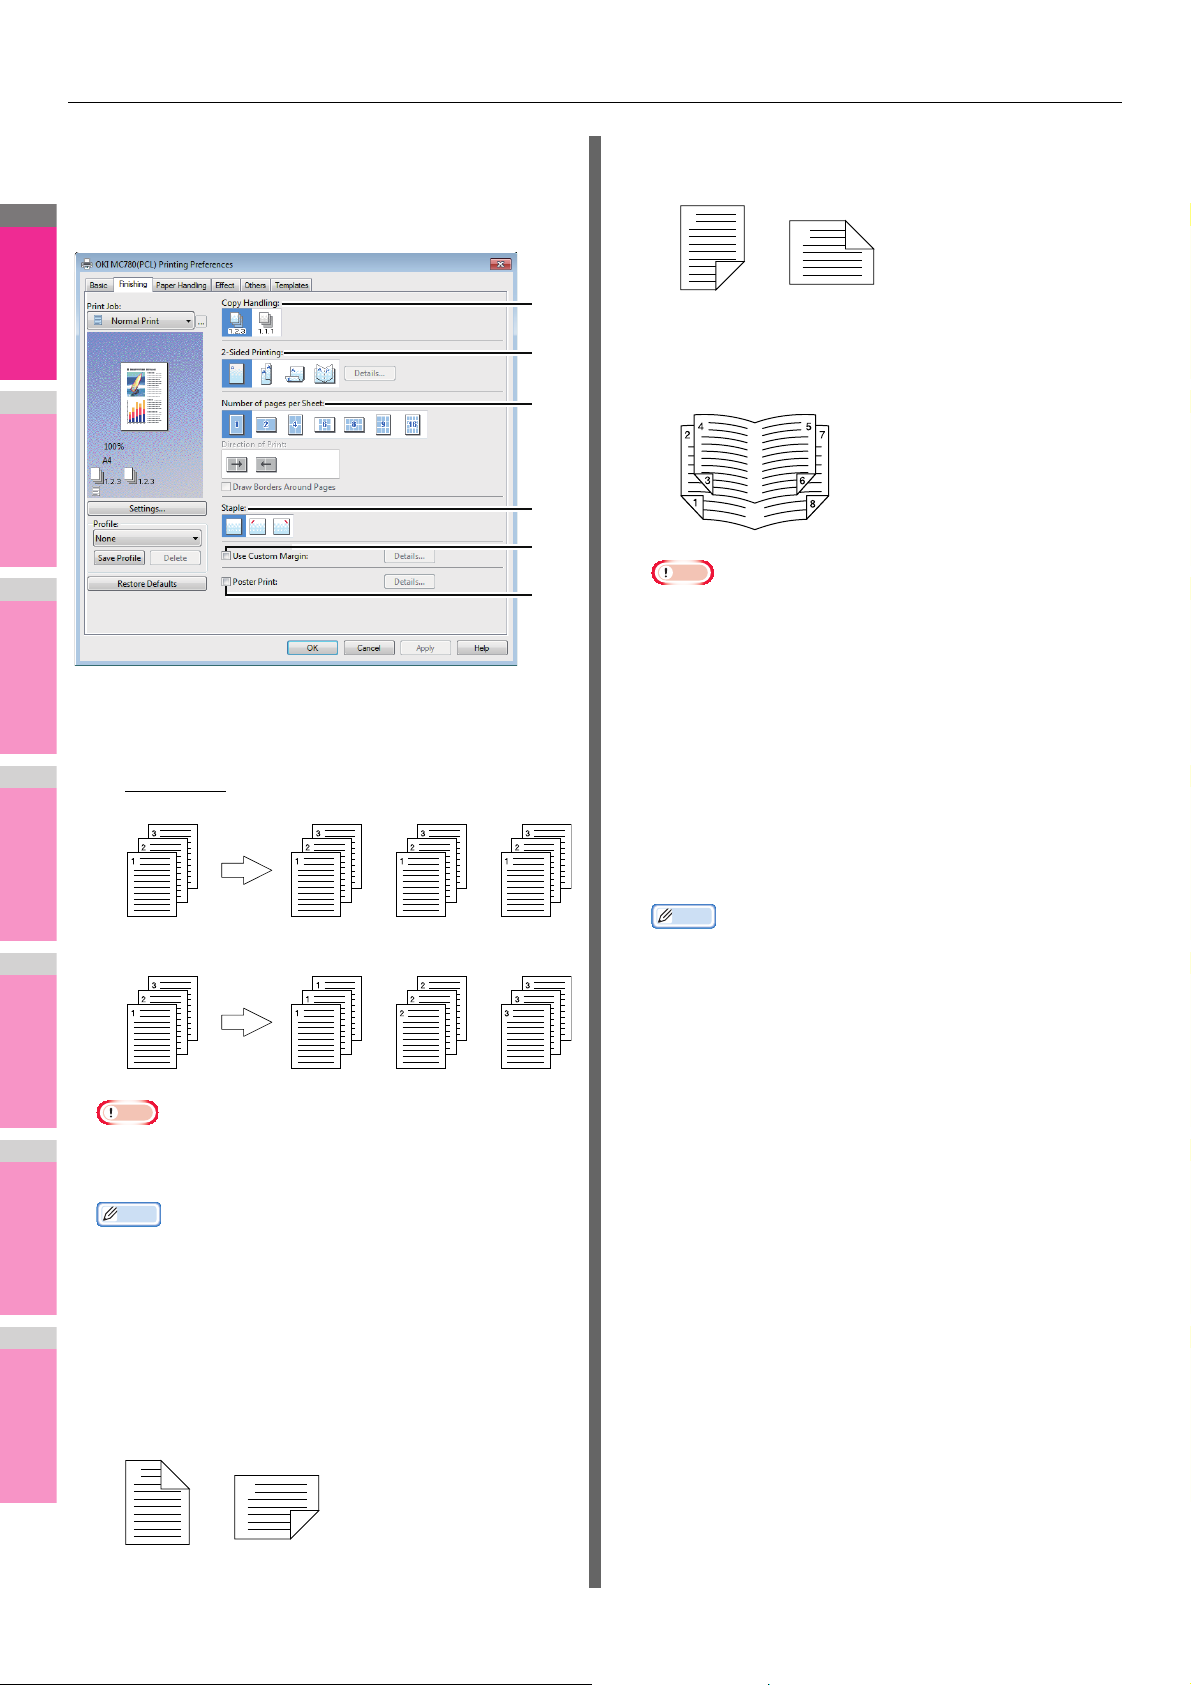
1) Copy Handling
This sets how to sort the printed sheets when numerous
copies are made for printing.
- Sort Copies
— Select this for sort-printing (1, 2, 3... 1,
2, 3...).
- Short Edge — Select this to print on both sides of the
paper with a margin on the short edge.
- Booklet — Select this to print a properly paginated
booklet or magazine-style publication. When this is
selected, click [Details] to specify the details of the
Booklet printing.
P.19 "Booklet Details"
Note
• 2-Sided printing cannot be set when the following paper
size is selected at the [Print Paper Size] box in the
[Basic] tab.
-A6
- Custom Paper Size (Some custom paper sizes
allow 2-sided printing.)
• 2-Sided printing cannot be set when the following paper
type in selected at the [Paper Type] box in the [Basic]
tab. However, this may differ depending on whether the
Finisher is installed.
- Special 1 - 6
- Envelope 1 - 4
-Thick5
- Group Copies — Select this for group-printing (1, 1,
1... 2, 2, 2... 3, 3, 3...).
• [Group Copies] can be selected only when more than 1
copy is entered at the Number of Copies option.
• For the detailed instructions on how to print with the
[Copy Handling] setting, see the following page:
P.45 "Sort printing"
2) 2-Sided Printing
This sets printing on both sides of paper. Select this check
box and then the position of the margin for 2-sided printing.
- Long Edge — Select this to print on both sides of the
paper with a margin on the long edge.
• To staple on the 2-sided printed sheets, set each option
separately.
P.48 "Stapling"
• For detailed instructions on how to print with the [2-Sided
Printing] setting, see the following page:
P.46 "Printing on both sides of a sheet"
3) Number of pages per Sheet
This sets the printing of multiple pages on one sheet. The
pages are reduced to fit the selected paper size
automatically and printed.
- 2 pages — Select this to print images from 2 pages
arranged on one sheet.
- 4 pages — Select this to print images from 4 pages
arranged on one sheet.
- 6 pages — Select this to print images from 6 pages
arranged on one sheet.
- 8 pages — Select this to print images from 8 pages
arranged on one sheet.
- 9 pages — Select this to print images from 9 pages
arranged on one sheet.
- 16 pages — Select this to print images from 16 pages
arranged on one sheet.
Direction of Print
This sets how the pages are arranged on one sheet.
- Left to Right — Select this to arrange pages
horizontally from the left and printed top to bottom on
one sheet.
- 17 -
Page 18
PRINTING FROM WINDOWS
2
1
3
4
5
6
7
Memo
Note
Memo
Memo
1x2 2x2 4x43x3
- Right to Left — Select this to arrange pages
horizontally from the right and printed top to bottom on
one sheet.
- Left to Right by column — Select this to arrange
pages vertically from the top and printed left to right on
one sheet.
- Right to Left by column — Select this to arrange
pages vertically from the top and printed right to left on
one sheet.
Draw Borders Around Pages
Select this check box to print borders around each page.
• When you select [Booklet] in the [2-Sided Printing] box,
only [2 pages] can be selected.
• For the detailed instructions on how to print with the
[Number of pages per Sheet] setting, see the following
page:
P.47 "Printing several pages on one sheet"
4) Staple
This sets whether a print job is printed with staples.
- Upper Left — Select this to staple the printed
document in the upper left.
- Envelope 2
- Envelope 3
- Envelope 4
• For detailed instructions on how to print with the [Staple]
setting, see the following page:
P.48 "Stapling"
5) Use Custom Margin
Select this check box to set the margin on the printed
pages. When this box is selected, click [Details] to set the
margins in the [Custom Margin] dialog box.
0.17 inch to 3.94 inches / 4.2 mm to 100 mm (The margin
width cannot be smaller than 0.17 inches / 4.2 mm.)
Note
• If [Booklet] is selected on [2-Sided Printing], this option
will be disabled.
• Enable this function to add the margins if the application
does not support the margin function. When the
application has a margin function, use the application’s
function rather than this option.
• This cannot specify the binding margin for Booklet
printing.
6) Poster Print
You can divide a print job onto more than one sheet of
paper, so you can create one large image, such as a
poster, by connecting the divided images. If this option is
enabled, click [Details] and set the Output number of
Sheets.
• The selectable options vary depending on the paper size
and orientation.
• The “Staple” option is available only when the Finisher is
installed.
• The “Staple” option is not available when the Group
Copies / Magazine sort function is selected.
• Stapling cannot be set when the following paper sizes
are selected in the [Print Paper Size] box in the [Basic]
tab.
-Statement
-A5
-A6
-Postcard
- IndexCard 3x5''
- Custom Paper Size
- Envelope - Com9
- Envelope - Com10
Note
• The Poster Print option is not available when any of the
Custom Paper Size, Number of pages per sheet, 2Sided Printing, Watermark, Overlay Image and Sheet
Insertion options is set.
• The Poster Print option is available only when any of the
sizes below is selected for [Print Paper Size] box on the
[Basic] tab.
A4, LT
- Envelope - Monarch
- Envelope DL
- Envelope - CHO3
- Envelope - YOU4
• Stapling cannot be set when the following paper types
are selected at the [Paper Type] box in the [Basic] tab.
However, this may differ depending on your model or
• For detailed instructions on how to print with the Poster
Print option, see the following page:
P.48 "Dividing one image into multiple sheets (Poster
Print)"
whether the Finisher is installed.
-Thick 5
-Special 1
-Special 2
-Special 3
-Special 4
-Special 5
-Special 6
- Envelope 1
- 18 -
Page 19
PRINTING FROM WINDOWS
2
1
3
4
5
6
7
Memo
Note
1
2
3
4
5
7
6
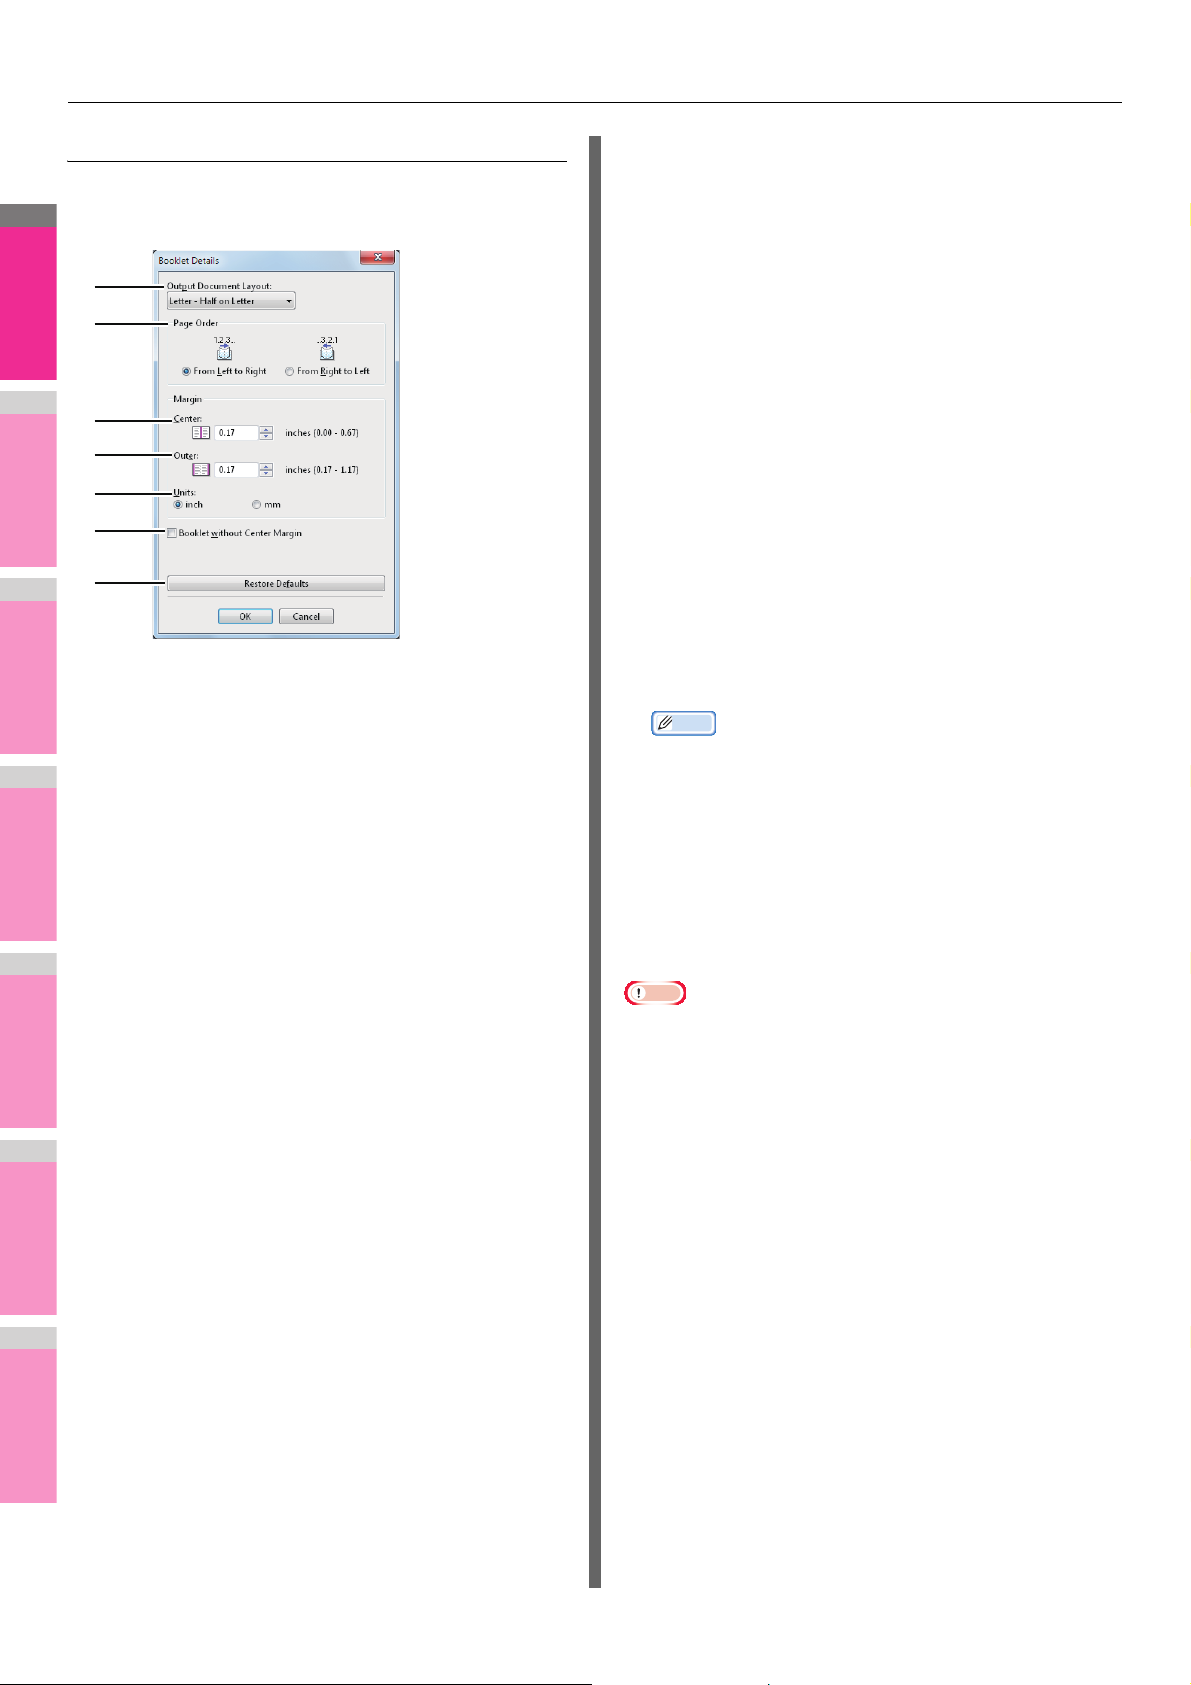
Booklet Details
In the [Booklet Details] dialog box, you can specify how
Booklet printing is performed.
1) Output Document Layout
Select the booklet size to be made.
- A5 on A4 — Select this to print an A5 size booklet.
Every 2 pages are printed on A4 paper to fit on half a
sheet (A5).
- B6 on B5 — Select this to print a B6 size booklet. Every
2 pages are printed on B5 paper to fit on half a sheet
(B6).
- A6 on A5 — Select this to print an A6 size booklet.
Every 2 pages are printed on A5 paper to fit on half a
sheet (A6).
- Letter-Half on Letter — Select this to print a 1/2 Letter
size booklet. Every 2 pages are printed on Letter paper
to fit on half a sheet.
- 1/2 LG on LG — Select this to print a 1/2 Legal size
booklet. Every 2 pages are printed on Legal paper to fit
on half a sheet.
- 1/2 Statement on Statement — Select this to print a 1/
2 Statement size booklet. Every 2 pages are printed on
Statement paper to fit on half a sheet.
- 1/2 13LG on 13LG — Select this to print a 1/2 13 inch
LG size booklet. Every 2 pages are printed on 13 inch
LG paper to fit on half a sheet.
- 1/2 8.5SQ on 8.5SQ — Select this to print a 1/2 8.5
inch SQ size booklet. Every 2 pages are printed on 8.5
inch SQ paper to fit on half a sheet.
- 32K on 16K — Select this to print a 32K size booklet.
Every 2 pages are printed on 16K paper to fit on half a
sheet.
- 1/2 Executive on Executive — Select this to print a
half of Executive size booklet. Every 2 pages are
printed on Executive paper to fit on half a sheet.
- 1/2 13.5'' LG on 13.5'' LG — Select this to print an half
of 13.5 inch LG size booklet. Every 2 pages are printed
on 13.5 inch LG paper to fit on half a sheet.
- 1/2 (Custom) on (Custom) — Select this to print a half
of customized size booklet. Every 2 pages are printed
on customized size paper to fit on half a sheet.
2) Page Order
Select this to print the pages from left to right or right to left.
3) Margin - Center
This sets the gutter in the center of a two-sided page. You
can enter the value between 0 and 0.67 inches (0 and
16.90 mm). The printed images will be reduced according
to the margin setting.
4) Margin - Outer
This sets the gutter on the right side and left side on the
paper. You can enter the value between 0.17 and 1.17
inches (4.20 and 29.60 mm). The printed images will be
reduced according to the margin setting.
5) Margin - Units
Select the unit for the Center Margin and Outer Margin
option. The default unit varies depending on the regional
setting in the Windows.
6) Booklet without Center Margin
Select this to set the center margin of the paper to 0 inch
(mm).
In this case the value set for [Margin - Center] becomes
invalid.
7) [Restore Defaults]
Click this to restore the settings displayed in the [Booklet
Details] dialog box to the original factory defaults.
• For detailed instructions on how to print with the
[Booklet] setting, see the following page:
P.46 "Making a booklet"
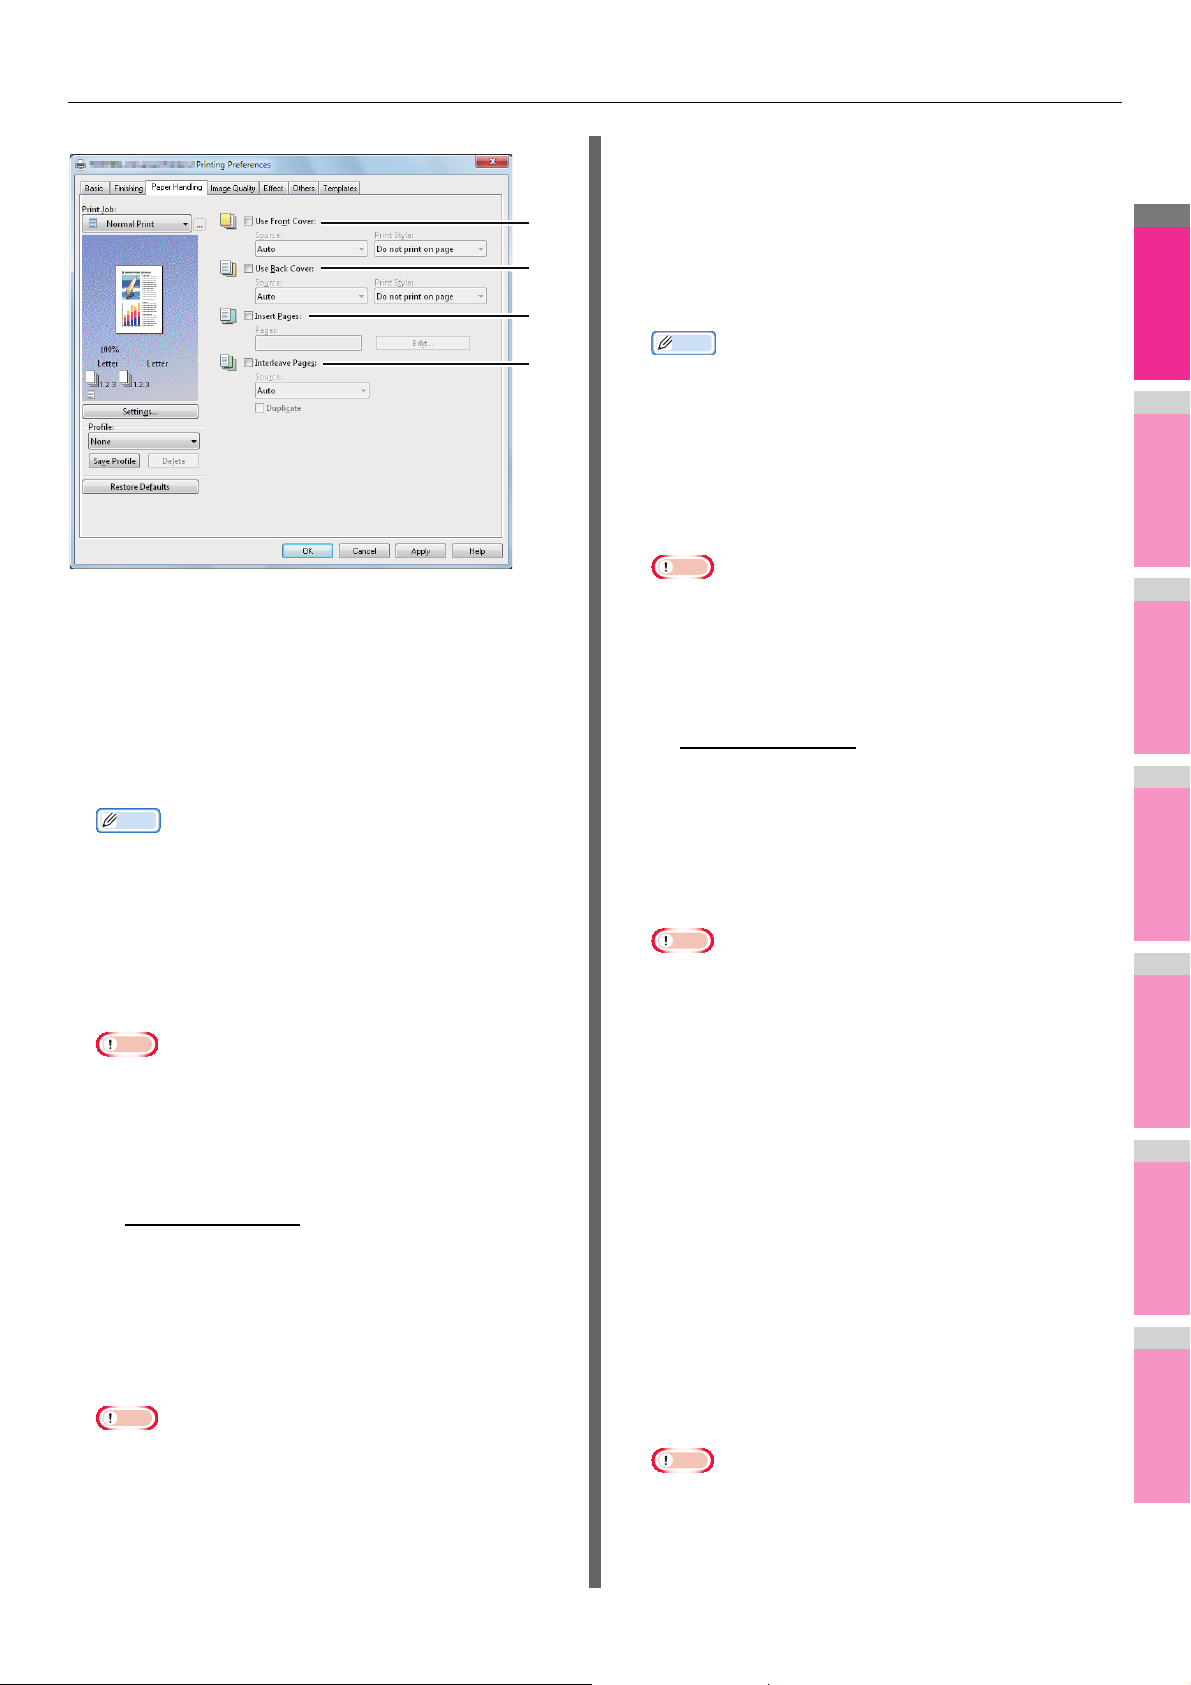
[Paper Handling] tab
The [Paper Handling] tab allows you to enable Front Cover
printing, Back Cover printing, Inserting Pages, and Interleaving
Pages.
• When the size of covers or sheets to be inserted is the same
as that of the copy paper, change the media type or specify
“Paper Source” on the [Basic] tab menu; otherwise all data
will be printed from the insertion tray.
• If you select [Store to e-Filing] in the [Print job] box, [Use
Front Cover], [Use Back Cover], [Insert Pages] and
[Interleave Pages] are unselectable.
- 19 -
Page 20
PRINTING FROM WINDOWS
2
1
3
4
5
6
7
Memo
Note
Memo
Note
Note
2) Use Back Cover
This sets back cover printing which allows you to insert or
print a back cover on a sheet fed from a different Tray or
1
2
Multi-Purpose Tray other than the Paper Source option
selected on the [Basic] tab.
To enable back cover printing, select the check box and
select the location from where a back cover sheet is to be
fed and the print style to be used.
3
1) Use Front Cover
This sets front cover printing which allows you to insert or
print a cover on a sheet fed from a different Tray or MultiPurpose Tray other than the Paper Source option selected
on the [Basic] tab.
To enable cover printing, select the check box and select
the location from where a cover sheet is to be fed and the
print style to be used.
• For detailed instructions on how to print with the [Use
Front Cover] setting, see the following page:
P.49 "Inserting different types of paper"
Source
Select the location from where a front cover sheet is to be
fed. When [Auto] is selected, the paper is automatically
selected according to the printed document size.
• The selectable values in the [Source] box vary
depending on the optional devices installed in this
equipment and their configuration on the [Device
Settings] tab.
Print Style
This selects how you want to print a front cover.
- Do not print on page
cover.
- Print one side of the page — Select this to print the
first page image on the front side of a cover.
- Print both sides of page — Select this to print the first
two page images on both sides of a cover. This is
available only when the 2-Sided Printing option is
enabled on the [Finishing] tab.
Note
— Select this to insert a blank
4
• For detailed instructions on how to print with the [Use
Back Cover] setting, see the following page:
P.49 "Inserting different types of paper"
Source
Select the location from where a back cover sheet is to be
fed. When [Auto] is selected, the paper is automatically
selected according to the printed document size.
• The selectable values in the [Source] box vary
depending on the optional devices installed in this
equipment and their configuration on the [Device
Settings] tab.
Print Style
This selects how you want to print a back cover.
- Do not print on page
— Select this to insert a blank
cover.
- Print one side of the page — Select this to print the
last page image on the front side of a cover.
- Print both sides of page — Select this to print the last
two page images on both sides of a cover. This is
available only when the 2-Sided Printing option is
enabled on the [Finishing] tab.
• If [Print one side of the page] is selected while 2-Sided
Printing is performed, the last page is printed on the
front side of the cover sheet and back side of the cover
will be blank.
• If [Print both sides of page] is selected but there is only
one page printed on the back cover, the last page is
printed on the front side of the cover sheet and back side
of the cover will be blank.
3) Insert Pages
This sets sheet insertion printing which allows you to insert
a sheet between pages, or print a specific page on a sheet
fed from a tray other than the Paper Source option selected
on the [Basic] tab.
This option is useful when you want to insert a blank sheet
between chapters, or when you want to print chapter cover
pages on the different paper.
To enable sheet insertion printing, select the check box and
click [Edit] to set how the pages are inserted in the [Insert
Pages] dialog box.
P.21 "Insert Pages"
• If [Print one side of the page] is selected while 2-Sided
Printing is performed, the first page is printed on the
front side of the cover sheet and the back side of the
cover will be blank.
Note
• This option cannot be set when the [Interleave Pages]
option is enabled.
• Up to 50 pages can be inserted.
- 20 -
Page 21
PRINTING FROM WINDOWS
2
1
3
4
5
6
7
Memo
Note
Memo
Note
1
2
3
• For detailed instructions on how to print with the [Insert
Pages] setting, see the following page:
P.49 "Inserting different types of paper"
4) Interleave Pages
This sets the interleaving page feature that is useful when
you want to insert paper of a different type (or from another
source) between every page of your print job. For example,
you can use this option to insert blank, colored sheets
between overhead transparencies.
To enable interleaving pages, select the check box and
select the location from where sheets are to be fed.
• When this option is enabled as well as the [Use Front
Cover] and [Use Back Cover] options enabled, no page
is inserted after the front cover and back cover.
• This option cannot be set when [Insert Pages] option is
enabled.
• For detailed instructions on how to print with the
[Interleave Pages] setting, see the following page:
P.50 "Interleaving pages"
Source
Select the location from where the interleaving sheet is to
be fed. When [Auto] is selected, the paper is automatically
selected according to the printed document size.
2) Print Style
This selects how you want to print on insertion sheets.
- Blank
— Select this to insert blank sheets.
- 1 Side — Select this to print the specified page on the
front side of the insertion sheets.
- 2 Sides — Select this to print the specified page and
the next page on both sides of the insertion sheets.
Note
• When [2 Sides] is selected from the [Print Style] box, the
entered page and the next page will be printed on the
inserted sheet.
3) Paper Source
Select the location from where the insertion sheets are to
be fed. When [Auto] is selected, the paper is automatically
selected according to the printed document size.
Note
• The selectable values in the [Paper Source] box vary
depending on the optional devices installed in this
equipment and their configuration on the [Device
Settings] tab.
4) Paper Type
Select the paper type to be inserted.
[Image Quality] tab
The [Image Quality] tab allows you to select how images are
printed. You can easily select the appropriate image quality
depending on the type of document.
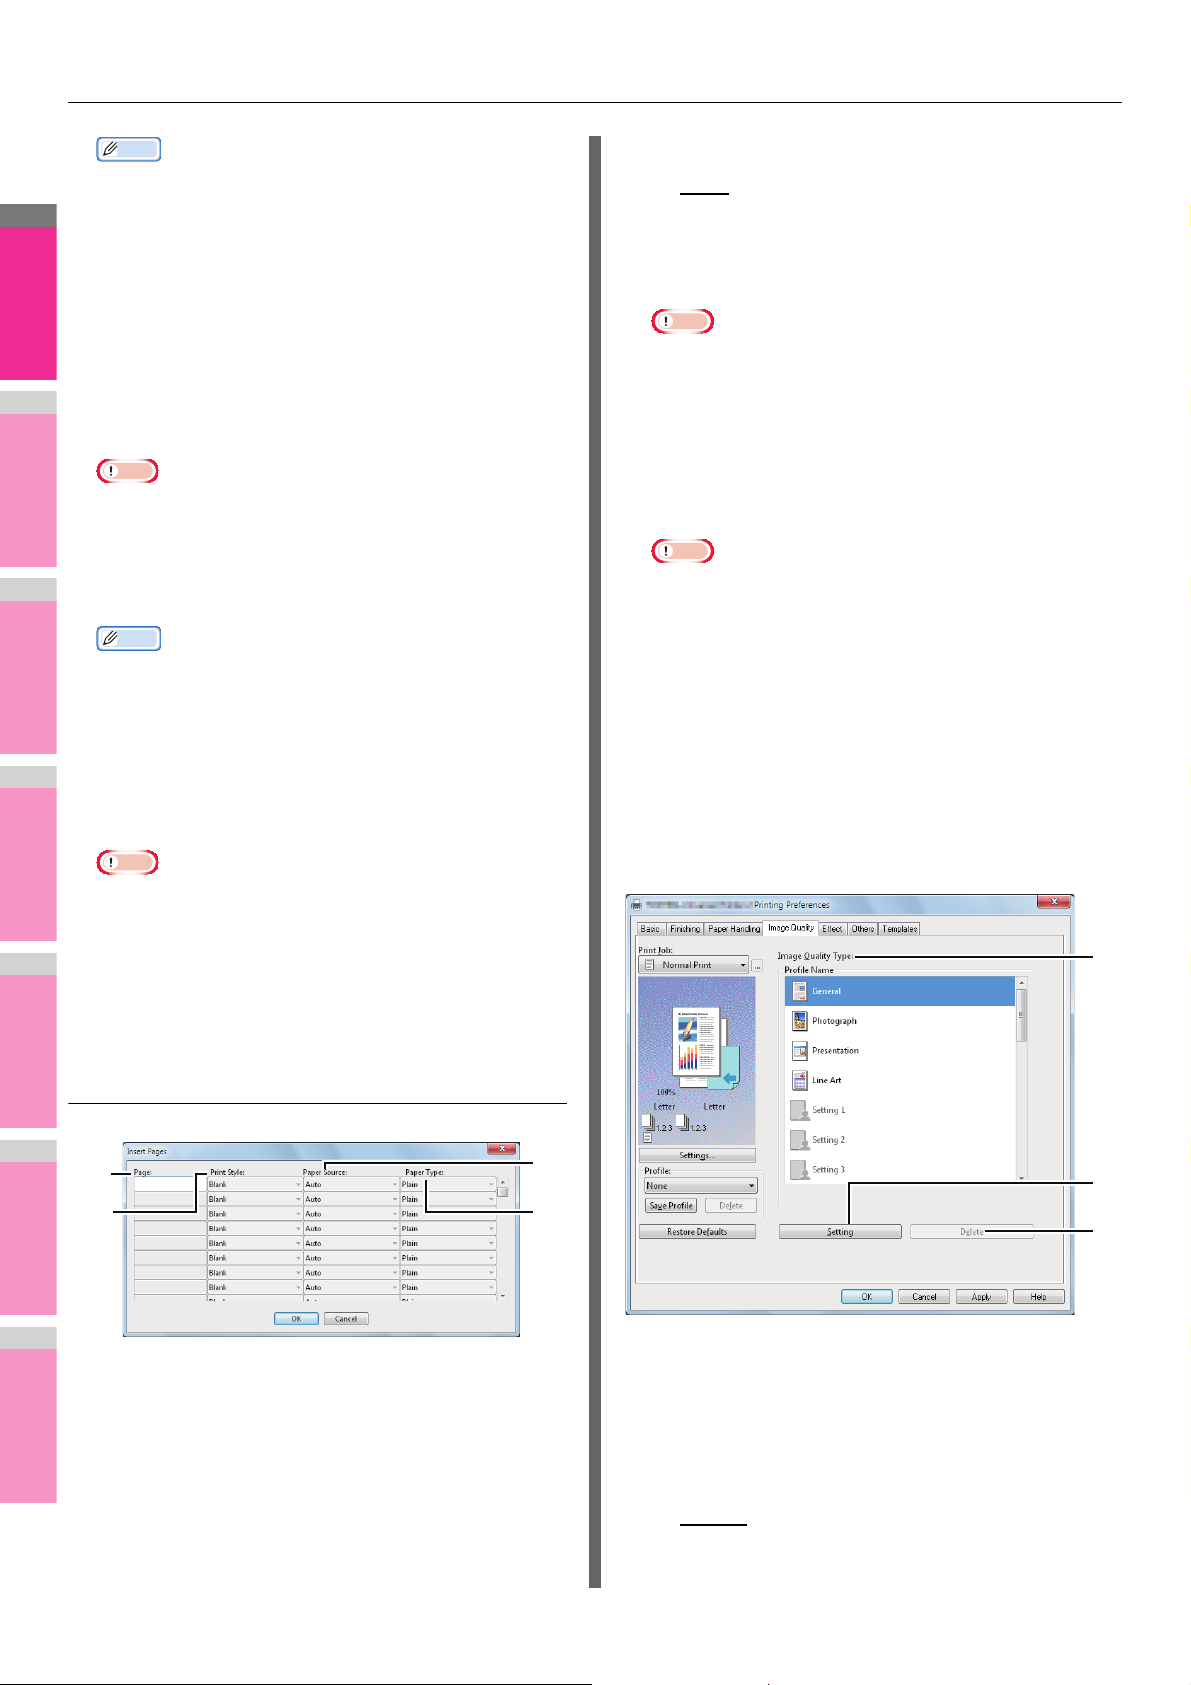
Insert Pages
1
2
1) Page
• The selectable values in the [Source] box vary
depending on the optional devices installed in this
equipment and their configuration on the [Device
Settings] tab.
Duplicate
When you select this check box, you can print previous
page images on the inserted sheet.
Enter the page number where the sheet is to be inserted.
When [Blank] is selected from the [Print Style] box, the
blank sheet is inserted before the entered pages.
When [1 Side] is selected from the [Print Style] box, the
entered page will be printed on the inserted sheet.
When [2 Sides] is selected from the [Print Style] box, the
entered page and the next page will be printed on the
inserted sheet.
3
4
1) Image Quality Type
This sets how colors are printed by selecting the job type.
The printer driver automatically applies the proper image
quality for the selected job type. You can select a predefined image quality type, or you can select a custom
image quality type that you created. The custom image
quality type can be created or modified by clicking [Setting].
- General
— Select this to apply the proper image quality
for printing a general color document.
- 21 -
Page 22
PRINTING FROM WINDOWS
2
1
3
4
5
6
7
Note
Memo
1
8
3
6
7
4
2
5
13
1
8
10
3
6
7
5
2
12
11
9
13
- Photograph — Select this to apply the proper image
quality for printing photos.
- Presentation — Select this to apply the proper image
quality for printing a vivid document.
- Line Art — Select this to apply the proper image quality
for printing a document contain a lot of characters or
line art.
- Advanced — Select this to apply a profile which can
adjust color space. The [Advanced] option is available
only for the printer drivers below.
- PS3
- XPS
Note
• The Image Quality type option is not available when
[Black and White] or [Twin Color] is selected at the
[Color] box on the [Basic] tab.
2) [Setting]
Click this to customize an image quality setting. When this
is clicked, the [Setting] dialog box appears. You can set up
to 20 custom image quality settings.
P.22 "Setting: [Basic] tab"
P.23 "Setting: [Color Balance] tab"
P.24 "Setting: [Image Attribute] tab"
P.24 "Setting: [Advanced] tab"
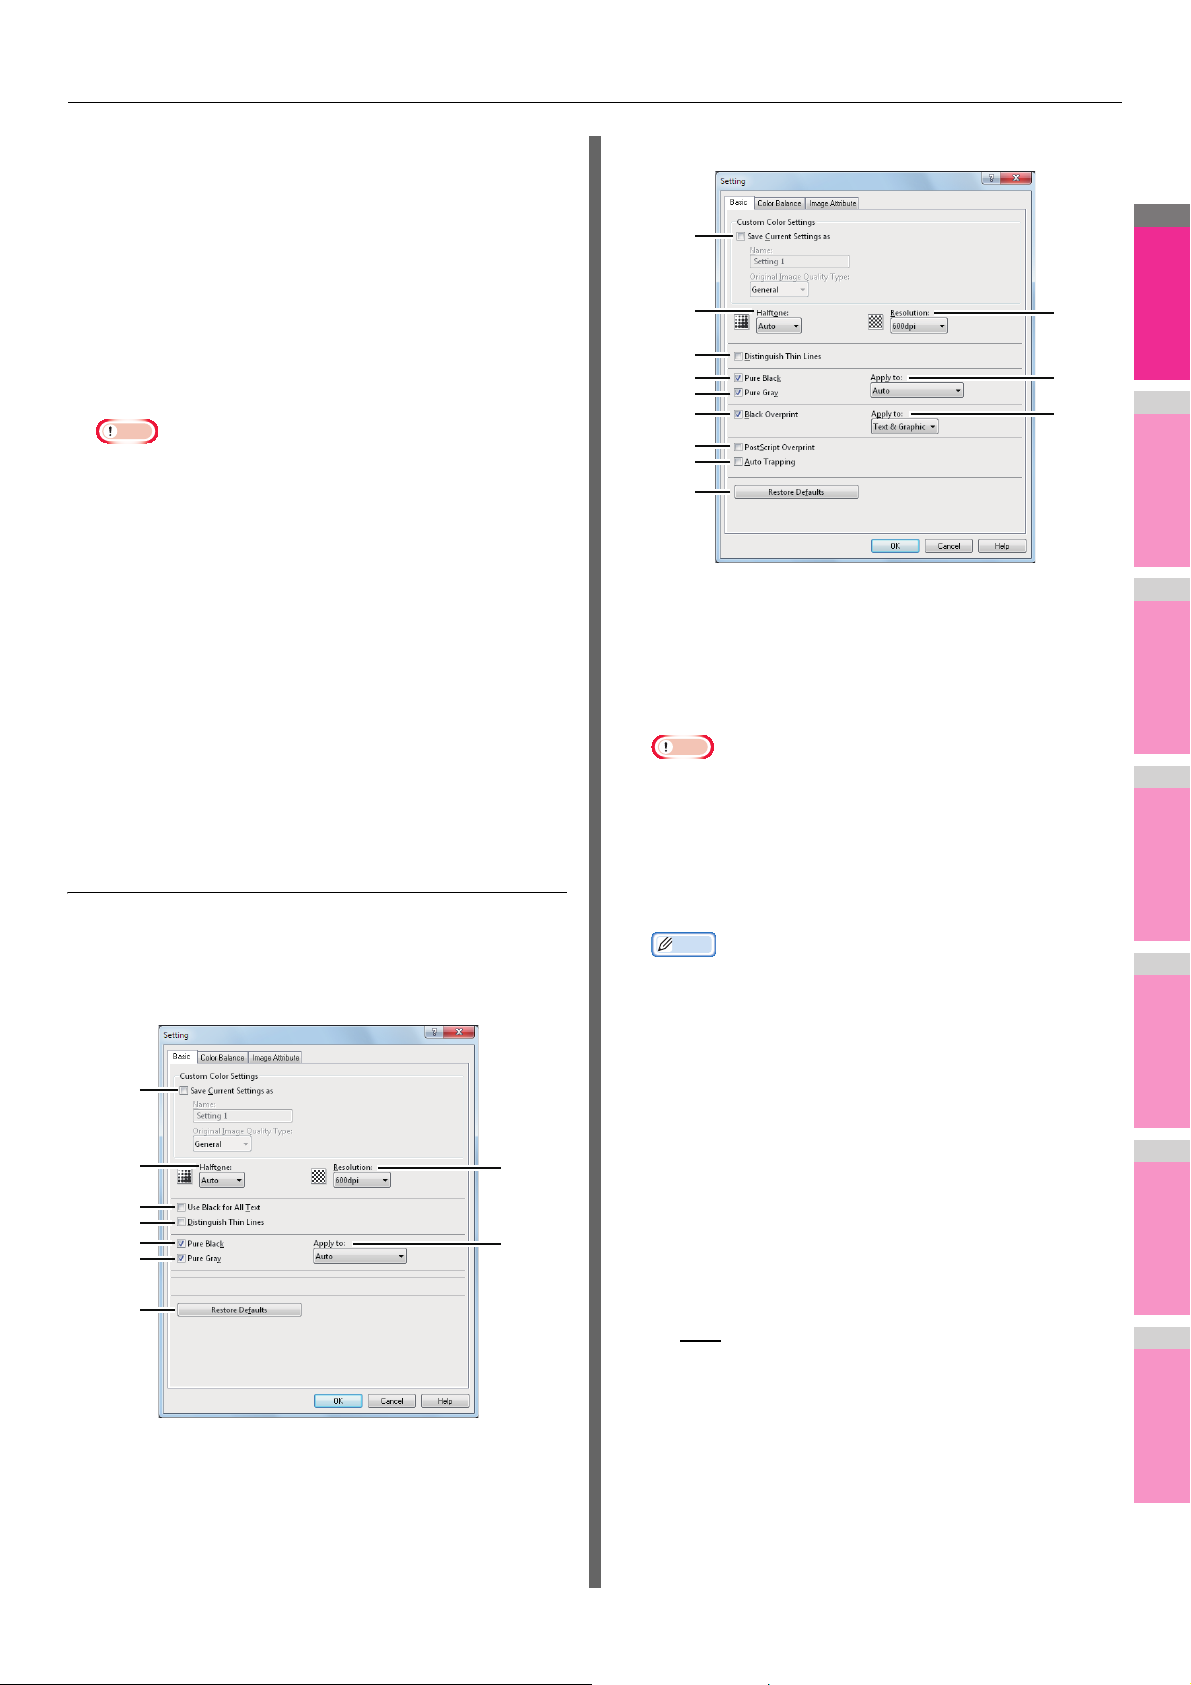
[Basic] tab for PS3
1) Save Current Settings as
Select this check box to save the settings as the different
setting. When this box is cleared, the Image Quality Type
that you selected will be undefined. Up to 20 custom image
quality types can be created.
3) [Delete]
Click this to delete the custom image quality setting. When
you click this, the confirmation dialog box appears. Click
[Yes] to delete the setting.
Setting: [Basic] tab
In the [Basic] tab of the [Setting] dialog box, you can specify
the following functions.
[Basic] tab for PCL/XPS
- 22 -
• This check box is available only when you display printer
driver properties from the [Devices and Printers] folder.
Name
Enter the Image Quality type name to be created. This
must be entered when [Save Current Settings as] is
selected.
• When you edit an existing custom Image Quality Type,
the settings of this Image Quality Type will be
overwritten regardless of whether or not this Image
Quality Type is renamed.
• Even if you enter any of the default Image Quality Type
names ([General], [Photograph], [Presentation], [Line
Art] or [Advanced]) registered as default settings, these
default Image Quality types will not be overwritten. The
Image Quality Type is saved as a new custom Image
Quality Type under the name you have specified.
Original Image Quality Type
Select the image quality type to be applied as the based
image quality.
2) Halftone
This sets how halftones are printed.
- Auto
- Smooth — Select this to print halftone smoothly.
- Detail — Select this to print halftone in detail.
3) Resolution
This sets the resolution for printing.
- 600 dpi — Select this to print in 600 x 600 dpi.
- 600 x 1200 dpi
— Select this to print using proper halftone
depending on the contents in the document
automatically.
*1
— Select this to print in 600 x 1200
dpi.
Page 23
PRINTING FROM WINDOWS
2
1
3
4
5
6
7
Note
Note
Note
Note
*1Images are reproduced more smoothly because
jaggies on the outlines of small text or fine lines such
as graphics are suppressed.
However, 600 dpi is recommended for photos
because the tone reproduction level of the image is
higher.
Note that if the resolution is 1200 dpi, it takes longer
than 600 dpi to print out because the capacity of the
data being handled is larger.
• When [Photograph] or [Presentation] is selected in
[Image Quality Type] of the [Image Quality] tab, [600 x
1200 dpi] cannot be displayed.
• When [600 x 1200 dpi] is selected, the functions below
are not available.
- Booklet printing
- Automatic change of paper source
- Auto Trapping
4) Use Black for All Text
Select this check box to print all text in 100% black except
white texts.
• This function is available only for the printer drivers
below.
-PCL
- XPS
9) Black Overprint
Select this check box when printing background content
that has black text overlaid on it. If this is enabled, the gap
between the text and the background is minimized and
color deviation is prevented. If this is not enabled, the
background of the black content will not be printed.
Note
• This function is available only for the printer drivers
below.
- PS3
10) Apply to
Select how the Black Overprint functions apply.
- Text — Select this to print all the full-color background
and then print black text on the color background.
- Text & Graphic
— Select this to print all the full-color
background and then print black text and graphics on
the color background.
Note
• This function is available only for the printer drivers
below.
- PS3
11) PostScript Overprint
Select this to enable overprint an object that has been set
so on an application.
5) Distinguish Thin Lines
Select this check box to print thin lines clearly.
6) Pure Black
Select this check box to print the black contents using black
toner. When this box is selected, please select how this
function applies in the [Apply to] box.
7) Pure Gray
Select this check box to print the gray scale contents using
black toner. When this box is selected, please select how
this function applies in the [Apply to] box.
• The Pure Gray option is not available when [Pure Black]
is not enabled.
8) Apply to
Select how the Pure Black and Pure Gray functions apply.
- Auto
— Select this to automatically select areas to be
printed using black toner when you want to print the
black (or black and gray scale) contents using its toner.
When this option is selected, appropriate areas are
printed using black toner according to the Image Quality
Type option.
- Text — Select this to print only black text or black-and-
gray text using black toner.
- Text & Graphic — Select this to print only black text
and graphics, or black-and-gray text and graphics using
black toner.
- Text, Graphic & Image — Select this to print all black
areas or all black-and-gray areas using black toner.
• This function is available only for the printer drivers
below.
- PS3
12) Auto Trapping
Select this to enable the Auto Trapping option. This is a
technique where the size of objects is modified so that two
colors printed next to each other overlap slightly to avoid
white spaces between them. These white spaces can be
caused by factors such as misregistration.
• This function is available when you print a document
with [Auto] or [Color] selected for the [Color] option in the
[Basic] tab of printer driver.
• When this function is enabled, the printing speed may be
slow.
13) [Restore Defaults]
Click this to restore all the image quality setting details
displayed in the [Basic] tab menu to the original factory
defaults.
Setting: [Color Balance] tab
In the [Color Balance] tab of the [Setting] dialog box, you can
specify the following functions. Adjust the density level by
moving the scroll bar, or pressing buttons on the right and left
of the scroll bar.
- 23 -
Page 24
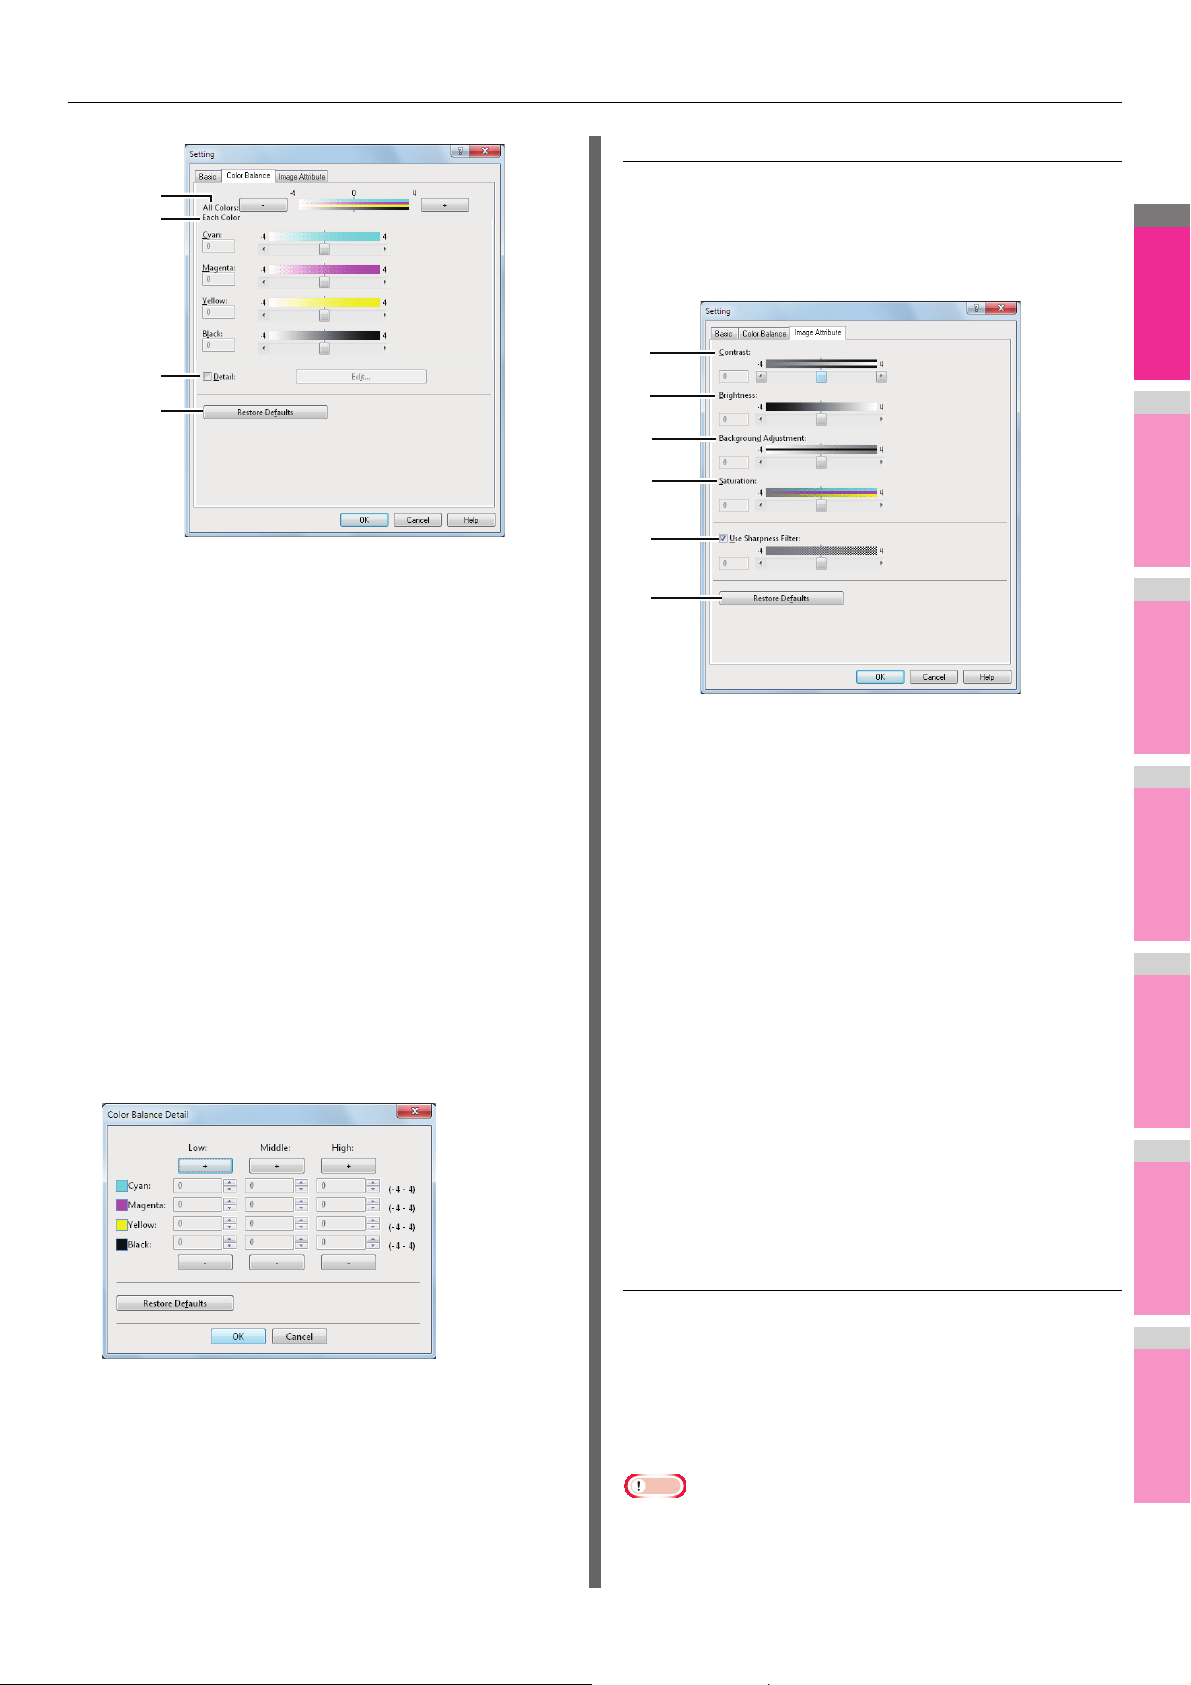
2
1
3
4
5
6
7
Note
1
2
3
4
1
2
3
4
5
6
1) All Colors
2) Each Color
PRINTING FROM WINDOWS
Setting: [Image Attribute] tab
In the [Image Attribute] tab of the [Setting] dialog box, you can
specify the following functions. Adjust the density level by
moving the scroll bar, or pressing buttons on the right and left
of the scroll bar.
Adjust the density of all the colors.
Adjusts the density of each color for printing. You can set
from -4 to 4.
3) Detail
Select this check box to adjust the density of each color
separately in details. When this box is selected, click [Edit]
to display the [Color Balance Detail] dialog box and specify
the density of each color.
— Color Balance Detail
In the [Color Balance Detail] dialog box, you can specify the
density of low, middle, and high colors for each color.
- Low — Change this density to adjust the density of light
color.
- Middle — Change this density to adjust the density of
half color.
- High — Change this density to adjust the density of
deep color.
- Restore Defaults — Click this to restore all the image
quality setting details displayed in the [Color Balance
Detail] dialog box to the original factory defaults.
1) Contrast
Adjust the contrast for printing. You can set from -4 (lowest)
to 4 (highest).
2) Brightness
Adjust the brightness for printing. You can set from -4
(darkest) to 4 (lightest).
3) Background Adjustment
Adjust the background adjustment for printing. You can set
from -4 (lightest) to 4 (darkest).
4) Saturation
Adjust the saturation for printing. You can set from -4 (low
clear) to 4 (high clear).
5) Use Sharpness Filter
Select this check box when you use a sharpness filter. You
can set from -4 (softest) to 4 (sharpest).
6) [Restore Defaults]
Click this to restore all the image quality setting details
displayed in the [Image Attribute] tab menu to the original
factory defaults.
Setting: [Advanced] tab
4) [Restore Defaults]
Click this to restore all the image quality setting details
displayed in the [Color Balance] tab menu to the original
factory defaults.
In the [Advanced] tab of the [Setting] dialog box, you can set
the functions below.
The color profile data of this equipment may be updated. If the
SNMP communication between this equipment and your
computer is available, open the [Advanced] tab menu and then
click [Update Now] to obtain the updated color profile data.
• The [Advanced] tab menu is displayed when [Advanced] is
selected in [Image Quality]. The [Advanced] option is
available only for the printer drivers below.
- 24 -
Page 25
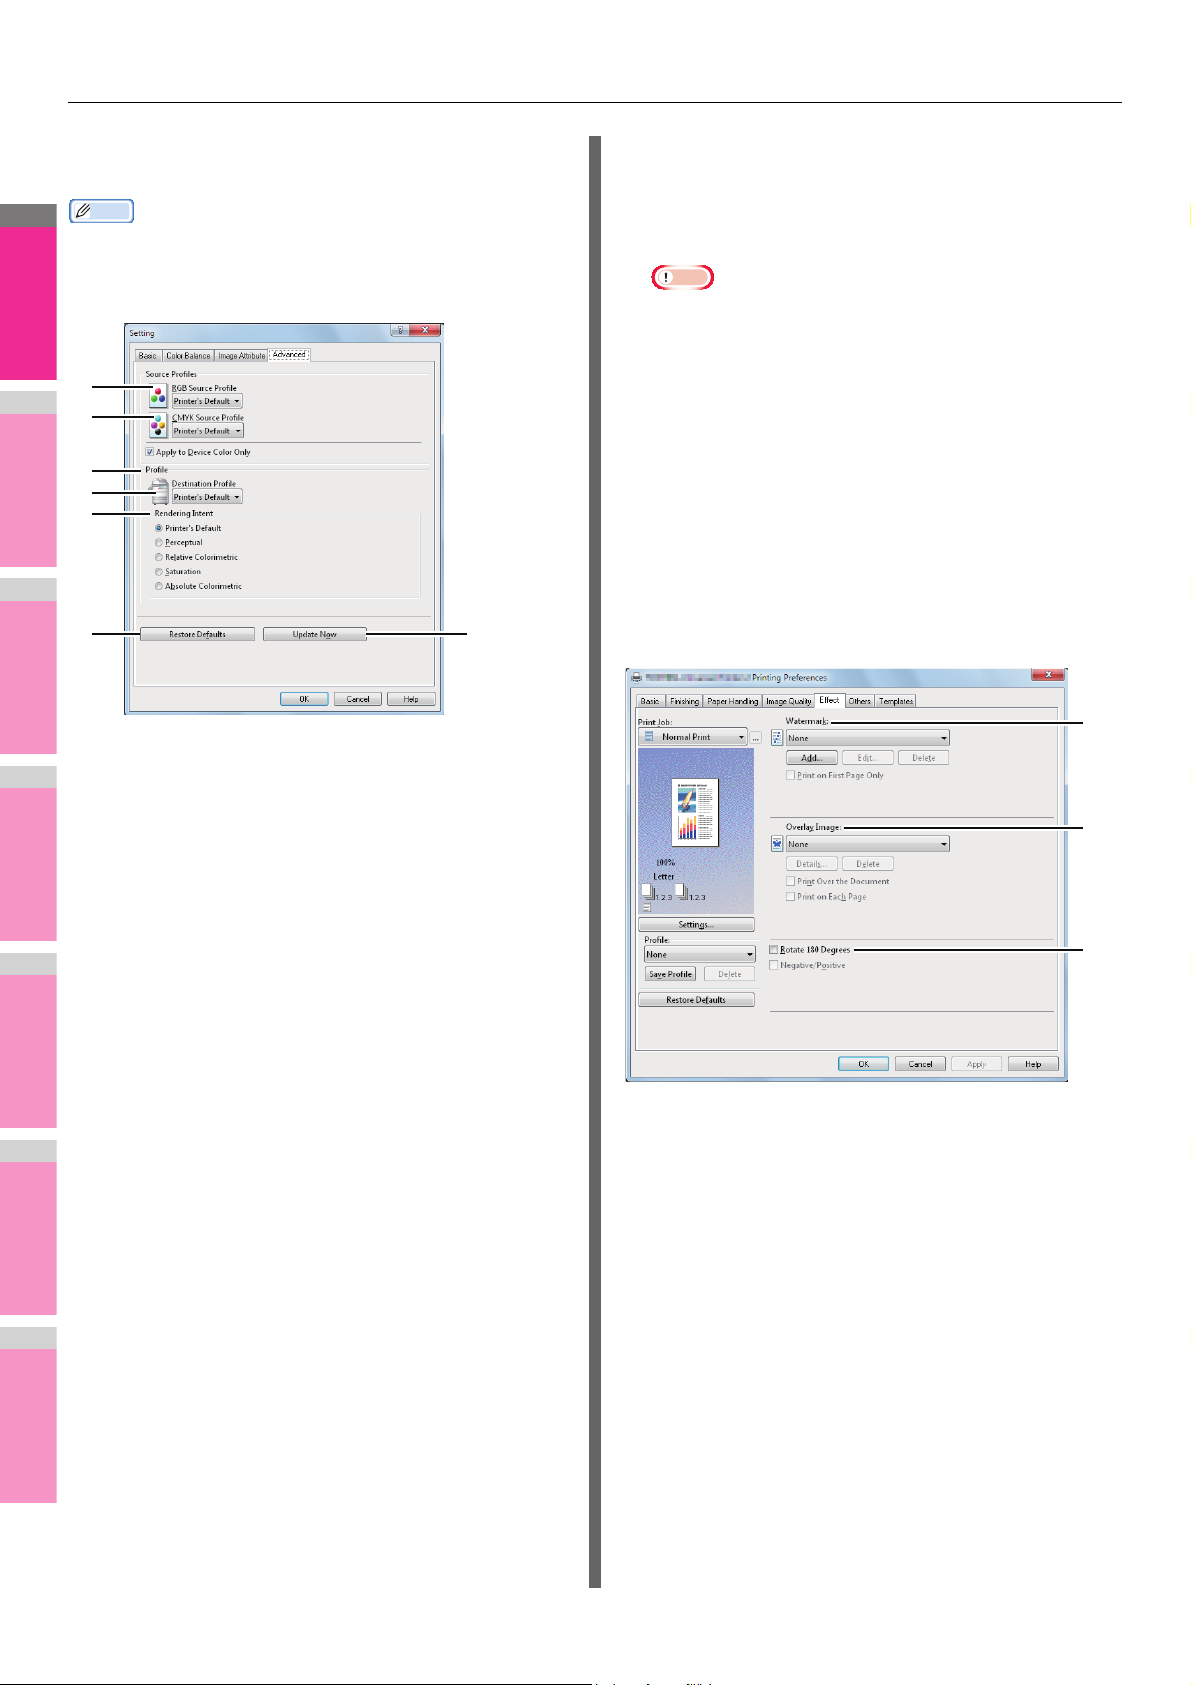
PRINTING FROM WINDOWS
2
1
3
4
5
6
7
Memo
Note
1
2
3
4
5
6 7
- PS3
- XPS
• Color profiles can also be set from the TopAccess menu.
For the detailed instructions on how to set color profiles from
the TopAccess menu, refer to the TopAccess Guide.
7) [Update Now]
Click this to obtain the latest color profile data set for this
equipment and update the existing color profile data. This is
enabled only when SNMP communication with this
equipment is enabled.
• [Printer’s Default] is a default setting for RGB Source
Profile, CMYK Source Profile, Destination Profile and
Rendering Intent. When you select [Printer’s Default],
color space conversion is performed according to the
default profile (that set as a default profile in the [ICC
Profile] submenu of the [Setup] menu in the TopAccess
administrator mode).
[Effect] tab
The [Effect] tab contains print options that add effects to your
print jobs such as Watermarks, Overlay Image printing, Rotate
printing, Mirror printing, and Negative/Positive printing.
[Effect] tab for PCL driver
1
1) RGB Source Profile
This selects the RGB source profile. When you obtained
color profile data from this equipment, the RGB source
profile data of this equipment appear.
2) CMYK Source Profile
This selects the CMYK source profile. When you obtained
color profile data from this equipment, the CMYK source
profile data of this equipment appear.
3) Apply to Device Color Only
Select this check box when you give priority to color profiles
embedded in the image.
4) Destination Profile
This selects the destination profile. When you obtained
color profile data from this equipment, the destination
profile data of this equipment appear.
2
3
5) Rendering Intent
This selects the method for color space conversion when
you print images.
- Printer’s Default — Color space conversion is
performed according to the default profile.
- Perceptual — This is recommended for photo images.
- Relative Colorimetric — More original colors can be
retained than those when you select [Perceptual].
- Saturation — This is recommended when the
vividness of colors is more important than their correct
reproduction. It is useful for graphic charts.
- Absolute Colorimetric — Original colors can be
retained even on colored paper.
6) [Restore Defaults]
Click this to restore all the image quality setting details
displayed in the [Advanced] tab menu to the original factory
defaults.
- 25 -
Page 26
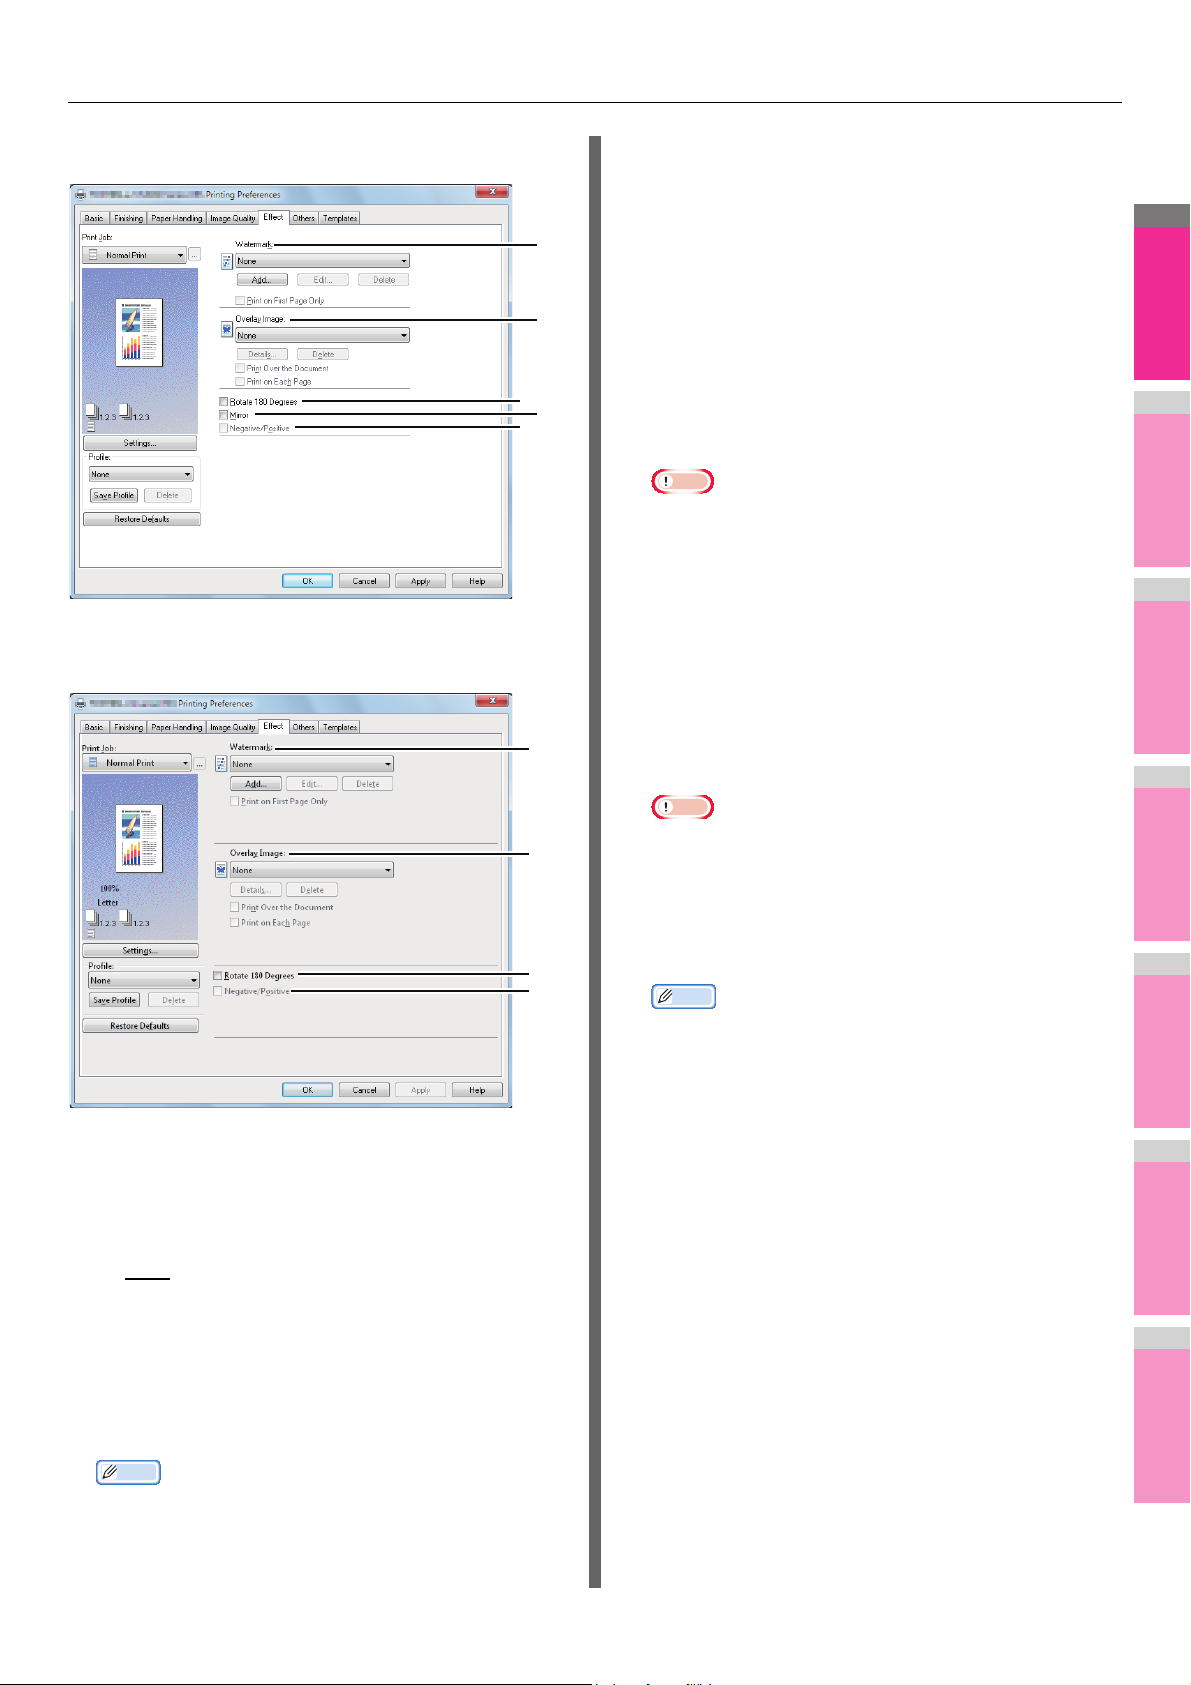
PRINTING FROM WINDOWS
2
1
3
4
5
6
7
Memo
Note
Note
Memo
[Effect] tab for XPS driver
[Effect] tab for PS3
[Add]
Click this to create a new watermark. The [Watermark]
dialog box appears when you click on this.
P.27 "Add/Edit Watermark"
1
[Edit]
Select a watermark from the [Watermark] box and click it to
edit the watermark. The [Watermark] dialog box appears
2
when you click on this.
P.27 "Add/Edit Watermark"
[Delete]
3
4
5
Select a watermark from the [Watermark] box and click it to
delete a watermark.
P.51 "Deleting a watermark"
• The default watermarks can be deleted but, once
deleted, they cannot be restored.
• [None] cannot be deleted.
Print on First Page Only
Select this check box to print a watermark on the first page
only. This setting will become available when any
watermark is selected from the [Watermark] box.
2) Overlay Image
This selects an overlay image to be used. This feature
1
allows you to print an image on the background of a print
job, although the watermark allows only text.
1) Watermark
2
3
5
This selects the watermark to be used or edited. The
following values except [None] are the default watermarks
that have been registered in the printer driver. Up to 15 new
watermarks can be added in this box.
- None
— Select this if no watermark is desired.
The following default watermarks are also displayed in the
box:
- TOP SECRET
- CONFIDENTIAL
-DRAFT
- ORIGINAL
-COPY
• For the detailed instructions on how to print with the
[Watermark] setting, see the following page:
P.50 "Printing with watermarks"
• When [Overlay Image] is selected together with the N-up
printing, 1 overlay image will be printed on the entire
page, regardless of the number of images set in 1 page.
• Both the overlay file and the documents on which you
superimpose the overlay image must be created in the
same size, color mode and orientation.
• If you want to use an overlay image in your job, you
must first create an overlay file. To do this, create an
overlay image with most applications and print it as an
overlay file. You can enable creating an overlay file on
the [Print Job] box.
P.40 "Printing a document as an overlay file"
• For the detailed instructions on how to print with the
[Overlay Image] setting, see the following page:
P.52 "Printing with an overlay file"
[Details]
Click this to set which overlay image is applied to which
page, such as changing the type of overlay image for odd
pages and that for even pages or applying an overlay
image only to the specified pages.
If you click this when [Multiple Overlays] is selected in the
[Overlay Image] box, the [Multiple Overlays] dialog box
appears.
P.28 "Multiple Overlays"
[Delete]
Click this to delete the overlay image that you select in the
box.
P.52 "Deleting an overlay image"
- 26 -
Page 27
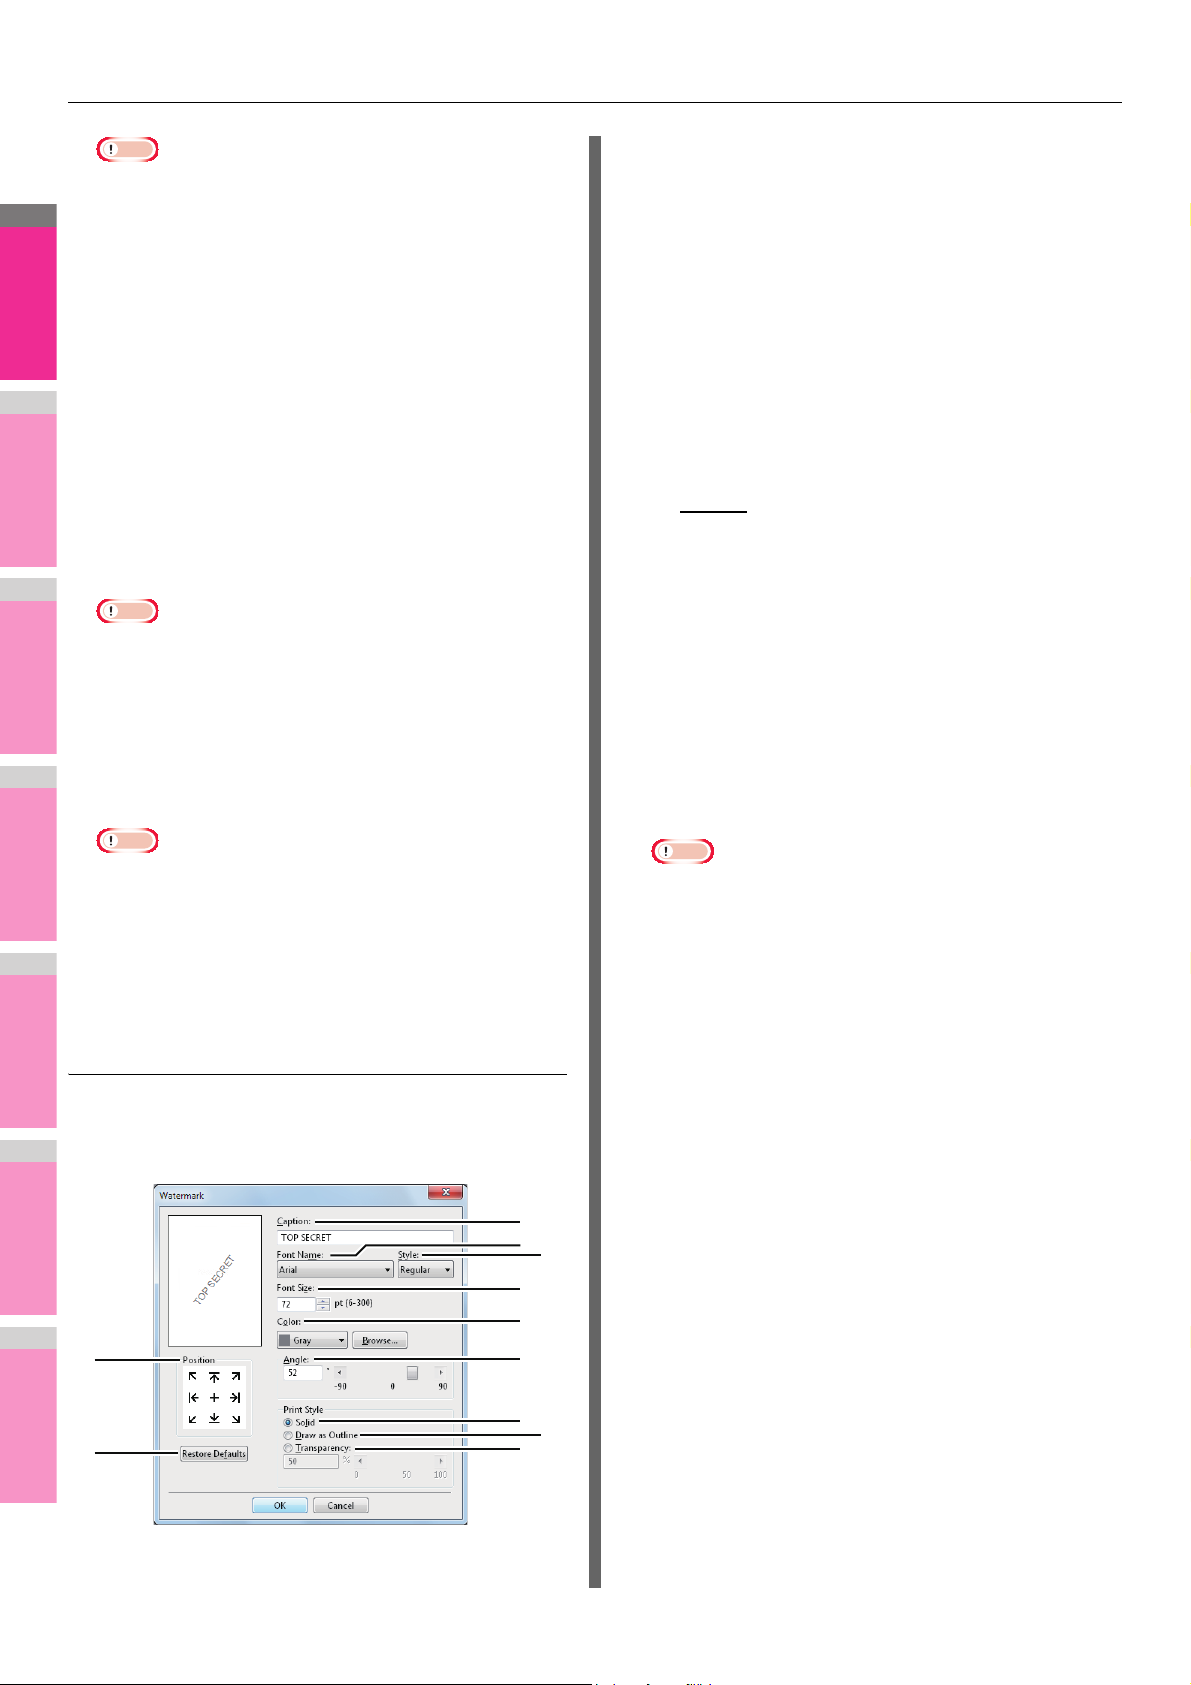
PRINTING FROM WINDOWS
2
1
3
4
5
6
7
Note
Note
Note
1
11
2
5
6
7
8
10
3
4
9
• [None] and [Multiple Overlays] cannot be deleted.
Print Over the Document
Select this check box to print an overlay image over the
document.
Print on Each Page
This selects whether overlay images are printed for each
page or paper when multiple pages are printed on one
sheet with options such as Number of pages per sheet or
Booklet. Select this check box when overlay images are
printed for each page.
3) Rotate 180 Degrees
Select this check box to perform rotation printing of an
image.
4) Mirror
Select this check box to perform mirror printing of an
image.
• This function is available only for the printer drivers
below.
-PCL
-XPS
5) Negative/Positive
Select this check box to perform negative printing of an
image.
1) Position
Select this to adjust the position of the watermark. Click the
arrow button or [+] located at the center to adjust it.
2) Caption
Enter the text of a watermark. You can enter up to 63
alphanumeric characters.
When you are editing a watermark, the selected watermark
text is displayed in the box.
The entered text is displayed as the sample image on the
left.
3) Font Name
Select the font to be used for the watermark text.
4) Style
Select the font style for the watermark text.
- Regular
— Select this to set the regular style to the
text.
- Bold — Select this to set the bold style to the text.
- Italic — Select this to set the italic style to the text.
- Bold Italic — Select this to set the bold and italic style
to the text.
5) Font Size
Enter the font size for the watermark text. The font size can
be set from 6 to 300 pt in units of 1 pt.
6) Color
Select the color of the watermark text. If the color that you
require is not listed in the box, click [Browse] to add new
color.
• The Negative/Positive option is available only when
[Black and White] is selected at the [Color] box on the
[Basic] tab.
• This function is available only for the printer drivers
below.
- PS3
- XPS
Add/Edit Watermark
When you click [Add] or [Edit], the [Watermark] dialog box
appears and you can create new watermark or edit selected
watermarks.
Note
• When [Black and White] is selected at the [Color] box on
the [Basic] tab, this option will be disabled.
7) Angle
Enter the degree of angle for rotating the watermark text.
The angle can be set from -90 to 90 degrees in units of 1
degree. You can also set the degree of the angle by moving
the scroll bar.
8) Solid
Select this to print a solid type of watermark.
9) Draw as Outline
Select this to print a outline type of watermark.
10)Transparency
Select this to print a transparent watermark. When you
select this, set the brightness from 0 (darker) to 100%
(lighter) in units of 1%. You can also set the brightness
using the scroll bar.
11) [Restore Defaults]
Click this to restore the settings displayed in the
[Watermark] dialog box to the original factory defaults.
- 27 -
Page 28
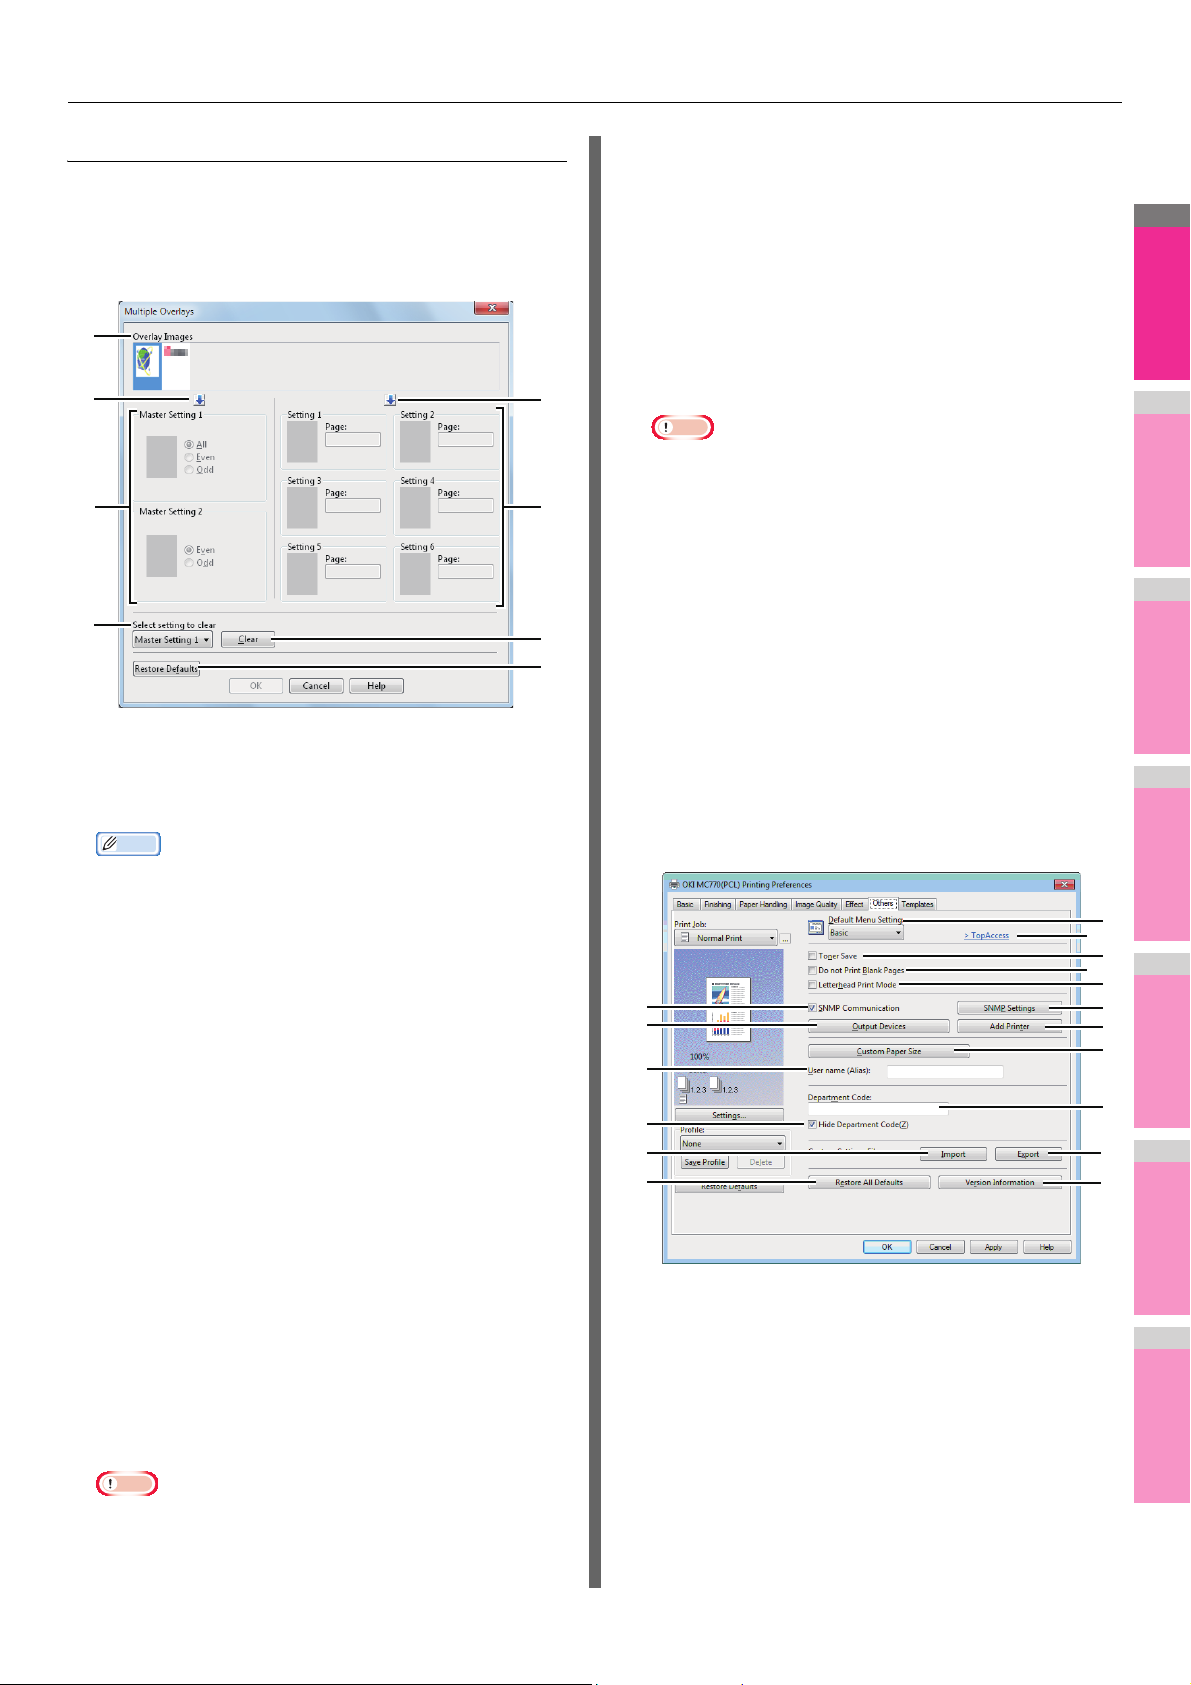
PRINTING FROM WINDOWS
2
1
3
4
5
6
7
Memo
Note
Note
1
6
2
4
3
5
7
8
1
10
3
17
15
5
12
14
2
4
7
9
6
8
11
13
16
Multiple Overlays
If you click [Details] when [Multiple Overlays] or the desired
overlay is selected in the [Overlay Image] box, the [Multiple
Overlays] dialog box appears. Set which overlay image is
applied to which page in this dialog box.
• If the specified pages are overlapped in both settings of
[Master Setting] and [Setting], the setting of [Setting] has
priority over that of [Master Setting].
5) Setting 1/2/3/4/5/6
This sets pages to which the selected overlay image is
applied by page number. To specify more than one page,
delimit with commas such as “1, 3, 5”. To specify pages in a
range, use a hyphen between the first and the last pages,
such as “6-10”.
- Page — Select this to apply the selected overlay image
only to the specified pages.
• If the specified pages are overlapped among multiple
settings, the newer setting has priority.
6) Select setting to clear
This selects the overlay image setting to be cleared.
7) [Clear]
This clears the overlay image setting selected in the [Select
setting to clear].
8) [Restore Defaults]
Click this to restore the settings displayed in the [Multiple
Overlays] dialog box to the original factory defaults.
1) Overlay Images
The registered overlay images are displayed in a
thumbnail. Select the desired overlay image.
[Others] tab
The [Others] tab contains print options such as toner saving,
custom paper size and so on.
• You can drag and drop an overlay image in the
thumbnail to the desired overlay group (Master Setting
1/2 or Setting 1/2/3/4/5/6) to set directly. If another
overlay image is already set in the selected group, the
overlay image is overwritten.
2) [ ] (Master Setting)
This sets the overlay image selected in the [Overlay
Images] box in the [Master Setting] field. Selection is
switched in the order of [Master Setting 1] to [Master
Setting 2] every time you click this.
3) [ ] (Setting)
This sets the overlay image selected in the [Overlay
Images] box in the [Setting] field. Selection is switched in
the order of [Setting 1], [Setting 2], [Setting 3], [Setting 4],
[Setting 5] and [Setting 6] every time you click this.
4) Master Setting 1/2
This sets if the selected overlay image is applied to all,
even or odd pages.
- All — Select this to apply the chosen overlay image to
all pages.
- Even — Select this to apply the chosen overlay image
only to even pages.
- Odd — Select this to apply the chosen overlay image
only to odd pages.
1) Default Menu Setting
Select the default tab that is displayed when you open the
printing preferences of the printer driver. Set frequently
used functions as a default menu setting for your
convenience.
• If the specified pages are overlapped among multiple
master settings, the setting of [Even] or [Odd] has
priority over that of [All].
- 28 -
Page 29
PRINTING FROM WINDOWS
2
1
3
4
5
6
7
Note
Note
Note
Note
Note
Memo
• If you made settings on the [Others] tab menu from the
print setting page of the application, they are restored to
the defaults when you close the printer driver.
If you want to resume the settings, set the printer driver
from the [Devices and Printers] folder.
P.9 "Setting initial values of print options"
2) TopAccess (Link)
Click this to start a web browser and display the TopAccess
menu.
3) Toner Save
Select this check box to print in the toner save mode.
• When the toner save mode is enabled, printing may
become lighter.
4) Do not Print Blank Pages
Select this check box to ignore blank pages for printing.
If the Watermark feature is enabled, all pages will be
printed even when the content is blank.
9) [Add Printer]
Select this to add the equipment found on the network to
[Printer Folder].
P.31 "Add Printer"
10) [Custom Paper Size]
Click this to specify the custom paper size. The [Custom
Paper Size] dialog box appears when you click this.
P.31 "Custom Paper Size"
Note
• In order to set [Custom Paper Size], you must access
the printer driver properties from the [Devices and
Printers] folder, but not from the [Print] dialog box in the
application.
• The [Custom Paper Size] can be set only by an
operation with the administrator privilege.
11) User name (Alias)
Enter a nickname as required, which is displayed on the
Private Print job list and Hold Print job list. You can specify
the desired name so that you can easily find the target job
from the job list when releasing it from the equipment’s
touch panel.
• The pages having a header or footer will be printed even
if the content is blank.
5) Letterhead Print Mode
Select this to add a blank sheet to the last page when
duplex printing is performed and the original has oddnumber pages.
6) SNMP Communication
This enables SNMP communication between this
equipment and your computer to retrieve the option
configuration information.
• If you disable SNMP Communication,
TopAccessDocMon notification also will be disabled.
7) [SNMP Settings]
Click this button when you need to verify or change the
SNMP settings.
P.30 "SNMP Settings"
• In order to set [SNMP Settings], you must access the
printer driver properties from the [Devices and Printers]
folder, but not from the [Print] dialog box in the
application.
8) [Output Devices]
This switches the equipment to be used for printing or splits
one print job between two pieces of equipment (Tandem
Printing).
P.53 "Switching equipment to print jobs"
P.54 "Splitting a print job across two pieces of
equipment (Tandem Printing)"
• Up to 31 characters can be entered for the [User name
(Alias)] box.
• The user name that is entered to log in to your computer
is initially used for [User name (Alias)]. If the user name
is not changed, the log-in user name is displayed on the
Private Print job list and Hold Print job list.
• The nickname entered for the [User name (Alias)] box is
applied only to the Private Print job list and Hold Print job
list. On other job list screens (Scheduled Print jobs /
Invalid jobs) and the Print Log screen, the log-in user
name is always displayed.
12)Department Code
Enter the user’s department code if the system is managed
with department codes. Please ask your administrator for
your department code.
Note
• When the User Management setting is enabled, it is
used to manage a print job instead of the Department
Code Management setting. In this case, a user name
that has been entered to log in to your computer is used
for the authentication of the print job. Therefore, you do
not need to set your department code to the printer
driver but you must register your user name in advance.
If your user name is not registered, the print job is
processed as an invalid one according to the User
Authentication Enforcement setting. Also if a print job is
sent in RAW format, it is processed according to the
RAW Print Job setting. For more information about the
User Authentication Enforcement setting or the RAW
Print Job setting, refer to the TopAccess Guide.
• If the No Limit Black function is enabled, you do not have
to specify the department code when you print a
document with selecting [Black and White] in the [Color]
option in the [Basic] tab of the printer driver.
- 29 -
Page 30
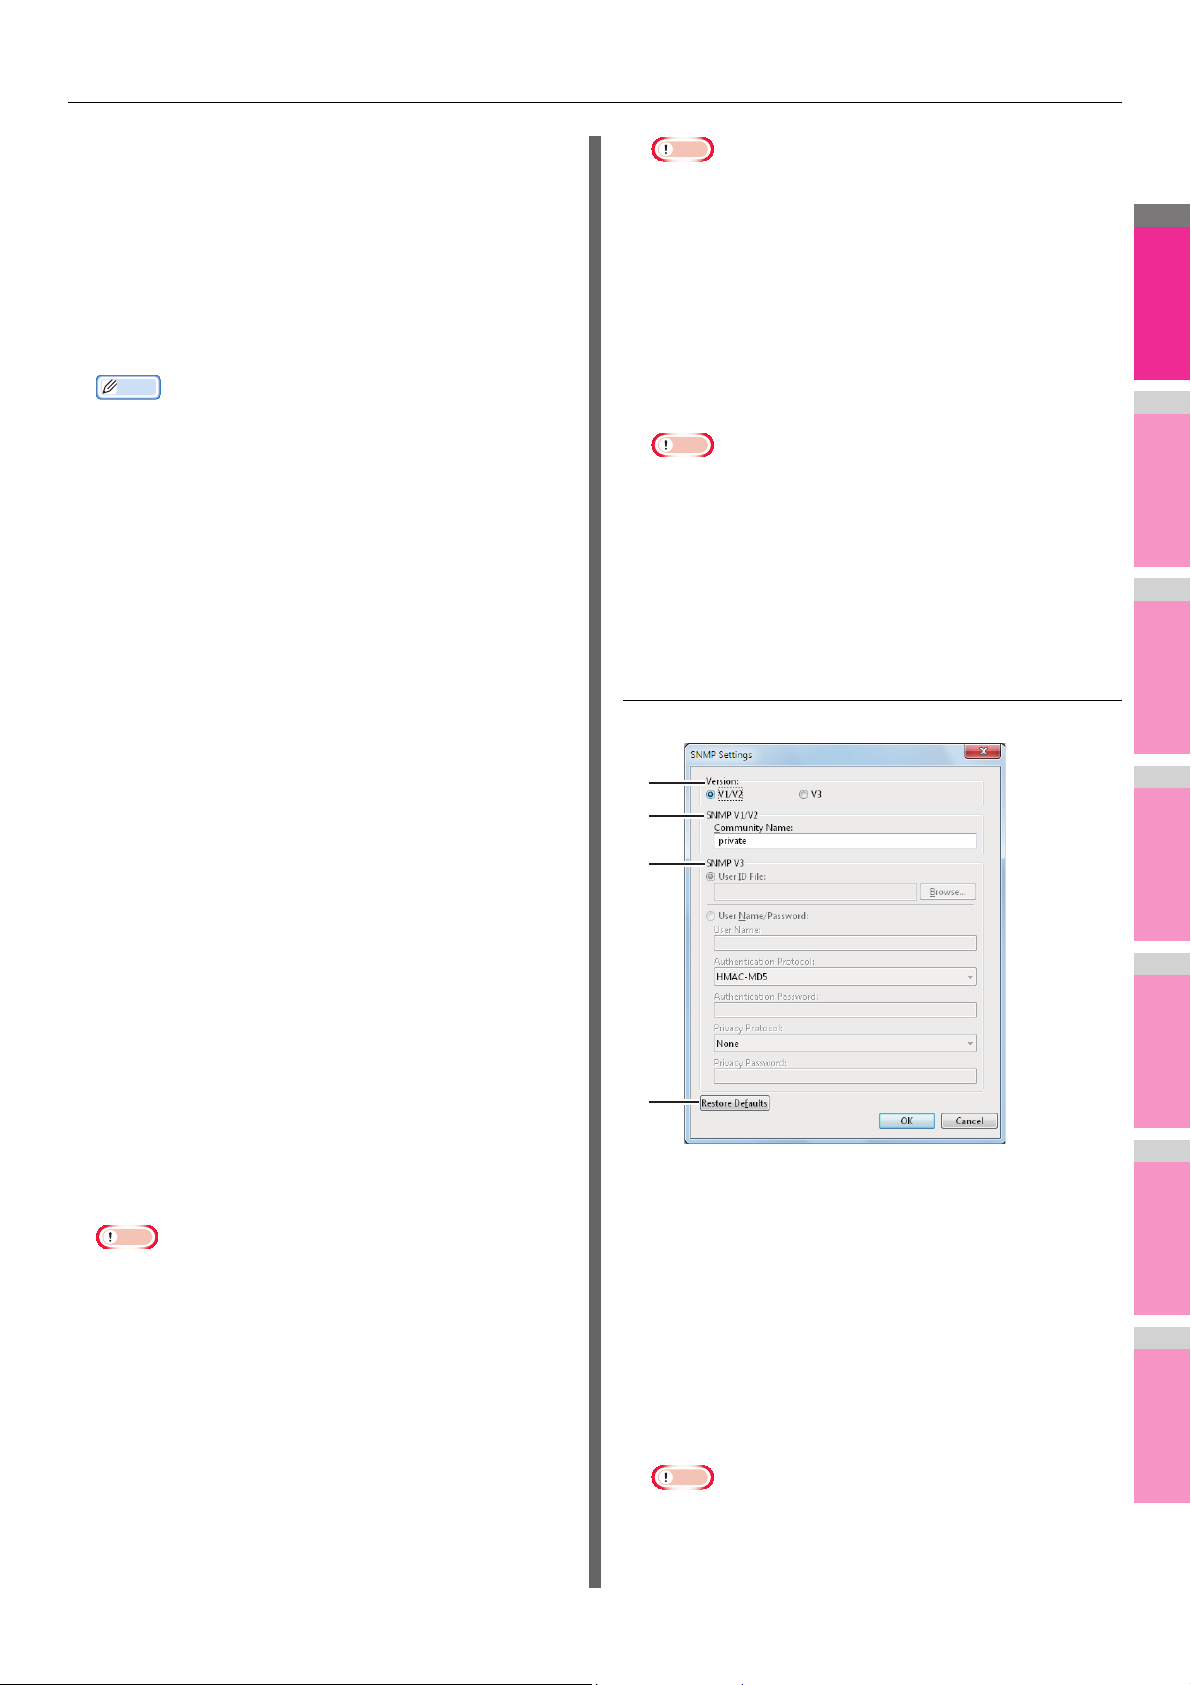
PRINTING FROM WINDOWS
2
1
3
4
5
6
7
Memo
1
2
3
4
• If the number of the printed sheets for a print job
Note
exceeds the output limitation for the entered department
code, the print job is stored in the invalid department
code print job list without printing. When you want to
print the print job, perform printing from [JOB STATUS]
on the touch panel by entering another department code
for which the output limitation is more than the number of
printed sheets.
• In the [Department Code] box, you can enter a
department code within 63 characters.
• In order to set and perform [Export], you must access
the printer driver properties from the [Devices and
Printers] folder, but not from the [Print] dialog box in the
application.
16) [Restore All Defaults]
Click this to return settings in all the tab menus other than
the [Device Settings] tab menus to the default ones. A
confirmation dialog box appears as you click this, and if you
click [OK], print settings in all the tab menus will return to
the default ones.
• How the equipment performs printing for an invalid
department code print job, for which an invalid
department code is specified, varies depending on the
Invalid Department Code Print Job setting that can be
set in the TopAccess Administrator mode and whether
SNMP communication is enabled or not.
- When SNMP communication is enabled and Invalid
Department Code Print Job is set to [Store to invalid job
list], an error message will be displayed when an invalid
department code is entered.
- When SNMP communication is disabled and Invalid
Note
• If you want to change the settings in the [Font] and
[Device Settings] tab menus, you need to access with
the administrator privilege from the Printers folder. For
the details, see the following page:
P.32 "[Device Settings] tab"
17) [Version Information]
Click this to display the [Version Information] dialog box.
Department Code Print Job is set to [Store to invalid job
list], the invalid department code print job will be stored
SNMP Settings
in the invalid department code print job list without
printing.
- When the Invalid Department Code Print Job is set to
[Print], the invalid department code print job will be
printed.
- When the Invalid Department Code Print Job is set to
[Delete], the invalid department code print job will be
deleted.
13) Hide Department Code
Select this check box to display a department code in the
blank symbols.
14) [Import]
Click this to import custom settings (e.g. template,
watermark, overlay, image quality type, custom paper size,
profiles) to the printer driver.
How to import custom settings
- Click [Import]. A dialog box to select a file appears.
Select a file (*cfu for PCL, *cfp for PS3, *cfv for XPS) to
be imported.
- Click [Open]. A dialog box to confirm if you overwrite the
file appears. Then click [OK].
Note
• In order to set and perform [Import], you must access the
printer driver properties from the [Devices and Printers]
folder, but not from the [Print] dialog box in the
application.
15) [Export]
Click this to export custom settings (e.g. template,
watermark, overlay, image quality type, custom paper size,
profiles) from the printer driver.
How to export custom settings
- Click [Export].
- The [Save as] dialog box appears. Specify a file name
and a directory. Then click [Save].
1) Version
Be sure to have the correct SNMP version set for your MFP
and select from the following options:
- V1/V2 — Select this option to enable SNMP V1 and V2.
- V3 — Select this option to enable SNMP V3.
- V1/V2/V3 (for [Discovery Settings] dialog box only)
— Select this option to enable SNMP V1, V2, and V3.
2) SNMP V1/V2
Community Name—If a community name other than
“private” (default) is set for the SNMP community name for
your MFP, enter its community name.
Note
• To find your MFP under the SNMP V1/V2 environment,
the community names set for the target MFP must be
specified correctly. For help, consult your administrator.
- 30 -
Page 31

PRINTING FROM WINDOWS
2
1
3
4
5
6
7
Note
1
3
4
2
1
2 3
5
4
6
3) SNMP V3
• To change the community name, the administrator
privilege is necessary. You must log in with the
“Administrator” privilege and open the printer driver
properties.
• Up to 31 characters including the following symbols can
be entered for the Community Name.
! " # $ % & ' ( ) * + , - / : ; < = > ? @ [ \ ] ^ _ ` { | } ~
If SNMP V3 is enabled, select one of the following items to
set how users are authenticated.
User ID File — Select this option when you want to use a
user ID file. Click [Browse] and specify the user ID file.
User Name/Password — Select this option when you want
to use the user name and password. When this option is
selected, use the keyboard to select the following items:
- User Name
- Authentication Protocol
- Authentication Password
- Privacy Protocol
- Privacy Password
• If you select to enable SNMP V3, consult your network
administrator for preliminary advice on how to
authenticate users.
• Up to 31 characters including the following symbols can
be entered for each of the User Name, Authentication
Password and Privacy Password.
! $ % & ' ( ) - , < > @ [ ] ^ _ ` { } ~
4) Available Printer List
This indicates the printers registered in [Printer Folder].
Custom Paper Size
In the [Custom Paper Size] dialog box, up to 40 custom paper
sizes can be defined. The custom page size that you specify
can be selected in the [Original Paper Size] and [Print Paper
Size] box on the [Basic] tab.
Memo
• The defined custom paper size setting can be used in
common for the PCL/PS3/XPS printer drivers.
4) [Restore Defaults]
Click this button when you want to reset all the settings
back to the defaults.
Add Printer
1) Paper Size List
1) Discovered Printers
This displays the MFP discovered over a network. You can
check its name, installation site, model name and status.
2) [Add]
This adds the printers selected in the [Discovered Printers]
box to [Printer Folder].
3) [Information]
This indicates the basic information of the machine
selected in the [Discovered Printers] box. You can check
the availability of color printing, 2-sided printing or stapling,
its copying speed, resolution and the type of paper placed.
Select the custom paper size that you want to modify.
2) [Add]
Click this to save the settings over the selected custom
paper size that you selected in the [Paper Size List].
Note
• If you click [Add], a dialog box prompting you to confirm
that the custom paper size differs depending on the
model. Select the custom paper size that your
equipment supports.
3) [Delete]
Click this to clear and restore the default settings of the
selected custom paper size that you selected in the [Paper
Size List]. When you click this, the confirmation dialog box
appears. Click [Yes] to delete the setting.
- 31 -
Page 32

PRINTING FROM WINDOWS
2
1
3
4
5
6
7
Note
Note
Note
4) Name
5) Paper Size
6) Units
Note
• To register a custom paper size, either A (Length) or B
(Width) should differ by more than 0.3 inches (7 mm)
from the standard paper size. If not, the created custom
paper size is considered as the standard paper size.
• You cannot create a custom paper size with A (Length)
longer than B (Width). If you want to print such a
document, do so by selecting [landscape] for the
[Orientation].
• There are some precautions when you use paper larger
than the standard sizes. For details, see the following
page:
P.52 "Printing on paper larger than standard sizes"
Enter the custom paper size name. You can enter up to 63
characters. This name will be displayed in the [Original
Paper Size] and [Print Paper Size] box on the [Basic] tab.
Enter A (Length) and B (Width) to specify the paper size.
• Select values within the range shown on the right of
each.
Select the unit for the paper size. The default unit varies
depending on the regional setting in the Windows.
1) Model Selection
This sets the model type.
• If you select [Universal], you can narrow down the setup
items of the printer driver to those used commonly in all
of the entire MFP. It is convenient in such cases as when
you are using a printer driver already installed to other
models.
2) Option
This option sets whether the following optional devices are
installed.
Trays
This sets the installation of trays according to the
configuration.
- Tray 1 — Select this when only Tray 1 is installed.
- Tray 1 & Tray 2 — Select this when Trays 1 and 2 are
installed.
- Tray 1, 2 & Tray 3 — Select this when Trays 1, 2 and 3
are installed.
- Tray 1, 2 & Tray 3, 4 — Select this when Trays 1, 2, 3
and 4 are installed.
3) Finisher
This sets whether or not the Finisher is installed.
- None — Select this when a Finisher is not installed.
- Inner Finisher (1 Tray) — Select this when a Finisher
is installed.
[Device Settings] tab
The [Device Settings] tab allows you to configure options.
When any optional unit is installed in this equipment, set the
configuration of the machine on this tab. The [Device Settings]
tab can be displayed only from the Printers folder (and not
when displaying the properties from the application’s print
dialog box).
• In order to set the [Device Settings] tab, you must access
the printer driver properties from the [Devices and Printers]
folder. For detailed instructions on how to set the [Device
Settings] tab, see the following guide:
Basic Guide
4) [Tray Setings]
Click this to set the paper size and paper type of each tray.
The [Tray Setings] dialog box appears by clicking this.
5) [Account Settings]
Click this button to set whether the user management
setting is enabled or not. You can also set whether the
Private Print Restriction function and Hold Print Restriction
function are enabled or not. The [Account Settings] dialog
box appears upon clicking this button.
P.33 "Account Settings"
6) [Customization]
This sets options specific to PCL6 or PostScript, or
changes the Plug-in settings or the printer driver language.
When you click this, the [Customization] dialog box
appears.
P.34 "Customization: [Plug-in] tab"
P.35 "Customization: [Language] tab"
1
2
3
P.35 "Customization: [PDL Settings] tab"
Note
• The Printer Language setting is available only for the
printer drivers below.
-PCL
- PS3
8
9
4
5
6
7
7) [Version Information]
Click this to display the [Version Information] dialog box.
8) Device Settings Retrieval
This enables SNMP communication between this
equipment and your computer to retrieve the option
configuration information.
- 32 -
Page 33

PRINTING FROM WINDOWS
2
1
3
4
5
6
7
Memo
Note
Memo
Memo
Memo
1
2
3
4
5
1
2
3
4
5
6
7
Update Automatically
Select this check box to update the option configuration
information automatically every time you open the [Device
Settings] tab.
[Update Now]
Click this to obtain the configuration information from this
equipment immediately.
• If the connection to the equipment has not been
configured correctly, the message “The address of your
machine could not be located. Would you like to find it?”
will be displayed when you click [Update Now]. If it is
displayed, click [Yes] and search for the equipment
using the [Local Discovery] dialog box. After searching
for the equipment, SNMP communication will be
enabled. For the instructions on how to search for the
equipment, refer to the instructions of
TopAccessDocMon.
• If you disable SNMP Communication,
TopAccessDocMon notification also will be disabled.
• Trays selectable differ depending on the option
configuration.
Account Settings
9) [Restore Defaults]
Click this to restore the configuration of this equipment
displayed in the [Device Settings] tab menu to the original
factory defaults.
Tray Settings
• When SNMP communication is enabled, the following
account information is automatically obtained from the
equipment.
1) User Authentication
Select the authentication method which is to be used. Set it
to correspond to that of your MFP.
- Off — Select this not to perform user authentication.
- MFP Local Authentication — Select this to perform
MFP Local Authentication.
- Windows Domain Authentication — Select this to
perform Windows Domain Authentication.
- LDAP Authentication — Select this to perform LDAP
Authentication.
1) Paper Size
Select the paper size set in each tray.
2) Enter the user credentials manually
When this check box is selected, you are prompted to enter
your user name and password every time you print a
2) Paper Type
Select the paper type set in each tray.
3) Attribute
Select the attribute of the paper. When you set the attribute,
the tray will be selected preferentially according to the print
settings.
4) Override Application Paper Source Settings
Select this check box to use the paper source setting in the
printer driver rather than the application setting.
5) [Restore Defaults]
Click this to restore the settings displayed in the [Tray
Settings] dialog box to the original factory defaults.
document. This option is available when any of MFP Local
Authentication, Windows Domain Authentication, or LDAP
Authentication is selected in the [User Authentication] box.
• This option can be used together with any of the user
authentication functions (MFP Local Authentication,
Windows Domain Authentication, LDAP Authentication).
3) User Name
The user name that is entered to log in to your computer is
displayed.
4) Domain Name
The domain name on which the equipment belongs is
displayed.
- 33 -
Page 34

PRINTING FROM WINDOWS
2
1
3
4
5
6
7
Memo
Memo
2
1
3
4
5
6
7
5) LDAP Server Settings
When you click this button, the [LDAP Server Settings]
dialog box will appear. This option can be selected only
when [LDAP Authentication] is selected in the [User
Authentication] box.
P.34 "Setting up LDAP servers"
6) Private Print Restriction
Select this check box to enable the Private Print Restriction
function.
7) Hold Print Restriction
Select this check box to enable the Hold Print Restriction
function.
• For details and setting of the Private Print Restriction
function and Hold Print Restriction function, refer to the
TopAccess Guide.
• After you adjust settings in the [Account Settings] dialog
box, make sure to confirm that the settings have been
changed as specified in the printing preferences dialog
box, accessing from the [File] menu > [Printing
Preferences]. You can also confirm that the settings
have been changed as specified on the properties page
of the printer driver when you print documents from
applications.
2) [Add]
Click this button to register the LDAP server in the [Server
Name List], which has been entered in the [Server Name]
box.
3) Server Name List
The registered LDAP servers are displayed in this list. Up
to 16 LDAP servers can be registered.
4) [Delete]
Click this button to delete an LDAP server in [Server Name
List]. Select the LDAP server that you want to delete in the
list, and click this button.
Customization: [Plug-in] tab
You can enable or disable the Plug-in setting.
Setting up LDAP servers
The [LDAP Server Settings] dialog box allows you to register
LDAP servers.
1
2
3
4
1) Server Name
Enter the desired LDAP server in this box if needed.
• Up to 64 characters (excluding # ; \ =) can be entered for
the [Server Name] box.
1) Paper Handling
Select this check box to enable the [Paper Handling] tab.
P.19 "[Paper Handling] tab"
2) Image Quality
Select this check box to enable the [Image Quality] tab.
P.21 "[Image Quality] tab"
3) Effect
Select this check box to enable the [Effect] tab.
P.25 "[Effect] tab"
4) Templates
Select this check box to enable the [Templates] tab.
P.35 "[Templates] tab"
5) Add Printer
Select this check box to enable [Add Printer] on the
[Others] tab.
P.28 "[Others] tab"
P.31 "Add Printer"
6) Tandem Print
Select this check box to enable [Output Devices] on the
[Others] tab.
P.28 "[Others] tab"
P.53 "Switching equipment to print jobs"
P.54 "Splitting a print job across two pieces of
equipment (Tandem Printing)"
- 34 -
Page 35

PRINTING FROM WINDOWS
2
1
3
4
5
6
7
Memo
Note
1
2
7) [Restore Defaults]
Click this to restore the factory defaults on the [Plug-in] tab.
Customization: [Language] tab
You can switch printer driver language.
1) Language
This selects the language to be used.
- Auto
• [Auto] is selected by default. When [Auto] is selected,
2) [Restore Defaults]
Click this to restore the factory defaults on the [Language]
tab.
/ Chinese (Simplified) / Chinese (Traditional) /
Danish / Dutch / English (UK) / English (US) / Finnish /
French / German / Italian / Japanese / Norwegian,
Nynorsk / Polish / Russian / Spanish / Swedish/ Turkish/
Czech / Greek / Hungarian / Portuguese (Brazil) /
Portuguese (Portugal)
the most appropriate printer driver language is
automatically set according to the regional and language
settings in Windows OS.
Customization: [PDL Settings] tab
• The PDL setting is available only for the printer drivers
below.
- PS3
1
2
3
4
1) Output PDL
The setting is fixed to [PCL6] when the PCL printer driver is
used. The setting is fixed to [PostScript] when the PS3
printer driver is used.
2) JPEG Compression
This sends compressed JPEG data to this equipment. This
setting is displayed only when the PCL printer driver is
used.
3) Bold level
This adjusts the boldness level of characters. You can
adjust the preferred level between 0.000 and 1.000. The
default value is “0.017”.
Note
• This option may have no effect on some fonts.
4) [Restore Defaults]
Click this to restore the factory defaults on the [PDL
Settings] tab.
[Templates] tab
You can register print options that you frequently use as a
profile. On the [Templates] tab you can save this profile in a
Template Button. Also you can display a dialog box for
selecting Template Buttons automatically upon printing,
enabling easy printing with profiles.
P.10 "Setting up print options with Template Buttons"
Memo
• To use a Template Button, you must first save a profile in
this button. For instructions on how to save profiles, see the
following page:
P.9 "Setting print options using profiles"
- 35 -
Page 36

PRINTING FROM WINDOWS
2
1
3
4
5
6
7
1
2
3
4
1
2
3
4
Edit Templates
You can edit the settings of the Template Buttons.
1) Number of Copies
This sets the number of copies. 1 copy to 999 copies.
2) Template Button
Click this to apply the profile saved in a Template Button to
each setting of the printer driver.
On the Template Button, the name of the profile saved and
the print image of the job appear. 5 factory default profiles
below are saved in a Template Button. You can save up to
6 profiles, including 5 default ones.
- BW, Duplex, Staple & 2in1
- Color Booklet
- Duplex & Staple
- Duplex, Staple & 2in1
- Duplex, Staple & Punch
3) Templates Dialog Box
Select this check box to display the [Templates] dialog box
automatically upon printing. You can select any of the
Template Buttons displayed on the [Templates] dialog box.
This saves you the effort of opening the printer driver menu
and setting up profiles each time you print, in such cases as
when you use profiles frequently.
4) [Edit]
This edits the Template Buttons. Click this to display the
[Edit Templates] dialog box.
P.36 "Edit Templates"
1) Profile
This selects the profile to be saved in a Template Button.
2) Template Button
This selects the Template Button to be edited.
3) [Save]
This saves the chosen profile in the selected Template
Button.
4) [Delete]
This deletes the settings of the selected Template Button.
Note
• The print options registered in each profile are not
deleted even if you click [Delete].
- 36 -
Page 37

PRINTING FROM WINDOWS
2
1
3
4
5
6
7
Note
Printing With Best Functions for Your Need s
In this section, procedures are given to print various types of
print jobs, using the layout and finishing options. Read this
section before starting printing and select the procedure best
suited for your needs.
P.37 "Printing various print job types"
P.43 "Layout and finishing options in [Basic] tab menu"
P.45 "Layout and finishing options in [Finishing] tab menu"
P.49 "Finishing options in [Paper Handling] tab menu"
P.50 "Finishing options in [Effect] tab menu"
P.52 "Using various types of paper"
P.53 "Switching equipment to print jobs"
P.54 "Splitting a print job across two pieces of equipment
(Tandem Printing)"
Printing various print job types
The printer drivers provide various ways to handle such jobs as
Scheduled Print, Private Print, Hold Print, Proof Print, Overlay
Image file, Store to e-Filing, and Multiple Job Type.
P.37 "Printing scheduled print jobs"
P.38 "Printing private print jobs"
P.39 "Printing hold print jobs"
P.39 "Printing proof print jobs"
P.40 "Creating an overlay file"
P.40 "Storing to e-Filing"
P.42 "Multiple Job Type"
Printing scheduled print jobs
The Print Scheduling feature allows you to specify the date and
time to print your job. This is especially useful for delaying your
print job until the off-peak hours.
• Time of the System and MFP should be the same.
Printing on a specified date and time
Display the [Basic] tab menu.
1
Select [Scheduled Print] in the [Print Job]
2
box.
Click [...] on the right of the [Print Job] box.
3
The [Scheduled Print] dialog box appears.
Click the arrow button at the [Date] box to
4
display the Calendar window, and select the
desired date for your print job.
Select the [Time] box and click the spin
5
button to change the time.
• To change the hour, select the hour number and click
the spin button.
• To change the time, select the time number and click
the spin button.
- 37 -
Page 38

PRINTING FROM WINDOWS
2
1
3
4
5
6
7
Memo
Memo
Click [OK].
6
Set any other print options you require and
7
click [OK].
Click [OK] or [Print] to send the print job.
8
The document will be queued to be printed at the
specified time and date.
Printing private print jobs
When you want to print private documents, use this feature.
Printing confidential documents
Display the [Basic] tab menu.
1
Select [Private Print] in the [Print Job] box.
2
Set any other print options you require and
3
click [OK].
Click [OK] or [Print] to send the print job.
4
The print job is stored in the Private Print job list in the
touch panel display.
Enter a password in the [Password] box
5
and click [OK].
Select [PRIVATE] on the touch panel.
7
• If the Private print job list is not displayed, select
[PRIVATE] from the box of the job types.
Select the desired user name and press
8
[OK].
• When you enter the nickname for the [User name
(Alias)] box on the [Others] tab, and send the job to the
equipment, its nickname will be displayed on the
Private Print job list. If not, the user name that is
entered to log in to your computer will be displayed on
the Private Print job list.
Enter the password for the Private Print job,
9
which has previously been set via the
computer, and then press [OK].
• When the user name that is entered to log in to your
computer is used for [User name (Alias)]:
The displayed list contains the Private Print jobs for
which the same password has been set.
• When the nickname is entered for [User name (Alias)]:
The displayed list contains the Private Print jobs for
which the same nickname and the same password
have been set.
Select the desired job (desired document
10
name) on the private print job list and press
[PRINT].
For the detailed instructions on how to use the control
panel, see the following page:
P.71 "Private Print jobs"
The print job is stored in the Private Print job list in the
touch panel display.
Note
• Enter a password using the alphanumeric characters
and symbol characters (ASCII code characters
between 0x21 to 0x7E) in the [Password] box. The
password must be between 1 and 63 characters.
• When you enter this password on the touch panel
display, confidential documents will be printed. If you
forget it, you will not be able to print them.
Press the [PRINT] button on the control
6
panel.
The print job list is displayed.
- 38 -
Page 39

PRINTING FROM WINDOWS
2
1
3
4
5
6
7
Note
Memo
Memo
Printing proof print jobs
You can print out one proof copy as a trial first. This helps to
prevent wasting paper. After you proof it, you are prompted to
specify whether you want to continue the print job or delete it.
• When you want to print multiple copies, each of which is to
be sent as an individual print job by your application, all the
copies, not just one copy, will be printed even if you set
Proof Print. In such a case, print just one trial copy first, and
then specify the required number of copies on the touch
panel display.
Printing a proof copy
Display the [Basic] tab menu.
1
Select [Proof Print] in the [Print Job] box.
2
Printing hold print jobs
When you want to print Hold Print documents, use this feature.
Printing hold print documents
Display the [Basic] tab menu.
1
Select [Hold Print] in the [Print Job] box.
2
Set any other print options as required and
3
click [OK].
Click [OK] or [Print] to send the print job.
4
The print job is stored in the Hold Print job list in the touch
panel display.
Set any other print options you require and
3
click [OK].
Click [OK] or [Print] to send the print job.
4
One copy of the document is printed and remaining sets
of job is stored in the Proof Job list in the touch panel
display.
Press the [PRINT] button on the control
5
panel.
Select [PROOF] on the touch panel.
6
Select the desired job on the proof print job
7
list and press [PRINT].
For detailed instructions on how to use the control panel,
see the following page:
P.70 "Proof Print jobs"
Press the [PRINT] button on the control
5
panel.
Select [HOLD] on the touch panel.
6
Select the desired user name.
7
• When you enter the nickname for the [User name
(Alias)] box on the [Others] tab, and send the job to the
equipment, its nickname will be displayed on the Hold
Print job list. If not, the user name that is entered to log
in to your computer will be displayed on the Hold Print
job list.
Select the desired job on the Hold Print job
8
list and press [PRINT].
For detailed instructions on how to use the control panel,
see the following page:
P.73 "Hold Print jobs"
• When the user name that is entered to log in to your
computer is used for [User name (Alias)]:
The displayed list contains the Hold Print jobs which
have been registered by the selected user.
• When the nickname is entered for [User name (Alias)]:
The displayed list contains all the Hold Print jobs which
have been registered by users having the same
nickname.
- 39 -
Page 40

PRINTING FROM WINDOWS
2
1
3
4
5
6
7
Note
Memo
Note
Creating an overlay file
You can save up to 20 documents as overlay files using printer
driver. You can print an overlay on the foreground or
background of a document. To do that, you must first create an
overlay file.
P.52 "Printing with an overlay file"
• If you save a multi-page document as an overlay file, only
the first page of the document will be saved as an overlay
file.
• Both the overlay file and the documents on which you
superimpose the overlay image must be created in the
same size, color mode, and orientation.
Printing a document as an overlay file
Display the [Basic] tab menu.
1
Select [Print to Overlay File] in the [Print
2
Job] box.
Click [...] on the right of the [Print Job] box.
3
The [Overlay Image Name] dialog box appears.
Enter an overlay image name and then click
4
[OK].
Storing to e-Filing
The Store to e-Filing feature allows you to send print jobs to eFiling on this equipment. The job stored to e-Filing can then be
printed from the touch panel display at a later time. It can be
also composed with other documents using the e-Filing web
utility.
You can select either a [public] or [user] box to store print jobs.
You can also specify a folder in which the print job is to be
stored in these boxes. The public box is shared by all users
who can see the jobs stored in this box. User boxes are boxes
that users can create as desired. Access to user boxes can be
restricted with a password.
• When the following paper sizes are selected for the originals
or the print paper, [Store to e-Filing] is not available.
Additionally, when paper of those sizes is also included in a
part of the documents, the printing job cannot be stored in
e-Filing either.
- Custom paper
- Non-standard size paper (multi-purpose tray)
- IndexCard 3x5''
- Envelope - Com9
- Envelope - Com10
- Envelope - Monarch
- Envelope - DL
- Envelope - CHO3
- Envelope - YOU4
- Envelope - C5
• When you store a document in e-Filing using the printer
driver, the printing image (not the original document in your
computer) will be stored in e-Filing.
• Documents stored in e-Filing are retained in the best image
quality for printing. If you want to download them into your
computer in a higher image quality, scan the original
documents and store them in e-Filing.
Memo
• You can manage the files within a box from the touch panel
display. Refer to the e-Filing Guide to manage files in a
box.
• You can also manage the files within a box using the e-Filing
web utility. Refer to the e-Filing Guide.
You can enter up to 63 characters.
Set any other print options you require and
5
click [OK].
Click [OK] or [Print] to send the print job.
6
The document is saved as an overlay file.
• You can use a created overlay file when you want to
print a document.
P.52 "Printing with an overlay file"
Saving a print job to a public box
Display the [Basic] tab menu.
1
Select [Store to e-Filing] in the [Print Job]
2
box.
- 40 -
Page 41

PRINTING FROM WINDOWS
2
1
3
4
5
6
7
Note
Set any other print options you require and
3
click [OK].
Select [Public Box].
4
When you specify a folder in which the print
5
job is to be stored in a Public Box, enter the
folder name in the [Box Folder] box.
Set any other print options you require and
3
click [OK].
Select a user box to save a print job and
4
enter the password (maximum 20-digit) for
the user box in the [Password] box if
required.
When you specify a folder in which the print
5
job is to be stored in a user box, enter the
folder name in the [Box Folder] box.
• If the entered folder name is not found, a new folder is
6
7
8
Saving a print job to a user box
1
2
created under this box.
• Enter the folder name within 64 characters.
• If the number of folders has reached 100, you cannot
create any more.
If you print the job as well as save it to the
Public Box, select the [Print] check box.
Click [OK].
Click [OK] or [Print] to send the print job.
The print job is saved to the public box.
Display the [Basic] tab menu.
Select [Store to e-Filing] in the [Print Job]
box.
Note
• If the entered folder name is not found, a new folder is
created under this box.
• Enter the folder name within 64 characters.
• If the number of folders has reached 100, you cannot
create any more.
If you print the job as well as saving to a
6
box, select the [Print] check box.
Click [OK].
7
Click [OK] or [Print] to send the print job.
8
The print job is saved to the specified user box.
- 41 -
Page 42

PRINTING FROM WINDOWS
2
1
3
4
5
6
7
Note
Memo
Note
Multiple Job Type
The Multiple Job Type feature allows you to combine any of
Scheduled Print, Private Print, Hold Print, Proof Print, Proof
Private Print and Proof Hold Print, with Store to e-Filing.
For example, you can store a job in the specified e-Filing of this
equipment and print it at the specified time by combining
Scheduled Print and Store to e-Filing.
To use the Multiple Job Type feature, click [...] on the right of
the [Print Job] box and select the job types to be combined.
• Before performing Scheduled Print, make sure the date and
time of this equipment and your computer are the same.
• When you print multiple copies, each of which is to be sent
as an individual print job by your application, all of the
copies are printed even if you set Proof Print. In this a case,
perform Proof Print of only one copy first, and then change
the number of copies on the touch panel to print the rest.
• Documents stored in e-Filing are retained with the optimal
image quality for printing. If you want to download them into
your computer with a higher image quality, scan the original
documents and store them in e-Filing.
• When you store a document in e-Filing using the printer
driver, it is stored as an image. This is not stored in e-Filing
in the same way as the original document is stored in your
computer.
Select a job type in the [Print Job] box.
4
The setup screen is switched according to the selected
job type.
• Set [Date] and [Time] if you select [Scheduled Print].
• Enter a password if you select [Private Print] or [Proof
Private Print].
• You can manage files in e-Filing on the touch panel. For
instructions on how to manage them, refer to the e-Filing
Guide.
• You can also manage files in e-Filing using the e-Filing web
utility. For instructions on how to manage them with the eFiling web utility, refer to the e-Filing Guide.
Printing with the Multiple Job Type feature
Display the [Basic] tab menu.
1
Select [Multiple Job Type] in the [Print Job]
2
box.
• Enter a password using the alphanumeric characters
and symbol characters (ASCII code characters
between 0x21 to 0x7E) in the [Password] box. The
password must be between 1 and 63 characters.
• When you enter this password on the touch panel
display, confidential documents will be printed. If you
forget it, you will not be able to print them.
If you want to store a print job in this
5
equipment, select the [Store to e-Filing]
check box.
Click [...] on the right of the [Print Job] box.
3
The [Multiple Job Type] dialog box appears.
- 42 -
Page 43

PRINTING FROM WINDOWS
2
1
3
4
5
6
7
Note
Select where the print job is stored at the
6
[Store to] box.
• If you store the print job in a user box, enter a
password if required.
When you specify a folder in which the print
7
job is to be stored in the selected e-Filing,
enter its folder name in the [Box Folder]
box.
Layout and finishing options in [Basic] tab menu
Using the printer driver, you can set various layout options to
suit your preferences. In this section various printing functions
enabled with the [Basic] tab menu are explained.
P.43 "Fitting images within paper size"
P.44 "Printing color documents in gray scale"
P.45 "Printing color documents in twin colors"
Fitting images within paper size
You can automatically enlarge or reduce an image to fit into a
specified paper size, or manually set the scale to enlarge or
reduce it. Also you can combine the desired paper size and
reproduction ratio.
Printing enlarged or reduced image to fit the
specified paper size
Display the [Basic] tab menu.
1
Select the document size on the [Original
2
Paper Size] box. Then select the paper size
that you want to print at the [Print Paper
Size] box.
• If the entered folder name is not found, a new folder is
created in the selected e-Filing under this name.
• Enter a folder name within 64 characters.
• If the number of folders has reached 100, you cannot
create any more.
Click [OK].
8
Click [OK] or [Print] to send the print job.
9
• If you select [Scheduled Print], the job is printed at the
specified date and time.
• If you select [Private Print] or [Proof Private Print], the
job is stored in this equipment as a Private Print job.
Print this job on the touch panel.
P.38 "Printing private print jobs"
• If you select [Hold Print] or [Proof Hold Print], the job is
stored in this equipment as a Hold Print job. Print this
job on the touch panel.
P.39 "Printing hold print jobs"
• If you select [Proof Print], [Proof Private Print] or [Proof
Hold Print], one sample copy is printed and the rest is
stored in this equipment as a Proof Print job. Print this
job on the touch panel.
P.39 "Printing proof print jobs"
• If you select the [Store to e-Filing] check box, the print
job is stored in the specified e-Filing.
The document image is automatically enlarged or
reduced depending on the original paper size and print
paper size.
Set any other print options you require and
3
click [OK].
Click [OK] or [Print] to send the print job.
4
The enlarged or reduced image is printed to fit the
specified paper size.
Printing an enlarged or reduced image by
specifying the scale manually
Display the [Basic] tab menu.
1
Check the [Image Scale] box. Then enter
2
the scale.
The scale can be set from 25% to 400% in units of 1%.
- 43 -
Page 44

PRINTING FROM WINDOWS
2
1
3
4
5
6
7
Set any other print options you require and
3
click [OK].
Click [OK] or [Print] to send the print job.
4
An enlarged or reduced image is printed in the specified
scale.
Combining a paper size and a reproduction
ratio
You can combine the desired paper size and reproduction
ratio, for example, printing an A5 original to A4 copy paper at a
reproduction ratio of 100%.
Display the [Basic] tab menu.
1
Select the document size on the [Original
2
Paper Size] box. Then select the paper size
that you want to print at the [Print Paper
Size] box.
Printing a color document in gray scale
Display the [Basic] tab menu.
1
Select [Black and White] at the [Color] box.
2
Set any other print options you require and
3
click [OK].
Click [OK] or [Print] to send the print job.
4
The print job is printed in the gray scale.
The document image is automatically enlarged or
reduced depending on the original paper size and print
paper size.
Check the [Image Scale] box. Then enter
3
the scale.
The scale can be set from 25% to 400% in units of 1%.
Set any other print options you require and
4
click [OK].
Click [OK] or [Print] to send the print job.
5
The image is printed on paper of the specified size at the
specified reproduction ratio.
Printing color documents in gray
scale
This equipment can print in color as well as black and white.
The printer driver automatically detects whether the document
uses only color or only black and white, and it prints the
document accordingly. Additionally, you can select the black
and white mode manually to print a color document in the gray
scale to reduce the print cost and consumption of color toners.
- 44 -
Page 45

PRINTING FROM WINDOWS
2
1
3
4
5
6
7
Printing color documents in twin
colors
This equipment can print in the twin color mode.
When the document is printed in the twin color mode, the black
parts of the document are printed in black and the colored parts
of the document are printed in a specified color.
Printing a color document in twin color mode
Display the [Basic] tab menu.
1
Select [Twin Color] at the [Color] box.
2
Click [Details].
3
The [Twin Color] dialog box appears.
Select a color in which the color parts of the
4
document are to be printed at the [Color]
box and click [OK].
Sort printing
You can select how multiple copies of a document to be output,
such as separately for each copy, grouping each page.
Sorting printed documents according to the
copies
Display the [Basic] tab menu.
1
Enter the number of copies to be printed at
2
the [Number of Copies] box.
Display the [Finishing] tab menu.
3
Select [Sort Copies] icon at [Copy
4
Handling].
Set any other print options you require and
5
click [OK].
Set any other print options you require and
5
click [OK].
Click [OK] or [Print] to send the print job.
6
The print job is printed in the twin color mode.
Layout and finishing options in [Finishing] tab menu
Using the printer driver, you can set various layout options to
suit your preferences. In this section various printing functions
enabled with the [Finishing] tab menu are explained.
P.45 "Sort printing"
P.46 "Printing on both sides of a sheet"
P.46 "Making a booklet"
P.47 "Printing several pages on one sheet"
P.48 "Stapling"
P.48 "Dividing one image into multiple sheets (Poster
Print)"
Click [OK] or [Print] to send the print job.
6
The printed documents are sorted according to the
copies.
Sorting printed documents according to the
pages
For example, assume that you have a three-page job (A, B, C)
and you want three copies of each page in this order (AAA,
BBB, CCC).
Display the [Basic] tab menu.
1
Enter the number of copies to be printed at
2
the [Number of Copies] box.
Display the [Finishing] tab menu.
3
Select [Group Copies] icon at [Copy
4
Handling].
- 45 -
Page 46

PRINTING FROM WINDOWS
2
1
3
4
5
6
7
Memo
Set any other print options you require and
5
click [OK].
Click [OK] or [Print] to send the print job.
6
The printed documents are sorted according to the
pages.
Printing on both sides of a sheet
You can print on both sides of the paper.
Printing on both sides of paper
Display the [Finishing] tab menu.
1
Select the [2-Sided Printing] check box and
2
select the direction to be printed.
Long Edge — Select this to print on both sides of the
paper with a margin on the long edge.
Short Edge — Select this to print on both sides of the
paper with a margin on the short edge.
Creating a booklet
Display the [Finishing] tab menu.
1
Select the [2-Sided Printing] check box and
2
select the [Booklet] icon.
Click [Details].
3
The [Booklet Details] dialog box appears.
Select the booklet size at the [Output
4
Document Layout] box.
• You can also set booklet printing at the [2-Sided
Printing] option by selecting the [Booklet] icon. For
instructions on how to perform booklet printing, see the
following section.
P.46 "Making a booklet"
Set any other print options you require and
3
click [OK].
Click [OK] or [Print] to send the print job.
4
The print job is printed on both sides of paper in the
specified direction.
Making a booklet
You can create a document in a book- or magazine-style
publication by selecting the Booklet option.
For example, if you create a document on Letter-size paper
(8½ x 11 inches) and then print in booklet mode, the yield is a
5½-x-8½- inch booklet. Each page has been scaled to fit on
half a sheet and reordered so that the booklet is properly
paginated when folded.
To retain your original document size when printing booklets,
select the booklet size to be the same as your original
document size.
A5 on A4 — Select this to print an A5 size booklet. Every
2 pages are printed on A4 paper to fit on half a sheet
(A5).
1/2 Folio on Folio — Select this to print a 1/2 Folio size
booklet. Every 2 pages are printed on Folio paper to fit on
half a sheet.
A6 on A5 — Select this to print an A6 size booklet. Every
2 pages are printed on A5 paper to fit on half a sheet
(A6).
Letter-Half on Letter — Select this to print a 1/2 Letter
size booklet. Every 2 pages are printed on Letter paper to
fit on half a sheet.
1/2 LG on LG — Select this to print a 1/2 Legal size
booklet. Every 2 pages are printed on Legal paper to fit
on half a sheet.
1/2 Statement on Statement — Select this to print a 1/2
Statement size booklet. Every 2 pages are printed on
Statement paper to fit on half a sheet.
1/2 13LG on 13LG — Select this to print a 1/2 13 inch LG
size booklet. Every 2 pages are printed on 13 inch LG
paper to fit on half a sheet.
1/2 8.5SQ on 8.5SQ — Select this to print a 1/2 8.5 inch
SQ size booklet. Every 2 pages are printed on 8.5 inch
SQ paper to fit on half a sheet.
32K on 16K — Select this to print a 32K size booklet.
Every 2 pages are printed on 16K paper to fit on half a
sheet.
- 46 -
Page 47

PRINTING FROM WINDOWS
2
1
3
4
5
6
7
Memo
Note
Memo
1/2 Executive on Executive — Select this to print a half
of Executive size booklet. Every 2 pages are printed on
Executive paper to fit on half a sheet.
1/2 13.5'' LG on 13.5'' LG — Select this to print an half of
13.5 inch LG size booklet. Every 2 pages are printed on
13.5 inch LG paper to fit on half a sheet.
1/2 (Custom) on (Custom) — Select this to print a half of
customized size booklet. Every 2 pages are printed on
customized size paper to fit on half a sheet.
Select the page order for booklet in the
5
[Page Order] option.
From Left to Right — Select this to print the pages from
left to right.
From Right to Left — Select this to print the pages from
right to left.
If you want to add a margin space between
6
facing pages, enter a width in the [Center]
Memo
• When [Overlay Image] is selected together with the N-up
feature, the overlay images are printed per sheet, not per
page. If you want to print them on each page, select the
[Print on Each Page] check box in [Overlay Image] on the
[Effect] tab.
P.25 "[Effect] tab"
Printing multiple pages per sheet
Display the [Finishing] tab menu.
1
Select how many pages you want to print
2
on a single sheet at the [Number of pages
per Sheet] box.
box, and if you want to add a margin on the
outside edge, enter a width in the [Outer]
box.
• You can change the unit of the margin at the [Units].
• The center margin can be set from 0.00 inch to 0.67
inches in units of 0.01 inch when the unit is inches, and
from 0.00 mm to 16.90 mm in units of 0.10 mm when
the unit is mm.
The printed images will be reduced according to the
margin setting.
• The outer margin can be set from 0.17 inch to 1.17
inches in units of 0.01 inch when the unit is inches, and
from 4.20 mm to 29.60 mm in units of 0.10 mm when
the unit is mm.
The printed images will be reduced according to the
margin setting.
• If you select the [Booklet without Center Margin] check
box, the value in [Center] becomes invalid and the
center margin becomes 0 mm (inches).
2 pages — Select this to print images from 2 pages
arranged on one sheet.
4 pages — Select this to print images from 4 pages
arranged on one sheet.
6 pages — Select this to print images from 6 pages
arranged on one sheet.
8 pages — Select this to print images from 8 pages
arranged on one sheet.
9 pages — Select this to print images from 9 pages
arranged on one sheet.
16 pages — Select this to print images from 16 pages
arranged on one sheet.
Select how the pages are arranged on one
3
sheet in the [Direction of print] option.
Click [OK] to close the [Booklet Details]
7
dialog box.
Set any other print options you require and
8
click [OK].
Click [OK] or [Print] to send the print job.
9
The print job is printed as a booklet.
• If this is not installed, fold the printed document
manually.
Printing several pages on one sheet
The N-up feature allows you to print several pages of a
document on one sheet of paper. This feature is very useful for
browsing a large number of pages for appearance or page
order.
For example, to check the navigation path of a number of web
pages or review the narrative of a slide presentation, using Nup is not only convenient but conserves paper as well.
Left to Right — Select this to arrange pages horizontally
from the left and printed top to bottom on one sheet.
Right to Left — Select this to arranged pages
horizontally from the right and printed top to bottom on
one sheet.
Left to Right by column — Select this to arrange pages
vertically from the top and printed left to right on one
sheet.
Right to Left by column — Select this to arrange pages
vertically from the top and printed right to left on one
sheet.
• Items that can be selected in [Direction of print] may
vary depending on the number of pages selected at
the [Number of pages per Sheet] box.
- 47 -
Page 48

PRINTING FROM WINDOWS
2
1
3
4
5
6
7
Note
Note
If you want to draw a line around each page,
4
select the [Draw Borders Around Pages]
check box.
Set any other print options you require and
5
click [OK].
Click [OK] or [Print] to send the print job.
6
Multiple pages are printed per sheet.
Stapling
You can staple sets of paper to exit from the equipment.
• Stapling is not available if a Finisher is not installed.
Stapling the paper
Display the [Finishing] tab menu.
1
Select the [Staple] check box. Select a
2
stapling option.
Dividing one image into multiple
sheets (Poster Print)
You can print one large image into more than one sheet of
paper by dividing it. The divided images on the multiple sheets
of paper are then reconnected, so that you can create a large
publication such as a poster.
• The Poster Print option is not available when any of the
Custom Paper Size, Number of pages per sheet, 2-Sided
Printing, Watermark, Overlay Image and Sheet Insertion
options is set.
• The Poster Print option is available only when any of the
sizes below is selected for [Print Paper Size] on the [Basic]
tab.
A4, LT
Performing Poster Print
Display the [Finishing] tab menu.
1
Select the [Poster Print] check box and
2
then click [Details].
Upper Left — Select this to staple the printed document
at the upper left.
Note
• The selectable options vary depending on the paper
3
4
size.
Set any other print options you require and
click [OK].
Click [OK] or [Print] to send the print job.
The output is stapled for each copy.
The [Poster Print] dialog box appears.
Select the number of sheets on which the
3
image is printed, and then click [OK].
1x2 — Select this to divide the image into 2 sheets.
2x2 — Select this to divide the image into 4 sheets.
3x3 — Select this to divide the image into 9 sheets.
4x4 — Select this to divide the image into 16 sheets.
- 48 -
Page 49

PRINTING FROM WINDOWS
2
1
3
4
5
6
7
Note
Note
• [1x2] is selectable only when A4 is selected for [Print
Paper Size].
• When you use the Poster Print option, disable the [Do
not Print Blank Pages] option on the [Others] tab. If you
use the Poster Print option while [Do not Print Blank
Pages] is left ON, blank pages in the divided image are
not printed.
Set any other print options you require and
4
click [OK].
Click [OK] or [Print] to send the print job.
5
The image is divided and printed into the specified
number of sheets of paper.
Finishing options in [Paper Handling] tab menu
Using the printer driver, you can set various layout options to
suit your preferences. In this section various printing functions
enabled with the [Paper Handling] tab menu are explained.
P.49 "Inserting different types of paper"
P.50 "Interleaving pages"
• To insert thick paper, select Multi-Purpose Tray and set
Thick for [MPT] for [MPT] in the [Tray Settings] dialog
box of the [Device Settings] tab in the printer driver.
• [Print both sides of page] is available only when 2Sided printing is enabled at the [Finishing] tab.
To print or insert a back cover, select the
3
[Use Back Cover] check box and set the
[Source] and [Print Style] options that you
require.
How to set the Source and Print Style options is the same
as for the [Use Front Cover] option.
To print or insert sheets between the pages,
4
select the [Insert Pages] check box and
click [Edit].
Inserting different types of paper
You can insert a different type of sheet into a specified location
in the printed documents. This is useful when you want to add
front and back covers, or sheets between chapters. Both
printed and blank sheets can be inserted.
Printing or inserting a front cover and back
cover
Display the [Paper Handling] tab menu.
1
To print or insert a front cover, select the
2
[Use Front Cover] check box and select the
tray where the cover paper is loaded at the
[Source] box. Then select whether you are
inserting a blank cover or printed front
cover at the [Print Style] box.
Do not print on page — Select this to insert a blank front
cover.
Print one side of the page — Select this to print the first
page of the document on a front side of a cover.
Print both sides of page — Select this to print the first
two pages of the document on both sides of a cover.
The [Insert Pages] dialog box appears.
Note
• Up to 50 pages can be inserted.
Enter the page numbers to which you want
5
to insert the sheet in each [Page] box and
select the [Print Style], [Paper Source], and
[Paper Type] options as you require.
Set any other print options you require and
6
click [OK].
Click [OK] or [Print] to send the print job.
7
A front cover and back cover are inserted into the printed
document.
• When [Auto] is selected in the [Source] box, the paper
is automatically selected according to the printed
document size.
- 49 -
Page 50

PRINTING FROM WINDOWS
2
1
3
4
5
6
7
Interleaving pages
This feature is useful when you want to insert a different type of
paper, or from another source, between every page of your
print job. For example, you could use this option to insert blank
or color sheets between overhead transparencies.
Inserting sheets between every page of a print
job
Display the [Paper Handling] tab menu.
1
To insert sheets between every page, select
2
the [Interleave Pages] check box and select
the tray where the desired paper is loaded
at the [Source] box.
Note
• When [Auto] is selected in the [Source] box, the paper
is automatically selected according to the printed
document size.
• To insert thick paper, select Multi-Purpose Tray and set
Thick for [Paper Type] for [MPT] in the [Tray Settings]
dialog box of the [Device Settings] tab in the printer
driver.
To print the previous page on interleaved
3
sheets, select the [Duplicate] check box.
This equipment prints every previous page on interleaved
sheets which are inserted after the page so that you can
duplicate a document.
Printing a watermark
Display the [Effect] tab menu.
1
Select the watermark to be printed at the
2
[Watermark] box.
Note
• You can create a new watermark if there is none you
want to apply on the box.
P.51 "Creating or editing a watermark"
If you want to print the watermark on only
3
the first page, select the [Print on First Page
Only] check box.
Set any other print options you require and
4
click [OK].
Click [OK] or [Print] to send the print job.
5
The print job is printed with the watermark.
Set any other print options you require and
4
click [OK].
Click [OK] or [Print] to send the print job.
5
The sheets are interleaved between every page.
Finishing options in [Effect] tab menu
Using the printer driver, you can set various layout options to
suit your preferences. In this section various printing functions
enabled with the [Effect] tab menu are explained.
P.50 "Printing with watermarks"
P.52 "Printing with an overlay file"
Printing with watermarks
Watermarks overprint your document with useful information,
such as [TOP SECRET,] [CONFIDENTIAL,] [DRAFT,]
[ORIGINAL,] or [COPY.]. You can choose from several
predefined watermarks or you can create and save your own
custom watermarks.
Watermarks are text only. To add graphics or other document
elements, use image overlays instead.
- 50 -
Page 51

PRINTING FROM WINDOWS
2
1
3
4
5
6
7
Note
Note
Creating or editing a watermark
Click [Add] to create a new watermark, or
1
select one that you want to edit and click
[Edit] to edit a watermark.
The [Watermark] dialog box appears.
To rotate the watermark, enter the number
8
of degrees in the [Angle] box.
• You can enter from -90 degrees to 90 degrees in units
of 1 degree in the [Angle] box.
• You can also set the angle using the scroll bar.
Select how the watermark text is printed
9
from [Solid], [Draw as Outline], and
[Transparency].
Solid — Select this to print a solid type of watermark.
Draw as Outline — Select this to print an outline type of
watermark.
Transparency — Select this for a transparent watermark.
Set the transparent ratio from 0 to 100% in units of 1%.
You can also set the transparent ratio using the scroll bar.
Click [OK] to save the watermark settings.
10
The watermark is added or edited.
Deleting a watermark
• You can delete the default watermarks. However, they
cannot be restored by clicking [Restore Defaults].
Select the watermark that you want to
Enter the watermark text in the [Caption]
2
box.
You can enter up to 63 characters for the [Caption] box.
However, if too many characters are entered, the
watermark may not be printed correctly.
Select the position of the watermark in
3
[Position].
Select the desired icon for the position.
Select a font for the watermark at the [Font
4
Name] box.
Select a font style for the watermark at the
5
[Style] box.
Enter the font size in the [Font Size] box.
6
You can enter any integer between 6 and 300pt in units of
1pt.
Select a color for the watermark at the
7
[Color] box.
If your preferred color is not listed in the box, click
[Browse] to display the color palette and add your color.
1
delete at the [Watermark] box.
Click [Delete].
2
The [Confirm Delete] dialog box appears.
Click [Yes].
3
The watermark is deleted.
• When [Black and White] is selected at the [Color] box
on the [Basic] tab, the [Color] box is not available.
- 51 -
Page 52

PRINTING FROM WINDOWS
2
1
3
4
5
6
7
Note
Printing with an overlay file
Using image overlays ensures that widely-used images are
readily available and consistently reproduced. Image overlays
are independent documents that are merged into other
documents during printing and thereby increase the time
required to print a job. To superimpose text on your document,
it may be faster to use watermarks.
To print with an overlay file, you must first create an overlay file.
P.40 "Creating an overlay file"
• When [Overlay Image] is selected together with the N-up
feature, the overlay images are printed per sheet, not per
page. If you want to print them on each page, select the
[Print on Each Page] check box in [Overlay Image] on the
[Effect] tab.
P.25 "[Effect] tab"
• Both the overlay file and the documents on which you
superimpose the overlay image must be created in the
same size, color mode, and orientation.
Printing an overlay image as a print job
Display the [Effect] tab menu.
1
Select the overlay image name to be used
2
in the [Overlay Image] box.
Deleting an overlay image
Select an overlay image that you want to
1
delete at the [Overlay Image] box.
Click [Delete].
2
The [Confirm Delete] dialog box appears.
Click [Yes].
3
The overlay image is deleted.
Using various types of paper
This equipment allows you to print on various types of paper.
The procedure below is for print jobs which require precautions
before you place the paper.
P.52 "Printing on paper larger than standard sizes"
3
4
Note
• If you use different overlay images for odd/even pages
or use overlay images only for the specified pages,
select [Multiple Overlays] and set them in its dialog
box.
P.28 "Multiple Overlays"
If you want to print the overlay image over
the document, select the [Print Over the
Document] check box.
Set any other print options you require and
click [OK].
Printing on paper larger than standard
sizes
The procedure below is for printing on paper larger than
standard sizes defined in the custom paper size setting.
(Example: Largest size: 12.34 x 47.24 inches (313.4 x 1200
mm))
Custom paper sizes can be defined in the [Other] tab menu.
P.31 "Custom Paper Size"
Click [OK] or [Print] to send the print job.
5
• The print job is printed with the overlay image.
- 52 -
Page 53

PRINTING FROM WINDOWS
2
1
3
4
5
6
7
Note
Note
Note
Printing on paper larger than standard sizes
Display the properties of the printer driver
1
and select the custom paper size in [Print
Paper Size] of the [Basic] tab menu before
starting printing.
• Be careful not to cut your fingers on the edge of paper when
you hold it.
• Make sure that the trailing edge of the paper will not be fed
into the equipment while you are holding it.
Set any other print options you require and
2
click [OK].
Click [OK] or [Print] to send the print job.
3
Place paper larger than the standard sizes
4
on the multi-purpose tray.
• Do not mix it with other sizes.
• Print one sheet by one from the multi-purpose tray
even if you have set the number of copies as more
than one.
Press [JOB STATUS] on the touch panel.
5
The paper type selection screen on the [SUPPLY] tab
appears.
Select the paper type corresponding to that
6
of the placed paper.
Press the [START] button on the control
7
panel.
• The print job is printed on paper larger than the
standard sizes.
• For the detailed instructions on how to use the control
panel, see the following page:
P.68 "Monitoring the Print Job Status"
Inserting from the multi-purpose tray
• The paper will be printed with a resolution of 300 dpi.
When the paper is coming out of the equipment
• Hold the paper gently as it is coming out of the equipment.
• Be careful not to cut your fingers on the edge of paper when
you hold it.
• Do not pull out the paper forcibly as it is exiting from the
equipment.
When the paper is being fed into the equipment
• Do not mix paper of different sizes.
• Place one sheet at a time on the multi-purpose tray even if
you wish to print multiple copies.
• Slightly curl the paper. Hold it gently as it is being fed into
the equipment.
Switching equipment to print jobs
When more than one piece of MFP exists over a network, you
can switch it to another one on the printer driver menu.
If the equipment that you intended to use is busy with a large
number of print jobs, for example, you can send your job to
another piece of MFP that is currently holding no print jobs and
have it printed.
- 53 -
Page 54

PRINTING FROM WINDOWS
2
1
3
4
5
6
7
Memo
Switching equipment to print jobs
Display the [Others] tab menu.
1
Click [Output Devices].
2
The [Output Devices] dialog box appears.
Select [Print Job to Selected Devices].
3
Note
• If the selected equipment does not support features
enabling the print options of the job, printing may not
be performed properly.
• Department code confirmation for the selected
equipment is not performed when the job is printed
from the selected one. If a department code specified
in the [Department Code] box on the [Others] tab is not
recognized on it, Department Management for this print
job is not performed.
Splitting a print job across two pieces of equipment (Tandem Printing)
This feature splits one print job across two pieces of equipment
to print it by means of copies.
If you have to print documents with a large number of pages in
a large number of copies, for example, you can have two
pieces of MFP on a network share this job to print by copies
simultaneously, so that it can be done in a shorter time.
Splitting a print job across two pieces of
equipment (Tandem Printing)
Display the [Others] tab menu.
Select the desired equipment in the
4
[Selected Devices] boxes.
Note
• You can select more than one piece of equipment in
the [Selected Devices] boxes. In this case, the same
number of copies is printed from all of the pieces of
equipment you selected.
• When you select the equipment in the [Selected
Devices] boxes, make sure to select that which
supports features enabling all the print options of the
job.
- Select equipment which enables stapling if the job
needs that.
• If you select the [Always Use This Setting] check box,
you can omit the setting of the [Output Devices] dialog
box from the next time.
• Equipment selected in the [Selected Devices] boxes
must be registered in [Printer Folder]. If you want to
use equipment not registered in [Printer Folder], add it
in [Add Printer] on the [Others] tab of printer driver.
P.31 "Add Printer"
Click [OK] to close the [Output Devices]
5
dialog box.
1
Click [Output Devices].
2
The [Output Devices] dialog box appears.
Select [Split Job across Selected Devices].
3
Select two pieces of equipment in the
4
[Selected Devices] boxes and then specify
the number of copies for each one.
Set any other print options you require and
6
click [OK].
Click [OK] or [Print] to send the print job.
7
A job is printed on the selected equipment.
Note
• If you select the [Auto] check box, the number of
copies set in the [Total Copies] box is automatically and
equally allocated to two pieces of equipment.
- 54 -
Page 55

PRINTING FROM WINDOWS
2
1
3
4
5
6
7
Memo
Note
• When you select the equipment in the [Selected
Devices] boxes, make sure to select that which
supports features enabling all the print options of the
job.
- Select equipment which enables stapling if the job
needs that.
• If you select the [Always Use This Setting] check box,
you can omit the setting of the [Output Devices] dialog
box from the next time.
• Equipment selected in the [Selected Devices] boxes
must be registered in [Printer Folder]. If you want to
use equipment not registered in [Printer Folder], add it
in [Add Printer] on the [Others] tab of printer driver.
P.31 "Add Printer"
Click [OK] to close the [Output Devices]
5
dialog box.
Set any other print options you require and
6
click [OK].
Click [OK] or [Print] to send the print job.
7
A job is printed on the selected equipment.
• If the selected equipment does not support features
enabling the print options of the job, printing may not
be performed properly.
• Department code confirmation for the selected
equipment is not performed when the job is printed
from the selected one. If a department code specified
in the [Department Code] box on the [Others] tab is not
recognized on it, Department Management for this print
job is not performed.
- 55 -
Page 56

2
1
3
4
5
6
7
● PRINTING FROM Macintosh
Note
Note
Note
PRINTING FROM Macintosh
Printing From Application
Setting options and printing from
Macintosh Computers
In Mac OS X applications, print options are set from both the
[Page Setup] dialog box and the [Print] dialog box.
Printing from Macintosh applications
Open a file and select [Page Setup] from the
1
[File] menu of the application.
Select the name of the equipment in the
2
[Format For] box and specify the Page
Setup settings for your print job.
• The [Print] dialog boxes vary depending on
applications.
Click [Print] to print a document.
6
• The content set in the [Print] dialog box can be saved as
[Presets]. Select [Save as] in the [Presets] box and save it
under the desired name. If you use this preset content as a
default setting, select it in the [Presets] box.
Page Setup dialog
The [Page Setup] dialog boxes can be displayed by selecting
the [Page Setup] command from the [File] menu of the
application.
In the [Page Setup] dialog boxes, you can specify the Page
Attributes settings and manage the Custom Page Size
settings.
• The [Page Setup] dialog boxes vary depending on
applications. In some applications, it is not included in the
[File] menu, but in the [Print] dialog boxes.
Page Attributes
Setting the Page Setup varies depending on how you
want to print a document.
P.56 "Page Attributes"
Click [OK] to save the Page Setup settings.
3
Select [Print] from the [File] menu of the
4
application.
In the dialog box that appears, make sure
5
the name of the equipment is selected at
the [Printer] box and specify the Print
settings for your print job.
1
2
3
4
1) Format For
This selects the machine to be used for printing.
Setting the Print Setup varies depending on how you
want to print a document.
- 56 -
Page 57

PRINTING FROM Macintosh
2
1
3
4
5
6
7
Note
Memo
2) Paper Size
This selects the size of a document to be printed.
Available original paper sizes are listed below:
• A4 (210 x 297 mm)
• A5 (148 x 210 mm)
• B5 (182 x 257
• Folio (210 x 330 mm)
• A6 (105 x 148mm)
•Postcard
• Letter (8 1/2 x 11")
• Legal (8 1/2 x 14")
• Statement (5 1/2 x 8 1/2")
• 13"LG (8 1/2 x 13")
• 8.5"SQ (8 1/2 x 8 1/2")
• 16K (195 x 270 mm)
• 13.5"LG (8 1/2 x 13.5")
• IndexCard (3 x 5")
• Executive (7 1/4 x 10 1/2")
Creating Custom Page Size
Select [Manage Custom Sizes] in the [Paper
1
Size] box.
Click [+].
2
3) Orientation
This sets the paper printing direction.
- Portrait
direction.
- Landscape (90 degree) — The document is printed in
the landscape direction from left.
4) Scale
This changes the size of the printed image on the page.
Enter the zoom ratio to enlarge or reduce an image. You
can set any integer from 1 to 10000(%) for the zoom ratio.
— The document is printed in the portrait
Custom Page Sizes
The PPD file for this equipment supports the Custom Page
Sizes.
• When you print on paper larger than standard sizes, print
one sheet at a time.
P.52 "Printing on paper larger than standard sizes"
• The paper sizes that can be set for the Custom Paper Size
differ depending on the model to be used.
A new custom page size name is added to the list.
• If you want to create a new custom page size by
duplicating an existing custom page size, select the
custom page size name on the list and click
[Duplicate].
Double-click the added custom page size
3
name on the list and rename the custom
page size.
- 57 -
Page 58

PRINTING FROM Macintosh
2
1
3
4
5
6
7
Memo
Note
1
2
4
3
1
2
3
4
5
6
Enter the width and height in the [Paper
4
Size] boxes, and select the machine name
of this equipment in the [Printer Margins]
box.
1) Copies
This sets the number of printed copies.
2) Collated
Select this check box for sort-printing (1, 2, 3... 1, 2, 3...)
3) Pages
This sets the range of pages to be printed.
— Select this to print all pages.
- All
- From/to — Select this to specify the pages to be
printed. Enter the page range in the From and to box.
4) Two-Sided
This sets two-sided printing. When you select this check
box, [Long-Edge binding] is automatically selected in the
[Two-Sided] box in the Layout menu.
Layout
In the Layout menu, you can set N-up printing (multiple pages
• Please use the margin settings that are automatically
entered by selecting the machine name in the [Printer
Margins] box.
• You can delete the created custom page size by
clicking [-].
per sheet).
Click [OK].
5
The Custom Page Size is saved and it can be selected in
the [Paper Size] box in the Page Attributes menu.
Print dialog
The [Print] dialog boxes can be displayed by selecting the
[Print] command from the [File] menu of the application.
• The [Page Setup] dialog boxes varies depending on
applications. In some applications, [Page Setup] may not be
included in the [File] menu, but in the [Print] dialog boxes.
• The layout of the setting items may vary depending on the
type of your Mac OS.
Copies & Pages
In the Copies & Pages menu, you can set general print options
such as the number of copies, and sort printing.
1) Pages per Sheet
This sets the number of multiple pages printed on one
sheet. The pages are reduced to fit the selected paper size
automatically and are printed.
— Select this if you do not wish to enable N-up
- 1
printing.
- 2 — Select this to print images from 2 pages arranged
on one sheet.
- 4 — Select this to print images from 4 pages arranged
on one sheet.
- 6 — Select this to print images from 6 pages arranged
on one sheet.
- 9 — Select this to print images from 9 pages arranged
on one sheet.
- 16 — Select this to print images from 16 pages
arranged on one sheet.
- 58 -
Page 59

PRINTING FROM Macintosh
2
1
3
4
5
6
7
1
2
Landscape
1
2
Portrait
1
2
Landscape
1
2
Portrait
1
2
3
2) Layout Direction
This sets how pages are arranged on one sheet. This is
available only when N-up printing (printing multiple pages
on one sheet) is set.
- Across Left to Right Before Down
horizontally from left to right and then top to bottom on
one sheet.
- Across Right to Left Before Down — Pages arranged
horizontally from right to left and then top to bottom on
one sheet.
- Down Before Across Left to Right — Pages arranged
vertically from top to down and then left to right on one
sheet.
- Down Before Across Right to Left — Pages arranged
vertically from top to down and then right to left on one
sheet.
3) Border
Select if a border line is to be drawn on each page.
- None
- Single Hairline — Select this to draw a single hairline
for the border.
- Single Thin Line — Select this to draw a single thin
line for the border.
- Double Hairline — Select this to draw a double hairline
for the border.
- Double Thin Line — Select this to draw a double thin
line for the border.
4) Two-Sided
This sets whether or not you want to print on both sides of
the paper.
- Off
sides of the paper.
- Long-Edge binding — Select this to bind along the
long edge side of the paper. The direction to be printed
on the back side of the paper differs depending on the
orientation.
— Pages arranged
— Select this if no border line is to be drawn.
— Select this when you do not want to print on both
Paper Handling
In the Paper Handling menu, you can set Reverse page order
printing and Odd or Even numbered page printing.
1) Pages to Print
Select whether all pages will be printed or only odd or even
pages will be printed.
2) Page Order
Select the page order for printing.
3) Destination Paper Size
Select the output paper size. The paper size selected in the
[Page Setup] dialog box appears as a default setting.
- Scale to fit paper size — Select this check box to
perform enlarge/reduce printing. When this is selected,
select the output paper size in the box. If you do not
want to enlarge the document images when a larger
paper size is selected, select the [Scale down only]
check box.
- Short-Edge binding — Select this to bind along the
short edge side of the paper. The direction to be printed
on the back side of the paper differs depending on the
orientation.
5) Reverse page orientation
This sets the paper exit orientation. When the orientation of
the paper is reversed with this setting, the top of the paper
comes to the control panel side.
6) Flip horizontally
Select this check box to perform mirror printing of a page.
Color Matching
In the Color Matching menu you can adjust the colors on the
printouts.
1
3
- 59 -
2
Page 60

PRINTING FROM Macintosh
2
1
3
4
5
6
7
Note
Note
1) ColorSync
Select this if you want the application you are using to
control the color management of the printouts.
2) In Printer
Select this if you want the machine you are using to control
the color management of the printouts.
3) Profile
Select a color profile to be applied if you selected
[ColorSync].
Cover Page
In the Cover Page menu, you can set whether to send a print
job with a banner page. The banner page includes information
about the job owner, job name, application name, date and
time, and machine name.
Paper Feed
In the Paper Feed menu, you can set the paper source.
1
2
3
1) All pages from
Select this when you want to use the same paper source
for all pages. When this is selected, select the paper source
or paper type to be used at the box.
1
2
3
1) Print Cover Page
You can set how to insert a banner page.
- None
- Before document — Select this to print a banner page
before the document.
- After document — Select this to print a banner page
after the document.
2) Cover Page Type
Select the type of the cover page.
3) Billing Info
Enter the billing information to have it appear on the banner
page.
— Select this to print without a banner page.
2) First Page From
Select this when you want to specify different paper
sources for the first page and remaining pages. When this
is selected, specify the paper source or paper type to be
used for the first page at the box.
3) Remaining From
Select the paper source or paper type to be used for
remaining pages in the box. This can be selected only
when you choose the [First Page From] option button.
Color Settings
In the Color Settings 1 and Color Settings 2 menus, you can
adjust the color settings for printing.
• This option is available only when your equipment is a
multifunctional digital color system (color MFP).
• Due to Mac OS limitations, text input into the [Billing Info]
box will only be displayed up to the length of the field.
- 60 -
Page 61

PRINTING FROM Macintosh
2
1
3
4
5
6
7
Color Settings 1
1
2
3
4
5
6
7
8
9
10
Color Settings 2
- Auto — Select this to determine the color mode
automatically. When a print job is a black and white
document, the system automatically prints the
document in the black mode. When a print job is a color
document, it prints the document in the color mode.
- Color
— Select this to print a document in the color
mode.
- Mono — Select this to print a document in the black
mode.
- Black and Red — Select this to print a document in the
twin color mode with red. When this is selected, the
black parts of the document are printed in black and the
color parts of the document are printed in red.
- Black and Green — Select this to print a document in
the twin color mode with green. When this is selected,
the black parts of the document are printed in black and
the color parts of the document are printed in green.
- Black and Blue — Select this to print a document in the
twin color mode with blue. When this is selected, the
black parts of the document are printed in black and the
color parts of the document are printed in blue.
- Black and Cyan — Select this to print a document in
the twin color mode with cyan. When this is selected,
the black parts of the document are printed in black and
the color parts of the document are printed in cyan.
- Black and Magenta — Select this to print a document
in the twin color mode with magenta. When this is
selected, the black parts of the document are printed in
black and the color parts of the document are printed in
magenta.
- Black and Yellow — Select this to print a document in
the twin color mode with yellow. When this is selected,
the black parts of the document are printed in black and
the color parts of the document are printed in yellow.
- Black and White — Select this to print a document in
the twin color mode with white. When this is selected,
the black parts of the document are printed in black and
the color parts of the document are not printed.
11
12
1) Color Type
This sets whether to print a job in the color mode or the
black mode.
2) Halftone
This sets how halftones are printed.
- Auto
— Select this to print with proper halftone
automatically depending on the contents in the
document.
- Detail — Select this to print halftone in detail.
- Smooth — Select this to print halftone smoothly.
3) Toner Save
Select this check box to print in the save mode.
4) Image Type
This sets how colors are printed by selecting the job type.
The printer driver automatically applies the proper image
quality to the selected job type.
- General
— Select this when printing a general color
document.
- Photo — Select this when printing photos.
- Presentation — Select this when printing a vivid
document.
- Line Art — Select this when printing a document that
contains a lot of characters or line art.
- Advanced Color Settings — Select this to apply a
profile which can adjust the color space. For details, see
the following page:
P.62 "Advanced Color Settings"
- 61 -
Page 62

PRINTING FROM Macintosh
2
1
3
4
5
6
7
Note
5) Black Overprint
This set when to print background content that has black
text overlaid on it. If this is enabled, the gap between the
text and the background is minimized and color deviation is
prevented.
- Off — Select this so as not to print the background of
the black content.
- Text — Select this to print all the full-color background
and then the black text on a color background.
- Text and Graphics
color background and then the black text and graphics
on a color background.
6) PostScript Overprint
Select this to overprint an object that has been set so on an
application.
Note
• This option is selectable only when [Auto] or [Color] is
selected in the [Color Type] box in the Color Settings 1
menu.
7) Auto Trapping
Select this to enable the Auto Trapping option. This is a
technique where the size of objects is modified so that two
colors printed next to each other overlap slightly to avoid
white spaces between them. These white spaces can be
caused by factors such as misregistration.
• When this function is enabled, the printing speed may be
slow.
8) Pure Black and Gray
Select whether to print the black and gray scale contents in
a document using black toner.
- Off — Select this to print the document in the color
mode.
- Black - Auto — Select this to automatically select
areas to be printed using black toner when you want to
print the black contents using its toner. When this option
is selected, the appropriate areas are printed using
black toner according to the Image Type option.
- Black - Text — Select this to print the black text using
black toner.
- Black - Text and Graphic — Select this to print the
black text and graphics using black toner.
- Black - Text, Graphic and Image — Select this to print
the black text, graphics and images using black toner.
- Black and Gray - Auto
select areas to be printed using black toner when you
want to print the black and gray scale contents using its
toner. When this option is selected, appropriate areas
are printed using black toner according to the Image
Type option.
- Black and Gray - Text — Select this to print the black
and gray scale text using black toner.
- Black and Gray - Text and Graphic — Select this to
print the black and gray scale text and graphics using
black toner.
- Black and Gray - Text, Graphic and Image — Select
this to print the black and gray scale text, graphics, and
images using black toner.
— Select this to print all the full-
— Select this to automatically
9) Resolution
This sets the resolution for printing.
- 600 dpi
— Select this to print in 600 x 600 dpi.
- 600 x 1200 dpi — Select this to print in 600 x 1200 dpi.
Note
• When [600 x 1200 dpi] is selected, the functions below
are not available.
- Booklet printing
- Automatic change of paper source
10) Red Seal Color Mode
Select this check box to enhance color reproducibility of red
seal (orient signature) printing.
11) Color Balance
Adjusts the density of each color for printing. You can set
from -4 to 4.
Note
• This option is selectable only when [Auto], [Color], or
[Black and Red / Green / Blue / Cyan / Magenta / Yellow
/ White] is selected in the [Color Type] box in the Color
Settings 1 menu.
12) Image Attribute
This sets the sharpness, brightness, contrast, saturation
and background adjustment for printing.
- Sharpness
Adjusts the sharpness for printing. You can set from -4
(softest) to 4 (sharpest) by moving the scroll bar when
the [Use Sharpness Filter] check box is selected.
-Brightness
Adjusts the brightness for printing. You can set from -4
(darkest) to 4 (lightest) by moving the scroll bar.
-Contrast
Adjusts the contrast for printing. You can set from -4
(lowest) to 4 (highest) by moving the scroll bar.
- Saturation
Adjusts the saturation for printing. You can set from -4
(low clear) to 4 (high clear) by moving the scroll bar.
- Background Adjustment
Adjusts the density level of the background. You can set
from -4 (lightest) to 4 (darkest) by moving the scroll bar.
Advanced Color Settings
The Advanced Color Settings menu is displayed when
[Advanced Color Settings] is selected for the [Image Type]
option in the Color Settings 1 menu.
Memo
• Advanced Color Settings can be set from the TopAccess
menu. For detailed instructions on how to set Advanced
Color Settings from the TopAccess menu, refer to the
TopAccess Guide.
- 62 -
Page 63

PRINTING FROM Macintosh
2
1
3
4
5
6
7
Memo
1
2
4
5
6
7
3
1
2
3
4
Print Mode
In the Print Mode menu, you can set the way this equipment
handles the print job. This menu allows you to enable various
job types such as Private Print, Proof Print and Hold Print.
1) RGB Source profiles
This selects RGB source profile. When you obtained color
profile data from this equipment, its RGB source profile
data appear.
2) CMYK Source profiles
This selects CMYK source profile. When you obtained color
1) Department Code
Select whether the entry of a department code is required
or not for printing. Select this check box to enable this
option if this equipment is managed under department
codes. When you do this, enter a department code in the
box on the right. For your department code, ask the
administrator.
profile data from this equipment, its CMYK source profile
data appear.
3) Apply to Device Color only
Select this check box when you give priority to color profiles
embedded in the image.
4) Destination profiles
This selects destination profile. When you obtained color
profile data from this equipment, its destination profile data
appear.
5) Rendering Intent
This selects an image processing method for color space
conversion when you print.
- Perceptual — This is recommended for photo images.
- Relative colorimetric
— More original colors can be
retained than those when you select [Perceptual].
- Saturation — This is recommended when the
vividness of colors is more important than their correct
reproduction. It is useful for graphic charts.
- Absolute colorimetric — Original colors can be
retained even on colored paper.
6) [Revert to defaults]
Click this to return the Advanced Color Settings to the
defaults.
7) [Use these settings]
Click this to save the color profile data set for this
equipment and return to the Color Settings 1 menu.
• Specify a department code in 1 to 63-digit alphanumeric
characters.
• A department code must consist of one-byte characters
such as numbers from 0 to 9, letters of the alphabet from
A to Z (in both capital and small ones), a hyphen (-), an
underscore (_), and a period (.).
2) Print Mode
This sets the type of print job.
- Normal
— Select this to print a job normally.
- Proof — Select this to print the first copy of a multicopy
job and then wait for approval before printing the
remaining copies. If a print job is sent as a proof job,
one copy of the job is printed and the remaining copies
are saved in the proof job queue on this equipment,
which are not printed until you activate printing from the
touch panel display. This option allows you to check the
job’s output before printing the remaining copies and
thereby reduce paper waste.
- Private — Select this to print a private job. When this
is selected, specify the 5-digit password in the field next
to the box. The print job is saved in the private job
queue on this equipment, and not printed until you
activate printing from the touch panel display of this
equipment. This option is useful when you want to print
a confidential document secured with a password. The
user has to enter the password to print the private job
when activating printing from the touch panel display.
- 63 -
Page 64

PRINTING FROM Macintosh
2
1
3
4
5
6
7
1
2
1
2
3
4
- Hold — Select this option to print a hold job. The print
job, sent as a hold job, is saved in the hold job queue on
this equipment. To perform printing, select the desired
job on the touch panel display and press [PRINT]. This
option is useful to prevent you from forgetting to remove
printed sheets.
3) Distinguish Thin Lines
Select this check box to print thin lines clearly.
4) Do not Print Blank Pages
Select whether you require blank pages to be printed.
Note
• When more than 2 is selected at the [Page per Sheet]
option in the Layout menu, the blank pages will be
printed.
• Pages with a header or footer will be printed even if the
content is blank.
Printer Features
In the Printer Features menu, you can set special printing
features.
Finishing
Note
• Destinations selectable differ depending on the option
configuration.
• Depending on the equipment settings, the paper may be
delivered to a tray that cannot carry out stapling when
[Printer’s Default] is selected as the [Destination] option.
2) Stapling
This sets whether a print job is stapled.
— Select this to print without stapling.
- Off
- Upper Left (Portrait) / Upper Right (Landscape) —
Select this to staple on the upper left for a portrait
document, or on the upper right for a landscape
document.
Note
• This option cannot be selected if a Finisher is not
installed.
Booklet
In the Finishing menu, you can set the destination and stapling.
In the Booklet menu, you can set booklet printing.
1) Destination
This selects the destination tray.
- Printer’s Default
default tray (that is set as such for raw jobs in the
Machine setting page of TopAccess Administrator’s
page).
- Face down/up stacker — Select this to set the output
to the face down/up stacker of this equipment.
- Tray 1 — Select this to set the output to the tray of the
Finisher.
— Select this to set the output to the
1) Booklet Paper Size
Select a paper size for the booklet. Both sides of a sheet
are printed as two pages. The booklet size will be half the
size of the paper size that you specify.
2) Left to Right Page Layout
Select this check box to create a booklet that can be read
from left to right.
3) Booklet Center Margin
Select the width of the margin added to the center.
- 64 -
Page 65

PRINTING FROM Macintosh
2
1
3
4
5
6
7
Note
Note
Note
Note
4) Booklet Outer Margin
Select the width of the margin added to the short edge side
of a sheet.
Cover Pages
In the Cover Pages menu, you can set Front Cover printing
and Back Cover printing.
• This option menu cannot be set when the Cover Page
option for sending a print job with a banner page is enabled.
1
2
- Print on 1 side of the page — Select this to print the
first page image on the front side of a cover. This is
available only when the Two-Sided Printing option is
enabled in the Layout menu.
2) Use Back Cover
This sets back cover printing which allows you to insert or
print a back cover on a sheet fed from a different tray or the
multi-purpose tray.
To enable back cover printing, select this check box and
select the location from where a back cover sheet is to be
fed and the print style to be used.
Source
Select from where the cover sheet is to be fed. When [Auto
(Default)] is selected, the paper is automatically selected
according to the printed document size.
• The selectable values in the [Source] box vary
depending on the optional devices installed in this
equipment and their configuration on the Paper Feed
menu.
Print Style
This selects how you want to print a back cover.
- Do not print on page
— Select this to insert a blank
back cover.
- Print on page — Select this to print the last page image
on the front side of a back cover. When the Two-Sided
Printing option is enabled in the Layout menu, the last
two page images are printed on both sides of a back
cover.
- Print on 1 side of the page — Select this to print the
last page image on the front side of a back cover. This
is available only when the Two-Sided Printing option is
enabled in the Layout menu.
1) Use Front Cover
This sets front cover printing which allows you to insert or
print a cover on a sheet fed from a different tray or the
multi-purpose tray.
To enable cover printing, select this check box and select
the location from where a cover sheet is to be fed and the
print style to be used.
Source
Select from where the cover sheet is to be fed. When [Auto
(Default)] is selected, the paper is automatically selected
according to the printed document size.
• The selectable values in the [Source] box vary
depending on the optional devices installed in this
equipment and their configuration on the Paper Feed
menu.
Print Style
This selects how to print the cover.
- Do not print on page
cover.
- Print on page — Select this to print the first page
image on the front side of a cover. When the Two-Sided
Printing option is enabled in the Layout menu, the first
two page images are printed on both sides of a cover.
Quality
In the Quality menu, you can specify various image quality
features.
• This option is available only when your equipment is a
multifunctional digital system (Black and White MFP).
— Select this to insert a blank
- 65 -
Page 66

2
1
3
4
5
6
7
1
2
3
1
2
3
PRINTING FROM Macintosh
e-Filing
In the e-Filing menu, you can send and store print jobs from
your application to e-Filing on this equipment (hard disk). The
jobs stored to e-Filing can then be printed using the touch
panel. You can select either a public or user box in which to
store print jobs. You can also specify a folder in which the print
jobs are to be stored in these boxes. The public box is shared
by all users who can view the jobs stored in this box. User
boxes are ones that users can create as desired. Access to
user boxes can be restricted with a password.
1) Halftone
This sets how to print halftones.
- Auto — Select this to print with proper halftone
depending on the contents in the document
automatically.
- Detail — Select this to print halftone in detail.
- Smooth — Select this to print halftone smoothly.
2) Smoothing
Select this check box to print texts and graphics smoothly.
3) Toner Save
Select this check box to print in the toner save mode.
Note
• When the toner save mode is enabled, printing may
become light.
1) Store this document to e-Filing
To store a print job in e-Filing, select this check box.
2) Print the document
If you want to print the job as well as saving it to a box,
select this check box.
3) Destination
Select either the public box or a user box in which to store
print jobs.
5-digit password
If a password is set in the user box, enter the 5-digit
password.
Destination folder
When you specify a folder in which the print job is to be
stored in a public or a user box, enter the folder name.
Note
• Enter the folder name within 64 characters.
• If the number of folders has reached 100, you cannot
create any more.
- 66 -
Page 67

PRINTING FROM Macintosh
2
1
3
4
5
6
7
Note
Note
Watermark
In the watermark menu, you can overprint the document with
useful information, such as [Confidential], [Draft], [Proof] and
[Top Secret]. You can choose from several predefined
watermarks or you can create and save your own custom
watermarks. Watermarks consist of text only.
1
2
3
4
5
6
7
8) Position
Adjust the position of the watermark by moving the scroll
bars.
Supply Levels
In the Supply Levels menu, the remaining toner and paper can
be checked.
8
1) Text
Select the watermark. You can create a new watermark if
there is none you want to apply on the box.
• You can enter up to 63 alphanumeric characters. If too
many characters are entered, the watermark may not be
printed correctly.
2) Font
Select the font to be used for the watermark text.
3) Size
Enter the font size for the watermark text.
The font size can be set from 6 to 300 pt in units of 1 pt.
You can also set the font size by moving the scroll bar.
4) Angle
Enter the degree of the angle for rotating the watermark
text. The angle can be set from 0 to 360 degrees in units of
1 degree. You can also set the degree of the angle by
moving the scroll bar.
5) Color
Select the color of the watermark text.
• When [Mono] is selected at the [Color Type] box in the
Color Settings 1, the documents are printed with a
shading of gray instead of the selected color.
6) Print over the document
Select this to print the watermark text placed above
everything.
7) Print under the document
Select this to print the watermark text placed below
everything.
- 67 -
Page 68

2
1
3
4
5
6
7
MANAGING PRINT JOBS FROM THE CONTROL PANEL
Note
Memo
● MANAGING PRINT JOBS FROM THE CONTROL PANEL
Monitoring the Print Job Status
Your print jobs can be monitored on the equipment’s touch
panel. The types of print jobs you can monitor include Normal
Print, Scheduled Print, Private Print, Hold Print and Proof Print.
If the Department Management feature is enabled, the
equipment can also display the Invalid jobs, which are held
without being printed. You can view the status, as well as
release, delete, pause/resume, and change the order of these
jobs. Connecting a USB storage device to the equipment
allows you to print PDF, encrypted PDF, XPS, JPEG, PRN and
PS files contained in the media directly from the touch panel
without using a client computer (USB Direct Printing).
• If the equipment is managed by the User Management
feature, you need to enter the user information, such as the
user name and password.
• Only when the Fax received print function is enabled, will
the following be possible. Hold Print jobs for faxes stored in
the equipment after they have been received can be
displayed in the list, which appears when you press the
[PRINT] button on the control panel and then [HOLD (FAX)].
To exit from the JOB STATUS screen, press [CLOSE].
Memo
• On the [JOBS] tab, you can select the desired mode for
monitoring the status by pressing [PRINT], [FAX], or
[SCAN].
• Besides the Job Skip function, this equipment prevents the
process of a print job from being paused with some setting
changes. When paper has run out during printing, for
example, you can continue printing with Automatic Change
of Paper Source (a function that feeds paper in the same
size from another tray when paper in the specified tray has
run out). For the details, refer to the "Setting Items/Printing"
( P. 2 2 8 ).
Deleting jobs
Follow the procedure below when you want to delete
unnecessary Normal Print / Scheduled Print jobs.
On the [JOBS] tab listing the print jobs,
1
select the job that you want to delete, and
then press [DELETE]. You can select more
than one job.
Normal Print / Scheduled Print jobs
When you press [JOB STATUS] on the touch panel, the [JOBS]
tab of the JOB STATUS screen appears. On the [JOBS] tab,
Normal Print and Scheduled Print jobs are listed together with
copy jobs. You can check the user name, date and time of
registration, paper size, number of pages, number of copies,
and current status of each job. You can also delete, pause or
resume each job, and change the order of the jobs on the list.
When the Job Skip function is enabled, a job fails due to lack of
paper or such is automatically skipped and the next job is
processed. For instructions on how to set the Job Skip
function, refer to the "Setting Items/Printing" ( P.2 2 8 ).
When “Delete OK?” appears, press
2
[DELETE].
For the Scheduled Print jobs, “Scheduled” is indicated in the
“Status” column.
Up to 1000 jobs can be listed.
To display the previous or next page, press or . The
number of jobs displayed on a page may vary depending on
the equipment used.
The selected job is deleted.
Pausing/Resuming jobs
Jobs whose status is “Wait” can be held in the queue
(Pausing).
- 68 -
Page 69

MANAGING PRINT JOBS FROM THE CONTROL PANEL
2
1
3
4
5
6
7
Note
Pausing jobs
On the [JOBS] tab listing the print jobs, select the job that you
want to pause and then press [PAUSE].
The selected job is paused. When a job is paused, the
subsequent jobs on the list will be released earlier.
Resuming paused jobs
Select the job that you want to resume and then press
[RESUME].
Changing the job order
You can change the order of the jobs by moving them within
the list.
• You can only move jobs from and to those whose status is
“Wait”.
On the [JOBS] tab listing the print jobs,
1
select the job that you want to move in the
list, and then press [MOVE].
If the target job is not displayed on the page, use and
2
to change between pages.
Specify the new position of the job. (The job
will be moved under the job selected here.)
- 69 -
Page 70

MANAGING PRINT JOBS FROM THE CONTROL PANEL
2
1
3
4
5
6
7
Confirming the information of a
skipped job
You can confirm the information of a job skipped by the Job
Skip function.
On the [JOBS] tab listing the print jobs,
1
confirm the information of the skipped job.
1) Select the skipped job.
2) Press [RECOVERY INFORMATION].
Resolve the cause of the skip following the
2
instructions on the screen.
Displaying the Proof Print job list
Follow the procedure below when you want to display the list of
Proof Print jobs.
On the control panel, press the [PRINT]
1
button.
Select [PROOF].
2
Note
• If multiple causes exist, the second cause is displayed
after you resolve the first one. Resolve all causes
accordingly.
Proof Print jobs
Proof Print refers to the function to print only a single copy as a
sample and suspend the rest of the job when you print multiple
copies from a computer on the network.
After viewing the first copy, you can decide, on the Proof Print
job list, whether to print out the remaining copies or cancel the
job to change the settings. If you select to print the remaining
copies, you can change the number of copies to print.
For detailed instructions on Proof Print, see the following page:
P.39 "Printing proof print jobs"
The Proof Print jobs are listed on the screen.
- 70 -
Page 71

MANAGING PRINT JOBS FROM THE CONTROL PANEL
2
1
3
4
5
6
7
Memo
Printing remaining copies
Follow the procedure below if you have checked the first copy
and want to print the remaining copies.
On the Proof Print job list ( P. 7 0), select
1
the job for printing.
If the target job is not displayed on the screen, use
and to change between pages.
Press [PRINT].
2
Deleting Proof Print jobs
Follow the procedure below to delete Proof Print jobs.
On the Proof Print job list ( P.7 0), select
1
the job that you want to delete, and then
press [DELETE].
If the target job is not displayed on the screen, use
and to change between pages.
When “Delete OK?” appears, press
2
[DELETE].
The remaining copies are printed out.
The job in progress can be monitored on the [JOBS] tab
listing the Normal Print jobs ( P.6 8 ).
The selected job is deleted.
Private Print jobs
• To change the number of copies to print, press [EDIT]
and enter the number of copies. Pressing [PRINT]
starts the job.
Private Print refers to the function to print a document from a
computer on the network only when a set password is keyed in
to the equipment’s control panel. This function is useful when
you want to print confidential documents and prevent them
from being seen by others. Private Print jobs can be released
or deleted from the Private Print job list.
For detailed instructions on Private Print, see the following
page:
P.38 "Printing private print jobs"
Displaying the Private Print job list
Follow the procedure below to display the list of Private Print
jobs.
- 71 -
Page 72

MANAGING PRINT JOBS FROM THE CONTROL PANEL
2
1
3
4
5
6
7
Memo
Memo
On the control panel, press the [PRINT]
1
button.
Enter the password for the Private Print job,
3
which has previously been set via the
computer, and then press [OK].
• If the Private print job list is not displayed, select
[PRIVATE] from the box of the job types.
On the Private Print job list, select the
2
desired user name and then press [OK].
The Private Print jobs are listed on the screen.
Note
• When you enter the nickname for [User name (Alias)]
box on the [Others] tab on a Windows computer, and
send the job to the equipment, its nickname will be
displayed on the Private Print job list. If not, the user
name that is entered to log in to your computer will be
displayed on the Private Print job list.
• If you perform the operation as the administrator, press
[ADMIN. PASSWORD] instead of selecting a user
name. The on-screen keyboard appears, with which
you can enter the 6-to-64-digit administrator password.
In this case, the jobs can be deleted but are not
allowed to be printed.
• When the Private Print job is sent from a Windows
computer:
- When the user name that is entered to log in to your
computer is used for [User name (Alias)], the
displayed list contains the Private Print jobs for
which the same password has been set.
- When the nickname is entered for [User name
(Alias)], the displayed list contains the Private Print
jobs for which the same nickname and the same
password have been set.
- 72 -
Page 73

MANAGING PRINT JOBS FROM THE CONTROL PANEL
2
1
3
4
5
6
7
Printing Private Print jobs
Follow the procedure below to release your Private Print jobs
from the control panel.
On the Private Print job list ( P.7 1 ), select
1
a job for printing. You can select more than
one job.
• If the target job is not displayed on the screen, use
and to change between pages.
• If you want to select all the jobs displayed on the
screen, press [SELECT ALL]. To cancel the selection,
press [ALL CLEAR].
Deleting Private Print jobs
Follow the procedure below to delete a Private Print job.
On the Private Print job list ( P.7 1), select
1
the job that you want to delete, and then
press [DELETE]. You can select more than
one job.
• If the target job is not displayed on the screen, use
and to change between pages.
• If you want to select all the jobs displayed on the
screen, press [SELECT ALL]. To cancel the selection,
press [ALL CLEAR].
Press [PRINT].
2
The equipment starts printing.
The job in progress can be monitored on the [JOBS] tab
listing the Normal Print jobs ( P.6 8 ).
When “Delete OK?” appears, press
2
[DELETE].
The selected job is deleted.
Hold Print jobs
Hold Print refers to the function to retain a document from a
computer on the network until a user performs printing from the
equipment’s touch panel. This function is useful to prevent you
forgetting to remove printed sheets. Hold Print jobs can be
released or deleted from the Hold Print job list.
For the detailed instructions on Hold Print, see the following
page:
P.39 "Printing hold print jobs"
- 73 -
Page 74

MANAGING PRINT JOBS FROM THE CONTROL PANEL
2
1
3
4
5
6
7
Memo
Displaying the Hold Print job list
Follow the procedure below to display the list of Hold Print
jobs.
On the control panel, press the [PRINT]
1
button.
Select [HOLD].
2
On the Hold Print job list, select the desired
3
user name.
The displayed list contains the Hold Print jobs stored in
the Hold Print queue.
Note
• When you enter the nickname for [User name (Alias)]
box on the [Others] tab on a Windows computer, and
send the job to the equipment, its nickname will be
displayed on the Hold Print job list. If not, the user
name that is entered to log in to your computer will be
displayed on the Hold Print job list.
• If you perform the operation as an administrator, press
[ADMIN. PASSWORD] instead of selecting a user
name. The on-screen keyboard appears, with which
you can enter the 6-to-64-digit administrator password.
In this case, the jobs can be deleted but are not
allowed to be printed.
The Hold Print jobs are listed on the screen.
• When the Hold Print job is sent from a Windows
computer:
- When the user name that is entered to log in to your
computer is used for [User name (Alias)], the
displayed list contains the Hold Print jobs which
have been registered by the selected user.
- When the nickname is entered for [User name
(Alias)], the displayed list contains all the Hold Print
jobs which have been registered by users having
the same nickname.
- 74 -
Page 75

MANAGING PRINT JOBS FROM THE CONTROL PANEL
2
1
3
4
5
6
7
Memo
Memo
Printing Hold Print jobs
Follow the procedure below to process your Hold Print jobs
from the control panel.
On the Hold Print job list ( P.7 4 ), select a
1
job for printing. You can select more than
one job.
• If the target job is not displayed on the screen, use
and to change between pages.
• If you want to select all the jobs displayed on the
screen, press [SELECT ALL]. To cancel the selection,
press [ALL CLEAR].
Press [PRINT].
2
Deleting Hold Print jobs
Follow the procedure below to delete a Hold Print job.
On the Hold Print job list ( P. 7 4 ), select
1
the job that you want to delete, and then
press [DELETE]. You can select more than
one job.
• If the target job is not displayed on the screen, use
and to change between pages.
• If you want to select all the jobs displayed on the
screen, press [SELECT ALL]. To cancel the selection,
press [ALL CLEAR].
When “Delete OK?” appears, press
2
[DELETE].
The equipment starts printing.
The job in progress can be monitored on the [JOBS] tab
listing the Normal Print jobs ( P.6 8 ).
• The printed job will be deleted from the Hold Print job
list.
The selected job is deleted.
• You cannot use the print job list to delete fax/Internet
Fax jobs and E-mail reception print jobs.
- 75 -
Page 76

MANAGING PRINT JOBS FROM THE CONTROL PANEL
2
1
3
4
5
6
7
Note
Invalid jobs
An Invalid job refers to a job being held due to an incorrect or
no department code being entered for performing the job. If the
equipment is managed by the Department Management
feature with the SNMP network services disabled, entering an
incorrect department code for printing from a computer on the
network causes the job to be held as an invalid job and stored
in the Invalid job queue. To release the job from the queue,
enter the correct department code on the [JOBS] tab listing the
Invalid jobs.
• A print job whose number of copies to print exceeds the limit
specified for a particular department code cannot be printed
out. In this case, ask the administrator for help.
Displaying the Invalid job list
Follow the procedure below to display the list of Invalid jobs.
Displaying the Invalid job list
On the control panel, press the [PRINT]
1
button.
Select [INVALID].
3
The Invalid jobs are listed on the screen.
Printing Invalid jobs
If you have entered an incorrect department code for printing,
you need to re-enter the correct one. Follow the procedure
below.
On the Invalid job list , select the job for
Enter the correct department code with the
2
on-screen keyboard and digital keys, and
then press [OK].
1
printing.
If the target job is not displayed on the screen, use
and to change between pages.
- 76 -
Page 77

MANAGING PRINT JOBS FROM THE CONTROL PANEL
2
1
3
4
5
6
7
Note
Press [PRINT].
2
Printing starts.
The job in progress can be monitored from the [JOBS] tab
listing the Normal Print jobs ( P.6 8 ).
Deleting Invalid jobs
Follow the procedure below to delete an Invalid job.
On the Invalid job list ( P. 7 6 ), select the
1
job that you want to delete, and then press
[DELETE].
If the target job is not displayed on the screen, use
and to change between pages.
When “Delete OK?” appears, press
2
[DELETE].
Printing files from USB media (USB Direct Printing)
USB Direct Printing refers to the printing of files saved in a
USB storage device that is connected to the USB port on the
equipment. With this feature, you can print PDF, encrypted
PDF (file extension: “.pdf”), XPS (file extension: “.xps”), JPEG
(file extension: “.jpg” or “.jpeg”), PRN (file extension: “.prn”),
and PS (file extension: “.ps”) files.
• USB Direct Printing requires the USB Direct Print setting to
be enabled on TopAccess. For details, refer to the
TopAccess Guide.
• You cannot specify which page(s) of the selected file to
print. All pages are to be printed.
• USB Direct Printing supports the printing of PDF files whose
versions are from 1.3 to 1.7.
• With this feature, the equipment can print encrypted PDF
files whose encryption level is either “40-bit RC4” or “128-bit
RC4.”
• The feature does not support encrypted PDF files whose
encryption level is [128bit AES], and some files of other
encryption levels may not be printable as well. In these
cases, print these files from a client computer.
• PDF files are printed with the sizes defined in the Page Size
in each one.
If the size defined in the PDF file is not supported in the
equipment, it is printed as a custom paper size.
(If the defined size is outside the supported range, the width
and the height are automatically converted into one within
the range.)
When you want to print PDF files with paper placed in a tray,
select it on the touch panel.
If the paper size placed in the tray is smaller than the one
defined in the PDF file, a part of images may not be printed.
• For printing the PRN files, the page description languages
supported by USB Direct Printing are PostScript 3, PCL5e,
PCL5c, PCL6 and XPS.
• Do not turn on the equipment when a USB storage device is
connected to the port.
• The USB storage device should meet the following
requirements:
- FAT16 and FAT32 formats
- Single-partition (USB media with multiple partitions are
not supported.)
However, some of the devices may not be used in this
equipment, even though these requirements have been
met.
The selected job is deleted.
- 77 -
Page 78

MANAGING PRINT JOBS FROM THE CONTROL PANEL
2
1
3
4
5
6
7
Note
Connect your USB storage device to the
1
USB port on the equipment.
In a few seconds, “Found USB DEVICE” appears at the
lower left of the screen.
• Do not disconnect the USB storage device when “USB
DEVICE in use Do not remove USB DEVICE” is
displayed on the screen. Removing the device while
the message is displayed could destroy the data in the
2
device or cause a malfunction of the equipment.
On the control panel, press the [PRINT]
button.
• If the equipment is not managed by department codes,
proceed to Step 4.
Select [USB].
4
Note
• Do not disconnect the USB storage device when “USB
DEVICE in use Do not remove USB DEVICE” is
displayed on the screen. Removing the device while
the message is displayed could destroy the data in the
device or cause a malfunction of the equipment.
In the list of files, select the file that you
5
want to print. Select the files you want to
print from the list.
• If the target file is not displayed on the screen, use
Enter the department code using the on-
3
screen keyboard and digital keys, and then
press [OK].
Note
• The above screen will not be displayed when the
equipment is not managed by department codes.
Proceed to the next step.
and to change between pages.
• To select a file contained in a folder, select the folder
and press [OPEN]. In the list of files that appears,
select the desired file to print.
• If you select an encrypted PDF file for which a
password has been set, the password entry screen is
displayed. Proceed to Step 6.
• If you change the paper size, stapling position, 2-Sided
Printing setting or PDF Overprint setting, proceed to
Step 9. If you start printing without changing any of
them, proceed to Step 10.
Note
• Do not disconnect the USB storage device when “USB
DEVICE in use Do not remove USB DEVICE” is
displayed on the screen. Removing the device while
the message is displayed could destroy the data in the
device or cause a malfunction of the equipment.
- 78 -
Page 79

MANAGING PRINT JOBS FROM THE CONTROL PANEL
2
1
3
4
5
6
7
Memo
Memo
If you select an encrypted PDF file for
6
which a password has been set, press
Press [SETTINGS] and then select the
9
setting items as required.
[PASSWORD].
• To print a JPEG file, you can set [SIZE].
• To print a PDF file, you can set [FINISHING], [2SIDED] and [PDF Overprint].
1) Press any of [SIZE], [FINISHING], [2-SIDED] and
[PDF Overprint].
Using the on-screen keyboard and the
7
digital keys, enter the user or master
password for the encrypted PDF file, and
2) Select the desired item.
3) Press [OK] when you finish the setting.
then press [OK].
•SIZE
Set the paper size.
• If the selected encrypted PDF file was created on
Adobe Acrobat 6.0 or later, enter the document open
password or permissions password.
• To print an encrypted PDF file for which “Low
Resolution (150 dpi)” is set on Adobe Acrobat, you
must enter the permissions password that was set for
the file when it was created.
Press [OK].
8
• FINISHING
Set the position of stapling.
NON-STAPLE — Select this not to staple.
STAPLE — Select this to staple.
• If you change the paper size, stapling position, 2-Sided
Printing setting or PDF Overprint setting, proceed to
Step 9. If you start printing without changing any of
them, proceed to Step 10.
- 79 -
Page 80

MANAGING PRINT JOBS FROM THE CONTROL PANEL
2
1
3
4
5
6
7
•2-SIDED
Set 2-Sided Printing.
Press [PRINT].
10
1 SIDE — Select this to print only one side.
BOOK — Select this to print on both sides by setting a
vertical binding margin. Pages are turned over from right
to left.
TABLET — Select this to print on both sides by setting a
horizontal binding margin. Pages are turned over from
bottom to top.
• PDF Overprint
If a PDF file contains an overprint, this is also overprinted
on a print job when this option is enabled.
• The equipment starts printing. The printouts are
directed to the receiving tray.
• The job in progress can be monitored from the [JOBS]
tab listing the Normal Print jobs.
Before Disconnecting the USB Storage Device:
Make sure that “USB DEVICE in use. Do not remove
USB DEVICE.” is not displayed on the touch panel. If it is,
do not disconnect the USB storage device; removing the
device while the message is displayed could destroy the
data in the device or cause a malfunction of the
equipment.
Viewing the Print Job Log
You can view the log of print jobs on the touch panel.
Viewing the print job log
On the touch panel, press [JOB STATUS].
OFF — Select this not to overprint the job.
ON — Select this to enable overprint the job.
ON (PDF/X ONLY) — Select this to enable overprint the
job only when the original PDF file is complied with PDF/
X specifications.
Note
• The paper size can be set only when you print a JPEG
file. (If you print more than one JPEG file continuously,
the paper size you set for the first file in this step is
applied to the second and the following.)
• The PDF Overprint setting is applied only to objects
overprinted in the original PDF file. If you want to
preview the effect of overprint in the PDF file, you can
do it with the Overprint Preview mode of Adobe Reader
by switching the preview screen.
1
- 80 -
Page 81

MANAGING PRINT JOBS FROM THE CONTROL PANEL
2
1
3
4
5
6
7
Memo
Press [LOG] to display the [LOG] tab.
2
Press [PRINT].
3
Checking Supplies
Viewing the tray status
When the equipment is idle, pressing [JOB STATUS] >
[SUPPLY] displays the [SUPPLY] tab. From this tab, you can
view the paper size setting selected for each tray. If you press
[SUPPLY] when printing is in progress, the tray from which
paper is being fed is highlighted.
If you try to print a document from a client computer and
specify a paper size while none of the trays or -purpose tray on
the equipment has the specified size of paper, a printing error
occurs, and [JOB STATUS] blinks. In this case, pressing [JOB
STATUS] displays the [SUPPLY] tab, from which you can learn
which tray needs additional sheets of paper. For further
instructions on how to clear a printing error, refer to the
Troubleshooting Guide.
Checking remaining toner levels
Pressing [JOB STATUS] > [TONER] displays the [TONER] tab
from which you can check the approximate amount of toner
remaining in the toner cartridges.
If any of the toner cartridges is running out, be sure to get a
new cartridge ready. For more information about replacing
The Print Log is displayed.
On the Print Log, each job’s user name, date and time of
the job, paper size, the number of pages and the number
of copies are displayed.
Up to 1000 jobs can be listed on the log.
To display the previous or next page, press or .
The number of jobs displayed on a page may vary
depending on the equipment used.
toner cartridges, refer to the Troubleshooting Guide.
To exit from the Print Log screen, press [CLOSE].
• If the equipment encounters an error while printing, it
records and displays an error code in the User Name
column. For details on print job errors and error codes,
refer to the Troubleshooting Guide.
- 81 -
Page 82

2
1
3
4
5
6
7
● OTHER PRINTING METHODS
Note
Memo
Note
FTP Printing
FTP printing is available when the FTP print service is enabled
in this equipment.
You can print a document by sending the print file to this
equipment using the FTP. This equipment can accept the
following files for printing:
• PCL file
• PS (PostScript) file
• Text file
OTHER PRINTING METHODS
If it prompts you to enter the password,
5
enter the FTP Print Password and press the
[Enter] key.
• It prompts you to enter the password if the FTP Print
User Name is assigned by an administrator. Ask your
administrator for the FTP Print Password.
• If the FTP Print User Name has been assigned but the
FTP Print Password is blank, do not enter when it
prompts you to enter the password and press the
[Enter] key.
• When the User Management setting is enabled, a print job
sent in FTP printing is processed as an invalid job according
to the User Authentication Enforcement setting. For more
information about the User Authentication Enforcement
setting, refer to the TopAccess Guide.
• In Windows, you can create the PCL file and PS file using
the machine driver. To create the PCL file or PS file, change
the printer port of the printer driver to “FILE:” port and print a
document using the printer driver. For more information
about printing to a file, refer to the Windows documentation.
• In Macintosh, you can create the PS file using the printer
driver. To create the PS file, select “File” at the [Destination]
box in the Print dialog box to print. For more information
about printing to a file, refer to the Macintosh
documentation.
Printing a file using the FTP command
The procedure below describes the example of printing using
the FTP command with the MS-DOS Prompt.
Launch the MS-DOS Prompt.
1
Change the current directory to that in
2
which the print file is located.
Type following command and press the
3
[Enter] key:
ftp <IP Address>
In the <IP Address> section, enter the IP address of this
equipment.
Type the following command and press the
6
[Enter] key:
put <file name>
For example, if the print file name is “sample.ps”:
put sample.ps
The file is sent to this equipment and
7
spooled in the queue.
If it prompts you to enter the user name,
4
enter the FTP Print User Name and press
the [Enter] key.
Note
• It prompts you to enter the user name if the FTP Print
User Name is assigned by an administrator. Ask your
administrator for the FTP Print User Name.
- 82 -
Page 83

OTHER PRINTING METHODS
2
1
3
4
5
6
7
Note
Note
Email Printing
Email printing is available only when the Email print service is
enabled in this equipment.
You can print a document by sending the print file to this
equipment as an email attachment using the mail client
software. This equipment can accept the following for printing;
TIFF-FX (Profile S), TIFF-FX (Profile F), TIFF-FX (Profile J),
TIFF images scanned in black and white, and text data (email
messages in the plain text format).
If any files failing to meet the above conditions are attached to
a received e-mail, an e-mail printing error occurs and is
recorded as an error code on the RECEIVE log. On
TopAccess, the “Email Print” settings are available for the
administrator so that error codes can be printed as a report.
The administrator can also set the equipment to forward such
e-mail to another e-mail address. For details, refer to the
TopAccess Guide.
• When the User Management setting is enabled, a print job
sent by Email is processed as an invalid job according to the
User Authentication Enforcement setting. For more
information about the User Authentication Enforcement
setting, refer to the TopAccess Guide.
• An Email print job has two printing types, Discard Printing
and RX Reduction Printing, that can be set by pressing the
[RX PRINT] button in [FAX] of the ADMIN menu on the
control panel.
When Discard Printing is ON, the part of the print image that
exceeds the paper printing area is discarded if the print
image is up to 10 mm larger than the printing area. If the
print image is 10 mm larger or more than the printing area,
the print image is printed on the largest sheet of paper.
When Discard Printing is OFF, the print image is printed on
the largest sheet of paper if its length exceeds the paper
printing area.
When RX Reduction Printing is ON, it will be vertically
reduced to fit on the paper if the print image is longer than
the paper. When the print image cannot fit in the paper even
if the print image is reduced, the print image is printed on
the largest sheet of paper.
When RX Reduction Printing is OFF, the print image is
printed on the largest sheet of paper if its length exceeds
the paper printing area.
Printing a file using the email client
The procedure below gives an example of printing using
Microsoft Outlook Express.
• When you send an email message to this equipment to print
a file, send it in plain text format. If you send an email
message in HTML format, this equipment prints the HTML
source code of the message.
Open your email application and create a
1
new mail message.
Enter the email address of the equipment in
2
the To: line.
Enter text in the Subject line or leave the
3
Subject line blank.
Enter text in the body field.
4
Attach the file you want to print.
5
Send the email.
6
Note
• The header and body of the email will be printed only
when the “Print Header” and “Print Message Body” for
the Email print service are enabled in this equipment.
- 83 -
Page 84

2
1
3
4
5
6
7
● APPENDIX
Internal Fonts List
The following fonts are included in this equipment.
Internal PCL fonts list
0 Courier 41 Helvetica-Narrow
1 CG-Times 42 Helvetica-Narrow-Bold
2 CG-Times Bold 43 Helvetica-Narrow-Oblique
3 CG-Times Italic 44 Helvetica-Narrow-BoldOblique
4 CG-Times Bold Italic 45 Palatino-Roman
5 CG Omega 46 Palatino-Bold
6 CG Omega Bold 47 Palatino-Italic
7 CG Omega Italic 48 Palatino-BoldItalic
8 CG Omega Bold Italic 49 ITC AvantGarde-Book
9 Coronet 50 ITC AvantGarde-BookOblique
10 Clarendon Condensed 51 ITC AvantGarde-Demi
11 Univers Medium 52 ITC AvantGarde-DemiOblique
12 Univers Bold 53 ITC Bookman-Light
13 Univers Italic 54 ITC Bookman-LightItalic
14 Univers Bold Italic 55 ITC Bookman-Demi
15 Univers Medium Condensed 56 ITC Bookman-DemiItalic
16 Univers Condensed Bold 57 NewCenturySchlbk-Roman
17 Univers Medium Condensed Italic 58 NewCenturySchlbk-Bold
18 Univers Condensed Bold Italic 59 NewCenturySchlbk-Italic
19 Antique Olive 60 NewCenturySchlbk-BoldItalic
20 Antique Olive Bold 61 Times-Roman
21 Antique Olive Italic 62 Times-Bold
22 Garamond Antiqua 63 Times-Italic
23 Garamond Halbfett 64 Times-BoldItalic
24 Garamond Kursiv 65 ITCZapfChancery-MediumItalic
25 Garamond Kursiv Halbfett 66 Symbol
26 Mrigold 67 Symbol PS
27 Albertus Medium 68 Wingdings
28 Albertus Extra Bold 69 ITCZapfDingbats
29 Arial 70 Courier Bold
30 Arial Bold 71 Courier Italic
31 Arial Italic 72 Courier Bold Italic
32 Arial Bold Italic 73 Letter Gothic Regular
33 Times New Roman 74 Letter Gothic Bold
34 Times New Roman Bold 75 Letter Gothic Italic
35 Times New Roman Italic 76 CourierPS
36 Times New Roman Bold Italic 77 CourierPS Oblique
37 Helvetica 78 CourierPS Bold
38 Helvetica-Bold 79 CourierPS BoldOblique
39 Helvetica-Oblique
40 Helvetica-BoldOblique
*1 These fonts can be added when the optional Unicode Font Enabler is installed.
AndaleMonoWTJ
AndaleMonoWTK
AndaleMonoWTT
AndaleMonoWTS
*1
*1
*1
*1
APPENDIX
- 84 -
Page 85

2
1
3
4
5
6
7
APPENDIX
Internal PS fonts list
AlbertusMT-Light NewYork Helvetica-Condensed
AlbertusMT Optima Helvetica-Condensed-Oblique
AlbertusMT-Italic Optima-Italic Helvetica-Condensed-Bold
AntiqueOlive-Roman Optima-Bold Helvetica-Condensed-BoldObl
AntiqueOlive-Italic Optima-BoldItalic Helvetica-Narrow
AntiqueOlive-Bold Oxford Helvetica-Narrow-Oblique
AntiqueOlive-Compact Palatino-Roman Helvetica-Narrow-Bold
Apple-Chancery Palatino-Italic Helvetica-Narrow-BoldOblique
ArialMT Palatino-Bold HoeflerText-Regular
Arial-ItalicMT Palatino-BoldItalic HoeflerText-Italic
Arial-BoldMT StempelGaramond-Roman HoeflerText-Black
Arial-BoldItalicMT StempelGaramond-Italic HoeflerText-BlackItalic
AvantGarde-Book StempelGaramond-Bold HoeflerText-Ornaments
AvantGarde-BookOblique StempelGaramond-BoldItalic JoannaMT
AvantGarde-Demi Symbol JoannaMT-Italic
AvantGarde-DemiOblique Taffy JoannaMT-Bold
Bodoni Times-Roman JoannaMT-BoldItalic
Bodoni-Italic Times-Italic LetterGothic
Bodoni-Bold Times-Bold LetterGothic-Slanted
Bodoni-BoldItalic Times-BoldItalic LetterGothic-Bold
Bodoni-Poster TimesNewRomanPSMT LetterGothic-BoldSlanted
Bodoni-PosterCompressed TimesNewRomanPS-ItalicMT Univers-CondensedBold
Bookman-Light TimesNewRomanPS-BoldMT Univers-CondensedBoldOblique
Bookman-LightItalic TimesNewRomanPS-BoldItalicMT Univers-Extended
Bookman-Demi Univers-Light Univers-ExtendedObl
Bookman-DemiItalic Univers-LightOblique Univers-BoldExt
Candid Univers Univers-BoldExtObl
Chicago Univers-Oblique Wingdings-Regular
Clarendon-Light Univers-Bold ZapfChancery-MediumItalic
Clarendon Univers-BoldOblique ZapfDingbats
Clarendon-Bold Univers-Condensed IPAexGothic
CooperBlack Univers-CondensedOblique IPAexMincho
CooperBlack-Italic Eurostile-ExtendedTwo
Copperplate-ThirtyTwoBC Eurostile-BoldExtendedTwo
Copperplate-ThirtyThreeBC Geneva
Coronet-Regular GillSans-Light
Courier GillSans-LightItalic
Courier-Oblique GillSans
Courier-Bold GillSans-Italic
Courier-BoldOblique GillSans-Bold
Eurostile GillSans-BoldItalic
Eurostile-Bold GillSans-ExtraBold
LubalinGraph-Book GillSans-BoldCondensed
LubalinGraph-BookOblique GillSans-Condensed
LubalinGraph-Demi Goudy
LubalinGraph-DemiOblique Goudy-Italic
Marigold Goudy-Bold
Monaco Goudy-BoldItalic
MonaLisa-Recut Goudy-ExtraBold
NewCenturySchlbk-Roman Helvetica
NewCenturySchlbk-Italic Helvetica-Oblique
NewCenturySchlbk-Bold Helvetica-Bold
NewCenturySchlbk-BoldItalic Helvetica-BoldOblique
- 85 -
Page 86

2
Copying Operations
EDITING FUNCTIONS························································· P.87
IMAGE ADJUSTMENT······················································ P.106
1
2
CONFIRMING JOB STATUS ············································ P.114
OTHER INFORMATION ···················································· P.118
3
4
5
6
7
Page 87

2
1
3
4
5
6
7
EDITING FUNCTIONS
● EDITING FUNCTIONS
Displaying EDIT Menu
You can display the EDIT menu by pressing the [EDIT] tab on
the touch panel when you want to use various editing
functions.
Image Shift
You can create a binding margin by shifting an image to the
left, right, top or bottom of the copy paper. This function is
called “image shift”. It is useful when you wish to punch or
staple a stack of paper after copying it.
Memo
You can make a binding margin in the combinations as follows:
• Top/bottom margin and left/right margin
Creating top/bottom margin or left/right margin
The EDIT menu has 2 pages. To switch the pages, press
or .
Place paper in the tray(s).
1
When using bypass copying, be sure to set the paper
size.
Place the original(s).
2
Press [IMAGE SHIFT] on the EDIT menu.
3
- 87 -
Page 88

EDITING FUNCTIONS
2
1
3
4
5
6
7
Memo
Select the type of binding margin.
4
Adjust the width of the binding margin.
5
1) Press [FRONT MARGIN] and adjust the binding
margin width on the front side using [ 0 mm]
(0") and [ 100 mm] (3.94"). (The width on the
back side will be also adjusted in the same way.)
2) Press [BACK MARGIN] and adjust the binding
margin width on the back side using [ 0 mm]
(0") and [ 100 mm] (3.94"). (Only the width on
the back side will be adjusted.)
3) Press [OK].
Press [OK].
6
Select other copy modes as required, and
7
then press the [START] button on the
control panel.
Edge Erase
You can whiten the edge of the copied image when a shadowlike dark part appears on it. This function is called “edge
erase”. It is useful when you want to make the copied image
neat and clear if the edge of the original is dirty or torn.
• Note that a left/right binding margin will be created on
the opposite side on the back side of paper in duplex
copying. (For example, when a binding margin is
created on the right of the front side of the paper, it will
be created on the left of the back side.)
Memo
• Only standard size originals are applicable.
Place paper in the tray(s).
1
When using bypass copying, be sure to set the paper
size.
Place the original(s).
2
Press [EDGE ERASE] on the EDIT menu.
3
- 88 -
Page 89

EDITING FUNCTIONS
2
1
3
4
5
6
7
Memo
Adjust the width of the part to be erased.
4
1) Press either [ 2 mm] (0.08") or [ 50 mm]
(1.97").
2) Press [OK].
Select other copy modes as required, and
5
then press the [START] button on the
control panel.
2IN1 / 4IN1
You can copy 2 or 4 originals to 1 sheet of paper by shrinking
them. This function is called “2IN1” or “4IN1”. If you use this
function together with duplex copying, you can make a total of
8 images on 1 sheet of paper.
Place paper in the tray(s).
1
When using bypass copying, be sure to set the paper
size.
• If you select paper of a different size to that of the
original, press [ZOOM] on the BASIC menu. Next
select the desired paper size, press [AMS] and then
[OK] in the menu shown below.
Place the original(s).
2
Press [2IN1 / 4IN1] on the EDIT menu.
3
The illustrations below show how you can arrange the images.
2IN1
4IN1
2IN1 & duplex copying (a: side 1, b: side 2)
a
b
4IN1 & duplex copying (a: side 1, b: side 2)
Perform 2IN1 / 4IN1 setting.
4
1) If you want to copy 2 originals on 1 page, select
[2IN1]. If you want 4 on 1 page, select [4IN1].
2) Select the duplex mode.
3) Press [OK].
a
b
a
b
- 89 -
Page 90

EDITING FUNCTIONS
2
1
3
4
5
6
7
Memo
Select other copy modes as required, and
5
then press the [START] button on the
control panel.
When the originals are placed on the RADF, scanning
and copying start. When they are placed on the document
glass, follow steps 6 and 7.
Place the next original, and then press
6
[NEXT COPY] on the touch panel or the
[START] button on the control panel.
Scanning of the next original starts. If you have more than
one original, repeat this step until the scanning of all the
originals is finished.
When the scanning of all the originals is
7
finished, press [JOB FINISH] on the touch
panel.
Copying starts.
Magazine Sort Mode
You can copy more than one original in the book-type page
order. This mode is called the magazine sort mode.
Magazine sort mode
Press [MAGAZINE SORT] on the EDIT
4
menu.
Set the binding margin width as required.
5
1) Press either [ 2 mm] (0.08") or [ 30 mm]
(1.18") to adjust the binding margin width.
2) Press [OK].
1
2
3
The magazine sort mode can also be selected on the BASIC
menu. For details, see the following page:
Basic Guide
Place paper in the tray(s).
1
Select the paper size.
2
Place the original(s).
3
• When placing portrait originals in a landscape direction
as shown on the follow in the magazine sort mode set
the image direction function to ON on the EDIT menu.
Otherwise the originals will not be copied in the proper
page order.
P.101 "Image Direction"
12
76
94
112
Select other copy modes as required, and
6
then press the [START] button on the
control panel.
- 90 -
Page 91

EDITING FUNCTIONS
2
1
3
4
5
6
7
Memo
Trimming Masking
Image Editing
You can select the various editing functions shown below for
scanned images.
Trimm ing: You can select a certain area of an original and
copy only the selected area.
Masking: You can mask a certain area of an original and
copy only the unmasked area.
Mirror image: You can reverse an image like a mirror.
Negative/Positive reversal: You can reverse the light-
and-dark of an image.
Select [TRIM] or [MASK].
3
Trimming / Masking
You can select the desired area of an original and copy only
the selected area (trimming). You can also mask the desired
area of an original and copy only the unmasked area
(masking). On both functions you can select up to 4 areas on 1
original. The selected area should be in a rectangle.
• Only standard size originals are applicable.
• Note that the entire image of the selected area may not be
copied if you do not select proper sizes for the original and
copy paper.
Place paper in the tray(s).
1
When using bypass copying, be sure to set the paper
size.
Press [EDITING] on the EDIT menu.
2
Place the original on the document glass
4
with its face up.
Place it with its bottom toward you. Align its top left corner
against that of the document glass so that the original will
be aligned with the original scales.
Do not place any heavy objects (8kg (18lb.) or over)
on the document glass and do not press on it with
force.
Breaking the glass could injure you.
Read the following 4 values to specify the
5
area using the left and top scales on the
document glass.
X1: From the top left to the left edge of the selected
area
X2: From the top left to the right edge of the selected
area
Y1: From the top left to the upper edge of the selected
area
Y2: From the top left to the lower edge of the selected
area
- 91 -
Page 92

EDITING FUNCTIONS
2
1
3
4
5
6
7
Note
Mirror image
Negative/Positive reversal
Key in the read values.
6
1) Press [X1], [X2], [Y1] and [Y2], and then key in the
read values correspondingly.
2) You can specify up to 4 areas on 1 page. When
you want to specify more than one area, press
[AREA 1] to [AREA 4] to switch the area, and then
key in the values correspondingly.
3) Press [OK] after you have specified all the areas.
• Negative/positive reversal is available only when BLACK or
FULL COLOR is selected as a color mode.
Place paper in the tray(s).
1
When using bypass copying, be sure to set the paper
size.
Place the original again on the document
7
glass with its face down.
Place it with its bottom right to you. Align its top side
against the left side of the document glass.
Place the original(s).
2
Press [EDITING] on the EDIT menu.
3
Select other copy modes as required, and
8
then press the [START] button on the
control panel.
Mirror image / Negative/positive reversal
You can reverse an image like a mirror (mirror image), or you
can reverse light-and-dark of an image (negative/positive
reversal).
Select [MIRROR] or [NEG/POS], and then
4
press [OK].
Select other copy modes as required, and
5
then press the [START] button on the
control panel.
XY Zoom
You can change the reproduction ratio in both vertical and
horizontal directions separately. This function is called “XY
zoom”.
- 92 -
Page 93

EDITING FUNCTIONS
2
1
3
4
5
6
7
Note
100%
100%
200%
200%
• The reproduction ratio is changeable from 25 to 400%.
However in the following cases, this range is 25 to 200%.
- When the color mode is FULL COLOR or AUTO COLOR
- When the original mode is IMAGE SMOOTHING
- When the color mode is BLACK and the original mode is
PHOTO
- When TWIN COLOR COPY is selected
- When MONO COLOR is selected
- When the original is placed on the RADF
- When the A4 original is copied on an A4 sheet when
Zoom is set to 50%, the edges of the image are chipped
off.
Place paper in the tray(s).
1
When using bypass copying, be sure to set the paper
size.
Set the reproduction ratio in both vertical
4
and horizontal directions.
1) Press [X], and then press either [ 25%] or
[ 400%] for a horizontal direction.
2) Press [Y], and then press either [ 25%] or
[ 400%] for a vertical direction.
3) Press [OK].
Select other copy modes as required, and
5
then press the [START] button on the
control panel.
Place the original(s).
2
Press [XY ZOOM] on the EDIT menu.
3
- 93 -
Page 94

2
1
3
4
5
6
7
Cover Sheet
Memo
REPORT
2003
3
2
1
REPORT
2003
You can add a special type of paper such as colored paper as
a front cover sheet or a back cover sheet. This function is
called “cover sheet”. In the cover sheet mode, you can select
whether or not to copy the front or back cover sheet as shown
in the table below.
Front cover
Mode Description
NONE Does not add a sheet as the front cover
BLANK Adds a blank sheet as the front cover
TOP COPIED Adds a sheet copied on the top side as the
front cover
BOTH COPIED Adds a sheet copied on both sides as the
front cover
Back cover
Mode Description
NONE Does not add a sheet as the back cover
BLANK Adds a blank sheet as the back cover
TOP COPIED Adds a sheet copied on the top side as the
back cover
BOTH COPIED Adds a sheet copied on both sides as the
back cover
EDITING FUNCTIONS
Place the normal paper in the tray(s).
2
Place the original(s).
3
When placing them on the document glass, they must be
placed from the first page.
Press [COVER SHEET] on the EDIT menu.
4
Select the front and back cover settings,
5
and then press [OK].
ONLY BACK
COPIED
Example: Selecting “TOP COPIED” for the front cover
and “BLANK” for the back cover
A sheet copied on the top is added as the front cover and a
blank sheet as the back cover.
Place the paper for the cover sheets.
1
Place it on the multi-purpose tray or in a tray previously
set for cover sheets. The paper for the cover sheets must
be placed in a different paper source than normal paper.
Note
• When placing paper in a tray for cover sheets, be sure
to select “COVER” as the paper type, and also set the
paper size and thickness.
• When placing paper on the multi-purpose tray, be sure
to set the paper size and thickness.
Basic Guide
• Place the paper for cover sheets of the same size as
normal paper in the same direction.
Adds a sheet copied on the back side as
the back cover
- 94 -
• You can select [BOTH COPIED] for the front or back
cover sheet only when [1->2 DUPLEX] or [2->2
DUPLEX] is set for the 2-sided copy mode on the
basic menu.
Press the [BASIC] tab to display the BASIC
6
menu. Then select a tray in which normal
paper is placed (not the one for the cover
sheets).
You must place the normal paper of the same size and
direction as that for the cover sheets in advance.
Page 95

EDITING FUNCTIONS
2
1
3
4
5
6
7
REPORT
2003
1
2
3
4
4
3
REPORT
2003
2
3
REPORT
2003
2
1
Select other copy modes as required, and
7
then press the [START] button on the
control panel.
When the originals are placed on the RADF, scanning
and copying start.
When they are placed on the document glass, follow
steps 8 and 9.
Sheet Insertion
You can insert a special type of paper such as colored paper at
the desired page. This function is called “sheet insertion”. You
can insert up to 2 types of sheets for a total of 50 pages. The
sheet insertion mode has the following 2 types:
Place the next original, and then press
8
[NEXT COPY] on the touch panel or the
COPIED: Inserts a copied sheet, replacing the specified page.
[START] button on the control panel.
Scanning of the next original starts. Repeat this
procedure until the scanning of all the originals is
finished.
When the scanning of all the originals is
9
finished, press [JOB FINISH] on the touch
panel.
Copying starts.
BLANK: Inserts a blank sheet before the specified page.
Place sheets for sheet insertion.
1
Place them on the multi-purpose tray or in a tray
previously set for insertion sheets. The paper for the
insertion sheets must be placed in a different paper
source than normal paper.
Note
• When placing paper in a tray for sheet insertion, be
sure to select “INSERT 1” or “INSERT 2” as a paper
2
3
4
type, and also set the paper size and thickness.
• When placing paper on the multi-purpose tray, be sure
to set the paper size and thickness.
Basic Guide
• Place the paper for insertion sheets of the same size
as normal paper in the same direction.
Place the normal paper in the tray(s).
Place the original(s).
When placing them on the document glass, they must be
placed from the first page.
Press [SHEET INSERTION] on the EDIT
menu.
- 95 -
Page 96

EDITING FUNCTIONS
2
1
3
4
5
6
7
Memo
Select either [COPIED] or [BLANK].
5
Select other copy modes as required, and
8
Select the page where the insertion sheets
6
will be inserted.
1) Select the type of the insertion sheets ([INSERT
SOURCE 1] or [INSERT SOURCE 2]).
2) Key in page numbers (1 to 1000) where the
insertion sheets will be inserted, and then press
[SET]. Repeat steps 1) and 2) if you want to insert
sheets at more than one page.
3) Press [OK] after you have keyed in the page
numbers.
then press the [START] button on the
control panel.
When the originals are placed on the RADF, scanning
and copying start.
When they are placed on the document glass, follow
steps 9 and 10.
Place the next original, and then press
9
[NEXT COPY] on the touch panel or the
[START] button on the control panel.
Scanning of the next original starts. Repeat this
procedure until the scanning of all the originals is
finished.
When the scanning of all the originals is
10
finished, press [JOB FINISH] on the touch
panel.
Copying starts.
• If you selected [COPIED] in step 5, the selected page
will be replaced with a copied insertion sheet. If you
selected [BLANK], a blank insertion sheet will be
inserted before the selected page.
• Up to 50 pages in total can be selected for [INSERT
SOURCE 1] and [INSERT SOURCE 2].
Press the [BASIC] tab to display the BASIC
7
menu. Then select the tray in which normal
paper is placed (not the one for sheet
insertion).
You must place the normal paper of the same size and
direction as that for the insertion sheets in advance.
- 96 -
Page 97

EDITING FUNCTIONS
2
1
3
4
5
6
7
YYYY.MM.DD 14:54
YYYY.MM.DD 14:54
Printed at the bottom
of a portrait copy
Printed at the top
of a landscape copy
3
2
1
3
2
1
Printed at the bottom center
of a portrait copy
Printed at the top right
of a landscape copy
Time Stamp
You can add the date and time on the copied paper.
Place paper in the tray(s).
1
Place the original(s).
2
Press [TIME STAMP] on the EDIT menu.
3
Page Number
You can add a page number on the copied paper.
Place paper in the tray(s).
1
Place the original(s).
2
Press [PAGE NUMBER] on the EDIT menu.
3
Select the direction and position of the time
4
stamp.
1) Select the direction ([SHORT EDGE] or [LONG
EDGE]).
2) Select the position ([UPPER] or [LOWER]).
3) Press [OK].
Select other copy modes as required, and
5
then press the [START] button on the
control panel.
Select the direction and position of a page
4
number.
1) Select the direction ([SHORT EDGE] or [LONG
EDGE]).
2) Select the position ([TOP LEFT], [TOP CENTER],
etc.).
3) If you want to specify the page number to start
with, press and go to step 5. Otherwise, press
[OK] and go to step 6.
- 97 -
Page 98

EDITING FUNCTIONS
2
1
3
4
5
6
7
Specify the page number you want to start
5
with.
1) Key in the page number.
2) Press [OK].
Select other copy modes as required, and
6
then press the [START] button on the
control panel.
- 98 -
Page 99

2
1
3
4
5
6
7
EDITING FUNCTIONS
Note
Job Build
You can scan several stacks of originals whose settings are individually different, and then copy or store them in one operation. This
function is called “job build”. For example, news clips (in the TEXT mode) and photographs in magazines (in the PHOTO mode) in A4
size and photographs in A4 size can be scanned in the optimal settings for each, and copied in one operation.
• Up to 1000 pages of originals can be copied in one operation.
• Some settings are not available for job build, and some settings for the first job will be applied to all of the other jobs. See the table
below before setting job build.
Settings not available Settings applied for all jobs Settings changeable for each job
Automatic Paper Selection
Twin color copying
Editing
XY zoom
Cover sheet
Sheet insertion
Magazine sort
2IN1 / 4IN1
Full image
e-Filing / File
Mixed-size originals
Copy paper size
Finishing mode
Photo zoom
Image shift
Time stamp
Page number
Image direction
Book - tablet
Omit blank page
Reproduction ratio
Automatic Magnification Selection
(Default setting for job build)
Original size
Original mode
Color mode
Simplex/Duplex copying settings (1->1
SIMPLEX, 2->1 SPLIT, 1->2 DUPLEX,
2->2 DUPLEX)
Background adjustment
Sharpness
Edge erase
Document feeder (Feeding mode)
Outside erase
- 99 -
Page 100

EDITING FUNCTIONS
2
1
3
4
5
6
7
Memo
Press [JOB BUILD] on the EDIT menu.
1
Press [OK].
2
Press the [START] button on the control
4
panel.
Scanning starts. When the scanning of all the originals is
finished, the message below appears.
Place the next stack of originals, and then
5
select the settings.
Repeat steps 4 and 5 until all the desired pages have
been scanned.
Note
• If you do not change any settings, those for the last job
will be applied.
Job build is now set and the message below appears.
When the scanning of all the originals is
6
finished, change the number of copy sets
as required. Then press [JOB FINISH] on
the touch panel.
Place the first stack of originals, and then
3
select settings.
Copying starts. If any storing function is set, that will also
start.
• When placing the original on the document glass,
remember that 1 page is equal to 1 job.
• When placing mixed-size originals on the RADF, see
the following page:
Basic Guide
• If you want to use a particular tray, select it.
Note
• Press [SETTINGS] on the touch panel to confirm the
current settings.
• If you want to change the settings, press the [RESET]
button on the control panel, and then restart the
procedure from step 1.
- 100 -
 Loading...