

Oki MC760x, MC770x, MC780x, ES7470x MFP, ES7480x MFP User's Manual Troubleshooting Guide
...
User’s Manual
Troubleshooting Guide

This manual supports the following models.
MC760x, MC770x, MC780x, ES7470x MFP, ES7480x MFP, MPS3537mc, MPS4242mc
The illustrations of the machine used in this document may be different from what you actually see
on your machine.
Table of contents
1 Troubleshooting............................. 4
When a Paper Jam Occurs.......................5
During Paper Jams ..............................................5
When a paper jam occurs in Tray 1, Multi-Purpose
Tray (MPT).............................................................5
When Paper Jam Occurs Inside the Machine.......... 6
When an Error Remains After Removing Jammed
Paper .....................................................................8
Paper Jam on Both Sides of the Printer Unit ...........9
When Paper Jam Occurs in Tray 2/3/4 (Option).... 10
When Paper Jam Occurs in Inner Finisher
(Option)................................................................11
When a Document is Jammed...........................12
When a Staple Jammed.....................................14
When Staple Jam Occurs in Inner Finisher
(Option)................................................................14
When Staple Jam Occurs in Offline Stapler
(Option)................................................................14
TROUBLESHOOTING FOR THE
HARDWARE ...........................................16
When This Screen Is Displayed.........................16
Messages Displayed on the Touch Panel..........17
TROUBLESHOOTING FOR PRINTING...20
Print Job Problems.............................................20
Clearing print job errors .........................................20
Cannot remember the document password for a
Private Print job ...................................................21
Printing a document including many graphics takes
time......................................................................21
Printer Driver Problems......................................21
Cannot print (port setting problems) ......................21
Cannot print (SNMP Community Name problems)
Command line options not processed....................22
Retrieval of printer configuration failed ..................22
Cannot change settings on the [Device Settings]
tab........................................................................22
Network Connection Problems ..........................22
Cannot print with the equipment (network
connection problems) .......................................... 22
Cannot print with SMB print ...................................23
Client Problems..................................................23
Checking the client status ......................................23
... 21
Hardware Problems ...........................................24
Print jobs not output............................................... 24
TROUBLESHOOTING FOR COPYING ...25
Copying Problems..............................................25
TROUBLESHOOTING for FAX ...............27
Troubleshooting .................................................27
Error codes ............................................................ 27
Error messages ..................................................... 27
Transmission/reception trouble.............................. 28
TROUBLESHOOTING FOR SCANNING
....29
Scanning Problems ............................................29
Cannot E-mail my scans........................................ 29
Cannot find the data saved in the shared folder .... 29
TROUBLESHOOTING FOR e-Filing.......30
e-Filing Web Utility Problems .............................30
e-Filing Web Utility terminates the session............ 30
Numerous sub windows repeatedly appear........... 30
Displaying the items in the Contents Frame
takes a long time ................................................. 30
Error messages ..................................................... 30
TROUBLESHOOTING FOR NETWORK
CONNECTIONS .....................................32
Locating the Equipment in the Network .............32
Cannot locate the equipment in the network ......... 32
Cannot locate the equipment with Local Discovery
Equipment does not respond to ping command .... 34
LDAP Search and Authentication Problems ......34
Network shutdown occurs or touch panel disabled
after LDAP search ...............................................34
LDAP authentication takes a long time.................. 34
Printing Problems (Network Related).................35
SMB print in a Windows operating system
environment......................................................... 35
Raw TCP or LPR print in a Windows operating
system environment ............................................ 35
IPP print in a Windows operating system
environment......................................................... 36
Novell print in a NetWare environment.................. 36
Macintosh environment.......................................... 37
Network Fax (N/W-Fax) Driver Problems...........37
N/W-Fax Driver Installation Error Messages .........37
... 33
- 2 -

N/W-Fax Driver General Errors..............................38
Wireless LAN Problems .....................................39
Client Software Authentication Problems...........40
Cannot log in using client software ........................ 40
CHECKING THE EQUIPMENT STATUS
WITH TopAccess ...................................41
Hardware Status Icons on TopAccess [Device]
Tab...................................................................41
Error Messages..................................................42
Error Codes........................................................43
Error codes on print jobs........................................ 43
Error codes on transmission and reception ...........44
Error codes on scan jobs .......................................47
2 Maintenance ................................. 52
Replacing Consumables / Maintenance
Units .......................................................53
Replacing the Toner Cartridge...........................53
Replacing the Image Drum Cartridge ................56
Replacing the Fuser Unit ...................................60
Replacing the Belt Unit ......................................62
Replacing the Inner Finisher Cartridge ..............64
Replacing the Offline Stapler Cartridge .............65
Table of contents
Maintenance ............................................66
Cleaning the Surface of the Machine .................66
Cleaning the document glass (glass surface) ....66
Clean the document transporting roller and
document holding roller....................................67
Clean the feed roller...........................................68
When cleaning the tray ..........................................68
When cleaning the Multi-Purpose tray...................68
Clean the LED heads .........................................69
Moving or Transporting the Machine....71
Moving the Machine ...........................................71
For the equipment with additional tray units
installed................................................................71
Transporting the Machine ..................................72
3 Appendix....................................... 74
Battery Disposal......................................75
4 Index.............................................. 76
- 3 -

1
1
Troubleshooting
2
When a Paper Jam Occurs·················································· P.5
TROUBLESHOOTING FOR THE HARDWARE ················· P.16
3
4
TROUBLESHOOTING FOR PRINTING······························ P.20
TROUBLESHOOTING FOR COPYING ······························ P.25
TROUBLESHOOTING for FAX··········································· P.27
TROUBLESHOOTING FOR SCANNING···························· P.29
TROUBLESHOOTING FOR e-Filing ·································· P.30
TROUBLESHOOTING FOR NETWORK CONNECTIONS
CHECKING THE EQUIPMENT STATUS WITH TopAccess
··············· P.32
············ P.41
2
1
3
4
5
6
7
● When a Paper Jam Occurs
During Paper Jams
When a paper jam occurs during printing, an alarm will sound,
and the following message will be displayed on the screen:
"Paper is jammed. Open the cover indicated by the flashing
light, and verify the jam." Follow the instructions indicated in
the following table to remove the jammed paper.
Error Details Reference Page
Paper jam in the Tray 1 or
Multi-Purpose Tray (MPT)
Paper jam in the machine P. 6
Paper jam on both sides of
the printer unit
Paper jam in Tray 2, 3 or 4
(Option)
P. 5
P. 9
P. 1 0
When a Paper Jam Occurs
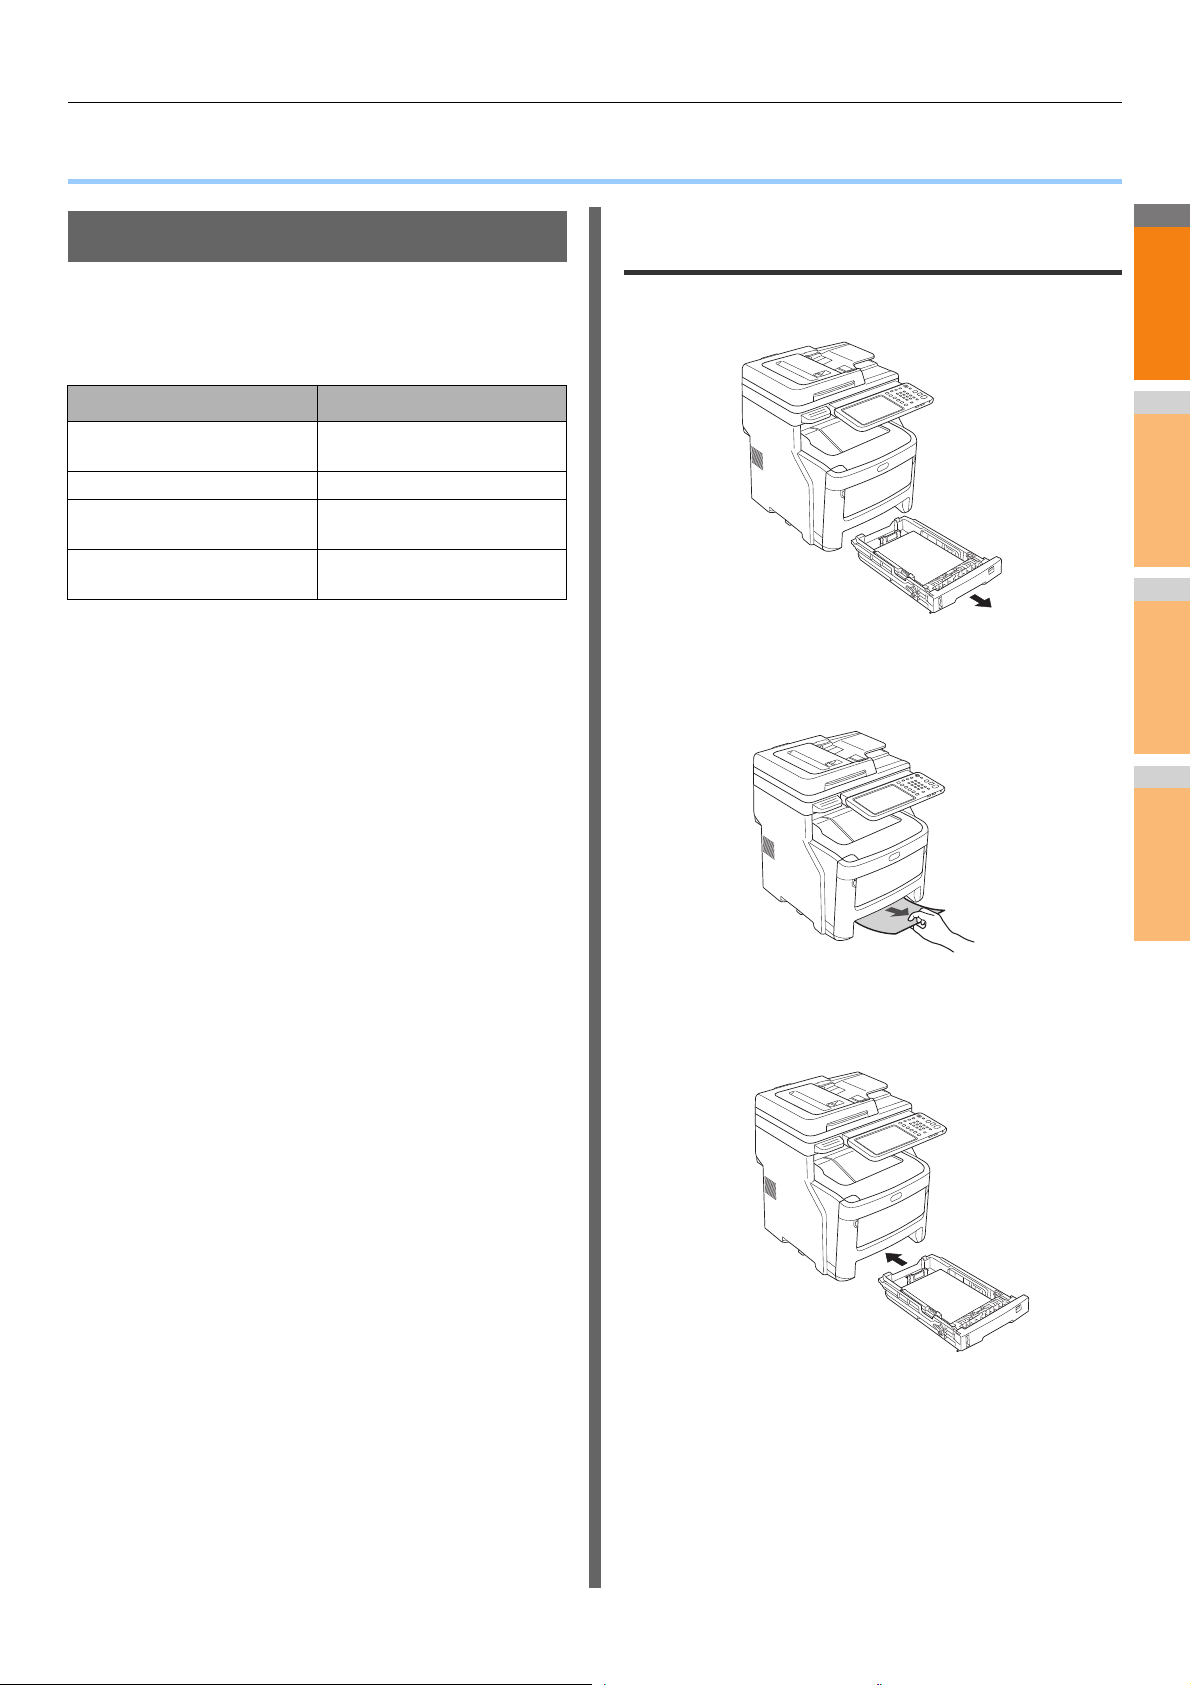
When a paper jam occurs in Tray 1, Multi-Purpose Tray (MPT)
Remove the paper tray from Tray 1.
1
Remove the jammed paper.
2
If you cannot see the jammed paper, do nothing, and
proceed to step 3.
Put the paper tray back.
3
If you removed the jammed paper in step 2, this
procedure is finished.
- 5 -
When a Paper Jam Occurs
2
1
3
4
5
6
7
Multi-Purpose
Tray (MPT)
Front cover
Lever
Front cover
Front cover
Front cover
Multi-Purpose
Tray (MPT)
Scanner
part
Handle
Top cover
Top cover open button
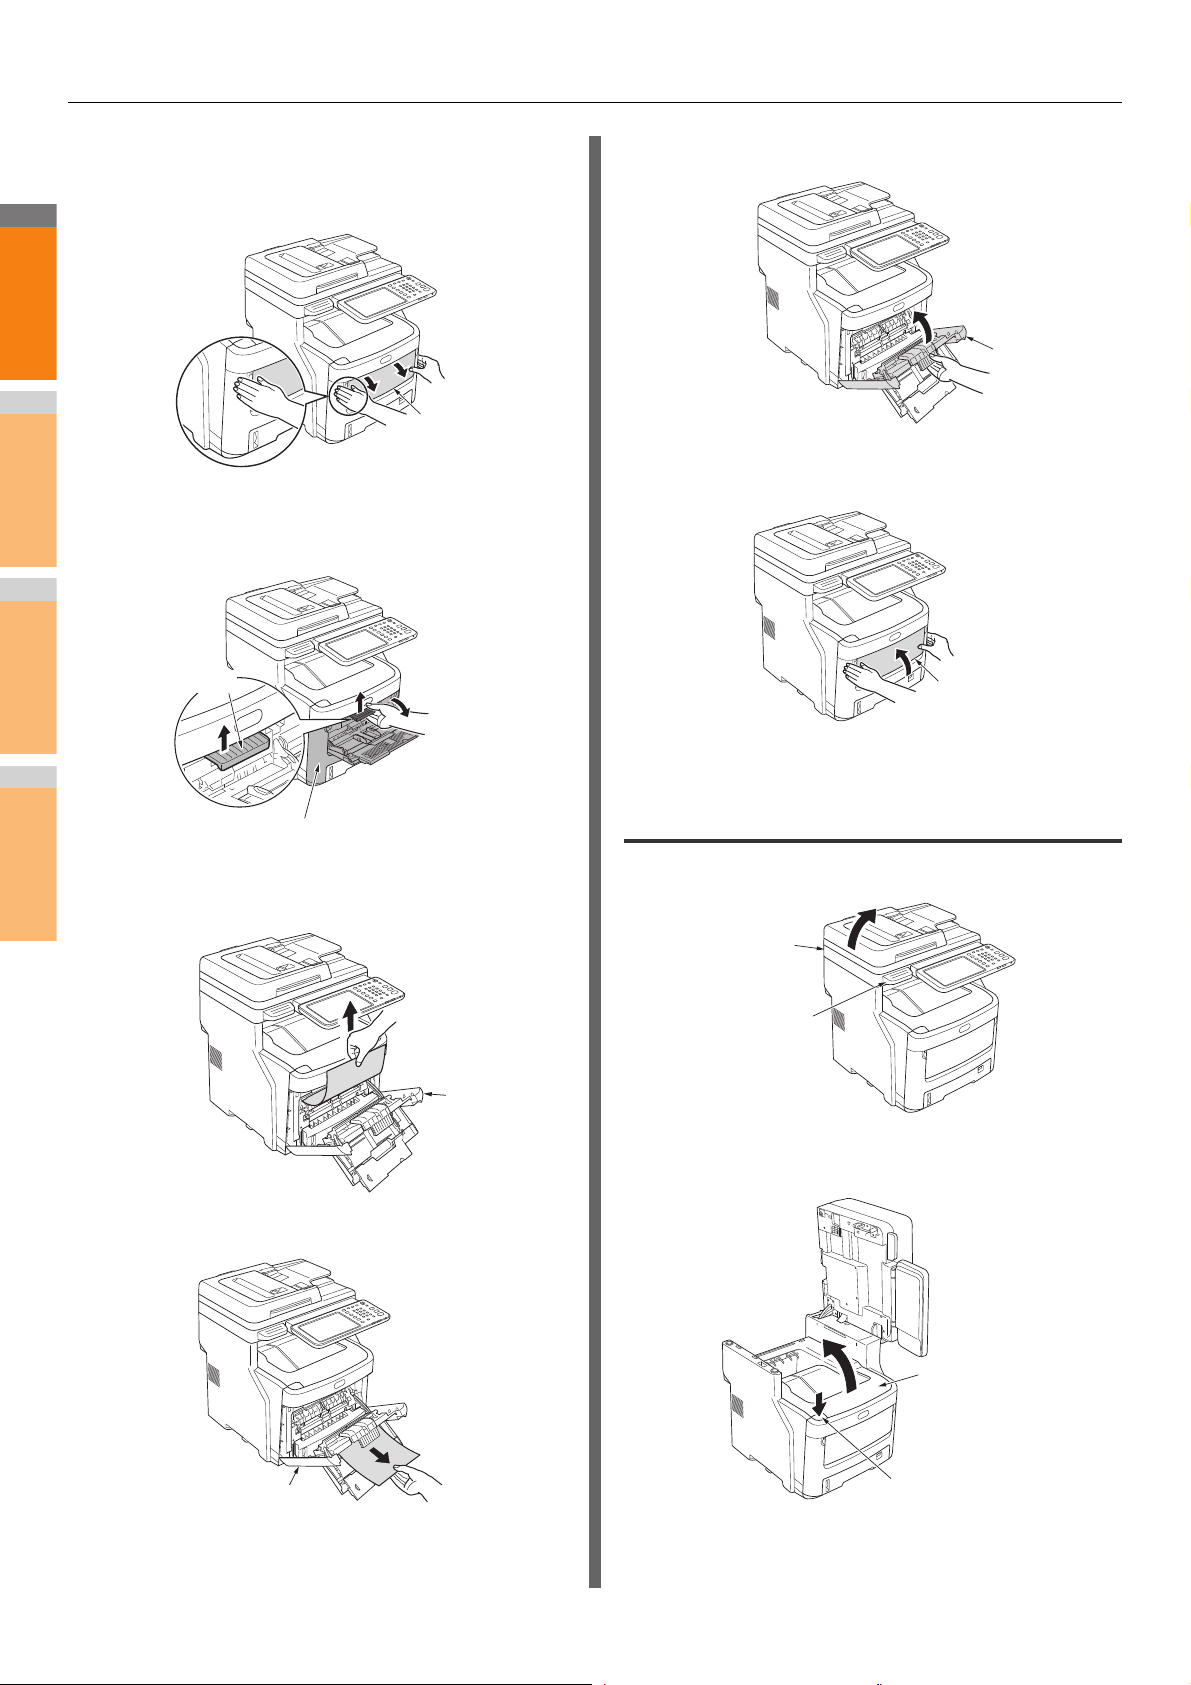
If the Multi-Purpose Tray (MPT) is closed,
4
hold both sides of the Multi-Purpose Tray
(MPT), and position it in front of you.
Pull the central lever upward, and open the
5
front cover.
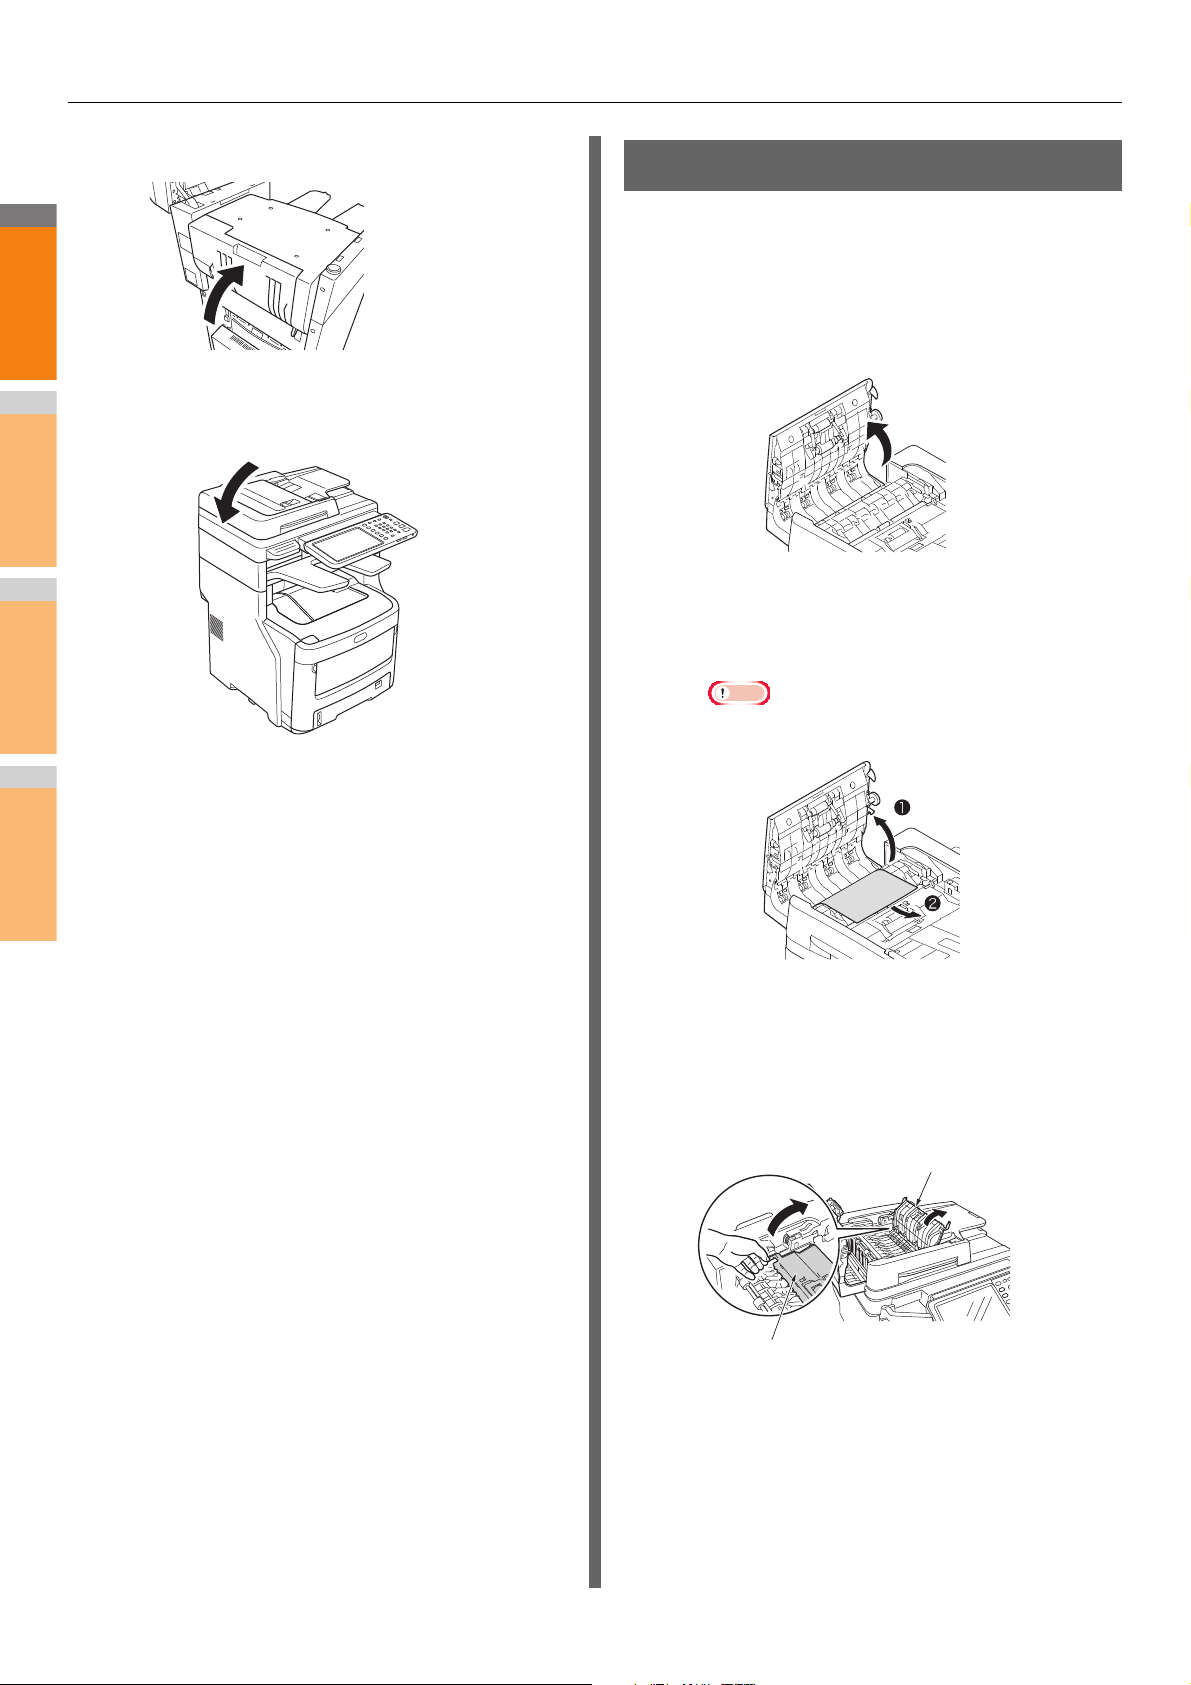
Close the front cover.
7
If the Multi-Purpose Tray (MPT) is not in
8
use, close the Multi-Purpose Tray (MPT).
When Paper Jam Occurs Inside the Machine
Pull the jammed paper slowly to remove it.
6
• When paper is fed from Tray 1, or Tray 2/3/4 (Option)
• When paper is fed from Multi-Purpose Tray (MPT)
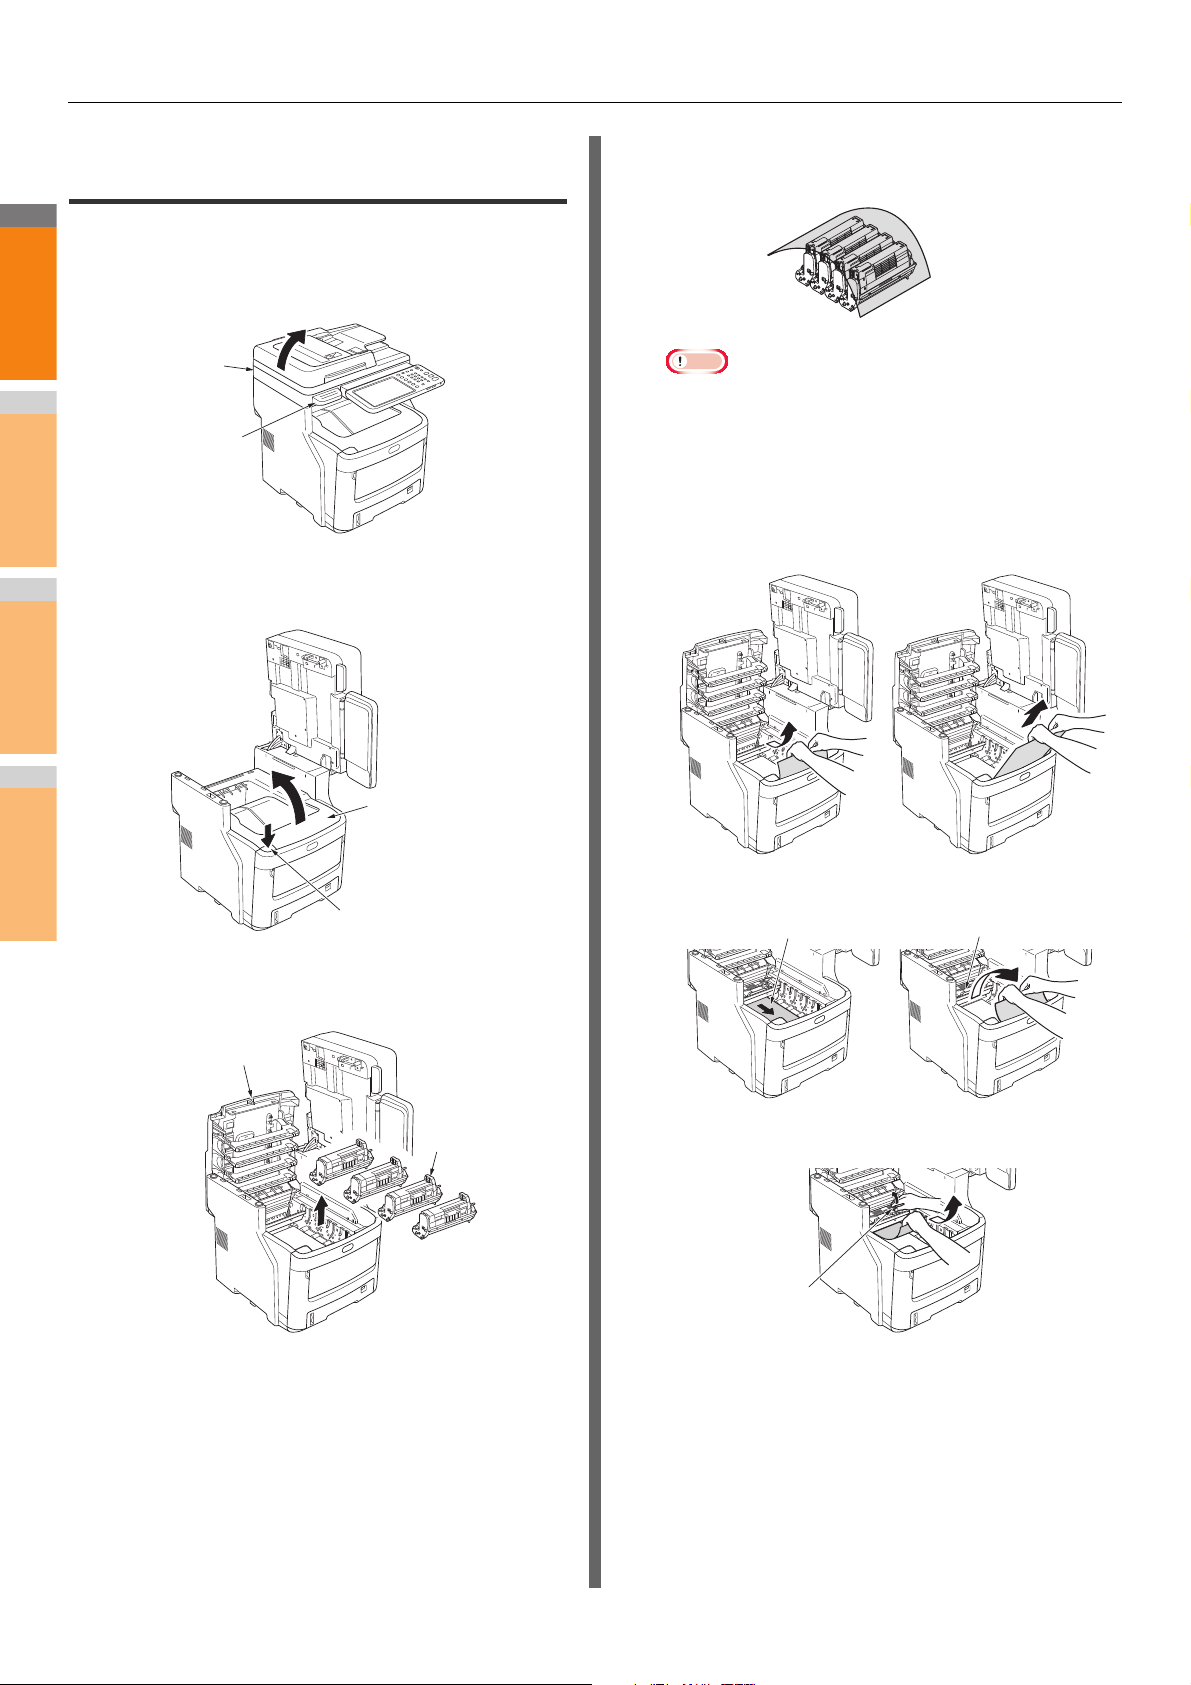
Hold the handle and lift the scanner part.
1
Push the top cover open button to open the
2
top cover.
- 6 -
When a Paper Jam Occurs
2
1
3
4
5
6
7
Fuser unit
lock control
lever (blue)
LED head
Handle
Jam release lever
Handle
Fuser unit
lock control
lever (blue)
Top cover
Scanner part
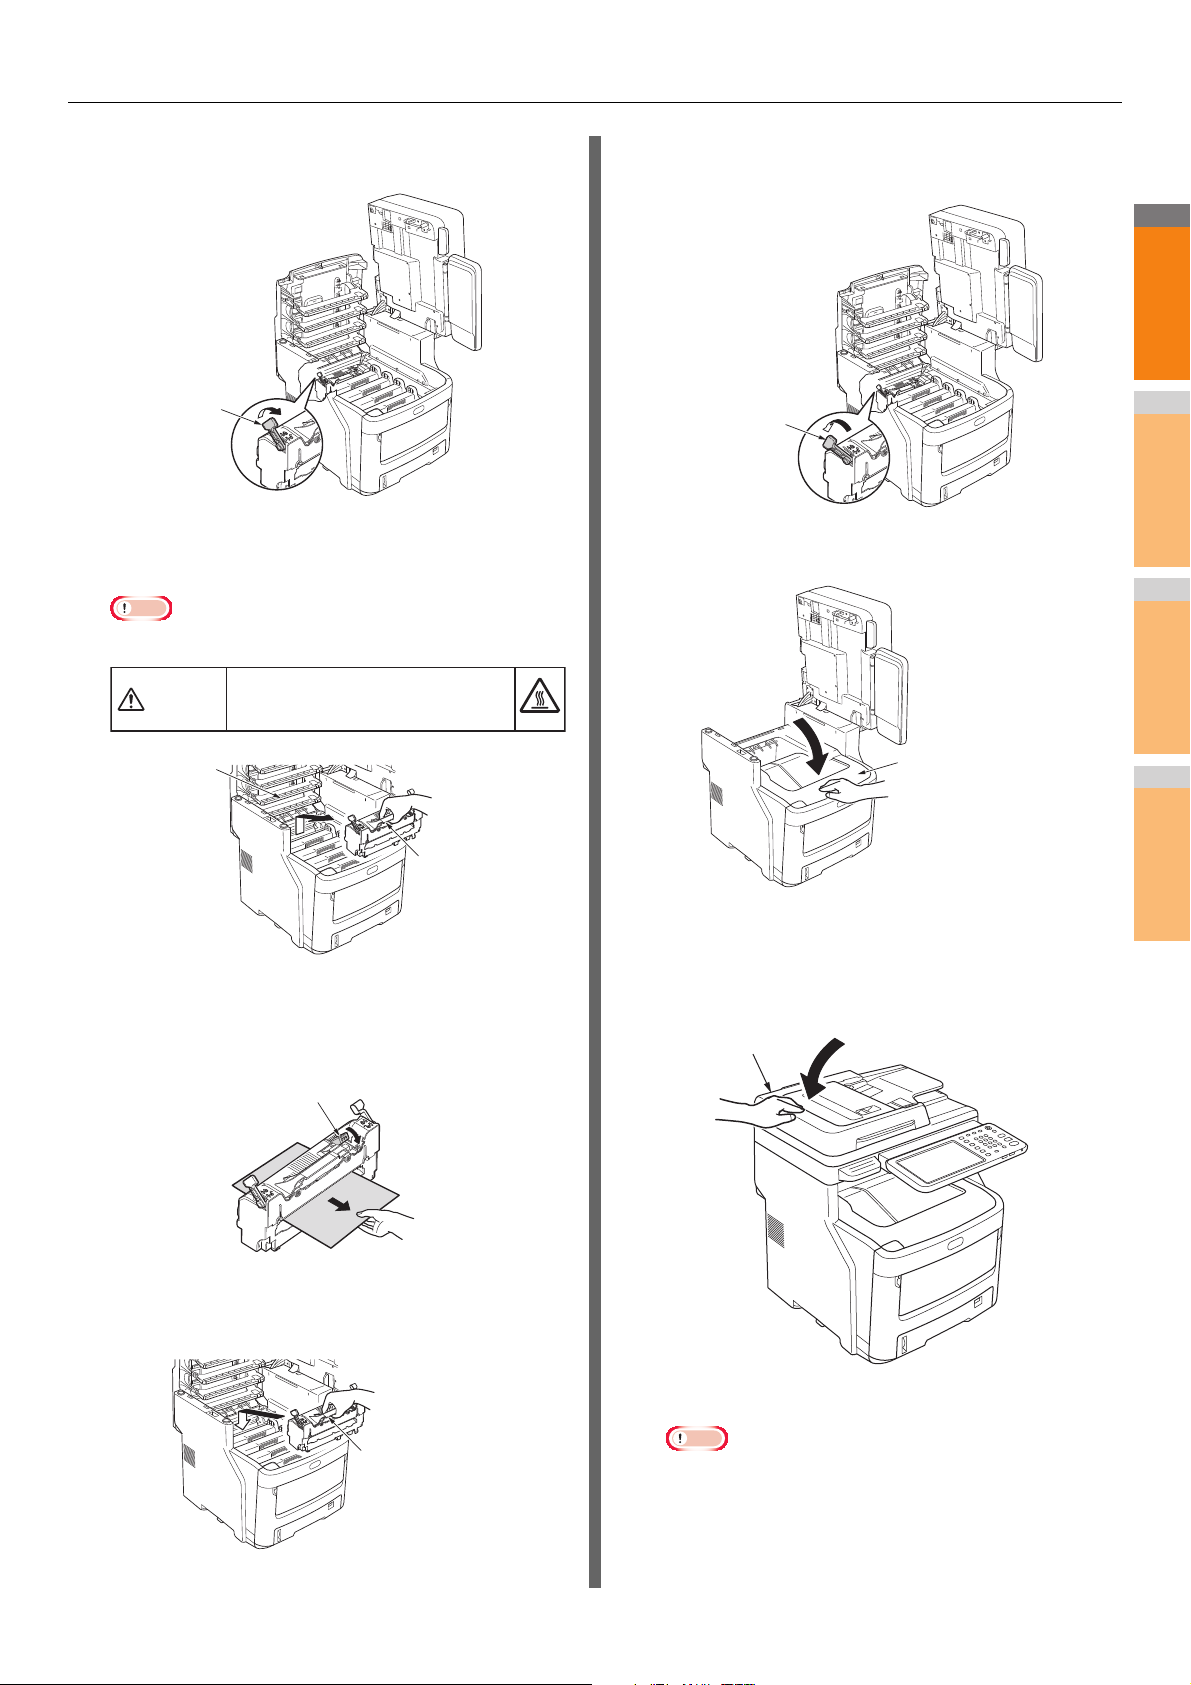
Pull the fuser unit lock control lever (blue)
3
in the direction of the arrow.
Grip the handle of the fuser unit, pull it out
4
carefully, and place it on a flat surface.
Note
• Make sure the fuser unit does not hit the LED head.
Warning
The fuser unit can be extremely hot,
and there is a risk of getting burned.
Push the fuser unit lock control lever (blue)
7
toward the back to lock it in place.
Close the top cover.
8
Pull the jam release lever downward, and
5
slowly pull the jammed paper out in the
direction of the arrow (toward you).
Hold the handle of the fuser unit, and gently
6
replace it inside the device.
Return the scanner part to its original
9
position. Press the top of the scanner part
into place.
This completes the procedure.
Note
• After removing jammed paper from the fuser unit, print
several blank pages, as stray toner is sometimes left
inside the fuser unit.
- 7 -
When a Paper Jam Occurs
2
1
3
4
5
6
7
Note
Scanner part
Handle
Top cover
Top cover open button
Top cover
Image drum
cartridges
Paper Fuser unit
Fuser unit lock
control lever (blue)
When an Error Remains After Removing Jammed Paper
Remove any remaining jammed paper using the following
procedure.
Hold the handle and lift the scanner part.
1
Push the top cover open button to open the
2
top cover.
Cover the drum cartridges with paper to
4
prevent direct exposure to light.
• The image drum (the green tube) is fragile; handle it
carefully.
• Do not expose the drum cartridges to direct sunlight or
strong light (more than about 1,500 lux). Do not expose
them to room lighting for more than five minutes.
Remove the jammed paper slowly.
5
• When the End of the Paper Is Visible
• When the End of the Paper is Not Visible
Remove the four image drum cartridges,
3
and place them on a flat surface.
• When the Back End of the Paper is Visible
- 8 -
When a Paper Jam Occurs
2
1
3
4
5
6
7
Image drum cartridges
Top cover
Scanner part
Duplex unit cover
Jam release lever
Duplex unit cover
Duplex unit cover
Duplex unit cover
Replace the image drum cartridges.
6
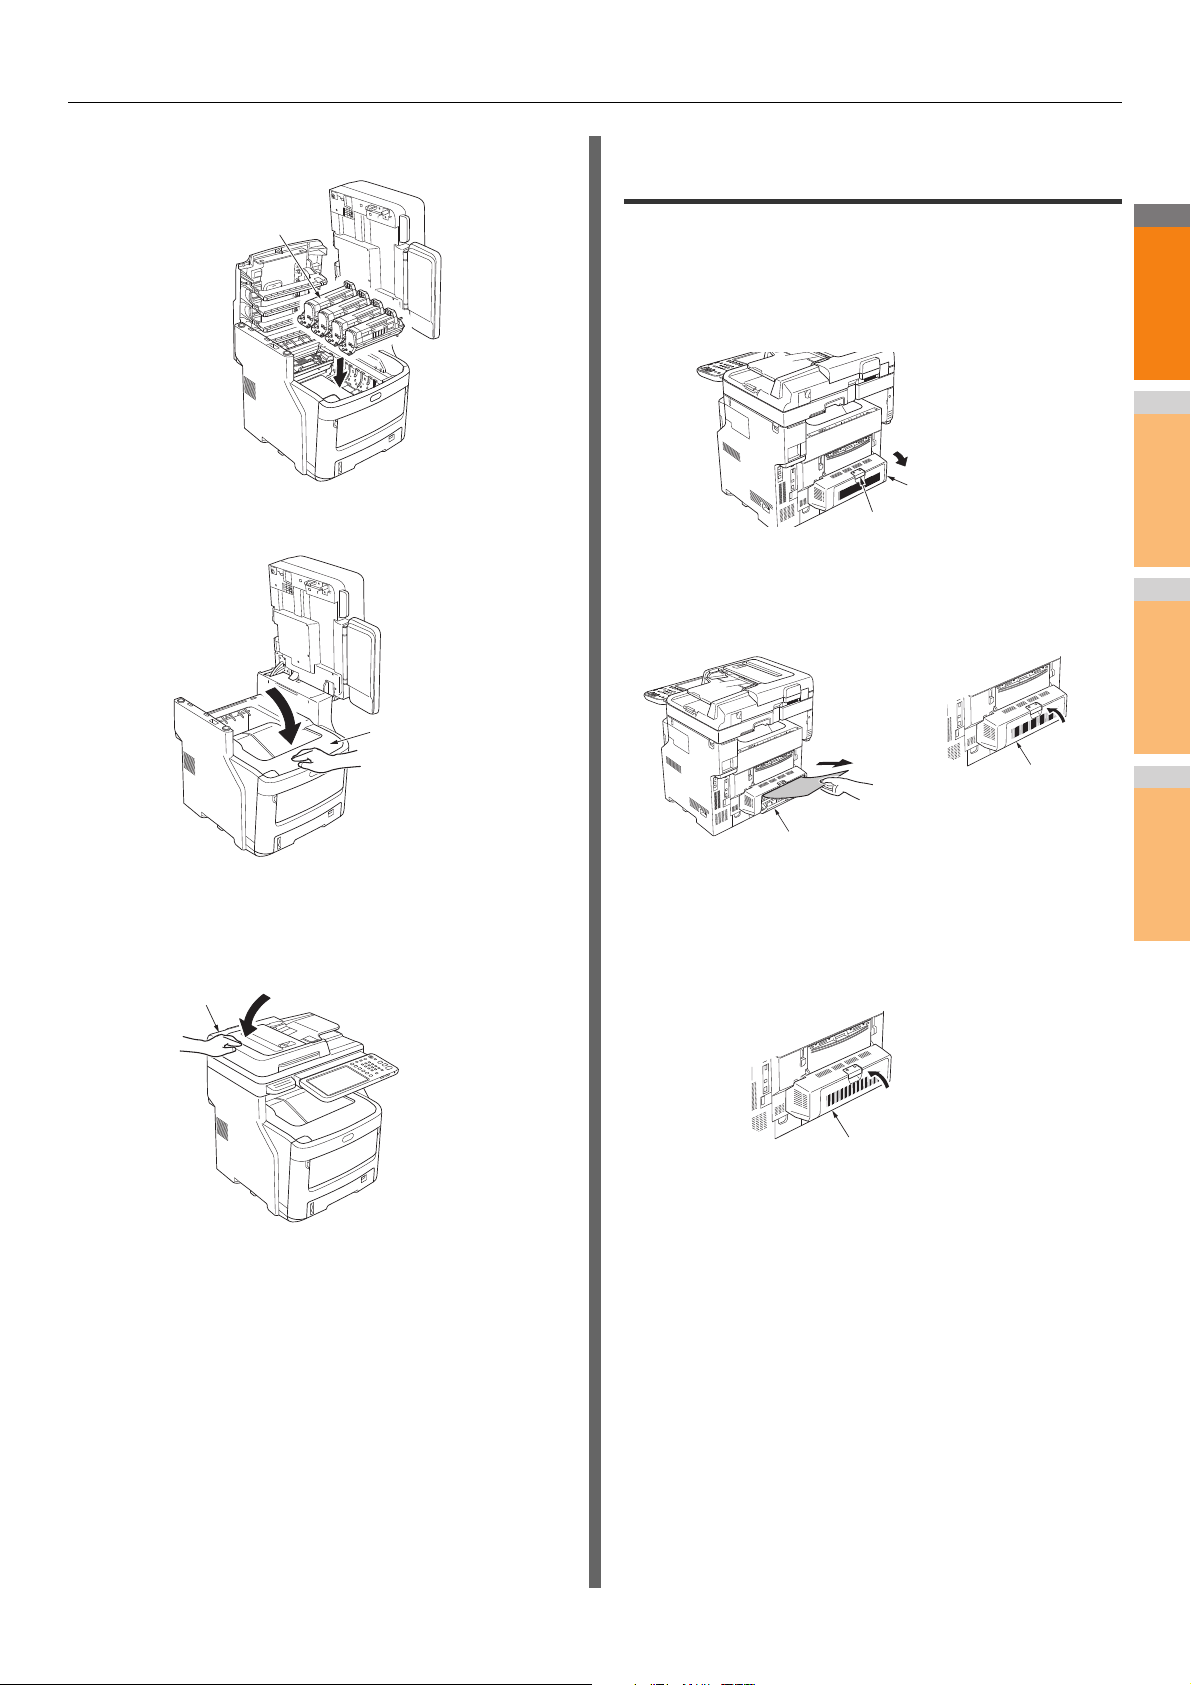
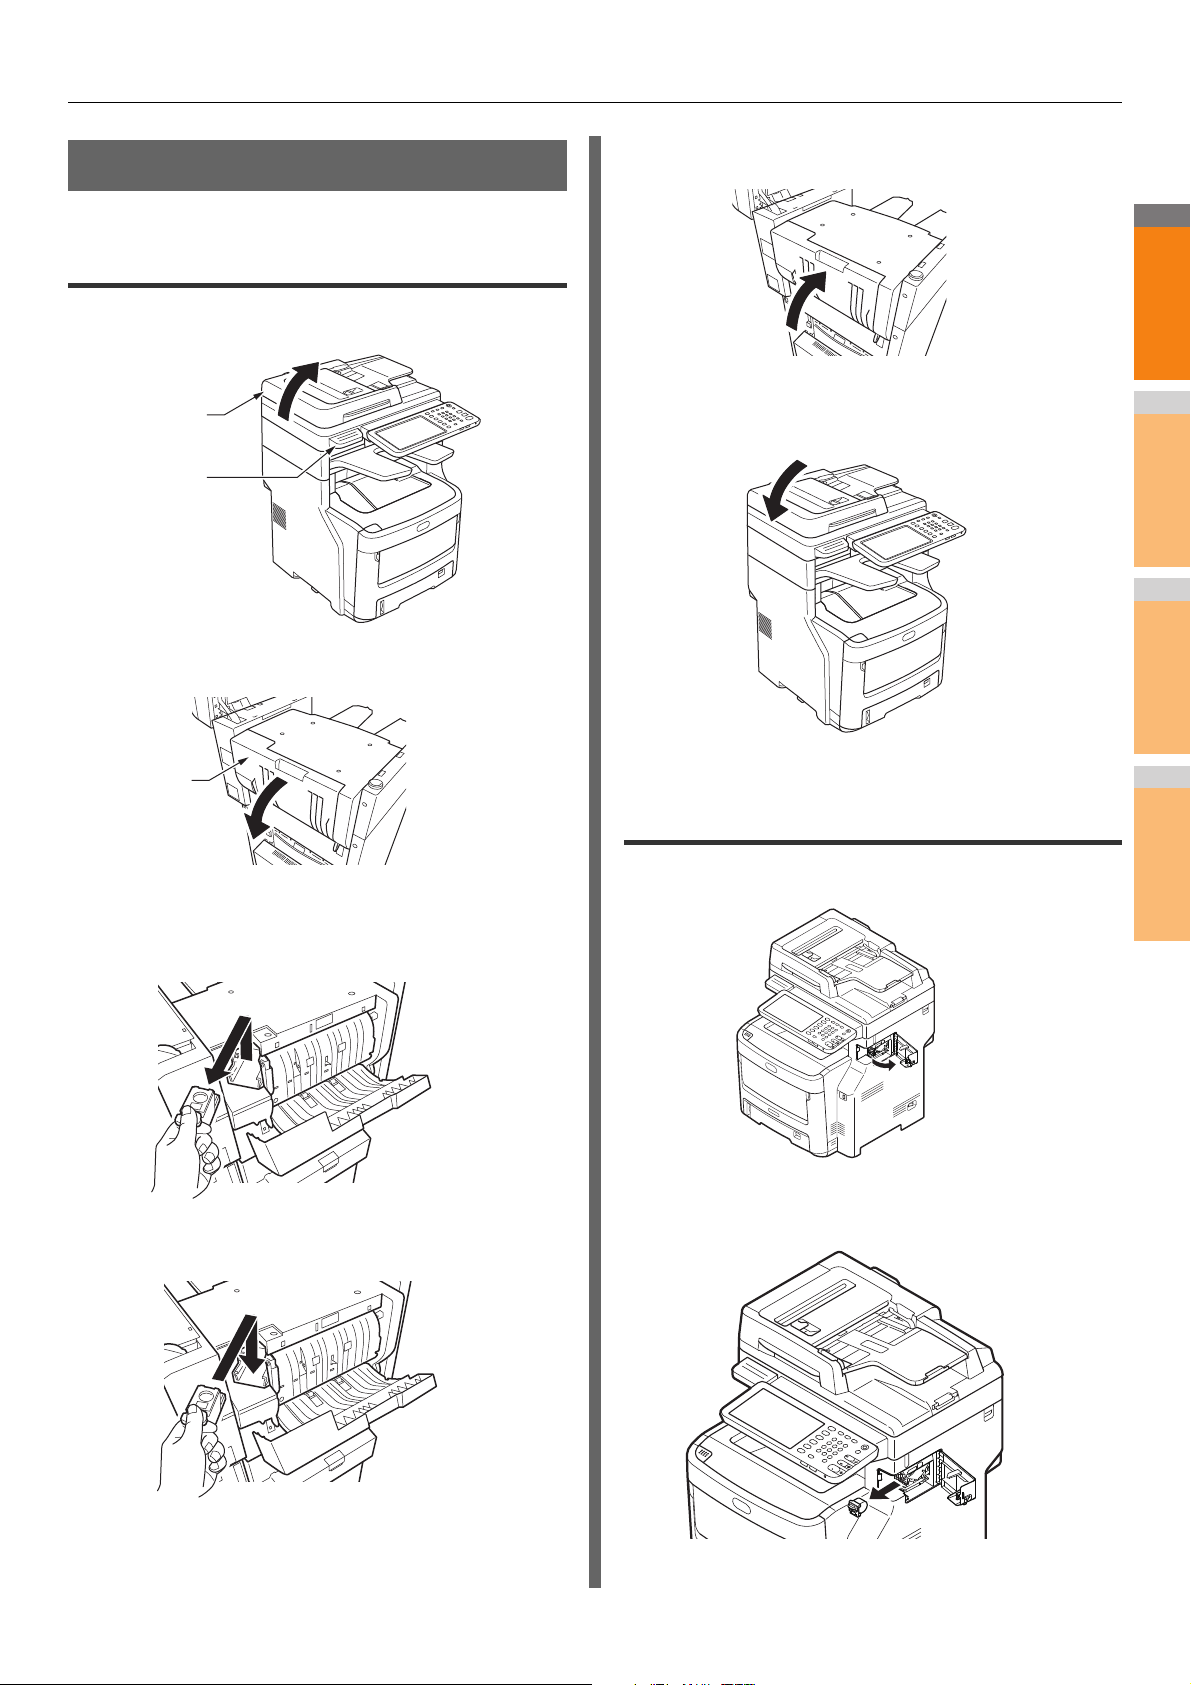
Paper Jam on Both Sides of the Printer Unit
There is a paper jam near the duplex unit.
Press the jam release lever of the duplex
1
unit on the back of device, and open the
duplex unit cover.
Close the top cover.
7
Remove the jammed paper.
2
If you cannot see the jammed paper, do nothing, and
proceed to step 3.
Return the scanner part to its original
8
position. Press the top of the scanner part
into place.
This completes the procedure.
Close the duplex unit cover.
3
If you removed the jammed paper in step 2, this
procedure is finished.
If you could not see the jammed paper in step 2, the
device should now automatically eject the jammed paper.
- 9 -
When a Paper Jam Occurs
2
1
3
4
5
6
7
Note
Duplex unit
Jammed paper
Cover
Duplex unit
Cover
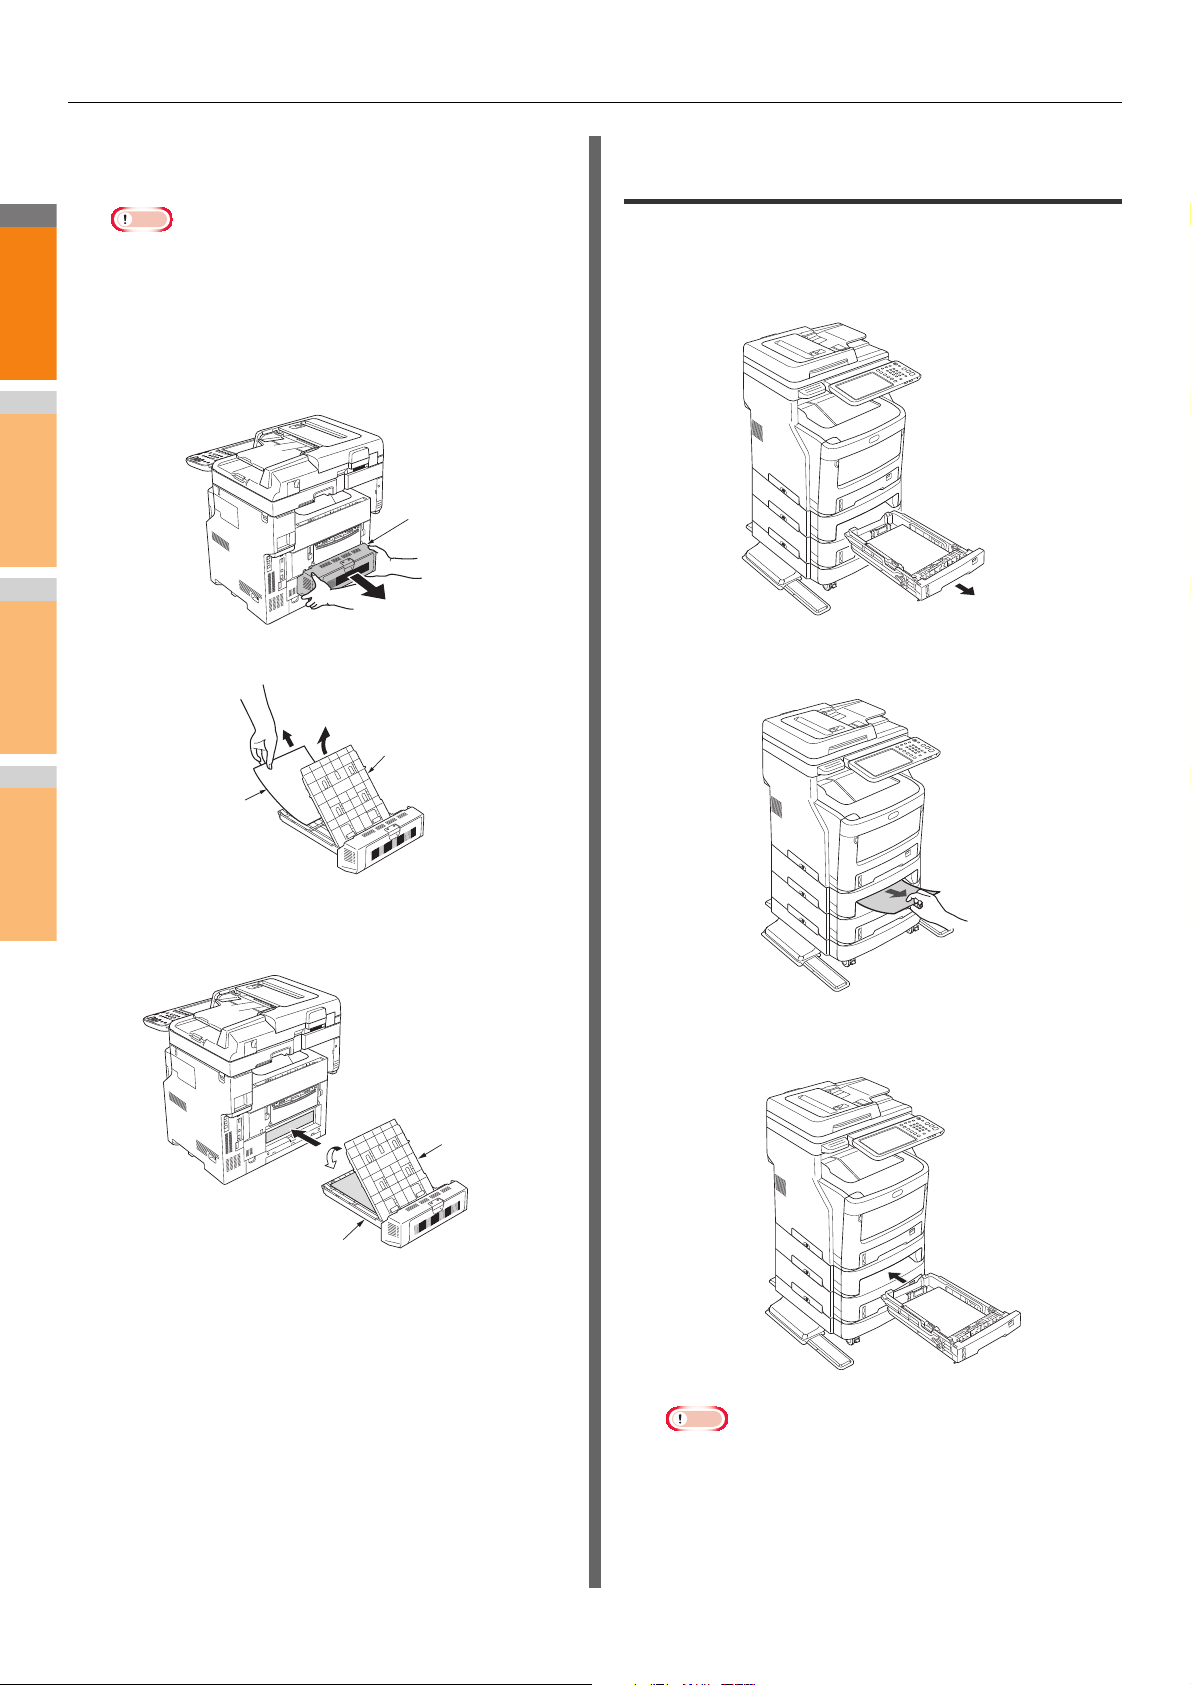
If the paper is not automatically ejected,
4
pull out the duplex unit cover.
• Before pulling out the duplex unit cover, please do the
following.
• Press the [POWER] button until a "pip" sound is heard.
"Shutdown is in progress." appears for a while, and
then the power is turned OFF. Then turn the power
switch OFF. Do not turn off the device abruptly. It can
5
cause malfunctions."
Lift the cover to remove the jammed paper.
When Paper Jam Occurs in Tray 2/3/4 (Option)
Here, a paper jam in Tray 2 is used as an example.
The same procedure is used for Tray 3/4.
Pull out the paper tray from Tray 2.
1
Remove the jammed paper.
2
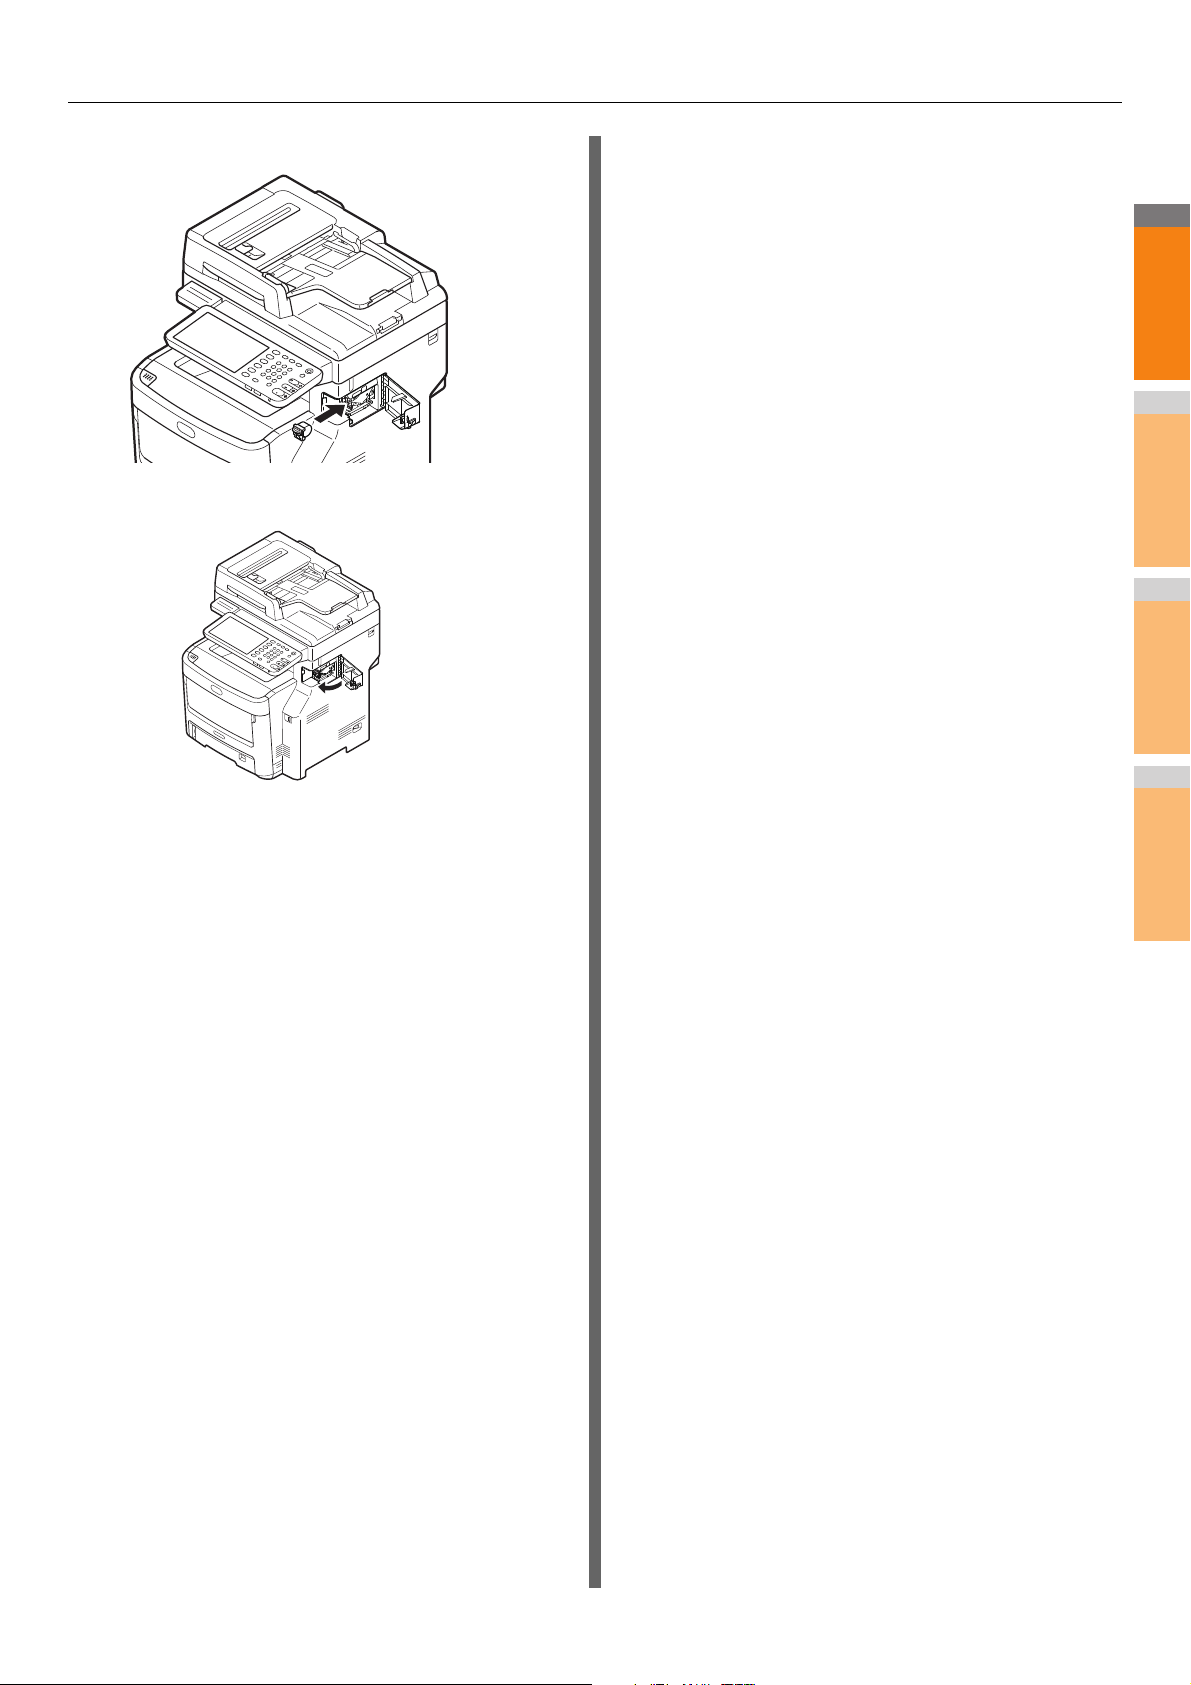
Replace the cover, and return the duplex
6
unit to its original position.
This completes the procedure.
Replace the paper tray.
3
Note
• Replacing the paper tray is not enough to fix the error.
You must also complete steps 4 to 7.
- 10 -
When a Paper Jam Occurs
2
1
3
4
5
6
7
Multi-Purpose
Tray (MPT)
Front cover
Lever
Front cover
Front cover
Multi-Purpose
Tray (MPT)
Scanner part
Handle
Cover
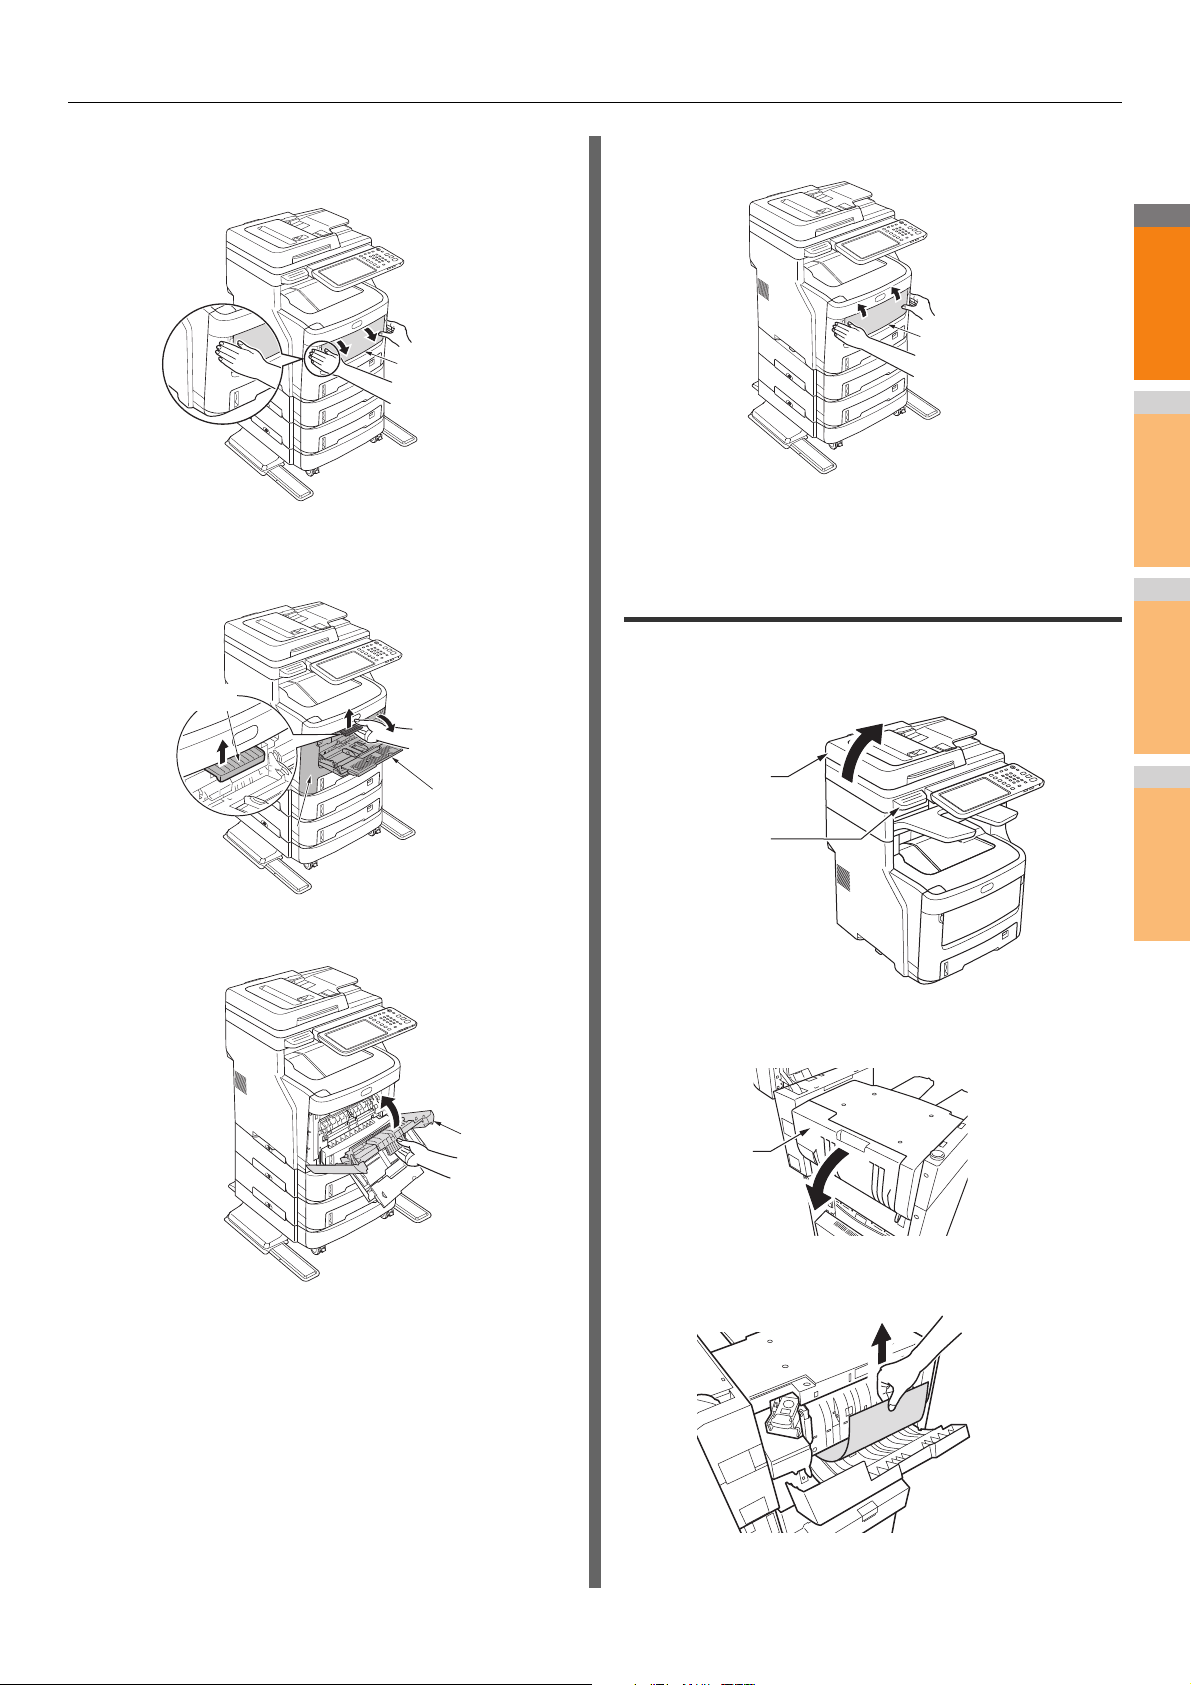
Hold both sides of the Multi-Purpose Tray
4
(MPT), and fold it down.
Pull the central lever upward, and open the
5
front cover.
Close the Multi-Purpose Tray (MPT).
7
This completes the procedure.
When Paper Jam Occurs in Inner Finisher (Option)
There is a paper jam near the Inner Finisher.
Hold the handle and lift the scanner part.
1
Close the front cover.
6
Open the finisher cover.
2
Remove the jammed paper.
3
- 11 -
When a Paper Jam Occurs
2
1
3
4
5
6
7
Note
Inner cover
Inner cover
Close the finisher cover.
4
When a Document is Jammed
When a document becomes jammed, an alarm will sound and
a message will appear in the control panel.
Open the RADF cover to remove the
1
jammed document.
(1) Pull the RADF cover open lever to open
the RADF cover.
Return the scanner part to its original
5
position.
(2) Remove the jammed document. Proceed
to step 2 if you cannot remove the jammed
document.
• Do not try to remove the document with force.
(3) If you were able to remove the document,
proceed to step 3.
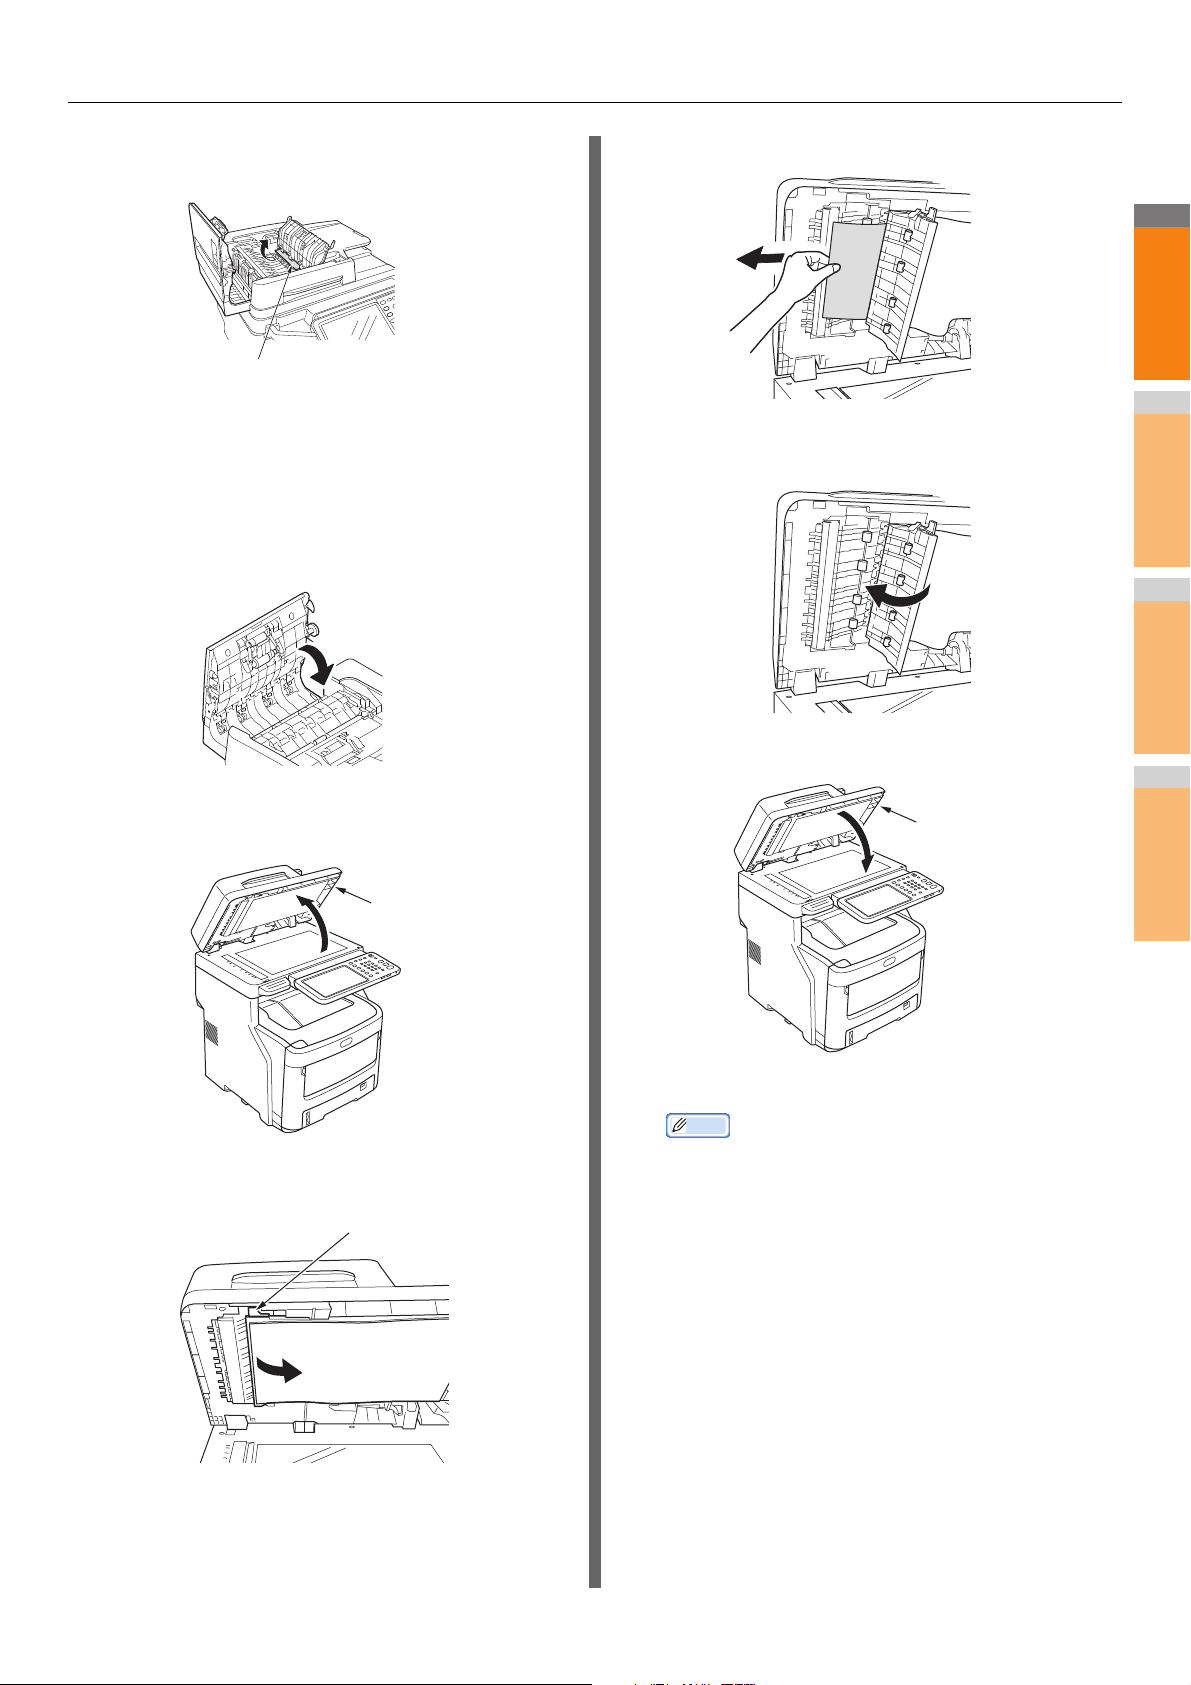
Open the inner cover to pull out the jammed
2
document.
(1) Open the inner cover.
- 12 -
When a Paper Jam Occurs
2
1
3
4
5
6
7
Memo
Jammed paper
Document holder
cover
Lever
Document holder
cover
(2) If you can see the edge of the jammed
(2) Pull the jammed paper slowly to remove it.
document, pull it out gently.
(3) If you were able to remove the document,
close the inner cover and proceed to step
(3) Return the document holding pad to its
original position.
3.
Close the RADF cover.
3
If you cannot see the jammed document, do nothing, and
proceed to step 4.
Close the document holder cover.
This completes the procedure.
Open the document holder cover.
4
(1) Pull down the lever to open the document
holding pad.
5
This completes the procedure.
• If an error occurs while copying, the copying gets
canceled.
- 13 -
2
1
3
4
5
6
7
When a Staple Jammed
Scanner part
Handle
Cover
When Staple Jam Occurs in Inner Finisher (Option)
Hold the handle and lift the scanner part.
1
Close the finisher cover.
5
When a Paper Jam Occurs
Open the rear cover of the finisher.
2
Return the scanner part to its original
6
position.
When Staple Jam Occurs in Offline Stapler (Option)
Open the offline stapler cover.
1
Pull out the cartridge and remove the
3
jammed staple.
4
Place the cartridge.
- 14 -
Pull out the cartridge and remove the
2
jammed staple.
When a Paper Jam Occurs
2
1
3
4
5
6
7
Place the cartridge.
3
Close the offline stapler cover.
4
- 15 -
2
1
3
4
5
6
7
TROUBLESHOOTING FOR THE HARDWARE
● TROUBLESHOOTING FOR THE HARDWARE
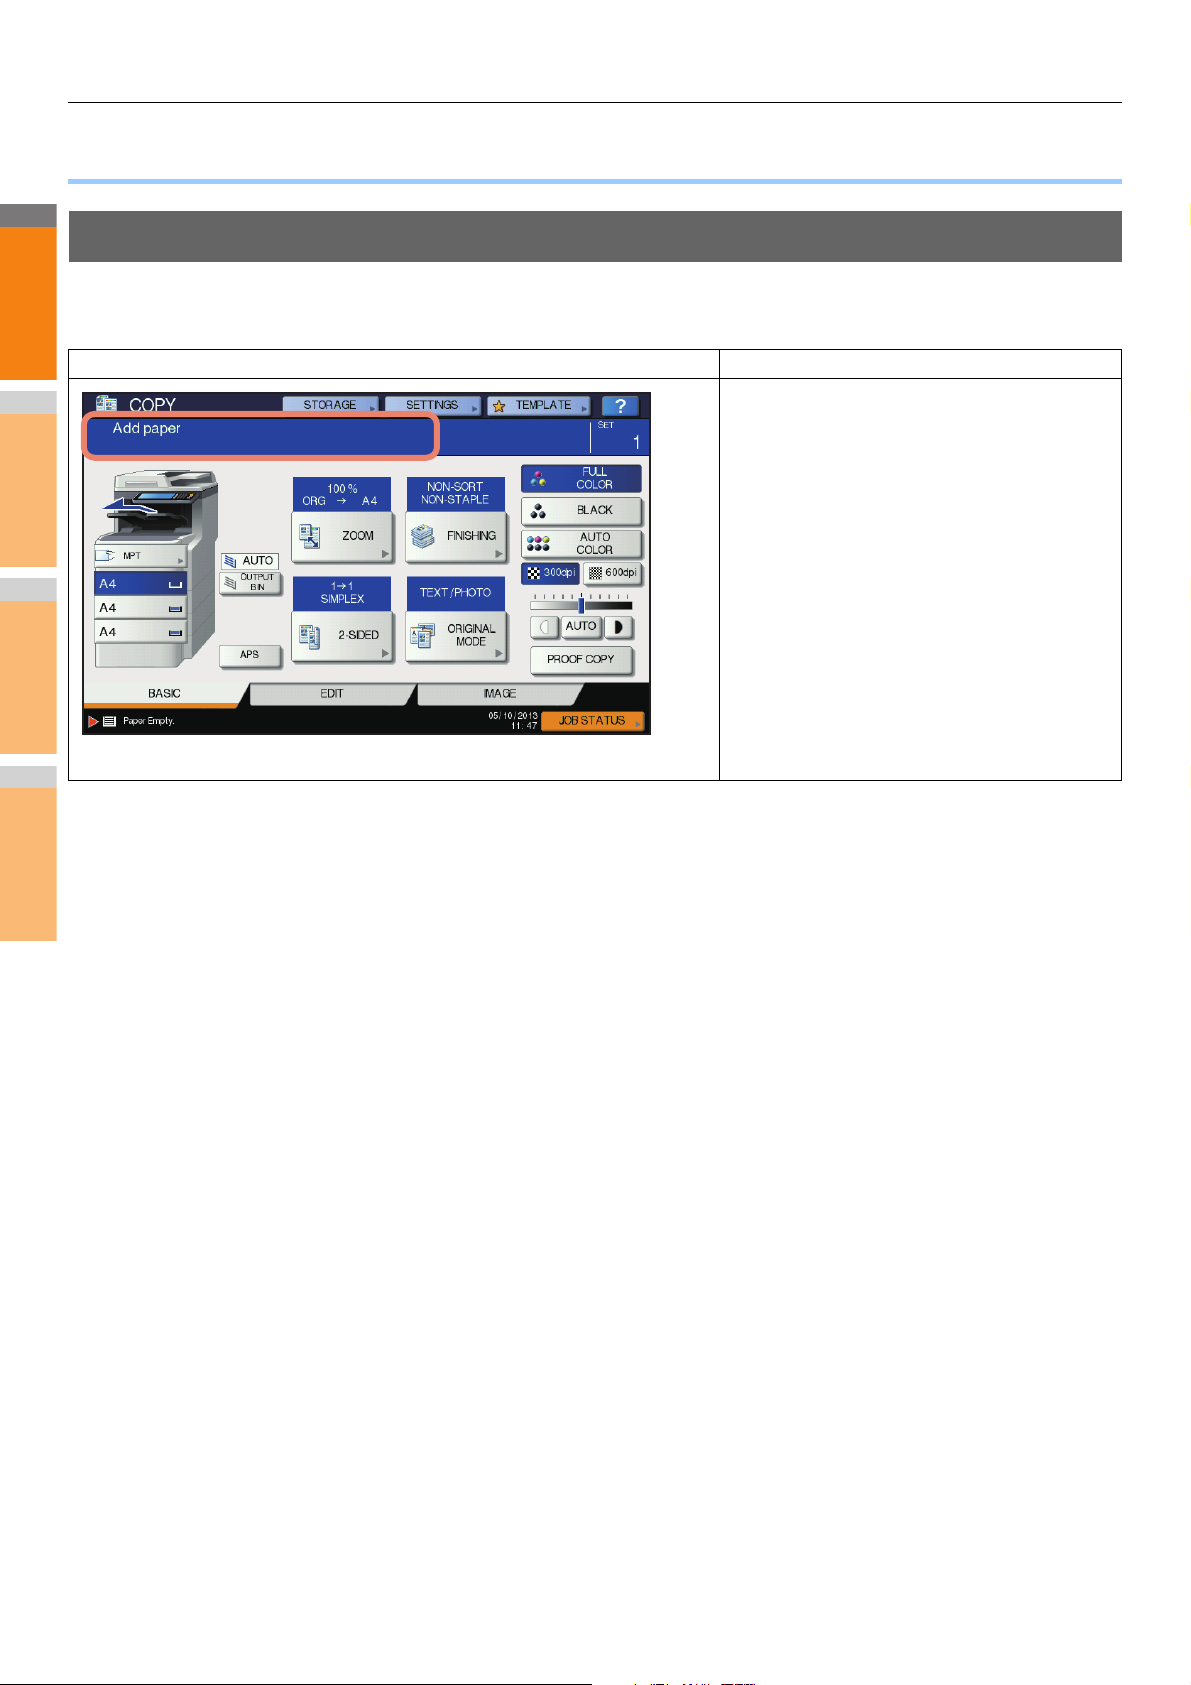
When This Screen Is Displayed
Various screens are displayed on the touch panel depending on the state of the equipment. This section describes how to solve
problems with some of the screen examples.
Screen Description / Remedy
A message appears on the upper part of the screen to
notify users of a problem, etc. For the major examples,
see the following pages.
P.17 "Messages Displayed on the Touch Panel"
- 16 -
TROUBLESHOOTING FOR THE HARDWARE
2
1
3
4
5
6
7
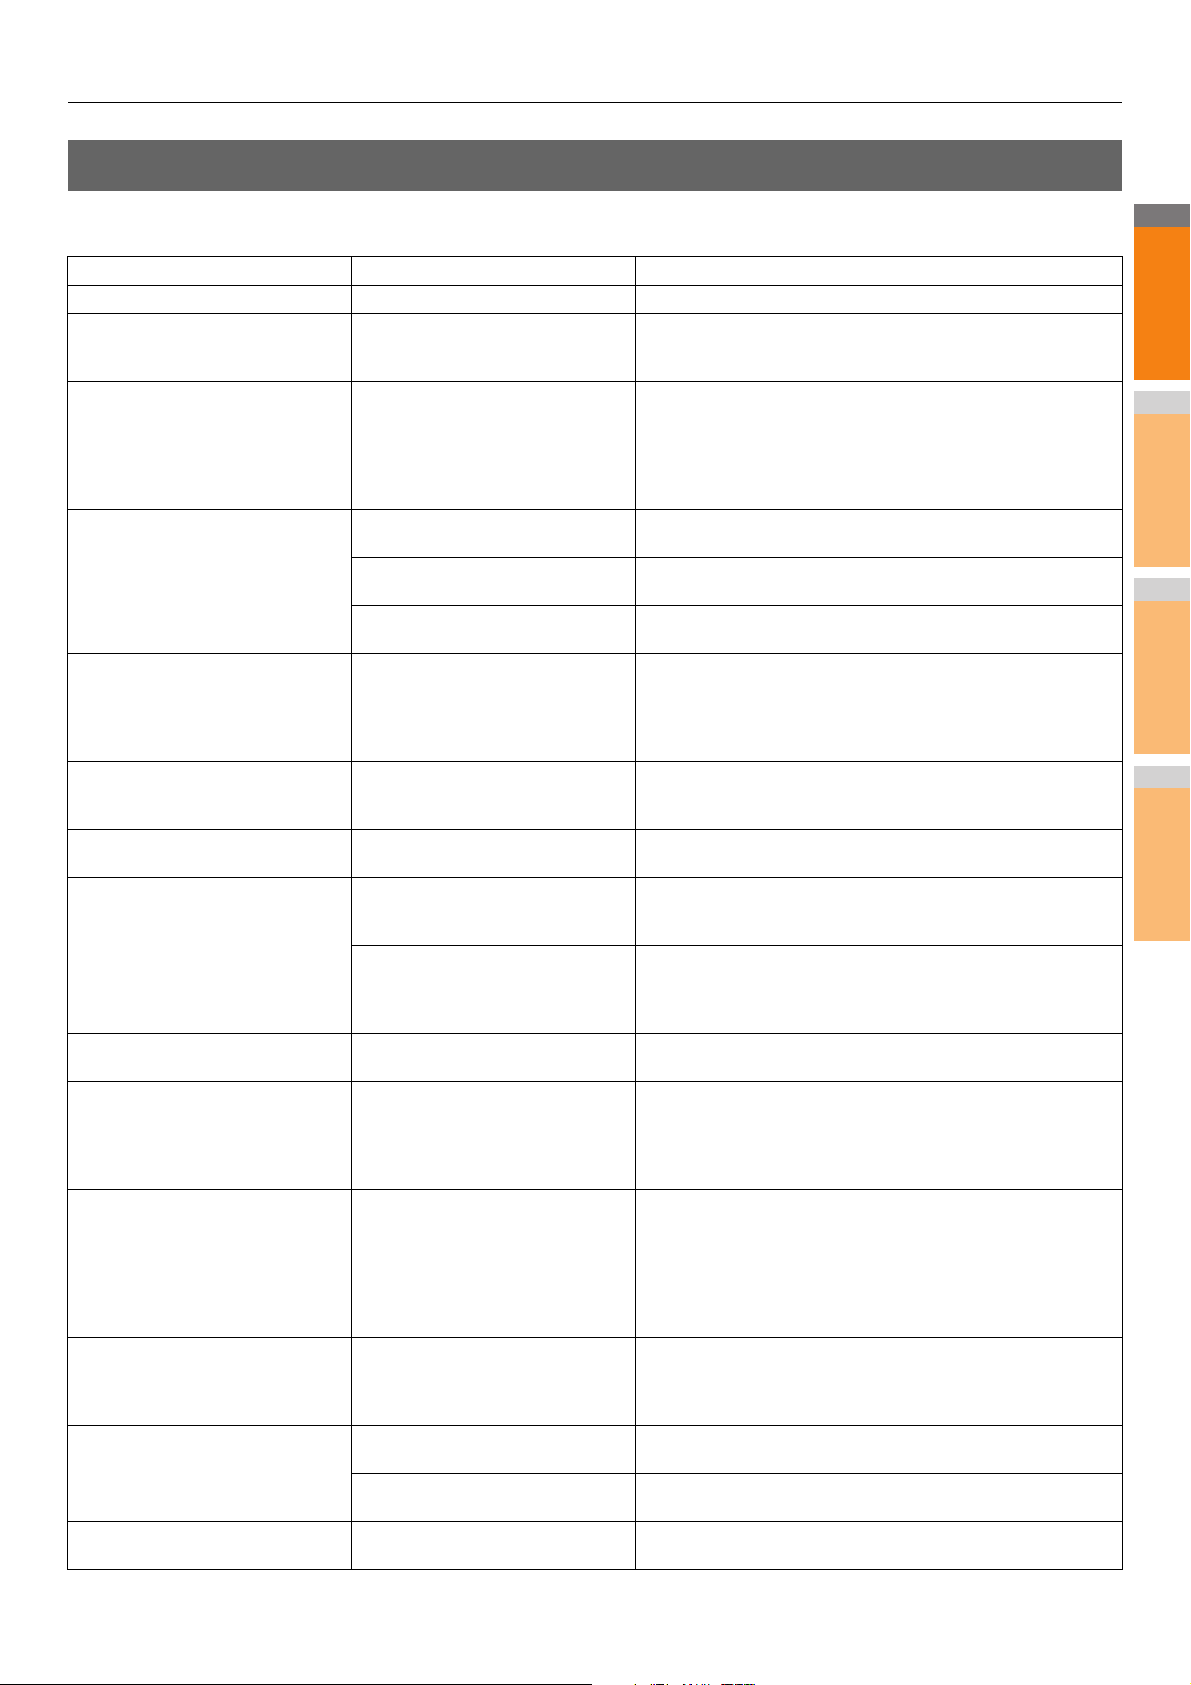
Messages Displayed on the Touch Panel
A message appears on the upper part of the screen to notify users of a problem, etc. The major examples of problems and how to
solve them are described in the table below.
Message Problem Description Corrective Action
Close *** cover. The cover indicated by *** is open. Check the cover on the touch panel and close it.
Misfeed in *** Paper misfeed has occurred inside
Install new *** toner cartridge No toner is left. “***” indicates the
*** TONER NOT RECOGNIZED
Check the toner cartridge
Check paper size setting on control
panel for tray N. Check the direction
or size of the paper.
Wait (Performing Self-check) The equipment is undergoing
Time for cleaning. Open the front
cover and follow the guidance.
Check the original and set it again The original is misfed inside of the
Change direction of original The orientation of the original placed
Cannot print this paper size
Select the other tray.
Cannot print this paper type
Set the other paper type
Change from this mode
Count over, cannot store anymore
READY(*** TONER NOT
RECOGNIZED)
READY (CHECK STAPLER) Staple jam has occurred in the stapler
the equipment.
color.
(The colors are shown abbreviated
when two or more toners are running
out: Y: yellow, M: magenta, C: cyan,
and K: black)
The toner cartridge indicated by *** is
not installed at all or improperly so.
The terminal of the toner cartridge is
stained.
The recommended toner cartridge is
not being used.
Paper misfeed has occurred because
of the mismatch between the paper
size placed in tray N and the size
registered for the tray N in the
equipment.
maintenance to keep its imaging
quality.
The LED print head need cleaning. Clean the LED print head.
Reversing Automatic Document
Feeder.
The direction or the size of the
original placed on the Reversing
Automatic Document Feeder is
incorrect.
on the document glass is incorrect.
Printing was attempted but failed. The
paper could not be output on the tray
selected for the paper output because
of a mismatch between the paper size
and the tray.
Printing was attempted but failed.
The paper could not be output in the
tray selected because of a mismatch
between the paper type and the tray.
(Special paper, thick 4 paper or thin
paper tried to be output on the lower
receiving tray of MJ-1107/MJ-1108.)
The number of originals to be
scanned has exceeded the limit
specified with the department or user
code during scanning.
The toner cartridge indicated by *** is
not installed at all or improperly so.
The recom
not being used.
of the finisher.
mended toner cartridge is
Remove the misfed paper following the guidance displayed on the
touch panel.
P.5 "When a Paper Jam Occurs"
See the color indication on the touch panel and replace the toner
cartridge.
(About another 50 copies can be made after this message
appears. The number varies depending on the conditions of
copying.)
P.54 "Replace the Toner Cartridges"
Install the toner cartridge correctly.
P.54 "Replace the Toner Cartridges"
Wipe the terminal with a soft cloth.
Use the recommended toner cartridge.
P.54 "Replace the Toner Cartridges"
Just removing the misfed paper does not prevent another paper
from being misfed. Be sure to correctly register the paper size in
the equipment.
Wait until the adjustment is completed and the message
disappears.
Remove the misfed original following the guidance on the touch
panel.
P.12 "When a Document is Jammed"
Check the direction and the size of the original and then replace it
on the Reversing Automatic Document Feeder. Then reattempt the
operation.
Change the orientation of the original by 90 degrees and place it on
the document glass.
Delete the failed print job, select the appropriate tray for the paper,
and perform printing again.
Delete the failed print job, select the appropriate tray for the paper,
and perform printing again.
Ask your administrator for details of setting the limit for the number
of copies.
Install the toner cartridge correctly.
.54 "Replace the Toner Cartridges"
P
Use the recommended toner cartridge.
P.54 "Replace the Toner Cartridges"
Remove the jammed staples.
- 17 -
TROUBLESHOOTING FOR THE HARDWARE
2
1
3
4
5
6
7
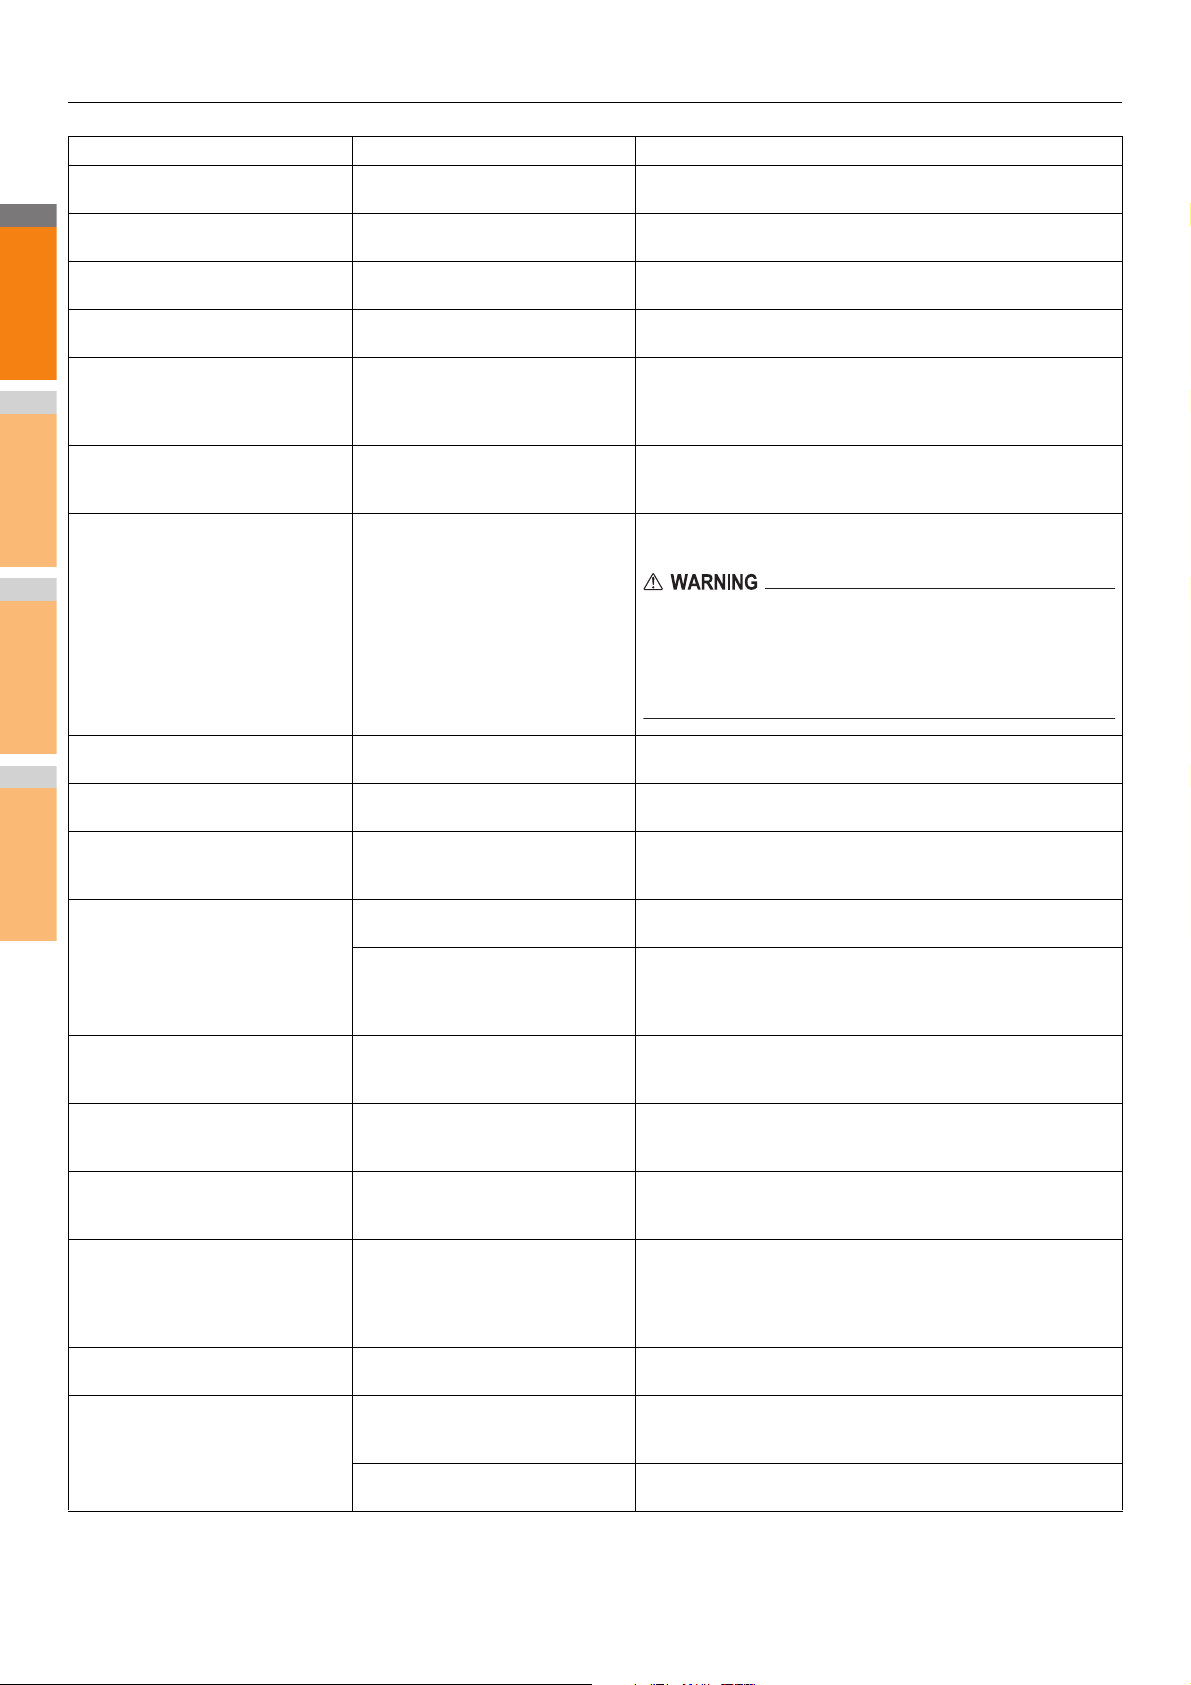
Message Problem Description Corrective Action
READY (CHECK STAPLER) No staples are left in the stapler of the
READY (FINISHER FULL) The receiving tray of the finisher is full
READY (FACE DOWN STACKER
FULL)
Check the toner cartridge The terminal of the toner cartridge is
Cannot copy
Check DEPARTMENT COUNTER
Add paper No paper is left in a tray or on the
Call for service The equipment requires adjusting by
finisher.
of paper.
The stacker of the equipment is full of
paper.
stained.
The number of originals to be
scanned has exceeded the limit
specified with the department code
during scanning.
multi-Purpose Tray (MPT).
a service technician.
Refill the staples.
Remove the paper from the receiving tray of the finisher.
Remove the paper from the stacker of the equipment.
Wipe the terminal with a soft cloth.
Ask your administrator for details of setting the limit for the number
of copies.
Set paper in the tray or on the multi-Purpose Tray (MPT). The
touch panel indicates which tray (or the multi-Purpose Tray (MPT))
has no paper.
Contact your dealer with the error code displayed on the right side
of the touch panel.
Never attempt to repair, disassemble or modify the equipment
by yourself.
You could cause a fire or get an electric shock.
Always contact your service representative for maintenance or
repair of the internal parts of the equipment.
Check staple cartridge No staples are left in the stapler of the
Examine Stapler Staple jam has occurred in the stapler
Saving energy - press START button. The equipment has entered into the
CHANGE TRAY TO CORRECT
PAP ER S IZE
Time for periodic maintenance The equipment requires inspection
POWER FAILURE A job was interrupted by a power
ERASING DATA The Data Overwrite Enabler is
Check paper size setting on control
panel for Multi-Purpose tray. Check
the direction or size of the paper.
Set the paper on the multi-Purpose
Tray (MPT) again.
Check the direction or size of the
paper on the multi-purpose tray and
press START
finisher.
of the finisher.
energy saving mode since it has not
been used for a certain time.
No paper suitable for the original is
set.
The size of the original is not detected
correctly because the original is sent
from the Reversing Automatic
Document Feeder at a skew.
and maintenance by a service
technician.
failure or some other reason.
clearing the data.
Paper misfeed has occurred because
of a mismatch between the paper size
placed in the multi-Purpose Tray
(MPT) and the size registered for the
multi-purpose tray in the equipment.
The paper placed on the multiPurpose Tray (MPT) misfed.
The direction or the size of the paper
placed on the multi-Purpose Tray
(MPT) is incorrect.
The side guides of the multi-Purpose
Tray (MPT) do not fit the paper length.
Refill the staples.
Remove the jammed staples.
Press any of the [START], [COPY], [e-FILING], [SCAN], [PRINT],
[FAX] and [POWER SAVE] buttons to clear the energy saving
mode.
Place the suitable size paper for the original in the tray.
Replace the original while aligning the side guides of the Reversing
Automatic Document Feeder to its width so that it will be placed
straight.
Contact your dealer for maintenance.
The print or fax job may be incomplete. Press [JOB STATUS] to
check whether any jobs are unfinished.
To clear the messages, press the [RESET] button twice.
This message is displayed if the Data Overwrite Enabler is
installed. You can operate the equipment while the message is
displayed.
Register the paper size correctly. Just removing the misfed paper
does not prevent another paper from being misfed.
Remove the misfed paper and set the paper again.
Check the direction and the size of the paper and then replace it on
the multi-Purpose Tray (MPT).
Align the side guides of the multi-Purpose Tray (MPT) to the paper
length.
- 18 -
2
1
3
4
5
6
7
Note
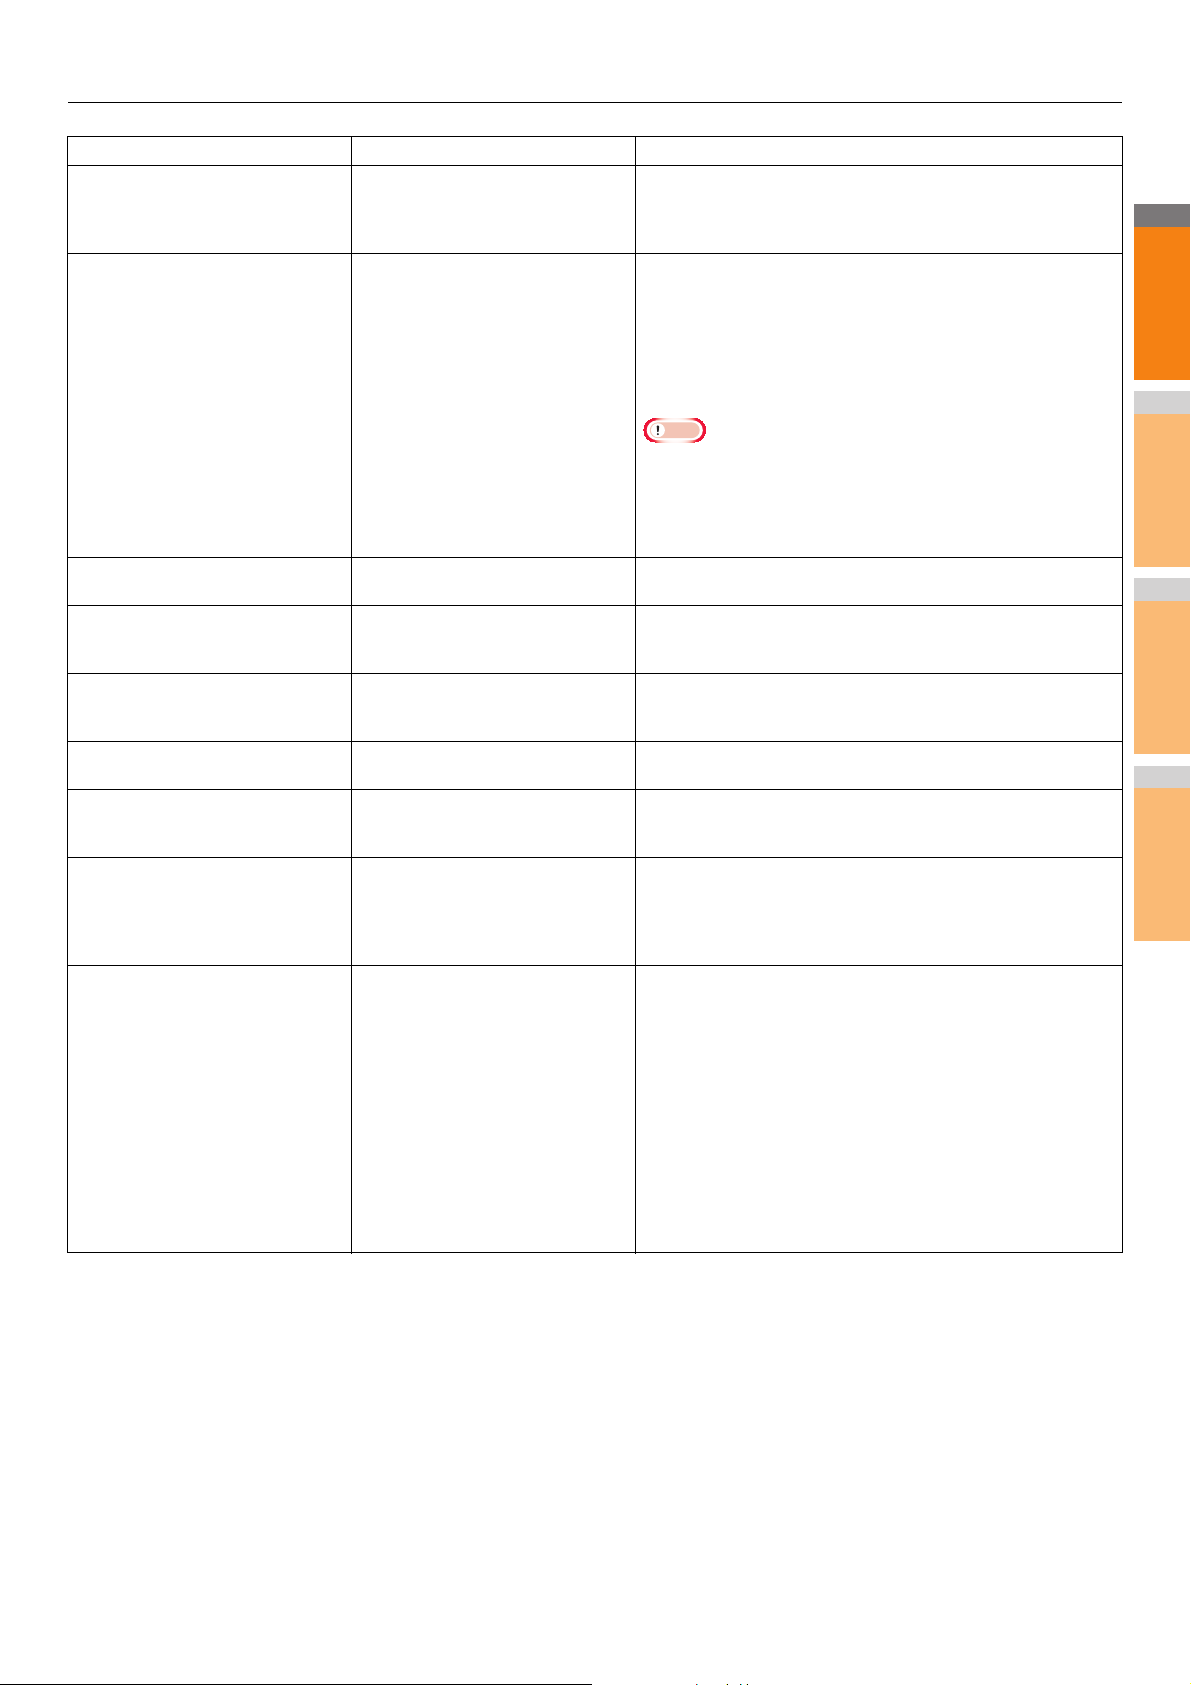
Message Problem Description Corrective Action
Reboot the machine An error has occurred in the
Toner near Empty (***) Toner is running out. “***” indicates
equipment and it stopped normal
operation.
the color.
(The colors are shown in
abbreviations when two or more
toners are running out: Y: yellow, M:
magenta, C: cyan, and K: black)
This original is copy protected An attempt is made to copy a
DEPARTMENT Quota exceeded.
Contact the Administrator.
Not enough Work Space to store
originals
Will you print out stored originals?
USER Quota exceeded.
Contact the Administrator.
USER and DEPARTMENT Quota
exceeded.
Contact the Administrator.
The number of originals exceeds the
limits.
The scanned data are deleted.
The number of originals exceeds the
limits.
Will you copy stored originals?
LAN cable is not detected
prohibited original.
The copying, printing or scanning
quota to the department has reached
“0”.
Internal memory available ran out
while scanning.
The copying, printing or scanning
quota to the user has reached “0”.
The copying, printing or scanning
quota to the user and department has
reached “0”.
The number of originals to be
scanned has exceeded the limit of
1000 sheets during scanning. (The
magazine sort or page number
function is used.)
The number of originals to be
scanned has exceeded the limit of
1000 sheets during scanning.
The LAN cable connection is not
detected.
TROUBLESHOOTING FOR THE HARDWARE
Rebooting the equipment may correct the error: Press the
[POWER] buttons on the control panel simultaneously until a “pip”
sound is heard to turn the power OFF, and then turn it back ON
with the [POWER] button.
Some toner is still left in the toner cartridge while this message is
displayed. You do not have to replace the toner cartridge yet.
Check the color of the toner on the touch panel and prepare the
toner cartridge.
(About another 1000 copies can be made after this message
appears. Depending on the conditions of copying, this message
may not appear even when the toner cartridge is near empty.)
• Replace the toner cartridge after the toner has completely run
out. [Install new *** toner cartridge] is displayed at that time.
• Black and white print is available while the other colors has run
out. Neither color nor black and white print can be done when
the black toner has run out.
This original cannot be copied.
For details of setting the quota, ask your administrator.
To print out the data for the originals stored (scanned) until the
message appeared, press [YES] on the touch panel. To delete the
stored data, press [NO].
For details of setting the quota, ask your administrator.
For details of setting the quota, ask your administrator.
Reduce the number of originals to be scanned, and try again.
To print out the data for the originals stored (scanned) until the
message appeared, press [YES] on the touch panel. To delete the
stored data, press [NO].
Check the following items.
• Check that the LAN cable is connected to the equipment.
• Check that there is no damage on the connector of the LAN
cable.
• Check that the LAN cable is open circuited.
• Check that the LAN cable is connected to the HUB. Check that
there is no damage to the connector.
• Check that the power is ON for the HUB to which the LAN cable is
connected.
• Check that the settings of the communication speed and the
Ethernet method for the equipment and the HUB are aligned.
Error Codes
The error codes indicating the status of the equipment may appear on the touch panel. You can find the listings of these error codes in
Chapter 7.
P.43 "Error Codes"
- 19 -
2
1
3
4
5
6
7
TROUBLESHOOTING FOR PRINTING
● TROUBLESHOOTING FOR PRINTING
Print Job Problems
This section describes how to clear the print jobs errors.
Clearing print job errors
Problem Description
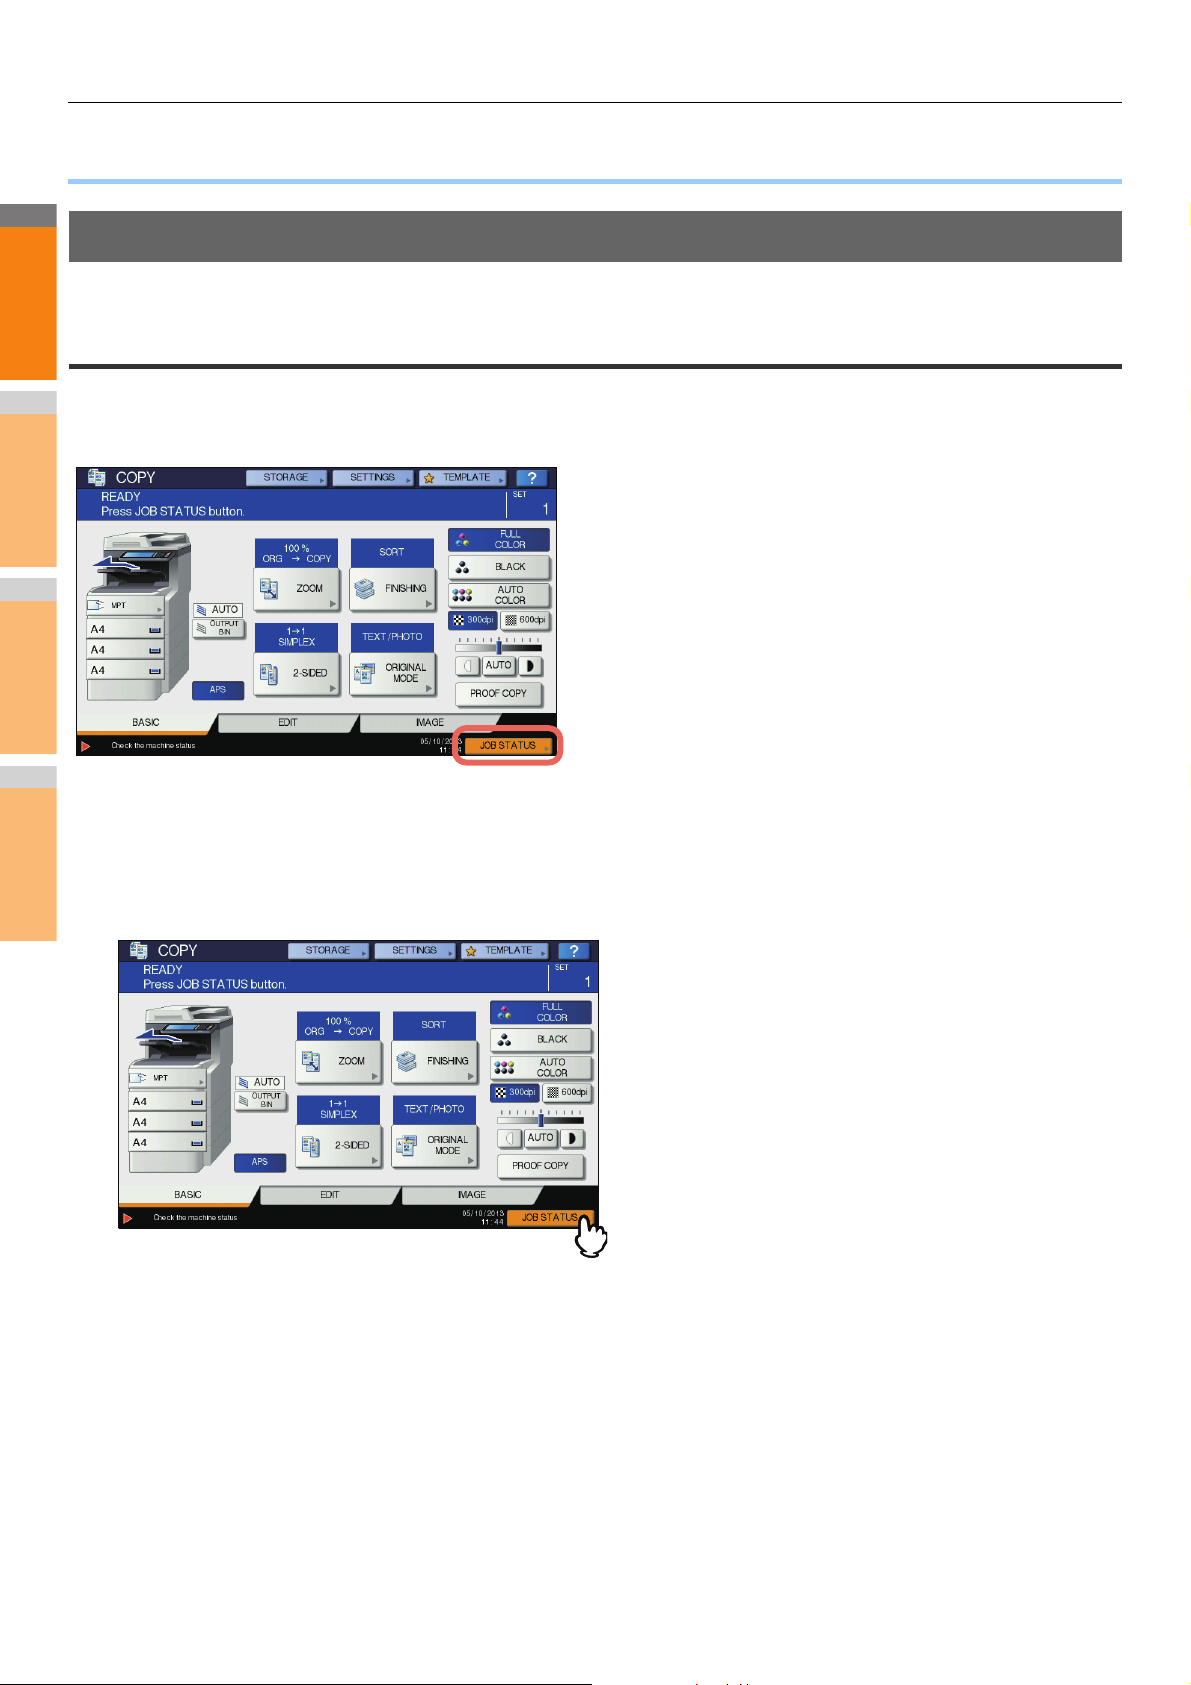
A print job error occurs and [JOB STATUS] blinks when the paper specified by the computer is not set in the trays of the equipment.
Corrective Action
Clear the error following the procedure below.
To print by placing paper on the multi-purpose tray (MPT)
Press the [JOB STATUS] which is blinking.
1
Place paper of the size specified with the computer on the multi-purpose tray (MPT), and press
2
the [START] button.
Printing is performed. Press [JOB STATUS] when printing has been completed.
Printing by selecting a paper size already placed in another tray
You can perform printing with the paper already placed in the trays. Some part of the image may not be printed, however, if the paper
size in the tray is smaller than the one you have specified.
Press the tray button you intend to use on the touch panel and press the [START] button.
- 20 -

TROUBLESHOOTING FOR PRINTING
2
1
3
4
5
6
7
Cannot remember the document password for a Private Print job
Problem Description
I cannot remember the document password for my Private Print job.
Corrective Action
The document password for a Private Print job is never shown, once the job has been sent to the equipment.
To print the failed Private Print job, submit the document again as a new Private Print job.
The failed Private Print job remains unprinted in the job queue. To delete it, either way below is required. Contact the administrator of
the equipment.
• Enter the administrator’s password in the Private Print job list on the touch panel and delete the job.
For details, refer to the Advanced Guide.
• Log in to TopAccess with the administrator’s password and delete the job in the Print Job list.
For details, refer to the TopAccess Guide.
Printing a document including many graphics takes time
Problem Description
It takes time to print a document including many graphics from a PCL driver.
Corrective Action
Since this may happen occasionally, clear the [JPEG Compression] check box of the [PDL Settings] tab in [Customization] of the
[Device Settings] tab before printing such documents.
Printer Driver Problems
This section describes the troubleshooting for the printer drivers.
Cannot print (port setting problems)
Problem Description
I cannot perform printing with the equipment.
Corrective Action
If the printer driver on the client computer points to a wrong network port, jobs neither appear in the current jobs queue nor are
printed. Fix the problem following the procedure below:
1. Select [Start] - [Devices and Printers].
2. Right-click the printer driver icon.
3. Select [Printer Properties] from the shortcut menu.
4. Select the [Ports] tab.
5. Make sure that the path to the machine and the device name are correct.
\\<device name>\print
<device name> is the same as the device name set from the touch panel. “print” may be “univ” or “ps3” depending on the printer
driver you use.
6. Click the [General] Tab and click [Print Test Page] to confirm that the settings are correct.
Cannot print (SNMP Community Name problems)
Problem Description
I cannot perform printing with the equipment.
Corrective Action
Check if the SNMP community names are the same in the following 3 settings.
• Equipment
• TCP/IP port of the [Ports] tab in the printer driver
• [SNMP Settings] dialog box of the [Others] tab in the printer driver
- 21 -
TROUBLESHOOTING FOR PRINTING
2
1
3
4
5
6
7
Memo
Command line options not processed
Problem Description
All the print options are sent to the equipment at the beginning of the print job. If the print file already contains print commands, they
overwrite the command line options you set. For example, if the print file specifies Letter paper, and you specify A4 paper with the lp
command, the document is printed on Letter size paper.
Corrective Action
Change the properties of the document you intend to print to create another print file. Submit the print job using the lp command
without setting additional parameters.
Retrieval of printer configuration failed
Problem Description
When accessing the machine properties, the message “Retrieval of printer configuration failed” is displayed.
Corrective Action
The printer driver cannot communicate with the equipment. Try the steps in the checklist below.
No Check... Yes No Corrective Action
1 Is the equipment turned on? Next Step
2 Can you connect the computer to the equipment
via TopAccess?
3 Does the same message appear again when you
access the property of the printer driver?
Next Step
End
Turn on the equipment.
Restart the equipment.
Check the printer driver port assignment and
make sure that it is correct.
Cannot change settings on the [Device Settings] tab
Problem Description
The [Device Settings] tab is grayed out and their settings cannot be changed.
Corrective Action
Users who do not have the privilege to change the printer driver setting cannot change the options in the [Device Settings] tab. Please
log in with the Administrator.
Network Connection Problems
This section describes the troubleshooting for printing in the network connection environment.
See also the checklists by types of printing and operating systems on P.35 "Printing Problems (Network Related)"
Cannot print with the equipment (network connection problems)
Problem Description
I cannot perform printing with the equipment.
Corrective Action
See the checklist below to determine if the cause of the problem is related to a network.
If it is, see P.35 "Printing Problems (Network Related)". In that section, several OS- and printing method-based check lists are
provided to help you find the appropriate action to take.
- 22 -
2
1
3
4
5
6
7
No. Check... Yes No Corrective Action
1 Have you set the protocol settings so they are
compatible with your network and client protocol
settings?
2 Have you set up the appropriate type(s) of print
services that should be supported?
3 If you are using Novell print services, did you set
up the Novell side of network printing, such as
creating print servers and attaching the print
queue?
4 If you set up Novell print services, can you see the
print job using PCONSOLE or NWAdmin?
5 Have you checked the gateway and subnet
settings to make sure that the equipment is part of
the same network gateway as the client from
which you are trying to print?
6 Are other services and communications
performed over the network behaving in the
normal and expected manner?
Next Step
Next Step
Next Step
Next Step
Next Step
End
Set up the proper protocol.
Check the settings required for your printing
environment.
Set up the NetWare server.
Refer to your Novell PCONSOLE or NWAdmin
user documentation for help with using these
utilities.
Set up the TCP/IP correctly.
Refer to your network documentation or use a
network diagnostic utility to identify the network
problem.
Cannot print with SMB print
TROUBLESHOOTING FOR PRINTING
Problem Description
When an attempt is made to print a document using an SMB connection, the job cannot be printed and such messages continuously
appear as “No more connections can be made to this remote computer” or “Your file could not be printed due to an error”.
Corrective Action
SMB print is supposed to be utilized in a small network. If you can use Windows XP, Windows Vista, Windows 7, Windows 8,
Windows Server 2003, Windows Server 2008 or Windows Server 2012 as a print server, printing via the Windows Print Server is
recommended.
If you cannot use the Windows Print Server in your network, use LPR print instead.
Client Problems
This section describes how to identify and correct the problems caused by the clients* connected to the equipment.
* One of the common examples of clients is a computer that sends a print job to the equipment and makes it perform printing.
Checking the client status
The printing problems are caused by the printer driver settings, network settings, errors in the network connections, and so forth. First,
contact the administrator of the equipment to see if there is one of these kinds of problems, or see the following sections:
P.21 "Printer Driver Problems"
P.22 "Network Connection Problems"
P.35 "Printing Problems (Network Related)"
Another possible cause is one related to a client. If the print jobs sent from a specific client within a network fail, the problem may be
caused by the client.
Problem Description
The jobs sent from a client cannot be printed.
- 23 -
TROUBLESHOOTING FOR PRINTING
2
1
3
4
5
6
7
Corrective Action
The checklist below will help you identify the source of the error and direct you to information resolving the problem. If the problem
persists after you have followed all of the steps, contact your dealer.
No. Check... Yes No Corrective Action
1 Does the equipment work properly? Are copy jobs
output properly?
2 See the Device page of TopAccess. Are the
options specified for the job supported by the
hardware configuration?
3 Can you print the jobs from other clients?
4 Have you ever printed successfully from this
client?
5 Did you set up the printer driver other than by an
SMB connection?
6 (For Macintosh only)
Can you see the equipment you created in the
Selector?
7 At this point, the problem is most likely to be related to a client-side error. Refer to the Basic Guide to fix the problem.
Next Step
Next Step
Next Step
Next Step
Next Step
Next Step
Check the device status displayed in the Device
page of TopAccess.
If not, delete the job, install the required
components, and try again. Contact your dealer
for further information.
See the following section to fix the problem.
P.22 "Cannot print with the equipment
(network connection problems)"
See the following section to fix the problem.
P.21 "Cannot print (port setting problems)"
See the following section to fix the problem.
P.23 "Cannot print with SMB print"
Refer to the Basic Guide.
Hardware Problems
This section describes troubles caused by the hardware device (the equipment).
If an icon or a message indicating an error is not displayed, or the problems in the printer drivers or the network connection cannot be
specified, a hardware problem is a possible cause of the trouble.
The following are common factors involved in the hardware problems:
• System board, cables, and connectors
• The equipment, and its components such as the duplexing unit or the Finisher
• System software or firmware of the equipment
Print jobs not output
Problem Description
All the clients within a network fail to make the equipment output the print jobs.
Corrective Action
There remains a possibility that improper settings of the software such as printer drivers caused the problem. However, a hardware
error is possible, if none of the clients can print the jobs. Try the steps on the checklist below. If the problem persists after you have
followed all of the steps, contact your dealer.
No Check... Yes No Corrective Action
1 Is printing prohibited from all connected client
computers?
2 Can you see the job from TopAccess or another
print monitoring utility, such as PCONSOLE or
Print Manager?
3 Can you identify the problem with the error
message or the error code and resolve it? End
Next Step
Next Step
See the following section to fix the problem:
P.22 "Network Connection Problems"
See the following section to fix the problem:
P.32 "Locating the Equipment in the Network"
See the following sections to fix the problem:
P.42 "Error Messages"
P.43 "Error Codes"
Also refer to the Basic Guide for more information on resolving output errors caused by software settings.
- 24 -

2
1
3
4
5
6
7
TROUBLESHOOTING FOR COPYING
● TROUBLESHOOTING FOR COPYING
Copying Problems
See the table below when you have a problem in operating copy function or have an unexpected copy output.
Problem Description Cause Corrective Action
Functions cannot be set. Another function that is unavailable for the
Copying stops during scanning of
the originals. (The message “The
number of originals exceeds the
limits Will you print out stored
originals?” appears.)
Copying stops during scanning of
the originals. (The message “Not
enough Work Space to store
originals Will you print out stored
originals?” appears.)
Copied image is too light. No toner is left. The message “Install new Black (Cyan, Magenta or Yellow)
Copied image is too dark. Copy density is set too dark. Lighten the density manually or try the automatic density
Copied image has stains. The Original Cover or the Reversing
Copy image is skewed. The original is sent from the Reversing
Copied image is partially missing. The size or orientation of the copy paper and
Copied image is blurred. There is a gap between the document glass
combination has already been set.
The number of scanned pages has reached
the maximum.
No available internal memory remains. To copy the scanned images, press [YES]. To cancel, press
Copy density is set too light. Darken the density manually or try the automatic density mode.
Automatic Document Feeder is not fully
lowered.
The document glass, platen sheet, scanning
area and guide are stained.
The copy density is set too dark. Lighten the density manually or try the automatic density
A transparent original such as a transparency
or tracing paper is being used.
Automatic Document Feeder at a skew.
that of the original are not consistent. The
reduction ratio is not properly set.
The binding margin is too wide. Set the binding margin width to fully cover the original.
The original is larger than the printable area. The outside part of the printable area cannot be copied. The
and the original.
The copy paper is damp. Replace it with dry copy paper.
Some functions cannot be combined.
For details, refer to Advanced Guide.
To copy the scanned images, press [YES]. To cancel, press
[NO].
[NO].
cartridge” appears when no toner is left. Replace the toner
cartridge of the color the message indicates.
P.54 "Replace the Toner Cartridges"
mode.
Lower it fully to block outside light.
Clean them.
mode.
To copy a transparent original clearly, put a sheet of blank,
white paper behind the original. Make sure that the paper is
large enough to cover the original.
Replace the original while aligning the side guides of the
Reversing Automatic Document Feeder to its width so that it
will be placed straight.
Fit the copy paper size to the original or set the reduction ratio
for the copy paper.
For details, refer to Chapter 4 of the Advanced Guide.
Full Image function enables you to copy the whole image of the
original in the 95 - 99% reduction ratio.
Lower the Original Cover or the Reversing Automatic
Document Feeder fully so that the original fully contacts the
document glass.
- 25 -

TROUBLESHOOTING FOR COPYING
2
1
3
4
5
6
7
Problem Description Cause Corrective Action
Copied image has black streaks
in the horizontal direction.
The scanning area or guides are stained. Clean them.
Copied image has white streaks
or color streaks in the vertical
direction.
A color original is copied in black
and white even if [AUTO
COLOR] is selected for the color
mode.
A black-and-white original is
copied in color even if [AUTO
COLOR] is selected for the color
mode.
The LED print head is stained. Clean the LED print head.
Some color originals may be copied in black
and white:
• Originals with very little colored part
• Overall blackish originals
• Originals in light color
Some black and white originals may be
copied in color:
• Yellowed originals
• Originals with background color
Set the color mode to [FULL COLOR].
You can change the criterion for determining whether an
original is black and white or color.
For further information, refer to the Advanced Guide.
Set the color mode to [BLACK].
You can change the criterion for determining whether an
original is black and white or color.
For further information, refer to the Advanced Guide.
- 26 -

2
1
3
4
5
6
7
● TROUBLESHOOTING for FAX
Memo
Troubleshooting
Error codes
Below is a list of error codes that you might see in the lists or reports.
Error Code Description Remedy
0012 Original misfeed Clear the misfed original.
0013 Cover open Firmly close the open cover.
0020 Power interruption Check the power interruption report.
0030 Reset Transmission is cancelled.
0033 Polling Error Check polling options setup (Security code, etc.), and check if the polling document
0042 Memory full Make sure that there is sufficient memory before making the call again.
0050 Line busy Retry communications.
0051 Fax line cable disconnected Check if the fax line cable is connected. To clear the message, press the [RESET]
0053 Security mismatch in relay or mail
box transmission
00B0 - 00E8 Communication Error Retry communications.
TROUBLESHOOTING for FAX
(The transmission is terminated by the misfed printing paper during the direct
transmission.)
exists.
button twice.
Confirm the remote party’s security code, system password, and your setup.
If you see an error code not listed here, retry the communication. If this error still occurs, contact your dealer.
Error messages
Below is a list of error messages that might appear on the touch panel. When any message in the list appears on the touch panel,
press [RESET] on the control panel to clear it, and then take action suggested in the “Remedy” column.
Message Cause Remedy
Memory overflow Memory overflowed when scanning documents to the
Communication error Communication error occurred during direct TX. Retry communications.
Job reservation full The number of reserved jobs exceeded the maximum. Either wait for job reservations to be completed, or
memory.
Job memory full The total number of destinations for reserved jobs
exceeded the maximum.
Sorry not possible On-hook or direct TX was attempted during
communications.
Not allowed now Further polling transmission reservation was attempted
even though polling transmission was already reserved.
Too Many Tel # Digits 128 digits or more were registered for a chain dial
Never attempt to repair, disassemble or modify the equipment by yourself.
You could cause a fire or get an electric shock. Always contact your service representative for maintenance or repair of the internal
parts of the equipment.
communication.
Either wait for memory to be cleared, or check the jobs
and delete reserved jobs to clear memory.
check the jobs and delete reserved jobs.
Either wait for job reservations to be completed, or
check the jobs and delete reserved jobs.
Wait for communications to end and retry
communications.
Either wait for polling transmission jobs to be completed,
or check the jobs and delete reserved jobs.
Confirm the number of digits dialed and register the
numbers again.
- 27 -

TROUBLESHOOTING for FAX
2
1
3
4
5
6
7
Memo
Transmission/reception trouble
Below is a list of trouble you might encounter during the transmission/reception.
Transmission troubles
Trouble Check Point
TRANSMIT is not displayed even if the
[START] button is pressed.
Originals are fed diagonally. • Are the document feeder slides adjusted to the width of the original that you are sending?
2 originals are fed together. • Have you placed more than the maximum number of originals that can be placed at one time?
The original is not being printed on the
paper of the remote Fax even though it
has been sent.
Black lines are shown in the image that
was sent.
Originals are not sent even if operations
are carried out normally.
Originals cannot be sent overseas. Specify Quality TX and resend.
• Is the modular cord disconnected?
• Is the power plug unplugged from the power outlet?
• Can you receive telephone calls?
• Is there any problem at the remote Fax? Check this with the party trying to receive the original.
• Does the original that you are sending match the conditions of the original that is available for
sending?
• Does the original that you are sending match the conditions of the original that is available for
sending?
• Have you pushed the originals into the feeder too hard?
Was the original placed correctly facing up?
When placing the original on the document glass, specify the original size.
Is the scanning area of the Reversing Automatic Document Feeder clean?
Clean it with a soft cloth.
Is the remote Fax compatible with your system?
This system supports G3 communications but not G2 or G4 communications.
Basic Guide
Reception troubles
Trouble Check Point
Originals cannot be received even if
“RECEIVE” is displayed and the [START]
button is pressed.
Paper is not output. Is the equipment out of paper?
The received original is printed dark and
is illegible or black stripes are printed on
the original.
Paper is output but not printed. • Is there enough toner?
Paper often misfeeds. • Is the tray size setting correct?
• Is the modular cord disconnected?
• Is there a problem at the remote Fax? Check this with the party trying to send the original.
• Make a local copy and confirm proper printing.
• Is the original being sent a dirty copy? Check this with the party trying to send the original.
• Is the trouble due to a problem or operation error at the remote Fax? Check this with the party trying
to send the original.
• Is the original placed correctly on the remote Fax? Check this with the party trying to send the
original.
• Is the tray properly inserted?
• Is the specified paper type being use?
If the suggested action does not solve the trouble or you encounter trouble not listed above, contact your dealer.
- 28 -

2
1
3
4
5
6
7
TROUBLESHOOTING FOR SCANNING
● TROUBLESHOOTING FOR SCANNING
Scanning Problems
This section describes troubleshooting for using scan data.
Cannot E-mail my scans
Problem Description
I have scanned a document and sent the copy as an e-mail attachment, but the e-mail does not reach the specified e-mail address.
Corrective Action
Check the following points:
• The correct e-mail addresses are specified.
• The equipment is correctly configured for and connected to the network.
• For the SMTP Client settings, the SMTP server address is correctly set.
• For the SMTP Client settings, the Port Number is correctly set.
• For the SMTP Client settings, the settings for SSL and/or authentication are correctly set.
• The data size of the attached file is smaller than/equal to the maximum data size receivable on the recipient’s side.
For details on the network settings, refer to the TopAccess Guide.
For details on e-mailing the scanned image, refer to the Basic Guide.
Cannot find the data saved in the shared folder
Problem Description
I have scanned a document and saved the copy in the shared folder of the equipment, but cannot locate the saved file.
Corrective Action
• For Windows OS, search the network for the equipment using the search function of Explorer. The data are stored in the
equipment’s shared folder named “FILE_SHARE.”
• For Macintosh, search the network for the equipment on Finder and access the folder named “FILE_SHARE.”
• If you cannot find the equipment on the network, make sure that the SMB Server Protocol setting is enabled on TopAccess.
For details on the network settings, refer to the TopAccess Guide.
For details on storing the scanned image, refer to the Basic Guide.
- 29 -

2
1
3
4
5
6
7
TROUBLESHOOTING FOR e-Filing
● TROUBLESHOOTING FOR e-Filing
e-Filing Web Utility Problems
This section describes troubleshooting for the web browser-based e-Filing web utility. You will also find the error messages and the
corrective actions for each message.
e-Filing Web Utility terminates the session
Problem Description
The message “This operation will end your e-Filing session.” appears and e-Filing Web Utility returns to its top page.
Corrective Action 1
Clicking the [Return], [Refresh], and [home] button or [login] link leads to this message and e-Filing Web Utility returns to its top page.
In this case, try again to do the operation you intended.
Corrective Action 2
Closing the window by clicking the [x] button of the browser leads to the message “This operation will end your e-Filing session.” and
the e-Filing session ends. Finish your current operation before you close the window.
Corrective Action 3
Operating the main window while the sub window is displayed leads to the message “This operation will end your e-Filing session.”
and the processing displayed on the sub window ends. Do not operate the main window until the processing on the sub window has
been completed.
Numerous sub windows repeatedly appear
Problem Description
Numerous sub windows repeatedly appear and e-Filing becomes uncontrollable.
Corrective Action
Close all the windows and exit from the web browser. Then restart the browser and clear the cookie files from “Internet Option” (for
Internet Explorer).
Displaying the items in the Contents Frame takes a long time
Problem Description
Displaying the items in the Contents Frame takes a long time.
Corrective Action
Displaying more than 100 items in the Contents Frame may take a long time. A smaller number of items shortens the time for
displaying.
Error messages
See the table below to troubleshoot the problem if a message appears.
Message Corrective Action
Internal error occurred. Please restart e-Filing. Turn the power of the equipment OFF and then ON and then try again. If
Your e-Filing Session has Timed Out. Please Restart. Exit from e-Filing and change the session timer setting to be longer on
The items have been modified. The items are currently being modified by another user. Try again after
the error message is still displayed, contact your network administrator
or contact your dealer for support.
the Setup page of the TopAccess Administrator mode. Then restart it.
the other user has finished.
- 30 -

TROUBLESHOOTING FOR e-Filing
2
1
3
4
5
6
7
Message Corrective Action
Cannot start e-Filing Session. The Disk is Full. Erase unnecessary data from the Control Panel. For instructions on how
Cannot create a Box. The Disk is full. Erase unnecessary data using the administrative function or deleting the
Cannot create a Folder. The Disk is full. Erase unnecessary data using the administrative function or deleting the
Cannot edit the Document. The Disk is full. Erase unnecessary data using the administrative function or deleting the
Cannot insert Page. The Disk is full. Erase unnecessary data using the administrative function or deleting the
Cannot archive Documents. The Disk is full. Erase unnecessary data using the administrative function or deleting the
Cannot upload archived file. The Disk is full. Erase unnecessary data using the administrative function or deleting the
Cut failed. Disk is full. Erase unnecessary data using the administrative function or deleting the
Copy failed. Disk is full. Erase unnecessary data using the administrative function or deleting the
Paste failed. Disk is full. Erase unnecessary data using the administrative function or deleting the
Save failed. Disk is full. Erase unnecessary data using the administrative function or deleting the
Cannot create a Folder. Maximum number of folders has been reached. Delete unnecessary folders and create a new folder. You can create up
Cannot create a Document. Maximum number of documents has been
reached.
Cannot insert Page. Maximum number of pages has been reached. Delete unnecessary pages and insert a new page. A document can
Paste failed. Maximum number of page range is reached. Delete unnecessary pages and paste pages in the document. A
Cut failed. The items have been deleted or modified. Refresh the page and make sure that the item was deleted or is currently
Copy failed. The items have been deleted or modified. Refresh the page and make sure that the item was deleted or is currently
Paste failed. The items have been deleted or modified. Refresh the page and make sure that the item was deleted or is currently
Delete failed. The items have been deleted or modified. Refresh the page and make sure that the item was deleted or is currently
Please enter valid password. Enter the correct password.
A folder with the name you specified already exists. Please try again. Use a name that does not exist in the box.
Another user is archiving or uploading. Please try again later. The document is being archived or uploaded by another user. Try again
The Maximum Possible Archive Size exceeded. Archiving is not
Possible.
The Box cannot be erased. A document contained in Box is being used. A document contained in the box is being used by another user. Try
The document is being used. Please try again later. The selected document is being used by another user. Try again after
File format doesn’t correspond. Please contact Administrator. Contact your administrator to convert the archive file and try again.
e-Filing is not ready. Please try again later. e-Filing has not yet been activated. Try again later.
to delete data from the Control Panel, refer to the e-Filing Guide.
data in boxes for making hard disk space.
data in boxes for making hard disk space.
data in boxes for making hard disk space.
data in boxes for making hard disk space.
data in boxes for making hard disk space.
data in boxes for making hard disk space.
data in boxes for making hard disk space.
data in boxes for making hard disk space.
data in boxes for making hard disk space.
data in boxes for making hard disk space.
to 100 folders in each box.
Delete unnecessary documents and create a new document. You can
create up to 400 documents in each box and folder.
contain up to 200 pages.
document can contain up to 200 pages.
being modified.
being modified.
being modified.
being modified.
after the other user has finished.
An archive file larger than 2 GB cannot be created. Make sure that the
archive file will be less than 2 GB by archiving smaller groups of files
instead of a large one.
again after the other user has finished.
the other user has finished.
- 31 -

2
1
3
4
5
6
7
TROUBLESHOOTING FOR NETWORK CONNECTIONS
● TROUBLESHOOTING FOR NETWORK CONNECTIONS
Locating the Equipment in the Network
Cannot locate the equipment in the network
Problem Description
I cannot locate the equipment in the network.
Corrective Action
Improper settings may cause problems in locating the equipment in the network. Try the checklist below to detect the cause of the
problem. If the problem remains unsolved, contact your dealer.
No. Check... Yes No Corrective Action
1 Is the startup page printed out? If not, wait until the
communication comes online. Examine the protocol
settings listed on the startup page. Are they correct?
2 Print out a configuration page. Make sure that there are
not any discrepancies or inconsistencies between the
current network settings and your network environment.
Change the network settings, if necessary. Use the Find
Computer utility from your Windows computer to locate
the equipment by its device name. Can you find the
equipment?
3 Can you locate other computers connected to the same
network?
4 Check the link LED activity on the hub and/or NIC of the
equipment and the client machine. Do the hardware
components appear to be functioning properly?
5 Confirm whether the Ethernet cable is normal. Does the
current Ethernet speed appear on the ETHERNET
setting screen ([SETTING] - [ADMIN] - [NETWORK] [ETHERNET]) ?
Furthermore, confirm whether the hub you are using
supports FULL mode. Does the hub support its mode ?
Next Step
Next Step
Next Step
Next Step
Next Step
6 Make sure that the device name for the equipment is
unique and verify that the WINS and/or DNS server
database are not causing potential naming conflicts with
the network settings on the equipment. If necessary,
change the network settings on the equipment. After the
communication comes back online, can you see the
equipment in the network?
7 If the network environment is using complex subnet or
supernet structures, is the IP address used by the
equipment within the network structures range of valid
addresses?
Next Step
End
Set up the proper protocols.
Set up the proper protocol if required.
Once you have located the equipment, configure the port
that it is mapped correctly to the device.
Check the network settings on the client computer to
make sure that they are compatible with the network
settings on the equipment.
Contact your dealer.
If “Link not detected” is displayed on the ETHERNET
setting screen, a contact failure or disconnection may be
occurred in the cable.
In this case, check the cable, and replace it with a new
one, if required.
Furthermore, if the hub does not support FULL mode,
connect the equipment to the switching hub. When the
port setting of the switch is fixed at half-duplex
communication, change it to any of 10/100/1000 Mbps,
full-duplex fixed communication mode or autonegotiation.
Contact your local network support specialist for further
assistance.
Set up the NetBIOS name of the device correctly.
Contact your local network support specialist for further
assistance.
- 32 -

TROUBLESHOOTING FOR NETWORK CONNECTIONS
2
1
3
4
5
6
7
Cannot locate the equipment with Local Discovery
Problem Description
Local Discovery cannot detect the equipment.
Corrective Action
The equipment is normally located automatically by SNMP. When the TWAIN driver, File Downloader, Address Book Viewer, Backup/
Restore Utility, Remote Scan driver, N/W-Fax driver or printer driver cannot automatically discover the equipment over the network,
the most likely cause is limitations of the protocols supported by the computer. In some cases, you need to add or update network
components; however, first see the checklist below to fix the problem.
No. Check... Yes No Corrective Action
1 Is SNMP enabled on the equipment? Next Step
2 Are the SNMP setting of the equipment and that of the
software the same?
3 Confirm that the protocol suite installed on the client
computer has been updated with the latest software for
the given operating system. If your network only supports
the IPX/SPX protocol, make sure that the most current
version of Novell Client software is installed.
4 Print an NIC Configuration page from the equipment.
Does the equipment support the same protocol as the
network?
5 Change the protocol settings from TopAccess, if
necessary, and reboot the equipment for the changes to
take effect. Repeat step 2. Was the device discovered?
6 Check the NIC Configuration page. Are the IP address
and subnet mask settings correct?
7 Check the router to make sure that it is not filtering out
the equipment packets. Is the router processing
equipment packets correctly?
8 Can another computer within the same network segment
discover the equipment?
9 Check the NIC Configuration page. Is the Unit Serial
Number part of the device name?
10 Check link activities on the port being used by the
equipment and the integrity of the network cable, hub, or
switch that connects the equipment to the network.
Replace any network components that you can tell or
suspect are faulty.
Next Step
Next Step
Next Step
End
Next Step
Next Step
Next Step
Next Step
End
Next Step
Enable the SNMP (MIB).
SNMP V1/V2: Check if the community names of the
equipment and the software are the same.
SNMP V3: Check if each item of the SNMP setting of the
equipment and the software is the same.
See the vendor’s website for information about product
updates and technical supports.
Configure the proper protocol.
Setup the TCP/IP settings correctly.
Adjust the router settings.
See the following section to fix the problem:
P.32 "Locating the Equipment in the Network"
Contact your dealer.
- 33 -

TROUBLESHOOTING FOR NETWORK CONNECTIONS
2
1
3
4
5
6
7
Equipment does not respond to ping command
Problem Description
The equipment does not respond to a ping command.
Corrective Action
Check the network settings following the checklist below.
No. Check... Yes No Corrective Action
1 Confirm that the TCP/IP protocol suite is installed on the
client computer.
2 Look at the NIC configuration page and confirm that the
TCP/IP settings are correct. Is the IP address entered
and valid? Are the Gateway and Subnet settings correct?
3 Reboot the equipment. Check the NIC Configuration
page that is printed out. Are the TCP/IP settings correct?
4 Try to ping the equipment again. Did the equipment
respond to the ping?
5 Can you ping the equipment from any other computer
within the same network? If not, the equipment might
have an IP address that is out of range or invalid.
6 Can you ping to another computer within the same
network?
7 If you have customized the device name, you can check
if the NIC is functional by restoring the default settings.
When the equipment automatically reboots and an NIC
Configuration page is printed, does the device name
include the NIC’s unit serial number?
8 Check link activities on the port being used by the
equipment and also the integrity of the network cable,
hub, or switch that is connecting the equipment to the
network. Replace any network components that you
suspect are faulty. Can you ping the equipment now?
Next Step
Next Step
Next Step
End
Next Step
Next Step
Next Step
End
Next Step
Refer to the networking section of your operating system
documentation.
Enter the correct TCP/IP settings.
The settings are not binding, contact your dealer.
Contact your local network specialist for a valid IP
address for the equipment.
Check the computer’s protocol settings to make sure the
gateway and subnet settings are correct.
The NIC is faulty or improperly installed. Contact your
dealer.
Contact your dealer.
LDAP Search and Authentication Problems
Network shutdown occurs or touch panel disabled after LDAP search
Problem Description
After performing the LDAP search, the network shutdown occurs or the touch panel is disabled.
Corrective Action
Try the checklist below. If the problem remains unsolved, contact your dealer.
No. Check... Yes No Corrective Action
1 Is the LDAP server correctly running? Next Step
2 Is the LDAP server setting correctly set?
End
Confirm that the LDAP server is correctly running.
Enter the correct LDAP setting. Re-enter the correct
password carefully because it is displayed by asterisks.
LDAP authentication takes a long time
Problem Description
It takes a long time to perform LDAP authentication on the touch panel.
Corrective Action
Try the checklist below. If the problem remains unsolved, contact your dealer.
- 34 -

TROUBLESHOOTING FOR NETWORK CONNECTIONS
2
1
3
4
5
6
7
Memo
No Check... Yes No Corrective Action
1 Is the LDAP server correctly running? Next Step
2 Is the LDAP server setting correctly set?
End
Confirm that LDAP server is correctly running.
Enter the correct LDAP setting. Reenter the correct
password carefully because it is displayed by asterisks.
Printing Problems (Network Related)
Among the several ways to use the equipment in the network, the simplest one is to set the equipment in the TCP/IP environment
using a DHCP server to assign IP addresses dynamically to devices. Using the default settings also assures an easier network
implementation, although you may be required to customize the settings to accommodate them in your particular environment.
Some common network configurations are shown below, along with the steps required to configure the equipment. If you perform all
the steps in the applicable checklist and still cannot print satisfactorily with the equipment, contact your dealer.
• You can change the network protocol settings with the touch panel of the equipment or with TopAccess (the Administration page).
• For the error messages that appear during the installation of the printer drivers, refer to the Basic Guide.
SMB print in a Windows operating system environment
No Check... Yes No Corrective Action
1 Are the IP address properties correctly set? Next Step
2 Is the Microsoft computer name (device name) unique? Next Step
3 Is the workgroup name valid and correctly entered? Next Step
4 When IPv4 is supported: Is the WINS server address
correctly set?
When IPv6 is supported: Is LLMNR for the IPv6 setting
enabled?
5 When IPv4 is supported: If the client computers are
located in different segments, is the WINS service
correctly provided?
6 Can you see the equipment in Windows Network
Neighborhood?
7 Were the proper printer drivers installed?
8 Is the driver’s port name valid? Next Step
9 Can you print with the equipment?
Next Step
Next Step
Next Step
Next Step
End
Set up the IP address correctly.
Set up the device name correctly.
Set up the workgroup correctly.
When IPv4 is supported: Set up the WINS server
address correctly, or enter “0.0.0.0” for the WINS server
address to disable the WINS service.
When IPv6 is supported: Enable LLMNR for the IPv6
setting referring to the TopAccess Guide.
When IPv4 is supported: Set up the WINS server and
enable it on the equipment to allow users access from a
different segment.
See the following section to fix the problem:
P.32 "Cannot locate the equipment in the network"
Refer to the Basic Guide to install the proper printer
drivers.
Refer to the Basic Guide to configure the proper port.
See the following section to fix the problem:
P.22 "Cannot print with the equipment (network
connection problems)"
Raw TCP or LPR print in a Windows operating system environment
No Check... Yes No Corrective Action
1 Are the IP Address properties correctly set? Next Step
2 Is Raw TCP print correctly set? Next Step
3 Is LPR/LPD print correctly set? Next Step
4 Were the proper printer drivers installed?
Next Step
Set up the IP address correctly.
Set up the Raw TCP print service correctly.
Set up the LPD print service correctly.
Refer to the Basic Guide to install the proper printer
drivers.
- 35 -

TROUBLESHOOTING FOR NETWORK CONNECTIONS
2
1
3
4
5
6
7
No Check... Yes No Corrective Action
5 Is the Raw TCP or LPR port configured with the correct
IP address?
6 Can you print to the equipment?
Next Step
End
Refer to the Basic Guide to configure the proper port.
See the following section to fix the problem:
P.22 "Cannot print with the equipment (network
connection problems)"
IPP print in a Windows operating system environment
No. Check... Yes No Corrective Action
1 Are the IP address properties correctly set? Next Step
2 Is the HTTP server on the equipment enabled? Next Step
3 Is the IPP print correctly set? Next Step
4 Were the proper printer drivers installed?
5 Is the IPP port configured with the correct URL? Next Step
6 Can you print to the equipment?
Next Step
End
Set up the IP address correctly.
Enable the HTTP server in the HTTP Network Service.
Set up the IPP print service correctly.
Refer to the Basic Guide to install the proper printer
drivers.
Refer to the Basic Guide to configure the proper port.
See the following section to fix the problem:
P.22 "Cannot print with the equipment (network
connection problems)"
Novell print in a NetWare environment
No. Check... Yes No Corrective Action
1 Are the IPX/SPX protocols enabled? Is the correct frame
type selected?
2 If applicable, did you successfully set up queue-based
print?
3 Did you configure the equipment for a NetWare
connection?
4 Did you configure the equipment for NetWare print
service?
5 Were the proper printer drivers installed?
6 Is the IPP port configured with the correct URL? Next Step
7 Can you see the equipment in Windows Network
Neighborhood?
8 Can you print to the equipment?
Next Step
Next Step
Next Step
Next Step
Next Step
Next Step
End
Set up the IPX/SPX correctly.
Set up the NetWare server properly.
Set up the NetWare network settings correctly.
Set up the NetWare print service correctly.
Refer to the Basic Guide to install the proper printer
drivers.
Refer to the Basic Guide to configure the proper port.
Check that the SMB protocol is enabled in the client
computers.
See the following section to fix the problem.
P.22 "Cannot print with the equipment (network
connection problems)"
- 36 -

TROUBLESHOOTING FOR NETWORK CONNECTIONS
2
1
3
4
5
6
7
Note
Macintosh environment
No. Check... Yes No Corrective Action
1 Are the IP address properties correctly set? Next Step
2 Can you access any other network device from the
Macintosh computer?
3 Can another Macintosh computer on the network print to
the equipment? If so, compare the settings to determine
which need to be changed to support print from this
machine.
Next Step
End
Set up the IP address correctly.
Refer to your Macintosh networking documentation or
contact Macintosh technical support.
Refer to your Macintosh networking documentation or
contact Macintosh technical support.
Network Fax (N/W-Fax) Driver Problems
This section describes the troubleshooting for the Network Fax (N/W-Fax) driver.
N/W-Fax Driver Installation Error Messages
Replace “Printer” with “N/W-Fax” as required in the troubleshooting description.
For information on the installation of the N/W-Fax driver, refer to the Basic Guide.
Setup needs to copy Windows NT files
Problem description
The wrong port type was selected from the Printer Ports dialog.
Corrective action
1. Click Cancel until the Add Printer Wizard terminates.
2. Select [Add a printer] in the Devices and Printers folder to start the Add Printer Wizard, and then perform the installation again.
3. When the screen for selecting a port is displayed, select [Local port] to add a printer.
Client software DVD now required
Problem description
When adding a new printer driver, the end user did not choose the Have Disk option; instead, the user selected the machine name
from the Add Printer list.
Corrective action
1. Cancel the Add Printer Wizard.
2. Select [Add a printer] in the Devices and Printers folder to start the Add Printer Wizard, and perform the installation again.
3. When the screen for selecting a printer is displayed, select [Have Disk].
4. Select [Use Existing Driver] to add another copy of an existing driver or browse to the subdirectory that contains the appropriate
*.inf file.
File *.DRV on client DVD could not be found
Problem description
When adding a new printer driver, the user did not choose the Have Disk option but selected the machine name from the Add Printer
list.
Corrective action
1. Cancel the Add Printer Wizard.
2. Select [Add a printer] in the Devices and Printers folder to start the Add Printer Wizard, and perform the installation again.
- 37 -

TROUBLESHOOTING FOR NETWORK CONNECTIONS
2
1
3
4
5
6
7
3. When the screen for selecting a printer is displayed, select [Have Disk].
4. Browse to the subdirectory that contains the appropriate *.inf file.
Location does not contain information about your hardware
Problem description
The path to the *.inf file selected during driver installation is too far away. In other words, there are too many characters in the
directory path.
Corrective action
Copy the directory containing the *.inf file to the local drive and resume installation.
This port is currently in use
Problem description
The driver was either opened, printing a job, or in use by another printer or application, when you attempted to delete it.
Corrective action
Make sure all print jobs have been completed before deleting a port. If there are still problems, exit all applications and try again.
Check each driver to see if another driver is using the same port. If so, first change the driver’s port setting and delete the port.
Problem with the current printer setup
Problem description
The driver was not set up properly, possibly because the installation procedure was not completed.
Corrective action
Delete the driver and either reinstall it from the Client Utilities/User Documentation DVD or download it from this equipment.
N/W-Fax Driver General Errors
“Could not connect to the MFP device” appears
Problem description
When users are trying to access to the properties of the N/W-Fax driver, an error message “Could not connect to the MFP device”
appears.
Corrective action
Communication between the N/W-Fax driver and this equipment failed. Make sure that this equipment is operating. If not, turn its
power ON.
Connect the N/W-Fax driver with this equipment through the TopAccess. If the connection fails, reboot the computer and this
equipment.
The fax jobs are not listed on the “Logs - Transmission” screen in TopAccess
Problem description
When confirming the fax job logs on the “Logs - Transmission” screen in TopAccess, the fax jobs that are sent are not displayed.
Corrective action
If the relevant fax job is not included in the Log list, your transmission job may not have been performed. In this case, search for jobs
without the department code in the “JOB STATUS - FAX” on the control panel. Then select the relevant fax job and press the [SEND]
button to resend it.
- 38 -

TROUBLESHOOTING FOR NETWORK CONNECTIONS
2
1
3
4
5
6
7
Fax transmission cannot be performed with a cover sheet
Problem description
In a N/W-Fax driver which is set to the IPP port, no cover sheet is output and an XL error occurs in the fax transmission when a printer
driver whose file name consists of 54 letters or more is specified for the default printer and a Fax is sent with a cover sheet added
from Microsoft Excel.
Corrective action
Set the file name of the printer driver in 30 letters or less.
Wireless LAN Problems
This section describes the troubleshooting for Wireless LAN.
Message Corrective Action
Bad certificate Unsupported certificate is installed. Reinstall the appropriate
certificate. This equipment supports md5RSA and sha1RSA
certificate only.
Bad record mac SSL Key exchange failed. Turn the power OFF and then ON to
Certificate expired The certificate has been expired. Make sure that the time is set
Certificate revoke The certificate has been revoked. Ask your network
Certificate unknown The installed CA certificate cannot work as server certificate.
Decompression failure This equipment does not support the SSL compression. Please
Handshake failure Unsupported encryption may be set on the server. Make sure to
Illegal parameter Unsupported version of the TLS protocol may be used. Make
No certificate No certificate is installed or you do not specify the certificate file
Peer error certificate Installed CA certificate cannot verify the server certificate in the
Peer error no certificate The RADIUS server operates the communication with the
Peer no cipher The RADIUS server requests the unsupported encryption for this
Peer error unsupported certificate type This equipment uses the certificate that the RADIUS server does
Peer unexpected message The RADIUS server sends the message that is not TLS
Unknown remote error type The RADIUS server sends the alert message of illegal TLS.
Unsupported certificate This equipment uses the certificate that the RADIUS server does
Unknown ca Installed CA certificate cannot verify the server certificate in the
Unable to connect Ask the administrator.
restart the equipment.
correctly or whether the certificate is expired.
administrator.
Make sure to install a correct CA certificate.
disable the SSL compression on the RADIUS server.
use the supported encryption method.
sure to use the supported version of the TLS protocol.
name. Make sure to install the certificate and specify the
certificate file name correctly.
RADIUS server.
Make sure to install a correct CA certificate.
certificate using the TLS protocol.
equipment.
not support.
standard. Confirm the settings on the RADIUS server.
not support.
RADIUS server.
Make sure to install a correct CA certificate.
- 39 -

TROUBLESHOOTING FOR NETWORK CONNECTIONS
2
1
3
4
5
6
7
Client Software Authentication Problems
Cannot log in using client software
Problem Description
I cannot log into the equipment using client software.
Corrective Action
If you cannot log into the equipment using client software, contact the administrator of the equipment. Since the user name and
password registered in the client software are used for authentication in the case of automatic login, the log-in screen may not be
displayed.
- 40 -

2
1
3
4
5
6
7
CHECKING THE EQUIPMENT STATUS WITH TopAccess
● CHECKING THE EQUIPMENT STATUS WITH TopAccess
Hardware Status Icons on TopAccess [Device] Tab
When the equipment requires maintenance or when an error occurs with the equipment, the icons indicating the status information
appear near the graphic image of the equipment on the TopAccess [Device] tab. The following are the icons displayed and their
descriptions.
For details of the [Device] tab of TopAccess, refer to the TopAccess Guide.
Printer Error 1
This icon indicates a non-recommended toner cartridge is used and that the equipment has stopped printing.
P.54 "Replace the Toner Cartridges"
Printer Error 2
This icon indicates:
• You need to remove paper from the face down/up stacker of the equipment.
• You need to remove paper from the receiving tray of the Finisher.
• You need to remove the staples jammed in the Finisher.
P.11 "When Paper Jam Occurs in Inner Finisher (Option)"
• The recommended toner cartridge is not being used.
P.54 "Replace the Toner Cartridges"
• The equipment cannot eject the paper to the face down/up stacker of the equipment.
Cover Open
This icon indicates the front cover is open.
Toner Empty
This icon indicates no toner is left. It also indicates which color is empty:
P.54 "Replace the Toner Cartridges"
Paper Empty
This icon indicates no paper is left in a tray.
Paper Misfeed
This icon indicates a paper misfeed occurred. It also indicates the location of the paper misfeed.
- 41 -

CHECKING THE EQUIPMENT STATUS WITH TopAccess
2
1
3
4
5
6
7
Staples Empty
This icon indicates no staples are left in the Finisher.
Call for Service
Contact your dealer to have the equipment inspected.
Error Messages
When a message appears on the [Device] Tab of TopAccess, see the table below for the corrective action.
TopAccess Message Corrective Action
Cover Open - Please Close Cover. Close the front cover.
Paper Feeding Cover Open - Please Close Cover. Close the paper feeder cover.
Transfer/Transport unit Cover Open - Please Close Cover. Close the transfer/transport unit.
Bypass Cover Open - Please Close Cover. Close the bypass cover.
Exit Cover Open - Please Close Cover. Close the exit cover.
Toner Cover Open - Please Close Cover. Close the toner cover.
Platen Cover Open - Please Close Cover. Close the platen cover.
Tray 1 Open - Please Close Tray 1. Close the tray.
Tray 2 Open - Please Close Tray 2. Close the tray.
Tray 3 Open - Please Close Tray 3. Close the tray.
Tray 4 Open - Please Close Tray 4. Close the tray.
Automatic Duplexing Unit Cover Open - Please Close Cover. Close the automatic duplexing unit cover.
Stacker Paper Full - Please Remove Paper. Remove the paper from the stacker.
Upper Tray Paper Full - Please Remove Paper. Remove the paper from the stacker.
Paper Empty in Tray 1 - Please Add Paper. Set the paper in the tray.
Paper Empty in Tray 2 - Please Add Paper. Set the paper in the tray.
Paper Empty in Tray 3 - Please Add Paper. Set the paper in the tray.
Paper Empty in Tray 4 - Please Add Paper. Set the paper in the tray.
Paper Misfeed in Job Separator - Please Clear Paper Path. Refer to the guidance on the touch panel to remove misfed paper.
Paper Misfeed in Automatic Duplexing Unit - Please Clear Paper Path. Refer to the guidance on the touch panel to remove misfed paper.
Paper Insertion Misfeed - Please Clear Paper Path. Refer to the guidance on the touch panel to remove misfed paper.
Paper Misfeed in Printer - Please Clear Paper Path. Refer to the guidance on the touch panel to remove misfed paper.
Paper Misfeed in Finisher - Please Clear Paper Path. Remove the misfed paper from the Finisher.
P.11 "When Paper Jam Occurs in Inner Finisher (Option)"
Staple Empty - Please Set Staple Cartridge Refill the Finisher staples.
Open the front cover, and clean the slit glass. Clean the slit glass.
Toner Not Recognized - Please Check Toner. Check and adjust the toner bottle.
Black Toner Empty - Please Install New Toner Cartridge. Replace the black toner.
P.54 "Replace the Toner Cartridges"
Cyan Toner Empty - Please Install New Toner Cartridge. Replace the cyan toner.
P.54 "Replace the Toner Cartridges"
Magenta Toner Empty - Please Install New Toner Cartridge. Replace the magenta toner.
P.54 "Replace the Toner Cartridges"
Yellow Toner Empty - Please Install New Toner Cartridge. Replace the yellow toner.
P.54 "Replace the Toner Cartridges"
Black Toner Near Empty - Please Prepare New Toner Cartridge. Prepare the new toner cartridge.
Cyan Toner Near Empty - Please Prepare New Toner Cartridge. Prepare the new toner cartridge.
- 42 -

CHECKING THE EQUIPMENT STATUS WITH TopAccess
2
1
3
4
5
6
7
Memo
TopAccess Message Corrective Action
Magenta Toner Near Empty - Please Prepare New Toner Cartridge. Prepare the new toner cartridge.
Yellow Toner Near Empty - Please Prepare New Toner Cartridge. Prepare the new toner cartridge.
Close duplexing unit cover Close the duplexing unit cover.
Fatal Error - Please Contact Service Technician. Contact your dealer.
Main Motor Error - Please Contact Service Technician. Contact your dealer.
Printer Input Error. Contact your dealer.
Scanner Error - Please Contact Service Technician. Contact your dealer.
Fuser Error - Please Contact Service Technician. Contact your dealer.
Error Codes
TopAccess has the pages for the job lists; print, transmission, reception, and scan jobs. The following error codes are shown on these
pages in the [Logs] tab (successful jobs have no codes). These codes help you specify the cause of an error you might encounter.
The error codes are also shown on the [LOG] window of the touch panel. See the following lists when you find an error code on the
touch panel.
Error codes on print jobs
Error Code Problem Description Corrective Action
4011 Job canceled The job was canceled.
4021 Power failure Check whether the power cable is connected properly and is inserted securely.
4031 HDD full error Delete unnecessary private print jobs and invalid department print jobs.
4041
4042 Department code authentication error Check the information about the department code registered in this equipment.
4045
4111
4112
4113
4121
4211
4212
4213 File storing limitation error The file storing function is set to “disabled”. Check the setting of the equipment.
4214
4221 Private-print-only error Jobs other than Private printing cannot be printed. Perform Private printing.
4311
4312
4313
4314
User authentication error The user performing the printing has not been authenticated or registered.
There is something wrong with the connection
with the LDAP server or its authority setting.
The number of prints has become “0” The number of prints specified in department and user management has
The number of prints has become “0” The number of prints specified in user management has become “0”. Set the
The number of prints has become “0” The number of prints specified in department management has become “0”.
Job cancellation due to the external counter error 1. Put in a coin and perform printing again.
Printing data storing limitation error Printing with the data being stored to the HDD temporarily (Proof print, Private
e-Filing storing limitation error Printing with the data being stored to the HDD (print and e-Filing, print to e-
Fax/iFax transmission failure The Fax/iFax transmission or N/W-Fax/iFax function is set to “disabled”. Check
No authority to execute a job The user has not been authorized to perform this operation. Ask your
Not authorized to store a file The user has not been authorized to perform this operation. Ask your
Not authorized to store in e-Filing The user has not been authorized to perform this operation. Ask your
Not authorized to send a Fax/iFax The user has not been authorized to perform this operation. Ask your
Perform user authentication or user registration.
Ask your LDAP server administrator about it.
become “0” at the same time. Set the number again or perform initialization.
number again or perform initialization.
Perform initialization.
2. Insert a card and perform printing again or contact your administrator.
3. Insert the Key Counter and perform printing again.
4. Clear the Schedule Print setting and perform printing again.
print, Scheduled print, etc.) cannot be performed. Use normal printing.
Filing, etc.) cannot be performed. Use normal printing.
the setting of the equipment.
administrator.
administrator.
administrator.
administrator.
- 43 -

CHECKING THE EQUIPMENT STATUS WITH TopAccess
2
1
3
4
5
6
7
Error Code Problem Description Corrective Action
4321
4411
4412
4611
4612
Not authorized to perform printing in the specified
setting
Image data generation failure Check if the file to be printed is broken. Perform printing again or use another
Double-sign encoding error A double-sign encoding error occurred because the PDF file is encrypted in
Font download failure Since the available number of fonts is exceeded, the font cannot be registered.
Font download failure Since there is no space in HDD, the font cannot be registered. Delete at least
4613
4621 Downloaded font deletion failure Check if the font to be deleted is registered.
4F10
Error codes on transmission and reception
Error Code Problem Description Corrective Action
0012 Original misfeed Remove the misfed original.
0013 Cover open Firmly close the open cover.
0020 Power interruption Check the power interruption report.
0030
0033
0042 Memory full Make sure that there is sufficient memory before making the call again.
0050 Line busy Reattempt the communications.
0053
00B0-00B5
00C0-00C4
00D0-00D2
00E8
00F0
00F1
1C10
1C11
1C12 Message reception error Turn the power OFF and then back ON. Perform the job in error again.
1C13 Message transmission error Turn the power OFF and then back ON. Perform the job in error again.
1C14
1C15
1C30-1C33
1C40
1C60
Font download failure Since an error has occurred, the font cannot be registered. Perform
Print failure If the error still persists after reattempting, turn the power OFF and then back
Interruption by paper misfeeds during direct
transmission
Polling Error Check polling options setup (Security Code, etc.), and check whether the
Security Mismatch in Relay or Mail Box
transmission
Signal Error or Line Condition Error Reattempt the communications.
HDD error Reattempt the communications. If the error still persists, contact your service
Software failure Reattempt the communications. If the error still persists, contact your service
Hardware noise Reattempt the communications. If the error still persists, contact your service
System access abnormality Turn the power OFF and then back ON. Perform the problem job again. If the
Insufficient memory Complete any running jobs first before performing the job in error. If the error
Invalid parameter If a template is being used, create it again. If the error still persists, turn the
Exceeding file capacity Ask your administrator to change the “Fragment Page Size” setting for the
Disk access error Complete any running jobs first before performing the job in error. If the error
Image conversion abnormality Turn the power OFF and then back ON. Perform the job in error again. If the
Failed to process your job. Insufficient Storage
space.
The user has not been authorized to perform this operation. Ask your
administrator.
printer driver.
unsupported script. Printing the file in this function is impossible.
Delete at least one font.
one font.
downloading again or regenerate the font data first.
ON. Then make another effort. If the error still persists, contact your service
representative.
Remove the misfed paper and reattempt the transmission.
polling document exists.
Confirm the remote party’s Security Code, system password and your setup.
representative.
representative.
representative.
error still persists, contact your service representative.
still persists, turn the power OFF and then back ON, and try again.
power OFF and then back ON, and try again.
Internet Fax setting, or reduce the number of pages and try again.
still persists, turn the power OFF and then back ON, and try again.
error still persists, contact your service representative.
Reduce the number of pages of the job in error and perform it again. Check
whether the server or local disk has sufficient space in its disk capacity.
- 44 -

CHECKING THE EQUIPMENT STATUS WITH TopAccess
2
1
3
4
5
6
7
Error Code Problem Description Corrective Action
1C61
1C63 Terminal IP address unset Ask your administrator to set the IP address of the equipment.
1C64 Terminal mail address unset Ask your administrator to set the Email address of the equipment.
1C65 SMTP address unset Ask your administrator to set the SMTP server address.
1C66 Server time-out error Check whether the SMTP server is operating properly.
1C69
1C6B
1C6C
1C6D
1C70 SMTP client OFF Ask your administrator to enable the SMTP Client and perform the job again.
1C71
1C72 POP Before SMTP error Confirm that the POP Before SMTP settings and POP3 settings are correct.
1CC0 Job canceled The job was canceled.
1CC1
3A10 MIME format error Ask the sender to resend the Email in the MIME1.0 format.
3A20 Email process error Ask the sender to resend the Email.
3A30 Partial Email timeout error Ask the sender to resend the Email, or change the Partial Wait time setting.
3A40 Invalid partial Email received Ask the sender to resend the partial Email in the RFC2046 format.
3A50
3A70
3A80
3B10 Email format error Ask the sender to resend the Email.
3B20 Content-Type error Ask the sender to resend the Email with attached files that are TIFF format.
3B40 Email decode error Ask the sender to resend the Email.
3C10, 3C13 TIFF analysis error Ask the sender to resend the Email with attached files that are TIFF format.
3C20
3C30
3C40
3C50 Offramp transmission error Ask the sender to specify the correct fax numbers and resend the Email.
3C60
3C70
3C90 OffRamp Fax transmission disable error Confirm if the Fax Send Function of MFP setting is disable or not.
3D10
Address Book reading failure Turn the power OFF and then back ON. Perform the job in error again. Reset
the data in the Address Book and perform the job again. If the error still
persists, contact your service representative.
SMTP server connection error Ask your administrator to set the login name or password of the SMTP server
and try again. Check whether the SMTP server is operating properly.
Terminal mail address error Ask your administrator to check the SMTP Authentication method or if there is
an unpermitted character in the Terminal mail address. Set the correct SMTP
Authentication method or delete the unpermitted character in the Terminal mail
address.
Destination mail address error Check if there is an unpermitted character in the Destination Email address.
Delete the unpermitted character and reset the appropriate Destination Email
address, then try again.
System error Turn the power OFF and then back ON. Perform the job in error again. If the
error still occurs, contact your service representative.
SMTP authentication error Confirm that the login name and password are correct. If SSL is enabled, make
sure that SSL port number is correctly set.
Power failure Check whether the power cable is connected properly and is inserted securely.
Check whether the power voltage is unstable.
HDD full error Ask the sender to resend the Email by separating it into several Emails. If this
error occurs due to running out of paper and too many waiting jobs being
stored in the hard disk, add paper to activate the other jobs.
Interrupt partial Email reception Ask your administrator to enable the Enable Partial Email setting and ask the
sender to resend the Email.
Partial Email disabled Ask your administrator to enable the Enable Partial Email setting and ask the
sender to resend the Email.
TIFF compression error Ask the sender to resend the Email with attached TIFF files in the MH, MR,
MMR, or JBIG compression.
TIFF resolution error Ask the sender to resend the Email with attached TIFF files whose resolution is
either 200 x 100, 200 x 200, 200 x 400, 300 x 300, or 400 x 400 dpi.
TIFF paper size error Ask the sender to resend the Email with attached TIFF files that can be printed
on paper permitted for the equipment.
Offramp security error Confirm that the specified fax numbers are registered in the address book of
the equipment. If not, register the fax numbers in the address book and ask the
sender to resend the Email with the correct fax numbers.
Power failure Confirm that the job is recovered or not. If not, ask the sender to resend the
Email.
Destination address error Ask your administrator whether the DNS and mail server settings are correctly
set. If they are, ask the sender to confirm that the destination address is
correct.
- 45 -

CHECKING THE EQUIPMENT STATUS WITH TopAccess
2
1
3
4
5
6
7
Error Code Problem Description Corrective Action
3D20
3D30 Fax unit is not installed Make sure that the Fax unit is installed, or connected correctly.
3E10
3E20
3E30
3E40
3F10, 3F20
Exceeding maximum offramp destinations Ask the sender to specify up to 40 destinations for one offramp gateway job.
The equipment cannot perform offramp gateway transmission for more than 40
destinations.
POP3 server communication error Ask your administrator whether the POP3 server address is correctly set, and
whether the POP3 server works properly. If SSL is enabled, make sure that
SSL port number is correctly set.
POP3 server communication timeout Ask your administrator whether the POP3 server works properly and the LAN
cable is connected to the server.
POP3 login error Ask your administrator whether the POP3 user name and password are set
correctly.
POP3 login type error Ask your administrator whether the POP3 login type (Auto, POP3, APOP) is set
correctly.
File I/O error Ask the sender to resend the Email. If the error still occurs, contact your service
representative.
- 46 -

2
1
3
4
5
6
7
Error codes on scan jobs
Memo
The error indications on scan jobs are done as follows:
• On TopAccess log list, messages indicating the status are displayed.
• On the touch panel of the equipment, error codes are displayed. See the listings below.
Error Code Problem Description Corrective Action
Email
2C10, 2C12,
2C13,
2C20-2C22
2C11, 2C62
2C14
2C15 Mail size exceeded limit or maximum size You are sending too many documents at a time. Send them separately.
2C30-2C33
2C40
2C43
2C44
2C45
2C60
2C61
2C63 Terminal IP address unset Ask your administrator to set the IP address of the equipment.
2C64 Terminal mail address unset Ask your administrator to set the Email address of the equipment.
2C65, 2C66,
2C69
2C6A
2C6B
2C6C
2C70 SMTP service is not available Ask your administrator whether the SMTP service is enabled.
2C71
2C72
2CC0 Job canceled The job was canceled.
2CC1
Wrong Job status A system error has occurred during the sending of an Email. Try it again. If
the error still persists, contact your service representative.
Not enough memory Complete any running jobs first before reperforming the job in error. If the
error still persists, turn the power OFF and then back ON, and then try
again.
Invalid parameter specified If you are using a template, create it again. If the error still persists, turn
the power OFF and then back ON, and then try again.
Disk access error Complete any running jobs first before reperforming the job in error. If the
error still persists, turn the power OFF and then back ON, and then try
again.
Failed to convert image file format This error occurs when conversion to a highly compressed PDF format
fails. Do the scanning again. If the error still persists, Use the normal PDF
format. When this error occurs in conversion other than to a highly
compressed PDF format, turn the power OFF and then back ON. Then try
to scan again. If the error still persists, contact your service representative.
Encryption error. Failure to create a file If the error still persists after reattempting, turn the power OFF and then
back ON. Then make another effort.
Creating a file was not allowed Creating an unencrypted file was not allowed. Configure the encryption
settings and try again. To create an unencrypted file, consult the
administrator.
Failure in making meta data Make sure that the template setting is correct, and do the scanning again.
If the error still persists, turn the power OFF and then back ON, and then
try again.
HDD full failure during processing Reduce the number of pages of the problem job and try again. Check
whether the server or local disk has sufficient space in its capacity.
Failure to read Address Book Turn the power OFF and then back ON. Try the problem job again. Reset
the data in the Address Book and reattempt it. If the error still persists,
contact your service representative.
Failure to connect to SMTP server Make sure that the SMTP server is correctly working or the SMTP server
address has been set correctly.
Failure to send Email message Turn the power OFF and then back ON. Try scanning again. If the error
still persists, contact your service representative.
Invalid address specified in From: field Ask your administrator to check the SMTP Authentication method or if
there is an unpermitted character in the Terminal mail address. Set the
correct SMTP Authentication method or delete the unpermitted character
in the Terminal mail address.
Invalid address specified in To: field Make sure that there is no unpermitted character in the Destination mail
address. Delete any unpermitted character and reset the appropriate
Destination mail address, then try again.
SMTP authentication error Confirm that the login name and password are correct. If SSL is enabled,
make sure that the SSL port number is correctly set.
POP Before SMTP error Confirm that the POP Before SMTP settings and POP3 settings are
correct.
Power failure occurred Make sure that the power cable is connected properly and is inserted
securely. Resend the job.
CHECKING THE EQUIPMENT STATUS WITH TopAccess
- 47 -

CHECKING THE EQUIPMENT STATUS WITH TopAccess
2
1
3
4
5
6
7
Error Code Problem Description Corrective Action
Save as File
2D10, 2D12,
2D13
2D11
2D14
2D15 Exceeding maximum file capacity Divide the file into several files, or try again in a single-page format.
Wrong Job status Turn the power OFF and then back ON. Try it again. If the error still
Not enough memory Wait for a while and try again. If the error still persists, turn the power OFF
Invalid parameter specified If you are using a template, create it again. If the error still persists, turn
Failure to create directory Make sure that the access privilege to the storage directory is writable and
2D30
Failure to create file Make sure that the access privilege to the storage directory is writable and
2D31, 2D33
2D32
2D40
Failure to delete file Make sure that the access privilege to the storage directory is writable and
Failure to convert image file format This error occurs when conversion to a highly compressed PDF format
2D43
2D44
2D45
2D62
2D63
2D64
2D65
2D66
2D67 FTP service is not available Ask your administrator whether the FTP service is configured correctly.
2D68 File Sharing service is not available Ask your administrator whether the SMB protocol is enabled.
2D69 NetWare service is not available Ask your administrator whether the NetWare protocol is enabled.
2DA6
2DA7
2DC0 Job canceled The job was canceled.
2DC1
Encryption error. Failure to create a file If the error still persists after reattempting, turn the power OFF and then
Creating a file was not allowed. Creating an unencrypted file was not allowed. Configure the encryption
Failure in making meta data Make sure that the template setting is correct, and do the scanning again.
Failure to connect to network destination Check
destination path.
Specified network path is invalid. Check
destination path.
Log on to file server failed. Check user name and
password.
There are too many documents in the folder.
Failure in creating a new document
Failed to process your job. Insufficient Storage
space.
Failure to delete file Delete the files in the shared folder with Explorer, turn the power OFF and
Failure to acquire resource Turn the power OFF and then back ON. Try the problem job again. If the
Power failure occurred Make sure that the power cable is connected properly and is inserted
persists, contact your service representative.
and then back ON, and make another effort.
the power OFF and then back ON, and then try again.
also that the disk in the directory has enough space, and then try again. If
more than one job is performed simultaneously, the error may occur
because the disk temporarily runs out of space. In this case, wait for a
while and try again. If the error still persists, turn the power OFF and then
back ON, and make another effort.
then try the job again. If the error still persists, turn the power OFF and
then back ON, and then make another effort.
fails. Do the scanning again. If the error still persists, Use the normal PDF
format. When this error occurs in conversion other than to a highly
compressed PDF format, turn the power OFF and then back ON. Then try
to scan again. If the error still persists, contact your service representative.
back ON. Then make another effort.
settings and try again. To create an unencrypted file, consult the
administrator.
If the error still persists, turn the power OFF and then back ON, and then
try again.
Make sure that the network folder is shared in your network and try
scanning again. If the error still persists, ask your administrator to check
whether the IP address or path of the server is correct. Also make sure
that the server is operating properly.
Make sure that you specify the correct network folder and try scanning
again.
Make sure that you specify the correct user name and password to log on
the file server, or you specify the correct file server. Then try scanning
again.
Delete the data in the local storage folder in the equipment and try
scanning again.
Reduce the number of pages of the problem job and try again. Check
whether the server or local disk has sufficient space in its capacity.
then back ON, and reattempt the problem job. If the error still persists,
contact your service representative.
error still persists, contact your service representative.
securely. Resend the job.
- 48 -

2
1
3
4
5
6
7
Error Code Problem Description Corrective Action
Store to USB
2E10, 2E12,
2E13
2E11
2E14
2E15 Document size exceeded limit or maximum size Divide the file into several files, or reattempt in a single-page format.
Wrong Job status Turn the power OFF and then back ON. Try the problem job again. If the
Not enough memory Wait for a while and try again. If the error still persists, turn the power OFF
Invalid parameter specified If you are using a template, create it again. If the error still persists, turn
Failure to create directory Make sure that the access privilege to the storage directory is writable and
2E30
Failure to create file Make sure that the access privilege to the storage directory is writable and
2E31, 2E33
2E32
2E40
Failure to delete file Turn the power OFF and then back ON. Try the problem job again. If the
Failure to convert image file format This error occurs when conversion to a highly compressed PDF format
2E43
2E44
2E45
2E65
2E66
2EC0 Job canceled The job was canceled.
2EC1
Remote Scan, WS Scan, File Downloader
2A20
2A31 WS Scan function is not available Check if the WS Scan function is enabled. If not, change it to “enabled”.
2A40 System fatal error Turn the power OFF and then back ON. Try scanning again.
2A50 Job canceled. The job was canceled.
2A51
Encryption error Failure to create a file If the error still persists after reattempting, turn the power OFF and then
Creating a file was not allowed Creating an unencrypted file was not allowed. Configure the encryption
Failure in making meta data Make sure that the template setting is correct, and do the scanning again.
There are too many documents in the folder.
Failure in creating a new document
Failed to process your job. Insufficient Storage
space.
Power failure occurred Make sure that the power cable is connected properly and is inserted
Failure to acquire resource Reattempt the problem job. If the error still persists, turn the power OFF
Power failure occurred Make sure that the power cable is connected properly and is inserted
Authentication for WS Scan failed When Fax & Scan of Windows is used with the WIA driver, check if the
2A60
2A70 Insufficient permission to execute Remote Scan Check if the user is authorized to perform this job.
2A71 Insufficient permission to execute WS Scan Check if the user is authorized to perform this job.
CHECKING THE EQUIPMENT STATUS WITH TopAccess
error still persists, contact your service representative.
and then back ON, and make another effort.
the power OFF and then back ON, and then try again.
also that the disk in the directory has enough space, and then try again. If
more than one job is performed simultaneously, the error may occur
because the disk temporarily runs out of space. In this case, wait for a
while and try again. If the error still persists, turn the power OFF and then
back ON, and make another effort.
also that the disk in the directory has enough space, and then try again. If
more than one job is performed simultaneously, the error may occur
because the disk temporarily runs out of space. In this case, wait for a
while and try again. If the error still persists, turn the power OFF and then
back ON, and make another effort.
error still persists, contact your service representative.
fails. Do the scanning again. If the error still persists, Use the normal PDF
format. When this error occurs in conversion other than to a highly
compressed PDF format, turn the power OFF and then back ON. Then try
to scan again. If the error still persists, contact your service representative.
back ON. Then make another effort.
settings and try again. To create an unencrypted file, consult the
administrator.
If the error still persists, turn the power OFF and then back ON, and then
try again.
Delete the data in the local storage folder in the equipment and try
scanning again.
Reduce the number of pages of the problem job and try again. Check
whether the server or local disk has sufficient space in its capacity.
securely. Resend the job.
and then back ON, and make another effort.
securely. Resend the job.
user name for the login is registered. When the control panel or EWB of
the equipment is used, check if the user name for the login is registered.
- 49 -

CHECKING THE EQUIPMENT STATUS WITH TopAccess
2
1
3
4
5
6
7
Error Code Problem Description Corrective Action
Insufficient permission to access e-Filing box
using scan utility
Job status failed Turn the power OFF and then back ON. Try the problem job again. If the
Failure to access file Turn the power OFF and then back ON. Try the problem job again. If the
Failure to access Electronic Filing Turn the power OFF and then back ON. Retry the job in error. Delete the
Failure to process image Turn the power OFF and then back ON. Try scanning again. If the error
Failure to process print image Make sure that the Function List can be printed out. Try printing again. If
The storage period of e-Filing documents will
expire
The HDD for storing e-Filing data is running out of
space.
Insufficient memory Turn the power OFF and then back ON. Try scanning again. If the error
Invalid box password specified Make sure that the password is correct and try scanning again, or first
2A72
Store to e-Filing
2B11
2B20
2B30 Insufficient disk space Delete unnecessary documents in e-Filing and try again.
2B31
2B50
2B51
2B71
2B80
2B90
2BA0
2BA1
2BB0 Job canceled The job was canceled.
2BB1
2BC0
2BD0
2BE0 Failure to obtain the machine parameters Turn the power OFF and then back ON. Try scanning again.
2BF0 Reached the maximum number of pages Reduce the number of pages of the job in error and perform the job again.
2BF1 Reached the maximum number of documents Delete the documents from the boxes or folders.
2BF2 Reached the maximum number of folders Delete the folders from the boxes.
Network Settings
2500
2501
2503
2504
2550
2551
Incorrect paper size, color mode or resolution This size, color mode or resolution is not supported by e-Filing. Please
Power failure occurred Make sure that the power cable is connected properly and is inserted
System fatal error Turn the power OFF and then back ON. Try scanning again. If the error
Power failure occurred during e-Filing restore Make sure that the power cable is connected properly and is inserted
Syntax error, command unrecognized Check whether the Terminal mail address and Destination mail address
Syntax error in parameters or arguments Check whether the Terminal mail address and Destination mail address
Bad sequence of commands Check whether the mail server is operating properly. Turn the power OFF
Command parameter not implemented Check whether the mail server is operating properly. Turn the power OFF
Mailbox unavailable Confirm that the destination Email addresses are correct. Check the
User not local Confirm that the destination Email addresses are correct. Check whether
Check if the user is authorized to perform this job.
error still persists, contact your service representative.
error still persists, contact your service representative.
specified e-Filing or folder and reset them. If the specified e-Filing or folder
cannot be deleted, contact your service representative.
still persists, contact your service representative.
the error still persists, contact your service representative.
Check whether any necessary documents are stored in e-Filing. The
documents will be deleted in a few days.
Delete all unnecessary documents in e-Filing.
still persists, contact your service representative.
reset the password and then reattempt the scan. When this error occurs in
the printing of the data in e-Filing, do this with the administrator’s
password. If recovery is still not completed or in case of an invalid
password for the operation of other printing (opening the file, etc.), contact
your service representative.
check the paper size, color mode or resolution.
securely. Resend the job.
still persists, contact your service representative.
securely. Resend the job.
are correct. Check whether the mail server is operating properly. Turn the
power OFF and then back ON. Try the problem job again.
are correct. Check whether the mail server is operating properly. Turn the
power OFF and then back ON. Try the problem job again.
and then back ON. Try the problem job again. If the error still persists,
contact your service representative.
and then back ON. Try the problem job again. If the error still persists,
contact your service representative.
access privilege for the mailbox in the mail server.
the mail server is operating properly.
- 50 -

CHECKING THE EQUIPMENT STATUS WITH TopAccess
2
1
3
4
5
6
7
Error Code Problem Description Corrective Action
2552
2553
Insufficient system storage The file is too large for the mailbox. Confirm the mailbox size on the mail
server. Transmit again in text mode or with a lower resolution. If the error
still persists, divide the document and transmit again.
Mailbox name not allowed Check if there is an unpermitted character in the mailbox name in the mail
server.
- 51 -

2
1
Maintenance
2
Replacing Consumables / Maintenance Units················· P.53
Maintenance ······································································· P.66
3
4
Moving or Transporting the Machine ······························· P.71

2
1
3
4
5
6
7
Replacing Consumables / Maintenance Units
● Replacing Consumables / Maintenance Units
Replacing the Toner Cartridge
Warning
• Do not expose the toner or the toner
cartridge to fire. The toner might explode
and cause burns.
• Do not store toner cartridges close to a fire.
The toner can ignite and cause fires or
burns.
• Do not clean up spilled toner with a vacuum
cleaner; the toner could ignite from sparks or
other electrical contact. Spilled toner should
be cleaned up with a wet towel.
Caution
• Some parts inside the device become hot
and can cause burns. Do not touch areas
labeled "Caution High Temperature".
• Keep toner and toner cartridges out of reach
of children. If children swallow toner, consult
a doctor immediately.
• When dealing with paper jams or replacing
toner cartridges, take care not to get toner
on your hands or clothes. If toner gets on
hands or skin, wash it off with soap and
water.
• If toner gets on clothes, wash in cold water;
hot water sets the toner into fabric.
• Do not disassemble the toner cartridge.
Toner may disperse and soil hands and
clothes or result in accidental inhalation.
• Place used toner cartridges in a plastic bag
to prevent toner from dispersing.
• If you spill toner, carefully clean it up with a
wet cloth.
• If toner is accidentally inhaled, gargle with
large amounts of water and get plenty of
fresh air. Consult a doctor if necessary.
• If toner gets on hands or skin, wash it off
with soap and water.
• If toner gets into the eyes, immediately flush
with plenty of water. Consult a doctor if
necessary.
• If toner is swallowed, drink large amounts of
water to dilute the toner. Consult a doctor if
necessary.
- 53 -

Replacing Consumables / Maintenance Units
2
1
3
4
5
6
7
Memo
Note
Scanner part
Handle
There is a risk of getting burned.
Do not touch the fuser unit. It can be extremely hot.
Caution
Top cover
Top cover open button
Warning
Never put a used toner cartridge
into a fire. It could explode and
cause burns.
Lever
Replace the Toner Cartridges
Hold the handle and lift the scanner part.
1
Press the top cover open button to open
2
the top cover.
(2) Rotate the blue lever on the toner cartridge
in the direction of the arrow until it stops.
The position of the lever is as follows.
• The toner cartridge can be removed
• The toner cartridge Is mounted
(3) Lift the right side of the toner cartridge (the
Remove the empty toner cartridge.
3
• For information on how to return used toner cartridges,
see "Collection of Used Consumables" in the section of
customer support / maintenance product warranty /
product warranty. If you choose not to return your used
toner cartridges, place them in a plastic bag and
dispose of them according to local regulations.
side with the blue lever), and remove it
from the machine.
• There is a post which fits inside the toner cartridge
on the end opposite of the blue lever. Take care
when removing the toner cartridge, because the
post may break if the toner cartridge is pulled
straight up with force.
(1) Identify the empty toner cartridge by its
label color.
- 54 -

Replacing Consumables / Maintenance Units
2
1
3
4
5
6
7
Note
Light-shielding film
Toner cartridge
Tap e
Toner cartridge
Image drum
cartridges
Hole
Groove
Lever
Cartridge
guide
LED head
(4) Remove the toner cartridge carefully from
the machine.
Note
• If the light-shielding film is dropped on the toner
while exchanging toner cartridges, the LED lens
may be exposed to toner. Wipe it clean with soft
tissue.
Insert a new toner cartridge.
4
(1) Remove the new toner cartridge from its
packaging, and make sure the color is
correct.
(2) Gently shake it up and down and side to
side several times.
(7) Rotate the blue lever on the toner cartridge
in the direction of the arrow until it stops.
• Do not force the toner cartridge into the machine.
If it doesn't fit properly, make sure that the label
colors of the toner cartridge and image drum
cartridge are the same. If the colors don't match,
the toner cartridge cannot properly be mounted.
• If the toner cartridge is not properly mounted, the
print quality may suffer.
Gently wipe the surface of the LED head
5
lens with a soft tissue.
Note
• Do not use solvents such as methyl alcohol or paint
thinners. They will damage the LED head.
(3) Lay the toner cartridge flat, and gently
remove the tape.
(4) Make sure that the label color of the toner
cartridge matches the label color of the
image drum cartridge.
(5) Turn the cartridge so that the surface you
removed the tape from is facing down.
Align the hole in the left end of the toner
cartridge with the post in the image drum.
(6) Press the right side of the toner cartridge
securely into place.
- 55 -

Replacing Consumables / Maintenance Units
2
1
3
4
5
6
7
Memo
Memo
Top cover
Scanner part
Warning
Close the top cover.
6
• If the message [Please Replace Toner] remains after
replacing the toner cartridge, reinstall the toner
cartridge.
Return the scanner part to its original
7
position.
Replacing the Image Drum Cartridge
• Do not expose the toner or the toner
cartridge to fire. The toner might explode
and cause burns.
• Do not store toner cartridges close to a fire.
The toner can ignite and cause fires or
burns.
Caution
• Some parts inside the device become hot
and can cause burns. Do not touch areas
labeled "Caution High Temperature".
• Keep toner and toner cartridges out of reach
of children. If children swallow toner, consult
a doctor immediately.
• If toner is accidentally inhaled, gargle with
large amounts of water and get plenty of
fresh air. Consult a doctor if necessary.
• If toner gets on hands or skin, wash it off
with soap and water.
• If you dispose of used cartridges yourself, be sure to place
them in a plastic bag and follow local regulations for proper
disposal.
• If toner gets into the eyes, immediately flush
with plenty of water. Consult a doctor if
necessary.
• If toner is swallowed, drink large amounts of
water to dilute the toner. Consult a doctor if
necessary.
• When dealing with paper jams or replacing
toner cartridges, take care not to get toner
on your hands or clothes. If toner gets on
hands or skin, wash it off with soap and
water.
• If toner gets on clothes, wash in cold water;
hot water sets the toner into fabric.
• Do not disassemble the toner cartridge.
Toner may disperse and soil hands and
clothes or result in accidental inhalation.
• Place used toner cartridges in a plastic bag
to prevent toner from dispersing.
• If you spill toner, carefully clean it up with a
wet cloth.
- 56 -

Replacing Consumables / Maintenance Units
2
1
3
4
5
6
7
Memo
Note
Scanner part
Handle
There is a risk of getting burned.
Do not touch the fuser unit. It can be extremely hot.
Caution
Top cover
Top cover open button
Image drum
cartridge
Recommended Schedule for Replacing the
Image Drum Cartridge
When the image drum cartridge nears the end of its lifespan,
the message [*Image Drum Near Life] (* represents the
specific color) will appear on the control panel to notify you that
it is time to prepare a new image drum cartridge. You can
continue printing until the message [Install new * Image Drum]
(* represents the specific color) appears, then printing will stop.
• After the message [Image Drum Near Life] appears, you can
continue to print before the message [Install new Image
Drum] appears.
• When the toner is almost gone, you may not be able to
resume printing, even by opening and closing the top cover.
• Use new image drum cartridges. Print quality may
deteriorate if more than a year has passed since the
cartridge was opened.
• Even after the message [Please open/close top cover]
appears, you can continue to print if there is still toner, by
opening and closing the top cover.
• If toner runs low after the message [Please open/close top
cover] appears, the same message will appear again if you
continue to print. Depending on your settings, the toner
might run low before the message [Please open/close top
cover] is displayed.
• Envelopes, post cards, labels and thick paper may use the
color drum, even when the grayscale setting is used.
• If the [ADMIN] > [GENERAL] > [STATUS MESSAGE] >
[SUPPLIES NEAR LIFE MESSAGE] from the Management
Setting menu is set to [Disable], the message [Image Drum
Near Life] will not appear.
• To get the best performance from your machine, please
genuine Okidata consumables.
• For best results, use genuine Okidata consumables. If you
use 3rd party consumables, you may experience problems
or unsatisfactory print quality. Service for problems caused
by use of 3rd party consumables is not covered by the
warranty or the maintenance contract. (Use of 3rd party
consumables does not always cause problems, but please
exhibit caution when using them.)
Replacing the Image Drum Cartridge
Hold the handle and lift the scanner part.
1
Press the top cover open button to open
2
the top cover.
Remove the old image drum cartridge.
3
(1) Identify the old image drum cartridge by its
label color.
(2) Remove the image drum cartridge (with
the toner cartridge attached).
- 57 -

Replacing Consumables / Maintenance Units
2
1
3
4
5
6
7
Memo
Note
Warning
Never put a used image drum or
toner cartridge into a fire. The
toner inside could explode and
cause burns.
Protective
sheet
Tape
Protective
sheet
Drying agent
Toner cartridge
Tap e
Protuberance
Toner cover
• For information on how to return used image drum
cartridges, see "Collection of Used Consumables"
in the section of customer support / maintenance
product warranty / product warranty. If you choose
not to return your used image drum cartridges,
place them in a plastic bag and dispose of them
according to local regulations.
Prepare a new image drum cartridge.
4
• Do not tilt the image drum. The toner might spill.
• The image drum (the green tube) is fragile; handle it
carefully.
• Do not expose the image drum cartridge to direct
sunlight or strong light (more than about 1,500 lux). Do
not expose them to room lighting for more than 5
minutes.
(1) Place the image drum cartridge on top of a
newspaper.
(2) Peel off the tape that secures the
protective sheet, and carefully remove it in
the direction of arrow.
Install a new toner cartridge in the image
5
drum cartridge.
Note
• Although it is possible to reinstall the toner cartridge
that are currently in use, we recommend using a new
toner cartridge for the following reasons.
- Print quality may deteriorate, if more than a year
has passed since the toner cartridge was
opened.
- New image drum cartridges are empty. Once
you have installed a toner cartridge, the new
image drum will fill with toner from that toner
cartridge. Therefore, if you install a toner
cartridge that has only a little toner, the message
[Toner Empty] may appear immediately.
- If you reinstall a toner cartridge currently in use,
the indicator which shows the amount of
remaining toner will be inaccurate.
(1) Remove the new toner cartridge from its
packaging.
Note
• Make sure that the color of the new toner cartridge is
correct.
(2) Gently shake it up and down and side to
side several times.
(3) Remove the desiccant (drying agent).
(3) Lay the toner cartridge flat, and gently
remove the tape.
(4) Make sure that the label color of the toner
cartridge matches the label color of the
image drum cartridge.
(5) Remove the toner cover from the image
drum cartridge.
- 58 -

Replacing Consumables / Maintenance Units
2
1
3
4
5
6
7
Image drum
cartridge
Top c o ver
Scanner part
(6) Turn the cartridge so that the surface you
removed the tape from is facing down.
Return the scanner part to its original
8
position.
Align the hole in the left end of the toner
cartridge with the post in the image drum.
(7) Press the right side of the toner cartridge
securely into place.
(8) Rotate the blue lever on the toner cartridge
in the direction of the arrow until it stops.
Memo
• If you dispose of used image drum cartridges yourself, be
Install the image drum cartridge.
6
(1) Make sure that the label color of the image
drum cartridge matches the label color in
the machine.
sure to place them in a plastic bag and follow local
regulations for proper disposal.
(2) Gently install the image drum cartridge.
Close the top cover.
7
- 59 -

Replacing Consumables / Maintenance Units
2
1
3
4
5
6
7
Memo
Note
Note
Scanner part
Handle
Top cover
Top cover open button
LED head
Fuser unit lock
control lever (blue)
Replacing the Fuser Unit
Push the top cover open button to open the
3
top cover.
Recommendation for Replacing the Fuser Unit
When the fuser unit nears the end of its lifespan, the message
[Time to Replace Fuser] will appear on the control panel to
notify you that it is time to prepare a new fuser. You can
continue printing until the message [Replace Fuser] appears,
then printing will stop.
The fuser unit is recommended to be replaced after about
60,000 prints on A4-sized paper (single-sided printing).
• After [Time to Replace Fuser] appears, you can continue to
print until [Replace Fuser] appears.
• Even after the message [Replace Fuser] appears, you may
still continue to print by opening and closing the top cover;
however, this may lead to paper jams and other problems.
We recommend replacing the fuser unit as soon as
possible.
Replace the fuser unit
Press the [POWER] button until a "pip"
1
sound is heard. "Shutdown is in progress."
appears for a while, and then the power is
turned OFF.
• Do not turn off the device abruptly. It can cause
malfunctions.
Caution
Do not touch the fuser unit. It can be extremely hot.
Remove the old fuser unit.
4
Caution
The fuser unit can become very hot. When removing the
fuser, hold it by its handle and be careful not to touch it
with your hand. If the fuser is hot, wait until it cools down.
There is a risk of getting burned.
There is a risk of getting burned.
(1) Pull the blue fuser unit lock control lever in
the direction of the arrow.
(2) Grip the handle of the fuser unit and pull it
up and out.
2
Hold the handle and lift the scanner part.
- 60 -

Replacing Consumables / Maintenance Units
2
1
3
4
5
6
7
Note
Stopper release
(orange)
Fuser unit lever (blue)
Handle
Fuser unit
lock control
lever (blue)
Fuser unit lock control lever (blue)
Fuser unit
lock control
lever (blue)
Fuser unit lock control lever (blue)
Top cover
Scanner part
Note
(5) Press and
secure blue lock control lever on
the left and right of the fuser unit.
• Avoid hitting the LED head.
Memo
• For information on how to return used fuser units,
see "Collection of Used Consumables" in the
section of customer support / maintenance
product warranty / product warranty. If you choose
not to return your used fuser unit, place it in a
plastic bag and dispose of it according to local
5
regulations.
Install the new fuser unit.
(1) Remove the new fuser unit from its
Close the top cover.
6
packaging.
(2) Press and hold the blue fuser unit lever in
the direction of the arrow, and remove the
(orange) stopper release.
• Use the stopper release if the printer is not used for
long periods of time, or is to be transported. Make sure
to store safely.
(3) Move the blue lock control lever on the left
and right of the fuser unit in the direction of
the arrows.
(4) Hold the fuser unit handles, and gently
insert the fuser unit into the device.
Return the scanner part to its original
7
position.
Memo
• If you dispose of the used fuser unit yourself, be sure to
place it in a plastic bag and follow local regulations for
proper disposal.
- 61 -

Replacing Consumables / Maintenance Units
2
1
3
4
5
6
7
Memo
Note
Scanner part
Handle
Top cover
Top cover open button
Image drum
cartridge
Replacing the Belt Unit
Recommendation for Replacing the Belt Unit
When the belt unit nears the end of its lifespan, the message
[Time to Replace Belt] will appear on the control panel to notify
you that it is time to prepare a new belt unit. You can continue
printing until the message [Replace Belt] appears, then printing
will stop.
The belt unit is recommended to be replaced after about
60,000 prints on A4-sized paper (single-sided printing).
However, this page yield is for common printing conditions (3
pages at a time). Printing one page at a time can reduce the
belt life by half.
Hold the handle and lift the scanner part.
2
Push the top cover open button to open the
3
top cover.
• After the message [Time to Replace Belt] appears, you can
continue to print before the message [Replace Belt]
appears.
• Even after the message [Replace Belt] appears, you may
still be able to print by opening and closing the top cover.
However, we recommend replacing the belt unit as soon as
possible.
Replace the belt unit
Press the [POWER] button until a "pip"
1
sound is heard. "Shutdown is in progress."
appears for a while, and then the power is
turned OFF.
Note
• Do not turn off the device abruptly. It can cause
malfunctions.
Caution
Do not touch the fuser unit. It can be extremely hot.
Remove the old belt unit.
4
(1) Remove the four image drum cartridges,
There is a risk of getting burned.
and put them on a table or flat surface.
(2) Cover the image drum cartridges with
paper to minimize their exposure to light.
- 62 -

Replacing Consumables / Maintenance Units
2
1
3
4
5
6
7
Memo
Note
Note
Lock lever (blue)
Lock lever (blue)
Belt unit
Belt unit
Lever (blue)
Lock lever
(blue)
Lock lever
(blue)
Image drum
cartridges
Top cover
(3) Turn the two blue lock levers in the
direction of the arrow to unlock the belt
unit. Then grip the two levers and remove
the belt unit.
• For information on how to return used belt units, see
"Collection of Used Consumables" in the section of
customer support / maintenance product warranty / product
warranty. If you choose not to return your used belt unit,
place it in a plastic bag and dispose of it according to local
regulations.
(3) Rotate the two blue lock levers in the
direction of the arrow , and confirm that
the belt unit is secure.
(4) Return the four image drum cartridges to
the machine.
• The image drums (the green tubes) are fragile; handle them
carefully.
• Do not expose the image drum cartridges to direct sunlight
or strong light (more than about 1,500 lux). Do not expose
them to room lighting for more than 5 minutes.
Never put a used belt unit into a
Warning
fire. It could explode and cause
burns.
Install the new belt unit.
5
(1) Remove the new belt unit from its
packaging.
(2) Grip the two blue belt unit levers and install
the belt unit.
Close the top cover.
6
• If the image drum cartridges cannot be installed, or if
the top cover doesn't close properly, check the position
of the two blue lock levers.
- 63 -

Replacing Consumables / Maintenance Units
2
1
3
4
5
6
7
Memo
Note
Scanner part
Scanner part
Handle
Cover
1
2
3
1
Case
Return the scanner part to its original
7
position.
• If you dispose of a used belt unit yourself, be sure to place it
in a plastic bag and follow local regulations for proper
disposal.
Replacing the Inner Finisher Cartridge
Press the [POWER] button until a "pip"
1
sound is heard. "Shutdown is in progress."
appears for a while, and then the power is
turned OFF.
Open the rear cover of the finisher.
3
Pull out the cartridge.
4
Press up the transparent case, and remove
5
the empty case from the cartridge.
2
• Do not turn off the device abruptly. It can cause
malfunctions.
Hold the handle and lift the scanner part.
Mount the new case to the cartridge.
6
- 64 -

Replacing Consumables / Maintenance Units
2
1
3
4
5
6
7
1
2
Press down the transparent case, and
7
remove the seals.
Replacing the Offline Stapler Cartridge
Open the offline stapler cover.
1
Install the new cartridge.
8
(1) Remove the new cartridge unit from its
packaging.
(2) Place the cartridge.
Remove the empty cartridge.
2
Close the finisher cover.
9
Attach the new cartridge.
3
Return the scanner part to its original
10
position.
Close the offline stapler cover.
4
- 65 -

2
1
3
4
5
6
7
Maintenance
Note
Note
Note
Note
Document holder
cover
Glass surface
● Maintenance
Cleaning the Surface of the Machine
• Do not use benzene or paint thinners. They may damage
plastic parts or paint.
Turn OFF the power to the machine.
1
• Do not turn off the device abruptly. It can cause
malfunctions.
(1) Press the [POWER] button until a "pip"
sound is heard.
(2) "Shutdown is in progress." appears for a
while, and then the power is turned OFF.
(3) Turn the power switch OFF.
Clean the surface of the machine.
2
Cleaning the document glass (glass surface)
If the document glass (glass surface) is dirty, black specks or
streaks may appear on your copies and prints, as well as on
documents you send to others. To maintain print quality, clean
the document glass once a month.
• Do not use benzene or paint thinners. They may damage
plastic parts or paint.
Open the document holder cover.
1
Clean the document glass (glass surface)
2
with a soft, damp cloth.
• Do not use anything except water or a mild detergent.
• There is no need to oil or lubricate parts of the
machine.
(1) Clean the surface of the machine with a
soft cloth moistened with water or a neutral
detergent.
Close the document holder cover.
3
Memo
• If the document glass is heavily soiled, clean with a small
amount of neutral detergent, then wipe with a soft, damp
cloth.
(2) Dry the surface of the machine with a soft,
dry cloth.
- 66 -

2
1
3
4
5
6
7
Clean the document transporting
Note
RADF cover
RADF cover
open lever
RADF cover
Roller
Roller
Inner cover
Document holder
cover
Lever
roller and document holding roller
If the document transporting roller is dirty, black specks or
streaks may appear on your copies and prints, as well as on
documents you send to others. It can also lead to document
jams.
If the document holding roller is dirty it may cause black specks
or streaks on your copies, as well as on documents you send
to others.
To maintain print quality and ensure smooth operation, clean
once a month.
Open the inner cover.
3
Clean the roller with a soft, damp cloth.
Maintenance
• Do not use benzene or paint thinners. They may damage
plastic parts or paint.
Pull the RADF cover open lever to open the
1
RADF cover.
Clean the document transporting roller
2
(1) Clean the roller with a soft, damp cloth.
Close the RADF cover.
4
(1) Close the inner cover.
(2) Close the RADF cover.
Clean the document holding roller.
5
(1) Open the document holder cover.
• Rotate the roller manually, making sure you clean
the entire roller. (Note that some rollers rotate in
only one direction.)
• If it is heavily soiled, clean with a small amount of
neutral detergent, then wipe with a soft, damp
cloth.
Memo
(2) Pull down the lever to open the document
holding pad.
- 67 -

2
1
3
4
5
6
7
Roller
Roller
Document holder
cover
Feed roller
Feed roller
Roller
Paper support
Multi-purpose tray
Maintenance
(3) Clean the roller with a soft, damp cloth.
(4) Return the document holding pad to its
original position.
Clean the feed roller
Clean the feed roller and pad when you experience frequent
paper jams.
When cleaning the tray
Pull the paper tray out.
1
Wipe the two feed rollers with a soft, damp
2
cloth.
Wipe the roller with a soft, damp cloth.
3
Close the document holder cover.
6
When cleaning the Multi-Purpose tray
Open the multi-purpose tray and spread the
1
paper support.
- 68 -

Maintenance
2
1
3
4
5
6
7
Memo
Feed roller cover
Scanner part
Handle
Top cover
Top cover button
Open the feed roller cover by pressing the
2
projection.
• When the front part of the multi-purpose tray is up, put
it down before opening the cover.
Remove the feed roller by rolling them
3
towards.
Clean the LED heads
Clean the LED heads if white streaks appear or fading occurs
when printing, or when characters become smudged.
Turn OFF power to the machine.
1
For a detailed explanation, see "Turning Power Off" in
the Setup Guide.
Hold the handle and lift the scanner part.
2
Push the top cover button down to open the
3
Wipe the feed roller with a wet, wringed
4
cloth.
Set the feed roller and confirm that the
5
roller are fixed.
Close the feed roller cover.
6
Fold the paper support and close the multi-
7
purpose tray.
top cover.
Caution
Do not touch the fuser unit. It can be extremely hot.
There is a risk of getting burned.
- 69 -

2
1
3
4
5
6
7
Note
LED head
LED head lens
Top cover
Scanner part
Maintenance
Gently wipe the surface of each LED head
4
lens with soft tissue.
• Do not use solvents such as methyl alcohol or paint
thinners. They will damage the LED heads.
Close the top cover.
5
Return the scanner part to its original
6
position.
- 70 -

2
1
3
4
5
6
7
● Moving or Transporting the Machine
Moving the Machine
Turn OFF power to the machine.
1
(1) Press the [POWER] button until a "pip"
sound is heard.
Moving or Transporting the Machine
For the equipment with additional tray units installed
Before moving the machine, remove the anti-tip feet and then
unlock the casters (two places).
After moving the machine, lock the casters and then return the
anti-tip feet to their original positions.
For more information, refer to the Setup Guide.
(2) "Shutdown is in progress." appears for a
while, and then the power is turned OFF.
(3) Turn the power switch OFF.
Remove the following parts.
2
• Unplug the power cord and ground wire
• Remove any cables
• Remove any paper from the trays
Three or more people are required to safely
3
move the machine.
- 71 -

Moving or Transporting the Machine
2
1
3
4
5
6
7
Handle
Scanner part
Top cover button
Top cover
Image drum
cartridges
Top cover
Transporting the Machine
Because the machine is precision equipment, it may get
damaged during transportation, depending on the packaging
method. Please transport it via the following procedure.
Turn OFF power to the machine.
1
(1) Press the [POWER] button until a "pip"
sound is heard.
Push the top cover button, and open the
4
top cover.
Remove the four image drum cartridges,
5
and place them on a table.
(2) "Shutdown is in progress." appears for a
while, and then the power is turned OFF.
(3) Turn the power switch OFF.
Remove the following parts.
2
• Unplug the power cord and ground wire
• Remove any cables
• Remove any paper from the trays
Hold the handle and lift the scanner part.
3
Caution
Do not touch the fuser unit. It can be extremely hot.
There is a risk of getting burned.
- 72 -

Moving or Transporting the Machine
2
1
3
4
5
6
7
Note
Memo
Vinyl Tape (back
side as well)
Top cover
Scanner part
Use vinyl tape to cover the junction of the
6
image drum cartridge and toner cartridge.
Do this on each of the four image drum
cartridges, then put them back in the
machine in their original positions.
Note
• The image drum cartridges should be kept inside the
machine when transporting. Seal them with vinyl tape
to prevent toner from spilling.
Close the top cover.
7
Separate the main printer unit from any
9
additional tray units.
If there are no additional tray units, proceed to step 10.
The separation procedure is the exact opposite of
installation. For more information, refer to the Setup
Guide.
Protect the machine with cushioning
10
material.
• Use the original box, packaging, and cushioning
material that came with your machine at the time of
purchase.
• When setting up the machine again after transport, be
sure to remove the tape from each of the image drum
and toner cartridges.
At least three people should lift the
11
machine unit and place it in the box.
Return the scanner part to its original
8
position.
- 73 -

3
1
Appendix
2
Battery Disposal································································· P.75
3
4

2
1
3
4
5
6
7
● Battery Disposal
This machine uses a lithium battery. If the terminal of the battery short-circuits, explosion or fire may occur.
To waste the battery, insulate the negative and positive poles to avoid short-circuit.
Battery Disposal
- 75 -

4
1
Index
2
3
4

2
1
3
4
5
6
7
B
L
T
Battery Disposal.................................. 75
C
Clients................................................. 23
Command line option.......................... 22
Copying
blurred image.............................. 25
color/black and white .................. 26
copying stops.............................. 25
density......................................... 25
image missing............................. 25
setting functions.......................... 25
skewed image............................. 25
stained image.............................. 25
streaked image ........................... 26
D
[Device Settings] tab........................... 22
Document ........................................... 12
Document password ........................... 21
E
e-Filing Web Utility
contents frame ............................ 30
error messages........................... 30
session ends............................... 30
sub windows ............................... 30
Error codes ................................... 27, 43
print jobs ..................................... 43
scan jobs..................................... 47
transmission and reception......... 44
Error messages................................... 27
e-Filing Web Utility...................... 30
TopAccess .................................. 42
touch panel ................................. 17
G
LDAP authentication........................... 34
LDAP search ...................................... 34
Local Discovery .................................. 33
Locating the equipment ................ 32, 33
LPR print....................................... 23, 35
M
Maintenance....................................... 66
document holding roller .............. 67
document transporting roller....... 67
feed roller.................................... 68
glass surface............................... 66
LED head.................................... 69
surface of the machine ............... 66
Moving the Machine ........................... 71
N
N/W-Fax driver ................................... 37
Network Fax driver ............................. 37
Novell print.......................................... 36
P
Paper jam
document.................................... 12
Paper ............................................ 5
ping command.................................... 34
Port
printer driver................................ 21
Print job errors.................................... 20
Printer configuration - retrieving ......... 22
Printing environment
Macintosh ................................... 37
NetWare...................................... 36
Novell print.................................. 23
Windows ............................... 35, 36
Printing problems (network related).... 35
Private print job................................... 21
Transporting the Machine.................... 72
Trouble ................................................ 28
glass surface....................................... 66
H
Hardware problems............................. 24
I
Icons on TopAccess
call for service............................. 42
cover open .................................. 41
paper empty................................ 41
paper misfeed ............................. 41
printer error 1 .............................. 41
printer error 2 .............................. 41
staples empty.............................. 42
toner empty................................. 41
IPP print .............................................. 36
R
Raw TCP print .................................... 35
Replacing
belt unit ....................................... 62
consumables............................... 53
fuser unit..................................... 60
image drum cartridge.................. 56
maintenance units....................... 53
toner cartridge............................. 53
S
Scan data
e-mailing scan data..................... 29
saving in the shared folder.......... 29
SMB print...................................... 23, 35
- 77 -

45510802EE Rev3
July 2014
 Loading...