

Page 1
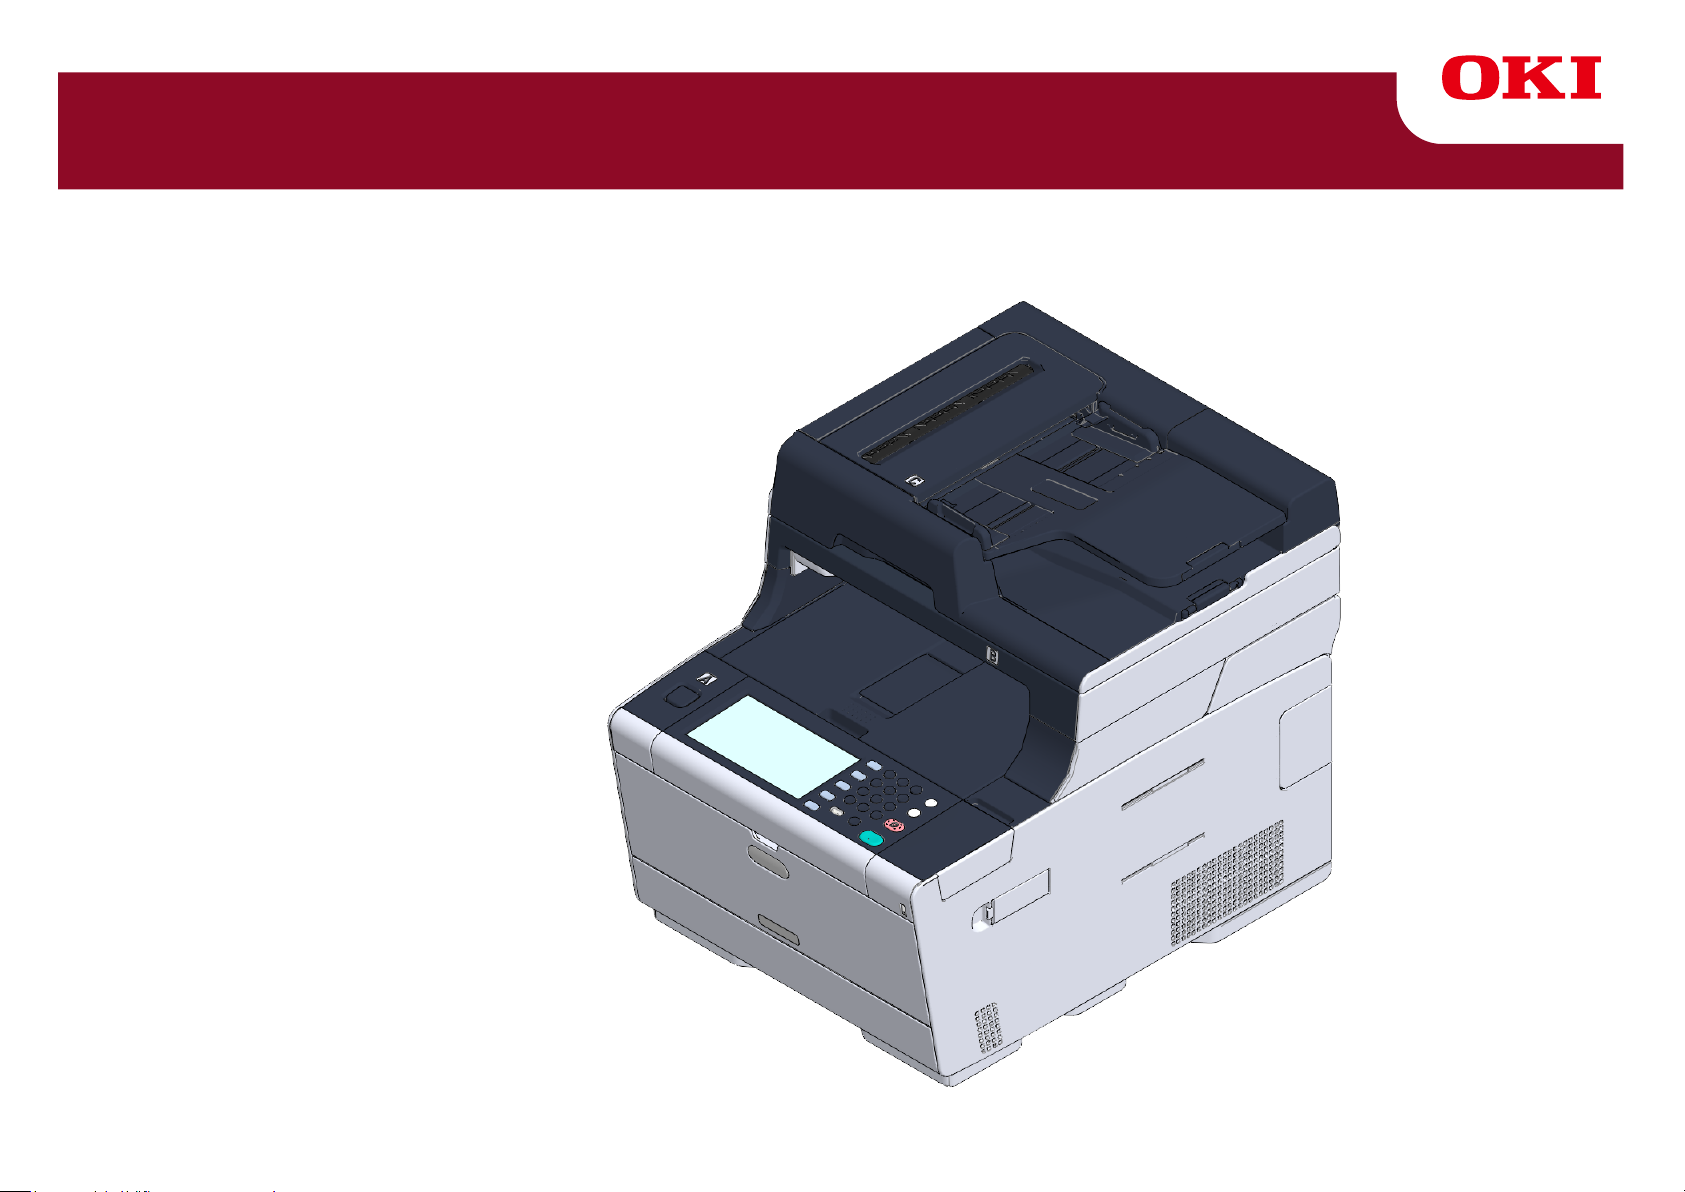
MC573/ES5473 MFP
User’s Manual
Page 2

Table of contents
1 Before starting .............................................................................................. 5
Cautions Related to Safety ............................................................................................................6
General Cautions ...........................................................................................................................7
About This Manual .........................................................................................................................9
About Descriptions .......................................................................................................................................9
Trademarks and Other Information .............................................................................................. 11
License ........................................................................................................................................13
2 Setting Up ................................................................................................... 14
Installation Requirements ............................................................................................................15
Installation Environment ............................................................................................................................. 15
Installation Space ....................................................................................................................................... 16
Checking the Accessories ...........................................................................................................18
Unpacking and Installing the Machine .........................................................................................19
Installing the Optional Equipment ................................................................................................23
Installing the Wireless LAN module ............................................................................................................23
Installing the Additional Tray Unit ...............................................................................................................24
Setting the Printer Driver ............................................................................................................................ 26
Connecting a Telephone Line ......................................................................................................28
Connecting to the Public Line (If Using Only for Faxes) .............................................................................28
Connecting to the Public Line (If Connecting a Telephone to the Machine) ...............................................29
Connecting the Optical IP telephone .......................................................................................................... 30
Connecting to the ADSL Environment ........................................................................................................ 31
Connecting PBX, Home Telephone or Business Phone .............................................................................32
Connecting as an Extension Telephone .....................................................................................................32
Connecting a CS Tuner or Digital Television ..............................................................................................33
Connecting the Power Code ........................................................................................................34
Connecting a LAN Cable/USB Cable ..........................................................................................36
Connecting a LAN Cable ............................................................................................................................36
Connecting a USB Cable ............................................................................................................................38
Loading Paper in the Tray ...........................................................................................................40
Checking the Setting Information .................................................................................................42
Setting Up This Machine ..............................................................................................................43
Language Setup ......................................................................................................................................... 43
Setting Date and Time ................................................................................................................................45
Setting the Administrator Password ...........................................................................................................47
Fax Setup ................................................................................................................................................... 48
Network Settings ........................................................................................................................................ 50
E-mail Setting ............................................................................................................................................. 51
Test Print .................................................................................................................................................... 54
Connecting to a Wireless LAN (Only When the Wireless LAN Module is Mounted) .................. 56
Before Connecting to a Wireless LAN ....................................................................................................... 56
Enabling Wireless LAN Connection ........................................................................................................... 57
Connecting to an Access Point (Infrastructure) ......................................................................................... 59
Setting up [Enabling Default Gateway] ...................................................................................................... 72
Connecting to the Machine Directly (AP mode) ......................................................................................... 74
Installing a Driver and Software to a Computer .......................................................................... 78
For Windows .............................................................................................................................................. 78
For Mac OS X ............................................................................................................................................ 81
3 Basic Operations ........................................................................................85
Names of Components ............................................................................................................... 86
Front View .................................................................................................................................................. 86
Rear View ................................................................................................................................................... 87
Inside of the machine ................................................................................................................................. 88
Basic Operations on the Operator Panel .................................................................................... 89
Names and Functions ................................................................................................................................ 89
Name and Functions on the Touch Panel .................................................................................................. 90
Entering Characters ................................................................................................................................... 92
Adjusting the Angle of the Operator Panel ................................................................................................. 93
Turning On or Off the Machine ................................................................................................... 94
Turning On the Machine ............................................................................................................................. 94
Turning Off the Machine ............................................................................................................................. 95
Loading Paper ............................................................................................................................ 97
About Paper Types That Can be Loaded ................................................................................................... 97
Loading Paper in Tray 1/2/3 ..................................................................................................................... 100
Loading Paper in the MP Tray ................................................................................................................. 101
Paper Storage .......................................................................................................................................... 103
Setting a Document .................................................................................................................. 104
About Documents That Can be Set ......................................................................................................... 104
Setting in the ADF .................................................................................................................................... 105
Setting on the Document Glass ............................................................................................................... 107
4 Copy ...........................................................................................................108
Copying ..................................................................................................................................... 109
Cancelling Copying ....................................................................................................................110
Specifying the Number of Copies .............................................................................................. 111
Descriptions of Screens for Copy ..............................................................................................112
- 2 -
Page 3

5 Scan ...........................................................................................................115
Sending Scanned Data as an E-mail Attachment ...................................................................... 116
Before Using Scan To E-mail .................................................................................................................... 116
Entering E-mail Address to Send E-mail .................................................................................................. 117
Saving Scanned Data in a Shared Folder .................................................................................119
Creating a Shared Folder in a Computer .................................................................................................. 119
Registering a Destination (Profile) ........................................................................................................... 120
How to Use Scan To Shared Folder .........................................................................................................121
Cancelling Scanning ..................................................................................................................122
Descriptions of Screens for Scan ..............................................................................................123
Scan To E-mail Screen .............................................................................................................................123
Scan To Shared Folder Screen ................................................................................................................126
6 Print ........................................................................................................... 129
Printing from a Computer (Windows) .........................................................................................130
For Windows PCL Printer Driver ..............................................................................................................130
For Windows PS Printer Driver ................................................................................................................. 131
Printing from a Computer (Mac OS X) .......................................................................................133
Cancelling a Print Job ..............................................................................................................134
About Screens and Functions of Each Printer Driver ................................................................135
Windows PCL Printer Driver .....................................................................................................................135
Windows PS Printer Driver .......................................................................................................................137
Mac OS X PS Printer Driver ..................................................................................................................... 139
Descriptions of Screens for Print ...............................................................................................144
7 Fax ............................................................................................................. 145
Basic Operations of Fax Functions ............................................................................................146
Entering Fax Number to Send a Fax ........................................................................................................ 146
Cancelling a Fax Transmission .................................................................................................................147
Setting for Receptions ...............................................................................................................149
Setting the Reception Mode .....................................................................................................................149
DRD .......................................................................................................................................................... 151
Setting the Waiting Time from When an Incoming Call Arrives to When Reception Starts (Response Waiting
Time) ......................................................................................................................................................... 152
Receiving Operation ................................................................................................................................. 152
Descriptions of Screens for Fax .................................................................................................154
Fax Screen ...............................................................................................................................................154
8 Maintenance ............................................................................................. 157
Replacing Consumables ............................................................................................................158
Cautions When Replacing Consumables .................................................................................................158
Replacing the Toner Cartridges ............................................................................................................... 159
Replacing the Image Drum ...................................................................................................................... 163
Replacing the Image Drum and Toner Cartridge at the Same Time ........................................................ 167
Cleaning Each Part of the Machine .......................................................................................... 171
Cleaning the Document Glass ................................................................................................................. 171
Cleaning the LED Head ........................................................................................................................... 172
9 Troubleshooting ........................................................................................174
If Paper Jams Occur ................................................................................................................. 175
If the Error Code is "370", "371", "372" .................................................................................................... 175
If the Error Code is "380", "381", "382", "385", "389" ............................................................................... 180
If the Error Code is "390" ......................................................................................................................... 184
If the Error Code is "391", "392", "393" .................................................................................................... 187
If the Error Code is "409" ......................................................................................................................... 189
If a Document Jam Occurs ....................................................................................................... 194
If a Document is Visible in the Paper Path ............................................................................................... 194
If a Document is Invisible in the Paper Path ............................................................................................ 195
Copy Problems ......................................................................................................................... 197
Unable to Copy ........................................................................................................................................ 197
Scan Problems ......................................................................................................................... 199
Unable to Scan ........................................................................................................................................ 199
Print Problems .......................................................................................................................... 200
Unable to Print ......................................................................................................................................... 200
Fax Problems ............................................................................................................................ 202
Unable to Send a Fax .............................................................................................................................. 202
Unable to Receive a Fax .......................................................................................................................... 204
If an Error Message is Displayed on the Operator Panel ......................................................... 205
Error Message List ................................................................................................................................... 205
10 Operating Management/ Specifications ................................................. 215
Changing the Administrator Password ..................................................................................... 216
Saving Power Consumption with the Power Save Function ..................................................... 217
Setting the Length of Idle Time Before Entering Power Save Mode ........................................................ 217
Setting the Length of Idle Time Before Entering Sleep Mode .................................................................. 218
Restrictions in Power Saving Function .................................................................................................... 218
Automatically Turning Off the Machine (Auto Power Off) ......................................................................... 219
Setting the Length of Idle Time Before Auto Power Off Works ................................................................ 220
Specifications ............................................................................................................................ 221
General Specifications ............................................................................................................................. 221
Copier Specifications ............................................................................................................................... 222
Fax Specifications .................................................................................................................................... 222
- 3 -
Page 4

Scanner Specifications .............................................................................................................................223
Printing Specifications ..............................................................................................................................223
Network Specifications .............................................................................................................................224
Wireless LAN Specifications (Option) ....................................................................................................... 225
Contact Us ....................................................................................................... 226
- 4 -
Page 5

1
Before starting
Cautions Related to Safety
General Cautions
About This Manual
Trademarks and Other Information
License
Page 6
Cautions Related to Safety
Indicates additional information which, if ignored or not followed, may result in
personal injury or death.
Indicates additional information which, if ignored, may result in personal injury.
1. Before starting
- 6 -
Page 7
General Cautions
Do not touch the safety switch inside this machine. High voltage may
occur, resulting in electric shock. Also, a gear may rotate, resulting in
injury.
Do not use a highly combustible spray near this machine. Some parts
inside the machine become very hot, possibly resulting in fire.
1. Before starting
Do not vacuum spilled toner with an electric vacuum cleaner. Vacuuming
spilled toner with an electric vacuum cleaner may result in ignition due to
sparks from electric contacts or other reasons.
If toner spills on the floor or other places, wipe the toner gently with a
damp rag or other cloth while using care not to scatter the toner.
Do not insert any object into a vent hole.
Electric shock, fire, or injury may result.
If the cover becomes extremely hot, the machine emits smoke or odor, or
you hear a strange sound, unplug the power plug from the outlet, and
contact your dealer.
Fire may result.
If liquid such as water gets inside the machine, unplug the power plug from
the outlet, and contact your dealer.
Fire may result.
If you drop a clip or other foreign objects into the machine, unplug the
power plug from the outlet, and take the foreign objects out.
Electric shock, fire, or injury may result.
Do not perform any operation or disassembly other than instructed in the
user manual.
Electric shock, fire, or injury may result.
If the machine is dropped or the cover is damaged, unplug the power plug
from the outlet, and contact your dealer.
Electric shock, fire, or injury may result.
Unplug the power plug regularly, and clean the bases of and in between
the plug blades.
If the power plug is left plugged into the outlet for an extended period of
time, dust adheres on the bases of the plug blades, and a short may occur,
possibly resulting in fire.
Do not place a cup filled with water or other objects on the machine.
Electric shock or fire may result.
Do not let pet urine or other liquid get inside this machine, or allow this
machine to get wet. Electric shock or fire may result.
When the machine cover is opened, do not touch the fuser unit. Burns may
result.
Do not throw the toner cartridge or image drum into a fire. The toner may
ignite, resulting in burns.
Do not connect the power cord, cables, or the ground wire in any way
other than instructed in the user manual.
Fire may result.
Operation using an UPS (uninterruptible power supply) or inverter is not
guaranteed. Do not use an uninterruptible power supply or inverter.
Fire may result.
Do not go near the paper output part when you turn the power on or when
printing is in progress. Injury may result.
- 7 -
Page 8
Do not touch a broken liquid crystal display. Injury may result. If you get
liquid (liquid crystal) spilled from the liquid crystal display into your eyes or
mouth, immediately rinse with a large amount of water. Seek medical
advice if necessary.
Do not disassemble the image drum or toner cartridge, or force them
open. You may inhale the scattered toner, or the toner may land on your
hands or clothes, making them dirty.
NOTE!
This product is not intended for use in the immediate visual field on the display work place. To
avoid disturbing reflections on the display work place, this product shall not be placed in the
immediate field of vision.
1. Before starting
- 8 -
Page 9

1. Before starting
About This Manual
Various information about this manual is provided here. Read these sections before using
this manual.
• Disclaimer
Every effort has been made to ensure that the information in this document is complete,
accurate, and up-to-date. The manufacturer assumes no responsibility for the result of
errors beyond its control. The manufacturer also cannot guarantee that changes in software
and equipment made by other manufacturers and referred to in this manual will not affect
the applicability of the information in it. Mention of software products manufactured by other
companies does not necessarily constitute endorsement by the manufacturer.
While all reasonable efforts have been made to make this document as accurate and helpful
as possible, we make no warranty of any kind, expressed or implied, as to the accuracy or
completeness of the information contained herein.
• Copyright of the manual
All rights reserved by Oki Data Corporation. No part of this document may be reproduced in
any form or by any means without prior written permission from Oki Data Corporation.
© 2016 Oki Data Corporation
• Manual Composition
• User's Manual (PDF) ------ Stored in the DVD-ROM which comes with the machine.
• Advanced Manual (PDF) ------ Download this manual from the Oki Data web site and refer
to it.
• Online Manual ------ Can be browsed on the Oki Data web site.
About Descriptions
Marks, symbols, illustrations, and other descriptions are provided.
•
About Marks
• About Symbols
• About Illustrations
Unless otherwise specified, this manual uses screenshots of the following screens.
• For Windows: Windows 7
• For Mac OS X: Mac OS X 10.9
[OKI MFP] may be written as the model name.
Depending on your OS, model or version, the description on this document may be different.
About Marks
This manual uses the following marks.
Symbol Meaning
Indicates the cautions and restrictions for operating this machine correctly. Be sure to read to
ensure that you can operate the machine correctly.
Indicates information that is useful for using this machine. It is recommended to read.
Indicates a reference topic. Read when you need more information.
• About Descriptions
• How to Use This Manual (Advanced Manual)
Indicates a related topic. Read when you need related information.
About Symbols
This section describes symbols and their meaning in this manual.
Symbol Meaning
Illustration (button name) Indicates a button (button name) on the operator panel of the machine.
- 9 -
Page 10

Symbol Meaning
[ ] Indicates a menu name, item name, option, or other items that are displayed on
the display screen on the operator panel.
Indicates a menu, window, or dialog name that is displayed on the screen on a
computer.
They can be clearly distinguished in descriptions or illustrations in procedures.
" " Indicates a message on the display screen or entered text.
Indicates a file name on a computer.
Indicates the topic title of a link destination.
< > Indicates a key on the computer keyboard.
> Indicates how to display the required menu of the machine or computer.
About Illustrations
The illustrations of MC573 are used in this manual as examples.
Illustrations of the display screen on the operator panel used in this manual are with the
factory default settings.
The descriptions in this manual may vary depending on your model.
1. Before starting
- 10 -
Page 11

1. Before starting
Trademarks and Other Information
OKI is a registered trademark of Oki Electric Industry Co., Ltd.
ENERGY STAR is a trademark of the United States Environmental Protection Agency.
Microsoft, Windows, Windows Server, Windows Vista and Internet Explorer are registered
trademarks of Microsoft Corporation.
Apple, Macintosh, Mac and Mac OS are the registered trademarks of Apple Inc.
iPad, iPhone, iPod, iPod touch and Safari are trademarks registered to Apple Inc. in the
United States and other countries.
AirPrint and the AirPrint logo are trademarks of Apple Inc.
Google, Google Docs, Android, and Gmail are trademarks of Google Inc.
Google Cloud Print is a trademark of Google Inc.
Adobe, Illustrator, Photoshop, PostScript and Reader are trademarks or trademarks of
Adobe Systems Incorporated in the United States and other countries.
CABLE TYPE LENGTH
(METER)
Power 1.8
USB 5.0
LAN 10.0
Telephone 3.0
CORE SHIELD
• ENERGY STAR
Target countries of the ENERGY STAR program are the United States, Canada
and Japan.
It is not applicable to other countries.
This product is compliant with ENERGY STAR v2.0 only.
• EMERGENCY FIRST AID
Take care with toner powder:
FeliCa is a registered trademark of Sony Corporation.
MIFARE is a trademark of NXP Semiconductors.
Other product names and brand names are registered trademarks or trademarks of their
proprietors.
This product complies with the requirements of the Council Directives 2014/30/EU (EMC), 2014/35/EU
(LVD), 2014/53/EU (RED), 2009/125/EC (ErP) and 2011/65/EU(RoHS), as amended where applicable, on
the approximation of the laws of the member states relating to Electromagnetic Compatibility, Low Voltage,
Radio & Telecommunications Terminal Equipment, Energy related Products and Restriction on the use of
certain Hazardous Substances in electrical and electronic equipment.
The following cables were used to evaluate this product for EMC directive 2014/30/EU
compliance, and configurations other than this may affect that compliance.
If swallowed, give small amounts of cold water and seek medical attention. DO
NOT attempt to induce vomiting.
If inhaled, move the person to an open area for fresh air. Seek medical attention.
If it gets into the eyes, flush with large amounts of water for at least 15 minutes
keeping eyelids open. Seek medical attention.
Spillages should be treated with cold water and soap to help reduce risk of staining
skin or clothing.
- 11 -
Page 12

• ENVIRONMENTAL INFORMATION
1. Before starting
- 12 -
Page 13

1. Before starting
License
This product contains software developed by the Heimdal Project.
Copyright (c) 1995 - 2008 Kungliga Tekniska Högskolan
(Royal Institute of Technology, Stockholm, Sweden).
All rights reserved.
Redistribution and use in source and binary forms, with or without modification, are permitted
provided that the following conditions are met:
1 Redistributions of source code must retain the above copyright notice, this list
of conditions and the following disclaimer.
2 Redistributions in binary form must reproduce the above copyright notice, this
list of conditions and the following disclaimer in the documentation and/or
other materials provided with the distribution.
3 Neither the name of the Institute nor the names of its contributors may be used
to endorse or promote products derived from this software without specific
prior written permission.
THIS SOFTWARE IS PROVIDED BY THE INSTITUTE AND CONTRIBUTORS "AS IS" AND
ANY EXPRESS OR IMPLIED WARRANTIES, INCLUDING, BUT NOT LIMITED TO, THE
IMPLIED WARRANTIES OF MERCHANTABILITY AND FITNESS FOR A PARTICULAR
PURPOSE ARE DISCLAIMED. IN NO EVENT SHALL THE INSTITUTE OR
CONTRIBUTORS BE LIABLE FOR ANY DIRECT, INDIRECT, INCIDENTAL, SPECIAL,
EXEMPLARY, OR CONSEQUENTIAL DAMAGES (INCLUDING, BUT NOT LIMITED TO,
PROCUREMENT OF SUBSTITUTE GOODS OR SERVICES; LOSS OF USE, DATA, OR
PROFITS; OR BUSINESS INTERRUPTION) HOWEVER CAUSED AND ON ANY THEORY
OF LIABILITY, WHETHER IN CONTRACT, STRICT LIABILITY, OR TORT (INCLUDING
NEGLIGENCE OR OTHERWISE) ARISING IN ANY WAY OUT OF THE USE OF THIS
SOFTWARE, EVEN IF ADVISED OF THE POSSIBILITY OF SUCH DAMAGE.
Copyright (c) 2009-2012 Eric Haszlakiewicz
Permission is hereby granted, free of charge, to any person obtaining a copy of this software and associated
documentation files (the "Software"), to deal in the Software without restriction, including without limitation the rights
to use, copy, modify, merge, publish, distribute, sublicense, and/or sell copies of the Software, and to permit
persons to whom the Software is furnished to do so, subject to the following conditions:
The above copyright notice and this permission notice shall be included in all copies or substantial portions of the
Software.
THE SOFTWARE IS PROVIDED "AS IS", WITHOUT WARRANTY OF ANY KIND, EXPRESS OR IMPLIED,
INCLUDING BUT NOT LIMITED TO THE WARRANTIES OF MERCHANTABILITY, FITNESS FOR A PARTICULAR
PURPOSE AND NON INFRINGEMENT. IN NO EVENT SHALL THE AUTHORS OR COPYRIGHT HOLDERS BE
LIABLE FOR ANY CLAIM, DAMAGES OR OTHER LIABILITY, WHETHER IN AN ACTION OF CONTRACT, TORT
OR OTHERWISE, ARISING FROM, OUT OF OR IN CONNECTION WITH THE SOFTWARE OR THE USE OR
OTHER DEALINGS IN THE SOFTWARE.
Copyright (c) 2004, 2005 Metaparadigm Pte Ltd
Permission is hereby granted, free of charge, to any person obtaining a copy of this software and associated
documentation files (the "Software"), to deal in the Software without restriction, including without limitation the rights
to use, copy, modify, merge, publish, distribute, sublicense, and/or sell copies of the Software, and to permit
persons to whom the Software is furnished to do so, subject to the following conditions:
The above copyright notice and this permission notice shall be included in all copies or substantial portions of the
Software.
THE SOFTWARE IS PROVIDED "AS IS", WITHOUT WARRANTY OF ANY KIND, EXPRESS OR IMPLIED,
INCLUDING BUT NOT LIMITED TO THE WARRANTIES OF MERCHANTABILITY, FITNESS FOR A PARTICULAR
PURPOSE AND NON INFRINGEMENT. IN NO EVENT SHALL THE AUTHORS OR COPYRIGHT HOLDERS BE
LIABLE FOR ANY CLAIM, DAMAGES OR OTHER LIABILITY, WHETHER IN AN ACTION OF CONTRACT, TORT
OR OTHERWISE, ARISING FROM, OUT OF OR IN CONNECTION WITH THE SOFTWARE OR THE USE OR
OTHER DEALINGS IN THE SOFTWARE.
• Open Source License Disclosure
The following open source software is included to use Google Cloud Print. The
descriptions about the open source license are as follows.
json-c
- 13 -
Page 14

2
Setting Up
Installation Requirements
Checking the Accessories
Unpacking and Installing the Machine
Installing the Optional Equipment
Connecting a Telephone Line
Connecting the Power Code
Connecting a LAN Cable/USB Cable
Loading Paper in the Tray
Checking the Setting Information
Setting Up This Machine
Connecting to a Wireless LAN (Only When the Wireless LAN Module is Mounted)
Installing a Driver and Software to a Computer
Page 15

2. Setting Up
Installation Requirements
• Installation Environment
• Installation Space
Installation Environment
Install the machine in the following environment.
Ambient temperature: 10°C to 32°C
Ambient humidity: 20% to 80% RH (relative humidity)
Maximum wet bulb temperature: 25°C
• Use care to prevent condensation. It may cause a malfunction.
• If installing your machine where the ambient humidity is 30% RH or below, use a humidifier or antistatic mat.
• Depending on the installation environment, the operation noise may be louder. If the noise bothers you, we suggest
you to install the machine in the place away from you or in another room.
•
Do not install the machine in a location subject to high temperatures or in a location
near fire.
•
Do not install the machine in a location where chemical reactions may occur (such as
a laboratory).
•
Do not install the machine near alcohol, thinners, or other flammable solvents.
•
Do not install the machine in a location within the reach of small children.
•
Do not install the machine in an unstable location (such as on an unsteady stand or
slanted location).
•
Do not install the machine in a location with high level of humidity or dust, or in a
location where the machine is exposed to direct sunlight.
•
Do not install the machine in an environment where it is exposed to salty air or
corrosive gas.
•
Do not install the machine in a location where it is exposed to a high level of vibration.
•
Do not install the machine in a location where its vent hole is blocked.
- 15 -
Page 16
•
Do not install this machine directly on a thick rug or carpet.
•
Do not install this machine in a closed room or other locations with bad circulation and
ventilation.
•
If you use this machine in a small room continuously for an extended period of time,
make sure to ventilate the room.
•
Install this machine away from a source that emits strong magnetic fields or noise.
•
Install this machine away from a monitor or television.
•
Carry this machine by holding both its sides and slightly slanting its rear side down.
2. Setting Up
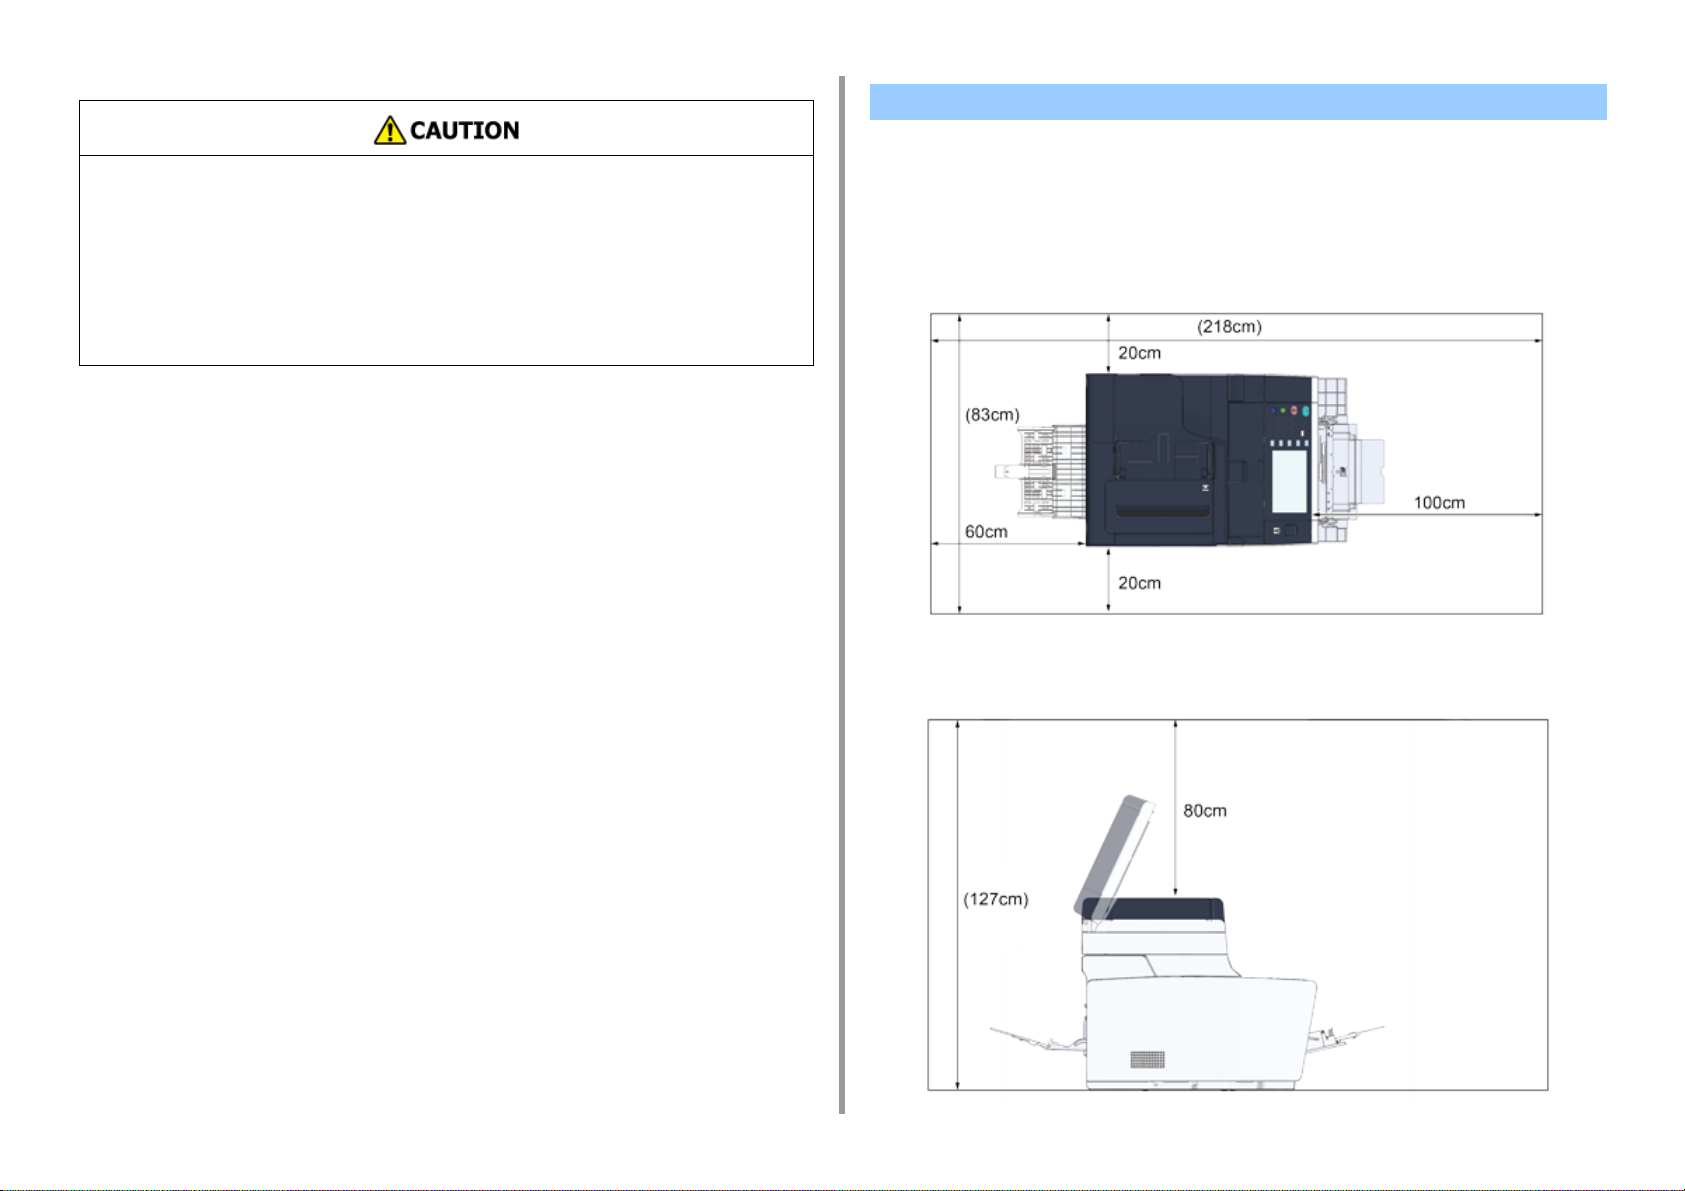
Installation Space
Install the machine on a flat surface that is wide enough to accommodate the legs of the
machine.
Allow for enough room around the machine as shown in the following figures.
• Top view
- 16 -
• Side view
Page 17
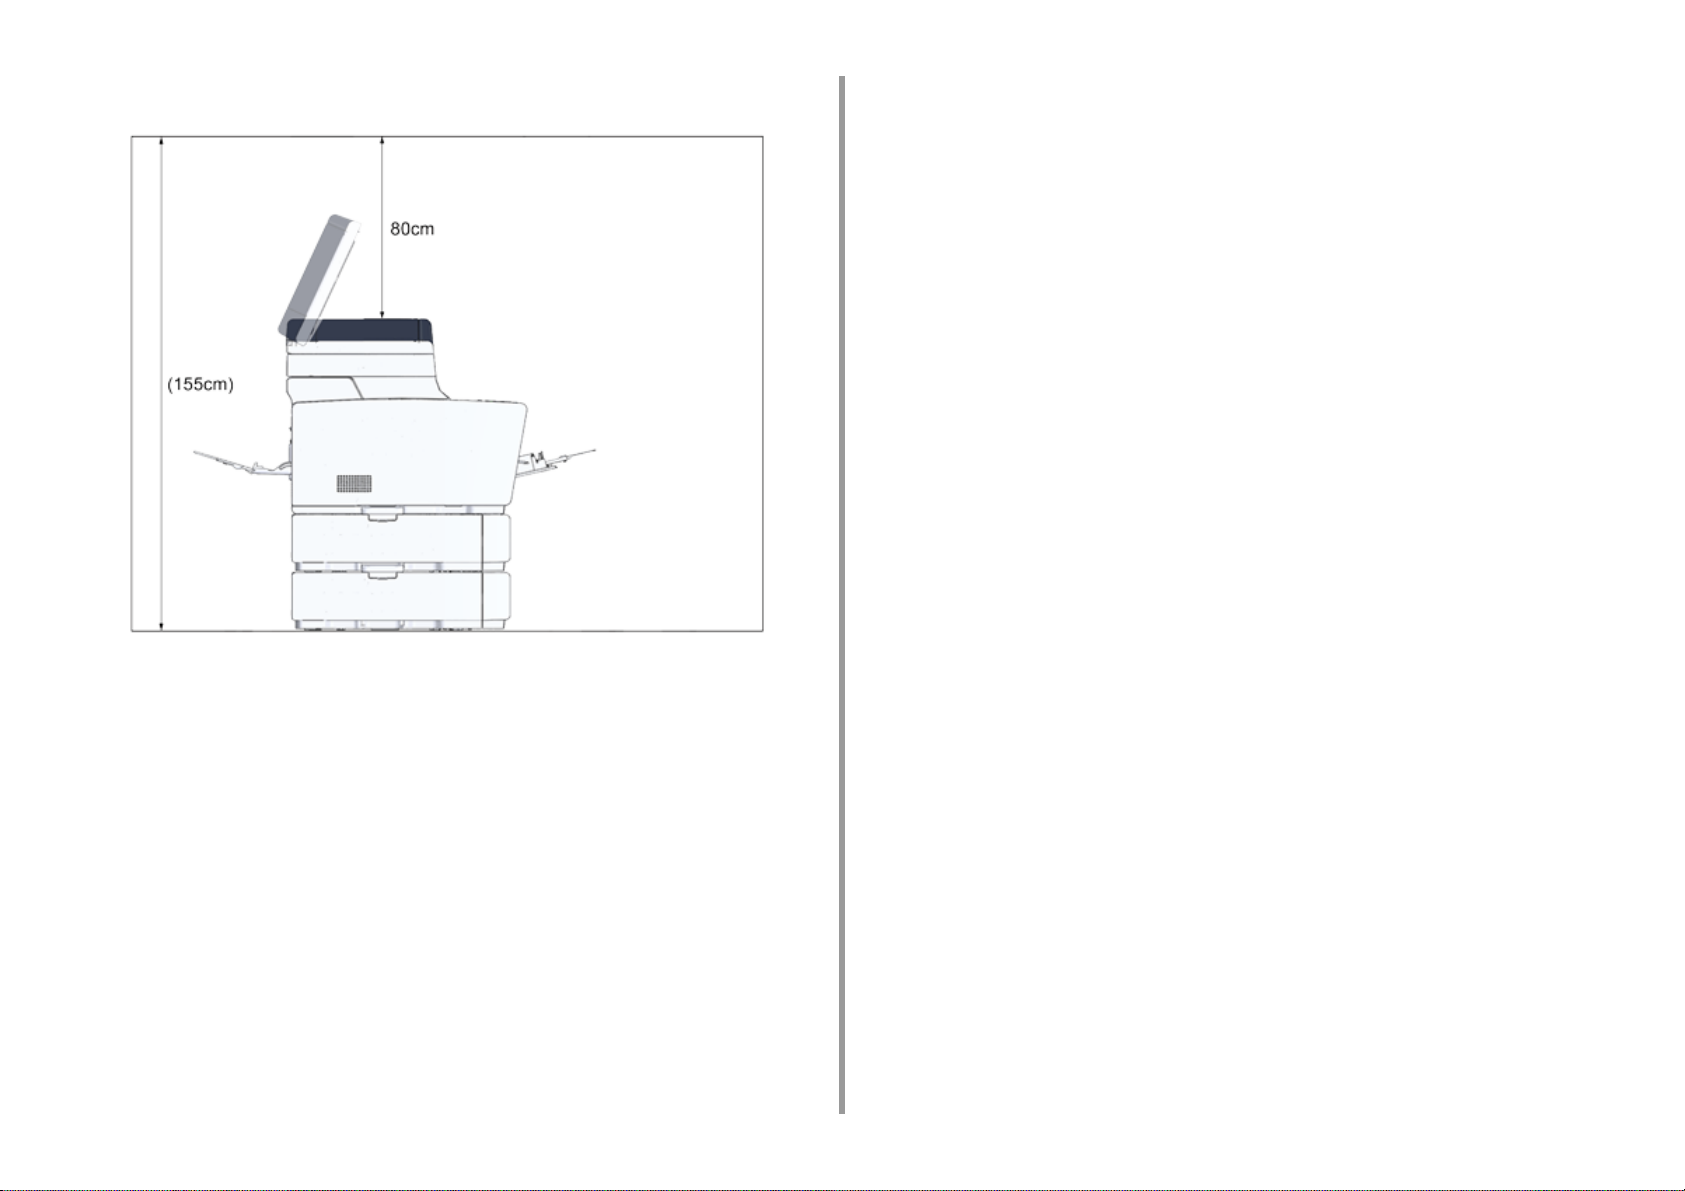
• Side view (when the additional tray unit is installed)
2. Setting Up
- 17 -
Page 18
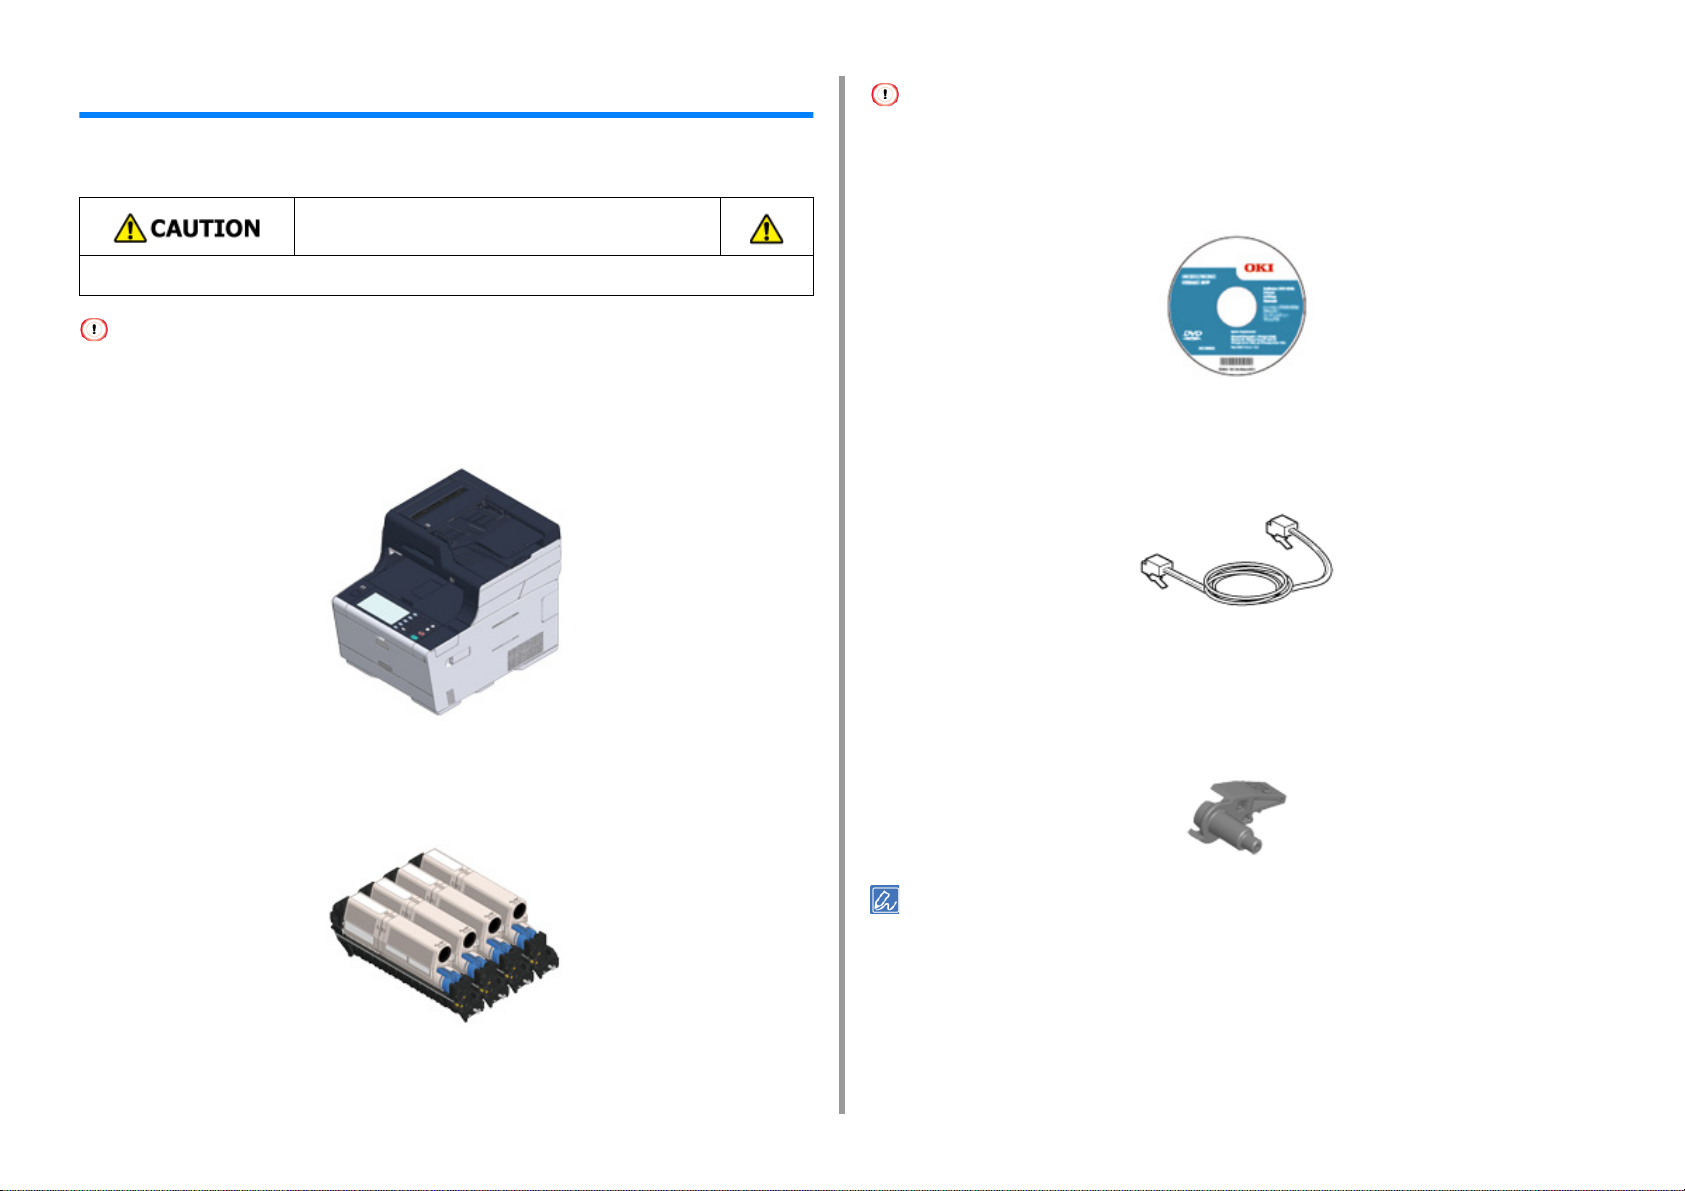
Checking the Accessories
Check that you have everything shown below.
Injury may result.
Lift this machine by 2 persons, because it weighs approximately 31 kg.
Be sure to use the supplied consumables first. If other consumables are used first, the life time may not be shown
correctly or supplied consumables may not be applied.
2. Setting Up
The starter toner cartridge is not installed in the ES model. Install the toner cartridge that is included in this machine.
Refer to "
Replacing the Image Drum".
• Software DVD-ROM
• Main body
• Four image drums (black, cyan, magenta and yellow)
• Four starter toner cartridges (black, cyan, magenta and yellow)
• Power cord
• Telephone cable
• Envelope lever
The envelope lever is attached to the MP tray. Use the envelope lever if envelopes wrinkle
after being printed.
For instructions, refer to "Printing on Envelopes (Advanced Manual)".
• LAN cables or USB cables are not included in the package. Prepare the cable that suits your connection
environment separately.
• Packaging and cushioning materials are used when transporting the machine. Do not dispose packaging materials
as they may be used in the future.
For the MC model, the starter toner cartridges are installed in the image drums, which are
installed in the machine before shipment.
- 18 -
Page 19

2. Setting Up
Unpacking and Installing the Machine
This section describes how to unpack and install the machine.
Injury may result.
Lift this machine by 2 persons, because it weighs approximately 31 kg.
• Use extra care when handling the image drum (the green cylinder), because it is fragile.
• Do not expose the image drum to direct sunlight or strong light (approximately 1,500 lux or more). Even under room
lighting, do not leave the image drum for 5 minutes or more.
• Packaging and cushioning materials are required for transporting the machine. Do not dispose of it, and keep it for
future use.
Remove the machine from the box, and then remove accessories, cushioning
1
materials and the plastic bag from the machine.
Lift the machine, and then place it where it is to be installed.
2
- 19 -
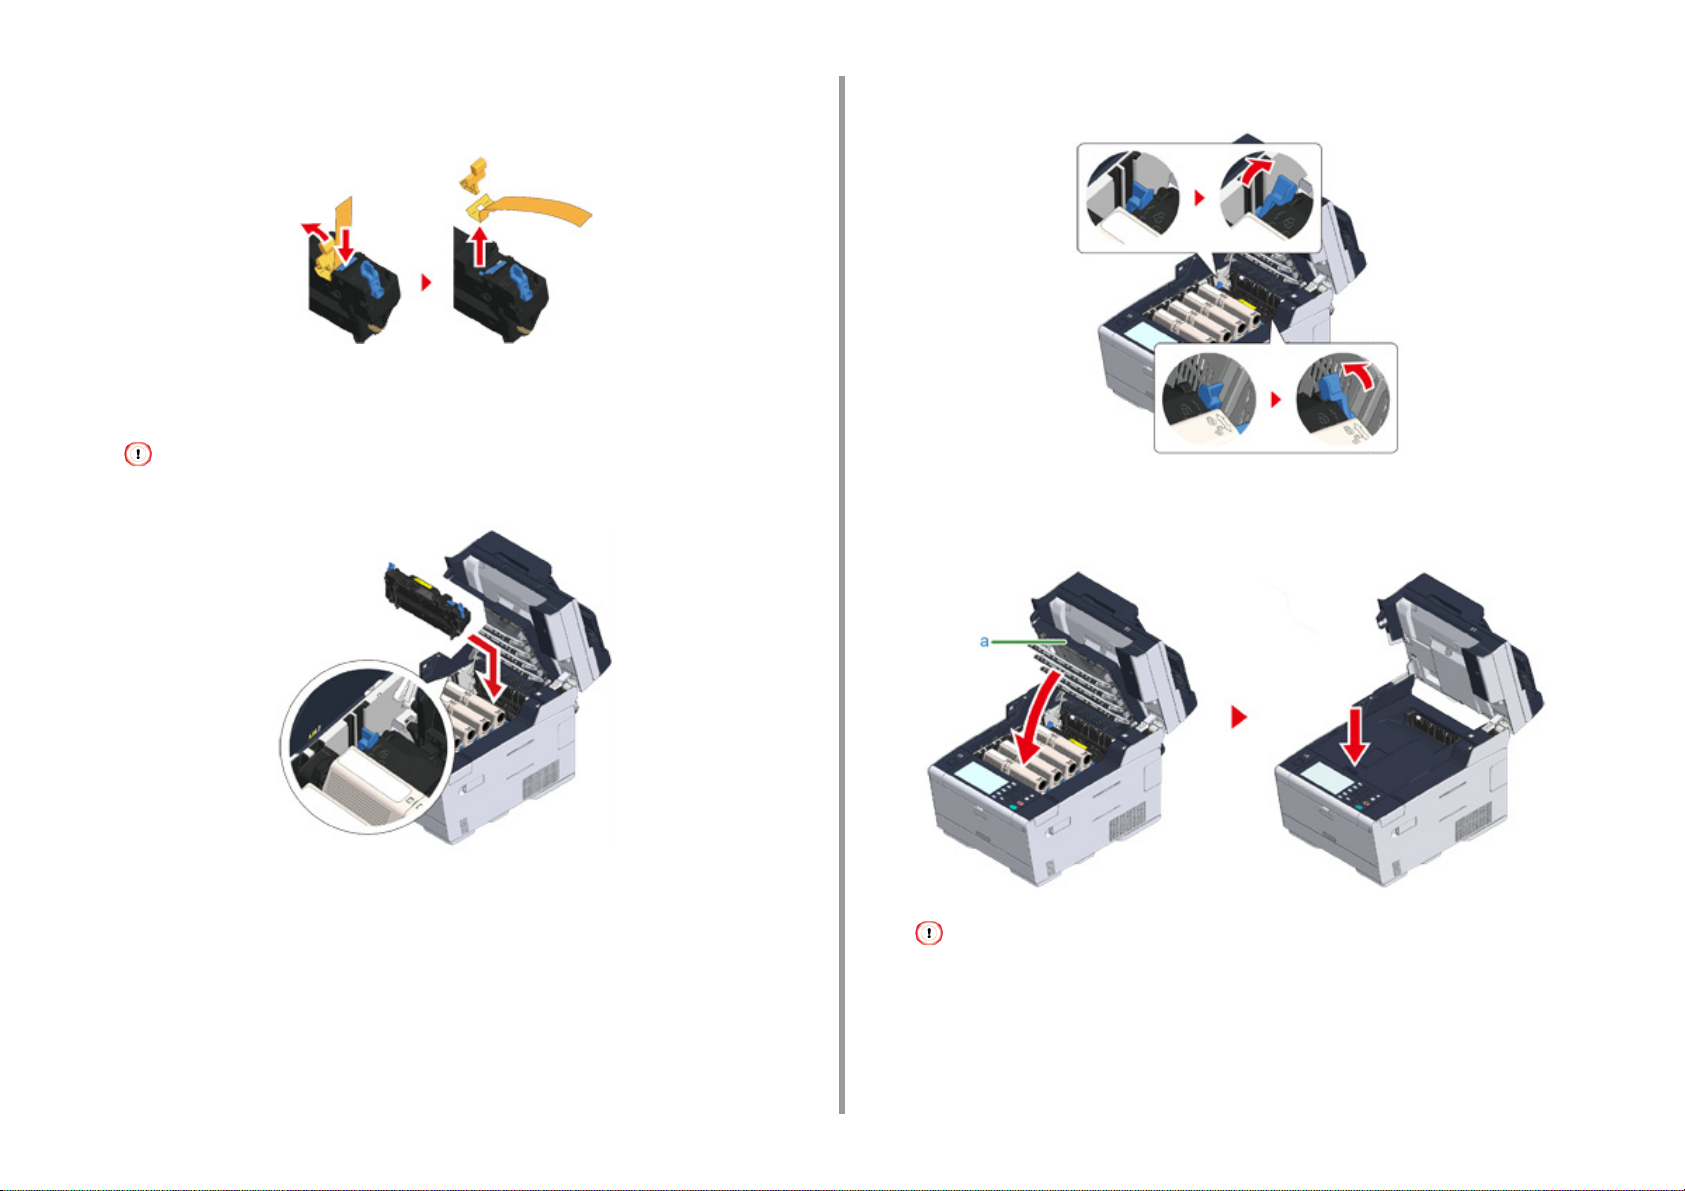
Do not open the scanner unit until step 4.
Remove the cushioning materials, protection tapes, protective sheet, and
3
desiccant packs.
Hold the handle (B) to open the scanner unit.
4
Page 20
2. Setting Up
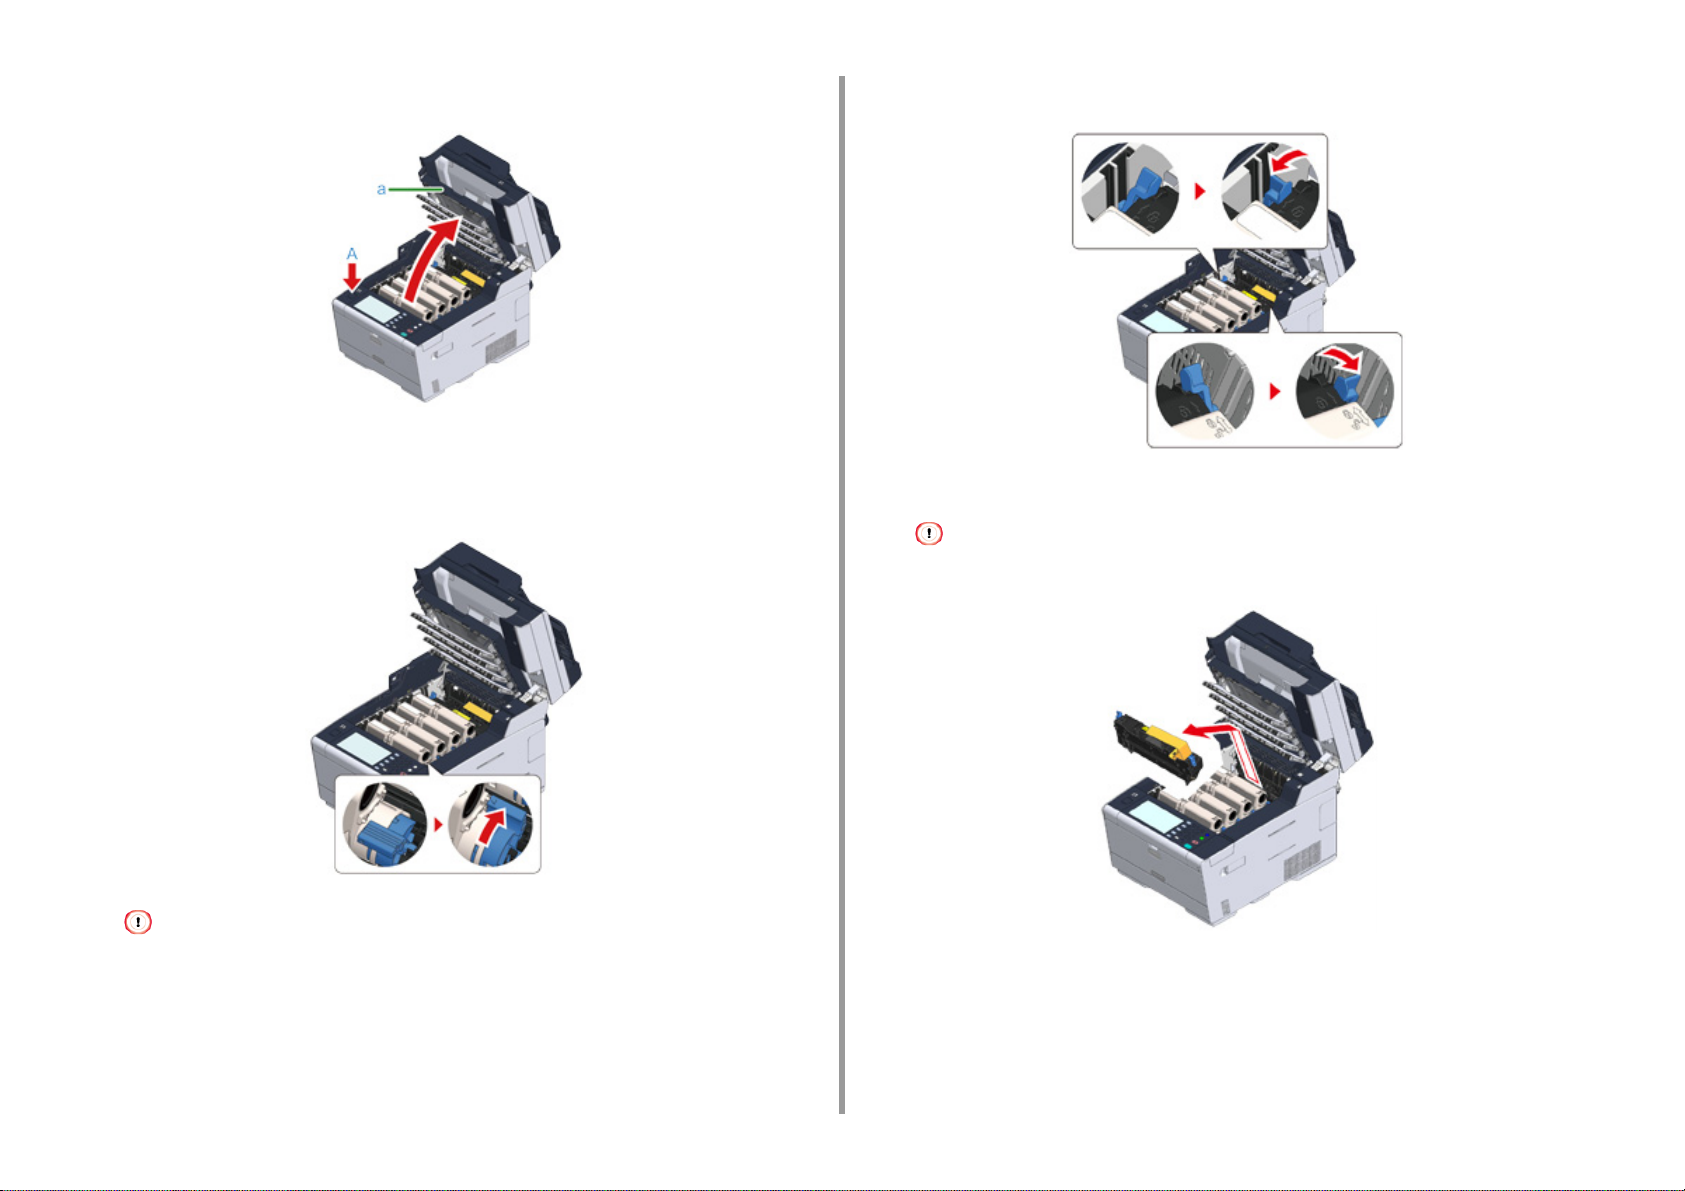
Press the button (A) and open the output tray (a) until it stops.
5
Pinch the tip of blue lever of the toner cartridge and turn forward until the tip
6
aligns on the lug of the cartridge.
Turn the levers of all 4 toner cartridges.
Pull the locking levers on the fuser unit toward you to unlock.
7
Hold the fuser unit handle and lift the fuser unit out of the machine.
8
While removing the fuser unit, be careful not to hit it to the LED head.
If you close the output tray without turning the blue lever, it may cause a malfunction. Be sure to turn the blue
lever until its top aligns on the lug in the back of the toner cartridge.
- 20 -
Page 21
2. Setting Up
Push the blue lever on the fuser unit and remove the orange safety stopper
9
and film.
Hold the fuser unit handle and aligning the fuser unit to the grooves behind the
10
toner cartridges, place the fuser unit into the machine.
While setting the fuser unit, be careful not to hit it to the LED head.
Push the levers on the fuser unit to lock.
11
Close the output tray (a) slowly and push the center of the output tray for
12
confirmation.
- 21 -
If the error message that the output tray is open does not disappear, make sure that the output tray is closed
securely.
Page 22
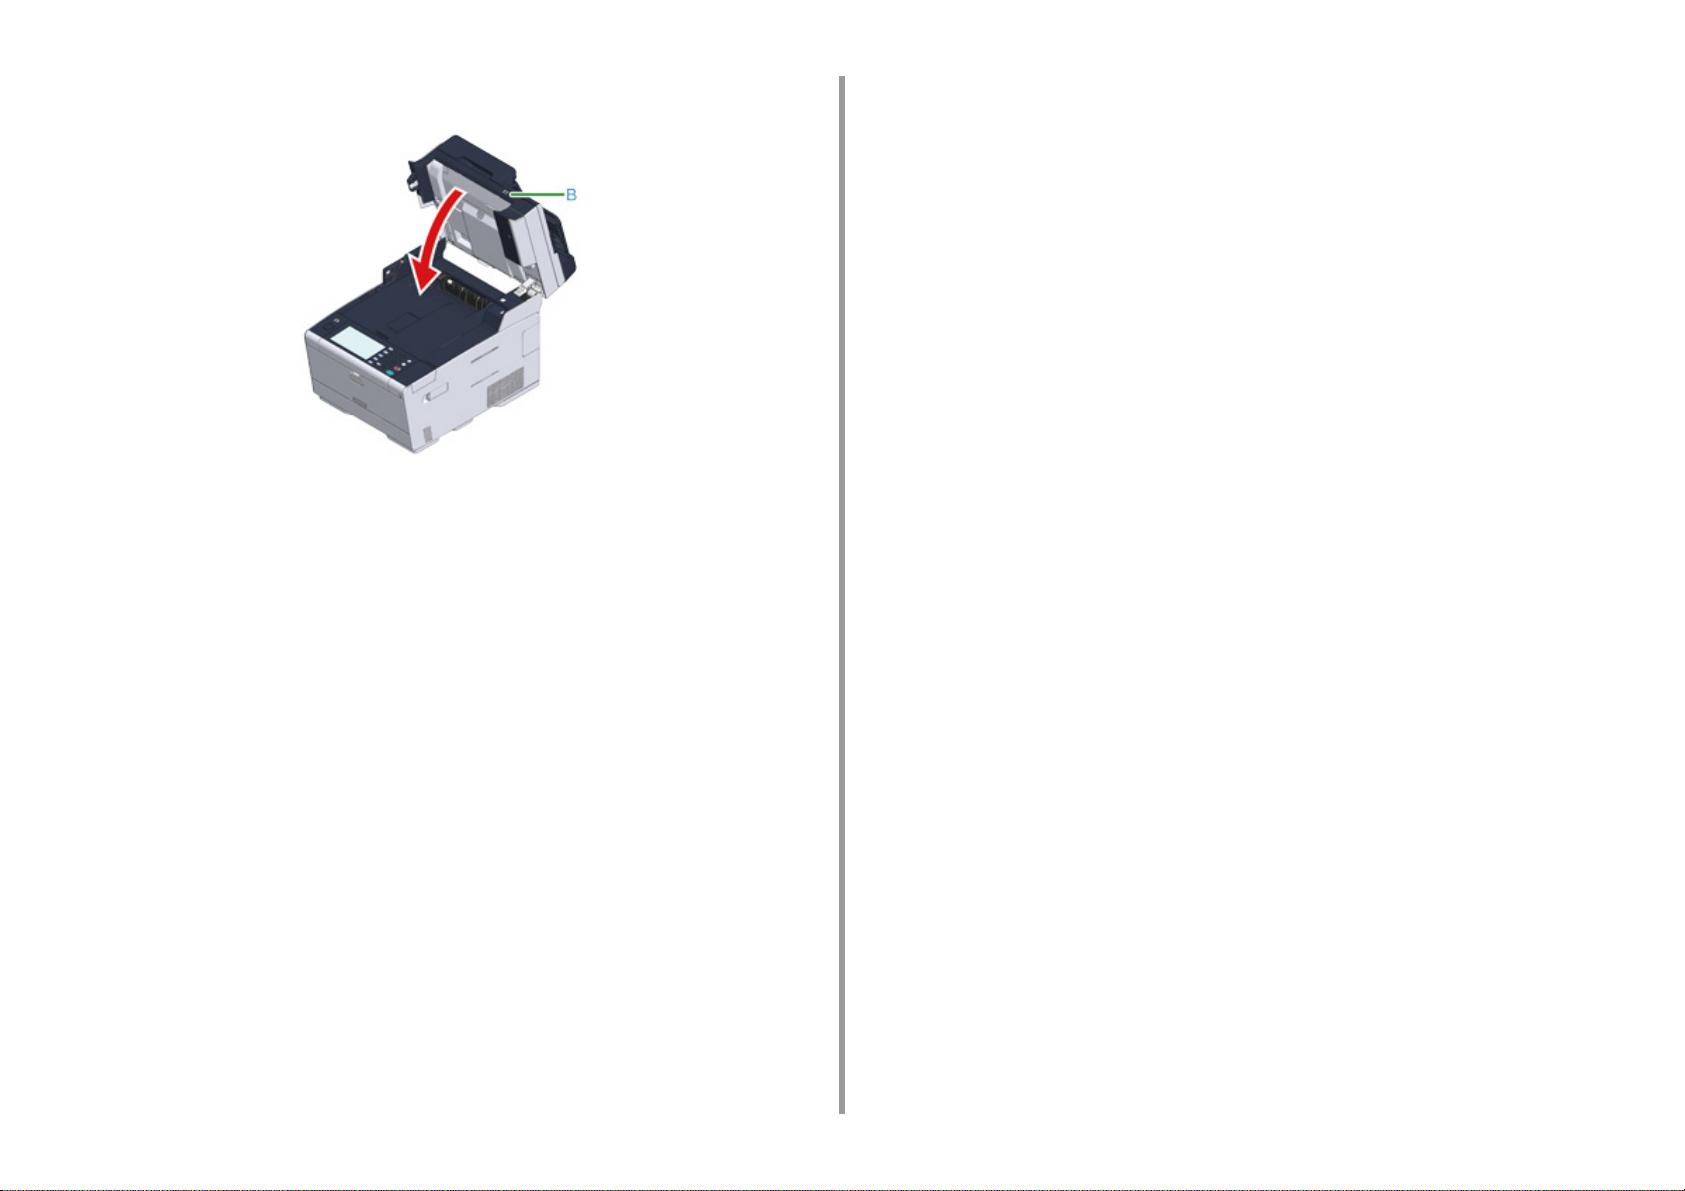
Hold the handle (B) to close the scanner unit.
13
2. Setting Up
- 22 -
Page 23
2. Setting Up
Installing the Optional Equipment
This section describes how to install optional equipment.
• Installing the Wireless LAN module
• Installing the Additional Tray Unit
• Setting the Printer Driver
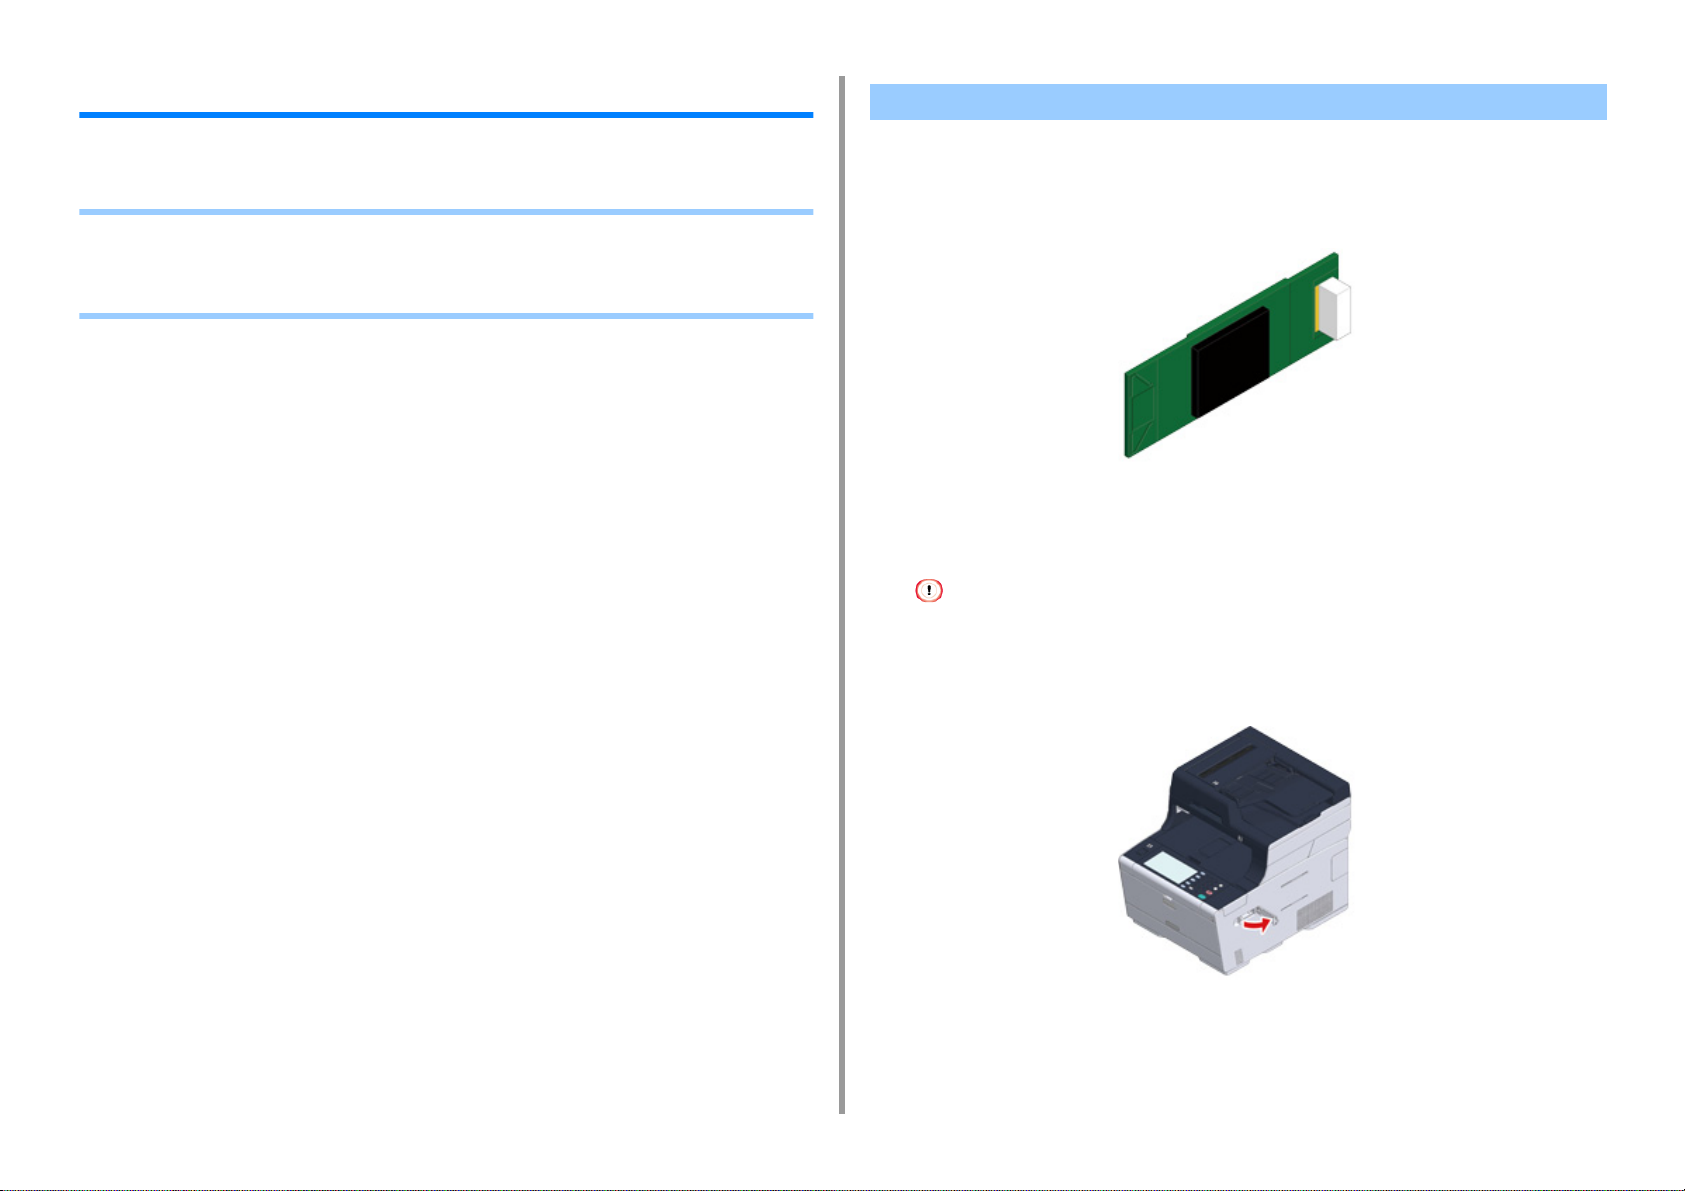
Installing the Wireless LAN module
Install the wireless LAN module when you want to use a wireless connection.
After installing, be sure to change the wireless LAN setting from [DISABLE] to [ENABLE] on
the operator panel.
Check that the machine is turned off and power cord and all the cables are
1
unplugged.
Installing the wireless LAN module with the machine turned on may cause the machine and wireless LAN module
to malfunction.
- 23 -
Open the wireless LAN module cover.
2
Page 24
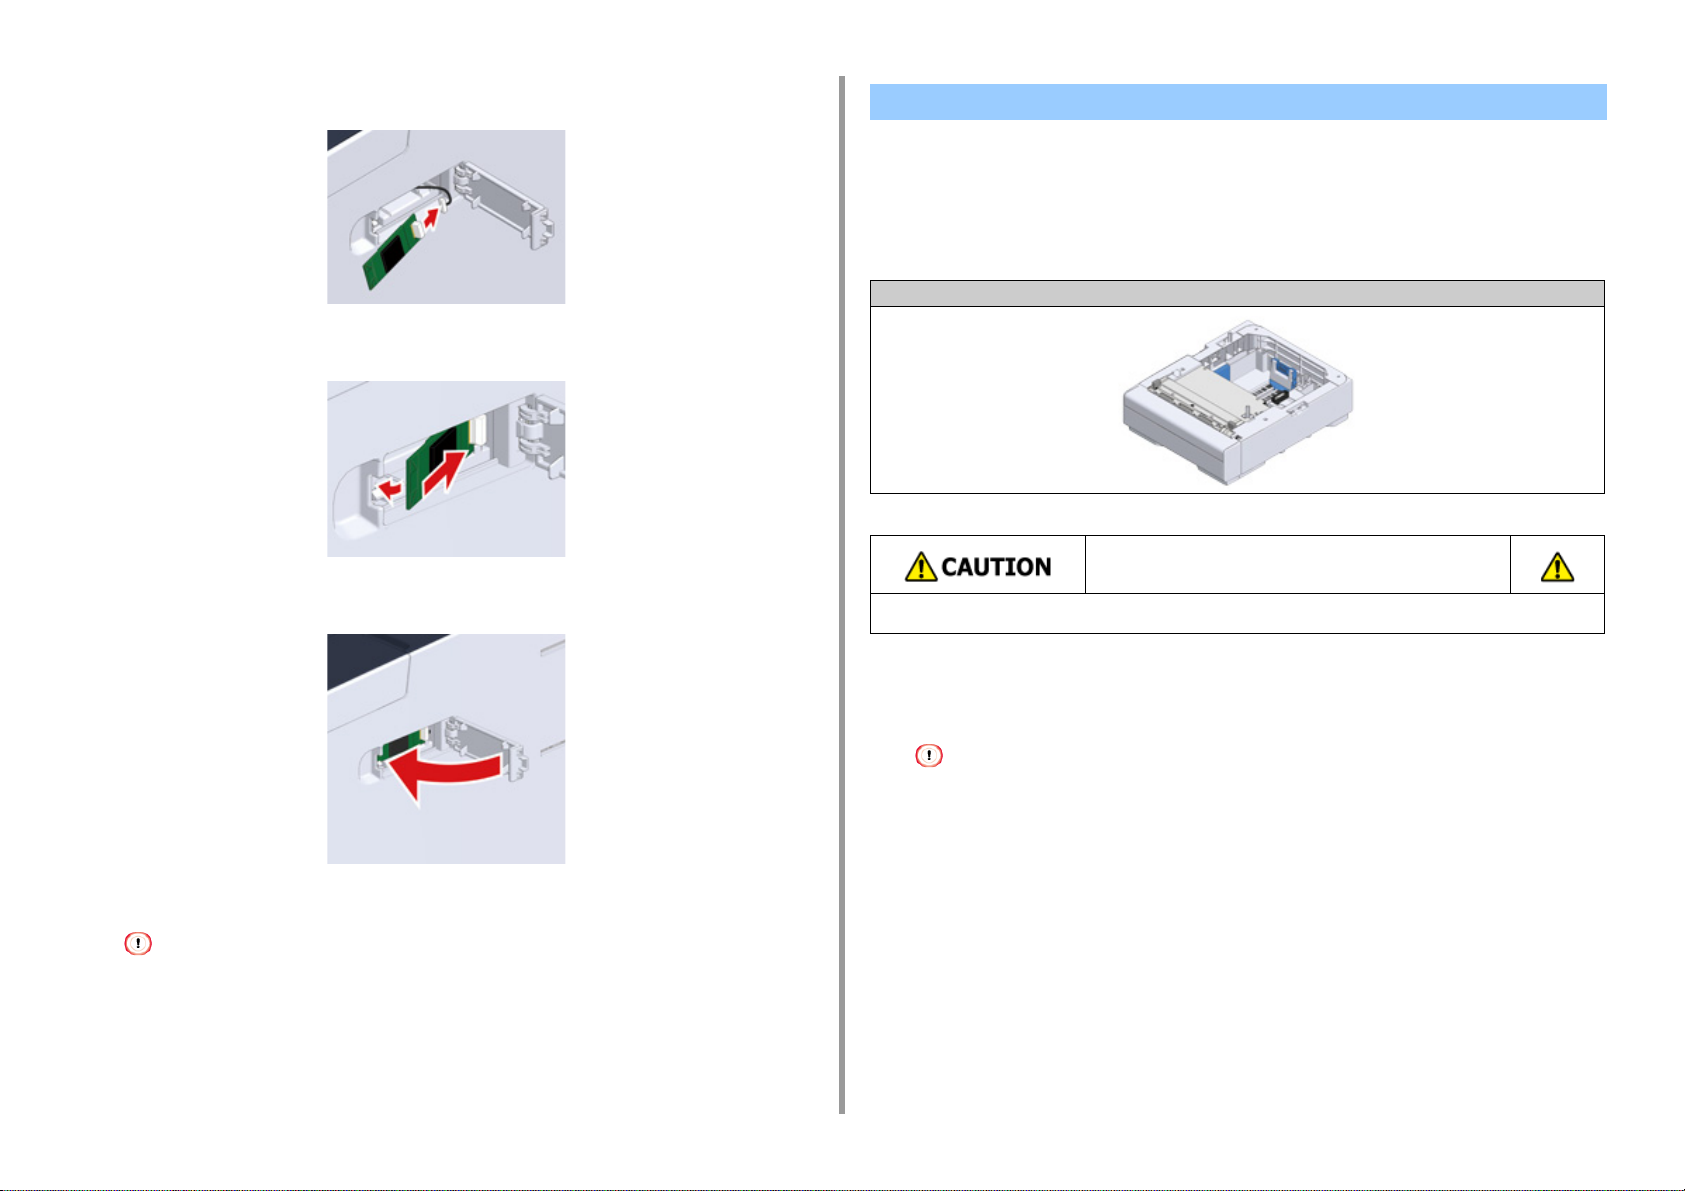
Eject the connector from the cover and connect with the wireless LAN module.
3
Install the wireless LAN module to the machine.
4
Close the wireless LAN module cover.
5
2. Setting Up
Installing the Additional Tray Unit
Attach the additional tray unit when increasing the number of sheets or paper to be set is
needed.
Up to 2 trays can be installed.
Set the number of trays on the printer driver after installing them.
Model Number N36501
Injury may result.
Lift this machine by 2 persons, because it weighs approximately 31 kg.
Go to "Connecting the Power Code”.
Attaching the wireless module cannot connect the machine to the wireless LAN.
Enable the wireless setting in the steps in "
is Mounted)
".
Connecting to a Wireless LAN (Only When the Wireless LAN Module
- 24 -
Check that the machine is turned off and power cord and all the cables are
1
unplugged.
Installing the additional tray unit with the machine turned on may cause the machine and additional tray unit to
malfunction.
Page 25
2. Setting Up
If you want to install two additional trays, fix them together with the lock pieces.
2
Slowly stack the machine on the additional tray unit aligning their back sides
3
and right sides.
Screw the machine and additional tray unit with the lock pieces.
4
- 25 -
Page 26
Setting the Printer Driver
When the additional tray unit is installed, be sure to set the number of trays after the printer
driver is installed.
For the information of installing the printer driver, see "Installing a Driver and Software to a
Computer
• To follow this procedure, you must log in to a computer as the administrator.
• If your Mac OS applies to the following conditions, the information about the installed option is automatically obtained,
• Setting Additional Tray(s) to the Windows PCL Printer Driver
1
2
".
not requiring you to set the printer driver.
- When the optional equipment is installed before the printer driver is installed
- When the machine is connected to a network over Bonjour
- When the machine is connected via USB interface
Click [Start], and then select [Devices and Printers].
Right-click [OKI MC573], and then select [OKI MC573 PCL6] from [Printer
properties].
Enter the total number of trays and then click [OK].
4
2. Setting Up
Select the [Device Options] tab.
3
If a TCP/IP network connection is used, click [Get Printer Settings] to set the number of trays automatically.
• Setting Additional Tray(s) to the Windows PS Printer Driver
Click [Start], and then select [Devices and Printers].
1
Right-click [OKI MC573], and then select [OKI MC573 PS] from [Printer
2
properties].
Select the [Device Settings] tab.
3
- 26 -
Page 27
2. Setting Up
Select [Get installed options automatically] for [Installable Options], and then
4
click [Setup].
Select the total number of trays for [Available Tray], and then click [OK].
5
When using a USB connection, select the total number of trays for [Available Trays] in [Installable Options].
Click [OK].
5
• Setting Additional Tray(s) to the Mac OS X Printer Driver
Select [System Preferences] from the Apple menu.
1
Click [Printers & Scanners].
2
Select the machine, and then click [Options & Supplies].
3
Select the [Options] tab.
4
- 27 -
Page 28
2. Setting Up
Connecting a Telephone Line
This section describes how to connect a telephone cable for fax transmissions.
The telephone line connection method varies depending on your environment. Connect the
telephone cable that suits your environment by referring to the illustrations in this manual.
Set the telephone cable in the recess of the machine so that it is not to be loose.
• Always use the telephone cable which comes with the machine. Using another telephone cable may cause a
malfunction.
• If a fax transmission or reception fails, set [Super G3] to [OFF].
• You cannot connect an ISDN line directly. To connect, use a terminal adapter (TA) and connect to the LINE connector
of the machine.
Connecting to the Public Line (If Using Only for Faxes)
Plug one end of the included telephone cable (a) into the LINE connector (b)
1
of the machine and the other end into a public line (analog) (c).
Keep the cover of the "TEL connector" inserted.
• Connecting to the Public Line (If Using Only for Faxes)
• Connecting to the Public Line (If Connecting a Telephone to the Machine)
• Connecting the Optical IP telephone
• Connecting to the ADSL Environment
• Connecting PBX, Home Telephone or Business Phone
• Connecting as an Extension Telephone
• Connecting a CS Tuner or Digital Television
- 28 -
Page 29

Connecting to the Public Line (If Connecting a Telephone to the Machine)
Plug one end of the included telephone cable (a) into the LINE connector (b)
1
of the machine and the other end into a public line (analog) (c).
Plug the telephone cable (f) that is connected to the external telephone into
3
the TEL connector (e) of the machine.
A telephone that is connected to the machine is called an external telephone.
2. Setting Up
Remove the telephone connector cover (d).
2
- 29 -
Page 30
• Only one telephone can be connected to the machine.
• Do not connect the telephone to the machine in parallel. If you connect the telephone to the machine in parallel,
the following problems occur, resulting in the machine not functioning correctly.
- If you pick up the handset of the telephone that is connected in parallel while the machine is sending or
receiving a fax, the fax image may be corrupted or a communication error may occur.
- If the incoming call is a voice call, the telephone may ring late or stop halfway, and if the incoming call is a
fax, the machine may not be able to receive the fax.
Connecting the Optical IP telephone
Plug the included telephone cable (a) that is connected to the Optical device
1
(IP telephone) (d) into the LINE connector (b) of the machine.
2. Setting Up
• If you connect a telephone with the fax function, disable the fax function of the telephone (disable fax reception)
before using.
In the case of direct interconnection, separate construction work is required. Contact your telephone company.
Remove the telephone connector cover.
2
Plug the telephone cable (e) that is connected to an external telephone into
3
the TEL connector (c) of the machine.
• If a fax dial fails, set the PBX line to [ON].
User Install (Advanced Manual)
• If a fax transmission or reception fails, set [Super G3] to [OFF].
User Install (Advanced Manual)
- 30 -
Page 31
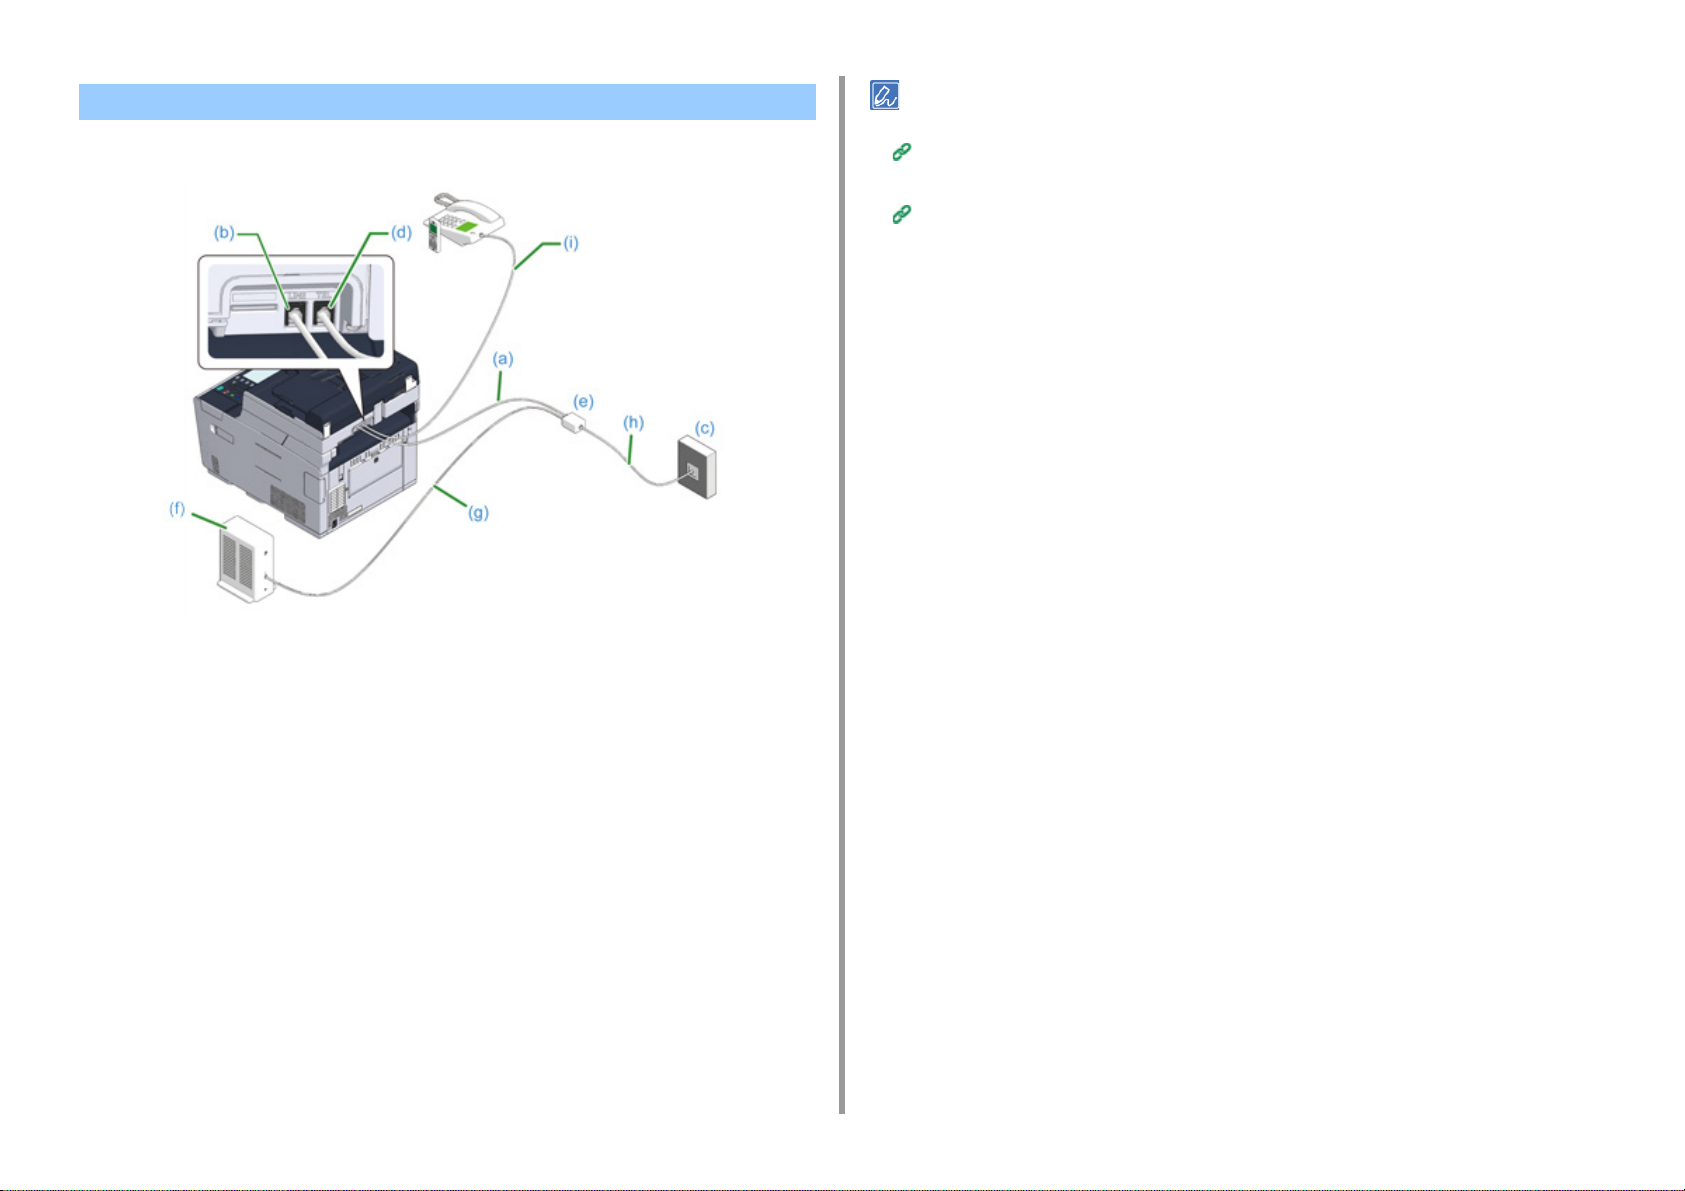
Connecting to the ADSL Environment
Besides the included telephone cable, a telephone cable of the same type is needed.
2. Setting Up
• If a fax dial fails, set the PBX line to [ON].
User Install (Advanced Manual)
• If a fax transmission or reception fails, set [Super G3] to [OFF].
User Install (Advanced Manual)
Plug one end of the included telephone cable (a) into the LINE connector (b)
1
of the machine and the other end into a phone line splitter (e).
If you use a phone-line-splitter-built-in type ADSL modem, plug the included telephone
cable (a) that is connected to the ADSL modem (f) into the LINE connector (b) of the
machine.
Connect the phone line splitter (e) to the ADSL modem (f) with a telephone
2
cable (g), and then plug another telephone cable (h) into the public line
(analog) (c).
Remove the telephone connector cover.
3
Plug the telephone cable (i) that is connected to an external telephone into the
4
TEL connector (d) of the machine.
- 31 -
Page 32

Connecting PBX, Home Telephone or Business Phone Connecting as an Extension Telephone
Plug the telephone cable that is connected to a control device such as PBX
1
into the LINE connector (a) of the machine.
2. Setting Up
Plug the included telephone cable (a) that is connected to the public line
1
(analog) (c) into the LINE connector (b) of the machine.
Plug the telephone cable (f) that is connected to a control device such as PBX
2
(e) into the TEL connector (d) of the machine.
• Home Telephone is a simple switcher for home use, which connects multiple telephones with one or two telephone
lines, enabling you to use extension and door phones.
• Business Phone is a simple switcher, which accommodates three or more telephone lines, with which many
telephones can be shared, allowing for extension phones or other usage.
If you use a telephone line for both fax and phone, plug the telephone cable of
2
the external telephone into the TEL connector (b).
If you connect to a PBX (private branch exchange), set the PBX line to [ON].
Fax Setup (Advanced Manual)
- 32 -
Page 33

Connecting a CS Tuner or Digital Television
Plug the included telephone cable (a) that is connected to the public line
1
(analog) (c) into the LINE connector (b) of the machine
2. Setting Up
Remove the telephone connector cover.
2
Plug the telephone cable (f) that is connected to the CS tuner or digital
3
television (e) into the TEL connector (d) of the machine.
- 33 -
Page 34

Connecting the Power Code
The power supply must meet the following conditions.
AC: 110 to 127V AC (Range 99 to 140V AC) / 220 to 240V AC (Range 198 to 264V AC)
Frequency: 50/60 Hz ± 2%
• If the power supply is unstable, use a voltage regulator.
• The maximum power consumption of the machine is 1240 W (120V AC) / 1270 W (230V AC). Check that the power
supply is sufficient.
• The operation that uses an uninterruptible power supply (UPS) or inverter is not guaranteed. Do not use an
uninterruptible power supply (UPS) or inverter.
2. Setting Up
Fire or electric shock may result.
•
Be sure to turn this machine off before connecting and disconnecting the power cord
and the ground wire.
•
Be sure to connect the ground wire to the designated ground terminal.
If this machine cannot be grounded, contact your dealer.
•
Be sure not to connect the ground wire to the ground of a water pipe, gas pipe or
telephone line, or to a lightning rod.
•
Be sure to connect the ground wire before connecting the power cord to the outlet.
Also, be sure to unplug the power cord from the outlet before disconnecting the
ground wire.
•
Be sure to plug or unplug the power cord by holding its power plug.
•
Securely plug the power cord into the outlet.
•
Do not plug or unplug the power cord with wet hands.
•
Install the power cord in a location where users cannot step on it, and do not place
any object on the power cord.
•
Do not bundle or tie the power cord.
•
Do not use a damaged power cord.
•
Do not overload the outlet.
•
Do not connect the power cords of this machine and other electric products to the
same outlet. If the power cord of this machine is connected to the same outlet as
other electric products, especially an air conditioning machine, copier, or shredder,
this machine may malfunction due to electrical noise. If you have to connect the
power cord of this machine to the same outlet as other products, use a commercially
available noise filter or noise cut transformer.
•
Use the power cord included in this machine, and plug the cord directly into the outlet.
Do not use the power cords of other products for this machine.
•
Do not use an extension cord. If you have to use an extension cord, use a cord rated
15A or higher.
•
Use of an extension cord may result in this machine malfunctioning due to AC voltage
drop.
•
Do not turn this machine off or unplug the power cord during printing.
•
If you do not use this machine for an extended period of time due to holidays, trips, or
other reasons, unplug the power cord.
•
Do not use the power cord included in this machine for other products.
- 34 -
Page 35

Plug the power cord into the power connector.
1
Plug the power cord into the outlet.
2
2. Setting Up
- 35 -
Page 36
2. Setting Up
Connecting a LAN Cable/USB Cable
When using the machine in a wired network connection or connecting to a computer via a
USB cable, connect the cable in the following steps.
• Connecting a LAN Cable
• Connecting a USB Cable
Connecting a LAN Cable
A LAN cable is not supplied.
Prepare a LAN cable (category 5e or higher, twist pair, straight) and hub.
1
Check that the machine and computer are turned off.
2
Open the interface cover on the back side of the machine pressing the center
3
part of it.
- 36 -
Page 37

2. Setting Up
Insert one end of the LAN cable into the network interface connector.
4
Pass the LAN cable under the tab, and then close the interface cover.
5
Insert the other end of the LAN cable into the hub.
6
Go to the procedure to "Loading Paper in the Tray".
- 37 -
Page 38

Connecting a USB Cable
A USB cable is not supplied.
Prepare a USB cable.
1
If you want to connect in USB 2.0 Hi-Speed mode, use a Hi-Speed USB 2.0 USB cable.
This machine does not support USB 3.0.
Check that the machine and computer are turned off.
2
Open the interface cover on the back side of the machine pressing the center
3
part of it.
Do not insert the USB cable into the network interface connector. It may cause a malfunction.
Pass the USB cable under the tab, and then close the interface cover.
5
2. Setting Up
Insert one end of the USB cable into the USB interface connector on the
4
machine.
- 38 -
Insert the other end of the USB cable into the USB interface connector on the
6
computer.
Page 39
For Windows, do not insert the other end of the USB cable into the computer until the instruction is displayed on
the screen when the driver installation is in progress.
2. Setting Up
Go to the procedure to "Loading Paper in the Tray".
- 39 -
Page 40

2. Setting Up
Loading Paper in the Tray
The procedure when loading paper in Tray 1 is used as an example.
The same procedure applies to Tray 2/3 (optional).
For details on available paper, see "
Pull the paper cassette out.
1
About Paper Types That Can be Loaded".
Slide the paper stopper (b) to the length of paper to be loaded.
3
Fan a stack of paper well, and then align the edges of the paper.
4
Load paper with the print side face down.
5
Slide the paper guide (a) to the width of paper to be loaded.
2
- 40 -
Do not load paper above the " " mark on the paper guide.
Secure the loaded paper with the paper guide.
6
Page 41

Replace the paper cassette into the machine.
7
Push the paper cassette until it stops.
2. Setting Up
- 41 -
Page 42

2. Setting Up
Checking the Setting Information
The first time the machine is turned on, "Easy Setup" is displayed.
The screen prompts you to enter the information. Check the required information on the
setting information sheet below beforehand.
If you skip these settings at the first time the machine is turned on, you can set the
information later on the operator panel or computer.
• Admin Password
"999999" is set by factory default. It is recommended to change the administrator password
to protect your security.
Item Description Setting Value
Admin Password The administrator password for the machine. 6 to
12 characters can be used. Be careful not to forget the
set password.
• Fax Setting
To use the fax function, the following information is needed.
Item Description Setting Value
Fax Number Set the fax number of this machine. You can enter up to
20 digits.
Sender ID Set the sender's information. You can enter up to
22 characters.
Item Description Setting Value
Mail Server Address Set the IP address or host name for the SMTP server.
You can enter up to 64 characters.
SMTP Port Set the SMTP port number.
SMTP Encryption Set [None], [SMTP], or [STARTTLS].
Set Sender's Address (From) It appears when sending E-mail.
Receive Setting Set [POP3], [SMTP], or [Disable].
If [POP3] is selected, check the POP3 server address.
Authentication Method Set [No Authentication], [SMTP Auth], or [POP Before
(SMTP-Auth / POP Before
SMTP) Authentication Method:
User Name
(SMTP Auth / POP Before
SMTP) Authentication Method:
Password
SMTP].
If [SMTP Auth] or [POP Before SMTP] is selected, check
the user name and password.
Set a user name for authentication. Up to 64 characters
can be registered.
Set a password for authentication. Up to 64 characters
can be registered.
• Network Setting
To connect the machine to a network using a LAN cable, the following information is needed.
Item Description Setting Value
IP Address Set the IP address of the machine.
Subnet Mask Set a subnet mask.
Default Gateway Set a gateway address.
DNS Server (Primary) Set the IP address for a Primary DNS server.
DNS Server (Secondary) Set the IP address for a Secondary DNS server.
WINS Server (Primary) Set the IP address for the Primary WINS server.
WINS Server (Secondary) Set the IP address for the Secondary WINS server.
• E-mail Setting
To use functions which require sending and receiving E-mail such as the Scan To E-mail
and Internet Fax functions, the following information is needed.
- 42 -
Page 43
2. Setting Up
Setting Up This Machine
The first time the machine is turned on or when the settings are initialized, [Easy Setup] is
displayed. Follow the on-screen instructions to set required information. You can skip the
setting pressing [Skip>>].
The simplest steps are shown here.
• Language Setup
• Setting Date and Time
• Setting the Administrator Password
• Fax Setup
• Network Settings
• E-mail Setting
• Test Print
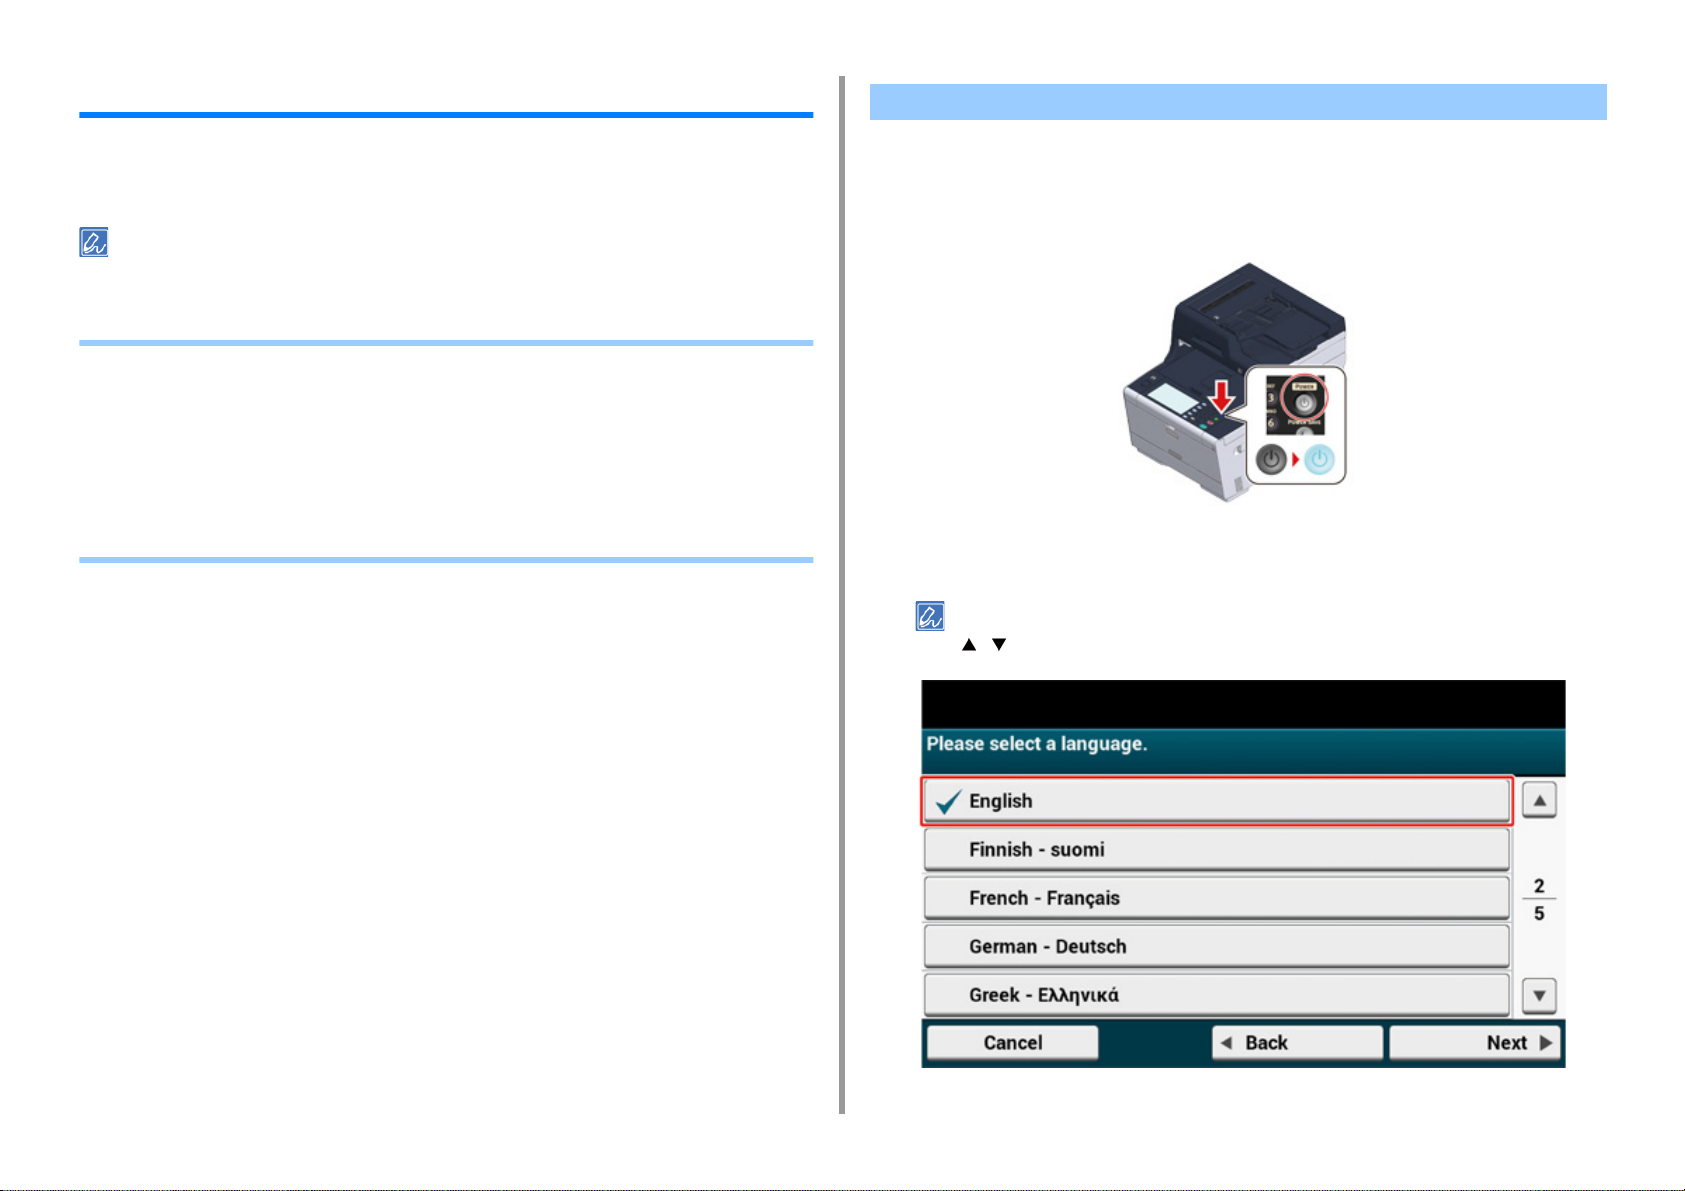
Language Setup
Press the power switch on the operator panel for a second to turn on the
1
machine.
When the machine is turned on, the power switch LED lamp turns on.
When the language selection screen in [Easy Setup] is displayed, press the
2
language you want to use.
Press [ ] [ ] to switch screens.
- 43 -
Page 44

2. Setting Up
Select the desired keyboard layout.
3
Press [Close].
4
The screen switches automatically in about 7 seconds without pressing [Close].
Press [Continue with default settings].
5
Check that the consumables and wiring are set up, and then press [Next].
6
- 44 -
Page 45

Setting Date and Time
Check that the [2. Date/Time Setting] screen is displayed, and then press
1
[Next].
The time zone setting screen appears.
Press [ ] [ ] to switch screens.
Set daylight saving time.
3
Select a setting suitable to your environment, and then press [Next].
2. Setting Up
Press [Select] for the time zone you want to use.
2
- 45 -
Page 46

2. Setting Up
Press [Manual].
4
Enter the month using [ ] [ ] or the numeric keypad on the operator panel.
5
Use the numeric keypad on the operator panel to enter a value in the field with the
(numeric keypad) icon.
Press the [Year] entry box once to enter the year, and then press [Next].
7
Use [ ] [ ] or the numeric keypad on the operator panel to enter the current
8
time in the same manner as the date entry, and then press [Next].
The setting values are updated.
Press [Close].
9
Press the [Day] entry box once to enter the day.
6
The screen switches automatically in about 7 seconds without pressing [Close].
- 46 -
Page 47

Setting the Administrator Password
The factory default administrator password is “999999”, however, we highly recommend you to set your own
administrator password to prevent unauthorised access to the “admin setup” menu.
Check that the [3. Admin Password] screen is displayed, and then press
1
[Next].
The setting a new administrator password screen appears.
2. Setting Up
• Set the administrator password using from 6 to 12 alphanumeric characters.
• The password is case sensitive.
Enter a new administrator password and press [Next].
2
• We suggest you to write down the set password not to forget it.
• The administrator password is required when changing the settings, etc.
Note that if you forgot or lost your administrator password, you could not change the [Admin Setup] or [Easy
Setup] settings.
- 47 -
Enter the password again to confirm.
3
Page 48

Press [Next].
4
The setting values are updated.
Press [Close].
5
2. Setting Up
Fax Setup
If you do not want to use the fax function, press [Skip>>] to go to Network Settings.
The screen switches automatically in about 7 seconds without pressing [Close].
Check that the [4. Fax Setting] screen is displayed, and then press [Next].
1
The screen prompting you to enter the fax number appears.
- 48 -
Page 49

Use the numeric keypad on the operator panel to enter the fax number and
2
press [Next].
Enter the sender’s information (sender’s name) and press [Next] on the touch
3
panel. The setting values are updated.
The information set here is sent to the other party who receives your fax.
Press [Close].
4
2. Setting Up
- 49 -
The screen switches automatically in about 7 seconds without pressing [Close].
Page 50

Network Settings
Since the network settings are required when using the print function, fax function, and scan function, you are
supposed to make the network setting here. (Only for customers using the network function)
Check that the [5. Network Setting] screen is displayed, and then press [Next]
1
for the connection with a LAN cable.
For the wireless connection, you do not need to make the network settings here. Press
[Skip>>] twice and go to Test Print. The wireless connection settings are to be
performed after [Easy Setup] is finished.
Set an IP address. Press [Auto].
3
When setting manually, check the following values specified by your provider or network administrator.
• IP Address
• Subnet Mask
• Default Gateway
• DNS Server (Primary)
• DNS Server (Secondary)
• WINS Server (Primary)
• WINS Server (Secondary)
2. Setting Up
Check that the wiring has correctly been finished.
2
- 50 -
Press [Close] on the following screen which is displayed after the setting is
4
updated.
Page 51

• Wait until updating the setting is complete.
• The screen switches automatically in about 7 seconds without pressing [Close].
2. Setting Up
E-mail Setting
E-mail setting is required when using “Scan To E-mail”, “Internet Fax”, and “Scan To Fax
Server”.
Before setting, fill in the “Checking the Setting Information
• Prepare an e-mail address specified for this machine. If you do not have an e-mail address that this machine uses,
obtain the e-mail address by making a contract with a provider or using other ways.
Network Settings” before using this function.
• Make “
• If you want to receive and print e-mail attachment files that are sent to the machine, select [POP3] or [SMTP] to suit
your e-mail setting environment.
• If you do not want to use functions which require e-mail settings, press [Skip>>] and go to
Check that the [6. E-mail Setting] screen is displayed, and then press [Next].
1
” with the required information.
Test Print.
The screen prompting you to enter the mail server address is displayed.
- 51 -
Page 52

2. Setting Up
Enter the mail server address and press [Next] on the touch panel.
2
Use the numeric keypad on the operator panel to enter the SMTP port and
3
press [Next].
Select SMTP Encryption.
4
Enter the sender's address and press [Next] on the touch panel.
5
- 52 -
Set the Reception Protocol.
6
Page 53

If [POP3] is selected, enter the POP3 server address.
Select Authentication method.
7
If [SMTP Auth] or [POP Before SMTP] is selected, enter the user name and password, and then press [Next].
Set whether to send a test mail.
8
To send a test mail, enter a destination address capable of receiving.
After updating the settings, press [Close].
9
2. Setting Up
- 53 -
The screen switches automatically in about 7 seconds without pressing [Close].
Page 54

Test P rint
If you do not want to print test page, press [Skip>>]. The Easy Setup is complete and the home screen appears.
Check that the [7. Print Test] screen is displayed, and then press [Next].
1
The Print Test screen is displayed.
Click [Print Test].
2
Press [Yes].
3
2. Setting Up
- 54 -
Page 55

Check that the menu map is printed, and then press [Close].
4
Press [Complete].
5
The Easy Setup is complete and the home screen appears.
2. Setting Up
You can change the settings from [Device Settings] > [Easy Setup] at the top of the home screen whenever you
want.
- 55 -
Page 56

2. Setting Up
Connecting to a Wireless LAN (Only When the Wireless LAN Module is Mounted)
Wireless LAN connection is disabled by default. To use the wireless LAN connection, enable
Wireless in the Admin Setup.
• Before Connecting to a Wireless LAN
• Enabling Wireless LAN Connection
• Connecting to an Access Point (Infrastructure)
• Setting up [Enabling Default Gateway]
• Connecting to the Machine Directly (AP mode)
Before Connecting to a Wireless LAN
• Wireless(Infrastructure) and Wireless(AP Mode) cannot be enabled at the same time.
• If the machine is used in a wireless network environment, the machine does not enter Deep Sleep mode but enters
Sleep mode.
• Do not place any electric products that emit weak radio waves (such as microwaves or digital cordless telephones)
close to the machine.
• The communication speed of a wireless LAN connection may be slower than that of a wired LAN or USB connection
depending on the environment. If you want to print big data such as a photo, it is recommended to print with a wired
LAN or USB connection.
Connecting to an Access Point
Before connecting this machine to a wireless LAN access point, check the following.
- 56 -
Check if your wireless LAN access point matches the following requirements.
1
Standards: IEEE 802.11 a/b/g/n
Access method: Infrastructure mode
Page 57

Check if the wireless LAN access point supports WPS.
2
If it does not support WPS, check the SSID and encryption key by referring to the
instruction manual that is included in the wireless LAN access point or other
documents.
• An SSID is also called a network name, ESSID or ESS-ID.
• An encryption key is also called a network key, security key, password, or Pre-shared Key.
Connecting to the Machine Directly
You can use the machine as a wireless access point to directly connect wireless devices
(computers, tablets, smartphones, etc.). Check the following.
Enabling Wireless LAN Connection
Check that the machine is turned on.
1
Press [Device Settings] at the top of the home screen.
2
2. Setting Up
Check if your wireless devices match the following requirements.
1
Standards: IEEE 802.11 b/g/n
Security: WPA2-PSK(AES)
Check if your wireless devices support WPS-PBC (push button).
2
If you are not sure that the device supports WPS-PBC, connect manually after turning on the machine.
- 57 -
Page 58
2. Setting Up
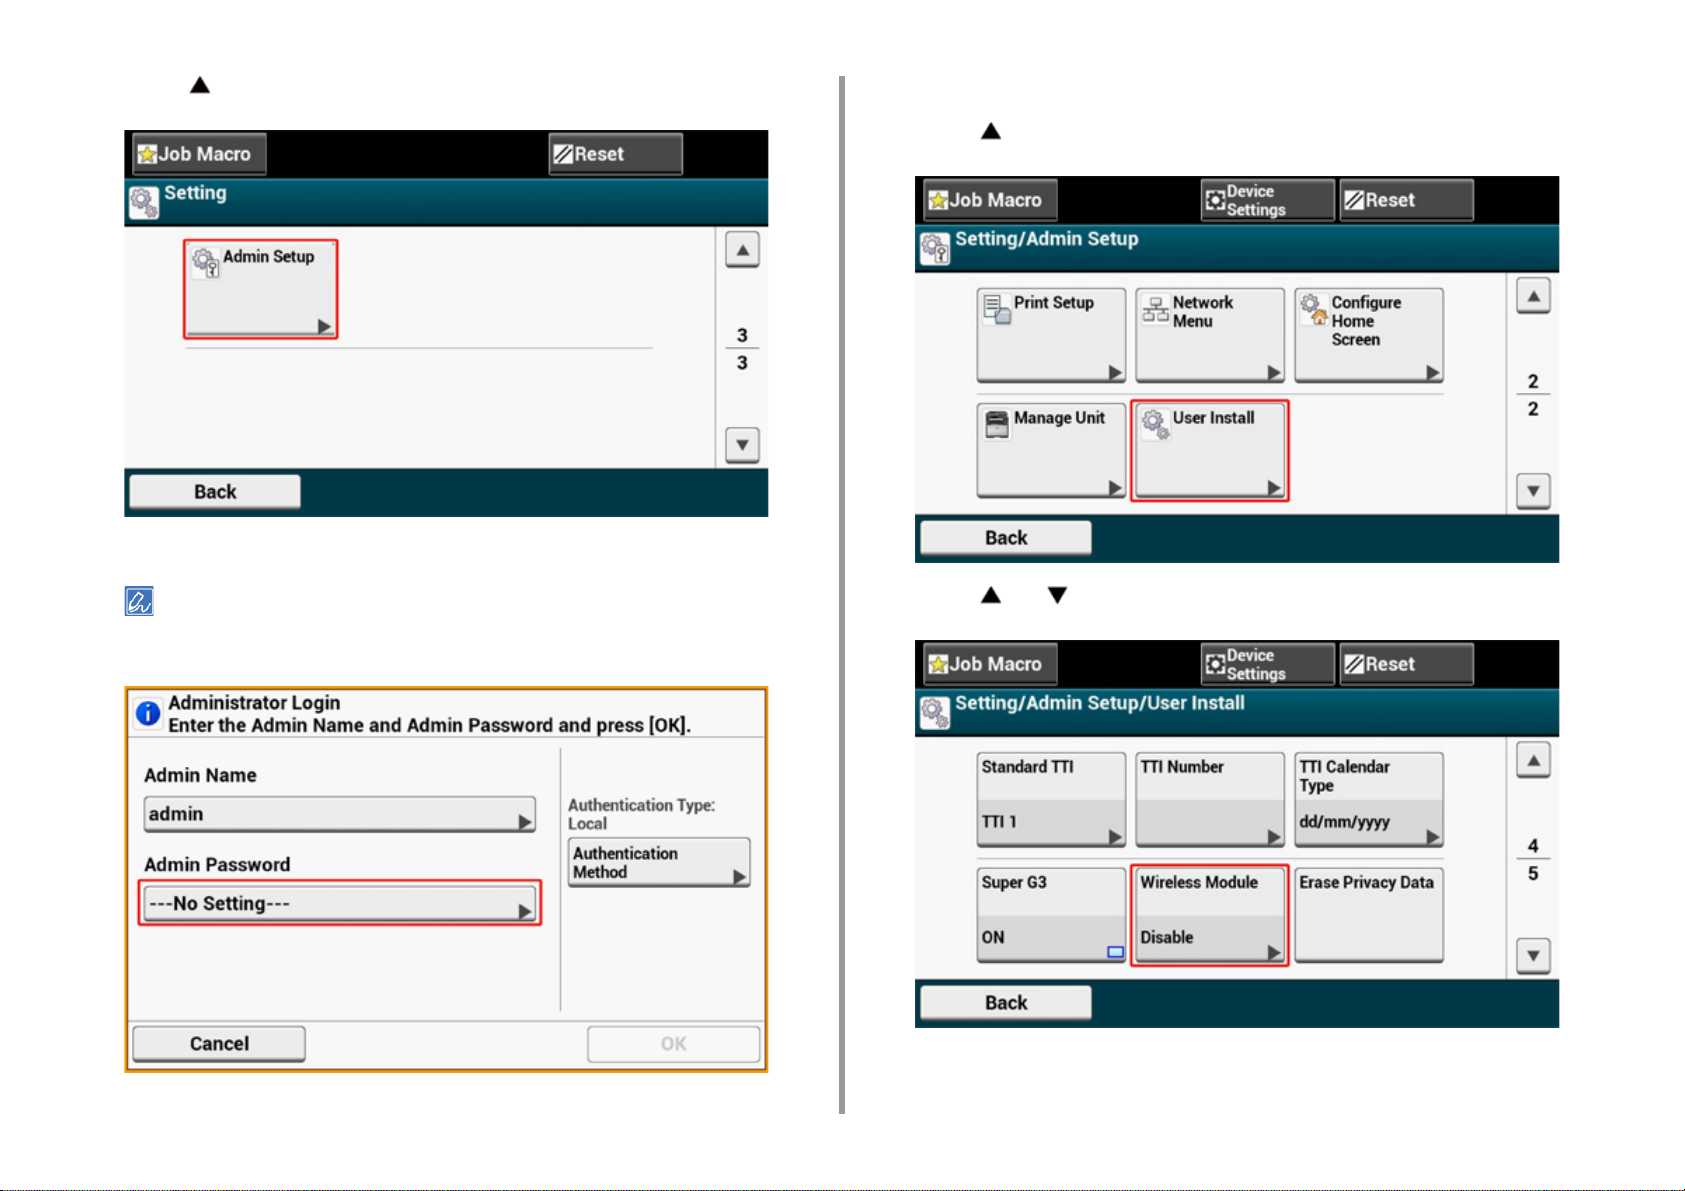
Press [ ] once and press [Admin Setup].
3
Enter the administrator password, and then press [OK].
4
The factory default administrator name and password are "admin" and "999999" respectively. If the administrator
password is changed in Easy Setup, enter the updated password.
On the administrator login screen, press [OK].
5
Press [ ] once and press [User Install].
6
Press [ ] or [ ] several times, and press [Wireless Module].
7
- 58 -
Page 59
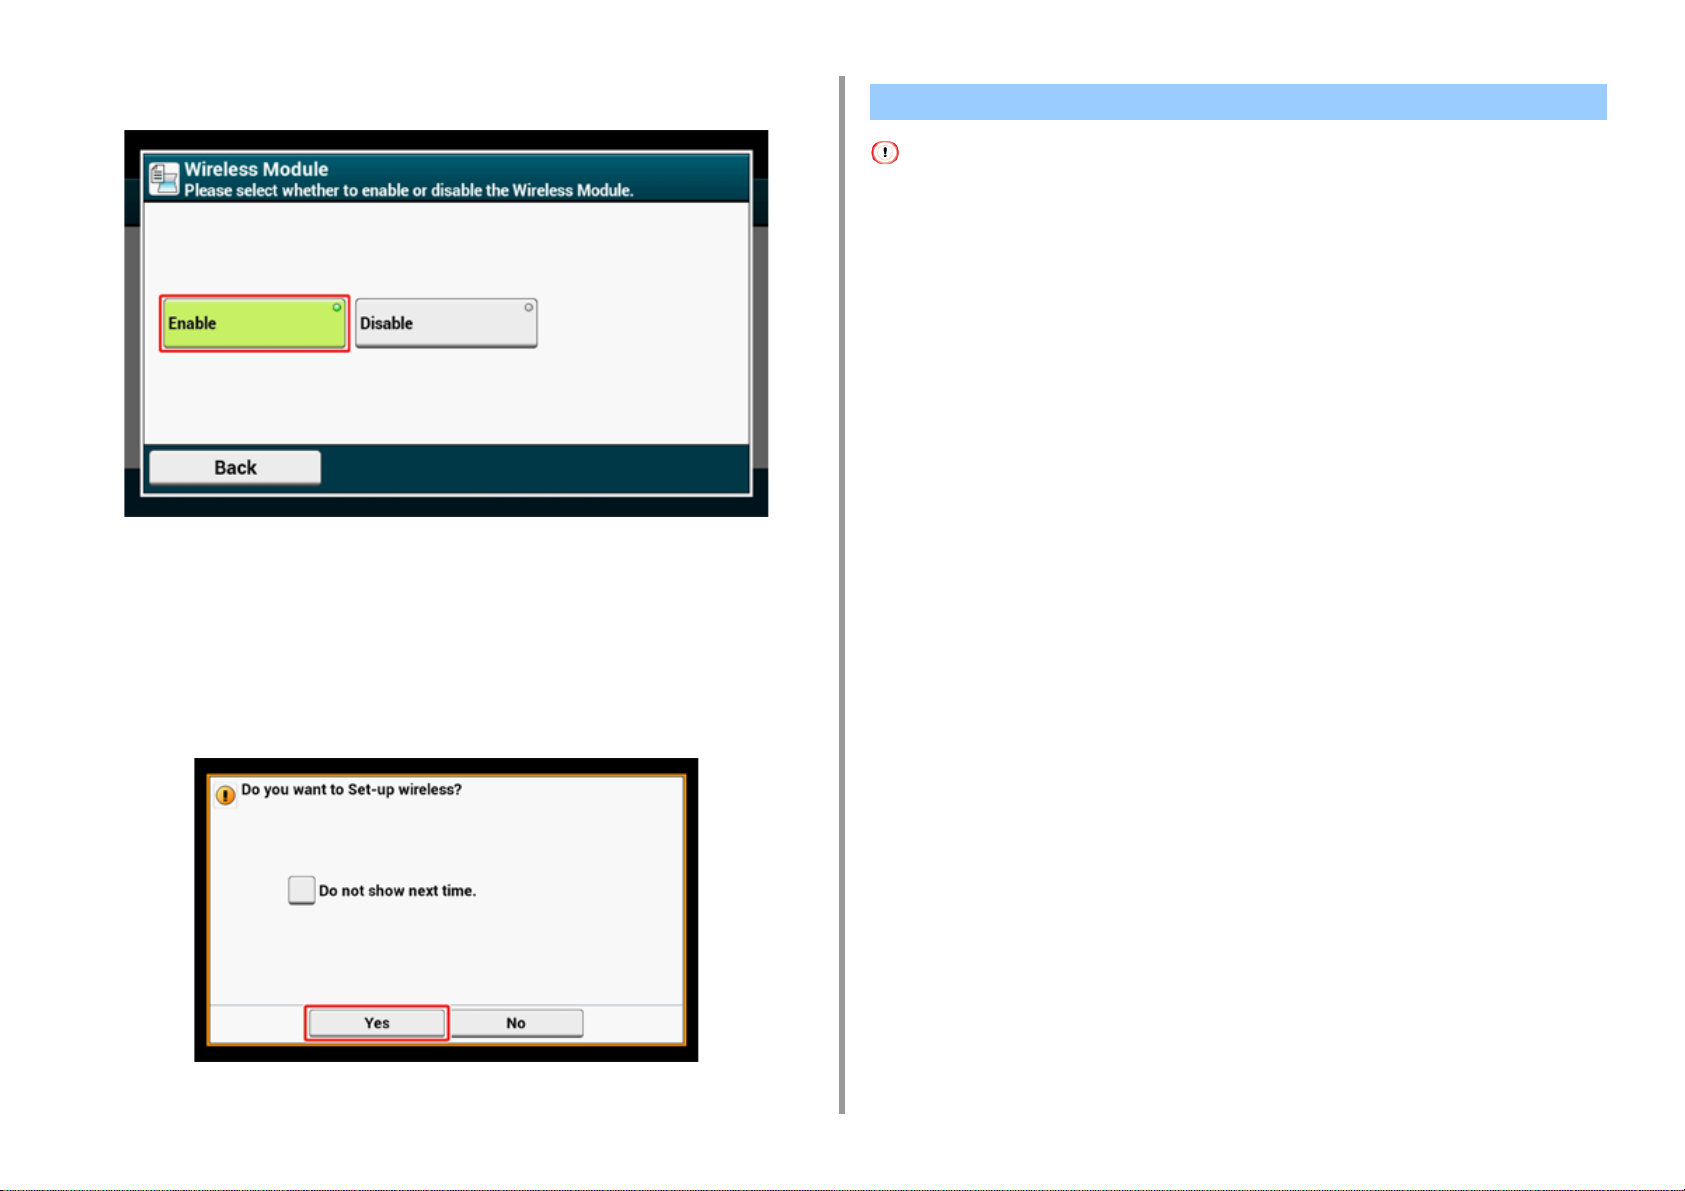
Press [Enable].
8
2. Setting Up
Connecting to an Access Point (Infrastructure)
• Install this machine in a place with a good view and near a wireless access point. (We suggest that the distance
between the machine and the wireless device be 30 m or less.)
• If there is metal, aluminum sash, or a reinforced concrete wall between the machine and wireless LAN access points,
connections may be harder to be established.
• Outdoor use of IEEE802.11a (W52/W53) is prohibited by the Radio Law. Use IEEE802.11a (W52/W53) only indoors.
• Connecting with WPS
If a wireless LAN access point supports WPS, you can connect to the wireless LAN with the
WPS button.
• Selecting a Wireless LAN Access Point from the Operator Panel to Connect
If a wireless access point does not support WPS, you can specify a wireless LAN access
point you want to use from the wireless LAN access points that the printer detects to
establish a connection.
Press [Back] until the home screen is displayed.
9
Press the power button to turn off the machine.
10
Press the power button to turn on the machine.
11
Press "Yes" if "Do you want to Set-up wireless?" is displayed on the touch
12
panel.
And then go to "Connecting to an Access Point (Infrastructure)".
• Setting from the Operator Panel Manually to Connect
Set the wireless LAN access point information (the SSID, encryption method, and
encryption key) manually to connect to the wireless LAN.
Connecting with WPS
If a wireless LAN access point supports WPS, you can easily connect to the wireless LAN
with the easy setup button (WPS button).
Connect by following the procedure below.
Check the position of the WPS button by referring to the instruction manual
1
that is included in a wireless LAN access point or other document.
Check that the wireless LAN access point starts and is operating properly.
2
Turn on the machine.
3
- 59 -
Page 60

If the following screen is displayed, press [Yes], and then proceed to step 6.
Press [Device Settings] on the touch panel.
4
Press [ ] once and press [Wireless(Infrastructure) Setting].
5
The following message is displayed for approximately 5 seconds.
Press [Enable].
7
2. Setting Up
Enter the administrator name and password and press [OK].
6
The factory default administrator name and password are "admin" and "999999"
respectively.
- 60 -
Page 61

If your environment requires to set IP address, etc. manually, press [Network
8
Setting]. If you do not need to set manually, go to step 12.
Press [Manual] on the [Wireless (infrastructure) settings] screen.
9
Ask your provider or network administrator about the setting value.
Press [Close] when the Wireless (infrastructure) settings are complete.
11
The screen switches automatically in a while without pressing [Close].
Press [Automatic setup (WPS)].
12
2. Setting Up
Follow the onscreen instructions to set the IP address, subnet mask, default
10
gateway, and DHCP v6.
- 61 -
Page 62

2. Setting Up
Press [WPS-PBC].
13
Press [Yes].
14
The machine starts searching for wireless LAN access points. The following screen is
displayed for approximately 2 minutes, during which press and hold the WPS button for
the wireless LAN access point for a few seconds.
You cannot operate the panel when WPS is in progress.
When the following screen is displayed, press [Close].
- 62 -
Page 63
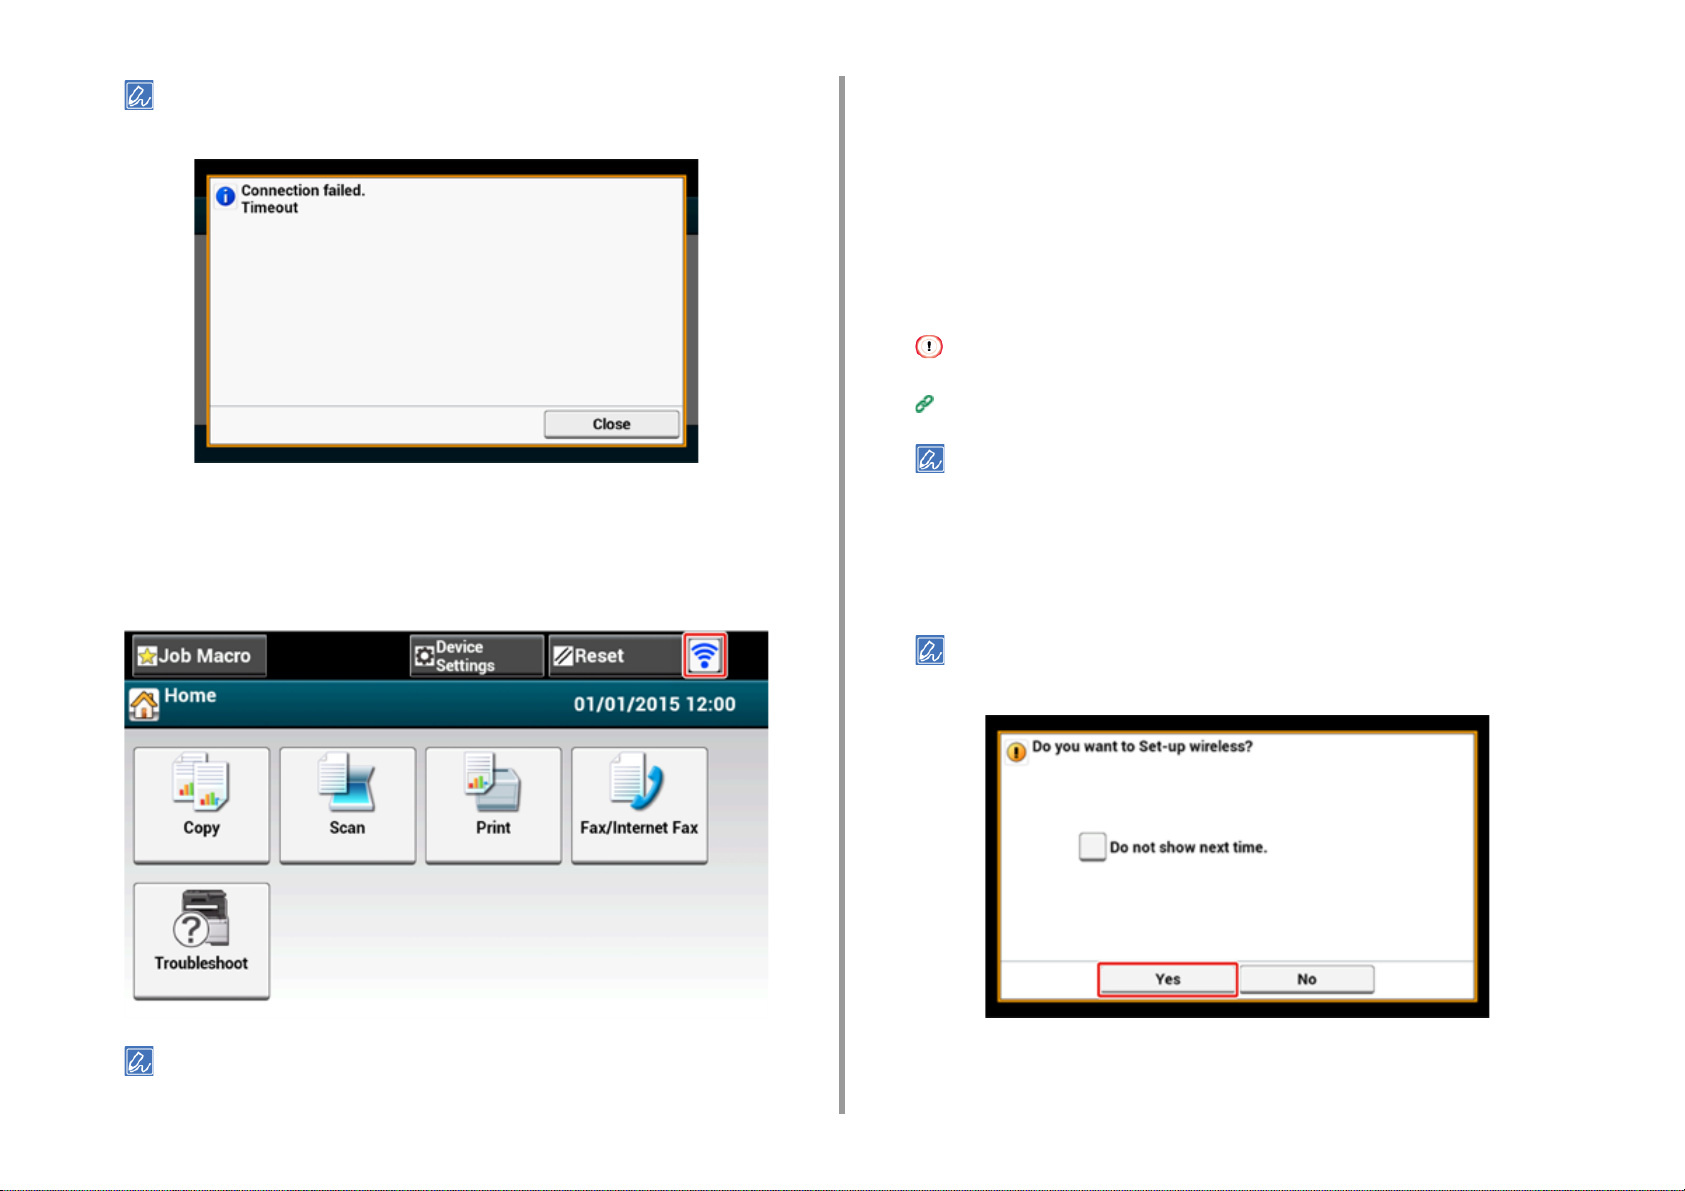
2. Setting Up
Selecting a Wireless LAN Access Point from the Operator Panel to Connect
• If the following screen is displayed, repeat the procedure from step 13.
• [Overlap] is displayed when multiple WPS push buttons are pressed almost at the same time at two or more
wireless LAN access points and connection is not established. Wait for a while, and then try again.
If the antenna mark is displayed at the top right of the home screen, the
15
connection is established correctly.
If a wireless LAN access point does not support WPS, you can specify a wireless LAN
access point you want to use from the wireless LAN access points that the machine detects
to establish a connection. In such a case, you must enter an encryption key.
Check the SSID and encryption key by referring to the instruction manual that
1
is included in a wireless LAN access point or other documents, and write the
information down.
WPA-EAP and WPA2-EAP cannot be set on the touch panel. Set them from the Web page of this machine.
Open the Web Page of This Machine (Advanced Manual)
• An SSID is also called a network name, ESSID or ESS-ID.
• An encryption key is also called a network key, security key, password or Pre-shared Key.
Check that the wireless LAN access point starts and is operating properly.
2
Turn on the machine.
3
If the following screen is displayed, press [Yes], and then proceed to step 6.
The antenna mark may not be displayed on some screens such as the copy top screen.
- 63 -
Press [Device Settings] on the touch panel.
4
Page 64

2. Setting Up
Press [ ] once and press [Wireless(Infrastructure) Setting].
5
Enter the administrator name and password and press [OK].
6
The factory default administrator name and password are "admin" and "999999"
respectively.
The following message is displayed for approximately 5 seconds.
Press [Enable].
7
If your environment requires to set IP address, etc. manually, press [Network
8
Setting]. If you do not need to set manually, go to step 12.
- 64 -
Page 65

Press [Manual] on the [Wireless (infrastructure) settings] screen.
9
Follow the onscreen instructions to set the IP address, subnet mask, default
10
gateway, and DHCP v6.
The screen switches automatically in a while without pressing [Close].
Press [Wireless Network Selection].
12
2. Setting Up
Ask your provider or network administrator about the setting value.
Press [Close] when the Wireless (infrastructure) settings are complete.
11
The machine starts searching for wireless LAN access points. Wait for a while.
- 65 -
Page 66

2. Setting Up
Select a wireless LAN access point to connect, and then press [Select].
13
If only [Manual Setup] is displayed, or the SSID of the wireless LAN access point you want to use is not included
in the list, set by following the procedure in "
The encryption key entry screen that is suitable for the encryption method of the selected wireless LAN access
point is displayed.
Setting from the Operator Panel Manually to Connect".
Item Description
Security Disable
Encryption key No entry is required.
If the displayed SSID is the same as the SSID that you checked in step 1,
15
press [Yes].
When "Connection successful." is displayed, press [Close].
If "Connection failed." is displayed, repeat the procedure from step 5.
Enter the encryption key that you checked in step 1, and then press [OK].
14
The encryption key varies depending on the wireless LAN access point or security.
If the [WPA Pre-shared Key] is displayed
•
Item Description
Security WPA/WPA2-PSK
Encryption key Enter the Pre-shared Key.
•
If [WEP Key] is displayed
Item Description
Security WEP
Encryption key Enter the WEP key.
•
If neither of the above two cases is applied
- 66 -
Page 67

If the antenna mark is displayed at the top right of the touch panel, the
16
connection is established correctly.
• An SSID is also called a network name, ESSID, or ESS-ID.
• An encryption key is also called a network key, security key, password, or Pre-shared Key.
Check that the wireless LAN access point starts and is operating properly.
2
Turn on the machine.
3
If the following screen is displayed, press [Yes], and then proceed to step 6.
2. Setting Up
The antenna mark may not be displayed on some screens such as the copy top screen.
Setting from the Operator Panel Manually to Connect
Set the wireless LAN access point information (the SSID, encryption method and encryption
key) manually to connect to the wireless LAN.
Check the SSID, encryption key, and security by referring to the instruction
1
manual that is included in a wireless LAN access point or other documents,
and write the information down.
If the encryption method is WPA-EAP and WPA2-EAP, set from the Web page of this machine.
For details, open the Web page of this machine and click [Admin Setup] > [Network] > [Wireless Setting] >
[Manual Setup].
Open the Web Page of This Machine (Advanced Manual)
- 67 -
Press [Device Settings] on the touch panel.
4
Page 68

2. Setting Up
Press [ ] once and press [Wireless(Infrastructure) Setting].
5
Enter the administrator name and password and press [OK].
6
The factory default administrator name and password are "admin" and "999999"
respectively.
The following message is displayed for approximately 5 seconds.
Press [Enable].
7
If your environment requires to set IP address, etc. manually, press [Network
8
Setting]. If you do not need to set manually, go to step 12.
- 68 -
Page 69

Press [Manual] on the [Wireless (infrastructure) settings] screen.
9
Follow the onscreen instructions to set the IP address, subnet mask, default
10
gateway, and DHCP v6.
The screen switches automatically in a while without pressing [Close].
Press [Wireless Network Selection].
12
2. Setting Up
Ask your provider or network administrator about the setting value.
Press [Close] when the Wireless (infrastructure) settings are complete.
11
- 69 -
Page 70

2. Setting Up
The machine starts searching for wireless LAN access points. Wait for a while.
Press [Manual Setup].
13
Select the encryption method that you checked in step 1, and then press
15
[Next].
The encryption key varies depending on the wireless LAN access point or security.
The procedure depends on the encryption method you selected in step 15.
16
If you selected [WPA/WPA2-PSK], select [TKIP/AES], and then press [Next]. Enter the
Pre-shared Key afterward and select [Next].
If you selected [WPA2-PSK], select [AES], and then press [Next]. Enter the Pre-shared
Key afterward and select [Next].
If you selected [WEP], enter the WEP Key, and press [Next].
Enter the SSID that you checked in step 1, and then press [Next].
14
The SSID is case sensitive. Enter the SSID correctly.
- 70 -
Page 71

If the displayed content is the same as that you checked in step 1, press [Yes].
17
It takes approximately 30 seconds for the machine to detect the wireless LAN access point.
When the screen indicates that connection is established, press [Close].
If the screen indicates that connection failed, press [Close] and go back to step 5.
If the antenna mark is displayed at the top right of the touch panel, the
18
connection is established correctly.
2. Setting Up
The antenna mark may not be displayed on some screens such as the copy top screen.
• If the wireless LAN connection is unstable
If the wireless LAN connection is unstable, read the cautions in "
to a Wireless LAN
LAN access point. If you cannot find a solution even after reading the cautions,
bring the machine and the wireless LAN access point close to each other.
", and then change the positions of the machine and wireless
Before Connecting
- 71 -
Page 72

Setting up [Enabling Default Gateway]
To use a wired LAN and wireless LAN simultaneously, only interfaces whose default gateway
is enabled can communicate with devices out of the segment.
Set only when communicating with the device outside of the segment using a wireless LAN.
[Enabling Default Gateway] is set to [Wired] by the factory default. If the machine is connected to the network using a
LAN cable, you do not need this operation.
Check that the machine is turned on.
1
Press [Device Settings] at the top of the home screen.
2
Press [ ] once and press [Admin Setup].
3
Enter the administrator password, and then press [OK].
4
2. Setting Up
- 72 -
The factory default administrator name and password are "admin" and "999999" respectively. If the administrator
password is changed in Easy Setup, enter the updated password.
Page 73

2. Setting Up
On the administrator login screen, press [OK].
5
Press [ ] once and press [Network Menu].
6
Press [Network Setup].
7
Press [Network Setting].
8
Press [Enabling Default Gateway].
9
[Enabling Default Gateway] is set to [Wireless(Infrastructure)].
- 73 -
Pressing [Enabling Default Gateway] switches between [Wired] and [Wireless(Infrastructure)].
Page 74

Press [Back] until the home screen is displayed.
10
2. Setting Up
Connecting to the Machine Directly (AP mode)
Wireless LAN (AP mode) directly connects wireless devices (computers, tablets,
smartphones, etc.) to the machine without using a wireless LAN access point.
• If there is metal, aluminum sash, or a reinforced concrete wall between the machine and wireless devices,
connections may be harder to be established.
• Up to four devices can be connected to the machine via the wireless LAN (AP mode). The fifth device will be rejected.
• Automatic connection (push-button)
If your wireless devices support WPS-PBC (push button), you can connect them to the
machine with the WPS button.
• Manual Setup
If your wireless devices do not support WPS-PBC (push button), you can enter [SSID] and
[Password] of the machine in your wireless devices to connect to the wireless LAN (AP
mode).
Automatic connection (push-button)
If your wireless devices support WPS-PBC (push button), you can connect them to the
machine with the WPS button.
Confirm the position of the WPS button on your wireless device by the manual
1
attached to the device.
Turn on the machine.
2
If the "Do you want to Set-up wireless?" message appears, select the [Do not show next time.] check box, and
then press [No].
Press [Device Settings] on the touch panel.
3
Press [Admin Setup].
4
Enter the administrator name and password and press [OK].
5
The factory default administrator name and password are "admin" and "999999"
respectively.
- 74 -
Page 75
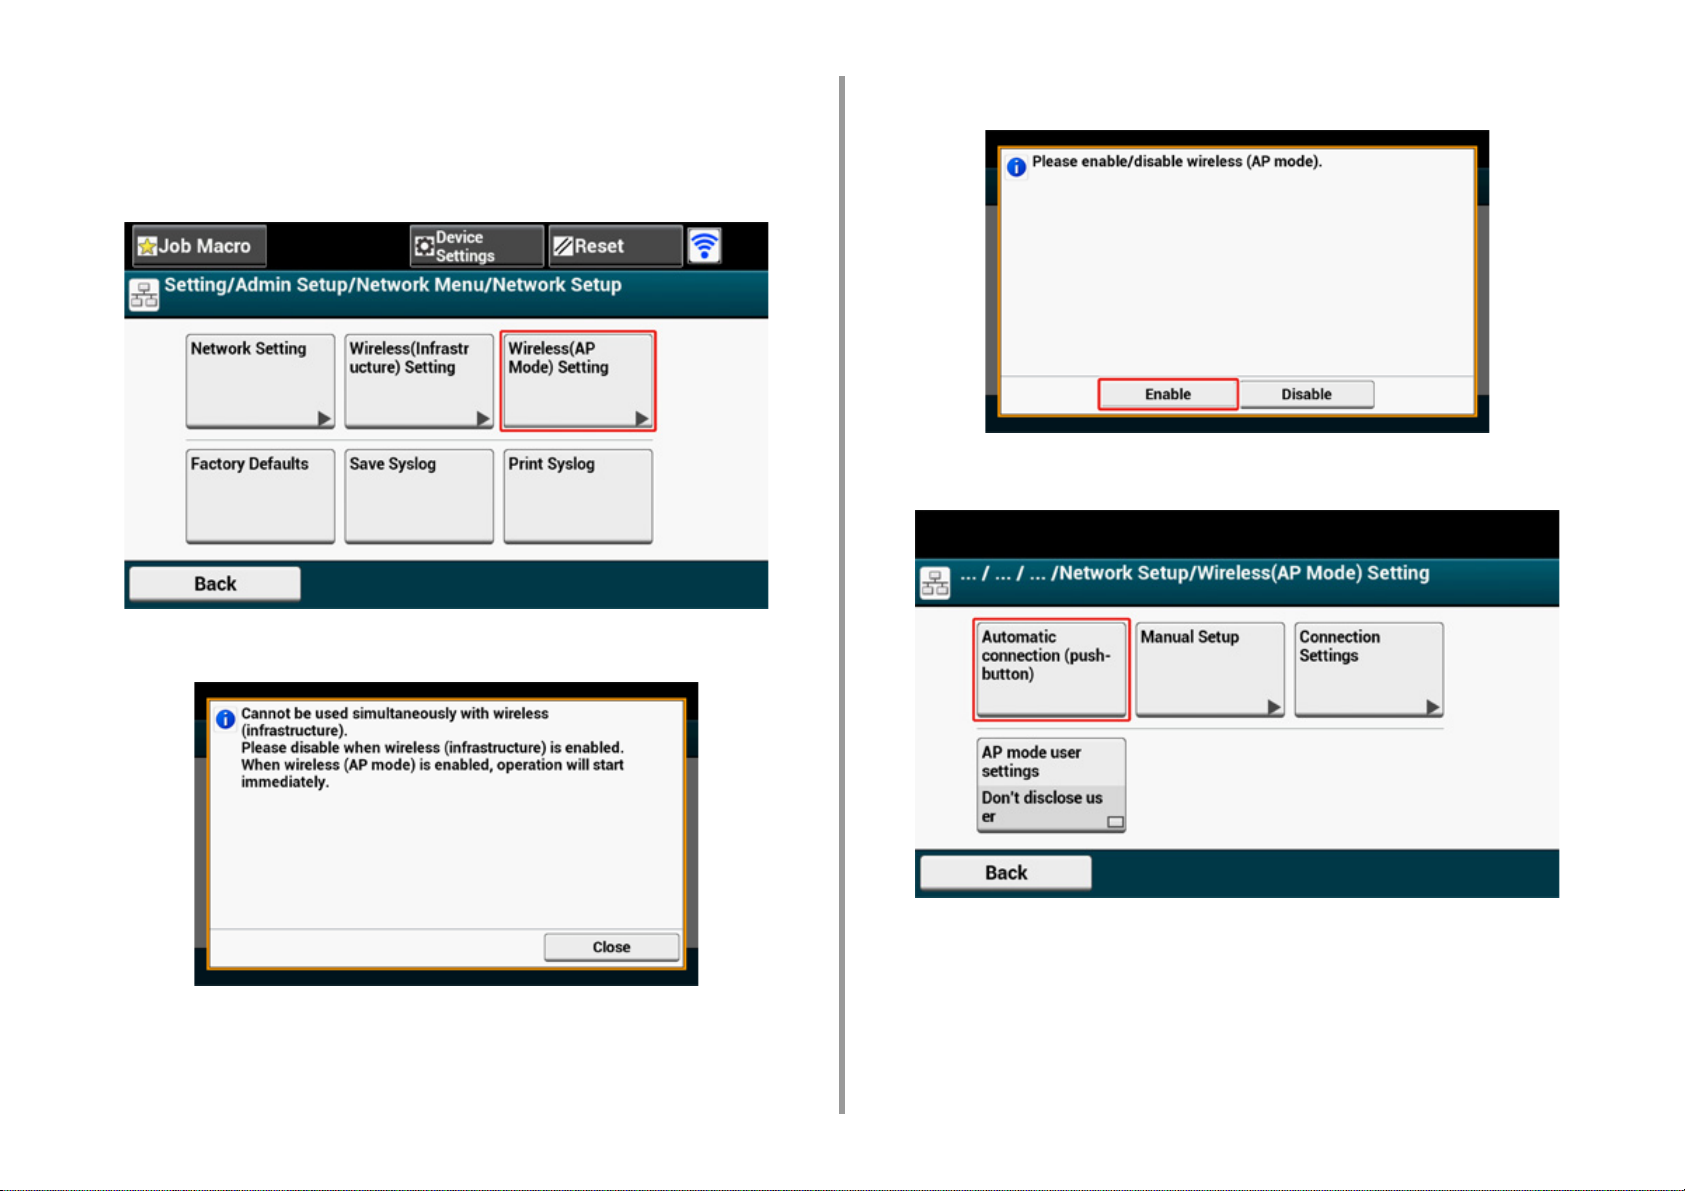
2. Setting Up
Press [Network Menu].
6
Press [Network Setup].
7
Press [Wireless(AP Mode) Setting].
8
The message below is displayed for about five seconds.
Press [Enable].
9
Press [Automatic connection (push-button)].
10
- 75 -
Page 76

2. Setting Up
Press [Yes].
11
Start the WPS-PBC (push button) operation on your wireless device to
12
connect to the machine.
When the following screen appears, the setup of the wireless LAN is completed.
Turn on the machine.
1
If the "Do you want to Set-up wireless?" message appears, select the [Do not show next time.] check box, and
then press [No].
Press [Device Settings] on the touch panel.
2
Press [Admin Setup] on the touch panel.
3
Enter the administrator name and password and press [OK].
4
The factory default administrator name and password are "admin" and "999999"
respectively.
Press [Network Menu].
5
Press [Network Setup].
6
Press [Wireless(AP Mode) Setting].
7
In case of connection failure, follow the steps in "Manual Setup" to try again.
Manual Setup
If your wireless devices do not support WPS-PBC (push button), you can enter [SSID] and
[Password] of the machine in your wireless devices to connect to the wireless LAN.
- 76 -
Page 77
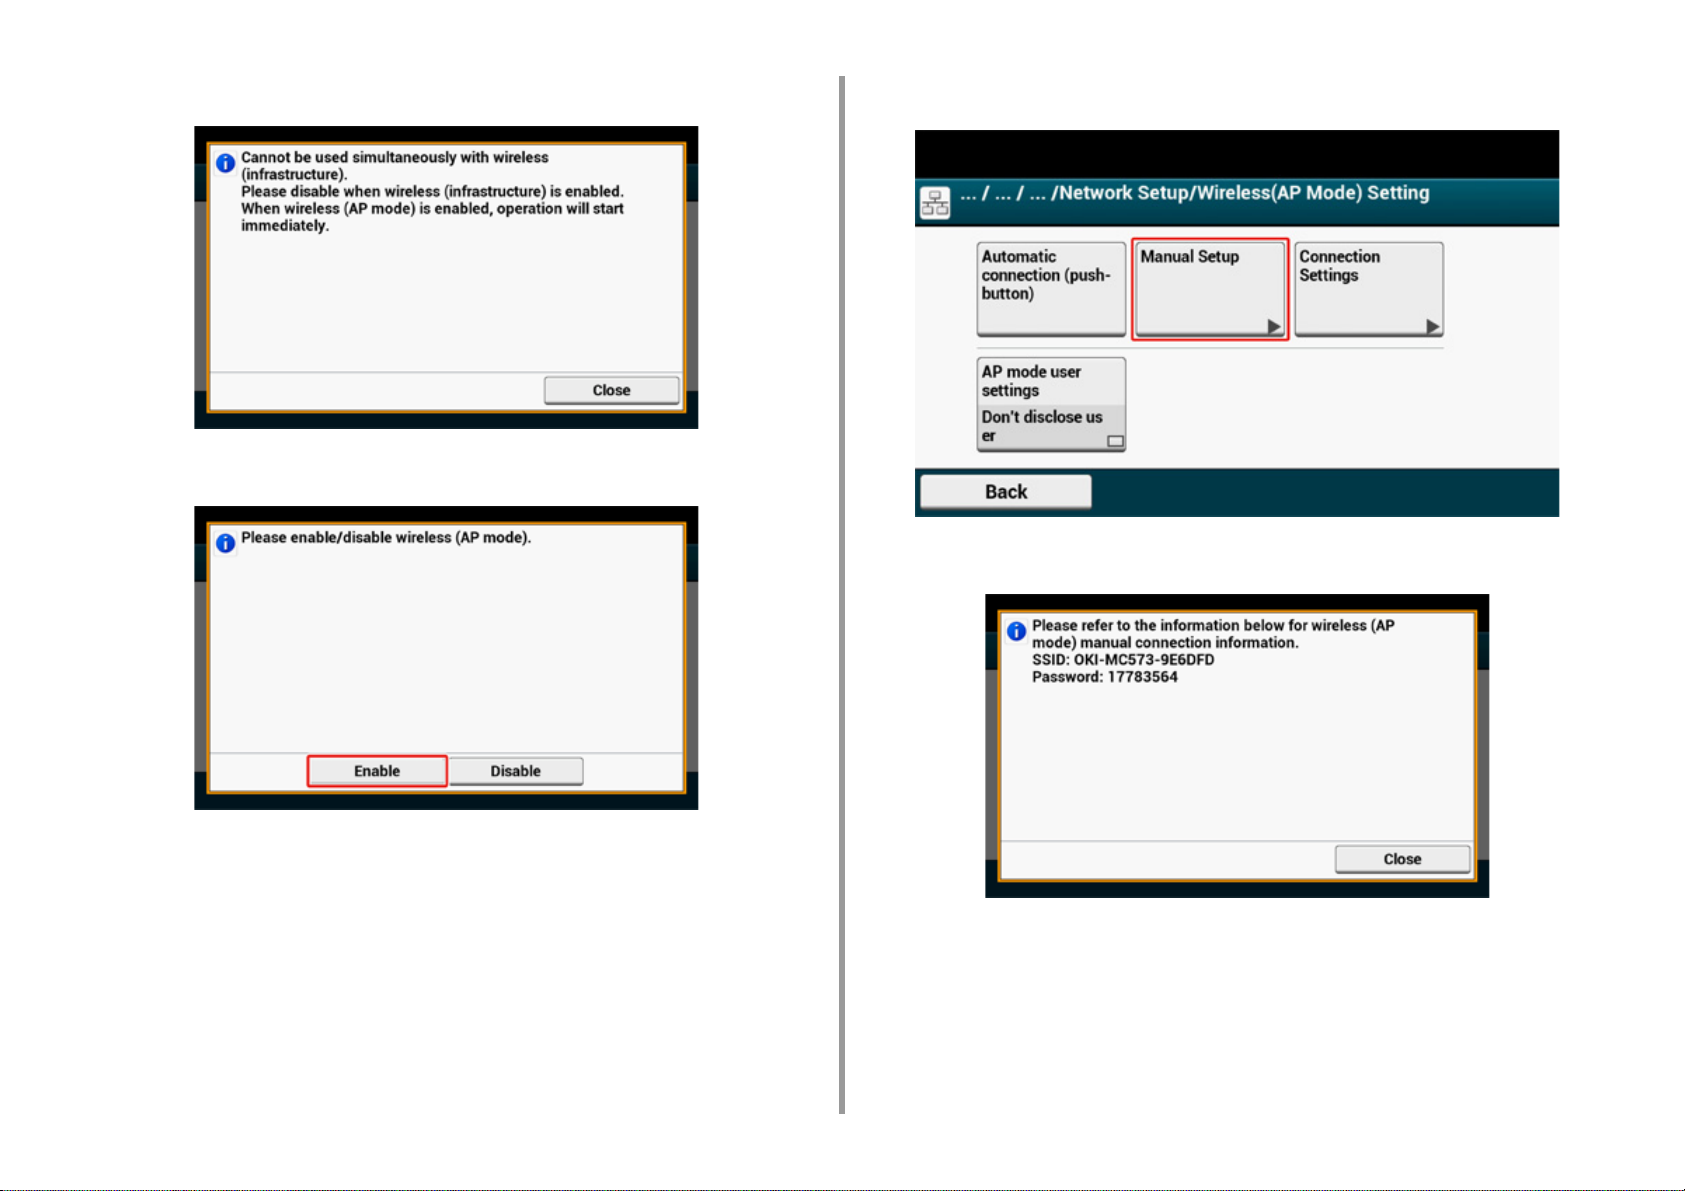
2. Setting Up
The message below is displayed for about five seconds.
Press [Enable].
8
Press [Manual Setup].
9
Check the [SSID] and [Password] of the machine.
10
- 77 -
Enter the [SSID] and [Password] that you checked in step 10 to connect the
11
machine and your wireless device.
Page 78

2. Setting Up
Installing a Driver and Software to a Computer
Install the printer driver, scanner driver, fax driver, etc. from the "Software DVD-ROM" to the
computer.
Other utility software can be installed at the same time.
• For Windows
• For Mac OS X
For Windows
Connect the machine and computer via a network or USB cable and start installing.
Check the status of this machine before installing.
• This machine is turned on.
• For network connection, this machine is connected to the network via a LAN cable and required information such as
IP address is already set.
Insert the included "Software DVD-ROM" into a computer.
1
When [Auto Play] is displayed, click [Run setup.exe].
2
- 78 -
If the [User Account Control] dialog is displayed, click [Yes].
Select a language from the drop-down list.
3
Read the license agreement, and then click [Accept].
4
Read [Environment advice], and then click [Next].
5
Page 79
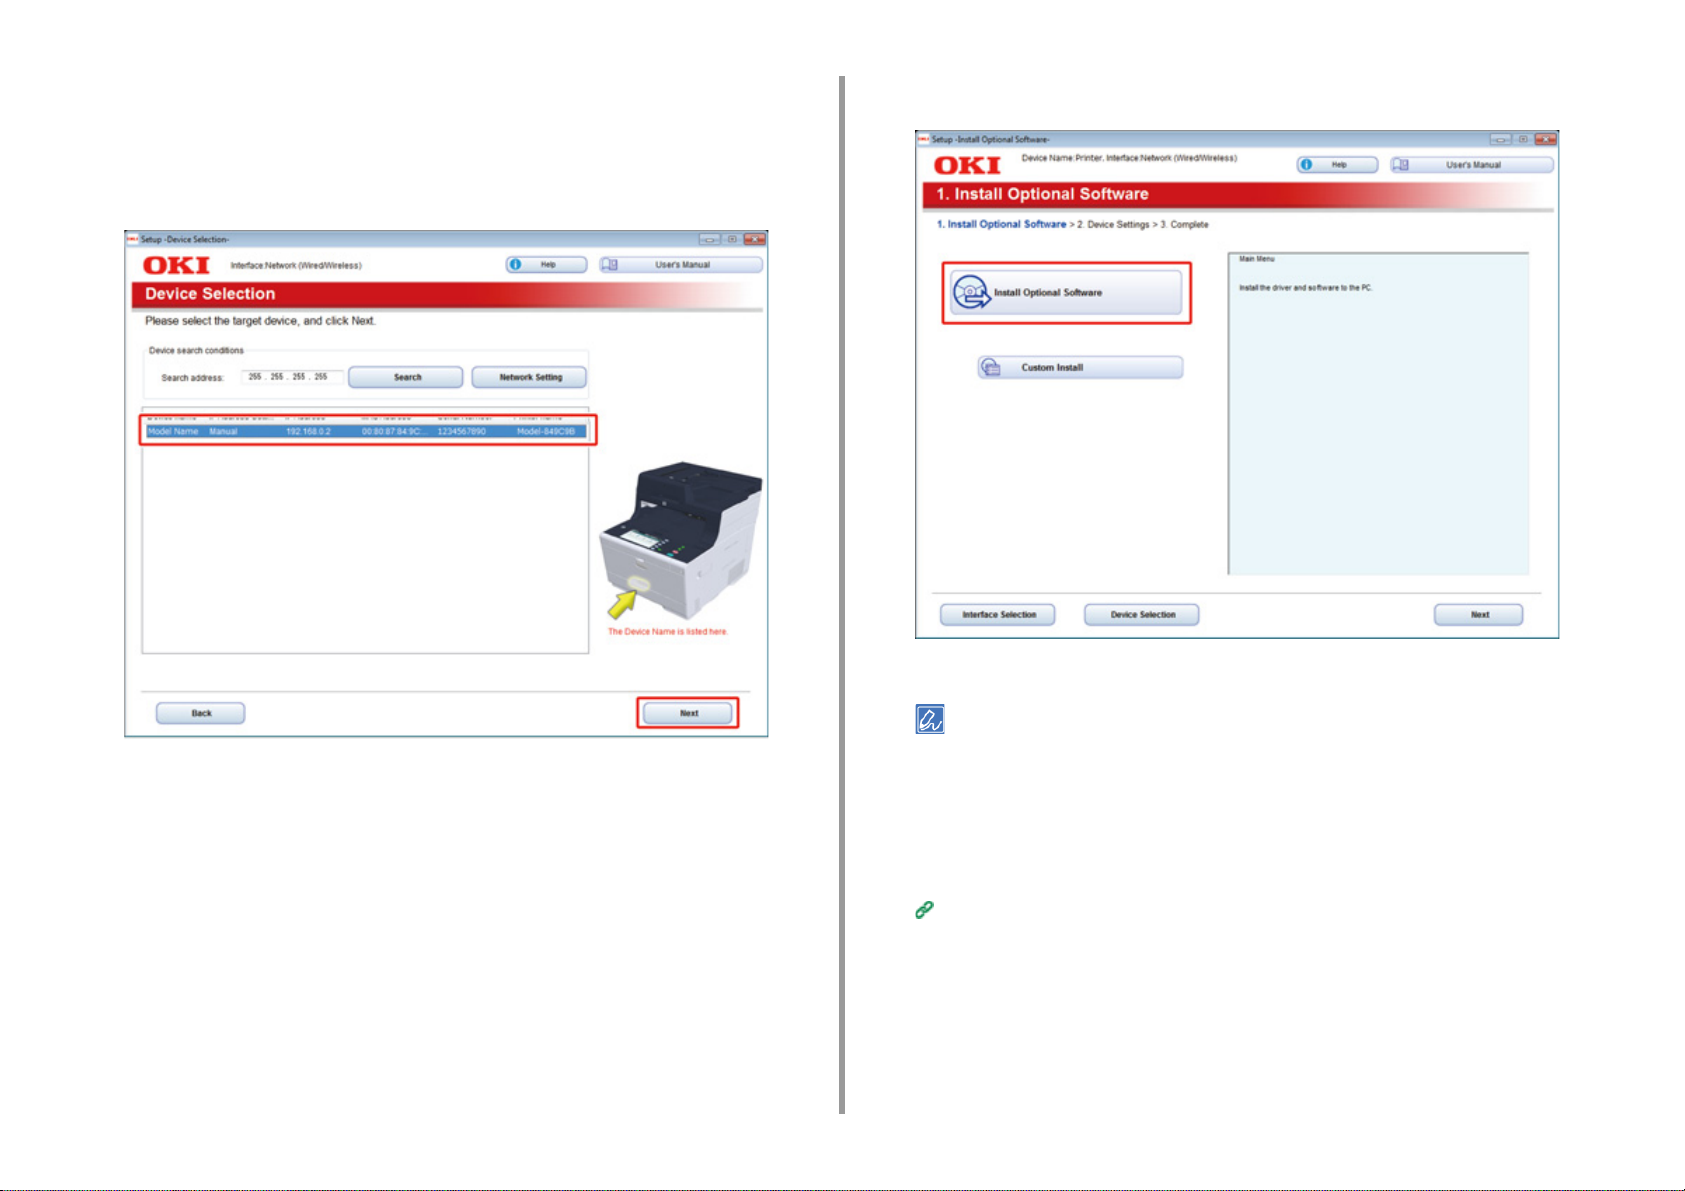
2. Setting Up
Select [Network] or [USB connection] in accordance to the connection method
6
of the machine and computer, and then click [Next].
If the [Windows Security Alert] dialog is displayed, click [Allow access].
Select the model name of the machine, and then click [Next].
7
Click [Install Optional Software].
8
- 79 -
Installation starts.
The following software is installed.
• PCL6 Printer Driver (Including Network Extension and Color Swatch Utility)
• Scanner Driver
•ActKey
•FAQ
Install other software from Custom Install.
Installing Software (Advanced Manual)
Make sure that the software is successfully installed, and then click [Printing
9
Te st ] .
Select the printer for test printing, and the click [Printing Test].
Make sure that the test printing was successful, and then click [OK].
Page 80

2. Setting Up
Click [Complete].
10
Click [Next].
11
- 80 -
If the following dialog is displayed, click [Yes].
Page 81
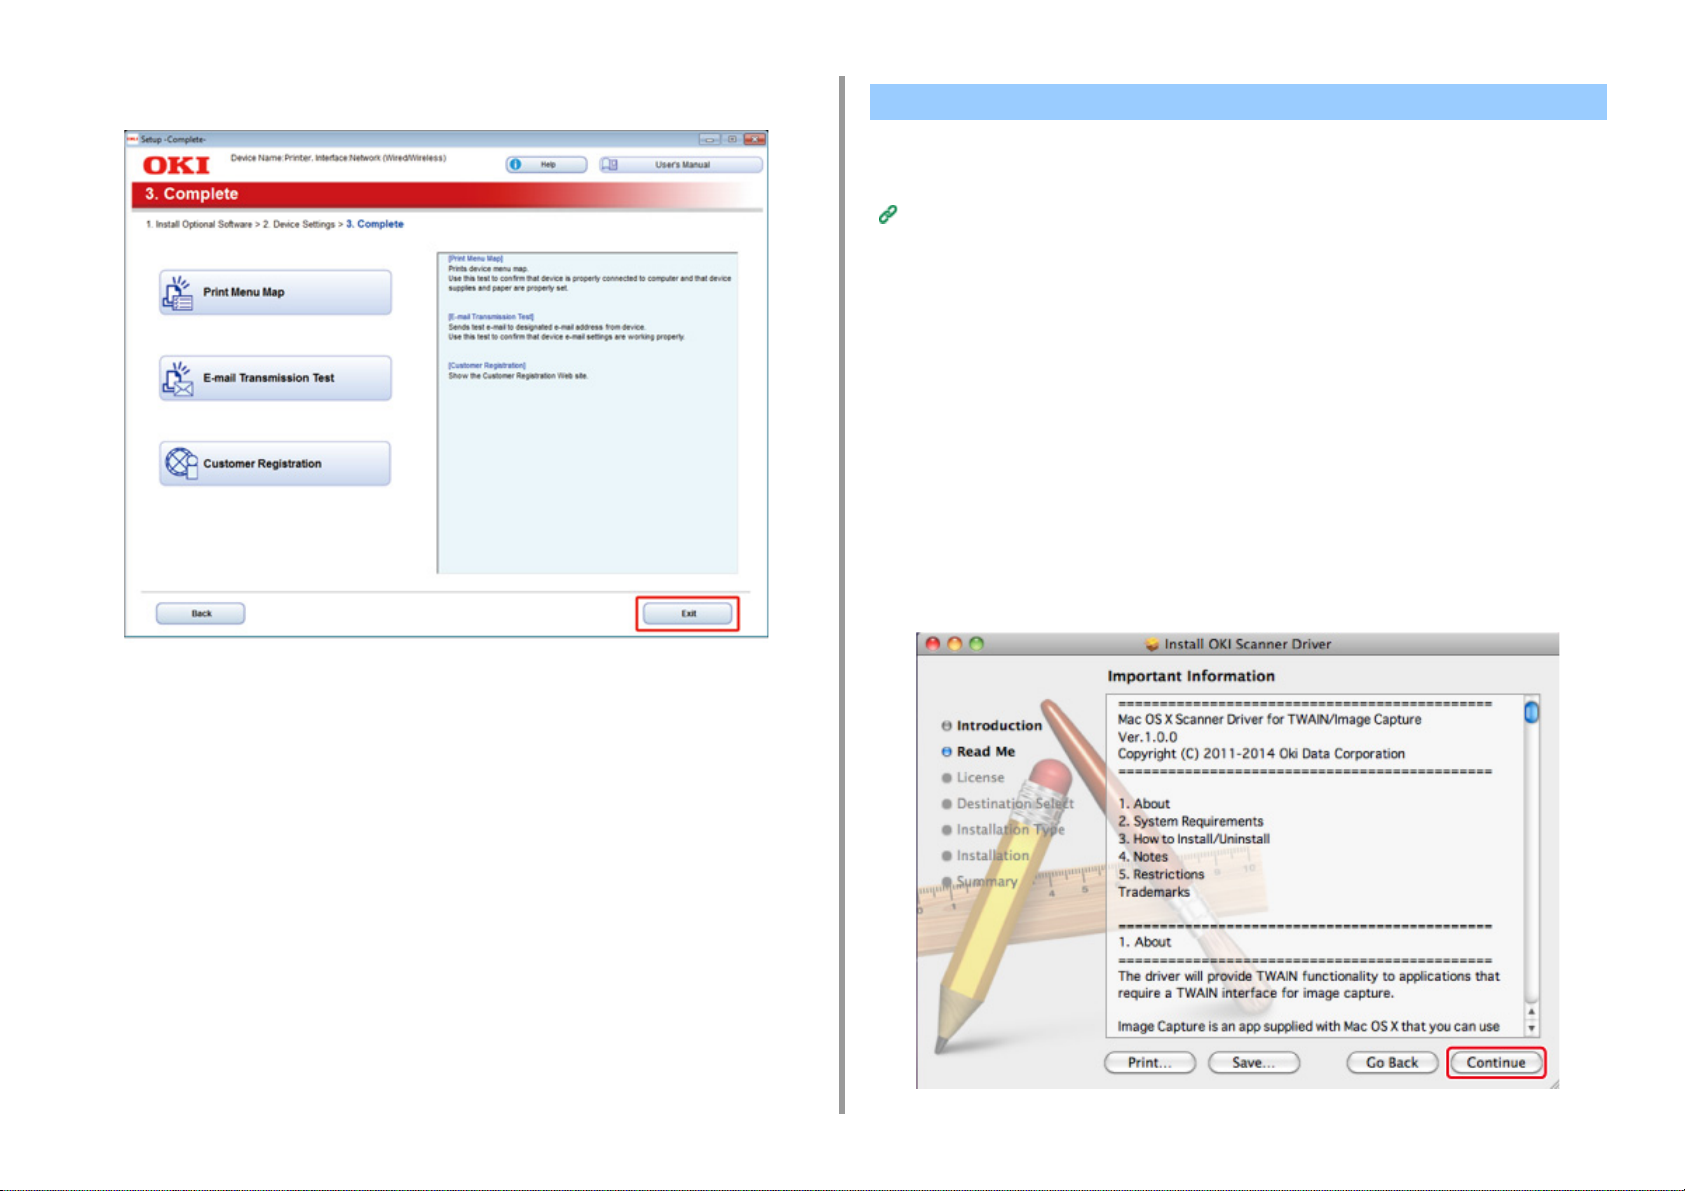
12
Click [Exit].
For Mac OS X
This section describes how to install the PS printer driver and scanner driver.
For installation of utilities, see the following.
Installing Software (Advanced Manual)
• Install the Mac OS X scanner driver
Make sure that the machine and a computer are connected and the machine
1
is turned on, and then insert the included "Software DVD-ROM" into the
computer.
Double-click the [OKI] icon on the desktop.
2
[Drivers] > [Scanner] > Double-click [Installer for OSX].
3
Click [Continue].
4
Check that the displayed content, and then click [Continue].
5
2. Setting Up
- 81 -
Page 82

2. Setting Up
Read the license agreement, and then click [Continue].
6
Click [Agree].
7
Click [Install].
8
To change the driver installation location, click [Change Install Location].
Click [Restart].
11
Enter the administrator name and password, and then click [Install Software].
9
Click [Continue Installation].
10
• Install the Mac OS X PS printer driver
When the installation is complete, print a test page in step 15.
Make sure that the machine and a computer are connected and the machine
1
is turned on.
Insert the "Software DVD-ROM" into a computer.
2
Double-click the [OKI] icon on the desktop.
3
[Drivers] > [PS] > Double-click [Installer for OSX].
4
Enter the administrator password, and then click [OK].
5
Follow the on-screen instructions to complete the installation.
Select [System Preferences] from the Apple menu.
6
Click [Printers & Scanners].
7
- 82 -
Page 83

Click [+].
8
Select [Add Printer or Scanner...] when the menu is displayed.
2. Setting Up
To change the name, enter a new name into [Name:].
Click [Default].
9
Select the machine, and then select [OKI MC573 PS] in [Use].
10
Types of Names Displayed in the Connection Methods List
Network OKI-MC573 (last 6 digits of MAC address) Bonjour
USB OKI DATA CORP MC573 USB
- 83 -
Click [Add].
11
If the confirmation screen for optional equipment appears, click [OK].
12
Page 84

Make sure that the machine is added to [Printers] and [OKI MC573 PS] is
13
displayed for [Kind].
2. Setting Up
If [OKI MC573 PS] is not displayed for [Kind] correctly, click [-], delete the machine from [Printers], and then newly
perform steps 8 to 12.
Click [Open Print Queue...].
14
Select [Print Test Page] from the [Printer] menu.
15
- 84 -
Page 85

3
Basic Operations
Names of Components
Basic Operations on the Operator Panel
Turning On or Off the Machine
Loading Paper
Setting a Document
This section describes basic operations of this machine.
Page 86

3. Basic Operations
Names of Components
The chapter describes the name of each component.
• Front View
• Rear View
• Inside of the machine
Front View
Symbol Name Description
a Auto document feeder (ADF) Automatically feed document on the document tray
to the scanner unit.
b Document tray Use this to read several sheets of document
automatically.
c Scanner unit Scans document automatically.
d Operator panel
Basic Operations on the Operator Panel
e USB port Port to insert a USB memory.
f MP tray (Multipurpose tray) Envelopes and various sizes and thicknesses of
g Open button Press this button to unlock when opening the output
h Paper supporter Draw this supporter when setting long size paper in
i Envelope lever Use this when printing on envelopes. For
This is the panel to operate the printer.
You can find touch panel and operation buttons on
the panel.
paper can be printed.
tray.
the MP tray.
instructions, refer to "Printing on Envelopes
(Advanced Manual)".
- 86 -
Page 87

Rear View
3. Basic Operations
Symbol Name Description
j Document glass Load document unable to set on the document tray.
k Document glass cover Cover which holds document set on the document
glass.
l Wireless LAN module cover Cover for installation part of the wireless LAN
module.
Symbol Name Description
m Output tray Printouts are stocked here.
Open when changing consumables.
n Tray 1 Load paper to be printed on.
Symbol Name Description
a Telephone connector Insert the cable of the external telephone when
using the fax.
b LINE connector Insert the supplied telephone cable when using the
fax.
c Rear output tray Open this when printing on thick paper, envelopes,
etc. Paper will be output with the printed side up.
d Power connector Insert the supplied power code.
e Interface connector cover Covers the interface area.
f Network interface connector Insert a LAN cable when the machine is connected
to a computer using the LAN cable.
g USB interface connector Insert a USB cable when the machine is connected
to a computer using the USB cable.
- 87 -
Page 88

Inside of the machine
Symbol Name Description
a LED head LED which exposes printing part to light. If printouts
have vertical stripes or blurs around letters, clean
the LED head.
b Fuser unit Fix toner on paper.
c Toner cartridge / Image drum (Y: yellow) Toner cartridges contain toner which is used for
d Toner cartridge / Image drum (M: magenta)
e Toner cartridge / Image drum (C: cyan)
f Toner cartridge / Image drum (K: black)
printing.
Image drum shapes letters and images.
Toner cartridges and image drums are
consumables.
When the message on the LCD panel prompting you
to change, please replace them accordingly.
3. Basic Operations
- 88 -
Page 89
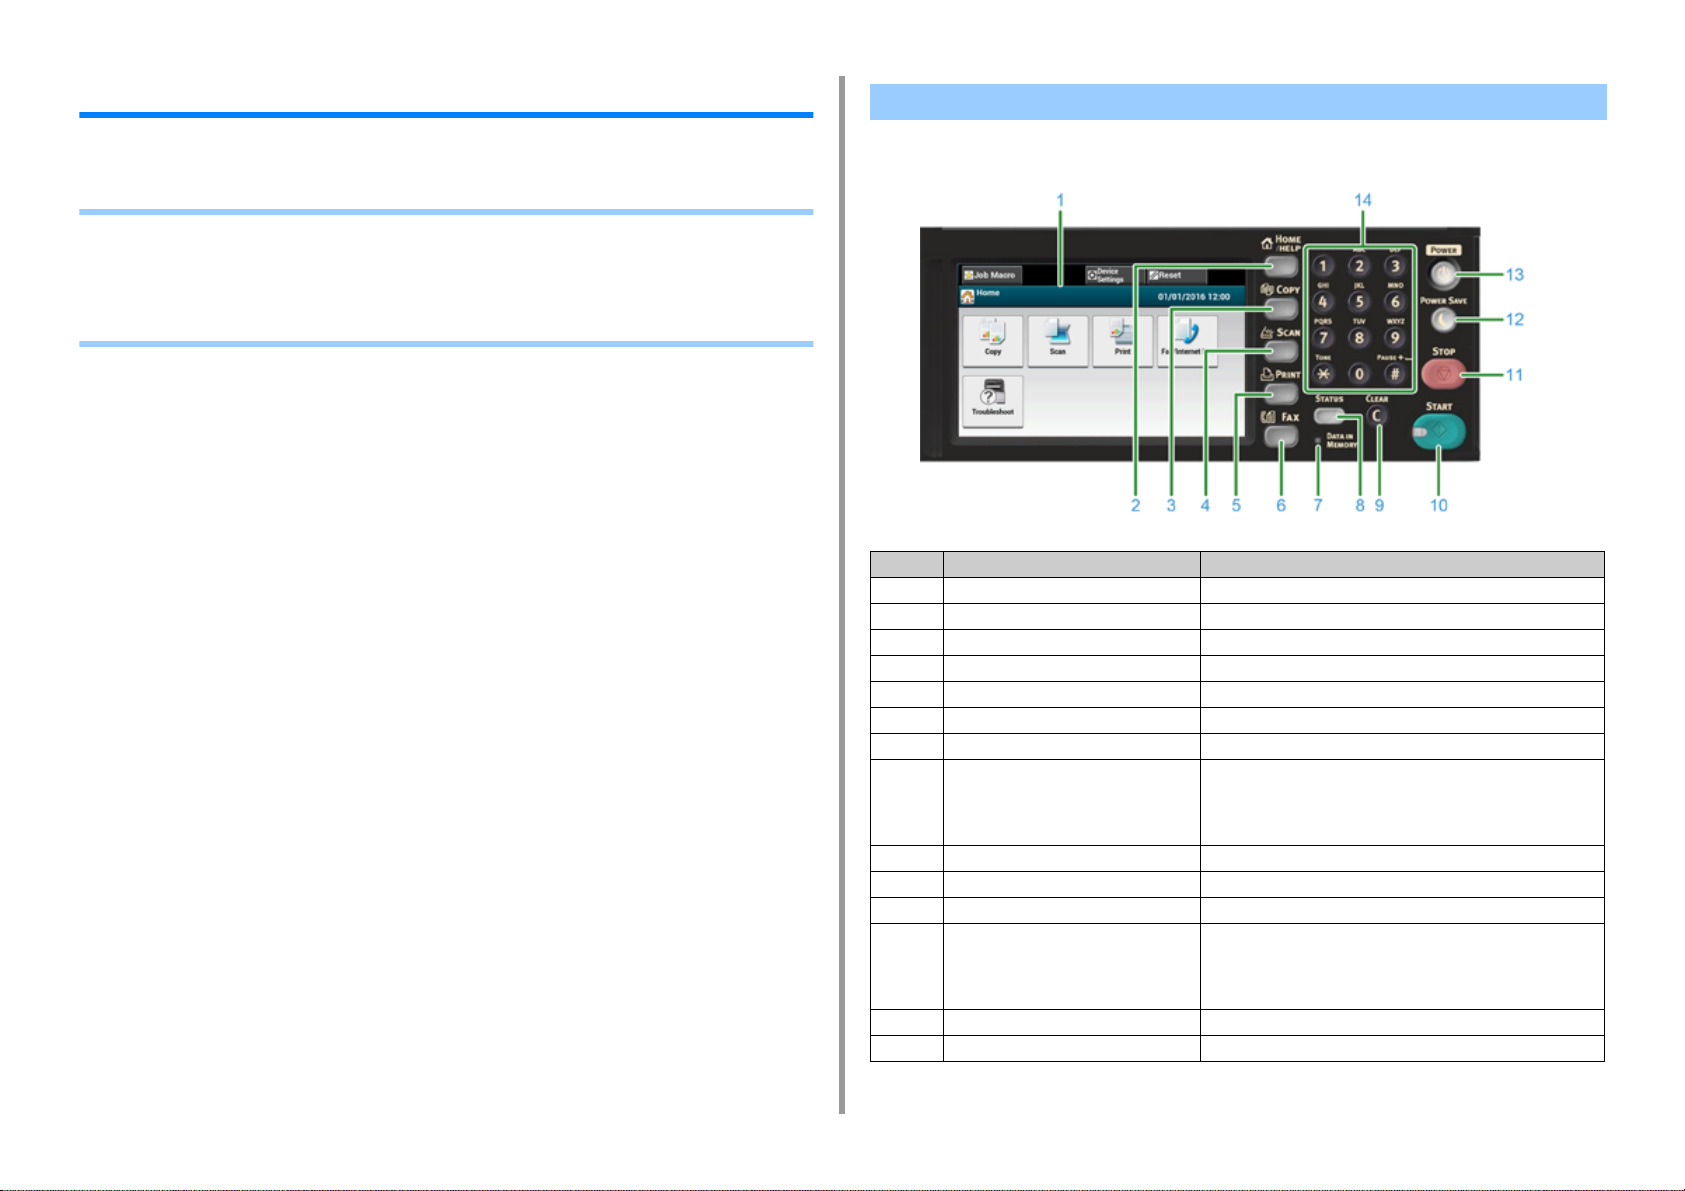
3. Basic Operations
Basic Operations on the Operator Panel
This section describes the operator panel of the machine.
• Names and Functions
• Name and Functions on the Touch Panel
• Entering Characters
• Adjusting the Angle of the Operator Panel
Names and Functions
This section describes the names and functions of components on the operator panel.
No. Name Function
1 Touch panel Allows you to select or set an item by pressing a displayed icon.
2 HOME/HELP button Displays the home screen.
3 COPY button Displays the copy function screen.
4 SCAN button Displays the scan function screen.
5 PRINT button Displays the print function screen.
6 FAX button Displays the fax function screen.
7 DATA IN MEMORY indicator Lights up when data remains in memory.
8 STATUS button Displays the status menu. Flashes/lights up if there is an error
status.
You can check the remaining amount of consumables and fax
communication status.
9 CLEAR button Clear the entered value.
10 START button Starts copying, scanning, faxing, or printing from USB Memory.
11 STOP button Cancels copying, fax transmissions, or other jobs.
12 POWER SAVE button Enters or exits the power saving mode.
In Power Save mode, lights up in green; In Sleep mode, flashes
in green (every 3 seconds); In Deep Sleep mode, flashes in
green (every 6 seconds).
13 POWER button Turns on or off this machine.
14 Numeric keypad Enters numbers and symbols.
- 89 -
Page 90
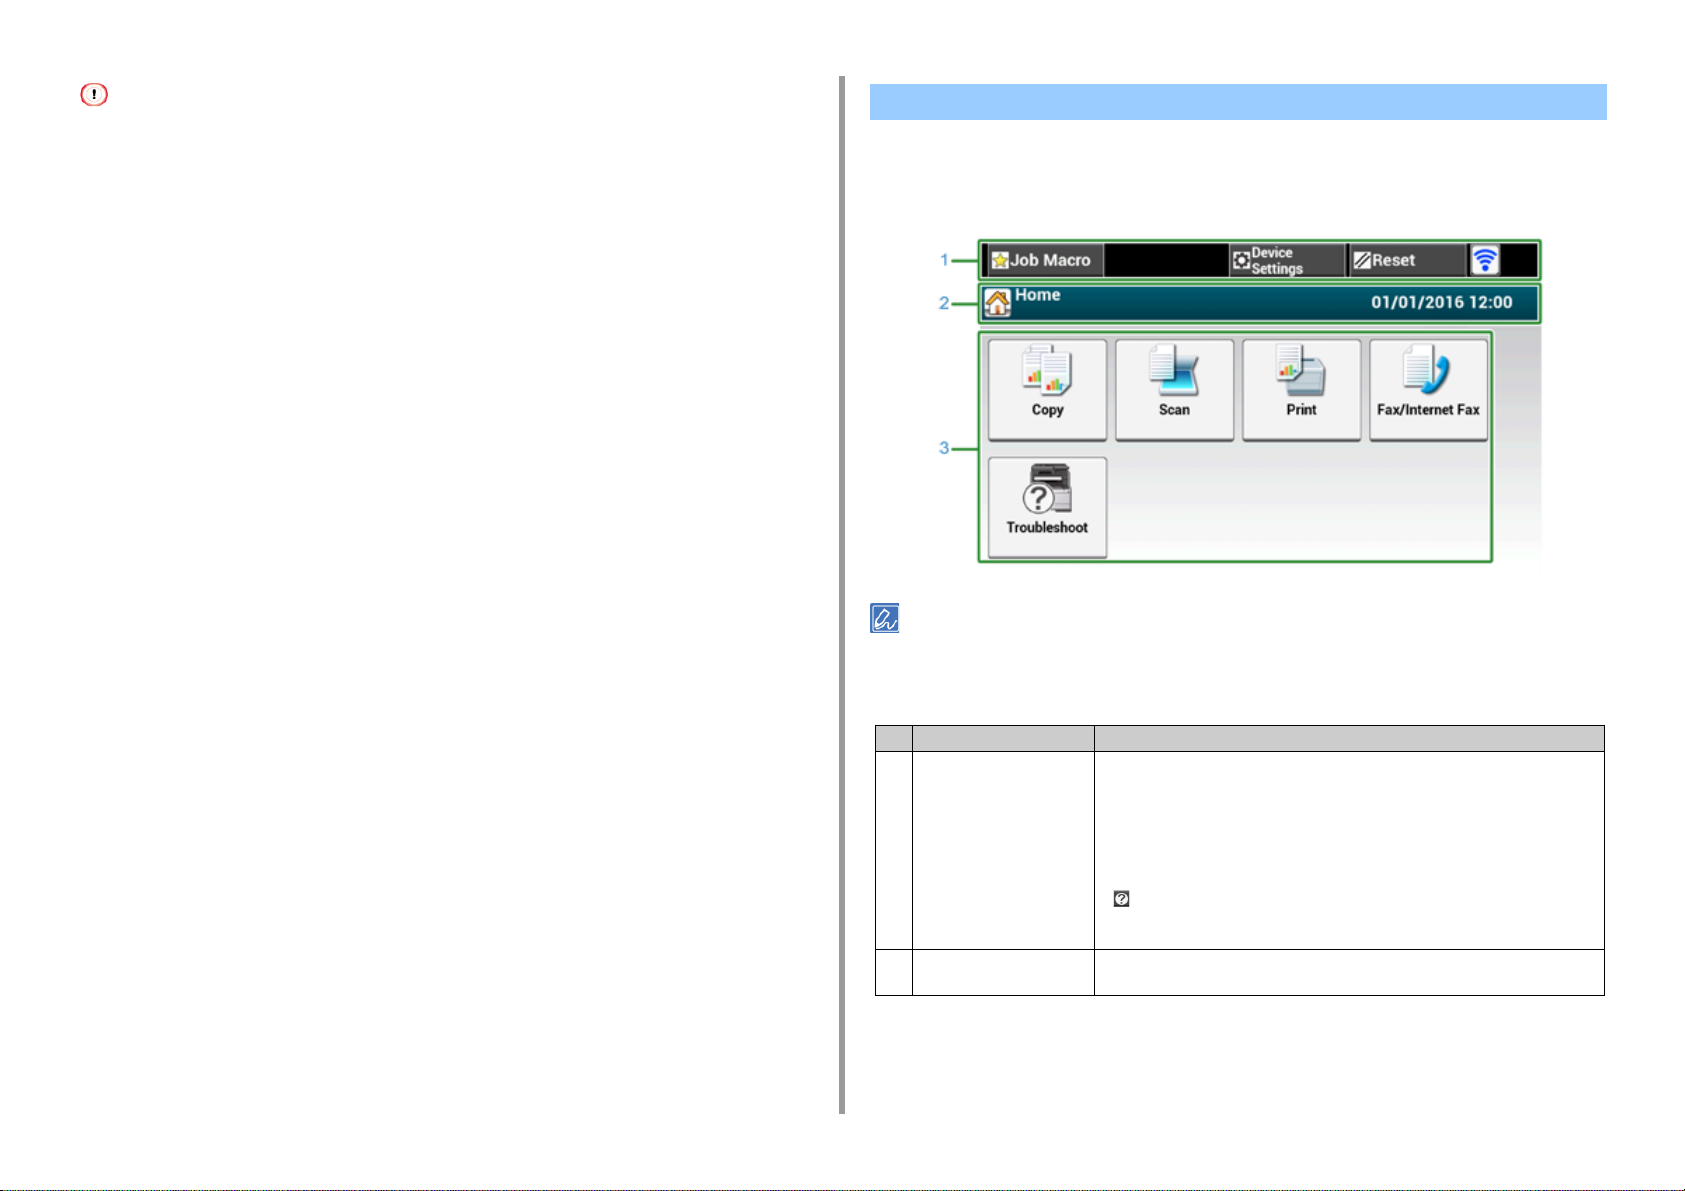
• When changing the angle of the operator panel, use care not to let your hands be caught between this machine and
the operator panel. Injury may result.
• Do not press the touch panel hard or poke it with a pointed object. It may damage the touch panel and cause
malfunction.
3. Basic Operations
Name and Functions on the Touch Panel
When this machine turns on, the home screen is displayed on the touch panel.
• Home Screen
The screen image shows the factory default setting. The screen that appears when the machine is turned on and gets
ready to be used can be changed from [Device Settings] > [Admin Setup] > [Manage Unit] > [Default Mode] on the
touch panel.
Item Description
1 Stationary button area Displays buttons that appear on the screen at all times.
Displays the following items.
• [Job Macro]
• [Function Settings]
• [Device Settings]
•[RESET]
• [Logout]
• Antenna mark: appears when the wireless LAN is enabled.
•[ ]
Only available buttons are displayed on the selected menu.
2 Title and operation guide
area
Displays the title of the current screen and provides guide for possible operations.
- 90 -
Page 91
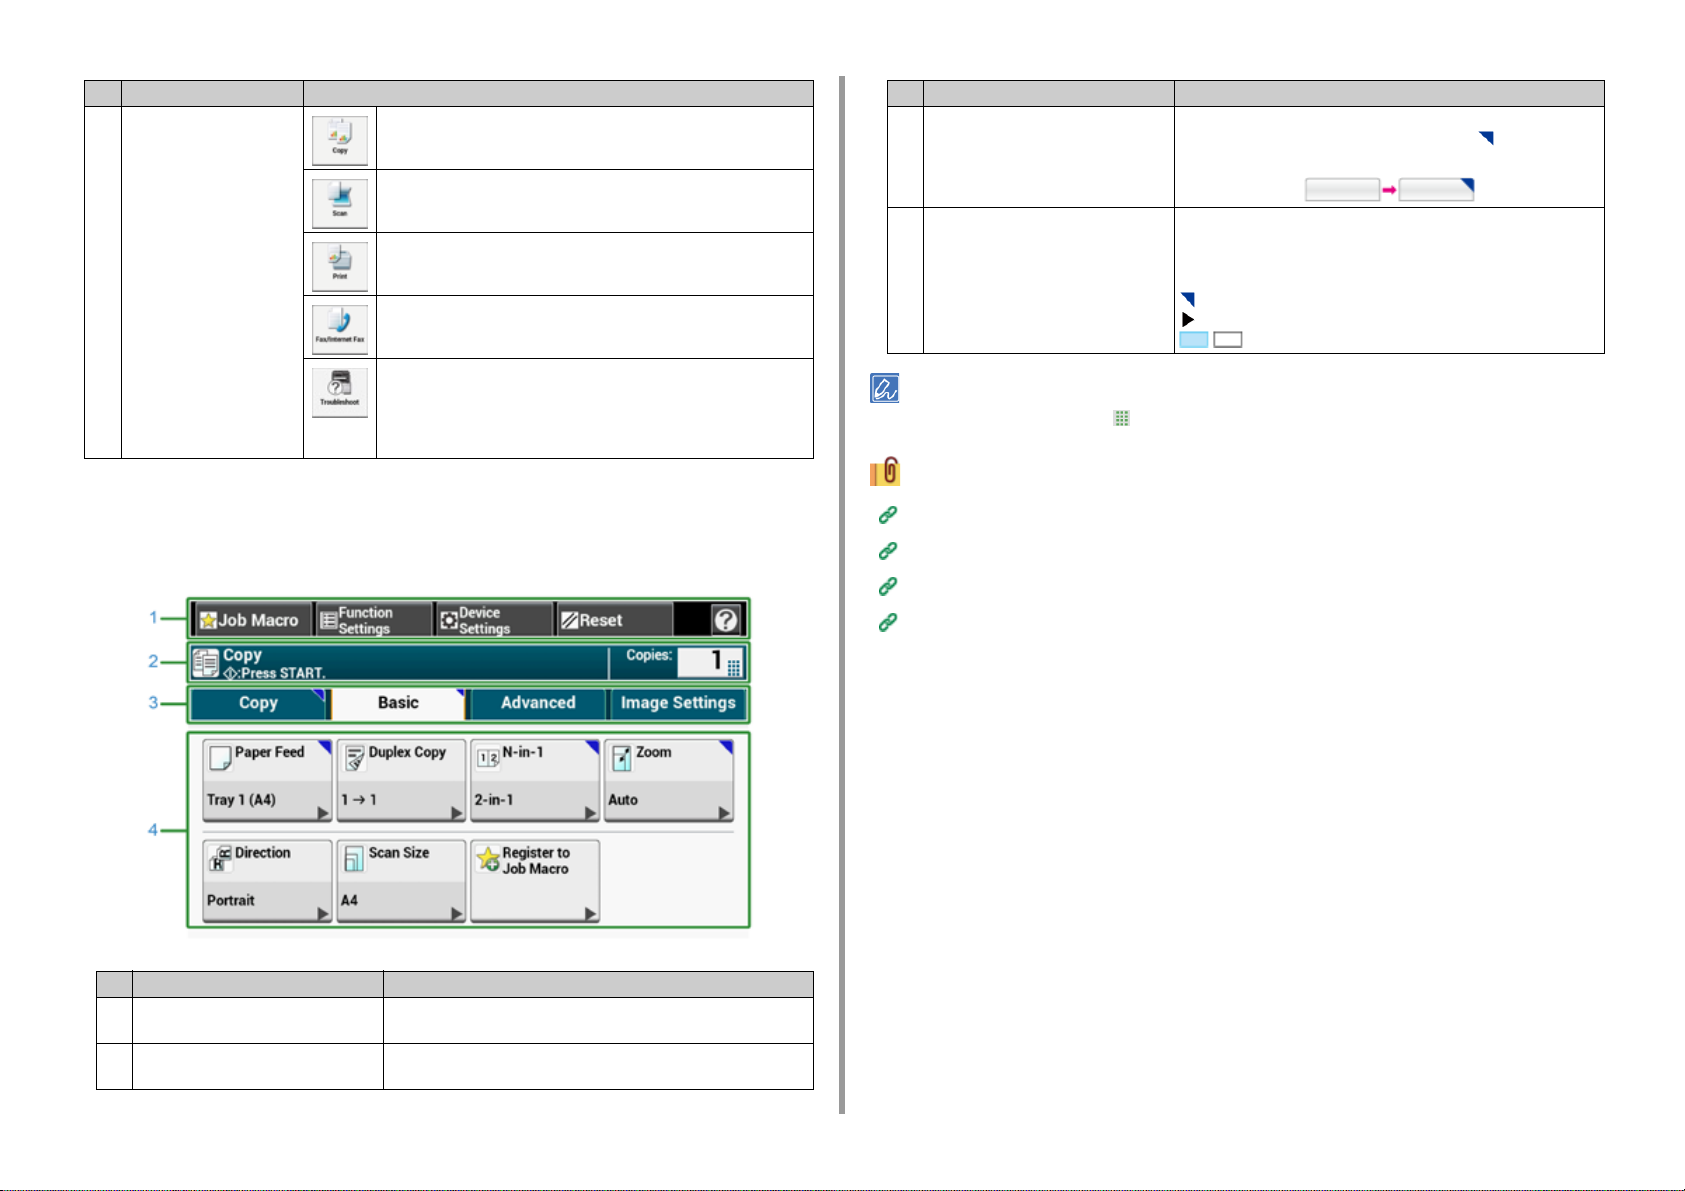
3. Basic Operations
Item Description
3 Main area Press to use the copy functions.
Press to use the scan functions.
Press to use the print functions.
Press to use the fax functions.
The following steps and functions are displayed.
• Change Consumable & Maintain
(Toner cartridges, Image drums, Belt units, Fuser units)
• Maintain and Care for the Unit
(Feeder Rollers, LED head, Scanner reader)
• How to View the Screen of Each Function
The following descriptions use the [Basic] tab of the copy function as an example.
Item Description
3 Tab labels Displays labels for tabs. Press a label to switch between tabs.
If any setting is changed from its default setting, is displayed.
4 Main area Displays a preview of copy output that will be produced with the
current settings.
The current setting is displayed on each button.
<About marks on a button>
: Indicates that the setting is changed from its default setting.
: Indicates that the next page exists.
/ : Indicates that the setting is turned on or off.
You can enter a value in the field with displayed by using the numeric keypad.
Descriptions of Screens for Copy
Descriptions of Screens for Scan
Descriptions of Screens for Print
Descriptions of Screens for Fax
Item Description
1 Stationary button area Displays buttons that appear on the screen at all times.
Only available buttons are displayed on the selected menu.
2 Title and operation guide area Displays the title of the current screen and provides guide for
possible operations.
- 91 -
Page 92

3. Basic Operations
Entering Characters
• Entering with the Touch Panel
• Entering with the Numeric Keypad
Entering with the Touch Panel
When you need to enter characters while you are setting an item, the following entry screen
is displayed.
You can enter uppercase and lowercase alphabets, numbers, and symbols.
• About the entry screen
The number of buttons in the entry screen differs depending on the input.
Item Description
5 Return button Puts a line break. This button appears when entering body text of an
6 Left button/right button/up button/down
button
7 Capital Lock Switches between the uppercase and lowercase characters.
8 Entry mode button Switches the entry mode (types of characters) for entering text.
The QWERTY keyboard set by default can be switched to the AZERTY keyboard. To switch to the AZERTY keyboard,
select [Manage Unit] > [Keyboard Layout] > [AZERTY] on the touch panel.
E-mail.
Moves the cursor left, right, up, or down.
• Entering Characters
Press the touch panel.
1
When the entry is complete, press [OK] or [Next].
2
To enter a diacritical mark, press and hold a character button with [...] shown. When a diacritical mark appears, press
the character you want to enter.
The screen below shows an image when holding down the "a" button.
Item Description
1 Text entry field Displays the entered characters.
2 The number of entered characters/the
maximum number of characters that
can be entered
3 Back Space button Deletes a character just before the cursor.
4 Character panel Enters characters.
Indicates the maximum number of characters that can be entered
and the number of entered characters.
The character type switches depending on the entry mode.
• Switching the Entry Mode (Numbers Alphabetic Characters)
Press [Alpha] or [Symbol].
1
- 92 -
Page 93
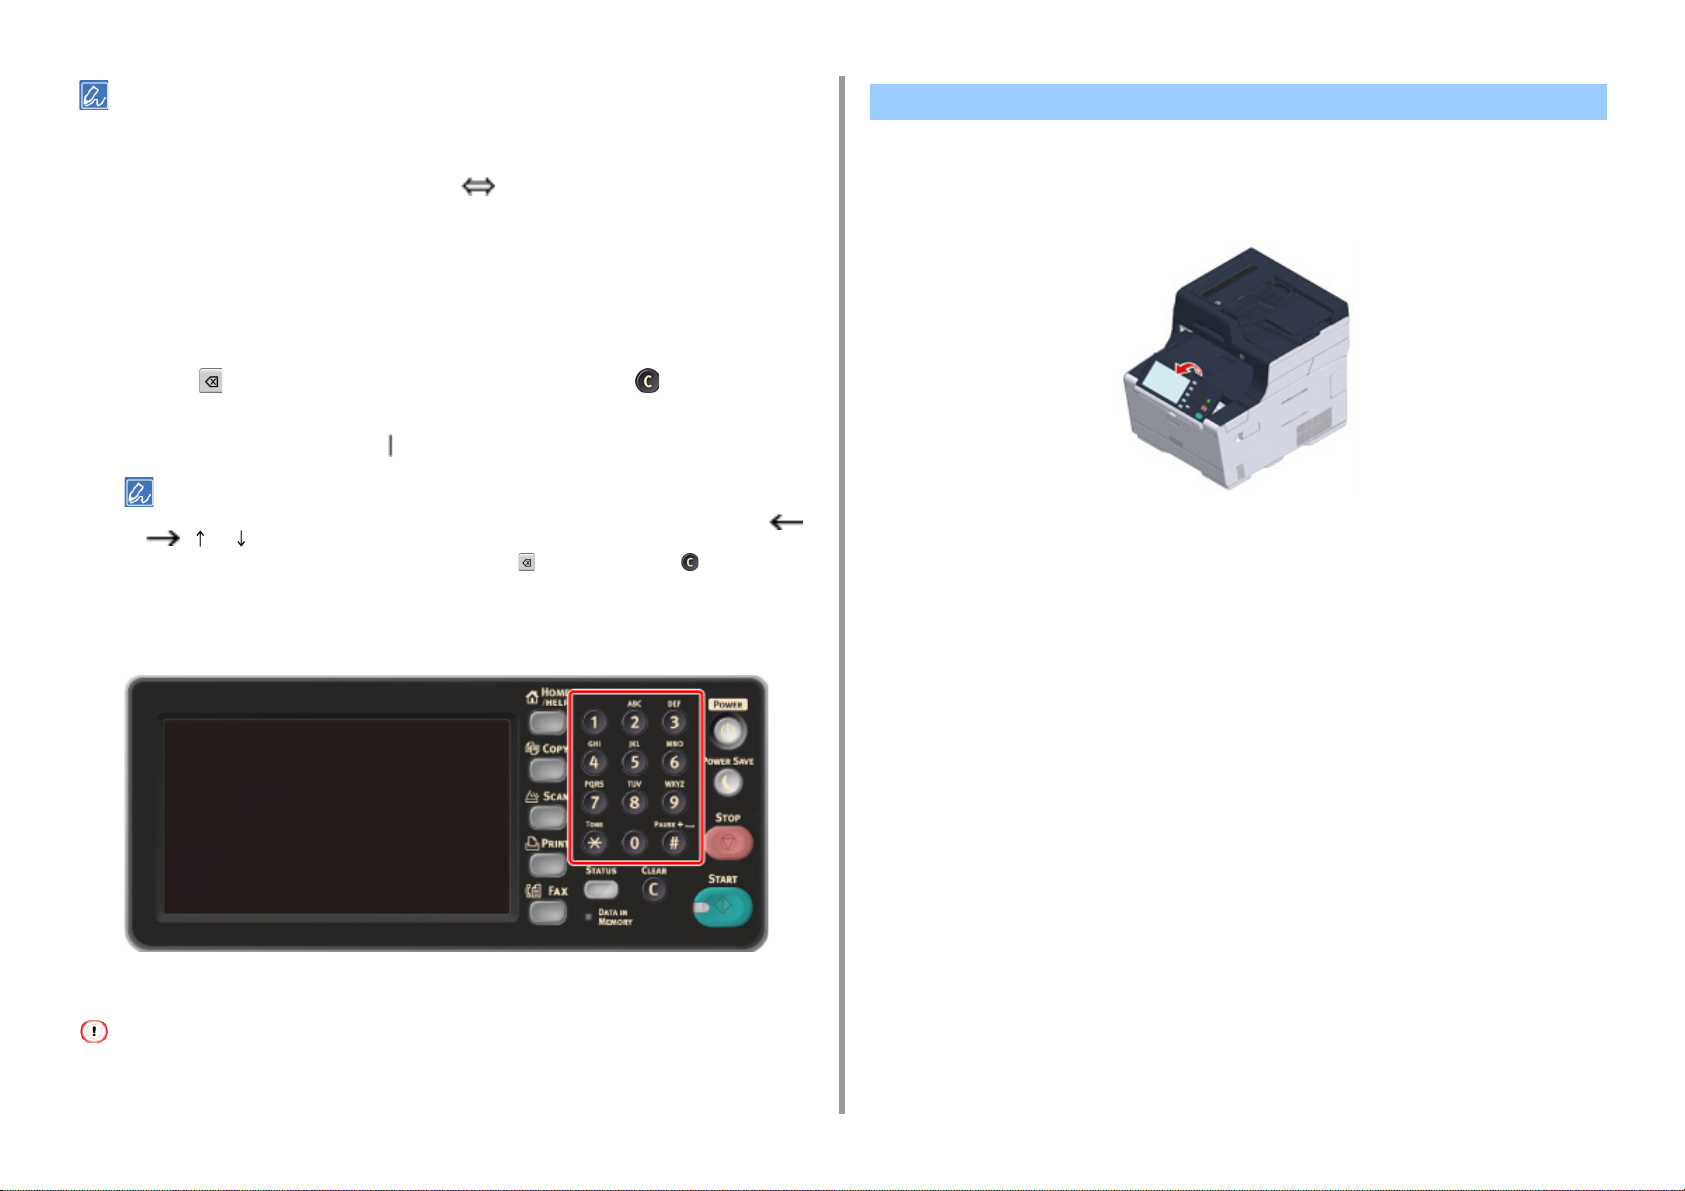
[RU] may be shown in case of Russian, and [EL] in case of Greek. In case of other languages, only [Alpha] and
[Symbol] may be shown.
3. Basic Operations
Adjusting the Angle of the Operator Panel
The operator panel can be tilted to improve the visibility.
• Switching the Entry Mode (Uppercase Lowercase)
Press the button to switch between the uppercase and lowercase characters.
1
• Deleting an Entered Character
Use the (back space) button on the touch panel or the (CLEAR) button
1
on the operator panel.
The character before the cursor ( ) is deleted.
• To delete an entered character, move the cursor to the right of the character. To move the cursor, press [ ],
[ ], [ ], or [ ].
• To clear characters you entered in a row, press and hold the (back space) button or (CLEAR) button.
Entering with the Numeric Keypad
Hold the upper center of the operator panel and pull it forward.
1
To set the operator panel back to the original position, pull the operator panel forward
until it stops and then push slowly.
You can enter the numbers labeled on each key.
It is impossible to enter the alphabet.
Please enter the alphabet from the touch panel.
- 93 -
Page 94
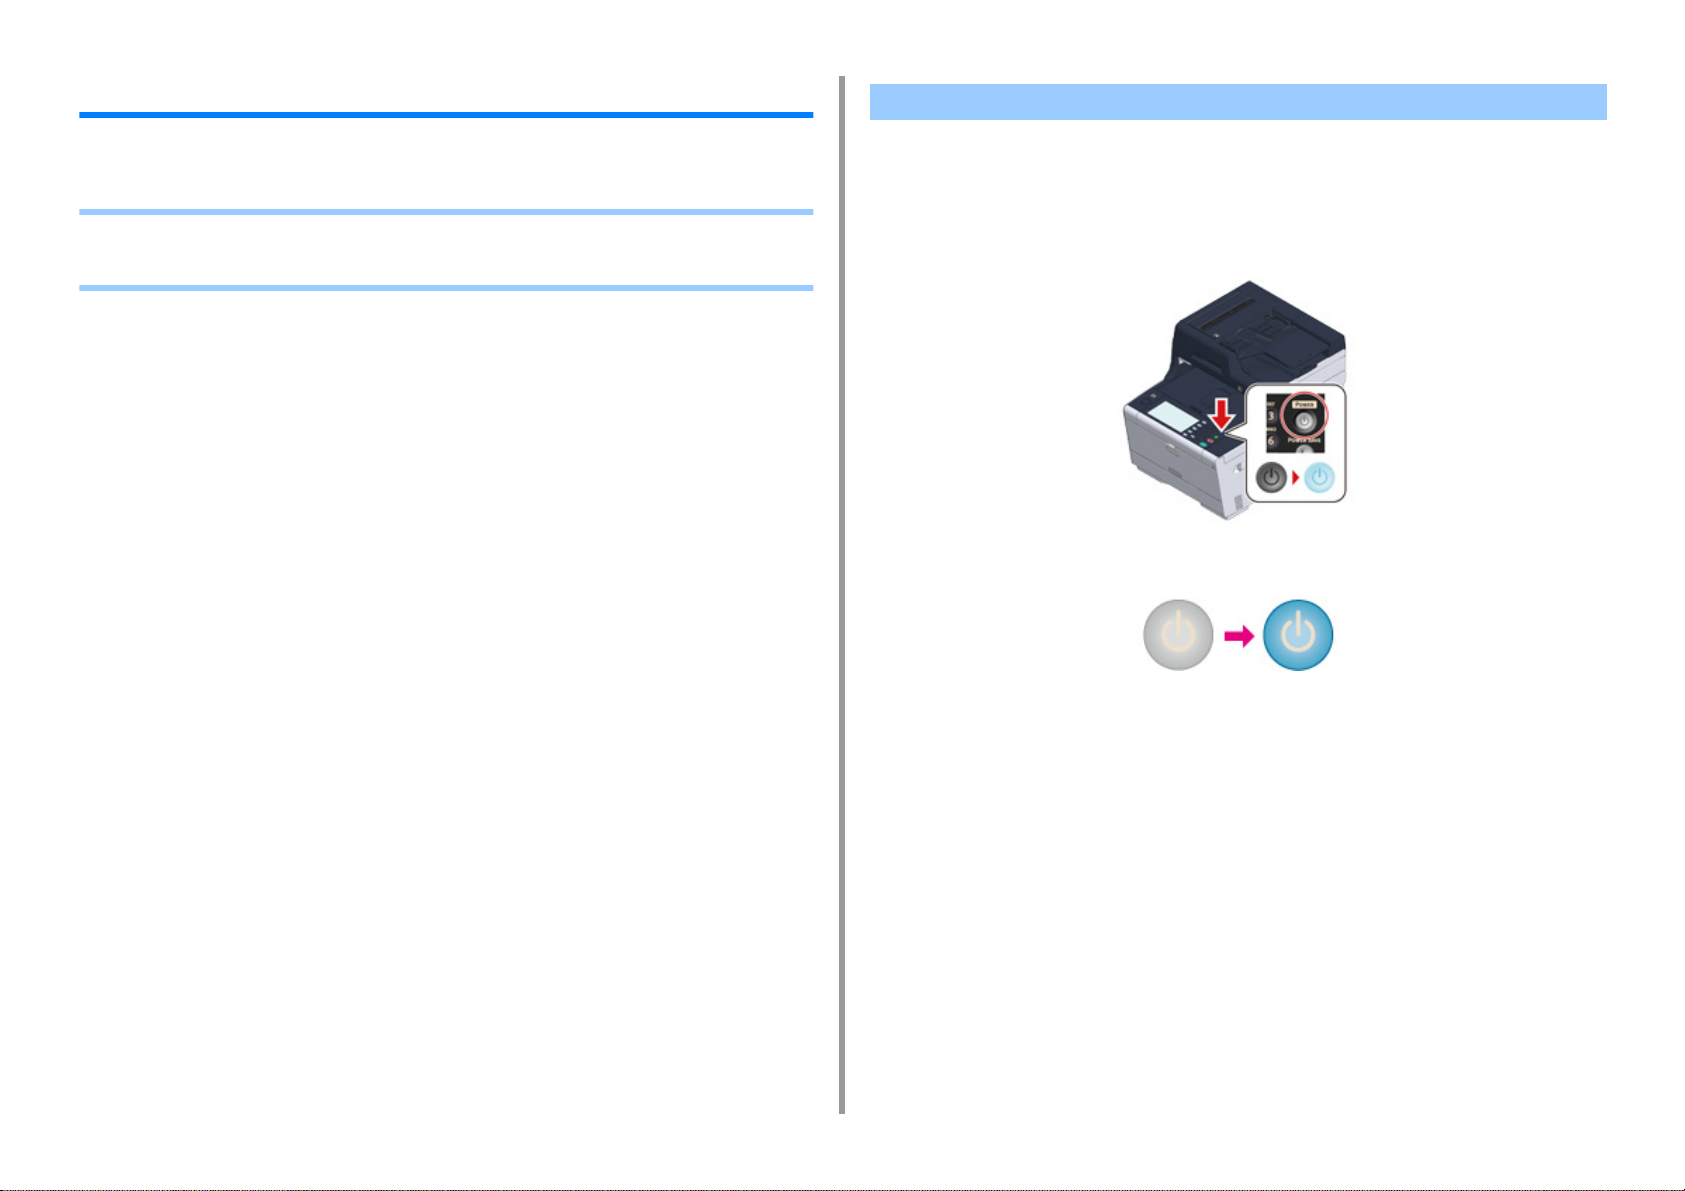
3. Basic Operations
Turning On or Off the Machine
This section describes how to turn on and off the machine.
• Turning On the Machine
• Turning Off the Machine
Turning On the Machine
Check that no documents are set on the document glass or in the ADF, and
1
the ADF cover is closed.
Press the power switch for approximately a second.
2
When the machine is turned on, the power switch LED lamp is lit.
- 94 -
Page 95
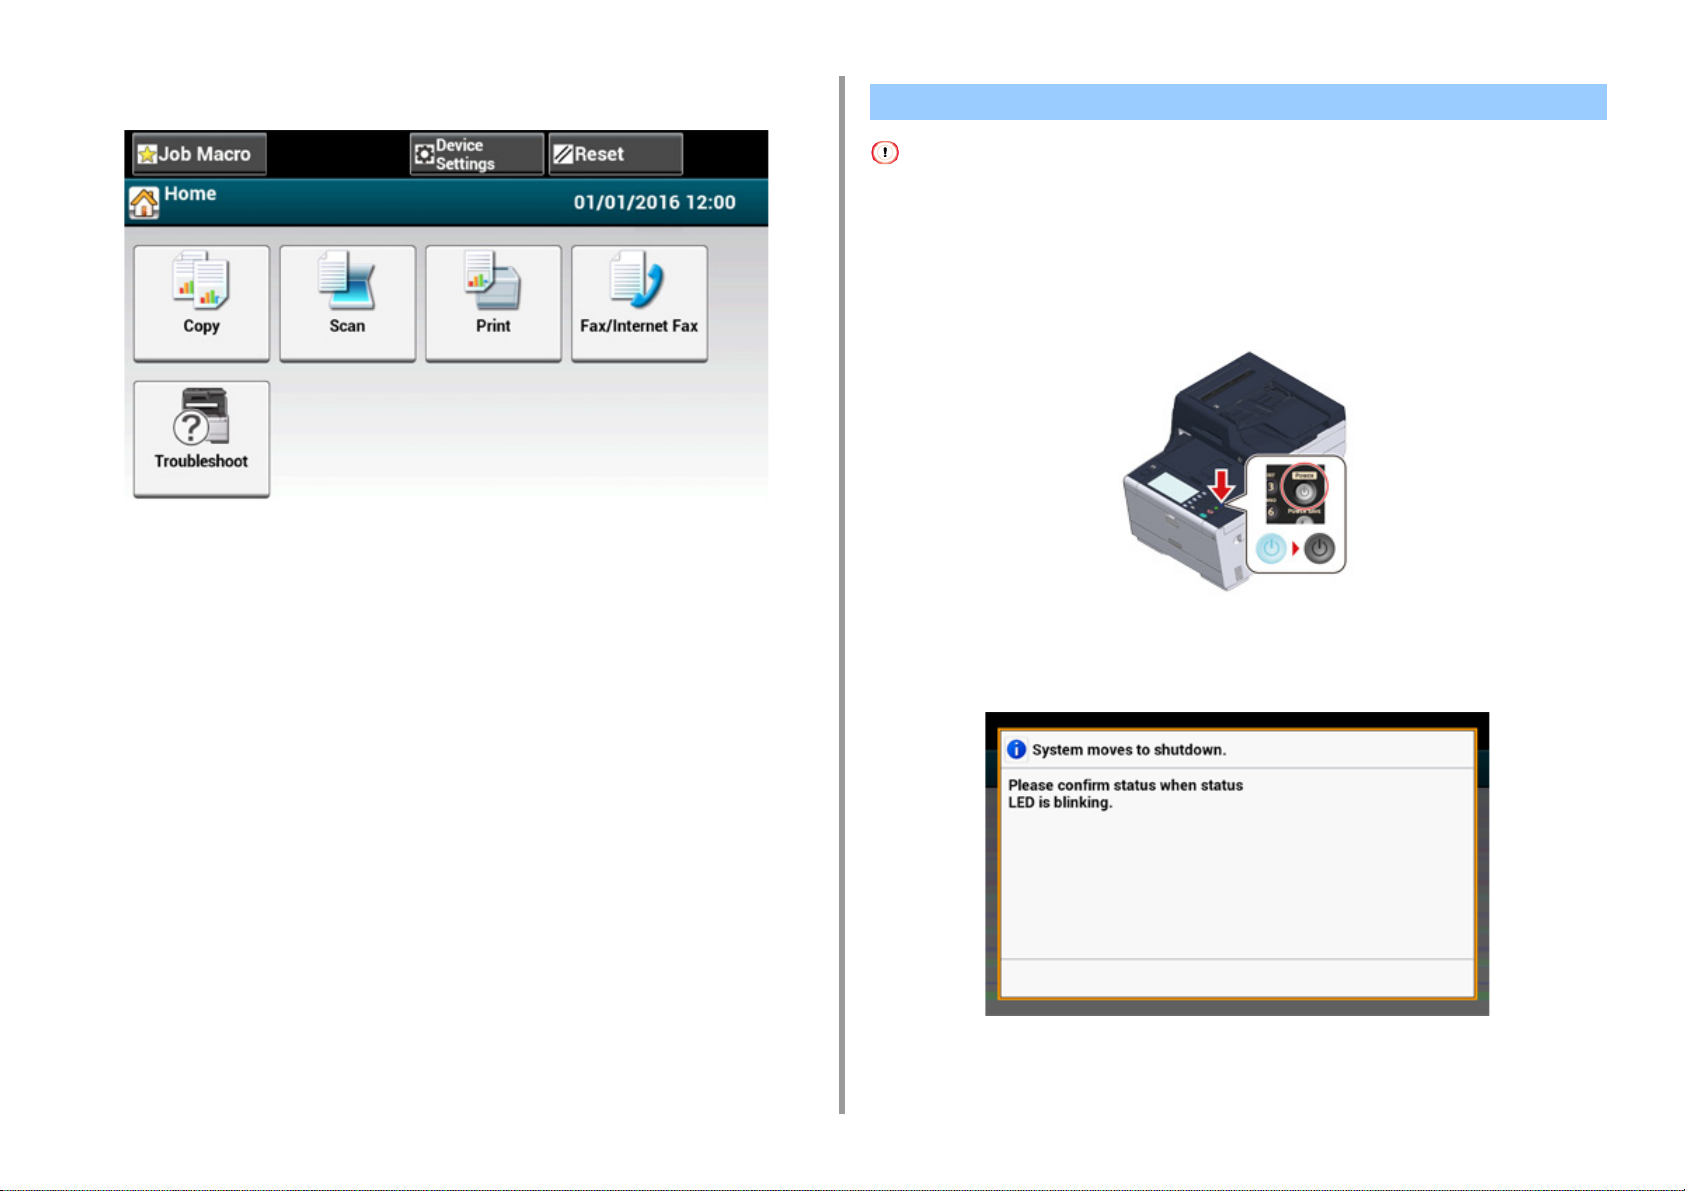
The home screen appears when the machine is ready.
3
3. Basic Operations
Turning Off the Machine
• Check that the machine is not receiving data before shutting down.
• Press and hold the power switch for 5 seconds or more to force shut down the machine. Use this method only if a
problem occurs.
For troubleshooting of this machine, see "
Press the power switch for approximately a second.
1
Troubleshooting".
- 95 -
The "System moves to shutdown. Please confirm status when status LED is blinking."
message is displayed on the touch panel, and the power switch LED lamp flashes at
approximately one-second intervals.
Page 96

After a while, the machine automatically turns off, and the power switch LED lamp goes
out.
What You Should Do If You Do Not Use This Machine for an Extended Period of Time
If you do not use this machine for an extended period of time due to holidays, trips, or other
reasons, unplug the power cord from the outlet.
This machine does not have functional failures if the power cord is unplugged for an extended period of time (four
weeks or more).
3. Basic Operations
- 96 -
Page 97

3. Basic Operations
Loading Paper
This chapter describes various information about paper that can be loaded in a paper tray of
this machine.
To set paper type and weight, press [Device Settings] > [Paper Setup] and press the tray you
want to use, and then select [Media Type] or [Media Weight].
• About Paper Types That Can be Loaded
• Loading Paper in Tray 1/2/3
• Loading Paper in the MP Tray
• Paper Storage
About Paper Types That Can be Loaded
• Available paper types
• About Paper Sizes, Weight, and Number of Sheets That Can be Loaded
• Recommended paper
Available paper types
To perform high-quality printing, be sure to use the supported paper types that satisfy
requirements, such as material, weight, or paper surface finishing. Use digital photo print
paper.
If you print on paper that is not recommended by Oki Data, check the print quality and the
movement of the paper thoroughly in advance to ensure that there are no problems.
• Plain paper
Paper type Paper size (mm) (Values in
brackets are inch sizes.)
A4 210 x 297 64 to 220 g/m2 (17 to 58 lb)
A5 148 x 210
A6 105 x 148
B5 182 x 257
B6 128 x 182
B6 Half 64 x 182
Letter 215.9 x 279.4 (8.5 x 11)
Legal 13 215.9 x 330.2 (8.5 x 13)
Legal 13.5 215.9 x 342.9 (8.5 x 13.5)
Legal 14 215.9 x 355.6 (8.5 x 14)
Executive 184.2 x 266.7 (7.25 x 10.5)
Statement (5.5 x 8.5)
8.5" SQ (8.5 x 8.5)
Folio (210 x 330 mm) 210 x 330
16K (184 x 260 mm) 184 x 260
16K (195 x 270 mm) 195 x 270
16K (197 x 273 mm) 197 x 273
Index Card (3 x 5)
4x6inch (4 x 6)
5x7inch (5 x 7)
For duplex printing, 64 to 176 g/m
(17 to 47 lb)
Paper weight
If you set paper that is 148 mm
(5.8 inches) wide or narrower,
printing becomes slower.
2
- 97 -
Page 98

3. Basic Operations
Paper type Paper size (mm) (Values in
Paper weight
brackets are inch sizes.)
Custom size Width: 64 to 216
Length: 90 to 1321
64 to 220 g/m2 (17 to 58 lb)
• Envelope
Paper type Paper size (mm) (Values in
brackets are inch sizes.)
Monarch 98.4 x 190.5 (3.875 x 7.5) Envelopes must be made of paper of
Com-9 98.4 x 225.4 (3.875 x 8.875)
Com-10 104.8 x 241.3 (4.125 x 9.5)
DL 110 x 220 (4.33 x 8.66)
C5 162 x 229 (6.4 x 9)
85 g/m
be folded.
Paper weight
2
(24 lb), and their flaps must
•Label
Paper type Paper size (mm) (Values in
brackets are inch sizes.)
A4 210 x 297 0.1 to 0.2 mm
Letter 215.9 x 279.4 (8.5 x 11)
Paper weight
• Other type of paper
Paper type Paper size (mm) (Values in
brackets are inch sizes.)
Partly-printing paper Subject to plain paper 64 to 220 g/m2 (17 to 58 lb)
Color paper Subject to plain paper 64 to 220 g/m
Paper weight
2
(17 to 58 lb)
About Paper Sizes, Weight, and Number of Sheets That Can be Loaded
Available paper sizes and types, and tray capacity are as follows.
•Tray 1
Available paper size Tray capacity Paper weight
A4
A5
1
A6*
B5
1
B6*
Letter
Legal (13 inches)
Legal (13.5 inches)
Legal (14 inches)
Executive
Statement*
1
8.5" SQ (8.5 x 8.5 inches)
Folio (210 x 330 mm)
16K (184 x 260 mm)
16K (195 x 270 mm)
16K (197 x 273 mm)
Custom size
*2
*1 Paper cannot be used for duplex printing.
*2 Width: 100 to 216 mm (3.9 to 8.5 inches), Length: 148 to 356 mm (5.8 to 14 inches)
250 sheets
(if paper weight is 80 g/m
2
)
Light
(64 to 74 g/m2)
Medium Light
(75 to 82 g/m
Medium
(83 to 90 g/m
Medium Heavy
(91 to 104 g/m
Heavy
(105 to 120 g/m
Ultra Heavy1
(121 to 176 g/m
• Tray 2/3 (Optional)
Available paper size Tray capacity Paper weight
A4
A5
B5
Letter
Legal (13 inches)
Legal (13.5 inches)
Legal (14 inches)
Executive
8.5 SQ (8.5 x 8.5 inches)
Folio (210 x 330 mm)
16K (184 x 260 mm)
16K (195 x 270 mm)
16K (197 x 273 mm)
Custom size
*1
530 sheets
(if paper weight is 80 g/m
2
)
Light
(64 to 74 g/m2)
Medium Light
(75 to 82 g/m
Medium
(83 to 90 g/m
Medium Heavy
(91 to 104 g/m
Heavy
(105 to 120 g/m
Ultra Heavy 1
(121 to 176 g/m
2
)
2
)
2
)
2
)
2
)
2
)
2
)
2
)
2
)
2
)
- 98 -
*1 Width: 148 to 216 mm (5.8 to 8.5 inches), Length: 210 to 356 mm (8.3 to 14 inches)
Page 99

3. Basic Operations
•MP Tray
Available paper size Tray capacity Paper weight
A4
A5
*1
A6
B5
1
B6*
1
B6 Half*
Letter
Legal (13 inches)
Legal (13.5 inches)
Legal (14 inches)
Executive
Statement*
8.5 SQ (8.5 x 8.5 inches)
Folio (210 x 330 mm)
16K (184 x 260 mm)
16K (195 x 270 mm)
16K (197 x 273 mm)
Index card (3x5 inches)*
4x6inch*
5x7inch
Custom size
Com-9*
Com-10
Monarch
DL
C5
1
1
*1
*2
1
*1
*1
*1
*1
1
100 sheets
(if paper weight is 80 g/m
10 sheets (envelopes)
2
)
Light
(64 to 74 g/m2)
Medium Light
(75 to 82 g/m
Medium
(83 to 90 g/m
Medium Heavy
(91 to 104 g/m
Heavy
(105 to 120 g/m
Ultra Heavy1
(121 to 176 g/m
Ultra Heavy2
(177 to 220 g/m
•Labels
Labels must be of the type recommended for use in copiers and laser printers, in which the
base carrier page is entirely covered by labels. Other types of label stocks may damage the
machine due to the labels peeling off during the printing process.
2
)
2
)
2
)
2
)
2
)
2
)
*1 Paper cannot be used for duplex printing.
*2 Width: 64 to 216 mm (2.5 to 8.5 inches), Length: 90 to 1,321 mm (3.5 to 52 inches)
Recommended paper
The machine supports a variety of print media, including a range of paper weights and sizes.
This section describes how to choose and use media. To obtain the best performance, use
75 to 90 g/m
embossed or very rough textured paper is not recommended. Pre-printed stationery can be
used, but the ink must not offset when exposed to the high fuser temperatures used in the
printing process.
• Envelopes
Envelopes must be free from twists, curls or other deformations. The envelopes must also
be of the rectangular flap type, with glue that remains intact when subjected to hot roll
pressure fusing in the machine. Window envelopes are not suitable.
2
plain paper that is designed for use in copiers and laser printers. Use of heavily
- 99 -
Page 100

Loading Paper in Tray 1/2/3
The procedure when loading paper in Tray 1 is used as an example, and the same procedure
applies to Tray 2/3 (optional).
Pull the paper cassette out.
1
Fan a stack of paper well, and then align the edges of the paper.
4
Load paper with the print side face down.
5
Do not load paper above the " " mark on the paper guide.
3. Basic Operations
Slide the paper guide (a) to the width of paper to be loaded.
2
Slide the paper stopper (b) to the length of paper to be loaded.
3
- 100 -
Secure the loaded paper with the paper guide.
6
 Loading...