

Page 1

MC160n
Network Guide
Page 2

x–2
Page 3

Preface
Every effort has been made to ensure that the information in this document is complete, accurate, and up-to-date. The manufacturer assumes no responsibility for the
results of errors beyond its control. The manufacturer also cannot guarantee that
changes in software and equipment made by other manufacturers and referred to in
this guide will not affect the applicability of the information in it. Mention of software
products manufactured by other companies does not necessarily constitute endorsement by the manufacturer.
While all reasonable efforts have been made to make this document as accurate and
helpful as possible, we make no warranty of any kind, expressed or implied, as to the
accuracy or completeness of the information contained herein.
The most up-to-date drivers and manuals are available from:
http://www.okiprintingsolutions.com
Copyright © 2009 Oki Europe Ltd. All rights reserved.
Oki is a registered trademark of Oki Electric IndustryCompany Ltd.
Oki Printing Solutions is a trademark of Oki Data Corporation.
Energy Star is a trademark of the United States Environmental Protection Agency.
Microsoft, MS-DOS and Windows are registered trademarks of Microsoft Corpora-
tion.
Apple, Macintosh, Mac and Mac OS are registered trademarks of Apple Computer.
Other product names and brand names are registered trademarks or trademarks of
their proprietors.
As an Energy Star Program Participant, the manufacturer has determined that this product meets the Energy Star guidelines for energy
efficiency .
This product complies with the requirements of the Council Directives 2004/108/EC (EMC), 2006/95/EC (LVD) and 1999/5/EC
(R&TTE), as amended where applicable, on the approximation of the
laws of the member states relating to electromagnetic compatibility,
low voltage and radio & telecommunications terminal equipment.
x-3
Page 4

Emergency first aid
Take care with toner powder:
If swallowed, give small amounts of cold water and seek medical
attention. DO NOT attempt to induce vomiting.
If inhaled, move the person to an open area for fresh air. Seek medical attention.
If it gets into the eyes, flush with large amounts of water for at least
15 minutes keeping eyelids open. Seek medical attention.
Spillages should be treated with cold water and soap to help reduce
risk of staining skin or clothing.
Importer to the EU/authorised representative
Oki Europe Limited (trading as Oki Printing Solutions)
Blays House
Wick Road
Egham
Surrey, TW20 0HJ
United Kingdom
For all sales, support and general enquiries contact your local distributor.
Environmental information
x-4
Page 5

Contents
Preface........................................................................................................ x-3
Emergency first aid ..................................................................................... x-4
Importer to the EU/authorised representative ............................................. x-4
Environmental information .......................................................................... x-4
1 Understanding the Network Setting Menu .................................................. 1-1
NETWORK SETTING Menu ........................................................................... 1-2
Location within the Configuration Menu ...................................................... 1-2
Accessing the Network Setting Menu ......................................................... 1-7
Using the Network Setting Menu Options ................................................... 1-7
TCP/IP .................................................................................................. 1-8
IP ADDR. SETTING.............................................................................. 1-8
DNS CONFIG. ...................................................................................... 1-9
DHCP.................................................................................................... 1-9
BOOTP ............................................................................................... 1-10
ARP/PING........................................................................................... 1-10
HTTP................................................................................................... 1-10
FTP ..................................................................................................... 1-10
SMB .................................................................................................... 1-11
BONJOUR .......................................................................................... 1-11
Contents x-5
Page 6

IPP ...................................................................................................... 1-11
SLP ..................................................................................................... 1-11
SNMP.................................................................................................. 1-12
SPEED/DUPLEX ................................................................................ 1-12
2 Network Printing ............................................................................................ 2-1
Network Connection ...................................................................................... 2-2
Theory ......................................................................................................... 2-2
Making the Connection ............................................................................... 2-3
Ethernet Interface ................................................................................. 2-3
Using DHCP.......................................................................................... 2-3
Setting the Address Manually ............................................................... 2-4
Network Printing ............................................................................................ 2-6
Bonjour.................................................................................................. 2-6
BOOTP ................................................................................................. 2-6
DHCP.................................................................................................... 2-7
DNS ...................................................................................................... 2-7
FTP ....................................................................................................... 2-7
HTTP..................................................................................................... 2-7
IPP ........................................................................................................ 2-7
LDAP..................................................................................................... 2-8
LPD/LPR ............................................................................................... 2-8
POP Before SMTP................................................................................ 2-8
Port 9100 .............................................................................................. 2-8
SLP ....................................................................................................... 2-8
SMB ...................................................................................................... 2-9
SMTP .................................................................................................... 2-9
SMTP Authentication ............................................................................ 2-9
SNMP.................................................................................................... 2-9
TCP/IP ................................................................................................ 2-10
Printing via IPP (Internet Printing Protocol)............................................... 2-11
Adding an IPP Port using Add Printer Wizard – Windows Server 2003/XP/
2000 .................................................................................................... 2-11
Adding an IPP Port using Add Printer Wizard – Windows Vista ......... 2-13
Oki contact details .......................................................................................... I-3
Contentsx-6
Page 7

Understanding
the Network
Setting Menu
Page 8
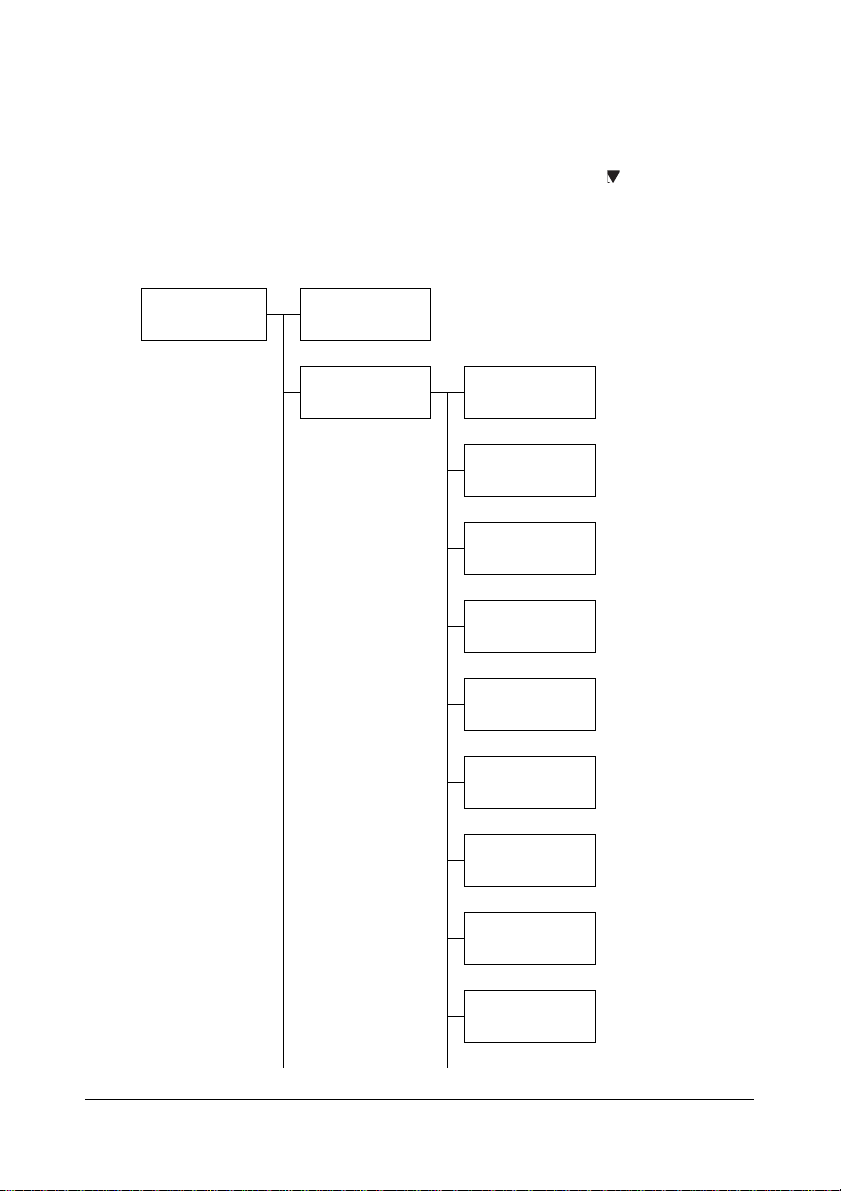
NETWORK SETTING Menu
Location within the Configuration Menu
" The ADMIN. MANAGEMENT menu is accessible only by the admin-
istrator. To display the settings for this menu, press to display
UTILITY, and press select key to display MACHINE SETTING ,
and then select ADMIN. MANAGEMENT, use the keypad to type in the
6-digits administrator access code (default : 000000), and then press
the Select key.
ADMIN. MANAGEMENT
ADMINISTRATOR
NO.
NETWORK SETTING
TCP/IP
IP ADDR. SETTING
DNS CONFIG.
DHCP
BOOTP
ARP/PING
HTTP
FTP
SMB
NETWORK SETTING Menu1-2
Page 9
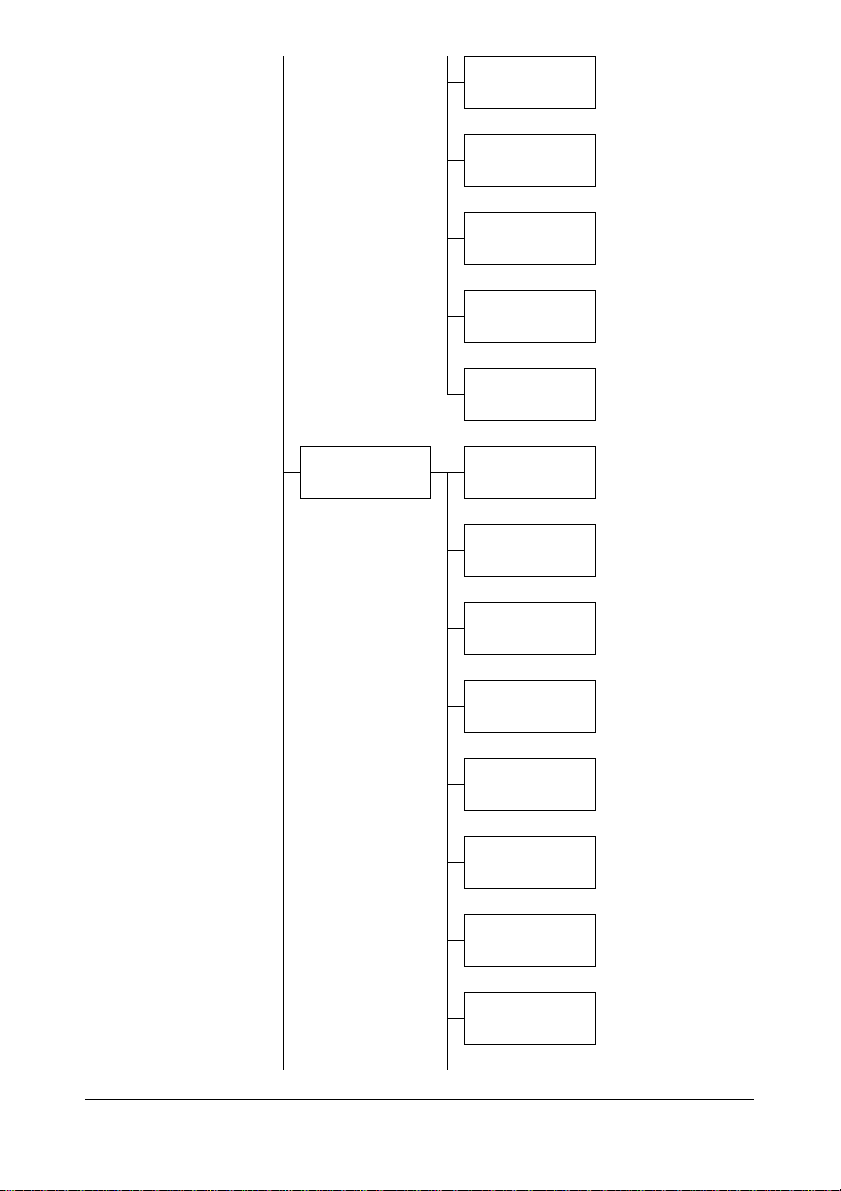
BONJOUR
IPP
SLP
SNMP
SPEED/DUPLEX
E-MAIL SETTING SMTP
SENDER NAME
E-MAIL ADDRESS
DEFAULT SUBJECT
SMTP SERVER
ADDR.
SMTP PORT NO.
SMTP TIMEOUT
TEXT INSERT
NETWORK SETTING Menu 1-3
Page 10
POP BEFORE
SMTP
DISABLE/
ENABLE
POP3 SERVER
ADDR.
POP3 PORT NO.
POP3 TIMEOUT
POP3 ACCOUNT
POP3 PASSWORD
SMTP AUTH. DISABLE/
ENABLE
SMTP USER NAME
SMTP PASSWORD
NETWORK SETTING Menu1-4
Page 11

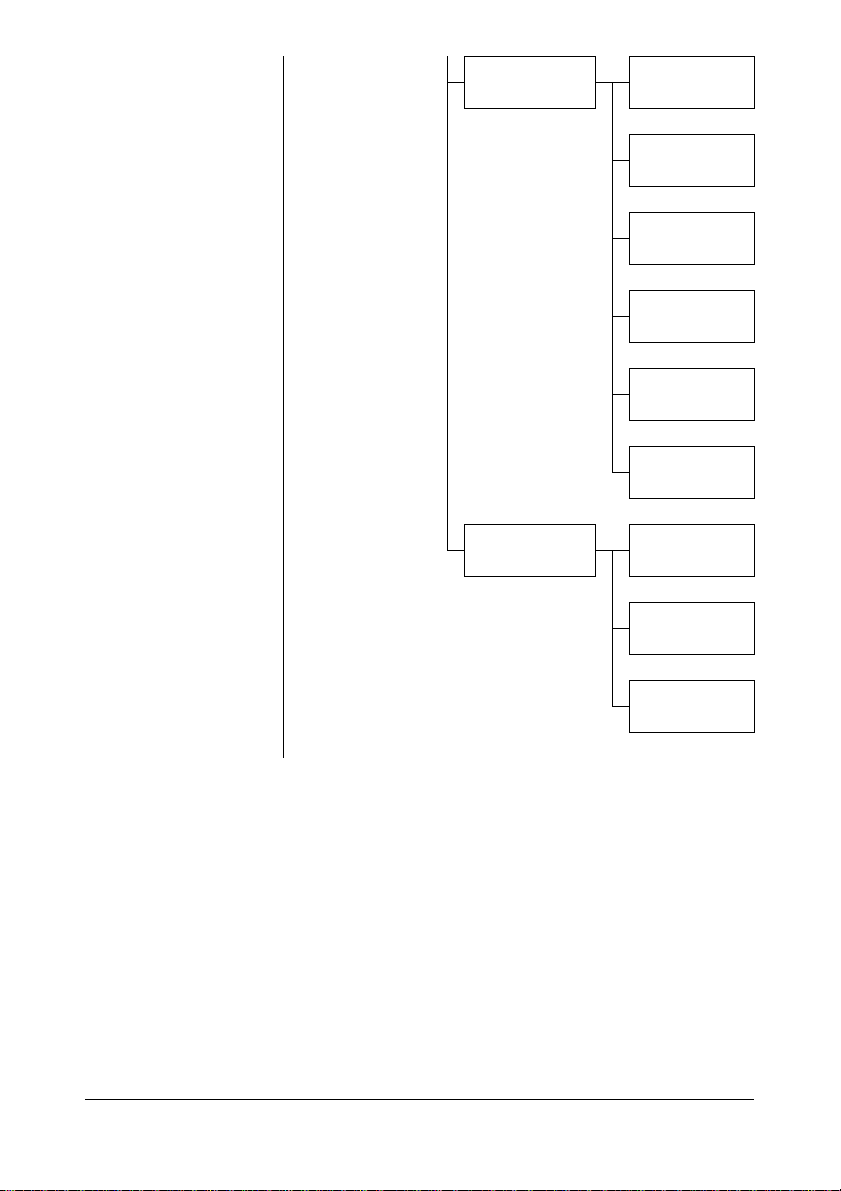
LDAP SETTING DISABLE/ENABLE
LDAP SERVER
ADDR.
LDAP PORT NO.
SSL SETTING
SEARCH BASE
ATTRIBUTE
SEARCH METHOD
LDAP TIMEOUT
MAX. SEARCH
RESULTS
AUTHENTICATION
LDAP ACCOUNT
LDAP PASSWORD
DOMAIN NAME
NETWORK SETTING Menu 1-5
Page 12

USB SETTING
COMM. SETTING
USER SETTING
AUTO REDIAL
NETWORK SETTING Menu1-6
Page 13

Accessing the Network Setting Menu
Use the following series of keystrokes at the machine to access the Network
Setting menu options on your machine. This menu provides access to all of
the configurable network items.
Press this
key . . .
UTILITY
ADMIN. MANAGEMENT
NETWORK SETTING
(until) the message window reads . . .
MACHINE SETTING
Use the keypad to input 6-digits administrator number.
ADMINISTRATOR NO.
Using the Network Setting Menu Options
If the machine is connected to a network, the following settings should be
specified. For details about each setting, contact your network administrator.
" To manually specify settings for the IP address, subnet mask and
gateway, set
IP ADDR. SETTING to SPECIFY.
" When entering the IP address, do not enter a class D (between
224.0.0.0 and 239.255.255.255) or class E (between 240.0.0.0 and
255.255.255.255) IP address.
In addition, “255” cannot be entered as the last three digits of the IP
address.
NETWORK SETTING Menu 1-7
Page 14

TCP/IP
Purpose Enables or disables TCP/IP.
ENABLE is selected, TCP/IP is enabled.
If
If DISABLE is selected, TCP/IP is disabled.
Options DISABLE/ENABLE
Default ENABLE
IP ADDR. SETTING
Purpose Sets the IP address of this machine on the network.
Sets the subnet mask of the network. The subnet mask
allows you to limit access to your machine (for example,
according to departmental divisions).
Sets the address of the router/gateway when a router/gateway is used on your network and you allow users outside
your network environment to print on your machine.
Options AUTO/SPECIFY
Default AUTO
(If IP ADDR. SETTING is set to SPECIFY)
IP ADDRESS: 0.0.0.0
SUBNET MASK: 255.255.255.0
GATEWAY: 0.0.0.0
Range (If IP ADDR. SETTING is set to SPECIFY)
0-255 for each xxx triplet
Use the keypad to input each number; use the and
keys to move between triplets.
Notes A single digit number, such as “1”, cannot be input as “001”.
Align the number on the left and input “1” as “1 _ _”. Use
the and keys to move between triplets.
ACK key can also be used for deleting. To cancel IP
The B
Address menu, hold down the BACK key for more than one
second, and then press the B
tings have been cleared.
ACK key again after all set-
NETWORK SETTING Menu1-8
Page 15

DNS CONFIG.
Purpose Sets whether or not the DNS server setting is to be speci-
fied.
If specifying the DNS server setting, the SMTP server can
be specified as a host name when using network scanning.
If ENABLE is selected, type in the IP address of the DNS
server.
If DISABLE is selected, the DNS server cannot be referenced.
Options DISABLE/ENABLE
Default DISABLE
Range (If DNS CONFIG. is set to ENABLE)
0-255 for each xxx triplet
Use the keypad to input each number; use the and
keys to move between triplets.
Notes A single digit number, such as “1”, cannot be input as “001”.
Align the number on the left and input “1” as “1 _ _”. Use
the and keys to move between triplets.
ACK key can also be used for deleting. T o cancel DNS
The B
CONFIG. menu, hold down the BACK key for more than
one second, and then press the BACK key again after all
settings have been cleared.
After changing the settings, the machine must be turned
off, then on again.
" When using network scanning and when specifying the SMTP server
as a host name instead of as an IP address, be sure to select
ENABLE, and then specify the IP address of the DNS server.
DHCP
Purpose If there is a DHCP server on the network, specifies whether
the IP address and other network information is automatically assigned by the DHCP server.
Options DISABLE/ENABLE
Default ENABLE
NETWORK SETTING Menu 1-9
Page 16

BOOTP
Purpose If there is a BOOTP server on the network, specifies
whether the IP address and other network information is
automatically assigned by the BOOTP server.
Options DISABLE/ENABLE
Default DISABLE
ARP/PING
Purpose If the IP address cannot be acquired due to the DHCP or
BOOTP address and if a fixed IP address cannot be
acquired, the destination IP address of the ICMP (Ping)
packet previously received by the machine can be acquired
as the IP address of the machine.
If ENABLE is selected, the IP address can be acquired automatically.
If DISABLE is selected, the IP address cannot be acquired
automatically.
Options DISABLE/ENABLE
Default DISABLE
HTTP
Purpose Select whether or not to enable HTTP.
If ENABLE is selected, HTTP is enabled.
If DISABLE is selected, HTTP is disabled.
Options DISABLE/ENABLE
Default ENABLE
FTP
Purpose Select whether or not to enable FTP server.
If ENABLE is selected, FTP server is enabled.
If DISABLE is selected, FTP server is disabled.
Options DISABLE/ENABLE
Default ENABLE
NETWORK SETTING Menu1-10
Page 17

SMB
Purpose Select whether or not to enable SMB.
If ENABLE is selected, SMB is enabled.
If DISABLE is selected, SMB is disabled.
Options DISABLE/ENABLE
Default ENABLE
BONJOUR
Purpose Select whether or not to enable Bonjour.
If ENABLE is selected, Bonjour is enabled.
If DISABLE is selected, Bonjour is disabled.
Options DISABLE/ENABLE
Default ENABLE
IPP
Purpose Select whether or not to enable IPP.
If ENABLE is selected, IPP is enabled.
If DISABLE is selected, IPP is disabled.
Options DISABLE/ENABLE
Default ENABLE
SLP
Purpose Select whether or not to enable SLP.
If ENABLE is selected, SLP is enabled.
If DISABLE is selected, SLP is disabled.
Options DISABLE/ENABLE
Default ENABLE
NETWORK SETTING Menu 1-11
Page 18

SNMP
Purpose Select whether or not to enable SNMP.
If ENABLE is selected, SNMP is enabled.
If DISABLE is selected, SNMP is disabled.
Options DISABLE/ENABLE
Default ENABLE
SPEED/DUPLEX
Purpose Specifies the transmission speed for the network and the
transmission method for bi-directional transmission.
Options
Default
AUTO
10BASE-T FULL
10BASE-T HALF
100BASE-TX FULL
100BASE-TX HALF
AUTO
NETWORK SETTING Menu1-12
Page 19

Network Printing
Page 20

Network Connection
Theory
To connect your machine in a TCP/
IP network environment, you must
make sure that the internal network addresses in the machine
have been set.
" In many cases, you have to
enter only a unique IP
address. However, you may
also have to enter a subnet
mask and/or a gateway
(router) address, depending on your network configuration requirements.
M
Network Connection2-2
Page 21

Making the Connection
Ethernet Interface
An RJ45 connector can be used as the Ethernet interface for this machine.
When connecting your machine to an Ethernet network, the tasks you per-
form depend on how you plan to set the machine’s IP (Internet Protocol)
address.
IP Address—A unique identifier for each device on a TCP/IP network.
Subnet Mask—A filter used to determine what subnet an IP address
belongs to.
Gateway—A node on a network that serves as an entrance to another
network.
Since the IP address for each PC and machine on your network must be
unique, you usually need to modify this preset address so it doesn’t conflict
with any other IP address or your network or any attached network. You can
do this in one of two ways. Each is explained in detail in the following sections.
Using DHCP
Setting the address manually
Using DHCP
If your network supports DHCP (Dynamic Host Configuration Protocol), the
machine’s IP address will be automatically assigned by the DHCP server
when you turn on the machine. (Refer to “Network Printing” on page 2-6 for a
description of DHCP.)
" If the IP address of the machine is not set automatically, check if the
machine has been set to allow DHCP to be used (
— REPORT — CONFIGURATION PAGE). If the machine has been
set so that DHCP cannot be used, select AUTO in the UTILITY -
ADMIN. MANAGEMENT - NETWORK SETTING - IP ADDR.
SETTING
AGEMENT - NETWORK SETTING - DHCP
menu, and ENABLE in the UTILITY - ADMIN. MAN-
1 Connect your machine to the network.
When using an Ethernet cable, plug the RJ45 connector into the Ethernet
interface port of the machine.
2 Turn on your PC and machine.
3 After the machine’s message window is initialized, install the printer driver.
Network Connection 2-3
REPORT/STATUS
menu.
Page 22

Setting the Address Manually
You may also manually change the machine’s IP address, subnet mask, and
gateway by using the following instructions. (See chapter 1, “Understanding
the Network Setting Menu,” for more information.)
" When the IP address is changed, add a new port or reinstall the
printer driver.
CAUTION
Y ou should alw ays notify yo ur network’s administrator before changing
the machine’s IP address.
1 Turn on your PC and machine.
2 After the machine’s message window is initialized, set the IP address.
Press this
key...
UTILITY
ADMIN. MANAGEMENT
NETWORK SETTING
IP ADDR. SETTING
AUTO
(until) the message window displays . . .
MACHINE SETTING
Use the keypad to input 6-digits administrator number.
ADMINISTRATOR NO.
TCP/IP
AUTO
SPECIFY
SPECIFY
Network Connection2-4
Page 23

IP ADDRESS
:0. 0. 0. 0
Use the keypad to input each number.
A single digit number, such as “1”, cannot be input as “001”. Align the number on the left and input “1” as “1 _ _”. Use the and keys to move
between triplets.
ACK key can also be used for deleting. To cancel IP Address menu,
The B
hold down the BACK key for more than one second, and then press the
BACK key again after all settings have been cleared.
SUBNET MASK
:255.255.255. 0
Use the keypad to input each number.
A single digit number, such as “1”, cannot be input as “001”. Align the number on the left and input “1” as “1 _ _”. Use the and keys to move
between triplets.
ACK key can also be used for deleting. To cancel Subnet Mask
The B
menu, hold down the B
the BACK key again after all settings have been cleared.
ACK key for more than one second, and then press
GATEWAY
:0. 0. 0. 0
Use the keypad to input each number.
A single digit number, such as “1”, cannot be input as “001”. Align the number on the left and input “1” as “1 _ _”. Use the and keys to move
between triplets.
ACK key can also be used for deleting. To cancel Gateway menu,
The B
hold down the BACK key for more than one second, and then press the
ACK key again after all settings have been cleared.
B
IP ADDR. SETTING
3 Restart the machine.
4 Print a configuration page to verify that the correct IP address, subnet
mask, and gateway have been set.
5 After the machine’s message window is initialized, install the printer driver.
Network Connection 2-5
Page 24

Network Printing
Network printing terms are described below:
Bonjour
BOOTP
DHCP
DNS
FTP
HTTP
IPP
LDAP
LPD/LPR
POP Before SMTP
Port 9100
SLP
SMB
SMTP
SMTP Authentication
SNMP
TCP/IP
This section contains descriptions of these network printing terms.
Bonjour
Macintosh network technology for automatically detecting devices connected
to the network and for specifying settings. Previously called “Rendezvous”,
the name was changed to “Bonjour” starting with Mac OS X v10.4.
BOOTP
BOOTP (Bootstrap Protocol) is an Internet protocol that enables a diskless
workstation to discover (1) its own IP address, (2) the IP address of a BOOTP
server on the network, and (3) a file that can be loaded into memory to boot
the workstation. This enables the workstation to boot without requiring a hard
or floppy disk drive.
Network Printing2-6
Page 25

DHCP
DHCP (Dynamic Host Configuration Protocol) is a protocol for assigning
dynamic IP addresses to devices on a network. With dynamic addressing, a
device can have a different IP address every time it connects to the network.
In some systems, the device’s IP address can even change while it is still
connected. DHCP also supports a mix of static and dynamic IP addresses.
Dynamic addressing simplifies network administration because th e software
keeps track of IP addresses rather than requiring an administrator to manage
the task. This means that a new computer can be added to a network without
the hassle of manually assigning it a unique IP address.
DNS
Abbreviation for Domain Name System. A system that acquires the supported IP addresses from host names in a network environment. DNS allows
the user to access other computers over a network by specifying host names,
instead of difficult to memorize and understand IP addresses.
FTP
Abbreviation for File Transfer Protocol. A protocol for transferring files over
the Internet or an intranet on the TCP/IP network.
HTTP
HTTP (HyperText Transfer Protocol) is the underlying protocol used by the
World Wide Web. It defines how messages are formatted and transmitted,
and what actions web servers and browsers should take in response to various commands. For example, when you enter a URL in your browser, this
actually sends an HTTP command to the Web server directing it to fetch and
transmit the requested web page.
IPP
IPP (Internet Printing Protocol) is a protocol for end users’ most common
printing situations over the Internet. It allows users to find out about a printer’s
capabilities, submit print jobs to a printer, determine the status of the printer
or print job, and cancel a previously submitted print job.
For more information on using IPP, See “Printing via IPP (Internet Printing
Protocol)” on page 2-11.
Network Printing 2-7
Page 26

LDAP
On a TCP/ IP network, such as the Internet or an intranet, LDAP (Lightweight
Directory Access Protocol) is a protocol that is used to access a database for
managing environment information and the e-mail addresses of network
users.
LPD/LPR
LPD/LPR (Line Printer Daemon/Line Printer Remote) is a platformindependent printing protocol that runs over TCP/IP. Originally implemented
for BSD UNIX, its use has spread into the desktop world and is now an
industry standard.
POP Before SMTP
A user authentication method for sending E-mail messages. First, the reception operation is performed and the user is authenticated by the POP server.
Then, IP addresses where the user was successfully authenticated by the
POP server are permitted to use the SMTP server. This method prevents
third parties without permission to use the mail server from sending mail messages.
Port 9100
When printing through a network, TCP/IP port number 9100 can be used to
send raw data.
SLP
Traditionally, in order to locate services on the network, users had to supply
the host name or network address of the machine providing the desired service. This has created many administrative problems.
However, SLP (Service Location Protocol) simplifies the discovery and use of
network resources such as printers by automating a number of network services. It provides a framework that allows networking applications to discover
the existence, location, and configuration of networked services.
With SLP users no longer need to know the names of network hosts. Instead,
they need to know only the description of the service they are interested in.
Based on this description, SLP is able to return the URL of the desired
service.
Network Printing2-8
Page 27

Unicast, Multicast, and Broadcast
SLP is a unicast and a multicast protocol. This means that messages can be
sent to one agent at a time (unicast) or to all agents (that are listening) at the
same time (multicast). However, a multicast is not a broadcast. In theory,
broadcast messages are “heard” by every node on the network. Multicast
differs from broadcast because multicast messages are only “heard” by the
nodes on the network that have “joined the multicast group.”
For obvious reasons network routers filter almost all broadcast traffic. This
means that broadcasts that are generated on one subnet will not be “routed”
or forwarded to any of the other subnets connected to the router (from the
router’s perspective, a subnet is all mach ines connected to one of its ports).
Multicasts, on the other hand, are forwarded by routers. Multicast traffic from
a given group is forwarded by routers to all subnets that have at least one
machine that is interested in receiving the multicast for that group.
SMB
SMB (Server Message Block) is a protocol for sharing network resources,
such as files and printers, in a Windows environment. If the Samba server
software is used on Linux or UNIX, services using SMB can be shared.
SMTP
SMTP (Simple Mail Transfer Protocol) is a protocol for sending E-mail.
This protocol was originally used to send E-mail between servers; however,
currently it is also used by client E-mail software that uses POP to send
E-mail to servers.
SMTP Authentication
Specification that adds user authentication functions to SMTP, which is used
for sending E-mail.
When sending E-mail, authentication of the user is performed by the SMTP
server, and the E-mail message is permitted to be sent only if authentication
was successful.
SNMP
SNMP (Simple Network Management Protocol) is actually a set of protocols
for managing complex networks. SNMP works by sending messages to different parts of a network. SNMP-compliant devices, called agents, store data
about themselves in Management Information Bases (MIBs) and return this
data to the SNMP requesters.
Network Printing 2-9
Page 28

TCP/IP
Most networks combine TCP (Transmission Control Protocol) with the
lower-level protocol IP (Internet Protocol). TCP establishes a virtual connection between two host systems and guarantees the delivery of data between
them while IP specifies the format and addressing of this data sent between
these two host systems.
Network Printing2-10
Page 29

Printing via IPP (Internet Printing Protocol)
" You must have administrator privileges in order to install the printer
driver.
" If the User Account Control window appears when installing on
Windows Vista, click the Allow button or the Continue button.
Adding an IPP Port using Add Printer Wizard – Windows
Server 2003/XP/2000
For Windows Server 2003/XP: Click Start, select Printers and Faxes,
and then click Add Printer.
For Windows 2000: Click Start, point to Settings, click Printers, and then
click Add Printer.
1 In the second dialog box select the Network Printer radio button and
then choose Next.
Windows Server 2003/XP
Windows 2000
Network Printing 2-11
Page 30

2 In the URL field in the next dialog box enter the printer’s network path-
name in one of the following formats and then choose Next:
http://ipaddress/ipp
http://ipaddress:80/ipp
http://ipaddress:631/ipp
Windows Server 2003/XP
If your system cannot connect to the printer, the following message appears:
Windows Server 2003/XP—“Windows cannot connect to the printer.
Either the printer name was typed incorrectly, or the specified printer
has lost its connection to the server. For more information, click Help.”
Windows 2000—“Could not connect to the printer. Y ou either entered
a printer name that was incorrect or the specified printer is no longer
connected to the server. Click Help for more information.”
Windows 2000
3 Windows Server 2003/XP—Go to step 4.
Windows 2000—If you entered a valid path in the previous step, the following message displays: “The server on which the MC160n printer
resides does not have the correct printer driver installed. If you want to
install the driver on your local computer, click OK.” The reason for this is
that you do not yet have a printer driver installed. Choose OK.
4 Choose Have Disk, locate the directory
on the CD where the printer driver files
are located (for example:
Printer Driver\English\Win32), and then
choose OK.
5 Finish installing the printer driver.
Network Printing2-12
Page 31

Adding an IPP Port using Add Printer Wizard – Windows
Vista
1 Click Start, click Control Panel, and then click Printers.
2 Click Add a printer.
3 In the dialog box click Add a network, wireless or Bluetooth printer.
4 In the dialog box, click The printer that I want isn’t listed.
Network Printing 2-13
Page 32

5 In the URL field in the next dialog box enter the printer’s network path-
name in one of the following formats and then choose Next:
http://ipaddress/ipp
http://ipaddress:80/ipp
http://ipaddress:631/ipp
If your system cannot connect to the machine, the following message
appears: “Windows cannot connect to the printer. Make sure that you have
typed the name correctly, and that the printer is connected to network.”
6 Choose Have Disk, locate the directory on the CD where the printer
driver files are located (for example: Printer Driver\English\Win32), and
then choose Next.
7 Finish installing the printer driver.
Network Printing2-14
 Loading...