

Page 1

Page 2

Page 3

PREFACE
Every effort has been made to ensure that the information in this
document is complete, accurate, and up-to-date. Oki assumes no
responsibility for the results of errors beyond its control. Oki also cannot
guarantee that changes in software and equipment made by other
manufacturers and referred to in this guide will not affect the applicability
of the information in it. Mention of software products manufactured by
other companies does not necessarily constitute endorsement by Oki.
While all reasonable efforts have been made to make this document as
accurate and helpful as possible, we make no warranty of any kind,
expressed or implied, as to the accuracy or completeness of the
information contained herein.
Copyright 2002 by Oki. All rights reserved.
Oki is a registered trademark of Oki Electric Industry Company Ltd.
Microsoft, MS-DOS and Windows are registered trademarks of Microsoft
Corporation.
Other product names and brand names are registered trademarks or
trademarks of their proprietors.
Written and produced by the Oki Publications Department.
Preface 1
Page 4

TABLE OF CONTENTS
Configuration . . . . . . . . . . . . . . . . . . . . . . . . . . . . . . 5
Introduction. . . . . . . . . . . . . . . . . . . . . . . . . . . . . 5
Specification . . . . . . . . . . . . . . . . . . . . . . . . . 6
Self-diagnostic test . . . . . . . . . . . . . . . . . . . .7
Configuration Utility. . . . . . . . . . . . . . . . . . . . .11
Available utilities . . . . . . . . . . . . . . . . . . . .11
Using Quick Setup . . . . . . . . . . . . . . . . . . . . . .12
Using a Web browser . . . . . . . . . . . . . . . . . . . .15
Standard Setup Using AdminManager . . . . . . . 18
Installation . . . . . . . . . . . . . . . . . . . . . . . . . . . .19
Interface . . . . . . . . . . . . . . . . . . . . . . . . . . . . . . 22
File menu. . . . . . . . . . . . . . . . . . . . . . . . . . .22
Status Menu. . . . . . . . . . . . . . . . . . . . . . . . .22
Setup Menu . . . . . . . . . . . . . . . . . . . . . . . . .23
Oki Device Setup . . . . . . . . . . . . . . . . . . . . 24
General Tab . . . . . . . . . . . . . . . . . . . . . 24
TCP/IP Tab . . . . . . . . . . . . . . . . . . . . . . 25
Netware Tab . . . . . . . . . . . . . . . . . . . . .26
EtherTalk Tab . . . . . . . . . . . . . . . . . . . . 28
NetBEUI Tab . . . . . . . . . . . . . . . . . . . .28
SNMP Tab . . . . . . . . . . . . . . . . . . . . . . 29
Create a NetWare Queue. . . . . . . . . . . . . . .35
Delete NetWare Object . . . . . . . . . . . . . . . .36
IP Address Setup. . . . . . . . . . . . . . . . . . . . .36
Option Menu . . . . . . . . . . . . . . . . . . . . . . . .37
Help Menu. . . . . . . . . . . . . . . . . . . . . . . . . .37
Using TELNET. . . . . . . . . . . . . . . . . . . . . . . . .38
Telnet hierarchical structure.. . . . . . . . . . . .41
Using SNMP. . . . . . . . . . . . . . . . . . . . . . . . . . .45
Using Setup Assistant . . . . . . . . . . . . . . . . . . . .45
Configurable items and Default Values . . . . . .46
Management utility . . . . . . . . . . . . . . . . . . . . . .61
PrintSuperVision. . . . . . . . . . . . . . . . . . . . .61
System requirement. . . . . . . . . . . . . . . . . . .62
Windows . . . . . . . . . . . . . . . . . . . . . . . .62
Supported Browsers . . . . . . . . . . . . . . . 63
Supported Printers . . . . . . . . . . . . . . . .63
Supported network interface cards . . . . 64
TABLE OF CONTENTS 2
Page 5

Installation . . . . . . . . . . . . . . . . . . . . . . . . . . . .65
Uninstallation . . . . . . . . . . . . . . . . . . . . . . . . . . 65
Printing utility . . . . . . . . . . . . . . . . . . . . . . . . . .66
OKI LPR . . . . . . . . . . . . . . . . . . . . . . . . . . .66
System Requirement . . . . . . . . . . . . . . . . .66
To install the OKI LPR utility . . . . . . . . . . . . . 67
Uninstallation . . . . . . . . . . . . . . . . . . . . . . . . . . 68
Microsoft Windows . . . . . . . . . . . . . . . . . . . . . . . .69
Overview. . . . . . . . . . . . . . . . . . . . . . . . . . . . . . 69
Installation of TCP/IP Protocol. . . . . . . . . . . . .70
Windows 95/98/Me. . . . . . . . . . . . . . . . . . . . . . 71
Windows NT 4.0. . . . . . . . . . . . . . . . . . . . . . . .71
Windows 2000 . . . . . . . . . . . . . . . . . . . . . . . . .72
Windows XP. . . . . . . . . . . . . . . . . . . . . . . . . . .72
Network printer IP address configuration. . . . .73
Windows 95/98/Me. . . . . . . . . . . . . . . . . . . . . . 75
Windows NT 4.0. . . . . . . . . . . . . . . . . . . . . . . .76
OkiLPR . . . . . . . . . . . . . . . . . . . . . . . . .76
Microsoft LPR . . . . . . . . . . . . . . . . . . .76
Windows 2000 . . . . . . . . . . . . . . . . . . . . . . . . .77
OKILPR . . . . . . . . . . . . . . . . . . . . . . . .77
Microsoft LPR . . . . . . . . . . . . . . . . . . .78
Port 9100 . . . . . . . . . . . . . . . . . . . . . . .78
IPP . . . . . . . . . . . . . . . . . . . . . . . . . . . . 79
Windows XP. . . . . . . . . . . . . . . . . . . . . . . . . . .80
OKILPR. . . . . . . . . . . . . . . . . . . . . . . . 80
Port 9100 . . . . . . . . . . . . . . . . . . . . . . . 81
IPP . . . . . . . . . . . . . . . . . . . . . . . . . . . .82
Novell Netware IPX . . . . . . . . . . . . . . . . . . . . .82
NetBEUI Protocol. . . . . . . . . . . . . . . . . . . . . . .83
Network Printer Settings . . . . . . . . . . .83
Windows 95/98/Me. . . . . . . . . . . . . . . . . . . . . . 83
Windows NT 4.0. . . . . . . . . . . . . . . . . . . . . . . .84
Windows 2000 . . . . . . . . . . . . . . . . . . . . . . . . .85
Windows XP. . . . . . . . . . . . . . . . . . . . . . . . . . .85
Printer driver configuration . . . . . . . . . . . . . . . 86
Novell NetWare . . . . . . . . . . . . . . . . . . . . . . . . . . . 88
Overview. . . . . . . . . . . . . . . . . . . . . . . . . . . . . . 88
Supported Versions and Modes . . . . . . . . . 88
Remote Printer Mode . . . . . . . . . . . . . . . . .88
TABLE OF CONTENTS 3
Page 6

Print Server Mode (Recommended) . . . . . .88
Setup Utilities . . . . . . . . . . . . . . . . . . . . . . . . . . 89
UNIX . . . . . . . . . . . . . . . . . . . . . . . . . . . . . . . . . . . 91
Overview. . . . . . . . . . . . . . . . . . . . . . . . . . . . . . 91
Configuration . . . . . . . . . . . . . . . . . . . . . . . 91
Network Interface card setting . . . . . . 91
Operating system configuration . . . . . . . . . 95
Sun OS 4.x.x (BSD) configuration . . . . 95
Sun Solaris 2.x configuration . . . . . . . . 97
HP-UX 10.x configuration . . . . . . . . .100
AIX 4.1.5 configuration . . . . . . . . . . . 102
LPD Printing . . . . . . . . . . . . . . . . . . . .103
Logical printers . . . . . . . . . . . . . . . . . .104
BSD-based UNIX . . . . . . . . . . . . . . . .104
System V-based UNIX . . . . . . . . . . . .104
FTP printing . . . . . . . . . . . . . . . . . . . .105
Logical directories . . . . . . . . . . . . . . .105
Apple Macintosh . . . . . . . . . . . . . . . . . . . . . . . . . 109
Overview. . . . . . . . . . . . . . . . . . . . . . . . . . . . . 109
Supported Versions. . . . . . . . . . . . . . . . . . . . .109
Installation . . . . . . . . . . . . . . . . . . . . . . . . . . .109
OS 8.6 to 9.1 . . . . . . . . . . . . . . . . . . . . . . . 109
OS X . . . . . . . . . . . . . . . . . . . . . . . . . . . . . 110
Troubleshooting . . . . . . . . . . . . . . . . . . . . . . . . . . 112
Self-diagnostic test . . . . . . . . . . . . . . . . . . . . . 112
TCP/IP . . . . . . . . . . . . . . . . . . . . . . . . . . . . . .113
NetWare . . . . . . . . . . . . . . . . . . . . . . . . . . . . .114
Remote Server mode . . . . . . . . . . . . . 114
Print Server mode . . . . . . . . . . . . . . . .115
EtherTalk . . . . . . . . . . . . . . . . . . . . . . . . . . . . 115
NetBEUI . . . . . . . . . . . . . . . . . . . . . . . . . . . . . 116
Glossary. . . . . . . . . . . . . . . . . . . . . . . . . . .117
TABLE OF CONTENTS 4
Page 7

CONFIGURATION
Introduction
The OkiLAN Internal Print Server is a fast 100BASE-TX/10BASE-T
network interface.
This network print server supports IEEE802.2, IEEE802.3, Ethernet-II
and SNAP and can detect those frame types automatically.
Also, it supports major protocols such as TCP/IP, IPX/SPX (NetWare),
EtherTalk and NetBEUI.
This section details the specification and several software utilities.
For multiple emulation printers, change the emulation in the Printer Menu
settings to Auto or PS before printing the self-diagnostic test and settings.
Configuration 5
Page 8

Specifications
CPU Falcon
Frame types IEEE 802.2
IEEE 802.3
Ethernet-II, SNAP, AUTO
Network interface 100BASE-TX
10BASE-T
Network protocols TCP/IP
Network layer ARP, RARP, IP, ICMP
Session layer TCP, UDP
Application layer LPR, FTP, TELNET, HTTP, IPP,
IPX/SPX (NetWare)
Remote printer mode (up to eight file servers and 32 queues)
Print server mode (up to eight print servers)
Encrypted password supported in print server mode
SNMP
EtherTalk
ELAP, AARP, DDP, AEP, NBP, ZIP, RTMP, ATP, PAP
NetBEUI
SMB, NetBIOS
Functions Self-diagnostic test printing
Banner supported
Monitoring/configure by Web browser
Printer status notification by E-Mail
BOOTP, DHCP, SNMP, DNS,
SMTP, POP3
Configuration 6
Page 9
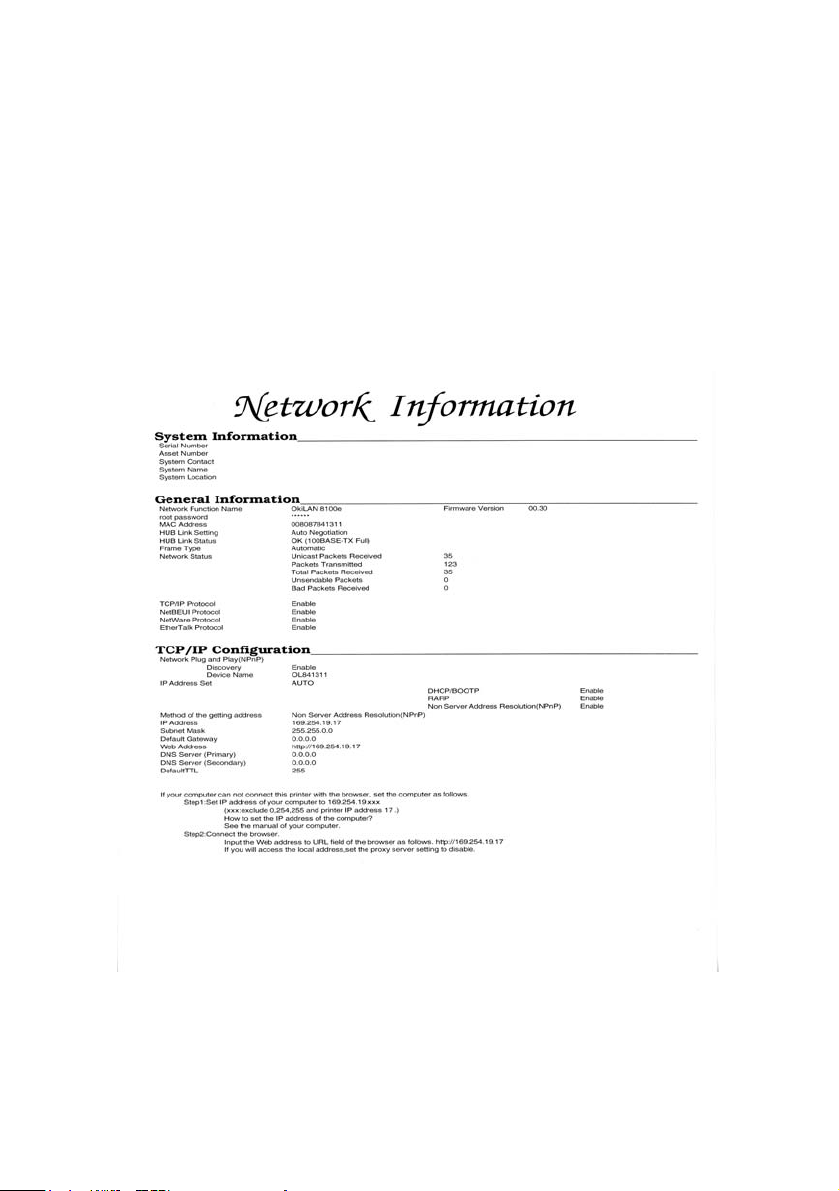
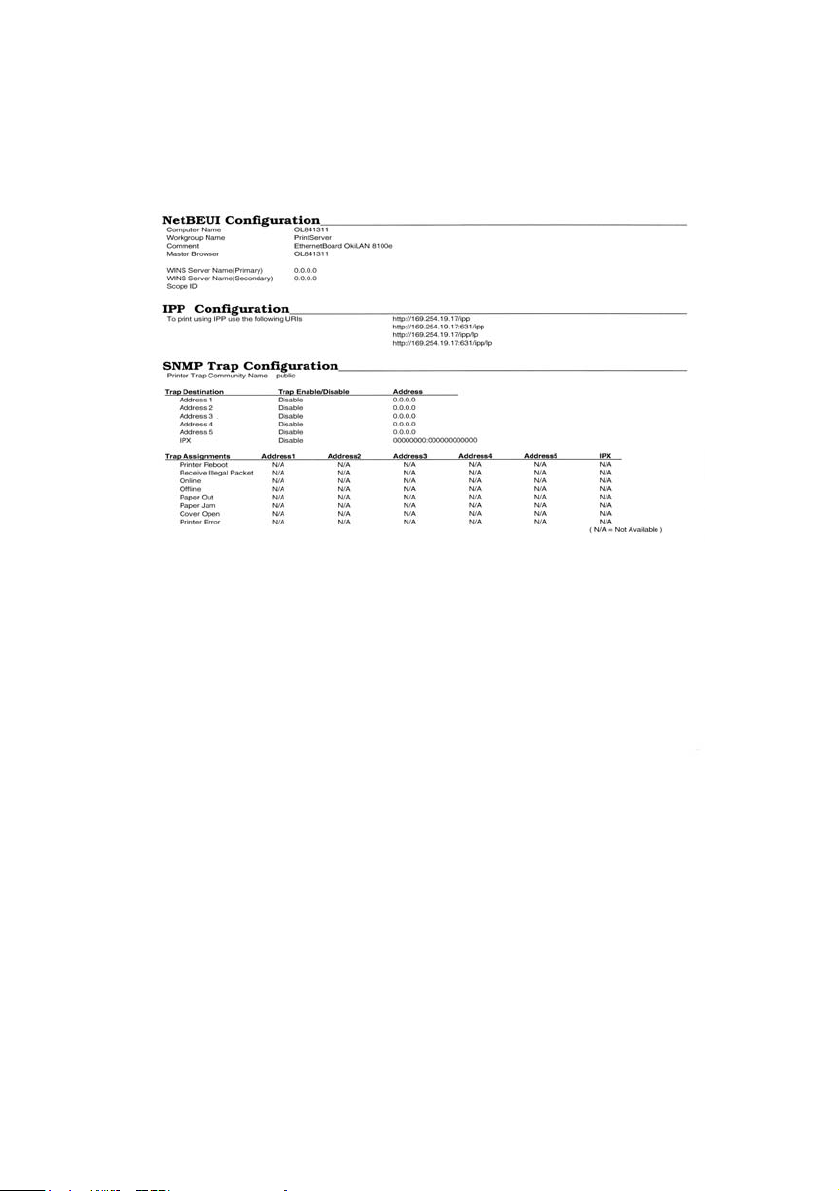
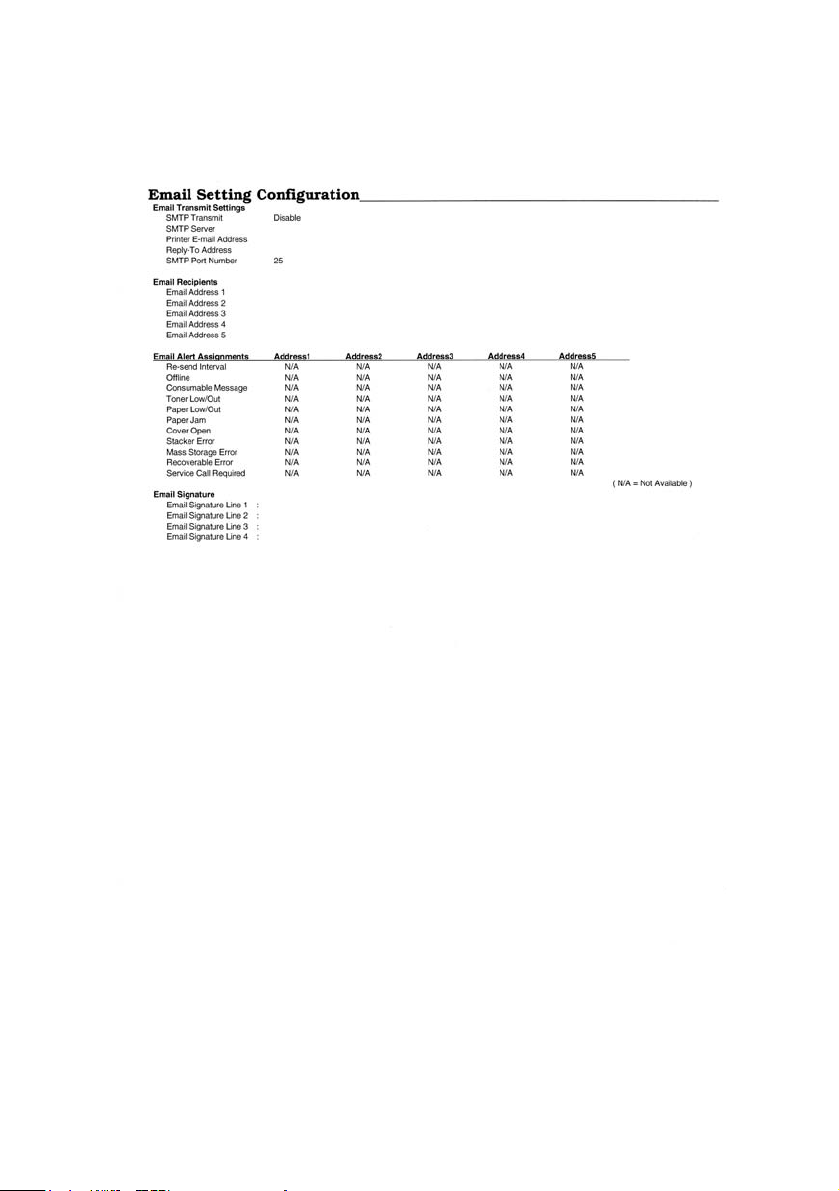
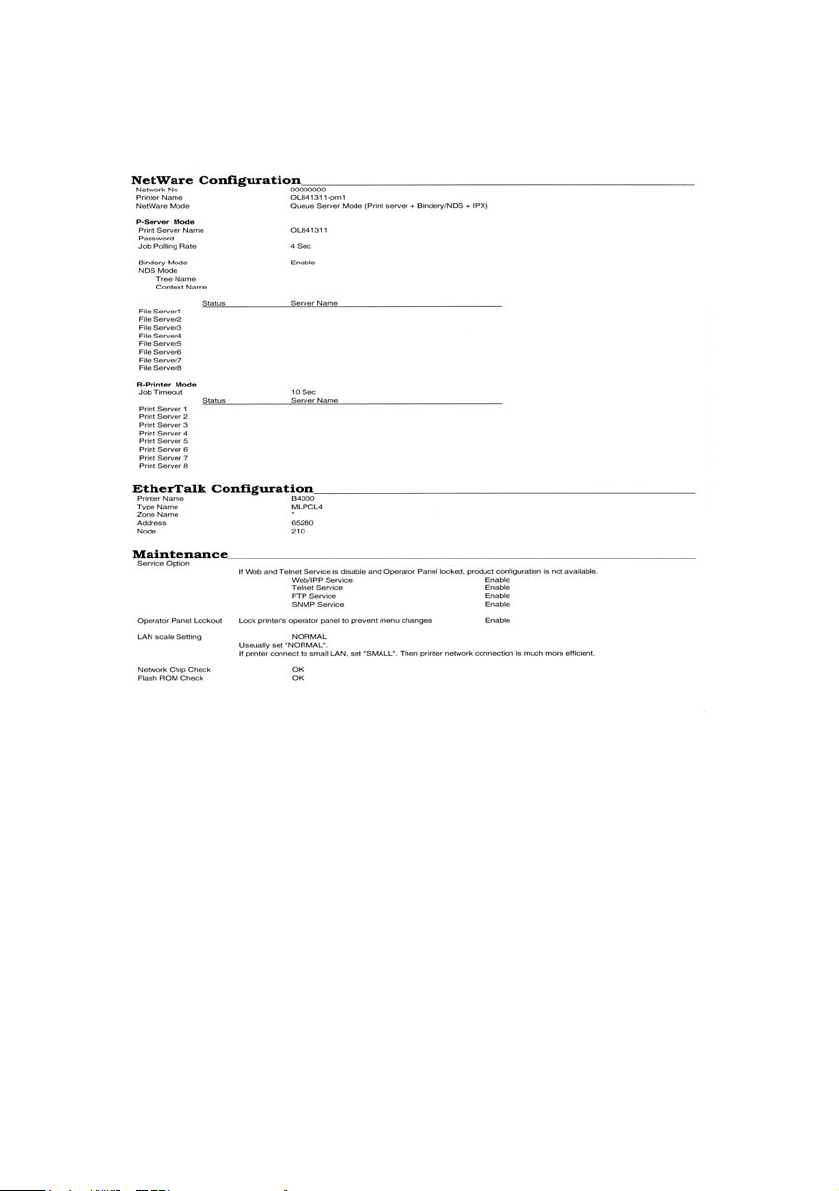
Self-diagnostic test
With the printer power switched on, press the print server test button for
more than three seconds and release. The self-diagnostic test results and
configuration settings are printed.
Printed self-diagnostic test sample
If “NG” is displayed instead of “OK” see the “Troubleshooting” chapter.
Printed configuration settings sample
Configuration 7
Page 10
Configuration 8
Page 11
Configuration 9
Page 12
Configuration 10
Page 13

Configuration Utility
Available utilities
You can configure the print server by using one of the following methods:
Utility Features System requirements
Quick Setup Configure the print server easily and
simply without installing any software
packages into your system. You can
set the following:
Enable/disable TCP/IP, NetWare,
EtherTalk, NetBEUI protocols.
> Set IP address, Subnet Mask and
Gateway for TCP/IP manually or
by using DHCP.
> Set NetWare Mode and create
Queue/Print Server/Printer
objects.
> Zone name and Port name for
EtherTalk.
Web browser Configure the print server and printer
by using a Web browser such as
Microsoft Internet browser or
Netscape Navigator.
AdminManager Configure the print server in detail. Windows95/98/Me/NT4.0/2000/XP
TELNET Configure the print server using
TELNET.
SNMP The printer and print server can be
controlled using third-party vendor
developed SNMP application.
Setup Assistant Configure multiple printers into
groups. Filter out printers. Search and
manage IP addresses. Includes
firmware upgrade tool. Create MIB
template.
Windows95/98/Me/NT4.0/2000/XP
(TCP/IP protocol or IPX/SPX
protocol should be installed).
To create a NetWare queue,
NetWare Client 32 or IntranetWare
Client should be installed in your
system.
Microsoft Internet Explorer Version
3.0 and higher or Netscape Navigator
Version 3.0 and higher. Operating
system that supports Web browser.
(TCP/IP protocol or IPX/SPX
protocol should be installed). to
create a NetWare queue, NetWare
Client 32 or IntranetWare Client
should be installed in your system.
Third-party vendor developed
TELNET client package.
A TELNET Application is standard
in Windows/UNIX/Linux.
Third-party vendor developed SNMP
application.
Windows 95 (OSR2 and above),
Windows 98, Me. Windows NT4.0,
2k and XP can be used only with
Administrator authority login;
Internet Explorer 4.0 or above.
.
Configuration 11
Page 14

Using Quick Setup
Quick Setup utility allows you to configure the print server easily and
simply without installing any software packages.
You can configure the following:
> Enable/disable TCP/IP, NetWare, EtherTalk, NetBEUI protocols.
> Set IP address, Subnet Mask and Gateway for TCP/IP manually or
by using DHCP.
> Set NetWare mode and create Queue/Print Server/Printer objects.
> Zone name and Port name for EtherTalk.
Configuration requires a PC with Windows 95/98/Me, Windows 2000
Advanced Server/Professional or Windows NT Server 4.0/Work-station
4.0, Windows XP running TCP/IP or IPX/SPX (NetWare).
This utility can only be used on a PC that can be connected to the network
with TCP/IP or IPX/ SPX.
This utility must be used on a PC that is located in the same segment as
the printer. To create a NetWare queue, NetWare Client 32 or
IntranetWare Client should be installed in your system.
Configuration 12
Page 15

The following explanation uses Windows 98 as an example.
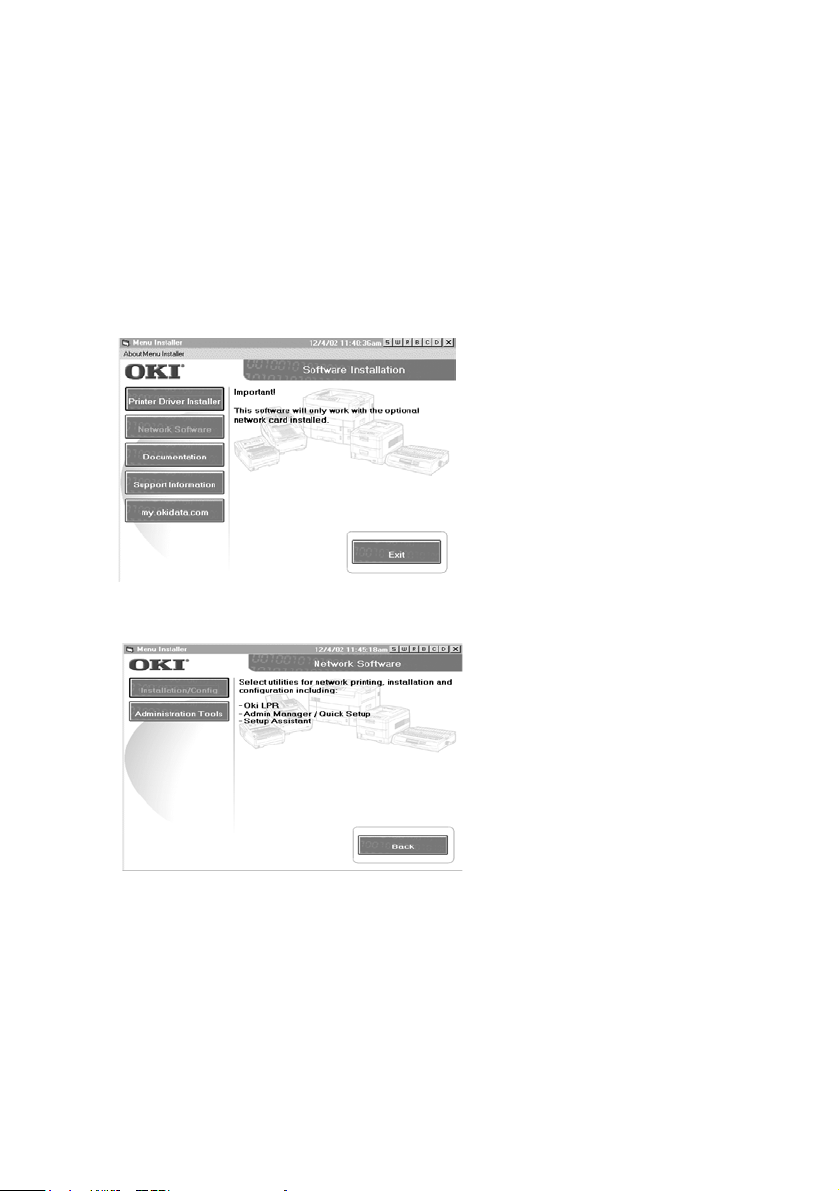
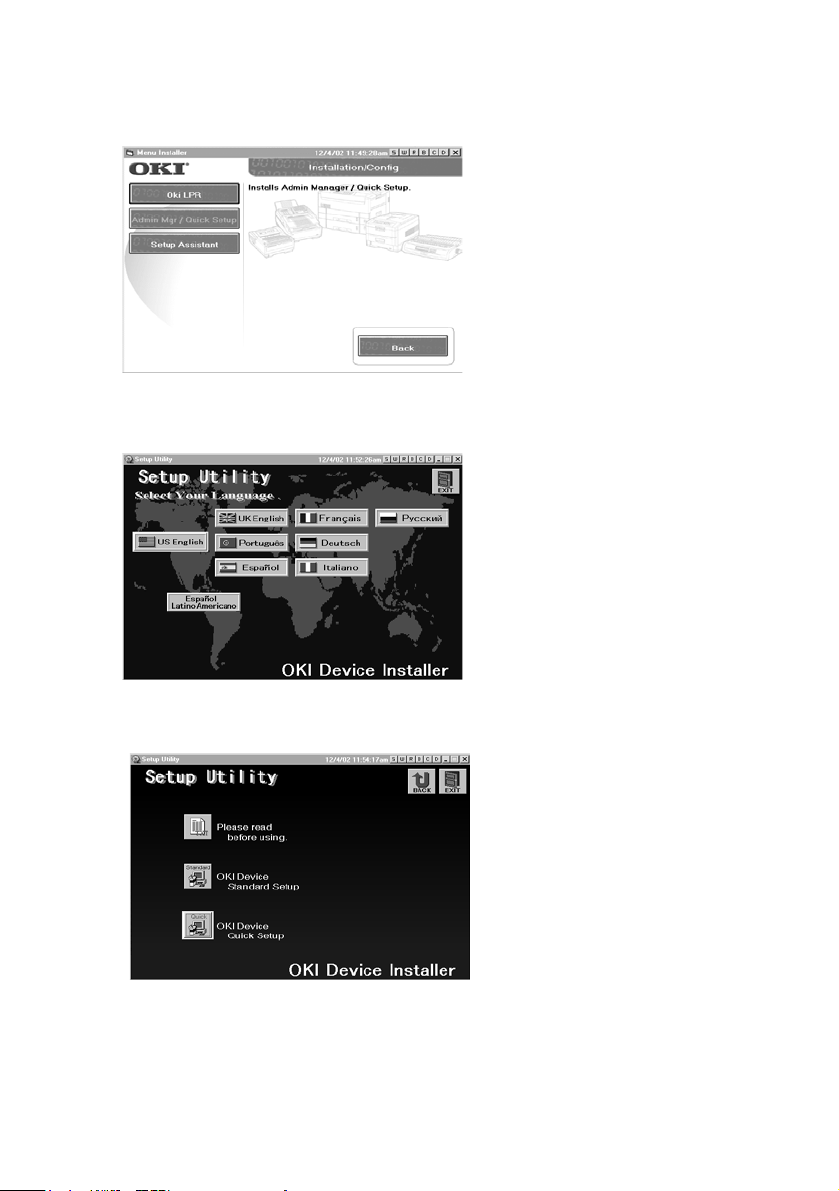
1. Insert the CD-ROM provided with your printer into the CD-ROM
drive. If the Menu Installer does not start automatically, click
Start→Run→Browse. Browse to your CD-ROM and click
Install→Οpen→OK.
2. Select [Network Software]
3. Select [Installation/Config].
Configuration 13
Page 16

4. Select the [Admin Mgr/Quick Setup].
5. Select the language..
6. Select Quick Setup.
Configuration 14
Page 17

7. Follow the on-screen instructions.
> The NetWare Client 32 or IntranetWare Client should be installed on the
PC used for the creation of network queues. Installation enables the user
to create network queues and perform other functions.
8. If the settings are correct, click [Execute]. The new settings are
transmitted to the network card but the network card is still operating
with pre-transmission settings.
9. Click [Finish] to validate the new settings. Depending on the model, the
printer may have to be switched off and on again.
Using a Web browser
If the print server is connected to the network using TCP/IP, its settings and
the printer menu settings can be configured using a Web browser, such as
Microsoft Internet Explorer Version 3.0 and higher, or Netscape Navigator
version 3.0 and higher. No guarantees are offered for other browsers. Refer to
the relevant manuals for details of how to launch and use the browser.
The network addresses used in this manual are shown as examples only.
Network addresses used in your installation must be generated from your own
network. To apply configuration changes using a Web browser, you will be
prompted for a username and password.The username is [root] and the default
password is the last six digits of the Ethernet address.
The following explanation uses Windows 95 and Microsoft Internet Explorer
version 4.0 as an example.
Configuration 15
Page 18
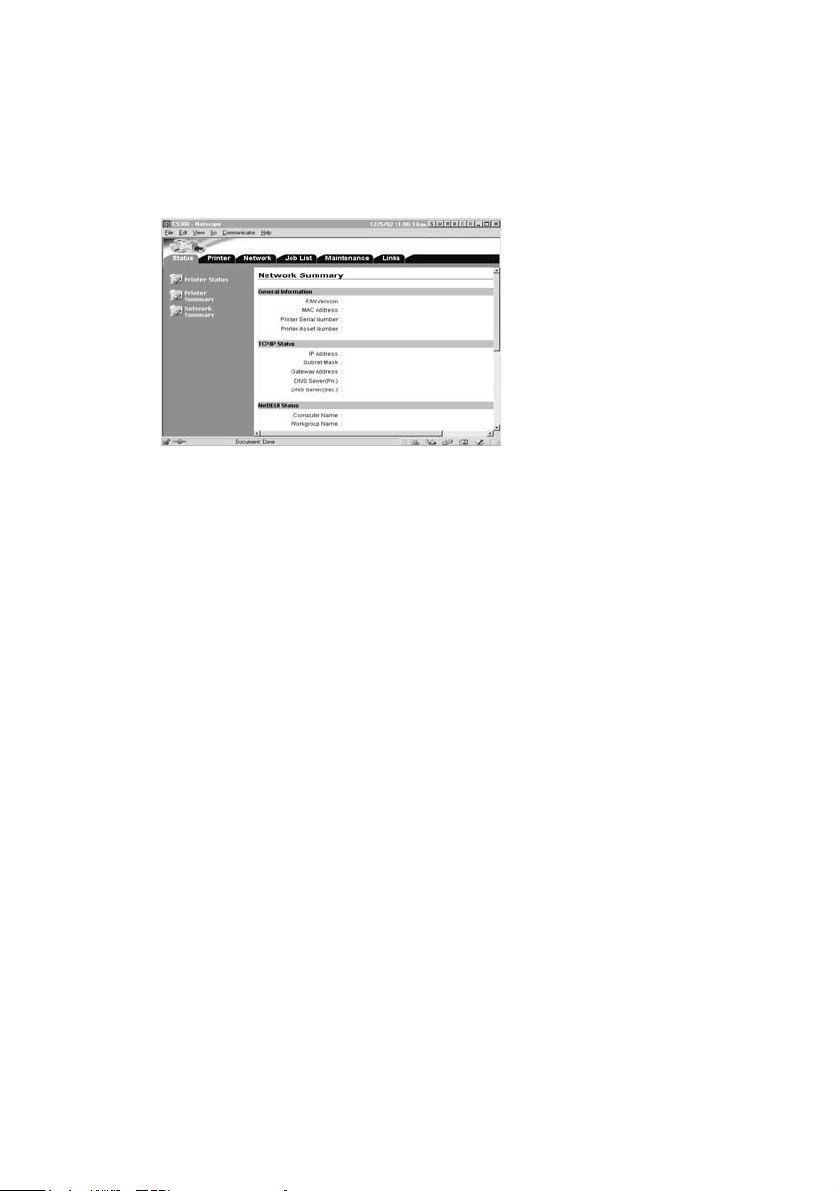
1. Configure the IP Address, Subnet Mask and Gateway for the
network card. Launch the Web browser, enter the IP Address of the
network interface card in [Address (Location/Position)] and press
the [Enter] key. The Printer Status screen is displayed.
2. Click on a tab to see a particular Category, then click the items you
want to change in the left column. For more details of
corresponding items in WEB and TELNET equivalents, see the
description in the Configurable Items and Default Values table
starting on page 46.
3. To ensure correct operation, follow the procedure below for the
appropriate network browser.
Microsoft Internet Explorer
a. Select [Internet Options] in the [Tools] menu.
b. Click on the [General] tab and click [Settings] in [Temporary
Internet files].
c. Select [Every visit to the page] in [Check for newer versions
of stored programs].
Netscape Navigator
a. Select [Settings] in the [Edit] menu
b. Click [Cache] in [Details].
Configuration 16
Page 19
c. Select [Once per session] in [Document in cache is compared
to document on network].
If you change the window size of the browser immediately
after changing the configuration, [Security information] may
be displayed. Uncheck [Display this message next time] in the
dialogue.
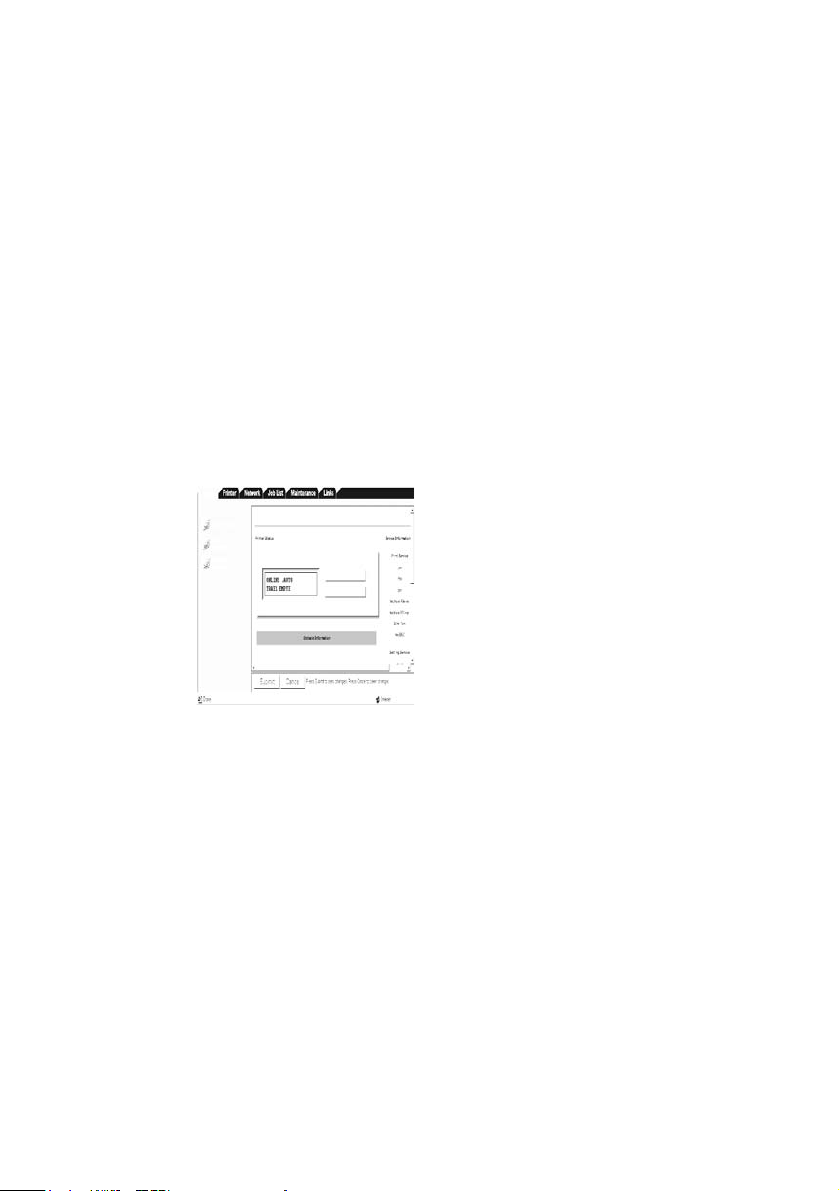
4. After making changes, click [Submit].
5. Enter [root] in User name and your password (default is the last six
digits of the Ethernet address) in Password and click [OK].
6. After the new values are transmitted to the network card, the
following screen is displayed. If a different message is displayed,
check the settings.
For example: For Ethernet address 00:80:92:01:00:D2, a default password
is [0100D2]. The Ethernet address (MAC address) is displayed during the
self-diagnostic test.
The root password can be changed to allow you to configure the print
server and printer by using a Web browser. The default password is the
last six digits of the MAC address.
Configuration 17
Page 20
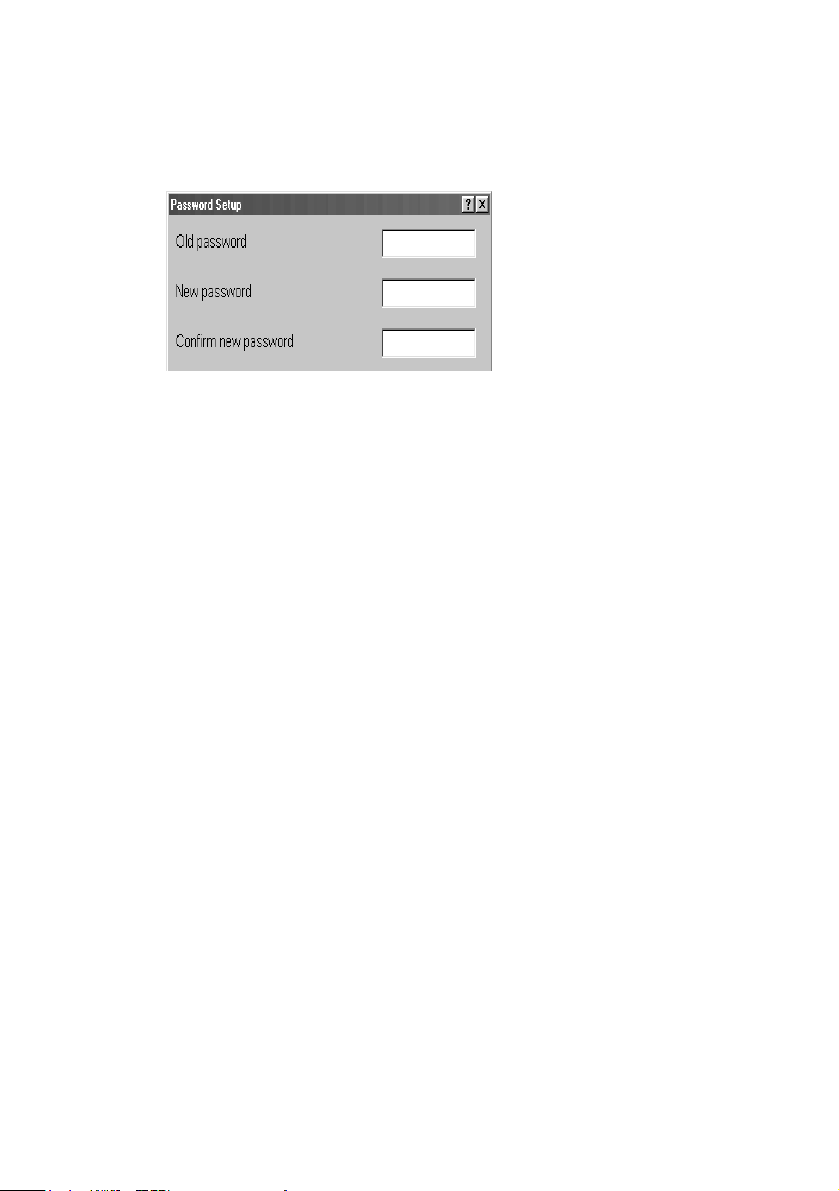
To change the root password for configuration via a Web browser, access
[http://OKILAN IP address or hostname>/system_password.htm]. After
inputting the current root password, this screen is displayed:
Input a new root password in [New Admin Password] and [Confirm New
Admin Password] then select [Submit] button.
The root password for configuration via Web browser is different for
AdminManager/TELNET/FTP. These passwords can be set in
AdminManager or TELNET.
Standard Setup Using AdminManager
AdminManager is a powerful Microsoft Windows-based utility to
configure all print server functions by using a graphical user interface.
Configuration requires a PC with Windows 95/98/Me, Windows 2000
Advanced Server/Professional or Windows NT Server 4.0/Work-station
4.0, Windows XP running TCP/IP or IPX/SPX (NetWare).
This utility can only be used on a PC that can be connected to the network
with TCP/IP or IPX/ SPX and must be used on a PC that is located in the
same segment as the printer.
To create a NetWare queue, NetWare Client 32 or IntranetWare Client
should be installed on to your system.
The following explanation uses Windows 98 as an example.
Configuration 18
Page 21
Installation
The following explanation uses Windows 98 as an example.
1. Insert the CD-ROM provided with your printer into the CD-ROM
drive. If the Menu Installer does not start automatically, click
Start→Run→Browse. Browse to your CD-ROM and click
Install→Οpen→OK.
2. Select [Network Software]
3. Select [Installation/Config].
Configuration 19
Page 22
4. Select the [Admin Mgr/Quick Setup].
5. Select the language..
6. Select OKI Device Standard Setup.
Configuration 20
Page 23
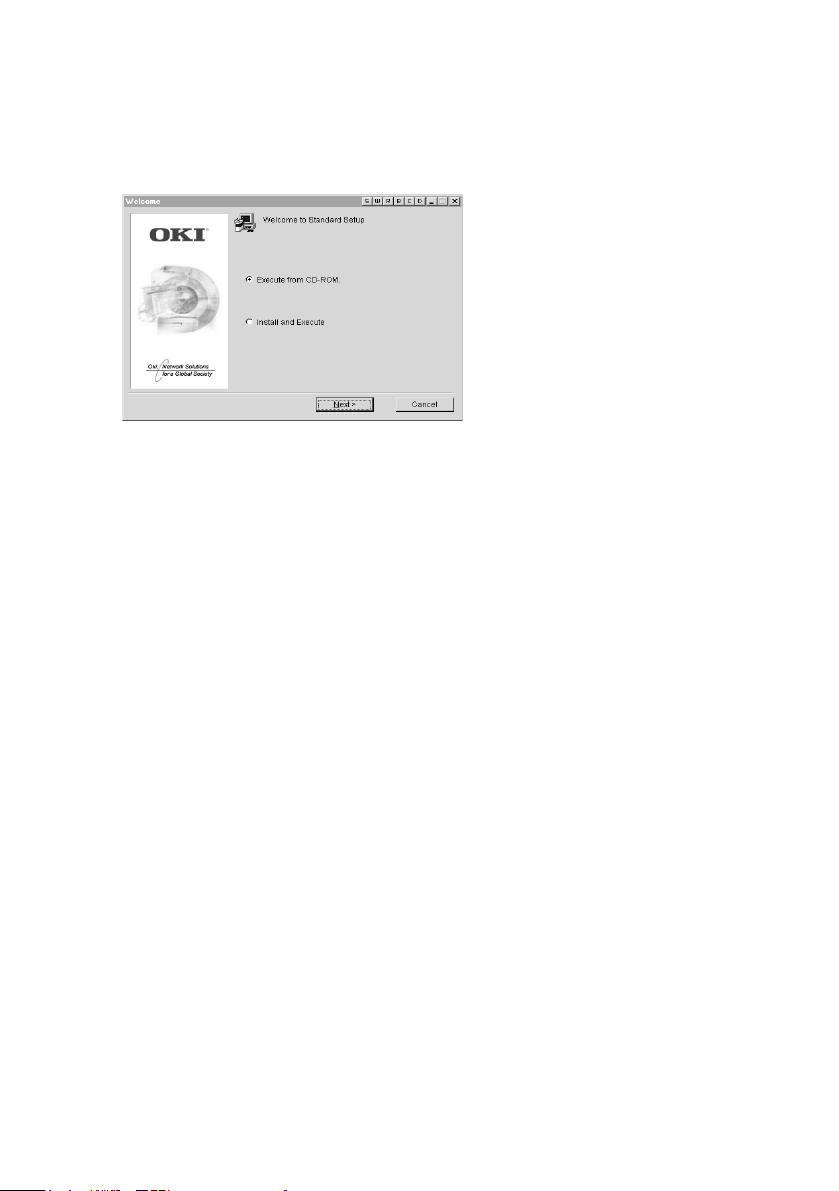
7. Follow the on-screen instructions. If you want to install
AdminManager on your local drive, select [Install and Execute].
Otherwise, select [Execute from CD-ROM].].
Configuration 21
Page 24

Interface
Select [Start]→[Programs]→[OKI Setup Utility]→[Admin Manager].
File menu
In the [File] menu, the following item can be selected:
Item Function
Search Search printers in your network and list all printers that have the
OkiLAN installed.
Status Menu
In the [Status] menu, the following items can be selected:
Item Function
Printer Status Current printer status is displayed:
System Status Displays current OkiLAN configuration. Configuration data
NetMeter Display current network status. For further information, see on-
can be saved as log file.
line help file of NetMeter.
Configuration 22
Page 25
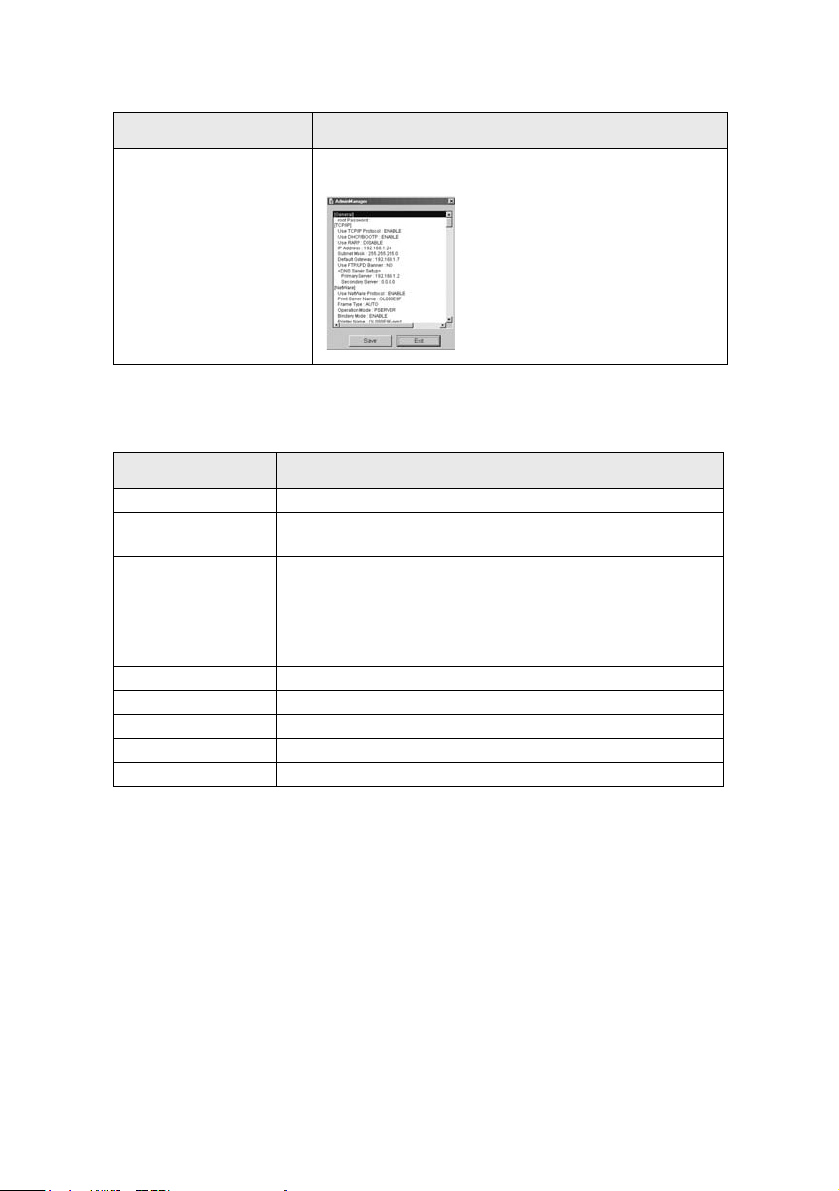
Item Function
List of Configuration Items Displays current configuration. Configuration data can be
saved as log file.
Setup Menu
In this menu, the following items can be selected:
Item Function
Oki Device Setup Configure the OkiLAN.
Setup by HTTP Launch the default browser in your environment to access the
Setup by TELNET Launch TELNET application in your environment to access the
Create NetWare Queue Create a NetWare queue.
Delete NetWare Object Delete NetWare object.
Reset Reset the selected network interface card.
Test Print Print self-diagnostic test pages.
IP Address Setup Set static IP address of network interface card manually.
selected printer’s web page.
selected printer’s TELNET port.
Note: The TELNET application is not included as part of the
OkiLAN package. Install the TELNET package on to your system.
For further information, see your Windows manual.
Configuration 23
Page 26
Oki Device Setup
In this section you can configure the print server. It contains details for the
following selectable tabs:
> General
>TCP/IP
>NetWare
>EtherTalk
>NetBEUI
>SNMP
> POP (if your printer supports E-Mail reception)
>SMTP
The following section explains each tab’s functionality.
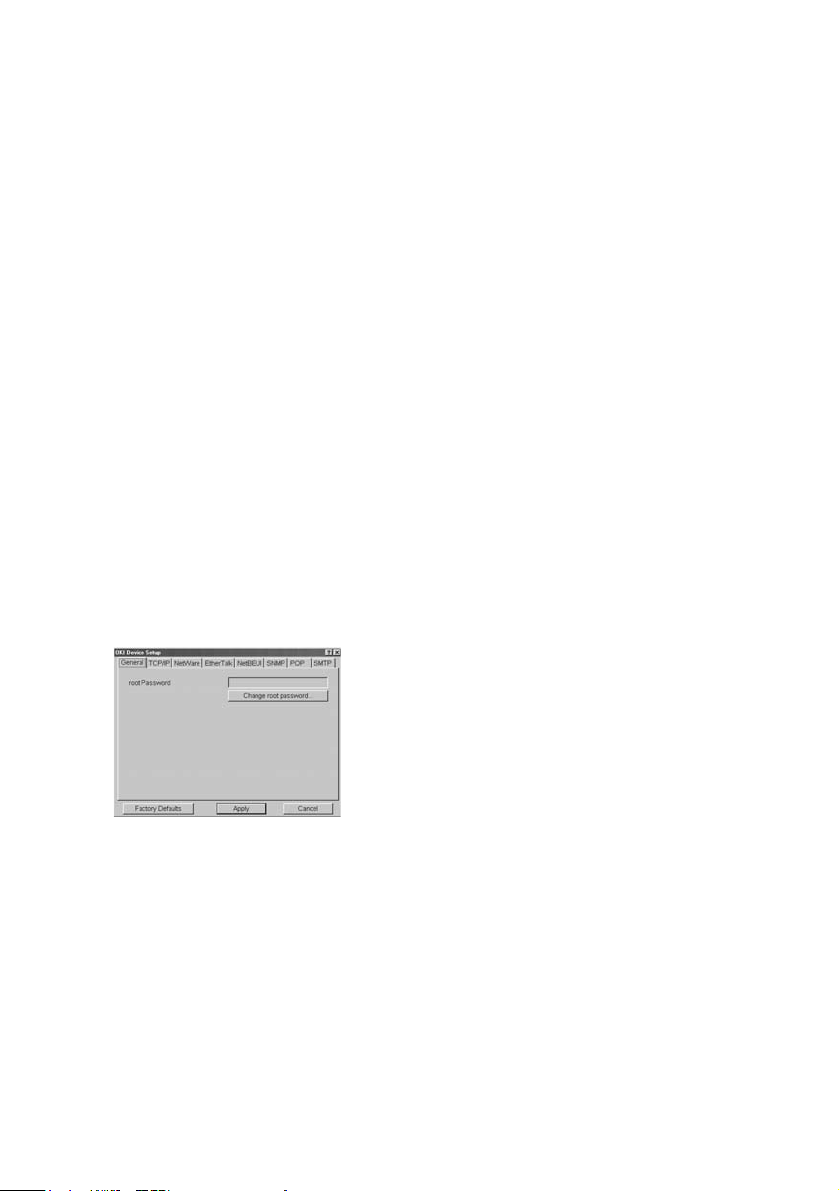
General Tab
This allows you to set or change the root password used for Admin
Manager, TELNET and FTP.
Configuration 24
Page 27

Location Comments
Change root password You can set/change the root password for AdminManager, TELNET
and FTP.
TCP/IP Tab
This allows you to configure TCP/IP related items.
Location Comments
Use TCP/IP Protocol Set TCP/IP protocol as enabled/disabled.
Use DHCP/BOOTP Check this item if IP address, subnet mask, default gateway and IP
addresses for DNS primary server and secondary servers are
retrieved from the DHCP or BOOTP server. Otherwise, clear.
Use RARP Check this item if IP address is retrieved from the RARP server.
IP Address Set the IP address of the selected network interface card.
Subnet Mask Set the subnet mask of the selected network interface card.
Default Gateway Set the default gateway of the selected network interface card.
Use FTP/LPD Banner Check this item if you want to add the FTP/LPD banner. Otherwise,
DNS Server . . . Set IP addresses for DNS primary and secondary servers.
Otherwise, clear.
clear.
Configuration 25
Page 28
To find corresponding items in WEB and TELNET, see the equivalent in
the Configurable Items and Default Values table that starts on page 46.
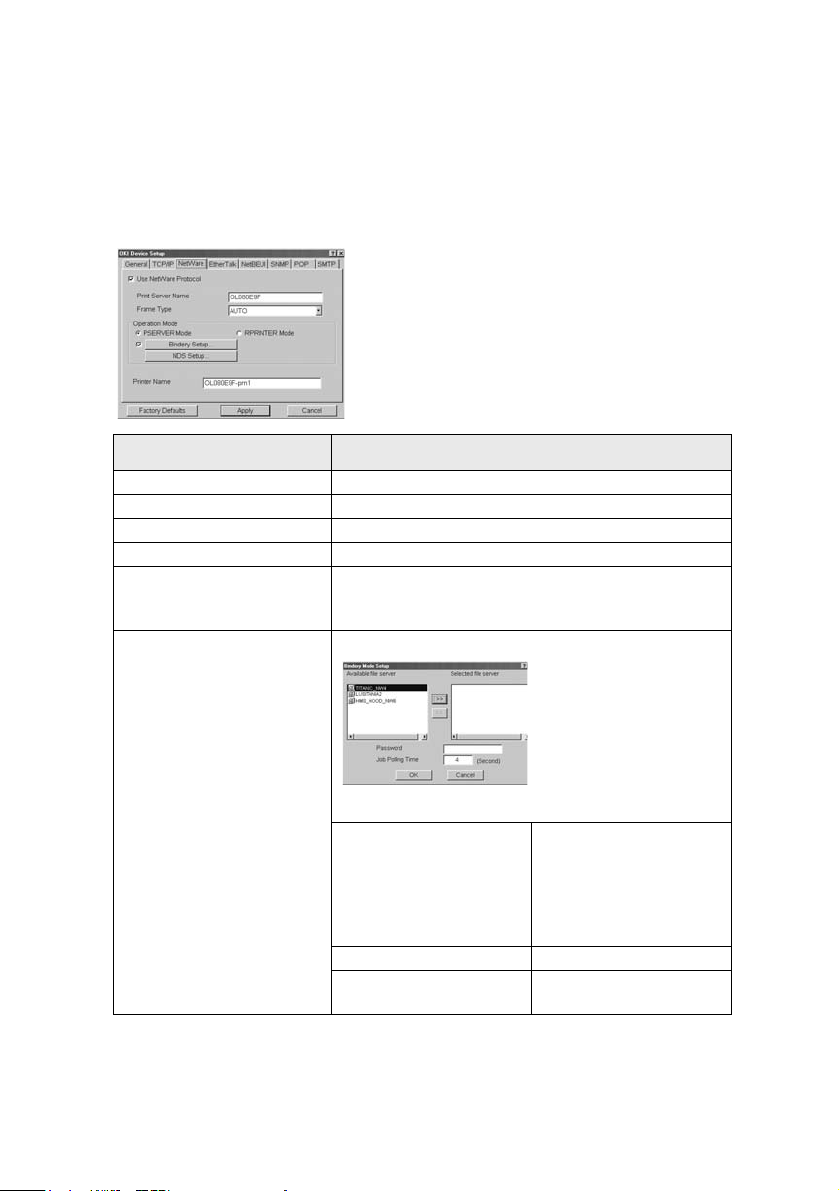
Netware Tab
This is where you can configure NetWare related items.
Location Comments
Use NetWare Protocol Set NetWare protocol as enabled/disabled.
Print Server Name Set Print Server name.
Frame Type Set primary NetWare frame type.
Operation Mode Set NetWare mode.
Check box besides Bindery
Setup
Bindery Setup Configure items related to Bindery mode.
Check if you want to use the Bindery mode and Bindery
Setup button becomes available. If it is unchecked, the button
is greyed out.
In this dialogue box, the following items can be configured.
Available File Server and
Selected File Server.
Password. Set password for Print Server.
Job Polling Time. Set print job polling interval
Configuration 26
Select file servers to connect.
Up to eight file servers can be
selected. Select a server from
Available file server list and
click >>. The server is copied
to Selected file server box.
in seconds.
Page 29
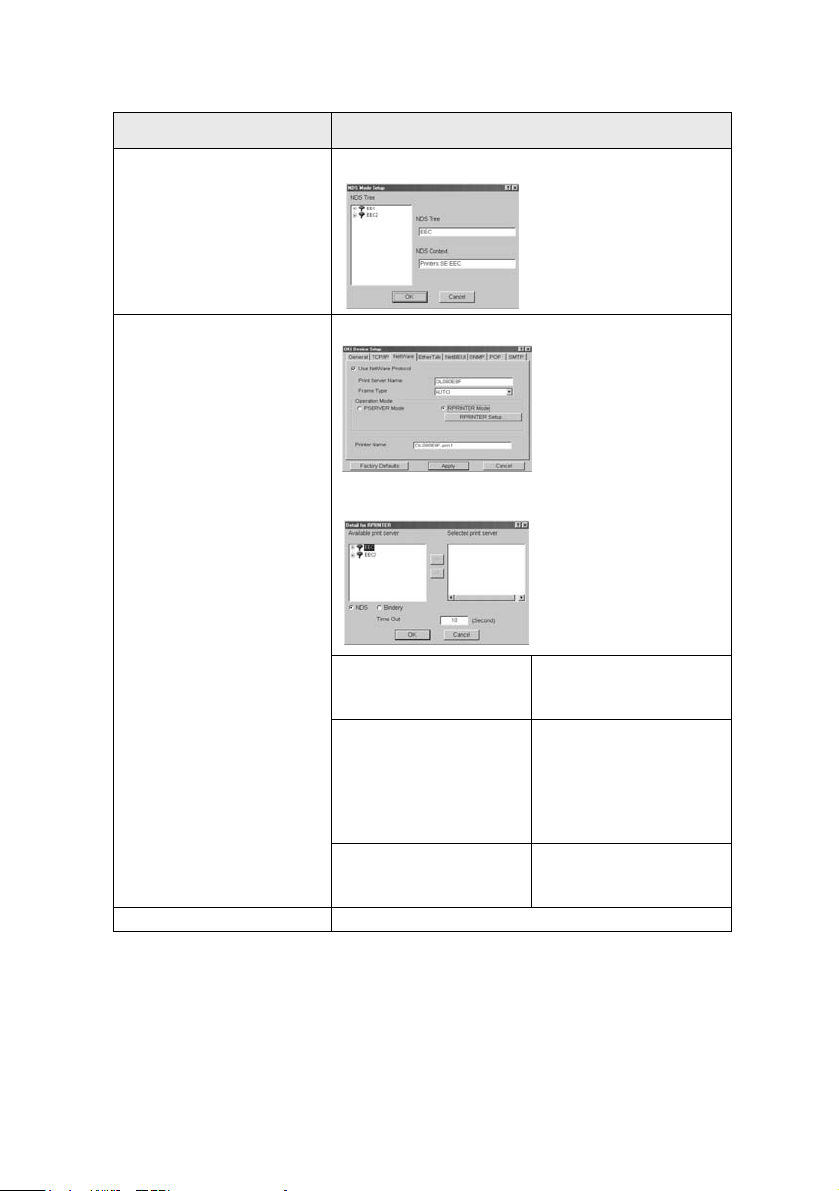
Location Comments
NDS Setup
RPRINTER Setup Available if you select RPRINTER mode in Operation Mode.
Set NDS tree and context where Print Server was created.
By selecting the [RPRINTER] button, this is displayed:
NDS or Bindery Show the Available print
Available print server and
Selected print server
Time Out Set duration from the last
Printer Name Set the NetWare printer object name.
Configuration 27
server tree in NDS mode or
Bindery mode.
Select file servers to connect.
Up to eight file servers can be
selected. Select a server from
Available file server list and
click >>. The server is copied
to Selected file server box.
data’s arrival to freeing of the
port in seconds.
Page 30
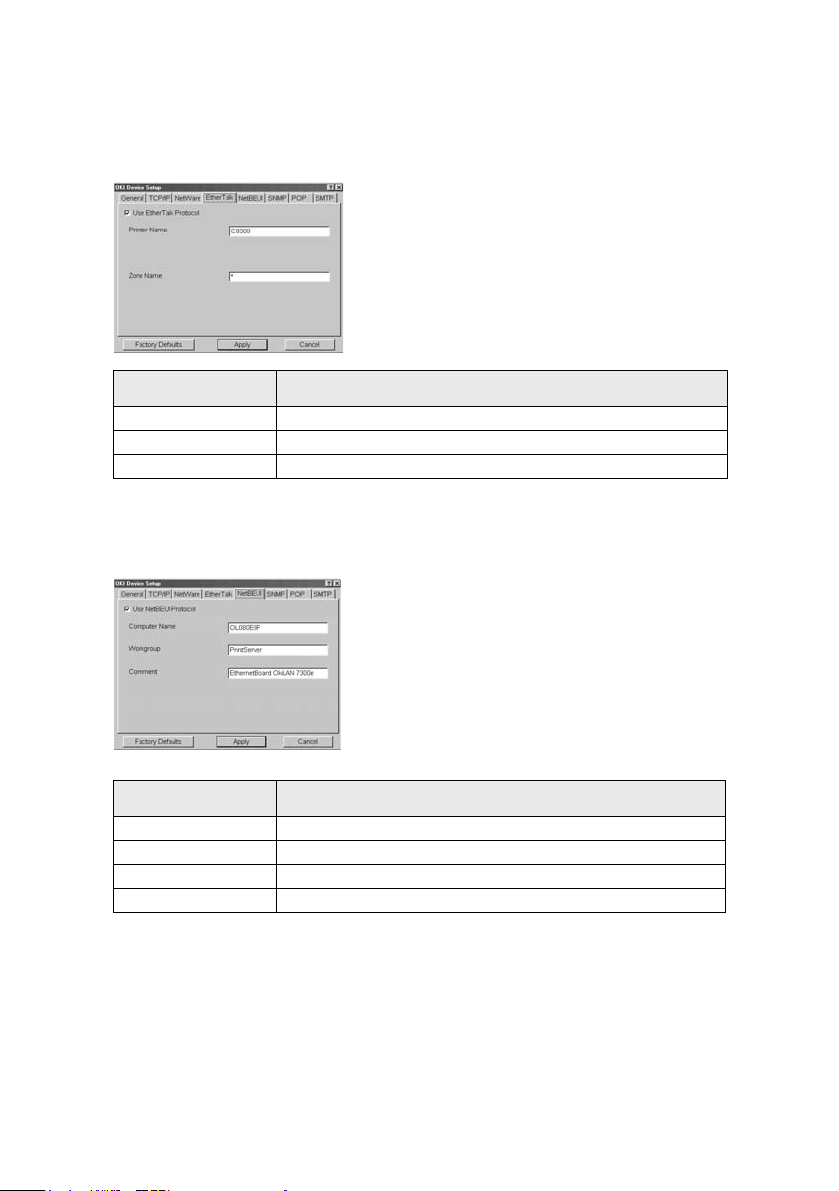
EtherTalk Tab
This allows you to configure EtherTalk related items.
Location Comments
Use EtherTalk Protocol Set EtherTalk protocol to enabled/disabled.
Printer Name Set EtherTalk Printer object name.
Zone Name Set the zone name to which the OkiLAN belongs.
NetBEUI Tab
This allows you to configure NetBEUI related items.
Location Comments
Use NetBEUI Protocol Set NetBEUI protocol to enabled/disabled.
Computer Name Set a computer name for the OkiLAN.
Workgroup Set a work group name to which the OkiLAN belongs.
Comment Set the comments for the OkiLAN.
Configuration 28
Page 31

SNMP Tab
This allows you to configure SNMP related items.
Location Comments
Authentic
Community
TRAP
Community
TRAP Address Set a destination IP address of a Trap packet. If 0.0.0.0 is set, the Trap is
SysContact Set SysContact (printer manager) name.
SysName Set SysName (printer model name).
SysLocation Set SysLocation (the location where the printer is installed).
Default TTL Set TTL (Time To Live) value.
Enable Authentic
Trap
This community name is used to check whether incoming SNMP requests
have the correct community name or not. The community name is
displayed as ****** for security reasons.
This community name is assigned to outgoing system traps such as cold
start, authentication failure, etc.
disabled.
Set Authentic Trap to enabled/disabled.
Configuration 29
Page 32

Location Comments
Printer Trap Setup
. . .
By selecting the button, the following dialogue box is displayed:
In the dialogue box, the following items can be configured:
Printer Trap
Community Name
TCP#1—5 Set the IP address to which a Trap packet will be
Detail . . . By selecting the button, the following dialogue
This community name is assigned to outgoing
printer status traps such as off-line, paper out, etc.
sent. You can set up to five IP addresses.
box is displayed:
In the dialogue box, the following items can be
configured:
Trap Enable Set sending a Trap
packet, enabled or
disabled, for each
destination.
On-Line Set sending a Trap,
enabled or disabled,
when the printer turns to
On-Line.
On-Line Set sending a Trap,
enabled or disabled,
when the printer turns to
Off-Line.
Paper Out Set sending a Trap,
enabled or disabled,
when paper is out.
Paper Jam Set sending a Trap,
enabled or disabled,
when paper is out.
Configuration 30
Page 33

Location Comments
Printer Trap Setup
. . .
Printer Trap Setup
. . .
Detail . . . Cover Open Set sending a Trap,
IPX Set node address and network address to which a
Detail . . . By selecting the button, the following dialogue
Detail . . . Cover Open Set sending a Trap,
enabled or disabled,
when the printer cover
opens.
Printer Error Set sending a Trap,
enabled or disabled,
when any errors occur.
Trap packet will be sent.
box is displayed:
In the dialogue box, the following items can be
configured:
Trap Enable Set sending a Trap
On-line Set sending a Trap,
Off-line Set sending a Trap,
Paper Out Set sending a Trap,
Paper Jam
Printer Error Set sending a Trap,
packet, enabled or
disabled, for each
destination.
enabled or disabled,
when the printer turns to
On-Line.
enabled or disabled,
when the printer turns to
Off-Line.
enabled or disabled,
when paper is out.
Set sending a Trap,
enabled or disabled, when
a paper jam occurs.
enabled or disabled,
when the printer cover
opens.
enabled or disabled,
when any errors occur.
Configuration 31
Page 34

POP Tab
This allows you to configure POP related items.
Location Comments
Use POP3 Protocol Set retrieving E-Mail via POP3, enabled or disabled.
POP3 Server Address/
Name
POP3 Port Number Set port number of POP3.
POP3 Server UserID Set User ID for POP3 server.
POP3 Server Password Set password for POP3 server.
Use APOP Check if you want to use APOP.
POP3 Interval Set interval to retrieve E-Mail(s) from POP3 server. Set to OFF if you
Set IP address or host name of POP3 server.
do not want to use POP3 function.
The OkiLAN supports an e-mail reception function (SMTP/POP3)
allowing the printer to print PDF and text files attached to emails.
Not all printers support this function. If the POP tab is not displayed, your
printer does not support this function.
Configuration 32
Page 35

SMTP Tab
In SNMP Tab, you can configure SNMP related items.
Location Comments
Use SMTP Transmit
Protocol
Use SMTP Receive
Protocol
SMTP Server
Address/Name
Reply-To Address Set the E-mail address that is used in the [Reply-To] field in the mail
E-Mail Address Set the E-mail address that is used in the [From] field in the mail
Set sending E-mail via SMTP, enabled or disabled.
Set receiving E-mail via SMTP, enabled or disabled.
Set IP address or host name of SMTP server.
header.
header.
Configuration 33
Page 36

Location Comments
1—5 By selecting each button, the following dialogue box is displayed:
In the dialogue box, the following items can be configured:
Available condition
and Selected
condition
To Address 1—5 Set E-mail addresses to that E-mail should be
Check Interval Set interval that the OkiLAN checks specified
Advanced . . . By selecting the button, the following dialogue box is displayed:
Select each E-mail alert condition.
Select a condition from Available Condition
list and click >>. The selected condition is
copied to Selected condition list. Available
conditions are:
Off line, Consumable Message, Toner Low/
Out, Paper Low/Out, Paper Jam, Cover Open,
Stacker Error, Mass Storage Error,
Recoverable Error, Service Call Request and
Finisher Error.
send. Up to five E-Mail addresses can be set.
event(s). An E-mail is sent when specified
event(s) occurs when DISABLE is selected.
In the dialogue box, the following items can be configured:
SMTP Port Number Set port number of SMTP.
Signature Set up to four signature lines. Signatures
added to the bottom of an E-mail.
Configuration 34
Page 37

Create a NetWare Queue
By selecting this item, you can create a NetWare queue on the NetWare
server from AdminManager.
> NetWare Client 32 or IntranetWare Client should be loaded on the
PC on which the AdminManager runs. Also the client package
should be configured to access NetWare NDS network or bindery
network.
> You should login to NetWare servers as a user who can create
objects on the servers. If you want to create a queue with the remote
printer mode on NetWare 4.1, you should select NDS mode. You
cannot create a queue if Bindery mode is selected.
1. Select [Create NetWare Queue] from the [Setup] menu.
2. Select [Next] button.
3. Select either [NDS mode] or [Bindery] mode depending on your
network environment.
4. Follow the on-screen instructions.
Mode Location PSERVER/
Print Server Queue Printer
RPRINTER
NDS Context should
be specified.
Bindery File server
should be
specified.
PSERVER
mode
RPRINTER
mode
PSERVER
mode only
Current Print
Server name is
used.
Select existing
Print Server.
Current Print
Server name is
used.
Set queue name
and its volume
for the queue
creation.
Set queue name
and its volume
for the queue
creation.
Set queue name
for the queue
creation.
Current Printer
name is used.
Current Printer
name is used.
Current Printer
name is used.
5. Confirm your configuration. If it is correct, select [Execute].
6. Select [Finish] button. If necessary, select [Setup]—[OKI Device
Setup] and continue your configuration.
Configuration 35
Page 38

Delete NetWare Object
By selecting this item, you can delete a NetWare queue/print server/
printer from NetWare server by AdminManager.
> NetWare Client 32 or IntranetWare Client should be loaded on to
the PC on which the AdminManager runs. Also, the client package
should be configured to access NetWare NDS network or bindery
network. You should login to NetWare servers as a user who can
delete objects on the servers.
1. Select [Delete NetWare Object] from [Setup] menu.
2. Select an object you want to delete and click [Delete] button.
3. To exit from this dialogue box, select [Quit].
IP Address Setup
If you only use TCP/IP and the OkiLAN has not yet been configured,
occasionally it may not be displayed on AdminManager. You can
configure the IP address of the OkiLAN by this function.
1. Select [IP Address Setup] from the [Setup] menu.
2. Set [Ethernet Address] and [IP Address] and select [OK].
> The Ethernet Address (MAC address) is displayed during the self-
diagnostic test.
3. AdminManager asks whether you want to initialise the network
interface card or not. Select [Yes]. Even if you select [No] here, the
IP address that you set can be used after turning the printer OFF and
ON. The requirement to turn your printer OFF and ON is dependent
on the network interface card.
Configuration 36
Page 39

Option Menu
In the [Option] menu, the following item can be selected:
Item Function
Use TCP/IP Protocol If this item is selected, AdminManager uses TCP/IP protocol to search/
Use IPX/SPX
Protocol
Environment Setup TCP/IP Tab Set broadcast addresses that are used to search
configure network interface cards.
If this item is selected, AdminManager uses IPX/SPX protocol to
search/configure network interface cards.
OKI network interface cards using the TCP/IP
protocol. If [Use TCP/IP protocol] is
unchecked, the search will not be carried out
using TCP/IP.
NetWare Tab Set network addresses that are used to search
TimeOut Tab [Search Every]: Set response waiting time from
OKI network interface cards via NetWare
protocol. If there any many NetWare file
servers on your network, specify the network
address to which the network card belongs. If
[Use NetWare protocol] is unchecked, the
search will not be carried out using NetWare,
but if [Auto Search] is selected,
AdminManager will search all networks that
AdminManager can detect.
a network card in seconds.
[Time Out]: Set time out between
AdminManager and the network interface card
in seconds.
[Retry]: Set how many times the retry will be
carried out between AdminManager and the
network interface card.
Help Menu
In the [Help] menu, [About] is available as well as revision information
for AdminManager.
Configuration 37
Page 40

Using TELNET
The OkiLAN can be configured using TELNET. TELNET requires the
OkiLAN to have a valid IP address configured. If the NIC already has an
IP address configured, skip steps one to three below.
> Note: Please ensure that a valid IP address for you network
environment is used. Use of an incorrect IP address can cause
serious problems on your network.
The following explanation uses Sun Solaris 2.4 as an example. The
method of configuring commands may differ between workstations. Refer
to the workstation’s manual.
1. Login as [root].
If you do not have Superuser rights, the network manager should run the
configuration.
2. Set a temporary IP Address on the NIC using the ARP command.
Example: for IP address 192.168.20.127 and network card address
00:80:92:01:00:D2
# arp –s 192.168.20.127 00:80:92:01:00:D2 temp
The Ethernet address (MAC address) is displayed during the selfdiagnostic test. A temporary address does not need to be set if an IP
address has already been set.
3. Use the PING command to confirm the connection with the
network card.
Example: for IP address 192.168.20.127
# ping 192.168.20.127
Configuration 38
Page 41

If there is no reply, there is a problem with the configuration of the IP
address (the IP address has been already set manually or DHCP/RARP
server may run), or with the network. Reset the network interface card
settings to default and try to set temporary IP address. If you still have the
problem after resetting the network interface card, consult the network
manager.
4. Login to the network card using TELNET.
Example: for IP address 192.168.20.127
$ telnet 192.168.20.127
Trying 192.168.20.127
Connected to 192.168.20.127
Escape character is ‘^]’.
EthernetBoard OkiLAN PRINTER".
login: root
‘root’ user needs password to login.
password:
User ‘root’ logged in.
No. Message Value (level.1)
------------------------------------
1:Setup TCP/IP
2:Setup SNMP
3:Setup NetWare
4:Setup EtherTalk
5:Setup NetBEUI
6:Setup printer port
7:Display Status
8:Setup printer trap
9:Setup SMTP (E-Mail)
97:Reset to factory set
98:Quit setup
Configuration 39
Page 42

99:Exit setup
Please select (1-99)?
5. Enter the number of the items to be changed and the details screen
for that item is displayed. The menu has the following hierarchical
structure so for more details see the description in the appropriate
numbers
Configuration 40
Page 43

Telnet hierarchical structure.
Level1 Level2 Level3 Ref No.
1: Setup TCP/IP 1: TCP/IP protocol
2: IP address
3: Subnet
4: Gateway
5: RARP protocol
6: DHCP/BOOTP protocol
7: DNS server(Pri.)
8: DNS server(Sec.)
9: Root password
99: Back to prior menu
2: Setup SNMP 1: Authentic community
2: Trap community
3: Trap address
4: SysContact
5: SysName
6: SysLocation
7: DefaultTTL
8: EnableAuthenTrap
99: Back to prior menu
3: Setup NetWare 1: NetWare protocol
2: Packet type
3: NetWare mode
4: Setup PSERVER mode 1: FSERVER name 1 NetWare-3
—
—
—
—
—
—
—
—
—
—
—
—
—
—
—
—
—
—
—
—
—
—
2: FSERVER name 2 NetWare-4
3: FSERVER name 3 NetWare-4
4: FSERVER name 4 NetWare-4
5: FSERVER name 5 NetWare-4
6: FSERVER name 6 NetWare-4
7: FSERVER name 7 NetWare-4
8: FSERVER name 8 NetWare-4
9: Machine name NetWare-5
10: Password NetWare-6
11: Job polling interval NetWare-7
12: Bindery mode NetWare-8
13: NDS tree NetWare-9
14: NDS context NetWare-10
99: Back to prior menu —
TCPIP-1
TCPIP-2
TCPIP-3
TCPIP-4
TCPIP-5
TCPIP-6
TCPIP-7
TCPIP-8
TCPIP-9
—
SNMP-1
SNMP-2
SNMP-3
SNMP-4
SNMP-5
SNMP-6
SNMP-7
SNMP-8
—
NetWare-1
NetWare-2
NetWare-3
Configuration 41
Page 44

Level1 Level2 Level3 Ref No.
3:Setup Netware 5: Setup RPRINTER mode 1: PSERVER name 1 NetWare-11
2: PSERVER name 2 NetWare-11
3: PSERVER name 3 NetWare-11
4: PSERVER name 4 NetWare-11
5: PSERVER name 5 NetWare-11
6: PSERVER name 6 NetWare-11
7: PSERVER name 7 NetWare-11
8: PSERVER name 8 NetWare-11
9: Job timeout NetWare-12
99:Back to prior menu —
99: Back to prior menu — —
4: Setup EtherTalk 1: EtherTalk protocol — EtherTalk-1
2: Zone name
99: Back to prior menu
5: Setup NetBEUI 1: NetBEUI protocol — NetBEUI-1
2: Computer name — NetBEUI-2
3: Workgroup name
4: Comment
99: Back to prior menu — —
6: Setup printer port 1: NetWare port name — Port-1
2: EtherTalk port name
3: BOJ string
4: EOJ string — Port-4
5: BOJ string(KANJI) — Port-5
6: EOJ string(KANJI)
7: Printer type
8: TAB size (char.) — Port-8
9: Page width (char.) — Port-9
10: Page length(line)
11: lpr/ftp banner
99: Back to prior menu — —
7: Display status 1: prn1 — STATUS-1
2: system
—
—
—
—
—
—
—
—
—
—
—
EtherTalk-2
—
NetBEUI-3
NetBEUI-4
Port-2
Port-3
Port-6
Port-7
Port-10
Port-11
STATUS-2
Configuration 42
Page 45

Level1 Level2 Level3 Ref No.
8: Setup printer trap 1: Prn-Trap community
2: Setup TCP#1 trap
3: Setup TCP#2 trap
4: Setup TCP#3 trap
5: Setup TCP#4 trap
7: Setup IPX trap 1: IPX Trap enable Trap-10
99: Back to prior menu — —
9: Setup SMTP(E-Mail) 1: SMTP Transmit — SMTP-1
2: SMTP Receive — SMTP-2
3: SMTP server name — SMTP-3
4: SMTP port number — SMTP-4
5: E-Mail address — SMTP-5
6: Reply-to address — SMTP-6
7: Event to address 1
8: Event to address 2
9: Event to address 3
10: Event to address 4
11: Event to address 5
—
1: TCP#1—5 Trap enable Trap-2
2: On-line trap Trap-3
3: Off-line trap Trap-4
4: Paper Out trap Trap-5
5: Paper Jam trap Trap-6
6: Cover Open trap Trap-7
7: Printer Error trap Trap-8
8: TCP#1—5 Trap address Trap-9
99: Back to prior menu —
2: On-line trap Trap-11
3: Off-line trap Trap-12
4: Paper Out trap Trap-13
5: Paper Jam trap Trap-14
6: Cover Open trap Trap-15
7: Printer Error trap Trap-16
8: IPX Trap address Trap-17
9: IPX Trap net Trap-18
99: Back to prior menu —
1: To Address 1—5 SMTP-7
2: Re-send Interval SMTP-8
3: Off-Line SMTP-9
4: Consumable Message SMTP-10
5: Toner Low/Out SMTP-11
6: Paper Low/Out SMTP-12
7: Paper Jam SMTP-13
8: Cover Open SMTP-14
9: Stacker Error SMTP-15
10: Mass Storage Error SMTP-16
11: Recoverable Error SMTP-17
12: Service Call Req. SMTP-18
13: Finisher SMTP-19
99: Back to prior menu —
Trap-1
Configuration 43
Page 46

Level1 Level2 Level3 Ref No.
9: Setup SMTP(E-Mail) 12: Signature line 1
10: Setup POP (E-Mail) 1: POP3 protocol
97: Reset to factory set
98: Quit setup
99: Exit setup
13: Signature line 2
14: Signature line 3
15: Signature line 4
99: Back to prior menu
2: POP3 server
3: POP port number
4: POP3 server UserID
5: POP3 server Password
6: Use APOP
7: Retrieve every (min.)
99: Back to prior menu
——
—— —
—— —
—
—
—
—
—
—
—
—
—
—
SMTP-20
—
POP-1
POP-2
POP-3
POP-4
POP-5
POP-6
POP-7
—
ETC-1
7. When configuration is complete, select [Exit Setup] to save your
change. To exit without saving your modification, select [Quit].
8. Turn the printer off and on again.
The network card continues to use pre-transmission settings until the
printer is turned off and back on again.
Configuration 44
Page 47

Using SNMP
The printer and network card can be managed via a standard SNMP
management station. The network card supports SNMPv1, MIB-II and
OKI Data Private MIB. In order for the OkiLAN to be managed correctly
from an SNMP management station, the OKI Data Private MIB needs to
be added to that management station. Please refer to the SNMP manager
documentation for information on how to do this.
The OKI Data Private MIB file can be found in the MIB folder on the
Network Software CD- ROM. Please refer to the readme file in the MIB
folder for further information.
The printer’s trap address can be set in five places using TCP/IP and in
one place with IPX.
Printer trap settings can be made with TELNET and a Web browser.
Using Setup Assistant
Setup Assistant is a large volume tool that can do the following:
> setup ID addresses on multiple print servers all at once.
> update firmware on multiple print servers all at once.
> update the template file and set details in multiple print servers all
at once.
Install Setup Assistant from the CD-ROM provided with your printer.
1. Insert the CD-ROM provided with your printer into the CD-ROM
drive. If the Menu Installer does not start automatically, click
Start→Run→Browse. Browse to your CD-ROM and click
Install→Οpen→OK.
2. Select [Network Software].
3. Select [Installation/Config].
4. Select [Setup Assistant].
5. Follow the on-screen instructions.
Configuration 45
Page 48

Configurable items and Default Values
Bold is the default setting.
Ref. No. Admin
TCPIP-1 [OKI Device
TCPIP-2 [OKI Device
TCPIP-3 [OKI Device
TCPIP-4 [OKI Device
TCPIP-5 [OKI Device
TCPIP-6 [OKI Device
TCPIP-7 [OKI Device
TCPIP-8 [OKI Device
Manager
Setup][TCP/IP]-[
Use TCP/IP
Protocol]
Setup][TCP/IP][IP Address]
Setup][TCP/IP][Subnet Mask]
Setup][TCP/IP][Default
Gateway]
Setup][TCP/IP][Use RARP]
Setup]-[TCP/
IP]-[Use
DHCP/
BOOTP]
Setup][TCP/IP][DNS Server...]
-[Primary
Server]
Setup]
-[TCP/IP][DNS Server...]
-[Secondary
Server]
Web browser TELNET/
[Network
Configuration][General Settings][Protocol Options][TCP/IP]
[Network
Configuration]-[TCP/
IP]-[Fixed IP
Address Settings]-[IP
Address]
[Network
Configuration]-[TCP/
IP]-[Fixed IP
Address Settings][Subnet Mask]
[Network
Configuration]-[TCP/
IP]-[Fixed IP
Address Settings][Default Gateway]
[Network
Configuration]-[TCP/
IP]-[Method for
assigning IP
Address]-[RARP]
[Network
Configuration]-[TCP/
IP]-[Method
for assigning IP
Address]-[DHCP/
BOOTP]
[Network
Configuration]-[TCP/
IP]-[Fixed IP
Address Settings][DNS Server Address
(Pri.)]
[Network
Configuration]-[TCP/
IP]-[Fixed IP
Address Settings][DNS Server Address
(Sec.)]
Diagnostic test
print
[Setup TCP/IP][TCP/IP protocol]
[Setup TCP/IP][IP address]
[Setup TCP/IP][Subnet mask]
[Setup TCP/IP][Gateway address]
[Setup TCP/IP][RARP protocol]
[Setup TCP/IP][DHCP/BOOTP
protocol]
[Setup TCP/IP][DNS server(Pri.)]
[Setup TCP/IP][DNS
server(Sec.)]
Available
options
ENABLE/
DISABLE
0.0.0.0—
255.255.255.255
(0.0.0.0)
0.0.0.0—
255.255.255.255
(0.0.0.0)
0.0.0.0—
255.255.255.255
(0.0.0.0)
ENABLE/
DISABLE
ENABLE/
DISABLE
0.0.0.0—
255.255.255.255
(0.0.0.0)
0.0.0.0—
255.255.255.255
(0.0.0.0)
Notes
Set TCP/IP
protocol,
enabled/
disabled
Set IP address
Set subnet
mask
Set gateway
(default route).
SET RARP
function,
enabled/
disabled
Set DHCP
function,
enabled/
disabled
Set IP address
for primary
DNS server
Set IP address
for secondary
DNS server
Configuration 46
Page 49

Ref. No. Admin
TCPIP-9 [OKI Device
SNMP-1 [OKI Device
SNMP-2 [OKI Device
SNMP-3 [OKI Device
SNMP-4 [OKI Device
SNMP-5 [OKI Device
Manager
Setup][General][Change root
password]
Setup][SNMP][Authentic
Community]
Setup][SNMP][TRAP
Community]
Setup][SNMP][TRAP
Address]
Setup][SNMP][SysContact]
Setup][SNMP][SysName]
Web browser TELNET/
[Network
Configuration][SNMP Traps]-
[MIB-II
Information][Authentic
Community]
[Network
Configuration][SNMP Traps][MIB-II
Information][Trap Community]
[Network
Configuration][SNMP Traps]-
[MIB-II
Information][Trap IP Address]
[Network
Configuration][General Settings][System
Information]-[System
Contact]
[Network
Configuration][General Settings][System
Information][System Name]
Diagnostic test
print
[Setup TCP/IP][root password]
[Setup SNMP][Authentic
community]
[Setup SNMP][Trap community]
[Setup SNMP][Trap address]
[Setup SNMP][SysContact]
[Setup SNMP][SysName]
Available
options
Any
alphanumeric
characters up
to seven
characters.
(Default is null)
Any
alphanumeric
characters up to
15 characters.
(Default is
[public])
Any
alphanumeric
characters up to
15 characters.
(Default is
[public])
0.0.0.0—
255.255.255.255
(0.0.0.0)
Any
alphanumeric
characters up to
255 characters.
(Default is null)
Any
alphanumeric
characters up to
255 characters.
(Default is null)
Notes
Set the root
password of
OkiLAN
This
community
name is used to
check whether
incoming
SNMP
requests have
the correct
community
name or not.
The
community
name is
displayed as
****** for
security
reasons
This
community
name is
assigned to
outgoing
system traps
such as cold
start, authentication failure,
etc.
Set a
destination IP
address of
Trap packet. If
0.0.0.0 is set,
Trap is
disabled
Set SysContact
(printer
manager)
name
Set SysName
(printer model
name)
Configuration 47
Page 50

Ref. No. Admin
SNMP-6 [OKI Device
SNMP-7 [OKI Device
SNMP-8 [OKI Device
NetWare-1 [OKI Device
NetWare-2 [OKI Device
NetWare-3 [OKI Device
NetWare-4 [OKI Device
NetWare-5 [OKI Device
Manager
Setup][SNMP][SysLocation]
Setup][SNMP][Default TTL]
Setup][SNMP][Enable Authen
Trap]
Setup][NetWare][Use NetWare
Protocol]
Setup][NetWare][Frame Type]
Setup][NetWare][Operation
Mode]
Setup][NetWare][Bindery
Setup][Selected file
server]
Setup][NetWare][Print Server
Name]
Web browser TELNET/
[Network
Configuration][General Settings][System
Information][System Location]
[Network
Configuration][SNMP Traps][MIB-II
Information]-[Enable
AuthenTraps]
[Network
Configuration][General Settings][Protocol Options][NetWare]
[Network
Configuration][General Settings][Frame Options][NetBEUI]
[Network
Configuration][NetWare]-[NetWare
Selections]-[NetWare
Mode]
[Network
Configuration][NetWare]-[File
Server for PServer
Mode]-[File Server
Names]
[Network
Configuration][NetWare]-[PServer
Mode]-[NetWare
Print Server Name]
Diagnostic test
print
[Setup SNMP][SysLocation]
[Setup SNMP][DefaultTTL]
[Setup SNMP][EnableAuthenTra
p]
[Setup NetWare][NetWare
protocol]
[Setup NetWare][Packet type]
[Setup NetWare][NetWare mode]
[Setup NetWare][Setup PSERVER
mode]–
[FSERVER name
1—8]
[Setup NetWare][Setup PSERVER
mode]– [Machine
name]
Available
options
Any
alphanumeric
characters up to
255 characters.
(Default is null)
0—255 Set TTL (Time
1 (Enable)/
2 (Disable)
ENABLE/
DISABLE
ETHER-II/
802.3/802.2/
SNAP/AUTO
RPRINTER/
PSERVER
Any
alphanumeric
characters up to
47 characters.
(Default is null)
Any
alphanumeric
characters up to
31 characters.
(Default is [OL]
+ last six digits
of MAC
address)
Notes
Set SysLocation (the
location where
the printer is
installed)
To Live) value
Set Authentic
Trap, enabled/
disabled
Set NetWare
protocol,
enabled/
disabled
Set primary
NetWare
packet type
Set NetWare
mode
Set file servers
to connect.
Up to eight file
servers can be
set.
If you have
nine or more
file servers,
you should set
file servers
here
Set Print
Server name
Configuration 48
Page 51

Ref. No. Admin
NetWare-6 [OKI Device
NetWare-7 [OKI Device
NetWare-8 [OKI Device
NetWare-9 [OKI Device
NetWare-10 [OKI Device
NetWare-11 [OKI Device
NetWare-12 [OKI Device
EtherTalk-1 [OKI Device
Manager
Setup][NetWare][Bindery
Setup][Password]
Setup][NetWare][Bindery
Setup]-[Job
Polling Time]
Setup][NetWare][Bindery
Setup]
Setup][NetWare][NDS Setup][NDS Tree]
Setup][NetWare][NDS Setup][NDS Context]
Setup][NetWare][RPRINTER
Setup][Selected print
server]
Setup][NetWare][RPRINTER
Setup]-[Time
Out]
Setup][EtherTalk][Use EtherTalk
Protocol]
Web browser TELNET/
[Network
Configuration][NetWare]-[PServer
Mode]-[Password]
[Network
Configuration][NetWare]-[PServer
Mode]-[Job Polling
Rate]
[Network
Configuration][NetWare]-[PServer
Mode]-[Bindery
Mode]
[Network
Configuration][NetWare]-[NDS][Tree Name]
[Network
Configuration][NetWare]-[NDS][Context]
[Network
Configuration][NetWare]-[Remote
Printer Mode][NetWare Print
Server Names]
[Network
Configuration][NetWare]-[Remote
Printer Mode][Job Timeout]
[Network
Configuration][General Settings][Protocol Options][EtherTalk]
Diagnostic test
print
[Setup NetWare][Setup PSERVER
mode]–
[Password]
[Setup NetWare][Setup PSERVER
mode]– [Job
polling interval]
[Setup NetWare][Setup PSERVER
mode]–[Bindery
mode]
[Setup NetWare][Setup PSERVER
mode] – [NDS
tree]
[Setup NetWare][Setup PSERVER
mode] – [NDS
context]
[Setup NetWare][SET RPRINTER
mode] –
[PSERVE name
1—8]
[Setup NetWare][SET RPRINTER
mode]–[Job
timeout]
[Setup EtherTalk][EtherTalk
protocol]
Available
options
Any
alphanumeric
characters up to
31 characters.
(Default is null)
2—255 (4) Set print job
ENABLE/
DISABLE
Any
alphanumeric
characters up to
31 characters.
(Default is null)
Any
alphanumeric
characters up to
77 characters.
(Default is null)
Any
alphanumeric
characters up to
47 characters.
(Default is null)
4—255 (10) Set duration
ENABLE/
DISABLE
Notes
Set password
for Print
Server
polling interval
in seconds
Set bindery
mode, enabled/
disabled.
Set DISABLE
if you use
OkiLAN as
PSERVER on
NDS
Set NDS Tree
name
Set NDS
context for
Print Server
Set print
servers to
connect.
Up to eight
print servers
can be set.
If you have
nine or more
print servers,
you should set
print servers
here
from the last
data’s arrival
to freeing the
port in seconds
Set EtherTalk,
enabled or
disabled
Configuration 49
Page 52

Ref. No. Admin
EtherTalk-2 [OKI Device
NetBEUI-1 [OKI Device
NetBEUI-2 [OKI Device
NetBEUI-3 [OKI Device
NetBEUI-4 [OKI Device
Port-1 [OKI Device
Port-2 [OKI Device
Manager
Setup][EtherTalk][Zone Name]
Setup][NetBEUI][Use NetBEUI
Protocol]
Setup][NetBEUI][Computer
Name]
Setup][NetBEUI][Workgroup]
Setup][NetBEUI][Comment]
Setup][NetWare][Printer Name]
Setup][EtherTalk][Printer Name]
Web browser TELNET/
[Network
Configuration][EtherTalk][EtherTalk Zone
Name]
[Network
Configuration][General Settings][Protocol Options][NetBEUI]
[Network
Configuration][NetBEUI][NetBEUI][Computer Name]
[Network
Configuration][NetBEUI][NetBEUI][Workgroup Name]
[Network
Configuration][NetBEUI][NetBEUI][Comment]
[Network
Configuration][NetWare]-[NetWare
Selections]-[NetWare
Printer Name]
[Network
Configuration][EtherTalk][EtherTalk Printer
Name]
Diagnostic test
print
[Setup EtherTalk][Zone name]
[Setup NetBEUI][NetBEUI
protocol]
[Setup NetBEUI][Computer name]
[Setup NetBEUI][Workgroup
name]
[Setup NetBEUI][Comment]
[Setup printer
port]-[NetWare
port name]
[Setup printer
port]-[EtherTalk
port name]
Available
options
Any
alphanumeric
characters up to
32 characters.
([*])
ENABLE/
DISABLE
Any
alphanumeric
characters up to
15 characters.
(Default is [OL]
+ last six digits
of MAC
address)
Any
alphanumeric
characters up to
15 characters.
(Default is
[PrintServer])
Any
alphanumeric
characters up to
48 characters.
(Default is
[EthernetBoard
OkiLAN])
Any
alphanumeric
characters up to
31 characters.
(Default is [OL]
+ last six digits
of MAC
address + prn1])
Any
alphanumeric
characters up to
32 characters.
(Default is the
printer name on
which OkiLAN
is installed)
Notes
Set Zone
Name to which
OkiLAN
belongs.
Set NetBEUI,
enabled or
disabled.
Set a computer
name for
OkiLAN.
Set a workgroup name to
which
OkiLAN
belongs.
Set the
comments for
OkiLAN.
Set NetWare
printer object
name
Set EtherTalk
printer object
name
Configuration 50
Page 53

Ref. No. Admin
Port-3 [Setup printer
Port-4 [Setup printer
Manager
Web browser TELNET/
Diagnostic test
print
port]-[BOJ string]
port]-[EOJ string]
Available
options
Any
alphanumeric
and following
control
characters up to
31 characters.
(Default is null).
\b Backspace
(0x08)
\t Tab (0x09)
\n Linefeed
(0x0a)
\v Vertical tab
(0x0b)
\f Page feed
(0x0c)
\r Carriage return
(0x0d)
\xnn Hex code
[nn] (0xnn)
\] Double quote
(0x22)
\\ Backslash
(0x5c)
Any
alphanumeric
and following
control
characters up to
31 characters.
(Default is null)
\b Backspace
(0x08)
\t Tab (0x09)
\n Linefeed
(0x0a)
\v Vertical tab
(0x0b)
\f Page feed
(0x0c)
\r Carriage return
(0x0d)
\xnn Hex code
[nn] (0xnn)
\] Double quote
(0x22)
\\ Backslash
(0x5c)
Notes
Set an
appropriate
command
sequence to be
sent to the
connected
printer before
printing job
Set an
appropriate
command
sequence to be
sent to the
connected
printer after
printing job
Configuration 51
Page 54

Ref. No. Admin
Port-5 [Setup printer
Port-6 [Setup printer
Manager
Web browser TELNET/
Diagnostic test
print
port]-[BOJ
string(KANJI)]
port]-[EOJ
string(KANJI)]
Available
options
Any
alphanumeric
and following
control
characters up to
31 characters.
(Default is null)
\b Backspace
(0x08)
\t Tab (0x09)
\n Linefeed
(0x0a)
\v Vertical tab
(0x0b)
\f Page feed
(0x0c)
\r Carriage return
(0x0d)
\xnn Hex code
[nn] (0xnn)
\] Double quote
(0x22)
\\ Back slash
(0x5c)
Any
alphanumeric
and following
control
characters up to
31 characters.
(Default is null)
\b Backspace
(0x08)
\t Tab (0x09)
\n Linefeed
(0x0a)
\v Vertical tab
(0x0b)
\f Page feed
(0x0c)
\r Carriage return
(0x0d)
\xnn Hex code
[nn] (0xnn)
\] Double quote
(0x22)
\\ Back slash
(0x5c)
Notes
Set an
appropriate
command
sequence to be
sent to the
connected
printer before
printing job
when data is
sent to sjis/euc
logical printer/
directory
Set an
appropriate
command
sequence to be
sent to the
connected
printer after
printing job
when data is
sent to sjis/euc
logical printer/
directory
Configuration 52
Page 55

Ref. No. Admin
Port-7 [Setup printer
Port-8 [Setup printer
Port-9 [Setup printer
Port-10 [Setup printer
Port-11 [OKI Device
STATUS-1 [Status]-
Manager
Setup]-[TCP/
IP]-[Use FTP/
LPD Banner]
[Printer Status]
Web browser TELNET/
[Printer Status] [Display status]-
Diagnostic test
print
port]-[Printer
type]
port]-[TAB size
(char.)]
port]-[Page width
(char.)]
port]-[Page
length(line)]
[Setup printer
port]-[lpr/ftp
banner]
[prn1]
Available
options
PS Set a printer
0—16 (8) Set tab size
0—255 (78) Set page width
0—255 (66) Set page length
NO/YES Set banner
Notes
type when data
is sent to sjis/
euc logical
printer/
directory
when data is
sent to sjis/euc
logical printer/
directory. The
value 0 does
not convert
any tabs
when data is
sent to sjis/euc
logical printer/
directory. If
the width of
one line
exceeds this
value, Carriage
Return and
Line Feed are
inserted
automatically.
The value 0
means no
limitation of
the line width
when data is
sent to sjis/euc
logical printer/
directory.
If the number
of lines
exceeds this
value, Form
Feed are
inserted
automatically.
The value 0
means no
limitation of
the line width
printing for
LPR/FTP
enabled/
disabled
Display logical
port status
Configuration 53
Page 56

Ref. No. Admin
STATUS-2 [Setup]-
Trap-1 [OKI Device
Trap-2 [OKI Device
Trap-3 [OKI Device
Trap-4 [OKI Device
Trap-5 [OKI Device
Manager
[System Status]
Setup][SNMP][Printer Trap
Setup . . . ][Printer Trap
Community
Name]
Setup][SNMP][Printer Trap
Setup . . .][TCP#1—5][Detail . . .][Trap Enable]
Setup][SNMP][Printer Trap
Setup . . .][TCP#1—5][Detail . . .][On-line]
Setup][SNMP][Printer Trap
Setup . . .][TCP#1—5][Detail . . .][Off-line]
Setup][SNMP][Printer Trap
Setup . . .][TCP#1—5][Detail . . .][Paper Out]
Web browser TELNET/
[Network
Configuration][Network Summary]
[Network
Configuration][SNMP Traps][Trap Destination][Printer Trap
Community Name]
[Network
Configuration][SNMP Traps][Trap Assignments][Trap Enable]
[Network
Configuration][SNMP Traps][Trap Assignments][On-line]
[Network
Configuration][SNMP Traps][Trap Assignments][Off-line]
[Network
Configuration][SNMP Traps][Trap Assignments][Paper Out]
Diagnostic test
print
[Display status][system]
[Setup printer
trap]-[Prn-Trap
community]
[Setup printer
trap]-
[Setup TCP#1—5
trap] – [TCP#1—5
Trap enable]
[Setup printer
trap]-[Setup
TCP#1—5 trap] –
[On-line trap]
[Setup printer
trap]-[Setup
TCP#1—5 trap] –
[Off-line trap]
[Setup printer
trap]-[Setup
TCP#1—5 trap] –
[Paper Out trap]
Available
options
Any
alphanumeric
characters up to
77 characters.
(Default is
[public])
ENABLE/
DISABLE
ENABLE/
DISABLE
ENABLE/
DISABLE
ENABLE/
DISABLE
Notes
Display system
status
This
community
name is
assigned to
outgoing
printer status
traps such as
off-line, paper
out, etc.
Set sending a
trap packet
enabled or
disabled for
each
destination.
Five IP address
destinations
can be set up
and one IPX
destination
Set sending a
trap, enabled
or disabled,
when the
printer turns to
ON-LINE
Set sending a
trap, enabled
or disabled,
when the
printer turns to
OFF-LINE
Set sending a
trap, enabled
or disabled,
when paper is
out
Configuration 54
Page 57

Ref. No. Admin
Trap-6 [OKI Device
Trap-7 [OKI Device
Trap-8 [OKI Device
Trap-9 [OKI Device
Trap-10 [OKI Device
Trap-11 [OKI Device
Manager
Setup][SNMP][Printer Trap
Setup . . .][TCP#1—5][Detail . . .][Paper Jam]
Setup][SNMP][Printer Trap
Setup . . .][TCP#1—5][Detail . . .][Cover Open]
Setup][SNMP][Printer Trap
Setup . . .][TCP#1—5][Detail . . .][Printer Error]
Setup][SNMP][Printer Trap
Setup . . .][TCP#1—5]
Setup][SNMP][Printer Trap
Setup . . .][IPX][Detail . . .][Trap Enable]
Setup][SNMP][Printer Trap
Setup . . .][IPX][Detail . . .][On-line]
Web browser TELNET/
[Network
Configuration][SNMP Traps][Trap Assignments][Paper Jam]
[Network
Configuration][SNMP Traps]-[Trap
Assignments]-[Cover
Open]
[Network
Configuration][SNMP Traps]-[Trap
Assignments][Printer Error]
[Network
Configuration][SNMP Traps]-[Trap
Destination][Address 1]—
[Address 5]
[Network
Configuration][SNMP Traps]-
[Trap Assignments][Trap Enable]
[Network
Configuration][SNMP Traps]-
[Trap Assignments][On-line]
Diagnostic test
print
[Setup printer
trap]-[Setup
TCP#1—5 trap] –
[Paper Jam trap]
[Setup printer
trap]-[Setup
TCP#1—5 trap] –
[Cover Open trap]
[Setup printer
trap]-[Setup
TCP#1—5 trap] –
[Printer Error trap]
[Setup printer
trap]-[Setup
TCP#1—5 trap] –
[TCP#1—5 Trap
address]
[Setup printer
trap]-
[Setup IPX trap] –
[IPX Trap enable]
[Setup printer
trap]-
[Setup IPX trap] –
[On-line trap]
Available
options
ENABLE/
DISABLE
ENABLE/
DISABLE
ENABLE/
DISABLE
0.0.0.0—
255.255.255.255
(0.0.0.0)
ENABLE/
DISABLE
ENABLE/
DISABLE
Notes
Set sending a
trap enabled or
disabled when
a paper jam
occurs
Set sending a
trap enabled or
disabled when
the printer
cover opens
Set sending a
trap enabled or
disabled when
any errors
occur
Set IP address
to which a trap
packet will be
sent. You can
set up to five
IP addresses
Set sending a
trap packet
enabled or
disabled for
each
destination.
You can set up
to five IP
address
destinations
and one IPX
destination.
Set sending a
trap enabled or
disabled when
the printer
turns to ONLINE
Configuration 55
Page 58

Ref. No. Admin
Trap-12 [OKI Device
Trap-13 [OKI Device
Trap-14 [OKI Device
Trap-15 [OKI Device
Trap-16 [OKI Device
Trap-17 [OKI Device
Trap-18 [OKI Device
Manager
Setup][SNMP][Printer Trap
Setup . . .][IPX][Detail . . .][Off-line]
Setup][SNMP][Printer Trap
Setup . . .][IPX][Detail . . .][Paper Out]
Setup][SNMP][Printer Trap
Setup . . .][IPX][Detail . . .][Paper Jam]
Setup][SNMP][Printer Trap
Setup . . .][IPX][Detail . . .][Cover Open]
Setup][SNMP][Printer Trap
Setup . . .][IPX][Detail . . .][Printer Error]
Setup][SNMP][Printer Trap
Setup . . .][IPX]
Setup][SNMP][Printer Trap
Setup . . .][IPX]
Web browser TELNET/
[Network
Configuration][SNMP Traps]-[Trap
Assignments]-
[Off-line]
[Network
Configuration][SNMP Traps]-[Trap
Assignments]-[Paper
Out]
[Network
Configuration][SNMP Traps][Trap Assignments][Paper Jam]
[Network
Configuration][SNMP Traps][Trap Assignments][Cover Open]
[Network
Configuration][SNMP Traps][Trap Assignments][Printer Error]
[Network
Configuration][SNMP Traps][Trap Destination][IPX]
[Network
Configuration][SNMP Traps][Trap Destination][IPX]
Diagnostic test
print
[Setup printer
trap]-[
Setup IPX trap] –
[Off-line trap]
[Setup printer
trap][Setup IPX trap] –
[Paper Out trap]
[Setup printer
trap]-[Setup IPX
trap] –
[Paper Jam trap]
[Setup printer
trap][Setup IPX trap] –
[Cover Open trap]
[Setup printer
trap][Setup IPX trap] –
[Printer Error trap]
[Setup printer
trap][Setup IPX trap] –
[IPX Trap
address]
[Setup printer
trap][Setup IPX trap] –
[IPX Trap net]
Available
options
ENABLE/
DISABLE
ENABLE/
DISABLE
ENABLE/
DISABLE
ENABLE/
DISABLE
ENABLE/
DISABLE
Any address
(00000000000)
Any address
(00000000)
Notes
Set sending a
trap enabled or
disabled when
the printer
turns to OFFLINE.
Set sending a
trap enabled or
disabled when
paper is out
Set sending a
trap enabled or
disabled when
a paper jam
occurs
Set sending a
trap enabled or
disabled when
the printer
cover opens
Set sending a
trap enabled or
disabled when
any errors
occur
Set node
address to
which a trap
packet will be
sent
Set network
address to
which a trap
packet will be
sent
Configuration 56
Page 59

Ref. No. Admin
SMTP-1 [OKI Device
SMTP-2 [OKI Device
SMTP-3 [OKI Device
SMTP-4
SMTP-5 [OKI Device
SMTP-6 [OKI Device
SMTP-7 [OKI Device
Manager
Setup][SMTP][Use SMTP
Transmit
Protocol]
Setup][SMTP][Use SMTP
Receive
Protocol]
Setup][SMTP][SMTP Server
Address/Name]
[OKI Device
Setup][SMTP][Advanced . . .][SMTP Port
Number]
Setup][SMTP]-[EMail Address]
Setup][SMTP][Reply-To
Address]
Setup][SMTP]-[1—
5]-[To Address
1—5]
Web browser TELNET/
[Network
Configuration][Email Settings][Email Transmit
Settings][SMTP Transmit]
[Network
Configuration][Email Settings][Email Receive
Settings][SMTP Receive]
[Network
Configuration][Email Settings][Email Transmit
Settings][SMTP Server]
[Network
Configuration][Email Settings][Email Transmit
Settings][SMTP Port Number]
[Network
Configuration][Email Settings][Email Transmit
Settings][Printer Email
Address]
[Network
Configuration][Email Settings][Email Transmit
Settings][Reply-To-Address]
[Network
Configuration][Email Settings][Email Recipients][Email Address 1]—
[Email Address 5]
Diagnostic test
print
[Setup SMTP
(E-Mail)][SMTP Transmit]
[Setup SMTP
(E-Mail)][SMTP Receive]
[Setup SMTP
(E-Mail)][SMTP server
name]
[Setup SMTP
(E-Mail)][SMTP port
number]
[Setup SMTP
(E-Mail)][E-Mail address]
[Setup SMTP
(E-Mail)]-[ReplyTo address]
[Setup SMTP
(E-Mail)]-[Event
to address 1—5] –
[To Address 1—5]
Available
options
ENABLE/
DISABLE
ENABLE/
DISABLE
0.0.0.0—
255.255.255.255
or host name up
to 64 characters.
(Default is null)
1—65535 (25) Set port
Any
alphanumeric
characters up to
78 characters.
(Default is null)
Any
alphanumeric
characters up to
78 characters.
(Default is null)
Any
alphanumeric
characters up to
78 characters.
(Default is null)
Notes
Set sending Email via
SMTP,
enabled or
disabled
Set receiving
E-mail via
SMTP,
enabled or
disabled.
Set IP address
or host name
of SMTP
server
number of
SMTP
Set the E-mail
address that is
used for
[From] field in
the mail header
Set the E-mail
address that is
used for
[Reply-To]
field in the
mail header
Set E-mail
addresses to
that E-mail
should be sent.
Up to five Email addresses
can be set
Configuration 57
Page 60

Ref. No. Admin
SMTP-8 [OKI Device
SMTP-9 [OKI Device
SMTP-10 [OKI Device
SMTP-11 [OKI Device
SMTP-12 [OKI Device
SMTP-13 [OKI Device
SMTP-14 [OKI Device
Manager
Setup][SMTP]-[1—
5]-[Check
Interval]
Setup][SMTP]-[1—
5]-[Selected
condition]
Setup][SMTP]-[1—
5]- [Selected
condition]
Setup][SMTP]-[1—
5]- [Selected
condition]
Setup][SMTP]-[1—
5]- [Selected
condition]
Setup][SMTP]-[1—
5]- [Selected
condition]
Setup][SMTP]-[1—
5]- [Selected
condition]
Web browser TELNET/
[Network
Configuration][Email Settings][Email Alert
Assignments][Re-send Interval]
[Network
Configuration][Email Settings][Email Alert
Assignments][Off Line]
[Network
Configuration][Email Settings][Email Alert
Assignments][Consumable
Message]
[Network
Configuration][Email Settings][Email Alert
Assignments]-[Toner
Low Toner Out]
[Network
Configuration][Email Settings][Email Alert
Assignments]-[Paper
Low Paper Out]
[Network
Configuration][Email Settings][Email Alert
Assignments]-[Paper
Jam]
[Network
Configuration][Email Settings][Email Alert
Assignments]-[Cover
Open]
Diagnostic test
print
[Setup SMTP(
E-Mail)]-[Even t to
address 1—5] –
[Re-send Interval]
[Setup SMTP
(E-Mail)]-[Event
to address 1—5] –
[Off Line]
[Setup SMTP
(E-Mail)]-[Event
to address 1—5] –
[Consumable
Message]
[Setup SMTP
(E-Mail)]-[Event
to address 1—5] –
[Toner Low/Out]
[Setup SMTP
(E-Mail)]-[Event
to address 1—5] –
[Paper Low/Out]
[Setup SMTP
(E-Mail)]-[Event
to address 1—5] –
[Paper Jam]
[Setup SMTP
(E-Mail)]-[Event
to address 1—5] –
[Cover Open]
Available
options
DISABLE/
30min/60min/
24hour
ENABLE/
DISABLE
ENABLE/
DISABLE
ENABLE/
DISABLE
ENABLE/
DISABLE
ENABLE/
DISABLE
ENABLE/
DISABLE
Notes
Set interval
that the
OkiLAN
checks
specified
event(s).
An E-mail is
sent when
specified
event(s) occur
when
DISABLE is
selected
An E-mail is
sent when the
printer is Offline if this is
enabled
An E-mail is
sent when
maintenance is
required if this
is enabled
An E-mail is
sent when
toner(s) low/
out occurs if
this is enabled
An E-mail is
sent when
paper low/out
occurs if this is
enabled
An E-mail is
sent when a
paper jam
occurs if this is
enabled
An E-mail is
sent when the
cover is
opened if this
is enabled
Configuration 58
Page 61

Ref. No. Admin
SMTP-15 [OKI Device
SMTP-16 [OKI Device
SMTP-17 [OKI Device
SMTP-18 [OKI Device
SMTP-19 [OKI Device
SMTP-20
POP-1 [OKI Device
POP-2 [OKI Device
Manager
Setup][SMTP]-[1—
5]- [Selected
condition]
Setup][SMTP]-[1—
5]- [Selected
condition]
Setup][SMTP]-[1—
5]- [Selected
condition]
Setup][SMTP]-[1—
5]- [Selected
condition]
Setup][SMTP]-[1—
5]- [Selected
condition]
[OKI Device
Setup]-[SMTP][Advanced . . .][Signature]
Setup]-[POP][Use POP3
Protocol]
Setup]-[POP][POP3 Server
Address/Name]
Web browser TELNET/
[Network
Configuration][Email Settings][Email Alert
Assignments][Stacker Error]
[Network
Configuration][Email Settings][Email Alert
Assignments]-[Mass
Storage Error]
[Network
Configuration][Email Settings][Email Alert
Assignments][Recoverable Error]
[Network
Configuration][Email Settings][Email Alert
Assignments][Service Call
Required]
[Network
Configuration][Email Settings][Email Alert
Assignments][Finisher Error]
[Network
Configuration][Email Settings][Email Signature][Signature line 1]—
[Signature line 4]
[Network
Configuration][Email Settings][Email Receive
Settings][POP Protocol]
[Network
Configuration][Email Settings][Email Receive
Settings][POP Server Name]
Diagnostic test
print
[Setup SMTP
(E-Mail)]-[Event
to address 1—5] –
[Stacker Error]
[Setup SMTP
(E-Mail)]-[Event
to address 1—5] –
[Mass Storage
Error]
[Setup SMTP(EMail)]-[Event to
address 1—5] –
[Recoverable
Error]
[Setup SMTP
(E-Mail)]-[Event
to address 1—5] –
[Service Call
Req.]
[Setup SMTP
(E-Mail)]-[Event
to address 1—5] –
[Finisher]
[Setup SMTP
(E-Mail)][Signature line
1—4]
[Setup POP
(E-Mail)]-[POP3
protocol]
[Setup POP
(E-Mail)]-[POP3
server]
Available
options
ENABLE/
DISABLE
ENABLE/
DISABLE
ENABLE/
DISABLE
ENABLE/
DISABLE
ENABLE/
DISABLE
Any
alphanumeric
characters up to
63 characters.
(Default is null)
ENABLE/
DISABLE
Any
alphanumeric
characters up to
63 characters.
(Default is null)
Notes
An E-mail is
sent when any
stacker error
occurs if this is
enabled
An E-mail is
sent when any
mass storage
error occurs if
this is enabled
An E-mail is
sent when any
recoverable
error occurs if
this is enabled
An E-mail is
sent when any
service call
request occurs
if this is
enabled
An E-mail is
sent when any
finisher error
occurs if this is
enabled
Set up to four
signature lines.
Signature is
added to the
bottom of an
E-mail
Set retrieving
E-mail via
POP3, enabled
or disabled
Set IP address
or host name
of POP3 server
Configuration 59
Page 62

Ref. No. Admin
POP-3 [OKI Device
POP-4 [OKI Device
POP-5 [OKI Device
POP-6 [OKI Device
POP-7 [OKI Device
ETC-1 [Setup]-[Reset] [Network
ETC-2 [Network
ETC-3 [Network
Manager
Setup]-[POP][POP3 Port
Number]
Setup]-[POP][POP3 Server
UserID]
Setup]-[POP][POP3 Server
Password]
Setup]-[POP][Use APOP]
Setup]-[POP][POP3
Interval]
Web browser TELNET/
[Network
Configuration][Email Settings][Email Receive
Settings][POP Port Number]
[Network
Configuration][Email Settings][Email Receive
Settings][POP Account]
[Network
Configuration][Email Settings][Email Receive
Settings][POP Password]
[Network
Configuration][Email Settings][Email Receive
Settings][APOP Support]
[Network
Configuration][Email Settings][Email Receive
Settings][POP Receive
Interval]
Configuration][General Settings][Restore Factory
Defaults]
Configuration][General Settings][System
Information]- [Printer
Serial Number]
Configuration][General Settings][System
Information]- [Printer
Asset Number]
Configurable items vary between printers.
Diagnostic test
print
[Setup POP
(E-Mail)]-[POP3
port number]
[Setup POP
(E-Mail)]-[POP3
server UserID]
[Setup POP
(E-Mail)]-[POP3
server Password]
[Setup POP
(E-Mail)]-
[User APOP]
[Setup POP
(E-Mail)]-
[Retrieve
every(min.)]
Reset to factory
set
Available
options
1—65535 (110 ) Set port
Any
alphanumeric
characters up to
16 characters.
(Default is null)
Any
alphanumeric
characters up to
16 characters.
(Default is null)
YES/NO Set YES if you
OFF/1min/
5min/10min/
30min/60min
Any
alphanumeric
characters up to
8 characters.
(Default is null)
Notes
number of
POP
Set user ID for
POP3 server
Set password
for POP3
server
want to use
APOP
Set interval to
retrieve Email(s) from
POP3 server.
Set OFF if you
do not want to
use POP3
function.
Reset OkiLAN
settings to
factory default
Read only
item. Printer
serial number
is displayed
Set a printer
asset number
Configuration 60
Page 63

Management utility
PrintSuperVision
PrintSuperVision is a web-based application for managing printing
devices connected to a network. It consists of two parts:
A web application based on Microsoft web server (Internet Information
Server, IIS or Personal WEB Server, PWS), that provides the user
interface.
A monitoring program (PrintSuperVisor) that runs all the time, collecting
data and saving it in a database for statistical reports and sending E-mail
alerts based on the saved configuration.
PrintSuperVision’s main functions are:
> Maintaining the list of printing devices and organising them in
logical groups.
> Initially discovering and configuring printers connected to the
network.
> Locating printers visually on maps.
> Monitoring devices over time and saving data for statistical reports.
> Sending email alerts when events occur that affect the functionality
of printers.
> Creating statistical reports about usage of printers.
> Tracking maintenance data related to printers.
> Integrating with Oki Data’s on-line web support.
Configuration 61
Page 64

System requirement
Windows
The main PrintSuperVision application can be installed in any of the
following Windows systems.
Operating System Service
Pack
Windows NT 4.0
Wo rk st at io n
Windows NT 4.0 Server 5.0 4.0 IIS (Internet Information Server) 1.0
Windows XP Home/
Professional
Windows 2000
Professional
Windows 2000 Server/
Advanced Server
Windows 98 — — PWD (Included in Windows 98 by
Windows 98 SE — — PWD (Included in Windows 98 by
6.0 4.0 PWS (Personal Web Server) available in
— — IIS installed as an option. Available in
1.0 — Internet Service Manager included in the
1.0 — Internet Service Manager included in the
Option
Pack
IIS/PWS
NT 4.0 Option Pack
the Windows XP CD
OS
OS
default)
PWS available in NT 4.0 Option Pack in
Microsoft Web site
default. PWS available in NT 4.0 Option
Pack in Microsoft Web site
While the PrintSuperVision application may work in Windows 95 with
PWS installed, PrintSuperVision may not install or work properly in some
versions of Windows 95. However, as a client, Windows 95 is fully
supported.
Microsoft does not officially support Windows Me-PWS in Windows Me.
PrintSuperVision does not support this OS. Also, Microsoft no longer
supports Peer Web Service. PrintSuperVision will not work with Peer
Web Service.
Configuration 62
Page 65

Supported Browsers
The browsers supported are:
Internet Explorer (IE) 4.01 and above.
Netscape Navigator 4.0 and above.
Opera 5.12 and above.
The PrintSuperVision application can be accessed from any Windows,
Macintosh, Unix, or Linux desktop that supports any of the abovementioned browsers.
While all the above browsers are supported, PrintSuperVision works best
when used with Internet Explorer. When using the Netscape browser, do
not select the option [Images off]. The hyperlinks may not work properly.
Some versions of Netscape browser do not display the frames properly,
and the [Back] button may not work correctly.
Supported Printers
PrintSuperVision provides general management information for OKI and
non-OKI printers connected to the network. For OKI printers, additional
details, reports and added features are available. The list below indicates
the supported printers as of this release.
C9200 OKIPAGE 8c Plus
C9400 OKIPAGE 20 Plus Series
C9300 OKIPAGE 20 Series
C9500 OKIPAGE 24 Series
C7200 OKIPAGE 16n
C7400 OKIFAX 5700
C7100 OKIFAX 5750
C7300 OKIFAX 5780
C7500 OKIFAX 5900
OKIPAGE 14i, 14ex OKIFAX 5950
OKIPAGE 12i/n OKIFAX 5980
OKIPAGE 10i ML4410
OKIPAGE 8c
Configuration 63
Page 66

While the printer properties are displayed in PrintSuperVision, only a few
of the printer settings can be set. For setting any other printer settings, a
hyperlink to the printer’s web page is provided in PrintSuperVision.
Supported network interface cards
The list of network interface cards supported is listed below:
Network Interface
Supported printer
Cards
OkiLAN 6200e Plus C9300, C9500, C7300, C7500
OkiLAN 6200e C9200, C9400, C7200, C7400
OkiLAN 3100e OKIPAGE 14i, 14ex
OkiLAN 6100e+ OKIPAGE 8c, OKIPAGE 8c Plus, OKIPAGE
20 Plus Series, OKIPAGE 20 Series,
OKIPAGE 24 Series, OKIPAGE 16n,
OKIFAX 5700, OKIFAX 5750, OKIFAX
5780, OKIFAX 5900, OKIFAX 5950,
OKIFAX 5980, ML4410
While the network interface card settings are displayed in
PrintSuperVision, only a few of the network interface card settings can be
set. For setting any other network interface card settings, a hyperlink to
the printer’s web page is provided in PrintSuperVision.
Configuration 64
Page 67

Installation
To install the Print SuperVision utility
WindowsXP/2000/NT4.0 requires administrator privileges.
1. Insert the CD-ROM provided with your printer into the CD-ROM
drive. If the Menu Installer doesn’t start automatically, click
Start→Run→Browse. Browse to your CD-ROM and click
Install→Οpen→OK.
2. Select [Network Software].
3. Select [Administration Tools
4. Select [PrintSuperVision].
5. Follow the on-screen instructions. In the [Edit Data] screen, you can
specify a port number for PrintSuperVision (default 80).
6. When installation ends, the [Setup complete] screen is displayed.
Click [Finish].
7. Now you should select [Start]-[Programs]-[PrintSuperVision][PrintSuperVision] or double-click the [PrintSuperVision] icon on
the desktop for the PrintSuperVision server.
8. For PrintSuperVision client, access [http://[the server IP address or
host name]/PrintSuperVision] from the Web browser. If you change
the port number you should add [:[port number]] such as [http://
192.168.20.127/PrintSuperVision:8080].
9. PrintSuperVision has an on-line help facility.
Uninstallation
To uninstall PrintSuperVision, either select
[Start]→[Programs]→[PrintSuperVision]→[Uninstall
PrintSuperVision], or from [Control Panel], select [Add/Remove
Programs], select [PrintSuperVision] from the index window and click
Configuration 65
Page 68

[Add/Remove]. When the uninstallation is completed, close [Add/
Remove Programs].
In some cases, an empty [Okidat/PrintSuperVision/] directory may be left
behind. Delete the directory manually.
Printing utility
OKI LPR
The OKI LPR Utility is a utility that allows printing data to printers
connected to the network via TCP/IP. This utility is for use with Windows
XP, Windows 2000, Windows Me, Windows 98, Windows 95 and
Window NT4.0.
The utility is for those OKI printers which support TCP/IP; it redirects
printing data to the lpr port of the specified IP address.
System Requirement
Windows XP/2000/Me/98/95/NT4.0 with TCP/IP support and the
following OKI printers that support TCP/IP.
C9200 OKIPAGE 8c Plus
C9400 OKIPAGE 20 Plus Series
C9300 OKIPAGE 20 Series
C9500 OKIPAGE 24 Series
C7200 OKIPAGE 16n
C7400 OKIFAX 5700
C7100 OKIFAX 5750
C7300 OKIFAX 5780
C7500 OKIFAX 5900
OKIPAGE 14i, 14ex OKIFAX 5950
OKIPAGE 12i/n OKIFAX 5980
OKIPAGE 10i ML4410
OKIPAGE 8c
Configuration 66
Page 69

To install the OKI LPR utility
The OKI LPR utility requires that the TCP/IP protocol should be installed
in your Windows system. To install the TCP/IP protocol into your
Windows system consult your Windows manual.
Windows XP/2000/NT4.0 requires administrator privileges.
1. Set up the printer driver by designating the output destination to
[Local Printer (LPT1:)]. For information on setting up your printer
driver, see the printer user manual.
1. Insert the CD-ROM provided with your printer into the CD-ROM
drive. If the Menu Installer doesn’t start automatically, click
Start→Run→Browse. Browse to your CD-ROM and click
Install→Οpen→OK.
2. Select [Network Software].
3. Select [Installation/Config]
4. Select [Oki LPR].
5. Follow the on-screen instructions.
6. Select [Install Oki LPR].
7. Follow the on-screen instructions.
8. Click [Next] when the [Welcome] screen is displayed.
9. Verify [Destination Folder] and [Spool Folder] and click [Next].
10. Check [Register in Startup] if you want automatic startup as
Windows boots up. Check [Launch as minimized] if you want to
startup in the Icon state and click [Next].
11. Verify the program folder name and click [Next]. The installation
starts.
Configuration 67
Page 70

12. When the installation ends, the [Setup complete] screen is
displayed. Check [Yes, I want to launch OKI LPR Utility now] and
click [Finish]. Check [Yes, I want to view the ReadMe File] if you
want to read [Readme]. The OKILPR utility starts.
13. Select [Add Printer] on the [Remote Print] menu.
14. Select [Printer] to accept the printer that has been added in the step
1.
15. Enter an IP address at [IP Address] and click [OK]. A printer is
added to the main window.
Refer to the On-line Help for information on how to use the utility.
Uninstallation
1. Stop the OKI LPR Utility.
2. Select [Start]→[Program]→[Okidata]→[OKI LPR
Utility]→[Uninstall OKI LPR Utility] ([Start]→[All
Programs]→[Okidata]→[OKI LPR Utility]→[Uninstall OKI LPR
Utility] on WindowsXP).
3. Click [Yes] when the [Confirm File Deletion] dialogue is displayed.
Deletion of the OKI LPR utility starts.
4. When the deletion has finished, the [Uninstall Complete] screen is
displayed. Click [OK].
If a file that has been added after installation exists in the folder to install
the OKI LPR utility or the folder to spool, you cannot delete the folder.
Delete any unwanted files before running [Uninstall OKI LPR Utility].
Configuration 68
Page 71

MICROSOFT WINDOWS
Overview
This chapter provides guidelines on how to print over the network from
various Microsoft Windows platforms. There are numerous ways of
printing from Windows and the exact set-up will vary depending upon
your environment. There are also numerous versions of Windows, which
can be configured as either a client, server or both.
Although there are many variants of Windows, the principles of network
printing are the same. Microsoft provides on-line help with all of their
operating systems and this is a good reference point for the exact details
of each configuration option within Windows.
The network printer supports the following protocols that can be used in
conjunction with the Windows operating system:
>TCP/IP
> IPX (Novell NetWare)
>NetBEUI
Microsoft Windows 69
Page 72

Installation of TCP/IP Protocol
There are a number of options available when printing using TCP/IP for
Windows. The following table lists the options:
Windows Version Method
Win 95/98/Me OKI LPR Utility
NT 4.0 OKI LPR Utility
Microsoft LPR
Windows 2000/ Windows XP OKI LPR Utility
Microsoft LPR
Port 9100
1
IPP
1
These functions are built into Windows and are displayed as options when using the Add Printer Wizard.
Although there are some differences in configuration options between the
various Windows platforms, the procedure for printing using TCP/IP is
the same.
1. Ensure that the TCP/IP protocol has been installed in Windows.
This can be confirmed by checking the network settings from
within the Control Panel. If TCP/IP has not been installed refer to
the section below Installation of TCP/IP protocol.
1
1
1
2. If not already configured, a suitable IP address, Subnet Mask and
Gateway address should be configured. Please refer to the on-line
help if necessary. It is vital that the IP address entered is unique and
valid. Entering an incorrect IP address may cause severe network
problems. Please check the address with the network administrator.
3. If your network environment uses domain names, DNS should be
enabled and configured on your system. However, this step is not
essential to enable network printing.
4. Restart the operating system.
Microsoft Windows 70
Page 73

Windows 95/98/Me
1. Click the [Start] button, select [Settings] and then click [Control
Panel].
2. In the [Control Panel] double-click on the [Network] icon.
3. In the [Network] dialogue box click [Configuration Panel].
4. If the [Client for Microsoft Networks] is not listed, click [Add].
5. In the [Select Network Component Type] dialogue box, select
[Protocol] then click [Add].
6. In the [Select Network Protocol] dialogue box, select [Microsoft]
from the list of manufacturers, then select [TCP/IP] from the list of
network protocols, then click [OK].
7. The Windows installation CD-ROM may be required. Follow the
remaining dialogue box prompts.
Windows NT 4.0
1. Click [Start], select [Settings] and then click [Control Panel].
2. Double-click the [Network] icon.
3. In the Network dialogue box, click the [Protocols] tab.
4. If the [TCP/IP Protocol] is not listed, click [Add].
5. In the [Select Network Protocol] dialogue box, select [TCP/IP
Protocol] and click [OK].
6. The Windows NT installation CD-ROM may be required. Follow
the remaining dialogue box prompts.
Microsoft Windows 71
Page 74

Windows 2000
1. Click the [Start] button, select [Settings] and then click [Network
and Dial-up Connections].
2. Double-click the [Local Area Connection] icon. In the [Local Area
Connection Status] dialogue box, click [Properties].
3. In the [Local Area Connection Properties] dialogue box, click
[Install].
4. In the [Select Network Component Type] dialogue box, select
[Protocol] and click [Add].
5. In the [Select Network Protocol] dialogue box, select [TCP/IP
Protocol] and click [OK].
6. Click [Close] button in the [Local Area Connection Properties]
dialogue box.
7. Click [Close] in the [Local Area Connection Status] dialogue box.
Windows XP
1. Click the [Start] button and select [Control Panel].
2. Select [Network and Internet Connection] and [Network
Connection].
3. Double-click [Local Area Connection] and click [Properties] in the
[Location Area Connection Status] dialogue box.
4. If the [Internet Protocol (TCP/IP)] is not listed, click [Install.].
5. In the [Select Network Component Type] dialogue box, select
[Protocol] then click [Add].
6. In the [Select Network Protocol] dialogue box, select [Internet
Protocol (TCP/IP)] then click [OK].
Microsoft Windows 72
Page 75

7. The Windows XP installation CD-ROM may be required. Follow
the remaining dialogue box prompts.
Once the protocol has been installed and configured in Windows, the next
step is to configure the TCP/IP parameters in the network printer.
Network printer IP address configuration
Use the Admin/Manager Standard Set-up Utility to configure the IP
Address, Subnet Mask and Gateway.
1. Connect the printer to the network and turn on.
2. Place the Network Software Utilities disk (or the software CD
provided with your printer) in the CD-ROM drive. The set-up
utility starts automatically. If the set-up utility does not start,
double-click on install.exe in the Windows folder of the CD-ROM.
3. Select [Network Software].
4. Select [Installation/Config].
5. Select the appropriate language.
6. Click [Next] on the Welcome screen.
7. If you agree to the User License Agreement, click [Next].
8. Select the appropriate network card, using the Ethernet address to
identify it, and click [Next].
The Ethernet address (MAC Address) of the printer can be found on
the self-diagnostic printout, which can be printed by pressing the
push-button on the network card for two seconds and then releasing
it.
Microsoft Windows 73
Page 76

Do you use the TCP/IP protocol?
When using lpr in UNIX and other TCP/IP environments, please
select [Yes]. To use in a TCP/IP environment, an IP address should
be assigned to the Ethernet board.
If [Yes] has been selected and TCP/IP is the only working protocol
and the IP address has not already been assigned, you can either
obtain an IP address automatically or assign an IP address.
When [Obtain an IP address automatically] is selected, the device IP
address will be automatically assigned by the DHCP server. In an
environment without a DHCP server, please assign the IP address
manually.
If you are assigning an IP address, you need to enter:
>An IP address
>Submit mask
>Gateway address.
9. Click [Next].
Do you use the NetWare protocol?
Consult your network manager to ensure that the NetWare file server
is properly installed and working on the network. Make sure that
NetWare Client32 or IntranetWare Client is installed on your
computer.
10. On selecting [Yes] you will be asked if [You set-up the queue from
the Wizard]?
Do you use the EtherTalk protocol?
EtherTalk is the required protocol for printing data from the
Macintosh environment.
Do you use the NetBEUI protocol?
Using NetBEUI makes it easy to manage your OKI product and print
within the network environment of Windows.
Microsoft Windows 74
Page 77

11. Confirm your configuration. If everything is correct, select
[Execute] to apply the configuration. Set-up has now been
completed. Select [Finish].
Now that both Windows and the printer have been configured to use TCP/
IP, the next step is to configure Windows to print to the network printer.
Windows 95/98/Me
When printing using TCP/IP, the Oki LPR utility is the only option to use.
The following procedure should be used.
When installing the driver, ensure it is installed as a local printer and not
a network printer. Ensure the appropriate printer driver has been installed
in Windows.
Install the Oki LPR utility as described on page 67 of this manual and add
the printer installed earlier.
Microsoft Windows 75
Page 78

Windows NT 4.0
With Windows NT 4.0, you have two options for printing using TCP/IP.
They are:
>Oki LPR
>Microsoft LPR
In order to use Microsoft LPR, it must first be installed into your operating
system.
NT 4.0 requires administrator privileges.
Oki LPR
Please follow the procedure described in the Windows 95/98/Me section
on page 75.
Microsoft LPR
To install this port, the following needs to be carried out.
1. Select [Start], [Settings], [Control Panel] and then select [Printers].
2. Select [Add Printer] Wizard.
3. Select [My Computer] and then [Next].
4. Select [Add Port].
5. Select [LPR Port] and then [OK].
6. In [Name or address of server providing lpd] type the host name or
IP address of the host for the printer you are adding.
7. In [Name of printer or print queue on that server] type the logical
printer name "lp" and then click [OK].
Microsoft Windows 76
Page 79

8. Follow the instructions on the screen to finish installing the LPRcompatible printer.
If the LPR port is not available, install the Microsoft TCP/IP Printing
Service.
Insert the printer driver for Windows NT4.0.
1. Select [Start]→[Settings]→[Control Panel] and then double-click
the [[Network] icon.
2. In the Network dialogue box, click the [Services] tab.
3. If [Microsoft TCP/IP Printing] is not listed, click [Add].
4. In the [Select Network Service] dialogue box, select [Microsoft
TCP/IP Printing] and click [OK].
5. The Windows NT installation CD-ROM may be required. Follow
the remaining dialogue box prompts.
Windows 2000
Windows 2000 requires administrator privileges.
With Windows 2000, there are four options for printing using TCP/IP.
>Oki LPR
>Microsoft LPR
> Port 9100
>IPP
In order to use Microsoft LPR, it must first be installed on your system.
OKI LPR
Please follow the procedure described in the Windows 95/98/Me section
on
page 75.
Microsoft Windows 77
Page 80

Microsoft LPR
To install this port, the following needs to be carried out:
1. Select [Start], [Settings], [Control Panel and Printers].
2. Open the [Printers] folder.
3. Double-click [Add Printer] and then select [Next].
4. Select [Local Printer], clear the [Automatically detect my printer]
check box, and then select [Next].
5. Select [Create a new port] and then [LPR Port].
6. Select [Next] and then provide the following information:
In [Name or address of server providing LPD] enter the host name
or Internet Protocol (IP) address of the host for the printer you are
adding.
In [Name of printer or print queue on that server] type lp.
Follow the instructions on the screen to finish installing the TCP/IP
printer.
Port 9100
1. Select [Start]→[Settings]→[Control Panel].
2. Open the [Printers] folder.
3. Double-click [Add Printer] and then select [Next].
4. Select [Local Printer], clear the [Automatically detect my printer]
check box and then click [Next].
5. Select [Create a New Port] and select [ Standard TCP/IP Port].
6. Select [Next].
Microsoft Windows 78
Page 81

7. The [Welcome to the Add Standard TCP/IP Printer Port Wizard]
will appear.
8. Select [Next] and provide the following information. Enter [Printer
name] or IP address, for example: 192.168.1.31. If the above IP
address is entered, the Port Name will default to IP_192.168.1.31.
9. Select [Next]. Additional port information will be required.
10. Under [Device Type], select [Custom] then [Settings].
11. Ensure [Protocol] is set to [Raw].
12. Ensure [Port Number] is 9100 and [SNMP Status Enabled] is
deselected.
13. Select [OK].
14. Select [Follow the instructions on the screen to finish installing the
printer.]
IPP
1. Select [Start]→[Settings]→[Control Panel and Printers].
2. Open the [Printers Folder].
3. Double-click [Add Printer] and then select [Next].
4. Select [Network Printer].
5. Select [Next].
6. Type printer URL in text box labelled [Connect to a printer in the
Internet or your Intranet], e.g. http://192.168.1.31/ipp/ip.
7. Select [Next].
Microsoft Windows 79
Page 82

8. Install printer driver.
Windows XP
Windows XP requires administrator privileges.
With Windows XP, there are four options for printing using TCP/IP.
>Oki LPR
>Microsoft LPR
> Port 9100
>IPP
In order to use Microsoft LPR, it must first be installed on your system.
OKI LPR
Please follow the procedure described in the Windows 95/98/Me section
on page 75.
Microsoft LPR
To install this port, the following needs to be carried out:
1. Select [Start]→[Settings]→[Control Panel]→[Printers and Other
Hardware].
2. Select [Printers and Faxes].
3. Click [Add Printer], then select [Next].
4. Select [Local printer attached to this computer], clear the
[Automatically detect and install my Plug and Play printer] check
box, and then click [Next].
5. Select [Create a New Port] and [Type Standard TCP/IP Port].
6. Click [Next].
7. [Welcome to the Add Standard TCP/IP Printer Port Wizard]
appears.
Microsoft Windows 80
Page 83

8. Click [Next] and provide the following information. Enter [Printer
name or IP address], for example: 192.168.1.31. If the above IP
address is entered, the Port Name will default to IP_192.168.1.31.
9. Click [Next]. [Additional Port Information Required] displayed.
10. Under [Device Type], select [Custom] then [Settings].
11. Ensure [Protocol] is set to [LPR].
12. Ensure [Queue Name] is lp and [SNMP Status Enabled] is
deselected.
13. Click [OK].
14. Follow on screen instructions to finish installing the printer.
Port 9100
1. Select [Start]→[Settings]→[Control Panel]→[Printers and Other
Hardware].
2. Select [Printers and Faxes].
3. Click [Add Printer] and then click [Next].
4. Select [Local printer attached to this computer], clear the
[Automatically detect and install my Plug and Play printer] check
box, and then click[Next].
5. Select [Create a New Port] and select [Type Standard TCP/IP Port].
6. Click [Next].
7. [Welcome to the Add Standard TCP/IP Printer Port Wizard]
appears.
8. Click [Next] and provide the following information. Enter [Printer
name or IP address], for example: 192.168.1.31. If the above IP
address is entered, the Port Name will default to IP_192.168.1.31.
9. Click [Next]. [Additional Port Information Required] is displayed.
Microsoft Windows 81
Page 84

10. Under [Device Type], select [Custom] then [Settings].
11. Ensure [Protocol] is set to [Raw].
12. Ensure [Port Number] is 9100 and [SNMP Status Enabled] is
deselected.
13. Click [OK].
14. Follow the instructions on the screen to finish installing the printer.
IPP
1. Select [Start], [Settings], [Control Panel]. and [Printers and Other
Hardware].
2. Select [Printers and Faxes].
3. Click [Add Printer] and then select [Next].
4. Select [A network printer, or a printer attached to another
computer].
5. Click [Next].
6. Select [Connect to a printer on the Internet or on a home or office
network] and type printer URL in text box, e.g. http://192.168.1.31/
ipp/ip.
7. Click [Next].
8. Install printer driver
Novell Netware IPX
IPX is used with Novell NetWare. The OkiLAN supports Novell 3, 4, 5
and 6, and allows print jobs to be directed to the appropriate Novell print
queue. Please refer to the relevant section of this manual for additional
information.
Microsoft Windows 82
Page 85

NetBEUI Protocol
NetBEUI is a protocol that was designed for use on small workgroups or
LANs. Within Windows, NetBEUI is used for file and printer sharing
between computers. It provides a simple method of printing, but the
protocol does have limitations and is not as robust as TCP/IP or IPX.
Typically it is employed in small or home networks.
Network Printer Settings
There are three configurable items under NetBEUI within the printer.
These can be configured using the standard set-up utility described in
Chapter 1.
Computer Name: Name assigned to the printer
Workgroup:
Comment: User definable description
1
Although the workgroup name can be changed, it is recommended that it remain PrintServer.
PrintServer
Although there are some differences in configuration options between the
various Windows platforms, the procedure for printing using NetBEUI is
the same.
Please ensure the NetBEUI protocol has been installed in Windows. This
can be confirmed by checking the network settings. If NetBEUI has not
been installed please refer to the section below.
1
The relevant Windows installation CD-ROM may be required and you
should follow the on-screen dialogue box prompts.
Windows 95/98/Me
1. Click [Start]→[Settings]→[Control Panel].
2. In the Control Panel double-click on the [Network] icon.
3. In the Network dialogue box select [Configuration Panel].
4. If [Client for Microsoft Networks] is not listed, click [Add].
Microsoft Windows 83
Page 86

5. In the [Select Network Component Type] dialogue box, select
[Protocol] then [Add].
6. In the [Select Network Protocol] dialogue box, select [Microsoft]
from the list of manufacturers, then select [NetBEUI] from the list
of [Network Protocols] and then click [OK].
7. The Windows installation CD-ROM may be required. Follow the
remaining dialogue box prompts.
Windows NT 4.0
1. Click the [Start] button, select [Settings] and then [Control Panel].
2. Double-click the [Network] icon.
3. In the [Network] dialogue box, click the [Protocols] tab.
4. If the [NetBEUI Protocol] is not listed, click [Add].
5. In the [Select Network Protocol] dialogue box, select [NetBEUI
Protocol] and click [OK].
Microsoft Windows 84
Page 87

Windows 2000
1. Click the [Start] button, select [Settings] and then click [Network
and Dial-up Connections].
2. Double-click the [Local Area Connection] icon. In the [Local Area
Connection Status] dialogue box, click [Properties].
3. In the [Local Area Connection Properties] dialogue box, if the
[NetBEUI Protocol] is not listed, click [Install].
4. In the [Select Network Component Type] dialogue box, select
[Protocol] and click [Add].
5. In the [Select Network Protocol] dialogue box, select [NetBEUI
Protocol] and click [OK].
6. Click [Close] in the [Local Area Connection Properties] dialogue
box.
7. Click the [Close] button in the [Local Area Connection Status] dialogue
box.
Windows XP
Although you can install the NetBEUI protocol into Windows XP, it is not
supported. You should be able to use NetBEUI on LAN connections
although you will not be able to use this on Remote Access Service
Connections.
1. In the [Start] menu, select [Settings] then [Control Panel].
2. Double-click [Network Connections].
3. Right-click the adapter you wish to add NetBEUI to and then click
[Properties].
4. On the [General] tab, select [Install].
5. Select [Protocol] and then [Add].
Microsoft Windows 85
Page 88

6. Select [Have Disk] and insert your Windows XP CD-ROM. Open
the Valueadd\msft\net\netbeui folder, click the Netnbf.inf file and
then click [Open]. Now the printer has been configured and
NetBEUI has been installed; you can configure Windows to print
over the network.
Printer driver configuration
In the following example, the printer has been configured as follows:
Computer Name: OL07DB85
Workgroup: PrintServer
Comment: EthernetBoard OKILAN
1. Set up the printer driver as the default local printer.
2. In the [Start] menu, select [Settings] then [Printers].
3. Select the relevant printer driver, then [Properties].
4. Click on the [Details] tab in the printer driver.
5. Select [Add Port]. Select [Network] and click [Browse].
6. Double-click [Entire Network], [PrintServer] and [OL07DB85].
7. Select [Prn1] and click OK.
8. Check that [Network] is selected and click [OK].
9. Select [Apply] and [OK] to close [Properties].
> Printing can be carried out using the application software.
> The Master Browser function manages machine information from
the same Workgroup, and replies to summary requests from other
workgroups.
> The Master Browser function operates only if the Workgroup name
is PrintServer.
Microsoft Windows 86
Page 89

> The Master Browser function can only manage this network card. If
the PrintServer name is put into another Workgroup, the network
card will not be able to find it on the network.
> A maximum of eight Ethernets can be managed by the Master
Browser function.
> Printing cannot be carried out and an error message appears when
jobs from other users (including other protocols) are being printed.
Microsoft Windows 87
Page 90

NOVELL NETWARE
Overview
The OkiLAN print server supports the Novell NetWare environment.
It is necessary to have NetWare Administrator or Supervisor rights to
change the configuration. This guide is for NetWare administrators. It
should be read in conjunction with the relevant Novell NetWare manual.
The latest Novell service packs and Novell client versions should be
installed.
Supported Versions and Modes
NetWare 3.11 + Bindery
NetWare 4.1+ Bindery and NDS
NetWare 5+ Bindery, NDS and NDPS
NetWare 6 Bindery, NDS, NDPS and iPrint
In NDS, the printer can be configured to work in either print server mode
or remote printer mode.
Remote Printer Mode
Remote Printer Mode requires a connection to be made to a workstation
running Pserver. Print jobs are received from the file server via the
NetWare print server. The network interface card emulates the
workstation on which the NetWare Rprinter operates. Remote Printer
Mode adds additional traffic to the network and is slower than Print Server
Mode but does not require any additional licenses.
Print Server Mode (Recommended)
In Print Server Mode, the file server is logged in and the printer queue is
repeatedly polled to determine whether a print job exists. The NetWare
print server or workstation where Pserver runs is emulated. This enables
high speed printing without applying a load to the network. Print Server
Mode requires a single user NetWare license.
Novell NetWare 88
Page 91

Printing the Network Interface Card Configuration Sheet
The printer’s configuration page reports information that is required for
NetWare configuration. To print a configuration page, while the printer is
switched on, depress the NIC’s push-button for three seconds and then
release.
The Ethernet address (MAC Address) of the printer can be found on the
self-diagnostic printout, which can be printed by pressing the push-button
on the network card for two seconds and then releasing it.
The first six digits of the Ethernet address are the same for all OkiLan
print servers. The last six digits of the Ethernet address are unique to each
card
This is all the information that is required to setup the OkiLan for
NetWare.
Setup Utilities
Use NWAdmin32 or the Pconsole utility to create and setup NetWare
printer objects. Please refer to Novell documentation for instructions on
how to achieve this.
Use the OKI Network Card Setup Utility (Quick Setup) or other printer
manager software, (AdminManager, Web browser, etc.) to configure the
network interface card. For instructions please refer to the Configuration
Novell NetWare 89
Page 92

Utility section and online help. Below is the NetWare configuration page
from AdminManager.
Novell NetWare 90
Page 93

UNIX
Overview
The OkiLAN print server supports many protocols such as LPD, FTP,
TELNET, SNMP and IPP, and works within the UNIX environment.
To use the network card within the UNIX environment, the following
steps are required:
Configuration
Network Interface card setting
The first step in installing the network card under UNIX is to set up the IP
address, Subnet Mask and Gateway. This section explains one way to set
them up from a UNIX workstation.
> The network addresses used in this manual are shown as examples
only. Network addresses used in your installation must be generated
for your own network.
> Log in as [root] to change the configuration of the Print Server. By
default, there is no root password.
> If an incorrect IP address, Subnet Mask or Gateway is entered, the
network may go down or other damage may occur. Check the
address with your network manager.
The following explanation uses Sun Solaris 2.8 (Solaris 8) as an example.
The actual commands may differ between versions of UNIX, so refer to
the workstation manuals for more information.
1. Log in as root to the workstation
> If you do not have superuser rights, the network manger should
conduct the configuration.
2. If the print server does not have an IP addresses already assigned,
use the arp command to set a temporary IP address.
Example: for IP address 192.68.20.127 and network card address
00:80:92:01:00:D2
UNIX 91
Page 94

# arp –s 192.168.20.127 00:80:92:01:00:D2 temp
The Ethernet address (MAC address) 00:80:92:01:00:D2 in the above
example can be determined from the network card self-diagnostic test
which can be printed by pressing the push-button on the network card for
two seconds and then releasing it.
3. Use the ping command to confirm the connection with the network
interface card.
Example: for IP address 192.168.20.127
# ping 192.168.20.127
If there is no reply, there is a problem with the configuration of the IP
address (the IP address has been already set manually or DHCP/RARP
server may run), or with the network. Reset the network interface card
settings to default and try to set temporary IP address.
If you still have the problem after resetting the network interface card,
consult the network manager.
4. Log in to the network interface card using TELNET.
Example: Logging in to IP address 192.168.20.127
#telnet 192.168.20.127
Trying 192.168.20.127
Connected to 192.168.20.127
Escape character is ‘^]’.
EthernetBoard OkiLAN
login: root
‘root’ user needs password to login.
password: <CR>
User ‘root’ logged in.
UNIX 92
Page 95

No. Message Value (level .1)
1 : Setup TCP/ IP
2 : Setup SNMP
3 : Setup NetWare
4 : Setup EtherTalk
5 : Setup NetBEUI
6 : Setup printer port
7 : Display Status
8 : Setup printer trap
9 : Setup SMTP Email
97 : Reset to factory set
98 : Quit setup
99 : Exit setup
Please select (1- 99)?
UNIX 93
Page 96

5. Type 1 and press the [Enter] key. Perform the following settings:
Please select (1- 99)? 1
No. Message Value
1 : TCP/ IP protocol : ENABLE
2 : IP address : 192.168.20.127
3 : Subnet Mask : 255.255.255.0
4 : Gateway address : 192.168.20.1
5 : RARP protocol : DISABLE
6 : DHCP/ BOOTP protocol: DISABLE
7 : root password : “ “
99 : Back to prior menu
Please select (1- 99)?
6. Log out from the network interface card. Turn the printer off and on
again to validate the following settings.
UNIX 94
Page 97

Operating system configuration
This section explains how to configure a printer for major UNIX
operating systems.
Sun OS 4.x.x (BSD) configuration
The following explanation uses Sun OS 4.1.3 and an OKI printer as
examples. The absolute path of commands and the configuration method
may differ between OS versions, so refer to the workstation manuals for
more information.
If an incorrect IP Address, Subnet Mask or Gateway is entered, the
network may go down or other damage may occur. Check the address
with the network manager and confirm that the IP address of the printer
has been set.
1. Log in as [root[ to the workstation.
If you do not have Superuser rights, the network manager should conduct
the configuration.
2. Register the IP address of the network card and the host name in the
/etc/hosts file.
Example: for IP address 192.168.20.127 and host name PRINTER
192.168.20.127 PRINTER
3. Use the ping command to confirm connection with the network
card.
Example: for host name PRINTER
# ping PRINTER
If there is no reply, then there is a problem with the configuration of the
IP address (the IP address has been already set manually or DHCP/RARP
server may run) or with the network. Reset the network interface card
settings to their defaults and then try to set a temporary IP address. If you
still have the problem after resetting the network interface card, consult
the network manager.
UNIX 95
Page 98

4. Register the printer in the /etc/printcap file.
Example: for host name PRINTER, to create a queue called PRINTER_lp
PRINTER_lp: \
:lp=:rm=C7400:rp=lp:\
:sd=/usr/spool/PRINTER_lp:\
:lf=/usr/spool/PRINTER_lp/OKIPRINTER_lp_errs:
PRINTER_lp The name of the printer queue
lp: The name of the device used to connect to the printer.
Does not need to be specified for a remote machine.
rm: The name of the host of the remote printer. This should
be the same as the name added to the /etc/hosts file.
rp: The name of the printer on the remote printer. It should
be lp.
sd: The spool directory. Give the absolute path.
lf: The error log file. Give the absolute path.
5. Create the spool directory and error log file.
Example: for spool Directory PRINTER_lp and Error Log file
OKIPRINTER_lp_errs
# mkdir /usr/spool/PRINTER_lp
#touch/usr/spool/PRINTER_lp/PRINTER _lp_errs
# chown –R daemon /usr/spool/PRINTER_lp
# chgrp –R # daemon /usr/spool/PRINTER_lp
6. Check that lpd (printer daemon) is activated.
# ps aux | grep lpd
7. If lpd is not running,start it by logging in as superuser and executing
# /usr/lib/lpd &
UNIX 96
Page 99

Sun Solaris 2.x configuration
Admintool is normally used to register remote printers on Open Windows.
However, it cannot be used here, as the data recipient and queue have the
same name. The procedure below must be used for registering a remote
printer.
If Solaris 2.x is connected to the remote printer for a long period according
to the system specifications, errors and forced disconnection may occur.
Therefore, if paper tearing, off-line and other errors result in waiting time,
printing may have to be aborted.
if an incorrect IP address is entered, the network may go down or other
damage may occur. Configure after consulting the network manager.
The following explanation uses Sun Solaris 2.8 (known as Solaris 8) and
an OKI printer as examples. The absolute path and method of configuring
commands may differ in other versions of the OS. Refer to the
workstation manual for more details.
1. Confirm that the IP address of the printer has been set.
2. Log in as [root] to the workstation. If you do not have superuser
rights, the network manager should conduct the configuration.
3. Register the IP address of the network card and the host name in /
etc/hosts file.
Example: for IP Address 192.168.20.127 and host name PRINTER
192.168.20.127 PRINTER
4. Use the ping command to confirm connection with the network
card.
Example: for host name PRINTER
# ping PRINTER
If there is no reply, there is a problem with the configuration of the IP
address (the IP address has been already set manually or DHCP/RARP
server may run), or with the network.
UNIX 97
Page 100

Reset the network interface card settings to default and try to set
temporary IP address. If you still have the problem after resetting the
network interface card, consult the network manager.
5. Register the network card as a remote printer server.
Example: for host name PRINTER
a. Stop the print scheduler.
# usr/sbin/lpshut
b. Create the printer queue.
# /usr/sbin/lpadmin -p PRINTER_lp -v /dev/
null \
m netstandard -o dest=PRINTER:lp
-o protocol=bsd
c. Set the queue to accept PostScript print jobs.
# /usr/sbin/lpadmin -p PRINTER_lp -I post-
script
d. Start the print scheduler.
# /usr/sbin/lpsched
e. Activate the print queue.
# /usr/sbin/accept PRINTER_lp
f. Enable the print queue
# /bin/enable PRINTER_lp
To customize output, for example to add additional commands at the start
of each print job, you can edit a copy of the netstandard model file then
add it using the lpadmin command
Example: for printer PRINTER_lp, with model file called
PRINTER0_model
# /usr/sbin/lpshut
UNIX 98
 Loading...