

C532/ES5432
Advanced Manual
About This Manual
This manual describes how to print from mobile terminals and how to use the
OKI color printer in various ways.
It also describes advanced features such as security settings and color adjustment.
Please read this manual carefully to achieve the maximum performance of the
product in various conditions.
This manual uses as an example Windows 7 for Windows, Mac OS X 10.9 for Mac
OS X and C532 for the device.
This manual uses C532 as an example to illustrate buttons and icons on the
operator panel, driver screens, and the method of inputting characters and
operating the device.
Depending on your OS, the actual display of the product may differ from the
descriptions in this manual. In addition, depending on the model you are using,
some functions described in this manual may not be available.
Depending on the device you are using, buttons or the like on the operator panel
and the actual operations may differ from the descriptions in this manual. Please
read the user’s manual for the specic model that comes with your device.
About Descriptions
This section describes the marks, symbols, abbreviations and illustrations used
in this manual.
About Marks
This manual uses the following marks.
Mark Meaning
Indicates cautions and restrictions for the correct operation of the
device. Be sure to read them to avoid misoperation.
Indicates useful tips and references on how to use the device. We
recommend you read them.
Indicates reference items. Please read them to learn the detailed
information.
Indicates related items. Please read them to learn the relevant
information.
About Symbols
This section describes the symbols used in this manual and their meanings.
Symbol Meaning
Illustration (button
name)
Indicates button shapes (button names) on the
operator panel of the device.
[ ] Indicates menu names, item names, options, etc.
displayed on the screen of the operator panel.
Indicates menus, windows and dialog box names
displayed on the computer screen.
They can be clearly distinguished in the description
and procedure illustration.
" " Indicates messages and input texts on the displayed screen.
Indicates le names on the computer.
Indicates item titles of link destinations.
< > Indicates keys on the computer keyboard.
> Indicates the transition of device or computer menus.
About Illustrations
The illustrations used in this manual are based on C532.
The displayed screens on the operator panel used in this manual are based on
the default settings.
- 2 -

Table of contents
1 Basic Operations ......................................................................................... 7
Adjusting the Contrast of the Display Screen ................................................................................8
Setting Output Destination .............................................................................................................9
Output Tray ...................................................................................................................................................9
Rear Output Tray ........................................................................................................................................10
Adjusting Volume ......................................................................................................................... 11
Checking the Information of the Machine ....................................................................................12
Printing a Report to Check ......................................................................................................................... 12
Checking the Status on the Operator Panel ...............................................................................................13
2 Print ............................................................................................................. 14
Printing on Various Types of Paper .............................................................................................15
Printing on Envelopes .................................................................................................................................15
Printing on Labels ....................................................................................................................................... 18
Printing on Long Paper ...............................................................................................................................20
Printing on Custom Size Paper ..................................................................................................................22
Printing with Various Settings from a Computer ..........................................................................24
Printing Manually One by One ...................................................................................................................24
Enlarging or Reducing to Fit the Specified Paper Size ...............................................................................26
Printing Only the Cover from a Different Tray .............................................................................................27
Making a Booklet ........................................................................................................................................ 28
Dividing a Document to Print on Some Sheets for Making a Poster .......................................................... 29
Adding Semi-transparent Text (Watermarks) ..............................................................................................29
Overlaying Forms or Logos (Overlay) ........................................................................................................30
Outputting a Document to a File Instead of Printing on Paper ................................................................... 32
Storing Frequently-printed Documents in the Printer .................................................................................. 32
Printing E-mail Attachment Files ................................................................................................................ 34
Saving Paper, Saving Toner ........................................................................................................35
Printing on Both Sides of Paper (Duplex Printing) ......................................................................................35
Saving Toner ...............................................................................................................................................36
Combining Multiple Pages onto One Sheet of Paper .................................................................................37
Adjusting Color on the Computer .................................................................................................39
Printing Color Data in Grayscale ............................................................................................................... 39
Using Color Matching on Printer Driver ...................................................................................................... 40
Simulating Printing Results for Ink ..............................................................................................................41
Color Separation .........................................................................................................................................42
Correcting Color Registration Error Manually .............................................................................................43
Correcting Density Manually .......................................................................................................................44
Adjusting Color Balance (Density) ............................................................................................................. 44
Adjusting Color with Software .................................................................................................................... 45
For a Better Finish ...................................................................................................................... 46
Enhancing Photos ...................................................................................................................................... 46
Printing with a Specified Resolution ........................................................................................................... 47
Emphasizing Fine Lines ............................................................................................................................. 48
Specifying the Font to Use ......................................................................................................................... 49
Changing Black Finish ............................................................................................................................... 50
Eliminating White Gap Between Text and Background (Overprinting Black) ............................................. 51
Useful Functions ......................................................................................................................... 53
Collating a Multiple Page Document in Units of Copies ............................................................................. 53
Printing from the Last Page of a Document ............................................................................................... 54
Selecting a Tray Automatically for the Specified Paper ............................................................................. 55
Switching to Another Paper Feed Tray Automatically When a Tray Runs Out Of Paper ........................... 57
Changing the Default Settings with a Printer Driver ................................................................................... 58
Saving Frequently-Used Settings in the Printer Driver to Use ................................................................... 59
Storing Print Data in This Machine before Printing .................................................................................... 60
Printing without Opening a PDF File (PDF Print Direct) ............................................................................ 61
Printing Data in USB Memory .................................................................................................................... 61
Printing Confidential Document .................................................................................................. 63
Encrypting the Print Data and Setting a Password Before Printing (Private Print) .................................... 63
3 Maintenance ................................................................................................65
Replacing Maintenance Parts ..................................................................................................... 66
Replacing the Belt Unit .............................................................................................................................. 66
Replacing the Fuser Unit ........................................................................................................................... 69
Cleaning Each Part of the Machine ............................................................................................ 72
Cleaning the Surface of the Machine ......................................................................................................... 72
Cleaning the Paper Feed Rollers (Tray 1/Tray 2/Tray 3) ........................................................................... 73
Cleaning the Paper Feed Rollers (MP Tray) .............................................................................................. 74
Updating Installed Drivers ........................................................................................................... 76
Updating the Printer Driver (Windows) ...................................................................................................... 76
Updating the Printer Driver (Mac OS X) ..................................................................................................... 77
Removing Installed Driver ........................................................................................................... 78
Removing the Printer Driver (Windows) ..................................................................................................... 78
Removing the Printer Driver (Mac OS X) ................................................................................................... 79
Updating Firmware ..................................................................................................................... 80
Initializing Memory and Settings ................................................................................................. 81
Initializing Flash Memory ........................................................................................................................... 81
Initializing the Settings of the Device ......................................................................................................... 82
- 3 -

4 Troubleshooting ......................................................................................... 83
If the ATTENTION indicator on the Operator Panel Lights Up or Flashes ...................................84
Print Problems .............................................................................................................................85
Network Connection Problems ...................................................................................................................85
Wireless LAN Connection Problems ..........................................................................................................86
USB Connection Problems ......................................................................................................................... 87
About Problems with Printing Results ..........................................................................................88
Table of Problems with Printing Results ..................................................................................................... 88
Vertical White Lines Appear .......................................................................................................................90
Printed Images are Fading Vertically ..........................................................................................................90
Printed Images are Light ............................................................................................................................ 91
White Spots and Lines Appear ................................................................................................................... 91
Dew Condensation Appears on Printed Paper ...........................................................................................92
Vertical Lines Appear .................................................................................................................................. 92
Horizontal Lines and Spots Appear Periodically .........................................................................................93
White Area on Paper is Lightly Stained ......................................................................................................93
The Periphery of Characters is Smudged ..................................................................................................94
The Entire Paper Area is Lightly Stained When Printing on Envelopes or Coated Paper ..........................94
Toner Comes Off When Printed Paper is Rubbed ......................................................................................95
Uneven Gloss .............................................................................................................................................95
Black or White Dots Appear .......................................................................................................................96
Dirt is Printed ..............................................................................................................................................96
The Entire Page is Printed Black ................................................................................................................97
Nothing is Printed .......................................................................................................................................97
White Patches Appear ................................................................................................................................ 98
The Peripheral Area of the Page is Dirty ....................................................................................................98
Color of the printed image is not what you expect ...................................................................................... 99
Solid printing of CMY 100% is too light ......................................................................................................99
Problems about Software ..........................................................................................................100
Problems on Configuration Tool ...............................................................................................................100
Problems on a Web Browser .................................................................................................................... 101
Printer Problems on a Windows PC ......................................................................................................... 101
Problems on the Machine or Paper ...........................................................................................102
Problems on the Machine .........................................................................................................................102
Problems on Paper ................................................................................................................................... 105
If a Power Failure Occurs .........................................................................................................................106
Before Relinquishing Your Device ............................................................................................................ 107
AirPrint Problems .......................................................................................................................108
Google Cloud Print Problems ....................................................................................................109
5 Operating Management/ Specifications ................................................. 111
Administrator Setup ...................................................................................................................112
Changing Admin Setup ............................................................................................................................ 112
Print From USB Memory Setup ............................................................................................................... 113
Print Setup ............................................................................................................................................... 113
Network Menu .......................................................................................................................................... 118
Manage Unit ............................................................................................................................................. 121
User Install ............................................................................................................................................... 124
Management Software .............................................................................................................. 125
User Authentication (Access Control) ....................................................................................... 126
Preparation (For Administrator) ................................................................................................................ 126
Log in to This Machine ............................................................................................................................. 133
Printing from a Computer ......................................................................................................................... 134
Registering IC Card Information .............................................................................................................. 137
Account Management ............................................................................................................... 138
Enabling Account Management ............................................................................................................... 138
Setting a Number of Points to Each Account ........................................................................................... 140
Creating a Shared Account ...................................................................................................................... 141
Setting Paper Size Points/Toner Points ................................................................................................... 143
Printing When Account Management is Enabled ..................................................................................... 145
Precautions when Operating .................................................................................................................... 145
Moving/Transporting This Machine ........................................................................................... 146
Moving This Machine ............................................................................................................................... 146
Transporting This Machine ....................................................................................................................... 147
6 Network ...................................................................................................... 148
AirPrint ...................................................................................................................................... 149
About AirPrint (Print) ................................................................................................................................ 149
Setting AirPrint (Print) .............................................................................................................................. 150
Registering the Machine in a Computer (Mac OS X) ............................................................................... 151
Printing with AirPrint (Print) ...................................................................................................................... 152
Google Cloud Print ................................................................................................................... 155
About Google Cloud Print ........................................................................................................................ 155
Setting Google Cloud Print ...................................................................................................................... 156
Printing with Google Cloud Print .............................................................................................................. 158
Checking Google Cloud Print Registrations ............................................................................................. 159
Checking or Changing the Use of Cloud Service Settings ....................................................................... 160
Deleting the Registered Information ........................................................................................................ 161
Checking That Deletion is Complete ........................................................................................................ 162
About Importing the CA Licenses of the Proxy Server ............................................................................. 163
Network-Related Software ........................................................................................................ 164
- 4 -

Network Settings ........................................................................................................................165
Using Wired LAN and Wireless LAN at the Same Time (Only When the Wireless LAN Module is Mounted)
165
Initializing the Network Settings ................................................................................................................ 166
Setting the DHCP Server ..........................................................................................................................167
Network Problems .....................................................................................................................168
7 Utility Software ......................................................................................... 169
List of Utility Software ................................................................................................................170
Windows Utilities ...................................................................................................................................... 170
Mac OS X Utilities .....................................................................................................................................171
Installing Software .....................................................................................................................172
For Windows .............................................................................................................................................172
For Mac OS X ........................................................................................................................................... 175
Web Page of This Machine ........................................................................................................176
Open the Web Page of This Machine .......................................................................................................176
Log In as the Administrator .......................................................................................................................177
Changing the Administrator Password (Web Page) ................................................................................. 179
Checking or Changing the Settings of This Machine ................................................................................179
Encrypting Communication with SSL/TLS ................................................................................................181
Using IPP ..................................................................................................................................................182
Encrypting Communication with IPSec .....................................................................................................183
Limiting by Using an IP Address (IP Filtering) ..........................................................................................186
Limiting by Using a MAC Address (MAC Address Filtering) .....................................................................187
E-mail Alert ...............................................................................................................................................187
Using SNMPv3 ......................................................................................................................................... 188
Using IEEE802.1X (Wired LAN) ...............................................................................................................189
Setting IEEE802.1X (Wireless LAN) ......................................................................................................... 190
Setting the LDAP Server .......................................................................................................................... 192
E-mail Setup .............................................................................................................................................193
Setting Power Save Mode (Web Page) ....................................................................................................193
Setting Sleep Mode (Web Page) ..............................................................................................................194
Setting Auto Power Off Mode (Web Page) ...............................................................................................194
About Items That Can be Set or Checked ................................................................................................ 195
Color Correct Utility ....................................................................................................................200
Changing Palette Color ............................................................................................................................200
Changing Gamma Value or Hue ...............................................................................................................202
Printing in Adjusted Color Settings ...........................................................................................................203
Saving Color Correction Settings .............................................................................................................204
Importing Color Correction Settings .........................................................................................................204
Deleting Color Correction Settings ...........................................................................................................205
Color Swatch Utility ....................................................................................................................206
Printing Color Swatch .............................................................................................................................. 206
Customizing the Color Swatch ................................................................................................................. 207
Printing a File With the Color You Want ................................................................................................... 207
PS Gamma Adjuster Utility ....................................................................................................... 208
Registering an Adjusted Halftone ............................................................................................................ 208
Printing with a Registered Halftone .......................................................................................................... 209
Configuration Tool ..................................................................................................................... 210
Registering This Machine ........................................................................................................................ 210
Starting Configuration Tool ....................................................................................................................... 211
Checking the Status of This Machine ....................................................................................................... 211
Cloning Settings ....................................................................................................................................... 212
Displaying the Alert Info ........................................................................................................................... 212
Setting the Network .................................................................................................................................. 216
Registering ICC Profile ............................................................................................................................ 218
Registering Forms (Form Overlay) .......................................................................................................... 218
Checking the Free Space in Memory/Hard Disk Drive ............................................................................. 219
Registering a User Name and Password ................................................................................................. 220
Removing This Machine .......................................................................................................................... 221
Descriptions of Screens for Configuration Tool ........................................................................................ 222
OKI LPR Utility .......................................................................................................................... 225
Starting OKI LPR Utility ............................................................................................................................ 225
Registering a Device to OKI LPR Utility ................................................................................................... 226
Checking the Status of a Registered Device ............................................................................................ 227
Forwarding Print Jobs to a Registered Device ......................................................................................... 227
Printing the Same Document from the Registered Multiple Devices ....................................................... 228
Opening the Web Page of the Registered Device ................................................................................... 229
Following the IP Address of the Registered Device Automatically .......................................................... 229
Setting the Web Port Number of the Machine .......................................................................................... 230
Sending a File to a Device That is Registered in OKI LPR Utility ............................................................ 230
Deleting an Unnecessary Print Job .......................................................................................................... 231
Uninstalling OKI LPR Utility (Uninstall) .................................................................................................... 231
Network Extension .................................................................................................................... 232
Showing Printer Properties ...................................................................................................................... 232
Checking the Settings of the Machine ..................................................................................................... 233
Set Options Automatically ........................................................................................................................ 234
Uninstall the Utility ................................................................................................................................... 234
Network Card Setup (Mac OS X) .............................................................................................. 235
Setting the IP Address ............................................................................................................................. 235
Configuring Web Settings ........................................................................................................................ 236
Quitting Network Card Setup ................................................................................................................... 236
Print Job Accounting Client ....................................................................................................... 237
For Windows ............................................................................................................................................ 237
- 5 -

For Mac OS X ........................................................................................................................................... 239
- 6 -

1
Basic Operations
Adjusting the Contrast of the Display Screen
Setting Output Destination
Adjusting Volume
Checking the Information of the Machine
This section describes basic operations of this machine.
Adjusting the Contrast of the Display Screen
Brightness of the display screen can be adjusted. The larger number you set, the darker the
screen becomes, and the smaller number you set, the brighter the screen becomes.
Values from -10 to +10 can be set.
Press the button on the operator panel repeatedly to select [Setting] and
1
press the (ENTER) button.
Press the button once to select [Admin Setup] and press the (ENTER)
2
button.
Enter the administrator password, and then press the (ENTER) button.
3
The factory default administrator password is "999999". If the administrator password is changed, enter the
updated password.
Press the button several times to select [Manage Unit] and press the
4
(ENTER) button.
1. Basic Operations
Press the button several times to select [System Setup] and press the
5
(ENTER) button.
Press the or button several times to select [Panel Contrast] and press
6
the (ENTER) button.
Press the or button to select the value you want to set and press the
7
(ENTER) button.
Check that [*] is displayed on the left of the selected value.
8
Press the (ONLINE) button to return to the standby screen.
9
- 8 -

1. Basic Operations
Setting Output Destination
The machine outputs paper to the output tray or rear output tray.
Do not open or close the rear output tray during printing. Paper jams may result.
• Output Tray
• Rear Output Tray
Output Tray
Use this output tray when printing on plain paper. Paper is output with the printed side down.
It is not available for envelopes, labels, or long paper.
Check that the rear output tray on the rear side of the machine is closed. If the rear output
tray is open, paper is always output to the rear output tray.
Open the paper support so that outputs do not slip down from the output tray.
- 9 -
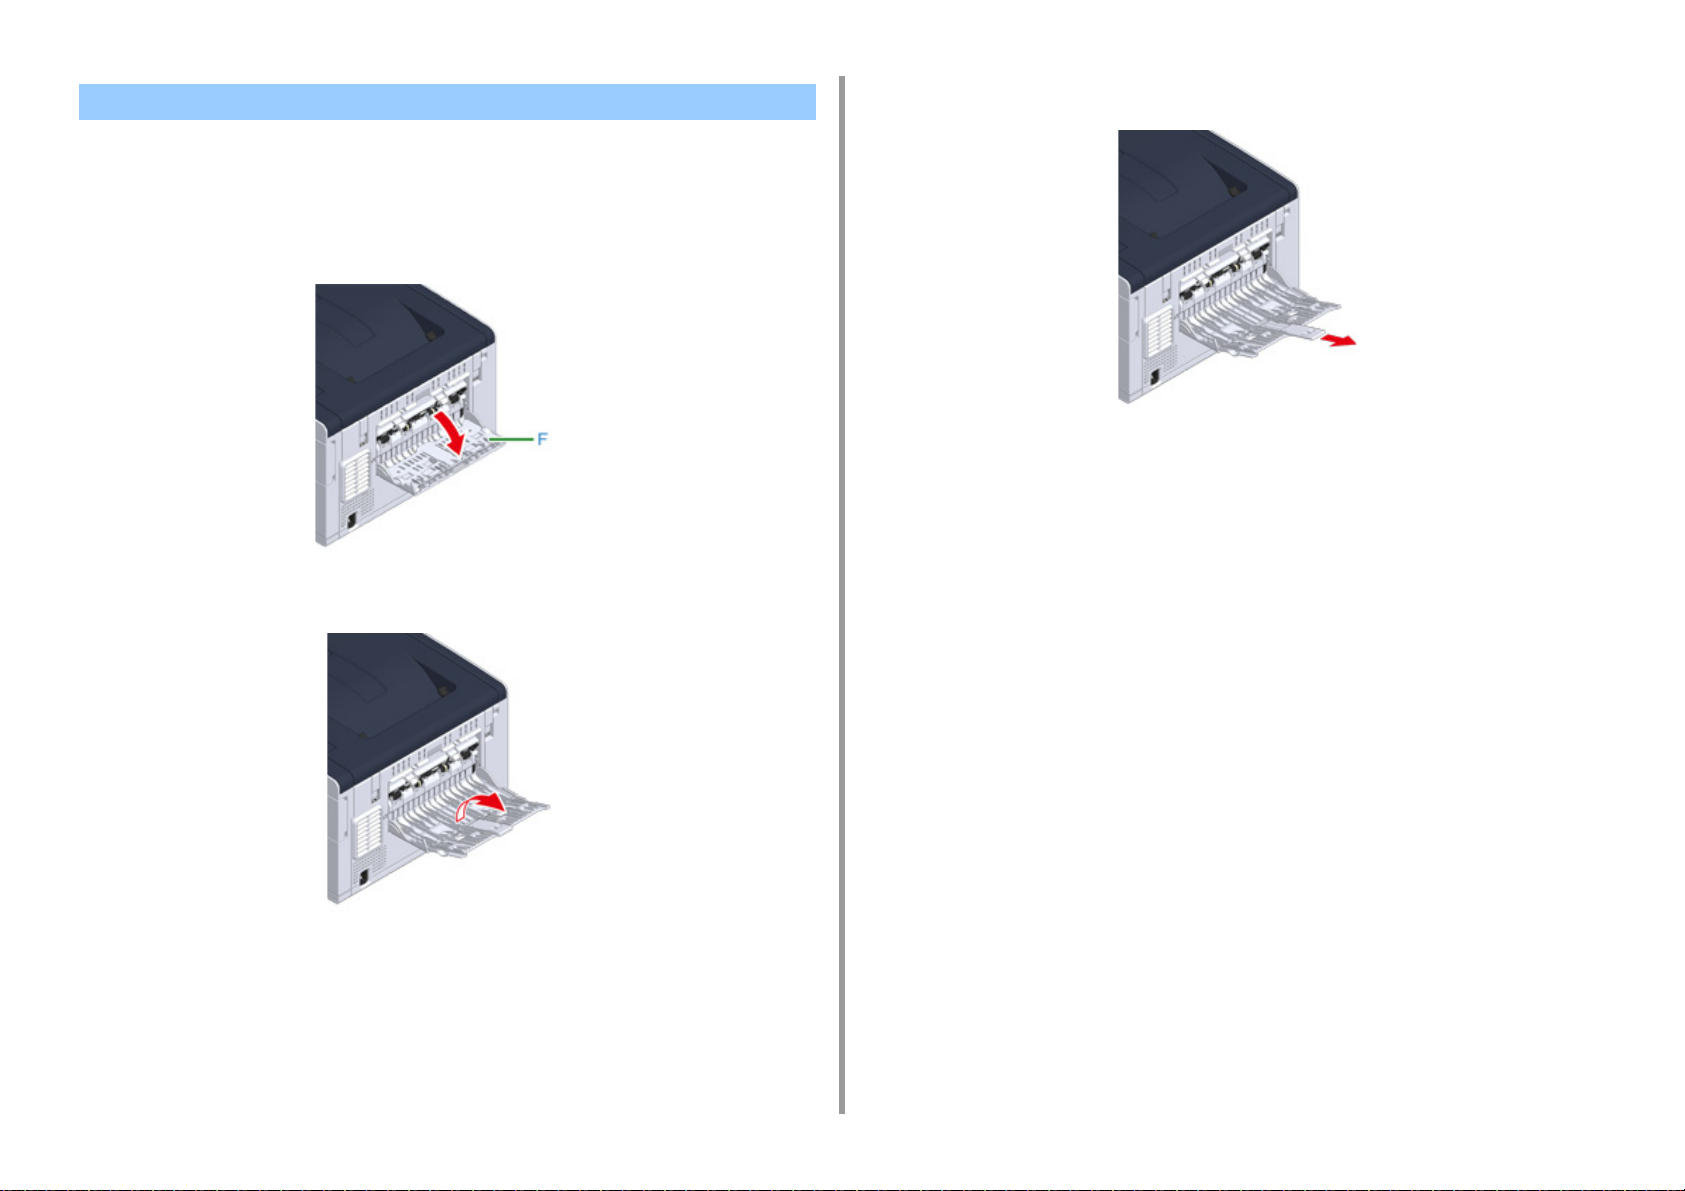
Rear Output Tray
Use the rear output tray when printing on envelopes, labels, or long paper.
Paper is output with the printed side up. Plain paper is also available for this output tray.
Open the rear output tray (F) on the rear side of the machine.
1
Unfold the paper support.
2
Draw the sub support.
3
1. Basic Operations
- 10 -

Adjusting Volume
The volume of the sounds which are emitted in the following conditions can be adjusted in
four levels.
• When a paper jam occurs
• AirPrint Buzzer Volume
Press the button on the operator panel repeatedly to select [Setting] and
1
press the (ENTER) button.
Press the button once to select [Admin Setup] and press the (ENTER)
2
button.
Enter the administrator password, and then press the (ENTER) button.
3
The factory default administrator password is "999999". If the administrator password is changed, enter the
updated password.
Press the or button to select [Manage Unit] and press the (ENTER)
4
button.
1. Basic Operations
Check that [Sound Control] is selected, and then press the (ENTER)
5
button.
Press the or button to select the item you want to adjust and press the
6
(ENTER) button.
Press the or button to select the volume level and press the
7
(ENTER) button.
Press the (ONLINE) button to return to the standby screen.
8
- 11 -
1. Basic Operations
Checking the Information of the Machine
Print the machine information and check the status.
• Printing a Report to Check
• Checking the Status on the Operator Panel
Printing a Report to Check
You can print and check the configuration or the job logs of this machine.
Press the button on the operator panel repeatedly to select [Setting] and
1
press the (ENTER) button.
Check that [Reports] is selected, and then press the (ENTER) button.
2
Press the or button to select the category of the report you want to print
3
and press the (ENTER) button.
Press the or button to select the report to print and press the
4
(ENTER) button.
If the administrator login screen is displayed, enter administrator password.
The factory default administrator password is "999999". If the administrator password is changed, enter the
updated password.
When [Execute] is displayed, press the (ENTER) button.
5
If [Setting] > [Admin Setup] > [Manage Unit] > [System Setup] > [Allow All Reports To Print] on the operator panel
is set to [Disable], log in as the administrator to print the report.
- 12 -
Item Description
Configuration Prints detailed settings of this machine.
System File List Prints a list of job files.
Demo Page Prints a demo page.
Error Log Prints an error log.
Usage Report Prints the total of the job logs.
Network Information Prints general information on the network.
Suppies Report Prints the information about consumables.
User Counter Report Prints the user counter report.
Account Counter Report Prints the account counter report.
Job Log Prints the Job Log.
1. Basic Operations
Item Description
Print PCL Font List Prints a list of PCL font samples.
PSE Font List Prints a list of PSE font samples.
PPR Font List Prints a list of IBMPPR font samples.
FX Font List Prints a list of EPSON FX font samples.
Color Tuning Pattern Prints a color tuning pattern.
ID Check Pattern Prints the pre-supplied ID check pattern for
detecting wrong IDs.
Engine Status Prints the current values of engine
parameter.
Color Profile List Prints a color profile list.
Checking the Status on the Operator Panel
You can check the residual life of consumables, and the counter information from the
operator panel.
Press the button on the operator panel to select [Status] and press the
1
(ENTER) button.
Check that [Device Information] is selected, and then press the (ENTER)
2
button.
Press the or button to select [Supplies Status] or [Counter] and press
3
the (ENTER) button.
Press the or button to select the item you want to check and press the
4
(ENTER) button.
The selected value is displayed on the display screen.
Press the (BACK) button to go back to the standby screen.
5
- 13 -

2
Printing on Various Types of Paper
Printing with Various Settings from a Computer
Saving Paper, Saving Toner
Adjusting Color on the Computer
For a Better Finish
Useful Functions
Printing Confidential Document
”WordPad" for Windows and "TextEdit" for Mac OS X are used as examples. The screens and steps may vary depending on the application.
2. Print
Printing on Various Types of Paper
This section describes how to print on various type of paper.
• Printing on Envelopes
• Printing on Labels
• Printing on Long Paper
• Printing on Custom Size Paper
Printing on Envelopes
• Attaching the Envelope Lever
• Loading Envelopes
• For Windows PCL Printer Driver
• For Windows PS Printer Driver
• For Mac OS X
• Removing the Envelope Lever
• Curling or creasing may occur after printing. Be sure to perform a test print to check that no problems exist.
• Load envelopes with the address side up in the direction as described below.
- If you are using envelopes with the flap (for gluing) on the long edge (Monarch, Com-9, Com-10, DL, C5), load
them with the flap folded so that the flap is on the left side when fed.
• Duplex printing is not available for envelopes.
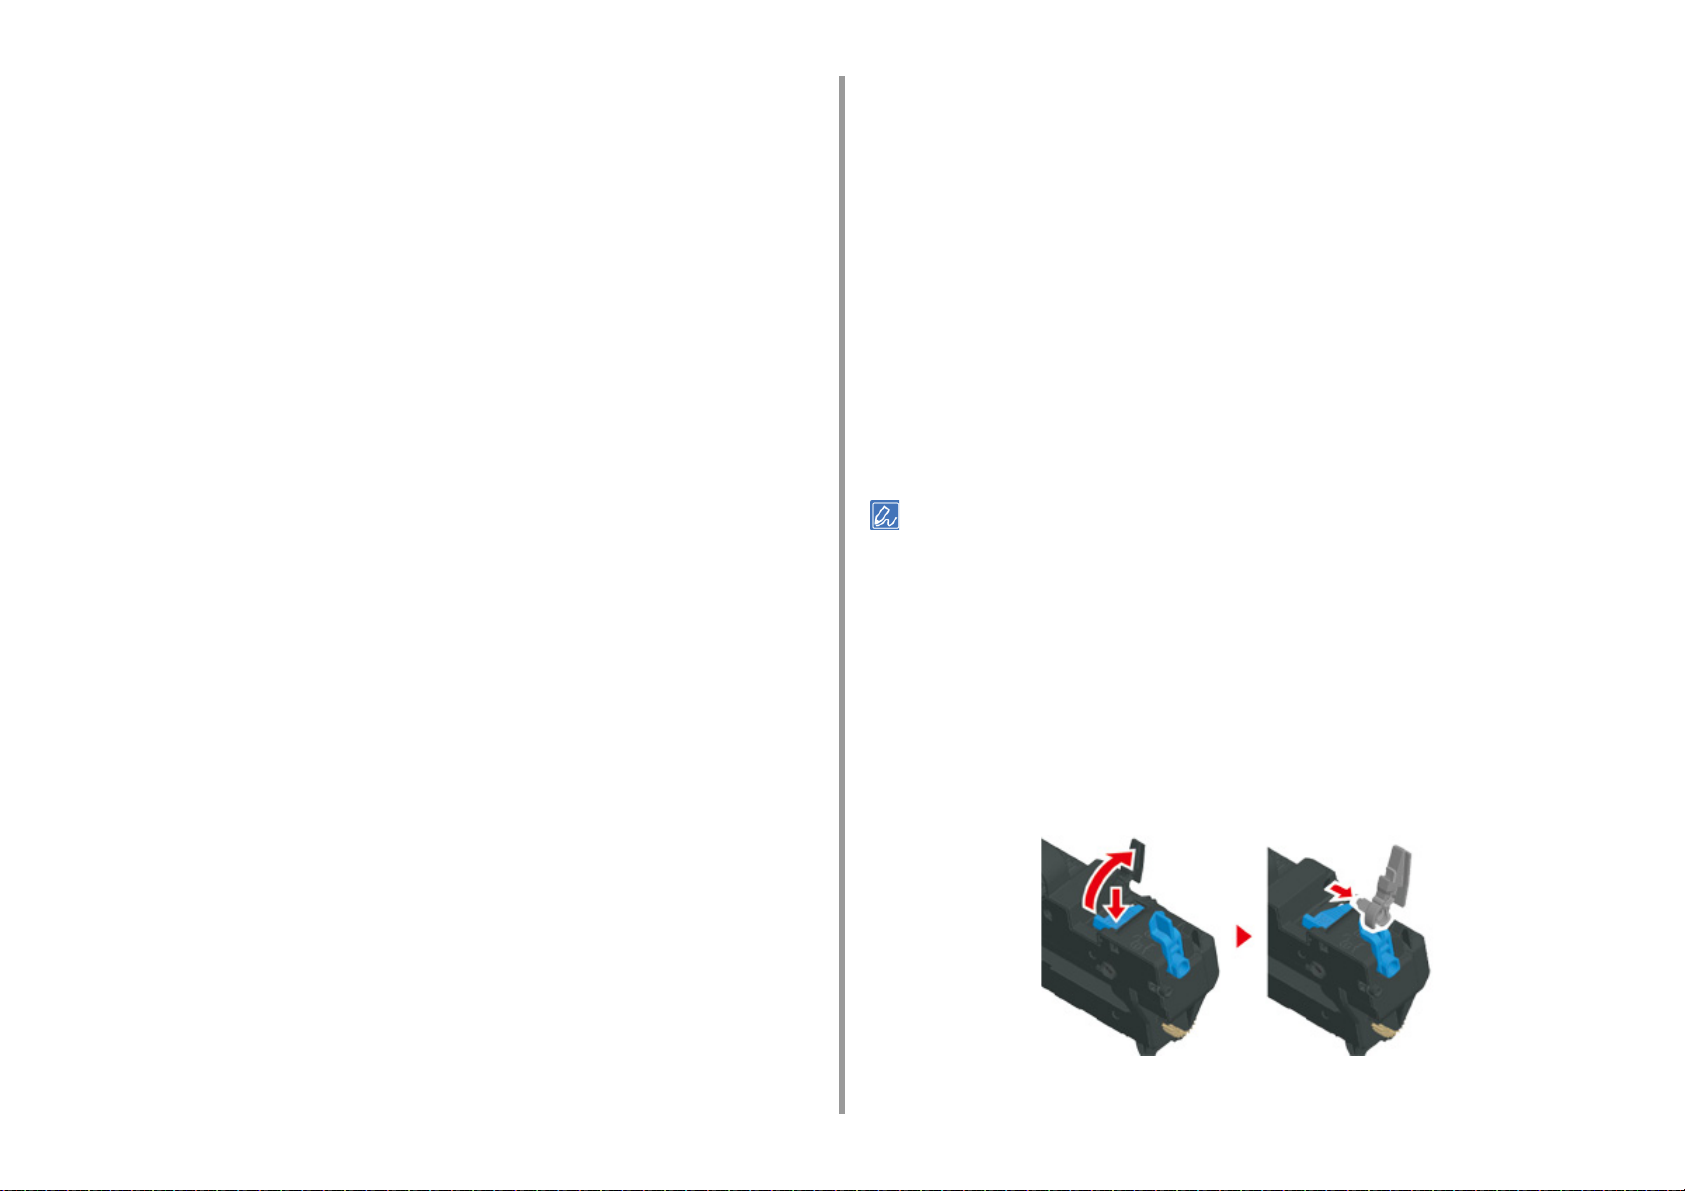
Attaching the Envelope Lever
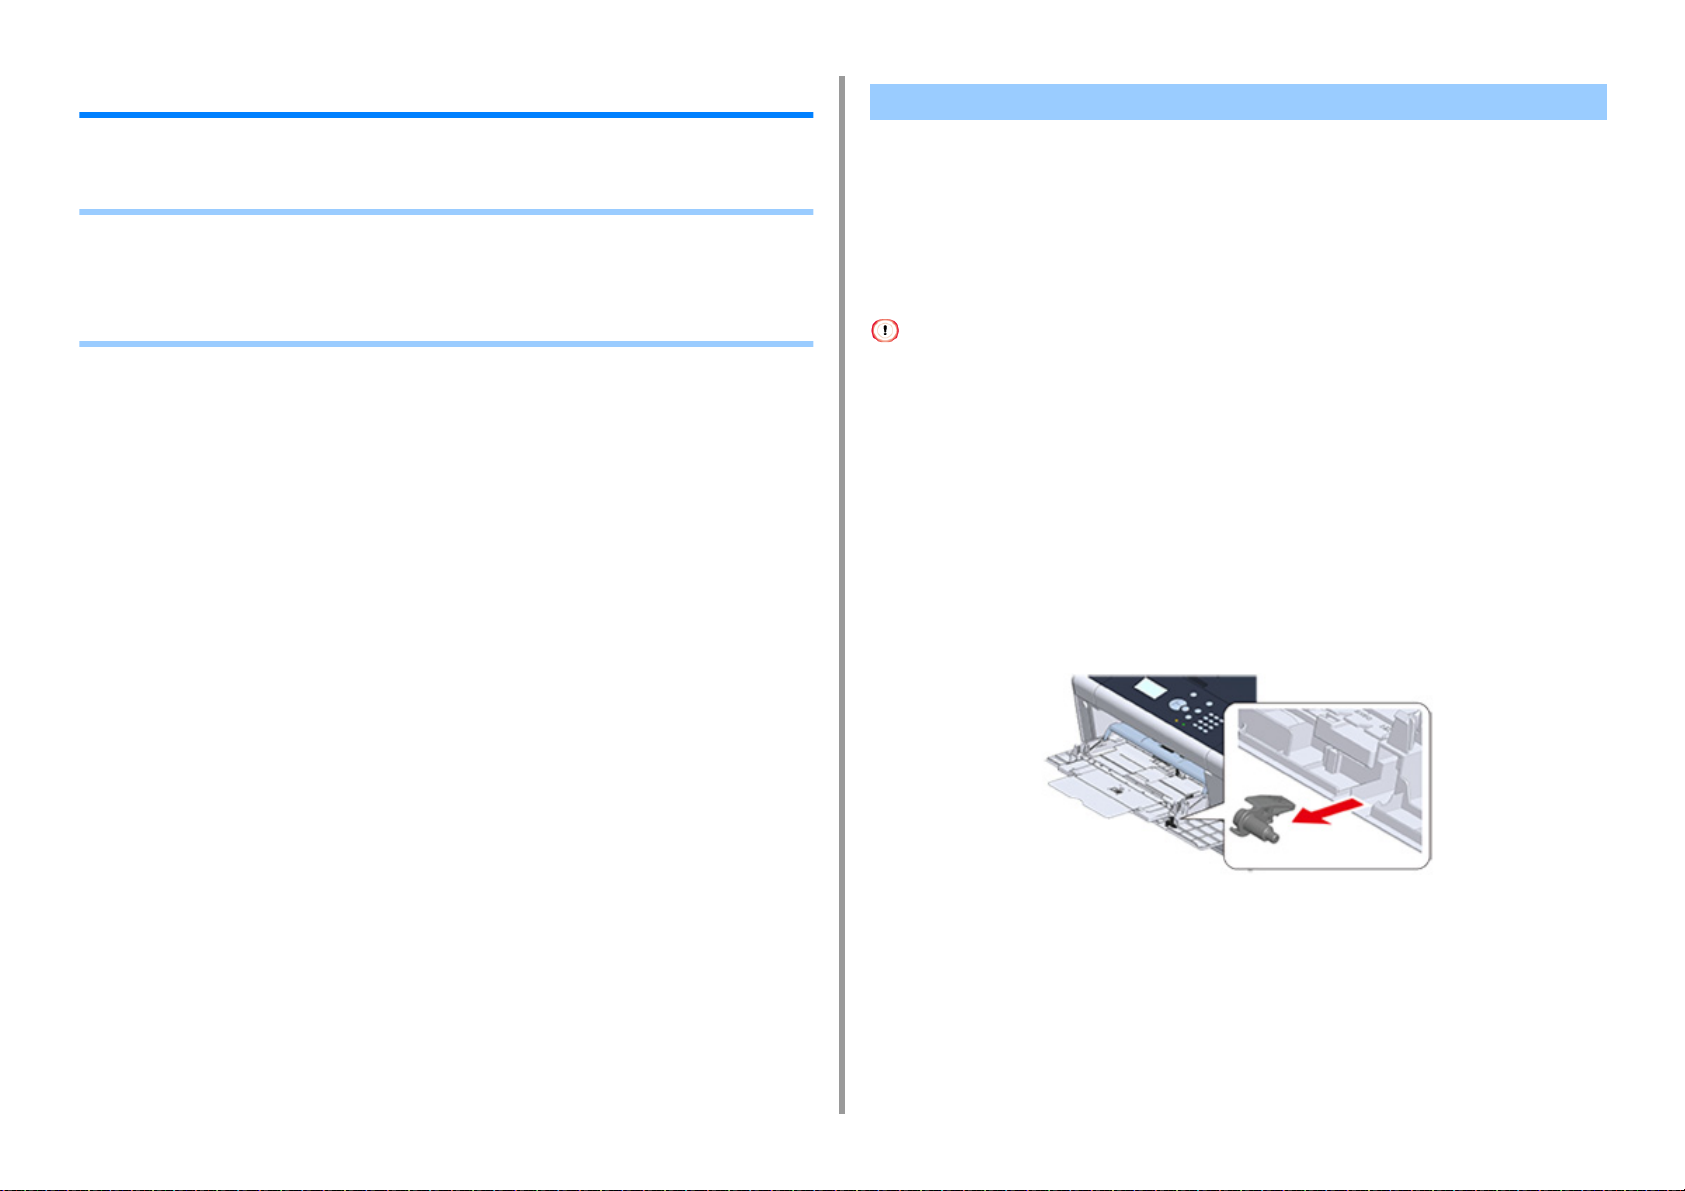
If a printed envelope is wrinkled, attach the envelope lever to the fuser unit.
Remove the envelope lever from the MP tray.
1
- 15 -
2. Print
Remove the fuser unit from the machine.
2
For details, see "Replacing the Fuser Unit".
Possible to get burned.
Since the fuser unit gets hot, carry out the operation carefully, and when lifting it up you
must hold it by the handle. Do not try to hold it whilst it is hot. Wait until it has cooled
down and then carry out the operation.
Attach the envelope lever to the fuser unit.
3
Press the jam release lever, and then insert the envelope lever in to the nearby hole.
Push the lever to lock.
Loading Envelopes
When printing on envelopes, change the paper size setting, and use the MP tray and rear
output tray.
Load envelopes until their edges touch the paper feed entrance with the print
1
side up.
Com-9, Com-10, DL, C5, Monarch
Open the rear output tray.
2
Press the button on the operator panel repeatedly to select [Setting] and
3
press the (ENTER) button.
Press the button to select [Paper Setup] and press the (ENTER) button.
4
Press the button to select [MP Tray] and press the (ENTER) button.
5
Check that [Paper size] is selected, and then press the (ENTER) button.
6
Press the or button to select the envelope size and press the
7
(ENTER) button.
Replace the fuser unit to the machine.
4
For details, see "Replacing the Fuser Unit".
Press the (ONLINE) button to return to the standby screen.
8
Available envelope types.
Loading Paper (User's Manual)
For Windows PCL Printer Driver
Open the file to print.
1
Select [Print] from the [File] menu.
2
Click [Preferences].
3
- 16 -
2. Print
Select the envelope size from [Size] on the [Setup] tab.
4
Select [Multi Purpose Tray] from [Source].
5
Select [Landscape] from [Orientation].
6
Change other settings if necessary, and then click [OK].
7
Click [Print] on the [Print] screen.
8
Open the output tray and remove the fuser unit, and then remove the envelope
9
lever.
For details, see "Removing the Envelope Lever".
For Windows PS Printer Driver
Open the file to print.
1
Select [Print] from the [File] menu.
2
Click [Preferences].
3
Click [Advanced] on the [Layout] tab and select the envelope size from [Paper
4
Size].
For Mac OS X
Open the file to print.
1
Select [Print] from the [File] menu.
2
Select the envelope size from [Paper Size] and select the orientation from
3
[Orientation].
Select [Multi-Purpose Tray] for [All Pages From] on the [Paper Feed] panel.
4
Change other settings if necessary, and then click [Print].
5
Open the output tray and remove the fuser unit, and then remove the envelope
6
lever.
For details, see "Removing the Envelope Lever".
If setting details are not displayed in the print dialog box, click [Show Details] at the bottom of the dialog box.
Removing the Envelope Lever
When all the envelopes are printed, remove the envelope lever from the fuser unit.
Click [OK].
5
Select [Landscape] from [Orientation] on the [Layout] tab.
6
Select [Multi-Purpose Tray] from [Paper Source] on the [Paper/Quality] tab.
7
Change other settings if necessary, and then click [OK].
8
Click [Print] on the [Print] screen.
9
Open the output tray and remove the fuser unit, and then remove the envelope
10
lever.
For details, see "Removing the Envelope Lever".
- 17 -
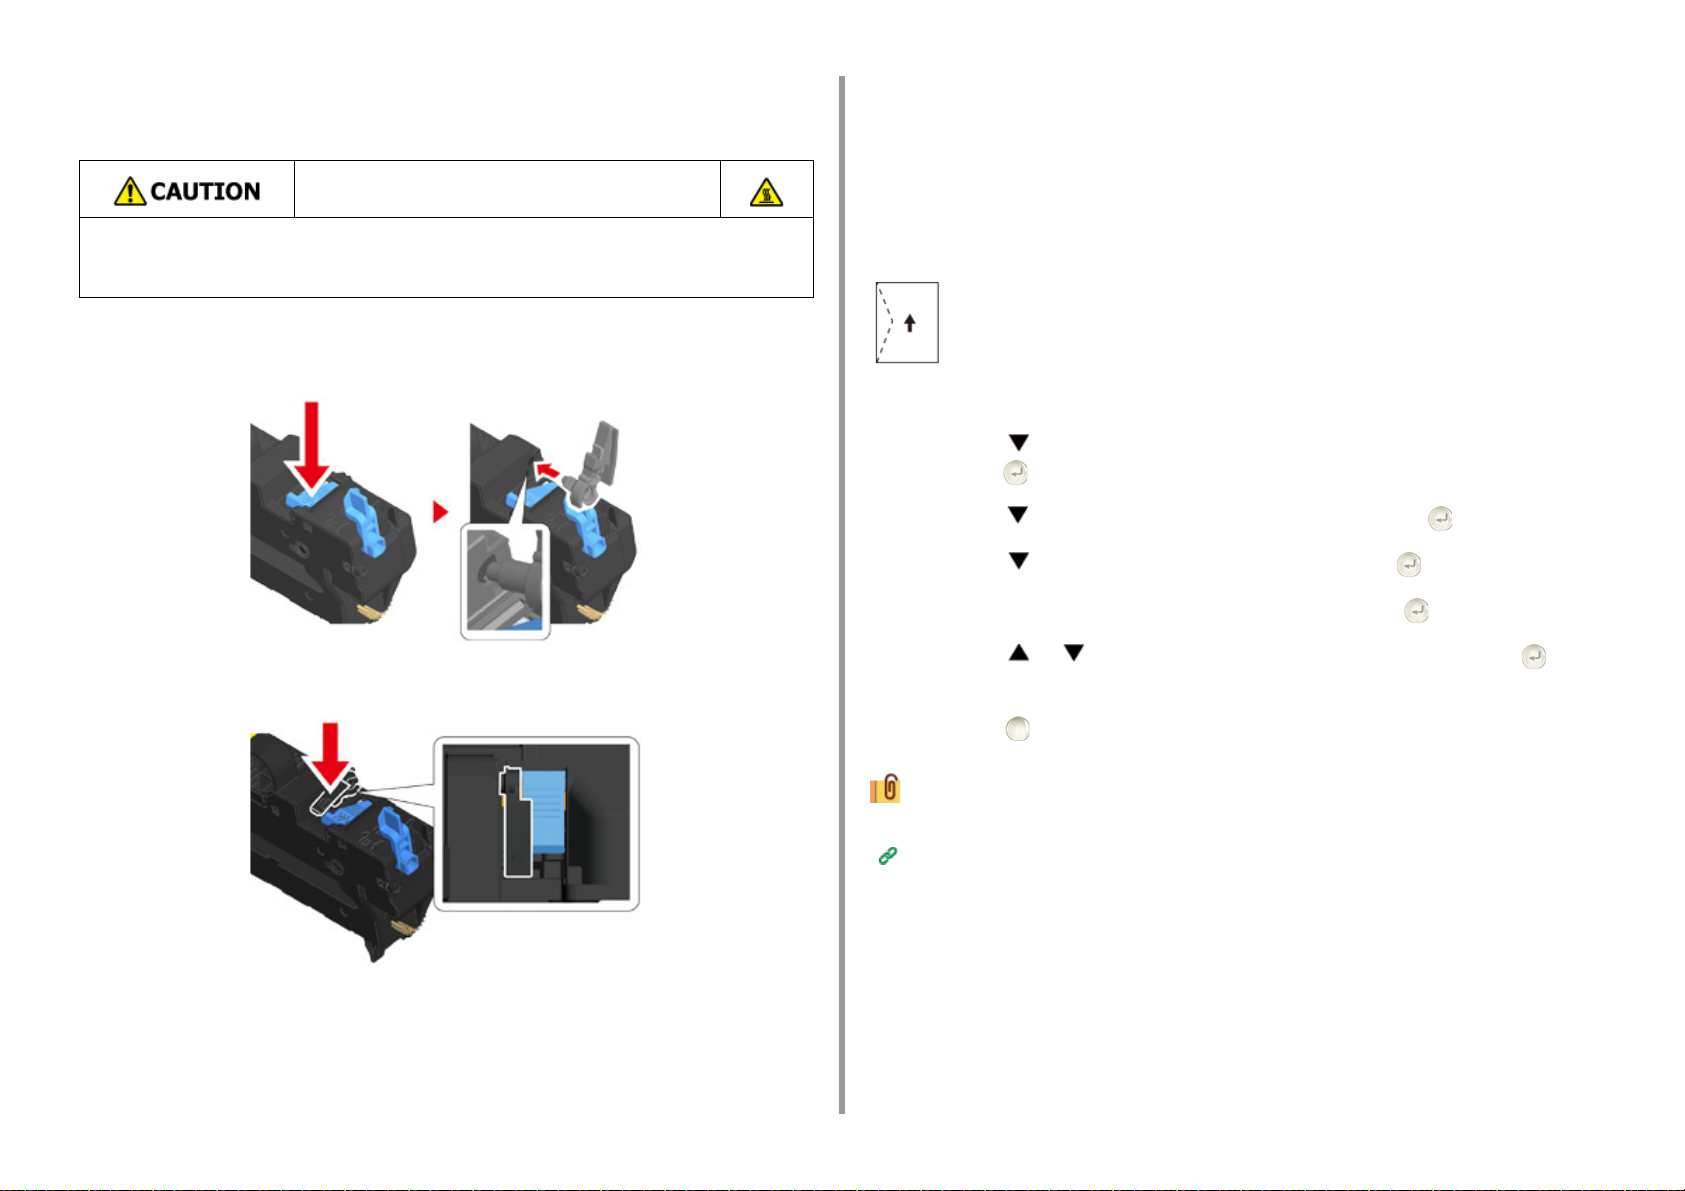
Remove the fuser unit from the machine.
1
For details, see "Replacing the Fuser Unit".
Press the jam release lever and lift the envelope lever, and then remove it.
2

Replace the fuser unit to the machine.
3
For details, see "Replacing the Fuser Unit".
Attach the envelope lever to the MP tray.
4
2. Print
Printing on Labels
• Loading Labels
• For Windows PCL Printer Driver
• For Windows PS Printer Driver
• For Mac OS X
Set a paper size and paper type for the MP tray from the operator panel. Then, set a paper
size, paper tray, and other printing settings with a printer driver.
Duplex printing is not available for labels.
Loading Labels
When printing on labels, change the paper type and paper size setting, and use the MP tray
and rear output tray.
Load labels in the MP tray.
1
Open the rear output tray.
2
Press the button on the operator panel repeatedly to select [Setting] and
3
press the (ENTER) button.
- 18 -
Press the button to select [Paper Setup] and press the (ENTER) button.
4
Press the button to select [MP Tray] and press the (ENTER) button.
5
Check that [Paper size] is selected, and then press the (ENTER) button.
6
Press the or button to select [A4] or [Letter] and press the (ENTER)
7
button.
Press the (BACK) button to go back to the [MP Tray] screen.
8
Press the button to select [Media Type] and press the (ENTER) button.
9
Press the or button to select [Labels] and press the (ENTER)
10
button.

2. Print
Press the (ONLINE) button to return to the standby screen.
11
For Windows PCL Printer Driver
Open the file to print.
1
Select [Print] from the [File] menu.
2
Click [Preferences].
3
Select [A4 210x297mm] or [Letter 8.5x11in] from [Size] on the [Setup] tab.
4
Select [Multi Purpose Tray] from [Source].
5
Select [Portrait] or [Landscape] from [Orientation].
6
Change other settings if necessary, and then click [OK].
7
Click [Print] on the [Print] screen.
8
For Windows PS Printer Driver
For Mac OS X
Open the file to print.
1
Select [Print] from the [File] menu.
2
Select [Letter] or [A4] from [Paper Size] and select the orientation from
3
[Orientation].
Select [Multi-Purpose Tray] for [All Pages From] on the [Paper Feed] panel.
4
Change other settings if necessary, and then click [Print].
5
If setting details are not displayed in the print dialog box, click [Show Details] at the bottom of the dialog box.
Open the file to print.
1
Select [Print] from the [File] menu.
2
Click [Preferences].
3
Click [Advanced] on the [Layout] tab and select [A4] or [Letter] from [Paper
4
size].
Click [OK].
5
Select [Landscape] or [Portrait] from [Orientation] on the [Layout] tab.
6
Select [Multi-Purpose Tray] from [Paper Source] on the [Paper/Quality] tab.
7
Change other settings if necessary, and then click [OK].
8
Click [Print] on the [Print] screen.
9
- 19 -
Printing on Long Paper
• Loading Long Paper
• For Windows PCL Printer Driver
• For Windows PS Printer Driver
• For Mac OS X
Set a paper size for the MP tray on the operator panel. Then, register a paper size with a
printer driver.
Paper sizes of from 64 to 216 mm in width and from 90 to 1321 mm in length can be
registered.
• Register the paper size so that the length is longer than the width. You cannot set the length that is shorter than the
width.
• This function may not be available for some applications.
• If the paper length exceeds 356 mm, the print quality may not be guaranteed even if the paper is used under the
recommended conditions.
Loading Long Paper
When printing on long paper, change the paper type setting, and use the MP tray and rear
output tray.
Load paper in the MP tray.
1
Open the rear output tray.
2
Press the button on the operator panel repeatedly to select [Setting] and
3
press the (ENTER) button.
Press the button to select [Paper Setup] and press the (ENTER) button.
4
Press the button to select [MP Tray] and press the (ENTER) button.
5
Check that [Paper size] is selected, and then press the (ENTER) button.
6
Press the or button to select [Custom] and press the (ENTER)
7
button.
Press the button to select [Custom] and press the (ENTER) button.
9
Check that [Width] is selected, and then press the (ENTER) button.
10
Enter the setting value, and then press the (ENTER) button.
11
Press the (BACK) button to go back to the [Custom] screen.
12
Press the button to select [Length] and press the (ENTER) button.
13
Enter the setting value, and then press the (ENTER) button.
14
Press the (ONLINE) button to return to the standby screen.
15
Available long paper
Loading Paper (User's Manual)
For Windows PCL Printer Driver
Open the file to print.
1
Select [Print] from the [File] menu.
2
Click [Preferences].
3
Select [User Defined Size] from [Size] on the [Setup] tab.
4
You can select the paper size from [Banner *** x *** mm] if the paper size is set to 210.0 x 900.0 mm,
215.0 x 900.0 mm, or 215.0 x 1200.0 mm.
For instructions on how to set custom size, refer to "
Select [Multi Purpose Tray] from [Source].
5
Change other settings if necessary, and then click [OK].
6
Click [Print] on the [Print] screen.
7
Printing on Custom Size Paper".
2. Print
Press the (BACK) button to go back to the [MP Tray] screen.
8
- 20 -

2. Print
For Windows PS Printer Driver
Click [Start], and then select [Devices and Printers].
1
Right-click the [OKI C532 PS] icon, and then select [Printing Preferences].
2
Click [Advanced] on the [Layout] tab.
3
Click [Paper Size], select [PostScript Custom Page Size] from the drop-down
4
list, and then enter values in [Width] and [Height].
Click [OK] until the print setting dialog box is closed.
5
Open the file to print.
6
Select [Print] from the [File] menu.
7
Click [Advanced].
8
Click [Advanced] on the [Layout] tab and select [PostScript Custom Page
9
Size] from [Paper size].
Click [OK].
10
Select [Multi-Purpose Tray] from [Paper Source] on the [Paper/Quality] tab.
11
Change other settings if necessary, and then click [OK].
12
Click [Print] on the [Print] screen.
13
Enter values in [Width] and [Height].
6
Click [OK].
7
Select the registered paper size from [Paper Size].
8
Select [Multi-Purpose Tray] for [All Pages From] on the [Paper Feed] panel.
9
Change other settings if necessary, and then click [Print].
10
If setting details are not displayed in the print dialog box, click [Show Details] at the bottom of the dialog box.
For Mac OS X
Open the file to print.
1
Select [Print] from the [File] menu.
2
Select [Manage Custom Sizes] from [Paper Size].
3
Click [+] to add an item to the list of paper sizes.
4
Double-click [Untitled], and then enter a name of the long paper size.
5
- 21 -

Printing on Custom Size Paper
• Loading Custom Size Paper
• For Windows PCL Printer Driver
• For Windows PS Printer Driver
• For Mac OS X
Set a custom paper size and paper type on the operator panel. Then, register a paper size
with a printer driver.
Paper sizes of from 64 to 216 mm in width and from 90 to 1321 mm in length can be
registered.
• Register paper in portrait, and load paper in a tray in portrait.
• If the paper length exceeds 432 mm (17 inches), use the rear output tray.
• This function may not be available for some applications.
• If the paper length exceeds 432 mm (17 inches), the print quality cannot be guaranteed.
• If paper is so long that it exceeds the paper supports of the MP tray, support the paper with your hands.
• It is not recommended to use a paper width of less than 100 mm (3.9 inches), because paper jams may result.
• About available paper sizes for each tray and for duplex printing
Loading Paper (User's Manual)
• The auto tray switch function is set to [ON] by factory default. When a tray runs out of paper during printing, another
tray automatically starts feeding paper. To feed custom size paper from a specified tray, set the auto tray switch
function to [OFF].
• If images are not correctly printed on large size paper, select [Normal(600x600dpi)] for [Quality] in the PS printer
driver. Printing may be improved.
Loading Custom Size Paper
When printing on custom paper size, change the paper type setting, and specify a paper tray.
Load paper that can be set to the custom size in the MP tray or tray.
1
Press the button on the operator panel repeatedly to select [Setting] and
2
press the (ENTER) button.
Press the button to select [Paper Setup] and press the (ENTER) button.
3
Press the button to select the tray on which paper is loaded in step 1 and
4
press the (ENTER) button.
Check that [Paper size] is selected, and then press the (ENTER) button.
5
Press the or button to select [Custom] and press the (ENTER)
6
button.
Press the (BACK) button to go back to the tray screen.
7
Press the button to select [Custom] and press the (ENTER) button.
8
Check that [Width] is selected, and then press the (ENTER) button.
9
Enter the setting value, and then press the (ENTER) button.
10
Press the (BACK) button to go back to the [Custom] screen.
11
Press the button to select [Length] and press the (ENTER) button.
12
Enter the setting value, and then press the (ENTER) button.
13
Press the (BACK) button to go back to the tray screen.
14
Change other settings if necessary.
15
Press the (ONLINE) button to return to the standby screen.
16
For Windows PCL Printer Driver
Click [Start], and then select [Devices and Printers].
1
Right-click the [OKI C532 PCL6] icon, and then select [Printing Preferences].
2
Click [Paper Feed Options] on the [Setup] tab.
3
Click [Custom Size].
4
Enter a name of the new size in [Name].
5
Enter values in [Width] and [Length].
6
Click [Add] to save the custom paper size to the list, and then click [OK].
7
You can save up to 32 custom sizes.
2. Print
- 22 -

2. Print
Click [OK] until the [Printing Preferences] dialog box is closed.
8
Open the file to print.
9
Select [Print] from the [File] menu.
10
Click [Preferences].
11
Select a registered paper size from [Size] on the [Setup] tab.
12
Change other settings if necessary, and then click [OK].
13
Click [Print] on the [Print] screen.
14
For Windows PS Printer Driver
Click [Start], and then select [Devices and Printers].
1
Right-click the [OKI C532 PS] icon, and then select [Printing Preferences].
2
Click [Advanced] on the [Layout] tab.
3
Click [Paper Size], and then select [PostScript Custom Page Size] from the
4
drop-down list.
Click [Edit Custom Page Size].
5
Enter values in [Width] and [Length], and then click [OK].
6
You cannot set [Offsets Relative to Paper Feed Direction].
Click [OK] until the [Printing Preferences] dialog box is closed.
7
Open the file to print.
8
Select [Print] from the [File] menu.
9
Click [Preferences].
10
Click [Advanced] on the [Layout] tab.
11
Click [Paper Size], and then select [PostScript Custom Page Size] from the
12
drop-down list.
Click [OK].
13
Change other settings if necessary, and then click [OK].
14
Click [Print] on the [Print] screen.
15
For Mac OS X
On Mac OS X, you can set a paper size out of the available range in the printer driver, resulting in improper printing. Set
a paper size within the available range.
Custom sizes very close to regular sizes may be handled as regular sizes on the Mac OS X printer driver.
Open the file to print.
1
Select [Print] from the [File] menu.
2
Select [Manage Custom Sizes] from [Paper Size].
3
Click [+] to add an item to the list of custom paper sizes.
4
Double-click [Untitled], and then enter a name of the custom paper size.
5
Enter values in [Width] and [Height].
6
Click [OK].
7
Select the paper size created from [Paper Size].
8
Change other settings if necessary, and then click [Print].
9
If setting details are not displayed in the print dialog box, click [Show Details] at the bottom of the dialog box.
- 23 -

2. Print
Printing with Various Settings from a Computer
This section describes various print settings such as enlarging/reducing document size or
making a booklet.
• Printing Manually One by One
• Enlarging or Reducing to Fit the Specified Paper Size
• Printing Only the Cover from a Different Tray
• Making a Booklet
• Dividing a Document to Print on Some Sheets for Making a Poster
• Adding Semi-transparent Text (Watermarks)
• Overlaying Forms or Logos (Overlay)
• Outputting a Document to a File Instead of Printing on Paper
• Storing Frequently-printed Documents in the Printer
• Printing E-mail Attachment Files
Printing Manually One by One
• For Windows PCL Printer Driver
• For Windows PS Printer Driver
• For Mac OS X
You can print one sheet at a time by loading paper in the MP tray.
The message prompting you to set paper on the MP tray is displayed on the display screen
every time you print one page. To continue printing, press the (ONLINE) button.
To cancel printing, press the (CANCEL) button.
For Windows PCL Printer Driver
Open the file to print.
1
Select [Print] from the [File] menu.
2
Click [Preferences].
3
Select [Multi Purpose Tray] from [Source] on the [Setup] tab.
4
Click [Paper Feed Options].
5
Select the [Use MP tray as manual feed] check box, and then click [OK].
6
Change other settings if necessary, and then click [OK].
7
Click [Print] on the [Print] screen.
8
When a message is displayed on the display screen, load paper in the MP
9
tray, and then press the (ONLINE) button.
When printing a multiple page document, the same message is displayed every time
you print one page.
For Windows PS Printer Driver
Open the file to print.
1
- 24 -

Select [Print] from the [File] menu.
2
Click [Preferences].
3
Select [Multi-Purpose Tray] from [Paper Source] on the [Paper/Quality] tab.
4
Click [Advanced].
5
Click [Multipurpose tray is handled as manual feed], and then select [Yes].
6
Click [OK].
7
Change other settings if necessary, and then click [OK].
8
Click [Print] on the [Print] screen.
9
When the message is displayed on the display screen, load paper in the MP
10
tray and press the (ONLINE) button.
When printing a multiple page document, the same message is displayed every time
you print one page.
For Mac OS X
2. Print
If setting details are not displayed in the print dialog box, click [Show Details] at the bottom of the dialog box.
Open the file to print.
1
Select [Print] from the [File] menu.
2
Select [Multi-Purpose Tray] for [All Pages From] on the [Paper Feed] panel.
3
Select [Print Options] from the panel menu.
4
Select [Multipurpose tray is handled as manual feed] check box in the [Feed]
5
tab.
Change other settings if necessary, and then click [Print].
6
When the message is displayed on the display screen, load paper in the MP
7
tray and press the (ONLINE) button.
When printing a multiple page document, the same message is displayed every time
you print one page.
- 25 -

Enlarging or Reducing to Fit the Specified Paper Size
• For Windows PCL Printer Driver
• For Windows PS Printer Driver
• For Mac OS X
Select the paper size to print.
5
Change other settings if necessary, and then click [OK].
6
Click [Print] on the [Print] screen.
7
2. Print
You can print on different paper sizes without changing the print data.
This function may not be available for some applications.
For Windows PCL Printer Driver
Open the file to print.
1
Select [Print] from the [File] menu.
2
Click [Preferences].
3
Select a paper size to edit from [Size] on the [Setup] tab.
4
Select the [Resize document to fit printer page] checkbox, and then select a
5
paper size to print.
Change other settings if necessary, and then click [OK].
6
Click [Print] on the [Print] screen.
7
For Mac OS X
Open the file to print.
1
Select [Print] from the [File] menu.
2
Select the [Scale to fit paper size] check box on the [Paper Handling] panel.
3
Select a paper size to print from [Destination Paper Size].
4
Change other settings if necessary, and then click [Print].
5
If setting details are not displayed in the print dialog box, click [Show Details] at the bottom of the dialog box.
For Windows PS Printer Driver
Open the file to print.
1
Select [Print] from the [File] menu.
2
Click [Preferences].
3
Select the [Resize document to fit printer page] checkbox on the [Job Options]
4
tab.
- 26 -

Printing Only the Cover from a Different Tray
• For Windows PCL Printer Driver
• For Mac OS X
Select a tray to feed the remaining pages from [Remaining From].
5
Change other settings if necessary, and then click [Print].
6
2. Print
You can feed the first page of a print job from one tray and the remaining pages from another
tray.
This function is not available with the Windows PS printer driver.
For Windows PCL Printer Driver
Open the file to print.
1
Select [Print] from the [File] menu.
2
Click [Preferences].
3
Click [Paper Feed Options] on the [Setup] tab.
4
Select the [Use different source for first page] check box.
5
Select a paper tray from [Source], and then click [OK].
6
Select a paper type from [Type] and media weight from [Weight] if necessary.
Change other settings if necessary, and then click [OK].
7
Click [Print] on the [Print] screen.
8
If setting details are not displayed in the print dialog box, click [Show Details] at the bottom of the dialog box.
For Mac OS X
Open the file to print.
1
Select [Print] from the [File] menu.
2
Select [Paper Feed] from the panel menu.
3
Select [First Page From], and then select a tray to feed the first page.
4
- 27 -

2. Print
Making a Booklet
• For Windows PCL Printer Driver
• For Windows PS Printer Driver
• This function may not be available for some applications.
• This function is not available on Mac OS X.
• Watermarks may not be printed properly with this function.
For Windows PCL Printer Driver
Open the file to print.
1
Select [Print] from the [File] menu.
2
Click [Preferences].
3
Select [Booklet] from [Finishing Mode] on the [Setup] tab.
4
Click [Options], and then set booklet printing settings if necessary.
5
• [Signature]: Specify a unit of pages to be bound.
• [2 pages]: Print two pages on one page.
• [Right to Left]: Print a booklet that is opened from the right.
• [Bind Margin]: Set a margin.
For Windows PS Printer Driver
Open the file to print.
1
Select [Print] from the [File] menu.
2
Click [Preferences].
3
Select [Booklet] from [Page Format] on the [Layout] tab.
4
Select the [Draw Borders] check box if necessary.
5
Click [Advanced].
6
Click [Booklet Binding Edge], and then set margins.
7
• To make a right-fold booklet (a booklet with its binding on the right side when the first page is facing up), select
[On Right Edge].
• To make an A5 booklet by using A4 paper, select [A4] from [Paper Size].
Click [OK] until the print setting dialog box is closed.
8
Change other settings if necessary, and then click [OK].
9
Click [Print] on the [Print] screen.
10
Click [OK].
6
Change other settings if necessary, and then click [OK].
7
Click [Print] on the [Print] screen.
8
• To make an A5 booklet by using A4 paper, select [A4] from [Size] on the [Setup] tab.
• If this function is not available with the Windows PCL printer driver, select [Start] > [Devices and Printers], right-click
the [OKI C532 PCL6] icon, and then select [Printer properties] > the [Advanced] tab > [Print processor] >
[OKX05HPP] > [OK].
- 28 -

2. Print
Dividing a Document to Print on Some Sheets for Making a Poster
You can create a poster by printing a document onto multiple sheets of paper, and then
combining the sheets afterwards.
• This function is not available when you are using the IPP network.
• This function is not available with the Windows PS printer driver or on Mac OS X.
For Windows PCL Printer Driver
Open the file to print.
1
Select [Print] from the [File] menu
2
Click [Preference].
3
Click [Poster Print] from [Finishing Mode] on the [Setup] tab.
4
Click [Options].
5
Set values to [Enlarge], [Add Registration Marks], and [Add Overlap] if
6
necessary, and then click [OK].
Change other settings if necessary, and then click [OK].
7
Click [Print] on the [Print] screen.
8
• To make an A3 poster using two sheets of A4 paper, select [A4] for the paper size, and the select [2] for [Zoom].
• If this function is not available with the Windows PCL printer driver, select [Start] > [Devices and Printers], right-click
the [OKI C532 PCL6] icon, and then select [Printer properties] > the [Advanced] tab > [Print processor] >
[OKX05HPP] > [OK].
Adding Semi-transparent Text (Watermarks)
• For Windows PCL Printer Driver
• For Windows PS Printer Driver
• This function is not available on Mac OS X.
• Watermarks are not printed properly for booklet printing.
• If the [Background] check box is selected on the [Watermark] screen for Windows PS printer driver, a watermark may
not be printed depending on the application. In such a case, clear the [Background] check box.
For Windows PCL Printer Driver
Open the file to print.
1
Select [Print] from the [File] menu.
2
Click [Preferences].
3
Click [Watermark] on the [Extend] tab.
4
Click [New].
5
Enter text that is printed as a watermark in [Text] in [Watermarks].
6
Set [Font], [Size], or other settings if necessary, and then click [OK].
7
Check that the watermark to print is selected, and then click [OK].
8
Change other settings if necessary, and then click [OK].
9
Click [Print] on the [Print] screen.
10
For Windows PS Printer Driver
- 29 -
Open the file to print.
1
Select [Print] from the [File] menu.
2
Click [Preferences].
3

Click [Watermark] on the [Job Options] tab.
4
Click [New].
5
Enter text that is printed as a watermark in [Text] in [Watermarks].
6
Set [Font], [Size], or other settings if necessary, and then click [OK].
7
Check that the watermark to print is selected, and then click [OK].
8
Change other settings if necessary, and then click [OK].
9
Click [Print] on the [Print] screen.
10
Overlaying Forms or Logos (Overlay)
• Registering Forms
• For Windows PCL Printer Driver
• For Windows PS Printer Driver
You can print overlays (such as logos or forms) on a document. An overlay is a group of
forms. You can register four forms to an overlay. The forms are overlaid in order of
registration and printed. The form that is registered last is printed on the top.
Registering Forms
Before printing overlay, create a form and register it in this machine.
Registering Forms (Form Overlay)
For Windows PCL printer driver users, follow the following steps to register forms.
Create a form you want to register to the printer on the application.
1
Select [Print] from the [File] menu.
2
Click [Preferences].
3
Click [Overlays] on the [Extend] tab.
4
Select [Register print document as a new form].
5
Click [OK].
6
Change other settings if necessary, and then click [OK].
7
Click [Print] on the [Print] screen.
8
Enter [Form name] and [ID] you want to register to the printer in [New Form].
9
2. Print
- 30 -
The printing position for overlay can be specified.
Select the pages of the document on which you want to print the overlay from
10
[Print on Pages] as registration information on the driver. To apply an overlay

2. Print
by specifying the pages, select [Custom], and then enter the pages to which
you want to apply the overlay in [Custom Pages].
Click [OK].
11
For Windows PCL Printer Driver
Open the file to print.
1
Select [Print] from the [File] menu.
2
Click [Preferences].
3
Select the [Extend] tab.
4
Click [Overlays].
5
Select [Overlay Print] and select a form you want to use for an overlay printing
6
from the drop-down list.
If you want to add a form registered using Configuration Tool or apply several forms as a group, click [Edit list...]
to add to the list.
When adding a form registered using Configuration Tool: Click [Add a registered form...], enter the form name in
[Form name] and ID of the form registered using the Storage Manager plugin of Configuration Tool, select pages
on which you want to apply the form from [Print on Pages], and then click [OK].
Click [OK].
7
Change other settings if necessary, and then click [OK].
8
Click [Print] on the [Print] screen.
9
Right-click the [OKI C532 PS] icon, and then select [Printing Preferences].
2
Click [Overlays] on the [Job Options] tab.
3
Select [User Overlay] from the drop-down list, and then click [New].
4
Enter the form name that you registered with the Storage Manager plug-in for
5
Configuration Tool in [Form Name], and then click [Add].
Enter a name of the overlay in [Overlay Name].
6
Select the pages of the document on which to print the overlay from [Print on
7
Pages].
To apply an overlay by specifying the pages, select [Custom], and then enter the pages to which to apply the
overlay in [Custom Pages].
Click [OK].
8
Select an overlay to use from [Defined Overlays], and then click [Add].
9
Click [OK].
10
Change other settings if necessary, and then click [OK].
11
Open the file to print.
12
Select [Print] from the [File] menu.
13
Click [Print] on the [Print] screen.
14
For Windows PS Printer Driver
To use this function with the Windows PS printer driver, you must log in to a computer as the administrator.
Click [Start], and then select [Devices and Printers].
1
- 31 -

Outputting a Document to a File Instead of Printing on Paper Storing Frequently-printed Documents in the Printer
2. Print
• For Windows
• For Mac OS X
You can output a document to a file.
You must log in to a computer as the administrator.
For Windows
Click [Start], and then select [Devices and Printers].
1
Right-click the [OKI C532 *] icon and then select [Printer properties].
2
* Select a driver type to use.
Select the [Ports] tab.
3
Select [FILE:] from the port list, and then click [OK].
4
Open a file.
5
Select [Print] from the [File] menu.
6
Click [Print].
7
Enter the name of a file, and then click [OK].
8
example : C: temp printdata.prn
For Mac OS X
• For Windows PCL Driver
• For Windows PS Driver
• For Mac OS X
• Printing the Stored Document from This Machine
Store a print job in the internal memory of the printer. When printing, select a shared job from
the operator panel.
If you cannot store the spooled data due to insufficient free space in the memory, a message is displayed to inform you
that the file system is full, and the print job is not executed.
For Windows PCL Driver
Open the file to print.
1
Select [Print] from the [File] menu.
2
Click [Preferences].
3
Select the [Job Options] tab.
4
Select [Shared Print].
5
You can name a print job from Job Type Options.
Set other settings if necessary, and click [OK].
6
Click [Print] on the [Print] Screen.
7
The print job is only sent to the printer, and it is not printed yet.
Open the file to print.
1
Select [Print] from the [File] menu.
2
Click [PDF] in the print dialog box, and then select a file format.
3
Enter the name of a file, select a save destination, and then click [Save].
4
For Windows PS Driver
Open the file to print.
1
Select [Print] from the [File] menu.
2
Click [Preferences].
3
- 32 -

2. Print
Select the [Job Options] tab.
4
Click [Shared Print] from [Job Type].
5
You can name a print job from Job Type Options.
Set other settings if necessary, and click [OK].
6
Click [Print] on the [Print] screen.
7
The print job is only sent to the printer, and it is not printed yet.
For Mac OS X
Open the file to print.
1
Select [Print] from the [File] menu.
2
Select [Secure Print] from the panel menu.
3
Select [Shared Print] in the [Job Type].
4
You can name a print job from Job Type Options.
Change other settings if necessary, and then click [Print].
5
The print job is only sent to the printer, and it is not printed yet.
When shared print jobs are listed, press the or button to select the
3
shared job you want to print and press the (ENTER) button. To print all
displayed shared print jobs, select [Print All], and then press the (ENTER)
button.
Select [Delete] to delete specified shared jobs.
Select [Delete All] to delete all shared jobs in the list.
If setting details are not displayed in the print dialog box, click [Show Details] at the bottom of the dialog box.
Printing the Stored Document from This Machine
Press the button on the operator panel to select [Print] and press the
1
(ENTER) button.
Check that [Shared Print] is selected, and then press the (ENTER) button.
2
A job searching starts.
To stop a job search, press (CANCEL).
- 33 -

Printing E-mail Attachment Files
Print attachment file of received E-mail.PDF (v1.7), JPEG, and TIFF (V6 Baseline) formats
can be printed.
To use this function, you must set the e-mail reception settings on a POP server or SMTP
server.
E-mail Setup
• For the number of copies, duplex printing or other printing settings, the current settings on the [Admin Setup] menu
are applied.
• Up to 10 files, each of which is a maximum of 8 MB, can be printed.
2. Print
- 34 -

2. Print
Saving Paper, Saving Toner
This section describes how to print saving paper or toner.
• Printing on Both Sides of Paper (Duplex Printing)
• Saving Toner
• Combining Multiple Pages onto One Sheet of Paper
Printing on Both Sides of Paper (Duplex Printing)
• For Windows PCL Printer Driver
• For Windows PS Printer Driver
• For Mac OS X
You can print on both sides of a sheet of paper.
• Duplex printing is available for the following paper sizes.
A4, A5, B5, Letter, Legal (13 inches), Legal (13.5 inches), Legal (14 inches), Executive,
8.5SQ (8.5in x 8.5in), Folio (210 mm x 330 mm), 16K (197 mm x 273 mm, 195 mm x
270 mm, 184 mm x 260 mm), Custom size
• Duplex printing is available for the following media weight.
64 to 176 g/m2 (17 to 46.8 lb)
Do not use media weight other than the above, because paper jams may occur.
This function may not be available for some applications.
When printing on custom size paper, duplex printing is available for the following width and length ranges.
• Width: 148 to 216 mm (5.8 to 8.5 inches)
• Length: 210 to 356 mm (8.3 to 14.0 inches)
For Windows PCL Printer Driver
Close the rear output tray.
1
Open the file to print.
2
Select [Print] from the [File] menu.
3
Click [Preferences].
4
Select [Long Edge] or [Short Edge] from [2-Sided Printing] on the [Setup] tab.
5
Change other settings if necessary, and then click [OK].
6
Click [Print] on the [Print] screen.
7
- 35 -

2. Print
For Windows PS Printer Driver
Close the rear output tray.
1
Open the file to print.
2
Select [Print] from the [File] menu.
3
Click [Preferences].
4
Select [Flip on Long Edge] or [Flip on Short Edge] from [Print on Both Sides]
5
on the [Layout] tab.
Change other settings if necessary, and then click [OK].
6
Click [Print] on the [Print] screen.
7
For Mac OS X
Close the rear output tray.
1
Open the file to print.
2
Select [Print] from the [File] menu.
3
Select [Long-Edge binding] or [Short-Edge binding] from [Two-Sided] on the
4
[Layout] panel.
Change other settings if necessary, and then click [Print].
5
If setting details are not displayed in the print dialog box, click [Show Details] at the bottom of the dialog box.
Saving Toner
• For Windows PCL Printer Driver
• For Windows PS Printer Driver
• For Mac OS X
Printing is possible with less toner.
The amount of toner can be saved in three levels.
• [Printer setting]: Conforms to the printer setting.
• [Off]: Prints at a normal density without saving toner.
• [Save Level Low]: Prints at a somewhat lower density level.
• [Save Level Middle]: Prints at a low density.
• [Save Level High]: Prints at a very low density.
If using this function, only [Normal (600x600)] or [Fast (600x600)] can be specified as the print quality.
The density of the image that is printed with this function may vary depending on the printed document.
For Windows PCL Printer Driver
Open the file to print.
1
Select [Print] from the [File] menu.
2
Click [Preferences].
3
Select the [Setup] tab.
4
Select the amount of toner to save from [Toner saving].
5
Change other settings if necessary, and then click [OK].
6
Click [Print] on the [Print] screen.
7
- 36 -

2. Print
For Windows PS Printer Driver
Open the file to print.
1
Select [Print] from the [File] menu.
2
Click [Preferences].
3
Select the [Color] tab.
4
Select the amount of toner to save from [Toner Saving].
5
Change other settings if necessary, and then click [OK].
6
Click [Print] on the [Print] screen.
7
For Mac OS X
Open the file to print.
1
Select [Print] from the [File] menu.
2
Select [Print Options] from the panel menu.
3
Select the amount of toner to save from [Toner Saving] in the [Quality2] tab.
4
Change other settings if necessary, and then click [Print].
5
Combining Multiple Pages onto One Sheet of Paper
• For Windows PCL Printer Driver
• For Windows PS Printer Driver
• For Mac OS X
You can print multiple pages of a document onto a single side of a sheet of paper.
• This function reduces the page size of your document for printing. The center of the printed image may not be in the
center of the paper.
• This function may not be available for some applications.
For Windows PCL Printer Driver
Open the file to print.
1
Select [Print] from the [File] menu.
2
Click [Preferences].
3
Select the number of pages to print on each sheet at [Finishing Mode] on the
4
[Setup] tab.
Click [Options].
5
Set each setting at [Page Borders], [Page layout], and [Bind Margin], and then
6
click [OK].
If setting details are not displayed in the print dialog box, click [Show Details] at the bottom of the dialog box.
Change other settings if necessary, and then click [OK].
7
Click [Print] on the [Print] screen.
8
For Windows PS Printer Driver
Open the file to print.
1
Select [Print] from the [File] menu.
2
- 37 -

Click [Preferences].
3
Select [Pages per Sheet] on the [Layout] tab.
4
Select the number of pages to print on each sheet from the drop-down list.
5
Select the [Border] check box to mark off a boundary.
6
Click [Advanced] and select page layout order from [Pages per Sheet Layout].
7
Click [OK].
8
Change other settings if necessary, and then click [OK].
9
Click [Print] on the [Print] screen.
10
For Mac OS X
Open the file to print.
1
Select [Print] from the [File] menu.
2
Select the number of pages to print on each sheet from [Pages per Sheet] on
3
the [Layout] panel.
2. Print
Set each setting at [Border] and [Layout Direction].
4
Change other settings if necessary, and then click [Print].
5
If setting details are not displayed in the print dialog box, click [Show Details] at the bottom of the dialog box.
- 38 -

2. Print
Adjusting Color on the Computer
This section describes how to adjust color setting when printing from a computer.
• Printing Color Data in Grayscale
• Using Color Matching on Printer Driver
• Simulating Printing Results for Ink
• Color Separation
• Correcting Color Registration Error Manually
• Correcting Density Manually
• Adjusting Color Balance (Density)
• Adjusting Color with Software
Printing Color Data in Grayscale
You can print color documents in grayscale.
For Windows PCL Printer Driver
Open the file to print.
1
Select [Print] from the [File] menu.
2
Click [Preferences].
3
On the [Setup] tab, select [Monochrome].
4
Change other settings if necessary, and then click [OK].
5
Click [Print] on the [Print] screen.
6
Selecting [Monochrome] on the printer driver enables you to print a color document in grayscale even when the
cyan, magenta, and yellow toners are empty.
For Windows PS Printer Driver
Open the file to print.
1
Select [Print] from the [File] menu.
2
Click [Preferences].
3
Select the [Color] tab and select [Grayscale].
4
Change other settings if necessary, and then click [OK].
5
Click [Print] on the [Print] screen.
6
Selecting [Grayscale] on the printer driver enables you to print a color document in grayscale even when the cyan,
magenta, and yellow toners are empty.
- 39 -

2. Print
For Mac OS X
Open the file to print.
1
From the [File] menu, select [Print].
2
Select [Color] from the panel menu.
3
Select [Grayscale].
4
Click [Print].
5
Selecting [Grayscale] on the printer driver enables you to print a color document in grayscale even when the cyan,
magenta, and yellow toners are empty.
Using Color Matching on Printer Driver
Color Matching means managing and adjusting documents color to keep it consistent
between input and output devices.
This section describes the Color Matching function on the printer driver.
• Automatic:
Color matching is applied according to the document. Normally, use this setting as a default
setting.
• Office Color:
Use this setting when printing business document using word processing software,
spreadsheet software, and presentation software. Color matching is applied when RGB
color space print data is converted to CMYK color space for the printer.
• Graphic Pro:
This function is suitable for using the DTP software. You can specify the simulation of
printing with the CMYK output devices.
• No Color Matching:
This function is suitable for colors to be matched with an application.
If you use Mac OS X, you can also use [ColorSync] function to do color matching.
• If you want to manage CMYK color data, use the Graphic Pro function.
• Link profiles for CMYK cannot be specified with the Windows PCL printer driver.
For Windows PCL Printer Driver
Open the file to print.
1
Select [Print] from the [File] menu.
2
Click on [Preferences].
3
Select [Color] for [Color Setting] on the [Setup] tab.
4
Click [Detail...] in the [Color Setting].
5
- 40 -

Select an item and then click [OK].
6
Change other settings if necessary, and then click [OK].
7
Click [Print] on the [Print] screen.
8
2. Print
Simulating Printing Results for Ink
You can simulate output such as that of an offset printing press by adjusting the CMYK color
data.
For Windows PS Printer Driver
Open the file to print.
1
Select [Print] from the [File] menu.
2
Click on [Preferences].
3
Select the [Color] tab.
4
Select an item and then click [OK].
5
Change other settings if necessary, and then click [OK].
6
Click [Print] on the [Print] screen.
7
For Mac OS X
Open the file to print.
1
From the [File] menu, select [Print].
2
Select the [Color] tab.
3
Select an item for [Color].
4
Change other settings if necessary, and then click [Print].
5
• For some applications, this function is not available on Mac OS X.
• This function can be used when the [Office Color] or [Graphic Pro] is selected for [Color Mode].
• For Windows PCL driver, this function can be used when [Graphic Pro] is selected for [Color Mode].
• For Windows PCL Printer Driver
• For Windows PS Printer Driver
• For Mac OS X
For Windows PCL Printer Driver
Open the file to print.
1
Select [Print] from the [File] menu.
2
Click on [Preferences].
3
Select [Color] for [Color Setting] on the [Setup] tab.
4
Click [Detail...] in the [Setup] tab and select [Graphic Pro].
5
Select [Printer Simulation].
6
Select an ink feature you want to simulate from [Simulation Target Profile] on
7
[Input Profile] and click [OK].
Change other settings if necessary, and then click [OK].
8
Click [Print] on the [Print] screen.
9
If setting details are not displayed in the print dialog box, click [Show Details] at the bottom of the dialog box.
For Windows PS Printer Driver
Open the file to print.
1
- 41 -

Select [Print] from the [File] menu.
2
Click on [Preferences].
3
Select the [Color] tab and select [Graphic Pro], and then click [Detail].
4
You can do a printer simulation with [Office Color], for business or other documents,
then click [Advanced], and select the properties of the ink you want to simulate from
[CMYK Ink Simulation].
2. Print
Color Separation
You can print by separating each color without using any applications.
• Windows PCL printer driver cannot be used for this function.
• If you are using Adobe Illustrator, use the color separation function of the application. Turn off the color matching
function of the printer driver.
Select the [Printer Simulation] check box.
5
Select an ink feature you want to simulate from [Simulation Target Profile] on
6
[Input] and click [OK].
Change other settings if necessary, and then click [OK].
7
Click [Print] on the [Print] screen.
8
For Mac OS X
Open the file to print.
1
From the [File] menu, select [Print].
2
Select [Color] from the panel menu.
3
Select [Graphic Pro] in [Color].
4
Click [Options] to select [Printer Simulation].
5
Select an ink feature you want to simulate from [Simulation Target Profile].
6
Change other settings if necessary, and then click [Print].
7
• For Windows PS Drivers
• For Mac OS X
For Windows PS Drivers
Open the file to print.
1
Select [Print] from the [File] menu.
2
Click on [Preferences].
3
Select the [Color] tab and click [Advanced].
4
Select the color you want to separate from [Print Color Separations] and then
5
click [OK].
Change other settings if necessary, and then click [OK].
6
Click [Print] on the [Print] screen.
7
For Mac OS X
Open the file to print.
1
If setting details are not displayed in the print dialog box, click [Show Details] at the bottom of the dialog box.
- 42 -
Select [Print] from the [File] menu.
2
Select the [Print Options] panel.
3
Select [Print Color Separations] in the [Quality 2] tab.
4

Change other settings if necessary, and then click [Print].
5
If setting details are not displayed in the print dialog box, click [Show Details] at the bottom of the dialog box.
2. Print
Correcting Color Registration Error Manually
The machine automatically adjusts color registration when the machine turns on or the output
trays are opened/closed. You can manually adjust color registration from the operator panel if
necessary.
Press the button on the operator panel repeatedly to select [Setting] and
1
press the (ENTER) button.
Press the button once to select [Admin Setup] and press the (ENTER)
2
button.
Enter the administrator password, and then press the (ENTER) button.
3
The factory default administrator password is "999999". If the administrator password is changed, enter the
updated password.
Press the button to select [Print Setup] and press the (ENTER) button.
4
Press the button to select [Color Menu] and press the (ENTER) button.
5
Press the or button to select [Adjust Registration] and press the
6
(ENTER) button.
- 43 -
When [Execute] is displayed, press the (ENTER) button.
7
Adjusting registration starts.

Correcting Density Manually Adjusting Color Balance (Density)
2. Print
This machine automatically adjusts color registration when an image drum cartridge is
replaced or when 500 sheets are printed. You can manually adjust color registration from the
operator panel if necessary.
Press the button on the operator panel repeatedly to select [Setting] and
1
press the (ENTER) button.
Press the button once to select [Admin Setup] and press the (ENTER)
2
button.
Enter the administrator password, and then press the (ENTER) button.
3
The factory default administrator password is "999999". If the administrator password is changed, enter the
updated password.
Press the button to select [Print Setup] and press the (ENTER) button.
4
Press the button to select [Color Menu] and press the (ENTER) button.
5
Press the button to select [Adjust Density] and press the (ENTER)
6
button.
When [Execute] is displayed, press the (ENTER) button.
7
Adjusting density starts.
When you adjust the shade to suit your preferences, operate from the operator panel.
To specify, darken or lighten pale part (Highlight), middle tone part (Mid-tone), and dark part
(Dark) of each color.
This section describes how to adjust for cyan. When adjusting other colors, perform the
same procedure to all colors and parts you want to adjust.
Press the button on the operator panel repeatedly to select [Setting] and
1
press the (ENTER) button.
Press the button once to select [Admin Setup] and press the (ENTER)
2
button.
Enter the administrator password, and then press the (ENTER) button.
3
The factory default administrator password is "999999". If the administrator password is changed, enter the
updated password.
Press the button to select [Print Setup] and press the (ENTER) button.
4
Press the button to select [Color Menu] and press the (ENTER) button.
5
Press the or button to select [Color Tuning/Print Pattern] and press the
6
(ENTER) button.
- 44 -
When [Execute] is displayed, press the (ENTER) button. Press the
7
(ENTER) button again to print the color adjustment pattern.
Press the (BACK) button to go back to the [Color Menu] screen.
8
Press the button to select [Cyan Tuning] and press the (ENTER)
9
button.
Press the button to select [Cyan Highlight] and press the (ENTER)
10
button.
Enter the setting value, and then press the (ENTER) button.
11

• To darken a little, select +1 to +3, to lighten a little, select -1 to -3.
• Enter the value using the numeric keypad or select the value with the or button.
2. Print
Adjusting Color with Software
• Color Correct Utility
Repeat steps 8 to 11 if you want to add further change.
12
Press the (ONLINE) button to return to the standby screen.
13
Start printing.
14
Repeat the procedure until the color shade meets your preferences.
• Color Swatch Utility
• PS Gamma Adjuster Utility
- 45 -

2. Print
For a Better Finish
This section describes settings to obtain better print results when printing from a computer.
• Enhancing Photos
• Printing with a Specified Resolution
• Emphasizing Fine Lines
• Specifying the Font to Use
• Changing Black Finish
• Eliminating White Gap Between Text and Background (Overprinting Black)
Enhancing Photos
You can print photographs more vividly.
This function is not available with the Windows PS printer drivers or on Mac OS X.
For Windows PCL Printer Driver
Open the file to print.
1
Select [Print] from the [File] menu.
2
Click [Preferences].
3
Select the [Job Options] tab.
4
Select the [Photo Enhance] check box.
5
Change other settings if necessary, and then click [OK].
6
Click [Print] on the [Print] screen.
7
- 46 -

Printing with a Specified Resolution
• For Windows
• For Mac OS X
You can change the print quality if necessary.
If printing on large-size paper with the Windows PS printer driver or on Mac OS X, using [Normal (600x600)] may
improve the print quality.
For Windows
Open the file to print.
1
Select [Print] from the [File] menu.
2
Click [Preferences].
3
Select the [Job Options] tab.
4
Select a print quality level from [Quality].
5
Change other settings if necessary, and then click [OK].
6
Click [Print] on the [Print] screen.
7
2. Print
If setting details are not displayed in the print dialog box, click [Show Details] at the bottom of the dialog box.
For Mac OS X
Open the file to print.
1
Select [Print] from the [File] menu.
2
Select the [Print Options] panel.
3
Select a desired value from [Quality] in the [Quality 1] tab.
4
Change other settings if necessary, and then click [Print].
5
- 47 -

Emphasizing Fine Lines
• For Windows PCL Printer Driver
• For Windows PS Printer Driver
• For Mac OS X
To prevent blurry small letters or fine lines, turn on [Adjust ultra fine lines] on the printer
driver.
This function is turned on by default.
Select the [Job Options] tab.
4
Click [Advanced].
5
Check the [Adjust ultra fine lines] check box, and then click [OK].
6
Change other settings if necessary, and then click [OK].
7
Click [Print] on the [Print] screen.
8
2. Print
Bar code gaps or other gaps may be narrower depending on the application. In such a case,
turn this function off.
For Windows PCL Printer Driver
Open the file to print.
1
Select [Print] from the [File] menu.
2
Click [Preferences].
3
Select the [Job Options] tab.
4
Click [Advanced].
5
Select [Adjust ultra fine lines] and select [On] for [Settings], and then click
6
[OK].
Change other settings if necessary, and then click [OK].
7
Click [Print] on the [Print] screen.
8
For Mac OS X
Open the file to print.
1
Select [Print] from the [File] menu.
2
Select [Quality1] from tabs.
3
Check the [Adjust ultra fine lines] check box in the [Quality 1] tab.
4
Change other settings if necessary, and then click [Print].
5
If setting details are not displayed in the print dialog box, click [Show Details] at the bottom of the dialog box.
For Windows PS Printer Driver
Open the file to print.
1
Select [Print] from the [File] menu.
2
Click [Preferences].
3
- 48 -

Specifying the Font to Use
• Print Using the Printer Fonts
• Print Using the Fonts of Computer
Right-click the [OKI C532 PS] icon and then select [Printer properties].
2
Double-click [Font Substitution Table] on the [Device Settings] tab.
3
Click a TrueType font, and then select a printer font to be used to substitute
4
the TrueType font from the list.
2. Print
Print Using the Printer Fonts
• The printer fonts do not exactly duplicate the appearance of the TrueType fonts displayed on the screen.
• This function is not available on Mac OS X.
• This function may not be available for some applications.
• For Windows PCL Printer Driver
Open the file to print.
1
Select [Print] from the [File] menu.
2
Click [Preferences].
3
Select the [Extend] tab.
4
Click [Fonts].
5
Select the [Font Substitution] check box in [TrueType Font Output Type].
6
Specify the printer font to use instead of TrueType fonts in [Font Substitution
7
Table].
Click [OK].
5
Open a file to print from a computer.
6
Select [Print] from the [File] menu.
7
Click [Preferences].
8
Click [Advanced] on the [Layout] tab.
9
Click [TrueType Font], and then select [Substitute with Device Font].
10
Click [OK].
11
Change other settings if necessary, and then click [OK].
12
Click [Print] on the [Print] screen.
13
Print Using the Fonts of Computer
You can print your documents by using TrueType fonts in a computer to reproduce the same
font appearance as on the screen.
Click [OK].
8
Change other settings if necessary, and then click [OK].
9
Click [Print] on the [Print] screen.
10
• For Windows PS Printer Driver
Click [Start], and then select [Devices and Printers].
1
This function is not available on Mac OS X.
• For Windows PCL Printer Driver
Open the file to print.
1
Select [Print] from the [File] menu.
2
Click [Preferences].
3
Select the [Extend] tab.
4
- 49 -

Click [Fonts].
5
Clear the [Font Substitution] check box in [TrueType Font Output Type], select
6
one of the following output formats, and then click [OK].
• Download as outline font
Creates font images in the printer.
• Download as bitmap font
Creates font images using the printer drivers.
2. Print
Changing Black Finish
You can change the black finish when printing in color. The black finish setting can be used
when [Office Color] or [Graphic Pro] is selected in the printer driver.
There are two types of black finishes; one is composed of cyan (C), magenta (M), yellow (Y)
and black (K) toners, and the other is composed of a black (K) toner only. A black finish using
CMYK toners is suitable for printing photographs. A black finish using a black toner only is
suitable for printing black text or graphics.
Change other settings if necessary, and then click [OK].
7
Click [Print] on the [Print] screen.
8
• For Windows PS Printer Driver
Open the file to print.
1
Select [Print] from the [File] menu.
2
Click [Preferences].
3
Click [Advanced] on the [Layout] tab.
4
Click [TrueType Font], and then select [Download as Softfont].
5
Click [OK].
6
Change other settings if necessary, and then click [OK].
7
Click [Print] on the [Print] screen.
8
If you use the [Office Color] function, you can also select the auto. If Automatic is selected,
the suitable method is selected automatically to print out the document.
•
For Windows PCL Printer Driver
• For Windows PS Printer Driver
• For Mac OS X
For Windows PCL Printer Driver
Open the file to print.
1
Select [Print] from the [File] menu.
2
Click on [Preferences].
3
Select [Color] for [Color Setting] on the [Setup] tab.
4
Click [Detail...] in the [Setup] tab, and select [Office Color] or [Graphic Pro].
5
Select the method to create black from [Black Finish], and click [OK].
6
Change other settings if necessary, and then click [OK].
7
Click [Print] on the [Print] screen.
8
For Windows PS Printer Driver
Open the file to print.
1
Select [Print] from the [File] menu.
2
- 50 -

Click on [Preferences].
3
Select [Color] tab and select [Office Color] or [Graphic Pro] and then click
4
[Options].
Select the method to create black from [Black Finish], and click [OK].
5
Change other settings if necessary, and then click [OK].
6
Click [Print] on the [Print] screen.
7
2. Print
Eliminating White Gap Between Text and Background (Overprinting Black)
Depending on the conditions of use, you can set black to overprint and reduce the white gap
between black letters and colored background.
• This function cannot be used with some applications.
• This function can be used when printing only text over a background color.
• If the toner layer is thick, the toner may not be fixed firmly.
For Mac OS X
Open the file to print.
1
From the [File] menu, select [Print].
2
Select [Color] from the panel menu.
3
Select [Office Color] or [Graphic Pro] and then click [Options].
4
Select the method to create black from [Black Finish].
5
[Black Finish] of [Graphic Pro] can be found on the [General] tab.
Change other settings if necessary, and then click [Print].
6
If setting details are not displayed in the print dialog box, click [Show Details] at the bottom of the dialog box.
• For Windows PCL Printer Driver
• For Windows PS Printer Driver
• For Mac OS X
For Windows PCL Printer Driver
Open the file to print.
1
Select [Print] from the [File] menu.
2
Click on [Preferences].
3
On the [Job Options] tab, Select [Advanced].
4
Set [Overprint Black] to [On] and click [OK].
5
Change other settings if necessary, and then click [OK].
6
Click [Print] on the [Print] screen.
7
For Windows PS Printer Driver
- 51 -
Open the file to print.
1
Select [Print] from the [File] menu.
2
Click on [Preferences].
3

Select the [Color] tab and click [Advanced].
4
Select the [Black Overprint] check box, and click [OK].
5
Change other settings if necessary, and then click [OK].
6
Click [Print] on the [Print] screen.
7
For Mac OS X
Open the file to print.
1
From the [File] menu, select [Print].
2
Select the [Print Options] panel.
3
Select the [Black Overprint] check box in the [Quality 1] tab.
4
Change other settings if necessary, and then click [Print].
5
2. Print
If setting details are not displayed in the print dialog box, click [Show Details] at the bottom of the dialog box.
- 52 -

2. Print
Useful Functions
This section describes useful functions when printing from a computer.
• Collating a Multiple Page Document in Units of Copies
• Printing from the Last Page of a Document
• Selecting a Tray Automatically for the Specified Paper
• Switching to Another Paper Feed Tray Automatically When a Tray Runs Out Of Paper
• Changing the Default Settings with a Printer Driver
• Saving Frequently-Used Settings in the Printer Driver to Use
• Storing Print Data in This Machine before Printing
• Printing without Opening a PDF File (PDF Print Direct)
• Printing Data in USB Memory
Collating a Multiple Page Document in Units of Copies
• For Windows PCL Printer Driver
• For Windows PS Printer Driver
• For Mac OS X
You can print a multiple page document in units of copies.
This function may not be available for some applications.
For Windows PCL Printer Driver
Open the file to print.
1
Select [Print] from the [File] menu.
2
Click [Preferences].
3
Select the [Job Options] tab.
4
Select the number of print copies from [Copies], and then select the [Collate]
5
check box.
Change other settings if necessary, and then click [OK].
6
Click [Print] on the [Print] screen.
7
For Windows PS Printer Driver
Open the file to print.
1
Select [Print] from the [File] menu.
2
Click [Preferences].
3
Enter the number of print copies in [Copies], and then select the [Collate]
4
check box on the [Job Options] tab.
- 53 -

Change other settings if necessary, and then click [OK].
5
Click [Print] on the [Print] screen.
6
2. Print
Printing from the Last Page of a Document
• For Windows PS Printer Driver
• For Mac OS X
Turn off the collating pages function on the application. If the collating pages function is turned on, documents are
printed without using the internal memory of the machine.
For Mac OS X
Open the file to print.
1
Select [Print] from the [File] menu.
2
Enter the number of copies in [Copies]. Deselect the [Collate pages] check
3
box in the [Paper Handling] tab.
Select [Print Options] on the panel menu, and then click [Collate] check box in
4
the [Paper] tab.
Change other settings if necessary, and then click [Print].
5
• If setting details are not displayed in the print dialog box, click [Show Details] at the bottom of the dialog box.
• If the [Collate pages] check box is selected in the [Paper Handling] panel, the machine prints documents without
using the internal memory.
You can print in forward or reverse page order to suit your needs.
When using the output tray, print in the forward page order to stack printouts in forward page
order.
When using the rear output tray, print in the reverse page order to stack printouts in forward
page order.
• If the rear output tray is not open, printouts are output to the output tray.
• This function is not available with the Windows PCL printer driver.
For Windows PS Printer Driver
Open the file to print.
1
Select [Print] from the [File] menu.
2
Click [Preferences].
3
Select [Back to Front] from [Page Order] on the [Layout] tab.
4
Change other settings if necessary, and then click [OK].
5
Click [Print] on the [Print] screen.
6
If [Page Order] is not displayed, select [Start] > [Devices and Printers], right-click the [OKI C532 PS] icon, select
[Printer properties] > the [Advanced] tab, and the select the [Enable advanced printing features] check box.
For Mac OS X
Open the file to print.
1
Select [Print] from the [File] menu.
2
- 54 -

Select [Reverse] for [Page Order] on the [Paper Handling] panel.
3
Change other settings if necessary, and then click [Print].
4
If setting details are not displayed in the print dialog box, click [Show Details] at the bottom of the dialog box.
2. Print
Selecting a Tray Automatically for the Specified Paper
• Setting the MP Tray
• For Windows PCL Printer Driver
• For Windows PS Printer Driver
• For Mac OS X
You can automatically select a tray (paper cassette (Tray 1/2/3)) or the MP tray that holds
paper of the same size that is set with the printer driver. Trays switch in accordance with the
[Tray Sequence] setting.
Be sure to set the paper size and weight for paper cassettes and the MP tray on the operator panel.
Loading Paper (User's Manual)
Setting the MP Tray
Set the MP tray as a target of the auto tray selection.
Press the button on the operator panel repeatedly to select [Setting] and
1
press the (ENTER) button.
- 55 -
Press the button to select [Paper Setup] and press the (ENTER) button.
2
Press the button to select [MP Tray] and press the (ENTER) button.
3
Press the or button to select [MP Tray Usage] and press the
4
(ENTER) button.
Press the or button to select [Normal Tray] and press the (ENTER)
5
button.
[MP Tray Usage] is set to [Do Not Use] by factory default.
Press the (ONLINE) button to return to the standby screen.
6

For Windows PCL Printer Driver
Open the file to print.
1
Select [Print] from the [File] menu.
2
Click [Preferences].
3
Select [Auto] from [Source] on the [Setup] tab.
4
Change other settings if necessary, and then click [OK].
5
Click [Print] on the [Print] screen.
6
For Windows PS Printer Driver
Open the file to print.
1
Select [Print] from the [File] menu.
2
Click [Preferences].
3
Select [Automatically Select] from [Paper Source] on the [Paper/Quality] tab.
4
Change other settings if necessary, and then click [OK].
5
Click [Print] on the [Print] screen.
6
2. Print
If setting details are not displayed in the print dialog box, click [Show Details] at the bottom of the dialog box.
For Mac OS X
Open the file to print.
1
Select [Print] from the [File] menu.
2
Select [Auto Select] from [All Pages From] on the [Paper Feed] panel.
3
Change other settings if necessary, and then click [Print].
4
- 56 -

2. Print
Switching to Another Paper Feed Tray Automatically When a Tray Runs Out Of Paper
• Setting Trays for the Auto Tray Switching
• For Windows PCL Printer Driver
• For Windows PS Printer Driver
• For Mac OS X
When the specified tray runs out of paper, the machine can continue to print from another
tray if paper of the same paper size and weight is loaded in the paper cassettes (Tray 1/2/3)
and the MP tray.
To use this function, enable the auto tray switching function on the operator panel first. Then,
set the auto tray switching function with the printer driver.
For the paper settings of each tray used for the auto tray switch function, set the same values to the machine and printer
driver.
Loading Paper (User's Manual)
Setting Trays for the Auto Tray Switching
Press the button on the operator panel repeatedly to select [Setting] and
1
press the (ENTER) button.
Press the button to select [Paper Setup] and press the (ENTER) button.
2
Press the button to select [Auto Tray Switch] and press the (ENTER)
3
button.
Press the button to select [ON] and press the (ENTER) button.
4
For Windows PCL Printer Driver
Open the file to print.
1
Select [Print] from the [File] menu.
2
Click [Preferences].
3
Click [Paper Feed Options] on the [Setup] tab.
4
Select the [Auto Tray Change] check box, and then click [OK].
5
Change other settings if necessary, and then click [OK].
6
Click [Print] on the [Print] screen.
7
For Windows PS Printer Driver
Open the file to print.
1
Select [Print] from the [File] menu.
2
Click [Preferences].
3
Click [Advanced] on the [Layout] tab.
4
Click [Tray Switch] and then select [ON].
5
Click [OK].
6
Change other settings if necessary, and then click [OK].
7
Click [Print] on the [Print] screen.
8
Trays switch in accordance with the [Tray Sequence] setting.
Press the (ONLINE) button to return to the standby screen.
5
For Mac OS X
1
2
- 57 -
Open the file to print.
Select [Print] from the [File] menu.

Select [Print Options] from the panel menu.
3
Check the [Tray Switch] check box in the [Feed] tab.
4
Change other settings if necessary, and then click [Print].
5
If setting details are not displayed in the print dialog box, click [Show Details] at the bottom of the dialog box.
Changing the Default Settings with a Printer Driver
You can use frequently-used printing settings as the printer driver's default settings.
This function is not available on Mac OS X.
For Windows Printer Driver
Click [Start], and then select [Devices and Printers].
1
Right-click the [OKI C532 *] icon, and then select [Printing Preferences].
2
* Select a driver type to use.
Set the printing settings to use as the driver's default settings.
3
Click [OK].
4
2. Print
- 58 -

Saving Frequently-Used Settings in the Printer Driver to Use
• Registering Frequently-used Settings
• Printing with Registered Settings
Set the printing settings to save.
3
Select [Save Current Settings as Preset] from [Presets].
4
Enter a name to save the settings, and then click [OK].
5
2. Print
Registering Frequently-used Settings
You can save the printer driver settings.
This function is not available with the Windows PS printer driver.
You can save up to 14 settings.
• Registering the Windows PCL Driver Settings
Click [Start], and then select [Devices and Printers].
1
Right-click the [OKI C532 PCL6] icon, and then select [Printing preferences].
2
Set the printing settings to save.
3
Click [Save] in [Driver Setting] on the [Setup] tab.
4
Enter a name to save the settings, and then click [OK].
5
Click [OK] to close the print setup dialog box.
6
Printing with Registered Settings
This function is not available with the Windows PS printer driver.
• For Windows PCL Driver
Open the file to print.
1
Select [Print] from the [File] menu.
2
Click [Preferences].
3
Select a setting to use from [Driver Setting] on the [Setup] tab.
4
Click [OK].
5
Click [Print] on the [Print] screen.
6
• For Mac OS X
Open the file to print.
1
• Registering the Mac OS X Printer Driver Settings
• The default settings on the [Page Setup] dialog box cannot be changed.
• The operation of the settings that are saved with a different printer driver cannot be guaranteed. Save the settings
with a name that you can distinguish.
Open the file to print.
1
Select [Print] from the [File] menu.
2
- 59 -
Select [Print] from the [File] menu.
2
Select a setting to use from [Presets].
3
Click [Print].
4
If [Show Presets] is selected from [Preset] and the [Reset Presets Menu to "Default Settings" After Printing check
box] check box is deselected, the set preset is always applied.

Storing Print Data in This Machine before Printing
• For Windows PCL Printer Driver
• For Windows PS Printer Driver
• For Mac OS X
You can spool print jobs to the memory that is integrated in this machine. This allows you to
finish your work on your computer early, which makes it possible for your computer to
process other tasks while this machine is operating in the background.
Select the [Job Options] tab.
4
Click [Advanced].
5
Check the [Job Spool] check box, and then click [OK].
6
Change other settings if necessary, and then click [OK].
7
Click [Print] on the [Print] screen.
8
2. Print
If you cannot store the spooled data due to insufficient free space in the internal memory of this machine, a message is
displayed to inform you that the file system is full, and the print job is not executed.
For Windows PCL Printer Driver
Open the file to print.
1
Select [Print] from the [File] menu.
2
Click [Preferences].
3
Select the [Job Options] tab.
4
Click [Advanced].
5
Select [Job Spool], and select [On] for [Settings], and then click [OK].
6
Change other settings if necessary, and then click [OK].
7
Click [Print] on the [Print] screen.
8
For Windows PS Printer Driver
For Mac OS X
Open the file to print.
1
From the [File] menu, select [Print].
2
Select the [Print Options] panel.
3
Check the [Job Spool] check box in the [Quality 2] tab.
4
Change other settings if necessary, and then click [Print].
5
If setting details are not displayed in the print dialog box, click [Show Details] at the bottom of the dialog box.
Open the file to print.
1
Select [Print] from the [File] menu.
2
Click [Preferences].
3
- 60 -

Printing without Opening a PDF File (PDF Print Direct) Printing Data in USB Memory
2. Print
You can send a PDF file to this machine to directly print it. With PDF Print Direct, you can
omit opening the PDF file with an application, such as Adobe Reader.
•
For Windows
• For Mac OS X
The paper size can be set by pressing the button on the operator panel to select [Setting] > [Admin Setup] > [Print
Setup] > [PS Setup] > [PDF Paper Size].
For Windows, install PDF Print Direct beforehand.
List of Utility Software
For Windows
Right-click a PDF file to print, and then select [PDF Print Direct].
1
Select a printer to use.
2
To set the user authentication function with the selected printer, select [User Auth] from
the [Printer Setting] menu.
To print an encrypted file, select the [Setting Password] check box, and then
3
enter the password.
If the same password is to be used again, click [Save Password].
You can connect USB Memory to the printer and print saved data.
• Not all USB Memory is guaranteed to use. (USB Memory with security functions are not supported.)
• USB hubs and external USB HDDs are not supported.
• Encrypted PDF files are not supported.
• The following file systems are supported: FAT12, FAT16, FAT32.
• Supported file formats: PDF(v1.7), JPEG, PDF, TIFF(v6 baseline), XPS, PRN (PS, PCL, XPS)
• Up to 32 GB USB Memory is supported.
• Up to 100 files in supported file formats that are saved in USB Memory are displayed in the file list.
- If 100 or more files are saved in USB Memory, the file list is not displayed properly.
- USB Memory with a directory structure of 20 or more levels may not be read properly.
- A file path exceeding 240 characters may not be read correctly.
• You can print one file in USB Memory at a time.
Insert USB Memory into the USB port.
1
Change other settings if necessary, and then click [Print].
4
For Mac OS X
Select [Printers & Scanners] in [System Preferences].
1
Check that the [OKI C532] icon is listed.
2
Drag the icon of the driver to the desktop or Dock.
3
Drag the file you want to print to the driver icon.
4
- 61 -
Press the button on the operator panel to select [Print] and press the
2
(ENTER) button.
Press the button to select [Print From USB Memory] and press the
3
(ENTER) button.
When [Select Print File] is displayed, press the (ENTER) button.
4
Press the or button to select the file to print and press the (ENTER)
5
button.

To set other items, press the button to select [Print Setup] and press the
6
(ENTER) button.
Select items you want to set and press the (BACK) button to go back to the file
screen.
Select [Print], and then press the (ENTER) button.
7
The screen returns to the file list screen after printing is complete.
To print another file, select a file from [Select Print file] and repeat steps 5 and 6.
To stop printing, press the (ONLINE) button to return to the standby screen.
Remove the USB Memory.
8
Cancelling a Print Job
To cancel a print job from USB Memory, press the (CANCEL) button on the operator
panel.
2. Print
To cancel printing, select "Yes", then press the (ENTER) button.
To continue printing, select "No", and then press the (ENTER) button.
If no operation is made for three minutes, the screen disappears and printing resumes.
The pages that are ready to be printed on this machine will be printed without changes.
- 62 -

2. Print
Printing Confidential Document
This section describes how to obtain print results in a confidential manner.
• Encrypting the Print Data and Setting a Password Before Printing (Private Print)
Encrypting the Print Data and Setting a Password Before Printing (Private Print)
• Encrypting and Setting Password on a Computer
• Printing an Encrypted/Password-protected Document from This Machine
With the private print function, you can encrypt and password-protect private documents or
confidential documents and store to the machine to prevent other people from seeing them,
and then authenticate on the operator panel before printing them.
Since the print jobs are encrypted before sending, you can protect confidential information
from injustice access.
• If you cannot store the spooled data due to insufficient free space in the internal memory of this machine, a message
is displayed to inform you that the file system is full, and the print job is not executed.
• You cannot use this function with the poster printing function and the booklet printing function with the Windows PCL
printer driver if you share this machine via the print server.
• When you use this function, clear the [Job Spool] check box.
Storing Print Data in This Machine before Printing
Encrypting and Setting Password on a Computer
• For Windows PCL Printer Driver
- 63 -
Open a file.
1
Select [Print] from the [File] menu.
2
Click [Preferences].
3
Select the [Job Options] tab.
4
Select [Private Print] in [Job Type].
5
Enter a password in [Password].
6
Click [OK].
7
Set other settings if necessary, and then click [OK].
8

2. Print
Click [Print] on the [Print] Screen.
9
The encrypted and password-protected print job is only sent to this machine, and it is
not printed yet.
• For Windows PS Printer Driver
Open a file.
1
Select [Print] from the [File] menu.
2
Click [Advanced].
3
Select the [Job Options] tab.
4
Select [Private Print] from [Job Type].
5
Enter a password in [Password].
6
Click [OK].
7
Set other settings if necessary, and then click [OK].
8
Click [Print] on the [Print] screen.
9
The encrypted and password-protected print job is only sent to this machine, and it is
not printed yet.
• For Mac OS X
Open a file.
1
From the [File] menu, select [Print].
2
Select [Secure Print] from the panel menu.
3
Select [Private Print] from [Job Type].
4
Enter a password in [Job Password].
5
Change other settings if necessary, and then click [Print].
6
The encrypted and password-protected print job is only sent to this machine, and it is
not printed yet.
• The print job saved in the memory is automatically deleted if the printing is complete or not printed for a certain
period of time. If an error occurs while sending the data or the job is altered after being sent, the job is
automatically deleted.
• If setting details are not displayed in the print dialog box, click [Show Details] at the bottom of the dialog box.
Printing an Encrypted/Password-protected Document from This Machine
Print an encrypted and password-protected print job saved in the internal memory of this
machine.
Press the button on the operator panel to select [Print] and press the
1
(ENTER) button.
Press the button to select [Private Print] and press the (ENTER) button.
2
When the user list is displayed, select the user name of your computer.
3
Enter the password that you set on the computer, and then press the
4
(ENTER) button.
When [Search all the Private Jobs?] is displayed, press the or button to
5
select [Yes] and press the (ENTER) button.
When private print jobs are listed, press the button to select the file you
6
want to print and press the (ENTER) button. To print all displayed jobs,
select [Print All], and then press the (ENTER) button.
Select [Delete] and press the (ENTER) button to delete the specified private job.
Select [Delete All] and press the (ENTER) button to delete all displayed private jobs.
- 64 -

3
Maintenance
Replacing Maintenance Parts
Cleaning Each Part of the Machine
Updating Installed Drivers
Removing Installed Driver
Updating Firmware
Initializing Memory and Settings
This category describes consumable replacements and cleaning to ensure a comfortable use of the machine for a longer life.

3. Maintenance
Replacing Maintenance Parts
This section describes how to replace maintenance parts.
• Replacing the Belt Unit
• Replacing the Fuser Unit
Replacing the Belt Unit
When the "Belt Unit Near Life" message appears on the display screen, prepare a
replacement belt unit. You can keep printing approximately 1,000 pages until the next
message appears.
When the "Please change Belt Unit" message appears, replace the belt unit.
The life expectancy of the belt unit is approximately 60,000 pages for A4 simplex printing
(three pages per job).
• The actual number of pages you can print with the belt unit depends on how you use it.
• Though opening and closing the output tray may extend the life of the belt unit somewhat, you should replace it soon
after the "Please change Belt Unit" is displayed to prevent malfunction.
• If you replace the belt unit, use it until the end of its usable life. If you remove the belt unit and install and use another
one before its usable life has expired, the use life will not be correctly displayed.
• If you press the button on the operator panel to select [Setting] > [Admin Setup] > [Manage Unit] > [System Setup]
and set [Near Life LED] to [Disable], the "Belt Unit Near Life" message will not be displayed.
• The image drum (the green tube) is very delicate. Handle it carefully.
• Do not expose the image drum to direct sunlight or very bright interior light (approximately more than 1,500 lux). Even
under the normal interior light, do not leave it for more than 5 minutes.
You can change the setting for displaying the "Belt Unit Near Life" message. To change the setting, press the
button on the operator panel to select [Setting] > [Admin Setup] > [User Install] > [Belt Near Life Timing]. Available
values are from 500 to 3,000 (in 500 increments).
- 66 -
Prepare a replacement belt unit.
1

3. Maintenance
Press the open button (A) and open the output tray (a).
2
Possible to get burned.
The fuser unit is extremely hot. Do not touch it.
Take all the four image drums out of the machine, and then place them on a
3
flat surface.
Cover the image drums you took out with paper so that the image drums do
4
not expose to the light.
Turn the lock levers (b) on the both sides of the belt unit forward to unlock.
5
- 67 -
Remove the belt unit by holding the lock lever (b).
6

3. Maintenance
Hold the lock levers (b) of a new belt unit and place the belt unit into the
7
machine.
Turn the lock levers (b) on the both sides of the belt unit backward.
8
Return all the four image drums to the machine.
9
- 68 -
Close the output tray (a) slowly and push the center of the tray for
10
confirmation.

Do not touch the LED head when closing the output tray.
Please recycle belt unit.
11
3. Maintenance
Replacing the Fuser Unit
When the "Fuser Unit Near Life" message appears on the display screen, prepare a
replacement fuser unit. You can keep printing approximately 1,000 pages until the next
message appears.
When the "Please change Fuser Unit." message appears, replace the fuser unit.
The life expectancy of the fuser unit is up to 60,000 pages for A4 simplex printing.
• The actual number of pages you can print with the fuser unit depends on how you use it.
• Though opening and closing the output tray may extend the life of the fuser unit somewhat, you should replace it soon
after "Please change Fuser Unit." is displayed to prevent malfunction.
• If you replace the fuser unit, use it until the end of its usable life. If you remove the fuser unit and install and use
another one before its usable life has expired, the use life will not be correctly displayed.
• If you press the button on the operator panel to select [Setting] > [Admin Setup] > [Manage Unit] > [System Setup]
and set [Near Life LED] to [Disable], the "Fuser Near Life" message will not be displayed.
• Do not expose the image drum to direct sunlight or very bright interior light (approximately more than 1,500 lux). Even
under the normal interior light, do not leave it for more than 5 minutes.
If you must dispose of a belt unit, put it in a plastic bag or similar container and dispose of it in accordance with
your municipality's ordinances or guidelines.
You can change the setting for displaying the "Fuser Unit Near Life" message. To change the setting, press the
button on the operator panel to select [Setting] > [Admin Setup] > [User Install] > [Fuser Near Life Timing]. Available
values are from 500 to 3,000 (in 500 increments).
Prepare a new fuser unit.
1
- 69 -

3. Maintenance
Press the open button (A) and open the output tray (a).
2
Possible to get burned.
Since the fuser unit gets hot, carry out the operation carefully, and when lifting it up you
must hold it by the handle. Do not try to hold it whilst it is hot. Wait until it has cooled
down and then carry out the operation.
Tilt forward the fuser unit lock levers (b) to unlock.
3
Hold the fuser unit handle (c) and lift the fuser unit out of the machine.
4
Push the blue lever on the new fuser unit and remove the orange safety
5
stopper.
- 70 -

Hold the handle of a new fuser unit, align the fuser unit to the grooves behind
6
the toner cartridges, place the fuser unit into the machine.
3. Maintenance
Do not touch the LED head when closing the output tray.
Tilt back the fuser unit lock levers (b) to lock.
7
Close the output tray (a) slowly and push the center of the tray for
8
confirmation.
Please recycle fuser unit.
9
If you must dispose of a fuser unit, put it in a plastic bag or similar container and dispose of it in accordance with
your municipality's ordinances or guidelines.
- 71 -

3. Maintenance
Cleaning Each Part of the Machine
This section describes how to clean the machine and parts.
• Cleaning the Surface of the Machine
• Cleaning the Paper Feed Rollers (Tray 1/Tray 2/Tray 3)
• Cleaning the Paper Feed Rollers (MP Tray)
• Cleaning the LED Head (User's Manual)
Cleaning the Surface of the Machine
• Do not use benzine, thinners, or alcohol, because they may damage the plastic parts of the machine.
• Do not lubricate the machine with oil. Do not apply oil.
Turn the machine off.
1
Turning the Machine Off (User's Manual)
Wipe the surface of the machine with a soft cloth that has been slightly
2
moistened with water or neutral detergent and then squeezed well.
Do not use other than water or neutral detergent.
- 72 -
Dry the surface of the machine with a dry soft cloth.
3

Cleaning the Paper Feed Rollers (Tray 1/Tray 2/Tray 3)
Clean the separation roller in the paper cassette and the paper feed rollers inside the
machine.
An example of Tray 1 is covered in the following procedure, and the same procedure applies
to Tray 2/3.
Pull out the paper cassette.
1
3. Maintenance
Wipe the separation roller on the paper cassette with a wet cloth that has been
4
wrung out well.
Load paper in the paper cassette and insert the paper cassette into this
5
machine.
Wipe the two paper feed rollers inside the machine with a wet cloth that has
2
been wrung out well.
Remove paper loaded in the paper cassette.
3
- 73 -

Cleaning the Paper Feed Rollers (MP Tray)
Clean the paper feed rollers in the MP tray.
Open the MP tray (a) forward by inserting your fingers into the front recess.
1
3. Maintenance
Slightly lifting the MP tray (a), press the right arm (b) inward, then unlock the
2
tab (c).
- 74 -
In the same manner, slightly lifting the MP tray, press the left arm inward, then
3
unlock the tab.
Open the paper set cover (d) until it touches to the machine body.
4

Wipe the two feeding rollers with a wet cloth that has been wrung out well.
5
Close the paper set cover (d).
6
3. Maintenance
Closing the MP tray without putting the tab back in place may crack the paper set cover. Be sure to put it back in
place.
In the same manner, while pressing the left arm on the MP tray inward, slightly
8
lift the MP tray and hook the tab.
Close the MP tray (a).
9
If the MP tray cannot be closed, press the paper setting part of the MP tray downward
to put the paper set cover back in place.
While pressing the right arm (b) on the MP tray (a) inward, slightly lift the MP
7
tray (a) and hook the tab (c).
- 75 -
3. Maintenance
Updating Installed Drivers
This section describes how to update diriver that is installed in a computer. You must have
the administrator rights for the computer to complete this procedure.
• Updating the Printer Driver (Windows)
• Updating the Printer Driver (Mac OS X)
Updating the Printer Driver (Windows)
Check details on the latest driver on the Web site.
You must log in as the administrator to perform this procedure.
Double-click the downloaded file.
1
If the [User Account Control] dialog box is displayed, click [Yes].
Select a language, and then click [OK].
2
Read the license agreement, and then click [Agree].
3
Install the driver by following the instructions.
4
If the driver of the previous version is already installed, the screen to select updating
will be displayed. Follow the instructions.
Also, rebooting the computer may be required before updating the driver.
If the [Program Capability Assistant] dialog box is displayed after installation,
5
be sure to click [This program installed correctly].
- 76 -

Updating the Printer Driver (Mac OS X)
Check details on the latest driver on the Web site.
You must log in as the administrator to perform this procedure.
Remove the driver.
1
Removing the Printer Driver (Mac OS X)
Install a new driver.
2
Installing a Driver and Software to a Computer (User's Manual)
3. Maintenance
- 77 -

3. Maintenance
Removing Installed Driver
This section describes how to remove the diriver that is installed in a computer. You must
have the administrator rights for the computer to complete this procedure.
• Removing the Printer Driver (Windows)
• Removing the Printer Driver (Mac OS X)
Removing the Printer Driver (Windows)
• You must log in as the administrator to perform this procedure.
• Restart the computer before removing the driver.
Click [Start], and then select [Devices and Printers].
1
Right-click the [OKI C532] icon, and then select [Remove device].
2
If the icons are grouped, select [Remove Print Queue] > [OKI C532 *].
* Refers to the driver type to remove (ex. PCL6/PS/XPS)
When a confirmation message is displayed, click [Yes].
3
When a message is displayed to inform you of the device in use, restart a computer, and then repeat steps 1 to 2.
Select an icon in [Printers and Faxes], and then click [Print server properties]
4
on the top bar.
Select the [Drivers] tab.
5
If [Change Driver Settings] is displayed, click it.
6
Select a driver to remove, and then click [Remove].
7
When a message is displayed to ask you to select whether you want to
8
remove the driver only or the driver and package from the system, select to
remove the driver and package, and then click [OK].
- 78 -
When a confirmation message is displayed, click [Yes].
9
When the [Remove Driver Package] dialog box is displayed, click [Delete] >
10
[OK].
If removal is rejected, restart the computer, and then repeat steps 4 to 10.
Click [Close] in the [Print Server Properties] dialog box.
11
Restart the computer.
12

Removing the Printer Driver (Mac OS X)
• For OS X 10.9 to 10.11
• For OS X 10.8.5
3. Maintenance
Insert the "Software DVD-ROM" into a computer.
5
Double-click [OKI] > [Drivers] > [PS] > [Uninstaller].
6
Follow the on-screen instructions, enter the administrator password, and then
7
click [OK] until the uninstallation procedure is complete.
You must log in as the administrator to perform this procedure.
For OS X 10.9 to 10.11
Select [System Preferences] from the Apple menu.
1
Select [Printers & Scanners].
2
Select a device to remove, and then click [-].
3
If a confirmation message is displayed, click [Delete Printer].
Close the [Printers & Scanners] dialog box.
4
Insert the "Software DVD-ROM" into a computer.
5
Double-click [OKI] > [Drivers] > [PS] > [Uninstaller].
6
Follow the on-screen instructions, enter the administrator password, and then
7
click [OK] until the uninstallation procedure is complete.
Remove the "Software DVD-ROM" from the computer.
8
Remove the "Software DVD-ROM" from the computer.
8
For OS X 10.8.5
Select [System Preferences] from the Apple menu.
1
Select [Print & Scan].
2
Select a device to remove, and then click [-].
3
If a confirmation message is displayed, click [Delete Printer].
Close the [Print & Scan] dialog box.
4
- 79 -

Updating Firmware
You can update the firmware of your machine to the latest version through the Internet.
For details, visit the web site.
3. Maintenance
- 80 -

3. Maintenance
Initializing Memory and Settings
This section describes how to initialize memory and settings saved in the machine.
• Initializing Flash Memory
• Initializing the Settings of the Device
Initializing Flash Memory
When you initialize flash memory, the following data is deleted.
• The job data saved with [Shared Print] or [Private Print].
• Form data
Press the button on the operator panel repeatedly to select [Setting] and
1
press the (ENTER) button.
Press the button once to select [Admin Setup] and press the (ENTER)
2
button.
Enter the administrator password, and then press the (ENTER) button.
3
The factory default administrator password is "999999". If the administrator password is changed, enter the
updated password.
Press the or button to select [Manage Unit] and press the (ENTER)
4
button.
Press the or button to select [Storage Maintenance Setup] and press
5
the (ENTER) button.
- 81 -
Press the or button to select [Initial Lock] and press the (ENTER)
6
button.
Press the or button to select [Disable] and press the (ENTER)
7
button.
Press the (BACK) button to go back to the [Manage Unit] screen.
8
Press the button to select [Flash Memory Setup] and press the
9
(ENTER) button.
Press the or button to select [Initialize] and press the (ENTER)
10
button.
When [Execute] is displayed, press the (ENTER) button.
11

Select from 2 ways of initializing memory.
• [Initialize]: Initializes the range of open area of Flash (displayed on File List).
• [Format Partition]: Initializes user information. You can format the PCL/Common/PS partitions respectively.
Press the or button to select [Yes] on the confirmation screen, and
12
press the (ENTER) button.
When the confirmation screen is displayed again, press the or button to
13
select [Yes] and press the (ENTER) button.
The machine reboots and the standby screen appears.
3. Maintenance
Initializing the Settings of the Device
You can return the configured settings of the device the following settings will return to the
factory default settings.
• When you initialize the settings of the device, the following data is deleted.
- Admin Password
- Paper Setup settings
- Print Setup settings
- Manage Unit settings
- User Install settings
Press the button on the operator panel repeatedly to select [Setting] and
1
press the (ENTER) button.
Press the button once to select [Admin Setup] and press the (ENTER)
2
button.
Enter the administrator password, and then press the (ENTER) button.
3
- 82 -
The factory default administrator password is "999999". If the administrator password is changed, enter the
updated password.
Press the or button to select [Manage Unit] and press the (ENTER)
4
button.
Press the or button to select [Reset Settings] and press the
5
(ENTER) button.
When [Execute] is displayed, press the (ENTER) button.
6
Press the or button to select [Yes] on the confirmation screen, and
7
press the (ENTER) button.
The machine reboots and the standby screen appears.

4
Troubleshooting
If the ATTENTION indicator on the Operator Panel Lights Up or Flashes
Print Problems
About Problems with Printing Results
Problems about Software
Problems on the Machine or Paper
AirPrint Problems
Google Cloud Print Problems

If the ATTENTION indicator on the Operator Panel Lights Up or Flashes
If any problem occurs in this machine, the ATTENTION indicator lights up or flashes. The
problem to be dealt with is displayed on the display screen.
4. Troubleshooting
- 84 -

4. Troubleshooting
Print Problems
This section describes problems with printing from a computer.
• If you cannot solve a problem with the following solutions, contact your dealer.
• For problems caused by an application, contact the manufacturer of the application.
• Unable to Print (User's Manual)
• Network Connection Problems
• Wireless LAN Connection Problems
• USB Connection Problems
Network Connection Problems
• Common to Windows and Mac OS X
Cause Solution Reference
Using a cross cable. Use a straight cable. -
The machine was turned on before a
cable was connected.
There is a problem with the
compatibility with the hub.
The network connection setting is
incorrect.
• For Windows
Cause Solution Reference
The IP address is incorrect. • Check that the same IP address is
All pages are not printed. If you are using the WSD port,
Connect cables before turning the
machine on.
Press the button on the operator
panel to select [Setting] > [Admin
Setup] > [Network Menu] > [Network
Setup] > [Network Setting] > [HUB
Link Setting], and then change the
setting.
To connect to a wired network, set
[Wired] for the network connection to
[Enable].
set for the machine and the
machine's port setting on the
computer.
• Check that the IP address is not
duplicated by another device.
• Check that the correct IP address,
subnet mask, and gateway address
are set.
• If using OKI LPR Utility, check the
IP address setting with OKI LPR
Utility.
change it to the standard TCP/IP
port.
Connecting a LAN Cable (User's
Manual)
-
Connecting a LAN Cable (User's
Manual)
Using Wired LAN and Wireless
LAN at the Same Time (Only
When the Wireless LAN Module
is Mounted)
Setting Up This Machine (User's
Manual)
OKI LPR Utility
-
- 85 -

4. Troubleshooting
Wireless LAN Connection Problems
• Common to Windows and Mac OS X
Cause Solution Reference
The network connection setting is
incorrect.
[Wireless(Infrastructure)] Not
connected to a wireless access point.
(If wireless LAN module is fitted)
[Wireless(AP Mode)] No wireless
devices (computers, tablets,
smartphones) are connected.
• [Wireless(Infrastructure)] and
[Wireless(AP Mode)] cannot be
enabled at the same time.
• To connect using
[Wireless(Infrastructure)], set
[Wireless(AP Mode)] to [Disable],
and then set
[Wireless(Infrastructure)] to
[Enable].
• To connect using [Wireless(AP
Mode)], set
[Wireless(Infrastructure)] to
[Disable], and then set
[Wireless(AP Mode)] to [Enable].
• Check that the wireless access
point power is switched on.
• Check the wireless access point
settings, and then try the manual
settings or automatic settings.
• Restart the wireless LAN function.
• Press the button on the
operator panel to select [Setting] >
[Admin Setup] > [Network Menu] >
[Network Setup] > [Wireless
(Infrastructure) Setting], and then
select [Wireless reconnection].
• Install this machine in a place with
a good view and near a wireless
access point. (We suggest that the
distance between the machine and
the access point be 30 m or less.)
If there is metal, aluminum sash, or
a reinforced concrete wall between
the machine and wireless access
points, connections may be harder
to be established.
Do not place any electric
appliances that emit weak radio
waves (such as microwaves or
digital cordless telephones) close to
the machine.
• Make sure that [Wireless(AP
Mode)] on the machine is set to
[Enable].
• Confirm the SSID/password for the
machine and try Manual Setup.
• Make a setting in a location near
the machine with good visibility.
• Up to four devices can be
connected to the machine via the
wireless LAN (AP mode). The fifth
device will be rejected. Disconnect
at least one device and try again.
Connecting to a Wireless LAN
(Only When the Wireless LAN
Module is Mounted) (User's
Manual)
Connecting to a Wireless LAN
(Only When the Wireless LAN
Module is Mounted) (User's
Manual)
Connecting to a Wireless LAN
(Only When the Wireless LAN
Module is Mounted) (User's
Manual)
• For Windows
Cause Solution Reference
The IP address is incorrect. • Check that the same IP address is
All pages are not printed. If you are using the WSD port,
set for the machine and the
machine's port setting on the
computer.
• Check that the IP address is not
duplicated by another device.
• Check that the correct IP address,
subnet mask, and gateway address
are set.
• If using OKI LPR Utility, check the
IP address setting with OKI LPR
Utility.
change it to the standard TCP/IP
port.
OKI LPR Utility
-
- 86 -

USB Connection Problems
• Common to Windows and Mac OS X
Cause Solution Reference
An unsupported USB cable is used. Use a USB 2.0 cable. -
A USB hub is used. Directly connect the machine to the
A printer driver is not installed
correctly.
• For Windows
Cause Solution Reference
The machine is offline. Right-click the [OKI C532 *] icon on
A switch, buffer, extension cable, or
USB hub is used.
Another printer driver that works
when connected via a USB interface
is installed.
computer.
Reinstall the printer driver.
the [Devices and Printers] folder, and
then select [See print jobs] (If the
icons are grouped, select [See print
jobs] > [OKI C532 *]).
* Indicates the driver type. (ex. PCL6/
PS/XPS)
In the dialog box, select the [Printer]
menu and then clear the check of
[Use Printer Offline].
Directly connect the machine to the
computer.
Remove the other printer driver from
the computer.
4. Troubleshooting
Connecting a USB Cable
(User's Manual)
Installing a Driver and Software
to a Computer (User's Manual)
-
Connecting a USB Cable
(User's Manual)
-
- 87 -

4. Troubleshooting
About Problems with Printing Results
This section describes problems with print results.
Click the corresponding symptom and check the remedy.
If you cannot solve a problem with the following solutions, contact your dealer.
• Table of Problems with Printing Results
• Vertical White Lines Appear
• Printed Images are Fading Vertically
• Printed Images are Light
• White Spots and Lines Appear
• Dew Condensation Appears on Printed Paper
• Vertical Lines Appear
• Horizontal Lines and Spots Appear Periodically
• White Area on Paper is Lightly Stained
• The Periphery of Characters is Smudged
• The Entire Paper Area is Lightly Stained When Printing on Envelopes or Coated Paper
• Toner Comes Off When Printed Paper is Rubbed
• Uneven Gloss
• Black or White Dots Appear
• Dirt is Printed
• The Entire Page is Printed Black
• Nothing is Printed
• White Patches Appear
• The Peripheral Area of the Page is Dirty
• Color of the printed image is not what you expect
• Solid printing of CMY 100% is too light
Table of Problems with Printing Results
Vertical White Lines Appear
Paper feeding direction
Printed Images are Light White Spots and Lines Appear
Dew Condensation Appears on Printed Paper Vertical Lines Appear
Horizontal Lines and Spots Appear Periodically
Printed Images are Fading Vertically
Paper feeding direction
Paper feeding direction
White Area on Paper is Lightly Stained
Paper feeding direction
- 88 -

4. Troubleshooting
The Periphery of Characters is Smudged The Entire Paper Area is Lightly Stained When Printing on
Envelopes or Coated Paper
Toner Comes Off When Printed Paper is Rubbed Uneven Gloss
Black or White Dots Appear Dirt is Printed
Color of the printed image is not what you expect Solid printing of CMY 100% is too light
The Entire Page is Printed Black Nothing is Printed
White Patches Appear The Peripheral Area of the Page is Dirty
- 89 -

4. Troubleshooting
Vertical White Lines Appear
Cause Solution Reference
The LED head is dirty. Wipe the LED head with a soft tissue
paper.
The toner is low. If "Toner Low" or "Toner Empty.
Replace with new Toner Cartridge."
appears, replace the toner cartridge.
The lightproof film of the image drum
is dirty.
The image drum is not installed
properly.
There may be foreign objects in the
image drum.
Wipe the lightproof film with a soft
tissue paper.
Install the image drum properly.
Replace the image drum.
Cleaning the LED Head (User's
Manual)
Replacing the Toner Cartridges
(User's Manual)
-
Replacing the Image Drum
(User's Manual)
Replacing the Image Drum
(User's Manual)
Printed Images are Fading Vertically
Cause Solution Reference
The LED head is dirty. Wipe the LED head with a soft tissue
paper.
The toner is low. If "Toner Low" or "Toner Empty.
Replace with new Toner Cartridge."
appears, replace the toner cartridge.
The paper is unsuitable. Use recommended paper.
Cleaning the LED Head (User's
Manual)
Replacing the Toner Cartridges
(User's Manual)
Loading Paper (User's Manual)
- 90 -

4. Troubleshooting
Printed Images are Light
Cause Solution Reference
The toner is low. If "Toner Low" or "Toner Empty.
The paper is damp. Use paper stored under proper
The paper is unsuitable. Use recommended paper.
The settings of the media weight is
incorrect.
Recycled paper is used. Press the button on the operator
Replace with new Toner Cartridge."
appears, replace the toner cartridge.
temperature and humidity conditions.
Press the button on the operator
panel to select [Setting] > [Paper
Setup] > the paper tray you are using,
and then select the proper values for
[Media Type] and [Media Weight]. Or,
select a thicker values for [Media
Weight].
panel to select [Setting] > [Paper
Setup] > the paper tray you are using,
and then make the [Media Weight]
value thicker.
Replacing the Toner Cartridges
(User's Manual)
Loading Paper (User's Manual)
Loading Paper (User's Manual)
Loading Paper (User's Manual)
Loading Paper (User's Manual)
White Spots and Lines Appear
Cause Solution Reference
The paper is damp or dry. Use paper stored under proper
temperature and humidity conditions.
Loading Paper (User's Manual)
- 91 -
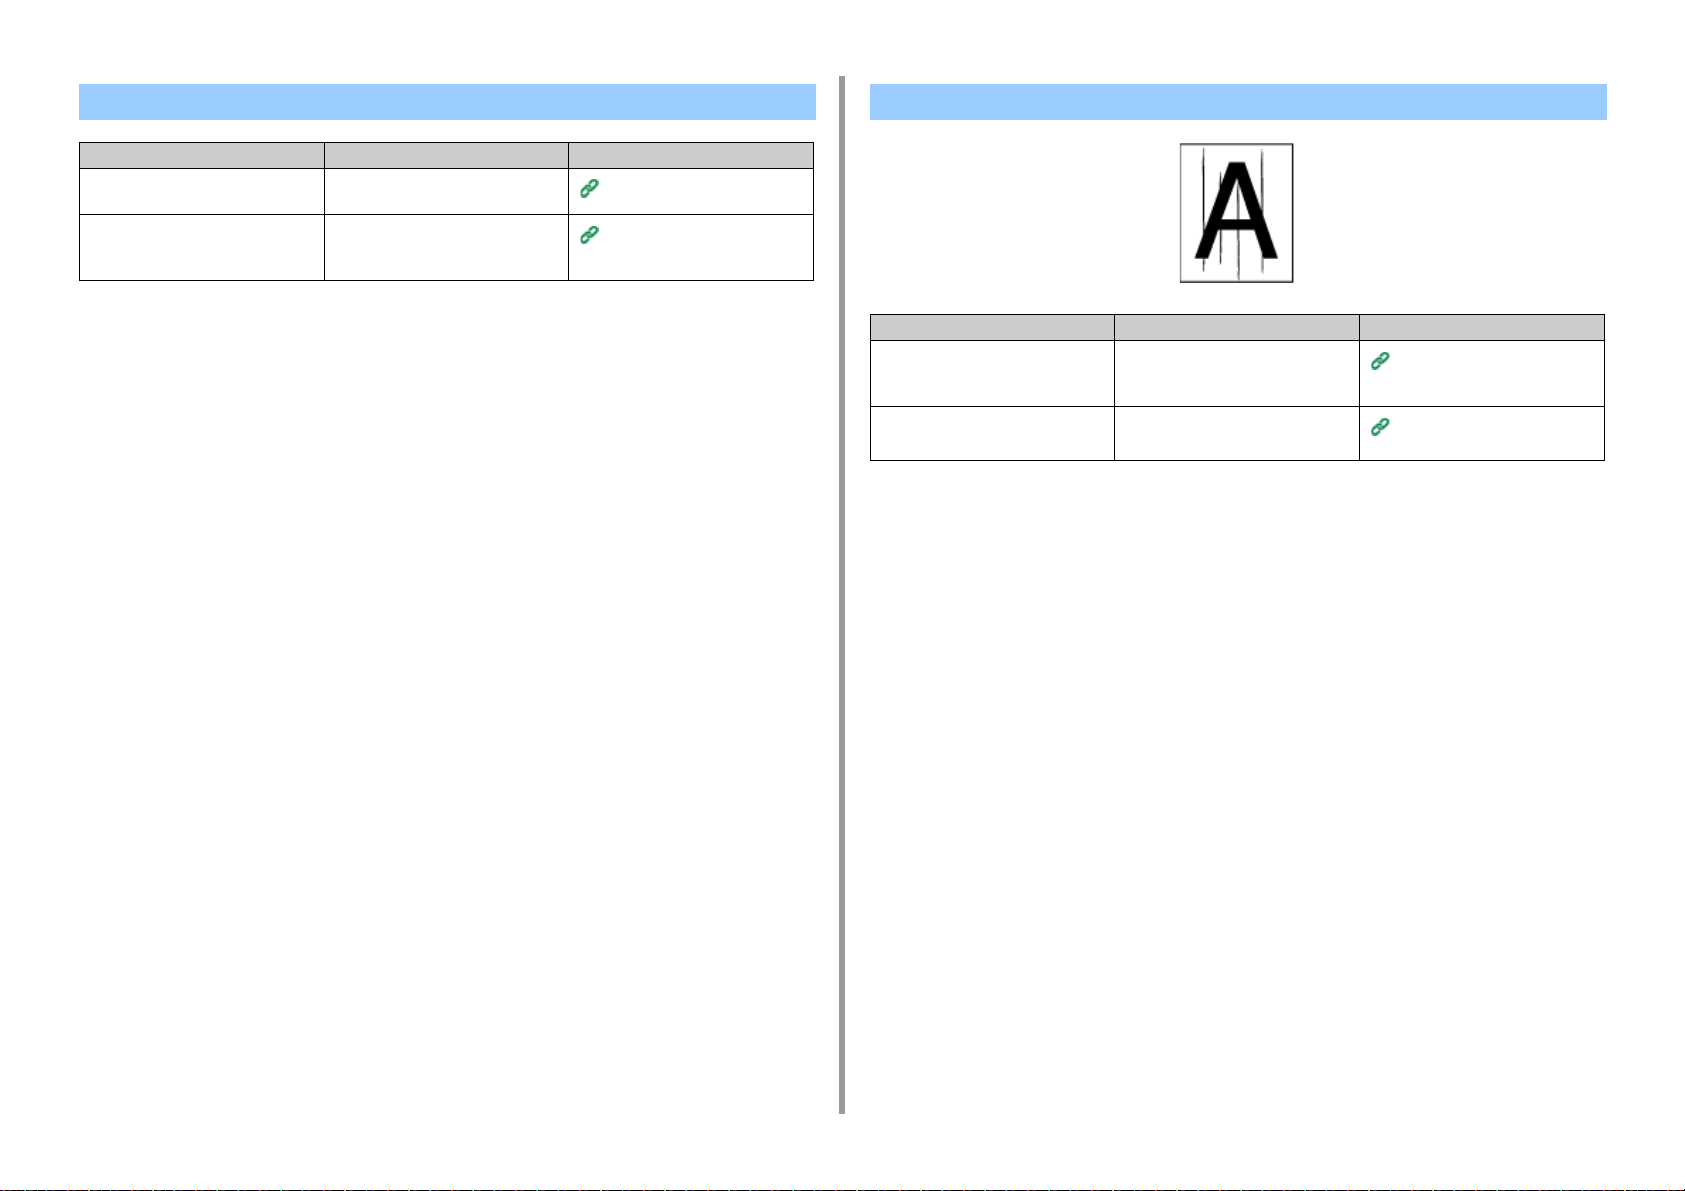
4. Troubleshooting
Dew Condensation Appears on Printed Paper
Cause Solution Reference
The paper is damp. Use paper stored under proper
temperature and humidity conditions.
The machine is printing when the
temperature and humidity conditions
are high.
Use the machine under proper
temperature and humidity conditions.
Loading Paper (User's Manual)
Installation Requirements (User's
Manual)
Vertical Lines Appear
Cause Solution Reference
The toner is low. If "Toner Low" or "Toner Empty.
Replace with new Toner Cartridge."
appears, replace the toner cartridge.
The image drum is damaged. Replace the image drum.
Replacing the Toner Cartridges
(User's Manual)
Replacing the Image Drum
(User's Manual)
- 92 -

4. Troubleshooting
Horizontal Lines and Spots Appear Periodically
Cause Solution Reference
If the intervals of lines or spots are
approximately 94 mm (3.7 inches), the
green tube of the image drum is
damaged or dirty.
If the intervals of lines or spots are
approximately 30 mm (1.2 inches),
there may be foreign objects in the
image drum.
The image drum has been exposed to
light.
Lightly wipe the image drum with a
soft tissue paper.
Replace the image drum if it is
damaged.
Open and close the output tray, and
then print again.
Place the image drum back into the
machine, and then do not use for a
few hours. If the problem persists,
replace the image drum.
-
Replacing the Image Drum
(User's Manual)
Replacing the Image Drum
(User's Manual)
White Area on Paper is Lightly Stained
Cause Solution Reference
The paper has a static charge. Use paper stored under proper
temperature and humidity conditions.
The paper is too thick. Use thinner paper.
The toner is low. If "Toner Low" or "Toner Empty.
Replace with new Toner Cartridge."
appears, replace the toner cartridge.
Loading Paper (User's Manual)
Loading Paper (User's Manual)
Replacing the Toner Cartridges
(User's Manual)
- 93 -

4. Troubleshooting
The Periphery of Characters is Smudged
Cause Solution Reference
The LED head is dirty. Wipe the LED head with a soft tissue
paper.
The paper is unsuitable. Use recommended paper.
The paper is damp. Replace the damp paper with new
paper.
Cleaning the LED Head (User's
Manual)
Loading Paper (User's Manual)
Loading Paper (User's Manual)
The Entire Paper Area is Lightly Stained When Printing on Envelopes or Coated Paper
Cause Solution Reference
The toner may stick to the whole area
of the envelope or coated paper.
This is not a malfunction.
Coated paper is not recommended.
-
- 94 -

4. Troubleshooting
Toner Comes Off When Printed Paper is Rubbed
Cause Solution Reference
The settings of the media type and
weight are incorrect.
Recycled paper is used. Press the button on the operator
The envelope lever remains attached. Remove the envelope lever.
The safety stopper remains attached
to the fuser unit.
Press the button on the operator
panel to select [Setting] > [Paper
Setup] > the paper tray you are using,
and then select the proper values for
[Media Weight]. Or, select a thicker
value for [Media Weight].
panel to select [Setting] > [Paper
Setup] > the paper tray you are using,
and then select a thicker value for
[Media Weight].
Remove the orange safety stopper
attached to the new fuser unit.
Loading Paper (User's Manual)
Loading Paper (User's Manual)
Printing on Envelopes
Replacing the Fuser Unit
Uneven Gloss
Cause Solution Reference
The settings of the media type and
weight are incorrect.
Press the button on the operator
panel to select [Setting] > [Paper
Setup] > the paper tray you are using,
and then select the proper value for
[Media Weight]. Or, select a thicker
value for [Media Weight].
Loading Paper (User's Manual)
- 95 -

4. Troubleshooting
Black or White Dots Appear
Cause Solution Reference
The paper is unsuitable. Use recommended paper.
If the intervals of lines or spots are
approximately 94 mm (3.7 inches), the
green tube of the image drum is
damaged or dirty.
Lightly wipe the image drum with a
soft tissue paper.
Replace the image drum if it is
damaged.
Loading Paper (User's Manual)
Replacing the Image Drum
(User's Manual)
Dirt is Printed
Cause Solution Reference
The paper is damp. Replace the damp paper with new
paper.
The paper is unsuitable. Use recommended paper.
Loading Paper (User's Manual)
Loading Paper (User's Manual)
- 96 -

4. Troubleshooting
The Entire Page is Printed Black
Cause Solution Reference
A malfunction may occur in the
machine.
Contact your dealer. -
Nothing is Printed
Cause Solution Reference
Two or more sheets of paper are fed
at the same time.
A malfunction may occur in the
machine.
Fan the paper well and load the paper
again.
Contact your dealer. -
Loading Paper (User's Manual)
- 97 -

4. Troubleshooting
White Patches Appear
Cause Solution Reference
The paper is damp. Replace the damp paper with new
paper.
The paper is unsuitable. Use recommended paper.
Loading Paper (User's Manual)
Loading Paper (User's Manual)
The Peripheral Area of the Page is Dirty
Cause Solution Reference
The document is not reduced at the
rate that suits the paper size.
Reduce the document at the rate that
suits the paper size.
Enlarging or Reducing to Fit the
Specified Paper Size
- 98 -

4. Troubleshooting
Color of the printed image is not what you expect
Cause Solution Reference
The toner is low. If "Toner Low" or "Toner Empty.
Replace with new Toner Cartridge."
appears, replace the toner cartridge.
The setting of [Black Finish] is not
suitable for the application.
The color adjustment has been
modified.
The color balance is out of
adjustment.
Color registration is out of alignment. Open and close the output tray. Or,
On the printer driver, select
[Composite Black (CMYK)] of [True
Black (K)] for [Black Finish].
Do color matching from the printer
driver.
Press the button on the operator
panel to select [Setting] > [Admin
Setup] > [Color Setup], and adjust
density or color balance.
press the button on the operator
panel to select [Setting] > [Admin
Setup] > [Color Setup], and then
[Adjust Registration].
Replacing the Toner Cartridges
(User's Manual)
Changing Black Finish
Using Color Matching on Printer
Driver
Correcting Density Manually
Adjusting Color Balance
(Density)
Print Setup
Solid printing of CMY 100% is too light
Cause Solution Reference
[CMY100% Density] is set to
[Disable].
Press the button on the operator
panel to select [Setting] > [Admin
Setup] > [Color Setup] > [CMY100%
Density], and then select [Enable].
-
- 99 -

4. Troubleshooting
Problems about Software
This section describes problems with software.
• Problems on Configuration Tool
• Problems on a Web Browser
• Printer Problems on a Windows PC
Problems on Configuration Tool
• [User Setting] tab
• Cloning
Symptom Cause/Solution Reference
A copy destination device
is not displayed on the
screen.
If multiple devices are
specified as copy
destinations, copying
cannot be made to some
of the devices.
The model name of the copy destination device is
different.
Cloning functions only between the devices with the
same model name.
Check the model name of the copy destination device.
The entered administrator password is different from
the administrator password of the device to which
copying cannot be made.
Check the administrator password of the device to
which copying cannot be made.
Cloning Settings
Cloning Settings
- 100 -
 Loading...