

Page 1

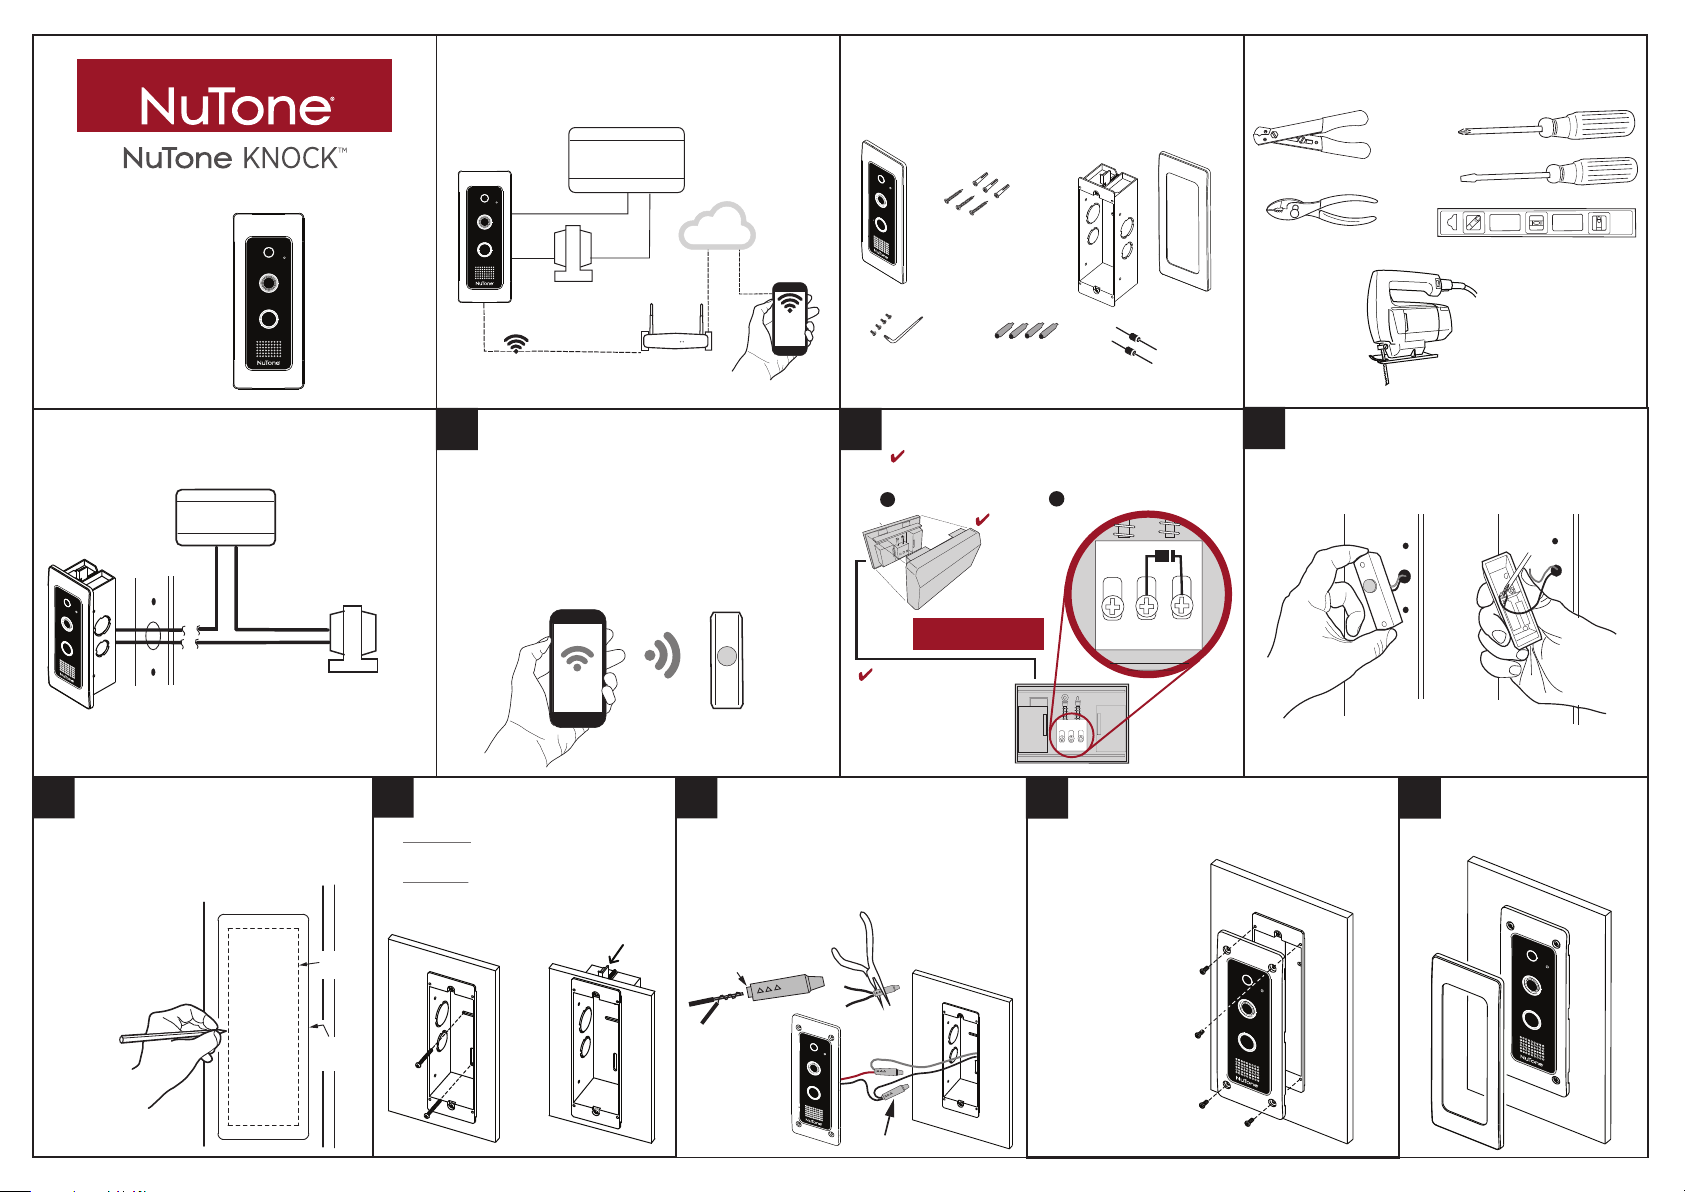
Flush Mount
DCAM100FM
Installation
Instructions
System Description
SMART
DOORBELL
CAMERA
DOORBELL
TRANSFORMER
WiFi COMMUNICATIONS
CHIME BOX
CLOUD
RETUOR iFiW
SMARTPHONE
Doorbell Camera Components
SMART
DOORBELL
CAMERA
TORX SCREW (4)
TORX
WRENCH
ANCHORS
(3)
PHILLIPS SCREWS
(3)
WIRE
CONNECTORS (4)
ROUGH-IN
MOUNTING
BOX
(Sold separately)
CAMERA
TRIM
RING
DIODES FOR
CHIME BOX (2)
Tools For Installation
WIRE STRIPPERS / CUTTER
PLIERS
JIGSAW
PHILLIPS SCREWDRIVER
FLAT SCREWDRIVER
LEVEL
System Overview
CHIME BOX
DOORBELL TRANSFORMER
Cut Out for Rough-in Box
4
• Use template (provided) to trace the
rough-in cutout area in desired location.
• Use a level to align the
template.
• Use a saw to cut
out traced area
accurately.
TRACE
AND CUT
1 2
Prepare for Installation
VERIFY WiFi STRENGTH
•
Go to existing doorbell location.
•
Use a Smartphone connected to the installations WiFi
router to confirm adequate signal strength (2 - 3 bars).
SMARTPHONE
5
Install Rough-in Box
• Method 1: Ensure that screws will have
proper supporting material in the wall.
• Method 2: Wall board must be 1-inch or
less in thinkness to use tabs. Do not
overtighten, as tabs can break.
Installing Diode in Chime Box
NOTE: It is recommended to TURN POWER OFF
before performing any wiring.
1 OPEN CHIME BOX
NOTE: Not
compatible
EXISTING
DOORBELL
IMPORTANT STEP
NOTE:
When (2)
DCAM100FM’s are used,
connect a second diode
between REAR and
TRANS terminals.
6
Wiring Doorbell Camera
• Run wires into rough in box for
electrical connections.
• Connect doorbell wires using weather-resistant
wire connectors (included).
2
1. TWIST THEN
FEED WIRES INTO
SHORT END OF
CONNECTOR
. CRIMP WIRES WITH
PLIERS ON SHORT END
OF CONNECTOR
electronic
3
•
Remove existing doorbell pushbutton from location.
•
2 INSTALL DIODE AS SHOWN
with
chimes
REAR TRANS
FRONT
TRANS
REAR
7 8
Camera Installation / Security Screw
FRONT
CHIME BOX
FRONT VIEW
WITHOUT COVER
• Use 4 security screws
(provided) with tool
(provided) to secure
camera to rough
in box.
Disconnect wires from back of pushbutton.
Existing Doorbell Removal
DISCONNECT WIRES
FROM PUSHBUTTON
DOORBELL
Complete Installation
• Press the trim ring into place.
TRIM RING
LOCATION
- OR -
CONNECTORS IN PLACE
Page 2

9 10
• TURN power ON.
• Press doorbell button.
TEST Doorbell Camera
Color
Flashing Blue once
Solid Blue 5 seconds
• If chime rings normally, continue to
next step.
• If chime DOES NOT ring
normally, the voltage of
transformer is low.
Go to Step 7. Or, replace with a
new 16 VAC, 30 VA transformer.
• Check the wire connections on
the unit, doorbell, and transformer.
12
1 Download Smartphone App
On the resident’s Smartphone, download and install the “NuTone Knock
Google Play Store (for Android phones) or from Apple App Store (for iOS phones).
2 Create an Account
With the Smartphone connected to the local network router via WiFi, select “Create an
Account.” Enter a name, valid email address, and passwork for the account, then select
Setup Operation
Flashing Blue
5 seconds (fast)
Solid Blue Doorbell can’t work
Solid Red
Flashing Green/Red
Flashing Green (Fast)
Solid Green
Flashing Green (Slow)
Flashing Red (Slow)
Flashing Red (Fast)
TM
” App from the
“Create an Account.” Receive the verification e-mail from
webinfo@nutonesmarthomeseries.com with the activation code.
NOTE: Check junk/spam email folder. This code expires in one hour after the email is
sent. Enter the activation code in the app and login.
3 Connecting to Doorbell Camera
The doorbell camera should be in Discovery mode and the button indicator should flash
red and green. If the indicator does not flash, try pressing the call button for ten to
fifteen seconds to enter Discovery mode.
4 Follow Steps on App for Final Setup.
NOTE: Remember to check App for
latest version of doorbell camera
firmware in the About Device Menu.
Accessories for NuTone
Warranty Period and Exclusions: Broan (the “Company”) warrants to the original consumer purchaser of its product ("you") that the product (the "Product") will be free from material defects in the Product or its workmanship for a
MODEL
DESCRIPTION
LA11WH Wired Door Chime
LA227WH Wi-Fi Door Chime
S97021209
S97021210
DCAM100RB
Broan 926 West State Street, Hartford, WI 53027
Mounting Box/Hardware Pack
Camera Trim Ring
Rough-in Box
www.nutone.com 888-336-3948
www.nutone.ca 877-896-1119
99045887B©2017 Broan
period of one (1) year from the date of original purchase.
The limited warranty period for any replacement parts provided by the Company and for any Products repaired or replaced under this limited warranty shall be the remainder of the original warranty period.
This warranty does not cover speed controls, fluorescent lamp starters, tubes, halogen and incandescent bulbs, fuses, filters, ducts, roof caps, wall caps and other accessories for ducting that may be purchased separately and installed
with the Product. This warranty also does not cover (a) normal maintenance and service, (b) normal wear and tear, (c) any Products or parts which have been subject to misuse, abuse, abnormal usage, negligence, accident, improper
or insufficient maintenance, storage or repair (other than repair by the Company), (d) damage caused by faulty installation, or installation or use contrary to recommendations or instructions, (e) any Product that has been moved
from its original point of installation, (f) damage caused by environmental or natural elements, (g) damage in transit, (h) natural wear of finish, (i) Products in commercial or nonresidential use, or (j) damage caused by fire, flood or
other act of God. This warranty covers only Products sold to original consumers in the United States by the Company or U.S. distributors authorized by the Company.
This warranty supersedes all prior warranties and is not transferable from the original consumer purchaser.
No Other Warranties: This Limited Warranty contains the Company's sole obligation and your sole remedy for defective products. The foregoing warranties are exclusive and in lieu of any other warranties, express or implied. THE
COMPANY DISCLAIMS AND EXCLUDES ALL OTHER EXPRESS WARRANTIES, AND DISCLAIMS AND EXCLUDES ALL WARRANTIES IMPLIED BY LAW, INCLUDING WITHOUT LIMITATION THOSE OF MERCHANTABILITY AND
FITNESS FOR A PARTICULAR PURPOSE. To the extent that applicable law prohibits the exclusion of implied warranties, the duration of any applicable implied warranty is limited to the period specified for the express warranty above.
Some states do not allow limitations on how long an implied warranty lasts, so the above limitation may not apply to you. Any oral or written description of the Product is for the sole purpose of identifying it and shall not be construed
as an express warranty.
Whenever possible, each provision of this Limited Warranty shall be interpreted in such manner as to be effective and valid under applicable law, but if any provision is held to be prohibited or invalid, such provision shall be ineffective
only to the extent of such prohibition or invalidity, without invalidating the remainder of such provision or the other remaining provisions of the Limited Warranty.
Remedy: During the applicable limited warranty period, the Company will, at its option, provide replacement parts for, or repair or replace, without charge, any Product or part thereof, to the extent the Company finds it to be covered
by and in breach of this limited warranty under normal use and service. The Company will ship the repaired or replaced Product or replacement parts to you at no charge. You are responsible for all costs for removal, reinstallation
and shipping, insurance or other freight charges incurred in the shipment of the Product or part to the Company. If you must send the Product or part to the Company, as instructed by the Company, you must properly pack the
Product or part—the Company is not responsible for damage in transit. The Company reserves the right to utilize reconditioned, refurbished, repaired or remanufactured Products or parts in the warranty repair or replacement
process. Such Products and parts will be comparable in function and performance to an original Product or part and warranted for the remainder of the original warranty period.
Exclusion of Damages: THE COMPANY’S OBLIGATION TO PROVIDE REPLACEMENT PARTS, OR REPAIR OR REPLACE, AT THE COMPANY’S OPTION, SHALL BE YOUR SOLE AND EXCLUSIVE REMEDY UNDER THIS LIMITED
WARRANTY AND THE COMPANY’S SOLE AND EXCLUSIVE OBLIGATION. THE COMPANY SHALL NOT BE LIABLE FOR INCIDENTAL, INDIRECT, CONSEQUENTIAL OR SPECIAL DAMAGES ARISING OUT OF OR IN CONNECTION
WITH THE PRODUCT, ITS USE OR PERFORMANCE.
Some states do not allow the exclusion or limitation of incidental or consequential damages, so the above limitation or exclusion may not apply to you. This warranty gives you specific legal rights, and you may also have other rights,
which vary from state to state.
This warranty covers only replacement or repair of defective Products or parts thereof at the Company’s main facility and does not include the cost of field service travel and living expenses.
Any assistance the Company provides to or procures for you outside the terms, limitations or exclusions of this limited warranty will not constitute a waiver of such terms, limitations or exclusions, nor will such assistance extend or
revive the warranty.
The Company will not reimburse you for any expenses incurred by you in repairing or replacing any defective Product, except for those incurred with the Company’s prior written permission.
How to Obtain Warranty Service: To qualify for warranty service, you must (a) notify the Company at the address or telephone number stated below within seven (7) days of discovering the covered defect, (b) give the model number
and part identification and (c) describe the nature of any defect in the Product or part. At the time of requesting warranty service, you must present evidence of the original purchase date. If you cannot provide a copy of the original
written limited warranty, then the terms of the Company’s most current written limited warranty for your particular product will control. The most current limited written warranties for the Company’s products can be found at
www.broan.com .
Broan 926 West State Street, Hartford, WI 53027 www.nutone.com 888-336-3948 www.nutone.ca 877-896-1119
LED Indicators Status
Status
Power ON
Cold start at low temperature Flashing Blue (Slow)
Connect to 16V transformer
without diode
The voltage of transformer is low
The voltage of transformer is too high
Powering up
Discovery Mode
Connecting to Cloud Server
Connected to Cloud Server
Session in Progress
Not connected to network
Firmware update
Note
1. Occurs after power on, or push the button
2. Can’t ring the chime box
1. Occurs after power on, or push the button
2. Proceed to Step 7.
Skip Step 7 and proceed to Step 8.
Skip Step 7 and proceed to Step 8.
11
If your transformer voltage is too low (see Step 10), proceed with Step 11.
Otherwise, skip Step 11 and proceed to Step 12.
1. Turn off the power.
2. Open the chime box.
3. Connect the two wires on
the Transformer terminal.
4. Turn on the power.
5. Blue LED flashes once.
6. The mechanical chime
will no longer ring. Add the optional Wi-Fi Chime if desired.
Doorbell Camera Troubleshooting
MY DOORBELL APP
Q: The App doesn’t save photos or videos on my smartphone?
A: Please ensure you have suffi cient memory on your smart device.
Also ensure permissions are enabled on the App to access
the device memory.
NETWORK
Q: The doorbell doesn’t register on the Wi-Fi network. Why?
The smart Doorbell Camera may be out of range of your Wi-Fi network. Move the
A:
router or install a Wi-Fi extender. Note, the Doorbell Camera supports 2.4Ghz
networks only.
Q: The smart Doorbell Camera loses network connectivity?
A: The smart Doorbell Camera may be out of range of your Wi-Fi network. Move the
router or install a Wi-Fi extender.
Limited Warranty
Wiring Doorbell without Chime Box connected (AC 16V, 10VA ~ 30VA)
Connect the
two wires
on the
Transformer
terminal.
Transformer
Doorbell
FRONT
TRANS
REAR
Doorbell Camera Troubleshooting
POWER
Q: The doorbell power cycles off and on?
A: Check that the doorbell camera power wires are
securely connected. The existing doorbell wiring may
be bad. Refer to Step 7.
Q: Why doesn’t the doorbell camera power up?
A: Refer to installation instructions:
1. Confirm transformer power is turned ON.
2. Confirm diode is installed correctly.
3. Confirm wiring / connections are correct and secure.
Regulatory Information
The DCAM100FM is certified to comply with applicable FCC and IC rules and regulations
governing RF and EMI emissions. Refer to DCAM100FM.
This device complies with Part 15 of the FCC Rules. Operation is subject to the following
two conditions: (1) This device may not cause harmful interference, and (2) This device must
accept any interference received, including interference that may cause undesired operation.
FCC Notice
This equipment has been tested and found to comply with the limits for a Class B digital
device, pursuant to Part 15 of the FCC Rules. These limits are designed to provide reasonable
protection against harmful interference in a residential installation.
This equipment generates, uses, and can radiate radio frequency energy and, if not installed
and used in accordance with the instructions may cause harmful interference to radio
communications. However, there is no guarantee that interference will not occur in a particular
installation. If this equipment does cause harmful interference to radio or television reception,
which can be determined by turning the equipment off and on, the user is encouraged to try
to correct the interference by one or more of the following measures:
• Reorient or relocate the receiving antenna.
• Increase the separation between the equipment and receiver
• Connect the equipment into an outlet on a circuit different
from that to which the receiver is connected.
• Consult the dealer or an experienced radio/TV technician to help.
Changes or modifications not expressly approved by the party responsible for compliance
could void the user’s authority to operate the equipment.
IC Notice
This Class B digital apparatus complies with Canadian ICES-003
This device complies with the Industry Canada license exempt RSS standard(s). Operation
is subject to the following two conditions: (1) this device may not cause interference, and (2)
this device must accept any interference, including interference that may cause undesired
operation of the device.
Cet appareil numérique de la classe B est conforme à la norme NMB-003 du Canada.
Le présent appareil est conforme aux CNR d’Industrie Canada applicables aux appareils
radio exempts de licence. L’exploitation est autorisée aux deux conditions suivantes : (1)
l’appareil ne doit pas produire de brouillage, et (2) l’utilisateur de l’appareil doit accepter tout
brouillage radioélectrique subi, même si le brouillage est susceptible d’en compromettre le
fonctionnement.
Page 3
Montage encastré
DCAM100FM
Directives
d’installation
Description du système
CAMÉRA
INTELLIGENTE
DU CARILLON
DE PORTE
TRANSFORMATEUR DU
CARILLON DE PORTE
COMMUNICATIONS Wi-Fi
BOÎTIER DU CARILLON
ROUTEUR Wi-Fi
NUAGE
TÉLÉPHONE
INTELLIGENT
Composantes de la caméra du carillon de porte
CAMÉRA
INTELLIGENTE
DU CARILLON
DE PORTE
VIS TORX (4)
DISPOSITIFS
D’ANCRAGE
VIS À TÊTE CRUCIFORME
(3)
SERRE-FILS (4)
CLÉ
TORX
(3)
BOÎTIER DE
MONTAG BRUT
(boîte de
montage
préliminaire)
DIODES POUR BOÎTIER
ANNEAU DE
GARNITURE
DE CAMÉRA
DE CARILLON (2)
Outils requis pour l’installation
TOURNEVIS CRUCIFORME
PINCE À DÉNUDER/COUPE-FILS
PINCES
SCIE SAUTEUSE
TOURNEVIS PLAT
NIVEAU
Aperçu du système
BOÎTIER DU CARILLON
TRANSFORMATEUR DU
CARILLON DE PORTE
Découpe pour le boîtier brut
4
• Utilisez le gabarit (fourni) pour tracer la zone
de découpe préliminaire à l’emplacement désiré.
• Utilisez un niveau pour
aligner le gabarit.
• Utilisez une scie
pour découper la
zone tracée avec
précision.
TRACER ET
DÉCOUPER
1 2
Préparation pour l’installation
VÉRIFICATION DE LA PUISSANCE DU SIGNAL Wi-Fi
• Allez à l’emplacement actuel du carillon de porte.
• À l’aide d’un téléphone intelligent connecté au routeur
Wi-Fi de l’installation, confirmez que la force du signal
est adéquate (2 à 3 bars).
TÉLÉPHONE INTELLIGENT
5
Installation du boîtier brut
• Méthode 1 : Vérifiez que les vis seront
convenablement soutenues dans le mur.
• Méthode 2 : L’épaisseur du panneau mural doit
BOUTON DU
CARILLON ACTUEL
6
• Faites passer les fils dans le boîtier brut pour
• Pour connecter les fils du carillon, utilisez des
être d’un (1) pouce (2,5 cm) ou moins pour
permettre l’utilisation de languettes. Ne serrez pas
à l’excès, car les languettes pourraient se casser.
1. TORDEZ LES FILS PUIS
INSÉREZ-LES DANS LA
PARTIE COURTE DU
SERRE-FILS
Installation d’une diode dans le boîtier du carillon
REMARQUE : Il est conseillé de FERMER
L’ALIMENTATION avant de procéder au câblage.
OUVREZ LE BOÎTIER DU CARILLON
1
REMARQUE :
Non compatible
avec les carillons
électroniques
ÉTAPE IMPORTANTE
REMARQUE : En cas
d’utilisation de (2)
DCAM100FM, connectez
une deuxième diode
entre les bornes
ARRIÈRE et TRANS.
Câblage de la caméra du carillon de porte
réaliser les connexions électriques.
serre-fils résistants aux intempéries (fournis).
2. SERREZ LES FILS
AVEC DES PINCES SUR
LA PARTIE COURTE DU
SERRE-FILS.
3
Retrait du carillon actuel
• Retirez de l’emplacement le bouton du carillon existant.
2
INSTALLEZ LA DIODE COMME ILLUSTRÉ
REAR TRANS
FRONT
TRANS
REAR
7 8
Installation de la caméra / Vis de sécurité
FRONT
VUE AVANT DU
BOÎTIER DU
CARILLON OUVERT
• Débranchez les fils de l’arrière du bouton.
DÉBRANCHEZ LES FILS
DU BOUTON DU CARILLON
• Utilisez 4 vis de
sécurité (fournies)
avec l’outil (fourni)
pour fixer la caméra
sur le boîtier brut.
Pour terminer l’installation
• Appuyez sur l’anneau de garniture
pour le mettre en place.
EMPLACEMENT
DE L’ANNEAU
DE GARNITURE
- OU -
SERRE-FILS EN PLACE
Page 4

9 10
• METTEZ l’alimentation sous TENSION.
• Appuyez sur le bouton du carillon.
TEST de la caméra du carillon
Couleur
Bleu clignotant (une fois)
Bleu fixe (5 secondes)
• Si le carillon sonne normalement,
passez à l’étape suivante.
• Si le carillon NE SONNE PAS
normalement, la tension du
transformateur est faible.
Passez à l’étape 7.
Ou, remplacez-le par un
transformateur neuf de 16 V CA et 30 VA.
• Vérifiez le branchement des fils sur l’unité,
le carillon de porte et le transformateur.
12
1. Télécharger l’application pour téléphone intelligent
Sur le téléphone intelligent du résident, téléchargez et installez l’application « NuTone Knock
boutique Google Play (pour les téléphones Androïdes) ou de la boutique Apple App (pour les téléphones iOS)
2. Créer un compte
Le téléphone intelligent étant connecté au routeur du réseau local par Wi-Fi, sélectionnez « Créer un compte ».
Saisissez un nom, une adresse courriel valide et un mot de passe pour le compte, puis sélectionnez
« Créer un compte ». Vous recevrez un courriel de vérification de webinfo@nutonesmarthomeseries.com,
accompagné d’un code d’activation.
REMARQUE : Vérifiez le contenu de votre boîte de courriels indésirables. Ce code expire au bout d’une
heure après l’envoi du courriel. Entrez le code d’activation dans l’application et connectez-vous.
3. Connexion à la caméra du carillon de porte
La caméra du carillon doit être en mode Découverte et le bouton témoin doit clignoter en rouge et en vert.
Si le témoin ne clignote pas, essayez d’appuyer sur le bouton d’appel pendant dix à quinze secondes pour
entrer en mode Découverte.
4. Suivre les étapes de l’application pour achever
la configuration.
Accessoires pour NuTone
MODÈLE
LA11WH
LA227WH
S97021209
S97021210
DCAM100RB
Broan 926 West State Street, Hartford, WI 53027
DESCRIPTION
Carillon de porte câblé
Carillon de porte Wi-Fi
Ensemble Boîtier de montage/éléments
de fixation
Anneau de garniture de la caméra
Boîte de montage préliminaire
www.nutone.com 888-336-3948
Broan Canada 1140 Tristar Drive
Mississauga, Ontario, Canada L5T 1H9
www.nutone.ca 1 877 896-1119
Installation et configuration
REMARQUE : N’oubliez pas de rechercher dans
l’application la dernière version du micrologiciel
de la caméra du carillon de porte dans le
menu About (à propos de) du dispositif.
Période de garantie et exclusions : Broan-NuTone LLC (la « Société ») garantit au consommateur acheteur initial (« vous ») de son produit (le « Produit ») que celui-ci est exempt de tout vice de matériau ou de fabrication pour une période
de un (1) an à compter de la date d’achat originale.
La période de la garantie limitée sur toute pièce de remplacement fournie par la Société et sur tout produit réparé ou remplacé en vertu de la présente garantie limitée correspond au reste de la période de garantie originale.
La présente garantie ne s’applique pas aux commandes de vitesse, tubes fluorescents et aux démarreurs, ni aux ampoules halogènes ou incandescentes, fusibles, filtres, conduits, capuchons de toit, capuchons muraux et autres accessoires
pour conduits pouvant avoir été achetés séparément et installés avec le produit. La présente garantie ne couvre pas (a) les travaux d’entretien et de service normaux, (b) l’usure normale, (c) tout produit ou toute pièce ayant fait l’objet d’une
mauvaise utilisation, d’un abus, d’un usage anormal, d’une négligence, d’un accident, d’un entretien, rangement ou réparation inadéquats ou insuffisants (autre que par la Société), (d) les dommages dus à une mauvaise installation, ou à une
installation ou utilisation contraires aux recommandations ou instructions, (e) tout produit déplacé de son lieu d’installation original, (f) les dommages dus à des éléments environnementaux ou naturels, (g) les dommages dus au transport,
(h) l’usure naturelle du fini, (i) les produits utilisés à des fins commerciales ou non-résidentielles ou (j) les dommages dus à un incendie, à une inondation ou à un événement fortuit. La présente garantie ne couvre que les produits vendus au
consommateur initial aux États-Unis par la Société ou par les distributeurs américains autorisés par la Société.
La présente garantie remplace toute garantie précédente et le consommateur et acheteur initial ne peut la céder à quiconque.
Aucune autre garantie : La présente garantie limitée stipule les seules obligations de la Société et votre seul recours en cas de produits défectueux. La garantie ci-dessus est exclusive et remplace toute autre garantie, expresse ou tacite. LA
SOCIÉTÉ EXCLUT TOUTE AUTRE GARANTIE EXPRESSE ET TOUTE GARANTIE DÉCOULANT IMPLICITEMENT DE LA LOI, Y COMPRIS, SANS S’Y LIMITER, LES GARANTIES DE VALEUR MARCHANDE ET D’ADÉQUATION À UN USAGE
PARTICULIER. Dans la mesure où la loi en vigueur interdit l’exclusion des garanties tacites, la durée de toute garantie tacite est limitée à la période stipulée ci-dessus pour la garantie expresse. Certaines juridictions interdisant de limiter la
durée d’une garantie tacite, la limitation ci-dessus peut ne pas s’appliquer à votre situation. Toute description verbale ou écrite du produit a pour seule fin de l’identifier et ne doit pas être interprétée comme une garantie expresse.
Si possible, chaque disposition de cette garantie limitée doit être interprétée de sorte à être en vigueur et valide en vertu des lois applicables, mais si une disposition s’avère interdite ou invalide, elle le sera seulement dans la mesure de cette
interdiction ou invalidité, sans invalider le reste de cette disposition ni les autres dispositions de la présente garantie limitée.
Recours : Pendant la période de garantie limitée applicable, la Société pourra, à son choix, fournir des pièces de rechange ou réparer ou remplacer, sans frais, tout produit ou toute pièce, dans la mesure où la Société constate qu’il est couvert
et contrevient à la présente garantie limitée dans des conditions normales d’utilisation et de service. La Société vous enverra gratuitement le produit réparé ou remplacé ou les pièces de rechange. Vous êtes responsable des frais de démontage,
de remontage, d’expédition, d’assurance ou de tous autres frais de transport pour l’envoi du produit ou de la pièce à la Société. Si vous devez envoyer le produit ou la pièce à la Société, tel que la Société vous l’indiquera, vous devrez l’emballer
correctement. La Société n’est pas responsable des dommages subis lors du transport. La Société se réserve le droit d’utiliser des produits ou des pièces remis en état, remis à neuf, réparés ou réusinés dans le processus de réparation ou de
remplacement sous garantie. Lesdits produits ou pièces seront comparables en fonction et en performance aux produits et pièces d’origine et seront garantis pendant le reste de la période de garantie originale.
Exclusion de dommages : L’OBLIGATION DE LA SOCIÉTÉ DE FOURNIR DES PIÈCES DE RECHANGE, OU DE RÉPARER OU REMPLACER LE PRODUIT, À SON CHOIX, CONSTITUE VOTRE SEUL ET UNIQUE RECOURS EN VERTU DE LA
PRÉSENTE GARANTIE LIMITÉE ET LA SEULE ET UNIQUE OBLIGATION DE LA SOCIÉTÉ. LA SOCIÉTÉ NE PEUT ÊTRE TENUE RESPONSABLE DE TOUT DOMMAGE INDIRECT, CONSÉCUTIF, ACCESSOIRE OU SPÉCIAL DÉCOULANT DE
L’UTILISATION OU DU RENDEMENT DU PRODUIT.
Certains territoires ou provinces ne permettant pas la limitation ou l’exclusion des dommages indirects ou consécutifs, la limitation ci-dessus peut ne pas s’appliquer à votre situation. La présente garantie vous confère des droits spécifiques
reconnus par la loi. D’autres droits pourraient également vous être accordés selon la législation locale en vigueur.
La présente garantie ne couvre que le remplacement ou la réparation des produits ou pièces défectueux à l’usine principale de la Société et ne comprend pas les frais de voyage et ni les dépenses quotidiennes pour une réparation àdomicile.
Toute aide que la Société vous fournit en dehors des dispositions, limitations ou exclusions de cette garantie limitée ne constituera en rien une renonciation auxdites dispositions, limitations ou exclusions, et ne prolongera aucunement cette
garantie pas plus qu’elle ne la remettra en vigueur.
La Société ne vous remboursera aucune dépense encourue par vous pour la réparation ou le remplacement de tout produit défectueux, sauf celles que vous avez encourues avec la permission écrite préalable de la Société.
Comment bénécier du service de garantie : Pour vous prévaloir de cette garantie, vous devez (a) aviser la Société à l’adresse ou au numéro de téléphone indiqués ci-dessous dans les sept (7) jours du constat de la défectuosité couverte,
(b) donner le numéro de modèle du produit et le numéro d’identification de la pièce et (c) décrire la nature de la défectuosité du produit ou de la pièce. Lors de votre demande de garantie, vous devez présenter une preuve de la date d’achat
originale. Si vous ne pouvez pas fournir une copie écrite de la garantie limitée originale, les dispositions de la garantie limitée écrite la plus récente de la Société concernant ce produit particulier s’appliqueront. Vous trouverez les garanties
99045889B©2017 Broan
limitées écrites les plus récentes des produits de la Société sur le site www.broan.ca.
Broan Canada 1140 Tristar Drive Mississauga, Ontario, Canada L5T 1H9 www.nutone.ca 1 877 896-1119
Bleu clignotant
(5 secondes) (rapide)
Bleu fixe Le carillon de porte ne peut pas fonctionner
Rouge fixe
Vert/rouge clignotant
Vert clignotant (rapide)
Vert fixe
Vert clignotant (lent)
Rouge clignotant (lent)
Rouge clignotant (rapide)
TM
» de la
État des indicateurs à DEL
État
Alimentation SOUS TENSION
Démarrage à froid à basse températureBleu clignotant (lent)
Connexion au transformateur 16 V
sans diode
Faible tension du transformateur
Tension du transformateur trop élevée
Mise sous tension
Mode Découverte
Connexion au serveur Cloud (nuage) en cours
Connecté au serveur Cloud (nuage)
Session en cours
Non connecté au réseau
Mise à jour logicielle
1. Se produit après la mise sous tension, ou l’appui sur le bouton
2. Impossible de faire sonner le carillon
1. Se produit après la mise sous tension, ou l’appui sur le bouton
2. Passez à l’étape 7
Omettez l’étape 7 et passez à l’étape 8.
Omettez l’étape 7 et passez à l’étape 8.
Remarque
Dépannage de la caméra de carillon de porte
APPLICATION MY DOORBELL
Q : L’application n’enregistre pas les photos ou les vidéos sur mon téléphone
intelligent?
R : Assurez-vous que votre appareil intelligent dispose de suffisamment de mémoire.
Vérifiez également que les autorisations sont activées sur l’application pour vous
permettre d’accéder à la mémoire de l’appareil.
RÉSEAU
Q : Le carillon ne s’inscrit pas dans le réseau Wi-Fi. Pourquoi?
R : La caméra intelligente du carillon de porte pourrait être hors de portée de votre
réseau Wi-Fi. Déplacez le routeur ou installez un amplificateur Wi-Fi. Veuillez noter
que la caméra du carillon de porte ne prend en charge que les réseaux de 2,4 Ghz.
Q : La caméra intelligente du carillon de porte perd sa connectivité au réseau?
R : La caméra intelligente du carillon de porte pourrait être hors de portée de votre
réseau Wi-Fi. Déplacez le routeur ou installez un amplificateur Wi-Fi.
Garantie limitée
11
Câblage du carillon de porte lorsque le boîtier du carillon
n’est pas connecté (CA 16 V, 10 VA à 30 VA)
Si la tension de votre transformateur est trop faible (voir l’étape 10), passez à l’étape 11.
Sinon, omettez l’étape 11 et passez à l’étape 12.
1. Coupez l’alimentation.
2. Ouvrez le boîtier du carillon.
3. Connectez les deux fils sur la
borne du transformateur.
4. Remettez
l’alimentation
Carillon de porte
FRONT
TRANS
REAR
Connectez les
deux fils sur
la borne du
transformateur.
Transformateur
sous tension.
5. La DEL bleue clignote une fois.
6. Le carillon mécanique ne retentira plus. Ajoutez le carillon
Wi-Fi en option, si vous le souhaitez.
Dépannage de la caméra de carillon de porte
ALIMENTATION
Q : L’alimentation du carillon de porte s’active et se désactive?
R : Vérifiez que les fils d’alimentation de la caméra du carillon
de porte sont solidement branchés. Le câblage actuel du
carillon est peut-être en mauvais état. Reportez-vous à
l’étape 7.
Q : Pourquoi la caméra du carillon ne se met-elle pas sous
tension?
R : Reportez-vous aux directives d’installation.
1. Vérifiez que le transformateur est SOUS TENSION.
2. Vérifiez que la diode est correctement installée.
3. Vérifiez que les fils et les connexions sont corrects et
bien assurés.
Avis relatif à la réglementation
La DCAM100FM est certifiée conforme aux règles et réglementations applicables FCC
et CI régissant les émissions RF et EMI. Consultez DCAM100FM.
Cet appareil est conforme aux normes énoncées à la section 15 des règlements de la
FCC. Son fonctionnement est assujetti aux conditions suivantes : (1) l’appareil ne doit
pas provoquer d’interférences nuisibles, et (2) il doit tolérer les interférences reçues,
notamment celles susceptibles de provoquer un fonctionnement non souhaité.
AVIS DE LA FCC
Cet équipement a été testé et constaté conforme aux limites des appareils numériques
de Classe B, en vertu de la section 15 des Règlements de la FCC. Ces limites visent à
offrir une protection raisonnable contre les interférences indésirables dans une
installation résidentielle.
Cet équipement génère, utilise et peut émettre des radiofréquences et, s’il n’est pas
installé et utilisé conformément aux instructions, peut produire des interférences
nuisibles pour les radiocommunications. Il n’y a toutefois aucune garantie que des
interférences ne se produiront pas dans une installation particulière. Si cet équipement
produit des interférences qui nuisent à une réception radio ou télévisuelle, ce qui peut
être déterminé en éteignant et en allumant l’appareil, l’utilisateur est invité à corriger la
situation par l’un ou l’autre des moyens suivants :
• Réorienter ou déplacer l’antenne réceptrice.
• Éloigner l’équipement du récepteur.
• Brancher l’équipement dans une autre prise de courant sur un circuit différent de
celui du récepteur.
• Consulter le détaillant ou un technicien spécialisé en radio/télévision.
Toute modification non expressément approuvée par la partie responsable du respect
de la réglementation peut annuler le droit de l’utilisateur d’utiliser cet équipement.
AVIS D’INDUSTRIE CANADA
Cet appareil numérique de Classe B est conforme à la norme canadienne ICES-003.
Cet appareil numérique de la classe B est conforme à la norme NMB-003 du Canada.
Le présent appareil est conforme aux CNR d’Industrie Canada applicables aux appareils
radio exempts de licence. L’exploitation est autorisée aux deux conditions suivantes :
(1) l’appareil ne doit pas produire de brouillage, et (2) l’utilisateur de l’appareil doit
accepter tout brouillage radioélectrique subi, même si le brouillage est susceptible d’en
compromettre le fonctionnement.
Page 5

Montura empotrada para
DCAM100FM
Instrucciones
de instalación
Descripción del sistema
CÁMARA
DEL TIMBRE
INTELIGENTE
TRANSFORMADOR
DEL TIMBRE
COMUNICACIONES POR Wi-Fi
CAJA DE TIMBRES
ENRUTADOR
DE Wi-Fi
NUBE
SMARTPHONE
Componentes de la cámara del timbre
CÁMARA
DEL TIMBRE
INTELIGENTE
TORNILLOS TORX (4)
LLAVE
TORX
ANCLAJES
(3)
TORNILLOS PHILLIPS
(3)
CONECTORES
DE CABLE (4)
CAJA DE
MONTAJE
DE EMPALME
(se vende
por separado)
EMBELLECEDOR
DE LA
CÁMARA
DIODOS PARA LA
CAJA DE TIMBRES
(2)
Herramientas para la instalación
CORTADOR/DESFORRADOR
DE CABLES
ALICATES
SIERRA DE CALAR
DESTORNILLADOR DE CABEZA PLANA
DESTORNILLADOR PHILLIPS
NIVEL
Descripción general del sistema
CAJA DE TIMBRES
TRANSFORMADOR
DEL TIMBRE
Recorte para la caja de empalme
4
• Use la plantilla (provista) para marcar el área
a recortar en el lugar deseado.
• Use un nivel para alinear la plantilla.
• Use una sierra
para cortar el
área marcada
con precisión.
MARCAR
Y CORTAR
1 2
Preparación para la instalación
VERIFIQUE LA INTENSIDAD DE LA SEÑAL DE Wi-Fi
•
Vaya a la ubicación del timbre existente.
•
Use un smartphone conectado al enrutador de Wi-Fi
de las instalaciones, para confirmar la intensidad adecuada
de la señal (2 - 3 barras).
SMARTPHONE
5
Instalación de la caja de empalme
TIMBRE DE PUERTA
• Método 1: Asegúrese de que los tornillos tengan
el material de soporte adecuado en la pared.
• Método 2: El panel de pared debe tener un grosor
de 1 pulgada (2.5 cm) o menos para usar pestañas.
No apriete demasiado, ya que las pestañas
pueden romperse.
Instalación del diodo en la caja de timbres
NOTA:
Se recomienda que CORTE LA ELECTRICIDAD
antes de realizar cualquier cableado.
ABRA LA CAJA DE TIMBRES
1
NOTA:
es compatible
con timbres
EXISTENTE
PASO IMPORTANTE
NOTA: Cuando se
utilicen (2) DCAM100FM,
conecte un segundo
diodo entre los terminales
REAR y TRANS.
6
Cableado de la cámara del timbre
• Pase los cables al interior de la caja de conexiones
eléctricas.
• Conecte los cables del timbre de la puerta usando
conectores resistentes a la intemperie (incluidos).
1. ENTRELACE Y PASE LOS
CABLES POR EL EXTREMO
CORTO DEL CONECTOR
2. ENGARCE LOS CABLES
CON PINZAS EN EL EXTREMO
CORTO DEL CONECTOR
electrónicos
3
Retirada del timbre existente
• Retire el botón del timbre existente del lugar donde esté
INSTALE EL DIODO COMO SE MUESTRA
2
instalado.
• Desconecte los cables de la parte posterior del botón.
No
REAR TRANS
FRONT
TRANS
REAR
7 8
Instalación de la cámara / Tornillo de seguridad
FRONT
VISTA FRONTAL
DE LA CAJA DE
TIMBRES SIN
CUBIERTA
DESCONECTE LOS CABLES
DEL BOTÓN DEL TIMBRE
DE LA PUERTA
• Use 4 tornillos de seguridad
(provistos) con la
herramienta (provista)
para fijar la cámara a la
caja de empalme.
Completar la instalación
• Coloque a presión el embellecedor.
UBICACIÓN DEL
EMBELLECEDOR
- O BIEN -
CONECTORES EN SU LUGAR
Page 6

9 10
• ENCIENDA la corriente
• Pulse el botón del timbre.
• Si el timbre suena con normalidad,
• Si el timbre NO suena con
• Verifique las conexiones de cables
12
PROBAR la cámara del timbre
Color
Destella una vez en color azul
Destella (lento) en color azul
Luz azul fija durante 5 segundos
continúe con el siguiente paso.
normalidad, significa que
el voltaje del transformador es
bajo. Diríjase al paso 7. O bien,
reemplácelo con un nuevo
transformador de 16 VCA y 30 VA.
en la unidad, el timbre de la puerta
y el transformador.
Destella (rápido) en color
azul durante 5 segundos
Luz azul fija
Luz roja fija
Destella en verde/rojo
Destella (rápido) en color verde
Color verde fijo
Destella (lento) en color verde
Destella (lento) en color rojo
Destella (rápido) en color rojo
Configuración
1. Descargue la aplicación para el smartphone
En el smartphone del residente, descargue e instale la aplicación “NuTone Knock
tienda Google Play (para teléfonos Android) o desde la Apple App Store (para teléfonos iOS).
TM
” de la
2. Cree una cuenta
Con el smartphone conectado al enrutador de la red local por Wi-Fi, seleccione “Create an Account”
(Crear una cuenta). Ingrese un nombre, un correo electrónico válido y una contraseña para la
cuenta, y luego seleccione “Create an Account” (Crear una cuenta). Recibirá un correo electrónico
de verificación de webinfo@nutonesmarthomeseries.com, con el código de activación.
NOTA: Revise la carpeta de correo no deseado/spam. Este código vence en una hora después de
enviar el correo electrónico. Ingrese el código de activación en la aplicación e inicie sesión.
3. Conexión a la cámara del timbre
La cámara del timbre debe estar en modo Discovery y el indicador del botón debe destellar en rojo
y en verde. Si el indicador no destella, pruebe pulsando el botón de llamada de diez a quince
segundos para entrar al modo Discovery.
4. Siga los pasos de la aplicación para la
configuración final.
Accesorios para NuTone
MODELO
LA11WH Timbre de puerta con cableado
LA227WH Timbre de puerta por Wi-Fi
S97021210 Embellecedor de la cámara
DCAM100RB Caja de montaje preliminar
DESCRIPCIÓN
Caja de montaje / Paquete de herrajesS97021209
Broan 926 West State Street, Hartford, WI 53027
www.nutone.com 888-336-3948
www.nutone.ca 877-896-1119
NOTA: Recuerde revisar la aplicación para ver si tiene
la última versión del firmware de la cámara del timbre
en el menú About Device (Acerca del dispositivo).
Periodo y exclusiones de la garantía: Broan-NuTone LLC (la “Compañía”) garantiza al consumidor comprador original de su producto (“usted”) que el producto (el “Producto”) estará libre de defectos en materiales o en mano de obra, por
un periodo de un (1) año a partir de la fecha de compra original.
El periodo de garantía limitada para cualquier pieza de repuesto proporcionada por la compañía y para cualquier Producto reparado o reemplazado bajo esta garantía limitada debe ser lo que reste del periodo de garantía original.
Esta garantía no cubre controles de velocidad, arrancadores de lámparas fluorescentes, tubos, bombillas de halógeno e incandescentes, fusibles, filtros, conductos, tapas de techo, tapas de pared ni otros accesorios que pudieran ser comprados
por separado e instalados con el producto. Esta garantía tampoco cubre (a) mantenimiento y servicio normal, (b) uso y desgaste normal, (c) Productos o piezas sujetos a mal uso, abuso, uso anormal, negligencia, accidente, mantenimiento
inadecuado o insuficiente, almacenamiento o reparación (que no sea reparación por parte de la Compañía), (d) daños causados por instalación defectuosa, o bien instalación o uso contrario a las recomendaciones o instrucciones, (e) cualquier
Producto que se haya movido de su punto de instalación original, (f) daños ocasionados por el medio ambiente o los elementos naturales, (g) daños en tránsito, (h) desgaste natural del acabado, (i) Productos en uso comercial o no residencial,
o (j) daños ocasionados por incendio, inundación u otro caso fortuito. Esta garantía cubre solamente Productos vendidos a clientes originales en los Estados Unidos por la Compañía o a distribuidores de EE. UU. autorizados por la Compañía.
Esta garantía sustituye todas las garantías anteriores y no es transferible del comprador consumidor original.
No hay otras garantías: Esta garantía limitada contiene la única obligación de la Compañía y su único recurso ante productos defectuosos. Las garantías anteriores son exclusivas y en lugar de cualquier otra garantía, expresa o implícita. LA
COMPAÑÍA NIEGA Y EXCLUYE CUALQUIER OTRA GARANTÍA EXPRESA, Y NIEGA Y EXCLUYE TODAS LAS GARANTÍAS IMPLÍCITAS POR LEY, INCLUYENDO, ENTRE OTRAS, LAS DE COMERCIALIZACIÓN Y APTITUD PARA UN PROPÓSITO
EN PARTICULAR. Hasta el grado en que la ley aplicable prohíba la exclusión de las garantías implícitas, la duración de cualquier garantía implícita aplicable está limitada al periodo especificado para la garantía expresa antes mencionada. Algunos
estados no permiten limitaciones en la duración de una garantía implícita, así que la limitación anterior tal vez no aplique en su caso. Cualquier descripción verbal o escrita del Producto es para el único propósito de identificarlo y no deberá
considerarse como una garantía expresa.
Siempre que sea posible, toda disposición de esta garantía limitada deberá ser interpretada de tal forma que sea efectiva y válida de conformidad con la ley aplicable, pero si alguna disposición fuera considerada prohibida o inválida, quedará
sin efecto solo en virtud de dicha prohibición o invalidez, sin invalidar el resto de dicha disposición o las demás disposiciones restantes de la garantía limitada.
Recurso: Durante el periodo de garantía limitada aplicable, la Compañía, a su opción, suministrará piezas de repuesto, o reparará o reemplazará, sin cargo alguno, cualquier Producto o pieza del mismo, hasta el grado en que la Compañía lo
encuentre cubierto bajo esta garantía limitada y en incumplimiento de la misma en condiciones normales de uso y servicio. La Compañía le enviará el Producto reparado o reemplazado o las piezas de repuesto sin cargo. Usted es responsable
de todos los costos de retiro, reinstalación y envío, seguro u otros cargos de flete incurridos en el envío del Producto o pieza a la Compañía. Si debe enviar el Producto o la pieza a la Compañía, tal como lo indique la Compañía, debe empaquetar
adecuadamente el Producto o la pieza: la Compañía no se hace responsable por los daños en tránsito. La Compañía se reserva el derecho de utilizar Productos o piezas reacondicionados, renovados, reparados o refabricados en el proceso de
reemplazo o reparación de garantía. Dichos Productos y piezas serán comparables en función y desempeño a un Producto o una pieza original y tendrán garantía durante el resto del periodo de la garantía original.
Exclusión de daños: LA OBLIGACIÓN DE LA COMPAÑÍA DE SUMINISTRAR PIEZAS DE REPUESTO, O DE REPARAR O REEMPLAZAR, A OPCIÓN DE LA COMPAÑÍA, SERÁ SU ÚNICO Y EXCLUSIVO RECURSO BAJO ESTA GARANTÍA LIMITADA,
Y LA ÚNICA Y EXCLUSIVA OBLIGACIÓN DE LA COMPAÑÍA. LA COMPAÑÍA NO SERÁ RESPONSABLE POR DAÑOS INCIDENTALES, INDIRECTOS, RESULTANTES O ESPECIALES QUE SURJAN POR EL USO O DESEMPEÑO DEL PRODUCTO,
O EN RELACIÓN CON EL MISMO.
Algunos estados no permiten la exclusión o limitación de daños incidentales o resultantes, por lo que la limitación antes mencionada podría no aplicarse a usted. Esta garantía le otorga derechos legales específicos, y usted podría tener otros
derechos que varían de un estado a otro.
Esta garantía cubre únicamente el reemplazo o la reparación de Productos defectuosos o piezas de los mismos en la planta principal de la Compañía, y no incluye el costo del viaje para el servicio de campo ni los viáticos.
Cualquier asistencia que proporcione o procure la Compañía para usted fuera de los términos, limitaciones o exclusiones de esta garantía limitada no constituirá una renuncia a dichos términos, limitaciones o exclusiones, ni dicha asistencia
extenderá o renovará la garantía.
La Compañía no le reembolsará ningún gasto en el que usted haya incurrido al reparar o reemplazar cualquier Producto defectuoso, excepto los incurridos con el permiso previo por escrito de la Compañía.
Cómo obtener el servicio cubierto por la garantía: Para tener derecho al servicio cubierto por la garantía, usted debe (a) notificar a la Compañía a la dirección o número de teléfono que aparecen abajo en un plazo de siete (7) días después de
descubrir el defecto cubierto, (b) proporcionar el número de modelo y la identificación de la pieza y (c) describir la naturaleza de cualquier defecto en el Producto o la pieza. En el momento de solicitar el servicio cubierto por la garantía, debe
presentar un comprobante de la fecha de compra original. Si usted no puede presentar una copia de la garantía limitada original por escrito, entonces regirán los términos de la garantía limitada por escrito más actualizada de la compañía para
su producto en particular. Las garantías limitadas por escrito más actualizadas para los productos de la Compañía se pueden encontrar en www.broan.com.
99045888B©2017 Broan
Broan 926 West State Street, Hartford, WI 53027 www.nutone.com 888-336-3948 www.nutone.ca 877-896-1119
Estado de los indicadores LED
Estado
ENCENDIDO
Arranque en frío a baja temperatura
Conectar a un transformador
de 16V sin diodo
El voltaje del transformador es bajo
El voltaje del transformador es demasiado alto
Encendiendo
Modo Discovery
Conectando al servidor de la nube
Conectado al servidor de la nube
Sesión en curso
No conectado a la red
Actualización del firmware
1. Se produce después de encender o pulsar el botón
2. No se puede hacer sonar el timbre
1. Se produce después de encender o pulsar el botón
2. Diríjase al paso 7.
El timbre no funciona
Omita el paso 7 y continúe con el paso 8.
Omita el paso 7 y continúe con el paso 8.
Nota
11
Cableado del timbre sin la caja de timbres conectada (CA 16V, 10VA ~ 30VA)
Si la tensión del transformador es demasiado baja (consulte el paso 10), proceda con
el paso 11.
De lo contrario, omita el paso 11 y continúe con el paso 12.
1. Apague la corriente.
2. Abra la caja de timbres.
3. Conecte los dos cables en el
terminal del transformador.
4. Encienda la corriente.
5. La luz LED azul
destella una vez.
6. El timbre mecánico ya no sonará. Agregue el timbre Wi-Fi
opcional si lo desea.
Diagnóstico de problemas de la cámara del timbre
APLICACIÓN MY DOORBELL
P: La aplicación no guarda fotos ni vídeos en mi smartphone.
R: Asegúrese de tener suficiente memoria en su dispositivo inteligente.
Asegúrese también de tener habilitados los permisos en la aplicación para tener
acceso a la memoria del dispositivo.
RED
P: El timbre no se registra en la red de Wi-Fi. ¿Por qué?
R. La cámara del timbre inteligente puede estar fuera del radio de acción de su red
Wi-Fi. Mueva el enrutador o instale un extensor de Wi-Fi. Nota: la cámara del timbre
sólo es compatible con redes de 2.4 GHz.
P: La cámara del timbre inteligente se desconecta de la red.
R: La cámara del timbre inteligente puede estar fuera del radio de acción de su red
Wi-Fi. Mueva el enrutador o instale un extensor de Wi-Fi.
Garantía limitada
Conecte los
dos cables en
el terminal del
transformador.
Transformador
Timbre
de puerta
FRONT
TRANS
REAR
Diagnóstico de problemas de la cámara del timbre
ALIMENTACIÓN
P: El timbre cicla entre apagado y encendido.
R: Verifique que los cables eléctricos de la cámara del
timbre estén conectados firmemente. El cableado del
timbre existente podría estar dañado. Consulte el paso 7.
P: ¿Por qué no se enciende la cámara del timbre?
R: Consulte las instrucciones de instalación:
1. Confirme que el transformador esté encendido.
2. Confirme que el diodo esté instalado correctamente.
3. Confirme que el cableado / las conexiones estén
correctas y seguras.
Información normativa
El DCAM100FM está certificado para cumplir con las reglas y reglamentos
correspondientes de la FCC e IC, que rigen las emisiones de RF y EMI. Consulte el
DCAM100FM.
Este dispositivo cumple con la Parte 15 de las reglas de la FCC. La operación está
sujeta a las dos condiciones siguientes: (1) Este dispositivo no puede ocasionar
interferencias nocivas, y (2) Este dispositivo debe aceptar cualquier interferencia
recibida, incluida la interferencia que pueda provocar un funcionamiento no deseado.
Aviso de la FCC
Este equipo ha sido probado y se determinó que cumple con los límites de un
dispositivo digital Clase B, de conformidad con la parte 15 de las Reglas de la
FCC. Estos límites están diseñados para brindar una protección razonable contra
las interferencias nocivas en una instalación residencial.
Este equipo genera, utiliza y puede irradiar energía de radiofrecuencia, y si no se
instala y utiliza de acuerdo con las instrucciones, podría causar interferencias
nocivas a las comunicaciones por radio. No obstante, no hay garantía de que no se
generará interferencia en una instalación particular. Si el equipo provoca
interferencias nocivas en la recepción de señales de radio o de televisión, lo cual se
puede determinar apagando y encendiendo el equipo, se recomienda al usuario que
trate de corregir la interferencia mediante una o más de las siguientes medidas:
• Reorientar o reubicar la antena de recepción.
• Aumentar la separación entre el equipo y el receptor.
• Conectar el equipo en un tomacorriente en un circuito diferente a aquel
donde esté conectado el receptor.
• Solicite asistencia al distribuidor o a un técnico con experiencia en radio y TV.
Los cambios o modificaciones no aprobados expresamente por la parte responsable
del cumplimiento podrían anular la autoridad del usuario para operar el equipo.
Aviso de la IC
Este aparato digital Clase B cumple con la norma canadiense ICES-003
Este dispositivo cumple con las normas RSS exentas de licencia de Industry
Canada. La operación está sujeta a las dos condiciones siguientes: (1) este
dispositivo no puede ocasionar interferencias, y (2) este dispositivo debe aceptar
cualquier interferencia, incluida la interferencia que pueda provocar un
funcionamiento no deseado del dispositivo.
 Loading...