

Page 1

OmniPage Direct
OmniPage Direct adds the power of OCR directly to any Windows wordprocessing, spreadsheet, or communications program. Working within
your application, you simply choose Scan text... in the File or Control
menu. Scanned text then appears in your document just as if you had
typed it yourself. Direct is virtually automatic: just point and click to
recognize a single paragraph or multiple pages.
Chapter 1 Installation . . . . . . . . . . . . . . . . . . . . . . . . . . . . . . p. 1
Be sure your scanner is working with the manufacturer’s scanning
software before you install Direct.
After running the SETUP software installation program within Windows,
creating a Windows swap file, and opening Direct, the Scan text...
command will appear in the File or Control menu of your Windows
application.
Chapter 2 How to Scan Text. . . . . . . . . . . . . . . . . . . . . . . . . . p. 7
Scanning text is as easy as pulling down the File or Control menu and
choosing Scan text.... The Scan text dialog box lets you scan immediately
or set options for special features such as recognizing parts of a page or
different languages.
This tutorial guides you through the simplest scan and also explains how
to use the Partial Page features.
Chapter 3 Commands and Settings . . . . . . . . . . . . . . . . . . . . p. 13
This chapter explains every command and setting within Direct. Topics
are listed alphabetically.
Page 2

Chapter 4 How to Improve Performance . . . . . . . . . . . . . . . . .p. 31
This chapter tells you the tricks for speeding up Direct and for improving
text-recognition accuracy. It explains how to recognize text from poorquality documents such as multiple-generation copies and newspaper
pages. Adjusting the
Brightness
setting is the easiest way to improve text-
recognition accuracy.
Chapter 5 Technical Information . . . . . . . . . . . . . . . . . . . . . . .p. 39
This chapter lists supported scanners and provides information that may
help you solve any installation or operation problems. Error messages are
listed as well as instructions on how to contact product support. Product
support and information for all Caere products is also available in the
Caere sections of both America Online and CompuServe (Keyword
CAERE).
CAERE CORPORATION
100 Cooper Court
Los Gatos, California 95030
European offices:
CAERE GmbH.
Ismaninger Straße 17-19
81675 Munich, Germany
OmniPage Direct Windows Version 2
Copyright© 1988-95 Caere Corporation. All rights reserved. CAERE®, OmniPage®, and OmniPage Professional
are trademarks of Caere Corporation. Many of the designations used by manufacturers and sellers to
distinguish their products are claimed as trademarks. Such designations appearing in this manual have been
printed in initial caps.
Product Serial Number:
_______________________________________________
(from Disk #1 label)
0 OmniPage Direct
Page 3

Chapter 1
Installation
This chapter describes how to install Direct and set it up to work with your
applications. The chapter has six sections:
• System Requirements
• Software Installation
• How to Create a Windows Swap File (Virtual Memory)
• Using WordPerfect
• Upgrading to Other Caere Products
• Special Topics
You must have at least an 8MB Windows swap file (virtual memory) to run
Direct.
Installation 1
Page 4

System Requirements
System Requirements
To run Direct, you’ll need the following system:
’
386 or higher computer.
•
• A Caere-supported scanner installed and working with your system. See Chapter 5, Technical Information.
• 14MB available hard-disk space.
•
RAM Minimum:
Windows swap file (virtual memory).
•
RAM Recommended:
Windows swap file (virtual memory).
• Microsoft Windows-compatible mouse.
• Windows Version 3.1 or higher.
Be sure your scanner is installed according to the manufacturer’s
instructions and is working on your system. Use the scanning software
supplied by the manufacturer before you install Direct.
4MB RAM total system memory and an 8MB
8MB RAM total system memory and a 12MB
2 Installation
Page 5

Software Installation
Please install Direct from the program disks. Do not install from copies.
To install Direct software:
1 Start Windows and open the Program Manager window.
2 Insert Direct disk #1 in your computer.
Software Installation
3 Choose
The Run dialog box appears.
4Type A:SETUP (or B:SETUP) in the edit box and click OK.
The installation program will prompt you for information as it
installs Direct.
5 Fill out the warranty registration card while the program copies
files to your computer.
6 Exit Windows after the installation program is complete.
7 Create a Windows swap file.
See the next section for instructions.
8 Mail in your warranty registration card.
To learn how to run Direct, see Chapter 2, How to Scan Text. To set up
Direct to load automatically whenever you start Windows, see Load OCR
when Direct is launched in Chapter 3.
in the Program Manager
Run
File
menu.
Installation 3
Page 6

How to Create a Windows Swap File (Virtual Memory)
How to Create a Windows Swap File
(Virtual Memory)
To run Direct, you need at least 8MB of free disk space set up as a
Windows swap file (virtual memory). For best performance, use a
Permanent
possible.
The swap file acts as virtual memory disk space that is used as if it were
volatile memory (RAM). Information is stored temporarily on disk rather
than using up RAM. This allows you to run more programs than you
could with RAM alone. However, using virtual memory is slower than
using RAM.
For more information about virtual memory, see the Windows User’s
Guide. For more information about the Windows Swap file, or if you have
any difficulty creating a swap file, see the chapter “Optimizing Windows”
in the Windows User’s Guide.
To create an 8MB Windows swap file:
rather than a
1 Close any open applications.
2 Double-click the Control Panel icon in the Main window of the
Program Manager.
Temporary
swap file and make it as large as
4 Installation
3 Double-click the 386 Enhanced icon to display the 386 Enhanced
dialog box.
4 Click
5 Check the entry after
6 Click
7 Select a new drive in the
8 Type at least 8192 in the
9 Click OK and exit the Control Panels.
Virtual Memory...
• A swap file equal to or larger than 8192 is sufficient. Click
to return to the 386 Enhanced dialog box and click
cel
again. Close the Control Panels.
• A swap file that is smaller than 8192KB must be changed. Pro-
ceed to step 6.
Change>>
swap file to be located somewhere other than on the default
drive.
If you cannot find a drive with 8192KB of free space, you need to
delete files to free up space.
to expand the dialog box.
to display the Virtual Memory dialog box.
.
Size
Can-
Cancel
drop-down list if you want the
Drive
New Size
edit box.
Page 7

Using WordPerfect
10 Click
11 Click
Using WordPerfect
If you are using pre-6.0 versions of WordPerfect, you must modify the
Direct setting.ini file. This file tells Direct how to paste text into these
applications.
1 Open Windows’ Notepad or other text editor.
2 Open the setting.ini text file located in the directory where you
;classname=(1:doc,2:spread), (1:paste, 2:no), (0:file, 1:system), (wparam-paste)
;OpusApp=1,1,1,2229 ;use this for word 2.0 (RTF)
;OpusApp=1,1,1,2266 ;use this for word 2.0b (RTF)
OpusApp=1,1,1,108 ;use this for word 6.0 (RTF)
;WordPerfect=1,1,0,265 ;WordPerfect (RTF)
WordPerfect=1,1,0,0 ;WordPerfect 6.0 (RTF)
3 If you’re using a pre-6.0 version of WordPerfect, delete the first
;WordPerfect=1,1,0,265 ;WordPerfect (RTF)
WordPerfect=1,1,0,0 ;WordPerfect 6.0 (RTF)
4 Choose
in the dialog box that asks if you are sure you want to
Ye s
make changes.
Restart Windows
to restart immediately.
Do not press Ctrl-Alt-Del to restart.
installed Direct.
The default installation directory is c:\direct.
The first six lines look like this:
A semicolon in front of a line deselects that line.
semicolon from the line that reads:
and add a semicolon in front of the line that reads:
in the File menu to save your changes.
Save
Reverse the process if you later upgrade software versions.
Installation 5
Page 8

Upgrading to Other Caere Products
Upgrading to Other Caere Products
If you upgrade to another Caere product such as OmniPage Professional
and your scanner is not listed in the Select Scanner dialog box, follow these
procedures:
1 Install your new Caere application.
2 Copy the following files from your OmniPage Direct directory to
the new Caere product directory:
*.chw (any file with the extension .chw)
*.pxw (any file with the extension .pxw)
pixdflt.dll, pixperm.dll, pixpnr.dll, and pixpcx.dll
mphase.dll
scnmgrtw.exe
scanmgr.ini
scanmgr.lst
3 Start your new Caere application and select your scanner in the
Select Scanner dialog box.
Special Topics
Dashboard Incompatible with OmniPage Direct 2.0
6 Installation
Dashboard, the desktop manager from HP, is incompatible with this
version of OmniPage Direct.
Graphics Applications
Direct does not work with graphics applications such as Paintbrush,
CorelDraw, etc.
Using OmniPage Direct and a Visioneer Scanner Version 1.0
Before running Direct, please copy the following files from your
OmniPage Direct directory to your Visioneer (MaxMate) scanner
directory:
maxcaere.ocr
caerenew.dll
caereold.dll
caeredir.dll
Page 9

Chapter 2
How to Scan Text
This chapter guides you through the basic steps of using Direct to scan and
recognize text.
We assume you have installed Direct according to the instructions in
Chapter 1 and that you know how to work in the Microsoft Windows
environment. Not all Direct features are described here; for a complete
description of any command or setting, see Chapter 3, Commands and
Settings.
To use Direct, follow these steps:
• Open the Direct program.
• Open your word-processing, spreadsheet, or other application.
• Choose
•The
tions. Open the Control menu by clicking the bar in the upper-left
corner of your application’s window.
• Adjust settings and click
• Select parts of a page (optional).
Scan Text...
Scan Text...
in your application’s File or Control menu.
command is in the Control menu of some applica-
in the Scan Text dialog box.
Scan
After recognition, the scanned text appears in your application.
Unrecognized characters are represented in your text file with a tilde (~).
How to Scan Text 7
Page 10
Step 1 Open Direct
Step 1 Open Direct
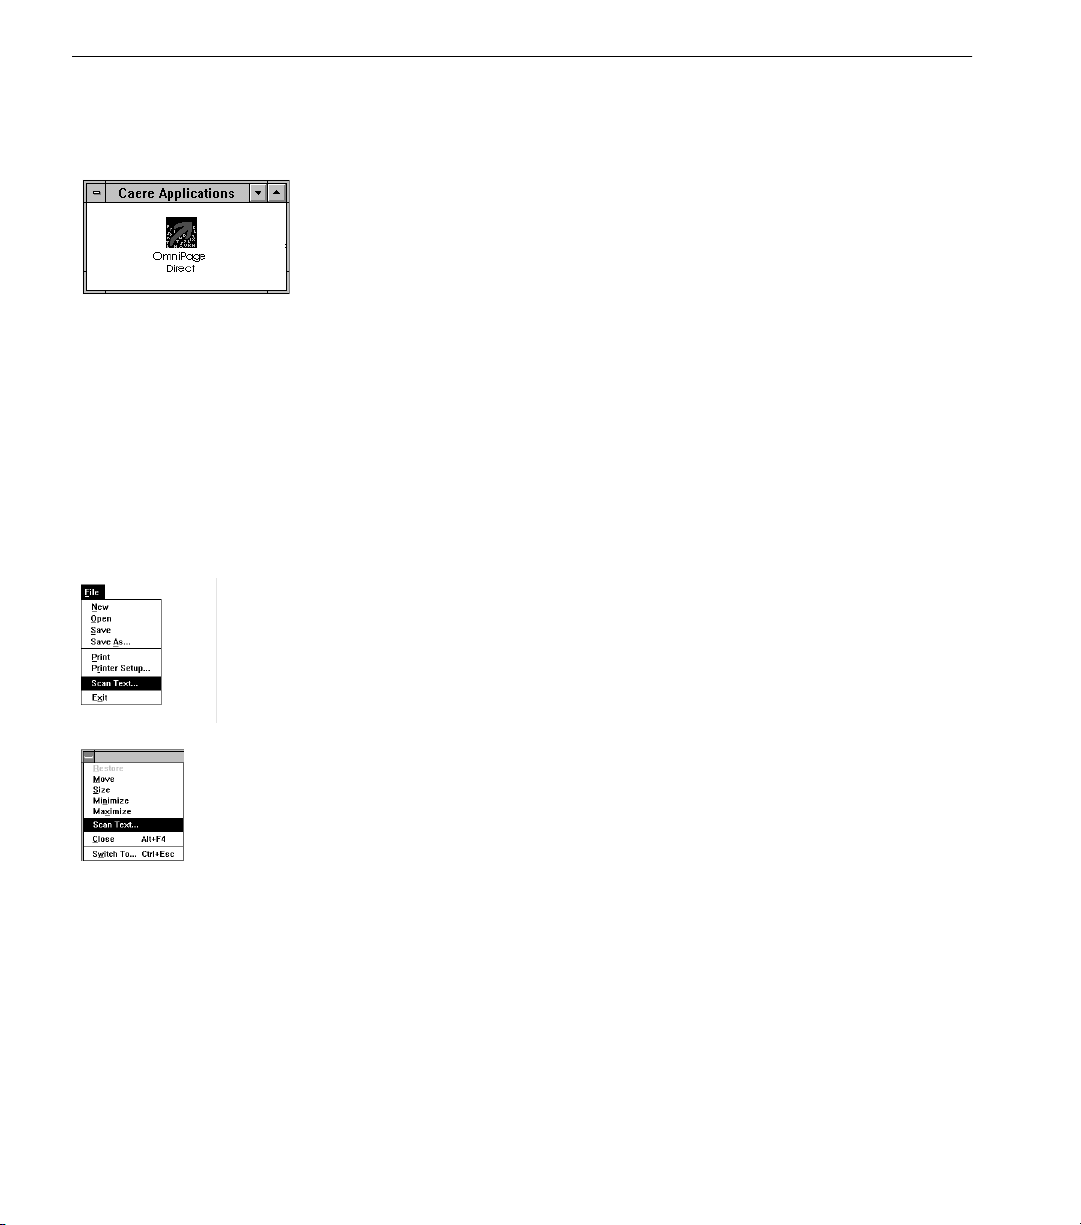
1 Open the Direct program to add the
your application’s File or Control menu.
2 Double-click the Direct icon in the Windows Program Manager.
Unless you have changed your Windows setup, the icon should
be in the Caere Applications program group box.
The minimized icon will appear in your Windows desktop window.
Step 2 Open Your Application
1 Open your word-processing, spreadsheet, or other application.
Direct only works within an open application.
2 Place a page in your scanner.
If you don’t know how to orient the page correctly, check your
scanner’s manual. Be sure your scanner is turned on.
Step 3 Choose
Scan Text...
Choose
The
Open the Control menu by clicking the bar in the upper-left corner of your
application’s window.
Scan Text...
Scan Text...
in your application's File or Control menu.
command is in the Control menu of some applications.
Scan Text...
menu item to
8 How to Scan Text
Page 11
Step 4 Adjust Settings and Click Scan
Step 4 Adjust Settings and Click
A dialog box appears after you choose
Direct is designed to automatically determine the best way to scan a page.
You can simply click
scanning situations.
Settings in this dialog box and in the Options dialog box let you customize
Direct for scanning your particular documents. This step explains how to
use the
recognition. Other settings are described in Chapter 3.
Partial Page
1 Highlight the
Full Page is the default setting.
2 If you wish to manually adjust the
Options...
The
Manually adjusting
and speed; see Chapter 4, Improving Performance.
• If a page has sharp, distinct characters printed on good-qual-
• If a page has thin, broken characters, move the slide towards
• If a page has thick, run-together characters, is printed on po-
If desired, click
and then deselect
Brightness
ity non-reflective paper, set the brightness slide to the middle,
normal setting.
Darken
rous paper such as newsprint, or is printed on glossy paper,
move the slide towards
and the default settings will accommodate most
Scan
feature, which lets you select parts of a page for
Partial Page
control will appear in the Scan Text dialog box.
.
Options
icon.
Brightness
to adjust other settings.
Scan
Scan Tex
Auto Intensity
can improve recognition accuracy
Lighten
t...
.
Brightness
.
.
control, click
3 Click
Scan
.
How to Scan Text 9
Page 12
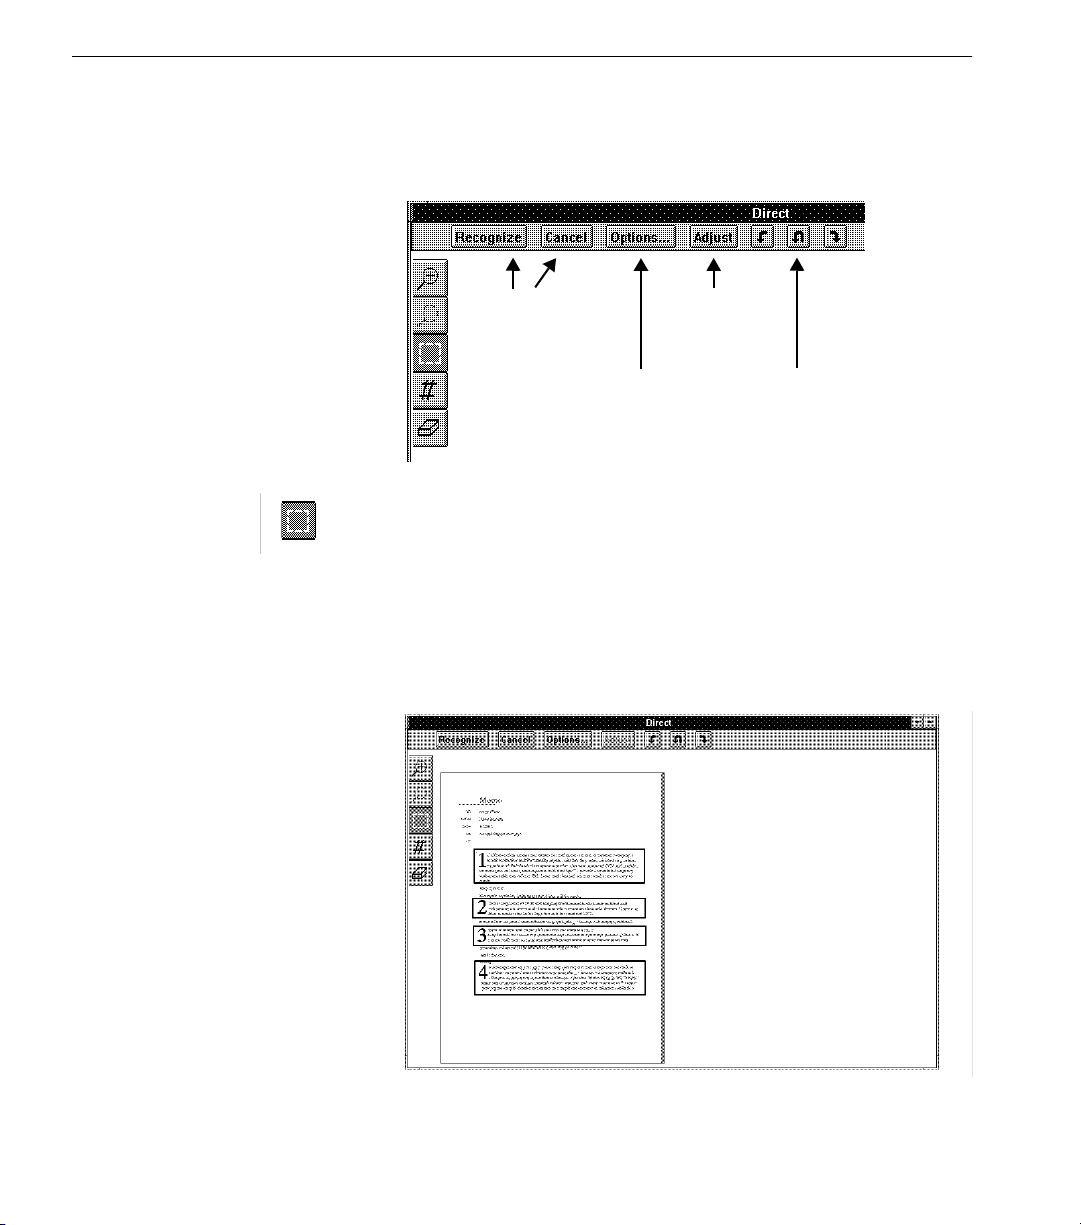
Step 5 Select Parts of a Page
Step 5 Select Parts of a Page
If you highlighted
Partial Page
, an image of your page and a set of tools will
appear after the page is scanned. The tools let you draw zones around
parts of the page, order the zones for recognition, and zoom in or out.
Zoom in
Zoom out
Draw zones
Order zones
Erase zones
1 Click on the
Start or stop
the
recognition
process.
Draw zones
Open the
Options
dialog box.
tool and then enclose each area you want
Stop
recognition
and reset
zones.
Rotate the
image 90°,
180°, or 270°.
recognized with a selection box by holding the mouse button
down and dragging the mouse.
Zones will be recognized in the order you select them unless you
use the
Order zones
select it by clicking on the
tool (the # symbol). To adjust a zone, first
Draw zones
tool and then clicking on
the zone. Then move the mouse pointer to a selection box handle,
hold the mouse button down, and move the mouse.
The window will look like this:
10 How to Scan Text
Page 13

Step 5 Select Parts of a Page
A number appears in each zone indicating the order in which the
zone will be recognized. You may draw up to 99 separate zones.
2 Click on the
Order zones
tool (the # symbol) to change the order in
which the zones will be recognized.
The numbers in the zones will disappear.
To reorder the zones, click on the zone you want recognized first.
The number 1 will appear in the zone. Then click on the next zone
you want recognized; the number 2 will appear. Continue until
the zones are appropriately ordered.
3 Click on the
Erase zones
tool and then click on a zone selection
box.
The selection box will be erased – not the zone itself.
4 Click
Recognize
to start recognition.
During recognition, text blocks are painted gray and then black on the
screen as Direct works. The Recognize button turns into an Adjust button.
If, during recognition, you want to change the way you drew or ordered
zones, click
Adjust
. The
Partial Page
window will reappear and you can use
the tools again.
After recognition the text will appear in your application just as if you had
typed it yourself.
How to Scan Text 11
Page 14

Step 5 Select Parts of a Page
12 How to Scan Text
Page 15

This chapter explains how to use Direct commands and settings. It is
organized alphabetically. Settings within a Direct list box are explained
under the title of the list box. For example, you can find descriptions of
Letter
About Direct
The About Direct box shows the current software version you are using,
any copyrights in effect, and the program's registered user, company
name, and serial number.
Adjust
Clicking
recognition is complete.
and
Chapter 3
Commands
and Settings
page-size settings under the Size heading.
Legal
lets you change settings after a scan has started but before
Adjust
For example, imagine you selected several parts of a page for recognition
and clicked
select a particular part. You click
Recognize button turns into an Adjust button); recognition stops and you
can select parts correctly without having to re-scan the page.
Auto Intensity
Select this to let Direct automatically set an optimal brightness setting with
grayscale scanners.
This feature is especially useful when you scan text printed on a colored
background. It also works well when you scan “copies of copies” that have
large gray areas.
Recognize
. During recognition, you notice that you forgot to
(during recognition, the
Adjust
Commands and Settings 13
Page 16

Automatically Launch Direct
Automatically Launch Direct
Brightness
Recognition is faster with this option turned off. If you scan high-quality
documents with crisp, black letters printed on white paper, deselect
Intensity
Select this if you want Direct to automatically start up whenever you open
the Windows program.
Your win.ini file will be altered to include a
load=c:\opdirect\direct.exe statement.
Select different brightness settings to lighten or darken a scanned image.
This control is available if
Options dialog box.
and use the manual
Auto or Normal Intensity
Brightness
control.
is deselected in the
Auto
The
Brightness
accuracy of text recognition. It accounts for variations in paper quality,
print quality, and scanner peculiarities. It acts like the brightness setting
on a copier.
Set brightness by moving the mouse arrow to the square in the slide,
holding the mouse button down, and moving the square toward the
desired setting. Or, click on the arrows to the left or right of the slide. Use
the numbers in the square as references for future documents. The caret
(^) represents the scanner’s normal setting.
If a page has sharp, distinct characters printed on good-quality nonreflective paper, set the brightness slide to the middle, normal setting.
setting is the most important means you have to affect the
14 Commands and Settings
Page 17

<CR> at End of Line
If a page has thin, broken characters, move the brightness slide toward
.
Darken
If a page has thick, run-together characters or if it is printed on porous
paper such as newsprint, or if it is printed on glossy paper, move the
brightness slide toward
Lighten
.
To evaluate brightness settings, watch the Character Window as Direct
performs text recognition. For a description of the Character Window, see
Chapter 4, How to Improve Performance.
<CR> at End of Line
Select this if you want a hard carriage return inserted at the end of each
line of text.
Use this setting if you’re scanning lists, lines of code, or other text where
you want each line to be an individual paragraph when it appears in your
word processor. This feature will not work with lines of text shorter than
a certain length; you’ll need to experiment to find the length minimums
with your particular pages.
When this is deselected, Direct will look for extra space between lines of
text on the scanned page and interpret space as a paragraph break. It will
insert a hard carriage return at the paragraph break. If text is continuous,
it will assume that the continuous text is one paragraph.
Commands and Settings 15
Page 18

Dictionary
Dictionary
Select a dictionary for use in spell checking and with the Language
Analyst. The dictionary should correspond to the language of the
document you’re scanning. The American-English dictionary is named
useng.ndx; the British-English dictionary is named ukeng.ndx.
Foreign-language dictionaries are available from your local Caere dealer
or by calling Caere at (800) 535-SCAN or (408) 395-5733.
Document Type
The Document Type list box lets you select various font characteristics of
your document.
Fully formed
Select this when you scan conventionally printed text characters.
Dot matrix
Select this when you scan characters printed in draft mode by a 9-pin dotmatrix printer. Do not select
quality mode or printed by a 24-pin dot-matrix printer.
Dot matrix
for pages printed in near-letter-
When you are finished scanning with the
deselect the setting. It is only appropriate for draft-mode, 9-pin dot-matrix
printed material.
Enable Hot Key
Select this if you want to start a scan by pressing a key or key combination.
Certain applications may crash if you click
Windows Control menus. You’ll need to enable a hot key to start a scan
within these applications.
Choose a hot key by first selecting or typing in a key in the
list box. Then click on Ctrl, Shift, or Alt to set up a key combination. For
example, if F2 appears in the list box and Ctrl and Shift are selected, then
you can start a scan by pressing the Control-Shift-F2 key combination.
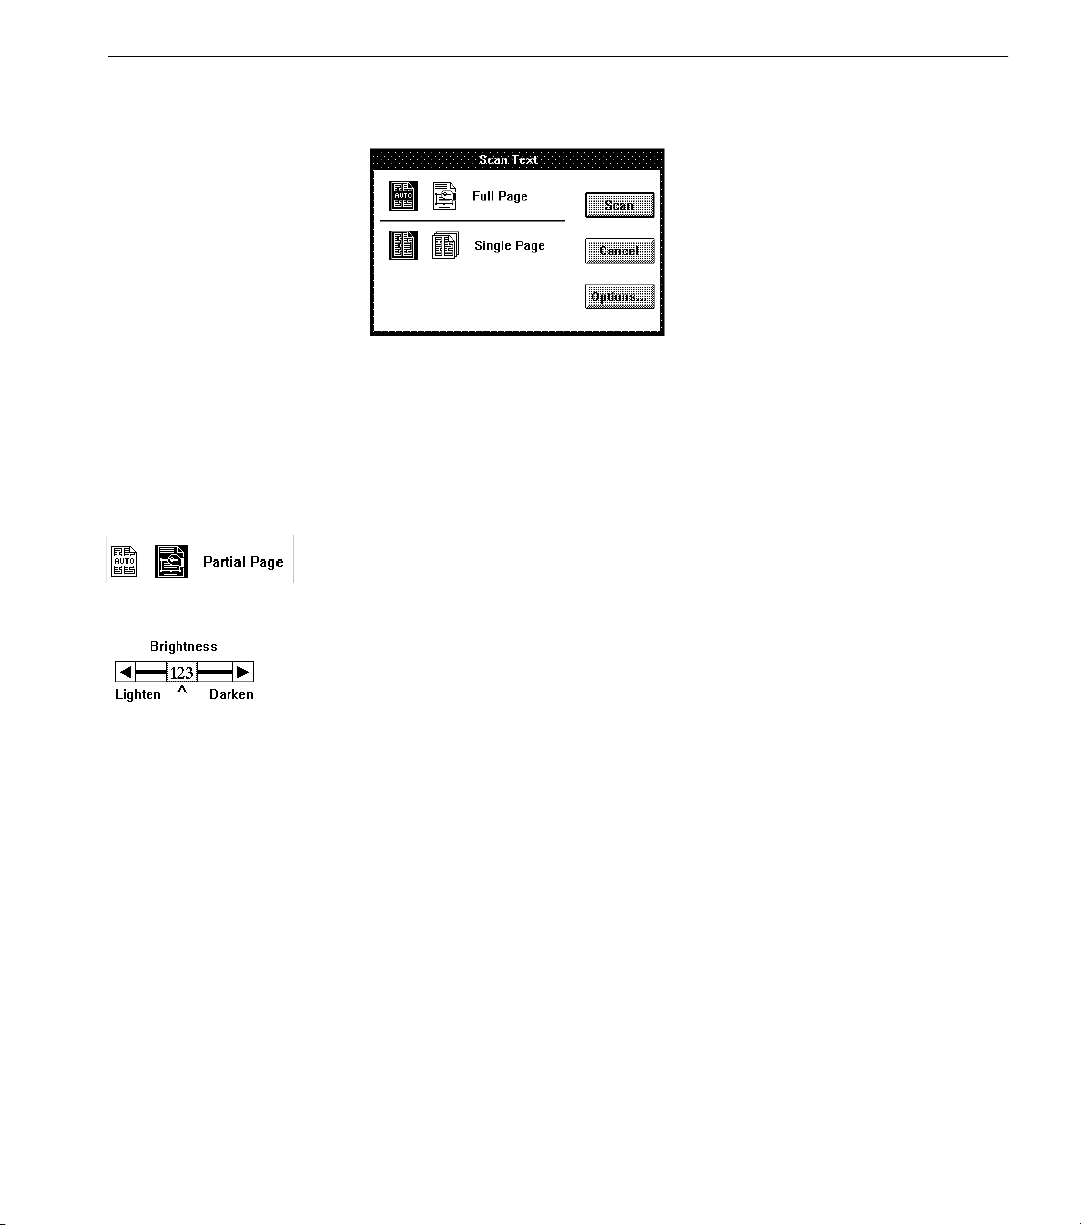
Full Page
Click the
page. Direct will determine column structure according to the
setting in the Options dialog box.
If you want Direct to only recognize parts of a page, click the
icon. After the scan, you’ll be able to select specific parts you want
recognized. See Chapter 2, How to Scan Text.
Full Page
Dot matrix
Scan Text...
icon to let Direct recognize all the text on a scanned
setting, be sure to
in the File or
Enable hot key
Page Layout
Partial Page
16 Commands and Settings
Page 19

Hardware Options
With some scanner installations, you’ll need to type information about
your scanner’s port address, speed, or other parameters. If the
Options
anything.
section of the Scanners dialog box is gray, you don’t have to do
Hardware Options
Hardware
If
Hardware Options
details on how to determine your scanner’s port address and other
parameters. These parameters are usually included at the end of the
DEVICE=YOUR_SCANNER entry in your config.sys file.
Help
Help is available by choosing
pressing the F1 function key while within a Direct dialog box.
Choosing
topics available in the Help program. Pressing the F1 function key will
bring up context-sensitive Help; a list of topics will appear explaining all
the settings in whichever Direct dialog box is currently open. The Direct
help program conforms to the Windows 3 Help standard.
When an index appears, simply click on the topic you need help with and
help text will appear.
Help...
Ignore Abbreviations
Select this to have the spelling checker ignore words with a capitalized
letter followed by three or fewer lowercase letters and a period (for
example, Mrs., Dr., etc.).
Ignore All CAPS
Select this to have the spelling checker ignore entirely capitalized words of
four characters or less (for example, acronyms such as HUD, USDA, etc.).
is not gray, check your scanner’s documentation for
in the Direct icon Control menu or by
Help...
in the Direct icon Control menu will bring up a list of
Ignore Proper Nouns
Select this to have the spelling checker ignore words that do not begin
sentences and that have capitalized first letters (for example, He saw
throw...).
Jane
Commands and Settings 17
Page 20

Languages
Languages
Select this to choose one or more languages for text recognition.
Direct will recognize additional characters (such as circumflexes, umlauts,
etc.) unique to a particular language. You may select more than one
language by clicking on different selections; however, for faster
recognition, select only the minimum number of languages you need.
Load OCR When Direct is Launched
Select this if you want Direct to load the optical character recognition
(OCR) program in your computer’s memory when Direct is started. Direct
will take a few seconds to load OCR, and then there will be no delay the
first time you scan a page.
Multiple Pages
18 Commands and Settings
There are two parts to the Direct program. One is the part that shows
dialog boxes and drives your scanner. The other, the OCR portion, is the
part that actually analyzes a scanned image and converts it into text. The
OCR part uses a lot of your computer's memory.
Normally, Direct waits until you scan before it loads OCR into memory.
The first time you scan, it takes a few seconds for Direct to load the OCR.
Once loaded, OCR stays in memory until you close the program.
However, you can use the
to clear OCR from memory without closing the Direct program.
Select this icon if you want to scan more than one page.
After a flatbed scanner scans a page, a prompt will appear asking you if
you want to scan more pages. If you use an automatic document feeder
(ADF), the prompt will appear when the ADF is empty.
Unload OCR after n minutes of inactivity
setting
Page 21

Options
Options
Click this to display the Options dialog box.
This dialog box lets you indicate the size page you're scanning, the column
structure, the type of characters printed on your page, and other options.
Usually, you won't need to use these advanced features; Direct will
automatically handle most of your documents. However, manually
adjusting these settings may speed up recognition.
Look up any of the settings in the Options dialog box in this chapter. They
are arranged alphabetically.
Orientation
The Orientation list box lets you select the orientation of the document you
are scanning.
Auto
Select this if you want Direct to automatically determine page orientation.
Portrait
Select this if vertical is the long dimension as with a business letter.
Landscape
Select this if horizontal is the long dimension as with a spreadsheet.
When scanning landscape-oriented pages, be sure you load them in your
scanner correctly. See your scanner's manual for instructions on how to
place landscape pages.
Commands and Settings 19
Page 22

Page Layout
Flipped
Select this if a portrait-oriented page is placed upside down in the scanner.
Flipscape
Select this if a landscape-oriented page is placed upside down in the
scanner.
Portrait
orientation
If
Portrait, Landscape, Flipped, or Flipscape
automatically flip an image if text-recognition accuracy is very poor.
Page Layout
Page layout modes describe how blocks of text on a page will be ordered
for recognition. For text recognition, Direct usually divides a page into a
series of text blocks and strips out graphics. For example, if two text blocks
are separated by white space (gutters), Direct will assume there are two
columns of text. The left column will appear first in your word processor
and then the right column will appear.
Auto
Select this if you want Direct to automatically determine column structure.
Direct will look for regular vertical separations of text (gutters) to define
columns. It then recognizes column-wide text blocks. It starts at the top of
the first column, moves to the bottom, and then continues to the top of the
next column, snaking through the text. The resulting text file displays the
text in one column from beginning to end.
Landscape
orientation
are selected, Direct will not
20 Commands and Settings
Do not use this setting for tables and financial forms. Although these kinds
of documents have multiple columns, snaking will destroy their
spreadsheet format.
Page 23

Partial Page
Single column/Tables
Select this when there is one column on a page, as with correspondence, or
when scanning a table, financial form, or spreadsheet.
Direct will treat the entire page as one column. It starts at the top of the
page and moves to the bottom outlining page-wide text blocks. If Direct
detects five rows or more of characters divided into columns, it assumes
the document is a spreadsheet. It will insert tabs as delimiters between the
columns to preserve the tabular format.
Scanning Spreadsheets and Tables
If your spreadsheet or table has a title across the top, use the Partial Page
feature and draw a zone around just the spreadsheet or table data. If you
include the title, column structure may be distorted.
If a scanned table appears in your application with large gutters (white
space between the columns), and it appears that the rightmost columns of
data are missing, widen the page size in your application.
No parsing
Select this to have Direct recognize the entire document as a single text
block.
Direct will not divide the text into separate text blocks or strip out
graphics. The document will be recognized as one text block; if there are
graphics on the page, Direct will attempt to recognize them as text
elements.
This feature is useful if you are scanning pleading pages or small text that
might appear as graphics to Direct: for example, telephone book pages.
Also, use
Partial Page
Highlight this icon when you want specific sections, or areas, of a page
recognized. If the
recognized.
After Direct scans your page, you'll be able to draw selection boxes around
specific parts of the page that you want recognized. You can also specify
the order in which you want the zones' text to appear in your word
processor, zoom your view of the page in or out, and rotate the image if
you placed it incorrectly in the scanner.
For tutorial-like instructions on how to use the
Chapter 2, How to Scan Text.
No parsing
Full Page
if you are scanning very small or narrow zones.
icon is highlighted, the entire page will be
Partial Page
Commands and Settings 21
feature, see
Page 24

Partial Page
Zoom in
Zoom out
Draw zones
Order zones
Erase zones
The Partial Page Tools
Zoom in/out
If you highlight
Start
recognition
Partial Page
Stop recognition
and return to your
application
, the zone window will appear after the scan.
Open the
Options dia-
log box
Stop recognition and return
to this window
Rotate image
90°, 180°, or
270
°
These tools let you select and order zones and zoom the view in or out. The
buttons on the button bar let you start and cancel the recognition process
and adjust settings in the Options dialog box.
If you want a close-up view of an area, click the
Zoom in
on the area of the page you want enlarged. Click the
tool and then click
Zoom out
tool and then
click on the area to zoom to a wider view.
22 Commands and Settings
The levels of zoom are Fit in Window, 25%, 50%, and 100%. The 100% view
gives you a pixel-for-pixel view of the scanned image. If you want to zoom
all the way in or out, hold down the CTRL key when you click on a zone
with a zoom tool.
Draw zones
Click this tool and then enclose each area you want recognized with a
selection box by holding the mouse button down and dragging the mouse.
Zones will be recognized in the order you select them unless you use the
Order zones
tool (the # symbol).
A number appears in each zone indicating the order in which the zone will
be recognized. You may draw up to 99 separate zones.
Once you have drawn a zone, you can adjust its size. First, click on the
zone to select it. Handles will appear on the edge of the selection box. Then
move the mouse pointer to a handle, hold the mouse button down, and
Page 25

Partial Page
move the mouse. To move the entire zone, move the pointer inside the
zone, hold down the mouse button, and move the mouse.
Order zones
Normally, zones are recognized in the order in which you select them. To
change the order in which the zones will be recognized, click on the
tool. The numbers in the zones will disappear.
zones
To reorder the zones, click on the zone you want recognized first. The
number 1 will appear in the zone. Then click on the next zone you want
recognized; the number 2 will appear. Continue until the zones are
appropriately ordered.
Erase zones
If you want to de-select a zone, click the Erase zones tool and
then click on the zone you want to deselect. The contents of the
zone will not be removed; only the selection box will go away.
Recognize
Click this button to start recognition.
Order
If you highlighted the
every page
in the Options dialog box) the same zones will be recognized on
Multiple pages
icon (and you did not select
Pause after
each page that is scanned. For example, if you select a zone on a form, and
then scan five forms, the same zone will be recognized on each form. If you
selected
Pause after every page
, you'll be able to draw different zones for
each page.
Cancel
Click this button to stop a scan and return to your application.
Options
Click this button to display the Options dialog box so you can change
settings. All settings are explained in alphabetical order in this chapter.
Adjust
Click this button to change settings after a scan has started but before
recognition is complete. The Recognize button turns into the Adjust
button during recognition.
For example, imagine you selected several zones on a page for recognition
and clicked
Recognize
select a particular zone. You click
. During recognition, you notice that you forgot to
; recognition stops and you can
Adjust
select zones correctly or adjust settings without having to re-scan the page.
Commands and Settings 23
Page 26

Pause After Every Page
Pause After Every Page
Port Address
Rotate Tools
Click these tools if you placed a page wrongly in your scanner. You can
rotate the image 180° or 90° clockwise or counter-clockwise. You don't
need to replace the page in your scanner; Direct will recognize the text if it
appears correctly oriented in the image window.
Select this if you are scanning multiple pages and you may want to change
settings for different pages.
For example, imagine you are scanning a magazine article that stretches
over several pages. You select
recognize all the advertisements that are on the page. You also select
after every page
will have to select different parts of each page. After each page is scanned,
you'll be able to draw different zones or change settings in the Options
dialog box.
With some scanner installations, you'll need to type information about
your scanner's port address, speed, or other parameters. If the
Options
anything.
section of the Scanners dialog box is gray, you don't have to do
because each page has a different text/ad layout and you
Partial Page
because you don't want to
Hardware
Pause
Recognize
Register Application
24 Commands and Settings
If
Hardware Options
how to determine your scanner's port address and other parameters.
These parameters are usually included at the end of the
DEVICE=YOUR_SCANNER entry in your CONFIG.SYS file.
Click this button to start the recognition process after you've selected
zones.
If you want to change the zones or settings after clicking
the
Direct is designed to automatically work with Windows applications
installed on your hard disk when you install Direct. As you install new
applications, you can set them up to work with Direct by registering the
applications and designating the application type: whether the application
is a word processor or a spreadsheet.
Adjust
button.
is not gray, check your scanner's documentation for
Recognize
, click
Page 27

Reject Character
To set up a word processor, spreadsheet, or other application to work with
Direct, follow these steps:
1 Launch the Direct program.
2 Launch the application you want to register.
3 Click once on the Direct icon at the bottom of the Windows Pro-
gram Manager window.
The Direct control menu will appear.
4 Click
The Register Application dialog box will appear.
5 Click either the
Processor if your application deals mostly with text or Spread-
sheet if it deals mostly with columns of numbers.
6 Click
7 Click the iconized mouse pointer in the window of the applica-
tion you want to register.
The
Windows Control menu.
If, after registration, your application crashes when you click
you'll need to use a key combination to start a scan. See
this chapter.
Reject Character
This edit box lets you choose a character to mark unrecognized characters
in your text. For example, if Direct could not recognize the J in REJECT,
and the tilde (~) was the reject character, the characters RE~ECT would
appear in your text.
Scanner
Select Scanner if you install a different scanner.
Register Application...
Word Processor
Register
Scan Text...
.
command will appear in your application's File or
or
Spreadsheet
radio button: Word
Scan Text...,
Enable hot key
in
This dialog box will appear when you launch Direct for the first time.
Highlight the appropriate scanner name and click OK.
With some scanner installations, you'll need to type in information about
your scanner's port address, speed, or other parameters. If the
Options
anything.
If
how to determine your scanner's port address and other parameters.
section of the Scanners dialog box is gray, you don't have to do
Hardware Options
is not gray, check your scanner's documentation for
Commands and Settings 25
Hardware
Page 28

Scan Text
These parameters are usually included at the end of the
DEVICE=YOUR_SCANNER entry in your config.sys file.
If you have a TWAIN-compliant scanner and a TWAIN data source dialog
box appears when you use Direct, you must make sure that the settings in
the TWAIN dialog box match those in the Direct Options dialog box.
Scan Text
For example, if you select
you must have Grayscale selected in the TWAIN dialog. The Size: area
setting in the Direct Options dialog must be as large or larger than the
scanning area setting in the TWAIN dialog. And, the resolution setting in
the TWAIN dialog must be 300dpi.
For more information about using TWAIN-compliant scanners, see
“TWAIN Scanners Not Listed” on page 41
Click this to open the Scan Text dialog box. Click
Options
if Auto Intensity is deselected in the Options dialog box.
button to adjust recognition settings.The Brightness slide appears
Auto Intensity
in the Direct Options dialog box,
to start a scan or the
Scan
26 Commands and Settings
Page 29

Settings
Select this to enable a hot-key and other preferences. Look up any of these
settings in this section. They are arranged alphabetically.
Single Page
Highlight this icon if you are scanning a single page. Highlight
Pages
feeder or by changing pages in the scanner by hand.
Size
This list box lets you select the dimensions of the document you are
scanning.
Settings
Multiple
if you're scanning more than one page with an automatic document
Speed
Auto
Select this to allow Direct to automatically determine the size of the page.
Letter
Select this for standard US 8.5" by 11" size pages.
A4
Select this for 21cm by 29.7cm European-size pages.
Legal
Select this for US 8.5" by 14" size pages.
With some scanner installations, you'll need to type in information about
your scanner's port address, speed, or other parameters. If the
Options
anything.
section of the Scanners dialog box is gray, you don't have to do
Commands and Settings 27
Hardware
Page 30

Spelling
If
Hardware Options
how to determine your scanner's port address and other parameters.
These parameters are usually included at the end of the
DEVICE=YOUR_SCANNER entry in your config.sys file.
is not gray, check your scanner's documentation for
Spelling
Choose this to select a user dictionary, set spell-checking options, and
toggle the Language Analyst on and off.
Spreadsheet
Select this if the application you want to register deals mostly with
numbers in columns.
Direct is designed to automatically work with Windows applications
installed on your hard disk when you install Direct. As you install new
applications, you can set them up to work with Direct by registering the
applications. See the
Register Application
topic.
Tilde Character(~)
The tilde character appears in your text file if Direct could not recognize a
character. You can change the tilde to another character by choosing a
different “reject” character in the Settings dialog box. To display this
dialog box, click the Direct icon once and then click
Unload OCR After n Minutes of Inactivity
Select this if you want Direct to unload the optical character recognition
(OCR) program from your computer's memory when Direct is not used
for a period of time. Direct will take a few seconds to load OCR the next
time you scan a page. “n” stands for a number of minutes from 0 to 99. 0
indicates that OCR will always stay loaded.
Settings
.
Use Language Analyst
28 Commands and Settings
There are two parts to the Direct program. One is the part that shows
dialog boxes and drives your scanner. The other, the OCR portion, is the
part that actually analyzes a scanned image and converts it into text. The
OCR part uses a lot of your computer's memory.
Once loaded, OCR normally stays in memory until you close the program.
However, this setting lets you clear OCR from memory without closing
the Direct program.
Select this to use the Language Analyst during recognition. The Language
Analyst automatically performs word and character analysis during
Page 31

Word Processor
recognition to check spelling and replace unknown words with words that
are most likely to be correct.
Speed up Direct by deselecting
Analyst improves recognition accuracy but increases the processing time.
Word Processor
Select this if the application you want to register deals mostly with text.
Direct is designed to automatically work with Windows applications
installed on your hard disk when you install Direct. As you install new
applications, you can set them up to work with Direct by registering the
applications. See the
Use Language Analyst
Register Application
. The Language
topic.
Commands and Settings 29
Page 32

Word Processor
30 Commands and Settings
Page 33

Chapter 4
How to Improve
Performance
You can make Direct run faster and recognize text more accurately by
learning how to use a few different settings.
• Speed up Direct by de-selecting
adjusting other options instead of using the default
• Improve text-recognition accuracy by using the Character Win-
dow to adjust the
document quality, scanning angle, and paper transparency.
Brightness
Auto Intensity
setting and by taking into account
and by manually
settings.
Auto
How to Improve Performance 31
Page 34

Improving Speed
Improving Speed
Direct is designed to run automatically, making text recognition easy and
effortless. However, the automatic features take longer to work. Deselecting
options will make Direct run much faster.
Use Language Analyst
The Language Analyst automatically performs word and character
analysis during recognition to check spelling and replace unknown words
with words that are most likely to be correct.
Use Language Analyst, Auto Intensity,
and manually setting other
Speed up Direct by deselecting
Analyst improves recognition accuracy but increases the processing time.
The Use Language Analyst selection is available by choosing
the Direct icon Control menu (click once on the minimized Direct icon on
the Windows desktop).
Auto Intensity
The
Auto Intensity
accuracy considerably if your page is dirty, if text is printed on a colored
background, or if the page has shading from a copy machine.
However, if you scan high-quality documents with crisp, black letters
printed on white paper, recognition is much faster with this setting turned
off. Deselect
Brightness
Document Type
Select
Fully formed
Select
Dot matrix
pin dot-matrix printer. Do not select
letter-quality mode or printed by a 24-pin dot-matrix printer.
Page Layout
Select
Single column/Tables
correspondence, or when scanning a table, financial form, or spreadsheet.
Use Language Analyst
feature, available with grayscale scanners, improves
Auto Intensity
control.
when you scan conventionally printed text characters.
when you scan characters printed in draft mode by a 9-
in the Options dialog box and use the manual
Dot matrix
when there is one column on a page, as with
. The Language
for pages printed in near-
Spelling...
in
Load OCR when Direct is Launched
32 How to Improve Performance
Select this if you want Direct to load the optical character recognition
(OCR) program in your computer's memory when Direct is started. Direct
will take a few seconds to load OCR, and then there will be no delay the
first time you scan a page.
Page 35

This command is available in the Settings dialog box: click the Direct icon
and then choose
Partial Page
The
of a page you want recognized. Using this feature, you don't need to wait
while Direct recognizes unnecessary text.
Partial Page
Improving Speed
Settings
feature lets you draw selection boxes around just the parts
in the icon Control menu.
For tutorial-like instructions on how to use the
Chapter 2, How to Scan Text.
Partial Page
feature, see
How to Improve Performance 33
Page 36

Improving Accuracy
Improving Accuracy
If you scan typeset, high-quality printed pages, you will probably find that
Direct recognizes text perfectly: the text that appears in your word
processor matches the text in the scanned page letter for letter.
With lesser-quality pages, text-recognition accuracy will be poorer. These
factors most affect text-recognition accuracy:
• Document Quality
• The Language Analyst
• The Brightness Setting
• Scanner Glass Clarity
• Paper Transparency
Document Quality
Direct recognizes characters in almost any font from 6 to 72 points in size.
However, keep the following in mind when using Direct:
• The print should be reasonably clean and crisp. Characters must
• The document should be free of notes, lines, or doodles; anything
• The document font must be non-stylized; for example, the
• It's hard to recognize underlined text accurately; the underline
be distinct: separated from each other and not blotched together
or run-on.
that is not a printed character will slow Direct considerably, and
any character distorted by a mark will be unrecognizable.
Zapf
Chancery
changes the shape of descenders on the letters q, g, y, p, and j.
font is too fancy for Direct.
The Language Analyst
34 How to Improve Performance
The Language Analyst automatically performs word and character
analysis during recognition to check spelling and replace unknown words
with words that are most likely to be correct.
Improve recognition accuracy by selecting
notice that using the Language Analyst increases the processing time.
The Use Language Analyst selection is available by choosing
the Direct icon Control menu (click once on the minimized Direct icon on
the Windows desktop).
Use Language Analyst
. You may
Spelling...
in
Page 37

The Brightness Setting
The
Brightness
recognition accuracy. It is available in the Scan Text dialog box if you deselect
Auto
setting is your most powerful means to improve text-
or
Normal Intensity
Improving Accuracy
in the Options dialog box.
Manually adjusting the
and print quality for all kinds of pages: newsprint, glossy paper, thickly
inked, etc. The following image shows a lower-case e printed on glossy
paper as it might appear to Direct. Notice the thin, horizontal line in the
middle. Is this character an e or a c? It may be hard for Direct to tell.
The following image shows the same character, as it appears to Direct,
when the brightness control is set to
Direct will always read this character as an e.
To adjust the
move the mouse pointer to the box, hold the mouse button down, and
slide the control left or right. The number in the control's box is a reference
you can use when you scan other documents. If you find that a particular
brightness setting is effective with a certain quality of document, use that
setting the next time you scan that type of page.
Brightness
Brightness
control, either click on the left or right arrows or
control allows for differences in paper
Darken.
Auto Intensity
Select this to let Direct automatically set the optimal brightness with
grayscale scanners. This feature is especially useful if your page is dirty, if
text is printed on a colored background, or if the page has shading from a
copy machine.
If you have a TWAIN-compliant scanner and a TWAIN data source dialog
box appears when you use Direct, you must make sure that the settings in
the TWAIN dialog box match those in the Direct Options dialog box.
How to Improve Performance 35
Page 38

Improving Accuracy
For example, if you select
Auto Intensity
in the Direct Options dialog box,
you must have Grayscale selected in the TWAIN dialog. The Size: area
setting in the Direct Options dialog must be as large or larger than the
scanning area setting in the TWAIN dialog. And, the resolution setting in
the TWAIN dialog must be 300dpi.
For more information about using TWAIN-compliant scanners, see
“TWAIN Scanners Not Listed” on page 41
The Character Window
The Character Window appears while Direct performs text recognition on
a page; it displays small portions of the scanned image. If text characters
appear thick and run-together, adjust the Brightness setting towards
Lighten
Darken
. If characters appear thin and broken, adjust the setting towards
. If characters appear at an angle, rescan the document after
straightening the page in the scanner.
The Character
Window
36 How to Improve Performance
If the Character Window does not appear during recognition, maximize
the size of your application's window and the Direct image window.
Page 39

Improving Accuracy
The following figure shows how well-formed characters appear in the
Character Window. No special brightness adjustment is needed.
The following figure shows how thin, broken characters appear in the
Character Window. Try adjusting the Brightness control toward
Darken.
The following figure shows how thick, run-together characters appear in
the Character Window. Try adjusting the Brightness control toward
Lighten.
Scanner Glass Clarity
The sheet of glass on the flatbed of the scanner must be clear. If it gets
dirty, wipe it gently with a soft, damp, lint-free cloth or tissue. Be sure it is
completely dry before you put pages on it.
How to Improve Performance 37
Page 40

Improving Accuracy
Paper Transparency
Some paper is thin enough that the scanner sees text printed on the
opposite side of the scanned page. This is often the case with telephonebook pages. To correct this problem, put a black piece of paper behind the
page between the page and the lid of the scanner.
38 How to Improve Performance
Page 41

Chapter 5
Technical Information
Although Direct is designed to allow new users to get up and running
quickly, problems sometimes occur. The information in this chapter is
organized in five sections:
• Supported Scanners
• Installation Problems
• Operation Problems
• Error Messages
• Product Support
Before You Begin Troubleshooting Direct
If you’re having a problem with Direct, first verify that your computer and
other applications are functioning properly.
Windows and your scanner's image-scanning software should be installed
and working properly before you install Direct.
Try using other Windows applications such as Write or Paintbrush. If the
problem occurs when a scanning operation is requested, try using the
scanning software that came with your scanner. Resolve any problems
that occur with Windows or your image-scanning software before you try
using Direct again.
Technical Information 39
Page 42

Supported Scanners
Supported Scanners
The following is a list of scanners that have been tested by Caere.
Scanner Model Driver Version Scan Manager
Abaton Scan 300/FB, 300SF SCN8.COM Rev. E SCMGR02.EXE
Abaton Scan 300S, 300GS ABASCAN.SYS 2.01 SCMGR01.EXE
Abaton Transcribe/300 TRANSCRB.SYS 1.0 SCMGR01.EXE
Agfa Focus I, II, and Color None SCMGR12.EXE
Agfa StudioScan w/PCZ or ASPI TWAIN 1.25 SCMGR07.EXE
Apple OneScanner (8-bit) ASPIxDOS.SYS SCMGR07.EXE
Bell and Howell ASPIxDOS.SYS SCMGR07.EXE
Brother BS300, BS300G USCAN.SYS 4.22 SCMGR04.EXE
Canon IX-12, IX-12F IXHND2.COM 1.04 SCMGR05.EXE
Canon IX-30F SI3.SYS 1.21 SCMGR31.EXE
Canon IX-3010, 4015 w/ADF TWAIN SCMGR07.EXE
Complete PC Flatbed Scanner CPCFSCAN.SYS 1.11 SCMGR08.EXE
Complete PC Page Scanner CPCSCAN.SYS 2.10 SCMGR13.EXE
DataCopy GS Plus XIS380GS.SYS 1.20 SCMGR07.EXE
Epson ES-300C, 600C, 800C ASPIx.SYS/ESPN 2.10 SCMGR07.EXE
Epson GT-4000, 6000, 6500 EPSON.SYS NA SCMGR07.EXE
Epson GT-8000 ASPIx.SYS/ESPN 2.10 SCMGR07.EXE
Fora IMG-11, 321, 511 USCAN.SYS 4.22 SCMGR04.EXE
Fujitsu 309X w/ Dunord I2000 12000.EXE 1.03 SCMGR55.EXE
Fujitsu 309X w/ Kofax board KF9X00.EXE 1.21 SCMGR07.EXE
Fujitsu 3096G ASPIxDOS.SYS 2.10 SCMGR07.EXE
Fujitsu ScanPartner 10 ASPIxDOS.SYS 2.10 SCMGR07.EXE
HP ScanJet, ScanJet Plus SJDRIVER.SYS 3.10 SCMGR08.EXE
HP ScanJet IIc, IIcx, IIp SJII.SYS 1.39 SCMGR42.EXE
Kofax KF9X.EXE 1.21, 2.0 SCMGR07.EXE
Kyocera A-800 SCNDRV.SYS 1.16 SCMGR33.EXE
Lightspeed 320F, 300G USCAN.SYS 4.22 SCMGR04.EXE
Mectel UF32, UF42, UG80 USCAN.SYS 4.22 SCMGR04.EXE
Microtek MSII MSCAN.SYS 2.73 SCMGR07.EXE
Microtek MS-300A, MS-300C MSCAN.SYS 2.73 SCMGR09.EXE
Microtek MSF-300A, -300C, -300G MSCAN.SYS 2.73 SCMGR09.EXE
Microtek MSF-300Q, MSF-300Z MSCAN.SYS 2.73 SCMGR09.EXE
Microtek MSF-400G, -400Q MSCAN.SYS 2.73 SCMGR09.EXE
Microtek ScanMaker 600G, 600Z MSCAN.SYS 2.73 SCMGR09.EXE
Microtek ScanMaker 600Z w/ADF MSCAN.SYS 2.73 SCMGR09a.EXE
Microtek ScanMaker II MSCSI.SYS 2.80 SCMGR09b.EXE
Microtek ScanMaker IIg, IIsp, IIxe MSCSI.SYS SCMGR07.EXE
Microtek ScanMaker III MSCSI.SYS SCMGR07.EXE
Nikon ScanTouch AX-1200 ASPIxDOS.SYS SCMGR07.EXE
Panasonic FX-RS307, FX-RS506 MEISCAN7.COM 4.0 SCMGR10.EXE
Pentax IQ Scan PENTX-HP.SYS SCMGR08.EXE
Ricoh IS60 (parallel) SCN8.COM Rev. E SCMGR02.EXE
Ricoh IS50, IS60 (SCSI) ASPIxDOS.SYS 2.10 SCMGR07.EXE
Ricoh IS30-MS, RS312 SCN8.COM Rev. E SCMGR02.EXE
Ricoh RS320, 322, 322+ (IS11) SCN8.COM Rev. E SCMGR02.EXE
Sirius32, 32GS USCAN.SYS 4.22 SCMGR04.EXE
TWAIN scanner Scanner dependent SCMGRTW.EXE
Umax UF32, UF42, UG80 USCAN.SYS 4.22 SCMGR04.EXE
Umax UC 630 TWAIN SCMGR07.EXE
Visa FBS300, FBS400, GS300 USCAN.SYS 4.22 SCMGR04.EXE
Wang SC300 SCN8.COM Rev. E SCMGR02.EXE
40 Technical Information
The Scan Manager (scmgr) file is a Caere program that works with your scanner’s driver file.
To save disk space you may delete unused scmgr files.
Page 43

Microtek Scanners
ScanMaker 600Z
will prompt you to insert each page rather than scan until empty. To scan
with the flatbed, please disconnect the ADF from the back of the scanner.
Supported Scanners
When using an automatic document feeder (ADF), Direct
ScanMaker IIhr
distorted, please contact Microtek and upgrade your scanner ROMs to
version 1.2.
If images scanned in grayscale mode with an ADF appear
TWAIN Scanners Not Listed
You may be able to use a TWAIN scanner not tested by Caere if you edit
the scanmgr.ini file that is located in your Direct directory. If you are an
experienced user, open scanmgr.ini and follow the instructions at the
beginning of the file.
In your TWAIN data source dialog box, you
Resolution: 300dpi; Scaling: 100%; Scan Frame: 8.5" x 11" or 8.5" x 14"; Scan
Mode: Grayscale or Line Art.
If you select grayscale mode in the TWAIN data source dialog box, you
can select
art mode in the TWAIN data source dialog box, but you have a grayscale
scanner, deselect
setting in the Direct Options dialog box must be as large or larger than the
setting in the TWAIN data source dialog box.
A copy of a standard scanmgr.ini file appears below.
;If your TWAIN scanner is not 100% compliant with the
;TWAIN specification, you will need to add a section
;to this file similar to the existing entries. Add an
;entry such as the following. (Remember to remove the
;semicolons and comments.)
Auto Intensity
in the Direct Options dialog box. If you select line
Auto Intensity
use these settings:
must
in the Direct Options dialog box. The Size:
;[Name of your TWAIN data source]
;SHOW_UI=0
;INVERT=1
;AUTO_BRI=1
;SHOW_UI=0
;The above indicates whether or not the TWAIN Data
;Source user interface will be displayed or not.
;0 means no, 1 means yes.
;INVERT=1 indicates whether the image will be
;inverted or not. If your scans appear as black
;pages with white text, and INVERT=1, make INVERT=0.
;If INVERT=0, make INVERT=1.
Technical Information 41
Page 44

Supported Scanners
;AUTO_BRI=1 determines whether or not grayscale
;scanning can be used with OmniPage. If you have a 256;grayscale scanner, this should be set at 1. If you
;have problems change it to 0.
;DISPLAY_PROGRESS=1 Use this if your data source does
;not have a progress indicator and SHOW_UI=0.
;IMPORTANT - In your TWAIN scan module dialog box, you
;MUST use these settings:
;RESOLUTION: 300dpi
;Scaling: 100%
;Scan Frame: 8.5" x 11" or 8.5" x 14"
;Scan Mode: Grayscale or Line Art
;Note: If you use Grayscale, choose 3D OCR or AnyPage
;in the OmniPage Scanner settings panel. If you use
;Line Art, choose Manual brightness in the OmniPage
;Scanner settings panel.
[ScanMgr]
MicrotekPort=0200
MicrotekSpeed=1
ModelName=
nBrightness=1
nContrast=1
Setup=Y
TwainDS=Microtek Image Scanner
CurrentScannerId=54
[RELISYS SCSI-2 Scanner]
COMMENT=Relisys, 111
SHOW_UI=1
INVERT=1
AUTO_BRI=1
42 Technical Information
[Avision TWAIN Source]
COMMENT=Avision
SHOW_UI=1
INVERT=1
AUTO_BRI=1
[FotoLook V1.25 Twain]
COMMENT=Agfa StudoiSCAN, 111
SHOW_UI=1
INVERT=1
AUTO_BRI=1
[Microtek Image Scanner]
COMMENT=ScanMakerIIg/ScanMakerIIsp,011
SHOW_UI=0
INVERT=1
AUTO_BRI=1
DISPLAY_PROGRESS=1
[UMAX Scanner V1.04]
SHOW_UI=0
Page 45

INVERT=0
AUTO_BRI=1
[Canon IX-4015]
COMMENT=CANONIX4015,011
SHOW_UI=0
INVERT=1
AUTO_BRI=1
[Canon IX-3010]
COMMENT=CANONIX3010,011
SHOW_UI=0
INVERT=1
AUTO_BRI=1
[Kofax Device]
COMMENT=FUJITSU,010
SHOW_UI=0
INVERT=1
AUTO_BRI=0
[DeskScan II]
COMMENT=ScanJet_Plus_IIp_IIc_IIcx,011
SHOW_UI=0
INVERT=1
AUTO_BRI=1
[Pentax IQ Scan]
COMMENT=PENTAX_IQ_SCAN, 011
SHOW_UI=0
INVERT=1
AUTO_BRI=1
Supported Scanners
[NISCAN Page]
COMMENT=NISCAN,111
SHOW_UI=1
INVERT=1
AUTO_BRI=1
[COMMENT]
COMMENT=THIS_COMMENT_IS_FOR_LOGITECH_ONLY
DPI=0 - 200 dpi, 1 - 300 dpi, 2 - 400 dpi
DOCTYPE=0 - black & white, 1 - gray scale
ORIENT=2 - Auto, 3 - portrait, 4 - landscape(L to R),
5 - landscape(R to L)
[Logitech ScanMan]
SHOW_UI=1
INVERT=1
AUTO_BRI=1
DPI=1
DOCTYPE=0
ORIENT=4
Technical Information 43
Page 46

Supported Scanners
[Logitech PowerPage]
INVERT=1
AUTO_BRI=0
DPI=1
DOCTYPE=0
ORIENT=3
44 Technical Information
Page 47

Installation Problems
An installation problem is often the result of an improper or incompatible
system configuration. Sometimes, installation problems occur because of
a bad disk or corrupted file. The following section details the most
common installation problems.
SETUP repeatedly requests the same disk.
If the correct disk is in the disk drive, the disk is probably damaged. To
check the disk, exit the installation program and Windows. From the DOS
prompt, type DIR A: If you receive an error message from DOS, the disk
is damaged.
If you are able to see the disk directory, try to copy a file from the disk to
your hard disk. DOS may be unable to copy files from the disk even if it
can read the directory.
If the disk is damaged, contact product support for a replacement.
Direct hangs the system at the beginning of the recognition
process.
Many computer systems provide a feature called shadow RAM to enhance
system performance. If Direct causes the system to hang, turn off the
shadow RAM function of your computer and try again. Refer to your
computer's operations manual for information on disabling shadow RAM.
Installation Problems
Some computer systems do not allow you to turn shadow RAM off.
Incompatibilities with these systems are usually not related to shadow
RAM.
System hangs may be related to incompatibilities with memory-resident
applications or device drivers. Use a text editor to comment out any
memory-resident device drivers and applications from your autoexec.bat
and config.sys file not used by Windows, Direct, your scanner, or your
hard drive and reboot your system.
Do not remove a device driver unless you know its function. Hard disks
and video displays often require special device drivers that should not be
removed. Back up driver files and your autoexec.bat, and config.sys files
to guard against potential mistakes.
Technical Information 45
Page 48

Installation Problems
You receive garbage or nothing when you attempt text recognition
AND when you select Partial Page you see vertical lines running
through the document image or no image at all.
The memory address for your scanner interface card is probably
interfering with the memory address for your video display adaptor. Use
the instructions in your scanner owner's manual to move the scanner
interface card to a different memory address.
An autoexec.bat file does not exist on the root directory of your
boot drive.
If SETUP, the Direct installation program, does not see a SET TEMP
variable, it will look for your autoexec.bat file on the C drive to add one.
When SETUP cannot find an autoexec.bat file on the C drive, an error
message will appear. If your boot drive is a different drive, such as A:, add
the following statement to your autoexec.bat file: SET TEMP =
X:\TEMPDIR where X is the drive where your temporary directory exists
and TEMPDIR is the name of your temporary directory.
If you do not have an autoexec.bat file on your boot drive, you must create
one. Refer to your DOS Operations Manual and your Windows User's
Guide for information on creating an appropriate autoexec.bat file. Once
created, add a SET TEMP statement to your autoexec.bat file.
Direct crashes when you try to scan text into Word for Windows
2.0 or WordPerfect.
46 Technical Information
You may have to modify the settings.ini text file in your Direct directory.
See “Using WordPerfect” on page 5.
Page 49

Operation Problems
Direct works but operates slowly and frequently accesses the
hard disk drive.
As a Windows application, Direct is able to take advantage of the
Windows swap file when running low on memory. This may occur with a
minimally configured system (only 4MB of RAM), if memory has become
fragmented with use, or if other applications are running in the
background. When low memory conditions occur, Windows will use disk
space to simulate the RAM it does not have available. Disk access time is
much longer than RAM access time; the computer system will run much
slower when it has to use a swap file.
A quick fix for memory fragmentation problems is to quit Direct and
Windows and reboot your system. This will clear any fragmentation of
memory that has occurred (until, of course, it happens again).
Try closing any other applications that are running in the background.
This will usually free enough memory for Direct to operate without using
the swap file. If you regularly work with long, complex documents,
adding more RAM to your system would be the best solution.
For more information on optimizing your system and application
performance under Windows, refer to the Windows User's Guide.
Operation Problems
The scanner will begin to scan and stop. The entire system locks
up and you have to reboot your computer.
You may have an interrupt conflict between your scanner and another
device. If you have a bus mouse and you usually do not use the mouse and
scanner at the same time, check the interrupt used by the scanner and
mouse for a possible conflict. The interrupt address typically used by some
network cards may cause the same problem.
Images appear inverted (like negatives).
TWAIN scanners not 100% compliant with the TWAIN standard must
have correct entries in the scanmgr.ini file located in your Windows
directory. See “TWAIN Scanners Not Listed” on page 41.
Your system hangs when you try to scan (TWAIN scanners only).
If you select
within the dialog box of your TWAIN data source. Also, TWAIN scanners
not 100% compliant with the TWAIN standard must have correct entries
in the scanmgr.ini file located in your Windows directory. See “TWAIN
Scanners Not Listed” on page 41.
Auto Intensity
you must also select
Grayscale
as the scan mode
Technical Information 47
Page 50

Error Messages
Error Messages
Cannot paste. Be sure your application is the active window
when you press the hot key.
Error during OCR – please re-scan. If error persists, page is
unscannable.
-OR-
Error finding blocks on the page.
Error initializing OCR.
-OR-
You may have tried to start a scan while the Program Manager or other
Windows utility was the active Windows application. Click on your wordprocessing or spreadsheet application window to make it the active
window. Then start a scan.
Very rarely, a page has a combination of lines or shapes which confuse the
OCR program. Try moving the page slightly in the scanner before rescanning. If you continue to get the error, you won't be able to scan that
page. If the error continues to occur with different pages, call technical
support.
48 Technical Information
Error transferring image to OCR.
Reboot your system and try using Direct again. You may have a memory
problem – check the memory allotment in the Program Manager Help
menu
Not enough disk space to write temp file.
Direct temporarily uses space on your hard disk to store data during
recognition. The more pages you scan, the more free disk space Direct
needs. Either scan fewer pages or free up disk space by deleting
unnecessary files.
Out of memory – try closing other applications.
Direct requires 8MB of available RAM configured as 1MB conventional
memory and at least 7MB of extended memory.
A 4MB Windows permanent swap file usually provides enough memory
to allow Direct to run at any time. However, if you have several
applications open, you may not have enough memory to run Direct. Close
one or more open applications to free memory.
dialog box. If the error persists, call product support.
About
Page 51

Please enter an Auto Unload number from 0 - 99.
Error Messages
The field (n) for the
Auto Unload OCR after n minutes of inactivity
setting
must be a number from 0 to 99. 0 indicates that OCR will always stay
loaded.
This application does not work with Direct. Be sure you clicked the mouse
on the correct application.
The last step in registering an application with Direct is clicking the mouse
pointer on the window of the application you want to register. You may
have accidentally clicked on the Windows Program Manager or other
Windows utility.
Unable to find the key.
The hardware lock (international versions only) is not attached to your
computer's LPT1 printer port.
Unrecognized hot key – please enter one character or function
key.
The field for the
Enable hot key
setting can show only one character or
function key (F1, F2, etc.). You can combine the one key with the Control,
Alt, or Shift keys by clicking their respective checkboxes.
There is no scanner selected.
You must set up Direct to work with your scanner. Click the Direct icon
and then click
Scanner
. Highlight your scanner in the Scanner dialog box
and click OK.
Technical Information 49
Page 52

Caere Product Support
Caere Product Support
Product support is available if you need help. However, please check the
index or table of contents to find the information you need in this manual
– you may be able to save yourself a phone call.
Dial-up Services
Product support and information are available through the following
services:
Service How to Contact Service Provided
CompuServe GO CAERE forum/updates
America Online Keyword CAERE forum/updates
Fax on demand 408-354-8471 ext. 4 common Q&A
Caere BBS 408-395-1631 text/help files/updates
Internet support@caere.com email help
Information We Need From You
50 Technical Information
You must be registered in order to receive Product Support!
Complete and send in the registration card included in your OmniPage
Direct package. If you need to call before you have registered, be sure to
have your serial number ready.
Registered users in North America who need further assistance can also
call Caere Product Support at 408-395-8319. See the next page for
international support numbers.
For the most efficient response, please have the following information on
hand and be near your computer when you call:
• Direct serial number (printed on your program disks).
• Direct version number.
• DOS operating system version.
• Scanner manufacturer and model.
• The amount of RAM in your system.
Page 53

• The amount of free conventional memory available.
• A listing of the autoexec.bat file.
• A listing of the config.sys file.
• The size and location of your Windows swap file.
• The make and model of your computer system and peripheral
devices (printers, monitors, etc.).
• The text of any error message you received.
• Details about what you were doing when an error occurred.
International Support
These numbers are for registered international users.
United Kingdom
(44) 01-442-22-7411 — Phone
(44) 01-442-22-7412 — Fax
(44) 01-442-22-7413 — BBS
Belgium, the Netherlands, and Luxembourg
(49) (0) 2208 71491 — Phone
Caere Product Support
(49) (0) 2208 71737 — Phone
(49) (0) 2208 71731 — Fax
Other International
Please contact your local distributor or dealer.
Technical Information 51
Page 54

Caere Product Support
52 Technical Information
 Loading...