

Page 1

9352303 Issue 3
User’s Guide
Electronic user’s guide released subject to "Nokia User’s Guides Terms and
Conditions, 7th June, 1998"
Page 2

Copyright © Nokia Mobile Phones 1997-2001. All rights reserved.
Reproduction, transfer, dis trib ution or s torage of part or all of the conte nts in thi s docum ent in any form with out the pri or
written permission of Nokia is prohibited.
Nokia and Nokia Connecting People are registered trademarks of Nokia Corporation. Other product and compan y names
mentioned herein may be trademarks or tradenam es of their respective owners.
This product includes software licensed from Symbian Ltd © Symbian Ltd 1998 - 2001. All rights reserved.
EPOC and all EPOC-based trademarks and logos are trademarks of Symbian Limited.
.
Java™ is a trademark of Sun Microsystems, Inc
Part of the software in this product is © Copyright STNC Ltd. 1994-1997. All rights reserved.
© 1984-1997 DataViz Inc. All rights reserved.
This software contains portions of the file translation library of Conversions Plus, a product of DataViz Inc., 55 Corporate
Drive, Trumbull, CT 06611 USA (203) 268-0030.
International CorrectSpell™ E ngli sh spe lling co rre ction s yste m, 199 5 by Ler nout & H auspi e Speech Produ cts N. V. All ri ghts
reserved. Reproduction or disassembly of embodied algorithms or database prohibited.
English spelling software developed by Lernout & Hauspie Speech Products N.V.
UK English Concise International Electronic Thesaurus Copyright © 1995 by Lernout & Hauspie Speech Products N.V. All
rights reserved. Reproduction or disassembly of embodied programs and databases prohibited.
Incorporates MPPC® compression from Hi/fn™
Part of the software in this product is © Copyright ANT Ltd. 1998. All rights reserved.
Stac ®, LZS ®, ©1996, Stac, Inc., ©1994-1996 Microsoft Corporation. Includes one or more U.S. Patents: No. 4701745,
5016009, 5126739, 5146221, and 5414425. Other patents pending.
Incorporates LZS® compression from Hi/fn™.
Hi/fn ®, LZS ®, ©1988-98, Hi/fn. Includes one or m or e U.S. Patents: No. 4701745, 5016009, 5126739, 5146221, and
5414425. Other patents pending.
Nokia operates a policy of continuous develo pment. Nokia re serve s the ri ght to make change s and i mprovem ents to an y of
the products described in this document without prior notice.
Under no circumstances shall Nokia be responsible for any loss of data or income or any special, incidental, consequential
or indirect damages howsoever caused.
The contents of this document are provided "as is". Except as required by applicable law, no warranties of any kind, either
express or implied, including, but not limited to, the implied warranties of merchantability and fitness for a particular
purpose, are made in relation to the accuracy, reliability or contents of this docum ent. Nokia res erves the righ t to revise t his
document or withdraw it at any time without prior notice
The availability of part icular products may vary by region. Please check with the Nokia dealer nea rest to you.
©2001 Nokia Mobile Phones. All rights reserved.
Page 3
DECLARATION OF CONFORMITY
We, NOKIA MOBILE PHONES Ltd declare under our sole responsibility that the product RAE-3Nis in conformity with the
provisions of the following Council Directive:1999/5/EC.
IMPORTANT NOTICE REGARDING THE WARRANTY
In order to be able the use of this product for many years, please note that it has a very
fragile and expensive colour display, which may break if you drop, knock or shake the
product. Our Limited Manufacturer´s Warranty shall not apply if the product has been
subject to rough handling.
©2001 Nokia Mobile Phones. All rights reserved.
Page 4

Table of Contents
Introduction...............................................................................1
Getting help...................................................................................................... ........3
Facts about your communicator.......................... ........................... ...................5
GSM data transmission.........................................................................................8
General information .................................................................11
Communicator display........................................................................ ...................11
Communicator keyboard................. ........................... ........................... ................16
Connectors................................................................................................................20
To charge the battery............................................................................................20
Memory card............................................................................................................24
General features...................................... ................................................................25
To install software from the CD-ROM..............................................................34
To activate the infrared connection..................................................................35
To transfer data from other devices..................................................................36
Phone..........................................................................................39
Selection keys................. .........................................................................................40
Display indicators..................................... ..............................................................41
©2001 Nokia Mobile Phones. All rights reserved.
Page 5

To make a call..........................................................................................................42
To answer a call................................................................................................... ...45
To manage calls......................................................................................................45
Keypad lock............................................. .................................................................46
To change profiles....................................................................................... ...........47
To view help............................................ ........................... ......................................48
To use the menus....................................................................................................48
Messages (Menu 1) ................................................................................................50
Call register (Menu 2)............................................. ........................... ...................53
Settings (Menu 3)................................................................................ ...................56
Call divert (Menu 4)...............................................................................................61
Infrared (Menu 5)...................................................................................................62
SIM services (Menu 6).................. .........................................................................62
Desk............................................................................................65
Main view.............................................. ...................................................................65
Telephone...................................................................................69
To make a call manually.......................................................................................70
To call a number in the Telephone directory..................................................70
To call a number in a recent calls list..............................................................71
To answer a call................................................................................................... ...72
To call and create a voice mailbox....................................................................73
©2001 Nokia Mobile Phones. All rights reserved.
Page 6

To record a call........................................................................................................73
To make a new call during a call........................................................... .............74
To make conference calls.....................................................................................75
To remove a conference call participant..........................................................76
To talk privately with one of the conference call participants .................76
To transfer calls.......................................................................................................76
To answer a waiting call.......................................................................................77
To send DTMF tones during a call......................................................................77
Telephone Settings.................................................................... .............................78
Flight profile.............................................................................................................92
Contacts.....................................................................................95
Contacts directory..................................................................................................95
To make a contact card............................................................ .......................... ...96
To open a contact card.........................................................................................97
To move or copy contacts from a SIM card....................................................98
To search for a contact card................................................................................98
To change fields in a contact card.....................................................................99
To attach a ringing tone............................... ........................................................100
To insert a picture................................... ........................... .......................... ...........101
To create or modify templates............................................................................101
To store DTMF tones..............................................................................................102
To create contact groups......................................................................................103
©2001 Nokia Mobile Phones. All rights reserved.
Page 7

To create a SIM contact card..............................................................................105
To send a contact card as a business card......................................................107
To receive a business card...................................................................................108
Settings.....................................................................................................................108
To create a new contacts database...................................................................110
Calendar.....................................................................................113
Calendar entries......................................................................................................113
Views ..........................................................................................................................120
Icons...........................................................................................................................127
Task lists....................................................................................................................128
To search for Calendar entries............................................................................129
Settings.....................................................................................................................130
Internet......................................................................................133
Internet applications.............................................................................................134
World Wide Web (WWW) browser....................................................................144
Pointer.......................................................................................................................151
WAP............................................................................................................................151
Java.............................................................................................................................156
Messaging..................................................................................157
Messaging centre...................................................................................................158
©2001 Nokia Mobile Phones. All rights reserved.
Page 8

Fax...............................................................................................................................165
Mail.............................................................................................................................169
Short Message Service.................. ........................................................................183
Office .........................................................................................187
Word...........................................................................................................................187
Sheet..........................................................................................................................192
Presentation viewer...............................................................................................200
File manager.............................................................................................................202
Extras.........................................................................................209
Clock...........................................................................................................................209
Calculator..................................................................................................................211
Control panel................................ ................................................... ........................212
Recorder....................................................................................................................224
Imaging......................................................................................................................225
Video player..............................................................................................................229
Cell broadcast viewer............................................................................................230
Fax modem...............................................................................................................232
Troubleshooting.........................................................................235
Care and Maintenance .............................................................247
©2001 Nokia Mobile Phones. All rights reserved.
Page 9

Important Safety Information.................................................249
Glossary......................................................................................257
Index...........................................................................................267
©2001 Nokia Mobile Phones. All rights reserved.
Page 10
FOR YOUR SAFETY Read these simple guidelines. Breaking the rules may be dangerous or illegal. Further detailed information is given in this Us er’s guide.
ROAD SAFETY COMES FIRST Do not use the communicator while
driving; park the vehicle first.
INTERFERENCE All wireless phones may get interference which could
affect performance.
SWITCH OFF IN HOSPITALS Follow any regulations or rules. Switch off
the phone near medical equipment.
SWITCH OFF IN AIRCRAFT Wireless phones can cause interference.
Using them on an aircraft is illegal.
SWITCH OFF WHEN REFUELLING Do not use the phone at a fuelling
point. Do not use near fuel or chemicals.
SWITCH OFF NEAR BLASTING Do not use the phone where blasting is
in progress. Observe restrictions, and follow any regulations or rules.
USE SENSIBLY Use only in the normal position (to ear). Do not t ouch the
antenna unnecessarily.
USE QUALIFIED SERVICE Only qualified service personnel must install
or repair equipment.
ACCESSORIES AND BATTERIES Use only approved accessories and
batteries. Do not connect incompatible products.
©2001 Nokia Mobile Phones. All rights reserved.
Page 11
MAKING CALLS VIA THE PHONE Close the cover and ensure the phone
is switched on and in service. Enter the phone number, including the area
code, then press . To end a call press . To answer a call press .
EMERGENCY CALLS Close the device cover. Ensure the phone is
switched is on and in service. Hold for several seconds, to clear the
display. Enter the emergency number, then press . Give your location.
Do not end the call until told to do so.
MAKE BACKUP COPIES Remember to make backup copies of all
important data.
CONNECTING TO OTHER DEVICES When connecting to any other
device, read its user’s guide for detailed safety instructions. Do not
connect incompatible products.
INFRARED PRECAUTIONS Do not point the IR beam at anyone’s eye or
allow it to interfere with other IR devices.
©2001 Nokia Mobile Phones. All rights reserved.
Page 12
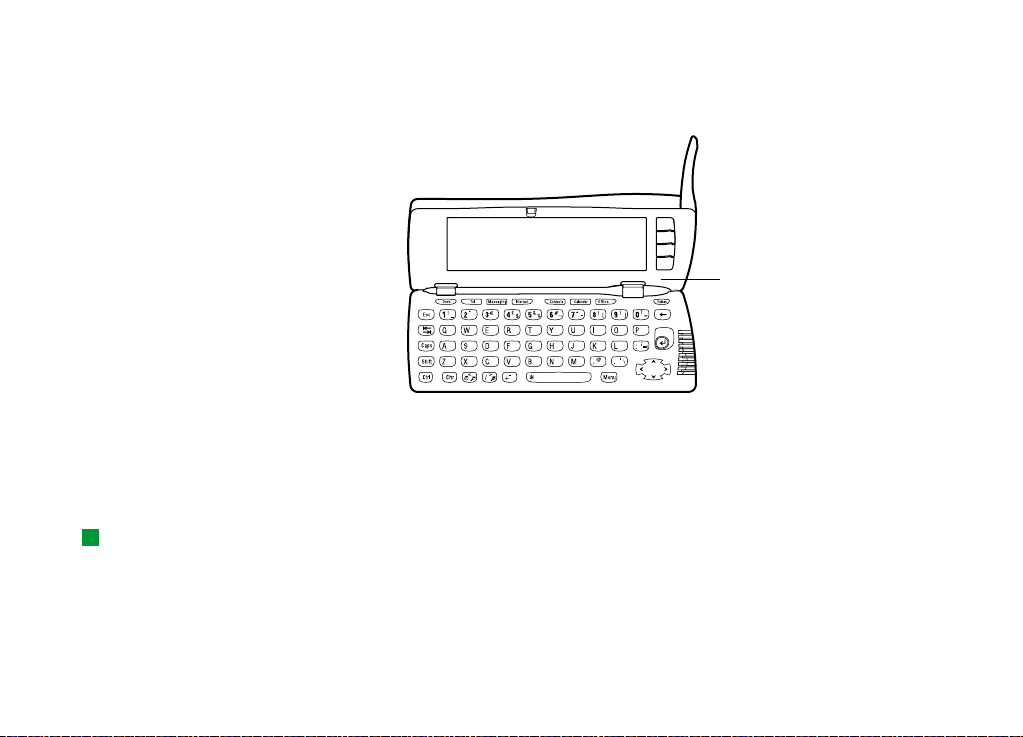
1. Introduction
1
Congratulations on purchasing the Nokia 9210 Communicator. It is a complete
communications tool: it is a wireless phone, messaging device, and a palmtop
organiser in one pocketable package.
Front Back
Earpiece
Phone
Microphone
Figure 1
©2001 Nokia Mobile Phones. All rights reserved.
Introduction
Page 13
2
Introduction
Tip: The communicator
interface has no power on/
off button - it switches itself
on when you open the cover
and switches off when you
close the cover.
The Nokia 9210 Communicator consists of two parts: the phone and the
communicator interface. The phone is on the device cover and the communicator
interface is inside the cover, both as shown in Figures 1 and 2.
communicator
interface
Figure 2
Both these parts use the same information from the memory of the communicator
- they are not separate devices. For example, the phone uses the names and phone
numbers stored in the Contacts directory of the communicator interface, and the
communicator interface uses the phone for voice and data communications, for
example, when sending and receiving faxes and connecting to the Internet.
The communicator interface contains many organiser and communications
applications. The large keyboard, command buttons, and display make using the
applications easy.
©2001 Nokia Mobile Phones. All rights reserved.
Page 14

The phone is designed for making and answering calls quickly. The communicator
looks and operates like other Nokia wireless phones, except the earpiece and
microphone are at the rear of the device. The phone is switched on and off by
pressing the button on the cover.
IMPORTANT: Do not switch on the phone when wireless phone use is
prohibited or when it may cause interference or danger.
Getting help
Online Help
The communicator has a help function, which you can access from any application
or view.
To view help, press the key on the communicator interface keyboard. You are
shown a page of information relevant to the task you are doing. You can also
search the help topics for specific subjects and keywords.
Note: The help application is located on the memory card. If you remove or
replace the original memory card, you will not be able to view the
help topics, unless you use PC Suite to install the help from the sales
package CD-ROM onto the new memory card. For more information, see
troubleshooting section 20 on page 246 and the PC Suite Guide on the
CD-ROM.
3
Introduction
©2001 Nokia Mobile Phones. All rights reserved.
Page 15

4
About the guides in the sales package
To help you begin to use your communicator, turn to the Getting Started Guide
supplied in your sales package. It explains the start-up procedure and gives basic
information on how to use the various applications.
Introduction
This user’s guide explains in more detail how the Nokia 9210 Communicator
operates. “General information” identifies the various parts of the communicator
and their functions, as well as the common features of the communicator.
The rest of this user’s guide deals with the communicator applications and the
phone. There is a short glossary of Internet and wireless terms and abbreviations
at the back of the user’s guide.
The PC Suite Guide explains the functionality of PC Suite for Nokia 9210
Communicator. With PC Suite you can move, copy, synchronise, back up, and
restore data between your communicator and a compatible PC.
The Software on CD-ROM Guide explains in detail the functionality of the
applications found on the CD-ROM that you can install on your communicator.
The PC Suite Guide and the Software on CD-ROM Guide are both on the CD-ROM
under the section “Using the Nokia 9210 Communicator”.
The Add-on Applications Guide gives a brief introduction of other software
available for the Nokia 9210 Communicator. This guide is only available in a
printed version.
The Settings Checklist helps you to connect your Nokia 9210 Communicator with
different kinds of wireless services.
©2001 Nokia Mobile Phones. All rights reserved.
Page 16

If you are switching from the Nokia 9000 Communicator, the Nokia 9000i
Communicator, the Nokia 9110 Communicator, or the Nokia 9110i Communicator
to the Nokia 9210 Communicator, see ‘To transfer data from other devices’ on page
36 and in the PC Suite Guide on the CD-ROM.
5
Note: In this user’s guide and the Getting started guide, the names of the
commands on the display are in bold and the settings and options are in
italics.
Facts about your communicator
About network services
The wireless phone described in this user’s guide is a dual band phone using either
GSM 900 or 1800 networks automatically.
A number of features included in this user’s guide are called network services. They
are special services provided by wireless service providers. Before you can take
advantage of any of these network services, you must subscribe to the service(s)
you require from your home service provider and obtain instructions for their use.
You can then activate these functions as described in this user’s guide. The manual
activation commands for various services are not presented in this user’s guide (for
example, using the and characters for activating or deactivating services).
The Nokia 9210 Communicator, nevertheless, is capable of handling commands
given in that form. For these commands, please consult with your service providers.
©2001 Nokia Mobile Phones. All rights reserved.
Introduction
Page 17

6
Introduction
Tip: Write the
information you obtain from
your service provider down
on the Settings Checklist for
future reference.
Services that need to be subscribed to are typically the short message service,
Internet, and fax.
Because the number of special services depends on what services are available in
your home network, it is, unfortunately, impossible to provide a comprehensive list
of the services and settings you need in this user’s guide. Therefore, this user’s
guide gives general information about additional services. Please contact your
network operator for further information about the availability and the details of
services in your home network.
If a service requires separate phone numbers or specific settings, they must be
stored in the settings of the communicator. For example:
Sending and receiving short messages requires that this service is supported by the
network you are using and activated for your SIM card, and that the phone number
of the message centre is stored in the settings of the SMS application.
Internet access requires that data service is supported by the network you are
using and activated for your SIM card. In addition, you must have obtained an
Internet access point from an Internet service provider.
Stickers on the sales package
The stickers contain important information for service and customer support
purposes. Keep these stickers in a safe and secure place.
Attach the sticker to the page preceding the Table of Contents of this user’s
guide. The correct place for the sticker is indicated with a frame.
Attach the sticker to the Club Nokia Invitation Card, if supplied in the sales
package.
©2001 Nokia Mobile Phones. All rights reserved.
Page 18

Access codes
The Nokia 9210 Communicator uses several access codes to protect against
unauthorised use of your communicator and SIM card. The access codes you need
most often are:
• the lock code (the predetermined default lock code is 12345), and
• the PIN code, which is provided with the SIM card.
You can change access codes that are used by both the phone and the
communicator interface via either of them, provided that the code can be changed.
For further details on access codes, see ‘Phone security’ on page 215.
The Internet applications of the communicator use passwords and user names to
protect against unauthorised use of the Internet and its services. These passwords
are changed in the settings of the Internet applications.
Contact information
All contact information that you store in the Contacts application, such as names,
addresses, and phone numbers, goes into the Contacts directory. The phone, the
communicator interface, and each of the applications have their own views of the
Contacts directory. The information shown depends on the information the
selected application can use. For example, when you are making a call via the
phone, you can view the name and phone number(s) of the contact. Possible fax
numbers, e-mail addresses, job titles, and so on, are not shown.
7
Introduction
Tip: You can synchronise
the contact information on
your communicator with a
corresponding application
on a compatible PC. See the
PC Suite Guide on the CDROM for details.
©2001 Nokia Mobile Phones. All rights reserved.
Page 19

8
GSM data transmission
The Nokia 9210 Communicator employs the data transmission capabilities of the
GSM network to send faxes, short messages, and e-mail, and to establish
Introduction
connections with remote computers.
Wireless data connections can be made from most locations where your phone
operates. However, it is recommended that you move the communicator to a
location where the strongest possible wireless signal can be obtained. When the
signal is strong, data transmission is efficient. In general, you should not expect
the same performance from wireless data communications as from landline
communications, due to the inherent characteristics of the wireless environment.
The following factors may impair wireless connections:
Noise
Radio interference from electronic appliances and equipment, as well as from
other phones will affect the quality of wireless data transmission.
Cell handover
As the phone user moves from one network cell to another, the signal strength of
the channel drops and the wireless telephone exchange may handover the user to
a different cell and frequency, where the signal is stronger. A cell handover may
also occur when the user is stationary, due to varying wireless traffic loads. Such
handovers may cause slight delays in the transmission.
©2001 Nokia Mobile Phones. All rights reserved.
Page 20

Electrostatic discharge
A discharge of static electricity from a finger or a conductor may cause erroneous
functions in electric devices. The discharge may result in distorted display and
unstable software operation. Wireless connections may become unreliable, data
may become corrupted, and the transmission halted. In this case you need to end
the existing call (if any), close the cover and switch off the phone (if on) and
remove the battery. Then replace the battery and establish a new wireless
connection.
Dead spots and dropouts
Dead spots are areas where radio signals cannot be received. Dropouts occur when
the phone user passes through an area where the radio signal is blocked or reduced
by geographical features or large structures.
Signal impairment
Distance and obstacles can cause signals to become out-of-phase. They can also
cause reflected signals. Both situations result in a loss of signal strength.
Low signal strength
Due to either distance or obstacles, the radio signal strength from a cell site may
not be strong or stable enough to provide a reliable data connection for
communication. Therefore, to ensure the best possible communication, remember
the following points:
9
Introduction
©2001 Nokia Mobile Phones. All rights reserved.
Page 21

10
• The data connection works best when the communicator is in a stationary
position. Attempting wireless data communication while in a moving vehicle is
not recommended. Fax transmission is more easily impaired than data or short
message transmission.
• Do not place the communicator on a metal surface.
Introduction
• Check that the signal strength on the communicator display is sufficient.
Moving the communicator within a room, especially towards a window, may
result in a stronger signal. If signals are not strong enough to support a voice
call, data connection should not be attempted until you can find a location with
better signal reception.
Note: When the antenna is up, the signal is stronger.
©2001 Nokia Mobile Phones. All rights reserved.
Page 22
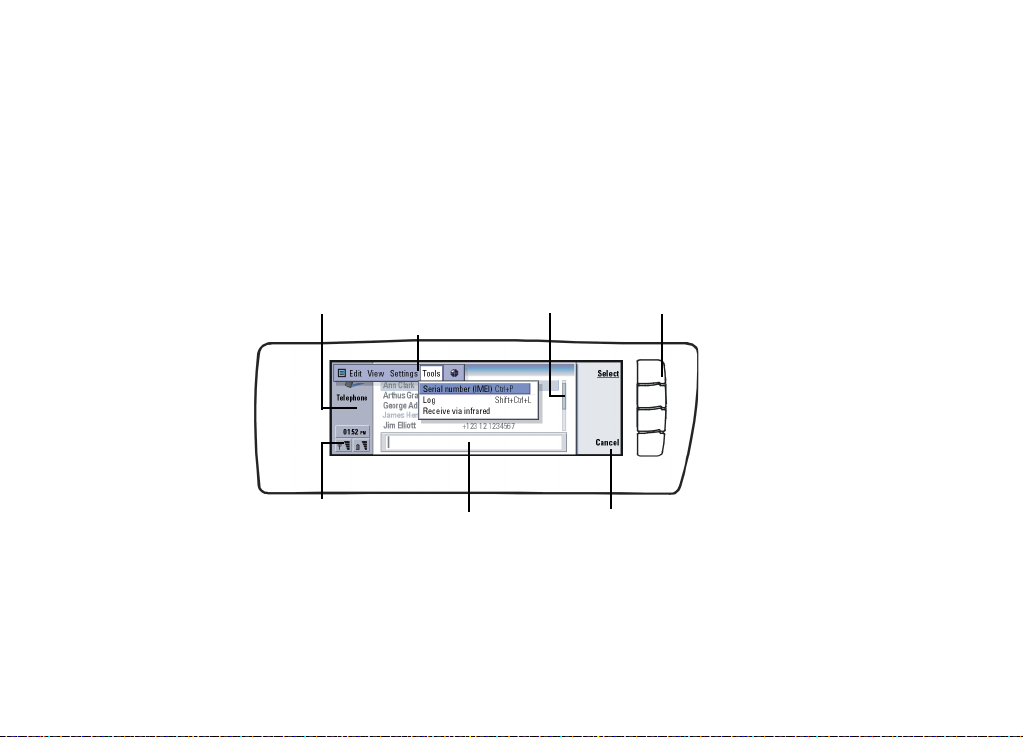
2. General information
This chapter explains how the communicator operates and how to supply power to
the communicator. For information on first start-up and setup of your
communicator, see the Getting started guide.
11
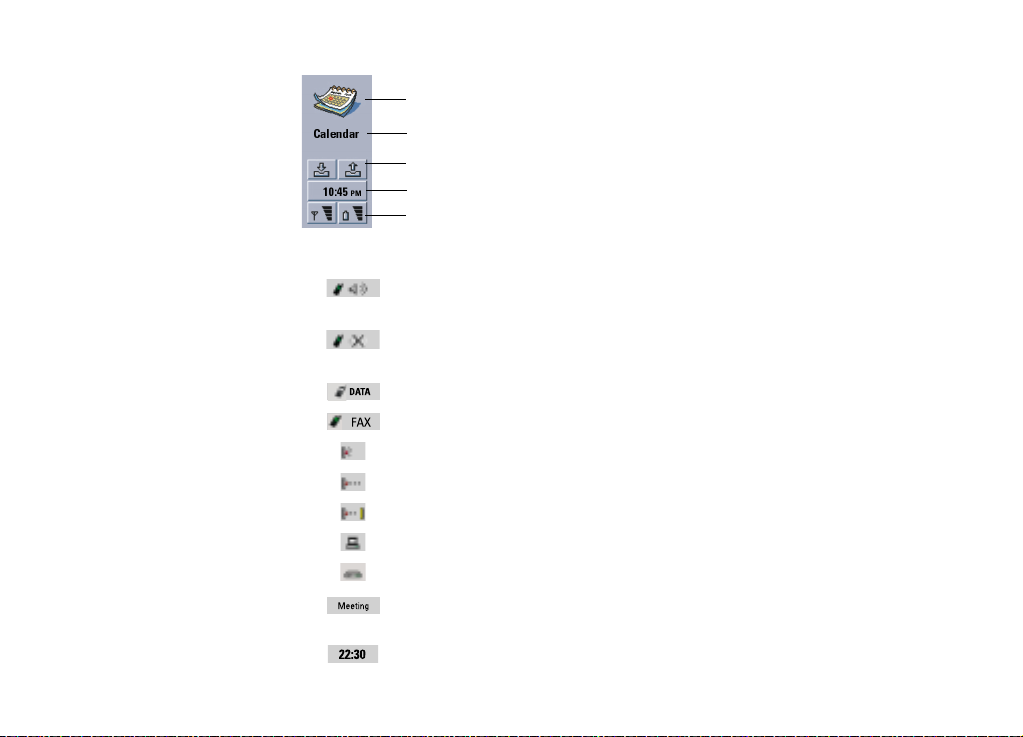
Communicator display
Name and icon of application
Menu bar
Figure 3
The communicator interface is turned on by opening the cover. The application
that was active the last time the communicator was used is shown on the display.
When you close the cover, the communicator interface turns off its display and
saves all data.
Indicator area
Search field
Scroll bar
Command buttons
Commands
©2001 Nokia Mobile Phones. All rights reserved.
General information
Page 23
12
Tip: When a command is
dimmed, it cannot be used.
General information
The commands always correspond to the command buttons, as shown in Figure 3.
The applications are run in the middle of the display. The indicators show
application and system-related information.
To move around a selected frame and select items, use the Arrows key at the lower
right-hand corner of the keyboard.
Where there is a search field at the bottom of the display, you can search for items
by using the keyboard to enter text into the search field.
The left hand frame is hig hlight ed. Press the Tab key to hig hlight
the right frame.
.
Figure 4
If there is more than one frame in the view, the selected one is always highlighted.
You can move from one frame to another by pressing the Tabulator key. See Figure
4.
©2001 Nokia Mobile Phones. All rights reserved.
This item is selected Details of item
The commands that
you can apply
Page 24
Dialogs and pages
13
This is a dialog
This is a page
Figure 5
An example of a dialog which contains several pages is shown in Figure 5.
Use the Arrows key to move within a
page.
Another page. To go to it,
press the Menu key.
Indicators
The application icon and application name in the indicator area display the
application you are in at the moment, as shown below.
The icons that appear on the Inbox/Outbox indicator rows change according to the
application and current situation. The battery level and signal strength indicators
are the same as shown on the phone display when the phone is on.
General information
©2001 Nokia Mobile Phones. All rights reserved.
Page 25
14
General information
Application icon
Application name
Inbox/Outbox
Time
Signal strength and battery level
Call status
- You have a voice call, and the handsfree loudspeaker and
microphone are on. See page 70.
- A voice call with the handsfree off. The loudspeaker and
microphone are muted.
- An open data connection, see the Internet chapter on page 133.
- The communicator is receiving or sending a fax.
- The communicator is trying to establish an infrared connection.
- An infrared connection has been established.
- The infrared connection is obstructed.
- The communicator is connected to a PC.
- The communicator is being used as a fax modem.
- The communicator is in a profile, in this case in the ‘Meeting’
profile. See ‘Telephone Settings’ on page 78.
- Time. You can adjust time in the Clock application. See page 209.
©2001 Nokia Mobile Phones. All rights reserved.
Page 26

Inbox/Outbox
- The inbox indicator informs you that you have received a fax, short
message, or mail.
- The document Outbox contains unsent messages. See ‘Outbox’ on page
161.
Battery level
- The battery is low and you should recharge it.
- The battery is charging. The bar scrolls until the battery is fully charged.
The outlet plug icon indicates that the communicator is connected to an external
power source.
- The battery is fully charged. All the four bars are displayed.
Signal strength
- The communicator is connected to a wireless network. When all the four
bars are shown, the wireless signal reception is good. If the signal is weak, make
sure the antenna is up. You can also try to improve the reception by moving the
communicator slightly or by using it in the handsfree mode.
- The phone is on, but it is outside network coverage.
- The phone is off. You cannot make or receive calls, and you cannot receive
messages with any of the communications applications (SMS, data, fax, or mail).
15
General information
©2001 Nokia Mobile Phones. All rights reserved.
Page 27
16
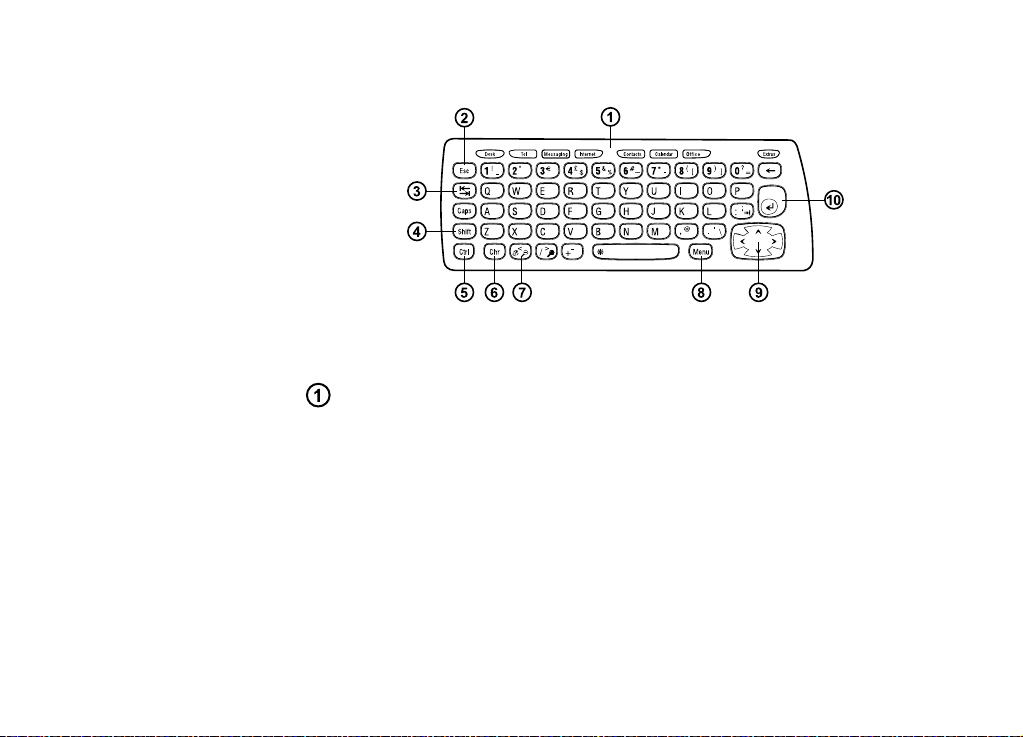
Communicator keyboard
General information
Figure 6
In addition to the normal character and number keys, the keyboard has a number
of special keys, as shown in Figure 6.
Application buttons
The buttons at the top of the keyboard start the corresponding applications or
open application groups. The buttons are: Desk, Telephone, Contacts, Calendar,
OfficeExtras, and Extras.
To use the applications
When the cover is opened, the application that was active the last time the
communicator was used, is shown on the display.
©2001 Nokia Mobile Phones. All rights reserved.
Page 28

To switch to another application, press the corresponding application button. You
can even do this during a call. You need not exit an application before starting
another. All inactive applications remain in the background until you activate them
again.
Note: When you open the WWW application, all other applications are closed
to reserve memory for WWW.
To send or receive calls or messages with any of the communications applications,
remember that the phone must be switched on and in a service area with adequate
wireless signal strength.
Note: Information need not be specifically saved. When you press Close, switch
to another application, or close the device cover, the Nokia 9210
Communicator saves all data.
To create a keyboard shortcut to a preferred application
Some applications buttons like Office, Desk, and Extras do not open applications
directly. However, you can specify an application in an application group as the
preferred application and access it directly from the keyboard. You can open a
preferred application by clicking Ctrl + the application button.
To make an application preferred, open an application group (such as Office), press
the Menu key, and select Tools > Preferred link…. Select the application from the list.
See the example in the column adjacent to this paragraph.
Escape (Esc)
To cancel an action, you can either press the Esc key or Cancel. Pressing the Esc
key also cancels and dismisses a dialog, and dismisses an information note.
17
General information
Example: If you make a the
Word application preferred
inside the Office application
group, you can press
Ctrl+Office within any
application to open Word.
©2001 Nokia Mobile Phones. All rights reserved.
Page 29

18
General information
Tabulator or Tab
You can use the Tab (Tabulator) key to move from one frame to another. When
writing or editing documents, the Tab key moves the cursor to the next tab stop.
Shift
The Shift key is used together with letter keys to insert capital letters and used
together with number keys to insert special characters. The Shift key does not need
to be held down when pressing a key: pressing first Shift and then a letter or
number key generates an uppercase or special character.
In combination with Control key and a particular letter key it generates shortcut
commands. See ‘Shortcuts’ on page 27
In writing and editing text, the Shift key and the Arrows key can be used to select
text, see ‘Shortcuts’ on page 27.
Control (Ctrl)
Pressed together with other keys on the keyboard, the control key generates
shortcut commands which can be used in viewing and writing text. See ‘Shortcuts’
on page 27.
Character (Chr)
Press the character key to open a character table where you can select special
characters. The character key is also used to access characters and commands that
are shown in green colour. The character key is also used with other keys to zoom
the view and activate or deactivate infrared.
©2001 Nokia Mobile Phones. All rights reserved.
Page 30

Help ( )
For online help at any time, press the key on the communicator keyboard. For
more information, see ‘Online Help’ on page 3.
Menu
Pressing the Menu key reveals options. The options available depend on the
application you are in. Use the Arrows key to move to the desired option and press
Select.
The chosen option only affects the item that is currently selected, open, or being
sent. The Menu may also contain the generic option Settings.
Arrows key
The Arrows key can be used to move the cursor or selected frame.
Enter
When the cursor is shown, pressing Enter moves the cursor to the beginning of the
next text line or adds a new line. Enter can also be used to open folders,
applications, and documents. When a command is underlined you can press Enter
instead of the command button . When information notes are shown, press Enter
instead of OK. In options and settings, when a value can be toggled, you may press
Enter instead of Change.
Tip: Using the menu key,
the Zoom option is
sometimes available. It
allows you to magnify the
view on display.
Tip: In the WWW
browser application, use the
Arrows key to move a
pointer around the display.
See page 151.
19
General information
©2001 Nokia Mobile Phones. All rights reserved.
Page 31

20
General information
Connectors
The Nokia 9210 Communicator can be connected to a variety of devices. Figure 7
shows the connectors, which are:
for infrared
connection
for the charger
for the RS232
Adapter cable
2L
and also the
Figure 7
Use the infrared port for connecting to a compatible PC, printer, digital camera, or
another communicator.
headset HDC-8L
DLR-
To charge the battery
Note: See important safety information on battery usage on page 22.
©2001 Nokia Mobile Phones. All rights reserved.
Page 32

1 Connect the charger cable to the bottom of the communicator, as shown in
Figure 8.
Figure 8
2 Connect the charger to the proper voltage AC wall outlet. W hile charging is in
progress, the battery level indicator scrolls on the phone display.
3 When the battery is fully charged, the bars stop scrolling and four bars are
displayed. You may now remove the charger plug from the communicator.
Note: You can use all the features of the communicator during charging.
When the battery level is low and only a few minutes of operation time remain, a
warning tone will sound, and the message BATTERY IS LOW will be repeated at
regular intervals on the phone display. When the charge level becomes too low for
operation, the RECHARGE BATTERY message will be displayed, accompanied by a
warning tone. If you do not connect the communicator to a charger, the
communicator switches itself off.
21
Tip: To check the current
battery level, see the battery
indicator on the
communicator or phone
display.
General information
©2001 Nokia Mobile Phones. All rights reserved.
Page 33

22
Tip: Read this section for
information on how to
General information
prolong the life of your
battery.
Note: When you connect a communicator with a fully discharged battery to a
charger, it will take 30-60 seconds before the CHARGING message
appears on the display and the battery indicator bar starts scrolling. After
that, it may take 10-30 seconds before you can switch the phone on.
Battery information
Use the battery only for its intended purpose.
Never use any charger or battery that is damaged or worn out.
Do not short-circuit the battery. Accidental short-circuiting can occur when a
metallic object (for example coin, clip, or pencil) causes direct connection of the +
and - terminals of the battery (metal strips on the bottom of the battery), for
example, when you carry a spare battery in your pocket or purse. Short-circuiting
the terminals may damage the battery or the connecting object.
Leaving the battery in hot or cold conditions, such as in a closed car in summer or
winter conditions, will reduce the capacity and lifetime of the battery. Always try
to keep the battery between +15°C (+59°F) and +25°C (+77°F). A communicator
with a hot or cold battery may temporarily not work, even when the battery is fully
charged. The performance of Lithium-ion batteries is particularly limited in
temperatures below 0°C (+32°F).
Do not dispose of batteries in a fire!
Batteries must be recycled or disposed of properly. Batteries must not be disposed
of in municipal waste.
Note that a new battery’s full performance is achieved only after two or three
complete charge and discharge cycles.
©2001 Nokia Mobile Phones. All rights reserved.
Page 34

Use only batteries approved by the communicator manufacturer and recharge the
battery only with the chargers approved by the manufacturer. With approved
chargers and accessories, the battery can be charged continuously.
The battery need not be fully discharged before recharging. When a charger is not
in use, disconnect it from the power source. Do not leave the battery connected to
a charger for longer than a week, since excessive charging may shorten its life. If
left unused, a fully charged battery will discharge itself over time.
The battery can be charged and discharged hundreds of times, but it will eventually
wear out. When the operating time (talk-time and stand-by time) is noticeably
shorter than normal, it is time to buy a new battery.
Temperature extremes will affect the ability of your battery to charge: allow it to
cool down or warm up first.
Battery operation time is affected by the following: whether both the phone and
the communicator interface are on, radio signal strength, various phone settings,
and the length of the screen blanker period.
It is recommended always to keep a charged battery in the communicator. Keeping
the battery charged maximises the lifetime of the backup battery supplying power
to the real-time clock of the communicator. In case the backup battery is drained,
it will be automatically charged the next time a charged battery is reconnected to
the communicator.
Always close the device cover before removing the battery. Closing the cover will
save all data.
23
General information
©2001 Nokia Mobile Phones. All rights reserved.
Page 35

24
Note: The battery does not fit into place if the SIM card is not correctly
installed. Do not force the battery into place! Check that you have
inserted the SIM card as described in the Getting started guide. If the
SIM card is incorrectly installed, remove it by pulling it out of the slot,
and insert it again.
Memory card
General information
©2001 Nokia Mobile Phones. All rights reserved.
You can use the memory card delivered in your sales package to manage your
documents, contacts databases, applications, backups, and so on.
Use the items on the memory card in the same way as corresponding items on the
communicator. You can, for example, install and remove software to and from the
memory card with the Install/Remove software application, and send messages to
contacts in the contacts directory of the memory card.
Note: Do not remove the memory card in the middle of an operation.
To insert the memory card
1 Close the device cover and make sure that the phone is switched off. If it is on,
press .
2 Open the hatch at the back of the communicator, using a minimum of two
fingers - one finger on each side of the hatch.
3 Slide the memory card under the memory card holder as shown in Figure 9.
Make sure that the gold contacts of the card are facing down.
Page 36

Figure 9
4 When you have secured the card in place, close the hatch.
WARNING: Keep all memory cards out of the reach of small children.
General features
To select several items at once
Where multi-selection is available, you can select several items at once. The
commands you use affect all the selected items. Multi-selection works in most
lists.
To select items one by one, scroll to the item and press and hold down Ctrl + space
bar.
25
General information
©2001 Nokia Mobile Phones. All rights reserved.
Page 37

26
General information
To select a larger set of consecutive items, paint the items by pres sing and holding
Shift + using the ∧ and ∨ arrows on the Arrows key or the space bar.
Multi-selection is cleared when you press the Esc key.
Special characters
The character key Chr, on the communicator keyboard is used to create characters
that are not included on the keyboard. The character key can always be used when
you are able to enter characters from the keyboard.
Note: Some special characters may get distorted when sent out of your
communicator. This happens in, for example, mail or short messages, and
is because of differences in network protocols.
To insert special characters from the character ta ble
1 Press and release the Chr key. A dialog opens.
2 Press the Menu key to select the page with the character you want to insert..
3 Select the special character or characters, then press Insert.
To insert special characters from the keyboard
Either, press and hold the Chr key and simultaneously press a key with a special
character printed on the key as the third character.
Or, to generate special characters by using certain unmarked keys, for example, “a”
and “e”, do as follows:
1 Press and hold the Chr key and simultaneously press a letter key. The first
special character matching the letter key is displayed.
©2001 Nokia Mobile Phones. All rights reserved.
Page 38

2 Continue to hold down the Chr key and press the letter key again. The second
special character is shown in place of the first one, and so on, until the first
character is shown again.
The case of the special character is determined by whether Shift or the Caps
lock key has been pressed.
Shortcuts
There are several shortcuts you can use in the document applications. The shorcuts
vary depending on the application used. The following table lists some of the
available shortcuts:
Shortcut Function
Ctrl + a
Ctrl + c
Ctrl + x
Ctrl + v
Ctrl + z
Ctrl + b
Ctrl + i
Ctrl + u
Ctrl + t
Ctrl + d
Selects all
Copies selected text
Cuts selected text
Pastes selected text
Undoes (the last action)
Applies bold
Applies italics
Applies underlining
Full screen mode (if available)
Deletes files, messages, shortcuts and other items.
Tip: You can find more
shortcuts in the menus on
the display of the
communicator interface.
27
General information
Ctrl + p Print or Properties
©2001 Nokia Mobile Phones. All rights reserved.
Page 39

28
Shortcut Function
Ctrl + n
Ctrl + o
Ctrl + e
Ctrl + s
Ctrl + Shift + s
Chr + left/right arrow (on Arrows key) Moves the cursor to the beginning or end of the line
General information
Chr + up/down arrow (on Arrows key) Moves up or down a page
Chr + Ctrl + up/down arrow (on Arrows key) Moves to start or end of document
Shift + Ctrl + left/right arrow (on Arrows key) Selects the previous or next word
Shift + right/left/up/down arrow (on Arrows key) Selects one text character or line
Shift + Chr + up/down arrow (on Arrows key) Selects text, page by page, inside a document
Creates a new file
Open
Close
Save
Save As
To save files
When you close a new file for the first time, or want to save it, you will be asked
to enter a name for the file and to identify a folder in which it should be saved.
©2001 Nokia Mobile Phones. All rights reserved.
Page 40

Figure 10
The following commands become available in the dialog:
OK - Confirms the name of the document.
Browse - Opens a dialog in which you can browse for a location where you save
your file.
Change format - Opens a list of formats. You can now change the format of the
document being saved.
Cancel - No saving is done and the dialog is closed.
Note: If you do not want to save the file, press the Menu key and select File>
Discard changes, then close the file.
To send documents
In addition to sending messages in Messaging application you can also send
documents out of the communicator in the applications where the Send function
is available on the Menu list.
As a fax - You can send the document as a fax.
As a mail - You can send the document as a mail message.
29
General information
©2001 Nokia Mobile Phones. All rights reserved.
Page 41

30
General information
As a short message - You can send the document as a short message.
Via infrared - You can send the document via infrared.
Note: When you open a document, the document is opened in the appropriate
editor or viewer. The commands vary according to the editor/viewer.
To search for text
You can search for text strings in the applications where this function is available
on the Menu list.
1 Press the Menu key and select Edit > Find…. A dialog opens.
2 Type the text string in the search field and press Find.
3 Once a text string match is found, it is highlighted.
To find out if there are more of the same text strings in the document, press
Find next.
4 To redefine the search, press Options. A dialog opens where you can define
options of Case sensitive or Match whole word.
To replace text
1 Select a piece of text, press the Menu key, and select Edit > Find…. Or,
search for a text string with the Find function explained above, and press
Replace. A dialog opens.
2 Type the text string in Replace with: field.
3 To replace all the matching text strings in the document, press Options. A
dialog opens; select Yes.
©2001 Nokia Mobile Phones. All rights reserved.
Page 42

4 Press Replace or Replace all .
To check spelling
Note: You can spell check only English text and words.
You can check words and text for spelling in the applications where Spell check… is
available on the Menu list. To be able to use this function, you first need to install
the Spell checker from the CD-ROM found in the sales package of your
communicator. For details, see ‘To install software from the CD-ROM’ on page 34.
1 Press the Menu key and select Tools > Spell check…. If the Spell checker comes
across a word it does not recognise, a dialog opens.
2 You can type in the correction in the correction field. Or, move to the
Suggestions field and press the Tab or Enter keys to open a list of suggestions.
3 Select a word from the list of suggestions, then press Replace to accept the
correction or suggestion.
4 If during step 2 you want to add an unrecognised word to the dictionary, press
Add.
To print
You can print various items, such as documents, pictures, faxes, mails, and short
messages.
Note: For further information on supported printers, see the Forum Nokia home
page on the World Wide Web at www.forum.nokia.com
Refer to the user’s guide of the printer for detailed safety instructions on the
printing device.
31
Tip: Replace all is
available only if you have
selected Yes in the Replace
all dialog.
General information
Tip: You can select
individual words to spell
check. Otherwise the whole
text is searched and spell
checked.
©2001 Nokia Mobile Phones. All rights reserved.
Page 43

32
General information
Tip: With log files you
can monitor your
communications, use the
information to create or
complete contact cards, or
reply directly to the sender
in the log.
1 Press the Menu key and select File > Prin ting > Print…. A note appears, showing
the print range, connection type, and printer used.
2 Press Print. To change the printing options, press Options.
3 To preview what you are about to print, press Print preview. A dialog opens.
To define page setup, press Page setup.
Figure 11
When printing via infrared, make sure that the infrared port of the communicator
faces the infrared port of the printer. Keep the infrared connection clear. If the
connection is obstructed for too long, for example, if something is moved between
the infrared sensors or the communicator is moved, printing is interrupted. For
details on infrared connection, see page 35.
Log
Log contains information about the communication history of your communicator.
The log shows all, or certain types of communication events in chronological order.
Note: Remote mailbox, WAP, and Internet connections are logged as data calls.
©2001 Nokia Mobile Phones. All rights reserved.
Page 44

Figure 12
33
Tip: To change the
categories Date and time and
Duration to Subject and
Status, press < and > on the
Arrows key.
To access the log
You can access the log from the Menu of several applications.
Press the Menu key and select Tools > Log.
To make use of an individual communication event
1 Choose a log event and press Use. The command buttons change.
2 You can now do the following: send a fax or short message to the contact, call
the contact, or add the contact to your Contacts directory. Check the command
buttons for available options.
To view only certain communication types
1 Press Filter by type to choose a communication type you want to view.
Press Filter by direction to choose whether you want to view communications
originated by you or by the remote party.
2 Select from the options.
3 Press OK.
©2001 Nokia Mobile Phones. All rights reserved.
General information
Tip: A communication
type can have one of the
following delivery statuses:
pending, delivered, failed,
sent, not sent, and scheduled.
Page 45

34
General information
Tip: For more
information about PC Suite,
see the PC Suite Guide on
the CD-ROM.
To erase the contents of the log
Log events remain in the log database for only a set number of days after which
they are automatically erased to free memory on your communicator. To redefine
the number of days, press the Menu key and select Tools > Log duration….
1 To erase some or all the contents of the log, press the Menu key and select File
> Clear log….
2 Type in the date. All log events with an earlier date will be removed from the
log.
3 Press Clear.
To install software from the CD-ROM
The applications and files on the communicator’s CD-ROM are ready to be installed
or moved to the communicator. Proceed with installation as follows:
1 Ensure that you have installed PC Suite on your computer. You can find this
program on the CD-ROM in the sales package.
2 Insert the CD-ROM into the CD-ROM drive of your computer.
3 Either: Connect your communicator to your computer using the adapter cable
supplied in the sales package.
Or: Prepare the communicator and the computer for an infrared connection. For
more information, see ‘To activate the infrared connection’ on page 35.
4 If the CD-ROM user interface does not open automatically, double-click the file
‘Nokia9210.exe’ in the CD-ROM file structure.
5 Select a program you want to install from the CD-ROM user interface and click
‘Install’.
©2001 Nokia Mobile Phones. All rights reserved.
Page 46

Note:Remember to install applications in the same language as your
communicator.
Use the memory card in the communicator to gain more space for the different
applications and files on the CD-ROM.
Note:For information on the installable applications, see the Software on CD-
ROM Guide on the CD-ROM.
35
To activate the infrared connection
1 Make sure that the infrared port of the communicator faces the infrared port
of the other device.
2 To activate the infrared connection, press Chr + (the key with the infrared
symbol; this key is on the right-hand side of the keyboard, next to the Enter
key).
3 To end the infrared connection, press Chr + again.
Note: Your communicator is a Class 1 Laser product.
©2001 Nokia Mobile Phones. All rights reserved.
General information
Tip: To activate the
infrared, you can also press
the Menu key and select
Tools > Receive via infrared.
Page 47

36
General information
Tip: Alternatively, press
the Menu key and select
Tools > Options….
To transfer data from other devices
Nokia 9110/9110i Communicator (Data mover)
Data mover transfers data from the Nokia 9110 /9110i Communicator to the Nokia
9210 Communicator. Via infrared you can transfer contact cards, calendar events,
notes, and Internet access settings, for example. You can either choose to transfer
all data or define the categories of data that you want to transfer.
To open Data mover, press the Extras application button, scroll with the Arrows
key, and select Data mover.
To transfer all data
1 In the main view, press Transfer now.
2 Activate the infrared connection on the Nokia 9110/9110i Communicator. The
transfer begins. All items are transferred to the Nokia 9210 Communicator.
To transfer selected data
1 In the main view, press Options. A dialog with four pages opens.
2 On each page, press Change to select or deselect the data categories to transfer
to the Nokia 9210 Communicator. To select or deselect all items on a page,
press Select all or Unselect all. When you are ready, press Done. A
confirmation dialog opens.
3 To start the transfer process, press OK. Activate the infrared connection on the
Nokia 9110/9110i Communicator. After the infrared connection has been
established, a dialog opens, displaying the file currently transferred and the
progress of the whole transfer process.
4 When the transfer is complete, press OK to close the application.
©2001 Nokia Mobile Phones. All rights reserved.
Page 48

5 If the transfer fails, a dialog is displayed. Press OK to try again.
Note: You can cancel the transfer process at any stage when the Cancel
command button is available.
To remove Data mover
If you do not have to move any more data from the Nokia 9110 /9110i
Communicator, you can remove Data mover to save memory. For more
information, see ‘To remove software’ on page 222
Compatible Nokia phones, personal organisers,
and PCs
To transfer data from the Nokia 5100/6100/7100/8200/8800/9110/9110i mobile
phone, your laptop or desktop PC, or the PalmPilot personal organiser to your Nokia
9210 Communicator, see the PC Suite guide on the sales package CD-ROM.
Note: To transfer contacts from your old SIM card to your Nokia 9210
Communicator, see ‘To move or copy contacts from a SIM card’ on page
98.
37
General information
Tip: To transfer data from
other personal organisers,
first synchronise data
between the device and the
PC application and then
synchronise data between
the PC application and the
Nokia 9210 application.
©2001 Nokia Mobile Phones. All rights reserved.
Page 49

39
3. Phone
Front Back
Earpiece
Phone
Microphone
Figure 13
With the cover phone you can make, receive, and manage calls, send and receive
short messages, search for phone numbers, change profiles and define many
settings. For more complicated tasks like sending long DTMF sequences or
modifying phone settings, use the Telephone application. See the Telephone
chapter, starting on page 69.
Phone
©2001 Nokia Mobile Phones. All rights reserved.
Page 50

40
Selection keys
Phone
Tip: To call your voice
mailbox, press and hold
.
Tip: If you have
subscribed to two phone
lines, you can switch
between them by pressing
and holding .
When operating the phone, press keys one at a time. The phone keypad is not
functional when the cover of the communicator is open.
Switches the phone on and off.
Switches between profiles. See ‘Profile settings’ on page 78.
Scroll through menus, submenus or settings. If there are no active
calls, you can use the scroll keys to browse through the phone book. When a call
is active, you can adjust the volume level by pressing the scroll keys.
Dials a phone number and answers a call. Sends the ongoing call to
hold if pressed during a call. In the standby mode: shows the list of the most
recently dialled numbers.
Ends any active call, cancels a dialled call, or clears the display.
0...9 The number and alphabet keys.
Used for creating functions.
The function of these two selection keys depends on the text shown
on the bottom of the display. See Figure 14.
Note: Hold the phone as you would any other mobile phone with the antenna
pointed up and over your shoulder. Do not touch the antenna
unnecessarily when the phone is switched on. Contact with the antenna
affects call quality and may cause the phone to operate at a higher
power level than otherwise needed.
IMPORTANT! Do not switch on the phone when the use of wireless phones is
prohibited, or when it may cause interference or danger.
©2001 Nokia Mobile Phones. All rights reserved.
Page 51

To use the selection keys
Figure 14
Selection keys are the keys located right below the right and left corners of the
cover display. Commands on the display vary according to the situation and
previous selections.
Often you must confirm the selection by pressing OK. If available, you can use
Back command to return to the previous menu level without making any changes.
Display indicators
The display indicators inform you about the current operation of the phone. The
indicators described below are shown when the phone is ready for use, with no
characters entered on the display.
NETWORK NAME or LOGO - The wireless network you are currently using.
and bar - The current signal strength at your location. The more bars visible,
the stronger the signal.
41
Phone
Example: Pressing the
selection key under the text
Menu, gains access to the
menu functions.
Tip: A press of the
key will return the display to
stand-by mode.
©2001 Nokia Mobile Phones. All rights reserved.
Page 52

42
Phone
Tip: When a call is active,
you can use the and
keys to lower or raise
the volume level of the
earpiece.
and bar - Battery charge level. The more bars visible, the more charge in the
battery.
- The phone keypad is locked or the lock code is active.
- The phone will not ring to notify you of an incoming call.
- You have received one or several new voice messages.
- You have received one or several new short messages.
- You have received one or several new fax messages.
- Infrared transmission is active.
- Call diverting is active.
To make a call
To make and receive calls,
• the phone must be switched on,
• the communicator must have a valid SIM card fitted, and
• you must be located in a service area of the wireless network.
1 Key in the area code and the phone number of the person you wish to call. If
you make a mistake, you can remove the digits one at a time by pressing Clear
repeatedly. To clear the whole display, press and hold Clear.
2 Press to dial the phone number.
3 To end the call, press .
Note: The microphone and earpiece are on the rear of the device.
©2001 Nokia Mobile Phones. All rights reserved.
Page 53

International calls
When making international calls, start by pressing twice quickly. The
international call character ‘+’ appears on the display, which informs the network
centre to select the international dialling prefix.
After this you can enter the country code, area code and phone number.
To search for phone numbers
You can retrieve phone numbers from memory by the name with which the phone
number was stored. For more information , see ‘To call a number in the Telephone
directory’ on page 70.
1 Press Names.
2 Scroll to Search and press Select.
3 Key in the name of the person whom you want to call, or the first letter(s) of
the name.
4 Press Search. The name closest to the keyed characters will appear.
5 If the name found was not the one you searched for, scroll through the names
with and until you reach the correct one.
6 Press Details to view the details of the highlighted name, or
press to call the person. If the person has several numbers, scroll the
selection frame onto the one you want and press .
43
Phone
Tip: To choose which
memory to use, press
Names, scroll to Options and
press Select twice. Scroll to
choose Device, SIM card, or a
and press Select.
©2001 Nokia Mobile Phones. All rights reserved.
Page 54

44
Phone
Example: Press 2 if the
speed dial location for the
phone number is 2.
Tip: Pressing and holding
dials your voice
mailbox number.
To speed dial
Speed dialling is a handy way to call frequently-used phone numbers. You must
enable speed dialling, see ‘Call settings (3-1)’ on page 56. You can define up to
eight speed dial numbers in the communicator memory. For information on how
to set speed dials, see page 82.
1 Key in the number of the speed dial location where you have stored the phone
number.
2 Press . The phone will display the phone number briefly, and then dial it.
Speed dialling is not possible during a call.
To call service numbers
Your service provider may have stored service numbers on your SIM card. For more
information, see ‘To call a number in the Telephone directory’ on page 70.
1 Press Names.
2 Scroll to Service Nos. and press Select.
3 Scroll to the service number and press to call the number.
To send DTMF tones
If you need to send long DTMF sequences, it is more convenient to send them via
the communicator interface, see ‘To send DTMF tones during a call’ on page 77.
1 Make the call to the desired phone number.
2 Key in the digits you want to send as DTMF tones. The digits are sent one by
one to the network.
©2001 Nokia Mobile Phones. All rights reserved.
Page 55

To answer a call
45
When you receive a call, the phone gives a ringing tone and the text Call flashes
on the display. If silent-profile is active, only the keypad and display light will flash.
If the caller can be identified, the caller’s name or phone number, and the text
Calling, will be displayed.
1 To answer the call, press .
If you do not want to answer the call, press . The caller will hear the
alerting tone change to a busy tone.
To mute the ringing tone of an incoming call, press Mute.
2 To end the call, press .
To manage calls
There are a number of functions you can use during a call. Many of the in-call
options are network services.
To access the functions, press Options during a call. Some or all of the following
in-call options may become available:
Answer - Allows you to answer an incoming call.
Reject - Allows you to reject an incoming call.
Hold/Activate - Hold allows you to put the current call on hold, so that another call
can be made. To activate the original call again, select Activate.
New call - Puts the active call on hold and dials a new phone number.
Tip: To change your
ringing tone, see ‘To attach a
ringing tone’ on page 100.
Tip: You can answer the
call even while using the
search or menu functions.
Tip: If the Divert if busy is
activated to divert the calls,
for example, to your voice
mailbox, rejecting an
incoming call will also divert
the call. See ‘To divert voice
calls’ on page 84.
Phone
©2001 Nokia Mobile Phones. All rights reserved.
Page 56

46
Send DTMF - Transmits DTMF tones. See ‘To send DTMF tones during a call’ on page
77.
Phone
End active call - Ends the active call.
End all calls - Ends both the active and held call.
Contacts - Opens the phone book.
Menu - Opens the Menu.
Mute/Unmute - Switches the microphone of the communicator off or on. If the
communicator is connected to a handsfree car kit, Mute also turns off the
microphone of the car kit.
Swap - Allows you to alternate between two calls, an active and a held call.
Transfer - Enables you to connect two voice calls together and disconnect yourself
from both calls. See ‘To transfer calls’ on page 76.
Conference - If one call is active and another call is on h old, this option merges
them into a conference call.
Private - During a conference call, Private allows you to converse privately with a
selected participant.
Keypad lock
The keypad lock prevents the keypad keys being pressed accidentally.
When the keypad is locked, you can answer calls normally by pressing . During
a voice call, the keypad is unlocked and the communicator can be operated in the
usual way. After the call, the keypad is automatically locked again.
©2001 Nokia Mobile Phones. All rights reserved.
Page 57

The keypad will be unlocked automatically when the communicator is connected
to a car kit. When the communicator is removed from the car kit, without being
switched off, the keypad will be locked automatically again.
To lock the keypad
Press Menu and then the key within 3 seconds.
Note: While the keypad is locked, the icon and the Unlock command are
displayed.
To unlock
Press Unlock and then the key within 3 seconds.
Note: When the keypad is locked, calls may be possible to the emergency
number programmed into your communicator (for example, 112 or other
official emergency number).
To change profiles
You can use the Profiles key to adjust phone tones for the various operating
environments of the communicator. One profile is always in use.
For more detailed information on the various profiles, how to adjust the settings
and so on, see ‘Profile settings’ on page 78.
1 Press the key on the keypad.
2 Press the key again until the selection frame is on the desired profile.
3 To select the profile, press and hold .
47
Phone
Tip: You can also use the
scroll key and OK to select a
profile.
©2001 Nokia Mobile Phones. All rights reserved.
Page 58

48
To view help
Phone
Tip: You can access the
menu functions even during
a call.
Most menu functions are provided with a help text, which gives a brief description
of the displayed function.
1 Scroll to the menu function about which you want help.
2 Wait for a few seconds. The first page of the help text will appear. The text
scrolls automatically. If you want to scroll it manually, press the scroll keys or
More.
3 To exit help, press Back.
To use the menus
The phone offers a set of menu functions that allow you to tailor the phone for
your particular use. The menus and submenus can be accessed by scrolling the
menu or using the appropriate shortcuts.
To scroll the menus
1 Press Menu.
2 Press either or to scroll the list of menus until you reach the desired
menu.
3 Press Select to access the menu. If the menu contains submenus, reach the one
you want with either or and press Select.
4 To return to the previous menu level, press Back.
To exit the menu without changing any settings and to return to the stand-by
mode, press .
©2001 Nokia Mobile Phones. All rights reserved.
Page 59

To use menu shortcuts
All the menus, submenus and settings are numbered. This number is shown in the
upper right corner of the display.
1 Press Menu.
2 Key in the index number of the menu you wish to access.
Example: To set the Anykey
answer on, press Menu 3 >
1 > 1 > 1.
Menu structure
The following menu table lists the names of the main menus and their submenus.
Some menus are subject to the availability of the service in your area. Third-level
menus are not shown.
Menu Function Submenus
MENU 1 MESSAGES
MENU 2 CALL REGISTER
MENU 3 SETTINGS 1 Call settings, 2 Phone settings, 3 Security settings, 4 Restore factory settings
MENU 4 CALL DIVER T
MENU 5 INFRARED
MENU 6 SIM SERVICES Only available, if supported by your SIM card.
1 Write message, 2 Inbox, 3 Drafts, 4 Sent, 5 Cell broadcast, 6 Service com-
mand editor, 7 Voice messages
1 Missed calls , 2 Received calls, 3 Dialled numbers, 4 Clear recent call lists, 5
Call duration, 6 Call costs
1 Divert all voice calls, 2 Divert if busy, 3 Divert if not answered, 4 Divert if out
of reach, 5 Divert if not available 6 Divert all fax calls, 7 Divert all data calls, 8
Cancel all diverts
49
Phone
©2001 Nokia Mobile Phones. All rights reserved.
Page 60

50
Messages (Menu 1)
Phone
Tip: You can call the
phone number in the
message by pressing
while viewing the message.
The Short Message Service (SMS) is a network service which enables you to receive
and send short messages. Contact your service provider for details.
Write message (1-1)
In this menu you can write and send a short message.
Inbox (1-2)
When you receive a short message or picture message, the text Message(s) received
and the indicator will appear on the display and a tone will sound, unless the
communicator is set to a silent profile. You can receive and forward picture
messages, but it is not possible to view them with the Nokia 9210 communicator.
A note is also shown when you receive faxes or mail. To read received faxes or mail,
you must use the respective applications of the communicator interface.
1 Press Read twice to view the message, or
press Exit to view it later.
If you view a message later, press Menu > 1 > 2 , scroll to the desired message
and press Read to view the message.
2 While viewing the message, press Options to scroll through the list of options
and press Select at the highlighted option to select it. The available options are:
Delete - Erases the selected message from the memory.
Reply- Opens the editor for a reply. Key in the reply and press Options > Send.
Forward- Asks for the number where the message should be forwarded. Enter
the number and press OK to forward the message.
©2001 Nokia Mobile Phones. All rights reserved.
Page 61

Edit- Opens the current message in the editor where you can modify the
message.
Use number - Copies the phone number from the message and moves it onto the
phone display. You can now call the number with .
Details - Shows the sender’s name and number, the date and time the message
was sent, and the number of the message centre.
Drafts (1-3)
In this menu you can view, modify, and send your draft short messages.
Sent (1-4)
In this menu you can view and modify the short messages you have sent.
Cell broadcast (1-5)
This network service allows you to receive SMS messages on topics that you have
predefined on the communicator interface. See ‘Cell broadcast viewer’ on page
230.
For available topics and relevant topic numbers, contact your service provider.
On - Sets the information message reception on.
Off - Turns the information message reception off.
51
Phone
©2001 Nokia Mobile Phones. All rights reserved.
Page 62

52
Tip: These requests are
Phone
also known as USSD
commands.
Tip: To call your voice
mailbox quickly, press and
hold .
Service command editor (1-6)
In this submenu, you can send service requests, such as activation commands for
network services, to your service provider. For more information, contact your
service provider.
Voice messages (1-7)
Listen to voice messages (1-7-1)
When you enter this submenu, the phone automatically calls your voice mailbox
at the phone number stored in menu 1-7-2. If required, key in the access code for
your mailbox or answering machine when the connection has been made.
If the voice mailbox number has not been saved before, the phone asks for you to
save it first.
Note that the voice mailbox is a network service and you may need to subscribe to
it first.
Voice mailbox number (1-7-2)
In this submenu, you can store and edit your voice mailbox number. A voice
mailbox can be a network service or your personal answering machine. For more
information and for the voice mailbox number, contact your service provider.
©2001 Nokia Mobile Phones. All rights reserved.
Page 63

Call register (Menu 2)
53
Missed calls (2-1)
Lists calls that you have missed.
Note: The communicator only registers missed calls when the phone is switched
on and within network coverage.
Received calls (2-2)
Lists calls that you have received.
Dialled numbers (2-3)
Lists calls that you have dialled.
Clear recent call lists (2-4)
Select which calls you want to erase. The options are All /Missed/Dialled/Receiv ed.
IMPORTANT: The phone numbers are erased without warning. You cannot
undo the operation.
Call duration (2-5)
Shows the duration of your outgoing and incoming calls, and allows you to reset
the timers.
Phone
Tip: Received calls and
Missed calls functions are
network services which
work only in networks that
allow you to view the
caller’s phone number.
©2001 Nokia Mobile Phones. All rights reserved.
Page 64

54
Last call duration (2-5-1)
Phone
Shows the duration of the last outgoing or incoming call in hours, minutes or
seconds, for example, 0:02:15.
All calls’ duration (2-5-2)
Shows the total duration of all calls made and received with any SIM card that you
have used with the communicator.
Received calls’ duration (2-5-3)
Shows the total duration of calls received with any SIM card that you have used
with the communicator.
Dialled calls’ duration (2-5-4)
Shows the total duration of calls made with any SIM card that you have used with
the communicator.
Clear timers (2-5-5)
Asks for the lock code and then resets all timers. You cannot undo the reset
operation.
Note: The actual time invoiced for calls and services by your service provider
may vary, depending upon network features, rounding-off for billing,
taxes and so on.
©2001 Nokia Mobile Phones. All rights reserved.
Page 65

Call costs (2-6)
This network service allows you to check various call costs. The costs are shown in
charging units or units of currency that you have set in Menu 2-6-3-2. The call
cost is shown for each SIM card separately. For these settings you need the PIN2
code, the PIN code, or no code at all, depending on your service provider. Contact
your service provider for more information.
Last call cost/units (2-6-1) & All calls’ cost/units (2-6-2)
Last call cost/units (2-6-1) Shows the cost or units of the last, or current, call. All
calls’ cost/units (2-6-2) shows the total cost or units of all calls made with the
current SIM card.
Whichever menu you choose, press Options selection key to access the following
three submenus:
Clear cost counters (2-6-3-1)
Resets all cost counters. You cannot undo the reset operation.
Show cost / Show in units (2-6-3-2)
You may select whether the call costs and call cost limits will be displayed in
currency or charging units. Contact your network service provider for the prices of
charging units.
The display shows the option that is currently not selected. To select the option
shown on the display, press Select. If you selected Show cost, key in the charging
unit price. Use or to insert a decimal point. Next, enter the currency name.
55
Phone
©2001 Nokia Mobile Phones. All rights reserved.
Page 66

56
Call cost limit (2-6-3-3)
Phone
This function allows you to limit the total costs of outgoing calls to a specified
number of charging units or units of currency that you have set in Menu 2-6-3-2.
To turn the limit on, select On. Key in the cost limit in charging units or currency
units. If you define the limit in currency units, you can press or to insert
a decimal point.
After the limit has been turned on, the number of remaining units is shown on the
display when in stand-by mode. When all units have been used, no calls can be
made.
To turn the limit off, select Off.
Note: In some networks, calls to the emergency number programmed into your
communicator (for example, 112 or other official emergency number)
may be made even if there are no charging units left.
Note: The actual time invoiced for calls and services by your service provider
may vary, depending upon network features, rounding-off for billing,
taxes and so on.
Settings (Menu 3)
Call settings (3-1)
Anykey answer (3-1-1)
When selected, you can answer an incoming call by pressing any key on the
keypad, except , , , Mute selection key, or the blank selection key.
©2001 Nokia Mobile Phones. All rights reserved.
Page 67

Automatic redial (3-1-2)
When this function is selected and you call a number that is busy or does not
answer, the phone will attempt to call the number until the call is connected. The
maximum number of redials is 10.
Press to end the call attempts.
Speed dialling (3-1-3)
When selected, you can dial phone numbers stored in the speed dial locations by
simply pressing and holding the assigned speed dial key. See ‘Speed dials’ on page
82 for more information.
Call waiting service (3-1-4)
Call waiting is a network service. Contact your operator for subscription. For more
information see ‘To answer a waiting call’ on page 77.
Choose Activate to enable call waiting, Cancel to disable call waiting, or Check
status to show whether call waiting is active and for which call types.
My number sending (3-1-5)
This network service allows you to set your phone number either to be displayed
or to be hidden from the person you are calling. Set by network resets the phone to
the default setting, On or Off, that you have agreed upon with your service provider.
Summary after call (3-1-6)
If you set this function to On, the phone will briefly display the duration and cost
(network service) after each call.
57
Phone
©2001 Nokia Mobile Phones. All rights reserved.
Page 68

58
Line for outgoing calls (3-1-7)
Phone
If your network supports this service, you can have two phone lines in your
communicator. You can select which line you want to use for making calls. For
more information, see ‘Line selection page’ on page 91.
Phone settings (3-2)
Clock (3-2-1)
You can select whether the time is shown on the display.
Cell info display (3-2-2)
When this function is selected, the phone will indicate when it is used in a network
cell based on Micro-Cellular Network technology. The setting will remain in effect
even if the SIM card is changed or the phone is switched off.
Welcome note (3-2-3)
You can write a message of up to 44 characters which appears on the display when
you switch on the phone.
Network selection (3-2-4)
The network to which you are connected can be selected either automatically or
manually.
If you select Automatic, the phone automatically selects one of the wireless
networks available in your area. Outside your home network service area, the
communicator will select one of the networks that has a roaming agreement with
your home network.
©2001 Nokia Mobile Phones. All rights reserved.
Page 69

If you select Manual, the phone will show a list of available networks and you can
select the network you wish to use if this network has a roaming agreement with
your home network service operator. If no such agreement is in force, the text No
access will be displayed and you must select another network.
Confirm SIM service actions (3-2-5)
You can set the phone to show you the confirmation messages sent between your
phone and the network when you are using the SIM services by selecting the
option Yes within the menu 3-2-5 ( Confirm SIM service actions).
Security settings (3-3)
The purpose of the security system is to prevent unauthorised use or altering of
important settings. In most cases, activating or changing the security options
requires the appropriate access code. See ‘Phone security’ on page 215.
Note: When security features which restrict calls are in use (for example, call
barring, fixed dialling, or system lock etc.), calls may be possible to
certain emergency numbers in some networks (for example, 112 or other
official emergency number).
PIN code request (3-3-1)
The options are On and Off. See ‘Phone security’ on page 215.
Call barring service (3-3-2)
This network service allows you to restrict incoming calls to, and outgoing calls
from, your phone.
59
Phone
Tip: A barring password
is required for using this
function.
©2001 Nokia Mobile Phones. All rights reserved.
Page 70

60
The options are: Outgoing calls/International calls/International calls except to home
country/Incoming calls/Incoming calls when abroad/Cancel all barrings.
Phone
Closed user group (3-3-3)
This network service allows you to set the communicator to accept calls to and
from a selected group of people. For details on creating a user group and activating
this service, contact your network service provider.
Preset - Resets the phone to use a user group the SIM card owner has agreed upon
with the network service provider.
On - Uses a particular user group. Calls can be made to or received from the
members of the selected group only.
Off - Calls can be made and received in the normal way. You can use this option
only if you are entitled to do so.
SIM change security (3-3-4)
You can protect your phone against unauthorised use with the lock code. To do
this, you need to select SIM change security. For details, see ‘Phone security’ on
page 215.
Change of access codes (3-3-5)
In this submenu, you can change the lock code, the PIN code, the PIN2 code and
the barring password. See ‘Phone security’ on page 215.
The access codes may only include the digits 0 to 9.
©2001 Nokia Mobile Phones. All rights reserved.
Page 71

System lock (3-3-6)
In this submenu, you can lock the communicator. Press Select and enter your lock
code. The communicator locks immediately. When communicator is locked, you
can make emergency calls to predefined numbers using the cover phone. You can
also answer incoming calls and make emergency calls using the Telephone
application. All other actions are blocked. Even if you remove and replace the
battery and switch on the phone, the communicator will remain locked. To unlock
the communicator, press Unlock and enter the lock code. For more information on
locking and other security options, see ‘Phone security’ on page 215.
Restore factory settings (3-4)
You can reset some of the menu settings to their original values. You need the lock
code for this function. This function will not affect stored phone numbers and
names, access codes, earpiece volume setting, call timers, cost counters, selected
application tones or SMS messages.
Call divert (Menu 4)
Tip: You can also press
Menu and # to enter your
lock code.
61
Phone
This network service allows you to direct your incoming voice calls to another
phone number when you do not want to be disturbed, or when the phone is
switched off or outside the network coverage area. For details, see ‘To divert voice
calls’ on page 84.
The options are: Divert all voice calls/Divert if busy/Divert if not answered/Divert if out of
reach/Divert if not available/Divert all fax calls/Divert all data calls/Cancel all diverts.
©2001 Nokia Mobile Phones. All rights reserved.
Tip: The icon is
shown in the stand-by mode
when you have activated the
Divert all voice calls.
Page 72

62
Select Activate to set the divert setting on if allowed by the network, Cancel to set
the setting off. Select Check status to check whether the divert is activated or not.
Phone
If you select Divert if not answered or Divert if not available, you can also select Set
delay to choose a delay time before the call is diverted. The options are 5 seconds/
10 seconds/15 seconds/20 seconds/25 seconds/30 seconds.
Infrared (Menu 5)
If you want to receive data from another device via infrared, use this function.
Make sure that the infrared port of the communicator faces the infrared port of
the other device and press Activate. For more information, see ‘To activate the
infrared connection’ on page 35.
Note: Your communicator is a Class 1 Laser product.
SIM services (Menu 6)
In addition to the functions available in the phone, your SIM card may provide
additional services that you can access in the menu 6. Menu 6 is shown only if it
is supported by your SIM card. The name and contents of the menu depend entirely
on the services available.
For availability, rates and information on using the SIM services, contact your SIM
card vendor, e.g. your network service provider, service provider or other thirdparty vendor.
©2001 Nokia Mobile Phones. All rights reserved.
Page 73

You can set the phone to show you the confirmation messages sent between your
phone and the network when you are using the SIM services by selecting the
option Asked within the menu 3-2-5 ( Confirm SIM service actions).
Note: Accessing these services may involve sending a text message (SMS) or
making a phone call for which you may be charged.
63
Phone
©2001 Nokia Mobile Phones. All rights reserved.
Page 74

65
4. Desk
Desk is an application where you can create and manage links to your favourite
documents, applications, or third-party software.
Main view
When you first use Desk, the main view has at least the following links by default:
an Internet shortcut to Internet setup, a document named “Read me first”, and a
WWW link to the official Nokia Web site.
You cannot select more than one link at a time. You can delete Desk links only in
the Desk application.
Figure 15
Desk
Tip: Your favourite links
can be, for example, certain
WWW pages, WAP services,
applications, documents,
and photo albums.
Tip: You can change the
order in which a link
appears. Select the link,
press the Menu key, and
select File > Move. Using the
Arrows key, move the link
across the display and press
Place here.
©2001 Nokia Mobile Phones. All rights reserved.
Page 75

66
Desk
Tip: To view and change
the icon, label and
parameters of a link, select
the link, press the Menu key,
and then select File >
Properties….
Example: Notes are handy
for writing short lists.
Tip: You can start writing
a note quickly in any
application or even during a
phone call by pressing the
Desk application button
twice.
To add a link
1 Select the program, program group, or other item for which you want to add a
shortcut to Desk.
2 Press the Menu key and then select File > Add to Desk.
To write notes
1 Press Write note. A simple text editor opens.
Figure 16
2 Write the note.
3 Press Close to save the document. The note will now appear in the main view
of Desk.
To change the background image
You can also customise the background image of the Desk main view.
1 Press the Menu key and then select Tools > Settings…. A dialog opens.
©2001 Nokia Mobile Phones. All rights reserved.
Page 76

2 Define the following:
Background image: The options are Yes/No.
Image file: Press Change to browse for an image. Press Preview to view the
image.
3 Press Done.
Note: The image file you choose as a background image should be scaled to
appear equal to or bigger than the screen size. For details, see ‘Imaging’
on page 225.
67
Desk
©2001 Nokia Mobile Phones. All rights reserved.
Page 77

5. Telephone
69
You can use the Telephone application to make and receive phone calls, handsfree
calls, or conference calls. You can record and redirect calls, use voice mailboxes,
and manage settings and profiles.
Open the Telephone application by pressing the Tel application button on the
keyboard.
To make phone calls,
• the phone must be switched on,
• the communicator must have a valid SIM card fitted, and
• you must be located in a service area of the wireless network.
Some of the operations explained here can also be made using the cover of the
communicator.
Note: Opening or closing the cover does not affect active phone calls. If you
have made a voice call using the Telephone application and you close the
cover, you can continue the call with the phone.
©2001 Nokia Mobile Phones. All rights reserved.
Tip: You can also switch
to other applications during
a phone call.
Telephone
Page 78

70
To make a call manually
Tip: To disable the
handsfree mode, press the
Telephone
Menu key, select Settings >
Call…, select Audio when
cover opened and press
Change to switch the
handsfree mode Off.
Tip: You can zoom in and
out to either make the text
more readable or fit more
entries on display. Press the
Menu key and select View >
Zoom in or Zoom out
Tip: To redial the last
dialled number you can also
press the shortcut keys
Chr+Tel.
1 Type the telephone number in the field at the bottom of the main view.
2 Press Call. Use the handsfree mode to speak and listen to the communicator
from a short distance when the cover is opened, or close the cover and continue
with the cover phone.
To call a number in the Telephone directory
When you have no active voice calls, the Telephone application main view shows
the Telephone directory. The default directory is in the communicator memory.
From the top of the telephone list, you can select directories contained in the SIM
card and - if fitted - directories contained in a memory card. Contact cards that do
not contain any phone numbers appear dimmed.
1 Select a contact in the directory either by scrolling or by using the search field.
2 Press Call. If the contact has more than one phone number, a list opens, listing
all the contact’s phone numbers. Choose a number from the list and press Call.
©2001 Nokia Mobile Phones. All rights reserved.
Page 79

Figure 17
To call a number in a recent calls list
71
Telephone
1 In the main view, press Recent calls. The Dialled calls dia log opens. If you have
new missed calls, the Missed calls dialog opens.
2 To see calls from one of the other lists, select a command button on the right
of the display. For example, to see a list of received calls, press Received calls.
3 Select a number from the list and press Call. Once you have made the call, you
can close the cover and continue the call, unless you want to use the handsfree
option. See page 70.
©2001 Nokia Mobile Phones. All rights reserved.
Tip: A shortcut to open
the Missed calls view is Ctrl +
Tel.
Tip: You can add a
telephone number to a
contact card. In the main
view, press Recent calls.
Select a call, press the Menu
key, and Edit > Add to
contacts.
Page 80

72
Telephone
Tip: The caller’s name
appears in the note if the
telephone number is sent
with the call, and if the
caller’s number is listed in
your Contacts directory.
Tip: To adjust the volume
of the speaker, use the
Arrows key: pressing >
increases the volume,
pressing < decreases the
volume.
To answer a call
Figure 18
1 When you receive a call and the communicator cover is open, a note about the
incoming call appears. To answer the call, press Answer or close the device
cover and answer the call via the phone.
2 If you do not want to take the call, press Reject. To mute the ringing tone, press
Mute tone.
Note: You cannot have two active calls at the same time unless you are in a
conference call. A current call is automatically put on hold when you
answer a new incoming call. For information about conference calls, see
‘To make conference calls’ on page 75.
©2001 Nokia Mobile Phones. All rights reserved.
Page 81

To call and create a voice mailbox
Voice mailboxes work just like an answering machine. You can use them to store
incoming messages of missed calls. Many network operators provide a voice
mailbox service with the SIM card. If your SIM voice mailbox does not have a
number, you can enter it yourself. Note that you are still required to contact your
network operator for a phone number to use with this voice mailbox.
To call your voice mailbox, in the main view of the Telephone directory, press Voice
mailbox. See Figure 17. If you have more than one voice mailbox, a dialog prompts
you to choose a mailbox from a list.
You can also create additional voice mailboxes as follows:
1 Contact your network operator for a number to use with an additional voice
mailbox.
2 Press the Menu key and select Settings > Voice mailboxes….
3 When the Voice mailboxes dialog appears, press Add. Enter a name and number.
To record a call
You can record the conversation during a call. Once a call is in progress, press the
Menu key and select Call > Record to open the Recorder application. For more
information on the Recorder application, see page 224.
Note: Obey all local laws governing recording of calls.
73
Telephone
Tip: Another way to call
your voice mailbox is to
press and hold the
key on the front cover of the
phone.
©2001 Nokia Mobile Phones. All rights reserved.
Page 82

74
Telephone
To make a new call during a call
You can have an active call and a call on hold at the same time. You can switch
between the two calls. This situation applies whether you made or received either
of the calls.
The display can show a maximum of three calls, although you can have only two
calls connected at the same time. See Figure 19. To answer the WAITING call you
must first end either the ON HOLD or the ACTIVE call.
1 If you already have an active call and a call on hold, drop one of the calls or
merge them into a conference call.
2 Press New call and make the new call. The previous call will be put on hold.
3 To switch between calls, use the Arrows key. The active call is framed with a
dark line. The command buttons change according to the status of the selected
call. For example, a call on hold can be changed to an active calMPl by
highlighting it with the Arrows key and then pressing Activate.
&DOOVWDWXVLFRQ
7KLVFDOOZLWKWKHGDUNOLQHDURXQG
WKHIUDPHLVVHOHFWHG
Figure 19
©2001 Nokia Mobile Phones. All rights reserved.
Page 83

4 To end a call, select the call you want to end with the Arrows key and pr ess End
call.
75
To make conference calls
The conference call is a network service. Contact your network operator to check
if this service is available. In a conference call, you and up to five persons can hear
each other simultaneously. The display shows a conference call as a single call.
1 Make a call.
2 Once the called person has answered, make a call to a second person by
pressing New call. The first call is put on hold.
3 Wait until the second person answers the call.
4 To place both persons into a conference call, press Conference call. The display
shows a single conference call. Press Conference commands to list the two
participants of the conference call.
5 To include another person, press New call. The conference call is put on hold.
When the person answers the call, press Conference call. This new person is
included in the conference call.
6 To include further persons, repeat step 5.
Figure 20
©2001 Nokia Mobile Phones. All rights reserved.
Telephone
Tip: You can close the
cover and continue the call
via the phone after you have
included all participants in
the conference call.
Page 84

76
Telephone
Tip: To view log files of
all calls, press the Menu key
and select Tools > Log. The
General log shows all calls,
both incoming and
outgoing, voice and data.
To remove a conference call participant
1 Press Conference commands.
2 Select the caller from the list of participants and press Drop. See Figure 20.
To talk privately with one of the conference call participants
1 Press Conference commands.
2 Select a participant from the list and press Private call. The call is now split
into two: the conference call is on hold and the one-to-one call is active.
3 Once you have finished the private conversation, you can return to the
conference call by pressing Conference call.
To transfer calls
Call transfer is a network service where you connect two calls together and
disconnect yourself from both calls. Contact your network operator to check if this
service is available.
When you have one call on hold, and another call active or an outgoing call
alerting, press the Menu key and select Call > Transfer to connect the calls together.
Note: You may be charged for some of the cost of the transferred call; contact
your network operator for details.
Note: You can only transfer voice calls. Fax, data, or conference calls cannot be
transferred.
©2001 Nokia Mobile Phones. All rights reserved.
Page 85

To answer a waiting call
To know that you have a call waiting, and to be able to answer it, you must first
subscribe to the call waiting network service. Call waiting is selected in network
services, see page 86.
1 When you receive a new call while you already have an active call, you hear a
sound and see a note informing you of a new incoming call.
2 Press Answer. The active call is put on hold.
To send DTMF tones during a call
Dual tone multi-frequency tone system is used by all touch-tone telephones. DTMF
assigns a specific frequency, or tone, to each key so that it can easily be identified
by a microprocessor. DTMF tones allow you to communicate with voice mailboxes,
computerised telephony systems, etc.
To send DTMF tones during a call, you have two methods.
Either,
Enter the digits with the communicator keyboard. No menu or command button
selection is needed before starting to enter the digits. Each keystroke generates a
DTMF tone which is transmitted while the call is active.
Alternatively,
1 Press Sen d DTMF. The DTMF sequences you have stored in the contact card of
the person you are talking with are shown. For information on how to store
DTMF sequences, see page 102.
77
Telephone
Tip: Besides the numbers
0 - 9, you can also use the
characters p, w, *, and #
when sending DTMF tones.
For information on these
characters, see ‘To store
DTMF tones’ on page 102.
©2001 Nokia Mobile Phones. All rights reserved.
Page 86

78
Telephone
2 Select a DTMF sequence. You can edit the sequence. If there are no stored
sequences, you can enter a new DTMF sequence into the input field.
3 Press Send tone.
Note: You can send DTMF tones during a conference call by typing the digits
with the communicator keyboard, but you cannot access stored DTMF
sequences.
Telephone Settings
In the Telephone main view, press the Menu key and select Settings to select one
of the following settings.
Profile settings
The profiles are used for grouping the settings of different operating environments
of the communicator. In the settings you can modify the profile features. One
profile is always in use.
To change the profile in use, press the Menu key. Use the Arrows key to select the
Profiles icon at the right-hand end of the menu bar and a new profile from the
menu list.
©2001 Nokia Mobile Phones. All rights reserved.
Page 87

79
Telephone
Figure 21
To select and modify a profile, press the Menu key and select Settings > Profiles….
The profiles provided with your communicator are:
General - The default profile of the communicator.
Silent - You can set this profile on when you want all the alert tones to remain
silent (except Clock and Calendar alarms - see ‘Note’ on page 79).
Meeting - You can specify how the communicator operates when you are in a
meeting, such as setting the volume of the tones low.
Outdoor - You can specify how the communicator operates when you are outdoors.
Pager - You can set this profile on when you want the communicator to act as a
pager. The default settings are that there is no ringing tone and that you get an
alert tone for received short messages.
Flight - Sets the Flight profile on. For more information, see ‘Flight profile’ on page
92.
Note: If you have turned on the Clock alarm or an alarm for timed entry in
Calendar, it remains on in all profiles, including Silent.
3URILOHVLFRQ
©2001 Nokia Mobile Phones. All rights reserved.
Page 88

80
Telephone
To create a new profile
1 To create a new profile, press the Menu key, select Settings > Profiles…, and press
New. The current values of the General profile are copied to the new profile, for
you to modify as you want.
2 To modify the settings of any of the profiles, highlight a profile name and press
Edit. A dialog with four pages opens, as shown in Figure 22. For each of the
pages, define the following:
Figure 22
General page
Name: Enter the name of the profile. Some profiles cannot be renamed.
Ringing type: Choose the ringing type for the ringing tone. The options are Normal/
Ascending/Ring once.
Ringing tone: Defines the sound for the incoming call. Press Change to choose from
sound files provided with the communicator or to browse for other sound
files, if available. To record a tone, see page 224.
©2001 Nokia Mobile Phones. All rights reserved.
Page 89

Ringing tone, line 1: and Ringing tone, line 2: Defines the sound for incoming calls
on two alternate lines, if available. Press Change to choose from sound
files that have been provided with the communicator or to browse for
other sound files, if available.
Personal tones: Defines whether the personal ringing tone of callers are used. The
options are On/Off. For information about attaching a ringing tone to a
contact card, see ‘To attach a ringing tone’ on page 100.
Alerts page
Clock alarm, Calendar alarm, Received SMS, and Received fax: You can choose a
specific sound for each of these situations to alert you. Highlight an
option, then press Change to choose from sound files provided with the
communicator or browse for other sound files. To adjust the volume of an
alarm, press Volume.
Notifications page
Keyboard tone: Adjusts the keyboard sound. The options are Off/Quiet/Loud.
Phone keypad tone: Adjusts the keypad sound. The options are Off/ Quiet/Loud.
Notification tones: Switches the notification tones between On/Off. Notification
tones are tones made by the communicator alerting you to an error (such
as an incorrect key press) or to a situation (such as a low battery).
81
Telephone
©2001 Nokia Mobile Phones. All rights reserved.
Page 90

82
Telephone
dial’ on page 44.
Tip: See also ‘To speed
Other page
Play ringing tone for: Allows you to choose which incoming calls will make a
ringing sound. The options are All calls/VIP group only/None. If you choose
VIP group only, only the calls coming from someone defined as a VIP will
ring; see page 110 in the Contacts chapter. All other calls alert on the
display with a message, but will not ring.
Divert all voice calls: Defines a destination to which you can divert all incoming
calls. The first option is User defined which means that you use the divert
settings specified in the main Call diverting dialog. (See page 83).
The remaining divert options are the same as listed on page 84. When you
change to a different profile, the settings you have made here override the
settings you select when you press the Menu key and select > Settings >
Network services > Call diverting…; see ‘Network services settings’ on page
83.
Speed dials
Speed dialling is a quick way to call frequently used numbers. You can assign speed
dials to eight phone numbers. An example is shown in Figure 23.
1 Press the Menu key and select Settings > Speed dials ….
2 To assign a number to a speed dial location or to change an existing number,
press either Add number or Change number. You see a list of contacts from
the contacts database.
3 Highlight a contact card and press Select. Contact cards without phone
numbers are dimmed.
©2001 Nokia Mobile Phones. All rights reserved.
Page 91

Location number 1 is reserved for calling your default voice mailbox; see page 86
for more information. You cannot change its value, and so the detail is dimmed.
For more information on voice mailboxes, see page 73.
Figure 23
Network services settings
Note: Network services may not be provided by all operators. If services are
provided, you may have to subscribe to them.
Information about the status of these services is stored in the network. Therefore,
the current settings are not shown until you request the information from the
network as follows:
1 Press the Menu key and select Settings > Network services
2 For example, to check the setting of Divert if busy, select Call diverting…, highlight
it with the Arrows key, then press Check status. While the communicator is
making a request to the network, a query note is shown on the display.
3 After a successful request, the new status now appears in the settings list.
83
Telephone
Tip: To change voice call
diverting or barring settings,
the phone must be switched
on.
©2001 Nokia Mobile Phones. All rights reserved.
Page 92

84
Telephone
Figure 24
To divert voice calls
Voice call diverting allows you to direct your incoming voice calls to another phone
number. This is also known as call forwarding.
1 Press the Menu key and select Settings > Network services > Call diverting…. The
Voice call diverting dialog opens.
2 Choose divert options:
Divert all calls — All incoming calls are diverted. Note that you can also have a
specific Divert all calls setting in a profile; see page 78 for more information.
Divert if busy — Incoming calls are diverted when you are engaged in another
call.
Divert if out of reach — Incoming calls are diverted when the phone is switched
off or outside the network service area.
Divert if not answered — Incoming calls are diverted if you do not answer them
within a certain time period.
Time delay — Applies to the option Divert if not answered. Time delay allows you to
choose the time period after which the call is diverted. You can set the delay to
Default/5 seconds/10 seconds/15 seconds/20 seconds/25 seconds/30 seconds
Divert if not available — In a single action, this option turns on diverting of Divert
if busy/Divert if out of reach/Divert if not answered.
©2001 Nokia Mobile Phones. All rights reserved.
Page 93

3 Press Change, and select one of the following options:
To: — Enter the number to which you want to divert the calls.
Default voice mailbox — Calls are diverted to your voice mailbox. If you have
more than one mailbox, you must choose one from a list shown to you. See page
86 for more information. The phone number of the voice mailbox must be set
by pressing the Menu key and selecting Network services > Other services….
Off — Turn off the divert.
To restrict voice calls
To restrict voice calls you use the voice call barring network service. To use call
barring or change the barring settings you need a barring password, which you can
obtain from the network operator.
1 Press the Menu key and select Settings > Network services > Call barring…. The
Voice call barring dialog opens.
2 Choose one of the available options:
Outgoing calls — Calls cannot be made.
Incoming calls — Calls cannot be received.
International calls — Calls cannot be made to foreign countries.
Incoming calls when abroad — Calls cannot be received when you are outside
your home country.
International except to home country - If you have enabled international roaming
with your network operator, you cannot make international calls abroad, except
to your home country.
If you subscribe to the alternate line network service, voice call barring applies only
to the Selected line.
Note: If voice call barring is in use, calls may still be possible to certain
emergency numbers, in some networks.
85
Telephone
©2001 Nokia Mobile Phones. All rights reserved.
Page 94

86
Telephone
To cancel all call diverts or barrings, press Cancel all or Cancel all.
Other network services
1 Press the Menu key and select Settings > Network services > Other services…
2 Other network service settings contains the following options:
Network selection — Allows you to change the way a network is selected and also
register to another network. You can set the network selection to either
Automatic or Manual. In automatic network selection, the communicator selects
the most appropriate network. In manual network selection, the communicator
searches for available networks and presents you with a list of networks found;
you can then select which network to use.
Call waiting - Press Change to choose On or Off. For a brief description of call
waiting, see ‘To answer a waiting call’ on page 77.
My number sending — Determines whether your number is hidden or presented
to the person you are calling. Press Change to see the options Default/On/Off.
Voice mailbox settings
For information on voice mailboxes, see page 73.
1 Press the Menu key and select Settings > Voice mailboxes.
2 To change the settings of a voice mailbox, highlight it and press Edit. A dialog
with two pages opens. See Figure 25.
©2001 Nokia Mobile Phones. All rights reserved.
Page 95

Figure 25
Properties page
Define the following options:
Name: Enter a descriptive name for the mailbox.
Number: Enter a number for the mailbox obtained from the network service.
Note: The type of voice mailbox determines whether you can edit both of these
fields. For example, the name and number of a SIM voice mailbox cannot
be edited.
DTMF tones page
DTMF : Define DTMF tones for a voice mailbox not provided with your SIM card.
Each tone is represented by a character. Press Add to enter characters and
store them with a label, such as DTMF2. You can also select No DTMF tones.
If you are editing a voice mailbox provided with your SIM card, this page
is dimmed.
Call settings
1 Press the Menu key and select Settings > Call….
2 Define the following options:
87
Telephone
©2001 Nokia Mobile Phones. All rights reserved.
Page 96

88
Telephone
Tip: To see the phone
serial number, press the
Menu key and select Tools>
Serial number (IMEI). Your
network operator may ask
you for this information.
Audio when cover opened: Determines whether the handsfree mode is selected
automatically when you open the cover. Press Change to toggle On/Off.
Automatic redial: When this setting is set On and you call a number that is busy
or does not answer, the communicator attempts to call the number until the
call is connected. Press Change to toggle On/Off.
Advanced settings
1 Press the Menu key and select Settings > Advanced….
2 Define the following options:
Call costs page
If your network supports the call charging display service, use this page to change
call charge settings and to view cost counters. Your communicator will prompt you
for your PIN2 code. If this page is dimmed, your SIM does not support this network
service.
Figure 26
Display credits: Determines the information about call costs shown in the call
display during a call. The options are No/Used/Remaining. Credits are
amounts of money, measured either in units or currency.
©2001 Nokia Mobile Phones. All rights reserved.
Page 97

Currency: Enter a maximum of three characters to indicate your choice of currency.
You can enter numbers or letters. For example, you can enter ‘FIM’ for
Finnish currency. This field is used with Unit price below and with Show in
currency.
Unit price: If you use ‘units’, enter a decimal number for the price of each charging
unit. You must also complete the Currency field above.
Maximum cost limit: You have two options: No limit or a value that you can define
in the field. You can define the limit in ei ther unit s or in currency. If you
are in a call when the cost limit is reached, the call ends. You cannot make
any more calls. You see a note on the display before and after the call
limit is reached.
Press Calculate costs: The information in this dialog is:
Last call: - The cost of the last call made.
All calls: - The cost of all calls made since the cost counter was reset. See
Figure 27.
Remaining credits - If you have defined a limit in Maximum cost limit this field
displays the amount of money or units remaining.
Press either Show in units or Show in currency to choose how you want
call costs to be displayed in your communicator. ‘Units’ is a network
measurement, such as ‘21 units’. ‘Currency’ is shown in the characters you
have entered in the Currency field.
Press Clear costs to clear the cost counters. You are required to enter your
PIN2 code.
89
Telephone
©2001 Nokia Mobile Phones. All rights reserved.
Page 98

90
Telephone
Figure 27
Note: The actual invoice for calls and services from your service provider may
vary, depending upon network features, rounding-off for billing, taxes,
and so on.
Fixed dialling page
Fixed dialling is a network service which allows you to restrict your calling to a
limited set of numbers stored in the SIM card. The service is offered by some
network operators. When the fixed dialling service is active, the SIM phone book
list shows only numbers in the fixed dialling list. You still have access to the
communicator’s Telephone directory, but you cannot call those numbers. If your
SIM card does not support this network service, this page is dimmed.
Figure 28
©2001 Nokia Mobile Phones. All rights reserved.
Page 99

If you want to change the settings or view the fixed numbers, you are required to
enter your PIN2 code. When the service is set to On, press Edit numbers to add,
modify, or delete numbers.
You are required to enter names and numbers into the fixed dialling list.
Note: When fixed dialling is set to on, calls may be possible to certain
emergency numbers in some networks (such as 112 or other official
emergency number).
Line selection page
If you subscribe to the alternate line network service, you will have two lines
(phone numbers) for your communicator. Each line can have different settings for
some of the Telephone features. If this service is unavailable or you do not use it,
the Line selection page appears dimmed.
Figure 29
The options on this page are:
Selected line: Defines the line used for outgoing calls. The options are Primary/
Alternate. Fax calls always use the primary line. If Line selection is acti ve
(see the next paragraph) you cannot change the line in use.
91
Telephone
©2001 Nokia Mobile Phones. All rights reserved.
Page 100

92
Line selection: Allows you to block the changing of the selected line. The values are
On/Off. Changing the value requires you to enter your PIN2 code.
Telephone
©2001 Nokia Mobile Phones. All rights reserved.
Flight profile
The flight profile prevents you from accidentally turning on the phone in an
aircraft. To select the flight profile:
1 In the Telephone main view, press the Menu key, scroll across the menu bar to
the Profiles icon , then highlight Flight.
2 Press Select.
With the flight profile active, you may do tasks which do not require
communication with the wireless network. For example, you can read previously
downloaded mail, write mail, notes, short messages, faxes, or update your
calendar. Once you have left the aircraft, turn off the flight profile by pressing Exit
Flight profile. Then you can turn on the phone by pressing , and your short
messages, faxes, and mail will be sent automatically.
When the flight profile has been selected, emergency calls must be made from the
phone (close the communicator cover):
1 Press . The phone display will read Flight profile is active..
2 While the note is visible (for approximately five seconds) you can dial an
emergency number programmed into your communicator, for example, 112.
3 Press .
 Loading...