

Page 1

PAMS Technical Documentation
NHM-8NX Series Transceivers
Assembly & Disassembly
Instructions
Issue 1 05/02 ãNokia Corporation
Page 2

NHM-8NX
Assembly & Disassembly Instructions PAMS Technical Documentation
Table of Contents
Page No
Disassembling the NHM-8NX Transceiver................................................................... 3
Preparation for Disassembly ........................................................................................3
Disassembly Tools .................................................................................................... 3
ESD Protection.......................................................................................................... 3
1. Remove B-cover ......................................................................................................4
2. Remove Battery .......................................................................................................4
3. Remove SIM Card ...................................................................................................5
4. Remove A-cover ......................................................................................................5
5. Remove screws (Torx #6) ........................................................................................6
6. Remove Lightguide Assembly ................................................................................6
6.1 Remove Metal frame & Earpiece........................................................................ 7
7. Remove PWB Assembly .........................................................................................8
7.1 Remove Shielding Lids ....................................................................................... 8
8. Remove components from D-cover Assembly ........................................................9
8.1 Remove SALT Speaker..................................................................................... 10
8.2 Remove SIM Support........................................................................................ 10
8.3 Remove Release spring ..................................................................................... 11
Assembling the NHM-8NX Transceiver ..................................................................... 12
Exploded NHM-8NX Assembly ................................................................................12
1. Mount components in D-cover ..............................................................................13
1.1 Mount Release Spring ....................................................................................... 14
1.2 Mount new shielding lids on PWB ................................................................... 14
2. Mount PWB on D-cover ........................................................................................15
3. Mount Earpiece and Metal frame ..........................................................................15
4. Mount Domesheet ..................................................................................................16
5. Mount Display Assembly on D-cover ...................................................................16
6. Mount screws (Torx #6) ........................................................................................17
7. Mount Keymat and A-cover Assembly .................................................................17
8. Mount SIM Card ....................................................................................................18
9. Mount Battery ........................................................................................................18
10. Mount B-cover Assembly ....................................................................................19
Page 2 ãNokia Corporation Issue 1 05/02
Page 3
NHM-8NX
PAMS Technical Documentation Assembly & Disassembly Instructions
Disassembling the NHM-8NX Transceiver
Preparation for Disassembly
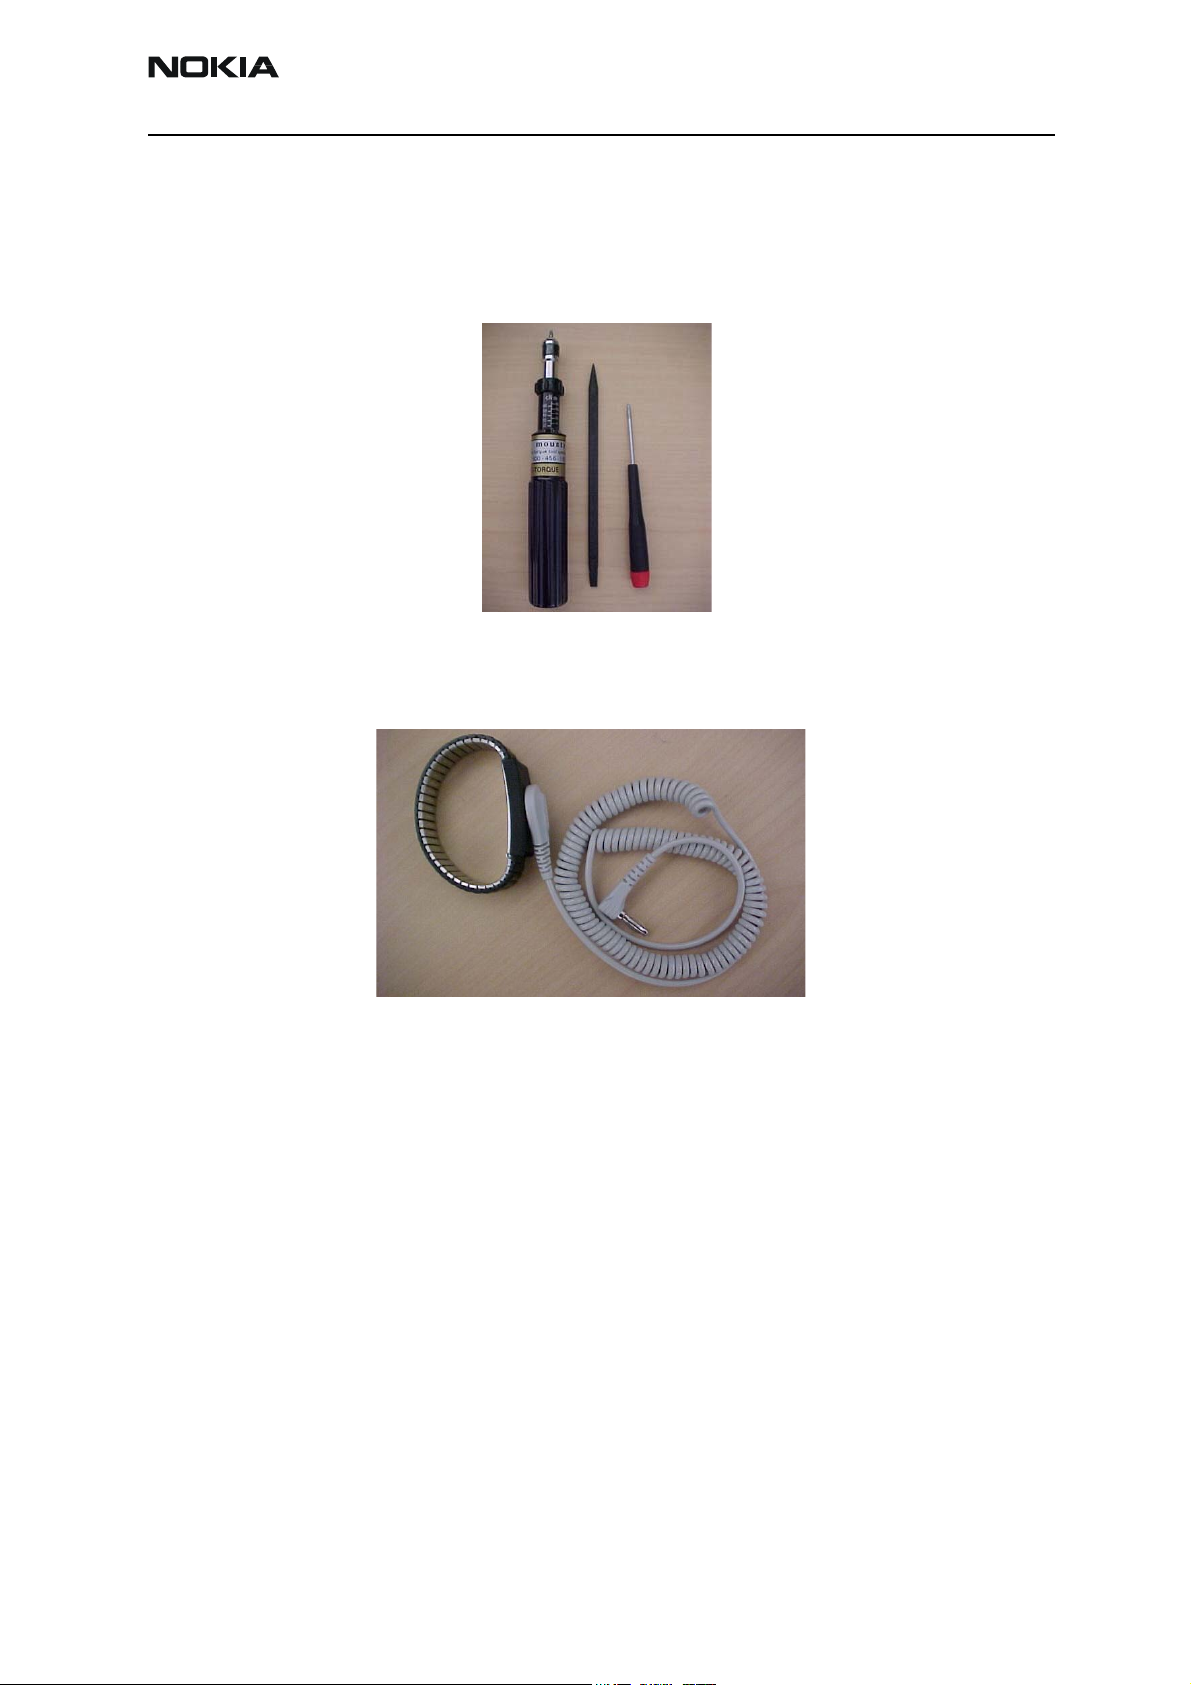
Disassembly Tools
Shown left to right: Torque-limiting screwdriver (torque set at 22N-cm), fiberglass soldering aid, and T6 Torx+ driver.
ESD Protection
Some form of ESD protection should be used when handling the PWB and other electronic components. The photo above shows a wrist strap, which can be grounded to a
bench. This or some other form of ESD protection should be used when handling the
phone.
Issue 1 05/02 ãNokia Corporation Page 3
Page 4

NHM-8NX
Assembly & Disassembly Instructions PAMS Technical Documentation
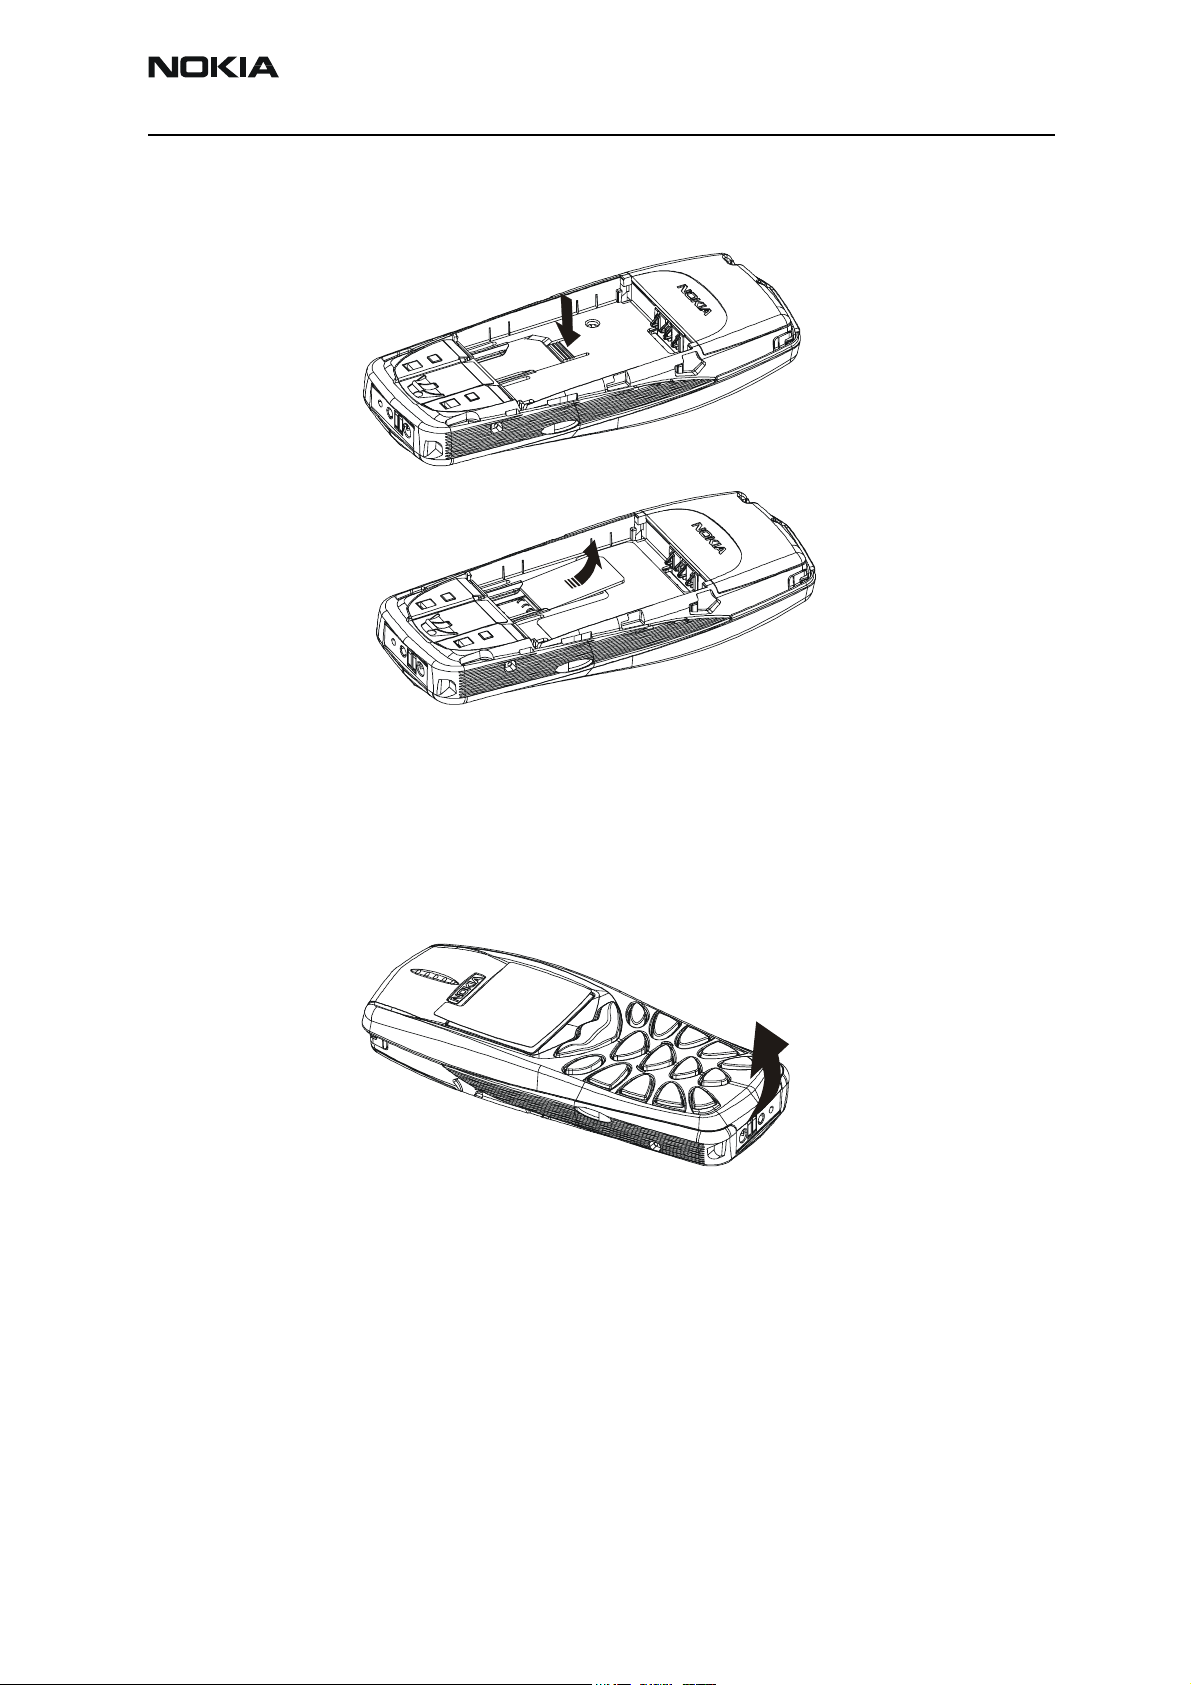
1. Remove B-cover
2
1
3
1 Press and hold release button.
2 With other hand place thumb on logo badge and push B-cover in the direction of
arrow 2.
3 Once B-cover is pushed forward lift off to remove.
2. Remove Battery
Grab with fingertip and nail and pull.
Page 4 ãNokia Corporation Issue 1 05/02
Page 5
NHM-8NX
PAMS Technical Documentation Assembly & Disassembly Instructions
3. Remove SIM Card
1
2
1 Press plastic spring down
2 Place thumb from the other hand on SIM Card. Press and slide the SIM Card in
the direction of arrow 2.
4. Remove A-cover
Place thumb under the edge of the A-cover and fingers on top and pull gently until snaps
deactivates.
Be careful that the keymat does not fall out
Issue 1 05/02 ãNokia Corporation Page 5
Page 6
NHM-8NX
Assembly & Disassembly Instructions PAMS Technical Documentation
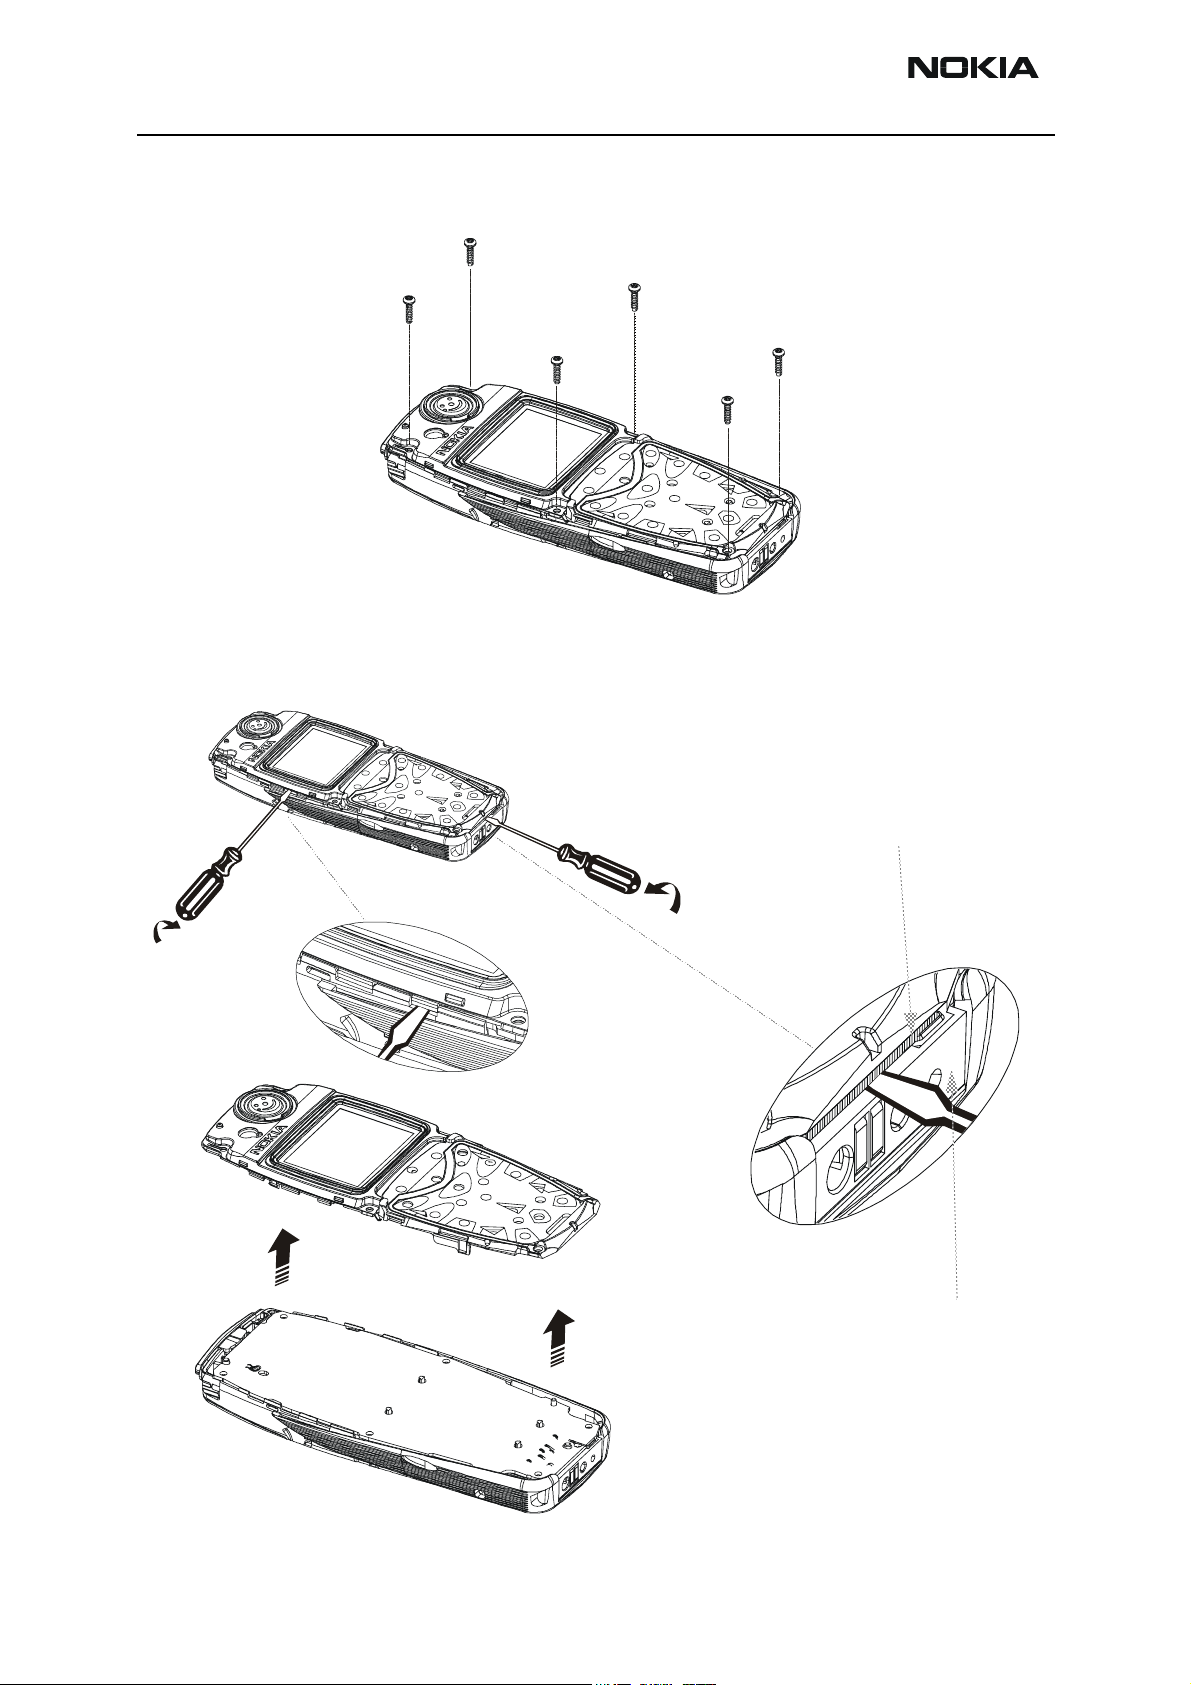
5. Remove screws (Torx #6)
6. Remove Lightguide Assembly
2
Use screwdriver size 2.50 - 3.50 mm.
PWB
1
3
Between PWB and Bottom connector. Be
careful not to damage the bottom
connector.
Page 6 ãNokia Corporation Issue 1 05/02
Bottom Connector
Page 7

NHM-8NX
PAMS Technical Documentation Assembly & Disassembly Instructions
6.1 Remove Metal frame & Earpiece
1b
1a
2
3
Use screwdriver size 2.50 – 3.50 mm.
1 Turn screwdriver at snaps only on one side.
2 When removing the Metal frame, be careful not to damage the 4 springs in the
corners.
3 Remove Earpiece.
Issue 1 05/02 ãNokia Corporation Page 7
Page 8

NHM-8NX
Assembly & Disassembly Instructions PAMS Technical Documentation
7. Remove PWB Assembly
LED
Remove PWB assembly and place PWB on ESD table with LED upwards.
Note: Treat LEDs with care - do not bend!
7.1 Remove Shielding Lids
Remove Shielding Lids.
Page 8 ãNokia Corporation Issue 1 05/02
Page 9

NHM-8NX
PAMS Technical Documentation Assembly & Disassembly Instructions
Do not re-use shielding lid once it is removed, hence SCRAP the removed lids.
When working with PWB, always use Solder Jig.
8. Remove components from D-cover Assembly
1
2
3
5
4
6
7
The following components are removable:
1Power key
2 Battery connector
3 SIM Card support
4 Vibra assembly
5 SALT Speaker
Issue 1 05/02 ãNokia Corporation Page 9
Page 10

NHM-8NX
Assembly & Disassembly Instructions PAMS Technical Documentation
6 Bottom connector
7 Release spring
8.1 Remove SALT Speaker
Use screwdriver size 2.50 – 3.50 mm.
Remove SALT Speaker by turning the screwdriver.
8.2 Remove SIM Support
SIM Support can be released by pressing downwards at one of the edges.
Page 10 ãNokia Corporation Issue 1 05/02
Page 11

NHM-8NX
PAMS Technical Documentation Assembly & Disassembly Instructions
8.3 Remove Release spring
1a
1b
2
1 Gently put screwdriver down at release spring interface and release the sping.
2 Remove the spring
Issue 1 05/02 ãNokia Corporation Page 11
Page 12

NHM-8NX
Assembly & Disassembly Instructions PAMS Technical Documentation
Assembling the NHM-8NX Transceiver
Exploded NHM-8NX Assembly
I001
I002
I003
I004
I018
I019
I020
I005
I006
I007
I021
I008
I009
I010
I011
I012
I013
I014
I015
I016
I017
Page 12 ãNokia Corporation Issue 1 05/02
Page 13

NHM-8NX
PAMS Technical Documentation Assembly & Disassembly Instructions
1. Mount components in D-cover
1
2
The following components are mountable:
3
5
4
6
7
1Power key
2 Battery connector
3 SIM Card support
4 Vibra assembly
5 SALT Speaker
6 Bottom connector
7 Release spring
Note: Ensure that all components are placed correctly.
Issue 1 05/02 ãNokia Corporation Page 13
Page 14

NHM-8NX
Assembly & Disassembly Instructions PAMS Technical Documentation
1.1 Mount Release Spring
2
1
1.2 Mount new shielding lids on PWB
Page 14 ãNokia Corporation Issue 1 05/02
Page 15

NHM-8NX
PAMS Technical Documentation Assembly & Disassembly Instructions
When working with PWB, always use the Solder Jig (MJS-67). Do not reuse the old lids.
2. Mount PWB on D-cover
Guiding hole
Guiding hole
Guiding pin
Use pins for guiding.
3. Mount Earpiece and Metal frame
1
Guidi ng pin
2
3
1 Mount the Earpiece in Lightguide.
2 Place Metal frame on Lightguide. Be careful about the four springs in each cor-
Issue 1 05/02 ãNokia Corporation Page 15
Page 16

NHM-8NX
Assembly & Disassembly Instructions PAMS Technical Documentation
ner.
3 Push the Metal frame down (at the arrows) until it snaps on.
4. Mount Domesheet
When mounting the domesheet use the two holes for guiding.
5. Mount Display Assembly on D-cover
1
2
1 Place the Display Assembly in the D-cover.
Page 16 ãNokia Corporation Issue 1 05/02
Page 17

NHM-8NX
PAMS Technical Documentation Assembly & Disassembly Instructions
2 Push the Display Assembly down (at the arrows) until it snaps on.
6. Mount screws (Torx #6)
4
3
2
1
5
6
Fastening the screws:
Use a torx #6 screwdriver to fasten the screws in the order shown in the diagram.
Max torque 28Ncm at 500-600RPM.
7. Mount Keymat and A-cover Assembly
Place keymat.
Issue 1 05/02 ãNokia Corporation Page 17
Page 18

NHM-8NX
Assembly & Disassembly Instructions PAMS Technical Documentation
Push down the A-cover until it snaps on.
8. Mount SIM Card
Slide the SIM Card into place.
9. Mount Battery
Slide the battery under the hooks in the D-cover.
Page 18 ãNokia Corporation Issue 1 05/02
Page 19

NHM-8NX
PAMS Technical Documentation Assembly & Disassembly Instructions
10. Mount B-cover Assembly
1
2
1 Place B-cover assembly on D-cover.
2 Push the B-cover in dirrection of arrow until it snaps on.
Issue 1 05/02 ãNokia Corporation Page 19
Page 20

NHM-8NX
Assembly & Disassembly Instructions PAMS Technical Documentation
This page intentionally left blank.
Page 20 ãNokia Corporation Issue 1 05/02
 Loading...