

Page 1

Programmes After Market Services
NHA–9 Series Transceivers
WinTesla Service
Software
Issue 2 03/00
Page 2

NHA–9
WinTesla Service Software
CONTENTS
Wintesla User Guide
Installing WinTesla On Your Hard Disk 5. . . . . . . . . . . . . . . . . . . . . . . . . . .
Using The Windows Interface 5. . . . . . . . . . . . . . . . . . . . . . . . . . . . . . . . . . .
Common User Interface 6. . . . . . . . . . . . . . . . . . . . . . . . . . . . . . . . . . . . . . . .
Equipment Required 6. . . . . . . . . . . . . . . . . . . . . . . . . . . . . . . . . . . . . . . . . . .
Mechanical Connections 6. . . . . . . . . . . . . . . . . . . . . . . . . . . . . . . . . . . . . . .
Using Wintesla 8. . . . . . . . . . . . . . . . . . . . . . . . . . . . . . . . . . . . . . . . . . . . . . . .
Phone Independence 8. . . . . . . . . . . . . . . . . . . . . . . . . . . . . . . . . . . . . . . . . .
Login ID Setup 9. . . . . . . . . . . . . . . . . . . . . . . . . . . . . . . . . . . . . . . . . . . . . . . .
The Login Screen 10. . . . . . . . . . . . . . . . . . . . . . . . . . . . . . . . . . . . . . . . . . . . .
The WinTesla Screen 11. . . . . . . . . . . . . . . . . . . . . . . . . . . . . . . . . . . . . . . . . .
PAMS
Technical Documentation
Page No
The Product Menu 11. . . . . . . . . . . . . . . . . . . . . . . . . . . . . . . . . . . . . . . . . . . . .
The Configure Menu 13. . . . . . . . . . . . . . . . . . . . . . . . . . . . . . . . . . . . . . . . . . .
Fault Log Application. 17. . . . . . . . . . . . . . . . . . . . . . . . . . . . . . . . . . . . . . . . . .
Help 21. . . . . . . . . . . . . . . . . . . . . . . . . . . . . . . . . . . . . . . . . . . . . . . . . . . . . . . . .
NHA–9 Service Software
Required Servicing Equipment 22. . . . . . . . . . . . . . . . . . . . . . . . . . . . . . . . . .
Mechanical Connections 23. . . . . . . . . . . . . . . . . . . . . . . . . . . . . . . . . . . . . . .
Installing NHA–9 on your Hard Disk 26. . . . . . . . . . . . . . . . . . . . . . . . . . . . . .
Running NHA–9 26. . . . . . . . . . . . . . . . . . . . . . . . . . . . . . . . . . . . . . . . . . . . . . .
The Login Screen 27. . . . . . . . . . . . . . . . . . . . . . . . . . . . . . . . . . . . . . . . . . . . .
The WinTesla Screen 28. . . . . . . . . . . . . . . . . . . . . . . . . . . . . . . . . . . . . . . . . .
The Product Menu 29. . . . . . . . . . . . . . . . . . . . . . . . . . . . . . . . . . . . . . . . . . . . .
Configure 38. . . . . . . . . . . . . . . . . . . . . . . . . . . . . . . . . . . . . . . . . . . . . . . . . . . .
Tuning 44. . . . . . . . . . . . . . . . . . . . . . . . . . . . . . . . . . . . . . . . . . . . . . . . . . . . . . .
T esting 56. . . . . . . . . . . . . . . . . . . . . . . . . . . . . . . . . . . . . . . . . . . . . . . . . . . . . . .
Amps 56. . . . . . . . . . . . . . . . . . . . . . . . . . . . . . . . . . . . . . . . . . . . . . . . . . . . .
Page 2
Namps 57. . . . . . . . . . . . . . . . . . . . . . . . . . . . . . . . . . . . . . . . . . . . . . . . . . . .
Aftersales 71. . . . . . . . . . . . . . . . . . . . . . . . . . . . . . . . . . . . . . . . . . . . . . . . . . . .
Dealer 74. . . . . . . . . . . . . . . . . . . . . . . . . . . . . . . . . . . . . . . . . . . . . . . . . . . . . . .
Help 94. . . . . . . . . . . . . . . . . . . . . . . . . . . . . . . . . . . . . . . . . . . . . . . . . . . . . . . . .
Issue 2 03/00
Page 3

PAMS
NHA–9
Technical Documentation
WinTesla Service Software
List of Figures–
Figure 1. Dongle Insertion 6. . . . . . . . . . . . . . . . . . . . . . . . . . . . . . . . . . . . . . . .
Figure 2. Servicing setup 7. . . . . . . . . . . . . . . . . . . . . . . . . . . . . . . . . . . . . . . .
Figure 3. WinTesla with loaded interfaces 8. . . . . . . . . . . . . . . . . . . . . . . . . .
Figure 4. Accessing Op_ID. val file 9. . . . . . . . . . . . . . . . . . . . . . . . . . . . . . . .
Figure 5. Editing Op_ID.val file 9. . . . . . . . . . . . . . . . . . . . . . . . . . . . . . . . . . .
Figure 6. Login Screen 10. . . . . . . . . . . . . . . . . . . . . . . . . . . . . . . . . . . . . . . . . .
Figure 7. FaultLog – configuration 16. . . . . . . . . . . . . . . . . . . . . . . . . . . . . . . . .
Figure 8. Editing fault, symptoms, modules files 19. . . . . . . . . . . . . . . . . . . . .
Figure 9. FaultLog – macro setup 21. . . . . . . . . . . . . . . . . . . . . . . . . . . . . . . . . .
Page No
Issue 2 03/00
Page 3
Page 4

NHA–9
WinTesla Service Software
PAMS
Technical Documentation
This page intentionally left blank.
Page 4
Issue 2 03/00
Page 5

PAMS
NHA–9
Technical Documentation
WinTesla Service Software
WinTesla User Guide
The name TESLA, when used by Nokia, is an acronym for TEst and
Service Locals Application. Tesla for Windows (i.e. WinTesla) is a
software package designed to operate in the Microsoft Windows
environment. The software package is made of two modules, the
Wintesla core module and a service software module. The Wintesla
module is similar to an operating system for various service modules. In
this way many Nokia products can be serviced using one common
software package.
Note: The Wintesla core module MUST be installed for ”any” service module to run.
Installing WinTesla On Your Hard Disk
The WinTesla core software is delivered on a 3.5” diskette and is
protected with a protection “key” (PKD–1), which must be attached to the
parallel port LPT 1 when the WinTesla service software is being used.
To install the WinTesla core software package, proceed as follows:
Insert the WinTesla Application diskette into drive A: of your PC.
From DOS ( NOT running windows ) type
A: INSTALL <Enter>
From Windows File Manager double click the mouse on
a:\install.exe
Follow the instructions given and use the
Repeat this procedure for the required module installation using the
upgrade
Note: For interim WinTesla releases use the upgrade option.
Your Windows desktop will now have a “Service Software” group and a
“Service Software” icon within that group.
To start the program, double click on the “Service Software” icon .
option instead of
(Windows will boot up automatically)
Or
new
.
Using The Windows Interface
If not familiar with the windows type interface, consult the
Windows User Guide
for further information.
new
option when requested.
Microsoft
Issue 2 03/00
Page 5
Page 6

NHA–9
WinTesla Service Software
Common User Interface
Due to the modular design of WinTesla, various generations of Nokia
products can be serviced, while sharing a similar user interface. The
common user interface is explained in the first part of this document and
is followed by the specific module information.
The software can be used to control the phone by entering commands via
the keyboard of a PC/AT – running MS Windows 3.x /Win 95
This document refers to WinTesla Version 5.03 or greater.
Equipment Required
Computer : IBM 486 PC/AT or compatible with at least
one, unused serial port, COM1 or COM2 one parallel port
(LPT1), 5 Meg. hard disk space required.
PAMS
Technical Documentation
: Any supported by MS Windows version 3.x/Win95
Operating System : DOS 5.0 or later running MS Windows
3.x /Win95
WinTesla Application Software (product code 0774046)
Software Protection Key PKD–1 (product code – 0750018)
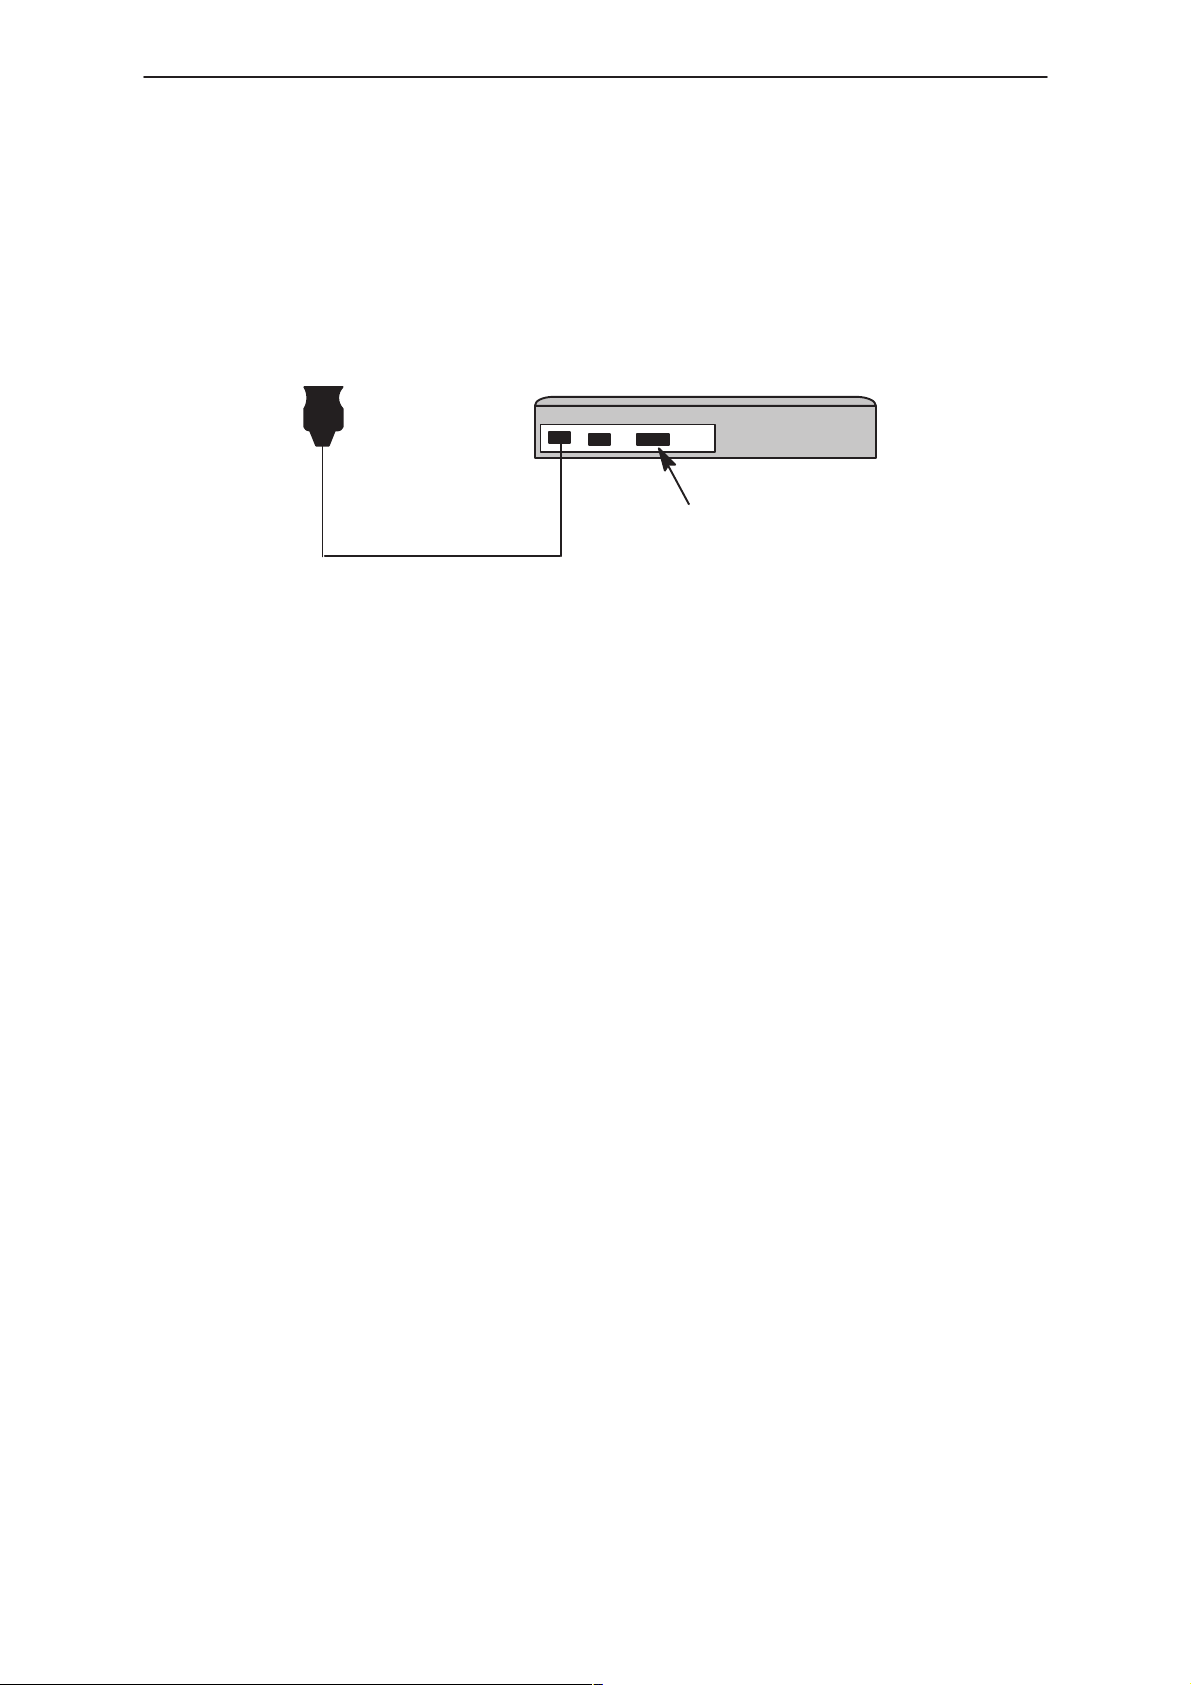
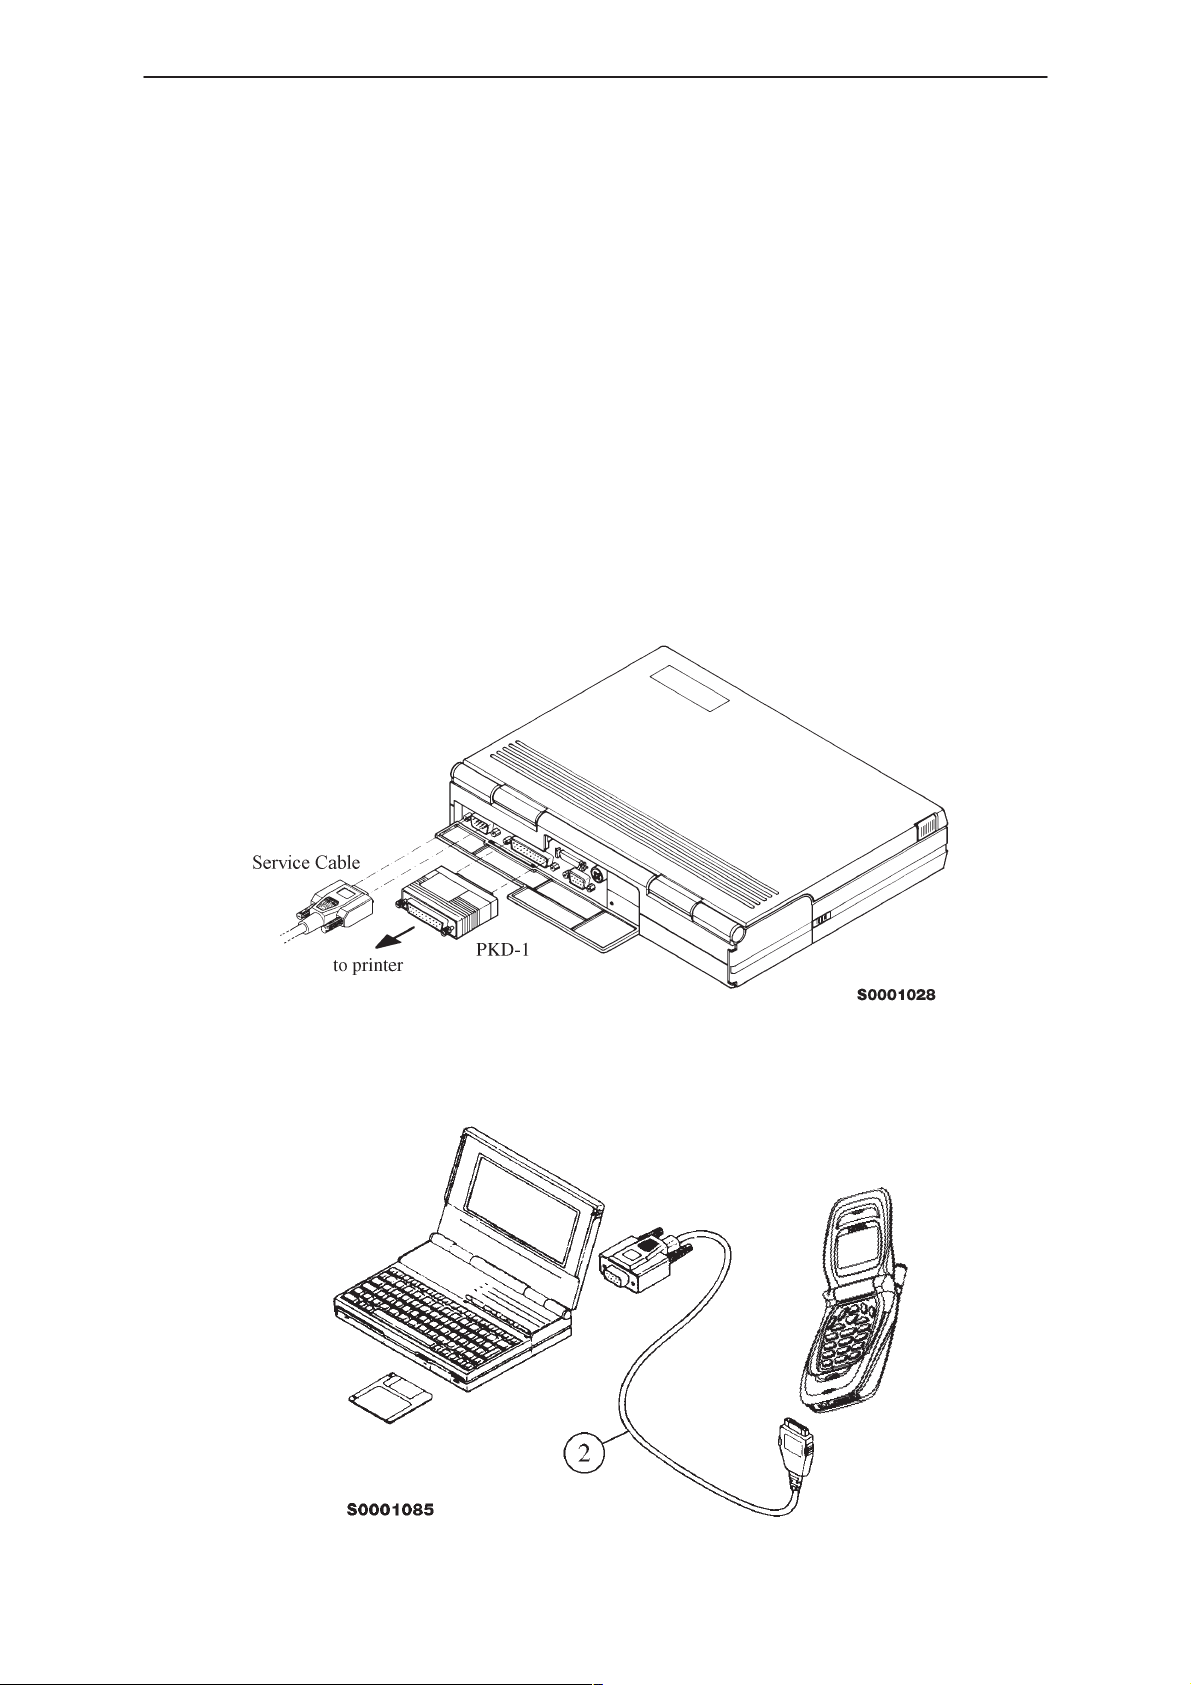
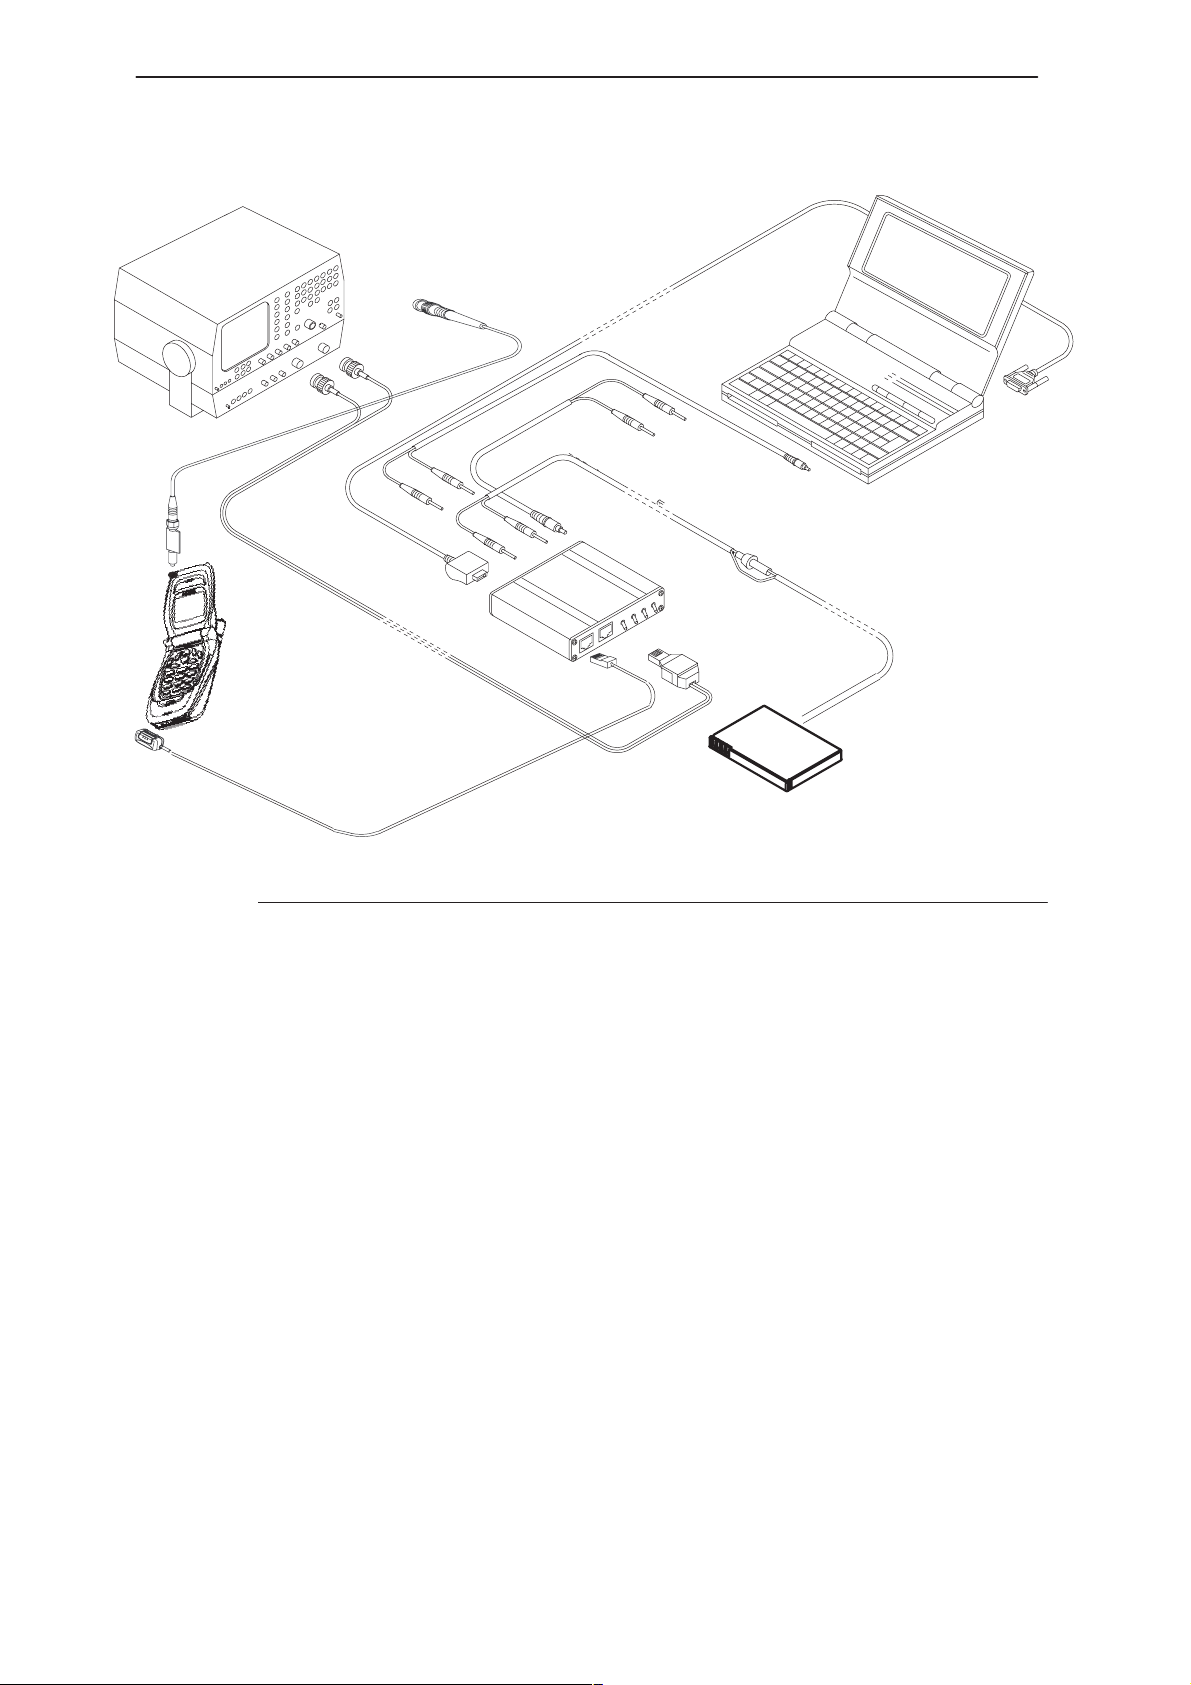
Mechanical Connections
The software controls the phone via a separate adapter (DAU–9M
0730762) connected to the serial port of the PC and to the phone’s bottom
connector using the Nokia proprietary communication method called
M2BUS.
Attach the protection key PKD–1 to parallel port one (25–pin female
D–connector) of the PC. When connecting the PKD–1 to the parallel port
be sure that you insert the PC end of the PKD–1 to the PC (male side).
Page 6
Figure 1. Dongle Insertion
Issue 2 03/00
Page 7
PAMS
NHA–9
Technical Documentation
The PKD–1 should not affect devices working with it. If some errors do
occur try printing without the PKD–1 connected. If printing is now OK
please contact your supplier who will endeavor to replace your PKD–1.
WinTesla Service Software
COM1 COM2 LPT–1
PC
PKD–1
Figure 2. Servicing setup
Issue 2 03/00
Page 7
Page 8
NHA–9
WinTesla Service Software
Using Wintesla
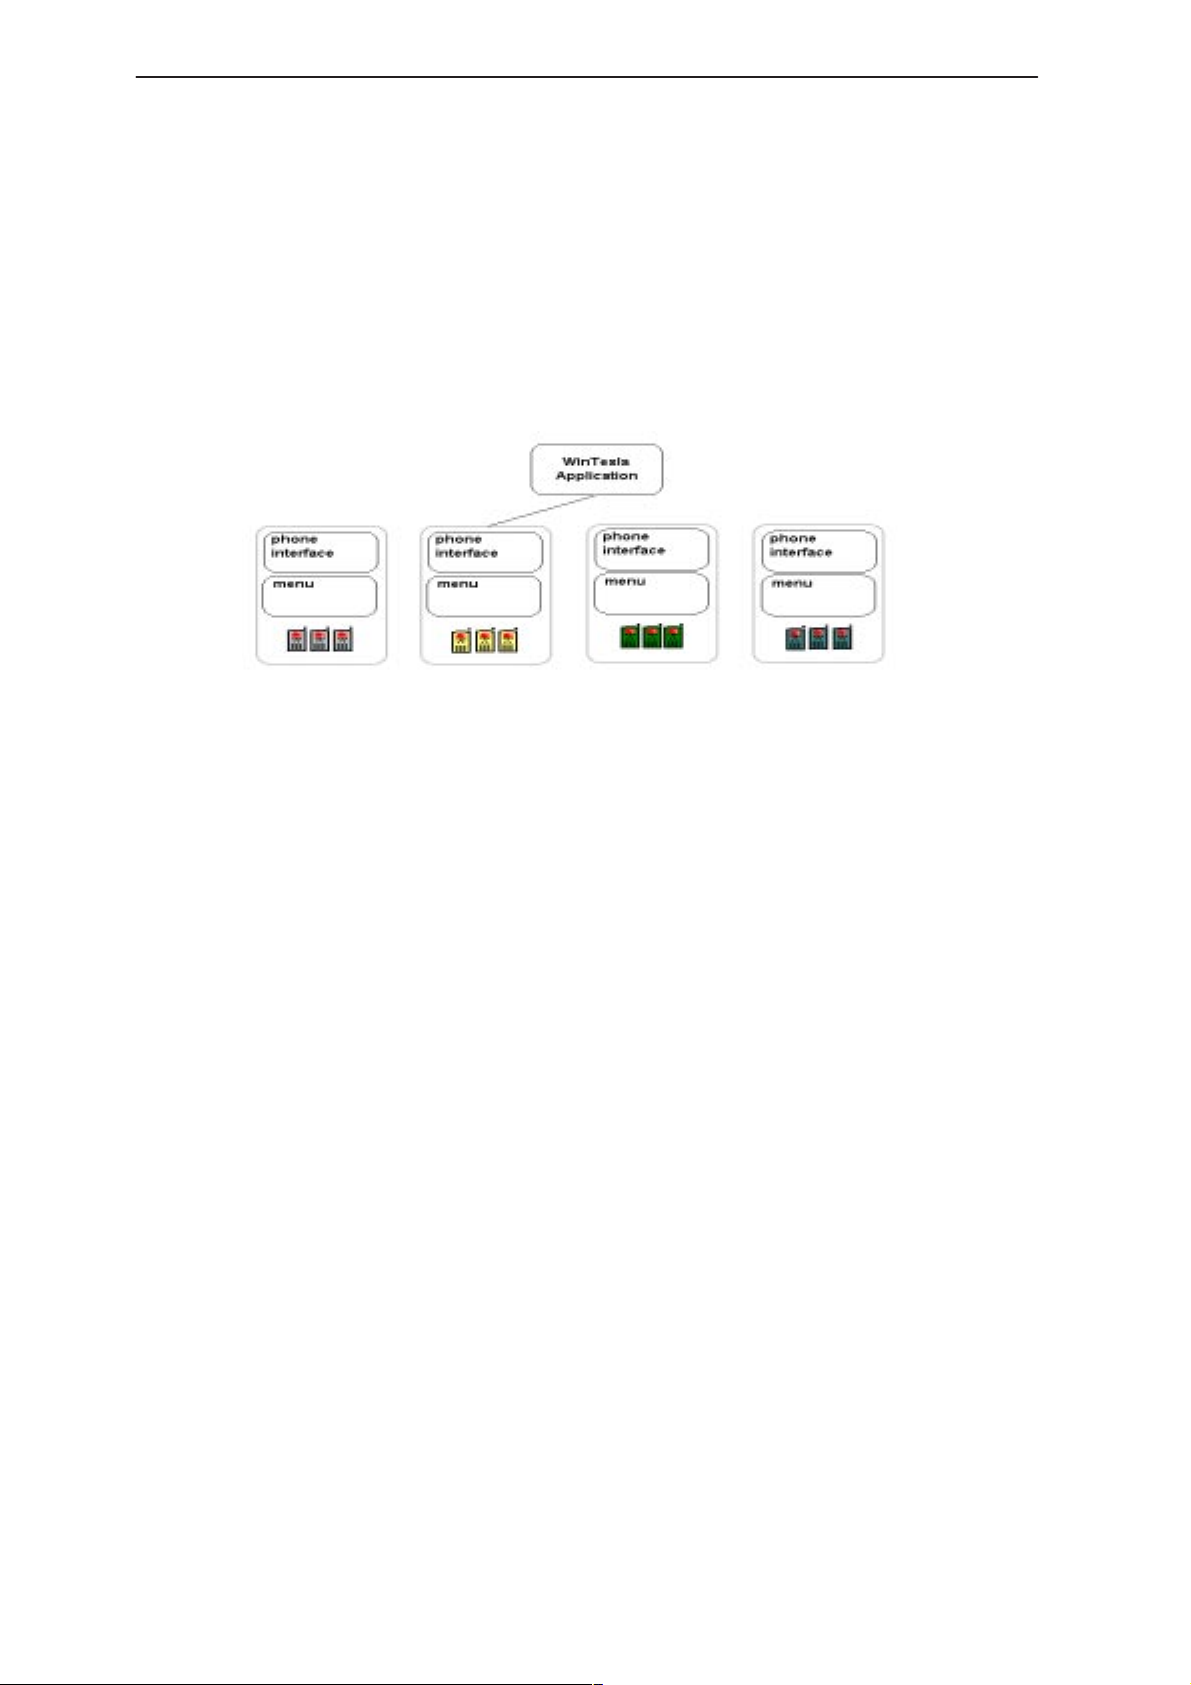
Phone Independence
The WinTesla application, “WinTesla.exe”, is phone independent. It relies
on separate, phone specific, “modules” to provide communication, menus
and test algorithms.
PAMS
Technical Documentation
Figure 3. WinTesla with loaded interfaces
For each phone type – or product family – a phone interface module and
menu module are required. The modularity of WinTesla allows support for
other languages, so one phone type may have one phone interface
module and several menu modules, all in different languages.
WinTesla allows you to select the language you wish to use (if available),
and will automatically load the correct phone interface module for the
connected phone. When a different phone type is connected, WinTesla
will load the new phone interface and associated menus.
Page 8
Issue 2 03/00
Page 9

PAMS
NHA–9
Technical Documentation
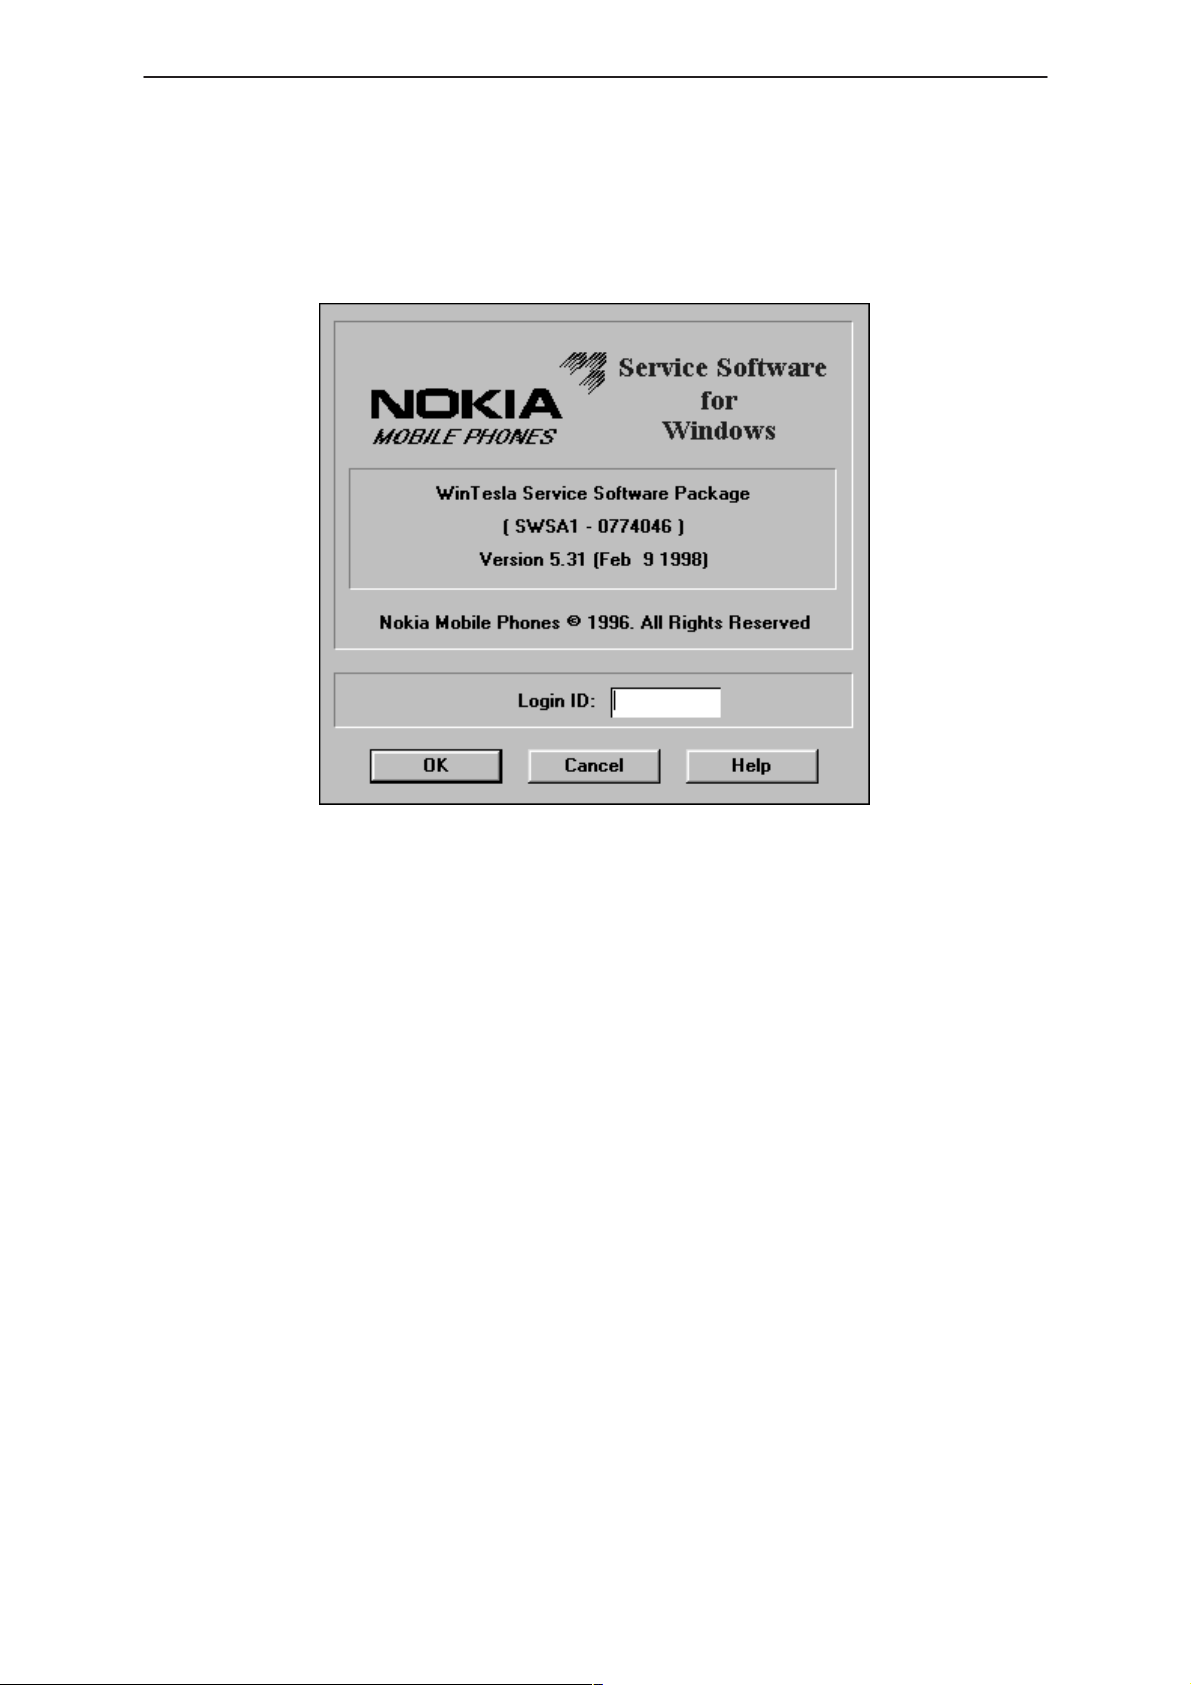
Login ID Setup
Once the software has been installed you need to set up your own Login
ID (max. 3 characters). Start Windows file manager and locate the
validate\op_id.val
Double clicking on the ‘
message, in order to avoid this use the File |Associate command in file
manager and link the file to the notebook application as shown below.
WinTesla Service Software
(located in the Wintesla subdir) file as shown in NO TAG
Op_ID.val’
file (a text file) gives a windows error
Figure 4. Accessing Op_ID. val file
Now by double clicking on the ‘
Op_ID.val
’, notebook opens and your own
ID can be entered and saved accordingly. Enter or edit any operator
definitions following the existing format in this file.
Enter your id here
Figure 5. Editing Op_ID.val file
Issue 2 03/00
Page 9
Page 10
NHA–9
WinTesla Service Software
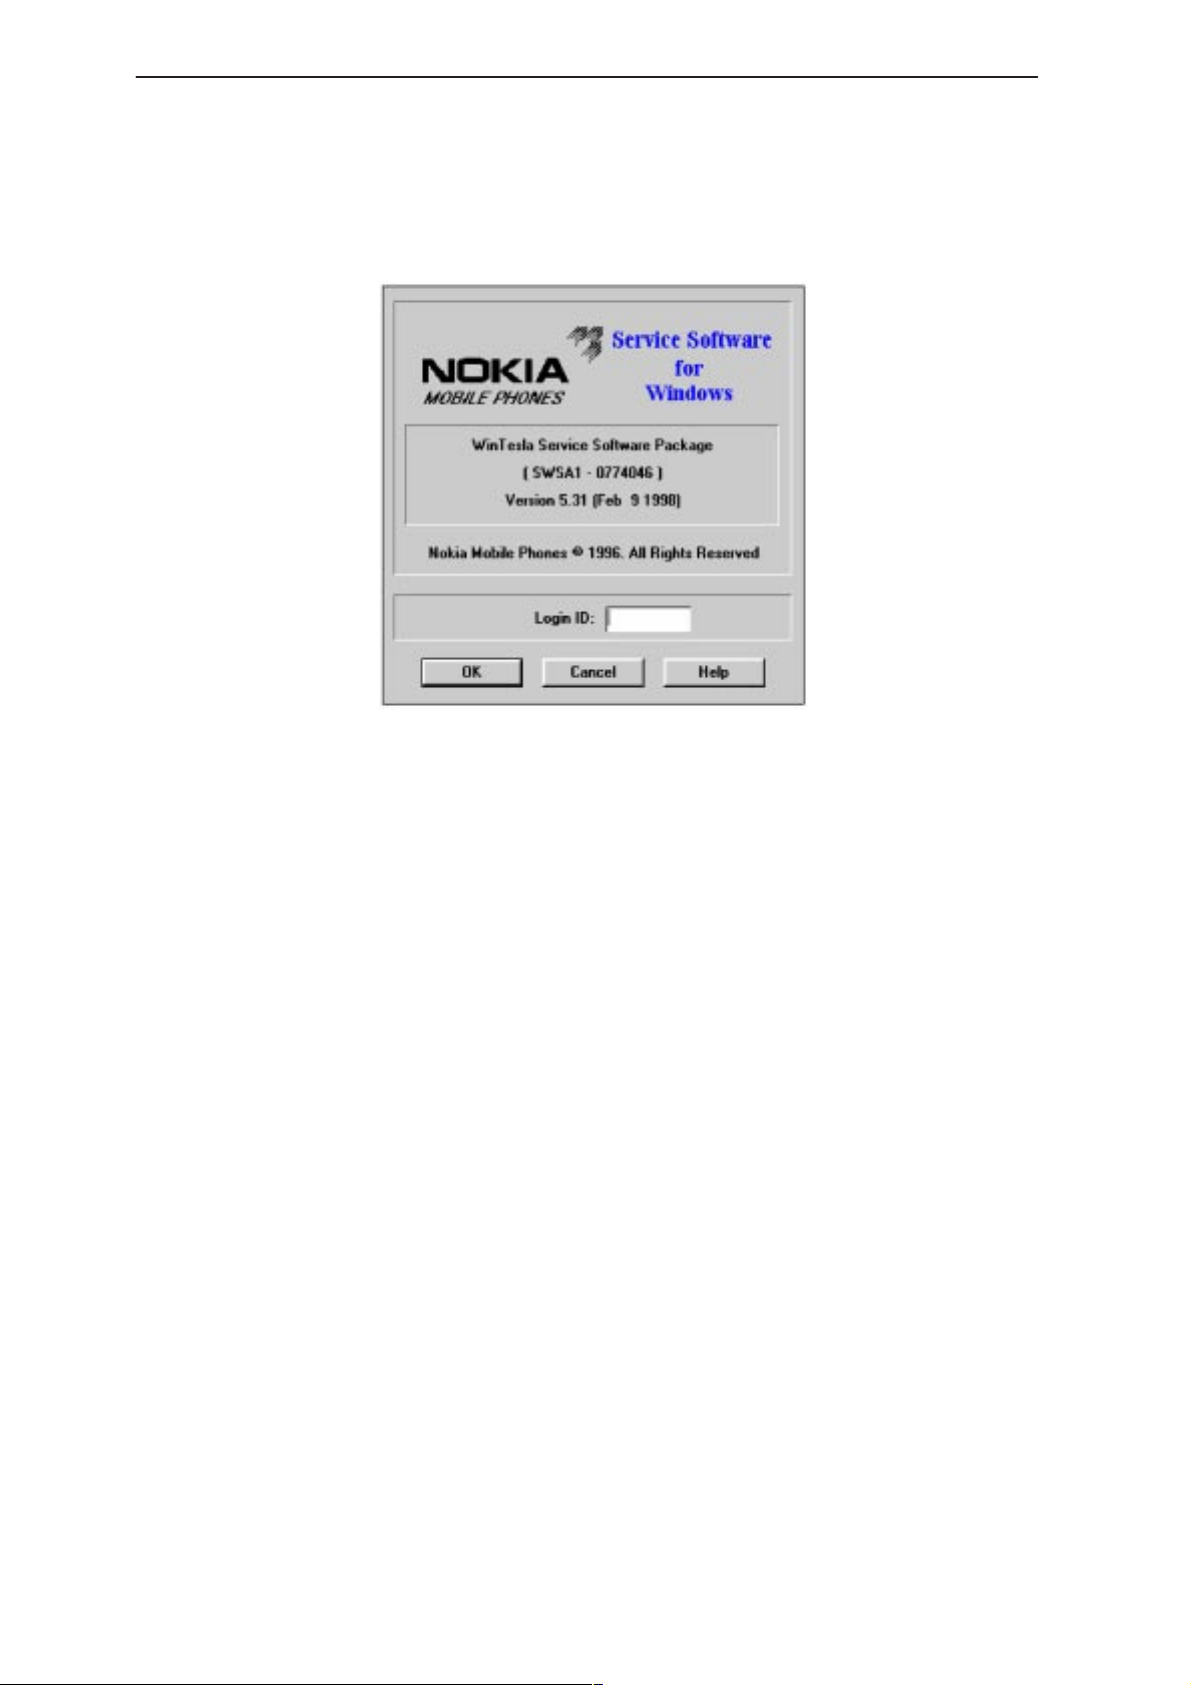
The Login Screen
When WinTesla first starts, the Login screen below will appear. Type in
your 3 character ID and press <Enter> or click on the OK button.
PAMS
Technical Documentation
Figure 6. Login Screen
If WinTesla can not find the file,
then the OK button will be ‘greyed’.
If CANCEL is clicked then the Fault Logging feature of WinTesla will be
deactivated.
op_id.val
, which contains the Login IDs,
Page 10
Issue 2 03/00
Page 11
PAMS
NHA–9
Technical Documentation
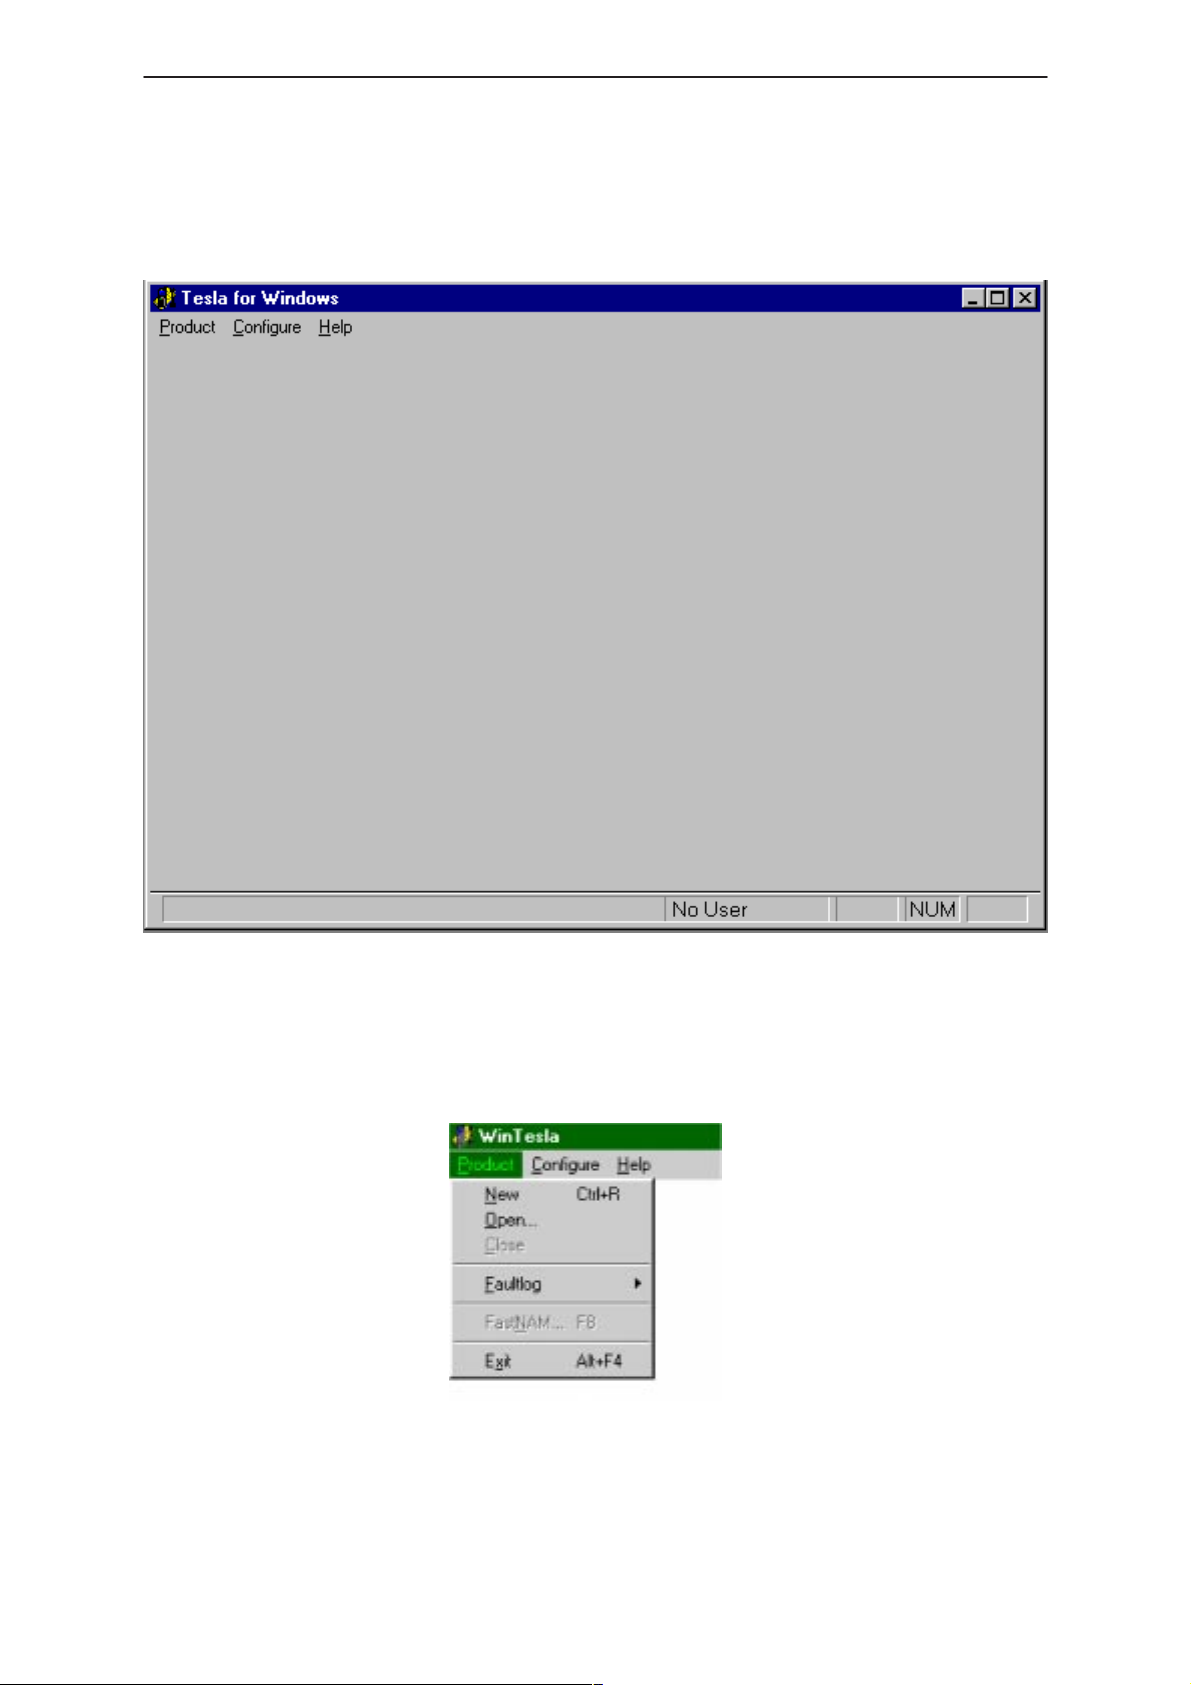
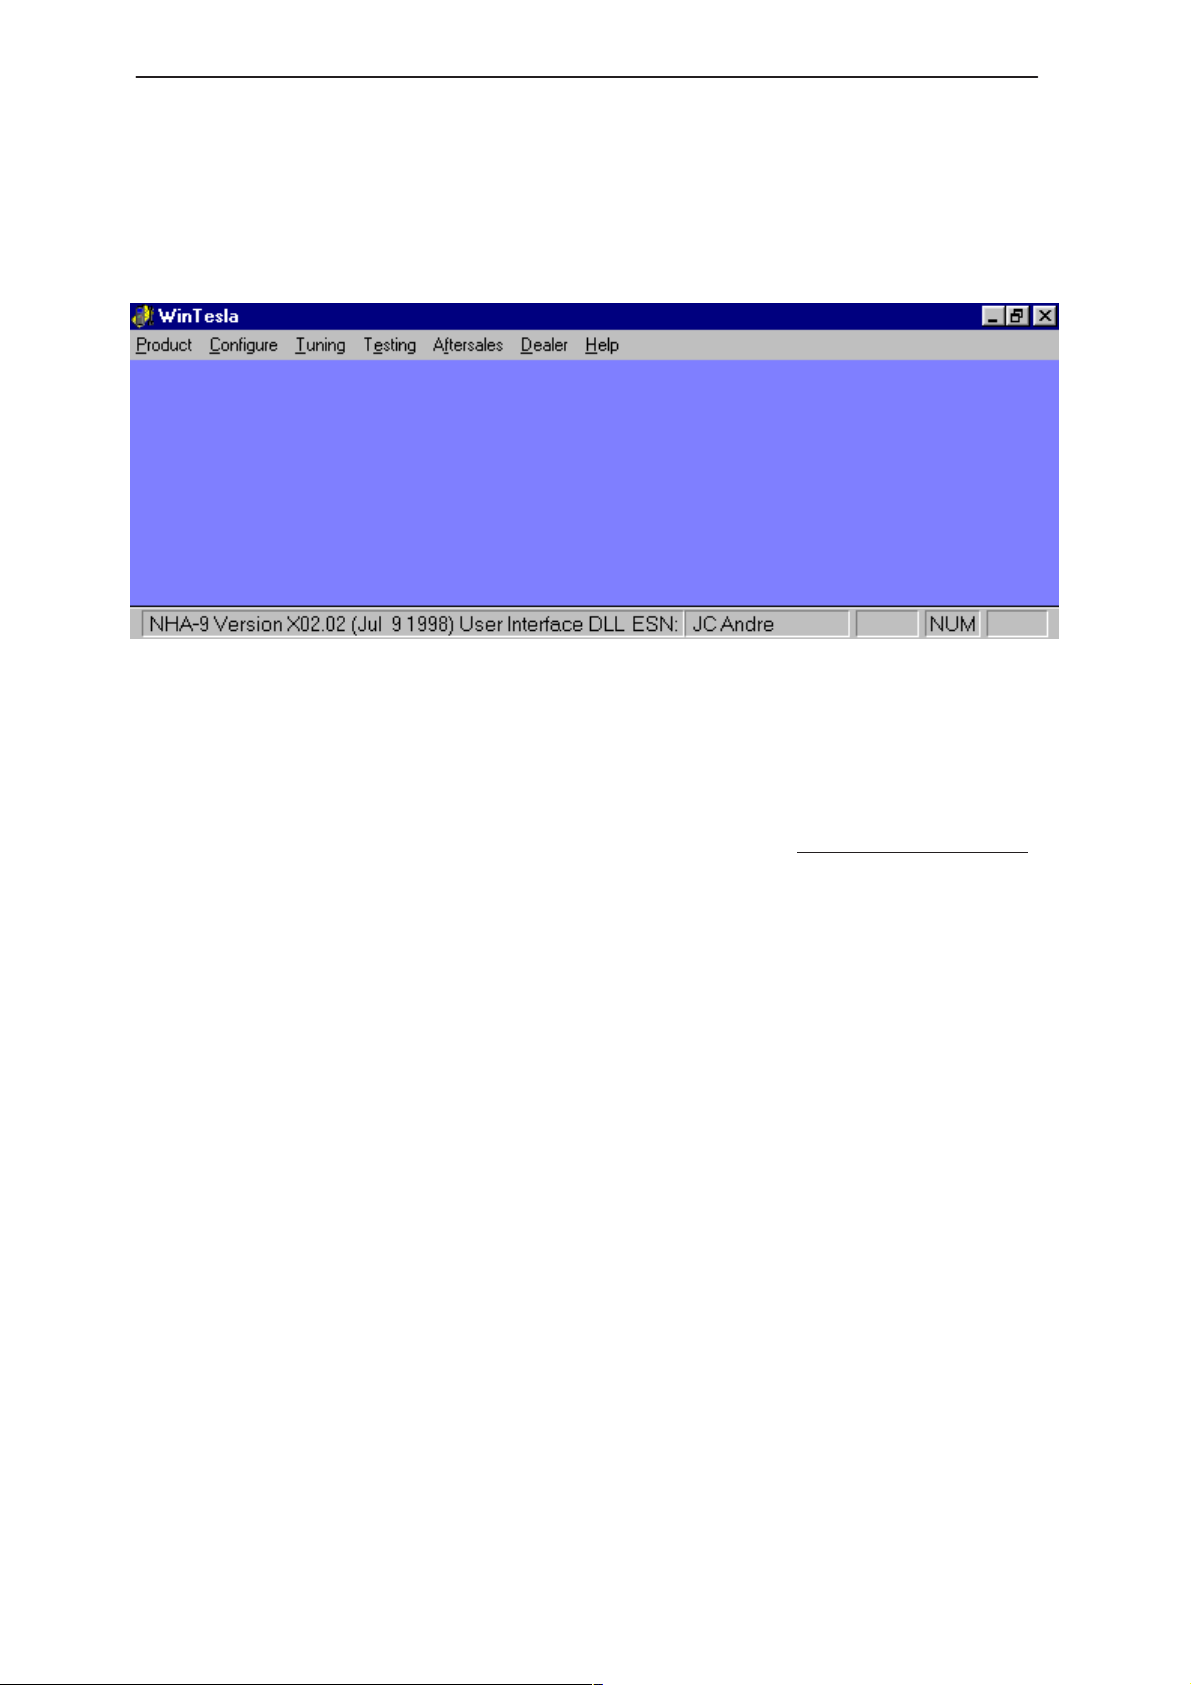
The WinTesla Screen
The main WinTesla screen – if no phone is attached – is displayed with 3
menu items at the top of the screen and a status bar at the bottom.
WinTesla Service Software
The information on the left of the status bar will be used to provide
information when WinTesla is performing tasks: such as reading data from
the phone. The status bar also includes the name of the current user.
The Product Menu
Issue 2 03/00
Page 11
Page 12
NHA–9
WinTesla Service Software
New (Ctrl+R)
The ‘New’ function (which can also be activated by pressing Ctrl+R ) is
used to scan for a phone when either the automatic rescan option is off or
the automatic rescan timer has not expired ( see
for automatic rescan ).
If the phone type is unrecognized or unsupported by the current WinTesla
system then a warning message will be displayed.
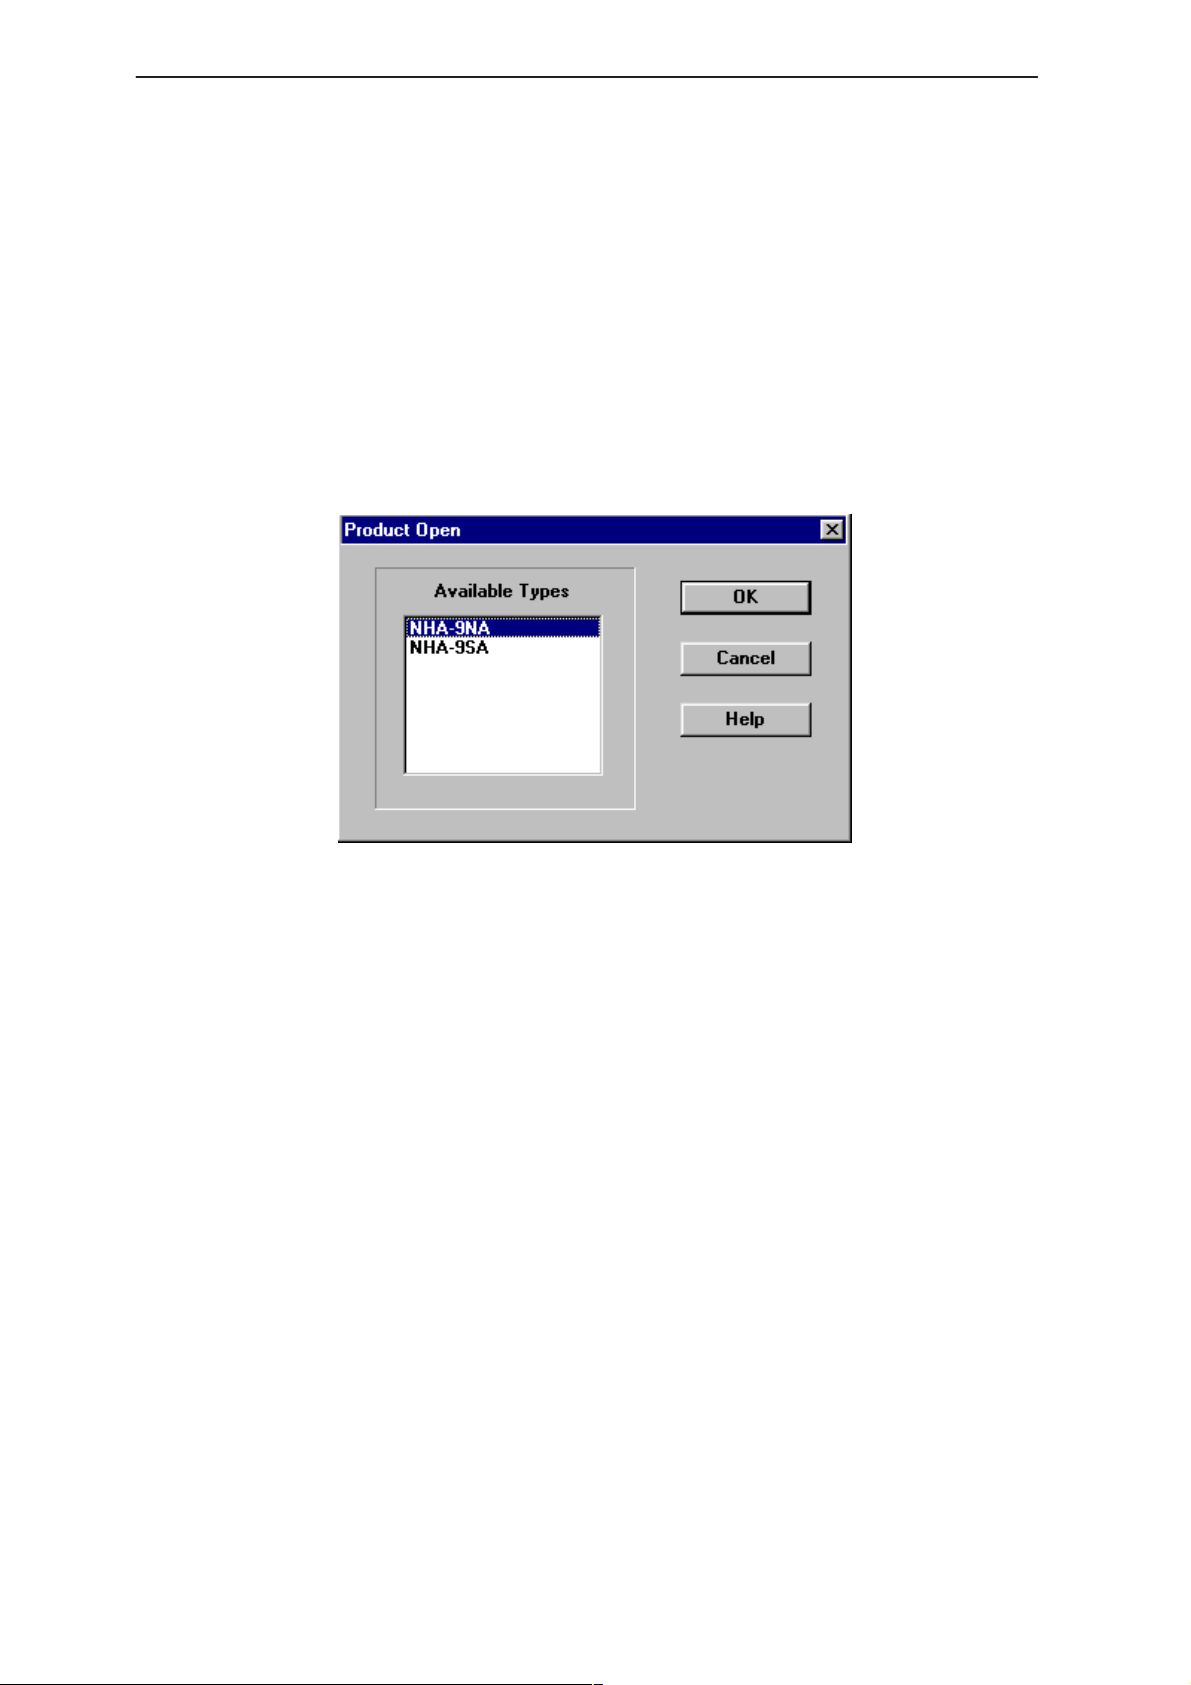
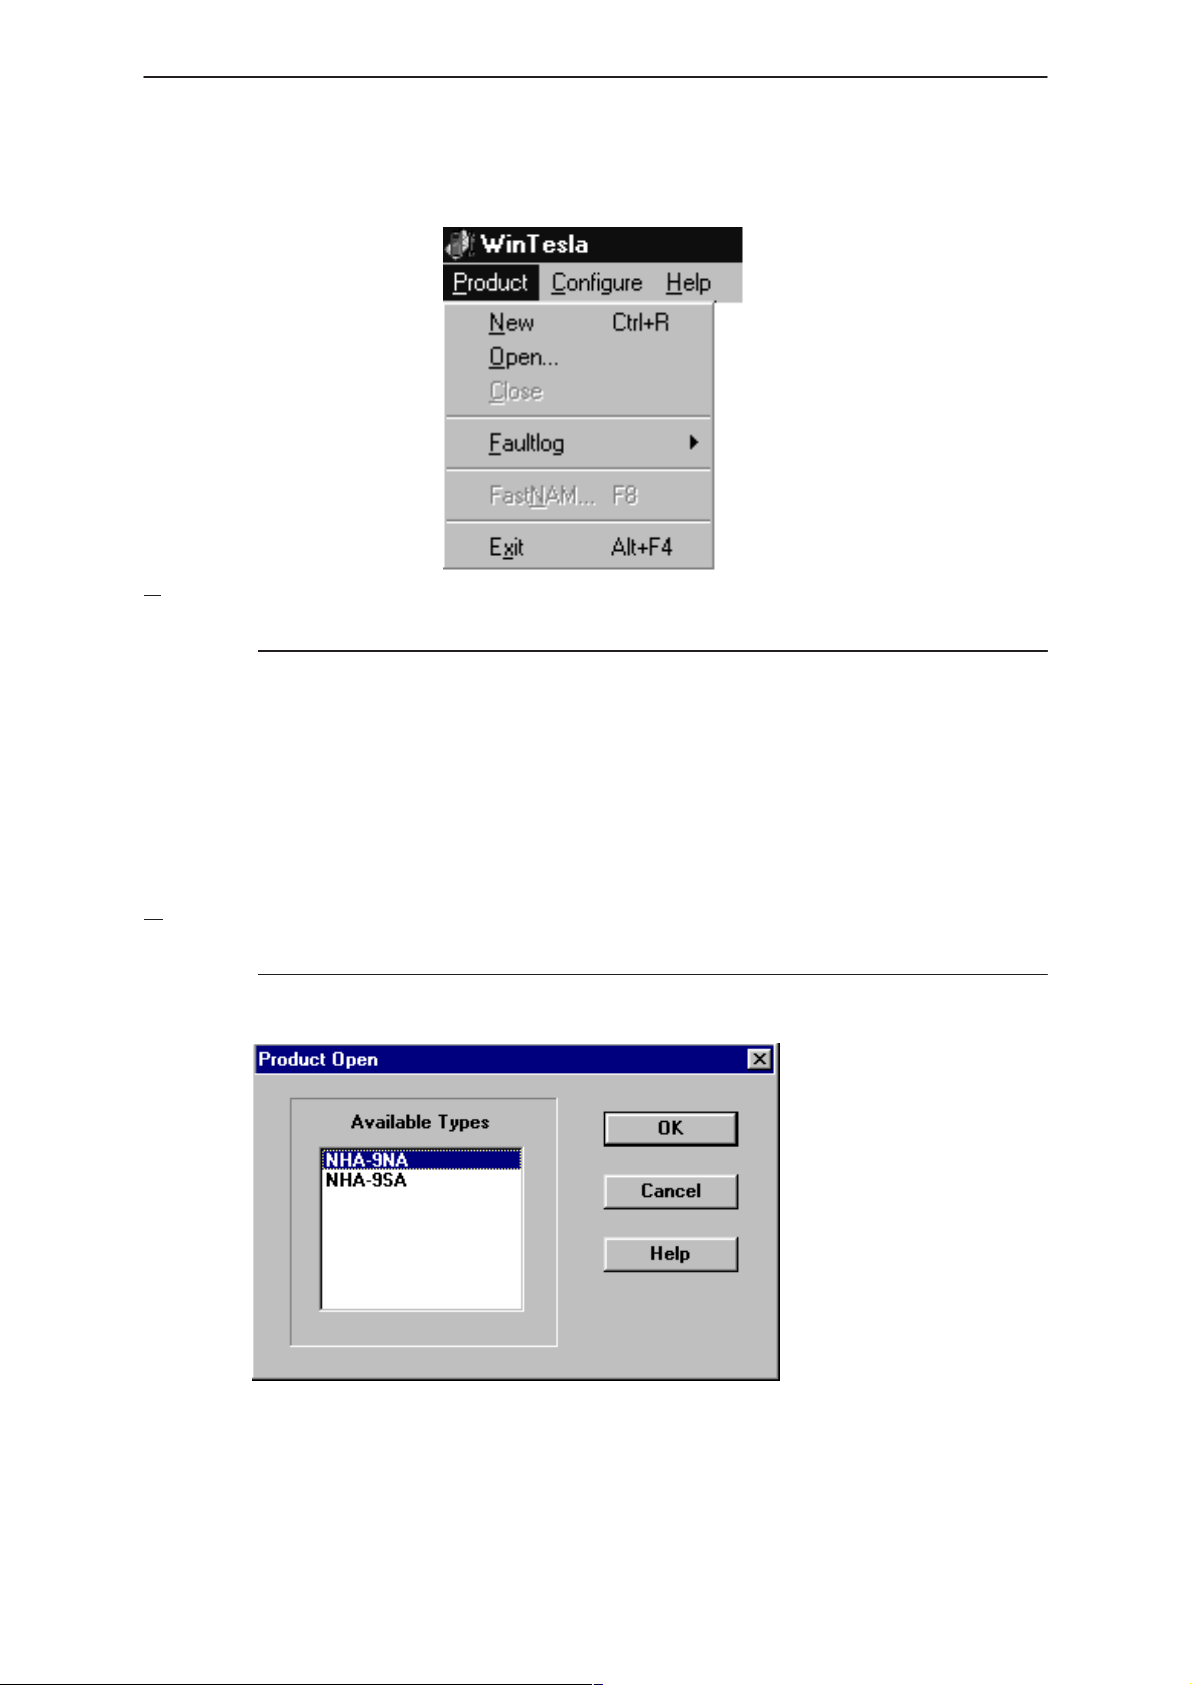
Open
The ‘Open’ function allows you to ‘force load’ a phone interface, even if
there is no phone connected to the system.
PAMS
Technical Documentation
Configure|Options section
Close
A dialog box will appear and list the supported phone types (see figure
above). To select a particular phone type to load; highlight the phone type
name and click on OK.
Clicking on CANCEL will stop the request and no new phone type will be
loaded.
Loading a phone interface will disable the automatic rescan function ( see
Configure|Options section for automatic rescan).
This function will close the currently loaded phone type interface that had
been loaded using the
Product|Open function. You can not ‘Close’ a loaded
phone type interface if it was loaded by a rescan.
Page 12
Issue 2 03/00
Page 13
PAMS
NHA–9
Technical Documentation
FaultLog
The ‘FaultLog’ option has a sub–menu (below). These functions are
described in the ‘FaultLog Application’ section.
If the FaultLog function has been disabled – either because the Login ID
was not correct or disabled through the
these menus will be ‘greyed’ and made un–selectable.
Exit (Alt+F4)
WinTesla Service Software
Configure|FaultLog function – then
Selecting this option will shut–down the WinTesla program.
The Configure Menu
The configuration menu allows you to setup such things as directory
paths, user interface language and FaultLog options.
Options
Issue 2 03/00
Page 13
Page 14
NHA–9
WinTesla Service Software
Language
This option allows you to change the language used in the WinTesla
application.
Current Password / New Password / Retype Password
Currently not available
User ID
Allows the user ID to be entered if the users name is setup in the
opt_id.val (validation) file.
M2BUS COM Port
This option allows you to select which communications port the phone is
to be connected. The change will take place immediately after pressing
OK.
Automatic Rescan
PAMS
Technical Documentation
Automatic rescan is a mechanism to automatically check for a new phone;
the time between re–scans is user configurable. When a phone is
scanned and recognized, the corresponding phone interface and menu
are loaded, extending the main menu at the top of the screen and
displaying the phone type and description at the bottom of the screen.
Product|New (or Ctrl+R ) function can be used to rescan the phone
The
in–between automatic rescans or when automatic rescan has been
disabled. The automatic re–scan mechanism is disabled when the
Product|Open function is used to load a phone interface.
A tick in the check–box indicates that the automatic rescan option has
been enabled. Clicking on the check–box (making the check–box blank)
will disable the automatic re–scan option. The time between re–scans (in
seconds) is entered into the edit box.
Pressing the OK button will save any changes made. Pressing CANCEL
will discard any changes you may have made.
Product Serial Numbers
Buses
Page 14
Issue 2 03/00
Page 15
PAMS
NHA–9
Technical Documentation
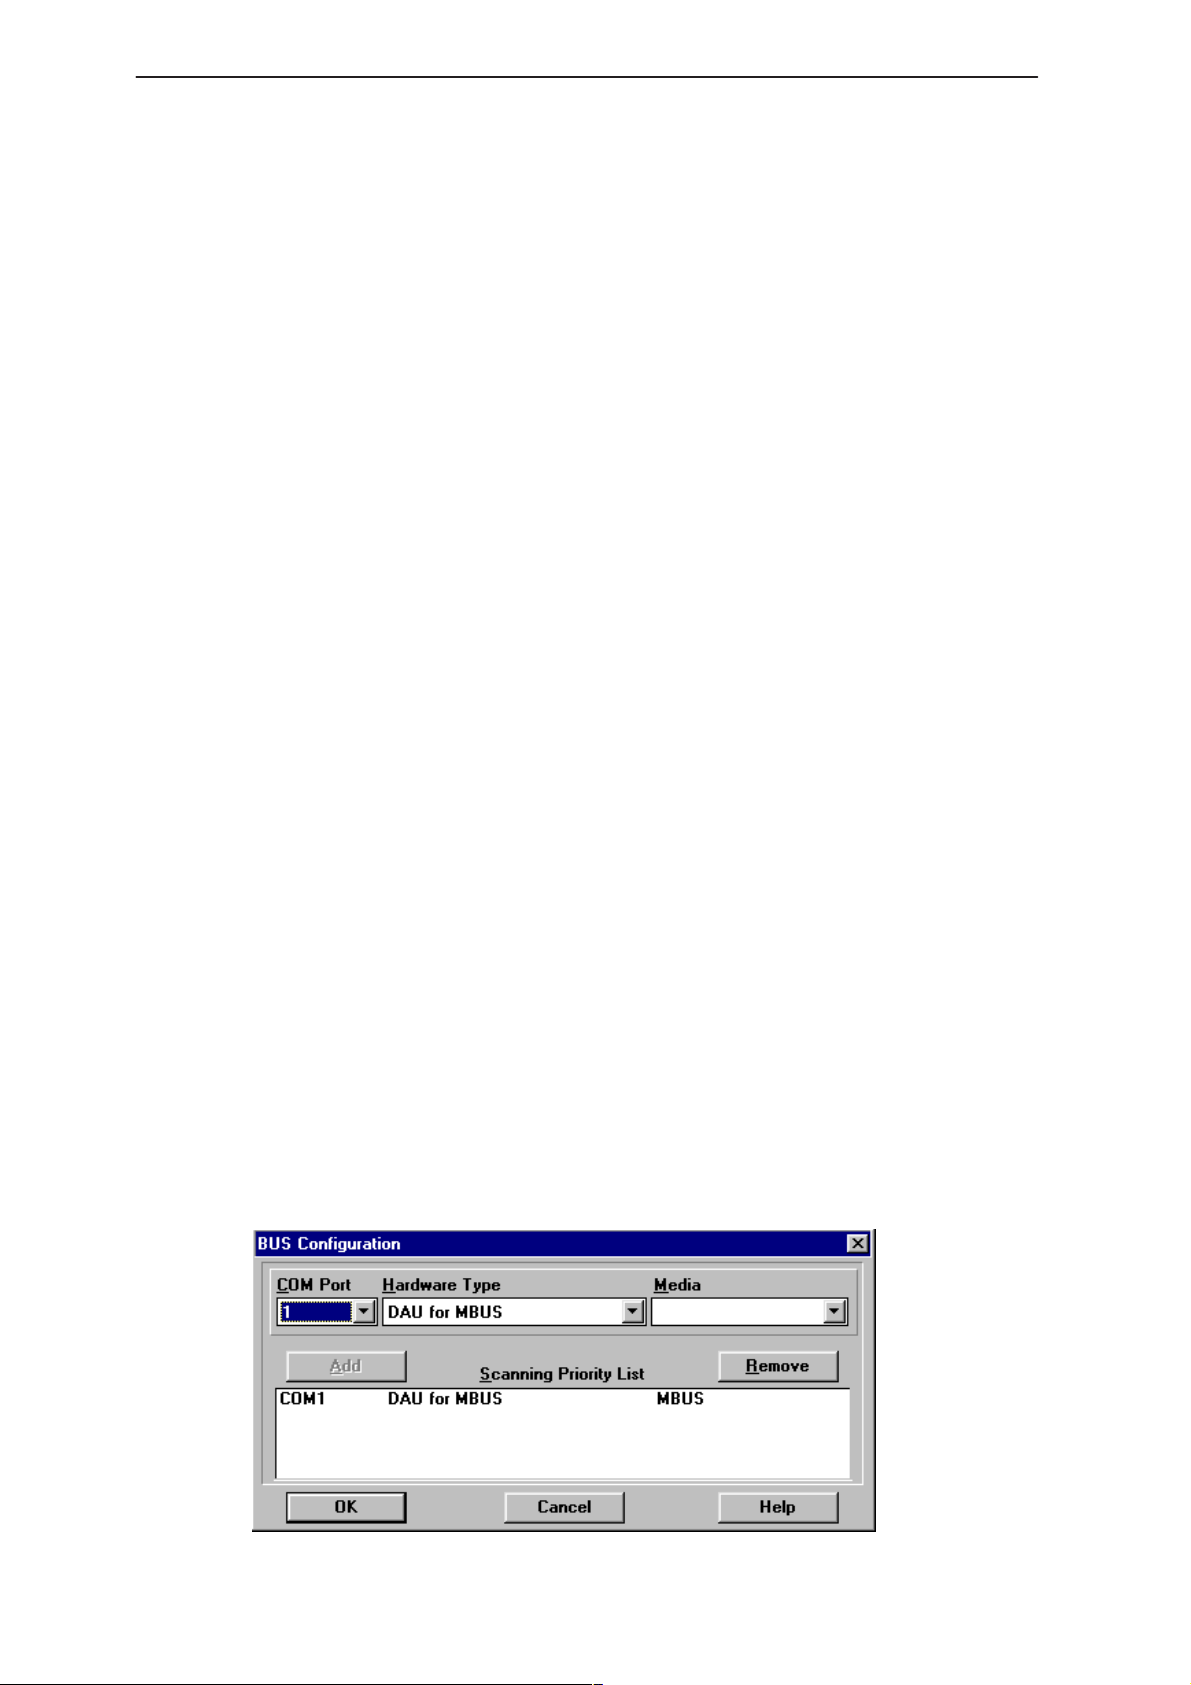
Com Port
This Option allows you to select the serial port used to connect to the
phone
Hardware Type
This Option allows you to select the type of hardware used to service the
phone.
Media
This allows you to select one of the media options authorized by the
selected hardware.
Add/Remove
This allows you to add/remove one hardware configuration (Com
port+Hardware type+Media) to the scanning priority list.
WinTesla Service Software
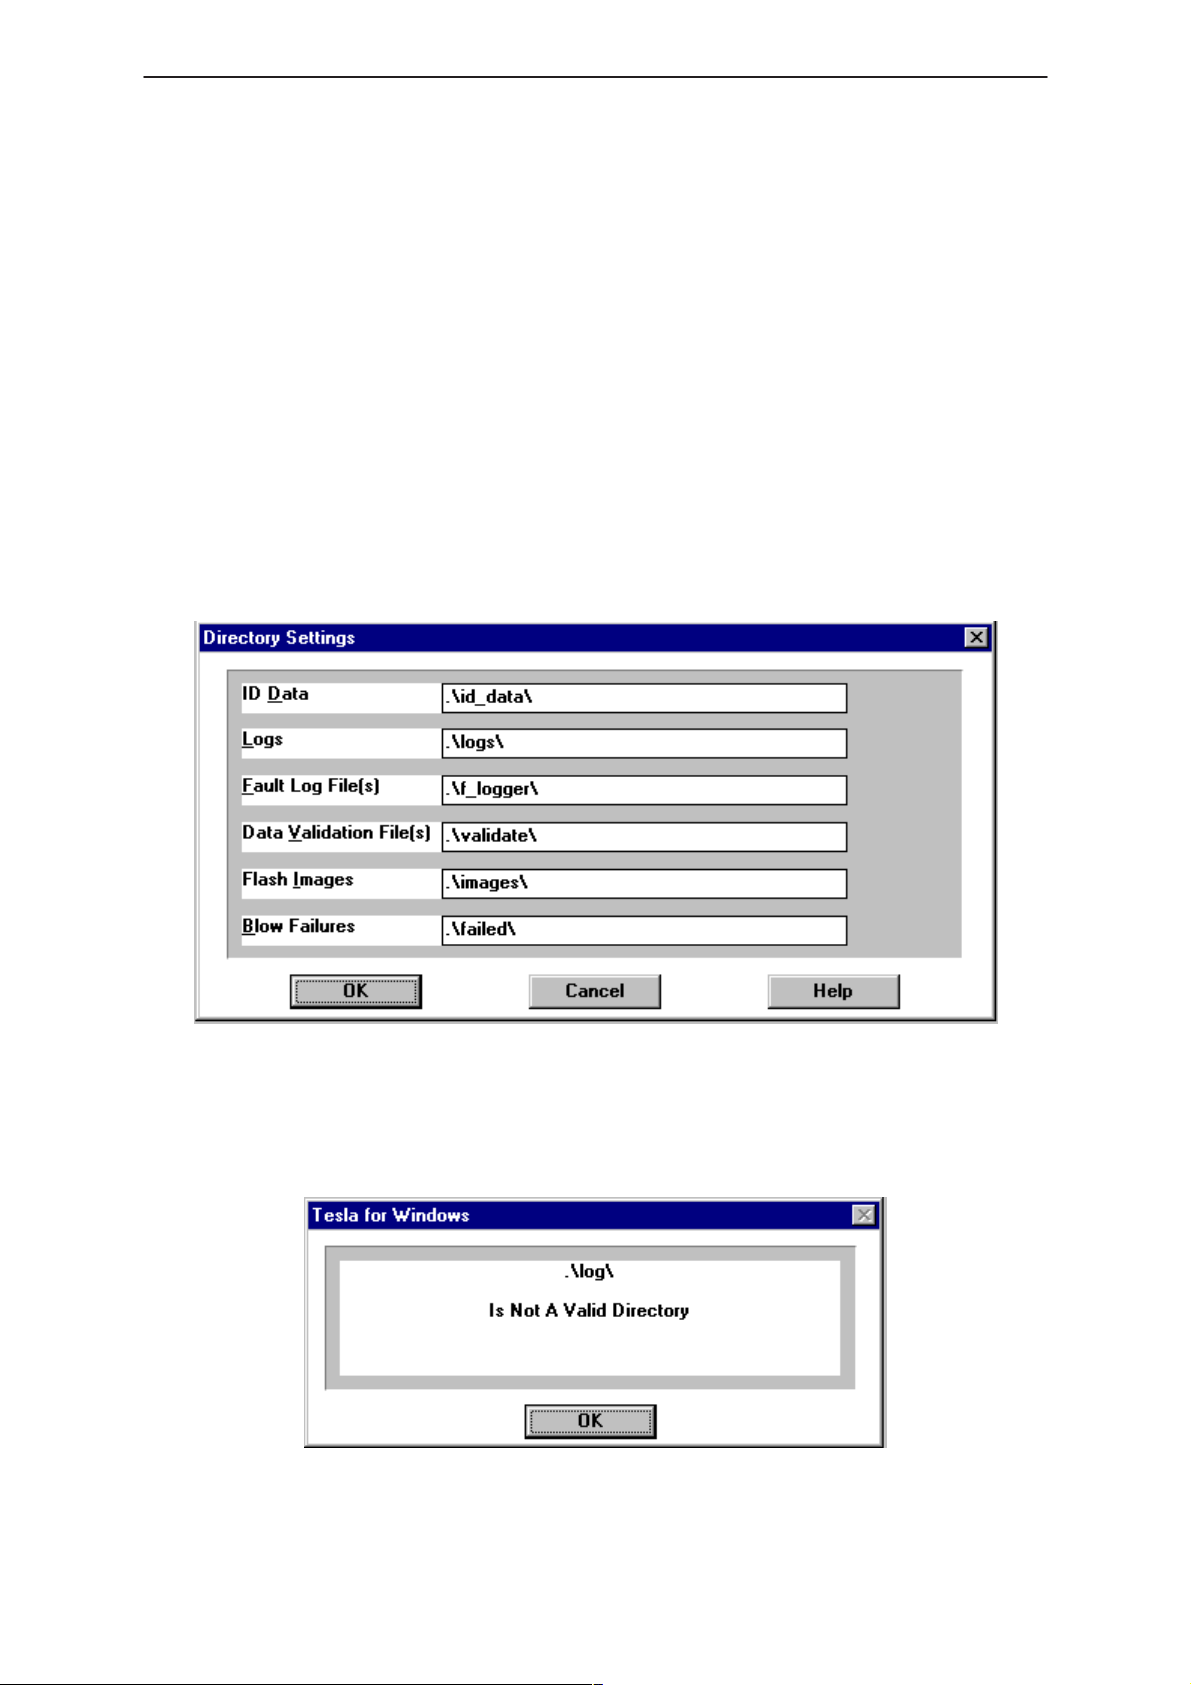
This function allows you to organize your data into different directories.
The directories must already exist. If an invalid directory is entered then
an error message will be displayed (below).
The use of a backslash (‘\’) at the end of the directory name is optional.
Clicking on the OK button will save your changes.
Issue 2 03/00
Page 15
Page 16
NHA–9
WinTesla Service Software
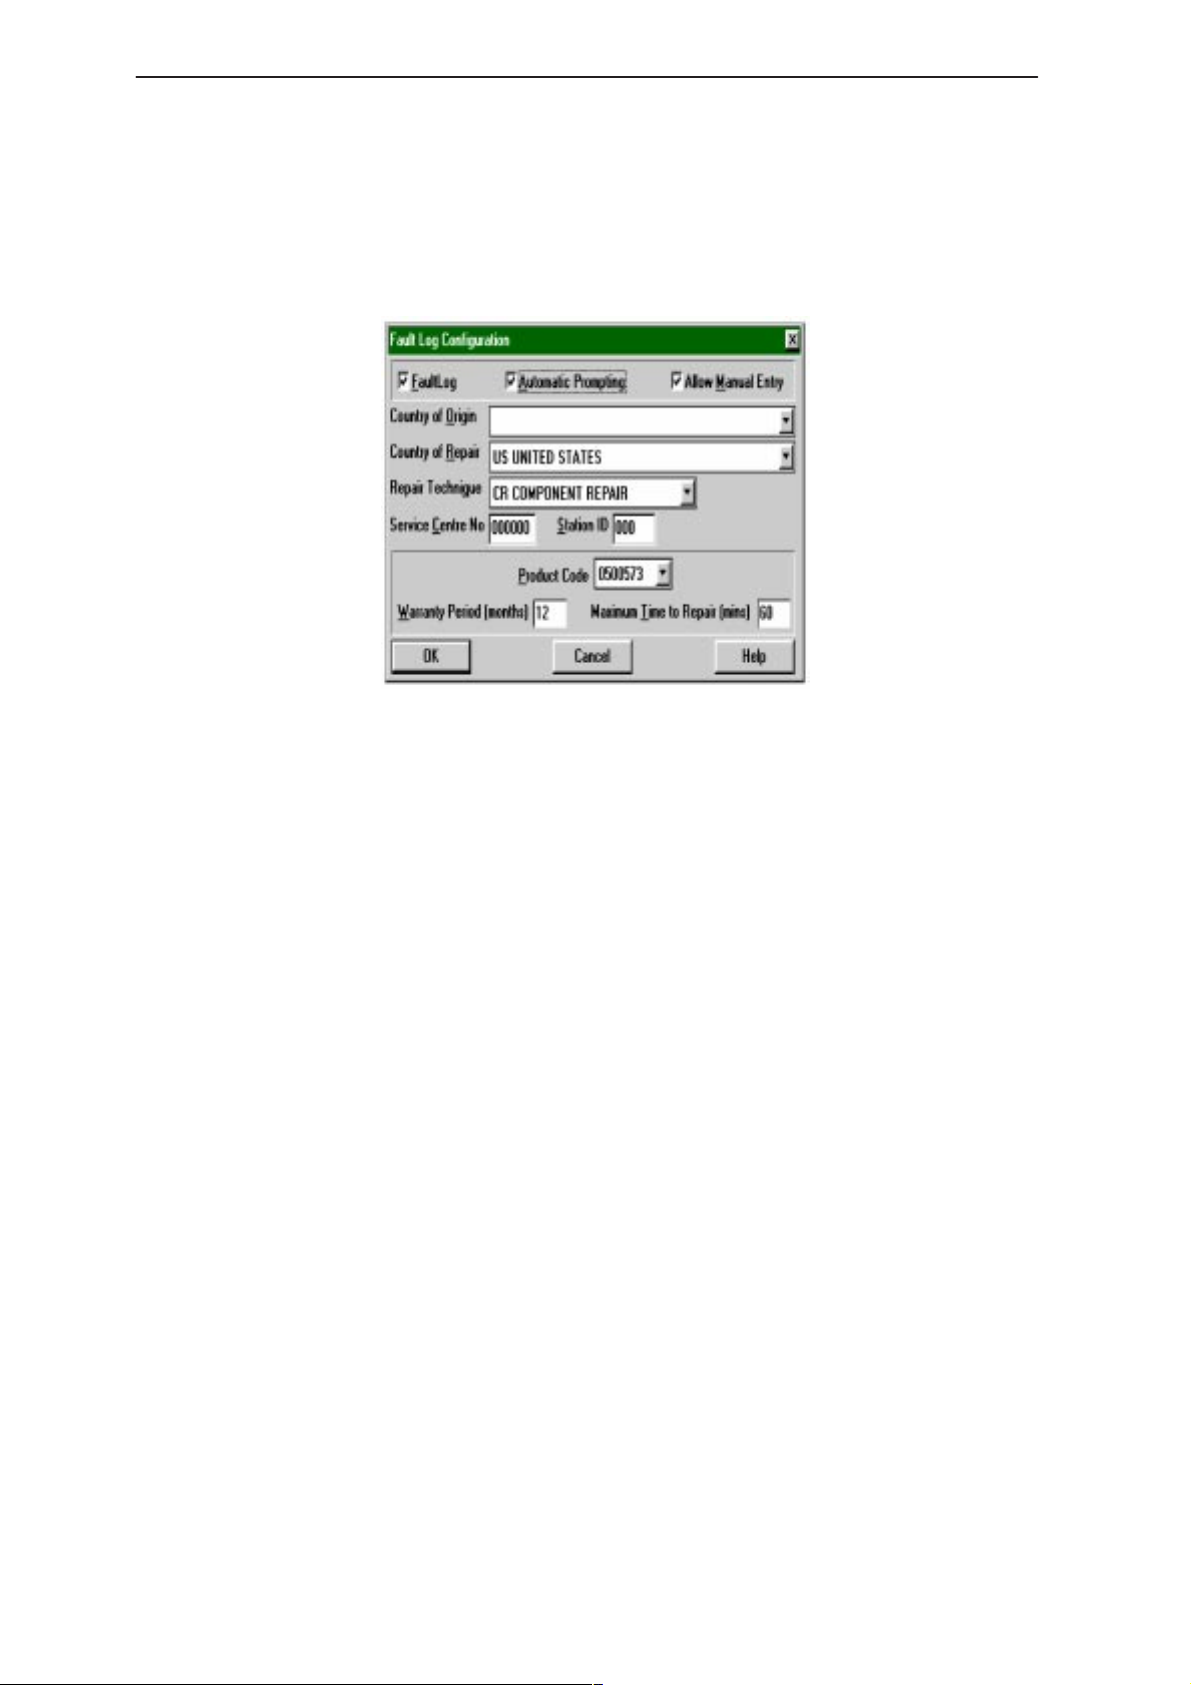
Fault Log Configuration
Fault Log is a feature that allows the PC to create a record of each phone
that is serviced for historical tracking. This function allows you to configure
the FaultLog mechanism. Clicking OK after making selections, saves all
changes made.
PAMS
Technical Documentation
Figure 7. FaultLog – configuration
Fault Log
This option allows you to enable or disable the FaultLog mechanism.
Choosing to disable the FaultLog mechanism results in the
|FaultLog options being ‘greyed’ and the F9 button being disabled.
Allow Manual Entry
This option allows you to disable manual entry of data that was
unavailable from the phone.
Automatic Fault Log Prompting
Enabling this option results in a prompt being displayed if the phone has
changed.
Station Identity
Enter the unique identity of your ‘workstation’; this ID is used to write
FaultLog files.
Country Of Repair
Product
Enter the country of repair.
Warranty Period ( months )
Each product code has an associated warranty period. This option allows
you to change those warranty periods. If no phone is connected then all
product codes supported will be displayed. However, if a phone is
connected then only the product codes associated with that phone type
are displayed.
Page 16
Issue 2 03/00
Page 17

PAMS
NHA–9
Technical Documentation
Note: Changing the Warranty Period in the Fault Log data file has no affect on the
products warranty terms as stated from the manufacturer.
Maximum Time To Repair ( minutes )
Enter the maximum time allowed to repair a phone.
Fault Log Application.
The aim of the Fault Log application is to provide NMP After Sales
Companies worldwide a standard method for the collection of Fault and
Repair Data from their service process’s. This information can also be
used by NMP R&D and Manufacturing organizations as well.
The Fault Log application can be regarded as a data entry sub–routine
run from the WinTesla Service Software package at the end of a repair.
This allows for quick and uniform recording of the service performed on
the product.
Each product repaired, will generate one unique record in a FaultLog file
consisting of up to 37 data fields containing information about the product
and how it was repaired. This information is read automatically where
possible, from the products own internal EEPROM and then entered
manually by the Service Technician to form a complete service record.
WinTesla Service Software
For more advanced implementations, the repair records are copied and
collected by the electronic mail system installed in the Service Center and
are sent electronically to a Central Service Database located in Finland.
Completing a FaultLog Record
Once WinTesla has been configured correctly it operates in the following
manner:–
Wintesla automatically reads the product details from the
products EEPROM and writes them as a record to a
pre–determined file.
Proceed with the repair task, utilising a combination of
software driven tuning and hardware modifications.
On completion of the repair task you have a choice:
1. A.)With the product still connected to the PC, manually display
the repair data entry screen by selecting Function Button F9.
2. B.) Alternatively, the product can be disconnected and the next
product for repair connected in its place.
So long as Automatic Prompting is enabled then the previous products
repair data entry screen will be displayed.
– Enter the repair work performed on the product in the repair
data screen.
Issue 2 03/00
– Check the automatic data for this product, read earlier, to
ensure its accuracy.
– When satisfied with the data, save the entry. This process
adds a complete record containing the product details and
the repair details to the FaultLog output file.
Page 17
Page 18

NHA–9
WinTesla Service Software
The output file can then be manipulated by a number of different systems,
as required, as a detailed record of the product fault.
To attempt to record all of this information 37 data fields are defined for
each FaultLog record. These can be split as follows:–
– Product definition information fields
– Repair / fault information fields.
Most products have their information stored in EEPROM, WinTesla
automatically reads this information from the EEPROM and writes it to the
FaultLog record. This part of the record is shown below.
PAMS
Technical Documentation
Fields that are ‘greyed out’ etc. are data that has been automatically
retrieved from the phone’s EEPROM. All other fields are entered
manually; fields are summarized below.
Operator
Automatic: Station, Country
Manual :
Phone
Automatic: Product code, Production SN, Order No., Hardware
ID, Software version, Mfr. SN/ESN/IMEI, Mfr. Date,
Manual:
Fault
Automatic: none
Manual
The current FaultLog application allows for the entering of three priority
levels of fault / repair information seen as
faults.
Time to repair, Job ID, Operator ID
Issue date
Warranty
Module, Fault, Symptom, Circuit ref., Part Number
Primary, Secondary
and
Tertiary
Page 18
Issue 2 03/00
Page 19
PAMS
NHA–9
Technical Documentation
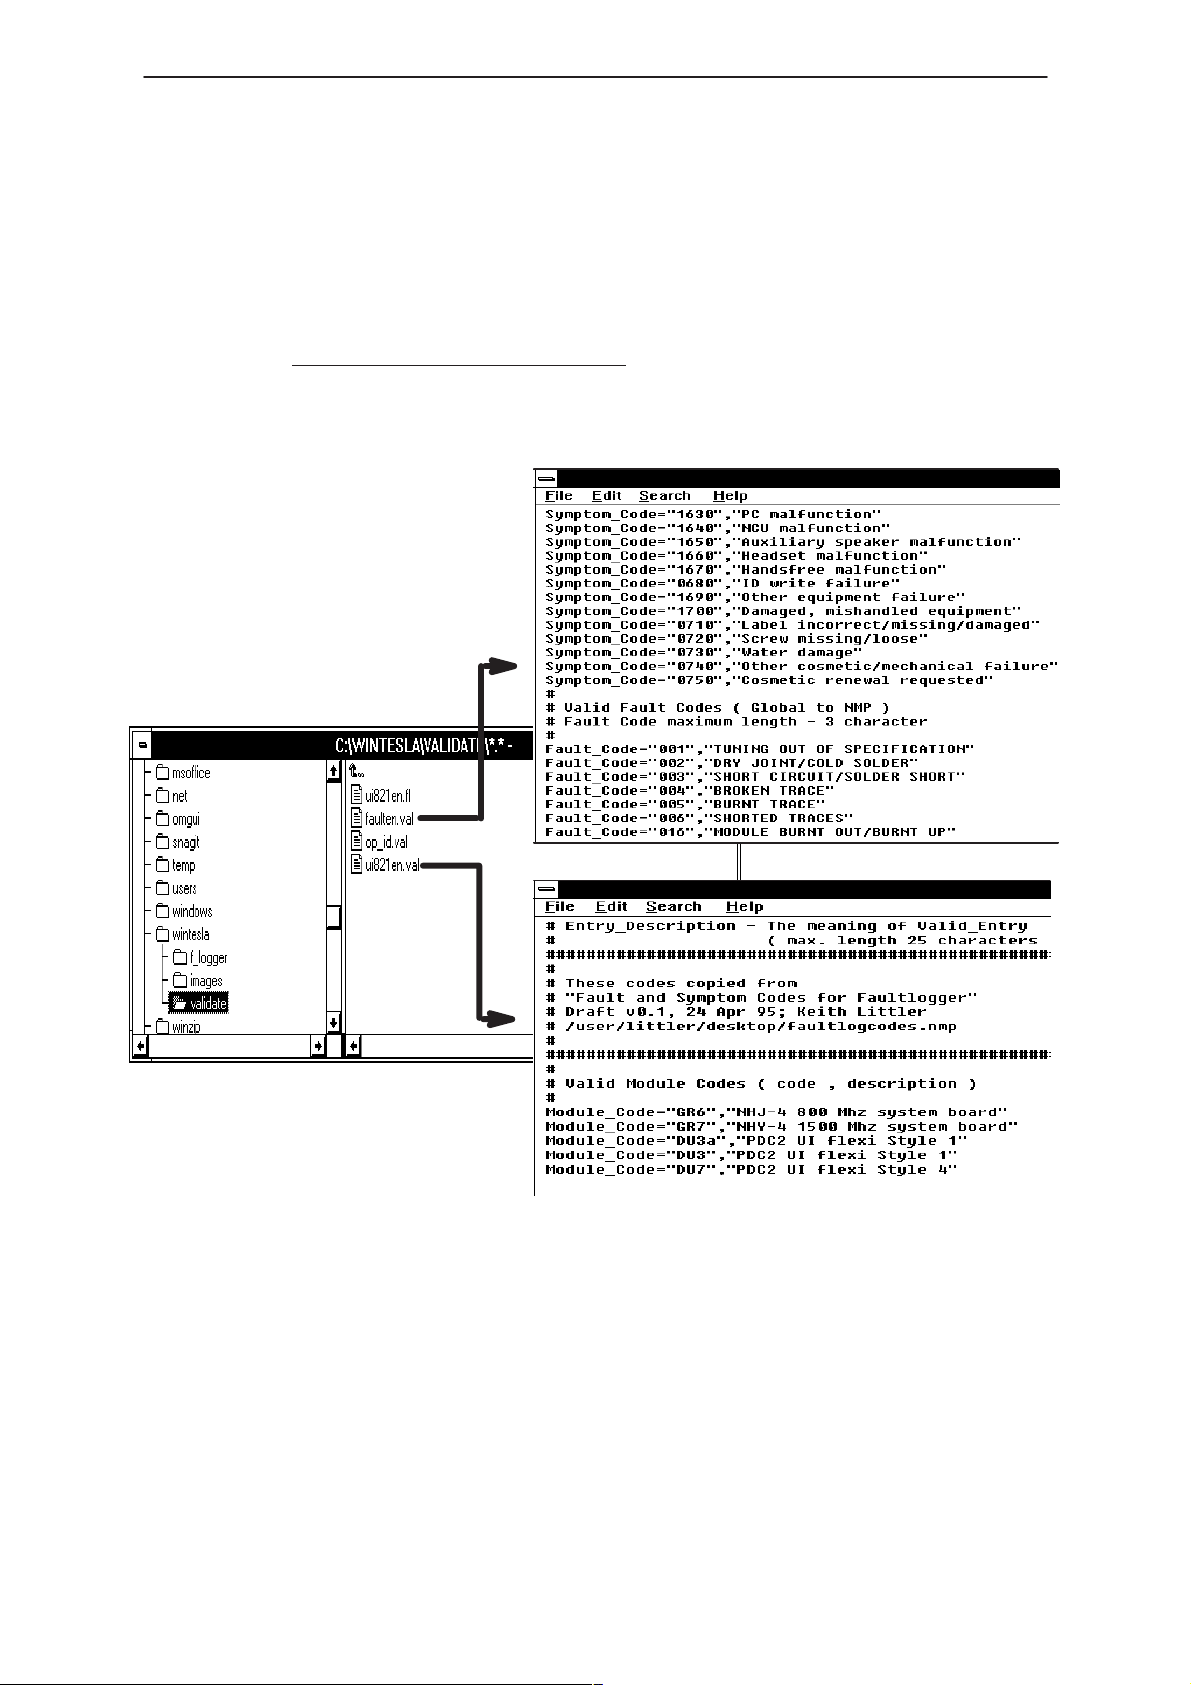
The
Module, Fault
arrows alongside each respective field.
A comprehensive list of faults and symptoms as well as all current
modules are already listed within the software. These three fields can be
updated by accessing and editing the following files in a similar manner as
described on page NO TAG
Field DOS File
–
–
and
Symptom
Modules
nhd4en.val–
Faults, Symptoms
WinTesla Service Software
fields have variables selected by the
faulten.val
Notepad – FAULTEN.VAL
Other Parts Replaced
Automatic none
Manual all fields
Enter other parts that have been replaced i.e. for wear and tear purposes
etc..
Notepad – UI821EN.VAL
Figure 8. Editing fault, symptoms, modules files
Issue 2 03/00
Page 19
Page 20

NHA–9
WinTesla Service Software
This Entry
Automatic ; Entry Indicator, Date, Time
PAMS
Technical Documentation
Manual ;
Cost
Automatic ; Total
Manual ;
This facility is for the use of third party repairers only
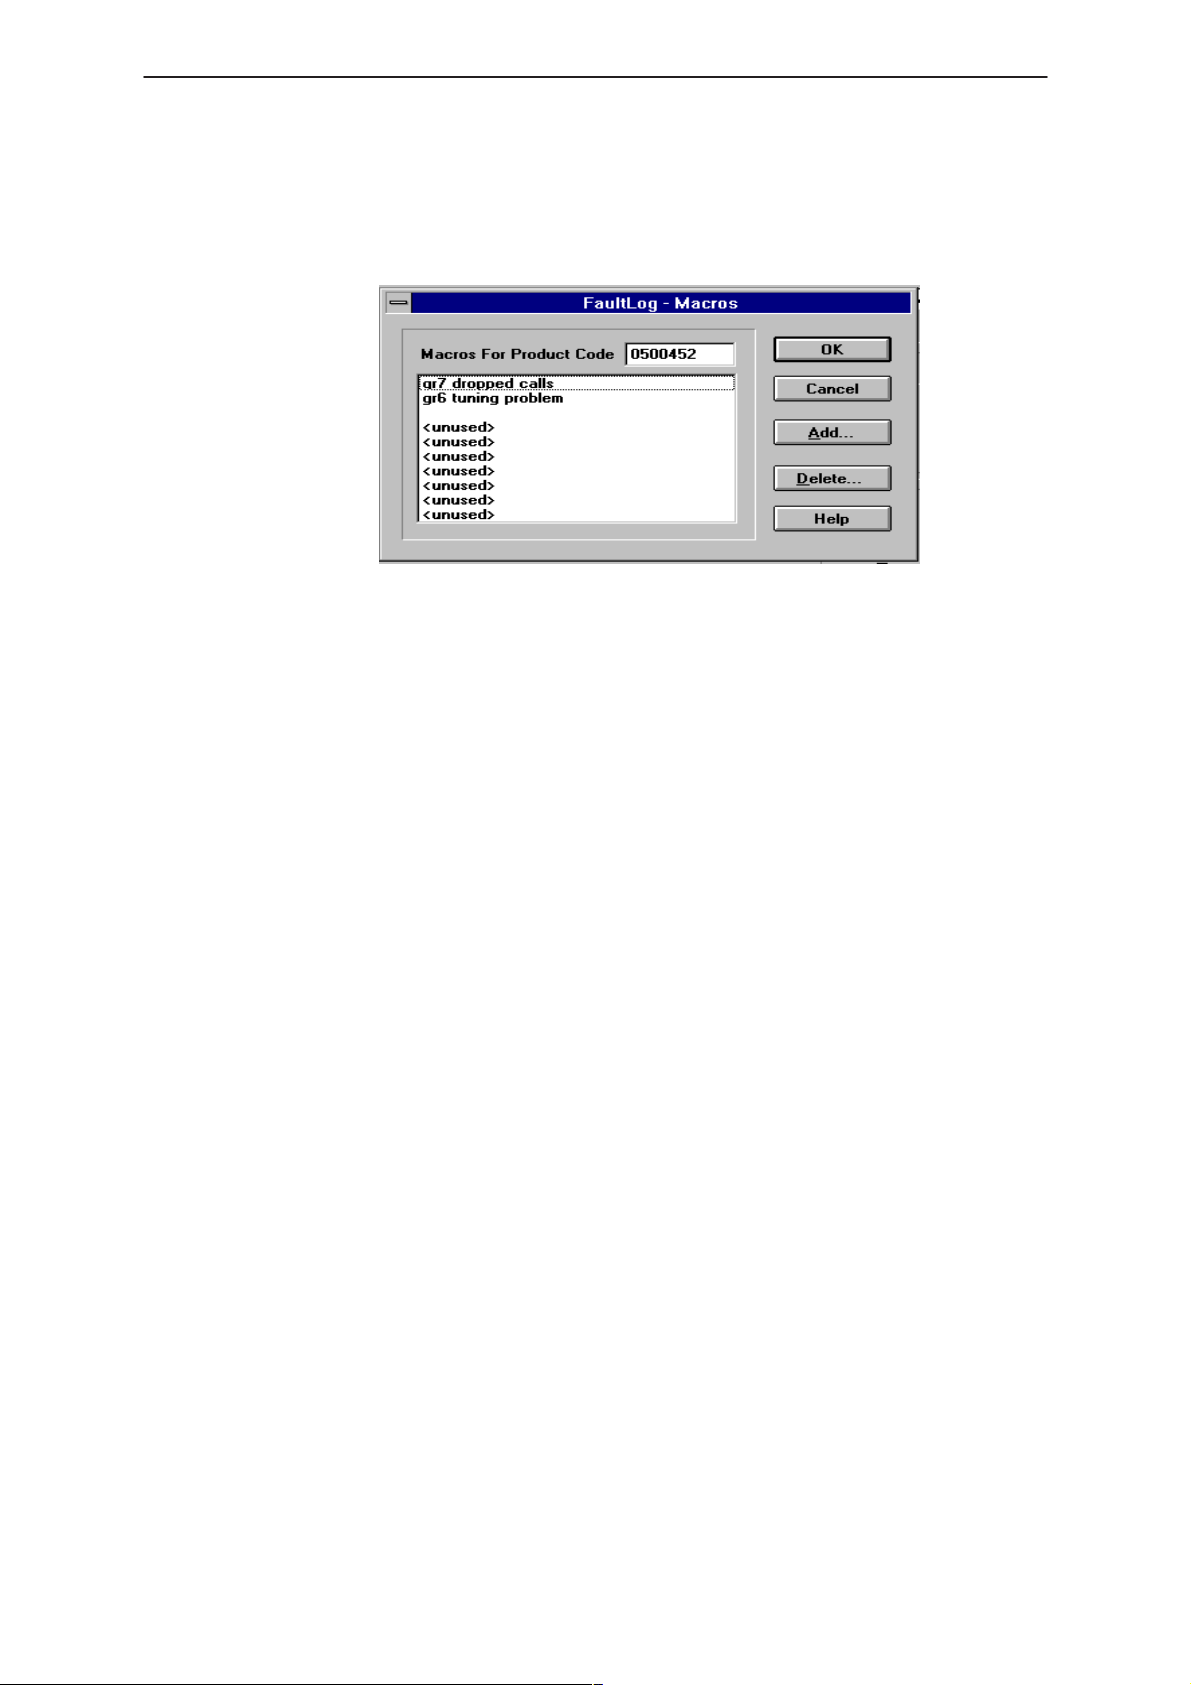
FaultLog Macros
The Macro sub–menu can be accessed by selecting the
the FaultLog main screen.
Macro’s in FaultLog are a set of standard repair actions defined and
stored in order to represent frequently repeated repairs. These Macro’s
are related to the Product Code of the product, so whatever product is
connected, FaultLog will display the Macro list for that particular Product
Code.
A Macro’s standard repair information can also be pasted into the
FaultLog record for that product.
Macro’s are saved initially under a name you can define yourself from the
main FaultLog screen. All the information contained in the manually
entered fields i.e. Module, Fault, Symptom, Circuit Ref and Part Number is
recorded and saved under this name.
Comment
Parts, Labour
macros button on
Page 20
Issue 2 03/00
Page 21
PAMS
NHA–9
Technical Documentation
Setting up a macro
1. After completing a manual entry as normal but before saving the
record, select the
definition screen.
2. Place the cursor over the next available Macro entry then select
Add
WinTesla Service Software
Macros button. This will bring you into the Macro
Figure 9. FaultLog – macro setup
Help
3. Give the Macro record a meaningful name and press OK. You
have now saved the repair data into a Macro for future use.
4. Use the
Delete function to remove unwanted macros
Now, when a similar problem is seen with another unit you can recall this
saved repair information into the units FaultLog record. If needed, the
FaultLog record can be edited after being recalled to customize the repair
before saving the FaultLog record.
There are a maximum of 10 Macro’s definable for each Product Code. If
an eleventh is required, it will be necessary to overwrite one of the
previous Macro’s.
The Macro definition file is called
macro.fl
and will be found in the path
specified for the data validation files. If this path is a networked path all
operators connected to the network will be permitted to share a common
Macro list helping with reporting uniformity.
An extensive help facility is available by clicking any screen or toolbar help
button and features convenient hypertext linking for easy navigation.
Issue 2 03/00
Page 21
Page 22

NHA–9
WinTesla Service Software
NHA–9 Service Software
The NHA–9 WinTesla Service Software is specially designed to facilitate
the servicing of NHA–9 products.
The software can be used to control the phone according to the user’s
requirements by entering commands via the keyboard / mouse of a PC
connected to the phone.
This section refers to AMPS/NAMPS Service Software Version 1.00 NMP
After Sales will notify service personnel about future upgrades via
Technical Bulletins. Software upgrades will be available from your local
NMP outlet.
Required Servicing Equipment
Computer:
– Intel 386/33 MHz or compatible
PAMS
Technical Documentation
– One unused serial port (16450 or 16550 UART)
– One parallel port
– 3.5” floppy disk drive
– Hard disk
– VGA display
Operating System:
– DOS 5.0 or later
– Microsoft Windows 3.x /Win95
– WinTesla 5.03 or greater SWSA1 (product code: 0774046)
– WinTesla Program NHA–9 (product code: 0770756)
– Service Software program: for 3.5” disk (product code: 8401665)
– Software Protection Key PKD–1 (product code: 0750018)
– Service Interface Box JBU–4 (product code: 0770041)
– Power Cable PCS–1 (product code: 0730012) (Qty 2)
– M2BUS adaptor DAU–4S (product code: 0730057)
Page 22
– Audio Cable ADS–1 (product code: 0730011)
– Service Cable SCH–5A (product code: 0730166)
– Service Cable M2BUS DAU–9M (product code: 0730162)
– Service Probe and Cable AAT–7 (product code: 0770124)
– Service Battery Pack BDS–7 (product code: 0770123)
– Service Jig MJS–7 (product code: 0770122)
– Service Jig MJS–7A (product code: 0772010)
– DAS–4 Service Cable Adapter” (0770183)
Issue 2 03/00
Page 23
PAMS
NHA–9
Technical Documentation
Mechanical Connections
The software controls the phone via a separate adaptor connected to the
serial port of the PC and to the telephone’s M2BUS.
Attach the protection key PKD–1 to parallel port one (25–pin female
D–connector) of the PC. When connecting the PKD–1 to the parallel port
be sure that you insert the PC end of the PKD–1 to the PC (male side). If
you use a printer on parallel port one, place the PKD–1 between the PC
and your printer cable.
The PKD–1 should not effect devices working with it. If some errors occur
try printing without the PKD–1. If printing is OK without the PKD–1 please
contact your dealer. We will offer you a new PKD–1 in exchange for your
old one.
Caution: Do not connect the PKD–1 to the serial port. This could
damage the PKD–1 !
WinTesla Service Software
Attach one end of the M2BUS interface cable, DAU–9M, to the PC serial
port and the other end to the bottom connector of the phone.
Issue 2 03/00
Page 23
Page 24
NHA–9
WinTesla Service Software
Equipment Setup – Covers On
PAMS
Technical Documentation
7.
2.
4.
3.
Item: Service accessory: Product code:
8
6.
1.
5.
1. Service box, JBU–4 0770041
2. M2BUS adapter cable, DAU–4S 0730057
3. Service cable, SCH–5A 0730166
4. Audio cable, ADS–1 0730011
5. Dummy battery, BDS–7 0770123
6. Power connector, PCS–1 0730012
7 Service Probe and cable AAT–7 0770124
8 Service Cable PCC–1B (ADC Tuning) 0770050
– Software protection key PKD–1 ”dongle” 0750018
Page 24
Issue 2 03/00
Page 25
PAMS
NHA–9
Technical Documentation
Equipment Setup – Covers Off
2.
6.
WinTesla Service Software
5.
to MJS–7
1.
4.
5.
to JBU–4
7.
3.
8
Item: Service accessory: Product code:
1. Service box, JBU–4 0770041
2. M2BUS adapter cable, DAU–4S 0730057
3. Repair Jig, MJS–7 (282 Version 1) 0770122
Repair Jig, MJS–7A (282 Version 2) 0772010
4. Audio cable, ADS–1 0730011
5 Power Connector PCS–1 0730012
6. Power connector, PCS–1 0730012
7 Service cable, SCH–5A 0730166
8 Service Probe and cable, AAT–7 0770124
– Software protection key PKD–1 ”dongle” 0750018
– DAS–4 Service Cable Adapter” 0770183
Note: DAS–4 is used for performing test equipment parametric tests.
To use, insert between JBU4 and SCH–5A
Issue 2 03/00
Page 25
Page 26

NHA–9
WinTesla Service Software
Installing NHA–9 on your Hard Disk
PAMS
Technical Documentation
1. Start Windows: type
2. Ensure that WinTesla 5.03 (or greater) is already installed on
your hard disk. If it is not installed please refer to the WinTesla
User Guide
3. Insert NHA–9 diskette into drive A: of your PC.
4. Start Installing program: select
Manager menu, then type
5. Follow the onscreen instructions.
Running NHA–9
1. Start the phone by pressing the power–on button of the
handset. Switch PC power on and start windows.
2. Double click on the ‘Service Software’ icon.
3. WinTesla will interrogate the phone attached to the PC and
load the correct software to service NHA–9.
WIN
and press
Enter
File –> Run
A:INSTALL
from Program
and press OK button
Page 26
Issue 2 03/00
Page 27
PAMS
NHA–9
Technical Documentation
The Login Screen
When WinTesla first starts, the login screen below will appear. Type in a 3
character ID and press <Enter> or click on the OK button.
WinTesla Service Software
OK button (default key)
The user name is stored in memory and the dialog box is closed. When
the dialog box is closed, the application starts.
If WinTesla cannot find the file, ‘op_id.val’, which contains the login IDs
then the OK button will be ‘greyed’.
Cancel button <Esc>
The Dialog box is closed and application is started, but the Faultlog
feature is disabled.
Help button <F1>
Activates the Windows Help application and displays context sensitive
Help.
Issue 2 03/00
Page 27
Page 28
NHA–9
WinTesla Service Software
The WinTesla Screen
The WinTesla screen – when an NHA–9 phone is attached – is displayed
with 7 menu items at the top of the screen and a status bar at the bottom.
PAMS
Technical Documentation
Menu bar
The menu bar is below the title bar and contains all available menu
selections. The menu bar is a dynamic element and is dependent on the
dongle type fitted, and whether a phone is connected.
Underlined characters in menu names and options indicates that the
menu selection can be made by pressing <Alt>+ underlined Character
Options can also be selected by activating menu bar with <Alt> key ( or
<F10> key ) and using arrow–keys to highlight the desired menu. In that
case, selection is done by pressing <Enter>.
Menus can also be selected by using the mouse.
Status Bar
The left hand area of the status bar displays information about NHA–9
WinTesla software version number and the ESN of the phone connected if
any.
The right hand area of the status bar displays information about User
Login ID, caps lock key latched down, num lock key latched down and
scroll lock key latched down.
.
Page 28
Tool bar
A tool bar is not provided in this release of software.
Issue 2 03/00
Page 29
PAMS
NHA–9
Technical Documentation
The Product Menu
New
Activation Status Bar Text
WinTesla Service Software
O
Alt+ P, N Scanning for products
Ctrl+R
The new function can be used to scan for a phone when either the
automatic rescan option is off or the automatic rescan timer has not
expired. Refer to Configure | Options section for automatic rescan.
If the phone type is unrecognized or unsupported by the current Wintesla,
then a warning message will be displayed.
pen
Activation Status Bar Text
Alt+ P, O –
The open function allows users to force load a phone interface, even if
there is no phone connected to the PC.
Issue 2 03/00
Page 29
Page 30

NHA–9
WinTesla Service Software
The dialog box (see illustration above) will appear and list the supported
phone types. To select a particular phone type to load; highlight the phone
type name and click on OK.
When a phone interface has been loaded, the product menu will be as
below
PAMS
Technical Documentation
Close command
Activation Status Bar Text
Alt+ P, C –
Closes the currently loaded phone type interface that had been loaded
using the Product | Open function. You cannot close a loaded phone type
interface if it was loaded by a rescan.
nitialize command
I
Activation Status Bar Text
Alt+ P, I –
Opens a submenu which contains the following options:
N
ormal Mode
Activation Status Bar Text
Alt+ P, I, N –
F5
Page 30
Puts phone in Cellular Services mode.
ocal Mode
L
Activation Status Bar Text
Alt+ P, I, L –
Shift+ F5
Puts phone in Local mode.
Issue 2 03/00
Page 31

PAMS
NHA–9
Technical Documentation
Faultlog
Faultlog is a feature that allows the PC to create a history record of each
phone that is serviced.
Activation Status Bar Text
Alt+ P, F –
Opens a submenu which contains following options:
ctivate Faultlog...
A
Activation Status Bar Text
Alt+ P, F, A –
F9
Refer to the WinTesla User Guide for faultlog instructions.
dit Faultlog...
E
WinTesla Service Software
Fastnam
Activation Status Bar Text
Alt+ P, F, E –
Refer to the WinTesla User Guide for faultlog instructions.
This dialogue is initially displayed when the user calls up the FastNAM
function.
It allows the user to see what configuration will be used to program
phones and allows the user to make changes if the present configuration
is incorrect for the phones to be programmed. The dialogue initially
displays data from the default configuration set in the Fast NAM
Configuration dialogue.
Configure File Display Dialogue
Menu Activation
Product => FastNAM Alt + P, N.
F8
Issue 2 03/00
Page 31
Page 32

NHA–9
WinTesla Service Software
PAMS
Technical Documentation
This dialogue has the following sections:
File Section
This shows the configuration file which will be used and its description.
Pressing the B
configuration file.
IN Section
M
The combination box may be expanded to show which MIN file will be
used to program each NAM. Up to 10 NAM’s are presently supported by
FastNAM.
But A maximum of 2 MIN files is required for NHA–9 products.
Pressing the B
file for the presently displayed NAM.
Pressing the C
programmed with MIN data.
AM Section
N
The combination box may be expanded to show which NAM data file will
be used to program each NAM. Up to 10 NAM’s are presently supported
by FastNAM.
rowse button allows the user to select a different
rowse button will allow the user to select a different MIN
lear button allows the user to set that the NAM will not be
Page 32
But A maximum of 2 NAM files is required for NHA–9 products.
The text part of the section will reflect all the major fields of the presently
displayed NAM data file.
Pressing the B
data file for the presently displayed NAM.
rowse button will allow the user to select a different NAM
Issue 2 03/00
Page 33

PAMS
NHA–9
Technical Documentation
Pressing the Clear button allows the user to clear the file name from the
presently displayed NAM so that it will not be programmed with NAM data.
I Section
U
The combination box may be expanded to show which User Interface data
file will be used to program each NAM. Up to 10 NAM’s are presently
supported by FastNAM.
But only 1 UI file is required for NHA–9 phones.
The text part of the section will reflect all the major fields of the presently
displayed UI data file.
Pressing the B
file for the presently displayed NAM.
Pressing the C
presently displayed NAM so that it will not be programmed with UI data.
Report
WinTesla Service Software
rowse button will allow the user to select a different UI data
lear button allows the user to clear the file name from the
FastNAM creates a report file containing a line of information for each
phone programmed. This allows the user to see what this report file is
called.
OK Button
Pressing this button will close the dialogue and invoke the FastNAM
function that uses the FastNAM Status Dialogue to display progress.
Cancel Button
Pressing this button will close the dialogue leaving the present default as it
was when the dialogue was opened. All changes to data made in this
dialogue are effective immediately, pressing cancel will NOT return the
data to the values they were when the dialogue was opened.
Help Button
dit Default Settings
E
Activation Status Bar Text
Alt+ P, E –
Will call up a context sensitive help screen.
This command is used to write operator defined channels and cable loss
value to a default settings file – tesla.ini
Issue 2 03/00
Page 33
Page 34

NHA–9
WinTesla Service Software
Exit button (Alt+X)
PAMS
Technical Documentation
The dialog box is closed and the values are written to tesla.ini
C
ancel button (Alt+C)
The dialog box is closed and the values are not written to tesla.ini
elp button (Alt+H)
H
Opens context sensitive help.
Quick Testing RSSI / IF
These parameters allow the ‘RSSI level ’and ‘IF count’ to be displayed
and updated regularly in the quick testing AMPS/NAMPS screens.
If disabled, the ‘RSSI level ’and ‘IF count’ are not displayed and the quick
testing AMPS/NAMPS screens are displayed quicker.
The Display Tuning paramater displays the tuning value as Decimal or
Hexadecimal in each of the following display boxes
The Cable Loss paramater is for entering the total loss of the probe and
its cable. (Used in the tuning and testing menus).
Page 34
Issue 2 03/00
Page 35

PAMS
NHA–9
Technical Documentation
Country Data
Activation Status Bar Text
Alt+ P, U –
WinTesla Service Software
Country Name
Name to make retrieving stored parameters easier for operator.
Country Code
Number corresponding to international standards.
International Prefix
The number used to replace + when making international calls.
National Prefix
The number used when making national calls.
Emergency Number
The emergency number in the selected country
P
revious Country button (Alt+P)
Scrolls backwards through country data stored in file – country.dat
Next Country button (Alt+N)
Scrolls forward through country stored in file – country.dat
C
ancel button (Alt+C)
The dialog box is closed and the parameters are not written to country.dat
Save And Exit button (Alt+X)
The dialog box is closed and the parameters are written to country.dat
Issue 2 03/00
Page 35
Page 36

NHA–9
WinTesla Service Software
Help button (Alt+H)
Opens context sensitive help.
Edit Na
m File
Activation Status Bar Text
Alt+ P, A –
This option allows the operator to customize default parameters for NAM
programming.
PAMS
Technical Documentation
Page 36
NAM Name
Name to make retrieving stored parameters easier for operator.
Number
The phone’s number.
Welcome Note
Message displayed for a few seconds when phone is first switched on.
Home SID
This number is used to define the primary traffic area of the phone. The
number contains the country code, system bit information and the area
code.
Access Method (EX)
This is used to define the method of sending the phone identification data.
Issue 2 03/00
Page 37

PAMS
NHA–9
Technical Documentation
Local Use Mark
This option is used to determine whether the phone must respond to local
control messages sent from the exchange.
Paging Channel (PCH)
This number is used to identify the primary traffic channel of the phone.
Typically 333 for system A and 334 for system B.
Group ID (GIM)
This is used to identify the group of the phone.
Country
This is used to select country code etc. from the country.dat file.
revious NAM button (Alt+P)
P
Scrolls backwards through NAMs stored in file – ampsnam.dat
ext NAM button (Alt+N)
N
WinTesla Service Software
Scrolls forward through NAMs stored in file – ampsnam.dat
C
ancel button (Alt+C)
The dialog box is closed and the parameters are not written to
ampsnam.dat
Save And Ex
The dialog box is closed and the parameters are written to ampsnam.dat
elp button (Alt+H)
H
Opens context sensitive help.
Note: Access Overload Class (ACCOLC) is not stored in the ampsnam.dat file because
the NAM Programming dialog calculates it.
Exit command
Activation Status Bar Text
Alt+ P, X –
Alt+ F4
it button (Alt+X)
Double click the application’s Control menu button:
Issue 2 03/00
This command ends the Service Software session
Page 37
Page 38

NHA–9
WinTesla Service Software
Configure
Options
Activation Status Bar Text
Alt+ C, O –
PAMS
Technical Documentation
es
Bus
irectories
D
aultlog
F
Refer to WinTesla User Guide Common Interface
Activation Status Bar Text
Alt+ C, S –
Refer to WinTesla User Guide Common Interface
Activation Status Bar Text
Alt+ C, D –
Refer to WinTesla User Guide Common Interface
Activation Status Bar Text
Alt+ C, F –
Refer to WinTesla User Guide Common Interface
Configure FASTNAM
This Dialogue allows the user to create sets of configuration files
containing data which will be programmed into the phone when the
WinTesla Product | FastNAM menu item is invoked.
The data needed will require the user to have a fairly complex technical
knowledge of the products to be programmed and the Network(s) upon
which the products are to operate.
All changes to data made in this dialogue are effective immediately,
pressing cancel will NOT return the data to the values they were when the
dialogue was opened.
Page 38
Issue 2 03/00
Page 39

PAMS
NHA–9
Technical Documentation
Menu Activation
Configure => FastNAM Alt + C, N
WinTesla Service Software
When creating the files required for FastNAM configuration, it is essential
to create as much as possible meaningful file names.
Containing for instance the product name and the customer for which the
phones are programmed.
ex.: for NHA–9 product for TELCEL customer => 282TELCA.extention.
282 = NHA–9 product commercial name
TEL = First three letters of the customer name
A = Indicate which programming it relates to (A, B, C...; A being
the first programming in our case).
It also advisable to store all configurations files in the same folder.
Issue 2 03/00
Page 39
Page 40

NHA–9
WinTesla Service Software
A typical NHA–9 FastNAM configuration folder should contain the
following file (for TELCEL customer for instance, first batch of
programming ”A”):
Configuration file 282TELA.CFG
Report file 282TELA.RPT
Min file #1 282TELA1.MIN
Min file #2 282TELA2.MIN
NAM file #1 282TELA1.NAM
NAM file #2 282TELA2.NAM
Preferred SID file 282TELA.SND
Country data file #1 282TELA1.CNT
Country data file #2 282TELA2.CNT
UI File 2 82TELA.UI
SCM File 282TELA.SCM
PAMS
Technical Documentation
Call card file 282TELA.CCD
Dialogue Components
FILE: Edit box
This contains the file name of the presently displayed configuration file.
This will be set to the presently active FastNAM file upon first opening the
dialogue. Whilst the cursor is in this field, pressing the Edit button will
produce a file browser dialogue to allow the user to choose an existing file
to load, or allow the user to create a new file
Des
cription: Edit box
This allows the user to add a short description of the intended use for the
data within this configuration. i.e. ‘Test data’, ‘Data for 3110 & 3810’. No
buttons are required, user types directly into edit box.
Main List Box:
This can display all data within this configuration and sub files.
Data is presented in levels, if a data item contains lower levels then it may
be expanded to show these lower levels or contracted to hide them.
Page 40
Each line in the list box represents a data item, each line can be thought
of as 4 sections. In left to right fashion, these sections may be described
as:–
Expand Flag :
The first character on the line denotes whether the item is expandable and
whether it is expanded or contracted. A ‘+’ symbol shows an expandable
data item and a ‘–’ symbol shows an expanded (contractible) data item.
The ‘<<–
expandable data item line.
>>‘ button is enabled when the cursor is positioned on an
Issue 2 03/00
Page 41

PAMS
NHA–9
Technical Documentation
Pressing this button will then expand or contract the item as appropriate.
Double clicking the left mouse button with the mouse cursor positioned on
the left side of an expandable item will have the same effect as the
>>‘ button.
‘<<–
Level Indicator:
The level of the data item is denoted by a number of ‘–’ characters, 2 ‘–’
are used for each level. i.e. Top level data items will have no level
indicator, the level down from top (items shown when a top data item is
expanded), will have ‘––’, items displayed by expanding one of these
levels will have ‘––––’ etc. The user should expand a few items to see this
in action, this is designed to hi–light the data hierarchy.
Data Description:
A description of the data item.
Data Value:
The value of the data item, some data items are simple categories, and
therefore may have no value (used only to group data into lower levels).
Others may be files, numbers or text values. The ‘E
and ‘D
the line where the cursor is positioned. The function of these buttons is
very much dependant upon the data item value type. Double clicking the
left mouse button with the mouse cursor positioned on the right side of an
editable item will have the same effect as the ‘E
elete’ buttons are enabled as appropriate to the data value upon
WinTesla Service Software
dit’, ‘Insert’, ‘Clear’
dit‘ button.
More information about the data for the NHA–9 product is available
through Nokia organisation.
OK Button
Pressing this button will close the dialogue and set the presently displayed
configuration as being the present default (displayed next time this
dialogue or Execute FastNAM Dialogue is called).
Cancel Button
Pressing this button will close the dialogue leaving the present default as it
was when the dialogue was opened. All changes to data made in this
dialogue are effective immediately, pressing cancel will NOT return the
data to the values they were when the dialogue was opened.
Help Button
Will call up a context sensitive help screen.
Issue 2 03/00
Page 41
Page 42

NHA–9
WinTesla Service Software
RSSI Scanning
Receive Signal Strength Indication
Activation Status Bar Text
Alt+ C, S –
This feature is provided to help operators select default channel settings
looking at the channel usage in the phone location
PAMS
Technical Documentation
RSSI Threshold
Enter the RSSI threshold above which channels are considered blocked.
Number of Scans
Enter the number of scans required. Default is 50.
Channel Number
Realtime display of channel being scanned. Provides operator confidence
that the system is running.
Scan Number
Realtime display of scan number. Gives the operator an idea as to how
long the scanning has to go before completion.
Start button (Alt+A)
Prompts the operator to enter a filename for storing results. Reads
parameters supplied by operator and starts the sweep.
top button (Alt+S)
S
Page 42
Only active when sweep is in progress. Aborts sweep.
it button (Alt+X)
Ex
The dialog box is closed. Only active when not sweeping. To exit whilst
sweeping, first press Stop button.
Issue 2 03/00
Page 43

PAMS
NHA–9
Technical Documentation
Help button (Alt+H)
Opens context sensitive help.
Results File
Stores the following data:
– Date and time of scan start
– Blocked Channel Number
– Frequency of blocked channel
– Mean RSSI of blocked channel
– Number of times channel was found blocked
N.B. Data is appended to existing file if duplicate name is selected.
WinTesla Service Software
Issue 2 03/00
Page 43
Page 44

NHA–9
WinTesla Service Software
Tuning
Tuning EEPROM Transfer
PAMS
Technical Documentation
Activation Status Bar Text
Alt+T,E –
The tuning values stored in EEPROM can be read from the phone and
stored in a file on the PC, or a file stored on the PC can be written to the
phone.
Page 44
Exit button (Alt+X)
The dialog box is closed.
H
elp button (Alt+H)
Opens context sensitive help
Read from Phone button (Alt+R)
Pressing this button presents you with the following screen:
Issue 2 03/00
Page 45

PAMS
NHA–9
Technical Documentation
Select the directory required. Then either select an existing name or type
in a new name for the file to store the phone data in.
WinTesla Service Software
OK button
Accept the filename selected. Returns to Tuning Value
Transfer screen. Data will be read from phone and stored
in the selected filename.
Cancel button
Cancels filename selection and returns to Tuning Value
Transfer screen without doing anything.
Network button
Allows access to networked disk drives. Refer to the
Microsoft Windows User Guide for more information.
Save as t
Driv
ype (Alt+T)
Alters the filter that control which type of files are
displayed. Refer to the Microsoft Windows User Guide for
more information.
es (Alt+V)
Selects disk drive to store data on. Refer to the
Microsoft Windows User Guide for more information.
Issue 2 03/00
Page 45
Page 46

NHA–9
WinTesla Service Software
Write to Phone button (Alt+W)
Pressing this button presents you with the following screen:
PAMS
Technical Documentation
Select the directory required. Then either select an existing name or type
in a new name for the file to read phone data from.
OK button
Accept the filename selected. Returns to Tuning Value
Transfer screen. Data will be read from selected filename
and stored in phone.
Cancel button
Cancels filename selection and returns to Tuning Value
Transfer screen without doing anything.
Network button
Allows access to networked disk drives. Refer to the
Microsoft Windows User Guide for more information.
List Files of T
ype (Alt+T)
Alters the filter that control which type of files are
displayed. Refer to the Microsoft Windows User Guide for
more information.
Page 46
Driv
es (Alt+V)
Selects disk drive to store data on. Refer to the
Microsoft Windows User Guide for more information.
Issue 2 03/00
Page 47

PAMS
NHA–9
Technical Documentation
Default Tuning Values
pressing this button displays the folloeing warning
ATTENTION: use this option only if the tuning is
unsuccessful using the standard method. Use the
From Phon
e option first in order to be able to
reload the initial tuning value if required.
Power
Tx
Activation Status Bar Text
Alt+T,X –
WinTesla Service Software
Read
This screen is used to tune the phone’s transmitter power levels.
The NHA–9 requires tuning on channel 300 and channel 799 over the
phone’s power range 2 to 7.
Tuning is performed by adjusting values held in the phone’s RAM. When
tuning is correct, the RAM contents must be copied into EEPROM.
Note Do not forget to set the ”Cable & Probe ”loss (ALT +P,E) as the output power level
takes this loss into account.
Before actually executing this screen the following message appears:
Issue 2 03/00
Page 47
Page 48

NHA–9
WinTesla Service Software
Selecting OK will produce the following:
PAMS
Technical Documentation
Select Power Level buttons (Alt+2 / 3 / 4 / 5 / 6 / 7)
Select power level to tune.
9 Tx = 848.97MHz button (Alt+9)
79
Set phone to high channel 799. This value is fixed and CANNOT be changed
by Product | Edit Default Channel Settings.
300 Tx = 8
34.00MHz button (Alt+8)
Set phone to mid channel 300. This value is fixed and CANNOT be changed
by Product | Edit Default Channel Settings.
Fine buttons (Alt++ / –)
Increase / decrease New Value by 1.
Coarse buttons (Alt+1 / 0)
Increase / decrease New Value by 10.
Note Value Displays: The tuning values can be displayed as dec. or hex
Save All New Values to EEPROM button (Alt+S)
Copies the contents of all Tx power New Values to EEPROM.
Save All New Values to EEPROM & Ex
it button (Alt+X)
All New Values are copied to EEPROM, the dialog box is then closed.
Save & Goto Next T
uning button (Alt+T)
All New Values are copied to EEPROM, the dialog box is then closed and the
next tuning dialog box (Tx/Rx Audio) is executed.
Page 48
Issue 2 03/00
Page 49

PAMS
NHA–9
Technical Documentation
Cancel button (Alt+H)
The dialog box is closed. Does not write anything to EEPROM.
Help button (Alt+H)
Opens context sensitive help.
Typical Tuning Sequence
– Remove antenna and connect power meter to phone.
– Select power level
– Select high band
– Adjust New Value contents using the fine and coarse but-
– Press ‘Save New Value to EEPROM’ button.
– Select mid band
– Adjust New Value contents using the fine and coarse but-
WinTesla Service Software
tons until the power meter reads within the levels specified.
tons until the power meter reads within the levels specified.
T
x / Rx
– Press ‘Save New Value to EEPROM’ button.
– Select next power level
Activation Status Bar Text
Alt+T,T –
The Tx and Rx registers within the phone must be tuned in the correct
order. WinTesla makes this easy by only allowing the correct sequence!
Before actually executing this screen the following message appears:
Issue 2 03/00
Page 49
Page 50

NHA–9
WinTesla Service Software
Selecting OK will produce the following:
PAMS
Technical Documentation
Only the tuning currently being performed is active (black text) all the
others are disabled (grey text). The text in the info box changes to suit the
tuning.
Info
This section of the screen provides the operator with useful information to
help setup the test instruments.
rite To EEPROM And Edit Next button (Alt+W)
W
Writes the register being adjusted to EEPROM and moves the focus to the
next edit box.
The order of tuning is:
– 1. ST
– 2. Voice (using DTMF)
– 3. Rx Chain (a new set instructions are used prior to this tuning)
Note: The limiter calibration tuning is not required for this product (AMSA–DIG Asic)
Page 50
Issue 2 03/00
Page 51

PAMS
NHA–9
Technical Documentation
Fine buttons (Alt++ / –)
Increase / decrease value by 1.
Next T
uning button (Alt+T)
The dialog box is closed. Does not write anything to EEPROM. The next
tuning dialog box (AFC) is executed. This button is only active when all
tunings have been completed.
it button (Alt+X)
Ex
The dialog box is closed. Does not write anything to EEPROM.
elp button (Alt+H)
H
Opens context sensitive help.
Note Value Displays: The tuning values can be displayed as dec. or hex
AFC
Automatic Frequency Control
Activation Status Bar Text
WinTesla Service Software
Alt+T,F –
To tune the AFC, follow the on screen instructions.
Align DAC (Digital Analog Converter) button (Alt+A)
Before calibrating the AFC, the DAC must be aligned, WinTesla ensures
this by not allowing calibration until alignement has been successfully
completed.
alibrate AFC button (Alt+C)
C
This button is only active after the DAC has been aligned and saved to
EEPROM.
Issue 2 03/00
Page 51
Page 52

NHA–9
WinTesla Service Software
Save New Value to EEPROM button (Alt+S)
This button is only active after and DAC Alignment or AFC Calibration has
been performed. Copies New Value to EEPROM.
PAMS
Technical Documentation
RSSI
Save & Goto Next T
This button is only active after the AFC Calibration has been performed.
Calibrate AFC New Value is copied to EEPROM, the dialog box is then
closed and the next tuning dialog box (RSSI) is executed.
it button (Alt+X)
Ex
The dialog box is closed. Does not write anything to EEPROM.
elp button (Alt+H)
H
Opens context sensitive help.
Received Signal Strength Indicator
Activation Status Bar Text
Alt+T,R –
To tune the RSSI, follow the on screen instructions and press the relevant
calibrate button. The RSSI can be tuned in any order, the order shown is
for convenience only.
uning button (Alt+T)
Before actually executing this screen the following message appears:
Page 52
Issue 2 03/00
Page 53

PAMS
NHA–9
Technical Documentation
Selecting OK will produce the following screen:
Note: Do not forget to set the ‘cable loss’ (ALT+P,E) as the original generator power level
display takes this into account.
WinTesla Service Software
Calibrate button (Alt+C)
After setting the signal generator to –75dBm, press this button to tune the
RSSI.
librate button (Alt+A)
Ca
After setting the signal generator to –105dBm, press this button to tune
the RSSI.
Cal
ibrate button (Alt+L)
After turning the signal generator off, press this button to tune the RSSI.
S
ave New Value to EEPROM button (Alt+S)
Copies New Value to EEPROM only if New Value is different to the
EEPROM value. WinTesla determines whether to save individual values or
all three.
Save and Goto Next T
uning button (Alt+T)
This button button copies New Value to EEPROM only if New Value is
different to the EEPROM. WinTesla determines whether to save individual
values or all three. The dialog box is then closed and the next tuning
dialog box (ADC) is executed.
it button (Alt+X)
Ex
The dialog box is closed. Does not write anything to EEPROM.
H
elp button (Alt+H)
Opens context sensitive help.
Note Value Displays: The tuning values can be displayed as dec. or hex
Issue 2 03/00
Page 53
Page 54

NHA–9
WinTesla Service Software
ADC
Activation Status Bar Text
Alt+T,C –
PAMS
Technical Documentation
Calibrate Battery Voltage button (Alt+V)
The service battery (BDS–7) provides 3.6V to VBATT. Press this button to
find the optimum New Value.
Calibrate C
The interface box (JBU4) provides 4.8V to VIN via the PCC–1B. Press this
button to find the optimum New Value.
Calibrate Charger Current button (Alt+B)
Supply 0V to VIN in disconnecting these PCC–1B and short circuit the two
banana plugs.
ave New Value to EEPROM button (Alt+S)
S
Copies New Value to EEPROM only if New Value is different to the
EEPROM value. WinTesla determines whether to save individual values or
all these.
Save and Goto Next T
This button button copies New Value to EEPROM only if New Value is
different to the EEPROM. WinTesla determines whether to save individual
values or all three The dialog box is then closed and the next tuning
dialog box (LCD) is executed.
harger Voltage button (Alt+C)
uning button (Alt+T)
Page 54
it button (Alt+X)
Ex
The dialog box is closed.
elp button (Alt+H)
H
Opens context sensitive help.
Issue 2 03/00
Page 55

PAMS
NHA–9
Technical Documentation
LCD Contrast
Activation Status Bar Text
Alt+T,L –
WinTesla Service Software
Fine buttons (Alt++ / –)
Increase / decrease New Value by 1.
S
ave New Value to EEPROM button (Alt+S)
Copies New Value to EEPROM.
R
estore to EEPROM Value button (Alt+R)
This copies the EEPROM value back to the LCD controller. NB
Note: This will only restore the original value if you have not pressed the Save New
value to EEPROM button.
Exit button (Alt+X)
The dialog box is closed. Does not write anything to EEPROM.
H
elp button (Alt+H)
Opens context sensitive help.
Issue 2 03/00
Page 55
Page 56

NHA–9
WinTesla Service Software
Testing
Amps
Quick Testing AMPS
Activation Status Bar Text
PAMS
Technical Documentation
Alt+E,A –
Page 56
Issue 2 03/00
Page 57

PAMS
NHA–9
Technical Documentation
Namps
Quick Testing Namps
Activation Status Bar Text
Alt+E,N –
WinTesla Service Software
Tx Modulation
Tx A
Issue 2 03/00
udio button (Alt+ A)
Switch Tx Audio path on or off. Enables Tx Audio In
selection panel. Off mutes Tx Audio.
Page 57
Page 58

NHA–9
WinTesla Service Software
Signalling Tone button (Alt+ O) (AMPS only)
Switch Signalling Tone on or off.
W
ideband Data button (Alt+ W) (AMPS only)
Switch wideband data on or off.
AT button (Alt+ S), DSAT button (ALT +D)
S
Switch SAT/DSAT on or off. Enables SAT/DSAT selection
panel. (SAT in AMPS mode, DSAT in NAMPS mode)
;
(SAT=Supervisory Audio Tone DSAT= Digital SAT
Tx Audio In
Enabled by Tx Audio button. Allows selection of ONLY one input from the
following choice:
– Mic
– XMic
PAMS
Technical Documentation
)
Internal microphone
External microphone
– DTMF
Dual Tone Generator
Compressor
Switches compressor on or off.
Sidetone
Switches sidetone on or off.
Tx/RX
Allows selection of ONLY one option from the following choice:
x Only button (Alt+R)
– R
– Standb
– Rx Tx P
Tx Power
Only active when PA enabled. Allows selection of ONLY one power level
from the following choice:
button (Alt+2)
– 2
y button (Alt+B)
A button (Alt+P)
Page 58
– 3
button (Alt+3)
– 4
button (Alt+4)
button (Alt+5)
– 5
– 6
button (Alt+6)
– 7 button (Alt+7)
Issue 2 03/00
Page 59

PAMS
NHA–9
Technical Documentation
SAT
Only available in AMPS mode.
Allows selection of ONLY one Supervisory Audio Tone (SAT) from the
following choice:
– SAT0 5970 Hz
– SAT1 6000 Hz
– SAT2 6030 Hz
DSAT
Only available in NAMPS mode.
Allows selection of ONLY one Supervisory Audio Tone from the following
choice:
– DSCC 0 2556CB
– DSCC 1 255B2B
– DSCC 2 256A9B
WinTesla Service Software
– DSCC 3 25AD4D
– DSCC 4 26AB2B
– DSCC 5 26B2AD
– DSCC 6 2969AB
– DSCC 7 AAAAAA
AFC (Automatic Frequency Control)
Switches AFC on or off.
VCTCXO (Voltage Controlled Temperature Compensated Xtal Oscillator)
Adjust the VCTCXO
Receive Audio
Mu
te button (Alt+ U)
Switches receive audio path off.
Input – Allows selection of ONLY one from the following choice:
– Expander On
Issue 2 03/00
– Expander Off
– DTMF
Page 59
Page 60

NHA–9
WinTesla Service Software
Volume – Allows selection of ONLY one from the following choice:
– Min
– Mid
– Max
Output – Allows selection of ONLY one from the following choice:
– Earpiece
– Ext Audio
Dual Tone Generator
Only available when enabled by Receive Audio switches.
Allows selection of two tones (one from each list) from the following lists:
– Off Off
– 695.8 Hz 1208.5 Hz
PAMS
Technical Documentation
– 769.0 Hz 1336.7 Hz
– 860.6 Hz 1483.2 Hz
– 933.8 Hz 1629.6 Hz
Channel Selection
Enter the required channel number in the edit box and press the
lect (Alt+E) button to change channel.
Se
Selects lower,middle and upper band in the case of a NAMPS phone.
Phone Identification
Displays the following information about the current phone:
– Product Serial Number
– Electronic Serial Number (ESN)
– Phone Type
– Software Version
– Hardware version
Page 60
RSSI Level, IF Count
Displays the RSSI Level and IF count in real–time if ‘quick testing RSSI/IF’
is selected in the edit default settings window (ALT+P,E)
it button (Alt+X)
Ex
The dialog box is closed.
H
elp button (Alt+H)
Opens context sensitive help.
Issue 2 03/00
Page 61

PAMS
NHA–9
Technical Documentation
ADC
Analog/Digital Conversion
Activation Status Bar Text
Alt+E,C –
This option displays all eight of the phone’s ADCs in real–time.
WinTesla Service Software
Raw Data Hex
Data straight from the phone displayed in hexadecimal.
Raw Data Decimal
Raw data displayed in decimal.
Converted value
Data from phone converted into meaningful value i.e. V, mV, dBm, using
offsets stored in EEPROM.
EEPROM Offsets
New calculated calibration offsets for EEPROM. These values are only
correct if the correct conditions are met: 47K +/–1% resistor connected
across BTEMP and GND pins; 3600mV or 4100mV across VBATT;
4700mV on VIN charger input. These conditions are met using a JBU4
and dummy battery (3.6V) or the production test equipment (4.1v).
Issue 2 03/00
Page 61
Page 62

NHA–9
WinTesla Service Software
Battery Voltage 3.6V / 4.1V
Selects whether 3600mV (Service) or 4800mV (Production ATE) is being
used for VBATT supply.
Accessory ID 0 / Disabled
Req A = 0 pulls accessory ID line low.
Req A = Disabled for normal use
Note. For testing only.
Charger Voltage
ChrgSW
1 –charge switch on(chaos2) 0 –charge switch off (chaos2)
Note :VCH must be greater than VBATT by +1.1V for 800mA to flow.
ChrgCrtrl 0/1
PAMS
Technical Documentation
For testing 3–wire charger control. Digital output.
Note. Cannot be used to control real charger.
Exit button (Alt+X)
The dialog box is closed.
H
elp button (Alt+H)
Opens context sensitive help.
Page 62
Issue 2 03/00
Page 63

PAMS
NHA–9
Technical Documentation
Display and Lights
Activation Status Bar Text
Alt+E,D –
This screen provides a simple test facility for the phone’s LCD and lights.
WinTesla Service Software
All Pixels On button (Alt+A)
Switches all LCD pixels on.
C
lear Display button (Alt+C)
The LCD is completely cleared. All pixels are switched off.
ChequerBoard 1 button (Alt+1)
Displays chequerboard 1. Use in conjunction with chequerboard 2 to test
pixels.
ChequerBoard 2
Displays chequerboard 2. This is the inverse of chequerboard 1, allowing
easy checking of pixel functionality.
Lights On button (Alt+O)
Pressing this button will switch the backlighting behind the LCD and
keymat on.
Lights Of
Pressing this button switches backlighting behind the LCD and keymat off.
f button (Alt+F)
button (Alt+2)
LED Flash Slow
Turns the LED on and off slowly
LED Flash Fast
Turns the LED on and off quickly
L
ED Off
Turns the LED off
Issue 2 03/00
Page 63
Page 64

NHA–9
WinTesla Service Software
Exit button (Alt+X)
The dialog box is closed.
H
elp button (Alt+H)
Opens context sensitive help
Au
dio
Activation Status Bar Text
Alt+E,U –
The layout of this screen reflects the logical audio routing of the phone.
Signals enter left and exit right.
PAMS
Technical Documentation
Page 64
Issue 2 03/00
Page 65

PAMS
NHA–9
Technical Documentation
Audio In
Allows selection of ONLY one input from the following choice:
– M
– X
– D
– Mute (Alt +U)
Audio Trim
Allows adjustment of audio trim levels.
Using the keyboard press <tab> until the VDTrim edit box is selected, then
use up and down arrow keys to scroll through available trim levels. Values
are written to the phone whilst scrolling.
WinTesla Service Software
ic (Alt +M)
Internal microphone
Mic (Alt +C)
External microphone
Tone Tx (Alt +D)
Dual Tone Generator
Deselects other inputs.
Using a mouse, bring up a list box of available trim levels by clicking on
the downward facing arrow or in the edit box:
Scroll through the list and choose the required value by clicking on the
mouse left button or pressing <tab>.
The ‘real’ value is displayed in dB.
Restore Original button
Restores VDTrim to the value stored in the phone’s
EEPROM.
Compressor
Switches compressor on or off.
Limiter Level
Allows adjustment of limiter trim levels.
Using the keyboard press <tab> until the Limiter edit box is selected, then
use up and down arrow keys to scroll through available trim levels. Values
are written to the phone whilst scrolling.
Issue 2 03/00
Page 65
Page 66

NHA–9
WinTesla Service Software
Using a mouse, bring up a list box of available trim levels by clicking on
the downward facing arrow or in the edit box:
Scroll through the list and choose the required value by clicking on the
mouse left button or pressing <tab>. The real value is displayed in dB.
Restore Original button
Restores Limiter to the value stored in the phone’s EEPROM.
Final Tx Trim
PAMS
Technical Documentation
Allows adjustment of Final Tx trim levels.
Using the keyboard press <tab> until the TxTrim edit box is selected, then
use up and down arrow keys to scroll through available trim levels. Values
are written to the phone whilst scrolling.
Using a mouse, bring up a list box of available trim levels by clicking on
the downward facing arrow or in the edit box:
Scroll through the list and choose the required value by clicking on the
mouse left button or pressing <tab>.
The ‘real’ value is displayed in dB.
Page 66
Restore Original button
Restores TxTrim to the value stored in the phone’s EEPROM.
Vibra
Switches the vibra motor on or off
Dual Tone Hands Free Buzzer
Only active when Dual Tone Generator is selected in Audio In or Receive
Switch sections.
Issue 2 03/00
Page 67

PAMS
NHA–9
Technical Documentation
Sets the Dual Tone Generator to play the frequency mix required for the
keys. The following keys are available:
– 1
– 2
– 3
– 4
– 5
– 6
– 7
– 8
– 9
– 0
– *
– #
WinTesla Service Software
(Alt +1)
(Alt +2)
(Alt +3)
(Alt +4)
(Alt +5)
(Alt +6)
(Alt +7)
(Alt +8)
(Alt +9)
(Alt +0)
(Alt +*)
(Alt +#)
Note. Only one key is selectable at any one time. The key plays until either another key
is selected or the Dual Tone Generator is disabled.
Hands Free
Switches hands free on or off. When switched on, additional attenuation
controls are enabled:
– 21 dB
– 24 dB
– 27 dB
– 30 dB
Buzzer
Controls buzzer frequency, duty cycle and whether it is switched on or off.
Set the buzzer up by:
– Type frequency into frequency edit box
– Type duty cycle into duty cycle edit box
– Select buzzer on or off by checking or unchecking Buzz On/
Off checkbox
Issue 2 03/00
– Press Write to Buzzer (Alt+ O) button
Page 67
Page 68

NHA–9
WinTesla Service Software
Rx Gain Trim
Allows adjustment of Rx Gain trim levels.
Using the keyboard press <tab> until the RxTrim edit box is selected, then
use up and down arrow keys to scroll through available trim levels. Values
are written to the phone whilst scrolling.
Using a mouse, bring up a list box of available trim levels by clicking on
the downward facing arrow or in the edit box:
PAMS
Technical Documentation
Scroll through the list and choose the required value by clicking on the
mouse left button or pressing <tab>.
The ‘real’ value is displayed in dB.
Restore Original button
Restores RxTrim to the value stored in the phone’s EEPROM.
Receive Switch
Allows selection of ONLY one input from the following choice:
– Exp
– Expander
– Dual Tone G
– Receive S
Rx Volume
ander On (Alt +P)
off (Alt +R)
enerator (Alt +G)
witch Off (Alt +S)
Page 68
Allows adjustment of Rx Volume trim levels.
Using the keyboard press <tab> until the VolCR edit box is selected, then
use up and down arrow keys to scroll through available trim levels. Values
are written to the phone whilst scrolling.
Using a mouse, bring up a list box of available trim levels by clicking on
the downward facing arrow or in the edit box:
Issue 2 03/00
Page 69

PAMS
NHA–9
Technical Documentation
Scroll through the list and choose the required value by clicking on the
mouse left button or pressing <tab>.
The ‘real’ value is displayed in dB.
Restore Original button
Restores VolCR to the value stored in the phone’s
EEPROM.
Sidetone
WinTesla Service Software
Switches sidetone on or off.
Audio Out
Allows selection of ONLY one output from the following choice:
– E
arpiece (Alt +E)
– H
eadset (Alt +T)
Enables two additional controls:
B
ias On (Alt+B)
as Off (Alt+ I)
Bi
Restore Al
Restores trim levels (only the levels displayed on this screen not the
whole phone) to the values stored in the phone’s EEPROM.
RX On/Off
The phone receive mode on or Off
TX On/Off
l (Alt+L)
Switches the phone’s transmit mode on or off
PA On/Off
Switches the power amplifier on or off. The power band has to be selected
Ex
it button (Alt+X)
The dialog box is closed.
H
elp button (Alt+H)
Context sensitive help
Issue 2 03/00
Page 69
Page 70

NHA–9
WinTesla Service Software
Channel Selection
Allows selection of the channel by modifying the channel numbers and
clicking on the select button. The channel frequency opens below the
select button.
PAMS
Technical Documentation
Page 70
Issue 2 03/00
Page 71

PAMS
NHA–9
Technical Documentation
Aftersales
Warranty Information
Activation Status Bar Text
Alt+D,W –
WinTesla Service Software
Original ESN
This is for indication only. This value cannot be changed.
Current ESN
This is for indication only. This value cannot be changed.
Manufacturing Date
This is for indication only. This value cannot be changed.
Programming Date
This value can be edited. MMYY = month year
Repair Date
This value can be edited. MMYY = month year. Enter the current date.
This value does not take the date from the PC.
Issue 2 03/00
Page 71
Page 72

NHA–9
WinTesla Service Software
Hardware ID
This value can be modified to take into account any hardware
modifications that may require a hardware ID change.
Stop Flag
Click on this check box to set or reset the Stop Flag. TAKE CARE WITH
THIS. ONLY SET OR RESET WHEN YOU ARE SURE IT NEEDS TO BE
DONE!
The purpose of the Stop Flag is to allow data transfer from the original
phone to exchange phone only.
The Stop Flag is set when the phone contains valid NAM data.
NAM Programming automatically sets this flag when writing data to the
phone.
Transfer Flag
PAMS
Technical Documentation
Click on this check box to set or reset the Transfer Flag. TAKE CARE
WITH THIS. ONLY SET OR RESET WHEN YOU ARE SURE IT NEEDS
TO BE DONE!
The purpose of the Transfer Flag is to prevent more than one data
transfer from a phone, so that a dealer cannot transfer data from a blank
phone.
The Transfer Flag is only set by the data transfer utility CRAPS.
ead From Phone button (Alt+R)
R
Warranty data is read from phone and updates the PC’s display.
W
rite To Phone button (Alt+W)
Writes warranty data to phone.
Ex
it button (Alt+X)
The dialog box is closed.
H
elp button (Alt+H)
Opens context sensitive help.
Page 72
Issue 2 03/00
Page 73

PAMS
NHA–9
Technical Documentation
NAM Password
Activation Status Bar Text
Alt+F,M –
This option allows modification of the NAM password. It also detects when
the NAM password is corrupted and then allows the program to reset it to
default
WinTesla Service Software
Issue 2 03/00
Page 73
Page 74

NHA–9
WinTesla Service Software
Dealer
Phone Identity
Activation Status Bar Text
PAMS
Technical Documentation
Alt+V,P –
Page 74
Displays the following information about the current phone:
– Phone Type
– Software Version
– ESN
– Hardware version
– Product Serial Number
– Manufacturing Date – month and year
Issue 2 03/00
Page 75

PAMS
NHA–9
Technical Documentation
– Programming Date – month and year
– Lifetimer – hours and minutes
– Product Code
Ex
it button (Alt+X)
The dialog box is closed.
elp button (Alt+H)
H
Opens context sensitive help.
AM Programming
N
Activation Status Bar Text
Alt+D,N –
This screen can be used to program all the subscriber data and common
NAM data into a phone. The phone can have two sets NAM data, both of
which are displayed on this screen.
WinTesla Service Software
Issue 2 03/00
Page 75
Page 76

NHA–9
WinTesla Service Software
Default
Dealers are strongly advised to use the default feature. Predefined NAM
data is stored using Product | Edit NAM File and can be used to program
NAMs here. The default box lists the contents of the file. Select the
required NAM by single clicking on the name. N.B. Data is not written to
the phone until the Write to Phone button is pressed.
Number
The phone’s number.
Welcome Note
Short message displayed when phone is powered up.
Home SID
This number is used to define the primary traffic area of the phone. The
number contains the country code, system bit information and the area
code.
PAMS
Technical Documentation
Access Method (EX)
This is used to define the method of sending the phone identification data.
Local Use Mark
This option is used to determine whether the phone must respond to local
control messages sent from the exchange.
Paging Channel (PCH)
This number is used to identify the primary traffic channel of the phone.
Typically 333 for system A and 334 for system B.
Group ID (GIM)
This is used to identify the group of the phone.
Station Class Mark
ACCOLC (Access Overload Class) and Preferred System
ACCOLC and Preferred System are automatically assigned by WinTesla.
Country
Page 76
Predefined country data is stored using Product | Edit Country Data and
is used to set country here. The default box lists the contents of the file.
Select the required country by clicking on the name. N.B. Data is not
written to the phone until the Write to Phone button is pressed.
SID Group
This is used to identify the SID group to which the SID belongs.
Issue 2 03/00
Page 77

PAMS
NHA–9
Technical Documentation
Use NAM 1 (Alt+ 1)
Phone powers up using NAM 1 as default or:
Use NAM 2
(Alt+ 2)
Phone powers up using NAM 2 as default.
Emergency Numbers
The emergency services numbers can be defined. Two edit boxes are
included for clarity.
Security Code
A five digit security code can be defined.
Lock Code
A four digit lock code can be defined.
Programming Date
WinTesla Service Software
Date that NAM data is written into phone. The date is in the format mmyy
mm = month, yy = year. Initial date is derived from the PC’s internal clock,
but may be changed by the operator.
Note Once programmed the date cannot be changed. The edit box will be disabled.
Read From Phone button (Alt+R)
NAM data is read from phone and displayed.
W
rite To Phone button (Alt+W)
All displayed NAM data is written to the phone.
Write Phone & Ex
it button (Alt+X)
All displayed NAM data is written to the phone and the dialog box is
closed.
Read From F
ile button (Alt+F)
NAM data is read from file and displayed. The operator is given a file
selection dialog box to choose from.
Write to Fi
le button (Alt+I)
All displayed NAM data is written to a file. The operator can create a file
using a file selection dialog box.
ancel button (Alt+C)
C
Nothing is written to the phone and the dialog box is closed.
elp button (Alt+H)
H
Opens context sensitive help.
Issue 2 03/00
Page 77
Page 78

NHA–9
WinTesla Service Software
SID Programming
Activation Status Bar Text
Alt+D,S –
This dialog box allows the editing of a maximum of 90 not NAM specific
SID
PAMS
Technical Documentation
Page 78
Before editing the SID table, ensure that an alphanumeric name has been
entered into the Tag 1, Tag 2 and Tag 3 edit boxes. Not all tags have to
have assigned names – only those that are actually used.
To edit an Alpha Tag, select the required Alpha Tag by double clicking on
the entry in the table. This will produce the following dialog box.
Issue 2 03/00
Page 79

PAMS
NHA–9
Technical Documentation
To edit a SID, select the required SID by double clicking on the entry in the
table. This will produce the following dialog box:
Simply enter the SID number, the SID group, its Alpha Tag and its priority.
ead From Phone button (Alt+R)
R
SID data is read from phone and updates the PC’s display.
W
rite To Phone button (Alt+W)
Writes SID data to phone.
WinTesla Service Software
L
oad From File button (Alt+L)
Reads SID data from file and displays on screen. The operator is given a
file selection dialog box to choose from.
ave To File button (Alt+S)
S
Writes SID data from screen to file. The operator can create a file name
using a file selection dialog box.
it button (Alt+X)
Ex
The dialog box is closed.
H
elp button (Alt+H)
Opens context sensitive help.
Issue 2 03/00
Page 79
Page 80

NHA–9
WinTesla Service Software
Calling Card
Activation Status Bar Text
Alt+D,A –
PAMS
Technical Documentation
Card Details
Allows selection of which card to display, from the following choice:
– Card A
– Card B
Dial Seq.
Allows selection of Dial Sequence.
Using the keyboard press <tab> until the Dial Seq. edit box is selected,
then use up and down arrow keys to scroll through available options.
Using a mouse, bring up a list box of available dialling sequences by
clicking on the downward facing arrow or in the edit box:
Page 80
Scroll through the list and choose the required option by clicking on the
mouse left button or pressing <tab>.
Issue 2 03/00
Page 81

PAMS
NHA–9
Technical Documentation
Access Number
Enter the Calling Card’s access number here.
Phone Number Prefix
Allows selection of Phone Number Prefix.
Using the keyboard press <tab> until the Phone Number Prefix edit box is
selected, then use up and down arrow keys to scroll through available
options.
Using a mouse, bring up a list box of available Phone Number Prefixes by
clicking on the downward facing arrow or in the edit box:
WinTesla Service Software
Scroll through the list and choose the required option by clicking on the
mouse left button or pressing <tab>.
Card Number
Enter the Calling Card’s number here. For security reasons, the card
number is displayed as a password (‘*’)
Name
Enter the Calling Card’s name here.
rase Card A From Phone button (Alt+E)
E
Calling Card A data is erased from the phone.
Eras
e Card B From Phone button (Alt+S)
Calling Card B data is erased from the phone.
Card To Use
Allows selection of ONLY one from the following choice:
– None
R
ead From Phone button (Alt+R)
Calling Card data is read from phone and updates the PC’s display.
rite To Phone button (Alt+W)
W
Writes Calling Card data to phone.
Issue 2 03/00
– Card A
– Card B
Page 81
Page 82

NHA–9
WinTesla Service Software
Write To Phone & Exit button (Alt+X)
Writes Calling Card data to phone, and closes dialog box.
PAMS
Technical Documentation
Short C
Read From F
Reads Calling Card data from file. The operator is given a file selection
dialog box to choose from.
W
rite To File button (Alt+W)
Writes Calling Card data to file. The operator can create a file name using
a file selection dialog box.
ancel button (Alt+C)
C
The dialog box is closed. Data is not written to phone.
H
elp button (Alt+H)
Opens context sensitive help.
ode Memory
Activation Status Bar Text
Alt+D,C –
This dialog box allows the editing of a maximum of 75 Short Code
Memories (SCM).
ile button (Alt+F)
Page 82
Issue 2 03/00
Page 83

PAMS
NHA–9
Technical Documentation
To edit, select the required SCM by double clicking on the entry in the
table. This will produce the following dialog box:
Simply enter the name (30 characters max), number, tick the VIP box if
required and press the Enter button. A maximum of 3 VIP is authorised.
oad From File button (Alt+L)
L
Reads SCM data from file. The operator is given a file selection dialog box
to choose from.
WinTesla Service Software
S
ave To File button (Alt+S)
Writes SCM data to file. The operator can create a file name using a file
selection dialog box.
ead From Phone button (Alt+R)
R
SCM data is read from phone and updates the PC’s display.
W
rite To Phone button (Alt+W)
Writes SCM data to phone.
Clear Short Code M
Phone’s SCM memory is erased. Pressing this button produces the
following:
em button (Alt+M)
Selecting OK will clear the phone’s Short Code Memory.
Issue 2 03/00
Page 83
Page 84

NHA–9
WinTesla Service Software
Clear Last Call Stack button (Alt+C)
Phone’s Last Call Stack memory is erased. Pressing this button produces
the following:
Selecting OK will clear the phone’s Last Call Stack.
Ex
it button (Alt+X)
PAMS
Technical Documentation
The dialog box is closed.
H
elp button (Alt+H)
Opens context sensitive help.
ser Menu Settings
U
Activation Status Bar Text
Alt+D,U –
This option gives a quick menu setup screen.
Page 84
Issue 2 03/00
Page 85

PAMS
NHA–9
Technical Documentation
Most of the changes are effective only after the phone has been switched
off.
Lock
–On
–Off
Auto Answer
–On
–Off
Auto Flip
–On
–Off
One Touch Dial
–On
–Off
WinTesla Service Software
Auto Retry
–On
–Off
Lights
–On
–Off
Roam Beeps
–On
–Off
Emergency 9
–On
–Off
Issue 2 03/00
Page 85
Page 86

NHA–9
WinTesla Service Software
Personal Profile
Ring Options
Allows selection of the ring option
Using the keyboard – press <tab> until the ring options box is selected,
then use the up/down arrow keys to scroll through the options.
PAMS
Technical Documentation
Using the mouse – bring up a list box of available ring options by clicking
the down arrow. Alternatively use the edit box to scroll through the list,
choose the required option and click the mouse left button on pressing
<tab>.
Ring Volume
Allows selection of ring volume.
Using the keyboard press <tab> until the ring volume edit box is selected,
then use up and down arrow keys to scroll through available volume
levels.
Using a mouse, bring up a list box of available ring volume levels by
clicking on the downward facing arrow or in the edit box:
Page 86
Scroll through the list and choose the required volume by clicking on the
mouse left button or pressing <tab>.
Issue 2 03/00
Page 87

PAMS
NHA–9
Technical Documentation
Alert Type
Allows selection of alert type.
Using the keyboard press <tab> until the alert type edit box is selected,
then use up and down arrow keys to scroll through available alert types.
Using a mouse, bring up a list box of available alert types by clicking on
the downward facing arrow or in the edit box:
WinTesla Service Software
Scroll through the list and choose the required alert type by clicking on the
mouse left button or pressing <tab>.
Message Alert
Allows selection of the message Alert
Using the keyboard – press <tab> until the message Alert box is selected,
then use the up/down arrow keys to scroll through the options.
Using the mouse – bring up a list box of available options by clicking the
down arrow. Scroll through the list, choose the required option and click
the mouse left button on pressing <tab>.
Issue 2 03/00
Page 87
Page 88

NHA–9
WinTesla Service Software
Keypad Volume
Allows selection of keypad volume.
Using the keyboard press <tab> until the keypad volume edit box is
selected, then use up and down arrow keys to scroll through available
volume levels.
Using a mouse, bring up a list box of available volume levels by clicking
on the downward facing arrow or in the edit box:
PAMS
Technical Documentation
Scroll through the list and choose the required volume by clicking on the
mouse left button or pressing <tab>.
Audio Volume
Allows selection of audio volume.
Using the keyboard press <tab> until the audio volume edit box is
selected, then use up and down arrow keys to scroll through available
volume levels.
Using a mouse, bring up a list box of available audio volume by clicking on
the downward facing arrow or in the edit box:
Page 88
Scroll through the list and choose the required volume by clicking on the
mouse left button or pressing <tab>.
Allowed Calls
Allows selection of allowed calls.
Using the keyboard press <tab> until the allowed calls edit box is selected,
then use up and down arrow keys to scroll through available allowed calls.
Using a mouse, bring up a list box of available allowed calls by clicking on
the downward facing arrow or in the edit box:
Issue 2 03/00
Page 89

PAMS
NHA–9
Technical Documentation
Scroll through the list and choose the required allowed calls by clicking on
the mouse left button or pressing <tab>.
Allowed Carrier
Allows selection of allowed carrier.
Using the keyboard press <tab> until the allowed carrier edit box is
selected, then use up and down arrow keys to scroll through available
allowed carriers.
Using a mouse, bring up a list box of available allowed carriers by clicking
on the downward facing arrow or in the edit box:
WinTesla Service Software
Scroll through the list and choose the required allowed carrier by clicking
on the mouse left button or pressing <tab>.
Profile Selection
Allows selection of the Profile Selection
Using the keyboard press <tab> until the profile selection box is selected,
then use up and down arrow keys to scroll through available selections.
Using a mouse, bring up a list box of available selections by clicking on
the downward facing arrow or in the edit box:
Scroll through the list and choose the required allowed carrier by clicking
on the mouse left button or pressing <tab>.
Issue 2 03/00
Page 89
Page 90

NHA–9
WinTesla Service Software
Language
Allows selection of language.
Using the keyboard press <tab> until the language edit box is selected,
then use up and down arrow keys to scroll through available languages.
Using a mouse, bring up a list box of available languages by clicking on
the downward facing arrow or in the edit box:
Scroll through the list and choose the required language by clicking on the
mouse left button or pressing <tab>.
PAMS
Technical Documentation
C
ancel button (Alt+C)
Nothing is written to the phone and the dialog box is closed.
Save & Ex
The settings are written to the phone and the dialog box is closed.
Ex
it button (Alt+X)
The dialog box is closed.
H
elp button (Alt+H)
Opens context sensitive help.
it button (Alt+X)
Page 90
Issue 2 03/00
Page 91

PAMS
NHA–9
Technical Documentation
Set Default Values
Activation Status Bar Text
Alt+D,V –
Resets the phone’s EEPROM to default values held in ROM. USE WITH
CARE!
WinTesla Service Software
Default UI button (Alt+U)
Resets the following:
– Calling Card
– User Settings
– Last Call Stack
– Notepad
– Missed Call Counter
Default N
Resets the following:
Reset T
Resets the following:
AM button (Alt+N)
– NAM
– SID
imers button (Alt+T)
– Call Timers
Clear S
Clears all the Short Code Memory locations
Reset A
Performs all of the above.
Issue 2 03/00
– Does not reset lifetimer
hort Code Memory button (Alt+S)
ll of Above button (Alt+A)
Page 91
Page 92

NHA–9
WinTesla Service Software
Reset Everything
Reset phone to default factory values. The following screen will then
appear
Exit button (Alt+X)
PAMS
Technical Documentation
The dialog box is closed.
H
Opens context sensitive help.
User Data T
Activation Status Bar Text
Alt+D,T –
Use to transfer blocks of EEPROM data to/from phone and file.
elp button (Alt+H)
ransfer
Page 92
Issue 2 03/00
Page 93

PAMS
NHA–9
Technical Documentation
Categories
Select from the following:
– User
– SCM
– Dealer
– Warranty
– All
Note: This option cannot be used to transfer user short code memory. Use the Dealer +
Short Code Memory option instead.
Read from Phone button (Alt+R)
Reads EEPROM data from the phone and writes it to a file. The operator
is given a file selection dialog box to create a filename.
rite to Phone button (Alt+W)
W
Reads EEPROM data from file and writes to phone. The operator is given
a file selection dialog box to choose from.
WinTesla Service Software
Note. Whilst a data transfer is taking place, the name of the datum currently being
transferred is displayed above the read/write buttons. This is to provide reassurance
during long transfers that the PC has not crashed.
Exit button (Alt+X)
The dialog box is closed.
H
elp button (Alt+H)
Opens context sensitive help.
Issue 2 03/00
Page 93
Page 94

NHA–9
WinTesla Service Software
Help
Index
Activation Status Bar Text
Alt+ H, I
Displays the NHA–9 help index
eneral Help
G
PAMS
Technical Documentation
Activation Status Bar Text
Alt+ H, G
Displays the NHA–9 general help
U
sing Help
Activation Status Bar Text
Alt+ H, U
Displays help information
bout WinTesla
A
Activation Status Bar Text
Alt+ H, A
Displays useful WinTesla information.
Page 94
Issue 2 03/00
 Loading...