

Page 1

FOREWORD
Thank you for purchasing a NISSAN automobile.
This user’s manual is for the navigation system
only.
Please read this manual carefully to ensure safe
operation of the navigation system. This manual
contains operating instructions for the NISSAN
Navigation System offered in your NISSAN vehicle
● Please read your vehicle’s owner’s manual
first.
● Do not remove this manual from the vehicle
when selling this vehicle. The next user of this
navigation system may need the manual.
● Because of possible specification changes,
sections of this manual may not apply to your
vehicle.
● All information, specifications and illustrations
in this manual are those in effect at the time of
printing. NISSAN reserves the right to change
specifications or design at any time without
notice.
Page 2

Page 3

Table of Contents
Introduction
How does the Nissan navigation system work?
What features are available on the Nissan navigation system?
1
2
3
How do I operate the Nissan navigation system?
How do I program a destination?
How do I use the Point of Interest (POI) feature?
How do I use the address book feature?
How do I use the avoid area feature?
How do I use the automatic re-routing feature?
How do I use the voice guidance feature?
How do I adjust the display?
Information on map data discs
Troubleshooting guide
Index
4
5
6
7
8
9
10
11
12
13
14
Page 4

Page 5

1 Introduction
How to use this manual ............................1-2
For safe operation ..............................1-2
Reference symbols .............................1-2
Safety note .......................................1-2
Laser product ..................................1-3
Page 6
HOW TO USE THIS MANUAL SAFETY NOTE
This manual uses special words and icons, organized by function. Please refer to the following
items and familiarize yourself with these symbols.
FOR SAFE OPERATION
WARNING
This is used to indicate the presence of
a hazard that could cause death or serious personal injury. To avoid or reduce the risk, the procedures must be
followed precisely.
CAUTION
This is used to indicate the presence of
a hazard that could cause minor or
moderate personal injury or damage to
your vehicle. To avoid or reduce the
risk, the procedures must be followed
carefully.
NOTE:
This indicates an item to help you understand the maximum performance of your
vehicle. If ignored, it may lead to a malfunction or poor performance.
REFERENCE SYMBOLS
INFO:
This indicates information necessary for efficient
use of your vehicle or accessories.
DEST button
This is a button on the control panel.
View key
This is a select key on the screen. By selecting
this key you can proceed to the next function.
This system is primarily designed to help you
reach your destination, and also performs other
functions as outlined in this manual. However,
you, the driver, must use the system safely and
properly. Information concerning road
conditions, traffic signs and the availability of
services may not always be up-to-date. The
system is not a substitute for safe, proper,
and legal driving.
Before using the navigation system, please read
the following safety information. Always use the
system as outlined in this manual.
WARNING
● When the driver operates the navigation system or uses the joystick
(screen function), first park the vehicle in a safe place and set the parking brake. Using the system while
driving can distract the driver and
may result in a serious accident.
Destinations cannot be set while the
vehicle is in motion.
● Do not rely on voice guidance alone.
Always be sure that all driving maneuvers may be made legally and
safely to avoid an accident.
1-2 Introduction
Page 7

● Do not disassemble or modify this
system. If you do, it may result in
accidents, fire, or electrical shock.
● Do not use this system if you notice
any malfunction such as a frozen
screen or lack of sound. Continued
use of the system may result in
accident, fire, or electrical shock.
● If you notice any foreign object in the
system hardware or spilled liquid, or
notice smoke or a smell coming from
it, stop using the system immediately
and contact your nearest NISSAN
dealer. Ignoring such conditions may
lead to accidents, fire, or electrical
shock.
NOTE:
Some states/provinces may have laws limiting the use of video screens while
driving. Use this system only where legal.
LASER PRODUCT
This navigation system is certified as a Class I
laser product.
The navigation system complies with DHHS
Laser-Radiation Standards, 21 CFR Chapter 1,
subchapter J.
WARNING
● Do not disassemble or modify this
system. There are no user serviceable parts in this navigation system.
● If maintenance, adjustments and operations other than those specified
in this manual are attempted, injury
due to laser radiation and exposure
could occur.
Introduction
1-3
Page 8

MEMO
1-4 Introduction
Page 9

2 How does the Nissan navigation system
work?
What is a navigation system? .......................2-2
About the navigation system .....................2-2
What is GPS (Global Positioning System)?...........2-2
Accuracy of positioning .........................2-2
Positioning adjustment ..........................2-3
Receiving signals from GPS satellites.............2-3
Display of GPS information ......................2-3
Detailed map coverage areas (MCA) for the
navigation system .................................2-3
When a gray road is displayed on the map ........2-4
Page 10

WHAT IS A NAVIGATION SYSTEM? WHAT IS GPS (Global Positioning
System)?
ABOUT THE NAVIGATION SYSTEM
This navigation system combines the data obtained from the vehicle (by gyro sensor) and from
GPS (Global Positioning System) satellites to
calculate the current location of the vehicle. This
position is then displayed on the screen, allowing route guidance to a destination.
GPS is a system developed and operated by the
U.S. Government, covering the entire planet.
This navigation system receives three or more
different radio signals from NAVSTAR (GPS
satellites), orbiting the earth 13,049 miles
(21,000 km) above ground. The data from different sets of signals are trigonometrically calculated to obtain the position of the vehicle.
INFO:
The tracking center in the U.S. controls signals
transmitted from GPS satellites. This control
sometimes results in reduced accuracy or no
signal received at all, in accordance with government requirements. Consequently, areas suchas
military bases may not accurately appear on the
navigation screen.
2-2 How does the Nissan navigation system work?
INV1761
ACCURACY OF POSITIONING
The color of the GPS Indicator on the upper
left corner of the screen indicates positioning as
follows:
● Green: positioning is possible and accurate
● Yellow: positioning is possible but accuracy is
minimal
● Gray: positioning is not possible
INFO:
For approximately 3 or 4 minutes after system
startup, the GPS indicator
even if accurate positioning is possible.
remains gray,
Page 11

POSITIONING ADJUSTMENT
When the system judges that the vehicle position information is not accurate based on vehicle
speed and gyro sensor data calculations, the
system will adjust the vehicle position information using GPS signals.
RECEIVING SIGNALS FROM GPS
SATELLITES
Sometimes, satellite reception is weak. The following are places where signals tend to be
weak:
● Inside tunnels and parking lots in buildings
● Areas with numerous tall buildings
● Under multi-layered highways
● In a dense forest
● Near military bases and certain government
facilities
Vehicles in these areas may not receive GPS
signals (Indicator color: gray).
INFO:
The antenna for GPS is located on the instru-
ment panel inside the vehicle. Do not place
any objects, especially mobile phones or
transceivers, on the instrument panel. Be-
cause the strength of the GPS signals are approximately one billionth of that of TV waves;
phones and transceivers will decrease the
strength or may totally disrupt the signals.
DISPLAY OF GPS INFORMATION
This system displays GPS information.
Please refer to “GPS information display” on
page 11-17.
NOTE:
Directional guidance provided by the navigation system does not take carpool lane
driving into consideration, especially when
carpool lanes are separated from other
road lanes.
DETAILED MAP COVERAGE AREAS
(MCA) FOR THE NAVIGATION SYSTEM
This system is designed to help you reach your
destination, and also performs other functions as
outlined in this manual. However, you, the driver,
must use the system safely and properly. Information concerning road conditions, traffic signs
and the availability of services may not always be
up-to-date. The system is not a substitute for
safe, proper, and legal driving.
Map data covers select metropolitan areas in the
United States.
Map data is available on map DVD-ROM. For information about map DVD-ROMs, contact a
NISSAN dealer or call the NISSAN Navigation
System help desk at 1-800-NISSAN-1
(1-800-647-7261).
Map data includes 2 types of areas: “Detailed
coverage areas” providing all detailed road data
and other areas showing “Main roads only”.
NOTE:
Detailed map data is not available in many
areas and is generally limited to select major metropolitan areas.
How does the Nissan navigation system work? 2-3
Page 12

For information on which metropolitan areas are
in detailed coverage areas, please refer to the
NISSAN Navigation System Software Booklet
(included). When you purchase an updated map
DVD-ROM, a new software booklet will be
provided.
WHEN A GRAY ROAD IS DISPLAYED ON THE MAP
● Route calculation may not be possible when a
destination or the current vehicle location is
near a gray road.
● When setting a destination, the road near the
cross cursor blinks. For gray roads, however,
the road may not blink.
● When you are driving on a gray road after the
vehicle has deviated from the suggested
route during route guidance, automatic rerouting may not start immediately.
● Route guidance (enlarged view and voice
guidance) may not be done at the intersection
where the road your vehicle is driving on and a
gray road intersect.
● POI information and street names near gray
roads are not contained in the map data.
2-4 How does the Nissan navigation system work?
Page 13

3 What features are available on the
Nissan navigation system?
Route guidance ...................................3-2
Point of interest (POI) directory .....................3-2
Address book .....................................3-2
Avoid area ........................................3-3
Automatic re-route.................................3-3
Detour ...........................................3-3
Birdview™ ........................................3-4
Voice guidance....................................3-4
Short menus ......................................3-4
Page 14

ROUTE GUIDANCE POINT OF INTEREST (POI)
DIRECTORY
ADDRESS BOOK
The main feature of the NISSAN Navigation System is Visual and Audio Route Guidance in selected detailed map coverage areas. Utilizing a
network of GPS (Global Positioning System)
satellites, the NISSAN Navigation System tracks
your location on the map and directs you where
you want to go.
Once you program a destination covered by a
detailed map, The NISSAN Navigation System
will determine a route from your current location
to your destination. The moving map display and
turn-by-turn voice commands help the driver determine upcoming turns.
This feature can be especially helpful in finding
unfamiliar locations or businesses. The system
may be unable to set a destination and/or calculate distance when a destination is outside a detailed map coverage area. Additionally, audio
route guidance may not be available if the destination is outside a detailed map coverage area.
For more information on how to program a
destination, please refer to section 5.
The NISSAN Navigation System offers an extensive Point of Interest (POI) directory in detailed
map coverage areas for your convenience. This
directory includes a wide variety of destinations
ranging from gas stations, ATMs, and restaurants to casinos, ski resorts, shopping centers
and businesses. By accessing the Point of Interest directory, you can search for addresses and
phone numbers for a destination, and with a
press of a button, the NISSAN Navigation System will calculate a route to the destination.
The Point of Interest directory offers many uses.
For example, the directory can be sorted by the
various types of restaurants near your current
location. If you need an ATM or gas station, the
NISSAN Navigation System can point you to the
closest one or the closest one of your favorite
brand.
For more information on how to use the Point of
Interest directory, please refer to section 6.
Using the Address Book feature, you will have
the ability to store up to 50 locations in detailed
map coverage areas into a personal directory.
This is especially useful for frequently visited
locations, such as your clients, relatives, or
friends. The Address Book feature will provide
you with easy access to frequently visited locations when setting them as your destination.
For more information on how to use your Address Book, please refer to section 7.
3-2 What features are available on the Nissan navigation system?
Page 15

AVOID AREA AUTOMATIC RE-ROUTE DETOUR
By using the Avoid Area feature, you can identify
areas or freeways that you would like the
NISSAN Navigation System to avoid when plotting routes. For example, if you know of a freeway
or area that is always congested with traffic, you
can program the NISSAN Navigation System to
plot routes that go around that particular freeway
or area.
For more information on the Avoid Area feature,
please refer to section 8.
If you miss a turn while using the Route Guidance feature, the NISSAN Navigation System
will automatically recalculate a new route to your
destination.
For more information on the Automatic Re-route
feature, please refer to section 9.
If you hear about a traffic accident on the radio
that is 4 miles (6 km) ahead of you and traffic is
backing up fast, you can use the Detour function
to calculate an alternative route that will help you
avoid the gridlock caused by the traffic accident.
The NISSAN Navigation System has the ability
to find an alternative route using secondary
roads that will return you to primary roads after a
specified number of miles.
For more information on the Detour feature,
please refer to section 9.
What features are available on the Nissan navigation system? 3-3
Page 16

Birdview™ VOICE GUIDANCE SHORT MENUS
INV1762 INV1763 INV1764
The NISSAN Navigation System gives you a
choice of two map viewing styles, a normal
2-dimensional Plan View map and the
3-dimensional Birdview™ map. The 3-D
Birdview™ map depicts a geographic area as
seen from an elevated perspective, so you will
get a better feel for the route ahead.
For more information on the Birdview™ feature,
please refer to section 11.
Route guidance is executed using voice and
screen instruction. When the vehicle approaches an intersection where you need to turn,
the voice guidance tells you the direction to take.
The system also has the following useful features:
● Enlarged display of intersections.
● Automatic rerouting when a vehicle is off the
course (when map is displayed).
For more information on the Voice Guidance
feature, please refer to section 10.
To make the NISSAN Navigation System easier
to use, there is a short menu function in which
the most commonly used items are listed. When
the indicator is illuminated, the short menus
(Easy Mode) are displayed. When the indicator
is turned off, the default navigation systems
menus (Expert Mode) are displayed.
INFO:
● [Easy Mode] is the default setting on the initial
screen at the delivery of your new vehicle.
3-4 What features are available on the Nissan navigation system?
Page 17

● Term [Expert Mode] is used in this manual
when the
turned off. When the amber indicator is highlighted, the system is set to [Easy Mode].
● When the SETTING , DEST or
ROUTE button is pressed in the [Easy
Mode] screen, the
For more information on the Short Menu feature,
please refer to section 4.
Short Menus key indicator is
Help key is displayed.
What features are available on the Nissan navigation system? 3-5
Page 18

MEMO
3-6 What features are available on the Nissan navigation system?
Page 19

4 How do I operate the Nissan navigation
system?
Control panel button functions ......................4-2
Names of the components.......................4-3
How to use the joystick and the enter button.......4-3
How to use the PREV button ..................4-4
How to use the SETTING button...............4-4
How to use the DEST button ..................4-7
How to use the ROUTE button ................4-8
How to eject/insert the disc........................4-10
Setting up the start-up screen .....................4-12
Confirmation of destination or waypoint ..........4-12
Clearing the memory..............................4-15
Setting the average speed.........................4-17
About route guidance .............................4-18
Notes on route guidance .......................4-18
About the display error .........................4-20
Page 20
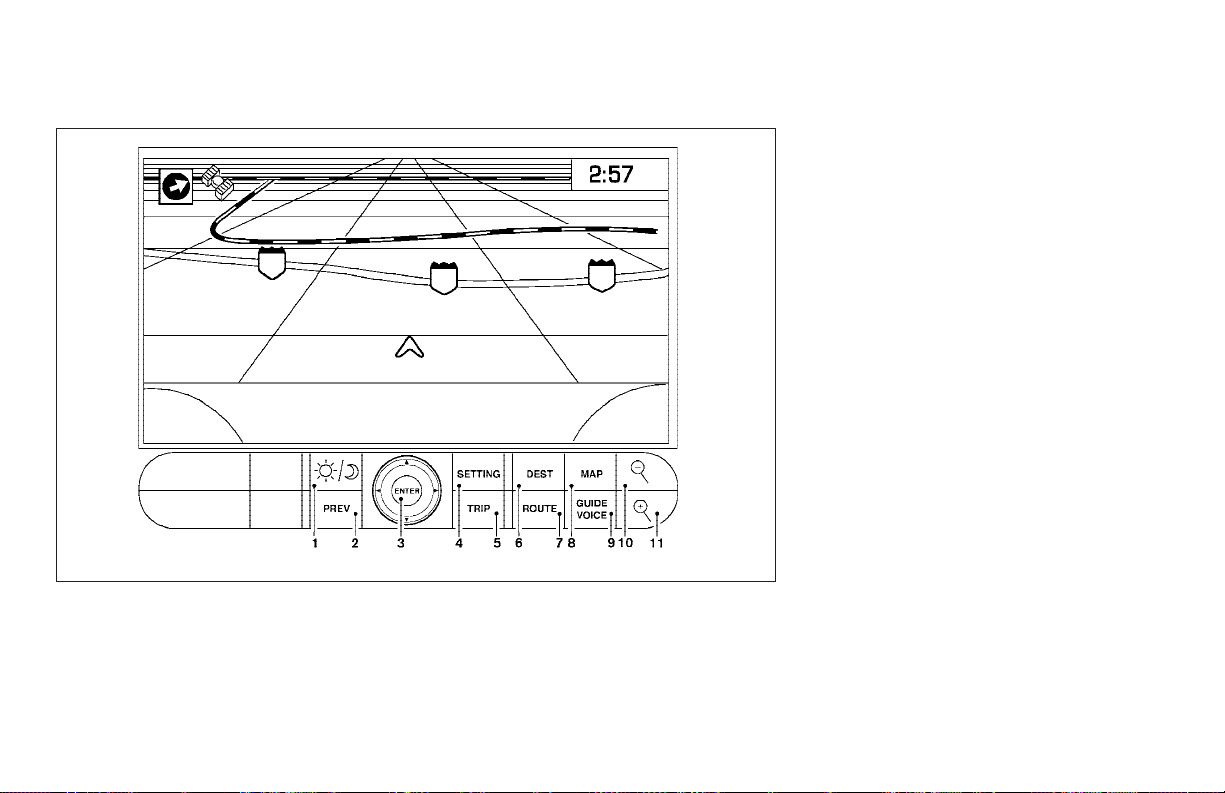
CONTROL PANEL BUTTON FUNCTIONS
LHA0388
4-2 How do I operate the Nissan navigation system?
Page 21
NAMES OF THE COMPONENTS
1. ( DAY/NIGHT ) button; refer to vehicle’s Owner’s Manual. Changes display
brightness.
2. PREV button; refer to page 4-4. Returns
to the previous screen during setup. Finishes the setup after it is completed.
3. JOYSTICK and ENTER button; refer to the
next section. Scrolls the map, selects and
sets each setting item.
4. SETTING button; refer to page 4-4. Performs various adjustments and settings to
help you use the navigation system more
effectively.
LNV0003
5. TRIP button; refer to vehicle’s Owner’s
Manual. Displays warning messages (if
there are any) and displays TRIP 1 → TRIP
2 → FUEL ECONOMY → MAINTENANCE
each time you press the button.
6. DEST button; refer to page 4-7. Displays
the “Set a Destination” menu.
7. ROUTE button; refer to page 4-8. Displays the setting menu screen at the time of
route calculation.
8. MAP button; refer to page 5-36. Toggles
between the intersection and the map during route guidance. Returns to the map
screen from the settings screen.
How do I operate the Nissan navigation system? 4-3
9. GUIDE VOICE button; refer to page
10-3. Provides voice guidance from the
current location.
10.
11.
12.
( ZOOM OUT ) button; refer to
page 11-6. Alters the scale of the map
display.
( ZOOM IN ) button; refer to page
11-6. Alters the scale of the map display.
( EJECT ) button; refer to page
4-10. Ejects the DVD.
HOW TO USE THE JOYSTICK AND
THE ENTER BUTTON
The navigation system is operated by selecting
keys on the screen with the joystick and pressing
the joystick in to ENTER your selection. Be sure
to understand the operation of the joystick before using the navigation system.
Selecting the keys on the screen
Use the joystick to select keys on the screen.
The joystick can be tilted in eight directions. The
selected key will be highlighted in yellow.
INFO:
Use the joystick to scroll the map.
Page 22
Selecting the function of the highlighted key
Press the ENTER button.
The display shows the screen used to carry out
the function of the selected key (highlighted in
yellow).
HOW TO USE THE PREV BUTTON
This button has two functions.
To return to the previous screen:
When this button is pressed during setup, setup
will be canceled, and the screen will return to the
previous screen.
To finish the set-up:
When this button is pressed after set-up is
completed, the settings will be renewed as
directed, and the screen will return to the map.
INFO:
When the PREV button must be pressed, (for
example, after the set-up is finished) instructions
are given in the operation procedure of each
section in this manual. If the PREV button is
pressed when not finished with the set-up, the
setting will be canceled, and the screen will return to the previous screen.
INV1765
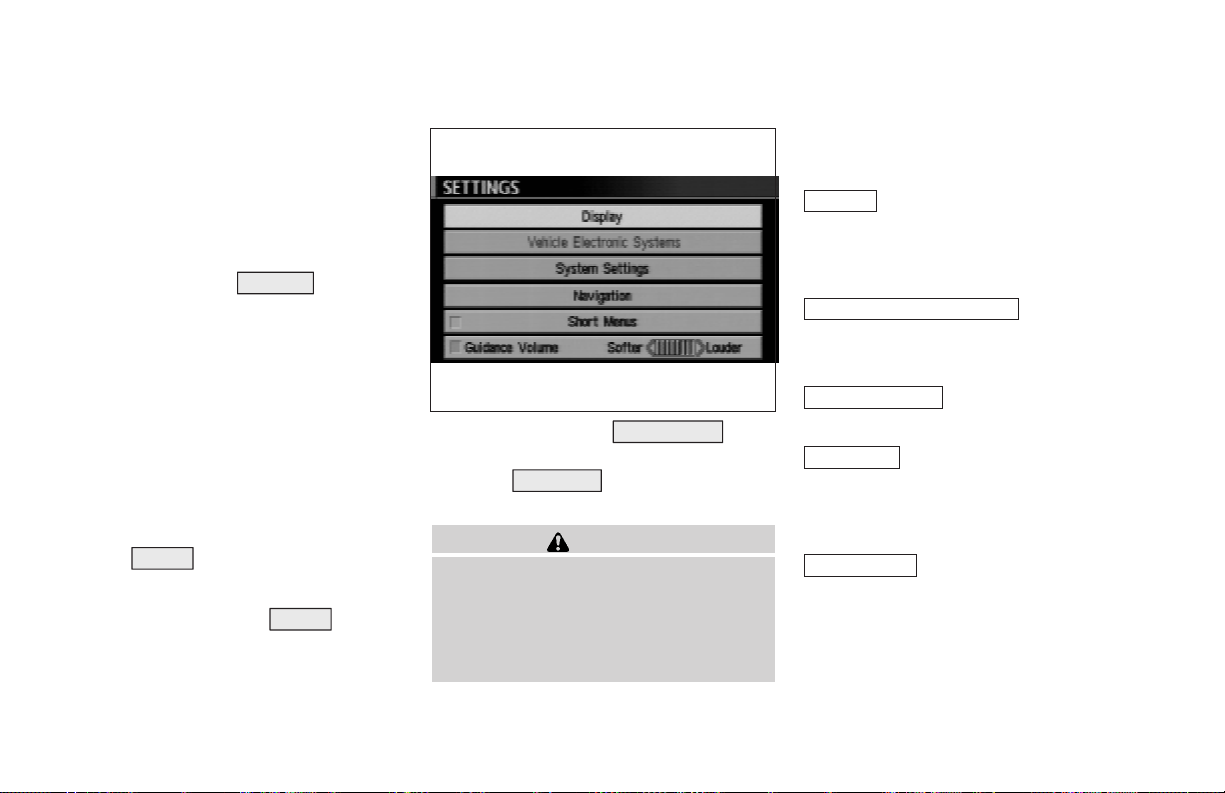
HOW TO USE THE SETTING BUTTON
When the SETTING button is pressed, the
[SETTINGS] screen is displayed.
WARNING
For safety, some of the functions on
the menu will be disabled while the vehicle is moving. To use the temporarily
disabled functions, park the vehicle in
a safe place, shift to P or N, and set the
parking brake.
To use the navigation system more effectively,
various adjustments and settings can be
performed.
Display key:
The key also adjusts the display
Brightness/Contrast/Map Background.
Please refer to page 11-20.
Vehicle Electronic Systems key:
No settings available for the navigation system.
Please refer to vehicle’s Owner’s Manual.
System Settings key:
Please refer to vehicle’s Owner’s Manual.
Navigation key:
Changes various settings of the navigation
system.
Please refer to page 4-5.
Short Menus key:
This key changes between [Expert Mode] and
[Easy Mode].
Please refer to 3-4.
4-4 How do I operate the Nissan navigation system?
Page 23
Guidance Volume key:
Adjusts or turns off volume of the voice
guidance.
Please refer to “Adjusting the guide volume” on
page 10-2.
Help key:
Available only in easy mode (Short menus).
You can see the explanation of navigational
functions.
INV1766
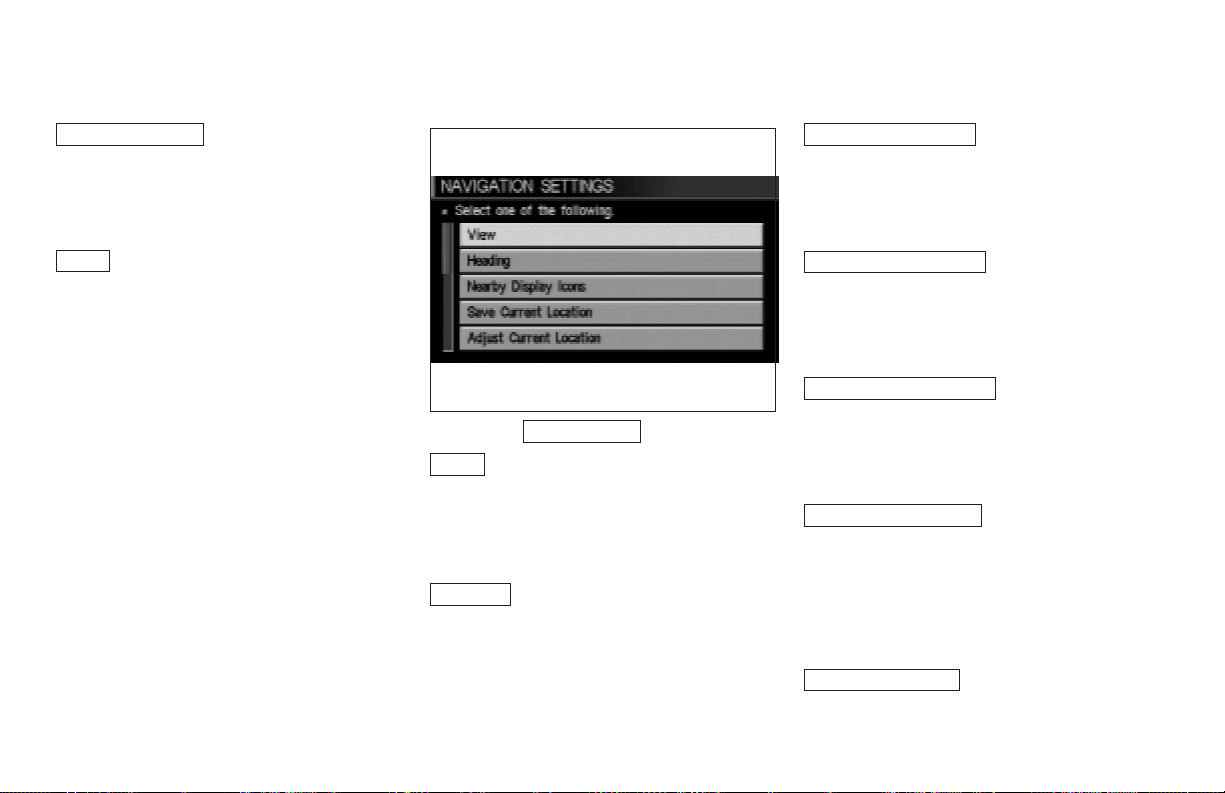
When the Navigation key is selected
View key:
This will let you choose between Birdview™ display and Plan View display.
Please refer to “Switching between Birdview™
and Plan View displays” on page 11-3.
Heading key:
You can set the map either to show the vehicle’s
current forward direction as up, or to show North
as up.
Please refer to “Changing the display direction
(in Plan View display)” on page 11-7.
How do I operate the Nissan navigation system? 4-5
Nearby Display Icons key:
Displays five types of points of interest around
the current location.
Please refer to “Setting the nearby display icons”
on page 6-15.
Save Current Location key:
Stores the current vehicle location in the address book.
Please refer to “Storing current vehicle position”
on page 7-4.
Adjust Current Location key:
Corrects the location and direction of the vehicle
icon.
Please refer to “Updating the current vehicle location and the direction” on page 11-18.
Auto Re-route On/Off key:
A new route to the desired destination will automatically be calculated again from the location
when the vehicle deviates from the suggested
route during route guidance.
Please refer to “Automatic re-routing” on page
9-2.
Avoid Area Setting key:
Defines areas to avoid when calculating a route.
Page 24
Please refer to “Setting avoid areas” on page
8-2.
Clear Memory key:
Clears all the stored memory (Address Book,
Avoid Area, Previous Dest.).
Please refer to “Clearing the memory” on page
4-15.
Edit Address Book key:
Changes the names and positions of the registered locations.
Please refer to “Setting up and editing the address book” on page 7-2.
GPS Information key:
GPS information will be displayed.
Please refer to “GPS information display” on
page 11-17.
Quick Stop Customer Setting key:
Sets the user-defined [Quick Stop] POI (Point
Of Interest).
Please refer to “Quick stop” on page 5-41.
Set Average Speed for Estimated Journey Time
key:
Please refer to “Setting the average speed” on
page 4-17.
Tracking On/Off key:
You can choose whether to display the path from
the start to the current position.
Please refer to “Displaying the track” on page
11-15.
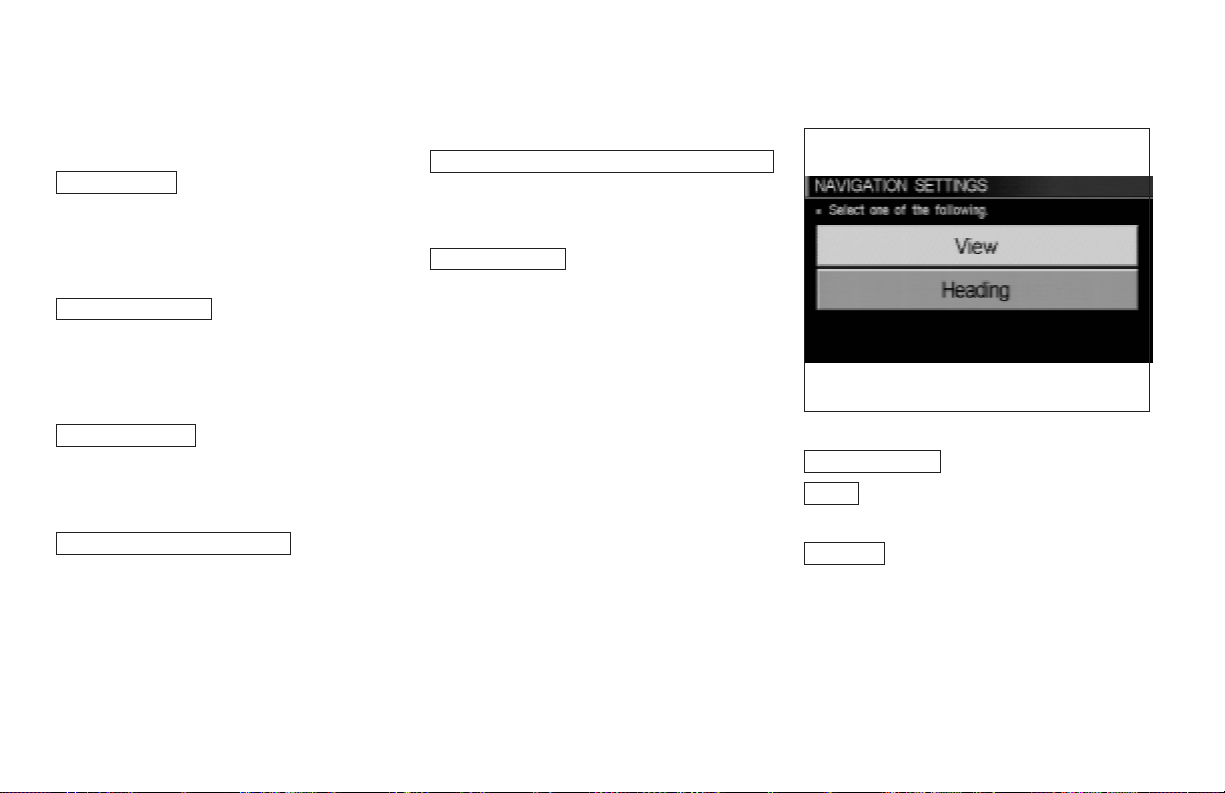
INV1767
Easy mode — when the
Short Menus key is selected
View key:
Same as in Expert Mode.
Heading key:
Same as in Expert Mode.
4-6 How do I operate the Nissan navigation system?
Page 25
INV1768
HOW TO USE THE DEST BUTTON
Sets destinations (final destination and waypoints) to search for a route.
This will activate various navigational functions.
WARNING
For safety, some of the functions on
the menu will be disabled while the vehicle is moving. To use the temporarily
disabled functions, park the vehicle in
a safe place, shift to P or N, and set the
parking brake.
● Address Book key:
Use this category item if you want to go to
places stored in the address book.
Please refer to “Setting with the
Address Book key” on page 5-3.
●
Previous Dest. key:
You can choose destinations from the last
10 destinations set.
For details, please refer to “Setting with the
Previous Dest key” on page 5-5.
●
Address/Street key:
Use this category item if you know the city
name, street name and house number of the
destination (waypoints).
Please refer to “Setting with the
Address/Street key” on page 5-7.
●
Intersection key:
Sets a destination using the intersection of
2 streets.
Please refer to “Setting with the
Intersection key” on page 5-14.
●
Point of Interest (POI) key:
Use this category item if you want to go to a
restaurant, hotel, gas station or other facility.
How do I operate the Nissan navigation system? 4-7
Please refer to “Setting with the
Point of Interest (POI) key” on page
5-21.
●
City key:
Sets the destination (waypoint) on the map
screen of the area around the input city.
Please refer to “Setting with the
City key” on page 5-21.
●
Phone Number key:
Use this category item when the destination
phone number is known.
Please refer to “Setting with the
Phone Number key” on page 5-25.
●
Map key:
Use this category itemif you want to choose
the place directly on the map display.
Please refer to “Setting with the
Map key” on page 5-27.
●
Country key:
This key is used to retrieve a location in another country when it is set as the destination (waypoint).
Please refer to “Setting with the
Country key” on page 5-29.
Page 26
Please refer to “Setting with the
page 5-30.
Address/Street key:
Same as in Expert Mode.
Point of Interest (POI) key:
Same as in Expert Mode.
Country key:
Same as in Expert Mode.
INV1769 INV1770
Easy Mode — when the
Short Menus key is selected
Help key:
You can see the explanation of the navigational
functions.
Home key:
When you set your home in the address book, a
route home will be calculated by selecting this
key.
If the home is not set beforehand, the setting
mode will appear to input the home address.
4-8 How do I operate the Nissan navigation system?
Home key” on
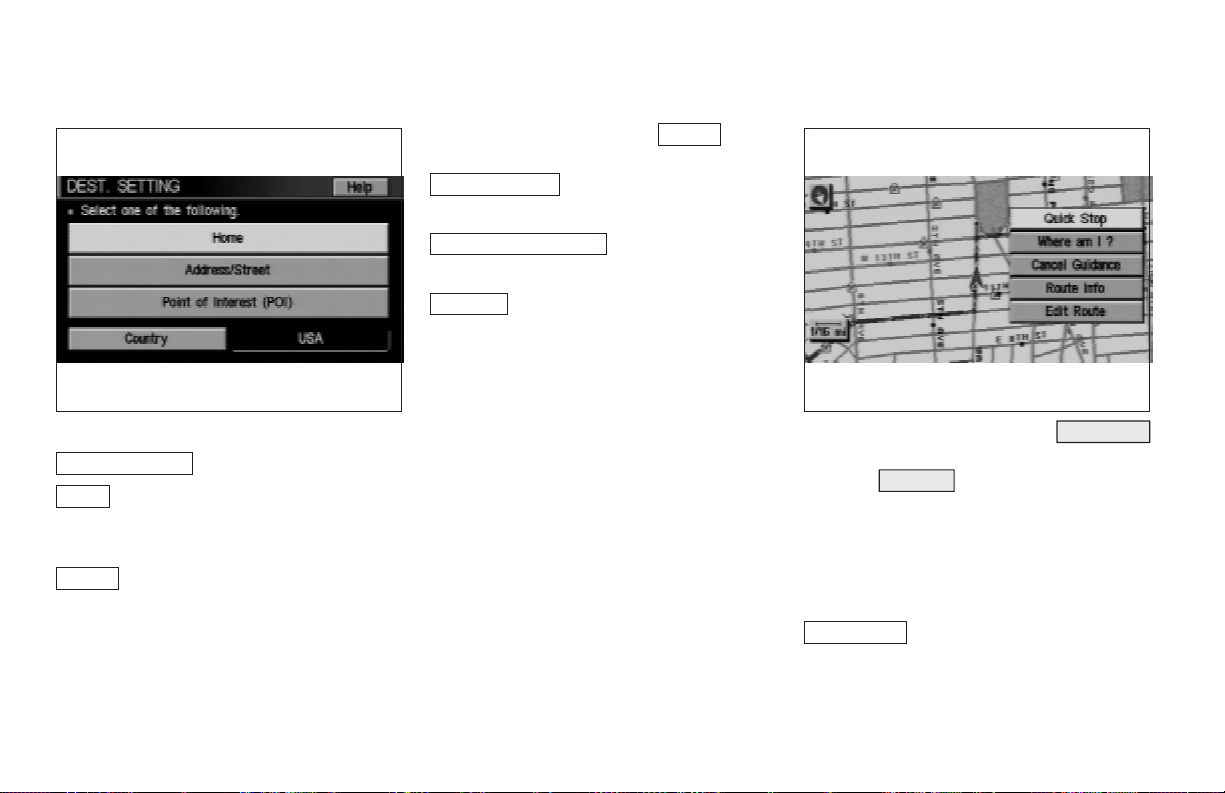
HOW TO USE THE ROUTE
BUTTON
When the ROUTE button is pressed while the
current location is displayed on the screen, the
display shows the following keys.
INFO:
When no operations are executed after a few
seconds, the keys will disappear automatically.
Quick Stop key:
Selects the destination (waypoints) from a list of
5 commonly used POI (Points of Interest).
Please refer to “Quick stop” on page 5-41.
Page 27
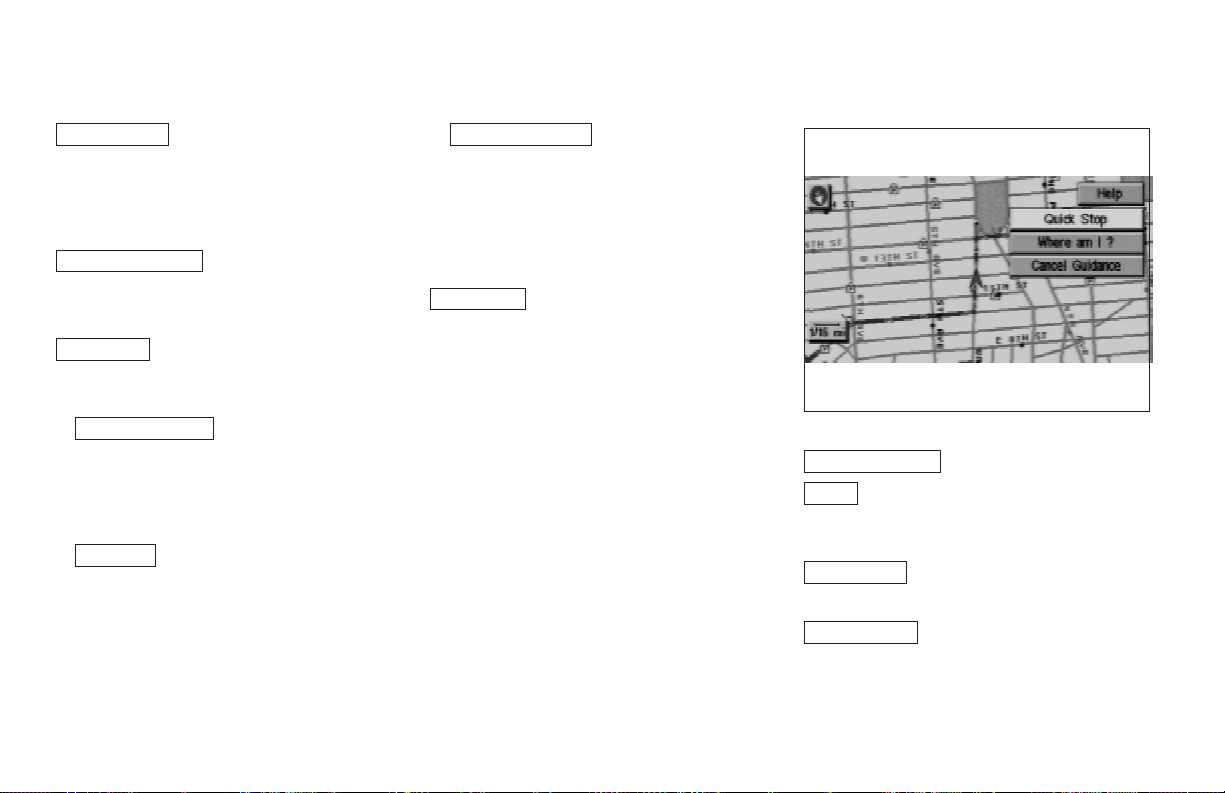
Where am I? key:
Displays the street where the vehicle is currently
located, the previous street, and the upcoming
street.
Please refer to “Where am I” on page 5-44.
Cancel Guidance key:
Cancels the route guidance.
Please refer to “Cancel guidance”on page 5-45.
Route Info key:
Displays the route to the destination. There are
three types of display methods.
●
Complete Route key:
Displays the entire route from the current location to the destination.
Please refer to “Displaying the complete
route to the destination” on page 11-10.
●
Turn List key:
Displays a list of the guidance points for the
entire route to the destination on a simple
map.
Please refer to “Displaying turn list” on page
11-11.
Route Simulation key:
●
Performs a simulation drive on the map
screen by moving a vehicle icon on all the
routes from the current location to the
destination.
Please refer to “Requesting the simulation
drive to the destination” on page 11-13.
Edit Route key:
Resets the set destination (waypoint).
Please refer to “Making the system guide the
route with detailed options” on page 5-31.
INV1771
Easy Mode — when the
Short Menus key is selected
Help key:
You can see the explanation of the navigation
functions.
Quick Stop key:
Same as in Expert Mode.
Where am I? key:
Same as in Expert Mode.
How do I operate the Nissan navigation system? 4-9
Page 28
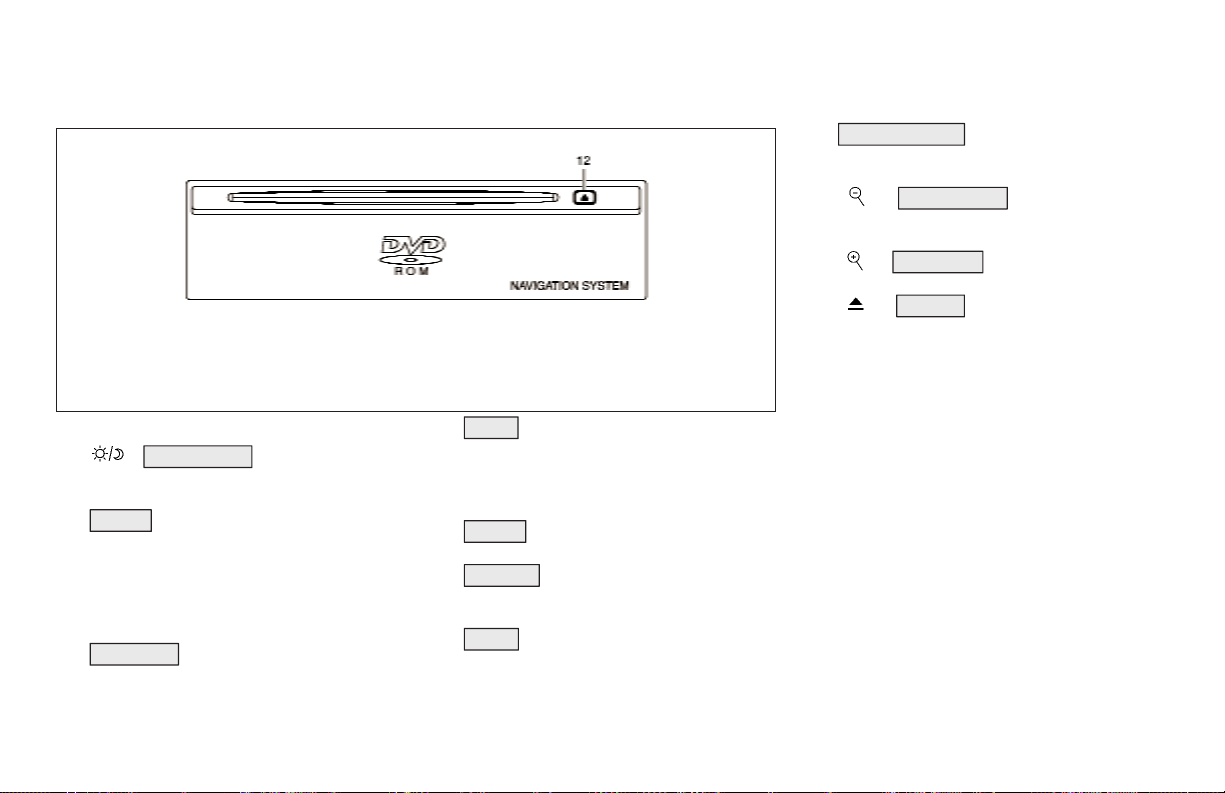
HOW TO EJECT/INSERT THE DISC
Cancel Guidance key:
Same as in Expert Mode.
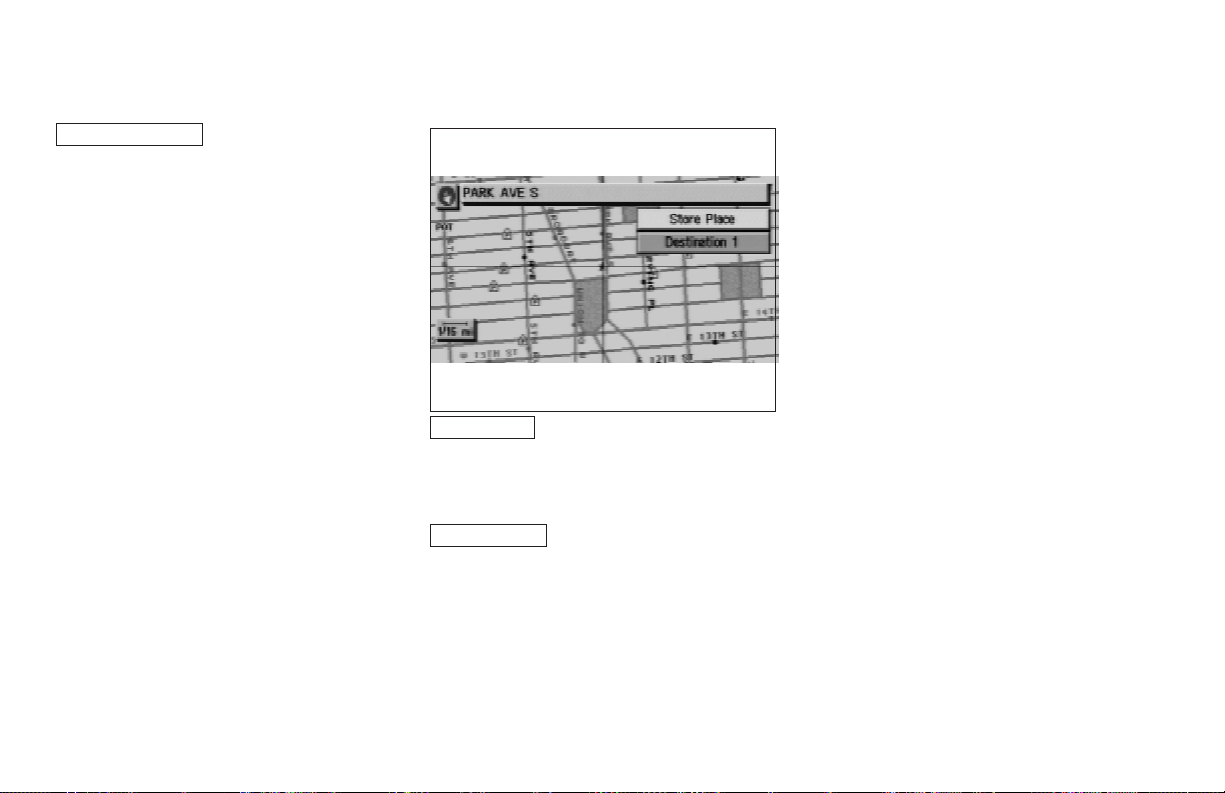
Keys that appear when the map is
scrolled with the joystick
You can scroll the map display and get information about the area near your vehicle and the
destination using the joystick.
INFO:
● This function can be used when the original
map disc is inserted.
● You can operate this with the map display on.
● This function cannot be used when the sys-
tem is calculating the route or drawing the
screen.
INFO:
The navigation system is installed under the front
passenger seat.
This system is provided with the map
DVD-ROM.
NOTE:
Please take great care in handling the
disc.
INV1772
Store Place key:
You can store the location with the cross pointer.
Please refer to “Storing current vehicle position”
on page 7-4.
Destination # key:
You can set the position as a destination, using
the cross pointer. The maximum number of destinations is six, and the last one stored will be the
final destination. (# will appear on the map to denote the selected locations from 1 to 6.) Please
refer to “Making the system guide the route with
detailed options” on page 5-31.
4-10 How do I operate the Nissan navigation system?
Page 29
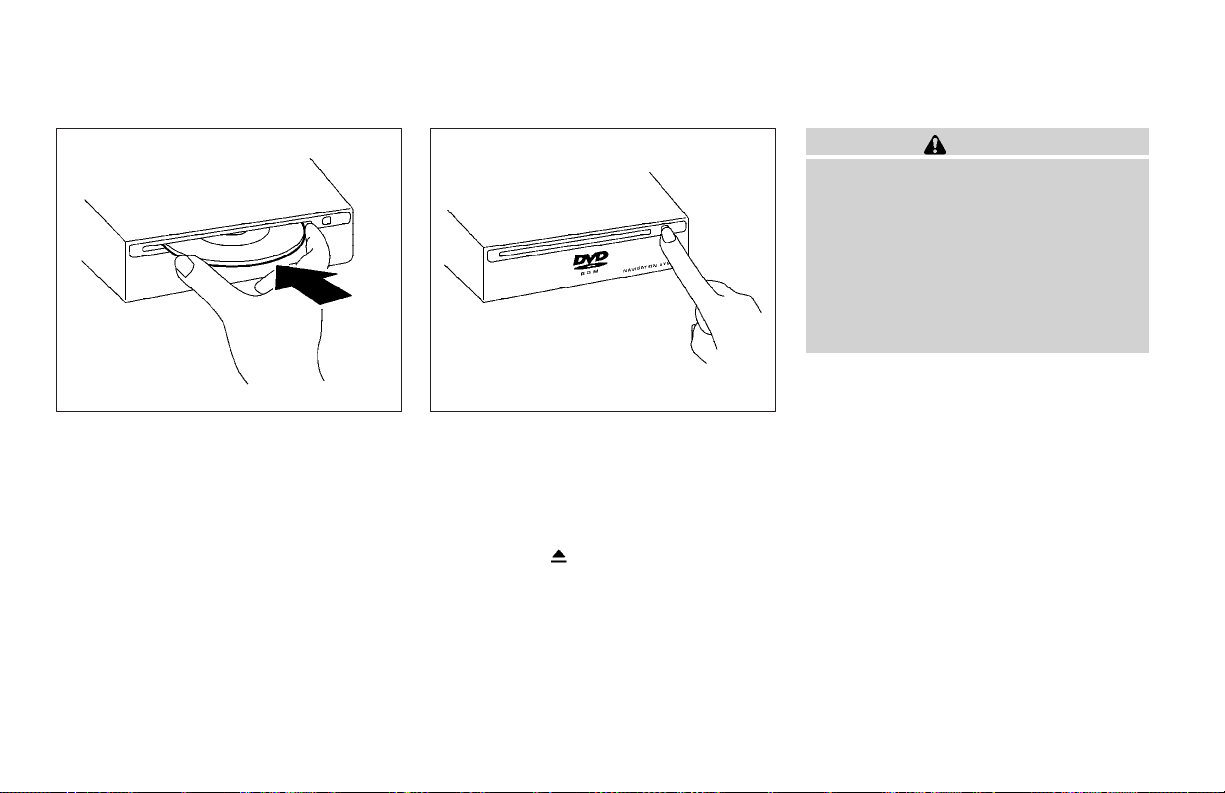
LHA0324 LHA0325
1. Slide the front passenger seat back for
easier access to the navigation system.
The map DVD-ROM is mounted under the
front passenger seat with the slot facing the
front of the vehicle.
2. To insert a disc:
Place the disc in the slot. It will be drawn in
automatically. You do not have to push it in
all the way.
3. To eject the disc:
Press the
disc.
button, and remove the
CAUTION
● The included map DVD-ROM is designed specifically for your navigation system. Do not use it in another
system as it could cause a
malfunction.
● Do not allow the system to get wet.
Excessive moisture such as spilled
liquids may cause the system to
malfunction.
How do I operate the Nissan navigation system? 4-11
Page 30
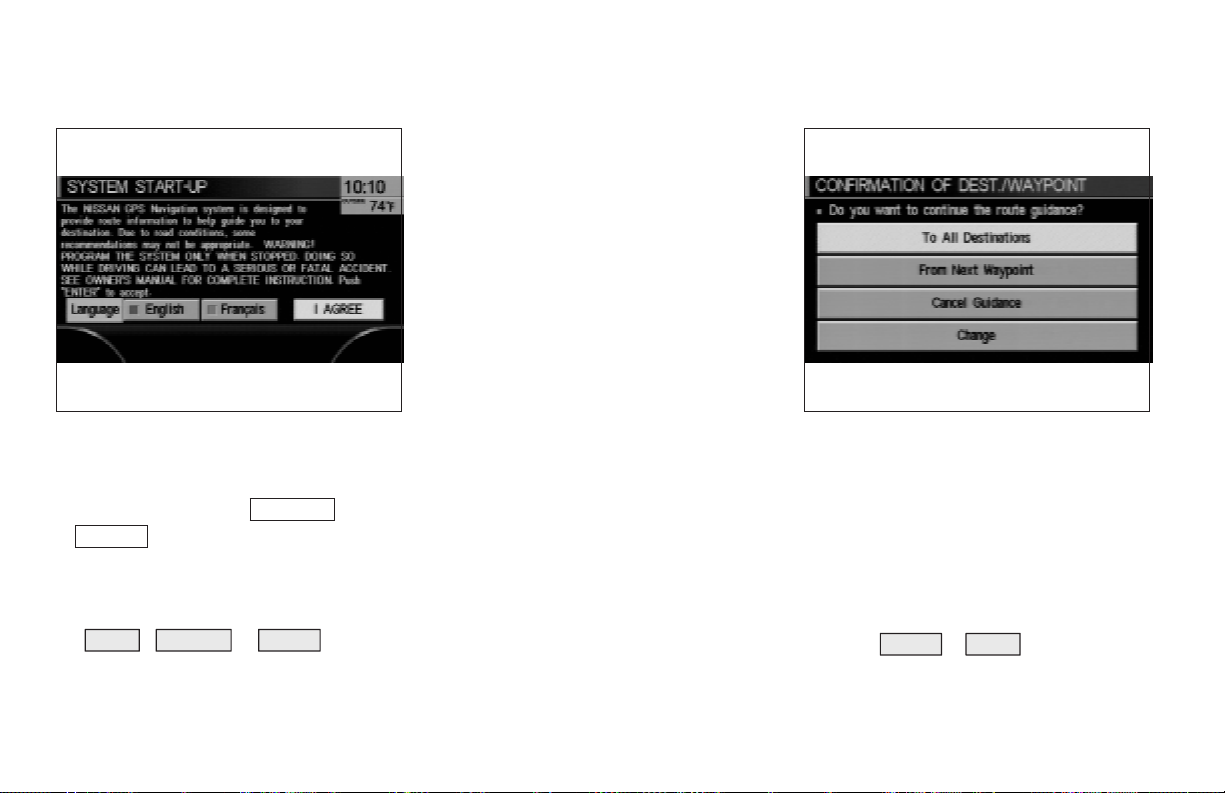
SETTING UP THE START-UP SCREEN
INV1773 INV1774
When you turn the ignition key to ACC, the
above warning is displayed on the screen. If it is
necessary to change language, select one of the
languages, then press the ENTER button. Read
the warning and select the
or
ENTER (Francais) key.
INFO:
If you do not press the ENTER button within one
minute, the display will black out. Pressing either
the MAP , ROUTE or DEST button will
bring back the start-up screen.
I AGREE (English)
CONFIRMATION OF DESTINATION
OR WAYPOINT
When the engine is turned off during route calculation and then turned on, the [CONFIRMATION OF DEST./WAYPOINT] screen will be displayed after the [SYSTEM START-UP] screen.
In the [CONFIRMATION OF DEST./ WAYPOINT] screen, the following four keys are
displayed.
● To All Destinations
● From Next Waypoint
● Cancel Guidance
● Change (only in Expert Mode)
INFO:
When the PREV or MAP button is pressed
in this screen, the [Turn by turn] screen will be
displayed.
4-12 How do I operate the Nissan navigation system?
Page 31

When the To All Destinations key is
selected
Route guidance will start to all
destinations/waypoints from the currentlocation.
INV1775 INV1776
When the From Next Waypoint key is
selected
Select the From Next Waypoint key when you
want to start route guidance to the next
waypoint/destination.
1. Select the
From Next Waypoint key.
2. When the
ance to the current waypoint is deleted and
route calculation to the next destination will
start.
INFO:
● If you do not want to delete the route
guidance, select the
will return to the map.
● This key can be selected only when a waypoint is set.
● When the PREV button is pressed, the
previous screen will be displayed.
Yes key is selected, routeguid-
No key and the screen
How do I operate the Nissan navigation system? 4-13
Page 32

INV1777 INV1778
When the Cancel Guidance key is
selected
The route guidance is canceled.
1. Select the
Cancel Guidance key.
2. When the
ance is canceled.
INFO:
● If you do not want to delete the route
guidance, select the
will return to the map.
● Press the GUIDE VOICE button to activate
the route guidance again.
● When the PREV button is pressed, the
previous screen will be displayed.
Yes key is selected, routeguid-
No key and the screen
When the Change key is selected
It is possible to edit the route guidance to the
destination.
INFO:
This key is displayed only in [Expert Mode].
4-14 How do I operate the Nissan navigation system?
Page 33

INV1779 INV1780
1. Select the Change key. 2. The [EDIT ROUTE] screen will be displayed.
Please refer to “Setting with
page 5-29.
Country key” on
CLEARING THE MEMORY
All the stored data (Address Book, Avoid Area,
Previous Dest) can be cleared.
1. Press the SETTING button.
How do I operate the Nissan navigation system? 4-15
Page 34

INV1781 INV1782 INV1783
2. Select the Navigation key on the [SET-
TINGS] screen.
3. Select the Clear Memory key. 4. Select the Yes key.
4-16 How do I operate the Nissan navigation system?
Page 35

INV1784 INV1781
5. When the Yes key is selected, the stored
data will be cleared, and the [NAVIGATION
SETTINGS] screen will appear.
SETTING THE AVERAGE SPEED
This navigation system can calculate and display
the expected arrival time to the destination. To
do this, set average vehicle speeds when driving
on freeways, main roads and ordinary roads.
The following settings are available.
● Freeway
Default: 55 MPH (90 km/h)
Max: 70 MPH (115 km/h)
Min: 40 MPH (65 km/h)
● Main Roads
Default: 25 MPH (40 km/h)
Max: 50 MPH (80 km/h)
Min: 10 MPH (20 km/h)
● Ordinary Roads
Default: 15 MPH (25 km/h)
Max: 35 MPH (55 km/h)
Min: 5 MPH (10 km/h)
1. Press the SETTING button.
2. Select the
TING] screen.
Navigation key on the [SET-
How do I operate the Nissan navigation system? 4-17
Page 36

ABOUT ROUTE GUIDANCE
The NISSAN Navigation System may not
●
calculate routes longer than about 1,100
miles (1,770 km). If your trip is longer than
1,100 miles (1,770 km), please divide your
trip by selecting one or two intermediate
destinations. Set your destination as the
first intermediate destination. Once you
pass the intermediate destination, you
may set your final destination as your destination if it is within 1,100 miles (1,770
km). Otherwise, set your destination using
your second intermediate destination.
INV1785 INV1786
3. Select the
Set Average Speed for Estimated Journey Time
key on the [NAVIGATION SETTINGS]
screen.
4. Move the joystick upward or downward to
select an item you want to change.
5. Move the joystick left or right and set an average vehicle speed.
INFO:
● It is possible to set the item illuminated in
yellow.
● When the
is selected, all settings return to default.
4-18 How do I operate the Nissan navigation system?
Return All Settings to Default key
NOTE:
The navigation system does not take driving
in “CAR-POOL LANES” into consideration
for the guidance especially when car-pool
lanes are separated from other road lanes.
NOTES ON ROUTE GUIDANCE
● The route selected by the system may not be
the shortest, nor are other circumstances
such as traffic jams considered.
●
Because of the inevitable difference in road
conditions and circumstances between the time
you use this system and the time the information
was produced from the DVD, there may be discrepancies in roads and regulations. In such
cases, follow the actual information available.
Page 37

● During route calculation, the map will not
scroll, however the vehicle icon will move with
the actual vehicle’s movement.
● During route calculation, buttons such as
MAP , DEST ,
and
be disabled.
● In some cases, after the calculation is
complete, it may take some time to get the
calculated route on the display.
● Waypoints that have been passed will not be
covered by the re-routing calculation.
● If you scroll the map while the suggested
route is being drawn, it may take more time to
finish drawing.
● If waypoints are set, the system is calculating
multiple routes between waypoints
simultaneously, and the following may result:
( ZOOM IN ) and the joystick will
– If one section (or more) of the routes be-
tween the waypoints is not found, none
of the route will be displayed.
– The route may not connect completely at
some waypoints.
– The route may require a U-turn close to
some waypoints.
( ZOOM OUT )
● Route calculation may not be completed in
the following cases:
– If there is no main road within 3.1 miles
(5 km) from the vehicle, a message saying so will appear on the screen. Try requesting route calculation when the vehicle is closer to the main road.
– If there is no main road within 3.1 miles
(5 km) from the destination or waypoint,
a message saying so will appear on the
screen. Try setting the location closer to
the main road.
– If the vehicle is too close to the destina-
tion or if there are no branches of the
roads to the destination. A message saying so will appear on the screen.
– If it is deemed impossible to reach the
destination or waypoints because of traffic regulations, etc.
– If the only route to reach the destination
or waypoints is extremely complicated.
– If the destination, current vehicle position
or waypoint is within the avoid area.
– If the setting of avoid areas covers the
routes to the destination, route calculation may not be possible.
How do I operate the Nissan navigation system? 4-19
● The following may occur when the route is being displayed:
– If you are requesting a calculation from
the main road, the origin of the route may
not exactly match the current vehicle
position.
– If you are requesting a calculation to a
destination on the main road, the end of
the route may not exactly match the
destination.
– If you are requesting a calculation from
the main road, the system may show a
route from another main road. This may
be because the icon to show the current
vehicle position (vehicle icon) is not set
accurately. In that case, park the car in a
safe place and reset the vehicle icon, or
continue driving to see if the vehicle icon
appears on the main road before requesting route calculation again.
–
There are cases in which the system
shows a detoured route to reach the destination or waypoints, if you set them from
memory or facility information. In order to
correct this, you will have to be careful
about the traffic direction, especially when
the lanes with different travel directions
are shown separately. Such places are interchanges and service areas.
Page 38

– This system makes no distinction be-
tween limited traffic control and total
control (blockage). It may show a detoured route even if the road is usable.
– Even if the freeway preference is set to
OFF, the route may be set on them. To
avoid this, set a waypoint on another
road type and request calculation.
– Even if the preference is set as OFF for a
ferry line, the route may be set on it. To
avoid this, set a waypoint on a road and
request calculation.
– Ferry lines, except those which accept
only pedestrians, bicycles and
motorcycles, are stored in this system.
When using them, take into consideration the travel time required and operational condition to decide whether to use
them or not.
ABOUT THE DISPLAY ERROR
The following cases may affect the display accuracy of the vehicle’s position or travel direction.
The accuracy will return to normal if the driving
conditions return to normal:
– When there is a similar road nearby.
– When the vehicle is traveling on a long stretch
of straight road or series of curves with a large
radius.
– When the vehicle is traveling in an area with a
checkerboard road system.
– When the vehicle is making consecutive S
curves.
– When the vehicle is at a large Y-shaped
junction.
– When the vehicle is on a loop bridge.
– When the vehicle is on a snow-covered or un-
paved road.
– When the vehicle has made several consecu-
tive turns or zigzags.
– When the vehicle is rotated on a parking lot
turntable while the ignition switch is OFF.
– Immediately after the vehicle is driven out of a
parking garage or underground parking lot.
– When the vehicle has different sizes of tires or
tire chains.
– When the vehicle is moved immediately after
the engine is started.
4-20 How do I operate the Nissan navigation system?
Page 39

5 How do I program a destination?
Various ways to set the destination (or waypoint)......5-2
Expert mode categories .........................5-2
Easy mode categories ..........................5-3
Setting with the
Setting with the
Setting with the
Setting with the
Setting with the
key ..........................................5-21
Setting with the
Setting with the
Setting with the
Setting with the
Address Book key
Previous Dest. key
Address/Street key
Intersection key
City key
Phone Number key
Map key
Country key
..............5-14
.....................5-21
.....................5-27
.................5-29
.............5-3
.............5-5
............5-7
...........5-25
Setting with the
Having the system guide you to the destinations .....5-31
Making the system guide the route with de-
tailed options .................................5-31
Adjusting and deleting the pre-set destination
(waypoints) ......................................5-37
To delete a destination .........................5-39
All clear .........................................5-40
Quick stop.......................................5-41
Quick stop customer setting ....................5-42
Where am I?.....................................5-44
Cancel guidance .................................5-45
When the
When the
When the
Home key (in easy mode)
All Destinations key is selected
Waypoint 1 key is selected
Do not Cancel key is selected
.........5-46
.....5-30
......5-45
.......5-46
Page 40

VARIOUS WAYS TO SET THE DESTINATION (or waypoint)
WARNING
To operate the navigation system or to
use the screen functions, first park the
vehicle in a safe place and set the parking brake. Using the system while driving can distract the driver and may result in a serious accident.
5-2 How do I program a destination?
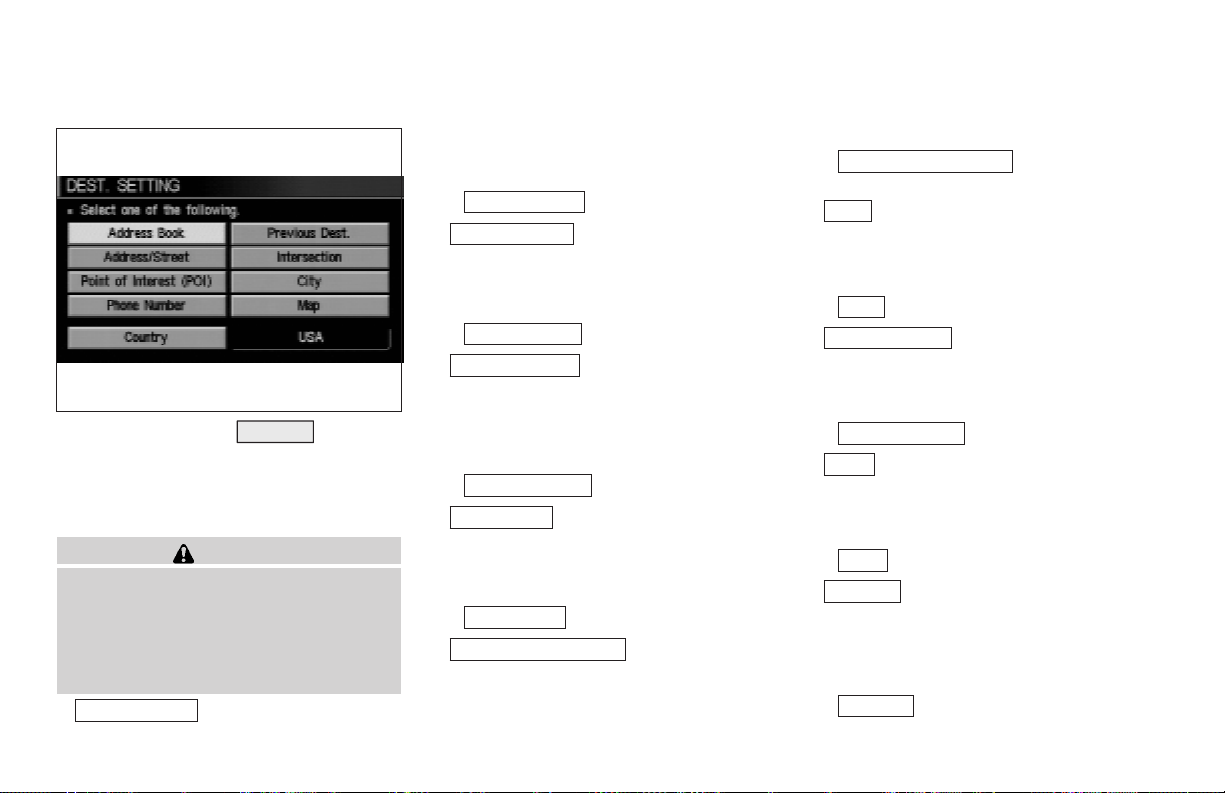
● Phone Number
● Map
INV1768
EXPERT MODE CATEGORIES
To set the destination and waypoints, you can
choose from the eight categories described
below. Use these options to choose the best
way to find the route to the destinations and
waypoints.
● Address Book
● Previous Dest
● Address/Street
● Intersection
● Point of Interest (POI)
● City
Page 41

INV1769
EASY MODE CATEGORIES
When the Expert Mode is canceled, the following three categories will be displayed as Easy
Mode.
● Home
● Address/Street
● Point of Interest (POI)
INFO:
● Use the
as in Expert Mode.Please referto “Settingwith
the
“Setting with the
key” on page 6-2.
● If the
ber in the [SETTING] screen, the screen is in
Easy Mode. In this case, the keys displayed are
different from the screen in Expert Mode.
● If you set a destination or waypoints, they will
be displayed with icons.
● If you want to go to places close to the stored
locations or facilities, use categories such as
facility, nearby facility or memory for easier
setting.
● When using either the Point of Interest (POI)
or nearby Points of Interest categories, the
names called up can be set as the destination
if you do not scroll the screen. If you want to
choose a different place on the screen from
the one called up, you will have to scroll the
screen.
Address Book key and the
key in the same way
Address Book key” on page 5-3 and
Short Menus key is highlighted in am-
SETTING WITH THE
Address Book KEY
The Address Book will allow you to store locations in the memory. This is especially useful for
locations that you visit frequently.
Please refer to “Setting up and editing the address book” on page 7-2.
How do I program a destination? 5-3
Page 42

INV1768 INV1787 INV1788
1. Press the DEST button.
2. Select the
[DEST. SETTING] screen.
The [DEST. SETTING (Address Book)] screen
will be displayed.
Address Book key on the
5-4 How do I program a destination?
3. Select the item key of your destination (waypoints) on the [DEST. SETTING (Address
Book)] screen.
4. To set the destination (waypoints), refer to
“Making the system guide the route with detailed options” on page 5-31.
Page 43

5. To slightly alter the destination.
Select the
screen of the area around the specified destination (waypoints).
Map key to display the map
INV1789 INV1790
6. If necessary, operate the joystick to adjust
the location of the destination (waypoint).
Press the ENTER button. Select the
Destination key to confirm. The [DEST.
SETTING] screen will be displayed. To set
the destination (waypoint), refer to “Making
the system guide the route with detailed
options” on page 5-31.
INFO:
Tochange the listingorder, select the
on the [DEST. SETTING (Address Book)] screen
and tilt the joystick to the rightor left, or press the
ENTER button.
Please refer to “Changing the listing order” on
page 7-7.
Sort key
SETTING WITH THE
Previous Dest. KEY
This system memorizes the last 10 destinations
previously chosen, allowing you to set new destinations or waypoints from them.
How do I program a destination? 5-5
Page 44

INV1791 INV1792 INV1793
1. Press the DEST button.
2. Select the
[DEST. SETTING] screen.
A total of 10 destinations and locations previously set can be stored and displayed.
Previous Dest. key on the
5-6 How do I program a destination?
3. Select the item key of your destination (waypoints) on the [DEST. SETTING (Previous
Dest.)] screen.
4. To set the destination (waypoints), refer to
“Making the system guide the route with detailed options” on page 5-31.
Page 45

INV1794 INV1795
5. To fine tune the destination. Select the
Map key to display the map screen of
the area around the specified destination
(waypoints).
SETTING WITH THE
Address/Street KEY
Sets the destination (waypoints) from the street
names and addresses that you enter.
There are two search methods; direct search by
the street names, and search by the street
names after the state and/or the city are defined.
6. If necessary, operate the joystick to adjust
the location of the destination (waypoints).
Press the ENTER button. Select the
Destination key to confirm. The [DEST.
SETTING] screen will be displayed. To set
the destination (waypoints), refer to “Making the system guide the route with detailed options” on page 5-31.
How do I program a destination? 5-7
Page 46

INV1796 INV1797 INV1798
1. First press the DEST button.
2. Select the
Address/Street key.
5-8 How do I program a destination?
Setting with the List key
The List key is used whenyou know the names
of the destination and waypoints.
1. A keyboard will be displayed on the [DEST.
SETTING (Address/Street)] screen. Enter
the street name you want to set.
INFO:
It is not possible to enter names if they are not
stored in the DVD-ROM.
2. Enter the street name of your destination.
For example, enter
3. Enter
U , then select the List key. The
list screen of street names which begin with
TU will appear.
T , then U.
Page 47

INV1799 INV1800 INV1801
● If less than 5 suggested streets remain, they
will be displayed automatically.
● The city names and street names will be
displayed.
● Use the joystick to scroll the display if more
than 5 suggested street names appear.
● When the
Next Search key is selected, it is
possible to narrow down cities. To use this
function, refer to “Setting with the
City key”
on page 5-21.
● When the PREV button is pressed, the
screen to input streetnames will be displayed.
4. Select one street of your destination.
5. Enter the house number.
Select the
OK key.
INFO:
It may not be possible to specify a location after
selecting the
OK key. In that case, a list of locations which correspond to the entered house
number will be displayed.
NOTE:
If a house number is entered and it is not a
“direct hit” for house numbers already
stored in the database, then only a map to
the general vicinity will be displayed.
6. To set the destination (waypoints), refer to
“Making the system guide the route with detailed options” on page 5-31.
How do I program a destination? 5-9
Page 48

INV1802 INV1803 INV1804
7. To slightly alter the destination.
Select the
of the area around the specified destination
(waypoints).
INFO:
● An approximate location corresponding to the
entered house number is displayed. If
necessary, correct the location using the
joystick.
● The location displayed by the calculation using the house number may differ from the actual location. In that case, correct the location
using the joystick.
Map key to display the map screen
5-10 How do I program a destination?
8. If necessary, operate the joystick to adjust
the location of the destination (waypoint).
Press the ENTER button. Select the
Destination key to confirm. The [DEST.
SETTINGS (Address/Street)] screen will
be displayed..
To set the destination (waypoint), refer to
“Making the system guide the route with detailed options” on page 5-31.
Setting with the State key
The State key is used when you select a
state/province to set the destination.
1. Select the
State key.
Page 49

INV0950 INV1806 INV1807
2. The display shows the screen to select
states. Input a state/province name.
When the Last 5 States key is selected, the
history of the previous five settings will be listed.
3. The display shows the state list. Select a
state/province name.
How do I program a destination? 5-11
Page 50

INV1808 INV1809 INV0955
4. The screen returns to the [DEST. SETTING
(Address/Street)] screen. When the
state/province is set, the display shows the
selected state/province next to the
State key.
Input the street name.
Please refer to “Setting with the
List key” on page 5-8.
5-12 How do I program a destination?
Setting with the City key
The City key is used when you select a city to
set the destination.
1. Select the
● The display shows the screen to retrieve
cities.
City key.
2. Input a city name.
Page 51

INV1811 INV1812 INV1813
When the Last 5 Cities key is selected, the
history of the previous five settings will be listed.
INFO:
It is not possible to select cities if they are not in
the state/province you set.
3. The display shows the city list.
Select a city of your choice.
4. The screen returns to the [DEST. SETTING
(Address/Street)] screen.
When the city is set, the display shows the
selected city next to the
City key.
Input the street name of your choice.
Proceed to “Setting with the
List key”on page
5-8.
How do I program a destination? 5-13
Page 52

SETTING WITH THE
Intersection KEY
This will allow you to set an intersection as a
destination (waypoints).
1. Press the DEST button.
2. Select the
A keyboard will be displayed.
Intersection key.
INV1814 INV1815
Setting with the List key
The List key is used whenyou know the names
of the destinations and waypoints.
1. Enter the first street name where the destination (waypoints) is located using the
keyboard, then select the
List key.
5-14 How do I program a destination?
Page 53

INV1816 INV1817
2. Select the first street name using the same
procedures as “Setting with the
Address/Street key”.
INFO:
● When the
Next Search key is selected, it is
possible to narrow down states and cities. To
use this function, refer to “Setting with the
City key” on page 5-21.
● For a road where lanes with different traffic directions are shown separately, the list shows
first street name, second street name, ...
● When entering a street name, enter a minor
street name as the first street and the calculation will be easier and quicker.
3. Enter the 2nd (intersecting) street name,
then select the
List key.
INFO:
If there are less than 5 streets which intersect
the first street, they will be displayed
automatically.
How do I program a destination? 5-15
Page 54

INV1818 INV1819 INV1820
4. Select the name of the second street.
The [DEST. SETTING (Intersection)] screen
will appear.
5-16 How do I program a destination?
5. To set the destination (waypoints), refer to
“Making the system guide the route with detailed options” on page 5-31.
6. To slightly alter the destination.
Select the
screen of the area around the specified destination (waypoints).
Map key to display the map
Page 55

INV1821 INV1822
7. If necessary, operate the joystick to adjust
the location of the destination (waypoint).
Press the ENTER button. Select the
Destination key to confirm. The [DEST.
SETTINGS (Intersection)] screen will be
displayed.
To set the destination (waypoint), refer to
“Making the system guide the route with detailed options” on page 5-31.
NOTE:
When the corresponding data does not exist under the following conditions, the
street name list may not be displayed:
● A street name is being input after the
City key has been selected.
● List is being displayed by selection of the
List key.
Setting with the State key
The State key is used when you select a
state/province to set the destination.
1. Select the
State key.
How do I program a destination? 5-17
Page 56

INV1823 INV1824 INV1825
2. The display shows the screen to select
states.
Input a state/province name.
5-18 How do I program a destination?
When the Last 5 States key is selected, the
history of the previous five settings will be listed.
3. The display shows the state list.
Select a state/province name.
Page 57

INV1826 INV1827 INV0973
4. The screen returns to the [DEST. SETTING
(Intersection)] screen.
When the state/province is set, the display
shows the selected state/province next to
the
State key.
Input the street name.
Please refer to “Setting with the
List key” on page 5-14.
Setting with the City key
The City key is used to retrieve an intersection
from the specified city to set the destination.
1. Select the
● The display shows the screen to retrieve
cities.
City key.
2. Input a city name.
How do I program a destination? 5-19
Page 58

INV1829 INV1830 INV1831
When the Last 5 Cities key is selected, the
history of the previous five settings will be listed.
INFO:
It is not possible to select cities if they are not in
the state/province you set.
5-20 How do I program a destination?
3. The display shows the city list.
Select a city of your choice.
4. The screen returns to the [DEST. SETTING
(Intersection)] screen.
When the city is set, the display shows the
selected city next to the
Input the street name of your choice.
Proceed to “Setting with the
5-14.
City key.
List key”on page
Page 59

INV1832 INV1833
SETTING WITH
THE
The NISSAN Navigation System includes a database of Point of Interest (POI) locations such
as restaurants, hotels, and gas stations. (refer to
section 6.)
By using this feature, you can set a Point of Interest location as a destination. For details on how
to use the POI feature, please refer to section 6.
KEY
SETTING WITH THE City KEY
Sets the destination (waypoints) on the map
screen of the area in and around the input city.
1. Press the DEST button.
2. Select the
TING] screen.
City key on the [DEST. SET-
How do I program a destination? 5-21
Page 60

INV1834 INV1835 INV1836
Setting with the List key
The List key is used whenyou know the names
of the destination and waypoints.
1. Enter the characters of the city name which
you wish to set as a destination (waypoints)
using the keyboard on the [DEST. SETTING
(City)] screen, then select the
INFO:
● When the
the currently-listed cities will be displayed.
● If less than 5 suggested cities remain, they will
be displayed automatically.
List key is selected, the data of
List key.
5-22 How do I program a destination?
2. Select the city name of your destination
(waypoints) on the [DEST. SETTING (City)]
screen.
3. To set the destination (waypoints), refer to
“Making the system guide the route with detailed options” on page 5-31.
Page 61

4. To slightly alter the destination.
Select the
screen of the area around the specified destination (waypoints).
Map key to display the map
INV1837 INV1838 INV1839
5. If necessary, operate the joystick to adjust
the location of the destination (waypoints).
Press the ENTER button. Select the
Destination key to confirm.
The [DEST. SETTING (City)] screen will be
displayed.
To set the destination (waypoints), refer to
“Making the system guide the route with detailed options” on page 5-31.
● List is being displayed by selection of
the
List key.
Setting with the State key
The State key is used when you select a
state/province to set the destination.
1. Select the
State key.
How do I program a destination? 5-23
Page 62

INV1840 INV1841 INV1842
2. The display shows the screen to select
states/provinces.
Input a state/province name.
5-24 How do I program a destination?
When the Last 5 States key is selected, the
history of the previous five settings will be listed.
3. The display shows the state/province list.
Select a state/province name.
Page 63

INV1843 INV1844
4. The screen returns to the [DEST. SETTING
(City)] screen.
When the state/province is set, the display
shows the selected state/province next to
the
State key.
Input the street name.
Please refer to “Setting with the
List key” on the previous section.
SETTING WITH THE
Phone Number KEY
NOTE:
This option only works when the destination is listed in the POI directory.
Sets the destination (waypoints) on the map
screen of the area and around the input phone
number.
1. Press the DEST button.
2. Select the
[DEST. SETTING] screen.
Phone Number key on the
How do I program a destination? 5-25
Page 64

INV1845 INV1846 INV1847
3. Enter the ten digit phone number of the
destination (waypoints) using the keyboard
on the [DEST. SETTING (Phone Number)]
screen.
4. If you select the
TING (Phone Number)] screen will be dis-
played.
OK key, the [DEST. SET-
5-26 How do I program a destination?
5. To set the destination (waypoints), refer to
“Making the system guide the route with detailed options” on page 5-31.
6. To slightly alter the destination.
Select the
screen of the area around the specified destination (waypoints).
Map key to display the map
Page 65

INV1848 INV1849 INV1850
7. If necessary, operate the joystick to adjust
the location of the destination (waypoints).
Press the ENTER button.
Select the
To set the destination (waypoints), refer to
“Making the system guide the route with detailed options” on page 5-31.
Destination key to confirm.
INFO:
When a hospital is set as a destination, a tele-
phone number of the destination will be
displayed.
SETTING WITH THE Map KEY
This will enable you to zoom into the map for detail and set the desired location. This works best
when you know the location geographically, or
want to check the geographical surroundings on
the map before setting the destinations.
1. Press the DEST button.
2. Select the
The map of the entire area will be displayed.
Map key.
How do I program a destination? 5-27
Page 66

INV1851 INV1852 INV2004
3. Operate the joystick to choose the destination (waypoints).
5-28 How do I program a destination?
4. Adjust the location using the joystick, and
press the ENTER button.
5. Select the
The [DEST. SETTING] screen will appear.
Destination key.
6. Please refer to “Making the system guide
the route with detailed options” on page
5-31.
INFO:
When the
SETTING] screen, route calculation starts. If you
want to add waypoints, select the
key.
OK key is selected in the [DEST.
Waypoint
Page 67

SETTING WITH THE Country KEY
When the Address/Street , Intersection ,
City , or Point of Interest (POI) key is used
to set the destination (waypoints) in other countries, theyare retrievedfrom the areasin thecountry which have been set in the country category.
When setting the destination (waypoints) in other
countries, select a country first.
1. Press the DEST button.
The [DEST. SETTINGS] screen will be
displayed.
Select the
Country key.
INV1853 INV1854
2. Select the
TER buttonis pressed, thecountry selection
toggles between USA and Canada.
3. Then, the selected country will be displayed
at the right of the
Country key. Each time the EN-
Country key.
How do I program a destination? 5-29
Page 68

SETTING WITH THE Home KEY (in
easy mode)
Sets the home as a destination.
INFO:
In the Expert Mode, this key will not be displayed.
Turn on the highlighted amber
key in the [SETTING] screen.
Short Menus
1. Press the DEST button.
2. Select the
Home key.
INV1769 INV1855
3. The [DEST. SETTING] screen will be
displayed.
Set the
To set the destination (waypoints), refer to “Making the system guide the route with detailed options” on page 5-31.
INFO:
If the home is not registered in the Address
Book, the [ADDRESS/STREET] screen will be
displayed.
Please refer to “Setting with the
Address/Street key” on page 5-7.
OK key.
5-30 How do I program a destination?
Page 69

HAVING THE SYSTEM GUIDE YOU
TO THE DESTINATIONS
WARNING
To operate the navigation system or to
use the screen functions, first park the
vehicle in a safe place and set the parking brake. Using the system while driving can distract the driver and may result in a serious accident.
INV1856
MAKING THE SYSTEM GUIDE THE
ROUTE WITH DETAILED OPTIONS
By choosing the destination from the menu, you
can choose detailed options such as waypoints
and calculation conditions and have the system
guide you from the current position to the
destination.
Setting the destination
First, you will have to set the destination.
1. Select a destination using one of the methods described earlier in this chapter:
– Address Book
– Previous Destination
– Address/Street
– Intersection
– Point of Interest (POI)
– City
– Phone Number
– Map
– Home
2. Set the route priorities and select the
Route Calc. key to calculate the route.
Refer to “Route calculation and guidance”
on page 5-35.
How do I program a destination? 5-31
Page 70

INV1857 INV1858 INV1859
INFO:
● If you select the
calculation will start without any waypoints.
● Press the PREV button to display the [EDIT
ROUTE] screen.
OK key at this point, route
5-32 How do I program a destination?
Setting the waypoints
After you set a destination, you can set waypoints.
INFO:
● When the ROUTE button is pressed on the
map and the
[EDIT ROUTE] screen will be displayed.
● The maximum number of destinations and
waypoints that can be set is six (6).
Please refer to “Expert mode categories” on
page 5-2.
1. Select the
the [EDIT ROUTE] screen.
Edit Route key is selected, the
key or key on
The [EDIT ROUTE] screen will be displayed.
2. Select a waypoint destination using one of
the destination selection procedures outlined earlier in the chapter.
Page 71

INV1857 INV1860
Select the conditions with high priorities.
If you want to get to your destination in the short-
est time, select the
Selecting the key will turn the indicator light in
the key ON; selecting it again will turn it OFF.
INFO:
● When you select the
route calculation will start without any additional waypoints.
● Press the PREV button to display the [EDIT
ROUTE] screen.
Shortest Time key.
OK key at this point,
● It is also possible to set a waypoint by selecting the
TING] screen.
Waypoint key in the [DEST. SET-
Setting the priorities for route calculation
After the setting of destinations and waypoints is
completed, set the calculation conditions such
as route type with high priorities.
1. Select the
The screen for setting calculation conditions will
appear. The conditions with the indicator light
ON will have high priority.
INFO:
When the ROUTE button is pressed on the
map and the
[EDIT ROUTE] screen will be displayed.
Priorities key.
Edit Route key is selected, the
How do I program a destination? 5-33
Page 72

INV1861 INV1862
2. Select the conditions with high priorities.
Select each key on the screen to turn its respective indicator light ON or OFF.
Shortest Time key:
The route to the destination is calculated so that
you can reach the destination in the shortest
time. In some cases, a freeway or toll road with
detours may be recommended.
NOTE:
It may not be the shortest time in all cases.
Shortest Distance key:
The route to the destination is calculated so that
it is the shortest distance.
NOTE:
It may not be the shortest distance in all
cases.
Minimize Toll Road key:
The route to the destination is calculated with
minimum use of toll roads.
Minimize FWY key:
The route to the destination is calculated with
minimum use of freeways.
Use Time Restricted Roads key:
The route using time restricted roads is
calculated.
When this key is selected and the
pressed, a confirmation screen will be displayed.
When the
will start.
INFO:
The system considers time restricted roads as
whole-day restricted. When the key is set to
OFF, time restricted roads will not be included in
route calculation.
Yes key ispressed, routecalculation
OK key is
5-34 How do I program a destination?
Page 73

WARNING
When the route is calculated with this
key ON, be sure to obey traffic
regulations.
Use Ferry Route key:
Select this key if you prefer routes with ferry
lines.
INV1863 INV1864
Route calculation and guidance
After setting all the items required, you may proceed to route calculation for guidance. After the
route calculation is completed, the guidance will
start automatically.
INFO:
When the ROUTE button is pressed on the
map and the
[EDIT ROUTE] screen will be displayed.
Select the
Edit Route key is selected, the
Route calc. key.
Route calculation screen will be displayed.
The suggested route will be displayed with a
thick blue line. If you enter this route, the voice
guide will start.
INFO:
● If you want to cancel the route calculation,
press the ENTER button.
● If you set a place which is not suitable as a
destination, the suggested route will not be
displayed. In such a case, the
displayed onthe screen. Selectthe
Reset a correct destination.
OK key willbe
OK key.
How do I program a destination? 5-35
Page 74

INV1865 INV1866
● If route calculation is not possible with all the
set preferences, the system may look up a
route that does not exactly correspond to the
preferences.
● When deleting the settings of destinations or
waypoints, press the ROUTE button.
Enlarged intersection display
When the vehicle approaches a guide point
such as an intersection, the enlarged map of the
point will be displayed.
NOTE:
● When the guide point is close to the guidance
start point, the enlarged map may not be
displayed.
● The guide point name may not be displayed.
● The position of the vehicle icon on the en-
larged map may differ from the position on the
current display.
1. Press the MAP or PREV button.
The map screen will appear.
INFO:
● When no operation is executed with the enlarged map displayed, the map stays
displayed.
● If route numbers are included in the map data,
route numbers will be displayed on the left
side of the screen.
● If street names are displayed in two lines,
route numbers will not be displayed.
5-36 How do I program a destination?
Page 75

INV1867 INV1868
INFO:
To display the enlarged map, press the MAP
button or PREV button.
2. When the vehicle arrives at the neighborhood of the destination, the route guidance
will end automatically.
INFO:
● To alternate between the map and the enlarged screen, press the MAP button or
PREV button.
● In the map screen, the distance to the next
guide point and the turning direction will be
displayed on the right side of the screen.
ADJUSTING AND DELETING THE PRESET DESTINATION (waypoints)
Using the joystick, you can adjust the destination (waypoints).
1. Press the ROUTE button.
2. Select the
Edit Route key.
How do I program a destination? 5-37
Page 76

INV1869 INV1870 INV1871
3. Choose the destination (waypoints) you
want to adjust onthe [EDIT ROUTE] screen.
5-38 How do I program a destination?
4. The map screen will be displayed for
adjusting. Use the joystick to adjust the
location.
INFO:
When you move thejoystick, the
be displayed.
Adjust key will
5. Select the
The new destination (waypoints) will be set.
Adjust key.
Page 77

INV1872 INV1873 INV1874
TO DELETE A DESTINATION
1. To delete the destination (waypoint),
choose the destination (waypoint) in step 3
and select the
Delete key.
2. Select the
The preset destination (waypoints) will be
deleted.
Yes key.
3. Press the Map button to return to the
map screen.
INFO:
● To set a new destination (waypoints), refer to
“Expert mode categories” or “Easy mode categories” on page 5-2.
● If you reset the new destination (waypoints),
the older destination (waypoints) will be
deleted. If you have requested a route
calculation, the previous suggested route will
be deleted from memory.
How do I program a destination? 5-39
Page 78

ALL CLEAR
INV1868 INV1875 INV1876
The destination and waypoint can be deleted at
one time.
1. Press the ROUTE button. Several keys
will be displayed on the right of the screen.
Select the
Edit Route key.
2. The [EDIT ROUTE] screen will be displayed.
Select the
All Clear key.
3. Select the
Yes key.
5-40 How do I program a destination?
Page 79

QUICK STOP
INV1314 INV1878 INV1879
The system will display pre-defined POI’s
(Points of Interest) in the current vicinity of the
vehicle and the distances to them. These POI’s
can be gas stations, hotels, restaurants, ATM’s
or customer-programmed facilities. This function
will operate while the vehicle is moving.
1. Press the ROUTE button.
The display shows several keys on the right of
the screen.
Select the
Quick Stop key.
2. The display shows the [QUICK STOP]
screen.
Select the category of your choice.
INFO:
Five categories are displayed on the screen. The
last one can be customized. When you use a
POI category frequently, it is convenient to use
the quick stop function. Please refer to “Quick
stop customer setting” on page 5-42.
The cuisine selection screen is displayed only
3.
when the
Select the
RESTAURANT
All key or Fast Food key.
key is selected.
How do I program a destination? 5-41
Page 80

INV1880 INV1881 INV1781
4. The display shows the direction and distance from the current vehicle position to
the selected facility.
Select the facility name you want to set as a
destination (waypoints).
5-42 How do I program a destination?
5. Set route priorities, then select the
OK key. Route calculation to the desti-
nation will be started.
INFO:
If quick stop is set after the destination was set,
the system starts the route calculation to the location as the waypoint. Five waypoints can be
registered at the same time.
QUICK STOP CUSTOMER SETTING
1. Press the SETTING button.
2. Select the
TINGS] screen.
Navigation key on the [SET-
Page 81

3. Select the
Quick Stop Customer Setting key on
the [NAVIGATION SETTINGS] screen.
INV1882 INV1883 INV1884
4. Select a facility you frequently visit. For
example, select the
NISSAN DEALER key.
When it is set, the screen returns to the pre-
5. Press the ROUTE button. Then, select
the
Quick Stop key, andpress theENTER
button. The display shows the selected facility in the last row.
vious screen.
Press the MAP button to return to the
map.
How do I program a destination? 5-43
Page 82

INV1885 INV1887 INV1888
INFO:
When a hospital is set as a destination, a tele-
phone number of the destination will be
displayed, if available.
WHERE AM I?
This key is used to find the name of the street on
which the vehicle is currently located.
1. Press the ROUTE button.
Several keys appear on the right of the screen.
Select the
Where am I? key.
2. The display shows the [WHERE AM I ?]
screen, which includes the next, current,
and previous streets. Each one shows the
streets which the vehicle is approaching,
currently traveling on, and those streets the
vehicle was previously traveling on. Press
the MAP or PREV button to return to
the map.
5-44 How do I program a destination?
Page 83

CANCEL GUIDANCE
INV1889 INV1890 INV1891
1. Press the ROUTE button.
2. Several keys appear on the right of the
screen. Select the
Cancel Guidance key.
The [CONFIRMATION] screen is displayed with
the following three keys.
● All Destinations
● Waypoint 1 or Waypoint
● Do not Cancel
WHEN THE All Destinations KEY IS
SELECTED
The route guidance is turned off temporarily.
1. Select the
2. When the
guidance is turned off.
INFO:
● When the
be displayed. When the PREV button is
pressed, the previous screen will be displayed.
● To restart the route guidance, press the
GUIDE VOICE button.
All Destinations key.
Yes key is selected, the route
No key is selected, the map will
How do I program a destination? 5-45
Page 84

WHEN THE Waypoint 1 KEY IS SELECTED
INFO:
This key can be selected only when a waypoint is
set.
Route guidance to the next waypoint is deleted.
INV1892
1. Select the
When the Ye s
2.
is deleted and route calculation will start.
INFO:
When the
displayed. When the PREV button is pressed,
the previous screen will be displayed.
Waypoint 1 key.
key is selected, the waypoint
No key is selected, the map will be
WHEN THE Do not Cancel KEY IS
SELECTED
The [CONFIRMATION] screen will return to the
map screen.
5-46 How do I program a destination?
Page 85

6 How do I use the Point of Interest (POI)
feature?
Setting with the key..........6-2
Setting with the
Setting with the
Setting with the
List key
Category key
State key
......................6-2
.....................6-7
.................6-5
Setting with the
Setting with the
POI categories ...................................6-14
Setting the nearby display icons....................6-15
City key
Nearby key
.....................6-10
..................6-12
Page 86

SETTING WITH THE
KEY
The keys in Point of Interest (POI) are:
● List
● Category
● State/Province
● City
● Nearby
1. First press the DEST button.
2. Select the
the [DEST. SETTING] screen.
6-2 How do I use the Point of Interest (POI) feature?
INV1832 INV1893
SETTING WITH THE List KEY
key on
The List key is used when you know the exact
names of the destinations and waypoints.
1. Input the facility name for your destination.
NOTE:
For a quicker search, input the state/
province, city and category before searching for your desired destination.
INFO:
If the system detects that the number of corre-
sponding facilities or cities is five or less, the display shows the list screen automatically.
Page 87

INV1894 INV1895 INV1896
2. The display shows the screen to select a facility or
Info key.
When the
Next Search key is selected, it is
possible to narrow down categories,
states/provinces and cities.
To use this function, refer to “Setting with the
Category key”, “Setting with the State key”
and “Setting with the
City key” on pages 6-5,
6-7 and 6-10.
How do I use the Point of Interest (POI) feature? 6-3
3. When a facility name is selected, the display
shows the [DEST. SETTING (POI)] screen
to set the destination.
Select the
selected. Select
OK key to enter the priorities
Waypoint to set the
closer destination as a waypoint.
Please refer to “Making the system guide
the route with detailed options” on page
5-31.
Page 88

INV1897 INV1896 INV2006
● When the Info key next tothe facilityname of
your choice is selected in step 2, the display
shows the detailed [Address] and [Telephone
number] of the selected facility, and the
Map and Enter keys.
4. When setting the facility as the destination,
select the
[DEST. SETTING (POI)] screen to set the
destination.
Set priorities and select the
Route Calc. key. Then, the route calcula-
tion will be started.
When you alter the destination or set
waypoints, select the
Please refer to “Making the system guide the
route with detailed options” on page 5-31.
6-4 How do I use the Point of Interest (POI) feature?
OK key. The display shows the
Waypoint key.
● When the
shows the map. When the ENTER button is
pressed, the display shows the
Destination key.
Map key is selected, the display
Page 89

INV1898 INV1899 INV1900
SETTING WITH THE Category KEY
The Category key isused whenyou selecta facility category to set the destination.
1. Select the
Category key.
2. The display shows the screen to select
categories.
Input a category name. See listing of categories on page 6-14.
How do I use the Point of Interest (POI) feature? 6-5
● When the
in step 2, the history of the previous five settings will be listed.
Last 5Categories key is selected
Page 90

INV1901 INV1902
3. The display shows the category list. Select
a category name.
INFO:
When the
screen to input thecuisine type will be displayed.
RESTAURANT key is selected, the
4. The screen returns to the [DEST. SETTING
(POI)] screen.
When the category is set, the display shows
the selected category beside the
Category key.
Input the facility name.
INFO:
● If you do not know the facility name you want
to go to, selectthe
names in the category will be listed in alphabetical order.
List key so thatthe facility
● It may take some time to show the list, depending on categories.
6-6 How do I use the Point of Interest (POI) feature?
Page 91

INV1903 INV1904 INV1905
5. When a facility name is input, the system retrieves the facility name according to the selected category and the input letters. Then,
the display shows the screen to select a fa-
cility and
Please refer to “Setting with the
List key” on page 6-2.
Info key.
When the
possible to narrow down states/provinces and
cities within the selected category.
To use this function, refer to “Setting with the
State key” and “Setting with the City key”on
pages 6-7 and 6-10.
Next Search key is selected, it is
How do I use the Point of Interest (POI) feature? 6-7
SETTING WITH THE State KEY
The State key is used when you select a
state/province to set the destination.
1. Select the
State key.
Page 92

INV1906 INV1907 INV1908
2. The display shows the screen to select
states.
Input a state/province name.
When the Last 5 States key is selected, the
history of the previous five settings will be listed.
6-8 How do I use the Point of Interest (POI) feature?
3. The display shows the state list.
Select a state/province name.
Page 93

INV1909 INV1910 INV1911
4. The screen returns to the [DEST. SETTING
(POI)] screen.
When the state/province is set, the display
shows the selected state/province next to
the
State key.
Input the state/province name.
INFO:
If you do not know the facility name you want to
go to, select the
List key so that the facility
names will be listed in alphabetical order.
5. When a facility name is input, the system retrieves the facility name according to the input letters.
Please refer to “Setting with the
List key” on page 6-2.
How do I use the Point of Interest (POI) feature? 6-9
When the
Next Search key is selected, it is
possible to narrow down categories and cities
within the selected state.
To use this function, refer to “Setting with the
Category key” and “Setting with the City
key” on pages 6-5 and 6-10.
Page 94

INV1912 INV1058 INV1914
SETTING WITH THE City KEY
The City key is used to retrieve a facility from
the specified city to set the destination.
1. Select the
City key.
2. The display shows the screen to select
cities. Input a city name.
6-10 How do I use the Point of Interest (POI) feature?
When the
2, the history of the previous five settings will be
listed.
Last 5 Cities key is selected in step
Page 95

INV1915 INV1916
3. The display shows the city list. Select a city
of your choice.
4. The screen returns to the [DEST. SETTING
(POI)] screen.
When the city is set, the display shows the
selected city beside the
City key. Input the
facility name of your choice.
INFO:
● If you do not know the facility name, select the
Category key to retrieve a facility. When the
facility is set fromthe
Category key, the dis-
play shows the selected facility beside the
Category key.
● It may take some time to show the list, de-
pending on categories.
How do I use the Point of Interest (POI) feature? 6-11
Page 96

INV1917 INV1918
5. When the facility name is input, the system
retrieves the facility name according to the
selected city and the input letters. Then, the
display shows the screen to select a facility
and
Info key.
Please refer to “Setting with the
List key” on page 6-2.
SETTING WITH THE Nearby KEY
The Nearby key is used to retrieve a facility
within 30 miles (50 km) from the current vehicle
location.
1. Select the
the [DEST. SETTING (POI)] screen.
2. Set category according to page 6-5.
3. Select the
Point of Interest (POI) key on
Nearby key.
INFO:
● Facilities in the selected category will be
listed from the nearest to the farthest.
Nearby key is available only when a cat-
● The
egory is set. Set a category first.
6-12 How do I use the Point of Interest (POI) feature?
Page 97

INV1919
● When there are any nearby facilities based on
the selected category, the display shows the
list of facility names, directions and distance
from the current vehicle location, and
Info keys.
Please refer to “Setting with the
List key” on page 6-2.
How do I use the Point of Interest (POI) feature? 6-13
Page 98

POI CATEGORIES
AIRPORT FERRY TERMINAL PARKING GARAGE
AMUSEMENT PARK GAS STATION PARKING LOT
ATM GOLF COURSE PERFORMING ARTS
AUTO SERVICE & MAINTENANCE GROCERY STORE POLICE STATION
AUTOMOBILE CLUB HISTORICAL MONUMENT RENTAL CAR AGENCY
BANK HOSPITAL REST AREA
BORDER CROSSING HOTEL RESTAURANT
BOWLING CENTER ICE SKATING RINK SCHOOL
BUS STATION INFINITI DEALER SHOPPING
BUSINESS FACILITY LIBRARY SKI RESORT
CASINO MARINA SPORTS CENTER
CITY CENTER MOVIE THEATER SPORTS COMPLEX
CITY HALL MUSEUM TOURIST ATTRACTION
COLLEGE AND UNIVERSITY NIGHTLIFE TOURIST INFORMATION
COMMUNITY CENTER NISSAN DEALER TRAIN STATION
COMMUTER RAIL STATION OTHERS WINERY
CONVENTION/EXHIBITION CENTER PARK & RIDE
COURT HOUSE PARK/RECREATION AREA
6-14 How do I use the Point of Interest (POI) feature?
Page 99

SETTING THE NEARBY DISPLAY
ICONS
Five types of facilities can be displayed on the map using respective icons, including:
– ATMs
– Gas stations
– Hotels
– Restaurants
– Rest areas
1. Press the SETTING button on the control panel.
INV1781 INV1920 INV1921
2. Select the
TINGS] screen.
Navigation key on the [SET-
3. Select the Nearby Display Icons key on
the [NAVIGATION SETTINGS] screen.
The [NEARBY DISPLAY ICONS] screen will be
displayed.
4. Select the facility you wish to display, and
press the ENTER button.
How do I use the Point of Interest (POI) feature? 6-15
Page 100

INFO:
Every time the ENTER button is pressed, the in-
dicator lights of the items are turned ON and
OFF alternately.
ON: To display nearby icons.
OFF: To stop displaying nearby icons.
INV1922 INV1923
The icons of the selected facilities will be
displayed.
INFO:
When the MAP button is pressed, the current
location will be displayed.
When the PREV button is pressed, the previ-
ous screen will reappear.
INFO:
When a hospital is set as a destination, a tele-
phone number of the destination will be
displayed, if available.
6-16 How do I use the Point of Interest (POI) feature?
 Loading...