

Page 1
NEPTUNE 7 FA
Operating Instructions
107140197 A
301002728 A
Page 2
NEPTUNE 7 FA
30
29
1
2
3
psi
bar
4
5
6
28
27
26
25
24
23
22
21
7
8
9
10
11
12
13
14
20
psi
bar
15
16
17
18
19
2
Page 3

NEPTUNE 7 FA
Contents
1 Important safety instructions ............................................................................. 4
1.1 For your own safety ....................................................................................................4
2 Description .......................................................................................................... 6
2.1 Purpose .......................................................................................................................6
2.2 Operating elements .....................................................................................................6
3 Before starting the cleaner ................................................................................. 7
3.1 Transport and assembly...............................................................................................7
3.2 Combustion settings ....................................................................................................7
3.3 Set the brake ...............................................................................................................7
3.4 Install Crank handle for high pressure hose reel/cord reel ..........................................8
3.5 Fill up detergent tanks .................................................................................................8
3.6 Fill up tank for Nilfisk-ALTO AntiStone (Anti-Scale) ....................................................8
3.7 Antiscale ......................................................................................................................9
3.8 Fill up fuel tank .............................................................................................................9
3.9 Connecting the high pressure hose .............................................................................9
3.10 Connecting the water supply .....................................................................................10
3.11 Antifreeze - before first use ........................................................................................10
3.12 Water connection ........................................................................................................11
3.13 Electrical connection ...................................................................................................11
EN
4 Control / Operation ........................................................................................... 12
4.1 Operation ...................................................................................................................12
4.2 Connections ...............................................................................................................12
4.3 Switching on the cleaner ............................................................................................12
4.4 Pressure regulation (Tornado Lance) ........................................................................13
4.5 Using cleaning agents ...............................................................................................14
5 Applications and methods ............................................................................... 15
5.1 Techniques .................................................................................................................15
5.2 Some typical cleaning tasks ......................................................................................16
6 Transport and storage ...................................................................................... 18
6.1 Transport ....................................................................................................................18
6.2 Switching off the cleaner ............................................................................................18
6.3 Disconnecting supply lines ........................................................................................18
6.4 Rolling up the electrical cord and storing accessories ............................................... 19
6.5 Storing the cleaner below 0°C (32°F) ........................................................................ 19
7 Maintenance ...................................................................................................... 20
7.1 Maintenance guidelines .............................................................................................20
7.2 Maintenance schedule ............................................................................................... 20
7.3 Maintenance work ......................................................................................................20
8 Troubleshooting ................................................................................................ 22
8.1 Indications on Display ................................................................................................22
8.2 Indication lights on control panel ...............................................................................23
8.3 Other Faults ...............................................................................................................23
9 Further information ........................................................................................... 24
9.1 Recycling the cleaner ................................................................................................24
9.2 Guarantee ..................................................................................................................24
9.3 EU Declaration of Conformity ....................................................................................25
9.4 Technical data ............................................................................................................26
1)
Options / model variants
Original instructions
3
Page 4

NEPTUNE 7 FA
EN
1 Important safety instructions
1.1 For your own safety
Prior to using the appliance for the first time, be sure to read this
document through.
Besides the operating instructions and the binding accident prevention regulations valid in the country of use, observe recognised
regulations for safety and proper use.
The appliance must
• only be used by persons, who have been instructed in its correct usage and explicitly commissioned with the task of operating it
• only be operated under supervision
• not be used by children
• not be used by mentally or physically disabled persons.
4
1)
Options / model variants
Original instructions
Page 5

NEPTUNE 7 FA
EN
CAUTION
• High pressure jets can be dangerous. Never direct the water
jet at persons, pets, electrical equipment or the machine itself.
• Be aware when cleaning delicate parts made of rubber, fabric, etc. with the high pressure cleaner. Keep some distance
between high pressure nozzle and surface in order to prevent
the surface from damage.
• During operation of the cleaner, recoil forces are produced at
the spraying device. It must therefore be held firmly in both
hands.
• Wear goggles during operation.
• The operator and anyone in the immediate vicinity of the site
of cleaning should take action to protect themselves from
being struck by debris dislodged during operation.
• Never use the machine in an environment where there could
be a danger of explosion.
• Risk of explosion – Do not use the cleaner to spray with flammable liquids.
• It is not allowed to clean asbestos- containing surfaces with
high pressure.
• Check that cleaning will not result in dangerous substances
(e.g. asbestos, oil) being washed off and harming the environment.
• Only use correct fuel as specified. Improper fuels can cause
severe hazard.
• Ensure that any exhaust emissions are not in a vicinity of air
intakes.
• Because of exhaust emissions, airborne dust and aerosols,
use proper safety gear when necessary.
• Do not operate the cleaner in inadequately ventilated rooms.
• Do not touch, cover or place hose or power cord over the
chimney.
• Do not tie the trigger handle open.
• Do not use any unsafe work techniques.
• Do not use the high-pressure hose for lifting loads.
• Operate the cleaner in the intended upright position only.
• High pressure hoses and couplings are safety relevant. Only
use parts recommended by your Nilfisk ALTO dealer.
1)
Options / model variants
Original instructions
5
Page 6

NEPTUNE 7 FA
EN
2 Description
2.1 Purpose
2.2 Operating elements
This high-pressure cleaner has been designed for professional
use. It can be used for cleaning agricultural and construction equipment, stables, vehicles, rusty surfaces, etc.
The cleaner has not been approved for cleaning surfaces which
comes into contact with food.
Always use the cleaner as described in these operating instructions. Any other use may damage the cleaner or the surface to be
cleaned or may result in severe injury to persons.
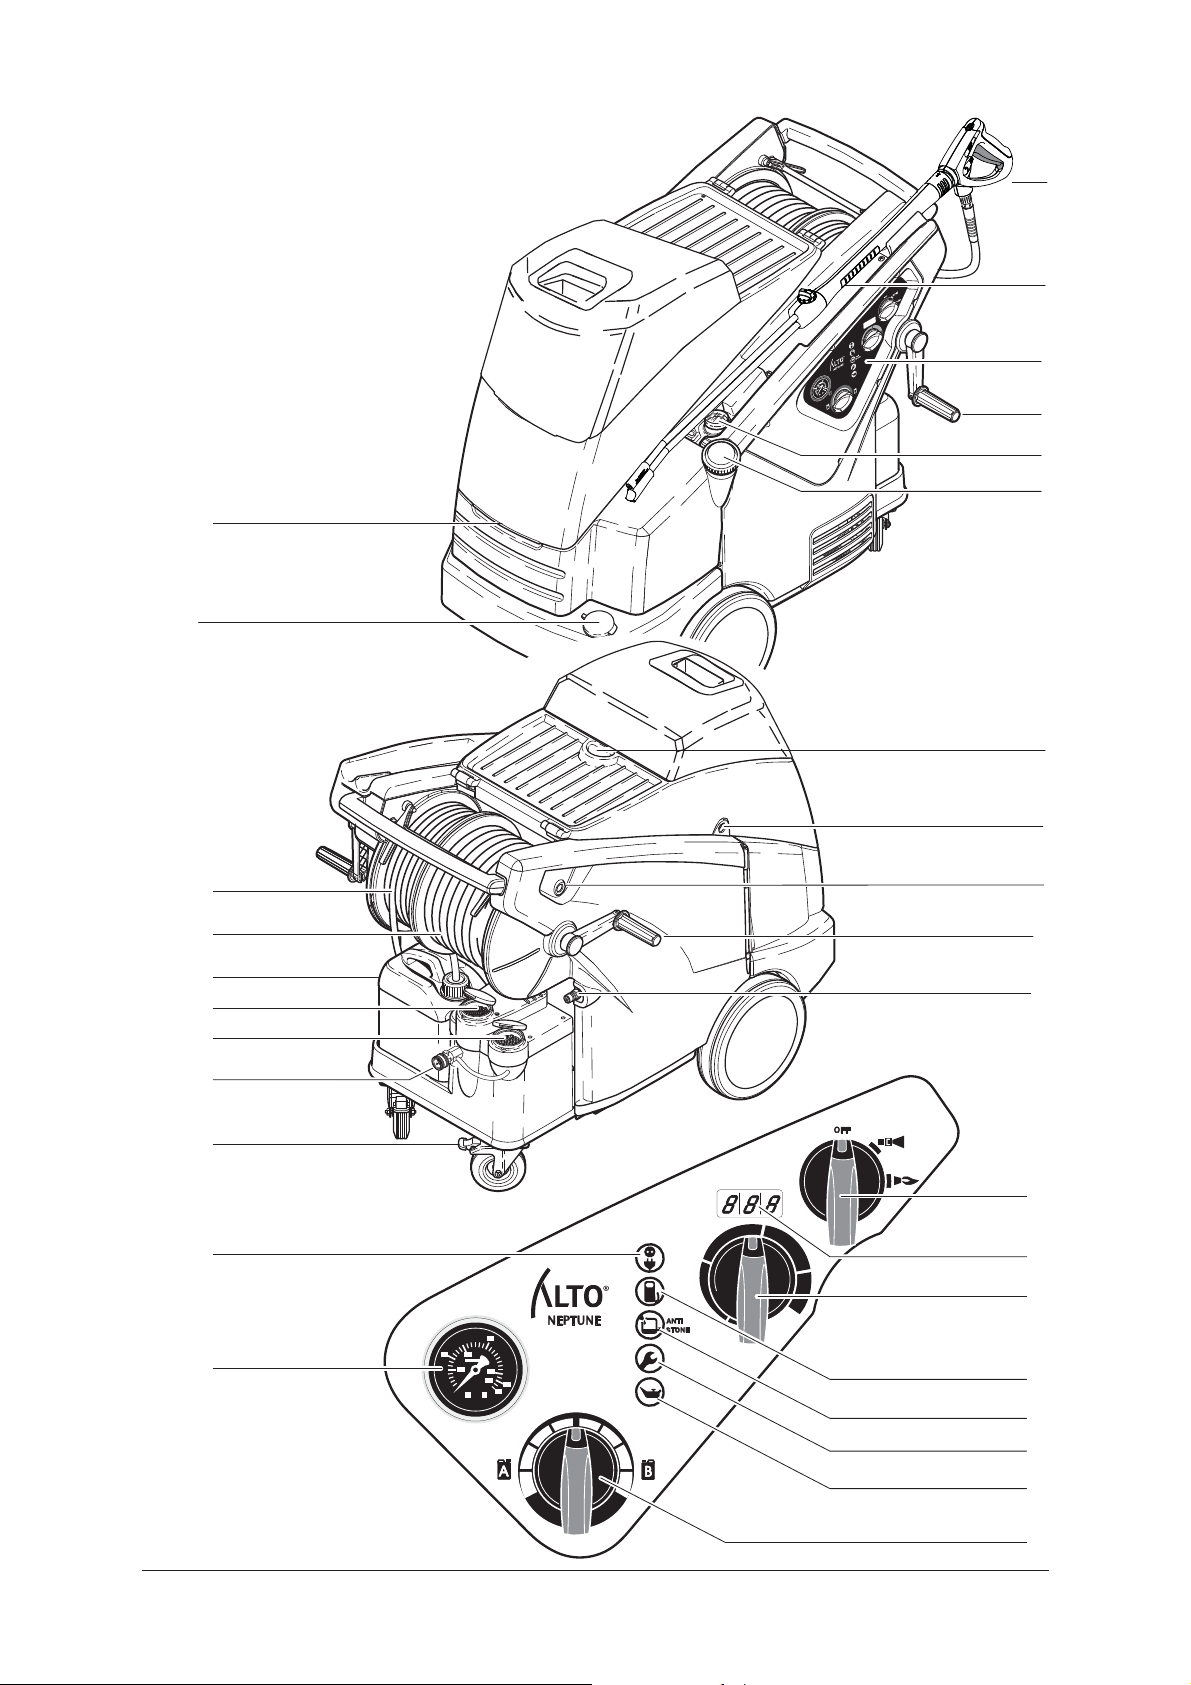
See fold-out page at front of these operating instructions.
1. Spray lance, gun and hose
2. Spray lance storage
3. Control panel
4. Crank handle for high pressure hose reel
5. Fuel level gauge
6. Tank filler for fuel
7. Receptacle for service crane and lifting ring
8. Top cover release
9. Service door release
10. Crank handle for high pressure hose reel
11. High pressure hose connection for machines without hose reel
12. Main switch ON/OFF - cold water/hot water
13. Display (Temperature or Codes)
14. Temperature control
15. Low fuel indicator
16. Low Nilfisk-ALTO AntiStone (Anti-Scale) indicator
17. Service interval due/expired
18. Pump oil low
19. Detergent metering knob
20. Pressure gauge
21. Power ON
22. Castor with parking brake
23. Water supply connection
24. Tank filler for anti-freeze
25. Tank filler for Nilfisk-ALTO Anti-Scale
26. Canister for detergent B
27. High pressure hose reel
28. Power cord reel
29. Tank filler for detergent A
30. Grip for top cover
Cord reel
1)
1)
1)
1)
1)
1)
1)
6
1)
Options / model variants
Original instructions
Page 7
NEPTUNE 7 FA
3 Before starting the cleaner
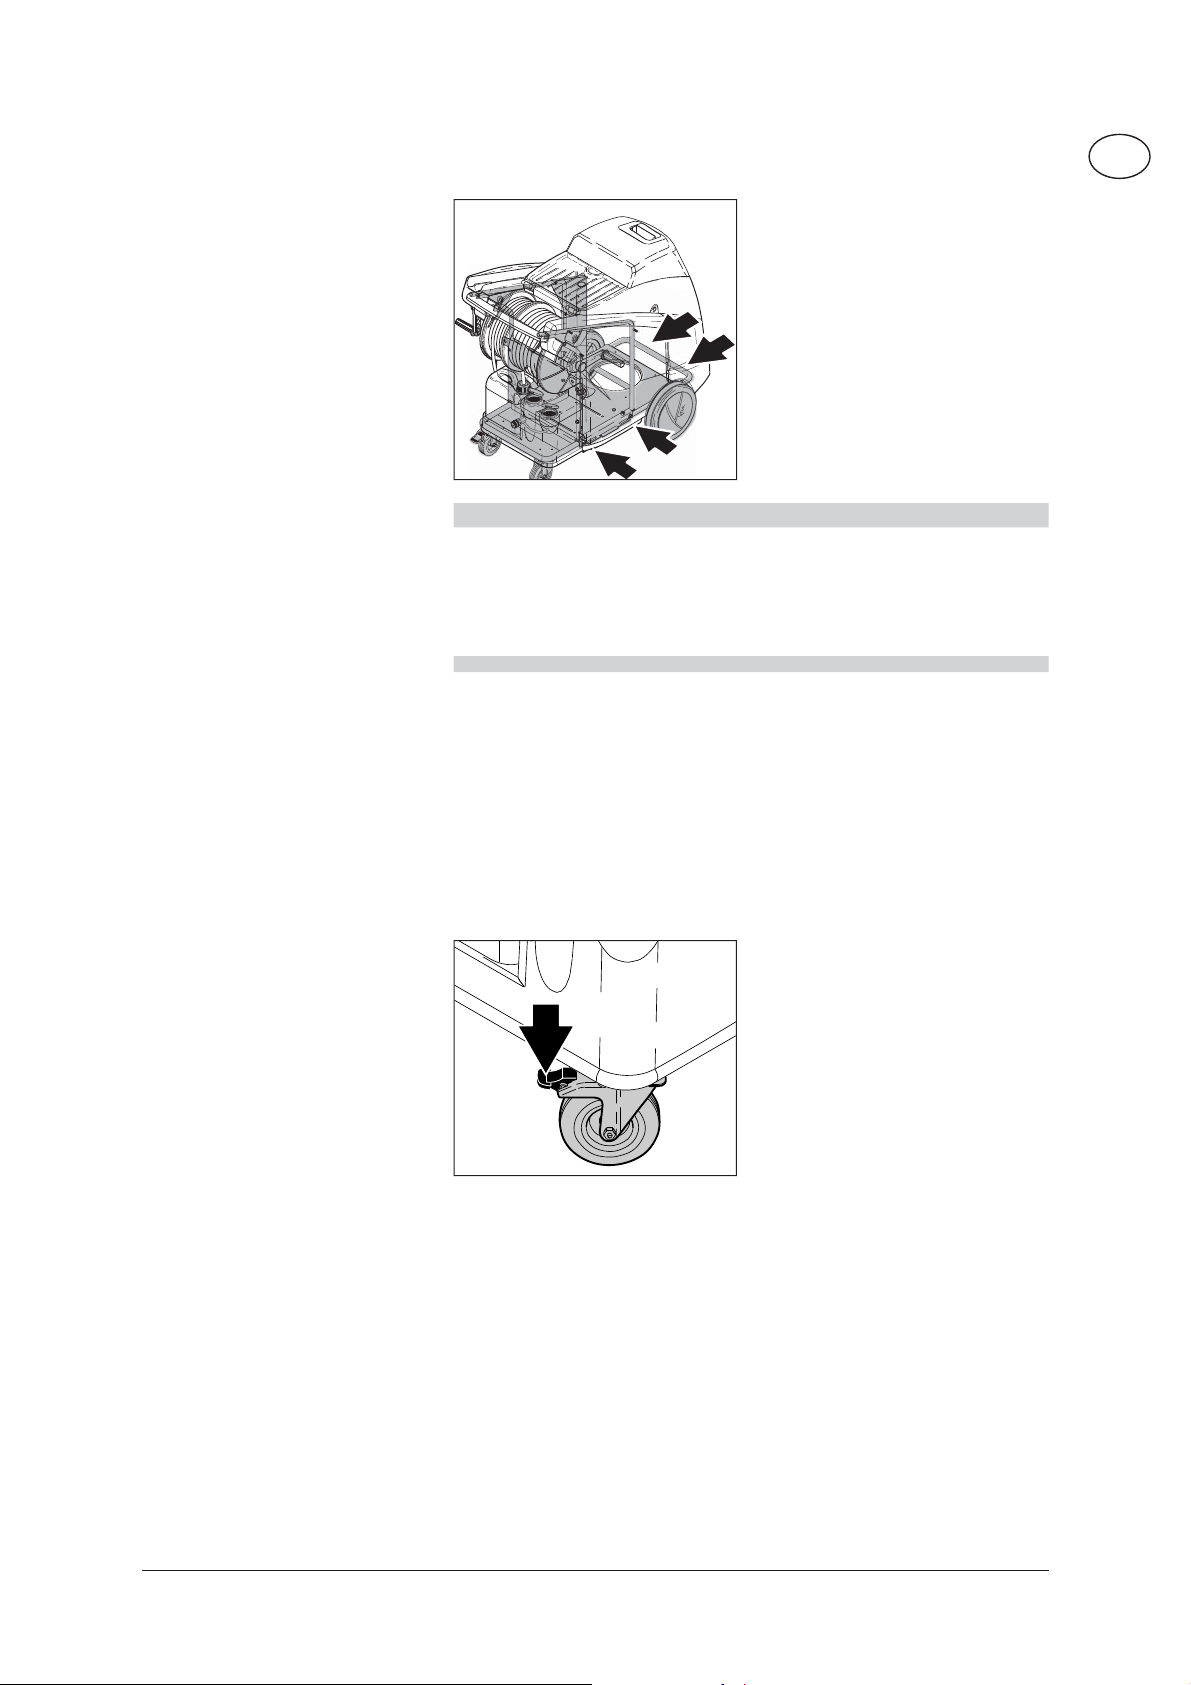
3.1 Transport and assembly
3.2 Combustion settings
CAUTION
Do not hold the plastic tank to lift the machine as it could become
detached from the frame.
The best places to hold the machine are:
• on the handle
• on the frame between the front wheels and the guide rollers.
Your Nilfisk-ALTO hot water pressure washer was thoroughly tested and adjusted for optimum performance before it left our factory.
The factory is located at approximately 120m (390 ft) above sea
level, and the combustion settings are optimal for that elevation.
1. The safest way to lift the
machine is to use a fork-lift
truck The arrows in the illustration indicate the best
places to position the fork.
2. It is also possible to lift the
machine by hand from the
pallet. Due to the weight
this work should be done
by at least three persons.
EN
3.3 Set the brake
If your location is higher than 1200m (3900 ft) above sea level,
your burner may require re-adjustment for proper performance and
best fuel economy. Contact your Dealer or Nilfisk-ALTO for assistance.
1. Before using the cleaner
for the first time, check it
carefully for any faults or
damage.
2. Run the machine only when
it is in perfect working condition.
3. Set the brake.
4. The slope on which the
high pressure cleaner is
placed must not exceed
0
more than 10
in any direc-
tion.
1)
Options / model variants
Original instructions
7
Page 8
EN
NEPTUNE 7 FA
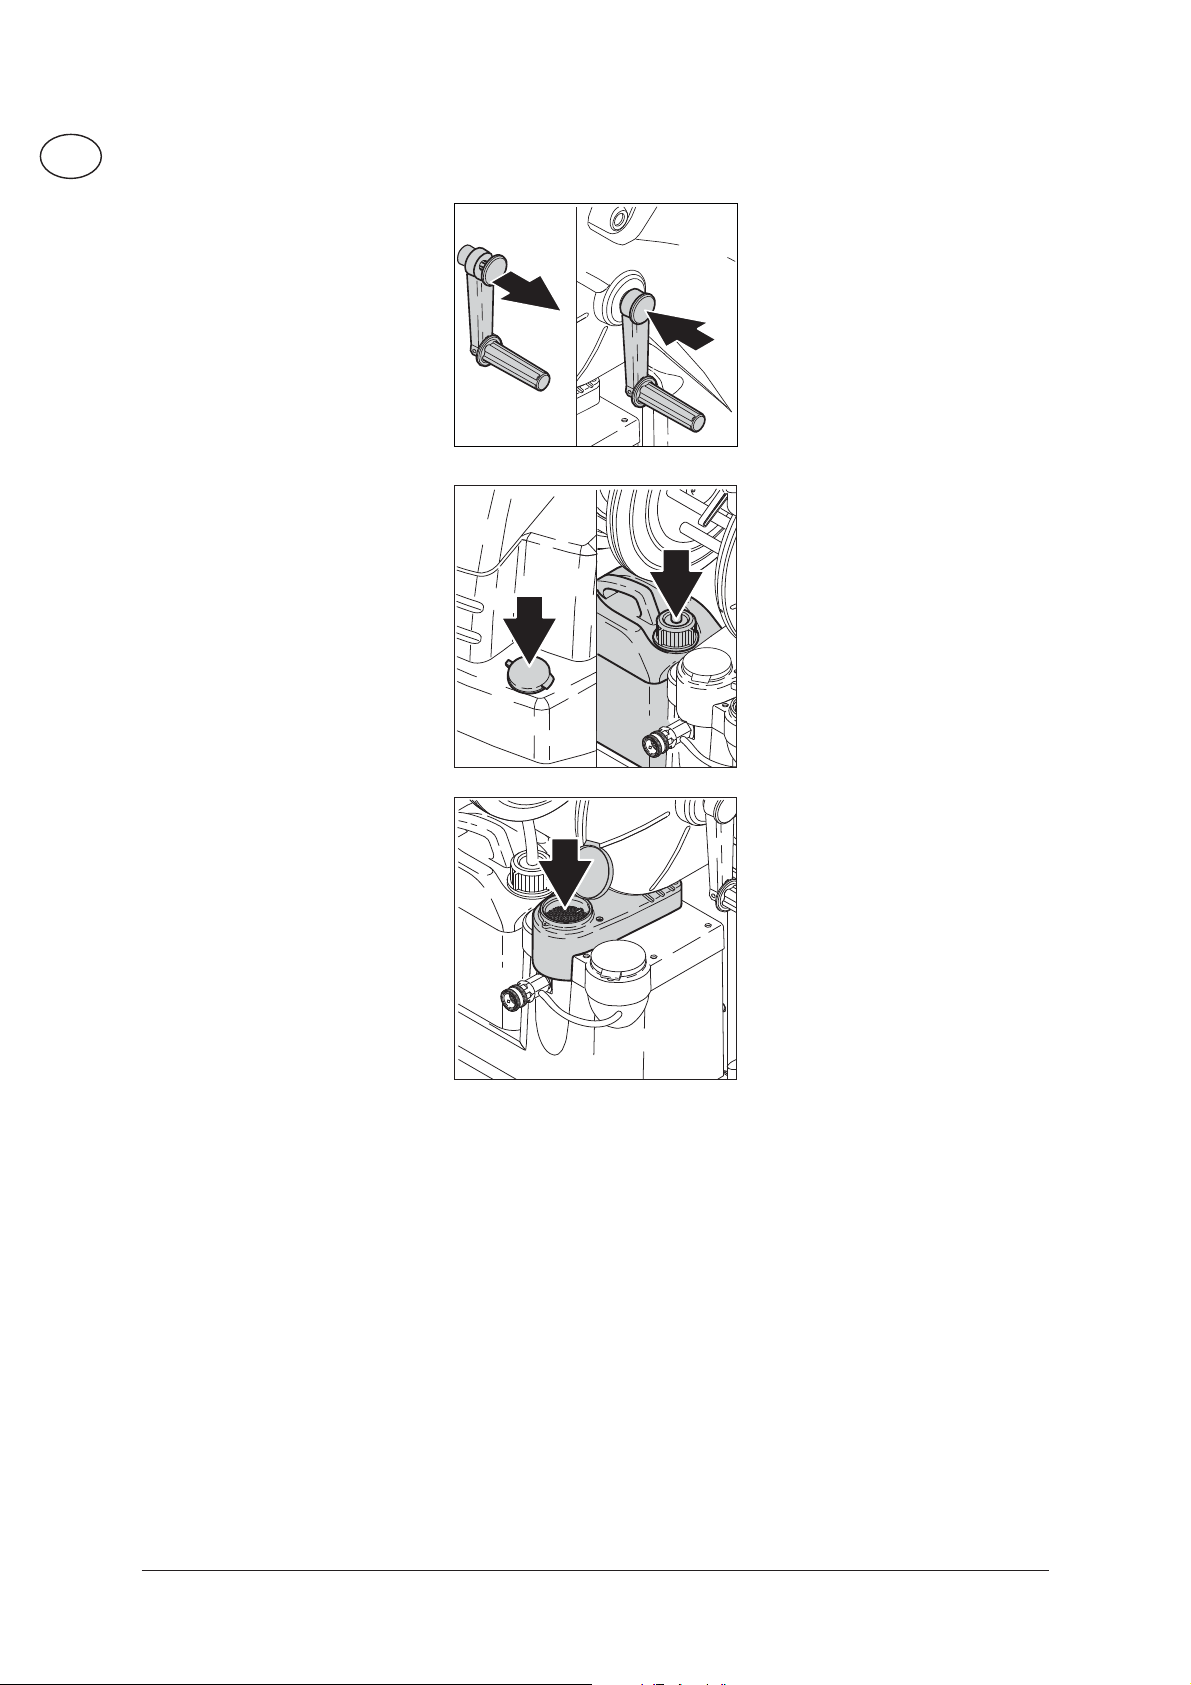
3.4 Install Crank handle
for high pressure
hose reel/cord reel
3.5 Fill up detergent
tanks
1. Pull cap of crank in arrow
direction.
2. Align tabs on crank with
slot in axle.
3. Put crank on axle of high
pressure hose reel/cord
reel.
4. Fix crank by pushing the
cap.
Fill up detergent tanks (A) and
(B) with concentrated detergent.
A
B
3.6 Fill up tank for NilfiskAL TO AntiStone (AntiScale)
Fill up Nilfisk-ALTO Anti-Stone
(Anti-Scale)/water softener
reservoir with the sample bottle provided. Nilfisk-ALTO An-
tiStone (Anti-Scale) prevents
any deposits of scale and acts
at the same time as a corrosion
inhibitor.
For compatibility reasons, use
only the tested Nilfisk-ALTO
AntiStone (Anti-Scale) which is
available as:
• Six-pack of 1 liter bottles:
order part number 8466
• 10 liter:
order part number 80919
• 25 liter:
order part number 81235
8
1)
Options / model variants
Original instructions
Page 9
NEPTUNE 7 FA
EN
3.7 Antiscale
The Nilfisk ALTO Antiscale dosing system is set by the factory.
To adjust the water hardness we recommend that the inlet water is
tested accordingly.
Use the schematic to find the right dosage of No Scale/anti stone
and water, and add the mixture to the antiscale tank.
Machine flow L/h Pump size ml/h ˚dH ˚f ˚e Dosage
1200 35 0-12 0-21,5 0 - 15 1:1 = 17ml/h
1200 35 12-30 21,5 - 53,7 15 - 37,5 Pure = 35ml/h
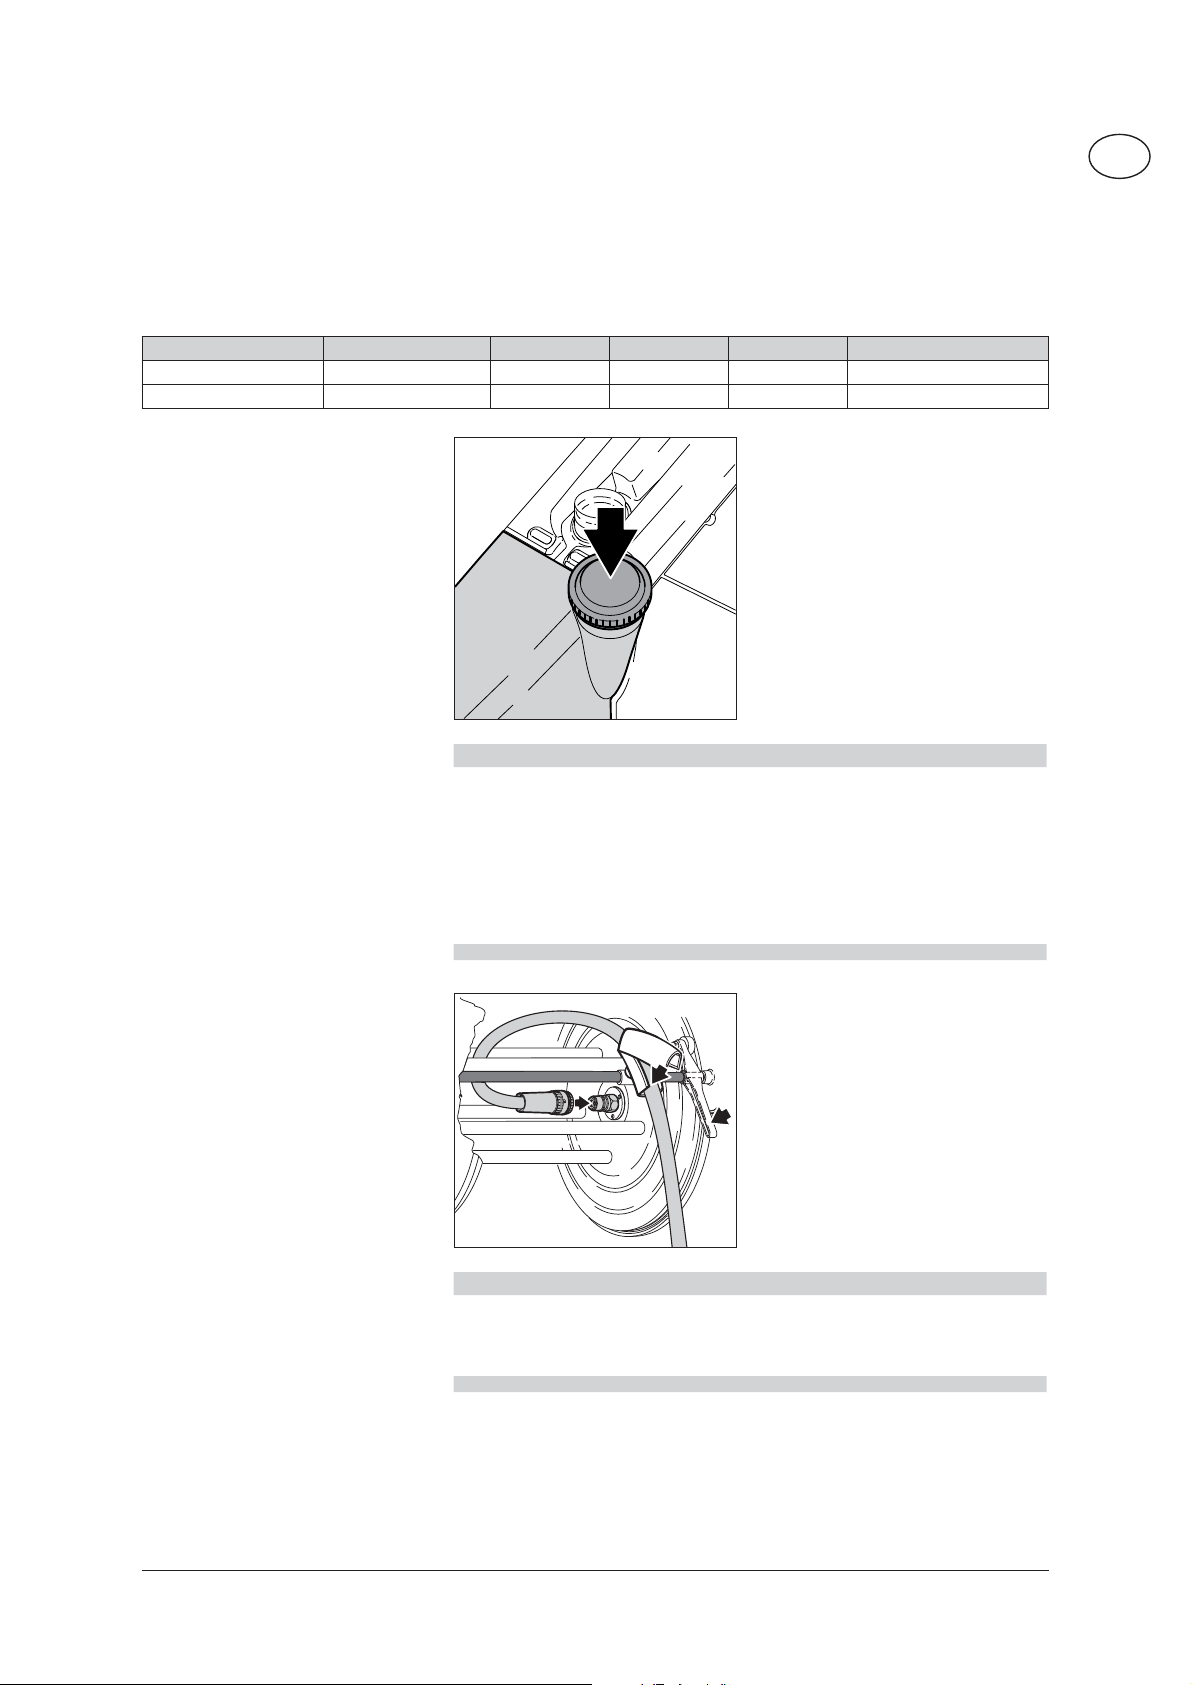
3.8 Fill up fuel tank
With the machine cold, turned
off and disconnected from power supply:
• Fill fuel tank from a clean
container with a fresh fuel
(fuel oil EL, or Diesel oil
DIN 51 603), or fuel type
recommended by your distributor.
NOTE
• At temperatures below 8°C (46°F), the fuel oil begins to
solidify (paraffin precipitation). This can lead to difficulties
in starting the burner. Before the winter months it is recommended that a fuel conditioner/stabilizer be added (available
from the fuel oil trade).
• Use clean fuel only, free of moisture and contamination. Contact your dealer for fuel source and type recommendations.
3.9 Connecting the high
pressure hose
3.9.1 Machines with high
pressure hose reel
1)
1. Connect the high pressure
hose quick connector to the
B
high pressure nipple (A) located at the hose reel axle.
2. Place the high pressure
C
A
hose into the hose guide
(B) and retain it with the
clip.
3. Release the brake (C) on
the hose reel and wind up
the high pressure hose.
NOTE
• High-pressure hoses, fittings and couplings are important for
the safety of the cleaner. Use only high-pressure parts approved by Nilfisk.
1)
Options / model variants
Original instructions
9
Page 10

EN
NEPTUNE 7 FA
3.9.2 Machines without
high pressure hose
1)
reel
3.10 Connecting the water
supply
Connect the high pressure hose
quick connector to the high
pressure nipple located at right
rear of machine above chemical
tank.
1. Attach quick connect
adapter found with Owners
Manual to the water supply
hose.
2. Rinse the water supply
hose briefly in order to
prevent sand an other dirt
particles entering into the
machine.
3. Attach water supply hose
with adapter to inlet quick
connector.
4. Open water supply faucet.
3.11 Antifreeze - before
first use
NOTE
• See chapter 9.4 Technical Data for required quantity of water
and water pressure.
• In the case of poor water quality (sand, etc.), it is recommended that an inlet water filter be installed.
• Water supply hose should be a reinforced hose and have a
minimum inside diameter of 3/4” (19 mm).
CAUTION
• Never operate the cleaner without water. Even brief shortages of water result in severe damage to the pump seals.
The machine is flushed with anti-freeze at the factory to protect it
against freezing; this mixture (approx. 5 l) may be captured in a
suitable container for reuse.
10
1)
Options / model variants
Original instructions
Page 11

NEPTUNE 7 FA
EN
3.12 Water connection
3.13 Electrical connection
This high pressure washer/cleaner is only allowed to be connected
with the drinking watermains, when an appropriate backflow preventer has been installed, Type BA according to EN 1717. If the
backflow preventer hasn’t been supplied, one can be ordered from
your Nilfisk ALTO dealer. As soon as water has flown through the
BA valve, this water is not considered to be drinking water any
more. The length of the hose between the backflow preventer and
the high pressure washer must be at least 12 metres (min diameter
3/4 inch) to absorb possible pressure peaks.
In the case of poor water quality (sand, etc.) add a water filter to
the machine.
Rinse the water supply hose briefly in order to prevent sand and
other dirt particles entering into the machine.
Operation by suction (for example from a rainwater vessel) is carried out without backflow preventer. Contact your Nilfisk ALTO
dealer for suction set recommendations.
age to machines electrical com-
230V
400V
400V
230V
ponents may occur.
The following should be
observed when connecting the
high pressure washer to the
electric installation:
• Only connect the machine
to an installation with earth
connection.
• The electric installation
shall be made by a certified
Some models have the ability
to be used on either 230 Volt
or a 440 Volt power supply. On
these models confirm that the
voltage selector switch is in the
proper position to match the
power supply. Otherwise dam-
electrician.
• According to IEC 60364-1
it is strongly recommended
that the electric supply to
this machine should include
a residual current device
(GFCI).
3.13.1 Extension cables
Cable connections should be
kept dry and off the ground.
1)
Options / model variants
Original instructions
CAUTION
• Do not damage the mains power lead, e.g. by driving over it,
pulling or crushing it.
• Disconnect the power cord by pulling the plug only, do not
pull or tug the power cord.
Cables on drums should always be completely unwinded to
prevent the cable from overheating. Extension cables should be
of a watertight construction and comply with the below-mentioned
requirements for length and cable dimensions.
Cable length m
Cross section
<16 A <25 A
up to 20 m ø1.5mm² ø2.5mm²
20 to 50 m ø2.5mm² ø4.0mm²
11
Page 12

NEPTUNE 7 FA
A
C
B
EN
4 Control / Operation
4.1 Operation
4.2 Connections
4.2.1 Connecting the spray
lance to the spray
gun
Before starting up the cleaner each time, please check it carefully
for any defects. Always check for sufficient levels of fuel, oil and
AntiScale. Also check the high pressure hose and gun, the insulation of the electric cable should be faultless and without any cracks.
To achieve a long life and avoid problems with dirt in the gun and
lance, the coupling and nipple have to be kept clean.
NOTE
1. Pull the blue quick-release
grip (A) of the spray gun
backwards.
2. Insert the nipple of the
spray lance (B) into the
quick-release connection
and release it.
3. Pull the spray lance (or
other accessory) forwards
to check that it is securely
attached to the spray gun.
4.3 Switching on the
cleaner
4.3.1 Cold water operation
/ Hot water operation
(up to 100°C)
NOTE
Always remove any dirt from the nipple before connecting the
spray lance to the spray gun.
1. Turn the main switch to
position
• Control electronics accomplishes a self check.
• The Display shows for approx. 1 second „---“.
• The motor starts.
•
2. Turn the main switch to
3. Select temperature.
4. Unlock the spray gun and
5. The oil burner will light.
6. Release trigger and lock
is ON.
position
squeeze trigger.
the spray gun when not in
use.
(cold water).
(hot water).
12
1)
Options / model variants
Original instructions
Page 13

NEPTUNE 7 FA
NOTE
The cleaner switches off automatically twenty seconds after the
spray gun has been closed. To start the cleaner again, squeeze
the trigger and the machine will start automatically.
EN
4.3.2 Steam operation over
100°C (212°F)
4.4 Pressure regulation
(Tornado Lance)
safety control block all the
way to the left (counterclock wise-direction).
3. Turn the main switch to
position
.
4. Select temperature (over
100°C (212°F)).
For special applications: replace the standard nozzle with
1. Open cabinet.
2. Turn the twist grip on the
the steam spray nozzle (accessory).
CAUTION
Beware of hot water and steam discharge up to 150°C when operating in steam stage.
1. Turn the twist grip on the
spray unit:
• High pressure = clockwise
(+) for high pressure
• Low pressure = counterclockwise (–) for low pressure.
1)
Options / model variants
Original instructions
13
Page 14

EN
NEPTUNE 7 FA
4.5 Using cleaning
agents
B
A
1%1%
3%
5%
3%
5%
ca. ca.
1. Select desired detergent
(A) or (B) and amount by
turning the knob to desired
percentage.
2. Spray the object to be
cleaned.
3. Allow the cleaning agent to
work.
4. Turn off the cleaning agent
4
3
0
2
1
and spray until clean water is comming out of the
lance.
5. Rinse off the object.
The percentage shown in the
illustration are only approximate
data.
For special applications such as
disinfection, the exact detergent
concentration has to be determined by using a graduated
measuring container. For water
outlet volume of the machine
see chapter 9.4 technical data.
The use of cleaning agents
while using the steam device
will show a lower percentage
and will result in a lower concentration.
NOTE
• Never allow cleaning agent to dry on the surface to be
cleaned. The surface may be damaged.
• This machine shall only be used with cleaning chemicals
supplied or recommended by Nilfisk ALTO.
• This machine will, when a cleaning agent has been chosen,
spray out the detergent on high- as well as low-pressure.
• To lenghten the lifetime of the machine, make sure to flush
the system with clean water after using chamicals.
14
1)
Options / model variants
Original instructions
Page 15

NEPTUNE 7 FA
5 Applications and methods
5.1 Techniques
5.1.1 Soaking
5.1.2 Detergent and Foam
Efficient high pressure cleaning is achieved by following a few
guidelines, combined with your own personal experience of specific cleaning tasks. Accessories and detergents, when correctly
chosen, can increase the efficiency of your pressure washer. Here
is some basic information about cleaning.
Encrusted or thick layers of dirt can be loosened or softened up by
a period of soaking. This is for example an ideal method within agriculture – for example, within pig sties. The ideal soaking method
can be achieved by using foam or simple alkaline detergent. Let
the product lie on the dirty surfaces for about 30 minutes before
pressure washing. The result will be a much quicker high pressure
cleaning process.
Foam or detergent should be applied onto dry surfaces so that the
chemical product is in direct contact with the dirt. Detergents are
applied from bottom to top, for example on a automobile bodywork,
in order to avoid “super clean” areas, where the detergent may
collect in higher concentrations and streams downwards. Let the
detergent work for several minutes before rinsing and never let it
dry on the surface being cleaned.
EN
5.1.3 Temperature
5.1.4 Mechanical Effect
5.1.5 High Water Flow or
High Pressure
Detergents are more effective at higher temperatures. Greases,
oils and fats can be broken down more effectively at higher temperatures also. Proteins can be cleaned at temperatures of around
60°C (140°F). Oils and traffic film around 70°C (158°F), and grease
can be cleaned at 80°-90°C (176-194°F).
In order to break down tough layers of dirt, additional mechanical
effect may be required. Special lances and rotary or wash brushes
offer this supplementary effect that cuts through dirt.
High pressure is not always the best solution and may also damage surfaces. The cleaning effect also depends upon water flow.
Pressure levels of around 100 bar (1450 psi) may be sufficient for
vehicle cleaning (in association with hot water) and higher flow
levels give the ability to rinse and flush away large amounts of dirt
easily.
1)
Options / model variants
Original instructions
15
Page 16

EN
NEPTUNE 7 FA
5.2 Some typical cleaning tasks
5.2.1 Agriculture
Task Accessories Method
Stables
Pig Pens, Sties
Chemical Foam Injectors
Foam lance
Cleaning of walls,
floors and equip-
Powerspeed lance
Floor Cleaner
ment
Detergents
Disinfectant
Universal
Alkafoam
Disinfectant
DES 3000
1. Soaking – apply foam to all surfaces (bottom to
top) and wait for approx. 30 minutes.
2. Remove the dirt from surfaces with the high pressure lance or chosen accessory. Again, clean from
bottom to top on vertical surfaces.
3. To flush away large quantities of dirt, change to low
pressure mode and use the higher flow to push
away the dirt.
4. Use recommended disinfectant products and methods to ensure hygiene. Apply DES 3000 disinfectant once the surfaces are perfectly clean.
Machinery
Tractors
ploughs etc.
Detergent injection
Powerspeed lances
Curved lances and
underchassis washers
Brushes
5.2.2 Vehicle
Task Accessories Method
Vehicle bodywork Standard lance
Detergent injection
Curved lances and
underchassis washers
brushes
Detergents
Active Shampoo
Active Foam
Sapphire
Super Plus
Aktive Wax
Allosil
RimTop
1. Apply detergent to vehicle or equipment surfaces
in order to soften up dirt and grime. Apply from bottom to top.
2. Proceed with cleaning using the high pressure
lance. Clean again from bottom to top. Use accessories to clean in difficult to reach places.
3. Clean fragile areas such as motors, rubber at lower
pressure levels to avoid damage.
1. Apply detergent to vehicle or equipment surfaces
in order to soften up dirt and grime. Apply from
bottom to top. In cases of particularly dirty vehicles,
pre-spray with a product such as Allosil in order
to remove traces of insects etc, then rinse at low
pressure and apply normal car cleaning detergent.
Let detergents settle for 5 minutes before cleaning
off. Metallic surfaces can be cleaned using RimTop.
2. Proceed with cleaning using the high pressure
lance. Clean again from bottom to top. Use accessories to clean in difficult to reach places. Use
brushes in order to add a mechanical cleaning effect. Short lances can help for cleaning of motors
and wheel arches. Curved lances or undercarriage
washers can be valuable for the cleaning of car
underchassis and wheel arches.
3. Clean fragile areas such as motors, rubber at lower
pressure levels to avoid damage.
4. Apply a liquid wax using the pressure washer in
order to protect the bodywork from pollution.
16
1)
Options / model variants
Original instructions
Page 17

5.2.3 Buildings and Equipment
Task Accessories Method
General surfaces
Foam injectors, foam
lances, standard
lances
Metallic equipment
Curved lances
Tank cleaning
head
Detergents
Intensive
J25 Multi
Combi Active
Alkafoam
NEPTUNE 7 FA
EN
1. Apply thick foam over the surfaces to be cleaned.
Apply on dry surfaces. Apply from top to bottom on
vertical surfaces. Let the foam act for up to 30 minutes for the optimal effect.
2. Proceed with cleaning using the high pressure
lance. Use applicable accessories. Use high pressure to dislodge large amounts of incrusted dirt or
grime. Use lower pressure and high water volume
in order to rapidly flush away loose dirt and rinse
surfaces.
3. Apply DES 3000 disinfectant once the surfaces are
perfectly clean.
Disinfectant
DES 3000
Areas covered by amounts of loose dirt, such as animal remains in slaughterhouses, can be removed by
using high water flow to flush away the dirt to evacuation pits or drains.
Tank cleaning heads can be used to clean barrels,
vats, mixing tanks etc. Cleaning heads may be hydraulically or electrically powered and give the possibility for
automatic cleaning without a constant user.
Rusted or damages surfaces prior
to treatment
Wet Sandblasting
equipment
1. Connect the sandblasting lance to the pressure
washer and place the suction tube in the sand.
2. Always wear protective equipment during sandblasting.
3. Spray the surfaces to be treated with the mix of
water and sand. Rust, paint etc will be stripped off.
These are merely several examples of cleaning tasks that can be solved by a pressure washer in association with accessories and detergents. Each cleaning task is different. Please consult your local
dealer or Nilfisk-ALTO representative in order to discuss the best solution for your own cleaning tasks.
1)
Options / model variants
Original instructions
17
Page 18

NEPTUNE 7 FA
EN
6 Transport and storage
6.1 Transport For safe transport in and on vechicles we recommend to prevent
the equipment from sliding and tilting by fixing it with belts.
Transport:
• Do not tilt the machine.
• Run the machine to empty the break tank and de pressurise
the high pressure hose by squeezing the trigger.
For transport and storage at temperatures around or below 0°C,
anti-freeze liquid should be drawn into the pump beforehand.
6.2 Switching off the
cleaner
1. Turn the main switch to
position „OFF“.
2. Turn off water supply at
faucet.
3. Squeeze the spray gun trigger until the pressure has
bled off.
4. Slide trigger lock to the
locked position.
6.3 Disconnecting supply
lines
1. Turn the main switch to position „OFF“.
2. Turn off water supply at faucet.
3. Squeeze the spray gun trigger until the pressure has bled off.
4. Slide trigger lock to the locked position.
5. Remove the water supply hose from the cleaner.
6. Remove power cord plug from the electrical supply.
18
1)
Options / model variants
Original instructions
Page 19

NEPTUNE 7 FA
EN
6.4 Rolling up the electrical cord and storing
accessories
6.5 Storing the cleaner
below 0°C (32°F)
A
Store the cleaner in a dry heated location to protect against
freezing or protect per below
instructions:
1. Switch on the cleaner with
the main switch in position
.
2. Squeeze trigger of the
Risk of tripping
To prevent accidents, always
carefully roll up the power cord.
Machines with hose and cord
reel:
1. Wind up the power cord
as illustrated with the plug
located in the center of the
cord reel.
2. Wind up the high pressure
hose as illustrated.
3. Place the spray lance into
the spray lance storage.
spray gun.
3. Turn off the water supply.
Do not remove the water
supply hose from the cleaner, this will result in water
spraying everywhere.
4. Gradually pour antifreeze
(approx. 5 litres) into the
water tank (A).
5. The machine is protected
against freezing when antifreeze mixture emerges
from the spray gun.
6. Release the trigger of the
spray gun.
7. Switch off the cleaner.
8. When the machine is put
into service again, the antifreeze solution can be collected and stored for future
use.
1)
Options / model variants
Original instructions
CAUTION
• Never startup a frozen cleaner. To avoid any possible damage, store the cleaner temporarily in a heated room before
using it again.
• Frost damages are not covered by the guarantee.
19
Page 20

NEPTUNE 7 FA
EN
7 Maintenance
7.1 Maintenance guidelines
7.2 Maintenance schedule
Water filters
Oil filter
Checking the pump oil quality
Changing the pump oil
Emptying the fuel oil tank
Flame Sensor
To avoid hazards, damaged parts must be replaced either by your
Nilfisk ALTO dealer, their customer service or a similarly qualified
person.
Ensure that the machine is regularly serviced by authorised NilfiskALTO dealers in accordance with the maintenance plan. Failure to
do so will invalidate the warranty.
The cleaner must be disconnected from its power source during
cleaning of the machine, maintenance, when replacing parts or
converting the machine to another function.
Weekly
After the first 50
operating hours
Every six months or
500 operating hours
As re-
quired
7.3 Maintenance work
7.3.1 Water filters
7.3.2 Maintenance of fuel
filter
Water filters are fitted at the
water and pump inlets to prevent large particles of dirt from
entering into the system.
1. Unscrew quick coupling.
2. Remove filter with tool and
clean it.
1. Open hose clips
2. Replace fuel filter
3. Close hose clips
4. Dispose the cleaning solution/damaged filter in accordance with the disposal
regulations.
20
1)
Options / model variants
Original instructions
Page 21

NEPTUNE 7 FA
EN
7.3.3 Checking the pump
oil quality
7.3.4 Changing the pump
oil
1. Check color of pump oil.
If the oil has a grey or white
shade, change the oil.
2. Top off oil level with fresh
oil if necessary.
Oil type see chapter 9.4 Technical Data.
1. Unscrew the oil drain plug
and drain oil into a suitable
container.
2. Check that the drain plug
gasket is in place and reinstall drain plug.
3. Fill pump with proper grade
and amount of oil.
Oil grade and capacity see
chapter ‘9.4 Technical Data’.
7.3.5 Emptying the fuel oil
tank
7.3.6 Flame sensor
1. Prepare a container which
is capable of containing the
amount of fuel remaining in
the tank.
2. Place drain channel beneath the drain plug.
3. Remove the drain plug and
drain the fuel into the prepared container carefully
not to spill fuel oil.
4. Check that the drain plug
gasket is in place and reinstall drain plug.
5. Check tank and plug for
leaks.
1. Remove the sensor and
clean with a soft cloth.
2. Confirm that the sensor is
correctly seated when reinstalling.
1)
Options / model variants
Original instructions
21
Page 22

NEPTUNE 7 FA
EN
8 Troubleshooting
8.1 Indications on Display
Indication
on display
FLF
FLO
FUE
HOP
HOS
> Flow sensor fault Contact Nilfi sk-AL TO Service
> Water supply turned off or inad-
equate supply to machine
> Detergent tank empty • Fill detergent tank or set detergent meter-
>
Pressure regulation on the safety
control block set to low water volume
> Machine scaled Contact Nilfi sk-AL TO Service
> Fuel shortage • Fill fuel tank
> Motor overheated • Turn main switch in position „OFF“, let
> Machine overheated Contact Nilfi sk-AL TO Service
Cause Remedy
Cold water operation possible
• Required volume fl ow and pressure see
chapter 9.4 Technical Data
ing to „OFF“
• Turn the twist grip on safety control block
to higher water pressure/volume
Cold water operation possible
machine cool down
• Remove extension cord, if being used.
• Possible phase failure; have electrical connections checked
LEA
LHE
LHL
POL
SEC
SEO
UPC
> Leakage or inadmissible operating
condition by short-time operation
> Spray gun leaking • Repair Spray gun
> High pressure hose, coupling or line
system leaking
> Detergent tank empty • Fill detergent tank or set detergent meter-
> Water inlet fi lter dirty • Clean fi lter
> High-pressure pump drawing in air • Repair leaks
> Flame sensor sooted • Clean fl ame sensor
> Ignition or fuel system failure
> Burner failure Contact Nilfi sk-AL TO Service
> Pump oil low • Fill to proper level
> Temperature sensor damaged Contact Nilfi sk-ALT O Service
> Temperature sensor damaged Contact Nilfi sk-ALT O Service
> Microprocessor failure Contact Nilfi sk-AL TO Service
• After three times of short-time ope ration the
machine switches off. To reset: Turn main
switch to position “OFF“, then start again.
Keep trigger squeezed for longer than 3
seconds. If a leak occurs in the hose and
gun and causes the machine to start and
stop briefl y 3 times, then the machine will
switch off.
• Replace high-pressure hose, retighten
screw fi ttings
ing to „OFF“
Contact Nilfi sk-AL TO Service
Cold water operation possible
Cold water operation possible
Cold water operation possible
Cold water operation possible
22
1)
Options / model variants
Original instructions
Page 23

8.2 Indication lights on control panel
Indication light Cause Remedy
flashing
ON
flashing
ON
> see FLO • see FLO
> Low fuel level • Fill fuel tank
Cold water operation possible
> Low Nilfisk-ALTO AntiStone
(Anti-Scale) level
> Service interval: Service due
• Fill Nilfisk-ALTO AntiStone (AntiScale) tank
Contact Nilfisk-ALTO Service
in 20 hours
> Service interval expired
Contact Nilfisk-ALTO Service
NEPTUNE 7 FA
EN
ON
> Pump oil low • Fill to proper level
8.3 Other Faults
Fault Cause Remedy
not ON
> Power cord not properly con-
nected to power supply
• Check power cord connetction
• Check fuse (see chapter 9.4 Technical Data)
Pressure too low > High pressure nozzle worn
• Replace nozzle
out
Machine is running with pulsating pressure and makes
knocking noise
> Pressure regulation set to
low pressure
> Pump has drawn in air due
to detergent tank being
empty
• Turn the twist grip on safety control
block clockwise (+)
• Close detergent valve. Remove lance
from gun. Operate spray gun and let
machine run until air in pump is gone
and the machine is running normally/
calm again.
No detergents drawn in > Detergent tank empty • Fill detergent tank
> Dirt in detergent tank • Clean detergent tank
> Suction valve at cleaning
agent inlet soiled
Burner soots > Fuel contamination
• Remove suction valve and clean or
replace
Contact Nilfisk-ALTO Service
1)
Options / model variants
Original instructions
> Burner sooted or adjustment
incorrect
23
Page 24

NEPTUNE 7 FA
EN
9 Further information
9.1 Recycling the cleaner
9.2 Guarantee
Make the old cleaner unusable. Unplug the cleaner and cut the
power cord.
Do not discard of electrical appliances with household waste.
As specified in European Directive 2002/96/EC on old electrical
and electronic appliances, used electrical goods must be collected
separately and recycled ecologically.
Contact your local authorities or your nearest dealer for further information.
Our general conditions of business are applicable with regard to
the guarantee. Subject to change as a result of technical advances.
The guarantee is invalidated if the machine is not operated in accordance with these instructions or otherwise abused. The guarantee is invalidated if the machine is not serviced as described.
24
1)
Options / model variants
Original instructions
Page 25

NEPTUNE 7 FA
EN
9.3 EU Declaration of
Conformity
Product
High Pressure Cleaner
Type
NEPTUNE 7
Description
200 / 3~ / 50Hz
200 / 3~ / 60Hz
220V / 1~ / 60Hz
220/440V / 3~ / 60Hz
400V / 3~ / 50Hz
440/220 / 3~ / 60Hz
The design of the unit corresponds to the following pertinent
regulations
EC Machine Directive 98/37/EG,
EC Low-voltage Directive 73/23/EG,
EC EMV Directive 89/336/EG
Applied harmonised standards
EN 12100-1, EN 12100-2, EN 60335-2-79, EN 55014-1,
EN 55014-2, EN 61000-3-2
Anton Sørensen
General Manager EAPC
Technical Operations
Brøndby, 2010-06
1)
Options / model variants
Original instructions
25
Page 26

EN
NEPTUNE 7 FA
9.4 Technical data
Neptune 7 FA
7-58 /
7-58X
Voltage 200 / 3~ / 50Hz
Voltage 200 / 3~ / 60Hz (JP)
Voltage 220V / 1~ / 60Hz (US)
Voltage 220/440V / 3~ / 60Hz (US)
Voltage 400V / 3~ / 50Hz (EU)
Voltage 440/220 / 3~ / 60Hz (KR)
Fuse (slow)
A3030161630
7-63 7-63 7-63 7-66
(JP)
Power rating
Working pressure
Permissible pressure
Volume flow max.
Volume flow Q
IEC
T max
T max steam
Permissable temperature
Max. water inlet temperature
Max. water inlet pressure
Dimensions l x w x h
Weight
Calculated sound pressure at
a distance of 1 m EN 60704-1
+/- KpA *
L
pA
kW 6.6 8.3 8.3 9.3 9.1
bar/MPa 159/15.9 175/17.5 175/17.5 175/17.5 214/21.4
bar/MPa 250/25
l/h 1200 1260 1260 1260 1200
l/h 1135 1170 1170 1170 1135
o
C9090909090
o
C 140 140 140 140 140
o
C 90-140 90-140 90-140 90-140 90-140
o
C4040404040
bar/MPa 10/1
mm
Kg
dB(A)
1190 x
702 x
1020
217 /
220(X)
76.6
+/- 1,5
1190 x
702 x
1020
1190 x
702 x
1020
1190 x
702 x
1020
1190 x
217 217 224 217
76.6
+/- 1,5
76.6
+/- 1,5
76.6
+/- 1,5
+/- 1,5
702 x
1020
76.6
Sound power level L
including KwA = 1,5dB *
Recoil forces
Fuel tank
Detergent tank A/B
Oil quantity
Oil type
26
MAX
wA
dB(A) 91.7 91.7 91.7 91.7 91.7
N5260616065
l35
l 15/10
l 1.0
Castrol AlphaSyn-T ISO 150
1)
Options / model variants
Original instructions
Page 27

Nilfi sk-AL T O
www.nilfi sk-alto.com
 Loading...