

Nikon SB 800 - AF Speedlight Flash Instruction Manual

En
●
SB-800 (En)
●
SB-800
Autofocus Speedlight
Instruction Manual

i 125
For your safety
Before using your product, please read the following safety precautions
carefully and thoroughly to ensure correct and safe use and to help
prevent damage to your Nikon product or injury to yourself or others.
For quick reference by those who use the product, please keep these
safety instructions near the product.
In this manual, safety instructions are indicated with these symbols:
Disregarding instructions marked with this symbol could
result in personal injury, or death and property damage.
Disregarding instructions marked with this symbol could
result in property damage.
WARNING
CAUTION

ii
WARNINGS for Speedlights
1 If corrosive liquids seep from the batteries and get in your eyes,
immediately wash your eyes with running water and consult with a
doctor. Your eyes could be seriously damaged if they are not treated quickly.
2 If corrosive liquids seep from the batteries and come in contact with
your skin or clothes, wash immediately with running water. Prolonged
contact could injure your skin.
3 Never attempt to disassemble or repair the flash unit by yourself, as this
could result in you receiving an electric shock and could also cause the unit
to malfunction; such malfunction could lead to personal injury.
4 If the flash unit is dropped and damaged, do not touch any exposed
interior metal parts. Such parts, especially the speedlight’s capacitor and
associated parts, could be in a high-charge state and if touched could
cause an electric shock. Disconnect the power or remove the batteries and
be sure that you do not touch any of the product’s electrical components,
and then bring the flash unit to your local Nikon dealer or authorized service
center for repair.
5 If you detect heat, smoke or notice a burning smell, immediately stop
operation and remove the batteries to prevent the unit from catching on
fire or melting. Allow the flash unit to cool down so that you can safely touch
it and remove the batteries. Then bring the unit to your local Nikon dealer or
authorized service center for repair.
6 The flash unit should never be submerged in liquid or exposed to rain,
saltwater or moisture unless it is properly protected from the liquids
and moisture. Underwater use requires a certified underwater housing.
If water or moisture gets inside the unit, this could cause the unit to catch on
fire or cause an electric shock. In such instances you should immediately
remove the batteries from the speedlight and then bring the unit to your
local Nikon dealer or authorized service center for repair.
Note: electronic devices that are penetrated by water or moisture are often
not economically repairable.
7 Do not use the unit in the presence of flammable or explosive gas.
If the flash unit is operated in areas where there is a flammable gas,
including propane, gasoline and dust, it could cause an explosion or fire.
8 Do not fire the flash unit directly at the driver of a moving car, as this
could temporarily impair the driver’s vision and cause an accident.
9 Do not fire the flash unit directly into the eyes of someone that is at
close range, as it could damage their eyes’ retinas. Never fire the flash unit
closer than 1 meter from infants.
Preparation

iii
For your safety
10 Do not fire the unit while the flash head is touching a person or object.
Such use can result in the person being burned, and/or their clothes igniting
from the heat of the flash’s firing.
11 Keep small accessories out of the reach of children to avoid the
possibility of the accessory being swallowed. If an accessory is accidentally
swallowed, immediately consult with a doctor.
12 Use only the batteries specified in this instruction manual. Batteries
other than those specified could leak corrosive liquids, explode or catch on
fire or otherwise not perform satisfactorily.
13 Do not mix battery types, brands or old and new batteries, as the
batteries could leak corrosive liquids, explode or catch on fire. When using
more than one battery in a product, always use identical batteries that were
purchased at the same time.
14 Non-rechargeable batteries such as manganese, alkaline-manganese
and lithium batteries should never be charged in a battery charger
because they could leak corrosive liquids, explode or catch on fire.
15 When using standard size (AA, AAA, C, D) or other common
rechargeable batteries such as NiCd and Ni-MH battery types, or when
recharging them, be sure to use only the battery charger specified by
the battery maker and read the instructions thoroughly. Do not recharge
these batteries with their terminals reversed in the charger or before the
batteries have cooled off sufficiently because they could leak corrosive
liquids, explode or catch on fire. The same caution also applies to using the
rechargeable batteries that may be supplied by the photo product’s
manufacturer.
CAUTIONS for Speedlights
1 Do not touch the flash unit with wet hands, as this could cause an
electric shock.
2 Keep the flash unit away from children to prevent them from putting the
unit in or near their mouth, or otherwise touching a dangerous part of
the product; as such contact could cause an electric shock.
3 Do not apply strong physical shocks to the unit, as this could cause a
malfunction that could cause the unit to explode or catch on fire.
4 Never use active agents that contain flammable substances such as
paint thinner, benzene or paint remover to clean the unit, and never
store the unit in locations containing chemicals such as camphor and
naphthalene, as this could damage the plastic case, cause a fire or cause
an electric shock.

iv
5 Remove any batteries from the unit before storing the unit for a long
time to prevent the unit from catching on fire or leaking corrosive liquids.
WARNINGS for Batteries
1 Never heat or throw batteries into a fire, as this could cause the batteries
to leak corrosive liquids, generate heat or explode.
2 Do not short-circuit or disassemble the batteries because this could
cause the batteries to leak corrosive liquids, generate heat or explode.
3 Do not mix battery types, brands or old and new batteries, as this could
cause the batteries to leak corrosive liquids, generate heat or explode.
4 Do not install batteries in the reverse direction as this could cause the
batteries to leak corrosive liquids, generate heat or explode. Even if only
one battery is installed in reverse it will cause the speedlight to
malfunction.
5 Be sure to use the battery charger specified by the battery maker to
avoid the possibility of batteries leaking corrosive liquids, generating heat or
exploding.
6 Do not carry or store batteries along with metallic materials such as
necklaces and hair pins because such materials could cause the batteries
to short-circuit, leading to battery leakage, heat generation or an explosion.
In addition, specially when carrying a quantity of batteries, place them
carefully in a storage case that prevents the battery terminals from
touching another battery’s terminals because if they touch in reverse
order it could also cause the batteries to short-circuit, leading to battery
leakage, heat generation or an explosion.
7 If corrosive liquids seep from the batteries and get in your eyes,
immediately wash your eyes with running water and consult with a
doctor. Your eyes could be seriously damaged if they are not treated
quickly.
8 If corrosive liquids seep from the batteries and come in contact with
your skin or clothes, wash immediately with running water. Prolonged
contact could injure your skin.
9 Always follow the warnings and instructions printed on the batteries to
avoid activities that could cause the batteries to leak corrosive liquids,
generate heat or catch on fire.
10 Be sure to use only batteries specified in this instruction manual, to
avoid the possibility of batteries leaking corrosive liquids, generating heat or
exploding.
Preparation

v
For your safety
11 Never open the casing surrounding batteries or use batteries whose
casing has been breached as such batteries could leak corrosive liquids,
generate heat or explode.
12 Keep batteries out of the reach of children to help avoid the possibility of
them being swallowed. If a battery is accidentally swallowed, immediately
consult with a doctor.
13 Batteries should not be submerged in water, exposed to rain, moisture
or saltwater unless they are properly protected from the wet
environment. If water or moisture gets inside the batteries, this could cause
them to leak corrosive liquids or generate heat.
14 Do not use any battery that appears abnormal in any way, including a
change in color or shape. Such batteries could leak corrosive liquids or
generate heat.
15 Stop recharging rechargeable batteries if you notice that recharging is
not completed within the specified time to help prevent the possibility of
the battery leaking corrosive liquids or generating heat.
16 When recycling or disposing of batteries, be sure to insulate their
terminals with tape. If the battery’s positive and negative terminals short-
circuit after coming into contact with metallic objects, it could cause fire,
heat generation or an explosion. Dispose of used batteries in accordance
with local government regulations.
17 Non-rechargeable batteries should never be charged in a battery
charger because they could leak corrosive liquids or generate heat.
18 Remove dead batteries from your equipment immediately, as they could
leak corrosive liquids, generate heat or explode.
CAUTION for Batteries
Do not throw or apply strong physical shocks to the batteries as this
could cause batteries to leak corrosive liquids, generate heat or explode.

1
Contents
Preparation
· For your safety.....................................................................i-v
· Foreword ............................................................................4-6
·Tips on using the Speedlight ................................................7
· Camera groups and available flash modes ......................8-9
· Speedlight parts and their functions .............................10-11
· Control buttons....................................................................12
· Icons on the LCD panel.................................................13-15
· Lenses.................................................................................16
•
Basic operation .................................................................17
1 Installing the batteries ..................................................18-19
2Test firing (Confirming the exposure) ...........................20-21
3 Attach the SB-800 to the camera and adjust
the flash head ............................................................22-23
4 Setting the ISO sensitivity.............................................24-25
5 Adjust the zoom-head position.....................................26-27
6 Setting the camera’s exposure mode and
metering system.........................................................28-29
7 Setting the SB-800’s flash mode ..................................30-31
8 Compose the picture and shoot with flash...................32-33
Using the SB-800 with the COOLPIX....................................34
•
Detailed operation.............................................................35
· SB-800’s available flash modes ..........................................36
· TTL auto flash mode ...........................................................37
· Non-TTL auto flash mode ..............................................38-41
· Manual mode .................................................................42-50
· Notes on continuous flash shooting....................................51
· Checking the correct exposure before shooting ................52
•
Other functions .................................................................53
· Exposure compensation and flash output level
compensation..............................................................54-56
· Flash-shooting distance range with zoom lenses
having a variable aperture ...............................................57
· Slow-sync flash mode, Red-eye reduction control,
and Rear-curtain sync .................................................58-59

2
Contents
· Auto FP High-Speed Sync mode........................................60
· Flash Value Lock (FV Lock) ................................................61
· Autofocus flash operation in dim light ...........................62-63
· Using the Quick Recycling Battery Pack SD-800 .........64-65
· Checking the illumination before actually
taking the picture (Modeling illuminator)..........................66
· Custom functions ................................................................67
· Custom settings .............................................................68-70
•
Advanced operations........................................................71
·Overview of multiple flash operation .............................72-73
·Wireless multiple flash shooting ....................................74-75
· Flash shooting in Advanced Wireless Lighting .............76-83
· SU-4 type wireless multiple flash shooting....................84-88
· Confirming wireless multiple flash operation
using the ready-light or the beeping sound.....................89
· Multiple flash shooting using cords...............................90-93
· System chart for TTL multiple flash shooting
using cords..................................................................94-95
· Flash shooting with digital SLRs cameras
using colored gel filters...............................................96-97
· Bounce flash operation................................................98-101
· Close-up flash operation............................................102-105
Flash shooting in the 1/300 TTL High-Speed
Flash sync mode (F5 only) .............................................106
•
Reference information ....................................................107
· TTL auto flash modes available
with the SB-800 .......................................................108-110
· Optional accessories .................................................111-113
·Tips on Speedlight care....................................................114
·Notes on batteries.............................................................115
·Troubleshooting..........................................................116-118
· About the LCD panel ........................................................119
· Specifications.............................................................120-123
· Index ..........................................................................124-125

3
Preparation
This section provides preliminary
information on using the SB-800.
Basic operation
Basic procedures to take simple,
properly exposed flash photographs in
the TTL auto flash mode.
Detailed operation
A variety of flash modes available with
the SB-800 are explained.
Other functions
Detailed information on each function
of the SB-800 is provided.
Advanced operations
Information on advanced flash
shooting techniques using the SB-800
is described.
Reference information
Optional accessories, Troubleshooting,
Speedlight care, Specifications, etc.
are presented in this section.

4
Foreword
Thank you for purchasing the Nikon Speedlight SB-800. To get the
most out of your Speedlight, please read this instruction manual
thoroughly before use. Also, read the separate booklet, “A collection of
example photos,” which provides an overview of the SB-800’s flashshooting capabilities with example photos. In addition, keep your
camera instruction manual handy for quick reference.
■■■
Main features and functions of the SB-800
• The SB-800 is a high-performance Speedlight with a guide number of 38/125
(ISO 100, m/ft.) or 53/174 (ISO 200, m/ft.) (at the 35mm zoom-head position,
20°C/68°F.) According to the camera and lens combination used with the
SB-800, you can perform various types of TTL auto flash (p. 37), Non-TTL
auto flash (p. 38), and Manual flash (p. 42).
•A power zoom function automatically adjusts the zoom-head position to
match the lens focal length (with the exception of some camera/lens
combinations) (p. 26). When the built-in wide-flash adapter is used or the
Nikon Diffusion Dome is attached (p. 27), the zoom-head position is
automatically set to match a 14mm or 17mm lens.
• The flash head tilts up to 90° or down to –7° and rotates horizontally 180° to
the left and 90° to the right, enabling bounce flash (p. 98) or close-up flash
photography (p. 102).
• The Nikon Creative Lighting System provides a variety of advanced
wireless multiple flash operations when the SB-800 is used with
compatible cameras (p. 5).
• When doing bounce flash or taking close-ups with flash, you can use the
built-in wide-flash adapter in conjunction with Nikon Diffusion Dome to create
extremely soft, diffused lighting with virtually no shadows, while maintaining
balanced lighting for the main subject and the background (pp. 101, 104).
• Custom functions are provided to set values, or activate or cancel functions
that are unnecessary to set each time (p. 67).
u Life-long learning
As part of Nikon’s “Life-long learning” commitment to ongoing product support
and education, continually-updated information is available on-line at the
following sites:
• For users in the U.S.A.: http://www.nikonusa.com/
• For users in Europe: http://www.europe-nikon.com/support
• For users in Asia, Oceania, the Middle East, and Africa: http://www.nikon-asia.com/
Visit these sites to keep up-to-date with the latest product information, tips,
answers to frequently-asked questions (FAQs), and general advice on digital
imaging and photography. Additional information may be available from the
Nikon representative in your area. See the URL below for contact information:
http://nikonimaging.com/

5
The SB-800 features the Nikon Creative Lighting System (CLS). This system
offers additional flash shooting possibilities with digital cameras by taking
advantage of camera’s digital communication capabilities. CLS is available
only when the SB-800 is used with compatible Nikon cameras. The SB-800
offers these major features:
• i-TTL mode
This is a TTL auto flash mode in the Nikon Creative Lighting System. Monitor
Preflashes are fired at all times. The subject is correctly exposed by the light
from the flash lighting and the exposure is less affected by the ambient
light (p. 37).
• Advanced Wireless Lighting
With the Advanced Wireless Lighting, wireless multiple flash operation in the
TTL (i-TTL) mode can now be accomplished with digital SLRs. In this mode,
you can divide the remote flash units into three groups and control the flash
output independently for each group, expanding your range of creative
multiple-flash shooting techniques (p. 76).
• Flash Value Lock
Flash Value, or “FV,” is the amount of flash exposure for the subject. Using
FV Lock with compatible cameras, you can lock in the appropriate flash
exposure for the main subject. This flash exposure is locked in, even if you
change the aperture or composition, or zoom the lens in and out (p. 61).
• Flash Color Information Communication
When the SB-800 is used with compatible digital SLRs, color temperature
information is automatically transmitted to the camera. In this way, the
camera’s white balance is automatically adjusted to give you the correct color
temperature when taking photographs with the SB-800.
•Auto FP High-Speed Sync
High-Speed flash synchronization at your camera’s highest shutter speed is
now possible. This is useful when you want to use a wider aperture to achieve
shallow depth of field to blur the background (p. 60).
• Wide-Area AF-Assist Illuminator
In autofocus operation, the SB-800 emits AF-Assist illumination over a wider
area. This enables you to perform autofocus photography in dim light even
when you change the camera’s focus area with cameras supporting this
function (p. 62).
See your equivalent camera’s instruction manual for details on the Nikon
Creative Lighting System.
Preparation
Nikon Creative Lighting System
6
Foreword
■■■
Notes
• Default: Functions and flash modes preset when shipped from the factory
are referred to as “Default” settings in this manual.
• CLS: Hereafter, Nikon’s new Speedlight system “Nikon Creative Lighting
System” is abbreviated “CLS.”
■■■
Marks used in this manual
•
v
: Denotes important points to prevent malfunction or shooting failure.
•
t
: Useful points that should be remembered for better usage of the SB-800.
•
u
: Provides convenient reference information when using the SB-800
■■■
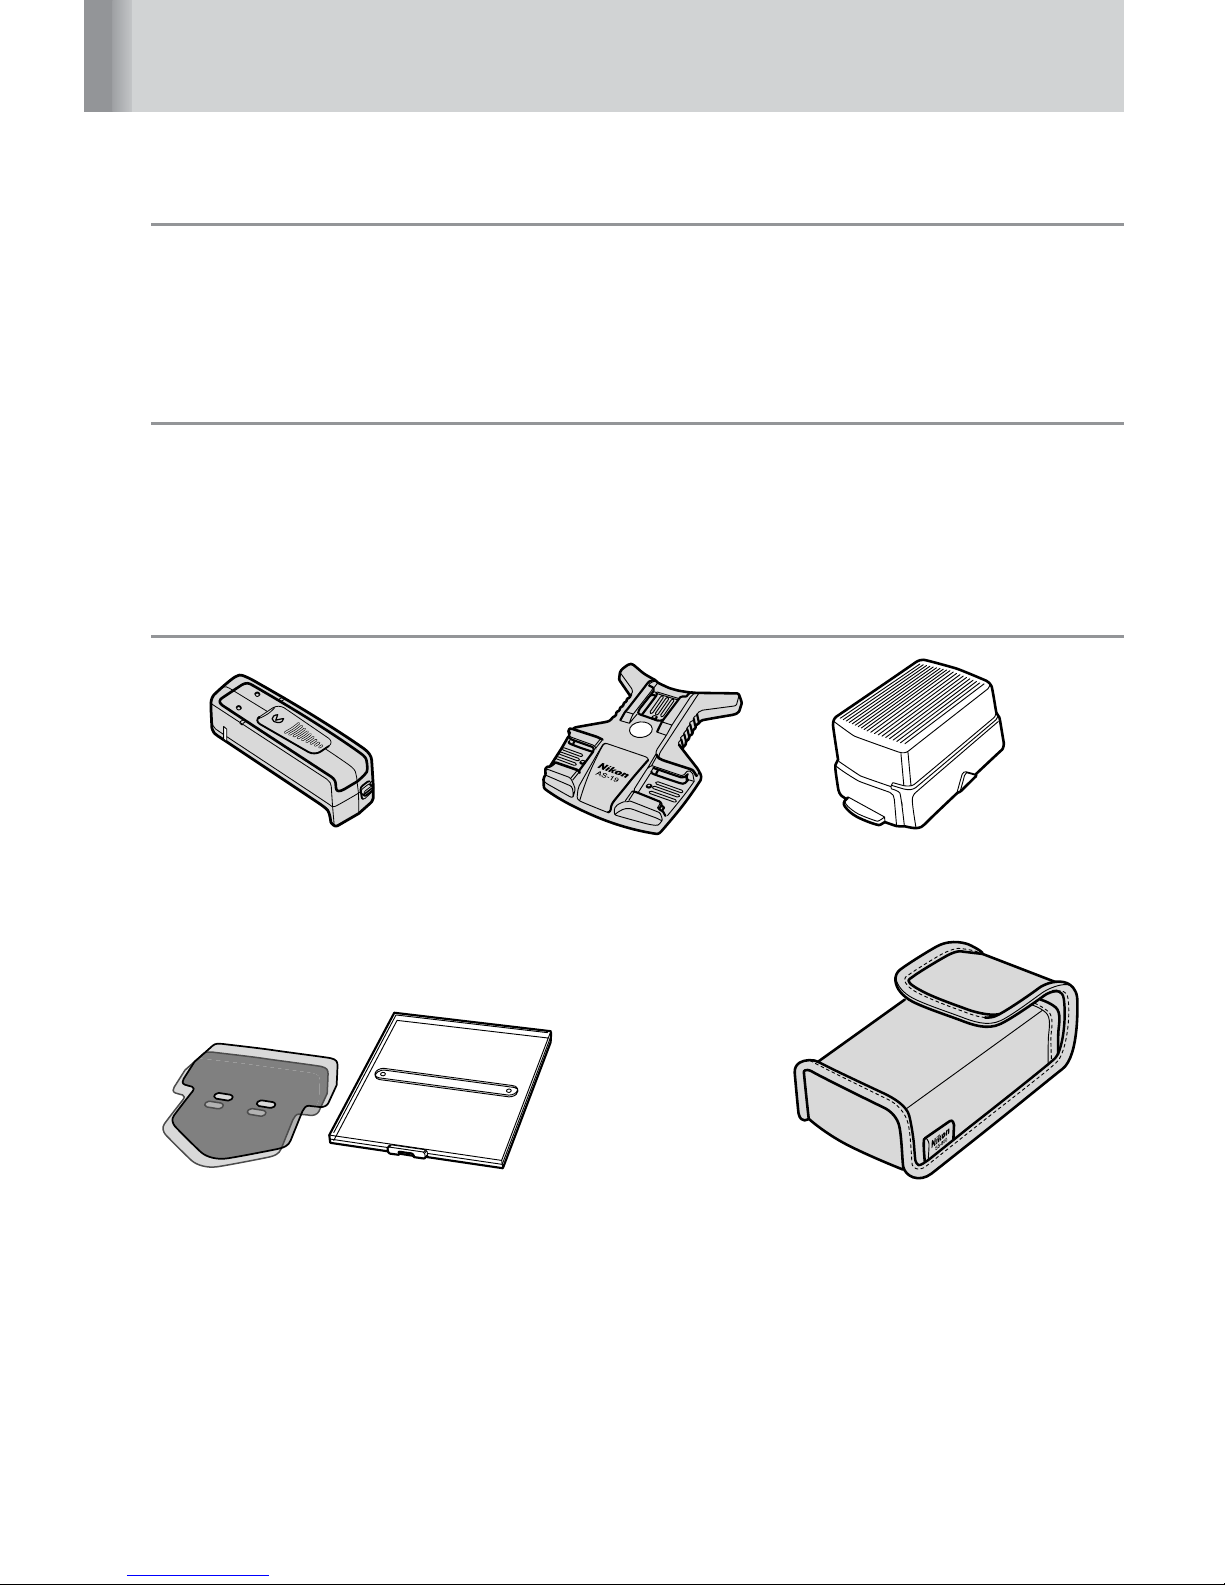
Supplied accessories
Quick Recycling Battery Pack Speedlight Stand Nikon Diffusion Dome
SD-800 AS-19 SW-10H
Colored Gel Filter Set SJ-800: Soft Case SS-800
FL-G1, TN-A1

7
Tips on using the Speedlight
Take trial shots
Make trial shots before photographing important occasions like weddings or
graduations.
Have Nikon spot-check your Speedlight regularly
Nikon recommends that you have your Speedlight serviced by an authorized
dealer or service center at least once every two years.
Using your Speedlight correctly
The Nikon Speedlight SB-800’s performance has been optimized for use with
Nikon brand cameras/accessories including lenses.
Camera/accessories made by other manufacturers may not meet Nikon’s
criteria for specifications, and nonconforming cameras/accessories could
damage the SB-800’s components. Nikon cannot guarantee the SB-800’s
performance when used with non-Nikon products.
Notes:
• The Nikon N90s, N90, N75-Series, N70, N60, N55-Series, N50, N8008, N8008s,
PRONEA 6i, N6006, N6000, N5005, N4004s and N4004 are sold exclusively
in the U.S.A.
• The Nikon N80-Series, N65-Series are sold exclusively in the U.S.A. and Central
and South America.
• The Nikon N2020 and N2000 are sold exclusively in the U.S.A and Canada.
Preparation

In this manual, Nikon SLR cameras are divided into nine groups: cameras
compatible with CLS*, digital SLRs not compatible with CLS*, and cameras in
Groups I to VII unless otherwise noted. First, consult the camera group table to
see which group your camera belongs to. Then as you read the manual, you will
find specific information on how to use the SB-800 with your particular camera.
*CLS: Nikon Creative Lighting System (p. 5)
8
Camera groups and available flash modes
*1 o: Balanced Fill-Flash. This always appears together with D (p. 37).
*2Wireless multiple flash in the i-TTL mode is possible.
*3 TTL mode is not possible.
TTL auto flash mode (p. 37)
Group Camera name
D DDo
i-TTL D-TTL TTL
*
1
Cameras
compatible D2H, D70 – –
with CLS*
Digital
SLRs not
D1-Series, D100 – –
compatible
with CLS*
F5, F100, F90X/N90s, F90-Series/N90,
I F80-Series/N80-Series, F75-Series/
N75-Series, F70-Series/N70
––
F4-Series, F65-Series/N65-Series,
II F-801s/N8008s, F-801/N8008, – –
Pronea 600i/6i
III F-601/N6006, F-601M/N6000
*
5
––
IV
F60-Series/N60, F50-Series/N50,
*
5
F-401x/N5005
––
V
F-501/N2020, F-401s/N4004s,
–– –
F-401/N4004, F-301/N2000
VI
FM3A, FA, FE2, FG, Nikonos V,
F3-Series (with the AS-17)
–– –
VII
New FM2, FM10, FE10, F3-Series,
––––
F55-Series/N55-Series
COOLPIX
cameras
COOLPIX 8400, COOLPIX 8800 – – –
compatible
with i-TTL

9
*4 Distance-priority manual flash p is not possible with D1X and D1H digital cameras.
*5 While performing Balanced Fill-Flash, no o icon appears.
*6 Repeating flash is not possible with the F3-Series (using the AS-17).
Non-TTL auto flash mode (p. 38)
Manual mode ( p. 42) Wireless multiple flash
p Advanced
BA
Distance-
Gq
Wireless
SU-4 type
Auto Non-TTL priority Manual Repeating
Lighting
(master flash)
Aperture flash
auto flash manual flash flash
(p. 76)
(p. 84)
flash
*
2
*
3
*
4
–
*
3
–
–
––
––
––
*
6
––
––
–
The SB-800’s available flash modes vary, depending on the cameras and lenses in
use or the camera’s exposure mode and metering system. For more details, refer to
“Detailed operation” (p. 35), “TTL auto flash modes available with the SB-800” (p.108)
and your camera’s instruction manual.
Preparation
●● : Available
–: Not available

10
Speedlight parts and their functions
1 Control button quick reference
(p. 12)
2 Flash head (p. 100)
Can be tilted up to 90° or down to –7°, and
rotated horizontally 180° to the left and 90° to
the right.
3 Flash head tilting/rotating lock
release button
(p. 22)
4 Light sensor window for wireless
remote flash
(p. 74)
5 Battery chamber lid attachment
indexes
(p. 18)
6 Battery chamber lid (p. 18)
7 Built-in bounce card (p. 101)
Creates a highlight in the subject’s eyes in
bounce flash photography.
8 Built-in wide-flash adapter (p. 104)
Increases the angle of coverage to match a
14mm or 17mm lens.
9 Wide-area AF-assist illuminator
(p. 62)
Automatically turns on for autofocus operation
when the light is dim.
10 External power source terminal
(supplied with cover) (p. 113)
11 Light sensor window for Non-TTL
auto flash
(p. 38)
Senses reflected light from the subject in Auto
Aperture B or Non-TTL auto A flash
mode.
12 External AF-assist illuminator
contacts (for SC-29)
Accepts optional TTL Remote Cord SC-29
13 Mount pin
14 Hot-shoe contacts
15 Mounting foot
5
6
3
4
1
2
9
8
7
11
10
12
13
15
14

11
16 Flash head tilting angle scale
(p. 100)
17 Modeling illuminator button (p. 66)
Press to fire flash repeatedly to check the
illumination and the shadows cast on the
subject before taking pictures.
Wireless remote flash cancel
button
(p. 75)
The SB-800 will not fire, while this button
is pressed.
18 Flash head rotating angle scale
(p. 100)
19 Terminal cover
20 TTL multiple flash terminal
(p. 92)
Connects the SB-800 to the remote flash
unit(s) in TTL multiple flash operation
using cords.
21 Sync terminal
(p. 93)
Connects the SB-800 to the sync terminal of
the remote flash unit(s) in other than TTL
multiple flash operation using cords.
22 LCD panel
(p. 119)
23 Control buttons (p. 12)
24 Ready-light
Lights up when the SB-800 is fully recycled
and ready to fire. Blinks after the SB-800 fires
at its maximum output in various auto flash
modes, indicating that the light may be
insufficient.
25 Mounting foot lock lever
(p. 22)
FL
AS
H
R
E
A
D
Y
22
21
17
20
18
19
25
24
23
16
Preparation

12
Control buttons
Recalling the underexposure value in the TTL auto
flash mode
Press the a and g buttons simultaneously to recall
the underexposure value (p. 33).
Resetting the settings
Press the a and b buttons simultaneously for
approx. 2 sec. to reset all settings, including the custom
settings (except the distance unit selected in m/ft) to
their default values.
Button lock
Press the b and g buttons simultaneously to lock
the functions of the control buttons (except the b,
Modeling illuminator, and FLASH buttons) to avoid
accidental malfunction. Press the buttons again to
release the lock.
e button/f button
Press to increase or decrease the values of the
highlighted items.
b button
Press for approx. 0.3 sec. to turn the power on
and off.
Multi Selector
g button
• Press to select the items to be set. The selected
item is highlighted and can be changed using
the e and f buttons.
• Press for approx. 2 sec. to display the Custom
settings mode (p. 68).
c button (wide)/d button (tele)
Press to change the zoom-head position (p. 26).
FLASH button
Press to test fire the flash (p. 20).
a button
Press to set the flash mode (p. 30).
Control button quick reference
Procedures for Custom settings, recalling the
underexposure value in the TTL auto flash
mode, resetting all settings to their default
values, and the button lock are shown in the
Control button quick reference chart on the
back of the built-in bounce card.

13
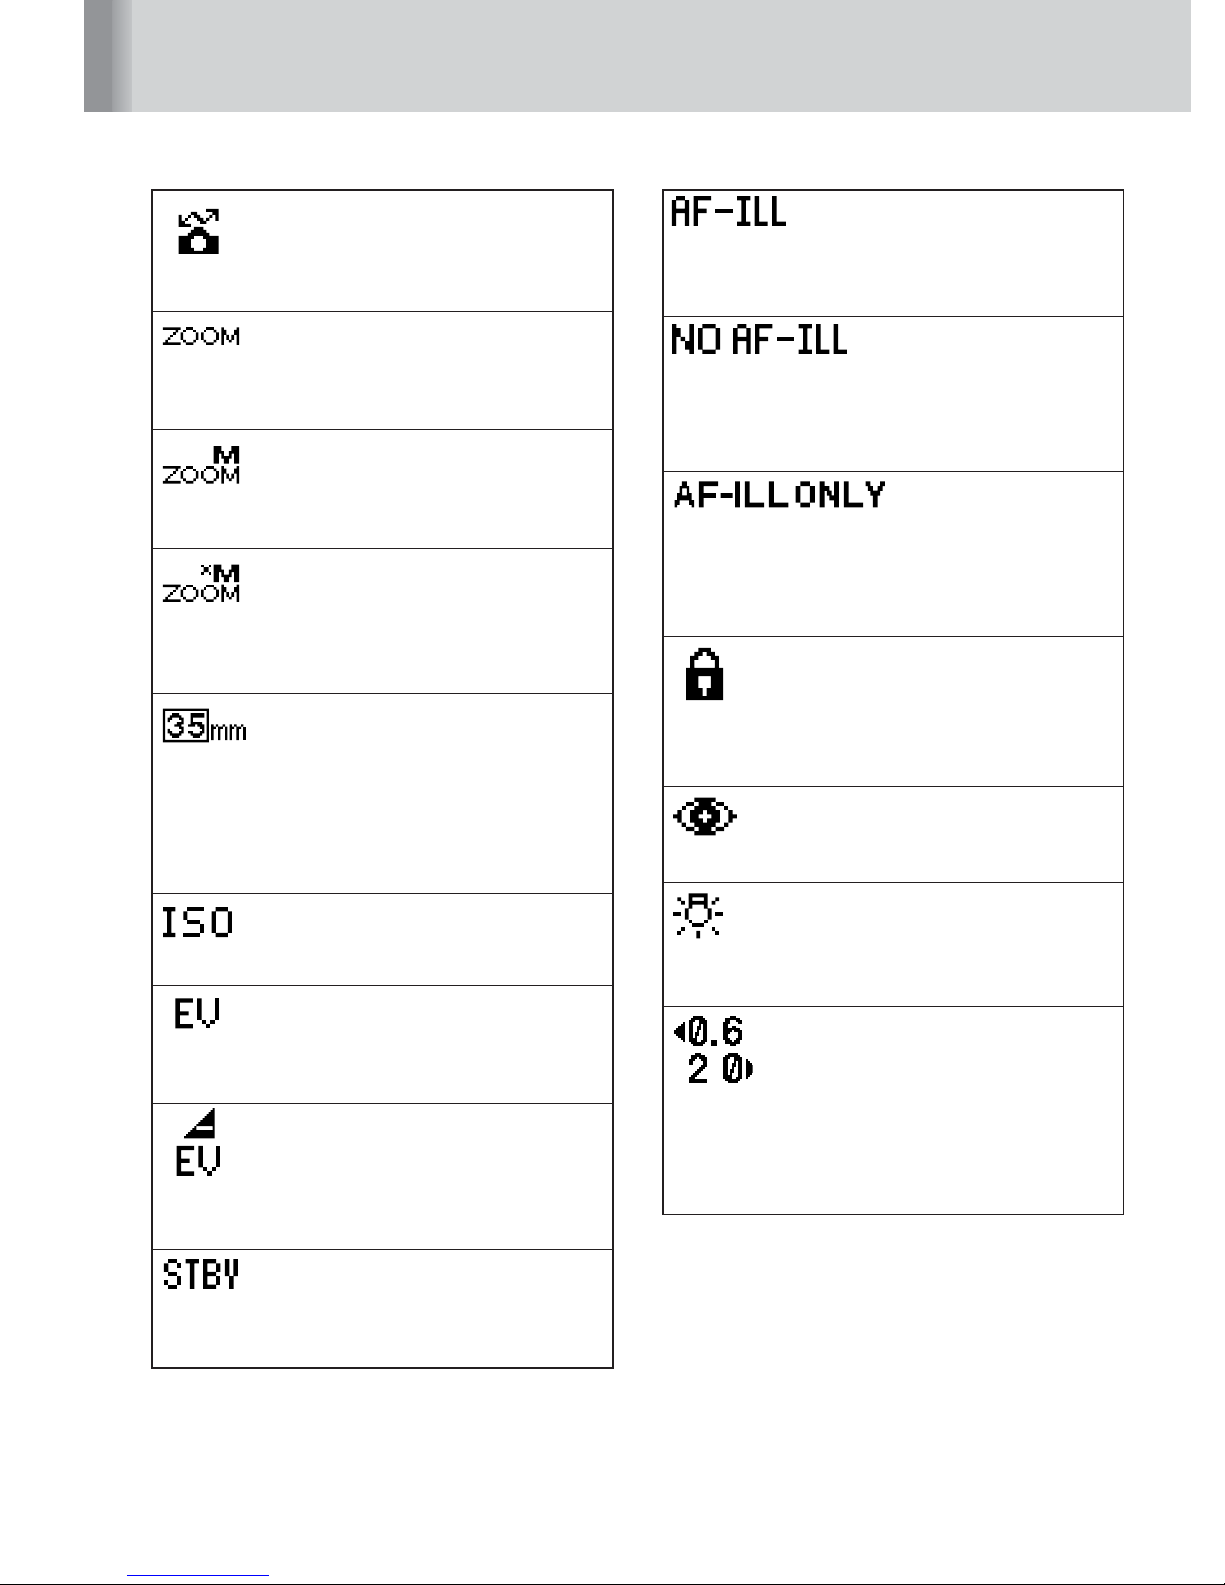
Icons on the LCD panel
Auto Aperture flash
In addition to Non-TTL auto
A flash (see below), the
SB-800’s built-in sensor
correctly controls the flash
output in combination with data
automatically transmitted from
the camera and lens to the
SB-800, including the ISO
sensitivity, aperture, focal
length, and exposure
compensation value (p. 38).
Non-TTL auto flash
The SB-800’s built-in sensor
measures the flash illumination
reflected back from the subject,
controlling the SB-800’s light
output automatically to give the
correct exposure (p. 40).
Distance-priority manual flash
Based on the ISO sensitivity
value and aperture, the SB-800
controls the light output
according to the distance value
entered (p. 44).
Manual flash
The flash always fires at a
specified output in combination
with the aperture and light
output level (p. 46).
Repeating flash
The SB-800 fires repeatedly
during a single exposure,
creating stroboscopic multipleexposure effects (p. 48).
Icons on the LCD panel show the status of the operations set. These icons
vary depending on the settings, the combination of camera/lens, and the
exposure mode.
■■■
Icons with a single flash unit
Icons when a camera compatible
with CLS* is used.
Monitor Preflashes
Just before the flash fires, the
SB-800 fires a series of
imperceptible preflashes that
are detected by the camera’s
TTL Multi-Sensor and analyzed
for brightness and contrast
(p. 36).
TTL mode
Based on the exposure control
information, the camera
automatically controls the flash
output level to give the correct
exposure (p. 37).
Balanced Fill-Flash
This always appears together
with D. Based on the exposure
control information, the flash
output level is automatically
controlled for a well-balanced
exposure of the main subject
and background (p.37).
Auto FP High-Speed
Sync
(CLS*)
The SB-800 automatically fires
at faster shutter speeds
exceeding the camera’s sync
shutter speed (p. 60).
Preparation
*CLS: Nikon Creative Lighting System (p. 5)
14
Icons on the LCD panel
The wide-area AF-assist
illuminator is activated
The wide-area AF-assist
illuminator comes on (p. 62).
The wide-area AF-assist
illuminator is canceled
The wide-area AF-assist
illuminator does not come on
(p. 62).
Flash firing canceled
The SB-800 does not fire but the
wide-area AF-assist illuminator
still comes on (p. 62).
Control buttons being locked
Control buttons (except the
ON/OFF, Modeling illuminator
and FLASH buttons) are locked
(p. 12).
Red-eye reduction
Red-eye reduction control is
activated (p. 58).
LCD panel illuminator
Pressing any control button
turns on the LCD panel
illuminator (p. 119).
Beyond the flash-shooting
distance range
The subject is beyond the flash
shooting distance range.
Ω: the closest available
distance, º: the farthest
available distance (p. 30).
Compatible with CLS (CLS*)
The SB-800 is connected to
cameras compatible with CLS*
(p. 8).
Power zoom function
The zoom-head position is
automatically adjusted to match
the lens focal length (p. 26).
Manual zoom-head position
setting
You can adjust the zoom-head
position manually (p. 26).
Canceling the power zoom
function
The power zoom is canceled,
and the zoom-head position can
only be adjusted manually (p. 26).
Zoom-head position setting if
the built-in wide-flash adapter
is broken off accidentally
The zoom-head position can be
adjusted if the built-in wide-flash
adapter is broken off
accidentally (p. 117).
ISO sensitivity
Represents the ISO sensitivity
value (p. 24).
Flash output level
compensation
Represents the flash output level
compensation value (p. 56).
Underexposure
Indicates the underexposure
value, showing that the light
might be insufficient in the TTL
auto flash mode (p. 33).
Standby duration
Represents the time before the
standby function is activated
(p. 67).

15
■■■
Highlighted items
Highlighted items indicate that they can be set or
changed. The highlighted items return to normal
after 8 seconds unless an adjustment is made.
*CLS: Nikon Creative Lighting System (p. 5)
■■■
Icons with multiple flash units
Icons in the Advanced Wireless Lighting mode
Master (CLS*)
Represents the settings of the
flash mode and flash output
level compensation value of the
master unit in the Advanced
Wireless Lighting mode (p. 78).
Group A (B, C) (CLS*)
Represents the settings of the
flash mode and flash output
level compensation value of the
remote flash unit(s) in Group A
(B, C) in the Advanced Wireless
Lighting mode (p. 78).
Channel (CLS*)
Represents the communication
channel number through which
the master and remote flash
units exchange data in the
Advanced Wireless Lighting
mode (p. 78).
Wireless master
In the wireless multiple flash
mode, the SB-800 is used as
the master flash unit connected
to the camera (p. 72).
Wireless remote
In the wireless multiple flash
mode, the SB-800 is set as a
remote flash unit, which fires in
sync with the master flash unit
(p. 72).
Wireless remote
In the wireless multiple flash
mode, the SB-800 is set as a
remote flash unit, which fires in
sync with the master flash unit
(p. 72).
Sound monitor on
When the SB-800 is set as a
remote flash unit, you can
monitor its operation by listening
to the beeping sound (p. 89).
Sound monitor canceled
“Beeping” sound is off (p. 89).
(B,C)
Preparation

16
Lenses
In this manual, Nikkor lenses are divided into two types: CPU Nikkor lenses
and non-CPU Nikkor lenses.
CPU Nikkor lenses
G-type Nikkor, D-type Nikkor, Non-G/D-type AF Nikkor
(except for AF Nikkor for the F3AF), AI-P Nikkor
Non-CPU Nikkor lenses AI-S Nikkor, AI Nikkor, Series E, etc.
CPU lenses
CPU lenses have CPU contacts.
G-type Nikkor lenses
G-type Nikkor lenses send distance information
to the camera body, but do not have an aperture
ring. Therefore, set the aperture on the camera
body. With some cameras, the usable exposure
mode is limited. For more details, refer to the
lens instruction manual.
D-type Nikkor lenses
D-type Nikkor lenses send distance information
to the camera body. Set the aperture either on
the lens aperture ring or on the camera body.
For more details, refer to the lens instruction
manual.

Basic operation
In this section, basic procedures are
illustrated so that you can easily perform
flash photography in the TTL auto flash mode.
You can easily perform flash photography by
following Steps 1–8 on the left-hand pages.
In this section, basic procedures are described when a
CPU lens is mounted on cameras compatible with CLS*,
digital SLRs not compatible with CLS*, and cameras in
Groups I to II. The SB-800’s available functions and the
LCD display vary depending on other camera/lens
combinations.
*CLS: Nikon Creative Lighting System (p. 5)

18
1
Slide open the battery chamber lid in the
direction of the arrow.
2
Install the batteries following the i and
j marks as shown. Align the battery
chamber lid attachment indexes, then
close the battery chamber lid by sliding it
into place while pressing down.
v Usable batteries
Install four AA-type penlight batteries (1.5V or lower) of any of these types:
(1) Alkaline-manganese (1.5V) (2) Lithium (1.5V) (3) Nickel (1.5V)
(4) NiCd (rechargeable, 1.2V) (5) Ni-MH (Nickel Metal Hydride) (rechargeable, 1.2V)
• When replacing batteries, replace all four (or five when using the Quick Recycling
Battery Pack SD-800) with fresh ones of the same brand.
• High-power manganese batteries are not recommended for use with the SB-800.
• Always carry extra batteries when traveling.
• For details on batteries, refer to “Notes on batteries” on page 115.
CAUTION!
• Do not use batteries not specified in this instruction manual, as this may
cause them to explode, leak corrosive liquids, or catch on fire.
• Do not mix battery brands or types, or use old with new batteries.
Otherwise the batteries may explode, leak corrosive liquids, or catch on fire.
• Do not recharge non-rechargeable batteries in a battery charger.
Otherwise the batteries may leak corrosive liquids or generate heat.
t Obtaining faster recycling times using 5 batteries
Use the provided Quick Recycling Battery Pack SD-800 to install five batteries
to shorten the recycling time. See page 64 for more details.
1 Installing the batteries

19
■■■
Minimum number of flashes and recycling times
When using four (or five) fresh batteries of the same type and the Speedlight
fires at M1/1 output.
Batteries Number of Min. recycling time Min. number of flashes/
batteries (approx.) recycling time
Alkaline- x4 6.0 sec. 130 / 6-30 sec.
manganese
x5 5.0 sec. 130 / 5-30 sec.
Lithium x4 7.5 sec. 170 / 7.5-30 sec.
x5 7.5 sec. 190 / 7.5-30 sec.
Nickel x4 6.0 sec. 140 / 6-30 sec.
x5 5.0 sec. 140 / 5-30 sec.
NiCd (1000 mAh)
x4 4.0 sec. 90 / 4-30 sec.
(rechargeable)
x5 3.5 sec. 90 / 3.5-30 sec.
Ni-MH (2000 mA)
x4 4.0 sec. 150 / 4-30 sec.
(rechargeable)
x5 2.9 sec. 150 / 2.9-30 sec.
• Minimum recycling time is for operation using fresh batteries.
• This data was measured without using the wide-area AF-assist illuminator, zoom-head
position adjustment, or LCD panel illumination.
• The above data may vary due to variations in battery performance.
■■■
Replacing/recharging the batteries
Refer to the following table to determine when to replace or recharge your
batteries, if the ready-light takes a long time to come on.
Type of battery Recycling time Remedy
Alkaline-manganese More than 30 seconds
Lithium More than 10 seconds Replace
Nickel More than 10 seconds
Ni-Cd (rechargeable)
More than 10 seconds Recharge
Ni-MH (rechargeable)
If extremely exhausted batteries are used, a strange sound can be heard caused by the
flash head zooming back and forth even when the SB-800 is turned off. In this case,
replace the SB-800’s batteries even if an external battery source is used.
t External power sources
Using an optional external power source increases the number of flash firings
and provides faster recycling times (p. 113).
Basic operation

20
1
Press the b button for approx. 0.3 sec.
to turn on the SB-800. Make sure the
ready-light comes on.
2
Press the FLASH button to test fire the
flash.
■■■
Test firing
CAUTION!
When test firing the Speedlight, never position your eyes close to the
flash head.
• The SB-800 fires at specified output in the Manual flash mode or at approx.
1/16 output in the TTL auto flash mode.
• In Auto Aperture/Non-TTL auto flash operations, the SB-800 fires at a flash
output controlled by the ISO sensitivity, aperture, and zoom-head position.
• In Auto Aperture/Non-TTL auto flash operations, you can check the amount of
insufficient flash output by pressing the FLASH button before taking the
actual picture (p. 52).
■■■
b button
Pressing the b button for approx. 0.3 sec. turns the SB-800 on and the
indications appear on the LCD panel. Pressing the button again turns the
SB-800 off and the indications disappear.
2 Test firing (Confirming the exposure)

21
t Standby function to conserve battery power
If the SB-800 and the camera are not used for more than a specified time, the
standby function activates and automatically turns the SB-800 off to conserve
battery power (it goes into the standby mode).
• In the standby mode, the R indicator appears on the LCD panel.
• When in the standby mode, the SB-800 turns back on again when the SB-800’s b or
FLASH button is pressed, or the shutter release button is lightly pressed (when using a
camera body that is compatible with TTL auto flash) (p. 8).
• In the Wireless flash mode, the standby function activates in approx. 40 seconds
(default setting) when the SB-800 is used as the master flash unit. However, the standby
function does not work regardless of the SB-800’s setting when the Speedlight is used
as a remote flash unit (p. 73).
• If the ready-light does not come on in approx. 60 seconds after turning the power on or
after the flash has fired, the SB-800 enters the standby mode regardless of the SB-800’s
setting.
•To avoid accidental firing or a malfunction when carrying the SB-800 in your camera
bag, press the b button to turn the flash unit off and make sure the R indicator
disappears.
Adjusting the time before the SB-800 goes into the standby mode
Adjust this duration using Custom settings (p. 67).
Basic operation

22
1
Make sure the SB-800 and the camera
body are turned off.
2
Rotate the mounting foot lock lever to the
left, slide the SB-800’s mounting foot into
the camera’s accessory shoe and turn the
lock lever to the right.
3
Hold down the flash head tilting/rotating
lock release button to adjust the flash
head to the horizontal/front position.
v Turn the mounting foot lock lever securely until it stops
To lock the Speedlight in place, turn the lock lever approx. 90° clockwise until it
stops. To unlock, turn the lever counterclockwise until it stops.
Lock Unlock
F
L
ASH
3 Attach the SB-800 to the camera and

23
adjust the flash head
t Warning indication
If the flash head is not adjusted to the horizontal/front position, when the power
is turned on, this warning appears on the LCD panel. See page 100 for the
flash head’s rotating angle.
•A dotted line below the underbar appears when
the flash head is tilted down –7°.
• The flash shooting distance range disappears if
the flash head is adjusted to other than the
horizontal/front or down –7° position.
Basic operation

24
In this manual, the sensitivity for digital SLRs and the film speed for film-based
cameras are generally referred to as ISO sensitivity.
For cameras compatible with CLS, digital SLRs not compatible with CLS and
cameras in Groups I to II, the ISO sensitivity is automatically set and appears
on the LCD panel when the camera and SB-800 are turned ON.
■■■
Available ISO sensitivity in TTL auto flash operation
The SB-800’s maximum ISO sensitivity range usable in the TTL auto flash mode
is ISO 25 to 1000.
• The ISO sensitivity range may become narrower, depending on the cameras in use. For
details, see your camera instruction manual.
• The flash shooting distance range on the SB-800’s LCD panel varies, depending on the
ISO sensitivity. Therefore, be sure to set the ISO sensitivity correctly.
u Digital data communication with the SB-800
When the SB-800 is used with cameras compatible with CLS, digital SLRs not
compatible with CLS and cameras in Groups I to II, digital data communication
is performed. The camera automatically sends the ISO sensitivity to the
SB-800. With a CPU lens, the aperture and focal length are automatically
set on the SB-800.
u
Notes on setting the Speedlight’s ISO sensitivity
In the TTL auto flash mode and Manual flash mode (except Distance-priority
manual p flash), there is no direct connection between setting the ISO
sensitivity on the Speedlight and controlling the flash output level. Setting the
ISO sensitivity is for correctly displaying the flash shooting distance range or
the shooting distance indication on the Speedlight’s LCD panel.
In the Non-TTL auto flash mode (Auto Aperture flash B/Non-TTL auto flash
A) and Distance-priority manual p flash operation, the correct exposure can
be obtained by setting the camera’s ISO sensitivity on the Speedlight, because
the Speedlight controls the flash output. For cameras compatible with CLS,
digital SLRs not compatible with CLS, and cameras in Groups I and II, the ISO
sensitivity is automatically transferred from the camera to the Speedlight.
4 Setting the ISO sensitivity
 Loading...