

Page 1
Nikon
Axitafiacus ^teetUi^
Instruction Manual
Page 2

CONTENTS
FOREWORD.................................................................................4
NOTES
..........................................................................................
NOMENCLATURE.....................................................................6-8
USABLE FLASH MODES WITH YOUR CAMERA................9-11
TTL AUTO [ID ............................................................................9
USABLE TTL FLASH MODES................................................10
NON-TTL AUTO H..................................................................11
MANUAL Ca ..........................................................................11
REPEATING FLASH ® ..........................................................11
FLASH SYNC MODE SELECTOR
READY-LIGHT INDICATIONS..............................................12-13
READY-LIGHT WARNING FUNCTIONS
SETTING POWER SWITCH.......................................................14
EXPOSURE COMPENSATION.............................................15-16
FLASH SIDE COMPENSATION.............................................15
CAMERA SIDE COMPENSATION
LIGHTING MANIPULATION
SETTING BEFORE SHOOTING
INSTALLING BATTERIES
ATTACHING FLASH UNIT TO
CAMERA ACCESSORY SHOE
ADJUSTING FLASH HEAD
SETTING ISO FILM SPEED
SETTING ANGLE OF COVERAGE
TTL AUTO FLASH WITH
NIKON F4 OR F-801/N8008..............................................25-49
FILL-FLASH PHOTOGRAPHY
MATRIX BALANCED FILL-FLASH.........................................27
CENTER-WEIGHTED FILL-FLASH........................................28
STANDARD TTL FLASH.........................................................28
............................................
..........................
.........................................
...................................................
...........................................
......................................................
....................................
....................................................
.............................................
..................................
...............................................
12-13
17-24
18-19
20-21
22-24
11
16
16
17
20
26
5
Page 3

USABLE TTL AUTO FLASH ACCORDING TO
LENS/EXPOSURE MODE/METERING SYSTEM
COMBINATION...................................................................29
MATRIX BALANCED FILL-FLASH OPERATION
In Programmed Auto Exposure Mode...........................32-34
In Shutter-Priority Auto Exposure Mode
In Aperture-Priority Exposure Mode..............................39-42
In Manual Exposure Mode
FLASH EXPOSURE COMPENSATION
REAR-CURTAIN SYNC FLASH—
For Natural Light Flows
SHUTTER SPEED/APERTURE FOR
EACH EXPOSURE MODE.................................................49
TTL AUTO FLASH WITH NIKON F-401s/N4004s
SHOOTING BRIGHT AND DARK SUBJECTS
Programmed TTL Auto Flash—In Program or
Shutter-Priority Auto Exposure Mode............................51-53
TTL Auto Flash—In Aperture Priority Auto or
Manual Exposure Mode
AUTOMATIC BALANCED FILL-FLASH
TTL AUTO FLASH WITH OTHER CAMERAS
(with Nikon F-501/N2020, F-301/N2000, FA, FE2
or FG).................................................................................57-63
PROGRAMMED TTL AUTO FLASH (with Nikon F-501/N2020
or F-301/N2000 in Programmed or Shutter-Priority
Auto Exposure Mode)....................................................57-59
TTL AUTO FLASH.............................................................60-61
EXPOSURE COMPENSATION WITH CAMERA’S
EXPOSURE DIAL...............................................................62
FILL-FLASH IN TTL FLASH MODE
............................................
......................................................
................................................
.................................
.......................................
.............
.......................
...........................
...............
.................
30-45
35-38
43-45
46-47
48
50-56
50-55
54-55
56
63
Page 4

AUTOFOCUS FLASH PHOTOGRAPHY (with Nikon F4,
F-801/N8008, F-501/N2020 or F-401s/N4004s)
NON-TTL AUTO FLASH-
For Shooting with Varied Lens Apertures
EXPOSURE COMPENSATION IN NON-TTL
AUTO FLASH MODE.........................................................68
USABLE APERTURES/SHOOTiNG DISTANCE RANGE
IN TTL AND NON-TTL AUTO FLASH MODES....................69
MANUAL FLASH—You Make All The Decisions
SYNCHRONIZATION IN CONTINUOUS SHOOTING
MANUAL FILL-FLASH
REPEATING FLASH-For Multiple Exposure.....................77-80
GUIDE NUMBER.......................................................................81
DIFFUSING LIGHT...............................................................82-85
BOUNCE FLASH PHOTOGRAPHY PROCEDURE
USING A DIFFUSER..............................................................85
MULTIPLE FLASH PHOTOGRAPHY
TTL MULTIPLE FLASH PHOTOGRAPHY.............................87
SYSTEM CHART FOR TTL MULTIPLE FLASH
ACCESSORIES FOR TTL MULTIPLE FLASH
TTL Remote Cord SC-17....................................................90
TTL Remote Cord SC-24....................................................90
TTL Multi-Flash Adapter AS-10..........................................90
TTL Multi-Flash Sync Cords SC-18 and SC-19
MANUAL MULTIPLE FLASH PHOTOGRAPHY
CLOSE-UP FLASH PHOTOGRAPHY IN
TTL AUTO FLASH MODE
TIPS ON SPEEDLIGHT CARE
ABOUT BATTERIES..................................................................95
GLOSSARY........................................................................... 96-9/
SPECIFICATIONS 98-99
......................................................
.................................
.....................................................
.............................................
.............
...................
.............
..........
........
..............
......................
.................
...................
64-65
66-68
70-76
73
74-76
83-85
86-91
88-89
90
90
91
92
93-94
Page 5

Page 6

FOREWORD
Thank you for purchasing the Nikon Autofocus Speedlight
SB-24. Used together with Nikon’s newest SLR models (F4,
F-801/N8008, F-401s/N4004s), it offers you the most advanced
and complete system for automatic flash photography available.
Used with any earlier Nikon SLR model, it lets you take advan
tage of TTL auto control and creative features such as Stroboeffect multiple flash exposures, and more.
To get the maximum performance from your new SB-24, be
sure to take time to read the instruction manual completely. It
includes a great deal of important information, including
explanations on how to use the newest, most advanced
features. Even the most experienced photographers should
thoroughly read this manual. Although the SB-24 controls may
seem familiar, much of its operation is different from ordinary
flash units.
We know you're anxious to get started, so if you are in a real
hurry, read the separate “QUICK AUTOMATIC OPERATION
WITH THE NIKON F4 OR F-801/N8008:' This explains what you
need to know to use the SB-24 and the newest Nikon SLRs in
the most automaitc mode. You'll be surprised how easy that
portion is, and you'll get balanced fill-flash pictures, as easy as
point-and-shoot.
Page 7

Then, to learn about all the SB-24’s other great features, take
time to read the complete manual. Your reward will be better
flash pictures, with more variety than you ever imagined
possible, and all done easily.
One additional point. Throughout the manual you will see
technical terms or photo expressions with which you may not
be familiar. To help you learn these terms, we've included a
Glossary. So it you come upon an unfamiliar term, check the
glossary on pages 96~97.
The Nikon N8008 and N4004s are sold exclusively in the
U.S.A. The Nikon N2020 and N2000 are sold exclusively
in the U.S.A, and Canada.
Page 8

NOTES
Do not fire flash near the eyes; doing so may injure the
retina. Do not touch the flash head when firing the SB-24;
it may be hot due to normal operation. Also, be sure to
keep plastics and other delicate materials away from the
flash head when hot.
Nikon cannot be responsible for malfunctions or other
problems resulting from the use of other manufacturers'
flash units, cameras or accessories, including external
power sources.
In certain cases, due to normal characteristics of the builtin microcomputer, the speedlight may not operate or an
abnormal display may appear, even with fresh, properly
installed batteries. If such a case occurs, turn off the flash
and remove the batteries, then reinstall batteries and turn
the power on. This should properly reset the computer.
“Red eye” is a common problem in flash photography.
Normally, flash pictures are taken when the surrounding
light is dim, and under such conditions the subject's eye
pupils will be dilated (open very wide). Red-eye effect
occurs when light from the camera’s flash reflects off the
interior of the eye and back into the camera’s lens. The
wide-open pupil allows much light to enter, and as a result,
the center portions of a subject's eyes can appear bright
red (white in a black and white picture). It is interesting to
note that the intensity of the red-eye effect varies among
individuals, and with two people in the same photograph,
one may have red-eye and the other may not.
The appearance of red-eye is also based on the angle at
which the light flashes on the subject and is reflected back
to the camera's lens. If the angle is 2 to 2.5 degrees or
narrower, the red-eye will occur. As you move closer to a
subject, the angle becomes wider, and the likelihood of
red-eye effect decreases. As you move farther from a
subject, the angle narrows and the incidence of red-eye
increases. When you get very far from a subject, the size
of the eye in the picture may become so small that red-eye
is not apparent, but when you switch to a lens with a
longer focal length, the subject becomes bigger and red
eye may become apparent.
With an angle exceeding 2.5 degrees, red-eye is not likely
to occur. For example, with a 35-55mm range lens and
when standing about 1.4m (4.5 ft) or closer to the subject,
the angle between the flash and lens exceeds 2.5 degrees
and red-eye effect will most likely not be visible.
5
Page 9
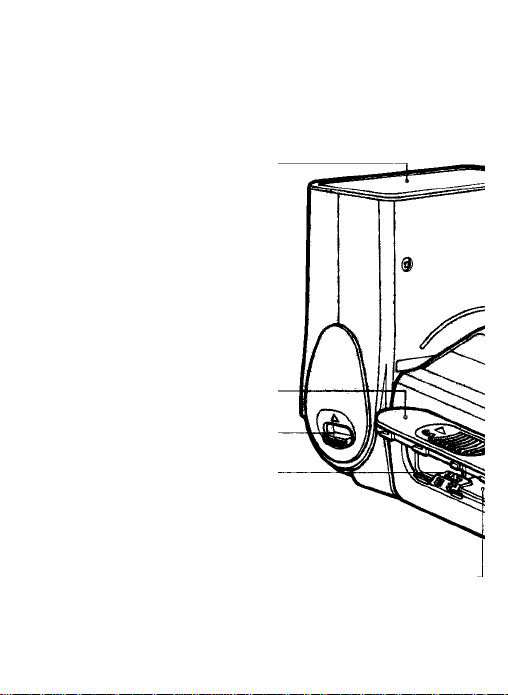
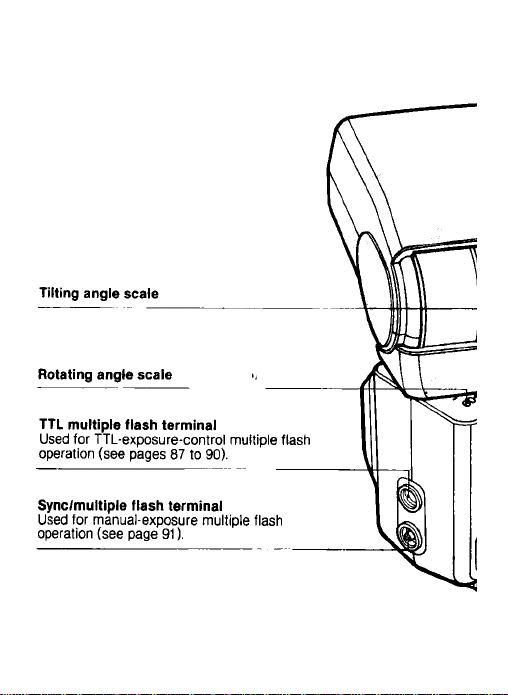
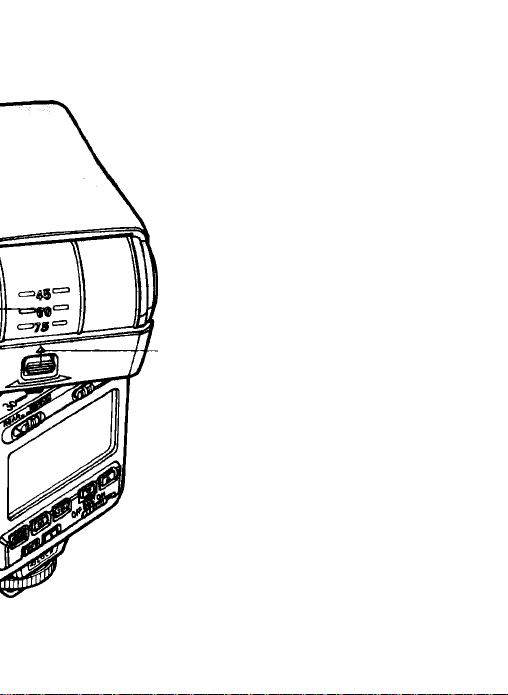
NOMENCLATURE
Flash head
Locks at the front position; tiits up to 90° and down to
-7°; rotates 90° to right and 180° to left. For bounce
flash photography, see pages 83 to 85.
Battery chamber lid
Slide and lift to open.
Flash head tilting lock release
lever
Meter/Feet select lever
(Inside battery chamber)
Battery chamber
Accepts tour 1.5 V AA-type penlight batteries, either
1.5V alkaline-manganese or 1,2V NiCd batteries
(voltage varies depending on manufacturer; maximum
permitted is 1.25 V).
Page 10
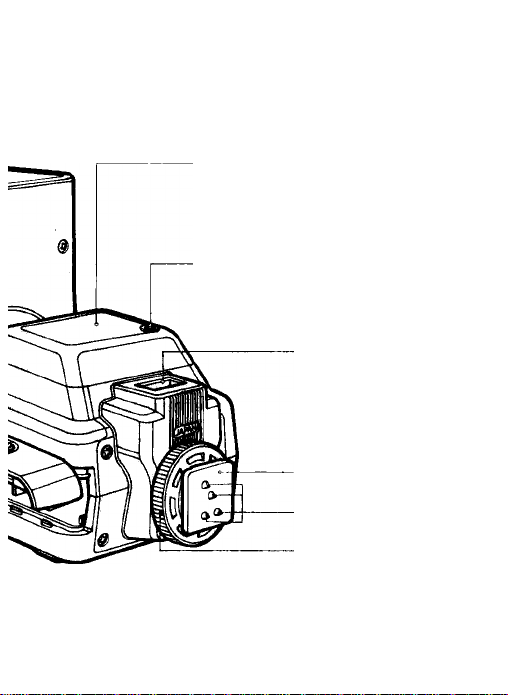
Autofocus assist illuminator LED
Enables autofocus operation in dim light and
total darkness.
Light sensor for non-TTL auto flash operation
In non-TTL auto flash operation, be careful not to
cover or otherwise obstruct the sensor.
External power source terminal
Accepts power cord of Nikon DC Unit
SD-7.
Mounting foot
Hot-shoe contacts
Mounting foot locking wheel
Page 11
Page 12
Flash head rotating lock release lever
Page 13
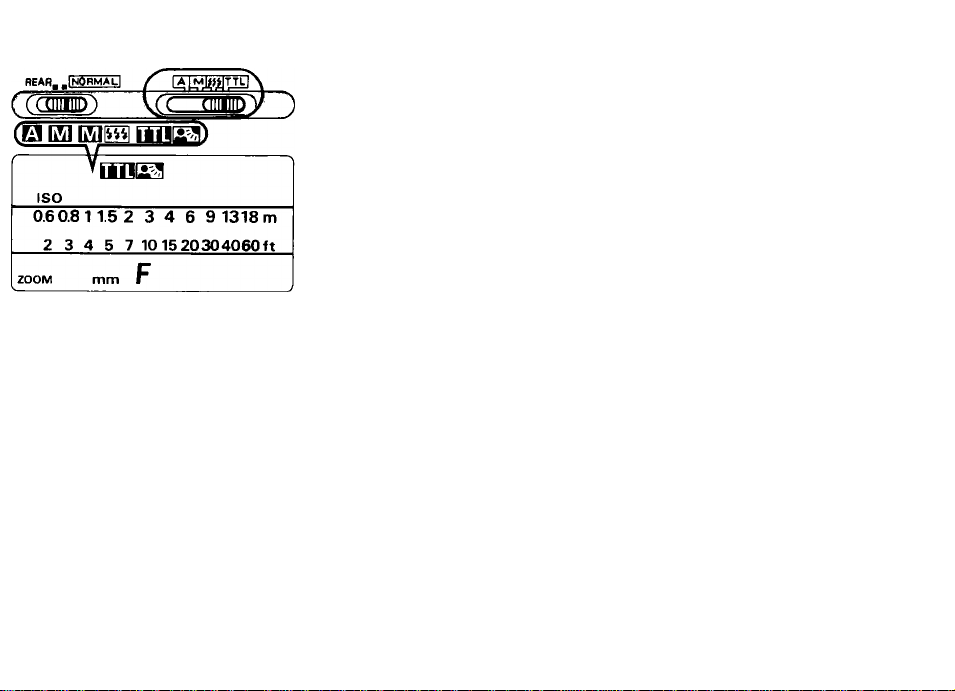
Flash sync mode selector (see page 11)
NORMAL for front-curtain sync flash
REAR for rear-curtain sync flash
REAR. .fNORM^
Flash mode selector (see pages 9 to 11)
tilt for TTL auto flash exposure control
ES for non-TTL auto flash exposure control
Ea for manual flash exposure control
ES for repeating flash
Flash mode indicator
Film speed/Repeating flash indicator
Flash shooting distance scale
Angle of coverage indicator
Aperture indicator
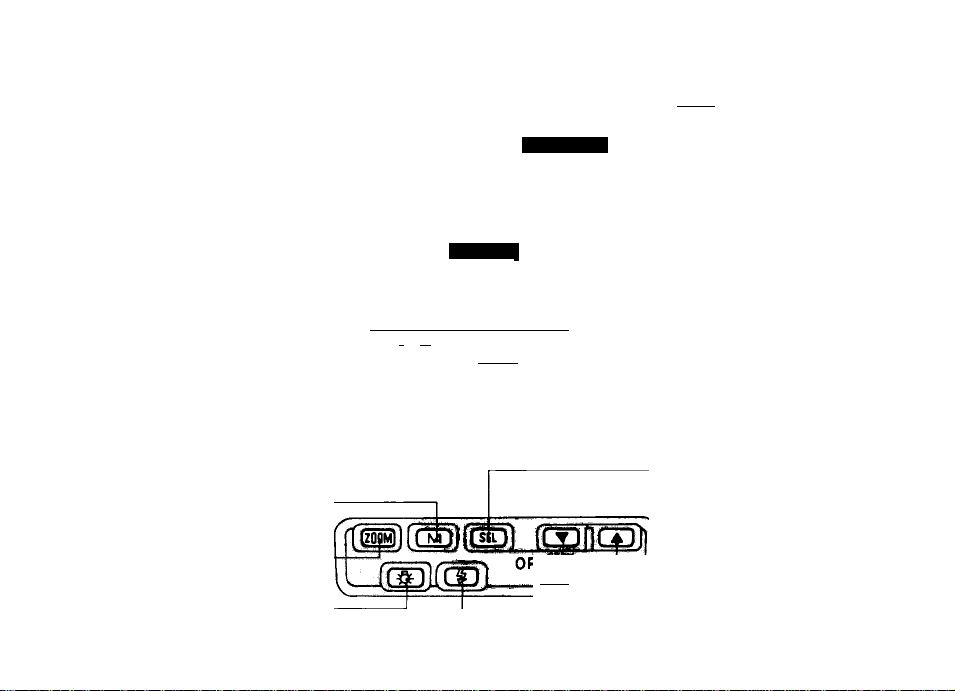
M button
In TTL auto mode with F4 or F-801/N800B:
Push to cancel/activate automatic flash output level
compensation.
In manual/repeating-flash mode
Push to manually select flash output power.
Zoom button
Push to manually set zoom head
focal length position.
Illuminator button
Push to illuminate the LCD panel.
Ready-light/open-flash button
For ready-light indication, see pages 12 to 13.
LCD panel
TTLFJb
fiS8 888H i
r-0-60.81 1.5 2 3 4 6 9 1318 m
__
2 3 4 5 7 1015 20304060 ft
I OQ
ZOOM UQ mm l
* FQ.fcl Mt/SS
■n 0-1-2-3
itmm\ \Ji
Exposure compensation indicator
Exposure compensation scale
Light amount indicator
Note: Some marks on the LCD panel may blink;
in this manual, blinking is indicated by ^
Select button , <
Controls use (on/off) of adjustment buttons.
Adjustment buttons (A and ▼)
For adjusting flash output level, aperture
value, number of flashes, frequency, etc.
Power switch
See page 14.
Page 14
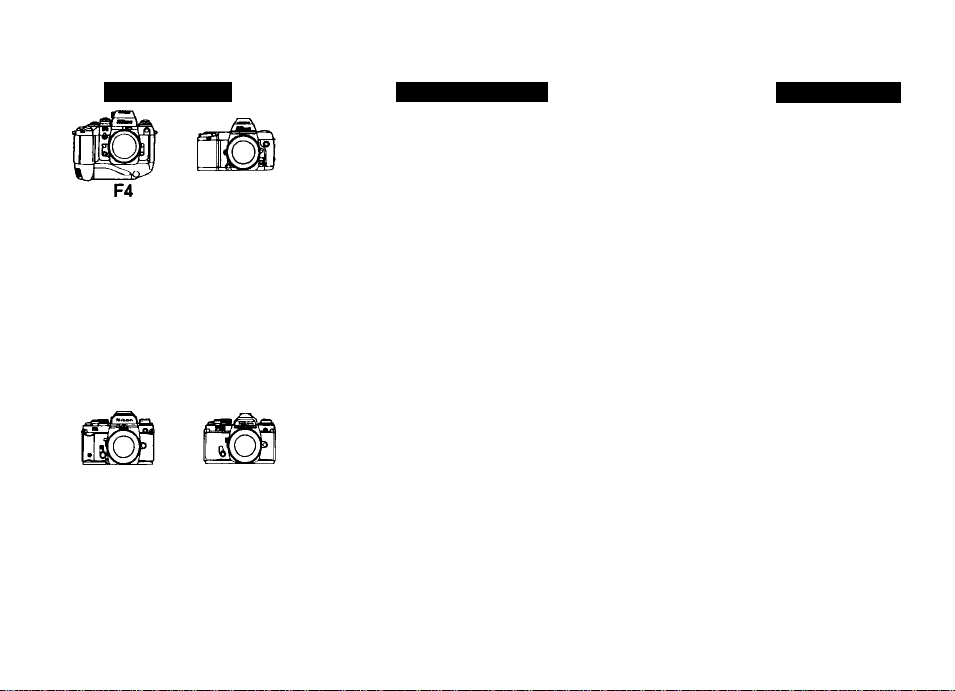
USABLE FLASH MODES WITH YOUR CAMERA
TTL AUTO an
In this mode, the camera’s TTL flash sensor measures all the
light which passes through the camera’s lens and reflects off
the film surface. This includes both ambient light and light from
the SB-24 flash. The flash shuts off at the moment the sensor
detects the correct exposure. Because the sensor detects light
passing through the lens, it automatically adjusts for most flash
shooting situations, including bounce flash, diffusion filters and
colored or neutral-density filters used on the lens or on the flash
head.
The SB-24's automatic flash operation depends on the Nikon
SLR model used. The chart on the following page indicates the
automatic modes available for each SLR model shown.
The SB-24’s flash mode selector lets you select from four flash
modes—TTL Auto UD , Non-TTL Auto El, Manual BJ or
Repeating-Flash SS . When the power switch Is on, the flash
mode Indicator confirms your selection in the LCD panel.
Subsequent sections of this instruction manual explain each of
the different automatic modes.
Available flash features also vary depending upon the type of
Nikon lens used and camera on which it is used. The newest AF
Nikkor lenses include built-in computers, and used with the
newest Nikon SLR models (F4, F-801/N8008, F-401s/N4004s)—
which incorporate a computer and multi-segment light meter—
provide the most advanced flash operation, known as Matrix
Balanced Fill-Flash.
Page 15
USABLE TTL FLASH MODES
Nikon camera Usable TTL flash
Described on
Matrix Balanced Fill-Flash/CenterWeighted Fill-Flash/Standard TTL Auto
pages 25 to 49
L
F-801/N8008
Automatic Balanced Fill-Flash (with AF
Nikkor lenses/Standard TTL Auto including ^ ( pages 50 to 56
F-401S/N4004S
Programmed TTL Auto
Standard TTL Auto including Programmed ^ r
TTL Auto (with Al-S-type lenses) L
pages 57 to 63 ]
F-501/N2020 F-301/N2000
Standard TTL Auto (all shutter speed
settings except M250 or B)
^ [ pages 60 to 63
FA FE2
Standard TTL Auto (all shutter speed
settings except M90 or B)
[ pages 60 to 63 ]
FG
TTL flash control with the SB-24 functions only with selected Nikon SLR models. F3 series, FM2 and FG-20 do not function with the
SB-24 and TTL operation. All other flash exposure modes (H El ES j function with these SLR models.
10
Page 16

NON-TTL AUTO H
In this mode, light is read through the light sensor on the front
of the SB-24, instead of being measured through the lens.
Exposure control requires that you manually adjust the lens
aperture. For non-TTL auto flash mode, see pages 66 to 68.
MANUAL m
Lets you select flash power from full power of 1/16 power and
set aperture according to flash-to-subject distance. Indicated on
the LCD panel.
For manual flash, see pages 70 to 76.
REPEATING FLASH SIS
This mode lets you flash a subject two or more times
consecutively in the same frame. It enables you to select the
number of flashes, flash speed (FIz) and power—either 1/8 or
1/16.
For detailed instructions on repeating flash, see pages 77 to 80.
Page 17

FLASH SYNC MODE SELECTOR—
(IIIIIIL)^ )
The SB-24 offers two types of flash synchronization, REAR and
NORMAL.
NORMAL synchronization, the way virtually all other systems
operate, fires the flash at the beginning of the exposure.
REAR synchronization, available with the Nikon F4 or F-801/
N8008, fires the flash at the end of the exposure.
For short exposure (speeds up to 1/250 second) you can barely
tell the difference befween the two methods. For longer expo
sures, however, when subject movement during the exposure
becomes evident, you can clearly see the difference.
Rear synchronization tends to give a more natural effect,
making the blur of subject movement appear to emanate from
the back for a more comfortable visual effect.
For details, see page 48.
11
Page 18

READY-LIGHT INDICATIONS
With the SB-24 turned on, its ready-light turns on to indicate the
flash is ready to fire. To activate the viewfinder ready-light
function when using the Nikon F4, F-801/N8008, F-501/N2020,
F-401S/N4004S, F-301/N2000, FA, FE2, or FG, lightly press the
shutter release button to turn on the camera’s meter.
• If the ready-light takes more than 30 sec. to light up
when using alkaline-manganese batteries, replace with
a fresh set.
• With NiCd batteries, if recycling time is over 10
seconds, recharge them.
* •
12
Page 19

READY-LIGHT WARNING FUNCTIONS
The ready-light in the camera viewfinder blinks in the cases
listed below. When blinking occurs, check the SB-24's flash
mode selector setting, camera's shutter speed/mode selector
setting and/or film speed setting and adjust as necessary.
The ready-light will blink before shooting:
• When SB-24's flash mode selector is at TTL with cameras
other than Nikon F4, F-801/N8008, F-501/N2020,
F-401S/N4004S, F-301/N2000, FA, FE2, or FG. Reset SB-24's
flash mode selector to A or M.
• When using the FA, FE2, or FG to perform TTL auto flash with
the camera’s shutter speed dial at a mechanical setting (M250,
M90 or B). Reset to another shutter speed setting. To use
M250, M90 or B, reset SB-24's flash mode selector to A or M.
• When performing programmed TTL auto or TTL auto flash
operation with a camera film speed setting beyond the usable
range. Use film within the appropriate TTL auto flash photog
raphy range (ISO 25-1000 with F-501/N2020 or F-301/N2000;
ISO 25-400 with F-401S/N4004S, FA, FE2 or FG). With the
FA, the ready-light also blinks when the camera’s film speed
setting approaches ISO 12.
• When the shutter speed of the FE or FM2 is not within the
flash sync speed range. Set the shutter speed to the flash
sync speed or slower.
• With Nikon F-401S/N4004S, when the SB-24 and built-in flash
are turned off, and the camera’s computer recommends flash
use.
Page 20

After shooting;
With the SB-24 in TTL auto or non-TTL auto flash mode, if both
viewfinder ready-light and SB-24 ready-light blink for a few
seconds after shooting, the flash has operated at maximum
power. Check the SB-24's LCD to determine whether you were
standing at a distance beyond the indicated maximum range.
Depending on conditions, choose a wider aperture for maximum
flash range (switch exposure mode to A or M if it is set at P or
S), or move closer to the subject.
Page 21
F-801/N8008
F-401S/N4004S
F-301/N2000
13
Page 22

SETTING POWER SWITCH
licsLJi^grTTrniTnnTJJ
OFFfiiON
a(^ Itsncati
To turn on the speedlight unit, use either STBY (STANDBY) or
ON settings. With Nikon F4, F-801/N8008, F-501/N2020,
F-401S/N4004S, F-301/N2000, FA, FE2, or FG, to conserve
energy, use STBY position,
STBY (STAN DBY) Position
—With Nikon F4, F-801/N8008, F-501/N2020,
F-401S/N4004S, F-301/N2000, FA, FE2, or FG
In most cases, use STBY position to turn on the SB-24. In STBY
position, approx. 80 seconds after the camera's meter turns off,
the SB-24 turns off to conserve power. To turn the SB-24 on
again, lightiy press the camera’s shutter reiease button or the
SB-24's open-flash button.
• When using a remote cord with a Nikon FA or FE2 connected
to Nikon Motor Drive MD-12, the camera remains on as iong
as the MD-12's power switch is on. (At STBY position SB-24
does not turn off.)
14
offTbIon
Page 23

Special Standby Function
In normal Standby function, when the camera's meter turns off,
the SB-24 also turns off. To reactivate the SB-24, turn the
camera’s meter on. With the following procedure, however, even
after the camera's meter turns off, the SB-24 automatically
recharges In approx, one-hour Intervals, so it will always be
ready for long shooting sessions.
1. Set power switch to OFF to turn off the SB-24.
2. While pressing illuminator button, set power switch to STBY.
3. Confirm LCD panel display blinks approx. 8 seconds.
• The SB-24 can be kept in standby for approx. 20 days
with AA-type aikaline-manganese batteries or approx.
10 days with AA-type NiCd batteries.
• To cancel this function, set the SB-24's power switch to
OFF.
ON Position
—With Nikon FA, FE2 or FG:
To turn on the SB-24 when using a mechanical shutter setting
(M250 with FA or FE2, M90 with FG, or B), you cannot use
STBY position; set the power switch to ON.
When not using the SB-24, always set power switch to
OFF to conserve battery power.
Page 24

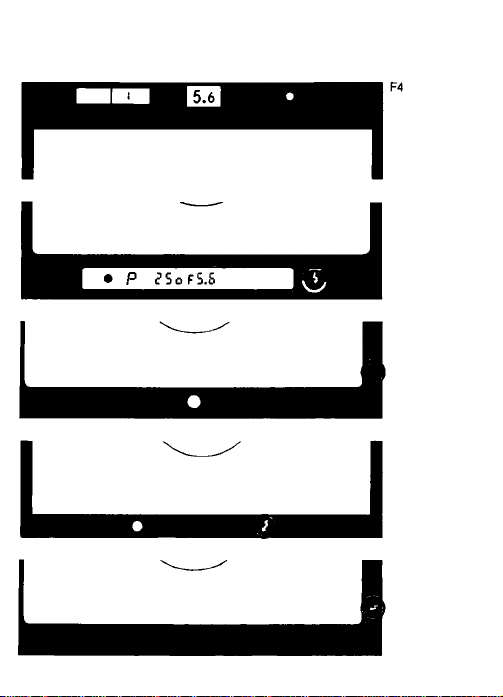
EXPOSURE COMPENSATION
“Correct” exposure is a value based on combinations of
film sensitivity, aperture and shutter settings necessary to
produce a “technically correct" exposure result. In prac
tical photography, we often want to vary the exposure
results to create different versions of the same picture.
This is accomplished by using exposure compensation.
Exposure compensation can be accomplished in many
ways. The accompanying chart indicates controls that
enable compensation with the Nikon SB-24 and the latest
Nikon SLR models. In addition to changing the exposure,
we can also modify a scene’s lighting by manipuiating
the light source, thus creating different lighting effects.
Exposure compensation
Flash side (flash exposure)
• Automatic compensation
• Automatic compensation + Manual adjustment
• Manual adjustment
Camera side (available-light exposure)
• Manual control
• Automatic control (Matrix Metering)
• Bracketing
[■Manual
^Auto (with optional multi-control back)
The following is a brief explanation of the various
compensation methods, including those accomplished
automatically by the camera/flash computer control,
those accomplished through user-controlled operation
and alternatives which manipulate the lighting on a scene.
As the results can vary depending on individual condi
tions, you may want to experiment with each method.
Experimenting for creativity is what this is all about.
Page 25

FLASH SIDE COMPENSATION
Computer, automatic: Nikon multi-segment light meters
using advanced computer programs evaluate a scene’s
brightness and contrast and calculate appropriate expo
sure compensation to accommodate a \«ide variety of
complex lighting conditions.
Computer, automatic pius manuai adjustment: auto
matic control as noted above, but with a user-determined
adjustment to the calculated exposure; accomplished
using the SB-24’s EV compensation control.
Manuai adjustment: turn off the camera/SB-24 auto
matic controls and select any manual adjustment using
the SB-24’s EV compensation control.
Rear- or Front-Curtain Sync: not generally referred to
as a compensation method, but can be considered so
because it offers a "different” exposure result.
15
Page 26
CAMERA SIDE COMPENSATION
Manual control: adjustment made via the camera’s EV
compensation control; affects the entire exposure, both
available light and light from the flash.
For available compensation range with each film speed, see the
table below.
Automatic control: accomplished via the camera's
multi-segment metering system; preprogrammed at the
factory according to extensive testing.
Bracketing: results in a variety of different exposures,
both under- and overexposed; can be accomplished
either by using manual adjustments or by using an
optional multi-control accessory back.
16
Page 27

LIGHTING MANIPULATION
Bounce flash; can be considered a compensation
method since it offers variation to the exposure and
augments available light; light may be bounced off
various surfaces to create different results.
Multiple flash: using more than one flash to create
specific lighting patterns on the subject. May be used
either
with available light, or to obscure (overpower) the
effects of available light.
Diffusers: devices placed in front of a camera lens to
soften a lighting effect or placed over each flash unit to
modify the quality of the light source.
Indirect flash: removing the flash from the camera and
holding it to the side, above or from below the subject to
create distinctly different lighting effects. This requires a
special extension cord which allows you to maintain
automatic control.
Page 28
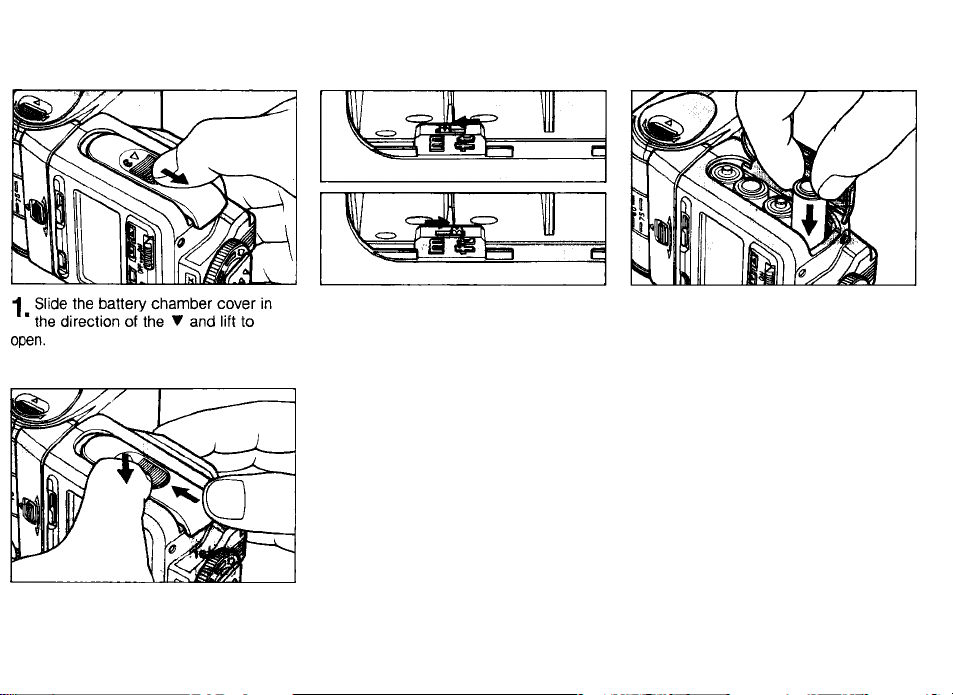
SETTING BEFORE SHOOTING
INSTALLING BATTERIES
4 Close the battery chamber lid, then
' slide cover back to close.
2 Slide the meter/feet lever to select
' the desired indication (meters or feet)
on the LCD panel. (Set at meters when
shipped from factory.)
3 Load four 1.5V AA-type penlight
" alkaline-manganese or 1.2 V NiCd
batteries into the battery chamber. Be
sure to follow the indicators
inside the chamber to ensure batteries
are properly loaded.
For an external power source, use
optional Nikon DC Unit SD-7. For
battery information, see page 95.
17
Page 29
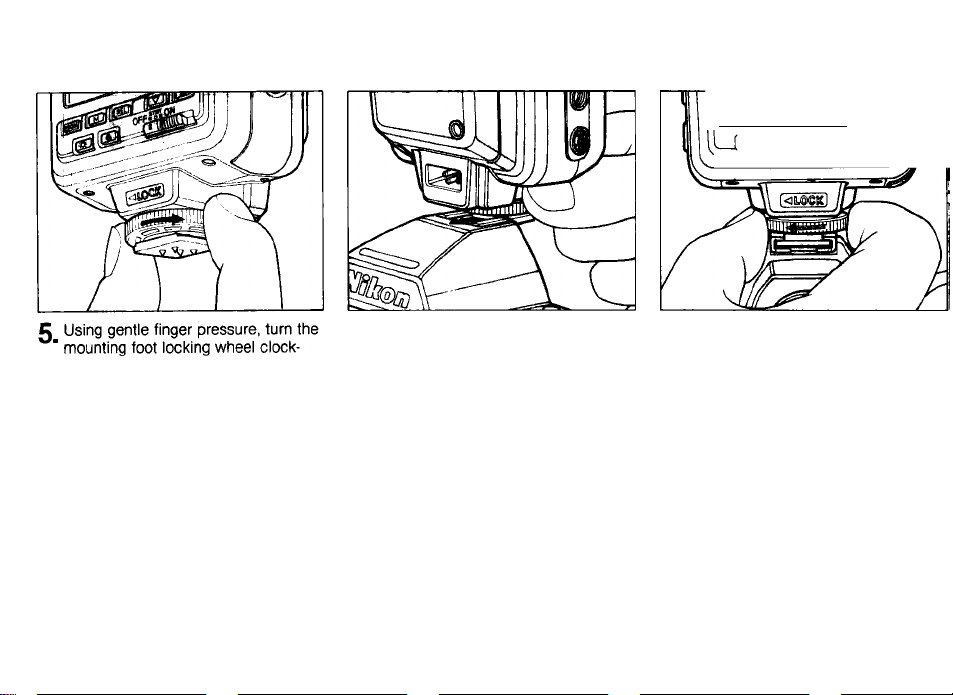
ATTACHING FLASH UNIT TO CAMERA ACCESSORY SHOE
(IgBlilEllOIOl [c^pnni
°''iu iiiiiMrr~J
wise as far as it goes without forcing.
18
0 Holding the flash near the bottom,
' slide the mounting foot fonward into
the camera’s accessory shoe as far as it
goes.
For Nikon F3-series camera with DE-2 or DE-3 finder:
Attach the Flash Unit Coupler AS-4 or AS-7 to the camera’s accessory shoe
before mounting the SB-24. The SB-24 cannot be mounted on an F3-series
camera with other finders.
Using finger pressure only, gently but
■ firmly tighten the locking wheel.
Page 30
tnn
• uu
ISO
3 C c *-i
IJJmm I I
g Set power switch to STBY (standby position) or ON to turn on SB-24. LCD panei appears. (For details about
' power switch setting, see page 14).
When it is necessary to set the aperture on the LCD
panei using adjustment buttons, F blinks.
For exampie:
• In Non-TTL Auto H flash mode (see pages 66 to 68).
• When using lenses without a built-in CPU.
• When using cameras other than the Nikon F4 or
F-801/N8008.
J V-
Page 31

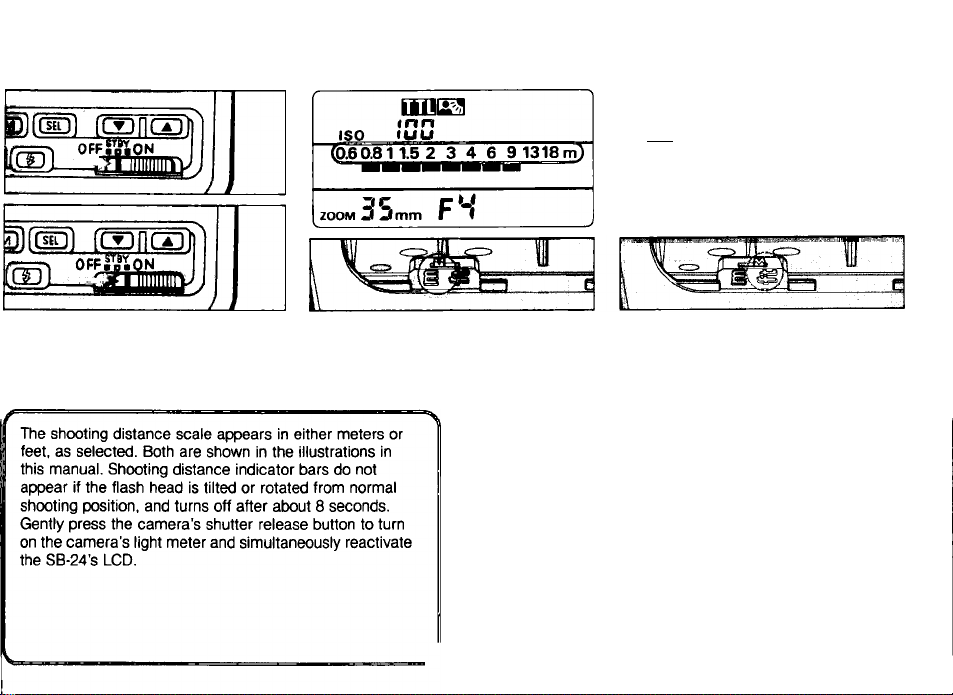
ADJUSTING FLASH HEAD
g_ Tilt the flash head to normal shooting position, and confirm
■ flash head is locked.
* •
»If flash head is set at -7°, the distance indicator bars
blink. Use this position with shooting distances less
than 1,5m (approx. 5 ft).
• For details on bounce flash photography, see pages 83
to 85,
Page 32

SETTING ISO FILM SPEED
TTI
ISO
Jim
0.60.811.5 2 3 4 6 9 1318 m
2 3 4 5 7 1015 20304060 ft
3C
ZOOM J _lmm
F'
•u
I
10. Set the ISO film speed.
With F4, F-801/N8008 or F-401s/N4004s: Turn on the camen
and lightly press the shutter release button. The film speed will
be indicated on the LCD panel.
Page 33

With other cameras:
(1) Push select button so "ISO” starts blinking in the LCD panel.
(2) While “ISO” is blinking, press the adjustment button T or A
to set the film speed in use.
• If you do not press the adjustment button for approx. 8
seconds or more, "ISO" automatically stops blinking. To
reactivate "ISO," press the select button again.
(3) When the desired film speed appears, press select button
again to cancel blinking.
• If "ISO" stops blinking automatically, you do not need to
press the select button again.
Except in Non-TTL Auto H flash mode, the film speed is
essentially just a number displayed in the LCD panel. This
means that, even if the displayed ISO number is incorrect,
as long all other camera and speedlight settings are
correct, the subject will be correctly exposed. Therefore,
fhe ISO setting cannot be used as an exposure compen
sation control. A separate exposure compensation control
provides that opportunity.
21
Page 34

SETTING ANGLE OF COVERAGE
finish
tnn
>SO lUU
0.60.811.5 2 3 4 6 9 131 8m
2 3_4 5 7 10 16 2030 406 0 ft
fw
11. Set the zoom head.
When using the F4 or F-801/N8008 with an AF Nikkor or Nikkor iens having a buiit-in CPU:
Within a covering power of 24mm to 85mm, the zoom head
automatically adjusts to provide an angle of coverage that
matches the focal length of the lens in use (indicated in the LCD
panel). When used in automatic selection mode with AF Nikkor
lenses of fixed focal length, the SB-24 zoom head automatically
adjusts to the closest available wider focal length setting. With
zoom lenses, the zoom head automatically adjusts as the zoom
lens adjusts, within the limits of the available zoom coverage of
the SB-24.
22
Page 35

luu Hz
ISO
0.6051 1.5 2 3 4 6 9 1318 m
2 3 4 5 7 1015 20304060 ft
u
1
F
It is also possible to select your desired angle of coverage
manually, by pressing the zoom button [ZOOM]. In the LCD
panel, "M” appears above “ZOOM" indicator.
Page 36

«rir<
<uu
ISO
0.6051 1.5 2 3 4 6 9 1318 m
2 3 4 5 7 1015 20304060ft
f'C« C
ZOOM*.) .Jmm F‘-i
i^ncxii
To return to auto position, repeatediy press the button untii the
“M" above "ZOOM" disappears (next setting after M85mm).
For focai lengths wider than 24mm, slight vignetting will occur.
Consider bounce flash or use of a diffuser card to achieve
expanded coverage. For focal lengths longer than 85mm, the
flash will provide over-coverage.
Page 37

on
I ri n
SET
<uu
ISO
0.60.81 1.5 2 3 4 6 9 13181
2 3_4 5 7 1015 20304060ft
(isita'ii
For other camera/lens combinations
Press the zoom button below the LCD panel until the figure in
the panel shows the focal length of the lens In use or shorter.
The figure changes as follows: -24mm-28mm-35mm-50mm70mm-85mmFor zoom lenses other than AF Zoom NIkkor, to cover the full
focal length range, select the zoom position that covers the
shortest focal length of the lens (e g., with an AF28-85mm
f/3.5-4.5 lens, select 28mm). "M" appears above “ZOOM"
indicator when the zoom head is set manually.
23
Page 38

The guide number changes according to the angle of
coverage. See page 81.
If the shooting distance is less than 1.5m (approx. 5ft), or
for close-up photography \Arhen SB-24 Is separate from
the camera body, select the zoom position that is shorter
than the focal length of the lens In use. To help ensure
full flash coverage, be sure to aim the flash properly.
24
J
Page 39

Page 40

TTL AUTO HD FLASH WITH NIKON F4 OR F-801/N8008-
The SB-24 takes full advantage of the F4 and F-801/N8008's
built-in computer, which automatically synchronizes the
camera's shutter speed and lens aperture to provide precisely
controlled exposures. The capability to handle wider brightness
ranges and use fill-flash under more complex conditions varies
from automatic operation to more advanced user-controlled
options.
With the Nikon F4 or F-801/N8008, by setting the SB-24 to TTL
auto flash mode, you will achieve advanced yet simplified fillflash photography.
You can choose any of the following flash categories—Matrix
Balanced Fill-Flash, Center-Weighted Fill-Flash or standard TTL
flash, according to the SB-24's TTL mode (with or without auto
matic flash output level compensation) and camera's metering
system (Matrix or Center-Weighted).
y SB-24
Camera \
metering systen^
Matrix Metering
Center-Weighted
Metering
With automatic flash
output level
compensation
imir^
Matrix Balanced
Fill-Flash
Center-Weighted
Fiil-Fiash
Without automatic flash
output level
compensation
in#i-
Standard TTL flash
Iini£3
0.60.81 1.5 2 3 4 6 9 1318m
2 3 4 5 7 101520304 060 11
<i^
ISO
OOM mm F
nn^
0.60.81 1.5 2 3 4 6 9 1318m
2 3 4 S 7 10 15 20304060 ft
To cancel/activate automatic flash output level compensation,
(to select either tmB^ or ), use the SB-24's “M” button.
F-801/N8008 F4 F-801/N8008
03*?So F*"i
@ i)
DDL JLI r <
B !l
To select either Matrix Metering or Center-Weighted Metering,
use the F-801/N8008's metering system selection button, or for
the F4, selectioh dial.
• When the F4 is set for Spot Metering, only standard TTL flash
is avaiiabie and wiii be selected automatically.
• The SB-24 takes full advantage of a special photographic
technique called rear-curtain sync flash. For details see page
48.
25
Page 41

FILL-FLASH PHOTOGRAPHY
A backlit subject, such as a person outside with their back
to the sun, or indoors in front of a window, usually appears
as a silhouette if the exposure is set for background
brightness. If the exposure is set for a darker, silhouetted
subject, then the background will be overexposed and
appear washed out.
A better result can be achieved by leaving the exposure
set for the brighter background and then using the flash to
illuminate the darker foreground subject. This brings the
brightness of the foreground subject up to the brightness
of the background. This technique is called "fill-flash", and
fhe SB-24 fogether with a Nikon F4, F-801/N8008 or F-401s/
N4004S provides all the exposure control to automatically
accomplish fill-flash.
With flash
Without flash
/j
Exposure compensated
26
Page 42

The SB-24 is capable of several different automatic fiii-fiash
methods. The method you choose depends on the Nikon SLR
model you use, lighting conditions, subject movement and the
esthetic quaiities you wish to achieve. Carefully consider each
picture situation.
MATRIX BALANCED FILL-FLASH
This is a feature of Nikon SLR models having muiti-segment
iight meters (Matrix meter). The camera's Matrix meter reads
the scene's iight ieveis and light patterns, and signais the
computer, which then calculates the available-light exposure
settings. When the shutter is released, the camera's TTL sensor
senses available light and flash illumination, then reiays the
information to the computer, which automaticaiiy controls the
flash operation. The computer automatically determines the
appropriate amount of fiash exposure compensation to use.
When the computer senses just the right amount of fiash
iiiumination for a baianced fili-flash exposure (based on the
automatic compensation controi), the flash is turned off. The
result is a well-baianced photo with the correct exposure for
both background and foreground subjects. Ali this takes place
automatically and much quicker than it can be expiained.
Page 43

standard TTL Flash
27
Page 44

CENTER-WEIGHTED FILL-FLASH
While the Matrix meter can automatically measure up to five
different segments of the scene's brightness, the CenterWeighted meter measures the entire scene and emphasizes its
reading on the center area. By pointing the center-weighted area
at different parts of the picture, you can choose which bright
ness ievei you want for the basic avaiiabie-light exposure, as
compared to the Matrix system which uses computer evaiuation
to determine the brightness/contrast ieveis upon which exposure
wiii be based.
if the brightness vaiue you have seiected is within the controlied
shutter/aperture range possibie, the fiash output compensation
wiii be automaticaily set for a naturai fiii-fiash effect. The amount
of computer seiected automatic compensation avaiiabie varies
with each Nikon SLR modei. For defaiis, check your camera
instruction manual, if you select a brightness value beyond the
controlled shutter/aperture range, the fiash output will be set
without compensation, as with standard TTL flash operation.
28
Page 45

STANDARD TTL FLASH
This mode may be used with either the Matrix Meter or Center-1
Weighted Meter. It differs from baianced fiii-fiash operation by
aiiowing you to manuaiiy select the amount of flash compensa- ’
tion instead of having the computer select it automaticaliy. You '
select the amount of compensation, from EV -i-1 to EV -3,
using the SB-24's EV compensation scaie.
Both Matrix and Center-Weighted modes always incorporate
some form of computer compensation, even if you make
adjustments manuaiiy. In Standard TTL mode, only your
manually selected compensation amount is used.
For manual flash outpuf compensation, see pages 46 to
47.
I
Page 46

USABLE TTL AUTO FLASH ACCORDING TO LENS/EXPOSURE MODE/METERING SYSTEM COMBINATION
With F4
Lenses
AF Nikkor lenses
Al-P-type Nikkor ienses
AFTeleconverter/AF Nikkor
lenses for Nikon F3AF/
Al-type Nikkor lenses
(including Al-S)
Other lenses
With F-801/N8008
---------
--------------
AF Nikkor lenses/
Al-P-type Nikkor lenses
Other lenses**
"■—Viewfinder
P
Ph
Matrix
Center-Weighted 0 0 0 0
Spot
Matrix
Center-Weighted 0* 0*
Spot
Matrix
Center-Weighted
Spot
_Exposure mode Pd
Matrix
Center-Weighted 0 0
Matrix 0* O' 0
Center-Weighted
0
A A
0* 0* 0
A A A A
A A
A A A
A A A
PPhS A M
0
0* 0*
Multi-Meter Finder
DP-20
A M
S
0 0 0
A A A
0 0 0* 0*
A A
0
0
0 0
0 0
Waist-Level Finder
AE Action Finder
DA-20
P
S A M
Ph
0 0 0
A A A
0
DW-20/
6X High-Magnification
Finder DW-21
P
S A
Ph
- - -
-
A A A
0
0 0
A A A
A A A
A A
0
A A
A A A A
0 Matrix Balanced Fill-Flash
O Center-Weighted Fill-Flash
A Standard TTL flash
* Exposure mode automatically shifts to A. Select aperture manually.
** Includes AF Teleconverters, Al-type Nikkor lenses (including Al-S), Bellows
- - - -
A A
- - -
A A A
A A A
Focusing Attachment PB-6, Auto Extension Rings, etc.
0
O Matrix Balanced Fill-Flash
O Center-Weighted Fill-Flash
A Standard TTL flash
* Exposure mode automatically
M
shifts to A. Select aperture
manually.
• TTL Remote Cord SC-24 is
required when using DW-20 or
A
-
DW-21.
29
Page 47

MATRIX BALANCED FILL-FLASH OPERATION
For Matrix Balanced Fill-Flash, first make mar. .¡nohmalI
sure of the following:
ISO
ZOOM
♦ Set the SB-24's mode selector to TTL,
and confirm I1IM0 mark stays on.
If mark is blinking, push the SB-24's
"M” button.
C^igl) )
0.60.81 1,5 2 3 4 6 9 1318m
2 3 4 5 7 1015 20304060 ft
* Choose and set the flash sync mode
selector to NORMAL.
30
Page 48

F4
F-801/N8008
* Set the metering system on the
camera to Matrix Metering.
♦ For autofocus operation, choose and
set the camera’s focus mode to Single
Servo Autofocus. (For details about
autofocus flash photography, see
pages 64 to 65.)
For Center-Weighted Fill-Flash Operation
Follow the procedure for Matrix Balanced Fill-Flash, but
set the camera to Center-Weighted exposure metering
instead.
* Choose and set the camera’s film
advance mode to single-frame
shooting.
• The usable film speed for TTL flash
photography is ISO 25-1000.
31
Page 49

In Programmed Auto Exposure Mode
This mode automatically selects the
optimum combination of aperture and
shutter speed to match the film speed in
use and the brightness of the scene.
Matrix Balanced Fill-Flash in programmed
auto exposure mode lets you concentrate
on picture composition and is desirable
when conditions are changing too fast for
you to pause for settings.
In programmed auto and shutterpriority auto exposure mode, you
cannot use a non-CPU lens. With
a non-CPU lens in aperture-priority
auto exposure mode, set the
camera’s exposure mode to A.
32
Set the F4 or F-801/N8008 camera's
1
exposure mode selector to P, PFI
or PD*
• For F-801/N8008 only.
1
2 Set lens to minimum aperture (i.e.
‘ highest f-number). If not properly set,
the shutter locks. (F4 shutter displays
FEE, but will fire.)
Page 50

F-801/N8008
lii»? 5 a
0 Q._,( {)
I • p(г5o FS)
Confirm the controlled aperture and a
shutter speed between 1/60 sec. and
1/250 sec. appear in the camera’s
viewfinder. The aperture-in-use and
shooting distance indicator bars appear
in the SB-24's LCD panel.
With the F-801/N8008, the controlled
aperture and shutter speed also appear
on the camera's LCD panel.
F-801/N8008
a“
m Qi 0 Fc' c'
0 Q,_,( i)
(KDfгг
Overexposure warning
For overexposure alert, Fll appears
(together with lens’ minimum aperture for
the F-801/N8008) in the position indicat
ing the camera’s shutter speed.
33
Page 51

<r<n
lUU
ISO
ofiORi 1R ? A fi a i3iam
2 3^T?TTu Tb ™S/^060 ft
J
3C
ZOOM J .tmm
M
F-801/N 8008
I ® p eso ~FT
Confirm the shooting distance range in
the SB-24's LCD panel. The shooting
distance range is automatically indicated
by the distance indicator bars.
Shooting distance range changes according to aperture value, film speeds,
zoom setting and/or flash level compensation selected on the camera or SB-24.
For shooting distance range, see page 69.
34
»When you remove your eyes from the
camera to confirm the information on
the SB-24's LCD panei, the camera
may move siightiy and cause the
exposure vaiue to change. ,i n.
To prevent this, use the AEL (Auto
Exposure Lock) bottom, i , [
4 Confirm the ready-light and in-focus
’ indicator are on, then fully depress
the shutter release button to take the
picture.
• For blinking ready-light warning, see
pages 12 to 13.
J
Page 52

In Shutter-Priority Auto Exposure Mode
This mode lets you manually set your desired shutter speed and
the matching aperture will be selected automatically. Use a fast
shutter speed to stop action, a slow one to produce a deliberate
blur.
In programmed auto exposure mode and shutter-priority
auto exposure mode, non-CPU lenses cannot be used.
For aperture-priority auto exposure mode with a non-CPU
lens, set the camera's exposure mode to A.
Page 53

1/30 sec.
35
Page 54

Set the F4 or F-801/N8008 camera’s
“ exposure mode selector to S.
36
2 Set lens to minimum aperture
" (highest f-number). If not properly set,
the shutter locks. (F4 shutter displays
FEE, but will fire.)
0 Set your desired shutter speed on the
' camera.
• If you select a shutter speed faster than
1/250 sec. and turn the flash unit on,
the camera automatically shifts to
1/250 sec.
Page 55

v.:\V!’A ■
■a (!.?s FS.&) si
F-801/N 8008
5
J“
^гs f5.s:
s !)
5(.'г5 fs-sT"
Check the exposure.
With F4 camera: " i '
Check camera’s viewfinder to confirm the seiected shutter speed is between 4 sec.
and 1/250 sec., (or X) and the aperture is controiied. The aperture-in-use and shooting
distance indicator bars appear in the SB-24’s LCD panel.
With F-801/N8008 camera:
Check the camera's viewfinder or LCD panei to confirm the selected shutter speed is
between 30 sec. and 1/250 sec. and the aperture is controlled between f/2.8 and the
lens’ minimum aperture. The aperture-in-use and shooting distance indicator bars
appear in the SB-24’s viewfinder.
37
Page 56

F-801/N8008
I n C
1 L II
C!-i ! ^ 51
I w *lrU.:U
S
0-!
fiTIE^
4nn
ISO
4UU
OfinBIIR? A R g 1318m
2^"?T'W'iB’S^304060 ft
z< c
ZOOM Jl ..I mm
S.S
F-801/N8008
(•) S Ic^S FS. 6
'
Overexposure warning
For overexposure alert, HI appears in the
position indicating the oamera's aperture.
Shooting distance range changes according to aperture value, film speeds,
zoom setting and/or flash level compensation selected on the camera or SB-24.
For shooting distance range, see page 69,
Confirm the shooting distance range in
the SB-24’s LCD panel. The shooting
distance range is automatically indicated
by the distance indicator bars.
Confirm the ready-light and in-focus
■ indicator are on, then fully depress
shutter release button to take the picture.
• For blinking ready-light warning, see
pages 12-13.
Page 57

In Aperture-Priority Exposure Mode
You select the lens aperture and the matching shutter speed is
automatically selected. This mode is recommended for
controlling depth of field.
f/5.6
39
Page 58

exposure mode selector to A
40
Page 59

F-801/N8008
[ *
/=M“
m (Bo F8)
B Q,-.,( i)
(So FS')
Check the exposure.
Check the camera’s viewfinder to confirm the selected aperture and a controlled
shutter speed between 1/60 and 1/250 sec. appear. The aperture-in-use and shooting
distance indicator bars appear in the SB-24's LCD panel.
With the F-801/N8008 camera, the selected aperture and controlled shutter speed also
appear on the camera’s LCD panel.
Ll
F-801/N8008
Overexposure warning:
For overexposure alert, HI appears in the
position indicating the camera’s shutter
speed. Select a smaller aperture.
q 1K
n _ nil
IB (H iO Fr/.3
B i)
■1 • R CkJ) f 3.3 «■■!»!••
41
Page 60

i ri rj
IU Lf
ISO
f^oa 115 2 3 4 6 9 1318 m
?TT?TiuT?20304060ft
z<c
ZOOM Jl Jmm
miri
4 n >”(
ISO
’0.60.81 1.5 2 3 4'
) u u
6 9 1318 m
2 3 4 5 7 10 15120304060ft
ZOOM ^Imm l\lLf >
If fir
OFFrJlON
F4
8
F-801/N8008
(•) R S o f8
Confirm the shooting distance range in
the SB-24’s LCD panei. t
With other lenses:
Press the adjustment button to set the
aperture to your selected lens aperture.
With an AF Nikkor or Nikkor lens w/built-in CPU:
The shooting distance range is automati
cally indicated by the distance indicator
bars.
For example: With the zoom setting at
35mm and the film speed index at ISO
100, selecting f/8 lets you take pictures
of subjects 0.6m to 4m (approx. 2ft. to
15 ft.) away
Shooting distance range changes according to aperture value, film speeds,
zoom setting and/or flash level compensation selected on the camera or SB-24.
For shooting distance range, see page 69.
42
4 Confirm the ready-light and in-focus
■ indicator are on, then fully depress
shutter release button to take the picture.
• For blinking ready-light warning, see'
pages 12 to 13. "
Page 61

In Manual Exposure Mode
In this mcxie, you set both the shutter speed and aperture
manually according to the desired effect.
Page 62

F-801/N8008
Set the F4 or F-801/N8008 camera’s exposure mode
■ selector to M.
F-801/N8008
M I B
LU i>'i
lai? S o) Fbi.b
;)
2 Set your desired shutter speed within the sync range and
‘ set your desired aperture on the lens.
43
Page 63

F4
BS!
F-801/N8008
^ C □ mfi m \ Q ■
F-801/N8008 1
¿icQ ° -eu ° 1
/11
)fS.Si
0 qLj ill
/l(^5o
Check the camera's viewfinder to confirm manuaiiy seiected shutter speed and aper
ture. The Eiectronic Anaiog Dispiay shows the difference in vaiue from the controiied
range.
Adjust aperture and/or shutter speed until the Electronic Anaiog Display indicates 0 or
the desired vaiue.
With the F-801/N8008, you can check exposure with the camera's LCD panei.
44
1 • fl(c"So FS ■
S C( F‘~l )
ihsfcrl)
Page 64

< ri rd
ISO ILIU
0.60.S1 1.5 2 3 4 6 9
2 3I 4 5 7 1015 2030 4060 ft
ZOOM 3 Timm
1318 m
ISO
0.60.1
n 1.5 2 3 4 6 9"
2 3
.4 5 7 1015 2030;
ZOOM Jl Jl mm
4 n n
4UU
318 m
ioeoft
F-801/N8008
I fS.S
+2..I..0..I..2-
Confirm the shooting distance range in
the SB-24’s LCD panei.
With other lenses:
Press the adjustment button to set
aperture to your selected lens aperture.
With an AF Nikkor or Nikkor lens w/built-in CPU:
The shooting distance range is automati-
caily indicated by the distance indicator
For example: With zoom setting at 35mm
and films speed index at ISO 100, select
ing f/4 lets you take pictures of subjects
1m to 9m (approx. 4ft. to 30ft.) away.
bars.
Shooting distance range changes according to aperture value, film speeds,
zoom setting and/or flash level compensation selected on the camera or SB-24.
For shooting distance range, see page 69.
4 Confirm the ready-light and in-focus
■ indicator are on, then fully depress
shutter release button to take the picture.
• For blinking ready-light warning, see
pages 12 to 13.
45
Page 65

FLASH EXPOSURE COMPENSATION
Varying the amount of flash, in relation to the available-light exposure, creates different
fill-flash effects. We say the fill-flash effect Is balanced when the flash Illumination is
sufficient to brighten the subject to “almost” the brightness of the background. Some
times we want to use a little more or less flash to make the subject a little brighter or
not quite so bright. Your choice may be based on desired esthetic qualities, or may be
forced by extremes in lighting.
Generally speaking, you don't want to make the subject too bright, you just want to
brighten shadows. To achieve a subtle fill-flash effecf, you may wanf to use some
manually selected “minus" compensation. However, when the background is ex
tremely bright, and the subject is in deep shadows, you will probably want to use some
"plus" compensation. While the SB-24 is quite powerful, whenever using it for fill-flash,
it is competing with the sun’s brightness—very strong competition.
With standard TTL flash (with E3 blinking) you can manually compensate exposure by
adjusting flash output level. You can also adjust flash oufput level for Matrix Balanced
Fill-Flash or Center-Weighted Fill-Flash, in combination with the computer’s automatic
compensation.
nni23i^ ! .............................
ISO
0.60.81 1.5 2 3 4 6 9 1318 m
2 3 4 5 7 10 15 20304060ft
Press the SB-24’s select button, and
■ confirm the compensation scale
appears and indicator starts blinking
in the LCD panel.
+l”5'-i-2-3
Dm
OFFjSiON
46
Page 66

ZOOM mm F
\
HDB3 Whip)
ISO *Xp-i^-3
0.60.81 1.5 2 3 4 6 9 1318 m
2 3 4 5 7 1015 20304060ft
ZOOM mm F
ODI^ ^ liii
ISO .+10-1-2-3
0.60.81 1.5 2 3 4 6 9 1318 m
2 3 4 5 7 1015 20304060 ft
/
iI®](®]i(iDl francaii
2 While indicator is blinking, press
■ button to increase the value or “A”
button to decrease it. The shooting dis
tance range changes accordingly.
fCnnCDi
2 Press the select button again, then
' confirm 01 indicator stops blinking.
Setting is complete.
• If you do not press the select button
within approx. 8 sec., the 21 indicator
also stops blinking.
• The exposure compensation value
remains in the LCD panei after setting.
(If exposure compensation value is 0.
the indication disappears.)
You can make additional com
pensation by using the camera’s
exposure compensation dial. For
example, with compensation of
-2 on the SB-24 and -1 on the
camera body, the total compen
sated value for flash output level is
-3, and the compensated value
for the background will be -1.
Note that the LCD panel shows
only the compensated value on
the SB-24.
I
47
Page 67

REAR-CURTAIN SYNC FLASH-For Natural Light Flows
ISea^Inormali
When used with the F4 or F-801/N8008, the SB-24 lets you
synchronize the flash to the instant before the rear (second)
curtain begins to close.
Set the SB-24’s flash sync mode selector to ‘'REAR." This turns
available light into a stream of light that follows the flash-illumi
nated moving subject.
Rear-curtain sync flash photography is most effective with
slower shutter speeds. Although the slowest possible shutter
speed for front-curtain sync flash photography in TTL mode
(with camera at PD, P, PH or A) is only 1/60 second, with rearcurtain sync flash photography, depending on the background,
you can slow the shutter down to 30 seconds.
• In shutter-priority auto or manuat exposure mode, be sure to
seiect an appropriate shutter speed, in programmed auto or
aperture-priority auto exposure mode, confirm shutter speed is
not too stow. Otherwise, it couid affect image sharpness. To
prevent camera shake, use a tripod.
• Rear-curtain sync fiash is avaiiabie when Hash mode selector
is set to TTL, A or M.
48
Page 68

Front-curtain sync
Page 69

SHUTTER SPEED/APERTURE FOR EACH EXPOSURE MODE IN TTL AUTO FLASH
In Matrix Metering (with 50mm f/1.4 lens at ISO 100)
Speedlight Front-curtain sync (NORMAL)
Exposure mode
PD*/P/PH
S
A
M
*F-801/N8008 only.
1/60-1/250 f/4-f/16(1) 1/60-1/250 f/4-f/16(1) 30-1/250 f/4-f/16(1)
As set (3) f/2.8-f/16 (2) Asset (3) f/2.8-f/16(2)
1/60-1/250 As set 1/60-1/250 As set 30-1/250 As set 30-1/250 As set
As set (3) As set As set (3) As set As set (3) As set As set (3) As set
I': Matrix Balanced Fill-Flash (background correctly exposed; TTL flash level automatically compensated)
I I: Standard TTL flash (background correctly exposed) ■ '
(1) Maximum usable aperture varies according to film speed in use; minimum aperture is the smallest aperture of the lens in
use. With the F4, aperture is automatically controlled between the lens' maximum aperture to its minimum.
(2) Maximum usable aperture is f/2.8; minimum aperture is the smallest aperture of the lens in use. With the F4, aperture is
automatically controlled between the lens’ maximum aperture to its minimum.
(3) When set from 1/500 to 1/8000 sec., the shutter is automatically set to 1/250 sec.
bear..[nWma3 la
C «np) )
HEAfl,,fNQR>^
_________
( CUBP (t (jiimIp) )
Rear-curtain sync (REAR)
iing^
As set (3) f/2.8-f/16 (2)
|ALMJf)jjTTLl
30-1/250 f/4-f/16(1)
As set (3) f/2.8-f/16 (2)
49
Page 70

TTL AUTO HD FLASH WITH NIKON F-401s/N4004s
SHOOTING BRIGHT AND DARK SUBJECTS
The SB-24’s flash light output control is performed in the same
manner as the camera's built-in TTL flash. The SB-24’s light
output amount, however, is more powerful than the camera’s
built-in TTL flash.
Although the SB-24's shooting distance range is greater than
that of the built-in flash, TTL auto flash shooting operation with
the SB-24 is same as with the camera's built-in flash.
Note that the camera’s viewfinder ready-light LED biinks to
indicate you should use a flash only when the optional flash unit
** attached on the camera is turned off.
• With the F-401S/N4004S camera, for correct exposure
in TTL auto flash mode, use film with a speed of ISO 25
to ISO 400.
• With the F-401 S/N4004S, l£3 mark will not appear.
* •
Depending on the camera’s exposure mode, you can perform
Programmed TTL auto flash or TTL auto flash operation.
Balanced fill-flash is not possible, however, at brightness levels
darker than EV10. The camera’s computer automatically detects
brightness and chooses the appropriate flash mode.
50
Page 71

Programmed TTL Auto Flash
In Program or Shutter-Priority
Auto Exposure Mode
Programmed TTL auto„flash simplifies
operations, because the camera's i
computer automatically selects both
shutter speed and aperture.
For Programmed TTL auto flash
operation, use only AF Nikkor
lenses, but not AF Nikkor 80mm
f/2.8, 200mm f/3.5 IF-ED or
Autofocus Converter TC-16/TC-16A.
(TO
SET
ISO
0.60.81 1.5 2 3 4 6 9 1318 m
2 3
4 5 7 1015 20304060 ft
oM
Set the SB-24’s flash mode selector
' to TTL, and the flash sync mode
selector to NORMAL.
2 Set the camera’s exposure mode to
■ either program auto or shutter-priority
auto exposure mode.
• For autofocus operation, set the
camera's focus mode selector to A.
(For details about autofocus flash
photography, see pages 64 to 65).
51
Page 72

SET
ISO \juuJ
O.^B 1 1.5 2 3 4 6'
2.3 4 5 7 10 15 20
zoo^il^ H)nm F Zuhl
9 1318m
104060 ft
3 Make sure the shooting distance is within the flash range.,Refer to the chart for the
■ flash range for each ISO film speed.
Unit: meters (feet)
ISO film speed
400 200
1118 5.6
100 50 25
4 2.8
24 mm
0.7-5.3
(2.2-17)
28mm 35mm 50mm
0.7-5.6
(2.4-18)
Zoom setting
0.8-6.3
(2.7-20)
1.0-7.4
(3.1-24)
70mm 85 mm
1.1-8.3
(2.5-27)
1.1-8.8
(3.7-29)
For example:
With the zoom setting at 35mm and film speed index at ISO 100, you can take pictures
of subjects 0.8m to 6.3m (approx. 2.7ft. to 20ft.) away.
ED]
« »”« r(
SET
lUU
ISO
0.60.81 1.5 2 3 4 6 9 1318 m
2 3 4 5 7 1015 20304060 ft
M C
ZOOM .tmm
icsnm
f5?50N_3
L-iMliML
I iiiiiiiiini;j
For a convenient reference, use the
adjustment buttons to set the aperture
(f-number) in the SB-24's LCD panel, as
indicated by the chart.
Page 73

4 Lightly press the shutter release button and confirm the
' ready-light and in-focus indicator are on.
g Fully depress shutter release button to take the picture.
• For blinking ready-light warning, see pages 12 to 13.
53
Page 74

TTL Auto Flash—In Aperture-
Priority Auto or Manual
Exposure Mode
TTL Auto Flash lets you select any
aperture from f/1.4 to f/32 to match the
shooting distance range with automatic
TTL control of the flash exposure.
SET «mm
ISO <uu
(D.60.81 1.5 2 3 4 '
OD
5 9 1318 m
1 2 3 4 5 7 10151 0304060 ft
ZOOM Jl .Jmm rVjJJ
[Eoo5l][fm] [fstD] |TT
Set the SB-24’s flash mode selector
' to TTL, and the flash sync mode
selector to NORMAL.
54
2 Set the camera’s exposure mode to
■ either aperture-priority auto or
manual exposure mode.
• For autofocus operation, set the
camera's focus mode selector to A.
(For autofocus flash photography, see
pages 64 to 65).
0 Using the adjustment buttons, select
■ the appropriate aperture to match the
shooting distance.
For example:
With the zoom setting at 35mm and film
speed index at ISO 100, selecting f/8 lets
you take pictures of subjects 0,6m to 4m
(approx. 2ft. to 15ft.) away.
Shooting distance range varies
according to aperture value, film
speed and/or zoom setting. For
Page 75

Set your chosen aperture.
shooting distance range, see page 69.
5 Lightly press tthe shutter release
“ button and confirm the ready-light
and in-focus indicator are on.
I I
0 Fully depress the shutter release
■ button to take the picture.
• For blinking ready-light warning, see
pages 12 to 13H
55
Page 76

AUTOMATIC BALANCED FILL-FLASH
When the SB-24 is turned off and the scene’s brightness is
EV10 or higher, if the computer's multi-se'gment sensor detects
that the central subject is darker than the surrounding area by
at least 1.5EV, the viewfinder ready-light LED biinks, recom
mending that you should use flash to brighten the picture.
(Note: the SB-24 must be turned off for this signal to operate.
The LED will not blink with the SB-24 In STBY or ON mode.)
Set the camera for Program exposure control and the SB-24 for
TTL exposure control. A balanced fill-flash picture will result,
automatically. It’s that easy.
When using the SB-24 or any other flash In the F-401s/N4004s
hot shoe, bullt-ln speedlight must remain In the down position.
You cannot use both speedlights at the same time. Using the
SB-24 relieves the camera’s power supply from operating the
built-in fiash, and you can expect the camera’s motor to be able
to power more rolls of film.
56
Page 77

ч>
ч>
Page 78

TTL AUTO HD FLASH WITH OTHER CAMERAS(with Nikon F-501/N2020, F-301/N2000, FA, FE2 or FG)
With a Nikon F-501/N2020, F-301/N2000, FA, FE2 or FG
camera, the SB-24 set at TTL provides standard TTL flash light
output control. With the F-501/N2020, F-301/N2000 in pro
grammed or shutter-priority auto exposure mode. Programmed
TTL auto flash will be selected. In other cases, the SB-24
performs TTL auto flash.
PROGRAMMED TTL AUTO FLASH (with Nikon
F-501/N2020 or F-301/N2000 in Programmed or
Shutter Priority Auto Exposure Mode)
Programmed TTL auto flash simplifies camera/flash operations,
allowing you to concentrate on picture composition without
worrying about exposure settings, including aperture.
For correct exposure in TTL auto flash mode, use film
within the range specified below:
F-501/N2020 and F-301/N2000 ISO 25 to 1000
FA, FE2 and FG ISO 25 to 400
For programmed TTL auto flash operation, use Al-S
type* lenses only.
* Al-S type lenses include AF Nikkor, Nikkor lens with a
built-in CPU and Series E lenses. Each lens shows the
minimum aperture in orange at the aperture indexing
post on the aperture ring. Lenses modified for Al
operation cannot be used for this mode.
* For autofocus operation with the F-501/N2020, set the
camera’s focus mode to Single Sen/o Autofocus. (For details
about autofocus flash photography, see pages 64 to 65).
* Set the camera’s film advance mode to single-frame shooting.
57
Page 79

F-301/N2000
Set the SB-24’s flash mode selector
‘ to TTL, and the flash sync mode
selector to NORMAL.
SET
ISO
0.^0.811.5 2 3 4 6
A3 4 5 7 10 1520.
2001
fSJ
1318 m
4060 ft
4 Make sure the shooting distance is
' within the flash range. Refer to chart
for flash range at each ISO film speed.
58
2 Set the camera’s exposure mode to
■ programmed auto exposure mode
2 Set the lens to Its minimum aperture
■ (highest f-number).
(P DUAL*, P, or P HI).
* For F-501/N2020 only.
Unit: meters (feet)
ISO film speed
800* 400 200 100 50 25
11
16
8 5.6
4
24 mm 28 mm 35mm 50mm 70mm 85mm
2.8
0.7-5.3
(2.2-17)
0.7-5.6
(2.4-18)
Zoom setting
0.8-6.3
(2.7-20)
1.0-7.4
(3.1-24)
1.1-8.3
(2.5-27)
1.1-8.8
(3.7-29)
'With ISO 1000 film, usable aperture is 16+ 1/3 f/stops. .
For example:
With the zoom setting at 35mm and film speed index at ISO 100, you can take pictures
of subjects 0.8m to 6.3m (approx. 2.7ft. to 20ft.) away.
Page 80

Lightly press the shutter release button and confirm the ready-light and in-focus
indicator are on.
For a convenient reference, use the
adjustment buttons to set the aperture
(f-number) in the SB-24’s LCD panel, as
indicated by the chart.
0 Fully depress the shutter release
" button to take the picture.
• For blinking ready-light warning, see
pages 12 to 13.
59
Page 81

TTL AUTO FLASH
TTL Auto Flash lets you select any aperture from f/1.4 to f/32 to
match the shooting distance range with automatic TTL control
of the flash exposure.
♦ For autofocus operation with the F-501/N2020, choose and
set the camera’s focus mode to Single Servo Autofocus. (For
details about autofocus flash photography, see pages 64 to 65).
♦ Choose and set the camera's film advance mode to single
frame shooting.
♦ With the Nikon F-501/N2020 or F-301/N2000, set the
camera's exposure mode to aperture-priority auto or manual
expousre mode.
•i Set SB-24’s flash mode selector to TTL, and the flash sync
‘ mode selector NORMAL.
60
Page 82

SET irnri
ISO
p.60.81 1.5 2 3 4)
1 2 3 4 5 7 1015J
zooW r< Jl mm f(ic0
'«¿I
2 Using the adjustment buttons, select the aperture that best
■ matches the shooting distance.
For example:
With the zoom setting at 35mm and the film speed index at ISO
too,
(approx. 2ft. to 15ft.) away.
Shooting distance range varies according to aperture
value, film speed and/or zoom setting. For shooting
distance range, see page 69.
HD
B 9 1318 m
,0304060 ft
-O®-
selecting f/8 lets you take pictures of subjects 0.6m to 4m
Page 83

4 Lightly press the shutter release button and confirm the ready-iight and in-focus
" indicator are on.
g Fuiiy depress the shutter release
' button to take the picture.
• For blinking ready-light warning, see
pages 12 to 13.
61
Page 84

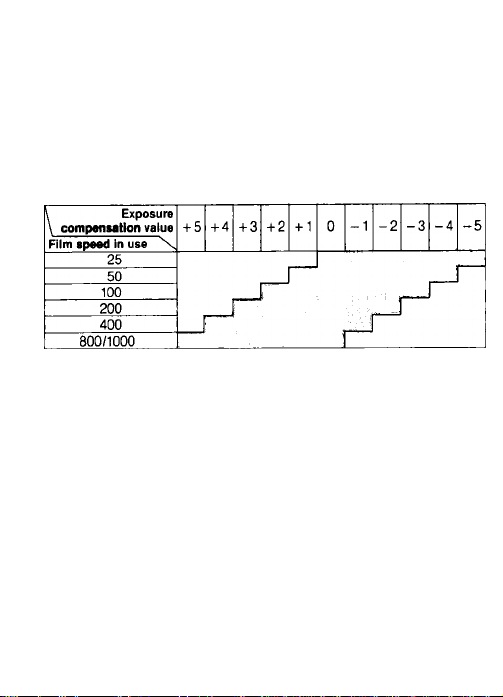
EXPOSURE COMPENSATION WITH CAMERA’S EXPOSURE DIAL
(SS ,
SET
ISO
[iuu f
0.60.
n 1.5 2 3 4 6 SpISm
2 3
.4 5 7 10 15 20 304060 ft
mSC. cK J
ZOOM
-t ..Imm 1 1
V.
y
p.60.81 1.5 2 3 4'
1 2 3 4 5 7 10 15.
M-/C. F*-/
ZOOM J mm I 1
Emm)] [nvfi] [flir
6 9 1318 m
¡0304060 ft
Some camera models include an EV compensation control.
Using this control you can modify the exposure to make your
picture lighter or darker. To make the picture lighter, use +
compensation. For darker pictures use - compensation. How
much compensation you choose depends on how much you
want to modify the resulting picture.
The shooting distance range for TTL automatic flash operation
varies with the amount of exposure compensation.
For example:
With ISO film, an aperture of fM, and a zoom setting of 35mm, if
you set the camera’s exposure compensation dial at +2, the
flash shooting distance range—which is Im to 9m (approx. 4ft.
to 30ft.) at ISO
too
—shifts to 0.6m to 4m (approx. 2ft. to 15ft.)
at ISO 25.
62
\ Exposure com-
Xpensaticm value
Film speed In U8^
25
50
too
200 25 50 100
400
800/1000* 100 200 400
•For Nikon F-501/N2020 and F-301/N2000 only.
+ 2 + 1 0
+ 3
— — 25 50 too 200 400
— — 25 50 100 200
—
25 50
50 too 200 400 800*
-1 -2 -3 -4 -5
400 800*
100 200 400 800* — —
200 400 800*
800*
— — — — —
— — —
— — — —
• Be sure the compensated film speed is within the film speed
range that guarantees correct exposure in the TTL mode of
each camera.
800*
—
Page 85

FILL-FLASH IN TTL AUTO HO FLASH MODE
When using the SB-24 for fill-flash
photography with a Nikon camera other
than F4, F-801/N8008 or F-401s/N4004s,
balance the exposure for both subject
and background in the following manner.
63
Page 86

AUTOFOCUS FLASH PHOTOGRAPHY (with Nikon F4, F-801/N8008,
F-501/N2020 or F-401s/N4004s)
When combined with the Nikon F4, F-801/N8008, F-501/N2020
or F-401s/N4004s camera, the SB-24's AF iiiuminator enables
you to perform autofocus operation in dim light and total
darkness.
F-501/N 2020
P S o fS
F-801/N 8008
'9
I.,
Set the Nikon F4, F-801/N8008 or F-501/N2020 focus mode
■ selector to S for Single Servo Autofocus mode, or set the
F-401s/N4004s to A for autofocus mode.
Set the camera’s exposure mode and metering system selector
and the SB-24’s flash mode selector as desired.
64
2 Lightly press the camera shutter release button and confirm
■ that the viewfinder ready-light comes on.
When ambient light is insufficient for
autofocus operation, the AF illumi
nator automatically turns on to start
operation. If ambient light is sufficient,
the AF illuminator does not light up.
Page 87

Confirm the in-focus indicator lights up, then fully depress
■ the shutter release button.
• The focal lengths that can be used with the AF illuminator and
AF Nikkor lenses are as follows:
F-501/N2020:
F4, F-801/N8008, F-401s/N4004s:
35mm to 105mm
•
24mm to 105mm
• The focusing range with an A F Nikkor 50mm f/1.8 for a
general subject with 35% reflectance at normal temperatures
is approx. 1m to 8m (3.2ft to 26.2ft).
Range
Page 88

For greater depth of field
In programmed TTL auto flash photography, use film with
a speed specified in the table below:
Maximum lens aperture Film speed
Lens only
F-501/N2020
with TC-16AS
f/2.8 or faster
Slower than f/2.8
f/1.4 or f/1.2
f/1.8, f/2, f/2.5or f/2.8
ISO 50 or higher
ISO too or higher
ISO 50 or higher
ISO too or higher
In other flash operation modes, set the lens aperture as
follows;
Maximum
iens aperture
Lens only
F-501fN2020 with
TC-16AS
Note: With Nikon F4, F-801/N8008 or F-401s/N4004s,
f/2.8 faster
Slower than
f/2.8
f/1.4 or f/1.2
f/1.8, f/2, f/2.5
or f/2,8
Aperture setting
f/2.8 or larger f-number
(f/2.8, f/4, f/5.6, etc.)
f/5.6 or larger f-number
(f/5.6, f/8, f/11,etc.)
f/2 or larger f-number
(f/2, f/2.8, f/4, etc.)
f/4 or larger f-number
(f/4, f/5.6, f/8 etc.)
sets the lens aperture to f/2.8 or slower.
65
Page 89

NON-TTL AUTO ES FLASH—For Shooting with Varied Lens Apertures
To use various lens apertures for the same subject or when your camera/lens
combination is incompatible with TTL auto flash mode, set the SB-24's flash mode
selector to A for non-TTL auto flash operation.
In non-TTL auto flash shooting, light output varies automatically to match the flash-tosubject distance, but instead of light being measured through the lens, it is measured
by the light sensor on the front of the SB-24.
The SB-24 can be used in non-TTL auto flash mode with any Nikon camera/lens
combination.
F-601/N2020 F-401S/N4004S
Set the camera’s exposure mode to aperture-priority auto or manual exposure
‘ mode.
REAR, ,IN0RMALI
(((mum)"
m
tso
0.60.81 1.5 2 3 4 6 9 1318 m
2 3 4 5 7 10 15 20304060 ft
2_ Set the SB-24's flash mode selector
■ to A, and the flash sync mode
selector to your choice of NORMAL or
REAR.
№!!Qllii
<mimL3i>
■»J
»
66
Page 90

ES
0.620.811.5 2 3 4 6
ZOOM
Using the adjustment buttons, select an appropriate aper-
' ture making sure the subject is within the allowed shooting
distance.
For example:
With the zoom set at 35mm and the fiim speed index at ISO
too,
take pictures of subjects 0.8m to 6m (3ft. to 20ft.) away.
Shooting distance range varies according to fiim speed,
aperture vaiue and/or zoom setting. For shooting
distance range, see page 69.
iriim
ISO <uu
3 4 5 7 10 15 20
3c ifc p
you can select f/2, 2.8, 4, 5.6, 8 or 11. At f/5.6, you can
9 1318 m
304060 ft
Page 91

4 Set your chosen aperture.
C Lightly press the shutter release button and confirm the
ready-light and in-focus indicator have come on.
67
Page 92

g Fully depress the shutter release button to take the picture.
• For blinking ready-light warning, see pages 12 to 13.
Test Firing for Non-TTL Auto Fiash
Push the open-flash button. If the ready-light blinks,
select a wider aperture or move closer to the subject.
68
Page 93

EXPOSURE COMPENSATION IN NON-TTL AUTO FLASH MODE
The Non-TTL Auto Flash mode works best for subjects of
average (18% gray) reflectance. For very dark subjects, we
recommend closing the aperture about 1/2 to 1 stop smaller
than indicated on the SB-24 LCD. For very bright (almost white)
subjects, it is just the opposite. Open the aperture about 1/2 to
1 stop. Similarly, the automatic system operates best under
average indoor conditions in the home—an average-size room
having white ceilings approx. 2.5 to 3 meter (8 to 10 feet) high.
In a very large room, or in one with very high ceilings, such as
an auditorium, if you are more than about 4.5 to 6 meters (15 to
20 feet) from the subject, you should experiment by opening the
aperture 1 to 2 stops wider than the LCD indicates. Since there
is no way to anticipate any specific condition, you may want to
take a few pictures using exposure bracketing.
Page 94

USABLE APERTURES/SHOOTING DISTANCE RANGE IN TTL AND NON-TTL AUTO FLASH MODES
ISO film speed Shooting distance range
1600**
8
11 8 5.6
a.
16
o
CO
22 16 11 8 5.6 4 2.8 0.7-5.3 0.7-5.6
32 22 16
1600** 800* 400 200 100 50 25
è 5.6
11 8 5.6 4 2.8 2 1,4 4.4-34 4.7-37
a
16
o
22 16
CO
32 22
] : Non-TTL auto flash
* For TTL auto flash with Nikon F4, F-801/N8008, F-501/N2020 or F-301/N2000; with ISO 1000 film, usable apertures will be smaller by 1/3 EV.
** For non-TTL auto flash only.
400
800*
2 1.4 5.2-20 5.7 - 20 6.4-20 7.5-20
2.8 2
4 2.8 2
5.6
2.8 2
4
8 5.6 4 2.8 2 1.0-7.5
11
32 22 16
32 22 16 11 8 0.6-1.8
ISO film speed
1.4
2
4 2.8
4
11
8 5.6
11
16
32
22 16
32 22
100
200
1.4 3.7-20 4.0-20 4.5-20 5.2-20
2.8
4
11
32 22
1.4 12-66 14-66 15-66 17-66 20-66 21-66
2
2.8 2 1.4 5.Ì-49 e.g-S2 T4-S5 8.8-88 9.7-88 11-66
8 5.6
11
32 22 16 11 2.0-4.3 2.0-4.6 2.0-5.2 2.0-6.0
50
1.4
2 1,4 1.8-15 Ì.Ò-1é 2.3-18
2.8 2
8 5.6
8 5.6 0.6-2.6 0.6-2.8
11
16
32 22 16 0.6-0.9
1.4
4
2.8 2
4
8 5.6
8 5.6
11
11
16
32 22 16 2.0-3.0 2.0-3.3 2.0-3.6 2.0-4.3 2.0-4.8 2.0-5.1
Zoom set at
25
24 mm
2.6-20 2.9-20
1.4
1.3-10 1.5-11
4 0.6-3.7 0.6-4.0 0.6-4.5
11
0.6-1.3
Zoom set at
24 mm
17-66 19-66 21-66
8.6-66
3.1-24
2.8 2.2-17 2.4-18 2.7-20
4 2.0-12
2.0-8.7 2.0-9.2
8 2.0-6.1 2.0-6.5 2.0-7.3
Zoom set at
28mm
1.0-8.0 1.2-9.0 1.3-10 1.5-11
0.6-2.0 0.6-2.2 0.6-2.6
0.6-1.4 0.6-1.5 0.6-1.8 0.6-2.0 0.6-2.2
0.6-1.0 0.6-1.1 0.6-1.3
Zoom set at
28mm
9.3-66 11 -66 12-66 14-66 15-66
3.3-26 3.7-29
2.0-13
Zoom set at
35mm
3.2-20 3.7-20 4.2-20 4.4-20
1.6-12
0.8-6.3
0.6-3.1
Shooting distance range
Zoom set at
35mm
5.3-41
2.0-14 2.2-17 2.5-19 2.6-20
2.0-10 2.0-12 2.0-13
Zoom set at
50mm
2.6-20 3.0-20 3.2-20
1.8-14 2.1-16
1.0-'7.4
0.7-5.2 0.8-5.8
0.6-3.7 0.6-4.1 0.6-4.4
Zoom set at
50mm
25-66 28-66 29-66
6.0-48
4.3-34
3.1-24
2.0-8.6 2.0-9.6 2.0-10
Zoom set at
70mm
8.4-20 8.9-20
5.9-20 6.3-20
1.1-8.3
0.6-2.9 0.6-3.1
0.6-1.4 0.6-1.5
Zoom set at
70mm
6.9-54
4.9-38
3.5-27 3.7-29
2.0-6.8 2.0-7.2
Unit: meters
Zoom set at
85mm
2.3-17
1.6-12
1.1 -8.8
0.8-6.2
Unit: feet
Zoom set at
85mm
7.3-58
5.2-41
2.0-14
69
Page 95

MANUAL \S\ FLASH—You Make All The Decisions-
With the SB-24's flash mode selector at M, you can manually choose your desired
level of flash power: full power (1/1), 1/2, 1/4, 1/8, or 1/16.
F4
F-501/N2020 F-401S/N4004S
Set the camera’s exposure mode to aperture-priority auto or manual.
REAR, .[NOHMALI
((^rmiiiD)
ISO
»llllll>r^.
0.60.81 1,5 2 3 4 6 9 1318 m
2 3 4 5 7 1015 20304060ft
' / '
1/ I
M
2 Set the SB-24's flash mode selector
■ to M, and the flash sync mode
selector to your choice of NORMAL or
REAR.
J
70
Page 96

GS]
ISO_______________________________
0.60.81 1.5 2 3 4 6 9 1318 m
2 3 4 5 7 1015 20304060 ft
CmI/S)
rcSTTCijI
Lon
OFFi
ED
ISO tfeJU _
0.60.81 1.5 2
2 3 4 5 7
ZOOM Tl Timm
<riiri
4 6 9 1318 m
3
15 20304060 ft
:iS) M.'/s
2 Press the "M" button to control the
' amount of light. The light output
changes as follows, and is shown in the
LCD panel.
-1/1 -1/2 -1/4-1/8-1/16-
4 Set an appropriate aperture, according to subject distance.
When using the Nikon F4 or F-801/N8008 with a iens having a buiit-in CPU:
SB-24’s LCD panel automatically indicates your chosen aperture and the shooting
distance mark m appears on the distance scale. Set the camera’s aperture to match
your desired shooting distance.
71
Page 97

ESI
SET (»■(>■<
ISO lUU
0.60.81 1.5 2
M C
ZOOM ._fmm
2 3 4 5 7
"3"
4 6 9 1318 m
15 20304060 ft
JO,
K5.S) mi/’-i
OFF
m
With other combinations:
To set the aperture in the LCD panel, press the adjustment button until the shooting distance
corresponds to your desired distance.
Set the indicated aperture.
For exampie:
With the zoom set at 35mm and the film speed index at ISO 100, selecting f/5.6 and light output 1/4 lets you take
pictures of subjects 3m (approx. 10ft) away.
Shooting distance varies according to aperture value,
film speed, zoom setting and/or amount of light.
m
mark I
1
J
You can also determine aperture using the SB-24's guide
number (GN). For details, see page 81.
r
Page 98

Lightly press the shutter release button and confirm the
" ready-light and in-focus indicator have come on.
• For blinking ready-light warning, see pages 12 to 13.
0_ Fully depress shutter release button to take the picture.
Page 99

SYNCHRONIZATION IN CONTINUOUS SHOOTING
The SB-24 is able to recycle fast enough to synchronize with a
motor-driven camera firing continuously at up to 6 frames per
second at 1/16 light output. This means you can take up to 8
flash pictures in rapid succession.
The maximum number of flashes for continuous shooting are
listed below. Batteries must be fresh to achieve the rates
indicated.
Maximum
number of
flashes
(approx.)
8
to
4
5
10
30
5
9
Batteries
AA-type batteries inside
SB-24
AA-type batteries inside
SB-24 plus C-type alkalinemanganese batteries inside
optional DC Unit SD-7
Light
output
M1/16
M1/8
M1/16
M1/8
Sync speed
(frames per
second)
Slower than 6
Slower than 3.3
Slower than 6
Slower than 3.3
Slower than 6
Slower than 3.3
Slower than 6
Slower than 3.3
Note: Never fire the flash more than 40 times at 1/8 light
output. After each major flash shooting, let the flash rest at least
10 minutes before firing again.
73
Page 100

MANUAL FILL-FLASH
Outdoor fill-flash used with manual mode requires that you
choose the flash-to-daylight ratio that gives the desired effect.
As with automatic fill-flash, your goal is to have the flash
brighten the shadowy areas of the picture, while leaving the
brighter highlights unaffected. To do this you must set up your
shot so the flash exposure will be underexposed by at least one
or two f/stops. The following procedure is just a guideline for
experimentation to enable you to get your desired effect.
ll£AR..rNORMALI
((('ffllllll'))
ISO
0.60.811.5 2 3 4 6 9 1318m
2 3 4 5 7 1015 20304060 ft
< / •
M
1/ I
Set the SB-24’s flash mode selector to M and the flash sync
mode selector to your choise of NORMAL or REAR, then turn
on the SB-24.
74
 Loading...