

Page 1
Milton
.A~-~'7.{~
/
Speedlight
fi!mmtHJJ
INSTRUCTION
.
MANUAL
Page 2
fj
.g.$(7):l,;t!); .
I;j:L:~I:
.g.$(7)-t!
~1'F(7)~*
.g.$(7)~UII····
;1(
--------------------------------------------
.....
..........................
..
......
.. ..
.......... ... ................... .. ..... .. ..
';1 ~ ..
...............
···
.........................
·······
·············""·"··"·····""·"·"··
:.--"\'·';-7-AI::·-
i'i
tfj~t
iz:.··rlt - .l.::.
/'"(7)-t!
·';
~f11'Jv-*x~)(7);*:iE
·;tl-SU-3
.. ·
......
............ ............. ...................... 5
. ............................. 6 - 8
1-·················· ········· ·· ·· ········ ·· ·····9
.. ··
..
· ...
...
..
· .. ·· .. ·
...... · .... · ....
L---T1'711-····································· ········ ·
77
·;t:.--.:1.
;f--7>
.. .. ·
..........
· .. ·
....
· .. · .. ·
77·;t:.--.:1./Oo,.
:lin
7·77·;t
't-$'-F717
tI~
(7)-¥51~-~$>j.**
1~fflorIiE71'Jvb
:li1/'"T:.--/\-(GN) ...... ·
·;tl-· .. · ..
......
· .. · .. · .. ·
ffl
-7-~j-"JV-
I-lIX~Htltt:1
"' "''''''''''''
.. ·
·t(7)IilJ!iIl·································
·;ff-$>j.~~
..
....
........
....
...............
}I~
......................................
.. · ..
.. · .. ·
.... · ....
· .. · .. · .. .. ·
...
.......
I:-:>L'-C""·
..
·· ..
··
......
.....
... ....
.... · ....
· .. · .. · .. .. · .. ·12 -
··················13
....
· .. .. · .. ·
.........
.................
.................
..
..
··
...... · .... ·
........
.. ····· 3
........... ··· 4
·······
9 -
· .. 10-
....
· .. ·· .. ···
.. · .... · ........
....
.. ·····
·· ··
·····
............ ... ·
........
...
..
· ....
···16
7~-t!-ij"I)-
~AIIil/~·;t:7SD-6
.2/~·;t:7SD-7
iz:'---ij"-I)-t-r:J-/'"S
15
12
13
13
14
·
14
. ·15
15
:J1Jv:'-->7D:J-
TTL~7t:J-
iz
:.--
-ij"-.l.::.
v
·;l
F71!J1.~I:-:>L
77$'--ij"-I::AI:-:>L
-¥
J....(7)
LiJ't
lIXt&
L
'J:.(7)
'II\:;1lll:-:>L
1±.m
··········· ····· ....................................
fi-7tI.::t-Jv",,-fi-15[ffi ···
16
16
........
...
·· .. ·
.. ··
.... · ....
/'"SC- 1
/'"SC- 12'
·;t
rSU
'-C
: ..
.......................
;i:~"""
'-C
........
..............
----------------
.. .. ..
........................................... .
....
.. ·
....
·· ....
.... · .... · ....
·· .. ···· .... .... ··
C.- 13
......
····
....
5"
.........
.....................
SC-23· ....
-2·
.. ·· ..
" ...........
'-C
'" ....
""""""""""""""""" "
·· ..
........ · ....
........
... ........• .
............
.................... ................. '
...................
··· .. ·· ·
....
.... · .... · ......
·· .. ·· · .. ·
··· ...........................
· .. ·
.... · ......
.... ......
.. ..
..... ...
......
.. · ....
.... ·
..
· ...... ··
.. ..
··
--------
....
· .... · .. · ..
.....
........... ..
""""""
..
.... · .... ··17
· .... ··17
···
.. ·
....
···
..........
.. ·17
....
...... ...... ·18
..
...
.............
............ ····
.. · .. · .. ··36-37
·
17
17
17
17
·
18
18
·
18
·
19
20
CONTENTS
NOMENCLATURE
FOREWORD
SETTING UP.....
BASIC OPERATION ....... ....
TECHNICAL INFORMATION ....... .....
Setting Camera
Shooting Mode Selector Dial ............................. 25
......
...
. .................................
's
Shutter Speed/ Sensor Unit SU·2 ... ............... . ....
________
..
....
................................ 3
........
.....
...
............. 4
.. .. .... ..
.. ..
.........
....
21
22-24
25-30
ACCESSORIES . ............ ....
DC Unit SD·7 ............. ............. . 32
TTL Remote Cords
Sensor Remote Cord
Sync Co
"
RED
rd
SC-
EYE" ...... .... ........ . ........................... .
SC-
SC-
15 ...................... . .........................
SelectinglDetermining Aperture .... 26- 27 TIPS ON SPEEDLIGHT CARE
Setting Sensor Unit SU·3 .... .................... . .... 28
Ready·
Light ..... . .....
Open· Flash Button ......
Fl
ash Head.. ......................... ................
....
..
...
.... .... ....
... .......
........... . 29
Sync/Multiple Flash Terminals ................................
Bracket Mounting Adapter . .
TIPS ON
UV
AND INFRARED PHOTOGRAPHy
...
.........
..
....
OPTIMUM BATTERY PERFORMANCE ..... 34
SPECiFiCATIONS .
SPECTRUM ENERGY DISTRIBUTION
. 29
29
CHARTS ............................ .........................
.. ..
..... . .............................. 35
30
30
31
Films ..................... ................................................ 31
Guide Number..........
.........
....
... ......... .
......
....
...
31
...
12 and SC-23 .............
13 .................
.......
........
_
.
...
......
..
..
...
36-37
32
32
32
32
32
33
33
2
Page 3
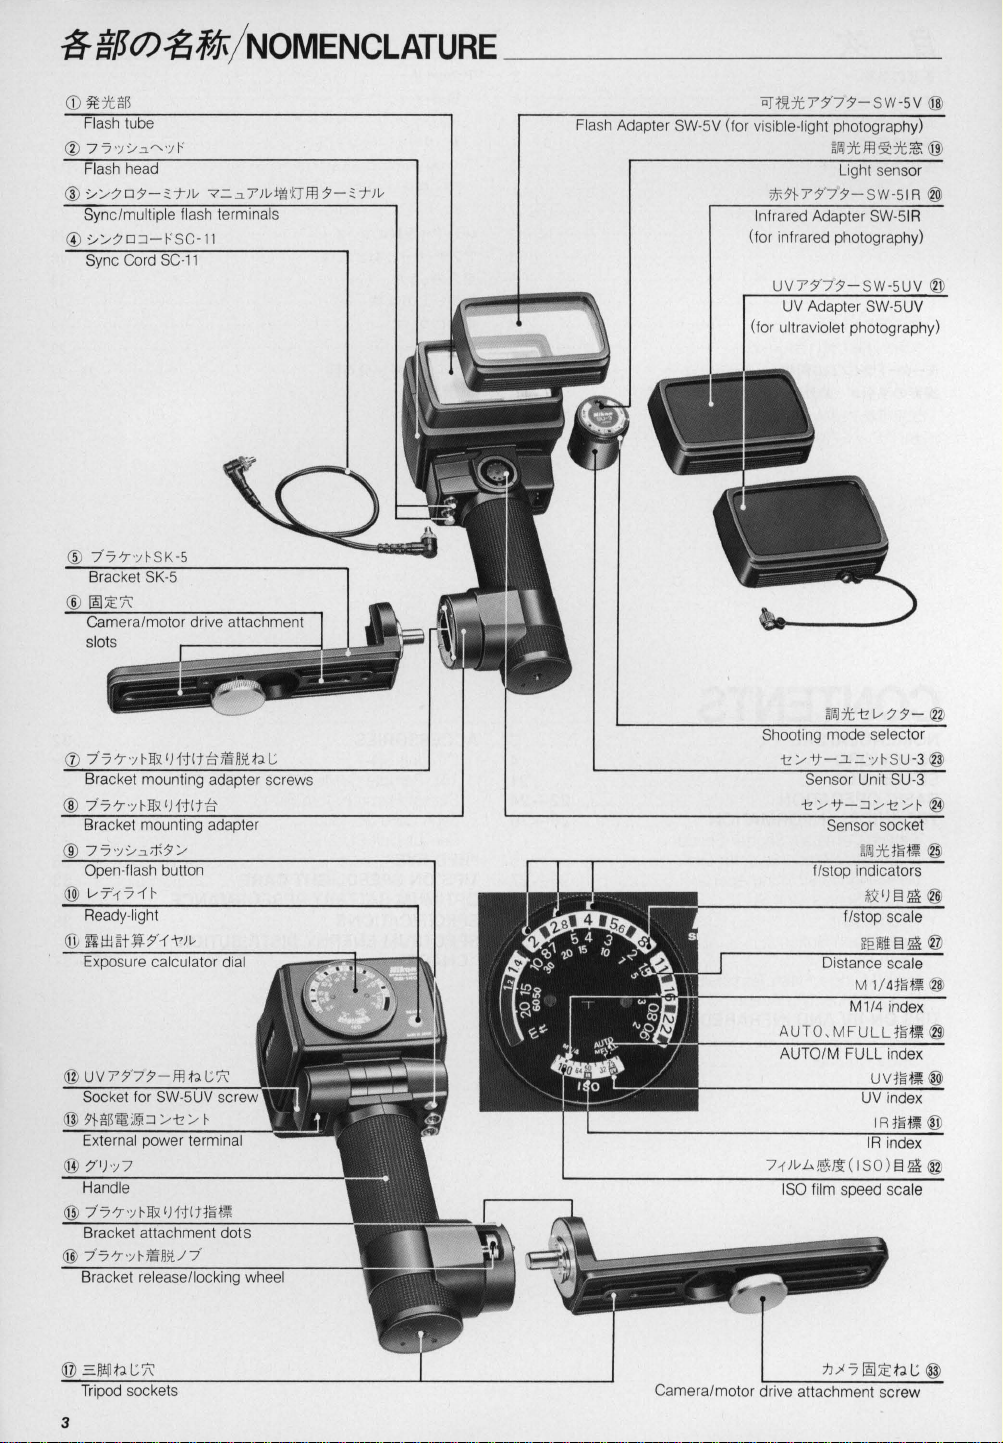
~g/J(J)~#
/
NOMENCLATURE
_______
Flash Adapter SW-5V
_
I
~
/:7D:$'-O:1")
Camera /motor drive attachment
slots
v
"=
i I s
mounting adapter screws
i
.:1
y )v
ill'kT
ffl
:$'-o:1")v
Light sensor
$:7}Y:$"7:$' -SW-5IR ®
Infrared Adapter SW-5
(tor infrared photography)
UVY:$"7:$'-SW-5UV
UV
Adapter SW-5UV
(for ultraviolet photography)
Shooting mode selector
-t
/-+t
-.l=
Sensor Unit SU-3
IR
';;I-SU-3 @
Bracket attachment
77
7';;l-mijlU
Bracket release/locking wheel
3
dots
7'
SO
film speed
I
attachment scr
ew
Page 4
(;t
t;'lfIJ
t=
::.~t:
U'(;j:'::'
t/c
-)
::"C"L'£
~@P'l
~
1::
' -
I'
-5
::.t~J~.~m:7t.~
L'15iJ(~tiEt
~~.
i~:lE.
I..-
L,j;j};.g.t:~1J
1t~~
t
SCR( ~ I):::J
~:7tA
1::
~:7t~9~:lE:7t
:7t(;j:jfl:~
*~{f~ln'90 £t:TTUIlJ:7t:J
!ijIJ7'C
') 7::7 t
~L'(;j:FA.
:::J -1'11f1fl):tJ
~(~1J1.:7tjUj~h-)tJ'"'('/!!
l
IU!t:(;j:
I)
- )
~2fnJiiJ(lfl:w.
.tJL'"'(.
*1C1i'iJ~
~tiEttj.')
t: t: /!!.
.tJFlJlL'L't:
--------
:::J
:"-
AI::'
I..-t:
o
t.J
1<
- 9
~~c:7t4~'I'i~~L'
1 ~ "'(
'9 0
lfliBit:r,t
tj.
').
4~t:.:7HJRj;i:~.
)(:1tM~Jfli:.
HHll..- £ 9
:,,-
-It
-
~.::.
';I
:"-*IJi~PJl;j[m
' _
I'
-51
~
(~1J1.:7tj;i:fj~h-)}lU''''::'.:I.
~:7tAI::'-
§ al
t:r,t
L:
"'(~IlJ:7tF{~
-It
I)
- ) ~ Ifl
FE2. FG. F-501. F-301.'::':::J /
>'
-5
t
~Ii/~';I::7
~tJ>s.
~1'F15;~
SO-6.lii2/~';1::7
C'
5:::J"~
£9
~
+*t:IJM
I..-
£ 9 0
--
-1'
::'~A
•• ~ ••
--------------------------------------
-51 ~ SB-140
1::-
L:"'(
!E!i~~IlJ]L
~.tJi'lJ:.lfL
1'-51
~SB-140(;j:28mm(.;:,,-;;(
::7
' 1)
';I
7'
71
1t~~
77'7
'7 -
E.~~.m~~3~~~~
~:7H.JRjU~t:.tJL,"'((;j:.
-'t~{m.
~1JbIClUMiIt
0
~
SU-3
~!fx
'Htlt ~ ::. t I: J ').
HU1i
HEIflI..-
L'
1..-.
t:iE
BIj*IJiliP15i\.~:7}ll'~
1'-51
~t:tj.'J£9
~3f5lJ:,rI:1;JH~~
-
I'SC-12~~L'(;j:SC-23(~I:
~::.
t
t:
J
'?"'(
F3 ~ I)
AV('iJ:.Ifl~:"-::7
~~.q~4~
:IH
j;)j-:JTTL§mllJ:7tj;i:
£ 9 0
SO-7(~t:!ijIj7'C
n.
4;\'1:
SO-6
~1~1fl9n(;f~1J1.:7tj;i:~t:
A
1::
' _
1'
~'E-7
0
::"1~lfliltr':::.~~lI.lJ!l.~J
I..-
"'(
I'
tJ'
':>
•
-517t:
.tJ1~L'
,t:
t:
/!! ~ ')
7'~~'I'itiP
Hx
'Htlt
~
~'I'itiE
§ til
7)v7)v
~
<
'1 / 4
:7}$§tIl~
::.
t
iJ
(T
/!!
.
-;;(
t.J
>'
-5
~
D
I)
7::7t-lt
4:J"
£"'('
11
<
.tJ~fth-L'
t:
C'
~
J
-)
----
--------------
--
FOREWORD
Th
ank you for your kind patronage of Nikon,
Nikon 88-140
wi
ll
make photography a much bigger part
________________
of your life.
Get to know your 88-140, but before using
ead th
to r
is manual well.
We
it
__
hope the
, be sure
4
Page 5
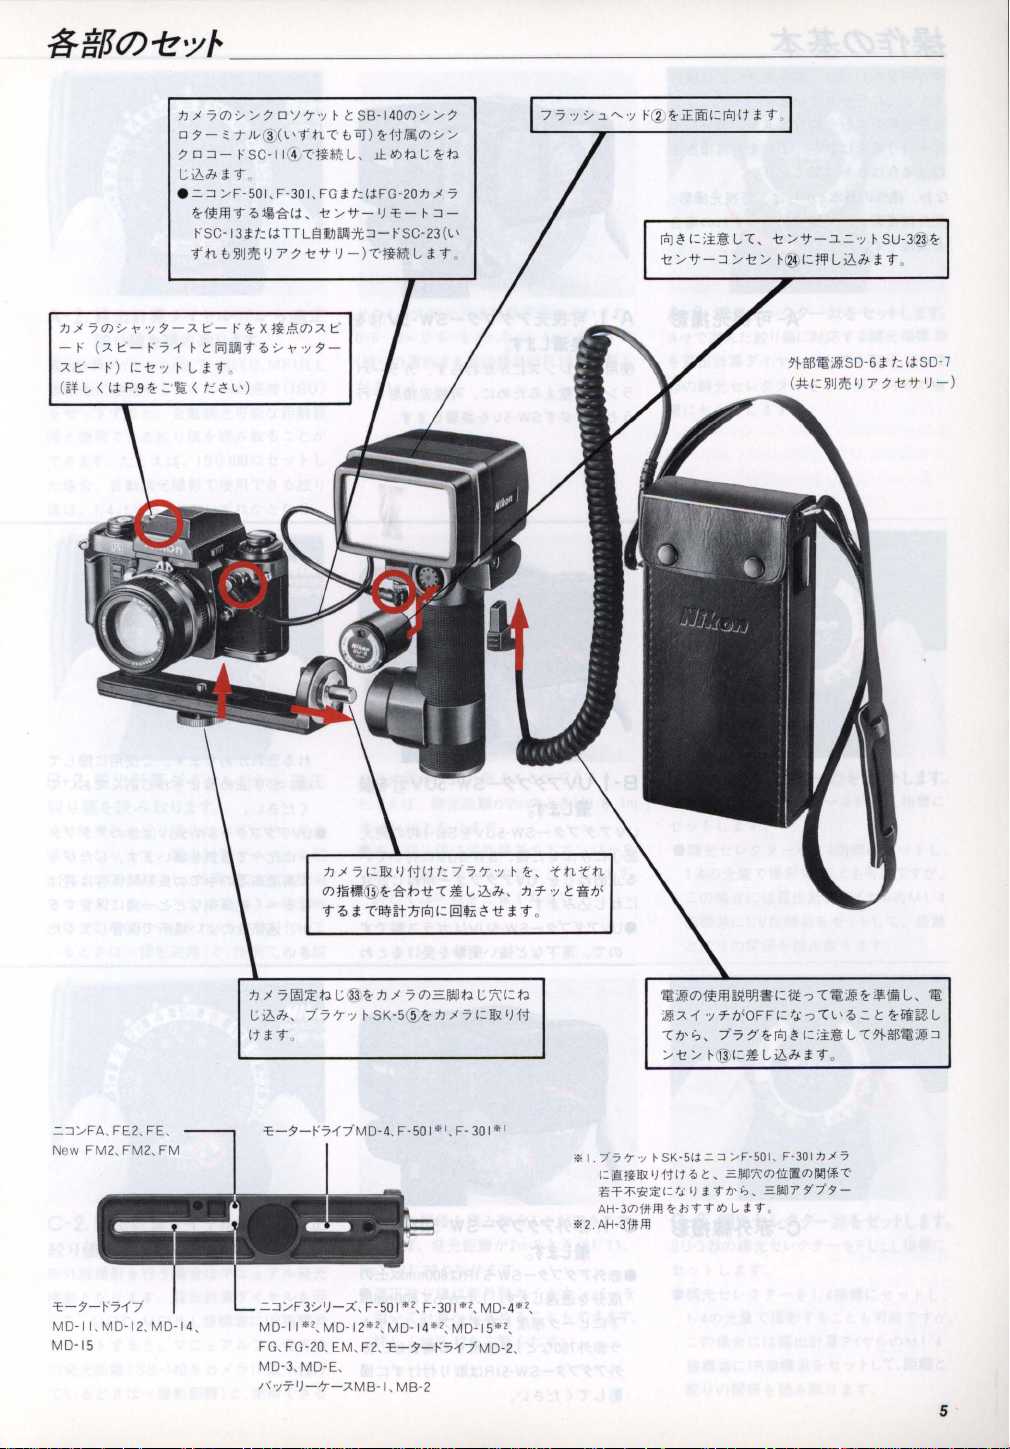
-8-9{J(J)f!'Yr
tJ
;,!
7
0
'7
:;; 0 ::J -I-'
t..:i.6Ji.j;"9
. :::::J
~~ffl"9~.*~,
I-'SC-
_______________
(J)
'/
"/
:;;
0
'J
7
';I
I-
t SB-
140
(J)
'/
"/7
0.
T Jl-@J(l'"9:h T t
SC-I I
(1;c'ji
"/
F'SOI, F-
30
13j;t:
IHTLEl
OJ)
~1tll.(J)
f,'C
i.."
Jl
d)tJ
t..:
I, FG j;
t:I;l
FG-20tJ;,! 7
~"/~-~~-I-::J
I!J!J!J7t
::J-I-'SC-23(\.'
'/"/
~tJ
1oJ~1:;i~i..,c,
t?
"/~
-::J"/t?"/
t?"/~-.30:::
1-®;I:jflli..,i.6Ji.j;"9.
_
';1
I-SU-3@~
tJ;'!7(J)'/~7'7-~
-I-'
(
~~-1-'71'l-t~IDlJ"9~'/~
~
~
- n
I:
wn <
1;1
p,g
t?
~ ::'
';I
~-I-'
I-
i..,
j; "9.
~ < t:~
\.,
~X
)
••
(J)~
~
';I
'7-
tJ;,!
7 I:JIll. 'J1
(J).~~~*bttc.i..,i.6Ji.,
"9 ~ j; c'
tltt:777
lli1anloJ
I:
Iill~
~
tt
';I
I-~
tJ~ 7
j; "9.
,
't:h't':h
t.ij
$H!I1IUliSD-6
j;
t:
l;t SD-7
:::::J"/FA
, FE2, FE ,
New FM2, FM2, FM
~-'7-1-'71'7
MD-II
, MD-12, MD-14 ,
MD-
IS
tJ;,!7~~tJt..:
t..:i.6Ji., 7 '
IH"9
.
~-'7-
:::::J
"/F3,/
MD-ll
FG
, FG-20, EM, F2,
3~tJ
77
';1
I-
SK-S~~1J;,!7
1-'71'7'MD-4,
1)-
;:(,
F-SO I"'Z, F-301'"Z,
lI'Z
, MD-12
"'Z,
;,!7(J)E~tJt..:~~tJ
MD-14"'Z,
~-5'-1-'71'7MD-2
MD-3, MD-E,
/
\';I
T')-7-~MB-I
,
MB-2
F-SO
1:JIll.')1t
1"'1, F-301
'"
I
MD-4'"Z,
MD-IS
"'Z,
,
;Iili~
l'
';I
~n(OFFI:t.:
cn'&?,
77
:;;'
"/
t?"/
",1.7'57':;
l!!2
.AH
I-SK'
I: oo:ltlli!
.~~R~~~ij.T~~,=:11!117~~'
AH-3(J)fMIl;,
-3fJfm
51:t:::::J/F'501, F-3
IJ
filt."
1:,
hTT!IJ
~IoJ~ I:;i~ L c~HIl~;m!::J
1-@,~.Li.6Ji.j;"9
=:1I!II7\(J)frr.(J)
L-
. T .
-:J
c\.
'~:: t Hi~'2,L
.
0ItJ
;I'5
IIIlf,f.
c'
5
Page 6

/¥f'F(J)~*
l*1"F0)~*1-
;t..fJ' 3 """J(:-$tfJ'n"(
<iJ:rJb'tlUJ
~
·Hl'
1-T
'j
f~.g-I;j:
tt.B,
~9H,*
t
Ia).m
3(;L
H'T
-)
-)
f~.g-I;J:B
C
~ ':'~
l*1"F0)~*4fJ'GI
liI~,
;ff
9H,*
"{
' 9 0
_
__
lUj~14(:
L'
f~.g-I;j:
~
,
< t:
liI~
J:
')
l*1"F
it 9
0
A
~,
~9H,*liI
it
t:;ff9H,*liI~
C'
L'
o
;j:, OJ:r~:7tlUJ,
0)
L ' 9'
nO)f~.g
~
__________
_
A-I.
'RJt-'l:7t75
~7iL.1T
iilll9.@
7
-)
8-1.
v
:..-
A
~!'t;Z
c
~
I;j:IJl'TSW-5V
UV71'·7·1'-SW-5UV@id-~
i
'7·1'- SW-5V@
o
:"-
;((:
fJ
'fJ'P
'"
.@
t:.If) (:, OJ:rJl.7tlUJ
~~f.;f
9',
l .t 9
7iL.1To
U v r 7
'7
'7
g~CD(:
~
.Li:.If)n.
(:n.
L.:i.6;;.
e
UVr7
O)"{
' ,
-SW-5UV
iJ'.\:
it
t:
L.:
~,UVr
it
9
'7'7 - SW-5UVI;j:
liT
tt
~SB-1400)~:7t
ii,
S
W-5UV
7'/7
- Illn.
0
tJ''71
C'
\g;
L
'iji~
~
(:1tL
§t
id-
tJ
7
-/'
\
~
1-T
0
,"{
L'
L.:
1\
@.
A~"{'9
It
.@
c p
n.@~~nfJ'd.J
(;j:,
11--9'
I)
.Li:.If)n.
it 9 0
':'1illl(:'~l"{
L.:
~n.
L.:i.61v
"('.BL'"{
<t:C'L'o
e
UVr7'7';$'-SW-5UVI;j:fjgO)r 7' 7· 7
-1:.tt"'-"{;,'lli3n~*L'it9
"(
~;.ffil.~;,'lli0)
tt.@
"'-
fJ
',
lm3n'I'1O)
C'
L'
0
t:p
"{'O):j~J(~rB9i*i'f(Hm,
<
~~:tlll1!iIJtt
C' c
J:
L
,~p.IT"{
-~(:i*:g9.@
'
i*:g
0
It:fJ
l"{
c
< t:
,)
' 6
C-$9U*?I~
C-1.
$*71'·7·1'-SW-5IR®id-~
JiL.1To
e
;ff9}r7
'7'7 - SW-5IR(
p.x.-$t~~l&J
T(:
'71;ff$'}750
l
it 9 0
t:'
-?
~N
t
t n
9}r7'7'$>-SW-5IRIHx
~
l "{ <
t:
C'
L ' 0
;j:
800
It
: fJ''')"{
~1f9'@
71'
~1i1ll9
.@~.g-(;j:,
IHtltT(:liI
nml:.J.
Jvb
800
J:.0)
nml:.J.
(
-If?
;ff
Page 7
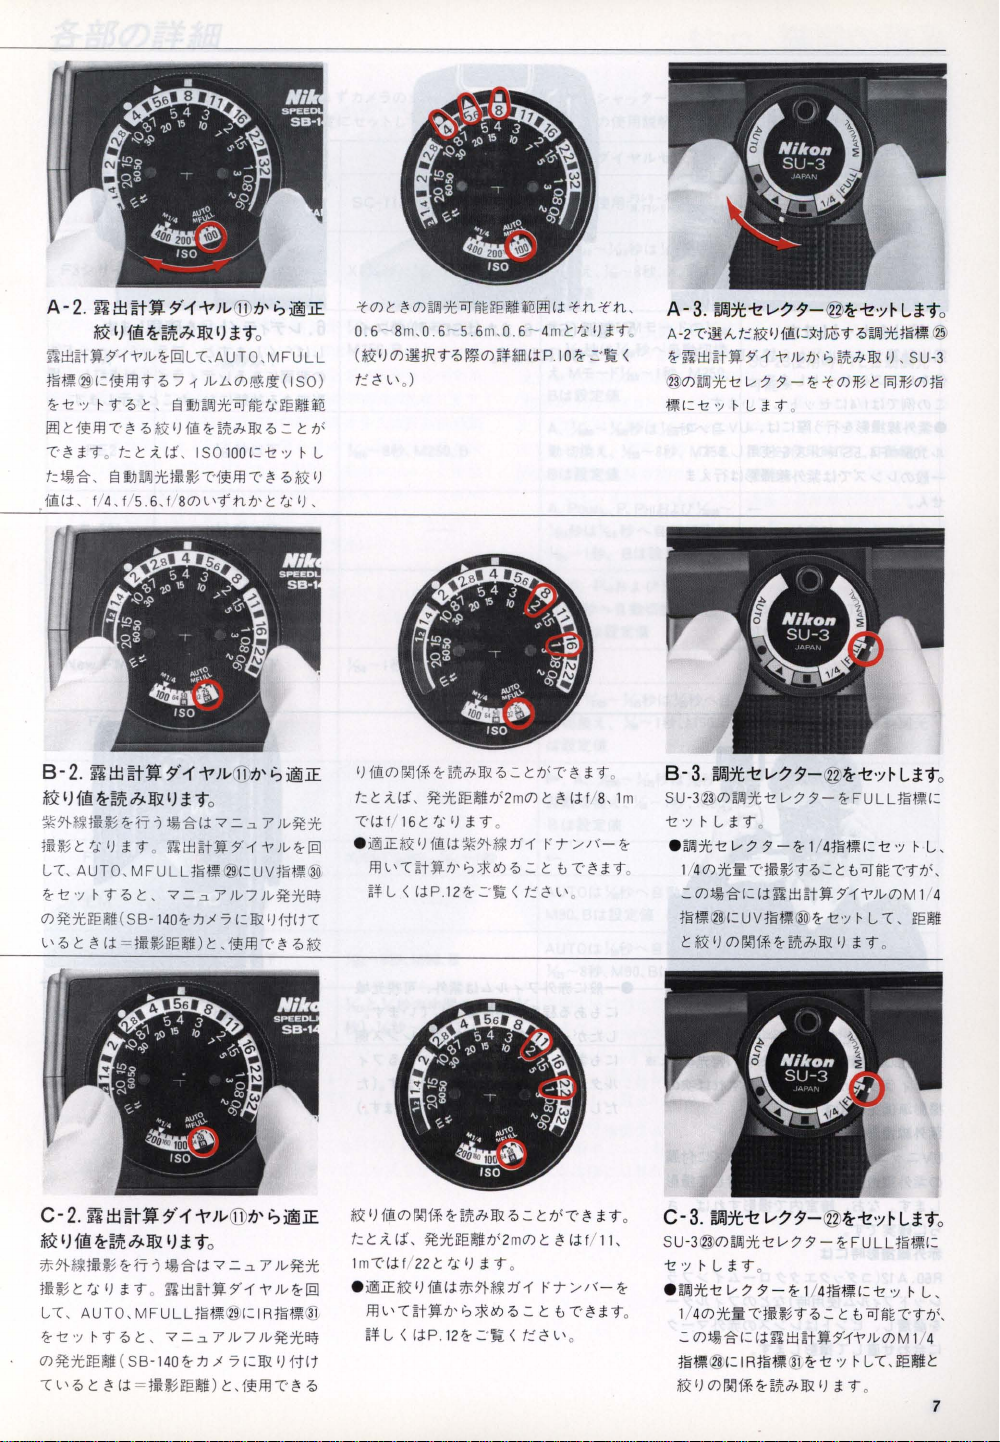
A -2, ~ t:lHltlJ
~
~
tl:J~t~7·11"lvzlBll..,
t:'H~~'=i~ffl9
z-t
'/
~9~1::, §1tJ~FoJ:7tOJIi
~1::~fflT~~&~.zmh.~~I::~
<:.~
;1:90 t:
~.~, §D.:7t.tiT~fflT~~&~
{
i/i.(j:
, 1/4, 1/5.6, 1
$"-1'
"V
)v @
1J'
i?
iOOlE
~)f~H7t0lJ-~~)19
-CAUTO,
~
71
I::
;Ui
, IS0100,=-t
80)vfn;/)'1::
0
MFULL
IvL...O)@iJi(ISO)
E
t<dellIUTI.
'/
~
tj.~)
I..,
,
'to)
I::
~O)~FoJ:7tOJmeliHli
0.6 -8m,O, 6(&1)
0)~tR9~
t: ~ \.'
.)
5. 6m,
0.
~O)~UB(j:P
TI.
~'j:'tnfn
6- 4 m
I::
tj.l)
. 1
0 z
::'1[
;1:9.
,
A - 3,
~7t-t!
v7$'-©~-t!
A-n·~M:*&:I){i/i.'=:M1ii59
<
H~tl:J~t~
@O)~FoJ:7t-t
~~,=-t'/ ~
7'
11"
I..--
7 7 - z
1..,;1:9
lv;/)'
.
';;
~
L19
~.:7ttlH~
':>
~j'Ch.l)
't
O)if~
,
SU-3
I::
[i'iJifMt~
0
®,
8 -2, ~
~
~:?H~tiiM
tUJ
I..,
z
0)~
L'
c-
~
*,:?H~UIM
tU31::fj.
I..,
z
O)~:7t~e
<:\.'~
t:f::j
~lJ
$"-1'
"V
)v
(j})7;
'
i?
iOOlE
~)
f~
H7tOlJ-lfx~)
I::fj.~)
<:, AUTO
-t
'/ ~ 9 ~ 1::
:7t~eliHl(SB-140z:h.)l-5I:.I){t(n
~
I:: ~ (j:
2. ~
t:f::j
~Jf~H7tOlJ-lfx~
I)
<:
, AUTO,
-t
'/ ~ 9 ~ 1::
i!l!l
I:: ~ 1j:=tUHeliHl
19
0
z1'i"j j~
;1:9.
,
=
Hi'
;I:
(
~(j:
'7'::';J,?
at
tl:J~t~:$"11"lvzlBl
MFULU~~~@=uvt~~~
,
'7'::';J,?
tiiM~eliHl)
~tlJ
9 .
MFULU~H~@'=IRt~~~
SB-140
7'
-1'"VJv@1J'
)
19
-j
.~(j:
1i
tl:J~H~
,
'7'::';J,?
z:h.)l
1::,
0
'7'::';J,
)
Iv~:7t
®
Iv
7
Iv~:7t~
i~ffl T ~
:$"11"
Iv
-5
I::,i~ffl<:
H x
i?
iOOlE
?
Iv~:7t
Iv
z
IBl
®
7
Iv~:7t~
,=~
I)
{tit
'~ ~
1j{i/i.O)llfll*H
t:I::;Ui
<:'(j:1
@iU&:
•
ffl
L'
fn
*&:
I)
{i/i.O)llfll*
t:I::;Ui,
1
m<:
'Ij: I
•
@iE&lj{iIi.(j:;jT-:?H~:h
ffl\.'<:~t~;/)',:>:;j<:/JI)~~
nl.., <
j'C
h.
~
~
I::
;/)(<:.~
;I:
9 .
,
~:7t~eliHl;/)
161::
tj.l)
Ij{iIi.(j:
<:
~
HM'';':;j<:/JI)
<
Ij:P.12z~·~< t:~L'
~:7dei!l!l;/)(2mO)I::
221::
(j:p.la~·
(2m
O)I::~(j:f
;I:
9 .
~:?H~
;ti1
~ ~
z~j'Ch. ~ ~
tj.
I)
;I:
9 .
·
1
~<
t:~\.'
/
rT:.o<-Z
I::
t T
~;I:
I::
;/)(<:
.
~
~(j:f/ll
rT/I<-z
I::
t<:·n9
.
8,
1m
9.
;I:
9 .
,
8-3,
SU·3~0).:7t-t
-t
'/
• •
1/40):7t
-=
t~l~@'=UVt~~~@z-t
1::&I)O)llfll*Hj'Ch~l)
C-3,
S
U-3
-t'/~1..,;l:9
• •
.
1
~0):7t.T.ti9~~l::tOJftT9~
~
t~l~@'= I Rt~l
&1)
~7t-t!v7$'-©~-t!';;~L19
1..--7:$'-
zFULU~~~'=
~
I..,
;I:
9 •
:7t
-t
1..--
77
- z
1/4
t~~l
\'H=
-t
'/
<:·tU39~~
0).~'=Ij:~tl:J~t.7
I::
t OJIiET9;/)(,
·
11"lvo)M
'/ ~
I..,
<:,
~eliHl
;1:9.
~7t-t!v77-©~-t!
@0).:7t-t1..--7 7 -
';;
~L19
zFULU~l~'=
•
:7t
-t
1..--
7 7 - z
O)j~~'=
O)llfll*Hj'Ch~
1/4
t~ l~'=
-t
'/
,j:~tl:J~t~71
~®
1"
Ivo)M
z
-t
'/
~
I..,
<:
,
~eliHll::
I)
;I:
9 .
~
~
1/4
1.."
1/4
0
1.."
0
7
Page 8
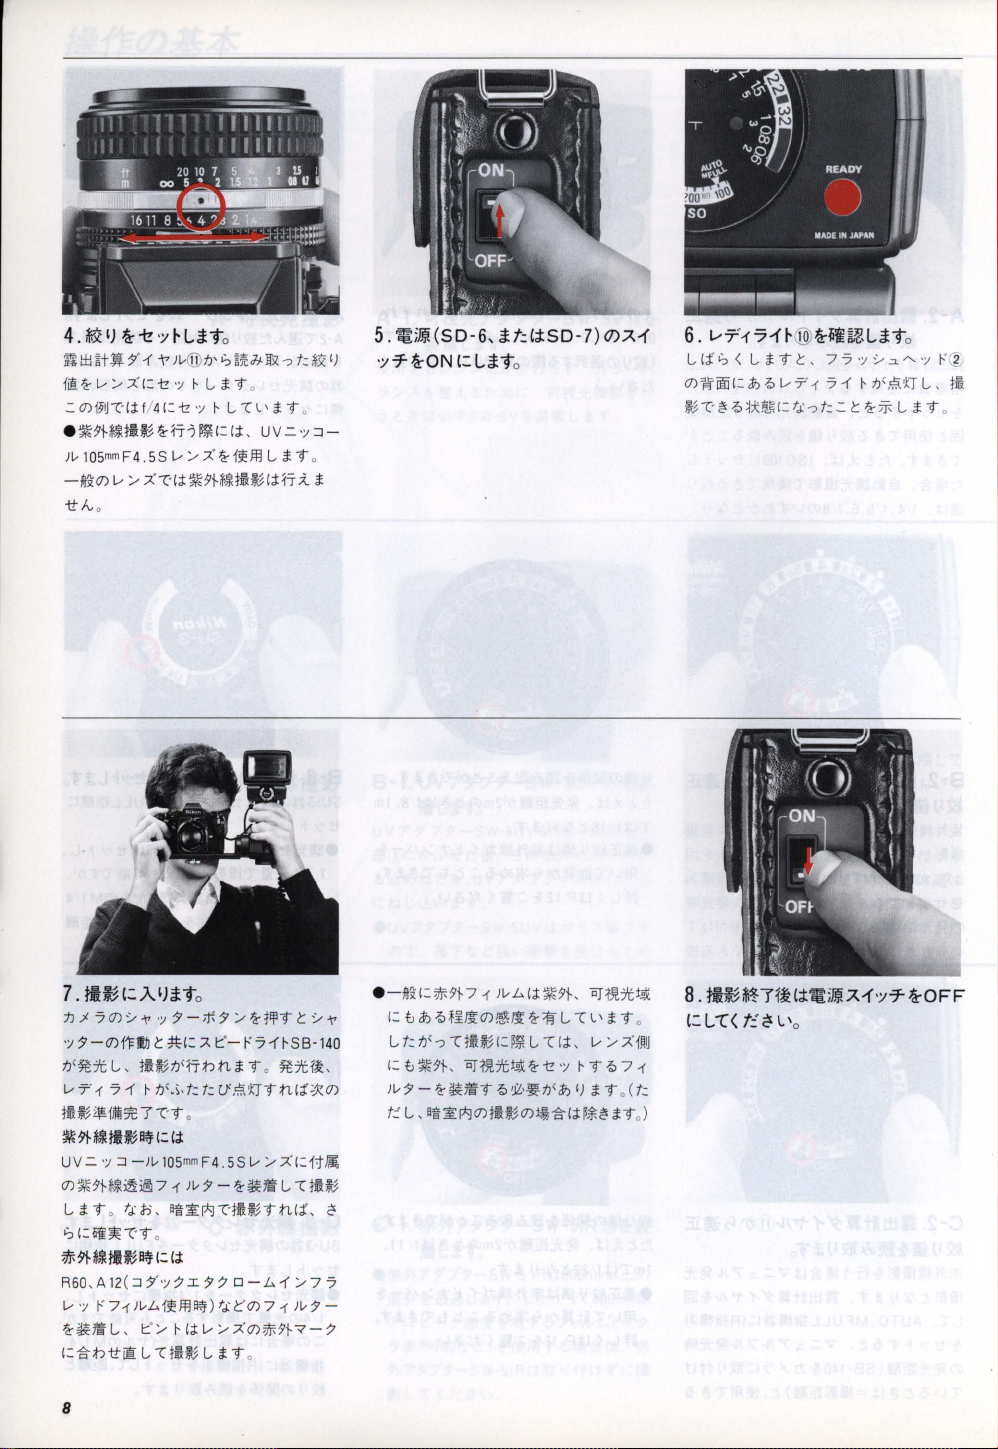
4.~IJ
~-t!
·;t
~L19
0
~t±J~t~
f~
'::O)fWC'(;l:f/4(
.
)v
-.O)I...-/A~~~~
it
$"1'"
)v@
tJ'
<?
~)'Ccf:l.lIX
~
1..-;/ A
(:
-tz
"J
~
l * 9
:-tz';I ~ lTL'*9
~$'H'*fU~~fiJ
mm
1
05
F 4,5 S
~(:';I:,
I...-
/ A
~
fie
••
Iv
o
0
Ifll
~~fi~*
UV
-:>
t:ft:.
0
=
';1
* 9 0
5.
~;~(50-6,
'J
·
;tT~ON
::]-
t:
L19
1t:(150-7)
0
O)A1'
6.
1''''T
'
171'H
j])
~~t~L19
lIi
<?
< l * 9
O)'/;\'rm(:a.;~I...-T1'
~T' ~ ~ tJ.:t~(:
t,
77
71
t.:
-:>
t:.::
0
';I
:/ ~ '"
~tJ
(};'Hll,
t
~jji:
l * 9 0
';I
t-'
(l,
f~
7.
tlJ3t:AIJ19
~~70):/~~$'-*$'/~~9t:/~
';I
$'-O)f'FlIJ
tJ
(3t7t
l,
I...-T1'
71
f~~~filli5'CJT'9
~9HM:Uja~(:(;I:
UV
=
';I
::]
-)v105
0)~$'H,*~i&J7
l * 9 0
<?
$9H~tI~a~
R60
1...-
~~ilil,
(:
t.:
(:~~-r
, A 12(
::]
';1
t-'71')v.L..f
i>:hitii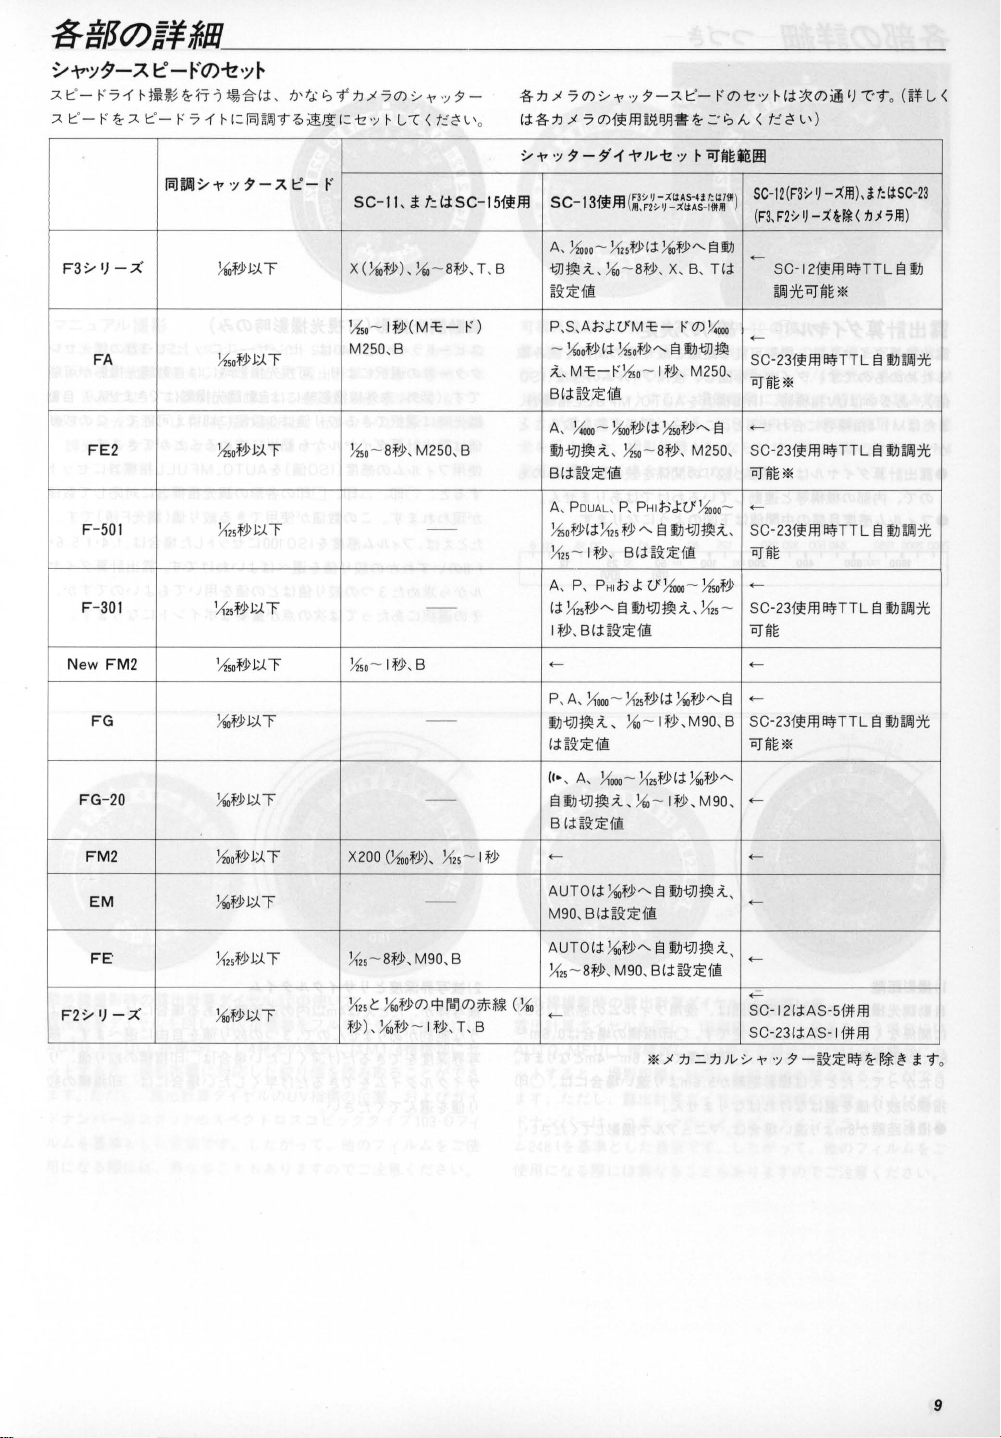
~96GVp¥mm
.y
-v'/~-
.7.1::
.7.
1::
F3~
New FM2
'- 1-'71
' - r
z.7.
1)_;;(
FA
FE2
F-
501
F-
301
FG
FG-
20
FM2
EM
A
t::
HIU6z1f-J
1::
' - r 7 1 H=
______________________________
- "'(7)
-I!
'/
~
±;lj;.g.(;!:
,
~
~J:]9 ~
IliJMl~'t',y'7-;;U::-1'
){,
f;" J.;.
r'f
),{,
of1>J.:J.T
),{,of1>J.:J.
T
YJ2sf.P
1:),
T
'A1,f.P
1:),
T
1,1sof1>1:)'
T
~
f1>J.:J.T
~f.PJ.:J.
T
!1oof1>J.:J.
T
~f.PJ.:J.T
t)'t,f.
'-:>
~ffl"
9'
tJ;j
7(J)
~
...,
';;
5 -
,=
12
';; ~ L
-"(
< t
:!.
'i:
L '0
SC-II,.i
X
O(o
1,1so
t:(;j:SC-15~ffl
f1», ){,-8f
- l
f.P(M'E-
1>,
T, B i;JHfluL
n
M250, B -
)'{so-8f
1>,
M250
, B
-
-
)'{,o-lf
1>,B
-
-
X2
00
(!1oof1-'),
),{,
,- I
fj>
-
~tJ;j
7
(J) ~ -\'
';;
(;!:~tJ;j
~
7(J){~ffl~~aJl
't' ';;
'7
- 5'
-{
i'
SC-13~m (~~~i
A,
~
oo
- ),{z,f»(;!: ){,f»A.
~-
~~:JE{@,
P
,S,
AhJ:U'M'E-
X,of1>
(;!:
),{,
of1>A.
;t, M'£:-r),{so- I
B(;I:~~:JE{@,
A,
YIOOO
-
~f1>(
I!J-I;JJt~;t
B(;!:~~:JE{@,
A, P
),{,of1>
),{,,-lf
A,
(;!:
<-
P, A,
tiJ-I;JH~;t,
(;I:~~:JE{@'
(1-
§tiJi;JH~;t,
B
<-
A
M90
,
OUAL,
p, PHlhJ:U'
(;1:),{"
1>,
p, PHlh
YJ2,f.PA.
§
I f
1>,
B(H
~:JE{~
YJooo-YJ2,f1>
, A,
YJooo
(
H~:JE{@,
UTO(;!:
~
,
B(;!:
~~:JE{~
)'{so-8f.P,
f1>
B(H~:JE{~
J:
I!J-I;JH~;t,
~-lf1>,M90,B
-
f1>
5 -.7.1::'-
)v
~~{~;('\i
8f.P
;!:
A.
U'!1'ooo
),{"f»(
~-lf1>,
A. § tiJi;JH~;t,
I-'
(J)-\z
';;
H;!:*(J)ij
.z='
o::,lv
< t:!.'i:
-\z
';;
~
iiJlIEiBlHI
~'ti:~
,
X,
B,
r(J)y'ooo
§
I!Ji;JH~
f.P,
M250
),{sof1-'A.
M250
§
1!J-I:]]:1~;t,
-
(;!:
~f;""§
;!:
~f.PA.
SC-12(F3it
1J!
)
(F3,
F2it
~I!J
~
T(;j:
§
!1ooo
),{sof1>
),{,,
M90,
SC'12{~fflIlifTTLlHh
~7f;;TilE*
~
SC'23{~fflIlifTTL
,
iiJliE
*
<-
,
SC-23{~ffl
OJ
liE
*
+--
-
SC-23{~fflIlif
OJ
iiI':
+--
-
SC
-23{~fflIlifTTL
OJ
liE
<-
<-
SC-23{~fflIlifTTL
OJ
iiI':
*
+--
<-
<-
__
')
-"(
'90 OJ
L')
)
-;(!Il) , ;
'
l
)-;(i-,*(
t:tiSC-23
t.J;l5!!l
~
1!J~7t
IlifTTL § 1!J~7t
TTL § 1!J~7t
§
1!J~7t
§
tiJ~7t
__
L <
)
F2~
FE
1)_;;(
),{"f;"J.:J.
li;,
f1>J.:J.T
AUTO(;!:
T
)'{'s-8f1>,
),{"
t
~
f1»,
~
f1>-l
M90, B
f1>(J)
'*'
rB'(J)~
f1>,
T, B
*,*
(li;,
~f1-'A. § tiJ-I;JH~;t
YJ2,-8f.P, M90
<-
,
B(;!:~~:JE
,
+--
{@,
+--
SC- 1
SC-23(;!:AS- 1
2(;!:AS-5{;lf
{;lfffl
ffl
9
Page 10
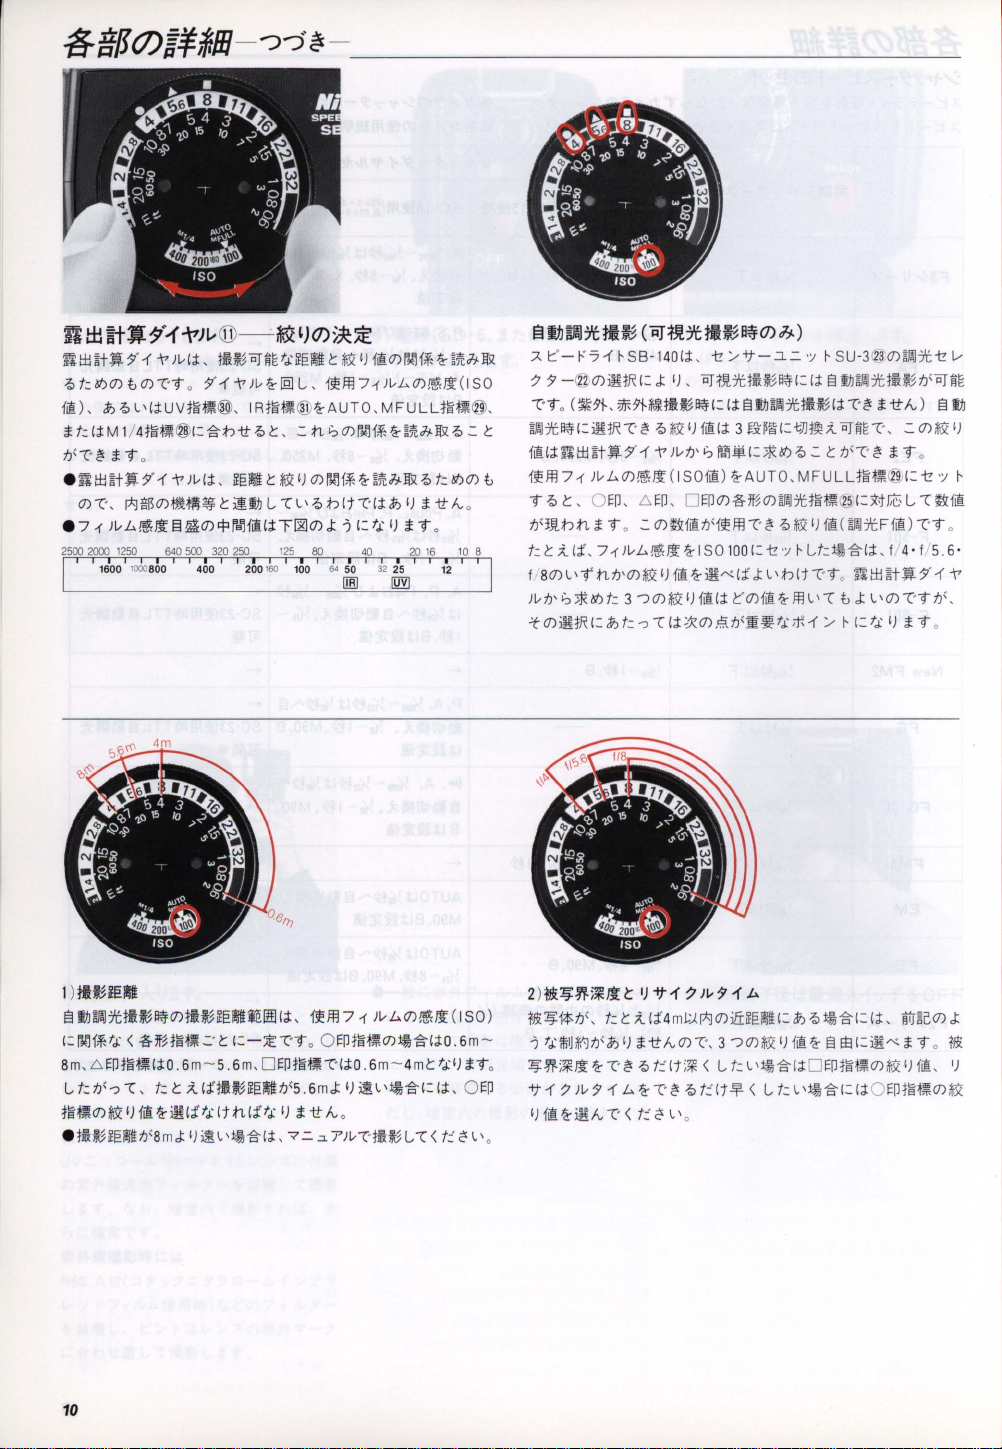
~gp~G¥j.m-~~~
ntfj~t.9·1-\7)L-
~t±J~t.$"
7,;,t:/if)O)
1@),
H:
tl-C'E't9
.
~t±JH.$"
O)-C',
.
71'
2500
-{
t'
to)-C'9
J?
7,;,
l'(;j:UVfl'it~®
(;j:
M
1/4
fl'it~@I:
0
-{
pgllBO)#l~~l::iU!J
)~L.,.ffi!\JJ
2000
1250
1600 1
000
800
@
-
~')O)~;iE
)~(;L
UUfoHlEti~§:lillt
0 $"-{
t'
)~~[8]
L"
l-1 Rfl'it~®~AUTO,
-&l-tlit
7,;,
1::,
.:::/1..:,
t'
)~(;j:,
~§:lillt
I::
*X~)
l-Cl'7,;,tl(t-C
!H
10)q,fe'1@
640500
400 200
320
250
(;j:
TI:i1l0)J: -j
125
160
100
-
__________________________
13
tIJ
w.J:7t
11
w3
I::
~&:~)
l@O)ll!ll,r;HftJ;.~
1~FIl7'O~L.,.0)@\JJ(ISO
MFULUl'it~@
0)1l!l1,r;
HftJ;.~
O)ll!ll,r;HftJ;.~M:
'
(;j:J?~)
I:
ti
I)
80
40
SA
50
32
[ffi
liN!
t
itlv
t 9 0
20
16
25 12
7,;,
/if)
.::
0)
o
10
AI::°-r7-{~SB-140(;j:
-7
$'
-@O)~fR
~~(.~,~~.m~Il\'f~~Elt1J~7tmB~~E'titlv)
,
~J;lJ7tll\'fl:~fR-C
I::
1@(;j:~t±J
1~FIl71'
t
97,;,1::
~t.
)~L.,.O)@\JJ
,
O~D,
tl:ljttln
8
t:1::
~(;L
I
8(7)
l'
9' ntJ'(7)*)i
)~tJ,.:,
>J(/if)t: 3
'to)~fRl:J?t:
(RJ~.ll:7t
I:
'
E'
$"
-{
L'>~D, D~DO)1§-JlM~7tfl'it~
t 9 0
.::
71')~L.,.@\JJ~
""")(7)
-:>
1Il3
aif
(7)
t1}.
)
,
-t:"--+j--.l'=
J:
~), OJ1J1.7tHH~
7,;,~&:~J1@(;j:
t'
)~tJ'':'
(I
(7)~H@til~FIl-C
IJ1@
*X
-CI;j:*O)!!:\tJ(~~ti;f,-{
H~J~(:1;JH~~OJIiE~,
FJi.li!-I:>J(/if)
SOl@
)
~AUTO, MFULUl'it~®I:
I
S01001:-t
~~«
Ii
I)
1@(;j:
1::'(7)l@ ~ FIll'
';1
~SU-3@0)~J;lJ7t-tV
~
Il\'fI:
(;j:
El
7,;,
.::
/::tl-C'
'
E'
7,;,
*X
I) 1@(
',
~ It:t~-&l-(;j:
J:
l'
tl
It
-C
'9 0
-C t J:
:..-
__
t1J~7ttU~tlOJjj
E'
t 9 0
@, I:x1r,tl-C;J(1@
~J;lJ7tFl@
,
I 4, 1/ 5.6'
~
t±J
~t.
l '(7)
~
I:ti
I)
EltiJ
'::(7)
*)i
~)
-t
'
;I
)
-C
-9 0
$"
-{
t'
~9
tJ
(,
t 9
0
E
~
lHI~~§:M
ElI!J~7ttil:ljIl\'fO)fUj~§:lillti~
1: ll!ll,r;ti < 1§-JlHl'it:li'::'
8
m,
L'>~Dfl'it:lil;j:
I t
:tJ(-:>
fl'i~~O)~&:
.
Hllj~§:IIl~tJ(8m
O
-C,
t:
1J1~
t~(iti
.
6m- S. 6
I::
~'itIB~§:lillttJ(
J:
I)
~l
~
(;j:,
1~FIl7
1::
1:-~-C'90 O
m,
D
(1"
nliti
,t~-&l-(;j:,
~Dfl'it~0)ilJ;-&l-I;j:
~Dfl'it~-C
"
;j:O.
S.6
mJ:
I)
I)
tit
Iv
o
"'=.::l
?)~~HU
l'
)~L.,.O)ffi!\JJ
6m- 4
~l'ilJ;-g.I:';j:,
;
l-C
ml::
<
(I SO)
O,6m-
til) t90
O
~D
t:.
~
L ' 0
10
2H
!~~;~JlI::
f!~i-ttJ(
-j tilfiIJf.JtJ(J?
~~;~JJ
-+j-
1J1~~~1v
,
t:
I::
I)
~
-Co E'
-{
-7
)~
$'
-{
L.,. ~ -Co E'
~
<
I)
-lt17
;Z
(i4
t
it
Iv
7,;,
t:'I·t;j/i <
t:.
~
ml:)'pg
(7) -C\ 3
7,;,
l'
o
)~71
L.,.
O)iQJ§:lillt
t:'lt
I:
""")
O)*
)i
1J1@ ~ El
It:
l
'ilJ;-&l-(;j:
~
<
It:
J?
7,;,
t,\J;-&l-I:
I;j:
EE
I:~«
D
~Dfl'it~O)
l 'ilJ;-&l-I:
(;j:
O
,
Jllj~c(7)
J:
t 9 0
flY.
*)i
1J1@
, I)
~Dfl'it~O)
*X
Page 11
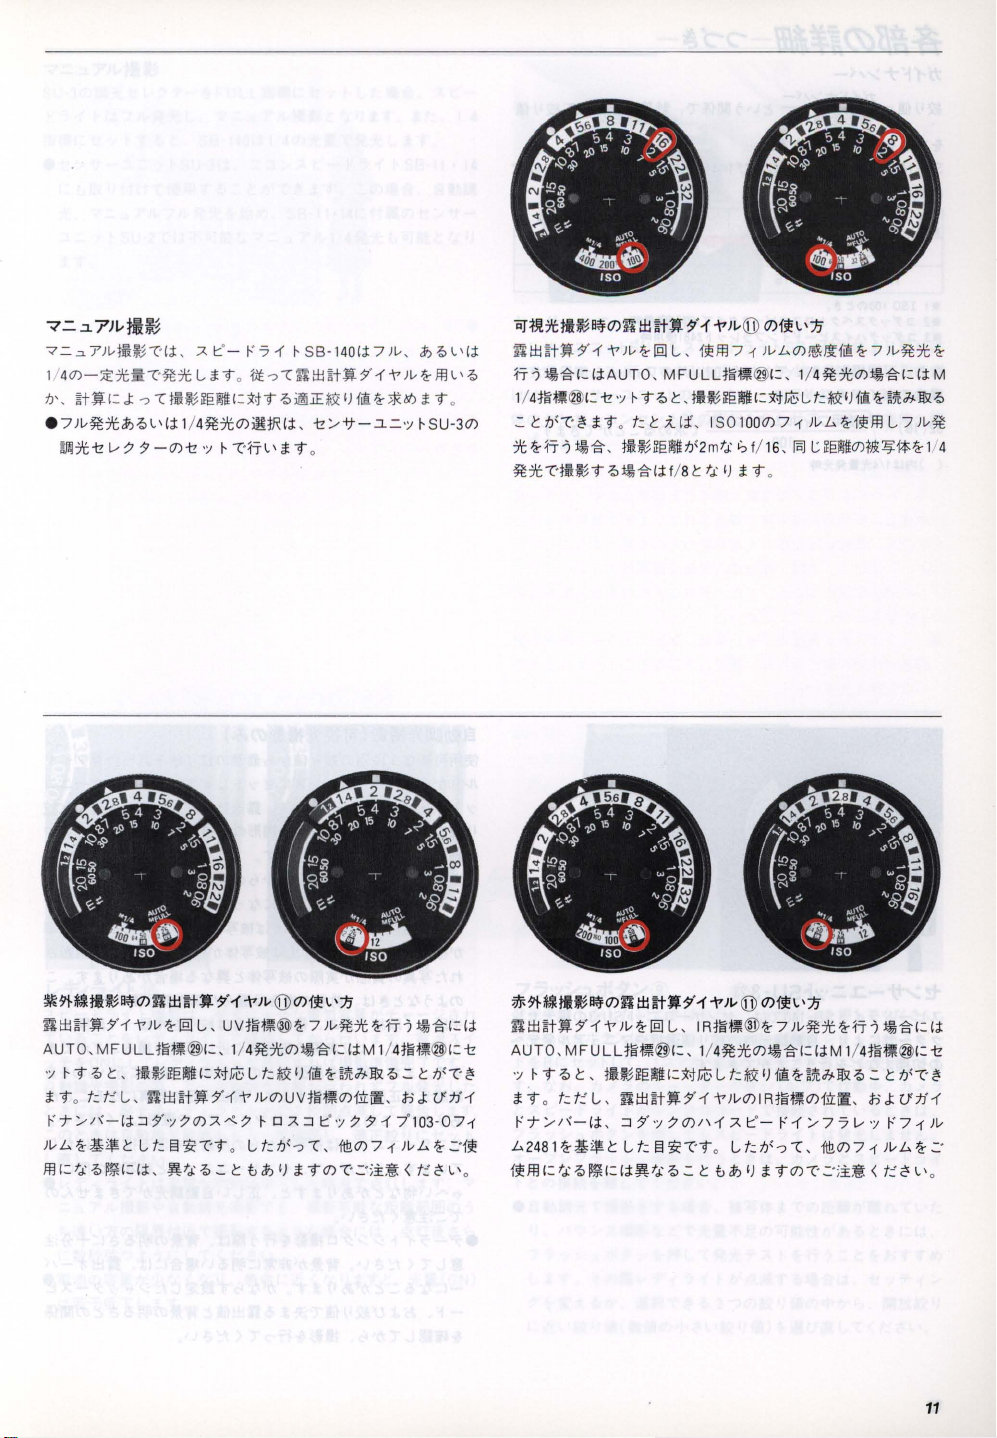
?
=.:1.
7)1;
au
-;
"'::'~?)vjll:~T(
1/4
0)-:lE7't.""(-~7't
fJ',
~t.,:
)v~7't&?.Q
• 7
~7't-t!v77-0)-t!,/
;
L
.::<.1::
'- 1--'71
L
J.
9
J:
-:>
""(UW~eliJil
L
\(;1:
1/4
~7'tO)iKtIW:,
~""('1'T
0
'
::M9
~SB-
fJE
-:>
""(
rt
.Q~jE*X
L'J.9
140
(;l:7)v,
i±l~t.
7-
1"'
)v
1J1~~*.\t)
-t! : ..
,-It-.:1.'::"
0
&?.QL\(;I:
~
ffl
J.
9
/
~
SU-30)
L'.Q
0
RJ1.!!.7't1l~~O)n
ni±l~t.7-1'" )v~
D-JtlJ;.g.,:(;l:AUTO,
1/41:H~@':
~ t fJ(-C-~
7'tHT
-J
i~.g.,
~7't""(-Hi~9.Qi~.g.(;l:
:±l~HH-11')v(j])
@ L ,
fj!ffl7
MFULUtH~®>':, 1/
-t!
'/ ~ 9.Q
t,
Ul~~eJlilt'::MJitLt:*XIJ1~Hi'CJ;.l&.Q
J.90 t:
t
;u;t,
jUHeJliltfJ(
t/
8t
IS01000)71
t
2m
t i?f/
tt
I)
O)fj!L
'15
1
)vL...O)~Jtf~~
)vL...
16
,
IiiJ
J.
9 0
7
4~7't0)tlJ;.g.':(;l:M
~fj!ffl
L.;~eJllliO)f~~j;H
)v~7't~
L 7
)v~
1!4
~*~lI~~O)n
ni±l~HH-
AUTO
,
MFULUi'H~®>':,
~
~9.Qt
J.
90 t:
f:' L ,
1--'1-
//(-(;1::::]
)vL...~£$tLt:E!3?""(-9
ffll:tt
.Q~':
i±l~.
711')v
1'''')v~@
,.B~
(;I:
L,
uV1tH~®~7
1/4~7't
JIiltC:MJitLk*Xijg~.J;.l&.Q~t~T~
ni±l~t.7-1'"
7-'/
70)'::<'
~7
0
,
~Vt.Q
~
t t
(j])
O)fj!L
O)i~.g.,:
)vO)UV1~~~O)fJi:li'
~
D
'::<':::]
Lt:fJ(-:>""(,
&?
I)
J.
'15
)v~7't~D-J
(;l:M
1::"/771'
1m0)71)VL...~:
90)""(
-
~
tlJ;.g.':(;I:
1/41i'H~@':-t!
,
;H
J:
7' 103-071
-;
~~ < t
:.
U':tH
:f
~
L'o
;ff-*~tI~~O)n
ni±l~t.7-1''''
AUTO,
~
~9.Qt,.~~JIiltC:MJitLk*Xijg~.J;.l&.Q~t~T~
J.90 t:t:'L
1--'1-//(-(;1:,
j!
L...2481~£$I::Lt:
{~ffl
,:
tt.Q
)v~@
MFU
LU~~~
,
~i±l~t.7-1'''')vo)IR1~~~0)1Ji:li:
:::] 7',/
~,:
(HVt.Q
i±l~.7-11')I.-
L ,
®>':, 1/
70)/\1.::<.
E!
3?T9
(j])
O)fj!\.'n
I
R1~~®~7
4~7tO)i~.g.,:
1::'-1--'1
0
Lt:fJ(-:>""(,
~
t t
&?
I)
J.
)v~7't
HT-J
i~.g.':(;I:
(;l:M
1/4
m~~@':-t!
,
;HJ:U'lH
/77
V
'/1--'
1m0)71)VL...~~
90)""(-
~-;~~
< f:'
71)v
~
L ' 0
11
Page 12
~98~t¥1.m-~~~
1i1'Fj-;,n
*X
'ifi!
~
-:*/Jt).;,::.
58-1400)7
0)~0)i.m
s~~
U>",,-<>ttl
* I I
*2
* 3 ::J7""/
ti;f),
~-g-O)jj1
32(16)X)
,-
jj1
=
Ul:~~g",~
UJ'T~
)v~:7ta;J
'J
""(
'T 0
FULL
1/ 4
SO
I
DO(/)
::J
t
7',"/ 7
;"':'7
7J\1'At'-f'1',/77v
RJtltliU3 (
~T/I~
ifffl71'
~T/I~
-
""'
( ) c:v-)mlH'
m
i T o
,
;f)
J:
V'114~
~
RJ:m:7t
>"
32
16
~
0
~
0
A::J
t '
,"/ 7 71' 7103
:;f) L'""(
, 1
50
-(;j:
)vb.0)150ii! T;;j(/Jt).;,::,
1
00
i""(
:7ta;JO)ji1
#;>H*~2
'"/
f'248Ifflllllil'
100
I-:J.
-
__________
'
_,
',
liUJ(:J:
'JiI.iE*X'ifi!
~T
/I~
-(;j:
;jMHt,"3
16
8
-0fflllllil'
j}O)
.
71'
22
II
.
)vb.~ifffl
tt:J'""(
'
~
iT
Lt:
o
*
__________________
_
-t!
;...--it-.3.=·.i'~SU
;l.I:::
' -
~71
~5B-140""('(;j:, t!/
'77
- @
(:
J:
'J,
O)~.~~~~fi-)::'C:~T~iT
-3@
-ij'-.l'::"
El
tIJ~:7ta;JO)t&:
'J
fUH
o
;t
R'<"
~5U-30)~
"1'::'.:L
J!]:7t
r
)v~:7t
t!l.-
r...
I1il
til ~
7t
lIJj
CRHJ!.
7t
1I~
(7) ~ )
~fflRJO~3&rnO)*X~g~~~~0)*X~g~n~~.~1~
)v@;I)'~
e
et!/
e
a7'C#I1x'J,
';t
~5U-30)
'J
fi!(:MM5T';'
El
t!J~:7tjfUM*ii1lH;j:7t
Eltll~:7tO)
""(';~IJ';'::'
$f.l(~tffij(:{!h'i~-g-(t:
f.l
h~~
O)J:-)~c:~~, n.O)~-g-https://manualmachine.com/v~~:7t*X~gJ:~t*X~~
*&-1
-)
iT
c:
(titffij(: iii L
.O)W.~
&*X~~#,
(:T.;, C:,
o i
f:,
tIlID!l:7t""('.iEimf.l' ~ tll:fJT.;, c:,
~
'J iTo
-ij'-.l.::.
""(L'iT
'(>r...L'~
""(' ::";i:Y.
o
tiC:'f.l(~IJ
< f: '"
7'-71 ~ :..-/ '7
;@';
L""( < f:
-I
:ti
~::.
-
~,
;f)J:V'*X~.T*i';'~~.C:'lfJ:O)~';''''C:O)ml~
Hi~'!.'.
L""(
l.--
/;Z
(:t!
,;t
~
LiT
o * (
:t!/
~J!]:7t
t!l.--'77-~, ~~~UJ7'1~)vJ:.""(
~:7t fiHJ@c:
@~~
,.~~~~O)&M:7t~t!/-ij'
""(
'{'FtIlT';'
,~-g-(t:
••
J:
IJ
.'~O)t~~~I:ifrL,~.~jJH::.
~'<"~mt
::.
0)
J:
-)
~
~~.~~~~O)&M:7t~ • .;,m§~~~L
C
Lt:f.l
L'
0
D
'" L'o
'If:l!!;f.l
c:
f.l(~
I) iTo
f.l'
~, tft~
~jf
~O)
f~~~(:
t! ';t ~ L i 9 0
J
""(
'T 0
J:
-)
(:ti
?
""(L'
i T o ::.O)t:/Jt),
c:
~
(if~~~f.l(,lI!.L,~-g-),<",
c:
~
(if~~~f.l(a L 'i~-g-)
O).~~t.~.;,~-g-~~~iT
••
00~-g-~*X~t*&-1
imti C:'
O)&M$f.l(100%(:ifrL'tO)~El
n~1')to)~.I:
ti
c: ~ (;j:
7 '::'.:L
r)v
?
""(
,
t!
/-ij'-.l'::";t
iTC:
,
.iELL'Eltll~J!]:7t;/](""(
tB:~
~1i
-)
,jf-(
;j:
, 'lfJ:O)aA';'
(
~F*,(:aA';'
f.l'ti
~1i?""(
L,~-g-I:I;j:
~9'alt;iE
< f: '" V o
I:
""('tlfJ
L""(
~C:t&:~~O)r.
, n~;t-
Lt::/-\'
-ij'-.l'::'
'
~/vt:*,x
::.
h""(
-.l'::'~~
&M
&M$
(;j:,
HlJ;
'"
o
::.
&~<J:
c:
f.l(""(
'
~
ti';'
::.
t
f.l
< f: '"
L'
0
'(
:L
·
~
i-tt/vO)
'"
I:
+~;i
I<
';t
7 -
;l.
1:::
'
(
'
12
Page 13

?'.=.
~
7Jv
~
'J
SU-30)~FoJxt
r 7 1 ~ t;l:
1iH~t:
.
t:.---tj--.l=-';!~SU-31;l:,
t: t IfX I Hi
x,
.l=-
;1'9
v;7
:$'-zFULU::H~t:t
7
)L-~X
t
';! ~ 9
~
L, 7 =-
t,
SB-
140
.:J.
l;l:
=-:::J
(t
-C
fil.'
ill
9 ~ .:
t
7
=-.:J.
r)L-7)L-~xz~I5/9'),
';! ~ SU-2 TI;l:
0
1"'CJ1iE
tt
7 =-.:J. r )[,1
r
)L-Hi.~
1/4
0)x:i!-C'~x
:'--AI:::"-r71
tJ<
T
f<
;I'
SB-
11'14t:1i
';!
t
9 0
~
U:i~.g.
ttl)
;I'
90 ;I'
L
;I'
~SB-II'14
.:
0)
i~.g. , ~!iJ
~O)t:.---tj-
/ 4
~x
t
CJ1iE
,
9
A
t:
0
t
1:::
"_
, 1 4
~FoJ
tt
I)
-t! : ..
rft -.:z.
.=. '/'
t :'---tj--
~9 • .g.~,
(tl;l:,
1*O)t
Li6h;l'
.l=-
';! ~ SU-3 z A
2~MO)?;I'hz~L~~~Wf<IfX~;I'9
t:.---tj--.l=-';!~O)
:.--
-tj--:::J :.--t:.-9
0
H7)
Tti
mt
1:::
"_ r
71 ~ SB-
:::J-1'
,;7:$'
~O)1:;
~
(3O)~Jtfz.g.hi:t
140
*1*,j:
0
JJI)Xf<t,
-C
SB-
SB-140*
140*
I)
IfX
I)
I;l:
1fX~rt
i.:f"'tlJl
VT171
A
1:::
-Cl'
';!
TzONt:
~
!iJ~FoJxt~~O)'~
t f<t:I;l:,
.:O)tf<~~!iJ~7t.~zt1-gN.L,~~.
L @ L
.
VT1'
=-.:J.
1?~l'1J0)~'&w.1ii5:-c
t:
.
~;1:!!O):g!itJ
I;l::Ei"fi§;T L
H@
" - r 7 1
~.:
;'ll:f1>~?
~
t~~I;l:, ~xl:
t z v T
-C
<
l'
7 1 ~ -C
L
-Cv
T1'
,
:n
~Xf~VT1'
t::'
C<
l'
0
71 ~ (;l:3'E'!l!:tJ<f-]8
r
)[,t~~-t->
~
!iJ~FoJ7ttUH
J:
1 t: L
<
j..,tt
<
;I'
9 0
+~tt~3fi.:glttJ(T
'oft'2, L
-C
tJ'
~
11'l';I' 9 0
71 ~ tJ<,':\aJ9nlitUjiJii'JB1'-C
-
~
!iJ~FoJx1'F!iJ
71
0% 'JB1'
'tUj
9~J:
-C
<
t::'
C<
ttl)
,
~~t:i5:
tJ<11'h
n ~ 7
~tJ<
f-]HJ>rB'.o!!:
'
t,
1
l'
0
;
~L-CW*L;I'9
U:a;f.o!!:-C
-.o!!:nL;I' 90 7
tUjCJ1iEtt~eiirnM!lO)
tt
• .g.t:
t;l:
<
ttl)
;l'9t,
-\'
- ::;
C<
n
~;mi
A 1
'9
0
)[,~X
L
t:
~t:t~~
1
,
.
o!!:m~c<
~
7t" (GN)
77
';;Y.:z.;f-9/'®
~
7t
T A
~
z L
t:
l' t f<
Ij
7 7
';!
:/
.:J.
of-
:$'
:.--z tlJl L -C
77~:/.:J.of-:$':'--
r zBI:t';! ~ L
9 0
ttl)
tAl:::
0
" -
77~:/.:J.of-:$':,--z~L-CtA~
~
_7":""
~
t O)tilmHl1! L
~
!iJ~FoJ7t-C
•
I)
, / <')
77~:/.:J.;f-:$':,--z~L-C~XTA
L;I'90~0)~VT1'71
~z~~~~,~fflTf<~3?0).~OO)CP~~, ~~.~
I:
i5:
l
,*
~~-
-C,
1
:::J7CP1@):
,
7J~70):/-\,
~
'
7 1
~
tJ<:/
:'--;7 0 :::J
77
';!:/.:J.
tjl:~
-C
<
t::'
'
tjl:~
Z9
~i~.g., f~~1*;I'
:.--
A
ijl:Jjtt
t'-C'x
~
lJ1iH(
;'~liHO)
'J'
~:'--77~:/.:J.m~(:/-\,~:$'
"(
J:.
~xC<
i:t~
';!
:$'-tJ<B(/<)[,~)-C'i'F!iJcp,
ZIT
- r -c'tfilm
-
1 t
f<
C< n -Cl'
r71~~~XL;I'
(;l:,
7J ~ 7 t A
C< l'o
-C-O)~ei!flWJlljln
1"'~O)CJ1iE'i'1tJ
~
ZIT1.:tZl)99/9')
~~~
.9~ • .g.~, t~T
C<
\"
*~
lJ1iH)
z~
U'@ L
)
t:tiil.'
<
J?
-C
<
t::'
-A~
ill-C'f<;I'
~
t
1:::
"_ r
~ t ~
<
t::'
C<
l'
7J~7
f<
I;l:,
i:t~
0
71
-C
\"t:
I:
Ij,
1':'-
C<
l'
0
13
0
Page 14

77':;
:/.:t."
'
:;~
··
@
7,
I::
-
~'71
~
SB-1400)
1oJ"-
't
n'fn
120';1'
90
'O)fftli!l':T':7')
(:/lllf*t,(
I~,/
/7,U1J.j(;j:.
h'7<:~
t:f.iUt
o)T'
,
t:
J.j0)~15-
1
90)T
t:.
C< L'o
~0),*,re',<2:t:loJh'7
J:..J.J:.
t
t,(
.
/~,/
/7,
':;:7l
<
I~'/
/7,mJ.j
C<
it
L"'
....
1v
')
• .&MtM($<.>(:>wTm-ec< n T L';I' 9 t -e.&M
.
.&M4iiJ(;j:t,(~""
it:
. .:0)'11l.
~
J:
7
t:
C<
it
~
iifili:EJ:f.tO)-gjll:
T
':';i~
<
t:.
C<
77
.:;
:/.:J. ....... :;
T'@],ii
C<
it ~ .:
t
;l'
9
.:O)t:/'I)7;.;I
0
ti1-T~;I'
mHifili:EJ:f.tt:
T ,
't
O).&M:7CT·re,tiil<.J
7
~
t,(:EJ:~~til:~.:
~:7CgjlO):7C'~(Hili:EJ:f.tt
J:
7.
IT
<
t:.
ftlffh('
~
t:
L'
0
9
0
77
':;:/.:J.
<
~oj:;-eO)
1
t:
.
7<:~t,(t't:xt9~A~tftlt;j:60
C<
L '0
J'c<
L\j~15-
.
I) .
flllaA.L..-7
I'
(;L
J:.7JIoJ
tiT
'
~.
~
7J1oJ
70)~fftli!l':
~
c10T
t,(
L 'T'. ~ t
t:fili:EJ:f.t
t
h
(T'~
19
to)~~
.\~
J:
7,
7,
1::
'-
I'
71 ~ O):7Ch(i![
(:
t,(
~.:
t h(
c10
·
~;t;7J
t t 30: 60:
,
tllifftli!l':
HllEJl9
7; 7
-til:
HfL'
71:
IT
1::
' -
I'
71
I)
190)
~
<
'
• SB-1400)
(;L
I'
1::ETO)ltIJ~lH~(t
.
~7'H,*
9/'1)T'~
77
,:;:/.:J.
......
':;
~'~
~;t;7JIoJ"-O)@]'iit;j:
~
~;t;7J1oJ
......
@]'
T' ~ 1
ii
C<
it
T
L'
1 9
;f;
J:
{f$<
7'H'*ti!:lja;fl:;f;
1
it
Iv
J:.7J1oJ
...... 120·@]'
it
Iv
1 t: .
o
~
~15-(;j:.
L' T (;j:
. I
J:.
7JIoJ
~
'/
iiC<
it
77
':;
......
O)@]'iiftlJi
/
7,
tii
t:
~*!i~T
:/.:J.
......
. :;
lj
(;j:
;f;
9
7'::'
.:I.7Jv:iM!tT
SB-140t:t;j::/
-7J
~
7
-=-.:J.
7,
1::
'-
I'
71
I;j:. ://:7D::J-I'SC-11
SC-15 (
JJJj?'C
imi:Th(OTIi
.
E
±j(ji:Tti!:ljo)~I;j:
it:I;j:1
/
t
7'::'
.:J.
m
1-~
/:7
D
~-
~ T )vh(2?ffl
7
)vil!li:T
ffl
t:
ffl
~
I:
SB-140 · 11·12 · 14' 15' 16'
@j,
I)
7:712
-!j-
I) - )
T'ti
ttl.
I)
19
0
.
12
/-!j--.::J..-=-
4ii'H~t:12
7
)v
if, ::;
':;~l.
:/
3
:.--
I:
-r
L'
1t:
12
14
Jv
@
~
C<
n T
L'
1
90)T
'.
~.:
t h(T' ~ ;I'
c10~L'(;j:::J1)v://:7D::J-~
*"iE9~
':;
~
SU-3@~h'tl.
,
fili±j(jm~IJo)7,I::
':; ~ IT
':
t
tUJ
9 0
filii!HTf~1jO)
17
~
ffl
L'
~~15-I:
I:
J: ,), 7
IT
-=-.:J.
i?9'FULL
'
-1'71
< t:
C<
L'
7)v
0
'
~
Page 15

7"77
':;
~llx')1ttt~
7'
'77
"J
~
IIX
'Htlti;'tJ'G
7'77';1
~ ~ &~~t}JIaJ"l.i:.t
e 7'
A
ffl L l ,
?.t~~m~.C'it-Q=tij~~.t9
~.(j:
l '
-tt-.l=
~.tUJCJIi~tt~§:JI!UU!](j:~O)J:
~ilnll./7
'77
';1
jj*'IHHIJ
fiJC'itt:'J,
7';1
~
Nil.
t::
'-
t-'
'7
-( ~ SB-140(j:,
~
~
,
SB-1
12(
ISO
1000) t
';I
~IIX'Htlti;'0)1lIilrm
C'
it
NiI.'J(H'Lt:'J9-Q~.g.(j:,
IJ
1tlt~mnll.tJ.
&lj)s .
40HlliJ.:7tl
~
SU-3@0).:7tt
®
7''77
';I
~
SK-S([,~
'
if6~7")
-Q
'JZ,~(j:
S::J
';I
7f]!1)" A '7-( t-'C'it,
-Q
.t l'@] L
? 0) A
'n
,
t±liifO)~~r.JJlLliP)IH9
iP)
IJ
.t
it
A,
t.:
Cf,
Hl'dJl1l-l'.t
CJtJl.:7tUi:~a;'f(:~~Iil/
t::
' -
t-'
'1ffflL,
~
)
J;).T
I:
tt
..
:
d:
t
v:7
$'-~o)~#::;:;'"
-j
I:tt
IIX
'Hj:9'-n:: ~ tj:,
I ~ M:
~
.t 9 0
t.J
(, t L
IIX
'Htlti;'
IIX'J1t(t~0)7
9
0
\
';1
:7
SO-6
0)
't -$' -t-'
'7
l'
't-$'-t-''7-(7to)
~:7t.t.J(:t.j-(
~
t:CJIi~t
'J
.t 9 0
t-'T:'--/~
tt
IJ
.t 90 t:.--
3
7'77';1
H~
~1f
7
I: 4 ::J
:.--='to),
'
'7
e
~tJf.I:
J:
IJ
1~
G
nt:
~~r.JCJIi~tttfil:J3~I'!WJl,
~I'!WJlielifllj:,
$1i1
t!t~tfO)&M$t.J
=tt.J'iP)'J.t9
6fIi/~';l7
tt
&M$
~ t "'J~.g.0)
SO-61:~.f"1I;1!J.~1fffl
t
(
1g;l' t ~ (~-:>Lfl
0
O)l
'9 0
;f;
J:
U':;£~cO)~O)
L,
f!t~tft.J(~~
~;1!J.t.J(;j1j*t
't!t~tf)
L
II
(:
Ij:~.
,t:
L
IJ,
tt
l'
.7t
tv:7'7-
O
t:H~
6
m~~
D
t:H~
e
SB-140t:TTL.7t::JSC-23
(FA
' FE2 '
TTL~fJJ.:7t~ft-j
liW(j:CJIi~l
t:
•
IS0100
T
:.--/~-~~t~
L.t9
.-:>k.ij't-$'-t-''7-(7tO)~m~.CJn~~
WJl
t
'
9
.g.t~~~,
J;)'~}0)71
Lt:t.J(-:>l, tJ'-(
o
tt
IJ
.t 9
0
t-'SC-12(F3:;"'1)-;;(tJ.><'71fffl~)
F-SOl
+301'
•
.g.(:t't-~-t-''7-(7tO)~m~.
0 =
O)i~.g.
~:7t.t.J(tJ'-(
)(.,L.
~1f-j t ~
L l < t:
C'
Ili.I
SJlJ
TQ~g
MiU
Ii
0.6m -
3m
0.6m - 2.lm
0.6m - I.S m
FG
tJ.><
'7ffffl~)
t t
:.---tt-.l=';1
t-'T:'--/~-l
(j:p
120)itl:1
l')
J;..J.Tt:tt
t-'T:'--/~-12~ffffl9-Q*$(')fiil
-:>
~ffffl
~
SU-3
'12(IS01
000)t~
thl
t:
t
~
I:~m~.
~1fffl
tJ'-(
•••
.tt:(j:
L l
L
,
t-'
'
~
15
Page 16

f~mRJ~~71
)I;./.>.
~"HlHI'j
A t:'-
I"
71
~SB-140~if.Ell
1;1:300 -400nml'9 0
A::J
t:'
,')
7717
7-~MnJ:
1.I;I:~:$'H~tU~(7)
~7tpt~
=
I:SW-SUV~r.fIl;'fI:
',)
::J
-)vl:1ili.i!,(7)~:$'H~~
.:tl:J:'Ja:9
.
:IJ 7 -7
7 D
1
-1.i!iflt
if.Elll'.!' ~ 71
'103-0 ,
V':IJ
7-71
El
~~T(;l:if.Elll
0
)1,.1.
~1f.Ell
tj.
'J
~MH~tI~
-A~tn!}I:.EIll'
)v1.(7)~7t~Ji~:ffi
71
)1,.1.
t
(7)t±J~Uj.
:$'H*~~I:flj.Elll
::J7"') 7
~
7
l'
~;;j<:$'}t..,x(
~.EIll'~':
iJ
t I
'
-:>
t:
i!ifl
'
.!'
~
1\1At:'-t'1/77I/
L
l~:$H
iE]103-F(7)it
)1,.1.
tif.Elll'.!';j;
t;;j<:$'}pt~~~t.
~7
Lt:~.g., f~ G n~
;j;
9
0
)1,.1.
(;I:
;;j<:$'}i..,xl
ft;Blftf..,x)
:J:
-:>
l ,
('t
U& )
~
~~
71
)v1.I;J:J:).T(7)im
)jH
UJHT-)
)1,.1.
I;I:::J
il.-
-jij~(7)/
9 0 t:.f: L ,
-
.!'
a:
it A,o
1 )1,.7
-(;I:;;j<:$'}i..,xt~~9
-
(;I:~7t
I:
~ilHCJ:f.lt7ttiU
.:
t tiCJlig t tj.
'')
1"71)1,.1.2481
'!f.(7)
;
Blft~
'f
'')
7 A ~ 7 ~ D
~/ 7
D,
1/:.f.:J.
;;j<:$'P
1)1,.
.:
n(;I: , SB-
·
.:
~J{(Hfg.,(7)~
L
a:
a:
l '
1$(i
'J
l '9 0
140
t,
n
J:
V'UV
it
A, iJ'.
71
L
t:
;;j<:$'H~
j)
T(HD~':
'J
a:
90 ;;j<
(7)
~
/
~Ul':IJ'1
~
D A
t:'-
I"
T
.
::J
)7"Y7
tft!j I:,
1.2
t±J~~~~~~~~CJntt~d?~a:90~~.m!},
ti!j(7)~
••
a:
9 0
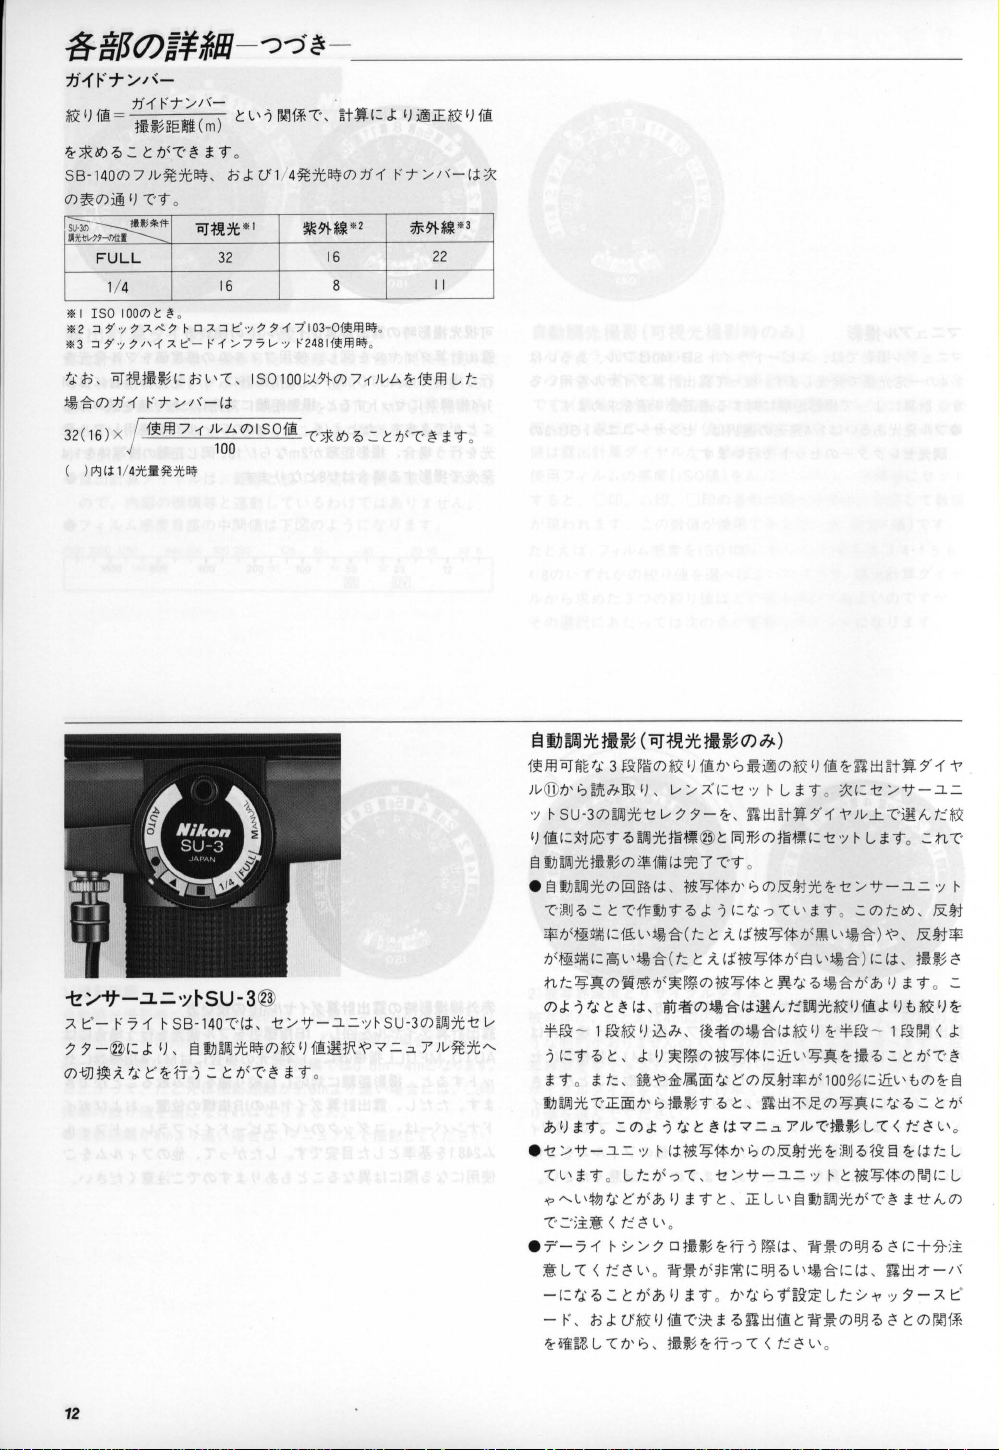
SB-1400HB't.r.
S
B-140(7)~7t.I;j'
5V, UVr7
7t.I;j'.)v:.f-~:ffiI:"')~
t'T/I(-.t±J(7)¥~t L ll'~::J
::J
t:'
':J
7
)717'103-
I"
1
/77
1/
")
/I(
-(;I:~tj. ~ f~.g.tid?
A~7
~
D
A::J
a:
t:
(;I:
::J )7'
481
~;;j<:$'H*tU
I:
cO'it~.~.T.g.Pitl.8Lln<.:t~n99~L
'7'
~ (:if.Ell
(;I:
,
~t~l:
,
)v:.f-~:ffi
7-SW-5UV, ;;j<:$'}
.
cO' < G;;j<:$'}7S0
::J7"') 7
71
)1;.b.(7)
.
~:$'H~tft!}71
l
'(7)l
:IJ;,L
.
at~~l'(7)~l
(;I:
':';i~
:1i·H·
-A~(7)CJ:f.lt7tU!Vj.'J
t
l'
-)
.:
n(;I: ,
.g.t*~ljjl:~tj.~.:t
1
)v1.(7)~Ji(;I:,
1:J:'Ja:9
t'T
/1
~~H#
::J
7'
'')
D-19(::J 7'
:!1ftL
Tl';j;
1
)1,.
1.
;Jf-~U~;fj
::J
7'
'')
tf~.EIl
~~.EIlL-Cm.L~t~(7)iOOiEn7\';.t;;j<~.T(7);lj1t'T/
1\
-
t!lfA,
t~(;I:':
.I777D
1&
~
H&.L'
',
f*1f(;l:if;ii{mH~:l
7
,,(7)~l
< t:
cO'
·
T~"'-(GN)
~;Z
n(;I:~:$'H~tft!}
fBi~f*.l:
-'t':l-~Ul-(;I:,
0
( -
~
;1(~
jf 1 ~'T
/"-
7
A~7
~
';I
7
(7):!.ltfl~IJ(7)-~I
U::
~
(7)iOOiE~7\';:l:t~7H,*-c
9
;j;
t:
,
0
~
¥~
(: Ellil
11'T
;.--"-
7 1 \ 1 A t:' -
L..
,
D-76(::J
Tl'
a:
(7)
71
)1,.1.
-
1.1/77I/
'')
/]
)v1.,?;;j<:$'H
A,
(;I:'JZ'9'at~t*J
A,(H¥Itl
l'
0
J:
-:>
ISO(7)J:
~
El
D
A::J
SB-140(7)~t±J~UP
,;, n ll'
I"
)7
" Y 7
90 H:
~¥~I:
~til:;¥.j71
'10'
)v1.I;I:;~JiI:(H~(:~~
C
I-:<T
1:1*"').: t
T1TL' , 7'
<
t:
cO' l'o
t~I:;;j<:$'H~T(7)~7tI:
,
imN;l'pnlL,~;lj1
,
;;j<:$'H*tiUH -
l
~:$'H*, ;;j<:$'H*(7)&M$iJ
,
H:
,
~:$'H~tft!},
-)tj.j:.ltml
'ti:
t
t:'
,') 7 717'103-
1
/7 7 1/
(7)!1f~~j(7)-fI
,
Ellil G n l
'
:lE:~~':
SB-140(7)~:$'H
vr
~(7)
J:
-)
tj.n
0(7)
)
(7)il!!:!!
;~ ~20'C
'
(7):IJ
'
'
11"'
)v(7)UV~~t~I;j:,:
;j;
9
0
':J
I"
7 1
)
(7)il!!:!!
SB-140(7)ftt±J~t.
l'
a:
9 0
1"71)1,.1.2236
ti1Z
'~
T9
0
-7
I~
'')
7
'?
~Jl~
t'T/I~-(GN)
(;l:iOO.EIll
' ~ a:
it A,o
{
CJ:f.lt7t(7)f~
;;j<:$'H~t~~1l;'f(7)7
tiJ{l'~
tj.l'':
t
~,
;;j<:$'H
*(7);lj1
;1i
H*.EIl
La:
Lt:
o
71
)1,.1.
~1f.Ell
L,
l ' 6
~if.Ell
L l
1
t'T
/1(-
t
1If-A,
(7)
7
)1,.
1.
2481
(7)
7 1
)1,.
1.
;~ ~20'C
)7
'11"'
l ' l 0
)1,.(7)1
Rt~
)7
"y
7
07
l'
)1,.1.,
a:
t:
(;I:::J
7'
':J
7
I"
7 1 )v1.2481J:).
t:'
,y 7 717'10
")
7 1 \ 1 A t:' -
Lt:~.g.l't
J:
-:>
l
f~
'J
;j;
9
G n
:$'
}(7)
71
0
3-071
I"
1 / 7 7
t~~f*.(:
t:
*x
'Jiil!t)' G ±
)1,.1.
T(7)
)v1.~~:$'H~
1/
':J
I"
J:
-:>
-f
;t-)I;=¥-~1il
n
J:
V'1ili.i!,(7)CJ:f.lt7tr)7
r
7'7'7-SW-5IR~r.fIl;'f(7)~
a:
L
-C(;l:P.36-P.37(7)~~':
'7'
'~
)7-SW-
<
A~7
1\
1 A
:IJ
'1
7
l'
)1,.
l
(;I:
~
;;j<~
.
5H~Ji
t:cO'l
'o
16
Page 17

77~~lj-
____________________________
__
~JI/":;7SD-6
llJi/~
';I
7 50-6(;1:,
'
:~jj
ll1~ffll'~
100
I::
lji.3Jf~¥i~
;t!l
0)
fie
ffl
I:
J:
J.JItf) , 59-14
HU:~tJ{Te<
MHl:tJ{iJi:>
=:J
/ A t:'-I-"'5
~;>Hl'~1It;~l
;
't!l6*(
§
l1J~7t§]il1tffl)
'J
,
~7tre'~tJ('lim
1::
O)~].Jj..g.tJ-tt
')
£ 9
0
l'
~
59-
140, 59-14,59-11
',
315VO)fJtIi¥~1I;t!l(0210)
~
l '
I;I:
,
~f~ffll
n ,
-t
-
£ 90 f Iii¥i'll!
4~1:
59-
$' -I-"
'5
140
(cm1t
l'
7'
1::
O)[i'i]~FoJ
::J1)v::"';";7Cl::J
:&
Ct
tJ.>I
1
Ui
f.] 1 mO)
7
~J1lllllii~
TTL~:7t::J-F
.::n~O):J-I-'~, "iiJa7t.M~TTL~tIJ~7tTrr-)~~O):J
-
I-"
l '9 0
12~
,
£1:
-
H~ffl)
1;1:
,
!i!2/":;7SD-7
lji.2/
~';;
7 50-71;1:,
I:#
im
ll1~ffll
~iI.*Pll,
tJ
"iiJ1i~l
S9-1
~C?
{"
=.::1.
7")vl'f.]270§](,*,;.ffit20
1::~(,ft~~T90 £~,m~0)lji.2%=tJI-"1I~0)~fflt
', .::O)~.g.
4,
S9-11#im)
=:J
/A
t:'- 1-''51' ~ 5 9-
'
e<
~
;>Hl~1I
;
~
l '9 0
)vtJ
')"
/tJ'/¥~1I;t!l~f~ffl9n
'C, S9-140 '
,
~7tre'~tJ{jHlif.]H:J>(,*,;.ffit20
I::
,lim
Ct
n £ 9
0
140, 59-14,59-
lji.2Jf
~
¥~1I;t!l6*
li, ~7t
S9-14' S9-11#im)
'
C,
11
~
r*Jl'l~':
§]~
S9-
140
,
"iiJ:fJl.7tti~Itf':S9-1400)~7t':J:
~.Jl~
Ct
~,
~
EI
tlJe~l::J
ro,,0)/~'/
t±lMiEO)1Z,~tJ
JAti I) £ 9 0
~
••
t~0)££~fflTe<£90)T,
A~-1-"71'~0)~1I~7·TTL§tIJ~7t~~~.~~~~.
~~9
~.::
t:, ::..-
£
-FSC-15
:J
l'
)14l.~0)::..-
59-
140 ~ F3
FA
, FE2,
tJ
.;I'50)~.g.':(;l:SC
tJ.;I 7
/ ~ 0 -
/
Ali~I;I:
{
tt
Ct ~ ':, .::
ttil'e<
'\'
";
$'
- A t:' -
/7 0 :J -I-"
l
t:
') . ±!HT1UJ9
·
SC-12·SC-
::"-
I)
-A
23
'tJ.>I7 t l'JlJj.i$-tJ-tt
F-501, F-301, FG, =:J
-23~fflL
tJ{tU~
L.-
/
;(~jj ll;
)v9
~
1Ji\:l
'9 0
t
1:>
~
A-
, 7
l'
Iv$'
(,
£
t:~ffll
'
e<
~ ~ IJfiiO)~~
O)l'].Jj..g.tJ-ttT(;I: tJ.;I
£ 9 0
I-"
0) § tIJ-t:JH!:!;( t l'TtJn
l'9
')
tJ.>I70)771'/¥-T
0 A t:' -
~~i$-1:1~ffll
I-"
7 1
~
I::
£ 9
0
~
~.g-(;l:5C-
/ A V mU:ffl::"-/70:J
'
£ 9
TTUltIJ~7t1::
0
~.Jl~ ( tt,:Jt:~~i*O)
~~7t, S9-1400)~7t.
.::
0)
t:
~,
1:E~0)1J1oJ
-tt
1::'~1~fflll
70)
t
L.-
t:
T
t
11
L,ro"A-
l'
7
l'
£ 9 0
-t!;
..
rtt-I)~-~::J
1z / '7"
- I)
-t
-
J1llll
(f.]lm£l'
140~=:J
'JZ,~tt
I;l:1U
til
/F-501,
:J-l-"l'90 SC-
~
L.-
/;{
I::
'e<£9
=:J
0
FG' FG-20'EM ,
AS-7f~ffl
ll
MiW2.til'T;(
9(t:t:l,
)tHl
,
771'/¥-r*JT~1I~7, §l1J~7t~~~.~~~0)
, £ t
NewFM2,FM2~0)"fe<£9)
-FSC-13
~
:J -I-"
SC-131;1:, S9-
)§l1J~7t~rr-)t:~O),g:&
F-301
, FG-20, FG,
13~f~ffll£91::
[i'i]1J1oJ
I:
IoJ
(t:~
/FA,F
E2'FE'N
;HJ:
V'F3::"-
I)
Jj.
.g.tJ
-tt£9t
:::..-
'\'
';; $'- A t:'-
140 ~ tJ
EM
tJ
, 1z/'7"
,
§
I'E
tt1JloJtJ,
ew
FM2
-;(tJ
.>I
'5
,
tJ.>I70)L.-T1'
1-'00§tIJ-t:JH~;(
.>I
7
if
T
:J-I-"T
,
.>171:: ii*7t
9
-~=
,;;
~0)71'T1'/7
·FM2 · F-501 · F-301·
(ti/
tJ
7'
'5-AS-
71'
tl'TtJn£
0
l'
tJ
,
£ t:
S9-
~t:~
~su
-3@
~t1i
-t!;..;"tt
A t:' -I-"
~
1:1lXIJ1tlt
"=.::1.
I:
/ ~ 0
~tJ{"iiJIi~
'
4'
*1'C
-.:z..=.
':;
~
S U -2
71 ~ S9-1
7"
)v7
-)vM
I::ft
1' 14ffl 0)1z
,
1~ffl9~'::l::tJ
)v~7tO)1t!!
L-1
IJ
, A L.--7~7ttJ("iiJIi~1::
~1~.~f~ffl
£ 9
(t:
0
/'7"-.:1.=
{l'
e<£90 '::O)±~.g-
U:'71'7"L.-
t:
L,
"iiJ:fJl.7tli~ltfo)Jj.)
';; ~ SU-2(;I:, S9-140
,
A"
§l1J~7t
tt
I) ,
=.::1.
7"
,
)v:':J
Mtlnlil
17
Page 18

77'/:/::l.jii!3"C\4~0)§t.NH
~(;L
77
'/
:/::l.
O)7tiJ(*./tlH~O)lIIl
{,l.ll.~1::
(:ili:< ,
~~)'\=>9L'l.ll.~I::~;t3:9
JLiJ(:*:~
~0)~ru~~:*:~<~~3:90U
~)
~:f;t~.:)(:
l.:i:P'J~a)j{,
2.
3.77
t~h
cVJ~)3:ttlv
l'l~Do?n'lL'3:9iJ
liJ'tA.4M(~/7-'1JioJ~
<
~*<
~
~iJ'n,
I::
(:
~IlIH~O)&MiJ(~l
~ ~), ~'/
1-'71l.ll.~HJi
(;j:,
(
l'li!i!JL~/J'c<
A.4~O)i!i!iJ(
,
~
/ 7-'0)1JioJ
~:/::l.~
-lL
~/7-'7t.~O?~~
~'/
1-'711.ll.~0)~~lt:;f',;I:i0)~,!U1'i1J
o
t~{'I::L'''i
~(:}~M9
(, 77'/
0
:i:P'JiJ(B~L,j~-;5-(;j:,
~0)~1~~~
(l'l'\=>{'
~
ii1HJH.J~L'~
~<~l'l~7tC<tt~
~'/
{,
f:
:/::l.iJ(~/7-'7t*iIi
@<-(:5!'lL'{,~(:
<
t~7,;,t
:~,
<' ~ I::
iJ
(T~
o
11±ioJlt
1-'7-0.ll.
~ (:;g:
~
A.4~O)i!i!
4~(:~
.#~.
.'1:"9
0
{,
O
;
~:d;j:
hj§iL
'~lfL't:
IllL't:f:Jt3:9~"i
1T?'lh
.
'::'::J
/SB-
.If.ra'~§'ti't:i*1ll'lh~)
~IiEltIlra'
t~h, lilB,5'cf*1lltllraHi.&J~
'~WPJT(:~
h
j§i
L'~
t:
~
3:
,
l
3:9
)
1400)tiliil
~Ill'I~IiElilB~(;j:,
l t:'::'::J
~O)j8jI)i~ljlL
/SB-
140~,
77:$'--tt-I:::
~~n1?-I;JJ~)
3:90 It:iJ
(;j:
lilB~''cf*1lltllra'
1).'1:
l'l(;j:jI~II~IiEt
If
r.!itJ,
iliU-tt
P'J
I::
C<
tt'l
'
.'I: It:if:
..
j~-;5-tcVJl)
-I:::';J...fiiIlll" h
L'
(:h~
ro9L
(L'3:
t:
t:
'-;5-;htt <
'ti"L.'
l'l
l'l, ilnl
~
3:
9
3:
l'lt
.'I:90)'l
~-~
'
;J..~
if:
0
,
f:
C<
me
CD
ilnl(: J I)
~
It'l'~
••
~h, ~O)i5Jl:.3:~~
.fii1Ul
(g)
*\I\l1,5HSC-23'\=>SC-
(::IJ)i
~1l9
-;5-
,
~';i:~
~~"~O).fiiIiEiJ(*!Wt'l
3:
9iJ
(,
*5)i,
T~.l::m~o?n{,.-;5-~,R~~~~ftl::~~3:~
(:
hi:Ett
< f:
C<
L ' 0
1
7
it
'/
~
:/::l.
-lilB(::/
{,fN±~:IJ)i
~1v~~I::~;g:~{,~,
(
f:
C<
l'
0
7
)~Ull.
'
~
{,
j~-;5-(;j:i~11
*w.,
>iT~(:J
••
O)~~O)~~~iliU-tt-~;J..
Hf#llll'li1!l:WI\~o"~:IJ)i
/7
0
tiffi':H
cH-;5-tJtt'l
iliUT~~~T~3:ttlv
~
h
51
{'i5Jl:'!3: t:l;j:
7
(4~
~).
9}0)~Ill'iffi.:r
~'f~1ll
(:
t~~j~
t 5
i5Jl:
',
L'
~
o
1{x
III
L
\...t.
CD
SB-
SB-140*f*iJ(;'5nf:a~(Hl;l'f:*o?iJ'L':fi1iJ':/
;J..T,i,
L''l(f:C<L'
l::'O);~J'\IH;j:
'l'<f:C<L'
7'
o
7;J..
o
://1'-'\=>"-/://,
T '/ 7
O)~iIii
~;~iJ'
l *
I)::J
/7
0
7)v::J-)vt~
90)'l'f~;ht~l'
140~f*~9{,
'l
(
f:
C< L'o
'ilI;M(;~;,mn
~(:t~~)
ili*±-tt-I:::
(g)
iii;g(:t~{,
~0(:(;j:,
"i
~)
Q)
S B -1400)
~~'l'9
~), !f,J.:rO)~L'~(:(;j:tJ
aik
*9
0
'
;J..~IUl"~
I::
~ 0(
/j~~lt:~), i*~lt~L''l'(
t~.pJT(:SB-140~iii~
3:
9 0
P'J
lilB
iJ'
o?
-5tjlj!ft~
< f:
C< l'o
@ SB-140(:7l<.iJ(iJ'iJ'
(5):litltllre'f~1fl
~l'l~IBl~7tH~~)i!&lf:ii:,
f:o?'tO)3:
'l'ilI;1ll~I&~)
::J/T/-tt-O)~'ftHJi~
Ifll'f: f:lt
V~L'
*1It5m!;J..1
t±J
3:
9
(J)
i~,ft
.-;5-
(:(;j:, 'ilI;m!O)'ilI;tt~~'9'I&~)
l
3:
91::
'ilI;1ll:i:HR'II9
n-;~;,mn~;g:~
'
*§~
RltIlO)!3I!J~P'Jt~I::
It:t~-;5-(;j:
<
f:c<
L'
o
'
)'\=>;ill\~0)~L'1::
,
f:C<L' o
3:91:: ,
(:
(;j:
iii
'ilI1± ~ 1'f
I::'(;j:
lf~
o?
t~
L' J "i
I:: ~ (;j:,
'/
T~OFFt:l'l
l'li*~
i5Jl:'!'\=>~Jf
Ifll'l
L' 'l' < f:
~)O)iliU-tt-I:::
(:
l'l
17,Ej
(:-/t
kT1'
l'l
(
f:c<
',
SB-140~:litltll(:;hf:~)
~O)
L ' {,
lilB-5tiJ( cVJ
C<
L ' 0
n-i5Jl:'!lt:
'
;J..llltlUl"~
< f:
C<
L ' 0
~
§'ti't:, 1lt5m!
71
< f:C<L' o
L'o
0
t±J
l
{'i*
tJ
~)O)
~O)J
i*jZgl::
t ..
~)
,
1r£
·
~§
~ti
~iJ(.';HJl
'tl
~'~
18
Page 19

~i~(=~L\j[
1.
fT
L
l''il[;t!l.:a-f~-7
~;1!l(j:,
~
~
@!'I-C'9
2 . ;!!Jt
1i;t!l(J)'ljJjEr
(;j:~7t@]~j(,
~(f)f:(\/),
;1&
a:
r<
-C<t:<3L'
t~n,
(;j:m~
3 .
1i~~,~
ifmt
4.
t
{,
5.1I[jt!J.(;j:J.,.:h.t:
A
1)
;
1!l:¥zm1~9{,J)j[~
L..t:t
fIIl
't
.? )[,71 I)
.
.
.
.
.
.
.
f~:ht~
<
(J)
§
3i:
(j:, §iID fJ'1ftlJiID
t T90
4-'T
7(J)-'j
0
f91j-85
't'~:h
~
fil!
;j:f~
;!!
~7trB'~t~
;l1m,L..t:1i;t!l.
T(;j:~7t
90 At:
<
f;U
f*::(.f
;t!l.
~
(J)
L..
-C
t,
' -
I"
'71
~JT
L..l
'1i~tH
o
::"71
r1i;t!l.(;j:f~;1&t1IiEfJ(ftn'tl'a:9(J)T,
R(J)
::"71
I"
-tt
t~
IJ
< G
~
a:-tt-Cn<t1iff#@]m9{,tl.#iY>~a:9
L..
-C1~
-'j
j:
I)
(;j:
flk;!!, flk;,E
(J)
El
c1il<
(;j:
I;j:20
'C
)':.I.rt'
HJJ
<-1:
(\/)
,
£ £ I:-tt
t:
'- 1"'71
:±JL..-C<t:<3l'o
t:
~,*§~
(J)f1!l.(J)
(:(;j:
L..,
;
t!l(J);w[IB
I)
a:
-B8:a-
1i;t!l(J)3I:~~(;j::i:
l'-C' < t:
~nJi,
:/
3 -
1i~(J)tlft~nffl~,
(J)i;&~~
f~;1&(J)
(J)i~fr,
1i;t!l(;j:)UP(:~ltA
~
SB-
~I;j:,
;~L..-C't(J)
< t:
<3 l'o
;
:t~
"'1/71
,
~7trB'JlIli\,
~7trB'JlIli\,
,:Jf.
9(J)
T
~';:t~
a:
1?iJ
(;t
<3
l ' o
;.1-71
-(J)~-'j'!lt;t!l(;j:;~if-Cf~1fl
~
<3
-ttt
:
(:
j: I) ,
t:
elf)
(:
-1l;\'1i<.J
N;;1&(:~-tt(i@]m
____________________
-C
t!3
c1il<11H.,
t:
~~
L..
1?~:fJJ(J)2-'T7
12
1985~12!'1
Ifl
JIl
'*"
(:
t~
{,
(:
L..
b'll
t '
(J)7'-7
zl~IflL..a:9tAt::::-~
f~;1&t:
t~
{, t
~
:a-f~;1&Il;\'
Ifll',
;t!lzf~1fl
-7
t:llH'¥1?
T
,
~;!!(:
t~
niJ'-") ,
;,EJt(J)f~
140
tf~1fl
Ant:a:a:(:L..a:9t,
t
: t t~
' /
~Z:l!!:;t!l
n j:
~7t@]~j(,
~*lt~(J)~,
< t:
{,
t
;ji;Afl
-C
Ii'iJIl;\' I:rrl'
I)
,
*m
~t~
(: 'Ii
L..
t~l'T
(: ~'f~1fl
1i'iJ1l;\'
(:
?t;,!
9{,(J)t&l'IJ
L..
a:
9
t~
{, l
1i;nW)'HJ~iID
l
'fiJi
I: f*::(.f l -C
9'
I:
L..
t~l'i~fr(;j:,
I))TI
J~T9
a: a:f~Ifl
'
:ltr<::..
(ff~;1&Il;\'(J)'liIiU;j:
71
' 1
~;t!l.:@
<3
l ' 0
:/1.
~;.&~(J)J)j[~
,
L..
t:
I)
a:kli'iJ~nfflTtfr.(J)~~~tlft
{,
~ t iJ(~
liE iJ(li
L..
a:
< t
:<3l'
a:
9 0
~JTL..l'1i;t!l.:a-iiU:t
-C
iY>
{,!£l!j§
~!'I B z~!IJ
fJ
'iZ§M,
~{1t(J)2-'T:$'
'f~T9
{,
t:
(;j:N;;!!Il;\'j:
~7t
L..
t~ < t~
(:
t~
{,
Hf~;1&fJ'
G<;f
;t;-C'90
(\/),
IIf
{,
i~fr(;j:,
r<
{,
fJ
'$!.!
f~;!!1l;\'
(:
~T
lit
9 0
'
'71
~(;j:N;
~
t t
iY>
I)
t~
{,
{,
j:
-'j
(:
L..
f~;1&Il;\'I:
0
0
;t
t'~ < t~
-tt9'(:tj:
t;
L..
1?;iHt l
0
a:
71
~
'l!!:
rT
//'i
(J)~t~
l'
t
(J):a-
V~l
t~l'-C
I)
a:
9 0
I)
a:
90 f*::(.f9
Hi:;:h
I), 1i!tili:9
< t:
<3
l '0
'il[;Ill!(J)l!!:;t!l
;jiiAfl
nt:j:I)'il[
t:
,
;ji;Afl
n:a-~~
I)
(J)-Jt-t:'A{iJ!.
;t!l
zf~1fl
L..
t:~fr
IoJL.L..
a:
9
0
- (J)7'- 7(;j:,
t ' (: j:
-:>
-C
(
:t~
I)
a:
9
0
;lEif't
f~1fl
''t
' < t
:<3l
'
<
t:
<3l'o
t:~
;t!l.
T t , jjN;
{,
(;l:![
il.
t:
t:
l!!:
~t~
L..t~
'0
9 0
o
________________
::..
71
FTl[jt!J.f~IflB~(J)
m~R(J)::"71
:if.$Ijlj(J)ft!!.t:,
.
~:Jf.
IH@.:X;jI:
i&!Jij[
.
(~~
Jij[.(J).~~l~~,*"AT~.~(J)J)j[~t~{,~t#~~
~';:t~
r'!lt
;t!lz~'f~Ifl
~(J).~t: t ~·i:t:if.
L
(:A1
(
:t~{,i~.g-(;j:,
t~l'T
< f: <3l' o
':;T(J)1;]]
I)z:n~)(;j:<3lt-c
~~c(J)-~~Ii<.Jt~;i
< t:
<3
l '0
<
t:<3l'
___
o
~
a:9
.~ ~,.~;.I-71-m~(J)~~HTm~<3:/1.kll;\'~rr
-c
<
f:~l'o :ll§i~~:/1.f:BifMJ:.1L.~
{, ~ t
iJ
'iY>
I)
a:
9 0
.
;wrIB(J).;t!l:a-J~1fl
t~
l '-C' <
t:
• ~ (j:
.
•
.
,
-~
a:f
:,
f~lfl{t.;t!!tJ'AALla:
~:)!Jlf*::(.fft(j::@
iJ(Pt~<t~-:>-Cl'{,tf!\Ij:,
f:
~
l 1 0
.1£
L..l
'~.z n ~
Ij:
,
~ii>T9(J)-C'~;
::..
71
rl!!:;1!l}.,Z
<t:<3l'
o
L..
t:
I)
<3
l 1 0
R8<.J
I:
(
jSC -35
iJ,~,t~ < t~
t~
-:>
-C
t!l~
(f:Jf.~HI: ~c
,
~.1*lt~(J)~t~9.;1!l:a-f~
'C
j'3'E.L..t~lIT<
-:>
tf~IflBifrB'iJ
3<:
1~
<3:/1.
9{,
t'i:UiUJ'!;I:;1t.9
(J)
ilTI~
[;Ig
-c
'rh
-C
f:~L'
-C
l'
9 ~ t
iJ(~
I)
:Jf.Jij[~:a-;j(@]**I)~L..-C<
'~
L..
<
;~~'
L..
-C
< t: <3ll•
t:;i
~
E3
ff
z<;f
1J1~1fl
< f:
19
L..
1fl
<3
o
0
t:
t
L..
-:>
L..
l 1 0
~
~
-C
19
Page 20

ft
~
______________________
. ifji\:
jj[~IJl1iIJiijlJi\:A
.
ti11-'7/
<;J:tJi7t
,,=
~?
,,=~?
~:>'H:~(
,,=~?
"=~?)[..1/4~7t~
*:>'H~(
ffl 0)
t~.g-)
,,=~? )1/7
"=~?)[..1/4
.
~Utftjll'
7l<'¥
1J1oJ70
.
'!!!:;!m
(:>'Hl~'!!!:iI!l!)
fJtJii/~':I?
31
5VntIIUz:'!!!:;1l!(0210)
.ljl.3ifj~Z:'!!!:;1l!6*(
.ljl.2/~':I?
.ljl.2ifj~Z:'!!!:;tl!6*
.
~7t§]~j[("
*ltJii
I
~
';.t
f-l300§]
.ljl.2/~';.t?
f-l270§]
f-l
80§]
f-l
100§]
.
~7tFB'~~("
f
JlIi/~';.t? SO-
J~Jlif-l3.
lI!
SO@!
IOO@!
200@!
300@! j Tv
1
.!ji2
~
';.t
fHli
f-l9.5fj>(.!ji2if~?
Ildli
*'1
fHli
f-l
.
'C-:$'-1-'7171::0)f§]~
5.5 :::J" / f1'0) A
~<;JIiECso
tl<;J:tJi7to)
.
~7tFfilil::
iJ!J7'C
t?v?7-
O
En:jl:i~~
6En:jIH~
o
"n:jl:i~1!l
1::
' -
I-'
71
H
~7t
A
A.? ~ )[..jjHR<;JfjE)
1
<-
(I
SO
1000)~.g-
)[..7
)["1/4~
:::J
:$"':I? AA.:7
)[..7
)
)[..~7t~
)[..~7t~
7t~
~
0
32(m)
16(m)
A:::J
16(m)
1::
":I:7:$'
17'130'01~fflO)t~.g-)
8(m)
:::J
$"':1
?I\
1 A
1::'-I-'
1/77
)[..~7t~
~j\';~
'
~jj[1J1oJ53:
SO'6
(!'JIJ?'C
SO'7
(!'JIJ?'C
= ~? )[,,7
? S 0
'61~
SO'71~ffl~
(.ljl.2if~?
(.ljl.
2if
~~'i'iIiE
(mll.&0).ljl.2if~
=
~?
6f~
5fj>
~
<I'\,"'
VT1'
<I'
Tv
T
l'
<I'
\,"'v T
l'
T
l'
?
SO-71~
ffl itf
1
2fj>(.!ji2if~~'i'iIiE"
4
tP(m~h:0).!ji2M=
1::
' -
-61~FIL ~Jft'ontliUZ:'!!!:;tl!1~ffl.
tJ
'1
~
.
T:"'-
~7ti~Il:!l(SW-5V1H
12 25 50
-
2
2
2.8
4
2.8
22(m)
l1(m)
mm
28
')
){~ffl~
H~
13
mJ:]7t§]nffl)
')
)1~ffl~
)[..~7t~)
ffl
~
)[..
tJ
I) " / H /
"/tJ
'/~Z:'!!!:;tl!)
=
tJ
1-'t[;-mO)w:?gfili)
)[,,7
)[..~7t~)
ffl~
71
~
.~nIlliM3.Sf1>t{'F
71
~
.~nlllir.'
71
~
.~nIlliM
71
~ .~nIlliM
)[..:iJ
')"
tJ
I-'O)'C
-:$'
1<-"('12
7
l'
)I/L~Jt(ISO)
100
200 400 800 1600
IJ
*&:
2.8
4
5.6
4 5 . 6 8
5.6
8
L--
L--/ ;(
O)@jftj
~z:'!!!:;1l!)
sf1>J:.lT
IsH
'J:.l
T
30f
1>J:.l
T
/H/~z:'!!!:;tl!)
/
H/~
z:'!!!:;tl!)
n~;tl!O)w:?gfili)
- r
717":4:::J,,;I:
(I SO
100
"('<;JiJi7ttU
f~
8
II
I I
16
"J
I-'
71
)["L24811~
tJ
1<
-
"('llU\tf§]
131!J~J:]7tT~7t
) j;)'TO)
I:: ~ )
J~)
!J!l7'Ci-e1t!!
II
16
0.6-8m
0.6
- 5 .
16
22
22
32
6m
0.6-4m
.
:k~C'
f-l217(~
.
:lll'S:
*,,*
+ SU-3
7'
77·;.t
C'
~
) X
94
(~;)
f-l
515 g
f-l
290
g
X
91
____
(j!ii)mm
_
. 1ili.itt'o
t
/
-It-~=.
7'
7 7
~/?
<;JiJi7t7' :$"7'
UV?
*:$'p
*
{H*<pO)'I'iIiET-:$'
*fr.,nHO)-~~~.O)k~~ft~L~~~9~=I::~~
');1: 9
';.t
~
D:::J-
$"7'$'
$"7'$'
0
;.t
~
SU-3
S K
-5
rSC-ll
:$'
-SW-5V
-SW-5UV
-SW-5IR
'j:~"(
*,i1ii!.(20
'C
)itfo)
to)
"('9 0
20
Page 21

SETTING
UP
________
_
Connect camera and flash unit.
Screw one end of the Sync Cord
SC-11
(i,
sync/multiple flash terminals
the other end into the camera
terminal. With the Nikon F
N2020*, F-301/N2000*,
camera, use Nikon
SC-13
• The Nikon N2020 and N2000 are so
sively
Set shutter speed on the camera
to the appropriate synchronization
speed.
See the table
proper shutter speed setting for flash
synchronization of each camera.
into either of the flash unit's
FG
or TTL Remote Cord SC-23.
in
the U.S.A. and Canadian markets.
on
page 25 for the
Sensor Cord
@,
and
's
sync
-5
or FG-2
ld
exclu·
01/
Make sure the flash head
straight ahead
position.
0
Connect power supply.
Make sure the power supply
off and plug the cord from the power
supply into the flash unit
power terminal@ .
in
normal shooting
® faces
is
turned
's
external
camera.
Firmly screw the attachment screw
@
on
the bracket into the ca mera's
tripod socke
Camera/motor drive attachment
slot
® selection guide
FA, FE2, FE
For
For MD-11,
MD-14, MD
MD-1
-15
, FM2,
2,
t.
FM
Attach the flash unit to the
camera/bracket assembly.
In
sert bracket into the bracket mount-
ing
adapter ® of the flash unit so the
two white dots
rotate the camera/bracket assembly
forward until the two units click-lock
into place.
For F-501/N2020*, F-301/N2000*,
M Drive MD-4
For F3-series, F-501/N2020**, F
N2000**, MD-4**, MDMD-14**, MDF2, MD-2, MD-3,
15
11 **,
MD-1
**, FG, FG-20, EM,
MD-E, MB-1, MB
-3
01/
2**,
-2
@,
are' aligned, then
•
To
fit
the SK-5 securely onto
Nikon
F-5011N2020
N2000 camera.
Tripod
Adapter AH-3
•• With
AH-3.
use
or
the
.
the
F-3011
Nikon
21
Page 22

BASIC
Steps 1
sections, according to shooting conditions: A for normal visible light, B
for
A -
photography
visible
UV
to
rays
For
light
OPERATION
3 are divided into three
and
C for infrared rays.
automatic
in
normal
flash
_______
A·1.
Attach the SW·5V Flash
Adapter
head.
@ to the flash
A·2. Set the exposure calcu·
lator dial
a suitable f·stop for automatic
operation.
Turn
dial
@
use.
With
usable flstops are
so
is
opposite the speed of the film
ISO
100
(jJ)
and choose
the AUTO/MFULL index
film, for example, the
fl4, f/5.6 and
f/S,
_
in
8-
For
flash
in
UV
rays
C-
For
infrared
photography
22
photography
flash
B·1.
Attach the SW·5UV 1 to
the flash head.
The
SW-5UV
must
prevent from being dropped, always
attach with the screw provided.
C·1.
The
SW-5
SOOnm
SW-5IR
sensitivity below
is
be
Attach the SW·5IR 0 to
the flash head.
and
with films having a maximum
made of glass,
handled with care.
IR transmits light rays of
above; do not
SOOnm
.
use
and
the
To
B·2. Set the exposure
calculator dial
note the proper f/stop.
Set the exposure calculator dial
the AUTO/MFULL index @
si
te
UV
®.
appears directly above the distance
scale. If the flash-to-subject distance
is
2 m, for example, the correct aper-
ture
Read
is
f/S.
With a subject 1 m away,
(jJ)
and
so
is
oppo-
the f-number which
C·2. Set the exposure calcu·
(jJ)
lator dial
proper f/stop.
Turn
the exposure calculator dial
the AUTO/MFULL index 9
3 .
site IR
appears directly above the distance
scale.
is
2m, for example, the usable aper-
Read
If
the flash-to-subject distance
and note the
so
is
the f-number which
oppo-
Page 23

with flash-to-subject distance
of 0.6m to
0.6 m to 5.6 m
0.
6m
respectively.
Select the proper aperture.
ther details
see "SelectingiDeterming Aperture"
on
page 26.
the usable aperture
You
using a guide number.
see page
8m
(2
to
(2
to
18
to
4m
(2 to 13
on
selecting the f/stop,
can
also determine aperture
27.
is
26ft.) for
ft.) for 6 ,
ft)
for
For
f/16.
For
details,
range
0,
and
D,
fur-
s
A·3. Set the shooting mode
selector@.
Turn
the
ring
on
sensor unit until the white index
opposite the index that corresponds
to the flstop selected (
the front of the
0,
B·3. Set the shooting mode
selector@.
Turn
the
ring
on
the
the
sensor unit until
opposite
maximum output.
To
light output, set the index to
this case, to determine the proper
aperture, reset the exposure calcu-
FULL,
make the fl
ash
so
the fl
fire
white index
at
6 or D ).
front of the
ash
fires
at
1/4 of its
1/4.
full
In
is
is
lator
dial
opposite
so
UV.
the M 1
14
index @
is
ture
is
f/11
the usable aperture
Aperture
a guide number.
page 27.
. With a subject 1 m away,
can
also
is
f/22.
be
determined
For
detail
s,
by
see
C·3. Set the shooting mode
selector @.
Turn
the
ring
on
sensor unit until the white index
opposite FULL,
maximum output.
To
make the flash fire
light output, set the index to
this case, to determine
the front of the
so
the flash fires
at
1/4
of
the
its
1/4.
proper
aperture, reset the exposure calcu-
dial
so
lator
opposite IR.
is
at
full
In
the M 1
14
index @
is
23
Page 24

BASIC
The
following operation procedures
can
be
light photography,
raphy
used for
and
infrared photography.
OPERATION-continued
all
normal visible-
UV
flash photog-
4.
Set
the
aperture
For
UV
flash photography, use the
UV-Nikkor 105mm f/4.5 lens only.
on
the
lens
____
. 5.
Turn
on
the
power
_
supply.
6.
Watch
When the
the flash unit
24
LED
the
ready· light @.
ready-light comes on,
is
ready to fire.
7.
Take
the
picture.
When the shutter
unit fires
The
ready-light soon lights
to indicate the flash unit
and ready to fire again.
For
UV
flash photography, attach
the UV transmitting filter (supplied
with UV-Nikkor lens) to the
F
or
infrared shooting, attach
appropriate filter (such
etc
.)
to the lens, and refocus with
infrared compensation index
len
s.
When shooting
however, it
filter.
and
the picture
is
not necessa
is
tripped, the flash
is
taken.
up
is
recyc
len
s.
as
the
on
in a da
rk
ry
to u
again
led
an
R60
the
room,
se
8.
Turn
off
the
power
,
a
supply.
Page 25

TECHNICAL
INFORMATION
____
_
Setting Camera's Shutter Speed/Shooting
For proper synchronization, set the shutter speed dial as
shown
in
the table bel
Camera
F3·series 1/80 or slower
FA
FE2
F·501/N2020,
F·301/N2000
FM2
(with 1
sync speed)
FG
FG·20
ow.
Synchronization speed
(sec.)
SC·11
With
1/60 - 8 sec., X, T and B
1/250
-1
1/250
or slower
1/250
or slower
1/
125
or slower
/2
50
sec.
1/250 or slower
1/90 or slower
1/90 or slower
1/250-8
sec. (in M mode),
M250 and B
sec., M250 and B
Not usable
Not usable
Not usable
Mode
Selector
Camera setting
or SC·15
1/250 - 1 sec., and B
Dial
With SC·12*,
SC·13** or SC·23**
All
settings***
All
settings***
All
sett
ing
s***
All
settings***
All
settings***
All
settings***
FM2 (with 1
EM 1/
FE 1/
F2'series
* For F3-series cameras only.
**
With F3-series cameras, Flash Unit Coupler AS-4 or AS-7
***
In
the automatic exposure mode or
switches
****
At AUTO, shutter speed automatically switches to 1/90 sec.
/2
00
sync speed)
to
sec.
the synchronization speed
1/200
or slower
90
or slower
125
or slower
1180
or slower
at
a manual shutter speed setting higher than the synchronization speed, the shutter speed automatically
as
soon
as
1/125-8
is
required; with F2-series cameras, AS-l
th
e power supply for S8 -
as
soon
as
1/125
- 1 sec
Not usable
sec
.,
M90 and B
Red
line between
140
is
turned on. For details, see
the power supply for the S8 -140
125
and 60,
.,
X200 and B
AUTO,
1/60-1
is
required.
the
is
turned
All
settings
***
1/125-8
and
camera instruction manual.
on.
sec
.,
B****
sec., T and B
M90
25
Page 26

TECHNICAL
INFORMATION
-continued
__
Selecting/Determining
Automatic
Turn
the
sponding to the film speed
index and
Dots between the numbers
present intermediate settings.
2500 2000 1250 640 500 320
1600
Three factors should
f/stop-flash-to-subject distance, depth of field and
recycling time.
Flash-to-subject
flstop indicators ® also indicate the range of flash-to-
subject distances for automatic shooting. Distance
ranges are constant, regardless of the film speed set
operation -for
exposure calculator dial until the number corre-
is
opposite the AUTO/MFULL
you
can read three usable f/stops.
on
250
1000
800 400 200
distance
be
125
160
considered
Aperture
visible
the film speed scale
80
100
64 50 32 25
[ffi)
in
selecting a suitable
light
20
40
16 10
IQY]
only
re-
12
on
the dial. 0.6 m to 8 m
to 5.6m
to
away, use the
when using
To
S8-140
8
Recycling Time
With a subject distance that remains constant, the wider
the aperture selected, the faster will
of the flash unit, but the less the depth of field. With
100
anyone
taking into consideration recycling time or desired
of field.
(2
13
For example, to shoot a subject more than 5.
to
ft.) for the 0 indicator.
shoot a subject more than
ISO
on
manual.
and a subject up to
of the three indicated
(2
to
26
18ft.) for the 6 indicator, and 0.
flstop indicated by the 0
100
film.
and
ft.) for the 0 indicator, 0.6 m
8m
(26ft.) away, use the
Depth-ot
-Fi
eld
be
the recycling time
4m
(13ft.) away, you can select
f/stops-f/4
6m
to
4m
6m
(18ft.)
indicator-f/4
, f/5.6 or
f/8-
depth
(2
ISO
For
Manual
The
S8-140 offers a choice of light output, full or
Depending
ing
mode selector of the Sensor Unit at the FULL or
position.
Operation
on
the amount of light desired, set the shoot-
26
1/4.
1/4
Visible-light
Turn
index
the
M1/4
output.
Read
to-subject distance, then set this aperture
For example, to shoot a subject
output with
at
1/4
flash
photography
the exposure calculator dial
@
is
opposite the film speed
@ index
the f-number which appears directly above the flash-
ISO
output, use f/8.
is
opposite film speed
100
, use fl16 .
so
the AUTO/MFULL
in
use for full output, or
on
2m
(7ft.) away at full
To
shoot the same subject
in
use for
your lens.
114
Page 27

UV
flash photography
Turn
the exposure calculator dial
is
index
opposite
opposite
Read the f
UV
UV
for 114 outpu
-num
ber which appears directly above the dis-
for full output, or the
t.
so
the AUTO/MFULL
M1/4
index
tance scale.
To
assure correct
take additional shots with
exposurE!, it
is recommended that
the lens opened up or stopped
down by one flstop.
Note that the exposure calculator dial of the S8-140
designed for use with Kodak Spectroscopic T
film
as
the standard. With other films, the dial shou
be
used
as
a guide.
ype 103
ld
is
you
is
-0
only
Infrared photography
Turn the exposure calculator dial
IR
index is opposite
IR
opposite
Read the
tance sca
To
assure correct exposure,
for
f-
number which appears directly above the dis-
le
.
for full output, or the
1/4
output.
take additional shots with the l
by
down
one f Istop.
so
the AUTO/MFULL
it
is
recommended that
ens
opened
M1
/4
up
or stopped
index is
you
Note that the exposure calculator dial of the S8-140
designed for use with Kodak High-Speed Infrared Film
as
2481
only
the standard. With other films, the dial should
be
used
as
a guide.
is
Guide number
Shoo
tin
g condition
Shooting mod e selector
"'"
'At
"With
".
FU
LL
1
/4
ISO
100
Kodak Spectroscopic Type 1
With Kodak High-Speed Infrared Film
Without referring to the exposure calculator dial, you
also determine the f/stop
= -
f/stop
For example, to get the proper aperture for visibl
photography when using
away, divide
To
calculate the correct guide number for other I
speeds, use
gu
ide number for ·d b
other
speed
.
I
SO
film = for I
32
(guide number) by 8 to get f/4.
th
e following equation:
gUI
Visible-
li
ght
""
32(
105)
16(52)
03-0
by
using the following equation:
guide number
--=---
flash-to-subject distance
ISO
100 film a
e n
um
er
SO
100
x
'
16(52)
film ; see page
2481
see page
-
---
d
es
ired
UV
" Infrared
8(2
6) 11 (36)
nd
ISO
100
22
31
for details.
31
for details.
a subject
SO film
fi
lm spee
(72)
e-
m(rl)
'"
can
light
8m
d
27
Page 28

TECHNICAL
INFORMATION-continued
__
Setting
The
S8-
140.
For
The
cators
front of the sensor unit to set the shooting mode selector
to the index that corresponds to the flstop selected by the
exposure calculator
reads the light reflected from the subject
can automatically vary its light output to match the flash-
to-subject distance.
Make sure that nothing comes between the sensor
light reflected from the subject.
Sensor
Sensor Unit
It
offers a choice of five settings.
automatic
0,
t::,
and
0 indexes correspond to the flstop
on
the exposure calculator dial.
Unit
SU-3
controls the operation of the
operation
dial.
At
these settings, the sensor
SU-3
Turn
3
the
ring
so
the S8-140
on
indi-
the
~
and
When shooting a dark subject (one with low reflectivity), reduce the aperture selected by one-half to one
full flstop. When the subject
flectivity), reset the aperture
flstop wider. Otherwise, your pictures might come out
over- or underexposed.
When shooting a subject with very high reflectivity,
as
such
manual to prevent underexposure.
For
Make sure the scene brightness does not exceed the
posure value determined by the combination of the
shutter speed (synchronization speed)
aperture.
a mirror or metallic surface, take pictures
fill-in
flash photography
is
so
light
it
in
is
tone (has high
one-half
and
the selected
to
re-
one full
on
ex-
For manual operation
Set
the SU-3 to FULL
light desired.
mum light output or
subject distance.
The
SU-3
S8-11
output.
28
The
can
to enable firing of the flash unit
or
S8-140 operates manually
1/4
light output regardless of flash-to-
be
attached to Nikon Speedlight S8-
1/4
, depending
on
the amount of
at
its maxi-
at
1/4
of its full
14
or
Detaching
Push
in
SU-3
the two protruding catches at the base
and
pull out the SU-3
the
Sensor
Sensor Unit.
Unit
of the
Page 29

Ready-Light
When the external power
the back of the 8B-140 lights up to indicate the 8B recycled and ready to fire. The ready-light lights up when
the 8B -
140
is
wait a few extra seconds when shooting subjects located
at the far limit of the auto shooting range.
In
automatic operation, the ready-light blinks for a few
seconds everytime the flash fires at its maximum output,
showing that light may
may
occur.
or move closer to the subject.
Note that when batter i
output of the flash unit decreases.
In
@
is
turned
on,
the ready-light at
140
recycled to appro)(.
be
this case, reset the lens to a wider aperture
es
80
% of full
insufficient and underexposure
are nearly exhausted, the light
capacity-
Open-Flash
The
red
open-flash button
manually without having to trip the camera's shutter.
is
By removing the connecting cord from the camera, setting the camera to B, and pushing the open-fl
repeatedly,
scopic" effects or paint the scene with light.
flash button can also be used
ready-light to determine the possibility of correct exposure
when shooting
bounce flash. After setting up the shot, push the openflash button. If the ready-light does not blink,
the picture.
exposure, use a wider aperture, or move the flash closer
to the subject or bounce surface.
you
If
Button
can create multiple-exposure "strobo-
on
automatic. This
it
does blink indicating a possibility of under-
®
is
used to fire the flash unit
in
conjunction with the
is
especially useful for
ash
The
you
button
open-
can take
Flash
For shooting
contrast for indoor snapshots,
up and simultaneously rotate
bounce light off the ceiling or walls. The
head can be tilted back
120° to the left and 120° to the right; click-stops are provided at 30°, 60° , 90°, and
ing movements.
However, when the flash head
cannot
restricted , depending
Surfaces used for bouncing light should
to prevent color photographs from coming out with
unnatural color cast.
Do not bounce the flash for
Head @
in
visible light, to soften shadows and lower
be
rotated to the left or right. Tilt may also
on
you
can tilt the flash head
it
to the left or right to
as
much
120
° for both tilting and rotat-
is
the degree of rotation.
UV
or infrared shooting.
SB-140
as
120° and rotated
tilted a full 120°,
be
white or silver
's flash
it
be
an
29
Page 30

TECHNICAL
INFORMATION-continued
__
Sync/Multiple
Two
standard Nikon screw-type terminals are provided
the S8-140 Speedlight. Use either terminal to connect the
S8-140 to the camera, and if necessary, use the other to
connect the S8-140 with another flash unit
multiple flash operation.
When using the Nikon Speedlight
S8
-15
S8-16A, S8-168, S8-17, or another S8-140
secondary unit, connect the flash units together us
Sync Cord
In
multiple flash operation,
on
SC-11
manual.
Flash
or SC-15.
Terminals
in
series for
S8-11
, S8-12, S8-14,
be
sure to use both flash units
®
ing
on
as
the
a
Bracket
To detach the flash unit for off-camera flash operation,
push the releasellocking wheel
ng
holdi
aligned- then pull the flash unit away from the bracket.
To detach the bracket mounting adapter from the flash
unit's handle
two screws
30
Mounting
it,
tip the flash forward until the two white dots are
(\1
, use a standard screwdriver to loosen the
(j)
on
the face of the adapter.
Adapter
@ to the left and while
®
Page 31

TIPS
ON
UV
AND
INFRARED
PHOTOGRAPHY
Films Guide Number
For
UV
photography
The wavelength range of
is
from 300 to 400nm. Usable films are:
• General panchromatic and regular photosensitive
materials
• Color film*
• Special film for
Spectroscopic
• Image will appear in a blue monochrome color.
Note that infrared films cannot
raphy with the
For
infrared
Usable films are:
• Kodak
• Sakura Infrared 750
• Kodak Echtachrome Infrared Film 2236
UV
Type
S8-140
High-Speed
UV
photography with the S8-140
photography, such as Kodak
103-0,
Type
103
-F, etc.
be
.
used for
photography
Infrared Film
2481
UV
photog-
Film care
• UV and infrared photographic films are easily impaired
by high
• Load UV and infrared films into the camera
room.
• Take care not to expose them to infrared rays.
temperatures-store
below
1Q°C
(50°
in
F).
a dark
The flash unit's guide number relates the output of a light
to the sensitivity of a film, and
visible-light photography.
infrared photography, because the amount of light
flected from subjects differs from that
photography and because film
mined for
For the S8-1
(shown
photography
Guide
Correct exposure, obtained with Kodak Spectroscopic
Type
20°C (68°F) for six minutes,
guide number for
• With other film
page
Guide
Correct exposure, obtained with Kodak High-Speed
Infrared Film 2481 *
20°C (68°
guide number for infrared photography.
• Wi
page 2
UV
and infrared photography.
40,
on
103-0* film by using a Kodak 0-19 developer at
27.
th
other film
7.
Nikon has determined the guide number
page 27) for
as
follows.
number
s,
number
F)
for
UV
photography.
the guide number
for
by
for
10
minutes,
s,
the guide
number
is
It
UV
infrared
using a Kodak 0-76 developer at
generally used only for
cannot
be
adopted for
in
se
nsitivity cannot
UV
photography or infrared
photography
is
used
to
determine the
may
differ from that shown on
photography
is
used to determine the
may
differ from that shown on
UV
and
re-
visible-light
be
deter-
Spectrum
See
charts
on
page
Energy
36
to
37.
Distribution
31
Page 32

ACCESSORIES
_______
_
OC
Unit
SO·7
The
SD-7
uses
six
power source for any of the Nikon Speedlights S8S8-14 and S8-11. It has a neckstrap for convenient use.
TTL
Remote
C-type batteries, and serves
Cords
SC·12
and
as
140,
SC·23
The
SC-12
is
for Nikon F3-series cameras; the
for the Nikon FA,
and Nikonos-V (via the Sync Cord,
-140
the S8
SC-23
provides
light photography only). Also provided are automatic
switchover of shutter speed to the proper synchronization
speed and ready-light indication
finder.
FE2
, F-501/N2020, F-301/N2000, FG,
and
an
appropriate camera with
TT
L control of flash exposure (for visible-
Type
in
the camera's view-
V).
Connecting
SC-23
SC-12
Sync
A coiled cord over one meter
a
the S8-140 to
camera.
Sensor
Replace the
selector to S (for slave), the S8burst of light which can trigger a second flash unit. The
is
remote flash unit
the optional Modulite Remote Control Unit ML-1 (which
set to channel
or
Slave flash operation can
light.
Cord
be
Unit
SU-
2),
SC·15
in
length, the
detached from its bracket and used off-
SU·2
3 with the
is
connected to the receiver portion of
while the S8-140 acts
SU-
2, set the
140
emits a modulated
be
performed only
as
SC-15
enables
SU-
2's mode
the transmitter.
in
visible
is
Sensor
The
SC-13
SU
-3
automatic (but not TTL), off-camera operation (for visiblelight photography onl
such
N2000, FG, FG-20, or EM,
via the
vided
the FM2, automatic switchover of shutter speed
proper synchronization speed
Remote
allows mounting of the S8-140's Sensor Unit
directly
on
a camera's ISO-type accessory shoe for
as
the FA,
AS-4
or
AS-7
in
the camera's viewfinder. For all cameras except
Cord
y).
With a dedicated Nikon camera,
FE2, FE
coupl
er,
SC·13
, FM2, F-501/N2020,
or"Wi
th
an
ready-light indication
is
F3-series camera
also provided.
F-3011
is
pro-
to
a
32
Page 33

"RED
"
Red
eye" is
where the center portions of the subject's eyes
appear as bright
in
white
the light from the flash illuminating the retina directly.
If the subject looks straight into the lens and there
li
ttle or
making the retina clear
To
avoid "red
lowing precautions:
1. A
sk
when the picture
2.
Remove the flash unit from the camera
as
far away as possible from the camera by using a
sync cord.
3.
Increase the room 's overall illumination to reduce
the opening
EYE"
a phenomenon
black and white picture
no
the subject not to look directly into the lens
red
ambient light. the pupil
eye," you
is
of
the
_______
in
flash photography
orbs
in
color photographs (or
s).
This
is
a result of
is
wide open,
ly
visible
in
the picture.
can take any or all of the fol-
taken.
and
sub
ject's pupil
s.
hold
____
is
it
_
TIPS
•
To
si
alcohol, since they might damage the
•
To
cuitry, keep the
the temperature
(122°F), such
summer sun; also do not store the unit
ally damp places.
of - 1O°C(14°F)-+SO°C(122°F).
• The
humidity. 8tore the 8W-SUV
we
ON
remove dirt or fingerprints,'wipe with a dry soft or
licon-treated cloth. Never
prevent damage to the
UV
adapter
ll
-ventilated place.
SPEEDLIGHT
flash
unit away from places where
is like
as
ly
inside the trunk of a car
Use
the S8-140 within the range
8W-SUV
use
thinner, benzine or
plastiC
flash
unit's electronic cir-
to
go
higher
than
in
in
exception-
is
easily affected
with a desiccant or
parts.
SO°C
the hot
by
in
CARE
• If your 88-140 has not been used for a
recycling time may
condenser
to
use
the 88-140 for many years, fire the flash unit
a few times every month. After firing, wait until the
ready-light lights, then turn off the power switch of
the power supply, remove the batterie
the S8-140
the condenser from deteriorating.
Keep
the flash unit away from salt water
•
rain
the
• Never attempt to disassemble
a
yourself.
an
authorized service facilit
___
be
in
peak condition, there
in
a suitab
.
Th
ese
delicate procedures should
longer.
lon
To
maintain the built-in
le
location. This will prevent
or
y.
g time, its
by
enab
ling
s,
and
and
rapair the flash
be
_
you
store
out of
left to
33
Page 34

OPTIMUM
1.
New
batteries
BATTERY
Between manufacture and first use, all batteries
exhibit some drain. Therefore, care shou
to purchase the newest (and freshest) ones possible.
To
help you do this, some manufacturers
stamp the date of manufacture on the bottom of
each battery. Ask your camera dealer for assistance
in
interpreting the codes .
2. Temperature
Battery life ratings are based
20°C
(68°F). At other temperatures , battery life
shortened. Spare batteries should therefore be kept
available if operation
pated.
3.
Continuous use
Batteries are drained much more quickly by con-
tinuous use then by intermittent use.
4. Storage
When not
in
use, the batteries should be removed
from the power supply to prevent leakage which
may damage the unit.
period of disuse, store the batteries
place below 20°C (68°F).
5. Battery brands
Do not mix brands of batteries or use batterie s with
different model numbers. Also, avoid mixing new
and old batteries since proper performance will not
be obtained and battery leakage may occur.
6.
Disposal
Do not dispose of batteries by burning. Also,
safety's sake, never disassemble batteries.
on
operation at around
in
low temperatures
To
minimize drain during the
in
a cool, dry
ld
be taken
in
PERFORMANCE
7.
Polarity
When installing batteries, observe the voltage polar-
antici-
for
8. NiCd batteries
is
ities carefu
tive (- ) terminals will result
should
an authorized Nikon dealer or service center.
In
comparison with regular batteries, NiCd batteries
provide faster recycling and higher efficiency at low
temperature
number of flashes per battery set depend upon the
age of the batteries, their charge
capacitie
o Do not continue to use NiCd batteries after th
Co
ntinued use may reduce their life span or cause leakage.
o Before char
instructions.
o Charging should only be done for the designated number
on
Excessive charging may cause battery detefloration.
o Charging should only be done
141°F) and
hot from
o Never attempt to charge NiCd batteries that are incorrectly
installed
o
The
long period of storage. If this occurs, discharge and recharge them
several times.
o
if
working time
correctly charged, replace them with
o Do not mix new
Do
•
lengths
ll
y.
Reversal of the positive
occur
, clean the SB -140 carefully or take it to
s.
However, the recycling time and the
s.
ging,
thoroughly read the battery and battery charger
a battery charger recommended by the battery manufacturer.
3SoC
19S0F).
use.
in
the battery charger.
charging capacity of NiCd batteries may be shortened after a
not use NiCd batteries which have been charged for different
of
time.
Never charge batteries while they are still
is
markedly reduced even after they have been
and
old NiCd batteries.
(+)
in
leakage . If leakage
s,
ey
are exhausted.
in
temperatures between
a fresh
set.
and nega-
and their
of
hours
SOC
34
Page 35

SPECIFICATIONS
______
All performance data are for normal-temperature
[20°C
(68
operation
Elect
ronic
constructi
OF)]
on
Automatic silicon-controlled
rectifier with series circuitry
Firing
spectrum
Guide
number
Shooting conditi
ti
ng mode selector
Shoo
""
'At
..
..
, With Kodak High·Speed Infrared Film
Angle
FULL
1/4
ISO 100
With Kodak Spectroscopic
of
coverage
Selectable
on
"'"
Visible-
light'
32
(105)
16
(52) 8 (26)
Type
103
-0 film
2481
UV"
16
(52)
70° horizontal and 53° vertical;
28
mm
or longer lenses can be
In
used
Power
source
Battery Pack SO-7 holding six
C-type batteries
Minimum
recycling time
(at manual full
output)
range
Battery (at manual full
1.2V rechargeable N
batteries
1.5Va
lkaline·manganese
batteries
1.5 V manganese batteries
Usable
f/stops
and
Number of
output)
iCd
approx.
100
270
approx.
approx. 80 times approx.
automatic
shooting
flashes
times approx. 4 sec.
times approx. 9.5 sec.
(for visible·light photography)
Position
of
sh
ooti
ng
mode
selector
12
-
0
t:,
2
0
2.S
Dimensions
Weight
Accessories
Subject
to
change without notice .
Film
25
50
2 2.S 4
2.S 4
4 5.6 S
provided
sensitivity
(ISO)
100
200
400
SOO
1600
f/stop
5.6
5.6 S
11
Appro
mm(W) x 91
94
Appro
S
11
16
x.2
17mm(H)x
x.5
15g
11
16
22
16
22
32
mm(O)
(with the Sensor Unit
Approx.290g
(Bracket SK-5 only)
Sensor Unit SU-3
Bracket SK-5
Sync Cord
SC-11
Flash Adapter SW-5V
UV
Adapter SW-5UV
Infrared Adapter SW-5IR
Auto
(2.0 -26.2)
(2.0
(2.0-131)
SU-
fra
22
11
12
Unit
shoo
range
0.6-S
0.6-5
-1S.4)
0.
6-4
red
(72)
(36)
3)
_ _
m (rt)
'"
sec.
: (ft.)
ting
.6
35
Page 36

j}jf;X"*Jv;f·-j}.ffj@/SPECTRUM
1
0
.8
ENERGY
DISTRIBUTION CHARTS
~
r
>.
e'
Q)
c
Q)
Q)
>
~
<ii
a:
r-
~
~
*'
H
:t<
~
0.2
V
o
0.
8
0.6
0.
4
0.2
A
J\.,.,.
v-
400 600 800
;
~.ft
/
7~f7°/y-(J)tt.L
~
- '
\
:t~*/Without
J\
W
ave
length (nm)
AA
A
\r
adapter
v"'\.r
V
V
1000
~
(
~
~
(nm)
36
o
~
400 600 800 1000 (nm)
~HJ!:7t77"7
°
7-SW-5V
;
~-&
/
Wavelength (nm)
.a-~mLt:~.g/
With
SW
·5V
K
Page 37

>-
~
<ll
C
<ll
<ll
>
~
Q3
a:
r-
.:.
'*"
H
*
1i<
!Ii!
0.8
0.6
0.4
0.2
V'
o
400
U V
7If7°~-
f\...
'v
~
600 800 1000
;Ilillt/
5 W -
5U
V
~~
Wavelength
m Lt:
(nm)
:t~.g-
/
With SW·5UV
A
1"/\fV\1
~
(nm)
>-
~
<ll
C
<ll
<ll
>
~
Q3
a:
r-
.:.
'*"
H
*
1i<
!Ii!
0.8
0.6
0.4
0.2
o
~
n
11
V
)
400 600 800 1000 (nm)
;
Ili-lil:
/
5iF9f.
7~"7°~-SW-
Wavelength
51R
~~mLt::t~.g-
(nm)
/
With
SW·5IR
~
'~
37
Page 38

No reproduction
(except for brief quotation
made without written authorization from Nipp
in
any form of this booklet,
in
critial articles or reviews), may
in
whole or
on
Kogaku
in
K.K.
part
be
(Nikon)
NIPPON KOGAKU K.K.
Fu
ji
Bld
Phone:
g., 2-3, Maru
81-3-21
nouchi 3-chom
4-5311
Telex:
e,
Chiyoda-ku, Tokyo 100, Jap
J22601 (NIKON)
Fax:
81-3-201-5856
an
Printed in Jap
an
8&026-c07
Page 39

TIPS
ON
UV
PHOTOGRAPHY
~m~~-~71~A~:.~~.".~.~~~mff~~~
/'/~-':?l'"'(
At:'
-
t-""7 ~ r
SB-140(J)~9H~jfl~,
/'
I
~-(;l:,
"f
rVfh:J
SJ:
U'
I\~
~L..."tSI),
/'/~-(;l:~clXL..."ts
"?~
~
L..."t1;l:1t!!(J)71
*~~~J:),T,=~cL...~90)-r::."fIJffl<
(J)1J"~
t-"T/'/~-(J)1@(;l:1l
1=~L..."t(;l:~9:~i§ll1±l~rr-')
,!'ji.li~,~'t:L...~9
7111-J."
::;t;fl~/SS
1oi:9H*
ijf.9j.~
lIE
r-71'X
T7-1JI~I(/
24
t«.:,
ijf.9j.750
..t:len
"(I:r/J
f:t~l7Jtl7Jl'1;
'HbT<f::"'l'
5'
".,)
;;
(J)A
A
c'-
~
~
/'7"7
ffffl~~8jj
cp-r(;l:1t!!(J)71')~L>.'=X<.t9~Jj~
I)
~trfv
)~L>.~1fffl L...t:~fiO)1J"~
<
h\
o
1i1~t/I(-
15
(-I;t'ttl.'ftl.I!Cn",
L..f:IJ'-,T
.
11
16
5.6
B
5 6
..t:len
11-"1'
~-r-II-
T7-~-lvLC
:::J::'I-"-II-
tl.
o
~
IJl.JI;ii.
A-/~-
-n
;;
iiF9H~jU~Bi¥(J)
AI..;;
r 0
A:J
c'·')
V'')
~
71'
)~L>. 2841
t::C5l' o 1J.s,
-r*~1i!-r9(J)-r,
*iiIJ'=TA
0-76
D-19
\·M!1l!;1l>:-/Ill
J
'->:-*~I:
Hn~HT7
ffi'ira,
~lfI
20'C
851"
20'C
7ft
20'C
1851"
20'C
651"
20'C
6ft
'.
1~:.E;1l1l1'1Ii::l':Blir.'JJ!1l!L..
't
{,lIfilt..t:le
Jj ~ t-"
:7
:9~/103-0,
~
i!!4!l'=!&
t-"T/I~-O)
"fh"fh
~llf;'!O)tU~
J:
WI
58-1401:lt7:9'7'
:9-1I!/Iltt'9.
;{1:ltR6071'
-1I!/Il
I~::I':
>:-9'-,T
T
t-"~
-');B
~
V/
)~:9
JJ!lt
Guide
with
Suggested guide numbers for the
tion manual are based solely
Spectroscopic
Numbers
Other
Brand
Type
for
UV
Films
103-0 film for
on
Photography
SB-140
in
this instruc-
specifications for Kodak
UV
photography.
Suggested guide number values for other brand films correspond with those values shown
however, that these values should only be considered
approximations.
To
ensure top photographic quality, we
in
the table below. Note
as
recommend you take additional shots using other f-stop
settings determined from the table or experiment by tak-
ing
pretest shots prior to the actual shooting.
Suggested
UV
photography
•
When
number
temperatures, and
Guide
NEOPAN
SS
Tri-X
Technical
Pan
developmg
values
Numbers
Guide
Film
number soluti
2415
film
, follow
were obtained
time duration
for
Other Film
De
veloper
on
11 Minldol
16
5.6
8
D-76
LC
Technidol
D-19
the
above
specifications precisely;
using
specific developer solutions,
s.
Brands
Temperature Time
68°F)
8
min.
7
min.
18
min.
6
min.
gUide
20°C (68°F)
2
0°C
(68°F)
20°C
(68°F)
20°C (
8&026-A07
 Loading...