

Page 1
Nikon Speedlight
INSTRUCTION MANUAL
Page 2

NOMENCLATURE
© Wide-Flash Adapter SW-3
@ Tilting flash head
® Shooting mode selector
® Sensor Unit SU-2
® Exposure calculator dial
® Sync/multiple flash sockets
@ Sensor socket
® Bracket mounting adapter
® Sync Cord SC-11
® Bracket mounting pin
® Attachment screw
) Bracket SK-4
® Tripod socket
Page 3

Page 4

i/stop scale (black) @
Page 5

CONTENTS
NOMENCLATURE
FOREWORD
BASIC OPERATION...............................................6-12
CONTROLS IN DETAIL
Bracket SK-4
Bracket Mounting Adapter
Tilting Flash Head
Wide-Flash Adapter SW-3
Exposure Calculator Dial................................16 — 17
Sensor Unit SU-2..................................................18
Ready-Light
Open-Flash Button................................................19
External Power Terminal......................................20
Sync/Multiple Flash Sockets
Sync Cord SC-11 .................................................21
Synchronization Chart..........................................21
ACCESSORIES...........................................................22
TTL Remote Cords SC-12 and SC-23
Sensor Remote Cord SC-13
Sync Cord SC-15..................................................22
DC Unit SD-7.......................................................22
"RED EYE"..................................................................23
TIPS ON SPEEDLIGHT CARE
OPTIMUM BATTERY PERFORMANCE
SPECIFICATIONS......................................................27
.................................................................
----------------------
...................................................
........................................................
......................................
...................................
................................................
...................................
..........................................................
................................
.................................
............................
13-21
.................
24-25
................
2-3
13
13
14
15
19
20
22
22
26
5
Page 6

Page 7

FOREWORD
Compatible with all Nikon SLE cameras, the bracket
mounting Nikon Speedlight SB-11 features automatic
control of the flash exposure to match the flash-to-subject
distance. By utilizing a silicon-controlled rectifier and
series circuitry, the speedlight is also able to conserve its
excess energy for the next shot when shooting subjects at
close range thus reducing recycling time and increasing
the number of flashes per battery set. The optional
accessory TTL Remote Cord SC-12 (for the Nikon F3series camera) or SC-23 (for the Nikon FA, FE2, F-301/
N2000* or FG camera) allows the SB-11 to be used for
automatic TTL (through-the-lens) control of the flash
exposure. In addition, the SB-11 has a tilting flash head
allowing you to bounce the light off the ceiling or walls
for more diffused lighting—a technique especially useful
when taking portraits or snapshots.
Even though the SB-11 is extremely easy to use, you
should familiarize yourself with the unit’s basic operation
as presented in the first section. For more detailed infor
mation, please refer to "CONTROLS IN DETAIL." A few
minutes wisely invested now will pay off later in years of
rewarding photographic experiences.
*In the U.S.A. and Canada, the Nikon F-301 camera is sold as the Nikon
N2000.
Page 8
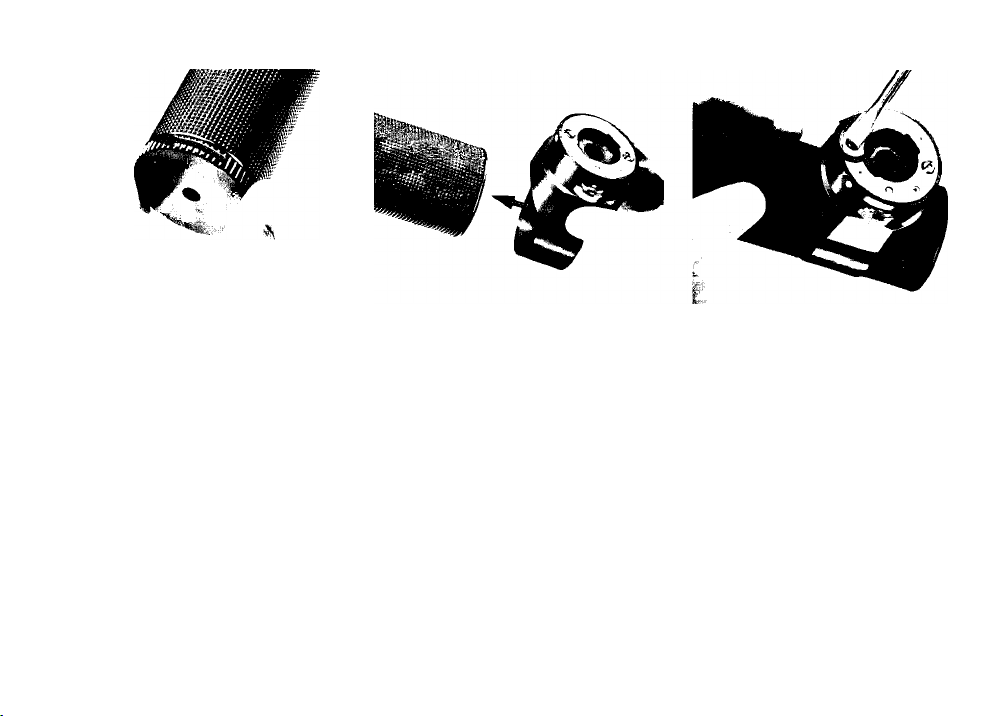
BASIC OPERATION
Open the battery
* chamber.
Unscrew the lid @ at the base of the
handle and remove the battery clip.
2, Attach the bracket
mounting adapter ® to
the speedlight s handle
First, use the screwdriver provided
to loosen the two screws on the
bracket mounting adapter. Then,
slip the adapter onto the speedlight's
handle and slide it to,the desired
position. Orient the adapter so that
its flat side is in the same plane as
the speedlight's exposure calculator
dial ©. Make sure the locking wheel
@ is facing toward the rear of the
speedlight.
0^ Secure the bracket
mounting adapter.
Tighten the screws to secure the
adapter into place.
Page 9
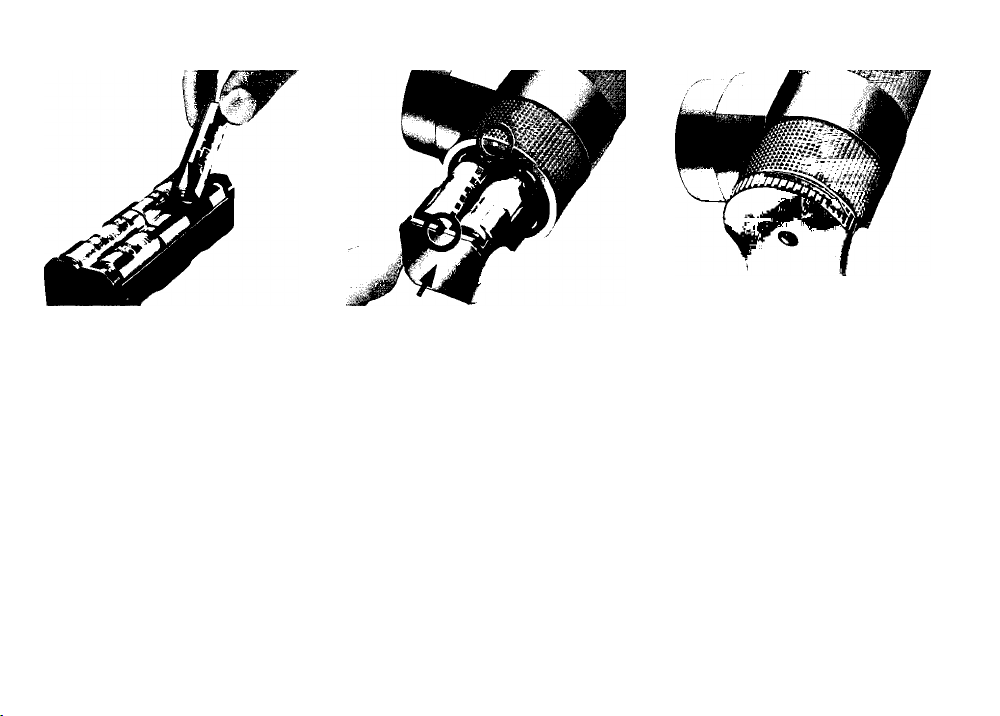
Load the batteries.
Insert eight AA-type penlight
batteries following the + and symbols on the inside of the battery
clip.
Install the battery clip.
Insert the battery clip into the
battery chamber. Make sure the ter
minal end goes in first. Then line up
the V-shaped notch on the end of the
clip with the white dot on the rim of
the battery chamber. Push the clip
until it drops into the fully seated
position.
0^ Close the battery
chamber.
Screw the battery lid back into place.
Page 10
BASIC OPERATION —continued-
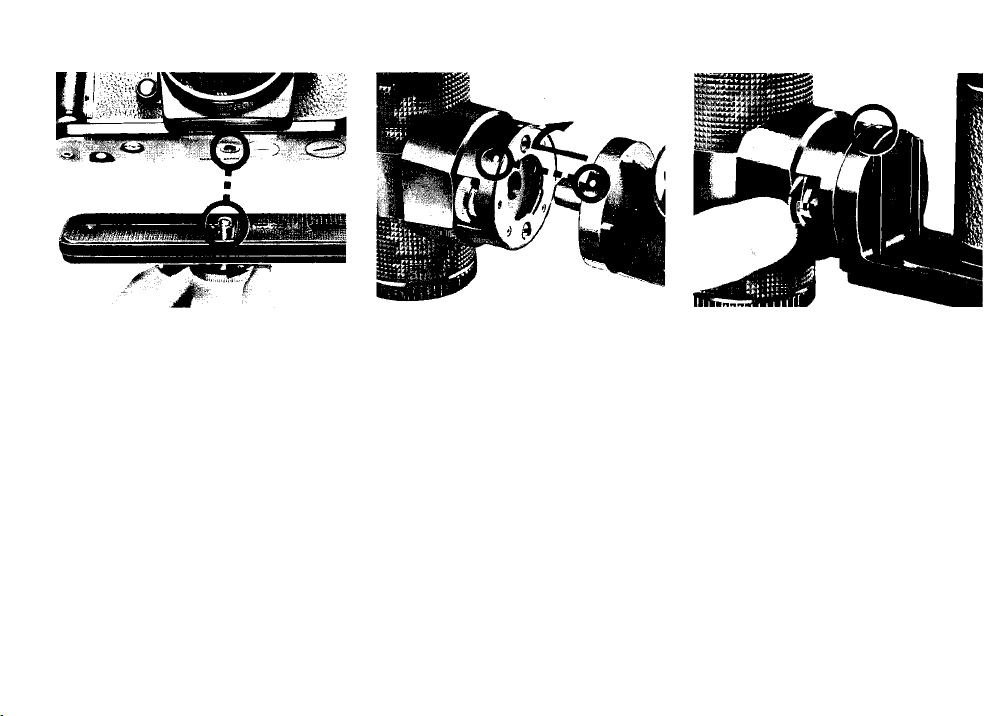
Attach the bracket @ to
the camera.
Position the camera in the bracket
with the bracket mounting pin ® on
the same side of the camera as its
rewind knob. Then, screw the brack
et's attachment screw ® into the
camera's tripod socket to secure the
two units together tightly.
Note: For attachment to the MD-4 Motor
Drive, you must reposition the bracket's
attachment screw to the other s!ot@. For
details, refer to page 13.
3^ Attach the bracket to
the speedlight.
Insert the bracket mounting pin into
the hole in the bracket mounting
adapter with the two dots @ aligned;
rotate the camera forward.
0^ Tighten the locking
wheel completely.
Page 11
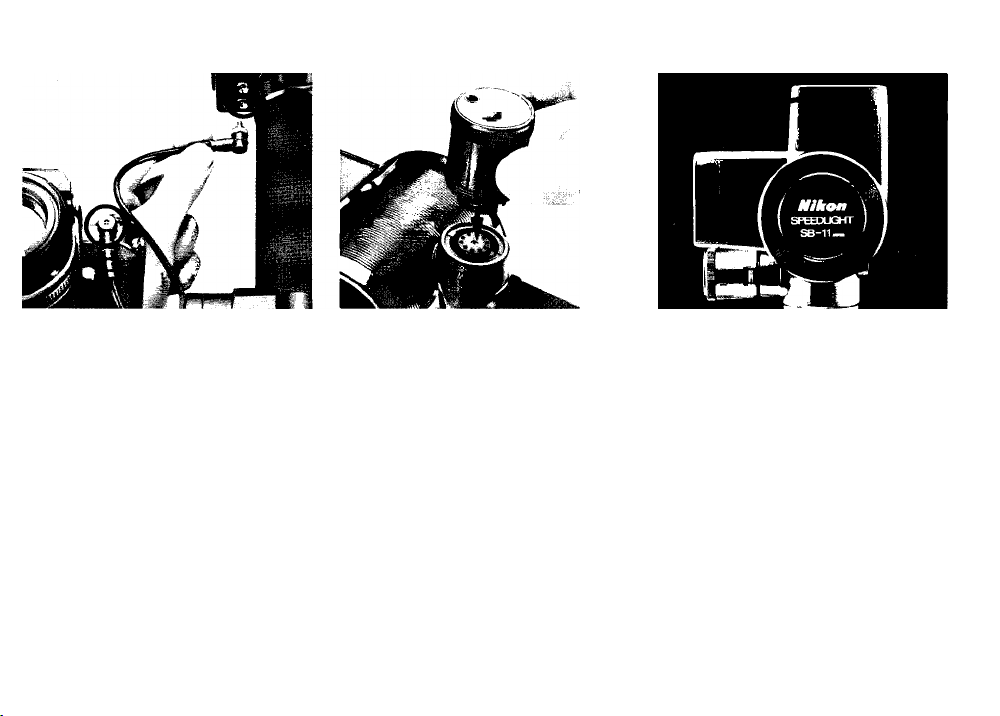
10. Attach the sync cord©.
Screw one end of the SC-11
Sync Cord into either of the speedlight's sync/multiple flash sockets ©;
screw the other end into the camera's
sync terminal.
11. Plug in the sensor ©.
With the "Nikon" name up,
push the Sensor Unit SU-2 into the
sensor socket © until it click-locks
into place.
1 9 Rotate the flash head ®
* to the normal shooting
position.
Page 12
BASIC OPERATION —continued-
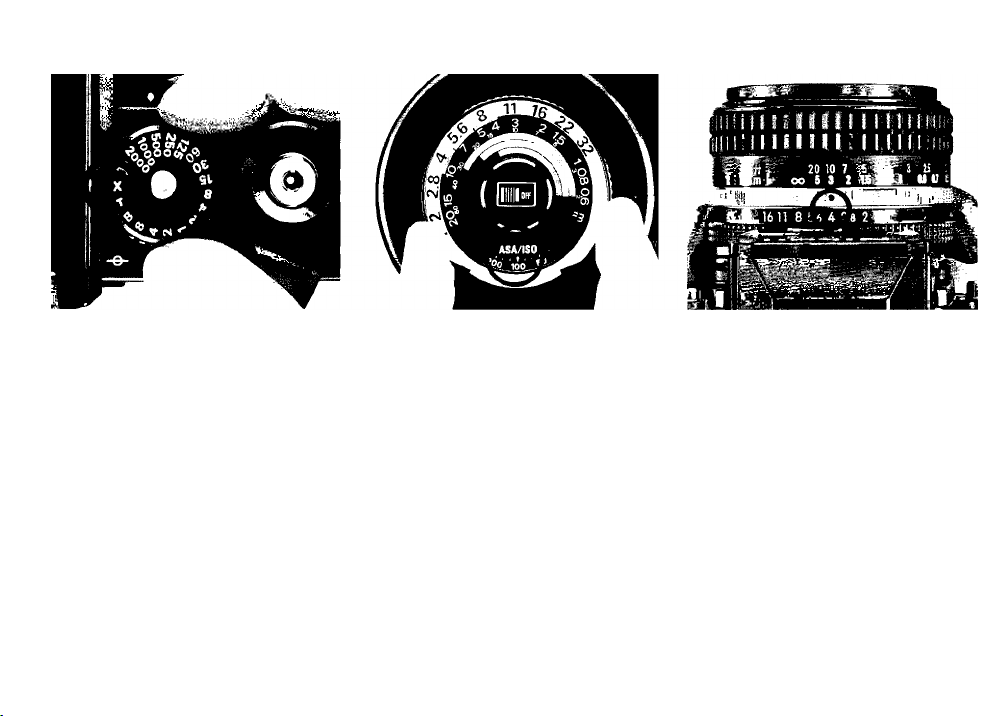
13. Set the camera's shutter
speed for proper synchro
nization.
Set the shutter speed dial to the
highest synchronization speed for
electronic flash (e.g. set the F3 to the
"X" setting). For other camera mod
els, refer to the chart on page 21.
10
14. Set the exposure
calculator dial (D.
Turn the dial until the ASA/ISO
index ® is opposite the speed of the
film in use. The color-coded lines
underneath the f/stop scale©indicate
the three usable f/stops for automatic
operation, whereas the auto shooting
range indicators ® give you the
range of flash-to-subject distances.
For example, if you're using ASA/
ISO 100 film and select f/4, the auto
matic shooting range is indicated by
an orange line. Thus you can shoot
any subject located between 0.6 and
9 meters (2 and 30 feet) from the
speedlight.
15. Set the lens aperture
ring to an appropriate
f/number.
Page 13

16. Set the shooting mode
selector ©.
Turn the ring on the front of the sen
sor until the white index is opposite
the color corresponding to that of the
f/stop selected. This sets the speedlight for automatic operation.
17. Turn on the speedlight.
Slide the power switch ® to
uncover the red mark.
18. Watch the ready-light®.
As soon as the LED ready-light
comes on, the speedlight is ready to
fire.
12
Page 14

—BASIC OPERATION —continued-
19. Take the picture.
After the speedlight fires, if
the ready-light, does not blink, you
have a perfect flash exposure.
12
20. Turn off the speedlight.
To conserve batfery power be
tween shooting sessions, slide the
power switch to the OFF position.
Page 15

CONTROLS IN DETAIL
For FA, FE2,
FE, FM2, FM
For F-301/N2000*,
Motor Drive MD-4
For MD-11,
MD-12, MD-14,
MD-15
*To fit the SK-4 securely onto the Nikon F-301/N2000 camera, use the
Nikon Tripod Adaptor AH-3.
-For F3-series, F-301/N2000
(wfith AH-3), FG, FG-20, EM, F2,
MD-2, MD-3, MD-E, MB-1, MB-2
Bracket SK-4 @
The Speedlight SB-11's bracket can be attached to various
camera and/or motor drive combinations. To change the
attachment screw from one slot to another, slide it to the
threaded end of the slot and unscrew it; then screw it
back into the threaded end of the other slot. Once screw
ed in, the attachment screw can be moved freely to any
position along the slot. The diagram indicates the recom
mended position of the attachment screw for all Nikon
SLR cameras and motor drives.
Note: The bracket contains a tripod socket (
the camera and speedlight to a tripod.
) for direct attachment of
Page 16

Bracket Mounting Adapter ®
The release/locking wheel on the bracket mounting
adapter allows the speedlight to be removed from the
bracket for off-camera flash operation. To detach the
speedlight, loosen the release/locking wheel completely
by turning it to the end of its travel, push the locking
wheel to the left to release the catch, tip the camera back
ward until the two white dots are aligned and pull the
camera away from the speedlight.
Note: The speedlighi's handle contains a tripod/hght stand socket @/or
mounting of the speedlight on a tripod or light stand for more convenient
off-camera operation.
13
Page 17

CONTROLS IN DETAIL —continued-
Tilting Flash Head @
The SB-ll's tilting flash head has click-stops at 30°, 60°,
90°, and approx. 120°. For normal shooting, point the
flash head straight ahead. In this position, the light
travels directly out to the subject providing the maximum
amount of light possible. However, to soften the shadows
and lower the contrast for indoor snapshots, you can tilt
the flash head back to bounce the light off the ceiling or
walls. Consult the illustration for details. You can also use
the open-flash button @ in conjunction with the ready-
light to determine if there is enough light for correct ex
posure before actually taking the picture. Please see
page 19 for more information. The color temperature of
the SB-ll's light output is balanced for use with daylighttype color film.
14
Notes:
1) When the flash head is tilted back only 30°, some amount of light from
the flash head may reach the subject directly, causing unevenness of
illumination. To avoid this, make sure the flash head is tilted back 60°
or more.
2) Unless the surface you are using to bounce the light off is white or
silver, your color photographs will come out with an unnatural color
cast similar to that of the reflecting surface.
Page 18

Wide-Flash Adapter SW-3 ©
The angle of illumination of the SB-11 by itself is 56°
horizontally and 40° vertically—wide enough for use
with a 35mm wideangle lens. When the Wide-Flash
Adapter is clipped onto the front of the flash head, it in
creases the illumination to 67° horizontally and 48° ver
tically providing just the right amount of coverage when
a 28mm lens is used. With the SW-3 attached, the light
output of the speedlight is reduced resulting in a decrease
in guide number from 36 (ASA/ISO 100 and meters) to
25. The AS7VISO 25 and feet guide number is reduced
from 60 to 42.
Page 19

Note: To detach the Wide-Flash Adapter SW-3, first rotate the tilting
flash head to other than the horizontal position. Then lift up the catch at
the top of the to remove it.
15
Page 20

CONTROLS IN DETAIL —continued-
Exposure Calculator Dial
For Automatic Operation
The SB-ll's exposure calculator dial helps you select the
usable range of f/stops for the speed of the film in use and
the flash-to-subject distance. On the dial, there are three
f/stops to choose from. Each f/stop determines the usable
distance range in which you can obtain the correct auto
matic exposure. The automatic shooting ranges for the
three f/stops are indicated by a set of curved color-coded
lines near the center of the dial.
If the subject distance remains the same, the wider the
aperture you select, the faster the recycling time of the
speedlight and the greater the maximum shooting dis
tance, but the less depth of field in the final photograph.
(D
Conversely, if you choose a small aperture, the depth of
field will be greater, but the recycling time will be longer
and the maximum shooting distance is less. Therefore, in
choosing an appropriate f/stop, you should take all these
factors—depth of field, recycling time, and maximum
shooting distance—into consideration.
The following examples explain how to use the exposure
calculator dial:
Example 1
If you are using ASA/ISO 100 film, you can shoot subjects
at distances from 0.6—9m (2—30ft) at f/4, 0.6—6.4m (2—
21ft) at f/5.6, and 0.6—4.5m (2—15ft) at f/8.
Example 1
16
Page 21

Example 2
Example 2
With ASA/ISO 100 and a subject three meters (10 feet)
away, you can shoot at either f/4, f/5.6, or f/8. If a short
recycling time is preferable, use f/4. If greater depth of
field is desired, use f/8.
Once you've selected an appropriate f/stop for the film in
use and the flash-to-subject distance, set this f/number on
your lens and fire away. Your pictures will come out
properly exposed.
Page 22

Example 3
For Manual Operation
Simply read off the f/number which appears directly
above the flash-to-subject distance W; then set this aper
ture on your lens.
Example 3
At ASA/ISO 100, if the subject is three meters (10 feet)
away, you should set the aperture ring on your lens to f/11.
17
Page 23

CONTROLS IN DETAIL —continued-
Sensor Unit SU-2 ©
The plug-in Sensor Unit SU-2 controls the operation of
the SB-11 Speedlight. It has five settings to choose from.
At the Auto Positions
To shoot on Auto, lift up and turn the knurled ring on the
outside of the sensor to one of the three positions (orange,
yellow, or blue) which are color-coded for use with the
exposure calculator dial. At these settings, the SB-11 is
able to vary its light output automatically to match the
flash-to-subject distance.
At the S (Slave) Position
At this setting, the SB-11 emits a modulated burst of light
which can trigger a second electronic flash. The remote
flash unit is attached to the receiver portion of the optional
Modulite Remote Control Unit ML-1 (which is set to
Channel 2), while the SB-11 Speedlight acts as the
transmitter.
At the M (Manual) Position
Set the SU-2 to the M setting and the SB-11 operates
manually at its maximum light output regardless of the
flash-to-subject distance. In this case, you have to calcu
late the exposure manually by referring to the exposure
calculator dial. See page 17 for more information.
18
Page 24

Ready-Light (g)
Built into the back of the SB-ll's flash head is a ready-
light which comes on as soon as the speedlight is recycled
and ready to fire. As an additional feature, the ready-
light blinks if the speedlight fires at its maximum output
indicating that the light might be insufficient for correct
exposure on Automatic. The warning blinks last for
approximately two seconds.
Page 25

Open-Flash Button'
The red open-flash button is used to fire the speedlight
manually without having to trip the camera's shutter. In
this manner, you can create multiple-exposure "strobo
scopic" effects or paint the scene with light by firing the
speedlight repeatedly with the camera set to "B" or "T."
The open-flash button is also used in conjunction with the
ready-light to determine if you can get the correct expo
sure when shooting on Automatic. This is especially
useful when doing bounce flash. After setting up the shot,
push the open-flash button. If the ready-light does not
blink, you can take the picture. If it does blink, try moving
the speedlight closer to the subject or bounce surface, or
reset the Sensor Unit SU-2 to a color-coded position
calling for a wider aperture.
19
Page 26

CONTROLS IN DETAIL — Continued-
External Power Terminal @
This terminal is for connection of a separate battery pack.
20
Sync/Multiple Flash Sockets ©
Two standard Nikon screw-in type terminals are provided
on the SB-11 Speedlight. Either terminal can be used to
attach the Sync Cord SC-11, while the other is provided
for connecting the SB-11 with another speedlight in series
for multiple flash operation.
Page 27

Sync Cord SC-11 ©
This cord has standard Nikon connections at both ends
for positive attachment of the SB-11 to a Nikon camera
having a screw-in type sync terminal.
Page 28

Synchronization Chart
1 Nikon Camera
F3-series
FA
FE2
FE
Proper synchronization speed (sec.)
1/80 (X) or slower
1/250 or slower
1/250 or slower
1/125 or slower
FM2
(with 1/250 sec.
1/250 or slower
sync speed)
FM2
(with 1/200sec.
1/200 (X200) or slower
sync speed)
F-301/N2000*
FG-20*
FG*
EM*
F2-series
1/125 or slower
1/90 (M90) or slower
1/90 (M90) or slower
1/90 (M90) or slower
1/80 (red line located between 1/60
and 1/125) or slower
‘These cameras do not have a sync terminal. To use the SB-11, you must
first attach the Sensor Remote Cord SC*13. Via the SC-13, the shutter
speed is automatically switched to the proper synchronization speed
with the camera in any automatic exposure mode.
21
Page 29

— ACCESSORIES
TTL Remote Cords SC-12 and SC-23
The SC-12 is for the Nikon F3-series cameras; the SC-23
is for the Nikon FA, FE2, F-301/N2000 and FG cameras.
Connecting the SB-11 and an appropriate camera with
SC-12 or SC-23 provides TTL control of the flash expo
sure. Automatic switchover of shutter speed to a proper
flash sync speed and a ready-light indication in the
camera's viewfinder are also provided.
Sensor Remote Cord SC-13
The SC-13 is used to mount the SB-ll's Sensor Unit SU-2
directly on a camera's ISO-type accessory shoe lor auto
matic (but not TTL), off-camera operation. With the FA,
FE2, FE, FM2, F-301/N2000, FG, FG-20, or EM camera,
or with the F3-series camera via the AS-4 coupler, a
ready-light indication is provided in the camera's view
finder. Except for the FM2, the automatic switchover of
shutter speed to a proper flash sync speed is also pro
vided.
Sync Cord SC-15
A coiled cord over one meter in length, the SC-15 screws
into the camera's sync terminal and allows the SB-11 to
be detached from its bracket and used off-camera.
DC Unit SD-7
The Nikon DC Unit SD-7 is an external power source
which can be used with the Nikon Speedlights SB-11 and
SB-14. This unit uses six C-type batteries of either the
22
Page 30

alkaline-manganese or general NiCd type. Alkalinemanganese batteries will produce approximately 270
flashes with the SB-11 and SB-14 on Manual (in normal
temperatures). Minimum recycling time with NiCd bat
teries is approximately 4 seconds with the SB-11 and SB-
14.
SD-7
Page 31

"RED EYE'^^---------------------
"Red eye" is a phenomenon in flash photography where
the center portions of the subject's eyes appear as bright
red orbs in color photographs (or white in black and
white pictures). This is a result of the light from the flash
illuminating the retina directly. If the subject looks
straight into the lens and there is little or no ambient
light, the pupil is wide open, making the retina clearly
visible in the picture.
To avoid "red eye," you can take any or all of the follow
ing precautions:
1. Ask the subject not to look directly into the lens when
the picture is taken.
2. Remove the flash unit from the camera and hold it as
far away as possible from the camera by using a sync
cord.
3. Increase the room's overall illumination to reduce the
opening of the subject's pupils.
23
Page 32

TIPS ON SPEEDLIGHT CARE
To remove dirt or fingerprints,
wipe with a dry soft or silicontreated cloth. Never use thinner,
benzine or alcohol, since they
might damage the plastic parts.
To clean the Wide-Flash Adapter,
wash it with soap and water.
Never use a brush, as this may
damage it.
24
If you do not plan to use the unit
for more than two weeks, remove
the batteries to avoid possible
damage to the circuitry by battery
leakage. If leakage should inad
vertently occur, take the flash unit
to your nearest Nikon authorized
service facility.
To prevent damage to the flash
unit's electronic circuitry, keep
the camera away from places
where the temperature is likely to
go higher than 50°C, such as
inside the trunk of a car in the hot
summer sun; also do not store the
unit in exceptionally damp
places. Use the SB-11 within the
range of —10°C~ -l-50°C.
Page 33

• If your SB-11 has not been used
for a long time, its recycling time
may be longer. To maintain the
built-in condenser in peak condi
tion, thereby enabling you to use
the SB-11 for many years, fire the
flash unit a few times every
month. After firing, wait until the
ready-light lights, then turn off
the power switch, remove the bat
teries, and store the SB-11 in a
suitable location. This will pre
vent the condenser from deterio
rating.
Keep the flash unit away from salt
water and out of the rain.
Never attempt to disassemble or
repair the flash yourself. These
delicate procedures should be left
to an authorized service facility.
25
Page 34

OPTIMUM BATTERY PERFORMANCE
New batteries. Between manufacturing and first use, all
batteries exhibit some drain. Therefore, care should be
taken to purchase the newest (and freshest) ones possi
ble. To help you do this, some manufacturers stamp the
date of manufacture on the bottom of each battery. Ask
your camera dealer for assistance in interpreting the
codes.
Temperature. Battery life ratings are based on operation
at around 25°C (77°F). At other temperatures, battery
life is shortened. Spare batteries should therefore be kept
available if operation in low temperatures is anticipated.
Continuous use. Batteries are drained much more quick
ly by Continuous use than by intermittent use.
Storage. When not in use, the batteries should be re
moved to prevent damage from leakage. To minimize
drain during the period of disuse, store the batteries in a
cool, dry place below 20°C (68°F).
Battery brands. Do not mix brands of batteries, nor use
batteries with different model numbers. Also, avoid mix
ing new and old batteries since proper performance will
not be obtained and battery leakage may occur.
Disposal. Do not dispose of batteries by burning. Also,
for safety's sake, never disassemble batteries.
Polarity. When installing batteries, observe the voltage
polarities carefully. Reversal of the positive (-I-) and neg
ative (-) terminals will result in leakage. If leakage
should occur, take the SB-11 to your dealer.
NiCd batteries. In comparison with regular batteries,
NiCd batteries provide faster recycling time and better
efficiency at low temperatures. However, note that the
recycling time and the number of flashes per battery set
are dependent on the age of the batteries, how much
charge they have, and their capacities.
26
Page 35

SPECIFICATIONS
Light output control
Guide number
(ASA/ISO 100 and
meters)
(ASA/ISO 25 and feet)
Angle of coverage
Automatic shooting
range
(at ASA/ISO 100)
ASA/ISO film speed
range
Recycling time
Automatic: flash output control
with silicon controlled rectifier
(thyristor) using Sensor Unit
SU-2;
Manual: full output
36 (25 with Wide-Flash Adapter
SW-3)
60 (42 with Wide-Flash Adapter
SW-3);
Horizontal: 56° (67° with SW-3);
Vertical: 40° (48° with SW-3)
0.6—9m (2—30ft) at f/4;
0.6—6.4m (2—21ft)atf/5.6;
0.6—4.5m (2—15 ft) at f/8
ASA/ISO 25~800
Automatic: variable depending
on shooting distance;
Manual: approx. 8 sec.
Page 36

Number of flashes
(approx.)
Power source
Ready-light
Open-flash button
Mounting
Dimensions
(approx.)
Weight
(excluding batteries)
Automatic: variable depending
on shooting distance;
Manual: 150 with fresh set of
alkaline-manganese batteries
Eight 1.5V AA-type penlight
batteries
Provided; blinks if flash output is
at its maximum indicating that
light might be insufficient for
correct automatic exposure
Provided
Bracket-type
276mm (H) x 104 mm (W) x
118mm(D)
Approx. 860g
27
Page 37

No reproduction in any form of this booklet,
in whole or In part (except for brief quotation in
critical articles or reviews), may be made without
written authorization from Nippon Kogaku K.K.
Page 38

NIPPON KOGAKU K.K.
Fuji Bldg., 2-3, Marunouchi 3-chome, Chiyoda-ku, Tokyo 100, Japan
Phone:81-3-214-5311 Telex: J22601 (NIKON) Fax:81-3-201-5856
Printed in Japan 8&135-A10
 Loading...