

1

Table of Contents
Buttons and Dials...................................... 3
The Command Dials.................................. 6
Memory Card Slots.................................. 12
Using Two Memory Cards ............................. 12
Guides and Tips....................................... 14
Help ....................................................................... 14
Two-Button Reset:
Restoring Default Settings........................ 14
Release Mode .......................................... 15
Live View.................................................. 16
g Hand-Held...................................................... 16
h Tripod............................................................... 18
Picture Controls ...................................... 20
Custom Picture Controls................................ 22
The Fn Button.......................................... 24
Menu Guide ............................................. 25
D PLAYBACK MENU........................................ 25
C SHOOTING MENU....................................... 26
A CUSTOM SETTING MENU......................... 30
B SETUP MENU ................................................. 37
N RETOUCH MENU.......................................... 40
O MY MENU........................................................ 40
2
Buttons and Dials
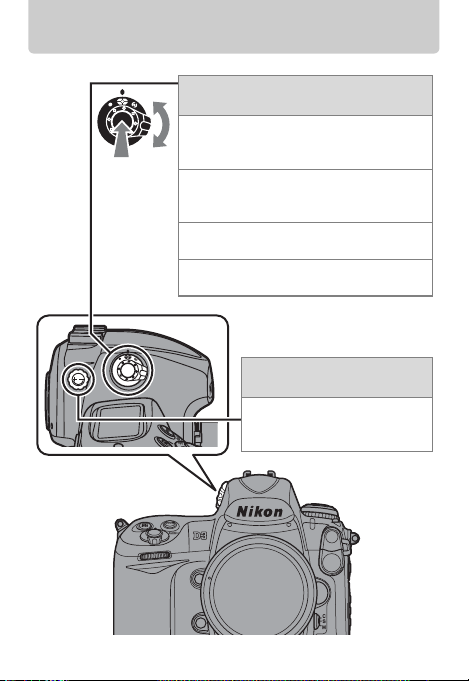
Metering selector
Metering selector lock button
Press the metering selector lock button
and rotate the metering selector to choose
a metering method.
Center-weighted (pg. 32)
Z
Assigns the greatest weight to the
center of the frame.
Matrix
a
Meters most of the frame.
Spot
b
Meters the selected focus point.
Diopter adjustment
control
Pull up and rotate until the
display in the viewfinder is in
focus.
3
Buttons and Dials
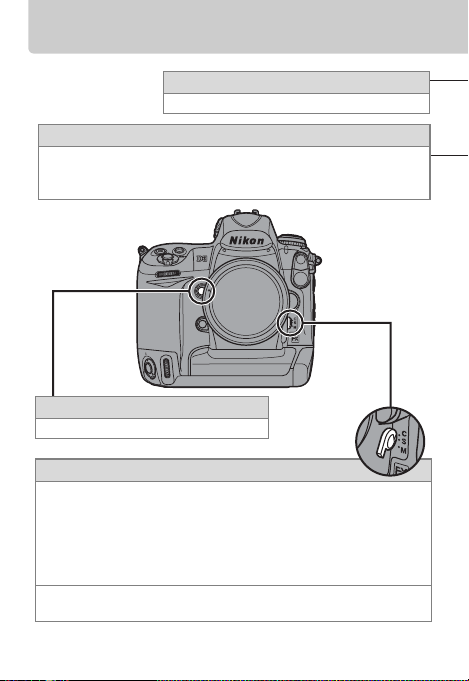
K (playback) button
View photographs in the monitor (pg. 25).
N (thumbnail/playback zoom) button
Press the N button and rotate the main command dial to display
thumbnails or to zoom the photograph currently displayed in the
monitor in or out.
Depth-of-field preview button
Preview depth of field.
Focus-mode selector
Modes S and C (autofocus)
The camera focuses using autofocus (AF) when shutter-release
button is pressed halfway.
when the camera focuses.
camera continues to adjust focus until the shutter is released
(pg. 30).
Mode M (manual)
Focus is adjusted manually using the lens focusing ring.
In mode S (single-servo AF), focus locks
In mode C (continuous-servo AF), the
4
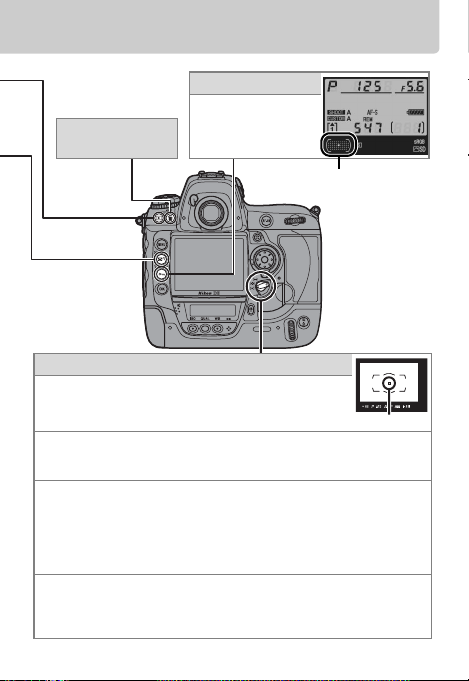
R (info) button
Display shooting
O (delete)
button
(pg. 25)
information in the
monitor (pg. 34).
The active focus point
is shown here.
AF-area mode selector
Choose how the camera selects the focus point for
autofocus.
Auto-area AF
H
The camera automatically detects the subject and selects the focus
point.
Dynamic-area AF
I
The user selects the focus point with the multi selector (if focus
selection is locked, rotate the focus selector lock to I). If the
subject briefly leaves the selected focus point in focus mode C (pg.
4), the camera will focus based on information from surrounding
focus points
Single-area AF (default)
K
The user selects the focus point with the multi selector (if focus
selection is locked, ro tate the focus selector lock to I); the camera
focuses on the subject in the selected focus point only.
(pg. 30).
Focus point
5
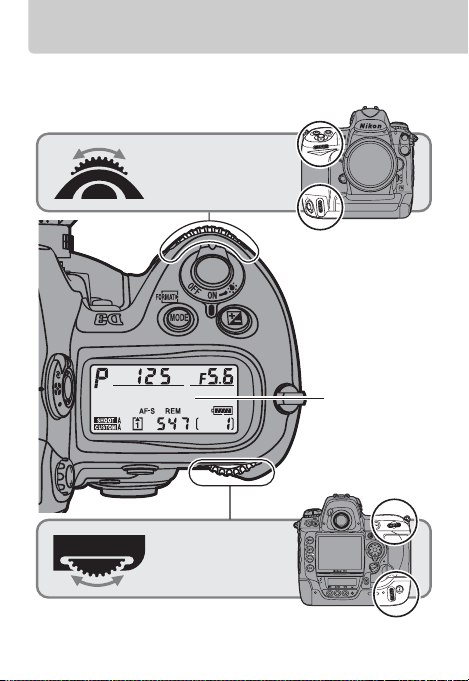
The Command Dials
The settings that can be adjusted by pressing a button and
rotating a command dial are listed below.
Sub-command
dial
Top Control
Panel
Main command
dial
6
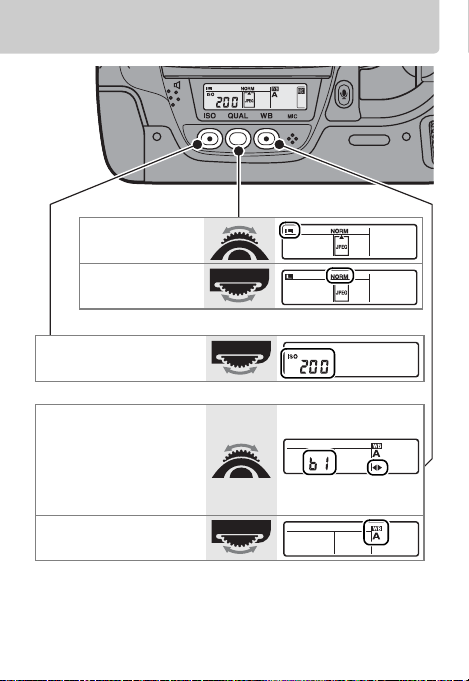
Choose an
image size
Set image
*
quality
*
Set ISO sensitivity
*
Fine-tune white
balance*/Set color
temperature*/
Choose a white
balance preset
Choose a white
balance setting
* Can also be adjusted from the shooting menu (pg. 26).
*
*
7
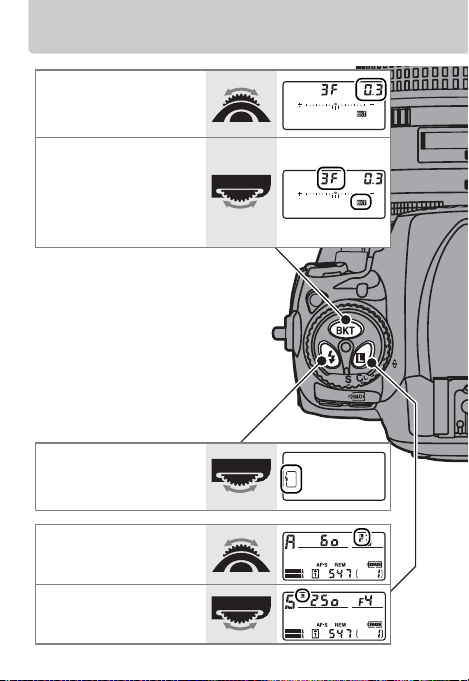
The Command Dials
Select bracketing
exposure
increment
Activate or cancel
bracketing/select
number of shots in
bracketing
sequence
Choose flash mode
for optional flash
unit
Aperture lock
Shutter speed lock
8
CUSTOM
CUSTOM
SHOOT
SHOOT
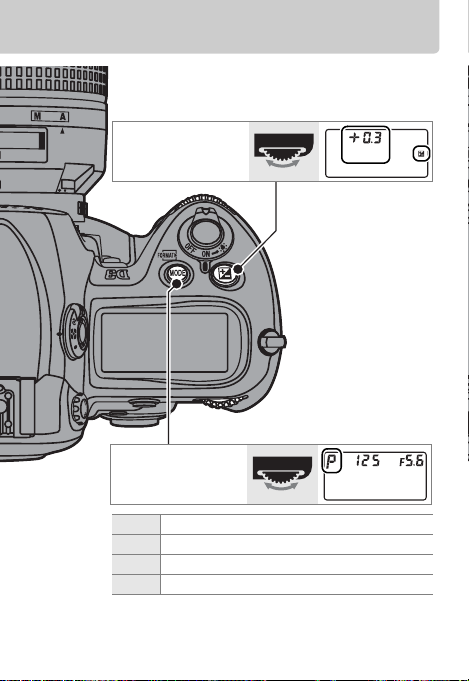
Set exposure
compensation
Choose the
exposure mode
e Programmed Auto
f Shutter-Priority Auto
g Aperture-Priority Auto
h Manual
9
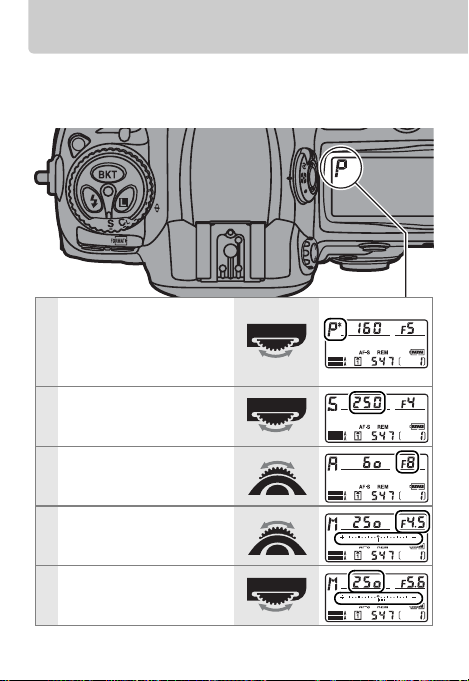
The Command Dials
Once the exposure mode has been selected, the following
settings can be adjusted by rotating the command dials
(pg. 9).
Choose a
combination of
e
aperture and
shutter speed
Choose a shutter
f
speed
Choose an aperture
g
Choose an aperture
h
Choose a shutter
h
speed
CUSTOM
CUSTOM
CUSTOM
CUSTOM
CUSTOM
SHOOT
SHOOT
SHOOT
SHOOT
SHOOT
10
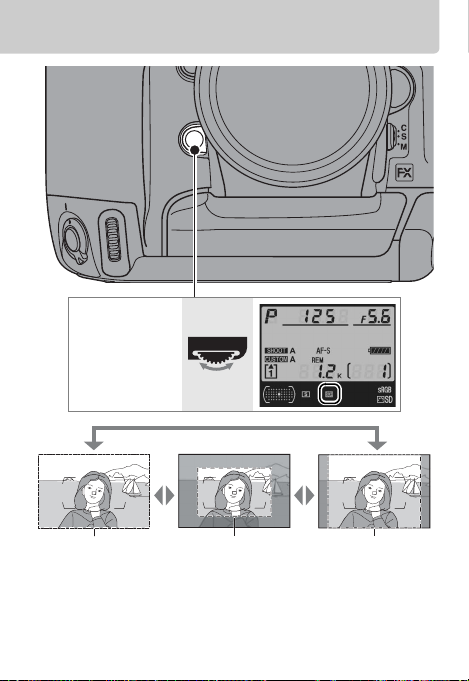
Choose an
image area
FX format
(36 × 24)
DX format
(24 × 16)
5 : 4
(30 × 24)
11
Memory Card Slots
Using Two Memory Cards
The D3 is equipped with two
memory card slots.
describes how to select a card for
formatting, recording, and
playback when two memory
cards are inserted.
This section
Slot 1
Slot 2
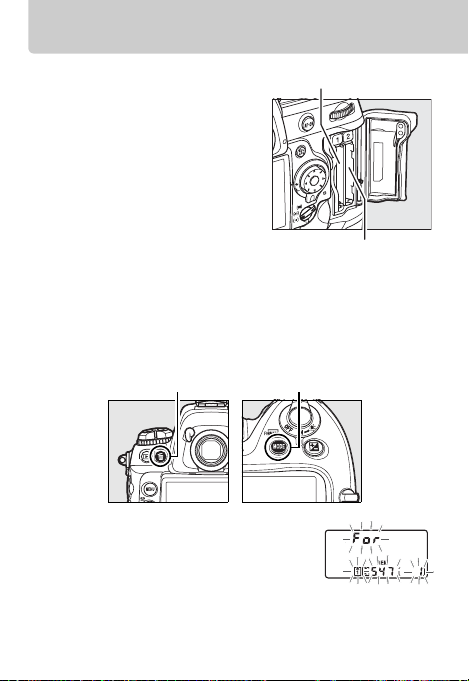
Formatting Memory Cards
1. Press the Q buttons.
Press both the Q (O and I) buttons simultaneously for
about two seconds.
O button I button
The icon for the current slot will start
to blink and a blinking C will
appear in the top control panel.
2. Select a memory card.
Rotate the main command dial to choose the memory
card that will be formatted.
SHOOT
12

3. Format the selected card.
Press both Q buttons again to format the selected
memory card.
Memory cards can also be formatted in the setup menu (pg. 37).
Recording Photographs
The [Slot 2] item in the shooting menu (pg. 26) is used to
select the role played by the memory card in slot j
during shooting.
Option
Overflow
(default)
Backup Each photograph is recorded to both
Rear control
panel
Description
The memory card in sl ot j is used to
record photographs when the
memory card in slot i is full.
memory cards.
RAW Slot 1JPEG Slot 2
Viewing Photographs
To select a memory card for
playback, press 1 while
pressing the N button.
The menu shown at right
will be displayed; highlight
the desired slot and press J.
As for [Backup], except that at image
quality settings of NEF (RAW)+JPEG,
the NEF (RAW) image is recorded to
the memory card in slot i, the JPEG
image to the memory card in slot j.
13

Guides and Tips
Help
If a d icon is displayed at the bottom left
corner of the monitor, help can be
displayed by pressing the L (d)
button.
Two-Button Reset: Restoring Default Settings
Camera settings can be restored to
default values by holding the ISO and WB
buttons down together for more than
two seconds (these buttons are marked
by a green dot).
not affected.
Custom Settings are
ISO
button
WB
button
14

Release Mode
Choose from the following six release
modes. To choose a release mode, press
the release mode dial lock release and
rotate the release mode dial.
Mode Description
Single frame
Continuous
low speed
Continuous
high speed
Live view
One photograph is taken each
time the shutter-release button
is pressed.
The camera takes photographs
at a slow rate while the shutterrelease button is pressed.
The camera takes photographs
at a fast rate while the shutterrelease button is pressed.
Frame photographs in the
monitor (pg. 16).
Self-timer
Mirror up
Take pictures with the selftimer.
Raise the mirror before taking
photographs.
15

Live View
g Hand-Held
Choose [Hand-held] mode.
1
Press the release mode dial lock
release and rotate the release mode
dial to a (live view).
In the shooting menu, select [Handheld] for [Live view] > [Live view
mode]. The [Release mode] option in
the [Live view] menu can be used to
choose from single frame and
continuous release modes.
Display the view through the lens in the monitor.
2
Press the shutter-release button all the
way down.
will be displayed in the monitor.
Frame the photograph in the monitor.
The view through the lens
Exit
16

Focus.
3
While framing the photograph in the
monitor, press the shutter-release
or
Check the composition and shoot.
4
Exit
button halfway or press one of the
B buttons.
The mirror will click down, the monitor
will turn off, and the camera will focus.
Release the shutter-release or B
button and check the composition in
the monitor.
Press the shutter-release button all the
way down to shoot.
clicks as the mirror drops into place
and the shutter is released.
You will hear two
17

Live View
h Tripod
Choose [Tripod] mode.
1
Frame the photograph.
2
Press the release mode dial lock
release and rotate the release mode
dial to a (live view).
In the shooting menu, select [Tripod]
for [Live view] > [Live view mode]. The
[Release mode] option in the [Live
view] menu can be used to choose
from single frame and continuous
release modes.
Frame the photograph in the
viewfinder and press one of the B
buttons to focus.
18

Display the view through the lens in the monitor.
3
Press the shutter-release button all the
way down.
will be displayed in the monitor.
Exit
Focus.
4
The camera will focus while the B
button is pressed.
monitor can be magnified to check
focus by pressing the N button and
rotating the main command dial to
right.
Check the composition and shoot.
5
After checking framing and focus,
press the shutter-release button all
the way down to shoot.
two clicks as the mirror drops into
place and the shutter is released.
The view through the lens
The view in the
You will hear
19

Picture Controls
Quickly select the final look for your photographs by
choosing a pre-existing Nikon Picture Control from the
Picture Control menu, or make separate detailed
adjustments to individual Picture Control settings.
Nikon Picture Controls
Standard
Q
Neutral
R
Vivid Pictures are enhanced for a vivid, photoprint
S
Monochrome
T
Standard processing for balanced results.
Minimal processing for natural results.
effect.
Take monochrome photographs.
20

Q Standard
The Picture Control Grid
Shows contrast and saturation for the
selected Picture Control.
Thumbnail/playback zoom button
Choose a preset variation on the
selected picture control for balanced
sharpening, contrast, and saturation.
Adjust individual settings manually.
T Monochrome
Create the effect of
monochrome photographs
taken with a color filter.
Choose the tint used in
monochrome photographs.
21

Picture Controls
Custom Picture Controls
Save/edit
Edit an existing Picture Control and save it as a new,
custom Picture Control.
Rename
Rename existing custom Picture Controls.
Delete
Delete custom Picture Controls.
Load/save
Save custom Picture Controls to the memory card, or
load custom Picture Controls created with ViewNX
(supplied) or Capture NX (available separately).
22

Choose an existing
Picture Control.
Adjust Picture
Control settings.
Choose a destination
for the Custom
Picture Control.
The new Picture
Control appears in the
Picture Control list.
Enter a name.
23

The Fn Button
Custom Setting f4 ([Assign FUNC.
button]) controls the function performed
by the
Fn button, either by itself or in
combination with the command dials.
D
E
v
w
* Most of the options can also be performed by using either the
depth-of-field or the AE-L/AF-L button (pg. 36).
24
*
Preview
q
FV lock
e
AE/AF lock
B
AE lock only
C
AE lock (Reset on release)
AE lock (Hold)
AF lock only
F
Flash off
s
Bracketing burst
t
Matrix metering
a
Center-weighted
Z
Spot metering
b
Virtual horizon
u
None (default)
Choose image area (default)
i
1 step spd/aperture
Choose non-CPU lens number
Focus point-selection
x
None

Menu Guide
The Menu Guide lists the options
in the top two levels of the menus.
D PLAYBACK MENU
Delete Selected
Playback folder NC_D3 (default)
Hide image Select/set
Display mode Done
Copy image(s) Select image(s)
Image review On
After delete Show next (default)
Items marked with a CF icon can be saved to the memory card in slot
i using the [Save/load settings] > [Save settings] option in the
camera setup menu (pg. 39).
other D3 cameras by inserting the memory card into slot i and
selecting [Save/load settings] > [Load settings].
All
All
Current
Deselect all?
Basic photo info
Highlights
Focus point
Detailed photo info
RGB histogram
Data
Select destination folder
Copy image(s)?
Off (default)
Show previous
Continue as before
The saved settings can be copied to
D PLAYBACK MENU 25

Menu Guide
Rotate tall On
Slide show Start
Print set (DPOF) Select/set
Off (default)
Frame interval
Audio playback
Deselect all?
C SHOOTING MENU
Shooting menu bank A(default)
Reset shooting menu Yes
Active folder New folder number (default)
File naming File naming
Slot 2 Overflow (default)
B
C
D
Rename
No (default)
Select folder
Backup
RAW Slot 1- JPEG Slot 2
26 C SHOOTING MENU

Image quality NEF (RAW)+JPEG fine
(pg. 7)
Image size Large (default)
(pg. 7)
Image area Auto DX crop
JPEG compression Size priority (default)
NEF (RAW) recording Type
White balance Auto (default)
(pg. 7)
NEF (RAW)+JPEG normal
NEF (RAW)+JPEG basic
NEF (RAW)
TIFF (RGB)
JPEG fine
JPEG normal (default)
JPEG basic
Medium
Small
Choose image area
Optimal quality
NEF (RAW) bit depth
Incandescent
Fluorescent
Direct sunlight
Flash
Cloudy
Shade
Choose color temp.
Preset manual
C SHOOTING MENU 27

Menu Guide
Set Picture Control Standard (default)
Manage Picture Control Save/edit (default)
Color space sRGB (default)
Active D-Lighting High
Long exp. NR On
High ISO NR High
ISO sensitivity settings ISO sensitivity
(pg. 7)
Live view
(pg. 16)
* Not available if no custom Picture Controls are present.
Neutral
Vivid
Monochrome
*
Rename
*
Delete
Load/save
Adobe RGB
Normal
Low
Off (default)
Off (default)
Normal (default)
Low
Off
ISO sensitivity auto control
Live view mode
Release mode
28 C SHOOTING MENU

Multiple exposure Done
Interval timer shoo ting Choose start time (default)
Number of shots
Auto gain
Now
Start time
C SHOOTING MENU 29

Menu Guide
A CUSTOM SETTING MENU
Custom setting bank
A(default)
B
C
D
Rename
Reset custom settings
Yes
No (default)
a Autofocus
a1 AF-C priority
selection
a2 AF-S priority
selection
a3 Dynamic AF area* 9 points (default)
a4 Focus tracking
with lock-on
*Only applies when focus mode selector is rotated to mode C.
Release (default)
Release + focus
Focus
Release
Focus (default)
21 points
51 points
51 points (3D-tracking)
Long
Normal (default)
Short
Off
30 A CUSTOM SETTING MENU

a Autofocus
a5 AF activation Shutter/AF-ON (default)
a6 Focus point
illumination
a7 Focus point
wrap-around
a8 AF point selection 51 points (default)
a9 AF-ON button AF-ON (default)
a10 Vertical AF-ON
button
AF-ON only
Manual focus mode
Continuous mode
Wrap
No wrap (default)
11 points
AE/AF lock
AE lock only
AE lock (Reset on release)
AE lock (Hold)
AF lock only
Same as AF-ON
AF-ON (default)
AE/AF lock
AE lock only
AE lock (Reset on release)
AE lock (Hold)
AF lock only
A CUSTOM SETTING MENU 31

Menu Guide
b Metering/exposure
b1 ISO sensitivity
step value
b2 EV steps for
exposure cntrl.
b3 EV steps for
exposure comp.
b4 Easy exposure
compensation
b5 Center-weighted
area
b6 Fine tune optimal
exposure
c Timers/AE lock
c1 Shutter-release
button AE-L
1/3 step (default)
1/2 step
1 step
1/3 step (default)
1/2 step
1 step
1/3 step (default)
1/2 step
1 step
On (Auto reset)
On
Off (default)
φ 8 mm
φ 12 mm (default)
φ 15 mm
φ 20 mm
Average
Yes
No (default)
On
Off (default)
32 A CUSTOM SETTING MENU

c Timers/AE lock
c2 Auto meter-off
delay
c3 Self-timer delay 2 s
c4 Monitor off delay 10 s
d Shooting/display
d1 Beep High
d2 Shooting speed Continuous high-speed
d3 Max. continuous
release
4 s
6 s (default)
8 s
16 s
30 s
1 min.
5 min.
10 min.
30 min.
No limit
5 s
10 s (default)
20 s
20 s (default)
1 min.
5 min.
10 min.
Low
Off (default)
Continuous low-speed
1–130
A CUSTOM SETTING MENU 33

Menu Guide
d Shooting/display
d4 File number
sequence
d5 Control panel/
viewfinder
d6 Shooting info
display
d7 LCD illumination On
d8 Exposure delay
mode
e Bracketing/flash
e1 Flash sync speed 1/250 s (Auto FP)
On (default)
Off
Reset
Rear control panel
Viewfinder display
Auto (default)
Manual
Off (default)
On
Off (default)
1/250 s (default)
1/200 s
1/160 s
1/125 s
1/100 s
1/80 s
1/60 s
34 A CUSTOM SETTING MENU

e Bracketing/flash
e2 Flash shu tter
speed
e3 Modeling flash On (default)
e4 Auto bracketing
set
e5 Auto bracketing
(Mode M)
e6 Bracketing order MTR > under > over (default)
1/60 s (default)
1/30 s
1/15 s
1/8 s
1/4 s
1/2 s
1 s
2 s
4 s
8 s
15 s
30 s
Off
AE & flash (default)
AE only
Flash only
WB bracketing
Flash/speed (default)
Flash/speed/aperture
Flash/aperture
Flash only
Under > MTR > over
A CUSTOM SETTING MENU 35

Menu Guide
f Controls
f1 Multi selector
center button
f2 Multi selector Reset meter-off delay
f3 Photo info/
playback
f4 Assign FUNC.
button (pg. 24)
f5 Assign preview
button
f6 Assign AE-L/AF-L
button
f7 Customize
command dials
f8 Release button to
use dial
f9 No memory card? Release locked
f10 Reverse indicators (default)
Shooting mode
*
Playback mode
Do nothing (default)
Info C/Playback D
Info D/Playback C (default)
FUNC. button press
FUNC. button+dials
Preview button press
Preview+command dials
AE-L/AF-L button press
AE-L/AF-L+command dials
Reverse rotation (default)
Change main/sub
Aperture setting
Menus and playback
Yes
No (default)
Enable release (default)
* The default for [Shooting mode] is [Select center focus point].
The default for [Playback mode] is [Thumbnail on/off].
36 A CUSTOM SETTING MENU

B SETUP MENU
Format memory card Slot 1
LCD brightness –3 – +3
Lock mirror up for
cleaning
Video mode NTSC
HDMI Auto (default)
World time Time zone
Slot 2
Start
PAL
480p (progressive)
576p (progressive)
720p (progressive)
1080i (interlaced)
Date and time
Date format
Daylight saving time
B SETUP MENU 37

Menu Guide
Language
Image comment Done
Auto image rotation On (default)
Voice memo Off (default)
Voice memo overwrite Disable (default)
Voice memo button Press and hold (default)
Input comment
Attach comment
Off
On (Auto and manual)
Manual only
Enable
Press to start/stop
38 B SETUP MENU

Audio output Via speaker (default)
USB Mass Storage
Dust off ref photo Start
Battery info –
Wireless transmitter Mode
Image authentication On
Save/load settings Save settings
GPS Auto meter off
Virtual horizon –
Non-CPU lens data Done
AF fine tune AF fine tune (On/Off)
Firmware version –
HDMI/audio-video output
Off
MTP/PTP (default)
Transfer settings
Print
Device info
Device settings
Off (default)
Load settings
Position
Lens number
Focal length (mm)
Maximum aperture
Saved value
Default
List saved values
B SETUP MENU 39

Menu Guide
N RETOUCH MENU
D-Lighting High
Red-eye correction –
Trim –
Monochrome Black-and-white (default)
Filter effects Skylight (default)
Color balance –
Image overlay –
Side-by-side comparison –
Normal (default)
Low
Sepia
Cyanotype
Warm filter
O MY MENU
Add items Playback menu
Remove items –
Rank items –
40 N RETOUCH MENU
Shooting menu
Custom setting menu
Setup menu
Retouch menu
Printed in Europe
SB7J01(11)
6MB01111-01
 Loading...