

Page 1

Playing Photographs Back
Take a Picture
En
Digital Camera
Quick Start Guide
Quick Start Guide
Read this guide for a basic introduction to
taking pictures with your D2X at default,
“point- and -shoot” settings.
The reverse side provides instructions for
installing PictureProject and transferring
pictures to your computer.
Complete information on using your
Nikon digital camera can be found in the
Nikon Guide to Digital Photography with
the D2X or the PictureProject reference
manual (on CD).
Unpacking the Camera
Be sure all items listed here were included with your camera.
NOTE: Memory cards are sold separately.
D2X camera ...............................................
BM-3 LCD monitor cover (attached to
camera) ......................................................
BF-1A body cap (attached to camera).....
Battery-chamber cover BL-1
(attached to camera) ................................
Quick Start Guide (this guide) .................
Nikon Guide to Digital Photography.......
Warranty....................................................
Type B BriteView III focusing screen .......
Quick Start Guide
Warranty
Parts of the Camera
Shutter-release button
Power
switch
Battery- chamber cover
Exposure mode (
Format (
Diopter adjustment knob
) button
) button
Top control panel
To U sers of Digital Cameras with Interchangeable Lenses: Foreign Matter on the Low-Pass Filter
Nikon takes every possible precaution to prevent foreign matter from coming into contact with the low- pass
fi lter during production and shipping. The D2X, however, is designe d to be us ed with i nt er ch angeabl e lens es,
and foreign matter may enter the camera when lenses are removed or exchanged. Once inside the camera,
this foreign matter may adhere to the low-pass fi lter, where it may appear in photographs taken under certain
conditions. To prevent foreign matter from entering the camera, do not exchange lenses in dusty environments.
To protect the camera when no lens is in place, be sure to replace the body cap provided with the camera,
being careful to fi rst remove all dust and other foreign matter that may be adhering to the body cap.
Should foreign matter fi nd its way onto the low-pass fi lter, clean the low-pass fi lter as instructed on pages 252–253
of the Guide to Digital Photography, or have the low-pass fi lter cleaned by authorized Nikon service personnel.
Photographs affected by the presence of foreign matter on the low-pass fi lter can be retouched using Nikon
Capture 4 (available separately) or the clean image options available in some third- party imaging software.
Playback ( ) but ton
EN-EL4 rechargeable Li- ion battery
with terminal cover (instruction manual
Eyelet
for camera strap
Menu ( ) bu tton
Enter (
included)....................................................
MH-21 quick charger with power cable
(instruction manual included) .................
AN-D2X strap ............................................
EG-D2 audio / video cable..........................
UC-E4 USB cable........................................
PictureProject CD-ROM (gray).................
PictureProject Reference Manual
CD-ROM (silver) ........................................
Delete ( ) button
Format (
) butto n
Monitor
Rear control panel
) butto n
Viewfi nder
eyepiece
Multi selector
Memvory card
slot cover
Card-slot cover
release button
(under cover)
Take a Picture
A. Charge the battery
Charge
lamps
Attaching the Camera Strap
Attach the camera strap securely to the two eyelets on the camera body as shown below.
C
L
C
S
C
L
C
S
Charge the EN-EL4 in the MH -21 Quick
Charger provided with the camera (see
the documentation provided with the
battery and charger for details). The
charge lamps will blink green while
the battery charges. Charging is
complete when the charge lamps
stop blinking.
When fully exhausted, EN-EL4
batteries will recharge in about 100
minutes.
C
L
C
S
C
L
C
S
B. Attach the battery-chamber cover
Battery pack latch
1 Turn the b atte r y -chambe r co ver
latch to the open position (
remove the battery-chamber cover
.
2
Attach the battery-chamber cover to
the battery pack by inserting the twin
projections on the battery into the
matching holes in the battery chamber
cover. Slide the cover on until the latch
returns to the closed position and the
arrow (
Before replacing the battery chamber
cover, check that the latch is open. If
the arrow ( ) is visible, the latch is
closed. Slide the latch in the direction
of the arrow as far a s it will g o be for e
replacing the cover.
See the EN- EL4 instruction manual for
details. If desired, the battery can be
recharged with the battery-chamber
cover attached.
) is visible.
)
and
C. Insert the battery
1 Turn the camera off.
2 Insert the battery pack .
3 Latch the battery-chamber cover .
To prevent the battery from being
dislodged during operation, be sure
the cover is securely latched.
D. Attach a Lens
Mounting marks
1 Turn t he camera off.
2 Keeping the mounting marks aligned
as shown left, position the lens in the
camera’s bayonet mount. Without
pressing the lens release button, rotate
the lens counterclockwise until it clicks
into place.
3 Lock aperture at the minimum setting
(highest f/-number). This step is not
necessary for type G lenses.
To t ake full advantage of the features
offered by the D2X, use a type G or D
CPU Nikkor lens.
E. Insert a memory card
1 After turning the camera off, open
the door protecting the card-slot
cover release button and press the
release button to open t he c ard s lot
cover .
2 Insert the memory card with the rear
label toward the monitor, sliding the
card in until it is fully seated in the
contacts at the back of the slot and
the eject button pops up . Close the
card slot cover.
Rear label
F. Set the camera clock
1
Turn ca mera on.
4
Position cursor in SET UP
menu.
2
Display menus. (If option
is highlighted, press multi
selector to left until icon at
left of menu is selected.)
5
Highlight Language.
7 8
Highlight option.
10
Display options.
13
Select local time zone.
15
Highlight Date.
18
Highlight Date format.
21
Return to WORLD TIME
menu.
Return to set up menu.
11
Highlight Time zone.
14
Return to WORLD TIME
menu.
16
Display DATE menu.
19
Display options.
22
Return to set up menu.
G. Format the memory card
Top con trol panel
Viewfi nder
3
Display SET UP menu.
6
Display options.
9
Highlight World Time.
12
Display map of world time
zones.
UTC fi eld shows time difference between selected time
zone and Coordinated Universal Time (UTC), in hours.
If daylight saving time is in
effect in local time zone,
highlight Daylight saving
time and press multi selector
to right. Press multi selector
down to highlight On and
press multi selector right.
Time will automatically be
advanced one hour.
17
Edit Year, Month, Day, Hour,
Minute, and Second. Press
multi selector left or right to
select item, up or down to
change. Press
set date and time and return
to WORLD TIME menu.
button to
20
Choose order in which date
is listed.
Note that formatting memory cards
permanently deletes any data they may
contain.
1 Hold the
down together for approximately two
seconds. A blink ing
the shut ter-speed display and the frame
count will blink. Press any other button
to exit with out for mat ting.
2 Press the
to format the card. During formatting,
the letters
frame-count dis play. When for mat ting
is com plete, the display will show the
approximate number of shots that can
be re cord ed at current set tings.
( and ) buttons
w ill appea r in
( and ) buttons again
will be appear in the
H. Adjust camera settings
When you turn the camera on for the fi rst time, image quality and size, sensitivity, white balance,
exposure mode, focus area, and focus mode are set as shown in the table below. Refer to the
Guide to Digital Photography for more information on camera settings.
Exposure mode
Focus area
Top con trol panel
Option Default Description
Image quality
Image size
Sensitivity
White balance
Exposure mode
Focus area Center focus area Camera focuses on subject in center focus area.
Focus mode
NORM
(JPEG Normal)
L
(Large)
100
(Auto)
(Programmed auto)
C
(AF- C)
Pictures are com pressed for balance be tween im age
quality and fi le size that is ideal for snap shots.
Images are 4,288 × 2,848 pix els in size.
Sensitivity (dig i tal equivalent of fi lm speed) set to value
roughly equiv a lent to ISO 100.
White balance is adjusted automatically for nat u ral
col ors under most types of lighting.
Built-in exposure program automatically adjusts
shutter speed and aperture for optimal exposure in
most situations.
Camera focuses continuously while shutter- release
button is pressed halfway. Press shutter-release
button all the way down to shoot.
Rear control panel
White balanceImage size
Image qualitySensitivity
Adjusting Viewfi nder Focus
The viewfi nder is equipped with diopter adjustment to accommodate
individual differences in vision. To adjust viewfi nder focus, pull the
diopter adjustment knob out and rotate it until the viewfi nder
display and focus brackets are in sharp focus .
When operating the diopter control with your eye to the
viewfi nder, care should be taken to avoid accidentally putting
your fi ngers or fi ngernails in your eye.
I. Frame a photograph and shoot
Playing Photographs Back
Photographs can be played back in the monitor any time after shooting, allowing you to check the
results of earlier photographs and choose a better angle or adjust lighting for your next shot. Unwanted
pictures can be deleted instantly to make room for more photographs on the memory card.
Memory card
access lamp
Compose your photograph with your
subject in one of the focus areas and press
the shutter-release button halfway to focus
. Confi rm that the in-focus indicator (
appears in the viewfi nder .
Press the shutter-release button the rest of
the way down to take the photograph.
While the photograph is being recorded to
the memory card, the card access lamp next
to the memory card slot will light .
Do not turn the camera off or remove the
memory card while the access lamp is lit.
Failure to obser ve this precaution could
result in loss of data or in damage to the
camera or card.
Viewing Photographs
1 To play photog raphs back, press the button.
The most recent photograph on the memory
card will be displayed in the monitor.
2 Press the multi selector down to view photos
in the order recorded, up to go back.
If no operations are per formed for 20 s
(default setting), the monitor will turn off
automatically to save power. Press the
button to return to playback.
Deleting Photographs
1 Press the multi selector up or down to display
the photo you want to delete.
2 Press the
3 A confi rmation dialog box will be displayed.
Press the
and re turn to play back.
button.
button again to de lete the image
)
Page 2
Viewing Pictures on a Computer
PictureProject
IN
Viewing Pictures on a Computer
Supported Operating Systems
Windows (pre-installed versions only) •Windows XP Home Edition / Windows XP Professional
•Windows Millennium Edition (Me)
Macintosh •Mac OS X (10.1.5 or later)
•Windows 2000 Professional
•Windows 98 Second Edition (SE)
Pictures taken with your D2X can be transferred to a computer, where they
can be viewed and organized. To transfer your pictures, you will need to
install PictureProject as described below. For complete instructions on using
PictureProject, see the PictureProject Reference Manual (on CD).
Step 1—Install PictureProject
Depending on the version of PictureProject installed, the installation process and the dialogs and messages displayed may differ from those described here.
Before installing PictureProject, exit all other applications, including virus-checking software.
Before Connecting the Camera
Take at least one picture and install PictureProject before connecting the camera to a computer.
Nikon View
Before installing PictureProject, uninstall Nikon View.
Windows XP Home Edition, Windows XP Professional, Windows 2000 Professional, Mac OS X
When installing or uninstalling PictureProject under the above operating systems, log on to an
account with administrator privileges.
Windows
Turn the computer on and wait for it to start up.
1
Insert the PictureProject installer CD into the CD-ROM drive.
2
The Install Center program will launch automatically and a
“Select Region” dialog will be displayed. Select a region and
click Next. (The “Select Region” dialog is not displayed in the
European release of PictureProject. European users can proceed
directly to Step 3).
A language selection dialog will be displayed. Select a language
3
and click Next.
If the Install Center Program Does Not Launch Automatically: Select My Computer from
the Start menu (Windows XP Home Edition / Windows XP Professional; in other versions
of Windows, double-click the My Computer icon on the desktop) and double-click the CD
(PictureProject) icon in the “My Computer” window.
Click Easy Install. The standard install includes:
4
• Mass Storage driver (Windows 98SE only)
• Driver for D1-series cameras
• Apple QuickTime 6
• Nikon FotoShare (Europe only)
• PictureProject
• Microsoft® DirectX 9
Windows 98SE
Clicking Easy Install displays the dialog shown at right.
Follow the on-screen instructions to install the Mass Storage
(Coolpix Camera) driver.
Follow the on-screen instructions to install the driver for D1-
5
series cameras.
Click Yes or Finish to restart the computer (the dialog shown below at right will be displayed
12
only if DirectX has been installed).
The PictureProject Import Assistant will be displayed when the
13
computer restarts. The Import Assistant can be used to catalog
pictures already on the computer for display in PictureProject.
For more information, see the PictureProject Reference Manual
(on CD).
Click Close to transfer new photos from the
camera without fi rst cataloging existing pictures.
Remove the PictureProject installer CD from the CD-ROM drive before shutting down the com-
14
puter.
Macintosh
Turn the computer on and wait for it to start up.
1
Insert the PictureProject installer CD into a CD-ROM drive. Double-click the PictureProject in-
2
staller CD icon on the desktop, then double-click the Welcome icon.
The “Select Region” dialog will be displayed. Select a region
3
and click Next. (The “Select Region” dialog is not displayed
in the European release of PictureProject. European users can
proceed directly to Step 4).
A language-selection dialog will be displayed; select a language
4
and click Next.
The Install Center program will launch automatically. Click Easy
5
Install to install PictureProject. Apple QuickTime 6 will also be
installed if an earlier version is currently installed on the computer.
Once installation is complete, European users can install Nikon
FotoShare by copying the “FotoShare” icon to the hard disk
(Step 12).
The message shown at right will be displayed (Europe only;
6
users in other areas can proceed directly to Step 7). Click OK.
When the computer restarts, log in to the account you used
11
to install PictureProject. The PictureProject Import Assistant
will be displayed. The Import Assistant can be used to catalog
pictures already on the computer for display in PictureProject.
For more information, see the PictureProject Reference Manual
(on CD).
Click Close to transfer new photos from the
camera without fi rst cataloging existing pictures.
After exiting the Import Assistant, open the “FotoShare” folder on the PictureProject installer
12
CD and install Nikon FotoShare by dragging the Nikon FotoShare icon to the “Applications”
folder on the hard disk (note that FotoShare is included only with the European release of
PictureProject). When copying is complete, remove the PictureProject installer CD from the CDROM drive.
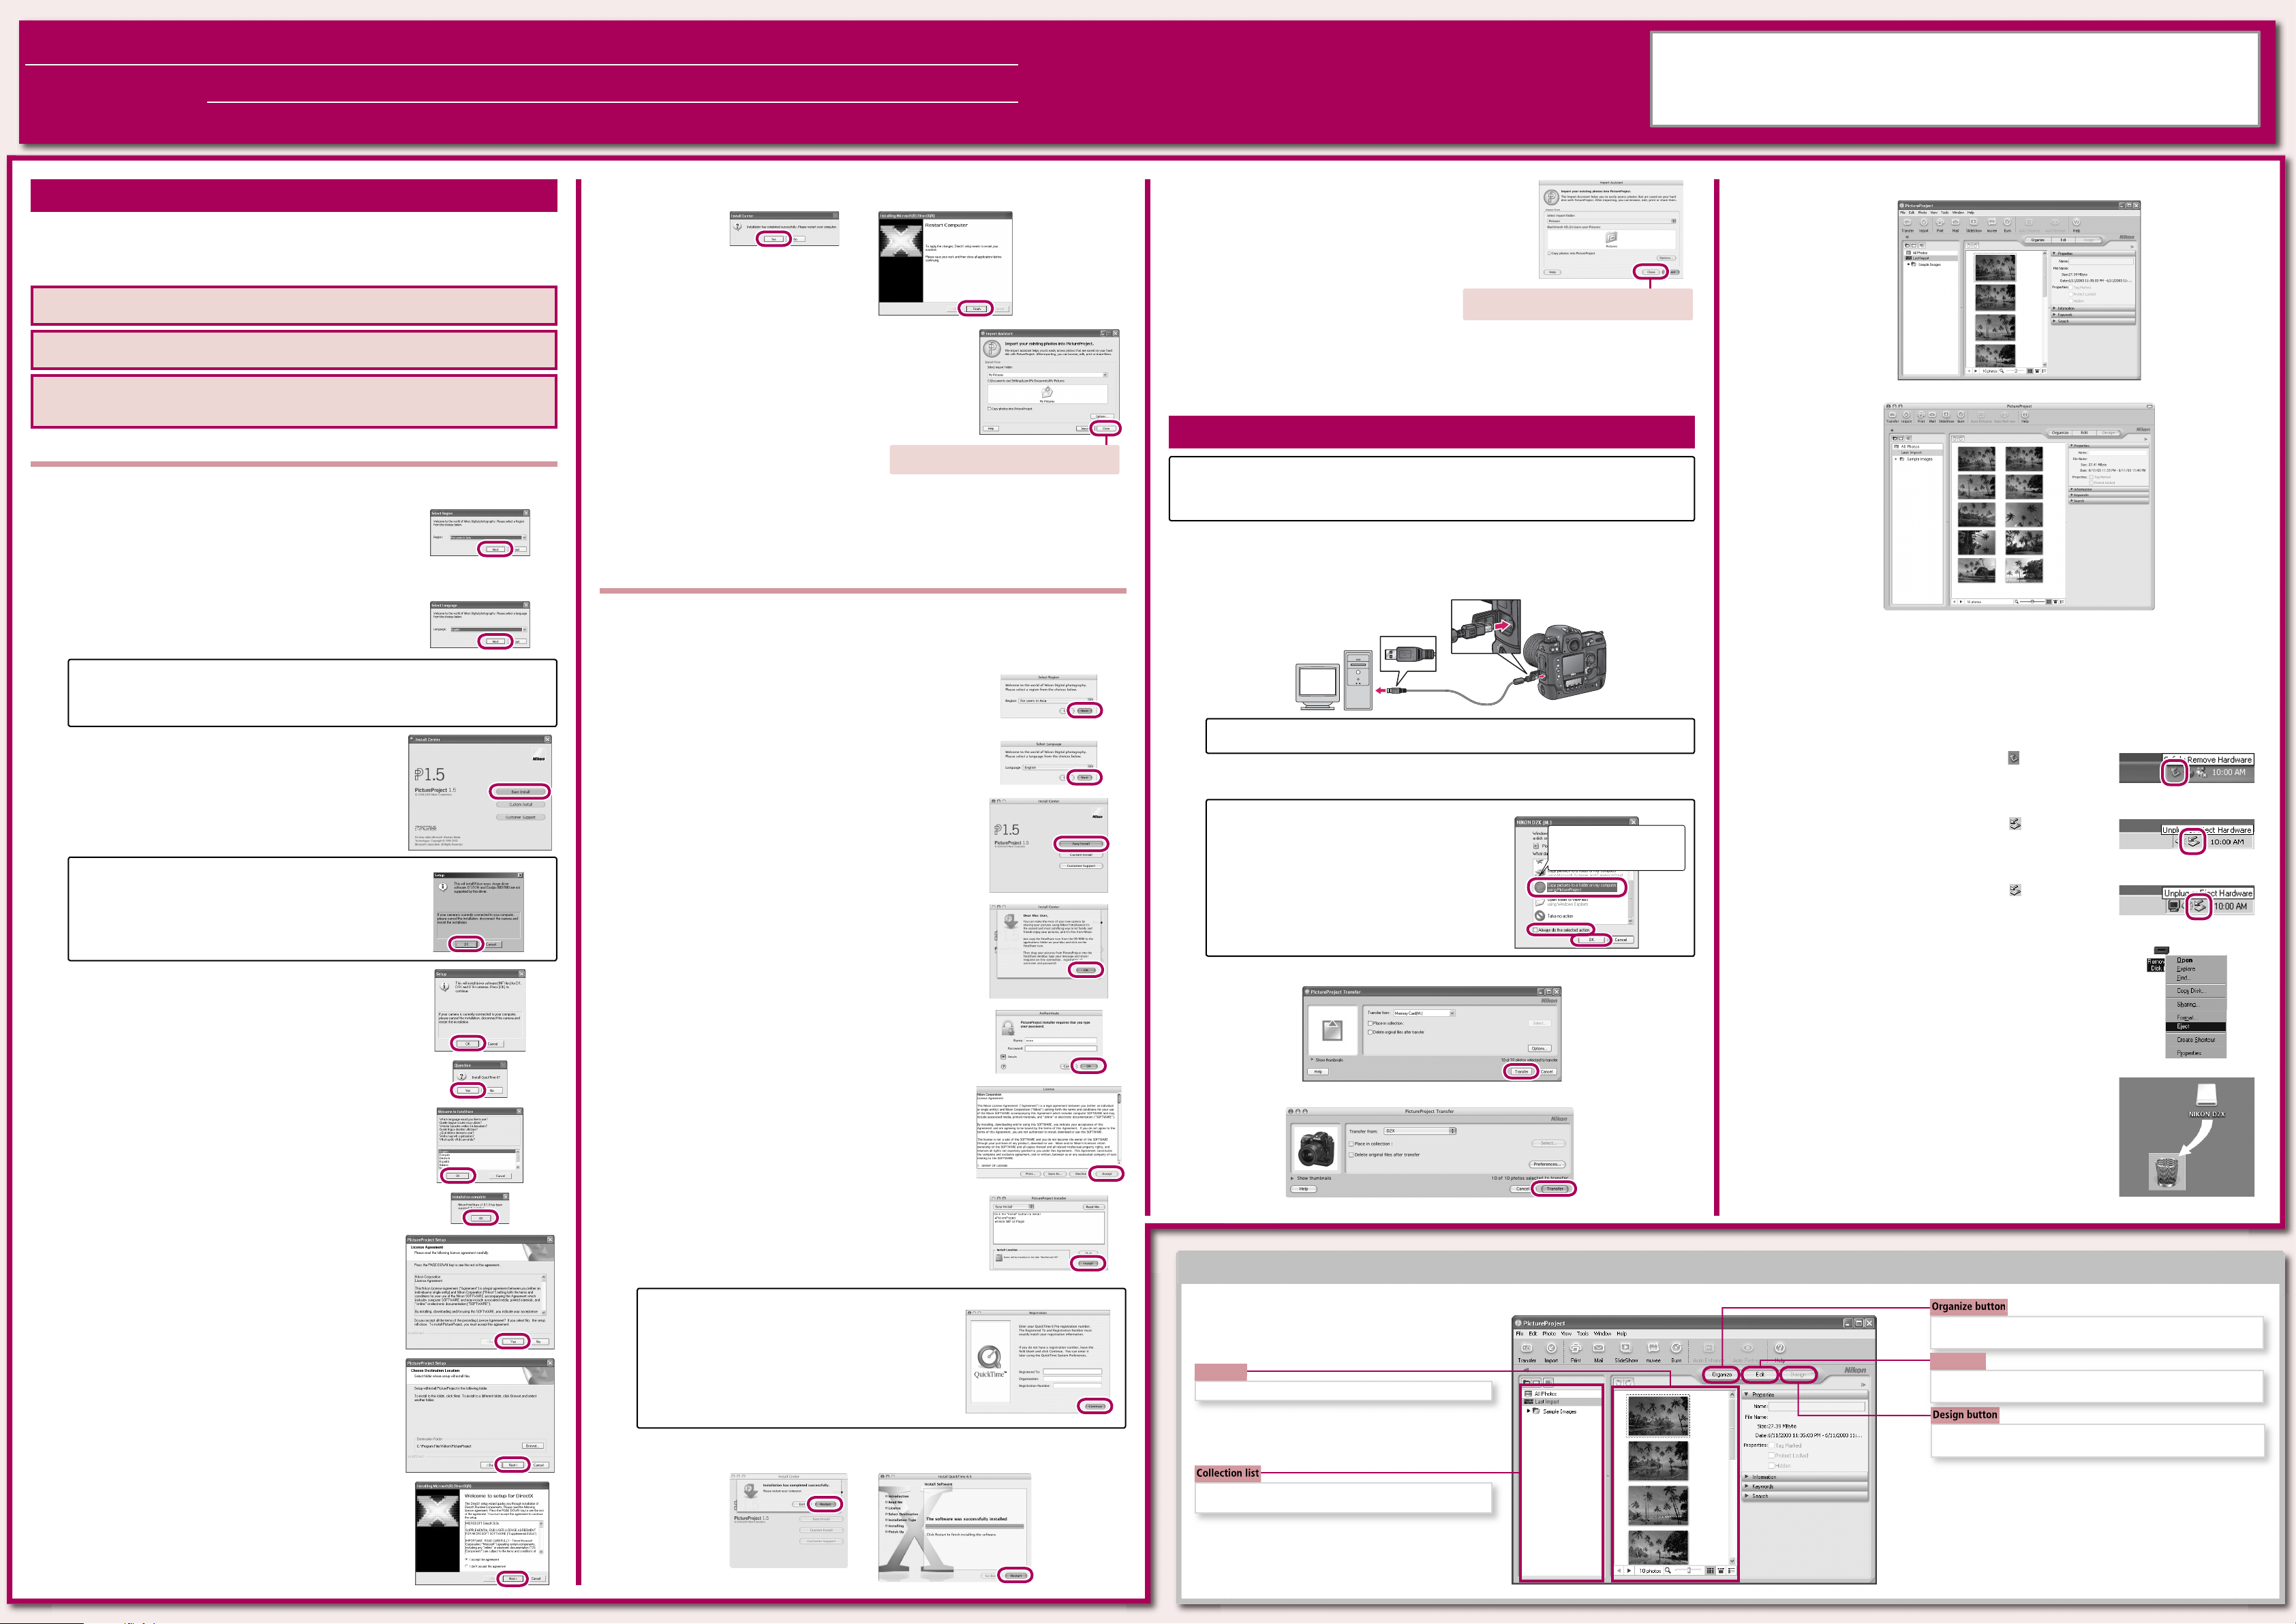
Step 2—Transfer Pictures
Use a Reliable Power Source
When transferring pictures between the camera and the computer, use a fully-charged EN-EL4 battery. If in doubt, charge the battery before beginning transfer or use an EH-6 AC adapter (available
separately). Do not, under any circumstances, use another make or model of AC adapter.
Turn the camera off and insert a memory card that contains pictures (see the front of this guide
1
for information on inserting memory cards).
Turn the computer on and wait for it to start up. Using the UC-E4 USB cable, connect the
2
camera to the computer as shown below.
C
L
C
S
A
/
V
O
U
T
DC
I
N
USB Hub
The camera may not function as expected when connected via a USB hub or keyboard.
Turn the camera on. PictureProject will automatically detect the camera and display the Picture-
3
Project Transfer window.
AutoPlay (Windows XP)
When you turn the camera on, the dialog shown at right
will be displayed. Select Copy pictures to a folder on
my computer using PictureProject and click OK to
start PictureProject. To bypass this dialog in the future,
check Always do the selected action.
Click Transfer to transfer all the pictures on the camera memory card to the computer.
Se lect Copy pic tures to a
folder on my com put er
using PictureProject
4
The pictures will be displayed in the PictureProject window when transfer is complete.
5
Windows
Macintosh
If the computer is connected to the Internet, PictureProject will periodically check for updates.
If an update is detected when PictureProject starts, an update dialog will be displayed. Follow
the on-screen instructions to update to the latest version of PictureProject.
Once your pictures are displayed in PictureProject, transfer is complete and you can remove the
6
camera from the system.
Windows XP Home Edition / Windows XP Professional
Click the “Safely Remove Hardware” icon ( ) in the taskbar
and select Safely remove USB Mass Storage Device - Drive
from the menu that appears.
Windows 2000 Professional
Click the “Unplug or Eject Hardware” icon ( ) in the taskbar
and select Stop USB Mass Storage Device - Drive from the
menu that appears.
Windows Millennium Edition (Me)
Click the “Unplug or Eject Hardware” icon ( ) in the taskbar
and select Stop USB Disk - Drive from the menu that appears.
Windows 98 Second Edition (SE)
In My Computer, click with the right mouse button on the
removable disk corresponding to the camera and select Eject
from the menu that appears.
Installation of QuickTime 6 opens with the dialog shown at
6
right. Click Yes.
The Nikon FotoShare setup program will start. Follow the on-
7
screen instructions to complete installation.
* Nikon FotoShare is available only in the European release of
PictureProject.
Click OK to exit the Nikon FotoShare setup program.
8
The PictureProject setup program will now start. After reading
9
the license agreement, click Yes to accept the agreement and
proceed with installation.
Click Next to install PictureProject to the default destination
10
folder (to select a different folder, click Browse...). A
confi rmation dialog will be displayed; click Yes to create the
destination folder. To create a shortcut to PictureProject on the
desktop, click Yes when prompted. Click Finish to exit the
PictureProject installer when installation is complete.
Enter the administrator name and password and click OK.
7
After reading the license agreement, click Accept to accept its
8
terms and display the ReadMe fi le. Take a few moments to read
this fi le, which may contain important information that could
not be included in this guide. After reading the ReadMe, click
Continue… to proceed with installation.
Click Install. A dialog will be displayed asking if you want to
9
use PictureProject Transfer with digital cameras; click Ye s to
have PictureProject Transfer start automatically when a camera
is connected. To add PictureProject to the Dock, click Yes when
prompted. Click Quit to exit the PictureProject installer when
installation is complete.
Apple QuickTime 6
If an older version of QuickTime is installed on your
computer, the QuickTime 6 installer will start automatically.
Follow the on-screen instructions to complete installation.
When the dialog shown at right is displayed, click Continue
without completing the “Registered To,” “Organization,”
and “Registration Number” fi elds.
On some systems, the QuickTime installer may require
considerable time to complete installation.
Click Restart to restart the computer (the dialog shown below at right will be displayed only if
10
QuickTime 6 has been installed).
Windows
Macintosh
PictureProject
The main controls in PictureProject are as follows:
Picture list
Lists the pictures in the currently selected collection or folder.
Mac OS X
Drag the “NIKON D2X” camera volume into the Trash.
Click to view and organize the pictures in the currently selected
collection or folder.
Edit button
Click to edit the selected picture. The tools available include cropping
as well as brightness and hue adjustment.
Click to arrange the pictures in the selected album in a variety of
layouts.
The muvee option requires DirectX 9 or later. If an earlier version
11
is installed, the dialog shown at right will be displayed. Follow
the on-screen instructions to install DirectX 9.
A list of the collections and folders in which pictures are
cataloged.
Other options include printing, e-mail, slide shows, and saving pictures
to CD or DVD (Mac OS X version 10.2.8 or later required to use Burn Disc
option under Mac OS X).
Printed in Japan
SB5C00700301(11)
6MBA2411-B
 Loading...