

Page 1
Setup
Taking Photographs
En
Insert the Battery
Focus and Shoot
View the Results
Attach the Strap
Charge the Battery
Attach a Lens
Insert a Memory Card (Available Separately)
Attach the Monitor Cover
Adjust Camera Settings
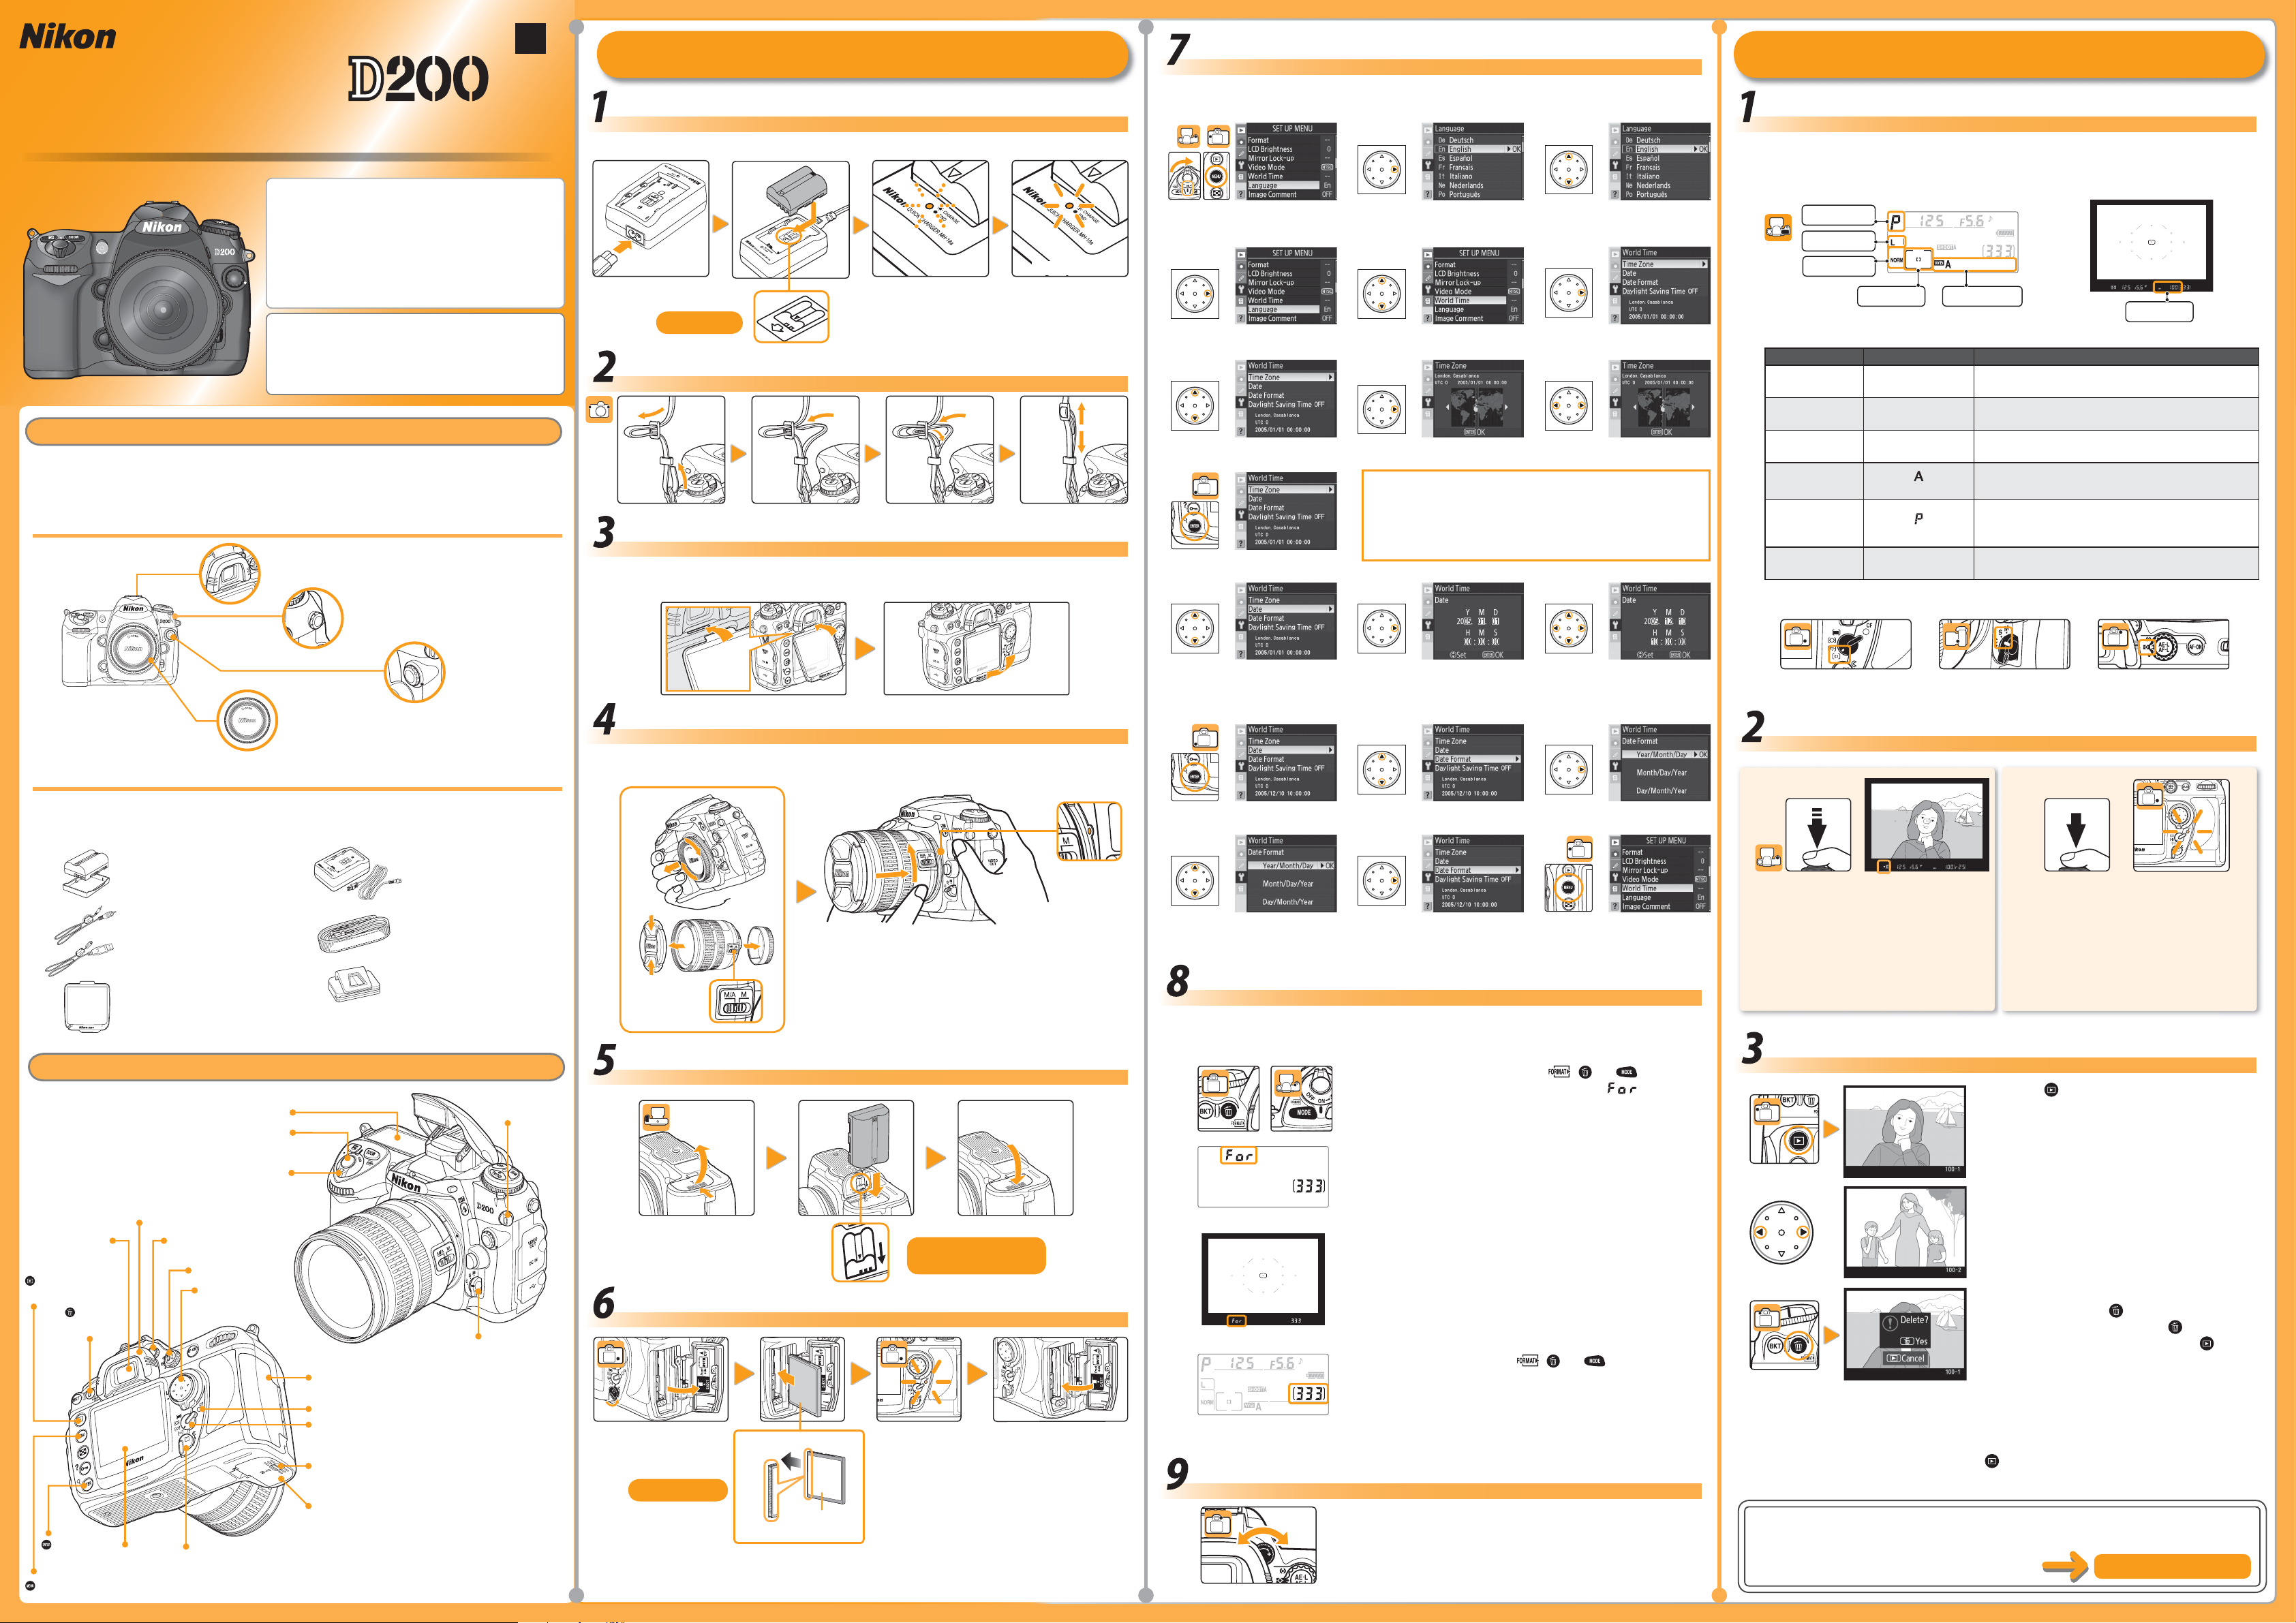
Choose a Language and Set the Camera Clock
Focus the Viewfi nder
Format the Memory Card
Setup
Choose a Language and Set the Camera Clock
Taking Photographs
Digital Camera
Quick Start Guide
Quick Start Guide
This guide provides fi rst-time users with information on taking photographs with the D200 and
on copying photographs to a computer. Complete information on using your Nikon digital
camera can be found in the Nikon Guide to Digital
Photography with the D200 and the PictureProject
Reference Manual (on CD).
Digitutor
“Digitutor,” a series of “watch and learn” manuals in
movie form, is available at the following website:
http://www.nikondigitutor.com/index_eng.html
Package Contents
Confi rm that the package contains the items listed below. Purchasers of the lens kit option should
confi rm that the package also includes a lens. Memory cards are not provided; please use one of
the memory cards listed on page 183 of the Guide to Digital Photography.
The following items are found on the camera:
❏ DK-21 viewfi nder eyepiece
❏ Sync terminal cover
Charge the Battery
The battery takes about 135 minutes to charge when fully exhausted.
Stops blinkingBlinks
Charging Charging complete
Insert as shown
Attach the Strap
Attach the Monitor Cover
Insert the projection on top of the cover into the matching indentation above the camera
monitor (), then press the bottom of the cover until you hear it click into place ().
The language option in the setup menu is automatically highlighted the fi rst time menus are
displayed. Choose a language and set the time and date.
1
Turn camera on and press MENU
button.
4
Return to setup menu.
2
Display language menu.
5
Highlight World Time.
3
Select language.
6
Display options.
7 98
Highlight Time zone.
10
Return to WORLD TIME menu.
Display map of world time zones. Select local time zone.
* UTC fi eld shows time diff erence between selected time zone and
Coordinated Universal Time (UTC), in hours.
† If daylight saving time is in eff ect in local time zone, highlight Daylight
Saving Time in WORLD TIME menu and press multi selector to right.
Press multi selector down to highlight On and press multi selector right.
†
Time will automatically be advanced one hour.
11 12 13
Adjust Camera Settings
When you turn the camera on for the fi rst time, image quality and size, ISO sensitivity, white
balance, exposure mode, and focus area are set as shown below. Refer to the Guide to Digital
Photography for more information on camera settings.
Exposure mode
Image size
Image qualit y
Focus area
Control panel Viewfi nder
Option Default Description
Image quality
Image size
*
ISO sensitivity 100
White balance
Exposure mode
Focus area Center
AF-area mode, focus mode, and metering are set as shown below.
NORM
(JPEG Normal)
(Large)
(Auto)
(Programmed auto)
L
White balance
ISO sensitivity
Pictures are com pressed for balance be tween im age
quality and fi le size that is ideal for snap shots.
Images are 3,872 × 2,592 pix els in size.
ISO sensitivity (dig i tal equivalent of fi lm speed) set to
value roughly equiv a lent to ISO 100.
White balance is adjusted automatically for nat u ral col ors
under most types of lighting.
Built-in exposure program automatically adjusts shutter
speed and aperture for optimal exposure in most
situations.
Camera focuses on subject in center focus area when
shutter-release button is pressed halfway.
D200 camera
The following items are included with the camera:
❏ Quick Start Guide (this guide)
❏ Guide to Digital Photography
❏ Warranty
❏ EN-EL3e rechargeable
Li-ion battery
(with terminal cover)
❏ EG-D100 video cable
❏ UC-E4 USB cable
❏ BM-6 LCD monitor cover
❏ PictureProject installer CD (gray)
❏ PictureProject reference manual CD (silver)
Parts of the Camera
Control panel
Shutter-release button
Power switch
Viewfi nder
eyepiece cup
Viewfi nder
eyepiece
(playback)
button
(delete)
button
Diopter adjustment
control
Metering selector
Multi selector
❏ Body cap
Memory card slot cover
Memory card access lamp
AF-area mode selector
Battery-chamber cover
latch
❏ 10-pin remote
terminal cover
❏ MH-18a Quick Charger
(with power cord)
❏ AN-D200 strap
❏ DK-5 eyepiece cap
(for use with self-timer;
clips to strap)
Eyelet for
camera strap
Focus-mode
selector
Attach a Lens
Care should be taken to prevent dust from entering the camera when the lens or body cap is
removed (an AF-S DX 18–70 mm f/3.5-4.5G ED lens is used in for illustrative purposes).
Insert the lens as shown, keeping the mounting mark s
aligned, and then rotate the lens counter-clockwise
until it clicks into place. Slide the A-M switch to “A”
(autofocus).
Insert the Battery
Insert terminals fi rst in
orientation shown
Insert a Memory Card (Available Separately)
Insert as shown
Direction of insertion
Access lamp lights
for about 1 s when
memory card is
inserted.
Mounting
marks
Press multi selector left or right
to select item, up or down to
change.
16
Display options.
14
Return to WORLD TIME menu.
Display DATE menu.Highlight Date.
15
Highlight Date Format.
1817 19
Return to WORLD TIME menu.
listed.
Format the Memory Card
Note that formatting permanently deletes any photographs and other data the memory card
may contain. Files that may be needed at a later date should be copied to a computer before
formatting.
Turn the camera on and press the
simultaneously for about two seconds until blinks in
the control panel and viewfi nder.
Control panel
Viewfi nder
To format the card, press the ( and ) buttons again
(to exit without formatting, press any other button). Do not
turn the camera off or the remove battery or memory card
until formatting is complete and the control panel shows the
Control panel
Focus the Viewfi nder
number of exposures remaining.
Return to set up menu.Choose order in which date is
( and ) buttons
Metering selectorFocus mode selectorAF-area mode selector
Focus and Shoot
12
In-focus indicator Memory card access lamp
Press the shutter-release button halfway.
The camera will automatically focus on the
subject in the selected focus area (by default,
the center focus area). When the focus
operation is complete, a beep will sound and
the in-focus indicator (●) will appear in the
viewfi nder.
View the Results
Press the shutter-release button the rest of
the way down to take the photograph. The
memory card access lamp will light while the
photograph is recorded to the memory card;
do not eject the memory card or remove or
disconnect the power source until the lamp
has gone out and recording is complete.
Press the button to view the most recent
photograph in the monitor.
Press the multi selector left or right to view
additional photographs.
To delete the photograph currently displayed in
the monitor, press the button. A confi rmation
dialog will be displayed; press the button again
to delete the photograph, or press the button
to exit without deleting the photograph.
To turn the monitor off and return to shooting
mode, press the shutter-release button halfway.
The monitor will turn off automatically if no
operations are performed for about 20 s. Press the
button to view pictures again.
(enter)
button
(menu) button
Monitor
Card slot cover latch
Battery-chamber
cover
Front
Terminals
Slide the memory card
in as shown above until
eject button pops up.
Rotate the diopter adjustment control until the focus brackets
in the viewfi nder are in focus when the shutter-release button is
pressed halfway. When operating the diopter control with your
eye to the viewfi nder, be careful not to injure your eye with your
fi n g e r s o r fi n g e r n a i l s .
For more information on taking photographs and other camera operations, see the Guide to
Digital Photography. See the other side of this guide for information on using the supplied
software to copy photographs to a computer.
Continued on reverse
Page 2

Installing PictureProject (Macintosh)
Installing PictureProject
Viewing Photographs on a Computer
Installing PictureProject (Windows)
PictureProject
1
Installing PictureProject
This section describes how to install PictureProject and copy photographs to a computer.
PictureProject can also be used to view, edit, and organize photographs. See the PictureProject Refer-
ence Manual (on CD) for more information.
Viewing the PictureProject Reference Manual
1 Start the computer and insert the silver reference CD.
2 Double-click the CD icon.
• Windows: Double-click the CD (Nikon) icon in My Computer.
• Macintosh: Double-click the CD (Nikon) icon on the desktop.
3
Double-click the INDEX or INDEX.pdf icon to display a language selection screen. Click a language
to display an index of the documentation available for PictureProject and click a title to view.
PictureProject
Edit
Organize
View and organize photographs.
Retouch photos using a variety
of tools, including cropping and
brightness and hue adjustment.
Follow the on-screen instructions to install the drivers for D1-
series cameras.
Windows 98 SE
The dialog shown at right will be displayed fi rst. Follow the onscreen instructions to install the Mass Storage drivers.
Click Yes .
The Nikon FotoShare setup program will start (Europe only).
Follow the on-screen instructions to install Nikon FotoShare.
Read the license agreement…
Installing PictureProject (Macintosh)
The illustrations in this section are intended as a guide only. The dialogs and messages displayed during installation may diff er in some respects from those shown here.
Turn the computer on and insert the PictureProject installer CD into the CD-ROM drive. Double-
click the PictureProject installer CD icon on the desktop, then double-click the Welcome icon.
Depending on the region of purchase, a “Select Region” dialog may be displayed; select a region
and click Next. A language-selection dialog will be displayed. Select a language and click Next.
Click Easy Install to begin installation of:
• PictureProject
• Apple QuickTime
The CD for use in Europe includes Nikon
FotoShare. Selec ting Easy Install displays
the dialog shown at right; click OK.
Nikon Capture Free Trial
Click Nikon Capture Free Trial in the Install Center window to open your web browser
to a site where you can download a trial version of Nikon Capture (Internet connection
required).
Nikon View
Click Nikon View in the Install Center window to open your web browser to a site where
you can download the latest version of Nikon View (Internet connection required).
Viewing Photographs on a Computer
The illustrations in this section are from Windows XP.
Use a Reliable Power Source
Nikon recommends using the optional EH-6 AC adapter to power the camera for extended periods.
Do not use another make or model of AC adapter.
Tur n the c amera off and connect the supplied USB cable as shown below. Do not use force or at-
tempt to insert the connectors at an angle. Connect the camera directly to the computer; do not
connect the cable via a USB hub or keyboard.
Turn the camera on. PictureProject will automatically detect the camera and the
Pic ture Proje ct Trans fer window will be displaye d in the computer monitor. Cli ck Tra ns fe r to copy
all photographs from the camera memory card to the computer.
Design
Collection list
Group photos into collections and
collections into folders.
Other tasks that can be performed with PictureProject include printing photographs,
sending photos by e-mail, viewing slide shows, and copying photographs to CD or DVD
(requires Windows or Mac OS X version 10.2.8 or later).
Picture list
View the photos in the current collection or folder.
Arrange photos in a variety of
layouts.
Before Installing PictureProject
PictureProject requires Mac OS X version 10.1.5 or later or a pre-installed version of Windows XP
Home Edition, Windows XP Professional, Windows 2000 Professional, Windows Millennium Edition
(Me), or Windows 98 Second Edition (SE). Turn off any virus-protection software and exit all other
applications before beginning installation.
Nikon View/Nikon Capture
Uninstall Nikon View before installing PictureProject. For information on using PictureProject
Important
with Nikon Capture, see the PictureProject Reference Manual (on CD).
…and click Ye s to accept and proceed with installation.
Click Next to install PictureProject to the location shown, or
click Browse… to choose a diff erent folder.
Click Yes .
Click Yes .
Click Finish.
Enter the administrator name and password…
…and click OK.
Read the license agreement…
…and click Accept to accept and view the ReadMe fi le. Take a few
moments to read this fi le, which may contain important information that could not be included in this guide. Click Continue… to
proceed with installation.
Click Install.
Click Yes .
Click Ye s.
Click Quit.
Transfer button
Windows XP
The dialog shown at right will be displayed when the camera is
turned on. Select Copy pictures to a folder on my computer
using PictureProject and click OK. To bypass this dialog in
future, check Always do the selected action.
The photographs will be displayed in PictureProject when transfer is complete.
PictureProject periodically checks for updates
when the computer is connected to the Internet.
If an update is detected when PictureProject starts,
an update dialog will be displayed. Follow the onscreen instructions to update to the latest version
of PictureProject.
Windows XP / Windows 2000 / Mac OS X
Log on to an account with administrator privileges when installing, using, or uninstalling
Important
PictureProject.
Before Connecting the Camera
Be sure that PictureProject is installed. If the Windows hardware wizard is displayed when
Important
the camera is connected, click Cancel to exit the wizard.
Installing PictureProject (Windows)
The illustrations in this section are intended as a guide only. The dialogs and messages displayed during installation may diff er in some respects from those shown here.
Turn the computer on and insert the PictureProject installer CD into the CD-ROM drive. The In-
stall Center program will launch automatically. Depending on the region of purchase, a “Select
Region” dialog may be displayed; select a region and click Next. A language-selection dialog will
be displayed. Select a language and click Next.
If the “Select Region” or “Select Language” Dialog Is Not Displayed
Open “My Computer” by selecting My Computer from the Start menu (Windows XP) or
by double-clicking the My Computer icon on the desktop (other versions of Windows)
and then double-click the CD (PictureProject) icon.
Click Easy Install to begin installation of:
• Nikon Mass Storage camera drivers (Windows 98 SE
only)
• Drivers for D1-series cameras
• Apple QuickTime 6
• Nikon Fotoshare (Europe only)
• PictureProject
• Microsoft DirectX 9
Nikon Capture Free Trial
Click Nikon Capture Free Trial in the Install Center window to open your web browser
to a site where you can download a trial version of Nikon Capture (Internet connection
required).
DirectX 9
If DirectX 9 is not already installed, the dialog shown at
right will be displayed. Follow the on-screen instructions to install DirectX 9.
Click Ye s to close the Install Center window. If a dialog is dis-
played directing you to restart the computer, follow the onscreen instructions.
After the computer restarts, the PictureProject Import Assistant will be displayed. The
Import Assistant is used to catalog existing images for display in PictureProject.
1 Click Import to catalog the images in the “Import from” folder in PictureProject. The time
needed to catalog the images is proportional to the number of images in the folder.
2 Click OK to close the Import Assistant when import is complete.
To proceed without cataloging existing images, click Close. Existing images can be cataloged manually at any time; see the PictureProject Reference Manual (on CD) for details.
Apple QuickTime
If an earlier version of QuickTime is installed, the QuickTime
installer will start. Follow the on-screen instructions to
complete installation. When the dialog shown at right is
displayed, click Continue. Do not complete the “Registered To,” “Organization,” and “Registration Number” fi elds.
Click OK to close the Install Center window. If a dialog is displayed
directing you to restart the computer, follow the on-screen instructions.
If the computer restarts, log in to the account used to install PictureProject. To install Nikon
FotoShare (Europe only), open the “FotoShare” folder on the PictureProject installer CD and drag
the Nikon FotoShare icon to the “Applications” folder on the hard disk.
Windows
“Import from”
folder
Close buttonImport button
Macintosh
“Import from”
folder
Close button
Import button
Disconnecting the Camera
Before turning the camera off and disconnecting the USB cable, remove the camera from the
system as described below.
• Windows XP Home Edition/Professional: Click the “Safely Remove
Hardware” ( ) icon in the taskbar and select Safely remove
USB Mass Storage Device from the menu that appears.
• Windows 2000 Professional: Click the “Unplug or Eject Hardware”
( ) icon in the taskbar and select Stop USB Mass Storage
Device from the menu that appears.
• Win dows Millennium Editi on (Me): Click the “Unplug or Eject Hardware” ( ) icon in the taskbar and select Stop USB Disk from
the menu that appears.
• Windows 98 Second Edition (SE): In My Computer, right click on
the removable disk corresponding to the camera and select
Eject from the menu that appears.
• Macintosh: Drag the camera volume (“NIKON D200”) into the
Tras h.
Nikon View
Click Nikon View in the Install Center window to open your web browser to a site where
you can download the latest version of Nikon View (Internet connection required).
Remove the PictureProject installer CD from the CD-ROM drive.
This completes installation of PictureProject. Proceed to “Viewing Photographs on a Computer.”
Continued in next column
Printed in Belgium
6MBA5511-02
 Loading...