

Page 1

Page 2

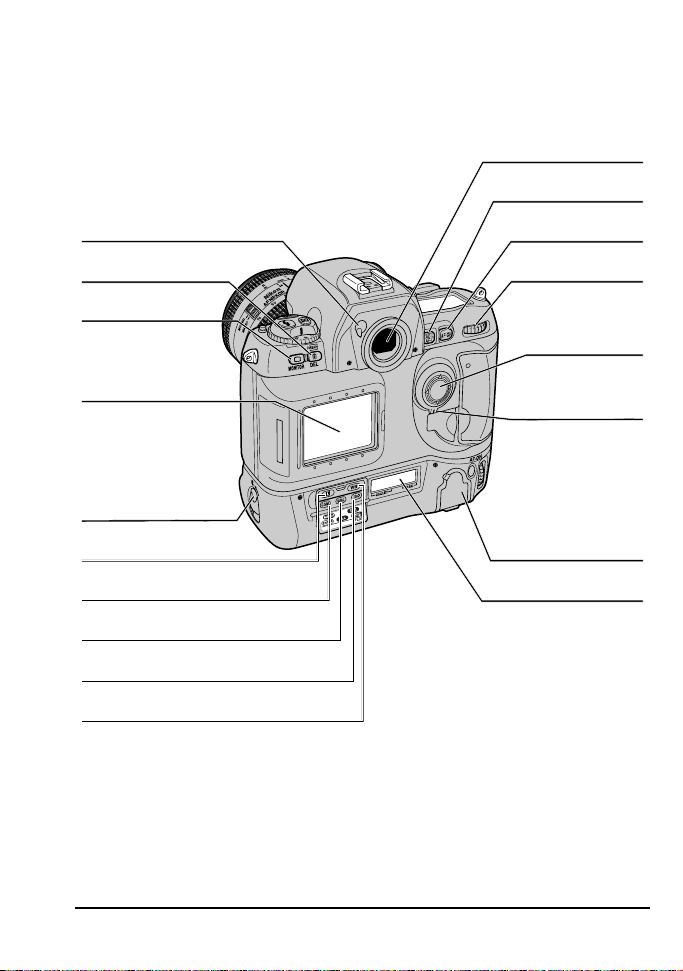
Getting to Know the D1
Parts of the D1
Focus mode
selector dial (pg. 33)
Lens release
button (pg. 6)
DC in, video out
connector cover (pg. 102)
10-pin remote
terminal (pg. 116)
Sync terminal for
external flash (pg. 95)
Self-timer
lamp (pg. 63)
Mode dial lock
release (pg. 26)
Eyelet for
camera strap
Auto bracketing
button (pg. 53–55)
Flash sync
mode button (pg. 96)
Mode dial (pg. 26)
AF area mode
button (pg. 34–35)
Accessory shoe (pg. 95)
Depth-of-field preview
button (pg. 64)
Sub-command
Shutter-release
button (pg. 20–21)
compensation
button (pg. 51–52)
Exposure mode button
(pg. 43–48)/ Format
indicator (pg. 64)
Metering selector
lock button (pg. 41–42)
Metering selector
Diopter adjustment
dial
Powe r switch
(pg. 4)
Eyelet for
camera strap
Exposure
button (pg. 13)
Top control
panel (pg. v)
Focal plane
(pg. 41–42)
knob (pg. 63)
ii
Getting to Know the D1: Parts of the D1
Page 3
Eyepiece shutter lever (pg. 62)
Delete button (pg. 81)/
Format button (pg. 13)
Monitor button (pg. 59)
LCD monitor (pg. vii)
Viewfinder eyepiece
AE/AF lock button (pg. 37, 41)
AF start (pg. 33)/
Cancel button (pg. 78)
Main command dial
Focus area selector
(pg. 36; playback pg. 79)
Focus area
selector lock
(pg. 36)
Battery pack latch (pg. 4)
Command lock/
Menu button (pg. 43, 46)
Custom setting button (pg. 66)/
Execute button (pg. 78)
Image quality button (pg. 29)/
Select all button (pg. 78)
Sensitivity button (pg. 30)/
Multiple select button (pg. 78)
White balance button (pg. 31)/
Thumbnail button (pg. 78)
Getting to Know the D1: Parts of the D1
IEEE 1394
connector cover
(pg. 103)
Rear control panel (pg. v)
iii
Page 4
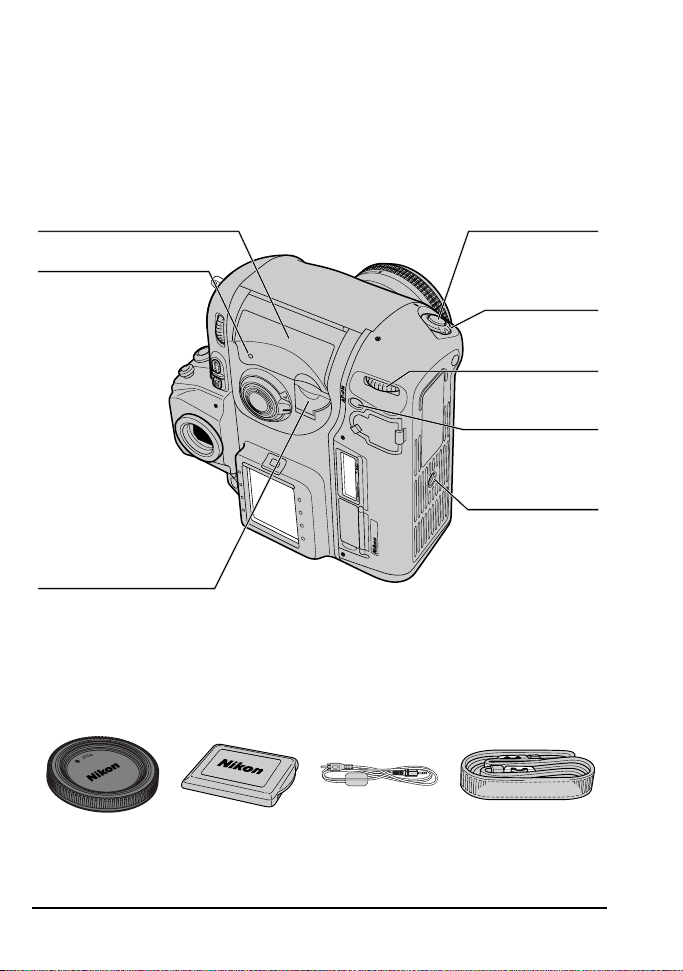
Cover for CompactFlash
card slot (pg. 12)
Memory card
access lamp (pg. 12)
Card slot cover
release button
(under cover) (pg. 12)
Accessories
Shutter-release button
(vertical shooting)
Shutter-release button
lock (vertical shooting)
Main command dial
(vertical shooting)
AF start (AF ON) button
(vertical shooting)
(pg. 4)
(pg. 4)
(pg. 33)
Tr ipod socket
iv
Body cap
BF-1A
Cover for
LCD monitor
Video cable
EG-D1
Camera strap
AN-D1
Getting to Know the D1: Parts of the D1
Page 5
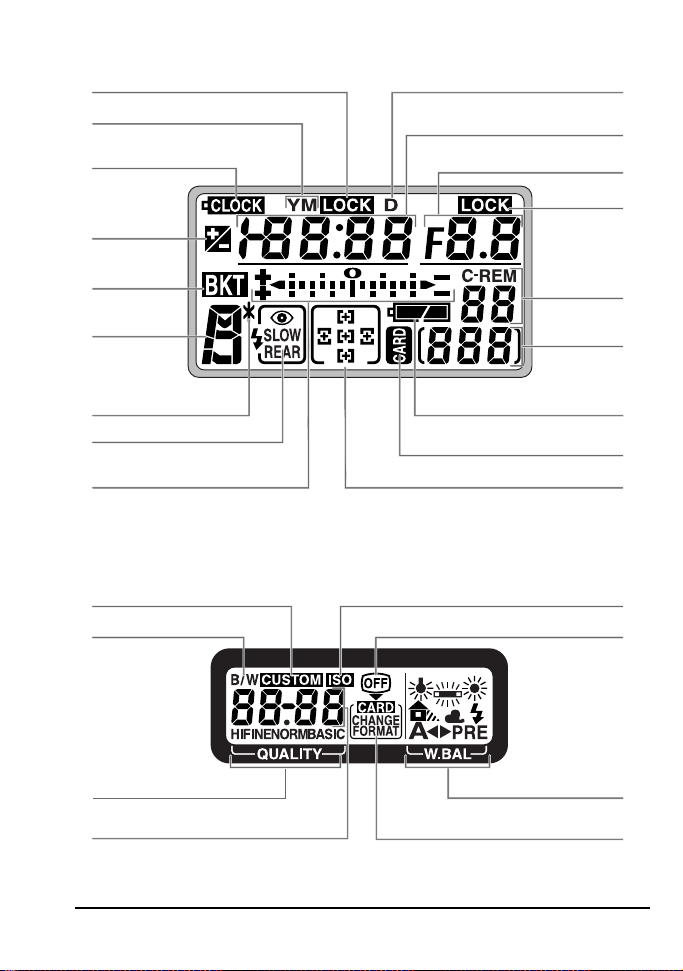
Top Control Panel
Shutter-speed lock (pg. 44)
Year/month indicator (pg. 8–9)
Clock battery indicator (pg. 8–9)
Exposure
compensation
indicator (pg. 51)
Bracketing
indicator (pg. 53)
Exposure
mode (pg. 43–47)
Flexible program
indicator (pg. 18)
Flash sync mode (pg. 96)
Electronic analog exposure display(pg. 48)/
Exposure compensation (pg. 54–55)
Shutter speed (pg. 43–44)/Exposure
compensation (pg. 51)/Date and time (pg. 8)
Aperture display (pg. 45)/Playback
(pg. 78–80)/PC mode indicator (pg. 104)
Day indicator (pg. 8–9)
Aperture lock
Number of
exposures
remaining
Current frame
number (pg. 22)
Battery indicator (pg. 5)
CompactFlash memory
card indicator (pg. 22)
Focus area display (pg. 36)
Rear Control Panel
Sensitivity indicator (pg. 30)Custom settings indicator (pg. 65)
Black-and-white mode (pg. 28–29) Monitor indicator
(pg. 46)
(pg. 22)
Image quality display (pg. 28–29)
Sensitivity/Number of exposures remaining/
File type/Custom settings number
Getting to Know the D1: Parts of the D1
White-balance
mode (pg. 31–32)
CompactFlash card
status display
v
Page 6
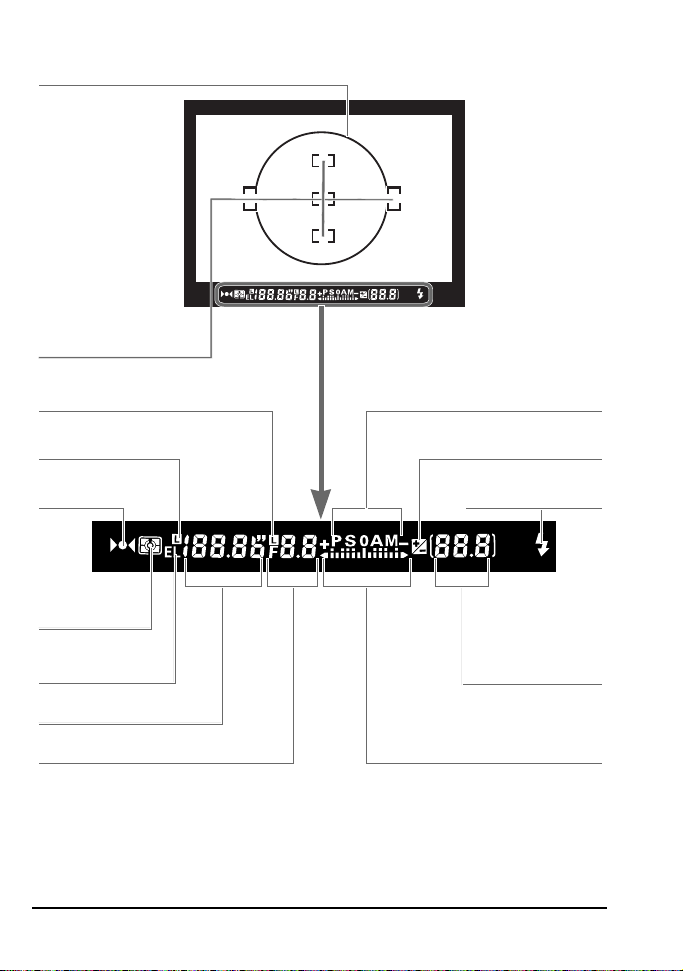
Viewfinder Display
12mm (0.47˝) reference circle for center-weighted metering (pg. 41)
Focus brackets
(focus area)
(pg. 36)
Spot-metering targets
(pg. 42)
Aperture lock (pg. 45) Exposure mode (pg. 43–48)
Shutter-speed lock (pg. 44)
Focus indicator (pg. 20) Flash-ready light (pg. 95)
Exposure compensation
indicator (pg. 18)
Metering
system (pg. 41)
Auto-exposure
lock (pg. 49)
Shutter speed (pg. 44)
Aperture (pg. 45)
vi
Frame counter (pg.22)/
Exposures remaining
in buffer (pg. 22)/
Exposure compensation
exposure display (pg. 48)/
Exposure compensation (pg. 54–55)
value (pg. 51)
Electronic analog
Getting to Know the D1: Parts of the D1
Page 7

LCD Monitor
1Frame number
1
100-6
1
100
NC_D1/DSC_
2000/01 /26
4567
1 Folder name
2Filename
3Frame number
23
0006.JPG
01:11:
6/18
20 NORM AL
5Time of recording
6Protected file
7Image quality
4 Date of recording
Note
The LCD monitor and control panels may darken or turn black at high temperatures. The
displays will return to normal when the temperature drops. At low temperatures, the
response time of the LCD control panels may drop, but response time will return to normal
when the temperature rises.
Getting to Know the D1: Parts of the D1
vii
Page 8

Caring for the Camera and Battery
Do not drop
The camera and lens may malfunction if
subjected to strong shocks or vibration.
Keep dry
This product is not waterproof, and may
malfunction if immersed in water or exposed
to high levels of humidity. Rusting of the
internal mechanism can cause irreparable
damage.
Avoid sudden changes in temperature
Sudden changes in temperature, such as
occur when entering or leaving a heated
building on a cold day, can cause
condensation inside the device. To prevent
condensation, place the device in its carrying
case or a plastic bag before exposing it to
sudden changes in temperature.
Keep away from strong magnetic fields
Do not use or store this device in the vicinity
of equipment that produces strong
electromagnetic radiation or magnetic
fields. Strong static charges or the magnetic
fields produced by equipment such as radio
transmitters could interfere with the color
LCD monitor, damage data stored on the
flash memory card, or affect the product’s
internal circuitry.
Do not touch shutter curtain
The shutter curtain is made of extremely thin
material and is easily damaged. Under no
circumstances should you exert pressure on
the curtain, poke it with cleaning tools or
other implements, or subject it to strong air
currents from a blower. Any of these actions
could scratch, deform, or tear the curtain.
Cleaning
• When cleaning the camera body, use a
blower to remove dust and lint, then wipe
gently with a soft, dry cloth. After using
your camera at the beach or seaside, wipe
off any sand or salt using a cloth lightly
dampened with pure water and then dry
your camera thoroughly. In rare instances,
static electricity produced by a brush or
cloth may cause the LCD displays to light
up or darken. This does not indicate a
malfunction, and the display will shortly
return to normal.
• When cleaning the lens and mirror,
remember that these elements are easily
damaged. Dust and lint should be gently
removed with a blower. When using an
aerosol blower, keep the can vertical (tilting
the can could result in liquid being sprayed
on the mirror). If you do get a fingerprint or
other stain on the lens, apply a small
amount of lens cleaner to a soft cloth and
wipe the lens carefully.
• See “Technical Notes: Cleaning the CCD”
for information on cleaning the CCD.
Storage
• To prevent mold or mildew, store the
equipment in a dry, well-ventilated area.
Do not store it with naptha or camphor
moth balls, close to equipment that
produces strong magnetic fields, or in areas
subject to high temperatures, for example
near a kerosene heater or in a car on a hot
day.
• When leaving the product unattended for a
long period of time, remove the battery to
prevent leakage and store the camera in a
plastic bag containing desiccant. Do not
however store the camera case in a plastic
bag, as this may cause the material to
deteriorate. Note also that desiccant loses
its ability to absorb moisture after a period
of time, and should be replaced at regular
intervals.
• To prevent mold or mildew, take the camera
out at least once a month to turn it on and
release the shutter a few times.
• Store the battery in a cool, dry place.
viii
Caring for the Camera and Battery
Page 9

Color LCD monitor
The monitor may contain a few pixels that are
•
always lit or that do not light. This is a
characteristic common to all TFT LCD monitors
and does not indicate a malfunction. Images
recorded with the camera will not be affected.
• Images in the monitor may be difficult to
see in a bright light.
• The monitor is lit by a fluorescent backlight.
Should the monitor begin to dim or flicker,
contact your Nikon service representative.
• Do not apply pressure to the LCD monitor,
as this could cause damage or malfunction.
Dust or lint adhering to the monitor can be
removed with a blower brush. Stains can
be removed by rubbing the surface lightly
with a soft cloth or chamois leather.
Should the monitor break, care should be
•
taken to avoid injury due to broken glass and
to prevent the liquid crystal from the monitor
touching the skin or entering the eyes or mouth.
•
Replace the monitor cover when transporting
the camera or leaving it unattended.
Attaching the monitor cover
Holding the camera firmly in your right hand,
place the monitor cover so that the left side is
positioned for attachment. Once the left side
is correctly in place, push the right side
towards the monitor until it “clicks” into place.
Removing the monitor cover
Holding the camera firmly in your right hand,
lightly press the left side of the cover to the
right, loosening the lock on the right side. Once
the right side is loosened, detach the right side
of the cover first, followed by the left side.
Turn camera off before removing
battery or unplugging AC adapter
Do not unplug the product or remove the
battery while the camera is on, or while
images are being recorded or deleted from
memory. Forcibly cutting power to the product
in these circumstances could result in loss of
data or in damage to internal circuitry or
memory. To prevent an accidental
interruption of power, avoid carrying the
product with you while the AC adapter is
connected.
Observe proper precautions when
handling batteries
Batteries may leak or explode if improperly
handled. Observe the following precautions
when handling batteries for use in this product:
• Be sure the product is off before inserting
or removing the battery. If you are using
the AC adapter, be sure it is unplugged.
• Foreign matter on the battery terminals—
for example, sweat or oil—may prevent a
contact from being formed. Before
installing the battery, clean it thoroughly
with a soft, dry cloth.
• When the product is used continuously on
battery power for an extended period, the
battery may become hot. Due caution
should be observed when removing the
battery.
• Use only batteries approved for use in this
equipment.
• Do not expose the battery to flame or to
excessive heat or moisture. Do not shortcircuit or disassemble the battery.
Spare batteries
• Keep a spare battery fully charged when
taking photographs on important
occasions. Depending on your location,
you may find it difficult to purchase
replacement batteries on short notice.
• On cold days, the capacity of the battery
tends to decrease. Be sure the battery is
fully charged before taking photographs
outside in cold weather. Keep a spare
battery in a warm place and exchange the
two as necessary. Once warmed, a cold
battery may recover some of its charge.
Caring for the Camera and Battery
ix
Page 10

Notice for customers in the U.S.A.
Federal Communications Commission (FCC) Radio Frequency
Interference Statement
This equipment has been tested and found to comply with the limits for a Class
B digital device, pursuant to Part 15 of the FCC Rules. These limits are
designed to provide reasonable protection against harmful interference in a
residential installation. This equipment generates, uses, and can radiate radio
frequency energy and, if not installed and used in accordance with the
instructions, may cause harmful interference to radio communications. However, there is no guarantee that interference will not occur in a particular
installation. If this equipment does cause harmful interference to radio or
television reception, which can be determined by turning the equipment off and
on, the user is encouraged to try to correct the interference by one or more of
the following measures:
• Reorient or relocate the receiving antenna.
• Increase the separation between the equipment and receiver.
• Connect the equipment into an outlet on a circuit different from that to which
the receiver is connected.
• Consult the dealer or an experienced radio/television technician for help.
CAUTIONS
Modifications
The FCC requires the user to be notified that any changes or modifications
made to this device that are not expressly approved by Nikon Corporation may
void the user's authority to operate the equipment.
Interface Cables
Use the interface cables sold or provided by Nikon for your equipment. Using
other interface cables may exceed the limits of Class B Part 15 of the FCC
rules.
D1
Tested To Comply
With FCC Standards
FOR HOME OR OFFICE USE
Notice for customers in Canada
CAUTION
This class B digital apparatus meets all requirements of the Canadian
Interference Causing Equipment Regulations.
ATTENTION
Cet appareil numérique de la classe B respecte toutes les exigences du
Règlement sur le matériel brouilleur du Canada.
x
Notice for Customers in the U.S.A. and Canada
Page 11

Notices
• Reproduction, in whole or in part, of any of the manuals provided with your Nikon product
requires prior permission from Nikon.
• The information contained in this manual is subject to change without notice.
• While Nikon makes every effort to produce perfect manuals, we appreciate any opportunity
for improvement. Should you find any mistakes, we would be grateful if you were to kindly
let us know. The address of Nikon’s representative in your area is provided separately.
• Nikon does not accept liability for damages resulting from the use of this product.
Notice Concerning Prohibition of Copying or Reproduction
Note that simply being in possession of material that has been digitally copied or reproduced
by means of a scanner, digital camera, or other device may be punishable by law.
• Items prohibited by law from being copied or reproduced
Do not copy or reproduce paper money, coins, securities, government bonds, or local
government bonds, even if such copies or reproductions are stamped “Sample”.
The copying or reproduction of paper money, coins, or securities which are circulated in a
foreign country is prohibited.
Unless the prior permission of the government has been obtained, the copying or
reproduction of unused postage stamps or post cards issued by the government is
prohibited.
The copying or reproduction of stamps issued by a government or of certified documents
stipulated by law is prohibited.
• Cautions on certain copies and reproductions
The government has issued cautions on copies or reproductions of securities issued by
private companies (shares, bills, checks, gift certificates, etc.), commuter passes, or
coupon tickets, except when a minimum of necessary copies are to be provided for
business use by a company. Also, do not copy or reproduce passports issued by the
government, licenses issued by public agencies and private groups, ID cards, and tickets,
such as passes and meal coupons.
• Comply with copyright notices
The copying or reproduction of copyrighted creative works such as books, music, paintings,
woodcut prints, maps, drawings, movies, and photographs is prohibited except when it is
done for personal use at home or for similar restricted and non-commercial use.
Trademark Information
Apple and Macintosh are registered trademarks of Apple Computer, Inc.
Microsoft and Windows are registered trademarks of Microsoft Corporation.
CompactFlash is a trademark of SanDisk Corporation.
All other trade names mentioned in this manual or the other documentation provided with
your Nikon product are trademarks or registered trademarks of their respective holders.
Notices
xi
Page 12

Contents
Getting to Know the D1............................................................................... ii
Caring for the Camera and Battery ....................................................... viii
About This Manual ....................................................................................... 1
First Steps ...................................................................................................... 3
1 Insert the Battery .................................................................................. 4
2Attach the Lens .................................................................................... 6
3Set the Time and Date ......................................................................... 8
4Choose a Language for the Menus ................................................. 10
5 Insert the Memory Card .................................................................... 12
6Take a Photograph............................................................................. 14
6.1 Set the advance mode to S (single frame) ........................... 14
6.2 Set image quality to NORM (normal) ..................................... 14
6.3 Set sensitivity to ISO 200 equivalent ........................................ 15
6.4 Set white balance to A (auto) ................................................ 15
6.5 Set the focus mode to S (single servo AF).............................. 16
6.6 Set the AF area mode to single area AF ............................... 16
6.7 Select the center focus area .................................................. 17
6.8 Select matrix metering ............................................................. 17
6.9 Set the exposure mode to programmed auto ..................... 18
6.10 Ready the camera ................................................................... 19
6.11 Half-press the shutter release button...................................... 20
6.12 Check the indicators in the viewfinder .................................. 20
6.13 Take a photograph................................................................... 21
7 Play the Photograph Back ................................................................ 23
Camera Settings ........................................................................................ 25
The Mode Dial ............................................................................................ 26
Image Quality ............................................................................................ 28
Sensitivity (ISO Equivalency) ..................................................................... 30
White Balance............................................................................................ 31
Autofocus ................................................................................................... 33
AF Area Mode ............................................................................................ 34
Focus Area .................................................................................................. 36
Focus Lock .................................................................................................. 37
Getting Good Results with Autofocus ..................................................... 39
Manual Focus ............................................................................................. 40
Metering ..................................................................................................... 41
Exposure Mode .......................................................................................... 43
Auto-Exposure Lock ................................................................................... 49
xii
Contents
Page 13

Exposure Compensation .......................................................................... 51
Auto Bracketing ......................................................................................... 53
Capture Preview Mode ............................................................................ 56
Record-and-Review .................................................................................. 58
Playing Photographs Back........................................................................ 60
Self Timer Mode .......................................................................................... 62
Diopter Adjustment ................................................................................... 63
LCD Illuminator ........................................................................................... 63
Depth-of-Field Preview .............................................................................. 64
Focal Plane Position................................................................................... 64
Custom Settings ......................................................................................... 65
Changing Custom Settings ....................................................................... 66
Custom Settings Options ........................................................................... 67
Quick Guide to Custom Settings Options ........................................ 74
Two-Button Reset ........................................................................................ 76
Playback ....................................................................................................77
Playing Photographs Back........................................................................ 78
The Playback Menu ................................................................................... 82
Flash Photography .................................................................................... 93
Through-the-Lens Flash Photography ...................................................... 94
Flash Sync Modes ...................................................................................... 96
Compatible Speedlights ........................................................................... 98
Using a Speedlight ................................................................................... 100
Connections ............................................................................................ 101
Connecting to a Television or VCR ........................................................ 102
Connecting to a Computer ................................................................... 103
Reading Photographs from Memory Cards ......................................... 105
Technical Notes....................................................................................... 107
Replacing the Focusing Screen ............................................................. 108
Compatible Lenses .................................................................................. 109
Cleaning the CCD ................................................................................... 112
Optional Accessories .............................................................................. 114
Troubleshooting ........................................................................................ 118
Specifications ........................................................................................... 123
Exposure Program (Programmed Auto) ................................................ 127
Index ........................................................................................................ 128
Contents
xiii
Page 14

xiv
Page 15

ABOUT THIS MANUAL
Thank you for your purchase of a Nikon D1 digital camera. This chapter
describes the basic layout of this manual.
1
Page 16

This manual is divided into seven main chapters:
First Steps
Outlines the steps you will take when using your camera for the first time, from
installing the batteries to taking photographs at basic settings.
Camera Settings
Details the advanced settings of your camera.
Custom Settings
Describes the options available in the camera’s custom settings menu.
Playback
Details how to play back and delete images recorded with your camera.
Flash Photography
Lists the flash options available for the D1.
Connections
Describes how to connect your camera to a computer or television.
Technical Notes
Lists the accessories available for your camera, describes how to care for the
camera’s CCD, and provides troubleshooting tips.
Tip
When taking photographs on important occasions, take a few trial shots to confirm that
the camera is functioning properly. Whenever you are in doubt about how a
photograph will turn out, you can take a trial shot and play it back in the camera’s LCD
monitor.
2
About This Manual
Page 17

FIRST STEPS
This chapter covers the steps you will take when using your camera for the first
time, from inserting the battery to taking your first photograph. It describes the
most commonly used settings for D-Type autofocus (AF) Nikkor lenses, as
shown below.
Lens D-Type AF Nikkor lens
Sensitivity
Operating mode
Image quality
White balance
Focus mode
AF area mode Single area AF
Focus area
Metering
Exposure mode
ISO 200 equivalent
Single-frame shooting (S)
Normal
Auto
Single-servo autofocus
(AF-S)
Center
3D color matrix metering
Programmed auto (P)
3
Page 18
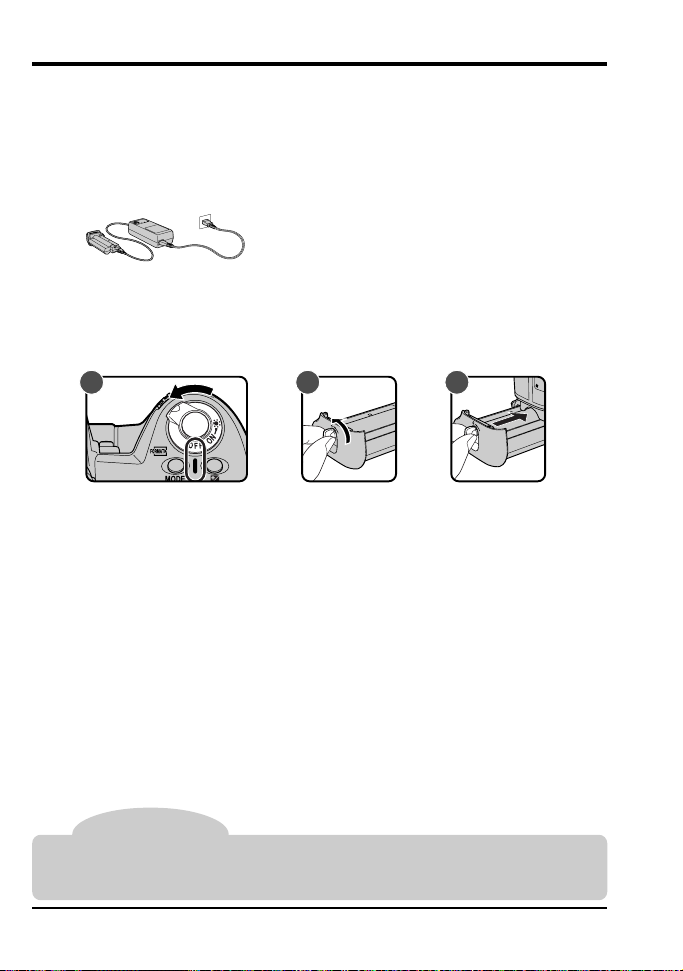
1 Insert the Battery
Insert the battery and check the battery indicator.
.1 Charge the battery
1
The D1 uses rechargeable EN-4 Ni-MH battery packs (available
separately). Be sure the battery is fully charged before inserting it in the
camera.
Batteries can be charged in about 90 minutes
using the MH-16 Quick Charger (available separately). See the documentation provided with
the MH-16 for details. More information about
batteries can be found in “Technical Notes:
Optional Accessories.”
.2 Insert the battery in the camera
1
A B C
Be sure the camera is off before inserting or removing the battery pack
(A). Turn the battery pack latch to the open position (B) and insert the
battery in the camera (C).
Tip
The EN-4 rechargeable battery pack can also be recharged using the MH-15 Quick
Charger for the F100 film camera or the EH-3 Quick Charger for the E3/E3s digital
cameras.
4
First Steps: Insert the Battery
Page 19
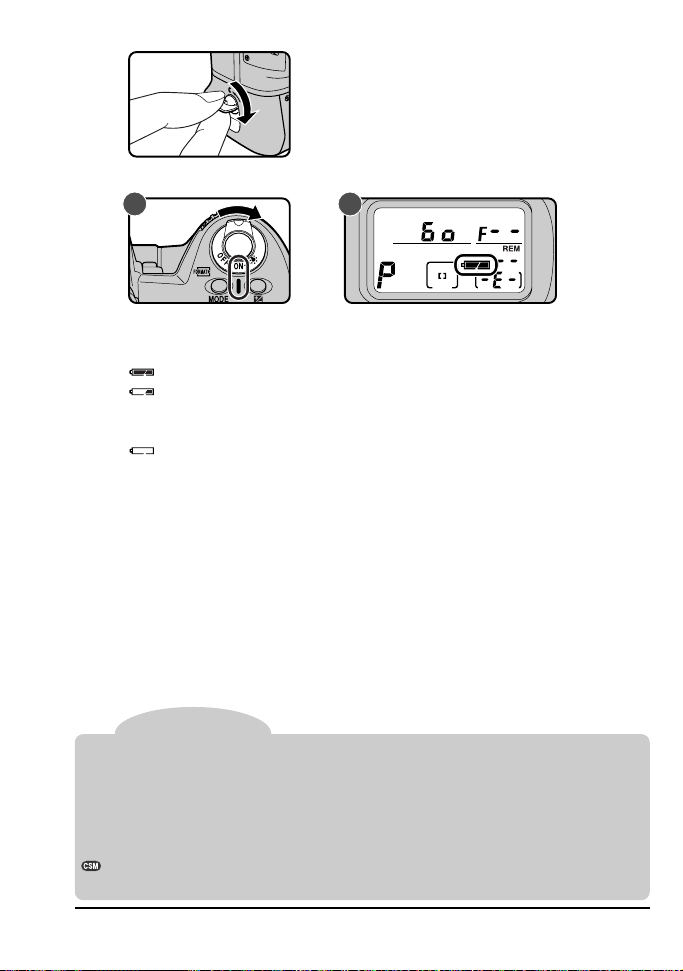
.3 Turn the battery pack latch to the locked position
1
.4 Check the battery indicator
1
A B
Turn the camera on (A) and confirm the battery level in the control panel
on top of the camera (B).
Battery fully charged
Low battery
Ready a fully-charged spare battery. (The display in the viewfinder
turns off to save power when no operations are being performed.)
Battery exhausted
No photographs can be taken until the battery has been replaced.
All indicators in the viewfinder and rear control panel, and all indicators
in the top control panel other than the exposure mode, battery indicator,
and exposure counter, disappear six seconds after the camera is
turned on (automatic meter switch-off).
Tip
Reactivating the display
Lightly press (half-press) the shutter-release button to reactivate the display in the
control panel and viewfinder. Indicators will be displayed for six seconds after you
remove your finger from the button. Note that when using the shutter-release button
for vertical shooting, you will need to set the shutter-release button lock release for
vertical shooting to the unlocked position.
The length of time before automatic meter switch-off can be changed using custom
settings (see “Custom Settings,” item 15).
First Steps: Insert the Battery
5
Page 20

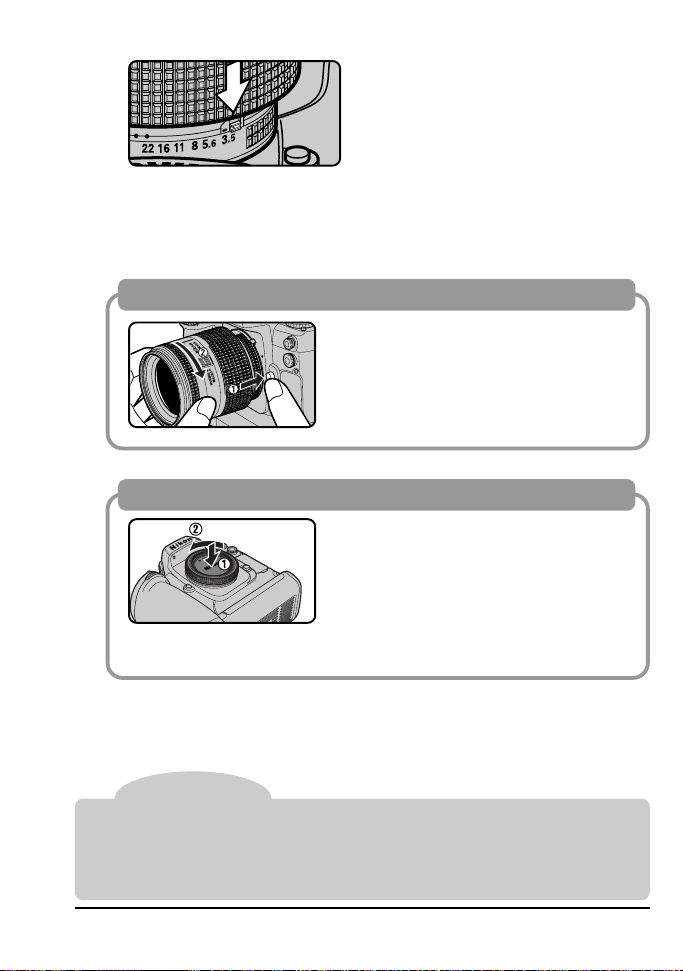
2Attach the Lens
After making sure that the camera is off, mount the lens and set the
aperture to its minimum setting (largest f-number).
.1 Attach the lens to the camera body
2
A B
Turn the camera off (A). Align the mounting mark on the lens with the
mounting mark on the camera body, then, being careful not to touch the
lens-release button, turn the lens counter-clockwise until it locks into
place (B).
If no lens is attached, or if a non-CPU lens is attached (see “Technical
Notes: Compatible Lenses”), F-- will appear in the top control panel and
viewfinder when the camera is turned on (if the exposure mode is set
to programmed auto or shutter-priority auto, the exposure mode
indicator will also blink).
.2 Set aperture to its minimum setting
2
Set the lens to minimum aperture (maximum f-number).
If the lens is not set to the minimum aperture, a blinking FEE indicator
will appear in the viewfinder and in the control panel on top of the
camera when the camera is turned on. The shutter can not be released
while this indicator is displayed.
Tip
To get the most from your camera, use a D-Type AF Nikkor lens (see “Technical Notes:
Compatible Lenses” for more information).
6
First Steps: Attach the Lens
Page 21
.3 Lock the aperture ring
2
2
ft
m
2
8
7
0
5
0
3
5
2
8
85
1
0
5
22
2
If you do not intend to set aperture manually using the lens aperture
ring, lock the lens aperture (the aperture ring can not be used unless
changes have been made to default settings as described in “Custom
Settings,” item 22).
Detaching the lens
Before detaching the lens, turn the camera off. Then turn the lens clockwise
while holding down the lens-release button.
When no lens is attached…
If the camera’s lens mount is not covered, dust may find its way onto the
mirror or viewfinder screen. This can be
prevented by attaching the BF-1A body
cap to the camera when no lens is in
place (note that the BF-1 body cap can
not be used with the D1).
Note
When attaching or detaching the lens or body cap, be careful that dirt or other foreign
matter does not enter the camera body. The presence of foreign matter inside the
camera could affect your photographs. When changing lenses or replacing the body
cap, hold the camera with the base down or tilted so that the lens mount faces the
ground. Be sure to replace the body cap when no lens is in place.
First Steps: Attach the Lens
7
Page 22
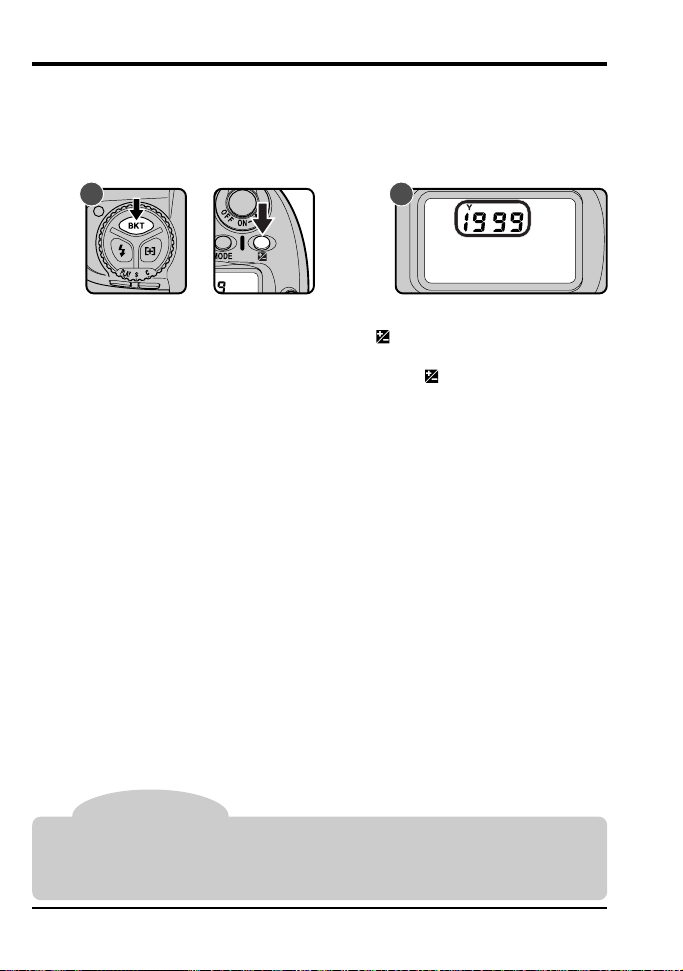
3 Set the Time and Date
The D1 records the time and date for each photograph taken. Before
using your camera, set the internal clock-calendar to the current time
and date.
.1 Check the time and date in the control panel
3
A B
After turning the camera on, press the auto-bracketing button (BKT)
and exposure compensation button (
indicator will be displayed in the control panel on top of the camera (B).
Press the exposure-compensation button (
month and day, a second time to display the hour and minute. Pressing
the button a third time will clear the time and date from the display).
Note
The clock-calendar is powered by an independent battery with a life of about ten years.
When no charge remains, the clock-battery replacement indicator will appear in the
control panel on top of the camera. Take the camera to a Nikon-authorized service
center, where the clock battery can be replaced for a fee.
) simultaneously. The year
) once to display the
8
First Steps: Set the Time and Date
Page 23

.2 Set the time and date
3
A B
To set the time and date, turn the camera on and hold the autobracketing button down for more than two seconds while pressing the
exposure compensation button (A). The year indicator in the control
panel on top of the camera will flash (B). Set the year using the main
command dial. Pressing the exposure-compensation button will cause
the month, day, hour, and minute to be displayed in turn; the item
currently displayed can be set using the main command dial. Press the
exposure compensation button when the minute is displayed to clear
the time and date from the display, putting any changes into effect (the
display disappears automatically, cancelling changes to settings, if no
operations are performed for three minutes).
Note
The time/date display is cleared from the control panel when the shutter-release button
is pressed half way. Changes to the time and date will not be saved.
First Steps: Set the Time and Date
9
Page 24
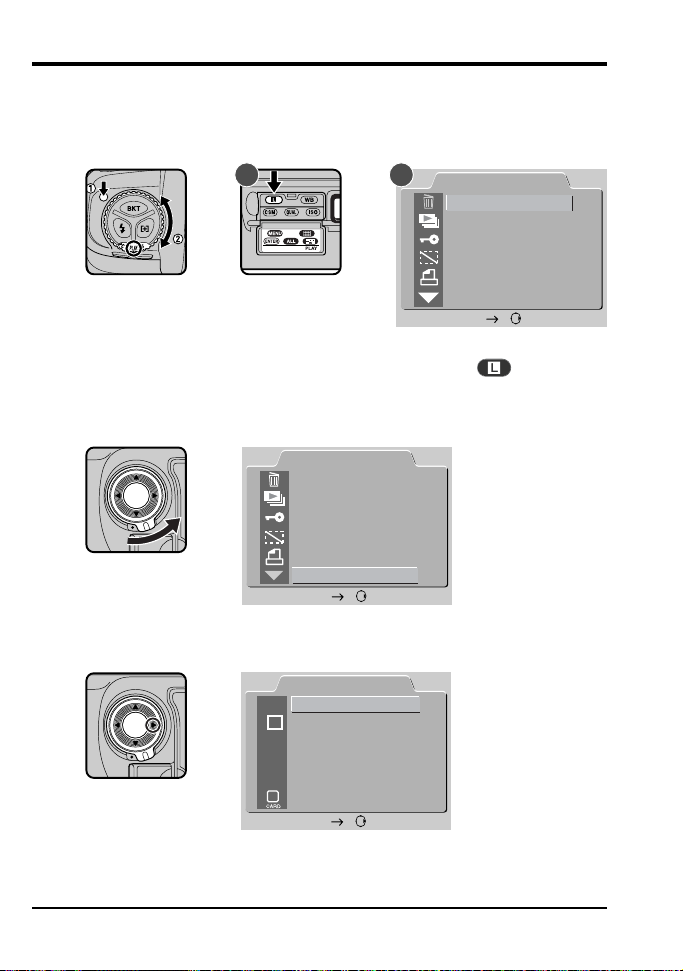
4Choose a Language for the Menus
Camera menus and messages can be displayed in English, German,
French, or Japanese. To select the language used:
.1 Display the playback menu
4
A B
Holding the mode dial lock-release down, turn the mode dial to PLAY
(playback mode). Turn the camera on and press the
display the playback menu (B).
.2 Choose SET UP from the playback menu
4
PLAY BACK
DELETE
SLIDE SHOW
PROTECT
HIDE IMAGE
PRINT SET
SET UP
SET
Unlock the focus-area selector and press ▼ until SET UP is highlighted.
Press the focus-area selector to the right to display the SET UP menu.
PLAY BACK
DELETE
SLIDE SHOW
PROTECT
HIDE IMAGE
PRINT SET
SET UP
SET
button (A) to
10
SET UP
FOLDERS
D1
OPTIONS
20S
AUTO O FF
LANGUAGE
E
N
VIDEO OUTPUT
CARDFORMAT
SET
First Steps: Choose a Language for the Menus
Page 25

.3 Choose a language from the LANGUAGE menu
4
SET UP
FOLDERS
D1
OPTIONS
20S
AUT O O F F
LANGUAGE
E
N
VIDEO OUTPUT
CARDFORMAT
SET
LANGUAGE
D
E
F
J
Using the focus-area selector, highlight LANGUAGE and press the
selector to the right to display the LANGUAGE menu. Highlight the
desired language and press the focus-area selector to the right (or
press the
button) to put your choice into effect.
First Steps: Choose a Language for the Menus
11
Page 26
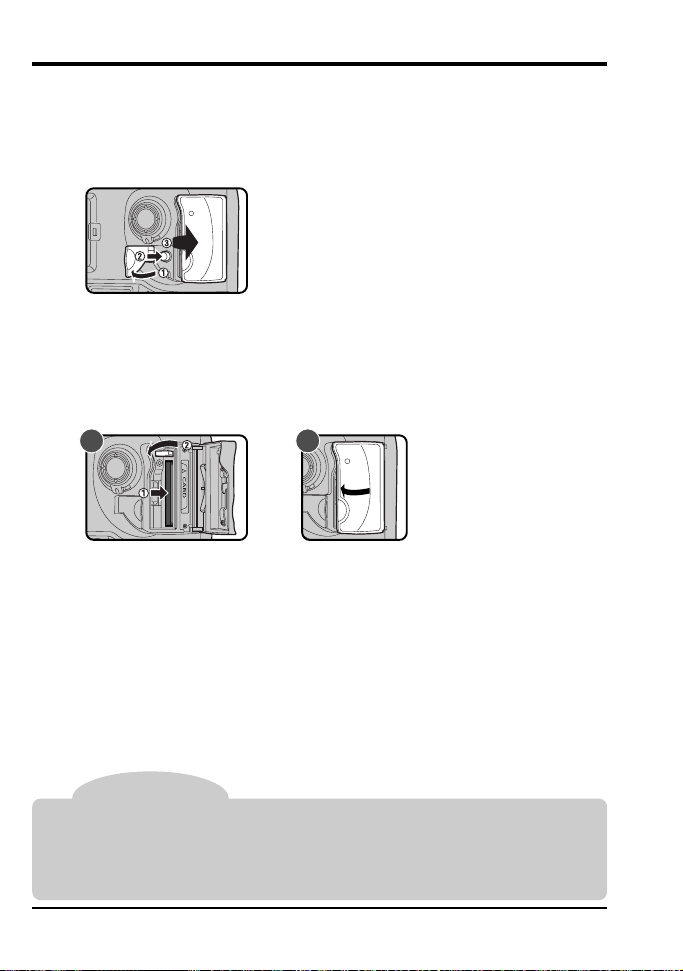
5 Insert the Memory Card
The D1 digital camera uses compact flash-memory cards to record
photographs and other information. Before taking photographs, you
will need to insert a memory card in the camera’s card slot.
.1 Open the card slot
5
After making sure the camera is off, open the door covering the cardslot cover release button (1) and press the card-slot cover release
button (2) to open the card slot (3).
.2 Insert the memory card, fold the eject button over,
5
and close the cover
A B
Insert the memory card in the slot (A), being sure that the card terminals
are fully inserted in the connector at the back of the slot. The card
should be inserted facing the ▲CARD label next to the card slot.
Important:
backwards. Do not use force when inserting the card. Either
✔
action could damage your camera.
Fold the eject button over and close the cover (B). If the button is not folded
over when the cover is closed, closing the door may partially eject the card,
causing errors in recording photographs or during playback.
Do not attempt to insert the card upside down or
Note
The following CompactFlash memory cards have been tested and approved for use
in the D1:
•Nikon EC-CF CompactFlash memory cards
• SanDisk Corporation SDCFB-4/8/15/30/40/48/64/96 CompactFlash memory cards
Operation is not guaranteed with other cards. IBM microdrive cards are not supported.
12
First Steps: Insert the Memory Card
Page 27
Removing memory cards
When removing memory cards, turn the camera off and open the
card-slot cover. After confirming that the access lamp is off, stand
the eject button up and press it down to eject the card.
to remove the card while the access lamp is on
in loss of data or in damage to the camera or the card.
Important:
use. Observe due caution when removing memory cards
✔
from the camera.
The compact flash card may become hot while in
Do not attempt
. Doing so could result
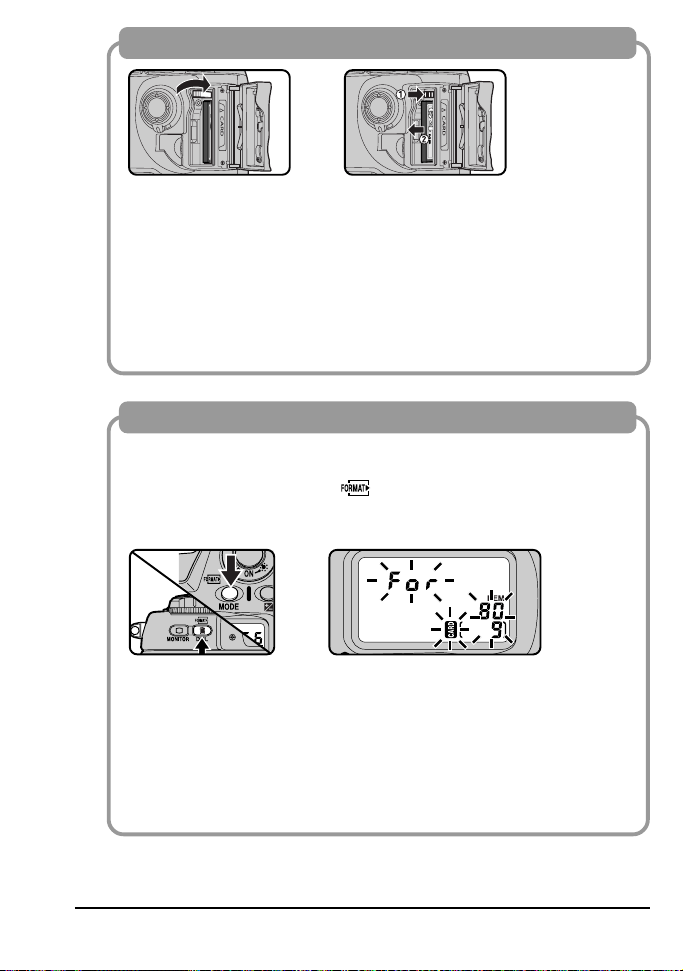
Formatting memory cards
Memory cards must be formatted before they can be used to record
photographs. When formatting memory cards, first make sure the
camera is on, then hold the
two seconds. A blinking FOR indicator will appear in the top control
panel. To format the memory card, press the two buttons again.
buttons down simultaneously for
Note:
Formatting memory cards permanently erases any
data they may contain. Before formatting the card, be sure
✔
to make copies of data you would like to keep.
When the card is formatted, the frame-number display in the control
panel on top of the camera will show 1, and the number of exposures
remaining will appear in both control panels (when a hundred or
more exposures remain, the control panels will show FL).
First Steps: Insert the Memory Card
13
Page 28

6Take a Photograph
This section describes how to take a photograph using the most
commonly-used settings.
.1 Set the advance mode to S (single frame)
6
Hold the mode dial lock-release down and turn the mode dial to S
(single frame). See “Camera Settings: The Mode Dial” for more
information.
.2 Set image quality to NORM (normal)
6
A C
B
After turning the camera on, hold the
main command dial (B). The image-quality display in the rear control
panel (C) will cycle through the image-quality settings as shown below.
Stop when the display shows NORM (normal).
HI FINE NORM BASIC
See “Camera Settings: Image Quality” for more information.
14
button down (A) and turn the
First Steps: Take a Photograph
Page 29
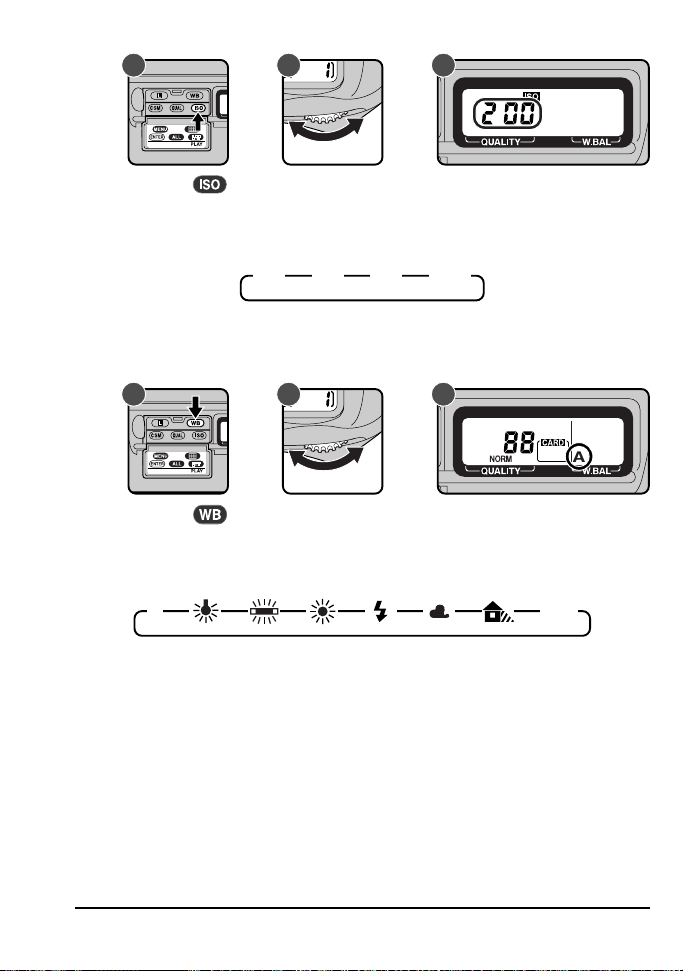
.3 Set sensitivity to ISO 200 equivalent
6
A CB
Hold the
sensitivity display in the rear control panel will cycle through the
sensitivity settings as shown below. Stop when the display shows 200
(ISO 200 equivalent).
See “Camera Settings: Sensitivity” for more information.
.4 Set white balance to A (auto)
6
A CB
Hold the
white-balance display in the rear control panel will cycle through the
white-balance settings as shown below. Stop when the display shows
A (auto white balance).
A PRE
See “Camera Settings: White Balance” for more information.
button down (A) and turn the main command dial (B). The
200 400 800 1600
button down (A) and turn the main command dial (B). The
First Steps: Take a Photograph
15
Page 30

.5 Set the focus mode to S (single servo AF)
6
Turn the focus mode selector until it clicks into place pointing to S
(single servo AF). For more information on focus settings, see “Camera
Settings.”
.6 Set the AF area mode to single area AF
6
A B C
Hold down the AF area mode button (A) and turn the main command
dial (B). Stop when [ ] (single area AF) appears in the control panel on
top of the camera (C). AF area mode is detailed in “Camera Settings:
AF Area Mode.”
Autofocus
In autofocus (AF) mode, the camera focuses automatically when the shutter-release
button is pressed half way, or when the AF start button is pressed. Two autofocus
modes are available: S (single-servo AF) and C (continuous AF). In single-servo AF,
the shutter can only be released when the camera is in focus.
Do not use the focus ring when autofocus is in effect.
Autofocus can be set to start only when the AF start button is pressed (see
“Custom Settings,” item 4).
16
First Steps: Take a Photograph
Page 31

.7 Select the center focus area
6
A B C
Unlock the focus area selector (A) and push the focus-area selector up,
down, left, and right until the focus area display in the control panel on
top of the camera shows center focus (B).
The focus area can only be selected while the focus area display is
shown in the control panel. To activate the focus area display, halfpress the shutter-release button.
After selecting the focus area, lock the focus area selector (C).
More information on focus area can be found in “Camera Settings:
Focus Area.”
.8 Select matrix metering
6
A B
Hold down the metering selector lock release and turn the metering
selector to
appear in the viewfinder (B).
Metering
The D1 offers three metering modes: matrix, center-weighted, and spot (see “Camera
Settings: Metering” for details). In matrix mode 3D color metering is used, which sets
exposure based on a variety of data from all areas of the frame provided by a CCD
sensor with 1005 (67 vertical × 15 horizontal) metering pixels. This system is particularly
effective with brightly-colored (white or yellow) or dark-colored (black or dark green)
subjects that occupy a substantial portion of the frame, producing photographs closer
to what is seen by the naked eye. 3D color metering can however only be used with
D-Type lenses. When another type of lens is in place, the system used is color matrix
metering, which does not take distance information from the lens into account.
First Steps: Take a Photograph
(matrix metering). The matrix metering indicator will
17
Page 32

.9 Set the exposure mode to programmed auto
6
Hold the MODE button down and turn the main command dial until the
exposure-mode indicator in control panel on top of the camera shows
P (programmed auto). When the shutter-release button is half-pressed,
aperture and shutter-speed will be shown in the control panel.
Flexible program
When the exposure mode is set to
programmed auto, the main command dial can be rotated to select
new combinations of aperture and
shutter speed. This makes it possible
ture-priority auto or shutter-priority auto in programmed mode. While
flexible program is in effect, an asterisk will appear next to the exposure
mode indicator (P) in the top control panel. Flexible program can be
cancelled by: rotating the command dial until the asterisk disappears,
changing the exposure mode, turning the power off, or performing a
two-button reset (see “Custom Settings: Two-Button Reset”).
Exposure mode
The D1 offers a choice of four exposure modes: programmed auto, shutter-priority
auto, aperture-priority auto, and manual. In programmed auto, the camera automatically adjusts exposure to produce the best results, as shown in “Technical Notes:
Exposure Program (Programmed Auto).” Use this mode in combination with flexible
program, exposure compensation (see “Camera Settings: Exposure Compensation”),
or auto bracketing (see “Camera Settings: Auto Bracketing”) for programmed photography that is at once sophisticated and simple. Other exposure modes can be selected
according to your subject and shooting conditions, allowing you to adjust depth of field,
or blur or freeze moving objects. See “Camera Settings: Exposure Mode” for details.
When a non-CPU lens is in use, the exposure mode will automatically be set to A
(aperture-priority auto; see “Camera Settings: Exposure Mode”). The exposure-mode
indicator in the control panel on top of the camera will show a flashing P, the exposuremode indicator in the viewfinder, A. The aperture display in the control panel and
viewfinder will show F--. Aperture must be set manually using the aperture ring on the
lens.
to approximate the effects of aper-
18
First Steps: Take a Photograph
Page 33

.10 Ready the camera
6
A B
Hold the camera as shown above, with your elbow propped lightly
against your body for support. Hold the hand-grip with your right hand
and cradle the camera or lens with your left. The shutter-release button
for portrait photographs can be used when the camera is in vertical
shooting mode (B).
The recommended stance for taking photographs is with one foot a half
pace in front of the other and your upper body in a stable position.
Camera shake and shutter speed
To prevent blurring caused by camera shake, the shutter speed
should be faster than the inverse of the focal length of the lens, in
seconds (for example, if the lens has a focal length of 50mm, shutter
speed should be faster than
mended when shooting at lower shutter speeds.
1
/50 sec.). Use of a tripod is recom-
First Steps: Take a Photograph
19
Page 34

.11 Half-press the shutter release button
6
A
Center the focus brackets on your subject (A) and lightly press the
shutter-release button half way (B). The camera will adjust focus
automatically, and the results of the autofocus operation will appear in
the viewfinder.
The subject is in focus.
The camera is focused on an area between the camera and the
subject.
The camera is focused on an area behind the subject.
The camera is unable to focus using autofocus. See “Camera
Settings: Autofocus” for instructions.
To focus on a subject that will not be in the center of the final
composition, change the focus area (see “Camera Settings: Focus
Area”) or use focus lock (see “Camera Settings: Focus Lock”).
.12 Check the indicators in the viewfinder
6
With the shutter-button held half way, check the indicators in the
viewfinder. By default, aperture and shutter speed are displayed in the
smallest possible increments (see “Custom Settings,” item 2, for
information on changing the size of the increments used for displaying
aperture, shutter speed, and exposure compensation).
If the subject is too bright or too dark, one of the following indicators will
appear in the viewfinder or the control panel on top of the camera.
HI Subject is too bright. Use a Neutral Density (ND) filter.
Lo Subject is too dark. Use a flash.
B
Note
The viewfinder shows approximately 96% of the image actually exposed on the CCD.
The area that appears in the final photograph will be slightly larger than the scene
viewed through the viewfinder.
20
First Steps: Take a Photograph
Page 35

.13 Take a photograph
6
A
B
With the shutter-release button held halfway down, check the focus
indicator in the viewfinder one final time (A) to confirm that the ●
indicator is showing and the camera is in focus (if your subject has
moved since the photograph was composed, autofocus will automatically track the subject so that it stays in focus). Then carefully press the
shutter-release button the rest of the way to take a photograph (B).
By default, the photograph will automatically be recorded on the
compact flash-memory card when the shutter-release button is pressed
all the way down. You can, however, set the camera to “capturepreview mode” to preview the photograph in the viewfinder before it is
recorded on the memory card. See “Camera Settings: Capture Preview
Mode.”
Notes
If the subject in the viewfinder appears to be out of focus even when the in-focus
indicator (●) appears in the viewfinder, adjust viewfinder diopter as described in
“Camera Settings: Diopter Adjustment.”
Avoid taking photographs with the camera focused on the sun or another strong light
source, as excessive light may cause deterioration in the camera’s charge-coupled
device (CCD). It may also produce a white blur effect in the final photograph.
The D1 is equipped with a combined electronic (CCD) and mechanical shutter. This
shutter operates differently from the mechanical shutters found in film cameras, with
the result that the interval between the sound made by the shutter and that made by
the mirror will not decrease past a certain point, even at high shutter speeds.
First Steps: Take a Photograph
21
Page 36

When the number of exposures remaining reaches 0
When there is not enough memory available on the compact flashmemory card to store further photographs at current settings, the
number of exposures remaining will show zero and the Cd (card)
indicator in the viewfinder and the CARD indicators in the control
panels will flash. In this case you will need to delete photographs
(see “Playback”) or insert another memory card (see “Insert the
Memory Card” in this chapter) before more photographs can be
taken.
Note
The frame number shown in the control panel on top of the camera corresponds to the
number of photographs in the current folder. When a new folder is created, the current
frame number will return to 1. New folders are created when:
•the number of photographs in the current folder reaches the maximum of 999
•a file number of 999 is reached in sequential numbering mode (see "Custom
Settings," item 29)
•you create a new folder using the NEW option in the FOLDERS menu (see
"Playback: The Playback Menu"
22
First Steps: Take a Photograph
Page 37

7 Play the Photograph Back
Photographs taken with the D1 can be played back on the camera’s
LCD monitor. If desired, photographs can also be deleted.
.1 Turn the monitor on
7
A B C
Press the button to turn the monitor on (A). The most recently
taken photograph will be displayed (B).
Other photographs in memory, if any, can be viewed by pressing the
focus area selector (C). Press ▲ to view photographs taken before the
photo currently displayed, or ▼ to view photographs taken after the
current photograph. Pressing ▲ when you reach the oldest photograph
will display the most recent photograph in memory; when the most
recent photo is displayed, press ▼ to view the oldest photograph in
memory. If the card contains no photographs, the message “CARD
CONTAINS NO PHOTOGRAPHS” will be displayed.
For more information on playback, see “Playback.”
Tip
In playback mode, the monitor will turn off automatically to save power if no operations
are performed for a specified period of time. The length of time before the monitor turns
off can be set using custom settings (see “Custom Settings,” item 18) or the auto-off menu
(see “Playback”).
After the monitor has turned off, the display can be restored by pressing the button
before automatic meter switch-off (see “Custom Settings,” item 15). Pressing the
button after this time will display the most recent photograph in memory.
First Steps: Play the Photograph Back
23
Page 38

.2 Delete a photograph
7
A B
ERASING IMAGES
DEL
YES ☞
To delete the photograph currently displayed in the LCD monitor, press
the
C
Press the
single image playback, where the next photograph in memory will be
displayed. To return to playback without deleting the photograph, press
any of the buttons on the rear of the camera except the
buttons. Press the button or lightly press the shutter-release
button to end playback without deleting the photograph.
For more information on deleting photographs, see “Playback.”
button (A). A confirmation dialog will be displayed (B).
button again (C) to delete the photograph and return to
and
24
First Steps: Play the Photograph Back
Page 39

CAMERA SETTINGS
This chapter details most of the camera settings you will use when taking
photographs. Information on custom settings, playback, and flash photography are provided in separate chapters.
25
Page 40

The Mode Dial
The mode dial is used to set the camera operating mode. The D1 can be
operated in single-frame or continuous shooting modes, self-timer mode,
playback mode, and PC mode.
To set the operating mode, hold the mode dial lock
button down and turn the mode dial to the desired
setting.
The following operating modes are available:
SSingle-frame shooting: One photograph is taken each time the
shutter-release button is pressed. The next photograph can not be
taken until the current photograph has been recorded to the flash
memory card and the card access lamp has gone out.
C Continuous shooting: Photographs are taken at a maximum rate of
4.5 frames per second while the shutter-release button is held down.
Photographs are stored in a temporary memory buffer, which can
hold a maximum of twenty-one photographs. When this limit is
reached, the camera will be unable to record more photographs until
at least one of the images in the buffer has been transferred to the
memory card.
Note
The frame advance rate quoted above for continuous shooting mode is the average
obtained at a temperature of 20°C (68°F) using continuous servo AF, manual
exposure mode, a shutter speed faster than
maximum aperture.
Should the D1’s battery become exhausted while you are photographing in continuous
shooting mode, the camera will stop shooting, save images held in the temporary
memory buffer to the memory card, and turn off.
The advance rate for continuous shooting can be changed using custom settings
(see “Custom Settings,” item 25). You can also set the size of the memory buffer
to any value between one and twenty-one frames (“Custom Settings,” item 26).
26
1
/
sec., and an aperture other than the
250
Camera Settings: The Mode Dial
Page 41

While photos are being transferred
from the buffer to the memory card,
you will only be able to take as many
photographs as have already been
transferred from the buffer to the card.
When the shutter-release button is
pressed half way, the number of consecutive photographs that can be
taken before the buffer fills up is displayed in the viewfinder and the
control panel on top of the camera (see above).
Self timer: This mode is ideal for photographs in which the photographer wishes to appear (see “Self Timer Mode” in this chapter).
PLAY
Playback mode: In this mode, photographs can be played back on
the LCD monitor (see “Playback”).
PC
PC mode: This mode is used when the camera is connected to a
computer (see “Connections”).
Important:
✔
not turn the camera off until all photographs in the buffer have been
When taking photographs in continuous shooting mode, do
transferred to the memory card. Doing so could result in loss of data.
Similarly,
do not remove the memory card or battery from the camera
or disconnect the AC Adapter while images are being transferred from
the buffer to the card. Doing so could result in loss of data or in damage
to the camera or the card. Be sure the camera is off and the access
lamp has gone out before removing the memory card.
The time duration for writing to the CompactFlash card will vary
depending on the card speed and content of your images. The
following chart shows typical writing time in each recording mode, but
the actual time may vary slightly.
Image Quality One image shot 21 continuous image shots
BASIC 2 seconds 25 seconds
NORMAL 2.5 seconds 45 seconds
FINE 5 seconds 95 seconds
HI (RGB) 30 seconds 10 minutes 30 seconds
HI (YCbCr) 20 seconds 7 minutes
HI (RAW) 15 seconds 2 minutes 30 seconds*
*Except for RAW files, the bit depth is 8 bit. RAW, uncompressed files are recorded at a bit
depth of 12, and saved in 16-bit format. Therefore, the time shown is for 10 images, as the file
space required is about twice that of other file types.
Camera Settings: The Mode Dial
27
Page 42

Image Quality
The image quality setting controls the image type (color or black-and-white),
file type (RGB TIFF, YCbCr TIFF, RAW data, or JPEG), and compression ratio.
A B
To choose the compression ratio, turn the main command dial while holding
down the
button (A). Image quality settings are displayed in the rear
control panel (B) in the order shown below.
HI FINE NORM BASIC
HI
High image quality, no compression: Images are not compressed
when saved. Images can be stored as TIFF files (RGB and YCbCr)
or RAW data.
FINE Fine image quality, low compression: Images are JPEG-com-
pressed at a compression ratio of 1:4.
NORM Normal image quality, medium compression: Images are JPEG-
compressed at a compression ratio of 1:8.
BASIC Basic image quality, high compression: Images are JPEG-com-
pressed at a compression ratio of 1:16.
RAW, YCbCr
RAW data format
Raw 12-bit data from the CCD are saved directly to the memory card. This file type
can only be read using
The RAW data format is only available when “RAW data format available” is
selected using Custom Setting 28 (see “Custom Settings”).
YCbCr format
Models color data using measures of luminance (Y) and chrominance (Cb, Cr). This
file type can be read using
Nikon Capture
Nikon View DX
software available separately from Nikon.
or
Nikon Capture
software.
28
Camera Settings: Image Quality
Page 43

To choose between black-and-white and color
photography, or to select the file type used at
an image quality of HI, hold down the
button and turn the sub-command dial to
cycle through the settings as shown below.
HI YCbCr TIFF ➠ YCbCr TIFF (B&W) ➠ RGB TIFF
➠ RGB TIFF (B&W) ➠ RAW ➠ YCbCr TIFF
FINE FINE ➠ FINE (B&W) ➠ FINE
NORM NORM ➠ NORM (B&W) ➠ NORM
BASIC BASIC ➠ BASIC (B&W) ➠ BASIC
When black-and-white is chosen, the rear control panel shows B/W. RAW and
TIFF formats are displayed in the rear control panel as shown below.
RAW YCbCr TIFF RGB TIFF
The approximate number of images that can be saved on 96 and 64 MB Nikon
memory cards in each format are shown below.
Format and file size
HI (RAW, approx. 4 MB) 23 15
HI (YCbCr TIFF, approx. 5.2 MB) 18 12
HI (RGB TIFF, approx. 7.8 MB) 12 8
FINE (approx. 1.3 MB) 66 44
NORM (approx. 650 KB) 132 88
BASIC (approx. 320 KB) 265 177
Note
File size for black-and-white and color images is identical.
Camera Settings: Image Quality
Approx. number Approx. number
of frames of frames
(96 MB card) (64 MB card)
29
Page 44

Sensitivity (ISO Equivalency)
Sensitivity can be set higher than the default setting (ISO 200 equivalent) when
taking photographs in low light conditions. Four settings (ISO 200, 400, 800,
and 1,600 equivalent) are available.
A B
To choose a sensitivity setting, turn the main command dial while holding down
the
button (A). Sensitivity settings are displayed in the rear control panel
(B) in the order shown below:
200 400 800 1600
To confirm the current sensitivity setting, press the
button. The current
setting for sensitivity will be displayed in the rear control panel.
Notes
The default setting of ISO 200 equivalent is recommended in most circumstances.
Photographs taken at other settings may include a slight amount of noise.
Sensitivity can be further increased by a factor of +1 or +2 over ISO 1600, making
fast shutter speeds possible when lighting is poor (see “Custom Settings,” item
31). Note that in this case photographs may display higher levels of noise. It is
recommended that you take a trial photograph and check the results before
shooting in this mode.
At a setting of +1, the sensitivity display in the rear control panel shows HI-1; at a
setting of +2, HI-2 is shown.
30
Camera Settings: Sensitivity (ISO Equivalency)
Page 45

White Balance
The human eye is able to adapt to changes in lighting, and consequently to
humans a white object will still look white whether viewed in sunlight or under
overcast skies, or indoors under incandescent or fluorescent lighting. A digital
camera, in contrast, must adjust colors according to the lighting in order that
colors that appear white when viewed directly appear white in the final
photograph. This adjustment is called “white balance.”
A B
To set white balance, turn the main command dial while holding down the
button (A). White balance settings are displayed in the rear control panel (B)
as follows:
A PRE
A Auto white balance: The 1005-pixel CCD adjusts white balance
automatically for light sources with color temperatures between
approximately 4200K and approximately 7000K.
Incandescent: Use this setting when taking photographs indoors under
incandescent light. Color temperature is fixed at approximately 3000K.
Fluorescent: Use this setting when taking photographs indoors under
fluorescent light. Color temperature is fixed at approximately 4200K.
Direct sunlight: Use this setting when taking photographs in direct
sunlight. Color temperature is fixed at approximately 5200K (daylight).
Flash: Use this setting with Nikon Speedlights. Color temperature is
fixed at approximately 5400K.
Overcast: Use this setting when taking photographs under overcast
skies. Color temperature is fixed at approximately 6000K (daylight).
Shade: Use this setting when taking photographs in the shade in sunny
weather. Color temperature is fixed at approximately 7000K (daylight).
PRE Preset white balance: White balance can be set using a white object
as a reference point.
Tip
While auto white balance is suited to most lighting conditions, other settings can be
used when you want to fix white balance to a value suited to a particular light source.
Camera Settings: White Balance
31
Page 46

The D1 uses through-the-lens (TTL) metering to set white balance in auto and
preset modes. This allows white balance to be set accurately when the subject
is lit differently from the camera.
Using preset white balance
Preset white balance is useful when taking photographs under colored lighting.
To set white balance:
Light a white object with the same lighting that will be used in the final photograph.
1
Select a white balance of PRE
2
as described on the previous
page, then hold the
ton down for 2 seconds. The
PRE indicator in the rear control panel will flash.
Using manual focus (see “Manual Focus,” below) and auto exposure
3
(exposure mode P, S, or A), focus the camera on the white object and press
the shutter-release button. Note that the desired results may not be
obtained if the image is extremely over- or under-exposed.
At a white balance adjustment setting of PRE, the camera remembers the
value for white calculated the last time the setting was used and adjusts white
balance based on that information. To correctly measure white balance under
entirely different lighting, you must measure white balance several times to get
a proper reading for white. For example, if you take a photo under red lighting
using the PRE setting to adjust white balance so that white appears white, the
camera retaines that information. If you then take a picture under blue lighting,
you will have to measure white balance several times to completely replace the
information stored in the camera.
but-
Note
Color temperature
The perceived color of a light source varies with the viewer and other conditions. Color
temperature is an objective measure of the color of a light source, defined with
reference to the temperature to which an object would have to be heated to radiate light
in the same wavelengths. While light sources with a color temperature in the
neighborhood of 5,000–5,500°K appear to be white, light sources with a lower color
temperature, such as incandescent light bulbs, appear to be slightly yellow or red.
Light sources with a higher color temperature seem to be tinged with blue.
32
Camera Settings: White Balance
Page 47

Manual white-balance adjustment
Fine adjustments can be made manually to fixed white balance settings.
A B
To adjust white balance, select a white balance other than PRE. Then, holding down
button, turn the sub-command dial to raise or lower the white balance setting
the
by ±3 in increments of 1 (A). Raising white balance adjustment makes your images
appear bluer; lowering the adjustment makes images appear more yellow or red. At
settings other than 0, a
indicator will appear in the rear control panel (B).
Autofocus
When the focus-mode selector (A) is set to S (single servo AF) or C (continuous
servo AF), the camera focuses automatically when the shutter-release button
is half-pressed (B), or the
A B
button is held down (see below).
SSingle servo AF (focus priority):
camera focuses when the shutter-release button is pressed half way.
Focus remains locked as long as the shutter-release button is held in
this position (focus lock). If the subject was moving when the shutterrelease button was pressed half way, the camera will focus continuously as long as the subject continues to move and the shutter-release
button is kept lightly pressed (focus tracking). Focus will lock when the
subject comes to a halt. The shutter can only be released when the infocus indicator (●) appears in the viewfinder (focus priority).
C Continuous servo AF (release priority): The camera focuses con-
tinuously as long as the shutter-release button is held half way down,
and focus will automatically track moving subjects (focus tracking).
The shutter can be released even when the in-focus indicator (●) is
not displayed in the
Tip
You can set the camera to perform an autofocus operation only when the
button or AF-ON button is pressed. See “Custom Settings,” item 4.
Camera Settings: Autofocus
viewfinder (release priority).
When the subject is at rest, the
33
Page 48

The “AF start” buttons
A B
An alternative means of activating the autofocus operation is to press the
button (A) or, when the shutter-release button lock for vertical shooting is
disabled, the AF-ON button (B). Both buttons perform the same function as
pressing the shutter-release button half way.
AF Area Mode
Autofocus can be set to focus only on the selected focus area (single area AF)
or to shift focus from one area to the next depending on the movement of the
subject (dynamic AF). By default, when dynamic AF is used in combination
with continuous servo AF, the camera first focuses on the subject in the
selected focus area and then shifts the focus area to keep this subject in focus.
In single servo AF, the camera first focuses on the object closest to the camera
and then shifts the focus area to track the subject as it moves (closest subject
priority). The defaults for dynamic AF can be changed using custom settings.
A B
Tip
By default, closest subject priority is used when single servo AF is combined with
dynamic AF, and is not used when continuous servo AF is in effect. Custom
Setting 9 can be used to turn closest subject priority off when single servo AF is
in effect. Similarly, Custom Setting 10 can be used to turn closest subject priority
on when continuous servo AF is used. See “Custom Settings,” items 9 and 10.
34
Camera Settings: AF Area Mode
Page 49

To select between single area and dynamic AF, turn the main command dial
while holding down the [+] button (A). The AF area mode is displayed in the
control panel on top of the camera (B).
Single area AF: The camera focuses on the subject in the area
selected for autofocus (see “Autofocus Area,” above). This mode is
useful when focusing on subjects that are relatively stationary.
Dynamic AF: The camera first focuses on the subject in the area
selected for autofocus. If the subject moves to another focus area,
the camera will automatically shift the focus area to follow it (the focus
area shown in the viewfinder will not, however, change). This makes
it possible to focus on subjects that are moving irregularly.
Dynamic AF with closest subject priority: The camera first focuses on the closest object to the photographer that falls in one of the
five focus areas, and then tracks this subject as it moves to other
focus areas. No focus area indicators are shown in the viewfinder or
in the control panel on top of the camera. This mode does not work
well with telephoto lenses or poorly-lit subjects; use single area AF
instead.
Autofocus modes
Focus
mode
AF area mode
Closest
subject priority
Focus area
selection
display
LCD
Focus area
shown in
viewfinder?
Single area AF
Single
servo AF
Continuous
servo AF
Dynamic area
AF
Single area AF
Dynamic area
AF
On (default)
Off (CSM 9)
Off (default)
On (CSM 10)
Camera Settings: AF Area Mode
NA
NA
Manual
Automatic
Manual
Manual
Manual
Automatic
Yes
No
Yes
Yes
Yes
No
35
Page 50

Focus Area
The D1 has five focus areas which together cover a wide area of the frame. By
choosing the focus area according to your composition and the position of your
subject, you can focus on an off-center subject without using focus lock.
To select a focus area, unlock the focus-area selector by rotating the lock
release to the unlocked position (A). You can move the focus area left or right,
up or down by pressing the focus-area selector in the corresponding direction.
A CB
The selected focus area appears in the control panel on top of the camera (B)
and is shown in red in the viewfinder (C). The focus area can be locked by
rotating the focus-area selector lock release to the locked position.
The focus area can not be selected manually when closest subject
Note:
priority is in effect. The focus area indicator is not displayed in the viewfinder
or in the control panel on top of the camera when closest subject priority is in
effect (see “AF Area Mode”).
Tip
Focus area can still be selected when another type of finder screen is inserted in the
camera.
By default, if the top focus area is selected, the focus area will not change when
the top of the focus-area selector is pressed. Similarly, pressing the selector to the
right when the right area is selected has no effect. This setting can be changed
so that pressing the top of the selector when the top area is selected activates the
bottom area, pressing the selector to the right when the right area is selected
activates the left area, etc. This allows you to shift focus from the right to left side,
top to bottom, without changing the position of your finger on the focus-area
selector. See “Custom Settings,” item 6.
36
Camera Settings: Focus Area
Page 51

Focus Lock
Focus lock can be used to focus on a subject not in any of the five focus areas,
or on other occasions when you would otherwise be unable to focus on the
subject using autofocus.
The procedure for using focus lock differs depending on whether you are usingsingle or continuous servo AF. Follow the steps below.
Position the subject in the focus area (A) and press the shutter-release
1
button half way (B).
A B
a
In single servo AF, confirm that the in-focus indicator (●) appears in the
2
viewfinder. Focus will remain locked at the current setting as long as the
shutter-release button is held half way down. To lock exposure as well as
focus, press the
as the
shutter-release button.
button is held down, even if you remove your finger from the
button. Focus and exposure will remain locked as long
Tip
The button can be set to lock only focus, rather than both focus and exposure.
See “Custom Settings,” item 21.
Camera Settings: Focus Lock
37
Page 52

b
In continuous servo AF, after confirming that the in-
2
focus indicator (●) appears in the viewfinder, press
button. Both exposure and focus will be
the
locked as long as the
if you remove your finger from the shutter-release
button.
Keeping focus locked, recompose your photograph (A) and press the
3
shutter-release button the rest of the way down to shoot (B).
A B
Do not change the distance between the camera and the subject while
focus lock is in effect. If your subject moves, release focus lock and focus
again at the new distance.
button is held down, even
Tip
If you keep the shutter-release button pressed half way down after taking a photograph,
focus lock will remain in effect, allowing you to take a succession of photographs at the
same focus setting. If you keep the
photographs at the same focus and auto exposure settings.
38
button pressed, you can take a succession of
Camera Settings: Focus Lock
Page 53

Getting Good Results with Autofocus
Autofocus performs best when:
•The subject is well lit. To use autofocus with very dark subjects, use the
AF-assist illuminator built into the Nikon SB-28DX Speedlight (available
separately) and select the center focus area.
•There is contrast between the subject and the background. For example,
autofocus may not perform well on subjects that are the same color as the
background.
•The objects in the focus brackets are all at the same distance from the
camera. For example, autofocus may not perform well when you are
photographing an object inside a cage, as the bars of the cage will be closer
to the camera than the object in the cage, and both the bars and the object
in the cage will be in the focus brackets.
•The subject is not dominated by regular geometrical patterns. For
example, the camera may have difficulty focusing on a row of windows in
a skyscraper.
•The subject is evenly lit.
If the in-focus indicator (●) does not appear in the viewfinder when the shutterrelease button is pressed half way, focus manually or use focus lock to focus
on another subject at the same distance, then recompose your photograph
(see “Focus Lock”).
Camera Settings: Getting Good Results with Autofocus
39
Page 54

Manual Focus
Manual focus can be used in situations in which autofocus will not produce the
expected results, or when the lens attached to the camera is not an AF Nikkor
lens.
A
To use manual focus, set the focus mode selector to M (A). Adjust focus using
the lens focusing ring (B) until the image displayed on the clear matte field in
the viewfinder is in focus.
Using the electronic range finder
A B
Set the focus mode selector to M and half-press the shutter-release button.
Before the focus indicator in the viewfinder disappears, rotate the lens focusing
ring (A) until the in-focus indicator (●) is displayed.
If the indicator appears in the viewfinder, the camera is focused on a point
between the camera and the subject. The
camera is focused on a point behind the subject. Note that a photograph can
be taken even when the in-focus indicator is not displayed in the viewfinder.
B
indicator appears when the
Note
The D1’s built-in electronic range finder is compatible with most Nikkor lenses
(including AF Nikkor lenses when used with manual focus) with a maximum aperture
of f/5.6 or faster, and can be used when focusing on subjects in any of the five focus
areas (see “Focus Area,” above).
40
Camera Settings: Manual Focus
Page 55

Metering
The D1 offers a choice of three metering methods, which can be chosen
according to how your subject is lit:
Color matrix metering/3D color matrix metering: The D1 uses a
3D color matrix metering system. In this system, metering is
performed by a CCD sensor with 1,005 (67 vertical × 15 horizontal)
metering pixels, which sets exposure using a selection of data from
all areas of the frame. This system is particularly effective with
brightly-colored (white or yellow) or dark-colored (black or dark
green) subjects that occupy a substantial portion of the frame,
producing photographs closer to what is seen by the naked eye. 3D
color metering can however only be used with D-type lenses. When
another type of lens is in place, color matrix metering is used. Unlike
3D matrix metering, this system does not make use of range information from the lens.
Spot or center-weighted metering is recommended when you use
AE-lock (see “AE Lock”) or exposure compensation (see “Exposure
Compensation”).
Center-weighted metering:
The camera measures
light in the entire frame, but assigns the greatest
weight to a circular area in the center of the viewfinder
8mm (0.31
˝) in diameter (the 12mm/0.47˝ circle in
the center of the viewfinder, shown at right, can be
used as a reference when center-weighted metering is selected).
Tip
The size of the area given the greatest weight in center-weighted metering can be
set to 6mm
14). Alternatively, you can set center-weighted metering to use the average of the
entire frame. The default setting is 8mm.
(0.24
˝), 10mm
(0.39
˝), or 13mm
(0.51
˝) (see “Custom Settings,” item
Camera Settings: Metering
41
Page 56

Spot metering: The camera measures light only in a circle 4mm
(0.15˝) in diameter and centered on the current focus area. The area
metered occupies approximately two percent of the entire frame.
This method can be used with back-lit subjects or on other occasions
when the background is much darker or much brighter than your
subject.
As a rule, spot metering measures light in the current focus area,
ensuring that your subject is properly exposed. When closestsubject priority is used with dynamic AF area selection, or when a
non-CPU lens is attached, light will be measured in the center focus
area only.
To choose a metering method, hold the metering
selector lock release down and rotate the metering
selector to the desired setting.
Tip
Some lenses do not support one or more of the above metering systems. See
“Technical Notes: Compatible Lenses” for more information.
42
Camera Settings: Metering
Page 57

Exposure Mode
The D1 offers a choice of four exposure modes: programmed auto, shutterpriority auto, aperture-priority auto, and manual. This section discusses
shutter-priority auto, aperture-priority auto, and manual exposure modes. For
more information on programmed auto, see “First Steps.”
— Shutter-priority auto
In shutter-priority auto, you set the shutter speed;
the camera automatically adjusts the aperture
to produce the best exposure. Shutter speed
can be set to a value between 30 and
seconds. High shutter speeds can be used to
freeze motion, low shutter speeds to blur moving objects.
To use shutter-priority auto:
Holding the MODE button down, rotate the main
1
command dial until
appears in the control panel
on top of the camera.
1
/
16,000
Note
Photographs can only be taken in shutter-priority auto when the lens aperture ring is
set to its maximum f-number. At other aperture settings, the aperture display in the
viewfinder and the control panel on top of the camera will show a blinking FEE and the
shutter will lock.
Shutter-priority auto can only be used with CPU lenses. If another type of lens is
attached, exposure mode is automatically set to aperture priority auto. The exposure
mode display in the control panel on top of the camera will show a blinking S, and A
will appear in the viewfinder. The aperture display in the viewfinder and the control
panel on top of the camera will show F--, indicating that aperture must be set manually
using the aperture ring on the lens.
Noise may appear in photographs taken at slow shutter speeds (speeds of roughly one
second or slower).
Camera Settings: Exposure Mode
43
Page 58

Rotate the main command dial to choose a shutter
2
speed.
Shutter-speed lock
If desired, you can lock shutter speed to the selected setting so that it does not
change accidentally when you use the main command dial for other purposes.
If you hold the
the shutter speed (A), shutter speed will be locked when you release the
button, and lock indicators will appear in the viewfinder and the control panel
on top of the camera (B). To release the lock, hold the
turn the main command dial.
A B
button down while turning the main command dial to select
button down and
Tips
The steps used in adjusting shutter speed and aperture can be changed using
Custom Setting 2. See “Custom Settings.”
You can choose the sub-command dial as the control for selecting shutter speed
and aperture. See “Custom Settings,” item 12.
If the subject will be over- or under-exposed at the selected shutter speed, a warning
will appear in the viewfinder and in the control panel on top of the camera when the
shutter-release button is pressed half way.
HI The photograph will be overexposed. Select a higher shutter speed. If the warning
persists, use a Neutral Density (ND) filter
Lo The photograph will be underexposed. Select a lower shutter speed or use a flash.
The electronic analog exposure display will show the amount the photograph will be
under- or over-exposed.
44
Camera Settings: Exposure Mode
Page 59

— Aperture-priority auto
In aperture-priority auto, you set the aperture
and the camera automatically adjusts the shutter speed to produce the best exposure. Small
apertures (high f-numbers) can be used to increase the depth of field, bringing background
and foreground into focus. Large apertures (low
f-numbers) can be used to blur the background.
Larger apertures can also be used to increase
the range of the flash.
To use aperture-priority auto:
Holding the MODE button down, rotate the main
1
command dial until
on top of the camera.
Rotate the sub-command dial to choose an aper-
2
ture between the minimum and maximum settings
possible for the lens.
appears in the control panel
Note
With CPU lenses, the lens aperture ring must be set to its maximum f-number when
aperture-priority auto is used. At other settings, the aperture display in the viewfinder
and the control panel on top of the camera will show a blinking FEE and the shutter will
lock.
When a non-CPU lens is used, aperture can be adjusted using the lens aperture ring.
The aperture display in the viewfinder and the control panel on top of the camera will
show F-- to indicate that aperture must be set manually using the aperture ring.
Custom Setting 22 can be used to allow aperture to be set with the aperture ring
on CPU lenses. See “Custom Settings,” item 22.
Camera Settings: Exposure Mode
45
Page 60

Aperture lock
If desired, you can lock aperture to the selected setting so that it does not
change accidentally when you use the sub-command dial for other purposes.
If you hold the
the aperture (A), aperture will be locked when you release the
lock indicators will appear in the viewfinder and the control panel on top of the
camera (B). To release the lock, hold the
command dial.
A B
button down while turning the sub-command dial to select
button, and
button down and turn the sub-
Tips
The steps used in adjusting shutter speed and aperture can be changed using
Custom Setting 2. See “Custom Settings.”
You can choose the sub-command dial as the control for selecting shutter speed
and aperture. See “Custom Settings,” item 12.
If the subject will be over- or under-exposed at the selected aperture, a warning will
appear in the viewfinder and in the control panel on top of the camera when the shutterrelease button is pressed half way.
HI The photograph will be overexposed. Select a higher f-number (smaller aperture).
If the warning persists, use a Neutral Density (ND) filter.
Lo The photograph will be underexposed. Select a lower f-number (larger aperture)
or use a flash.
The electronic analog exposure display will show the amount the photograph will be
under- or over-exposed.
46
Camera Settings: Exposure Mode
Page 61

— Manual
In manual exposure mode, you control both
aperture and shutter speed. Shutter speed can
be set for a long time exposure (bulb) or to fixed
values between 30 and
ture can be set to any value between the minimum and maximum values for the lens. Using
the electronic analog exposure display in the
viewfinder or the control panel on top of the
camera, you can adjust exposure to suit your
objective and shooting conditions.
To use manual exposure:
Holding the MODE button down, rotate the main
1
command dial until
on top of the camera.
Rotate the main command dial to choose a shutter
2
speed (A). Aperture is set by rotating the subcommand dial (B).
A
1
/
seconds. Aper-
16,000
appears in the control panel
B
Tips
At a shutter-speed setting of bulb, the shutter will remain open as long as the shutterrelease button is held down (long time exposure). Note however that if the shutter is
open for more than one second at any setting, noise may appear in the final
photograph.
Aperture and shutter speed can be locked using the
“Shutter-priority auto” and “Aperture-priority auto.”
The steps used in adjusting shutter speed and aperture can be changed using
Custom Setting 2. See “Custom Settings.”
You can reverse the roles of the main- and sub-command dials for selecting
shutter speed and aperture. See “Custom Settings,” item 12.
button, as described in
Camera Settings: Exposure Mode
47
Page 62

Check exposure in the electronic analog exposure display in the viewfinder
3
or the control panel on top of the camera, and readjust settings to achieve
the desired result.
Reading the electronic analog exposure display
The electronic analog exposure display shows the amount the image will
be over- or under-exposed if a photograph is taken at current settings. The
display varies depending on whether exposure compensation is displayed
in increments of
1
/3, 1/2, or 1 EV (the illustrations below show the electronic
analog exposure display in the control panel on top of the camera).
1
/3 EV Increments
+2 +1 0 –1 –2
1
/2 or 1 EV Increments
Overexposed
➔
➔Underexposed
Overexposed
➔
➔Underexposed
+3 +2 +1 –1 –3–20
Some examples of how to read the display are given below.
1
/3 EV Increments
1
/2 or 1 EV Increments
Optimal exposure Optimal exposure
Underexposed by 2/3 EV Underexposed by 1 EV
Overexposed by Overexposed by
more than 2 EV more than 3 EV
If the limits of the camera’s metering system are exceeded, the electronic
analog exposure display will flash.
Note
When using an AF Micro-Nikkor lens
When setting aperture by means of the sub-command dial, you need not take the
exposure ratio into account
that takes the exposure ratio into account is only necessary if you are using the lens
aperture ring.
if you are using an external exposure meter
. Compensation
48
Camera Settings: Exposure Mode
Page 63

Auto-Exposure Lock
When spot or center-weighted metering is used in combination with programmed auto, shutter-priority auto, or aperture-priority auto, the camera
determines exposure automatically with reference to lighting conditions in a
limited area of the frame. Auto-exposure lock is used when you want auto
exposure to be based on a subject that will not be in the focus area in the final
composition.
To use auto-exposure lock:
With the metering selector lock release held down,
1
rotate the metering selector to select centerweighted or spot metering.
After positioning the subject in the focus area, press the shutter-release
2
button half way and confirm that the in-focus indicator (●) appears in the
viewfinder (A). With the shutter-release button held half way down, press
and hold the
A B
Exposure is calculated based on lighting conditions in the current focus
area (spot metering) or in an 8mm circle in the center of the viewfinder
(center-weighted metering).
button (B).
Notes
Matrix metering is not recommended for use with auto-exposure lock, as it is unlikely
to produce the desired results.
Note that if autofocus (single servo AF or continuous servo AF) is in effect, focus will
lock when the
displayed in the viewfinder. If desired, camera settings can be changed so that only
auto-exposure is locked when the
21).
If spot metering is used in combination with closest-subject priority (see “AF Area
Mode”), exposure will be based on lighting conditions in the center focus area.
Camera Settings: Auto-Exposure Lock
button is pressed. Check to see that the in-focus indicator (●) is
button is pressed (see “Custom Settings,” item
49
Page 64

With the button held down, recompose your photograph (A) and shoot
3
(B).
A B
While the button is held down, you can adjust shutter speed (when
shutter-priority auto is selected as the exposure mode), aperture (aperturepriority auto), or flexible program (programmed auto). The aperture (in
shutter-priority auto), shutter speed (aperture priority auto), or flexible
program are automatically adjusted to produce the exposure set using
auto-exposure lock. The adjusted values for shutter speed and aperture
are displayed in the viewfinder and the control panel on top of the camera.
Metering can not be changed while exposure lock is in effect. Any changes
to metering will take effect only after the
button is released.
Tips
Camera settings can be changed so that auto-exposure locks when the shutter-
release button is pressed half way. See “Custom Settings,” item 7.
The size of the area given the greatest weight in center-weighted metering can be
set to 6mm
14). Alternatively, you can set center-weighted metering to use the average of the
entire frame. The default setting is 8mm.
Camera settings can be changed so that auto-exposure lock remains in effect after
you release the
next time the
50
(0.24
˝), 10mm
button is pressed. See “Custom Settings,” item 21.
(0.39
˝), or 13mm
button. In this case, normal auto-exposure will be restored the
(0.51
˝) (see “Custom Settings,” item
Camera Settings: Auto-Exposure Lock
Page 65

Exposure Compensation
Exposure compensation is used to deliberately change exposure from the
optimum value as determined by the camera. This can be used, for example,
to shoot subjects containing sharp lighting contrasts at a variety of different
exposures. Exposure compensation is possible in any exposure mode.
Press the button and rotate the main command dial. Exposure
1
compensation adjusted in increments of
a minimum of –5 EV.
1
/3 EV, to a maximum of +5 EV or
Viewfinder display
–0.3 EV
+2 EV
At values other than 0, a
indicator appears in the viewfinder and in the
control panel on top of the camera. The electronic analog exposure display
will show the amount of compensation, and the “0” indicator at the center
of the display will blink to show that exposure compensation is in effect.
Tips
To display exposure compensation as a numerical value, press the button. The
current exposure compensation will appear next to the
In general, the best results are achieved using a positive value for exposure
compensation when your principal subject is darker than the background, and a
negative value when the subject is brighter than the background.
Exposure compensation can be set to change in increments of 1/2 EV or 1 EV. See
“Custom Settings,” item 2.
Camera settings can be changed so that exposure compensation can be adjusted
by turning the main or sub-command dial, even when the
See “Custom Settings,” item 13.
indicator.
button is not pressed.
Camera Settings: Exposure Compensation
51
Page 66

Compose your photograph, focus, and shoot.
2
Normal exposure can be restored by setting exposure compensation to a
value of 0.0, or by performing a two-button reset (see, “Two-Button Reset”).
Exposure compensation is not reset when the camera is turned off.
52
Camera Settings: Exposure Compensation
Page 67

Auto Bracketing
Bracketing is used to take a series of photographs of the same subject using
a variety of exposure values that “bracket” optimum value as determined by the
camera (or, in manual mode, by the photographer). This can be used to take
multiple shots of the same subject at different exposure settings without
stopping to adjust exposure compensation manually. Up to three photographs
can be taken at exposure settings varying from +2 to –2 EV (these values are
added to the value chosen for exposure compensation using the exposure
compensation function described on the previous pages). Bracketing can be
used in any exposure mode.
Holding down the BKT button (A), rotate the main command dial until BKT
1
appears in the control panel on top of the camera (B). The
the viewfinder and in the control panel on top of the camera will blink.
A B
Holding the BKT button down (A), rotate the sub-command dial to choose
2
a bracketing program (B). The bracketing programs available depend on
Custom Setting 2 (see overleaf).
A B
indicator in
Note
Changes to exposure are effected by changing the shutter speed (manual and
aperture-priority auto exposure modes), the aperture (shutter-priority auto), or both
shutter speed and aperture (programmed auto).
Flash and auto-exposure bracketing
If a Speedlight is attached when bracketing is in effect, both flash level (TTL level as
determined for the main subject) and auto-exposure will be changed for each
exposure regardless of the exposure mode. Camera settings can be changed so that
only one of flash-exposure bracketing or auto-exposure bracketing will be performed.
See “Custom Settings,” item 11.
Camera Settings: Auto Bracketing
53
Page 68

When Custom Setting 2 is set to 1/3 increments (default):
Setting
–2F1.0 2 (±0, –1.0)
–2F0.7 2 (±0, –0.7)
–2F0.3 2 (±0, –0.3)
+2F1.0 2 (±0, +1.0)
+2F0.7 2 (±0, +0.7)
+2F0.3 2 (±0, +0.3)
–3F1.0 3 (–1.0, –2.0, ±0)
–3F0.7 3 (–0.7, –1.3, ±0)
–3F0.3 3 (–0.3, –0.7, ±0)
+3F1.0 3 (+1.0, ±0, +2.0)
+3F0.7 3 (+0.7, ±0, +1.3)
+3F0.3 3 (+0.3, ±0, +0.7)
3F1.0 3 (± 0, –1.0, +1.0)
3F0.7 3 (± 0, –0.7, +0.7)
3F0.3 3 (± 0, –0.3, +0.3)
Control Panel Number of Shots/
Exposure Display Bracketing (EVs)
When Custom Setting 2 is set to increments of 1/2:
Setting
–2F1.0 2 (±0, –1.0)
–2F0.5 2 (±0, –0.5)
+2F1.0 2 (±0, +1.0)
+2F0.5 2 (±0, +0.5)
–3F1.0 3 (–1.0, –2.0, ±0)
–3F0.5 3 (–0.5, –1.0, ±0)
+3F1.0 3 (+1.0, ±0, +2.0)
+3F0.5 3 (+0.5, ±0, +1.0)
3F1.0 3 (± 0, –1.0, +1.0)
3F0.5 3 (± 0, –0.5, +0.5)
Control Panel Number of Shots/
Exposure Display Bracketing (EVs)
54
Camera Settings: Auto Bracketing
Page 69

When Custom Setting 2 is set to increments of 1:
Setting
–2F1.0 2 (±0, –1.0)
+2F1.0 2 (±0, +1.0)
–3F1.0 3 (–1.0, –2.0, ±0)
+3F1.0 3 (+1.0, ±0, +2.0)
3F1.0 3 (± 0, –1.0, +1.0)
To take the first photograph in the series, compose a photograph, focus,
3
and shoot. If the camera is set to continuous shooting mode (operating
Control Panel Number of Shots/
Exposure Display Bracketing (EVs)
mode C), the camera will take the specified number of shots while the
shutter-release button is held down and then stop automatically. In singleframe shooting or when the self timer is on (see “Self Timer Mode”),
photographs are taken one at a time each time the shutter-release button
is fully pressed. Bracketing can be cancelled before all the photographs in
the series have been taken by holding down the BKT button and rotating
the main command dial until BKT is no longer displayed in the control
panel. The bracketing program currently selected will be recalled the next
time bracketing is used.
Tips
The shutter-speed and aperture values displayed during shooting reflect the exposure
compensation value for the current photograph.
Bracketing can be combined with exposure compensation (see “Exposure
Compensation”). This can be used to achieve exposure compensations of more than
+2.0 or less than –2.0 during bracketing.
If the camera is turned off before you have taken all the photographs in the sequence,
you can continue from where you left off when the camera is turned back on. If the
memory card fills up before you have completed the sequence, you can continue from
where you left off after deleting images or inserting a new memory card.
By default, the camera shoots photographs with a negative compensation value
before shooting those with a positive compensation value. This can be changed
using Custom Setting 3 (see “Custom Settings”).
Camera Settings: Auto Bracketing
55
Page 70

Capture Preview Mode
When the camera is set to single-frame shooting, or the self timer is used, you
can use capture-preview mode to view photographs in the LCD monitor before
they are saved to the memory card. This makes it possible to delete unwanted
photographs before they are saved.
To use capture preview:
Pressing the button, rotate the main command dial to select item 1 in
1
the custom settings menu (at default settings, “1-0,” for “Item 1, option 0,”
will be displayed in the rear control panel).
With the button held down, rotate the sub-command dial to set the
2
menu option to “1” (“capture-preview mode enabled”).
When you release the button, CUSTOM will be displayed in the rear
control panel.
Set the camera to single-frame shooting or self-timer mode.
3
Photographs taken at these settings will be displayed in the LCD monitor
before they are saved to the memory card. If the camera has been set to
display the histogram and image highlights (see “Playback”), these will be
shown as well. If the camera is connected to a television set, photos will
also be displayed on the television screen.
56
Camera Settings: Capture Preview Mode
Page 71

If no other operation is performed, the monitor will stay on for the length of time
specified in Custom Setting 18 or the playback menu “Auto Off” option (if this
time is shorter than the time required to record the photograph, the monitor will
remain on for five seconds after the image has been recorded to the card). The
monitor will then turn off automatically to save power.
The operations that can be performed while the photograph is on display are
as follows:
To record the photograph
Press the
button. The monitor will turn off and the photograph will be
recorded to the memory card.
To delete the photograph before it is recorded to the memory card
Half-press the shutter-release button, or press the
or button. The
photograph will be deleted without being recorded to the memory card and
the monitor will turn off.
To turn the monitor on or off
Press the
button to turn the monitor on or off. When the monitor is
turned off, a monitor indicator will appear in the rear control panel,
indicating that the photograph has yet to be deleted or recorded to the
memory card. The photograph will be displayed again when the monitor
is turned on.
Notes
Capture preview is only available in single-frame shooting or self-timer modes.
Photographs are not displayed when the camera is set to continuous shooting or PC
mode.
If, after the monitor has been turned off, another photograph is taken while the monitor
indicator is displayed in the rear control panel, the current photograph will be deleted
and the photograph just taken will appear in the monitor.
Camera Settings: Capture Preview Mode
57
Page 72

Record-and-Review
When the camera is set to single-frame shooting, or the self timer is used, you
can choose to have photographs displayed automatically in the monitor
immediately after they have been saved to the memory card. This allows you
to delete unwanted photographs immediately after they have been taken.
To use record-and-review:
Pressing the button, rotate the main-command dial to select item 1 in
1
the custom settings menu (at default settings, “1-0,” for “Item 1, option 0,”
will be displayed in the rear control panel).
With the button held down, rotate the sub-command dial to set the
2
menu option to “2” (“record-and-review mode enabled”).
When you release the
control panel.
Set the camera to single-frame shooting or self-timer mode.
3
Photographs taken at these settings will be displayed in the LCD monitor.
If the camera has been set to display the histogram and image highlights
(see “Playback”), these will be shown as well. If the camera is connected
to a television set, photos will also be displayed on the television screen.
58
button, CUSTOM will be displayed in the rear
Camera Settings: Record-and-Review
Page 73

If no other operation is performed, the monitor will stay on for the length of time
specified in Custom Setting 18 or the playback menu “Auto Off” option (if this
time is shorter than the time required to record the photograph, the monitor will
remain on for five seconds after the image has been recorded to the card). The
monitor will then turn off automatically to save power.
The operations that can be performed while the photograph is on display are
as follows:
To delete the photograph
Press the
button. A confirmation dialog will be displayed; if you press
again, the photograph will be deleted and the monitor will turn off.
To end the display
After the camera has finished recording or deleting the photograph and the
memory card access lamp has gone out, press any button other than the
auto-bracketing button, the flash-sync mode button, or the AF-area mode
button. The photograph will disappear from the display and the monitor will
turn off.
To turn the monitor on or off
Press the
button to turn the monitor on or off. When the monitor is
turned off, a monitor indicator will appear in the rear control panel,
indicating that the photograph is still on display. The photograph will
appear again when the monitor is turned on.
Notes
Record-and-review is only available in single-frame shooting or self-timer modes.
Photographs are not displayed when the camera is set to continuous shooting or PC
mode.
If, after the monitor has been turned off, another photograph is taken while the monitor
indicator is displayed in the rear control panel, the current photograph will be cleared
from the display and the photograph just taken will appear in the monitor. The current
photograph is not deleted when cleared from the display.
Camera Settings: Record-and-Review
59
Page 74

Playing Photographs Back
Photographs already stored on the memory card can be played back without
setting the camera to playback (PLAY) mode. This playback feature can be
used in single-frame shooting, continuous shooting, and self-timer modes.
To play photographs back:
Press the shutter-release button half way to wake
1
the camera up.
Press the monitor button.
2
The most recent photograph in memory will be
displayed. If the camera has been set to display the
histogram and image highlights (see “Playback”),
these will be shown as well. If the camera is
connected to a television set, photos will also be
displayed on the television screen (the camera’s
LCD monitor must be on for photographs to be
displayed).
Notes
If no photographs have been stored in the memory card, the message “CARD
CONTAINS NO IMAGES” will be displayed.
The focus area selector can not be used to select the focus area while playback is in
progress.
Photographs can not be played back in PC mode.
60
Camera Settings: Playing Photographs Back
Page 75

The operations that can be performed while playing photographs back are as
follows:
To end playback
Press the
button or half-press the shutter-release button. The
photograph currently on display will disappear and the monitor will turn off.
To stop the monitor from turning off automatically
If no other operation is performed, the monitor will stay on for the length of
time specified in Custom Setting 18 or the playback menu “Auto Off” option.
The monitor will then turn off automatically to save power.
After the monitor has turned off, the display can be restored by pressing the
button before automatic meter switch-off (see “Custom Settings,” item
15).
To delete the photograph currently displayed
Press the
button. A confirmation dialog will be displayed; press
again to delete the photograph. To return to single-image playback without
deleting the photograph, press any of the buttons on the rear of the camera
except the
and buttons.
To view other photographs in memory
Press the focus area selector up (▲) or down (▼).
To view information on the current photograph
Press the focus area selector to the left (
) or right ( ) to hide or display
information on the current photograph.
Notes
The left and right edges of photographs are not shown when the photographs are
displayed in capture preview, record-and-review, or using the single-image playback
feature described above.
Camera Settings: Playing Photographs Back
61
Page 76

Self Timer Mode
The D1’s built-in self timer is ideal for photographs in which photographers
wish to appear themselves. The camera should be placed on a stable, level
surface (a tripod is recommended).
To use the self timer:
Holding down the mode dial lock release, rotate the
1
mode dial to select
Compose the picture and focus.
2
With single-servo AF, check that the in-focus indicator (●) appears in the
viewfinder. Photographs can not be taken when the camera is not focused.
In exposure modes other than manual (M), you should close the viewfinder
3
eyepiece shutter (A) to prevent light entering via the eyepiece from
affecting the results of the auto-exposure operation. You can then press
the shutter-release button all the way down to start the self timer (B).
.
A B
After the shutter-release button is pressed, the self-timer lamp on front of
the camera (C) will blink for eight seconds. Two seconds after the lamp
stops blinking, the shutter will release automatically and a photograph will
be taken.
To turn the self timer off before a photo is taken, set the mode dial to a mode
other than
Do not stand in front of the lens when adjusting camera settings in single-servo or
continuous-servo autofocus modes.
If a shutter speed of bulb (long time exposure) is chosen in self-timer mode, shutter
speed will be set to approximately
The timer can be set to delays of 2, 5, or 20 seconds using Custom Setting 16 (see
“Custom Settings”).
62
Tips
.
1
/10 sec.
Camera Settings: Self Timer Mode
C
Page 77

Diopter Adjustment
The viewfinder is equipped with diopter adjustment to accommodate individual
differences in vision.
Pull the diopter knob out and rotate it until the focus
brackets in the viewfinder are in sharp focus. Diopter
can be adjusted between –3 DP and +1 DP. Corrective
lenses (available separately) allow diopter to be adjusted between –3 DP and +2 DP.
Important:
✔
operating the diopter dial.
Be careful not to accidently put your finger in your eye when
LCD Illuminator
The rear control panel and the control panel on top of the camera are equipped
with an illuminator so that you can view camera settings in the dark.
To turn the illuminator on, rotate the power switch to
. The illuminator will remain on while the switch is
held in this position. After the switch is released, the
illuminator will remain on while exposure indicators are
displayed, or until the shutter is released.
Tip
The illuminator can be set to turn on when any button is pressed. See “Custom
Settings,” item 17.
Camera Settings: Diopter Adjustment/LCD Illuminator
63
Page 78

Depth-of-Field Preview
To check the depth of field for the aperture setting in the current exposure
mode, hold down the depth-of-field preview button.
The lens will be stopped down to the aperture selected
by the camera in programmed-auto or shutter-priority
auto exposure modes, or to the value selected by the
user in aperture-priority auto or manual modes. The
view through the viewfinder will give you an approximate idea of the depth of field that can be obtained at
the current aperture.
Focal Plane Position
The position of the focal plane inside the camera is indicated by a mark on the
camera body.
The distance between the camera and the subject
should be measured from this mark whenever distance
is measured manually. The distance between the lens
mounting flange and the focal plane is 46.5 mm (1.83˝).
64
Camera Settings: Depth-of-Field Preview/Focal Plane Position
Page 79

CUSTOM SETTINGS
Custom settings are available for a variety of camera functions. Settings can
be changed singly or in combination according to your preferences and the
task at hand.
65
Page 80

Changing Custom Settings
To make changes to custom settings:
Select the desired item by rotating the main command dial while holding
1
down the
and the option currently selected for that item (e.g., “1-0” for “Item 1, option
0”).
The D1 offers a total of 32 items (0–31), each with its own menu of options.
Select an option for the chosen item by rotating the sub-command dial.
2
button. The rear control panel will show the item number
After you release the
panel.
Tip
To return custom settings to their default values, perform a two-button reset as described
in “Two-Button Reset” at the end of this chapter. Only settings in the current custom set
(see “Custom Settings Options,” item 0) will be reset.
66
button, CUSTOM will appear in the rear control
Custom Settings: Changing Custom Settings
Page 81

Custom Settings Options
0. Custom Settings
The camera can store up to two sets of custom settings (Set A and Set B).
Using Custom Setting 0, you can recall either of these sets. Any changes
to settings apply to the current set.
Option: A Custom Set A (default)
1. Image Status
The camera offers a choice of capture modes for single-frame shooting and
self-timer modes: “capture preview” (photographs are displayed in the
monitor before being saved to the memory card) and “record-and-review”
(photographs are displayed in the monitor after being saved to the memory
card). Either mode allows you to delete unwanted photographs immediately after shooting.
Option: 0 Photograph is not displayed (default)
2. EV Steps for Exposure Control
This setting controls the size of the increments for adjusting shutter-speed,
aperture, exposure compensation, and auto exposure bracketing.
Option: 3
3. Bracketing Order
In auto bracketing, photographs are taken in the order given in “Camera
Settings: Auto Bracketing” when the default option (0) is in effect. Selecting
option 1 causes bracketing to proceed from negative to positive compensation values.
Option: 0 Default (see “Camera Settings: Auto Bracketing”)
4. Autofocus Activation
By default, autofocus is performed when the shutter-release button is
pressed half way. It can also be set to start only when the
pressed.
Option: 0 Autofocus is performed when the shutter-release button is
B Custom Set B
1 Capture-Preview Mode
2 Record-and-Review Mode
1
/3 increments (default)
1
/2 increments
2
1 Increments of 1
1 Negative-to-positive bracketing
pressed half way (default)
1 Autofocus is only performed when the
button is
button is pressed
Custom Settings: Custom Settings Options
67
Page 82

5. Anti-Vibration Mode (Delay Exposure until Mirror Shock Has Subsided)
By default, the image is captured at the same time the shutter is released.
To minimize mirror shock, you can set the camera to capture the image
after the shutter is released.
Option: 0 No delay (default)
6. Focus Area Selection
At default settings, the focus area display is bounded by the four outer focus
areas. Thus, for example, pressing the focus selector toward the top when
the top focus area is already selected will have no effect. This can be
changed so that the focus area “wraps around” from top to bottom and right
to left. In this case, pressing the focus selector toward the top when the top
focus area is highlighted selects the bottom focus area, and vice-versa.
Similarly, pressing the selector to the right when the right area is highlighted selects the left focus area.
Option: 0 Default (focus area does not wrap around)
7. AE Lock
By default, auto-exposure only locks when the
can be changed so that auto-exposure locks when the shutter-release
button is pressed half way.
Option: 0 Auto exposure locks only when the
8. Mirror Up
This setting can be used to leave the mirror in the up position so that the
CCD can be cleaned. See “Technical Notes: Cleaning the CCD.”
Option: 0 Mirror down during cleaning (default)
9. Dynamic AF Mode in Single-Servo AF
This item can be used to activate or deactivate closest subject priority when
dynamic AF is used with single-servo autofocus.
Option: 0 Closest subject priority enabled (default)
1 Release delay in effect
1 Wrap-around in effect
button is pressed. This
button is pressed
(default)
1 Auto-exposure locks when the shutter-release button is pressed
half way
1 Mirror up during cleaning
1 Closest subject priority disabled
68
Custom Settings: Custom Settings Options
Page 83

10. Dynamic AF Mode in Continuous-Servo AF
This item can be used to activate or deactivate closest subject priority when
dynamic AF is used with continuous-servo autofocus.
Option: 0 Closest subject priority disabled (default)
11. Auto Exposure/Flash Exposure Bracketing
By default, when a Speedlight is used with auto bracketing (see “Camera
Settings: Auto Bracketing), flash exposure bracketing and auto-exposure
bracketing will be performed simultaneously. Using this item, you can
change camera settings so that only flash exposure bracketing or only
auto-exposure bracketing is performed.
Option:
12. Command Dial Functions
By default, the main command dial is used to change shutter speed in
shutter-priority and manual exposure modes, the sub-command dial to
change aperture in aperture priority and manual exposure modes. This
relationship can be reversed using this item.
Option: 0 Main command dial controls shutter speed, sub-command
13. Exposure Compensation Settings
This item allows exposure compensation to be set without pressing the
button.
Option: 0 Exposure compensation is set by pressing the
1 Closest subject priority enabled
AS
Flash exposure bracketing and auto-exposure bracketing
performed together (default)
AE
Only auto-exposure bracketing is performed
Sb
Only flash exposure bracketing is performed
dial controls aperture (default)
1 Sub-command dial controls shutter speed, main command
dial controls aperture
turning the main command dial (default)
1 Exposure compensation can be set by turning the sub-com-
mand dial (programmed auto or shutter-priority auto) or main
command dial (aperture-priority auto or manual). If the roles
of the main command and sub-command dials are switched
using Custom Setting 12, exposure compensation will be
assigned to the sub-command dial in programmed auto,
aperture-priority auto, and manual modes, and to the main
command dial in shutter-priority auto.
button and
Custom Settings: Custom Settings Options
69
Page 84

14. Center-Weighted Metering Area
By default, center-weighted metering assigns the greatest weight to a circle
in the center of the viewfinder 8 mm (0.32˝) in diameter. The diameter of
the area assigned the greatest weight can be changed to 6 mm (0.24˝), 10
mm (0.39˝), or 13 mm (0.51˝), or exposure can be based on the average
lighting for the entire frame.
Option: 6 Greatest weight assigned to a 6 mm circle
15. Time Delay for Auto Meter-Switch-Off
By default, exposure indicators are displayed in the control panel on top of
the camera for six seconds after the camera is turned on. This can be
changed to four, eight, or sixteen seconds.
Option: 4 Four-second delay
16. Self-Timer Duration
When photographs are taken using the self-timer, the default delay
between the time the shutter-release button is pressed all the way down
and the time the shutter is released is ten seconds. The timer can also be
set to delays of two, five, or twenty seconds.
Option: 2 Two-second delay
17. LCD Illumination
By default, the LCD illuminator comes on when the power switch is turned
to
button is pressed.
Option: 0 LCD illuminator comes on when power switch is turned to
18. LCD Monitor Auto Power Off
The time the LCD monitor will remain on if no operations are performed
during playback can be set using this item.
Option: 0 Twenty seconds (default)
8 Greatest weight assigned to an 8 mm circle (default)
10 Greatest weight assigned to a 10 mm circle
13 Greatest weight assigned to a 13 mm circle
A Exposure based average for entire frame
6 Six-second delay (default)
8 Eight-second delay
16 Sixteen-second delay
5 Five-second delay
10 Ten-second delay (default)
20 Twenty-second delay
. Using this item, the illuminator can be set to come on when any
(default)
1 LCD illuminator comes on when any button is pressed
1 One minute
2 Five minutes
3 Ten minutes
70
Custom Settings: Custom Settings Options
Page 85

19. Aperture Setting
On certain lenses, aperture varies with focal length or lens-to-film distance. For
example, some Zoom-Nikkor lenses’ maximum aperture varies with focal
length, while some Micro-Nikkor lenses’ maximum aperture varies with lensto-film distance. By default, the aperture set using the sub-command dial in
aperture-priority or manual exposure modes is preserved as either focal length
or lens-to-film distance changes. Using this item, the camera can be set to
maintain aperture a constant number of steps from the maximum aperture for
the current focal length or lens-to-film distance. Suppose an aperture of f/8 is
selected with an AF Zoom-Nikkor 70-210 mm f/4-5.6D lens zoomed out to 70
mm. When the lens is zoomed to this position, f/8 is two steps from the
maximum aperture of f/4. At default settings, the aperture will remain a
constant f/8 even when the lens is zoomed out to 210 mm. If the camera is set
to maintain aperture a constant number of steps from the maximum aperture
for the current focal length, however, the aperture at 210 mm will be f/11, two
steps from f/5.6, the maximum aperture for this focal length.
Option: 0 Aperture does not change with focal length or lens-to-film dis-
20. Shutter Release Indication via Self-Timer Lamp
The self-timer lamp on the front of the camera can be set to light immediately
before the shutter is released, even when the self timer is not used.
Option: 0 Self-timer lamp does not light when shutter is released (default)
Button
21.
By default, both auto exposure and autofocus are locked when the
is pressed and remain locked when it is held down. Using this item, you can
change settings so that auto exposure remains locked when the button is
released, or so that only one of auto exposure or autofocus is locked while the
button is held down.
Option: 0 Both auto exposure and autofocus are locked while the
22. Aperture Selection
By default, aperture can only be set using the sub-command dial in aperturepriority auto and manual exposure modes. Using this item, you can change
settings so that aperture can only be adjusted using the lens aperture ring.
Option: 0 Aperture can only be adjusted using sub-command dial (default)
tance (default)
1 Aperture is maintained at a value a constant number of steps from
the maximum aperture for the current focal length or lens-to-film
distance
1 Self-timer lamp lights immediately before shutter is released
button
button is pressed (default)
1 Only auto exposure is locked while the
2 Only autofocus is locked while the
3 Auto exposure is locked when the
remains locked until the button is pressed a second time
1 Aperture can only be adjusted with lens aperture ring
button is pressed
button is pressed
button is pressed, and
Custom Settings: Custom Settings Options
71
Page 86

23. Sharpening
The D1 can be set to increase or decrease the sharpness of edges in
photographs recorded using the camera.
Option: 0 Normal (default)
24. Tone Compensation
This setting controls the image compensation performed by the camera
when a photograph is taken. Compensation is performed by means of
curves which define the relationship between the tone distribution in the
original image and the compensated result. By default, the D1 automatically adjusts tonal range and distribution for optimal results when matrix
metering is used. At settings other than RAW (when data from the CCD are
recorded directly to the memory card without adjustment), you can choose
from auto, normal, low-contrast, and high-contrast settings. You can also
use custom curves created and downloaded to the camera using
Capture
curve is linear.
Option: 0 Auto (default)—camera adjusts curves to produce optimal
25. Shooting Speed in Continuous Shooting Mode
This item can be used to adjust the frame advance rate in continuous
shooting mode.
Option:
1 Low
2 High
3 None
software for the D1 (available separately). The default custom
contrast (matrix metering only; when another metering method
is used, this option is equivalent to option 1, i.e. normal tone
compensation)
1 Normal—this curve is suitable for scenes with a normal
distribution of shadows, mid-tones, and highlights
2 Low-contrast—use this curve to prevent highlights in brightly-
lit scenes from being “washed out”
3 High-contrast—use this curve to bring out hazy background
details
4 User-defined custom curve
Ch
Approx. 4.5 frames per second (default)
3 Approx. 3 fps
2 Approx. 2 fps
1 Approx. 1 fps
CL
Each photograph is written to the memory card before the
following photograph is taken. Photographs are not stored in
the temporary memory buffer.
Nikon
72
Custom Settings: Custom Settings Options
Page 87

26. Maximum Number of Consecutive Shots in Continuous Shooting Mode
This item determines the number of photographs that can be stored in the
temporary memory buffer in continuous shooting mode (see “Camera
Settings: The Mode Dial”).
Option: 21 Twenty-one standard photographs, ten photographs in RAW
format (default)
1–20 Specified number of photographs, from one to twenty (one to
nine in RAW format)
27. LCD Monitor Display Mode
By default, only image data are displayed when photographs are played
back. Using this item, you can also show the histogram and/or highlights
(see “Playback” for more information on histograms and highlights).
Option: 0 Image only (default)
1 Image and histogram
2 Image and highlights
3 Image, histogram, and highlights
28. Save RAW Images
The RAW data format is only available at an image quality of HI when this
item is set to 1.
Option: 0 RAW data format not available (default)
1 RAW data format available
29. Auto File Numbering Mode
The D1 stores photographs in numbered files and folders. Because no two
photographs or folders on any given memory card will have the same
number at the same time, there is no possibility of confusion so long as you
continue to use a single memory card without formatting it. If you format
the card or use a new card, however, a number previously assigned may
be used again. If you then copy a folder or photograph to a computer, an
earlier folder or photograph with the same number may be overwritten.
This can be prevented using option 1. With this option, when a new card
is inserted, numbering will continue from the highest number available on
the previous card. Choose option 0 to restore normal filename assignment.
Option: 0 Normal filename assignment (default)
1 Sequential filename assignment
Note
If you select option 1, Sequential filename assignment, it is important to remember to
turn the camera off before removing the power source. If the batteries are removed,
or if the AC adapter is disconnected while the camera is on, sequential filename
assignment will be reset, with the result that two files could have the same name, albeit
in different folders.
Custom Settings: Custom Settings Options
73
Page 88

30. Shooting Mode in PC Mode
The normal frame-advance mode when the camera is connected to a
computer is single frame shooting, but the continuous shooting can be
chosen using this item.
Option: S Single frame shooting (default)
C Continuous shooting
31. Sensitivity Up
By default, sensitivity can be set to a values equivalent to ISO 200, 400,
800, or 1,600. Sensitivity up can be used to increase sensitivity by a factor
of +1 or +2 over ISO 1600. These settings can be used to achieve high
shutter speeds at night-time sporting events, or to achieve optimal exposure when taking photographs of poorly-lit subjects. Note, however, that
high sensitivity settings increase the amount of noise that appears in the
final photograph. It is recommended that you take a trial photograph to
check the results when shooting at high sensitivity settings.
Option: 0 Sensitivity can be set to values equivalent to 200, 400, 800, or
1,600 (default)
1 Sensitivity set to +1 (sensitivity display in rear control panel
shows HI-1)
2 Sensitivity set to +2 (sensitivity display in rear control panel
shows HI-2)
Quick Guide to Custom Settings Options
Copy the following table and keep it with your camera for reference.
Custom Setting Option Meaning Custom Setting Option Meaning
0: Custom settings
1: Image status
2: EV steps for
exposure
control
3: Bracketing
order
4: Autofocus
activation
5: Anti-vibration
mode
A Custom Set A
b Custom Set B
0 Disabled
Capture Preview
1
2
3
2
1 1
0 Default
1 Negative-to-positive
0
1
0 Disabled
1 Enabled
Mode
Record-and-Review
Mode
1
/
3
1
/
2
Shutter-release
button activates AF
AF activated by
button only
6: Focus area
selection
7: AE lock
8: Mirror up
9: Dynamic AF
mode (singleservo AF)
10: Dynamic AF
mode (continuous-servo AF)
0 Default
1 Wrap-around
Only button
0
1
0 Mirror down
1 Mirror up
0
1
0
1
locks AE
AE locks when
shutter-release
button pressed half
Closest subject
priority enabled
Closest subject
priority disabled
Closest subject
priority disabled
Closest subject
priority enabled
way
74
Custom Settings: Custom Settings Options
Page 89

Custom Setting Option Meaning Custom Setting Option Meaning
11: Auto exposure/
flash exposure
bracketing
12: Command dial
functions
13: Exposure
compensation
settings
14: Center-weight-
ed metering
area
15: Time delay for
auto meterswitch-off
16: Self-timer
duration
17: LCD illumina-
tion
18: LCD monitor
auto power off
19: Aperture setting
20: Shutter-release
indication via
self-timer lamp
21: button
22: Aperture
selection
Flash and auto
AS
AE Auto exposure only
Sb Flash exposure only
0 Default
1
0 Default
1
6, 8, 10,
13, A
4, 6, 8,
16
2, 5, 10,
20
0
1
0 Fixed
1 Variable
0 Disabled
1 Enabled
0 Locks AE and AF
1 AE lock only
2 AF lock only
3
0 Sub-command dial
1 Lens aperture ring
exposure
Roles of main and
sub command dials
reversed
Exposure compen-
sation set by turning
main or sub com-
mand dial
Diameter of meter-
ing area in mm (“A”
is average for entire
frame)
Delay in seconds
Duration in seconds
LCD illuminates
when power switch
set to
LCD illuminates
when any button is
pressed
20 seconds0
1 minute1
5 minutes2
10 minutes3
Press once to lock
AE. Press again to
release.
23: Sharpening
24: Tone compen-
sation
25: Shooting speed
in continuous
shooting mode
26: Maximum
number of
consecutive
shots in continuous shooting
mode
27: LCD monitor
display mode
28: Save RAW
images
29: Auto file
numbering
mode
30: Shooting mode
in PC mode
31: Sensitivity up
0 Normal
1 Low
2 High
3 None
0 Auto
1 Normal
2 Contrast–
3 Contrast+
4 Custom
Ch 4.5 fps
3 3 fps
2 2 fps
1 1 fps
CL Rapid single frame
21 (10 shots in RAW
21
1–20
0 Image only
1
2 Image and highlights
3
0
1
0 Default
1
S
C Continuous shooting
0 Disabled
1 +1.0
2 +2.0
format)
1–20 (1–9 shots in
RAW format)
Image and histo-
gram
Image, histogram,
and highlights
RAW format not
available
RAW format avail-
able
Sequential number-
ing
Single-frame
shooting
Custom Settings: Custom Settings Options
75
Page 90

Two-Button Reset
Two-button reset restores camera and custom settings to their default values.
To reset camera settings, hold the
buttons down together for more than two seconds.
The following camera settings will be reset to their
default values:
Setting Default
Image quality Normal (color)
Sensitivity ISO 200 equivalent
White balance
AF area mode Single area AF
Focus area Center
Exposure mode Programmed auto
Flexible program None
Shutter-speed lock Off
Aperture lock Off
Auto-exposure lock Off
Exposure compensation ±0
Auto bracketing Off
Flash synchro mode Front-curtain sync
A (auto white balance; manual white
balance adjustment set to 0)
and
To reset custom settings for the current custom set (A or B) to their default
values, hold the
seconds. The CUSTOM indicator in the rear control panel will start to blink.
Release both buttons while the indicator is blinking and then press the buttons
again. Both camera settings and custom settings for the current custom set
will be restored to their default values.
76
and buttons down together for more than two
Custom Settings: Two-Button Reset
Page 91

PLAYBACK
This chapter describes the D1’s playback options, including viewing photographs and photograph information, deleting photographs, and the playback
menu.
77
Page 92

Playing Photographs Back
Playback Controls
The buttons next to the rear control panel and the button have two
functions, one for changing camera settings and another in playback mode.
Button Name in playback mode Function in playback mode
Menu Display/hide playback menu
Thumbnail Display thumbnails
Execute Select menu item
Select All Select all thumbnails
Multiple Select Select multiple images
Cancel
Single-Frame Playback
Photographs stored in the memory card can be played back one at a time on
the LCD monitor.
Holding down the mode dial lock release, turn the mode dial to PLAY
1
(playback mode). Playback indicators will appear in the control panel on
top of the camera (B).
A B
Cancel operation and return to
previous menu
An hourglass icon will be displayed while the
camera reads the most recent photograph in
memory. The image is displayed together with
the folder number and frame number (see
right).
Tip
The button controls the LCD monitor. Press the button to turn the monitor on
and off. If the camera is connected to a television, the television will continue to display
images even when the monitor is off.
78
Playback: Playing Photographs Back
Page 93

After rotating the focus area selector lock to the unlocked
2
position, use the focus area selector to view other
photographs or photo information.
Pressing the focus area selector up or down displays the other photographs in memory one at a time. To scroll quickly to a particular frame
number without viewing intervening photos, hold the selector down for
more than two seconds. Photographs will be reduced to thumbnails in the
center of the LCD monitor for rapid display, with the frame number
appearing at the bottom of each photograph. The camera will scroll quickly
through photographs while the focus area selector is held down. Release
the selector when the desired frame is reached.
To display or hide information for the current photograph, including date of
recording and camera settings at the time the photograph was made, press
the selector to the right or left. The display changes as shown below.
Frame number
▲
▲
Image only
Photo information
▲
▲
Frame number Filename
Date and time of recording
▲
▲
Page 2
(File type)
▲
Photo information
▲
Page 1
Photograph information includes: the model of camera used, the camera
firmware version, metering, shutter speed, aperture, exposure compensation, sensitivity, image type (color or black-and-white), white balance,
white-balance adjustment, tone curve, edge enhancement, and focal
length. The information actually displayed depends on the lens used.
▲
▲
Tips
The first and last photographs in memory are linked. Pressing the focus-area selector
towards the top when the last photo in memory is selected takes you to the first photo;
pressing the selector towards the bottom when the first photo is selected takes you to
the last photo.
The brightness of the LCD monitor can be adjusted using the sub-command dial.
Playback: Playing Photographs Back
79
Page 94

Thumbnail Playback
The D1 can display the photographs stored in the flash memory card as
thumbnail images. In this mode, up to nine images can be displayed at a time.
Holding down the mode dial lock release, turn the mode dial (A) to PLAY
1
(playback mode) and press the
nine preview images (C).
A B C
The currently selected thumbnail will be highlighted.
If there are more than nine photos in memory, use the main command dial
2
to page through the previews, nine at a time (A). Use the focus area
selector to highlight the photo you want to view (B), then press the
button or the button to view it at full size (C).
A B C
button (B) to display a menu of up to
Tip
When images are displayed in playback mode, the monitor will turn off automatically
if no operations are performed for the length of time specified in Custom Setting 18 or
the playback menu “Auto Off” setting (see “The Playback Menu,” below). The display
can be restored by pressing the shutter-release button lightly within the time specified
in Custom Setting 15 (default is six seconds).
80
Playback: Playing Photographs Back
Page 95

Deleting Images
To delete the image currently displayed, or to delete
the image currently selected in the thumbnail display,
press the
photos cannot be recovered
of any photographs you wish to keep, prior to deletion.
button. Note that
; be sure to make copies
once deleted,
ERASING IMAGES
DEL
YES ☞
This dialog appears
when the
pressed. Press the
button again to delete
the selected photograph. To return to playback without deleting
the photograph, press
any of the buttons on
the rear of the camera
except the
buttons.
Notes
If there are no photographs in the current folder, the message, "card contains no image
data" will be displayed. Although you will not be able to play photographs back, you
can still use the options available in the SET UP submenu of the playback menu (see
"The Playback Menu," below). To view or delete images in other folders, select "D1
NC_D1" or "DCF_ALL" using the FOLDERS item in the SET UP submenu.
The D1 can not display photographs taken with other digital cameras full screen. It can
display thumbnail previews of photographs taken with cameras that conform to the
Design Rule for Camera File Systems (DCF).
The left and right edges of photographs are not shown when the photographs are
played back in the LCD monitor.
button is
and
Playback: Playing Photographs Back
81
Page 96

The Playback Menu
The playback menu offers options for deleting multiple images, creating
shows, protecting photographs from de
letion, and hiding photographs during
slide
playback. It also includes options for setting up photos for printing at print
services or on printers that support the Digital Print Order Format (DPOF).
To use the playback menu:
Holding down the mode dial lock release, turn the
1
mode dial to PLAY (playback mode).
Press the button (A) to display the playback menu (B).
2
A B
Menu items can be highlighted by pressing the top of the focus area
3
selector to move up through the list, or the bottom of the selector to move
PLAY BACK
DELETE
SLIDE SHOW
PROTECT
HIDE IMAGE
PRINT SET
SET UP
SET
down through the list.
PLAY BACK
DELETE
SLIDE SHOW
PROTECT
HIDE IMAGE
PRINT SET
SET UP
SET
82
Playback: The Playback Menu
Page 97

To select the currently highlighted item, press the button or press the
4
focus area selector to the right.
SLIDE SHOW
START
FRAME INTVL
SET
A submenu of options for the currently selected item will be displayed. To
return to the playback menu without making any changes to settings, press
the focus area selector to the left or press the
To make changes to settings, highlight the desired option (A) and press the
5
button (B) or press the focus-area selector to the right.
A B
button.
Playback: The Playback Menu
83
Page 98

Delete
The DELETE submenu contains the following options:
SELECTED:Delete multiple selected pho-
tographs
ALL:Delete all photographs in the
current folder
PRINT SET:Delete print-order files created
using the PRINT option
SELECTED
When this option is selected, a thumbnail menu showing the images in the
current folder will be displayed. Choose the photographs to be deleted
from the thumbnail menu and press the
button. A confirmation dialog
will be displayed; select YES to permanently delete the selected photographs. Select NO or press the
button to cancel the operation and return
to the thumbnail menu.
ALL
When this option is selected, a confirmation dialog will be displayed.
Selecting YES in this dialog permanently deletes all photographs in the
current folder with the exception of those protected with the PROTECT
option or hidden using HIDE IMAGE. Select NO or press the
cancel the operation and return to the DELETE submenu.
PRINT SET
When this item is highlighted, pressing the focus-area selector to the right
or pressing the
button deletes the current print order file created using
the PRINT SETUP option.
DELETE
SELECTED
ALL
PRINT SET
SET
button to
Tip
Selecting photographs from a thumbnail menu
To select multiple photos from a thumbnail menu, highlight images with the focus area
selector and press the
are marked with an icon; to deselect an image, highlight it and press the
To complete the operation, highlight the last of the images to be selected and press
button. To exit from the thumbnail menu, press the or button.
the
84
button, or press to select all images. Selected images
button.
Playback: The Playback Menu
Page 99

Slideshow
The SLIDE SHOW submenu contains the following
options:
START:Start a slide show
FRAME INTVL:Select the time each image will
be displayed
START
When this option is selected, the camera will display the photographs in
memory one at a time in the order they were taken (photographs hidden
using the HIDE IMAGE option will not be displayed).
To pause the slide show, press the
button; a pause screen will be
displayed. Selecting RESTART in the pause screen will restart the
slideshow. Press the
button to end the slideshow and return to the
playback menu.
When the slideshow finishes, a pause screen will be displayed. To exit the
slideshow and return to playback mode, press the
FRAME INTVL
This option is available in the SLIDE SHOW
submenu and the slideshow pause screen. Selecting this option brings up a menu of interval
settings. The interval controls the time between
photographs in the slide show (the default interval is two seconds). When an interval setting is
selected, the slideshow will begin or continue
from where it was interrupted. Press the
button to end the slideshow and return to the playback menu.
SLIDE SHOW
START
FRAME INTVL
SET
button.
FRAME INTVL
2 S
3 S
5 S
10 S
SET
Notes
When a slideshow is in progress, the camera will power off automatically if no
operation is performed for ten minutes.
The actual interval between images varies with the size of the images that must be
displayed.
Playback: The Playback Menu
85
Page 100

Protect
The PROTECT option in the playback menu allows
you to change the protected status of selected images. Images can be chosen from a thumbnail menu,
where protected images are marked with a
icon.
Protected images can not be deleted (although they
are erased when the memory card is formatted), and
have read-only status when viewed on a computer.
Hide Image
The HIDE IMAGE option in the playback menu allows
you to change the hidden status of selected images.
Images to be hidden or revealed can be chosen from
a thumbnail menu, where hidden images are marked
and icons. Hidden images can not be
with
deleted (although they are erased when the memory
card is formatted), and are not displayed during
playback or slide shows. They are treated as hidden,
read-only files when viewed on a computer.
PROTECT
SET
HIDE IMAGE
SET
Tip
Selecting photographs from a thumbnail menu
To select multiple photos from a thumbnail menu, highlight images with the focus area
selector and press the
are marked with an icon; to deselect an image, highlight it and press the
To complete the operation, highlight the last of the images to be selected and press
button. To exit from the thumbnail menu, press the or button.
the
86
button, or press to select all images. Selected images
button.
Playback: The Playback Menu
 Loading...