


LaserRangefinder/Telémetro láser/Télémètre laser/
Laser-Entfernungsmesser/Telemetro laser/Laseravståndsmätare/
Laserafstandsmeter/Лазерный дальномер/Telêmetro a laser/
Dalmierz laserowy/Laseretäisyysmittari/Laseravstandsmåler/
Laserafstandsmåler/Laserový dálkoměr/Telemetru cu laser/
Lézeres távolságmérő
Instruction manual/Manual de instrucciones/Manuel d’utilisation/Bedienungsanleitung/
Manuale di istruzioni/Bruksanvisning/Gebruiksaanwijzing/Pуководство по
продукции/Manual de instruções/Instrukcją obsługi/Käyttöohje/Instruksjonsmanual/
Brugsvejledning/Návod k použití/Manual de instrucţiuni/Kezelési útmutató
En
Es
Fr
De
It
Sv
Nl
Ru
Pb
Pl
Fi
No
Dk
Cz
Ro
Hu

En
Es
Fr
De
Sv
Nl
Ru
Pb
Pl
Fi
No
Dk
Cz
Ro
Hu
English .................................................... 3
Español ................................................. 25
It
Français ................................................47
Deutsch................................................. 69
Italiano ................................................. 91
Svenska ..............................................113
Nederlands ......................................... 135
Русский ..............................................157
Português brasileiro .......................... 179
Polski ..................................................201
Suomi ..................................................223
Norsk ..................................................245
Dansk .................................................. 267
Česky...................................................289
Română ..............................................311
Magyar................................................333
2

Introduction
Read this First ......................................................................4
SAFETY AND OPERATION PRECAUTIONS ..................5
Getting to know the Laser Rangefinder
Key features ..........................................................................8
Nomenclature/Composition ..........................................9
Internal display ................................................................ 10
Functions
STABILIZED function ...................................................... 11
First Target Priority algorithm .....................................11
LOCKED ON sign
(First Target Priority detection sign) ......................... 11
Actual Distance Indicator ............................................. 11
Inserting/Replacing battery
Type of battery ................................................................. 12
Inserting/Replacing battery ........................................ 12
Battery level indicator ................................................... 12
English
CONTENTS
Navigating the menus
Changing the measurement display mode (F1)
Changing the internal display luminance (F2) ..... 15
Changing the distance display unit (F3) ................. 16
Switching the Actual Distance Indicator (F4)
ON or OFF .......................................................................... 17
Operation diagram of the setting menus .............. 18
Measurement
Adjusting the focus of the internal display............ 19
Measuring .......................................................................... 19
Single measurement ...................................................... 20
Continuous measurement ........................................... 20
Technical notes
Specifications ................................................................... 21
Troubleshooting/Repair ............................................... 23
... 14
En
Es
Fr
De
It
Sv
Nl
Ru
Pb
Pl
Fi
No
Dk
Cz
Ro
Hu
3

Introduction
Read this First
En
Thank you for purchasing the Nikon Laser Rangefinder COOLSHOT PRO STABILIZED.
Es
Before using the product, read this manual thoroughly to ensure proper use.
Fr
After reading this manual, keep it in a readily accessible place for future reference.
De
l About the manual
• No part of the manual may be reproduced, transmitted, transcribed, stored in a retrieval system, or
It
Sv
Nl
Ru
Pb
Pl
Fi
No
Dk
Cz
Ro
Hu
4
translated into any language in any form, by any means, without Nikon’s prior written permission.
• Illustrations and display content shown in this manual may differ from the actual product.
• Nikon will not be held liable for any errors this manual may contain.
• The appearance, specifications, and capabilities of this product are subject to change without notice.
l About controls for radio interference
• This device complies with Part 15 of the FCC Rules. Operation is subject to the following two conditions:
(1) This device may not cause harmful interference, and
(2) This device must accept any interference received, including interference that may cause undesired
operation.
• This equipment has been tested and found to comply with the limits for a Class B digital device, pursuant
to Part 15 of the FCC Rules and to EU EMC directive. These limits are designed to provide reasonable
protection against harmful interference in a residential installation. This equipment generates, uses and
can radiate radio frequency energy and, if not installed and used in accordance with the instructions, may
cause harmful interference to radio communications. However, there is no guarantee that interference
will not occur in a particular installation. If this equipment does cause harmful interference to radio or
television reception, which can be determined by turning the equipment off and on, the user is
encouraged to try to correct the interference by one or more of the following measures:
• Reorient or relocate the receiving antenna.
• Increase the separation between the equipment and receiver.
• Consult the dealer or an experienced radio/TV technician for help.
Notice for customers in Canada
CAN ICES-3(B)/NMB-3(B)

SAFETY AND OPERATION PRECAUTIONS
Strictly observe the guidelines
contained in this manual in
order to use this product safely
and prevent possible injury or
property damage to you and
others. Understand the contents
thoroughly for correct use of the
product.
WARNING
This indicates that improper use by
ignoring the contents described
herein can result in potential death
or serious injury.
CAUTION
This indicates that improper use by
ignoring the contents described
herein can result in potential injury
or material loss.
• Do not aim at eyes.
• Do not point the laser at people.
• Do not look at lasers with other
optical instruments such as lenses
or binoculars. You may damage
your eyes.
• When not measuring, keep your
fingers away from the PWR button
to avoid accidentally emitting the
laser.
• When not in use for an extended
period, remove the battery.
• Do not disassemble, remodel, or
repair the product. The laser
emission may be harmful to your
health. If the product is
disassembled, remodeled, or
repaired, it is no longer
guaranteed by the manufacturer.
• Store the product in a place out of
reach of children.
SAFETY PRECAUTIONS (Laser)
This product uses an invisible laser
beam. Be sure to observe the
following:
WARNING
• Do not press the PWR button while
looking into the laser emission
aperture. You may damage your
eyes.
SAFETY PRECAUTIONS
(Monocular)
WARNING
• Never look directly at the sun,
intense light, or lasers while using
this product. It may seriously
damage the eyes or cause
blindness.
CAUTION
• Keep the plastic bag used to wrap
this product or other small parts
out of reach of children. The bag
may block their mouths and noses
and cause them to suffocate.
• Be careful of children inadvertently
swallowing small parts or
accessories. If children swallow
such parts, see a doctor
immediately.
• Turn off this product when not in
use.
• When carrying this product, store
it in the case.
• If this product fails to operate
correctly for any reason,
discontinue use immediately and
consult with a Nikon authorized
service representative.
En
Es
Fr
De
It
Sv
Nl
Ru
Pb
Pl
Fi
No
Dk
Cz
Ro
Hu
5

• Do not leave this product in an
unstable place. It may fall and
cause injury or malfunction.
En
• Do not use this product while
Es
walking. You may walk into
something or fall and cause injury
Fr
or malfunction.
De
• Do not swing this product by the
strap. You may hit others and
It
cause injury.
Sv
• The rubber parts of this product
(such as the eyecup) or rubber
Nl
parts of the included case and
Ru
strap may deteriorate if used or
stored for a long period of time.
Pb
The deteriorated rubber may
Pl
attach on clothes and cause stains.
Check their condition before use,
Fi
and consult with a Nikon
No
authorized service representative
if a defect is found.
Dk
• Using the rubber eyecup for
Cz
extended periods of time may
cause skin inflammation. If you
Ro
develop any symptoms, stop use
Hu
and see a doctor immediately.
6
PRECAUTIONS
(Lithium battery)
Incorrect use may cause the lithium
battery to rupture or leak, which will
corrode the device or stain your
hands and clothing.
Be sure to observe the following:
• Install the battery with the + and
– poles positioned correctly.
• Remove the battery when this is
depleted or will not be used for
extended periods.
• Keep the battery away from fire or
water. Never disassemble the
battery.
• Do not charge the lithium battery.
• Do not short the terminal of the
battery chamber.
• Do not carry the battery together
with keys or coins in a pocket or
bag. You may short the battery and
cause overheating.
• If liquid leaked from the lithium
battery comes into contact with
clothing or skin, rinse with plenty
of water. If it enters the eyes or
mouth, rinse with water and
consult a doctor immediately.
• When disposing of the lithium
battery, follow your local area
regulations.
HANDLING AND OPERATION
PRECAUTIONS
• Do not subject this product to
physical shock.
• If you accidentally apply strong
physical shock or drop the product
and suspect a malfunction, consult
with your local dealer or a Nikon
authorized service representative
immediately.
• Do not use the product
underwater.
• Wipe off any rain, water, sand, or
mud on the product as soon as
possible with a soft, clean cloth.
• When this product is exposed to
extreme temperature changes
(suddenly brought from a cold
place to a warm place or viceversa), the lens surfaces may get
cloudy. Do not use the product
until the cloudiness has
disappeared.
• Do not leave the product in a car
on a hot or sunny day, or near heat
generating equipment.

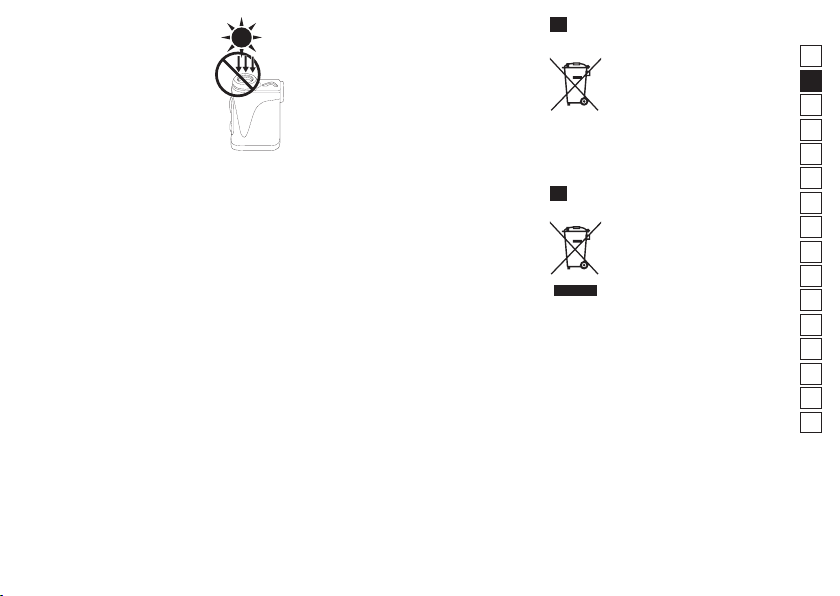
• Do not leave the
eyepiece in direct
sunlight. The
condenser effect of
the lens may
damage the internal
display surface.
CARE AND MAINTENANCE
PRECAUTIONS
LENS
Be careful that you do not directly
touch the lens surface with your
hands when cleaning it. Remove
dust or lint with a blower*. For
fingerprints or other stains that
cannot be removed with a blower,
wipe the lens with a dry soft cloth or
cleaning cloth for eyeglasses, using a
spiral motion that starts at the center
of the lens and working towards the
edges. Wiping too firmly or wiping
with a hard material may damage
the lens. If this fails, gently wipe the
lens using a cloth lightly dampened
with commercial lens cleaner.
MAIN BODY
After gently removing dust with a
blower, clean the body surface with a
soft, clean cloth. After use at a
seaside, wipe off salt that may be on
the body surface with a damp, soft,
clean cloth, and then wipe with a dry
cloth. Do not use benzene, thinner,
or other cleaners containing organic
solvents.
STORAGE
Water condensation or mold may
occur on lens surfaces because of
high humidity. Therefore, store the
product in a cool, dry place. After use
on a rainy day or at night, thoroughly
dry it at room temperature, then
store in a cool, dry place.
* A rubber cleaning tool that blows
air from a nozzle.
En
Symbol for separate collection applicable
in European countries
This symbol indicates that this battery is
to be collected separately.
The following apply only to users in
European countries.
• This battery is designated for
separate collection at an appropriate
collection point. Do not dispose of as
household waste.
• For more information, contact the
retailer or the local authorities in
charge of waste management.
En
Symbol for separate collection applicable
in European countries
This symbol indicates that this product is
to be collected separately.
The following apply only to users in
European countries.
• This product is designated for
separate collection at an appropriate
collection point. Do not dispose of as
household waste.
• For more information, contact the
retailer or the local authorities in
charge of waste management.
Notice for customers in the State of California
WARNING:
This product contains chemicals
including Lead which is known to the
State of California to cause cancer and
birth defects or other reproductive
harm. For more information go to
www.P65Warnings.ca.gov.
En
Es
Fr
De
It
Sv
Nl
Ru
Pb
Pl
Fi
No
Dk
Cz
Ro
Hu
7

Getting to know the Laser Rangefinder
Key features
En
• STABILIZED function is employed for reducing the
Es
vibrations caused by hand movement
Fr
• Red internal display is easy-to-read
• Employs the First Target Priority algorithm that
De
makes a flagstick easy to measure
It
• LOCKED ON sign (First Target Priority detection
Sv
sign) is lit when measuring overlapping subjects
and the distance to the closest subject is displayed
Nl
• High-quality 6× finder with multilayer coating
Ru
• Larger ocular for easy viewing
• Select from four measurement display modes
Pb
• Golf mode (default setting) displays the slope
Pl
adjusted distance (horizontal distance ± height)
Fi
which is useful for golf
• Built-in Actual Distance Indicator
No
• Press and hold down the PWR button to activate
Dk
the continuous measurement function (up to
approx. 8 seconds)
Cz
• Automatic power shut-off (approx. 8 sec.
Ro
unoperated from standby screen)
Hu
• Waterproof and fogproof (not designed for
underwater usage)
• Invisible/Eyesafe EN/IEC Class 1M Laser
l About measurement results
This device is a basic rangefinder. Its measurement results cannot be used as official evidence.
8
This product uses an invisible laser beam for
measuring. It measures the time the laser beam
takes to travel from the rangefinder to the target
and back. Laser reflectivity and measurement
results may vary according to climatic and
environmental conditions, as well as the color,
surface finish, size, shape and other
characteristics of the target.
Measurement may be inaccurate or fail in the
following cases:
• In snow, rain or fog
• Small or slender target
• Black or dark target
• Target has stepped surface
• Moving or vibrating target
• When measuring the surface of water
• Target measured through glass
• When the target is glass or a mirror
• When laser incidence to the target’s reflective
surface is oblique

Nomenclature/Composition
a
b 87
6
5
4
3
2
0
9
1
c
1 MODE button
2 PWR button (POWER ON/Measurement
button)
3 6× monocular eyepiece
4 Eyecup/Diopter adjustment ring
5 Diopter index
6 Strap eyelet
7 Battery-chamber cover
8 Battery-chamber cover “Open” indication
9 Monocular objective lens/Laser emission
aperture
0 Actual Distance Indicator
a Invisible Laser detector aperture
b Product number label
• Body ×1
• Case ×1
* The carabiner-like ring that comes with the case is for the purpose of carrying the Laser Rangefinder only.
• Strap ×1
• Lithium battery (CR2) ×1
Composition
Do not hang anything heavy on it, nor tug on it strongly. It cannot be used for climbing.
c Indication
En
Es
Fr
De
It
Sv
Nl
Ru
Pb
Pl
Fi
No
Dk
Cz
Ro
Hu
9

Internal display
8
7
6
5
4
3
2
1
En
Es
1 Height (actual distance at golf mode setting)
Fr
De
It
Sv
Nl
Ru
Pb
Pl
Fi
No
Dk
Cz
Ro
Hu
• The internal display of this product is enlarged by the eyepiece. Although you may see dust that has
10
: “Failure to measure” or “Unable to measure”
2 Target mark
: Aim at the target you want to measure.
Position the target at the center of the mark.
3 Unit of measure (m: meter/YD: yard)
4 Distance
: “Failure to measure” or “Unable to measure”
5 Battery level indicator
6 Measurement display mode indications
7 Laser irradiation mark
: Appears while the laser is being irradiated for a
measurement. Do not look towards the objective lens
side while this mark is shown.
8 LOCKED ON sign (First Target Priority detection sign)
: When measuring overlapping subjects, and the
distance to the closest subject is displayed, this sign is
lit.
entered, it does not effect the accuracy of measurement.

Functions
STABILIZED function
l ON and OFF
The STABILIZED function is activated concurrently when the Laser Rangefinder is ON.
When the Laser Rangefinder is OFF, the STABILIZED function automatically turns off.
First Target Priority algorithm
When measuring overlapping subjects, First Target Priority algorithm displays the distance to the closest
subject.
LOCKED ON sign (First Target Priority detection sign)
When measuring overlapping subjects, such as a flagstick with trees in the background, and the distance
to a closest subject is displayed, LOCKED ON sign (First Target Priority detection sign)* is lit in the
viewfinder.
* Single measurement: When measuring overlapping subjects and the distance to a closest subject is
displayed, the sign appears.
Continuous measurement: When displayed figures shift to a closer subject, the sign appears.
LOCKED ON sign (First Target Priority
detection sign) is lit.
Actual Distance Indicator
When the Actual Distance Indicator setting is ON and the measurement display mode is set to actual
distance mode, the Actual Distance Indicator blinks while the Laser Rangefinder is ON.
You can find out at a glance that the inclinometer function is not being used.
En
Es
Fr
De
It
Sv
Nl
Ru
Pb
Pl
Fi
No
Dk
Cz
Ro
Hu
11

Inserting/Replacing battery
Type of battery
En
3V CR2 lithium battery ×1
Es
Fr
Inserting/Replacing battery
De
1. Open the battery-chamber cover.
It
Sv
Nl
Ru
Pb
Pl
Fi
No
Dk
Cz
Ro
Hu
12
Rotate the battery-chamber cover counterclockwise and remove it.
2. Insert the battery.
To replace the battery, take out the old battery before inserting a new one.
Follow the battery insertion mark inside the battery chamber to insert the + and - ends of the battery in
the correct orientation (insert so that the - end faces up). If the battery is not inserted correctly, the
Laser Rangefinder will not operate.
3. Attach the battery-chamber cover.
Rotate the battery-chamber cover clockwise and secure it firmly. When attaching the battery-chamber
cover, securely screw it all the way and check that it is secured.
• The battery-chamber cover may be difficult to rotate because this product uses a rubber seal to
maintain its waterproof capabilities.
Battery level indicator
Display Description
After power on, displays for 2 seconds only. Sufficient power available.
After power on, displays for 2 seconds only.
Displayed continuously. Low. Battery should be replaced with a new one.
Blinks. After blinking 3 times, automatically
powers off.
Power getting low.
Prepare to replace the battery.
The battery is empty.
Replace the battery.

Navigating the menus
• Operating the MODE button
There are two ways to press the MODE button. Operate the button while following the descriptions in this manual.
- “Press and hold” means to continue pressing the button for 1.5 seconds or longer.
- “Press” means to press the button quickly (less than 1.5 seconds).
En
Es
Fr
De
It
Sv
Nl
Ru
Pb
Pl
Fi
No
Dk
Cz
Ro
Hu
13
Changing the measurement display mode (F1)
Switch between four modes (refer to the figure below) according to your golf
En
playstyle. The displayed information differs depending on the mode. Factory
Es
default setting is golf mode.
1. Press the PWR button to turn on the Laser Rangefinder.
Fr
2. Press and hold the MODE button.
De
It
Sv
Nl
Ru
Pb
Pl
Fi
No
Dk
Cz
Ro
Hu
14
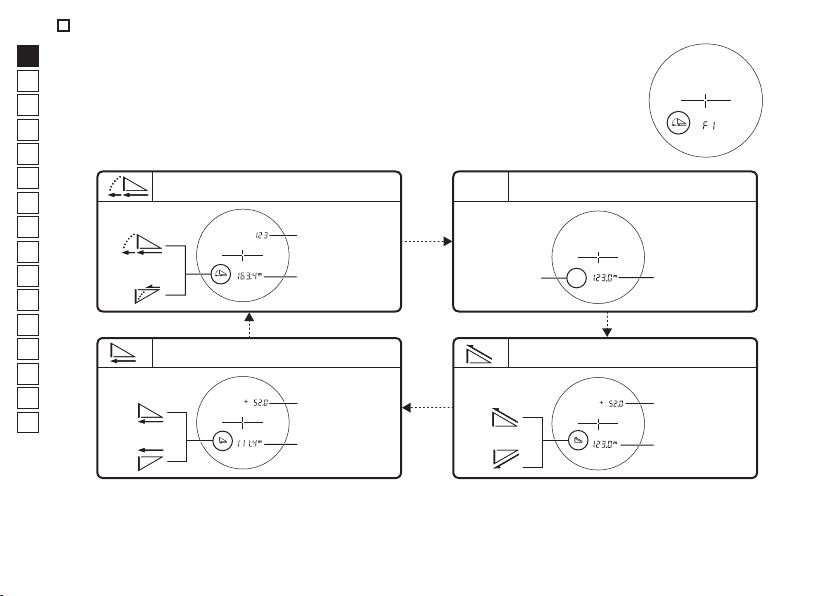
• You can now change the measurement display mode.
3. The setting switches every time you press the PWR button.
Golf mode: Slope adjusted distance (horizontal distance
± height) and actual distance
Incline
Decline
Horizontal distance and height mode
Incline
Decline
Actual
distance
Slope adjusted
distance
(horizontal distance
± height)
Height
Horizontal
distance
• If you press and hold the MODE button or do not operate the buttons for about 8 seconds, the
displayed setting is saved and the Laser Rangefinder returns to standby.
• The setting is saved even when the Laser Rangefinder is turned OFF.
N/A
Actual distance mode
N/A
Actual distance and height mode
Incline
Decline
Actual
distance
Height
Actual
distance

Changing the internal display luminance (F2)
Adjust the brightness of the internal display. The factory default setting is A (Auto, automatic brightness
control). You can select A, or 1 to 5.
• A (Auto): The luminance is adjusted automatically according to the brightness of
the surroundings.
• 1 - 5: 1 is the darkest, while 5 is the brightest.
1. Press the PWR button to turn on the Laser Rangefinder.
2. Press and hold the MODE button.
3. Press the MODE button once.
• You can now change the internal display luminance.
4. The setting switches every time you press the PWR button.
A 1 2 3 4 5
• If you press and hold the MODE button or do not operate the buttons for about 8 seconds, the
displayed setting is saved and the Laser Rangefinder returns to standby.
• The setting is saved even when the Laser Rangefinder is turned OFF.
l Temporarily changing the internal display luminance setting
If the internal display is difficult to see due to the surrounding conditions, you can temporarily change
the brightness. The luminance changes every time you press the MODE button.
• The luminance level is not displayed in the internal display.
• A (Auto) cannot be set.
• When the Laser Rangefinder is turned OFF, the internal display returns to the original luminance.
En
Es
Fr
De
It
Sv
Nl
Ru
Pb
Pl
Fi
No
Dk
Cz
Ro
Hu
15

Changing the distance display unit (F3)
For the display unit of the measurement results, select YD (yards) or m (meters). Factory default setting is
En
YD (yard).
Es
1. Press the PWR button to turn on the Laser Rangefinder.
2. Press and hold the MODE button.
Fr
3. Press the MODE button twice.
De
It
Sv
Nl
Ru
Pb
Pl
Fi
No
Dk
Cz
Ro
Hu
16
• You can now change the distance display unit.
4. The setting switches every time you press the PWR button.
(yard) (meter)
• If you press and hold the MODE button or do not operate the buttons for
about 8 seconds, the displayed setting is saved and the Laser Rangefinder
returns to standby.
• The setting is saved even when the Laser Rangefinder is turned OFF.

Switching the Actual Distance Indicator (F4) ON or OFF
When the Actual Distance Indicator setting is ON and the measurement display mode is set to actual
distance mode, the Actual Distance Indicator blinks while the Laser Rangefinder is ON. You can find out at
a glance that the inclinometer function is not being used. Factory default setting is On (on).
1. Press the PWR button to turn on the Laser Rangefinder.
2. Press and hold the MODE button.
3. Press the MODE button three times.
• You can now change the Actual Distance Indicator.
4. The setting switches every time you press the PWR button.
(on) (off)
• If you press the MODE button or do not operate the buttons for about
8 seconds, the displayed setting is saved and the Laser Rangefinder returns
to standby.
• The setting is saved even when the Laser Rangefinder is turned OFF.
En
Es
Fr
De
It
Sv
Nl
Ru
Pb
Pl
Fi
No
Dk
Cz
Ro
Hu
17

Operation diagram of the setting menus
En
Es
Standby
Fr
De
It
Sv
Nl
Ru
Pb
Pl
Fi
No
Dk
Cz
Ro
Hu
Temporarily change the luminance level.
Switch between five luminance levels.
• If you press and hold the MODE button or do not operate the buttons for about 8 seconds while operating
the setting menus, the displayed setting is saved and the Laser Rangefinder returns to standby.
18
Measurement display mode: F1
Golf mode: Slope adjusted distance (horizontal
distance ± height) and actual distance
Horizontal distance
and height mode
Internal display luminance: F2
A 1 2 3 4 5
Distance display unit: F3
(yard) (meter)
Actual Distance Indicator: F4
(on) (off)
Press and hold the MODE button.
Press the MODE button.
Press the PWR button.
Actual distance
N/A
mode
Actual distance and height
mode
Measurement
Caution — Controls, adjustments or usage of procedures other than those specified herein may produce
negative effects or damage to your health due to laser radiation.
• Before measuring, be sure to confirm each menu setting. Refer to “Navigating the menus” for menu details
and how to change the settings.
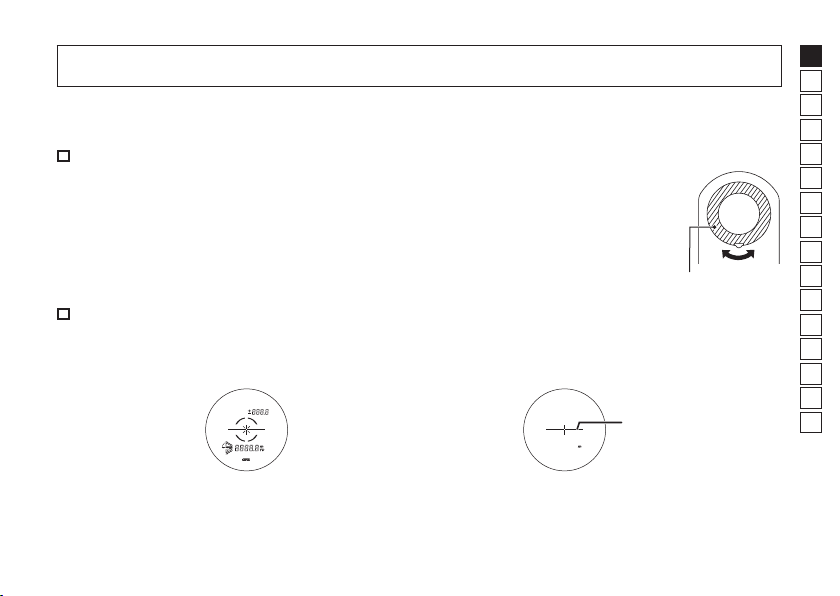
Adjusting the focus of the internal display
If the internal display is difficult to see, adjust the focus with the following
procedure.
1. Press the PWR button to turn on the power.
2. Look through the eyepiece and rotate the diopter adjustment ring until the
internal display comes into focus.
Diopter adjustment ring
Measuring
1. Press the PWR button to turn on the power.
• If you do not operate the button for about 8
seconds, the power turns off automatically.
Immediately after power-on
3. Press the PWR button to measure.
After measurement, the result is displayed for approx. 8 seconds, then power automatically turns off.
Press the PWR button while the power is on to measure again.
2. Aim at the target.
Position the center of the target mark on the
target.
Target mark
En
Es
Fr
De
It
Sv
Nl
Ru
Pb
Pl
Fi
No
Dk
Cz
Ro
Hu
19
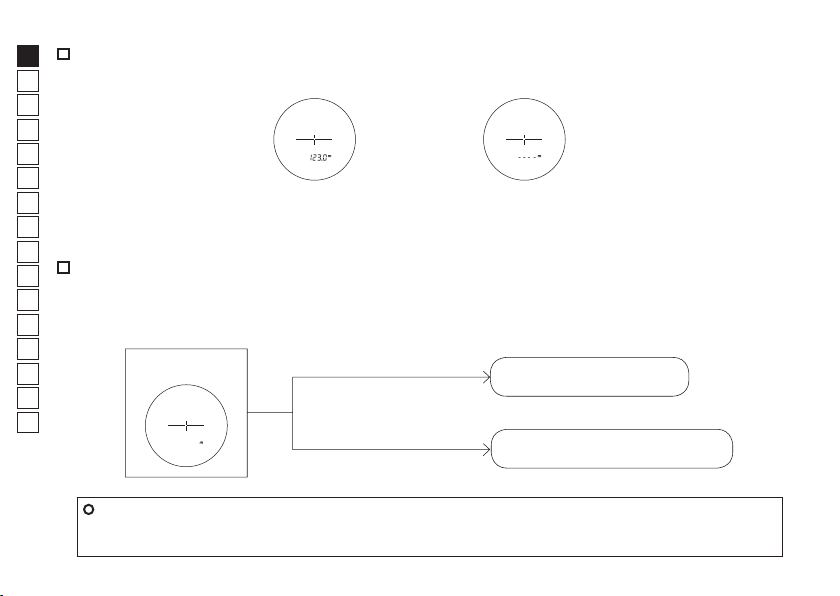
Single measurement
En
Pressing the PWR button once starts single measurement, then displays the results.
Es
Fr
De
It
Sv
Nl
Ru
Pb
Continuous measurement
Pl
Press and hold down the PWR button to start continuous measurement up to approx. 8 seconds. During
Fi
measurement, the measured result is displayed consecutively while the laser irradiation mark is blinking. If
No
you release your finger from the button, continuous measurement stops.
Dk
Cz
Ro
Hu
Standby
Example of measured
distance display
Press the PWR button once
Press and hold down the PWR
button
Example of measurement
failure
Single measurement
Continuous measurement
l When measuring a flagstick at a golf course
Keep targeting the flagstick at the center of the target mark with the continuous measurement function
to minimize the effects of hand shake.
20

Technical notes
Specifications
Measurement range (actual distance) 7.5-1,090 meters/8-1,200 yards
Distance display (increment)
Accuracy (actual distance)
Magnification (×) 6
Effective diameter of objective lens (mm) 21
Angular field of view (real) (˚) 7.5
Eye relief (mm) 18.0
Exit pupil (mm) 3.5
Diopter adjustment ±4 m
Dimensions (L × H × W) (mm/in.)
Weight (g/oz.) Approx. 170/6.0 (without battery)
Operating temperature (˚C/˚F) -10 — +50/14 — 122
Operating humidity (%RH) 80 or less (without dew condensation)
Power source
Structure
Electromagnetic compatibility
*1
Horizontal distance/Slope adjusted distance (lower): Every 0.2 m/yd.
Battery chamber is rainproof — JIS/IEC protection class 4 (IPX4) equivalent
FCC Part15 SubPartB class B, EU:EMC directive, AS/NZS, VCCI classB,
Actual distance (upper): Every 1 m/yd.
Actual distance (lower): Every 0.5 m/yd.
Height (upper):
±1.25 m/yd. (700 m/yd. and over, shorter than 1,000 m/yd.)
Automatic power shut-off (after approx. 8 sec. unoperated)
Waterproof (up to 1 m/3.3 ft for 10 minutes)
Every 0.2 m/yd. (shorter than 100 m/yd.)
Every 1 m/yd. (100 m/yd. and over)
±0.75 m/yd. (shorter than 700 m/yd.)
±1.75 m/yd. (1,000 m/yd. and over)
-1
96 × 74 × 42/3.8 × 2.9 × 1.7
CR2 lithium battery × 1 (DC 3V)
(under Nikon’s testing conditions)
CU TR 020, ICES-003
*2
, fogproof
*3
En
Es
Fr
De
It
Sv
Nl
Ru
Pb
Pl
Fi
No
Dk
Cz
Ro
Hu
21

Environment RoHS, WEEE
En
Es
Laser classification
Fr
Wavelength (nm) 905
De
Pulse duration (ns) 9.5
Output (W) 15
It
Beam divergence (mrad) Vertical: 1.8, Horizontal: 0.25
Sv
• The specifications of the product may not be achieved depending on the target object’s shape, surface texture and nature,
Nl
and/or weather conditions.
*1
Ru
Under Nikon’s measurement conditions.
*2
Waterproof models
Pb
This product has waterproof capabilities, and will suffer no damage to the optical system nor observation if submerged or
dropped in water to a maximum depth of 1 m/3.3 ft for up to 10 minutes.
Pl
This product offers the following advantages:
Fi
•Canbeusedinconditionsofhighhumidity,dustandrainwithoutriskofdamagetointernalfunctions.
•Nitrogen-filleddesignmakesitresistanttocondensationandmold.
No
However, observe the following when using the Nikon Laser Rangefinder:
Dk
•Donotoperateorholdtheproductinrunningwater.
•Ifanymoistureisfoundonmovablepartsofthisproduct,stopusingtheproductandwipeitoff.
Cz
*3
The battery chamber is rainproof, not waterproof. Water may enter the device if the Rangefinder is submerged in water. If
Ro
water enters the battery chamber, wipe out any moisture and allow time for the chamber to dry.
Hu
Battery life
Approx. 2,400 times (at approx. 20°C (68°F))
This figure may differ according to conditions such as temperature and other factors. Use only as a guide.
•ThebatterysuppliedwiththisNikonLaserRangefinderisforoperationchecking.Duetonaturalelectricaldischarge,the
life of this battery will likely be shorter than that noted above.
IEC60825-1: Class 1M/Laser Product
FDA/21 CFR Part 1040.10: Class I Laser Product
22

Troubleshooting/Repair
If this product fails to function as expected, check the list below before consulting your local dealer or the
store where you purchased it.
l If there is a problem with the product.
Problem Cause/Solution
• Does not turn on
• Unable to measure
• Anomalous result
• Cannot see the internal display
• Difficult to see the internal display
• Do not know if STABILIZED
function is working
• Cannot turn off the STABILIZED
function
• There are minute motion sounds
when the power turns on and off
• There are sounds from the inside
when the body is shaken while
the power is off
] is displayed in the internal
• [
display
• Press the PWR button (top of the body).
• Check that the battery is inserted correctly.
• Replace the battery with a new one.
• Confirm the settings.
• Confirm if it can measure a large target close to you (example: a building
approx. 15 m/yd. ahead of you).
• Clean the lens surface if necessary.
• Check the brightness of the internal display, and adjust it as necessary.
Cover the objective lens so that checking the internal display is easier.
• Compare the vibration of the target in the viewfinder when the Laser
Rangefinder is ON and OFF.
• While the Laser Rangefinder is ON, the STABILIZED function is always activated.
• The STABILIZED function is activated concurrently when the Laser
Rangefinder is ON. When the Laser Rangefinder is OFF, the STABILIZED
function automatically turns off.
• The STABILIZED function cannot be turned on or off manually.
• Due to the STABILIZED system motor, minute motion sounds occur.
These sounds are normal, please continue to use the Laser Rangefinder.
• The stabilizing mechanism moves inside. These sounds are normal.
These sounds do not occur when the power is on, even if the body is
shaken.
• Failure indication. Please contact your local dealer or the store where you
purchased the product.
En
Es
Fr
De
It
Sv
Nl
Ru
Pb
Pl
Fi
No
Dk
Cz
Ro
Hu
23

l If you require a repair, please contact your local dealer or the store where you purchased the product.
En
Do not repair or disassemble. It may result in a serious incident.
Es
Please note that Nikon is not responsible for any direct or indirect damage if the user attempts to repair or
Fr
disassemble the product.
De
It
Sv
Nl
Ru
Pb
Pl
Fi
No
Dk
Cz
Ro
Hu
24

Introducción
Lea esto primero ............................................................. 26
PRECAUCIONES DE SEGURIDAD Y FUNCIONAMIENTO
Primeros pasos con el telémetro láser
Características clave ....................................................... 30
Nomenclatura/Componentes .................................... 31
Pantalla interna ................................................................ 32
Funciones
Función STABILIZED (reducción de vibraciones)
...... 33
Algoritmo de prioridad al primer sujeto ................ 33
Símbolo LOCKED ON (símbolo de detección con
Prioridad al Primer Sujeto) ........................................... 33
Indicador de distancia real .......................................... 33
Inserción/Sustitución de la batería
Tipo de batería ................................................................. 34
Inserción/Sustitución de la batería ........................... 34
Indicador del nivel de batería ..................................... 34
Español
CONTENIDO
Navegación por los menús
..... 27
Medición
Notas técnicas
Cambio del modo de visualización de la medición (F1)
Cambio de la luminosidad de la pantalla interna (F2)
Cambio de la unidad de visualización de la distancia (F3)
... 36
...... 37
..... 38
Encendido o apagado del Indicador de distancia
real (F4) ............................................................................... 39
Diagrama de funcionamiento de los menús de
configuración ................................................................... 40
Ajuste del enfoque de la pantalla interna .............. 41
Medición ............................................................................ 41
Medición única ................................................................ 42
Medición continua ......................................................... 42
Especificaciones .............................................................. 43
Solución de problemas/Reparación ......................... 45
25
En
Es
Fr
De
It
Sv
Nl
Ru
Pb
Pl
Fi
No
Dk
Cz
Ro
Hu

Introducción
Lea esto primero
En
Muchas gracias por comprar el telémetro láser de Nikon COOLSHOT PRO STABILIZED.
Es
Antes de usar el producto, lea detenidamente este manual para asegurarse de que lo usa correctamente.
Fr
Una vez que lea este manual, manténgalo en un lugar de fácil acceso para futuras referencias.
l Acerca del manual
De
• N
It
Sv
Nl
Ru
Pb
Pl
Fi
No
Dk
Cz
Ro
Hu
26
inguna parte del manual puede ser reproducida, transmitida, transcrita, almacenada en un sistema de recuperación
ni traducida a ningún idioma de ninguna forma ni por ningún medio sin el permiso previo por escrito de Nikon.
• Las ilustraciones y el contenido que aparecen en este manual pueden diferir del producto real.
• Nikon no será considerada imputable por ningún error que pueda contener este manual.
• El aspecto, las especificaciones y las capacidades de este producto pueden cambiar sin previo aviso.
l Acerca de los controles sobre radiointerferencia
• Este dispositivo cumple con la Parte 15 de las Reglas de la FCC. El funcionamiento está sujeto a las dos
condiciones siguientes:
(1) Este dispositivo no puede provocar interferencias peligrosas, y
(2) Este dispositivo debe aceptar cualquier interferencia recibida, incluidas las interferencias que pueden
provocar un funcionamiento no deseado.
• E
ste equipo ha sido evaluado y cumple con los límites para un dispositivo digital de clase B, de conformidad con
la Parte 15 de las reglas de la FCC y con la directiva sobre CEM de la UE. Estos límites están diseñados para
proporcionar una protección razonable contra la interferencia perjudicial en una instalación residencial. Este
equipo genera, usa y puede irradiar energía de frecuencia de radio y, si no se instala y usa de conformidad con
las instrucciones, podría causar una interferencia perjudicial a las comunicaciones de radio. Sin embargo, no hay
garantía de que la interferencia no ocurra en una instalación particular. Si el equipo provoca perturbaciones en
la recepción de radio o televisión, lo que se puede comprobar apagando y volviendo a encender el equipo, el
usuario debería intentar corregir la interferencia mediante una o más de las medidas siguientes:
• Reoriente o reubique la antena receptora.
• Aumente la separación entre el equipo y el receptor.
• Consulte al distribuidor o a un técnico de televisión/radio experimentado.
Aviso para los clientes de Canadá
CAN ICES-3(B)/NMB-3(B)

PRECAUCIONES DE SEGURIDAD Y FUNCIONAMIENTO
Observe estrictamente las
orientaciones recogidas en este
manual para usar este producto
con seguridad y evitar posibles
lesiones o daños materiales a usted
y otras personas. Debe entender
por completo el contenido para
usar correctamente el producto.
ADVERTENCIA
Esto indica que cualquier uso
incorrecto que ignore el contenido
aquí incluido puede provocar la
muerte o heridas graves.
PRECAUCIÓN
Esto indica que cualquier uso
incorrecto que ignore el contenido
aquí incluido puede provocar posibles
lesiones o pérdidas materiales.
• No apunte a los ojos.
• No apunte a personas con el láser.
• No mire a los láseres con otros
instrumentos ópticos como lentes
y binoculares. Su visión podría
resultar dañada.
• Cuando no esté realizando
mediciones, mantenga los dedos
apartados del botón PWR para
evitar la emisión accidental del
láser.
• Si no va a utilizarlo durante un
período prolongado, retire la
batería.
• No desmonte, remodele ni repare
el producto. La emisión láser
podría ser nociva para su salud. Si
el producto se desmonta,
remodela o repara, ya no contará
con la garantía del fabricante.
• Guarde el producto en un lugar
fuera del alcance de los niños.
PRECAUCIONES DE
SEGURIDAD (Láser)
Este producto utiliza un haz láser
invisible. Asegúrese de respetar lo
siguiente:
ADVERTENCIA
• N
o pulse el botón PWR mientras mira
hacia el diafragma de emisión láser.
Su visión podría resultar dañada.
PRECAUCIONES DE
SEGURIDAD (Monocular)
ADVERTENCIA
• Nunca mire directamente al sol, a
una luz intensa ni a los láseres
cuando utilice este producto.
Podría dañar gravemente la visión
y provocar ceguera.
PRECAUCIÓN
• Mantenga la bolsa de plástico
utilizada para envolver el producto
y las piezas pequeñas fuera del
alcance de los niños. La bolsa
podría obstruir la boca y la nariz y
causarle asfixia.
• Tenga cuidado de que los niños no
se traguen piezas o accesorios
pequeños de forma involuntaria. Si
un niño se traga alguna de estas
piezas, consulte a un médico
inmediatamente.
• Apague este producto si no va a
utilizarlo.
• Cuando transporte el producto,
guárdelo en la funda.
• Si este producto no funciona
correctamente por algún motivo,
deje de usarlo de inmediato y
consulte a un representante del
servicio autorizado de Nikon.
En
Es
Fr
De
It
Sv
Nl
Ru
Pb
Pl
Fi
No
Dk
Cz
Ro
Hu
27

• No deje este producto en un lugar
inestable. Podría caerse y provocar
lesiones o averías.
En
• No utilice este producto mientras
Es
camina. Podría tropezarse o caerse
y provocar lesiones o averías.
Fr
• No balancee este producto con la
De
correa. Podría golpear a alguien y
herirle.
It
• Las piezas de goma de este
Sv
producto (como la ojera) o las de
la funda y la correa incluidas
Nl
podrían deteriorarse si las utiliza o
Ru
guarda durante mucho tiempo. La
goma deteriorada podría adherirse
Pb
a la ropa y provocar que se
Pl
manche. Compruebe su estado
antes de usarla y consulte a un
Fi
representante del servicio
No
autorizado de Nikon si encuentra
un defecto.
Dk
• El uso de las ojeras de goma
Cz
durante mucho tiempo podría
causar la inflamación de la piel. Si
Ro
desarrolla estos síntomas, deje de
Hu
usarlas de inmediato y consulte a
un médico.
28
PRECAUCIONES
(Batería de litio)
Un uso incorrecto de la batería de
litio podría provocar que se rompiera
o sufriese fugas, lo que corroería el
dispositivo o mancharía las manos y
la ropa.
Asegúrese de respetar lo siguiente:
• Monte la batería con los polos + y
- orientados correctamente.
• Retire la batería cuando esté
agotada o cuando no la vaya a
utilizar durante mucho tiempo.
• Mantenga la batería apartada del
fuego o el agua. Nunca desmonte
la batería.
• No recargue la batería de litio.
• No cortocircuite el terminal del
compartimento de la batería.
• No lleve la batería junto con llaves
o monedas en un bolsillo o bolsa.
La batería podría cortocircuitarse y
provocar un sobrecalentamiento.
• Si el líquido derramado de una
batería de litio entra en contacto
con la ropa o la piel, enjuáguela
con mucha agua. Si entra en
contacto con los ojos o la boca,
enjuáguelos de inmediato con
agua y consulte a un médico.
• Deseche la batería de litio
conforme a las regulaciones
locales de su zona.
PRECAUCIONES DE
MANIPULACIÓN Y
FUNCIONAMIENTO
• No exponga este producto a
golpes físicos.
• Si aplica por accidente un golpe
físico fuerte o el producto se cae y
cree que está averiado, consulte de
inmediato a su proveedor local o a
un representante del servicio
autorizado de Nikon.
• No utilice el producto bajo el agua.
• Limpie la lluvia, agua, arena o
barro del producto lo antes
posible con un paño suave y
limpio.
• Cuando este producto se exponga
a cambios extremos de
temperatura (si cambia
repentinamente de un lugar frío a
uno cálido, o viceversa), la
superficie de la lente podría
nublarse. No utilice el producto
hasta que la nubosidad haya
desaparecido.
• No deje el producto en un coche
estacionado en un día cálido o
soleado, o cerca de un equipo que
genere calor.
• No exponga el
ocular a la luz
directa del sol. El
efecto de
condensador del
objetivo puede
dañar la superficie
de la pantalla
interna.
PRECAUCIONES DE CUIDADO
Y MANTENIMIENTO
LENTE
Tenga cuidado de no tocar
directamente la superficie de la lente
con las manos cuando la limpie.
Retire el polvo o la pelusa con un
soplador*. Para las marcas de dedos
u otras manchas que no puedan
quitarse con un soplador, limpie la
lente con un paño seco y suave o un
paño de limpieza para gafas
realizando un movimiento en espiral
que empiece en el centro de la lente
y continúe hacia los bordes. La lente
podría dañarse si se limpia con
demasiada fuerza o con un material
duro. Si esto no funciona, limpie
suavemente la lente usando un paño
ligeramente humedecido con un
limpiador de lentes comercial.
CUERPO PRINCIPAL
Tras quitar suavemente el polvo con
un soplador, limpie la superficie del
cuerpo con un paño suave y limpio.
Después de su uso en la playa, limpie
la sal que puede haber en la
superficie del cuerpo con un paño
húmedo, suave y limpio, y luego
límpiela con un paño seco. No utilice
benceno, disolvente ni otros
limpiadores con disolventes
orgánicos.
ALMACENAMIENTO
En caso de humedad elevada puede
aparecer condensación de agua o
moho sobre la superficie de la lente.
Por tanto, guarde el producto en un
lugar fresco y seco. Después de
usarlo en un día lluvioso o por la
noche, séquelo a temperatura
ambiente y guárdelo en un lugar
fresco y seco.
* Una herramienta para la limpieza
de goma que sopla aire por una
boquilla.
Es
Símbolo para recogida separada aplicable
en países europeos
Este símbolo indica que esta batería se
recogerá por separado.
Lo siguiente sólo se aplicará a usuarios
en países europeos.
• Esta batería ha sido designada para
su recogida en un punto de recogida
apropiado. No la tire como desecho
doméstico.
• Para más información, contacte con
el vendedor o autoridades locales a
cargo de la gestión de residuos.
Es
Símbolo para recogida separada aplicable
en países europeos
Este símbolo indica que este producto se
recogerá por separado.
Lo siguiente sólo se aplicará a usuarios
en países europeos.
• Este producto ha sido designado
para su recogida en un punto de
recogida apropiado. No la tire como
desecho doméstico.
• Para más información, contacte con
el vendedor o autoridades locales a
cargo de la gestión de residuos.
En
Es
Fr
De
It
Sv
Nl
Ru
Pb
Pl
Fi
No
Dk
Cz
Ro
Hu
29

Primeros pasos con el telémetro láser
Características clave
En
• La función STABILIZED (reducción de vibraciones)
Es
se utiliza para reducir las vibraciones provocadas
Fr
por el movimiento de la mano
• La pantalla interna roja es fácil de leer
De
• Utilice el algoritmo de Prioridad al Primer Sujeto
It
que hace que una bandera sea fácil de medir
El símbolo LOCKED ON (símbolo de detección con Prioridad
•
Sv
al Primer Sujeto) se enciende cuando se miden sujetos
Nl
solapados y se indica la distancia al sujeto más cercano
• Visor de alta calidad de 6× con recubrimiento
Ru
multicapa
Pb
• Ocular más grande para facilitar la visión
• Seleccione entre cuatro modos de visualización de
Pl
la medición
Fi
l modo de golf (modo predeterminado) muestra la
• E
distancia ajustada en pendiente (distancia
No
horizontal ± altura), lo que resulta útil al jugar al golf
Dk
• Indicador de distancia real integrado
• Mantenga pulsado el botón PWR para activar la
Cz
función de medición continua (hasta 8 segundos
Ro
aproximadamente)
Hu
• Apagado automático (aprox. 8 s después de
inactividad desde la pantalla de espera)
• Impermeable y resistente a la niebla (no diseñado
para un uso submarino)
• Láser invisible/seguro para la vista de clase 1M
según EN/IEC
l Acerca de los resultados de medición
Este dispositivo es un telémetro básico. Sus resultados de medición no se pueden utilizar como prueba oficial.
30
Este producto utiliza un haz láser invisible para
realizar la medición. Mide el tiempo que tarda el
haz láser en ir desde el telémetro al objetivo y
volver. La reflectividad láser y los resultados de
medición pueden variar en función de las
condiciones climáticas y ambientales, así como
del color, acabado superficial, tamaño, forma y
otras características del sujeto.
La medición puede resultar imprecisa o fallar en
los casos siguientes:
• Nieve, lluvia o niebla
• Sujeto pequeño o delgado
• Sujeto negro u oscuro
• Sujeto con una superficie escalonada
• Sujeto en movimiento o vibrante
• Al medir la superficie del agua
• Sujeto medido a través de vidrio
• El sujeto es un cristal o un espejo
• El láser incide oblicuamente sobre la superficie
reflectante del objetivo
 Loading...