

Nikon COOLPIX S100 Reference Manual
Nikon
COOLPI "
DIGITAL CAMERA
SIO0
Reference Manual
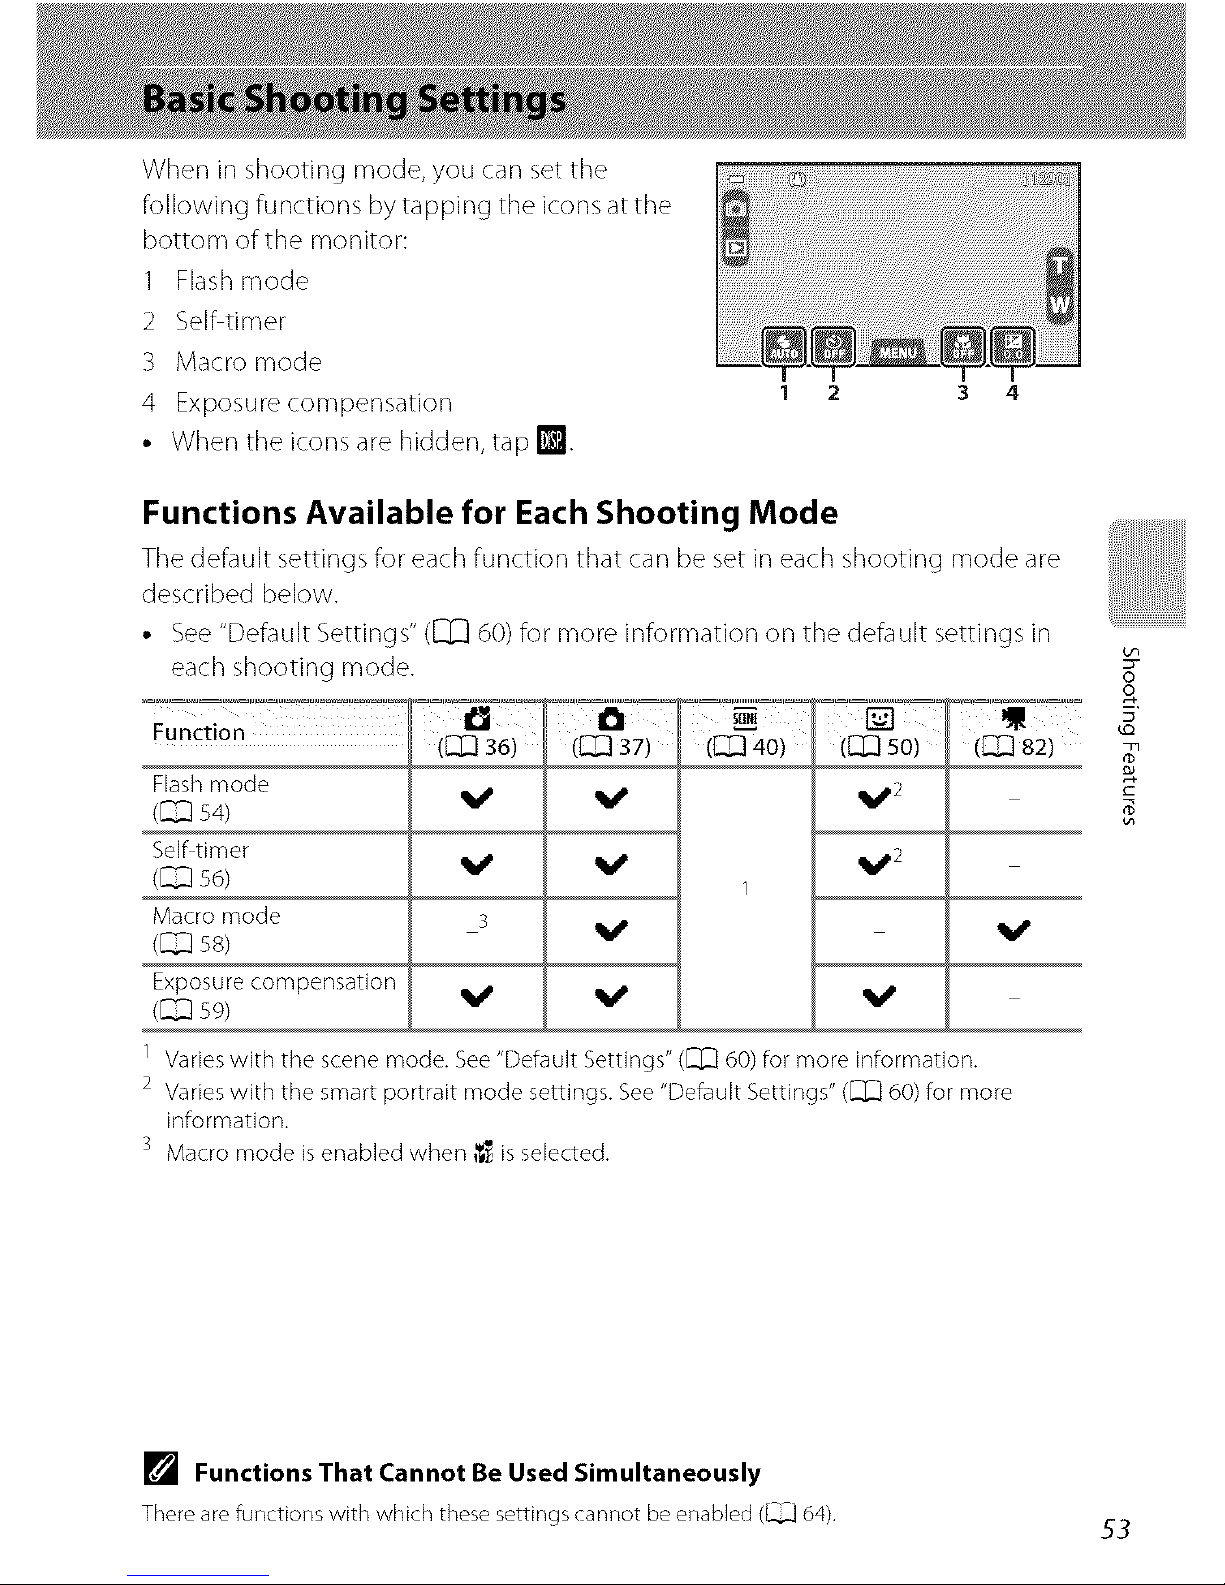
When in shooting mode, you can set the
following functions by tapping the icons at the
bottom of the monitor:
1 Flash mode
2 Selhtimer
3 Macro mode
4 Exposure compensation
• When the icons are hidden, tap W.
3 4
Functions Available for Each Shooting Mode
The default settings for each functkm that carl be set in each shooting mode are
described below.
• See "Default Settings" ([_ d0) for more information on the default settings in
each shooting mode.
Function ,_'_'_, ([_]J37) (_40) ([]_ 50)
Flashmode
V' V' V '2
(_ s4)
Selftimer ql_,2
(_ s6) V' V'
1
Macro mode 3 _j, _j,
(_ SS)
Exposurecompensation
(_ sg) V' V' V'
1 Varieswith the scenemode.See"DefaultSettings"([]_] 60)for more information.
2 Varieswith the smartportrait mode settings.See"DefaultSettings"([]]_Q60)for more
information.
3 Macro mode isenabledwhen _$_isselected.
oo
E
[] Functions That Cannot Be Used Simultaneously
There are functions with which these settings cannot be enabled (_ 64),
53
Basic Shooting Settings
Using the Flash (Flash Modes)
You can set the flash mode to match the shooting conditions.
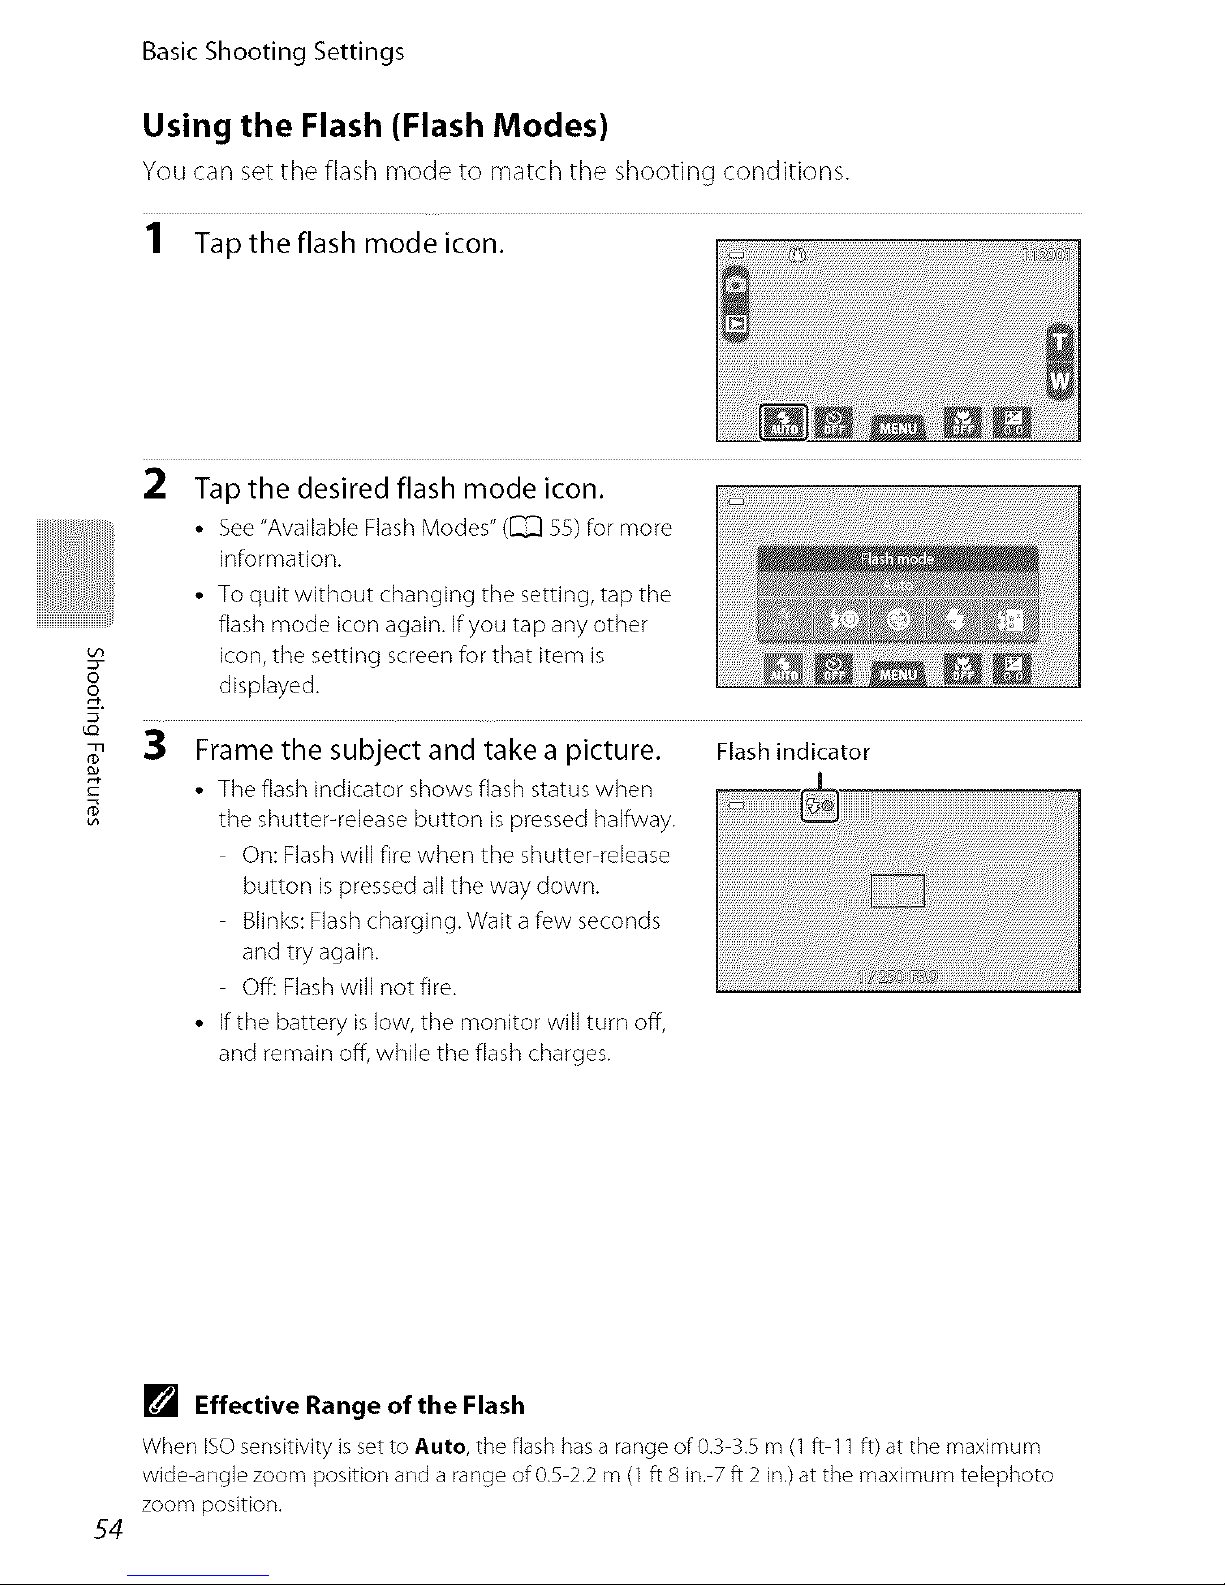
1 Tap the flash mode icon.
8
2 Tap the desired flash mode icon.
• See"Available Flash Modes" (_ 55) for more
information.
• To quit without changing the setting, tap the
flash mode icon again. Ifyou tap any other
icon, the setting screen for that item is
displayed.
3 Frame the subject and take a picture, Flash indicator
• The flash indicator shows flash status when _ .......................................................................................................................................................................
the shutter-release button is pressed halfway.
On: Flash will fire when the shutter release
button is pressed all the way down.
Blinks: Flash charging. Wait a few seconds
and try aga in.
01_: Hash will not fire. 'I_'_2 _)
• If the battery is low, the monitor will turn off,
and remain off, while the flash charges.
54
[] Effective Range of the Flash
When IS© sensitivity is set to Auto, the flash has a range of 0,3 3,5 m (1 ft 11 ft) at the maximu m
wide angle zoom position and a range of 0.5 2.2 m (1 ft 8 in, 7 ft 2 in,) at the maximum telephoto
zoom position,
Basic Shooting Settings
Available Flash Modes
Auto
AUTO
Flash fires automatically when lighting is poor.
}(_ AUto With red-eye reduction
Suited to pictures of people. This option reduces the "red-eye" phenomenon that
caused by the use of flash.
@ off
Flash will not fire even when lighting is poor. We recommend using a tripod to
stabilize the camera when shooting in dark surroundings.
Fill flash
Flash fires whenever a picture is taken. Use to "fill in" (illuminate) shadows and
back lit subjects.
_I_ Slowsync
A_0 (auto) is combined with slow shutter speed.
Suited to evening and night portraits that include background scenery.
Flash illuminates main subject; slow shutter speeds are used to capture
background at night or under dim lighting.
oo
[] The Flash Mode Setting
• The flash mode setting varies with shooting mode.
See "Functions Available for Each Shooting Mode" (_ 53) for more information.
See "Default Settings" ([.]]_] 60) for more information.
• There are functions with which this setting cannot be enabled. See "Features That Cannot Be
Applied Simultaneously" ([.]]_]64) for more information.
• The flash mode setting applied in I_1 (auto) mode (_ 37) is saved in the camera's memory even
after the camera is turned off.
[] Red-eye Reduction
This camera uses advanced red eye reduction ("in Camera Red Eye Fix"). To reduce red eye, a series
of low intensity pre flashes fire before the main flash. In addition, if the camera detects red eye when
a picture is taken, the affected area is processed to reduce red eye before the picture is saved. Note
the following when shooting:
• Due to the pre flashes, there is a longer than usual interval between the time the shutter release
button is pressed and the time the shutter is released,
• More time than usual is required to record pictures,
• Red eye reduction may not produce the desired results in some situations,
• In extremely rare instances, areas not subject to red eye may be affected by red eye reduction
processing; in these cases, choose another flash mode and try again,
55
Basic Shooting Settings
Using the Self-timer
Tile camera is equipped with a ten second and two second timer for selhportraits.
This feature is useful for reducing tile effects of camera shake that occurs when
pressing the shutter release button. When using the selfltimer, use of a tripod is
recommended. Set Vibration reduction to Off from the setup menu (C[_ 88)
when using a tripod to stabilize the camera.
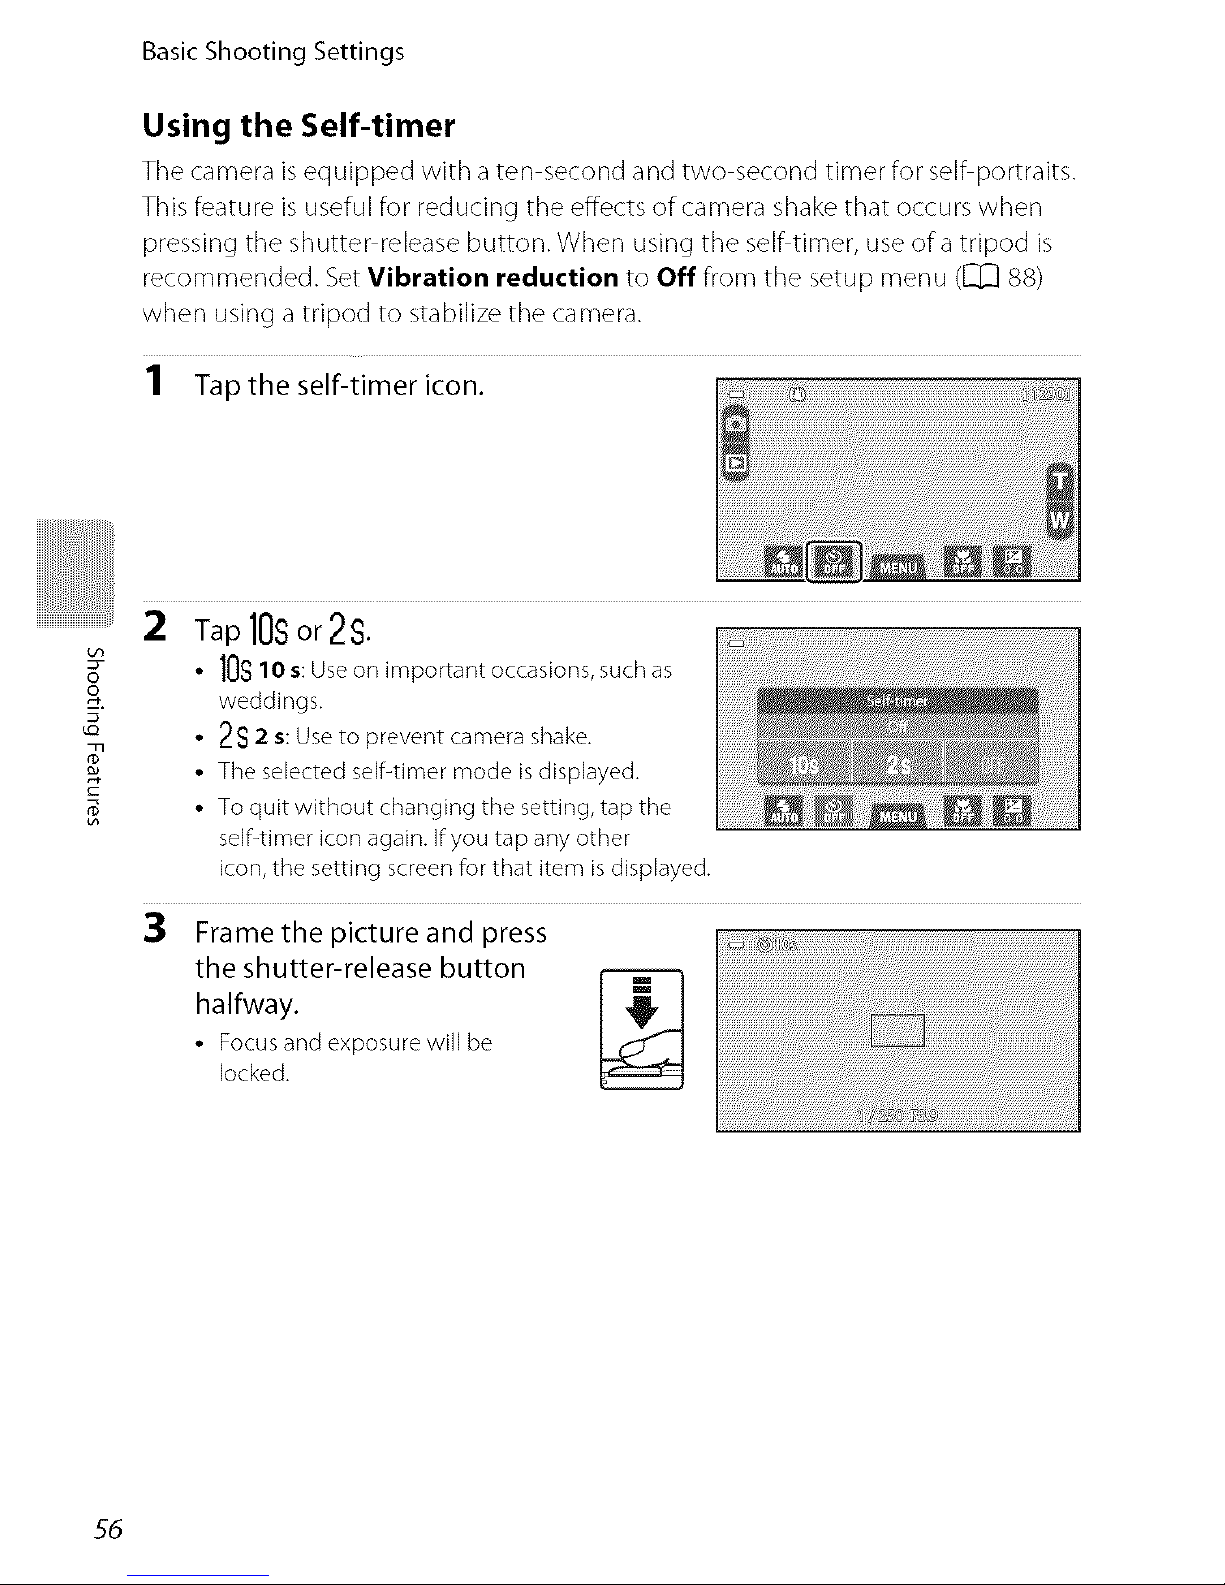
1 Tapthe self-timer icon.
i!!!!!
oo
g
2 Tapioso;2sl
• lOs lO s:Useor] important occasions,suchas
weddings.
• 2S 2 s: Useto prevent camerashake.
• Theselectedself-timermode isdisplayed.
• To quit without changing the setting,tap the
self-timericonagain.Ifyou tap anyother
icon,the setting screenforthat item isdisplayed.
3 Frame the picture and press
the shutter-release button
halfway.
• Focusandexposurewill be
locked.
55
Basic Shooting Settings
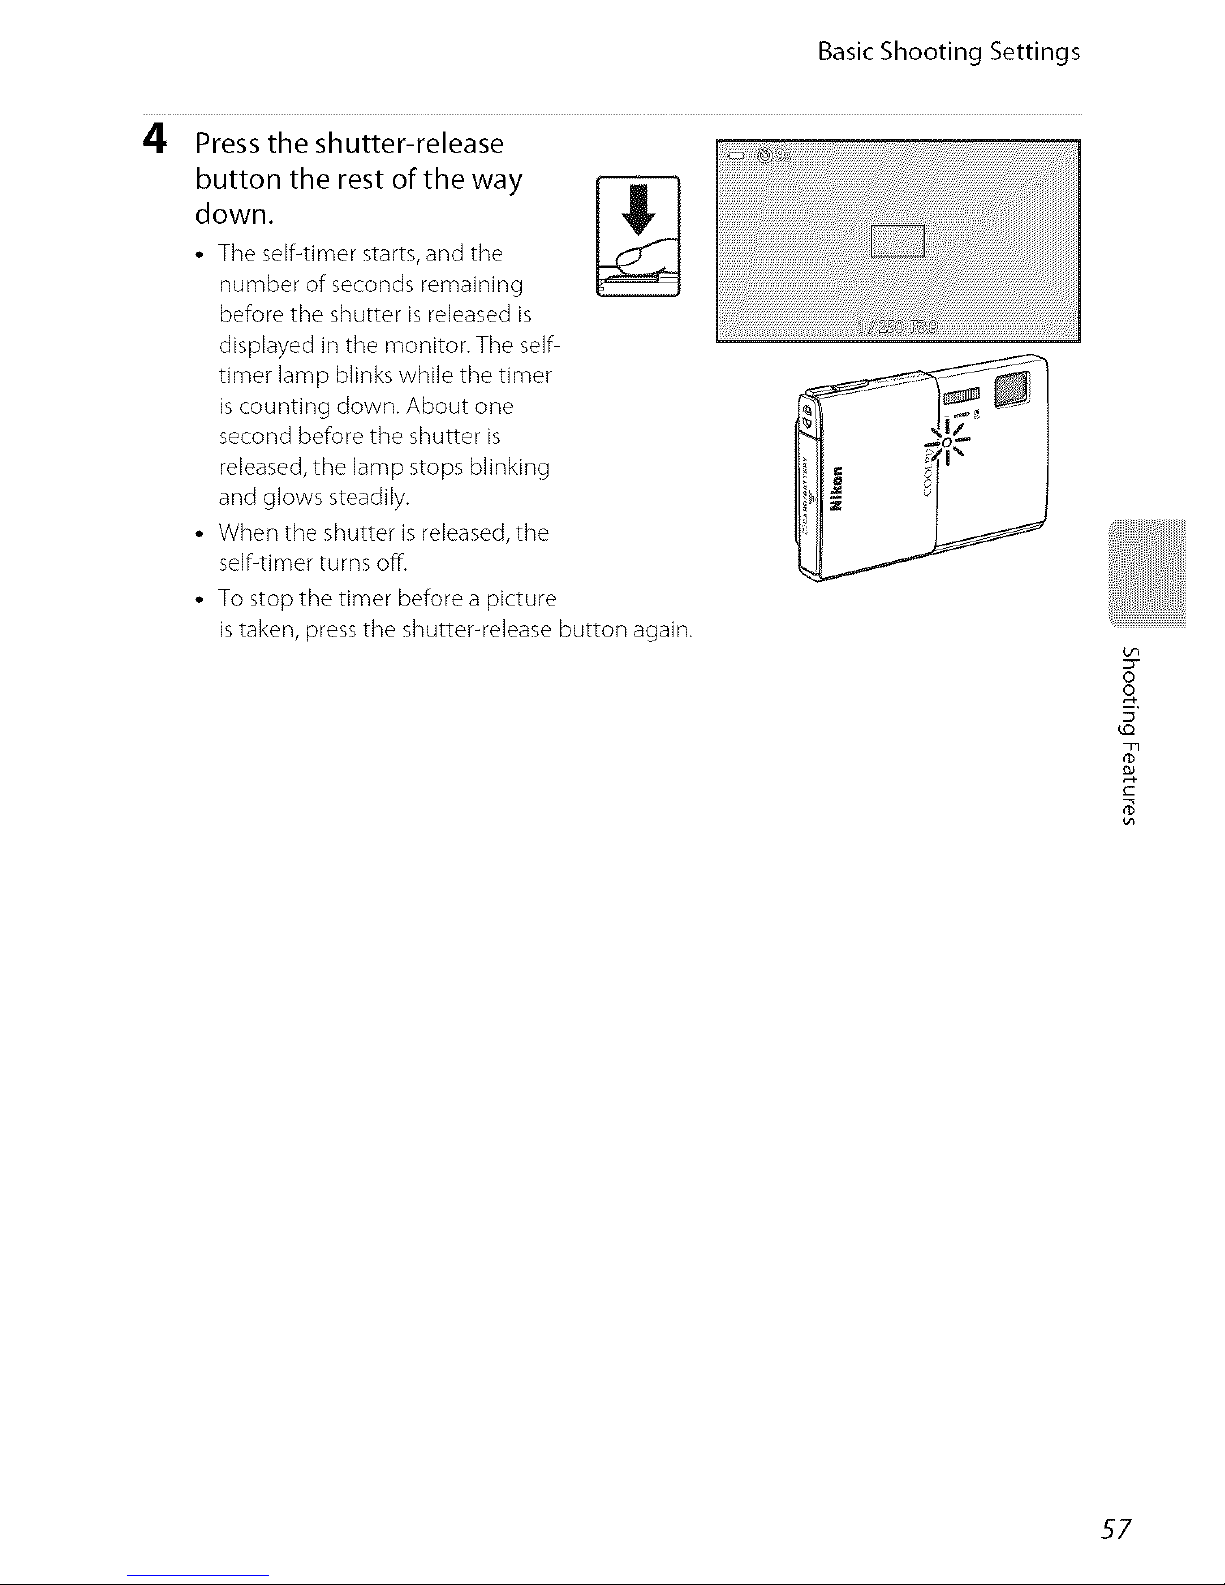
4 Press the shutter-release
button the rest of the way
down.
• The self-timer starts, and the
number of seconds remaining
before the shutter is released is
displayed in the monitor. The se]fi
timer lamp blinks while the timer
is counting down. About one
second before the shutter is
released, the ]amp stops blinking
and glows steadily.
• When the shutter is released, the
sdf<imer turns off.
• To stop the timer before a picture
is taken, press the shutter-release button again.
8
57
Basic Shooting Settings
Using Macro Mode
VVhen using macro mode, tt]e camera car] focus on objects as close as 1 cm
(0.4 in.) from the front of the lens.
This feature is useful when taking close up pictures of flowers and other small
subjects.
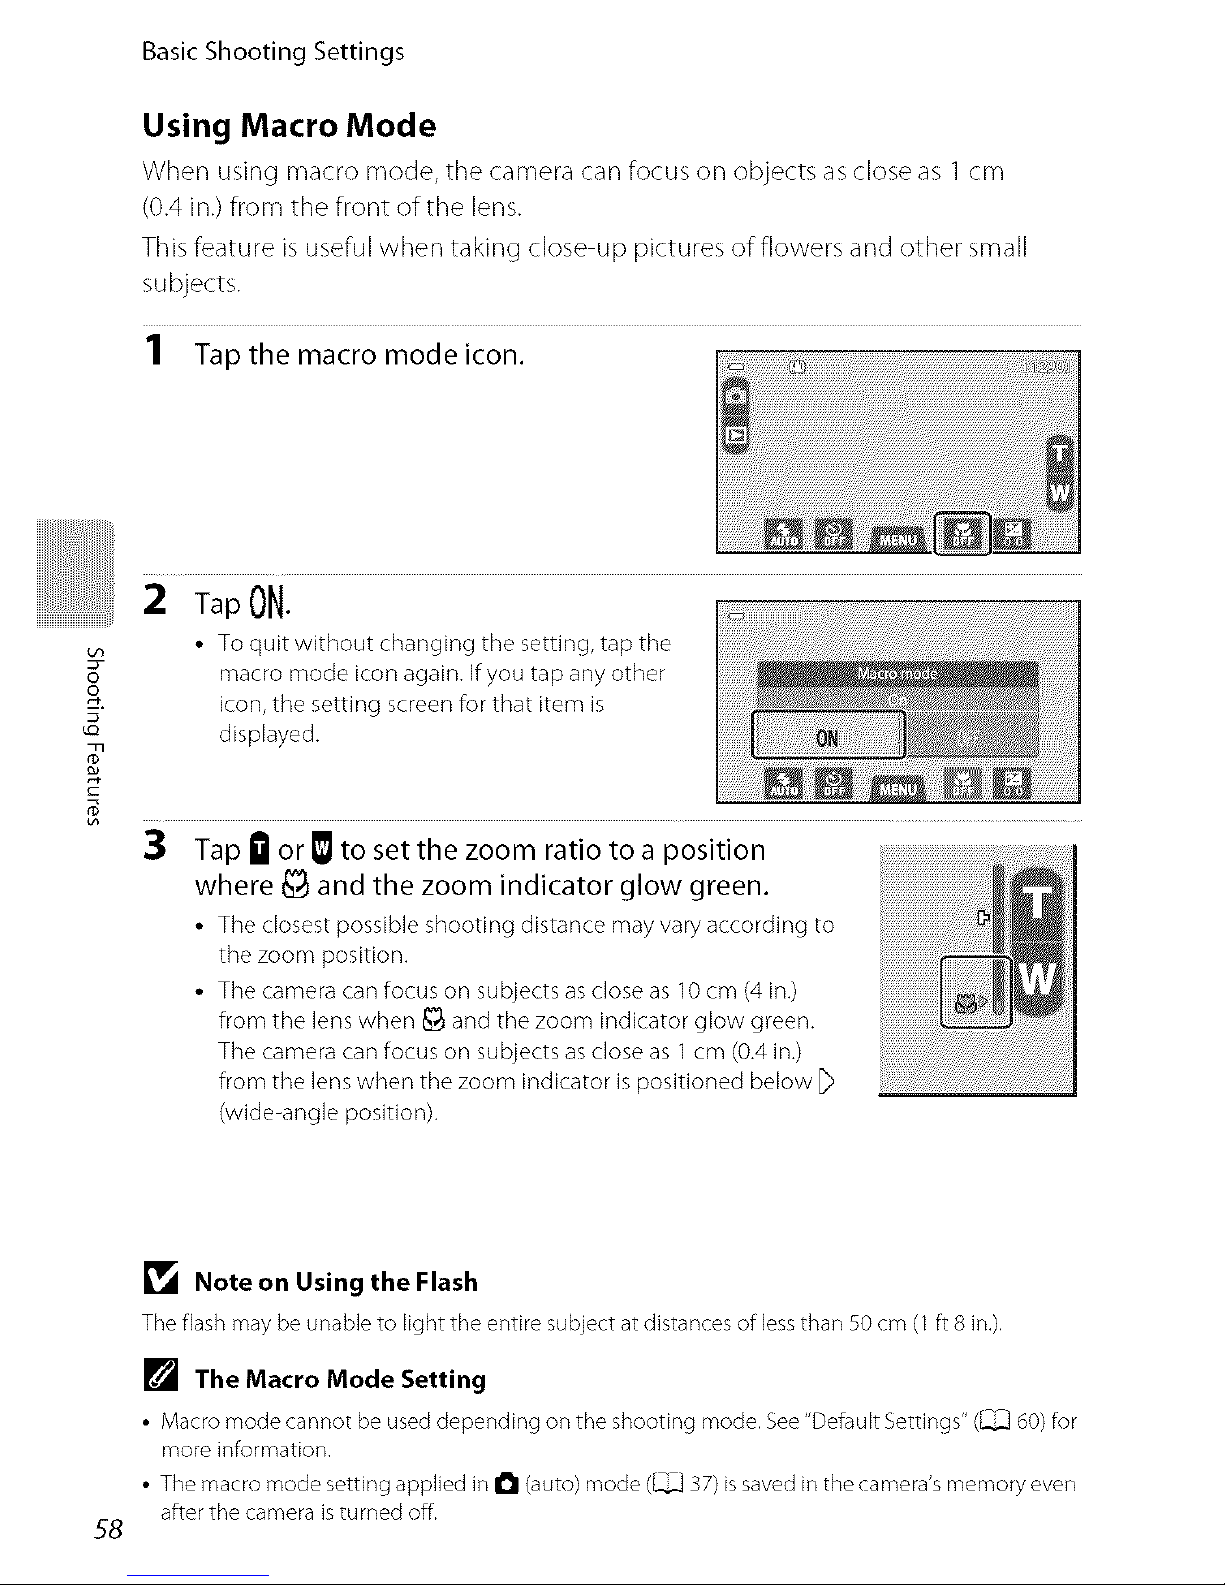
1 Tap the macro mode icon.
i!!!!!
oo
T
2 Tap ON.
• To quit without changing the setting, tap the
macro mode icon again. If you tap any other
icon, the setting screen for that item is
displayed.
3 Tap III or _ to set the zoom ratio to a position
where _ and the zoom indicator glow green.
• The closest possible shooting distance may vary according to
the zoom position.
• The camera can focus on subjects as close as 10 cm (4 in.)
from the lens when _ and the zoom indicator glow green.
The camera can focus on subjects as close as 1cm (0.4 in.)
from the lens when the zoom indicator is positioned below _>
(wide-angle position).
58
_1_ Note on Using the Flash
The flash may be unable to light the entire su_ect at distances of less than SOcm (1 ft 8 in.).
[] The Macro Mode Setting
• Macro mode cannot be used depending on the shooting mode. See "Default Settings" (_ 60) for
more information,
• The macro mode setting applied in I_1 (auto) mode (_ 37) is saved in the camera's memory even
after the camera is turned off.
Basic Shooting Settings
Adjusting Brightness (Exposure Compensation)
Exposure compensation is used to alter exposure from the value suggested by the
camera to make pictures brighter or darker.
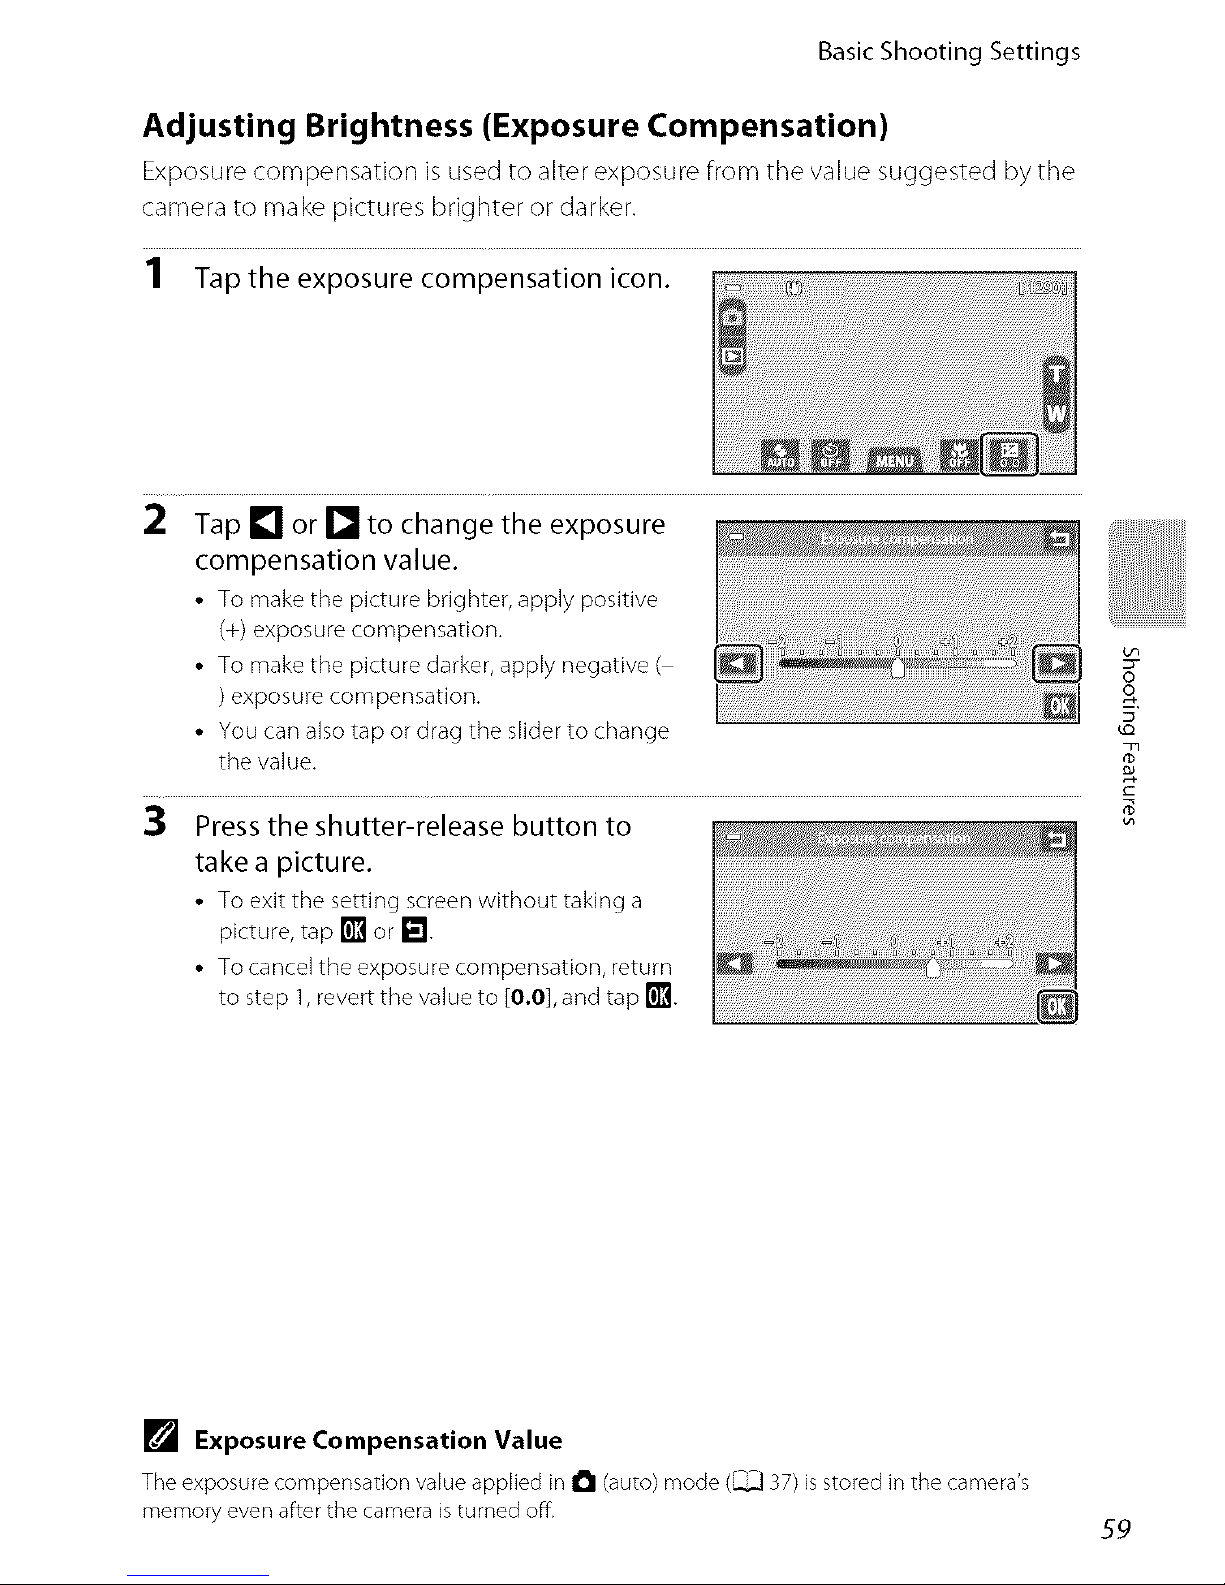
1 Taptheexposurecompeosat,oo,coo.
2 Tap [] or [] to change the exposure
compensation value.
• To make the picture brighter, apply positive
(+) exposure compensation.
• To make the picture darker, apply negative (
)exposure compensation.
• You can also tap or drag the slider to change
the value.
[] Exposure Compensation Value
The exposure compensation value applied in I_1 (auto) mode (_ 37) is stored in the camera's
memory even after the camera is turned off.
$9
8
T
Basic Shooting Settings
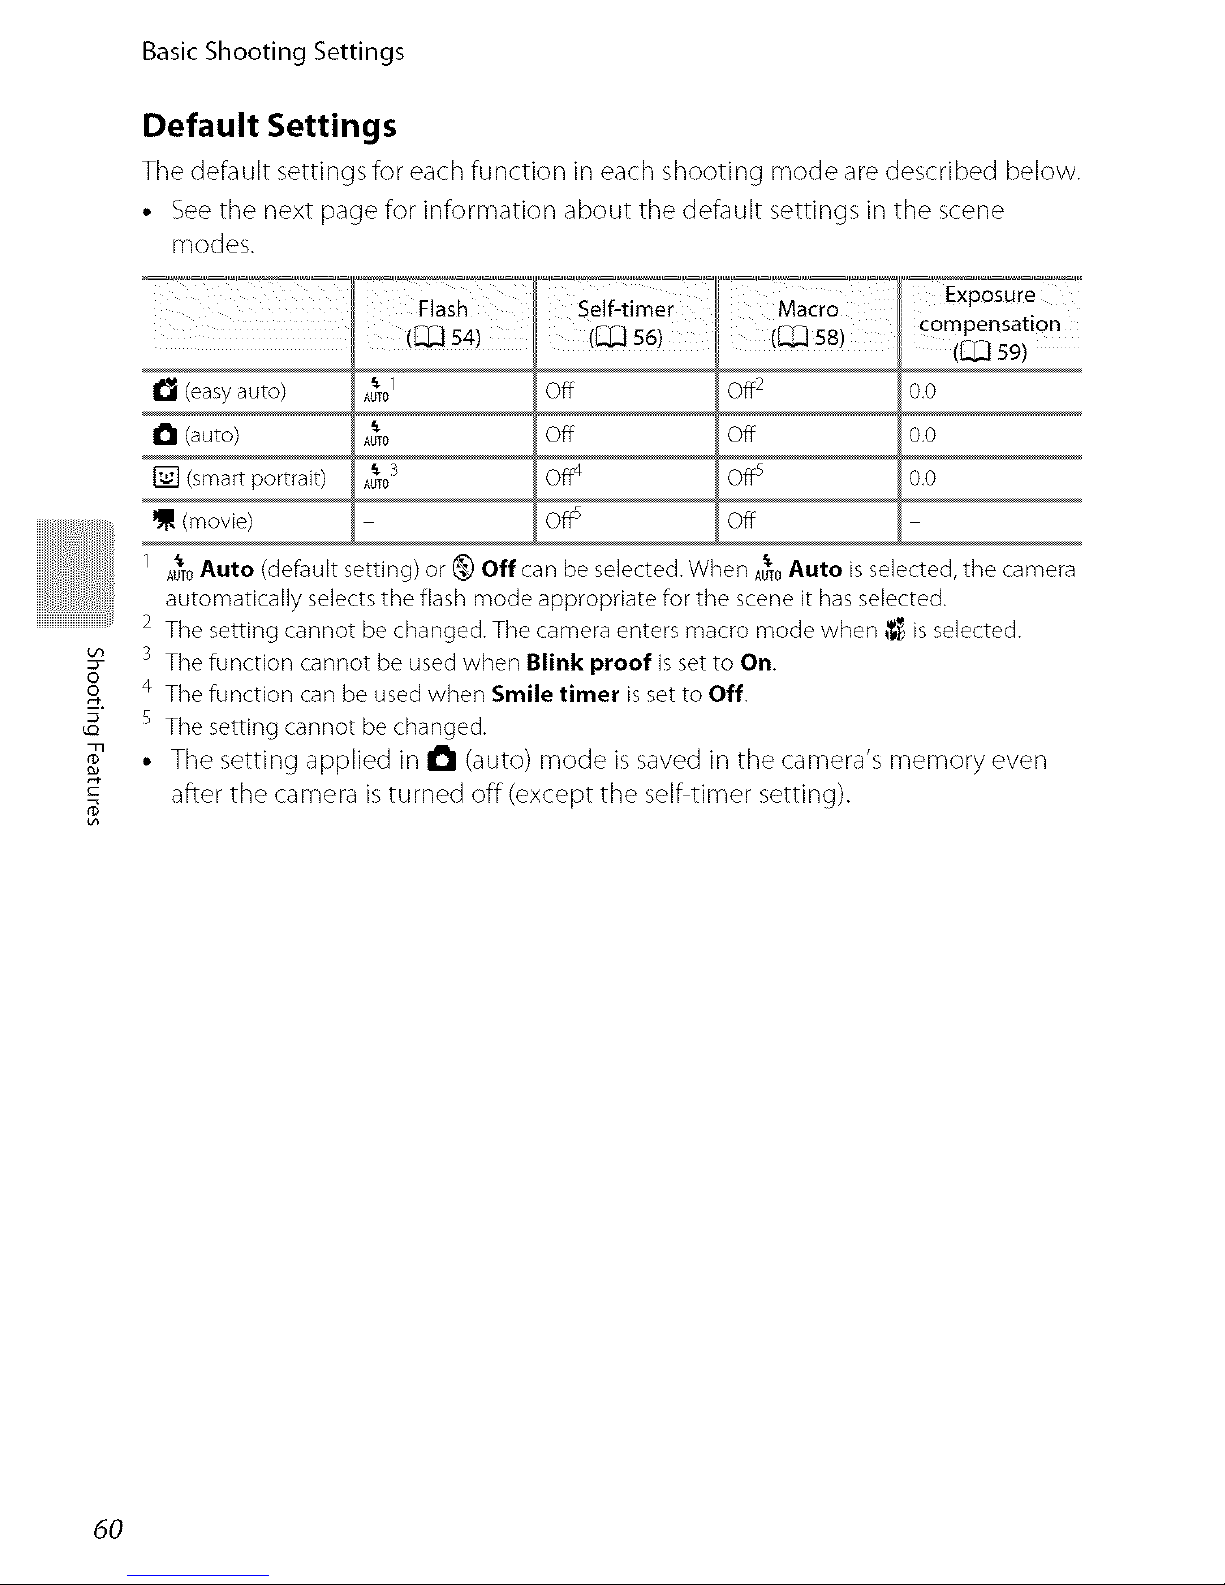
Default Settings
The default settings for each function in each shooting mode are described below.
• See the next page for information about the default settings in the scene
modes.
_I._,_ ....... _._!_ _j_._.... _,_÷ _,_,_
(_54) (%_)58) compensation
([_ S9)
I_l (easy auto) AUTO_" Off Off 2 0,0
I_1 (auto) Aum_" 0.0
[] (smart portrait) Aum_"3 Off4 Offs 0.0
(movie) Off_ Off
1 A_0Auto (default setting) or _ Off can be selected. When A_0Auto is selected, the camera
automatically selects the flash mode appropriate for the scene it has selected.
2 The setting cannot be changed. The camera enters macro mode when (_ is selected.
3 The function cannot be used when Blink proof is set to On
4 The function can be used when Smile timer is set to Off.
s The setting cannot be changed.
• The setting applied in I_1 (auto) mode is saved in the camera's memory even
after the camera is turned off (except the self timer setting).
60
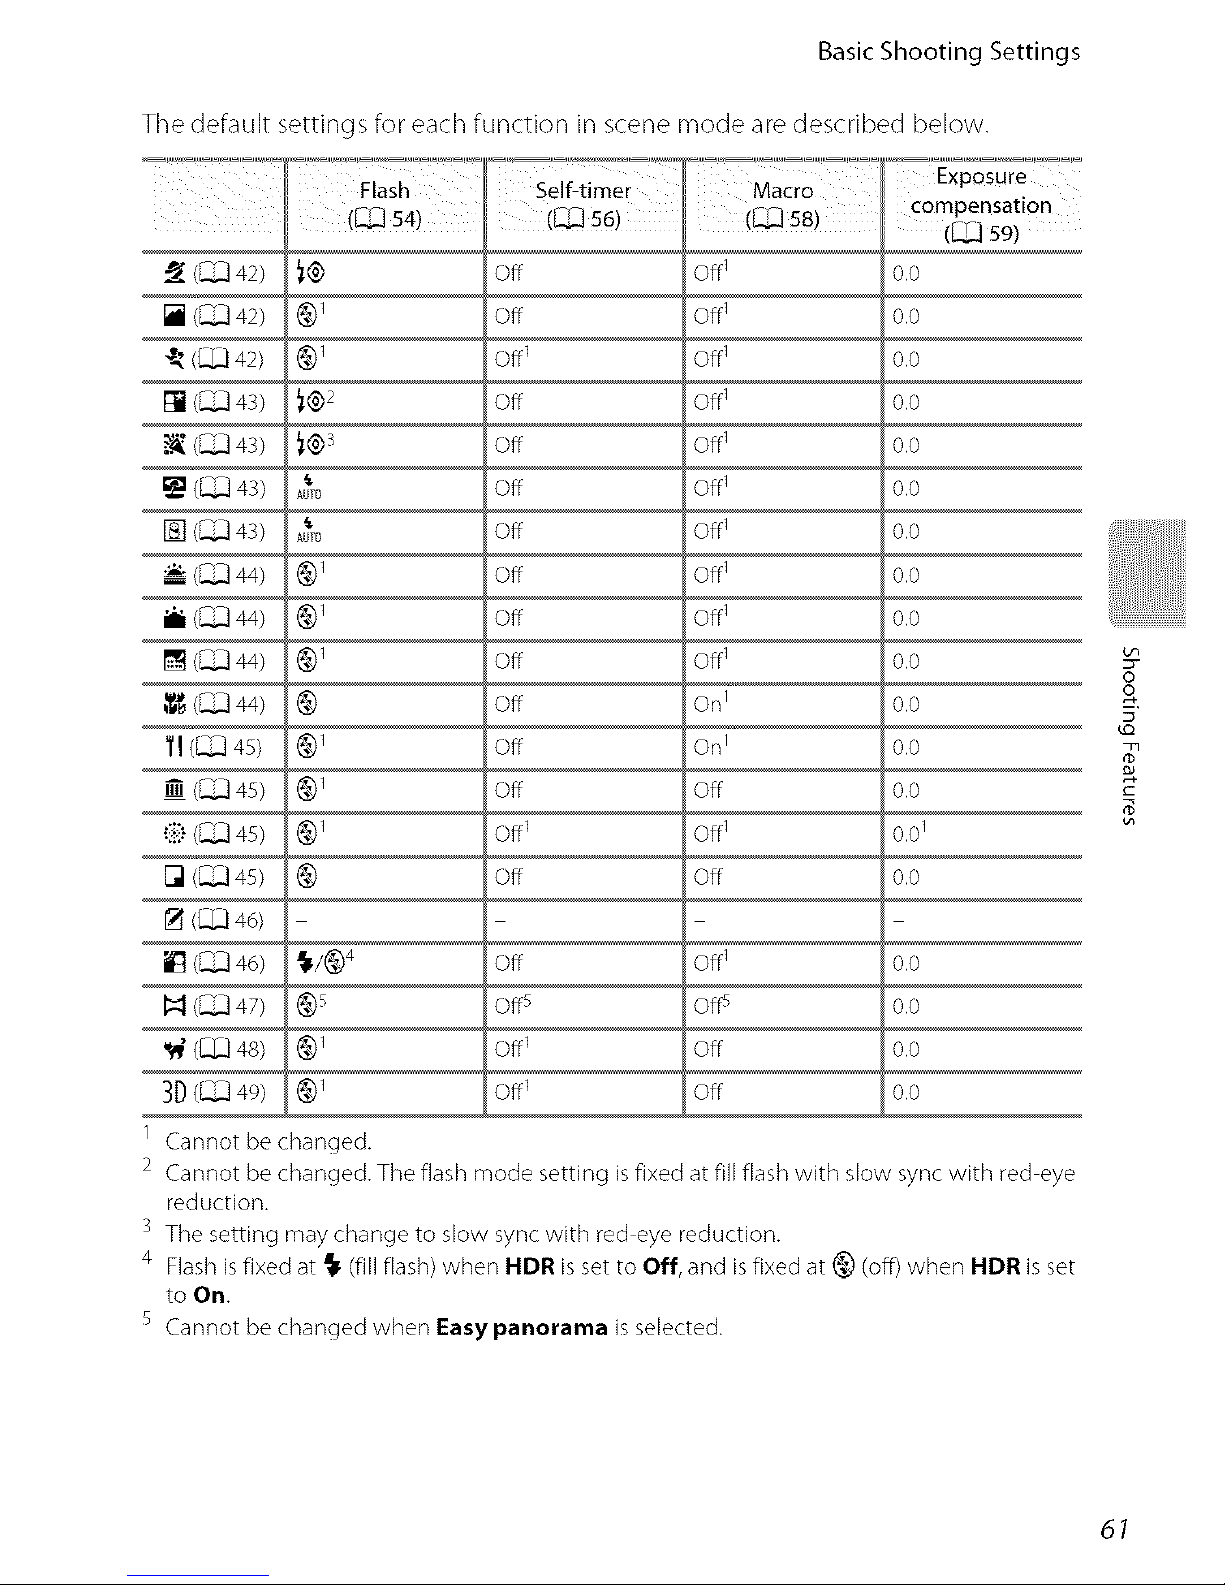
Basic Shooting Settings
The default settings for each function in scene mode are described below.
_-w_'='_ _"_°_?_"÷ _"_"_=i"_"_' Exposure
Flash Self-timer Macro compensation
(%_.] 54) ([_.] 56) ([_.] 58)(_59)
(_ 42) _@
[](_42) @1
_ (_342) @1
[] (_ 43) _@2
(_ 43) _@s
(_ 43)
AUTO
[] (_ 43)
AUTO
(_ 44) @1
i (_ 44) @1
[] (_ 44) @1
,_ (_ 44) @
•:if"(_ 49 @1
[] (_ 49 @
(Q3 46)
Iq (_ 47) @s
3D(_49) @1
1 Cannot be changed.
Off Off1 0.0
Off Off1 0.0
Off1 Off1 0.0
Off Off1 0.0
Off Off1 0.0
Off Off1 0.0
Off Off1 0.0
Off Off1 0.0
Off Off1 0.0
Off Off1 0.0
Off On 1 0.0
Off On 1 0.0
off off o.o
off 1 off 1 o.o1
off off o.o
Off Off1 0.0
Offs O_ 0.0
Off1 Off 0.0
Off1 Off 0.0
2 Cannot be changed. The flash mode setting is fixed at fill flash with slow sync with red eye
reduction.
3 The setting may change to slow sync with red eye reduction.
4 Flash is fixed at _ (fill flash) when HDR is set to Off, and isfixed at @ (off} when HDR is set
to On.
S Cannot be changed when Easy panorama is selected.
oo
T
E
s
61
oo
You can use the Image mode setting in the shooting menu to select the
combination of image size and compression rate that is used when saving
pictures.
Enter mode -') MENUtab -') _!" mode
shooting Image
Choose the image mode best suited to the manner in which pictures will be used
and the capacity of the internal memory or memory card. The higher the image
mode setting, the larger the sizeat which it can be printed or displayed without
appearing noticeably "grainy," but limiting the number of pictures that can be
recorded.
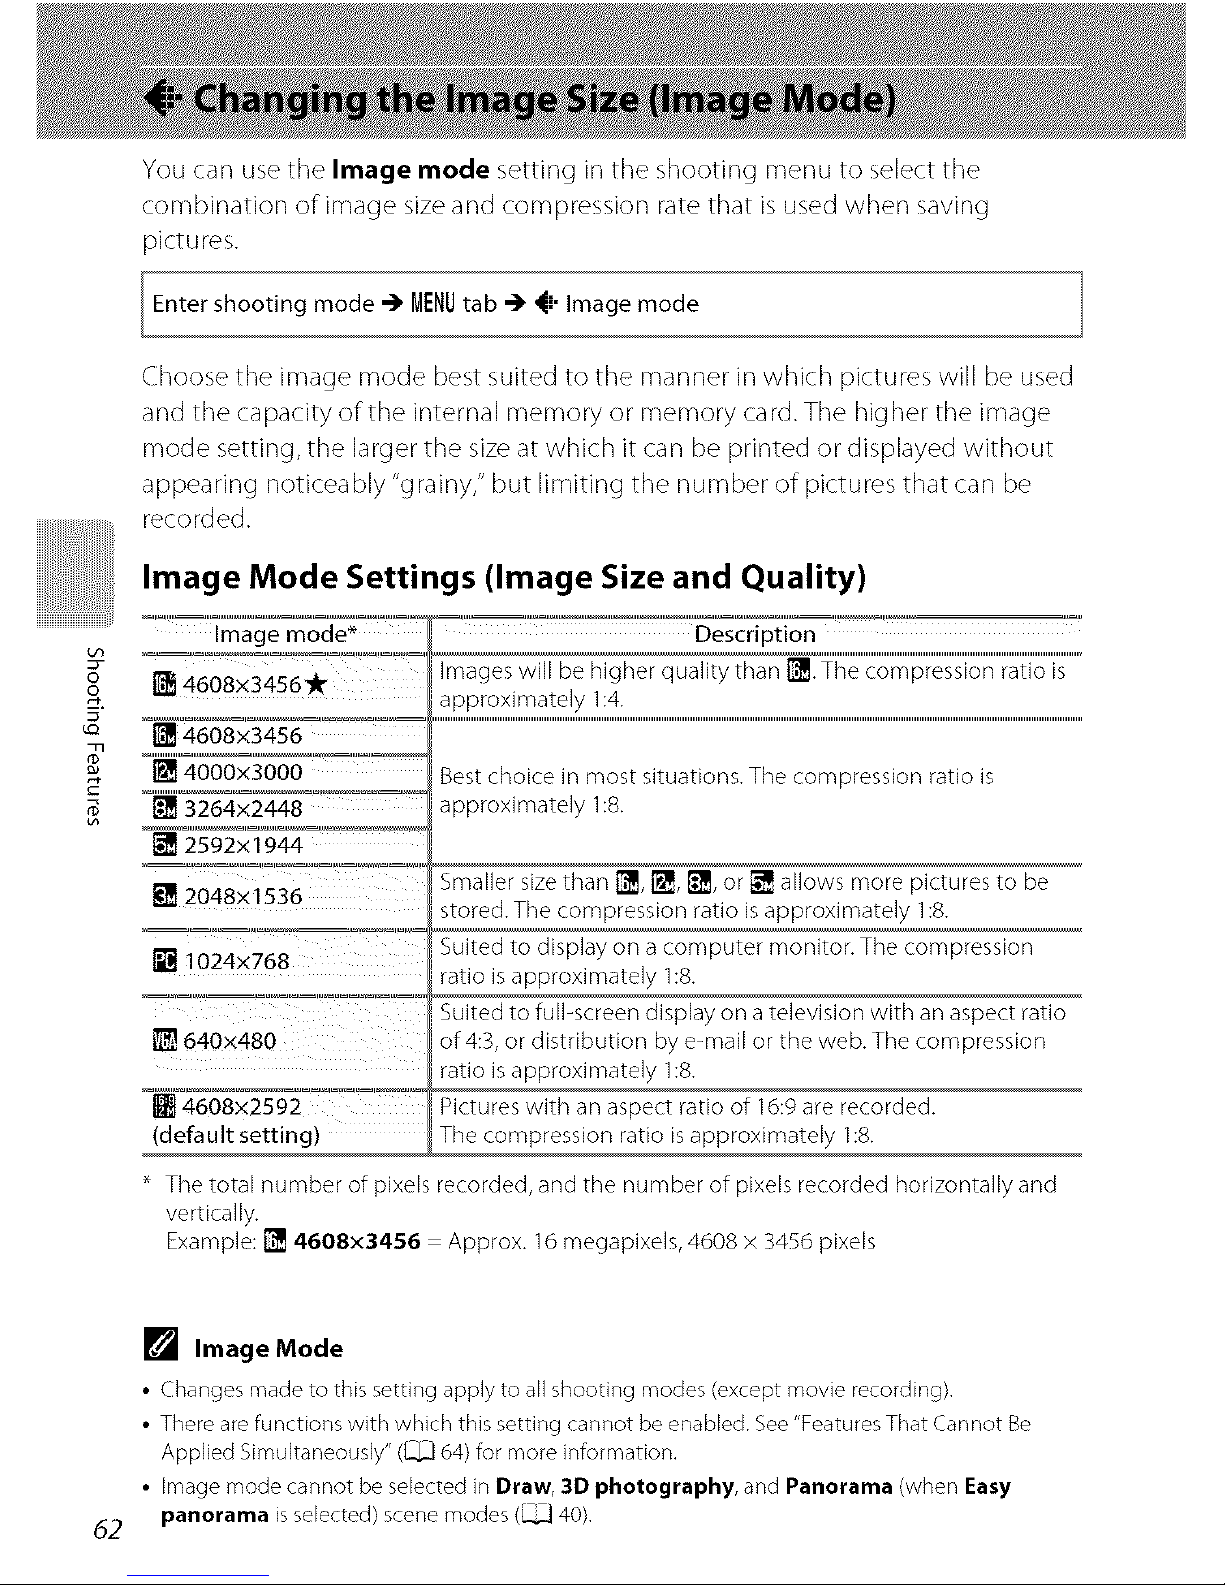
Image Mode Settings (Image Size and Quality)
Description
1'_4608x3456* "_"_'_' Images will be higher quality than t_ °'T'h'e"'c'o"m"p're's"s"i"o"n""ra't"i"o""i"s..........
approximately 1:4.
i_ 4608x3456 ................................................................................................................................................................................................................................................................................................................................................................................................................
[] 4000x3000 ....
Best choice in most situations. The compression ratio is
[] 3264x2448 ...... _ approximately 1:8.
[] 2592xl 944
....._!_"_ Smaller size than t_!lq,[], _]_,or _'_ allows more pictures to be
[] 2048x1536 stored. The compression ratio is approximatdy 1:8.
1024x768 Suited to display on a computer monitor. The compression
ratio is approximately 1:8.
Suited to full-screen display on a television with an aspect ratio
of 4:3, or distribution by e-mail or the web. The compression
ratio is approximately 1:8.
Pictures with an aspect ratio of 16:9 are recorded.
(default setting) The compression ratio is approximately 1:8.
The total number of pixels recorded, and the number of pixels recorded horizontally and
vertically.
Example: _ 4608x3456 = Approx. 16 megapixels, 4608 x 3456 pixels
62
[] Image Mode
• Changes made to this setting apply to all shooting modes (except movie recording),
• There are functions with which this setting cannot be enabled. See "Features That Cannot Be
Applied Simultaneously" ([._] 64) for more information,
• image mode cannot be selected in Draw, 3D photography, and Panorama (when Easy
panorama is selected) scene modes (_ 40),
_!, Changing the Image Size (Image Mode)
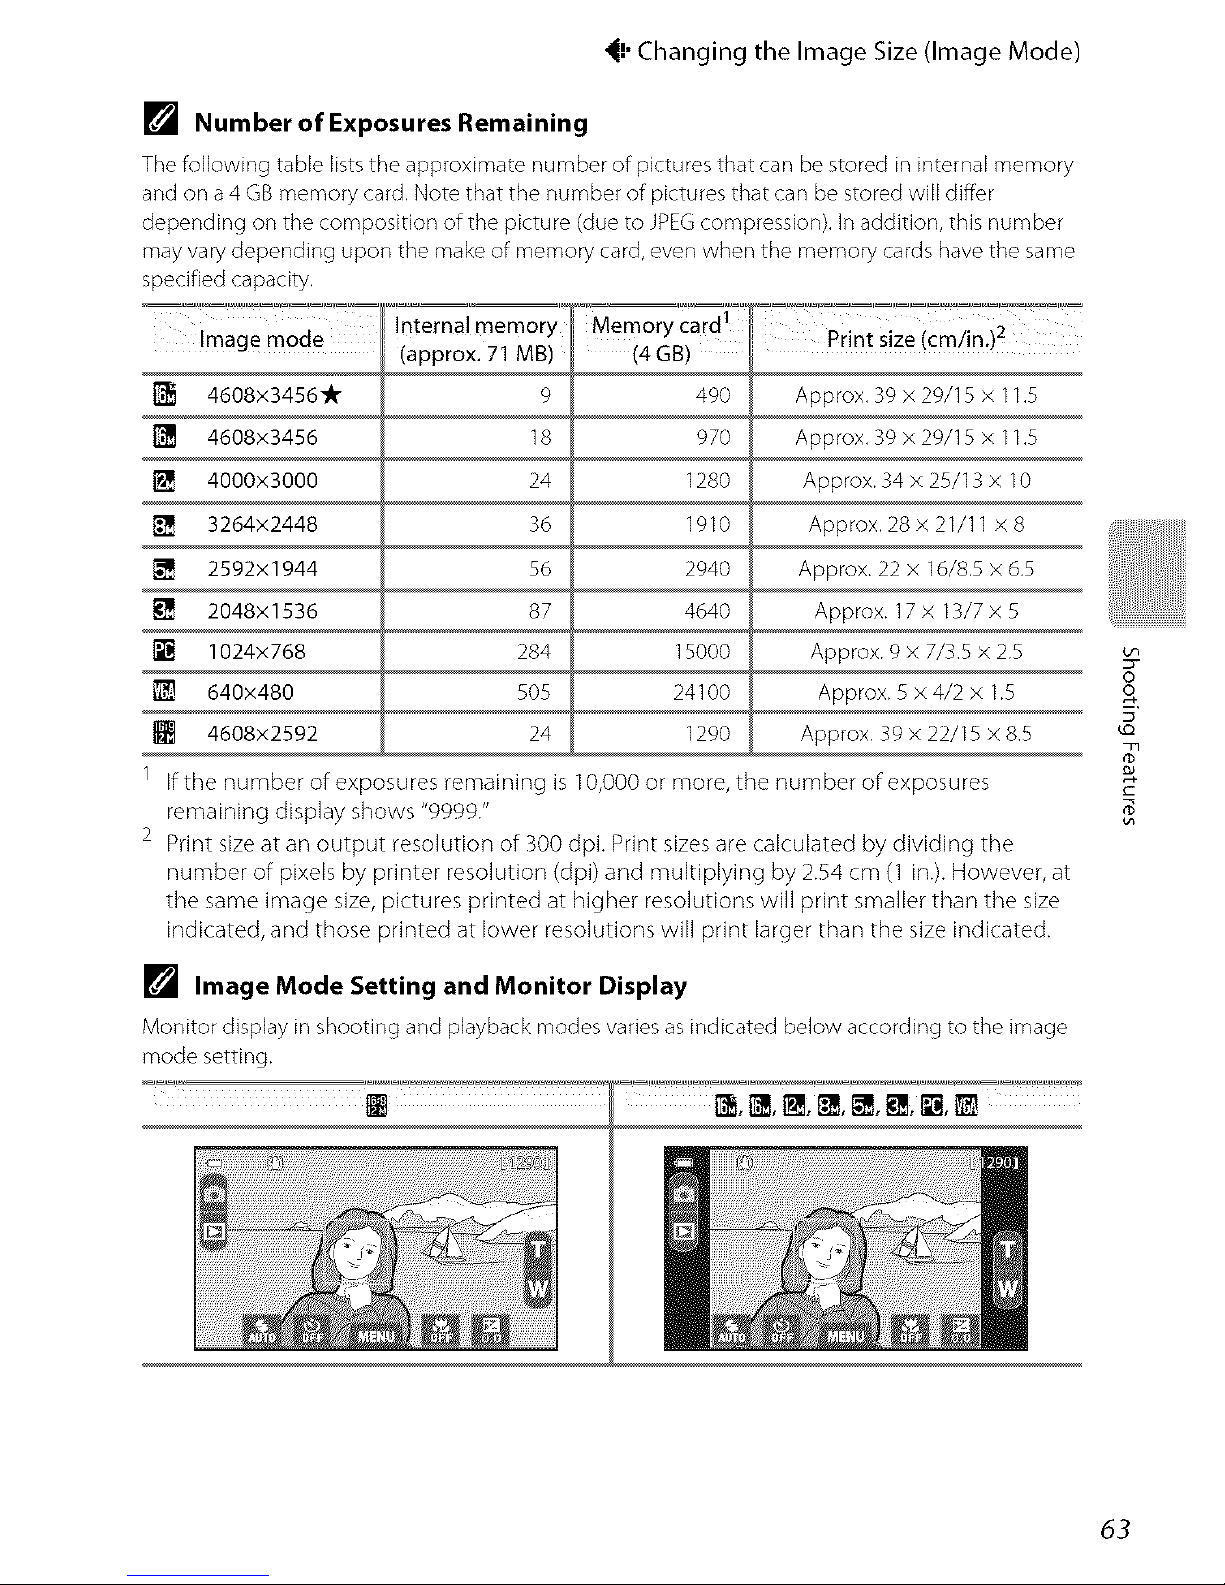
[] Number of Exposures Remaining
The _llowing table lists the approximate number of pictures that can be stored in internal memory
and on a 4 GB memory card, Note that the number of pictures that can be stored will differ
depending on the composition of the picture (due to JPEG compression), In addition, this number
may vary depending upon the make of memory card, even when the memory cards have the same
specified capacity,
Image mode
4608x3456_A -
4608x3456
l_ 4000x3000
3264x2448
2592x1944
2048x1536
[] 1024x768
640x480
4608x2592
Internal memory
(approx. 71 MB)
9
18
24
36
56
87
284
505
24
Memory card 1
(4 GB)
490
970
1280
1910
2940
4640
15000
24100
1290
Print size (cmiin.)2
Approx, 39 x 29/15 x 11,5
Approx, 39 x 29/15 x 11,5
Approx. 34 x 25/13 x 10
Approx. 28 x 21/11 x 8
Approx. 22 x 16/8.5 x 6,5
Approx. 17 x 13/7 x 5
Approx. 9 x 7/3,5 x 2.5
Approx. 5 × 4/2 × 1.5
Approx, 39 x 22/15 x 8,5
1 If the number of exposures remaining is 10,000 or more, the number of exposures
remaining display shows "9!)99."
2 Print size at an output resolution of 300 dpi. Print sizes are caWcuJatedby dividing the
number of pixeJsby printer resolution (dpi) and multiplying by 2.54 cm (1 in.). However, at
the same image size, pictures printed at higher resolutions will print smaller than the size
indicated, and those printed at lower resolutions will print larger than the size indicated.
[] Image Mode Setting and Monitor Display
Monitor display in shooting and playback modes varies as indicated below according to the image
mode setting.
_,1_, i_, r_,_, [], I_,_
oo
T
63
i!!!!!
oo
T
rD
64
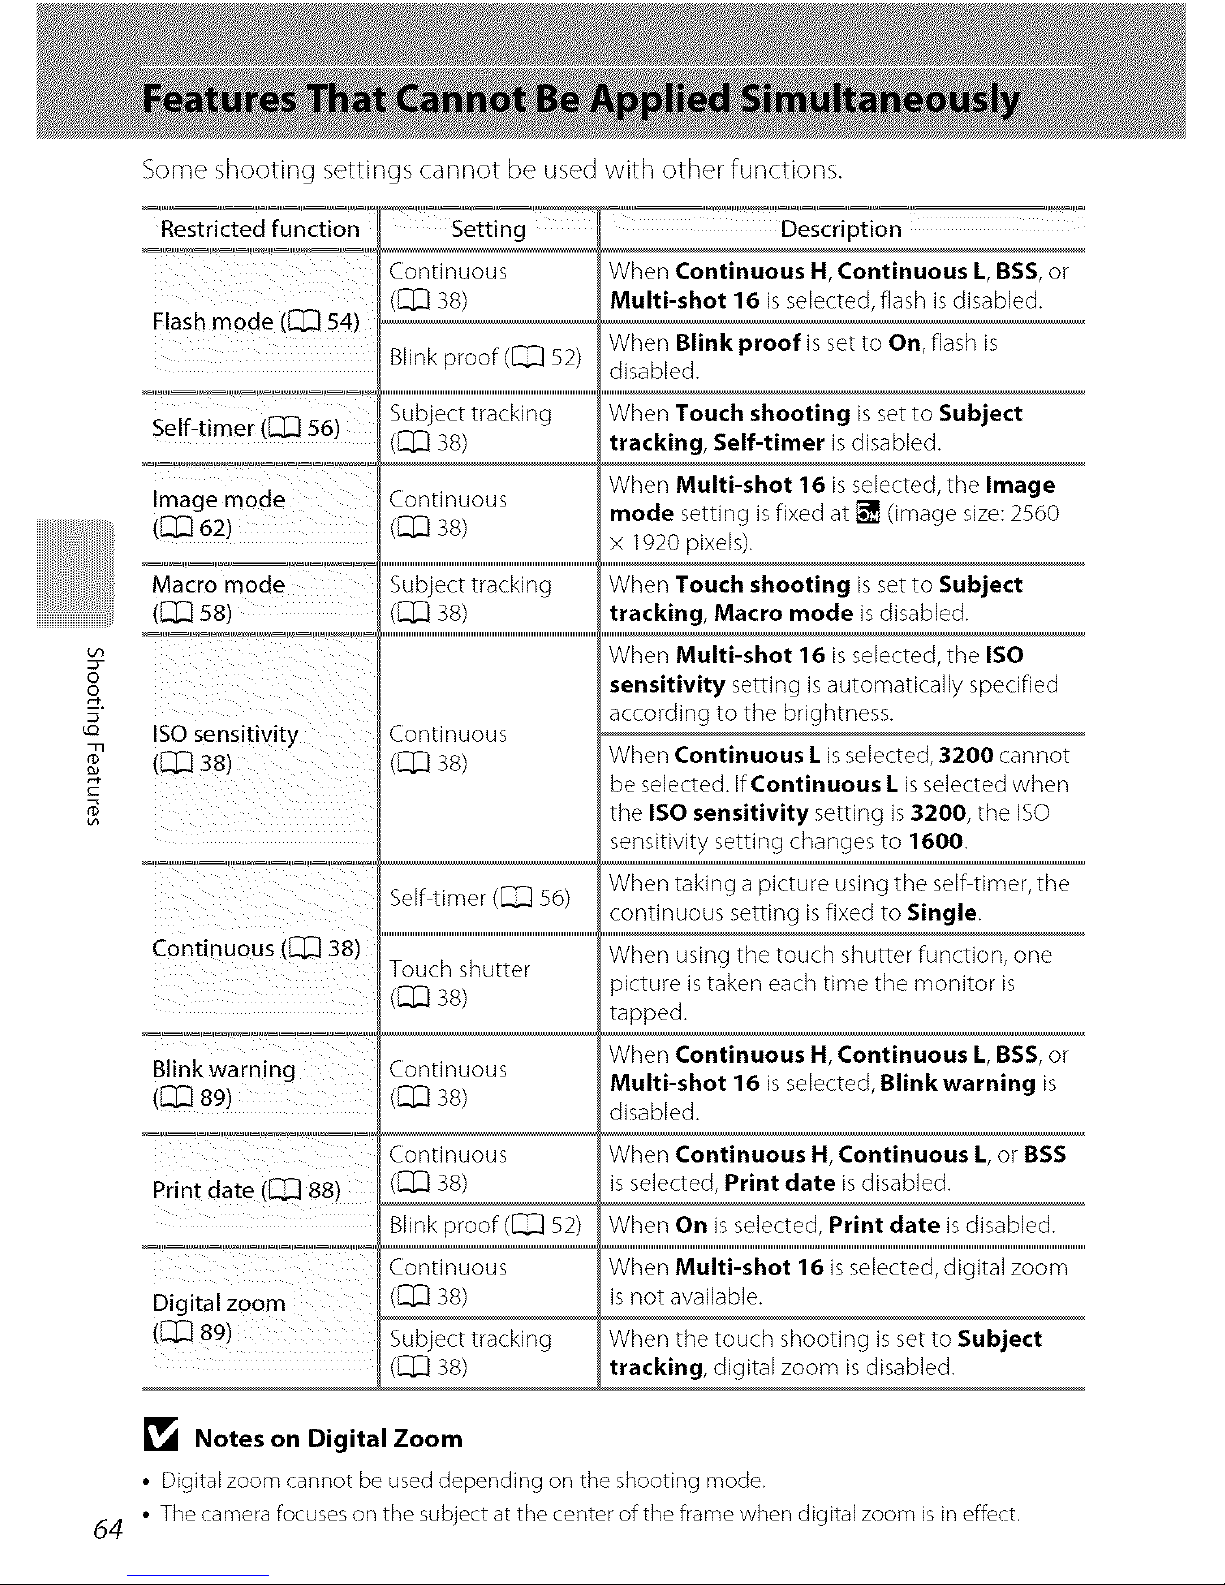
Some shooting settings cannot be used with other functions.
Restricted function Setting
C.ontinuous
Flashmode ([_ 54) ([Z]38)
Blinkproof(_ 52)
Image mode
(_[Z] 62)
Macro mode
(El3 s8)
ISO sensitivity
(_ 38)
Continuous (_[_ 38)
Continuous
(q3 38)
3ubject tracking
(_ 3S)
3Nf timer ([[_ 56)
Touch shutter
({2_ 3S)
Description
When Continuous H, Continuous L, BSS, or
Multi-shot 16 is selected, flash is disabled.
When Blink proof is set to On, flash is
disabled.
When Touch shooting isset to Subject
tracking, Self-timer is disabled.
When Multi-shot 16 is selected, tile Image
mode setting isfixed at [] (image size: 2560
x 1920 pixels).
When Touch shooting isset to Subject
tracking, Macro mode is disabled.
When Multi-shot 16 is selected, tile ISO
sensitivity setting is automatically specified
according to the brightness.
When Continuous L isselected, 3200 cannot
be selected. If Continuous L isselected when
the ISO sensitivity setting is 3200, the ISO
sensitivity setting changes to 16OO.
When taking a picture using the serf timer, the
continuous setting isfixed to Single.
When using the touch shutter function, one
_icture is taken each time the monitor is
Blink warning
d:Z3 89)
Print date (_] 88)
Digltal zoom
([_]891
:ontinuou_
(_ 3S)
:ontinuou_
(_ 3S)
Blinkoroof ([_ 52)
:ontinuou_
(_ 3S)
3ubjecttrackin9
(q3 3s)
tapped.
When Continuous H, Continuous L, BSS, or
Multi-shot 16 is selected, Blinkwarning is
disabled.
When Continuous H, Continuous/, or BSS
is selected, Print date is disabled.
When On is selected, Print date is disabled.
When Multi-shot 16 is selected, digital zoom
is not available.
When the touch shooting is set to Subject
tracking, digital zoom is disabled.
Notes on Digital Zoom
• Digital zoom cannot be used depending on the shooting mode.
• The camera focuses on the subject at the center of the frame when digital zoom is in effecL
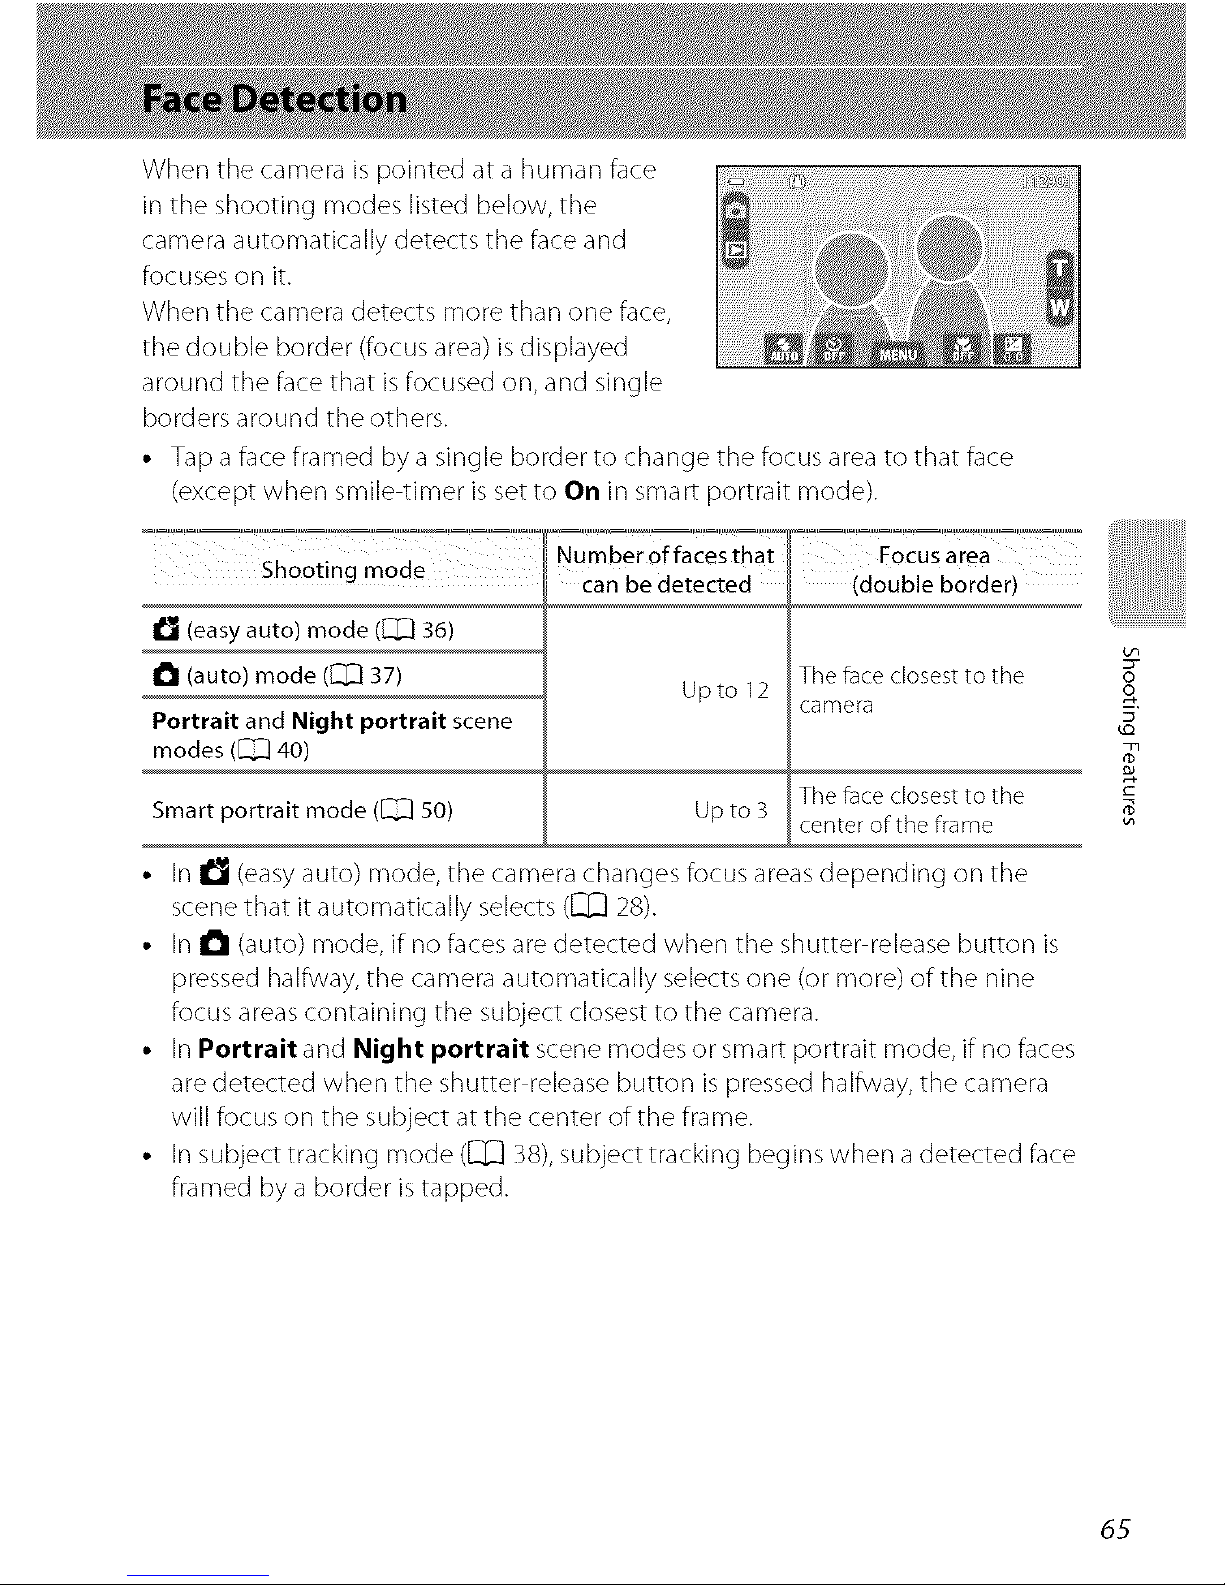
When the camera is pointed at a human face
in the shooting modes listed below, the
camera automatically detects the face and
focuses on it.
VVhen the camera detects more than one face,
tile double border (focus area) is displayed
around tile face that is focused on, and single
borders around tile others.
• Tap a face framed by a single border to change tile focus area to that face
(except when smile timer is set to On in smart portrait mode).
I_i (easy auto) mode ([ZZZ]36)
i_l (auto) mode ([ZZZ]37)
Portrait and Night portrait scene
modes (_ 40)
Smart portrait mode (_ 50)
Number of faces that Focus area
can be detected (double border)
Upto 12
The face closest to the
camera
The face closest to the
Up to 3 center of the frame
• In I_ (easy auto) mode, the camera changes focus areas depending on the
scene that it automatically selects ([_ 28).
• In I_ (auto) mode, if no faces are detected when tile shutter release button is
pressed halfway, tile camera automatically selects one (or more) of the nine
focus areas containing tile subject closest to tile camera.
• In Portrait and Night portrait scene modes or smart portrait mode, if no faces
are detected when tile shutter release button is pressed halfway, tile camera
will focus on tile subject at tile center of the frame.
• In subject tracking mode ([_ 38), subject tracking begins when a detected face
framed by a border is tapped.
oo
65
oo
Face Detection
L_ Notes on the Face Detection Function
• The camera may be unable to detect faces in the following situations:
When faces are partially hidden by sunglasses or other obstructions
When faces take up too much or too little of the frame
• When the frame includes more than one face, the faces detected by the camera and the face on
which the camera focuses depend upon a variety of factors, including the direction in which the
faces are looking.
• When shooting a subject that is not suitable for autofocus (_ 29), the camera may not be able to
focus properly on the subject despite the fact that the double border glows green. Should this
occur, refocus on another subject positioned at the same distance from the camera as the actual
portrait subject ([,_ 39),
[] Viewing Pictures That Were Taken Using Face Detection
If you enlarge a picture by tapping E'I or tapping the face detected at the time of shooting twice
quickly in full frame playback mode, the picture is enlarged so that the detected face is displayed in
the center of the monitor (except pictures taken in sequence).
If the camera detected multiple faces when the picture was taken, you can tap [] or [] to display a
different face. Once you change the zoom ratio, you will be able to zoom in on an area of the picture
where there are no faces.
66
The camera detects up to three human faces when the shutter is released, and
processes the image to soften facial skin tones before saving the image. The skin
softening feature isactive when using the following shooting modes.
• When shooting in Portrait ([_ 42) or Night portrait ([_ 43) scene mode, or
when the camera selects one of these scene modes while in I_ (easy auto)
mode.
• When shooting in smart portrait mode ([_ 50).
• Skinsoftening can also be applied to saved pictures by using the glamour
retouch function ([_ 73).
oo
Notes on Skin Softening
• More time than usual may be required to save a picture.
• In some shooting conditions, facial skin tones may not be smoothed or parts other than face may
be modified. If the desired results are not produced, switch to another shooting mode or set Skin
softening to Off if using smart portrait mode, and shoot again,
• The skin softening level cannot be adjusted when Portrait or Night portrait is selected in the
scene mode.
67

68
Playback Features
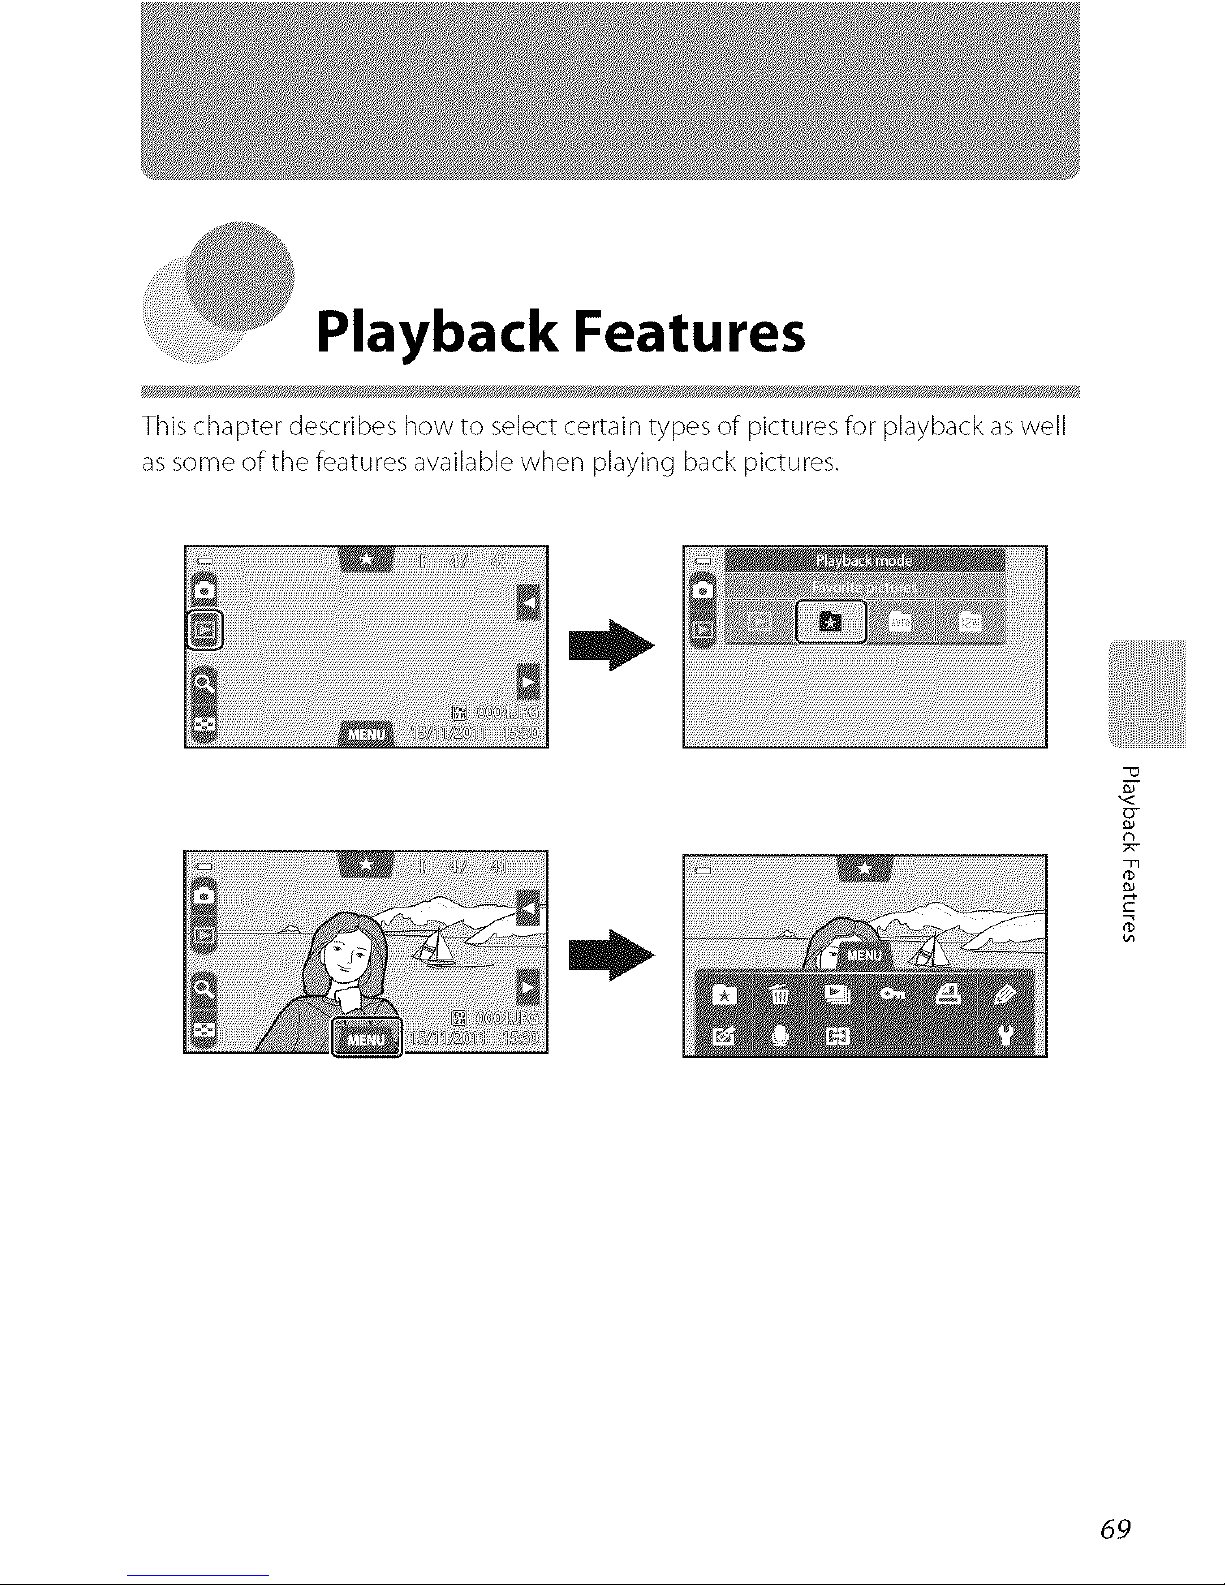
This chapter describes how to select certain types of pictures for playback as well
as some of the features available when playing back pictures.
g-
69
m
You can change the playback mode according to the type of pictures you want to
view.
Available Playback Modes
[] Play 30
All pictures are played back. When you switch from shooting mode to playback mode,
this mode is selected,
_ Favorite pictures _'_10
Only pictures added to albums are played back.
Pictures should be added to albums before selecting this mode (_ 73).
Auto sort _'_14
Pictures are automatically sorted in to categories, such as portraits, landscapes, and
movies. You can use this mode to specify a category and play back pictures in that
category only.
_!_ Listbydate
Only pictures taken on the same date are played back.
3D 3D playback
Only pictures taken in 3D photography scene mode are output (played back) in 3D.
This playback mode can be selected only when the camera isconnected to a
3D-compatible TV or monitor using a 3D-compatible HDMI cable.
• Set TV settings in the setup menu ([_ 88) asfollows:
- HDMI: Auto (default setting) or 1080i
HDMI 3D output: On (default setting)
70
Selecting Certain Types of Pictures for Playback
Switching Between Playback Modes
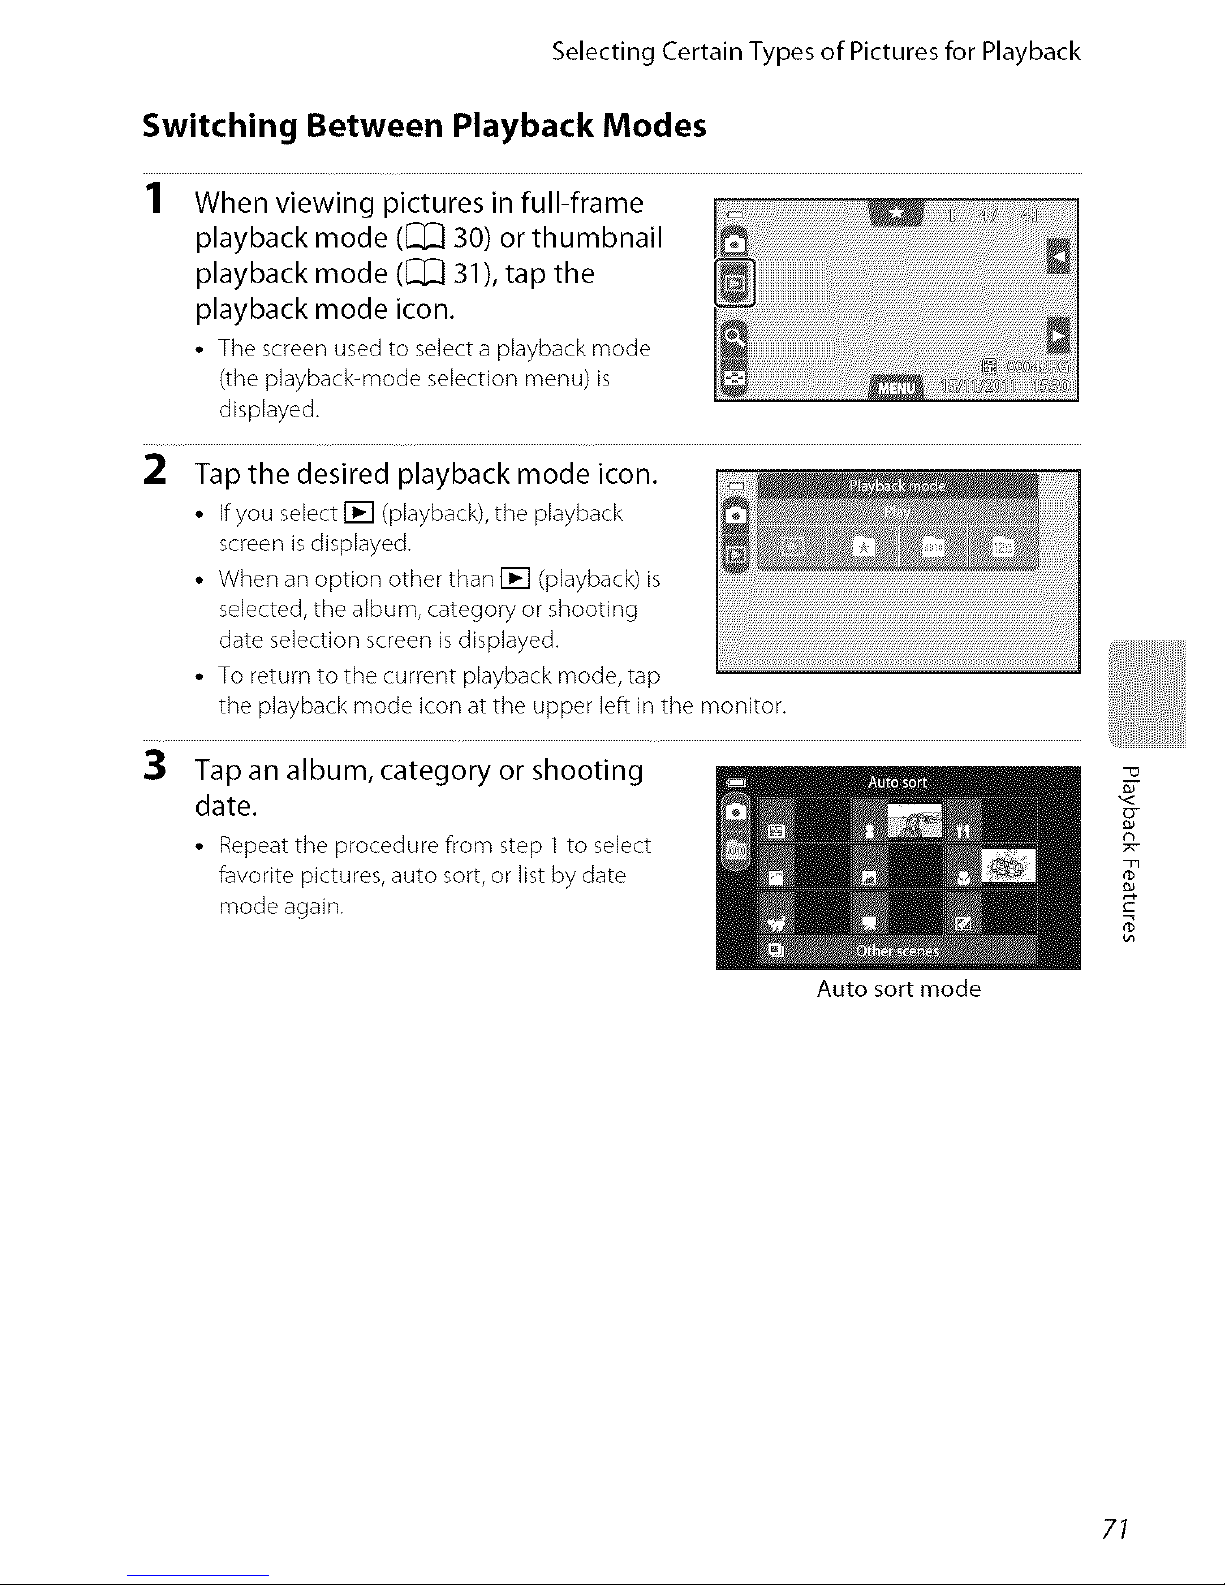
1 When viewing pictures in full-frame
playback mode ([_ 30) or thumbnail
playback mode ([_[_ 31), tap the
playback mode icon.
• Thescreenusedto selectaplaybackmode
(theplayback-modeselectionmenu) is
displayed.
2 Tap the desired playback mode icon.
• Ifyou select[] (playback),the playback
screenisdisplayed.
• Whenan option otherthan [] (playback)is
selected,thealbum,category or shooting
dateselectionscreenisdisplayed.
• To return tothe current playbackmode,tap
the playbackmode iconat the upperleft in the monitor.
3 Tap an album, category or shooting
date.
• Repeatthe procedurefrom step 1to select
favoritepictures,auto sort,or list by date
mode again.
Auto sort mode
R-
g_
71
m
Selecting Certain Types of Pictures for Playback
Setting the Picture Rating
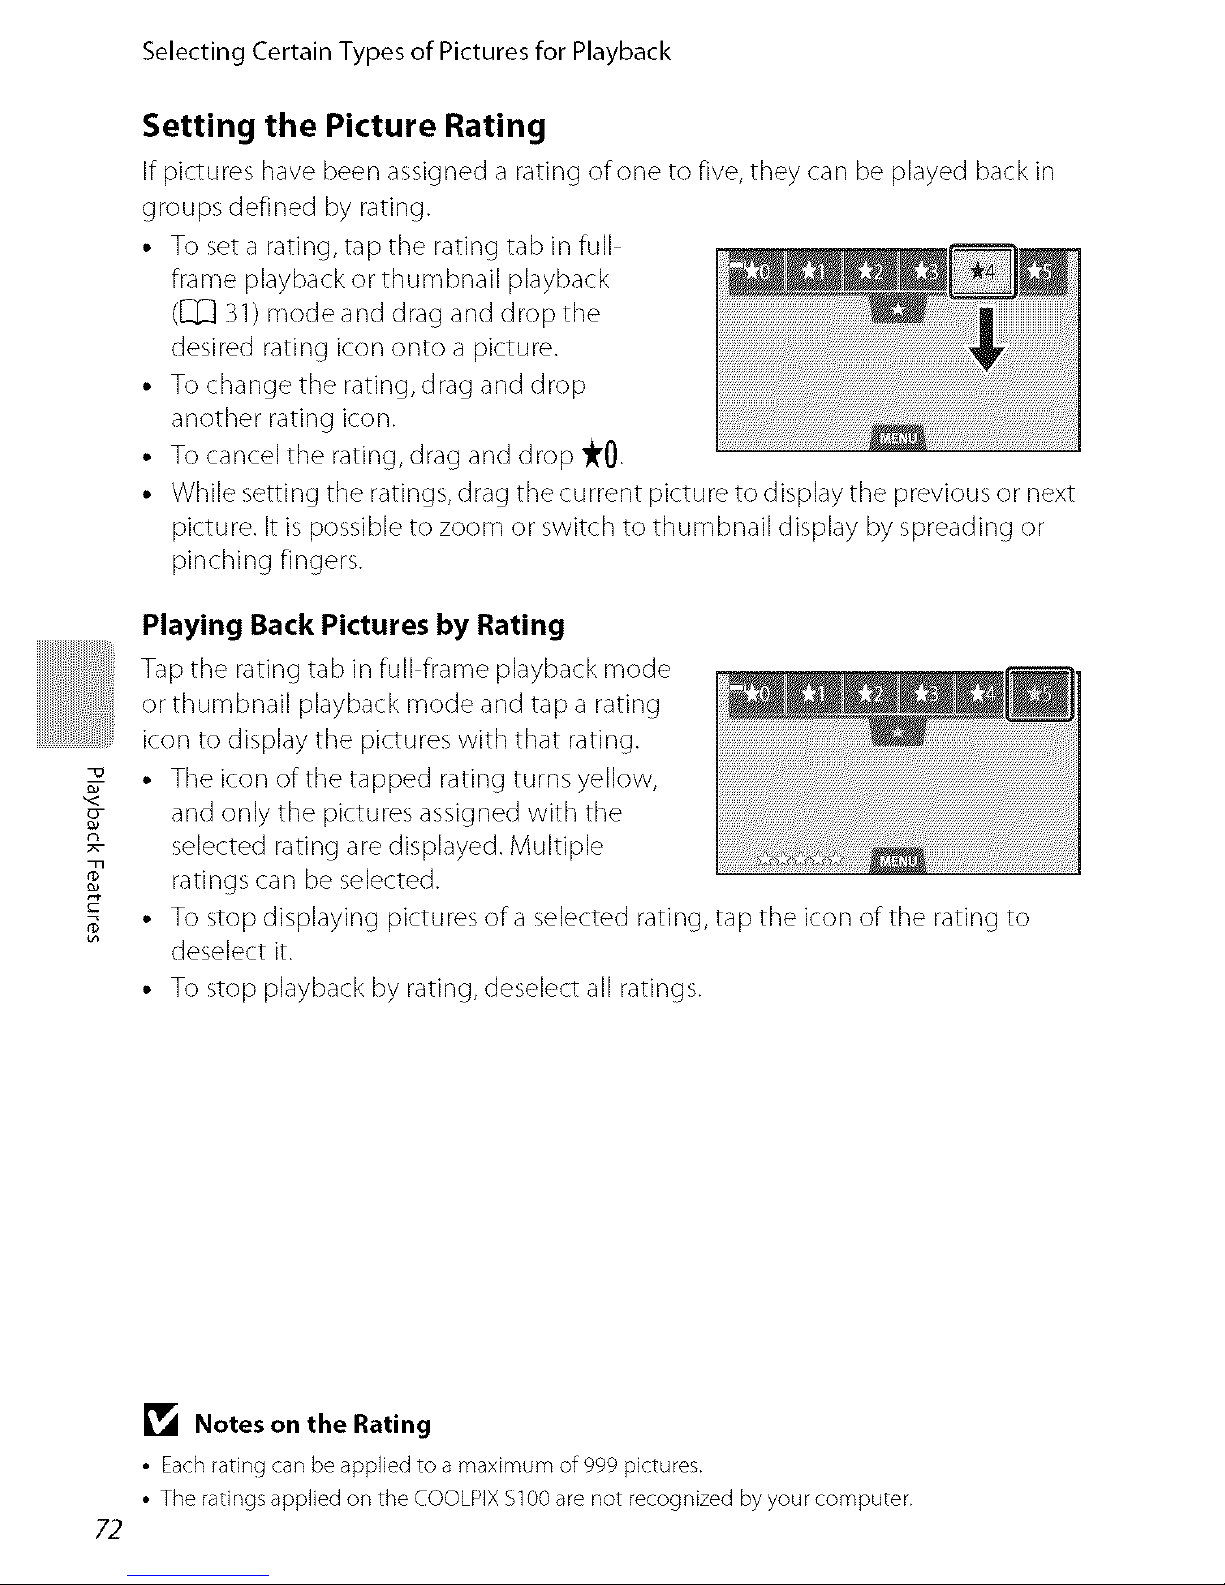
Ifpictureshave beenassigneda ratingofoneto five,they carlbe playedbackin
groupsdefined by rating.
• Tosetarating,tap the rating tab in fuji
frameplaybackor thumbnail playback
(l_[_31)mode anddragand drop the
desiredrating icononto apicture.
• Tochangethe rating,dragand drop
another ratingicon.
• Tocancelthe rating,dragand drop _0.
• Whilesettingthe ratings,drag thecurrent pictureto displaythe previousor next
picture.It is possibleto zoomor switch to thumbnail displayby spreadingor
pinching fingers.
Playing Back Pictures by Rating
Tap the rating tab in full frame playback mode
or thumbnail playback mode and tap a rating
icon to display the pictures with that rating.
• The icon of the tapped rating turns yellow,
and only the pictures assigned with the
selected rating are displayed. Multiple
ratings can be selected.
• To stop displaying pictures of a selected rating, tap the icon of the rating to
deselect it.
• To stop playback by rating, deselect all ratings.
72
_1_ Notes on the Rating
• Each rating can be applied to a maximum of 999 pictures.
• The ratings applied on the COOLPIX $100 are not recognized by your computer.
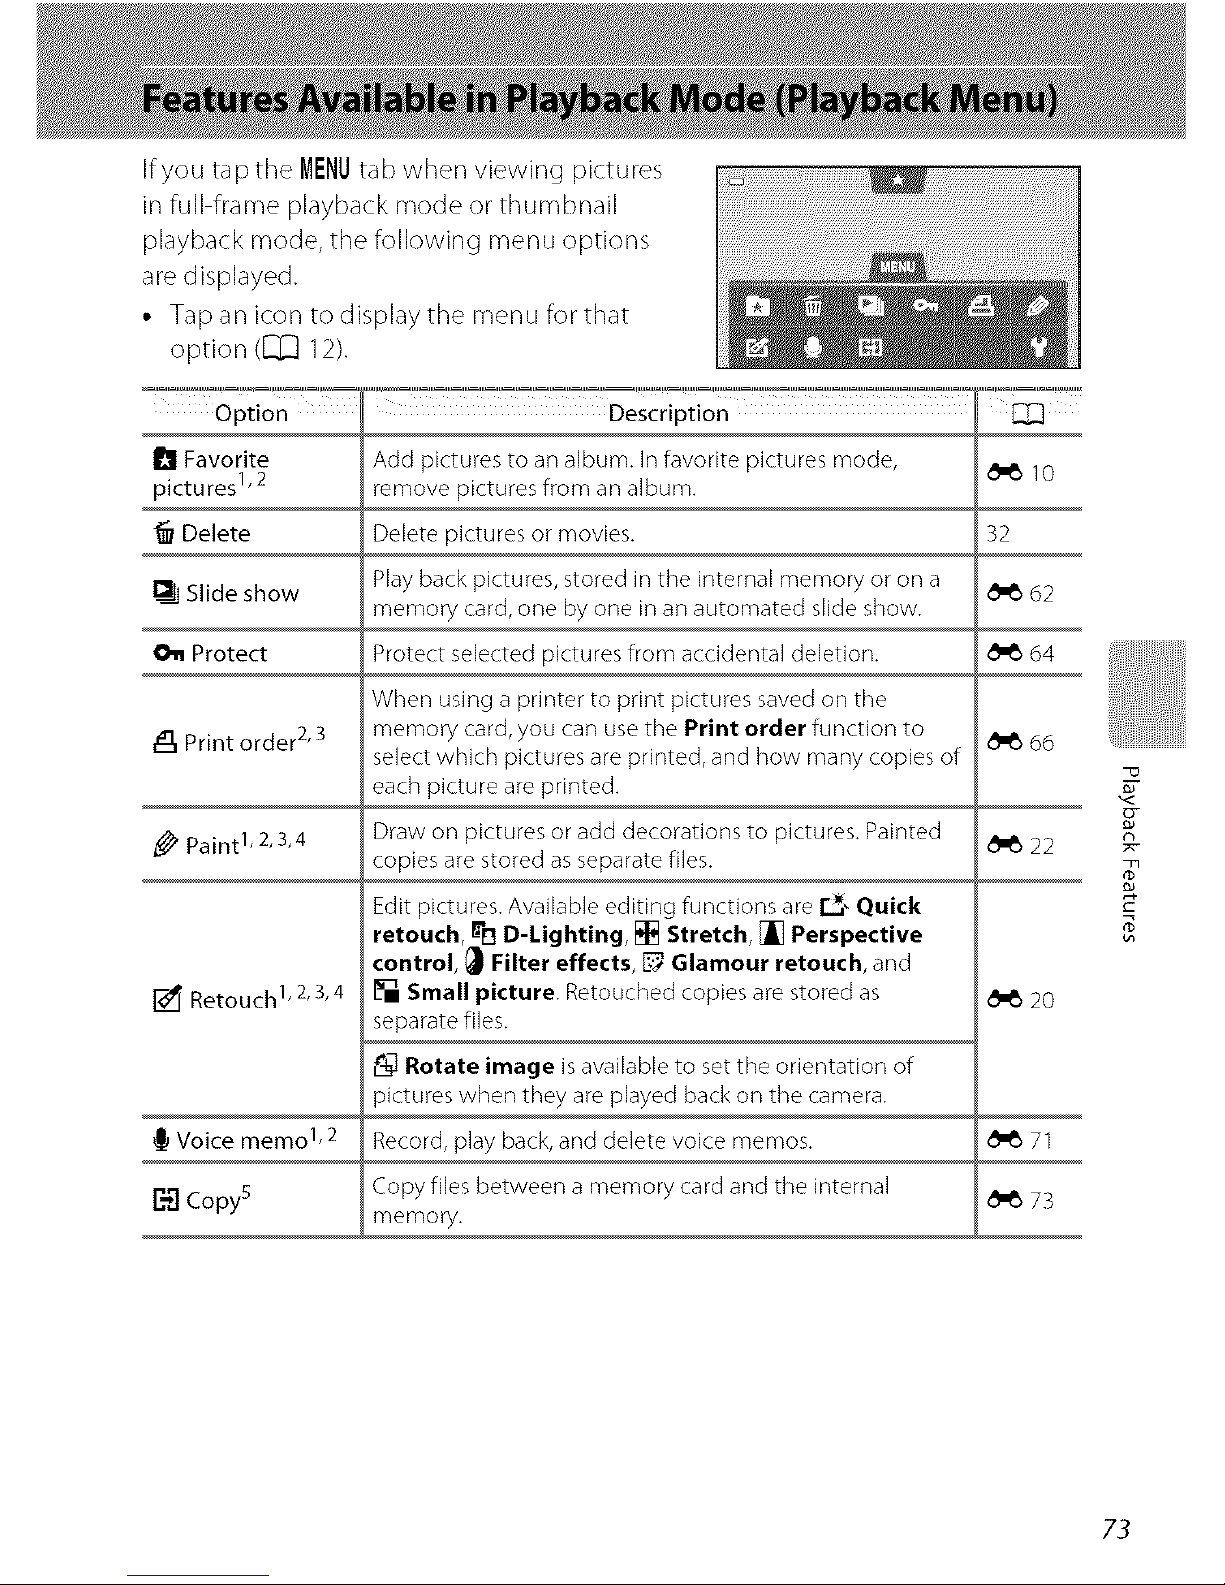
If you tap the MENUtab when viewing pictures
in full frame playback mode or thumbnail
playback mode, the following menu options
are displayed.
• Tap an icon to display the menu for that
option ([]Z] 12).
Option Description °_" _[_]
_1 Favorite Add pictures to an album. In favorite pictures mode, _'_ 10
pictures 1,2 remove pictures from an album.
Delete Delete pictures or movies. 32
Slide show Play back pictures, stored in the internal memory or on a _ 62
memory card, one by one in an automated slide show.
011 Protect Protect selected pictures from accidental deletion. _ 64
When using a printer to print pictures saved on the
_, Print order 2'3 memory card, you can use the Print order function to _ 66
select which pictures are printed, and how many copies of
each picture are printed.
Paint 1, 2,3,4 Draw on pictures or add decorations to pictures. Painted _ 22
copies are stored as separate files.
Edit pictures. Available editing functions are r_,, Quick
retouch, _lq D-Lighting, [] Stretch, _ Perspective
control, _ Filter effects, _ Glamour retouch, and
Retouch 1,2,3,4 [] Small picture. Retouched copies are stored as _ 20
separate flies.
_L_Rotate image is available to set the orientation of
)ictures when they are played back on the camera.
Voice memo 1,2 Record, play back, and delete voice memos. _ 71
_ Copy s Copy files between a memory card and the internal _ 73
memory.
?-
73

Features Available in Playback Mode (Playback Menu)
74
1 When using thumbnail playback mode, this function cannot be applied. Display the picture
in full frame playback mode.
2 The function cannot be used for movies.
3 The function cannot be applied to pictures taken in 31) photography scene mode
(_ 49).
4 Copies created with editing functions other than the paint function cannot be further
edited with the same function used to create them. However, some editing functions such
as the paint, small picture, and cropping functions may be additionally performed.
s This function isavailable only in [] (play) playback mode.
6 This function isavailable only when pictures in a sequence are displayed individually.
n
s
74
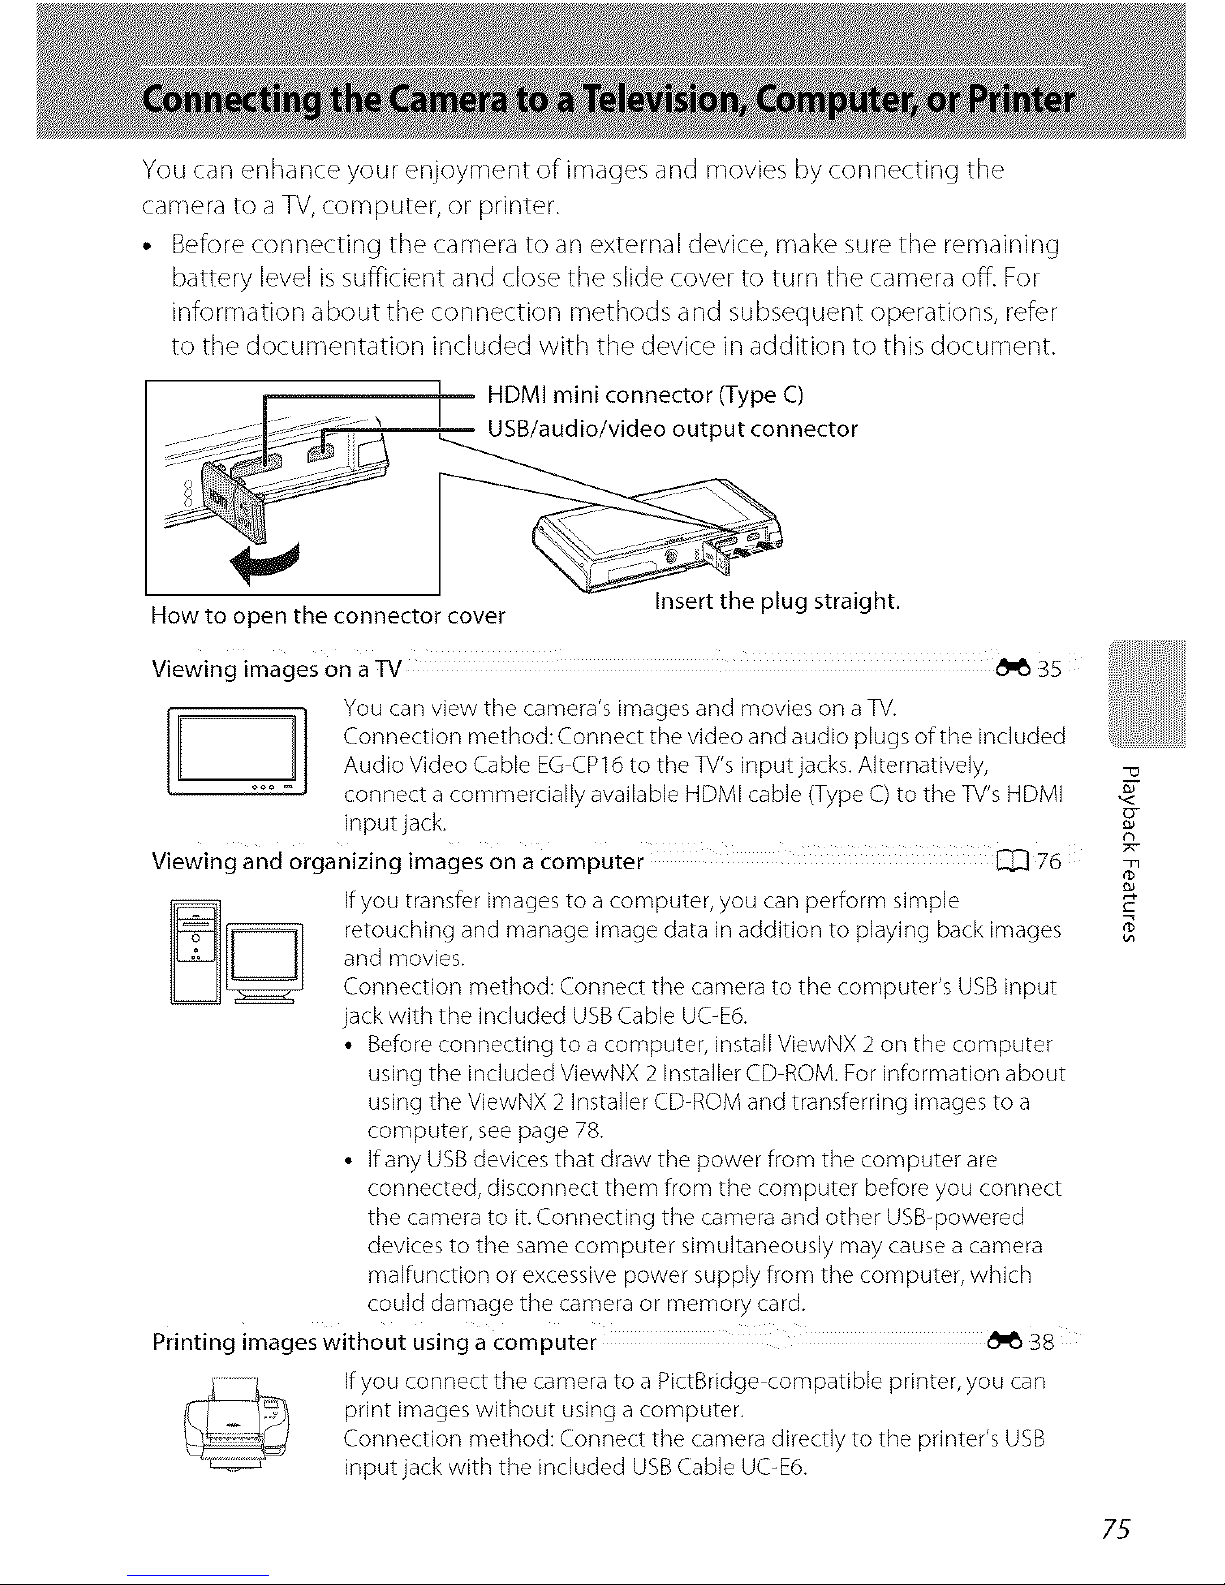
You can enhance your enjoyment of images and movies by connecting the
camera to aTV,computer, or printer.
• Before connecting the camera to an external device, make sure the remaining
battery level issufficient and close the slide cover to turn the camera off. For
information about the connection methods and subsequent operations, refer
to the documentation included with the device in addition to this document.
F :::::. _ i HDMI mini connector (Type C)
_?_;_°ii'/ USB/audio/video output connector
How to open the connector cover Insert the plug straight.
Viewing images on a Tv _35
You can view the camera's images and movies on a TV.
Connection method: Connect the video and audio plugs of the includedAudio Video Cable EG CP16 to the TV's inputjacks. Alternatively,
connect a commercially available HDMI cable (Type C) to the TV's HDMI
input jack.
Viewing and organizing images on a computer _ 76
If you transfer images to a computer, you can perform simple
retouching and manage image data in addition to playing back images
and movies.
Connection method: Connect the camera to the computer's USB input
jack with the included USB Cable UC-E6.
• Before connecting to a computer, install ViewNX 2 on the computer
using the included ViewNX 2 Installer CD ROM. For information about
using the ViewNX 2 installer CD-ROM and transferring images to a
computer, see page 78.
• If any USB devices that draw the power from the computer are
connected, disconnect them from the computer before you connect
the camera to it. Connecting the camera and other USB-powered
devices to the same computer simultaneously may cause a camera
malfunction or excessive power supply from the computer, which
could damage the camera or memory card.
Printing images Without using a computer _38
If you connect the camera to a PictBridge compatible printer, you can
print images without using a computer.
Connection method: Connect the camera directly to the printer's USB
inputjack with the included USBCable UC-E6.
?-
75
ViewNX 2 is an all in one software package which enables you to transfer, view,
edit and share images.
Install ViewNX 2 using the ViewNX 2 Installer CD ROM.
R-
Installing ViewNX 2
• An Internet connection is required.
Compatible Operating Systems
Windows
• VVindows 7 Home Basic/Home Premium/Professional/Enterprise/Ultimate
• Windows Vista Home Basic/Home Premium/Business/Enterprise/Ultimate
(Service Pack 2)
• Windows XP Home Edition/Professional (Service Pack 3)
Macintosh
• Mac OSX (version 10.5.8,10.6.7)
Refer to the Nikon website for the latest information on operating system
compatibility.
1 Start the computer and insert the ViewNX 2 Installer CD-ROM into the
CD-ROM drive.
• MacOS:When theViewNX 2 window isdisplayed,double-clicktheWelcome icon.
76
 Loading...