

Page 1

AF-S Micro NIKKOR
60mm f/2.8
Nano Crystal Coat
使用説明書
User’s Manual
Benutzerhandbuch
Manuel de l’utilisateur
Manual del Usuario
Anvädarhandbok
Руководство пользовэтеля
Gebruikshandleiding
Manuale d’uso
(P. 110–121)
(P. 122–133)
(P. 134–145)
(P. 2–13)
(PP. 14–25)
(S. 26–37)
(P. 38–49)
(PP. 50–61)
(S. 62–73)
(CTP. 74–85)
(P. 86–97)
(PP. 98–109)
ED
J
En
De
Fr
Es
Se
Ru
Nl
It
Ck
Ch
Kr
p
Page 2
Jp
安全上のご注意
ご使用の前に「安全上のご注意」をよくお読みのうえ、正しくお使いく
ださい。この「安全上のご注意」は製品を安全に正しく使用していただき、
あなたや他の人々への危害や財産への損害を未然に防止するために、重
要な内容を記載しています。お読みになった後は、お使いになる方がい
つでも見られる所に必ず保管してください。
表示について
表示と意味は次のようになっています。
この表示を無視して、誤った取り扱いをすると、人が死亡または重
警告
傷を負う可能性が想定される内容を示しています。
この表示を無視して、誤った取り扱いをすると、人が傷害を負う可
能性が想定される内容および物的損害の発生が想定される内容を示
注意
しています。
お守りいただく内容の種類を、次の絵表示で区分し、説明しています。
絵表示の例
△記号は、注意(警告を含む)を促す内容を告げるものです。図の中や近
くに具体的な注意内容(左図の場合は感電注意)が描かれています。
記号は、禁止(してはいけないこと)の行為を告げるものです。図の中
や近くに具体的な禁止内容(左図の場合は分解禁止)が描かれています。
●記号は、行為を強制すること(必ずすること)を告げるものです。図の
中や近くに具体的な強制内容(左図の場合は電池を取り出す)が描かれて
います。
警告
分解したり修理・改造をしないこと
感電したり、異常動作をしてケガの原因となります。
分解禁止
落下などによって破損し、内部が露出したときは、露出
部に手を触れないこと
接触禁止
感電したり、破損部でケガをする原因となります。
カメラの電池を抜いて、販売店またはニコンサービス機関に修理を
すぐに修理依頼を
依頼してください。
2
Page 3
電池を取る
すぐに修理依頼を
水かけ禁止
使用禁止
見ないこと
感電注意
放置禁止
使用注意
保管注意
移動禁止
放置禁止
警告
熱くなる、煙が出る、こげ臭いなどの異常時は、速やか
にカメラの電池を取り出すこと
そのまま使用すると火災、やけどの原因となります。電池を取り出
す際、やけどに充分注意してください。電池を抜いて、販売店また
はニコンサービス機関に修理を依頼してください。
水につけたり水をかけたり、雨にぬらしたりしないこと
発火したり感電の原因となります。
引火・爆発のおそれのある場所では使用しないこと
プロパンガス・ガソリンなど引火性ガスや粉塵の発生する場所で使
用すると、爆発や火災の原因となります。
レンズまたはカメラで直接太陽や強い光を見ないこと
失明や視力障害の原因となります。
注意
ぬれた手でさわらないこと
感電の原因になることがあります。
製品は幼児の手の届かないところに置くこと
ケガの原因になることがあります。
逆光撮影では、太陽を画角から十分にずらすこと
太陽光がカメラ内部で焦点を結び、火災の原因になることがあります。
画角から太陽をわずかに外しても火災の原因になることがあります。
使用しないときは、レンズにキャップをつけるか太陽光の
あたらない所に保管すること
太陽光が焦点を結び、火災の原因になることがあります。
三脚にカメラやレンズを取り付けたまま移動しないこと
転倒したりぶつけたりしてケガの原因になることがあります。
窓を閉め切った自動車の中や直射日光が当たる場所など、
異常に温度が高くなる場所に放置しないこと
内部の部品に悪い影響を与え、火災の原因となることがあります。
Jp
3
Page 4
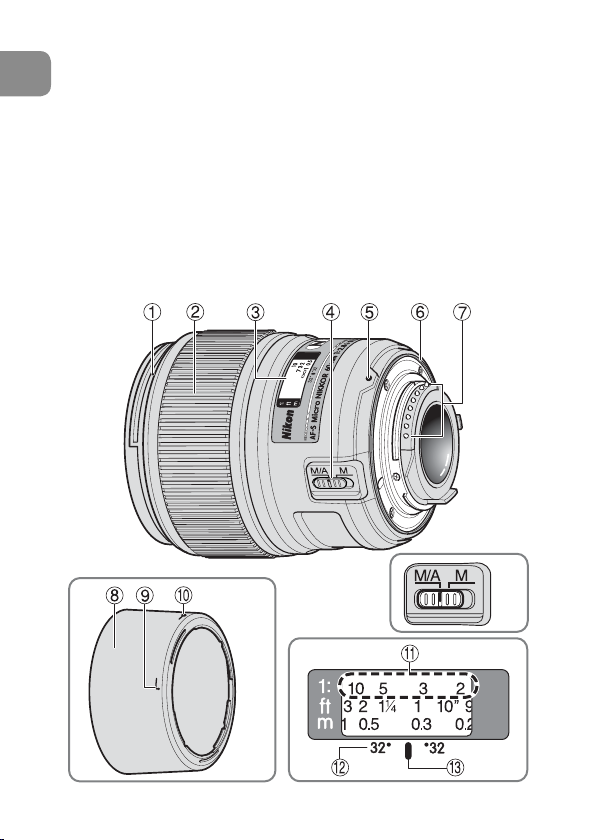
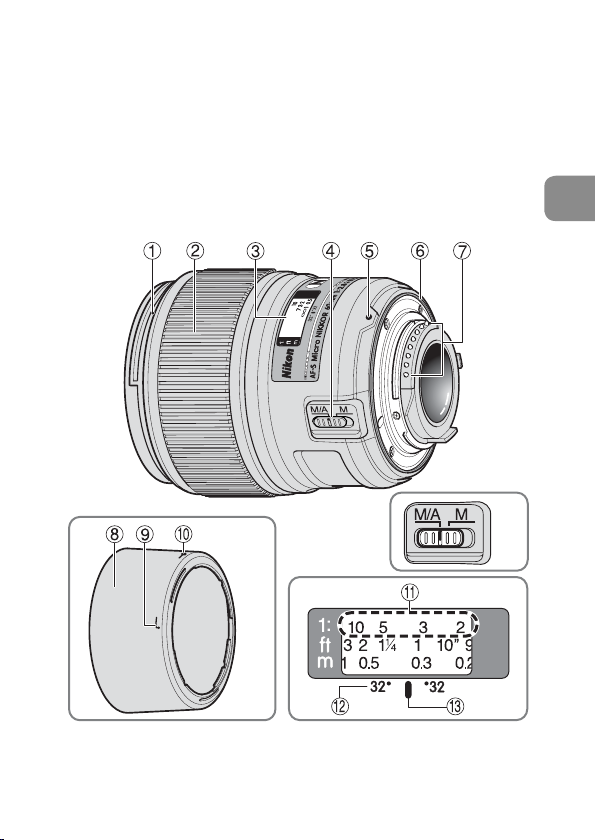
1.各部の名称
①フード着脱指標(P.9)
②フォーカスリング(P.7)
③距離目盛(P.7)
④フォーカスモード切り換えス
イッチ(P.7)
⑤レンズ着脱指標
⑥レンズマウントゴムリング
(P.6)
:( )参照頁
A
⑦CPU 信号接点(P.6)
⑧フード(P.9)
⑨フード取り付け指標(P.9)
⑩フードセット指標(P.9)
⑪倍率目盛(P.7)
⑫被写界深度目盛(P.7)
⑬距離目盛基準線(P.7)
B
C
4Jp4
Page 5

2.使用できる機能
カメラによって使用できる機能には制限・制約がありますので、カメラ
の使用説明書でもご確認ください。
カメラ
D3、D2 シリーズ、D1 シリーズ、
D300、D200、D100、D80、
D70 シリーズ、D60、D50、D40 シリーズ
F6、F5、F100、F80 シリーズ、
ニコン U2、ニコン U
プロネア 600i、プロネア S
F4 シリーズ、F90X シリーズ、
F90 シリーズ、F70D
ニコン Us、F60D、F50D、
F-401 シリーズ
F-801 シリーズ、F-601M × ○ ○ × ×
F3AF、F-601、F-501、
MFカメラ(F-601M を除く)
※2
オート
フォーカス
○ ○ ○○○
○ ○ ○○○
○ ○ ○○○
○ ○ ○××
× ○ ○○○
× × ×××
○:使用可 ×:使用不可
※1
P
露出モード
SAM
※1:P には AUTO(オート)モード、イメージプログラムモードを含
みます。
※2:M モードの設定はありません。
3.はじめに
このたびはニッコールレンズをお買い上げいただき、誠にありがとうご
ざいます。このレンズは、高速で静かな AF(オートフォーカス)撮影を
可能にするレンズ内超音波モーター(サイレント・ウェーブ・モーター)
駆動方式を採用した高性能なマイクロレンズです。
■特 長
●
AF(オートフォーカス)撮影および MF(マニュアルフォーカス)撮
影の切り換えが簡単にできるフォーカスモード切り換えスイッチを装
備しています。
●
AF 撮影中にも瞬時にマニュアルフォーカスに切り換えられる「マニュ
アル優先オートフォーカス」機能を装備しています。
Jp
5
Page 6

●
被写体までの距離情報をカメラ側に伝達する機能を備え、3D マルチ
Jp
パターン測光機能を持ったカメラとの組み合わせでは、より的確な露
出制御を実現します。
●
ニコン独自の ED(特殊低分散)ガラスによる色収差の補正とともに、
非球面レンズや良好なボケ味が得られる円形絞りの採用で、優れた光
学性能、描写性能を発揮します。
●
ナノクリスタルコート(Nano CrystalCoat)を一部のレンズに施し
たことで、強い太陽光が当たるスポーツ撮影から、スポットライトの
ある室内撮影まで、クリアーで抜けの良い画像を提供します。
●
最短撮影距離 0.185m までの近接撮影ができます。
■ご注意
●
CPU 信号接点は汚さないようにご注意ください。
●
ニコン DX フォーマットのニコンデジタル一眼レフカメラ(D2 シリ
ーズ、D300 など)に装着すると、対角線画角は 2630′となり、
35mm 判換算では焦点距離約 90mm 相当のレンズになります。
●
レンズマウントゴムリングが破損した場合は、そのまま使わずに、販
売店またはニコンサービス機関に修理を依頼してください。
●
ワイヤレスリモートスピードライトSB-R200 は、レンズ先端に 4 個
まで装着できます。
4.フォーカスモードの切り換え
カメラによって、フォーカスモードを選択できます。
カメラ
D3、D2 シリーズ、
D1 シリーズ、D300、D200、
D100、D80、D70 シリーズ、
D60、D50、D40 シリーズ、
F6、F5、F4 シリーズ、F100、
F90X シリーズ、F90 シリーズ、
F80 シリーズ、F70D、
ニコン U2、ニコン U、
プロネア 600i、プロネア S
ニコン Us、F60D、F50D、
F-801 シリーズ、
F-401 シリーズ、F-601M
カメラの
フォーカス
モード
AF
(C / S)
MF
AF
(C / S)
MF
レンズのフォーカスモード
M/A M
マニュアル優先
オートフォーカス
マニュアルフォーカス
(フォーカスエイド可能:F-601M
は不可)
(フォーカスエイド可)
マニュアルフォーカス
(フォーカスエイド可)
マニュアルフォーカス
6
Page 7
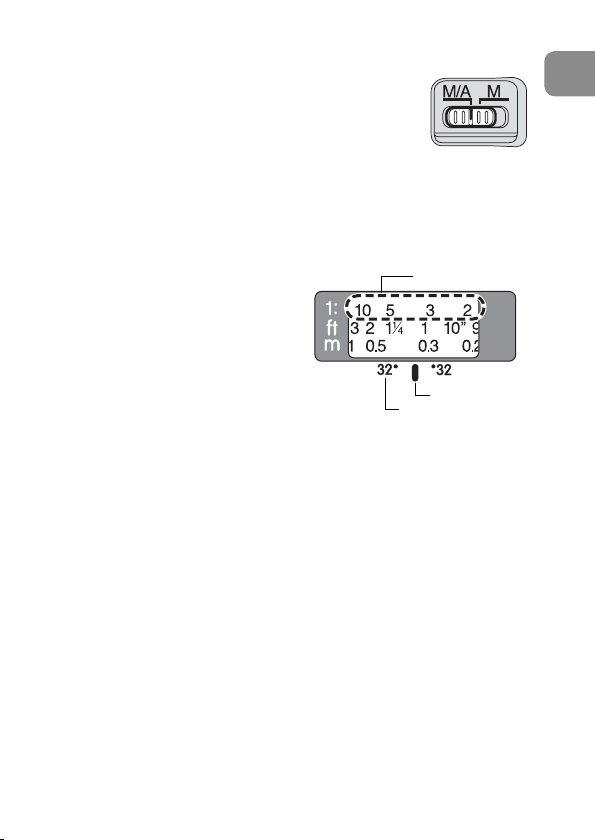
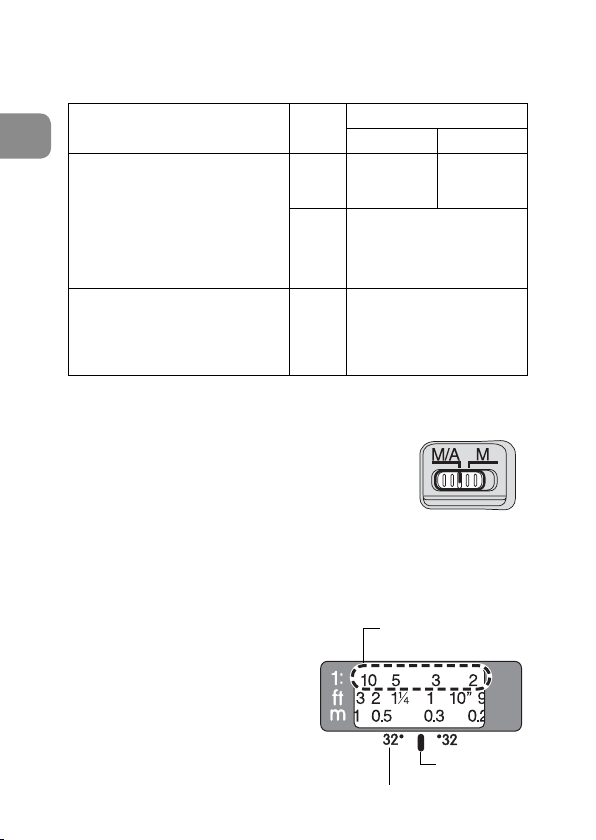
■ M/A(マニュアル優先オートフォーカスモード)(P.6 参照)
a
フォーカスモード切り換えスイッチを M/A にセッ
トします。
b
オートフォーカスでシャッターボタンを半押し中、
またはカメラの AF 作動ボタンを押したままフォー
カスリングを回すと、マニュアルフォーカスができます。
●
シャッターボタンまたはカメラの AF 作動ボタンから指を離し、再
度オートフォーカス動作(シャッターボタンの半押しなど)をする
と、オートフォーカスに戻ります。
Jp
5.被写界深度
被写体の前後のどの範囲が鮮明に写
るかという被写界深度の範囲は、距
離目盛基準線の両側の被写界深度目
盛が示す距離目盛で、おおよそ読む
ことができます。ただし、近距離で
はズレが生じるため被写界深度目盛
は使用できませんので被写界深度表
(P.150)をご覧ください。被写界深
度プレビュー(絞り込み)機構を持
つカメラでは、プレビューボタンを
押してファインダー内で被写界深度
を確認できます。
倍率目盛
距離目盛基準線
被写界深度目盛
6.撮影倍率
撮影倍率とは、フィルム面上に写された像の大きさと被写体の実際の大
きさとの比率です。たとえば実際には 5cm の長さの被写体がフィルム
面上に 1cm に写ったときの撮影倍率は 1/5 倍(1:5)といいます。
距離目盛のすぐ上の倍率目盛(オレンジ色)により、先に倍率を決めて
から撮影することもできます。たとえば 1/5 倍の倍率で撮影したいと
きは倍率目盛の5を距離目盛に合わせ、ピントを合わせます。なお、
各撮影距離での撮影倍率については被写界深度表(P.150)を ご参照
ください。
7
Page 8

7.接写、複写撮影
Jp
接写、複写撮影の際は特にカメラブレに注意してください。カメラブレ
を防ぐ方法として、しっかりとした三脚を用い、ケーブルレリーズ、ま
たはリモートコードを併用することをおすすめします。接写撮影では、
一般に被写界深度が著しく浅くなるので、奥行きのある被写体の撮影で
は、絞りを十分絞って、露出時間を長くしてください。また、写したい
部分をフィルム面(撮像素子面)と平行に置くことなどの注意も必要です。
●
クローズアップレンズをお使いの場合は、マニュアルフォーカスで撮
影してください。
クローズアップ
レンズ
No.5T
No.6T
No.5T+6T1⁄
撮影倍率 被写界面積(cm) 撮影距離(cm)
1
⁄
― 1.07 26.7x40.0―2.24x3.36 80.6―18.5
11.1
1
⁄
― 1.14 13.6x20.5―2.11x3.16 48.2 ―18.5
5.7
― 1.20 10.0x15.0―2.00x3.00 41.2―18.5
4.2
8.露出倍数について
レンズの F 値は無限遠での被写体の像の明るさを表しますが、撮影倍率
を上げて撮影すると像の明るさは F 値より減少します。このときの実質
的な明るさを有効F値(実効 F 値ともいいます)と呼び、実質的な明る
さが減少した分だけ増やす露出の係数を露出倍数といいます。
9.有効 F 値の変化について(P.146の図参照)
このレンズは、撮影倍率が上がるに従いフィルム面上(撮像素子面)で
の像の明るさは減少します。有効 F 値(実効 F 値ともいいます)は大き
く(=暗く)なります。この変化量はカメラが自動的に補正するので、
露出を決める際や TTL 調光によるフラッシュ撮影で露出倍数を考慮する
必要はありません。
なお、カメラ側の外部表示パネルやファインダー内表示部で表示される
絞り値は露出倍数が自動的に補正された F 値です。
8
Page 9
10.絞り値の設定
絞り値は、カメラ側で設定してください。カメラの露出(撮影)モード
が A(絞り優先オート)、M(マニュアル)で絞りをセットした場合でも、
撮影距離によって有効 F 値(実効 F 値ともいいます)が変化すると、カ
メラは設定した F 値を保つように、自動的に絞りを調整(最大約 1.6 段)
します。
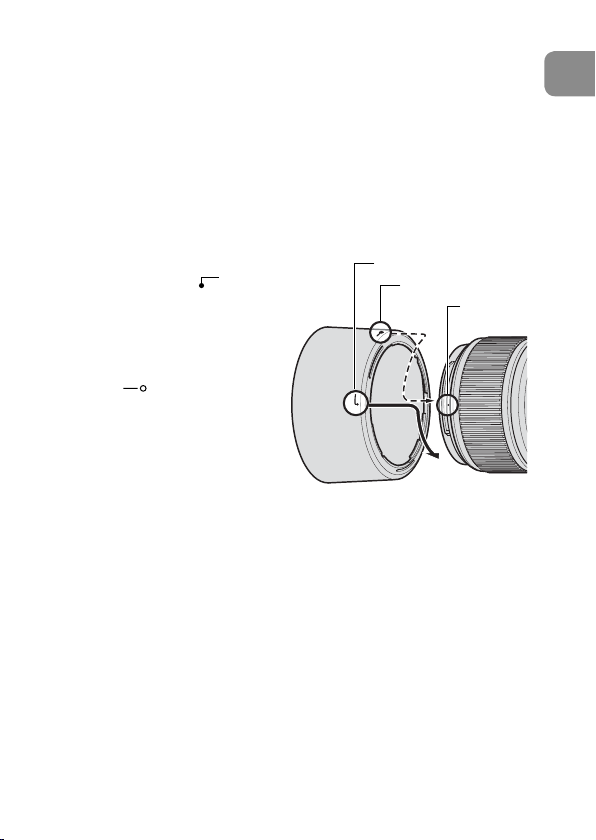
11.バヨネットフード HB-42 の取り付け、取り外し
■取り付け方
レンズ先端のフード着脱指標とフ
ード取り付け指標(
のいずれか)を合わせて、時計回
りにカチッと音がするまでフード
を回転させ、確実に取り付けます。
●
フード着脱指標とフードセット
指標(
を確認してください。
●
フードが正しく取り付けられな
いと撮影画面にケラレを生じま
すのでご注意ください。
●
フード先端を強くつかむと着脱
が困難になります。着脱の際は、フードの根元(フード取り付け指標
部分)付近を持って回転させてください。
●
収納時はフードを逆向きにしてレンズに取り付けられます。
)が合っていること
、2 ヵ所
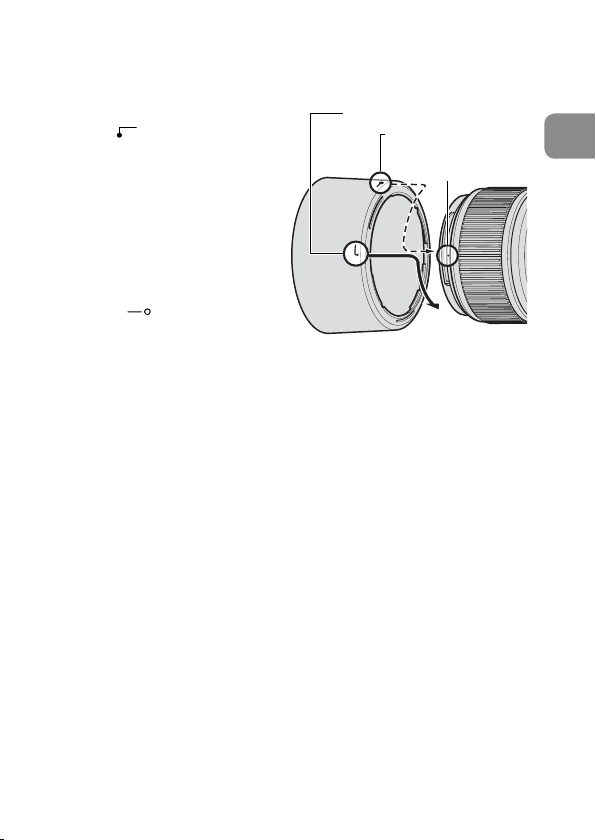
■取り外し方
フードの根元(フード取り付け指標部分)付近を持ち、反時計回りにフ
ードを回転させて取り外します。
フード取り付け指標
フードセット指標
フード着脱
指標
Jp
12.カメラ内蔵フラッシュ使用時のご注意
ケラレ(写真の一部に影ができる)を防止するため、レンズフードは取
り外して使用してください。
9
Page 10

13.ファインダースクリーンとの組み合わせ
Jp
スクリーン
カメラ
F5+DP-30 ◎◎ ◎ ◎ ― ○◎―◎ ―
F5+DA-30 ◎◎ ◎ ◎ ― ◎―◎ ―
F4+DP-20 ―◎ ◎ ― ◎◎◎― ◎
F4+DA-20 ―◎ ◎ ― ◎◎― ◎
ABCE
F6 ◎◎―◎ ― ―――◎―◎ ―
EC-B
FG1G2G4G2 J K L M P U
EC-E
■構図の決定やピント合わせの目的には
◎: 好適です
○: 視野の一部が多少見にくくなりますが、撮影結果には全く影響があ
りません。
: 各カメラに存在しないファインダースクリーンです。
空欄:使用不適当です。ただし、M スクリーンの場合、撮影倍率 1/1 倍
以上の近接撮影に用いるため、この限りではありません。
ご注意
●
上記以外のカメラで B、E スクリーンをお使いの場合は、それぞれ B、
E スクリーンの欄をご覧ください。
10
Page 11

14.レンズのお手入れと取り扱い上のご注意
●
レンズ面の清掃は、ホコリを拭う程度にしてください。指紋がついた
ときは、柔らかい清潔な木綿の布に無水アルコール(エタノール)ま
たは市販のレンズクリーナーを少量湿らせ、レンズの中心から外周へ
渦巻状に、拭きムラ、拭き残りのないように注意して拭いてください。
●
シンナーやベンジンなどの有機溶剤は絶対に使用しないでください。
●
レンズ表面の汚れや傷を防ぐためには、NC フィルターをお使いいただ
けます。また、レンズフードも役立ちます。
●
レンズをケースに入れるときは、必ず、レンズキャップを前後に取り
付けてください。
●
レンズを長期間使用しないときは、カビやサビを防ぐために、高温多
湿のところを避けて風通しのよい場所に保管してください。また、直
射日光のあたるところ、ナフタリンや樟脳のあるところも避けてくだ
さい。
●
レンズを水に濡らすと、部品がサビつくなどして故障の原因となりま
すのでご注意ください。
●
ストーブの前など、高温になるところに置かないでください。極端に
温度が高くなると、外観の一部に使用している強化プラスチックが変
形することがあります。
15.付属アクセサリー
●
62mm スプリング式レンズキャップLC-62 ●裏ぶたLF-1
●
バヨネットフードHB-42 ●ソフトケースCL-1018
16.別売アクセサリー
●
62mm ネジ込み式フィルター(円偏光フィルターⅡを含む)
17.使用できないアクセサリー
●
テレコンバーター:全種類
●
オート接写リング:PK リング全種類 ●K リング:全種類
●
オートリング:BR-4 ●ベローズアタッチメント:全種類
※その他のアクセサリーでも、使用できない場合があります。アクセサ
リーの使用説明書でご確認ください。
Jp
11
Page 12

18.仕 様
Jp
型式:
焦点距離: 60mm
最大口径比: 1:2.8
レンズ構成: 9 群 12 枚(ED レンズ 1 枚、非球面レンズ 2 枚、
画角: 39 40···35mm 判一眼レフカメラ
26 30···DX フォーマットのデジタル一眼レフカメラ
32···········IX240 カメラ
倍率目盛: 1:10 〜 1:1(等倍)
撮影距離情報: カメラへの撮影距離情報出力可能
ピント合わせ: IF(ニコン内焦)方式、超音波モーターによるオート
撮影距離目盛: ∞〜 0.185m、8in.(併記)
最短撮影距離: 0.185m(等倍)
絞り羽根枚数: 9 枚(円形絞り)
絞り方式: 自動絞り
絞りの範囲: f/2.8
測光方式: 開放測光
アタッチメントサイズ
大きさ: 約 73(最大径)× 89mm(バヨネットマウント基
質量: 約 425g
●
仕様、外観の一部を、改善のため予告なく変更することがあります。
ニコン F マウント CPU 内蔵 G タイプ、AF-S マイクロ
レンズ
ナノクリスタルコート 1 面)
FX フォーマットのデジタル一眼レフカメラ
フォーカス、マニュアルフォーカス可能
32
:62mm(P=0.75mm)
準面からレンズ先端まで)
12
Page 13

Jp
13
Page 14

Notes on Safety Operations
CAUTION
Do not disassemble
En
Touching the internal parts of the camera or lens could result in injury.
Repairs should be performed only by qualified technicians. Should the
camera or lens break open as the result of a fall or other accident, take the
product to a Nikon-authorized service representative for inspection after
unplugging the product and/or removing the battery.
Turn off immediately in the event of malfunction
Should you notice smoke or an unusual smell coming from the camera or
lens, remove the battery immediately, taking care to avoid burns. Continued
operation could result in injury. After removing or disconnecting the power
source, take the equipment to a Nikon-authorized service representative for
inspection.
Do not use the camera or lens in the presence of flammable gas
If the electronic equipment is operated in the presence of flammable gas, it
could result in an explosion or a fire.
Do not look at the sun through the lens or viewfinder
Viewing the sun or other strong light sources through the lens or viewfinder
could cause permanent visual impairment.
Keep out of reach of children
Particular care should be taken to prevent infants from putting the batteries
or other small parts into their mouths.
Observe the following precautions when handling the
camera and lens
• Keep the camera or lens unit dry. Failure to do so could result in a fire or
electric shock.
• Do not handle or touch the unit with wet hands. Failure to do so could
result in electric shock.
• In backlit shooting, keep the sun well out of the frame.
The sunlight could focus into the lens body and cause a fire. When the
sun gets close to the frame, it can also cause a fire.
• When the lens will not be used for a long time, attach both front and rear
lens caps and store the lens away from direct sunlight. Failure to do so
could result in a fire, as the lens might focus sunlight onto an object.
14
Page 15

1. Nomenclature ( ): Reference page
1
Lens hood mounting index (p.21)
2
Focus ring (p.18)
3
Distance scale
4
Focus mode switch (p.18)
5
Mounting index
6
Lens mount rubber gasket (p.17)
7
CPU contacts (p.17)
8
Lens hood (p.21)
9
Lens hood attachment index (p.21)
0
Lens hood setting index (p.21)
!
Reproduction ratio scale (p.18)
@
Depth-of-field indicators (p.18)
#
Distance index line (p.18)
A
En
B
C
15
Page 16

2. Usable cameras and available functions
There may be some restrictions or limitation for available functions.
Refer to your camera instruction manual for details.
En
Cameras
D3, D2-Series, D1-Series, D300, D200, D100,
D80, D70-Series, D60, D50, D40-Series
F6, F5, F100, F80-Series/N80-Series*,
F75-Series/N75-Series*, F65-Series/N65-Series*
Pronea 600i/6i*, Pronea S*
F4-Series, F90X/ N90s*, F90-Series/N90*,
F70-Series/N70*
F60-Series/ N60*, F55-Series/N55-Series*,
F50-Series/N50*, F-401x/N5005*,
F-401s/ N4004s*, F-401/N4004*
F-801s/N8008s*, F-801/N8008*,
F-601M/N6000*
F3AF, F-601/N6006*, F-501/N2020**,
Nikon MF cameras (except F-601M/N6000*)
* Sold exclusively in the USA
** Sold exclusively in the USA and Canada
*1 P includes AUTO (General-Purpose Program) and Vari-Program System.
*2 Manual (M) is not available.
2
Autofocus
—
—
— ————
: Possible —: Impossible
Exposure mode
*1
P
6$0
——
——
16
Page 17

3. Introduction
Thank you for purchasing the AF-S Micro NIKKOR 60mm f/2.8G ED
lens. This is a high-performance Micro lens featuring high-speed
Internal Focusing (IF) mechanisms. It also employs a Silent (S) Wave
Motor to drive the focusing mechanism.
Major features
• Autofocus (A) or manual (M) mode can easily be selected with
the Focus mode switch.
• Autofocusing with manual override is provided, allowing instant
change from autofocusing to manual focusing.
• More accurate exposure control is possible when this is mounted
on a Nikon camera having 3D color Matrix Metering capability,
because subject distance information is transferred from the lens
to the camera body.
• The use of two aspherical and one ED (extra-low dispersion) lens
elements ensures sharp pictures virtually free of color fringing.
Also, by utilizing a 9-blade diaphragm that produces a nearly
circular aperture, out-of-focus images in front of or behind the
subject are rendered as pleasing blurs.
• The Nano Crystal Coat deposited on some of the lens elements
ensures that fine, clear images can be reproduced under various
shooting conditions, from the sunny outdoors to spotlighted
interior scenes.
• The closest focusing distance possible is 0.185 m (0.6 ft.)
Important
• Be careful not to soil or damage the CPU contacts.
• When mounted on Nikon digital SLR (Nikon DX format) cameras,
such as the D2-Series and D300, the lens’ picture angle becomes
26°30’ and its 35 mm equivalent focal length is approx. 90 mm.
• If the lens mount rubber gasket is damaged, be sure to visit the
nearest Nikon authorized dealer or service center for repair.
• A total of four Wireless Remote Speedlights SB-R200 can be
attached to the front of the lens.
En
17
Page 18
4. Focusing
Set your camera´s focus mode selector according to this chart.
En
D3, D2-Series, D1-Series, D300, D200,
D100, D80, D70-Series, D60, D50,
D40-Series, F6, F5, F4-Series, F100,
F90X/ N90s*, F90-Series/N90*,
F80-Series/N80-Series*,
F75-Series/N75-Series*,
F70-Series/N70*, F65-Series/N65-Series*,
Pronea 600i/6i*, Pronea S
F55-Series/N55-Series*, F60-Series/N60*,
F50-Series/N50*, F-801s/N8008s*,
F-801/N8008*, F-601M/N6000*,
F-401x/N5005*, F-401s/ N4004s*,
F-401/N4004*
Cameras
Camera’s
focus
mode
AF
(C/S)
MF
AF
(C/S)
MF
Lens’ focus mode
M/A M
Autofocus with
manual priority
Manual focus
(Focus assist is available.)
Manual focus
(Focus assist is available,
except with the F-601M/N6000*.)
* Sold exclusively in the USA
Autofocus with manual override (M/A mode)
a
Set the focus mode switch to “M/A”.
b
You can manually override autofocus by
operating the focus ring while lightly
depressing the shutter release button or the
AF start button on the camera.
•
To cancel manual override, remove your finger from the shutter
release button or the AF start button on the camera, and lightly
depress the shutter release button to return to the autofocus mode.
5. Depth of field
The depth-of-field indicators are
engraved beside the distance index
line. At close distances, however, so
little is in focus that it may be better
to check the depth of field table (on
page 150). If your camera has a
depth of field preview button or
lever, use it to check the depth of
field in the viewfinder.
18
Reproduction ratio
scale
Depth-of-field indicators
Manual focus
(Focus assist is
available.)
Distance
index line
Page 19

6.
Focusing at a predetermined reproduction ratio
The reproduction ratio is the relation between the size of the
image recorded on film and the actual subject size. If, for example,
the image on the focusing screen is one-fifth the actual subject
size, the reproduction ratio is 1:5.
To photograph at a predetermined reproduction ratio, use the
following procedure:
a
Manually turn the focus ring until the desired reproduction ratio
scale number is aligned with the distance index line.
b
Aim at the subject, then change your position, moving closer to
or farther away from the subject, until the image in the
viewfinder sharpens.
To obtain the appropriate reproduction ratio for each focused
distance, see the table on page 150.
7.
Notes on close-up photography and duplication work
Camera shake
The AF-S Micro NIKKOR 60mm f/2.8G ED provides such
exceptionally high image magnification that even the slightest
movement during shooting can cause the image to blur. Be sure to
mount the camera on a tripod and use a cable release or remote
cord to release the shutter.
Close working distance
At the high reproduction ratios used in close-up shooting, the depth
of field is very shallow. To ensure greater depth of field, stop down
the lens, then carefully position the camera to ensure the most
important surface of the subject is in the same zone of sharp focus.
• Use manual focus when using the close-up lens.
Close-up
attachment
No. 5T 1/11.1–1.07
No. 6T 1/5.7 –1.14
No. 5T + 6T 1/4.2 –1.20
Reproduction
ratio
Subject field (cm/inch)
26.7 x 40.0 – 2.24 x 3.36 /
10.50 x 15.70 – 0.88 x 1.32
13.6 x 20.5 – 2.11 x 3.16 /
5.35 x 8.07 – 0.83 x 1.24
10.0 x 15.0 – 2.00 x 3.00 /
3.93 x 5.90 – 0.79 x 1.18
Focused distance
(cm/inch)
80.6 – 18.5 /
31.7 – 7.3
48.2 – 18.5 /
19.0 – 7.3
41.2 – 18.5 /
16.2 – 7.3
En
19
Page 20

8.
Exposure factor
The f-number of a lens indicates brightness of the image formed
by the lens set at “infinity” shooting distance. The higher the
reproduction ratio is, the more the brightness of the image will
En
decrease. The actual brightness of the image is called the “effective
f-number,” and the exposure compensation value for the change
of the effective f-number is called the “exposure factor.”
9.
Effective f-number variation (P. 146)
With this lens, the higher the reproduction ratio is, the more the
brightness of the image on the film (image sensing device) will
decrease and the effective f-number will increase (the amount of
light that comes through the lens´ aperture will decrease). This
variation is automatically compensated for by the camera´s
exposure meter, so the user can determine exposure or operate TTL
flash shooting without having to consider the exposure factor.
The f-number displayed in the camera´s LCD panel or viewfinder is
the value automatically compensated.
10.
Setting the aperture
Set the aperture on the camera body. When exposure (or shooting)
mode is set at “A” (Aperture Priority auto) or “M” (manual), the
camera will control to maintain the predetermined f-number (up to
approx. 1.6 stops) as the effective f-number varies with shooting
distance.
20
Page 21
11. Using bayonet hood HB-42
Attaching the hood
Align the lens hood attachment
index ( ) on the hood (either
one of the two indexes) with
the lens hood mounting index
on the lens, and turn the lens
hood clockwise until it click
stops to secure.
• Make sure that the lens
hood mounting index aligns
with the lens hood setting
index (
• If the lens hood is not
correctly attached, vignetting can occur.
• To facilitate attachment or removal of the hood, hold it by its
base (around the lens hood attachment index) rather than its
outer edge.
• To store the lens hood, attach it in the reverse position.
).
Detaching the hood
While holding the base of the hood (near the lens hood
attachment index) rather than its outer edge, turn it
counterclockwise to detach.
12.
Flash pictures using cameras with a built-in flash
To prevent vignetting, do not use a lens hood.
Lens hood attachment index
Lens hood setting index
Lens hood
mounting index
En
21
Page 22

13. Recommended focusing screens
Various interchangeable focusing screens are available for certain
Nikon SLR cameras to suit any picture-taking situation. The ones
recommended for use with this lens are:
En
Screen
Camera
F6
F5+DP-30
F5+DA-30
F4+DP-20
F4+DA-20
: Excellent focusing
Ⴟ
: Acceptable focusing
Ⴜ
Slight vignetting or moir patterns appear in the viewfinder, but
not on the film.
—
: Not available.
Blank box means not applicable. Since type M screen can be used
for both macro photography at a 1:1 magnification ratio and for
photomicrography, it has different applications than other screens.
• When using the B and E focusing screens in cameras other than
those listed above, refer to the columns for the B and E screens.
ABC E
EC-B G1
EC-EFG2
G4 J K L M P U
22
Page 23

14. Lens care
• Clean the lens surfaces with a blower brush. To remove dirt and
smudges, use a soft, clean cotton cloth or lens tissue moistened
with ethanol (alcohol) or lens cleaner. Wipe in a circular motion
from center to outer edge, taking care not to leave traces or
touch other parts of the lens.
• Never use thinner or benzene to clean the lens as this might
damage it, result in a fire, or cause health problems.
• To protect the front lens element, an NC filter is available. A lens
hood also helps protect the front of the lens.
• When storing the lens in its lens case, attach both front and rear
caps.
• When the lens will not be used for a long time, store it in a cool,
dry place to prevent mold. Also store the lens away from direct
sunlight or chemicals such as camphor or naphthalene.
• Do not get water on the lens or drop it in water as this will cause
it to rust and malfunction.
• Reinforced plastic is used for certain parts of the lens. To avoid
damage, never leave the lens in an excessively hot place.
15. Standard accessories
• 62mm snap-on front lens cap LC-62 • Rear lens cap LF-1
• Bayonet hood HB-42 • Flexible lens pouch CL-1018
16. Optional accessories
• 62mm screw-in filters, including circular polarizing filter II
17. Incompatible accessories
• Teleconverters
• Auto Ring BR-4 and all models of Auto Extension Ring PK, K
Ring and Bellows focusing attachment.
Other accessories may not be suitable for use with this lens. For
details, carefully read your accessories instruction manual.
En
23
Page 24

18. Specifications
Type of lens: G-type AF-S Micro NIKKOR lens with built-
Focal length: 60 mm
En
Maximum
aperture:
Lens construction: 12 elements in 9 groups (1 ED, 2 aspherical
Picture angle: 39°40´ with 35 mm (135) format Nikon
Reproduction ratio
scale:
Distance
information
Focusing: Nikon Internal Focusing (IF) system
Shooting distance
scale:
Closest focusing
distance:
No. of diaphragm
blades:
Diaphragm: Fully automatic
Aperture range: f/2.8 to f/32
Exposure
measurement:
Attachment size: 62 mm (P = 0.75 mm)
in CPU and Nikon bayonet mount
f/2.8
and 1 Nano Crystal Coat-deposited lens
elements)
film-SLR cameras and Nikon FX format
digital SLR cameras
26°30´ with Nikon DX format digital SLR
cameras
32° with IX240 system cameras
1:10 to 1:1 (life-size)
Output to camera body
(utilizing an internal Silent Wave Motor);
manually via separate focus ring.
Graduated in meters and feet from
0.185 m (8 in.) to infinity ()
0.185 m (0.6 ft) (life-size)
9 pcs. (rounded)
Via full-aperture method
24
Page 25

Dimensions: Approx. 73 mm dia. x 89 mm extension
from the camera´s lens mount flange
Weight: Approx. 425 g (15.0 oz)
Specifications and designs are subject to change without any notice or
obligation on the part of the manufacturer.
En
25
Page 26

Hinweise für sicheren Betrieb
ACHTUNG
Nehmen Sie das Objektiv nicht auseinander
Beim Berühren der Innenteile von Kamera oder Objektiv droht
Verletzungsgefahr. Überlassen Sie Reparaturen unbedingt ausschließlich
qualifizierten Technikern. Kommt es durch einen heftigen Stoß (z. B. Fall auf
den Boden) zu einem Bruch von Kamera oder Objektiv, so trennen Sie
zunächst das Produkt vom Stromnetz bzw. entnehmen die Batterie(n) und
De
geben es dann an eine autorisierte Nikon-Servicestelle zur Überprüfung ab.
Schalten Sie die Kamera bei einer Fehlfunktion sofort aus
Entnehmen Sie bei Entwicklung von Rauch oder ungewöhnlichem Geruch
durch Kamera oder Objektiv sofort die Akkus/Batterien. Gehen Sie dabei
dabei vorsichtig vor, denn es besteht Verbrennungsgefahr. Bei einem
Weiterbetrieb unter diesen Umständen droht Verletzungsgefahr. Geben Sie
das Gerät nach Entnahme der Akkus/Batterien bzw. nach Trennung vom
Netzadapter an eine autorisierte Nikon-Servicestelle zur Überprüfung ab.
Verwenden Sie Kamera oder Objektiv nicht in der Nähe von
brennbarem Gas
In der Nähe von brennbarem Gas sollten Sie niemals elektronische Geräte in
Betrieb nehmen. Es besteht Explosions- und Brandgefahr.
Schauen Sie niemals durch Objektiv oder Sucher in die Sonne
Beim Betrachten der Sonne oder anderer starker Lichtquellen durch Objektiv
oder Sucher droht eine permanente Schädigung des Sehvermögens.
Achten Sie darauf, dass Kamera und Zubehör nicht in
die Hände von Kindern gelangen
Es ist unbedingt dafür zu sorgen, dass Kleinkinder keine Batterien oder
andere kleine Teile in den Mund nehmen können.
Beachten Sie beim Umgang mit Kamera und Objektiv
unbedingt die folgenden Vorsichtmaßnahmen:
• Halten Sie Kamera oder Objektiv stets trocken. Andernfalls droht Brand-
oder Stromschlaggefahr.
• Handhaben oder berühren Sie die Komponente keinesfalls mit nassen
Händen. Andernfalls droht Stromschlaggefahr.
• Achten Sie bei Gegenlichtaufnahmen darauf, dass sich die Sonne nicht im
Bildfeld befindet.
Das Sonnenlicht könnte in gebündelter Form in das Objektivgehäuse
geleitet werden und einen Brand verursachen. Auch wenn sich die Sonne
zu nahe am Bildfeld befindet, kann es zu einem Brand kommen.
• Bringen Sie vor einem längeren Nichtgebrauch des Objektivs den vorderen
und hinteren Deckel an und bewahren das Objektiv geschützt vor direkter
Sonnenlichteinwirkung auf. Andernfalls droht Brandgefahr wegen
möglicher Fokussierung von Sonnenlicht auf Gegenstände.
26
Page 27
1. Nomenklatur ( ): Seitennummer
1
Montagemarkierung für
Gegenlichtblende (S.33)
2
Entfernungseinstellring (S.30)
3
Entfernungsskala
4
Fokusschalter (S.30)
5
Montagemarkierung
6
Dichtungsmanschette (S.29)
7
CPU-Kontakte (S.29)
8
Gegenlichtblende (S.33)
9 Montagemarkierung der
Gegenlichtblende (S.33)
0 Kontrollmarkierung der
Gegenlichtblende (S.33)
!
Skala für Abbildungsmaßstab (S.30)
@
Tiefenschärfemarkierungen (S.30)
# Markierung für Entfernungsskala (S.30)
A
De
B
C
27
Page 28

2. Verwendbare Kameras und verfügbare
Funktionen
Möglicherweise gibt es hinsichtlich der verfügbaren Funktionen
Einschränkungen.
Informationen hierzu finden Sie in der Bedienungsanleitung zu
Ihrer Kamera.
De
D3, D2-Serie, D1-Serie, D300, D200, D100,
D80, D70-Serie, D60, D50, D40-Serie
F6, F5, F100, F80-Serie, F75-Serie, F65-Serie
Pronea 600i, Pronea S*
F4-Serie, F90X, F90-Serie, F70-Serie
F60-Serie, F55-Serie, F50-Serie,
F-401x, F-401s, F-401
F-801s, F-801, F-601M —
F3AF, F-601, F-501
Nikon MF Kameras (außer F-601M)
*1 P schließt die Automatik (AUTO) und Motivprogramme mit ein.
*2 Manuelle Belichtungssteuerung (M) nicht möglich.
Kameras
2
Autofokus
Belichtungssteuerung
—
— ————
: Möglich —: Nicht möglich
*1
P
6$0
——
——
28
Page 29

3. Einführung
Vielen Dank für das Vertrauen in Nikon-Technik. Das AF-S Micro
NIKKOR 60mm f/2,8G ED ist ein Hochleistungs-Mikroobjektiv mit
schneller Innenfokussierung (IF). Außerdem verfügt es über einen
Silent Wave Motor (S) für einen leisen, präzisen Fokusantrieb.
Die wichtigsten Merkmale
• Der Fokusschalter gestattet das Umschalten zwischen Autofokus
(A) und manuellem Fokus (M).
• Auch wenn der Autofokus aktiviert ist, können Sie jederzeit
manuell eingreifen (Priorität der manuellen Scharfeinstellung).
• Das Objektiv überträgt die eingestellte Entfernung an die Kamera
und ermöglicht so eine präzisere Belichtungssteuerung (3DMatrixmessung).
• Der Einsatz zweier asphärischer und einer ED-Linse (mit
besonders geringer Dispersion) gewährleistet scharfe, nahezu
farbsaumfreie Bilder. Neun Blendenlamellen sorgen für eine
nahezu kreisrunde Blendenöffnung, so daß außerhalb des
Schärfenbereichs vor und hinter dem Motiv liegende Elemente in
ansprechende Unschärfe getaucht werden.
• Die Nanokristallvergütung einiger Linsen sorgt für klare Bilder in
den unterschiedlichsten Aufnahmesituationen, von
Außenaufnahmen bei hellem Sonnenschein bis hin zu
Innenaufnahmen bei grellem Scheinwerferlicht.
• Die kürzest mögliche Aufnahmeentfernung beträgt 0,185 m.
Wichtige Hinweise
• Halten Sie die CPU-Kontakte sauber und schützen Sie sie vor
Beschädigung.
• Wird das Objektiv mit Nikon Digital-SLR-Kameras (Nikon DX-
Format), wie etwa der Modelle der D2-Serie sowie Modell D300
verwendet, beträgt der Bildwinkel 26°30’ und der
Brennweitenbereich entspricht 90 mm bei einer
Kleinbildformatkamera.
• Bei einer Beschädigung der Dichtungsmanschette sollten Sie das
Objektiv beim nächsten Nikon-Vertragshändler bzw.bei einer
Nikon-Reparaturwerkstatt zur Reparatur abgeben.
• An der Vorderseite des Objektivs können bis zu vier Slave-
Blitzgeräte vom Typ SB-R200 angebracht werden.
De
29
Page 30

4. Fokussteuerung
Wählen Sie anhand der folgenden Tabelle eine von der Kamera
unterstützte Fokussteuerung:
Kameras
D3, D2-Serie, D1-Serie, D300, D200,
D100, D80, D70-Serie, D60, D50,
De
D40-Serie, F6, F5, F4-Serie, F100,
F90X, F90-Serie, F80-Serie, F75-Serie,
F70-Serie, F65-Serie, Pronea 600i,
Pronea S
F60-Serie, F55-Serie, F50-Serie,
F-801s, F-801, F-601M, F-401x,
F-401s, F-401
Fokussteuerung
(Kamera)
Autofokus mit Priorität der manuellen
Scharfeinstellung (M/A-Modus)
a
Stellen Sie den Fokus-Modusschalter auf “M/A” ein.
b
Der Autofokus lässt sich durch Drehen des Einstellrings und
gleichzeitiges Antippen des Auslösers oder der
AF-Starttaste (AF-ON) an der Kamera oder der
Fokus-Betriebstaste am Objektiv manuell
übersteuern.
• Zur Deaktivierung der manuellen
Übersteuerung geben Sie den Auslöser oder die AF-Starttaste
an der Kamera oder die Fokus-Betriebstaste am Objektiv frei
und tippen den Auslöser an, um wieder auf Autofokus-Modus
umzuschalten.
5. Tiefenschärfe
Neben der Markierung für die Entfernungsskala
sind Markierungen für die Tiefenschärfe
eingraviert. Bei sehr kurzen Aufnahmeabständen
ist die Tiefenschärfe allerdings so gering, dass es
sich empfiehlt, die Werte der Tiefenschärfetabelle
(auf Seite 150) zu entnehmen. Wenn lhre
Kamera über eine Abblendtaste oder einen
Abblendhebel verfügt, können Sie die
Tiefenschärfe im Sucher kontrollieren.
30
Fokussteuerung (Objektiv)
M/A M
Autofokus mit
AF
Priorität der man.
(C/S)
Scharfeinstellung
Manueller Fokus
MF
(mit elektronischer Einstellhilfe)
Manueller Fokus (mit elektronischer
AF
Einstellhilfe; keine Einstellhilfe bei
(C/S)
F-601M)
MF
Skala für
Abbildungsmaßstab
Tiefenschärfemarkierungen
Manueller Fokus
(mit elektronischer
Einstellhilfe)
Markierung für
Entfernungsskala
Page 31

6.
Voreinstellung des Abbildungsmaßstabs
Als Abbildungsmaßstab bezeichnet man das Verhältnis der Größe eines
aufgenommenen Objekts und der Größe dessen Bildes auf dem Film/
Bildsensor. Ein Abbildungsmaßstab von 1:5 bedeutet beispielsweise,
dass die Abbildung ein Fünftel der Größe des Motivs aufweist.
Um Aufnahmen mit einem vorbestimmten Abbildungsmaßstab zu
erstellen, gehen sie wie folgt vor:
a
Stellen sie den Scharfeinstellring per Hand so ein, dass der
gewünschte Abbildungsmaßstab der Markierung für die
Entfernungseinstellung gegenübersteht.
b
Richten Sie die Kamera auf das Motiv, und bewegen Sie sich
anschließend mitsamt der Ausrüstung vom Motiv weg oder zu
ihm hin, bis das Bild im Sucher scharf erscheint.
Die Abbildungsmaßstäbe, die sich aus den jeweiligen
Entfernungseinstellungen ergeben, können sie der Tabelle auf Seite
150 entnehmen.
7.
Hinweise für Nahaufnahmen und Duplikationen
Verwacklungsunschärfe
Das AF-S Micro NIKKOR 60mm f/2,8G ED ermöglicht
überdurchschnittlich große Abbildungsmaßstäbe, sodass selbst
geringste Bewegungen während der Aufnahme
Verwacklungsunschärfe verursachen könnten. Die Kamera sollte
deshalb auf ein Stativ gesetzt und mit einem Draht- oder
Fernauslöser bedient werden.
Geringe Aufnahmeabstände
Bei der Makrofotografie mit ihren hohen Abbildungsmaßstäbe ist
die Tiefenschärfe besonders eng begrenzt. Blenden Sie ab, um eine
größere Tiefenschärfe zu erreichen, und richten Sie die Kamera
sorgfältig so aus, dass die wichtigsten Motivdetails in einer
Schärfeebene liegen.
•
Bei Einsatz einer Vorsatzlinse ist manuelle Scharfeinstellung erforderlich.
Vorsatzlinse
Nr. 5T + 6T 1/4,2 –1,20 10,0 x 15,0 – 2,00 x 3,00 41,2 – 18,5
Abbildungsmaßstab
Nr. 5T 1/11,1–1,07 26,7 x 40,0 – 2,24 x 3,36 80,6 – 18,5
Nr. 6T 1/5,7 –1,14 13,6 x 20,5 – 2,11 x 3,16 48,2 – 18,5
Motivfeld (cm) Eingestellte Entfernung
De
31
Page 32

8.
Belichtungsfaktor
Die Blendenzahl eines Objektivs gibt an, wie hell das vom Objektiv
erzeugte Bild bei Aufnahmeentfernung “unendlich” ist. Je größer
das Abbildungsverhältnis, desto geringer die Bildhelligkeit. Die
tatsächliche Helligkeit des Bilds kennzeichnet die so genannte
“effektive Blendenzahl”, und die Belichtungskorrektur für die
Änderung der effektiven Blendenzahl wird als “Belichtungsfaktor”
De
bezeichnet.
9.
Variation der effektiven Blendenzahl (S.146)
Bei diesem Objektiv nimmt die Bildhelligkeit in der Filmebene (oder
an der Bilderfassungskomponente) mit zunehmendem
Abbildungsverhältnis ab, während die effektive Blendenzahl (der
Lichteinfall durch die Objektivöffnung nimmt ab) größer wird.
Diese Variation wird automatisch von dem Belichtungsmesser der
Kamera kompensiert, sodass der Benutzer die Belichtung
bestimmen oder TTL-Blitzaufnahmen ohne Berücksichtigung des
Belichtungsfaktors machen kann.
Die auf dem LCD-Display oder Sucher der Kamera angezeigte
Blendenzahl ist der automatisch kompensierte Wert.
10.
Blendeneinstellung
Stellen Sie die Blende an der Kamera ein. Ist der Belichtungsmodus
(oder Aufnahmemodus) auf “A” eingestellt (Zeitautomatik) oder
auf “M” (manuelle Einstellung), stellt die Kamera die
Öffnungsblende so ein, dass die gewählte Blendezahl (bis zu etwa
1,6 Stufen) beibehalten wird, wobei sich die effektive Blendenzahl
mit der Aufnahmeentfernung ändert.
32
Page 33

11. Verwenden der Bajonett-Gegenlichtblende
HB-42
Anbringen der
Gegenlichtblende
Richten Sie die
Montagemarkierungen an
Objektiv und Gegenlichtblende
(
) aneinander aus und
drehen Sie die
Gegenlichtblende im
Uhrzeigersinn, bis sie hörbar
einrastet.
• Stellen Sie sicher, dass die
Kontrollmarkierung ( ) mit
der Montagemarkierung am
Objektiv fluchtet.
• Wenn die Gegenlichtblende falsch angebracht ist, kann es zu
Vignettierung (Abschattungen an den Bildrändern) kommen.
• Halten Sie die Gegenlichtblende zum Anbringen oder Abnehmen
an ihrer Basis fest, nicht am vorderen Rand.
• Die Gegenlichtblende kann zum Verstauen in umgekehrter
Position an das Objektiv angesetzt werden.
Abnehmen der Gegenlichtblende
Halten Sie die Gegenlichtblende an der Basis (nahe der
Montagemarkierung) und drehen Sie sie gegen den Uhrzeigersinn.
Montagemarkierung
der Gegenlichtblende
Kontrollmarkierung der
Gegenlichtblende
Montagemarkierung
für Gegenlichtblende
12. Blitzaufnahmen mit dem integrierten
Blitzgerät
Verwenden Sie beim Fotografieren mit Einsatz des integrierten
Blitzgeräts keine Gegenlichtblende.
De
33
Page 34

13. Empfohlene Einstellscheiben
Für bestimmte Nikon-Kameras stehen verschiedene auswechselbare
Einstellscheiben zur Verfügung, um jeder Aufnahmesituation
gerecht zu werden. Die für dieses Objektiv empfohlenen werden in
der Tabelle aufgeführt:
Einstellscheibe
De
Kamera
F6
F5+DP-30
F5+DA-30
F4+DP-20
F4+DA-20
: Hervorragende Scharfeinstellung
Ⴟ
: Akzeptable Scharfeinstellung
Ⴜ
Das Sucherbild vignettiert leicht. Die Aufnahme selbst bleibt
hiervon unberührt.
—
: Nicht möglich
Leerfelder bedeuten: Nicht verwendbar. Die Einstellscheibe M ist
für die Makrofotografie mit einem Abbildungsmaßstab von 1:1
und für die Mikrofotografie konzipiert. Ihre Eigenschaften
unterscheiden sich daher von denen anderer Einstellscheiben.
• Die Spalten für die Scheiben B und E gelten auch bei
Verwendung der Scheiben B und E in anderen als den oben
genannten Kameras.
ABC E
EC-B G1
EC-EFG2
G4 J K L M P U
34
Page 35

14. Pflege des Objektivs
• Säubern Sie Glasflächen mit einem Blasepinsel. Entfernen Sie
Staub und Flecken mit einem sauberen, weichen Baumwolltuch
oder Optik-Reinigungstuch, das Sie mit Ethanol (Alkohol) oder
Optik-Reinigungsflüssigkeit anfeuchten. Wischen Sie in
kreisförmigen Bewegungen von der Mitte nach außen, ohne
Wischspuren zurückzulassen.
• Verwenden Sie niemals Verdünner oder Benzin zur Reinigung, da
dieses zu Beschädigungen führen, Gesundheitsschäden
verursachen oder ein Feuer auslösen könnte.
• Ein Klarglasfilter (NC) kann als Frontlinsenschutz verwendet
werden. Die Gegenlichtblende wirkt als zusätzlicher Schutz.
• Bei Aufbewahrung des Objektivs in seinem Köcher sollten beide
Objektivdeckel aufgesetzt sein.
• Bei längerer Nichtbenutzung sollte das Objektiv an einem kühlen,
trockenen Ort aufbewahrt werden. Halten Sie das Objektiv von
direkter Sonneneinstrahlung und Chemikalien wie Kampfer oder
Naphthalin (Mottenmittel) fern.
• Das Objektiv ist nicht wasserdicht und kann beschädigt werden,
wenn es Nässe ausgesetzt wird.
• Einige Teile des Objektivs bestehen aus verstärktem Kunststoff.
Eine Lagerung an übermäßig heißen Orten kann zur
Beschädigung führen.
15. Im Lieferumfang enthaltenes Zubehör
• Aufsteckbarer 62-mm-Objektivfrontdeckel LC-62
• Objektivrückdeckel LF-1 • Bajonett-Gegenlichtblende HB-42
• Objektivbeutel CL-1018
16. Optionales Zubehör
• 62-mm-Schraubfilter, einschließlich Zirkularpolarisationsfilter II
17. Nicht kompatibles Zubehör
• Telekonverter
• Automatikring BR-4, Alle Automatikringe der PK-Reihe,
K-Zwischenringe und Balgengeräte.
Anderes Zubehör ist möglicherweise für bestimmte Kameras nicht
geeignet.Lesen Sie sorgfältig die Anleitungen zu Ihrem Zubehör.
De
35
Page 36

18. Technische Daten
Objektivtyp: AF-S Micro NIKKOR mit G-Charakteristik,
Brennweite: 60 mm
Lichtstärke: 1:2,8
Optischer Aufbau: 12 Linsen in 9 Gruppen (1 ED, 2 aus
De
Bildwinkel: 39°40’ mit Nikon-Film-
Skala für den
Abbildungsmaßstab:
Entfernungsdaten: Übermittlung an die Kamera
Fokussierung: Innenfokussierung nach dem Nikon-IF-
Entfernungsskala: Unterteilt in Meter und Fuß, von 0,185 m
Naheinstellgrenze: 0,185 m (Originalgröße)
Blende: Irisblende mit 9 gerundeten Lamellen
Blendensteuerung: Vollautomatisch
Blendenbereich: 2,8 bis 32
Belichtungsmessung:
Filtergewinde: 62 mm (P = 0,75 mm)
Abmessungen: ca. 73 x 89 mm (Durchmesser x Länge bis
Gewicht: ca. 425 g
Irrtümer und Änderungen vorbehalten.
eingebauter CPU und Nikon-F-Bajonett.
asphärisch und eine mit
Nanokristallvergütung)
Spiegelreflexkameras im 35 mm-Format
(135) und Digital-Spiegelreflexkameras im
Nikon-FX-Format
26°30’ mit Digital-Spiegelreflexkameras im
Nikon-DX-Format
32° mit IX240-Systemkameras
von 1:10 bis 1:1 (Originalgröße)
System (mittels integriertem Silent-WaveMotor); manuell über separaten
Fokussierring
bis unendlich ()
Offenblendenmessung
Flansch)
36
Page 37

De
37
Page 38

Remarques concernant une utilisation en toute sécuritév
ATTENTION
Ne démontez pas le matériel
Le fait de toucher aux pièces internes de l’appareil ou de l’objectif pourrait
entraîner des blessures. Les réparations doivent être effectuées uniquement
par des techniciens qualifiés. Si l’appareil ou l’objectif est cassé suite à une
chute ou un autre accident, apportez le produit dans un centre de service
agréé Nikon pour le faire vérifier après avoir débranché le produit et/ou retiré
l'accumulateur ou les piles.
En cas de dysfonctionnement, éteignez immédiatement
Si vous remarquez de la fumée ou une odeur inhabituelle se dégageant de
Fr
l’appareil photo ou de l’objectif, retirez immédiatement l’accumulateur ou
les piles, en prenant soin de ne pas vous brûler. Continuer d’utiliser son
matériel peut entraîner des blessures. Après avoir retiré ou débranché la
source d’alimentation, confiez votre matériel à un centre de service agréé
Nikon pour le faire vérifier.
N’utilisez pas l’appareil photo ou l’objectif en
présence de gaz inflammable
N’utilisez pas de matériel électronique en présence de gaz inflammable car
cela risque de provoquer une explosion ou un incendie.
Ne regardez pas le soleil dans l’objectif ou le viseur
Regarder le soleil ou tout autre source lumineuse violente dans l’objectif ou
le viseur peut provoquer de graves lésions oculaires irréversibles.
Tenez hors de portée des enfants
Faites extrêmement attention à ce que les enfants ne mettent pas à la
bouche les accumulateurs/piles ou d’autres petites pièces.
Observez les précautions suivantes lorsque vous
manipulez l’appareil et l’objectif
• Maintenez l’appareil et l’objectif au sec. Le non-respect de cette
precaution peut provoquer un incendie ou une électrocution.
• Ne manipulez pas et ne touchez pas le matériel avec les mains humides.
Le non-respect de cette précaution peut provoquer une électrocution.
• Lorsque vous photographiez à contre-jour, laissez le soleil hors du champ.
Les rayons du soleil peuvent se focaliser dans l'objectif et provoquer un
incendie. Lorsque le soleil est proche du centre de la vue, il peut
également provoquer un incendie.
• Lorsque vous n’utilisez pas l’objectif pendant une longue période, fixez les
bouchons avant et arrière et rangez l’objectif à l’abri de la lumière directe
du soleil. Le non-respect de cette précaution peut provoquer un incendie,
car l’objectif peut concentrer la lumière du soleil sur un objet.
38
Page 39

1. Nomenclature ( ): Page de référence
1 Repère de montage du parasoleil (p.45)
2
Bague de mise au point (p.42)
3
Échelle des distances
4 Commutateur de mode de mise au point (p.42)
5
Repère de montage
6 Joint en caoutchouc de l’objectif (p.41)
7
Contacts électroniques (p.41)
8
Parasoleil (p.45)
9 Repère de fixation du parasoleil (p.45)
0 Repère de réglage du parasoleil (p.45)
! Échelle des rapports de reproduction (p.42)
@ Échelle de profondeur de champ (p.42)
#
Ligne de repère des distances (p.42)
A
Fr
B
C
39
Page 40

2. Appareils utilisables et fonctions disponibles
Il peut y avoir des restrictions et des limites pour les fonctions
disponibles. Consultez le manuel d’utilisation de l’appareil pour
obtenir les détails.
Appareil
D3, série D2, série D1, D300, D200, D100,
D80, série D70, D60, D50, série D40
F6, F5, F100, série F80, série F75, série F65
Fr
Pronea 600i, Pronea S*
Série F4, F90X, série F90, série F70
Série F60, série F55, série F50, F-401x, F-401s,
F-401
F-801s, F-801, F-601M —
F3AF, F-601, F-501,
appareils MF Nikon (sauf F-601M)
*1 P inclut AUTO (Programme à usage général) et le système
Vari-programme.
*2 Manuel (M) n’est pas disponible.
2
Autofocus
Mode d’exposition
*1
P
—
— ————
: Possible —: Impossible
6$0
——
——
40
Page 41

3. Introduction
Merci d’avoir acheté l’objectif AF-S Micro NIKKOR 60mm f/2,8G ED.
C'est un objectif Micro de haute performance possédant un système
des mécanismes de mise au point interne (IF) de grande vitesse.
Il utilise aussi un moteur silencieux SWM (Silent Wave Motor) pour
piloter le mécanisme de mise au point.
Principales caractéristiques
• Les modes autofocus (A) et manuel (M) sont facilement
sélectionnables avec le commutateur de mode de mise au point.
• Un mode autofocus avec priorité manuelle est disponible et
permet de passer immédiatement de l’autofocus à la mise au
point manuelle.
• Un contrôle d’exposition plus précis est possible quand cet
objectif est monté sur un appareil Nikon à mesure matricielle 3D,
parce que l’information de distance au sujet est transférée de
l’objectif au boîtier.
• L’utilisation de deux éléments asphérisque et d’une élément ED
(dispersion extra basse) assure des images nettes virtuellement
exemptes de frangeage couleur. Et l’emploi d’un diaphragme à 9
lames produisant une ouverture quasi circulaire estompe
agréablement les images floues à l’avant ou à l’arrière du sujet.
• Le traitement nanocrystal sur certaines lentilles permet d'assurer
une image nette dans toutes les conditions de prise de vue, des
extérieurs ensoleillés aux scènes en intérieur sous les spots.
•
La distance de mise au point minimale est 0,185 mm.
Important
• Veillez à ne pas salir ni endommager les contacts électroniques.
• Lorsqu’il est monté sur les reflex numériques Nikon (format
Nikon DX) telles les séries D2 et D300, le champ angulaire de
l’objectif devient 26°30’ et la focale équivalente en 24 x 36 mm
est d’environ 90 mm.
• Si le joint en caoutchouc de l’objectif est endommagé, rendez-
vous chez votre revendeur ou dans le centre de réparations agréé
Nikon le plus proche pour réaliser les réparations nécessaires.
• Au total, quatre flashes asservis sans câble SB-R200 peuvent être
montés à l’avant de l’objectif.
Fr
41
Page 42

4. Mise au point
Réglez le sélecteur du mode de mise au point de l’appareil conformément à ce tableau :
Mode de
Appareil
D3, série D2, série D1, D300, D200,
D100, D80, série D70, D60, D50,
série D40, F6, F5, série F4, F100,
F90X, série F90, série F80, série F75,
série F70, série F65, Pronea 600i,
Fr
Pronea S
Série F55, série F60, série F50, F-801s,
F-801, F-601M, F-401x, F-401s, F-401
Autofocus avec priorité manuelle (Mode M/A)
a
Placez le commutateur de mise au point sur “M/A”.
b
Vous pouvez annuler manuellement l’autofocus
mise au
point de
l’appareil
Mode de mise au point de
l’objectif
M/A M
AF
Autofocus avec
(C/S)
priorité manuelle
Mise au point manuelle
MF
(assistance à la mise au point disponible)
AF
Mise au point manuelle
(C/S)
(l’assistance à la mise au point est
MF
disponible, sauf avec le F-601M)
Mise au point
manuelle
(assistance à la mise
au point disponible)
en actionnant la bague de mise au point tout
en relâchant légèrement le déclencheur ou le
bouton Départ-AF (AF-MARCHE) sur l’appareil
ou le bouton de mise au point sur l'objectif.
• Pour annuler la commande de passage en
mode manuel, ôtez le doigt du déclencheur ou du bouton
Départ AF (AF-MARCHE) sur l'appareil ou du bouton de mise au
point sur l'objectif, et relâchez légèrement le déclencheur pour
revenir au mode autofocus.
5. Profondeur de champ
Les échelles de profondeur de champ
sont gravées à côté de ligne de
repère des distances. Lors de prises
de vue très rapprochées, Ia
profondeur de champ est si faible
qu’il vaut mieux se reporter au
tableau de profondeur de champ
(page 150). Si votre boîtier comporte
la commande/ le poussoir de contrôle
de profondeur de champ, ou le levier
de contrôle de profondeur de champ,
vous pouvez tester la profondeur de
champ dans le viseur.
42
Échelle des rapports
de reproduction
Ligne de repère
des distances
Échelle de profondeur
de champ
Page 43

6.
Mise au point à un rapport prédéterminé
Le rapport de reproduction est le rapport entre la dimension de
l’image enregistrée sur le film et la dimension réelle du sujet. Si par
exemple l’image de visée représente le cinquiéme du sujet, on dit
que le rapport de reproduction est de 1:5.
Pour photographier à un rapport de reproduction donné, utilisez la
procédure suivante :
a
Tournez la bague de mise au point jusqu’a ce que le nombre
désiré sur l’échelle de rapport de reproduction soit aligné avec
la ligne de repère des distances.
b
Visez le sujet, puis changez de place, s’en rapprocher ou s’en
éloigner, jusqu’à ce que l’image dans le viseur soit partaitement
au point.
Pour obtenir le rapport de reproduction adapté à chaque distance
de mise au point, consultez le tableau de la page 150.
7. Conseils pour la macrophotographie et les
travaux de duplication
Le bougé
Le AF-S Micro NIKKOR 60mm f/2,8G ED a un tel grossissement de
l’image que le moindre rnouvement pendant la prise de vue
donnera un cliché flou. Pour éviter ceci, placez l’appareil photo sur
un pied et utilisez un déclencheur souple ou un câble de
télécommande.
Les plans très rapprochés
Du fait des grossissements importants rencontrés en
macrophotographie, on manque énormément de profondeur de
champ. On peut l’améliorer en diaphragmant, mais on doit placer
le boîtier de telle sorte que les plans les plus importants du sujet se
trouvent dans la même zone de netteté.
•
Utilisez la mise au point manuelle lorsque vous utilisez un objectif macro.
Accessoires
macro
No. 5T 1/11,1–1,07 26,7 x 40.0 – 2,24 x 3,36 80,6 – 18,5
No. 6T 1/5,7 –1,14 13,6 x 20,5 – 2,11 x 3,16 48,2 – 18,5
No. 5T + 6T 1/4,2 –1,20 10,0 x 15.0 – 2,00 x 3,00 41,2 – 18,5
Rapport de
reproduction
Champ couvert (cm)
Distance de mise au
point (cm)
Fr
43
Page 44

8.
Facteur d’exposition
La valeur f d’ouverture d’un objectif indique la luminosité de
l’image résultant de l’objectif réglé sur une distance de prise de
vue “infinie”. Plus le taux de reproduction est élevé, plus la
luminosité de l’image diminue. La luminosité réelle de l’image est
ce qu’on appelle le “la valeur f efficace d’ouverture”, et la valeur
de correction d’exposition pour le changement de la valeur f
efficace d’ouverture est appelée “facteur d’exposition”.
9.
Variation de la valeur f efficace d’ouverture
Fr
(page 146)
Avec cet objectif, plus le taux de reproduction est élevé, plus la
luminosité de l’image sur le film (dispositif de capture d’image)
diminue et la valeur f efficace d’ouverture augmente (la quantité
de lumière qui passe à travers l’ouverture de l’objectif diminue).
Cette variation est automatiquement compensée par le contrôleur
d’exposition de l’appareil photo, de sorte que l’utilisateur peut
déterminer l’exposition et faire de la prise de vue au FLASH TTL
sans avoir à prendre en considération le facteur d’exposition.
La valeur f d’ouverture affichée sur l’écran ACL de l’appareil photo
ou dans le viseur est la valeur corrigée automatiquement.
10.
Réglage de l’ouverture
Réglez l’ouverture sur le boîtier. Lorsque le mode d’exposition (ou
de prise de vue) est réglé sur “A” (Priorité d’ouverture
automatique) ou “M” (manuel), l’appareil photo effectue un
contrôle pour maintenir la valeur f d’ouverture prédéterminée
(jusqu’à env. 1,6 diaphragme) quand la valeur f efficace
d’ouverture varie avec la distance de prise de vue.
44
Page 45

11.
Utilisation d’un parasoleil à baïonnette HB-42
Fixation du parasoleil
Alignez le repère de fixation
( ) situé sur le parasoleil (l’un
des deux repères) avec le
repère de montage situé sur
l’objectif, puis tournez le
parasoleil dans le sens horaire
jusqu’au déclic d’arrêt pour le
bloquer.
• Vérifiez que le repère de
montage est bien aligné
avec le repère de réglage du
parasoleil (
• Si le parasoleil n’est pas
correctement fixé, on assiste
à un effet de vignetage.
• Il vous sera plus facile de fixer ou de retirer le parasoleil si vous le
tenez par la base (aux environs du repère de fixation) et non par
le bord extérieur.
• Avant de ranger l’objectif, fixez le parasoleil à l’envers.
).
Repère de fixation du
parasoleil
Repère de réglage du
parasoleil
Repère de montage
du parasoleil
Démontage du parasoleil
Tout en maintenant la base du parasoleil (aux environs du repère
de fixation) plutôt que le bord extérieur, tournez-le dans le sens
anti-horaire pour le démonter.
12. Photographie au flash avec des appareils
ayant un flash intégré
Pour éviter le vignetage, n’utilisez pas le parasoleil.
Fr
45
Page 46

13. Verres de visée recommandés
Divers verres de visée sont disponibles pour certains appareils photo
reflex Nikon qui s’adaptent à toutes les conditions de prise de vue.
Les verres recommandés avec cet objectif sont listés ci-dessous :
Verre
Appareil
F6
F5+DP-30
F5+DA-30
F4+DP-20
Fr
F4+DA-20
: Mise au point excellente
: Mise au point passable
ABC E
Un vignetage ou un effet de moiré affecte l’image de visée.
L’image sur le film n’est cependant pas affectée par ces
phénomènes.
: Non disponible.
Une case vide indique aucune application. Du fait que le verre M
peut être utilisé pour la macrophotographie à un rapport de
grossissement 1:1 et pour la microphotographie, il a des
applications diffèrentes de celles des autres verres.
• Lors de l’utilisation de verres B et E dans des appareils autres que
ceux indiqués ci-dessus, reportez-vous aux colonnes des verres B
et E.
EC-B G1
EC-EFG2
G4 J K L M P U
46
Page 47

14. Entretien de l’objectif
• Nettoyez la surface de l’objectif avec un pinceau soufflant. Pour
enlever les poussières ou les traces, utilisez de préférence un tissu
de coton doux, ou un tissu optique, légèrement humidifié avec
de l’alcool éthylique (éthanol). Essuyez en effectuant un
mouvement circulaire en partant du centre.
• N’employez jamais de solvant ou de benzène qui pourrait
endommager l’objectif, prendre feu ou nuire à la santé.
• Pour protéger la lentille avant de l'objectif, un filtre NC est
disponible. Un parasoleil assure également une bonne protection
contre les chocs.
• Lors du rangement de l’objectif dans son étui, pensez à remettre
en place les bouchons avant et arrière.
• En cas d’inutilisation pour une longue période, entreposez
l’objectif dans un endroit frais, sec et aéré pour éviter les
moisissures. Tenez l'objectif éloigné des sources de lumière, et
des produits chimiques (camphre, naphtaline, etc.).
• Ne projetez pas de l'eau sur l'objectif et ne l'immergez pas : cela
pourrait le rouiller et provoquer des dommages irréparables.
• Divers matériaux de synthèse sont utilisés dans la fabrication.
Pour éviter tout problème, ne soumettez pas l’objectif à de fortes
chaleurs.
15. Accessoires fournis
• Bouchon avant d’objectif diamètre 62 mm LC-62
• Bouchon arrière LF-1 • Parasoleil à baïonnette HB-42
• Étui souple pour objectif CL-1018
16. Accessoires en option
• Autres filtres à vis 62 mm, y compris filtre polarisant circulaire II
17. Accessoires incompatibles
• Les téléconvertisseurs
• La bague auto BR-4 et tous les modèles de bague allonge auto
PK, les bagues K et les soufflets.
L’emploi d’autres accessoires peut ne pas être adapté avec cet
objectif. Lisez attentivement le manuel d’utilisation de l’accessoire
pour les détails.
Fr
47
Page 48

18. Caractéristiques
Type d’objectif : Objectif Micro NIKKOR AF-S de type G avec
Focale : 60 mm
Ouverture
maximale :
Construction
optique :
Fr
Angle de champ: 39°40’ avec les reflex argentique 24x36
Échelle des
rapports de
reproduction :
Informations de
distance :
Mise au point : Système de mise au point interne (IF) Nikon
Échelle des
distances de prise
de vue :
Distance minimale
de mise au point :
Nb. de lamelles du
diaphragme :
Diaphragme : Entièrement automatique
microprocesseur intégré et monture à
baïonnette Nikon.
f/2,8
12 lentilles en 9 groupes (1 lentille ED, 2
lentilles asphériques et 1 lentille bénéficiant
d’un traitement nanocristal)
Nikon et reflex numériques Nikon au
format FX
26°30’ avec les reflex numériques Nikon au
format DX
32° avec les appareils photo IX240
De 1 :10 à 1 :1 (grandeur nature)
Communiquée au boîtier de l'appareil
photo
(utilisant un moteur silencieux SMW),
manuelle par bague de mise au point
séparée
Graduée en mètres et pieds de 0,185 m à
l’infini ()
0,185 m (grandeur nature)
9 (circulaires)
48
Page 49

Plage des
ouvertures :
Mesure de
l’exposition :
Diamètre de
fixation pour
accessoires :
Dimensions : Env. 73 mm diam. x 89 mm extension à
Poids : Env. 425 g
Les caractéristiques et les schémas sont susceptibles d’être modifiés sans
préavis ni obligation de la part du constructeur.
f/2,8 à f/32
Via méthode pleine ouverture
62 mm (P = 0,75 mm)
partir de la monture d’objectif située sur
l’appareil photo
Fr
49
Page 50

Notas sobre un uso seguro
PRECAUCIÓN
No desarme el equipo
El contacto con las piezas internas de la cámara o del objetivo puede
provocar lesiones. Las reparaciones solamente deben ser ejecutadas por
técnicos cualificados. Si a causa de un golpe u otro tipo de accidente la
cámara o el objetivo se rompen y quedan abiertos, desenchufe el producto
y/o retire la batería, y a continuación lleve el producto a un centro de servicio
técnico autorizado Nikon para su revisión.
Apague inmediatamente el equipo en caso de
funcionamiento defectuoso
Si observa que sale humo o que la cámara o el objetivo desprenden un olor
extraño, retire la batería inmediatamente, con cuidado de no quemarse. Si
sigue utilizando el equipo corre el riesgo de sufrir lesiones. Después que haya
Es
retirado o desconectado la fuente de alimentación, lleve el equipo a un
centro de servicio técnico autorizado Nikon para su revisión.
No utilice la cámara ni el objetivo en presencia de
gas inflamable
No utilice equipos electrónicos en presencia de gas inflamable, ya que podría
producirse una explosión o un incendio.
No mire hacia el sol a través del objetivo ni del visor
Mirar hacia el sol u otra fuente de luz potente a través del objetivo o del
visor podría producirle daños permanentes en la vista.
Mantener fuera del alcance de los niños
Se debe tener especial cuidado en evitar que los niños se metan en la boca
pilas u otras piezas pequeñas.
Adopte las siguientes precauciones al manipular la
cámara y el objetivo
• Mantenga la cámara y el objetivo secos. De no hacer esto podría
producirse un incendio o una descarga eléctrica.
• No manipule ni toque la unidad con las manos húmedas. De hacer eso
podría recibir una descarga eléctrica.
• En fotografías a contraluz, procure que el sol no entre ni quede cerca del
encuadre. Podría producirse un efecto lente dentro del cuerpo del objetivo
e incendiarse éste. Esto también puede ocurrir cuando el sol queda cerca
del encuadre.
Cuando el objetivo no vaya a utilizarse por un período de tiempo prolongado,
•
colóquele las tapas frontal y trasera al objetivo y guárdelo alejado de la luz
solar directa. De no hacer esto podría producirse un incendio, ya que el
objetivo pudiera enfocar la luz solar directa sobre un objeto.
50
Page 51

1. Nomenclatura ( ): Página de referencia
1
Indice de montura de la visera del
objetivo (p.57)
2
Anillo de enfoque (p.54)
3
Escala de distancias
4 Interruptor de modo de enfoque (p.54)
5
Indice de monturas
6 Junta de goma de montaje del
objetivo (p.53)
7
Contactos CPU (p.53)
8
Visera del objetivo
(p.57)
9
Indice de acoplamiento de la visera
del objetivo (p.57)
0
Indice de ajuste de la visera del
objetivo (p.57)
!
Escala de proporción de
reproducción (p.54)
@
Escala de profundidades de campo
(p.54)
#
Línea indicadora de distancias
(p.54)
A
Es
B
C
51
Page 52

2. Cámaras que puede utilizar y funciones
disponibles
Puede haber algunas restricciones o limitaciones para las funciones
disponibles. Para más detalles, consulte el manual de instrucción de
la cámara.
Modo de
Cámaras
D3, Serie D2, Serie D1, D300, D200, D100,
D80, Serie D70, D60, D50, Serie D40
F6, F5, F100, Serie F80/Serie N80*, Serie F75/
Serie N75*, Serie F65/Serie N65*
Pronea 600i/6i*, Pronea S*
Es
Serie F4, F90X/N90s*, Serie F90/N90*,
Serie F70/N70*
Serie F60/N60*, Serie F55/Serie N55*,
Serie F50/N50*, F-401x/N5005*,
F-401s/ N4004s*, F-401/N4004*
F-801s/N8008s*, F-801/N8008*,
F-601M/N6000*
F3AF, F-601/N6006*, F-501/N2020**,
Nikon MF cámaras
(excepto F-601M/N6000*)
*De venta exclusiva en los EE.UU.
**De venta exclusiva en los EE.UU. y Canadá.
*1 P incluye AUTO (Programa para propósitos generales) y sistema de
programa variable.
*2 No puede utilizar el manual (M).
2
Enfoque
automático
—
—
— ————
exposición
*1
P
: Posible —: Imposible
6$0
——
——
52
Page 53

3. Introducción
Muchas gracias por adquirir el objetivo AF-S Micro NIKKOR 60mm
f/2,8G ED. Este es un objetivo macro de grandes prestaciones que
presenta mecanismos de enfoque interno de alta velocidad (IF).
Además para el movimiento del mecanismo de enfoque emplea un
Motor de onda silenciosa (S).
Principales funciones
• El modo de Enfoque automático (A) y el modo manual (M)
pueden seleccionarse mediante le interruptor de modo de
enfoque.
• Se incluye enfoque automático con prioridad manual que
proporciona cambio automático de enfoque automático a
enfoque manual.
• Es posible un control de exposición más preciso cuando el
objetivo está montado en una cámara Nikon con posibilidad de
medición matricial tridimensional porque la información de
distancia del sujeto se transfiere del objetivo a la cámara.
• El uso de dos lentes asférica y una lente ED (dispersión extra-
baja) en el objetivo garantiza que las imágenes serán más nítidas,
sin mezcla de colores. Además, con el uso de un diafragma de 9
hojas que produce una abertura casi circular, las imágenes fuera
de enfoque delante o detrás del sujeto aparecen más borrosas
para crear un hermoso efecto de esfumado.
• El recubrimiento de nanocristales de algunas lentes garantiza
imágenes nítidas en diversas condiciones de disparo, desde
exteriores soleados a escenas de interior con iluminación artificial
de gran potencia.
•
La distancia de enfoque más cercana posible es de 0,185m (0,6 pies).
¡Importante!
• Tenga cuidado de no manchar o dañar los contactos de la CPU.
• Cuando se monta en las cámaras SLR digitales Nikon (formato
Nikon DX) como las de la serie D2 y la D300, el ángulo de
imagen del objetivo se vuelve de 26°30’ y su distancia focal
equivalente a 35 mm es de aproximadamente 90 mm.
• Si la junta de goma de montaje del objetivo se daña, asegúrese
de ir a un distribuidor autorizado Nikon o a un centro de servicio
para que lo reparen.
• En la parte frontal del objetivo puede acoplarse un total de
cuatro Flashes remotos inalámbricos SB-R200.
Es
53
Page 54

4. Enfoque
Ajuste el selector de modo de enfoque de su cámara de acuerdo con este cuadro:
Cámaras
D3, Serie D2, Serie D1, D300, D200,
D100, D80, Serie D70, D60, D50,
Serie D40, F6, F5, Serie F4, F100,
F90X/N90s*, Serie 90/N90*, Serie F80/
Serie N80*, Serie F75/Serie N75*,
Serie F70/N70*, Serie F65/Serie N65*,
Pronea 600i/6i*, Pronea S
Serie F55/Serie N55*, Serie F60/N60*,
Serie F50/N50*, F-801s/N8008s*,
F-801/N8008*, F-601
Es
F-401x/N5005*, F-401s/ N4004s*,
F-401/N4004*
Enfoque automático con prioridad manual (Modo M/A)
a
Coloque el interruptor de modo de enfoque en “M/A”.
b
Es posible anular manualmente el enfoque automático
M/N6000*,
Modo de
enfoque de
la
manipulando el anillo de enfoque manual a la vez que
se presiona ligeramente el disparador o el botón de
inicio de enfoque automático (AF-ON) en la cámara o
el botón de enfoque en el objetivo.
•
Para cancelar la anulación manual, retire el dedo
del disparador o del botón de inicio de enfoque automático en la
cámara o del botón de enfoque en el objetivo, y presione ligeramente
el disparador para regresar al modo de enfoque automático.
5. Profundidad de campo
La escala de profundidades de campo está
grabada al lado de la línea del índice de
distancia. A cortas distancias, sin embargo,
queda tan poco dentro del foco que
puede ser más útil verificar el cuadro de
profundidad de campo (página 150). Si su
cámara tiene un botón de previsualización
de la de profundidad de campo o palanca
de previsualización de la de profundidad
de campo, usted puede verificar la
profundidad de campo en el visor.
54
Modo de enfoque del objetivo
cámara
AF
(C/S)
MF
AF
(C/S)
MF
M/A M
Enfoque
automático
con prioridad
manual
Enfoque manual
(Con ayuda de enfoque)
Enfoque manual
(Con ayuda de enfoque,
excepto con la F-601M/N6000*)
* De venta exclusiva en los EE.UU.
Escala de proporción
de reproducción
Escala de profundidades
de campo
Enfoque
manual
(Con ayuda
de enfoque)
Línea indicadora
de distancias
Page 55

6.
Enfoque a una proporción de reproducción
predeterminada
La proporción de reproducción es la relación entre el tamaño de la
imagen (grabada en la pelicula) y el tamaño real del sujeto. Si, por
ejemplo, Ia imagen en la pantalla de enfoque es una quinta parte del
tamaño real del sujeto, Ia proporción de reproducción será de 1:5.
Al fotografiar en una proporción de reproducción predeterminada,
utilice el siguiente procedimiento:
a
Gire manualmente el anillo de enfoque hasta que el número de
escala de proporción de reproducción deseado esté alineado
con la línea indicadora de distancias.
b
Apunte el sujeto, luego cambie su posición, acérquese o aléjese
del sujeto hasta que la imagen en el visor sea clara y nítida.
Para obtener la proporción de reproducción apropiada para cada
distancia focal, vea el cuadro de profundidad de campo (página 150).
7.
Observaciones sobre fotografía de acercamiento y
trabajo de duplicación
Movimiento de la cámara
EI AF-S Micro NIKKOR 60mm f/2,8G ED proporciona ampliación de
imagen tan grande que aún el movimlento más ligero durante la
toma causa una imagen borrosa. Monte la cámara en un trípode y
utilice un cable de disparo o un cable de mando a distancia para
liberar el obturador.
Distancias de trabajo cercanas
Con altas proporciones de reproducción utilizadas durante tomas
de primeros planos, Ia profundidad de campo es muy baja.
Disminuya la abertura del objetivo para asegurar una profundidad
de campo más grande, Iuego posicione cuidadosamente la cámara
para asegurarse de que la superficie más importante del sujeto está
en la misma zona de enfoque nítido.
• Al utilizar objetivo para acercamiento, utilice el enfoque manual.
Accesorio de
acercamiento
No. 5T 1/11,1–1,07
No. 6T 1/5,7 –1,14
No. 5T + 6T 1/4,2 –1,20
Relación de
reproducción
Campo abarcado
(cm/pulgada)
26,7 x 40,0 – 2,24 x 3,36 /
10,50 x 15,70 – 0,88 x 1,32
13,6 x 20,5 – 2,11 x 3,16 /
5,35 x 8,07 – 0,83 x 1,24
10,0 x 15,0 – 2,00 x 3,00 /
3,93 x 5,90 – 0,79 x 1,18
Distancia de enfoque
(cm/pulgada)
80,6 – 18,5 /
31,7 – 7,3
48,2 – 18,5 /
19,0 – 7,3
41,2 – 18,5 /
16,2 – 7,3
Es
55
Page 56

8.
Factor de exposición
El número f de un objetivo indica el brillo de la imagen formada
por el objetivo ajustado a distancia de fotografiado “infinito”. A
mayor relación de reproducción, mayor la disminución en el brillo
de la imagen. El valor de brillo real de la imagen es el llamado
“número f efectivo,” y al valor de compensación de la exposición
para el cambio del número f efectivo, se le llama “factor de
exposición.”
9.
Variación del número f efectivo (página 146)
Con este objetivo, a mayor relación de reproducción, más
disminuirá el brillo de la imagen en la película (dispositivo de
detección de imagen) y aumentará el número f efectivo (disminuirá
la cantidad de luz que pasa a través de la abertura del objetivo).
Es
Esta variación es compensada automáticamente por el medidor de
exposición de la cámara, por tanto el usuario puede determinar la
exposición o realizar fotografía con flash TTL sin tener que
considerar el factor de exposición.
El número f visualizado en el panel LCD de la cámara o en el visor
es el valor compensado automáticamente.
10.
Ajuste de abertura
Ajuste la abertura en la cámara. Cuando el modo de exposición
(o fotografiado) se ajusta en “A”
o “M” (manual), la cámara controlará para mantener el número
f predeterminado (hasta aproximadamente 1,6 paradas) ya que el
número f efectivo varía con la distancia de fotografiado.
(prioridad de abertura automática)
56
Page 57

11. Utilización de la visera de la bayoneta HB-42
Instalación de la visera
Alinee el índice de acoplamiento
de la visera del objetivo ( ) de
la visera (cualquiera de los dos
índices) con el índice de
montaje de la visera del
objetivo situado en éste, y gire
la visera en el sentido de las
agujas del reloj hasta que
quede fijada con un chasquido.
• Asegúrese de que el índice
de montaje de la visera del
objetivo se alinea con el
índice de ajuste de la visera
del objetivo ( ).
• Si la visera del objetivo no está instalada correctamente, puede
producirse efectos de viñeteado.
• Para facilitar la colocación o desmontaje de la visera, sujétela por
la base (alrededor del índice de acoplamiento de la visera del
objetivo) en lugar de por la parte externa.
• Para guardar la visera del objetivo, instálela en la posición
inversa.
Indice de acoplamiento de la
visera del objetivo
Indice de ajuste de la
visera del objetivo
Indice de montura de
la visera del objetivo
Desmontaje de la visera
Mientras sujeta la base de la visera (alrededor del índice de
acoplamiento de la visera del objetivo) y no en su borde exterior,
gire la visera en el sentido contrario al de las agujas del reloj para
extraerla.
12.
Fotografía con flash utilizando cámaras con flash
incorporado
Para evitar el viñeteado, no utilice la visera del objetivo.
Es
57
Page 58

13. Pantallas de enfoque recomendadas
Hay diferentes pantallas de enfoque intercambiables para algunas
cámaras SLR de Nikon apropiados para cualquier situación
fotográfica. Las recomendadas para utilizar con este objetivo son
las que aparecen en la lista a continuación.
Pantalla
Cámara
F6
F5+DP-30
F5+DA-30
F4+DP-20
F4+DA-20
: Enfoque excelente
Es
Ⴟ
: Enfoque aceptable
Ⴜ
Ligero viñeteo que afecta la imagen de la pantalla, pero la
imagen de la película no es afectada por esto.
—
: No existe.
Los blancos significan inaplicable. Como la pantalla de tipo M se
usa para macrofotografía a una razón de aumento de 1:1 asi como
para microfotografía, su aplicación es distinta a la de las demás
pantallas.
• Cuando se utilicen las pantallas de enfoque B y E en cámaras
distintas de las relacionadas arriba, ver las columnas
correspondientes a las pantallas B y E.
ABC E
EC-B G1
EC-EFG2
G4 J K L M P U
58
Page 59

14. Forma de cuidar el objetivo
• Limpiar la superficie del objetivo con un cepillo soplador. Para
eliminar la suciedad o las huellas, utilizar un trapo de algodón
suave y limpio o papel especial para objetivos humedecido en
etanol (alcohol) o limpiador de objetivos. Limpiar describiendo un
movimiento circular del centro hacia fuera, teniendo cuidado de
no dejar restos ni tocar otras partes.
• No usar en ningún caso disolvente o benceno para limpiar el
objetivo ya que podría dañarlo, provocar un incendio o causar
problemas sanitarios.
• Para proteger al objetivo frontal, está disponible un filtro NC.
También una visera 1 contribuirá a proteger la parte frontal
del objetivo.
• Cuando se guarde el objetivo en su estuche, colocarle las
dos tapas.
• Cuando no se vaya a utilizar el objetivo durante largo tiempo,
guardarlo en un lugar fresco y seco para evitar la formación de
moho. Guardar el objetivo, además, lejos de la luz solar directa o
de productos químicos tales como alcanfor o naftalina.
• No mojar el objetivo ni dejarlo caer al agua, ya que se oxidaría y
no funcionaría bien.
• Algunas partes del objetivo son de plástico reforzado. Para evitar
daños, no dejarlo nunca en un lugar excesivamente caliente.
15. Accesorios estándar
• Tapa frontal de presión a 62 mm LC-62
• Tapa trasera de objetivo LF-1
• Visera de bayoneta HB-42 • Bolsa de objetivo flexible CL-1080
16. Accesorios opcionales
• Otros filtros con rosca de 62 mm incluyendo el filtro polarizador
circular II
17. Accesorios incompatibles
• Teleconvertidores
• Anillo auto BR-4 y todos los modelos de anillo de autoextensión
PK, anillo K, accesorio de enfoque de fuelle.
Hay otros accesorios que pueden ser inadecuados para utilizar con
este objetivo. Para más detalles, lea cuidadosamente el manual de
instrucciones de su accesorios.
Es
59
Page 60

18. Especificaciones
Tipo de objetivo: AF-S Micro NIKKOR tipo G con CPU
Distancia focal: 60 mm
Abertura máxima: f/2,8
Estructura del
objetivo:
Ángulo de imagen: 39°40’ para las cámaras SLR de película
Es
Escala de
proporción de
reproducción:
Información de
distancia:
Enfoque: Sistema de enfoque interno de Nikon (IF)
Escala de
distancias de la
toma:
Distancia de
enfoque mínima:
No. de láminas del
diafragma:
Diafragma: Totalmente automático
Gama de aperturas f/2,8 a f/32
Medición de
exposición:
incorporado y montura de bayoneta Nikon.
12 elementos en 9 grupos (1 lente ED, 2
lentes asféricas y 1 objetivo con
recubrimiento nanocristalino)
con formato de 35 mm (135) de Nikon y
para las cámaras SLR digitales con formato
FX de Nikon
26°30’ para las cámaras SLR digitales con
formato DX de Nikon
32° para las cámaras del sistema IX240
1:10-1:1 (tamaño natural)
Salida al cuerpo de la cámara
(con un motor Silent Wave interno);
manual por anillo de enfoque
independiente
Calibrado en metros y pies desde 0,185 m
(8 pulgades) a infinito ()
0,185 m (0,6 pie) tamaño narural
9 piezas (redondeadas)
Método de abertura total
60
Page 61

Tamaño de
accesorios:
Dimensiones: Aprox. 73 mm de diám. x 89 mm desde la
Peso: Aprox. 425 g (15,0 onzas)
Las especificaciones y los diseños están sujetos a cambio sin previo aviso ni
obligación por parte del fabricante.
62 mm (P = 0,75 mm)
pestaña de montaje
Es
61
Page 62

Anmärkningar gällande säkerhet
VARNING
Får inte monteras isär
Att vidröra de inre delarna i kameran eller linsen kan leda till skada.
Reparationer bör endast utföras av kvalificerade tekniker. Skulle kameran
eller objektivet brytas itu på grund av ett fall eller en annan olycka, ta
produkten till en auktoriserad serviceverkstad för Nikon så att den kan
undersökas efter att ha kopplats bort från elnätet och/eller batteriet tagits
bort.
Slå av omedelbart i händelse av att fel uppstår
Ta bort batteriet omedelbart, försiktigt så att du inte bränner dig, om du
skulle upptäcka att rök eller en ovanlig lukt kommer från kameran eller
objektivet. Fortsatt användning kan leda till skada. Efter att strömkällan
tagits bort eller kopplats ur, ta produkten till en auktoriserad serviceverkstad
för Nikon så att den kan undersökas.
Använd inte kameran eller objektivet där det finns
Se
lättantändlig gas
Om den elektroniska utrustningen används där det finns lättantändlig gas
kan det orsaka en explosion eller en brand.
Titta inte rakt in i solen genom linsen eller sökaren
Att titta rakt in i solen eller andra starka ljuskällor genom objektivet eller
sökaren kan orsaka permanenta ögonskador.
Förvara utom räckhåll för barn
Kontrollera att inte barn stoppar batterier eller andra smådelar i munnen.
Tänk på följande när du hanterar kameran och
objektivet
• Håll kameran eller objektivet torrt. I annat fall kan det orsaka en brand
eller en elektrisk stöt.
• Hantera eller rör inte vid enheten med våta händer. I annat fall kan det
orsaka en elektrisk stöt.
• Vid fotografering i motljus, håll solen utanför motivet.
Solljuset kan fokuseras in i objetivet och orsaka en brand. När solen
kommer nära motivet kan den också orsaka en brand.
• När objektivet inte kommer att användas under en längre tid, sätt på både
främre och bakre linsskyddet och förvara det så att det inte ligger i direkt
solljus. I annat fall kan det orsaka en brand eftersom objektivet kan
fokusera solljuset på ett föremål.
62
Page 63

1. Terminologi ( ): Referenssida
1 Motljusskydd monteringsindex (s. 69)
2
Fokusring (s. 66)
3
Avståndsskala
4
Fokuslägesväljare (s. 66)
5
Monteringsindex
6
Gummipackning för montering av
objektiv (s. 65)
7
CPU-kontakter (s. 65)
8
Objektivfattning (s. 69)
9
Motljusskydd fästindex (s. 69)
0 Motljusskydd inställningsindex (s. 69)
!
Skala för reproduktionsratio (s. 66)
@
Indikatorer för skärpedjup (s. 66)
#
Distansindikeringslinje (s. 66)
A
Se
B
C
63
Page 64

2. Användbara kameror och tillgängliga
funktioner
Det kan finnas några begränsningar i de tillgängliga funktionerna.
Se kameran användarhandbok för mer information.
Exponeringsläge
Kameror Autofokus
D3, D2-serien, D1-serien, D300, D200, D100,
D80, D70-serien, D60, D50, D40-serien
F6, F5, F100, F80-serien, F75-serien, F65-serien
Pronea 600i, Pronea S*
F4-serien, F90X, F90-serien, F70-serien
F60-serien, F55-serien, F50-serien,
F-401x, F-401s, F-401
F-801s, F-801, F-601M —
Se
F3AF, F-601, F-501,
Nikon MF kameror (utom F-601M)
*1 P inkluderar AUTO (General-Purpose Program) och Vari-Programsystem.
*2 Manuell (M) är inte tillgängligt.
2
*1
P
—
— ————
: Möjlig —: Ej möjligt
läge
6$0
——
——
64
Page 65

3. Introduktion
Tack för att du valde AF-S Micro NIKKOR 60mm f/2.8G ED-objektiv.
Detta är ett kvalitetsobjektiv med specialmekanismer för snabb
internfokusering (IF). Dessutom har det en ultraljudsmotor (S) som
driver fokuseringsmekanismen.
Huvudfunktioner
• Autofokus (A) eller manuellt läge (M) kan enkelt väljas med hjälp
av fokuslägesväljaren.
• Autofokus med manuell styrning tillhandahålls, vilket tillåter
omedelbar växling från autofokus till manuell fokusfunktion.
• Det är också möjligt att få en mer exakt exponeringskontroll när
den är monterad på en Nikonkamera med 3D färgmatrismätning,
eftersom avståndsinformationen till föremålet överförs från
objektivet till kamerahuset.
• Användningen av två asfäriska och en ED (extra låg dispersion)
objektivelement garanterar skarpa bilder praktiskt taget fria från
färgförskjutning. Genom att använda en bländare med 9 blad
som ger en näst intill cirkulär bländare, kommer bilder som inte
är i fokus framför eller bakom föremålet att återges med en skön
oskärpa.
• Nanokristallbeläggningen på några av linselementen garanterar
att fina, klara bilder kan reproduceras under alla
fotograferingsförhållanden, från soliga utomhus- till
spotlightbelysta inomhusmotiv.
• Det minsta möjliga fokuseringsavståndet är 0,185 m.
Viktigt
• Var försiktig så att du inte smutsar ned eller skadar CPU-
kontakterna.
• När den monteras på en Nikon digital SLR-kamera (Nikon DX-
format), som D2-serien och D300 blir objektivvinkeln 26°30’ och
dess motsvarande fokallängd vid 35 mm är ungefär 90 mm.
• Om gummipackningen för monteringen av objektivet skadats,
besök hos närmaste auktoriserade återförsäljare eller ditt
servicecenter för reparation.
• Upp till tu trådlösa fjärrstyrda Speedlight-blixtar SB-R200 kan
monteras på objektivets framsida.
Se
65
Page 66

4. Fokusering
Ställ kamerans fokuslägesväljare enligt denna tabell:
Kameror
D3, D2-serien, D1-serien, D300, D200,
D100, D80, D70-serien, D60, D50,
D40-serien, F6, F5, F4-serien, F100,
F90X, F90-serien, F80-serien, F75-serien,
F70-serien, F65-serien, Pronea 600i,
Pronea S
F55-serien, F60-serien, F50-serien,
F-801s, F-801, F-601M, F-401x, F-401s,
F-401
Kamerans
fokusläge
(C/S)
(C/S)
Objektivets fokusläge
M/A M
AF
Autofokus med
manuell prioritet
Manuell fokusering
MF
(Möjlighet till fokuseringshjälp.)
AF
Manuell fokusering
(Möjlighet till fokuseringshjälp,
MF
utom med F-601M.)
Autofokus med möjlighet till manuell styrning
(M/A-läge)
a
Ställ fokuslägesväljaren på “M/A”.
Se
b
Du kan koppla ur autofokusfunktionen och fokusera manuellt
så här: vrid fokusringen samtidigt som du
trycker lätt på avtryckaren eller AFstartknappen på kameran.
• Så här återgår du till autofokusläget: Ta bort
fingret från avtryckaren eller AF-startknappen
på kameran. Tryck sedan lätt på avtryckaren.
5. Djupskala
Skärpedjupsindikatorerna är graverade bredvid
distansindikeringslinjen. På korta
avstånd är det dock så lite i fokus
att det kan vara bättre att
kontrollera tabellen för skärpedjup
(på sidan 150). Om din kamera har
en knapp eller spak för
förhandsgranskning av skärpedjup,
använd den för att kontrollera
skärpedjupet i sökaren.
Skala för
reproduktionsratio
Indikatorer för skärpedjup
Manuell
fokusering
(Möjlighet till
fokuseringshjälp.)
Distansindikeringslinje
66
Page 67

6.
Fokusering med förbestämd reproduktionsratio
Reproduktionsration är relationen mellan storleken på den bild som
har sparats på film och motivets verkliga storlek. Till exempel, om
bilden på fokusskärmen är en femtedel så stor som motivet är i
verkligheten, är reproduktionsration 1:5.
För att fotografera med en förbestämd reproduktionsratio, använd
följande procedur:
a
Vrid fokusringen manuellt tills önskad inställning för
reproduktionsratio är i linje med distansindikeringslinjen.
b
Rikta sökaren på motivet och ändra sedan din position genom
att närma dig eller avlägsna dig från motivet tills bilden i
sökaren blir skarpare.
För att få reda på korrekt reproduktionsratio för varje
fokusavstånd, se tabellen på sidan 150.
7.
Anmärkningar gällande närbilder och dupliceringsarbete
Kameravibration
AF-S Micro NIKKOR 60mm f/2.8G ED tillhandahåller en
exceptionellt hög bildförstoring. Minsta rörelse under fotografering
kan därför orsaka att bilden blir suddig. Se till att montera kameran
på ett stativ och använd fjärrutlösning via kabel eller fjärrkontroll.
Närbildsavstånd
Vid de höga reproduktionsratios som används vid
närbildsfotografering, är skärpedjupet väldigt litet. För att skapa
större skärpedjup, blända ner linsen och positionera därefter
försiktigt kameran för att se till att den viktigaste ytan av motivet
är i samma skarpa fokus.
• Använd manuellt fokus när du använder närbildslinsen.
Närbildslins
Nr. 5T + 6T 1/4,2 –1,20 10,0 x 15,0 – 2,00 x 3,00 41,2 – 18,5
Avbildningsskala
Nr. 5T 1/11,1–1,07 26,7 x 40,0 – 2,24 x 3,36 80,6 – 18,5
Nr. 6T 1/5,7 –1,14 13,6 x 20,5 – 2,11 x 3,16 48,2 – 18,5
Motivfält (cm)
Fokuseringsavstånd (cm)
Se
67
Page 68

8.
Exponeringsfaktor
En lins f-nummer indikerar ljusstyrkan för bilden som skapas av
linsen när den är inställd på “oändligt” fotoavstånd. Ju högre
reproduktionsratio, desto mindre kommer ljusstyrkan att vara för
bilden. Den aktuella ljusstyrkan för bilden kallas för “effektivt
f-nummer” och kompensationsvärdet för exponering för ändring
av effektivt f-nummer kallas ”exponeringsfaktor”.
9.
Effektiv f-nummervariation (s. 146)
För denna lins, ju högre reproduktionsration är, ju mer kommer
ljusstyrkan för bilden på filmen (bildsensorn) att minska och det
effektiva f-numret kommer att öka (mängden ljus som kommer
genom linsens bländare kommer att minska). Denna variation
kompenseras automatiskt av kamerans exponeringsmätare, så
användaren kan avgöra exponering eller använda TTL-blixt utan att
behöva ta hänsyn till exponeringsfaktorn. F-numret som visas på
kamerans LCD-skärm eller i sökaren, är det värde som automatiskt
Se
kompenseras.
10.
Bländarinställning
Ställ in bländaren på kamerahuset. När exponeringsläget (eller
fotograferingsläget) är inställt på “A” (automatisk bländarprioritet)
eller “M” (manuell), kommer kameran att bibehålla
förhandsinställt f-nummer (upp till cirka 1,6 ”stops”) eftersom det
effektiva f-numret varierar med fotograferingsavstånd.
68
Page 69

11. Använda bayonet hood HB-42
Att fästa motljusskyddet
Ställ in indikeringen ( ) på
motljusskyddet (vilken som
helst av det två indikeringarna)
med monteringsindikeringen
på objektivet och vrid
motljusskyddet medsols tills du
hör ett klickande ljud.
• Se till att motljusskyddets
monteringsindex är i linje
med motljusskyddets
inställningsindex (
• Om motljusskyddet inte sätts
fast korrekt kan vinjettering
uppstå.
• För att underlätta fastsättning eller avlägsnande, håll
motljusskyddet kring basen (vid motljusskyddets fästindex) hellre
än i dess ytterkant.
• Ta bort det tvärtom innan du lagrar det.
).
Motljusskydd fästindex
Motljusskydd
inställningsindex
Motljusskydd
monteringsindex
Att avlägsna skyddet
Vrid motsols medan du håller i den nedre delen av skyddet (nära
monteringsindikeringen) snarare än dess yttre kant för att
avlägsna.
12. Blixtbilder med kamerans inbyggda blixt
För att undvika vinjettering, använd inte motljusskydd.
Se
69
Page 70

13. Rekommenderade mattskivor
Det finns olika utbytbara mattskivor för vissa SLR-kameror från
Nikon till olika fotograferingssituationer. Till detta objektiv
rekommenderas följande:
Skärm
Kamera
F6
F5+DP-30
F5+DA-30
F4+DP-20
F4+DA-20
: Utmärkt fokusering
Ⴟ
: Acceptabel fokusering
Ⴜ
En lätt vinjettering eller moirémönster syns i sökaren, men inte
på filmen.
—
: Inte tillgängligt.
Se
En tom ruta innebär att det inte är tillämpligt. Eftersom skärmtyp
M kan användas för både makrofotografering vid 1:1
förstoringsgrad och för fotomikrografi, har den andra tillämpningar
än andra skärmar.
• När mattskivorna B och E används i andra kameror än de som
räknats upp ovan, se kolumnerna för B- och E-skivorna.
ABC E
EC-B G1
EC-EFG2
G4 J K L M P U
14. Objektivvård
• Rengör linsytan med en blåspensel. Använd en mjuk, ren
bomullstrasa eller en linsduk fuktad med etanol (alkohol) för att
ta bort smuts och fläckar. Torka i en cirkulär rörelse från mitten
ut mot ytterkanten; se till att inte röra vid andra delar av
objektivet eller lämna några spår.
• Använd aldrig thinner eller bensen för att rengöra objektivet
eftersom det kan skada det, orsaka brand eller orsaka
hälsoproblem.
• Ett NC-filter finns tillgängligt för att skydda det främre
linselementet. Ett motljusskydd hjälper till att skydda den främre
delen av objektivet.
70
Page 71

• Sätt på både främre och bakre linsskyddet när objektivet förvaras
i objektivväskan.
• Förvara objektivet på en sval, torr plats, när det inte kommer att
användas under en längre period, för att förhindra mögel.
Förvara också objektivet så att det inte utsätts för direkt solljus
eller kemikalier som kamfer eller naftalin.
• Få inte vatten på objektivet eller tappa det i vatten eftersom
detta kommer att orsaka rost och funktionsfel.
• Förstärkt plast används i vissa delar av objektivet. Lämna aldrig
objektivet på en mycket varm plats, för att undvika skador.
15. Standardtillbehör
• 62 mm LC-62 främre objektivlock som snäpps fast
• Bakre objektivlock LF-1
• Motljusskydd med bajonettfattning HB-42
• Flexibel objektivväska CL-1018
16. Tillvalsutrustning
• 62 mm gängade filter, inkluderande runt polarisationsfilter II
17. Tillbehör som inte är kompatibla
• Telekonvertrar
• Auto Ring BR-4 och alla modeller av Auto Extension Ring PK,
K Ring och Bellows fokuseringstillägg.
Det kan finnas andra tillbehör som inte är kompatibla med detta
objektiv. Läs igenom bruksanvisningen för dina tillbehör noggrant
gällande detaljer.
Se
71
Page 72

18. Specifikationer
Objektivtyp: G-typ AF-S Micro NIKKOR-objektiv med
Fokallängd: 60 mm
Maximal bländare: f/2,8
Linskonstruktion: 12 element i 9 grupper (1 ED, 2 asfäriska
Bildvinkel: 39°40´ med 35 mm-format (135) Nikon
Reproduktionsratioskala:
Avståndsinformation:
Fokusering: Nikons internfokuseringssystem (IF, med
Se
Avståndsskala för
fotografering:
Minsta möjliga
fokuseringsavstånd:
Antal slutarblad: 9 st. (rundade)
Bländare: Helautomatisk
Bländarskala: f/2,8 till f/32
Exponeringsmätning:
Storlek: 62 mm (P = 0,75 mm)
Mått: Ungefär 73 mm diameter x 89 mm utstick
Vikt: Ungefär 425 g
Specifikationer och design kan ändras utan meddelande eller skyldighet från
tillverkarens sida.
inbyggd CPU och Nikon bajonettfattning
och 1 nanokristallbelagt linselement).
film SLR-kameror och Nikon FX-format
digitalkameror
26°30´ med Nikons digitala SLR-kameror i
DX-format
32° med IX240 systemkameror
1:10 till 1:1 (naturlig storlek)
Visas i kamerahuset
intern ultraljudsmotor); manuellt med
separat fokusring.
Graderad i meter och fot från 0,185 m till
oändlighet ()
0,185 m (naturlig storlek)
Via fullbländare
från objektivets monterade fläns
72
Page 73

73
Se
Page 74

Рекомендации по безопасной эксплуатации изделия
ПРЕДУПРЕЖДЕНИЕ
Не разбирайте устройство
Прикосновение к внутренним частям фотокамеры или объектива
может привести к получению травм.
Ремонт должен производиться только квалифицированными
специалистами. При повреждении и вскрытии фотокамеры или
объектива в результате падения или другого происшествия доставьте
изделие для проверки в авторизованный сервисный центр Nikon;
предварительно отключите устройство или извлеките батарею.
При появлении неисправности немедленно
выключите фотокамеру
При появлении дыма или запаха, исходящего от фотокамеры или
объектива, немедленно извлеките батарею; соблюдайте меры
предосторожности, чтобы не получить ожоги. Продолжение работы с
устройством может привести к получению травм. После извлечения
батареи или отключения источника питания доставьте изделие для
проверки в ближайший авторизованный сервисный центр компании Nikon.
Не используйте фотокамеру или объектив при
наличии легковоспламеняющихся газов
Не работайте с электронным оборудованием при наличии в воздухе
легковоспламеняющихся газов — это может привести к взрыву или пожару.
Не смотрите на солнце через объектив или
Ru
видоискатель
Взгляд на солнце или другой яркий источник света через объектив
или видоискатель может вызвать необратимое ухудшение зрения.
Храните устройство в недоступном для детей месте
Примите особые меры предосторожности во избежание попадания
батарей и других небольших предметов в рот детям.
Во время эксплуатации фотокамеры или объектива
соблюдайте следующие меры предосторожности
•
Храните фотокамеру или объектив в сухом месте. Несоблюдение
этого требования может привести к поражению электрическим током.
• Не прикасайтесь к устройству мокрыми руками. Несоблюдение
этого требования может привести к поражению электрическим током.
•
При съемке с подсветкой сзади не допускайте попадания солнечных лучей в кадр.
Солнечные лучи могут сфокусироваться в корпус объектива и стать причиной
пожара. Кроме того, причиной пожара могут стать солнечные лучи,
попадающие на корпус в непосредственной близости от видоискателя.
•
Если объектив не планируется использовать на протяжении длительного времени,
присоедините заднюю и переднюю крышки и поместите объектив на хранение в
место, которое не подвержено воздействию прямых солнечных лучей. При
несоблюдении этого требования возникает вероятность возникновения пожара,
поскольку объектив может фокусировать солнечные лучи на окружающих предметах.
74
Page 75

1. Компоненты ( ): справочная страница
1
Установочная метка бленды
(стр. 81)
2
Фокусировочное кольцо (стр.78)
3
Шкала расстояния
4
Переключатель режимов
фокусировки (стр. 78)
5
Установочная метка
6
Резиновый уплотнитель
крепления объектива (стр. 77)
7
Разъемы процессора (стр. 77)
8
Бленда (стр. 81)
9
Метка крепления бленды
(стр. 81)
0 Метка фиксации бленды (стр. 81)
!
Масштаб съемки (стр. 78)
@
Индикаторы глубины резкости
(стр. 78)
#
Указатель расстояния (стр. 78)
A
Ru
B
C
75
Page 76

2. Совместимые фотокамеры и доступные
функции
Использование доступных функций объектива может быть
связано с некоторыми ограничениями.
Подробные сведения см. в руководстве по эксплуатации
фотокамеры.
Фотокамеры
D3, Серия D2, Серия D1, D300, D200, D100,
D80, Серия D70, D60, D50, Серия D40
F6, F5, F100, Серия F80, Серия F75,
Серия F65
Pronea 600i, Pronea S*
Серия F4, F90X, Серия F90, Серия F70
Серия F60, Серия F55, Серия F50, F-401x,
F-401s*, F-401
F-801s, F-801, F-601M —
Ru
F3AF, F-601, F-501,
камеры Nikon MF (кроме F-601M)
*1 Режим P включает в себя режим AUTO (универсальная программа) и
систему с варипрограммой.
*2 Ручной режим (M) недоступен.
2
автофокусировка
P
—
—————
: Возможно —: Невозможно
Режим
экспозиции
*1
6$0
——
——
76
Page 77

3. Введение
Благодарим вас за приобретение объектива AF-S Micro
NIKKOR 60mm f/2.8G ED. Это мощный микро-объектив с
высокоскоростным механизмом внутренней фокусировки.
Управление механизмом фокусировки осуществляется с
помощью бесшумного ультразвукового мотора.
Основные особенности
•
Режим автоматической (A) или ручной (M) фокусировки можно
легко выбрать с помощью переключателя режима фокусировки.
• Доступна автоматическая фокусировка с возможностью
коррекции вручную, обеспечивающая немедленное
переключение с автоматической на ручную фокусировку.
• При установке этого объектива на фотокамеру Nikon,
оснащенную системой цветного матричного 3D замера
экспозиции, можно повысить точность управления
экспозицией за счет того, что информация о расстоянии до
объекта съемки передается от объектива в фотокамеру.
• Использование двух
элемента из стекла со сверхнизкой дисперсией
обеспечивает получение резких снимков, практически
лишенных цветовой «бахромы». Использование
девятилепестковой диафрагмы с практически круглым
отверстием обеспечивает красивое «размытие» заднего
фона и переднего плана.
• Нанокристаллическое антибликовое покрытие, нанесенное
на некоторые элементы объектива, гарантирует получение
четких снимков отличного качества в различных условиях —
от съемки при солнечном освещении до съемки в
помещениях при свете прожекторов.
• Минимальное расстояние фокусировки - 0,185 м.
Внимание
•
Старайтесь не загрязнять и не повреждать контакты управления.
•
При присоединении объектива к цифровой зеркальной
фотокамере Nikon формата DX, например, к фотокамере серии
D2 и D300, угол зрения объектива становится равным 26°30’, а
фокусное расстояние (в эквиваленте для 35-мм пленочной
фотокамеры) становится приблизительно равным 90 мм.
• В случае повреждения резинового уплотнителя крепления
объектива обратитесь к авторизованному дилеру компании
Nikon или в сервисный центр для проведения ремонта.
• К передней части объектива можно прикрепить четыре
дистанционно управляемые беспроводные вспышки Wireless
Remote Speedlights SB-R200.
асферических элементов и одного
Ru
77
Page 78

4. Фокусировка
Эта таблица поможет вам выбрать нужное положение
переключателя режимов фокусировки на фотокамере.
Режим фокусировки объектива
Фотокамеры
D3, Серия D2, Серия D1, D300, D200,
D100, D80, Серия D70, D60, D50,
Серия D40, F6, F5, Серия F4, F100,
F90X, Серия F90, Серия F80,
Серия F75, Серия F70, Серия F65,
Pronea 600i, Pronea S
Серия F55, Серия F60, Серия F50,
F-801s, F-801, F-601M, F-401x,
F-401s, F-401
Ru
Автофокусировка с возможностью коррекции
вручную (режим M/A)
a
Установите переключатель режима
фокусировки на «M/A».
b
Можно вручную корректировать автофокус с
помощью фокусировочного кольца, слегка отпуская
спусковую кнопку затвора или кнопку запуска AF на фотокамере.
• Чтобы отменить ручной режим фокусировки, отпустите спусковую
кнопку затвора или кнопку запуска AF на фотокамере и слегка
отпустите спусковую кнопку затвора для возврата в режим
автофокусировки.
5. Глубина резкости
Индикаторы глубины резкости
выгравированы рядом с указателем
расстояния. При малых расстояниях,
однако, фокусировка мало полезна,
так что лучше свериться с таблицей
глубины резкости (на стр. 150). Если
ваша фотокамера оснащена кнопкой
или рычагом предварительного
просмотра глубины резкости,
используйте ее/его для проверки
глубины резкости через видоискатель.
78
Режим
фокусировки
фотокамеры
AF
(C/S)
MF
AF
(C/S)
MF
M/A M
Режим
автоматической
фокусировки с
приоритетом
коррекции
вручную
Ручной фокус
(можно использовать функцию
помощи при фокусировке.)
Ручной фокус
(можно использовать функцию
помощи при фокусировке; эта
функция недоступна при
использовании фотокамеры F-601M.)
Масштаб съемки
Индикаторы глубины
резкости
Ручной фокус
(можно
использовать
функцию
помощи при
фокусировке.)
Указатель
расстояния
Page 79

6.
Фокусировка с предварительно
определенным масштабом съемки
Масштаб съемки - это соотношение между размером
изображения, записанного на пленку, и фактическим размером
предмета. Если, например, изображение на фокусировочном
экране составляет одну пятую фактического размера
предмета, масштаб съемки составляет 1:5.
Для фотографирования с предварительно определенным
масштабом съемки действуйте следующим образом:
a
Вручную поверните фокусировочное кольцо до выравнивания нужного
номера на шкале масштаба съемки с указателем расстояния.
b
Направьте объектив на предмет, затем смените свое
положение, подойдя к предмету или отойдя от него, пока
изображение в видоискателе на станет резким.
Для получения подходящего масштаба съемки для каждого
расстояния съемки см. стр. 150.
7.
Примечания по фотографиям с макросъемкой и
дублированием
Тряска фотокамеры
AF-S Micro NIKKOR 60mm f/2.8G ED обеспечивает настолько
высокое увеличение изображения, что даже малейшее
движение во время съемки может вызвать его размытость.
Обязательно устанавливайте фотокамеру на треногу и
используйте спусковой тросик или шнур дистанционного
управления для спуска затвора.
Малое расстояние съемки
При высоких масштабах во время макросъемки глубина
резкости очень ограничена. Для получения большей глубины
резкости затемните объектив, затем аккуратно расположите
камеру, чтобы наиболее важная деталь объекта находилась в
той же зоне резкого фокуса.
•
Используйте ручной фокус при работе с макросъемочными объективами.
Макросъемочна я
насадка
№ 5T 1/11,1–1,07 26,7 x 40,0 – 2,24 x 3,36 80,6 – 18,5
№ 6T 1/5,7 –1,14 13,6 x 20,5 – 2,11 x 3,16 48,2 – 18,5
№ 5T + 6T 1/4,2 –1,20 10,0 x 15,0 – 2,00 x 3,00 41,2 – 18,5
Масштаб съемки Сюжетное поле (см)
Дистанция
съемки (см)
Ru
79
Page 80

8.
Кратность изменения экспозиции
Число F объектива указывает яркость изображения,
формируемого объективом, настроенным на расстояние
съемки «до бесконечности». Чем выше масштаб съемки, тем
больше снижается яркость изображения. Фактическая яркость
изображения, называемая «действительное число F», а
значение поправки экспозиции для изменения
действительного числа F называется «кратностью изменения
экспозиции».
9.
Изменение действительного числа F
(стр. 146)
При использовании данного объектива чем выше масштаб
съемки, тем больше снижается яркость изображения на
пленке (устройство восприятия изображения), а
действительное число F повышается (количество света,
попадающего сквозь диафрагму объектива уменьшается). Это
изменение автоматически компенсируется датчиком
экспозиции фотокамеры, так что пользователь может задать
экспозицию или использовать TTL-вспышку, не учитывая
Ru
кратность изменения экспозиции. Число F, отображаемое на
ЖК-дисплее фотокамеры или в видоискателе, является
автоматически компенсируемым значением.
10.
Установка диафрагмы
Установите диафрагму на корпусе фотокамеры. Когда режим
экспозиции (или съемки) настроен на «A» (Приоритет
диафрагмы автоматически) или «M» (вручную), фотокамера
будет поддерживать предварительно заданное число F (до
прим. 1,6 остановок), поскольку действительное число F
изменяется в зависимости от расстояния съемки.
80
Page 81

11.
Использование байонетной бленды HB-42
Присоединение бленды
Совместите метку
крепления бленды (
бленде (любую из двух
меток) с установочной
меткой бленды на
объективе и поверните
объектив против часовой
стрелки до щелчка
фиксатора.
• Убедитесь, что
установочная метка
бленды совпадает с
меткой фиксации бленды
).
(
• При неправильном подсоединении бленды может
наблюдаться виньетирование.
• Для удобства подсоединения или отсоединения бленды
держите ее за основание (вокруг метки присоединения
бленды объектива), а не за наружную кромку.
• Для хранения бленды присоединяйте ее в обратном
положении.
) на
Метка крепления бленды
Метка фиксации
бленды
Установочная
метка бленды
Отсоединение бленды
Держась за основание бленды (рядом с меткой присоединения
бленды объектива), а не за ее наружный край, поверните ее
против часовой стрелки для отсоединения.
12. Съемка на фотокамеру со встроенной
вспышкой
Во избежание виньетирования не используйте бленду
объектива.
Ru
81
Page 82

13.
Рекомендуемые фокусировочные экраны
Сменные фокусировочные экраны, доступные для
определенных зеркальных фотокамер Nikon, помогают
осуществлять съемку практически в любых ситуациях. С этим
объективом рекомендуется использовать следующие
фокусировочные экраны.
Экран
Фотокамера
F6
F5+DP-30
F5+DA-30
F4+DP-20
F4+DA-20
: Исключительное качество фокусировки
Ⴟ
: Приемлемое качество фокусировки
Ⴜ
Небольшое виньетирование или муар могут иметь место в
видоискателе, но не на пленке.
—
: Недоступно
Пустое поле означает, что фокусировочный экран использовать
нельзя. Поскольку экран типа M можно использовать как для
Ru
макросъемки с коэффициентом увеличения 1:1, так и для
микрофотографии, области его применения отличаются от
областей применения других экранов.
• При использовании фокусировочных экранов типа B и E в
фотокамерах, отличных от приведенных в таблице выше, см.
столбцы для экранов типа B и E.
ABCE
EC-B G1
EC-EFG2
G4 J K L M P U
14. Уход за объективом
• Для очистки поверхности объектива используйте грушу со
щеточкой. Для удаления грязи и пятен воспользуйтесь
мягкой чистой хлопчатобумажной тканью или специальной
салфеткой, смоченной в этаноле (спирте) или средстве для
чистки объектива. Протирайте объектив по спирали от
центра линзы объектива к ее краям, стараясь не оставлять
следов и не дотрагиваться до остальных частей объектива.
• Во избежание повреждения объектива, риска
возникновения пожара или причинения вреда здоровью
никогда не используйте для чистки объектива растворители
или жидкости на основе бензола.
82
Page 83

• Для защиты передней линзы объектива доступен
нейтральный светофильтр. Бленда также помогает защитить
переднюю часть объектива.
• Если объектив хранится в чехле, присоедините к объективу
заднюю и переднюю крышки.
• Если не предполагается использование объектива на
протяжении длительного времени, для предотвращения
образования плесени храните объектив в сухом и
прохладном месте. Берегите объектив
солнечных лучей и никогда не храните его вместе с
веществами на основе нафталина или камфары.
• Избегайте попадания воды на объектив, поскольку это
может привести к появлению ржавчины и неправильной
работе объектива.
• Некоторые компоненты объектива изготовлены из
армированной пластмассы. Во избежание повреждений
никогда не подвергайте объектив воздействию высоких
температур.
от попадания прямых
15. Стандартные принадлежности
• 62-мм передняя крышка объектива LC-62
• Задняя крышка объектива LF-1
• Байонетная бленда HB-42 • Мягкий чехол CL-1018
16. Дополнительные принадлежности
• 62-мм ввинчиваемые фильтры, включая круговой
поляризационный фильтр II
17. Несовместимые принадлежности
• Телеконверторы
• Автоматическое кольцо BR-4 и все модели автоматического
удлинительного кольца PK, K-кольцо и фокусировочная
насадка.
Другие принадлежности могут не подходить для
использования с этим объективом. Подробности см. в
инструкции к принадлежностям.
Ru
83
Page 84

18. Технические характеристики
Тип объектива: Объектив AF-S Micro NIKKOR типа G со
Фокусное
расстояние:
Максимальная
диафрагма:
Оптическая
схема:
Угол зрения: 39°40´ при использовании с 35-мм (135)
Ru
Масштаб съемки: 1:10 - 1:1 (натуральный размер)
Информация о
расстоянии:
Фокусировка: Система внутренней фокусировки Nikon
Шкала расстояния
съемки:
Минимальное
расстояние
съемки:
Число лепестков
диафрагмы:
встроенным микропроцессором и
байонетом Nikon
60 мм
f/2,8
12 элементов в 9 группах (включая 1
элемент из ED-стекла, 2 асферических
элемента и один элемент с
нанокристаллическим покрытием)
пленочными зеркальными
фотокамерами Nikon и цифровыми
зеркальными фотокамерами Nikon
формата FX
26°30´ при использовании с цифровыми
зеркальными фотокамерами Nikon
формата DX
32° при использовании с фотокамерами
со стандартом фотопленки IX240
Передается в фотокамеру
Internal Focusing (IF) (с использованием
бесшумного ультразвукового мотора);
вручную с помощью отдельного
фокусировочного кольцà.
Градуирована в метрах и футах, начиная
с 0,185 м до бесконечности ()
0,185 м (натуральный размер)
9 (скругленные)
84
Page 85

Диафрагма: Полностью автоматическая
Шкала
диафрагмы:
Замер
экспозиции:
Установочный
размер:
Размеры: Прибл. 73 мм (диаметр) x 89 мм (длина
Вес: Прибл. 425 г
Технические характеристики и конструкция могут быть
изменены без предварительного уведомления или каких-либо
обязательств со стороны производителя.
f/2,8 to f/32
Методом с полностью открытой
диафрагмой
62 мм (Р = 0,75 мм)
от крепежного фланца объектива на
фотокамере)
Ru
85
Page 86

Veiligheidsinstructies
WAARSCHUWING
Demonteer het toestel niet
Het aanraken van de interne onderdelen in de camera of het objectief kan
leiden tot verwonding.
Reparaties mogen alleen worden uitgevoerd door bevoegde technici. Als de
camera of het objectief onverhoopt openbreekt door een val of ander
ongeluk, moet u het product voor onderzoek naar een door Nikon erkende
servicedienst brengen nadat u het product heeft losgekoppeld van de
stroomtoevoer en/of de accu heeft verwijderd.
Schakel het toestel bij storing onmiddellijk uit
Als er rook of een ongewone geur uit de camera of het objectief komt, moet
u de accu direct verwijderen. Let hierbij op dat u geen brandwonden
oploopt. Als u de camera of het objectief in dit geval blijft gebruiken, kan
dat leiden tot letsel. Nadat de stroomvoorziening is losgekoppeld of
verwijderd, kunt u het toestel vervolgens naar een door Nikon erkende
servicedienst brengen voor verder onderzoek.
Gebruik de camera of het objectief niet in de buurt van ontvlambare gassen
Als de elektronische apparatuur in de buurt van ontvlambaar gas gebruikt
wordt, kan dat een ontploffing of brand veroorzaken.
Kijk niet door het objectief of de zoeker naar de zon
Als u door het objectief of de zoeker naar de zon of een andere sterke
lichtbron kijkt, loopt u kans op permanent oogletsel.
Houd het toestel buiten bereik van kinderen
Nl
Er moet vooral op gelet worden dat kleine kinderen de batterijen of andere
kleine onderdelen niet in hun mond stoppen.
Neem de volgende voorzorgsmaatregelen in acht bij
het gebruik van de camera en het objectief
• Stel de camera of het objectief niet bloot aan vocht. Als deze namelijk nat
worden kan dat leiden tot brand of een elektrische schok.
• Raak het toestel niet aan met natte handen. Als u dit wel doet kan dat
leiden tot een elektrische schok.
• Zorg er bij tegenlichtopnamen voor dat de zon zich ver genoeg buiten
beeld bevindt.
Het zonlicht zou anders in het objectief kunnen vallen en brand kunnen
veroorzaken. Als het zonlicht te dicht bij het beeld komt, kan dat ook
brand veroorzaken.
• Doe de lensdoppen op de voor- en achterkant van het objectief wanneer
het objectief een tijdje niet gebruikt gaat worden en berg de lens op op
een plek waar hij niet wordt blootgesteld aan direct zonlicht. Als u dit niet
doet, kan dat leiden tot brand omdat het zonlicht door het objectief op
een voorwerp gericht kan worden.
86
Page 87

1. Terminologie ( ): Referentiepagina
1 Montage-index voor zonnekap (p.93)
2
Scherpstelring (p.90)
3
Afstandsschaal
4
Scherpstelring (p.90)
5
Montage-index
6
Rubberen pakking van
objectiefvatting (p.89)
7
CPU-contacten (p.89)
8
Zonnekap (p.93)
9 Bevestigings-index voor zonnekap (p.93)
0
Instel-index voor zonnekap (p.93)
! Reproductieverhoudingsschaal (p.90)
@
Scherptediepte-indicatoren (p.90)
#
Afstandsindexlijn (p.90)
A
B
C
Nl
87
Page 88

2. Geschikte camera's en beschikbare functies
Er kunnen beperkingen gelden voor de beschikbare functies.
Raadpleeg de handleiding van de camera voor meer informatie.
Camera's Autofocus
D3, D2-serie, D1-serie, D300, D200, D100,
D80, D70-serie, D60, D50, D40-serie
F6, F5, F100, F80-serie, F75-serie, F65-serie
Pronea 600i, Pronea S*
F4-serie, F90X, F90-serie, F70-serie
F60-serie, F55-serie, F50-serie, F-401x, F-401s,
F-401
F-801s, F-801, F-601M —
F3AF, F-601, F-501,
Nikon MF Camera's (behalve F-601M)
*1 P inclusief AUTO (algemeen programma) en onderwerpstanden (Digital
Vari-Program).
*2 Handmatig (M) is niet beschikbaar.
2
*1
P
—
— ————
: Mogelijk —: Niet mogelijk
Nl
Belichtings-
stand
6$0
——
——
88
Page 89

3. Inleiding
Gefeliciteerd met de aanschaf van het AF-S Micro NIKKOR 60mm
f/2.8G ED-objectief. Dit hoogwaardige Micro-objectief is voorzien van
een speciaal systeem high-speed interne scherpstelling (IF). Het is
bovendien uitgerust met een Silent (S) Wave Motor die het
scherpstelmechanisme aanstuurt.
Belangrijkste functies
• Autofocus (A) of handmatige scherpstelling (M) kan eenvoudig
worden gekozen met de schakelaar voor de scherpstelstand.
• Het is mogelijk om de autofocus handmatig aan te passen,
waardoor u direct kunt overschakelen van autofocus naar
handmatige scherpstelling.
• Nog nauwkeurigere regeling van de belichting is mogelijk
wanneer dit objectief gebruikt wordt op een Nikon camera met
3D-matrixmeting, omdat afstandsinformatie voor een onderwerp
vanuit het objectief naar de camera gestuurd wordt.
• Het gebruik van twee asferische en één ED-lenselement (Extra-
lage Dispersie) zorgt voor scherpe beelden, vrijwel zonder
kleurranden. En dankzij een diafragma van negen lamellen dat
een bijna ronde opening oplevert, worden onscherpe delen voor
of achter het onderwerp mooi wazig weergegeven.
• De Nano Crystal Coat op enkele lenselementen zorgt onder alle
opnameomstandigheden voor scherpe, heldere foto's, van
zonnige buitenopnamen tot binnenopnamen bij sfeerlicht.
• De kortste scherpstelafstand is 0,185 m.
Belangrijk
•
Let erop dat de CPU-contacten niet vuil worden of beschadigd raken.
• Bij montage op een Nikon digitale spiegelreflexcamera (Nikon
DX-formaat), zoals de D2-serie en de D300, wordt de beeldhoek
26°30' en bedraagt de brandpuntsafstand in
kleinbeeldequivalent circa 90 mm.
• Als de rubberen pakking van de objectiefvatting is beschadigd,
moet u het objectief voor reparatie naar de leverancier of
servicedienst van Nikon brengen.
• Er kunnen in totaal vier Speedlights met draadloze
afstandsbediening SB-R200 aan de voorkant van het objectief
worden bevestigd.
89
Nl
Page 90

4. Scherpstellen
Stel de keuzeknop voor de scherpstelling van uw camera in aan de
hand van deze tabel.
Camera's
Camera's
D3, D2-serie, D1-serie, D300, D200,
D100, D80, D70-serie, D60, D50,
D40-serie, F6, F5, F4-serie, F100, F90X,
F90-serie, F80-serie, F75-serie, F70-serie,
F65-serie, Pronea 600i, Pronea S
F55-serie, F60-serie, F50-serie, F-801s,
F-801, F-601M, F-401x, F-401s, F-401
Scherpstelstand van objectief
scherpstelling
stand
AF
(C/S)
MF
AF
(C/S)
MF
M/A M
Autofocus met
handmatige
aanpassing en
prioriteiten
Handmatige scherpstelling
(hulpverlichting is beschikbaar.)
Handmatige scherpstelling
(hulpverlichting is beschikbaar,
behalve bij de F-601M.)
Autofocus handmatige aanpassing (M/A-stand)
a
Zet de belichtingsstand van de camera op "M/A".
b
U kunt autofocus handmatig aanpassen door
aan de scherpstelring te draaien terwijl u de
ontspanknop of de AF-startknop op de
camera of de scherpstelknop op de camera
half indrukt.
• Verwijder om de handmatige aanpassing op te heffen uw vinger
Nl
van de ontspanknop of de AF startknop op de camera, en druk
licht op de ontspanknop om terug te keren naar de autofocusfunctie.
5. Scherptediepte
De scherptediepte-indicatoren zijn in de afstandsindexlijn ingegraveerd. Van
dichtbij kan er echter op zo weinig
scherpgesteld worden dat het aan te raden
is de scherptedieptetabel te bekijken (op
pagina 150). Als uw camera een knop of
hendel heeft voor scherptedieptecontrole,
gebruik dit dan om de scherptediepte van
de zoeker te controleren.
90
Reproductieverhoudingsschaal
Scherptediepte-indicatoren
Handmatige
scherpstelling
(hulpverlichting
is beschikbaar.)
Afstandsindexlijn
Page 91

6.
Scherpstelling bij een voorafbepaalde
reproductieverhouding
De reproductieverhouding is de verhouding tussen het
beeldformaat op film en het werkelijke formaat van het onderwerp.
Als het beeld op het matglas bijvoorbeeld een vijfde van de
werkelijke grootte heeft, dan is de reproductieverhouding 1:5.
Doe het volgende om met een voorafbepaalde
reproductieverhouding te fotograferen:
a
Draai met de hand aan de scherpstelring tot het gewenste cijfer op
de reproductieverhoudingsschaal naast de afstandsindexlijn staat.
b
Richt op het onderwerp, verander van positie door dichterbij of
verderweg van het onderwerp te gaan staan, tot het beeld in
de zoeker scherp wordt.
Zie de tabel op pagina 150 om de juiste reproductieverhouding
voor iedere scherpstelafstand te vinden.
7.
Opmerkingen bij close-upfotografie en duplicatiewerk
Bewegende camera
De AF-S Micro NIKKOR 60mm f/2.8G ED biedt zulke sterke
beeldvergroting dat zelfs de kleinste beweging tijdens de opname
het beeld troebel kan maken. Zorg dat de camera op een
driepootstatief staat en gebruik een kabelontspanner of
afstandsbedieningskabel om de ontspanknop te bedienen.
Korte werkafstand
Bij hoge reproductieverhoudingen met close-upopnames, is de
scherptediepte zeer klein. Om de scherptediepte te vergroten,
diafragmeert u de lens en plaatst u de camera daarna voorzichtig
neer om te zorgen dat het belangrijkste oppervlak van het
onderwerp zich in hetzelfde gebied bevindt als de scherpstelling.
• Stel handmatig scherp wanneer u het close-upobjectief gebruikt.
Close-up
bevestiging
Nr. 5T + 6T 1/4,2 –1,20 10,0 x 15,0 – 2,00 x 3,00 41,2 – 18,5
Reproductieverhouding
Nr. 5T 1/11,1–1,07 26,7 x 40,0 – 2,24 x 3,36 80,6 – 18,5
Nr. 6T 1/5,7 –1,14 13,6 x 20,5 – 2,11 x 3,16 48,2 – 18,5
Onderwerpveld (cm)
Scherpgestelde
afstand (cm)
Nl
91
Page 92

8.
Belichtingsfactor
De f-waarde van een objectief geeft de helderheid van het beeld
aan, gevormd door het objectief dat op "oneindig" voor de
opnameafstand staat. Hoe hoger de reproductieverhouding, hoe
meer de helderheid van het beeld zal afnemen. De werkelijke
helderheid van het beeld wordt de "effectieve f-waarde" genoemd
en de belichtingscorrectiewaarde voor de verandering van de
effectieve f-waarde wordt de "belichtingsfactor" genoemd.
9.
Effectieve f-waardevariatie (P. 146)
Hoe hoger de reproductieverhouding met dit objectief is, des te
meer zal de helderheid van het beeld op de film (beeldsensor)
afnemen en de effectieve f-waarde toenemen (de hoeveelheid licht
die door het objectiefdiafragma komt, neemt af). Deze variatie
wordt automatisch gecompenseerd door de belichtingsmeter van
de camera, zodat de gebruiker de belichting kan bepalen of de
TTL-flitsopname bedienen zonder met de belichtingsfactor
rekening te houden. De weergegeven f-waarde op het LCD-scherm
of de zoeker is de automatisch gecompenseerde waarde.
10.
Het diafragma instellen
Stel het diafragma op de camera in. Wanneer de belichtings- (of
opname) modus ingesteld is op "A" (diafragmavoorkeuze) of "M"
(handmatig), dan zal de camera zorgen dat de voorafbepaalde
Nl
f-waarde gelijk blijft (tot ongeveer 1,6 stops), terwijl de effectieve
f-waarde verandert met de opnameafstand.
92
Page 93

11. Gebruik van de bajonet-zonnekap HB-42
De zonnekap bevestigen
Lijn de bevestigingsindex ( )
op de zonnekap (één van beide
indexen) uit met de montageindex op het objectief en draai
de zonnekap naar rechts totdat
deze in de klikstop vergrendelt.
• Zorg dat de montage-index
is uitgelijnd met de
instelindex ( ).
• Als de zonnekap niet juist is
bevestigd, kan er
vignettering optreden.
• Om het bevestigen en verwijderen van de zonnekap te
vergemakkelijken, moet u deze onderaan vasthouden rondom de
bevestigingsindex voor de zonnekap, en niet bij de buitenrand.
• Om de zonnekap op te bergen, bevestigt u deze omgekeerd op
het objectief.
De zonnekap losmaken
Draai de zonnekap linksom terwijl u de voet (dichtbij de
bevestigingsindex op de zonnekap), dus niet de buitenrand,
vasthoudt.
Bevestigings-index voor zonnekap
Instellings-index voor
zonnekap
Montage-index
voor zonnekap
12. Flitsfoto's maken met camera's met
ingebouwde flitser
Gebruik ter voorkoming van vignettering geen zonnekap.
Nl
93
Page 94

13. Aanbevolen matglazen
Er zijn diverse uitwisselbare matglazen beschikbaar voor bepaalde
Nikon SLR-camera's voor elke fotogelegenheid. De volgende
worden voor dit objectief aangeraden:
Matglazen
Camera
F6
F5+DP-30
F5+DA-30
F4+DP-20
F4+DA-20
: Uitstekende scherpstelling
Ⴟ
: Redelijke scherpstelling
Ⴜ
Lichte vignettering of moiré treedt op in de zoeker maar niet op
de foto.
—
: Niet beschikbaar.
Een leeg vakje betekent “niet van toepassing”. Aangezien een
M-type matglas zowel kan worden gebruikt voor macrofotografie
met een vergrotingsfactor van 1:1 als voor microfotografie, heeft
dit matglas andere toepassingen dan de andere matglazen.
• Bij gebruik van B-type en E-type matglazen in andere camera´s
dan de hierboven vermelde, raadpleegt u de kolommen voor de
Nl
B-type en E-type matglazen.
ABC E
EC-B G1
EC-EFG2
G4 J K L M P U
94
Page 95

14. Objectiefonderhoud
• Reinig het objectiefoppervlak met een blaasborsteltje. Gebruik
voor het verwijderen van vuil en vlekken een zachte, schone
katoenen doek of een lenstissue dat is bevochtigd met ethanol
(alcohol) of lensreiniger. Wrijf in ronde bewegingen vanuit het
midden naar de buitenkant, waarbij u erop let dat u geen
vlekken achterlaat of andere delen van het objectief aanraakt.
• Gebruik nooit thinner of benzeen om het objectief te reinigen
aangezien het objectief hierdoor beschadigd kan raken en dit
kan leiden tot brand of gezondheidsproblemen.
• Er is een NC-filter beschikbaar om het voorste lenselement te
beschermen. Een zonnekap beschermt ook de voorkant van het
objectief.
• Bevestig zowel de voorste als de achterste lensdop wanneer u
het objectief opbergt in de objectieftas.
• Als het objectief gedurende lange tijd niet gebruikt wordt, bergt
u dit op een koele, droge plaats op om schimmelvorming te
voorkomen. Berg het objectief ook op uit de buurt van direct
zonlicht of chemicaliën zoals kamfer of nafta.
• Zorg dat er geen water op het objectief terechtkomt en laat het
niet in water vallen aangezien dit leidt tot roestvorming en
defecten.
• Sommige onderdelen van het objectief zijn gemaakt van hard
plastic. Om beschadiging te voorkomen mag u het objectief
nooit op een zeer warme plaats laten liggen.
15. Standaardaccessoires
• 62mm voorste opsteeklensdop LC-62
• Achterste opsteeklensdop LF-1
• Bajonet-zonnekap HB-42 • Zachte tas CL-1018
16. Los verkrijgbare accessoires
• 62mm inschroeffilters, inclusief circulair polarisatiefilter II
17. Onverenigbare accessoires
• Teleconverters
• Auto Ring BR-4 en alle modellen van Auto Extension Ring PK, K
Ring en Bellows scherpstellingsbevestiging.
Andere accessoires zijn misschien niet geschikt voor dit objectief.
Lees voor meer informatie het accessoirehandboek grondig door.
Nl
95
Page 96

18. Specificaties
Type objectief: G-type AF-S Micro NIKKOR-objectief met
Brandpuntsafstand:
Maximaal
diafragma:
Objectiefconstructie:
Beeldhoek: 39°40´ bij 35mm (135) formaat Nikon film-
Reproductieverhoudingsschaal:
Afstandsinformatie:
Scherpstelling: Nikon Internal Focusing (IF)-systeem (met
Schaal
opnameafstand:
Nl
Kortste
scherpstelafstand:
Aantal
diafragmalamellen:
Diafragma: Volledig automatisch
Diafragmaschaal: f/2,8 tot f/32
Belichtingsmeting: Door middel van de volledige diafragma-
Montageafmeting:
ingebouwde CPU en Nikon-bajonetvatting
60 mm
f/2,8
12 elementen in 9 groepen (1 EDlenselementen, 2 asferische lenselementen
en 1 lenselement met Nano Crystal Coat)
SLR camera's en Nikon FX-formaat digitale
SLR-camera's
26°30´ bij Nikon DX-formaat digitale SLRcamera's
32° bij camera's met IX240-systeem
1:10 tot 1:1 (levensgroot)
Doorgeven aan camerabody
een interne Silent Wave Motor); handmatig
met een afzonderlijke scherpstelring.
In meters en feet van 0,185 m tot oneindig
()
0,185 m (levensgroot)
9 stuks (afgerond)
methode
62 mm (P = 0,75 mm)
96
Page 97

Afmetingen: Circa 73 mm (diameter) x 89 mm (afstand
van de objectiefvatting op de camera)
Gewicht: Circa 425 g
Specificaties en ontwerp kunnen zonder voorafgaande aankondiging
worden gewijzigd door de fabrikant.
Nl
97
Page 98

Note sulle operazioni di sicurezza
ATTENZIONE
Non smontare
Toccando le parti interne della fotocamera o dell’obiettivo si potrebbero
causare dei guasti. Le riparazioni devono essere eseguite solamente da
tecnici qualificati. Qualora, in caso di caduta o di qualsiasi altro incidente, la
fotocamera o l’obiettivo dovessero rompersi, portare il prodotto presso un
punto assistenza Nikon autorizzato per l’ispezione, dopo averlo scollegato
dalla presa e/o rimosso la batteria.
In caso di malfunzionamento, disattivare
immediatamente la fotocamera
Qualora dalla fotocamera o dall’obiettivo dovesse uscire del fumo o un
odore insolito, rimuovere immediatamente la batteria, facendo attenzione a
non ustionsarsi. Continuando a utilizzare la fotocamera, sussiste il rischio di
lesioni. Dopo aver rimosso o scollegato la fonte di alimentazione, portare
l’apparecchio presso un punto assistenza Nikon autorizzato per l’ispezione.
Non usare la fotocamera o l’obiettivo in presenza di
gas infiammabili
In caso contrario, si potrebbe procurare un’esplosione o un incendio.
Non guardare il sole in modo diretto attraverso
l’obiettivo o il mirino
Guardando in modo diretto il sole o qualsiasi altra fonte intensa di luce, si è
soggetti al rischio di indebolimento permanente della vista.
Tenere lontano dalla portata dei bambini
Fare molta attenzione che i bambini non ingeriscano le batterie o altre
piccole parti.
Nell’utilizzo della fotocamera e dell’obiettivo,
osservare le seguenti precauzioni
It
• Mantenere la fotocamera o l’obiettivo asciutti. In caso contrario, si
potrebbe verificare un incendio o scosse elettriche.
• Non maneggiare né toccare l’unità con le mani bagnate. In caso contrario,
si potrebbero verificare scosse elettriche.
• Negli scatti in controluce, escludete il sole dall’inquadratura.
La luce del sole potrebbe concentrarsi nel corpo dell’obiettivo e provocare
un incendio. Anche l’approssimarsi del sole all’inquadratura può provocare
un incendio.
• Se si prevede di non utilizzare l’obiettivo per un periodo prolungato,
montare entrambi i tappi di protezione e riporlo lontano dalla luce diretta
del sole. In caso contrario, potrebbe verificarsi un incendio, poiché la lente
potrebbe focalizzare la luce del sole su un qualsiasi oggetto.
98
Page 99

1. Nomenclature ( ): Pagina di riferimento
1 Indice di montaggio del paraluce (p.105)
2
Anello di messa a fuoco (p.102)
3
Scala delle distanze
4
Interruttore del modo di messa a
fuoco (p.102)
5
Indice di montaggio
6
Guarnizione in gomma della
montatura dell’obiettivo (p.101)
7
Contatti CPU (p.101)
8
Paraluce (p.105)
9
Indice di collegamento del paraluce
(p.105)
0
Indice di regolazione del paraluce
(p.105)
!
Scala di riproduzione (p.102)
@
Scala profondità di campo (p.102)
#
Contrassegno distanza (p.102)
A
B
It
C
99
Page 100

2. Fotocamere utilizzabili e funzioni disponibili
Potrebbero esserci delle restrizioni o delle limitazioni nell’utilizzo delle
funzioni disponibili. Per informazioni dettagliate, fare riferimento al
manuale di istruzioni della fotocamera.
Fotocamere Autofocus
D3, serie D2, serie D1, D300, D200,
D100, D80, serie D70, D60, D50, serie D40
F6, F5, F100, serie F80, serie F75, serie F65,
Pronea 600i, Pronea S*2
Serie F4, F90X, serie F90,serie F70
Serie F60, serie F55, serie F50, F-401x,
F-401s, F-401
F-801s, F-801, F-601M —
F3AF, F-601, F-501
Nikon MF fotocamere (tranne F-601M)
*1 P include AUTO (Programma d’uso generico) e il sistema Vari-Program.
*2 Manuale (M) non è disponibile.
Modo di esposizione
*1
P
6$0
—
— ————
: Possibile —: Impossibile
It
——
——
100
 Loading...