

Page 1
AF-S DX Micro NIKKOR 85mm f/3.5G ED VR
使用説明書
User’s Manual
Benutzerhandbuch
Manuel d'utilisation
Manual del usuario
Användarhandbok
Pykoводство пользoвaтеля
Gebruikshandleiding
Manuale d'uso
Návod k obsluze
Užívateľská príručka
P. 2
P. 12
S. 26
P. 36
P. 46
S. 56
C
TP. 66
P. 76
P. 86
STR. 96
STR. 106
P. 116
P. 130
P. 138
Jp
En
De
Fr
Es
Sv
Ru
Nl
It
Cz
Sk
Sc
Tc
Kr
Page 2
安全上のご注意
Jp
ご使用の前に「安全上のご注意」をよくお読みのうえ、正しくお使いくだ
さい。この「安全上のご注意」は製品を安全に正しく使用していただき、
あなたや他の人々への危害や財産への損害を未然に防止するために、重要
En
な内容を記載しています。お読みになった後は、お使いになる方がいつで
も見られる所に必ず保管してください。
De
表示について
Fr
表示と意味は次のようになっています。
Es
Se
Ru
Nl
警告
注意
お守りいただく内容の種類を、次の絵表示で区分し、説明しています。
絵表示の例
It
Cz
Sk
Ck
Ch
分解禁止
Kr
この表示を無視して、誤った取り扱いをすると、人が死亡ま
たは重傷を負う可能性が想定される内容を示しています。
この表示を無視して、誤った取り扱いをすると、人が傷害
を負う可能性が想定される内容および物的損害の発生が
想定される内容を示しています。
記号は、注意(警告を含む)を促す内容を告げるものです。図
の中や近くに具体的な注意内容(左図の場合は感電注意)が描か
れています。
記号は、禁止の行為(してはいけないこと)を告げるものです。
図の中や近くに具体的な禁止内容(左図の場合は分解禁止)が描
かれています。
記号は、行為を強制すること(必ずすること)を告げるもので
す。図の中や近くに具体的な強制内容(左図の場合は電池を取り
出す)が描かれています。
警告
分解したり、修理や改造をしないこと
感電したり、異常動作をしてケガの原因となります。
接触禁止
すぐに
修理依頼を
2
落下などによって破損し、内部が露出したときは、露出部に手を触れ
ないこと
感電したり、破損部でケガをする原因となります。
カメラの電池を抜いて、販売店またはニコンサービス機関に修理を依
頼してください。
Page 3
警告
熱くなる、煙が出る、こげ臭いなどの異常時は、速やかにカメラの電池
電池を取る
を取り出すこと
そのまま使用すると火災、やけどの原因となります。電池を取り出す
際、やけどに充分注意してください。電池を抜いて、販売店またはニコ
すぐに
ンサービス機関に修理を依頼してください。
修理依頼を
水につけたり、水をかけたり、雨にぬらしたりしないこと
発火したり感電の原因となります。
水かけ禁止
引火、爆発のおそれのある場所では使用しないこと
プロパンガス・ガソリンなど引火性ガスや粉塵の発生する場所で使用
すると、爆発や火災の原因となります。
使用禁止
レンズまたはカメラで直接太陽や強い光を見ないこと
失明や視力障害の原因となります。
見ないこと
Jp
En
De
Fr
Es
Se
Ru
注意
ぬれた手でさわらないこと
感電の原因になることがあります。
感電注意
製品は幼児の手の届かないところに置くこと
ケガの原因になることがあります。
放置禁止
逆光撮影では、太陽を画角から充分にずらすこと
太陽光がカメラ内部で焦点を結び、火災の原因になることがありま
す。画角から太陽をわずかに外しても火災の原因になることがありま
使用注意
す。
使用しないときは、レンズにキャップをつけるか太陽光のあたらない
所に保管すること
太陽光が焦点を結び、火災の原因になることがあります。
保管注意
三脚にカメラやレンズを取り付けたまま移動しないこと
転倒したりぶつけたりしてケガの原因になることがあります。
移動注意
窓を閉め切った自動車の中や直射日光が当たる場所など、異常に温度
が高くなる場所に放置しないこと
内部の部品に悪い影響を与え、火災の原因となることがあります。
放置禁止
Nl
It
Cz
Sk
Ck
Ch
Kr
3
Page 4
Jp
En
De
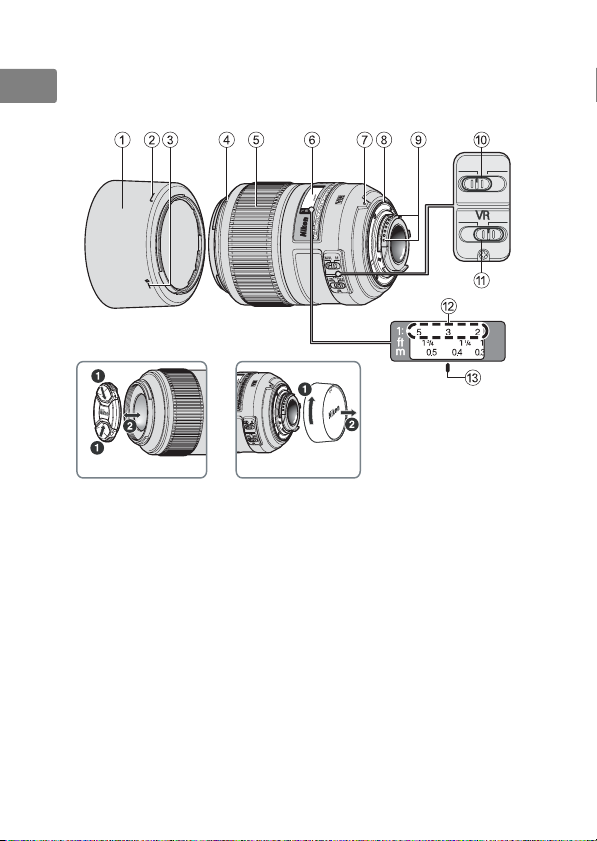
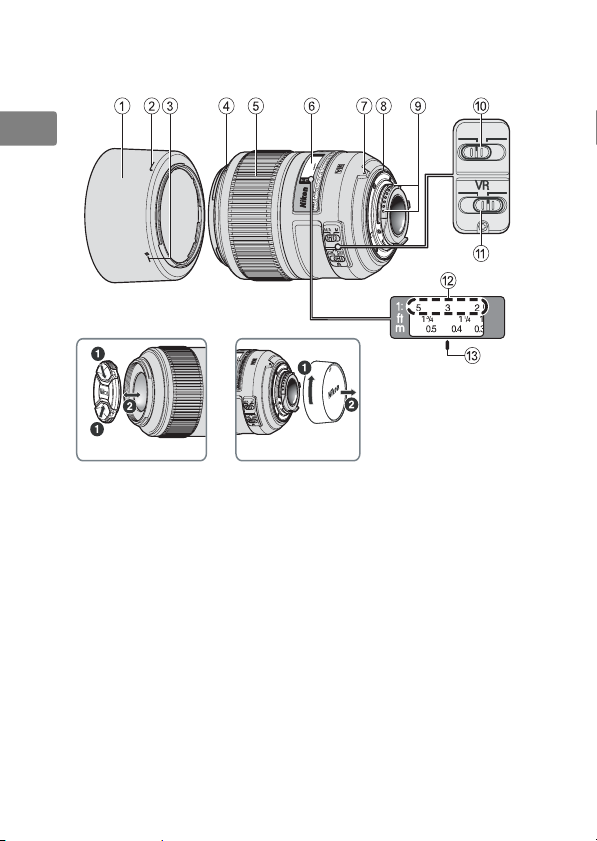
■ 各部の名称
M/A
M
Fr
Es
Se
Ru
Nl
It
Cz
A
Sk
1 フード(P. 9)
Ck
2 フード取り付け指標(
3 フードセット指標(
Ch
4 フード着脱指標(
5 フォーカスリング(
Kr
6 距離目盛
7 レンズ着脱指標(
8 レンズマウントゴムリング
P. 10)
(
B
P. 9)
P. 9)
P. 6)
P. 5)
9
CPU信号接点(P. 10)
P. 9)
0 フォーカスモード切り換え
スイッチ(
a 手ブレ補正スイッチ(
b 倍率目盛(
c 距離目盛基準線(
P. 6)
P. 7)
OFF
ON
P. 8)
P. 7)
( ):参照頁
4
Page 5

このたびはDXニッコールレンズをお買い上げくださいまして、誠にあり
がとうございます。このレンズは、ニコン
タル一眼レフカメラ(
ニコン
DXフォーマットでの撮影画角は、35mm判換算で焦点距離の約1.5
倍の焦点距離に相当する画角になります。
ご使用の前に、この使用説明書をよくお読みの上、正しくお使いください。
また、カメラの使用説明書もご覧ください。
D300シリーズ、D90など)専用です。
DXフォーマットのニコンデジ
Jp
En
De
■ 主な特長
・ 全撮影距離でシャープな描写力をもち、接写、複写をはじめ、スナップ
や一般撮影にも適します。
・
IF(ニコン内焦)方式を採用しているため、ピント合わせ時の保持バラ
ンスが良いなど、操作性にも優れています。
・ ニコン独自の
良好なボケ味が得られる円形絞りの採用により優れた光学性能、描写性
能を発揮します。
・ ワイヤレスリモートスピードライト
可能です。
ED(特殊低分散)ガラスによる色収差の補正とともに、
SB-R200は、レンズ先端に4個装着
■ レンズの取り付け、取り外し
カメラへの取り付け方
1 カメラの電源をOFFにします。
2 レンズの裏ぶたを取り外します。(図
3 カメラとレンズのレンズ着脱指標 7 を合わせ、反時計回りにカチッ
と音がするまでレンズを回します。このとき、レンズの着脱指標 7
が真上にきます。
4 レンズキャップを取り外します。(図
カメラからの取り外し方
1 カメラの電源をOFFにします。
2 カメラのレンズ取り外しボタンを押しながら、時計回りにレンズを回
します。
B)
A)
Fr
Es
Se
Ru
Nl
It
Cz
Sk
Ck
Ch
Kr
5
Page 6

■ ピント合わせの方法
Jp
ご使用のカメラや撮影目的によって、下表のようなピント合わせが選択で
きます。
En
De
Fr
Es
Se
Ru
Nl
It
Cz
Sk
Ck
Ch
Kr
カメラの
フォーカスモード
AF
MF マニュアルフォーカス(フォーカスエイド可)
カメラのフォーカスモードについては、カメラの使用説明書をご覧くださ
い。
M/A(マニュアル優先オートフォーカスモード)の使い方
1 レンズのフォーカスモード切り換えスイッチ 0 を[M/A]にセット
します。
2
AF(オートフォーカス)撮影時、カメラのシャッターボタンを半押
ししたまま、あるいは
フォーカスリング5 を手で回転させると、瞬時に
フォーカス)撮影が行えます。
3 カメラのシャッターボタンの半押しや
と
AF(オートフォーカス)で撮影が可能となります。
■ 絞り値の設定
絞り値は、カメラ側で設定してください。カメラの露出(撮影)モードが
AまたはMで絞りをセットした場合でも、撮影距離によって有効 F値(実
効
F値)を保つように、自動的に絞りを調整(最大 約1.1段)します。
■ 被写界深度
プレビュー(絞り込み)機構を持つカメラでは、撮影前にファインダー内
で被写界深度を確認できます。
このレンズは
離が短くなるにしたがって焦点距離が短くなります。
IF(ニコン内焦)方式を採用しています。IF方式は、撮影距
レンズのフォーカスモード
M/A M
マニュアル優先
オートフォーカス
AF 作動(AF-ON)ボタンを保持したまま、
マニュアルフォーカス
(フォーカスエイド可)
AF 作動ボタンを再度操作する
MF(マニュアル
6
Page 7

■ 撮影倍率(倍率目盛)
撮影倍率とは、撮像素子面上に写された像の大きさと被写体の実際の大き
さとの比率です。例えば、実際には
に
1cmに写ったときの撮影倍率は1/5倍(1:5)といいます。
倍率目盛b により、あらかじめ倍率を決めてから撮影することもできま
す。
(例)
1/5倍の倍率で撮影したいとき
マニュアルフォーカスで、倍率目盛の
カメラを前後に動かしてピントを合わせます。
5cmの長さの被写体が撮像素子面上
5を距離目盛基準線cに合わせ、
Jp
En
De
Fr
■ 接写/複写撮影
・ 接写/複写撮影の際は、カメラブレを防ぐために、三脚をお使いになり、
ケーブルレリーズまたはリモートコードの併用をおすすめします。
・ 接写撮影の際は、一般に被写界深度が著しく浅くなります。奥行きのあ
る被写体の撮影では、絞りを充分絞って、露出時間を長くしてくださ
い。また、写したい部分を撮像素子面と平行に置くようにしてください。
■ 露出倍数
レンズのF 値は無限遠での被写体の像の明るさを表しますが、撮影倍率を
上げて撮影すると像の明るさは
明るさを有効F値(実効
増やす露出の係数を露出倍数といいます。
F値より減少します。このときの実質的な
F値)と呼び、実質的な明るさが減少した分だけ
■ 有効F値の変化(P. 148 の図)
このレンズは、撮影倍率が上がる(撮影距離が短くなる)に従い撮像素子
面での像の明るさが減少します。有効
ります。この変化量はカメラが自動的に補正するので、露出を決める際や
TTL調光によるフラッシュ撮影で露出倍数を考慮する必要はありません。
なお、カメラの表示パネルやファインダー内表示部で表示される絞り値
は、露出倍数が自動的に補正された
F値( 実 効 F値)は大きく(暗く)な
F値です。
Es
Se
Ru
Nl
It
Cz
Sk
Ck
Ch
Kr
7
Page 8

■ 手ブレ補正機能
Jp
手ブレ補正スイッチの使い方
En
De
ON
ON: シャッターボタンを半押しすると、手ブレを補正
OFF
します。ファインダー像のブレも補正するため、ピ
ント合わせが容易で、フレーミングしやすくなり
ます。
OFF:手ブレを補正しません。
Fr
手ブレ補正使用時のご注意
・ ∞〜約 2.6 m(撮影倍率:1/30×)までの撮影では、シャッタースピー
Es
Se
Ru
Nl
Cz
Sk
Ck
Ch
Kr
ドで
従い、手ブレ補正の効果は徐々に減少します。(※
し、
用時、
レンズは最も望遠側で測定。)
・ シャッターボタンを半押し後、ファインダー像が安定してから撮影する
ことをおすすめします。
・ 手ブレ補正の原理上、シャッターレリーズ後にファインダー像がわずか
に動くことがありますが、異常ではありません。
It
・ 流し撮り(パンニング)などでカメラの向きを大きく変えた場合、流し
た方向の手ブレ補正は機能しません。例えば、横方向に流し撮りする
と、縦方向の手ブレだけが補正されます。
・ 手ブレ補正中にカメラの電源を
ないでください。(その状態でレンズを振るとカタカタ音がすることが
ありますが、故障ではありません。カメラの電源を再度
音は消えます。)
・ 内蔵フラッシュ搭載のカメラで、内蔵フラッシュ充電中は、手ブレ補正
は行いません。
・
AF 作動(AF-ON)ボタンのあるカメラで、AF作動ボタンを押しても、
手ブレ補正は作動しません。
・ 三脚を使用するときは、手ブレ補正スイッチaを[
さい。ただし、三脚を使っても雲台を固定しないときや、一脚を使用
するときには、スイッチを[
※
3.0段分
FX フォーマット対応レンズはFX フォーマットデジタル一眼レフ使
の手ブレを補正します。1/30× から撮影倍率が上がるに
CIPA規格準拠。ただ
DX レンズは DX フォーマットデジタル一眼レフ使用時。ズーム
OFFにしたり、レンズを取り外したりし
ON]にすることをおすすめします。
ONにすれば、
OFF]にしてくだ
8
Page 9
■ カメラの内蔵フラッシュ使用時のご注意
・ 撮影距離0.6 m以上で使用してください。
・ ケラレを防止するために、レンズのフードは取り外して使用してくださ
い。
※カメラの内蔵フラッシュのケラレとは、フラッシュの光がレンズの先端
でさえぎられて影になり、写真に映り込む現象です。
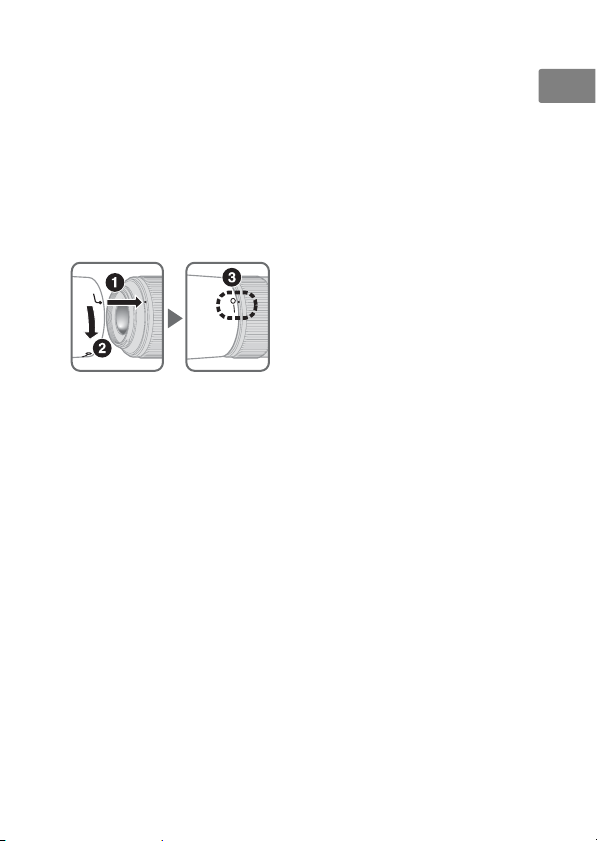
■ フードの使い方
画像に悪影響を及ぼす光線をカットし、レンズ面の保護にも役立ちます。
取り付け方
・ フード脱着指標(C)とフ ー ド
セット指標(B)が合っている
ことを確認してください(3)。
Jp
En
De
Fr
Es
Se
Ru
・ フードの先端を強くつかむと着脱が困難になります。着脱の際は、フー
ド取り付け指標(A)付近を持って回転させてください。
・ フードが正しく取り付けられないと撮影画面にケラレを生じますので
ご注意ください。
・ 収納時はフードを逆向きにしてレンズに取り付けられます。
Nl
It
Cz
Sk
Ck
Ch
Kr
9
Page 10

■ レンズのお手入れと取り扱い上のご注意
Jp
・ CPU信号接点9 は汚さないようにご注意ください。
・ レンズマウントゴムリング 8 が破損した場合は、そのまま使用せず販
En
De
Fr
Es
Se
Ru
Nl
売店またはニコンサービス機関に修理を依頼してください。
・ レンズ面の清掃は、ホコリを拭う程度にしてください。指紋がついたと
きは、柔らかい清潔な木綿の布に無水アルコール(エタノール)または
市販のレンズクリーナーを少量湿らせ、レンズの中心から外周へ渦巻状
に、拭きムラ、拭き残りのないように注意して拭いてください。
・ シンナーやベンジンなどの有機溶剤は絶対に使用しないでください。
・
レンズ表面の汚れや傷を防ぐためには、NCフィルター
けます。また、レンズのフードも役立ちます。
・ レンズをケースに入れるときは、必ずレンズキャップと裏ぶたを取り付
けてください。
・ フードを持ってカメラを持ち上げたりしないでください。
・ レンズを長期間使用しないときは、カビやサビを防ぐために、高温多湿
のところを避けて風通しのよい場所に保管してください。また、直射日
光のあたるところ、ナフタリンや樟脳のあるところも避けてください。
・ レンズを水に濡らすと、部品がサビつくなどして故障の原因となります
のでご注意ください。
・ ストーブの前など、高温になるところに置かないでください。極端に温
It
度が高くなると、外観の一部に使用している強化プラスチックが変形す
ることがあります。
Cz
■ 付属アクセサリー
・ 52mmスプリング式レンズキャップ LC-52
Sk
・ 裏ぶた
・ バヨネットフード
Ck
・ ソフトケース CL-1018
Ch
■ 別売アクセサリー
・ 52mmネジ込み式フィルター
Kr
HB-37
をお使いいただ
10
Page 11

■ 仕 様
型式: ニコン
焦点距離:
最大口径比:
レンズ構成: 10群14枚(EDレンズ1枚)
画角:
倍率目盛: ∞〜1:1(等倍)
撮影距離情報: カメラへの撮影距離情報出力可能
ピント合わせ:
手ブレ補正 ボイスコイルモーター(
撮影距離目盛: ∞〜
最短撮影距離: 撮像面から
絞り羽根枚数:
絞り方式: 自動絞り
絞りの範囲:
測光方式: 開放測光
アタッチメントサイズ
寸法: 約
質量: 約
※ 仕様、外観の一部を、改善のため予告なく変更することがあります。
FマウントCPU内蔵Gタイプ、
AF-S DXマイクロニッコールレンズ(ニコンデジタ
ル一眼レフカメラ[
85 mm
1:3.5
18° 50'
IF(ニコン内焦)方式、超音波モーターによるオー
トフォーカス、マニュアルフォーカス可能
方式
0.286 m(1 ft 併記)
9枚(円形絞り)
f/3.5―32
:52 mm(P=0.75 mm)
73 mm(最大径)×98.5 mm(バヨネットマウント
基準面からレンズ先端まで)
355 g
DXフォーマット]専用)
VCM)によるレンズシフト
0.286 m(等倍)
Jp
En
De
Fr
Es
Se
Ru
Nl
It
Cz
Sk
Ck
Ch
Kr
11
Page 12

Notes on Safety Operations
Jp
CAUTION
En
Do not disassemble
Touching the internal parts of the camera or lens could result in
De
injury. Repairs should be performed only by qualified technicians.
Should the camera or lens break open as the result of a fall or
Fr
other accident, take the product to a Nikon-authorized service
representative for inspection after unplugging the product and/
Es
or removing the battery.
Turn off immediately in the event of malfunction
Sv
Should you notice smoke or an unusual smell coming from the
camera or lens, remove the battery immediately, taking care to
Ru
avoid burns. Continued operation could result in injury.
After removing or disconnecting the power source, take the
Nl
product to a Nikon-authorized service representative for
inspection.
It
Do not use the camera or lens in the presence of flammable
gas
Cz
Operating electronic equipment in the presence of flammable
gas could result in an explosion or fire.
Sk
Do not look at the sun through the lens or viewfinder
Ck
Viewing the sun or other strong light sources through the lens or
viewfinder could cause permanent visual impairment.
Ch
Keep out of reach of children
Particular care should be taken to prevent infants from putting
Kr
the batteries or other small parts into their mouths.
Observe the following precautions when handling the
camera and lens
• Keep the camera and lens unit dry. Failure to do so could result
in fire or electric shock.
12
Page 13

• Do not handle or touch the camera or lens unit with wet hands.
Failure to do so could result in electric shock.
• When shooting with back-lighting, do not point the lens at the
sun or allow sunlight to pass directly down the lens as this may
cause the camera to overheat and possibly cause a fire.
• When the lens will not be used for an extended period of time,
attach both front and rear lens caps and store the lens away
from direct sunlight. Failure to do so could result in a fire, as the
lens may focus sunlight onto a flammable object.
Jp
En
De
Fr
Es
Sv
Ru
Nl
It
Cz
Sk
Ck
Ch
Kr
13
Page 14
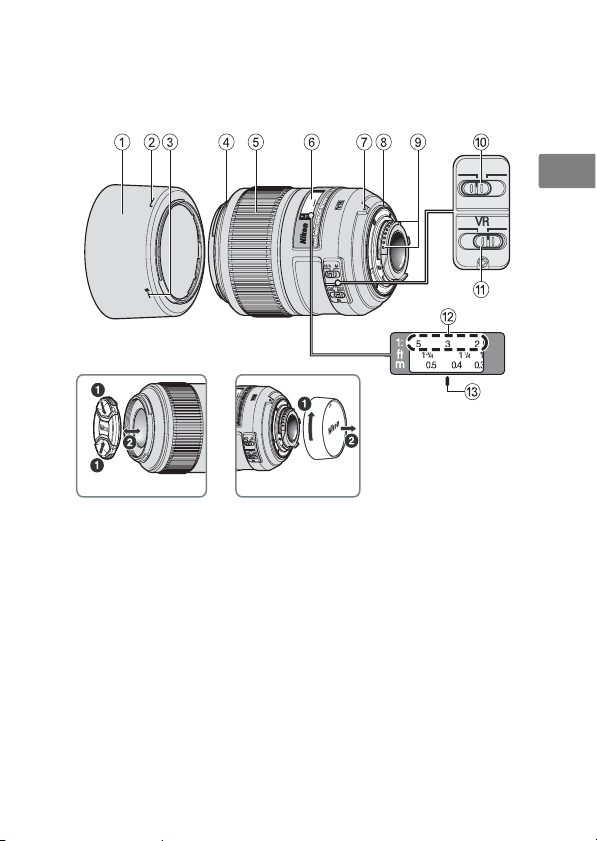
■ Nomenclature
Jp
En
De
Fr
Es
Sv
Ru
Nl
It
Cz
Sk
Ck
Ch
Kr
A
1Lens hood (P. 22)
2Lens hood attachment
index (P. 22)
3Lens hood setting index
(P. 22)
4Lens hood mounting
index (P. 22)
5Focus ring (P. 17)
6Distance scale
7Mounting index (P. 16)
M
M/A
OFF
ON
B
8Lens mount rubber
gasket (P. 22)
9CPU contacts (P. 22)
0Focus mode switch (P. 17)
aVibration reduction ON/
OFF switch (P. 20)
bReproduction ratio scale
(P. 18)
cDistance index line (P. 18)
( ) : reference page
14
Page 15

Thank you for purchasing the AF-S DX Micro NIKKOR 85mm f/
3.5G ED VR lens. DX NIKKOR lenses are specially designed for
us e w it h N ikon di gi ta l-S LR (N ik on DX fo rm at ) cam er as , s uch as
the D300-series and D90. When mounted on Nikon DX format
cameras, the lens picture angle is equivalent to approximately
1.5× the focal length in 35mm format. Before using this lens,
please read these instructions and refer to your camera’s
User’s Manual.
■ Major features
• This lens exhibits sharp rendering characteristics suited to
close-up photography, reproduction work, snapshots, and
general photography at all shooting distances.
• This lens is equipped with the Nikon Internal Focusing (IF)
system, which offers excellent balance between sharp focus
on the primary subject and pleasing blur characteristics in
the background and foreground.
• Superior optical performance and rendering characteristics
are maximized with the use of one extra-low dispersion (ED)
glass element, which ensure correction of chromatic
aberration. In addition, the rounded aperture produces soft
and pleasing blur characteristics in portions of pictures that
are out-of-focus.
• Up to four Wireless Remote Speedlight SB-R200s can be
mounted on the edge of the lens.
Jp
En
De
Fr
Es
Sv
Ru
Nl
It
Cz
Sk
Ck
Ch
Kr
15
Page 16

■ Using the lens
Jp
Mounting the lens on the camera
1 Turn the camera off.
En
2 Remove the rear lens cap. (Fig. B)
3 Align the mounting index 7 on the lens with the
De
Fr
Es
Sv
Ru
mounting index on the camera, and rotate the lens
counterclockwise until it clicks into place. Be sure that the
lens is in the correct position when the mounting index 7
is on the top of the lens.
4 Remove the front lens cap. (Fig. A)
Removing the lens from the camera
1 Turn the camera off.
2 Press and hold the lens release button on the camera
while turning the lens clockwise.
Nl
It
Cz
Sk
Ck
Ch
Kr
16
Page 17

■ Focusing
Set your camera’s focus mode selector according to the chart
below:
Camera
focus mode
AF
MF Manual focus (electronic rangefinder is available.)
For more information on camera focus modes, refer to your
camera’s User’s Manual.
Autofocus with
manual override
Lens’ focus mode switch
M/A M
Manual focus (electronic
rangefinder is available.)
Autofocus with manual override (M/A mode)
1 Set the lens focus mode switch 0 to M/A.
2 Autofocus is enabled, but autofocus operation can be
overridden by rotating the separate focus ring 5 while
pressing the shutter-release button halfway, or while
pressing the AF-ON button on the camera body of
cameras so equipped.
3 Press the shutter-release button halfway or the AF-ON
button once again to cancel manual focus and resume
autofocus.
■ Setting the aperture
Use the camera to adjust the aperture setting. When
exposure (or shooting) mode is set at “A” or “M”, the camera
will control aperture to maintain the effective f-number (up to
approx. 1.1 stops) even if shooting distance is changed.
Jp
En
De
Fr
Es
Sv
Ru
Nl
It
Cz
Sk
Ck
Ch
Kr
17
Page 18

■ Depth of field
If your camera supports depth-of-field preview, the effects of
Jp
the aperture setting can be previewed in the viewfinder
before shooting.
En
This lens is equipped with the Internal Focusing (IF) system.
As the shooting distance decreases, the focal length also
De
decreases.
Fr
■ Focusing at a predetermined reproduction
Es
Sv
Ru
Nl
Cz
Sk
Ck
Ch
Kr
ratio (Reproduction ratio scale)
The reproduction ratio is the relation between the size of the
image recorded on the image sensor and the actual subject
size. If, for example, the image on the image sensor is one-fifth
the actual subject size, the reproduction ratio is 1:5.
To photograph at a predetermined reproduction ratio, use
the following procedure:
1 Manually turn the focus ring until the desired
It
reproduction ratio scale number is aligned with the
distance index line c.
2 Aim at the subject, then change your position, moving
closer to or farther away from the subject, until the image
in the viewfinder sharpens.
■ Notes on close-up photography and
reproduction work
Camera shake
This lens provides such exceptionally high image
magnification that even the slightest movement during
shooting can cause the image to blur. Therefore, the use of a
tripod and a cable release or remote cord is highly
recommended to prevent the effects of camera shake.
18
Page 19

Close working distance
At the high reproduction ratios used in close-up shooting, the
depth of field is very shallow. To ensure sufficient depth of
field, stop down the lens, extend the exposure time, and
carefully position the camera so that the most important
portion of the subject is parallel to the surface of the image
sensor to ensure sharp focus.
■ Exposure factor
The f-number of a lens indicates brightness of the image
formed by the lens set at “infinity” shooting distance. The
greater the reproduction ratio, the more image brightness
decreases. The actual brightness of the image is called the
“effective f-number,” and the exposure compensation value
for the change of the effective f-number is called the
“exposure factor.”
■ Effective f-number variation (P. 148)
With this lens, the greater the reproduction ratio (the shorter
the shooting distance), the more the brightness of the image
projected onto the image sensor decreases and the more the
effective f-number increases (the amount of light passing
through the lens’ aperture decreases). This variation is
automatically compensated for by the camera’s exposure
meter, so the user can determine exposure or operate TTL
flash shooting without having to consider the exposure
factor.
The f-number displayed in the camera’s LCD panel or
viewfinder is the value automatically compensated.
Jp
En
De
Fr
Es
Sv
Ru
Nl
It
Cz
Sk
Ck
Ch
Kr
19
Page 20

■ Vibration reduction mode
Jp
Setting the vibration reduction ON/OFF switch
En
ON
De
Fr
Es
Sv
Notes on using vibration reduction
• By enabling vibration reduction (VR), slower shutter speeds
Ru
Cz
Sk
Ck
Ch
Kr
(3.0 stops*) can be used when shooting distance is between
Nl
It
and 2.6 m (the reproduction ratio from to 1/30×). The
higher the reproduction ratio from 1/30× is, the more the
effects of vibration reduction will decrease gradually. (*The
effects of VR on shutter speed are measured according to
Camera and Imaging Products Association (CIPA) standards;
FX-format lenses are measured using FX-format digital
cameras, DX-format lenses using DX-format cameras. Zoom
lenses are measured at maximum zoom.)
• After pressing the shutter-release button halfway, wait until
the image in the viewfinder stabilizes before pressing the
shutter-release button the rest of the way down.
• Due to the characteristics of the vibration reduction
mechanism, the image in the viewfinder may be blurred
after the shutter is released. This is not a malfunction.
• If the camera is panned in a wide arc, compensation for
camera shake in the panning direction is not performed. For
example, only the effects of vertical camera shake is reduced
with horizontal panning.
ON: The effects of camera shake are reduced
OFF
while the shutter- release button is pressed
halfway and also at the instant the shutter
is released. Because vibration is reduced in
the viewfinder, auto/manual focusing and
exact framing of the subject are easier.
OFF:The effects of camera shake are not
reduced.
20
Page 21

• Do not turn the camera off or remove the lens from the
camera while vibration reduction is operating. Failure to
observe this note could result in the lens sounding and
feeling as if an internal component is loose or broken when
it is shaken. This is not a malfunction. Turn the camera on
again to correct this.
• With cameras featuring a built-in flash, vibration reduction
does not function while the built-in flash is charging.
• With autofocus cameras featuring an AF-ON button,
vibration reduction does not function even when the AFON button is pressed.
• When the camera is mounted on a tripod, set the vibration
reduction ON/OFF switch a to OFF. However, set the
switch to ON when using a tripod without securing the
tripod head, or when using a monopod.
■ The built-in flash and vignetting
• The built-in flash cannot be used over distances of less than
0.6 m (2.0 ft.).
• To prevent vignetting, do not use the lens hood.
* Vignetting is the darkening of the corners around the image
that occurs when light emitted by the camera’s built-in flash
is obstructed by the lens barrel.
Jp
En
De
Fr
Es
Sv
Ru
Nl
It
Cz
Sk
Ck
Ch
Kr
21
Page 22
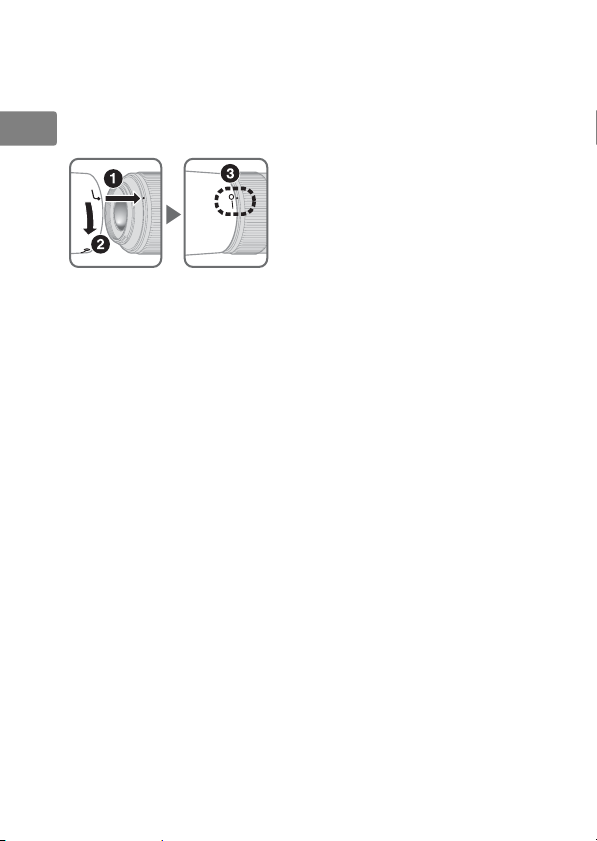
■ Using the lens hood
The lens hood blocks light rays that have harmful effects on
Jp
pictures. It also helps to protect the glass surface of the lens.
En
Attaching the hood
De
Fr
• Be sure that the lens hood
mounting index (C) is
aligned with the lens hood
setting index (
Es
• To facilitate attachment or removal of the hood, hold it by
Sv
Ru
Cz
Sk
Ck
Ch
Kr
the lens hood attachment index (
edge.
• If the lens hood is not correctly attached, vignetting may
occur.
Nl
• The lens can be stored with the lens hood attached in the
reverse position.
It
■ Lens care
• Be careful not to allow the CPU contacts 9 t o beco me dir ty
or damaged.
• If the lens mount rubber gasket 8 is damaged, be sure to
visit the nearest Nikon-authorized service representative for
repair.
• Clean lens surfaces with a blower brush. To remove dirt and
smudges, use a soft, clean cotton cloth or lens tissue
moistened with ethanol (alcohol) or lens cleaner. Wipe in a
circular motion from the center to the outer edge, taking
care not to leave traces or touch other parts of the lens.
• Never use organic solvent such as thinner or benzene to
clean the lens, as this could cause damage, result in a fire, or
cause health problems.
A) rather than its outer
B) (3).
22
Page 23

• NC filters are available to protect the front lens element. The
lens hood also helps to protect the front of the lens.
• When storing the lens in its flexible lens pouch, attach both
the front and rear lens caps.
• When the lens is mounted on a camera, do not pick up or
hold the camera and lens by the lens hood.
• When the lens will not be used for an extended period of
time, store it in a cool, dry place to prevent mold and rust. Be
su re t o st ore the len s aw ay f rom dir ect sun lig ht o r ch emi cal s
such as camphor or naphthalene.
• Do not get water on the lens or drop it in water as this will
cause it to rust and malfunction.
• Reinforced plastic is used for certain parts of the lens. To
avoid damage, never leave the lens in an excessively hot
place.
■ Standard accessories
• 52mm snap-on Front Lens Cap LC-52
•Rear Lens Cap
• Bayonet Hood HB-37
• Flexible Lens Pouch CL-1018
■ Optional accessory
• 52mm screw-on filters
Jp
En
De
Fr
Es
Sv
Ru
Nl
It
Cz
Sk
Ck
Ch
Kr
23
Page 24

■ Specifications
Jp
Type of lens: G-type AF-S DX Micro NIKKOR lens with
En
De
Focal length: 85 mm
Maximum
Fr
aperture:
Lens
Es
construction:
Picture angle: 18º 50’
Sv
Reproduction
ratio scale:
Ru
Distance
information:
Nl
Focusing: Nikon Internal Focusing (IF) system,
It
Vibration
Cz
reduction:
Shooting
Sk
distance scale:
Closest
Ck
focusing
distance:
Ch
No. of
diaphragm
Kr
blades:
Diaphragm: Fully automatic
Aperture
range:
built-in CPU and Nikon bayonet mount
(specially designed for use with Nikon
digital-SLR—DX format—cameras)
f/3.5
14 elements in 10 groups (1 ED lens
element)
to 1:1 (life-size)
Output to camera
autofocus using a Silent Wave Motor,
manually via separate focus ring
Lens-shift method using voice coil motors
(VCMs)
Graduated in meters and feet from 0.286 m
(1 ft) to infinity ( )
0.286 m (0.9 ft.) from focal plane (life-size)
9 pcs. (rounded)
f/3.5 to f/32
24
Page 25

Exposure
measurement:
Attachment
size:
Dimensions: Approximately 73 mm (dia.) × 98.5 mm
Weight: Approximately 355 g (12.5 oz)
Specifications and designs are subject to change without notice
or obligation on the part of the manufacturer.
Via full-aperture method
52 mm (P = 0.75 mm)
(extension from the camera’s lensmounting flange)
Jp
En
De
Fr
Es
Sv
Ru
Nl
It
Cz
Sk
Ck
Ch
Kr
25
Page 26

Hinweise für sicheren Betrieb
Jp
En
De
Fr
Es
Sv
Ru
Nl
It
Cz
Sk
Ck
Ch
Kr
ACHTUNG
Keinesfalls zerlegen.
Beim Berühren der Innenteile von Kamera oder Objektiv droht
Verletzungsgefahr. Überlassen Sie Reparaturen unbedingt ausschließlich
qualifizierten Technikern. Kommt es durch einen heftigen Stoß (z.B. Fall auf
den Boden) zu einem Bruch von Kamera oder Objektiv, so trennen Sie
zunächst das Produkt vom Stromnetz bzw. entnehmen die Batterie(n) und
geben es dann an eine autorisierte Nikon-Servicestelle zur Überprüfung ab.
Bei einer Störung sofort die Stromversorgung ausschalten.
Bei Entwicklung von Rauch oder ungewöhnlichem Geruch durch Kamera
oder Objektiv entnehmen Sie sofort die Batterie(n); dabei vorsichtig vorgehen,
denn es besteht Verbrennungsgefahr. Bei einem Weiterbetrieb unter diesen
Umständen droht Verletzungsgefahr.
Nach dem Abtrennen von der Stromversorgung geben Sie das Gerät an eine
autorisierte Nikon-Servicestelle zur Überprüfung ab.
Kamera oder Objektiv keinesfalls bei Vorhandensein von brennbarem
Gas einsetzen.
Wird elektronisches Gerät bei brennbarem Gas betrieben, so droht u. U.
Explosions- oder Brandgefahr.
Keinesfalls durch Objektiv oder Sucher in die Sonne blicken.
Beim Betrachten der Sonne oder anderer starker Lichtquellen durch Objektiv
oder Sucher droht eine permanente Schädigung des Sehvermögens.
Dem Zugriff von Kindern entziehen.
Es ist unbedingt dafür zu sorgen, dass Kleinkinder keine Batterien oder andere
Kleinteile in den Mund nehmen können.
Beim Umgang mit Kamera und Objektiv unbedingt die folgenden
Vorsichtmaßnahmen beachten:
• Schützen Sie die Kamera und das Objektiv vor Feuchtigkeit. Andernfalls
droht Brand- oder Stromschlaggefahr.
• Handhaben oder berühren Sie die Kamera bzw. das Objektiv keinesfalls mit
nassen Händen. Andernfalls droht Stromschlaggefahr.
• Bei Gegenlichtaufnahmen nicht das Objektiv gegen die Sonne richten oder
das Sonnenlicht direkt durch das Objektiv eintreten lassen. Dies könnte eine
Überhitzung der Kamera verursachen und ein Brand könnte die Folge sein.
• Vor einem längeren Nichtgebrauch des Objektivs bringen Sie den vorderen
und hinteren Deckel an und bewahren das Objektiv geschützt vor direkter
Sonnenlichteinwirkung auf. Andernfalls droht Brandgefahr wegen
möglicher Fokussierung von Sonnenlicht durch das Objektiv auf brennbare
Gegenstände.
26
Page 27
■ Nomenklatur
M/A
ON
M
OFF
Jp
En
De
Fr
Es
Sv
Ru
Nl
It
A
1 Gegenlichtblende (S. 33)
2 Markierung für die Arretierung
der Gegenlichtblende (S. 33)
Markierung für die Ausrichtung
3
der Gegenlichtblende (S. 33)
4 Markierung für die Arretierung
für Gegenlichtblend (S. 33)
5 Entfernungseinstellring (S. 29)
6 Entfernungsskala
7 Markierung für die Arretierung
(S. 29)
B
8 Dichtungsmanschette (S. 34)
9 CPU-Kontakte (S. 34)
0 Fokusmodusschalter (S. 29)
a VR-Modus-Schalter ON/OFF
(S. 32)
b Reproduktionsverhältnis-Skala
(S. 30)
c Markierung für die
Entfernungseinstellung (S. 30)
Cz
Sk
Ck
Ch
Kr
27
Page 28

Wir danken Ihnen für das Vertrauen, das Sie Nikon mit dem Kauf des
AF-S DX Micro-NIKKOR 85 mm 1:3,5G ED VR entgegenbringen. DX-
Jp
NIKKOR-Objektive sind speziell für die Verwendung mit digitalen NikonSpiegelreflexkameras mit DX-Bildformat konstruiert, wie etwa der D300-
En
Serie und der D90. Der Bildwinkel des Objektivs entspricht bei
Verwendung an einer DX-Format-Kamera dem eines Objektivs mit der ca.
De
1,5-fachen Brennweite an einer Kleinbildkamera. Machen Sie sich bitte
vor dem Gebrauch dieses Objektivs mit dem Inhalt dieser
Fr
Bedienungsanleitung und dem Benutzerhandbuch Ihrer Kamera vertraut.
■ Die wichtigsten Merkmale
Es
• Dieses Objektiv gewährleistet feinst detaillierte Bilderfassung und
Sv
Ru
Cz
Sk
eignet sich für Nahaufnahmen, Reproduktion, Schnappschüsse und
allgemeine Fotorgrafie bei allen Aufnahmeentfernungen.
• Diese Objektiv ist mit einer Innenfokussierung (IF; internal focusing)
ausgestattet, das einen exzellenten Abgleich zwischen scharfer
Fokussierung des Primärmotivs und ansprechender Unschärfeeffekte
Nl
im Vorder- und Hintergrund bietet.
• Durch eine ED-Glas-Linse (extra-low dispersion) wird der Farbfehler
It
effektiv korrigiert. So werden eine außergewöhnlich hohe optische
Leistung und Detailerfassung erzielt. Die Blende mit abgerundeten
Lamellen erzeugt ein sehr natürliches Bokeh bei unscharf abgebildeten
Objekten in Vorder- und Hintergrund.
• Bis zu vier Slave-Blitzgeräte SB-R200 können am Objektiv befestigt
werden.
Ck
Ch
Kr
28
Page 29

■ Verwendung des Objektivs
Anbringen des Objektivs an der Kamera
1 Schalten Sie die Stromversorgung der Kamera aus.
2 Nehmen Sie den hinteren Objektivdeckel ab. (Abb. B)
3 Fl uchten Sie die Markierungen für die Arretierung 7 an Objektiv und
Kamera, und drehen Sie das Objektiv gegen den Uhrzeigersinn, bis es
hörbar einrastet. Stellen Sie sicher, dass sich das Objektiv in der
korrekten Position befindet, wenn sich die Markierung für die
Arretierung 7 oben auf dem Objektiv befindet.
4 Nehmen Sie den vorderen Objektivdeckel ab. (Abb. A)
Abnehmen des Objektivs von der Kamera
1 Schalten Sie die Stromversorgung der Kamera aus.
2 Halten Sie die Objektiv-Freigabetaste gedrückt und drehen Sie das
Objektiv im Uhrzeigersinn.
■ Fokussierung
Stellen Sie den Fokusmodusschalter Ihrer Kamera entsprechend der
nachstehenden Tabelle ein.
Fokussteuerung
(Kamera)
AF
MF
Weitere Informationen zum Kamera-Fokusmodus finden Sie im
Benutzerhandbuch Ihrer Kamera.
Autofokus mit Priorität der
Scharfeinstellung
(Scharfeinstellung mit elektronischer Einstellhilfe verfügbar)
Autofokus mit Priorität der manuellen Scharfeinstellung
(M/A-Modus)
1 Stellen Sie den Fokusmodusschalter 0 am Objektiv auf M/A.
Der Autofokus ist aktiviert, aber Sie können manuell fokussieren,
2
indem Sie den Entfernungeinstellring 5 drehen, während Sie den
Auslöser am ersten Druckpunkt gedrückt halten oder während Sie die
AF-ON-Taste am Kameragehäuse gedrückt halten (insofern die
Kamera über eine AF-ON-Taste verfügt).
3
Drücken Sie den Auslöser erneut bis zum ersten Druckpunkt oder
drücken Sie die AF-ON-Taste erneut, wenn Sie von der manuellen
Fokussierung zum Autofokusbetrieb zurückwechseln möchten.
Fokussteuerung (Objektiv)
M/A M
Manueller Fokus
manuellen
Manueller Fokus
(Scharfeinstellung mit
elektronischer Einstellhilfe
verfügbar)
Jp
En
De
Fr
Es
Sv
Ru
Nl
It
Cz
Sk
Ck
Ch
Kr
29
Page 30

■ Blendeneinstellung
Stellen Sie die Blende an der Kamera ein. Wenn die Belichtung (oder
Jp
Aufnahme) auf »A« oder »M« gestellt ist, kontrolliert die Kamera die
Blende, um den effektiven Blendenwert (bis zu ca. 1,1 Stufen)
En
beizubehalten, auch wenn sich die Aufnahmeentfernung ändert.
■ Tiefenschärfe
De
Wenn Ihre Kamera die Tiefenvorschau unterstützt, können die Effekte der
Blendeneinstellung vor der Aufnahme im Sucher als Vorschau angezeigt
werden.
Fr
Diese Objektiv ist mit einer Innenfokussierung (IF; internal focusing)
ausgestattet. Bei niedrigen Entfernungseinstellungen nimmt auch die
Es
Brennweite ab.
■ Fokussierung bei einem festgelegten
Sv
Reproduktionsverhältnis
(Reproduktionsverhältnis-Skala)
Das Reproduktionsverhältnis ist die Beziehung zwischen der Größe des auf
Ru
dem Bildsensor gespeicherten Bilds und der tatsächlichen Motivgröße.
Wenn z.B. das Bild auf dem Bildsensor ein Fünftel der tatsächlichen
Nl
Motivgröße ausmacht, beträgt das Reproduktionsvehältnis 1:5.
Um mit einem vorher festgelegten Reproduktionsverhältnis zu
fotografieren, wie folgt vorgehen:
It
1 Drehen Sie den Entfernungs-Einstellring, bis die gewünschte
Cz
Sk
Reproduktionsverhältniszahl mit der Markierung für die
Entfernungseinstellung c ausgerichtet ist.
2 Visieren Sie das Motiv an, ändern Sie dann Ihre Position, nähern bzw.
entfernen Sie sich vom Motiv, bis das Motiv im Sucher scharf wird.
■ Hinweise zu Nahaufnahme und Reproduktion
Kameraverwacklung
Ck
Dieses Objektiv bietet eine außergewöhnlich starke Bildvergrößerung,
wodurch selbst die kleinste Bewegung während der Aufnahme
Ch
Bildunschärfe erzeugen kann. Aus diesem Grund werden der Einsatz eines
Stativs und eines Kabelauslösers bzw. eines Kabelfernauslösers dringendst
Kr
empfohlen, um die Effekte der Kameraverwacklung zu verhindern.
Nahe Arbeitsentfernung
Bei den hohen Reproduktionsverhältnissen, die für Nahaufnahmen
verwendet werden, ist die Tiefenschärfe sehr flach. Um eine ausreichende
Tiefenschärfe und gleichzeitig eine scharfe Fokussierung zu
gewährleisten, das Objektiv abblenden, die Belichtungszeit vergrößern
und die Kamera sorgfältig positionieren, damit der wichtigste Bildbereich
des Motivs sich parallel zur Oberfläche des Bildsensors befindet.
30
Page 31

■ Belichtungsfaktor
Der Blendenwert eines Objektivs zeigt das Belichtungsverhältnis des
Bilds, das bei der Aufnahmeentfernung »unendlich« vom Objektiv
erzeugt wurde. Je größer das Reproduktionsverhältnis, desto stärker
nimmt das Belichtungsverhältnis des Bilds ab. Das tatsächliche
Belichtungsverhältnis des Bilds wird als »effektiver Blendenwert« und der
Wert der Belichtungskorrektur für die Änderung des effektiven
Blendenwerts als »Belichtungsfaktor« bezeichnet.
■ Effektive Änderung des Blendenwerts (S. 148)
Je größer das Reproduktionsverhältnis bei diesem Objektiv (je kürzer die
Aufnahmeentfernung), desto stärker nimmt das Belichtungsverhältnis
des auf den Bildsensor projizierten Bilds ab und desto stärker nimmt der
effektive Blendenwert zu (die durch die Objektivblende eintretende
Lichtmenge nimmt ab). Diese Abweichung wird automatisch durch das
Belichtungsmesssystem der Kamera kompensiert. So kann der Benutzer
die Belichtung bestimmen oder TTL-Blitzaufnahmen durchführen, ohne
dabei den Belichtungsfaktor beachten zu müssen.
Der angezeigte Blendenwert auf dem Monitordisplay bzw. Sucher der
Kamera ist der automatisch kompensierte Wert.
Jp
En
De
Fr
Es
Sv
Ru
Nl
It
Cz
Sk
Ck
Ch
Kr
31
Page 32

■ Bildstabilisator
Einstellen des VR-Modus-Schalter ON/OFF
Jp
ON:
OFF
En
ON
De
Fr
Hinweise zum Bildstabilisator
Es
• Bei eingeschaltetem Bildstabilisator (VR) können längere Belichtungszeiten
Sv
Ru
Cz
Sk
Ck
Ch
Kr
(3,0 Stufen*) verwendet werden, wenn sich die Aufnahmeentfernung
zwischen und 2,6 m (das Reproduktionsverhältnis von bis 1/30
befindet. Je höher das Reproduktionsverhältnis ab 1/30×, desto stärker
nehmen die Effekte des Bildstabilisators Schritt für Schritt ab. (*Die Wirkung
des Bildstabilisators (VR) auf die Belichtungszeit wird gemäß CIPAStandards ermittelt (Camera and Imaging Products Association); FX-
Nl
Objektive werden an FX-Format-Kameras gemessen, DX-Objektive an DXFormat-Kameras. Zoomobjektive werden bei der längsten
Brennweiteneinstellung gemessen.)
It
•
Tippen Sie den Auslöser an, warten Sie, bis sich das Bild im Sucher
stabilisiert hat, und drücken Sie erst dann den Auslöser ganz nach unten
• Aufgrund der Eigenschaften des Bildstabilisierungsmechanismus
erscheint das Bild im Sucher nach dem Auslösen unter Umständen
verschwommen. Dies ist jedoch keine Fehlfunktion.
• Wenn Sie mit dieser Einstellung die Kamera bei einem Schwenk in einem
weiten Bogen bewegen, so werden Kameravibrationen in Richtung dieser
Bewegung nicht ausgeglichen. Bei horizontalen Schwenkbewegungen
werden z.B. nur die Effekte der vertikalen Kameraverwacklungen verringert.
• Schalten Sie die Kamera nicht aus und nehmen Sie auch nicht das Objektiv
von der Kamera ab, solange der Bildstabilisator arbeitet. Andernfalls kann
beim Schütteln des Objektivs ein Geräusch zu hören sein, als seien innere
Bauteile lose oder gebrochen. Dies ist jedoch keine Fehlfunktion. Schalten
Sie einfach die Kamera wieder ein, um das Problem zu beheben.
• Bei Kameras mit integriertem Blitzgerät funktioniert der Bildstabilisator
nicht, solange das integrierte Blitzgerät geladen wird.
• Bei Autofokus-Kameras, die mit einer AF-ON-Taste ausgestattet sind, bewirkt
das Drücken der AF-ON-Taste keine Aktivierung des Bildstabilisators.
• Bei Verwendung eines Stativs wird die Verwendung des Bildstabilisators
nicht empfohlen. Stellen Sie den Bildstabilisatorschalter in diesem Fall auf
a »OFF
«. Ausnahme: Bei Verwendung eines Einbeinstativs oder nicht
arretierten Stativkopfs sollte der Bildstabilsator aktiviert werden (»ON«).
Der Effekt von Kameraverwacklungen wird bei
Betätigung des Auslösers bis zum ersten Druckpunkt
und zum Zeitpunkt des Auslösens verringert. Da die
Vibrationen bereits im Sucher verringert werden,
gestalten sich automatisches/manuelles Scharfstellen
und die exakte Ausrichtung des Motivs einfacher.
OFF: Die Effekte von Kameraverwacklungen werden
nicht verringert.
×
)
.
32
Page 33

■ Integriertes Blitzgerät und Abschattung*
• Das integrierte Blitzgerät kann nicht für Entfernungen von unter 0,6 m
eingesetzt werden.
• Verwenden Sie beim Blitzen mit dem integrierten Blitzgerät keine
Gegenlichtblende.
* Unter Abschattung versteht man die Abdunkelung der Bildecken,
wenn das Blitzlicht vom Integrierten Blitzgerät der Kamera vom
Objektivtubus verdeckt wird.
■ Verwendung der Gegenlichtblende
Die Gegenlichtblende verhindert das Eindringen von Streulicht, das
negative Auswirkungen auf die Bildqualität haben kann. Des Weiteren
schützt sie die Frontlinse des Objektivs.
Anbringen der Gegenlichtblende
• Richten Sie die Markierung für die
Arretierung der Gegenlichtblende
(B) an der objektivseitigen
Markierung für das Ansetzen der
Gegenlichtblende (C) aus (3).
• Das Anbringen bzw. Abnehmen der Gegenlichtblende fällt leichter, wenn
Sie diese an der Basis (in der Nähe der Markierung für die Arretierung der
Gegenlichtblende (A)) und nicht an den äußeren Kanten fassen.
• Wenn die Gegenlichtblende nicht richtig angebracht ist, schattet sie u. U.
einen Teil des Motivs ab.
• Das Objektiv kann mit umgekehrt angebrachter Gegenlichtblende
aufbewahrt werden.
Jp
En
De
Fr
Es
Sv
Ru
Nl
It
Cz
Sk
Ck
Ch
Kr
33
Page 34

■ Pflege des Objektivs
• Halten Sie die CPU-Kontakte 9 stets sauber und schützen Sie sie vor
Jp
Beschädigung.
• Bei einer Beschädigung der Dichtungsmanschette 8 sollten Sie das
En
De
Sv
Ru
Cz
Sk
Ck
Ch
Kr
Objektiv bei einer Nikon-Servicestelle zur Reparatur abgeben.
• Säubern Sie die Linsenobeflächen mit einem Blasepinsel. Staub und Flecken
entfernen Sie mit einem sauberen, weichen Baumwolltuch oder OptikReinigungspapier, das Sie mit Ethanol (Alkohol) oder
Optikreinigungsflüssigkeit anfeuchten. Wischen Sie in kreisförmigen
Fr
Bewegungen von der Mitte nach außen, ohne dass Wischspuren
zurückbleiben oder Sie andere Teile des Objektivs berühren.
Es
• Verwenden Sie niemals organische Lösungsmittel wie Verdünner oder
Benzin zum Reinigen des Objektivs. Dies könnte das Objektiv beschädigen,
einen Brand auslösen bzw. gesundheitliche Schäden mit sich bringen.
• Zum Schutz der Frontlinse kann ein Klarglasfilter (NC) verwendet werden.
Die Gegenlichtblende wirkt als zusätzlicher Frontlinsenschutz.
• Beim Verstauen des Objektivs in seinem flexiblen Etui müssen der vordere
und der hintere Deckel aufgesetzt sein.
Nl
• Halten oder heben Sie das Objektiv oder die Kamera nicht an der
angesetzten Gegenlichblende.
It
• Bei längerer Nichtbenutzung sollte das Objektiv an einem kühlen, trockenen
Ort aufbewahrt werden, um Schimmelbildung und Korrosion zu vermeiden.
Halten Sie das Objektiv von direkter Sonneneinstrahlung oder Chemikalien
wie Kampfer oder Naphthalin fern.
• Halten Sie das Objektiv von Wasser fern, das zur Korrosion und zu
Betriebsstörungen führen kann.
• Einige Teile des Objektivs bestehen aus verstärktem Kunststoff. Lassen Sie
das Objektiv deshalb nie an übermäßig heißen Orten liegen!
■ Im Lieferumfang enthaltenes Zubehör
• Vorderer Objektivdeckel LC-52 mit Schnappverschluss (52 mm)
• Hinterer Objektivdeckel
• Bajonett-Gegenlichtblende HB-37
• Objektivbeutel CL-1018
■ Optionales Zubehör
• 52 mm-Schraubfilter
34
Page 35

■ Technische Date
Objektivtyp: AF-S-DX-NIKKOR-Objektiv vom Typ G mit
Brennweite: 85 mm
Lichtstärke: 3,5
Optischer Aufbau: 14 Linsen in 10 Gruppen (1 ED-Linsenelement)
Bildwinkel: 18º 50’
Reproduktionsverhältnis-
Skala:
Entfernungsdaten:
Fokussierung: Nikon Internal Focusing (IF, interne Fokussierung)
Bildstabilisator: Optischer Bildstabilisator mit beweglicher
Entfernungsskala:
Naheinstellgrenze:
Blende: Irisblende mit 9 gerundeten Lamellen
Blendensteuerung:
Blendenbereich: 3,5 bis 32
Belichtungsmessung:
Filtergewinde: 52 mm (P = 0,75 mm)
Abmessungen: ca. 73 mm (Durchm.) × 98,5 mm
Gewicht: ca. 355 g
Änderungen und Irrtümer vorbehalten.
integrierter CPU und F-Bajonettanschluss (speziell
ausgelegt für den Gebrauch mit digitalen NikonSpiegelreflexkameras mit DX-Bildformat)
bis 1:1 (lebensgroß)
Übermittlung an die Kamera
System, Autofokus mit Silent Wave Motor, manuell
über separaten Entfernungseinstellring
Linsengruppe; Antrieb durch
Schwingspulenmotoren
Unterteilung in Meter von 0,286 m bis unendlich
0,286 m von der Sensorebene gemessen
(lebensgroß)
Vollautomatisch
Offenblendenmessung
(Länge ab Bajonettauflage)
()
Jp
En
De
Fr
Es
Sv
Ru
Nl
It
Cz
Sk
Ck
Ch
Kr
35
Page 36

Remarques concernant une utilisation en toute sécurité
Jp
En
De
Fr
Es
Sv
Ru
Nl
It
Cz
Sk
Ck
Ch
Kr
ATTENTION
Ne pas démonter
Le fait de toucher aux pièces internes de l'appareil ou de l'objectif pourrait
entraîner des blessures. Les réparations doivent être effectuées par des
techniciens qualifiés. Si l'appareil ou l'objectif est cassé suite à une chute ou un
autre accident, apportez le produit dans un centre de service agréé Nikon
pour le faire vérifier après avoir débranché le produit et retiré les piles.
En cas de dysfonctionnement, éteignez l'appareil immédiatement
Si vous remarquez de la fumée ou une odeur inhabituelle se dégageant de
l'appareil photo ou de l'objectif, retirez immédiatement les piles, en prenant
soin de ne pas vous brûler. Continuer d'utiliser son matériel peut entraîner des
blessures.
Après avoir retiré ou débranché la source d'alimentation, confiez le produit à
un centre de service agréé Nikon pour le faire vérifier.
N'utilisez pas l'appareil photo ou l'objectif en présence de gaz
inflammable
L'utilisation de matériel électronique en présence de gaz inflammable
risquerait de provoquer une explosion ou un incendie.
Ne regardez pas le soleil dans l'objectif ou le viseur
Regarder le soleil ou toute autre source lumineuse violente dans l'objectif ou
le viseur peut provoquer de graves lésions oculaires irréversibles.
Tenir hors de portée des enfants
Faites extrêmement attention à ce que les enfants ne mettent pas à la bouche
les piles ou d'autres petites pièces.
Observez les précautions suivantes lorsque vous manipulez l'appareil
et l'objectif
• Maintenez l'appareil photo et l'objectif au sec. Le non-respect de cette
précaution peut provoquer un incendie ou une électrocution.
• Ne manipulez pas et ne touchez pas l'appareil photo ou l'objectif avec les
mains humides. Le non-respect de cette précaution peut provoquer une
électrocution.
• Lors d'une prise de vue à contre-jour, ne dirigez pas l'objectif vers le soleil et
évitez que les rayons du soleil pénètrent dans l'objectif ; l'appareil photo
pourrait chauffer à l'excès, ce qui risquerait de provoquer un incendie.
• Lorsque vous n'utilisez pas l'objectif pendant une période prolongée, fixez
les bouchons avant et arrière, et rangez l'objectif à l'abri de la lumière directe
du soleil. Le non-respect de cette précaution peut provoquer un incendie,
car l'objectif peut concentrer la lumière du soleil sur un objet inflammable.
36
Page 37

■ Nomenclature
M/A
ON
M
OFF
Jp
En
De
Fr
Es
Sv
Ru
Nl
It
A
1 Parasoleil (P. 43)
2 Repère de fixation du
parasoleil (P. 43)
3 Repère de réglage du
parasoleil (P. 43)
Repère de montage du
4
parasoleil
5 Bague de mise au point (P. 39)
6 Échelle des distances
7 Repère de montage (P. 39)
(P. 43)
B
8 Joint en caoutchouc de
l'objectif (P. 44)
Contacts électriques CPU
9
0 Commutateur de mode de
mise au point (P. 39)
a Commutateur ON/OFF
(MARCHE/ARRET) de réduction
de vibration (P. 42)
b Échelle du facteur de
reproduction (P. 40)
c Ligne de repère de la distance
(P. 40)
( ) : Page de référence
(P. 44)
Cz
Sk
Ck
Ch
Kr
37
Page 38

Nous vous remercions d'avoir choisi l'objectif AF-S DX Micro NIKKOR
85mm f/3,5G ED VR. Les objectifs DX NIKKOR sont spécialement conçus
Jp
pour l'utilisation avec des appareils photo reflex numériques Nikon
(format Nikon DX), tels que ceux des séries D300 et D90. Une fois monté
En
sur des appareils photo au format Nikon DX, l'angle de champ de
l'objectif équivaut à environ 1,5× la focale en format 24 × 36 mm. Avant
De
d'utiliser cet objectif, veuillez lire ces instructions et vous reporter au
Manuel d'utilisation de votre appareil photo.
Fr
■ Principales caractéristiques
• Cet objectif se distingue par la précision de son rendu, particulièrement
Es
adapté aux gros plans, aux travaux de reproduction, aux instantanés et
Sv
Ru
Cz
Sk
aux photos ordinaires à toutes les distances de prise de vue.
• Cet objectif est équipé du système de mise au point interne Nikon (IF)
qui garantit un excellent équilibre entre la précision de la mise au point
sur le sujet principal et un effet de flou intéressant au niveau de l'arrièreplan et de l'avant-plan.
Nl
• L'utilisation d'une lentille en verre (ED) à très faible dispersion, qui
garantit une correction de l'aberration chromatique, offre de
It
remarquables performances optiques pour un rendu exceptionnel. En
outre, l'ouverture arrondie permet de créer des effets de flou doux et
intéressants dans des zones de l'image non mises au point.
• Jusqu'à quatre flashes asservis sans câble SB-R200 peuvent être fixés sur
le pourtour de l'objectif.
Ck
Ch
Kr
38
Page 39

■ Utilisation de l'objectif
Fixation de l'objectif sur l'appareil photo
1 Éteignez l'appareil photo.
2 Ôtez le bouchon arrière de l'objectif. (Fig. B)
3 Alignez le repère de montage 7 de l'objectif avec le repère de
montage de l'appareil photo, puis faites pivoter l'ob jectif dans le sens
inverse des aiguilles d'une montre jusqu'à ce qu'il se mette en place.
Assurez-vous que l'objectif est correctement positionné lorsque le
repère de montage 7 se trouve au-dessus de l'objectif.
4 Ôtez le bouchon d'objectif avant. (Fig. A)
Retrait de l'objectif de l'appareil photo
1 Éteignez l'appareil photo.
2 Maintenez enfoncée la commande de déverrouillage de l'objectif
située sur l'appareil photo tout en faisant pivoter l'objectif dans le
sens des aiguilles d'une montre.
■ Mise au point
Réglez le sélecteur de mise au point de l'appareil photo conformément
au tableau ci-dessous.
Mode de mise au
point de l'appareil
AF
MF
Pour plus de détails concernant le mode de mise au point de l'appareil,
reportez-vous au Manuel d'utilisation de l'appareil photo.
Autofocus avec priorité manuelle (Mode M/A)
1
Réglez le commutateur de mode de mise au point 0 de l'objectif sur
2
L'autofocus est activé, mais il est possible d'utiliser la mise au point
manuelle en tournant la bague de mise au point 5 séparée tout en
appuyant sur le déclencheur à mi-course ou tout en enfonçant la
commande AF-ON du boîtier, pour autant que votre appareil en so it équipé
3 Appuyez sur le déclencheur à mi-course ou appuyez de nouveau sur
la commande AF-ON pour annuler la mise au point manuelle et
revenir à l'autofocus.
Mode de mise au point de l'objectif
M/A M
Autofocus avec priorité
manuelle
Mise au point manuelle
(télémètre électronique disponible.)
Mise au point manuelle
(télémètre électronique
disponible.)
M/A
Jp
En
De
Fr
Es
Sv
Ru
Nl
It
Cz
Sk
Ck
Ch
Kr
.
.
39
Page 40

■ Réglage de l'ouverture
Utilisez l'appareil photo pour régler l'ouverture. Lorsque le mode
Jp
d'exposition (prise de vue) est réglé sur « A » ou « M », l'appareil photo
contrôle l'ouverture pour préserver la valeur d'ouverture effective
En
(jusqu'à la valeur 1,1 environ) même en cas de changement de distance
de prise de vue.
De
■ Profondeur de champ
Si votre appareil photo prend en charge l'aperçu de la profondeur de
champ, les effets du réglage d'ouverture peuvent être prévisualisés dans
Fr
le viseur avant la prise de vue.
Cet objectif est équipé du système de mise au point interne (IF). Si la
Es
distance de prise de vue diminue, la longueur focale diminue également.
■
Sv
Ru
Nl
Cz
Sk
Ck
Ch
Kr
Mise au point à un facteur de reproduction
prédéterminé (Échelle du facteur de reproduction)
Le facteur de reproduction correspond au rapport entre la taille de
l'image enregistrée par le capteur d'image et la taille réelle du sujet. Si, par
exemple, l'image enregistrée sur le capteur d'image est le cinquième de
la taille réelle du sujet, le facteur de reproduction est de 1:5.
Pour photographier à un facteur de reproduction prédéterminé,
procédez de la manière suivante :
It
1 Tournez manuellement la bague de mise au point jusqu'à ce que le
nombre figurant sur l'échelle du facteur de reproduction soit aligné
sur la ligne de repère de la distance c.
2 Visez le sujet, puis changez de position en vous rapprochant ou en
vous éloignant jusqu'à ce que l'image soit nette dans le viseur.
■ Remarques sur les gros plans et les travaux de
reproduction
Bougé de l'appareil photo
Cet objectif offre un tel agrandissement de l'image que le moindre
mouvement peut provoquer du flou à la prise de vue. L'utilisation d'un
pied et d'un câble de déclenchement ou d'une télécommande filaire est
vivement recommandé pour éviter les effets de bougé de l'appareil photo.
Distance de prise de vue rapprochée
Les facteurs de reproduction élevés utilisés pour les gros plans réduisent
considérablement la profondeur de champ. Pour que celle-ci soit
suffisante, fermez le diaphragme de l'objectif, prolongez le temps
d'exposition et placez soigneusement l'appareil photo pour que la
majeure partie du sujet soit parallèle à la surface du capteur d'image,
garantissant ainsi une mise au point précise.
40
Page 41

■ Facteur d'exposition
La valeur d'ouverture d'un objectif indique la luminosité de l'image qui se
forme lorsqu'il est réglé sur une distance de prise de vue égale à l'« infini ».
Plus le facteur de reproduction est élevé, plus l'image perd de sa
luminosité. La luminosité réelle de l'image est appelée « valeur
d'ouverture effective » et la valeur de correction de l'exposition en cas de
modification de la valeur d'ouverture effective porte le nom de « facteur
d'exposition ».
■ Variation de la valeur d'ouverture effective
(P. 148)
Avec cet objectif, plus le facteur de reproduction est élevé (plus la
distance de prise de vue est courte), plus la luminosité de l'image
projetée sur le capteur d'image diminue et plus la valeur d'ouverture
effective augmente (la quantité de lumière qui traverse l'ouverture de
l'objectif diminue). Cette variation est automatiquement corrigée par la
mesure de l'exposition de l'appareil photo, afin que l'utilisateur puisse
déterminer l'exposition ou opter pour la prise de vue au flash TTL sans se
préoccuper en permanence du facteur d'exposition.
La valeur d'ouverture affichée sur l'écran ACL ou dans le viseur de
l'appareil photo est automatiquement corrigée.
Jp
En
De
Fr
Es
Sv
Ru
Nl
It
Cz
Sk
Ck
Ch
Kr
41
Page 42

■ Mode de réduction de vibration
Réglage du commutateur ON/OFF de réduction de vibration
Jp
En
ON
De
Fr
Remarques relatives à l'utilisation du mode de réduction
de vibration
Es
• En activant la réduction de vibration (VR), les vitesses d'obturation lente
Sv
Ru
Cz
Sk
Ck
Ch
Kr
(3,0 valeurs*) peuvent être utilisées lorsque la distance de prise de vue est comprise
entre et 2,6 m (le facteur de reproduction est compris entre et 1/30×). Les
effets de la réduction de vibration s'accentuent progressivement,
proportionnellement à l'augmentation du facteur de repr oduction à partir de 1/30×.
(*Les effets de la fonction VR sur la vitesse d’obturation sont mesurés selon les
normes de la CIPA (Camera and Imaging Products Association) ; les mesures des
objectifs de format FX sont effectuées avec des appareils photo numériques de
Nl
format FX, celles des objectifs de format DX avec des appareils photo de format DX.
Les zooms sont réglés sur leur focale maximale lorsque les mesures sont effectuées.)
It
•
Sollicitez légèrement le déclencheur, puis attendez que l'image affichée
dans le viseur se stabilise avant d'appuyer à fond sur le déclencheur
• En raison des caractéristiques du mécanisme de réduction des
vibrations, l'image affichée dans le viseur peut être floue lorsque vous
relâchez le déclencheur. Il ne s'agit pas d'un dysfonctionnement.
• Si vous déplacez l'appareil photo en arc de cercle, la correction du
bougé de l'appareil ne s'effectue pas dans le sens du panoramique. Par
exemple, seuls les effets du bougé vertical de l'appareil photo sont
réduits lorsque vous faites un panoramique horizontal.
N'éteignez pas l'appareil photo ou ne retirez pas l'objectif de l'appareil
•
lorsque le mode de réduction de vibration est actif. Si vous ne respectez pas
cette consigne, l'objectif peut émettre un son et donner l'impression qu'un
composant interne est détaché ou cassé. Il ne s'agit pas d'un
dysfonctionnement. Allumez à nouveau l'appareil pour résoudre cet incident
• Avec des appareils photo équipés d'un flash intégré, la réduction de
vibration ne fonctionne pas lorsque ce dernier se recharge.
• Dans le cas des appareils photo autofocus équipés d'une commande
AF-ON, la réduction de vibration n'opère pas, même si vous appuyez
sur la commande AF-ON.
• Si l'appareil photo est monté sur un trépied, réglez le commutateur ON/OFF
de réduction de vibration
ON
lorsque vous utilisez un pied ou un trépied dont vous ne fixez pas la tête.
ON :
OFF
Les effets du bougé de l'appareil photo sont réduits
lorsque le déclencheur est enfoncé à mi-course ainsi
qu'au moment où il est relâché. Comme la vibration
est réduite dans le viseur, cela facilite la mise au point
automatique/manuelle et le cadrage précis du sujet
OFF : Les effets du bougé de l'appareil photo ne sont
pas réduits.
a
sur
OFF
. Toutefois, réglez le commutateur sur
.
.
.
42
Page 43

■ Flash intégré et vignettage
• Il est impossible d'utiliser le flash intégré à des distances inférieures à
0,6 m.
• Pour éviter le vignetage, n'utilisez pas le parasoleil.
* Le vignettage est l'assombrissement des coins de l'image qui se produit
lorsque la lumière émise par le flash intégré à l'appareil photo est
retenue par le barillet de l'objectif.
■ Utilisation du parasoleil
Le parasoleil bloque les rayons lumineux qui ont des effets indésirables
sur les photos. Il aide également à protéger la surface du verre de
l'objectif.
Fixation du parasoleil
• Vérifiez que le repère de montage
du parasoleil (C) est bien aligné
sur le repère de réglage du
parasoleil (
B) (3).
Jp
En
De
Fr
Es
Sv
Ru
Nl
• Pour faciliter le montage ou le retrait du parasoleil, tenez-le par son
repère de fixation (
• Si le parasoleil n'est pas correctement fixé, il risque d'entraîner du
vignettage.
• L'objectif peut être rangé en fixant le parasoleil à l'envers.
A) et non par son bord extérieur.
It
Cz
Sk
Ck
Ch
Kr
43
Page 44

■ Entretien de l'objectif
• Il est important de nettoyer régulièrement les contacts électriques CPU
Jp
9 et de ne pas les endommager.
• Si le joint en caoutchouc de l'objectif 8 est endommagé, rendez-vous
En
De
Sv
Ru
Cz
Sk
Ck
Ch
Kr
dans un centre de service agréé Nikon le plus proche pour réaliser les
réparations nécessaires.
Nettoyer la surface de l'objectif avec une soufflette ou une brosse de
•
nettoyage. Pour enlever les poussières ou les traces, utiliser de préférence
Fr
un tissu de coton doux, ou un tissu optique, légèrement humidifié avec
de l'alcool éthylique (éthanol). Procédez par légers mouvements
Es
circulaires en partant du centre vers l'extérieur, en prenant soin de ne pas
laisser de traces et de ne pas toucher d'autres zones de l'objectif
• N'utilisez jamais de solvants organiques, tels que diluant ou benzène,
pour nettoyer l'objectif, car vous risqueriez d'endommager le produit,
de provoquer un incendie ou de vous blesser.
Des filtres NC sont disponibles pour protéger la lentille de l'objectif avant.
•
Le parasoleil assure également une bonne protection contre les chocs
Nl
• Lorsque vous rangez l'objectif dans son étui souple, fixez les deux
bouchons avant et arrière de l'objectif.
It
• Lorsque l'objectif est installé sur un appareil photo, ne saisissez et ne
tenez pas l'appareil photo ainsi que l'objectif par le parasoleil.
• Si vous n'utilisez pas l'objectif pendant une période prolongée,
rangez-le dans un endroit sec et frais afin d'éviter la formation de
moisissure ou de rouille. Veillez à tenir le matériel éloigné des sources
de lumière et des produits chimiques (camphre, naphtaline, etc.).
• Éviter les projections d'eau ainsi que l'immersion, qui peuvent
provoquer la formation de rouille et des dommages irréparables.
• Certaines pièces de l'objectif sont en plastique renforcé. Pour éviter
tout problème, ne pas soumettre l'objectif à de fortes chaleurs.
■ Accessoires fournis
• Bouchon d'objectif avant encliquetable 52mm LC-52
• Bouchon arrière d'objectif
• Parasoleil à baïonnette HB-37
• Étui souple pour objectif CL-1018
■ Accessoire en option
• Filtres à visser 52mm
.
.
44
Page 45

■ Caractéristiques
Type d'objectif :
Focale : 85 mm
Ouverture
maximale :
Construction
optique :
Angle de champ : 18º 50’
Échelle du facteur
de reproduction :
Informations de
distance :
Mise au point : Système de mise au point interne Nikon (IF),
Réduction de
vibration :
Échelle de distance
de prise de vue :
Distance minimale
de mise au point :
Nb. de lamelles du
diaphragme :
Diaphragme : Entièrement automatique
Plage des ouvertures :
Mesure de
l'exposition :
Diamètre de fixation
pour accessoires :
Dimensions :
Poids :
Les caractéristiques et la conception sont susceptibles d'être modifiées sans
préavis ni obligation de la part du fabricant.
Objectif AF-S DX Micro NIKKOR de type G avec CPU
intégré et monture à baïonnette Nikon (spécialement
conçu pour être utilisé sur des appareils photo reflex
numériques Nikon au format DX)
f/3,5
14 éléments dans 10 groupes (1 lentille ED)
à 1:1 (taille réelle)
Communiquée à l'appareil photo
autofocus avec moteur silencieux, manuellement
via une bague de mise au point indépendante
VR optique utilisant des moteurs à bobine
acoustique (VCM)
Graduées en mètres et pieds de 0,286 m à l'infini
0,286 m à partir du plan focal (taille réelle)
9 (circulaires)
f/3,5 à f/32
Via méthode pleine ouverture
52 mm (P = 0,75 mm)
Env. 73 mm diam. × 98,5 mm (à partir du plan
d'appui de la monture d'objectif de l'appareil)
Env. 355 g
()
Jp
En
De
Fr
Es
Sv
Ru
Nl
It
Cz
Sk
Ck
Ch
Kr
45
Page 46

Notas sobre un uso seguro
Jp
En
De
Fr
Es
Sv
Ru
Nl
It
Cz
Sk
Ck
Ch
Kr
PRECAUCIÓN
No desarme el equipo
El contacto con las piezas internas de la cámara o del objetivo puede provocar
lesiones. Las reparaciones solamente deben ser ejecutadas por técnicos
cualificados. Si a causa de un golpe u otro tipo de accidente la cámara o el
objetivo se rompen y quedan abiertos, desenchufe el producto y/o retire la
batería, y a continuación lleve el producto a un centro de servicio técnico
autorizado Nikon para su revisión.
Apague inmediatamente el equipo en caso de funcionamiento
defectuoso
Si observa que sale humo o que la cámara o el objetivo desprenden un olor
extraño, retire la batería inmediatamente, con cuidado de no quemarse. Si
sigue utilizando el equipo corre el riesgo de sufrir lesiones.
Una vez extraída o desconectada la fuente de alimentación, lleve el producto
a un centro de servicio técnico autorizado Nikon para su revisión.
No utilice la cámara ni el objetivo en presencia de gas inflamable
La utilización de equipos electrónicos en presencia de gas inflamable podría
producir una explosión o un incendio.
No mire hacia el sol a través del objetivo ni del visor
Mirar hacia el sol u otra fuente de luz potente a través del objetivo o del visor
podría producirle daños permanentes en la vista.
Mantener fuera del alcance de los niños
Se debe tener especial cuidado en evitar que los niños se metan en la boca
pilas u otras piezas pequeñas.
Adopte las siguientes precauciones al manipular la cámara y el objetivo
• Mantenga la cámara y el objetivo secos. De no hacer esto podría producirse
un incendio o una descarga eléctrica.
• No manipule ni toque la cámara ni el objetivo con las manos húmedas. De
lo contrario podría recibir una descarga eléctrica.
• En disparos a contraluz, no apunte el objetivo hacia el sol ni deje que la luz
solar pase directamente por él, ya que podría sobrecalentar la cámara y,
posiblemente, causar un incendio.
• Cuando el objetivo no vaya a utilizarse por un período de tiempo
prolongado, colóquele la tapa frontal y guárdelo alejado de la luz solar
directa. De no hacer esto podría producirse un incendio, ya que el objetivo
podría enfocar la luz solar directa sobre un objeto inflamable.
46
Page 47

■ Nomenclatura
M/A
ON
M
OFF
Jp
En
De
Fr
Es
Sv
Ru
Nl
It
A
1 Visera del objetivo (P. 53)
2 Marca de acoplamiento de la
visera del objetivo (P. 53)
3 Marca de ajuste de la visera del
objetivo (P. 53)
4 Marca de montaje de la visera
del objetivo (P. 53)
5 Anillo de enfoque (P. 49)
6 Escala de la distancia
7 Indice de monturas (P. 49)
B
8 Junta de goma de montaje del
objetivo (P. 54)
9 Contactos CPU (P. 54)
0 Interruptor de modo de
enfoque (P. 49)
a Interruptor ON/OFF de
reducción de vibración (P. 52)
b Escala de relación de
reproducción (P. 50)
c Línea de índice de distancia
(P. 50)
( ) : Página de referencia
Cz
Sk
Ck
Ch
Kr
47
Page 48

Gracias por adquirir el objetivo AF-S DX Micro NIKKOR 85mm f/3,5G ED
VR. Los objetivos DX de NIKKOR están especialmente diseñados para su
Jp
uso con cámaras digitales SLR de Nikon (formato Nikon DX), como las de
la serie D300 y la D90. Cuando se montan en las cámaras de formato DX
En
de Nikon, el ángulo de imagen del objetivo equivale aproximadamente a
1,5× de la distancia focal en formato 35mm. Antes de utilizar este
De
objetivo, lea estas instrucciones y consulte el Manual del usuario de la
cámara.
Fr
■ Principales funciones
• Este objetivo presenta características precisas de captación adecuadas
Es
para fotografía de primeros planos, trabajos de reproducción,
Sv
Ru
Cz
Sk
instantáneas y fotografía general a todas las distancias de disparo.
• Este objetivo está equipado con el sistema de enfoque interno de
Nikon (IF), que ofrece un equilibrio excelente entre el enfoque preciso
del sujeto principal y un atractivo efecto borroso en primer plano y en
el fondo.
Nl
• Su rendimiento óptico superior y sus características de captación se
refuerzan gracias al uso de un elemento de vidrio de dispersión extra
It
baja (ED) que garantiza la corrección de la aberración cromática.
Además, el diafragma redondeado genera características de
difuminación suave en las zonas de la imagen desenfocadas.
• Es posible montar hasta cuatro flashes remotos inalámbricos SB-R200
en el extremo del objetivo.
Ck
Ch
Kr
48
Page 49

■ Uso del objetivo
Montaje del objetivo en la cámara
1 Apague la cámara.
2 Retire la tapa posterior del objetivo. (Fig. B)
3 Alinee la indice de monturas 7 del objetivo con la indice de
monturas de la cámara y gire el objetivo en sentido contrario al de las
agujas del reloj hasta que quede fijo (escuchará un chasquido).
Asegúrese de que el objetivo se encuentra en la posición correcta
cuando la indice de monturas 7 está sobre el objetivo.
4 Retire la tapa frontal del objetivo. (Fig. A)
Extracción del objetivo de la cámara
1 Apague la cámara.
2 Presione el botón de liberación del objetivo de la cámara y, sin
soltarlo, gire el objetivo en el sentido de las agujas del reloj.
■ Enfoque
Ajuste el modo de enfoque de la cámara de acuerdo con el cuadro de
abajo.
Modo de enfoque
de la cámara
AF
MF Enfoque manual (hay disponible un telémetro electrónico.)
Para más detalles sobre el modo de en enfoque de la cámara, consulte el
Manual del usuario de su cámara.
Enfoque automático con prioridad manual (Modo M/A)
1 Ajuste el interruptor de modo de enfoque 0 del objetivo a M/A.
2 El enfoque automático está habilitado, pero su funcionamiento
puede anularse girando el anillo de enfoque 5 separado mientras se
pulsa el disparador a medio recorrido, o pulsando el botón AF-ON del
cuerpo de la cámara si cuenta con este botón.
3 Pulse el botón del disparador a medio recorrido o el botón AF-ON una
vez más para cancelar el enfoque manual y volver al enfoque
automático.
Enfoque automático con
Modo de enfoque del objetivo
M/A M
prioridad manual
Enfoque manual (hay
disponible un telémetro
electrónico.)
Jp
En
De
Fr
Es
Sv
Ru
Nl
It
Cz
Sk
Ck
Ch
Kr
49
Page 50

■ Ajuste del diafragma
Util ice l a cám ara para ajus tar el d iaf ragm a. Si el m odo d e exp osici ón (o de
Jp
disparo) está ajustado en “A” o en “M”, la cámara controlará el diafragma
para mantener el número f efectivo (hasta aprox. 1,1 pasos) incluso si
En
cambia la distancia de disparo.
■ Profundidad de campo
De
Si la cámara es compatible con la previsualización de profundidad de
campo, los efectos de la apertura del diafragma se pueden previsualizar
Fr
en el visor antes de disparar.
Este objetivo dispone del sistema de enfoque interno (IF). A medida que
disminuye la distancia de disparo, lo hace también la distancia focal.
Es
■
Enfoque a una relación de reproducción
Sv
Ru
Nl
Cz
Sk
predeterminada (escala de relación de reproducción)
La relación de reproducción es la relación existente entre el tamaño de la
imagen grabada en el sensor de imagen y el tamaño real del sujeto. Por
ejemplo, si la imagen del sensor de imagen es una quinta parte del
tamaño real del sujeto, la relación de reproducción es 1:5.
Para fotografiar con una relación de reproducción predeterminada, lleve
a cabo el procedimiento siguiente:
1 Gire manualmente el anillo de enfoque hasta que el número de escala
It
de relación de reproducción que desee aparezca alineado con la línea
del índice de distancia c.
2
Apunte la cámara al sujeto y cambie de posición acercándose o alejándose
del sujeto hasta que la imagen se visualice con nitidez en el visor
■ Notas sobre la fotografía de primeros planos y el
trabajo de reproducción
Sacudidas de la cámara
Ck
La extraordinaria precisión de imagen de alta calidad que proporciona
este objetivo hace que incluso el más leve movimiento durante la toma
Ch
pueda desenfocar la imagen. Por ello, se recomienda encarecidamente
usar un trípode y un cable fijo o remoto para evitar los efectos de las
Kr
sacudidas de la cámara.
Distancia de trabajo de cerca
A relaciones altas de reproducción como las usadas en los primeros
planos y macro, la profundidad de campo es bastante pequeña. Para
garantizar suficiente profundidad de campo, apoye el objetivo, aumente
el tiempo de exposición y coloque con cuidado la cámara para que la
parte más importante del sujeto quede paralela a la superficie del sensor
de imagen y asegurar así un enfoque nítido.
.
50
Page 51

■ Factor de exposición
El número f de un objetivo indica la luminosidad de la imagen formada
por el objetivo ajustado en una distancia de disparo “infinita”. A mayor
relación de reproducción, menor luminosidad de imagen. La
luminosidad real de la imagen recibe el nombre de “número f efectivo” y
el valor de la compensación de exposición para el cambio del número f
efectivo recibe el nombre de “factor de exposición”.
■ Variación del número f efectivo (P. 148)
Con este objetivo, cuanto mayor sea la relación de reproducción (menor
distancia de disparo), más disminuirá la luminosidad de la imagen
proyectada en el sensor de imagen y mayor será el número f efectivo (se
reduce la cantidad de luz que pasa por el diafragma del objetivo). Esta
variación se compensa automáticamente con el exposímetro de la
cámara para que el usuario pueda determinar la exposición o disparar
con un flash TTL sin necesidad de tener en cuenta el factor de exposición.
El número f que se visualiza en la pantalla LCD o en el visor de la cámara
es el valor compensado automáticamente.
Jp
En
De
Fr
Es
Sv
Ru
Nl
It
Cz
Sk
Ck
Ch
Kr
51
Page 52

■ Modo de reducción de la vibración
Ajuste del interruptor ON/OFF de reducción de la vibración
Jp
ON: Los efectos de las sacudidas de la cámara se
OFF
En
ON
De
Fr
Notas sobre el uso de la reducción de vibración
Es
• Si se activa la reducción de la vibración (VR), se pueden utilizar
velocidades de obturación más lentas (3,0 pasos*) si la distancia de
Sv
Ru
Cz
Sk
Ck
Ch
Kr
disparo está entre y 2,6 m (relación de reproducción entre y 1/
30×). Cuanto más se supere el valor de relación de reproducción de 1/
30×, mayor será el efecto gradual de disminución de reducción de la
vibración. (*Los efectos de la VR en la velocidad de obturación se miden
según los estándares de Camera and Imaging Products Association
(CIPA); los objetivos de formato FX se miden mediante el uso de
Nl
cámaras digitales de formato FX, los objetivos de formato DX, mediante
el uso de cámaras de formato DX. Los objetivos con zoom se miden con
el zoom máximo.)
It
Tras pulsar el disparador a medio recorrido, espere a que se estabilice la
•
imagen que aparece en el visor antes de pulsar por completo el disparador
• Debido a las características del mecanismo de reducción de la
vibración, la imagen del visor puede ap arecer borrosa después de soltar
el disparador. No se trata de un mal funcionamiento.
• Si la cámara realiza un barrido formando un arco amplio, no se realiza
compensación para las sacudidas de la cámara en la dirección del
barrido. Por ejemplo, sólo los efectos de las sacudidas verticales de la
cámara se reducen con barrido horizontal.
No apague la cámara ni retire el objetivo de la cámara mientras esté
•
activado el modo de reducción de la vibración. Si no se adopta esta
medida, podría producirse un sonido y tacto en el objetivo similar a
cuando un componente interno está suelto o roto al moverse. No se trata
de un mal funcionamiento. Vuelva a encender la cámara para corregirlo
• En cámaras con flash incorporado, la reducción de la vibración no
funciona cuando se está cargando el flash incorporado.
En las cámaras con enfoque automático que dispongan de botón AF-ON,
•
la red ucc ión de l a vi bra ció n no fun cio na i nclu so s i se pul sa e l bo tón AF- ON
• Cuando la cámara esté montada en un trípode, ajuste el interruptor
ON/OFF de reducción de vibración a en OFF. Sin embargo, ponga el
interruptor en la posición ON cuando utilice un trípode sin fijarle la
rótula o si utiliza un monopié.
reducen cuando se pulsa el disparador a medio
recorrido y también en el momento de soltarlo.
Como la vibración se reduce en el visor, el enfoque
automático/manual y el encuadre exacto del
sujeto resultan más sencillos.
No se reducen los efectos de las sacudidas de la cámara.
OFF:
.
.
.
52
Page 53

■ Flash incorporado y viñeteado
• El flash incorporado no se puede utilizar a distancias inferiores a 0,6 m.
• Para evitar el viñeteado, no use el parasol del objetivo.
* El viñeteado es el oscurecimiento de las esquinas de la imagen que se
produce cuando la luz emitida por el flash incorporado de la cámara se
obstruye con el parasol del objetivo.
■ Utilización del visera del objetivo
La visera del objetivo bloquea los rayos de luz que generan efectos no
deseados en las fotografías. También ayuda a proteger la superficie de
vidrio del objetivo.
Instalación de la visera
• Es importante que la marca de
montaje de la visera del objetivo
C) esté alineada con la marca de
(
ajuste de la visera del objetivo
B) (3).
(
• Para facilitar la fijación o la extracción de la visera, sujételo por la marca
de acoplamiento de la visera del objetivo (
exterior.
• Si la visera del objetivo no está correctamente colocada, podría
producirse viñeteado.
• El objetivo se puede guardar con la visera colocada en posición inversa.
A) y no por el borde
Jp
En
De
Fr
Es
Sv
Ru
Nl
It
Cz
Sk
Ck
Ch
Kr
53
Page 54

■ Forma de cuidar el objetivo
• Es importante mantener limpios los contactos CPU 9 y evitar que se
Jp
dañen.
• Si la junta de goma de montaje del objetivo 8 se daña, asegúrese de
En
De
Sv
Ru
Cz
Sk
Ck
Ch
Kr
ir a un centro de servicio técnico autorizado Nikon para que lo reparen.
• Limpiar la superficie del objetivo con un cepillo soplador. Para eliminar
la suciedad o las huellas, utilizar un trapo de algodón suave y limpio o
papel especial para objetivos humedecido en etanol (alcohol) o
limpiador de objetivos. Limpiar describiendo un movimiento circular
Fr
del centro hacia fuera, teniendo cuidado de no dejar restos ni tocar
otras partes del objetivo.
Es
• No usar en ningún caso productos orgánicos, como disolvente ni
benceno para limpiar el objetivo ya que podría provocar daños, un
incendio o problemas de la salud.
• Se dispone de filtros NC para proteger la parte frontal del objetivo.
También una visera del objetivo contribuirá a proteger la parte frontal
del objetivo.
Nl
• Al guardar el objetivo en su bolsa flexible, coloque las tapas delantera y
trasera del objetivo.
• Cuando el objetivo esté montado en una cámara, no sostenga ni
It
levante la cámara y el objetivo por la visera del objetivo.
• Si no se va a utilizar el objetivo durante un periodo largo de tiempo,
guardarlo en un lugar fresco y seco para evitar la formación de moho y
óxido. Asegúrese de guardar el objetivo, además, lejos de la luz solar
directa o de productos químicos tales como alcanfor o naftalina.
• No mojar el objetivo ni dejarlo caer al agua, ya que se oxidaría y no
funcionaría bien.
• A lg una s pa rt es d el obj et ivo son de plá st ico re for za do. Par a e vit ar dañ os ,
no dejarlo nunca en un lugar excesivamente caliente.
■ Accesorios estándar
• Tapa frontal a presión del objetivo de 52mm LC-52
• Tapa trasera del objetivo
•Parasol de bayonetaHB-37
• Bolsa flexible para objetivo CL-1018
■ Accesorio opcional
• Filtros con rosca de 52mm
54
Page 55

■ Especificaciones
Tipo de objetivo: Objetivo de tipo G AF-S DX Micro NIKKOR con
Distancia focal: 85 mm
Apertura máxima: f/3,5
Estructura del
objetivo:
Ángulo de imagen:
Escala de relación
de reproducción:
Información de
distancia:
Enfoque: Sistema de enfoque interno (IF) de Nikon, sistema de
Reducción de
vibraciones:
Escala de distancia
de disparo:
Distancia de
enfoque mínima:
Núm. de láminas
del diafragma:
Diafragma: Totalmente automático
Gama de
aberturas:
Medición de
exposición:
Tamaño de
accesorios:
Dimensiones: Aprox. 73 mm de diám. × 98,5 mm (extensión de la
Peso: Aprox. 355 g
Las especificaciones y los diseños están sujetos a cambios sin previo aviso ni
obligación por parte del fabricante.
montaje de CPU y bayoneta de Nikon integrada
(diseñado especialmente para su uso con cámaras
digitales SLR de Nikon formato DX)
14 elementos en 10 grupos (1 ED - elemento del
objetivo)
18º 50’
De a 1:1 (tamaño real)
Salida a la cámara
enfoque automático con motor Silent Wave;
manualmente mediante anillo de enfoque separado
Método de desplazamiento del objetivo mediante
motores de bobina de voz (VCM)
Graduada en metros a partir de 0,286 m y hasta el
infinito ( )
0,286 m a partir del plano focal (tamaño real)
9 piezas (redondeadas)
f/3,5 hasta f/32
Método de abertura total
52 mm (P = 0,75 mm)
brida de la montura del objetivo de la cámara)
Jp
En
De
Fr
Es
Sv
Ru
Nl
It
Cz
Sk
Ck
Ch
Kr
55
Page 56

Att notera för en säker hantering
Jp
En
De
Fr
Es
Sv
Ru
Nl
It
Cz
Sk
Ck
Ch
Kr
SE UPP!
Montera inte isär kameran
Om du rör vid delarna Om du rör vid delarna inne i kameran eller objektivet
kan du skada dig. Reparationer ska endast utföras av kvalificerade tekniker. Om
kameran eller objektivet skulle brytas upp efter att de tappats i marken eller
stötts till, ska du efter att den kopplats bort från nätströmmen och/eller
batteriet lossats, lämna in produkten till ett auktoriserat Nikon-servicecenter
för inspektion.
Stäng genast av kameran om den slutar att fungera korrekt
Om det kommer rök eller någon ovanlig lukt från kameran eller objektivet ska
du genast ta bort batteriet. Var försiktig så att du inte bränner dig. Fortsatt
användning kan medföra personskada.
När du har avlägsnat eller kopplat bort strömkällan bör du ta utrustningen till
ett auktoriserat Nikon-servicecenter för kontroll.
Använd inte kameran eller objektivet i närheten av lättantändlig gas
Hantering av elektrisk utrustning i närheten av lättantändlig gas kan resultera
i explosion eller brand.
Titta inte in i solen genom objektivet eller sökaren
Om du tittar in i solen eller någon annan stark ljuskälla genom objektivet eller
sökaren kan ögonen skadas permanent.
Förvara utom räckhåll för barn
Var försiktig och förvara produkten utom räckhåll för barn så att de inte
stoppar batterier eller andra smådelar i munnen.
Observera följande försiktighetsåtgärder när du hanterar kameran
och objektivet
• Håll kameran och objektivet torra. Underlåtenhet att följa denna anvisning
kan resultera i brand eller elektrisk stöt.
• Hantera eller rör inte kameran eller linsen med våta händer. Underlåtenhet
att följa dessa anvisningar kan resultera i elektrisk stöt.
• När du fotograferar i motljus ska du tänka på att inte rikta objektivet mot
solen och inte heller låta solstrålar gå rakt in i objektivet. Annars kan kameran
bli överhettad och kanske orsaka brand.
• När objektivet inte ska användas under en längre tidsperiod ska både främre
och bakre objektivlock sättas fast och objektivet placeras på en plats
skyddad mot direkt solljus. Underlåtenhet att följa denna anvisning kan
orsaka brand, eftersom objektivet kan fokusera solljuset mot ett
lättantändligt objekt.
56
Page 57

■ Terminologi
M/A
ON
M
OFF
Jp
En
De
Fr
Es
Sv
Ru
Nl
It
A
1 Motljusskydd (S. 63)
2 Motljusskydd fästindex (S. 63)
3 Motljusskydd
inställningsindex (S. 63)
4 Motljusskydd
monteringsindex (S. 63)
5 Fokusring (S. 59)
6 Avståndsskala
7 Monteringsindikering (S. 59)
B
8 Gummipackning för
montering av objektiv (S. 64)
9 CPU-kontakter (S. 64)
0 Brytare för fokuslägesväljare
(S. 59)
a Vibrationsreduceringens
ON/OFF-brytare (S. 62)
b Skala för
avbildningsförhållande (S. 60)
c Avståndsindex (S. 60)
( ) : Referenssida
Cz
Sk
Ck
Ch
Kr
57
Page 58

Tack för att du har köpt objektivet AF-S DX Micro-NIKKOR 85mm f/3,5G
ED VR. DX NIKKOR-objektiv är särskilt utformade för att användas med
Jp
Nikon digitala systemkameror (Nikon DX-format), till exempel D300serien och D90. Vid montering på kameror i Nikon DX-format motsvarar
En
objektivets bildvinkel ungefär 1,5× brännvidden i 35mm format. Innan du
använder objektivet ska du läsa de här instruktionerna och kamerans
De
Användarhandbok.
■ Huvudfunktioner
Fr
• Detta objektiv har egenskaper för skarp avbildning som är lämpliga för
närbildsfotografering, reproduktionsarbete, ögonblicksbilder och
Es
allmän fotografering vid alla arbetsavstånd.
• Det här objektivet är utrustat med Nikons system för innerfokusering
Sv
Ru
(IF), vilket ger en utmärkt balans mellan skarp fokus på primärmotivet
och behaglig oskärpa på bakgrunden och förgrunden.
• Ett glaselement (ED) för extra låg färgspridning ger överlägsna optiska
prestanda och återgivningsegenskaper och en bättre reducering av
Nl
kromatisk aberration. Dessutom ger den rundade bländaren en mjuk
och behaglig oskärpa till de delar av bilden som inte är i fokus.
It
• Maximalt fyra trådlösa slavblixtar SB-R200 kan monteras på objektivets
kant.
Cz
Sk
Ck
Ch
Kr
58
Page 59

■ Använda objektivet
Montera objektivet på kameran
1 Stäng av kameran.
2 Ta bort det bakre objektivlocket (bild B).
3 Rikta in objektivets monteringsindikering 7 mot
monteringsindikeringen på kameran, och vrid sedan objektivet
moturs tills det klickar på plats. Kontrollera att objektivet sitter rätt när
monteringsindikeringen 7 befinner sig högst upp på objektivet.
4 Ta bort det främre objektivlocket (bild A).
Ta loss objektivet från kameran
1 Stäng av kameran.
2 Tryck och håll ner objektivlåsknappen på kameran och vrid samtidigt
objektivet medurs.
■ Fokusering
Ställ in kamerans fokuslägesväljare enligt denna tabell.
Kamerans
fokusläge
AF
MF
Mer information om kamerans fokuslägen finns i kamerans
Användarhandbok.
Autofokus med möjlighet till manuell styrning (M/A-läge)
1 Ställ in linsens brytare för fokuslägesväljare 0 på M/A.
2 Autofokus har aktiverats, men den automatiska fokuseringen kan
åsidosättas om du roterar den separata fokusringen 5 samtidigt som
du trycker in avtryckaren halvvägs, eller om du trycker på AF-ONknappen på kamerahuset om kameran har en sådan.
3 Tryck in avtryckaren halvvägs eller tryck på AF-ON-knappen en gång
till om du vill avbryta den manuella fokuseringen och gå tillbaka till
autofokus.
Autofokus med möjlighet
till manuell styrning
(elektronisk avståndsmätare finns tillgänglig.)
Objektivets fokusläge
M/A M
Manuell fokusering
(elektronisk avståndsmätare
finns tillgänglig.)
Manuell fokusering
Jp
En
De
Fr
Es
Sv
Ru
Nl
It
Cz
Sk
Ck
Ch
Kr
59
Page 60

■ Ställa in bländaren
Använd kameran för att justera bländarinställningen. När
Jp
exponeringsläge (eller fotograferingsläge) är inställt på ”A” eller ”M”,
reglerar kameran bländaren för att upprätthålla det effektiva f-numret
En
(upp till cirka 1,1 steg) även om fotograferingsavståndet ändras.
■ Skärpedjup
De
Om kameran stödjer förhandsgranskning av skärpedjupet kan du
förhandsgranska effekterna av bländarinställningen i sökaren före
Fr
fotografering.
Det här objektivet är utrustat med ett system för innerfokusering (IF). Om
Es
fotograferingsavståndet minskar, minskar också brännvidden.
■
Sv
Ru
Nl
Cz
Sk
Ck
Ch
Kr
Fokusering med ett förbestämt avbildningsförhållande
(Skala för avbildningsförhållande)
Avbildningsförhållandet är förhållandet mellan storleken på bilden som
registreras på bildsensorn och det faktiska motivets storlek. Om t ex
bilden på bildsensorn är en femtedel av motivets faktiska storlek, är
avbildningsförhållandet 1:5.
För att fotografera med ett förbestämt avbildningsförhållande, utför
följande steg:
It
1 Vrid fokusringen manuellt tills önskat nummer på skalan för
avbildningsförhållande är inriktat mot avståndsindexet c.
2 Rikta mot motivet, ändra därefter din position och gå närmare eller
längre bort från motivet, tills bilden i sökaren blir skarp.
■ Att notera vid närbildsfotografering och
reproduktionsarbete
Kameraskakning
Med detta objektiv får man så exceptionellt hög bildförstoring att även
den minsta rörelse när bilden tas kan göra att bilden blir suddig. Därför
rekommenderas starkt användning av stativ och trådutlösare eller
fjärrutlösare för att förhindra effekterna av kameraskakning.
Korta arbetsavstånd
Vid de höga avbildningsförhållanden som används vid
närbildsfotografering, är skärpedjupet mycket grunt. För att säkerställa
tillräckligt skärpedjup, blända ner objektivet, förläng exponeringstiden,
och placera noga kameran så att de viktigaste delarna av motivet är
parallella med bildsensorns yta för att säkerställa skarp fokus.
60
Page 61

■ Exponeringsfaktor
Ett objektivs f-nummer indikerar den ljusstyrka som objektivet ger när
fotograferingsavståndet är inställt på ”oändlighet”. Ju större
avbildningsförhållande, desto mer minskar bildens ljusstyrka. Bildens
faktiska ljusstyrka kallas ”effektivt f-nummer” och
exponeringskompensationsvärdet för att ändra det effektiva f-numret
kallas ”exponeringsfaktor”.
■ Variation av effektivt f-nummer (S. 148)
Ju större avbildningsförhållande (ju kortare fotograferingsavstånd), desto
mer minskar ljusstyrkan som projiceras på bildsensorn och desto mer
ökar det effektiva f-numret (mängden ljus som passerar genom
objektivets bländare minskar), med detta objektiv. Kamerans
exponeringsmätare kompenserar automatiskt för denna variation, så
användaren kan fastställa exponeringen eller fotografera med TTL-blixt
utan att behöva fundera över exponeringsfaktorn.
f-numret som visas i kamerans LCD-panel eller sökaren är det automatiskt
kompenserade värdet.
Jp
En
De
Fr
Es
Sv
Ru
Nl
It
Cz
Sk
Ck
Ch
Kr
61
Page 62

■ Vibrationsreduktion
Ställa in vibrationsreduktionens ON/OFF-knapp
Jp
ON: Effekterna av kameraskakning reduceras när du
OFF
En
ON
De
Fr
Att notera om vibrationsreduktion
Es
• Genom att aktivera vibrationsreduktion (VR), kan längre slutartider
Sv
Ru
Cz
Sk
Ck
Ch
Kr
(3,0 steg*) användas när fotograferingsavståndet är mellan och 2,6
m (avbildningsförhållande från till 1/30×). Ju högre
avbildningsförhållandet från 1/30× är, desto mer minskar effekterna av
vibrationsreduktion gradvis. (*Effekterna av VR på slutartiden mäts i
enlighet med standarden från Camera and Imaging Products
Association (CIPA); Objektiv med FX-format mäts med digitalkameror i
Nl
FX-format, och objektiv med DX-format med kameror med DX-format.
Zoomobjektiv mäts vid maximal zoom.)
• Tryck först ned avtryckaren halvvägs och vänta sedan tills bilden i
It
sökaren stabiliseras innan du trycker ned avtryckaren helt.
• På grund av vibrationsreduceringens mekaniska egenskaper kan bilden
i sökaren bli suddig efter att avtryckaren släppts. Detta är inte något fel.
• Om du flyttar kameran i en vid båge när du panorerar, kompenserar den
inte för vibrationer i panoreringsriktningen. Till exempel reduceras
endast effekterna av vertikal kameraskakning vid horisontell panorering.
• Stäng inte av kameran och lossa inte objektivet från kameran när
vibrationsreduceringen är aktiverad. Om detta inte efterföljs kan det
låta och kännas som en invändig del är lös eller trasig i objektivet när du
skakar på det. Detta är inte något fel. Starta kameran igen för att
korrigera detta.
• För kameror som har inbyggd blixt, fungerar inte
vibrationsreduceringen när den inbyggda blixten laddas.
• I kameror med autofokus med en AF-ON-knapp fungerar inte
vibrationsreduktion även om knappen AF-ON trycks ned.
• När kameran är monterad på ett stativ ska vibrationsreduceringens
ON/OFF-brytare a ställas in på OFF. Ställ dock in knappen på ON när
du använder ett trebent stativ utan att fixera stativhuvudet eller när du
använder ett enbent stativ.
trycker ned avtryckaren halvvägs samt vid det
ögonblick då bilden tas. Eftersom vibrationer
reduceras i sökaren, underlättas den automatiska
eller manuella fokuseringen och själva
komponeringen av motivet i sökaren blir lättare.
OFF: Effekterna av kameraskakning reduceras inte.
62
Page 63

■ Inbyggd blixt och vinjettering
• Den inbyggda blixten kan inte användas för kortare avstånd än 0,6 m.
• För att undvika vinjettering, använd inte motljusskydd.
* Vinjettering är mörka hörn som syns runt bilden när ljuset från
kamerans inbyggda blixt hindras av objektivhuset.
■ Använda motljusskyddet
Motljusskyddet skyddar bilderna från ljusstålar. Det hjälper även till att
skydda objektivets glasyta.
Att fästa motljusskyddet
• Kontrollera att motljusskyddets
monteringsindex (
motljusskyddets inställningsindex
B) (3).
(
C) är riktat mot
Jp
En
De
Fr
Es
Sv
Ru
• Det är lättare att fästa och ta av motljusskyddet om du håller det vid
fästindex (
• Om motljusskyddet inte sitter korrekt kan vinjettering uppstå.
• Objektivet kan förvaras med motljusskyddet på i omvänt läge.
A) i stället för i ytterkanten.
Nl
It
Cz
Sk
Ck
Ch
Kr
63
Page 64

■ Vård av objektivet
• Var försiktig så att inte CPU-kontakterna 9 blir smutsiga eller skadas.
Jp
• Om gummipackningen för monteringen av objektivet 8 skadats,
En
De
Sv
Ru
Cz
Sk
Ck
Ch
Kr
besök hos närmaste Nikon-auktoriserade återförsäljare eller ditt
servicecenter för reparation.
• Rengör objektivets ytor med en blåsborste. Använd en mjuk, ren
bomullsduk eller linsduk fuktad med etanol (alkohol) eller
linsrengöringsmedel, för att ta bort smuts och fettfläckar. Torka i en
cirkulär rörelse från mitten och utåt. Lämna inte kvar några spår av
Fr
rengöringsmedlet och rör inga andra delar av objektivet.
• Använd aldrig organiska lösningsmedel som t ex thinner eller bensen
Es
för rengöring av objektivet, eftersom det kan skada det och orsaka
brand eller hälsoproblem.
• Det finns NC-filter som skyddar den främre linsen. Linsskyddet hjälper
också till att skydda den främre linsen.
• När objektivet förvaras i sin flexibla objektivpåse ska både främre och
bakre linsskydd vara monterade.
Nl
• När objektivet är monterat på kameran bör du inte lyfta eller hålla
kameran och objektivet i linsskyddet.
• Om objektivet inte ska användas under en längre tidsperiod ska det
It
förvaras svalt och torrt så att mögel och rost kan undvikas. Förvara det
också skyddat mot direkt solljus och kemikalier såsom kamfer och
naftalen.
• Se till att det inte kommer vatten på objektivet och tappa det inte i
vatten, eftersom det då kommer att rosta och sluta fungera.
• Förstärkt plast används i vissa av objektivets delar. Lämna aldrig
objektivet på en alltför varm plats för att undvika skador.
■ Standardtillbehör
• 52mm främre objektivlock som knäpps på plats LC-52
•Bakre objektivlock
•BajonettskyddHB-37
• Flexibelt objektivfodral CL-1018
■ Extra tillbehör
• 52mm skruvfilter
64
Page 65

■ Specifikationer
Objektivtyp: G-typ AF-S DX Micro NIKKOR -objektiv med inbyggd
Fokallängd: 85 mm
Maximal bländare: f/3,5
Linskonstruktion: 14 element i 10 grupper (1 ED-linselement)
Bildvinkel: 18º 50’
Skala för
avbildningsförhållande:
Avståndsinformation:
Fokusering: Nikon-system för innerfokusering (IF), autofokus
Vibrationsreducering:
Avståndsskala: Anges i meter från 0,286 m till oändlighet ( )
Minsta
fokusavstånd:
Antal slutarblad: 9 st. (rundade)
Bländare: Helautomatisk
Bländarskala: f/3,5 till f/32
Exponeringsmätning:
Storlek: 52 mm (P = 0,75 mm)
Mått: Ungefär 73 mm diameter × 98,5 mm (utstick från
Vikt: Cirka 355 g
Specifikationer och utförande kan ändras när som helst, utan att tillverkaren
meddelar detta och utan någon skyldighet för densamme.
CPU och Nikon-bajonettfattning (speciellt
konstruerat för användning tillsammans med Nikon
digitala systemkameror i DX-format)
till 1:1 (life-size)
Visas i kamerahuset
med en fokuserande Silent Wave-motor, manuellt
med separat fokusring
Objektivbyte med VCM-motorer (voice coil)
0,286 m från skärpeplanet (life-size)
Via fullbländare
objektivets monterade fläns)
Jp
En
De
Fr
Es
Sv
Ru
Nl
It
Cz
Sk
Ck
Ch
Kr
65
Page 66

Примечания по безопасности использования
Jp
En
De
Fr
Es
Sv
Ru
Nl
It
Cz
Sk
Ck
Ch
Kr
ПРЕДУПРЕЖДЕНИЕ
Не разбирайте фотокамеру
Прикосновение к внутренним частям фотокамеры или объектива может
привести к получению травм. Ремонт должен производиться только
квалифицированными специалистами. В случае повреждения корпуса
фотокамеры или объектива в результате падения или другого происшествия
отключите сетевой блок питания и/или извлек ите батарею и доставьте изделие
для проверки в авторизованный сервисный центр Nikon.
В случае неисправности немедленно выключите фотокамеру
При появлении дыма или необычного запаха, исходящего из фотокамеры или
объектива, немедленно извлеките батареи, стараясь не допустить ожогов.
Продолжение работы с устройством может привести к получению травм.
После извлечения батареи или отключения источника питания доставьте
изделие для проверки в ближайший авторизованный сервисный центр
компании Nikon.
Не пользуйтесь фотокамерой или объективом при наличии в
воздухе легковоспламеняющихся газов
Работа с электронным оборудованием при наличии в воздухе
легковоспламеняющихся газов может привести к взрыву или пожару.
Не смотрите на солнце через объектив или видоискатель
Если смотреть на солнце или другие источники яркого света через объектив
или видоискатель, то это может вызвать необратимое ухудшение зрения.
Храните в недоступном для детей месте
Примите особые меры предосторожности во избежание попадания батарей и
других небольших предметов детям в рот.
Соблюдайте следующие меры предосторожности во время
эксплуатации фотокамеры и объектива
• Не допускайте попадания воды на фотокамеру и объектив.
Несоблюдение этого требования может привести к пожару или
поражению электрическим током.
• Не прикасайтесь к фотокамере или объективу мокрыми руками.
Несоблюдение этого требования может привести к поражению
электрическим током.
• При съемке с задним освещением не направляйте объектив на солнце,
а также не допускайте попадания солнечного света в объектив, так как
это может привести к перегреву фотокамеры и ее возгоранию.
• Если объектив не будет использоваться в течение длительного
времени, прикрепите переднюю и заднюю крышки объектива и не
оставляйте объектив под прямыми солнечными лучами. Несоблюдение
этого условия может привести к возгоранию, поскольку объектив
может сфокусировать солнечные лучи на каком-либо
легковоспламеняющемся предмете.
66
Page 67

■ Компоненты
M/A
ON
M
OFF
Jp
En
De
Fr
Es
Sv
Ru
Nl
It
A
1 Бленда (стр. 73)
2 Метка крепления бленды
(стр. 73)
3 Метка фиксации бленды
(стр. 73)
4 Установочная метка бленды
(стр. 73)
5 Кольцо фокусировки (стр. 69)
6 Шкала расстояния
7 Установочная метка (стр. 69)
B
8 Резиновый уплотнитель
крепления объектива
(стр. 74)
9 Контакты микропроцессора
(стр. 74)
0 Переключатель режимов
фокусировки (стр. 69)
a Переключатель подавления
вибраций ON/OFF (стр. 72)
b Шкала масштаба съемки
(стр. 70)
c Деление расстояния (стр. 70)
( ) : справочная страница
Cz
Sk
Ck
Ch
Kr
67
Page 68

Благодарим за приобретение объектива AF-S DX Micro NIKKOR 85мм
f/3,5G ED VR. Объективы серии DX NIKKOR разработаны специально
Jp
для использования с цифровыми зеркальными фотокамерами Nikon
(формат Nikon DX), например, с фотокамерами серий D300 и D90. При
En
использовании с фотокамерами формата Nikon DX угол изображения
объектива эквивалентен фокусному расстоянию приблизительно
De
1,5× в формате 35мм. До использования этого объектива
ознакомьтесь с данными инструкциями и прочитайте Руководство
Fr
пользователя.
■ Основные возможности
Es
• Этот объектив обладает превосходными оптическими
Sv
Ru
Cz
Sk
Ck
характеристиками, подходящими для макросъемки, съемки
репродукций, выполнения моментальных снимков и обычной
съемки с любых расстояний.
• Этот объектив оборудован системой внутренней фокусировки
Nikon (IF), которая обеспечивает превосходный баланс между
Nl
четкой фокусировкой на главном объекте, а также красивые
неясные очертания на заднем и переднем планах.
It
• Благодаря использованию одной линзы со сверхнизкой
дисперсией (ED), которая обеспечивают коррекцию хроматических
аберраций, улучшаются превосходные оптические характеристики
и возможности передачи. Кроме того, скругленная диафрагма
обеспечивает более красивые мягкие и неясные очертания тех
частей снимка, которые находятся вне фокуса.
• На краю объектива можно смонтировать до четырех беспроводных
дистанционно управляемых вспышек SB-R200.
Ch
Kr
68
Page 69

■ Использование объектива
Установка объектива на камеру
1 Выключите фотокамеру.
2 Снимите заднюю крышку объектива. (рис. B)
3 Совместите установочную метку 7 на объективе с
установочной меткой на фотокамере и поверните объектив
против часовой стрелки до щелчка. Убедитесь, что объектив
установлен правильно, при этом установочная метка 7
должна находиться в верхнем положении.
4 Снимите переднюю крышку объектива. (рис. A)
Снятие объектива с камеры
1 Выключите фотокамеру.
2 Нажмите и удерживайте кнопку отсоединения объектива на
фотокамере, и поверните объектив по часовой стрелке.
■ Фокусировка
Установите селектор режима фокусировки камеры в соответствии с
нижеприведённой таблицей.
Режим
фокусировки
фотокамеры
AF
MF Ручной фокус (имеется электронный дальномер.)
Для получения дополнительных сведений о режимах фокусировки
фотокамеры см. Руководство пользователя фотокамеры.
Автофокусировка с возможностью коррекции
вручную (режим M/A)
1 Установите переключатель режимов фокусировки 0 в
положение M/A.
2 Включена функция автофокуса, однако ее работу можно
скорректировать, вращая отдельное кольцо фокусировки 5,
нажав спусковую кнопку затвора наполовину или нажав кнопку
AF-ON на корпусе камеры (при ее наличии).
3 Снова нажмите спусковую кнопку затвора наполовину или
кнопку AF-ON для отмены ручной фокусировки и возобновления
автофокусировки.
Режим фокусировки объектива
M/A M
Автофокусировка с
возможностью
коррекции вручную
Ручной фокус (имеется
электронный дальномер.)
Jp
En
De
Fr
Es
Sv
Ru
Nl
It
Cz
Sk
Ck
Ch
Kr
69
Page 70

■ Установка диафрагмы
На фотокамере настройте параметры диафрагмы. Когда в качестве
Jp
режима экспозиции (или съемки) выбрано значение «A» или «M»,
фотокамера будет регулировать значение диафрагмы для
En
обеспечения эффективного диафрагменного числа f (прибл. до 1,1
ступени) даже при изменении расстояния съемки.
■ Глубина резко изображаемого пространства
De
Если фотокамера поддерживает функцию просмотра глубины резко
изображаемого пространства, то результаты настройки диафрагмы
Fr
можно будет проверить в видоискателе перед съемкой.
Этот объектив оборудован системой внутренней фокусировки (IF). По мере
уменьшения расстояния съемки также уменьшается фокусное расстояние.
Es
■ Фокусировка с предварительно заданным
Sv
Ru
Nl
Cz
Sk
Ck
Ch
Kr
масштабом съемки (шкала масштаба съемки)
Масштаб съемки - это отношение между размером записанного на
датчик изображения и фактическим размером объекта. Например,
если изображение на датчике в пять раз меньше фактического
размера объекта, то масштаб съемки составляет 1:5.
Чтобы выполнить фотосъемку с предварительно заданным
масштабом, выполните следующую процедуру.
1
It
Вручную поверните кольцо фокусировки, чтобы совместить требуемое
значение на шкале масштаба съемки с делением расстояния
2 Наведите фотокамеру на объект, затем измените свое положение,
приближаясь к объекту или удаляясь от него, пока изображение в
видоискателе не станет резким.
■ Примечания относительно макросъемки и
съемки репродукций
Дрожание фотокамеры
Этот объектив обеспечивает настолько большое увеличение
изображения, что даже незначительное движение во время съемки может
привести к его размытости. Поэтому для предотвращения дрожания
фотокамеры настоятельно рекомендуется использовать штатив и
спусковой тросик или кабельный пульт дистанционного управления.
Съемка с близкого расстояния
При использовании больших значений масштаба макросъемки
глубина резко изображаемого пространства очень мала. Для
обеспечения достаточной глубины резко изображаемого
пространства затемните объектив диафрагмой, увеличьте выдержку
и осторожно разместите камеру таким образом, чтобы наиболее
важная часть объекта была параллельна поверхности датчика
изображения, чтобы обеспечить четкую фокусировку.
c.
70
Page 71

■ Кратность изменения экспозиции
Диафрагменное число f объектива означает яркость изображения,
сформированного объективом при его наведении на бесконечность.
Чем больше масштаб съемки, тем меньше яркость изображения.
Фактическая яркость изображения называется «эффективное
диафрагменное число f», а величина поправки экспозиции для
изменения эффективного диафрагменного числа f называется
«кратность изменения экспозиции».
■ Изменение эффективного диафрагменного
числа f (стр. 148)
Чем больше масштаб съемки (меньше расстояния съемки) при
использовании этого объектива, тем меньше яркость изображения,
проецируемого на датчик изображения, и больше эффективное
диафрагменное число f (при этом уменьшается количество света,
проходящего через диафрагму объектива). Это изменение
автоматически компенсируется экспонометром фотокамеры,
поэтому пользователь может определять экспозицию или управлять
съемкой со вспышкой TTL, не учитывая кратности изменения
экспозиции.
Диафрагменное число f, отображаемое на панели ЖКИ или в
видоискателе фотокамеры, является автоматически
скомпенсированным значением.
Jp
En
De
Fr
Es
Sv
Ru
Nl
It
Cz
Sk
Ck
Ch
Kr
71
Page 72

■ Режим подавления вибраций
Установка переключателя подавления вибраций
Jp
ON/OFF
ON:
En
ON
OFF
De
Fr
Примечания по использованию подавления вибрации
Es
• При включении функции подавление вибраций (VR) можно использовать более
Sv
Ru
Cz
Sk
Ck
Ch
Kr
длинные выдержки (3,0 ступени*) при съемке с расстояний от до 2,6 м (масштаб
съемки от до 1/30×). Чем значение масштаба съемки больше значения 1/30×,
тем меньше результаты подавления вибраций. (*Влияние VR на выдержку
измеряется в соответствии со стандартами Camera and Imaging Products
Association (CIPA; Ассоциация производителей фотокамер и устройств обработки
изображений); объективы формата FX измеряются с помощью цифровых
фотокамер формата FX, объективы формата DX измеряются фотокамерами
Nl
формата DX. Зум-объективы измеряются при максимальном увеличении.)
• После нажатия спусковой кнопки затвора наполовину необходимо
дождаться стабилизации изображения в видоискателе перед тем, как
It
нажать спусковую кнопку затвора до конца.
• Вследствие особенностей характеристик механизма подавления
вибраций после того, как будет отпущена кнопка спуска затвора,
изображение в видоискателе может оказаться смазанным.
• При съемке панорамы по широкой траектории подавление вибраций
фотокамеры в направлении съемки панорамы не будет выполняться.
Например, при горизонтальном панорамировании уменьшается только
эффект вертикального дрожания фотокамеры.
• Не выключайте фотокамеру и не снимайте с фотокамеры объектив при
работе в режиме подавления вибраций. Если пренебречь этим
примечанием, то при сотрясении объектива может послышаться звук,
как при отсоединении или поломке внутренних компонентов. Это не
является неисправностью. Для устранения этой ситуации снова
включите фотокамеру.
• При использовании моделей фотокамер, оснащенных встроенной
вспышкой, при заряде вспышки функция подавления вибраций не работает.
• При использовании фотокамер с автофокусировкой, оснащенных
кнопкой AF-ON, функция подавления вибраций не будет работать даже
при нажатии кнопки AF-ON.
• Если фотокамера установлена на штатив, установите переключатель
подавления вибраций ON/OFF a в положение
переключатель в положение ON, если при использовании штатива его головка
не закрепляется, а также при использовании монопода.
Эффект дрожания фотокамеры уменьшается при
нажатии спусковой кнопки затвора наполовину
и в момент спуска затвора. Снижение уровня
вибраций в видоискателе облегчает выполнение
автоматической и ручной фокусировки, а также
точного кадрирования объекта съемки.
OFF: Эффект дрожания фотокамеры не уменьшается.
OFF
. Однако переместите этот
72
Page 73

■ Встроенная вспышка и виньетирование
• Встроенную вспышку нельзя использовать для съемки с
расстояний менее 0,6 м.
• Во избежание виньетирования не используйте бленду объектива.
* Виньетирование – это затемнение углов изображения,
возникающее при заграждении света встроенной вспышки
фотокамеры оправой объектива.
■ Использование бленды
Бленда блокирует световые лучи, которые ухудшают изображение.
Она также помогает защитить стеклянную поверхность объектива.
Присоединение бленды
• Убедитесь, что установочная
метка бленды (C) совпадает с
меткой фиксации бленды (
(3).
• Для облегчения установки или снятия бленды де ржите ее в области
метки крепления бленды (
• Неправильная установка бленды может привести к
виньетированию.
• Объектив также можно хранить, прикрепив к нему бленду
обратной стороной.
A), а не за внешнюю кромку.
B)
Jp
En
De
Fr
Es
Sv
Ru
Nl
It
Cz
Sk
Ck
Ch
Kr
73
Page 74

■ Уход за объективом
• Не допускайте попадания грязи на контакты микропроцессора 9 или
Jp
их повреждения.
• В случае повреждения резинового уплотнителя крепления объектива
En
De
Fr
Es
Sv
Ru
Nl
It
Cz
Sk
Ck
Ch
Kr
обратитесь к авторизованному сервисному центру Nikon или в
8
сервисный центр для проведения ремонта.
• Выполняйте очистку поверхности объектива продуванием воздухом.
Для удаления грязи и пятен используйте мягкую, чистую
хлопчатобумажная ткань или протирочную ткань для объектива,
смоченную этанолом (алкоголем) или жидкостью для чистки линз.
Протирайте круговыми движениями от центра к краям, стараясь не
оставлять следов или дотрагиваться до других частей объектива.
• Никогда не используйте органические растворители или бензол для
чистки объектива, так как это может привести к его повреждению,
пожару или проблемам со здоровьем.
• Для защиты передней линзы объектива можно использовать
нейтральные светофильтры. Бленда объектива также помогает
защитить переднюю линзу объектива.
• При хранении объектива в мягком чехле следует прикрепить переднюю
и заднюю крышки объектива.
• Не поднимайте и не носите объектив или фотокамеру, держась за
прикрепленную к объективу бленду.
•
Если объектив не будет использоваться в течение длительного времени,
храните его в сухом, прохладном месте для предотвращения образования
гибка или коррозии. Никогда не оставляйте объектив под воздействием
прямых солнечных лучей и не подвергайте его воздействию химикатов,
например камфарных или нафталиновых средств
• Избегайте попадания на объектив воды и не бросайте его в воду, так как
это может стать причиной возникновения ржавчины или
неисправности.
• В некоторых частях объектива используется пластиковый материал
повышенной прочности. Для предотвращения повреждения никогда не
оставляйте объектив в местах с повышенной температурой.
.
■ Стандартные принадлежности
• Передняя крышка объектива LC-52 диаметром 52мм
• Задняя защитная крышка объектива
• Бленда с байонетным креплением HB-37
• Мягкий чехол для объектива CL-1018
■ Дополнительная принадлежность
• Ввинчивающиеся фильтры диаметром 52мм
74
Page 75

■ Технические характеристики
Тип объектива: Объектив AF-S DX Micro NIKKOR типа G со
Фокусное
расстояние:
Максимальная
диафрагма:
Оптическая схема:
Угол зрения: 18º 50’
Шкала масштаба
съемки:
Информация о
расстоянии:
Фокусировка:
Подавление
вибрации:
Шкала расстояния
съемки:
Минимальное
расстояние съемки:
Число лепестков
диафрагмы:
Диафрагма: Полностью автоматическая
Шкала диафрагмы:
Замер экспозиции:
Установочный
размер:
Размеры: Прибл. 73 мм (диаметр) × 98,5 мм (длина от
Вес: Прибл. 355 г
Характеристики и дизайн могут быть изменены без предупреждения
и каких-либо обязательств со стороны изготовителя.
встроенным микропроцессором и байонетном
Nikon (разработан специально для
использования с цифровыми зеркальными
фотокамерами Nikon формата DX)
85 мм
f/3,5
14 элементов в 10 группах (1 линза ED)
от до 1:1 (фактический размер)
Передается в фотокамеру
Система внутренней фокусировки (IF) Nikon,
автофокусировка с использованием бесшумного
волнового привода, ручная фокусировка с помощью
отдельного кольца фокусировки
Метод перемещения линз с помощью
электродвигателей с линейной обмоткой (VCM)
Градуирована в метрах и футах от 0,286 м до
бесконечности ( )
0,286 м от фокальной плоскости (фактический
размер)
9 (скругленные)
f/3,5 - f/32
Методом с полностью открытой диафрагмой
52 мм (P = 0,75 мм)
крепежного фланца объектива на фотокамере)
Jp
En
De
Fr
Es
Sv
Ru
Nl
It
Cz
Sk
Ck
Ch
Kr
75
Page 76

Veiligheidsvoorschriften
Jp
En
De
Fr
Es
Sv
Ru
Nl
It
Cz
Sk
Ck
Ch
Kr
WAARSCHUWING
Haal het toestel niet uit elkaar
Het aanraken van de inwendige delen van het fototoestel of van het objectief
kan een letsel veroorzaken. Herstellingen mogen alleen worden uitgevoerd
door bevoegde technici. Indien het fototoestel of het objectief breekt na een
val of een ander ongeluk, laat u het product door een door Nikon erkende
servicedienst nakijken nadat u de stekker uit het stopcontact hebt gehaald
en/of de batterijen hebt verwijderd.
Schakel het toestel onmiddellijk uit bij storingen
Indien u merkt dat er rook of een ongewone geur uit het fototoestel of het
objectief komt, moet u de batterij onmiddellijk verwijderen om brandwonden te
vermijden. Verdere bediening van het toestel kan een letsel tot gevolg hebben.
Nadat u de stroombron hebt verwijderd of losgekoppeld, laat u het toestel
nakijken door een door Nikon erkende servicedienst.
Gebruik het fototoestel of het objectief niet in de buurt van
ontvlambare gassen
Het bedienen van elektronische apparatuur in de buurt van ontvlambare
gassen kan leiden tot een ontploffing of brand.
Kijk niet naar de zon door het objectief of de beeldzoeker
Kijken naar de zon of naar ander fel licht door het objectief of de beeldzoeker
kan een blijvend oogletsel veroorzaken.
Buiten het bereik van kinderen houden
Zorg ervoor dat kleine kinderen de batterijen of andere kleine onderdelen niet
in hun mond kunnen stoppen.
Let op de volgende punten bij het gebruik van het fototoestel en het objectief
•
Houd de camera en het objectief droog. Indien u deze voorzorgsmaatregel
niet in acht neemt, kan dit brand of een elektrische schok tot gevolg hebben
• Bedien het fototoestel of het objectief niet of raak deze niet aan met natte
handen. Indien u deze voorzorgsmaatregel niet in acht neemt, kan dit een
elektrische schok tot gevolg hebben.
•
Wanneer u opnames maakt bij tegenlicht, mag u het objectief niet naar de zon
richten en moet u vermijden dat zonlicht rechtstreeks in het objectief valt. Dit kan
namelijk leiden tot oververhitting van de camera met mogelijk brand tot gevolg
•
Wanneer u het objectief niet gebruikt gedurende een langere periode, bevestig
dan zowel de voorste als de achterste objectiefdoppen om het objectief te
beschermen tegen direct zonlicht. Indien u deze voorzorgsmaatregel niet in
acht neemt, kan dit brand tot gevolg hebben, aangezien het objectief het
zonlicht kan convergeren op een ontvlambaar voorwerp
.
.
.
76
Page 77

■ Terminologie
M/A
ON
M
OFF
Jp
En
De
Fr
Es
Sv
Ru
Nl
It
A
1 Zonnekap (P. 83)
2 Bevestigings-index voor
zonnekap (P. 83)
3 Instel-index voor zonnekap
(P. 83)
4 Montage-index voor zonnekap
(P. 83)
5 Scherpstelring (P. 79)
6 Afstandschaal
7 Montage-index (P. 79)
B
8 Rubberen pakking van
objectiefvatting (P. 84)
9 CPU-contacten (P. 84)
0 Scherpstelstandschakelaar
(P. 79)
a ON/OFF-schakelaar voor
vibratiereductie (P. 82)
Reproductieverhoudingsschaal
b
(P. 80)
c Afstandsindexlijn (P. 80)
( ) : Referentiepagina
Cz
Sk
Ck
Ch
Kr
77
Page 78

Gefeliciteerd met de aanschaf van het AF-S DX Micro NIKKOR 85mm
f/3,5G ED VR-objectief. DX NIKKOR-objectieven werden speciaal
Jp
ontwikkeld voor gebruik met digitale Nikon SLR-camera's (Nikon DXformaat), zoals de D300-reeks en de D90. Wanneer het objectief is
En
geplaatst op camera's van Nikon DX-formaat, is de beeldhoek van het
objectief gelijk aan circa 1,5× de brandpuntsafstand in 35mm-formaat.
De
Lees deze instructies eerst door en raadpleeg de Gebruikshandleiding van
uw camera alvorens u dit objectief gebruikt.
Fr
■ Belangrijkste functies
• Dit objectief beschikt over scherpe weergavekenmerken die geschikt
Es
zijn voor close-upopnames, reproductiewerk, snapshots en algemene
Sv
Ru
Cz
Sk
fotografie bij alle opnameafstanden.
• Dit objectief is uitgerust met het Nikon Internal Focusing-systeem (IF),
wat zorgt voor een uitstekend evenwicht tussen een scherp
hoofdonderwerp en een aangename beeldwaas in de achter- en
voorgrond.
Nl
• De superieure optische prestaties en de weergavekenmerken worden
gemaximaliseerd door het gebruik van een extra ED-glaselement
It
(extra-low dispersion) dat zorgt voor een correctie van de chromatische
aberratie. Daarnaast produceert het afgeronde diafragma een zachte
en aangename beeldwaas in delen van het beeld waarop niet is
scherpgesteld.
• Tot vier SB-R200 draadloze Speedlights op afstand kunnen worden
gemonteerd op de rand van het objectief.
Ck
Ch
Kr
78
Page 79

■ Het objectief gebruiken
Het objectief bevestigen op de camera
1 Schakel de camera uit.
2 Verwijder de achterste objectiefdop (fig. B).
3 Breng de montage-index 7 op het objectief in een lijn met de
montage-index op de camera en draai het objectief linksom totdat
deze op de juiste plaats klikt. Zorg ervoor dat het objectief correct
gericht is met de montage-index 7 bovenop het objectief.
4 Verwijder de voorste objectiefdop (fig. A).
Het objectief verwijderen van de camera
1 Schakel de camera uit.
2 Houd de objectiefontgrendeling op de camera ingedrukt terwijl u het
objectief rechtsom draait.
■ Scherpstellen
Stel de scherpstelfunctieschakelaar van de camera in overeenkomstig de
volgende tabel.
Camera's
scherpstelling
stand
AF
MF
Raadpleeg de Gebruikshandleiding van de camera voor meer informatie
over de scherpstelmodi van de camera.
Autofocus handmatige aanpassing (M/A-stand)
1 Stel de scherpstelmodusschakelaar 0 in op M/A.
2 Autofocus is ingeschakeld, maar u kunt dit opheffen door de aparte
scherpstelring 5 te verdraaien terwijl u de ontspanknop half
ingedrukt houdt of terwijl u de AF-ON-knop ingedrukt houdt op
fototoestellen die hiermee zijn uitgerust.
3 Druk de ontspanknop of de AF-ON-knop opnieuw half in om de
handmatige scherpstelling te annuleren en autofocus te hernemen.
Autofocus handmatige
Scherpstelstand van objectief
M/A M
Handmatige scherpstelling
aanpassing
Handmatige scherpstelling
(elektronische meetzoeker beschikbaar.)
(elektronische meetzoeker
beschikbaar.)
Jp
En
De
Fr
Es
Sv
Ru
Nl
It
Cz
Sk
Ck
Ch
Kr
79
Page 80

■ Het diafragma instellen
Gebruik het fototoestel om de instellingen van het diafragma aan te passen.
Jp
Wanneer de belichtings- of opnamemodus ingestel d is op “A” of “M”, regelt
de camera het diafragma om de effectieve f-waarde te handhaven (tot ong.
En
1,1 stoppen) zelfs als de opnameafstand wordt gewijzigd.
■ Scherptediepte
De
Als uw camera een scherptedieptevoorbeeld ondersteunt, kunt u het
effect van de diafragma-instelling in de beeldzoeker bekijken voor u een
opname maakt.
Fr
Dit objectief is uitgerust met een Internal Focusingsysteem (IF). Naarmate
de opnameafstand afneemt, neemt de brandpuntsafstand ook af.
Es
■
Scherpstellen met een vooraf ingestelde
Sv
Ru
Nl
Cz
Sk
Ck
Ch
Kr
reproductieverhouding (reproductieverhoudingsschaal)
De reproductieverhouding is de relatie tussen de grootte van het beeld
vastgelegd op de beeldsensor en de werkelijke grootte van het
onderwerp. Als de grootte van het beeld op de beeldsensor bijvoorbeeld
een vijfde bedraagt van de werkelijke grootte van het onderwerp, is de
reproductieverhouding 1:5.
Voer de volgende stappen uit om te fotograferen met een vooraf
ingestelde reproductieverhouding:
It
1 Verdraai de scherpstelring manueel tot het nummer van de gewen ste
reproductieverhoudingsschaal op een lijn staat met de
afstandsindexlijn c.
2 Richt de camera op het onderwerp en wijzig vervolgens uw positie
door dichter bij of verder van het onderwerp te gaan staan tot het
beeld in de beeldzoeker scherp wordt.
■
Opmerkingen bij close-upopnames en reproductiewerk
Cameratrilling
Dit objectief zorgt voor een beeldvergroting die zo uitzonderlijk hoog is
dat zelfs de kleinste beweging tijdens het fot ograferen kan leiden tot een
onscherp beeld. Het is daarom ten zeerste aan te raden een statief en een
afstandskabel te gebruiken om cameratrillingen te voorkomen.
Kleine werkafstand
Bij de hoge reproductieverhoudingen die worden gebruikt bij closeupopnames is de scherptediepte erg laag. Om voldoende scherptediepte
te hebben, verkleint u het diafragma van het objectief, verlengt u de
belichtingstijd en positioneert u de camera nauwkeurig zodat het
belangrijkste deel van het onderwerp zich parallel bevindt met het
oppervlak van de beeldsensor om een juiste scherpstelling te verzekeren.
80
Page 81

■ Filterfactor
De f-waarde van een objectief wijst op de helderheid van het beeld die
wordt gevormd door het objectief bij een “oneindige” opnameafstand.
Hoe groter de reproductieverhouding, hoe lager de helderheid van het
beeld. De eigenlijke helderheid van het beeld wordt de “effectieve fwaarde” genoemd, en de belichtingscorrectiewaarde voor de wijziging
van de effectieve f-waarde wordt de “filterfactor” genoemd.
■ Variatie van de effectieve f-waarde (P. 150)
Hoe groter de reproductieverhouding van dit objectief (hoe korter de
opnameafstand), hoe meer de helderheid van het beeld geprojecteerd
op de beeldsensor afneemt en hoe meer de effectieve f-waarde
toeneemt (de hoeveelheid licht die binnenvalt door het diafragma van
het objectief neemt af). Deze variatie wordt automatisch
gecompenseerd door de belichtingsmeter van de camera. De gebruiker
kan dus de belichting instellen of een DDL-flitser gebruiken zonder
rekening te moeten houden met de filterfactor.
De f-waarde die wordt weergegeven op het LCD-scherm of in de
beeldzoeker van de camera is de automatisch gecompenseerde waarde.
Jp
En
De
Fr
Es
Sv
Ru
Nl
It
Cz
Sk
Ck
Ch
Kr
81
Page 82

■ Vibratiereductiestand
De ON/OFF-schakelaar voor vibratiereductie instellen
Jp
ON:
OFF
En
ON
De
Fr
Opmerkingen over het gebruik van de vibratiereductie
• Door vibratiereductie (VR) in te schakelen, kunnen langere sluitertijden
Es
(3,0 stoppen*) worden gebruikt als de opnameafstand tussen en 2,6
Sv
Ru
Cz
Sk
Ck
Ch
Kr
m ligt (de reproductieverhouding tussen en
1/30×). Hoe meer de reproductieverhouding 1/30× overstijgt, hoe
meer het effect van de vibratiereductie afneemt. (*De effecten van VR
op sluitertijd worden gemeten overeenkomstig de Camera and
Imaging Products Association (CIPA)-standaarden; FX-formaat
objectieven worden gemeten met behulp van FX-formaat digitale
camera’s, DX-formaat objectieven met behulp van DX-formaat
Nl
camera’s. Zoomobjectieven worden bij maximale zoom gemeten.)
Nadat u de ontspanknop half hebt ingedrukt, wacht u totdat het beeld
•
It
in de beeldzoeker stabiliseert alvorens u de ontspanknop verder indrukt
• Als een gevolg van de eigenschappen van vibratiereductie is het
mogelijk dat het beeld in de beeldzoeker vaag wordt na het loslaten
van de sluiterknop. Dit is geen storing.
• Als het fototoestel gepand wordt in een grote cirkel, wordt er geen
compensatie uitgevoerd voor bewegingen van het fototoestel in de
panrichting. Zo worden alleen de effecten van verticale
cameratrillingen verminderd tijdens horizontaal pannen.
• Schakel het fototoestel niet uit of verwijder het objectief niet van het
fototoestel terwijl de vibratiereductie in werking is. Als u deze
voorzorgsmaatregel niet in acht neemt, kan het objectief klinken en
aanvoelen alsof een interne component is losgekomen of afgebroken
wanneer ermee wordt geschud. Dit is geen storing. Schakel het
fototoestel opnieuw in om dit te corrigeren.
• Bij fototoestellen met ingebouwde flitser werkt de vibratiereduct ie niet
wanneer de ingebouwde flitser wordt opgeladen.
• Bij autofocuscamera's die uitgerust zijn met een AF-ON-knop, werkt de
vibratiereductie niet wanneer u de AF-ON-knop indrukt.
• Als het fototoestel op een statief met drie poten is geplaatst, stelt u de
ON/OFF-schakelaar voor vibratiereductie a in op OFF. Wanneer u
echter een statief (met een of drie poten) gebruikt zonder het
statiefhoofd vast te maken, zet u de schakelaar op ON.
De effecten van cameratrillingen worden verminderd
wanneer de ontspanknop half wordt ingedrukt en
ook op het moment dat de sluiter wordt losgelaten.
Omdat de vibratie wordt verminderd in de zoeker, is
het eenvoudiger om automatisch/handmatig scherp
te stellen en het onderwerp precies te kadreren
OFF:
De effecten van cameratrillingen worden niet verminderd
.
.
.
82
Page 83

■ De ingebouwde flitser en vignettering
• De ingebouwde flitser kan niet worden gebruikt op afstanden van
minder dan 0,6 m.
• Gebruik ter voorkoming van vignettering geen zonnekap.
* Vignetteren is het verduisteren van de hoeken rond een beeld, wat
voorkomt wanneer het licht dat door de flitser wordt weergegeven,
wordt belemmerd door het objectiefvat.
■ Gebruik van de zonnekap
De zonnekap blokkeert lichtstralen die een negatief effect hebben op de
beelden. De kap beschermt eveneens het glazen oppervlak van het
objectief.
De zonnekap bevestigen
• Zorg ervoor dat de montageindex voor zonnekap (
uitgelijnd met de instel-index voor
zonnekap (
B) (3).
C) wordt
Jp
En
De
Fr
Es
Sv
Ru
Nl
• Om het vastmaken of verwijderen van de zonnekap te
vergemakkelijken, neemt u deze vast aan de bevestigings-index voor
zonnekap (
• Als de zonnekap niet correct is bevestigd, kan er vignettering
voorkomen.
• U kunt het objectief opbergen met de zonnekap in omg ekeerde positie
vastgemaakt.
A) in plaats van aan de buitenste rand.
It
Cz
Sk
Ck
Ch
Kr
83
Page 84

■ Onderhoud van het objectief
• Zorg ervoor dat de CPU-contacten 9 niet vuil of beschadigd worden.
Jp
• Als de rubberen pakking van de objectiefvatting 8 is beschadigd,
En
De
Sv
Ru
Cz
Sk
Ck
Ch
Kr
moet u het objectief voor reparatie naar de dichtstbijzijnde door Nikon
erkende servicedienst brengen.
Reinig het objectief met een blaasbalgje. Om vuil en vlekken te verwijderen,
•
gebruikt u een zachte, zuivere katoenen doek of een objectiefdoekje met
ethanol (alcohol) of objectiefreiniger. Maak ronddraaiende bewegingen van
Fr
het midden naar de buitenkant en let erop dat u geen strepen maakt of
andere onderdelen van het objectief aanraakt
Es
• Gebruik nooit organische oplosmiddelen zoals thinner of benzeen om
het objectief te reinigen. Deze kunnen namelijk schade, brand of
gezondheidsproblemen veroorzaken.
NC-filters zijn beschikbaar om het voorste objectiefelement te beschermen.
•
De zonnekap helpt ook om de voorkant van het objectief te beschermen
• Wanneer u het objectief in het flexibele objectiefetui opbergt, maakt u
zowel de voorste als de achterste objectiefdoppen vast.
Nl
Wanneer het objectief is geïnstalleerd op een fototoestel, mag u het
•
fototoestel en het objectief niet optillen of vasthouden aan de zonnekap
It
Bewaar het objectief op een koele, droge plaats wanneer u deze gedurende
•
een lange periode niet gebruikt om schimmel- en roestvorming te
voorkomen. Berg het objectief ook op om deze te beschermen tegen
rechtstreeks zonlicht of chemicaliën zoals kamfer en naftaleen
• Laat geen water op het objectief komen en laat het objectief niet in water
vallen. Hierdoor zal het objectief roesten en slecht functioneren.
• Bepaalde onderdelen van het objectief zijn vervaardigd uit versterkt
plastic. Zet het objectief nooit in een overmatig hete ruimte om schade
te voorkomen.
.
■ Standaardaccessoires
• 52mm makkelijk te bevestigen voorste objectiefdop LC-52
• Achterste objectiefdop
•BajonetkapHB-37
• Flexibel objectiefetui CL-1018
■ Optioneel accessoire
• 52mm vastschroefbare filters
.
.
.
84
Page 85

■ Specificaties
Type objectief: G-type AF-S DX Micro NIKKOR-objectief met
Brandpuntsafstand:
Maximaal
diafragma:
Objectiefconstructie:
Beeldhoek: 18º 50’
Reproductieverhoudingsschaal:
Afstandsinformatie:
Scherpstelling: Nikon Internal Focusing-systeem (IF), autofocus met
Vibratiereductie: Objectief-shiftmethode met behulp van voice coil-
Opnameafstandschaal:
Kortste
scherpstelafstand:
Aantal
diafragmalamellen:
Diafragma: Volledig automatisch
Diafragmaschaal: f/3,5 tot f/32
Belichtingsmeting:
Montageafmeting:
Afmetingen: Circa 73 mm (diameter) × 98,5 mm (afstand van de
Gewicht: Circa 355 g
Wijzigingen in ontwerp en technische gegevens voorbehouden zonder
voorafgaande kennisgeving of verplichting vanwege de fabrikant.
ingebouwde CPU en Nikon-bajonetvatting (speciaal
ontworpen voor gebruik met Nikon digitale SLR—
DX-formaat— camera's)
85 mm
f/3,5
14 elementen in 10 groepen
(1 ED-objectiefelement)
tot 1:1 (werkelijke grootte)
Doorgeven aan camerabody
Silent Wave Motor; handmatig scherpstellen met
aparte scherpstelring
motoren (VCM's)
Gradueel in meter van 0,286 m tot oneindig ( )
0,286 m vanaf filmvlak (werkelijke grootte)
9 stuks (afgerond)
Door middel van de volledige diafragmamethode
52 mm (P = 0,75 mm)
objectiefvatting op de camera)
Jp
En
De
Fr
Es
Sv
Ru
Nl
It
Cz
Sk
Ck
Ch
Kr
85
Page 86

Note sulle operazioni di sicurezza
Jp
En
De
Fr
Es
Sv
Ru
Nl
It
Cz
Sk
Ck
Ch
Kr
ATTENZIONE
Non smontare
Toccando le parti interne della fotocamera o dell'obiettivo si potrebbero
causare dei guasti. Le riparazioni devono essere eseguite solamente da tecnici
qualificati. Qualora, in caso di caduta o di qualsiasi altro incidente, la
fotocamera o l'obiettivo dovessero rompersi, portare il prodotto presso un
punto di assistenza Nikon autorizzato per l'ispezione, dopo averlo disinserito
dalla presa e/o rimosso la batteria.
In caso di malfunzionamento, disattivare immediatamente la
fotocamera
Qualora dalla fotocamera o dall'obiettivo dovesse uscire del fumo o un odore
insolito, rimuovere immediatamente la batteria, facendo attenzione a non
ustionarsi. Continuando a utilizzare la fotocamera, sussiste il rischio di lesioni.
Dopo aver rimosso o scollegato la fonte di alimentazione, portare il prodotto
presso un punto di assistenza Nikon autorizzato per l'ispezione.
Non usare la fotocamera o l'obiettivo in presenza di gas infiammabili
L'utilizzo di apparecchiature elettroniche in presenza di gas infiammabili può
causare esplosioni o incendi.
Non guardare il sole in modo diretto attraverso l'obiettivo o il mirino
Guardando in modo diretto il sole o qualsiasi altra fonte intensa di luce, si è
soggetti al rischio di indebolimento permanente della vista.
Tenere lontano dalla portata dei bambini
Fare molta attenzione che i bambini non ingeriscano le batterie o altre piccole
parti.
Nell'utilizzo della fotocamera e dell'obiettivo, osservare le seguenti
precauzioni
• Mantenere la fotocamera e l'obiettivo asciutti. In caso contrario si potrebbe
verificare un incendio o scosse elettriche.
• Non maneggiare né toccare la fotocamera o l'obiettivo con le mani bagnate.
In caso contrario, si potrebbero verificare scosse elettriche.
•
Durante le riprese in controluce, non puntare l'obiettivo verso il sole ed evitare
che la luce solare passi direttamente attraverso di esso, poiché la fotocamera
potrebbe surriscaldarsi ed eventualmente provocare un incendio
•
Se si prevede di non utilizzare l'obiettivo per un periodo prolungato di tempo,
montare entrambi i tappi di protezione e riporlo lontano dalla luce diretta del
sole. Il mancato rispetto di questa istruzione può causare incendi, poiché
l'obiettivo potrebbe concentrare la luce del sole su un oggetto infiammabile
.
.
86
Page 87

■ Denominazione
M/A
ON
M
OFF
Jp
En
De
Fr
Es
Sv
Ru
Nl
It
A
1 Paraluce (p. 93)
2 Indice di collegamento del
paraluce (p. 93)
3 Indice di regolazione del
paraluce (p. 93)
4 Indice di montaggio del
paraluce (p. 93)
5 Anello di messa a fuoco (p. 89)
6 Scala delle distanze
7 Indice di montaggio (p. 89)
B
8 Guarnizione in gomma della
montatura dell'obiettivo
(p. 94)
9 Contatti CPU (p. 94)
0 Interruttore del modo di messa
a fuoco (p. 89)
a Interruttore ON/OFF di
riduzione vibrazioni (p. 92)
b Scala dei rapporti di
ingrandimento (p. 90)
c Linea di riferimento distanza
(p. 90)
( ) : Pagina di riferimento
Cz
Sk
Ck
Ch
Kr
87
Page 88

Grazie per aver acquistato l'obiettivo AF-S DX Micro NIKKOR 85mm f/3,5G
ED VR. Gli obiettivi DX NIKKOR sono appositamente studiati per essere
Jp
impiegati con le fotocamere SLR digitali Nikon (formato Nikon DX), come
la serie D300 e la D90. Quando è montato su fotocamere formato Nikon
En
DX, l'angolo d'immagine dell'obiettivo è approssimativamente pari a
1, 5× la l un ghe zza fo cal e n el f or mat o 3 5mm . Pr im a di ut ili zz are l' obi ett iv o,
De
leggere queste istruzioni e consultare il Manuale d'uso della fotocamera.
■ Caratteristiche principali
Fr
• Questo obiettivo garantisce un'elevata nitidezza e fedeltà ed è pertanto
indicato per riprese a distanza ravvicinata, lavori di riproduzione,
Es
istantanee, oltre che per riprese generiche a tutte le distanze dal
Sv
Ru
Cz
Sk
soggetto.
• Questo obiettivo è dotato di sistema Nikon IF (Internal Focusing), che
permette di ottenere un ottimo equilibrio tra messa fuoco nitida del
soggetto principale e un piacevole effetto sfocato per le parti in primo
piano e lo sfondo.
Nl
• La soluzione costruttiva adottata, comprendente un elemento in vetro
ED (extra-low dispersion), offre prestazioni ottiche e di riproduzione
It
eccezionali, garantendo la correzione delle aberrazioni cromatiche.
Inoltre, l'apertura arrotondata del diaframma consente di ottenere un
effetto mosso più morbido e piacevole nelle zone sfuocate
dell'immagine.
• Sull'obiettivo è possibile fissare fino a quattro lampeggiatori remoti
senza cavi SB-R200.
Ck
Ch
Kr
88
Page 89

■ Uso dell'obiettivo
Montaggio dell'obiettivo sulla fotocamera
1 Spegnere la fotocamera.
2 Togliere il copriobiettivo posteriore. (Fig. B)
3 Allineare l'indice di montaggio obiettivo 7 con l'indice di montaggio
posto sul corpo della fotocamera e ruotare l'obiettivo in senso
antiorario finché non scatterà in posizione. Accertarsi che l'obiettivo
sia in posizione corretta quando l'indice di montaggio 7
sull'obiettivo è rivolto verso l'alto.
4 Togliere il copriobiettivo anteriore. (Fig. A)
Smontaggio dell'obiettivo dalla fotocamera
1 Spegnere la fotocamera.
2 Tenere premuto il pulsante di sblocco obiettivo sulla fotocamera e
contemporaneamente ruotare l'obiettivo in senso orario.
■ Messa a fuoco
Impostare il selettore di modo di messa a fuoco della fotocamera in
conformità alla seguente tabella.
Modo di messa
a fuoco della
fotocamera
AF
MF Messa a fuoco manuale (telemetro elettronico disponibile.)
Per ulteriori informazioni sui modi di messa a fuoco della fotocamera,
consultare il Manuale d'uso della fotocamera.
Messa a fuoco automatica con esclusione per il
funzionamento in manuale (modo M/A)
1 Impostare l'interruttore del modo di messa a fuoco 0 dell'obiettivo
su M/A.
2 L'autofocus è attivo, ma è possibile escluderlo ruotando l'anello di
messa a fuoco 5 separato e premendo contemporaneamente il
pulsante di scatto a metà corsa, oppure premendo il pulsante AF-ON
sul corpo macchina, se la fotocamera ne è dotata.
3 Per disattivare la messa a fuoco manuale e riattivare l'autofocus,
premere il pulsante di scatto a metà corsa, oppure premere
nuovamente il pulsante AF-ON.
funzionamento in manuale
Modo di messa a fuoco dell'obiettivo
M/A M
Messa a fuoco automatica
con esclusione per il
Messa a fuoco manuale
(telemetro elettronico
disponibile.)
Jp
En
De
Fr
Es
Sv
Ru
Nl
It
Cz
Sk
Ck
Ch
Kr
89
Page 90

■ Impostazione dell'apertura
Regolare l'apertura utilizzando la fotocamera. Quando è impostato "A" o
Jp
"M" come modo di esposizione (o di scatto), la fotocamera controlla
l'apertura per mantenere il numero f/ effettivo (fino a circa 1,1 stop),
En
anche se la distanza di ripresa cambia.
■ Profondità di campo
De
Se la fotocamera è dotata di anteprima della profondità di campo, è possibile
verificare l'effettiva profondità di campo nel mirino prima di scattare.
Questo obiettivo è dotato di sistema IF (Internal Focusing). La lunghezza
Fr
focale diminuisce proporzionalmente alla distanza di ripresa.
■ Messa a fuoco con un rapporto di ingrandimento
Es
predeterminato (Scala dei rapporti di
Sv
Ru
Nl
Cz
Sk
ingrandimento)
Il rapporto di ingrandimento è il rapporto tra le dimensioni del soggetto
registrate sul sensore di immagine e le dimensioni effettive del soggetto.
Se, per esempio, il soggetto sul sensore di immagine è un quinto delle
dimensioni reali, il rapporto di ingrandimento sarà di 1:5.
Per fotografare con un rapporto di ingrandimento predeterminato,
attenersi alla seguente procedura:
1 Ruotare manualmente l'anello di messa a fuoco finché il numero sulla
It
scala dei rapporti di ingrandimento non sarà allineato con la linea di
riferimento distanza c.
2
Inquadrare il soggetto, quindi cambiare posizione, avvicinandosi o
allontanandosi da esso, finché l'immagine nel mirino non risulterà più nitida
■ Note per le riprese a distanza ravvicinata e i lavori
di riproduzione
Movimento fotocamera
Ck
Questo obiettivo permette di ottenere rapporti di ingrandimento
talmente elevati, che anche il movimento più impercettibile durante la
Ch
ripresa può provocare foto mosse. Pertanto, si consiglia vivamente di
utilizzare un cavalletto e un comando flessibile o cavo di scatto per
Kr
prevenire gli effetti del movimento della fotocamera.
Distanza di messa a fuoco ridotta
Con gli elevati rapporti di ingrandimento tipici delle riprese a distanza
ravvicinata, la profondità di campo è ridottissima. Per ottenere una
profondità di campo sufficiente, impostare un diaframma chiuso,
aumentare il tempo di posa e inquadrare attentamente, in modo che la
porzione più importante del soggetto risulti parallela alla superficie del
sensore di immagine, per essere certi di ottenere una messa a fuoco nitida.
.
90
Page 91

■ Fattore di esposizione
Il numero f/ di un obiettivo indica la luminosità dell'immagine ottenuta
con l'obiettivo "all'infinito". Più il rapporto di ingrandimento è alto, più la
luminosità diminuisce. La luminosità effettiva dell'immagine è detta
"numero f/ effettivo", mentre il valore di compensazione dell'esposizione
che determina una variazione del numero f/ effettivo è detto "fattore di
esposizione".
■ Variazione del numero f/ effettivo (p. 150)
Con questo obiettivo, più il rapporto di ingrandimento è elevato (più la
distanza di ripresa è ridotta), più la luminosità dell'immagine proiettata
sul sensore diminuisce, e più il numero f/ effettivo aumenta (ossia, la
quantità di luce che passa attraverso il diaframma diminuisce). Questa
variazione è compensata automaticamente dall'esposimetro della
fotocamera, pertanto l'utente può determinare l'esposizione o eseguire
riprese con flash TTL senza preoccuparsi del fattore di esposizione.
Il numero f / visua lizzat o nel monitor LCD o nel mirino della fotocamera è
il valore compensato automaticamente.
Jp
En
De
Fr
Es
Sv
Ru
Nl
It
Cz
Sk
Ck
Ch
Kr
91
Page 92

■ Modo riduzione vibrazioni
Interruttore ON/OFF di riduzione vibrazioni
Jp
ON: Gli effetti del movimento della fotocamera
OFF
En
ON
De
Fr
Note sulla funzione riduzione vibrazioni
Es
• Attivando la funzione di riduzione vibrazioni (VR), è possibile utilizzare tempi
Sv
Ru
Cz
Sk
Ck
Ch
Kr
di posa più lunghi (3,0 stop*) con distanze di ripresa da a 2,6 m (rapporto
di ingrandimento da a 1/30×). Più il rapporto di ingrandimento è elevato
rispetto a 1/30×, più si avrà una diminuzione graduale degli effetti della
funzione di riduzione vibrazioni. (*Gli effetti di VR sul tempo di posa sono
misurati in base agli standard CIPA (Camera and Imaging Products
Association); gli obiettivi in formato FX sono misurati usando fotocamere
Nl
digitali in formato FX, gli obiettivi in formato DX usando fotocamere in
formato DX. Gli obiettivi zoom sono misurati allo zoom massimo.)
•
Dopo aver premuto il pulsante di scatto a metà corsa, attendere che l'immagine
It
nel mirino si stabilizzi, quindi premere completamente il pulsante di scatto
• Le caratteristiche del meccanismo di riduzione delle vibra zioni possono
rendere sfocata l'immagine nel mirino quando si rilascia il pulsante di
scatto. Non si tratta di un malfunzionamento.
• Se si esegue un ampio arco per creare una panoramica, i movimenti
della fotocamera nella direzione della panoramica non vengono
compensati. Ad esempio, durante il panning orizzontale vengono
ridotti soltanto gli effetti del movimento verticale della fotocamera.
• Non disattivare la fotocamera né rimuovere l'obiettivo quando la
modalità riduzione vibrazioni è in funzione. In caso contrario, il
movimento dell'obiettivo può generare un suono simile a quello di un
componente interno lento o rotto. Non si tratta di un
malfunzionamento. Per risolvere il problema, riattivare la fotocamera.
• Sulle fotocamere dotate di flash incorporato, la funzione riduzione vibrazioni
non può essere utilizzata mentre il flash incorporato si sta ricaricando.
• Nel caso di fotocamere con autofocus dotate di pulsante AF-ON, la
riduzione vibrazioni non funziona nemmeno premendo AF-ON.
• Quando la fotocamera è sul cavalletto, impostare l'interruttore ON/OFF
di riduzione vibrazioni a su OFF. Tuttavia, occorre impostare il
selettore su ON quando si utilizza un cavalletto senza fissarne la testa, o
quando si utilizza un monopiede.
vengono ridotti mentre il pulsante di scatto è
premuto parzialmente e anche nell'istante dello
scatto. Le vibrazioni vengono ridotte nel mirino,
pertanto la messa a fuoco automatica/manuale e
l'inquadratura esatta del soggetto sono più facili.
OFF: Gli effetti del movimento della fotocamera non
vengono ridotti.
.
92
Page 93

■ Flash incorporato e vignettatura
• Il flash incorporato non può essere utilizzato a distanze inferiori a 0,6 m.
• Per evitare la vignettatura (riduzione della luminosità ai margini
dell'immagine), non usare un paraluce.
* La vignettatura è la riduzione della luminosità agli angoli dell'immagine
che si verifica quando la luce emessa dal flash incorporato della
fotocamera è ostacolata dal barilotto dell'obiettivo.
■ Utilizzo del paraluce
Il paraluce blocca i raggi di luce che hanno effetti dannosi sull'immagine,
e protegge la superficie in vetro dell'obiettivo.
Collegamento del paraluce
• Assicurarsi che il l'indice di
montaggio del paraluce (C) sia
allineato con l'indice di
regolazione del paraluce (
(3).
• Per facilitare il fissaggio e la rimozione del paraluce, impugnarlo per la
base vicino all'indice di collegamento del paraluce (
il bordo esterno.
• Se il paraluce non è fissato correttamente, si può verificare la
vignettatura.
• L'obiettivo può essere riposto con il paraluce montato al contrario.
A) anziché verso
B)
Jp
En
De
Fr
Es
Sv
Ru
Nl
It
Cz
Sk
Ck
Ch
Kr
93
Page 94

■ Cura e manutenzione dell'obiettivo
• Fare attenzione a non sporcare o danneggiare i contatti CPU 9.
Jp
• Nel caso in cui la guarnizione in gomma della montatura dell'obiettivo
En
De
Sv
Ru
Cz
Sk
Ck
Ch
Kr
8 sia danneggiata, provvedere alla relativa riparazione presso il punto
assistenza Nikon autorizzato più vicino.
• Pulire la superficie delle lenti con un pennello a pompetta. Per
rimuovere impronte e macchie, fare uso di un fazzoletto di cotone,
soffice e pulito, o di una cartina ottica leggermente imbevuti co n alcool
Fr
o con un liquido detergente specifico per obiettivi. Strofinare
delicatamente con movimento circolare dal centro verso l'esterno,
Es
facendo attenzione a non lasciare tracce o toccare altre parti.
Non utilizzare solventi organici o benzene per pulire l'obiettivo, in quanto
•
potrebbero danneggiare l'obiettivo, causare incendi o problemi di salute
• Per la protezione dell'elemento anteriore dell'obiettivo sono disponibili
appositi filtri NC. Anche il paraluce può essere utilizzato per proteggere
la parte anteriore dell'obiettivo.
• Prima di riporre l'obiettivo nella relativa custodia flessibile, montare
Nl
entrambi i coperchi anteriore e posteriore.
• Quando l'obiettivo è montato sulla fotocamera, non afferrare o reggere
It
la fotocamera e l'obiettivo dal paraluce.
Se si prevede di non utilizzare l'obiettivo per periodi prolungati, riporlo in un
•
ambiente fresco e asciutto per prevenire la formazione di muffe e ruggine.
Tenerlo inoltre lontano dal sole o da agenti chimici come canfora o naftalina
• Non bagnarlo e fare attenzione che non cada in acqua. La formazione
di ruggine potrebbe danneggiarlo in modo irreparabile.
• Alcune parti della montatura sono realizzate in materiale plastico
rinforzato. Per evitare danni non lasciare mai l'obiettivo in un luogo
eccessivamente caldo.
■ Accessori in dotazione
• Copriobiettivo anteriore snap-on 52mm LC-52
• Copriobiettivo posteriore
• Paraluce a baionetta HB-37
• Custodia morbida per obiettivo CL-1018
■ Accessori opzionale
• Filtri a vite da 52mm
.
.
94
Page 95

■ Caratteristiche tecniche
Tipo di obiettivo: Obiettivo AF-S DX Micro NIKKOR tipo G con CPU
Lunghezza focale: 85 mm
Apertura
massima:
Costruzione
obiettivo:
Angolo di campo: 18º 50’
Scala dei rapporti
di ingrandimento:
Dati distanze: Misurati sul riferimento del piano focale fotocamera
Messa a fuoco: Sistema IF (Internal Focusing) Nikon, autofocus con
Riduzione
vibrazioni:
Scala distanze di
ripresa:
Distanza di messa
a fuoco minima:
Nr. delle lamelle
diaframma:
Diaframma: Completamente automatico
Gamma di
apertura:
Misurazione
dell'esposizione:
Misura
dell'accessorio:
Dimensioni: Ca. 73 mm diam. × 98,5 mm
Peso: Ca. 355 g
Le specifiche e i disegni sono soggetti a modifica senza preavviso od obblighi
da parte del produttore.
incorporata e attacco a baionetta Nikon
(appositamente studiato per l'utilizzo con
fotocamere digitali Nikon SLR-DX)
f/3,5
14 elementi in 10 gruppi (1 elemento ED)
Da a 1:1 (dimensioni reali)
motore Silent Wave; manuale mediante ghiera di
messa a fuoco separata
Metodo di spostamento ottiche con motori voice
coil (VCM)
Graduata in metri e piedi, da 0,286 m all'infinito ( )
0,286 m dal piano focale (dimensioni reali)
9 pz. (arrotondati)
Da f/3,5 a f/32
Con metodo a tutta apertura
52 mm (P = 0,75 mm)
(estensione della flangia)
Jp
En
De
Fr
Es
Sv
Ru
Nl
It
Cz
Sk
Ck
Ch
Kr
95
Page 96

Poznámky k bezpečnému provozu
Jp
En
De
Fr
Es
Sv
Ru
Nl
It
Cz
Sk
Ck
Ch
Kr
UPOZORNĚNÍ
Zařízení nerozebírejte
Nedotýkejte se vnitřních částí fotoaparátu ani objektivu, může tak dojít
k poranění. Opravy by měl provádět pouze kvalifikovaný technik. Pokud by
v důsledku pádu či jiné nehody došlo k otevření fotoaparátu či objektivu,
odpojte produkt a/nebo z něj vyjměte baterii a odneste jej do autorizovaného
servisu Nikon, aby mohl být zkontrolován.
V případě nesprávného fungování zařízení okamžitě vypněte
Pokud byste zaznamenali, že z fotoaparátu či objektivu vychází kouř či
neobvyklý zápach, vyjměte okamžitě baterii, ale dbejte, abyste se nepopálili.
Další používání by mohlo vést ke zranění.
Po vyjmutí baterie či odpojení zdroje napájení produkt odneste do
autorizovaného servisu Nikon, aby mohl být zkontrolován.
Nepoužívejte fotoaparát ani objektiv v přítomnosti hořlavých plynů
Provozování elektronického zařízení v přítomnosti hořlavých plynů může vést
k výbuchu či požáru.
Objektivem ani hledáčkem se nedívejte na slunce
Pohled do slunce či jiného silného zdroje světla objektivem nebo hledáčkem
fotoaparátu může způsobit trvalé poškození zraku.
Zařízení uchovávejte mimo dosah dětí
Zejména je třeba zabránit tomu, aby si malé děti vkládaly baterie nebo jiné
malé součástky do úst.
Při manipulaci s fotoaparátem a objektivem dodržujte následující
opatření
• Fotoaparát a objektiv uchovávejte v suchu. V případě nedodržení tohoto
opatření může dojít k požáru či úrazu elektrickým proudem.
•
Nemanipulujte s fotoaparátem ani s objektivem a nedotýkejte se jich, máte-li
mokré ruce. V případě nedodržení tohoto opatření může dojít k úrazu
elektrickým proudem
• Při fotografování v protisvětle nemiřte objektivem přímo do slunce
a nedovolte, aby sluneční světlo procházelo přímo do objektivu, protože by
tak mohlo dojít k přehřátí fotoaparátu, případně i k požáru.
• Pokud není objektiv po delší dobu používán, nasaďte přední i zadní krytku
objektivu a uložte objektiv mimo dosah přímého slunečního světla. Pokud
byste tak neučinili, může dojít k požáru, protože objektiv může soustředit
sluneční světlo na nějaký hořlavý předmět.
.
96
Page 97

■ Názvosloví
M/A
ON
M
OFF
Jp
En
De
Fr
Es
Sv
Ru
Nl
It
A
1 Sluneční clona (str. 103)
2 Značka pro upevnění sluneční
clony (str. 103)
3 Značka aretované polohy
sluneční clony (str. 103)
4 Montážní značka sluneční
clony (str. 103)
5 Zaostřovací kroužek (str. 99)
6 Stupnice vzdáleností
7 Montážní značka (str. 99)
B
8 Gumové těsnění
upevňovacího bajonetu
objektivu (str. 104)
9 Kontakty CPU (str. 104)
0 Volič zaostřovacího režimu
(str. 99)
a Spínač redukce vibrací (str.
102)
b Měřítko zobrazení (str. 100)
c Značka pro odečítání
vzdáleností (str. 100)
( ) : odkazovaná stránka
Cz
Sk
Ck
Ch
Kr
97
Page 98

Děkujeme, že jste si zakoupili objektiv AF-S DX Micro NIKKOR 85 mm
f/3,5G ED VR. Objektivy NIKKOR DX jsou určeny speciálně pro digitální
Jp
jednooké zrcadlovky Nikon (formát Nikon DX), například pro fotoaparáty
řady D300 nebo D90. Při upevnění objektivu na fotoaparát formátu Nikon
En
DX je obrazový úhel objektivu ekvivalentní objektivu s 1,5 násobkem
ohniskové vzdálenosti na kinofilmovém fotoaparátu resp. fotoaparátu
De
formátu FX. Před použitím objektivu si pročtěte tyto pokyny a Návod
kobsluze fotoaparátu.
Fr
■ Hlavní vlastnosti
• Tento objektiv má vynikající ostrost a je vhodný pro makrosnímky,
Es
reprodukce, momentky a běžné fotografování libovolně vzdáleného
Sv
Ru
Cz
Sk
objektu.
• Tento objektiv je vybaven systémem vnitřního zaostřování Nikon
(Internal Focusing, IF), a nabízí vyváženou kresbu s ostrým zobrazením
hlavního objektu a přjemně měkkou reprodukcí neostrých míst
vpopřdí a pozadí snímku.
Nl
• Výjimečná optická výkonnost a charakteristiky reprodukce jsou
maximalizovány díky použití jednoho optického členu s extrémně
It
nízkým rozptylem světla (ED), který zajišťuje korekci barevných vad.
Irisová clona s kruhovým otvorem navíc zajišťuje příjemně měkkou
reprodukci neostrých míst obrazu mimo rovinu ostrosti.
•Na přední část objektivu lze připevnit až čtyři bezdrátově ovládané
blesky SB-R200.
Ck
Ch
Kr
98
Page 99

■ Použití objektivu
Upevnění objektivu k fotoaparátu
1 Vypněte fotoaparát.
2 Sejměte zadní krytku objektivu. (obr. B)
3 Zarovnejte montážní značku 7 na objektivu s montážní značkou na
fotoaparátu a otáčejte objektivem proti směru hodinových ručiček,
dokud nezaklapne do aretované polohy. Zkontrolujte, zda je objektiv
ve správné poloze, kdy se montážní značka 7 nachází na nejvyšším
místě objektivu.
4 Sejměte přední krytku objektivu. (obr. A)
Sejmutí objektivu z fotoaparátu
1 Vypněte fotoaparát.
2 Stiskněte a podržte tlačítko aretace bajonetu na fotoaparátu
a otáčejte objektivem po směru hodinových ručiček.
■ Zaostřování
Na fotoaparátu nastavte volič zaostřovacích režimů podle níže uvedené
tabulky:
Zaostřovací režim
fotoaparátu
AF
MF Manuální zaostřování (k dispozici je elektronický dálkoměr)
Více informací o zaostřovacích režimech fotoaparátu naleznete v Návodu
k obsluze fotoaparátu.
Autofokus s prioritou manuálního zaostření (režim M/A)
1 Nastavte volič zaostřovacích režimů 0 do polohy M/A.
2 Je aktivován autofokus, ale jeho činnost lze potlačit otočením
zaostřovacího kroužku 5 při namáčknutí tlačítka spouště do
poloviny nebo při stisknutí tlačítka AF-ON na fotoaparátech, které
jsou tímto tlačítkem vybaveny.
3 Chcete-li zrušit manuální zaostřování a vrátit se k autofokusu,
stiskněte do poloviny tlačítko spouště nebo jednou stiskněte tlačítko
AF-ON.
Volič zaostřovacích režimů objektivu
M/A M
Autofokus s prioritou
manuálního zaostření
Manuální zaostřování
(k dispozici je elektronický
dálkoměr)
Jp
En
De
Fr
Es
Sv
Ru
Nl
It
Cz
Sk
Ck
Ch
Kr
99
Page 100

■ Nastavení clony
Nastavení clony lze upravit pomocí fotoaparátu. Je-li nastaven expoziční
Jp
režim „A“ nebo „M“, upravuje fotoaparát nastavení clony tak, aby se
zachovalo stejné efektivní clonové číslo (až do rozdílu cca 1,1 EV) i při
En
změně zaostření na jinou vzdálenost.
■ Hloubka ostrosti
De
Pokud váš fotoaparát podporuje kontrolu hloubky ostrosti, lze před
fotografováním zobrazit účinek nastavení clony v hledáčku.
Tento objektiv je vybaven systémem vnitřního zaostřování (Internal
Fr
Focusing, IF). Snižováním vzdálenosti fotografování se snižuje také
ohnisková vzdálenost.
Es
■ Ostření v předem nastaveném měřítku zobrazení
Sv
Ru
Nl
Cz
Sk
(stupnice měřítek zobrazení)
Měřítko zobrazení je poměr mezi velikostí obrazu zaznamenaného na
obrazovém snímači a skutečnou velikostí objektu. Pokud je například
velikost obrazu na obrazovém snímači rovna jedné pětině skutečné
velikosti objektu, pak je měřítko zobrazení 1:5.
Chcete-li fotografovat v předem nastaveném měřítku zobrazení,
postupujte takto:
1 Ručně nastavte zaostřovací kroužek tak, aby se hodnota
It
požadovaného měřítka zobrazení objevila proti značce pro
odečítání zaostřené vzdálenosti c.
2 Zaměřte fotografovaný objekt a poté přibližováním fotoaparátu
k objektu/vzdalováním fotoaparátu od objektu nastavte přístroj do
takové vzdálenosti, kdy vidíte fotografovaný objekt ostře zobrazený
v hledáčku.
■ Poznámky k pořizování makrosnímků a vytváření
Ck
Ch
Kr
reprodukcí
Chvění fotoaparátu
Tento objektiv nabízí tak vysoké zvětšení obrazu, Ce sebemenší pohyb
během fotografování může způsobit rozmazání obrazu. Proto
doporučujeme používat stativ a kabelovou spoušť, abyste zabránili
chvění fotoaparátu.
Nízká pracovní vzdálenost
Při vysokých měřítcích zobrazení používaných při pořizování
makrosnímků je hloubka ostrosti velmi malá. Abyste zajistili dostatečnou
hloubku ostrosti, použijte vyšší zaclonění, prodlužte dobu expozice
a opatrně fotoaparát nastavte tak, aby nejdůležitější část objektu ležela
rovnoběžně s povrchem obrazového snímače.
100
 Loading...