


Dec. 3, 2013
Trademarks: NewTek, TriCaster, TriCaster XD, TriCaster 8000, TriCaster TCXD8000, TCXD8000, TriCaster 860, TriCaster TCXD860, TCXD860, TriCaster 460, TriCaster TCXD460, TCXD460, TriCaster 410, TriCaster TCXD410, TCXD410, TriCaster 40, TriCaster TCXD40, TCXD40, TriCaster 855, TriCaster TCXD855, TCXD855, TriCaster 455, TriCaster TCXD455, TCXD455, TriCaster EXTREME, TriCaster 850 EXTREME, TriCaster TCXD850 EXTREME, TCXD850 EXTREME, TriCaster 450 EXTREME, TriCaster TCXD450 EXTREME, TCXD450 EXTREME, TriCaster 850, TriCaster TCXD850, TCXD850, TriCaster 450, TriCaster TCXD450, TCXD450, TriCaster 300, TriCaster TCXD300, TCXD300, TriCaster PRO, TriCaster STUDIO, TriCaster BROADCAST, TriCaster DUO, 3PLAY, 3Play, 3Play 4800, 3PXD4800, 3Play 820, 3PXD820, 3Play 425, 3PXD425 3Play 330, 3PXD330, ProTek, ProTek Care, ProTek Elite, iVGA, SpeedEDIT, IsoCorder, LiveText, DataLink, LiveSet, TriCaster Virtual Set Editor, TriCaster VSE, LiveMatte, TimeWarp, VT, VT[3], VT[4], V[T5], Video Toaster, Toaster, Inspire 3D, 3D Arsenal, Aura, LightWave, LightWave 3D and LightWave CORE are trademarks, service marks, and registered trademarks of NewTek. All other brand names, product names, or trademarks belong to their respective holders.

TABLE OF CONTENTS |
|
ABOUT THIS MANUAL .................................................................................................................................... |
5 |
CHAPTER 1 INSTALLATION AND ACTIVATION .................................................................................................. |
7 |
SECTION 1.1 WELCOME....................................................................................................................................... |
7 |
SECTION 1.2 SYSTEM REQUIREMENTS ..................................................................................................................... |
7 |
SECTION 1.3 INSTALLATION .................................................................................................................................. |
8 |
1.3.1 GETTING READY..................................................................................................................................................... |
8 |
1.3.2 INSTALLATION STEPS............................................................................................................................................... |
8 |
1.3.3 VIRTUAL SET EDITOR LAUNCH ............................................................................................................................... |
10 |
1.3.4 REGISTRATION .................................................................................................................................................... |
10 |
CHAPTER 2 VSE WALKTHROUGH................................................................................................................... |
13 |
SECTION 2.1 FIRST STEPS ................................................................................................................................... |
13 |
SECTION 2.2 THE STARTUP WIZARD ..................................................................................................................... |
13 |
SECTION 2.3 VSE DESKTOP TOUR ........................................................................................................................ |
14 |
CHAPTER 3 FEATURES AND CONTROLS ......................................................................................................... |
25 |
SECTION 3.1 STARTUP WIZARD ........................................................................................................................... |
25 |
SECTION 3.2 MENUS ........................................................................................................................................ |
26 |
3.2.1 FILE................................................................................................................................................................... |
26 |
3.2.2 VIEW................................................................................................................................................................. |
28 |
3.2.3 HELP ................................................................................................................................................................. |
28 |
SECTION 3.3 ANGLE BIN .................................................................................................................................... |
28 |
SECTION 3.4 CONTROL STACK ............................................................................................................................. |
29 |
3.4.1 ITEM HEADERS.................................................................................................................................................... |
29 |
3.4.2 POSITION, SCALE, AND ROTATION.......................................................................................................................... |
30 |
3.4.3 PROC AMP......................................................................................................................................................... |
31 |
3.4.4 STYLE ................................................................................................................................................................ |
32 |
SECTION 3.5 ANIMATION CONTROLS .................................................................................................................... |
32 |
SECTION 3.6 VIRTUAL SET CANVAS ...................................................................................................................... |
32 |
SECTION 3.7 IMPORTING PHOTOSHOP® FILES ......................................................................................................... |
33 |
3.7.1 FILE REQUIREMENTS ............................................................................................................................................ |
34 |
3.7.2 INPUT LAYERS ..................................................................................................................................................... |
34 |
SECTION 3.8 HOLOGRAPHIC LIVESETS ................................................................................................................... |
38 |
3.8.1 PANORAMIC BACKGROUND IMAGES........................................................................................................................ |
39 |
A HOW DO I … ? ........................................................................................................................................ |
45 |
|
Page | i |

A.1 |
VIRTUAL SETS......................................................................................................................................... |
45 |
A.1.1 ADD MORE VIRTUAL SET PRESETS?...................................................................................................................... |
45 |
|
A.1.2 CREATE A COMPLETELY CUSTOM VIRTUAL SET? ..................................................................................................... |
45 |
|
A.2 |
FILE MANAGEMENT ................................................................................................................................. |
46 |
A.2.1 LOCATE MY NEW VIRTUAL SETS IN TRICASTER’S LIVE DESKTOP?............................................................................... |
46 |
|
A.2.2 ORGANIZE VIRTUAL SETS IN CUSTOM LOCATIONS?................................................................................................. |
46 |
|
A.2.3 DELETE UNWANTED VIRTUAL SETS?..................................................................................................................... |
46 |
|
B |
KEYSTROKE SHORTCUTS ......................................................................................................................... |
47 |
B.1 |
MENU OPERATIONS ................................................................................................................................. |
47 |
B.2 |
VIRTUAL SET CANVAS ............................................................................................................................... |
47 |
B.3 |
CONTROL STACK...................................................................................................................................... |
47 |
B.4 |
ANIMATION CONTROL .............................................................................................................................. |
47 |
C |
VERSION NOTES ..................................................................................................................................... |
49 |
D |
INDEX .................................................................................................................................................... |
51 |
CREDITS....................................................................................................................................................... |
52 |
|
ii

PART I (GETTING STARTED)
Introducing Virtual Set Editor – installation and registration, a top-level overview of primary features, and a hands-on tour to get you started.
Page | 3

ABOUT THIS MANUAL
Virtual Set Editor 2.5 provides new and important capabilities, and for the first time, is available as a standalone application for use on an external workstation or even a laptop.
This manual provides basic information you need to begin working with Virtual Set Editor in the introductory Walkthrough section, and goes on to provide a comprehensive reference section you can turn to when you need finer detail.
Please take a moment to peruse this section, which explains the manual’s organization.
Part I – Getting Started: An introduction to Virtual Set Editor – a brisk jog through fundamentals, including installation and registration, along with a feature walkthrough. If you’re a quick study, Getting Started may provide all you really need.
Part II – Reference: This section covers the finer details of Virtual Set Editor – for those who need it, and those who just like to know everything.
Part III – Appendices: Appendix B lists all shortcut keys. Part III is also home to a question and answer section (“How Do I … ?”) and comprehensive keyword index.
Page | 5
CHAPTER 1 INSTALLATION AND ACTIVATION
This chapter explains how to properly install your new software, whether for integration and use within TriCaster or for standalone operation.
It also reviews registration for warranty, updates and technical support, and product activation. After completing this short section, you’ll be all set to continue into the Walkthrough chapter that follows it.
SECTION 1.1 WELCOME
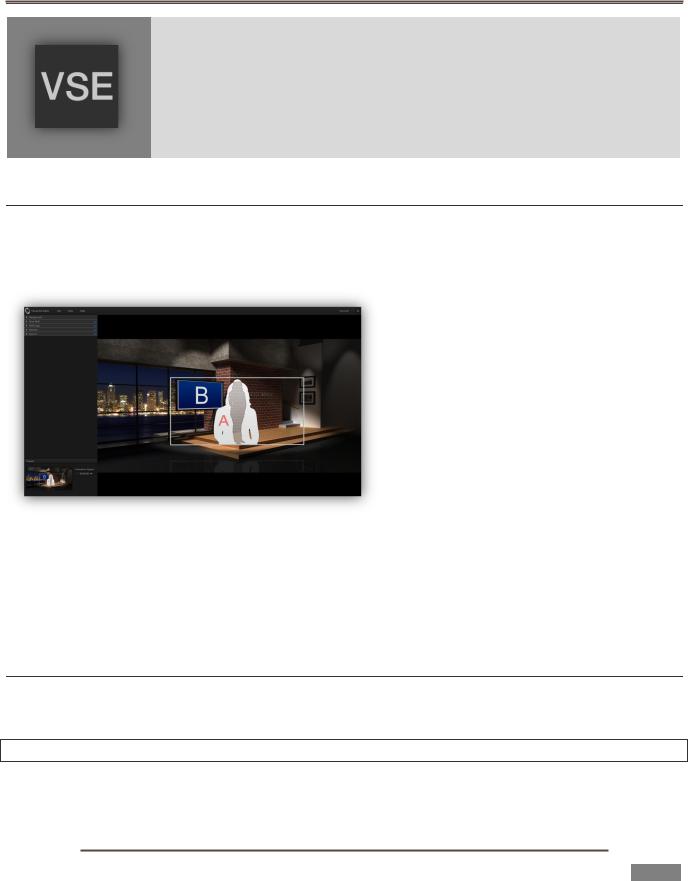
NewTek TriCaster comes with ‘network-class’ virtual sets developed using proprietary NewTek LiveSet™ technology. Virtual Set Editor (VSE) enables XD series TriCaster users to customize included high definition (HD) live virtual sets, and can also be used for compiling original LiveSets on suitable standalone
systems.
Decorate virtual sets with custom logos, modify color schemes, furniture options, create custom start and end points for zooms, adjust placement and scale for video inputs, and even create brand new sets from custom graphics files.
Controls such as position, scale, rotation, color correction (brightness, hue, contrast and saturation), and the Media Browser will be immediately familiar to TriCaster users.
FIGURE 1
Once a TriCaster virtual set has been customized, you can easily export it for immediate use in live production. NewTek Virtual Set Editor permits schools, broadcasters and independent producers to personalize their productions – easily and affordably.
SECTION 1.2 SYSTEM REQUIREMENTS
VSE 2.5 can be installed on a on a standalone Windows® workstation, or on any HD-capable NewTek TriCaster model.
Hint: You should always check for TriCaster software updates prior to installing new Add-ons.
Standalone system requirements are as follows:
DirectX 11 NVidia GPU with 1GB graphics memory or better
Page | 7

1280x800 display
4 GB RAM or better
64bit Windows® Vista or Windows 7® Operating system
5GB free hard drive space
Important Note: The VSE 2 installer also includes Animation Store Creator. TriCaster models without Animation Store transition support will not list ASC in their Add-Ons links.
SECTION 1.3 INSTALLATION
To begin, let’s review ‘what came in the box’:
USB key
Installation instruction card (insert).
1.3.1GETTING READY
1.Power up the system you intend to install VSE on (whether a TriCaster or suitable Windows PC).
2.For a TriCaster setup:
a.Select the Shut Down icon on the icon ring in the TriCaster Startup Screen’s Home page.
b.Click the Exit to Windows link at right.
c.Click the Exit to Windows button in the confirmation dialog that opens next.
(At this point, the TriCaster Startup Screen exits, and you are taken to the Microsoft
Windows™ Desktop.)
3.Insert the VSE thumb drive into an unused USB port.
1.3.2INSTALLATION STEPS
Important Note: The VSE installer validates system display capabilities. It will decline to install the software when the display hardware of the target system is inadequate.
Power saving modes on some systems may automatically disable more powerful display hardware when the display can run under reduced load, using motherboard graphics chipsets instead. In such cases VSE installation may fail, since the more powerful hardware is not detected. You may be able to adjust the system’s graphics card preferences to sidestep this problem,
(For example, for some nVidia gpus – open the graphics card driver control applet, select “Manage3D settings”, and choose “high-performance NVIDIA processor” as the “Preferred Graphics processor”.)
4.Click the Windows Start Menu icon at lower left on the Windows® Desktop, and select the Computer button (to open a system file explorer).
5.Double-click the icon for the VSE USB thumb drive to open a file window.
6.Run the installer application by double-clicking the VSE Setup.exe icon.
Page | 8
(On launch, the installer presents various dialogs to ask you to accept the end user license agreement, and other information as it proceeds.)
7.Click Next in the introductory dialog to begin the installation process (Figure 2).
8.Read the License Agreement in the following dialog, and then select I accept the agreement and click the Next button to continue.
9.The following pane presents the VSE readme, which contains version notes for your software. (Some people memorize these to impress their family and friends, but this is not mandatory.) Click Next when you are ready to continue.
FIGURE 2 |
FIGURE 3 |
10.The installer will now set up VSE on your system. A progress gauge is shown during installation (Figure 3).
FIGURE 4
11. A final dialog announces successful completion of the installation process.
Page | 9
1.3.3 VIRTUAL SET EDITOR LAUNCH
TRICASTER
12. After installation, the TriCaster Startup Screen will automatically appear.
FIGURE 5
13.The icon ring on the Home page now displays an Add-Ons icon – select this icon, and click the Virtual Set Editor link at right (Figure 5).
STANDALONE
12.By default, a VSE icon is shown on the Windows® Desktop after installation.
13.Double-click this icon to launch VSE (or use the Windows® Start menu to do so).
1.3.4REGISTRATION
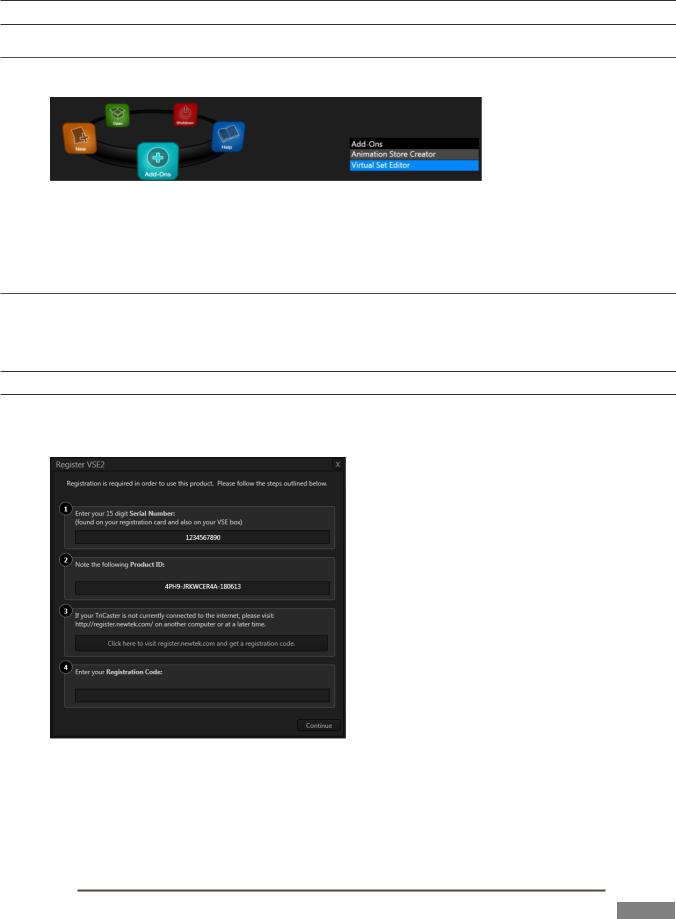
14.On first launch (and subsequent launches until registration and activation are complete) the registration dialog is shown (Figure 6).
FIGURE 6
15.If the host system is connected to Internet, you can click the “Click here …” button to perform your
VSE registration online.
Page | 10

16.Otherwise, note the Product ID shown in this panel, and visit the registration web page (as shown in Step 2) to register your software and receive your unlock code.
17.Click Continue to display the VSE desktop.
Note: Virtual sets can be created before registering and activating VSE, but display a watermark. To remove it, simply re-open the project after activating the software, and then re-save.
Page | 11

CHAPTER 2 VSE WALKTHROUGH
This chapter provides a quick hands-on tour of the major components and functions of Virtual Set Editor. In a very short time, its features and use will be second nature to you.
More detailed reference material on all aspects of VSE follows in Part II (Reference).
Having installed VSE in the previous chapter, we’re ready for a little cruise through its highlights.
SECTION 2.1 FIRST STEPS
As Chapter 1 closed, VSE was installed, registered, and activated. Even without those last two steps, you can continue to use VSE throughout the 14 day registration grace period. Note, though, that virtual sets created before activation display a watermark. To remove it, simply re-open the project after activating the software, and then re-save.
1.Launch the Virtual Set Editor, either from the link displayed at right when you click the Add-Ons icon on TriCaster’s Startup page, or using the icon on your Windows® Desktop for standalone installations.
SECTION 2.2 THE STARTUP WIZARD
The first thing you will see on launching VSE is the Startup Wizard (Figure 7). This convenient panel makes it a breeze to create a new virtual set project, or pick up where you left off on a recent project.
FIGURE 7
Page | 13
The Startup Wizard has two bins. The left-hand one is named Open Recent. Eventually, it will display icons for projects you have opened previously. Initially though, it is empty – apart from Browse and Import Photoshop® folder icons (both discussed later).
The right-hand pane is labeled New Project, and shows thumbnail icons for all installed virtual set presets. Each preset contains numerous modifiable and optional elements.
2. Click the icon for the City Loft virtual set preset.
FIGURE 8
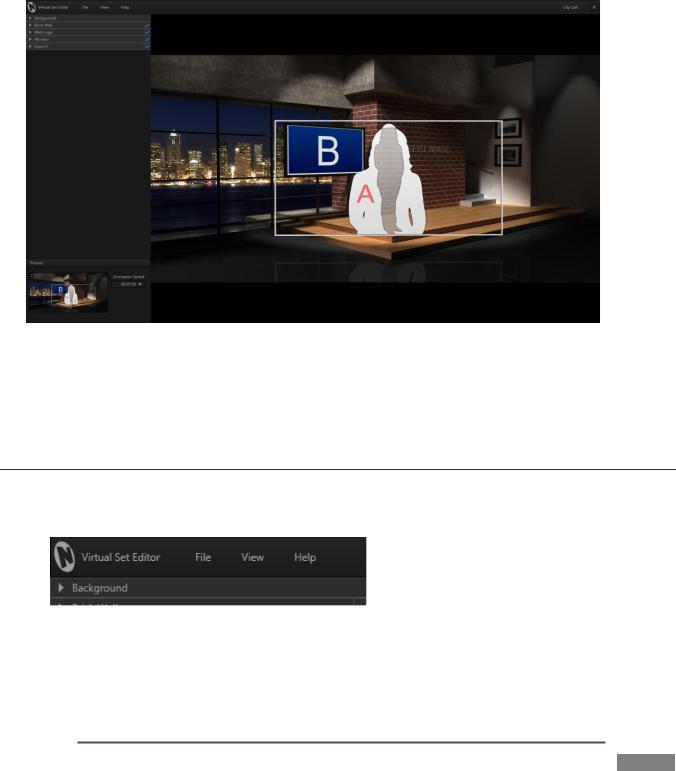
A progress gauge is shown as the various elements constituting the selected preset are loaded. In just a few moments, the default City Loft set is shown on the large Virtual Set Canvas that consumes the biggest part of the VSE Desktop (Figure 8).
SECTION 2.3 VSE DESKTOP TOUR
3.Stop and take a look around the VSE Desktop. The dominant feature is the Virtual Set Canvas, which is a large interactive preview pane – but take note, too, of the following additional details:
FIGURE 9
4. You will find the File, View and Help menus (Figure 9) at upper-left on the VSE Desktop.
Page | 14
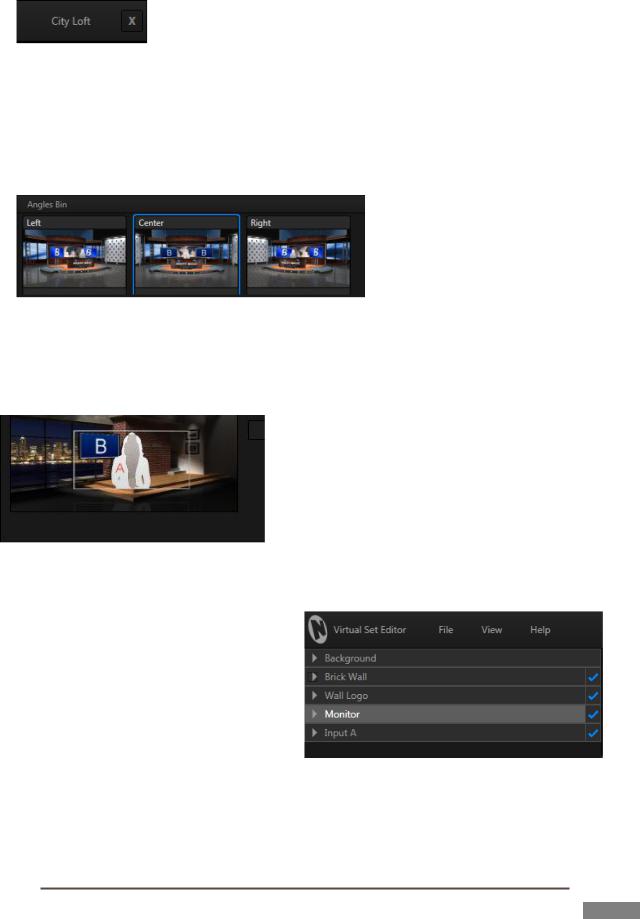
FIGURE 10
5.The current VSE project is identified at the opposite end of the titlebar, next to the [x] button (Exit). Initially, this is simply the name of the preset you opened.
6.Clicking Exit returns you to the Home page of TriCaster’s Startup Screen (or Windows® Desktop), after first prompting you to Save your project (when appropriate).
FIGURE 11
7.Figure 11 shows the Angles Bin (displaying the ‘Demo Studio’ project), located in the VSE Desktop footer (beneath the large Virtual Set Canvas). When a project includes multiple angles, icons in this bin let you select which one (such as Left, Center, Right, and so-on) you are working with.
8.The Presets control group is located at left in the Desktop footer (Figure 12). These controls allow you to set custom Shot positions, effectively LiveSet zoom/pan presets. (Clicking the thumbnail opens the
Shot selector.
FIGURE 12
TriCaster™ Version 2 and standalone installations support 8 different shots; other models may show less.
9.The Control Stack (Figure 13) occupies a column on the left side of the VSE Desktop. This pane shows a labeled header row for each and every editable item in the currently loaded project.
Every header row, in turn, has a triangular |
|
gadget at left, which you can click to expand or |
|
collapse the controls for each item. |
FIGURE 13 |
|
10.Go ahead and click this triangle in the Monitor control header. Observe that the control group expands to reveal a bevy of adjustable settings.
11.Click a Monitor expand/contract triangle again to close the group.
Page | 15
 Loading...