


 Loading...
configu
NewTek Spark Plus™ IO
3G-SDI & HDMI
NDI ® Encoder/Decoder
Operating Instructions
Revised – April 27, 2020
Trademarks: NewTek, NewTek VMC, NewTek VMC1, NewTek VMC1 IN, NewTek VMC1 OUT, NewTek NC1, NewTek NC1 IN, NewTek NC1 I/O, NewTek NC1 I/O IP, TriCaster, TriCasterTC1, TriCaster Advanced Edition, TriCaster XD, TriCaster8000, TriCaster TCXD8000, TCXD8000, TriCaster 860, TriCaster TCXD860, TCXD860, TriCaster 460, TriCaster TCXD460, TCXD460, TriCaster 410, TriCaster TCXD410, TCXD410,
TriCaster Mini SDI, TriCaster Mini, TriCaster TC Mini, TriCaster40, TriCaster TCXD40, TCXD40, TriCaster 855, TriCaster TCXD855, TCXD855, TriCaster 455, TriCaster TCXD455, TCXD455, TriCaster EXTREME, TriCaster 850 EXTREME, TriCaster TCXD850 EXTREME, TCXD850
EXTREME, TriCaster 450 EXTREME, TriCaster TCXD450 EXTREME, TCXD450 EXTREME, TriCaster 850, TriCaster TCXD850, TCXD850, TriCaster 450, TriCaster TCXD450, TCXD450, TriCaster 300, TriCaster TCXD300, TCXD300, TriCaster PRO, TriCaster STUDIO, TriCaster BROADCAST, TriCaster DUO, MediaDS, MDS1, 3PLAY, 3Play, 3Play 3P1, 3Play 4800, 3PXD4800, 3Play 440, 3PXD440, 3Play Mini, 3Play 820, 3PXD820, 3Play 425, 3PXD425 3Play 330, 3PXD330, TalkShow, TalkShow VS 4000, TalkShow VS100, Network Device Interface, NDI, NewTek Connect, NewTek Spark, NewTek Connect Spark, NewTek Connect Spark Plus, NewTek Spark Pro, NewTek IsoCorder, ProTek, ProTek Care, ProTek Elite, iVGA, SpeedEDIT, IsoCorder, LiveText, LiveGraphics Creator, LiveGraphics, Live Story Creator, DataLink, LiveSet,
LiveGraphics, TriCaster Virtual Set Editor, Virtual Set Editor Advanced Edition, TriCaster VSE, TriCaster VSE Advanced Edition, LiveMatte, TimeWarp, VT, VT[3], VT[4], V[T5], Video Toaster, Toaster, Inspire 3D, 3D Arsenal, Aura, LightWave, LightWave 3D and LightWave CORE are
trademarks, service marks, and registered trademarks of NewTek. All other brand names, product names, or trademarks belong to their respective holders.

Section 1 TABLE OF CONTENTS
SECTION 1 INTRODUCTION AND SETUP |
..................................................................................................... 4 |
|
1.1 |
Overview..................................................................................................................................................................................................... |
4 |
1.2 |
Getting Ready ............................................................................................................................................................................................ |
6 |
1.3 |
Making Connections ................................................................................................................................................................................. |
6 |
1.3.2 Studio Monitor .................................................................................................................................................................................. |
8 |
|
1.3.3 Logging In ......................................................................................................................................................................................... |
10 |
|
1.3.4 Audio/Video Settings ..................................................................................................................................................................... |
10 |
|
1.3.5 Utilities.............................................................................................................................................................................................. |
12 |
|
1.3.6 Device Details .................................................................................................................................................................................. |
12 |
|
1.3.7 Device and Channel Name ............................................................................................................................................................ |
12 |
|
1.3.8 Audio................................................................................................................................................................................................. |
13 |
|
1.4 |
Network Settings ..................................................................................................................................................................................... |
13 |
1.4.1 NDI Connection ............................................................................................................................................................................... |
13 |
|
1.4.2 Ethernet............................................................................................................................................................................................ |
15 |
|
1.4.3 Local-Link (Failsafe) ........................................................................................................................................................................ |
15 |
|
1.4.4 NDI Decoding Configuration ......................................................................................................................................................... |
16 |
|
1.4.5 Output of NDI Decoding ................................................................................................................................................................ |
17 |
|
1.4.6 Decoding Parameter Settings ....................................................................................................................................................... |
18 |
|
1.5 |
Tally............................................................................................................................................................................................................ |
19 |
CREDITS AND TRADEMARKS..................................................................................................................... |
20 |
|
Trademarks ..................................................................................................................................................................................................... |
20 |
|
Section 1 INTRODUCTION AND SETUP
This guide explains how to connect power, sources and audio-visual sources to your NewTek Spark Plus IO. It also explains how to update, and where you can find additional NDI® softwareto extend your workflow. After completingthis section, you’ll be ready to begin using your device.
|
1.1 OVERVIEW |
Thank you for purchasing this NewTek™ product. NewTek is extremely proud of its record of innovation, |
|
and its commitment to excellence in design, manufacture, and superb product support. |
|
NewTek provides someof the most advancedlive productiontools available anywhere, and we are confident |
|
you will findthem exceptionally powerful and versatile. Your NewTek input moduledelivers a huge amount |
|
of functionality in a compact package. Prosumers and video professionals alike will appreciate the |
|
convenienceand flexibility it provides in connectionwith both video production and capture. |
|
Unlike typical encoders and capture card systems, your NewTek Spark Plus™ IO leverages NewTek’s |
|
NDI-based IP workflow, supported by leading video software and hardware developers around the globe. |
|
This manual will assist you to install and configure your new device. First let’s go over product highlights |
|
from both models: |
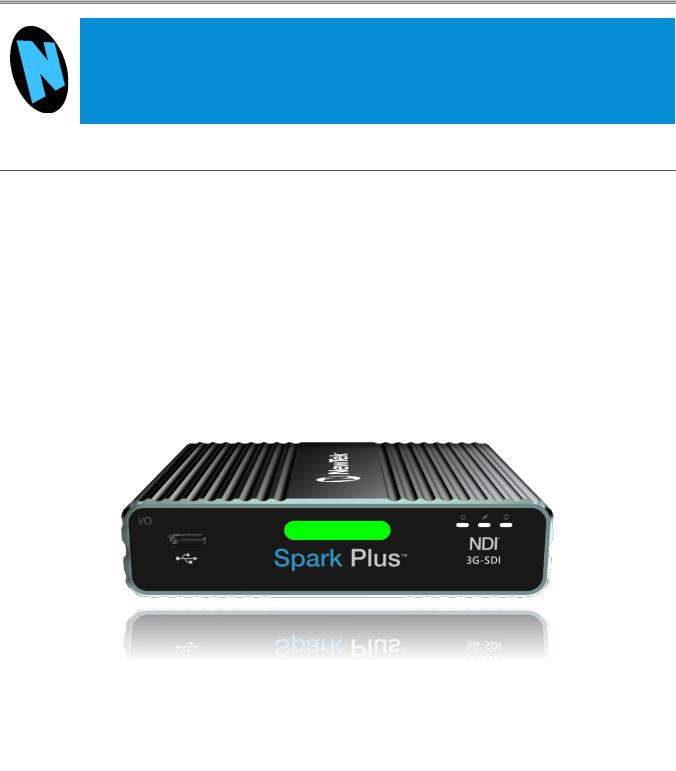
Spark Plus IO 3G-SDI |
|
™ |
FIGURE 1
Spark Plus IO 3G-SDI not only converts 3G-SDI Video to NDI® (Encoding) but also converts NDI to 3G-SDI (Decoding). It supports up to 1080/60 video input (Encoder) or up to 1080/60 video output (Decoder).
It features an 3G-SDI input and 3G-SDI loop through for view on the monitor while NDI streaming, or 3G-SDI output while decoding. It also includes 3G-SDI video input/output with embedded audio - Figure 1.
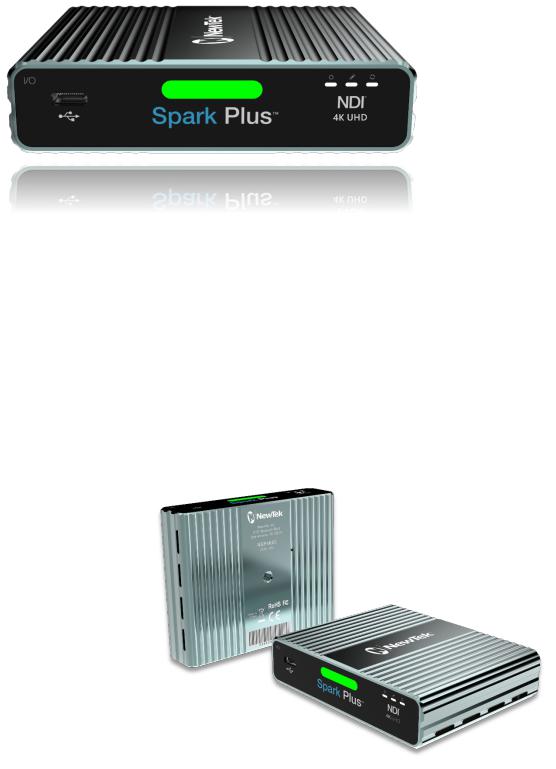
Spark Plus™ IO HDMI
FIGURE 2
Spark Plus IO HMDI converts 4K UHD HDMI Video to NDI® (Encoding) and converts NDI to 4K UHD HDMI (Decoding). It supports up to UHD 4K/60 video input (Encoder) or up to 4K/60 video output (Decoder). It features an HDMI input and HDMI loop through for view on the monitor while NDI streaming, or HDMI output while decoding. It also includes HDMI video input/output with embedded audio - Figure 2.
|
Included in Spark Plus IO 3G-SDI and |
|
Spark Plus IO HDMI |
•• |
Bi-directional conversion |
• |
Built-in tally light |
• |
3.55mm audio input |
• |
1GbE port with PoE support |
• |
Threaded screw camera mount |
|
DC 5V-18V power supply |

1.2 GETTING READY
Your NewTek Spark Plus™ uses the NDI® protocol for audio/video transmission, and more. Your first step will be to install a few NDI utilities appropriate for your computer platform or device:
Navigate to https://www.ndi.tv/tools/in your web
1. browser, and follow directions to download and install the NewTek NDI Tools pack, available at no cost.
NDI Toolsprovides a very valuable array of practical NDI learning tools and utilities, including NewTek’s NDI Studio Monitor, which will not only locate and display the network video output from your Spark Plus unit, but also makes it easy access to its settings.
Spark Plus IO 3G-SDI Back Panel |
|
1. |
1GbE port with PoE |
2. |
Support |
SDI Input |
|
3. |
SDI Output |
4. |
3.5mm Audio |
5. |
USB-C |
FIGURE 3
Spark Plus IO HDMI Back Panel 1. 1GbE port with PoE
Support
2. HDMI Output
3. HDMI Input
4. 3.5mm Audio
5. USB-C
6. Tally
FIGURE 4
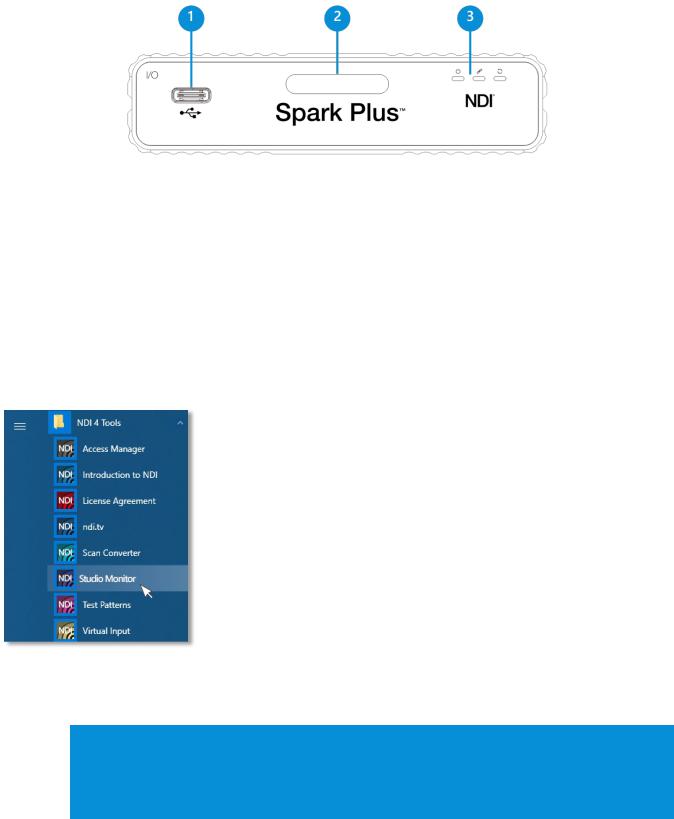
Spark Plus IO Front Panel
|
FIGURE 5 |
2. Tally |
3. Status Indicator |
1. |
1. Type-C Extension |
||
Supply power supply to the unit, by connecting the supplied power adapter to Spark’s USB-C port, |
|||
|
located beside the audio input connector. The unit boots as soon as power is supplied. At this point, |
||
|
the 3 small LED Status Indicator lights will illuminate. (If this does not happen, check your |
||
2. |
connections and retry.) |
|
|
Continue to connect one end of a network cable to Spark’s RJ-45 Ethernet port. |
|||
3. |
Connect the other end of the cable to your network switch or router. |
||
4. |
Optional steps: |
|
|
a. Connect an HDMI video cable from a suitable video source to Spark’s HDMI input connector.
b. If you wish, connect an analog audio source to the 6.35mm stereo audio input.
If you connecteda video source in step 4 above, your Spark Plus is already sending NDI audio and video to your local network. We’ll talk about how to access and use it soon, but first let’s discuss how to access Spark’s settings and features.
FIGURE 6
Hint: In ‘mission’ critical installations, it is wise to use an uninterruptable power supply (UPS). Likewise, consider A/C “power conditioning”, especially in situations where local power is unreliable or ‘noisy’. Surge protection is especially important in some locales. Power conditioners can reduce wear on power supplies and other electronics, and provide a further measure of protection from surges, spikes, lightning and high voltage
Loading...