


Revised – April 26, 2015
Trademarks: NewTek, TriCaster, TriCaster XD, TriCaster 8000, TriCaster TCXD8000, TCXD8000, TriCaster 860, TriCaster TCXD860, TCXD860, TriCaster 460, TriCaster TCXD460, TCXD460, TriCaster 410, TriCaster TCXD410, TCXD410, TriCaster Mini, TriCaster 40, TriCaster TCXD40, TCXD40, TriCaster 855, TriCaster TCXD855, TCXD855, TriCaster 455, TriCaster TCXD455, TCXD455, TriCaster EXTREME, TriCaster 850 EXTREME, TriCaster TCXD850 EXTREME, TCXD850 EXTREME, TriCaster 450 EXTREME, TriCaster TCXD450 EXTREME, TCXD450 EXTREME, TriCaster 850, TriCaster TCXD850, TCXD850, TriCaster 450, TriCaster TCXD450, TCXD450, TriCaster 300, TriCaster TCXD300, TCXD300, TriCaster PRO, TriCaster STUDIO, TriCaster BROADCAST, TriCaster DUO, 3PLAY, 3Play, 3Play 4800, 3PXD4800, 3Play 440, 3PXD440, 3Play 820, 3PXD820, 3Play Mini, 3Play 425, 3PXD425 3Play 330, 3PXD330, TalkShow, TalkShow VS100, ProTek, ProTek Care, ProTek Elite, iVGA, SpeedEDIT, IsoCorder, LiveText, DataLink, LiveSet, TriCaster Virtual Set Editor, TriCaster VSE, LiveMatte, TimeWarp, VT, VT[3], VT[4], V[T5], Video Toaster, Toaster, Inspire 3D, 3D Arsenal, Aura, LightWave, LightWave 3D and LightWave CORE are trademarks, service marks, and registered trademarks of NewTek. All other brand names, product names, or trademarks belong to their respective holders.

VERSION 2.2
.

TABLE OF CONTENTS
1 |
INTRODUCTION..................................................................................................... |
1 |
|
1.1.1 |
Manual Organization .................................................................................................... |
1 |
|
2 |
GETTING STARTED .............................................................................................. |
3 |
|
2.1 |
System Requirements ..................................................................................................... |
3 |
|
2.2 |
Installing LiveText™......................................................................................................... |
3 |
|
2.2.1 |
Step 1 ............................................................................................................................ |
4 |
|
2.2.2 |
Step 2 ............................................................................................................................ |
4 |
|
2.2.3 |
Step 3 ............................................................................................................................ |
5 |
|
2.2.4 |
Step 4 ............................................................................................................................ |
5 |
|
2.2.5 |
Step 5 ............................................................................................................................ |
6 |
|
2.2.6 |
Step 6 ............................................................................................................................ |
6 |
|
2.3 |
Making the Connection ................................................................................................... |
7 |
|
2.4 |
A Simple Example............................................................................................................ |
8 |
|
2.5 |
Using Page Templates ................................................................................................... |
12 |
|
3 |
TITLING TOOLS................................................................................................... |
15 |
|
3.1 |
LiveText Overview......................................................................................................... |
15 |
|
3.2 |
Output Aspect (4:3 or 16:9?) ......................................................................................... |
16 |
|
3.3 |
Project Page Management ............................................................................................ |
16 |
|
3.3.1 |
The Pages Panel .......................................................................................................... |
17 |
|
3.4 |
File Menu ...................................................................................................................... |
18 |
|
3.5 |
The Tool Panel............................................................................................................... |
19 |
|
|
|
|
i |
3.5.1 |
Text and Drawing ........................................................................................................ |
19 |
|
3.5.2 |
Alignment.................................................................................................................... |
22 |
|
3.6 |
The Motion Panel.......................................................................................................... |
24 |
|
3.6.1 |
Speed Control ............................................................................................................. |
24 |
|
3.6.2 |
End Behavior............................................................................................................... |
25 |
|
3.7 |
Control Panel Tabs ........................................................................................................ |
25 |
|
3.7.1 |
View ............................................................................................................................ |
25 |
|
3.7.2 |
Text and Drawing ........................................................................................................ |
27 |
|
3.7.3 |
The Color Tab .............................................................................................................. |
29 |
|
3.7.4 |
The Style Tab............................................................................................................... |
31 |
|
3.7.5 |
The Filebin................................................................................................................... |
32 |
|
3.7.6 |
The Layers Tab ............................................................................................................ |
32 |
|
3.8 Options and Keyboard Control ......................................................................................35
4 |
DATALINK™ AND LIVETIME™........................................................................ |
37 |
|
4.1 |
Datalink Overview......................................................................................................... |
38 |
|
4.1.1 |
Key Names and Title Pages ......................................................................................... |
38 |
|
4.1.2 |
The DataLink Profile.................................................................................................... |
39 |
|
4.1.3 |
TXT Linker.................................................................................................................... |
39 |
|
4.1.4 |
Database Linker .......................................................................................................... |
39 |
|
4.1.5 |
Network Linker............................................................................................................ |
39 |
|
4.1.6 |
Serial Linker................................................................................................................. |
40 |
|
4.2 |
Working With Keys and Values ..................................................................................... |
40 |
|
4.2.1 |
TXT Linker.................................................................................................................... |
40 |
|
4.3 |
Connecting External Devices ......................................................................................... |
44 |
|
4.3.1 |
USB-Serial Adapters .................................................................................................... |
44 |
|
4.3.2 |
Find the COM Port ...................................................................................................... |
45 |
|
4.4 |
Configuring DataLink ..................................................................................................... |
47 |
|
4.4.1 |
Creating a DataLink Profile.......................................................................................... |
47 |
|
ii
4.4.2 |
Network Feed (RSS) Settings....................................................................................... |
48 |
|
4.4.3 |
Database Setup ........................................................................................................... |
48 |
|
4.4.4 |
Serial (Scoreboard) Setup ........................................................................................... |
50 |
|
4.4.5 |
Applying a Datalink Profile.......................................................................................... |
51 |
|
4.5 |
Control Keys.................................................................................................................. |
51 |
|
4.5.1 |
Page Control Keys ....................................................................................................... |
51 |
|
4.5.2 |
Image Control Keys ..................................................................................................... |
51 |
|
4.6 |
LiveTime™ ..................................................................................................................... |
52 |
|
5 LIVE PRODUCTION AND FILE MANAGEMENT .......................................... |
53 |
||
5.1 |
Live Display ................................................................................................................... |
53 |
|
5.2 |
File Exports.................................................................................................................... |
55 |
|
5.2.1 |
File Menu .................................................................................................................... |
55 |
|
5.3 |
Filebin Features............................................................................................................. |
58 |
|
5.4 |
Stand-In Images ............................................................................................................ |
62 |
|
6 APPENDIX A – KEYBOARD SHORTCUTS..................................................... |
63 |
||
7 APPENDIX B – KEY LIST BY DEVICE............................................................. |
71 |
||
7.1 |
Daktronics..................................................................................................................... |
71 |
|
7.1.1 |
Baseball....................................................................................................................... |
71 |
|
7.1.2 |
Basketball.................................................................................................................... |
71 |
|
7.1.3 |
Football ....................................................................................................................... |
72 |
|
7.1.4 |
Hockey ........................................................................................................................ |
73 |
|
7.1.5 |
Soccer.......................................................................................................................... |
74 |
|
7.1.6 |
Volleyball .................................................................................................................... |
74 |
|
7.2 |
DSI Keys: ....................................................................................................................... |
75 |
|
iii
7.3 |
Daktronics CG................................................................................................................ |
75 |
|
7.3.1 |
Basketball ................................................................................................................... |
78 |
|
7.3.2 |
Football ....................................................................................................................... |
79 |
|
7.3.3 |
Hockey ........................................................................................................................ |
80 |
|
7.3.4 |
Soccer ......................................................................................................................... |
81 |
|
7.3.5 |
Volleyball .................................................................................................................... |
82 |
|
7.4 |
OES |
................................................................................................................................ |
83 |
7.4.1 |
Basketball .................................................................................................................... |
83 |
|
7.5 |
Translux ...........................................................................................................Fairplay |
84 |
|
7.5.1 ....................................................................................................................... |
Football |
84 |
|
7.6 |
Whiteway...................................................................................................................... |
84 |
|
7.6.1 .................................................................................................................... |
Basketball |
84 |
|
7.7 |
Whiteway .......................................................................................................Rainbow |
85 |
|
7.7.1 .................................................................................................................... |
Basketball |
85 |
|
8 |
APPENDIX C – NETWORKING NOTES .......................................................... |
87 |
8.1 |
Ping is Your Friend......................................................................................................... |
87 |
9 |
INDEX..................................................................................................................... |
91 |
10 |
CREDITS............................................................................................................. |
94 |
iv

1 INTRODUCTION
Installed on a ‘satellite’ workstation (or laptop), LiveText greatly extends the live production environment, providing a new level of creativity, confidence, and professionalism!
Users of compatible live production systems (like NewTek’s famous TriCaster™ family) are the primary beneficiaries. LiveText multiplies creative opportunities and brings new depth to production capabilities.
The LiveText system operator directly controls titling options for full pages, lower thirds, scrolls and crawls ‘on the fly’ -- without intruding into the live broadcast controlled by the TriCaster operator. LiveText output can be previewed for director approval, or immediately displayed ‘on air. ‘
LiveText offloads the creative and logistical burdens of titling during a live production to a dedicated operator. The director is free to concentrate on the video production (with improved title accuracy as a side benefit.) LiveText 2 also provides integrated DataLink™ support (allowing direct realtime links to many popular third-part sports game clock systems), as well as great new LiveTime™ clock/timer features. In addition, LiveText allows export of various title pages file types for direct use in various NewTek live production systems.
1.1.1 MANUAL ORGANIZATION
While powerful, LiveText is quite intuitive. If you have some basic familiarity with graphics applications, much of it will come naturally. Or, if you’re familiar with the similar titling capabilities as a result of experience with other NewTek products, you’ll feel right at home.
Chapter 2 (Getting Started) will help you install LiveText and connect to your live production network. Next, in Chapter 3 (Titling Tools) you’ll explore LiveText’s title page creation and management tools. Chapter 4 covers DataLink™ and LiveTime™, and Chapter 5 explains how to use LiveText titles in your live production environment (as well as other applications.) Appendices providing information on keyboard shortcuts and networking are followed by a keyword index.
1

2 GETTING STARTED
This chapter will help you install, register and establish a network connection between LiveText™ and your (compatible) live production system.
We will review recommended system specifications, installation and registration, networking procedures and connection troubleshooting.
2.1SYSTEM REQUIREMENTS
LiveText requires (as a minimum):
A CPU which supports the SSE2 instruction set (typically an Intel® Core2® or better)
A graphics display card (PCI-E recommended) with Microsoft® DirectX® 9™ (or better) compatibility
A monitor capable of displaying a minimum resolution of 1280x800 pixels
2GB RAM (4GB or more preferred)
Gigabit network recommended for network transmission to supported live systems (TriCaster, VT[5])
2.2INSTALLING LIVETEXT™
Open a file window to locate and run the installer application by double-clicking its icon.
On launch, the installer presents various dialogs to ask you to accept the end user license agreement, confirm or modify various defaults (such as the program installation path) , and so on as it proceed..
After installation the Registration dialog is presented, providing an opportunity to register your copy of LiveText and obtain the permanent unlock code required to operate it beyond the 14 day grace period.
3
2.2.1 STEP 1
Read the End User License Agreement, and click to accept (or decline) before proceeding.
Figure 1
2.2.2 STEP 2
Click Next to accept the default installation location, or using the Browse button to modify the path where you wish LiveText’s program files to be installed on your system.
Figure 2
4
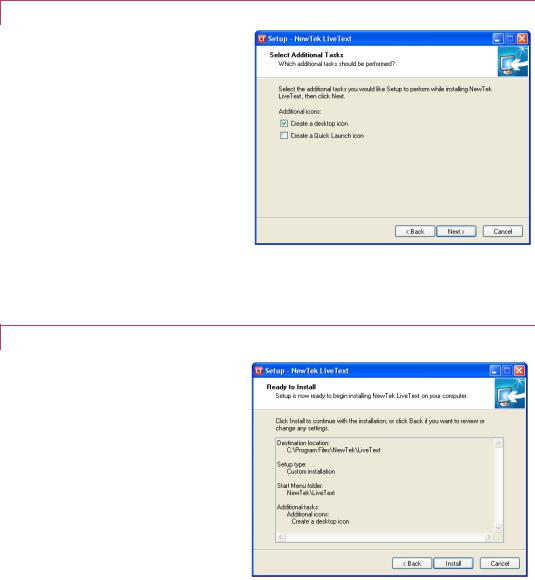
2.2.3 STEP 3
If you wish to have a convenient Desktop or Quick Launch icon to launch LiveText, click the appropriate switches and click Next.
Figure 3
2.2.4 STEP 4
Review your previous selection, and then press Install.
Figure 4
5

2.2.5 STEP 5
With Launch NewTek LiveText check-marked, click Finish to proceed to the Registration pane.
Figure 5
2.2.6 STEP 6
If your LiveText system is connected to Internet, you can click the “Click here” button to perform your
LiveText registration online.
Otherwise, note the Product ID shown in this panel and visit the registration web page as shown to register your software and receive your unlock code.
At this point, you can begin to work with LiveText!
Figure 6
6

2.3MAKING THE CONNECTION
LiveText is designed to play an important role as an integral component in a live production suite. In this configuration, the LiveText workstation is connected to the live switching unit (such as a TriCaster™) across a network.
A peer-to-peer network connection can be established between the two units using a crossover cable. Often though, the LiveText workstation will be a client on a larger LAN (local area network), which network also includes the live production system. (In this configuration, displays from additional networked systems may also be available to the live production system as video sources via NewTek’s iVGA utility.)
Naturally, the existence of the network connection is critical if you wish to use LiveText in a
‘direct-to-air’ application. A ‘hard-wired’ Ethernet connection is preferred – and ‘the faster the better’ (Gigabit networking is strongly recommended, especially for more demanding use such as long animated scrolls or crawls. For HD sessions, it should be considered mandatory.)
Note that the LiveText host and networked live production system must be on the same local subnet. Also, if your LiveText host is protected by a firewall, you will need to either disable the firewall, or configure it to allow LiveText access to the network.
Network throughput can be quite variable in some environments (such as a corporate or tradeshow network.) To the extent you can ensure non-essential network traffic does not interfere with LiveText operation during live production, you will enjoy more peace of mind.
In most cases, at this point your network connection is correctly established and you are ‘good to go.’ (If you should happen to run into a connection issue, see Appendix C – Networking Notes for information on diagnosing network problems).
Otherwise, you can skip right to the next chapter – Titling Tools.
Performance Note: Realtime playback depends on several factors. For example, previewing a scroll in the edit window could cause another scroll playing Live to skip on some systems. To be safe, it’s always wise to test prior to important live events.
7

2.4A SIMPLE EXAMPLE
Let’s try creating a simple title page:
Figure 7
1.Click the T in Text and Drawing, then click in the Canvas to set the insertion point
2.Type “LiveText”, press Enter, then type “Productions”
Figure 8
8

3.Click the Arrow (Select) button, and drag out a box (marquee) to surround both lines of text on the Canvas, selecting them (Figure 8).
Figure 9
4.Click the Style tab (below the Canvas), and then click thumbnail number 4 in the Styles bin area. This will immediately add color and beveling to the (selected) text you entered previously.
Figure 10
9

5.Click the View tab, and turn on Safe Area, to help compose your page
Figure 11
6.Next, click both the Vertical and Horizontal Center buttons in the Alignment section of the Tool Panel, centering the text on the Canvas.
Figure 12
7.With both lines of text still selected, click Group (in the Alignment section) to link them together
8.Then drag a corner point of the grouped text to make it larger (use your judgment, using the Safe Area overlay as a guide – the inner rectangle denotes the traditional ‘text safe’ margin.)
10
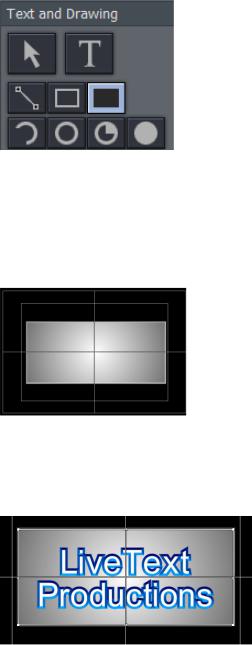
Figure 13
9.Click the Filled Rectangle button in Text and Drawing
10.Click thumbnail number 6 in the Styles tab, and drag out a rectangle in the Canvas that completely covers your text.
Figure 14
11.Select the rectangle (using the Arrow tool), and click Send Backward in the Alignment section
Figure 15
11

Figure 16
Go on to adjust Tracking, Leading in the tabbed Text and Drawing controls beneath the Canvas, and finish up by adding a Shadow to your text.
2.5USING PAGE TEMPLATES
A large number of gorgeous and very useful Page Templates are included with LiveText, to speed you on your way. You can easily modify these to suit your own production designs.
Figure 17
1.Select Add Page from the drop-down menu in the Pages panel at right (Figure 17).
2.As you slide your mouse down the list, notice that a thumbnail fly-out keeps pace showing a preview for each template.
12

3.Select Slate 1, loading that template into the Canvas for modifications
Figure 18
4.Click the T button (Text) in the Text and Drawing control panel at upper-left, and slide you mouse around over the text fields in the Canvas
5.Notice that a black outline surrounds each text line in turn. Select the text inside one of these outlines, and change it to suit your need.
Figure 19
Congratulations, with LiveText you’re a CG artist. Could it be any easier?
13

3 TITLING TOOLS
Designing and managing great looking still and animated text and graphics for your productions is easy with LiveText. It’s deep professional character generation tools will provide a clean, professional looking result you’ll be proud to broadcast!
3.1 LIVETEXT OVERVIEW
The main panel is dominated by the large cental Canvas, which provides an interactive display of the current project page.
The column at left is a Tool Panel for creating and editing visual elements, including text. LiveText’s File menu is above this column.
The Motion Panel is located just below the Canvas. It permits you to create animated scrolls or crawls.
Right beneath the Motion Panel is the
tabbed Control Panel, which gives you |
Figure 20 |
|
|
control over attributes of text and |
|
graphic objects. |
|
Finally, a column on right of the Canvas provides multi-page management (the Pages panel) of your project, file Load, Save and Export functions, and at the top – the all important Live Preview pane.
15
3.2OUTPUT ASPECT (4:3 OR 16:9?)
You may be wondering whether you need to consider the image aspect of your LiveText projects.
LiveText 2.0 projects are effectively aspect independent. The LiveText Canvas (canvas) where you prepare your title pages is always 16:9. When connected to a compatible live broadcast system (such as TriCaster) over a network, the current LiveText output aspect is updated as required (from 4:3 to 16:9 or vice versa) to conform to the aspect of the live production system connected. The current network output format is shown at upper-right in LiveText’s titlebar.
When exporting title pages as bitmap (image) files for external use, you choose the resolution and image aspect from the export dialog. When you opt for a 4:3 export only the corresponding center region of 16:9 title pages is exported. (The Safe Area overlay has 4:3 page edge and text safe lines to make this easy to visualize.)
3.3PROJECT PAGE MANAGEMENT
LiveText projects consist of one or more pages. If you want one main introductory title, another title for a station ID, an animated list of scrolling credits for the end, and so on – each of these is created as a separate page within the whole project.
Completed pages may be exported (using
Export Current Page or Export All Pages in the
File menu) for use in other programs supporting (including TriCaster, VT[5] and SpeedEDIT) as image (.PNG) or animation (.avi) files, or as Title Pages (.cgxml) compatible with TriCaster TCXD systems.
Figure 21
Entire projects can also be saved and re-loaded later, allowing you to work with one design for one production while a completely different look for another is only a few clicks away.
16

Note: Project and page files (.cg files) created with earlier versions of LiveText came in 4:3 and 16:9 formats. If you load one of these older files into LiveText 2.0, you will be asked whether you wish to load it as 4:3 (centered on the page), or as 16:9 (filling the screen).
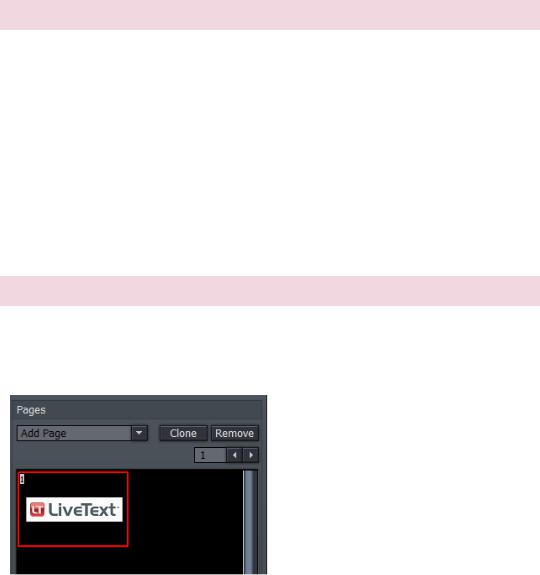
3.3.1 THE PAGES PANEL
The Pages panel at the right of the Canvas displays a thumbnail image of each page in the current project, and provides page management tools. A new project will show one (empty) page. When a project has multiple pages, the thumbnail for the one currently selected for editing in the Canvas is surrounded by a white border.
A (red border) indicates the page currently assigned as LiveText’s Live output (if any).
Jump to a specific page in your project by entering the page number in the Page field. Or you can cycle up or down through the pages by clicking on the neighboring arrow buttons. Click a page thumbnail in the Pages panel to edit it (displaying it in the Canvas,) or double-click it to send it out Live.
 CLONE AND REMOVE
Clicking the Clone button copies the currently highlighted page, inserting the copy below that page.
Hint: Clone permits you to quickly and easily ensure pages conform to a particular graphic theme or format – just Clone an adequate number for you needs, then modify them individually.
Clicking Remove deletes the currently selected page from the project (careful, there is no Undo for this action.)
 ADD PAGE
You click the small arrow button beside Add Page to insert another page into your project. New pages are added under the current page (and of course, they are not sent out as Live until you want them to be).
17

The drop-down menu reveals a number of types of pages you can add. The uppermost choices represent new blank pages of various types.
Hint: You can also quickly add blank pages simply by clicking repeatedly in an empty black area of the thumbnail column – each click adds one empty page.
This drop-down menu is home to a long list of professionally designed templates, ready and waiting for your modifications. As you scroll over the entries, a fly out thumbnail representation appears to make choosing something just right for your needs easy.
Figure 22
Hint: Another selection in the Add Pages menu permits you to “Add Page to Templates List.” This lets you store the currently highlighted pages as LiveText templates, for quick access and consistent styling using templates of your own design.
3.4FILE MENU
The File menu is in the upper-left corner of the LiveText desktop, and contains project and page file management tools. These functions are considered in Chapter 5, Live Production and File Management.
18
3.5THE TOOL PANEL
The Tool Panel situated left of the Canvas provides the basic tools to create the text and graphic elements of your title page compositions, establish their relationships to one another if any, and set their primary attributes.
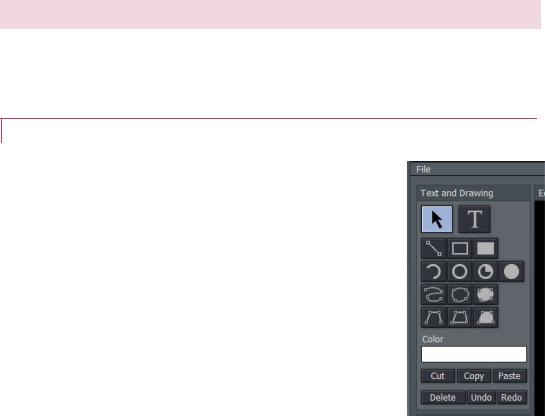
3.5.1 TEXT AND DRAWING
T (Text)
Click on the T (Text) button to activate the text function. Before you enter text, this button must be highlighted. Click in the Canvas and an I- beam icon starts blinking. This is your Canvas cursor. When you type, the I-beam is the insert point for the text. You can move the I-beam anywhere on the Canvas by clicking it with your mouse and dragging it around or just clicking your mouse on another spot in the Canvas.
To edit the characters of any existing text, click your cursor anywhere on the line of text, and drag your mouse to select letters or whole words (selected character will be highlighted.)
Hint: Use the End and Home keys on your keyboard to navigate to the beginning and end of text lines. If you
mistyped, you can use the Backspace key to erase or the Figure 23 keyboard arrow keys to go back or forth on the line or up and
down between lines.
Arrow (Selection)
Clicking on the Arrow button activates the Selection tool (and switches off the Text tool). This selects the whole line, not just parts of it. If you have just typed something in, clicking the Arrow will create a box around what you typed. Select the line by clicking anywhere on it.
When you roll your mouse over the box, the cursor changes form. When it becomes a twoheaded arrow, you can click to grab an edge of the box and drag it in or out to resize the text. When the cursor sprouts four arrowheads, you can click and grab the whole box to move it
19

around the Canvas. Hold down the Shift key over a corner of a selected object and a curved arrow cursor indicates you may now drag to rotate it.
 GRAPHIC SHAPE TOOLS
The area immediately below the Arrow and T(Text) buttons is home to a number of tools used to create shapes. Each shape is initially a separate graphic object.
The tools are very easy to use, and just as easy to edit at any time after their creation, whether simply to adjust their position, or to add or modify much more elaborate treatments.
Figure 24
For the most part, shapes are easily created by clicking one of the buttons, and dragging the cursor in the Canvas. The shape responds interactively to your movements, and is created when you release the mouse button.
Line
To make a straight line, you simply click in the Canvas where you want the line to begin and then drag the mouse to where you want the line to end.
Rectangle
The Rectangle button creates outlines of four-sided objects.
Filled Rectangle
This tool works just like the Rectangle tool except it fills in shape with the same color as the outline.
Arc
The second row contains variations of ellipses. With the first, you can create segments of arcs. Click the mouse in the Canvas and drag to establish the radius of the arc, releasing the button when you are happy. Then click and drag again to define the extent of the arc. Release the button to complete it.
Oval
The Oval works just like the Rectangle tool. Click and drag in the Canvas to draw out your shape.
Filled Arc
The Filled Arc operation is the same as the Arc tool (see above). The only difference is that the arc created is filled in. Think of the Filled Arc as the pie chart tool.
20

Filled Oval
This tool works like the Filled Rectangle.
Spline
This tool and its siblings create freeform spline curve shapes. Click in the Canvas and release the mouse to establish the starting point. Move to another spot on the screen and click again to establish a second node though which the spline will pass. Continue to add nodes until you are satisfied, then double-click to end the curve.
Closed Spline
The technique for the Closed Spline is similar to the Spline: click in the Canvas, release the mouse, move to the next spot and click again, etc... With this tool though, nodes are automatically connected to the first (anchor) point to create an enclosed object. When you’re finished, simply double-click.
Closed Filled Spline
This tool works just like the Closed Spline tool except it fills in shape with the same color as the outline.
Polygonal Line
This tool functions like the Spline except it doesn’t create a curve between the nodes. You click in the Canvas to establish your anchor point, release the mouse and move to your next spot, and click to create a node. A straight line will connect the two points. Move and click again and a line will connect this point with the previous one. With this tool, a sharp angle is maintained at the intersection of the lines. You double-click at the last point to finish.
Polygon
This tool works like the Polygonal Line, except as soon as you create the first node, it’s connected to the anchor point, automatically creating an enclosed object.
Filled Polygon
This tool works just like the Polygon tool except it fills in shape with the same color as the outline.
Figure 25
21
Color - The large color well below the drawing tools permits you to set a base color for the objects you create using the tools. Left click it to open the Color Picker panel, or right click and drag to use an eye dropper cursor to pick a color from the screen.
Note: Extensive control over color is provided in the Color section of the tabbed Control Panel discussed a bit further on in this chapter.
 OBJECT MANAGEMENT
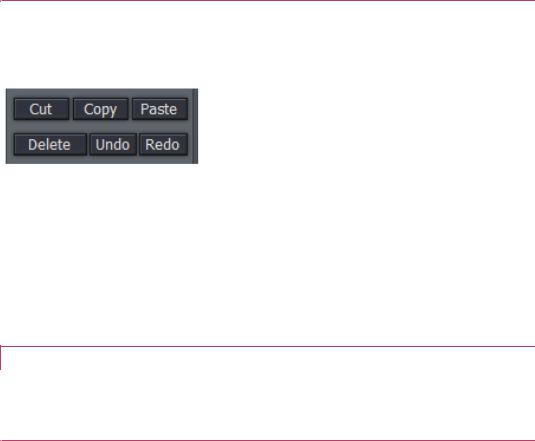
Completing this section are essential basic editing tools: Cut, Copy, Paste, Delete, Undo, and Redo. The traditional Windows keyboard shortcuts also work:
Figure 26
Cut — Ctrl + x
Copy — Ctrl + c
Paste — Ctrl + v
Delete — Delete key
Undo — Ctrl + z
Redo — Ctrl + y
3.5.2ALIGNMENT
The alignment panel permits quick and easy positioning and re-ordering of objects on the Canvas.
 HORIZONTAL JUSTIFICATION
The top row of buttons in this section control horizontal justification buttons, aligning text as are commonly found in word processing programs.
22

Left Justify - aligns your text to begin just inside the left edge of the
Text Safe Area
Center - aligns the center of the line(s) with the center of the Text
Safe Area.
Right Justify - aligns your text so the end of the line(s) is just inside the right edge of the Text Safe Area.
Figure 27
 VERTICAL JUSTIFICATION
Each of the buttons in the next row justifies your text within the vertical Safe Text area of the screen.
Top - aligns your text just below the upper limit of the Text Safe Area.
Center - centers your text vertically in the Text Safe Area.
Bottom - aligns your text just above the lower limit of the Text Safe Area.
 DEPTH CONTROL
Text and objects in the Canvas which occupy the same space are normally displayed in the order created – first items to the rear, as it were, with newer object in front. The depth controls in this section permit you to modify this order. Select an object (or line of text) and click once to move one step relative to other objects.
Bring Forward – move the selected item forward
Send Backward – move the selected item back
Note: The Layers section of the tabbed Control Panel (discussed in Section3.7.6) provides an alternative (and often more convenient method) of re-ordering objects and text.
23
 Loading...