


 Loading...
LightWave® [8]
Reference Manual
This publication, or parts thereof, may not be reproduced in any form, by any method, for any purpose without prior written consent from NewTek, Inc.
© Copyright 2004, NewTek, Inc. All Rights Reserved
NewTek, Inc
5131 Beckwith Blvd San Antonio, TX 787249 USA
1-800-862-7837
+1-210-370-8000 www.newtek.com

LightWave [8]
II
Software License and Limited Warranty
PLEASE READ CAREFULLY BEFORE INSTALLING THIS SOFTWARE. BY INSTALLING THIS SOFTWARE, YOU AGREE TO BECOME BOUND BY THE TERMS OF THIS LICENSE. IF YOU DO NOT AGREE TO THE TERMS OF THIS LICENSE, RETURN THIS PACKAGE TO THE PLACE WHERE YOU OBTAINED IT WITHIN 15 DAYS FOR A FULL REFUND.
1. Grant of License
The enclosed computer program(s) (the “Software”) is licensed, not sold, to you by NewTek, Inc. (NEWTEK) for use only under the terms of this License, and NEWTEK reserves any rights not expressly granted to you. You own the disk(s) on which the Software is recorded or fixed, but the Software and all copyright rights therein, foreign and domestic, is owned by NEWTEK or its suppliers and is protected by United States copyright laws and international treaty provisions.
The copyright restrictions of this license extend to any further updates, software patches, or bug fixes made available to you by NEWTEK, whether distributed by floppy disc, CD ROM, or in an electronic format via BBS, ftp, email, etc.
This License allows you to use one copy of the Software on a single computer at a time. To “use” the Software means that the Software is either loaded in the temporary memory (i.e., RAM) of a computer, or installed on the permanent memory of a computer (i.e., hard disk, CD ROM, etc.).
You may use at one time as many copies of the Software as you have licenses for. You may install the Software on a common storage device shared by multiple computers, provided that if you have more computers having access to the common storage device than the number of licensed copies of the Software, you must have some software mechanism which locks out any concurrent user in excess of the number of licensed copies of the Software (an additional license is not needed for the one copy of Software stored on the common storage device accessed by multiple computers).
You may make one copy of the Software in machine readable form solely for backup purposes. The Software is protected by copyright law. As an express condition of this License, you must reproduce on the backup copy the NEWTEK copyright notice in the following format “(c) 1990 - 2004 NEWTEK”.
You may permanently transfer all your rights under this License to another party by providing such party all copies of the Software licensed under this License together with a copy of this License and all written materials accompanying the Software, provided that the other party reads and agrees to accept the terms and conditions of this License.
2. Restrictions
The Software contains trade secrets in its human perceivable form and, to protect them, YOU MAY NOT REVERSE ENGINEER, DECOMPILE, DISASSEMBLE, OTHERWISE REDUCE THE SOFTWARE TO ANY HUMAN PERCEIVABLE FORM. YOU MAY NOT MODIFY, ADAPT, TRANSLATE, RENT, LEASE, LOAN, RESELL FOR PROFIT, OR CREATE ANY MODIFICATIONS OR OTHER DERIVATIVE WORKS BASED UPON THE SOFTWARE OR ANY PART THEREOF.
3. Termination
This License is effective until terminated. This License will terminate immediately without notice from NEWTEK or judicial resolution if you fail to comply with any provision of this License. Upon such termination you must destroy the Software, all accompanying written materials and all copies thereof. You may also terminate this License at any time by destroying the Software, all accompanying written materials and all copies thereof.
4. Export Law Assurances
You agree that neither the Software nor any direct product thereof is being or will be shipped, transferred or re-exported, directly or indirectly, into any country prohibited by the United States Export Administration Act and the regulations thereunder or will be used for any purpose prohibited by the Act.
5. Limited Warranty and Disclaimer, Limitation of Remedies and Damages.
YOU ACKNOWLEDGE THAT THE SOFTWARE MAY NOT SATISFY ALL YOUR REQUIREMENTS OR BE FREE FROM DEFECTS. NEWTEK WARRANTS THE MEDIA ON WHICH THE SOFTWARE IS RECORDED TO BE FREE FROM DEFECTS IN MATERIALS AND WORKMANSHIP UNDER NORMAL USE FOR 90 DAYS FROM PURCHASE, BUT THE SOFTWARE AND ACCOMPANYING WRITTEN MATERIALS ARE LICENSED “AS IS.” ALL IMPLIED WARRANTIES AND CONDITIONS (INCLUDING ANY IMPLIED WARRANTY OF MERCHANTABILITY OR FITNESS FOR A PARTICULAR PURPOSE) ARE DISCLAIMED AS TO THE SOFTWARE AND ACCOMPANYING WRITTEN MATERIALS AND LIMITED TO 90 DAYS AS TO THE MEDIA. YOUR EXCLUSIVE REMEDY FOR BREACH OF WARRANTY WILL BE THE REPLACEMENT OF THE MEDIA OR REFUND OF THE PURCHASE PRICE. IN NO EVENT WILL NEWTEK OR ITS DEVELOPERS, DIRECTORS, OFFICERS, EMPLOYEES OR AFFILIATES BE LIABLE TO YOU FOR ANY CONSEQUENTIAL, INCIDENTAL OR INDIRECT DAMAGES (INCLUDING DAMAGES FOR LOSS OF BUSINESS PROFITS, BUSINESS INTERRUPTION, LOSS OF BUSINESS INFORMATION, AND THE LIKE), WHETHER FORESEEABLE OR UNFORESEEABLE, ARISING OUT OF THE USE OR INABILITY TO USE THE SOFTWARE OR ACCOMPANYING WRITTEN MATERIALS, REGARDLESS OF THE BASIS OF THE CLAIM AND EVEN IF NEWTEK OR AN AUTHORIZED NEWTEK REPRESENTATIVE HAS BEEN ADVISED OF THE POSSIBILITY OF SUCH DAMAGES.
The above limitations will not apply in case of personal injury only where and to the extent that applicable law requires such liability. Because some jurisdictions do not allow the exclusion or limitation of implied warranties or liability for consequential or incidental damages, the above limitations may not apply to you.
6. General
This License will be construed under the laws of the State of Texas, except for that body of law dealing with conflicts of law. If any provision of this License shall be held by a court of competent jurisdiction to be contrary to law, that provision will be enforced to the maximum extent permissible and the remaining provisions of this License will remain in full force and effect. If you are a US Government end-user, this License of the Software conveys only “RESTRICTED RIGHTS,” and its use, disclosure, and duplication are subject to Federal Acquisition Regulations, 52.227-7013 (c)(1)(ii). (See the US Government Restricted provision below.)
7. Trademarks
VT, VT[3], Video Toaster, Toaster and Aura are trademarks of NEWTEK. LightWave and LightWave 3D are registered trademarks of NEWTEK. All other brand names, product names, or trademarks belong to their respective holders.
8. US Government Restricted Provision
If this Software was acquired by or on behalf of a unit or agency of the United States Government this provision applies. This Software:
(a)Was developed at private expense, and no part of it was developed with government funds,
(b)Is a trade secret of NEWTEK for all purposes of the Freedom of Information Act,
(c)Is “commercial computer software” subject to limited utilization as provided in the contract between the vendor and the government entity, and
(d)In all respects is proprietary data belonging solely to NEWTEK.
For units of the Department of Defense (DoD), this Software is sold only with “Restricted Rights” as that term is defined in the DoD Supplement to the Federal Acquisition Regulations, 52.227-7013 (c) (1) (ii).
Use, duplication or disclosure is subject to restrictions as set forth in subdivision (c) (l) (ii) of the Rights in Technical Data and Computer Software clause at 52.227-7013. Manufacturer: NEWTEK, 5131 Beckwith Boulevard, San Antonio, TX 78249.
If this Software was acquired under a GSA Schedule, the US Government has agreed to refrain from changing or removing any insignia or lettering from the software or the accompanying written materials that are provided or from producing copies of manuals or disks (except one copy for backup purposes) and:
(e)Title to and ownership of this Software and documentation and any reproductions thereof shall remain with NEWTEK,
(f)Use of this Software and documentation shall be limited to the facility for which it is required, and,
(g)If use of the Software is discontinued to the installation specified in the purchase/delivery order and the US Government desires to use it at another location, it may do so by giving prior written notice to NEWTEK, specifying the type of computer and new location site. US Governmental personnel using this Software, other than under a DoD contract or GSA Schedule, are hereby on notice that use of this Software is subject to restrictions which are the same as or similar to those specified.

Copyright and Trademarks
LightWave® 8.0
© Copyright 1990-2004 NewTek, Inc. All rights reserved.
Additional components Copyright: Steve Worley (1995-2004), Worley Labs (1995-2004), RainMaker (2003-2004) and Daisuke Ino (1995-2004)
LightWave® and LightWave 3D® are registered trademarks of NewTek, Inc.
FxMonkey™, HyperVoxels™, IntelligEntities™, Motion Mixer™, MultiMeshes™, Particle FX™, P.A.V.L.O.V.™, Skelegons™, SkyTracer 2™, Vmaps™ are trademarks of NewTek, Inc.
Acknowledgements
Lead Engineers for LightWave [8]
Bob Hood
Jamie Finch
Engineering
Daisuke Ino, Kevin Nations, Scott Thompson, William Vaughan, Mike Watkins, Andrew Cross, Art Howe, David Vrba, Scott Martindale, Deuce Bennett, Peter Jespersen, Steve Forcucci, David Ikeda, Christopher Lutz, Elmar Möelzer, David Fourstenlechner, Josh Darling, Jarom Schow, Richard Brak, David Mathews, Mike Reed, Scott Wheeler
Content Assembly
William Vaughan, Kevin Nations, John Fletcher, Gil Triana, Donny Oropeza, Marvin Miller, Kurtis Harris
Installer
Jeremy Wiseman, Scott Thompson
Documentation
William Vaughan, Peter Jesperson, Ben Vost, Chuck Baker, Paul Lara, Kurtis Harris, Nathalie Cross, Robin Kressbach, Corinne Smelker, Terry Smelker
Product Marketing
Donetta Colboch, William Vaughan, Chuck Baker, Marina Madden, Kurtis Harris, Terry Smelker
Special Thanks To:
Tim Jenison, Jim Plant, Franck Lafage, Ben Vost, Marc Gaillard, Hiroyoshi Abe, Kevin Philips, Robin Wood, Dan Ablan, Nick Boughen, Larry Shultz, Michael Linde, and to all the Beta Team Members.
LightWave [8]
III

Chapter 1: LightWave 3DGetting Started
Introduction |
3 |
Installation |
5 |
System Requirements |
5 |
Hardware Lock Installation |
5 |
Upgrading From a Prior Version |
5 |
Software Installation |
6 |
Registering and Licensing Your Software |
7 |
Running the Program |
7 |
Conventions |
8 |
About the Manual |
8 |
Typographic Conventions |
8 |
Key LightWave Terms and Concepts |
9 |
Working With The Interface |
|
LightWave Panels and Dialogs |
3 |
Math in Input Fields |
3 |
Enter/Tab Keys with Input Fields |
3 |
Yes and No |
3 |
Color Selection |
3 |
Color Pickers |
4 |
Standard List Windows |
5 |
Reorganizing Lists |
5 |
Context Pop-up Menus |
5 |
Customizing Your Interface |
6 |
Menus |
6 |
Keyboard Shortcuts |
9 |
Generic Plug-ins |
20 |
Confi guration Files |
2 |
Custom Confi guration Files |
2 |
Layout Startup Command |
22 |
Customizing Layout Viewport Navigation |
22 |
Customizing Camera Presets |
22 |
LightWave 3D Basics |
22 |
LightWave Scene and Object Statistics |
22 |
Measurement Units |
23 |
Filenames and Extensions |
23 |
Object Import/Export |
24 |
Image and Animation Types |
25 |
The Hub |
28 |
Optimizing RAM Usage |
29 |
LightWave 3D Resources |
30 |
Internet Mailing List and Newsgroups Resources |
30 |
NewTek Web and FTP Sites |
30 |
Community |
30 |
Technical Support |
3 |
Customer Services |
3 |
LightWave [8]
V

LightWave [8]
Layout |
33 |
Chapter 2: ntroduction |
35 |
The LightWave Layout Interface |
5 |
The Grid |
56 |
Schematic View |
57 |
Keyframing |
58 |
Navigating a Scene |
66 |
Playing a Scene |
67 |
Creating Keyframes |
67 |
Creating and Modifying Keys Automatically |
68 |
Editing Motion Paths Directly in a Viewport |
69 |
Deleting Keyframes |
70 |
Delete Motion Key Plug-in |
70 |
Saving and Loading Motion Files |
72 |
DopeTrack |
72 |
BioVision Motion Capture Support |
78 |
Keyframer |
79 |
Help Menu |
83 |
Chapter 3: File Menu |
85 |
Save Commands |
89 |
Importing Items into Layout |
9 |
Exporting Items from Layout |
92 |
Chapter 4: Edit Drop Down Menu |
105 |
Undo |
107 |
Redo |
107 |
Edit Menu Layout |
108 |
Edit Keyboard Shortcuts |
109 |
Window Confi g |
1 0 |
Window Confi g Loader |
1 0 |
Layout Display Options |
1 |
Layout General Options |
124 |
Schematic View Tools |
13 |
Set Content Directory |
13 |
Recent Content Directory |
13 |
Chapter 5: Window Drop Down Menu |
133 |
Basics of Window Menu Options |
135 |
Virtual Darkroom |
176 |
HyperVoxels |
182 |
Motion Mixer |
2 |
SkyTracer2 |
226 |
Wave Filter Image |
240 |
V

Chapter 6: Graph Editor |
247 |
Graph Editor: Adjusting the Curve Edit Window |
258 |
Graph Editor Options |
267 |
Graph Editor: Editing Color Channels |
269 |
Graph Editor: Curves Tab |
27 |
Graph Editor: Expressions Tab |
282 |
Expressions |
286 |
Graph Editor: Modifi er Tab |
3 8 |
Chapter 7: Scene Editor |
325 |
Classic Scene Editor |
364 |
Chapter 8: tems Tab |
373 |
Load |
375 |
Add |
377 |
Replace |
383 |
Delete |
383 |
Chapter 9: Modify Tab |
385 |
Translate |
387 |
Rotate |
392 |
Transform |
394 |
General |
397 |
Tools |
399 |
Chapter 10: Setup Tab |
43 |
General |
433 |
Add |
435 |
Modify |
438 |
Detail |
449 |
Edit |
452 |
Motions |
462 |
Global Options |
472 |
Chapter 11: Utilities Tab |
485 |
Commands |
487 |
LScript |
488 |
Plugins |
493 |
Skygen |
535 |
Chapter 12: Render Tab |
537 |
Render Options |
539 |
Rendering a Limited Region |
552 |
Enable Viper |
553 |
Render Frame |
553 |
Render Scene |
553 |
Render Selected Object |
553 |
Motion Blur and Depth of Field Preview |
553 |
VIPER |
554 |
Print Assistant |
557 |
Network Render |
557 |
LightWave [8]
VI

LightWave [8]
Chapter 13: View Tab |
559 |
Viewports |
56 |
View Layout |
563 |
Layout Grid Tools |
563 |
Layout Selection Tools |
564 |
Chapter 14: Object Properties |
567 |
Object Properties Panel Introduction |
569 |
Object Properties: Geometry Tab |
570 |
Object Properties: Custom Objects |
576 |
Object Properties: Deform Tab |
588 |
Object Properties: Displacement Plug-ins |
6 7 |
Object Displacement: Morph Mixer |
639 |
Object Properties: Render Tab |
643 |
Object Properties: Edges Tab |
650 |
Object Properties: Lights Tab |
654 |
Object Properties: Dynamics Tab |
655 |
Chapter 15: Bone Properties Panel |
7 3 |
Chapter 16: Camera Basics |
72 |
Introduction |
723 |
Chapter 17: Light Properties |
74 |
Lighting Introduction |
743 |
Basic Light Attributes |
744 |
Lights Display Size |
745 |
Light Exclusion |
746 |
Saving Lights |
747 |
Light Types |
747 |
Light Color and Intensity |
753 |
Shadows |
754 |
Lens Flares |
758 |
Volumetric Lights |
767 |
Global Illumination Panel |
77 |
Luxigons |
783 |
Chapter 18: mage Viewer |
785 |
Chapter 19: Distributed Rendering: Introduction 79 |
|
Chapter 20: Creating a Preview Animation |
809 |
Layout Transport Controls |
813 |
VII

Modeler |
8 5 |
Chapter 21: ntroduction to Modeling |
8 7 |
Components of a 3D Object |
8 9 |
Point and Polygons |
82 |
Editing Objects |
822 |
Selection Mode: Points and Polygons |
823 |
Interface |
827 |
Help Menu |
832 |
Chapter 22: File Menu |
833 |
Starting a New Object |
835 |
Loading an Existing Object from Disk |
835 |
Importing an Object |
836 |
Saving Object Files |
839 |
Closing Object Files |
840 |
Sections |
840 |
Exporting Objects |
840 |
Quit |
84 |
Chapter 23: Edit Menu |
843 |
Basic Point and Polygon Maintenance |
845 |
Undoing Operations |
845 |
Undoing the Undo |
845 |
Customizing Keyboard Shortcuts |
846 |
Edit Menu Layout |
847 |
Edit Modeler Tools |
848 |
General Options |
849 |
Display Options |
85 |
Chapter 24: Windows Menu |
87 |
Multi-Layer Object Standard |
873 |
Multi-document Environment |
873 |
Layout Communication |
874 |
Layer Navigation |
874 |
Layer Browser Panel |
875 |
Vertex Map Panel |
876 |
Hide Floating Windows On/Off |
879 |
Hide Toolbar On/Off |
879 |
Chapter 25: Viewports |
88 |
Save View Presets |
884 |
Display Options |
884 |
Viewport Titlebar |
884 |
View Type |
885 |
Rendering Style |
885 |
Resetting Tools |
89 |
LightWave [8]
X

LightWave [8]
X
Chapter 26: Bottom Edge Menu |
893 |
Info Display |
895 |
Grid Info Field |
895 |
Modes: Action Center Control |
896 |
Numeric Panel |
896 |
Make Command |
897 |
Symmetry Mode |
897 |
Surface: Change Surface |
898 |
Vmap Shortcut |
899 |
Chapter 27: Create Tab |
90 |
Primitives |
903 |
Text Tools |
945 |
Points |
954 |
Polygons |
959 |
Curves |
970 |
Make Curves |
983 |
Chapter 28: Modify Tab |
985 |
Translate |
987 |
Rotate |
102 |
Transform |
1044 |
Chapter 29: Multiply Tab |
1087 |
Extend |
1089 |
Duplicate |
1136 |
Subdivide |
1153 |
Chapter 30: Construct Tab |
1177 |
Reduce |
1179 |
Remove |
1186 |
Combine |
1189 |
Patches |
1199 |
Convert |
1202 |
Meta |
1206 |
Chapter 31: Detail Tab |
1209 |
Points |
12 |
Polygons |
12 5 |
Curves |
1223 |
Edges |
1225 |
Measurement |
1232 |
Chapter 32: Map Tab |
1237 |
Introduction |
1239 |
General |
1244 |
Weight |
1258 |
Color |
1265 |
Texture |
13 6 |
Poly Map |
1328 |
Point Map |
1332 |
Morph |
1348 |

Chapter 33: Setup Tab. . . . . . . . . . . . . . . . . . . . 1357
Skelegons. . . . . . . . . . . . . . . . . . . . . . . . . . . . . . . . . . . . . . . . . . . . . . . . . . . . . . . . . . . . . . . . . . . . . . . . . . . . . . . . . . . . . . .1359
Layout Tools . . . . . . . . . . . . . . . . . . . . . . . . . . . . . . . . . . . . . . . . . . . . . . . . . . . . . . . . . . . . . . . . . . . . . . . . . . . . . . . . . . . .1374
Chapter 34: Utilities Tab. . . . . . . . . . . . . . . . . . . 1379
Commands . . . . . . . . . . . . . . . . . . . . . . . . . . . . . . . . . . . . . . . . . . . . . . . . . . . . . . . . . . . . . . . . . . . . . . . . . . . . . . . . . . . . .1381
LScript . . . . . . . . . . . . . . . . . . . . . . . . . . . . . . . . . . . . . . . . . . . . . . . . . . . . . . . . . . . . . . . . . . . . . . . . . . . . . . . . . . . . . . . . . 1385
Plug-ins. . . . . . . . . . . . . . . . . . . . . . . . . . . . . . . . . . . . . . . . . . . . . . . . . . . . . . . . . . . . . . . . . . . . . . . . . . . . . . . . . . . . . . . . .1387
Chapter 35: View Tab. . . . . . . . . . . . . . . . . . . . . 1389
Viewports. . . . . . . . . . . . . . . . . . . . . . . . . . . . . . . . . . . . . . . . . . . . . . . . . . . . . . . . . . . . . . . . . . . . . . . . . . . . . . . . . . . . . . .1391
Layers. . . . . . . . . . . . . . . . . . . . . . . . . . . . . . . . . . . . . . . . . . . . . . . . . . . . . . . . . . . . . . . . . . . . . . . . . . . . . . . . . . . . . . . . . . .1395
Selection . . . . . . . . . . . . . . . . . . . . . . . . . . . . . . . . . . . . . . . . . . . . . . . . . . . . . . . . . . . . . . . . . . . . . . . . . . . . . . . . . . . . . . 1400
Selection Sets . . . . . . . . . . . . . . . . . . . . . . . . . . . . . . . . . . . . . . . . . . . . . . . . . . . . . . . . . . . . . . . . . . . . . . . . . . . . . . . . . .1417
View . . . . . . . . . . . . . . . . . . . . . . . . . . . . . . . . . . . . . . . . . . . . . . . . . . . . . . . . . . . . . . . . . . . . . . . . . . . . . . . . . . . . . . . . . . . .1421
Chapter 36: Surface Editor. . . . . . . . . . . . . . . . 1423
Introduction . . . . . . . . . . . . . . . . . . . . . . . . . . . . . . . . . . . . . . . . . . . . . . . . . . . . . . . . . . . . . . . . . . . . . . . . . . . . . . . . . . . 1425
Surface Editor Panel . . . . . . . . . . . . . . . . . . . . . . . . . . . . . . . . . . . . . . . . . . . . . . . . . . . . . . . . . . . . . . . . . . . . . . . . . . . .1428
Texture Editor. . . . . . . . . . . . . . . . . . . . . . . . . . . . . . . . . . . . . . . . . . . . . . . . . . . . . . . . . . . . . . . . . . . . . . . . . . . . . . . . . . 1442
Layer Type: Image Mapping . . . . . . . . . . . . . . . . . . . . . . . . . . . . . . . . . . . . . . . . . . . . . . . . . . . . . . . . . . . . . . . . . . . 1450
Layer Type: Procedural Texture . . . . . . . . . . . . . . . . . . . . . . . . . . . . . . . . . . . . . . . . . . . . . . . . . . . . . . . . . . . . . . . . 1460
Layer Type: Gradient. . . . . . . . . . . . . . . . . . . . . . . . . . . . . . . . . . . . . . . . . . . . . . . . . . . . . . . . . . . . . . . . . . . . . . . . . . . 1481
Advanced Tab . . . . . . . . . . . . . . . . . . . . . . . . . . . . . . . . . . . . . . . . . . . . . . . . . . . . . . . . . . . . . . . . . . . . . . . . . . . . . . . . . 1485
Environment Tab . . . . . . . . . . . . . . . . . . . . . . . . . . . . . . . . . . . . . . . . . . . . . . . . . . . . . . . . . . . . . . . . . . . . . . . . . . . . . . 1488
Shaders Tab. . . . . . . . . . . . . . . . . . . . . . . . . . . . . . . . . . . . . . . . . . . . . . . . . . . . . . . . . . . . . . . . . . . . . . . . . . . . . . . . . . . . 1489
Chapter 37: Image Editor . . . . . . . . . . . . . . . . . 1507
Chapter 38: Preset Shelf . . . . . . . . . . . . . . . . . . 1517
Chapter 39: Appendices . . . . . . . . . . . . . . . . . . . 1523
Glossary of 3D Terms. . . . . . . . . . . . . . . . . . . . . . . . . . . . . . . . . . . . . . . . . . . . . . . . . . . . . . . . . . . . . . . . . . . . . . . . . . . . . . . . . . . . 1525
Do the Math . . . . . . . . . . . . . . . . . . . . . . . . . . . . . . . . . . . . . . . . . . . . . . . . . . . . . . . . . . . . . . . . . . . . . . . . . . . . . . . . . . . . . . . . . . . . . . . . .i
Color Chart: RGB Values . . . . . . . . . . . . . . . . . . . . . . . . . . . . . . . . . . . . . . . . . . . . . . . . . . . . . . . . . . . . . . . . . . . . . . . . . . . . . . . . . . . .iv
NewTek Content End User License Agreement. . . . . . . . . . . . . . . . . . . . . . . . . . . . . . . . . . . . . . . . . . . . . . . . . . . . . . . . . . . . . . v
Index . . . . . . . . . . . . . . . . . . . . . . . . . . . . . . . . . . . . 1555
LightWave [8]
XI
Chapter 1: LightWave 3D
Getting Started
LightWave [8]
1
Introduction
Welcome to the wonderful world of 3D! Opening this package is the beginning of a fantastic journey to anywhere you can imagine. For proof of that, you only need to consider the accomplishments of the many talented artists who have chosen the Emmy-winning LightWave 3D over the years, and put it to use in award-winning work for film, television, print, visualization and more, over nearly a decade and a half of LightWave’s history. From covers for Time and Newsweek to motion graphics for NBC’s Access Hollywood to award winners and nominees for Emmys and Oscars, compelling imagery created using LightWave 3D is everywhere around you.
The first LightWave user to pick up an Emmy was Ron Thornton, for the special visual effects in the pilot episode of Babylon 5, in 1993. When the series run began, NewTek staff made a practice of watching the episodes at NewTek’s office, Barco-projected on a 10-foot screen. In one of the early episodes there was a sequence of the capture of a derelict ship, a long shot with the ships tumbling and the camera in motion. The visual was so convincing and the motion so sustained that the bottom dropped out of your stomach watching it. Until then, the time and expense of practicals had limited television effects shots to usually just a quick glance or a very few seconds, whereas this shot went on for more than half a minute. Stunning, and the first indication of how radical the change that CGI would make in visual effects was going to be.
LightWave [8]
3

Most recently the good folks at Zoic Studios have picked up Emmy and VES awards for the work they did with LightWave and the new VT[3] on Firefly, and Area 51 took an Emmy for their visual effects work, done with LightWave, on Children of Dune. DNA received an Oscar nomination for the motion picture Jimmy Neutron: Boy Genius, a film completely modeled, animated and rendered with LightWave 3D and off-the-shelf plugins. In general, the limits of what can be accomplished are being erased and the horizon expanded daily in terms of what we can make look photographically real, but also the ways we can create a stylized yet convincing reality. LightWave has been one of the keys in revolutionizing visual effects and graphic arts with the incredible tools that 3D can bring to these disciplines.
LightWave 3D allows you to be the producer, art director, cinematographer and director, all rolled into one, if you so desire. Your “actors” consist of objects and characters that you build in Modeler or import from another program. You place the lights to illuminate them, assign surface colors and create textures to clothe them, and then choreograph movements to animate them. Once your actors are in place, the camera records all of their movements, creating moving imagery that you compile into animations.
LightWave is very versatile, and can create animations and still images for virtually any use, from the tiniest web graphics all the way up to print images at 16,000 x 16,000 pixels, and anywhere in between. A multitude of preset resolutions are provided with this comprehensive package, including industry standard D1 and D2 (NTSC and PAL) video resolutions.
Modeling, animating, rigging, rendering, motion design, special effects — it’s all here — complete right out of the box. This manual will help you learn the basics of 3D design with LightWave — from installing the program to the fundamentals. Once you’ve worked your way through the guide, hop on the Internet and download some of our tutorials. We’re always adding valuable tips and tricks for you to increase your knowledge and expertise.
LightWave [8]
4

Installation
System Requirements
General Requirements:
•System RAM: 512 MB minimum requirement, 1 GB recommended
•Dedicated Video RAM: 64 MB per display minimum requirement, 128 MB recommended
•Minimum Screen Resolution: 1024x768 minimum requirement, 1280x1024 recommended
•Hard Drive Space: 230 MB for program installation (not including content)
Windows®:
•Operating System: Windows® 2000 SP3 or Windows® XP SP1
•Processor: Intel® Pentium® III minimum requirement, Intel® Pentium® IV recommended
•Graphics Support: Full OpenGL® and DirectX®
Macintosh®:
•Operating System: Mac OS® X 10.3.3 PantherTM
•Processor: PowerPC® G4 minimum requirement, G5 recommended
•Graphics Support: Full OpenGL®
Hardware Lock Installation
If this is your first installation of LightWave 3D, this package came with a USB hardware lock (“dongle”). Just plug this into an available USB port on your PC or Mac to unlock the software. You can plug the dongle in while your machine is running.
Upgrading From a Prior Version
If you already have a version of LightWave 3D installed on your computer, you will already have a hardware key (USB, ADB or parallel), also known as a “dongle”. The software will recognize your existing USB or parallel dongle. If you have an ADB dongle, you will need to contact our customer services section to exchange for a USB dongle. Users of a parallel dongle who wish to upgrade to the convenience and platform independence of the USB dongle may contact customer services to make the exchange. Please note that there is a fee and shipping and handling charges to cover the cost of the exchange.
Other than the above noted issues regarding hardware keys, the same installation instructions apply for an upgrade as for new users. The installation program will not delete any existing objects, scenes, or images on your system unless an existing item has the same name and is in the same directory as an item that LightWave [8] installs. For this reason, you may want to install LightWave [8] in a new directory. We strongly recommend that you back up your system before you install LightWave 3D.
WARNING: NewTek strongly recommends that you backup your system before you install LightWave 3D.
LightWave [8]
5

LightWave [8]
6
Software Installation
To install LightWave 3D on your system, insert the LightWave 3D Program Disc CD-ROM. The installer should automatically start up. If it doesn’t, open the CD and run setup.exe on the PC, or the LightWave installer program on the Mac. Both platform installers are on the same CD.
Windows 2000 or XP:
Step 1: If this is a new seat of LightWave being installed for the first time, attach the supplied USB dongle. Please note that if Sentinel drivers for the dongle are not present, then during the installation you will be asked to remove the dongle while drivers are installed.
Step 2: Insert the LightWave 3D [8] Program CD.
Step 3: Install Shield will inform you if the Sentinel Drivers must be installed.
Step 4: There will also be a pop-up message about severe problems if the dongle is not removed and the machine is not restarted before installing LightWave 3D [8]. DO NOT click to close this pop-up yet.
Step 5: When Install Shield starts the procedure for the dongle driver install, click on ‘Complete’, not ‘Custom’. Let it install the drivers for both the parallel and USB dongles, even though you will only be using the USB dongle.
Step 6: When you are told to do so, remove the dongle from the machine.
Step 7: Allow the drivers to be installed.
Step 8: When done, you will get another message about restarting your computer.
Step 9: Click to close the message from step 4.
Step 10: Click to restart the machine.
Step 11: When Windows has completed rebooting, and you see the desktop, reinsert the dongle.
Step 12: When the ‘New Hardware Found’ Wizard comes up, let it run.
Step 13: If it asks you which driver to use, select ‘automatic’, and there should only be one driver on C: (or whatever drive you are installing to). Select it.
Step 14: Re-activate the LightWave 3D [8] installer.
Step 15: Install the software.
Step 16: Follow the on-screen steps to register LightWave 3D [8].
Step 17: The LightWave program icons will be located in the NewTek LightWave 3D [8] folder in the Start | Programs menu.
Mac OS X (10.3.3 or higher):
Step 1: If this is a new seat of LightWave being installed for the first time, attach the supplied USB dongle.
Step 2: Insert the LightWave 3D [8] Program CD.
Step 3: Double-click the install icon.
Step 4: Install the software.

Step 5: Follow the on-screen steps to register LightWave 3D [8].
Step 6: The LightWave program icons will be located in the LightWave [8] folder in the Applications folder.
Step 7: Drag LightWave and Modeler to the Dock for easy access, or create aliases by Option-Dragging the icons to the Desktop
Registering and Licensing Your Software
Initially, LightWave will create a temporary license key that will allow the application to run in full mode for a certain number of days before you must register the software. After the temporary key expires, LightWave will run only in Demo mode until the permanent license key is installed.
Registration is quick and easy, and can be completed 24 hours a day, 7 days a week on our web site. It is important that you register your software — not just to unlock it — as registration allows you to receive free technical support, upgrades, special offers, and new product information.
LightWave 3D [8] includes a registration wizard that automates the process of registering the software, and installing the permanent license key code, if you have installed LightWave on an Internet-connected computer system or have access to such a system.
To register, you will need your Hardware Lock ID and your Serial Number. To get your Hardware Lock ID, just run the Registration Wizard or run LightWave. A dialog box will appear that tells you this information. Your Serial Number is located either on the bottom of your box or on the back of your CD jewel case, and contains only numbers. We recommend that you record your serial number in the manual, as well.
The Registration Wizard will automatically connect to the registration page on the NewTek website. If you have not previously registered a product with NewTek on the new registration page, you will first have to create a profile, and will then be taken to the page to register your copy of LightWave by entering the Serial Number and the Hardware Lock ID. The automated registration page will generate and display your License Key Code, and will also email it to you. The Registration Wizard can complete the process of installing your license key so that you have permanent access to LightWave [8].
A tutorial on the registration process is provided both for Mac and PC users. You may wish to review the tutorial prior to completing the registration process.
If you do not have access to an Internet connected system, you will need to contact customer services by phone or by mail to register LightWave. US office customers, please call 1-800-862- 7837 or 210-370-8000. International customers will need to contact their regional distributor, and contact information for that distributor can usually be found on your LightWave packaging or in your LightWave reference manual; US customer services can also assist you in determining your regional distributor if needed — call +1-210-370-8000.
NewTek’s US Mailing address is:
Attn: Registration
NewTek, Inc.
5131 Beckwith Blvd
San Antonio, TX 78249
Running the Program
LightWave 3D is started the same way as any other program on the particular platform on which it’s installed. LightWave 3D has two major applications that work together: Layout and Modeler. Each program can be started independently; however, you may also access them by clicking the appropriate button on their respective interfaces.
LightWave [8]
7

LightWave [8]
8
Conventions
About the Manual
LightWave 3D is generally divided into two separate environments: LightWave Layout and LightWave Modeler. (It is a common convention to refer to the animation and rendering toolset as LightWave, or just Layout, and to refer to the object creation toolset as Modeler.)
For Layout, the buttons on the toolbar are often shortcuts to controls that can also be accessed from one of Layout’s many panels. The Layout section of the manual begins with a panel and topic-based approach to explaining Layout, since many controls for certain tasks are grouped together on panels, and continues with explanations of the tools as found on the menu tab toolbars.
Modeler is a little different. All of its tools are accessed from the toolbar, and panels are used to execute more focused tasks. As such, the Modeler portion of the manual is generally organized by the order of tools in the toolbar.
Typographic Conventions
The following conventions will be used throughout this manual.
Directory Structure
Except for a few system files, all of the software will be installed in a single subdirectory on the drive you specified during the installation process. Therefore, subdirectories referred to in this documentation are located in this main subdirectory. (For example, if the discussion refers to the Images drawer, the actual path might be C:\LIGHTWAVE\IMAGES.)
Typefaces
ALL CAPS |
Computer keys, directories, device names (e.g., ENTER, C:\LIGHTWAVE\OBJECTS, |
|
CTRL+P, etc.). |
Bold |
Names of interface menus, fields, buttons, etc. are set in bold type. |
Keystroke Combinations
KEY1 + KEY2 Simultaneous keystrokes. Hold the first key and press the second key.
Mouse Operations
LMB |
Left mouse button |
MMB |
Middle mouse button (if applicable) |
RMB |
Right mouse button |
Selecting |
Single-clicking an element with the LMB so that it becomes active or selected. |
Deselecting |
Single-clicking an element with the LMB so that it becomes inactive or unselected. |
Activating |
Selecting an option by clicking on its toggle button. |
Deactivating |
Unselecting an option by clicking on its toggle button. |
Clicking |
Placing your mouse pointer over something and then pressing a mouse button. |
|
This nearly always means the LMB. |
Right-clicking |
Clicking an element with your RMB. |
Double-clicking Rapidly clicking an element twice.
Dragging |
Selecting an element with your mouse pointer and continuing to hold the mouse |
|
button down as you move your mouse. This nearly always means with the LMB. |
NOTE: Important Information for Macintosh users:
For maximum functionality, a two or three button mouse is recommended with LightWave. Using a single button mouse,
a RMB action can be applied by holding the COMMAND (Apple) key while pressing the mouse button.
Attenti-cons
WARNING: The warning symbol will highlight a discussion that warns the user about something. You should pay special attention to text marked with this symbol.
NOTE: The note symbol will highlight a discussion that is particularly noteworthy.
HINT: The hint symbol will highlight tips and suggestions that are usually of a time-saving nature.
FUN FACT: Interesting information that will not necessarily make you smarter with LightWave, but will allow you to amaze and amuse your friends
with your inside knowledge of 3D industry trivia.
Key LightWave Terms and Concepts
In the Appendices you will find an extensive Glossary of terms used in 3D graphics. The following are a brief selection of some common terms and concepts used with LightWave that will help you to get started. These are also covered in the Glossary, in some cases at greater length.
Animation Channel — Animation Channel refers to the different Position, Rotation, and Scaling settings an item can have in Layout. It can also refer to other envelopeable elements like light intensity. See also motion channel.
Axis — Axis refers to the XYZ coordinates used as the basis for positioning elements in LightWave’s 3D space. It is somewhat like the concept of left/right, up/down, and near/far.
Bone — For any object, you can define a skeletal system composed of bones. By moving bones around, you can change the shape of an object.
Bounding Box — A Bounding Box is a six-sided box conforming to the outer dimensions of an object. It is commonly used as a quickly drawn stand-in for a more complex object.
Camera — As in real life, a camera records events. Looking through LightWave’s camera shows you the view as it will be generated.
Control Mesh — A Control Mesh is a cage of points used to shape SubPatches.
Endomorph — An Endomorph is an object containing one or more Morph Maps.
LightWave [8]
9

LightWave [8]
10
Envelope — An envelope is a way of setting a particular value that usually changes over time using a graphical input mode.
Frames — LightWave works with frames. A frame is one image out of many that define an animation. There are approximately 30 frames per second in NTSC video, 25 frames per second in PAL video, and 24 frames per second in film.
Geometry — Geometry refers to the positional layout of points and polygons that define an object.
Item — An item in Layout refers to an object, bone, light, or camera.
Keyframe (Also known as just a key) — A keyframe is a frame for which you define a value for an animation channel(s) (e.g., position or rotation) for an item in Layout. Animations are composed of a beginning keyframe, an ending keyframe and usually some number of keyframes in between. See also tween, in the Glossary.
Light — A light in LightWave is generally used just like a light in real life. Lights illuminate a scene and allow you to see the objects within it.
LScript — This is LightWave’s built-in scripting language. LScripts can be installed and used just like plugins.
Motion Channel — Motion Channel is generally the same as Animation Channel, but refers only to position, rotation, and scale. (i.e., not light intensity.)
Normal — A polygon normal is the imaginary line projecting out perpendicular to a surface at any point indicating the direction of the polygon. A polygon surface normal is represented as dashed lines on selected polygons in Modeler. LightWave sees polygons or faces of an object only from the surface normal side. A single-sided polygon (like a piece of paper) with its normal facing away from the camera will be invisible to the camera from that viewpoint (unless the surface is using the Double Sided option). A vertex normal’s direction is the average of the polygon normals it is connected to.
Null Object — A null object is an object that contains no geometry and will not show up in a rendered image. Nulls are useful for tracking, grouping (parenting), and using with inverse kinematics functions. They are also commonly used to control plug-ins.
Object — An object is composed of points and faces. Points connected together to form a polygon define a face. Faces joined together form an object.
Parenting — Parenting refers to LightWave’s ability to set hierarchical associations between items in a Scene. Generally, the parent item will have some level of influence on its child, whether it is position, rotation, size, etc. The child can also be a parent to another item.
Particles — Usually refers to animated points used for sparks, fire, and even liquid. LightWave’s particle engine is called Particle FX.
Pivot Point — The position in an object that acts as the center of rotation and position reference.
Pixel — A pixel is the smallest unit of measurement in an image and is used to describe the image’s width and height.
Plane — A plane refers to a two-dimensional (i.e., flat and level) surface. You might want to think of a plane as a piece of glass that is infinitely large, but has no depth.
Plug-in — A plug-in is a program that works with and extends the functionality of LightWave.
Render — Rendering is the computer’s process of calculating and generating an image based on the values you have selected for the different options in LightWave.

Scene — A Scene is a LightWave project defining the objects loaded and their motions, the number of lights and their values/motions, the resolution of the final image, special effects, Camera settings, and so on. This ASCII text file is generally saved from Layout.
Session — A session is a single use of an application. A session starts when you first boot the application and ends when you exit.
Spline (Curves) — LightWave uses splines or curved paths between keys while moving items about. When modeling, splines refer to open or closed curves.
SubPatch — SubPatch is a modeling mode where polygons become a cage that controls an underlying mesh of NURBS.
Surface — Essentially, the surface is the skin of an object. A single object can have multiple surface names, each with its own independent attributes (e.g., color), and multiple objects can share the same surface name(s).
Texture — A texture is an attribute of a defined surface, or an entire object, in the case of displacement and clip maps.
Vertex — A vertex is the point at which the sides of a polygon intersect.
Working With The Interface
In no time, you’ll find yourself mastering LightWave’s intuitive interface. LightWave uses very few picture-icons that may confuse you. Instead, most functions are listed on the interface panels in plain text. Listed below are a few other conventions involved with the LightWave interface:
Button — A button refers to an area on the screen that you click on with your mouse to cause some function to occur. Generally, only a single click is required. There are also special types of buttons, like toggle, pop-up menu, and envelope buttons. Some buttons become highlighted, indicating a chosen or active status.
Contextual Pop-ups — This refers to context-sensitive pop-up menus. Such menus appear when you SHIFT+CTRL+LMB and are aware of the area the mouse pointer is over.
Dialog — See Requester
Drag Button — A drag button is similar in effect to a slider, except the button does not move. To use, just click on it and hold the mouse button, then drag the mouse. Depending on the parameter being adjusted, the direction and mouse button used will have different specific effects.
Envelope Button — An Envelope button is a small button marked with an E. Selecting this button will display the Graph Editor where you can create an envelope for the setting. A highlighted envelope button indicates a value has an envelope applied. To turn off (i.e., remove) an envelope, hold the SHIFT key and click on the Envelope button.
Ghosted Item — LightWave will ghost out parameters that are not available to you. This is usually the result of a certain option not being activated. Selecting a ghosted item will display a message informing you why it cannot be used.
Information Field/Display — Information Fields/Displays are text displays found throughout the different panels. These displays cannot be changed directly and simply provide information and feedback.
Input Field — Input fields are areas on the screen where you can enter data.
LightWave [8]
11
Mini-Slider — A mini-slider is a button with two arrows on it, pointing right and left. Clicking on one and holding the LMB, then dragging to the right or left will raise or lower the value of the
parameter next to it. In many cases, however, the slider does not encompass the entire spectrum of possible values.
Panels — Panels are any one of the windows that open when you click on a button in LightWave. Many panels have additional tabbed sections that are selected when you click on a tab. Panels may be Modal or Non-modal. A modal panel must be closed before you can continue working with the rest of the application. A non-modal panel lets you shift the focus between it and another part of the application without having to close the panel—you can continue to work elsewhere in the current application while the panel is displayed. Modeler’s Numeric Panel
is non-modal because you can do other things while it is open. In contrast, Modeler’s Display Options Panel is modal because you must close it before you can continue working.
Pop-up Menu — Pop-up menu buttons have a downward facing arrow on their right edge. To use, click on it and hold the LMB. The menu will pop up and as you move your pointer over the menu, each item will become highlighted. When the desired selection is highlighted, release the LMB. If you decide not to select an item, simply move the pointer off the menu and release the LMB. Certain pop-up menus contain lists of objects, images, and lights, which are normally listed in the order they were loaded or created.
Requester — A requester is also known as a dialog box. These appear on the screen for operations like file loading and saving. This also refers to smaller windows that appear requesting the user input data into various fields.
Reset Area — The reset area is a non-active open area (e.g., not a button) on the Modeler toolbar that acts as a reset button, much like you might use the ESC key on other applications.
Scrollbar — See Slider
Shaded Display — See Solid-Shaded Display.
Slider — A slider allows you to modify a setting by dragging the slider’s button along the bar. Alternatively, you can click to the right or left of the button or use the arrow buttons at either end to incrementally change the setting value. (Also known as a scrollbar.)
Solid Shaded Display — Solid shaded display refers to a non-wireframe display mode where some level of surface texture detail is visible.
Texture Button — A Texture button is a small button marked with a T. Selecting this button will present a texture panel allowing you to define a texture for the chosen parameter. A highlighted texture button indicates a texture in use for the given parameter. To turn off (i.e., remove) a texture, hold the SHIFT key and click on the Texture button.
Toggle Button — A Toggle button is a small button that becomes highlighted with a check mark when clicked. This indicates the adjacent feature is active.
LightWave [8]
12
LightWave Panels and Dialogs
LightWave’s panels and requesters are generally non-modal and can be left open even while you interact, say, with the Layout window and its controls.
Math in Input Fields
Numeric input fields support basic math operations (+, -, *, /, and ^) and algebraic equations. You can even mix units. Here is an example: (12ft+14m)^2+(3/5). The result, 312.3908 m, would appear after you press the Enter key. Note that the result is shown using the default unit; here, it is meters. Also, since we didn’t specify the unit of measure for the 3 and 5, the default is used.
Enter/Tab Keys with Input Fields
When you enter values into dialogs that have multiple input fields, the Tab and Enter keys have special functions to save you time. Pressing the Tab key stores the entered/current value and automatically advances you to the next input field. Shift + Tab moves to the previous field. The Enter key also stores value, but dismisses dialog, if appropriate.
Yes and No
Whenever a requester asks you a Yes or No question, pressing the Enter key is the same as selecting Yes, while pressing the Esc key is the same as selecting No. Likewise, an Error, Warning or Reminder requester with a choice of Continue or Cancel can use Esc for Cancel and Enter for Continue. For those requesters with only a Continue, pressing either Esc or Enter will close the panel.
Color Selection
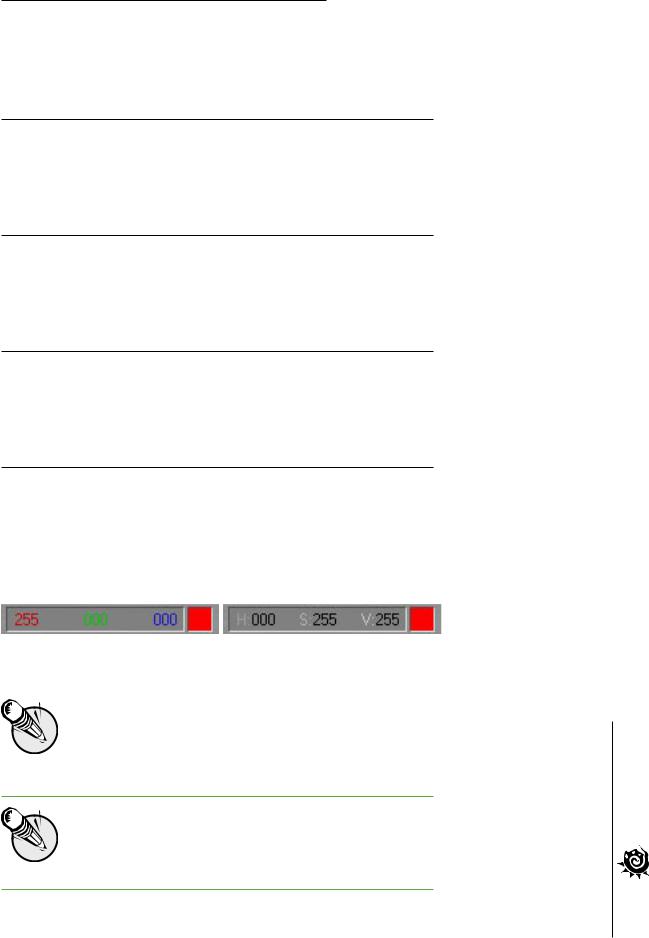
Where you must select a certain color (e.g., surface color), there will be a three-number color component display and a color swatch box. You can also drag your mouse on each color component to change its value. By default, the standard RGB color space is displayed; however, if you right-click on the display, you may also use the Hue, Saturation, and Value (HSV) color space, if that is more familiar to you. HSV is based on the artist’s concepts of tint, shade, and tone. There are 16.7 million possible color combinations.
Left: RGB, Right: HSV
NOTE: Unlike RGB, HSV color components are not independent. For example, if Value is 0 (i.e., brightness is 0), you will not be able to change Hue (color) nor Saturation. Similarly, if Saturation is 0,
you will not be able to change Hue. Moreover, reducing one component may cause another component to decrease.
NOTE: LightWave will attempt to display the selected color to the best of your display’s capabilities. This will generally result in an approximation of the color if you are using less than a 24-bit
display mode.
LightWave [8]
13

Color Pickers
Clicking the color swatch box will open a color selection requester that is standard for your specific platform or the built-in color picker.
Windows Color Picker
The LW_ColrPikr color picker is a color selector with more features, such as a wavelength and temperature-guided layout of color. Select this on the General Options Tab of the Preferences Panel (Edit > General Options).
LightWave Color Picker
LightWave [8]
14
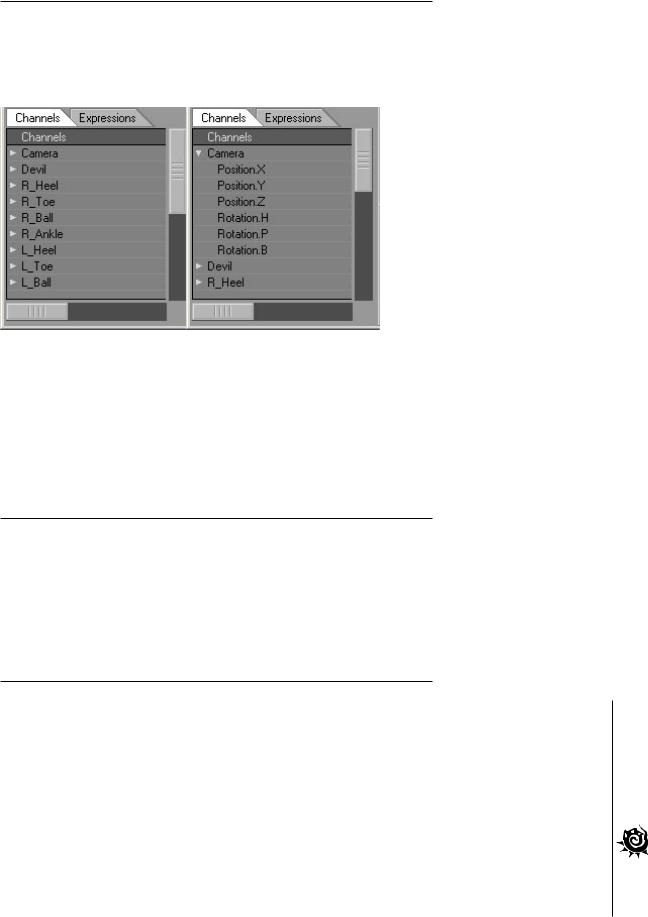
Standard List Windows
Windows that contain lists of items (surfaces, scene items, menu items, etc.) all have a slider bar to scroll through the list. If the list is hierarchical in nature, there will be arrowheads to the left of item names. If the arrowhead is facing to the right, then they are subordinate items to this parent item.
Clicking the arrowhead will make it face down and also reveal the subordinate items.
Left: All lists are collapsed, Right: Camera Entry is uncollapsed
If selection is appropriate, you can click on an item to select it. Ctrl + click will select non-contiguous items and Shift + Click will select a range of items.
List windows that are hierarchical in nature can be reorganized by dragging items around in the list. Where appropriate, multiple selection is supported.
Reorganizing Lists
In some list windows (e.g., menu configuration), you can reorganize entries by just dragging them in the window. Place your pointer over the entry and drag it up or down. You will see a thin line appear as you drag. This is the insert point. Releasing the mouse button will drop the entry here.
Now, if your pointer is at a position where the dropped item could be, say, a sub-item of an entry, the same level as the entry, or even the same level as the next entry, the length of the line would change as you drag. The position of the left end of the line determines the level of the drop.
Context Pop-up Menus
Both Layout and Modeler have special “context” pop-up menus that you display by holding Ctrl + Shift and clicking your LMB, MMB, or RMB with your mouse pointer over a viewport — there are different menus for each mouse button.
LightWave [8]
15
LightWave [8]
16
Customizing Your Interface
WARNING: We strongly suggest that you keep the default menu organization intact. Otherwise, technical support and using the documentation may become difficult. A better solution is to create a
new menu tab and/or groups and place your frequently used tools in them.
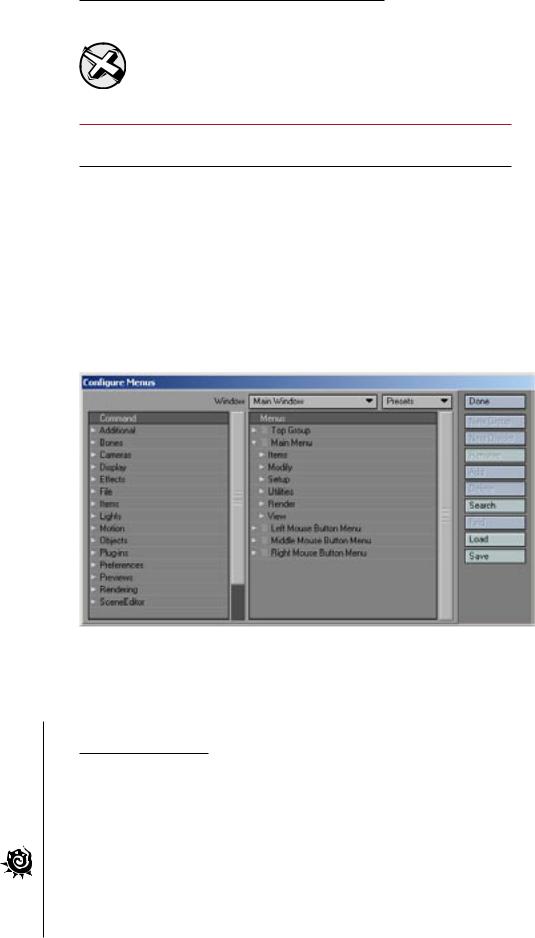
Menus
LightWave menus are customizable. You can add, remove, group, and reorganize commands.
Choose Edit >Edit Menu Layout to open the Configure Menus Panel. In the (left) Command window, a list of available commands will appear. These will be grouped by type.
In the (right) Menus window, several main sections have sub-items, which are indented to show the hierarchical relationships. Top Menu Group contains the items that are always visible no matter which tab is selected. Main Menu items are the main tabs and related buttons for the main interface toolbar. Bottom Edge is for Modeler only and relates to the controls along the bottom edge of the screen. Left, Middle, and Right Mouse Button Menu (when available) are the menus that appear when the Shift + Ctrl keys are held down along with the corresponding mouse button. There may be other menu sections defined.
In the Menus window, dots indicate commands while arrows indicate groups of commands/subgroups beneath it. If the arrow points to the right , the group’s sub-menu items are collapsed and not visible. To reveal the sub-menu items for a collapsed group, simply click on its right-facing arrow. To collapse an open group, click on its downward-facing arrow.
First-Level Menu Items
Menu items on the first-level must always be a group. Commands and sub-groups may exist on the second menu level. On the toolbar, a Main Menu group’s name will appear as a heading above the grouped command buttons. If the group name is blank, no heading will appear. On the next menu level, commands or sub-groups can also be used. If a sub-group is used, it will appear as a pop-up menu on the interface.

The hierarchy would look like this:
Section Type (e.g., Main Menu)
Group (Group name appears on row of horizontal tabs on the main interface) Command/Sub-group (If a group, its name, if any, appears as a header above the
next group of commands)
Command/Sub-group (If a group, its name appears on pop-up button)
Adding New Groups
If you select a collapsed group when you click the New Group button, it will be added at the same level as the group. If you select an un-collapsed group when you click the New Group button, it will be added inside the group.
Divider Line
Clicking the New Divider button will add a dashed line below the selected menu item. This is displayed as a dividing line between menu items when it appears in a pop-up menu group.
Renaming Menu Items
You can rename any menu item (including commands) by selecting it with your mouse and then clicking the Rename button.
NOTE: The command name is not always what is displayed on a button. If the command uses a shorter name, the button may use the exact or a similar name. However, the button name can be very
different in some cases. Of course, you can always rename the displayed name.
Automatic “More” buttons
If an interface (e.g., Layout or Modeler) is sized too small to fit all Toolbar buttons, a More pop-up button will appear at the end of menu groups and contain the hidden buttons. Note that sometimes the menu names can be different depending on whether they are listed on the toolbar or listed in a pop-up menu.
Adding Commands
To add a command, select it in the (left) Command window and select the target position in the (right) Menus window. Then click the Add button. The command will be added under the selected target — inside the group if a group was selected. Alternatively, you may drag the command to the Menus window.
Reorganizing Menus
You can reorganize entries by just dragging them in the window. Place your pointer over the entry and drag it up or down. You will see a thin line appear as you drag. This is the insert point. Releasing the mouse button will drop the entry here.
Now, if your pointer is at a position where the dropped item could be, say, a sub-item of an entry, the same level as the entry, or even the same level as the next entry, you will see the line change its length as you drag. The position of the left end of the line determines the level of the drop.
HINT: To place the group/command at a specific point in a group, make sure the group is uncollapsed before you begin dragging.
LightWave [8]
17

LightWave [8]
18
Default Menu Locations for Plug-in Commands
The plug-ins that come with LightWave have default (Layout or Modeler) menu locations for their commands. However, when you add plug-ins, the commands will be placed in their default menu locations only if you are using the default menu. (You are using the default menu, if you have never customized the menu configuration or have chosen Default from the Presets pop-up menu.)
Modeler places commands without default menu locations in the Construct > Utility: Additional pop-up menu. For Layout, you must manually assign such commands to menus.
Finding Assignments and Commands
If you have a command selected in the left window and click Find, the command, if any, on the right will become selected. Selecting a command in the right window and clicking Find will select the matching command in the left window.
Since a command can be assigned to more than one menu location, successive Find clicks will show the next assignment, if more than one exists.
Clicking Search allows you to type in a search phrase to find a command. Note that this will only find the first instance and it is case sensitive.
HINT: If you know the keyboard shortcut, but want to find the corresponding menu location, use the Find function on the Configure Keys Panel to determine the command name. Then, use the Find
function on the Configure Menus Panel to see where it is assigned.
Deleting Menu Items
To delete a command/group, select it and click the Delete button.
Window Pop-up
The Window pop-up menu lets you select different menus to edit (e.g., Graph Editor), if available.
Maintaining Menu Sets
The Load and Save buttons let you retrieve and store menu sets that you develop. To restore the default menu configuration, choose Default from the Presets pop-up menu. If you’d like to have a menu set similar to LightWave 6.0, choose 6.0 Style. (For Layout, you can even choose 5.6 Style.)
Arranging Menu Tabs
You can reorganize the main menu tabs by simply dragging them left or right on the main interface. Before you release the mouse button you will see an insertion point marker appear.
Middle Mouse Button Menu
The context menu for the middle mouse button exactly mirrors the group structure for commands, as found in the menu and key editing dialogs — including any plug-in commands added to the system. If you know where a command is located in the master groupings, you can find it in the middle button menu.
Keyboard Shortcuts
Keyboard shortcuts are displayed on the right side of buttons, if applicable. Keystrokes that need the Shift key are displayed in uppercase if they are letters. (e.g., A) Unshifted keystrokes are displayed in lowercase. (e.g., a) For example, M is Shift + M and & would be Shift + 7. This manual, however, always explicitly indicates when the Shift key should be used.
WARNING: You need to be aware of the state of your Caps Lock. If this is active, it can affect upper and lowercase keyboard shortcuts.
Panel-Specific Shortcuts
Some panels have their own special keyboard shortcuts. To use them, you must have that panel active. (Click on it, if it isn’t already active.) If the panel is not active and that shortcut has another meaning for LightWave in general, the general function will be run. Moreover, if the panel is active, but doesn’t use the keyboard shortcut, it will be passed to the main interface.
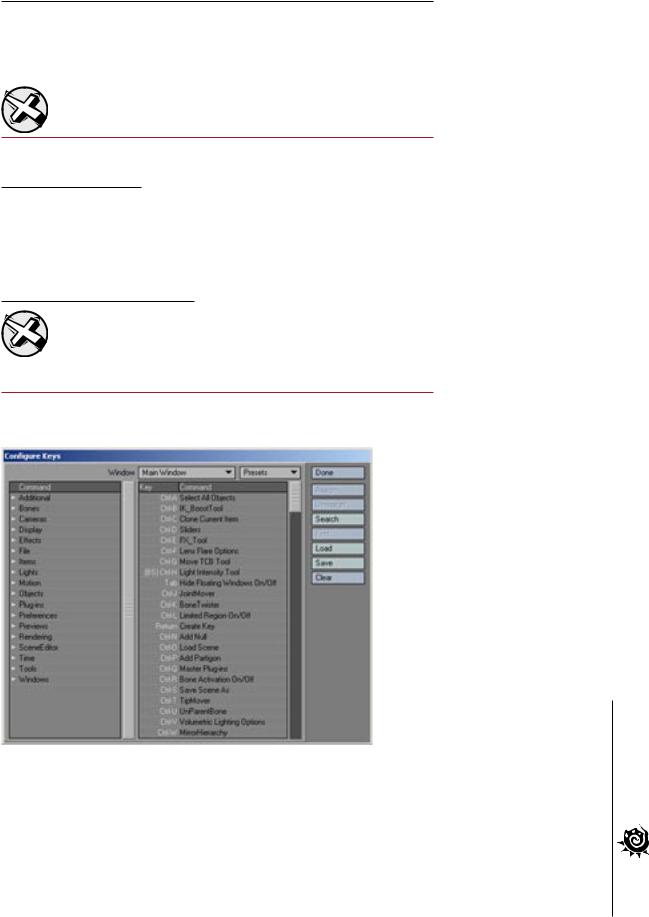
Customizing Keyboard Shortcuts
WARNING: We strongly suggest that you keep the default keyboard mapping assignments and make new assignments only to unmapped keys. (Most of the function keys are open.) Otherwise, technical
support and using the documentation may become difficult.
Like the menus, keyboard shortcuts can be configured to suit your own needs. To display the
Configure Keys Panel, choose Edit> Edit Keyboard Shortcuts.
The window on the left contains a complete list of all assignable commands grouped by type. The right window shows a complete list of all keystrokes and assigned commands, if applicable.
LightWave [8]
19
LightWave [8]
20
To assign a command to key:
Select a command in the left window.
Select the target key in the right window. (You can hit the desired key or keystroke combo to quickly select the key.)
Click the Assign button. This will overwrite any existing assignment. Alternatively, you may drag the command to the right window.
To unassign a command to key:
Select the target key in the right window.
Click the Unassign button.
Finding Assignments and Commands
If you have a command selected in the left window and click Find, the command, if any, on the right will become selected. Selecting a command in the right window and clicking Find will select the matching command in the left window.
Clicking Search allows you to type in a search phrase to find a command. Note that this will only find the first instance and it is case sensitive.
NOTE: Keyboard shortcuts can be assigned to only one command. Assigning a command that is already assigned to a different key will assign it to the new key, but remove it from the old one.
Maintaining Key Mapping Sets
The Load and Save buttons let you retrieve and store key mapping sets that you develop. The Clear button clears out all assignments, so use with caution.
NOTE: In Modeler, you can use Modeler > Preferences > Revert to Startup Preferences to restore your initial settings; however, any changes since you first ran the application will not be reflected.
Any available preset key mapping sets can be chosen from the Presets pop-up menu. The Window pop-up menu lets you select different menus to edit (e.g., Graph Editor), if available.
Generic Plug-ins
Generic Layout plug-ins (Scene > Utilities: Generics) will appear in the Plug-in commands group. Thus, they can be added to menus or mapped to keyboard shortcuts.

Configuration Files
The various LightWave configuration files are stored in your the SYSTEM:PREFERENCES folder (with long names) under Macintosh OS X or the DOCUMENTS AND SETTINGS directory under Windows 2000 or XP. Generally, you will not need to edit these files directly.
Custom Configuration Files
Layout (LIGHTWAV.EXE), Modeler (MODELER.EXE) and the Hub (HUB.EXE) all support a -c command line argument that allows you to save your configuration files somewhere other than the system default (e.g., C:\WINNT\PROFILES). To use, add a -c<path> parameter when you launch the appropriate executable.
Example: MODELER.EXE -CD:\MONKEY
For Windows systems, just create shortcuts for Layout and Modeler and add the option to the Target entry in the Properties panel for the shortcut.
For Mac systems the options are implemented using a special text file known as a command line file, located typically inside the Program Files directory. The file must be named the same as the application followed by a space and then the word CMDLINE as follows:
LightWave cmdLine
Modeler cmdLine
LWSN cmdLine
If they don’t exist, a user may create them if necessary. The files must be in plain text format. TextEdit by default saves files in .RTF format - this will NOT work. It is possible to modify the preferences for TextEdit to save files in Plain text versus Rich text. The same command option arguments are available as on the PC, but the user will need to be aware of the different directory paths in use on the Mac.
For example, if the file LIGHTWAVE CMDLINE contained the following line, the Hub would be disabled and the path for LightWave’s config files would be directed to a folder named SOMEPLACEELSE, on the root of the hard drive:
-0 -c”Macintosh HD:SOMEPLACEELSE”
The following line would set the location for the plugin preferences file:
-p”Macintosh HD:SOMEPLACEELSE”
The same holds for Modeler, the Hub and LWSN (LightWave ScreamerNet - the network rendering node). LWSN requires the user to path the preferences location and the project directory before the job/ack references. An example of the contents of a LWSN CMDLINE file might be:
-2 -c”Macintosh HD:Users:myusername:Library:Preferences:” -d”Macintosh
HD:Users:myusername:projectdirectory:” “Macintosh
HD:Users:myusername:projectdirectory:job1” “Macintosh
HD:Users:myusername:projectdirectory:ack1”
The -c argument sets up entries that the Hub tracks. So, if you click the Modeler button on the Layout interface, for example, it will run with the proper config file.
LightWave [8]
21
Loading...