

Page 1

Page 2

Revised – April 26, 2015
Trademarks: NewTek, TriCaster, TriCaster XD, TriCaster 8000, TriCaster TCXD8000, TCXD8000, TriCaster 860, TriCaster
TCXD860, TCXD860, TriCaster 460, TriCaster TCXD460, TCXD460, TriCaster 410, TriCaster TCXD410, TCXD410, TriCaster
Mini, TriCaster 40, TriCaster TCXD40, TCXD40, TriCaster 855, TriCaster TCXD855, TCXD855, TriCaster 455, TriCaster
TCXD455, TCXD455, TriCaster EXTREME, TriCaster 850 EXTREME, TriCaster TCXD850 EXTREME, TCXD850 EXTREME,
TriCaster 450 EXTREME, TriCaster TCXD450 EXTREME, TCXD450 EXTREME, TriCaster 850, TriCaster TCXD850, TCXD850,
TriCaster 450, TriCaster TCXD450, TCXD450, TriCaster 300, TriCaster TCXD300, TCXD300, TriCaster PRO, TriCaster STUDIO,
TriCaster BROADCAST, TriCaster DUO, 3PLAY, 3Play, 3Play 4800, 3PXD4800, 3Play 440, 3PXD440, 3Play 820, 3PXD820,
3Play Mini, 3Play 425, 3PXD425 3Play 330, 3PXD330, TalkShow, TalkShow VS100, ProTek, ProTek Care, ProTek Elite,
iVGA, SpeedEDIT, IsoCorder, LiveText, DataLink, LiveSet, TriCaster Virtual Set Editor, TriCaster VSE, LiveMatte, TimeWarp,
VT, VT[3], VT[4], V[T5], Video Toaster, Toaster, Inspire 3D, 3D Arsenal, Aura, LightWave, LightWave 3D and LightWave
CORE are trademarks, service marks, and registered trademarks of NewTek. All other brand names, product names, or
trademarks belong to their respective holders.
Page 3

VERSION 2.2
.
Page 4

TAB LE OF CON T ENTS
1 INTRODUCTION ..................................................................................................... 1
1.1.1 Manual Organization .................................................................................................... 1
2 GETTING STARTED .............................................................................................. 3
2.1 System Requirements ..................................................................................................... 3
2.2 Installing LiveText™ ......................................................................................................... 3
2.2.1 Step 1 ............................................................................................................................ 4
2.2.2 Step 2 ............................................................................................................................ 4
2.2.3 Step 3 ............................................................................................................................ 5
2.2.4 Step 4 ............................................................................................................................ 5
2.2.5 Step 5 ............................................................................................................................ 6
2.2.6 Step 6 ............................................................................................................................ 6
2.3 Making the Connection ................................................................................................... 7
2.4 A Simple Example ............................................................................................................ 8
2.5 Using Page Templates ................................................................................................... 12
3 TITLING TOOLS................................................................................................... 15
3.1 LiveText Overview ......................................................................................................... 15
3.2 Output Aspect (4:3 or 16:9?) ......................................................................................... 16
3.3 Project Page Management ............................................................................................ 16
3.3.1 The Pages Panel .......................................................................................................... 17
3.4 File Menu ...................................................................................................................... 18
3.5 The Tool Panel............................................................................................................... 19
i
Page 5

3.5.1 Text and Drawing ........................................................................................................ 19
3.5.2 Alignment .................................................................................................................... 22
3.6 The Motion Panel .......................................................................................................... 24
3.6.1 Speed Control ............................................................................................................. 24
3.6.2 End Behavior ............................................................................................................... 25
3.7 Control Panel Tabs ........................................................................................................ 25
3.7.1 View ............................................................................................................................ 25
3.7.2 Text and Drawing ........................................................................................................ 27
3.7.3 The Color Tab .............................................................................................................. 29
3.7.4 The Style Tab ............................................................................................................... 31
3.7.5 The Filebin ................................................................................................................... 32
3.7.6 The Layers Tab ............................................................................................................ 32
3.8 Options and Keyboard Control ...................................................................................... 35
4 DATALINK™ AND LIVETIME™ ........................................................................ 37
4.1 Datalink Overview ......................................................................................................... 38
4.1.1 Key Names and Title Pages ......................................................................................... 38
4.1.2 The DataLink Profile .................................................................................................... 39
4.1.3 TXT Linker .................................................................................................................... 39
4.1.4 Database Linker .......................................................................................................... 39
4.1.5 Network Linker............................................................................................................ 39
4.1.6 Serial Linker ................................................................................................................. 40
4.2 Working With Keys and Values ..................................................................................... 40
4.2.1 TXT Linker .................................................................................................................... 40
4.3 Connecting External Devices ......................................................................................... 44
4.3.1 USB-Serial Adapters .................................................................................................... 44
4.3.2 Find the COM Port ...................................................................................................... 45
4.4 Configuring DataLink ..................................................................................................... 47
4.4.1 Creating a DataLink Profile.......................................................................................... 47
ii
Page 6

4.4.2 Network Feed (RSS) Settings ....................................................................................... 48
4.4.3 Database Setup ........................................................................................................... 48
4.4.4 Serial (Scoreboard) Setup ........................................................................................... 50
4.4.5 Applying a Datalink Profile .......................................................................................... 51
4.5 Control Keys .................................................................................................................. 51
4.5.1 Page Control Keys ....................................................................................................... 51
4.5.2 Image Control Keys ..................................................................................................... 51
4.6 LiveTime™ ..................................................................................................................... 52
5 LIVE PRODUCTION AND FILE MANAGEMENT .......................................... 53
5.1 Live Display ................................................................................................................... 53
5.2 File Exports.................................................................................................................... 55
5.2.1 File Menu .................................................................................................................... 55
5.3 Filebin Features ............................................................................................................. 58
5.4 Stand-In Images ............................................................................................................ 62
6 APPENDIX A – KEYBOARD SHORTCUTS ..................................................... 63
7 APPENDIX B – KEY LIST BY DEVICE ............................................................. 71
7.1 Daktronics ..................................................................................................................... 71
7.1.1 Baseball ....................................................................................................................... 71
7.1.2 Basketball .................................................................................................................... 71
7.1.3 Football ....................................................................................................................... 72
7.1.4 Hockey ........................................................................................................................ 73
7.1.5 Soccer .......................................................................................................................... 74
7.1.6 Volleyball .................................................................................................................... 74
7.2 DSI Keys: ....................................................................................................................... 75
iii
Page 7

7.3 Daktronics CG ................................................................................................................ 75
7.3.1 Basketball ................................................................................................................... 78
7.3.2 Football ....................................................................................................................... 79
7.3.3 Hockey ........................................................................................................................ 80
7.3.4 Soccer ......................................................................................................................... 81
7.3.5 Volleyball .................................................................................................................... 82
7.4 OES................................................................................................................................ 83
7.4.1 Basketball .................................................................................................................... 83
7.5 Translux Fairplay ........................................................................................................... 84
7.5.1 Football ....................................................................................................................... 84
7.6 Whiteway ...................................................................................................................... 84
7.6.1 Basketball .................................................................................................................... 84
7.7 Whiteway Rainbow ....................................................................................................... 85
7.7.1 Basketball .................................................................................................................... 85
8 APPENDIX C – NETWORKING NOTES .......................................................... 87
8.1 Ping is Your Friend ......................................................................................................... 87
9 INDEX ..................................................................................................................... 91
10 CREDITS ............................................................................................................. 94
iv
Page 8

1 INT RODUC TION
Installed on a ‘satellite’ workstation (or laptop), LiveText greatly extends
the live production environment, providing a new level of creativity,
confidence, and professionalism!
Users of compatible live production systems (like NewTek’s famous
TriCaster™ family) are the primary beneficiaries. LiveText multiplies
creative opportunities and brings new depth to production capabilities.
The LiveText system operator directly controls titling options for full pages, lower thirds, scrolls
and crawls ‘on the fly’ -- without intruding into the live broadcast controlled by the TriCaster
operator. LiveText output can be previewed for director approval, or immediately displayed ‘on
air. ‘
LiveText offloads the creative and logistical burdens of titling during a live production to a
dedicated operator. The director is free to concentrate on the video production (with improved
title accuracy as a side benefit.) LiveText 2 also provides integrated DataLink™ support (allowing
direct realtime links to many popular third-part sports game clock systems), as well as great new
LiveTime™ clock/timer features. In addition, LiveText allows export of various title pages file
types for direct use in various NewTek live production systems.
1.1 .1 MANUAL ORGAN IZAT ION
While powerful, LiveText is quite intuitive. If you have some basic familiarity with graphics
applications, much of it will come naturally. Or, if you’re familiar with the similar titling
capabilities as a result of experience with other NewTek products, you’ll feel right at home.
Chapter 2 (Getting Started) will help you install LiveText and connect to your live production
network. Next, in Chapter 3 (Titling Tools) you’ll explore LiveText’s title page creation and
management tools. Chapter 4 covers DataLink™ and LiveTime™, and Chapter 5 explains how to
use LiveText titles in your live production environment (as well as other applications.)
Appendices providing information on keyboard shortcuts and networking are followed by a
keyword index.
1
Page 9

Page 10
2 GET TING START E D
This chapter will help you install, register and establish a network
connection between LiveText™ and your (compatible) live production
system.
We will review recommended system specifications, installation and
registration, networking procedures and connection troubleshooting.
2.1 SYSTEM REQUIRE MENTS
LiveText requires (as a minimum):
A CPU which supports the SSE2 instruction set (typically an Intel® Core2® or better)
A graphics display card (PCI-E recommended) with Microsoft® DirectX® 9™ (or better)
compatibility
A monitor capable of displaying a minimum resolution of 1280x800 pixels
2GB RAM (4GB or more preferred)
Gigabit network recommended for network transmission to supported live systems
(TriCaster, VT[5])
2.2 INST ALLING LIVETEXT ™
Open a file window to locate and run the installer application by double-clicking its icon.
On launch, the installer presents various dialogs to ask you to accept the end user license
agreement, confirm or modify various defaults (such as the program installation path) , and so on
as it proceed..
After installation the Registration dialog is presented, providing an opportunity to register your
copy of LiveText and obtain the permanent unlock code required to operate it beyond the 14 day
grace period.
3
Page 11
Figure 1
Figure 2
2.2 .1 STEP 1
Read the End User License Agreement,
and click to accept (or decline) before
proceeding.
2.2 .2 STEP 2
Click Next to accept the default installation
location, or using the Browse button to
modify the path where you wish LiveText’s
program files to be installed on your
system.
4
Page 12
Figure 3
Figure 4
2.2 .3 STEP 3
If you wish to have a convenient Desktop
or Quick Launch icon to launch LiveText,
click the appropriate switches and click
Next.
2.2 .4 STEP 4
Review your previous selection, and then
press Install.
5
Page 13
Figure 5
Figure 6
2.2 .5 STEP 5
With Launch NewTek LiveText check-marked,
click Finish to proceed to the Registration
pane.
2.2 .6 STEP 6
If your LiveText system is connected
to Internet, you can click the “Click
here” button to perform your
LiveText registration online.
Otherwise, note the Product ID
shown in this panel and visit the
registration web page as shown to
register your software and receive
your unlock code.
At this point, you can begin to work
with LiveText!
6
Page 14

2.3 MAKING TH E CON NECT I O N
LiveText is designed to play an important role as an integral component in a live production suite.
In this configuration, the LiveText workstation is connected to the live switching unit (such as a
TriCaster™) across a network.
A peer-to-peer network connection can be established between the two units using a crossover
cable. Often though, the LiveText workstation will be a client on a larger LAN (local area
network), which network also includes the live production system. (In this configuration, displays
from additional networked systems may also be available to the live production system as video
sources via NewTek’s iVGA utility.)
Naturally, the existence of the network connection is critical if you wish to use LiveText in a
‘direct-to-air’ application. A ‘hard-wired’ Ethernet connection is preferred – and ‘the faster the
better’ (Gigabit networking is strongly recommended, especially for more demanding use such as
long animated scrolls or crawls. For HD sessions, it should be considered mandatory.)
Note that the LiveText host and networked live production system must be on the same local
subnet. Also, if your LiveText host is protected by a firewall, you will need to either disable the
firewall, or configure it to allow LiveText access to the network.
Network throughput can be quite variable in some environments (such as a corporate or
tradeshow network.) To the extent you can ensure non-essential network traffic does
not interfere with LiveText operation during live production, you will enjoy more peace of
mind.
In most cases, at this point your network connection is correctly established and you are ‘good to
go.’ (If you should happen to run into a connection issue, see Appendix C – Networking Notes for
information on diagnosing network problems).
Otherwise, you can skip right to the next chapter – Titling Tools.
Performance Note: Realtime playback depends on several factors. For example,
previewing a scroll in the edit window could cause another scroll playing Live to skip on
some systems. To be safe, it’s always wise to test prior to important live events.
7
Page 15
2.4 A SI MPLE EXAMP L E
Let’s try creating a simple title page:
Figure 7
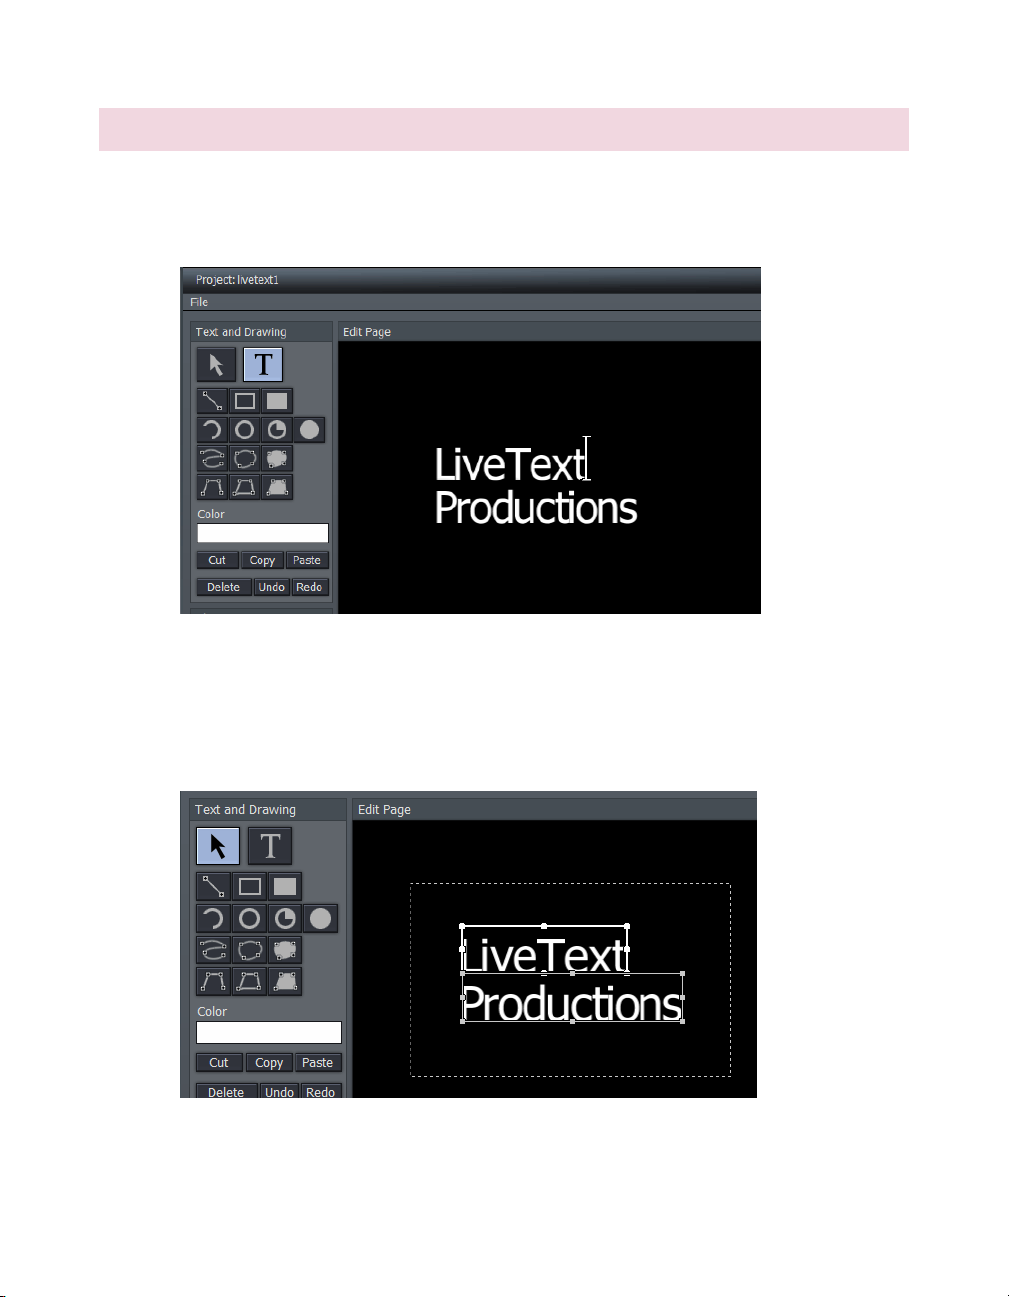
1. Click the T in Text and Drawing, then click in the Canvas to set the insertion point
2. Type “LiveText”, press Enter, then type “Productions”
Figure 8
8
Page 16
3. Click the Arrow (Select) button, and drag out a box (marquee) to surround both lines of
text on the Canvas, selecting them (Figure 8).
Figure 9
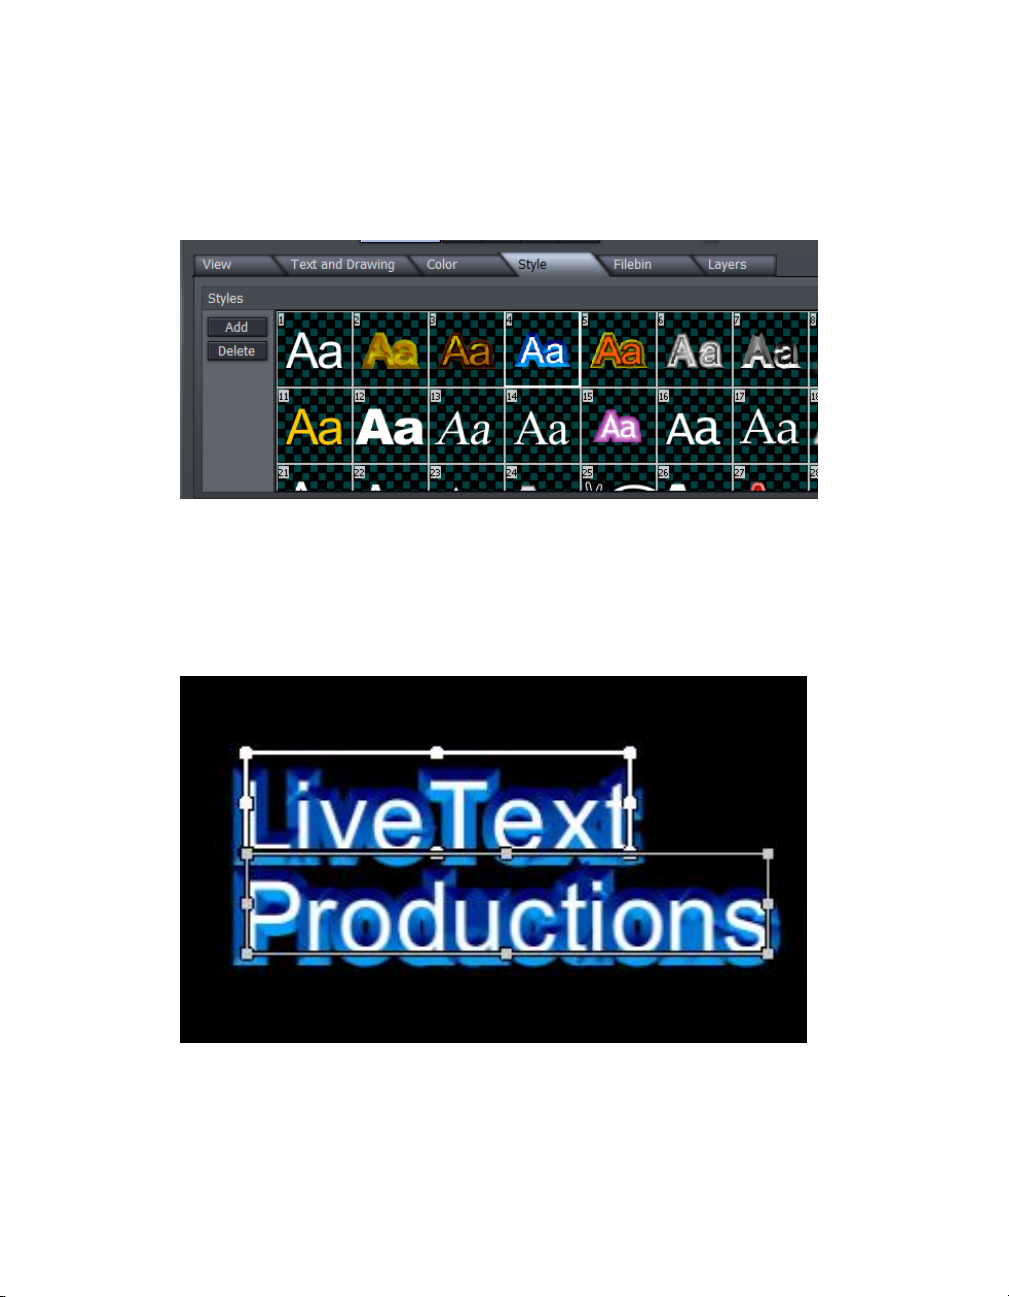
4. Click the Style tab (below the Canvas), and then click thumbnail number 4 in the Styles
bin area. This will immediately add color and beveling to the (selected) text you entered
previously.
Figure 10
9
Page 17
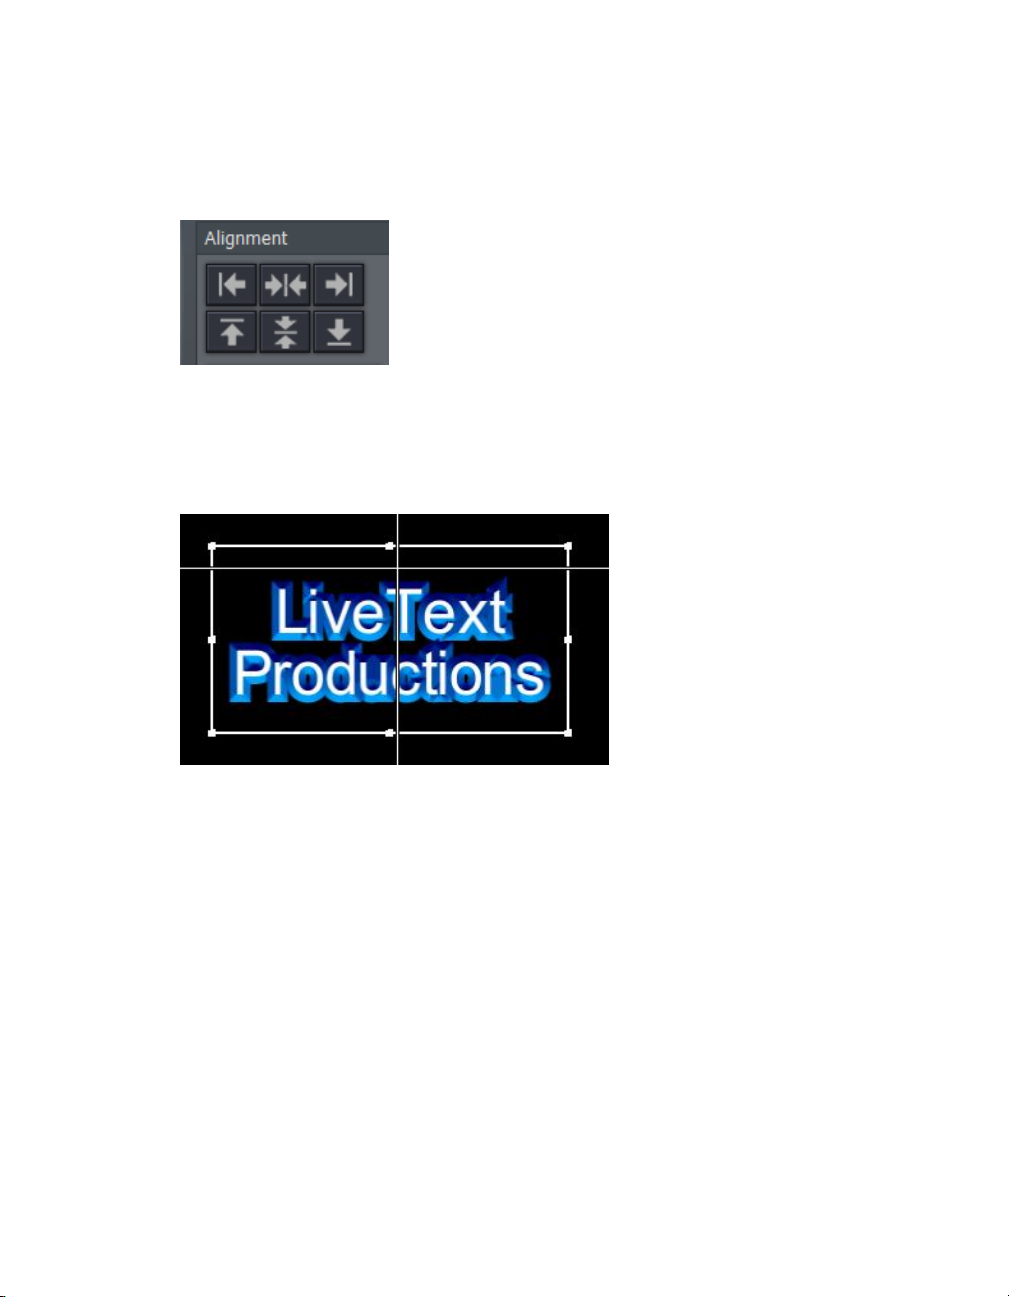
5. Click the View tab, and turn on Safe Area, to help compose your page
Figure 11
6. Next, click both the Vertical and Horizontal Center buttons in the Alignment section of
the Tool Panel, centering the text on the Canvas.
Figure 12
7. With both lines of text still selected, click Group (in the Alignment section) to link them
together
8. Then drag a corner point of the grouped text to make it larger (use your judgment, using
the Safe Area overlay as a guide – the inner rectangle denotes the traditional ‘text safe’
margin.)
10
Page 18
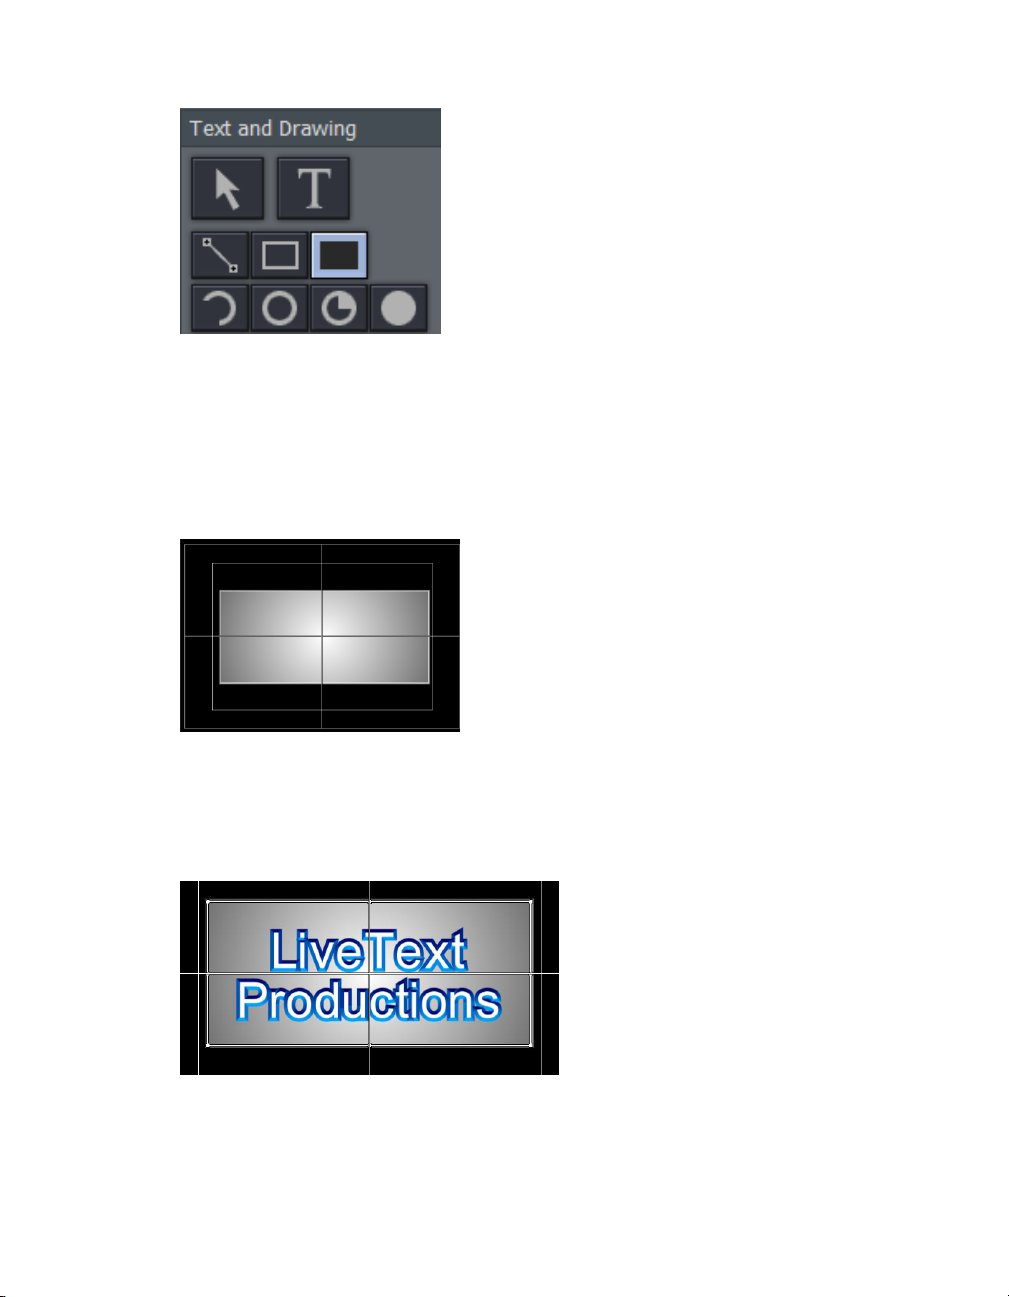
Figure 13
9. Click the Filled Rectangle button in Text and Drawing
10. Click thumbnail number 6 in the Styles tab, and drag out a rectangle in the Canvas that
completely covers your text.
Figure 14
11. Select the rectangle (using the Arrow tool), and click Send Backward in the Alignment
section
Figure 15
11
Page 19
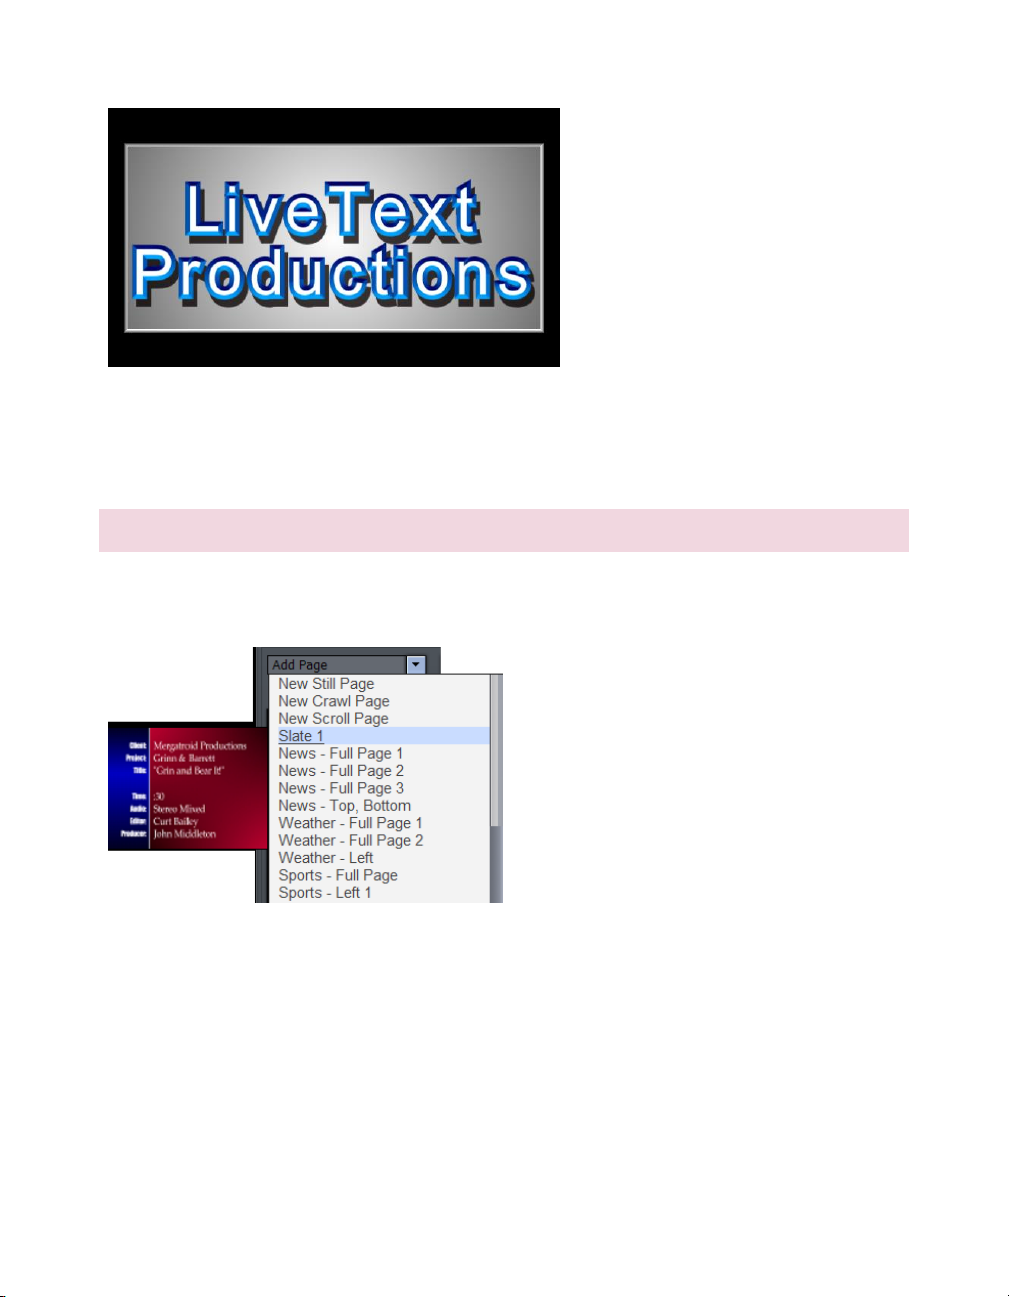
Figure 16
Go on to adjust Tracking, Leading in the tabbed Text and Drawing controls beneath the Canvas,
and finish up by adding a Shadow to your text.
2.5 USIN G PAG E TEM PLATE S
A large number of gorgeous and very useful Page Templates are included with LiveText, to speed
you on your way. You can easily modify these to suit your own production designs.
Figure 17
1. Select Add Page from the drop-down menu in the Pages panel at right (Figure 17).
2. As you slide your mouse down the list, notice that a thumbnail fly-out keeps pace
showing a preview for each template.
12
Page 20

3. Select Slate 1, loading that template into the Canvas for modifications
Figure 18
4. Click the T button (Text) in the Text and Drawing control panel at upper-left, and
slide you mouse around over the text fields in the Canvas
5. Notice that a black outline surrounds each text line in turn. Select the text inside
one of these outlines, and change it to suit your need.
Figure 19
Congratulations, with LiveText you’re a CG artist. Could it be any easier?
13
Page 21

Page 22
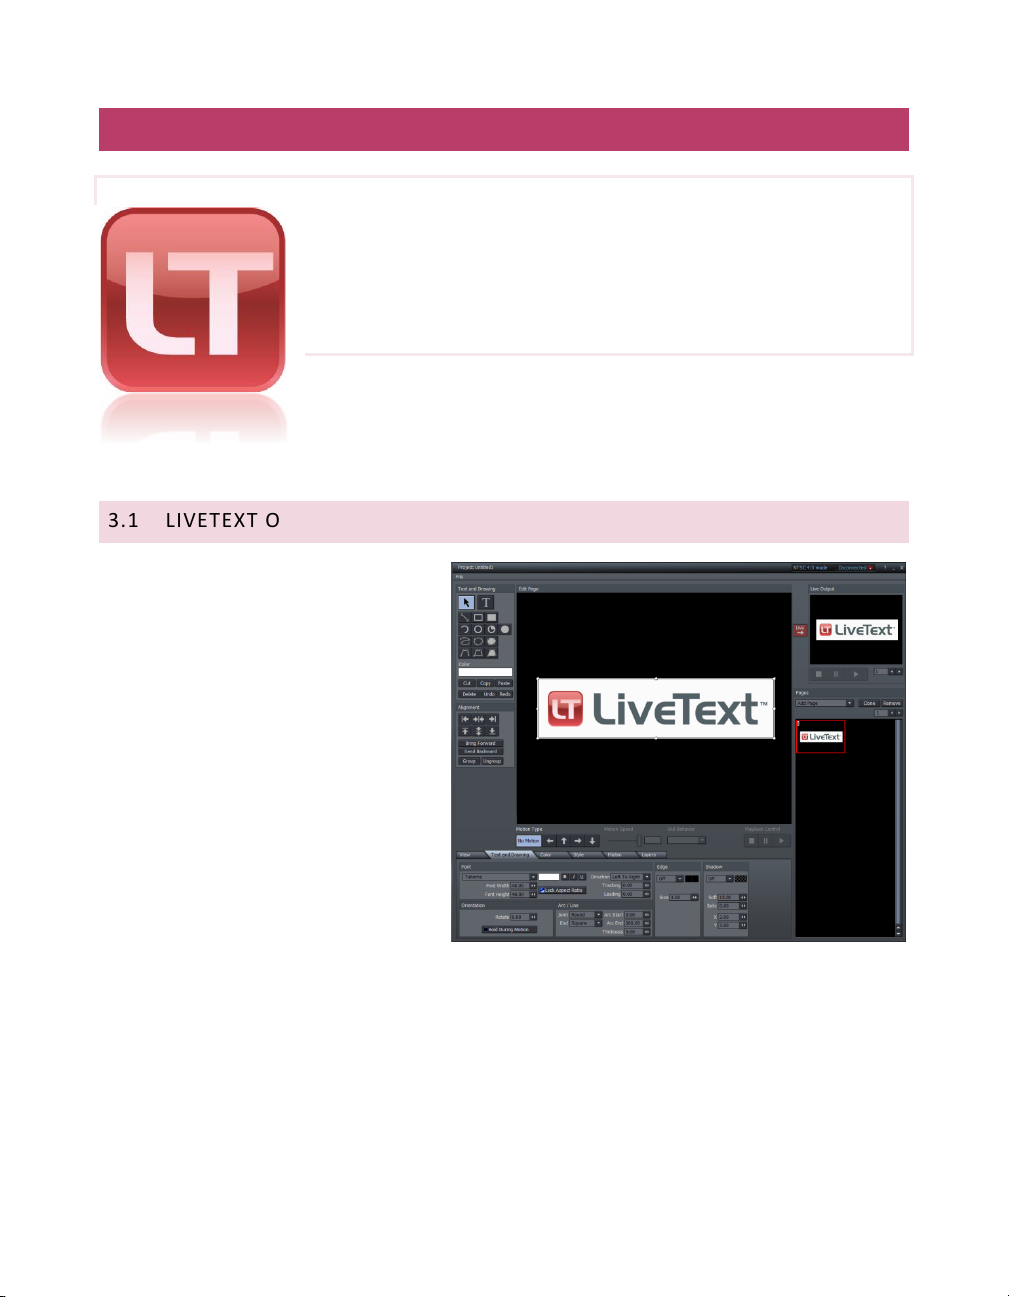
Figure 20
3 TITLIN G TOO LS
Designing and managing great looking still and animated text and
graphics for your productions is easy with LiveText. It’s deep
professional character generation tools will provide a clean, professional
looking result you’ll be proud to broadcast!
3.1 LIVETEXT OVERV IEW
The main panel is dominated by the
large cental Canvas, which provides an
interactive display of the current
project page.
The column at left is a Tool Panel for
creating and editing visual elements,
including text. LiveText’s File menu is
above this column.
The Motion Panel is located just below
the Canvas. It permits you to create
animated scrolls or crawls.
Right beneath the Motion Panel is the
tabbed Control Panel, which gives you
control over attributes of text and
graphic objects.
Finally, a column on right of the Canvas provides multi-page management (the Pages panel) of
your project, file Load, Save and Export functions, and at the top – the all important Live Preview
pane.
15
Page 23
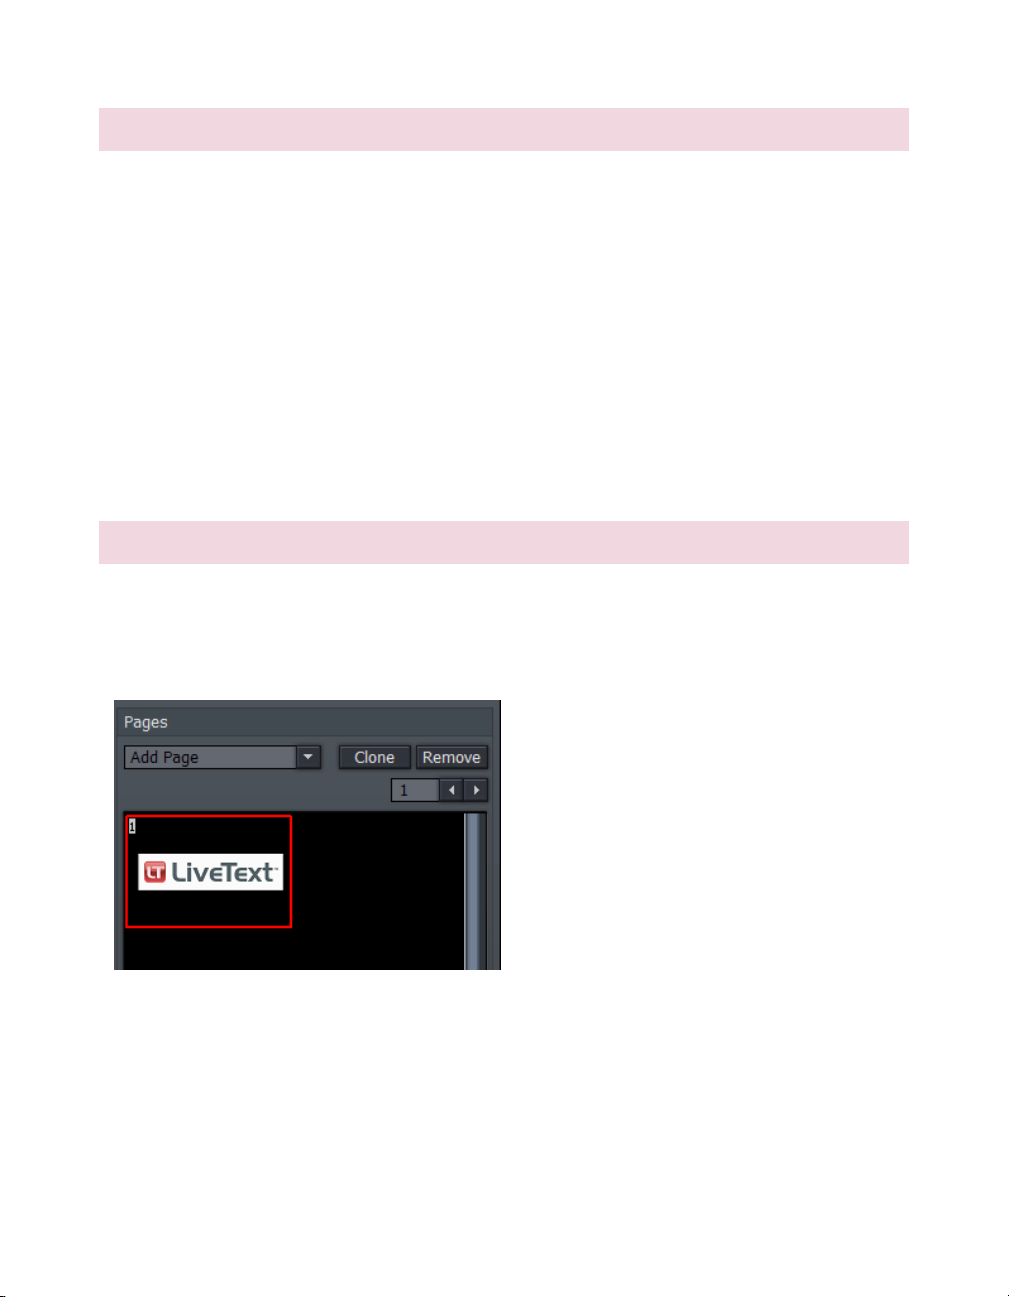
Figure 21
3.2 OUTPUT ASPEC T (4: 3 OR 16:9? )
You may be wondering whether you need to consider the image aspect of your LiveText projects.
LiveText 2.0 projects are effectively aspect independent. The LiveText Canvas (canvas) where
you prepare your title pages is always 16:9. When connected to a compatible live broadcast
system (such as TriCaster) over a network, the current LiveText output aspect is updated as
required (from 4:3 to 16:9 or vice versa) to conform to the aspect of the live production system
connected. The current network output format is shown at upper-right in LiveText’s titlebar.
When exporting title pages as bitmap (image) files for external use, you choose the resolution
and image aspect from the export dialog. When you opt for a 4:3 export only the corresponding
center region of 16:9 title pages is exported. (The Safe Area overlay has 4:3 page edge and text
safe lines to make this easy to visualize.)
3.3 PROJE CT PAGE M ANAG E M ENT
LiveText projects consist of one or more pages. If you want one main introductory title, another
title for a station ID, an animated list of scrolling credits for the end, and so on – each of these is
created as a separate page within the whole project.
Completed pages may be exported (using
Export Current Page or Export All Pages in the
File menu) for use in other programs
supporting (including TriCaster, VT[5] and
SpeedEDIT) as image (.PNG) or animation (.avi)
files, or as Title Pages (.cgxml) compatible with
TriCaster TCXD systems.
Entire projects can also be saved and re-loaded later, allowing you to work with one design for
one production while a completely different look for another is only a few clicks away.
16
Page 24

Note: Project and page files (.cg files) created with earlier versions of LiveText came in
4:3 and 16:9 formats. If you load one of these older files into LiveText 2.0, you will be
asked whether you wish to load it as 4:3 (centered on the page), or as 16:9 (filling the
screen).
3.3 .1 THE PAG ES PA NEL
The Pages panel at the right of the Canvas displays a thumbnail image of each page in the
current project, and provides page management tools. A new project will show one (empty)
page. When a project has multiple pages, the thumbnail for the one currently selected for
editing in the Canvas is surrounded by a white border.
A (red border) indicates the page currently assigned as LiveText’s Live output (if any).
Jump to a specific page in your project by entering the page number in the Page field. Or you can
cycle up or down through the pages by clicking on the neighboring arrow buttons. Click a page
thumbnail in the Pages panel to edit it (displaying it in the Canvas,) or double-click it to send it
out Live.
CLONE AND REMOVE
Clicking the Clone button copies the currently highlighted page, inserting the copy below that
page.
Hint: Clone permits you to quickly and easily ensure pages conform to a particular
graphic theme or format – just Clone an adequate number for you needs, then modify
them individually.
Clicking Remove deletes the currently selected page from the project (careful, there is no Undo
for this action.)
ADD PAGE
You click the small arrow button beside Add Page to insert another page into your project. New
pages are added under the current page (and of course, they are not sent out as Live until you
want them to be).
17
Page 25
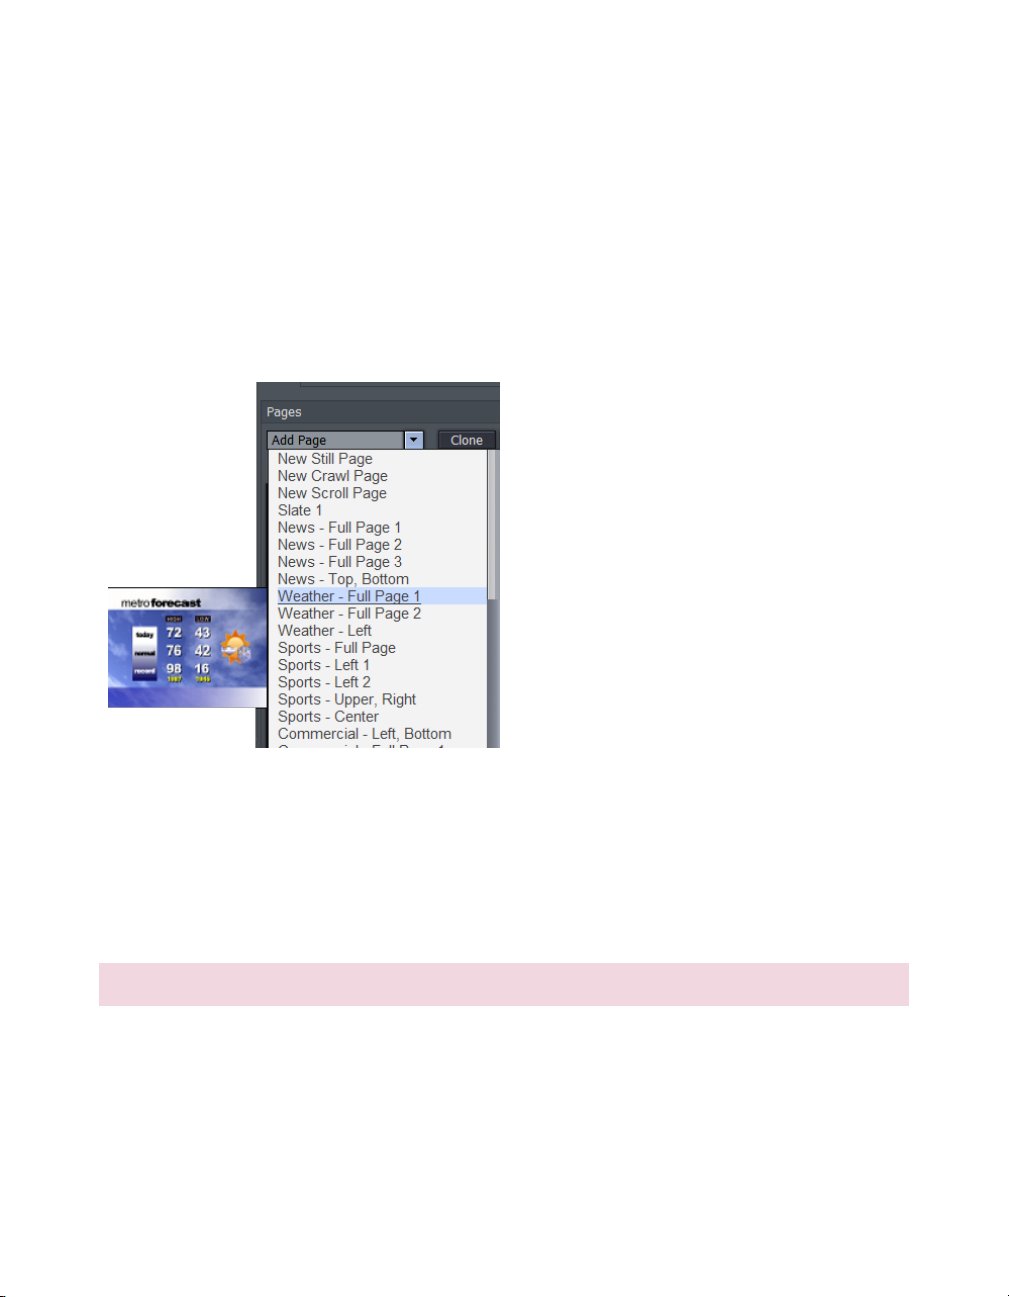
The drop-down menu reveals a number of types of pages you can add. The uppermost choices
represent new blank pages of various types.
Hint: You can also quickly add blank pages simply by clicking repeatedly in an empty
black area of the thumbnail column – each click adds one empty page.
This drop-down menu is home to a long list of professionally designed templates, ready and
waiting for your modifications. As you scroll over the entries, a fly out thumbnail representation
appears to make choosing something just right for your needs easy.
Figure 22
Hint: Another selection in the Add Pages menu permits you to “Add Page to Templates
List.” This lets you store the currently highlighted pages as LiveText templates, for quick
access and consistent styling using templates of your own design.
3.4 FILE MENU
The File menu is in the upper-left corner of the LiveText desktop, and contains project and page
file management tools. These functions are considered in Chapter 5, Live Production and File
Management.
18
Page 26
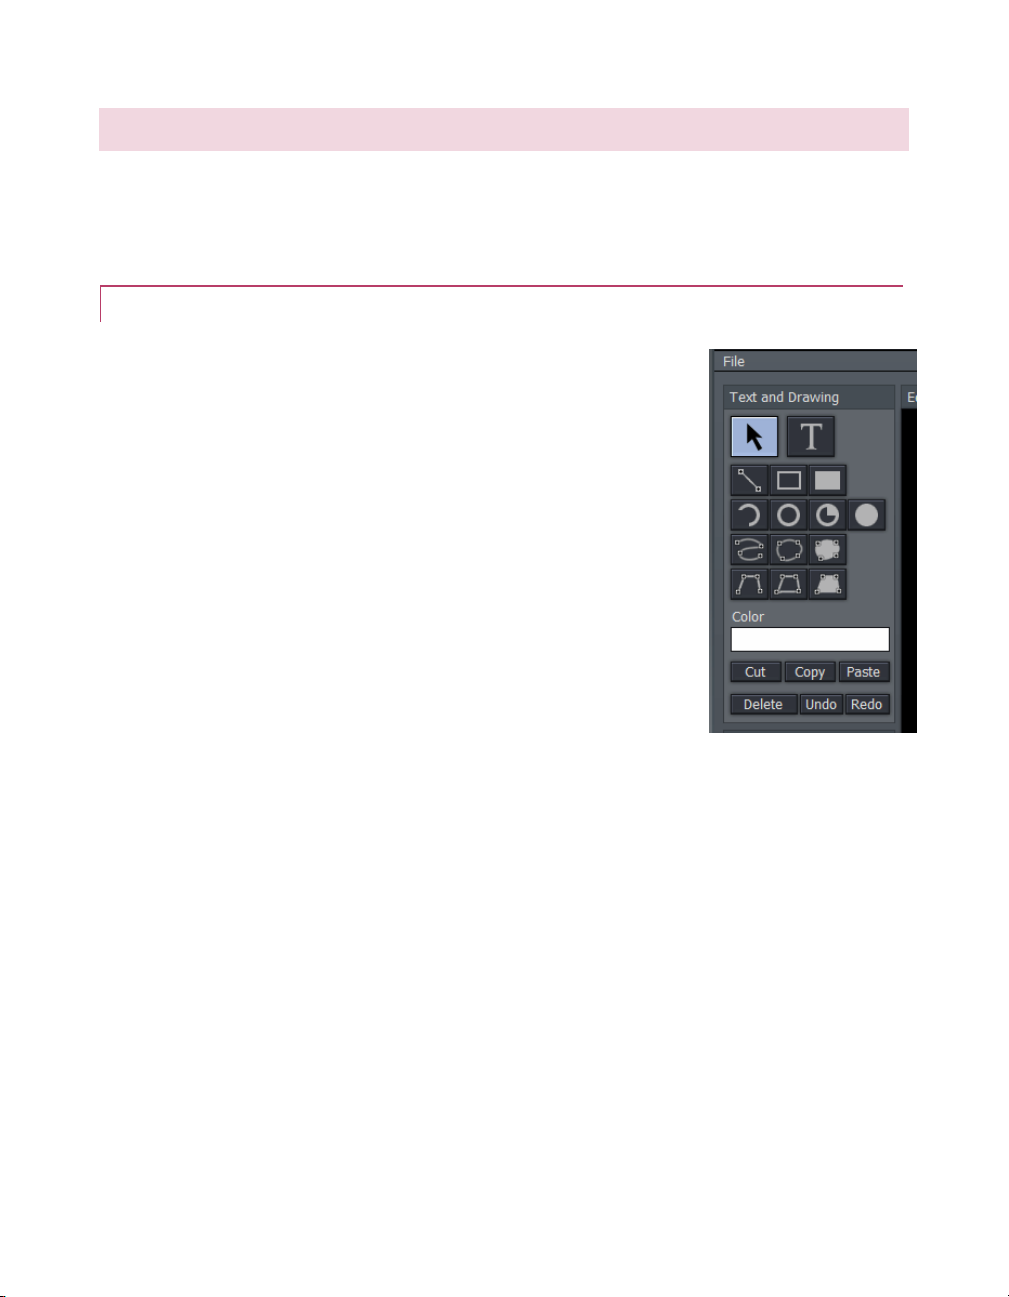
Figure 23
3.5 THE T OOL P ANEL
The Tool Panel situated left of the Canvas provides the basic tools to create the text and graphic
elements of your title page compositions, establish their relationships to one another if any, and
set their primary attributes.
3.5 .1 TEX T AND DRA WING
T (Text)
Click on the T (Text) button to activate the text function. Before you
enter text, this button must be highlighted. Click in the Canvas and an Ibeam icon starts blinking. This is your Canvas cursor. When you type,
the I-beam is the insert point for the text. You can move the I-beam
anywhere on the Canvas by clicking it with your mouse and dragging it
around or just clicking your mouse on another spot in the Canvas.
To edit the characters of any existing text, click your cursor anywhere
on the line of text, and drag your mouse to select letters or whole
words (selected character will be highlighted.)
Hint: Use the End and Home keys on your keyboard to
navigate to the beginning and end of text lines. If you
mistyped, you can use the Backspace key to erase or the
keyboard arrow keys to go back or forth on the line or up and
down between lines.
Arrow (Selection)
Clicking on the Arrow button activates the Selection tool (and switches off the Text tool). This
selects the whole line, not just parts of it. If you have just typed something in, clicking the Arrow
will create a box around what you typed. Select the line by clicking anywhere on it.
When you roll your mouse over the box, the cursor changes form. When it becomes a twoheaded arrow, you can click to grab an edge of the box and drag it in or out to resize the text.
When the cursor sprouts four arrowheads, you can click and grab the whole box to move it
19
Page 27
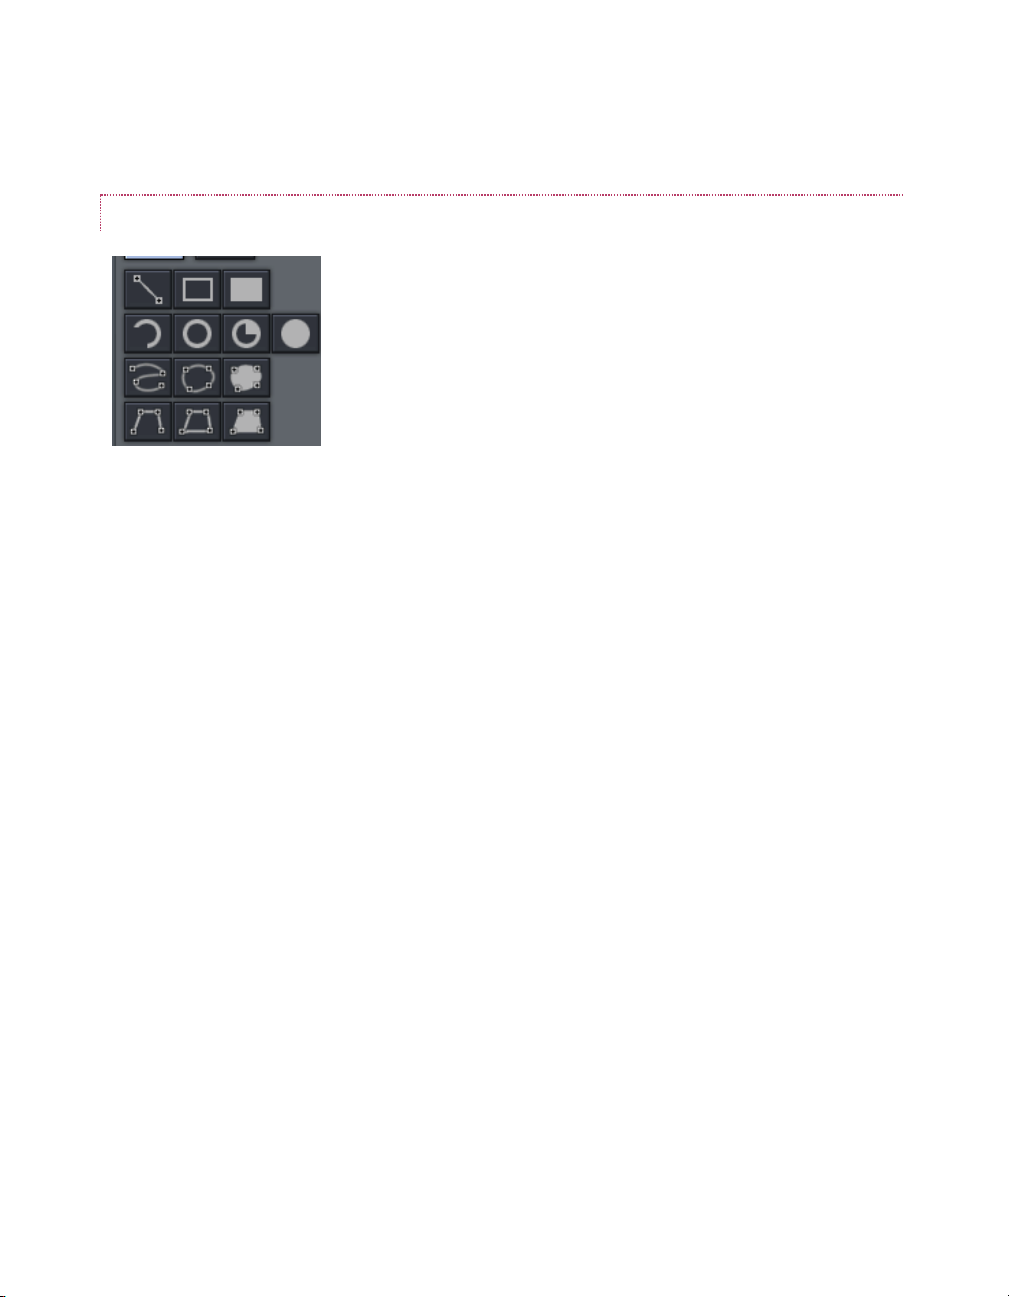
Figure 24
around the Canvas. Hold down the Shift key over a corner of a selected object and a curved
arrow cursor indicates you may now drag to rotate it.
GRAPHIC SHAPE TOOLS
The area immediately below the Arrow and T(Text) buttons is home
to a number of tools used to create shapes. Each shape is initially a
separate graphic object.
The tools are very easy to use, and just as easy to edit at any time
after their creation, whether simply to adjust their position, or to
add or modify much more elaborate treatments.
For the most part, shapes are easily created by clicking one of the buttons, and dragging the
cursor in the Canvas. The shape responds interactively to your movements, and is created when
you release the mouse button.
Line
To make a straight line, you simply click in the Canvas where you want the line to begin and then
drag the mouse to where you want the line to end.
Rectangle
The Rectangle button creates outlines of four-sided objects.
Filled Rectangle
This tool works just like the Rectangle tool except it fills in shape with the same color as the
outline.
Arc
The second row contains variations of ellipses. With the first, you can create segments of arcs.
Click the mouse in the Canvas and drag to establish the radius of the arc, releasing the button
when you are happy. Then click and drag again to define the extent of the arc. Release the
button to complete it.
Oval
The Oval works just like the Rectangle tool. Click and drag in the Canvas to draw out your shape.
Filled Arc
The Filled Arc operation is the same as the Arc tool (see above). The only difference is that the
arc created is filled in. Think of the Filled Arc as the pie chart tool.
20
Page 28

Figure 25
Filled Oval
This tool works like the Filled Rectangle.
Spline
This tool and its siblings create freeform spline curve shapes. Click in the Canvas and release the
mouse to establish the starting point. Move to another spot on the screen and click again to
establish a second node though which the spline will pass. Continue to add nodes until you are
satisfied, then double-click to end the curve.
Closed Spline
The technique for the Closed Spline is similar to the Spline: click in the Canvas, release the
mouse, move to the next spot and click again, etc... With this tool though, nodes are
automatically connected to the first (anchor) point to create an enclosed object. When you’re
finished, simply double-click.
Closed Filled Spline
This tool works just like the Closed Spline tool except it fills in shape with the same color as the
outline.
Polygonal Line
This tool functions like the Spline except it doesn’t create a curve between the nodes. You click
in the Canvas to establish your anchor point, release the mouse and move to your next spot, and
click to create a node. A straight line will connect the two points. Move and click again and a line
will connect this point with the previous one. With this tool, a sharp angle is maintained at the
intersection of the lines. You double-click at the last point to finish.
Polygon
This tool works like the Polygonal Line, except as soon as you create the first node, it’s
connected to the anchor point, automatically creating an enclosed object.
Filled Polygon
This tool works just like the Polygon tool except it fills in shape with the same color as the
outline.
21
Page 29

Color - The large color well below the drawing tools permits you to set a base color for
the objects you create using the tools. Left click it to open the Color Picker panel, or right
click and drag to use an eye dropper cursor to pick a color from the screen.
Note: Extensive control over color is provided in the Color section of the tabbed Control
Panel discussed a bit further on in this chapter.
OBJECT MANAGEMENT
Completing this section are essential basic editing tools: Cut, Copy, Paste, Delete, Undo, and
Redo. The traditional Windows keyboard shortcuts also work:
Figure 26
Cut — Ctrl + x
Copy — Ctrl + c
Paste — Ctrl + v
Delete — Delete key
Undo — Ctrl + z
Redo — Ctrl + y
3.5 .2 ALIGNME NT
The alignment panel permits quick and easy positioning and re-ordering of objects on the
Canvas.
HORIZONTAL JUSTIFICATION
The top row of buttons in this section control horizontal justification buttons, aligning text as are
commonly found in word processing programs.
22
Page 30
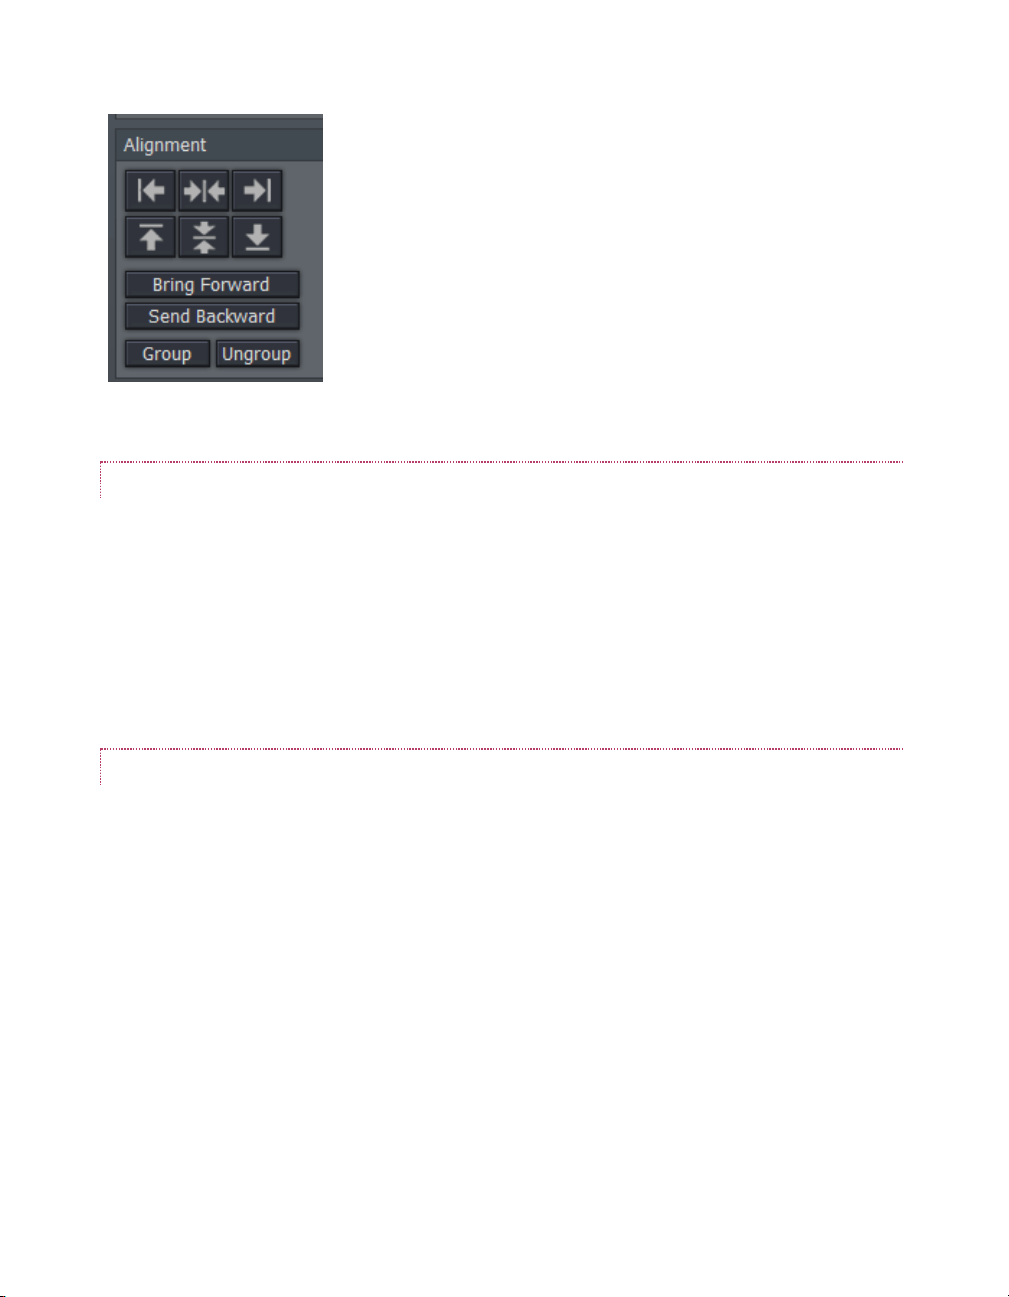
Figure 27
Left Justify - aligns your text to begin just inside the left edge of the
Text Safe Area
Center - aligns the center of the line(s) with the center of the Text
Safe Area.
Right Justify - aligns your text so the end of the line(s) is just inside
the right edge of the Text Safe Area.
VERTICAL JUSTIFICATION
Each of the buttons in the next row justifies your text within the vertical Safe Text area of the
screen.
Top - aligns your text just below the upper limit of the Text Safe Area.
Center - centers your text vertically in the Text Safe Area.
Bottom - aligns your text just above the lower limit of the Text Safe Area.
DEPTH CONTROL
Text and objects in the Canvas which occupy the same space are normally displayed in the order
created – first items to the rear, as it were, with newer object in front. The depth controls in this
section permit you to modify this order. Select an object (or line of text) and click once to move
one step relative to other objects.
Bring Forward – move the selected item forward
Send Backward – move the selected item back
Note: The Layers section of the tabbed Control Panel (discussed in Section3.7.6)
provides an alternative (and often more convenient method) of re-ordering objects and
text.
23
Page 31

GROUP/UNGROUP
Even though each line of text and graphic object is really a separate entity, you can select
multiple lines and Group them together to respond to modifications in unison.
The UnGroup button undoes the union. Hold down the Ctrl key while clicking multiple items or
lines of text and press the Group button. The bounding boxes are now replaced by a single
bounding box. Hit UnGroup again, and the lines become separate entities once more.
3.6 THE M OTIO N PANEL
Figure 28
The Motion Panel contains the tools to create both scrolls and crawls. This is where you control
the direction, speed and behaviors of your crawls and scrolls.
The No Motion button and Direction arrows are self-explanatory. If you want a text crawl from
left to right, pick the right pointing arrow. For a scroll moving up, choose the up arrow, etc.
3.6 .1 SPE ED CO NTRO L
In the Motion Speed field, choose a specific rate of motion in units of ‘pixels per frame.’
Fun with math: For a text crawl across an NTSC format screen, knowing that the screen
is 720 pixels and there are roughly 30 frames per second, you can readily work out a
suitable value. To have an object or text item crawl from one side to the other in four
seconds, 720 divided by 120 (30 frames per each of the 4 seconds) equals 6.
If motion pages move too quickly, motion may not appear smooth. A common preference is for a
line of text to take about seven seconds to travel from the bottom of the screen to the top. You
may wish to test the speed out on a TV monitor to see if it suits you.
24
Page 32

3.6 .2 END BEH AVIO R
The End Behavior setting in the Motion Panel determines what happens when an animated page
runs its full course.
Over tells the CG to scroll or crawl the page once, and then stop when the page has left
the screen.
Stop tells the CG to scroll or crawl the page once and then to hold on the last line of
text.
Loop tells the CG to loop the page continuously.
Loop + Frame tells the CG to loop the page continuously and to place a blank frame
between loop repetitions.
3.7 CONT ROL P ANEL TABS
Figure 29
Near the bottom of the screen (beneath the Motion Panel) is the multi-tab Control Panel. The
individual panels provide precise command of countless text and graphic object attributes,
organization, and management.
3.7 .1 VIEW
Figure 30
The View tab reveals three sections, Grid, Guides and Display. These all add one or another type
of overlay to the Canvas above, as an aid to composing your graphic and text pages on. As you
would expect, none of the overlay elements appear in the final output.
25
Page 33

Figure 31
Figure 32
Figure 33
GRID
Define a grid to help you align objects on the Canvas in specific arrangements.
The two numeric entry fields with
associated mini-sliders adjust the width and
height of cells in the grid.
The Grid switch toggles the grid overlay
on/off. Enabling Snap effectively makes the
lines of the grid somewhat magnetic - you
are not restricted to placing items exclusively along the grid lines, but the cursor is drawn toward
them, making it easy to do so if you wish.
GUIDES
This feature is somewhat similar, in that it offers
overlaid lines and a similar Snap feature. However,
rather than displaying a full grid, you define where the
lines will go – add just one guide line, or as many as you
like.
To add a Guide, Rulers must be enabled in the Display section. Click in the calibrated ruler
display, (horizontal or vertical), and drag the cursor across the Canvas. Release the mouse
button when the new Guide is positioned where you want it to go. If you hover the cursor above
a Guide, it becomes a double-headed arrow that you can drag change the Guide’s position. Use
Clear Guides to remove all existing Guides from the screen.
DISPLAY
Traditional television displays crop the image area of video
somewhat. For this reason, it’s customary to allow a certain
amount of ‘safe area’ on the margins of the screen – to make
sure that important text displays or action are not
inadvertently cut off for viewers.
26
Page 34

The Safe Area switch in the Display pane enables an overlay on the Canvas. The lines make it
easy for you to create your title pages with these overscan limitations in mind. Inner rectangles
mark the 4:3 Text Safe area and outer boundaries, while the outermost lines show the edge of
the entire 16:9 page.
For very complex pages, it can be useful to enable the Wireframe switch. While enabled, this
removes opaque color from objects on the Canvas window, leaving only an outline through
which other items can be seen.
Checkerboard replaces the default black Canvas background with two-tone checks (these do not
appear in exported title pages, of course). Finally, the Rulers option provides another level of
precision when preparing your title pages by adding calibrated scales to the display. (And, as
noted a moment ago, you add Guides to the Canvas using the Rulers.)
3.7 .2 TEX T AND DRA WING
Figure 34
This tab provides primary control over all text and graphic object attributes.
FONT AND ORIENTATION
FONT
The drop-down Font menu allows you to choose from your installed typefaces. Bold, Italic, and
Underline buttons are to its right, along with another basic face color well.
The Width and Height controls are locked proportionally when the neighboring Lock Aspect
Ratio control is lit up. Rotate adjusts the exact degree of rotation (on the Z axis.)
Tracking adjusts the amount of space between neighboring pairs of letters.
Hint: You can also adjust tracking interactively in the Canvas. Place the cursor between
letters and hold down the Alt key while using the arrow keys to add or reduce spacing.
27
Page 35

Figure 35
Leading adjusts the amount of vertical space between text lines. Multi-select the lines you wish
to adjust using CTRL + click (or by dragging a rectangle around them in the preview window), and
raise or lower the Leading value to suit your need.
ORIENTATION
Rotate changes the orientation of text and drawing
objects. Hold During Motion, when enabled,
ensures that the selected object does not move as
an element within Scroll or Crawl pages. Do Not
Render prevents the image from being displayed as
part of the page when displayed or rendered.
ARC/LINE
The Joint menu options affect way corners of a
drawn CG object are created – choose from Round,
Bevel, or Square. Similarly, the End menu selection
determines whether the ends of a line object
terminate in a Square, Round, or Point.
Arc Start and End values permit great precision for Arc and Filled Arc objects, and the Thickness
value is pretty much self-explanatory.
EDGE
Edge refers to a two-tone border that conforms to character or object shape. The way corners
are painted is controlled by the drop-down menu – options are Round, Square, or Bevel.
The two boxes to the right of the menu are where you choose the colors for the inside and
outside edges of the border applied around your objects. Inside color is the box on the left,
outside color is on the right.
Click in the box to bring up the Color Picker panel, or right-click it to activate the Eyedropper tool
to choose a color from the Canvas.
28
Page 36

Figure 37
SHADOW
Shadow options include Cast, Drop, and Soft (the numeric Soft setting is only relevant to the
latter.) The Italic setting permits you to shear the Shadow independent of the ‘shadow-casting’
object, and the X and Y fields control the amount of offset for the shadow.
NOTE: Images with Shadow option enabled cannot serve as ‘stand-in images’ (see Section 1.3).
3.7 .3 THE COL OR TA B
The Color tab provides the control over characteristics for coloring and texturing objects,
including text.
Figure 36
COLOR DESCRIPTION
Use the Edit menu to specify which aspect of a text line or graphic object you intend to modify.
There are three choices: Fill controls colors used in the body of the font or object. Choosing
Edge or Shadow restricts modifications one of those characteristics.
Type permits you to choose between six different types of color (or image-based texture):
Choosing Solid for Type applies a single color to the surface (the
one in the neighboring Solid Color pane). When you pick one of
the middle four instead (Linear, Corners, Angle, or Radial), the
current Gradient colors are applied.
Linear (Type) applies the Gradient in a straight left-to-right
pattern. Corners will apply the gradient color starting at the upper
left corner diagonally, sweeping around to the bottom right. Angle
applies the Gradient starting at 3 o’clock and rotating
counterclockwise.
29
Page 37

Figure 38
Figure 39
Radial applies the gradient starting at the center of the surface and emanating to the edge.
Texture applies an image map (specified using the Image drop-down menu in the Solid Color
Pane at right) to the surface. Adjusting the Rotate value changes the application angle for the
gradient or texture, when active.
SELECTION, LINE & CHARACTER
If you have multiple lines of text on a page, you can choose how
the color, gradient, or texture will be applied. Selection fits your
settings to selected characters or objects (including multiple
selections.) Line applies them independently to each line of text,
while Character applies the texture independently to each
character.
Note: In reality, each text line is always a separate object. If you
select just part of a text line (in the Canvas while in T(Text) mode (whether by dragging the mouse
or using Shift with the arrows keys), and apply different settings, the line will split into two objects
to accommodate your wishes. You may want to use the Group function to continue treating the
line as a single object.
THE GRADIENT PANEL
The gradient panel provides awesome color control, allowing you to create and apply many
beautiful effects.
GRADIENT PRESETS
The upper section of the Gradient Panel
contains a goodly number of presets,
represented visually. Scroll up and down
through the selections using the arrow
buttons at right, and simply click a
gradient you like to activate it (replacing
the content of the edit pane below.)
Use Add to send the current gradient to the presets list, or Remove to clear a preset.
30
Page 38

The dotted vertical lines in the gradient preview pane mark the nodes of specific color values
that define the gradient. You can drag these left or right interactively, or select one by clicking
directly on it, and Move it using the mini-slider control at right. The display updates immediately
to show the results of the changes you make.
Add a new node by double-clicking in the gradient preview. Delete a selected node using the
Delete button, and set its color using the Node Color well. You can also separately adjust the
Bright(ness) of nodes using the mini-slider at right.
To multi-select nodes for certain operations, you can click them one at a time with the Ctrl key
depressed or drag out a marquee around them right in the editor (a shaded box shows the
selection zone in this case.) With one or more nodes selected, each time you drag the Clone
slider, another set of duplicate nodes is created. You can also clone one or more nodes by
holding down Ctrl and dragging left or right in the gradient preview pane. Scale expands or
contracts the distance between multi-selected nodes.
Clear Gradient lets you start fresh, while Loop Gradient allows the gradient to repeat itself, so
that the color at one end loops seamlessly to the opposite end (this control has no effect when
nodes exist at each end of the gradient.)
3.7 .4 THE STY LE TA B
Figure 40
The Style tab allows you to add gorgeous and complex treatments to your text and graphic
objects with a single click. It is also a great way to ensure consistency for the title slates you use
in your productions!
To apply a Style preset, simply select a line of text or an object in the Canvas, and then click a
representative thumbnail in the Styles pane. Create your own custom look, and add it to the
Styles list using Add, and of course, remove those you don’t care for using Delete.
31
Page 39

3.7 .5 THE FIL EBIN
You can drag image, .cg or .TXT file icons right onto the Canvas directly from this Filebin.
(Loading a .CG file in this manner replaces the current project.)
Figure 41
Above the file window is a menu with navigation and file management buttons at left, and a file
icon preference menu at right. More detail on the various features of the Filebin can be found in
Chapter 5, Live Production and File Management.
3.7 .6 THE LAY ERS T AB
The Layers tab provides a convenient way to modify the depth of various text and CG objects on
the Canvas, as well align objects relative to one another.
Figure 42
At times the Canvas can become rather cluttered, making it tricky to select text lines or objects
directly by clicking. The final tab provides a convenient alternative. Each item in your current
page is represented by an individual line in the Layers panel.
32
Page 40

Figure 45
Figure 43
Consider the situation above, which shows a line of text that is, unfortunately, occluded by a
rectangle object. Re-ordering layers is a simple matter in the Layers panel.
Figure 44
Simply drag the line for the rectangle above
the text line with the mouse. The insertion
point where the current selection will be
dropped when you release the mouse is
shown by a thick white line.
Objects nearest the top of the list will appear
further back in the result – appearing behind
objects that appear lower down in the Layers
list.
33
Page 41

Multi-select objects by dragging a box around them in the Canvas window; then just click a
button in the Align section to line them up.
The last object selected will be brightly highlighted in the Layer panel, and will be the
one that other objects align to.
TAGGING LAYERS
The NewTek Developer Library provides tools that permit third-party developers to extend
TriCaster’s integrated titling capabilities in powerful ways.
For example, a custom external application might be prepared that could update specific text
lines and images on a title page, then display it. Text lines or images in title pages may be
targeted using their object indices, but a friendlier method of identifying objects is to use ‘tags’.
Tags are custom nicknames given to individual items on the title page to make it easy to identify
and address them. Though not visible in the TriCaster interface (apart from within the LiveText
application), tags can thus be very useful.
Figure 46
To add custom tags to objects on a title page, use the Layer tab. Simply double click on an entry
in the Layer tab and type in the tag (Figure 46).
34
Page 42

3.8 OPTIO NS A ND KE YBOA R D CONT ROL
An extensive list of Keyboard Shortcuts is available (for example, pressing Alt + s toggles the Safe
Area overlay in the Canvas on and off.) Press F1 to view shortcuts (please see also Appendix A –
Keyboard Shortcuts).
35
Page 43

Page 44

4 DAT ALINK™ AND LIVE TIME ™
DataLink™ provides users of NewTek’s TriCaster™ and VT[5]™ live video
production systems the ability to display dynamically updated data from
a variety of external sources.
Supported data sources include various third-party sports scoreboard
systems, RSS feeds from the Internet, plus two common file types –
standard ASCII text files and SQL database files. In addition, LiveText‘s
native LiveTime™ allows users to embed realtime clock and date displays
in title pages.
Together, the combined features of DataLink and LiveTime allow you to prepare and display title
pages that containing score, time or various other data types (including images) from both
internal and external sources, and update these in realtime.
Figure 47
Several different DataLink modules continually monitor data from their respective sources as
follows:
The TXT Linker draws values from specified ASCII text files.
The Database Linker provides allows the use of MySQL database functions, and even
supports data accessed across a network.
37
Page 45

Sections of this chapter displaying the scoreboard icon (seen at left) are of
special interest to users who plan to connect their LiveText system to a
supported external hardware scoreboard controller.
The Network Linker keeps an eye on user-defined RSS (Really Simple Syndication) feeds
from Internet sources, and updates values embedded in title pages as appropriate.
The Serial Linker monitors a data feed from external hardware controllers (commonly
associated with game clocks, and typically connected by serial cable).
In addition, LiveTime brings more capabilities, using the LiveText host’s internal system clock to
supply time displays embedded in title pages.
4.1 DATALI NK OV ERVI EW
4.1 .1 KEY NAM ES AND TI TLE PAG ES
DataLink dynamically updates special key name entries in your title page. When the page is
displayed on output, information drawn from external data sources is substituted for the key
name. (The external data is formatted with the attributes you assigned to the key name entry
when creating the title page).
You could think of DataLink this way: the Data portion of the name refers to external
information (data) expressed as a ‘key-value pair’.
The data is thus formatted as follows:
(key name) = (value assigned)
Here is a typical key-value pair:
current temp = 75° F
The Link part of DataLink reflects the fact that key entries in your title pages are linked to
matching data from the key-value pairs. DataLink dynamically updates the information
displayed, quietly operating in the background to monitor data sources for changes.
38
Page 46

4.1 .2 THE DAT ALINK PROFILE
As mentioned earlier, special DataLink components monitor specific external sources. These are
the TXT, Serial, Network and Database Linkers. The specific combination and configuration of
data sources available in a given LiveText session is determined by the active DataLink profile at
launch. DataLink profiles are created and managed using the DataLink Configuration utility.
Let’s consider the Linker modules individually in more depth now.
4.1 .3 TXT LINKER
This module keeps an eye on its namesake file type, the ubiquitous ASCII text file (.txt). The
linker refreshes the title page display whenever the text file is updated, serving many handy and
creative purposes.
Note: TXT Linker monitors files (.txt) you place in the folder Text Input, and can reference
key-value pairs from multiple files at that location.
For example, a simple ASCII text file (.txt) containing a list of names (prepared as key-value pairs)
could be used to automatically update a credits slate, or perhaps to populate the name fields in a
series of individual lower thirds for a weekly production (Section 4.2.1 explains the details of this
example).
The TXT Linker continuously watches for changes in the values assigned to keys. If a value
changes in the file, the display is immediately updated. Thus, third-party programs may be
designed for various applications that continuously update the onscreen text display by simply
changing values assigned to keys in the text file.
4.1 .4 DAT ABAS E LINKER
The Database Linker provides even more powerful possibilities. It allows the use of supported
MySQL database queries to derive replacement values for DataLink keys on the title page – even
accessing the data across a network.
4.1 .5 NE TWORK LINK ER
Today, a nearly endless supply of information is available from both free and commercial sources
via Internet RSS feeds. The Network Linker allows you to access these sources to supply
information to your title pages, and update it as changes occur.
39
Page 47

4.1 .6 SERIAL L INKE R
This Linker receives data from a number of popular external hardware
scoreboard controllers. The external system provides information to
DataLink by a physical COM port connection. (Section 4.3, Connecting
External Devices, explains how to connect these devices so they can
communicate with DataLink.)
DataLink supports popular external devices from several different manufacturers. The Serial
Linker monitors the incoming data stream, and assigns specific values to unique DataLink key
names. These values are then substituted for the corresponding key name entries in title pages.
These special key names are listed by brand in Section 0.
Note: As the data supplied by various external systems differs, DataLink uses unique key
names for each supported brand.
4.2 WORKI NG W ITH KEYS A ND VA LUES
In this section we’ll get into the details of working with DataLink for your live productions. We’ll
explain how to add DataLink key names to your title pages, and how these may be used in
various ways. The quickest way to become familiar with DataLink is to dive right in and try it out.
4.2 .1 TXT LINKER
As discussed back in Section 4.1, DataLink’s TXT Linker pulls data from ASCII text files (.txt)
residing in a specific (constantly monitored) folder. As this is arguably the simplest source
available to DataLink, let’s use it to demonstrate a few basics before continuing.
This monitored folder location varies depending on your operating system. The simplest way to
find it is to use a shortcut in the Windows™ Start menu. Click Start, then the Programs link, and
locate the NewTek>LiveText>DataLink folder. Click the folder icon inside that labeled Open File
Observer Folder.
By default, this folder contains just a file named example.txt.
1. Double-click the text file icon to open it in your default text editor.
To supply usable values for DataLink, text files should contain nothing other than key-value
pairs, arranged in the following format:
40
Page 48

[key] = [value]
Key names from the file(s) will be available as DataLink entries in your LiveText title pages. The
value you enter beside the key name in the text file is the actual information that will be shown
when the page is displayed on output.
The sample file currently contains just two key-value pairs, as follows:
city = San Antonio
temperature = 98°
Note: Keys and values may contain punctuation and spaces.
2. Launch LiveText, if it’s not already running. Note that you can move back and forth
between the text editor (with the sample file loaded) and the LiveText window by
pressing Alt + Tab on your keyboard.
3. Click the Text [T] tool button, click somewhere on the empty Canvas, and type “The
current temperature is:"
4. Left-click outside that text object (to complete it), then move over to the right a bit and
press the right mouse button. This will open a drop-down menu.
5. Select temperature from the list, and release the mouse button.
6. A new object is created containing the text % temperature %. This is how a DataLink
key appears on the canvas in Text Edit mode (bracketed between percentage signs).
The keyword “temperature” was listed in the menu because it has been defined in
example.txt, as we noted previously. Likewise, a value is assigned to “temperature” in that
ASCII text file. Let’s see how LiveText displays that value.
Figure 48
41
Page 49

7. Click the Select (Arrow) button in LiveText’s tool panel. The “temperature” key is
immediately replaced by “98°”, the value currently assigned to that key in the text file.
8. Press Alt + Tab on your keyboard to switch back to the text editor. (If necessary, move
it a bit to one side on the screen so you can see”2.0“on the LiveText canvas.)
9. Change the value assigned to “temperature” in the text file to “75°”, then pull down the
File menu (in the text editor) and select Save.
As soon as you save the change to the text file, LiveText refreshes its display as well.
10. On a new line (below the “temperature = 75°” line in the text file), type:
business = NewTek
11. Re-save the text file.
12. Now, click the Text [T] tool in LiveText. Right-click on the canvas, and notice that a new
item appears in the drop-down menu options – “business”.
Let’s try something slightly different.
13. Press Alt + Tab to bring the text editor forward again, and delete all of the text in the file
(don’t save the file, though).
14. Enter a new line of text as follows (enter your personal name for your name):
My Name = your name
15. Select Save As from the File menu, and save the file using the file name Names.txt, then
right-click on the canvas again – notice that “My Name” appears in the menu option list,
even though it’s in a different text file. TXT Linker watches for changes in all suitable
files located in the observed folder.
Experiment with TXT Linker a bit more:
Try applying a Style to DataLink key objects.
Click the Layers tab, and double-click on a DataLink object name. Notice that this allows
you to type in a custom name for the object. Press Enter on the keyboard to complete
42
Page 50

the operation; naming the layer does not modify the object on the canvas.
Type a sentence in a new text object, then right-click between words in the sentence to
insert a DataLink key into it – right in the middle of another text object (or select the
characters of a word, and repeat the exercise to replace them with a DataLink key.
Let’s briefly consider one (slightly more elaborate example) using the TXT Linker:
Suppose you regularly produce a half-time show featuring interviews with 8 to 10 different
guests. You could create a LiveText project with 10 pages, and manually modify each page
before every episode.
Or, you could prepare the pages once, and let DataLink update them all for you automatically
every time! To do that, you could proceed as follows:
1. Prepare a simple text file similar to this one:
guest1 = Bill E. Bob
guest2 = Sam Houston
guest3 = Dorothy Lamour
… etc.
2. Go to the Add Pages drop-down menu in LiveText, and select a nice-looking lower third
template (or make your own if you prefer).
3. Where the guest’s name should appear, place the DataLink key “%guest1%”.
Note: You may find it faster at times to directly type the key name on the canvas
(between percentage signs) rather than using the drop-down menu. Either method will
work just fine.
4. Clone the page as many times as necessary
5. Click the second thumbnail (no need to edit the first one) in the Pages column at right to
select it for modification, and click the [T] button (to activate text entry).
6. Click in the DataLink key field on the canvas, and replace %guest1% with %guest2%
Note that
7. Click the next page, and change the key to %guest3%, and so-on, until all done.
43
Page 51

That’s all you need to do. Before each episode, have your production assistant take a few
moments to update the guest.txt file content, and the hard part is done. Afterward, simply load
the LiveText project you created – each successive page automatically displays the correct name
in sequence when displayed.
The other DataLink modules (Serial Linker, Database Linker and Network Linker) reference
different data sources, but the process of creating title pages with DataLink key names is exactly
the same as we have reviewed above.
Let’s go on to consider the Serial Linker. Unlike the other two modules, DataLink depends on an
external hardware connection to supply values for these keys. In the next section, we’ll explain
how to connect these external devices.
4.3 CONNE CTING EXTE RNAL D EVICE S
THE STEPS IN THIS SECTION ARE MANDATORY IF YOUR INSTALLATION REQUIRES DATA FROM AN
EXTERNAL HARDWARE SCOREBOARD CONTROLLER.
Naturally, for DataLink to communicate with an external data source, that equipment must be
connected to the LiveText host system and powered up. As well, DataLink must be configured to
find and use the connection. We’ll discuss how to make and configure connections under this
heading.
4.3 .1 USB-SER IAL A DAPTE RS
The diversity of supported external systems, cable connectors,
and available ports on the host system means this connection
may require an adapter.
Newer external devices may use USB connections, but others
use older RS-232 (25-pin) connectors, or occasionally (slightly
more recent) 9-pin style connectors.
Unless the external system is supplied with a USB connection, a USB-Serial adapter is likely
required to connect it to a host systems with newer motherboards).
To connect using a USB-Serial adapter, follow these steps:
1. Connect the scoreboard controller’s output cable connector to the USB-Serial adapter.
a. Plug the adapter into the LiveText host system.
44
Page 52

b. Install drivers for your USB-Serial adapter on the host system. Drivers for the adapter
are generally supplied on a Compact Disk (CD) packaged with the adapter by the
manufacturer.
Unless these drivers are correctly installed, DataLink cannot receive data from the
external controller. (Carefully follow the instructions provided by the manufacturer of
the adapter you purchased).
Note: Certain Daktronics controllers (including Allsport 3000 and 5000 models) require an
AllSport CG unit to convert the propriety Daktronics feed to serial data for use in LiveText.
Please contact your Daktronics representative for more information.
4.3 .2 FIND TH E COM PORT
The next step involves determining which COM port has bee assigned to the new connection by
the operating system. This information is required to configure DataLink.
2. Right-click the My Computer icon on the Windows Desktop, and select Manage from the
menu (to open the Computer Management panel).
3. Open the Device Manager (Figure 49) by clicking that entry in the left pane of this window.
4. Click the + sign next to Ports (COM and LPT) in the right-hand pane to disclose available
communication ports.
5. Locate the entry for your scoreboard controller – take note of which COM port number is
assigned to it (such as COM 1 or COM2).
Note: You should see your new connection listed. If it doesn’t appear at first, try removing
and re-inserting the USB cable connector – or you can use the “Scan for hardware changes”
item in the Device Manager’s Action menu.
(If it does appear but shows a ! icon appears next to the entry, this may indicate a problem
with either the USB connection or your adapter driver installation – try re-installing the
adapter driver, following the directions supplied with it.)
45
Page 53

Figure 49
6. Close the Device Manager.
Again, the port number you noted above is required to enable DataLink to recognize the external
device. Section 4.4.4 explains how to configure DataLink to access this source and the stream of
information it provides.
Important Note: In some environments, Windows may arbitrarily reassign the external device to
a different COM port following a reboot. If this happens, you could simply update the COM port
entry in the affected configuration profile. However, you may prefer instead to lock the
connected device to a specific COM port, using the Windows Device Manager.
To do this, please locate the current port entry for your scoreboard controller. Right-click the
entry name, and select Properties in the drop-down menu. Next, click the Port Settings tab at the
top of the Properties panel, and click the button labeled “Advanced”.
46
Page 54

Use the Com Port Number drop-down menu to choose an unused port number, and click the OK
button. OK the Properties panel too, then close the Device Manager. The Port Number you
assigned should now be retained on subsequent reboots.
4.4 CONFIGURING DATALINK
The easiest way to configure LiveText is to use the DataLink Configuration
utility, a standalone application provided to let you create and manage
convenient LiveText configurations for different purposes, and select which
one to use when LiveText runs.
Figure 50
The DataLink Configuration utility lets you select which data sources DataLink refers to when a
particular profile (configuration settings file) is chosen, and even supports multiple data source
types at one time.
The Data Profile Manager is launched from the Windows™ Start Menu:
1. Click the Start menu icon, and navigate to Programs.
2. Locate NewTek>LiveText, and select the DataLink entry to launch the utility.
4.4 .1 CREATIN G A D ATAL INK PRO FILE
3. Click New in the Profile section of the DataLink Configuration utility.
Hint: the Live Settings pane (at right) shows which profile is currently active for LiveText
use, while the Profile section shows which one you are creating or modifying right now.
47
Page 55

Figure 51
4. Enter a name for the profile in the name field (left of the New button).
(The Save button lights, to remind you to save changes before ending.)
5. Checkmark the data source types – Network (for RSS feed), Database or Serial – you
wish to have access to in the new profile,
Note: DataLink’s ASCII (.TXT) file support is always active, and requires no setup.
At this point, we can proceed to set up the individual sources for the DataLink profile.
4.4 .2 NE TWORK FEED (RSS ) SET TINGS
1. Having already added a checkmark
beside Network, click the configure
button (gear) at right. This opens the
Network Feed Settings pane (Figure
51).
2. Begin by clicking New, then enter a
name to identify this specific RSS feed.
3. Checkmark the Enable Feed button
(you can temporarily disable individual
RSS feeds within a profile without
having to re-enter the relevant data
later).
4. In the Address field, enter the URL to the RSS site.
5. Continue to complete the entry fields below, as shown in Figure 51.
6. Click Save to lock in your changes, then Done.
Hint: Key names for RSS feed elements are automatically generated.
4.4 .3 DAT ABAS E SET UP
The Database Linker monitors database files for keys (and changes to the corresponding values).
This allows users to take use supported MySQL database query functions to derive values that
are then used to update the fields displayed on the text page.
48
Page 56

Figure 52
Hint: If you plan to use this feature, you (or someone helping you) will need a measure of
familiarity with database addressing and queries.
DataLink finds files to monitor by keeping an eye on (.xml format) definition files located in a
folder named Database Input, inside the Stats
Plugins folder. You can find this location using
the NewTek>LiveText>DataLink section of the
Windows Start menu). The file content provides
the information that DataLink needs in order to
access the external database values.
Just as the DataLink Configuration utility
provides tools to set up Network feeds, you can
use it to configure queries to be run against
database files too.
1. Click the configuration button (gear)
next to Database to open a database
setup pane.
2. Enter a representative name in the Database field (this is simply to help you identify the
data source; it need not be an actual file name).
3. Enter a qualified User ID and Password for the database in the fields provided.
4. Specify the driver used for SQL queries in the Driver field.
5. In the Queries section of the panel, click New, and then provide a Key name beneath to
identify the value you expect to result from the named query.
6. Enter the query string you wish to associate with this Key into the large, empty pane
below.
7. Enable the Multiple Keys switch when more than one match to the SQL query is
acceptable. In this case, DataLink creates a key/value pair for each qualified result.
For example, a keyword “author” could produce an array of matches, which DataLink
would arrange as follows:
49
Page 57

Figure 53
%author% -> "Voltaire"
%author.1% -> "James Joyce"
%author.2% -> "Herman Melville"
8. Click Save to record your entries.
9. Click New again, and continue to add more keys and queries as required.
10. Click Save, and then Done (to close the panel.
4.4 .4 SERIAL (SCOR EBOAR D) SE TUP
As must be clear by now, this DataLink
component receives data from
compatible external scoreboard
hardware controllers. We explained
how to connect these external devices to the host system
in Section 4.3, Connecting External Devices.
You can now proceed to use the DataLink Configuration
utility to prepare a DataLink profile. This effectively
notifies LiveText which system you are using, what data it
should expect to receive, and where the source is
connected.
1. Use the Board menu to choose the device
brand/model you have connected from the list of
supported devices.
2. Choose the Sport in the same manner. The rest of the settings for serial devices auto-fill
based on your Board and Sport selections, with one exception as described next.
3. Select the Port using the information from Section 4.3.2.
4. Click Done to conclude (Serial Settings does not have a Save button.)
50
Page 58

Once you have a supported device successfully connected and configured, the drop-down key
insertion menu in LiveText’s canvas will list valid key names for that device.
KEY NAME LIST
Appendix B – Key List by Device, enumerates the actual key available for use with DataLink and
the different brands of external equipment it supports.
4.4 .5 APP LYING A D ATALINK PRO FILE
Having created a DataLink profile (or several of them), select it in the Profiles panel of the
DataLink Configuration utility. Then simply press the Update button, making it the active
configuration that DataLink will refer to the next time you launch LiveText.
4.5 CONT ROL KEYS
LiveText’s DataLink tools provide still further possibilities. Several special keys called control keys
effectively permit you to drive LiveText output externally (beyond merely altering the value of a
text string).
4.5 .1 PAGE CO NTROL KEYS
For example, control keys permit you to replace a photo embedded in a title page (even while it
is displayed live), or change the title page currently displayed, and additionally (if it is an
animated scroll or crawl) play or stop it. The principal control keys are LiveText_PageNo and
LiveText_Play.
As you would expect, simply changing the numeric value assigned to the key LiveText_PageNo
causes the corresponding page in LiveText’s Pages list to be sent to Live output. The control key
LiveText_Play accepts either of two different values – 1 or 0. Assigning the first causes an
animated page to play, whereas assigning 0 (zero) to LiveText_Play stops playback.
4.5 .2 IMAGE CONTRO L KEYS
Custom control keys governing image file references in title pages can also be created. These
keys and corresponding values are defined in either ascii files or by a database query (see
sections 4.2.1 and 4.4.2).
51
Page 59

This works as follows:
Assign a custom control key name and value that can be detected by either the TXT
Linker or Database Linker, as discussed earlier – let’s say you that a key named
mytitlepic01 is given the value D:\PlayerPics\Joe Gamestar.jpg. In this case, as you can
see, the value is the full file path for a specific image.
In LiveText, add an image to the current page (in the canvas pane), right-click it, and
select the key “mytitlepic01” from the drop-down menu – just as you would assign any
DataLink key to an object.
That’s all that’s required to configure the page for realtime image updates. Afterward, whenever
the Database Linker module returns a new value for mytitlepic01, the image displayed in the title
page will automatically be updated. For example, if the value for mytitlepic01 is changed to
D:\PlayerPics\Suzy Q. Champion.jpg, that new file will immediately replace Joe Gamestar.jpg.
Many of the default title page templates pages supplied with LiveText have stand-in (or
‘placeholder’) images all ready for you to replace with imagery of your own. These too can have
image keys assigned to them.
If you look at the entry for a stand-in image in LiveText’s Layers tab, you can determine which of
the several default files is used in a given title page.
You may find it useful to note the resolution for those images (to prepare images that will fit
perfectly). The file resolutions for the common placeholder images in LiveText 2 are as follows:
PLandscape_placeholder.png (936x586)
PLargePortrait_placeholder.png (521x578)
Portrait_placeholder.png (406x441)
4.6 LIVETIME™
Whether or not you have an external scoreboard system connected (and regardless of whether
you are using TXT Linker or Database Linker or not), a number of time-related options appear in
LiveText’s key insertion drop-down menu. Examples of these key names are Time, Date, and
variants on these – such as Date (YYYY). These keys are courtesy of LiveTime which allows you to
place clock and date objects that are updated in realtime on your title pages. When LiveTime
keys are displayed, the corresponding values are derived from the LiveText host’s system clock.
This provides many useful and creative possibilities.
52
Page 60

Figure 54
5 LIV E PR ODUCT ION A N D FIL E MAN AGEME NT
Title pages and projects created in LiveText can be utilized in a surprising
number of ways. Going ‘direct to air’ in a live production is amazing
enough, but there are also many other benefits to LiveText, too!
This chapter explores the options available, whether in connection with
immediate live display or for other purposes. As well, it explains the
many convenient and useful features available in LiveText’s file
windows.
LiveText output is immediately available for display in live productions using network-connected
live production systems such as NewTek’s TriCaster. Too, individual LiveText pages can be
exported as image or animations files, and used in various ways.
5.1 LIVE DISP LAY
Once a network connection exists between the LiveText
workstation and live production system (see Section 2.3,
Making the Connection) ‘going live’ is a simple matter.
Click the large red Live button (beside the Live Output
display in the upper-right corner) outputs the currently
selected title page to the network as a source.
The person controlling the connected live production
system then selects the LiveText entry from the list of
available sources.
Once assigned as the currently active External source, the LiveText page can be displayed as part
of the live production by selecting LiveText as a source for one of TriCaster’s Network Inputs.
53
Page 61

Figure 55
You can use Add Page or edit other title pages in the Canvas even when a LiveText page is
displayed on the networked live broadcast system. The Live Output is normally only updated
when you click Live again. There is another way to select the Live Output page, though:
Double-clicking a thumbnail image in the Pages panel sends it immediately to Live Output.
(When you do this, the designated page is added to both the Canvas and the Live Output
preview.)
Hint: The thumbnail icon for the Live Output page is outlined in red, and the thumbnail for the
page you are editing is outlined in white.
If the current page is animated – i.e., a
(vertical) Scroll or (horizontal) Crawl - the
transport controls beneath the preview
pane are activated.
Click the right-most (>) button to
commence Play, the center button (||) to
Pause (or resume play when already
paused), and the first button (|<) to go to
the beginning of the animated page.
Hint: Conveniently, LiveText automatically
begins scroll and crawl animation on a
blank frame.
The number of the current Live Output page is shown in a field to the right of the Play button.
You can use the nearby arrow buttons to move backward and forward through the list of pages,
or jump to a specific page by entering its number and pressing the Enter key.
Note: The forward/backward buttons and direct numeric entry controls are disabled if an
animated page is either playing or paused.
54
Page 62

Figure 56
5.2 FILE EXPOR TS
LiveText pages exported as bitmap format files (.png, .avi) can be used creatively in the DDR and
Picture modules of compatible live broadcast systems (such as TriCaster).
LiveText also exports Title Page files (.cgxml) for use in the Media Players (DDR, Stills, Titles)
found in the Live Desktop of TriCaster TCXD series systems.
Image and animated pages (both bitmap and .cg formats) exported from LiveText can also be
used in connection with SpeedEDIT 2 video editing projects.
CGXML Title Page Notes: TriCaster live Title Page format (.cgxml) presently supports almost
every attribute that LiveText offers – but there are a few exceptions.
For example, multiple font properties on one text line are not supported, which means in turn that
different words on a single line cannot be different colors, or use different typefaces. Of course
you can achieve the same effect by using additional text objects as necessary.
For similar reasons, text entered as paragraphs is automatically split into multiple lines in .cgxml
Title Page files. (Supplemental support for paragraph text is provided in current LiveText versions
for use with TriCaster Advanced Edition. This allows long text strings, and even multiple
paragraphs, to wrap correctly inside the bounding box defined by your text entry on the LiveText
canvas.)
5.2 .1 FILE MENU
The File menu is in the upper left corner of the LiveText desktop. It contains project and page file
management tools. Projects and (editable pages) are stored as *.cg files.
55
Page 63

Choosing New clears the current project, and opens a new blank one. (LiveText’s custom file
explorer is discussed in detail shortly, in Section 5.3).
Open also clears the current project, replacing it with another a .cg file (a LiveText project) you
have previously created and saved (see the note in Section 3.3 re: legacy LiveText projects).
ADD FILES (IMPORTING)
Add Files can be used to add an image or even a text file (see below) to the current LiveText
page. Alternatively, you can change the file suffix in the file requester to show files ending in
“.txt”.
This permits you to import long lists of textual data prepared in standard ASCII text format and
saved as a .txt file. This feature will be discussed a bit later, in Section 0.
Note: You may find it preferable to add files using the Layers tab (discussed next) to drag
files onto the Canvas.
PROJECT (SAVE AS)
Save the current project with all of its component pages as a LiveText project file (.cg). Saved
files may be reloaded later of course, and may also be compatible with selected CG applications
in the NewTek family.
This latter option opens up possibilities similar to those discussed next under Export Current
Page.
EXPORT CURRENT PAGE
Export Current Page can export a single CG Page (.cg is LiveText’s project file format), convert
the highlighted page into a Still Image file format (.png file format), or a Title Page file (.cgxml)
for live production use with TriCaster TCXD systems. If the current page is a motion page (a Scroll
or Crawl) the options in the File Type are CG Page and Video for Windows (.avi) file format.
You can choose common NTSC or PAL video resolutions when saving either still or animated files
using the Resolution menu options.
56
Page 64

Exported page types (other than .cg) can be added to the playlist of a DDR module (or Picture
module) on selected live production systems, and applied via the Overlay module; or you may
use them in non-linear editing applications. If the page(s) contain transparent areas, the
transparency will be retained.
Figure 57
Project files (.cg) can be imported into LiveText 2 compatible software, or re-loaded into
LiveText.
EXPORT ALL PAGES
This export feature works much like Export Current Page. The primary difference is that all pages
comprising the current project are exported.
57
Page 65

The Title Page (.cgxml) file export type does not support motion pages – hence if you choose that
alternative, LiveText will automatically prepare .avi clips for any motion pages encountered as it
exports the project pages.
If the current page when you select Export Current Page is a still, the File Type menu offers
export as Still Image (*.png). Nevertheless, LiveText will again automatically prepare .avi clips for
any motion pages encountered as it exports the project pages.
5.3 FILEBIN FEATUR ES
LiveText features custom file browsing features used in connection with loading and saving
various file types. Two file browsers are provided – the one used in connection with File menu
selections, and the main Filebin - a tabbed panel underneath LiveText’s Canvas and Motion
Control pane.
Figure 58
For the most part, although the layout of the two file panes varies slightly, the features are quite
similar, and you should quickly become comfortable with them.
VIEW OPTIONS
The largest part of either file browser is the file list window. In the default view (and several of
the optional ones) you will see a large thumbnail image icon to represent any image file.
58
Page 66

Figure 59
This view can be personalized to suit your need or taste in several ways.
Figure 60
A drop-down menu in the upper-right corner of the pane controls the appearance of items in the
file list window. By default this menu is set to Large Icon. You can use this menu to radically alter
the appearance and features of the panel. Try the different view options out, and you’ll quickly
see how they affect the display.
The only view option that requires a little longer explanation is the Details view (Details Only is
similar, but minus the file icon.) The Details view gives you a lot of in-depth information about
your files.
Figure 61 – Filebin tab, Details View
59
Page 67

NAVIGATION
In standard fashion, double-click a folder or drive shown in the file list window to enter it,
displaying its content.
Figure 62
Above the file list pane, a row of rectangular text boxes appears (Figure 62) as you navigate down
into your directory structure. These text boxes show the directory path of the current view. Click
directly on a text box to jump back to that drive or folder location.
Figure 63
Nearby you will find buttons labeled Back and Forward (or triangular forward and back gadgets.)
These work just like the similar features found in an internet web browser.
THE HOTLIST
If you have a folder you frequently access, you can add it to the Hotlist at the bottom of file
windows. Navigate to the folder you want to add, and press the plus sign at the left corner (click
the minus sign to remove the current Hotlist button.)
Figure 64
When you right-click directly on a Hotlist button, a two-item menu pops up. You can Remove
the selected entry, or Rename it. The Rename option creates a ‘nickname’ for the current folder,
and refreshes the Hotlist to display it. (If your list is wider than the bin, there is a scroll gadget
lower right.)
60
Page 68

CUT, COPY, PASTE, DELETE
Cut, Copy, Paste and Delete buttons are also located here. These operate on the currently
selected items in the file list window.
Of course, the common keystroke shortcuts also work in the usual manner (CTR+c for
Copy, CTRL+v for Paste, CTRL+x for Cut, and the DEL key to Delete a file.)
The New Folder button creates a new directory at the current level, and pops up a small dialog
allowing you to change its name on creation. Alternatively, you can create a New Folder from
the menu that appears when you right-click in an empty spot in the file list window.
FILE SELECTION
As you’d expect, simply clicking a file in the file list window selects it. If you click one file and
then hold Shift down when you click another, you can select all the files in between. Or, click
multiple files (in any order) while holding down the CTRL key to select a number of files which are
not next to each other in the file list.
FILEBIN OPERATIONS
The tabbed Filebin panel (under the Canvas) is unique in that it has no ‘add’ or ‘save’ (etc.)
buttons. Really, this Filebin is intended for quick and convenient interactive use. Simply drag a
file onto the Canvas to load or import it. When the file is a .cg file, the current LiveText project
will be completely replaced by the import. On the other hand, if you drag an image file into the
Canvas, it is added to the current page. Text files (in standard ASCII .txt format) are a special
case. Dragging a text file onto the Canvas (or importing one using the File menu) triggers a
powerful feature, described next.
61
Page 69

Figure 65
IMPORT TEXT
If you drag an (ASCII) file onto the
Canvas from the tabbed Filebin, the
Import Text panel pops up.
This panel offers numerous controls
over the manner in which the lines of
text in the file are treated on import,
and how multiple pages will be
generated as necessary for them.
You can create a new page for each line of text, or form a single long page containing multiple
lines. As well, you can control placement of the text on the newly created page(s) using the
Alignment, Preset or Custom Position buttons.
5.4 STAN D-IN IMAGE S
Among other things, the Title Editor in TriCaster’s Media Players (DDR, Stills and Titles) allows
you to substitute a different image for stand-in (or “placeholder”) images in Title Pages (.cgxml)
exported from LiveText. Details of how to replace stand-in images are found in the TriCaster
manual.
When creating title pages for this purpose in LiveText, you may find it saves you time to add the
string “_placeholder” somewhere in the filename of images you prepare for this purpose. For
example, you might name an image "headshot_placeholder.png", or "_PLACEHOLDER_crest.jpg".
Images named in this manner will automatically appear as stand-in images (unlocked) in the Title
Pages you export to TriCaster using the Send to Live options in LiveText’s File menu.
NOTE: Images with Shadow or Edge options enabled cannot serve as ‘stand-in images’. Also,
image-mapped (textured) objects cannot serve stand-ins. (Drag the placeholder image onto the
canvas from the File bin rather than texturing and object).
62
Page 70

Show Keyboard Shortcuts
F1
Font Name (next/previous)
F5 (Shift +)
Font Size
F6 (Shift +)
Font Rotation
F7 (Shift +)
Font Tracking (Spacing)
F8 (Shift +)
Increase/decrease Width by 5 pixels
Alt w (Shift +)
Increase/decrease Height by 5 pixel
Alt h (Shift +)
Increase/decrease Edge by 1 pixel
Alt k (Shift +)
Increase/decrease Italic by 1 pixel
Alt i (Shift +)
Increase/decrease Tracking by 1 pixel
Alt space (Shift +)
Next/Previous Font
Alt f (Shift +)
6 APP ENDIX A – K EYBO ARD SHORT CUTS
FONT
TEXT
63
Page 71

Select All
Ctrl a
Deselect All
Ctrl d
Cut
Ctrl x
Copy
Ctrl c
Paste
Ctrl v
Delete
Del
Redo
Ctrl y
Undo
Ctrl z
Select One character
Shift + L/R Arrow
Move curser to beginning
Home
Move curser to end
End
Select to the beginning
Shift + Home
CLIPBOARD
TEXT TOOL
64
Page 72

Select to the end
Shift + End
Delete entire trailing word
Ctrl + Delete
Select entire line
Shift + Up/Down Arrow
Kerning by letter
Alt + L/R Arrow
Move and scale
LMB (Left Mouse Button)
Rotate and Spacing
LMB + Shift
Multi-Select by area
LMB + Drag
Multi-Select Individual Objects
LMB + Ctrl
Nudge Up 1 pixel
Up Arrow
Nudge Down 1 pixel
Down Arrow
Nudge Left 1 pixel
Left Arrow
Nudge Right 1 pixel
Right Arrow
Nudge Up 10 pixels
Shift + Up Arrow
MODIFY TOOL
65
Page 73

Nudge Down 10 pixels
Shift + Down Arrow
Nudge Left 10 pixels
Shift + Left Arrow
Nudge Right 10 pixels
Shift + Right Arrow
Left Safety
Alt l
Center Safety Alignment
Alt c
Right Safety
Alt r
Bottom Safety Alignment
Alt b
Align Left
Alt Shift l
Align
Alt Shift r
Align Top
Alt Shift t
Align Bottom
Alt Shift b
Align Horizontal Center
Alt Shift c
ALIGNMENT
LAYOUT
66
Page 74

Align Vertical Center
Alt Shift v
Add a new page
Ctrl Insert
Delete Current Page
Ctrl Shift Delete
Clone Current Page
Ctrl Shift Insert
Move up the Page list
PageUp
Move down the Page list
PageDown
Move to top of Page list
Ctrl PageUp
Move to bottom of Page list
Ctrl PageDown
Add (Sub) 1 to Shadow Offset X
Alt x (Shift +)
Add (Sub) 1 to Shadow Offset y
Alt y (Shift +)
Shadow Type (up/down)
Alt F5 (Shift +)
Shadow Size (raise/lower)
Alt F6 (Shift +)
PAGE
SHADOW
67
Page 75

Shadow Angle (raise/lower)
Alt F7 (Shift +)
Shadow Softness (raise/lower)
Alt F8 (Shift +)
Edge Type (up/down)
Ctrl F5 (Shift +)
Edge Size (raise/lower)
Ctrl F6 (Shift +)
Toggle Safe Area on and off
Alt s
Open
Ctrl + O
Save
Ctrl + S
Save As
Ctrl + Shift + S
Add Files
Alt + Insert
Back
Backspace
Forward
Shift + Backspace
EDGE
VIEW
FILES/FILEBIN…
68
Page 76

Selection…
Select All
Ctrl + A
Deselect All
Ctrl + Shift + A
First Item
Home
Last Item
End
Previous Item
Left/Up Arrow
Next Item
Right/Down Arrow
Previous Item and Keep Current Selection
Ctrl + Left/Up
Next Item and Keep Current Selection
Ctrl + Right/Down
First Item and Keep Current Selection
Ctrl + Home
Last Item and Keep Current Selection
Ctrl + End
Select All Previous Items
Shift + Home
Select All Previous and Keep Current Selection
Ctrl + Shift + Home
Select All Following Items
Shift + End
Select All Following and Keep Current Selection
Ctrl + Shift + End
69
Page 77

Send current page to live
F9
Play current live motion page (toggles play and pause)
F10
Pause current live motion page
F11
Stop current live motion page
F12
Next Page to Live
Alt + PageDown
Previous Page to Live
Alt + PageUp
LIVE
70
Page 78

7 APP ENDIX B – KEY L IST B Y DEV ICE
This section lists the actual key names that are available for use with DataLink for the different
brands of external equipment it supports.
Mostly, the key names are self-explanatory, but we’ve added slightly more descriptive notes
anyway. Here’s the complete current list, grouped by manufacturer.
Note: the key names listed are shown inserted between percent (%) signs as a reminder, since
this is how you will enter them onto your pages.
7.1 DAKTR ONIC S
7.1 .1 BASEBAL L
%DakClock% - Game Clock Time – “MM:SS.T”
%DakClockStatus% - Game Clock Status
%DakHomeHits% - Home Team Hits
%DakGuestScore% - Guest Team Score
%DakInning% - Current inning
%DakHhr% - Hour (from Clock Time)
%DakMin% - Minutes (from Clock Time)
%DakSec% - Seconds (from Clock Time)
%DakTen% - Tenths (secs/10 from Clock Time)
7.1 .2 BASKETB ALL
%DakClock% - Game Clock Time – “MM:SS.T”
%DakClockStatus% - Game Clock Status
%DakShotClock% - Shot Clock Time – “SS“
71
Page 79

%DakHomeScore% - Home Team Score
%DakGuestScore% - Guest Team Score
%DakHomeFouls% - Home Team Fouls
%DakGuestFouls% - Guest Team Fouls
%DakHomeTOFull% - Home Time Outs Left – Full
%DakHomeTOPart% - Home Time Outs Left – Partial
%DakHomeTOTotal% - Home Time Outs Left – Total
%DakGuestTOFull% - Guest Time Outs Left – Full
%DakGuestTOPart% - Guest Time Outs Left – Partial
%DakGuestTOTotal% - Guest Time Outs Left – Total
%DakPeriod% - Current period
%DakHhr% - Hour (from Clock Time)
%DakMin% - Minutes (from Clock Time)
%DakSec% - Seconds (from Clock Time)
%DakTen% - Tenths (secs/10 from Clock Time)
7.1 .3 FOOTBAL L
%DakClock% - Game Clock Time – “MM:SS.T”
%DakClockStatus% - Game Clock Status
%DakPlayClock%% - Play Clock Time – “SS“
%DakHomeScore% - Home Team Score
%DakGuestScore% - Guest Team Score
72
Page 80

%DakHomeTOFull% - Home Time Outs Left – Full
%DakHomeTOPart% - Home Time Outs Left – Partial
%DakHomeTOTotal% - Home Time Outs Left – Total
%DakGuestTOFull% - Guest Time Outs Left – Full
%DakGuestTOPart% - Guest Time Outs Left – Partial
%DakGuestTOTotal% - Guest Time Outs Left – Total
%DakQuarter% - Current quarter
%DakMin% - Minutes (from Clock Time)
%DakSec% - Seconds (from Clock Time)
%DakTen% - Tenths (secs/10 from Clock Time)
7.1 .4 HOCKEY
%DakClock% - Game Clock Time – “MM:SS.T”
%DakClockStatus% - Game Clock Status
%DakShotClock%% - Shot Clock Time – “SS“
%DakHomeScore% - Home Team Score
%DakGuestScore% - Guest Team Score
%DakHomeTOFull% - Home Time Outs Left – Full
%DakHomeTOTotal% - Home Time Outs Left – Total
%DakGuestTOFull% - Guest Time Outs Left – Full
%DakGuestTOTotal% - Guest Time Outs Left – Total
%DakPeriod% - Current period
73
Page 81

%DakMin% - Minutes (from Clock Time)
%DakSec% - Seconds (from Clock Time)
%DakTen% - Tenths (secs/10 from Clock Time)
7.1 .5 SOCCER
%DakClock% - Game Clock Time – “MM:SS.T”
%DakClockStatus% - Game Clock Status
%DakShotClock%% - Shot Clock Time – “SS“
%DakHomeScore% - Home Team Score
%DakGuestScore% - Guest Team Score
%DakHomeTOFull% - Home Time Outs Left – Full
%DakGuestTOFull% - Guest Time Outs Left – Full
%DakGuestTOTotal% - Guest Time Outs Left – Total
%DakHalf% - Current half
%DakMin% - Minutes (from Clock Time)
%DakSec% - Seconds (from Clock Time)
%DakTen% - Tenths (secs/10 from Clock Time)
7.1 .6 VOL LEYBALL
%DakClock% - Game Clock Time – “MM:SS.T”
%DakClockStatus% - Game Clock Status
%DakHomeServiceIndicator%%
%DakHomeScore% - Home Team Score
74
Page 82

%DakGuestScore% - Guest Team Score
%DakHomeTOFull% - Home Time Outs Left – Full
%DakHomeTOTotal% - Home Time Outs Left – Total
%DakGuestTOFull% - Guest Time Outs Left – Full
%DakGuestTOTotal% - Guest Time Outs Left – Total
%DakGameNumber% - Current game number
%DakMin% - Minutes (from Clock Time)
%DakSec% - Seconds (from Clock Time)
%DakTen% - Tenths (secs/10 from Clock Time)
7.2 DSI K EYS:
Basketball
%DSIClock% - Game Clock Time – “MM:SS.T”
%DSIShotClock% - Shot Clock Time – “SS“
%DSIMin% - Minutes (from Clock Time)
%DSISec% - Seconds (from Clock Time)
%DSITen% - Tenths (secs/10 from Clock Time)
7.3 DAKTR ONIC S CG
Baseball
%CGDakHomeScore% - Home Team Score
%CGDakGuestScore% - Guest Team Score
%CGDakInning% - Current inning
75
Page 83

%CGDakInningText% - Current inning (text)
%CGDakInningDescription% - Inning Description (text)
%CGDakHomeAtBat% - Home At -bat indicator (0 or 1).
%CGDakGuestAtBat% - Guest At-bat indicator (0 or 1).
%CGDakHomeHits% - Home Team Hits
%CGDakHomeErrors% - Home Team Errors
%CGDakHomeLeftOnBase% - Home Team Left-on-base
%CGDakGuestHits% - Guest Team Hits
%CGDakGuestErrors% - Guest Team Errors
%CGDakGuestLeftOnBase% - Guest Team Left-on-base
%CGDakBatterNumber% - At-bat Player Number
%CGDakBatterAverage% - At-bat Player Average
%CGDakBall% - Ball count
%CGDakStrike% - Strike count
%CGDakOut% - Outs
%CGDakHit% - Hits
%CGDakError% - Errors
%CGDakHitErrorText% - Error (text)
%CGDakErrorPosition% - Error Position
%CGDakInningLabel1% - First Inning label
%CGDakInningLabel2% - etc.
%CGDakInningLabel3%
%CGDakInningLabel4%
%CGDakInningLabel5%
76
Page 84

%CGDakInningLabel6%
%CGDakInningLabel7%
%CGDakInningLabel8%
%CGDakInningLabel9%
%CGDakInningLabel10%
%CGDakInningLabel11%
%CGDakInningLabel12%
%CGDakHomeInningScore1% - Home Score, First Inning
%CGDakHomeInningScore2% - etc.
%CGDakHomeInningScore3%
%CGDakHomeInningScore4%
%CGDakHomeInningScore5%
%CGDakHomeInningScore6%
%CGDakHomeInningScore7%
%CGDakHomeInningScore8%
%CGDakHomeInningScore9%
%CGDakHomeInningScore10%
%CGDakHomeInningScore11%
%CGDakHomeInningScore12%
%CGDakGuestInningScore1% - Guest Score, First Inning
%CGDakGuestInningScore2% - etc.
%CGDakGuestInningScore3%
%CGDakGuestInningScore4%
%CGDakGuestInningScore5%
77
Page 85

%CGDakGuestInningScore6%
%CGDakGuestInningScore7%
%CGDakGuestInningScore8%
%CGDakGuestInningScore9%
%CGDakGuestInningScore10%
%CGDakGuestInningScore11%
%CGDakGuestInningScore12%
%CGDakHomePitcherNum% - Home Pitcher Player Number
%CGDakHomePitchesBalls% - Home Pitches, Balls
%CGDakHomePitchesStrikes% - Home Pitches, Strikes
%CGDakHomePitchesFoulBall% - Home Pitches, Foul Balls
%CGDakHomePitchesInPlay% - Home Pitches In Play
%CGDakHomePitchesTotal% - Total Home Pitches
%CGDakGuestPitcherNum% - Guest Pitcher Player Number
%CGDakGuestPitchesBalls% - Guest Pitches, Balls
%CGDakGuestPitchesStrikes% - Guest Pitches, Strikes
%CGDakGuestPitchesFoulBall% - Guest Pitches, Foul Balls
%CGDakGuestPitchesInPlay% - Guest Pitches In Play
%CGDakGuestPitchesTotal% - Total Guest Pitches
7.3.1 B ASKE TBALL
%CGDakClock% - Game Clock Time – “MM:SS.T”
%CGDakClockStatus% - Game Clock Status
%CGDakShotClock% - Shot Clock Time – “SS“
78
Page 86

%CGDakHomeScore% - Home Team Score
%CGDakGuestScore% - Guest Team Score
%CGDakHomeFouls% - Home Team Fouls
%CGDakGuestFouls% - Guest Team Fouls
%CGDakHomeTOFull% - Home Time Outs Left – Full
%CGDakHomeTOPart%% - Home Time Outs Left – Partial
%CGDakHomeTOTotal% - Home Time Outs Total
%CGDakGuestTOFull% - Guest Time Outs Left – Full
%CGDakGuestTOPart% - Guest Time Outs Left – Partial
%CGDakGuestTOTotal% - Guest Time Outs Left – Total
%CGDakPeriod% - Current period
%CGDakMin% - Minutes (from Clock Time)
%CGDakSec% - Seconds (from Clock Time)
%CGDakTen% - Tenths (secs/10 from Clock Time)
7.3.2 FOOTB ALL
%CGDakClock% - Game Clock Time – “MM:SS.T”
%CGDakHomeTeamName% - Home Team Name
%CGDakGuestTeamName% - Guest Team Name
%CGDakHomeScore% - Home Team Score
%CGDakGuestScore% - Guest Team Name
%CGDakQuarter% - Current quarter
%CGDakBallOn% - Current ball position
79
Page 87

%CGDakDown% - Current down
%CGDakToGo% - Yards to go
%CGDakHomePossess% - Possession indicator (0 or 1).
%CGDakGuestPossess% - Possession indicator (0 or 1).
%CGDakPlayClock% - Play Clock Time – “SS“
%CGDakHomeTO% - Home Time Outs
%CGDakGuestTO% - Guest Time Outs
%CGDakMin% - Minutes (from Clock Time)
%CGDakSec% - Seconds (from Clock Time)
%CGDakTen% - Tenths (secs/10 from Clock Time)
7.3.3 H OCKE Y
%CGDakClock% - Game Clock Time – “MM:SS.T”
%CGDakClockStatus% - Game Clock running status indicator
%CGDakHomeScore% - Home Team Score
%CGDakGuestScore% - Guest Team Score
%CGDakHomeTO% - Home Time Outs
%CGDakGuestTO%% - Guest Time Outs
%CGDakHomeShotsOnGoal% - Home Shots on Goal
%CGDakGuestShotsOnGoal% - Guest Shots on Goal
%CGDakPeriod% - Current period
%CGDakHomePenalty1_PlayerNum% - Home Penalty, player number
%CGDakHomePenalty1_PenaltyTime% - Home Penalty, time left
%CGDakGuestPenalty1_PlayerNum% - Guest Penalty, player number
80
Page 88

%CGDakGuestPenalty1_PenaltyTime% - Guest Penalty, time left
%CGDakHomePenalty2_PlayerNum% - Home Penalty, player number
%CGDakHomePenalty2_PenaltyTime% - Home Penalty, time left
%CGDakGuestPenalty2_PlayerNum% - Guest Penalty, player number
%CGDakGuestPenalty2_PenaltyTime% - Guest Penalty, time left
%CGDakMin% - Minutes (from Clock Time)
%CGDakSec% - Seconds (from Clock Time)
%CGDakTen% - Tenths (secs/10 from Clock Time)
7.3.4 SOCCE R
%CGDakClock% - Game Clock Time – “HH:MM:SS.T”
%CGDakHomeTeamName% - Home Team Name
%CGDakGuestTeamName% - Guest Team Name
%CGDakHomeScore% - Home Team Score
%CGDakGuestScore% - Guest Team Score
%CGDakHalf% - Current half
%CGDakHomeShotsOnGoal% - Home Shots on Goal
%CGDakHomeSaves% - Home Saves
%CGDakHomeCornerKicks% - Home Corner Kicks
%CGDakGuestShotsOnGoal% - Guest Shots on Goal
%CGDakGuestSaves% - Guest Saves
%CGDakGuestCornerKicks% - Guest Corner Kicks
%CGDakHomeFouls% - Home Fouls
%CGDakGuestFouls% - Guest Fouls
81
Page 89

%CGDakHhr% - Hours (from Clock Time)
%CGDakMin% - Minutes (from Clock Time)
%CGDakSec% - Seconds (from Clock Time)
%CGDakTen% - Tenths (secs/10 from Clock Time)
7.3.5 VOLLE YBALL
%CGDakClock% - Game Clock Time – “MM:SS.T”
%CGDakClockStatus% - Game clock running status indicator
%CGDakHomeGameScore% - Home Team Score
%CGDakGuestGameScore% - Guest Team Score
%CGDakHomeTO% - Home Time Out
%CGDakGuestTO% - Guest Time Out
%CGDakHomeServiceIndicator% - Home Service indicator (0 or 1)
%CGDakGuestServiceIndicator% - Guest Service indicator (0 or 1)
%CGDakHomeGamesWon% - Home Games Won
%CGDakGuestGamesWon% - Guest Games Won
%CGDakGameNumber% - Current Game Number
%CGDakHomeGameScore1% - Home Score, First Game
%CGDakHomeGameScore2% - Home Score, Second Game
%CGDakHomeGameScore3% - Home Score, Third Game
%CGDakHomeGameScore4% - Home Score, Fourth Game
%CGDakGuestGameScore1% - Guest Score, First Game
%CGDakGuestGameScore2% - Guest Score, Second Game
%CGDakGuestGameScore3% - Guest Score, Third Game
82
Page 90

%CGDakGuestGameScore4% - Guest Score, Fourth Game
%CGDakMin% - Minutes (from Clock Time)
%CGDakSec% - Seconds (from Clock Time)
%CGDakTen% - Tenths (from Clock Time)
7.4 OES
7.4 .1 BASKETB ALL
%OESClock% - Game Clock Time – “MM:SS.T”
%OESShotClock% - Shot Clock Time
%OESAwayScore% - Guest Team Score
%OESHomeScore% - Home Team Score
%OESHomeFouls% - Home Team Fouls
%OESAwayFouls% - Guest Team Fouls
%OESHomeTOFull% - Home Team Time Out - Full
%OESHomeTOPart% - Home Team Time Out - Partial
%OESAwayTOFull% - Guest Team Time Out - Full
%OESAwayTOPart% - Guest Team Time Out - Partial
%OESPeriod% - Current period
%OESMin% - Minutes (from Clock Time)
%OESSec% - Seconds (from Clock Time)
%OESTen% - Tenths (secs/10 from Clock Time)
83
Page 91

7.5 TRANSLUX FAIRP LAY
7.5 .1 FOOTBAL L
%TLFPClock% - Game Clock Time – “MM:SS.T”
%TLFPQuarter% - Current quarter
%TLFPHomeScore% - Home Team Score
%TLFPVisitorScore% - Visiting Team Score
%TLFPDown% - Current down
%TLFPToGo% - To go (yards
%TLFPBallOn% - Ball on (yard line)
%TLFPFieldTimer% - Current field timer (SS)
%TLFPMin% - Minutes (from Clock Time)
%TLFPSec% - Seconds (from Clock Time)
%TLFPTen% - Tenths (secs/10 from Clock Time)
7.6 WHIT EWAY
7.6 .1 BASKETB ALL
%WWPeriod% - Current period
%WWClock% - Game Clock Time – “MM:SS.T”
%WWAwayScore% - Guest Team Score
%WWHomeScore% - Home Team Score
84
Page 92

%WWShotClock% - Shot Clock Time
%WWMin% - Minutes (from Clock Time)
%WWSec% - Seconds (from Clock Time)
%WWTen% - Tenths (secs/10 from Clock Time)
7.7 WHIT EWAY R AINB OW
7.7 .1 BASKETB ALL
%WWRSportNum% - Sport Number
%WWRPeriod% - Current period
%WWRShotClock% - Shot Clock Time
%WWRAwayScore% - Guest Team Score
%WWRHomeScore% - Home Team Score
%WWRMinutes% - Minutes (from Clock Time)
%WWRSeconds% - Seconds (from Clock Time)
%WWRTenths% - Tenths (from Clock Time)
85
Page 93

Page 94

Figure 66
8 APP ENDIX C – NETWO RKIN G NOT E S
Clearly, a reliable and competent network connection must exist for your LiveText workstation’s
output to be displayed live using a compatible live production system. Any issue that impedes a
good connection will likewise impede or even preclude the use of LiveText along with a live
production system such as TriCaster or VT[5].
Reading this section will not turn you into a network guru, but it will assist you to diagnose some
simple issues.
8.1 PING IS Y OUR FRIEND
More complex problems may require you to
turn to the system administrator for help -- but
you may be able to resolve simpler issues by
borrowing one of the IT Departments secret
weapons!
Ping is a humble but effective (and free!) tool to
confirm that the requisite connection exists. A
standard inclusion in operating systems, Ping
may help you diagnose LiveText connection
issues.
Ping sends a small set of data packets to the target host (IP number), then ‘listens’ for an echo
response in return. It estimates the round-trip time in milliseconds, records any data losses, and
87
Page 95

displays a summary when finished. Bottom line, if you can’t ping your target, your connection has
problems (the problem might be as simple as a bad cable connection.)
Finding the target IP number:
To issue a ping, you need know the IP number of the target computer.
On a Windows XP® system, you can find this number by:
(On TriCaster, click the [x] button in the upper-right corner of the screen, and select
Admin to get to the Windows Desktop.)
Next, select Network Connections from the Windows Start Menu (look in the Settings
sub-menu if it is not listed at the top level.)
Inside the Network Connections panel, right-click on the icon for your LAN (local Area
Network) and select Status. The IP Address for the system is shown on the Support tab.
Issuing a Ping
Ping is a command line program, and must be run from a command shell on the issuing
computer. To open a command shell and send a ping, follow the procedure below that applies.
Windows
On TriCaster, click the [x] button in the upper-right corner of the screen, and select
Admin to get to the Windows Desktop.
For all Windows XP® systems (including TriCaster) select the Windows Start Menu
command Run
Type “CMD” (without quotation marks) into the Run dialog panel
Press your Enter key a command shell window will open.)
Type “Ping” (without quotes) followed by a space and the target IP number, as in the
image below – then press Enter.
Figure 67
88
Page 96

Ping will go to work, and in a moment or two begin reporting results. A ping failure
(indicating a network problem) will look like Figure 68.
Figure 68
A successful ping will display a report like Figure 69.
Figure 69
89
Page 97

Page 98

9 IND EX
A
ASCII Text File, 39, 40
C
Clocks, 52
Color Picker, 22, 28
Colors
ColorPicker, 22, 28
COM port, 46
Control Keys, 51
Cut, Copy, Paste, Delete, 22, 61
D
Database Linker, 39, 48
DataLink, 37
Control Keys, 51
Image Control Keys, 51
DataLink Configuration utility, 47
DataLink profile, 47
Dates, 52
Device Manager, 45
E
External Devices
Connecting, 44
Scoreboard, 38, 40
F
Filebin, 68
Hotlist, 60
Files
File Operations, 22, 61
Undo/Redo, 17, 22, 64
G
Grid and Guides, 25, 26
H
Hotlist, 60
I
Image Control Keys, 51
K
Key-value pairs, 40, 50
L
Linker
ASCII Text File, 39, 40
Database, 39, 48
Network (RSS), 48
Scoreboard, 38, 40, 50
Key Definitions, 50
TXT, 39, 40
LiveTime, 52
Loop, 25, 31
P
Paragraph Text, 55
Pause, 54
Ping, 87
Play, Pause, & Stop, 54
Port
COM, 46
91
Page 99

R
RSS, 48
S
Scoreboard Linker, 38, 40
Key Definitions, 50
Scoreboard Linker, 50
Shadows, 12, 29, 67, 68
Stand-in images, 62
Stop, 54
T
Tags, 34
Template, 43
Templates, 12
Timers, 52
Title Template, 43
Titling
Grid and Guides, 25, 26
Lock Aspect Ratio, 27
Templates, 12
Txt Linker, 40
TXT Linker, 39
V
Video
Shadows, 12, 29, 67, 68
W
Windows
Color Picker, 22, 28
92
Page 100

 Loading...