

Page 1
)NSTALLATION'UIDE
Wireless USB 2.0 Adapter Model WN121T
These setup instructions assume that you will connect to an access point or wireless router.
Estimated Completion 10 minutes.
Installation
Note: The adapter is compatible with Windows V i sta, Windows XP S2 and Windows
2000 SP4 operating systems. Windows XP SP1 users must upgrade with a Microsoft Hot
Fix KB822603 first.
1. First, install the WN121T
software.
Insert the NETGEAR CD. If the CD main
page does not appear, double click
Autorun.exe on the CD.
a. Click Install the Software. The Check
for Updates window opens.
b. If you are connected to the Internet, click
Check for Updates. If not, you can
choose to install from the CD.
c. When the Installation Complete message appears, click Next.
2. Now, connect the Wireless USB 2.0 Adapter.
a. Locate an available USB port on your
computer.
b. Insert the end of the cable on the
Wireless USB 2.0 Adapter into the USB
port.
c. The Found New Hardware Wizard
opens. Follow the wizard prompts.
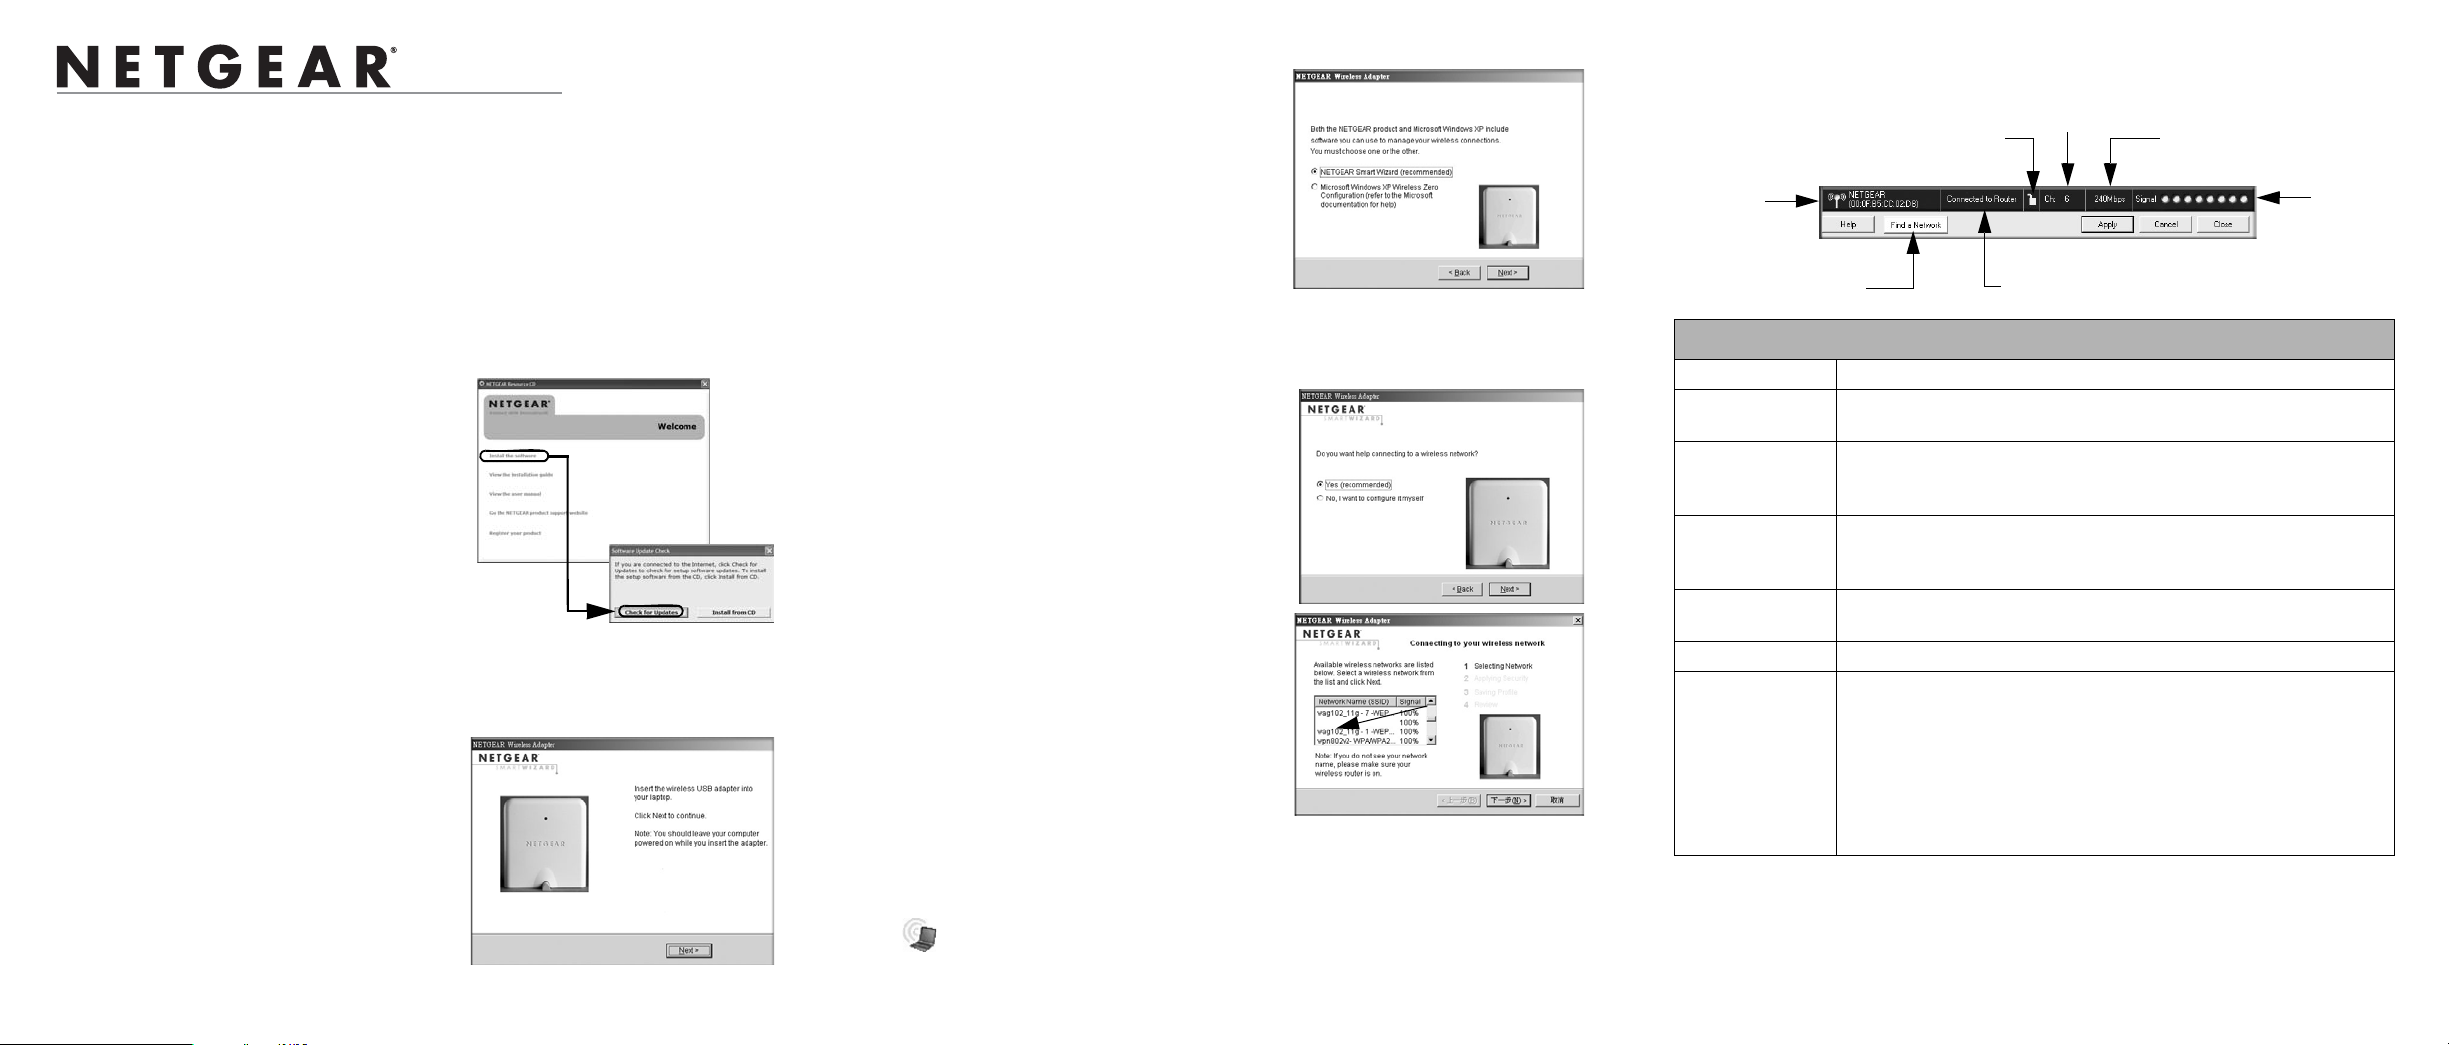
3. Use the Smart Wizard to set up your wireless PC card.
a. Windows 2000 users go to Step b.
Windows XP or Vista users can set up the
wireless adapter with the NETGEAR
Smart Wizard (recommended) or the
Windows configuration utilities. .
• NETGEAR Smart Wizard: Reveals
more information about each network
and makes it easier to troubleshoot
network connection problems.
• Windows configuration utilities: See the Windows documentation or
“Using Windows XP and Vista Wireless Configuration Utilities” at:
http://documentation.netgear.com/reference/enu/winzerocfg/index.htm
b. Click Next to accept the Smart Wizard.
You will be prompted to let the wizard help
you connect to a network (recommended).
c. Click Next to accept.
4. Connect to a wireless network.
a. Select the wireless network from the drop-
down list, and the wizard records your
choice.
Note: Hidden networks do not broadcast
the Network Name (SSID). These
networks are in the drop-down list, but the
Network Name (SSID) is blank.
If the network uses security, then the
Smart Wizard detects it.
b. Follow the Wizard steps for Security (if used) and for saving a Profile.
c. After you have reviewed the settings, click Finish.
The icon appears in the system tray and on the desktop; and the Settings page opens.
The wizard initiates your wireless connection. It could take up to a minute for your
wireless connection to be established. Check the status bar.
Hidden Network
Using the Status Bar
The status bar is located at the bottom of the Settings page.
Security
Wireless
network
Find a Network
Understanding the Status Bar
Wireless network Identifies which wireless network you have joined.
Security • Locked: security enabled.
• Unlocked: security not enabled.
Channel The wireless channel used by the network. If many wireless networks
in your area use the same channel they can interfere with one
another.
Throughput Wireless throughput measured in Mega bits per second. To optimize
throughput, connect to a network with a high-speed router or access
point, and a high-speed Internet connection.
Signal strength More dots indicates a stronger signal. Usually, you will experience
higher throughput when the signal is strongest.
Find a Network Click Find a Network to open the Connection Wizard.
Connection
status
Identifies the status of your network connection.
• Connected to Internet: Wireless Internet connection is OK.
• Connected to Router: Wireless connection to the router is OK but
the router is not connected to the Internet.
• 169.254.x.x or ___.___.___.___ : The wireless connection to the
router is OK but there is a problem with the router. See the online
help or the NETGEAR RangeMax Wireless USB 2.0 Adapter
Model WPNT121 User Manual on the NETGEAR CD.
Channel
Throughput
Signal
strength
Connection status
Page 2

Technical Support
After completing the Smart Wizard configuration assistant, locate the serial number on the
bottom label of your product and use it to register your product at
http://www.NETGEAR.com/register.
Registration on the website or over the phone is required before you can use our telephone
support service. The phone numbers for worldwide regional customer support centers are
on the Warranty and Support Information card that came with your product.
Go to http://kbserver.netgear.com for product updates and Web support.
January 30, 2007
This symbol was placed in accordance with the European Union Directive
2002/96 on the Waste Electrical and Electronic Equipment (the WEEE
Directive). If disposed of within the European Union, this product should be
treated and recycled in accordance with the laws of your jurisdiction
implementing the WEEE Directive.
© 2007 by NETGEAR, Inc. All rights reserved. NETGEAR is a registered trademark of NETGEAR, Inc. in the
United States and/or other countries. Other brand and product names are trademarks or registered trademarks of
their respective holders. Information is subject to change without notice.
 Loading...