

Page 1
Installation Guide for the
NETGEAR 54 Mbps
Wireless PC Card WG511
NETGEAR, Inc.
4500 Great America Parkway
Santa Clara, CA 95054 USA
Phone 1-888-NETGEAR
M0-WG511NA-0
February 2003
Page 2

Technical Support
Please refer to the support infor mation card that shipped with your product.
By registering your product at www.NETGEAR.com/register
, we can
provide you with faster expert technical support and timely notices of product and
software upgrades.
NETGEAR, INC.
Support Information
Phone: 1-888-NETGEAR (For US & Canada only)
For other countries see your Support information card.
E-mail: Support@NETGEAR.com
Web site: www.NETGEAR.com
St atem ent of Condit ions
In the interest of improving internal design, operational function, and/or reliability, NETGEAR
reserves the right to make changes to the products described in this document without notice.
NETGEAR does not assume any liability that may occur due to the use or application of the
product(s) or circuit layout(s) described herein.
©2002 NETGEAR, Inc. NETGEAR, the Netgear logo, The Gear Guy and Everybody's Connecting are
trademarks or registered trademarks of Netgear, Inc. in the United States and/or other countries. Microsoft
and Window s are registered trademarks of Micr osoft Corporatio n in the United States and/ or other countries.
Other brand and product names are trademarks or registered trademarks of their respective holders.
Information is subject to change without notice. All rights reserved
February 2003
Certificate of the Manufacturer/Importer
It is hereby certified that th e Model WG5 1 1 Wireless PC Card has been suppressed in accordance with the condi tions set
out in the BMPT- AmtsblVfg 243/19 91 and Vfg 46/1992. The operation of some equipment (for example, test
ii
.
Page 3

transmitters) in accordance with the regulations may, however , be subject to certain restrictions. Please refer to the notes
in the operating instructions.
Federal Office for Telecommunications Approvals has been notified of the placing of this equipment on the market and
has been granted the right to test the series for compliance with the regulations.
VCCI Statement
This equipment is in the Cla ss B category (information equip ment to be used in a residential are a or an adjacent area
thereto) and conforms to the standards set by the Voluntary Control Council for Interference by Data Processing
Equipment and Electroni c Office Machines aimed at preventing radio interference in such residential areas. When used
near a radio or TV receiver, it may become the cause of radi o interference. Read instructions for correct handling.
Federal Communications Commission (FCC) Complia nce Notice:
Radio Frequency Notice
NETGEAR 54 Mbps Wireless PC Card WG511
Tested to Comply
with FCC Standards
FOR HOME OR OFFICE USE
This device complies with part 15 of the FCC Rules. Operation is subject to the following two conditions:
1. This device may not ca use harmful interference.
2. This device must accept a ny interference received, including interference that may cause undesired operation.
Note: This equipment has been tested and found to comply with the limits for a Class B digital device, pursuant to part
15 of the FCC Rules. These limits are designed to provide reasonable protection against harmful interference in a
residential in stallation. This equipment generates, uses, and can radia te radio frequency e nergy a nd, if not installed and
used in accordance with the instructio ns, may c ause harmfu l interference to radio commu nicatio ns. However, there is no
guarantee that interference will not occur in a particular installation. If this equipment does cause harmful interference to
radio or television reception, which can be determined by turning the equipment off and on, the user is encouraged to try
to correct the interference by one or more of the following measures: (1) Reorie nt or relocate the receiving antenn a, (2)
Increase the separation between the equipment and receiver, (3) Connect the equipment into an outlet on a circuit
different from that to which the receiver is connected, (4) Consult the dealer or an experienced radio/TV technician for
help.
Warning!
To comp ly with the FCC’s of exposure
requirements you must maintain a distance
of at least 1 cm from the antenna of th is
device while it is in use . T his de vice sh ou ld
not be co-locat ed with other transmitters.
Federal Communications Commission (FCC) Radiation Exposure Statement
This equipment complies with FCC radiation exposure limits set forth for an uncontrolled environment. In order to
avoid the possibility of exceedin g the FCC radio fre quenc y expo sure limits, h uman p roximity to the ante nna shall n ot be
less than 20 cm (8 inches) during normal operation.
Canadian Department of Communications Radio Interference Regulations
This digital apparatus (Model WG511 Wireless PC Card) does not exceed the Class B limits for radio-noise emissions
from digital apparatus as set out in the Radio Interference Regulations of the Canadian Department of Communications.
iii
Page 4

iv
Page 5

Contents
Chapter 1
Introduction
About the NETGEAR 54 Mbps Wireless PC Card WG511 ................................................1
Key Features and Related NETGEAR Products ...............................................................1
What’s in the Box? .............................................................................................................2
A Road Map for ‘How to Get There From Here’ ................................................................3
Chapter 2
Basic Setup
What You Will Need Before You Begin ..............................................................................7
Verify System Requirements .......................................................................................7
Observe Location and Range Guidelines ...................................................................8
Two Basic Operating Modes ..............................................................................................8
WG511 Default Wireless Configuration Settings ...............................................................9
Basic Installation Instructions ............................ ....... ...... ....... ...... ...... ....... ...... ....... ...... ....10
For Windows XP Users Installing a WG511 ..............................................................10
For Windows 2000 & 98/Me Users Installing a WG511 ............................................14
WG511 Wireless Connection Indicators ..........................................................................18
Interpreting the LED on the WG511 ..........................................................................18
Interpreting System Tray Icon Colors ........................................................................19
Basic Troubleshooting Tips .................................................... ...... ...... ....... .......................20
Chapter 3
Configuration
Understanding the Configuration Options .......................................................................21
Using Configuration Profiles ............................................................................................21
Connect to an Access Point in Infrastructure Mode ..................................................22
How to Configure an Infrastructure Mode Profile ......................................................23
Connecting to Another PC in Ad-hoc Mode .....................................................................25
How to Configure an Ad-hoc Moce Profile ................................................................26
Enabling Wireless Security Features ...............................................................................28
Identifying the Wireless Network Name (SSID) and WEP Security Settings ............29
How to Configure WEP Encryption Security .............................................................30
Contents i
Page 6

Appendix A
Technical Specifications
Appendix B
Wireless Networking Basics
Wireless Networking Overview ........................................................................................35
Infrastructure Mode ........................ ....... ...... ....... ...... ....... ...... ...... ....... ...... ....... ...... ....35
Ad Hoc Mode (Peer-to-Peer Workgroup) ..................................................................36
Network Name: Extended Service Set Identification (ESSID) ..................................36
Authentication and WEP ..................................................................................................36
802.11b Authentication ..............................................................................................37
Open System Authenticati on .... ...... ....... ...... ....... ...... ....... ...... ....................................37
Shared Key Authentication ........................................................................................38
Overview of WEP Parameters .............. ...... ....... ...... ....... ...... ...... ....... ...... ....... ..........3 9
Key Size ....................................................................................................................40
WEP Configuration Options ......................................................................................40
Wireless Channels ...........................................................................................................41
Appendix C
Preparing Y our PCs for Network Access
Preparing Your Computers for TCP/IP Networking .........................................................43
Configuring Windows 98 and Me for TCP/IP Networking ................................................43
Install or Verify Windows Networking Components ...................................................43
Enabling DHCP to Automatically Configure TCP/IP Settings in Windows 98 and Me 45
Selecting Windows’ Internet Ac ce ss Metho d .................................................. ...... ....47
Verifying TCP/IP Properties ......................................................................................47
Configuring Windows 2000 or XP for TCP/IP Networking ...............................................48
Install or Verify Windows Networking Components ...................................................48
DHCP Configuration of TCP/IP in Windows XP or 2000 ...........................................49
DHCP Configuration of TCP/IP in Windows XP .......................................................49
DHCP Configuration of TCP/IP in Windows 2000 ....................................................51
Verifying TCP/IP Properties for Windows XP or 2000 ...............................................53
Glossary
List of Glossary Terms .......................................................................................................1
Index
ii Contents
Page 7

Installation Guide for the NETGEAR 54 Mbps Wireless PC Card WG511
Chapter 1
Introduction
This chapter introduces the features, package contents, and appearance of the NETGEAR® 54
Mbps Wireless PC Card WG511.
About the NETGEAR 54 Mbps Wireless PC Card WG511
The NETGEAR 54 Mbps Wireless PC Card WG511 gives you ultimate mobility in your office or
while you are traveling. It frees you from traditional Ethernet wiring and helps you create a
wireless network for sharing your broadband cable or DSL Internet access among multiple PCs in
and around your ho me . I t is de signed for notebook c omput ers r unni ng Mi cr oso ft
both 16-bit PCMCIA and 32-bit CardBus compatible and works in any available PCMCIA or
CardBus slot.
®
Windows®. It is
Its auto-sensing capability allows the highest packet transfer at up to 54 Mbps for maximu m
throughput or dynamic ra nge shifti ng to lower spe eds due to dis tance or oper ating li mitations in an
environment with a lot of electr omagnetic interference.
It provides reliable, standards-based 802.11b 11 Mbps WLAN connectivity that is protected with
industry-standa rd sec urity. In addition, it of f ers t he fas ter sp eeds of th e soon- to-be ratif ied 80 2.11g
standard. It works with Windows 98, Me, 2000, and XP operating systems.
Key Features and Related NETGEAR Products
The WG511 Wireless PC Card provides the followin g features:
• Reliable IEEE 802.11b standards-based wireless technology.
• Supports roaming between access points when configured in Infrastructure mode.
• 54 Mbps high speed data transfer. Wireless nodes negotiate to operate in the optimal data
transfer rate. In a noisy environment or when the distance between the wireless nodes is far,
the wireless nodes automatically fall back to operate at lower transfer rates.
Introduction 1-1
Page 8

Installation Guide for the NETGEAR 54 Mbps Wireless PC Card WG511
• Highest level of data encryption using128-bit Shared Key WEP data encryption method.
Lower level of data encryption or no data encryption is available to simplify your network
setup or to improve data transfer rate.
The following Netgear products can be configured to communicate with the WG511 Wireless PC
Card.
• WG602 54 Mbps Wireless Access Point
• WGR614 Wireless Cable/DSL Router
• WAB102 Dual Band Access Point
• WAB501 Dual Band PC Card
• MA101 802.11b Wireless USB Adapter
• ME102 802.11b Wireless Access Point
• MA311 802.11b Wireless PCI Adapter
• MR314 and MR814 802.11b Wireless Cable/DSL Routers
• MA701 802.11b Wireless Compact Flash Card
What’s in the Box?
The product package should contain the following items:
• NETGEAR 54 Mbps Wireless PC Card WG511
• Installation Guide for the NETGEAR 54 Mbps Wireless PC Card WG511
• NETGEAR 54 Mbps Wireless PC Card WG511 Resource CD, including:
— Driver and Configuration Util ity Softwa re
— Installation Guide for the NETGEA R 54 Mbps Wireless PC Card WG511
• Warranty card
• Support information card
If any of the parts are incorrect, missing, or damaged, contact your NETGEAR dealer. Keep the
carton, including the original packing materials, in case you need to return the product for repair.
The NETGEAR 54 Mbps Wireless PC Card WG511 has two interfaces. The PCMCIA Type II
connector connects to any not ebook PC wi th an ava ilable PCMCIA or CardBus sl ot. The wi reles s
interface of the NETGEAR 54 Mbps Wireless PC Card WG511 remains outside of the notebook
PC chassis when the wireless PC card is inserted into a notebook. The green LED indicates the
wireless link condition of the NETGEAR 54 Mbps Wireless PC Card WG511 with another
wireless node or the associated access point.
1-2 Introduction
Page 9

Installation Guide for the NETGEAR 54 Mbps Wireless PC Card WG511
A Road Map for ‘How to Get There From Here’
The introduction and adoption of any new technology can be a difficult process. Wireless
technology has re moved one of the bar rier s to n etworki ng: r unning wires. It al lows more peopl e to
try networking while at the same time exposes them to the inherent complexity of networking.
General networking concepts, set up, and maintenance can be difficult to understand. In addition,
wireless technology adds issues, such as range, interference, signal quality, and security to the
picture.
To help overcome potential barriers to successfully using wireless networks, the table below
identifies how to accompl ish such thi ngs as connecti ng to a wireles s network , assuring appr opriate
security measures are taken, browsing the Internet through your wireless connection, exchanging
files with other compu ters and us ing printer s in the combined wireless and wired network.
Table 1-1. A Road Map for How to Get There From Here ...
If I Want To ... ? What Do I Do? What’s Neede d? How Do I?
Connect to a
wireless
network
1. Identify the
wireless
network name
(SSID) and, if
used the
wireless
security
settings.
2. Set up the
NETGEAR 54
Mbps Wireless
PC Card
WG511 with
the settings
from step 1.
1. A wireless network
2. A notebook PC within the
operating range of the wirel ess
network. For guidelines about
the range of 802.11b wireless
networks, please see
2“Observe Location and
Range Guidelines” on page
2-8.
To set up the WG511, see
Chapter 2, Basic Setup and
follow the instructions provided.
To learn about wireless
networking technology, please
see Appendix B-35, “Wireless
Networking Basi cs ” for a gene ral
introduction.
Introduction 1-3
Page 10

Installation Guide for the NETGEAR 54 Mbps Wireless PC Card WG511
Table 1-1. A Road Map for How to Get There From Here ...
If I Want To ... ? What Do I Do? What’s Neede d? How Do I?
Protect my
wireless
connection from
snooping,
hacking, or
information
theft.
Note: Secure Internet sites such as banks and online merchants use encryption security built into browsers
like Internet Explorer and Netscape. Any wireless networking security features you might implement are in
addition to those already in place on secure Internet sites.
Connect to the
Internet over my
wireless
network.
1. Assure that the
wireless
network has
security
features
enabled.
2. Configure my
WG511 with
the security
settings of the
wireless
network.
3. Use Windows
security
features.
1. Activate my
wireless link
and verify my
network
connection.
2. Open an
Internet
browser such
as Internet
Explorer or
Netscape
Navigator.
1. A wireless network with
authentication and WEP
encryption enabled.
2. Wireless networking
equipment that supports WEP
encryption, such as the
WG511 and all Netgear
wireless networking products.
1. An active Internet connection
like those from cable or DSL
service providers.
2. A wireless network connected
to the cable or DSL Internet
service through a cable/DSL
router as illustrated in
3“Connect to an Access Point
in Infrastructure Mode” on
page 3-22.
3. TCP/IP Internet networking
software installed and
configured on my n otebook PC
according to the requirements
of the Internet service provider
4. A browser like Internet
Explorer or Netscape
Navigator.
To learn about wireless
networking security, please see
B“Authentication and WEP” on
page B-36.
To use WEP security features,
please see 3“Enabling Wireless
Security Features” on p ag e 3-28
and configure your WG511
accordingly.
To configure your WG511 in
Infrastructure Mode, please see
2“Basic Installation Instruc ti ons”
on page 2-10, and locate the
section for your version of
Windows.
For assistance with configuring
the
TCP/IP Internet software on a
PC, please see C“Preparing
Your Computers for TCP/IP
Networking” on page C-43or
refer to the PC Networking
Tutorial on t he NETGEAR 54
Mbps Wireless PC Card WG511
Resource CD and the Help
information provided the
Windows system you are using.
.
1-4 Introduction
Page 11

Installation Guide for the NETGEAR 54 Mbps Wireless PC Card WG511
Table 1-1. A Road Map for How to Get There From Here ...
If I Want To ... ? What Do I Do? What’s Neede d? How Do I?
Exchange files
between
wirelessly
connected
notebook
computer and
other
computers in a
my combined
wireless and
wired
network.
1. Use the
Windows
Network
Neighborhood
feature to
browser for
computers in
the combined
wireless and
wired network.
2. Browse the
hard drive of
the target
computer in
the network in
order to locate
the directory or
files you want
to work with.
3. Use the
Windows
Explorer copy
and paste
functions to
exchange files
between the
computers.
1. The notebook computer I am
using to connect to the
wireless network needs to be
configured with the Window s
Client and File and Print
Sharing.
2. The notebook computer I am
using to connect to the
wireless network needs to be
configured with the sa me
Windows Workg roup or
Domain settings as the other
Windows computers in the
combined wireless and wired
network.
3. Any Windows networking
security access rights such as
login user name/ password
that have been ass igned in the
Windows network or for
sharing particular files must be
provided when Windows
prompts for such inf ormation.
4. If so-called Windows ‘peer’
Workgroup netw orking is being
used, the drive, file system
directory, or file need to be
enabled for sharing.
For assistance with Windows
networking software, please see
Appendix C-43, “Preparing Your
PCs for Network Access” for
configuration scenarios or refer
to the Help system inc luded wi th
your version of Windows.
Windows Domain se ttin gs are
usually managed by corporate
computer support groups.
Windows Workgroup settings
are commonly managed by
individuals who want to set up
small networks in their homes, or
small offices.
For assistance with setting up
Windows networking , refer to the
PC Networking Tutorial on the
NETGEAR 54 Mbps Wireless
PC Card WG511 Resource CD
and the Help information
provided the Windows system
you are using.
Introduction 1-5
Page 12

Installation Guide for the NETGEAR 54 Mbps Wireless PC Card WG511
Table 1-1. A Road Map for How to Get There From Here ...
If I Want To ... ? What Do I Do? What’s Neede d? How Do I?
Use printers in
a combined
wireless and
wired
network.
1. Use the
Windows
Printers and
Fax features to
locate
available
printers in the
combined
wireless and
wired network.
2. Use the
Windows Add
a Printer
wizard to add
access a
network printer
from the
notebook PC
you are using
to wirelessly
connect to the
network.
3. From the File
menu of an
application
such as
Microsoft
Word, use the
Print Setup
feature to
direct your
print output to
the printer in
the network.
1. The notebook computer I am
using to connect to the
wireless network needs to be
configured with the Window s
Client and File and Print
Sharing.
2. The notebook computer I am
using to connect to the
wireless network needs to be
configured with the sa me
Windows Workg roup or
Domain settings as the other
Windows computers in the
combined wireless and wired
network.
3. Any Windows networking
security access rights such as
login user name/ password
that have been ass igned in the
Windows network must be
provided when Windows
prompts for such inf ormation.
4. If so-called Windows ‘peer’
networki ng is being used, the
printer needs to be en abled for
sharing.
Windows Domain se ttin gs are
usually managed by corporate
computer support groups.
Windows Workgroup settings
are commonly managed by
individuals who want to set up
small networks in their homes, or
small offices.
For assistance with setting up
Windows networking , refer to the
PC Networking Tutorial on the
NETGEAR 54 Mbps Wireless
PC Card WG511 Resource CD
and the Help information
provided the Windows system
you are using.
For assistance with setting up
printers in Windows, refer to the
Help and Support information
that comes with the version of
the Windows operating sy ste ms
you are using.
1-6 Introduction
Page 13

Chapter 2
Basic Setup
This section describes how to install your NETGEAR 54 Mbps Wireless PC Card WG511 and set
up basic wireles s connect ivity o n your W ir eless Lo cal Area Network
network configuration is covered in Chapter 3, Configuration in this manual.
Note: Indoors, computers can easil y connect to 802 .1 1 wirel ess networ ks at di stances of
several hundred fee t. Because wal ls do not alway s block wireles s signals, others outside
your immediate ar ea could acc ess your net work. It is important to take app ropriate steps
to secure your network from unauthorized access. The NETGEAR 54 Mbps Wireless
PC Card WG511 provides highly effective security features which are covered in
“Enabling W ir eless Securi ty Fea tu res ” on pa ge 3-2 8 i n this manual . Deploy the s ecuri ty
features appropria te to your needs.
(WLAN). Advanced wireless
What You Will Need Before You Begin
You need to verify your computer meets the minimum system requirements and identify the
wireless network configuration settings of the WLAN where you will connect before you can
configure your wireless pc card and connect.
Verify System Requirements
Before installing the NETGEAR 54 Mbps Wireless PC Card WG511, please make sure that these
minimum requirements have been met:
• You must have a Pentium® Class notebook computer with an available Cardbus slot.
• A CD-ROM drive.
• 5 Mbytes of free hard disk space.
• Some versions of Windows may ask for the original Windows operating system installation
files to com plete the installation of the WG511 driver software.
Basic Setup 2-7
Page 14

Installation Guide for the NETGEAR 54 Mbps Wireless PC Card WG511
Observe Location and Range Guidelines
Computers can connect over 802.11g wireless networks indoors at a range which vary
significantly based on the physical location of the computer with the NETGEAR 54 Mbps
Wireless PC Card WG511. For best results, avoid potential sources of interference, such as:
• Large meta l surfaces
• Microwaves
• 2.4 GHz Cordless phones
In general, 802.11g wireless devices can communicate through walls. However, if the walls are
constructed with co ncr ete, or have metal, or meta l mesh, the 802.11g effective range will decrease
if such materials are between the devices.
Two Basic Operating Modes
The WG511 Wireless PC Card, like all 802.11b adapters, can operate in the following two basic
modes:
• Infrastructure Mode: An 802.11 networking framework in which devices and computers
communicate with each other by first going through an
mode is used when computers i n a house conne ct to an Acc ess Point that is attac hed to a route r
which lets multiple computers share a single Cable or DSL broadband Internet connection.
• Ad-Hoc Mode: An 802.11 networking framework in which devices or computers
communicate directly with each other, without the use of an AP.
is used when two Windows computers are configured with file and print sharing enabled and
you want to exchange files directly between them.
Both of these configuration options are available with the WG511 Wireless PC Card.
Infrastructure configuration procedures for basic network connectivity are covered below.
Advanced infrastructure configuration procedures and ad-hoc configuration are covered in
Chapter 3, Configuration of this manual.
access point (AP). For example, this
For example, Ad-Hoc Mode
2-8 Basic Setup
Page 15

Installation Guide for the NETGEAR 54 Mbps Wireless PC Card WG511
WG511 Default Wirele ss Configuration Settings
If this is a new wireless network installation, use the factory default settings to set up the network
and verify wireless connectivi ty. If this is an addition to an existing wireless network, y ou will
need to identify the wireless configuration and security parameters already defined.
Your NETGEAR 54 Mbps Wireless PC Card WG511 factory default basic settings are:
• Network Name Service Set Identification (SSID): NETGEAR
Note: In order for the WG511 Wireless PC Card to communicate with a wireless access point
or wireless adapter, all devices must be configured with the same wireless network name
(SSID).
• Network Mo de (Infrastructure or Ad-hoc): Infrastructure
• Data security WEP encryption: Disabled
The section below provides instructions for setting up the NETGEAR 54 Mbps Wireless PC Card
WG511 for basic wireless connectivity to an access point. The procedures below provide
step-by-step installation instructions for Windows PCs. Use the procedure that corresponds to the
version of Windows you are using.
Basic Setup 2-9
Page 16
Installation Guide for the NETGEAR 54 Mbps Wireless PC Card WG511
Basic Installation Instructions
Use the procedure below that corresponds to the version of Windows you are using.
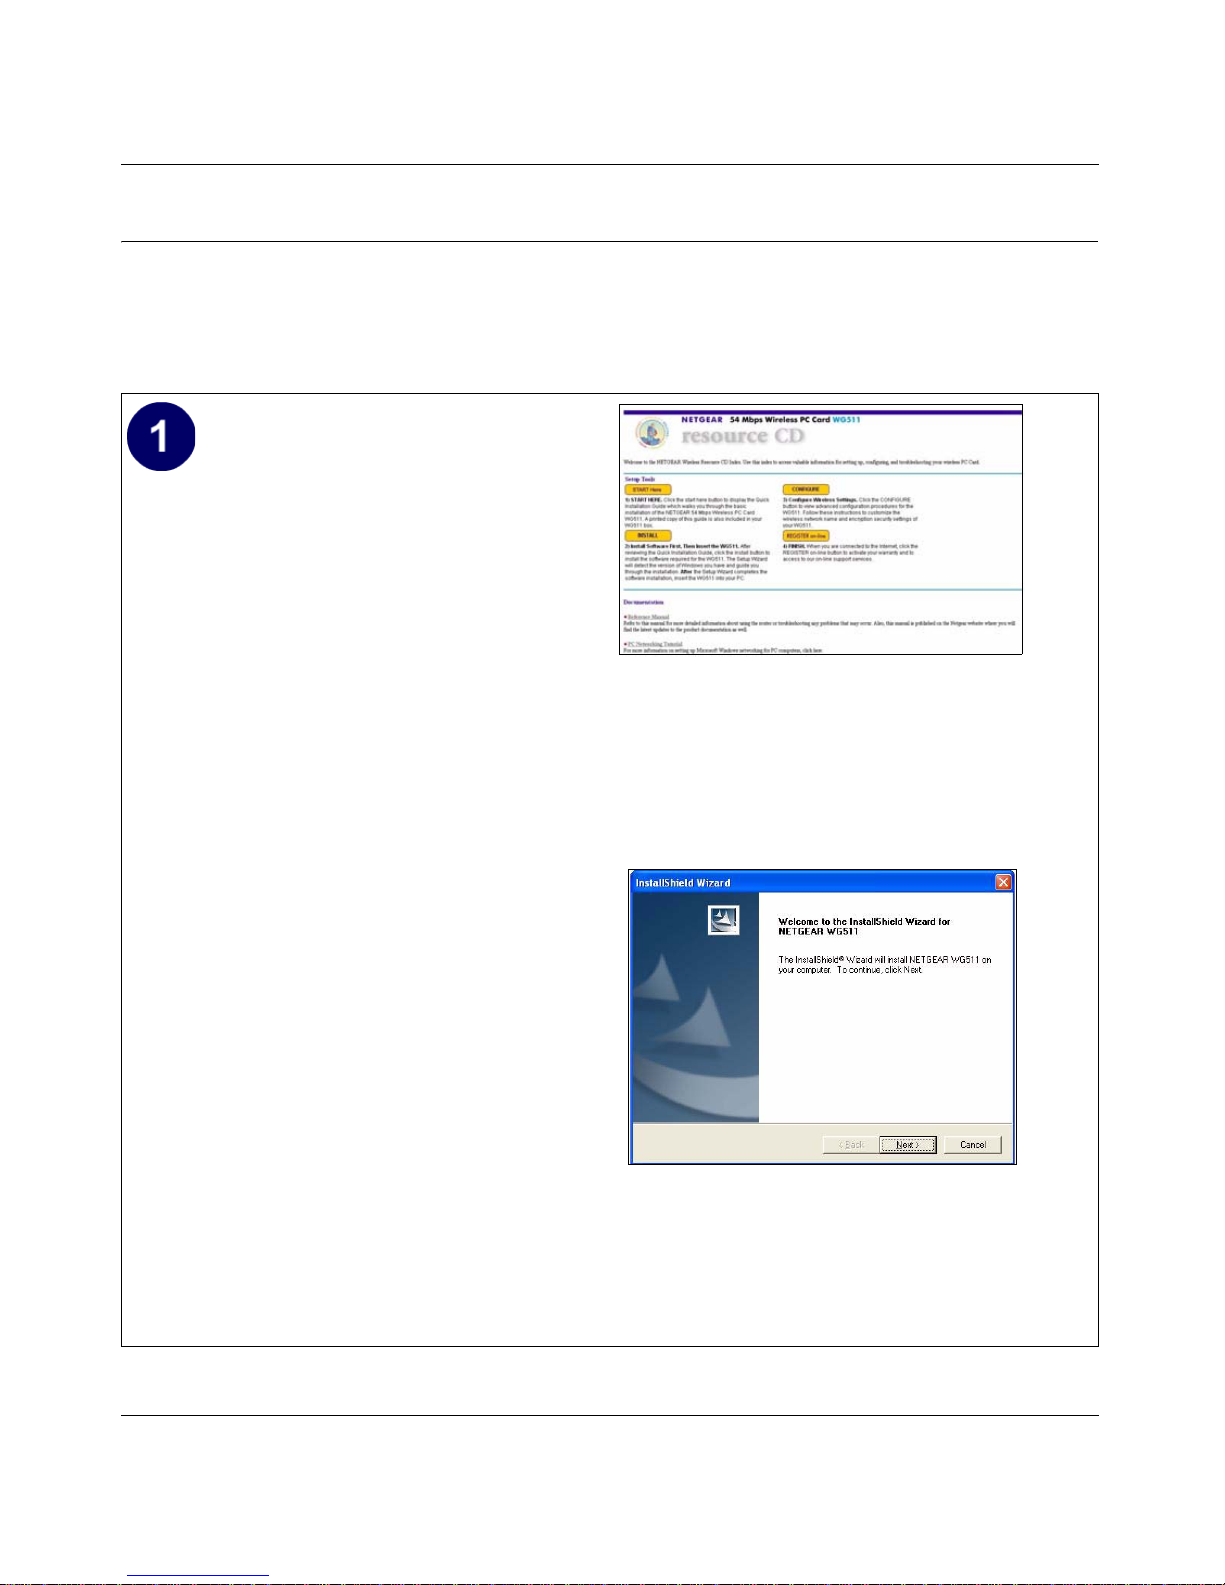
For Windows XP Users Installing a WG51 1
Install the WG511 driver and configuration
utility software.
a. Power on your notebook, let the
operating system boot up completely,
and log in as needed.
b. Insert the Resource CD for the WG511
into your CD-ROM drive. The CD index
page shown at the right will load.
c. Click the INST ALL button a nd an Install
Software window opens. Read the
instructions for running the software
setup utility.
Note: If this page does not automatically appear,
browse the root of the CD and double-click on
INDEX.HTM to display this page.
WG511 Resource CD
d. Click the Install Software link. When t he
browser warning message appears, click
Open to sta rt the Install Shield Wizard.
e. Follow the Install Shield Wizard steps,
and click Finish when done to restart
your computer.
Install Shield Wizard
Note: If a Windows XP Certification warning appears,
click Continue Anyway to proceed.
2-10 Basic Setup
Page 17
Installation Guide for the NETGEAR 54 Mbps Wireless PC Card WG511
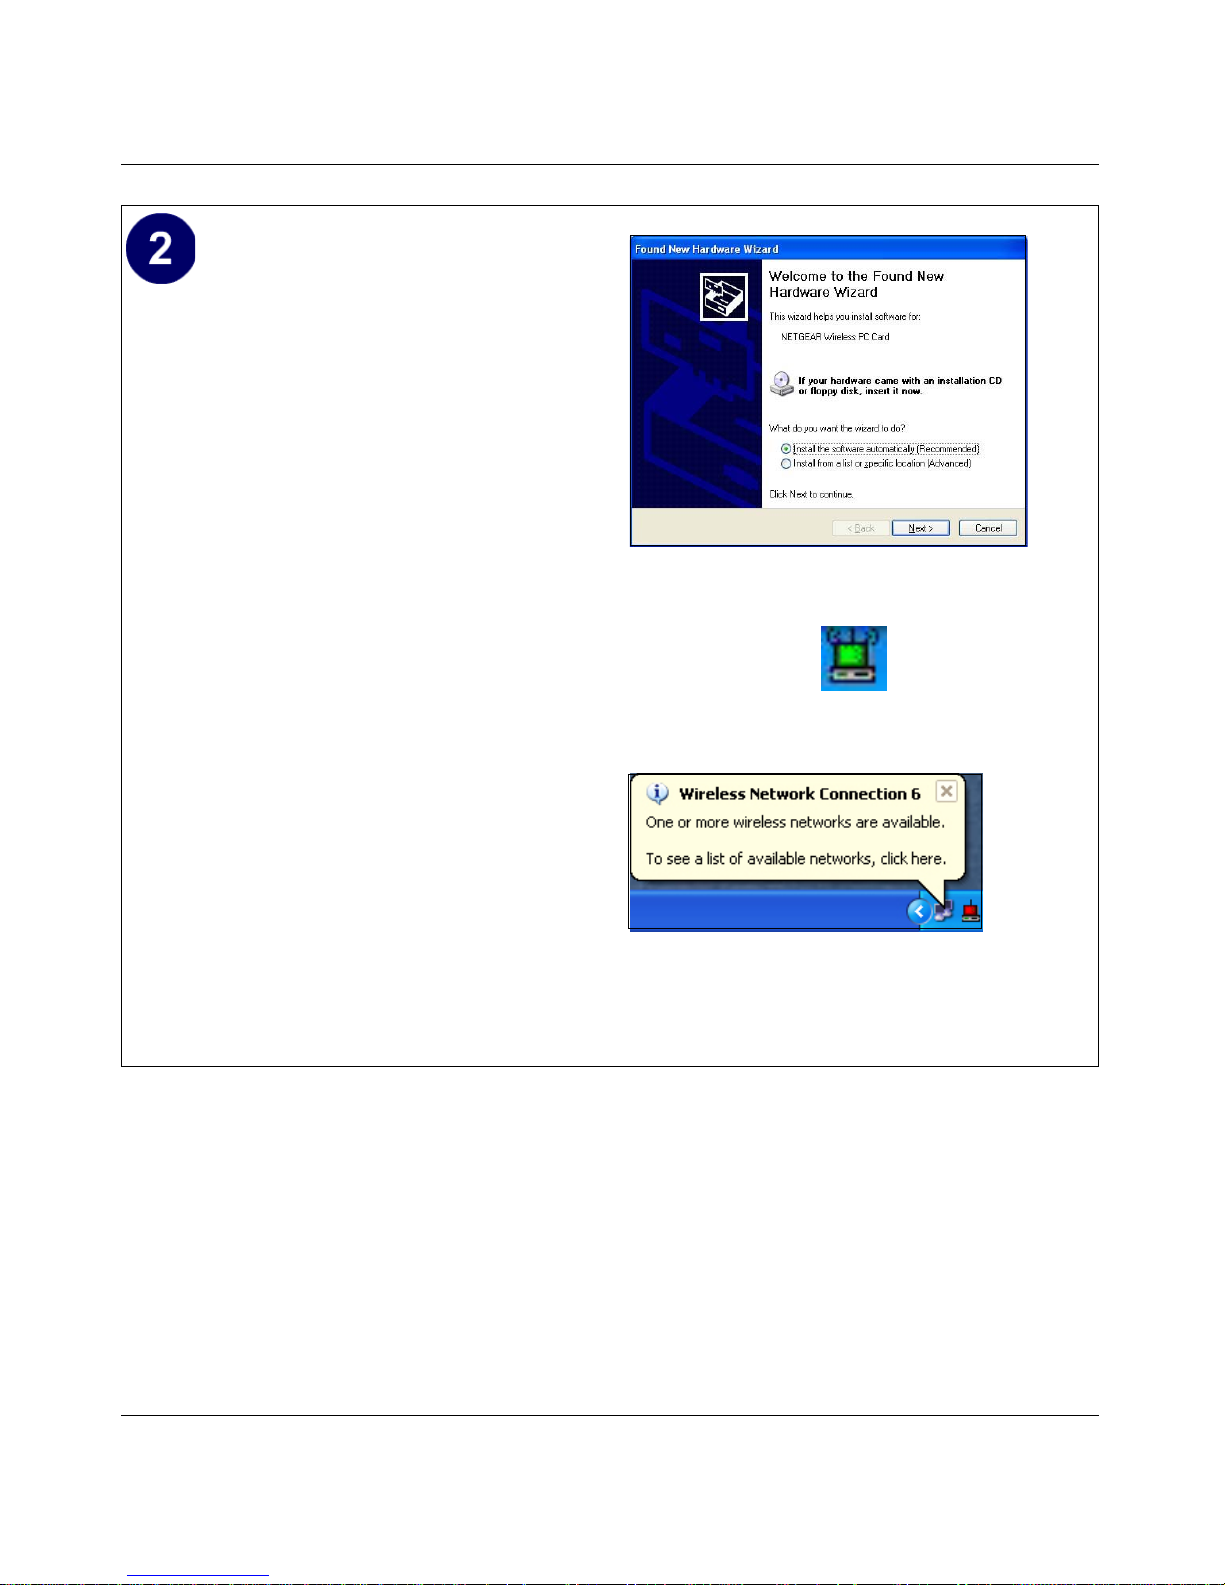
Install the NETGEAR 54 Mbps Wireless PC
Card WG511.
a. Locate an available CardBus slot on the
side of your noteboo k. Hold the PC Car d
with the Netgear logo facing up and
insert it into the CardBus slot.
The Found New Hardware Wizard is
displayed.
b. Click Next and follow the prompts to
proceed.
Click Continue Anyway if you are
prompted with a Windows XP Logo testing
message.
Add New Hardware Wizard
WG511 System Tray Icon
After the install ation com pletes, cl ick Finish
to close the wizard.
Yo u should see the WG511 system tray icon
on the right in the lower right portion of the
Windows task bar.
Windows XP will display a Wireless
Network Connection message.
Windows XP Network Connection Alert
Basic Setup 2-11
Page 18
Installation Guide for the NETGEAR 54 Mbps Wireless PC Card WG511
.
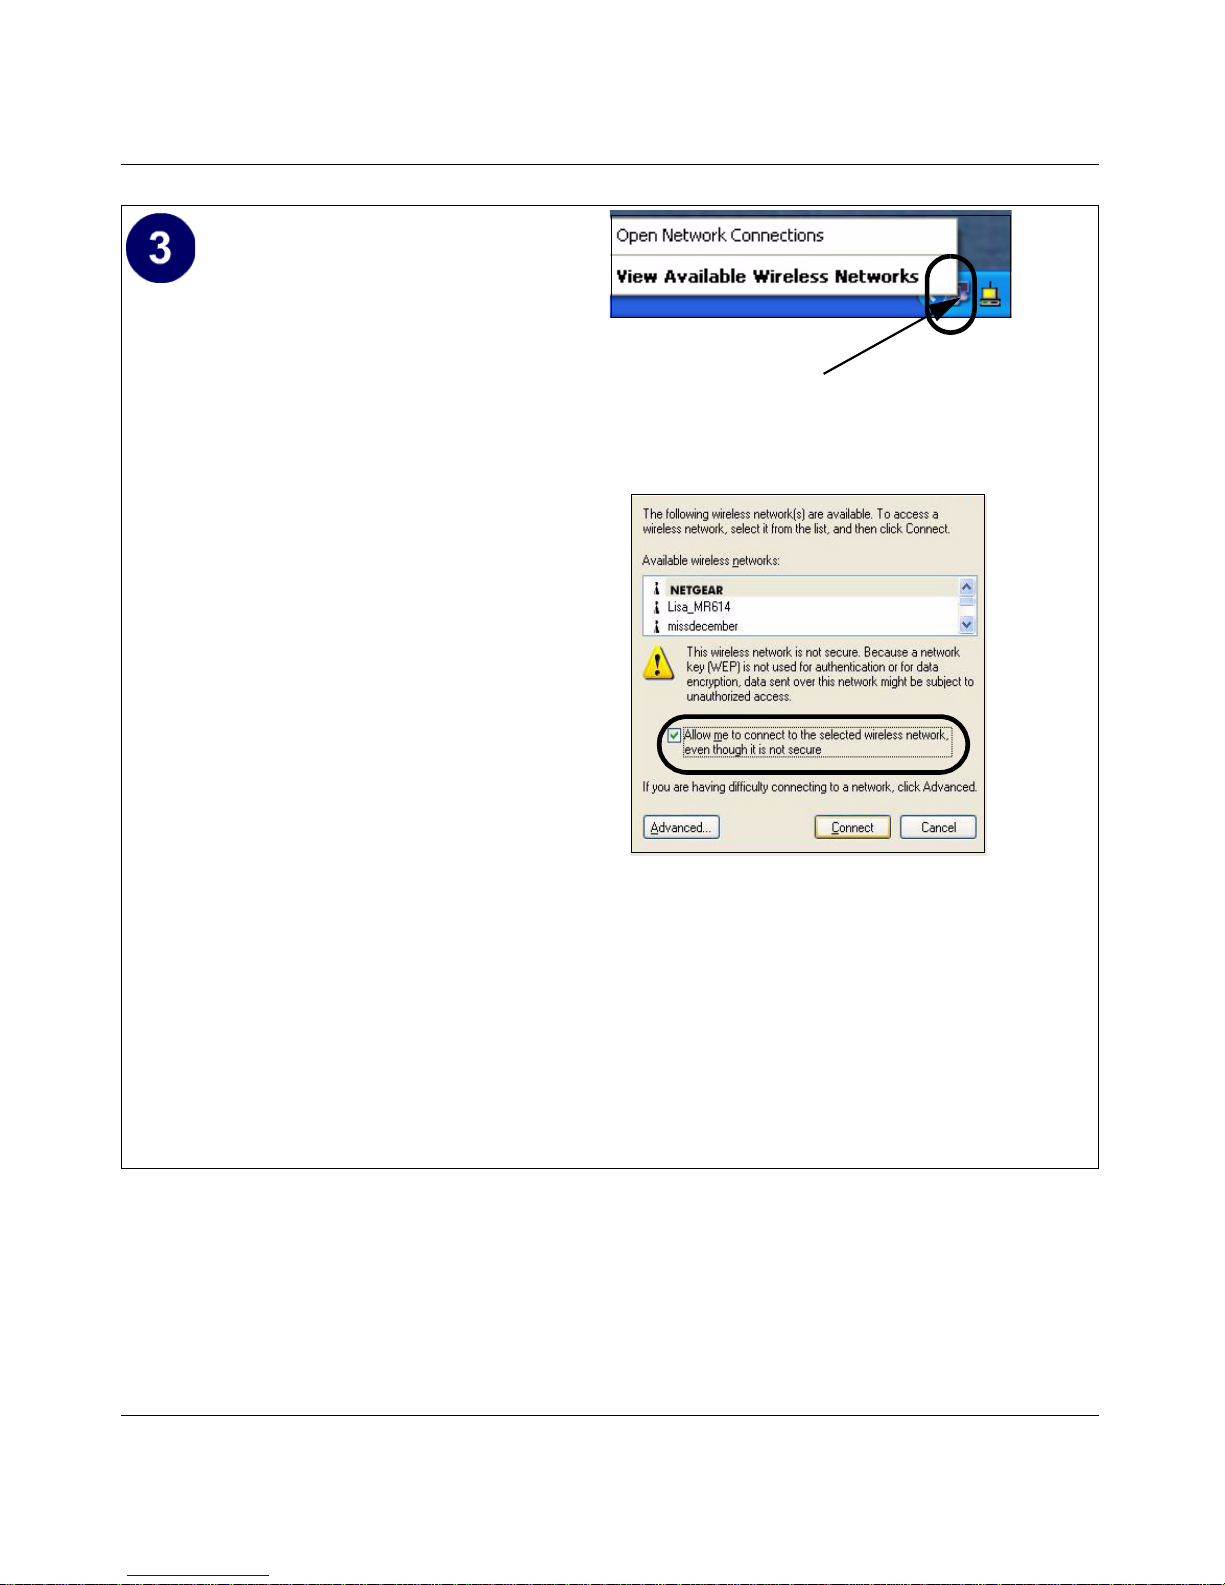
Configure your WG511.
a. Right click on the network icon in the
Windows XP system tray to open the
Right click here to display this menu
network options menu.
b. Click on the View Available Wireless
Networks menu item.
c. If there is more than one wire less
network in your vic inity, click on the one
to which you will connect.
d. Click on the “Allo w me to c onnect to the
selected wireless net work eve n though
this is not secure” check box.
e. Click Connect.
Windows XP Network Connection Alert
Note: This procedure assumes your wirel es s network
is not using WEP security. If your wireless network
uses WEP, set up your WG511 accordingly. To view
WEP settings help, click the Advanced button and
click the “Learn about...” lin k on the Windows XP Local
Area Connection Wireless Network s Propertie s tab
page.
2-12 Basic Setup
Page 19
Installation Guide for the NETGEAR 54 Mbps Wireless PC Card WG511
Verify wireless connectivity to your network.
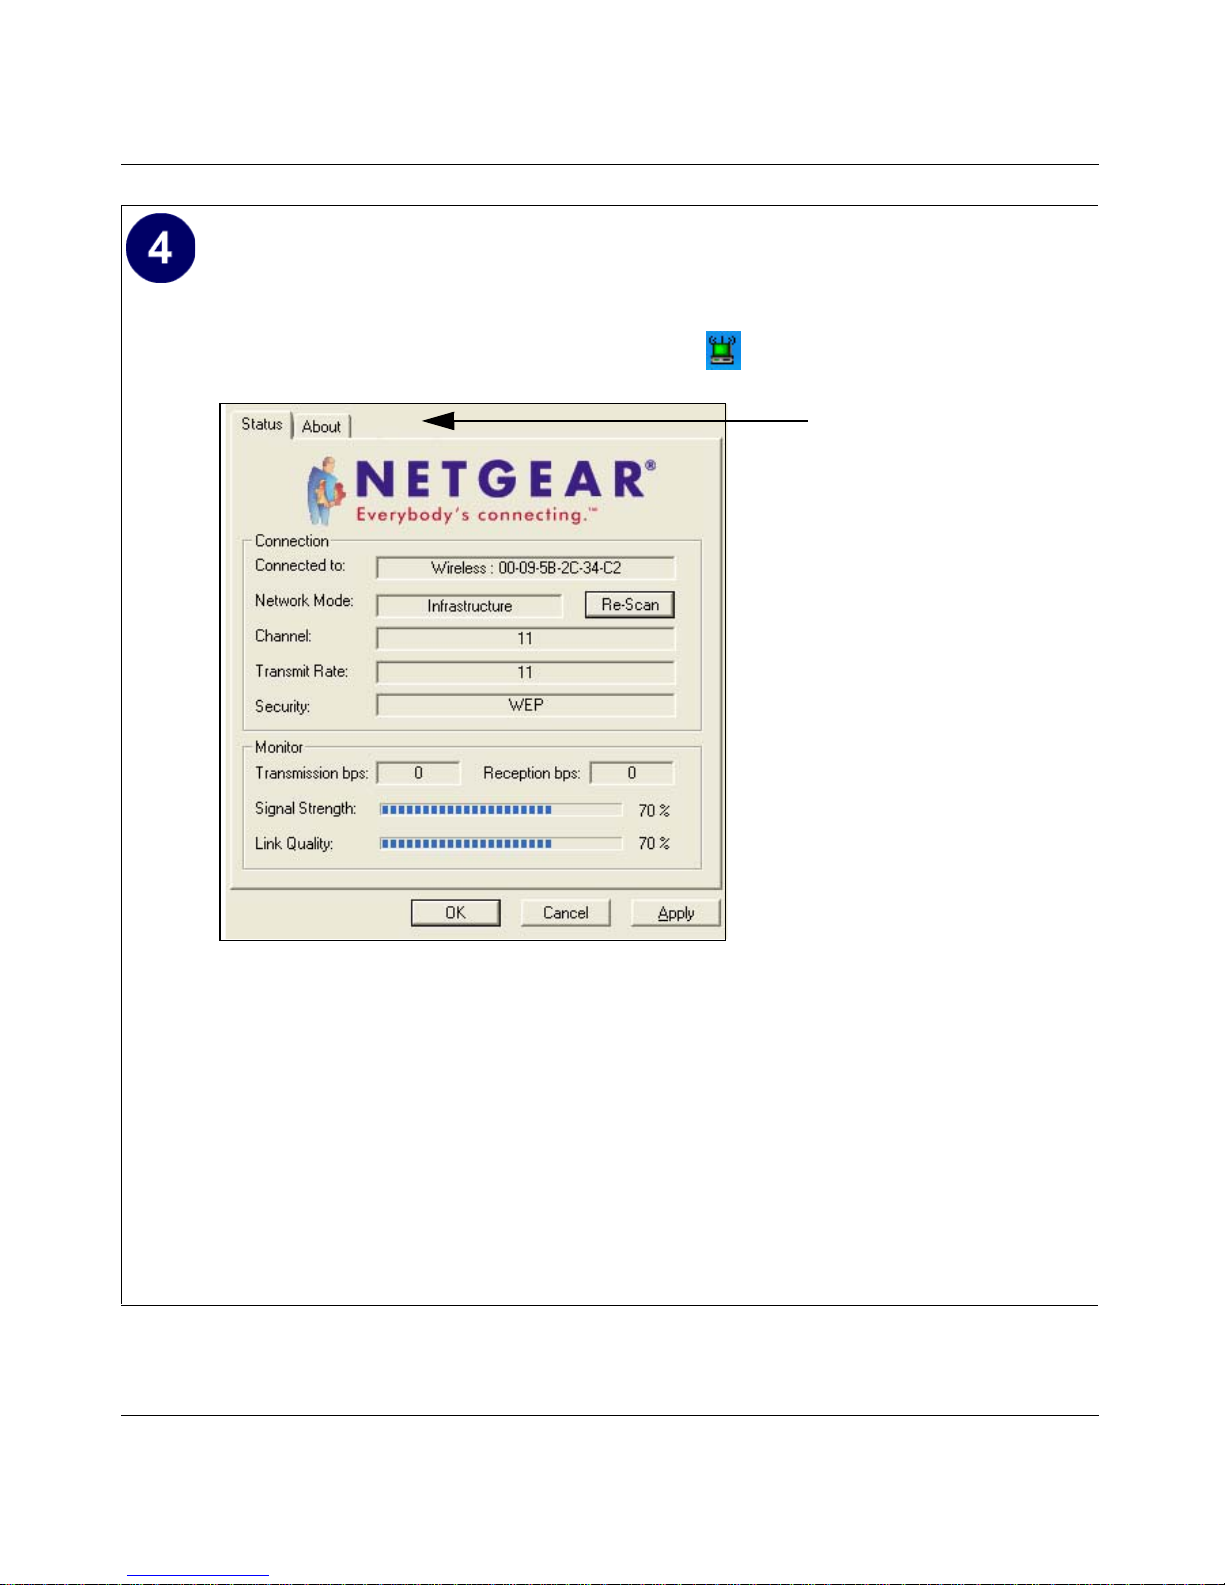
a. Open the WG511 utility by clicking on the icon in the Windows system tray.
Note: When the Windows XP
wireless configuraton utility is
enabled (the default), on ly these two
tab pages appear.
To use the full Netgear utility, please
see “Understanding the
Configuration Options” on page
3-21.
b. Verify that your Connection and Status Monitor information matches your wireless
network.
c. Check the two WG511 LEDs:
• Solid green for the LINK LED indicates a good connection. Blinking for the LINK
LED indicates attempting to connect. Off for the LINK LED indicates the card is
turned off or not fully plugged in.
• Blinking for the amber transmission LED indicates data trans mission.
d. Verify connectivity to the Internet or network resources.
Note: If you are unable to connect, see “Basic Troubleshooting Tips” on page 2-20.
Basic Setup 2-13
Page 20

Installation Guide for the NETGEAR 54 Mbps Wireless PC Card WG511
For Windows 2000 & 98/Me Users Installing a WG511
Install the WG511 driver and configuration
utility software.
Note: Windows 2000, may require you to be
logged on with administrator rights.
a. Power on your notebook, let the
operating system boot up completely,
and log in as needed.
WG511 Resource CD
b. Insert the Resource CD for the WG511
into your CD-ROM drive. The CD index
page shown at the right will load.
c. Click the INST ALL button a nd an Install
Software window opens. Read the
instructions for running the software
setup utility.
Note: If the Resource CD p age doe s not automa tically
appear, browse the root directory of the CD and
double-click on
INDEX.HTM to display this page.
d. Click the Install Software link. When t he
browser warning message appears, click
Open to sta rt the Install Shield Wizard.
e. Follow the steps in the Install Shield
Wizard, and click Finish when done to
restart your computer.
InstallShield Wizard
2-14 Basic Setup
Page 21

Installation Guide for the NETGEAR 54 Mbps Wireless PC Card WG511
Install the NETGEAR 54 Mbps Wireless PC
Card WG511.
a. Locate an available CardBus slot on the
side of your noteboo k. Hold the PC Car d
with the Netgear logo facing up and
insert it into the CardBus slot.
The Found New Hardware Wizard is
displayed.
b. Click Next and follow the prompts to
proceed. After the installation
completes, click Finish to close the
wizard.
Yo u should see the WG511 system tray icon
on the right in the lower right portion of the
Windows task bar.
Add New Hardware Wizard
Note: If Windows warns about a Digital Signature Not
Found, click Yes to continue.
WG511 System Tray Icon
Basic Setup 2-15
Page 22

Installation Guide for the NETGEAR 54 Mbps Wireless PC Card WG511
.
Configure your WG511 and save the
Profile.
a. Click on the WG511 systray icon in the
to open the WG511 configuration utility.
The WG511 Wireless PC Card
configuration utility displays.
b. Change the Network Name SSID to
match your network.
Tip: As an alternative to typing in the
SSID, you can use the Si te Survey tab to
view the available wireless networks,
choose the one you want, and click the
Connect button.
c. Cli ck the Profile tab. Enter a name for
your profile.
d. Click the Save button to save all your
settings in the Profile, and then click the
Activate button. You can save multiple
profiles and activate whichever one you
need to use.
Click here to open the configuration utility
WG511 system tray icon
WG511 Configuration Utility
Note: The NETGEAR default settings are
Infrastructure mode, with NETGEAR fo r the wirele ss
network name SSID, and WEP disab led. If your WLAN
settings are diffe rent from the Netgear default settings,
you will not connect. Set up your WG511 accordingly.
Tip: If you use your notebook PC to
connect to a wireless network at work
and at home, create prof il es called work
and home. Then , act ivate which ever one
you need for wherever you are located.
e. Click OK to close the utility.
Note: This procedure assumes you are
connecting to a wireless network which is not
using WEP security. If your network includes
WEP settings, click the Security tab page and
configure the WG511 accordingly. For help with
these steps, please see “Enabling Wireless
Security Features” on page 3-28 below.
2-16 Basic Setup
Page 23

Installation Guide for the NETGEAR 54 Mbps Wireless PC Card WG511
Verify wireless connectivity to your network.
a. Open the WG511 utility by clicking on the icon in the Windows system tray.
Note: You can use the Site Survey
to verify the availability of wireless
networks and their SSIDs.
For more on information, please
see “Understanding the
Configuration Options” on page
3-21.
b. Click the Status tab page. Verify that your Connection and Status Monitor information
matches your wireless network.
c. Check the two WG511 LEDs:
• Solid green for the LINK LED indicates a good connection. Blinking for the LINK
LED indicates attempting to connect. Off for the LINK LED indicates the card is
turned off or not fully plugged in.
• Blinking for the amber transmission LED indicates data trans mission.
d. Verify connectivity to the Internet or network resources.
Note: If you are unable to connect, see “Basic Troubleshooting Tips” on page 2-20.
Basic Setup 2-17
Page 24

Installation Guide for the NETGEAR 54 Mbps Wireless PC Card WG511
WG511 Wireless Connection Indicator s
The NETGEAR 54 Mbps Wirel ess PC Card WG51 1 pr ovides the fo llowing three in dicators which
give you feedback on the status of your wireless connection:
• The two LEDs on the NETGEAR 54 Mbps W ireless PC Card WG51 1 indicate t he condition of
wireless link.
• The color of the SysTray icon is on the System Tray portion of the taskbar in the Microsoft
Windows desktop indicates the status of the connection.
Interpreting the LED on the WG511
Figure 2-1: WG511 LED
These LEDs are described below.
Table 2-1: LED Descriptions
LED Activity Description
LINK -- Green On The card is plugged in to the notebook PC.
Blinking Blinking indicates t
ACTIVITY -- Amber On/Blinking
but is unable to do so
If blinking, the WG5 11 is has a connection and is transmitting
he WG511 is trying to establish a connection
.
or receiving data.
Off There is no wireless network connection.
2-18 Basic Setup
Page 25

Installation Guide for the NETGEAR 54 Mbps Wireless PC Card WG511
Interpreting System Tray Icon Colors
The System Tray (SysTray) resides on one end of the taskbar in the Microsoft Windows desktop.
Color Condition Description
Red
Yellow
Green
The wireless PC Card has
no connection to any
other wireless node.
The wireless PC Card has
a connection wit h another
wireless node.
The wireless PC Card has
a connection wit h another
wireless node.
The wireless PC Card is not able to link to any other
wireless node or the link is lost. Check your
configuration or try moving to a location where the
wireless signal quality is bette r.
The wireless link is weak. You may deed to move to a
better spot, such as closer to the wireless access point.
Also, look for possible inter fe ren ce such as a 2.4 GHz
cordless phone or large m etal surface.
The wireless PC Card has established good
communication with an access point and the signal
quality is strong.
Basic Setup 2-19
Page 26

Installation Guide for the NETGEAR 54 Mbps Wireless PC Card WG511
Basic Troubleshooting Tips
If you have problems connected to your wireless network, try the tips below.
Symptom Cause Solution
The PC Card
LINK LED is
not lit.
The LINK LED
is blinking
repeatedly.
I can connect to
an access point,
but I cannot
connect to other
computers on
the network or
the Interne t.
The WG511 is not
inserted in to the
slot properly or
the WG511
software is not
loaded.
The WG511 is
attempting to
connect to access
point but cannot
connect.
This could be a
physical layer
problem or a
network
configuration
problem.
Remove and reinsert the WG511.
Check the Windows device manager to see if the PC
Card is recognized and enabled. Reload the WG511
software, if necessary.
Try to i nstall the WG51 1 in a dif ferent Car dBus slot on
your system if one is available.
The access point may not be powered on. Or, the
access point and the PC card are not configured with
the same w i reless parameters. C heck the SSID and
WEP settings.
Check to make sure that the access point is physically
connected to the Ethernet network.
Make sure th at the IP addresses and th e Windows
networking parameters are all configured correctly.
Restart the cable or DSL modem, router, access point,
and notebook PC.
Also, for prob lems with accessi ng networ k resour ces, the W indows softwar e might not be in stalled
and configured properly on your computers. Please refer to Appendix C, "Preparing Your PCs for
Network Access" of the Reference Manual on the NETGEAR 54 Mbps Wireless PC Card WG511
Resource CD.
2-20 Basic Setup
Page 27

Chapter 3
Configuration
This section describes how to configure your NETGEAR 54 Mbps Wireless PC Card WG511 for
wireless connectivity on your Wireless Local Area Network
encryption features.
Note: The instructions in this section refer to the Netgear WG511 configuration utility.
For Windows XP users to use the Netgear configuration utility, you must first disable
the Windows XP configuration utility by opening the network connections from the
system tray icon, click the Properties button, click the Wireless Networks tab and then
uncheck the “Use Windows to configure my wireless network settings” box.
Understanding the Configuration Options
(WLAN) and use the data security
The WG511 configuration utility provides a complete and easy to use set of tools to:
• Configure wireless settings.
• Monitor wireless network connections.
• Save your settings in configuration profiles.
The section below introduces these capabilities of th e configura t ion utility.
Using Configurat ion Profiles
The WG511 configura tion uti lity use s profiles to st ore all th e configur ation set tings fo r a parti cular
wireless network.
network you wish to join.
Configuration 3-21
You can store multiple profiles and recall the one which matches the
Page 28

Installation Guide for the NETGEAR 54 Mbps Wireless PC Card WG511
For example, if you use your notebook PC to connect to a wireless network in an office
and a wireless network in your home, you can create a profile for each wireless network.
Then, you can easily load the profile that has all the configuration settings you need to joi n
the network you are using at the time.
There are two types of wireless network connections you can configure:
• Infrastructure Mode -- uses the 802.11 infrastructure mode.
• Ad-hoc Mode -- uses the 802.11 ad-hoc mode
For more information of 802.11 wireless network modes, please see “Wireless Networking
Overview” on page B-35 of this manual.
Connect to an Access Point in Infrastructure Mode
Wireless Access Point
Cable/DSL Router
NETGEAR 54 Mbps Wireless
PC Card WG511 in a
Notebook Computer
Cable or DSL modem
Figure 3-1: WG511 Wireless PC Card connecting to a wireless access point.
This section provides instructions for configuring the NETGEAR 54 Mbps Wireless PC Card
WG511 to connect to a wireless access point.
3-22 Configuration
Page 29

Installation Guide for the NETGEAR 54 Mbps Wireless PC Card WG511
How to Configure an Infrastructure Mode Profile
Follow the instructions below to configure an infrastructure mode profile for connecting to an
access point.
1. Run the WG511 Configuration Utility.
a. Make sure the WG511 software is installed and the WG511 is fully inserted in an available
CardBus slot in your PC.
b. Open the configuration utility by clicking on the WG511 icon in the Windows
system tray.
Figure 3-2: Configuration tab p age
c. Click on the Configuration tab to display the view shown above.
2. Configure the wireless Ne twork settings.
a. In the Network section, be sure that Infrastructure is selected for the Network Mode.
b. Enter the SSID. This is also calle d the Wireless Netw ork Name.
Configuration 3-23
Page 30

Installation Guide for the NETGEAR 54 Mbps Wireless PC Card WG511
Note: You will not get a wireless network connection unless the network SSID matches
exactly what is configured in the access point.
Tip: You can click the Site Survey tab to view a list of the available wireless networks and
their SSIDs at the location where you are.
3. Save your settings in a Profile.
a. Click the Profiles tab to view the screen below.
Figure 3-3: Profiles tab pa ge
b. Type a descriptive name for the Profile Name.
c. Click the Save button to save this profile. All the configuration settings are saved
in this profile.
d. Click Activate to activate your settings.
e. Click OK to exit the configuration utility.
4. Verify wireless connectivity to your network.
3-24 Configuration
Page 31

Installation Guide for the NETGEAR 54 Mbps Wireless PC Card WG511
Verify connectivity by using a br owser suc h as Netsca pe or Inte rnet Expl orer to connect to the
Internet, or check for file and printer access on your network.
Note: If you cannot con nec t, pl ea se see the “Basic Tr oubl es hoot ing Tips” on pag e 2- 20. Als o,
for problems with accessing network resources, the Windows Client and File and Print
Sharing software might not be installed and configured properly on your computers. Please
refer to.
“Preparing Your Computers for TCP/IP Networking” on page C-43.
Connecting to Another PC in Ad -hoc Mode
PC with 802.11b or g
wireless adapter
WG511 Wireless PC Card
in a Notebook Computer
Figure 3-4: NETGEAR WG511 Wireless PC Card in Peer-to-Peer Mode
The peer-to- peer sett ing of the WG511 uses Ad-Hoc mode. Ad-Hoc mode is an 802.11 n etworking
framework in which devices or computers communicate directly with each other, without the use
of an access point. For example, this mode is used when two Windows computers are configured
with file and print sharing enabled and you want to exchange files directly between them.
Configuration 3-25
Page 32

Installation Guide for the NETGEAR 54 Mbps Wireless PC Card WG511
How to Configure an Ad-hoc Moce Profile
Note: Ad-hoc mode will not work using DHCP settings. Ad-hoc mode requires either static IP
addresses (such as
parameters such as adding the IPX protocol support. For instructions on setting up static IP
addresses or IPX protocol settings on a Windows PC, please refer to the PC Networking Tutorial
included on the NETGEAR 54 Mbps Wireless PC Card WG511 Resource CD.
Follow the instructions below to configure an Ad-hoc mode profile.
1. Run the WG511 Configuration Utility.
a. Make sure the WG511 software is installed and the WG511 is fully inserted in an available
CardBus slot in your PC.
b. Open the configuration utility by clicking on the WG511 icon in the Windows
system tray.
192.168.0.1) or other appropriate Windows networking configuration
Figure 3-5: Configuration tab page Ad-hoc mode selected
c. Click the Configuration tab to display the view shown above.
d. Select Ad-hoc from the Network mode drop-down list.
e. Click Apply to apply your settings
2. Save your settings in a Profile.
a. Click the Profiles tab to view the screen below.
3-26 Configuration
Page 33

Installation Guide for the NETGEAR 54 Mbps Wireless PC Card WG511
Figure 3-6: Profiles tab pa ge
b. Type a descriptive name for the Profile Name.
c. Click the Save button to save this profile. All the configuration settings are saved
in this profile.
d. Click Activate to activate your settings.
e. Click OK to exit the configuration utility.
3. Configure the PC network settings.
a. Configure each PC with either a static IP address or with the IPX protocol.
Note: For instructions on configuring static IP addresses or the IPX protocol, please refer
to the networking turorial on your NETGEAR 54 Mbps Wireless PC Card WG511
Resource CD.
b. Restart the PCs.
4. Verify wireless connectivity between your peer devices.
Verify connectivity by using the Ping.
Configuration 3-27
Page 34

Installation Guide for the NETGEAR 54 Mbps Wireless PC Card WG511
a. On the Windows taskbar click the Start button, and then click Run.
b. Assuming the target PC is configured with 192.168.0.1 as its IP address, type ping -t
192.168.0.1
c. This will cause a continuous ping to be sent to the device with the 192.168.0.1 static IP
and then click OK.
address. The ping response should change to “reply.”
At this point the connection is established.
Note: If you cannot con nec t, pl ea se see the “Basic Tr oubl es hoot ing Tips” on pag e 2- 20. Als o,
for problems with accessing network resources, the Windows Client and File and Print
Sharing software might not be installed and configured properly on your computers. Please
refer to.
“Preparing Your Computers for TCP/IP Networking” on page C-43.
Enabling Wireless Security Features
You can strengthen the s ecu rity of yo ur wir eless conne ction by enabl ing Wired Equivalent Privacy
(WEP) encryption of the wireless data communications. For more information on 802.11 wireless
security, please see “Authentication and WEP” on page B-36.
In addition to the WG511 wireless security features, you should also configure appropriate LAN
network security features such as requiring a user name and password to access the shared
resources in your network.
3-28 Configuration
Page 35

Installation Guide for the NETGEAR 54 Mbps Wireless PC Card WG511
The procedures below identify how to configure the WEP encryption settings of your NETGEAR
54 Mbps Wireless PC Card WG511.
Identifying the Wireless Network Name (SSID) and WEP Security
Settings
Print this form, fill in the configuration para meters and put it in a safe place for possible future
reference. For an existing wireless network, the person who set up the network will be able to
provide this information.
• Wireles s Net w ork Name ( SSID) : The Service Set Ide ntifi cati on ( SSID) i d e nti fi es the wireless
local area network. NETGEAR is the default W G511 wireless network name (SSID). You
may customize it by using up to 32 alphanumeric characters. Write your customized wireless
network name (SSID) on the line below.
Note: The SSID in the wireless acces s point is the SSID you config ure in the wir eless pc card.
For the access point and wireless nodes to communicate with each other, all must be
configured with the same SSID.
Wireless networ k name (SSID): ______________________________
• WEP Security Encryption key: The default WEP encryption key number is 1, and the default
key size is 64 bits.
Note: The key number as well as t he key val ue used by all wir eless nodes must be the same. If
they are different, you will not be able to connect.
WEP Encryption Key Size, circle one: 64 or 128 bits
WEP Encryption Passphrase, if used: ____________________________
A Passphrase is used to automatically generate the WEP hexadecimal numbers for the key. If
the wireless network Access Point uses a Passphrase, you can also use that here. Otherwise,
you will have to manually enter the hexadecimal numbers.
WEP Hexadecimal Numbers: ______________________________
The WEP Hexadecimal Numbers are needed if a Passphr ase is not us ed in the wireless
network access point but rather if the key is manually entered.
Use the procedures below to configure basic security settings in the WG511.
Configuration 3-29
Page 36

Installation Guide for the NETGEAR 54 Mbps Wireless PC Card WG511
How to Configure WEP Encryption Security
Following the steps below to perform this procedure.
connecting to an access point.
1. Run the WG511 Configuration Utility.
a. Make sure the WG511 software is installed and the WG511 is fully inserted in an available
CardBus slot in your PC.
b. Open the configuration utility by clicking on the WG511 icon in the Windows
system tray.
Figure 3-7: Security tab page
c. Click on the Configuration tab to display the view shown above.
2. Configure the Security settings.
a. Check the Enable Encryption check box.
3-30 Configuration
Page 37

Installation Guide for the NETGEAR 54 Mbps Wireless PC Card WG511
b. Enter the SSID. This is also calle d the Wireless Netw ork Name.
Note: You will not get a wireless network connection unless the network SSID matches
exactly what is configured in the access point.
Tip: You can click the Site Survey tab to view a list of the available wireless networks and
their SSIDs at the location where you are.
3. Save your settings in a Profile.
a. Click the Profiles tab to view the screen below.
Figure 3-8: Profiles tab pa ge
b. Type a descriptive name for the Profile Name.
c. Click the Save button to save this profile. All the configuration settings are saved
in this profile.
d. Click Activate to activate your settings.
e. Click OK to exit the configuration utility.
1. Run the Configuration Utility and select the Encryption tab page.
Configuration 3-31
Page 38

Installation Guide for the NETGEAR 54 Mbps Wireless PC Card WG511
2. Select the WEP encryption strength you will use. The choices are:
• 64-bit WEP data encryption
• 128-bit WEP data encryption
Note: Larger encryption keys require more processing and may slow the communicat io ns
response times.
3. Check the Create with Passphrase radio button and enter the passphrase. Click Apply and the
configuration utility automatically generates the WEP keys.
Note: The characters are case sensitive. Be sure to use the same passphrase for all the wireless
devices in the network.
If the passphrase method is not available in the other devices, you must manually enter the
keys to match exactly what is in the access point and other 802.11b wireless devices.
4. The Default Key setting must match what is set in the access point and the other 802.11
wireless devices.
5. Click Apply then OK for the changes to take effect.
3-32 Configuration
Page 39

Appendix A
Technical Specifications
This appendix provides technical specifications for the NETGEAR 54 Mbps Wireless PC Card
WG511
Antennae 2 Integrated internal diversity antennae
Radio Data Rate 1, 2, 5.5, 6, 9, 12, 18, 24, 36, 48, and 54 Mbps (Auto Rate Sensing)
Frequency 2.4GHz to 2.5GHz CCK and OFDM Modulation)
Power Consumption 3.3V DC, typically 45 0mA in fu ll Transmit (TX), 300mA in full Receive (RX),
Emissions FCC, CE, TELEC
Bus interface Cardbus
Provided drivers Microsoft Windows 98, 2000, ME, XP
Dimensions L: 120mm
Weight 40 g
Status LED Wireless Link
Operating Environment Operating temperature: 0 to 55 degree C
Safety US: UL1950
Encryption 40-bit (also called 64-bit) and 128-bit WEP data encryption
Warranty Limited 3-year warranty
.
and 70mA in power save mode
W: 54 mm
H: 7 mm
Technical Specifications A-33
Page 40

Installation Guide for the NETGEAR 54 Mbps Wireless PC Card WG511
A-34 Technical Specifications
Page 41

Appendix B
Wireless Networking Basics
This chapter provides an overview of Wireless networking.
Wireless Net w orking Overview
The WG511 Wireless PC Card conforms to the Institute of Electrical and Electronics Engineers
(IEEE) 802.1 1b standar d for wirel ess LAN
into conformance to t he 802.11g standard when it is ratified. On an 802.1 1 b or g wirele ss link, dat a
is encoded using direct-sequence spread-spectrum (DSSS) technology and is transmitted in the
unlicensed radio spe ctrum at 2.5GHz. The maxi mum data rate for the wireless l ink is 1 1 Mbps, but
it will automaticall y back do wn from 11 Mbps to 5.5, 2, and 1 Mbps when the radio signal is we ak
or when interference is detected. The 802.11g auto rate sensing rates are 1, 2, 5.5, 6, 9, 12, 18, 24,
36, 48, and 54 Mbps.
s (WLANs) and a product upda te will bri ng the WG51 1
The 802.11 standard is also called Wireless Ethernet or Wi-Fi by the Wireless Ethernet
Compatibility Alliance (WECA, s ee http://www.wi-fi.net), an industry standard group promoting
interoperability among 802.11 devices. The 802.11 standard offers two methods for configuring a
wireless network - ad hoc and infrastructure.
Infrastructure Mode
With a wireless Access Point, you can operate the wireless LAN in the infrastructure mode. This
mode provides wireless connectivity to multiple wireless network devices within a fixed range or
area of coverage, interacting with wireless nodes via an antenna.
In the infrastructure mode, the wireless access point converts airwave data into wired Ethernet
data, acting as a bridge between the wired LAN and wireless clients. Connecting multiple Access
Points via a wired Ethernet backbone can further extend the wireless network coverage. As a
mobile computing device moves out of the range of one access point, it moves into the range of
another. As a result, wireless clients can fr eely r oam from on e Access Point d omain to anothe r and
still maintain seamless network connection.
Wireless Networking Basics B-35
Page 42

Installation Guide for the NETGEAR 54 Mbps Wireless PC Card WG511
Ad Hoc Mode (Peer-to-Peer Workgroup)
In an ad hoc network , computers a re brought together as needed; t hus, th ere is no st ructure or fixed
points to the network - each node can generally communicate with any other node. There is no
Access Point involved in this configuration. This mode enables you to quickly set up a small
wireless workgroup and allows workgroup members to exchange data or share printers as
supported by Mi croso ft n etworki ng in the vari ous Windows operating systems. Some ve ndors al so
refer to ad hoc networking as peer-to-peer group networking.
In this configuration, network packets are directly sent and received by the intended transmitting
and receiving stations. As long as the stations are within range of one another, this is the easiest
and least expensive way to set up a wireless network.
Network Name: Extended Service Set Identification (ESSID)
The Extended Service S et Identifi cation (ESSID) is one of two types of Service Set Identification
(SSID). In an ad hoc wireless network with no access points, the Basic Service Set Identification
(BSSID) is used. In an infrastructure wireless network that includes an access point, the ESSID is
used, but may still be referred to as SSID.
An SSID is a thirty-tw o character (maximum) alphanumeric key i dentifying the name of the
wireless local area network. Some vendors refer to the SSID as network name. For the wireless
devices in a network to communicate with each other, all devices must be configured with the
same SSID.
Authentication and WEP
The absence of a physical connection between nodes makes the wireless links vulnerable to
eavesdropping and information theft. To provide a certain level of security, the IEEE 802.11
standard has defined two types of authentication methods, Open System and Shared Key. With
Open System auth entication, a wir eless PC can join any net work and r eceive a ny messa ges that a re
not encrypted. With Shared Key authentication, only those PCs that possess the correct
authentication key can join the network. By default, IEEE 802.11 wireless devices operate in an
Open System network.
Wir ed Equivale nt Privac y
to operate in Shared Key authentication mode. There are two shared key methods implemented in
most commercially available products, 64-bit and 128-bit WEP data encryption.
(WEP) data encrypti on is used wh en the wir eless devi ces are configure d
B-36 Wireless Networking Basics
Page 43

Installation Guide for the NETGEAR 54 Mbps Wireless PC Card WG511
802.11 Authentication
The 802.11 standard defines several services that govern how two 802.11 devices communicate.
The following events must occur before an 802.11 Station can communicate with an Ethernet
network through an access point such as the one built in to the WG511:
1. Turn on the wireless station.
2. The station listens for messages from any access points that are in range.
3. The station finds a message from an access point that has a matching SSID.
4. The station sends an authentication request to the access point.
5. The access point authenticates the station.
6. The station sends an association request to the access point.
7. The access point associates wit h the statio n.
8. The station can now communicate with the Ethernet network through the access point.
An access point mus t authent icate a st ation bef ore the st ation ca n associat e with the access poi nt or
communicate with the network. The IEEE 802.11 standard defines two types of authentication:
Open System and Sh ared Key.
• Open System Authenticatio n allows any device to join the network, assuming that the device
SSID matches the access point SSID. Alternatively, the device can use the “ANY” SSID
option to associate with any available Access Point wi thin range, regardless of its SSID.
• Shared Key Authentication requires that the station and the access point have the same WEP
Key to authenticate. These two authentication procedures are described below.
Open System Authentication
The following steps occur when two devices use Open System Authentication:
1. The station sends an authentication request to the access point.
2. The access point authenticates the station.
3. The station associates with the access point and joins the network.
This process is illustrated in be low.
Wireless Networking Basics B-37
Page 44

Installation Guide for the NETGEAR 54 Mbps Wireless PC Card WG511
802.11 Authentication
Open System Steps
1) Authentication request sent to AP
Access Point (AP)
Client
2) AP authenticates
3) Client connects to network
Cable/DSL
ProSafeWirelessVPNSecurityFirewall
PWR TEST
INTERNET LOCAL
WLAN
LNK
ACT
Enable
12345678
100
LNK/ACT
MODEL
FVM318
Cable or
DLS modem
attempting
to connect
Figure 3-9: 802.11 open system authentication
Shared Key Authentication
The following steps occur when two devices use Shared Key Authentication:
1. The station sends an authentication request to the access point.
2. The access point sends challenge text to the station.
3. The station uses its configured 64-bit or 128-bit default key to encrypt the challenge text, and
sends the encrypted text to the access point.
4. The access point decrypts the encrypted text using its configured WEP Key that corresponds
to the station’s default key. The access point compares the decrypted text with the original
challenge text. If the decrypted text matches the original challenge text, then the access point
and the station share the same WEP Key and the access point authenticates the station.
5. The station connects to the network.
If the decrypt ed t ext do es not match t he or iginal chal lenge text (i. e., th e acce ss po int a nd stat ion do
not share the same WEP Key), then the access point will refuse to authenticate the station and the
station will be unable to communicate with either the 802.11 network or Ethernet network.
This process is illustrated in be low.
B-38 Wireless Networking Basics
Page 45

Installation Guide for the NETGEAR 54 Mbps Wireless PC Card WG511
802.11 Authentication
Shared Key Steps
request sent to AP
2) AP sends challenge text
Client
attempting
to connect
3) Client encrypts
challenge text and
sends it back to AP
4) AP decrypts,and if correct,
authenticates client
5) Client connects to network
Figure 3-10: 802.11 shared key authentication
Cable/DSL
ProSafeWirelessVPNSecurityFirewall
PWR TEST
Access Point (AP)1) Authentication
INTERNET LOCAL
WLAN
LNK
ACT
Enable
12345678
100
LNK/ACT
MODEL
FVM318
Cable or
DLS modem
Overview of WEP Parameters
Before enabling WEP on an 802.11 network, you must first consider what type of encryption you
require and the key size you want to use. Typically, there are three WEP Encryption options
available for 802.11 products:
1. Do Not Use WEP: The 802.11 network does not encrypt data. For authentication purposes, the
network uses Open System Authentication.
2. Use WEP for Encryption: A transmitting 802.11 device encrypts the data portion of every
packet it sends us ing a confi gured WEP Key. The receiving 802.1 1b dev ice decry pts th e data using
the same WEP Key. For authentication purposes, the 802.11b network uses Open System
Authentication.
3. Use WEP for Authentication and Encryption: A transmitting 802.1 1 dev ice encrypt s the data
portion of every packet it sends using a configured WEP Key. The receiving 802.11 device
decrypts the data using the same WEP Key. For authentication purposes, the 802.11 network uses
Shared Key Authentication.
Note: Some 802.11 access points also support Use WEP for Authentication Only (Shared Key
Authentication without data encryption).
Wireless Networking Basics B-39
Page 46

Installation Guide for the NETGEAR 54 Mbps Wireless PC Card WG511
Key Size
The IEEE 802.11 standard supports two types of WEP encryption: 40-bit and 128-bit.
The 64-bit WEP data encryption method, allows for a five-character (40-bit) input. Additionally,
24 factory-set bits are added to the forty-bit input to generate a 64-bit encryption key. (The 24
factory-set bits are not user-configurable). This encryption key will be used to encrypt/decrypt all
data transmitted via the wireless interface. Some vendors refer to the 64-bit WEP data encryption
as 40-bit WEP data encryption si nce th e user-configurable portion of the encryption key is 40 bits
wide.
The 128-bit WEP data encryption method consists of 104 user-configurable bits. Similar to the
forty-bit WEP data encryption method, the remaining 24 bits are factory set and not user
configurable. Some vendors allow passphrases to be entered instead of the cryptic hexadecimal
characters to ease encryption key entry.
128-bit encryption is stronger than 40-bit encryption, but 128-bit encryption may not be available
outside of the United States due to U.S. export regulations.
When configured for 40-bit encryption, 802.11 products typically support up to four WEP Keys.
Each 40-bit WEP Key is expressed as 5 sets of two hexadecimal digits (0-9 and A-F). For
example, “12 34 56 78 90” is a 40-bit WEP Key.
When configured for 128-bit encryption, 802.11b products typically support four WEP Keys but
some manufacturers sup port only one 128-bit key. The 128-bit WEP Key is expressed as 13 s ets of
two hexadecimal digits (0-9 and A-F). For example, “12 34 56 78 90 AB CD EF 12 34 56 78 90”
is a 128-bit WEP Key.
Note: Typically, 802.11 access points can store up to four 128-bit WEP Keys but some 802.11
client adapters can only store one. Therefore, make sure that your 802.11 access and client
adapters configurations matc h.
WEP Configuration Options
The WEP settings must match on all 802.11 devices that are within the same wireless network as
identified by the SSID. In general, if your mo bil e c li ent s will roam between access poi nt s, t hen all
of the 802.1 1 acce ss poin ts and all of the 802.11 client adapters on the network must have the same
WEP settings.
B-40 Wireless Networking Basics
Page 47

Installation Guide for the NETGEAR 54 Mbps Wireless PC Card WG511
Note: Whatever keys you enter for an AP, you must a ls o en ter t he same keys for the client adapter
in the same order. In other words, WEP key 1 on the AP must match WEP key 1 on the client
adapter, WEP key 2 on the AP must match WEP key 2 on the client adapter, etc.
Note: The AP and the client adapters can have different def au lt WEP Ke ys as lo ng as the keys are
in the same order. In other words, the AP can use WEP key 2 as its defa ul t key to transmit while a
client adapter can us e WEP key 3 as it s def ault key to tr ansmit. The two devi ces wi ll co mmunic ate
as long as the AP’s WEP key 2 is the same as the client’s WEP key 2 and the AP’s WEP key 3 is
the same as the client’s WEP key 3.
Wireless Channe ls
IEEE 802.11b and g wireless nodes communicate with each ot her usi ng radio frequency signa ls in
the ISM (Industrial, Scientific, and Medical) band between 2.4 GHz and 2.5 GHz. Neighboring
channels are 5 MHz apart. However, due to spread spectrum effect of the signals, a node sending
signals using a particular channel will utilize frequency spectrum 12.5 MHz above and below the
center channel frequency. As a result, two separate wireless networks using neighboring channels
(for example, channel 1 and channel 2) in the same general vicinity will interfere with each other.
Applying two channels that allow the maximum channel separation will decrease the amount of
channel cross-talk, and provide a noticeable performance increase over networks with minimal
channel separati on.
Wireless Networking Basics B-41
Page 48

Installation Guide for the NETGEAR 54 Mbps Wireless PC Card WG511
The radio frequency channels used are listed in Table 3-1:
Table 3-1. 802.11b and g Radio Frequency Channels
Channel Center Frequency Frequency Spread
1 2412 MHz 2399.5 MHz - 2424.5 MHz
2 2417 MHz 2404.5 MHz - 2429.5 MHz
3 2422 MHz 2409.5 MHz - 2434.5 MHz
4 2427 MHz 2414.5 MHz - 2439.5 MHz
5 2432 MHz 2419.5 MHz - 2444.5 MHz
6 2437 MHz 2424.5 MHz - 2449.5 MHz
7 2442 MHz 2429.5 MHz - 2454.5 MHz
8 2447 MHz 2434.5 MHz - 2459.5 MHz
9 2452 MHz 2439.5 MHz - 2464.5 MHz
10 2457 MHz 2444.5 MHz - 2469.5 MHz
11 2462 MHz 2449.5 MHz - 2474.5 MHz
12 2467 MHz 2454.5 MHz - 2479.5 MHz
13 2472 MHz 2459.5 MHz - 2484.5 MHz
Note: The available channels supported by the wireless products in va ri ous count ries are different .
The preferred channel separation between the channels in neighboring wireless networks is 25
MHz (5 channels). This means that you can apply up to three different channels within your
wireless network. There are only 11 usable wireless channels in the United States. It is
recommended that you st art using cha nnel 1 and gr ow to use chann el 6, and 11 when necessary, as
these three channels do not overlap.
B-42 Wireless Networking Basics
Page 49

Appendix C
Preparing Your PCs for Network Access
This appendix describes how to prepare your PCs to connect to the Internet through the
NETGEAR 54 Mbps Wireless PC Card WG511.
For adding file and print sharing to your network, please consult the Windows help information
included with the version of Windows installed on each computer on your network.
Preparing Your Computers for TCP/IP Networking
Computers access the Internet using a protocol called TCP/IP (Transmission Control Protocol/
Internet Protocol ). Eac h comput er on your network must have TCP/IP installed and sel ect ed as its
networking protocol. If a Network Interface Card (NIC) is already installed in your PC, then TCP/
IP is probably already installed as well.
Most operating systems include the software components you need for networking with TCP/IP.
Windows 95 or later includes the software components for establishing a TCP/IP network.
In your TCP/IP network, each PC and the wireless access point must be assigned a unique IP
addresses. Each PC must also have certain other TCP/IP configuration information such as a
subnet mask (netmask), a domain name server (DNS) address, and a default gateway address. In
most cases, you should install TCP/IP so that the PC obtains its specific network configuration
information automatically from a DHCP server during startup.
Configuring Window s 98 and Me for TCP/IP Networking
As part of the PC preparation process, you may need to install and configure
TCP/IP on your PC. Befo re star ting, loc ate your W indows CD; you may n eed to insert it during the
TCP/IP installation proces s.
Install or Verify Windows Networking Components
To install or verify the necessary components for IP networking:
Preparing Your PCs for Network Access C-43
Page 50

Installation Guide for the NETGEAR 54 Mbps Wireless PC Card WG511
1. On the W i ndows taskbar, cl ick the Start bu tt on, poi nt to Settings, and then cl ick Control Panel.
2. Double-click the Network icon.
The Network window opens, which displays a list of installed components:
You must have an Ethernet adapter or an WG511, the TCP/IP protocol, and the Client for
Microsoft Networks.
Note: It is not necessary to remove any other network components shown in the
Network window in order to install the adapter, TCP/IP, or Client for Microsoft
Networks.
If you need to add TCP/IP:
a. Click the Add button.
b. Select Protocol, and then click Add.
c. Select Microsoft.
d. Select TCP/IP, and then click OK.
If you need to add the Client for Microsoft Networks:
a. Click the Add button.
b. Select Client, and then click Add.
c. Select Microsoft.
d. Select Client for Microsoft Networks, and then click OK.
If you need to add File and Print Sharing for Microsoft Networks:
C-44 Preparing Your PCs for Network Access
Page 51

Installation Guide for the NETGEAR 54 Mbps Wireless PC Card WG511
a. Click the Add button.
b. Select Client, and then click Add.
c. Select Microsoft.
d. Select File and Print Sharing for Microsoft Networks, and then click OK.
3. Restart your PC for the changes to ta ke effect.
Enabling DHCP to Automatically Configure TCP/IP Settings in
Windows 98 and Me
After the TCP/IP protocol components are installed, each PC must be assigned specific
information about itself and resources that are available on its network. The simplest way to
configure this information is to allow the PC to obtain the information from a DHCP server in the
network.
You will find there are many similarities in the procedures for different Windows systems
when using DHCP to configure TCP/IP.
The following steps will walk you through the configuration process for each of these
versions of Windows.
Locate your Network Neighborhood icon.
• If the Network Neighborhood icon is on the Windows desktop, position your
mouse pointer over it and right-click your mouse button.
• If the icon is not on the desktop,
•Click Start on the task bar located at the bottom left of the window.
• Choose Settings, and then Control Panel.
• Locate the Network Neighborhood icon and click on it. This will open
the Network panel as shown below.
Preparing Your PCs for Network Access C-45
Page 52

Installation Guide for the NETGEAR 54 Mbps Wireless PC Card WG511
Verify the following settings as shown:
• Client for Microsoft Network exists
• Ethernet a dapter is present
•TCP/IP is present
• Primary N etwork L ogon is set to
Windows logon
Click on the Properties button. The
following TCP/IP Properties window will
display.
C-46 Preparing Your PCs for Network Access
Page 53

Installation Guide for the NETGEAR 54 Mbps Wireless PC Card WG511
By default, the IP Address tab is open on
this windo w.
• Verify the following:
Obtain an IP address automaticall y is
selected. If not selected, click in the
radio button to the left of it to sele ct it.
This setting is required to enable the
DHCP server to automatically assign an
IP address.
•Click OK to continue.
Restart the PC.
Repeat the se steps for each PC with this
version of Windows on your network.
Selecting Windows’ Internet Access Method
1. On the W i ndows taskbar, cl ick the Start butt on, poi nt to Settings, and then cl ick Control Panel.
2. Double-click the Internet Optio ns icon.
3. Select “I want to set up my Internet connection manually” or “I want to connect through a
Local Area Network” and click Next.
4. Select “I want to connect through a Local Area Network” and click Next.
5. Uncheck all boxes in the LAN Internet Configuration screen and click Next.
6. Proceed to the end of the Wizard.
Verifying TCP/IP Properties
After your PC is configured and has rebooted, you can check the TCP/IP configuration using the
utility w inipcfg.exe:
1. On the Windows taskbar, click the Start button, and then click Run.
Preparing Your PCs for Network Access C-47
Page 54

Installation Guide for the NETGEAR 54 Mbps Wireless PC Card WG511
2. Type winipcfg, and then click OK.
The IP Configuratio n window opens, which li sts (among other things ), your IP a ddress, su bnet
mask, and default gateway.
3. From the drop-down box, select your Ethernet adapter.
The window is updated to sho w your sett ings, whi ch shoul d match t he value s below if you ar e
using the default TCP/IP settings that NETGEAR recommends for connecting through a
router or gateway:
• The IP address is between 192.168.0.2 and 192.168.0.254
• The subnet mask is 255.255.255.0
• The default gateway is 192.168.0.1
Configuring Window s 2000 or XP for TCP/IP Networ king
As part of the PC preparation process, you may need to install and configure
TCP/IP on each networked PC. Before starting, locate your Windows CD; you may need to insert
it during the TCP/IP installation process.
Install or Verify Windows Networking Components
To install or verify the necessary components for IP networking:
1. On the W i ndows taskbar, cl ick the Start butt on, poi nt to Settings, and then cl ick Control Panel.
2. Double-click the Network and Dialup Connections icon.
3. If an Ethernet adapter is present in your PC, you should see an entry for Local Area
Connection. Double-click that entry.
4. Select Properties.
5. Verify that ‘Client for Microsoft Networks’ and ‘Internet Protocol (TCP/IP)’ are present. If
not, select Install and add them.
6. Select ‘Internet Protocol (TCP/IP)’, click Properties, and verify that “Obtain an IP address
automatically is selected.
7. Click OK and close all Network and Dialup Connections windows.
8. Then, restart your PC.
C-48 Preparing Your PCs for Network Access
Page 55

Installation Guide for the NETGEAR 54 Mbps Wireless PC Card WG511
DHCP Configuration of TCP/IP in Windows XP or 2000
You will find there are many similarities in the procedures for different Windows systems when
using DHCP to configure TCP/IP.
The following steps will walk you through the configuration process for each of these versions of
Windows.
DHCP Configuration of TCP/IP in Windows XP
Locate your Network Neighborhood icon.
• Select Control Panel from the Windows XP Start Menu.
• Select the Network Connections icon on the Control Panel. This will take you to the next
step.
Now the Network Connection window
displays.
The Connections List that shows all the
network connections set up on the PC,
located to the right of the window.
• Right-click on the Connection with the
wireless icon and choose Status.
Preparing Your PCs for Network Access C-49
Page 56

Installation Guide for the NETGEAR 54 Mbps Wireless PC Card WG511
Now you should be at the Local Area
Network Connection Status window. This
box displays the connection status,
duration, speed, and activity statistics.
Administ rator logon access righ ts are
needed to use this window.
•Click the Properties button to view
details about the connection.
The TCP/IP details are presented on the
Support tab page.
• Select Internet Protocol, and click
Properties to view the configuration
information.
C-50 Preparing Your PCs for Network Access
Page 57

Installation Guide for the NETGEAR 54 Mbps Wireless PC Card WG511
Verify that Obtain an IP address
automatically ra dio button is se lected and
that the Obtain DNS server address
automatically radio button is selected.
•Click the OK button.
This completes the DHCP configuration in
Windows XP.
Repeat the se steps for each PC with this
version of Windows on your network.
DHCP Configuration of TCP/IP in Windows 2000
After you install a network card, TCP/IP for Windows 2000 is configured and set to DHCP
without your having to configure it. However, if there are problems, following the steps below to
configure TCP/IP with DHCP for Windows 2000.
Click on the My Network Places icon on the Windows desktop. This will bring up a window
called Network and Dial-up Connections.
• Right click on Local Area Connection and select Properties.
Preparing Your PCs for Network Access C-51
Page 58

Installation Guide for the NETGEAR 54 Mbps Wireless PC Card WG511
The Local Area Connection Properties
dialog box appears. Verify that you have
the correct Ethernet card selected in the
Connect using: box and that the following
two items are displ ayed and s elected in the
box of “Components checked are used by
this connection:”
• Client for Microsoft Networks and
• Internet Protocol (TCP/ IP)
Click OK.
With Internet Protocol (TCP/IP) selected,
click on Properties to open the Internet
Protocol (TCP/IP) Properties dialogue
box. Verify that
• Obtain an IP address
automatically is selected.
• Obtain DNS server address
automatically is selected.
Click OK to return to Local Area
Connection Properti es. Click OK again to
complete the configuration process.
Restart the PC. Repeat these steps for each
PC with this version of Windows on your
network.
C-52 Preparing Your PCs for Network Access
Page 59

Installation Guide for the NETGEAR 54 Mbps Wireless PC Card WG511
Verifying TCP/IP Properties for Windows XP or 2000
To check your PC’s TCP/IP configuration:
1. On the Windows taskbar, click the Start button, and then click Run.
The Run window opens.
2. Type cmd and then click OK.
A command window opens
3. Type ipconfig /all
Your IP Configuration informati on will be l isted, and sh ould match t he values below if you are
using the default TCP/IP settings that NETGEAR recommends for connecting through a
router or gateway:
• The IP address is between 192.168.0.2 and 192.168.0.254
• The subnet mask is 255.255.255.0
• The default gateway is 192.168.0.1
4. Type exit
Preparing Your PCs for Network Access C-53
Page 60

Installation Guide for the NETGEAR 54 Mbps Wireless PC Card WG511
C-54 Preparing Your PCs for Network Access
Page 61

List of Glossary Terms
Use the list below to find definitions for technical terms used in this manual.
Glossary
802.11b
DHCP
Dynamic Host
Configuration
Protocol
Gateway
IP
IP Address
ISP
Internet Protocol
IEEE specification for wireless networking at 11 Mbps using direct-sequence
spread-spectrum (DSSS) technology and operating in the unlicensed radio
spectrum at 2.5GHz.
See Dynamic Host Configuration Protoco l.
DHCP. An Ethernet protocol specifying how a centralized DHCP server can
assign network configuration information to multiple DHCP clients. The
assigned information includes IP addresses, DNS addresses, and gateway
(router) addresses.
A local device, usually a router , that connects hosts on a local netw ork to othe r
networks.
See Internet Protocol.
A four-byte number uniquely defining each host on the Internet. Ranges of
addresses are assigned by Internic, an organization formed for this purpose.
Usually written in dotted-decimal notation with periods separating the bytes
(for example, 134.177.244.5 7).
Internet service provider.
The main internetworking protocol used in the Internet. Used in conjunction
with the Transfer Control Protocol (TCP) to form TCP/IP.
LAN
local area network
See local area network.
LAN. A communications network serving users within a limited area, such as
one floor of a building. A LAN typically connects multiple personal
computers and shared network devices such as storage and pr inters. Although
many technologies exist to implement a LAN, Ethernet is the most common
for connecting personal computers.
Glossary
1
Page 62

Installation Guide for the NETGEAR 54 Mbps Wireless PC Card WG511
MAC address
Mbps
packet
router
Routing Information
Protocol
subnet mask
UTP
WAN
WEP
Media Access Control address. A unique 48-bit hardware address assigned to
every Ethernet node. Usually written in the form 01:23:45:67:89:ab.
Megabits per second.
A block of information sent over a network. A packet typically contains a
source and destination network address, some protocol and length
information, a block of data, and a checksum.
A device that forwards data between networks. An IP router forwards data
based on IP source and destination addresses.
A protocol in which routers periodically exchange information with one
another so that they can determine minimum distance paths between sources
and destinations.
See netmask.
Unshielded twisted pair. The cable used by 10BASE-T and 100BASE-Tx
Ethernet networks.
See wide area network.
Wired Equivale nt Privacy. WEP is a data encryption protoco l for 802.11b
wireless networks. All wireless nodes and access points on the network are
configured with a 64-bit or 128-bit Shared Key for data encryption.
wide area network
WAN. A long distance link used to extend or connect remotely located local
area networks. The Internet is a large WAN.
2 Glossary
Page 63

Index
Numerics
802.11b B-35
A
ad-hoc mode B-36
B
BSSID B-36
E
ESSID B-36
F
features 1-1
I
infrastructure mode B-36
IP networking
for Windows C-43, C-48
W
WEP 1-4, 3-28, B-36
Wi-Fi B-35
Windows, configuring for IP routing C-43, C-48
winipcfg utility C-47
Wired Equivalent Privacy. See WEP
Wireless Ethernet B-35
wireless network name 1-3
L
LEDs
description 2-18
O
Open System authentication B-36
S
Shared Key authentication B-36
SSID 1-3, 2-9, B-36
T
TCP/IP properties
verifying for Windows C-47
Index 1
 Loading...