


Netgear WAX610 Installation Manual
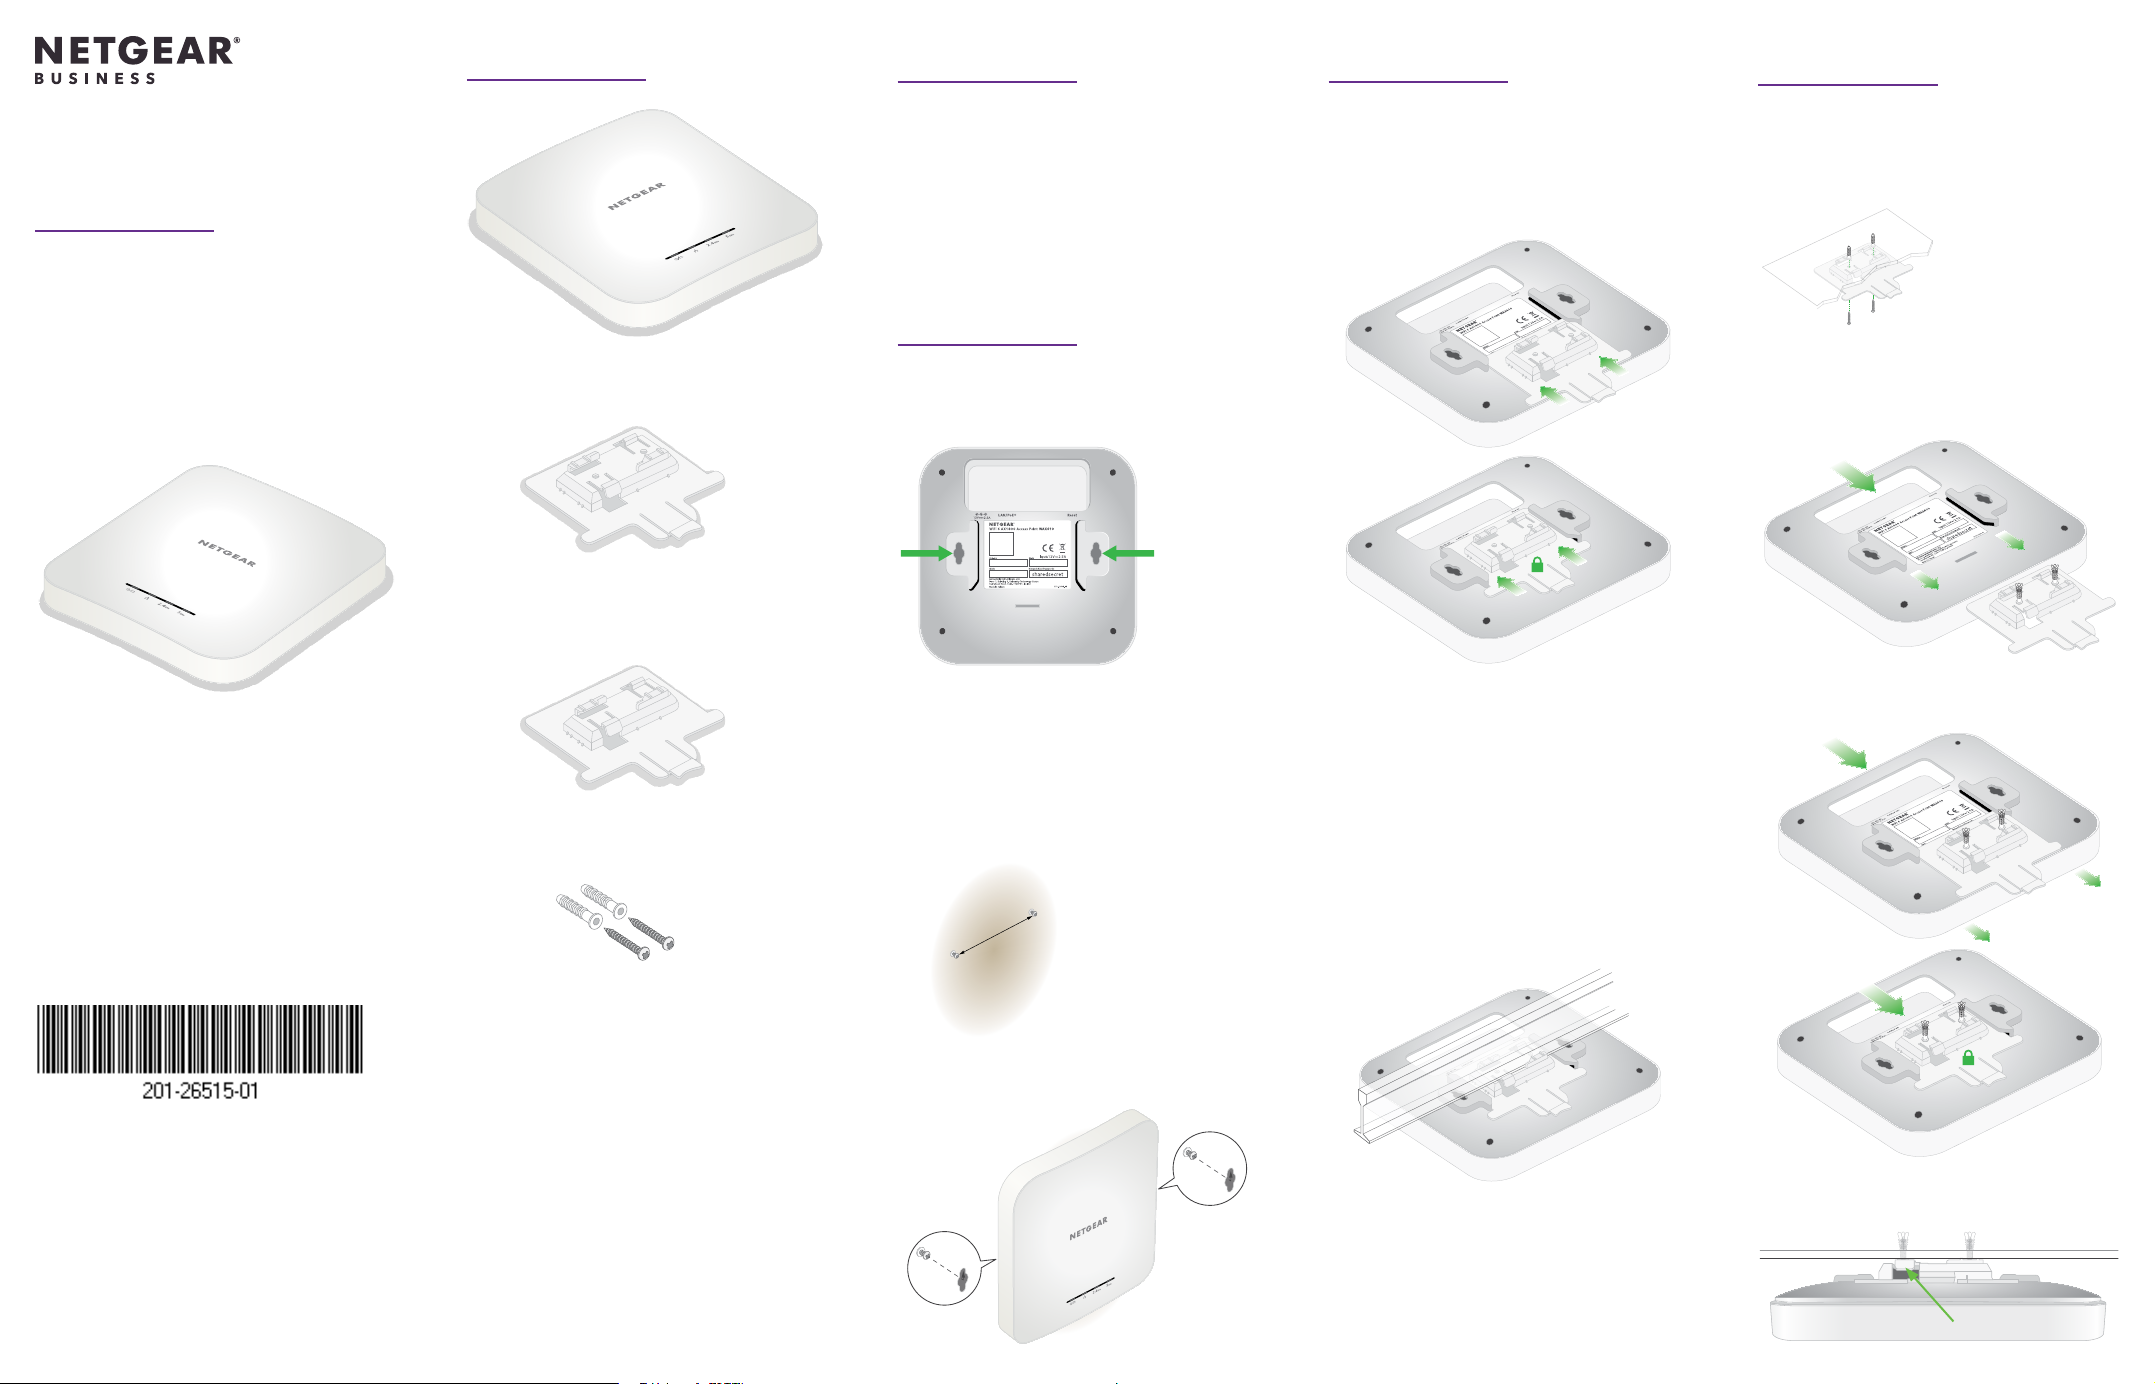
Package contents
Installation options
Mount to a T-bar
Mount to a solid ceiling
Installation Guide
Insight Managed
WiFi 6 AX1800
Dual Band Access Point
Model WAX610
Access Point Model WAX610
Mounting bracket with screw holes for
mounting to a solid ceiling or 15/16in.
(23.8mm) T-bar.
Mounting bracket without screw holes for
mounting to a 9/16 in. (14.3 mm) T-bar.
You can mount the access point to a solid
surface (a wall or a ceiling) or to a ceiling with
a 9/16 in. (14.3 mm) or 15/16 in. (23.8mm)
T-bar, or you can install the access point
freestanding on a at sur face.
We recommend that you use a at Ethernet
cable so that the cable ts in the narrow
space between the access point and the
surface on which it is mounted or placed.
Mount to a solid wall
The bottom of the access point includes two
holes that let you mount the access point on
two screws inserted in a wall.
1. Mark the wall where you want to insert
the provided anchors and screws, which
must be 3.875 in. (98.5 mm) apart, and
insert the anchors and screws.
Leave about 0.25 in. (6 mm) of each
screw protruding from the wall so that
you can insert the screws into the holes
on the bottom of the access point.
3.875 in. (98.5 mm)
1. Depending on the size of the T-bar,
slide the 9/16 in. (14.3 mm) or 15/16in.
(23.8mm) bracket between the guides
on the bot tom the access point until it
locks in place. The locking tab must be at
the front of the access point.
2. Hold the access point upside down.
Note: If you can reach behind the T-bar,
hold the T-bar with one hand and the
access point with your other hand.
3. Align the rectangular protruding part of
the bracket with the T-bar.
4. Hook the bracket onto one side of the
T-bar.
5. Hook the bracket onto the other side of
the T-bar until the bracket locks onto the
T-bar.
1. Using the anchors and screws provided,
attach the 15/16 in. (23.8mm) bracket
with the screw holes to the ceiling.
The rectangular protruding part of the
bracket must be facing the ceiling.
2. Hold the access point upside down with
the front of the access point facing the
bracket. Then, line up the guides on
the bottom of the access point with the
bracket.
3. Slide the access point into the bracket
until it locks in place. The locking tab
must be at the front of the access point.
NETGEAR, Inc.
350 East Plumeria Drive
San Jose, CA 95134, USA
NETGEAR INTERNATIONAL LTD
Floor 1, Building 3,
University Technology Centre
Curraheen Road, Cork,
T12EF21, Ireland
© NETGEAR, Inc., NETGEAR and the NETGEAR
Logo are trademarks of NETGEAR, Inc. Any
non-NETGEAR trademarks are used for reference
purposes only.
May 2020
Two screws and anchors for ceiling- or
wallmounting
Note: Depending on the product ordered,
the package might not include a power
adapter. You power up the access point by
connecting it to a PoE+ switch. However, as an
option, you can order a power adapter.
2. Line up the holes on the bottom of the
access point with the screws in the wall
and mount the access point to the wall.
Note: To unlock the access point, push the
locking tab toward the ceiling and slide the
access point out of the bracket.
Locking tabSide view
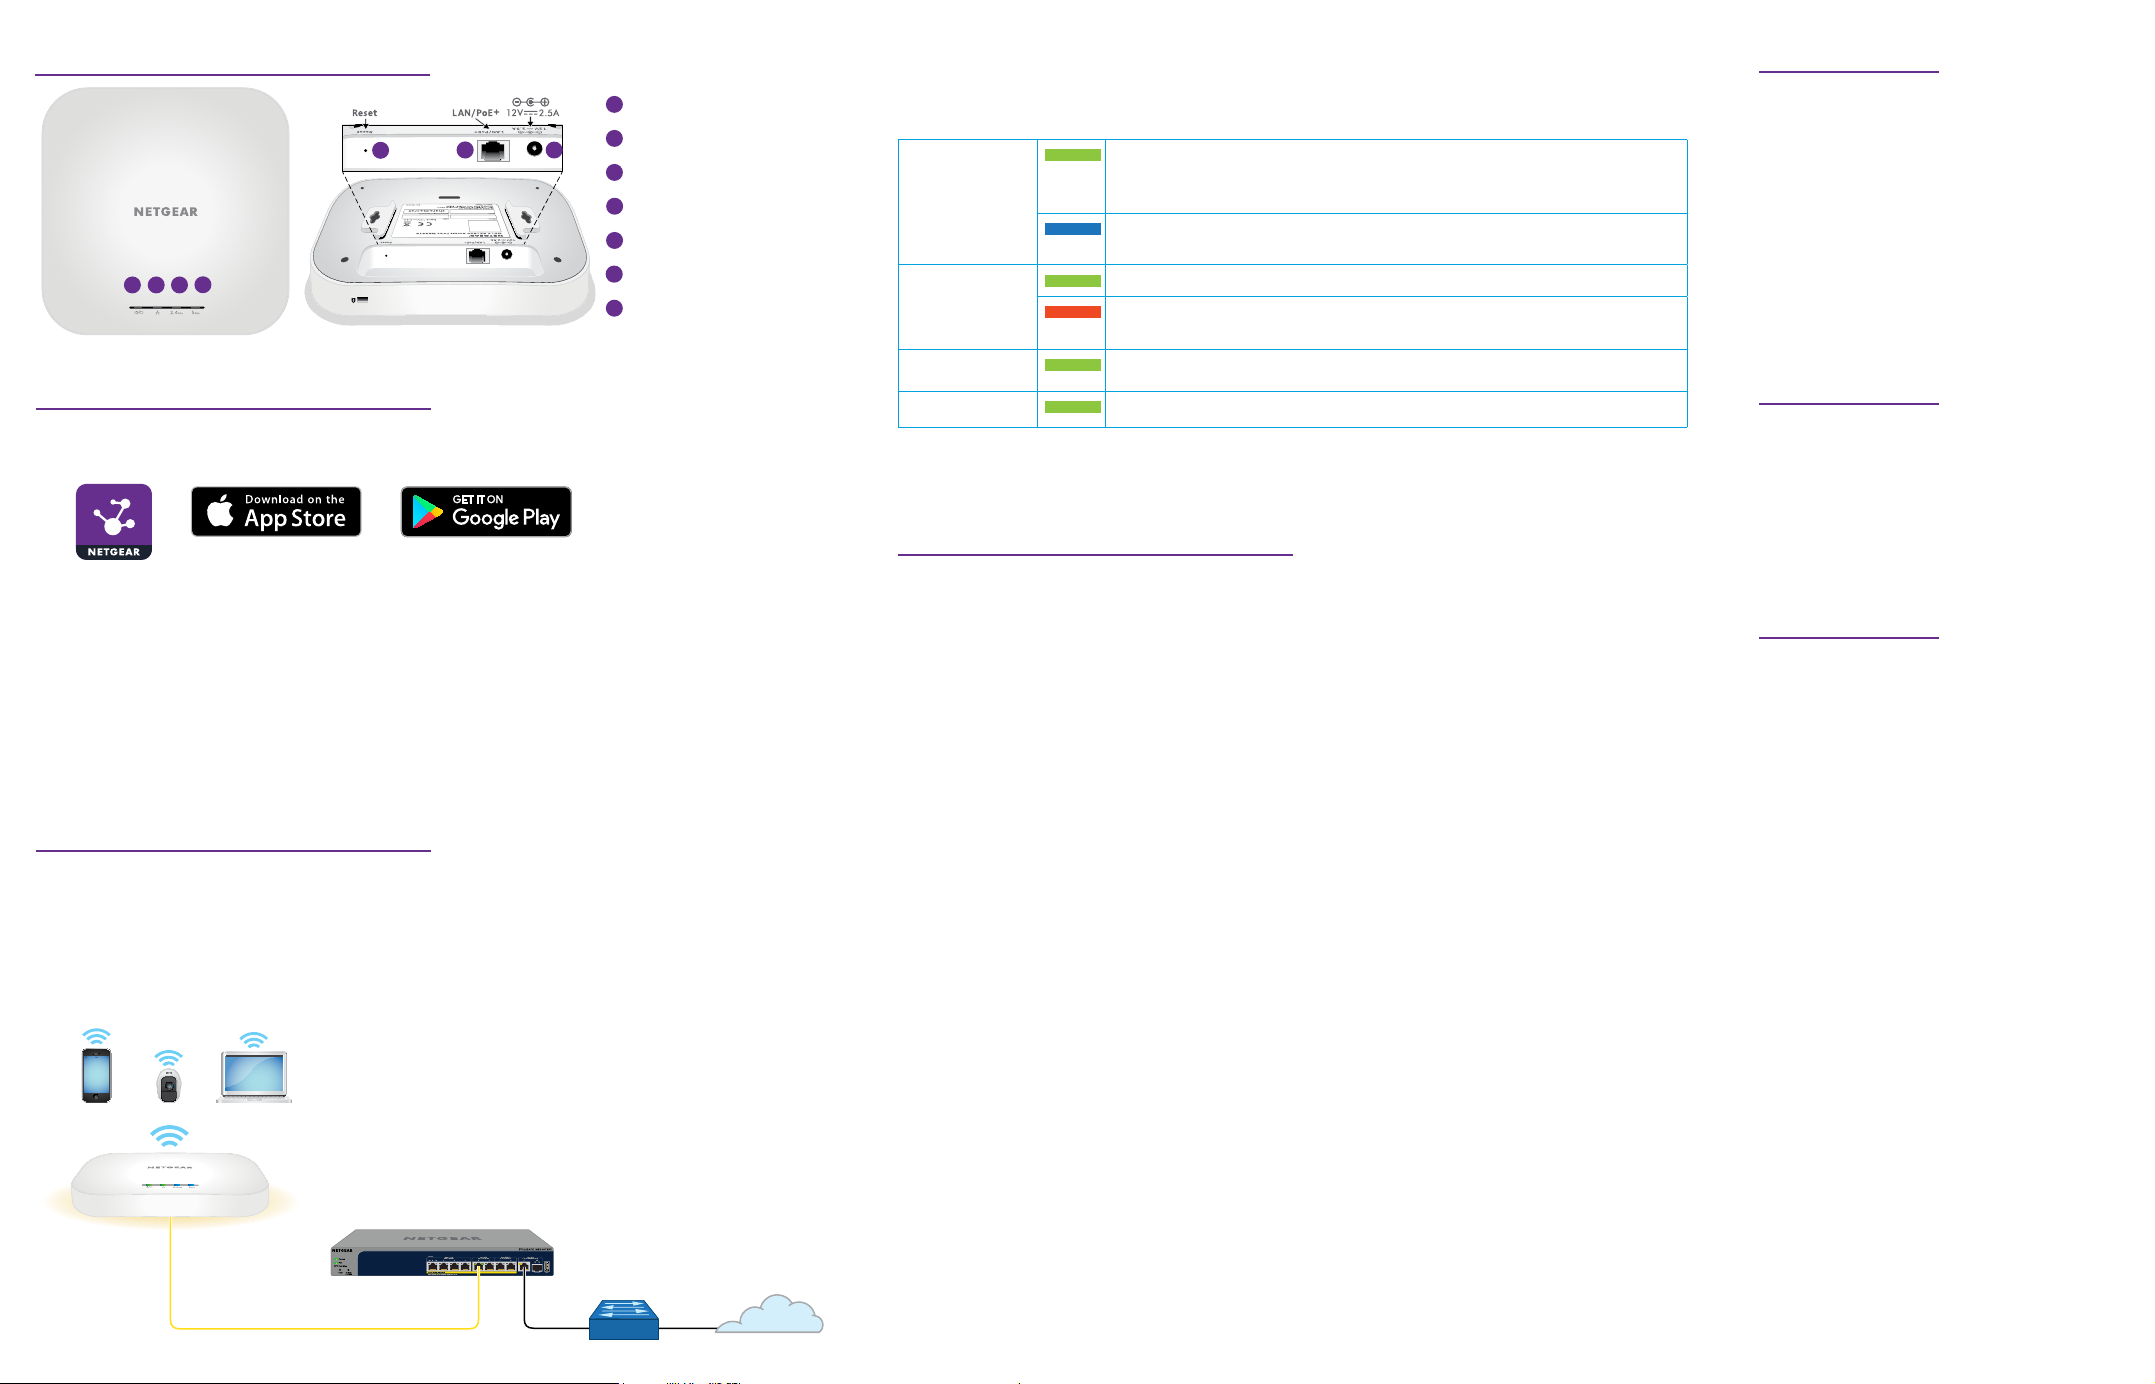
Overview
5
4
6
7
55
1
2
3
5
6
7
1
Power/Cloud LED
2
LAN LED
3
2.4 GHz WLAN LED
5 GHz WLAN LED
5
Reset button
4
LAN/PoE+ port
DC power connector
1. Register the access point in NETGEAR Insight
1. On your mobile device, visit the Apple App Store or Google Play Store, search for
NETGEAR Insight, and download the latest version of the app.
2. Open the NETGEAR Insight app.
3. If you do not own a NETGEAR account, tap Create NETGEAR Account and follow
the instructions.
4. Enter the email address and password for your account and tap LOG IN.
5. Tap + in the upper right corner.
6. Either use the camera on your phone to scan the QR code or barcode, or type in
the serial number.
7. Follow the instructions to register the device.
2. Connect the access point to a PoE+ switch
Power up the access point by connecting the LAN/PoE+ port to a PoE+ switch that
supplies 802.3at (PoE+) power.
The LAN/PoE+ port supports Ethernet speeds up to 2.5 Gbps. The following gure
shows a NETGEAR MS510TXPP switch, which supports speeds of 2.5 Gbps and higher.
However, if your Internet connection, modem, and switch support a speed of 1 Gbps
(which is a common speed), the access point LAN connection functions at 1 Gbps.
The access point receives an IP address from a DHCP server (or a router that functions
as a DHCP server) in your network. If your network does not include a DHCP server, the
access point uses its default IP address 192.168.0.100.
During installation and setup, the access point’s LEDs can light in these colors:
Power/Cloud
(one of two
management
options)
LAN
(one of two
speed options)
2.4 GHz WLAN
5 GHz WLAN
Solid green. The access point started up and functions either as a
standalone access point or as an Insight discovered access point that
is not connected to the Insight cloud-based management platform.
Solid blue. The access point functions in Insight mode and is
connected to the Insight cloud-based management platform.
Solid green. The LAN port detects a speed of 2.5 Gbps.
Solid amber. The LAN port detects a speed of less than 2.5 Gbps,
such as 1 Gbps (which is a common speed).
Solid green. The 2.4 GHz radio is operating without clients.
Solid green. The 5 GHz radio is operating without clients.
For more information about the LEDs, see the user manual, which you can download
by visiting netgear.com/support/product/WAX610.
3. Congure the access point with NETGEAR Insight
Make sure that the switch to which the access point is connected is connected to the
Internet.
1. Connect your mobile device to the access point’s default SSID.
The default SSID is on the access point label on the bottom of the access point
and is shown in the format NETGEARxxxxxx-SETUP, where xxxxxx are the last six
hexadecimal digits of the access point’s MAC address. The default password is
sharedsecret.
2. Open the NETGEAR Insight app.
3. Enter the email address and password for your Insight account and tap LOG IN.
In most situations, Insight detects the access point automatically. This process can
take several minutes.
4. Select the access point and tap Next.
You are prompted to add the access point to an Insight network location.
5. Create a new network location, tap Next, and then tap OK.
The device admin password that you entered for the new network location replaces
the existing admin password on all devices that you add to the network location.
Other setup methods
If you are an Insight Premium or
Insight Pro subscriber, you can use the
NETGEAR Insight Cloud portal to set up
the access point.
To set up the access point, you can
also use the access point’s local
browser user interface (UI). For more
information, see the user manual, which
you can download by visiting
netgear.com/support/product/WAX610.
Support and Community
Visit netgear.com/support to get your
questions answered and access the
latest downloads.
You can also check out our NETGEAR
Community for helpful advice at
community.netgear.com.
Regulatory and Legal
Si ce produit est vendu au Canada,
vous pouvez accéder à ce document
en français canadien à https://www.
netgear.com/support/download/.
(If this product is sold in Canada, you
can access this document in Canadian
French at https://www.netgear.com/
support/download/.)
For regulatory compliance information
including the EU Declaration of
Conformity, visit https://www.netgear.
com/about/regulatory/.
See the regulatory compliance
document before connecting the
power supply.
WiFi clients
WA X610
PoE+ switch
Sample network connections
Router Internet
Your Insight network location is now set up and the access point is added to the
network location.
6. If prompted, name the access point and tap Next.
The access point automatically updates to the latest Insight rmware. This might
take up to 10 minutes, during which the access point might restart.
The access point is now an Insight managed device that is connected to the Insight
cloud-based management platform. If the Power/Cloud LED was solid green, it now
lights solid blue.
7. Use the Insight app to congure and manage the access point.
For NETGEAR’s Privacy Policy, visit
https://www.netgear.com/about/
privacy-policy.
By using this device, you are agreeing
to NETGEAR’s Terms and Conditions
at https://www.netgear.com/about/
terms-and-conditions. If you do not
agree, return the device to your place
of purchase within your return period.
Do not use this device outdoors.