

Netgear WAX218 User Manual
User Manual
WiFi 6 AX1800/AX3600 Dual Band
PoE/PoE+ Access Points
Models
WAX214
WAX218
NETGEAR, Inc.
350 E. Plumeria DriveDecember 2020
San Jose, CA 95134, USA202-12175-01

NETGEAR WiFi 6 AX1800/AX3600 Dual Band PoE/PoE+ Access Points, WAX214 and WAX218
Support and Community
Visit netgear.com/support to get your questions answered and access the latest
downloads.
You can also check out our NETGEAR Community for helpful advice at
community.netgear.com.
Regulatory and Legal
Si ce produit est vendu au Canada, vous pouvez accéder à ce document en français
canadien à https://www.netgear.com/support/download/.
(If this product is sold in Canada, you can access this document in Canadian French at
https://www.netgear.com/support/download/.)
For regulatory compliance information including the EU Declaration of Conformity, visit
https://www.netgear.com/about/regulatory/.
See the regulatory compliance document before connecting the power supply.
For NETGEAR’s Privacy Policy, visit https://www.netgear.com/about/privacy-policy.
By using this device, you are agreeing to NETGEAR’s Terms and Conditions at
https://www.netgear.com/about/terms-and-conditions. If you do not agree, return the
device to your place of purchase within your return period.
Do not use this device outdoors. The PoE source is intended for intra building connection
only.
Trademarks
© NETGEAR, Inc., NETGEAR, and the NETGEAR Logo are trademarks of NETGEAR, Inc.
Any non-NETGEAR trademarks are used for reference purposes only.
Revision History
CommentsPublish DatePublication Part
Number
First publication.December 2020202-12175-01
2

Contents
Chapter 1 Introduction
Unique features for each model.........................................................8
Additional documentation...................................................................8
Safety instructions and warnings for an indoor access point..........9
Chapter 2 Hardware Overview Model WAX214
Unpack model WAX214....................................................................12
Top panel with LEDs for model WAX214........................................12
Hardware interfaces model WAX214..............................................13
Label model WAX214........................................................................15
Chapter 3 Hardware Overview Model WAX218
Unpack model WAX218....................................................................17
Top panel with LEDs for model WAX218........................................17
Hardware interfaces model WAX218..............................................18
Label model WAX218........................................................................20
Chapter 4 Installation and Initial Log-in
Set up the access point in your network..........................................22
Set up the access point with a PoE or PoE+ network
connection......................................................................................22
Set up the access point with a non-PoE network connection...24
Initial log-in process...........................................................................26
Connect directly to the access point over WiFi and log in for the
first time...........................................................................................26
Connect to the access point over the LAN and log in for the first
time..................................................................................................29
When to use aplogin.net and when to use the assigned IP
address................................................................................................32
Find the IP address of the access point...........................................33
Find the IP address of the access point with the NETGEAR Insight
mobile app..........................................................................................34
Log in to the access point after you complete the initial log-in
process.................................................................................................35
Change the language........................................................................36
Join a WiFi network on the access point.........................................37
3

NETGEAR WiFi 6 AX1800/AX3600 Dual Band PoE/PoE+ Access Points, WAX214 and WAX218
Chapter 5 Manage the Wired Network Settings
Specify a static IPv4 address.............................................................40
Specify a link-local IPv6 address.......................................................41
Reenable the DHCP client of the access point...............................42
Manage the STP settings...................................................................43
Chapter 6 Manage the Basic Radio and WiFi Settings
Change the device name..................................................................47
Change the country and region of operation.................................48
Configure a WiFi network that is open or secured with WPA2 or
WAP3 personal security.....................................................................49
Configure a WiFi network that is secured with WPA2 or WAP3
enterprise security..............................................................................53
Configure a guest network on an SSID............................................57
2.4 GHz management SSID...............................................................58
Change the passphrase for the 2.4 GHz management SSID....59
Disable the idle time-out for the 2.4 GHz management SSID...60
Disable the 2.4 GHz management SSID.....................................61
Chapter 7 Manage the Advanced WiFi and Radio Settings
Manage the channel high throughput mode.................................64
Manage the channel or channels.....................................................65
Manage the radio transmit power....................................................67
Change the minimum bit rate...........................................................68
Manage client limits...........................................................................70
Manage the multicast and unicast streams to WiFi clients............71
Scan for neighboring access points and WiFi routers...................72
Manage the 802.11ax mode for the 2.4 GHz radio........................74
Set up a WiFi on/off schedule for an SSID.......................................75
Set up band steering for an SSID.....................................................77
Set up a RADIUS accounting server.................................................79
Configure Network Access Server settings.....................................80
Configure traffic shaping...................................................................82
Set up a MAC filter for an SSID.........................................................84
Manually block a WiFi client or connection from an SSID.............86
Change the DHCP server settings for guest WiFi networks..........87
Chapter 8 Maintain the access point
Upgrade the firmware........................................................................90
Reboot the access point from the local browser UI.......................91
Schedule the access point to reboot...............................................92
Back up or restore the configuration file.........................................93
Back up the access point configuration settings.......................93
4

NETGEAR WiFi 6 AX1800/AX3600 Dual Band PoE/PoE+ Access Points, WAX214 and WAX218
Restore the access point configuration settings........................94
Reset the access point to factory default settings..........................95
Manage the date and time settings.................................................97
SNMPv1, SNMPv2, and SNMPv3......................................................98
Enable SNMPv1 and SNMPv2 and manage the settings..........99
Enable SNMPv3 and manage the settings...............................100
Logs....................................................................................................102
View and manage the system log..............................................102
Set up a remote log server.........................................................104
Set up email alerts............................................................................105
Change the local device password................................................107
Specify an existing management VLAN........................................108
Control the LEDs..............................................................................109
Chapter 9 Monitor the access point and its Network Connections
Display the access point device, memory, LAN, and WiFi status
information........................................................................................112
Display the WiFi connections..........................................................116
Display the CPU, SSID, and LAN traffic loads...............................118
Chapter 10 Perform Diagnostics and Troubleshooting
Send a ping.......................................................................................121
Send a traceroute request...............................................................122
Send a name server lookup request..............................................123
Perform a speed test........................................................................124
Quick tips for WiFi troubleshooting...............................................125
Troubleshoot with the LEDs............................................................126
Power LED remains off................................................................127
2.4 GHz WLAN LED, 5 GHz WLAN LED, or both WLAN LEDs are
off...................................................................................................128
LAN LED is off in a setup with a power adapter......................128
Troubleshoot the WiFi connectivity...............................................129
A WiFi device cannot connect to the access point..................129
You cannot connect over the 2.4 GHz management SSID.....130
Troubleshoot Internet browsing.....................................................131
You cannot log in to the access point over a LAN connection....132
Changes are not saved in the local browser UI............................133
Troubleshoot your network using the ping utility of your computer
or mobile device...............................................................................133
Test the LAN path from a Windows-based computer to the access
point..............................................................................................133
Test the path from a Windows-based computer to a remote
device............................................................................................134
5

NETGEAR WiFi 6 AX1800/AX3600 Dual Band PoE/PoE+ Access Points, WAX214 and WAX218
Appendix A Factory Default Settings and Technical Specifications
Factory default settings...................................................................137
Technical specifications...................................................................139
Appendix B Mount Model WAX214 to a Wall or Ceiling
Mount model WAX214 to a wall....................................................142
Mount model WAX214 to a solid ceiling......................................143
Mount model WAX214 to a T-bar..................................................145
Appendix C Mount Model WAX218 to a Wall or Ceiling
Mount model WAX218 to a wall....................................................148
Mount model WAX218 to a solid ceiling......................................149
Mount model WAX218 to a T-bar..................................................151
6

1
Introduction
This manual is for the following NETGEAR WiFi 6 Dual Band Access Point models:
WAX214: NETGEAR WiFi 6 AX1800 Dual Band PoE Access Point.
•
WAX218: NETGEAR WiFi 6 AX3600 Dual Band PoE+ Access Point.
•
Models WAX214 and WAX218, in this manual referred to as the access point, provide
802.11ax high-performance WiFi connectivity for a small office/home office and supports
dual-band concurrent WiFi 6 operations at 2.4 GHz and 5 GHz.
This chapter contains the following sections:
• Unique features for each model
• Additional documentation
• Safety instructions and warnings for an indoor access point
Note: For more information about the topics that are covered in this manual, visit the
support website at netgear.com/support/.
Note: Firmware updates with new features and bug fixes are made available from time
to time at netgear.com/support/download/. You can check for and download new
firmware manually. If the features or behavior of your product does not match what is
described in this manual, you might need to update the firmware.
Note: In this manual, WiFi network means the same as SSID (service set identifier or
WiFi network name). That is, when we refer to a WiFi network we mean an individual
SSID.
7

NETGEAR WiFi 6 AX1800/AX3600 Dual Band PoE/PoE+ Access Points, WAX214 and WAX218
Unique features for each model
The following table shows the main differences between model WAX214 and model
WAX218:
Table 1. Model WAX214 and model WAX218 main differences
Model WAX218Model WAX214Feature
Approximate combined
throughput
1
Form factor (L x W x H):
1
If used without a power adapter.
1800 Mbps total:
600 Mbps at 2.4 GHz
1200 Mbps at 5 GHz
6.33 x 6.33 x 1.31 in.
(160.9 x 160.9 x 33.3 mm)
3600 Mbps total:
1200 Mbps at 2.4 GHz
2400 Mbps at 5 GHz.
PoE+ (802.at)PoE (802.af)Power over Ethernet
2.5 Gbps1 GbpsMaximum speed LAN port
8.0 x 8.0 x 1.37 in.
(205.7 x 205.7 x 35.8 mm)
Additional documentation
The following documents are available at netgear.com/support/download/:
Installation guides
•
Data sheets
•
User Manual8Introduction

NETGEAR WiFi 6 AX1800/AX3600 Dual Band PoE/PoE+ Access Points, WAX214 and WAX218
Safety instructions and warnings for an indoor access point
Use the following safety guidelines to ensure your own personal safety and to help
protect your system from potential damage.
To reduce the risk of bodily injury, electrical shock, fire, and damage to the equipment,
observe the following precautions:
This product is designed for indoor use only in a temperature-controlled and
•
humidity-controlled environment. Note the following:
-
For more information about the environment in which this product must operate,
see the environmental specifications in the appendix or the data sheet.
-
If you want to connect the product over an Ethernet cable to a device located
outdoors, the outdoor device must be properly grounded and surge protected,
and you must install an Ethernet surge protector inline between the indoor
product and the outdoor device. Failure to do so can damage the product.
-
Before connecting the product to outdoor cables or wired outdoor devices, see
https://kb.netgear.com/000057103 for additional safety and warranty information.
Failure to follow these guidelines can result in damage to your NETGEAR product,
which might not be covered by NETGEAR’s warranty, to the extent permissible by
applicable law.
Do not service the product except as explained in your product documentation.
•
Some devices should never be opened.
If any of the following conditions occur, unplug the product from its power source,
•
and then replace the part or contact your trained service provider:
- Depending on your product, the power adapter, power adapter cable, power
adapter plug, or PoE Ethernet cable is damaged.
-
An object fell into the product.
- The product was exposed to water.
- The product was dropped or damaged.
-
The product does not operate correctly when you follow the operating
instructions.
Keep the product away from radiators and heat sources. Also, do not block cooling
•
vents.
User Manual9Introduction

NETGEAR WiFi 6 AX1800/AX3600 Dual Band PoE/PoE+ Access Points, WAX214 and WAX218
Do not spill food or liquids on your product components, and never operate the
•
product in a wet environment. If the product gets wet, see the appropriate section
in your troubleshooting guide, or contact your trained service provider.
Do not push any objects into the openings of your product. Doing so can cause fire
•
or electric shock by shorting out interior components.
Use the product only with approved equipment.
•
If applicable to your product, allow the product to cool before removing covers or
•
touching internal components.
Be sure that devices that are attached over Ethernet cables are electrically rated to
•
operate with the power available in your location.
Depending on your product, use only the supplied power adapter or an Ethernet
•
cable that provides PoE.
If your product uses a power adapter:
-
If you were not provided with a power adapter, contact your local NETGEAR
reseller.
-
The power adapter must be rated for the product and for the voltage and current
marked on the product electrical ratings label.
To help prevent electric shock, plug any system and peripheral power cables into
•
properly grounded power outlets.
If applicable to your product, the peripheral power cables are equipped with
•
three-prong plugs to help ensure proper grounding. Do not use adapter plugs or
remove the grounding prong from a cable. If you must use an extension cable, use
a three-wire cable with properly grounded plugs.
Observe extension cable and power strip ratings. Make sure that the total ampere
•
rating of all products plugged into the extension cable or power strip does not
exceed 80 percent of the ampere ratings limit for the extension cable or power strip.
To help protect your system from sudden, transient increases and decreases in
•
electrical power, use a surge suppressor, line conditioner, or uninterruptible power
supply (UPS).
Position system cables, power adapter cables, and PoE Ethernet cables carefully.
•
Route cables so that they cannot be stepped on or tripped over. Be sure that nothing
rests on any cables.
Do not modify power adapters, power adapter cables, or plugs. Consult a licensed
•
electrician or your power company for site modifications.
Always follow your local and national wiring rules.
•
User Manual10Introduction

2
Hardware Overview Model WAX214
The NETGEAR WiFi 6 AX1800 Dual Band PoE Access Point Model WAX214 is an indoor,
standalone access point.
The access point provides 802.11ax high-performance WiFi connectivity for a small
office/home office and supports dual-band concurrent WiFi 6 operations at 2.4 GHz
and 5 GHz with a combined throughput of 1.8 Gbps (about 600 Mbps at 2.4 GHz and
1200 Mbps at 5 GHz).
A single Gigabit PoE LAN port lets you connect the access point to a PoE (802.3af)
switch. If you use a regular switch, the access point requires a power adapter, which is
supplied for model WAX214PA. (For model WAX214, a power adapter is an option that
you can purchase.)
The chapter contains the following sections:
• Unpack model WAX214
• Top panel with LEDs for model WAX214
• Hardware interfaces model WAX214
• Label model WAX214
11
NETGEAR WiFi 6 AX1800/AX3600 Dual Band PoE/PoE+ Access Points, WAX214 and WAX218
Unpack model WAX214
The package contains the following items:
WAX214 access point
•
Mounting bracket with screw holes for mounting to a solid ceiling or 15/16 in.
•
(23.8 mm) T-bar
Two screws and anchors for ceiling mounting or wall-mounting
•
Installation guide
•
Note: You power up the access point by connecting it to a PoE switch. Depending on
the product ordered, the package might also include a power adapter. If you ordered
a package without a power adapter, you can still order a power adapter as an option.
For information about the mounting options, see Mount Model WAX214 to a Wall or
Ceiling on page 141.
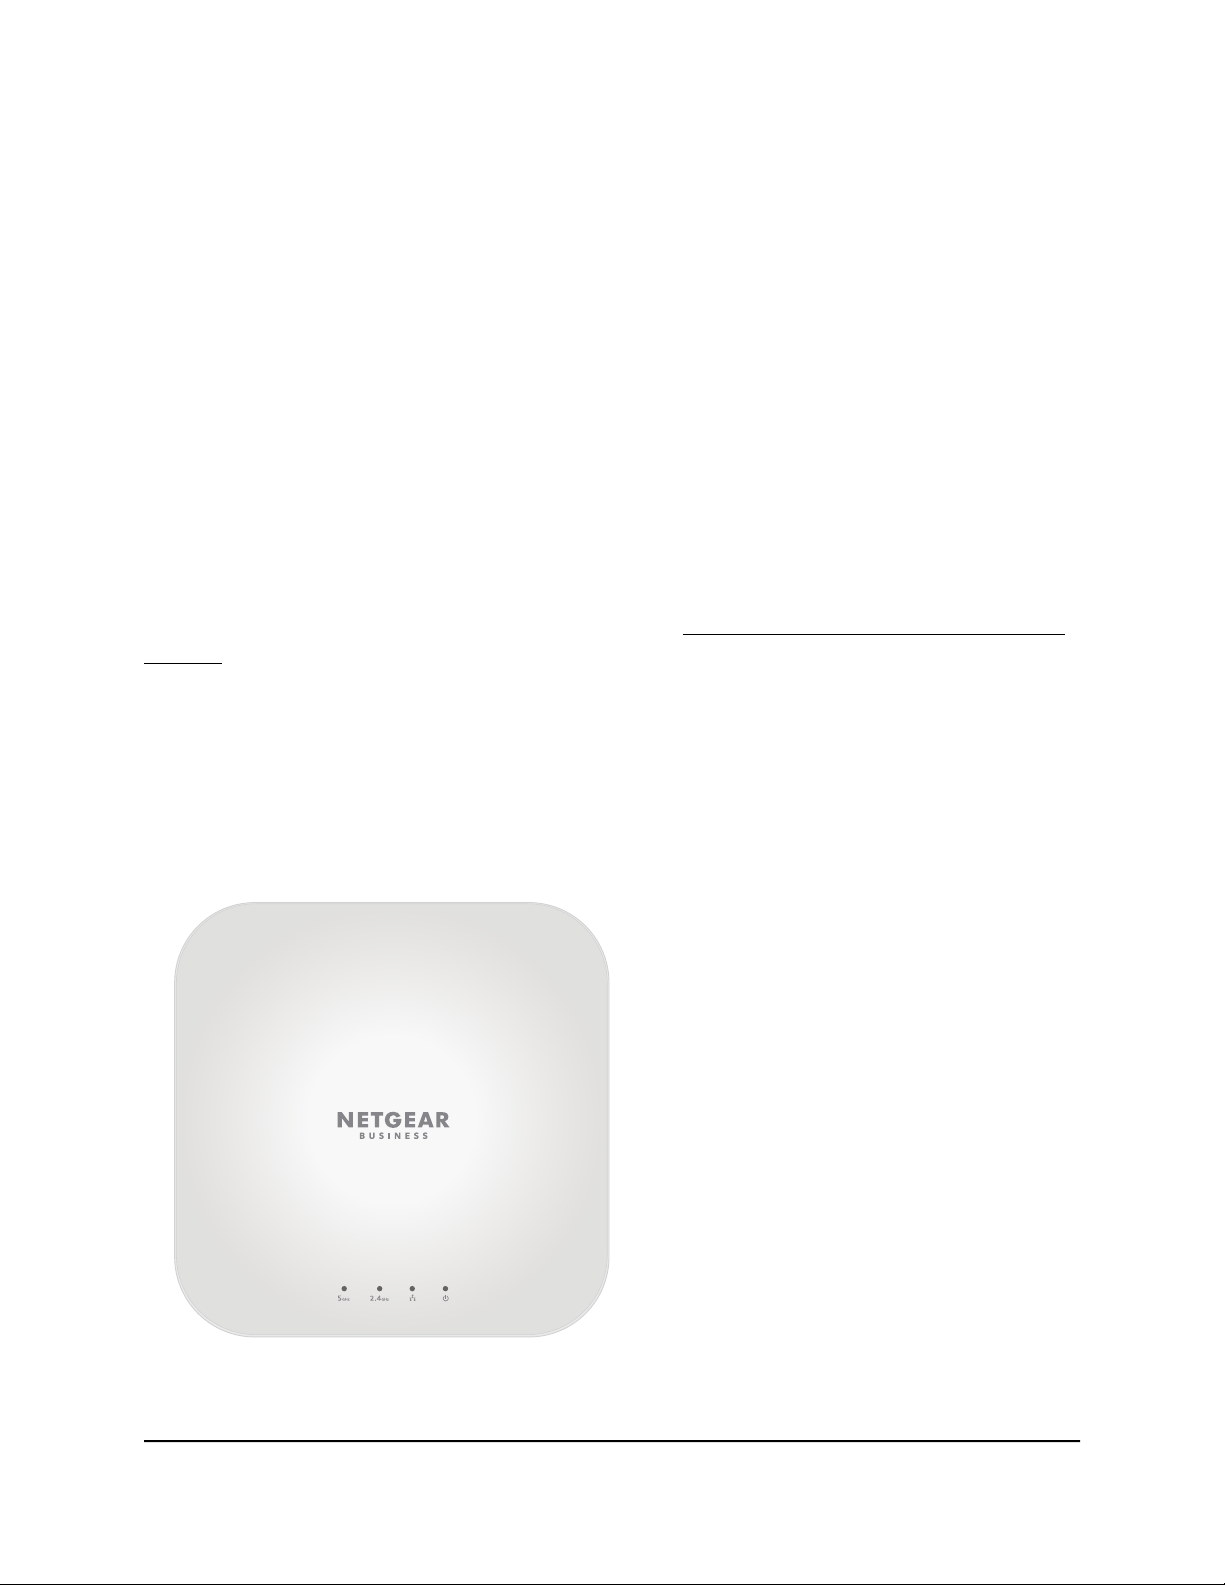
Top panel with LEDs for model WAX214
The LEDs that provide the status of the access point are located on the top panel of the
access point.
Figure 1. Top panel with LEDs for model WAX214
WAX214
User Manual12Hardware Overview Model
NETGEAR WiFi 6 AX1800/AX3600 Dual Band PoE/PoE+ Access Points, WAX214 and WAX218
Table 2. LED descriptions model WAX214
DescriptionLED Icon
Solid blue: The 5 GHz radio is operating without clients.5 GHz WLAN LED
Blinking blue: The 5 GHz radio is transmitting or receiving data.
Off: The 5 GHz WiFi radio is off.
Solid blue: The 2.4 GHz radio is operating without clients.2.4 GHz WLAN LED
Blinking blue: The 2.4 GHz radio is transmitting or receiving data.
Off: The 2.4 GHz WiFi radio is off.
Solid blue: The LAN/PoE port detects a link with a powered-on device.LAN LED
Blinking blue: The LAN/PoE port is transmitting or receiving data.
Off: Either no powered-on Ethernet device is connected to the
LAN/PoE port, or, if a powered-on Ethernet device is connected, no
Ethernet link is detected.
Solid amber: The access point is powered on.Power LED
Off: No power is supplied to the access point.
Note: For information about troubleshooting with the LEDs, see Troubleshoot with the
LEDs on page 126.
Hardware interfaces model WAX214
The bottom panel of the access point has a LAN/PoE port, Reset button, and DC power
connector for an optional power adapter.
WAX214
User Manual13Hardware Overview Model
NETGEAR WiFi 6 AX1800/AX3600 Dual Band PoE/PoE+ Access Points, WAX214 and WAX218
Figure 2. Hardware interfaces of model WAX214
The bottom panel contains the following components:
Reset button. You can use the Reset button to restart the access point or to reset
•
the access point to its factory default settings. To restart the access point, press the
Reset button for about two seconds. Pressing the Reset for 10 seconds or longer
resets the access point to factory default settings.
LAN/PoE port. You can use the LAN/PoE Gigabit Ethernet RJ-45 port to connect
•
the access point to a PoE switch, or if you use a power adapter, to a non-PoE switch.
The LAN/PoE port supports Ethernet speeds up to 1 Gbps.
DC power connector. If you do not use a PoE switch to provide power to the access
•
point, connect an optional power adapter to the DC power connector.
Note: The back panel provides a Kensington lock slot for an optional security cable.
WAX214
User Manual14Hardware Overview Model

NETGEAR WiFi 6 AX1800/AX3600 Dual Band PoE/PoE+ Access Points, WAX214 and WAX218
Label model WAX214
The access point label shows the serial number, MAC address, default WiFi network
name (SSID) for the 2.4 GHz management SSID, and network key (WiFi password) for
the management SSID. The management SSID provides access to the local browser
interface (UI) only. That is, the management SSID is not intended for general WiFi clients
access.
Figure 3. Product label model WAX214
WAX214
User Manual15Hardware Overview Model

3
Hardware Overview Model WAX218
The NETGEAR WiFi 6 AX3600 Dual Band PoE Access Point Model WAX218 is an indoor,
standalone access point.
The access point provides 802.11ax high-performance WiFi connectivity for a small
office/home office and supports dual-band concurrent WiFi 6 operations at 2.4 GHz
and 5 GHz with a combined throughput of 3.6 Gbps (about 1200 Mbps at 2.4 GHz and
2400 Mbps at 5 GHz).
A single 2.5 Gbps PoE LAN port lets you connect the access point to a PoE+ (802.3at)
switch. If you use a regular switch, the access point requires a power adapter, which is
supplied for model WAX218PA. (For model WAX218, a power adapter is an option that
you can purchase.)
The chapter contains the following sections:
• Unpack model WAX218
• Top panel with LEDs for model WAX218
• Hardware interfaces model WAX218
• Label model WAX218
16

NETGEAR WiFi 6 AX1800/AX3600 Dual Band PoE/PoE+ Access Points, WAX214 and WAX218
Unpack model WAX218
The package contains the following items:
WAX218 access point
•
Mounting bracket with screw holes for mounting to a solid ceiling or 15/16 in.
•
(23.8 mm) T-bar
Two screws and anchors for ceiling mounting or wall-mounting
•
Installation guide
•
Note: You power up the access point by connecting it to a PoE+ switch. Depending
on the product ordered, the package might also include a power adapter. If you ordered
a package without a power adapter, you can still order a power adapter as an option.
For information about the mounting options, see Mount Model WAX218 to a Wall or
Ceiling on page 147.
Top panel with LEDs for model WAX218
The LEDs that provide the status of the access point are located on the top panel of the
access point.
Figure 4. Top panel with LEDs for model WAX218
WAX218
User Manual17Hardware Overview Model
NETGEAR WiFi 6 AX1800/AX3600 Dual Band PoE/PoE+ Access Points, WAX214 and WAX218
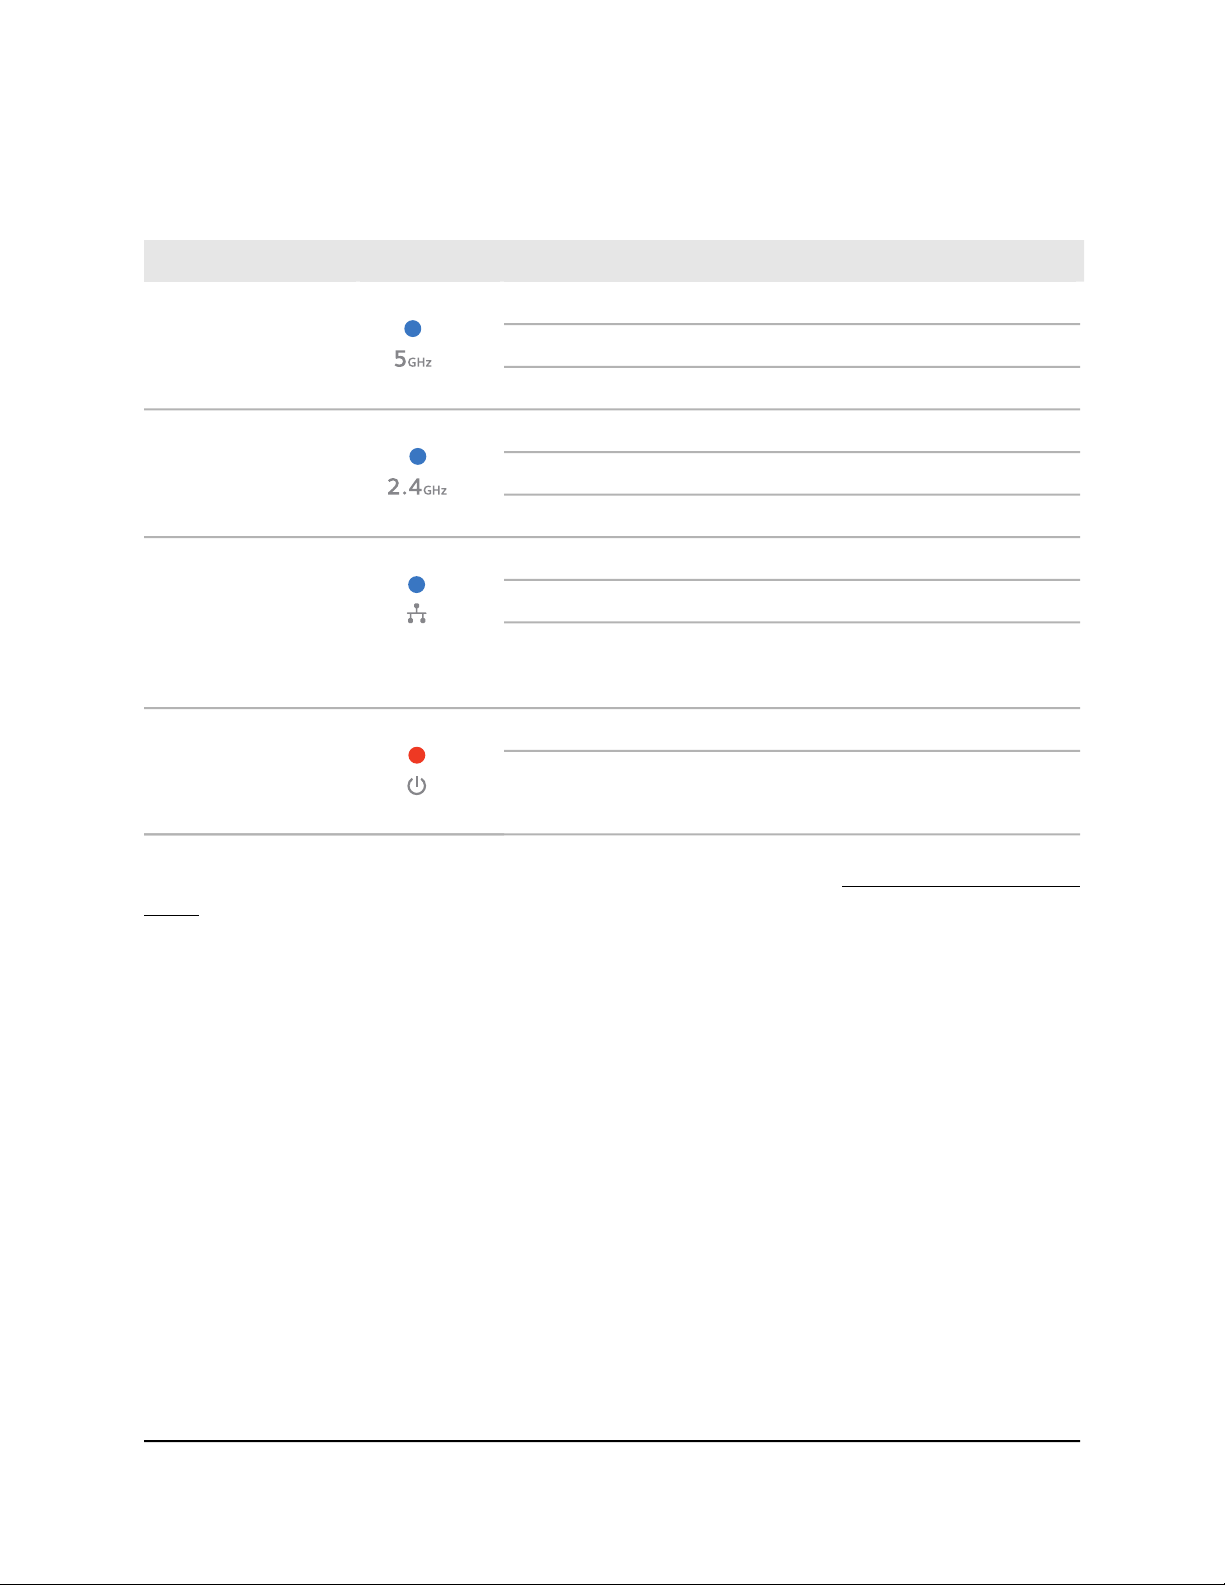
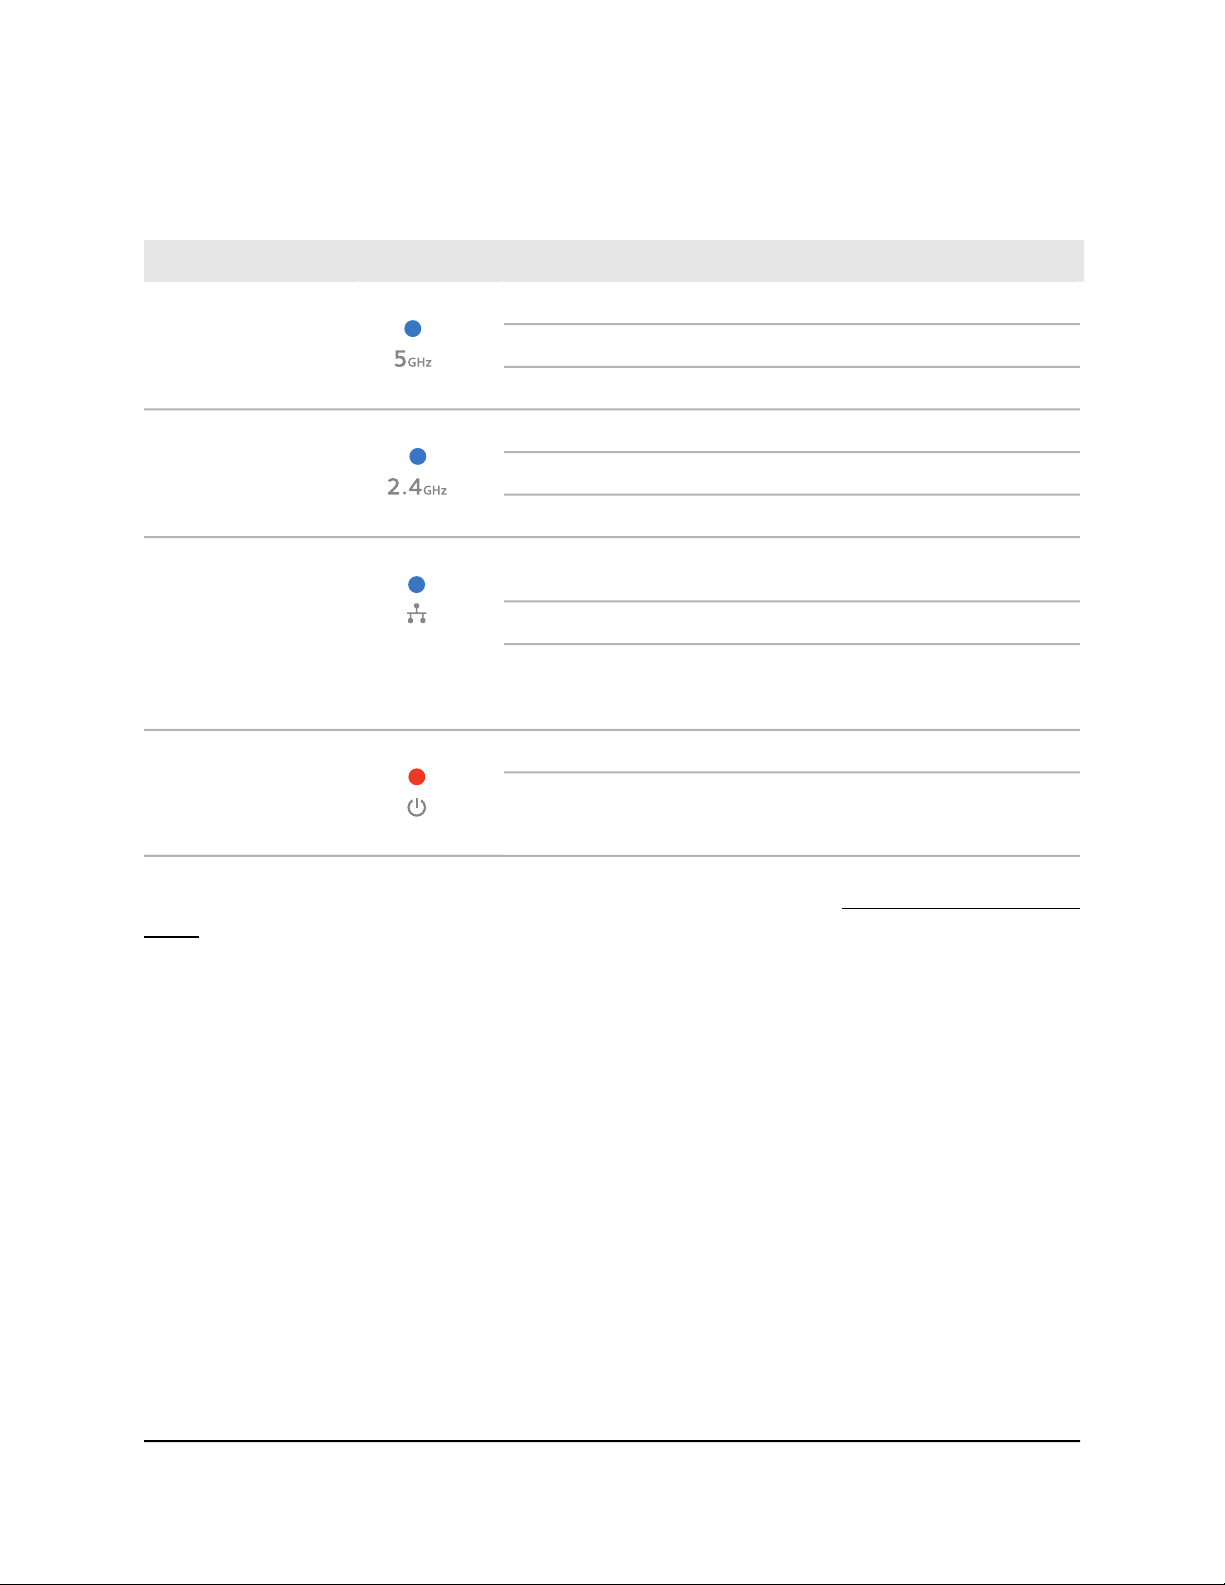
Table 3. LED descriptions model WAX218
DescriptionLED Icon
Solid blue: The 5 GHz radio is operating without clients.5 GHz WLAN LED
Blinking blue: The 5 GHz radio is transmitting or receiving data.
Off: The 5 GHz WiFi radio is off.
Solid blue: The 2.4 GHz radio is operating without clients.2.4 GHz WLAN LED
Blinking blue: The 2.4 GHz radio is transmitting or receiving data.
Off: The 2.4 GHz WiFi radio is off.
LAN LED
Solid blue: The LAN/PoE+ port detects a link with a powered-on
device.
Blinking blue: The LAN/PoE+ port is transmitting or receiving data.
Off: Either no powered-on Ethernet device is connected to the
LAN/PoE+ port, or, if a powered-on Ethernet device is connected, no
Ethernet link is detected.
Solid amber: The access point is powered on.Power LED
Off: No power is supplied to the access point.
Note: For information about troubleshooting with the LEDs, see Troubleshoot with the
LEDs on page 126.
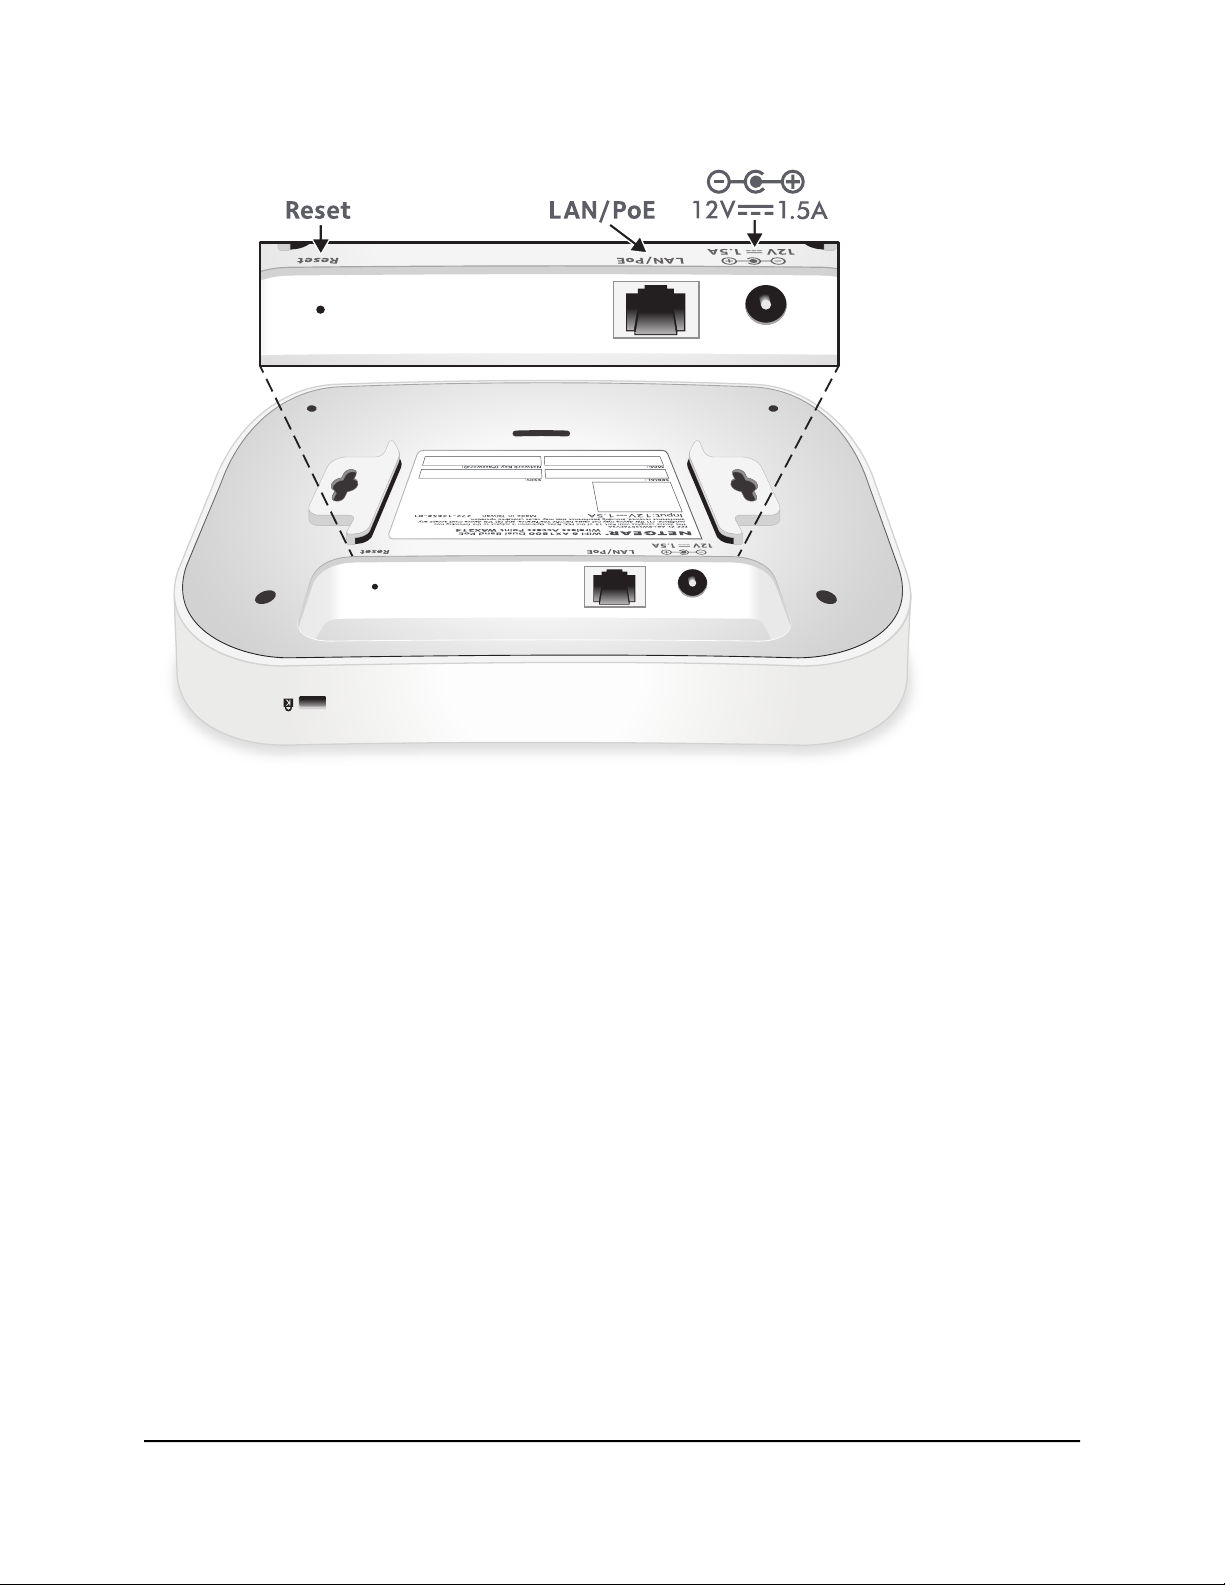
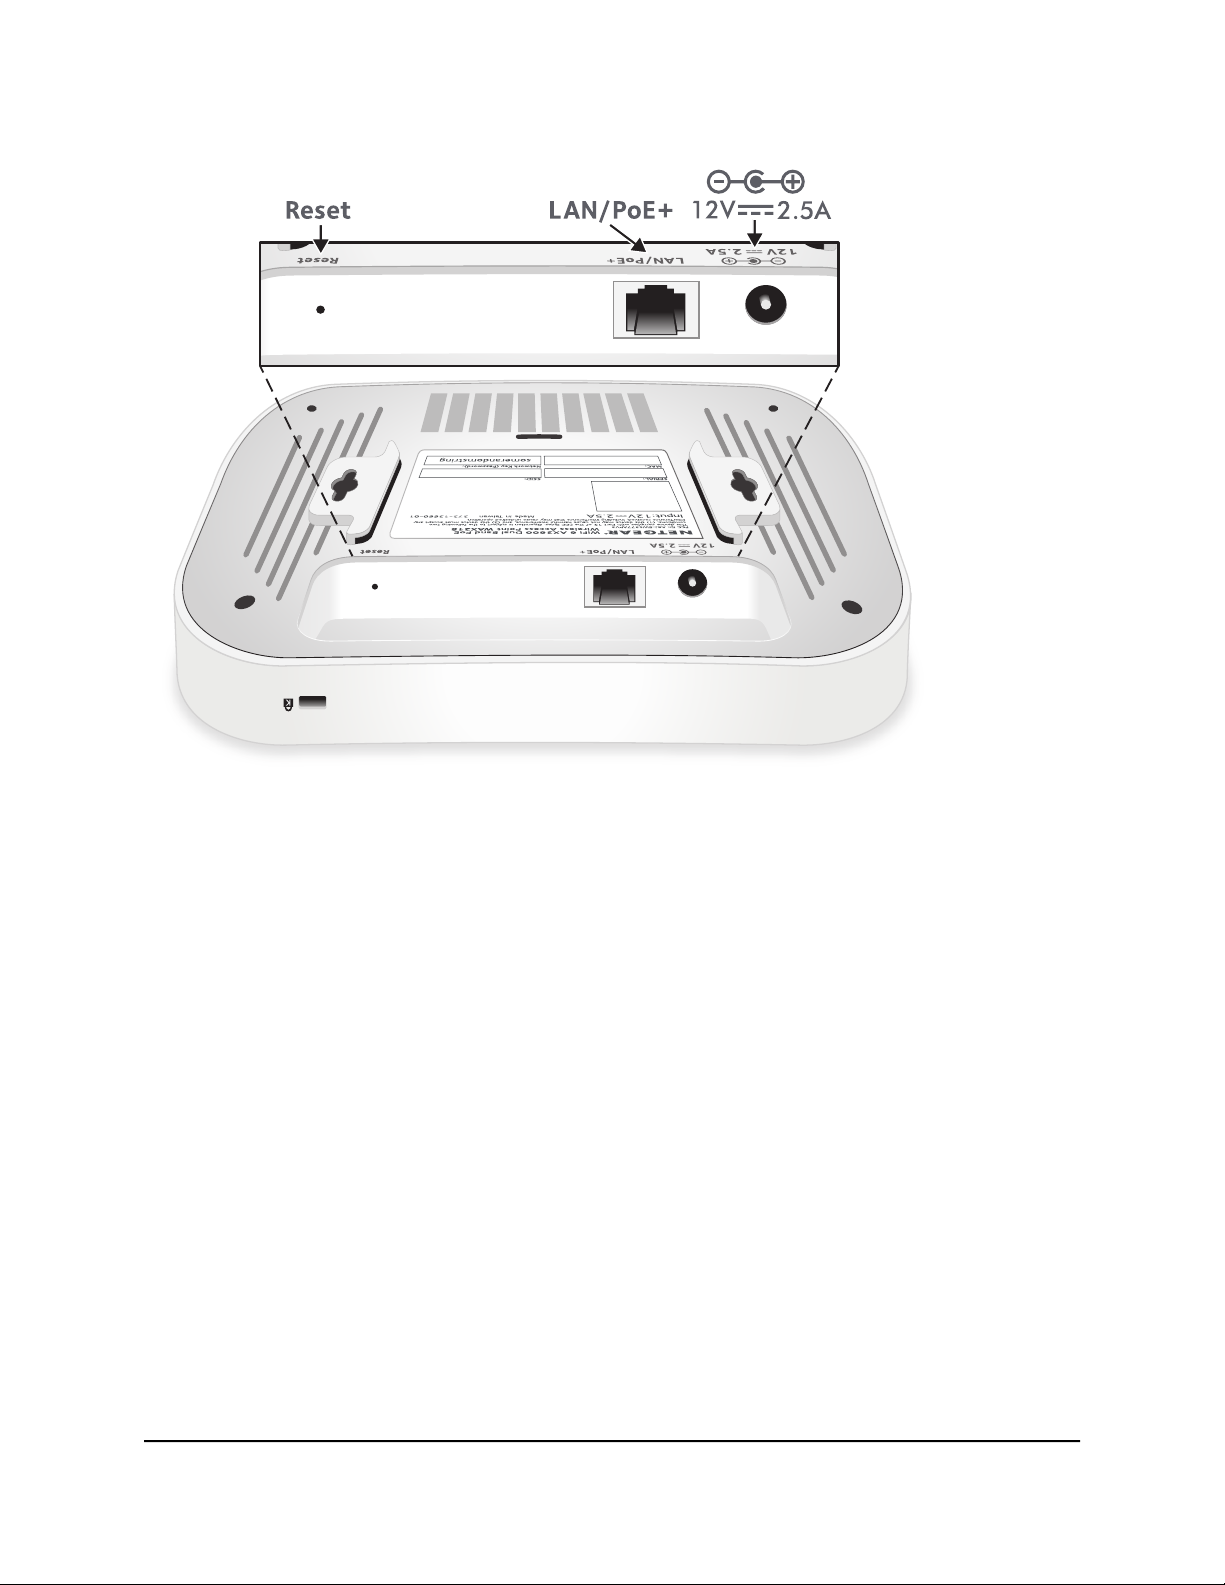
Hardware interfaces model WAX218
The bottom panel of the access point has a LAN/PoE+ port, Reset button, and DC power
connector for an optional power adapter.
WAX218
User Manual18Hardware Overview Model
NETGEAR WiFi 6 AX1800/AX3600 Dual Band PoE/PoE+ Access Points, WAX214 and WAX218
Figure 5. Hardware interfaces of model WAX218
The bottom panel contains the following components:
Reset button. You can use the Reset button to restart the access point or to reset
•
the access point to its factory default settings. To restart the access point, press the
Reset button for about two seconds. Pressing the Reset for 10 seconds or longer
resets the access point to factory default settings.
LAN/PoE+ port. You can use the LAN/PoE+ Gigabit Ethernet RJ-45 port to connect
•
the access point to a PoE+ switch, or if you use a power adapter, to a non-PoE switch.
The LAN/PoE+ port supports Ethernet speeds up to 2.5 Gbps.
Note: If you do not use a power adapter, use a PoE+ (803.2.at) switch. If you use a
PoE (803.2.af) switch, the access point might not receive sufficient power for normal
operation.
DC power connector. If you do not use a PoE+ switch to provide power to the access
•
point, connect an optional power adapter to the DC power connector.
Note: The back panel provides a Kensington lock slot for an optional security cable.
WAX218
User Manual19Hardware Overview Model
NETGEAR WiFi 6 AX1800/AX3600 Dual Band PoE/PoE+ Access Points, WAX214 and WAX218
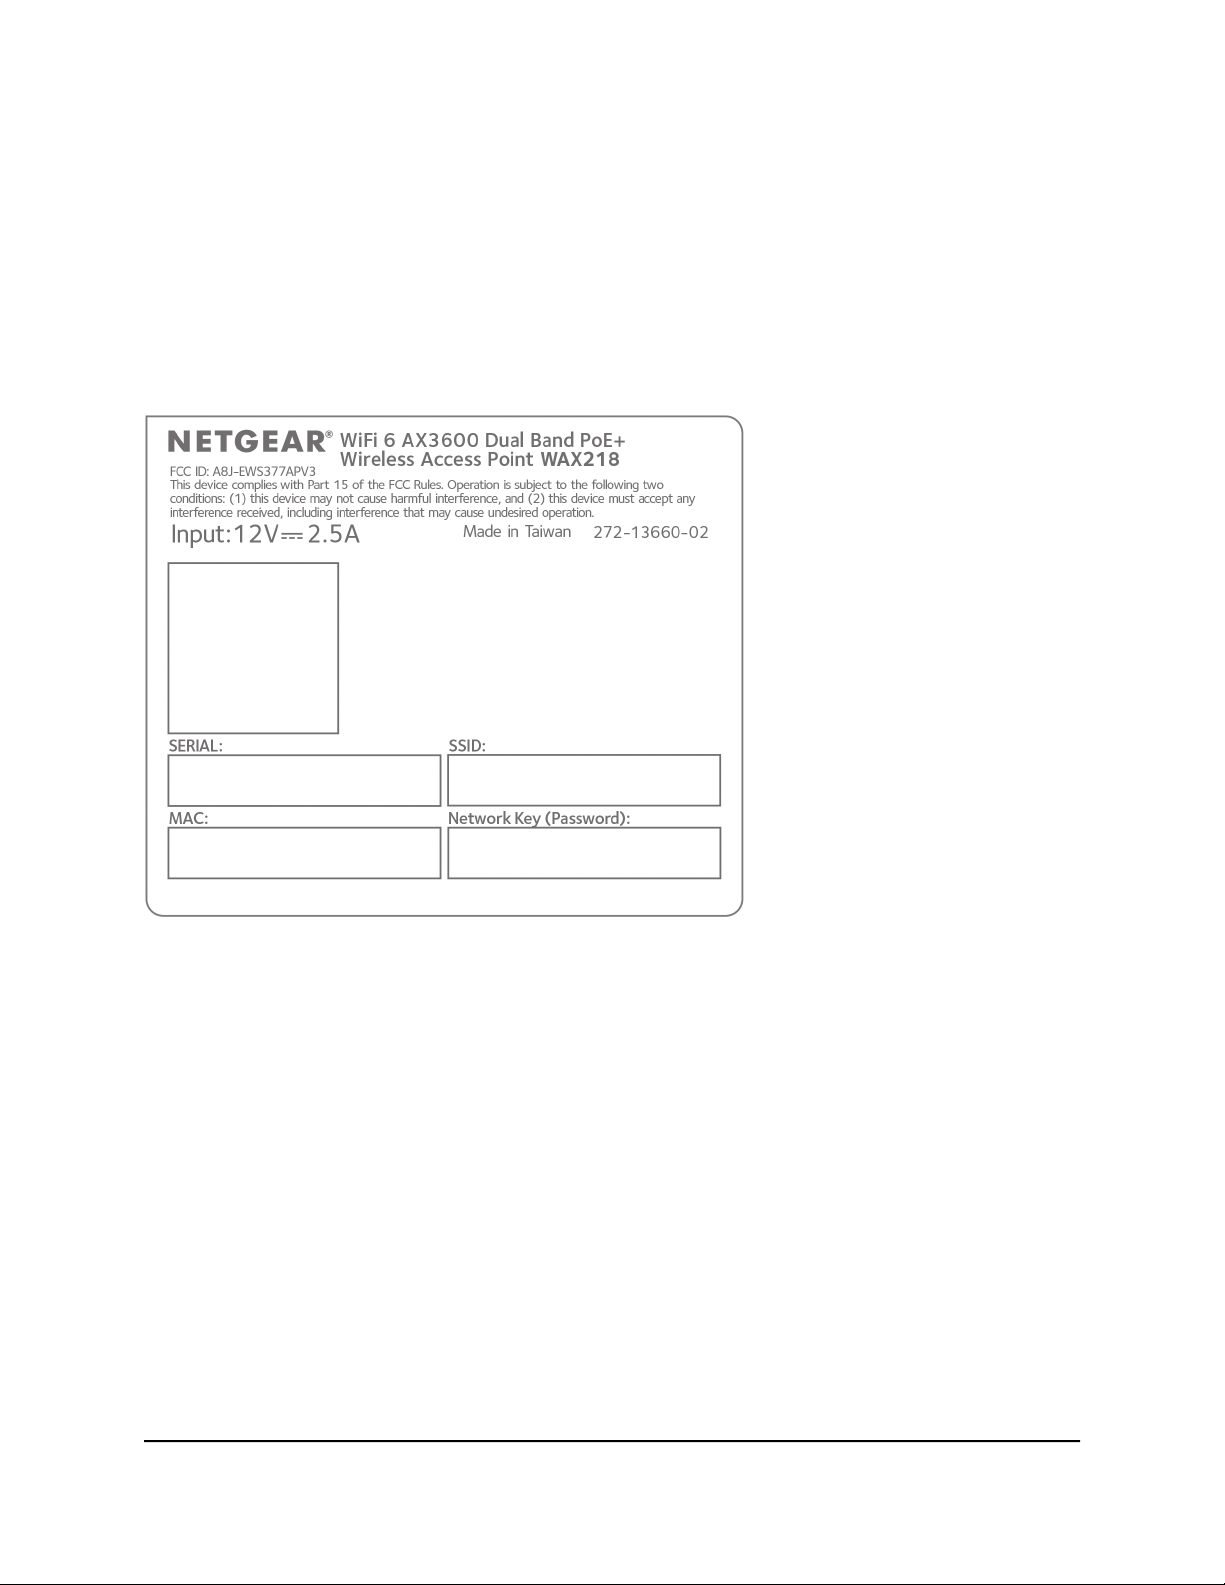
Label model WAX218
The access point label shows the serial number, MAC address, default WiFi network
name (SSID) for the 2.4 GHz management SSID, and network key (WiFi password) for
the management SSID. The management SSID provides access to the local browser
interface (UI) only. That is, the management SSID is not intended for general WiFi clients
access.
Figure 6. Product label model WAX218
WAX218
User Manual20Hardware Overview Model

4
Installation and Initial Log-in
This chapter describes how you can install and access the access point in your network
and go through the initial log-in process.
Note: When you log in to the access point, you connect to the local browser UI.
The chapter contains the following sections:
• Set up the access point in your network
• Initial log-in process
• When to use aplogin.net and when to use the assigned IP address
• Find the IP address of the access point
• Find the IP address of the access point with the NETGEAR Insight mobile app
• Log in to the access point after you complete the initial log-in process
• Change the language
• Join a WiFi network on the access point
21
NETGEAR WiFi 6 AX1800/AX3600 Dual Band PoE/PoE+ Access Points, WAX214 and WAX218
Set up the access point in your network
The access point is intended to function as a WiFi access point in your existing network.
The following sections describe how you can set up the access point in your network:
• Set up the access point with a PoE or PoE+ network connection
• Set up the access point with a non-PoE network connection
To set up your access point, follow the procedure in one of these sections.
Set up the access point with a PoE or PoE+ network connection
You can connect the access point to a Power over Ethernet (PoE) switch in your network.
The type of PoE switch depends on the access point model (see below). The switch
must be connected to a network router that is connected to the Internet. If you use a
PoE connection, the access point does not require a power adapter.
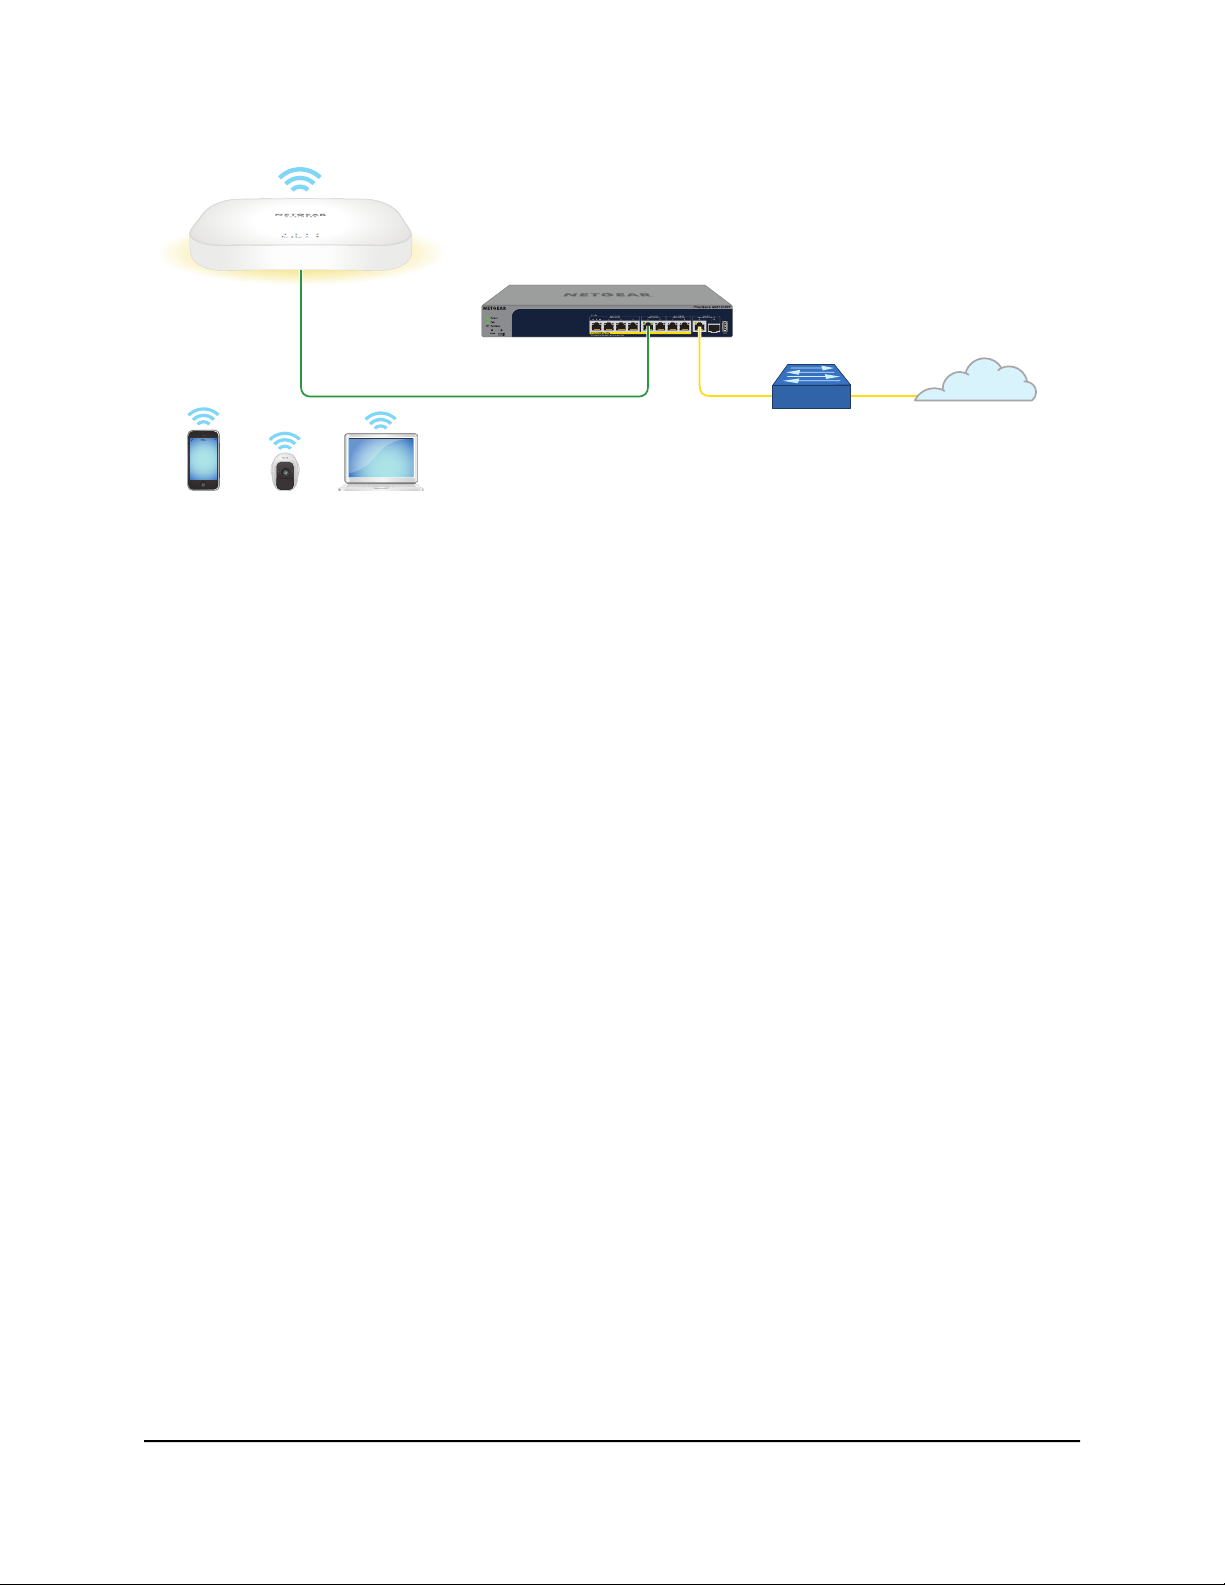
Figure 7. Set up model WAX214 with a PoE connection to your network
Note: The LAN/PoE port on model WAX214 supports Ethernet speeds up to 1 Gbps.
Most switches support speeds of up to 1 Gbps.
User Manual22Installation and Initial Log-in
NETGEAR WiFi 6 AX1800/AX3600 Dual Band PoE/PoE+ Access Points, WAX214 and WAX218
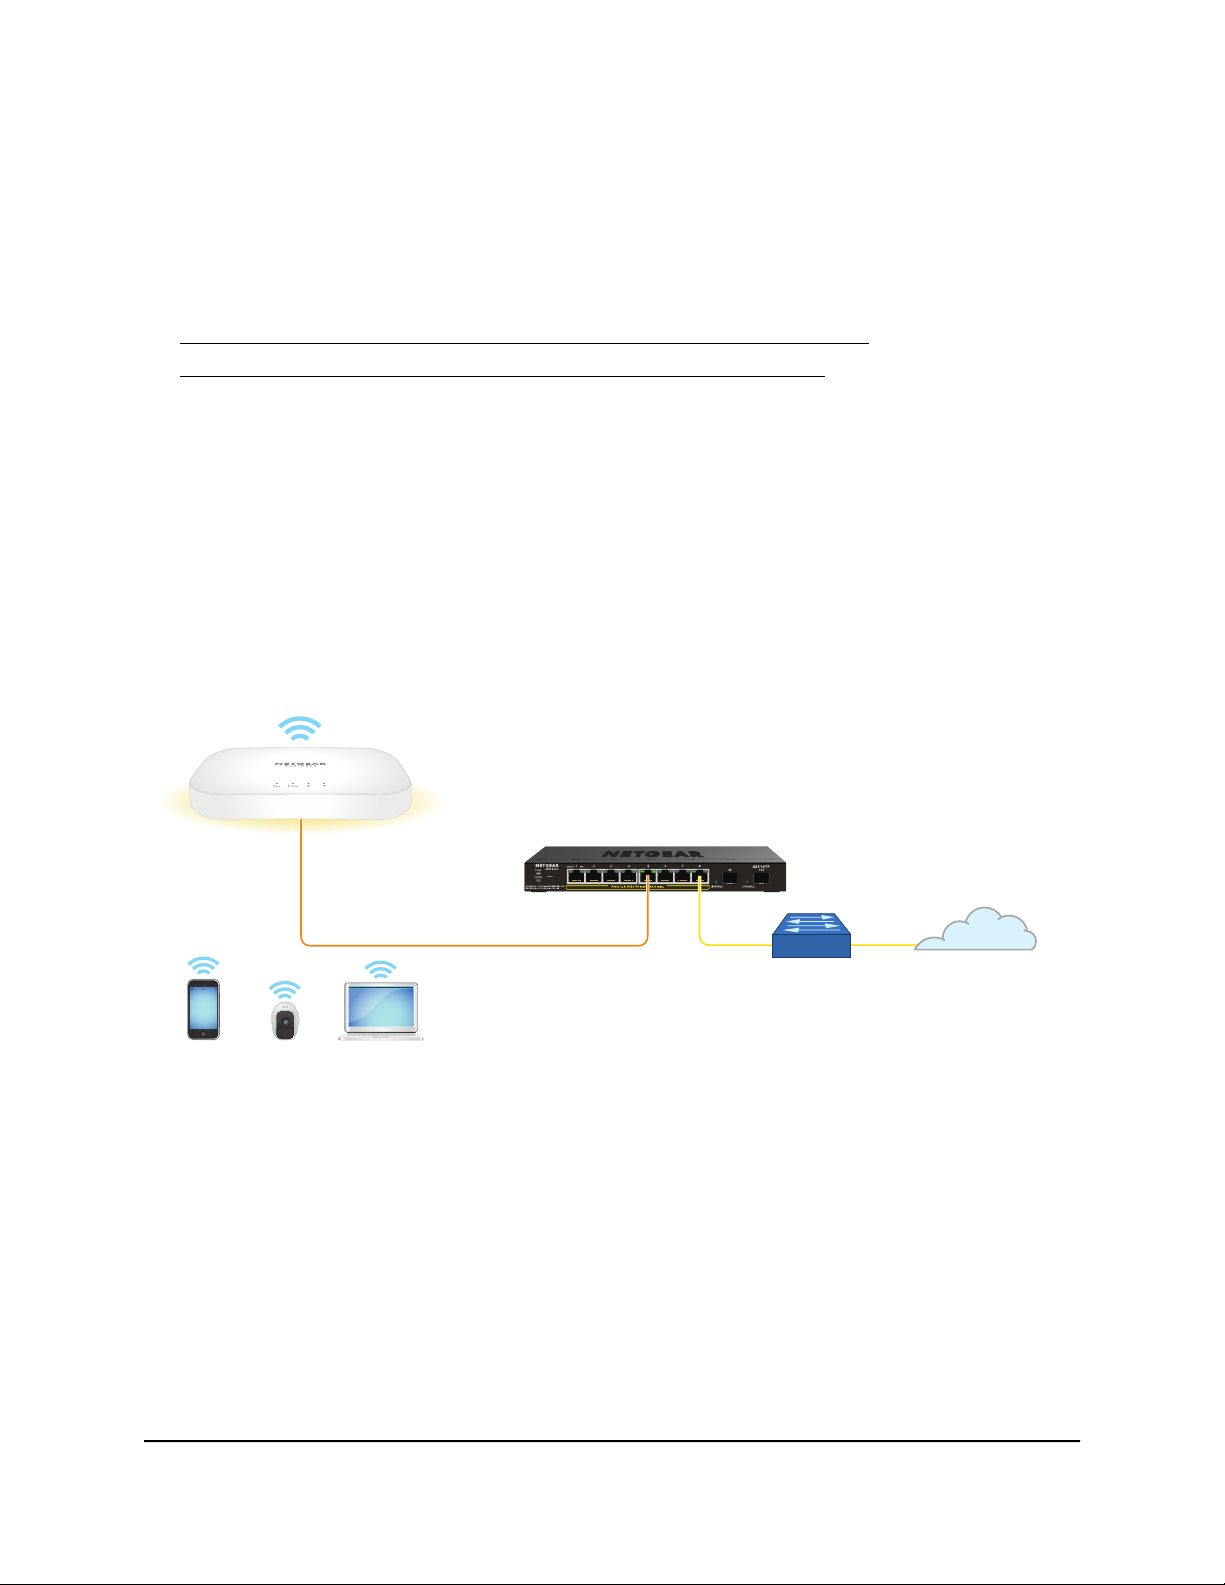
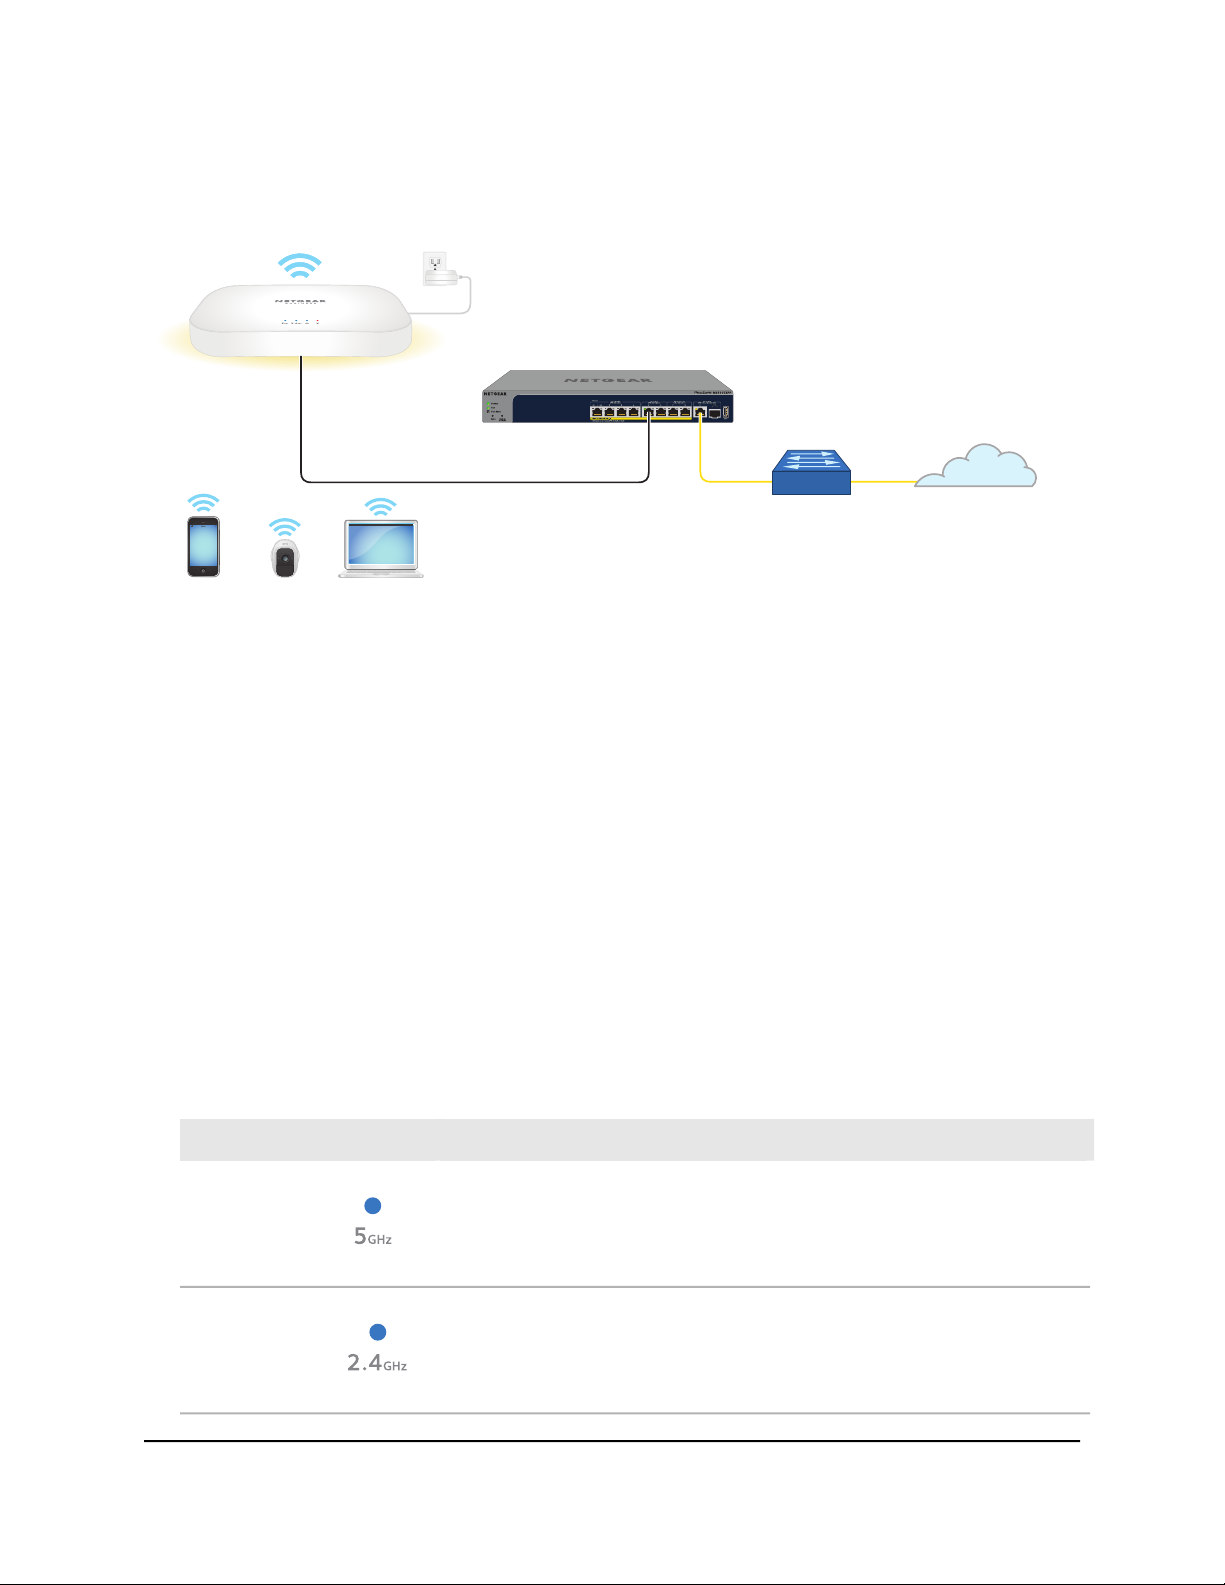
Figure 8. Set up model WAX218 with a PoE+ connection to your network
Note: The LAN/PoE+ port on model WAX218 supports Ethernet speeds up to 2.5 Gbps.
The previous figure shows a NETGEAR MS510TXPP switch, which supports speeds of
2.5 Gbps and higher. However, if your Internet connection, modem, and switch support
a speed of 1 Gbps (which is a common speed), the access point LAN connection functions
at 1 Gbps.
To set up the access point with a PoE or PoE+ connection to your network:
1. Connect an Ethernet cable to the LAN/PoE (model WAX214) or LAN/PoE+ (model
WAX218) port on the access point.
2.
Connect the other end of the Ethernet cable to switch that is connected to your
network and to the Internet.
Model WAX214: Connect the cable to a PoE port on a PoE (802.3af) switch. You
•
can also use a PoE+ (802.3at) switch.
Model WAX218: Connect the cable to a PoE+ port on a PoE+ (802.3at) switch.
•
We recommend that you do not use a PoE (803.2.af) switch because the provided
power might be insufficient for this model.
3. Check to see that the LEDs light.
User Manual23Installation and Initial Log-in
NETGEAR WiFi 6 AX1800/AX3600 Dual Band PoE/PoE+ Access Points, WAX214 and WAX218
DescriptionLED
The 5 GHz WLAN LED lights solid blue or blinks blue.5 GHz WLAN
The 2.4 GHz WLAN LED lights solid blue or blinks blue.2.4 GHz WLAN
The LAN LED lights solid blue or blinks blue.LAN
The Power LED lights solid amber.Power
You can now access the access point for initial configuration (see Initial log-in process
on page 26).
Set up the access point with a non-PoE network connection
You can connect the access point to a regular switch, that is, a non–Power over Ethernet
switch in your network. The switch must be connected to a network router that is
connected to the Internet. If you use a regular switch, the access point requires a power
adapter, which is supplied for model WAX214PA and model WAX218PA. (For model
WAX214 and model WAX218, a power adapter is an option that you can purchase.)
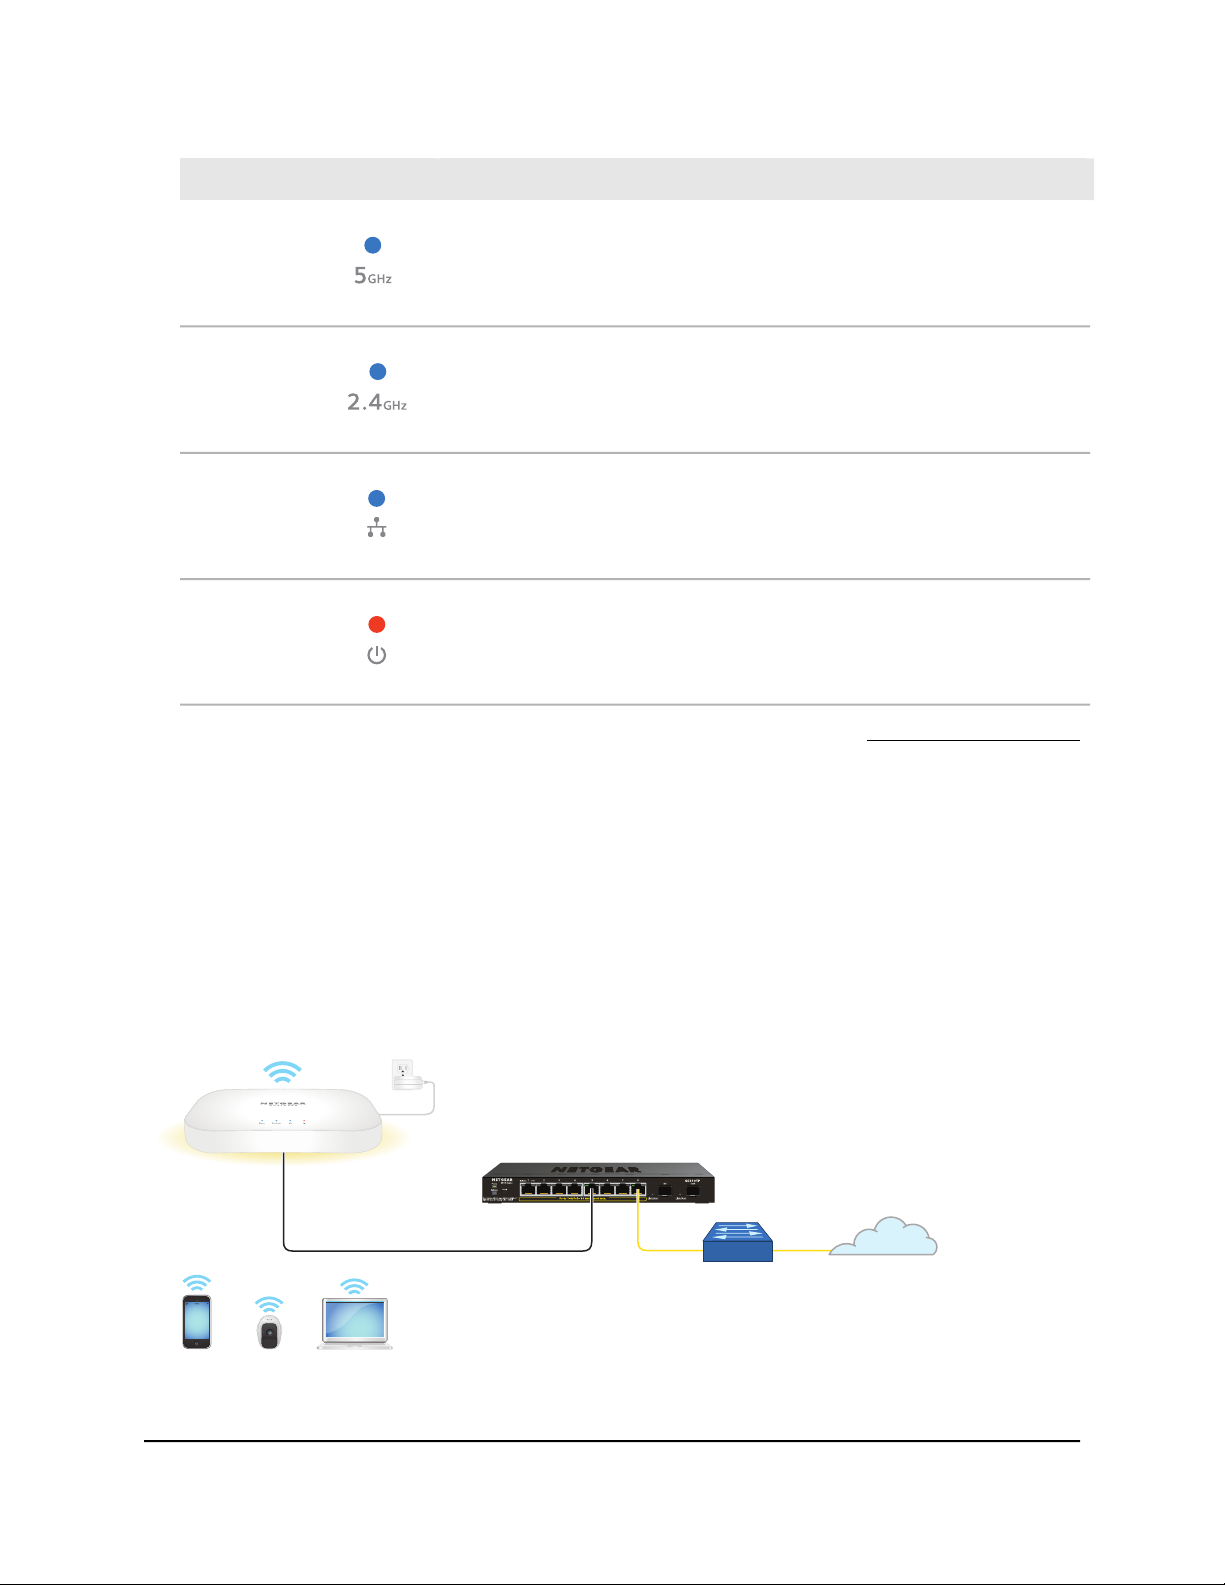
Figure 9. Set up model WAX214 with a non-PoE connection to your network
User Manual24Installation and Initial Log-in
NETGEAR WiFi 6 AX1800/AX3600 Dual Band PoE/PoE+ Access Points, WAX214 and WAX218
Note: The LAN/PoE port on model WAX214 supports Ethernet speeds up to 1 Gbps.
Most switches support speeds of up to 1 Gbps.
Figure 10. Set up model WAX218 with a non-PoE connection to your network
Note: The LAN/PoE+ port on model WAX218 supports Ethernet speeds up to 2.5 Gbps.
The previous figure shows a NETGEAR MS510TXPP switch, which supports speeds of
2.5 Gbps and higher. However, if your Internet connection, modem, and switch support
a speed of 1 Gbps (which is a common speed), the access point LAN connection functions
at 1 Gbps.
To set up the access point with a non-PoE connection to your network:
1. Connect an Ethernet cable to the LAN/PoE (model WAX214) or LAN/PoE+ (model
WAX218) port on the access point.
2.
Connect the other end of the Ethernet cable to a switch that is connected to your
network and to the Internet.
3. Connect the power adapter to the access point and plug it into an electrical outlet.
4. Check to see that the LEDs light.
DescriptionLED
The 5 GHz WLAN LED lights solid blue or blinks blue.5 GHz WLAN
The 2.4 GHz WLAN LED lights solid blue or blinks blue.2.4 GHz WLAN
User Manual25Installation and Initial Log-in

NETGEAR WiFi 6 AX1800/AX3600 Dual Band PoE/PoE+ Access Points, WAX214 and WAX218
(Continued)
DescriptionLED
The LAN LED lights solid blue or blinks blue.LAN
The Power LED lights solid amber.Power
You can now access the access point for initial configuration (see Initial log-in process
on page 26).
Initial log-in process
During the initial log-in process, the access point presents its Day Zero page. You must
define a local device password that lets you access the local browser UI access point.
You also must define a new WiFi network name (SSID) and associated WiFi passphrase
(WiFi password).
After you complete the initial-log-in process and attempt to log in to the local browser
UI, the access point no longer presents the Day Zero page but displays the regular login
page that allows you to enter your local device password.
For more information about the initial log-in process, see one of the following sections:
Connect directly to the access point over WiFi and log in for the first time on page
•
26
Connect to the access point over the LAN and log in for the first time on page 29
•
Connect directly to the access point over WiFi and log in for the first time
This section describes how to connect a WiFi-enabled computer or mobile device over
the 2.4 GHz management SSID to the access point for the first time and complete the
initial configuration.
User Manual26Installation and Initial Log-in
NETGEAR WiFi 6 AX1800/AX3600 Dual Band PoE/PoE+ Access Points, WAX214 and WAX218
Figure 11. Connect directly to the access point over WiFi
The previous figure shows the access point (in this example, model WAX214) connected
to a switch, which is connected to a router and the Internet. WiFi devices are directly
connected to the access point.
To connect directly to the access point over WiFi and log in to the local browser
UI for the first time:
1.
On a WiFi-enabled computer or mobile device, find and connect to the access point’s
management SSID.
The management SSID depends on the model and the MAC address. In the following
examples, XXXXXX represents the last six digits of the MAC address of the LAN
interface of the access point:
WAX214: WAX214XXXXXX-CONFIG-ONLY
•
WAX218: WAX218XXXXXX-CONFIG-ONLY
•
In this manual, we also refer to this management SSID as the “CONFIG-ONLY” SSID.
The default WiFi passphrase for the management SSID, which is a unique WiFi
password, is printed on the access point label.
If you cannot get a WiFi connection to the access point, see You cannot connect
over the 2.4 GHz management SSID on page 130.
2.
Launch a web browser and enter https://www.aplogin.net (which is the same as
https://192.168.0.100) in the address field.
The Day Zero login page displays. This page displays only the first time that you log
in.
IMPORTANT: If your browser does not display the Day Zero login page, see the
following step.
User Manual27Installation and Initial Log-in

NETGEAR WiFi 6 AX1800/AX3600 Dual Band PoE/PoE+ Access Points, WAX214 and WAX218
3.
If your browser displays a security message and does not let you proceed, do one
of the following:
Google Chrome: If Google Chrome displays a Your connection is not private
•
message, click the ADVANCED link. Then, click the Proceed to x.x.x.x (unsafe)
link, in which x.x.x.x represents the IP address of the switch.
Apple Safari: If Apple Safari displays a This connection is not private message,
•
click the Show Details button. Then, click the visit this website link. If a warning
pop-up window displays, click the Visit Website button. If another pop-up window
displays to let you confirm changes to your certificate trust settings, enter your
Mac user name and password and click the Update Setting button.
Mozilla Firefox: If Mozilla Firefox displays a Your connection is not secure
•
message, click the ADVANCED button. Then, click the Add Exception button.
In the pop-up window that displays, click the Confirm Security Exception button.
Microsoft Internet Explorer: If Microsoft Internet Explorer displays a There is a
•
problem with this website’s security certificate message, click the Continue to
this website (not recommended) link.
Microsoft Edge: If Microsoft Edge displays a There is a problem with this website’s
•
security certificate message or a similar warning, select Details > Go on to the
webpage.
4.
On the Day Zero page, configure the following settings:
a.
In the AP Login New Password field, specify a unique local login password, and
confirm the password in the Confirm New Password field.
We recommend that your password meets the following conditions:
Contains 8 to 32 characters
•
Contains no more than two identical characters in a row
•
In addition, we recommend that your password meets at least three of the
following four conditions:
At least one uppercase character
•
At least one lowercase character
•
At least one number
•
At least one special character, such as the following characters:
•
@ # $ % ^ & * ( ) !
b.
In the SSID field, specify a WiFi network name for the main (first) WiFi network.
This SSID does not replace the management SSID (depending on the model,
WAX214XXXXXX-CONFIG-ONLY or WAX218XXXXXX-CONFIG-ONLY), which
User Manual28Installation and Initial Log-in

NETGEAR WiFi 6 AX1800/AX3600 Dual Band PoE/PoE+ Access Points, WAX214 and WAX218
you can continue to use to log in over a WiFi connection to the local browser UI
of the access point.
In addition to the management SSID, the access point supports four WiFi networks.
By default, only the main WiFi network is enabled.
c.
In the Passphrase field, specify a passphrase (WiFi password) for the main WiFi
network.
This passphrase must be a minimum of 8 characters and can be a maximum of
63 characters.
This passphrase does not replace the passphrase for the management SSID,
which you can continue to use to log in over a WiFi connection to the local browser
UI of the access point.
d. Select the check box to accept NETGEAR’s terms and conditions and acknowledge
that you read the privacy notice.
e. Click the Apply button.
Yous settings are saved. The access point restarts. After about two minutes, the
login page displays.
5.
If you are still connected to the management SSID but the login page does not
display, in the address field of your web browser, enter https://www.aplogin.net.
Note: If your browser displays a security message and does not let you proceed,
see Step 3.
6.
In the Local Device Password field, enter your new local device password, and click
the Login button.
The Device Status page displays. You can now configure the access point for your
network and environment.
Connect to the access point over the LAN and log in for the first time
The following procedure assumes that your network includes a DHCP server (or router
that functions as a DHCP server) and that the access point and your computer are on
the same LAN. By default, the access point functions as a DHCP client and receives an
IP address from a DHCP server.
User Manual29Installation and Initial Log-in
NETGEAR WiFi 6 AX1800/AX3600 Dual Band PoE/PoE+ Access Points, WAX214 and WAX218
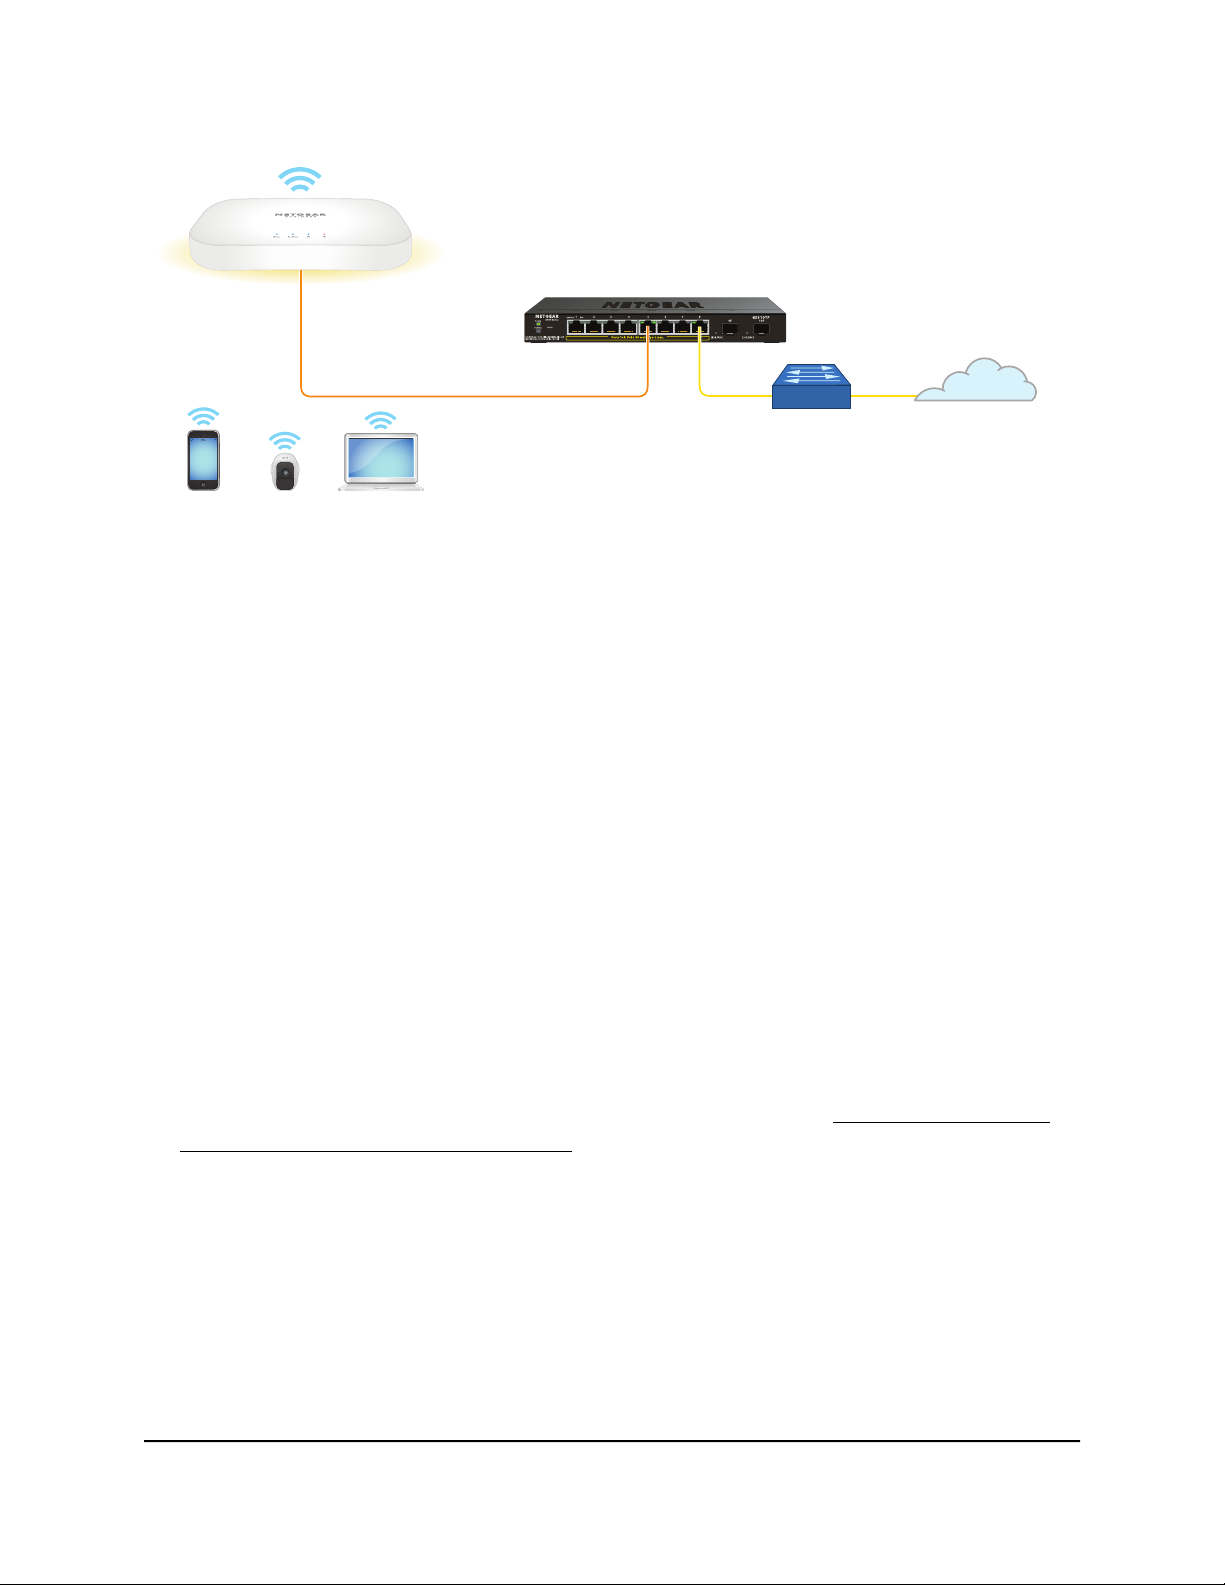
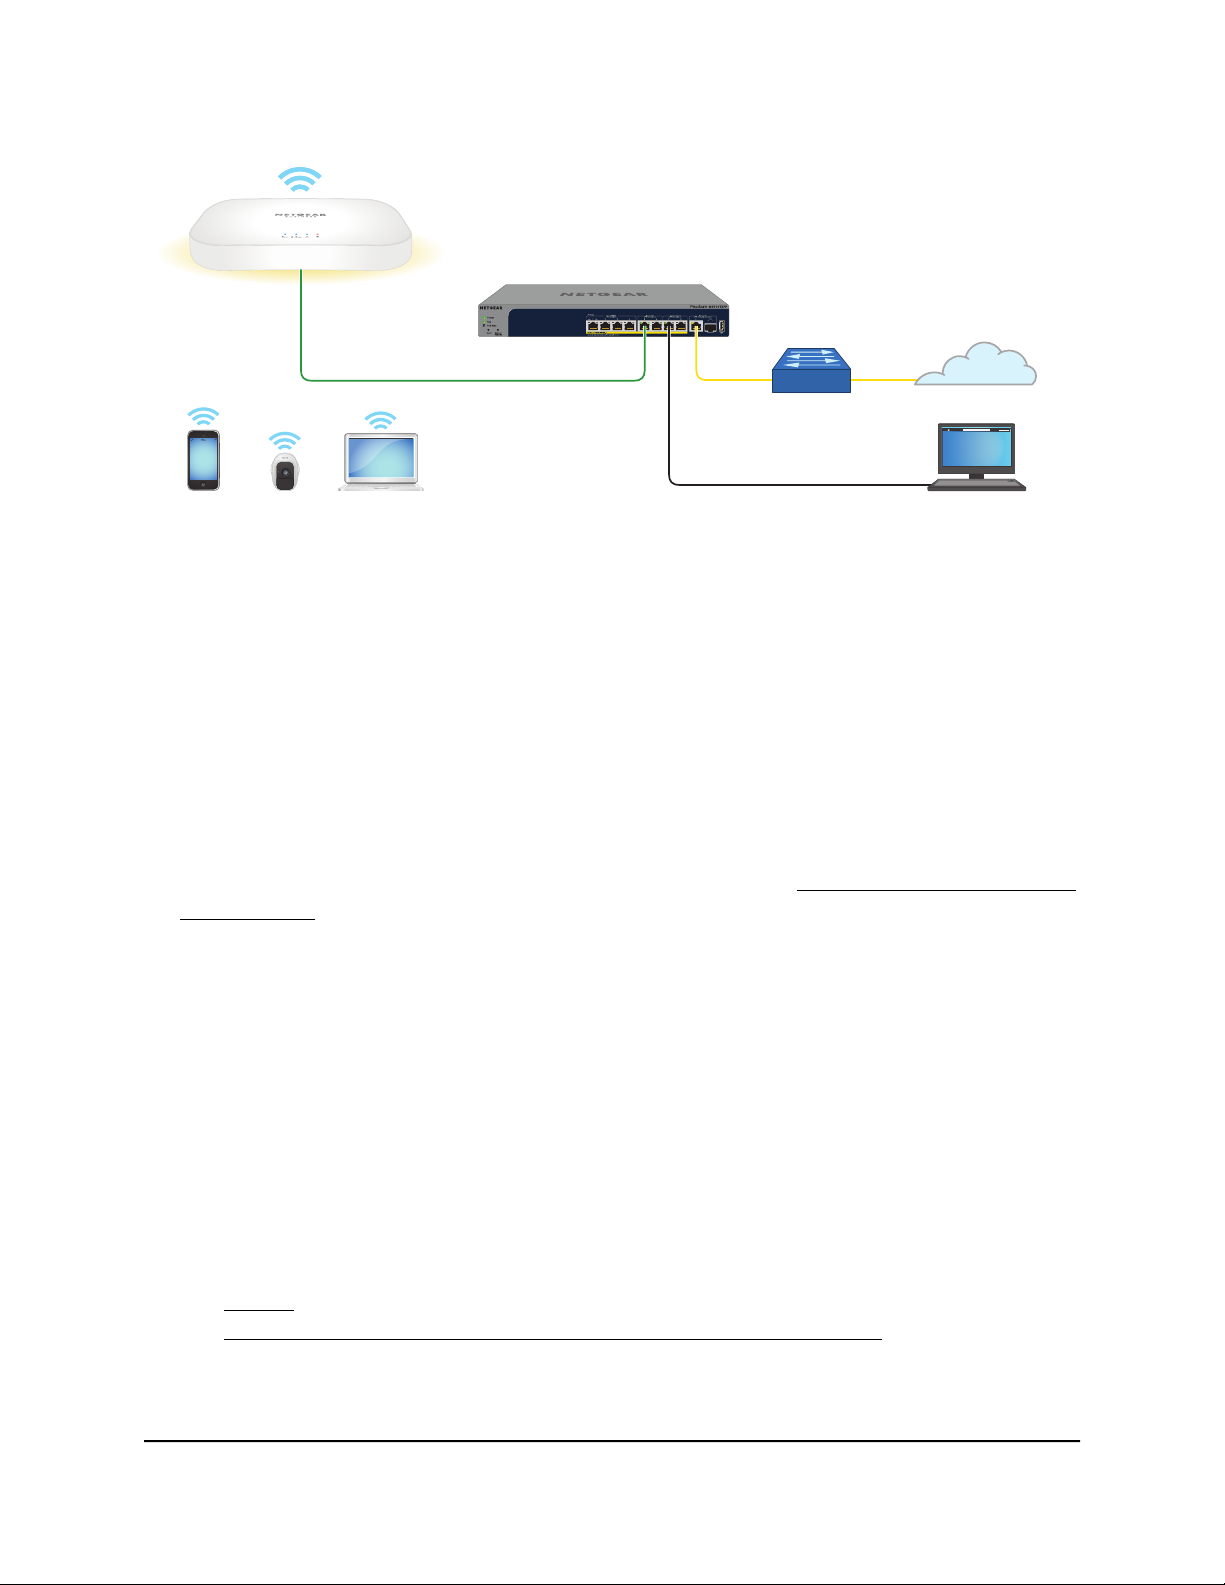
Figure 12. Connect to the access point over the LAN
The previous figure shows the access point (in this example, model WAX218) connected
to a switch, which is connected to a router and the Internet. A computer is connected
to the same switch as the access point. (The computer can connect to the LAN in a
different way, but as long as the computer and the access point are on the same LAN,
the following procedure is applicable.)
To connect to the access point over the LAN and log in for the first time:
1. Using an Ethernet cable, connect an Ethernet port on your computer to a LAN port
on a switch or hub that is connected to your LAN.
2.
If you do not yet know the IP address that is assigned to access point, use one of the
following options, each of which is described in detail in Find the IP address of the
access point on page 33):
Use the automatic device detection of a Windows-based computer.
•
Access your existing router or DHCP server.
•
Use the NETGEAR Insight mobile app.
•
Use a third-party IP scanner.
•
3. Launch a web browser and enter the IP address that is assigned to the access point
in the address field.
The Day Zero login page displays. This page displays only the first time that you log
in.
If your browser does not display the Day Zero login page but a security message,
see Step 4. However, if you cannot get a LAN connection to the access point at all,
see You cannot log in to the access point over a LAN connection on page 132.
User Manual30Installation and Initial Log-in
 Loading...