

8-Port Easy Mount Gigabit Ethernet PoE+ Smart Managed Plus Switch
Model GS408EPP
User Manual
January 2019
202-11693-02
350 East Plumeria Drive
San Jose, CA 95134
USA

8-Port Easy Mount Gigabit Ethernet PoE+ Smart Managed Plus Switch
Support
Thank you for purchasing this NETGEAR product. You can visit https://www.netgear.com/support/ to register your product,
get help, access the latest downloads and user manuals, and join our community. We recommend that you use only official
NET
GEAR support resources
Compliance and Conformity
For regulatory compliance information including the EU Declaration of Conformity, visit
https://www.netgear.com/about/regulatory/.
See the regulatory compliance document before connecting the power supply.
Do not use this device outdoors. If you connect cables or devices that are outdoors to this device, see
http://kb.netgear.com/000057103 f
or safety and warranty information.
Trademarks
© NETGEAR, Inc., NETGEAR, and the NETGEAR Logo are trademarks of NETGEAR, Inc. Any non-NETGEAR trademarks are
used for reference purposes only.
Revision History
Publication Part Number Publish Date Comments
202-11693-02 January 2019 • Updated the product name.
• Removed the resource CD.
• Revised Chapter 1, Getting Started.
• Revised Enable Port Mirroring.
202-11693-01 December 2016 First publication.
2

Contents
Chapter 1 Getting Started
Chapter 2 Manage the Network Settings
Related Documentation . . . . . . . . . . . . . . . . . . . . . . . . . . . . . . . . . . . . . . . . . . . . . . . 6
Configure the Switch . . . . . . . . . . . . . . . . . . . . . . . . . . . . . . . . . . . . . . . . . . . . . . . . . 6
Access the Switch Using a Web Browser . . . . . . . . . . . . . . . . . . . . . . . . . . . . . . . . . 6
Access a Switch Connected to a Network. . . . . . . . . . . . . . . . . . . . . . . . . . . . . . 7
Access a Switch That Is Off-Network . . . . . . . . . . . . . . . . . . . . . . . . . . . . . . . . . 8
Access the Switch With the ProSAFE Plus Configuration Utility . . . . . . . . . . . . . 8
Install the ProSAFE Plus Utility . . . . . . . . . . . . . . . . . . . . . . . . . . . . . . . . . . . . . . . 8
Access the Switch Using the ProSAFE Plus Utility . . . . . . . . . . . . . . . . . . . . . . . 9
Use the NETGEAR Switch Discovery Tool to Access the Switch . . . . . . . . . . . . . 10
Use the NETGEAR Insight Mobile App to Discover the Switch . . . . . . . . . . . . . . 11
Change the Password . . . . . . . . . . . . . . . . . . . . . . . . . . . . . . . . . . . . . . . . . . . . . . . . 12
Register Your Product . . . . . . . . . . . . . . . . . . . . . . . . . . . . . . . . . . . . . . . . . . . . . . . . 13
Specify IP Address Settings for the Switch . . . . . . . . . . . . . . . . . . . . . . . . . . . . . . 15
Use Browser-Based Access to Specify the Switch IP Address. . . . . . . . . . . . 15
Use the ProSAFE Plus Utility to Specify the Switch IP Address . . . . . . . . . . . 16
Manage Multicast Traffic With IGMP Snooping . . . . . . . . . . . . . . . . . . . . . . . . . . 17
Customize IGMP Snooping . . . . . . . . . . . . . . . . . . . . . . . . . . . . . . . . . . . . . . . . . 17
Specify a VLAN for IGMP Snooping. . . . . . . . . . . . . . . . . . . . . . . . . . . . . . . . . . 18
Set Up Link Aggregation Groups . . . . . . . . . . . . . . . . . . . . . . . . . . . . . . . . . . . . . . . 19
Chapter 3 Optimize Performance With Quality of Service
Enable 802.1p/DSCP-Based Quality of Service . . . . . . . . . . . . . . . . . . . . . . . . . 22
Enable Port-Based Quality of Service . . . . . . . . . . . . . . . . . . . . . . . . . . . . . . . . . . 23
Set Up Rate Limiting . . . . . . . . . . . . . . . . . . . . . . . . . . . . . . . . . . . . . . . . . . . . . . . . . 24
Set Up Broadcast Filtering . . . . . . . . . . . . . . . . . . . . . . . . . . . . . . . . . . . . . . . . . . . . 25
Chapter 4 Use VLANS for Traffic Segmentation
VLAN Overview . . . . . . . . . . . . . . . . . . . . . . . . . . . . . . . . . . . . . . . . . . . . . . . . . . . . . 28
Create a Basic Port-Based VLAN . . . . . . . . . . . . . . . . . . . . . . . . . . . . . . . . . . . . . . 28
Assign Ports to Multiple VLAN Groups. . . . . . . . . . . . . . . . . . . . . . . . . . . . . . . . . . 30
Create 802.1Q-Based VLANs in a Basic Configuration. . . . . . . . . . . . . . . . . . . . 31
Create 802.1Q-Based VLANs in an Advanced Configuration . . . . . . . . . . . . . . 33
Add Tagged or Untagged Ports to an 802.1Q-Based VLAN. . . . . . . . . . . . . . . . 34
Specify a Port PVID for an 802.1Q-Based VLAN . . . . . . . . . . . . . . . . . . . . . . . . 35
Manage the Voice VLAN . . . . . . . . . . . . . . . . . . . . . . . . . . . . . . . . . . . . . . . . . . . . . . 37
3

8-Port Easy Mount Gigabit Ethernet PoE+ Smart Managed Plus Switch
Select the Voice VLAN and Class of Service . . . . . . . . . . . . . . . . . . . . . . . . . . . 37
Enable the Voice VLAN for Ports . . . . . . . . . . . . . . . . . . . . . . . . . . . . . . . . . . . . 38
Manage the OUI Table . . . . . . . . . . . . . . . . . . . . . . . . . . . . . . . . . . . . . . . . . . . . . 39
Chapter 5 Manage and Monitor the Switch
Manage Flow Control . . . . . . . . . . . . . . . . . . . . . . . . . . . . . . . . . . . . . . . . . . . . . . . . 43
Manage the Port Speed . . . . . . . . . . . . . . . . . . . . . . . . . . . . . . . . . . . . . . . . . . . . . . 44
Specify a Port Description . . . . . . . . . . . . . . . . . . . . . . . . . . . . . . . . . . . . . . . . . . . . 45
Enable Loop Detection . . . . . . . . . . . . . . . . . . . . . . . . . . . . . . . . . . . . . . . . . . . . . . . 46
Control the Port LEDs . . . . . . . . . . . . . . . . . . . . . . . . . . . . . . . . . . . . . . . . . . . . . . . . 46
Enable the Power Saving Mode. . . . . . . . . . . . . . . . . . . . . . . . . . . . . . . . . . . . . . . . 47
Change the Switch Management Mode. . . . . . . . . . . . . . . . . . . . . . . . . . . . . . . . . 48
Manage Access Control . . . . . . . . . . . . . . . . . . . . . . . . . . . . . . . . . . . . . . . . . . . . . . 49
Add Devices to the Access Control Table . . . . . . . . . . . . . . . . . . . . . . . . . . . . . 49
Remove Devices From the Access Control Table . . . . . . . . . . . . . . . . . . . . . . . 50
Upgrade the Firmware . . . . . . . . . . . . . . . . . . . . . . . . . . . . . . . . . . . . . . . . . . . . . . . 51
Reboot the Switch . . . . . . . . . . . . . . . . . . . . . . . . . . . . . . . . . . . . . . . . . . . . . . . . . . . 52
Save the Switch Configuration . . . . . . . . . . . . . . . . . . . . . . . . . . . . . . . . . . . . . . . . 52
Restore a Saved Switch Configuration . . . . . . . . . . . . . . . . . . . . . . . . . . . . . . . . . . 53
Restore Factory Default Settings . . . . . . . . . . . . . . . . . . . . . . . . . . . . . . . . . . . . . . 54
Enable Port Mirroring . . . . . . . . . . . . . . . . . . . . . . . . . . . . . . . . . . . . . . . . . . . . . . . . 55
View Switch Information . . . . . . . . . . . . . . . . . . . . . . . . . . . . . . . . . . . . . . . . . . . . . 56
View Port Statistics. . . . . . . . . . . . . . . . . . . . . . . . . . . . . . . . . . . . . . . . . . . . . . . . . . 57
Chapter 6 Manage Power over Ethernet
PoE Overview. . . . . . . . . . . . . . . . . . . . . . . . . . . . . . . . . . . . . . . . . . . . . . . . . . . . . . . 59
Device Class Power Requirements . . . . . . . . . . . . . . . . . . . . . . . . . . . . . . . . . . . . . 59
Power Allocation and Power Budget . . . . . . . . . . . . . . . . . . . . . . . . . . . . . . . . . . . 60
Manage and View the PoE Port Configuration . . . . . . . . . . . . . . . . . . . . . . . . . . . 61
Reset One or More PoE+ Ports . . . . . . . . . . . . . . . . . . . . . . . . . . . . . . . . . . . . . . . . 64
Chapter 7 Diagnostics and Troubleshooting
Test Cable Connections . . . . . . . . . . . . . . . . . . . . . . . . . . . . . . . . . . . . . . . . . . . . . . 66
Resolve a Subnet Conflict to Access the Switch. . . . . . . . . . . . . . . . . . . . . . . . . . 67
Appendix A Supplemental Information
Factory Default Settings . . . . . . . . . . . . . . . . . . . . . . . . . . . . . . . . . . . . . . . . . . . . . 69
Technical Specifications . . . . . . . . . . . . . . . . . . . . . . . . . . . . . . . . . . . . . . . . . . . . . . 70
4

1. Getting Started
1
This user manual describes how you can configure and operate the NETGEAR 8-Port Easy
Mount Gigabit Ethernet PoE+ Smart Managed Plus Switch, Model GS408EPP, by using the local
browser–based management interface.
The manual describes the software configuration procedures and explains the options that are
available within those procedures.
This chapter covers the following topics:
• Related Documentation
• Configure the Switch
• Access the Switch Using a Web Browser
• Access the Switch With the ProSAFE Plus Configuration Utility
• Use the NETGEAR Switch Discovery Tool to Access the Switch
• Use the NETGEAR Insight Mobile App to Discover the Switch
• Change the Password
• Register Your Product
Note: In this manual, the local browser–based management interface is
referred to as the local browser interface.
Note: For more information about the topics covered in this manual, visit the
support website at netgear.com/support.
Note: Firmware updates with new features and bug fixes are made
available from time to time at
products can regularly check the site and download new firmware, or
you can check for and download new firmware manually. If the
features or behavior of your product does not match what is
described in this guide, you might need to update your firmware.
netgear.com/support/download/. Some
5

8-Port Easy Mount Gigabit Ethernet PoE+ Smart Managed Plus Switch
Related Documentation
For more information about the switch, see the following documents that you can download
by visiting
• 8-Port Easy Mount Gigabit Ethernet PoE+ Smart Managed Plus Switch Model
GS408EPP Installation Guide
• 8-Port Easy Mount Gigabit Ethernet PoE+ Smart Managed Plus Switch Model
GS408EPP Hardware Installation Guide
• ProSAFE Plus Configuration Utility User Manual
netgear.com/support/download/:
Configure the Switch
Gigabit Ethernet Smart Managed Plus Click switches are plug-and-play , so they can be used
without any configuration. Just connect power, connect to your network and to your other
devices, and you’re done. You can also configure and manage additional advanced features
of the switch either by using your computer’s web browser or by installing the ProSAFE
Utility on your Windows-based computer.
®
Plus
For easiest access, we recommend that you cable the switch to a network with a router or
DHCP server that assigns IP addresses, power on the switch, and then use a computer that
is connected to the same network as the switch (on-network). However, it is also possible to
configure the switch connected directly only to the computer that you are using to configure it,
and not connected to the network (off-network).
You can configure and manage advanced features of the switch either by using your
computer’s web browser and accessing the switch at its IP address or by installing the
ProSAFE Plus Utility on your Windows-based computer.
If you use a Mac or a 64-bit Windows-based computer, you can use the NETGEAR Switch
Discovery Tool to discover the switch in your network and access the local browser interface
of the switch.
You can also use the NETGEAR Insight mobile app on your smartphone to discover the
switch in your network.
Access the Switch Using a Web Browser
You can access and configure the switch directly by entering the IP address of the switch in
the address bar of a web browser and accessing the local browser interface of the switch.
When you use the local browser interface, the simplest way to configure the switch is not
connected to your network (off-network). You can also configure the switch with it connected
to your network, router, or modem, (on-network) but you must be able to determine the IP
address of the switch if your network uses DHCP.
Getting Started
6

8-Port Easy Mount Gigabit Ethernet PoE+ Smart Managed Plus Switch
Access a Switch Connected to a Network
By default, the DHCP client of the switch is enabled. To access the switch, use the IP
address that the DHCP server assigned to the switch.
To determine the IP address of the switch, do one of the following:
• ProSAFE Plus Utility. If you use a Windows-based computer, use the ProSAFE Plus
Utility to detect the IP address (see
Configuration Utility). You can also access and configure the switch from the utility.
• NETGEAR Switch Discovery Tool. If you use a Mac or a 64-bit Windows-based
computer, use the NETGEAR Switch Discovery Tool to detect the IP address (see
the NETGEAR Switch Discovery Tool to Access the Switch).
• NETGEAR Insight mobile app. If you use an iOS or Android smartphone, use the
NETGEAR Insight mobile app to detect the IP address (see
Mobile App to Discover the Switch on page 11).
• DHCP server. Access the DHCP server or the router that functions as the DHCP server.
• IP scanner utility. Use an IP scanner utility, which are available free of charge online.
Access the Switch With the ProSAFE Plus
Use
Use the NETGEAR Insight
To use your web browser to configure a switch that is connected to a network:
1. Cable the switch to a network with a router or DHCP server that manages IP addresses.
2. Power on the switch.
The DHCP server assigns the switch an IP address.
3. Connect your computer to the same network as the switch.
4. Determine the IP address of the switch.
DHCP is enabled on the switch by default. Use the IP address that the DHCP server
assigned to the switch.
If you are unsure how to determine the IP address of the switch, see the introduction of
this section for the many options that are available to you.
5. Open a web browser, and enter the IP address of the switch.
6. When prompted, enter the password.
The default password is password.
7. Click the Login button.
You can now configure additional options for the switch through the local browser
interface.
Getting Started
7

8-Port Easy Mount Gigabit Ethernet PoE+ Smart Managed Plus Switch
Access a Switch That Is Off-Network
To use your web browser to configure a switch that is not connected to a network:
1. Record your computer’s TCP/IP configuration settings, and then configure the computer
with a static IP address of 192.168.0.210 and 255.255.255.0 as the subnet mask.
Note: If you are unsure how to do this, visit netgear.com/support and search
for Static IP address on computer.
2. Plug the switch into a power outlet and then connect your computer to the switch using an
Ethernet cable.
You can connect the Ethernet cable to any port on the switch.
3. Open a web browser, and enter http://192.168.0.239.
This is the default address of the switch.
4. When prompted, enter the password.
The default password is password.
5. Click the Login button.
You can now configure additional options for the switch through the local browser
interface.
6. After you complete the configuration of the switch, reconfigure the computer that you used
for this process to its original TCP/IP settings.
You can now connect your switch to your network using an Ethernet cable.
Access the Switch With the ProSAFE Plus Configuration Utility
The ProSAFE Plus Configuration Utility runs on Windows-based computers. You can install
the utility to select additional options to manage and customize the switch for your network.
Visit
netgear.com/support/product/PCU to download the utility and its user manual.
Install the ProSAFE Plus Utility
The ProSAFE Plus Utility requires WinPcap and Adobe Air . If WinPcap and Adobe Air are not
detected during ProSAFE Plus Utility installation, you are prompted to allow them to be
installed.
To install the ProSAFE Plus Utility:
1. Visit netgear.com/support/product/PCU.
2. Select and download the latest version of the utility to your computer.
3. Unzip the downloaded file to extract the utility installation file.
Getting Started
8

8-Port Easy Mount Gigabit Ethernet PoE+ Smart Managed Plus Switch
4. Install the utility on your computer.
5. If prompted, allow WinPcap and Adobe Air to be installed.
Note: We recommend that you reboot your computer after installing the
ProSAFE Plus Utility.
Access the Switch Using the ProSAFE Plus Utility
For easiest access, we recommend that you cable the switch to a network with a router or
DHCP server that assigns IP addresses, power on the switch, and then use a computer that
is connected to the same network as the switch.
By default, the switch management mode allows management through the ProSAFE Plus
Utility. For more information, see
Note: You can also access and configure the switch directly using a web
browser. See Access the Switch Using a Web Browser on page 6.
Change the Switch Management Mode on page 48.
To configure the switch using the ProSAFE Plus Utility:
1. Cable the switch to a network with a router or DHCP server that manages IP address.
2. Power on the switch.
The DHCP server assigns the switch an IP address.
3. Connect your computer to the same network as the switch.
You can use a WiFi or wired connection. The computer and the switch must be on the
same Layer 2 network.
Note: You can use the ProSAFE Plus Utility to upgrade the firmware on the
switch. In that situation, do not use a WiFi connection to the switch but
use only a direct wired connection over an Ethernet cable. That is,
configure a computer with an IP address in the same subnet as the
switch and connect directly to the switch using an Ethernet cable
before you start the firmware upgrade using the ProSAFE Plus Utility.
4. Double-click the ProSAFE Plus Utility icon.
The configuration home page displays a list of Web Managed (Plus) Switches that it
discovers on the local network.
Note: To use the ProSAFE Plus Utility, you must configure your computer’s
security software to allow broadcast UDP packets to go through UDP
remote and source (local and destination) ports 63321 through 63324. To
allow this traffic, you can create a rule in your computer’s security
Getting Started
9

8-Port Easy Mount Gigabit Ethernet PoE+ Smart Managed Plus Switch
software, or temporarily disable the firewall, Internet security, antivirus
programs, or all of these on the computer that you use to configure the
switch. If you temporarily disable any security services, be sure to
reenable those services once configuration is complete.
5. Select the switch that you want to configure.
If you do not see the switch, click the REFRESH button.
6. Click the APPL Y button.
The login window displays.
7. When prompted, enter the password.
The default password is password.
The Switch Information page displays.
8. Use the utility to configure the switch settings.
9. When you are finished with the configuration, return the computer’s firewall, Internet security,
and antivirus programs to their usual settings.
For a description of the ProSAFE Plus Switch Utility features, see the ProSAFE Plus Switch
Utility User Guide. You can access the user guide through links on the Help tab of the utility
or you can download it by visiting
netgear.com/support/download/.
Use the NETGEAR Switch Discovery Tool to Access the Switch
For easiest access, we recommend that you cable the switch to a network with a router or
DHCP server that assigns IP addresses, power on the switch, and then use a computer that
is connected to the same network as the switch.
The NETGEAR Switch Discovery Tool lets you discover the switch in your network and
access the local browser interface of the switch from a Mac or a 64-bit Windows-based
computer.
To install the NETGEAR Switch Discovery Tool, discover the switch in your network,
and access the local browser interface of the switch:
1. Download the Switch Discovery Tool by visiting
netgear.com/support/product/netgear-switch-discovery-tool.aspx.
Depending on the computer that you are using, download either the Mac version or the
version for a 64-bit Windows-based computer.
2. Temporarily disable the firewall, Internet security, antivirus programs, or all of these on the
computer that you use to configure the switch.
3. Unzip the Switch Discovery Tool files, double-click the .exe or .dmg file (for example,
NETGEAR+Switch+Discovery+Tool+Setup+1.2.101.exe or
NetgearSDT-V1.2.101.dmg), and install the program on your computer.
Getting Started
10

8-Port Easy Mount Gigabit Ethernet PoE+ Smart Managed Plus Switch
The installation process places a NETGEAR Switch Discovery Tool icon on your
desktop.
4. Reenable the security services on your computer.
5. Power on the switch.
The DHCP server assigns the switch an IP address.
6. Connect your computer to the same network as the switch.
You can use a WiFi or wired connection. The computer and the switch must be on the
same Layer 2 network.
7. Open the Switch Discovery Tool.
To open the program, double-click the NETGEAR Switch Discovery Tool icon on your
desktop.
The initial page displays a menu and a button.
8. From the Choose a connection menu, select the network connection that allows the Switch
Discovery Tool to access the switch.
9. Click the Start Searching button.
The Switch Discovery Tool displays a list of Smart Managed Plus Switches that it
discovers on the selected network.
For each switch, the tool displays the IP address.
10. To access the local browser interface of the switch, click the ADMIN PAGE button.
The login page of the local browser interface opens.
11. Enter the switch password.
The default password is password. The password is case-sensitive.
The Switch Information page displays.
Use the NETGEAR Insight Mobile App to Discover the Switch
If the switch is connected to a WiFi router or access point, the NETGEAR Insight mobile app
lets you discover the switch in your network.
To use the NETGEAR Insight mobile app to discover the switch in your network:
1. On your iOS or Android mobile device, go to the app store, search for NETGEAR
Insight, and download and install the app.
2. Connect your mobile device to the WiFi network of the WiFi router or access point to which
the switch is connected.
3. Open the NETGEAR Insight mobile app.
Getting Started
11

8-Port Easy Mount Gigabit Ethernet PoE+ Smart Managed Plus Switch
4. Select LOG IN to log in to your existing NETGEAR account or tap the CREATE NETGEAR
ACCOUNT button to create a new account.
After you log in to your account, the IP address of the switch displays in the device list.
5. Write down the IP address for future use.
Change the Password
The default password to access the switch is password. We recommend that you change
this password to a more secure password. The ideal password contains no dictionary words
from any language and contains uppercase and lowercase letters, numbers, and symbols. It
can be up to 20 characters.
To change the password:
1. Connect your computer to the same network as the switch.
You can use a WiFi or wired network connection, or connect directly to a switch that is
off-network using an Ethernet cable.
2. Launch a web browser.
3. In the address field of your web browser, enter the IP address of the switch.
If you do not know the IP address of the switch, see Access the Switch Using a Web
Browser on page 6.
The login window opens.
4. Enter the switch’s password in the password field.
The switch’s default password is password.
The Switch Information page displays.
5. Select Maintenance > Change Password.
The Change Password page displays.
6. In the Old Password field, type the current password for the switch.
7. Type the new password in the New Password field and in the Re-type New Password
field.
8. Click the Apply button.
Your settings are saved. Keep the new password in a secure location so that you can
access the switch in the future.
Getting Started
12

8-Port Easy Mount Gigabit Ethernet PoE+ Smart Managed Plus Switch
Register Your Product
We recommend that you use the NETGEAR Insight mobile app to register your product (see
Use the NETGEAR Insight Mobile App to Discover the Switch on page 11).
Registering your product allows you to receive email alerts and streamlines the technical
support process. However, you can also register your product through the local browser
interface.
Note: For you to register the switch, the switch must be connected to the
Internet.
To register your product through the local browser interface:
1. Connect your computer to the same network as the switch.
You can use a WiFi or wired connection.
2. Launch a web browser.
3. In the address field of your web browser, enter the IP address of the switch.
If you do not know the IP address of the switch, see Access the Switch Using a Web
Browser on page 6.
The login window opens.
4. Enter the switch’s password in the password field.
The switch’s default password is password.
The Switch Information page displays.
5. Select Help > Registration.
The Product Registration page displays.
6. Click the Register button.
7. Follow the onscreen process to register your product.
Getting Started
13

2. Manage the Network Settings
This chapter covers the following topics:
• Specify IP Address Settings for the Switch
• Manage Multicast Traffic With IGMP Snooping
• Set Up Link Aggregation Groups
2
14
8-Port Easy Mount Gigabit Ethernet PoE+ Smart Managed Plus Switch
Specify IP Address Settings for the Switch
By default, the switch IP address works as follows:
• If you cable the switch to a network with a DHCP server before you power on the switch,
the DHCP server assigns an IP address to the switch when the switch is powered on.
• If you power on the switch when it is not connected to a network with a DHCP server
switch uses its default IP address, which is 192.168.0.239.
You can disable the DHCP mode feature in the switch and enter IP address and subnet
mask values for the switch as well as the address of the gateway device used by the
switch.
Use Browser-Based Access to Specify the Switch IP Address
To specify IP address settings for the switch:
1. Connect your computer to the same network as the switch.
, the
You can use a WiFi or wired network connection, or connect directly to a switch that is
of
f-network using an Ethernet cable.
2. Launch a web browser.
3. In the address field of your web browser
If you do not know the IP address of the switch, see Access the Switch Using a Web
Browser on page 6.
The login window opens.
4. Enter the switch’
The switch’s default password is password.
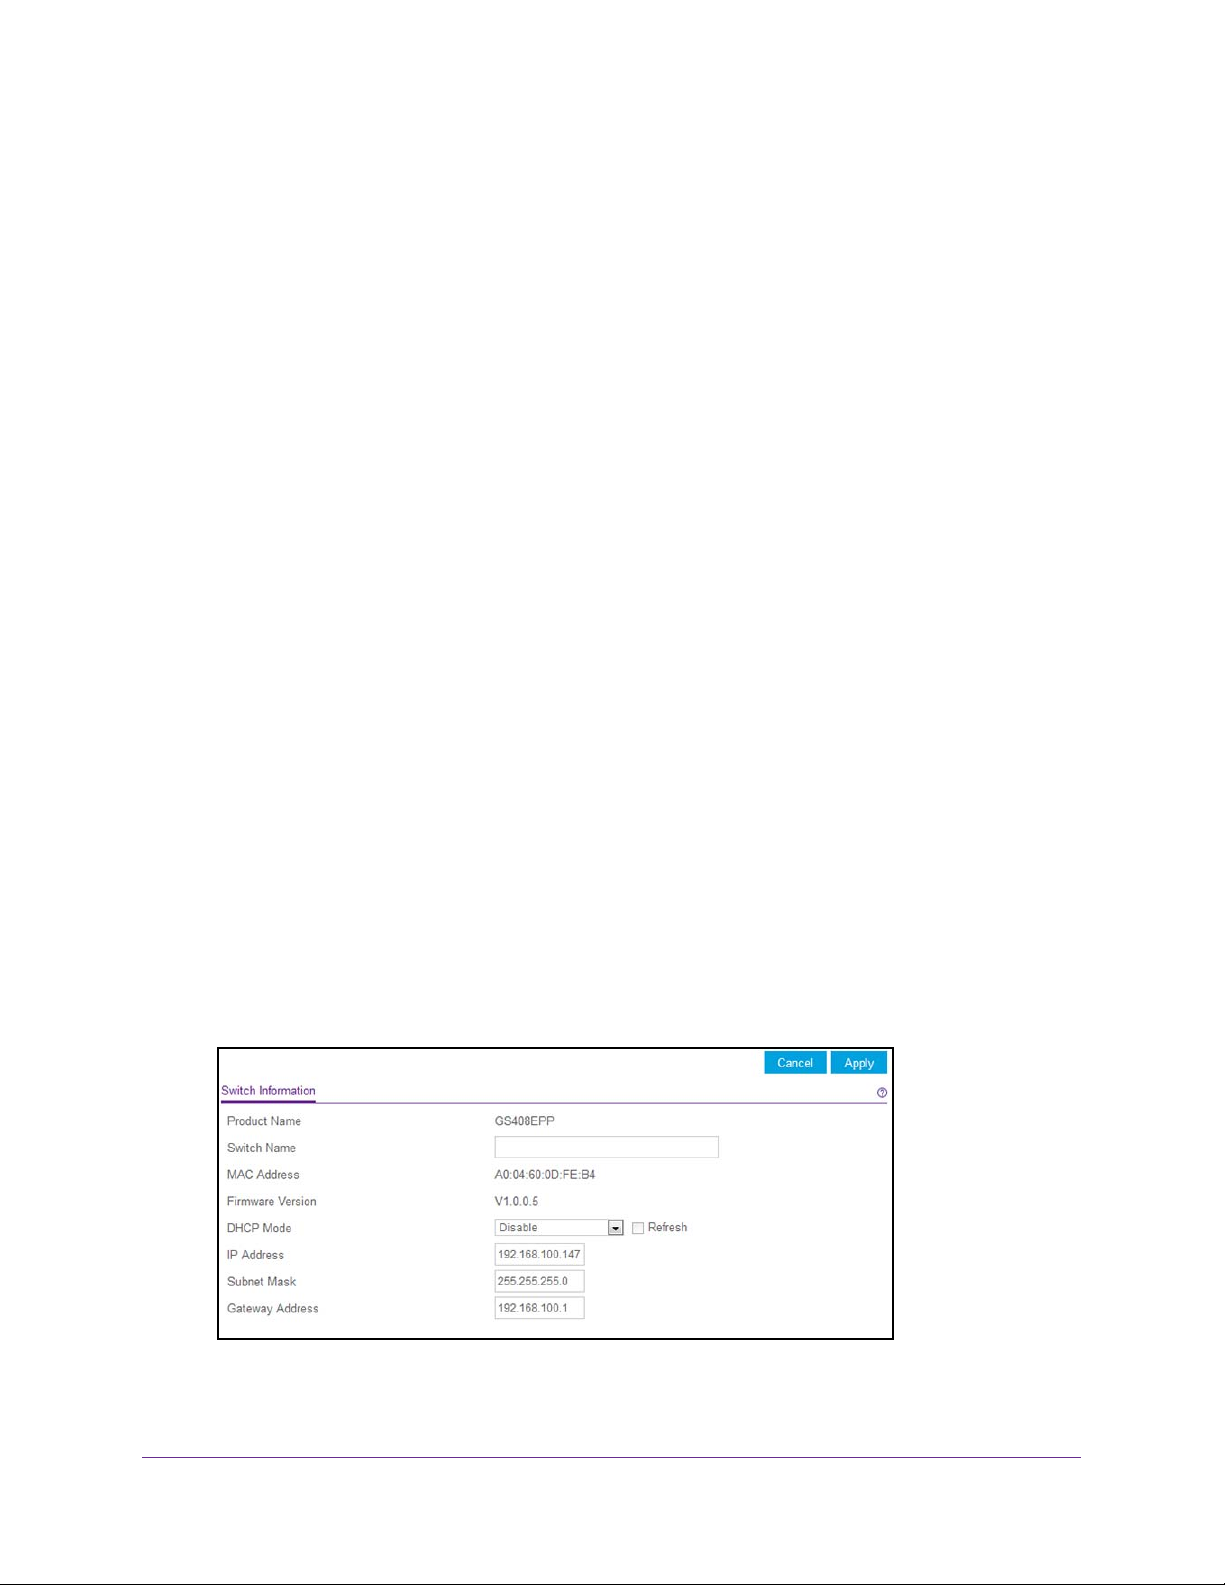
The Switch Information page displays.
5. In the DHCP Mode menu, select Disable.
s password in the password field.
, enter the IP address of the switch.
The IP Address, Subnet Mask, and Gateway Address fields are enabled.
6. Enter the IP address, subnet mask, and if available, the gateway address.
Manage the Network Settings
15
8-Port Easy Mount Gigabit Ethernet PoE+ Smart Managed Plus Switch
7. Click the Apply button.
Your settings are saved.
Use the ProSAFE Plus Utility to Specify the Switch IP Address
To specify IP address settings for a switch:
1. Connect your computer to the same network as the switch.
You can use a WiFi or wired network connection, or connect directly to a switch that is
of
f-network using an Ethernet cable.
2. Double-click the ProSAFE Plus Utility icon.
The Switch Selection page displays a list of Web Managed (Plus) switches that it
discovers on the local network.
3. Select the switch.
If you do not see the switch, click the REFRESH button.
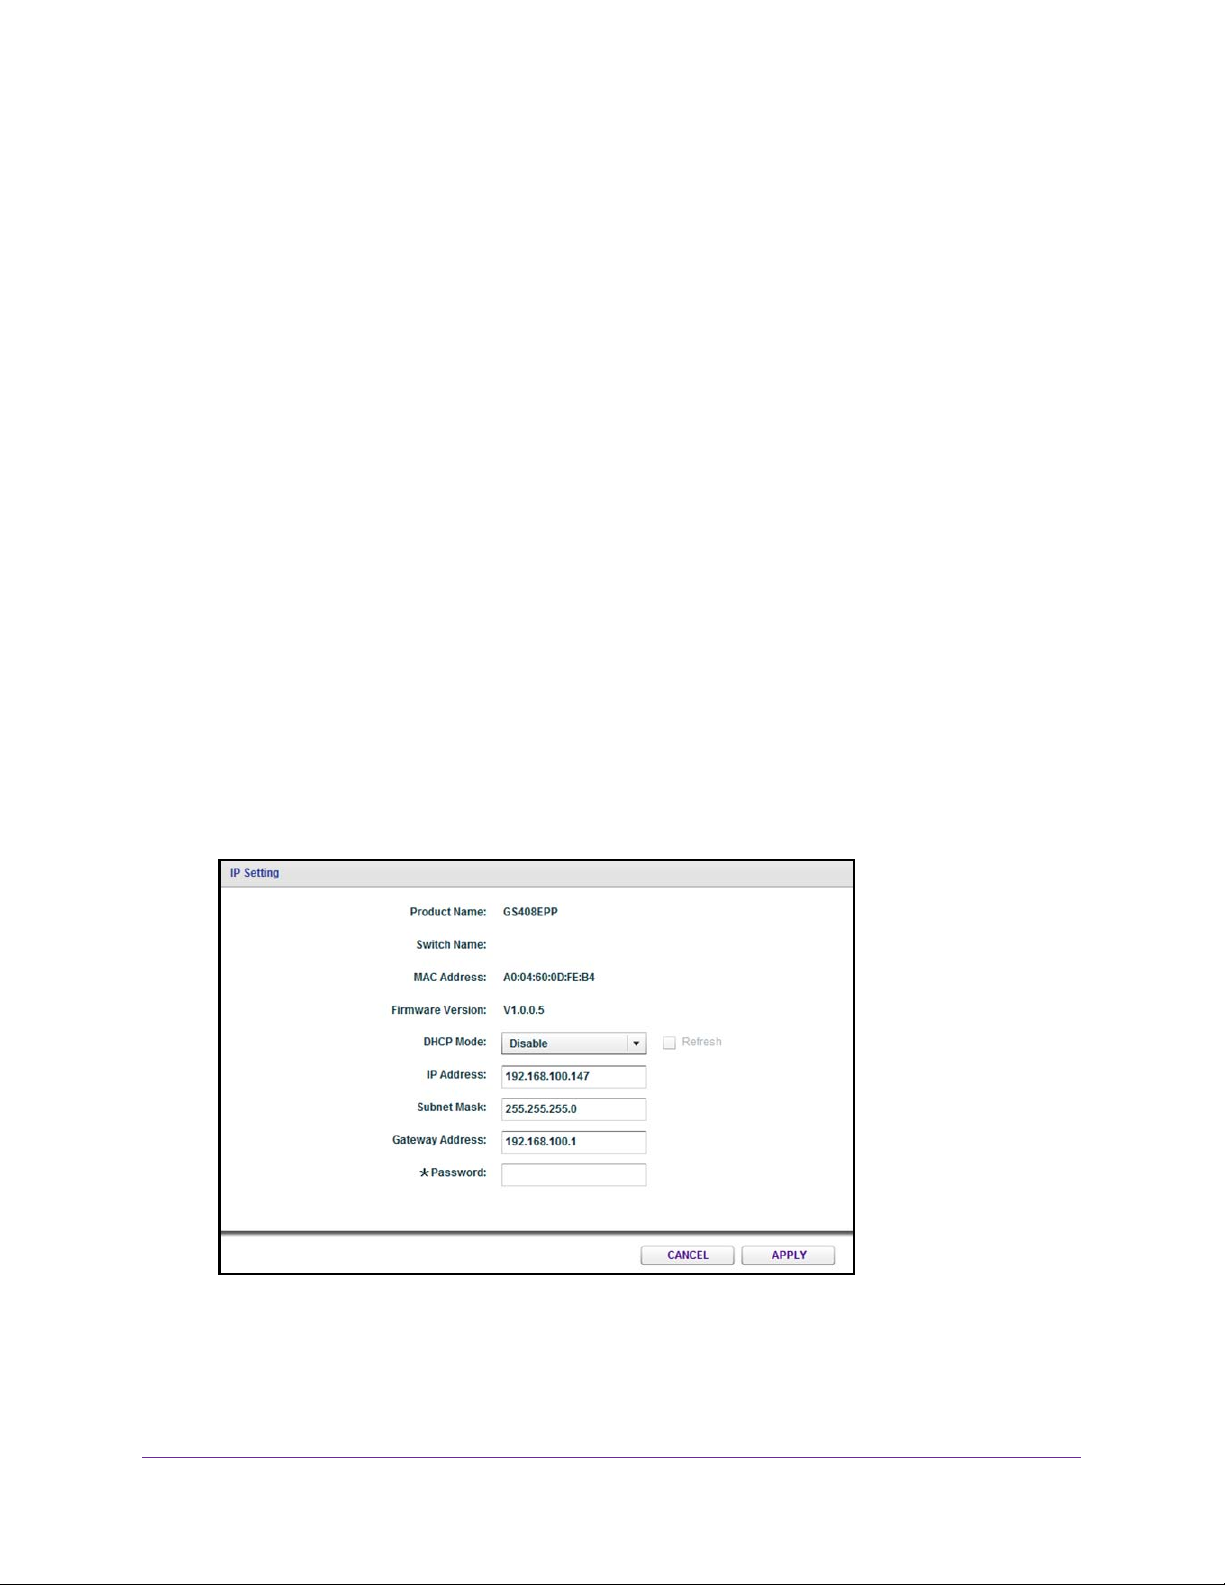
4. Click the IP Setting button.
The IP Setting page displays.
Note: To navigate to this page, select Network, select the switch, and click
the IP Setting button.
5. In the DHCP Mode menu, select Disable.
The IP Address, Subnet Mask, and Gateway Address fields are enabled.
6. Enter the IP address, subnet mask, and if available, the gateway address.
7. Enter the switch’
s password in the Password field.
Manage the Network Settings
16

8-Port Easy Mount Gigabit Ethernet PoE+ Smart Managed Plus Switch
The switch’s default password is password.
8. Click the APPL Y button.
Your settings are saved.
Manage Multicast Traffic With IGMP Snooping
Internet Group Management Protocol (IGMP) snooping allows a switch to forward multicast
traffic intelligently on the switch. Multicast IP traffic is traffic that is destined to a host group.
Host groups are identified by Class D IP addresses, which range from 224.0.0.0 to
239.255.255.255. Based on the IGMP query and report messages, the switch forwards traffic
only to the ports that request the multicast traffic. This feature prevents the switch from
broadcasting the traffic to all ports and possibly affecting network performance.
The switch maintains a map that shows which links need which IP multicast streams. The
switch forwards multicast traffic only to the links that requested them and cuts multicast traffic
from links that do not contain a multicast listener. Essentially, IGMP snooping helps optimize
multicast performance at Layer 2 and is especially useful for bandwidth-intensive IP multicast
applications such as IPTV.
Customize IGMP Snooping
By default, IGMP snooping is enabled. You can customize the settings for your network.
To customize IGMP snooping:
1. Connect your computer to the same network as the switch.
You can use a WiFi or wired network connection, or connect directly to a switch that is
off-network using an Ethernet cable.
2. Launch a web browser.
3. In the address field of your web browser, enter the IP address of the switch.
If you do not know the IP address of the switch, see Access the Switch Using a Web
Browser on page 6.
The login window opens.
4. Enter the switch’s password in the password field.
The switch’s default password is password.
The Switch Information page displays.
5. Select System > Multicast.
Manage the Network Settings
17
8-Port Easy Mount Gigabit Ethernet PoE+ Smart Managed Plus Switch
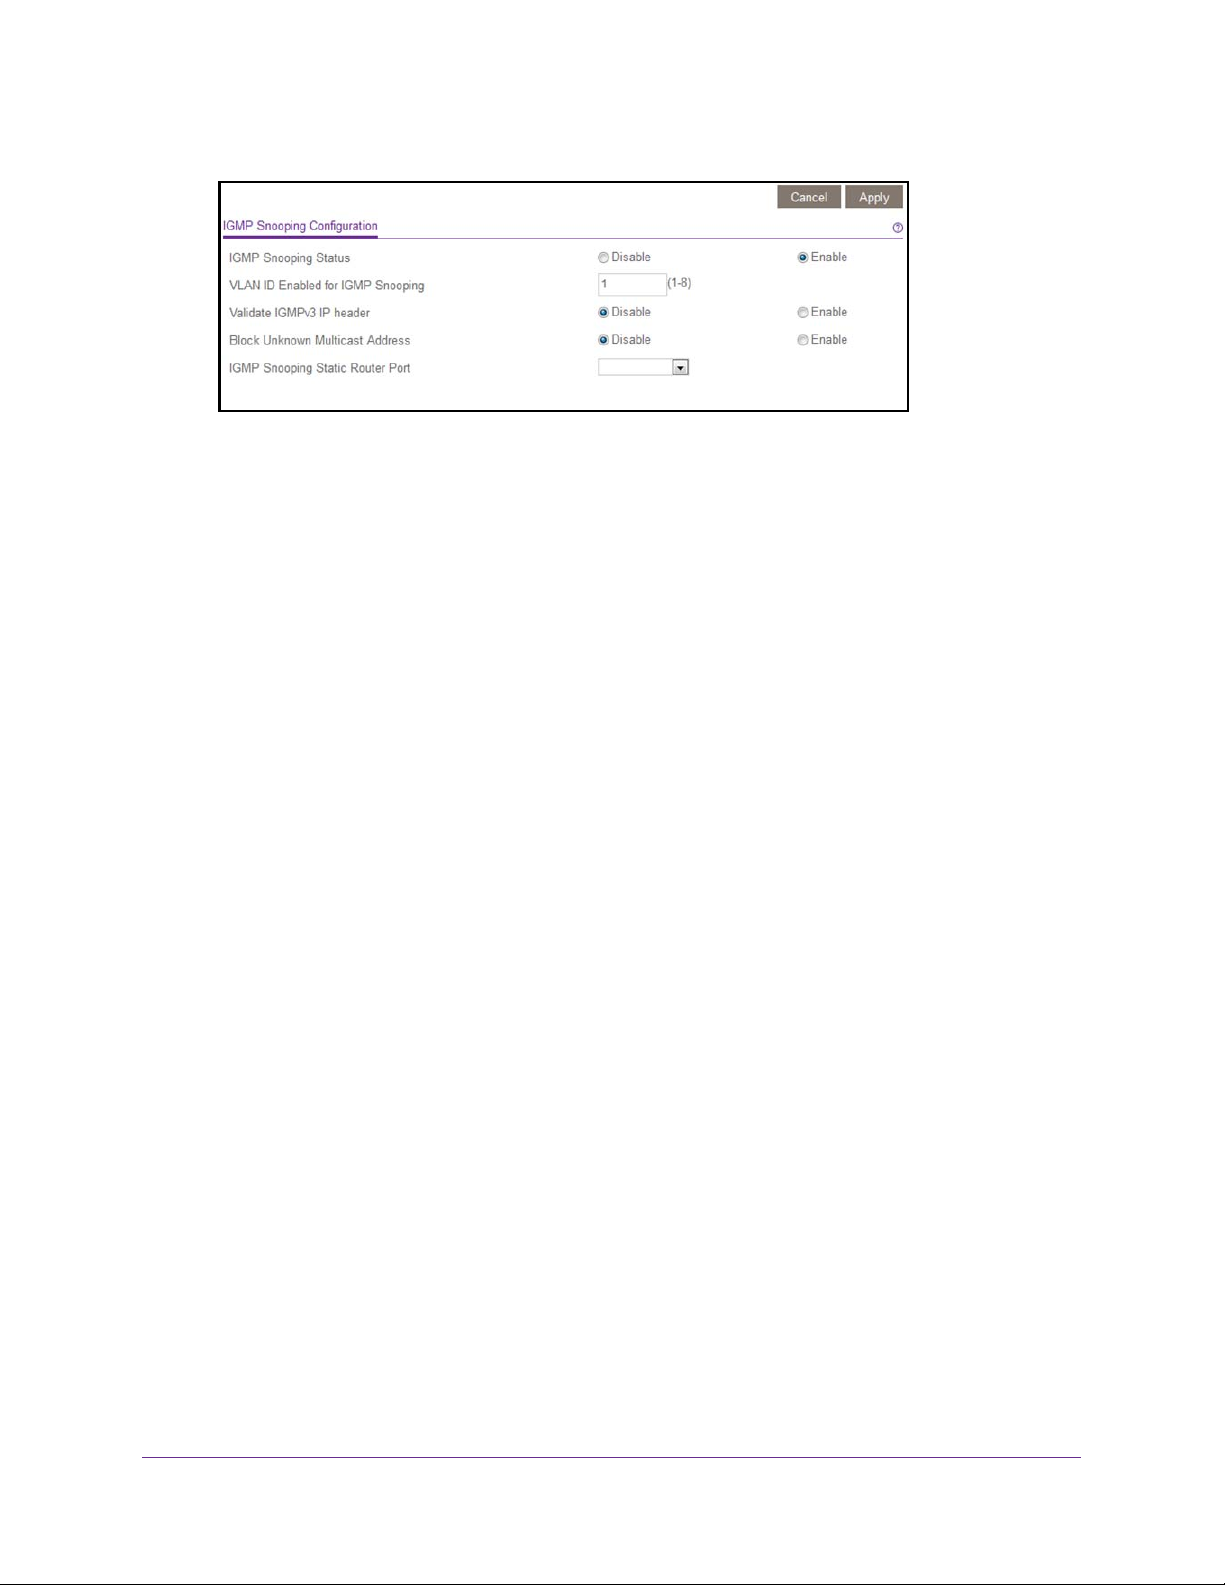
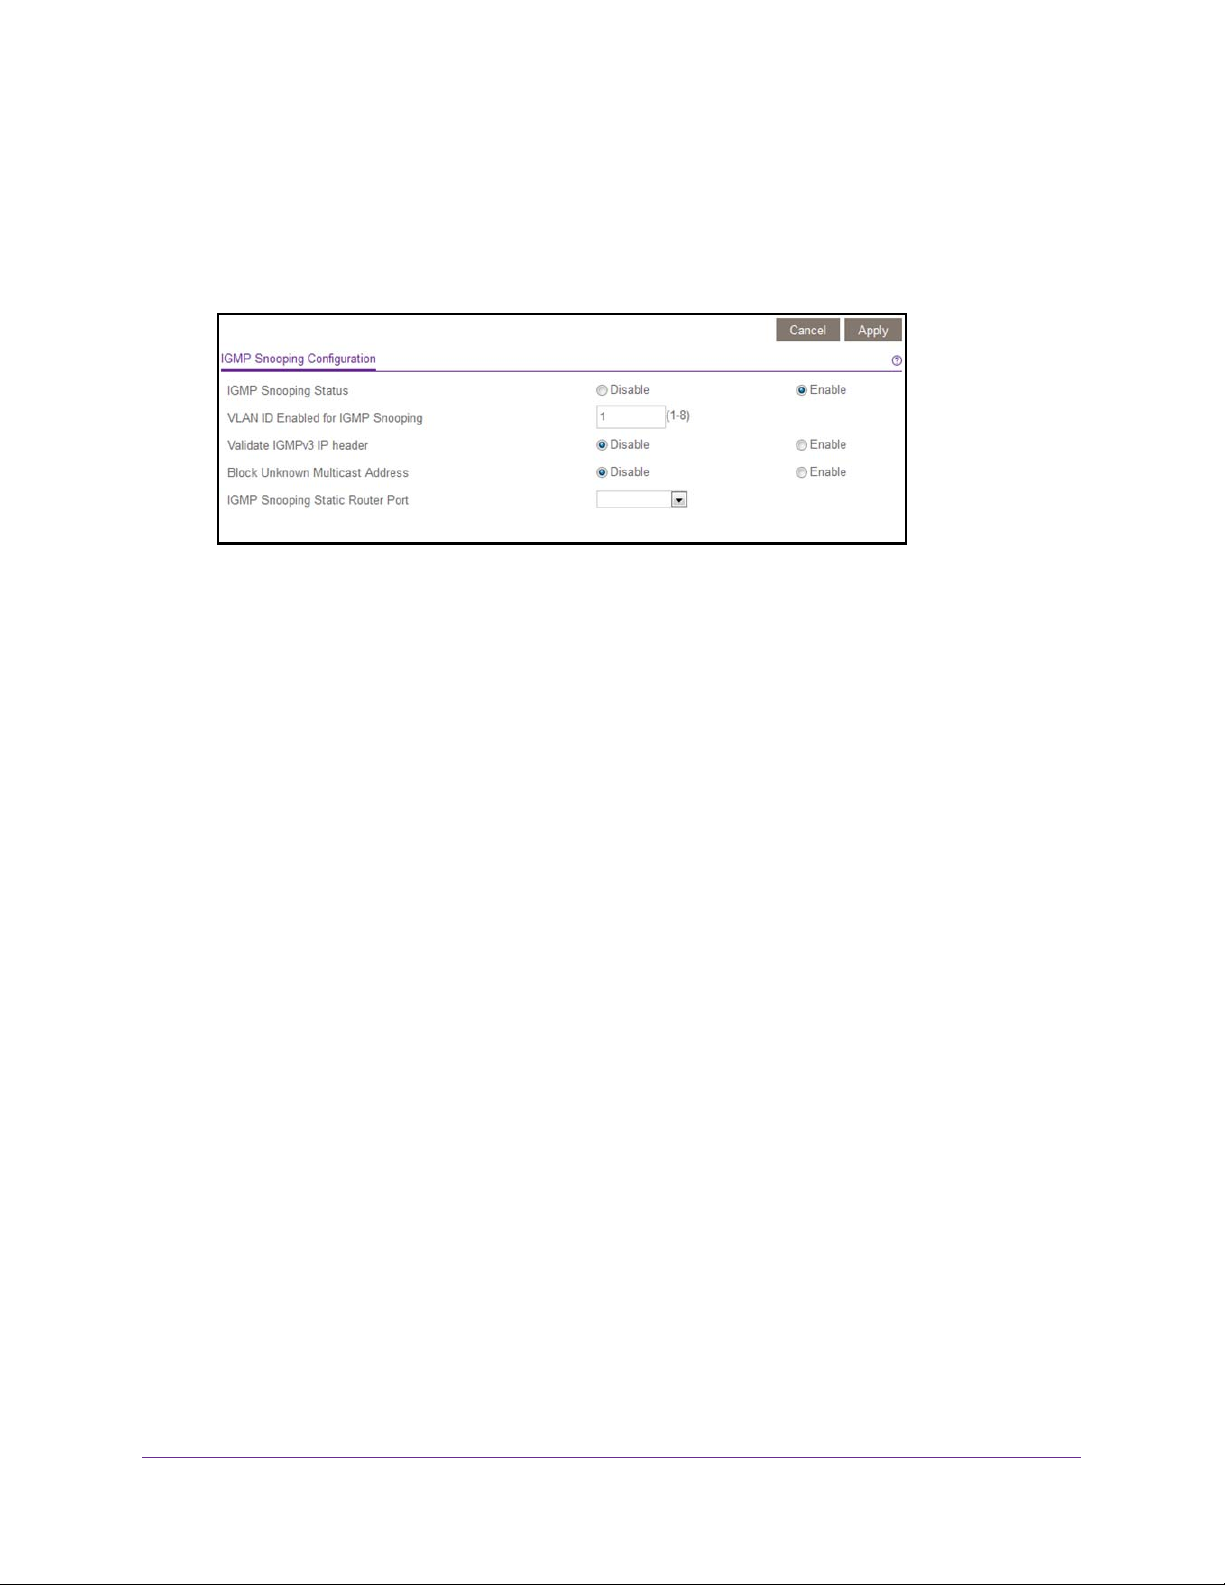
6. Make sure that the IGMP Snooping Status Enable radio button is selected.
By default, the Enable radio button is selected.
7. (Optional) Select the V
alidate IGMPv3 IP header Enable radio button.
Some network devices might not conform to the IGMPv3 standard. When the Validate
IGMPv3 IP header option is enabled, IGMP messages are required to include
TTL = 1
and ToS Byte = 0xC0 (Internetwork Control), and the router alert IP option (9404) must be
set. Otherwise, the packets are ignored.
8. (Optional) Select the Block Unknown MultiCast
Address Enable radio button.
When this feature is enabled, multicast packets are forwarded only to the ports that are in
the multicast group learned from IGMP snooping.
All unknown multicast packets are
dropped.
9. (Optional) Select any item in the IGMP Snooping Static Router Port menu.
You can select a port to be the dedicated IGMP snooping static router port if no IGMP
query exists in the network for the switch to discover the router port dynamically
. After a
port is selected as the static router port, all IGMP Join and Leave reports are forwarded to
this port.
10. Click the Apply button.
Your settings are saved.
Specify a VLAN for IGMP Snooping
To specify a VLAN for IGMP snooping:
1. Connect your computer to the same network as the switch.
You can use a WiFi or wired network connection, or connect directly to a switch that is
of
f-network using an Ethernet cable.
2. Launch a web browser.
3. In the address field of your web browser
, enter the IP address of the switch.
If you do not know the IP address of the switch, see Access the Switch Using a Web
Browser on page 6.
The login window opens.
Manage the Network Settings
18
8-Port Easy Mount Gigabit Ethernet PoE+ Smart Managed Plus Switch
4. Enter the switch’s password in the password field.
The switch’s default password is password.
The Switch Information page displays.
5. Select System > Multicast.
6. Make sure that the IGMP Snooping Status Enable radio button is selected.
By default, the Enable radio button is selected.
7. In the VLAN ID Enabled for IGMP Snooping field, enter the ID of the VLAN.
By default, if you enable IGMP snooping, snooping occurs on VLAN 1. However, you can
enable snooping on any VLAN as follows:
• For port-based VLANs, you can enter a VLAN ID from 1 to 8.
• For 802.1Q-based VLANs, you can enter a VLAN ID from 1 to 4094.
8. Click the Apply button.
Your settings are saved.
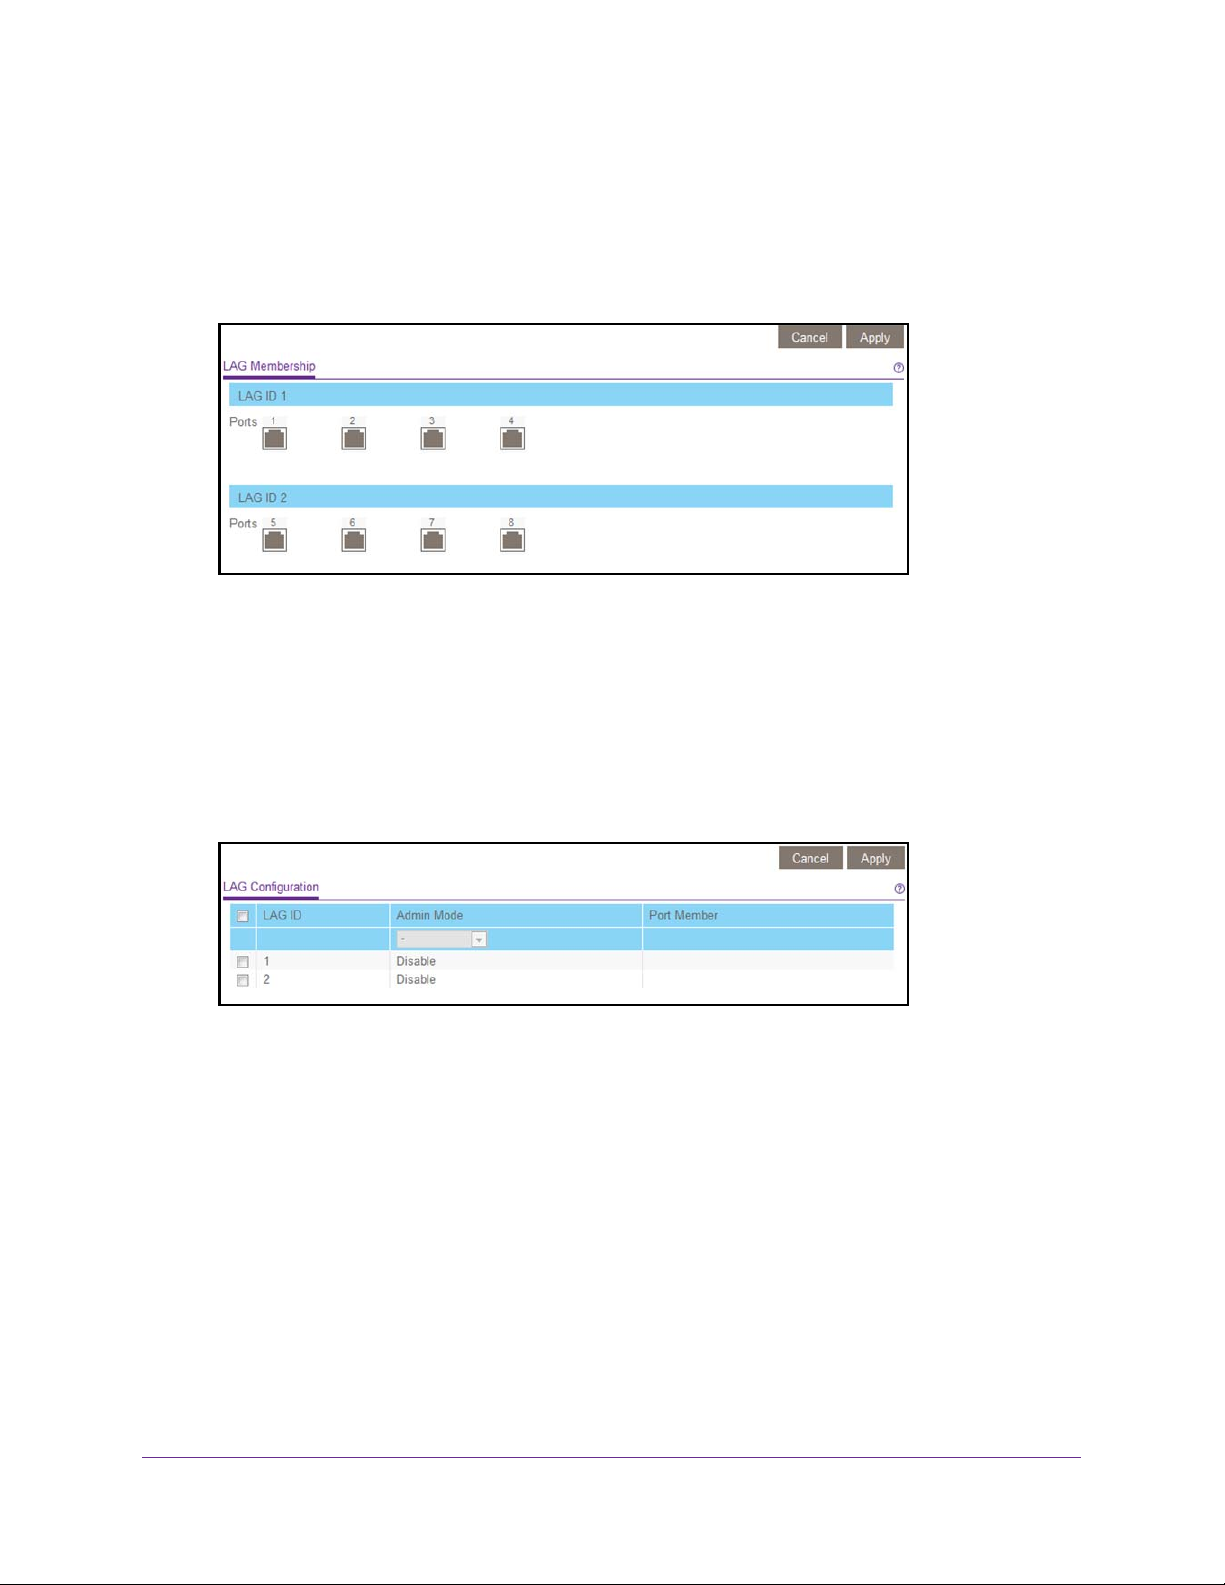
Set Up Link Aggregation Groups
Link aggregation groups (LAGs) allow you to combine multiple Ethernet links into a single
logical link. Network devices treat the aggregation as if it were a single link, which increases
fault tolerance and load sharing. Specify LAG membership before you enable the LAG. The
switch supports up to two static LAGs.
To specify LAG membership and enable one or both LAGs:
1. Connect your computer to the same network as the switch.
You can use a WiFi or wired network connection, or connect directly to a switch that is
of
f-network using an Ethernet cable.
2. Launch a web browser.
3. In the address field of your web browser
If you do not know the IP address of the switch, see Access the Switch Using a Web
Browser on page 6.
The login window opens.
Manage the Network Settings
, enter the IP address of the switch.
19
8-Port Easy Mount Gigabit Ethernet PoE+ Smart Managed Plus Switch
4. Enter the switch’s password in the password field.
The switch’s default password is password.
The Switch Information page displays.
5. Select System > LAG > LAG Membership.
6. For each LAG, select the ports for the LAG by selecting the associated check boxes under
the port numbers.
A LAG must consist of at least two ports. For LAG 1, you can select a combination of
ports 1 through 4. For LAG 2, you can select a combination of ports 5 through 8.
7. Click the Apply button.
Your settings are saved.
8. Select System > LAG > LAG Configuration.
9. Select the ID of the LAG for which you just set up the port membership or select both LAG
IDs.
10. In the Admin Mode menu, select Enable.
11. Click the Apply button.
Your settings are saved.
Manage the Network Settings
20

3. Optimize Performance With
Quality of Service
This chapter covers the following topics:
• Enable 802.1p/DSCP-Based Quality of Service
• Enable Port-Based Quality of Service
• Set Up Rate Limiting
• Set Up Broadcast Filtering
3
21

8-Port Easy Mount Gigabit Ethernet PoE+ Smart Managed Plus Switch
Enable 802.1p/DSCP-Based Quality of Service
802.1p/DSCP-based priority uses a field in the data packet header that identifies the class of
data in the packet (for example, voice or video). When 802.1p/DSCP-based priority is used,
the switch reads information in the packet header to determine the priority to assign to the
packet. The switch reads both 802.1p tag information and DSCP and ToS tag information. If
an ingress packet contains an 802.1p tag and a DSCP or ToS tag, the switch gives
precedence to the 802.1p tag.
All ports on the switch check the packet header and transmit the packet with a priority
determined by the packet content.
To enable 802.1p/DSCP-based QoS:
1. Connect your computer to the same network as the switch.
You can use a WiFi or wired network connection, or connect directly to a switch that is
off-network using an Ethernet cable.
2. Launch a web browser.
3. In the address field of your web browser, enter the IP address of the switch.
If you do not know the IP address of the switch, see Access the Switch Using a Web
Browser on page 6.
The login window opens.
4. Enter the switch’s password in the password field.
The switch’s default password is password.
The Switch Information page displays.
5. Select QoS.
The Quality of Service page displays.
6. Select the 802.1p/DSCP-based radio button.
A pop-up window opens, informing you that the current QoS settings will be lost.
7. Click the YES button.
The pop-up window closes.
8. Click the Apply button.
Your settings are saved.
Optimize Performance With Quality of Service
22

8-Port Easy Mount Gigabit Ethernet PoE+ Smart Managed Plus Switch
Enable Port-Based Quality of Service
You can assign a priority to all data passing through a particular port. Data with a higher
priority is transmitted faster. If packets arrive at several ports at the same time, the ports
configured as higher priority transmit their packets first. You must determine which ports will
carry delay-sensitive data.
To enable port-based QoS:
1. Connect your computer to the same network as the switch.
You can use a WiFi or wired network connection, or connect directly to a switch that is
off-network using an Ethernet cable.
2. Launch a web browser.
3. In the address field of your web browser, enter the IP address of the switch.
If you do not know the IP address of the switch, see Access the Switch Using a Web
Browser on page 6.
The login window opens.
4. Enter the switch’s password in the password field.
The switch’s default password is password.
The Switch Information page displays.
5. Select QoS.
The Quality of Service page displays.
6. If this is the first time that you are setting up port-based QoS, select the Port-based radio
button and continue with
Otherwise, see Step 9.
A pop-up window opens, informing you that the current QoS settings will be lost.
7. Click the YES button.
The pop-up window closes.
8. Click the Apply button.
Your settings are saved and the Port Priority table displays.
Step 7.
Optimize Performance With Quality of Service
23

8-Port Easy Mount Gigabit Ethernet PoE+ Smart Managed Plus Switch
9. To set the port priority for one or more ports, do the following:
a. Select one or more ports.
b. In the Priority menu, select the priority
.
The options are High Priority, Medium Priority, Normal Priority, and Low Priority.
The default setting is Low Priority
c. Click the Apply button.
Your settings are saved. The same priority is applied to all ports that you selected.
10. T
o set a different port priority for one or more other ports, repeat Step 9.
.
Set Up Rate Limiting
You can limit the rate at which the switch accepts incoming data and the rate that it
retransmits outgoing data.
Rate limiting can be set for a port in addition to other QoS settings. If the port rate limit is set,
the switch restricts the acceptance or retransmission of data to the values configured.
To set up rate limiting:
1. Connect your computer to the same network as the switch.
You can use a WiFi or wired network connection, or connect directly to a switch that is
of
f-network using an Ethernet cable.
2. Launch a web browser.
3. In the address field of your web browser
, enter the IP address of the switch.
If you do not know the IP address of the switch, see Access the Switch Using a Web
Browser on page 6.
The login window opens.
4. Enter the switch’
s password in the password field.
Optimize Performance With Quality of Service
24

8-Port Easy Mount Gigabit Ethernet PoE+ Smart Managed Plus Switch
The switch’s default password is password.
The Switch Information page displays.
5. Select QoS > Rate Limit.
6. Set the ingress (incoming) and egress (outgoing) traffic rates by doing the following:
a. Select one or more ports.
b. In the Ingress Rate menu, select the maximum rate.
You can set a rate from 512 Kbps to 512 Mbps. By default, no limit is set.
c. In the Egress Rate menu, select the maximum rate.
You can set a rate from 512 Kbps to 512 Mbps. By default, no limit is set.
d. Click the Apply button.
Your settings are saved.
7. T
o set different rates for one or more other ports, repeat Step 6.
Set Up Broadcast Filtering
You can configure the switch to block broadcast storms (massive transmission of broadcast
packets forwarded to every port on the same VLAN). If they are not blocked, broadcast storm
packets can delay or halt the transmission of other data. Some switches allow you to select a
storm control rate for each port. Others assign a predetermined storm control rate for all ports
on the switch.
If broadcast traffic on any port exceeds the threshold that you set, the switch temporarily
blocks (discards) the broadcast traf
To set up broadcast filtering:
fic.
1. Connect your computer to the same network as the switch.
You can use a WiFi or wired network connection, or connect directly to a switch that is
of
f-network using an Ethernet cable.
2. Launch a web browser.
Optimize Performance With Quality of Service
25

8-Port Easy Mount Gigabit Ethernet PoE+ Smart Managed Plus Switch
3. In the address field of your web browser, enter the IP address of the switch.
If you do not know the IP address of the switch, see Access the Switch Using a Web
Browser on page 6.
The login window opens.
4. Enter the switch’
s password in the password field.
The switch’s default password is password.
The Switch Information page displays.
5. Select QoS > Broadcast Filtering.
The Broadcast Filtering page displays.
6. If this is the first time that you are setting up broadcast filtering,
button and continue with Step 7.
Otherwise, see Step 8.
7. Click the Apply button.
Your settings are saved and the Storm Control Rate table displays.
select the Enable radio
8. Set the storm control rate by doing the following:
a. Select one or more ports.
b. In the Storm Control Rate menu, select the maximum rate.
You can set a rate from 512 Kbps to 512 Mbps. By default, no limit is set.
c. Click the Apply button.
Your settings are saved.
9. T
o set a different rate for one or more other ports, repeat Step 8.
Optimize Performance With Quality of Service
26

4. Use VLANS for Traffic Segmentation
This chapter covers the following topics:
• VLAN Overview
• Create a Basic Port-Based VLAN
• Assign Ports to Multiple VLAN Groups
• Create 802.1Q-Based VLANs in a Basic Configuration
• Create 802.1Q-Based VLANs in an Advanced Configuration
• Add Tagged or Untagged Ports to an 802.1Q-Based VLAN
• Specify a Port PVID for an 802.1Q-Based VLAN
• Manage the Voice VLAN
4
27

8-Port Easy Mount Gigabit Ethernet PoE+ Smart Managed Plus Switch
VLAN Overview
Virtual LANs (VLANs) are made up of networked devices that are grouped logically into
separate networks. You can group ports on a switch to create a virtual network made up of
the devices connected to the ports.
Ports can be grouped in VLANs using port-based or 802.1Q criteria:
• Port-based VLANs. Assign ports to virtual networks. Ports with the same VLAN ID are
placed in the same VLAN. This feature provides an easy way to partition a network into
private subnetworks.
• 802.1Q VLANs. Create virtual networks using the IEEE 802.1Q standard. 802.1Q uses a
VLAN tagging system to determine which VLAN an Ethernet frame belongs to. You can
configure ports to be a part of a VLAN. When a port receives data tagged for a VLAN, the
data is discarded unless the port is a member of that VLAN. This technique is useful for
communicating with devices outside your local network as well as receiving data from
other ports that are not in the VLAN. However, to use an 802.1Q VLAN, you must know
the VLAN ID.
Create a Basic Port-Based VLAN
A port-based VLAN configuration lets you assign ports on the switch to a VLAN. The number
of VLANs is limited to the number of ports on the switch. In a basic port-based VLAN
configuration, ports with the same VLAN ID are placed into the same VLAN.
You can also assign ports to multiple VLANs (see Assign Ports to Multiple VLAN Groups on
page 30).
By default, all ports are members of VLAN 1.
To create a basic port-based VLAN:
1. Connect your computer to the same network as the switch.
You can use a WiFi or wired network connection, or connect directly to a switch that is
off-network using an Ethernet cable.
2. Launch a web browser.
3. In the address field of your web browser, enter the IP address of the switch.
If you do not know the IP address of the switch, see Access the Switch Using a Web
Browser on page 6.
The login window opens.
4. Enter the switch’s password in the password field.
The switch’s default password is password.
The Switch Information page displays.
5. Select VLAN.
Use VLANS for Traffic Segmentation
28

8-Port Easy Mount Gigabit Ethernet PoE+ Smart Managed Plus Switch
The Basic Port-based VLAN Status page displays.
6. If this is the first time that you are accessing the Basic Port-based VLAN Status page or if
you are changing the VLAN assignment method, select the Enable radio button and
continue with Step 7.
Otherwise, see Step 9.
A pop-up window opens, informing you that the current VLAN settings will be lost.
7. Click the YES button.
The pop-up window closes.
8. Click the Apply button.
Your settings are saved.
The Basic Port-based VLAN Group table displays.
9. Under each port to be added to a VLAN, enter the VLAN ID of the VLAN.
You can enter a VLAN ID from 1 to 8. If all the VLANs share an uplink to the Internet or
servers, enter all in the VLAN ID field for the port that you want to use for the uplink.
Note: If ports are members of the same LAG, you must assign them to the same
VLAN.
10. Click the Apply button.
Your settings are saved.
Use VLANS for Traffic Segmentation
29

8-Port Easy Mount Gigabit Ethernet PoE+ Smart Managed Plus Switch
Assign Ports to Multiple VLAN Groups
Port-based virtual LAN configuration assigns ports on the selected switch to a virtual LAN
group. The number of VLANs that can be created is limited to the number of ports on the
switch.
You can also create a basic port-based VLAN in which ports with the same ID are grouped
into the same VLAN group (see
By default, all ports are members of VLAN 1.
To assign ports to multiple VLAN groups in a port-based VLAN:
1. Connect your computer to the same network as the switch.
You can use a WiFi or wired network connection, or connect directly to a switch that is
off-network using an Ethernet cable.
2. Launch a web browser.
3. In the address field of your web browser, enter the IP address of the switch.
Create a Basic Port-Based VLAN on page 28).
If you do not know the IP address of the switch, see Access the Switch Using a Web
Browser on page 6.
The login window opens.
4. Enter the switch’s password in the password field.
The switch’s default password is password.
The Switch Information page displays.
5. Select VLAN > Port Based > Advanced.
The Advanced Port-based VLAN Status page displays.
6. If this is the first time that you are accessing the Advanced Port-based VLAN Status page
or if you are changing the VLAN assignment method, select the Enable radio button and
continue with
Otherwise, see Step 9.
A pop-up window opens, informing you that the current VLAN settings will be lost.
7. Click the YES button.
The pop-up window closes.
8. Click the Apply button.
Step 7.
Your settings are saved.
The VLAN Configuration and VLAN Membership sections display.
Use VLANS for Traffic Segmentation
30

8-Port Easy Mount Gigabit Ethernet PoE+ Smart Managed Plus Switch
9. In the VLAN identifier menu, select the VLAN.
10. Select the ports that you want to add to the VLAN by doing the following:
a. (Optional) In the Group Operation menu, select either Select All or Remove All.
All ports are either added to the VLAN or removed from the VLAN.
b. Select or remove individual ports by selecting the check box under the port
numbers.
Note: If ports are members of the same LAG, you must assign them to the same
VLAN.
c. Click the Apply button.
Your settings are saved. In the VLAN Membership table, the ports display as
members of the VLAN.
11. T
o select ports for another VLAN, repeat Step 9 and Step 10.
Create 802.1Q-Based VLANs in a Basic Configuration
A 802.1Q-based VLAN configuration lets you assign ports on the switch to a VLAN with an ID
number in the range of 1–4093. By default, all ports are members of VLAN 1.
In an advanced 802.1Q-based VLAN configuration, you can set up VLANs to which you can
add tagged or untagged ports and you can use port VLAN ID (PVID). For more information,
Create 802.1Q-Based VLANs in an Advanced Configuration on page 33.
To create 802.1Q-based VLANs in a basic configuration:
1. Connect your computer to the same network as the switch.
You can use a WiFi or wired network connection, or connect directly to a switch that is
of
f-network using an Ethernet cable.
2. Launch a web browser
3. In the address field of your web browser
.
, enter the IP address of the switch.
Use VLANS for Traffic Segmentation
31

8-Port Easy Mount Gigabit Ethernet PoE+ Smart Managed Plus Switch
If you do not know the IP address of the switch, see Access the Switch Using a Web
Browser on page 6.
The login window opens.
4. Enter the switch’
s password in the password field.
The switch’s default password is password.
The Switch Information page displays.
5. Select VLAN > 802.1Q.
The Basic 802.1Q VLAN page displays.
6. If this is the first time that you are accessing the Basic 802.1Q VLAN Status page or if you
are changing the VLAN assignment method, select the Enable radio button and continue
with Step 7.
Otherwise, see Step 9.
A pop-up window opens, informing you that the current VLAN settings will be lost.
7. Click the YES button.
The pop-up window closes.
8. Click the Apply button.
Your settings are saved.
The Basic 802.1Q VLAN Identifier table displays.
9. Under each port to be added to a VLAN, enter the VLAN ID of the VLAN.
You can enter a VLAN ID from 1 to 4093. If all the VLANs share an uplink to the Internet
or servers, enter all in the VLAN ID field for the port that you want to use for the uplink.
Note: If ports are members of the same LAG, you must assign them to the same
VLAN.
10. Click the Apply button.
Your settings are saved.
Use VLANS for Traffic Segmentation
32

8-Port Easy Mount Gigabit Ethernet PoE+ Smart Managed Plus Switch
Create 802.1Q-Based VLANs in an Advanced Configuration
In an advanced 802.1Q-based VLAN configuration, you can assign ports on the switch to a
VLAN with an ID number in the range of 1–4093 and you can add tagged or untagged ports
to a VLAN. In addition, you can use port VLAN IDs (PVIDs). By default, all ports are untagged
members of VLAN 1.
To create 802.1Q-based VLANs in an advanced configuration:
1. Connect your computer to the same network as the switch.
You can use a WiFi or wired network connection, or connect directly to a switch that is
off-network using an Ethernet cable.
2. Launch a web browser.
3. In the address field of your web browser, enter the IP address of the switch.
If you do not know the IP address of the switch, see Access the Switch Using a Web
Browser on page 6.
The login window opens.
4. Enter the switch’s password in the password field.
The switch’s default password is password.
The Switch Information page displays.
5. Select VLAN > 802.1Q > Advanced > VLAN Configuration.
The Advanced 802.1Q VLAN Status page displays.
6. If this is the first time that you are accessing the Advanced 802.1Q VLAN Status page or if
you are changing the VLAN assignment method, select the Enable radio button and
continue with
Otherwise, see Step 9.
A pop-up window opens, informing you that the current VLAN settings will be lost.
7. Click the YES button.
The pop-up window closes.
8. Click the Apply button.
Your settings are saved.
The VLAN Identifier Setting table displays.
Step 7.
Use VLANS for Traffic Segmentation
33

8-Port Easy Mount Gigabit Ethernet PoE+ Smart Managed Plus Switch
9. In the VLAN ID field, enter a VLAN ID.
You can enter a VLAN ID from 1 to 4094.
10. Click the Add button.
The new VLAN is added to the VLAN Identifier Setting table.
After you create a new VLAN ID, use the VLAN membership option to add ports to the
VLAN. (Select VLAN > 802.1Q >
Tagged or Untagged Ports to an 802.1Q-Based VLAN on page 34.)
Advanced > VLAN Membership. See also Add
Note: To delete a VLAN, select the check box for the VLAN and click the
Delete button.
Add Tagged or Untagged Ports to an 802.1Q-Based VLAN
After you define a VLAN ID using the advanced 802.1Q VLAN option (see Create
802.1Q-Based VLANs in an Advanced Configuration on page 33), you must add ports to the
VLAN.
While you add ports to a VLAN, you can specify whether the ports must be tagged or
untagged. Port tagging allows a port to be associated with a particular VLAN and allows the
VLAN ID tag to be added to data packets that are sent through the port.
VLAN that must receive the data.
By default, all ports are untagged.
To add tagged or untagged ports to an 802.1Q-based VLAN:
1. Connect your computer to the same network as the switch.
You can use a WiFi or wired network connection, or connect directly to a switch that is
of
f-network using an Ethernet cable.
The tag identifies the
2. Launch a web browser.
3. In the address field of your web browser
Use VLANS for Traffic Segmentation
, enter the IP address of the switch.
34

8-Port Easy Mount Gigabit Ethernet PoE+ Smart Managed Plus Switch
If you do not know the IP address of the switch, see Access the Switch Using a Web
Browser on page 6.
The login window opens.
4. Enter the switch’
The switch’s default password is password.
The Switch Information page displays.
5. Select VLAN > 802.1Q >
You can select VLAN Membership only if you already enabled the advanced 802.1Q
VLAN option (see Create 802.1Q-Based VLANs in an Advanced Configuration on
page 33).
6. In the VLAN ID menu, select the VLAN.
7. Select the ports that you want to add to the VLAN by doing the following:
a. (Optional) In the Group Operation menu, select Untag All, T
All ports are either added to the VLAN (tagged or untagged) or removed from the
VLAN.
b. Select individual ports and assign them as tagged (T) or untagged (U) ports or
remove individual ports by selecting the check box under the port numbers.
s password in the password field.
Advanced > VLAN Membership.
ag all, or Remove all.
By default, all ports are untagged.
c. Click the Apply button.
Your settings are saved. In the VLAN Membership table, the ports display as
members of the VLAN.
8. T
o select ports for another VLAN, repeat Step 6 and Step 7.
9. T
o verify your selections, select VLAN > 802.1Q > Advanced > VLAN Configuration.
The Advanced 802.1Q VLAN Status page displays. In the VLAN Identifier Setting table,
the ports display next to the VLAN or VLANs to which they were added.
Specify a Port PVID for an 802.1Q-Based VLAN
A default port VLAN ID (PVID) is a VLAN ID tag that the switch assigns to data packets it
receives that are not already addressed (tagged) for a particular VLAN. If you connect a
computer on port 6 and you want it to be a part of VLAN 2, configure port 6 to automatically
add a PVID of 2 to all data received from the computer. This step ensures that the data from
Use VLANS for Traffic Segmentation
35

8-Port Easy Mount Gigabit Ethernet PoE+ Smart Managed Plus Switch
the computer on port 6 can be seen only by other members of VLAN 2. You can assign only
one PVID to a port.
To assign a PVID to one or more ports:
1. Connect your computer to the same network as the switch.
You can use a WiFi or wired network connection, or connect directly to a switch that is
of
f-network using an Ethernet cable.
2. Launch a web browser.
3. In the address field of your web browser
, enter the IP address of the switch.
If you do not know the IP address of the switch, see Access the Switch Using a Web
Browser on page 6.
The login window opens.
4. Enter the switch’
s password in the password field.
The switch’s default password is password.
The Switch Information page displays.
5. Select VLAN > 802.1Q >
Advanced > Port PVID.
You can select Port PVID only if you already enabled the advanced 802.1Q VLAN option
(see Create 802.1Q-Based VLANs in an Advanced Configuration on page 33).
6. Select the check boxes for one or more ports.
7. Enter the PVID.
You can enter a PVID only for a VLAN that already exists.
8. Click the Apply button.
Your settings are saved.
Use VLANS for Traffic Segmentation
36

8-Port Easy Mount Gigabit Ethernet PoE+ Smart Managed Plus Switch
Manage the Voice VLAN
You can select one VLAN as the voice VLAN, select the Class of Service (CoS) for voice
traffic, and enable or disable the voice VLAN for specific ports that carry traffic from IP
phones.
The voice VLAN feature can help ensure that the sound quality of an IP phone is
safeguarded from deteriorating when the data traffic on the port is high.
The following are two operational modes for IP phones:
• IP phones that are configured with the VLAN mode enabled ensure that the phone uses
tagged packets for all communications.
• IP phones that are configured with the VLAN mode disabled ensure that the phone uses
untagged packets for all communications.
Select the Voice VLAN and Class of Service
A single VLAN can function as the voice VLAN. By default, VLAN 1 is the voice VLAN. If you
created other VLANs, you can select another VLAN as the voice VLAN.
To select the voice VLAN and Class of Service:
1. Connect your computer to the same network as the switch.
You can use a WiFi or wired network connection, or connect directly to a switch that is
off-network using an Ethernet cable.
2. Launch a web browser.
3. In the address field of your web browser, enter the IP address of the switch.
If you do not know the IP address of the switch, see Access the Switch Using a Web
Browser on page 6.
The login window opens.
4. Enter the switch’s password in the password field.
The switch’s default password is password.
The Switch Information page displays.
5. Select VLAN > Voice VLAN > Properties.
The Voice VLAN Properties page displays.
6. In the Voice VLAN ID menu, select the voice VLAN.
By default, VLAN 1 is the voice VLAN.
7. In the Class of Service menu, select the Class of Service (CoS) tag that applies to traffic on
the voice VLAN.
The CoS tag is a value from 0 to 7 that must be reassigned for packets that are received
on the voice VLAN. The default value is 6.
Use VLANS for Traffic Segmentation
37

8-Port Easy Mount Gigabit Ethernet PoE+ Smart Managed Plus Switch
8. Click the Apply button.
Your settings are saved.
Enable the Voice VLAN for Ports
By default, the voice VLAN is disabled for all ports.
To enable the voice VLAN for one or more ports:
1. Connect your computer to the same network as the switch.
You can use a WiFi or wired network connection, or connect directly to a switch that is
of
f-network using an Ethernet cable.
2. Launch a web browser.
3. In the address field of your web browser
If you do not know the IP address of the switch, see Access the Switch Using a Web
Browser on page 6.
, enter the IP address of the switch.
The login window opens.
4. Enter the switch’
s password in the password field.
The switch’s default password is password.
The Switch Information page displays.
5. Select VLAN > V
oice VLAN > Port Settings.
6. Select the check boxes for one or more ports.
To select all ports, select the check box in the table heading.
7. In the V
oice VLAN Mode menu, select Enable.
8. Click the Apply button.
Your settings are saved.
Use VLANS for Traffic Segmentation
38

8-Port Easy Mount Gigabit Ethernet PoE+ Smart Managed Plus Switch
Manage the OUI Table
Device hardware manufacturers can include an Organizationally Unique Identifier (OUI) in a
network adapter to help identify a hardware device. The OUI is a unique 24-bit number
assigned by the IEEE registration authority. The switch comes preconfigured with OUIs that
identify the IP phone manufacturer.
You can change an existing OUI, add a new OUI and description to identify the IP phones on
your network, or remove an OUI that you no longer need.
Add an OUI Prefix to the OUI Table
To add an OUI prefix to the OUI table:
1. Connect your computer to the same network as the switch.
You can use a WiFi or wired network connection, or connect directly to a switch that is
of
f-network using an Ethernet cable.
2. Launch a web browser.
3. In the address field of your web browser
, enter the IP address of the switch.
If you do not know the IP address of the switch, see Access the Switch Using a Web
Browser on page 6.
The login window opens.
4. Enter the switch’
The switch’s default password is password.
The Switch Information page displays.
5. Select VLAN > V
6. In the Telephony (OUIs) field, specify the OUI prefix to be added in the format AA:BB:CC.
7. In the Description field, enter the description for the OUI prefix.
s password in the password field.
oice VLAN > OUI Table.
The maximum length of description is 32 characters.
8. Click the Add button.
Your settings are saved. The OUI prefix is added.
Use VLANS for Traffic Segmentation
39

8-Port Easy Mount Gigabit Ethernet PoE+ Smart Managed Plus Switch
Change an OUI Prefix in the OUI Table
To change an existing OUI prefix in the OUI table:
1. Connect your computer to the same network as the switch.
You can use a WiFi or wired network connection, or connect directly to a switch that is
of
f-network using an Ethernet cable.
2. Launch a web browser.
3. In the address field of your web browser
If you do not know the IP address of the switch, see Access the Switch Using a Web
Browser on page 6.
The login window opens.
, enter the IP address of the switch.
4. Enter the switch’
s password in the password field.
The switch’s default password is password.
The Switch Information page displays.
5. Select VLAN > V
oice VLAN > OUI Table.
6. Select the check box for the OUI prefix.
7. In the T
elephony (OUIs) field, change actual prefix.
The prefix must remain in the format AA:BB:CC.
8. In the Description field, change the description.
The maximum length of description is 32 characters.
9. Click the Apply button.
Your settings are saved.
Delete One or More OUI Prefixes From the OUI Table
To delete one or more OUI prefixes from the OUI table:
1. Connect your computer to the same network as the switch.
You can use a WiFi or wired network connection, or connect directly to a switch that is
of
f-network using an Ethernet cable.
Use VLANS for Traffic Segmentation
40

8-Port Easy Mount Gigabit Ethernet PoE+ Smart Managed Plus Switch
2. Launch a web browser.
3. In the address field of your web browser, enter the IP address of the switch.
If you do not know the IP address of the switch, see Access the Switch Using a Web
Browser on page 6.
The login window opens.
4. Enter the switch’s password in the password field.
The switch’s default password is password.
The Switch Information page displays.
5. Select VLAN > Voice VLAN > OUI Table.
The OUI Table page displays.
6. Select the check boxes for one or more OUI prefixes.
7. Click the Delete button.
Your settings are saved. The OUI prefixes are removed.
Use VLANS for Traffic Segmentation
41

5. Manage and Monitor the Switch
This chapter covers the following topics:
• Manage Flow Control
• Manage the Port Speed
• Specify a Port Description
• Enable Loop Detection
• Control the Port LEDs
• Enable the Power Saving Mode
• Change the Switch Management Mode
• Manage Access Control
• Upgrade the Firmware
• Reboot the Switch
• Save the Switch Configuration
• Restore a Saved Switch Configuration
• Restore Factory Default Settings
• Enable Port Mirroring
• View Switch Information
• View Port Statistics
5
42

8-Port Easy Mount Gigabit Ethernet PoE+ Smart Managed Plus Switch
Manage Flow Control
Flow control works by pausing a port if the port becomes oversubscribed and dropping all
traffic for small bursts of time during the congestion condition. You can enable or disable
IEEE 802.3x flow control. By default, flow control is disabled.
To manage flow control:
1. Connect your computer to the same network as the switch.
You can use a WiFi or wired network connection, or connect directly to a switch that is
of
f-network using an Ethernet cable.
2. Launch a web browser.
3. In the address field of your web browser
If you do not know the IP address of the switch, see Access the Switch Using a Web
Browser on page 6.
The login window opens.
, enter the IP address of the switch.
4. Enter the switch’
The switch’s default password is password.
The Switch Information page displays.
5. Select System > Management > Port Status.
6. Select the check boxes for one or more ports.
7. In the Flow Control menu, select Enable or Disable.
8. Click the Apply button.
Your settings are saved.
s password in the password field.
Manage and Monitor the Switch
43

8-Port Easy Mount Gigabit Ethernet PoE+ Smart Managed Plus Switch
Manage the Port Speed
By default, the port speed on all ports is set automatically after the switch determines the
speed using autonegotiation with the link partner. You can select a specific port speed setting
for each port, or disable a port by shutting it down manually.
To specify the port speed or shut down ports:
1. Connect your computer to the same network as the switch.
You can use a WiFi or wired network connection, or connect directly to a switch that is
of
f-network using an Ethernet cable.
2. Launch a web browser.
3. In the address field of your web browser
If you do not know the IP address of the switch, see Access the Switch Using a Web
Browser on page 6.
The login window opens.
, enter the IP address of the switch.
4. Enter the switch’
The switch’s default password is password.
The Switch Information page displays.
5. Select System > Management > Port Status.
6. Select the check boxes for one or more ports.
7. In the Speed menu, select one of the following options:
• Auto. The port speed is set automatically after the switch determines the speed using
autonegotiation with the link partner. This is the default setting.
• Disable.
• 10M half.
• 10M full.
• 100M hull.
• 100M full.
s password in the password field.
The port is shut down.
The port is forced to function at 10 Mbps with half-duplex.
The port is forced to function at 10 Mbps with full-duplex.
The port is forced to function at 100 Mbps with half-duplex.
The port is forced to function at 100 Mbps with full-duplex.
Manage and Monitor the Switch
44

8-Port Easy Mount Gigabit Ethernet PoE+ Smart Managed Plus Switch
8. To configure other ports with a different setting, repeat Step 6 and Step 7.
9. Click the Apply button.
Your settings are saved.
Specify a Port Description
You can add a description for a port. By default, no port descriptions exist and the ports are
indicated by their numbers only.
To specify a port description:
1. Connect your computer to the same network as the switch.
You can use a WiFi or wired network connection, or connect directly to a switch that is
of
f-network using an Ethernet cable.
2. Launch a web browser
3. In the address field of your web browser
If you do not know the IP address of the switch, see Access the Switch Using a Web
Browser on page 6.
The login window opens.
4. Enter the switch’
The switch’s default password is password.
The Switch Information page displays.
5. Select System > Management > Port Status.
.
, enter the IP address of the switch.
s password in the password field.
6. Select the check box for a port.
7. In the Port Description field, enter a description.
8. Click the Apply button.
Your settings are saved.
Manage and Monitor the Switch
45

8-Port Easy Mount Gigabit Ethernet PoE+ Smart Managed Plus Switch
Enable Loop Detection
If loop detection is enabled and the switch detects a loop, both LEDs of a port blink at a
constant speed. By default, loop detection is disabled.
To enable loop detection:
1. Connect your computer to the same network as the switch.
You can use a WiFi or wired network connection, or connect directly to a switch that is
off-network using an Ethernet cable.
2. Launch a web browser.
3. In the address field of your web browser, enter the IP address of the switch.
If you do not know the IP address of the switch, see Access the Switch Using a Web
Browser on page 6.
The login window opens.
4. Enter the switch’s password in the password field.
The switch’s default password is password.
The Switch Information page displays.
5. Select System > Management > Loop Detection.
The Loop Detection page displays.
6. Select the Enable radio button.
7. Click the Apply button.
Your settings are saved.
Control the Port LEDs
By default, the port Link Speed LED and port Activity LED light when a port is in use. You can
turn off the port LEDs entirely or you can turn off the port Activity LED only.
To control the switch LEDs:
1. Connect your computer to the same network as the switch.
You can use a WiFi or wired network connection, or connect directly to a switch that is
off-network using an Ethernet cable.
2. Launch a web browser.
3. In the address field of your web browser, enter the IP address of the switch.
If you do not know the IP address of the switch, see Access the Switch Using a Web
Browser on page 6.
Manage and Monitor the Switch
46

8-Port Easy Mount Gigabit Ethernet PoE+ Smart Managed Plus Switch
The login window opens.
4. Enter the switch’
The switch’s default password is password.
The Switch Information page displays.
5. Select System > Management > Port LED Control.
6. Select one of the following radio buttons:
• Link Speed +
port is in use. This is the default setting.
• Link Speed Only.
Activity LED remains off.
• Off. Both the port Link Speed LED and port
use.
7. Click the Apply button.
Your settings are saved.
s password in the password field.
Activity. The port Link Speed LED and port Activity LED light when a
The port Link Speed LED lights when a port is in use but the port
Activity LED remain off when a port is in
Enable the Power Saving Mode
The power saving mode enables the IEEE 802.3az Energy Efficient Ethernet (EEE) function,
cable length power saving, and link-up and link-down power saving:
• EEE. Combines the Energy Efficient Ethernet (EEE) 802.3 MAC sublayer with the
100BASE-TX, 1000BASE-T, and 10GBASE-T physical layers to support operation in Low
Power Idle (LPI) mode. When LPI mode is enabled, systems on both sides of the link can
disable portions of their functionality and save power during periods of low link utilization.
• Short Cable Power Saving. Dynamically detects and adjusts power that is required for
the detected cable length.
• Link-Down Power Saving. Reduces the power consumption considerably when the
network cable is disconnected. When the network cable is reconnected, the switch
detects an incoming signal and restores normal power
To manage the power saving mode:
1. Connect your computer to the same network as the switch.
You can use a WiFi or wired network connection, or connect directly to a switch that is
of
f-network using an Ethernet cable.
2. Launch a web browser.
3. In the address field of your web browser
, enter the IP address of the switch.
.
Manage and Monitor the Switch
47

8-Port Easy Mount Gigabit Ethernet PoE+ Smart Managed Plus Switch
If you do not know the IP address of the switch, see Access the Switch Using a Web
Browser on page 6.
The login window opens.
4. Enter the switch’s password in the password field.
The switch’s default password is password.
The Switch Information page displays.
5. Select System > Management > Power Saving Mode.
The Power Saving Mode page displays.
6. Select one of the following radio buttons:
• Enable. The power saving mode is enabled. This is the default setting.
• Disable. The power saving mode is disabled.
7. Click the Apply button.
Your settings are saved.
Change the Switch Management Mode
By default, you can manage the switch through a web browser and through the ProSAFE
Plus Utility . You can change the switch management mode so that only management through
a web browser is enabled and access through the ProSAFE Plus Utility is disabled. Even if
you disable management through the ProSAFE Plus Utility, the switch and its IP address on
the network are still discoverable through the ProSAFE Plus Utility.
To change the switch management mode:
1. Connect your computer to the same network as the switch.
You can use a WiFi or wired network connection, or connect directly to a switch that is
off-network using an Ethernet cable.
2. Launch a web browser.
3. In the address field of your web browser, enter the IP address of the switch.
If you do not know the IP address of the switch, see Access the Switch Using a Web
Browser on page 6.
The login window opens.
4. Enter the switch’s password in the password field.
The switch’s default password is password.
The Switch Information page displays.
5. Select System > Management > Switch Management Mode.
Manage and Monitor the Switch
48

8-Port Easy Mount Gigabit Ethernet PoE+ Smart Managed Plus Switch
6. Select one of the following radio buttons:
eb browser Only. You can configure the switch through a web browser only.
• W
• W
eb browser GUI and ProSAFE Utility . You can configure the switch through a web
browser or through the ProSAFE Plus Utility. This is the default setting.
7. Click the Apply button.
Your settings are saved.
Manage Access Control
Access control allows you to control which devices can access the switch over a web
browser for management purposes. By default, access control is disabled. By adding one or
more devices to the Access Control table, access control is enabled and only devices in the
table are allowed to access the switch over a web browser.
Add Devices to the Access Control Table
Use the following guidelines for adding devices to the Access Control table:
• The IP address must be a unicast address.
• The subnet mask must be valid.
• T
o allow all devices under a subnet, enter zero for the host address, that is, the host ID
portion of the IP address. For example, if you enter 192.168.100.0, all devices in the
192.168.100.1–192.168.100.254 range are allowed to access the switch over a web
browser.
To add devices to the Access Control table:
1. Connect your computer to the same network as the switch.
You can use a WiFi or wired network connection, or connect directly to a switch that is
of
f-network using an Ethernet cable.
2. Launch a web browser.
3. In the address field of your web browser
If you do not know the IP address of the switch, see Access the Switch Using a Web
Browser on page 6.
The login window opens.
, enter the IP address of the switch.
4. Enter the switch’
s password in the password field.
Manage and Monitor the Switch
49

8-Port Easy Mount Gigabit Ethernet PoE+ Smart Managed Plus Switch
The switch’s default password is password.
The Switch Information page displays.
5. Select System > Maintenance >
Access Control.
6. Configure the following settings:
• Source IP
Address. Enter the IP address of the devices or range of devices that
must be allowed to access the switch over a web browser.
• Mask. Enter the subnet mask that is associated with the IP address.
7. Click the Add button.
Your settings are saved. Access control is now enabled.
Remove Devices From the Access Control Table
You can remove a device from the Access Control table. If you remove all devices from the
table, access control is disabled.
To remove devices from the Access Control table:
1. Connect your computer to the same network as the switch.
You can use a WiFi or wired network connection, or connect directly to a switch that is
of
f-network using an Ethernet cable.
2. Launch a web browser.
3. In the address field of your web browser
, enter the IP address of the switch.
If you do not know the IP address of the switch, see Access the Switch Using a Web
Browser on page 6.
The login window opens.
4. Enter the switch’
s password in the password field.
The switch’s default password is password.
The Switch Information page displays.
5. Select System > Maintenance >
Access Control.
Manage and Monitor the Switch
50

8-Port Easy Mount Gigabit Ethernet PoE+ Smart Managed Plus Switch
6. Select the check boxes for one or more devices.
To select all devices in the table, select the check box in the table heading.
7. Click the Delete button.
Your settings are saved. If you removed all devices from the table, access control is
disabled.
Upgrade the Firmware
You can check for the latest firmware version for your switch by visiting
netgear.com/support/download/ and entering in your product model number in the Enter a
Product Name/Model Number field and then clicking the magnifying glass to search.
Read the new firmware release notes to find out if you must reconfigure the switch after
upgrading.
versions on your switch.
To upgrade the firmware:
1. Connect your computer to the same network as the switch.
You can use a WiFi or wired network connection, or connect directly to a switch that is
of
2. Launch a web browser.
3. In the address field of your web browser
If you do not know the IP address of the switch, see Access the Switch Using a Web
Browser on page 6.
The login window opens.
4. Enter the switch’
The switch’s default password is password.
The Switch Information page displays.
5. Select System > Maintenance > Firmware Upgrade.
The Firmware Upgrade page displays.
The firmware upgrade method depends on the current firmware and boot loader
f-network using an Ethernet cable.
, enter the IP address of the switch.
s password in the password field.
6. Click the Browse button and locate and select the new firmware image file.
7. Click the Apply button.
The upgrade starts.
Manage and Monitor the Switch
51

8-Port Easy Mount Gigabit Ethernet PoE+ Smart Managed Plus Switch
WARNING:
To avoid the risk of corrupting the firmware, do not interrupt the
upgrade. For example, do not turn off the switch or disconnect it.
When the upgrade is complete, your switch restarts. The upgrade process typically takes
about three minutes.
Reboot the Switch
You can reboot the switch remotely.
To reboot the switch:
1. Connect your computer to the same network as the switch.
You can use a WiFi or wired network connection, or connect directly to a switch that is
off-network using an Ethernet cable.
2. Launch a web browser.
3. In the address field of your web browser, enter the IP address of the switch.
If you do not know the IP address of the switch, see Access the Switch Using a Web
Browser on page 6.
The login window opens.
4. Enter the switch’s password in the password field.
The switch’s default password is password.
The Switch Information page displays.
5. Select System > Maintenance > Device Reboot.
The Device Reboot page displays.
6. Select the check box.
7. Click the Apply button.
The switch reboots.
Save the Switch Configuration
You can save the switch configuration as a file. We recommend that you save the
configuration. Then you can quickly restore the switch configuration if you change the
settings and then decide to return the switch to its previous settings.
Manage and Monitor the Switch
52

8-Port Easy Mount Gigabit Ethernet PoE+ Smart Managed Plus Switch
To save the switch configuration:
1. Connect your computer to the same network as the switch.
You can use a WiFi or wired network connection, or connect directly to a switch that is
off-network using an Ethernet cable.
2. Launch a web browser.
3. In the address field of your web browser, enter the IP address of the switch.
If you do not know the IP address of the switch, see Access the Switch Using a Web
Browser on page 6.
The login window opens.
4. Enter the switch’s password in the password field.
The switch’s default password is password.
The Switch Information page displays.
5. Select System > Maintenance > Save Configuration.
The Save Configuration page displays.
6. Click the Save button.
A pop-up window opens. Depending on the settings of your browser, you can select a
location to save the switch configuration file (a .cfg file).
Follow the directions of your browser to save the switch configuration.
Restore a Saved Switch Configuration
You can restore switch configuration that you saved.
To restore the switch configuration that you saved:
1. Connect your computer to the same network as the switch.
You can use a WiFi or wired network connection, or connect directly to a switch that is
off-network using an Ethernet cable.
2. Launch a web browser.
3. In the address field of your web browser, enter the IP address of the switch.
If you do not know the IP address of the switch, see Access the Switch Using a Web
Browser on page 6.
The login window opens.
4. Enter the switch’s password in the password field.
The switch’s default password is password.
The Switch Information page displays.
Manage and Monitor the Switch
53

8-Port Easy Mount Gigabit Ethernet PoE+ Smart Managed Plus Switch
5. Select System > Maintenance > Restore Configuration.
The Restore Configuration page displays.
6. Click the Browse button and locate and select the saved configuration file (a .cfg file).
7. Click the Apply button.
The saved configuration is restored to the switch.
Restore Factory Default Settings
You can return the switch to its factory settings.
To restore factory settings:
1. Connect your computer to the same network as the switch.
You can use a WiFi or wired network connection, or connect directly to a switch that is
off-network using an Ethernet cable.
2. Launch a web browser.
3. In the address field of your web browser, enter the IP address of the switch.
If you do not know the IP address of the switch, see Access the Switch Using a Web
Browser on page 6.
The login window opens.
4. Enter the switch’s password in the password field.
The switch’s default password is password.
The Switch Information page displays.
5. Select System > Maintenance > Factory Default.
The Factory Default page displays.
6. Select the check box.
7. Click the Apply button.
The switch returns to its factory settings. The switch reboots to load the restored
configuration.
Manage and Monitor the Switch
54

8-Port Easy Mount Gigabit Ethernet PoE+ Smart Managed Plus Switch
Enable Port Mirroring
Port mirroring lets you mirror the incoming (ingress) and outgoing (egress) traffic of a single
port to a predefined destination port.
To enable port mirroring:
1. Connect your computer to the same network as the switch.
You can use a WiFi or wired network connection, or connect directly to a switch that is
of
f-network using an Ethernet cable.
2. Launch a web browser.
3. In the address field of your web browser
If you do not know the IP address of the switch, see Access the Switch Using a Web
Browser on page 6.
The login window opens.
, enter the IP address of the switch.
4. Enter the switch’
The switch’s default password is password.
The Switch Information page displays.
5. Select System > Monitoring > Mirroring.
6. In the Destination Port section, select the destination port by selecting the check box under
the port number.
You can select a single destination port only . You cannot select a destination port that is a
member of a LAG.
7. In the Source Port section, select the source port by selecting the check box under the port
number
.
s password in the password field.
You can select a single source port only. You cannot select a source port that is a
member of a LAG.
8. Select the Mirror Status Enable radio button.
9. Click the Apply button.
Your settings are saved.
Manage and Monitor the Switch
55

8-Port Easy Mount Gigabit Ethernet PoE+ Smart Managed Plus Switch
View Switch Information
You can view the switch product name (model), switch name, MAC address, firmware
version, DHCP mode, and IP address information.
To view information about the switch:
1. Connect your computer to the same network as the switch.
You can use a WiFi or wired network connection, or connect directly to a switch that is
of
f-network using an Ethernet cable.
2. Launch a web browser.
3. In the address field of your web browser
If you do not know the IP address of the switch, see Access the Switch Using a Web
Browser on page 6.
The login window opens.
, enter the IP address of the switch.
4. Enter the switch’
The switch’s default password is password.
Note: To navigate to the Switch Information page when you are already
logged in to the switch, select System > Management > Switch
Information.
s password in the password field.
Manage and Monitor the Switch
56

8-Port Easy Mount Gigabit Ethernet PoE+ Smart Managed Plus Switch
View Port Statistics
You can view port statistics and reset the port counters.
To view port statistics or clear the port counters:
1. Connect your computer to the same network as the switch.
You can use a WiFi or wired network connection, or connect directly to a switch that is
of
f-network using an Ethernet cable.
2. Launch a web browser.
3. In the address field of your web browser
If you do not know the IP address of the switch, see Access the Switch Using a Web
Browser on page 6.
The login window opens.
, enter the IP address of the switch.
4. Enter the switch’
The switch’s default password is password.
5. Select System > Monitoring > Port Statistics.
For each port, the page displays the following information:
• Bytes Received.
• Bytes Sent.
• CRC Error Packets.
port.
6. T
o clear all port counter, click the Clear Counters button.
s password in the password field.
The total number of data bytes received on the port.
The total number of data bytes sent from the port.
The total number of packets with a CRC error received on the
The port counters are reset to 0.
Manage and Monitor the Switch
57

6. Manage Power over Ethernet
This chapter covers the following topics:
• PoE Overview
• Device Class Power Requirements
• Power Allocation and Power Budget
• Manage and View the PoE Port Configuration
• Reset One or More PoE+ Ports
6
58

8-Port Easy Mount Gigabit Ethernet PoE+ Smart Managed Plus Switch
PoE Overview
The switch includes eight Power over Ethernet plus (PoE+) ports. The switch can supply up
to 30W PoE+ (IEEE 802.3at) to an individual PoE+ port, with a total maximum PoE power
budget of 124W across all active PoE+ ports.
By default, supplied power is prioritized in ascending port order, up to the total power budget
of the device. If the power requirements for the attached devices exceed the total power
budget of the switch, the power to the device on the highest-numbered PoE+ port is disabled
to make sure that the devices connected to the higher-priority
, lower-numbered PoE+ ports
are supported first.
It is important to note that although a device is listed as an 802.3at (PoE+) powered or
802.3af (PoE) powered device, it might not require the maximum power limit that is specified.
Many devices require less power
, allowing all eight PoE ports to be active simultaneously,
when the devices correctly report their PoE class to the switch.
Device Class Power Requirements
PoE and PoE+ use Ethernet cables to supply power to PoE-capable devices on the network,
such as WiFi access points, IP cameras, VoIP phones, and switches. The switch is compliant
with the IEEE 802.3at standard (PoE+) and backward compatible with the IEEE 802.3af
standard (PoE). The switch can pass power through to any powered device (PD) that
supports these standards. PoE and PoE+ let you power such devices without the need for a
separate power supply.
The switch supports a Plug-and-Play process by which it detects the type of device that is
connected to one of its PoE+ ports and whether that device needs power and how much so
that the switch can provide the correct power the device.
During the Plug-and-Play process, the connected device can provide its Class response to
the switch in many ways, depending on how the vendor programmed the device.
The following table shows the device classes for PoE+ devices adhering to the IEEE 802.3at
standard.
The device classes for PoE devices adhering to the IEEE 802.3af standard are
identical with the exception that Device Class 4 is not supported.
Table 1. PoE and PoE+ device class power allocation
Device
Class
0 PoE and PoE+ 0.44W–12.95W 15.4W 16.2W
Standard Range of Power
Delivered to the
Powered Device
Minimum Output at
PoE Switch Port
(Minimum Allocated)
Maximum Output at
PoE Switch Port
(Maximum Allocated)
1 PoE and PoE+ 0.44W–3.84W 4.0W 4.2W
2 PoE and PoE+ 3.84W–6.49W 7.0W 7.4W
3 PoE and PoE+ 6.49W–12.95W 15.4W 16.2W
4 PoE+ only 12.95W–25.5W 30.0W 31.6W
Manage Power over Ethernet
59

8-Port Easy Mount Gigabit Ethernet PoE+ Smart Managed Plus Switch
Power Allocation and Power Budget
The switch is a smart switch in that it can allocate the required power to a connected device
by using a prioritization scheme: By default, power is supplied in ascending port order (that is,
lower port numbers are served first) until the power budget is consumed and insufficient
power remains to allocate to the next device. When less than 7W of PoE power is available
on a port, the port PoE LED lights yellow, and the attached device does not receive power
from the port. However, the switch continues to send data through the port connection.
The switch is also a smart switch in that it can override the IEEE power classification of a
powered device (PD): If the PD consumes less power than required by its power
classification, the switch provides only the power that the PD consumes instead of the power
that is required by the PD’s power classification.
The total available power budget for all eight PoE+ ports is 124W. If some PoE+ ports are in
use and deliver power, you can calculate the available power budget for the other PoE+ ports
by subtracting the consumed (that is, delivered power) from the total available power budget.
An example:
Port 1 delivers 4.4W to a PD. The available power budget is 119.6W (124W–4.4W).
Another example:
A Class 4 PD is attached to Port 1, a Class 2 PD to Port 2, and another Class 4 PD to Port 3.
However, the PDs consume less power than defined by their classes: The PD attached to
Port 1 consumes 7.3W, the PD attached to Port 2 consumes 4.7W, and the PD attached to
Port 3 consumes 8.9W. So even though the switch provides power to two Class 4 devices
and one Class 3 device, the available power budget is 103.1W (124W–7.3–4.7–8.9W).
To determine the delivered power by PoE+ ports:
1. Connect your computer to the same network as the switch.
You can use a WiFi or wired network connection, or connect directly to a switch that is
off-network using an Ethernet cable.
2. Launch a web browser.
3. In the address field of your web browser, enter the IP address of the switch.
If you do not know the IP address of the switch, see Access the Switch Using a Web
Browser on page 6.
The login window opens.
4. Enter the switch’s password in the password field.
The switch’s default password is password.
The Switch Information page displays.
5. Select System > PoE.
Manage Power over Ethernet
60

8-Port Easy Mount Gigabit Ethernet PoE+ Smart Managed Plus Switch
The delivered power is stated in the Output Power (W) column (4.6W for Port 1 in the
previous figure).
Manage and View the PoE Port Configuration
The switch provides eight PoE+ ports (1–8) that comply with the IEEE 802.3at standard
(PoE+) and are backward compatible with the IEEE 802.3af standard (PoE).
To configure and view the PoE+ port settings:
1. Connect your computer to the same network as the switch.
You can use a WiFi or wired network connection, or connect directly to a switch that is
of
f-network using an Ethernet cable.
2. Launch a web browser.
3. In the address field of your web browser
If you do not know the IP address of the switch, see Access the Switch Using a Web
Browser on page 6.
The login window opens.
4. Enter the switch’
The switch’s default password is password.
The Switch Information page displays.
5. Select System > PoE.
s password in the password field.
, enter the IP address of the switch.
Manage Power over Ethernet
61

8-Port Easy Mount Gigabit Ethernet PoE+ Smart Managed Plus Switch
6. Select the check boxes for the PoE+ ports that you want to configure or select the check box
in the heading to configure all eight PoE+ ports.
7. Configure the settings as described in the following table.
The settings that you configure apply to all selected PoE+ ports.
Menu Item Description
Port Power Select the administrative mode of the port:
• Enable. The port’s capacity to deliver power is enabled. This is the default
setting.
• Disable. The port’s capacity to deliver power is disabled.
Port Priority The port priority determines which ports can still deliver power after the total
power delivered by the switch exceeds the total power budget of 124W. (In such a
situation, the switch might not be able to deliver power to all connected devices.)
If
the same priority applies to two ports, the lower-numbered port receives higher
priority.
Select one of the following priorities:
• Low. Low priority. This is the default setting.
• High. High priority.
• Critical. Critical priority.
Power Mode Select the one of the following power modes:
• 802.3af. The port is powered in and limited to the IEEE 802.3af mode. A PD
that requires IEEE 802.3at does not receive power if the port functions in
IEEE 802.3af mode.
• Legacy. The port is powered using high-inrush current, which is used by
legacy PDs that require more than 15W to power up.
• Pre-802.3at. The port is initially powered in the IEEE 802.3af mode and,
before 75 msec pass, is switched to the high-power IEEE 802.3at mode.
Select this mode if the PD does not perform Layer 2 classification or if switch
performs 2-event Layer 1 classification.
• 802.3at. The port is powered in the IEEE 802.3at mode. This is the default
mode. In this mode, if the switch detects that the attached PD is not a Class
4 device, the PD does not receive power from the switch.
Power Limit Type The power limit type controls the maximum power that a port can deliver. Select
one of the following types:
• None. The port draws up to Class 0 maximum power in low power mode and
up to Class 4 maximum power in high power mode.
• Class. The port power limit is equal to the class of the attached PD.
• User. The port power limit is equal to the value that is specified in the
Power
Limit(W) field. This is the default setting.
Note: If a PD does not report its class correctly, use of these options can preserve
additional PoE power by preventing the switch from delivering more power than the
PD requires. However, depending on which option you select, a PD that does not
report its class correctly might not power up at all.
Manage Power over Ethernet
62

8-Port Easy Mount Gigabit Ethernet PoE+ Smart Managed Plus Switch
Menu Item Description
Power Limit (W) Enter the maximum power (in watts) that the port can deliver.
The range is 3.0–30.0W, with 0.1W steps. The default is 30W.
Detection Type The detection type specifies how the port detects the attached PD. Select one of
the following types:
• IEEE 802. The port performs a 4-point resistive detection. This is the default
setting.
• 4pt 802.3af + Legacy. The port performs a 4-point resistive detection, and if
required, continues with legacy detection.
• Legacy. The port performs legacy detection.
8. Click the Apply button.
Your settings are saved.
The following table describes the nonconfigurable fields on the PoE Port Configuration
page.
Field Description
Class The class defines the range of power a powered device (PD) is drawing from the
switch. The class definitions are as follows:
• 0: 0.44–16.2W
• 1: 0.44–4.2W
• 2: 0.44–7.4W
• 3: 0.44–16.2W
• 4: 0.44–31.6W
• Unknown. The class cannot be detected, or no PD is attached to the port.
Output Voltage (Volts) The voltage that is delivered to the PD in volts.
Output Current (mA) The current that is delivered to the PD in mA.
Output Power (W) The power that is delivered to the PD in watts.
Temperature The temperature detected at the port, measured in degrees Celsius.
Status The operational status of the port. The possible values are as follows:
• Disabled. No power is delivered.
• Delivering Power. Power is being drawn by the PD.
• Requesting Power. The port is requesting power.
• Fault. A problem occurred with the power.
• Test. The port is in test mode.
• Other Fault. The port is idle because of an error condition.
• Searching. The port is not in one of the other states in this list.
Manage Power over Ethernet
63

8-Port Easy Mount Gigabit Ethernet PoE+ Smart Managed Plus Switch
Field Description
Fault Status The error description when the PoE port is in a fault state. The possible values are
as follows:
• No Error. The port is not in any error state and can provide power.
• MPS Absent. The port detected the absence of the main power supply,
preventing the port from providing power.
• Short. The port detected a short circuit condition, preventing the port from
providing power.
• Overload. The PD that is connected to the port attempts to draw more power
than allowed by the port’s settings, preventing the port from providing power
at all.
• Power Denied. The port was denied power because of a shortage of power
or because of an administrative condition. In this condition, the port cannot
provide power.
Reset One or More PoE+ Ports
You can forcibly reset one or more PoE+ ports on the switch. If a PoE device is attached to the
port, the device restarts. Resetting a PoE+ port does not affect its data link, so if a non-PoE
device is attached to the port, the device is not affected and does not restart.
To configure PoE+ port settings:
1. Connect your computer to the same network as the switch.
You can use a WiFi or wired network connection, or connect directly to a switch that is
off-network using an Ethernet cable.
2. Launch a web browser.
3. In the address field of your web browser, enter the IP address of the switch.
If you do not know the IP address of the switch, see Access the Switch Using a Web
Browser on page 6.
The login window opens.
4. Enter the switch’s password in the password field.
The switch’s default password is password.
The Switch Information page displays.
5. Select System > PoE.
The PoE Port Configuration page displays.
6. Select the check boxes for the PoE+ ports that you want to reset or select the check box in
the heading to reset all eight PoE+ ports.
7. Click the Power Cycle Port(s) button.
The ports are reset.
Manage Power over Ethernet
64

7. Diagnostics and Troubleshooting
This chapter covers the following topics:
• Test Cable Connections
• Resolve a Subnet Conflict to Access the Switch
7
65

8-Port Easy Mount Gigabit Ethernet PoE+ Smart Managed Plus Switch
Test Cable Connections
You can use the cable diagnostic feature to easily find out the health status of network
cables. If any problems exist, this feature helps quickly locate the point where the cabling
fails, allowing connectivity issues to be fixed much faster, potentially saving technicians hours
of troubleshooting.
If an error is detected, the distance at which the fault is detected is stated in meters. (This is
the distance from the port.)
To test a cable connection:
1. Connect your computer to the same network as the switch.
You can use a WiFi or wired network connection, or connect directly to a switch that is
of
f-network using an Ethernet cable.
2. Launch a web browser.
3. In the address field of your web browser
, enter the IP address of the switch.
If you do not know the IP address of the switch, see Access the Switch Using a Web
Browser on page 6.
The login window opens.
4. Enter the switch’
The switch’s default password is password.
The Switch Information page displays.
5. Select System > Monitoring > Cable T
6. Select one or more check boxes.
7. Click the T
s password in the password field.
ester.
est Selected Port button.
The switch tests the cable connection for the selected ports and displays the results. This
process might take up to a few minutes.
Diagnostics and Troubleshooting
66

8-Port Easy Mount Gigabit Ethernet PoE+ Smart Managed Plus Switch
Resolve a Subnet Conflict to Access the Switch
If you power on the switch before you connect it to a network that includes a DHCP server,
the switch uses its own default IP address of 192.168.0.239. This subnet might be different
from the subnet used in your network. You might see the following message if you try to use
the ProSAFE Plus Utility to access the switch:
The switch and manager IP address are not in the same subnet.
To fix this subnet conflict:
1. Disconnect the Ethernet cable between the switch and your network.
2. Unplug the switch’s power cord.
3. Reconnect the Ethernet cable between the switch and your network.
4. Plug the switch’s power cord into an electrical outlet.
The switch powers on. The network DCHP server discovers the switch and assigns it an
IP address that is in the correct subnet for the network.
Diagnostics and Troubleshooting
67

A. Supplemental Information
This appendix covers the following topics:
• Factory Default Settings
• Technical Specifications
A
68

8-Port Easy Mount Gigabit Ethernet PoE+ Smart Managed Plus Switch
Factory Default Settings
You can return the switch to its factory settings. Use the end of a paper clip or some other
similar object to press and hold the Factory Defaults button on the back panel of the switch
for at least four seconds. The switch resets and returns to the factory settings that are shown
in the following table.
Table 2. Factory default settings
Setting Value or Description
Switch name None (empty)
Switch password password
IP address 192.168.0.239
Subnet mask 255.255.255.0
DHCP mode Enabled
Port speed Auto negotiation
Flow control Disabled
Loop detection Disabled
Port LED control Link speed and activity
Power saving mode Enabled
Switch management mode Web browser GUI and ProSAFE Utility
Access control Disabled
Port mirroring Disabled
IGMP snooping • Enabled. IGMP snooping status
• Disabled. Validation of IGMPv3 IP headers
• Disabled. Blocking of unknown multicast addresses
PoE • Port Power. Enabled
• Port priority. Low
• Power mode. 802.3at
• Power limit type. User
• Power limit. 30.0W
• Detection type. IEEE 802
LAGs Disabled
Port-based VLANs Disabled
802.1Q VLANs Disabled
Voice VLAN • 1. Voice VLAN ID
• 6. Class Of Service
• Disabled. Port voice VLAN mode
Supplemental Information
69

8-Port Easy Mount Gigabit Ethernet PoE+ Smart Managed Plus Switch
Table 2. Factory default settings (continued)
Setting Value or Description
QoS 802.1p/DSCP based
Rate limiting Disabled
Broadcast filtering Disabled
Technical Specifications
Table 3. Technical specifications model GS408EPP
Specification Value or Description
Network interfaces RJ-45 connectors supporting 10BASE-T, 100BASE-TX, or 1000BASE-T
Network cable Category 5e (Cat 5e) or better Ethernet cable
Ethernet ports 8
Power 100–240 VAC 50/60 Hz, 3A maximum
Power consumption 5.8W maximum without PoE
148W maximum with PoE
PoE+ (802.3at) ports Ports 1–8
Total PoE power budget
(across all PoE+ ports)
Weight 1.6 kg (3.53 lb)
Dimensions (W X D x H) 380 mm x 100 mm x 43.2 mm (15 in. x 3.9 in. x 1.7 in.)
Operating temperature 32–122°F (0–50°C)
Operating humidity 0%–90% relative humidity, noncondensing
Electromagnetic CE Class B, FCC Class B, VCCI Class B, RCM Class B, KCC, BSMI, and EAC
Safety agency approvals CE mark, CB UL
30W maximum per PoE+ port, up to 124W total PoE power for the switch.
For more information, see Chapter 6, Manage Power over Ethernet.
Supplemental Information
70
 Loading...