

Page 1
Installation
Connect the Switch to Your Network
During initial setup, you must connect the switch to a network that you can
access with a local WiFi connection to use the Insight mobile app, or to the
Internet to use the Insight Cloud Portal.
For Gigabit connections, use Category 5e (Cat 5e) or higher-rated Ethernet
cables terminated with RJ-45 connectors.
To use an SFP port, you must insert a 1G SFP transceiver module, which is
available from NETGEAR.
To use an SFP+ port, you must insert either a 10G SFP+ or 1G SFP
transceiver module, which is available from NETGEAR.
¾ To connect the switch:
1. Connect devices to the network ports on the switch.
2. Connect the switch to a network.
3. Power on the switch and wait for two or three minutes.
The Power LED lights green, indicating that switch completed its
startup process and is available on the network.
The switch receives an IP address from a DHCP server (or a router that
functions as a DHCP server) in your network. If your network does not
include a DHCP server, the switch uses 192.168.0.239 as its default IP
address.
4. To check the port connections from the switch to the powered-on
devices that you connected, do the following:
• Make sure that the Ethernet cables are plugged in correctly.
• Check the le LED for each port on the switch.
The le port LED lights solid green to indicate a valid connection
to a powered-on device and blinks green to indicate trac on this
port.
Package Contents
Unpack the box and verify the contents:
• Switch model GC752X or GC752XP
• Power cord (localized to the country of sale)
• Rack-mount kit
• Four rubber footpads for tabletop installation
• Installation guide
Insight
GC7252X P
GC752X
Access the Switch for Configuration
The NETGEAR Insight app lets you use your mobile device to discover,
configure, manage, and monitor your switch. You can use this app to access the
switch with a local WiFi connection or you can log in to the Insight Cloud Portal.
The Cloud Portal lets you configure, manage, and monitor the switch from your
PC, Mac, or tablet for a larger-screen experience.
Local WiFi access. When you use the Insight mobile app for initial
configuration, the switch must be connected to a WiFi access point (because
the switch does not provide WiFi capacity). Connect your mobile device to that
access point’s WiFi network.
Cloud access from a mobile device. Aer initial configuration, as long as your
switch is on a network with an Internet connection, you can access the switch
through the cloud using the Insight mobile app.
Insight Cloud Portal. The Insight Cloud Portal is available for Insight Premium
subscribers to setup, manage, and monitor their Insight devices. A seven-day
free trial of Insight Premium and the Insight Cloud Portal are included with each
24-port or larger Insight Smart Cloud Switch.
Visit https://insight.netgear.com/#/login.
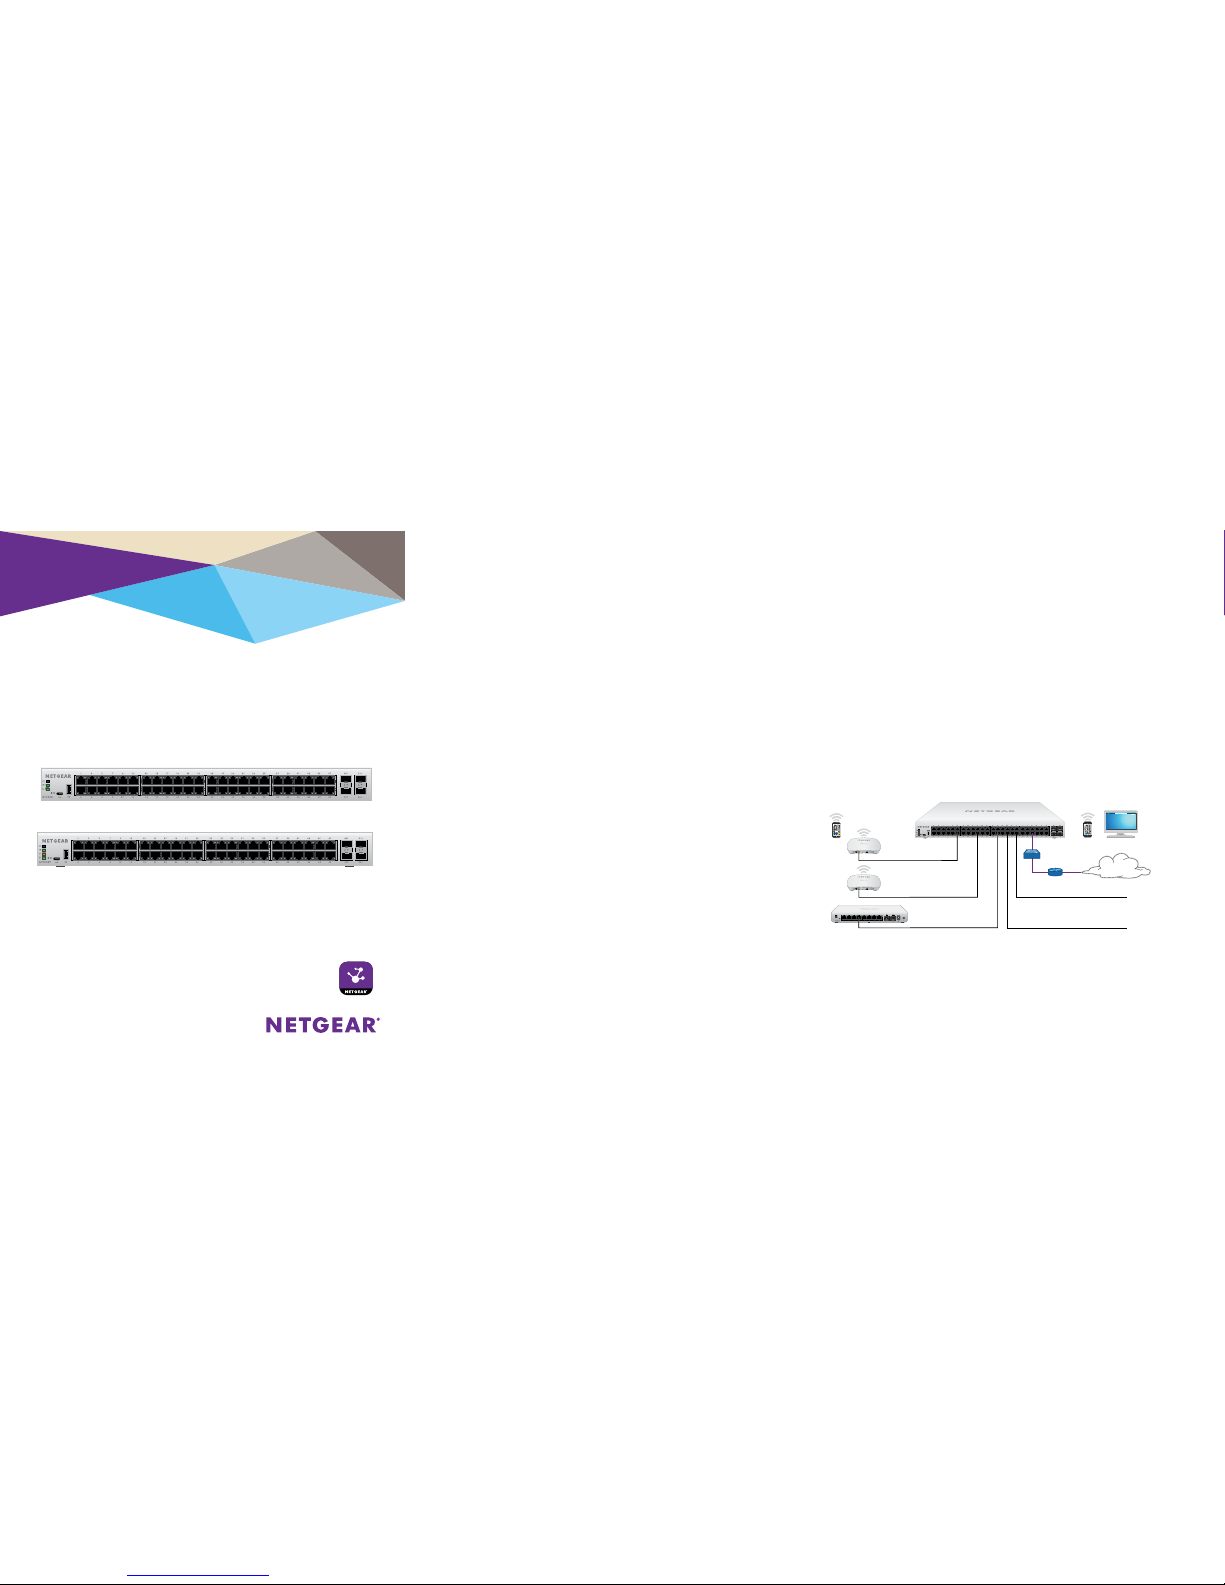
GC752XP switch
Internet
Cloud access through
the Internet
GC110 switch
VoIP phones
NETGEAR Insight Managed
52-Port Gigabit Ethernet Smart Cloud Switch with
2 SFP 1G & 2 SFP+ 10G Fiber Ports (GC752X)
52-Port Gigabit Ethernet PoE+ Smart Cloud Switch with
2 SFP 1G & 2 SFP+ 10G Fiber Ports (GC752XP)
Sample connection
Network
Router or
gateway
PoE WiFi access poin ts
Local WiFi access
Page 2
February 2018
© NETGEAR, Inc., NETGEAR and the NETGEAR Logo
are trademarks of NETGEAR, Inc. Any non‑NETGEAR
trademarks are used for reference purposes only.
NETGEAR, Inc.
350 East Plumeria Drive
San Jose, CA 95134, USA
NETGEAR INTL LTD
Building 3, University Technology Centre
Curraheen Road, Cork, Ireland
Note: You might be prompted to connect the switch to power and
to an uplink. Since you already did this (Connect the Switch to Your
Network), tap the NEXT button.
The NETGEAR Insight app discovers the switch and registers it on the
network that you named in Step 6.
If you are using the local WiFi access method and the app does not
discover the switch, make sure that your mobile device and the switch
are connected to the same WiFi network.
9. Select the switch to configure and manage it.
You can use the NETGEAR Insight app to access the switch later to view or
change the configuration settings.
For more information about how to connect a NETGEAR Insight managed
switch to an existing network, visit https://kb.netgear.com/000044341.
Note: We do not recommend using the switch’s local browser–based
management interface to configure the switch oine. Changes made using
this method are not pushed to the cloud, so they are not reflected in the
Insight app or the Insight Cloud Portal, and might create conflicts with the
Insight-managed network to which the switch is connected. If you cannot
connect your switch to a network with Internet access, and you want to use
the local-only browser interface to access the switch, see the user manual.
To download the user manual, visit netgear.com/support/product/GC752X
or netgear.com/support/product/GC752XP.
Configure the Switch Using the NETGEAR
Insight App
¾ To configure the switch:
1. On your iOS or Android mobile device, visit the app store, search for
NETGEAR Insight, and download the app.
2. Connect your mobile device to the WiFi network of the access point
that is connected to the switch.
For initial configuration, you must use local WiFi access. Aer you
complete initial configuration and discover the switch, you can use cloud
access if the switch is connected to the Internet.
3. Open the NETGEAR Insight app on your mobile device.
4. If you did not set up a NETGEAR account yet, tap CREATE NETGEAR
ACCOUNT and follow the onscreen instructions.
5. To log in to your NETGEAR account, tap LOG IN and enter your
credentials.
6. Name your network and specify a device admin password that applies
to all devices that you add to this network.
7. Tap the NEXT button.
8. To add the switch to your account, use one of the following options:
• Enter the serial number.
• Scan the serial number bar code.
• Tap Switch as the device type and follow the prompts to scan the
network or scan the QR code.
PoE Troubleshooting for Model GC752XP
Here are some tips for correcting simple problems that might occur:
• Make sure that the PoE Max LED is o. The switch provides a total power
budget of 505 watts. If the PoE Max LED is solid amber, disconnect one
or more powered devices (PDs) to prevent PoE oversubscription. Start by
disconnecting the PD from the highest-numbered port.
Note: You can manually override the amount of power that is reserved
for each PoE port and attached PD by using the Insight mobile app or the
Insight Cloud Portal.
• Check the right LED for the port on the switch that is connected to a
powered PD. The right port LED on the switch lights solid green to indicate
that PoE is being delivered to the PD. If the right port LED lights solid
amber, a PoE fault occurred.
Support
Thank you for purchasing this NETGEAR product. You can visit
www.netgear.com/support to register your product, get help, access the latest
downloads and user manuals, and join our community. We recommend that you
use only ocial NETGEAR support resources.
Si ce produit est vendu au Canada, vous pouvez accéder à ce document en
français canadien à http://downloadcenter.netgear.com/other/.
(If this product is sold in Canada, you can access this document in Canadian
French at http://downloadcenter.netgear.com/other/.)
For the current EU Declaration of Conformity, visit
http://support.netgear.com/app/answers/detail/a_id/11621/.
For regulatory compliance information, visit
http://www.netgear.com/about/regulatory/.
See the regulatory compliance document before providing power to
the switch.
Insight
Insight
 Loading...