

Page 1
Around Town LTE Mobile Internet
Model AC778AT
User Manual
March 2015
202-11479-01
350 East Plumeria Drive
San Jose, CA 95134
USA
Page 2

Around Town LTE Mobile Internet
Support
Thank you for selecting NETGEAR products.
After installing your device, locate the serial number on the label of your product and use it to register your product at
https://my.netgear.com. You must register your product before you can use NETGEAR telephone support. NETGEAR
recommends registering your product through the NETGEAR website.
For product updates and web support, visit http://support.aroundtowninternet.com/ or call 1-855-678-9123.
Compliance
For regulatory compliance information, visit http://www.netgear.com/about/regulatory.
See the regulatory compliance document before connecting the power supply.
Trademarks
© NETGEAR, Inc., NETGEAR and the NETGEAR Logo are trademarks of NETGEAR, Inc. Any non-NETGEAR trademarks are
used for reference purposes only.
2
Page 3

Contents
Chapter 1 Get Started
Package Contents . . . . . . . . . . . . . . . . . . . . . . . . . . . . . . . . . . . . . . . . . . . . . . . . . . . . 8
Meet Your Hotspot . . . . . . . . . . . . . . . . . . . . . . . . . . . . . . . . . . . . . . . . . . . . . . . . . . . 9
Power Button. . . . . . . . . . . . . . . . . . . . . . . . . . . . . . . . . . . . . . . . . . . . . . . . . . . . . 10
LCD Screen Elements . . . . . . . . . . . . . . . . . . . . . . . . . . . . . . . . . . . . . . . . . . . . . . 10
Accessories . . . . . . . . . . . . . . . . . . . . . . . . . . . . . . . . . . . . . . . . . . . . . . . . . . . . . . 11
Set Up Your Hotspot . . . . . . . . . . . . . . . . . . . . . . . . . . . . . . . . . . . . . . . . . . . . . . . . . 12
Set Up Your Hotspot Over the Internet. . . . . . . . . . . . . . . . . . . . . . . . . . . . . . . 12
Set Up Your Hotspot Without Internet Access . . . . . . . . . . . . . . . . . . . . . . . . . 14
Install the Battery . . . . . . . . . . . . . . . . . . . . . . . . . . . . . . . . . . . . . . . . . . . . . . . . . . . 17
Recharge the Battery . . . . . . . . . . . . . . . . . . . . . . . . . . . . . . . . . . . . . . . . . . . . . . . . 18
Recharge the Battery Using the AC Charger . . . . . . . . . . . . . . . . . . . . . . . . . . 19
Recharge the Battery Using Your Computer. . . . . . . . . . . . . . . . . . . . . . . . . . . 19
Configure a Tethered Connection. . . . . . . . . . . . . . . . . . . . . . . . . . . . . . . . . . . . . . 20
Install Windows Device Drivers Using TRU-Install . . . . . . . . . . . . . . . . . . . . . . 21
Install Mac Device Drivers Using TRU-Install . . . . . . . . . . . . . . . . . . . . . . . . . . 22
Manage Your Hotspot and Settings . . . . . . . . . . . . . . . . . . . . . . . . . . . . . . . . . . . . 23
NETGEAR AirCard App for Smartphones and Tablets. . . . . . . . . . . . . . . . . . . . . . 23
Chapter 2 Use Your Hotspot
Log In to the Hotspot Web Page . . . . . . . . . . . . . . . . . . . . . . . . . . . . . . . . . . . . . . . 25
Connect to the Hotspot WiFi Network. . . . . . . . . . . . . . . . . . . . . . . . . . . . . . . . . . 25
Connect Using a WiFi Network Manager. . . . . . . . . . . . . . . . . . . . . . . . . . . . . . 25
Connect Using WPS . . . . . . . . . . . . . . . . . . . . . . . . . . . . . . . . . . . . . . . . . . . . . . . 26
Monitor Data Usage . . . . . . . . . . . . . . . . . . . . . . . . . . . . . . . . . . . . . . . . . . . . . . . . . 28
View Data Usage on the LCD Screen . . . . . . . . . . . . . . . . . . . . . . . . . . . . . . . . . 28
View Data Usage on the Hotspot Web Page. . . . . . . . . . . . . . . . . . . . . . . . . . . 29
View Data Usage on the Account Overview Page . . . . . . . . . . . . . . . . . . . . . . 29
Manage Alerts . . . . . . . . . . . . . . . . . . . . . . . . . . . . . . . . . . . . . . . . . . . . . . . . . . . . . . 31
View Alerts on the LCD Screen. . . . . . . . . . . . . . . . . . . . . . . . . . . . . . . . . . . . . . 32
View Alerts on the Hotspot Web Page. . . . . . . . . . . . . . . . . . . . . . . . . . . . . . . . 33
Configure the WiFi Settings on the Hotspot . . . . . . . . . . . . . . . . . . . . . . . . . . . . . 33
Show the WiFi Settings on the LCD Screen. . . . . . . . . . . . . . . . . . . . . . . . . . . . 33
Hide the WiFi Settings On the LCD Screen . . . . . . . . . . . . . . . . . . . . . . . . . . . . 34
Change the Hotspot WiFi Network Name and Password. . . . . . . . . . . . . . . . . . . 35
Change Hotspot Web Page Login Password . . . . . . . . . . . . . . . . . . . . . . . . . . . . . 36
Configure the TRU-Install Installation Settings. . . . . . . . . . . . . . . . . . . . . . . . . . . 37
Enable TRU-Install Driver Installation . . . . . . . . . . . . . . . . . . . . . . . . . . . . . . . . 37
Disable TRU-Install Installation . . . . . . . . . . . . . . . . . . . . . . . . . . . . . . . . . . . . . . 39
3
Page 4

Around Town LTE Mobile Internet
Disconnect from or Connect to the Mobile Broadband Network . . . . . . . . . . . 40
Disconnect from the Mobile Broadband Network. . . . . . . . . . . . . . . . . . . . . . 40
Connect to the Mobile Broadband Network. . . . . . . . . . . . . . . . . . . . . . . . . . . 40
View Details About Your Hotspot . . . . . . . . . . . . . . . . . . . . . . . . . . . . . . . . . . . . . . 41
View Details About Your Hotspot on the Web Page . . . . . . . . . . . . . . . . . . . . 41
View Details About Your Hotspot on the LCD Screen . . . . . . . . . . . . . . . . . . . 43
Chapter 3 Manage Your Around Town Account
View Your Account Settings. . . . . . . . . . . . . . . . . . . . . . . . . . . . . . . . . . . . . . . . . . . 46
Manage Your Data Plan . . . . . . . . . . . . . . . . . . . . . . . . . . . . . . . . . . . . . . . . . . . . . . 46
Add a Data Plan. . . . . . . . . . . . . . . . . . . . . . . . . . . . . . . . . . . . . . . . . . . . . . . . . . . 46
View Your Purchase History . . . . . . . . . . . . . . . . . . . . . . . . . . . . . . . . . . . . . . . . 47
Manage Account Alerts . . . . . . . . . . . . . . . . . . . . . . . . . . . . . . . . . . . . . . . . . . . . . . 48
Manage Data Plan Expiration Email Notifications . . . . . . . . . . . . . . . . . . . . . . 48
Upgrade Your Account to Smart Alerts . . . . . . . . . . . . . . . . . . . . . . . . . . . . . . . 50
View Account Alerts and Notifications . . . . . . . . . . . . . . . . . . . . . . . . . . . . . . . 51
Save Your Credit Card Information. . . . . . . . . . . . . . . . . . . . . . . . . . . . . . . . . . . . . 52
Manage Data Auto-Renew Settings. . . . . . . . . . . . . . . . . . . . . . . . . . . . . . . . . . . . 53
Automatically Renew Your Data Plan . . . . . . . . . . . . . . . . . . . . . . . . . . . . . . . . . 53
Disable Auto-Renew. . . . . . . . . . . . . . . . . . . . . . . . . . . . . . . . . . . . . . . . . . . . . . . 54
Transfer Your Account to a New Hotspot. . . . . . . . . . . . . . . . . . . . . . . . . . . . . . . . 55
Manage Your Around Town Password . . . . . . . . . . . . . . . . . . . . . . . . . . . . . . . . . . 56
Reset Your Around Town Password . . . . . . . . . . . . . . . . . . . . . . . . . . . . . . . . . . 57
Change Your Around Town Account Password. . . . . . . . . . . . . . . . . . . . . . . . . 57
Change Your Account Email Address . . . . . . . . . . . . . . . . . . . . . . . . . . . . . . . . . . . 58
Manage Your Billing Address . . . . . . . . . . . . . . . . . . . . . . . . . . . . . . . . . . . . . . . . . . 59
View Your Billing Address. . . . . . . . . . . . . . . . . . . . . . . . . . . . . . . . . . . . . . . . . . . 59
Edit Your Billing Address. . . . . . . . . . . . . . . . . . . . . . . . . . . . . . . . . . . . . . . . . . . . 59
Manage Your Account PIN . . . . . . . . . . . . . . . . . . . . . . . . . . . . . . . . . . . . . . . . . . . . 60
View Your Account PIN. . . . . . . . . . . . . . . . . . . . . . . . . . . . . . . . . . . . . . . . . . . . . 60
Edit Your Account PIN . . . . . . . . . . . . . . . . . . . . . . . . . . . . . . . . . . . . . . . . . . . . . 61
Manage Your Account Phone Number . . . . . . . . . . . . . . . . . . . . . . . . . . . . . . . . . . 61
View Your Account Phone Number . . . . . . . . . . . . . . . . . . . . . . . . . . . . . . . . . . 62
Edit Your Account Phone Number . . . . . . . . . . . . . . . . . . . . . . . . . . . . . . . . . . . 62
Chapter 4 Manage Your Hotspot
Update the Hotspot Software . . . . . . . . . . . . . . . . . . . . . . . . . . . . . . . . . . . . . . . . . 65
Back Up and Restore Hotspot Settings. . . . . . . . . . . . . . . . . . . . . . . . . . . . . . . . . . 66
Download Your Hotspot’s Settings . . . . . . . . . . . . . . . . . . . . . . . . . . . . . . . . . . . 66
Restore Your Hotspot’s Settings . . . . . . . . . . . . . . . . . . . . . . . . . . . . . . . . . . . . . 67
Reset the Hotspot to Factory Default Settings. . . . . . . . . . . . . . . . . . . . . . . . . . . 68
Reset Factory Default Settings If You Forgot the Admin Login Password . . 69
Reset Factory Default Settings If You Know the Admin Login Password . . . 69
Reset the Hotspot to Its Device Settings. . . . . . . . . . . . . . . . . . . . . . . . . . . . . . . . 71
Extend Battery Life. . . . . . . . . . . . . . . . . . . . . . . . . . . . . . . . . . . . . . . . . . . . . . . . . . 72
Adjust the Display Settings . . . . . . . . . . . . . . . . . . . . . . . . . . . . . . . . . . . . . . . . . . . 73
4
Page 5

Around Town LTE Mobile Internet
Adjust the LCD Screen’s Brightness . . . . . . . . . . . . . . . . . . . . . . . . . . . . . . . . . . 73
Set the LCD Screen’s Timeout Settings . . . . . . . . . . . . . . . . . . . . . . . . . . . . . . . 74
Set the Hotspot’s WiFi Sleep Settings. . . . . . . . . . . . . . . . . . . . . . . . . . . . . . . . . . . 75
Chapter 5 Control Access to the Network
Set Up a Guest Network. . . . . . . . . . . . . . . . . . . . . . . . . . . . . . . . . . . . . . . . . . . . . . 78
Turn On the Guest Network Using the Web Page . . . . . . . . . . . . . . . . . . . . . . 78
Turn On the Guest Network Using the LCD screen . . . . . . . . . . . . . . . . . . . . . 79
Change the Guest Network Name or Password . . . . . . . . . . . . . . . . . . . . . . . . 79
Turn Off the Guest Network Using the Web Page . . . . . . . . . . . . . . . . . . . . . . 80
Turn Off the Guest Network Using the LCD screen. . . . . . . . . . . . . . . . . . . . . 81
Change Guest Encryption Security Settings. . . . . . . . . . . . . . . . . . . . . . . . . . . 81
Set the Maximum Number of Connected Devices. . . . . . . . . . . . . . . . . . . . . . . . 83
View or Block Connected Devices . . . . . . . . . . . . . . . . . . . . . . . . . . . . . . . . . . . . . 83
View Devices Connected to the Network . . . . . . . . . . . . . . . . . . . . . . . . . . . . . 84
Block Devices from the Network . . . . . . . . . . . . . . . . . . . . . . . . . . . . . . . . . . . . 84
View Devices Blocked from the Network . . . . . . . . . . . . . . . . . . . . . . . . . . . . . 85
Unblock a Device. . . . . . . . . . . . . . . . . . . . . . . . . . . . . . . . . . . . . . . . . . . . . . . . . . 85
Set Up MAC Filtering. . . . . . . . . . . . . . . . . . . . . . . . . . . . . . . . . . . . . . . . . . . . . . . . . 86
Allow All Devices to Access the Network . . . . . . . . . . . . . . . . . . . . . . . . . . . . . 86
Block Devices from the Network Using MAC Filtering . . . . . . . . . . . . . . . . . . 87
Allow Specific Devices to Access the Network Using MAC Filtering. . . . . . . 88
Configure the WiFi Signal If a Device Is Tethered . . . . . . . . . . . . . . . . . . . . . . . . . 89
Turn On the WiFi Signal If a Device Is Tethered . . . . . . . . . . . . . . . . . . . . . . . . 89
Turn Off the WiFi Signal If a Device Is Tethered. . . . . . . . . . . . . . . . . . . . . . . . 90
Chapter 6 Security Settings
Change the Hotspot Network Name and Password . . . . . . . . . . . . . . . . . . . . . . . 93
Change the Encryption Security Settings . . . . . . . . . . . . . . . . . . . . . . . . . . . . . . . 93
Configure Port Filtering . . . . . . . . . . . . . . . . . . . . . . . . . . . . . . . . . . . . . . . . . . . . . . 95
White List an Application Using Port Filtering. . . . . . . . . . . . . . . . . . . . . . . . . . 95
Black List an Application Using Port Filtering . . . . . . . . . . . . . . . . . . . . . . . . . . 96
Remove a Port Filtering Entry . . . . . . . . . . . . . . . . . . . . . . . . . . . . . . . . . . . . . . . 97
Configure a DMZ . . . . . . . . . . . . . . . . . . . . . . . . . . . . . . . . . . . . . . . . . . . . . . . . . . . . 97
Enable the DMZ. . . . . . . . . . . . . . . . . . . . . . . . . . . . . . . . . . . . . . . . . . . . . . . . . . . 98
Disable the DMZ . . . . . . . . . . . . . . . . . . . . . . . . . . . . . . . . . . . . . . . . . . . . . . . . . . 99
Configure VPN Passthrough. . . . . . . . . . . . . . . . . . . . . . . . . . . . . . . . . . . . . . . . . . 100
Enable VPN Passthrough . . . . . . . . . . . . . . . . . . . . . . . . . . . . . . . . . . . . . . . . . . 100
Disable VPN Passthrough. . . . . . . . . . . . . . . . . . . . . . . . . . . . . . . . . . . . . . . . . . 101
Chapter 7 Advanced Settings
Clear Account Details . . . . . . . . . . . . . . . . . . . . . . . . . . . . . . . . . . . . . . . . . . . . . . . 104
Configure the Connection Mode. . . . . . . . . . . . . . . . . . . . . . . . . . . . . . . . . . . . . . 105
Configure the WiFi Channel . . . . . . . . . . . . . . . . . . . . . . . . . . . . . . . . . . . . . . . . . . 106
Configure the RTS Threshold. . . . . . . . . . . . . . . . . . . . . . . . . . . . . . . . . . . . . . . . . 106
Configure the Fragmentation Threshold . . . . . . . . . . . . . . . . . . . . . . . . . . . . . . . 107
5
Page 6

Around Town LTE Mobile Internet
Configure Port Forwarding . . . . . . . . . . . . . . . . . . . . . . . . . . . . . . . . . . . . . . . . . . 108
Enable Port Forwarding for an Application . . . . . . . . . . . . . . . . . . . . . . . . . . . 108
Remove a Port Forwarding Entry . . . . . . . . . . . . . . . . . . . . . . . . . . . . . . . . . . . 110
Configure UPnP . . . . . . . . . . . . . . . . . . . . . . . . . . . . . . . . . . . . . . . . . . . . . . . . . . . . 111
Enable UPnP. . . . . . . . . . . . . . . . . . . . . . . . . . . . . . . . . . . . . . . . . . . . . . . . . . . . . 111
Disable UPnP . . . . . . . . . . . . . . . . . . . . . . . . . . . . . . . . . . . . . . . . . . . . . . . . . . . . 112
Configure the Hotspot’s LAN. . . . . . . . . . . . . . . . . . . . . . . . . . . . . . . . . . . . . . . . . 113
View the Hotspot’s LAN IP Address . . . . . . . . . . . . . . . . . . . . . . . . . . . . . . . . . 113
Set the Hotspot’s LAN IP Address. . . . . . . . . . . . . . . . . . . . . . . . . . . . . . . . . . . 114
Configure the Hotspot’s Netmask. . . . . . . . . . . . . . . . . . . . . . . . . . . . . . . . . . . . . 114
View the Hotspot’s Netmask. . . . . . . . . . . . . . . . . . . . . . . . . . . . . . . . . . . . . . . 115
Set the Hotspot’s Netmask . . . . . . . . . . . . . . . . . . . . . . . . . . . . . . . . . . . . . . . . 115
Configure DHCP . . . . . . . . . . . . . . . . . . . . . . . . . . . . . . . . . . . . . . . . . . . . . . . . . . . 116
Enable DHCP . . . . . . . . . . . . . . . . . . . . . . . . . . . . . . . . . . . . . . . . . . . . . . . . . . . . 117
Set the DNS Mode. . . . . . . . . . . . . . . . . . . . . . . . . . . . . . . . . . . . . . . . . . . . . . . . . . 118
Update the PRL . . . . . . . . . . . . . . . . . . . . . . . . . . . . . . . . . . . . . . . . . . . . . . . . . . . . 119
Update the Network Profile. . . . . . . . . . . . . . . . . . . . . . . . . . . . . . . . . . . . . . . . . . 120
Set the Allowed Network Mode . . . . . . . . . . . . . . . . . . . . . . . . . . . . . . . . . . . . . . 121
Configure System Logs. . . . . . . . . . . . . . . . . . . . . . . . . . . . . . . . . . . . . . . . . . . . . . 122
View Logs. . . . . . . . . . . . . . . . . . . . . . . . . . . . . . . . . . . . . . . . . . . . . . . . . . . . . . . 122
Enable System Logs . . . . . . . . . . . . . . . . . . . . . . . . . . . . . . . . . . . . . . . . . . . . . . 123
Clear the System Logs . . . . . . . . . . . . . . . . . . . . . . . . . . . . . . . . . . . . . . . . . . . . 124
Download the System Logs. . . . . . . . . . . . . . . . . . . . . . . . . . . . . . . . . . . . . . . . 125
View Mobile Broadband Status Details . . . . . . . . . . . . . . . . . . . . . . . . . . . . . . . . 126
View the SIM Security . . . . . . . . . . . . . . . . . . . . . . . . . . . . . . . . . . . . . . . . . . . . . . 128
View Your Hotspot’s Access Point Name . . . . . . . . . . . . . . . . . . . . . . . . . . . . . . . 128
Chapter 8 Troubleshooting
Questions About Activating Your Hotspot. . . . . . . . . . . . . . . . . . . . . . . . . . . . . . 131
Questions About Connecting Devices and Accessing the Internet . . . . . . . . . 131
Questions About the Hotspot Battery . . . . . . . . . . . . . . . . . . . . . . . . . . . . . . . . . 133
Questions About the Hotspot Web Page . . . . . . . . . . . . . . . . . . . . . . . . . . . . . . . 133
Questions About Improving WiFi Performance. . . . . . . . . . . . . . . . . . . . . . . . . . 134
Addition Questions . . . . . . . . . . . . . . . . . . . . . . . . . . . . . . . . . . . . . . . . . . . . . . . . . 135
Chapter 9 System Requirements and Specifications
System Requirements . . . . . . . . . . . . . . . . . . . . . . . . . . . . . . . . . . . . . . . . . . . . . . . 138
Radio Frequency and Electrical Specifications . . . . . . . . . . . . . . . . . . . . . . . . . . 139
Software Specifications . . . . . . . . . . . . . . . . . . . . . . . . . . . . . . . . . . . . . . . . . . . . . 139
Environmental Specifications. . . . . . . . . . . . . . . . . . . . . . . . . . . . . . . . . . . . . . . . . 141
Mechanical Specifications . . . . . . . . . . . . . . . . . . . . . . . . . . . . . . . . . . . . . . . . . . . 141
6
Page 7

1. Get Started
The hotspot delivers speed and performance for up to 10 WiFi devices, like your smartphone,
tablet, or printer, almost anywhere you go.
This chapter covers the following topics:
• Package Contents
• Meet Your Hotspot
• Set Up Your Hotspot
• Install the Battery
• Recharge the Battery
• Configure a Tethered Connection
• Manage Your Hotspot and Settings
• NETGEAR AirCard App for Smartphones and Tablets
For more information about the topics covered in this manual, visit
http://support.aroundtowninternet.com/.
1
7
Page 8
Around Town LTE Mobile Internet
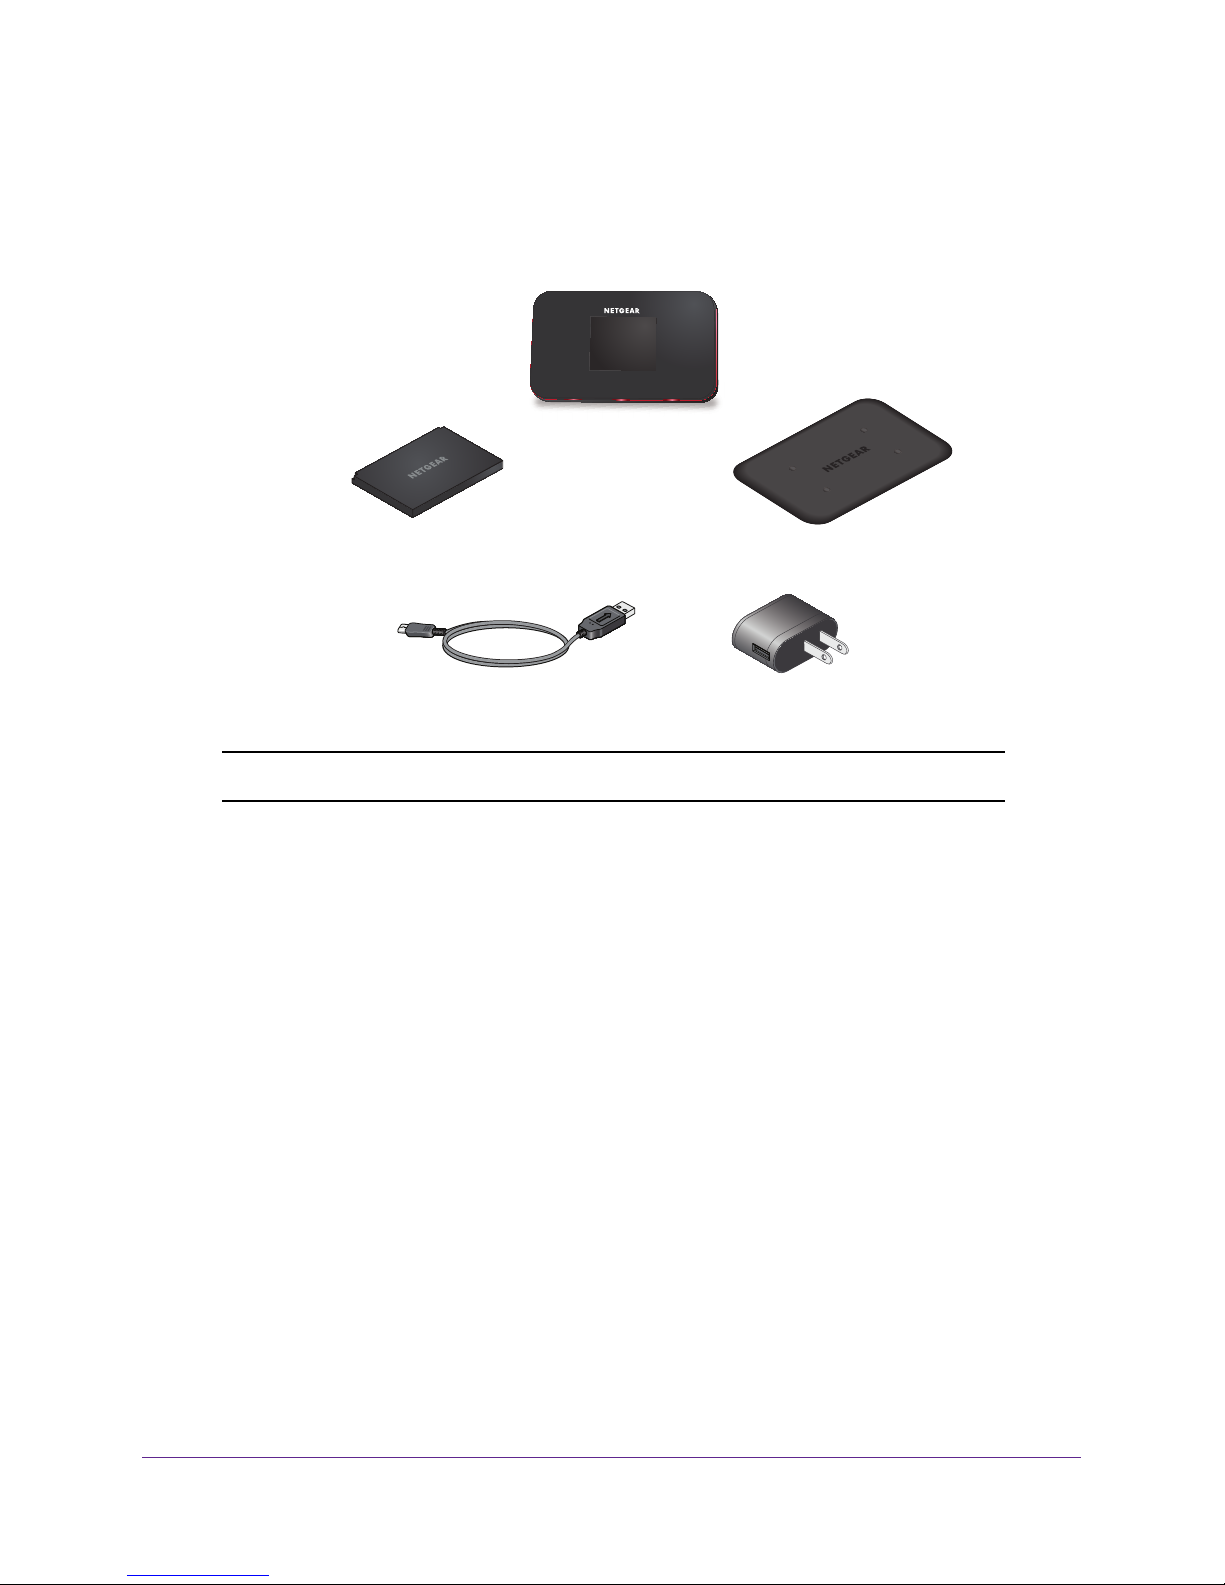
Package Contents
Your package contains the following items:
Rechargeable battery Back cover
Hotspot
micro-USB cable
AC charger with USB port
Note: A micro-SIM card is preinstalled inside the hotspot.
Get Started
8
Page 9
Around Town LTE Mobile Internet
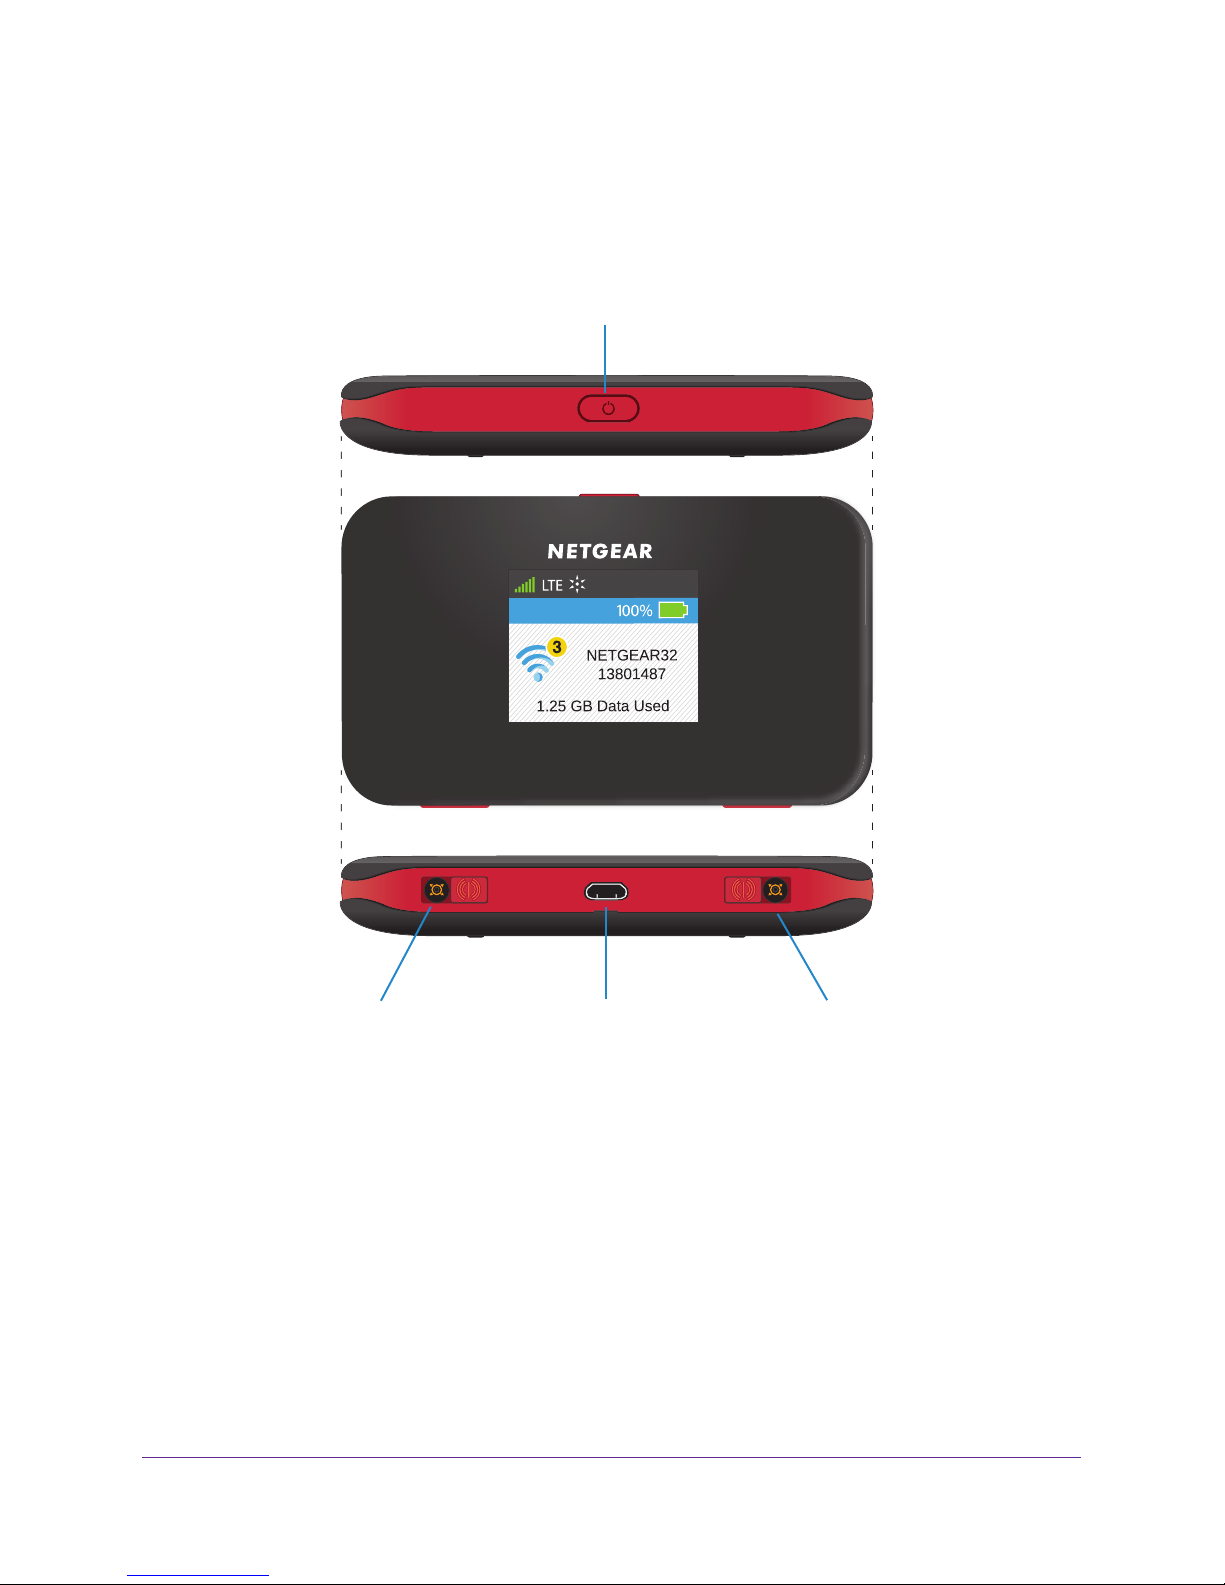
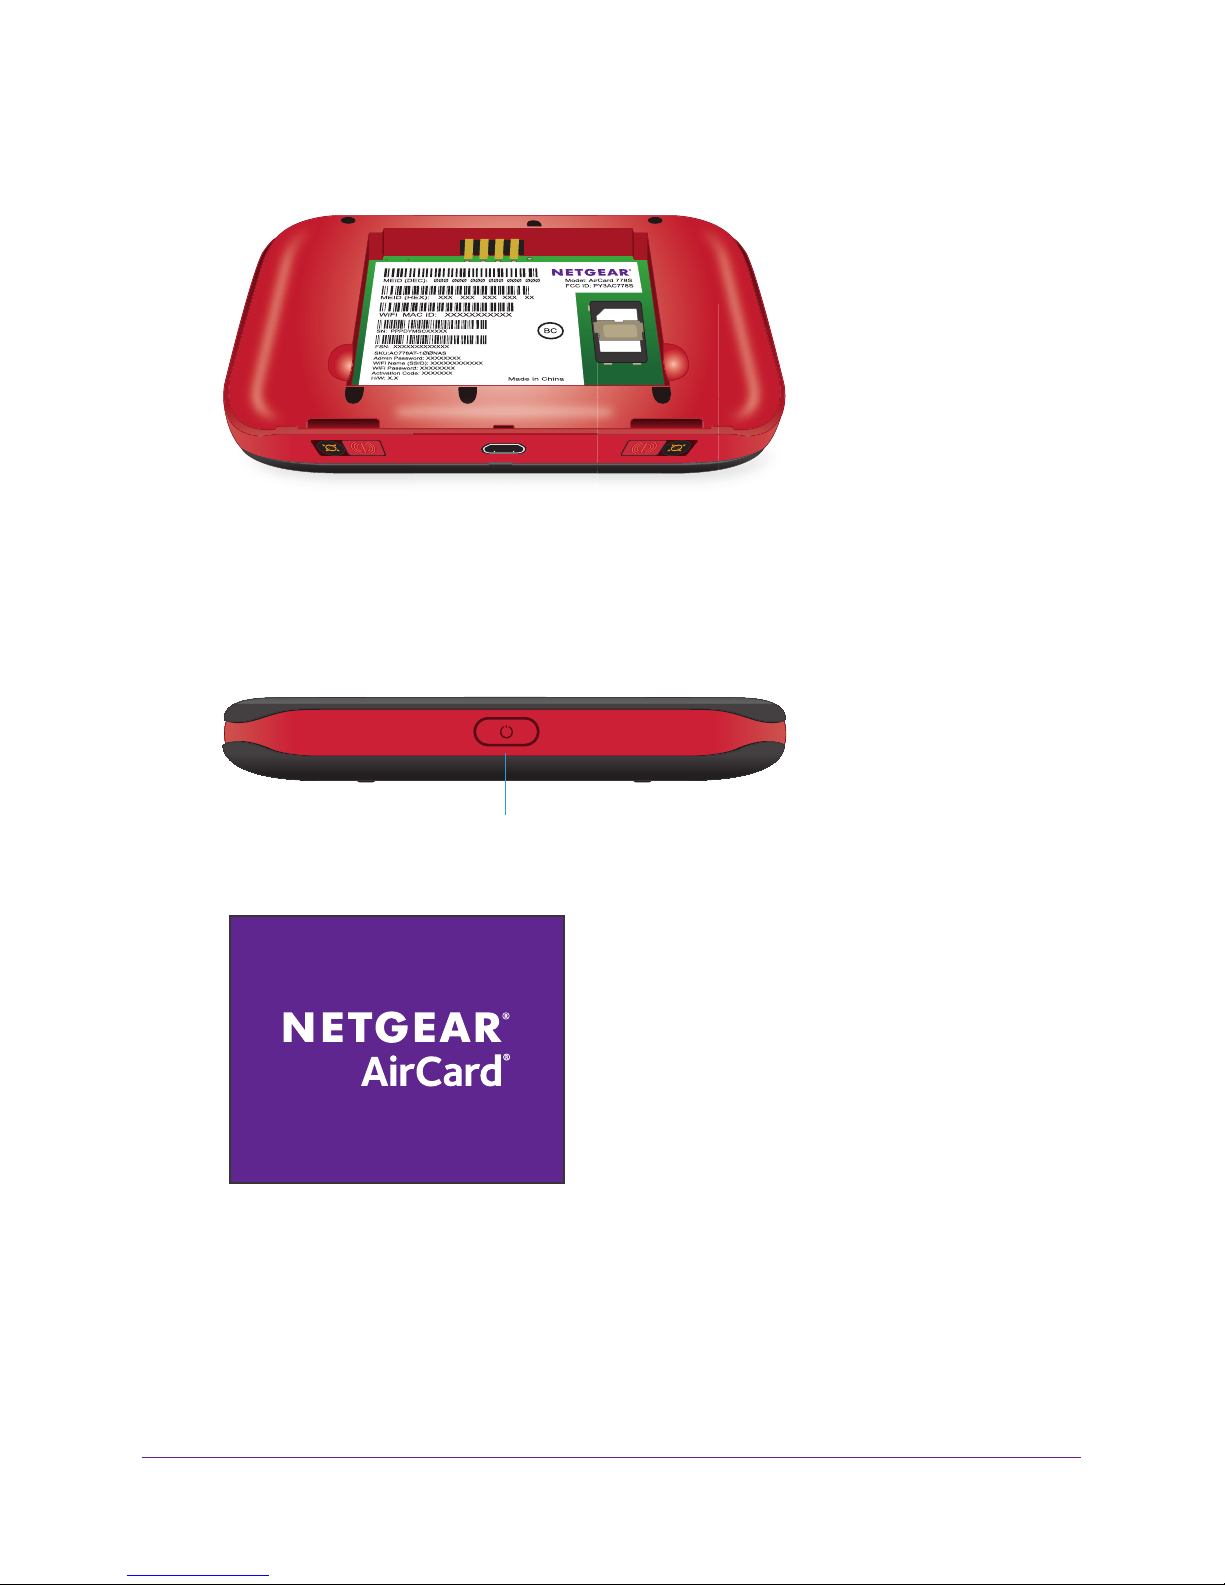
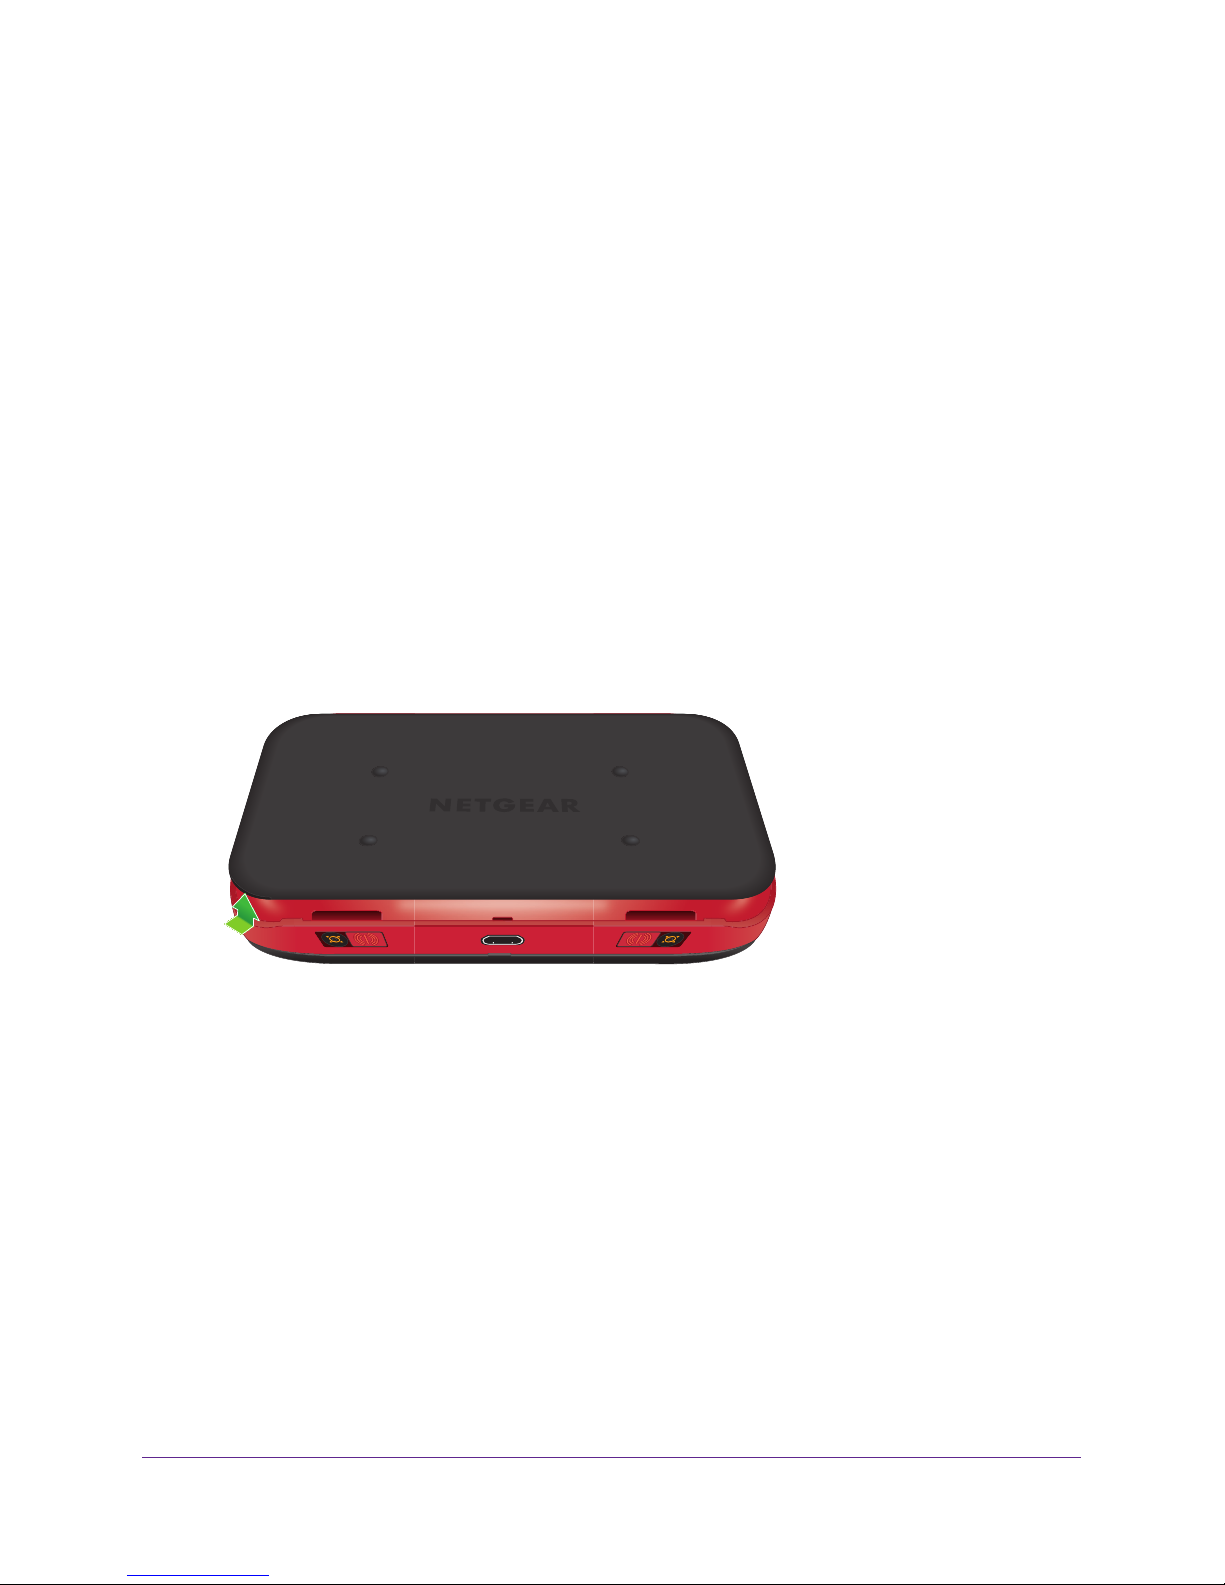
Meet Your Hotspot
Before you connect your hotspot, familiarize yourself with its LCD screen, icons, buttons, and
connectors.
Power button
Antenna connector
Figure 1. Hotspot hardware features
Micro-USB port
Get Started
9
Antenna connector
Page 10
Around Town LTE Mobile Internet
Power Button
Use the Power button to power the hotspot on and off, to wake the LCD screen, and to cycle
to the next screen.
Table 1. Power button usage
Desired Result Action
Turn on hotspot. Press and hold the Power button until the NETGEAR
screen displays.
Turn off hotspot. Press and hold the Power button for about five seconds until
the LCD screen turns of
Wake WiFi signal and
screen.
Cycle to the next screen. Press the Power button until the desired screen displays.
Press and quickly release the Power button.
f.
AirCard
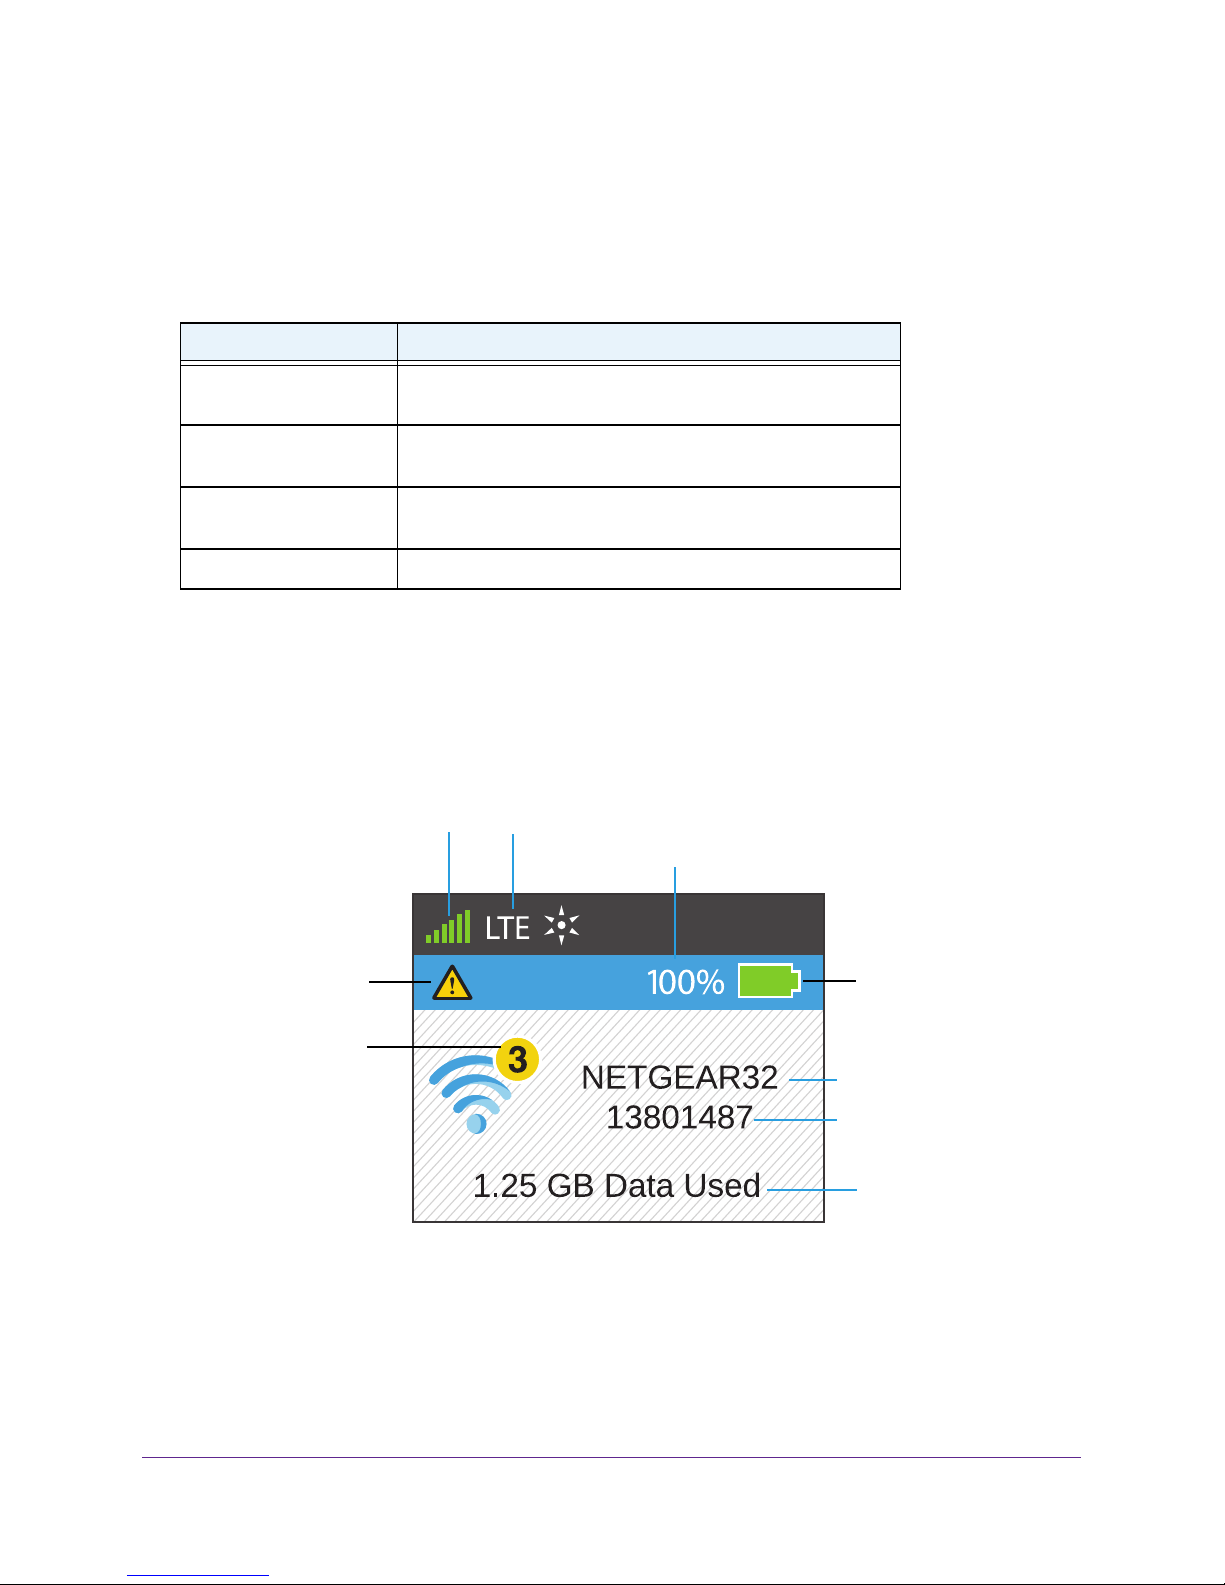
LCD Screen Elements
The LCD screen displays icons, data usage, your hotspot’s WiFi network name, and your
WiFi password.
Signal
strength
Mobile broadband network
Remaining battery percentage
System alert
Number of
connected
devices
Figure 2. LCD screen
Battery
WiFi network name
WiFi network password
Data usage
Get Started
10
Page 11
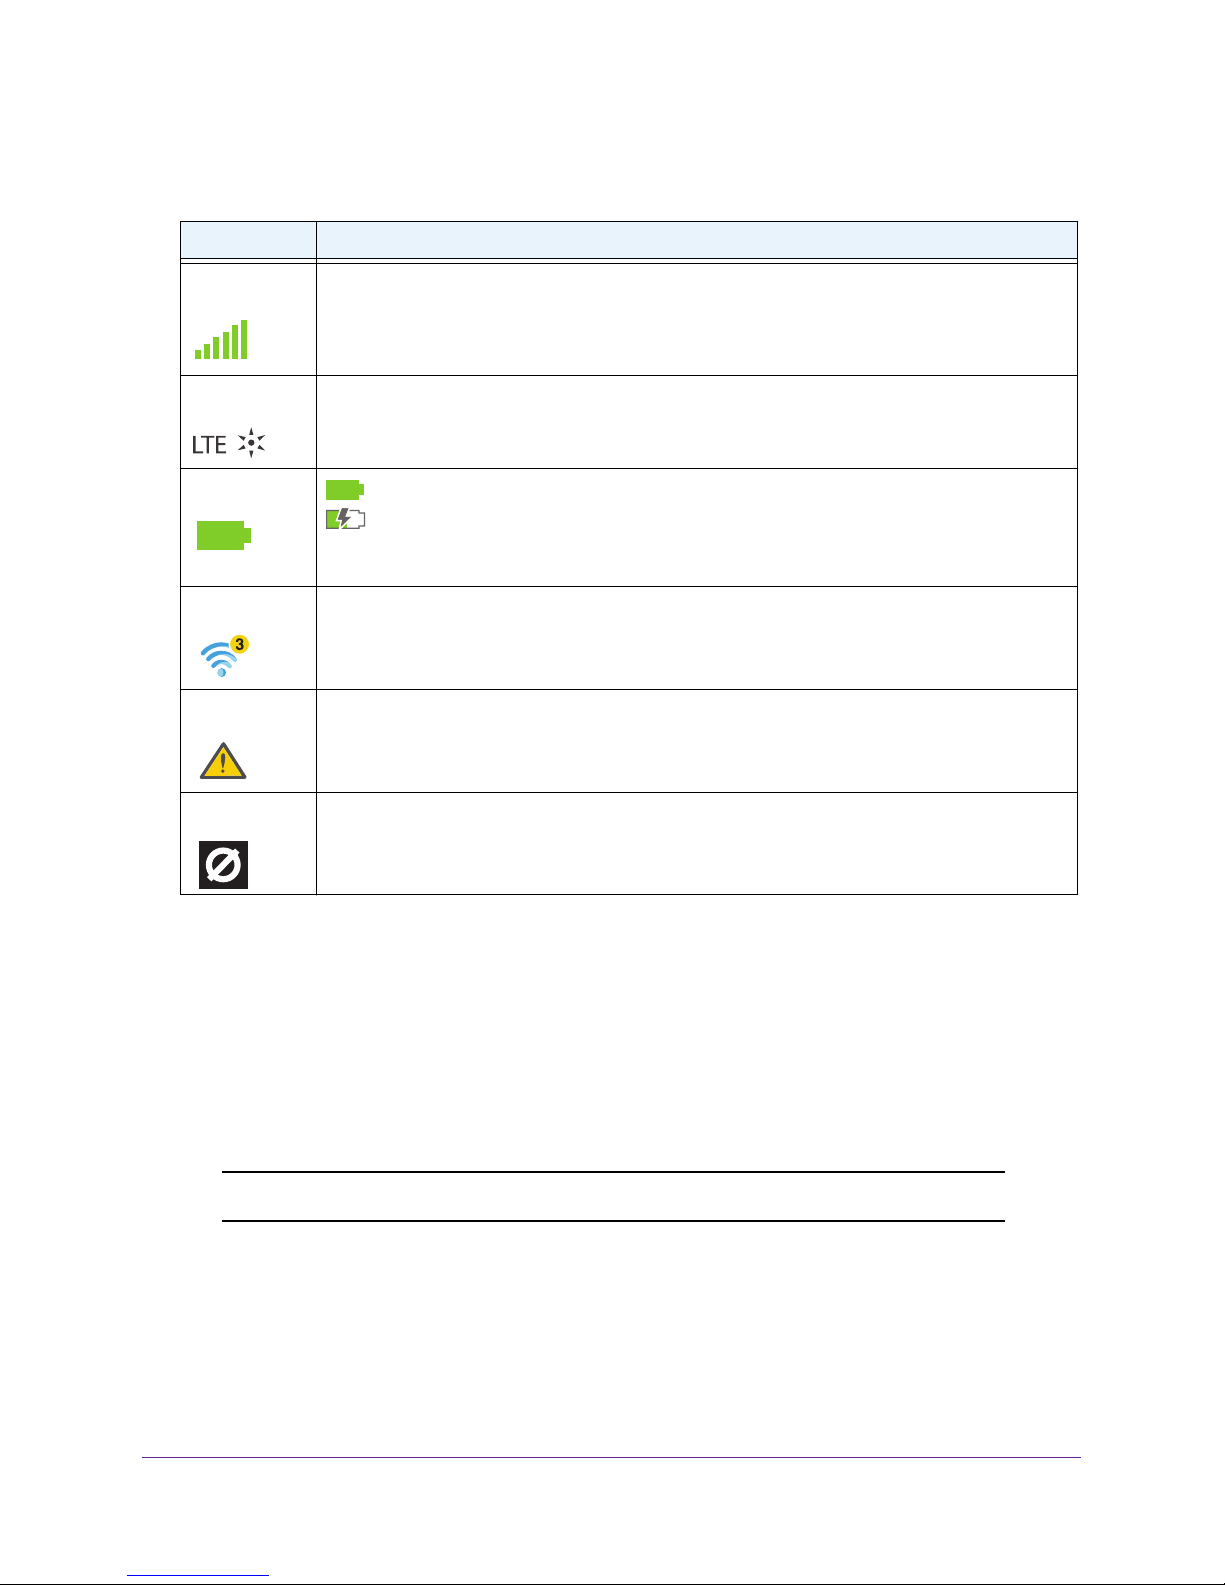
Table 2. LCD screen elements
Icon Description
Around Town LTE Mobile Internet
Signal Strength
Network Type
Battery Status
WiFi Status
System Alert System alerts require attention.
No Signal
1 bar . The hotspot signal is weak.
5 bars . The hotspot signal is strong.
Indicates which mobile broadband network your hotspot is connected to.
Indicates the percentage of remaining battery charge.
Indicates that the battery is charging.
Blue. WiFi is active.
Gray. WiFi is inactive.
The number indicates the number of devices that are connected to the hotspot.
Indicates that the hotspot is in a zero coverage area and is not connected to the mobile
broadband network.
Accessories
Your hotspot ships with the following accessories:
• Micro-USB cable . Use this cable to recharge the battery or to tether the hotspot to your
computer
• W
all charger . Use a wall charger with the USB cable to recharge the battery or to power
the hotspot from a wall socket.
Note: External antennas are not included with your hotspot.
You can purchase the following accessories separately:
• AirCard Signal Boosting Cradle (DC1
extends coverage indoors and in areas with low signal strength, and adds Ethernet
connectivity.
.
13A). The boosting cradle boosts the signal,
Get Started
11
Page 12

Around Town LTE Mobile Internet
• Extended battery. The extended battery is a 3600 mAh battery that provides a battery
life that is 1.5 times longer than that of the standard battery.
Accessory availability varies by region. For more information, visit
http://www.netgear.com/aircardaccessories.
Set Up Your Hotspot
You must activate and register your hotspot before you can connect to the hotspot’s WiFi
network. You can activate and register the hotspot with or without Internet access.
CAUTION:
Do not insert the battery into your hotspot or power it on before following
these instructions. If you powered on the hotspot before following these
instructions, power it off and remove the battery.
Set Up Your Hotspot Over the Internet
You can set up your hotspot if you already connected to the Internet. If you want to set up
your hotspot but you are not connected to the Internet, see
Internet Access on page 14.
To activate and register your hotspot if you are connected to the Internet:
1. Make sure that the hotspot is powered off.
Note: If you powered on the hotspot before activating it, power it off and
remove the battery.
2. Launch a web browser from a computer or WiFi device that is connected to the hotspot
network.
3. Enter http://aroundtowninternet.com/register in the address field of the browser.
The login screen displays.
4. Click the Start Registration button.
5. Type the activation code in the Activation Code field and click the Submit button.
Set Up Your Hotspot Without
Get Started
12
Page 13
Around Town LTE Mobile Internet
The activation code is on the back of the hotspot and on the retail packaging label.
6. Follow the onscreen instructions to register your hotspot.
7. After the hotspot is registered, insert the battery into the hotspot.
For more information about how to install the battery, see Install the Battery on page 17.
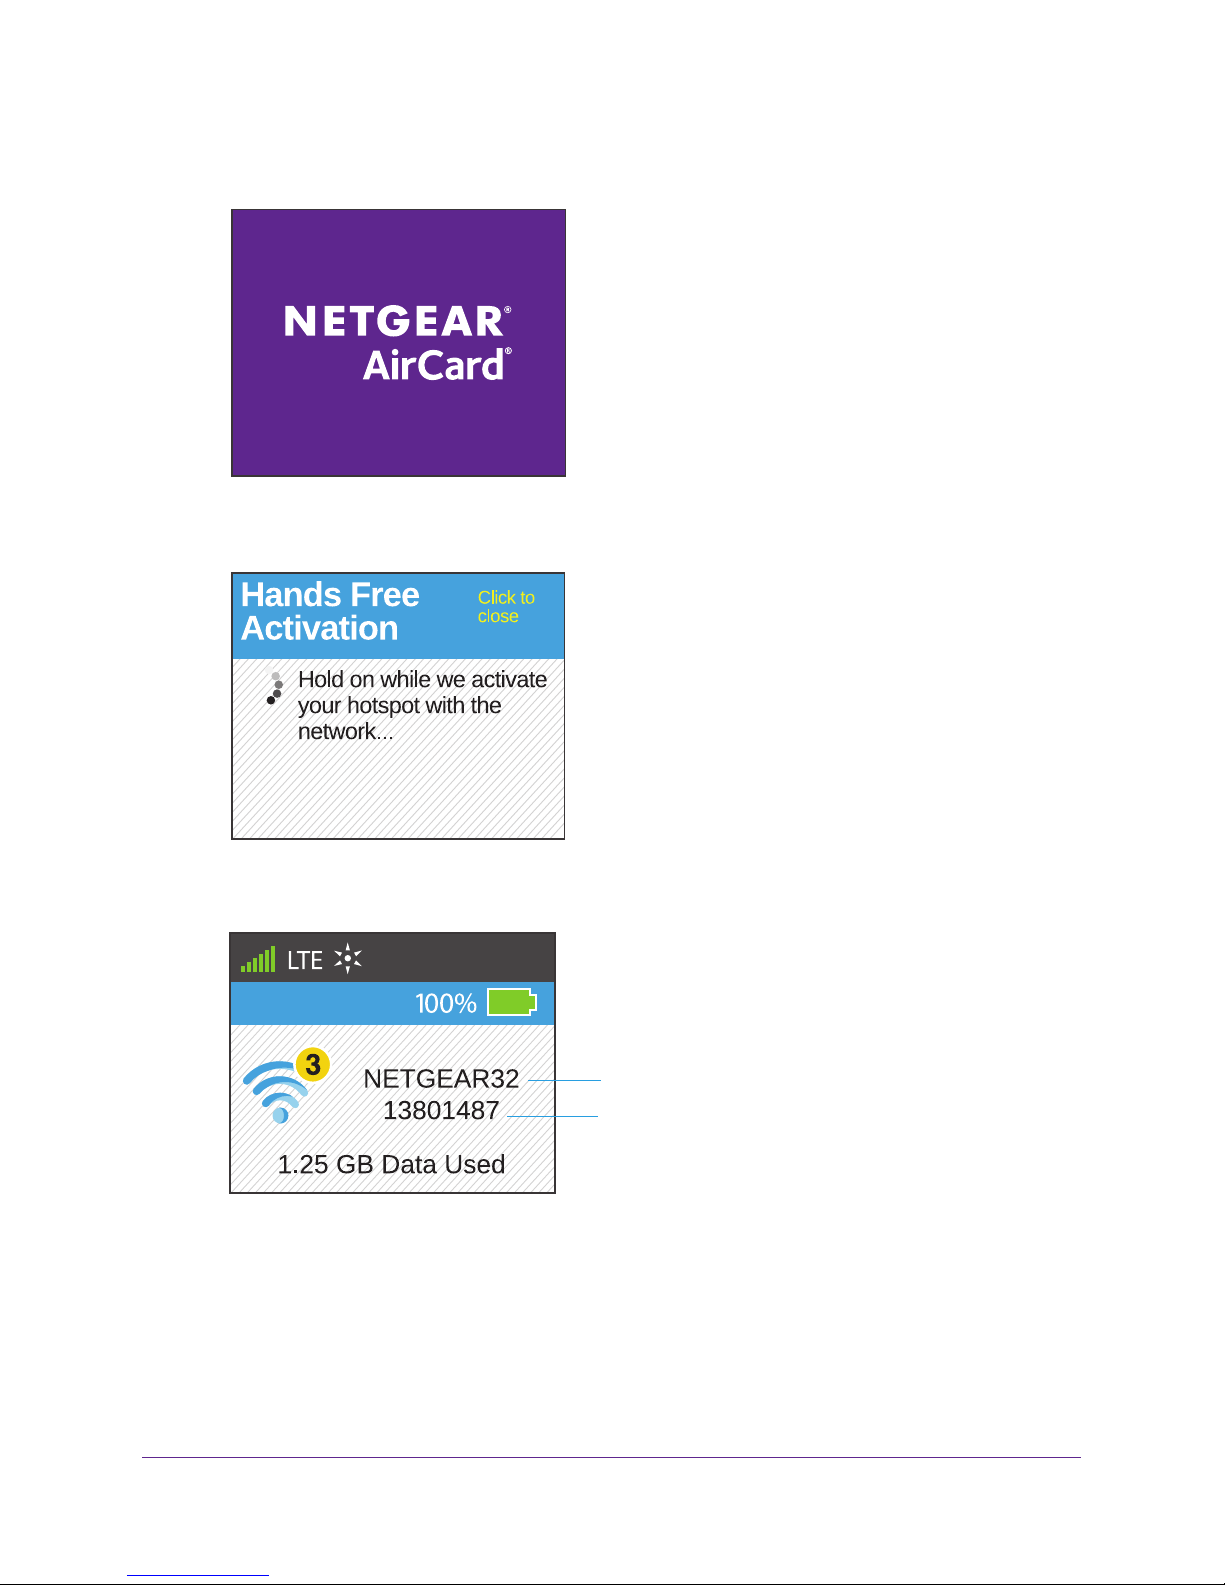
8. Press and hold the Power button on the hotspot until the LCD screen lights.
Power button
The NETGEAR AirCard screen displays:
Get Started
13
Page 14
Around Town LTE Mobile Internet
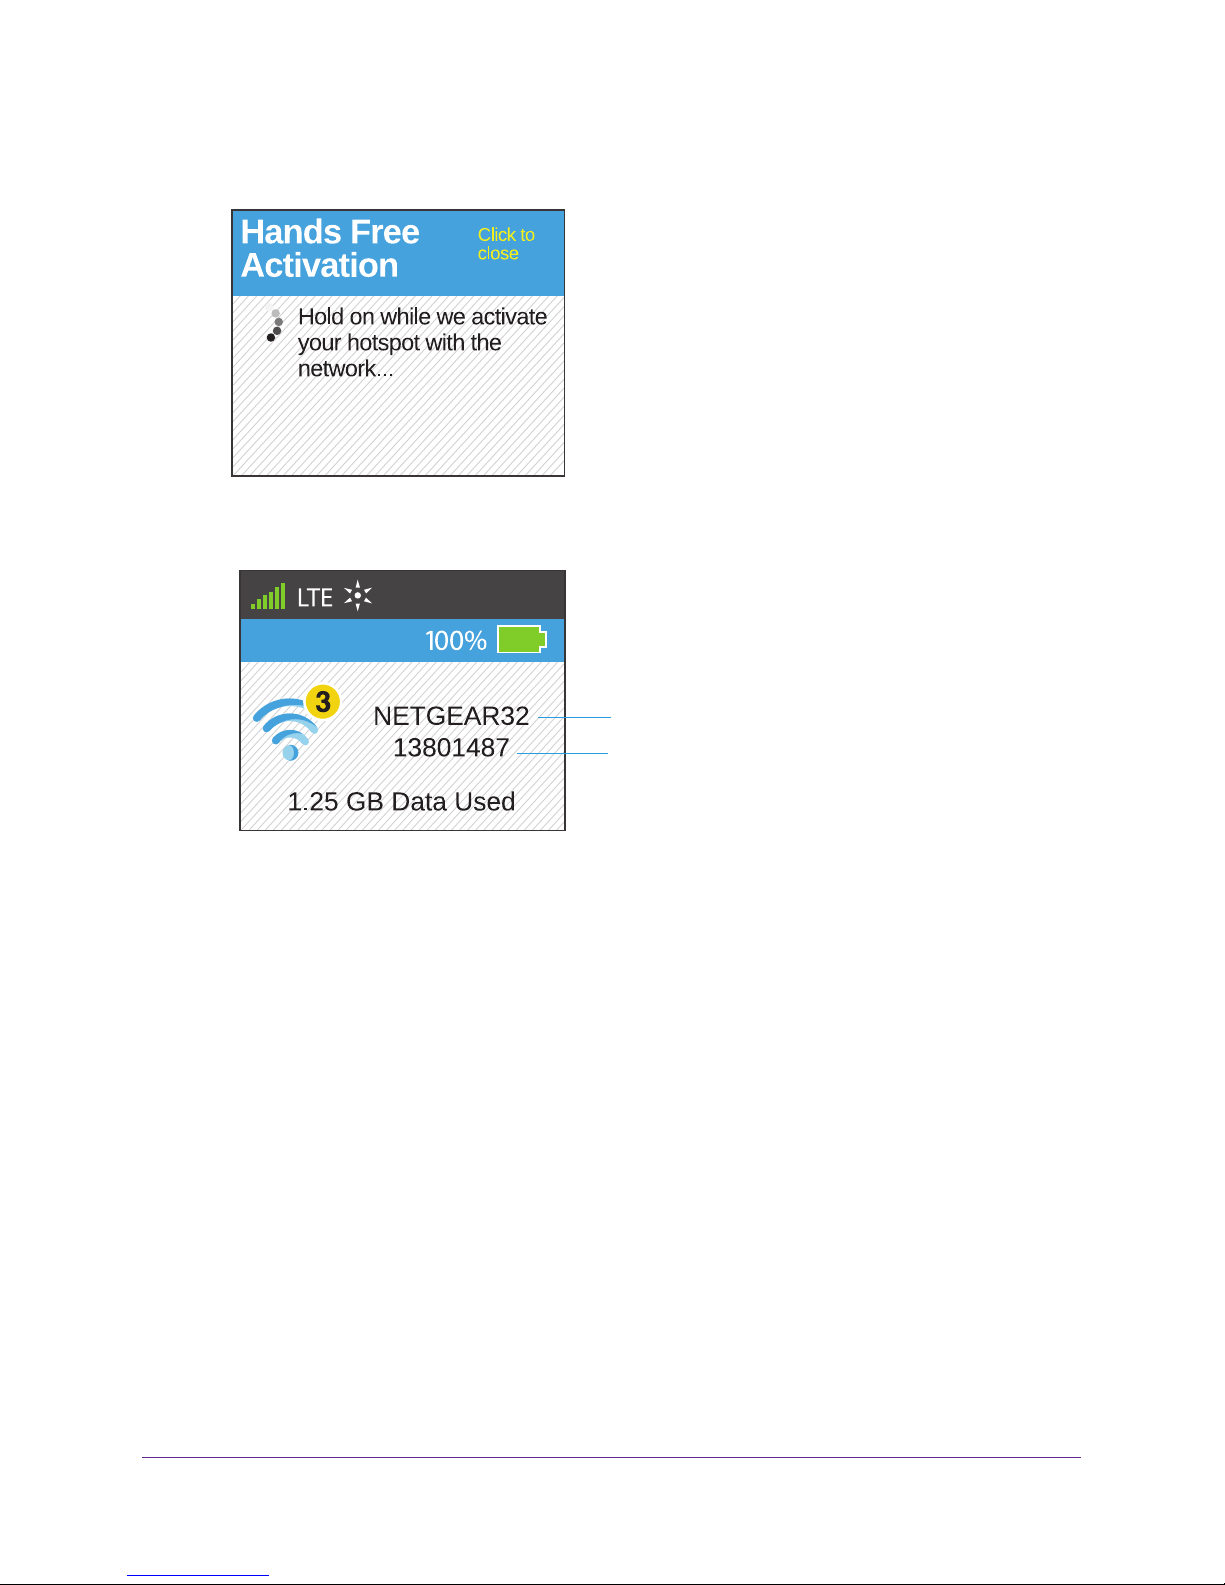
9. Wait for the Hands Free Activation screen to display and for the hotspot to activate.
When the activation process is complete, the hotspot displays the WiFi network name
(SSID) and password.
SSID
Password
You can now connect your computers or WiFi devices to the hotspot’s WiFi network.
The hotspot comes with 1000 MB of free data access. For more information about how to
manage your
Around Town account or add a new data plan, see Chapter 3, Manage Your
Around Town Account.
You can view or change the hotspot’s settings from the hotspot web page. For more
information, see Log In to the Hotspot Web Page on page 25.
Set Up Your Hotspot Without Internet Access
To set up your hotspot if you are not connected to the Internet, you need a device that can
send an SMS message to activate your hotspot. Because your hotspot comes with 1000 MB
of free data, after you activate your hotspot, you can connect a computer or WiFi device to
the hotspot to complete the setup process.
To activate and register your hotspot using SMS if you are not connected to the
Internet:
1. Make sure that the hotspot is powered off.
Get Started
14
Page 15
Around Town LTE Mobile Internet
Note: If you powered on the hotspot before activating it, power it off and
remove the battery.
2. Send an SMS message to 1-855-678-9123 and in the body of the message include only the
activation code.
The activation code is on the back of the hotspot and on the retail packaging label.
3. Wait for a confirmation message and for the hotspot to activate.
This process might take up to 15 minutes.
4. After you receive the confirmation message, insert the battery into the hotspot.
For more information about how to install the battery, see Install the Battery on page 17.
5. Press and hold the Power button on the hotspot until the LCD screen lights.
Power button
Get Started
15
Page 16
Around Town LTE Mobile Internet
The NETGEAR AirCard screen displays:
6. Wait for the Hands Free Activation screen to display and for the hotspot to complete the
activation process.
When the activation process is complete, the hotspot displays the WiFi network name
(SSID) and password.
SSID
Password
7. Connect your computer or WiFi device to the hotspot using the SSID and password that
display on the hotspot.
8. Launch a web browser from the computer or WiFi device that is connected to the AC778A
network.
9. Enter http://aroundtowninternet.com/register in the address field of the browser
.
The login screen displays.
T
Get Started
16
Page 17
Around Town LTE Mobile Internet
10. Click the Start Registration button.
11. T
ype the activation code in the Activation Code field and click the Submit button.
The activation code is on the back of the hotspot and on the retail packaging label.
12. Follow the onscreen instructions to register your hotspot and set up your account.
The hotspot comes with 1000 MB of free data access. For more information about how to
manage your
Around Town account of add a new plan, see Chapter 3, Manage Your Around
Town Account.
You can view or change the hotspot’s settings from the hotspot web page. For more
information, see Log In to the Hotspot Web Page on page 25.
Install the Battery
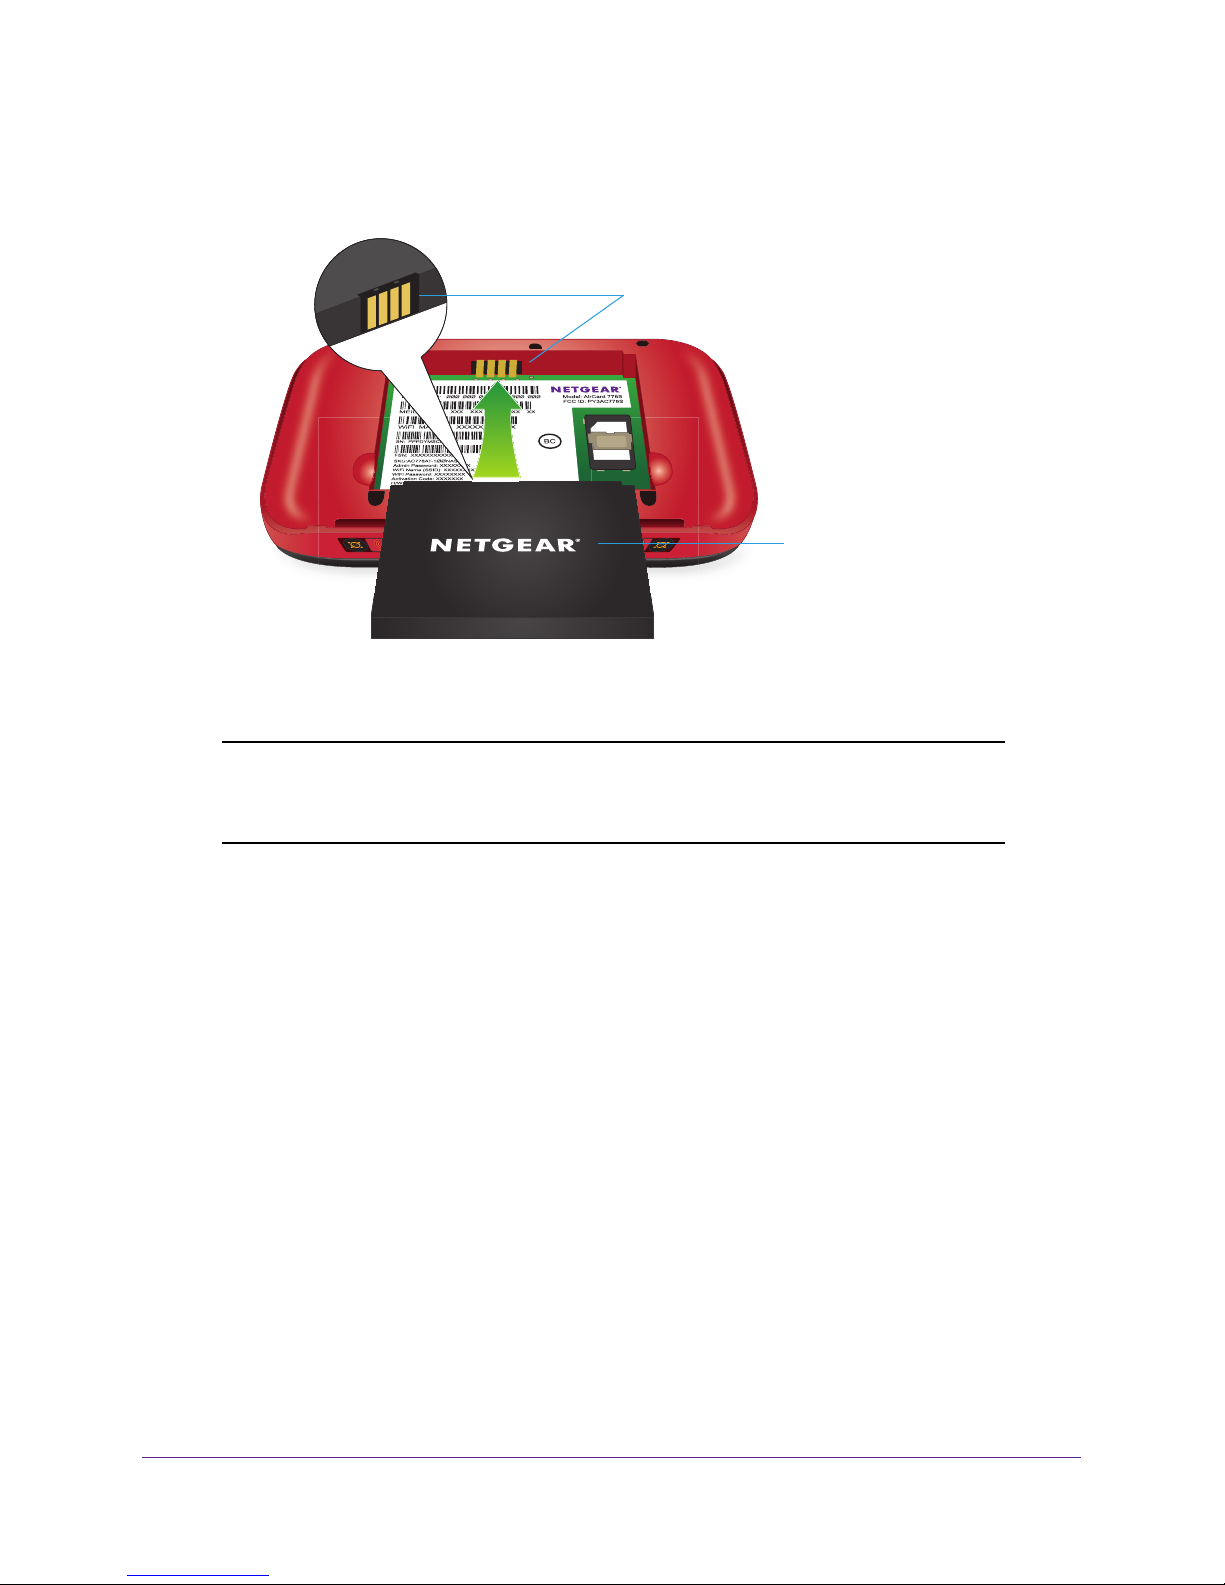
To install the battery:
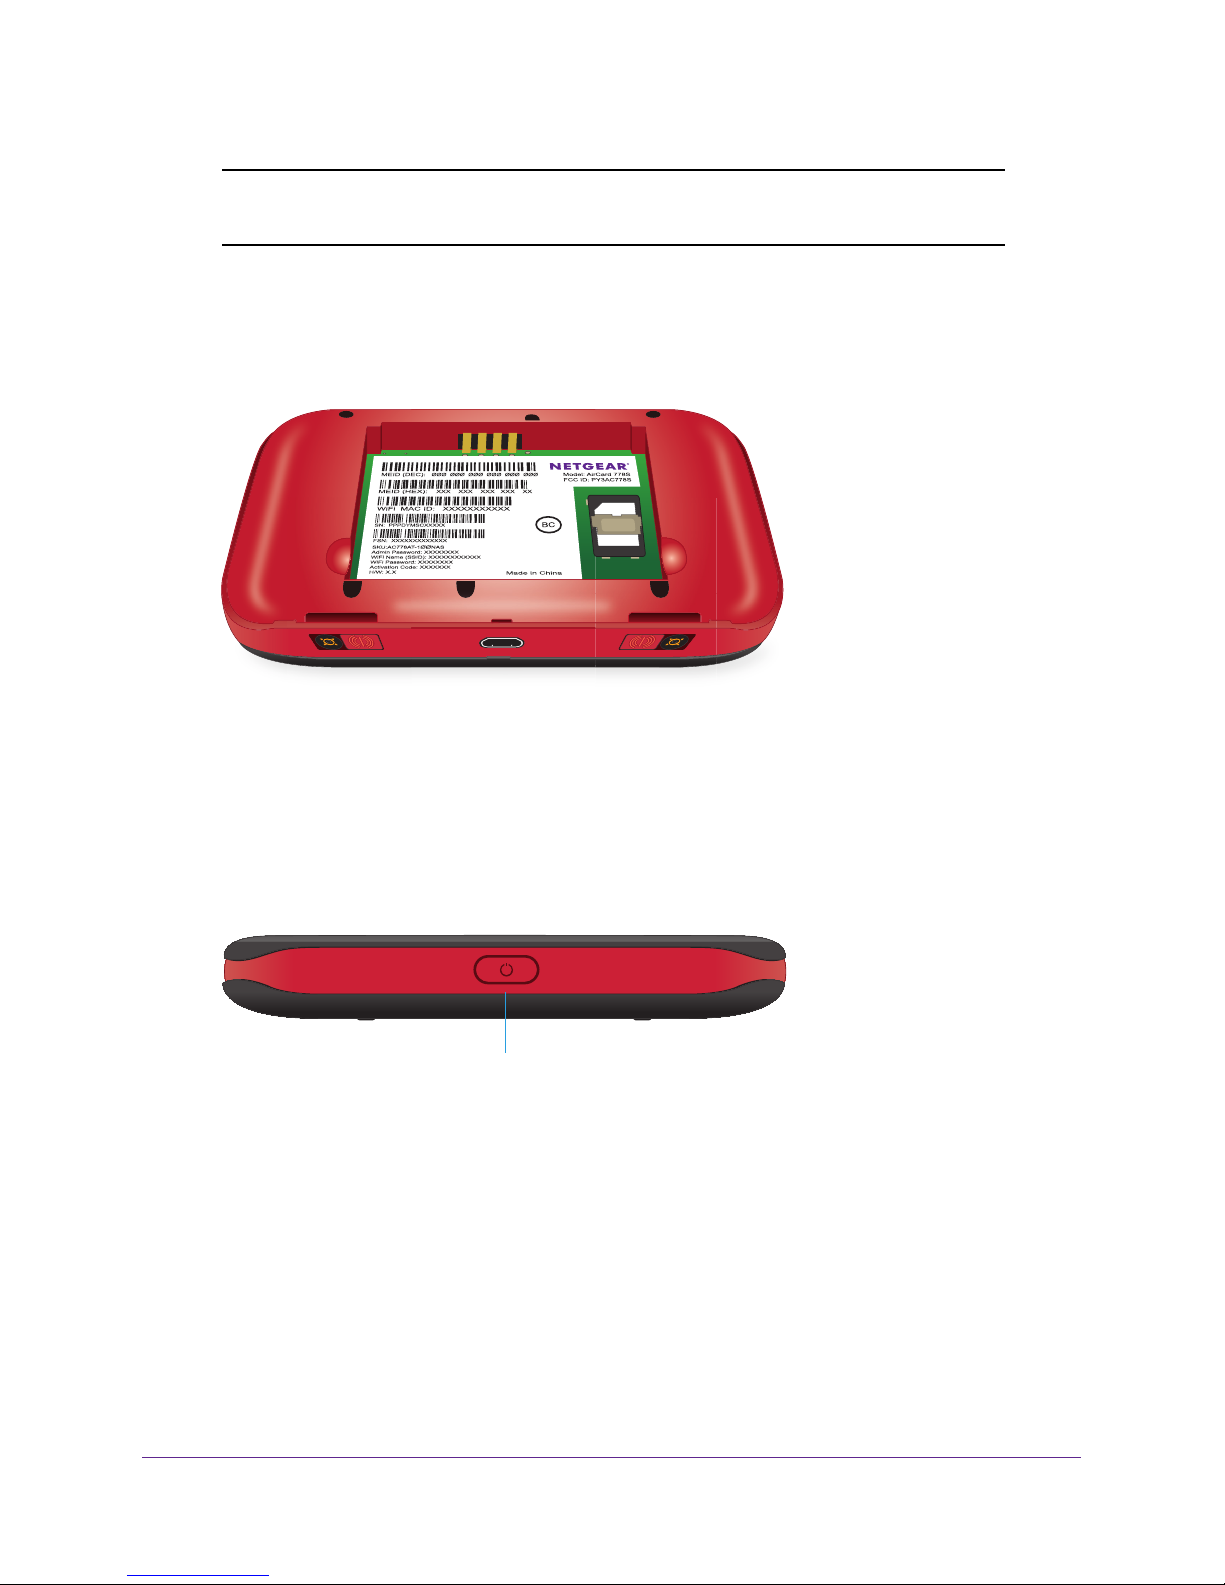
1. If the back cover is attached to the hotspot, remove the back cover by lifting at the notch
on either corner of the hotspot.
Get Started
17
Page 18
Around Town LTE Mobile Internet
2. Insert the battery as shown, ensuring that the gold contacts on the battery line up with the
gold contacts on the hotspot.
Gold contacts
Battery
3. Replace the back cover.
Note: The battery comes partially charged and ready to use. When the
battery needs recharging, follow the instructions in Recharge the
Battery on page 18.
Recharge the Battery
The battery comes partially charged. You can recharge the battery from a wall socket or from
the USB port on your computer. Recharging using the AC charger is faster than recharging
using a USB port on a computer.
Get Started
18
Page 19
Around Town LTE Mobile Internet
Recharge the Battery Using the AC Charger
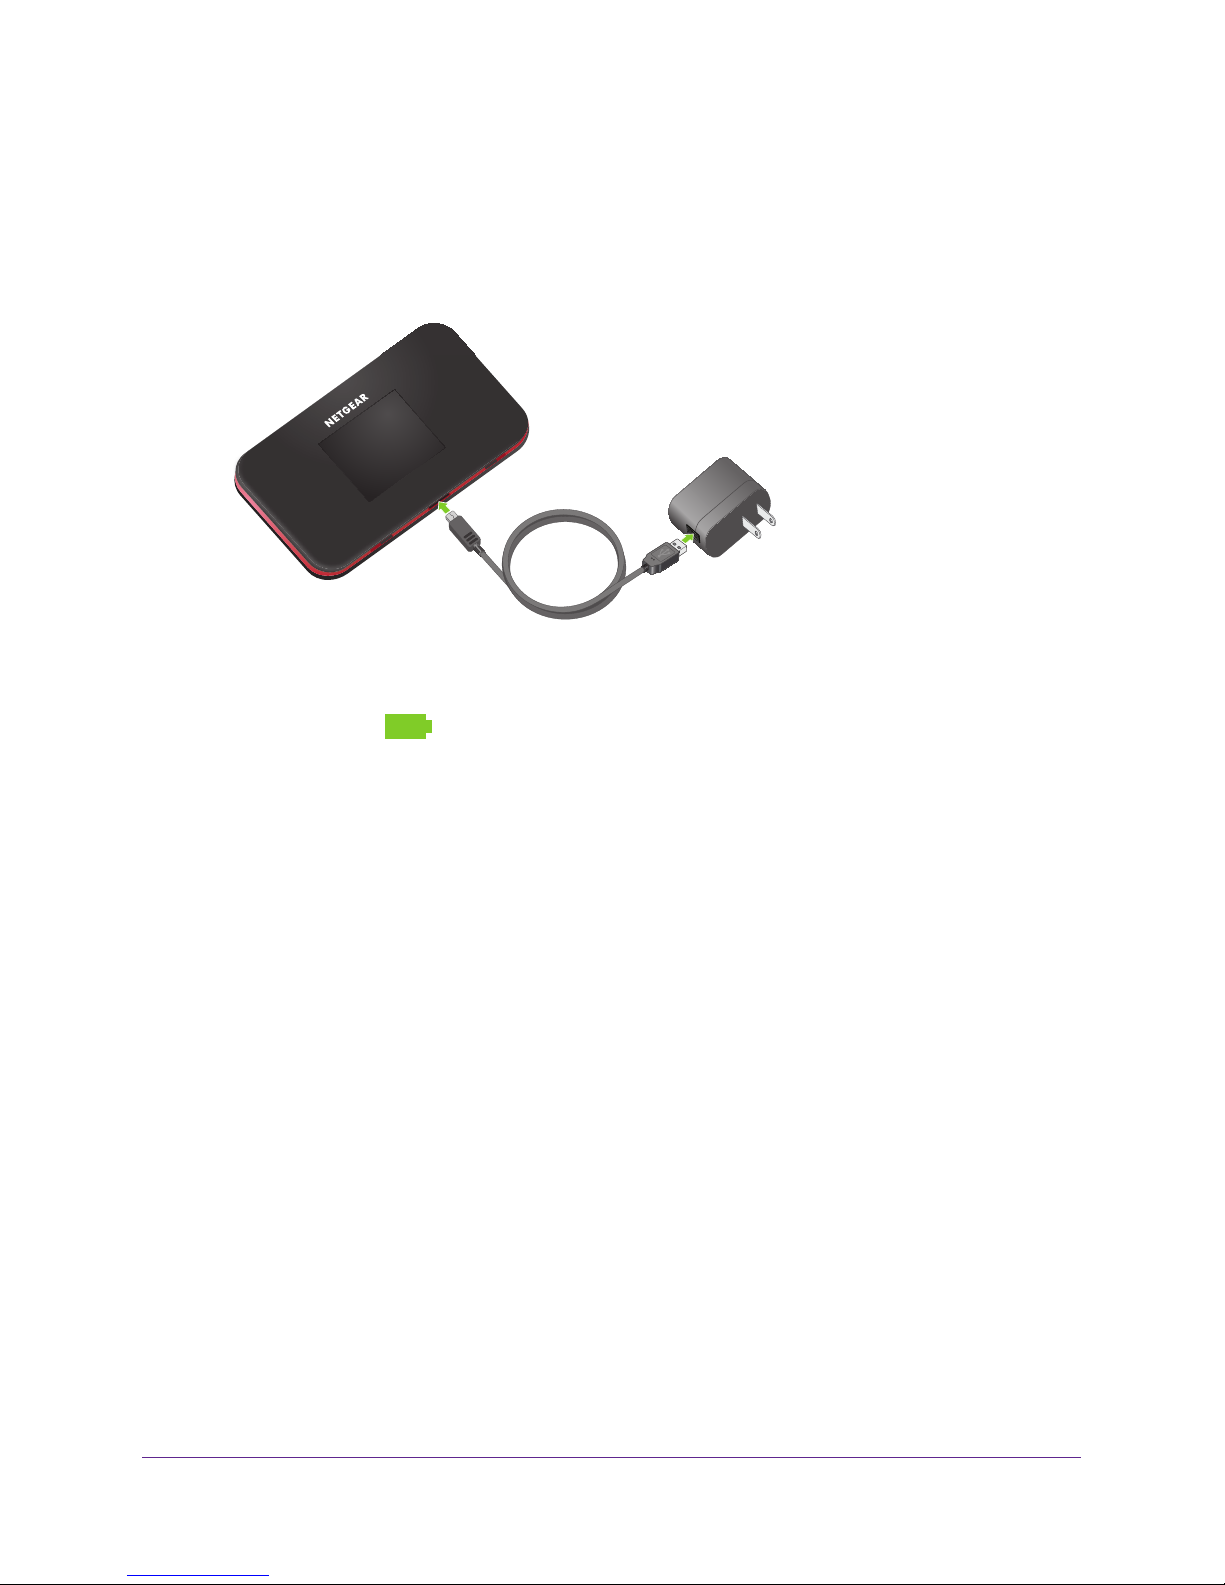
To recharge the battery using the AC charger:
1. Attach one end of the micro-USB cable to the hotspot and attach the other end to the
AC charger (included).
AC charger
micro-USB cable
2. Plug the AC charger into an electrical outlet.
The battery icon
on the LCD screen indicates the percentage of remaining battery
charged. When the battery is fully charged, a notification tells you that the battery is fully
changed and to remove the power
.
Note: The LCD screen goes into sleep mode after a set time to extend
battery life. To wake the LCD screen, press and quickly release the
Power button.
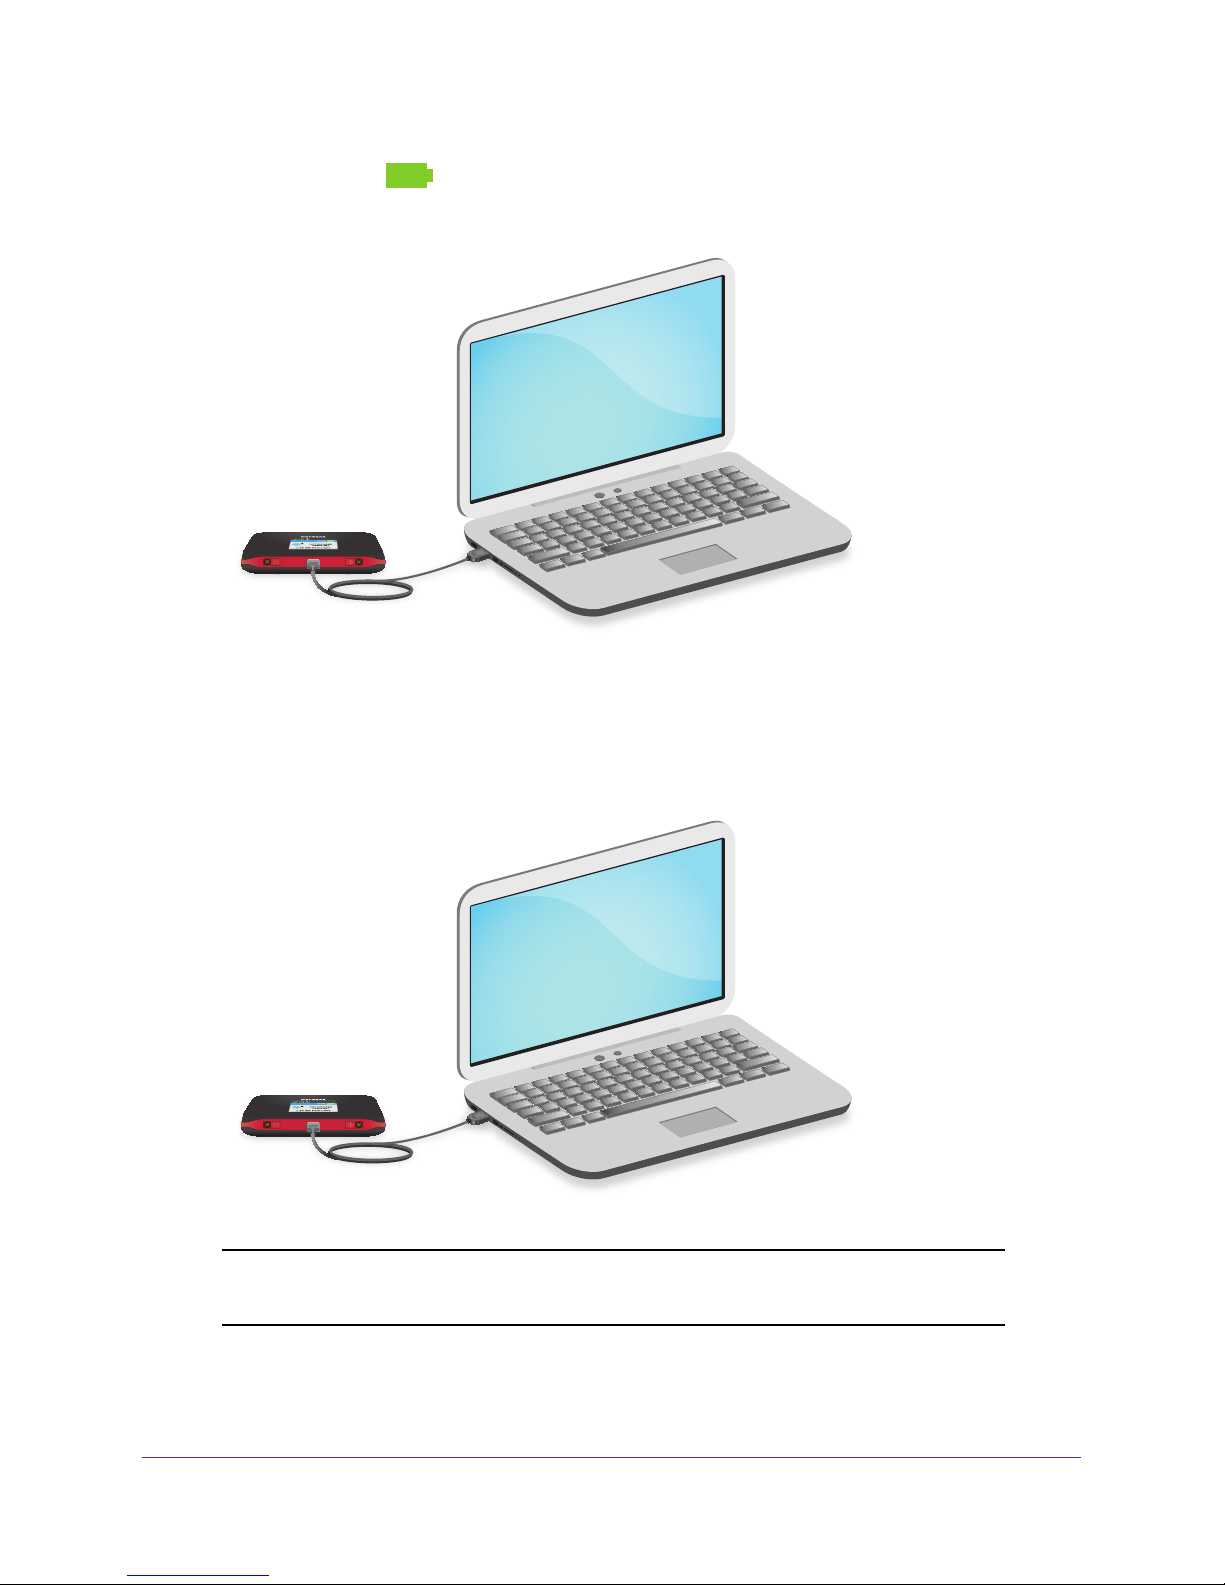
Recharge the Battery Using Your Computer
To recharge the battery using your computer, you must connect the hotspot to the computer
using the micro-USB cable that came with your hotspot.
To recharge the battery from the USB port on your computer:
1. Attach one end of the micro-USB cable to the hotspot and plug the other end into the
USB port on your computer
.
Get Started
19
Page 20
Around Town LTE Mobile Internet
The battery icon on the LCD screen indicates the percentage of remaining battery
charge. When the battery is fully charged, a notification tells you that the battery is fully
charged and to remove the power
.
Configure a Tethered Connection
Your hotspot supports a direct connection through a USB cable to a Windows or Mac
computer. (This is commonly referred to as a “tethered” connection.)
Note: The first time that you tether your hotspot, drivers are loaded on your
computer to support it.
If you use a USB connection for data transfer (and not just for charging your device), you
must install the device drivers.
Get Started
20
Page 21
Around Town LTE Mobile Internet
If you’re using Mac OS X 10.4.x, after you connect your device, you might see a warning
message that your computer is running on UPS backup battery and that you should perform
a computer shutdown. You can ignore this message. To prevent this message from being
displayed, install the device driver using TRU-Install. For more information, see the following
sections:
• Install Windows Device Drivers Using TRU-Install on page 21
• Install Mac Device Drivers Using TRU-Install on page 22
Install Windows Device Drivers Using TRU-Install
TRU-Install is a feature that installs the necessary drivers the first time you connect your
hotspot to your Windows or Mac computer through the micro USB cable. An installation CD is
not required.
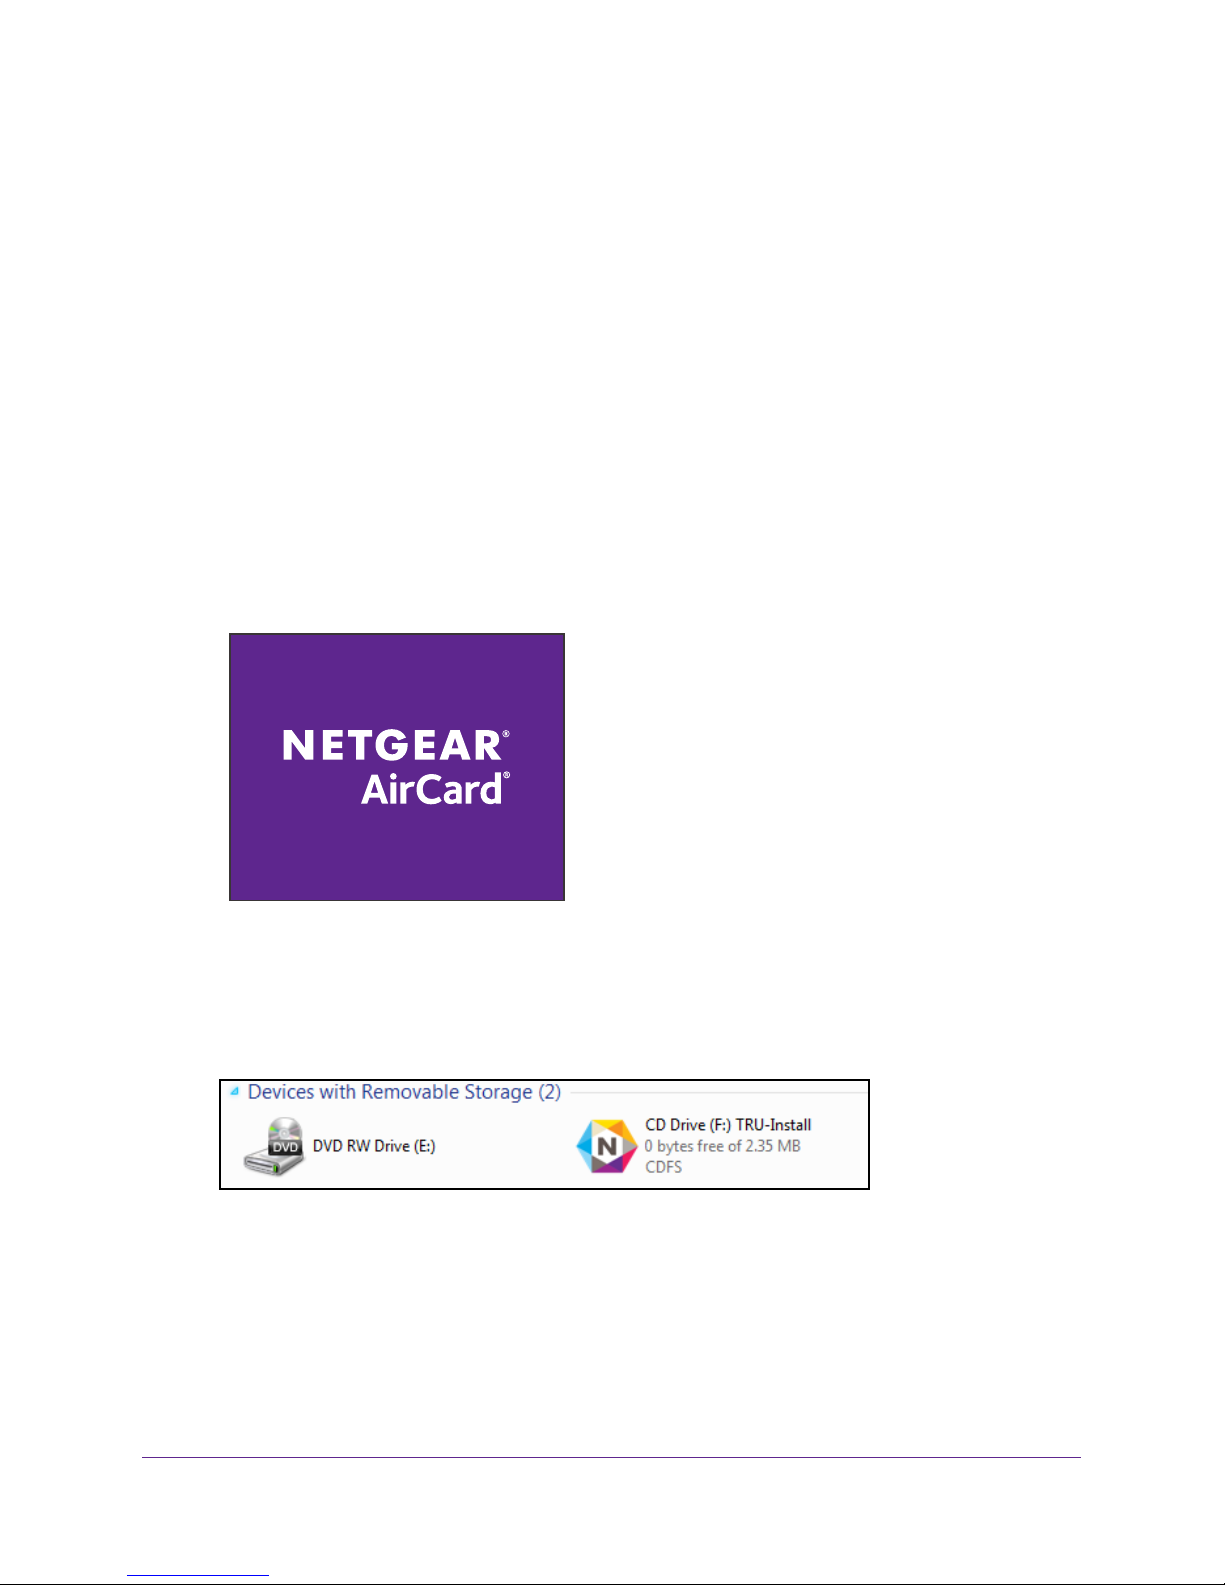
To install the device drivers on devices running Windows:
1. Press and hold the Power button on the hotspot until the LCD screen lights.
2. Attach one end of the micro-USB cable to the hotspot and plug the other end into the
USB port on your computer.
The TRU-Install screen displays.
3. If the
TRU-Install screen does not display, on your computer select Start > Computer to
view the devices connected to your computer.
4. Double-click the TRU-Install drive, browse to the files in the TRU-Install drive, and
double-click Setup.exe.
5. Follow the onscreen instructions.
Get Started
21
Page 22
Around Town LTE Mobile Internet
Install Mac Device Drivers Using TRU-Install
TRU-Install is a feature that installs the necessary drivers the first time you connect your
hotspot to your Mac computer using the micro-USB cable. An installation CD is not required.
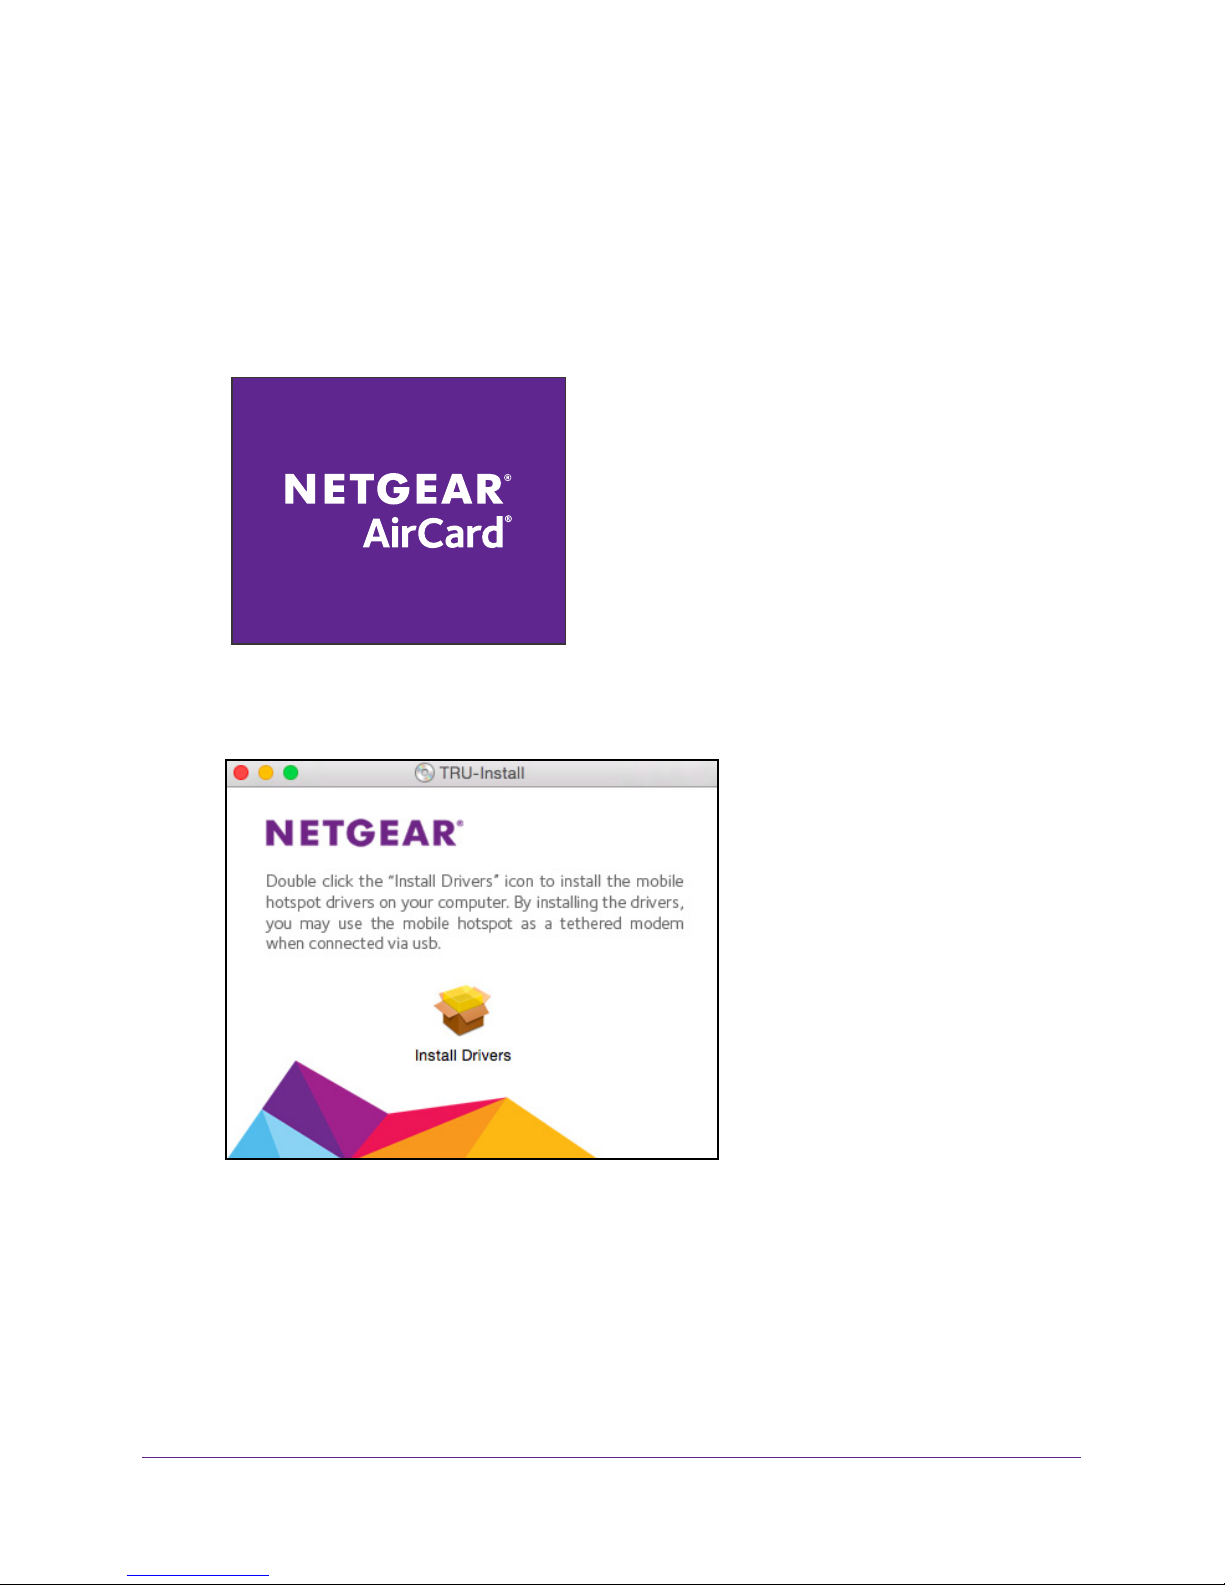
To install the device drivers on a Mac:
1. Press and hold the Power button on the hotspot until the LCD screen lights.
2. Attach one end of the micro-USB cable to the hotspot and plug the other end into the
USB port on your computer.
3. W
ait for the TRU-Install screen to display on your computer.
4. If the TRU-Install screen does not display, on your computer open Finder and under the
Devices section, click the TRU-Install drive.
5. Double-click the Install Drivers icon.
6. Follow the onscreen instructions.
Get Started
22
Page 23

Around Town LTE Mobile Internet
Manage Your Hotspot and Settings
You can manage your hotspot and change settings using the following features:
• The hotspot’
• The hotspot web page. See Log In to the Hotspot Web Page on page 25.
• Y
our account overview page. See View Your Account Settings on page 46.
• A mobile app. See NETGEAR AirCard App for Smartphones and Tablets on page 23.
s LCD screen. See LCD Screen Elements on page 10.
NETGEAR AirCard App for Smartphones and Tablets
Download the complimentary mobile app from
www.netgear.com/AirCardApps. Use this app to view your hotspot’s
settings, connection status, and data usage information from your
smartphone or tablet.
To manage all hotspot settings, visit the hotspot web page at
http://netgear.aircard or http://192.168.1.1.
Get Started
23
Page 24

2. Use Your Hotspot
This chapter explains how to use your hotspot.
This chapter covers the following topics:
• Log In to the Hotspot Web Page
• Connect to the Hotspot WiFi Network
• Monitor Data Usage
• Manage Alerts
• Configure the WiFi Settings on the Hotspot
• Change the Hotspot WiFi Network Name and Password
• Change Hotspot Web Page Login Password
• Configure the TRU-Install Installation Settings
• Disconnect from or Connect to the Mobile Broadband Network
• View Details About Your Hotspot
2
24
Page 25

Around Town LTE Mobile Internet
Log In to the Hotspot Web Page
Your hotspot comes configured and ready to use. Use the hotspot web page to manage your
hotspot’s settings.
Log in as an administrator to change settings and view detailed information. (The default
administrator login password is password.)
To login to the hotspot web page:
1. Launch a web browser from a computer or WiFi device that is connected to the hotspot
network.
2. Enter http://netgear.aroundtown or http://192.168.1.1 in the address field of the web
browser.
The hotspot web page displays.
3. Enter the admin login password in the Sign In field.
The default password is password. The password is case-sensitive.
4. Click the Sign In button.
The Sign In section closes.
After you log in, you can access all of the features available on the LCD screen plus
advanced features.
Connect to the Hotspot WiFi Network
You can connect up to 10 WiFi devices (such as smartphones, laptops, tablets, digital
cameras, printers, gaming consoles, and digital picture frames) to your hotspot network. For
information about setting connections for main WiFi and guest WiFi networks, see
Maximum Number of Connected Devices on page 83.
You can add a WiFi device to your WiFi network manually. If the device you are adding is
WPS enabled, you can use the WPS method to connect the device without using the WiFi
password.
Connect Using a WiFi Network Manager
You can connect to the hotspot WiFi network using the WiFi network manager on your
computer or WiFi device.
Set the
To connect to the hospot WiFi network using a WiFi network manager:
1. Open the WiFi network manager on your computer or WiFi device.
2. Find and select the hotspot WiFi network name (SSID).
Use Your Hotspot
25
Page 26
Around Town LTE Mobile Internet
The hotspot’s SSID is on the hotspot’s LCD screen.
SSID
Password
3. When prompted, enter the hotspot WiFi password.
The hotspot’s password is on the hotspot’s LCD screen.
The computer or WiFi device connects to the hotspot WiFi network.
Connect Using WPS
You can add a WPS-enabled WiFi device to your WiFi network without a WiFi password,
using the hotspot web page. You can connect by either using the device’s WPS button or
enter your device’s WPS PIN.
Connect Using the Device’s WPS Button
To connect to the hotspot WiFi network using the device’s WPS button:
1. Launch a web browser from a computer or WiFi device that is connected to the hotspot
network.
2. Enter http://netgear
browser.
The hotspot web page displays.
3. Enter the admin login password in the Sign In field.
The default password is password.
4. Click the Sign In button.
The Sign In section closes.
5. Select W
i-Fi > Connect.
.aroundtown or http://192.168.1.1 in the address field of the web
The password is case-sensitive.
Use Your Hotspot
26
Page 27
Around Town LTE Mobile Internet
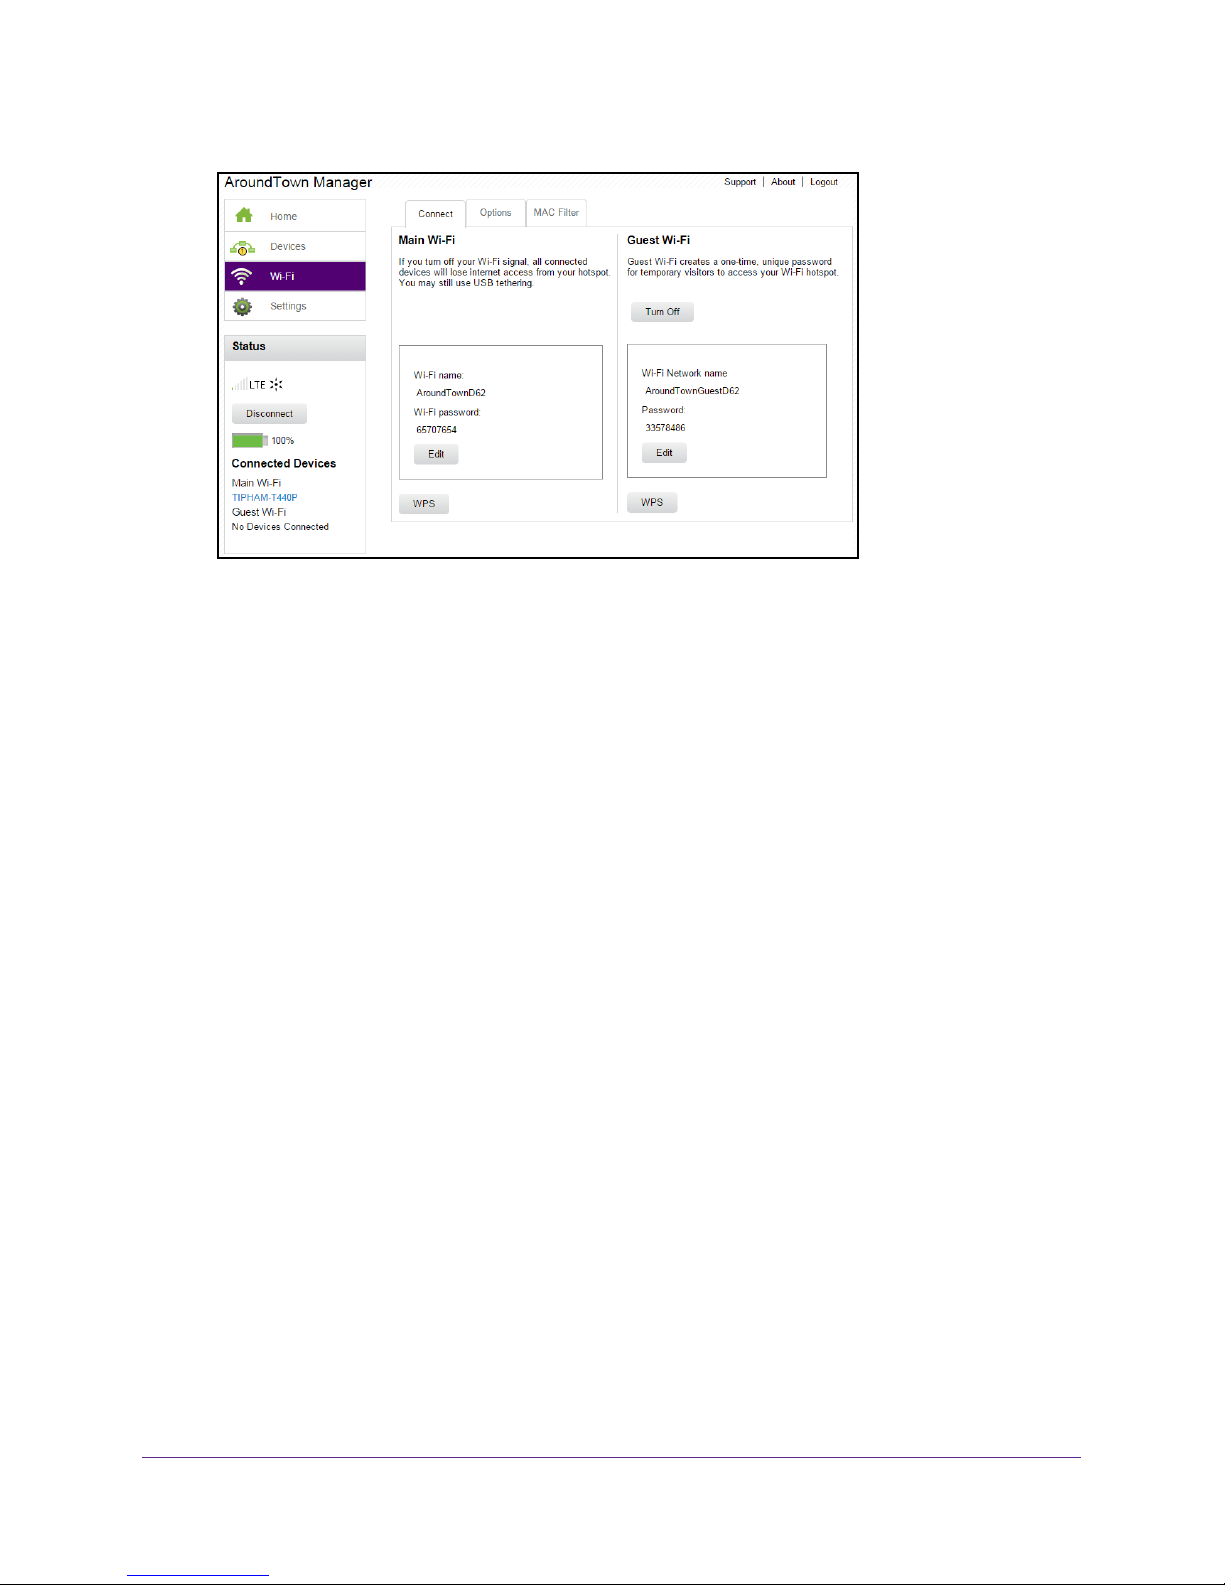
6. Click WPS button in the Main Wi-Fi section or Guest Wi-Fi section.
The WPS screen displays.
7. Click the WPS button pairing button.
The computer or WiFi device connects to the hotspot WiFi network.
Connect Using the Device’s WPS PIN
To connect to the hotspot WiFi network using the device’s WPS PIN:
1. Launch a web browser from a computer or WiFi device that is connected to the hotspot
network.
2. Enter http://netgear
browser.
The hotspot web page displays.
3. Enter the admin login password in the Sign In field.
The default password is password.
4. Click the Sign In button.
The Sign In section closes.
5. Select W
i-Fi > Connect.
.aroundtown or http://192.168.1.1 in the address field of the web
The password is case-sensitive.
Use Your Hotspot
27
Page 28

Around Town LTE Mobile Internet
6. Click WPS button in the Main Wi-Fi section or Guest Wi-Fi section.
The WPS screen displays.
7. Click the Enter WPS Pairing button.
8. When prompted, enter the PIN provided by your WPS-enabled WiFi device in the field and
click the Submit button.
The computer or WiFi device connects to the hotspot WiFi network.
Monitor Data Usage
You can monitor data usage using either the LCD screen, the hotspot web page, or your
Around Town account overview page. If you want to manage your data plan, visit your
Around Town account overview page. For more information, see Manage Your Data Plan on
page 46.
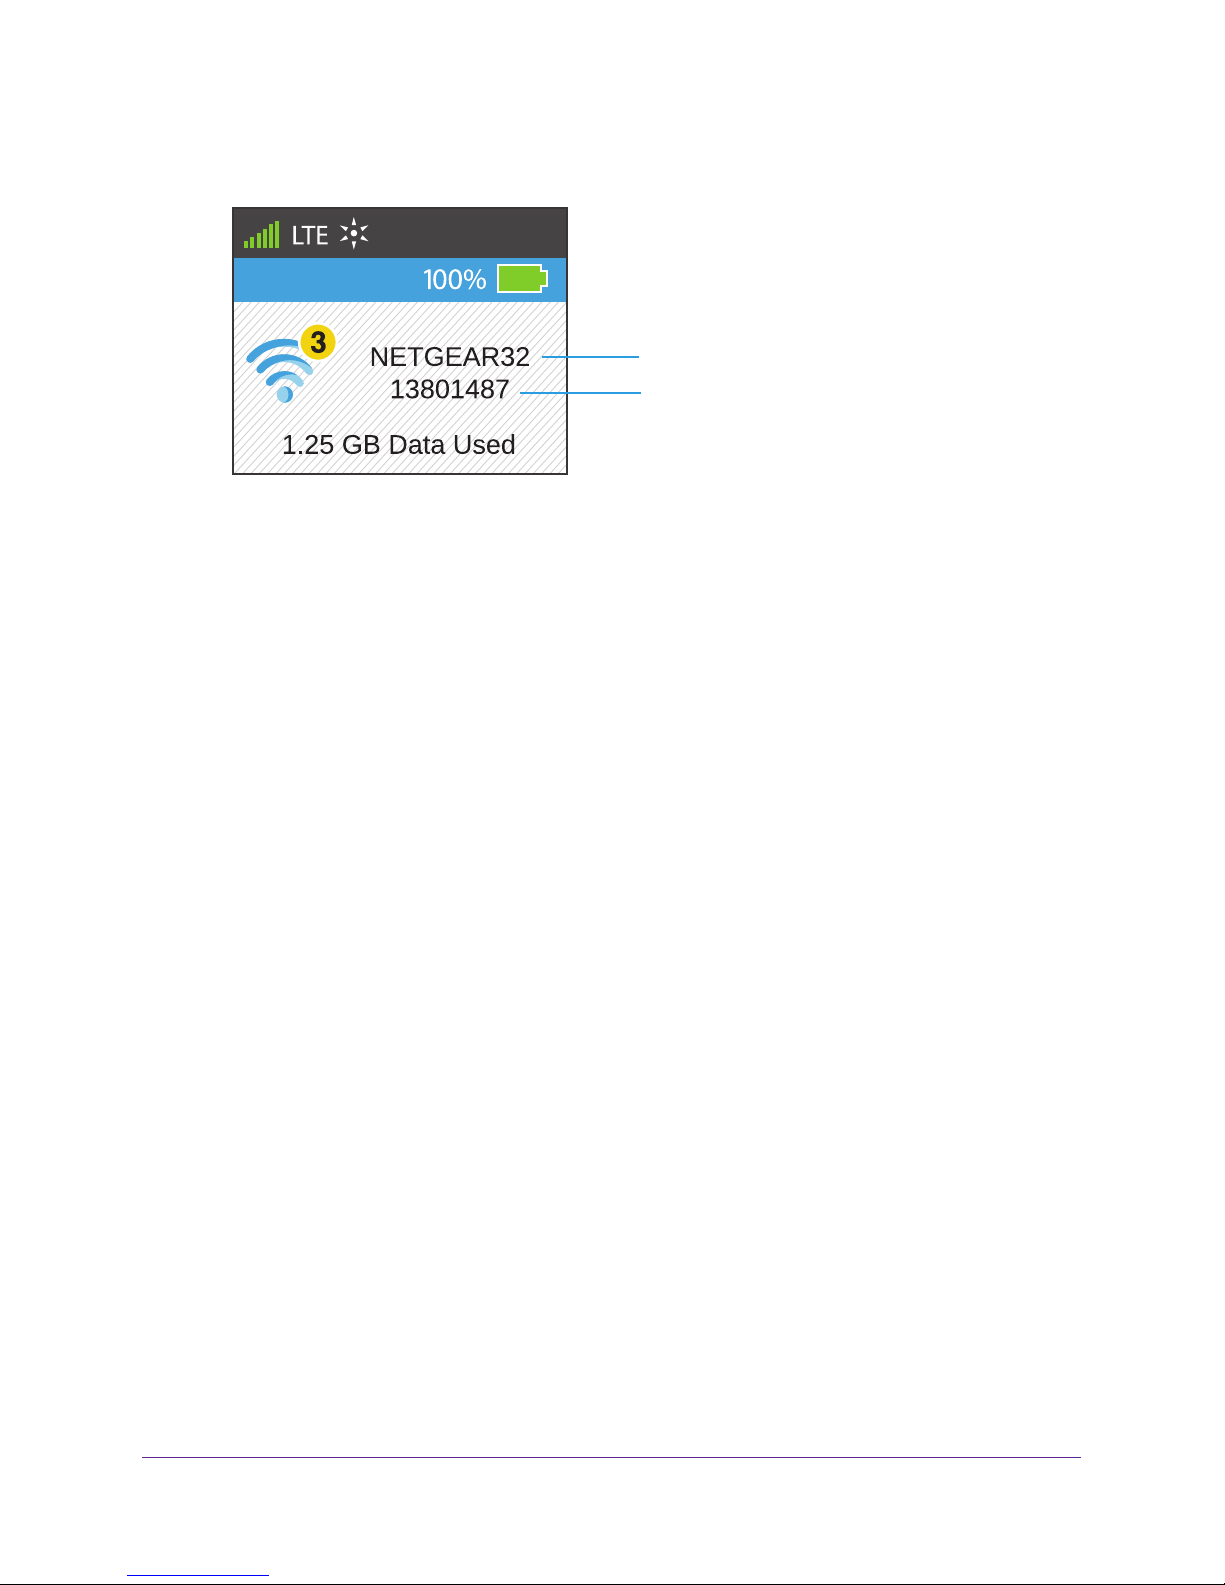
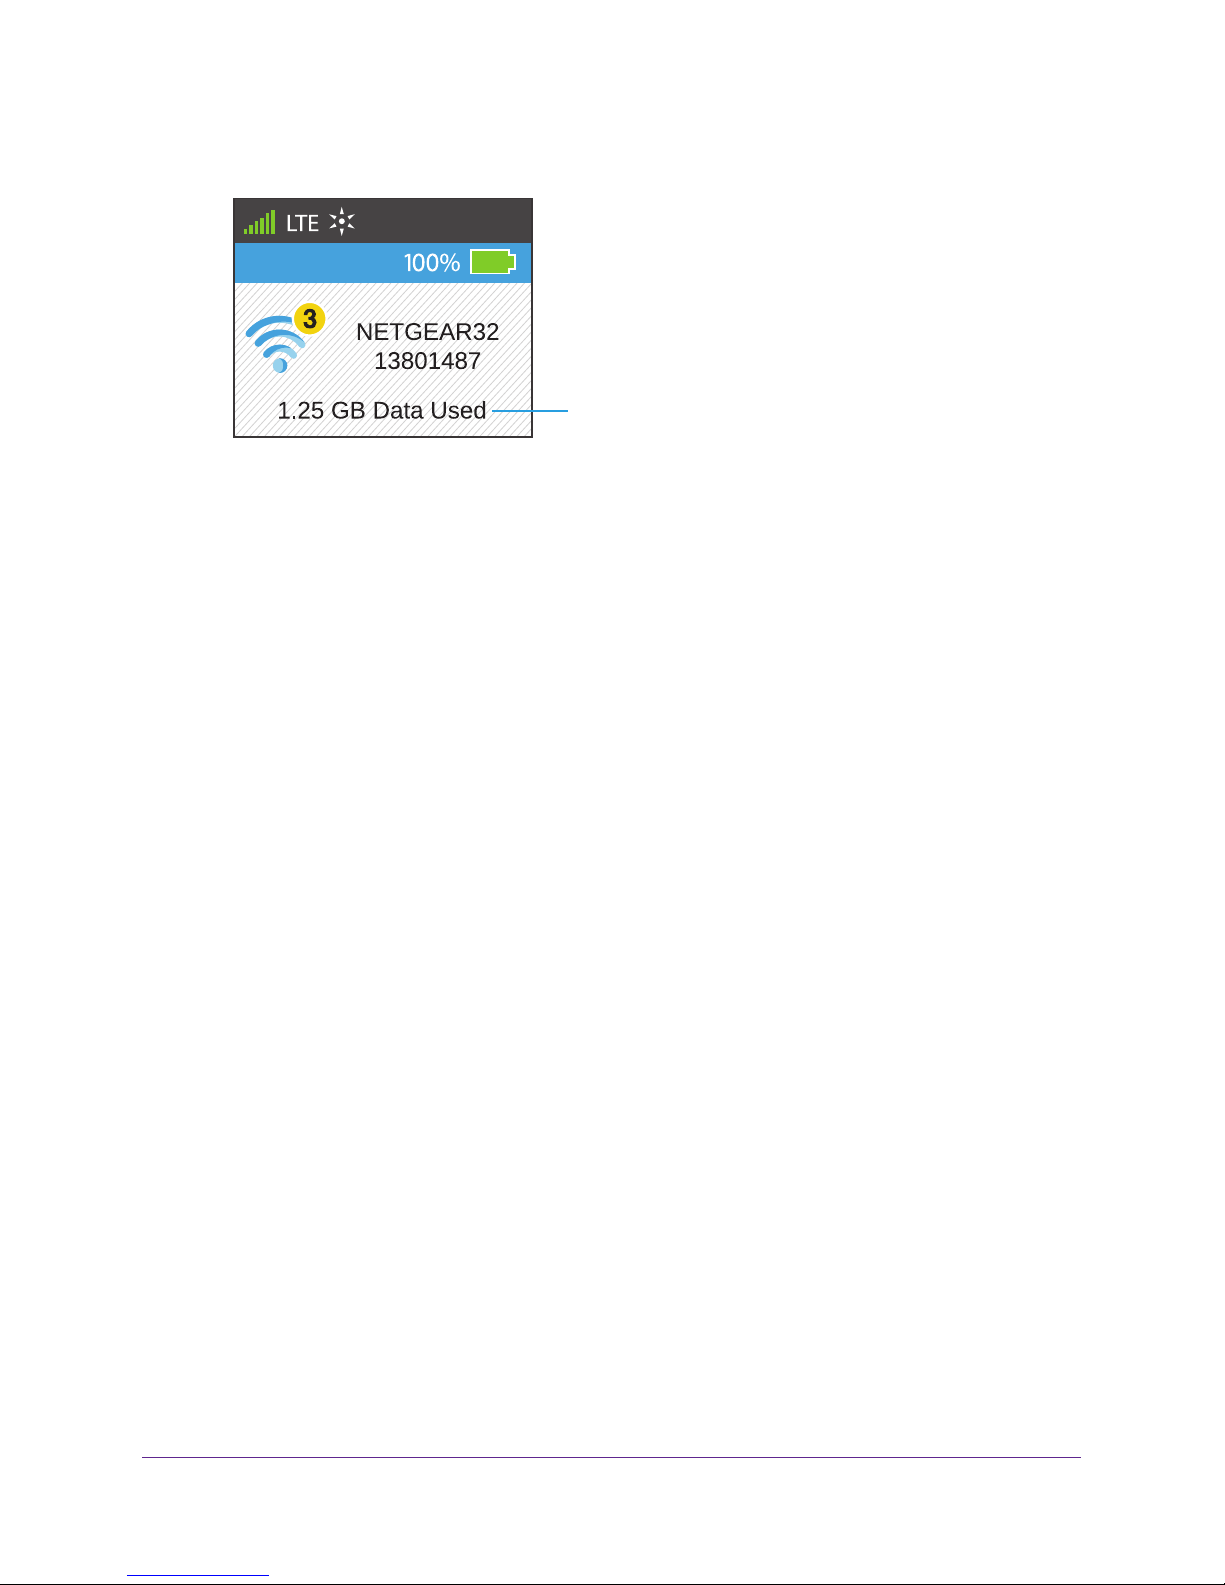
View Data Usage on the LCD Screen
To view estimated data usage on the hotspot LCD screen:
Wake the LCD screen by pressing the Power button.
Use Your Hotspot
28
Page 29
Around Town LTE Mobile Internet
The LCD screen shows the estimated data usage for the current month.
Data usage
View Data Usage on the Hotspot Web Page
To view your data usage on the hotspot web page:
1. Launch a web browser from a computer or WiFi device that is connected to the hotspot
network.
2. Enter http://netgear
.aroundtown or http://192.168.1.1.
The hotspot web page displays.
3. Enter the password in the Sign In field.
The default password is password.
The password is case-sensitive.
4. Click the Sign In button.
The Sign In section closes.
Your data usage displays in the Data Usage section.
View Data Usage on the Account Overview Page
You can view your remaining data balance and recent data usage from your account
overview page. For more information about your account overview page, see Chapter 3,
Manage Your Around Town Account.
To view your data usage on the account overview page:
1. Launch a web browser from a computer or WiFi device.
Your computer or WiFi device does not need to be connected to the hotspot network for
you to view your account settings.
2. Enter http://aroundtowninternet.com in the address field of the web browser
.
The Around Town web page displays.
3. At the top of the screen, click the MY ACCOUNT link.
The Login page displays.
Use Your Hotspot
29
Page 30

Around Town LTE Mobile Internet
4. Enter your account user name in the Username field.
Your user name is the email address that you set up when you registered your hotspot.
5. Enter your account password in the Password field.
This is the password that you set up when you registered your hotspot.
6. Click the Submit button.
The Account Overview page displays.
7. In the Devices section, select a device.
The Devices screen displays.
The remaining data balance and recent data usage display. For more information, see the
following sections:
• View Your Remaining Data Balance on page 30
• View Your Recent Data Usage on page 31
View Your Remaining Data Balance
You can view your remaining data balance on your account overview page.
To view your remaining data balance:
1. Launch a web browser from a computer or WiFi device.
Your computer or WiFi device does not need to be connected to the hotspot network for
you to view your account settings.
2. Enter http://aroundtowninternet.com in the address field of the web browser.
The Around Town web page displays.
3. At the top of the screen, click the MY ACCOUNT link.
The Login page displays.
4. Enter your account user name in the Username field.
Your user name is the email address that you set up when you registered your hotspot.
5. Enter your account password in the Password field.
This is the password that you set up when you registered your hotspot.
6. Click the Submit button.
The Account Overview page displays.
7. In the Devices section, click your device.
The Devices screen displays.
Your remaining data balance displays in the Remaining Balance section.
Use Your Hotspot
30
Page 31

Around Town LTE Mobile Internet
View Your Recent Data Usage
You can view your recent data usage by date and time on your account overview page.
To view your recent data usage:
1. Launch a web browser from a computer or WiFi device.
Your computer or WiFi device does not need to be connected to the hotspot network for
you to view your account settings.
2. Enter http://aroundtowninternet.com in the address field of the web browser.
The Around Town web page displays.
3. At the top of the screen, click the MY ACCOUNT link.
The Login page displays.
4. Enter your account user name in the Username field.
Your user name is the email address that you set up when you registered your hotspot.
5. Enter your account password in the Password field.
This is the password that you set up when you registered your hotspot.
6. Click the Submit button.
The Account Overview page displays.
7. In the Devices section, click your device.
The Devices screen displays.
Your recent data usage displays in the Recent Usage section and is organized by date.
8. To view your data usage by time, click the View Details link next to each date.
The Balance History screen displays. Your data usage displays and is organized by time.
Manage Alerts
Your hotspot displays alerts about situations that require your attention. The alerts suggest
the actions you need to take to resolve them.
The following are some of the alerts that you might encounter:
• Software Updated Available. For information about how to update your software, see
Update the Hotspot Software on page 65.
• Max WiFi devices reached. For information about how to configure the maximum
number of connected devices, see
page 83.
• Mobile Broadband disconnected. For information about how to connect to the mobile
broadband, see
page 40.
Disconnect from or Connect to the Mobile Broadband Network on
Set the Maximum Number of Connected Devices on
Use Your Hotspot
31
Page 32

Around Town LTE Mobile Internet
• WiFi is off. If the WiFi is off, WiFi sleep settings might be set up. For more information
about the WiFi sleep settings, see Set the Hotspot’s WiFi Sleep Settings on page 75.
• Hotspot is not activated. For information about how to activate the hotspot, see Set Up
Your Hotspot on page 12.
• SIM errors. Reboot the hotspot. If the SIM error still displays, call
Your hotspot’s LCD screen and web page displays alerts to advise you of hotspot status
changes.
about how to manage your account alerts, see Chapter 3, Manage Your Around Town
Account.
Your account overview page displays alerts about your data plan. For information
Around Town support.
View Alerts on the LCD Screen
To view alerts on the LCD screen:
1. Press the Power button to wake up the LCD screen.
A yellow triangle displays on the LCD screen when there is a system alert.
System Alerts
2. Press the Power button until the ALERTS screen displays.
ALERTS
MOBILE BROADBAND
DISCONNECTED
Your data connection is
disconnected.
3. Read each alert that displays and follow any displayed instructions.
4. T
o move to the next alert, click the Power button twice.
Use Your Hotspot
32
Page 33

Around Town LTE Mobile Internet
Note: Alerts remain as long as the issues that cause them are active. When
the issues are resolved, the alerts are removed automatically.
View Alerts on the Hotspot Web Page
To view alerts on the hotspot web page:
1. Launch a web browser from a computer or WiFi device that is connected to the hotspot
network.
2. Enter http://netgear
browser.
The hotspot web page displays.
3. Enter the admin login password in the Sign In field.
.aroundtown or http://192.168.1.1 in the address field of the web
The default password is password.
4. Click the Sign In button.
The Sign In section closes.
Active alerts display at the top of the hotspot web page.
5. Follow the instructions in each alert to address the conditions that caused it to display.
The password is case-sensitive.
Configure the WiFi Settings on the Hotspot
You can show or hide the WiFi settings that display on the hotspot’s LCD screen.
Show the WiFi Settings on the LCD Screen
You can displays the WiFi network name and password on the hotspot’s LCD screen.
Use Your Hotspot
33
Page 34

Around Town LTE Mobile Internet
To show the WiFi setttings on the LCD sceen:
1. Launch a web browser from a computer or WiFi device that is connected to the hotspot
network.
2. Enter http://netgear
.aroundtown or http://192.168.1.1 in the address field of the web
browser.
The hotspot web page displays.
3. Enter the admin login password in the Sign In field.
The default password is password.
The password is case-sensitive.
4. Click the Sign In button.
The Sign In section closes.
5. Select W
i-Fi > Options.
6. Scroll down to the Wi-Fi options section.
7. In the Wi-Fi Info on Home section, select the Show radio button.
The Submit button displays after you make a selection.
8. Click the Submit button.
A warning message displays.
9. Click the Submit button.
Your changes are saved.
Hide the WiFi Settings On the LCD Screen
You can hide the WiFi network name and password on the hotspot’s LCD screen.
To show the WiFi setttings on the LCD sceen:
1. Launch a web browser from a computer or WiFi device that is connected to the hotspot
network.
2. Enter http://netgear
browser.
The hotspot web page displays.
3. Enter the admin login password in the Sign In field.
The default password is password.
.aroundtown or http://192.168.1.1 in the address field of the web
The password is case-sensitive.
Use Your Hotspot
34
Page 35

4. Click the Sign In button.
The Sign In section closes.
Around Town LTE Mobile Internet
5. Select W
i-Fi > Options.
6. Scroll down to the Wi-Fi options section.
7. In the Wi-Fi Info on Home section, select the Hide radio button.
The Submit button displays after you make a selection.
8. Click the Submit button.
A warning message displays.
9. Click the Submit button.
Your changes are saved.
Change the Hotspot WiFi Network Name and Password
Your hotspot comes with a randomly generated and secured WiFi network name and
password that you can continue to use as is.You can change the WiFi network name and
password for your main WiFi or guest WiFi network.
To change network name and password:
1. Launch a web browser from a computer or WiFi device that is connected to the hotspot
network.
2. Enter http://netgear
.aroundtown or http://192.168.1.1 in the address field of the web
browser.
The hotspot web page displays.
3. Enter the admin login password in the Sign In field.
The default password is password.
The password is case-sensitive.
4. Click the Sign In button.
The Sign In section closes.
Use Your Hotspot
35
Page 36

Around Town LTE Mobile Internet
5. Select Wi-Fi > Options.
6. In the Main Wi-Fi or Guest Wi-Fi section, change the WiFi name and password as desired.
7. T
o change the guest WiFi password automatically, select the Generate a new password
each time I turn on the Guest Wi-Fi check box.
The Submit button displays after you change any of the settings.
8. Click the Submit button.
9. When prompted, click the Submit button again.
All devices that were connected must reconnect with the new name and password.
Change Hotspot Web Page Login Password
You can change the login password for the hotspot web page.
To change the login password for the hotspot web page:
1. Launch a web browser from a computer or WiFi device that is connected to the hotspot
network.
2. Enter http://netgear
browser.
The hotspot web page displays.
3. Enter the admin login password in the Sign In field.
The default password is password.
4. Click the Sign In button.
The Sign In section closes.
.aroundtown or http://192.168.1.1 in the address field of the web
The password is case-sensitive.
Use Your Hotspot
36
Page 37

Around Town LTE Mobile Internet
5. Select Settings > General > Device.
6. In the Homepage section, click the Show Password link.
The AroundT
7. Enter a new password in the AroundT
The new password can be up to 31 characters and contain uppercase and lowercase
letters, numbers, and symbols.
The Submit button displays after you make a selection.
8. Click the Submit button.
Your changes are saved.
own Manager Password displays.
own Manager Password field.
Configure the TRU-Install Installation Settings
TRU-Install is a feature that installs the necessary drivers the first time you connect your
device to your Windows or Mac computer using the micro-USB cable. An installation CD is
not required. The default setting is for the hotspot to automatically install the TRU-Install
feature.
Enable TRU-Install Driver Installation
You can enable the hotspot to automatically install the TRU-Insall feature when the hotspot is
connected to a computer.
Use Your Hotspot
37
Page 38

Around Town LTE Mobile Internet
To enable the TRU-Install installation feature:
1. Launch a web browser from a computer or WiFi device that is connected to the hotspot
network.
2. Enter http://netgear
.aroundtown or http://192.168.1.1 in the address field of the web
browser.
The hotspot web page displays.
3. Enter the admin login password in the Sign In field.
The default password is password.
The password is case-sensitive.
4. Click the Sign In button.
The Sign In section closes.
5. Select Settings > General > Software and Reset.
6. In the Startup Options section, select the Install driver when connecting to Windows or
MAC computers with a USB cable check box.
The Submit button displays after you make a change.
7. Click the Submit button.
Your changes are saved.
Use Your Hotspot
38
Page 39

Around Town LTE Mobile Internet
Disable TRU-Install Installation
You can disable the automatic TRU-Install installation feature so that the hotspot does not
install the TRU-Install feature when the hotspot is connected to a computer.
To disable the TRU-Install installation feature:
1. Launch a web browser from a computer or WiFi device that is connected to the hotspot
network.
2. Enter http://netgear
browser.
The hotspot web page displays.
3. Enter the admin login password in the Sign In field.
.aroundtown or http://192.168.1.1 in the address field of the web
The default password is password.
The password is case-sensitive.
4. Click the Sign In button.
The Sign In section closes.
5. Select Settings > General > Software and Reset.
6. In the Startup Options section, clear the Install driver when connecting to Windows or
MAC computers with a USB cable check box.
The Submit button displays after you make a change.
7. Click the Submit button.
Your changes are saved.
Use Your Hotspot
39
Page 40

Around Town LTE Mobile Internet
Disconnect from or Connect to the Mobile Broadband
Network
If you just want to manage your hotspot’s settings, but you don’t want to connect to the
Internet and access your data, you can disconnect your hotspot from the mobile broadband
network.
Disconnect from the Mobile Broadband Network
To disconnect from the mobile broadband network:
1. Launch a web browser from a computer or WiFi device that is connected to the hotspot
network.
2. Enter http://netgear.aroundtown or http://192.168.1.1 in the address field of the web
browser.
The hotspot web page displays.
3. Enter the admin login password in the Sign In field.
The default password is password. The password is case-sensitive.
4. Click the Sign In button.
The Sign In section closes.
5. In the Status section, click the Disconnect button.
Your hotspot disconnects from the mobile broadband network.
An alert on the hotspot web page and on your hotspot’s LCD screen notifies you that the
hotspot is disconnected from the mobile broadband network.
Connect to the Mobile Broadband Network
To connect to the mobile broadband network:
1. Launch a web browser from a computer or WiFi device that is connected to the hotspot
network.
2. Enter http://netgear.aroundtown or http://192.168.1.1 in the address field of the web
browser.
The hotspot web page displays.
3. Enter the admin login password in the Sign In field.
The default password is password. The password is case-sensitive.
4. Click the Sign In button.
The Sign In section closes.
5. In the Status section, click the Connect button.
Use Your Hotspot
40
Page 41

Around Town LTE Mobile Internet
Your hotspot connects to the mobile broadband network.
View Details About Your Hotspot
You can view details about your hotspot on the hotspot web page or the hotspot’s LCD
screen.
View Details About Your Hotspot on the Web Page
To view details about your hotspot on the hotspot web page:
1. Launch a web browser from a computer or WiFi device that is connected to the hotspot
network.
2. Enter http://netgear.aroundtown or http://192.168.1.1 in the address field of the web
browser.
The hotspot web page displays.
3. Enter the admin login password in the Sign In field.
The default password is password. The password is case-sensitive.
4. Click the Sign In button.
The Sign In section closes.
5. Click the About link near the upper right corner of the screen.
The following information displays:
• Account Details:
- My number. The hotspot’s phone number.
- MSID. The mobile station ID (MSID) associated with your phone number.
- MEID. The mobile equipment identifier (MEID) of your device.
- ICCID. The serial number of the SIM.
- IMEI. The device’s unique Internet Mobile Equipment Identity (IMEI) code.
- Activation Code. The hotspot’s activation code.
• Wi-Fi Details
- Wi-Fi name. The hotspot’s main WiFi network name.
- Wi-Fi password. The hotspot’s main WiFi network password.
- MAC Address. The hotspot’s MAC address. Each hotspot is assigned a unique
MAC address by its manufacturer.
- Encryption. The security standard used for the WiFi network.
- Wi-Fi Devices. The number of devices currently connected to the hotspot’s Wi-Fi
networks.
- Max Wi-Fi Devices. The maximum number of devices that can connect to the
hotspot’s main WiFi network.
Use Your Hotspot
41
Page 42

Around Town LTE Mobile Internet
- Max Guest Wi-Fi Devices. The maximum number of devices that can connect to
the hotspot’s guest WiFi network.
- Broadcast Network Name. Indicates whether the WiFi network name is being
broadcast.
• Firmware:
- FW Version. The hotspot’s firmware version.
- FW Build Date. The date the firmware version was created.
- Wed App Version. The hotspot’s web page version.
- Bootloader Version. The version of the software that starts up your hotspot.
• Device:
- Model. The manufacturer’s name for your hotspot.
- AroundTown Manager. The URL for the hotspot’s web page.
- PRL Version. The Preferred Roaming List (PRL) version number.
- Power State. The hotspot’s power state (Online, Offline).
- Current temperature. The hotspot’s temperature in Celsius. If your device is too
warm, make sure that the area is well ventilated and that air can circulate around
your device to cool it.
- Current voltage. The amount of power the hotspot is currently using.
- Battery charge level. The amount of charge remaining in the battery.
- Battery status. The current operating condition of the battery (Charging, No
Battery, Normal, Low, Critical).
- Battery temperature. The battery’s temperature. If the battery is getting too
warm, turn your device off and do not charge it.
• WWAN Info:
- Activation Date. The hotspot’s activation date.
- Refurbished. Indicates whether the hotspot was refurbished or not.
- IP Address. The IP address of the WWAN radio.
- User NAI. The 3G network identifier.
- LTE APN NI. The 4G network identifier.
- Lifetime LTE Transferred. The total amount of data sent and received while the
hotspot was connected to LTE networks.
- Lifetime 3G Transferred. The total amount of data sent and received while the
hotspot was connected to 3G networks.
- Lifetime Total Transferred. The total amount of data sent and received by the
hotspot.
6. To save this information to your computer or WiFi device, click the Save to File button.
Use Your Hotspot
42
Page 43

Around Town LTE Mobile Internet
View Details About Your Hotspot on the LCD Screen
You can view details about your hotspot on the hotspot’s LCD screen. Four ABOUT screens
display account information about your hotspot. To view more information about your
account, see View Details About Your Hotspot on the Web Page on page 41.
To view details about your hotspot on the LCD screen:
1. Press the Power button to wake the LCD screen.
2. Press the Power button again until the
Four ABOUT screens display. You must press the Power button twice to display the next
ABOUT screen.
ABOUT screen displays.
The following information displays:
• MEID.
• ICCID.
The MEID of your device.
The serial number of the SIM.
• Activated. Indicates if the hotspot’
changed.
• Activation Code.
The hotspot’s activation code.
3. Press the Power button twice.
The following information displays:
• AroundT
• W
i-Fi name. The hotspot’s main WiFi network name.
ownManager. The URL for the hotspot’s web page.
s activation status and the date and time the status
Use Your Hotspot
43
Page 44

Around Town LTE Mobile Internet
• MAC Address. The hotspot’ MAC address. Each hotspot is assigned a unique MAC
address by its manufacturer.
4. Press the Power button twice.
The following information displays:
• PRL V
• My number.
• T
ersion. The Preferred Roaming List (PRL) version number.
The hotspot’s phone number.
emperature. The hotspot’s temperature in Celsius. If your device is too warm, make
sure that the area is well ventilated and that air can circulate around your device to
cool it.
• FW V
ersion. The hotspot’s firmware version.
5. Press the Power button twice.
The following information displays:
• FW Build Date.
• Model.
• PRI V
The manufacturer’s name for your hotspot.
ersion. The Product Release Instructions (PRI) version for the hotspot’s routing
The date the firmware version was created.
hardware. The PRI is a file that contains the settings used to configure wireless
products for a particular service provider, customer, or purpose.
• W
ed App Version. The hotspot web page version.
6. Press the Power button again to return to the home screen.
Use Your Hotspot
44
Page 45

3. Manage Your Around Town
Account
This chapter provides information about how to configure your Around Town account settings.
This chapter covers the following topics:
• View Your Account Settings
• Manage Your Data Plan
• Manage Account Alerts
• Save Your Credit Card Information
• Manage Data Auto-Renew Settings
• Transfer Your Account to a New Hotspot
• Manage Your Around Town Password
• Change Your Account Email Address
• Manage Your Billing Address
• Manage Your Account PIN
• Manage Your Account Phone Number
3
45
Page 46

Around Town LTE Mobile Internet
View Your Account Settings
You can view or change your account settings from your Around Town account overview
page. You can manage settings such as your data plan or purchase new data plans.
To log in to your account overview page, use the account user name and password that you
set up when you registered your hotspot.
To view or change your hotspot’s settings, you must visit the hotspot’s web page. For more
information, see
To view your account settings:
1. Launch a web browser from a computer or WiFi device.
Your computer or WiFi device does not need to be connected to the hotspot network for
you to view your account settings.
2. Enter http://aroundtowninternet.com in the address field of the web browser.
Log In to the Hotspot Web Page on page 25.
The Around Town web page displays.
3. At the top of the screen, click the MY ACCOUNT link.
The Login screen displays.
4. Enter your account user name in the Username field.
Your user name is the email address that you set up when you registered your hotspot.
5. Enter your account password in the Password field.
This is the password that you set up when you registered your hotspot.
6. Click the Submit button
The Account Overview page displays.
Manage Your Data Plan
You can manage your data plans from the Around Town account overview page.
Add a Data Plan
You can purchase a new data plan if you want to increase your data or if you are running low
on data.
To add a data plan:
1. Launch a web browser from a computer or WiFi device.
Your computer or WiFi device does not need to be connected to the hotspot network for
you to view your account settings.
Manage Your Around Town Account
46
Page 47

Around Town LTE Mobile Internet
2. Enter http://aroundtowninternet.com in the address field of the web browser.
The Around Town web page displays.
3. At the top of the screen, click the MY ACCOUNT link.
The Login page displays.
4. Enter your account user name in the Username field.
Your user name is the email address that you set up when you registered your hotspot.
5. Enter your account password in the Password field.
This is the password that you set up when you registered your hotspot.
6. Click the Submit button.
The Account Overview page displays.
7. In the Devices section, select a device.
The Devices screen displays.
8. Click the Add a Plan link.
9. Select the radio button next to the plan that you want to add and click the PURCHASE
button.
The Payment screen displays.
10. Enter your credit card information and billing address.
11. Click the SUBMIT button.
The data plan is added to your device account.
View Your Purchase History
After you purchase a data plan, you can view your purchases in the Purchase History screen.
To view your purchase history:
1. Launch a web browser from a computer or WiFi device.
Your computer or WiFi device does not need to be connected to the hotspot network for
you to view your account settings.
2. Enter http://aroundtowninternet.com in the address field of the web browser.
The Around Town web page displays.
3. At the top of the screen, click the MY ACCOUNT link.
The Login page displays.
4. Enter your account user name in the Username field.
Your user name is the email address that you set up when you registered your hotspot.
5. Enter your account password in the Password field.
Manage Your Around Town Account
47
Page 48

Around Town LTE Mobile Internet
This is the password that you set up when you registered your hotspot.
6. Click the Submit button.
The Account Overview page displays.
7. In the Devices section, select a device.
The Devices screen displays.
8. On the right, click the Purchase History link.
Your purchase history displays.
Manage Account Alerts
Your hotspot account comes with free email notifications, so that you can be notified when
data plan is about to expire. You can enable or disable notifications. You can also upgrade
your account to receive smart alerts for $1.99 per month.
Manage Data Plan Expiration Email Notifications
You can set your account to email you notifications when your data plan is about to expire.
Enable Data Plan Expiration Email Notifications
To enable email notifications:
1. Launch a web browser from a computer or WiFi device.
Your computer or WiFi device does not need to be connected to the hotspot network for
you to view your account settings.
2. Enter http://aroundtowninternet.com in the address field of the web browser.
The Around Town web page displays.
3. At the top of the screen, click the MY ACCOUNT link.
The Login page displays.
4. Enter your account user name in the Username field.
Your user name is the email address that you set up when you registered your hotspot.
5. Enter your account password in the Password field.
This is the password that you set up when you registered your hotspot.
6. Click the Submit button.
The Account Overview page displays.
Manage Your Around Town Account
48
Page 49

Around Town LTE Mobile Internet
7. In the Devices section, click your device.
8. On the right, click the Alerts & Notifications link.
The Alerts & Notifications screen displays.
9. Check to see if your notification email address is correct.
10. T
o change your notification email address, do the following:
a. Click the Change link.
The Update Notification E-mail Address screen displays.
b. Enter your new email address in the New E-mail
Address field.
c. Click the Submit button.
Your notification email address is changed.
11. In the Product Expired Notification section, select the Notify me by e-mail check box.
12. Click the Submit button.
Your changes are saved.
Disable Data Plan Expiration Email Notifications
To disable email notifications:
1. Launch a web browser from a computer or WiFi device.
Your computer or WiFi device does not need to be connected to the hotspot network for
you to view your account settings.
2. Enter http://aroundtowninternet.com in the address field of the web browser
The Around Town web page displays.
3. At the top of the screen, click the MY ACCOUNT link.
The Login page displays.
.
Manage Your Around Town Account
49
Page 50

Around Town LTE Mobile Internet
4. Enter your account user name in the Username field.
Your user name is the email address that you set up when you registered your hotspot.
5. Enter your account password in the Password field.
This is the password that you set up when you registered your hotspot.
6. Click the Submit button.
The Account Overview page displays.
7. In the Devices section, click your device.
8. On the right, select click the Alerts & Notifications link.
The Alerts & Notifications screen displays.
9. In the Product Expired Notification section, clear the Notify me by e-mail check box.
10. Click the Submit button.
Your changes are saved.
Upgrade Your Account to Smart Alerts
Your hotspot comes with free basic notifications that allow you to receive email notifications
when your data plan is about to expire. You can upgrade your account to review smart alerts,
for $1.99 per month, that allow you to receive alerts based on a balance threshold. You will
also receive alerts through email and text messages when your data plan is about to expire.
To upgrade your account alerts to smart alerts:
1. Launch a web browser from a computer or WiFi device.
Your computer or WiFi device does not need to be connected to the hotspot network for
you to view your account settings.
2. Enter http://aroundtowninternet.com in the address field of the web browser
.
Manage Your Around Town Account
50
Page 51

Around Town LTE Mobile Internet
The Around Town web page displays.
3. At the top of the screen, click the MY ACCOUNT link.
The Login page displays.
4. Enter your account user name in the Username field.
Your user name is the email address that you set up when you registered your hotspot.
5. Enter your account password in the Password field.
This is the password that you set up when you registered your hotspot.
6. Click the Submit button.
The Account Overview page displays.
7. In the Devices section, click your device.
8. On the right, click the Manage Services link.
The Services screen displays.
9. Select the Upgrade to Smart
Alerts check box.
10. Click the Update button.
11. When prompted, enter your credit card information and billing address.
12. Click the SUBMIT button.
Your changes are saved.
View Account Alerts and Notifications
You can view alerts and notifications from your account overview page.
To view your account alerts and notifications:
1. Launch a web browser from a computer or WiFi device.
Manage Your Around Town Account
51
Page 52

Around Town LTE Mobile Internet
Your computer or WiFi device does not need to be connected to the hotspot network for
you to view your account settings.
2. Enter http://aroundtowninternet.com in the address field of the web browser.
The Around Town web page displays.
3. At the top of the screen, click the MY ACCOUNT link.
The Login page displays.
4. Enter your account user name in the Username field.
Your user name is the email address that you set up when you registered your hotspot.
5. Enter your account password in the Password field.
This is the password that you set up when you registered your hotspot.
6. Click the Submit button.
The Account Overview page displays.
7. In the Devices section, click your device.
The Devices screen displays.
Alerts and notifications that were sent to your account display in the Recent Alerts &
Notification section.
Save Your Credit Card Information
You can save your credit card information to your account.
To save your credit card information:
1. Launch a web browser from a computer or WiFi device.
Your computer or WiFi device does not need to be connected to the hotspot network for
you to view your account settings.
2. Enter http://aroundtowninternet.com in the address field of the web browser.
The Around Town web page displays.
3. At the top of the screen, click the MY ACCOUNT link.
The Login page displays.
4. Enter your account user name in the Username field.
Your user name is the email address that you set up when you registered your hotspot.
5. Enter your account password in the Password field.
This is the password that you set up when you registered your hotspot.
6. Click the Submit button.
Manage Your Around Town Account
52
Page 53

Around Town LTE Mobile Internet
The Account Overview page displays.
7. Select Payment Settings.
The Payment settings screen displays.
8. Enter your credit card information and billing address.
9. Click the SUBMIT button.
Your changes are saved.
Manage Data Auto-Renew Settings
You can set your account to automatically renew your data plan before you run out of data, or
you can disable auto-renew.
Automatically Renew Your Data Plan
You can set your account to automatically renew a data plan that you already use before
your run out of data.
To automatically renew your data plan before you run out of data:
1. Launch a web browser from a computer or WiFi device.
Your computer or WiFi device does not need to be connected to the hotspot network in
order to view your account settings.
2. Enter http://aroundtowninternet.com in the address field of the web browser.
The Around Town web page displays.
3. At the top of the screen, click the MY ACCOUNT link.
The Login page displays.
4. Enter your account user name in the Username field.
Your user name is the email address that you set up when you registered your hotspot.
5. Enter your account password in the Password field.
This is the password that you set up when you registered your hotspot.
6. Click the Submit button.
The Account Overview page displays.
Manage Your Around Town Account
53
Page 54

Around Town LTE Mobile Internet
7. In the Devices section, click your device.
8. On the right, click the Manage Auto-Renew link.
The Manage Auto-Renew screen displays.
You must save your credit card information and billing address to your account before
you can see this screen. For more information, see Save Your Credit Card Information on
page 52.
9. In the Select your
Auto-Renew options menu, select the data plan you want to renew.
10. Click the SUBMIT button.
Your changes are saved.
Disable Auto-Renew
You can disable auto-renew so that your account does not automatically renew your data
plan when you run out of data.
To disable auto-renew:
1. Launch a web browser from a computer or WiFi device.
Your computer or WiFi device does not need to be connected to the hotspot network in
order to view your account settings.
2. Enter http://aroundtowninternet.com in the address field of the web browser
The Around Town web page displays.
.
3. At the top of the screen, click the MY ACCOUNT link.
The Login page displays.
4. Enter your account user name in the Username field.
Your user name is the email address that you set up when you registered your hotspot.
Manage Your Around Town Account
54
Page 55

Around Town LTE Mobile Internet
5. Enter your account password in the Password field.
This is the password that you set up when you registered your hotspot.
6. Click the Submit button.
The Account Overview page displays.
7. In the Devices section, click your device.
8. On the right, click the Manage Auto-Renew link.
The Manage Auto-Renew screen displays.
You must save your credit card information and billing address to your account before
you can see this screen. For more information, see Save Your Credit Card Information on
page 52.
9. In the Select your
Auto-Renew options menu, select Disable Auto-Renew.
10. Click the SUBMIT button.
Your changes are saved.
Transfer Your Account to a New Hotspot
If you bought another hotspot, you can transfer your current account to your new hotspot.
You can have multiple hotspots connected to one account.
You must activate your new hotspot first and then clear your account details before
transferring your account. For more, information, see Clear Account Details on page 104.
To transfer your account to your new hotspot:
1. Launch a web browser from a computer or WiFi device.
Your computer or WiFi device does not need to be connected to the hotspot network for
you to view your account settings.
Manage Your Around Town Account
55
Page 56

Around Town LTE Mobile Internet
2. Enter http://aroundtowninternet.com in the address field of the web browser.
The Around Town web page displays.
3. At the top of the screen, click the MY ACCOUNT link.
The Login page displays.
4. Enter your account user name in the Username field.
Your user name is the email address that you set up when you registered your hotspot.
5. Enter your account password in the Password field.
This is the password that you set up when you registered your hotspot.
6. Click the Submit button.
The Account Overview page displays.
7. In the Devices section, click on your device.
8. On the right, click the Settings link.
The Settings screen displays.
9. Click the Swap Devices link.
10. Enter your new hotspot’
11. Click the Submit button.
Your account transfers to your new hotspot.
Manage Your Around Town Password
If you forgot your Around Town account password, you can reset it from the Login page. If
you know your current password, but you want to change it, you can change it after you log in
to your account.
s activation code in the New Activation Code field.
Manage Your Around Town Account
56
Page 57

Around Town LTE Mobile Internet
Reset Your Around Town Password
If you forgot your Around Town account password, you can use a link on the Login page to
reset it.
To reset your Around Town account password:
1. Launch a web browser from a computer or WiFi device.
Your computer or WiFi device does not need to be connected to the hotspot network for
you to view your account settings.
2. Enter http://aroundtowninternet.com in the address field of the web browser.
The Around Town web page displays.
3. At the top of the screen, click the MY ACCOUNT link.
The Login page displays.
4. Click the Lost Password link.
5. The Lost password screen displays.
6. Enter your Around Town account email address in the E-mail Address field.
If you forgot your Around Town account email address, you need to reset your hotspot to
its factory default settings and reactivate your hotspot. For more information, see
Configure the TRU-Install Installation Settings on page 37.
7. Click the Submit button.
An email is sent to you with instructions for how to reset your password.
8. Follow the instructions in the email to reset your password.
Change Your Around Town Account Password
You can change you Around Town account password if you can log into your account.
If you forgot your password and you want to reset it, see Reset Your Around Town Password
on page 57.
To change your account password from your account:
1. Launch a web browser from a computer or WiFi device.
Your computer or WiFi device does not need to be connected to the hotspot network for
you to view your account settings.
2. Enter http://aroundtowninternet.com in the address field of the web browser.
The Around Town web page displays.
3. At the top of the screen, click the MY ACCOUNT link.
The Login page displays.
4. Enter your account user name in the Username field.
Manage Your Around Town Account
57
Page 58

Around Town LTE Mobile Internet
Your user name is the email address you set up when you registered your hotspot.
5. Enter your account password in the Password field.
This is the password you set up when you registered your hotspot.
6. Click the Submit button.
The Account Overview page displays.
7. Select Account Settings > Change Password.
The Change Password screen displays.
8. Enter your old password in the Old Password field.
9. Enter your new password in the Password field.
10. Retype your new password in the Retype New Password field.
11. Click the Save button.
Your changes are saved.
Change Your Account Email Address
You can change your Around Town account email address.
To change your Around Town account email address:
1. Launch a web browser from a computer or WiFi device.
Your computer or WiFi device does not need to be connected to the hotspot network for
you to view your account settings.
2. Enter http://aroundtowninternet.com in the address field of the web browser.
The Around Town web page displays.
3. At the top of the screen, click the MY ACCOUNT link.
The Login page displays.
4. Enter your account user name in the Username field.
Your user name is the email address you set up when you registered your hotspot.
5. Enter your account password in the Password field.
This is the password you set up when you registered your hotspot.
6. Click the Submit button.
The Account Overview page displays.
7. Select Account Settings > Change Email.
The E-mail Address screen displays.
8. Enter your new email address in the Enter new E-mail Address field.
Manage Your Around Town Account
58
Page 59

Around Town LTE Mobile Internet
9. Enter your current account password in the Enter Password field.
10. Click the Save button.
Your changes are saved.
Manage Your Billing Address
You can view or change your credit card’s billing address.
View Your Billing Address
To view your billing address:
1. Launch a web browser from a computer or WiFi device.
Your computer or WiFi device does not need to be connected to the hotspot network for
you to view your account settings.
2. Enter http://aroundtowninternet.com in the address field of the web browser.
The Around Town web page displays.
3. At the top of the screen, click the MY ACCOUNT link.
The Login page displays.
4. Enter your account user name in the Username field.
Your user name is the email address you set up when you registered your hotspot.
5. Enter your account password in the Password field.
This is the password you set up when you registered your hotspot.
6. Click the Submit button.
The Account Overview page displays.
7. Select Account Settings > View/Edit Address.
The Address screen displays your billing address.
Edit Your Billing Address
To edit your credit card’s billing address:
1. Launch a web browser from a computer or WiFi device.
Your computer or WiFi device does not need to be connected to the hotspot network for
you to view your account settings.
2. Enter http://aroundtowninternet.com in the address field of the web browser.
The Around Town web page displays.
Manage Your Around Town Account
59
Page 60

Around Town LTE Mobile Internet
3. At the top of the screen, click the MY ACCOUNT link.
The Login page displays.
4. Enter your account user name in the Username field.
Your user name is the email address you set up when you registered your hotspot.
5. Enter your account password in the Password field.
This is the password you set up when you registered your hotspot.
6. Click the Submit button.
The Account Overview page displays.
7. Select Account Settings > View/Edit Address.
The Address screen displays.
8. Click your billing address.
The Change Address screen displays.
9. Edit your billing address.
10. Click the Save button.
Your changes are saved.
Manage Your Account PIN
The account PIN is used to track customer issues.
View Your Account PIN
To view your account PIN:
1. Launch a web browser from a computer or WiFi device.
Your computer or WiFi device does not need to be connected to the hotspot network for
you to view your account settings.
2. Enter http://aroundtowninternet.com in the address field of the web browser.
The Around Town web page displays.
3. At the top of the screen, click the MY ACCOUNT link.
The Login page displays.
4. Enter your account user name in the Username field.
Your user name is the email address you set up when you registered your hotspot.
5. Enter your account password in the Password field.
This is the password you set up when you registered your hotspot.
Manage Your Around Town Account
60
Page 61

Around Town LTE Mobile Internet
6. Click the Submit button.
The Account Overview page displays.
7. Select Account Settings > View/Edit Account PIN.
The Account PIN screen displays your account PIN in the Current Account PIN section.
Edit Your Account PIN
To edit your account PIN:
1. Launch a web browser from a computer or WiFi device.
Your computer or WiFi device does not need to be connected to the hotspot network for
you to view your account settings.
2. Enter http://aroundtowninternet.com in the address field of the web browser.
The Around Town web page displays.
3. At the top of the screen, click the MY ACCOUNT link.
The Login page displays.
4. Enter your account user name in the Username field.
Your user name is the email address you set up when you registered your hotspot.
5. Enter your account password in the Password field.
This is the password you set up when you registered your hotspot.
6. Click the Submit button.
The Account Overview page displays.
7. Select Account Settings > View/Edit Account PIN.
The Account PIN screen displays.
8. Enter a new PIN in the New Account PIN field.
9. Click the Save button.
Your changes are saved.
Manage Your Account Phone Number
You can view or edit your account phone number. Your account phone number is your
contact phone number.
Manage Your Around Town Account
61
Page 62

Around Town LTE Mobile Internet
View Your Account Phone Number
To view your account phone number:
1. Launch a web browser from a computer or WiFi device.
Your computer or WiFi device does not need to be connected to the hotspot network for
you to view your account settings.
2. Enter http://aroundtowninternet.com in the address field of the web browser.
The Around Town web page displays.
3. At the top of the screen, click the MY ACCOUNT link.
The Login page displays.
4. Enter your account user name in the Username field.
Your user name is the email address you set up when you registered your hotspot.
5. Enter your account password in the Password field.
This is the password you set up when you registered your hotspot.
6. Click the Submit button.
The Account Overview page displays.
7. Select Account Settings > View/Edit Phone Number.
The Phone Number screen displays your phone number in the Current Phone Number
section.
Edit Your Account Phone Number
To edit your account phone number:
1. Launch a web browser from a computer or WiFi device.
Your computer or WiFi device does not need to be connected to the hotspot network for
you to view your account settings.
2. Enter http://aroundtowninternet.com in the address field of the web browser.
The Around Town web page displays.
3. At the top of the screen, click the MY ACCOUNT link.
The Login page displays.
4. Enter your account user name in the Username field.
Your user name is the email address you set up when you registered your hotspot.
5. Enter your account password in the Password field.
This is the password you set up when you registered your hotspot.
Manage Your Around Town Account
62
Page 63

Around Town LTE Mobile Internet
6. Click the Submit button.
The Account Overview page displays.
7. Select Account Settings > View/Edit Phone Number.
The Phone Number screen displays.
8. Enter a new phone number in the New Phone Number field.
9. Click the Save button.
Your changes are saved.
Manage Your Around Town Account
63
Page 64

4. Manage Your Hotspot
This chapter explains how to manage your hotspot.
This chapter covers the following topics:
• Update the Hotspot Software
• Back Up and Restore Hotspot Settings
• Reset the Hotspot to Factory Default Settings
• Reset the Hotspot to Its Device Settings
• Extend Battery Life
• Adjust the Display Settings
• Set the Hotspot’s WiFi Sleep Settings
4
64
Page 65

Around Town LTE Mobile Internet
Update the Hotspot Software
The hotspot checks automatically for new software and updates once a week. If an update
becomes available, the hotspot displays an alert. You can follow the instructions on the alert
to update the software or you can manually check for software updates and update the
software manually.
To update the software and firmware manually:
1. Launch a web browser from a computer or WiFi device that is connected to the hotspot
network.
2. Enter http://netgear
browser.
The hotspot web page displays.
3. Enter the admin login password in the Sign In field.
.aroundtown or http://192.168.1.1 in the address field of the web
The default password is password.
The password is case-sensitive.
4. Click the Sign In button.
The Sign In section closes.
5. Select Settings > General > Software and Reset.
6. In the Software Update section, click the Check for update button.
If an update is available, an Install Now button displays.
7. Click the Install Now button.
Manage Your Hotspot
65
Page 66

Around Town LTE Mobile Internet
8. Click the Continue button.
Your hotspot updates the software and reboots.
Back Up and Restore Hotspot Settings
You can back up and restore your hotspot’s settings. Backing up and restoring is useful if you
use more than one hotspot and you want the same settings on all of your hotspots. You can
also save your settings before resetting to factory defaults or changing the settings.
Download Your Hotspot’s Settings
To restore your hotspot’s settings later, you must download and save your hotspot’s current
settings to your computer.
To download a copy of your hotspot’s settings:
1. Launch a web browser from a computer or WiFi device that is connected to the hotspot
network.
2. Enter http://netgear.aroundtown or http://192.168.1.1 in the address field of the web
browser.
The hotspot web page displays.
3. Enter the admin login password in the Sign In field.
The default password is password. The password is case-sensitive.
4. Click the Sign In button.
The Sign In section closes.
Manage Your Hotspot
66
Page 67

Around Town LTE Mobile Internet
5. Select Settings > General > Software and Reset.
6. In the Download / Backup Settings section, click the Save button.
By default, the file (export.cfg) is saved to your Downloads folder
.
Restore Your Hotspot’s Settings
You can restore your hotspot to its previous settings if you downloaded and saved your
hotspot’s previous settings to your computer. Save your settings before resetting to factory
defaults or changing the settings.
To restore your hotspot’s settings:
1. Launch a web browser from a computer or WiFi device that is connected to the hotspot
network.
2. Enter http://netgear
browser.
The hotspot web page displays.
3. Enter the admin login password in the Sign In field.
The default password is password.
4. Click the Sign In button.
The Sign In section closes.
.aroundtown or http://192.168.1.1 in the address field of the web
The password is case-sensitive.
Manage Your Hotspot
67
Page 68

Around Town LTE Mobile Internet
5. Select Settings > General > Software and Reset.
6. In the Restore Settings section, click the Choose File button.
7. Navigate to the location where the export.cfg file is stored.
By default, hotspot setting files are saved to your Downloads folder.
8. Click the Open button.
Your hotspot is restored with the imported file settings.
Reset the Hotspot to Factory Default Settings
You can return your hotspot to its factory default settings. If you reset your hotspot to its
factory default settings, you must activate your hotspot again.
If you just want to reset your hotspot to its default behavior and you don’t want to change your
account or reactivate your hotspot, you can reset the device settings. For more information,
see Reset the Hotspot to Its Device Settings on page 71.
Reset your hotspot to its factory default settings in the following cases:
• You changed the default administrator login password and you can’t remember the new
password.
• Y
ou’ve changed the DHCP settings such that your device is inoperable. (For example, no
communication is oc.)
Manage Your Hotspot
68
Page 69

Around Town LTE Mobile Internet
Reset Factory Default Settings If You Forgot the Admin Login
Password
You can reset the hotspot’s factory default settings from the hotspot web page if you forgot
the admin login password. If you know the admin login password and you want to reset the
hotspot to its factory default settings, see
Admin Login Password on page 69.
To reset your hotspot to its factory default settings, you must get a Master Subsidy Lock
(MSL) code from Around Town support.
Note: The hotspot’s default administrator login password is password.
To reset the hotspot to its factory default settings if you forgot the admin password:
1. Contact Around Town support at 1-855-678-9123 to get an MSL code.
2. Launch a web browser from a computer or WiFi device that is connected to the hotspot
network.
Reset Factory Default Settings If You Know the
3. Enter http://netgear.aroundtown or http://192.168.1.1 in the address field of the web
browser.
The hotspot web page displays.
4. At the top of the screen, click the Support link.
The Support screen displays.
5. In the Factory Reset section, click the Reset button.
6. Enter the MSL code in the field that displays.
7. Click the Submit button.
A confirmation screen displays.
8. Click the Begin Reset button.
The hotspot resets to its factory default settings.
Reset Factory Default Settings If You Know the Admin Login
Password
You can reset the hotspot’s factory default settings from the hotspot web page if you know
the admin login password. If you forgot the administrator login password, see
Default Settings If You Forgot the Admin Login Password on page 69.
Reset Factory
To reset your hotspot to its factory default settings, you need to get a Master Subsidy Lock
(MSL) code from Around Town support.
Manage Your Hotspot
69
Page 70

Around Town LTE Mobile Internet
Note: The hotspot’s default administrator login password is password.
To reset the hotspot to its factory default settings if you know the admin password:
1. Contact
Around Town support at 1-855-678-9123 to get a MSL code.
2. Launch a web browser from a computer or WiFi device that is connected to the hotspot
network.
3. Enter http://netgear
.aroundtown or http://192.168.1.1 in the address field of the web
browser.
The hotspot web page displays.
4. Enter the admin login password in the Sign In field.
The default password is password.
The password is case-sensitive.
5. Click the Sign In button.
The Sign In section closes.
6. Select Settings > General > Software and Reset.
7. In the Factory Reset section, click the Reset button.
8. Enter the MSL code in the field that displays.
9. Click the Submit button.
A confirmation screen displays.
Manage Your Hotspot
70
Page 71

Around Town LTE Mobile Internet
10. Click the Begin Reset button.
The hotspot resets to its factory default settings.
Reset the Hotspot to Its Device Settings
If you want to reset your hotspot to its default settings, but don’t want to change your account
or network activation, you can reset your hotspot to its device settings.
If you want to reset your hotspot to its factory default settings and reset your account and
reactivate your hotspot, see
To reset the hotspot to its device settings:
1. Launch a web browser from a computer or WiFi device that is connected to the hotspot
network.
2. Enter http://netgear.aroundtown or http://192.168.1.1 in the address field of the web
browser.
Reset the Hotspot to Factory Default Settings on page 68.
The hotspot web page displays.
3. Enter the admin login password in the Sign In field.
The default password is password. The password is case-sensitive.
4. Click the Sign In button.
The Sign In section closes.
Manage Your Hotspot
71
Page 72

Around Town LTE Mobile Internet
5. Select Settings > General > Software and Reset.
6. In the Settings Reset section, click the Reset button.
A message displays confirming that you want to reset your device settings.
7. Click the Begin Reset button.
The hotspot resets to its device settings.
Extend Battery Life
By default, the hotspot is configured to optimize battery life. You can extend the battery life in
several ways:
• When you’re not using your hotspot, turn it off.
• T
ether your hotspot to your computer using the micro-USB cable, and disable WiFi. For
more information, see Configure a Tethered Connection on page 20.
• Adjust the LCD settings:
- Decrease the brightness of the LCD. For more information, see Adjust the LCD
Screen’s Brightness on page 73.
- Set the LCD to turn of
Timeout Settings on page 74.
• Use a shorter WiFi inactivity time out period. For more information, see Set the Hotspot’s
WiFi Sleep Settings on page 75.
f sooner. For more information, see Set the LCD Screen’s
Manage Your Hotspot
72
Page 73

Around Town LTE Mobile Internet
• Limit the number of WiFi devices that can connect to the hotspot WiFi network. For more
information, see
• If only one network coverage type is available to you (LTE or 3G), set the allowed network
mode to that coverage type only. For more information, see
Mode on page 121.
Set the Maximum Number of Connected Devices on page 83.
Set the Allowed Network
Adjust the Display Settings
The hotspot’s LCD screen is automatically set to dim to save energy.
You can adjust the following display settings:
• Adjust the LCD screen’s brightness level.
• Set the screen time-out to a shorter period to reduce the amount of time that LCD screen
is not touched before the screen turns blank.
Adjust the LCD Screen’s Brightness
To adjust the LCD screen’s brightness:
1. Launch a web browser from a computer or WiFi device that is connected to the hotspot
network.
2. Enter http://netgear.aroundtown or http://192.168.1.1 in the address field of the web
browser.
The hotspot web page displays.
3. Enter the admin login password in the Sign In field.
The default password is password. The password is case-sensitive.
4. Click the Sign In button.
The Sign In section closes.
5. Select Settings > General > Device.
Manage Your Hotspot
73
Page 74

Around Town LTE Mobile Internet
6. In the Screen section, select a brightness setting:
• Brightness. Brightens the LCD screen.
• Dim. Dims the LCD screen and prolongs the battery life.
The Submit button displays after you make a selection.
7. Click the Submit button.
Your changes are saved.
Set the LCD Screen’s Timeout Settings
You can set the LCD screen to automatically turn off when the hotspot is it being powered on
through the hotspot’s battery, AC charger, or a USB connection between the hotspot and a
computer.
To set the LCD screen’s timeout settings:
1. Launch a web browser from a computer or WiFi device that is connected to the hotspot
network.
2. Enter http://netgear
browser.
The hotspot web page displays.
.aroundtown or http://192.168.1.1 in the address field of the web
3. Enter the admin login password in the Sign In field.
The default password is password.
4. Click the Sign In button.
The password is case-sensitive.
Manage Your Hotspot
74
Page 75

Around Town LTE Mobile Internet
The Sign In section closes.
5. Select Settings > General > Device.
6. In the Screen Timeout section, select a value for the following settings:
imeout on Battery. This is the amount of time before the LCD screen turns off if the
• T
hotspot is powered on through the hotspot’s battery.
• T
imeout on AC. This is the amount of time before the LCD screen turns off if the
hotspot is powered on through the hotspot’s AC charger.
• T
imeout on USB. This is the amount of time before the LCD screen turns off if the
hotspot is powered on through a USB connection between the hotspot and the
computer.
The Submit button displays after you make a selection.
7. Click the Submit button.
Your changes are saved.
Set the Hotspot’s WiFi Sleep Settings
You can set the hotspot to turn off its WiFi radio if no devices are connected to WiFi for a
period of time.
To set the hotspot’s WiFi sleep settings:
1. Launch a web browser from a computer or WiFi device that is connected to the hotspot
network.
2. Enter http://netgear
browser.
.aroundtown or http://192.168.1.1 in the address field of the web
Manage Your Hotspot
75
Page 76

Around Town LTE Mobile Internet
The hotspot web page displays.
3. Enter the admin login password in the Sign In field.
The default password is password.
4. Click the Sign In button.
The Sign In section closes.
5. Select Settings > General > Device.
The password is case-sensitive.
6. In the Sleep section, select a value for the following settings:
i-Fi sleep on Battery. Turns off the WiFi radio if no devices are connected for this
• W
period of time, while the hotspot is on battery power. (Select 5 minutes to make your
battery last longer.)
• W
i-Fi sleep on AC. Turns off the WiFi radio if no devices are connected for this
period of time while the hotspot is connected to the AC charger. (Select 5 minutes to
make your battery last longer.)
• W
i-Fi sleep on USB. Turns off the WiFi radio if no devices are connected for this
period of time while the hotspot is tethered to the computer. (Select 5 minutes to make
your battery last longer.)
The Submit button displays after you make a change.
7. Click the Submit button.
Your changes are saved.
Manage Your Hotspot
76
Page 77

5. Control Access to the Network
This chapter explains how control who can access your hotspot WiFi network.
This chapter covers the following topics:
• Set Up a Guest Network
• Set the Maximum Number of Connected Devices
• View or Block Connected Devices
• Set Up MAC Filtering
• Configure the WiFi Signal If a Device Is Tethered
5
77
Page 78

Around Town LTE Mobile Internet
Set Up a Guest Network
Guest networks allows visitors to connect to the hotspot’s WiFi network and use the Internet
without using your main WiFi network name and password.You can set up a guest network
for visitors to access the network.
Turn On the Guest Network Using the Web Page
You can turn on the guest WiFi network form the hotspot web page or the hotspot’s LCD
screen.
To turn on the guest WiFi network using the hotspot web page:
1. Launch a web browser from a computer or WiFi device that is connected to the hotspot
network.
2. Enter http://netgear
browser.
.aroundtown or http://192.168.1.1 in the address field of the web
The hotspot web page displays.
3. Enter the admin login password in the Sign In field.
The default password is password.
4. Click the Sign In button.
The Sign In section closes.
5. Select W
i-Fi > Connect.
The password is case-sensitive.
6. In the Guest Wi-Fi section, click the Turn On button.
The guest WiFi turns on and the hotspot displays the guest WiFi network name and
password.
Control Access to the Network
78
Page 79

Around Town LTE Mobile Internet
Turn On the Guest Network Using the LCD screen
You can turn on the guest WiFi network form the hotspot web page or the hotspot’s LCD
screen.
To turn on the guest WiFi network using the hotspot’s LCD screen:
1. Press the Power button on the hotspot to wake up the LCD screen.
2. Press the Power button until the Guest WI-FI screen displays.
3. Press the Power button twice to turn on the guest WiFi network.
The guest WiFi turns on and the LCD screen displays the guest WiFi network’s name and
password.
Change the Guest Network Name or Password
You can change the guest WiFi network’s name or password from the hotspot’s web page.
To change the guest network name or password:
1. Launch a web browser from a computer or WiFi device that is connected to the hotspot
network.
2. Enter http://netgear
browser.
The hotspot web page displays.
3. Enter the admin login password in the Sign In field.
The default password is password.
4. Click the Sign In button.
The Sign In section closes.
.aroundtown or http://192.168.1.1 in the address field of the web
The password is case-sensitive.
5. Select W
i-Fi > Options.
Control Access to the Network
79
Page 80

Around Town LTE Mobile Internet
6. In the Guest Wi-Fi section, enter a new WiFi network name or password in the fields.
7. (Optional) If you want the hotspot to generate a new password each time the guest WiFi is
turned on, select the check box.
The Submit button displays after you make a change.
8. Click the Submit button.
Your changes are saved.
Turn Off the Guest Network Using the Web Page
You can turn off the guest WiFi network from the hotspot web page or the hotspot’s LCD
screen.
To turn off the guest network using the hotspot web page:
1. Launch a web browser from a computer or WiFi device that is connected to the hotspot
network.
2. Enter http://netgear
browser.
The hotspot web page displays.
3. Enter the admin login password in the Sign In field.
The default password is password.
4. Click the Sign In button.
The Sign In section closes.
.aroundtown or http://192.168.1.1 in the address field of the web
The password is case-sensitive.
5. Select W
i-Fi > Connect.
Control Access to the Network
80
Page 81

Around Town LTE Mobile Internet
6. In the Guest Wi-Fi section, click the Turn Off button.
The guest WiFi turns off.
Turn Off the Guest Network Using the LCD screen
You can turn off the guest WiFi network from the hotspot web page or the hotspot’s LCD
screen.
To turn off the guest WiFi network using the hotspot’s LCD screen:
1. Press the Power button on the hotspot to wake the LCD screen.
2. Press the Power button until the Guest WI-FI screen displays.
3. Press the Power button twice to turn off the guest WiFi network.
The guest WiFi turns off.
Change Guest Encryption Security Settings
By default Wi-Fi security is enabled for your hotspot and its WiFi networks. You can change
the security used for your guest WiFi network.
Control Access to the Network
81
Page 82

Around Town LTE Mobile Internet
To change the encryption security settings for your guest WiFi network:
1. Launch a web browser from a computer or WiFi device that is connected to the hotspot
network.
2. Enter http://netgear
.aroundtown or http://192.168.1.1 in the address field of the web
browser.
The hotspot web page displays.
3. Enter the admin login password in the Sign In field.
The default password is password.
The password is case-sensitive.
4. Click the Sign In button.
The Sign In section closes.
5. Select W
iFi > Options.
6. Scroll down to the Security section.
7. From the Guest Encryption menu, select a WiFi encryption option:
• None. Anyone can access your WiFi network without a password and you are
responsible for charges incurred. NETGEAR recommends that you do not select this
option.
• WP
A Personal TKIP. Strong security standard that is supported by most WiFi
devices.
• WP
A Personal TKIP AES. Strong security standard that is supported by most WiFi
devices.
• WP
A2 Personal AES. Strong security that is supported by newer WiFi devices
(default).
• WP
A2 Personal TKIP AES. A stronger, newer security standard that is limited to
newer WiFi devices.
• WP
A/WPA2. Strong security that is supported by most WiFi devices. WiFi devices
that use either WPA or WPA2 can connect to the hotspot.
The Submit button displays after you make a selection.
8. Click the Submit button.
Your changes are saved.
Control Access to the Network
82
Page 83

Around Town LTE Mobile Internet
Set the Maximum Number of Connected Devices
You can connect up to 10 WiFi devices to the hotspot. These connections are shared
between the hotspot’s main and guest WiFi networks.
To set the number of devices that can connect to the hotspot’s WiFi networks:
1. Launch a web browser from a computer or WiFi device that is connected to the hotspot
network.
2. Enter http://netgear
browser.
The hotspot web page displays.
3. Enter the admin login password in the Sign In field.
.aroundtown or http://192.168.1.1 in the address field of the web
The default password is password.
4. Click the Sign In button.
The Sign In section closes.
5. Select W
6. Scroll down to the Max Wi-Fi section.
7. From the Max Wi-Fi menu, select the number of devices that are allowed to access your
hotspot.
The maximum number of devices that you can select is 10.
8. Click the < button or the > button to adjust the number of connections available on the main
and guest networks.
The Submit button displays after you make a selection.
9. Click the Submit button.
i-Fi > Options.
The password is case-sensitive.
The number of devices that are allowed to access your hotspot is set.
View or Block Connected Devices
You can view a list of devices that are connected to your hotspot WiFi network on the hotspot
web page. You can also block undesired devices that are already connected to the hotspot
WiFi network from connecting later.
Control Access to the Network
83
Page 84

Around Town LTE Mobile Internet
Note: When you block or unblock users, the hotspot resets to activate the
new settings. Any devices connected to the hotspot are disconnected
when the hotspot resets.
View Devices Connected to the Network
To view devices connected to the hotspot network:
1. Launch a web browser from a computer or WiFi device that is connected to the hotspot
network.
2. Enter http://netgear.aroundtown or http://192.168.1.1 in the address field of the web
browser.
The hotspot web page displays.
3. Enter the admin login password in the Sign In field.
The default password is password. The password is case-sensitive.
4. Click the Sign In button.
The Sign In section closes.
5. Select Devices.
A list of devices connected to the main WiFi and guest WiFi networks displays.
Block Devices from the Network
If a device is already connected to the hotspot WiFi network, and you want to block it from
connecting, you can block this device from the hotspot web page. If the undesired device is
not connected and you know the MAC address, you can manually add it to the black list. For
more information, see
To block a device from the connecting to the network:
1. Launch a web browser from a computer or WiFi device that is connected to the hotspot
network.
2. Enter http://netgear.aroundtown or http://192.168.1.1 in the address field of the web
browser.
The hotspot web page displays.
Block Devices from the Network Using MAC Filtering on page 87.
3. Enter the admin login password in the Sign In field.
The default password is password. The password is case-sensitive.
4. Click the Sign In button.
The Sign In section closes.
5. Select Devices.
Control Access to the Network
84
Page 85

Around Town LTE Mobile Internet
A list of devices connected to the main WiFi and guest WiFi networks displays.
6. Click the device name.
The device details display.
7. Click the Block Device button.
8. When prompted, click the Block Device button again.
The device cannot access your WiFi network.
View Devices Blocked from the Network
To view a list of blocked devices:
1. Launch a web browser from a computer or WiFi device that is connected to the hotspot
network.
2. Enter http://netgear
browser.
.aroundtown or http://192.168.1.1 in the address field of the web
The hotspot web page displays.
3. Enter the admin login password in the Sign In field.
The default password is password.
4. Click the Sign In button.
The Sign In section closes.
5. Select W
6. From the MAC Filter Mode menu, select Black list - Block all in list.
The list of blocked devices displays.
i-Fi > MAC Filter.
The password is case-sensitive.
Unblock a Device
To unblock a device:
1. Launch a web browser from a computer or WiFi device that is connected to the hotspot
network.
2. Enter http://netgear
browser.
The hotspot web page displays.
3. Enter the admin login password in the Sign In field.
.aroundtown or http://192.168.1.1 in the address field of the web
Control Access to the Network
85
Page 86

Around Town LTE Mobile Internet
The default password is password. The password is case-sensitive.
4. Click the Sign In button.
The Sign In section closes.
5. Select W
6. From the MAC Filter Mode menu, select Black list - Block all in list.
The list of blocked devices displays.
7. Click the X button next to a device.
The device can access your network.
i-Fi > MAC Filter.
Set Up MAC Filtering
You can use Media Access Control (MAC) filtering to prevent unauthorized devices from
connecting to the hotspot WiFi network. The MAC filter is used to grant (white list) or block
(black list) devices access to the main and guest WiFi networks. Access is based on the MAC
address of each device.
Allow All Devices to Access the Network
To allow all devices to connect to the hotspot WiFi network:
1. Launch a web browser from a computer or WiFi device that is connected to the hotspot
network.
2. Enter http://netgear
browser.
The hotspot web page displays.
3. Enter the admin login password in the Sign In field.
The default password is password.
4. Click the Sign In button.
The Sign In section closes.
.aroundtown or http://192.168.1.1 in the address field of the web
The password is case-sensitive.
Control Access to the Network
86
Page 87

Around Town LTE Mobile Internet
5. Select Wi-Fi > MAC Filter.
6. From the MAC Filter Mode menu, select None.
The Submit button displays.
7. Click the Submit button.
You changes are saved.
Block Devices from the Network Using MAC Filtering
You block (black list) certain devices from accessing the network by adding their MAC
address to a black list. All devices are allowed to access the hotspot WiFi network, unless
they’re in this black list.
To block a device from the WiFi network using MAC filtering:
1. Launch a web browser from a computer or WiFi device that is connected to the hotspot
network.
2. Enter http://netgear
.aroundtown or http://192.168.1.1 in the address field of the web
browser.
The hotspot web page displays.
3. Enter the admin login password in the Sign In field.
The default password is password.
The password is case-sensitive.
4. Click the Sign In button.
The Sign In section closes.
5. Select W
i-Fi > MAC Filter.
6. From the MAC Filter Mode menu, select Black List - Block all in list.
7. In the Name field, enter the name of the device you want to block.
8. In the MAC Address field, enter the MAC address of the device you want to block.
Control Access to the Network
87
Page 88

Around Town LTE Mobile Internet
9. Click the + button.
The device is added to the black list.
10. Click the Submit button.
You changes are saved.
Allow Specific Devices to Access the Network Using MAC
Filtering
You allow (white list) specific devices to access the network by adding their MAC addresses
to the white list. Devices that are not added to the white list cannot access the hotspot WiFi
network.
To allow specific devices to access the hotspot WiFi network using MAC filtering:
1. Launch a web browser from a computer or WiFi device that is connected to the hotspot
network.
2. Enter http://netgear
browser.
.aroundtown or http://192.168.1.1 in the address field of the web
The hotspot web page displays.
3. Enter the admin login password in the Sign In field.
The default password is password.
4. Click the Sign In button.
The Sign In section closes.
5. Select W
6. From the MAC Filter Mode menu, select White List - Allow only those in list.
7. In the Name field, enter the name of the device you want to grant access to.
8. In the MAC Address field, enter the MAC address of the device you want to grant access
to.
9. Click the + button.
i-Fi > MAC Filter.
The password is case-sensitive.
The device is added to the white list.
10. Click the Submit button.
Your changes are saved.
Control Access to the Network
88
Page 89

Around Town LTE Mobile Internet
Configure the WiFi Signal If a Device Is Tethered
If a device is tethered to the hotspot through a USB connection, you can turn the hotspot’s
WiFi signal off so that other devices cannot connect to the hotspot WiFi network. If you allow
the WiFi signal to stay on, all devices, including the tethered device, can connect to the
hotspot WiFi network and access the Internet.
Note: To tether your hotspot to a computer, you must download the
necessary device drivers using TRU-Install. For more information, see
Configure a Tethered Connection on page 20.
Turn On the WiFi Signal If a Device Is Tethered
If you allow the WiFi signal to stay on when a device is tethered to the hotspot through a USB
connection, all devices, including the tethered device, can connect to the hotspot WiFi
network and access the Internet.
To turn on the WiFi signal if a device is tethered to the hotspot:
1. Launch a web browser from a computer or WiFi device that is connected to the hotspot
network.
2. Enter http://netgear
browser.
The hotspot web page displays.
3. Enter the admin login password in the Sign In field.
The default password is password.
4. Click the Sign In button.
The Sign In section closes.
5. Select W
6. Scroll down to the Wi-Fi Options section.
i-Fi > Options.
.aroundtown or http://192.168.1.1 in the address field of the web
The password is case-sensitive.
7. Select the Wi-Fi stays On radio button.
The Submit button displays after you make a selection.
8. Click the Submit button.
Control Access to the Network
89
Page 90

Around Town LTE Mobile Internet
A warning message displays.
9. Click the Submit button.
Your changes are saved.
Turn Off the WiFi Signal If a Device Is Tethered
You can turn off the hotspot’s WiFi signal if a device is tethered to the hotspot through a USB
connection. Only the device tethered to the hotspot can access the Internet.
If you turn off the WiFi signal when a device is tethered, note the following:
• Only a computer that is tethered to your device can connect to the hotspot WiFi network
and access the Internet.
• The hotspot’
• The hotspot’
• WPS is not available.
s battery life is prolonged.
s battery charges faster.
To turn off the WiFi signal if a device is tethered to the hotspot:
1. Launch a web browser from a computer or WiFi device that is connected to the hotspot
network.
2. Enter http://netgear
.aroundtown or http://192.168.1.1 in the address field of the web
browser.
The hotspot web page displays.
3. Enter the admin login password in the Sign In field.
The default password is password.
The password is case-sensitive.
4. Click the Sign In button.
The Sign In section closes.
5. Select W
i-Fi > Options.
6. Scroll down to the Wi-Fi Options section.
7. Select the Wi-Fi stays Off radio button.
The Submit button displays after you make a selection.
8. Click the Submit button.
A warning message displays.
Control Access to the Network
90
Page 91

9. Click the Submit button.
Your changes are saved.
Around Town LTE Mobile Internet
Control Access to the Network
91
Page 92

6. Security Settings
This chapter explains how to manage the security settings on your hotspot.
This chapter covers the following topics:
• Change the Hotspot Network Name and Password
• Change the Encryption Security Settings
• Configure Port Filtering
• Configure a DMZ
• Configure VPN Passthrough
6
92
Page 93

Around Town LTE Mobile Internet
Change the Hotspot Network Name and Password
You can change the hotspot’s main WiFi network name and password from the hotspot web
page. For more information on how to change the guest WiFi networks’ name and password,
see Change the Guest Network Name or Password on page 79.
To change the hotspot’s main WiFi network name and password:
1. Launch a web browser from a computer or WiFi device that is connected to the hotspot
network.
2. Enter http://netgear
browser.
The hotspot web page displays.
3. Enter the admin login password in the Sign In field.
.aroundtown or http://192.168.1.1 in the address field of the web
The default password is password.
4. Click the Sign In button.
The Sign In section closes.
5. Select W
6. In the Main Wi-Fi section, enter a new WiFi network name or password in the appropriate
field.
The Submit button displays after you make a change.
7. Click the Submit button.
i-Fi > Options.
The password is case-sensitive.
Your changes are saved.
Change the Encryption Security Settings
By default Wi-Fi security is enabled for your hotspot and its WiFi networks. You can change
the security used for your main and guest WiFi networks.
Security Settings
93
Page 94

Around Town LTE Mobile Internet
To change the encryption security settings for your WiFi networks:
1. Launch a web browser from a computer or WiFi device that is connected to the hotspot
network.
2. Enter http://netgear
.aroundtown or http://192.168.1.1 in the address field of the web
browser.
The hotspot web page displays.
3. Enter the admin login password in the Sign In field.
The default password is password.
The password is case-sensitive.
4. Click the Sign In button.
The Sign In section closes.
5. Select W
iFi > Options.
6. Scroll down to the Security section.
7. Select a WiFi encryption option from the Encryption menu or Guest Encryption menu:
• None. Anyone can access your WiFi network without a password and you are
responsible for charges incurred. NETGEAR recommends that you do not select this
option.
• WP
A Personal TKIP. Strong security standard that is supported by most WiFi
devices.
• WP
A Personal TKIP AES. Strong security standard that is supported by most WiFi
devices.
• WP
A2 Personal AES. Strong security that is supported by newer WiFi devices
(default).
• WP
A2 Personal TKIP AES. A stronger, newer security standard that is limited to
newer WiFi devices.
• WP
A/WPA2. Strong security that is supported by most WiFi devices. WiFi devices
that use either WPA or WPA2 can connect to the hotspot.
The Submit button displays after you make a selection.
8. Click the Submit button.
Your changes are saved.
Security Settings
94
Page 95

Around Town LTE Mobile Internet
Configure Port Filtering
Port filtering lets you specify which applications (for example, HTTP, FTP, email servers) can
(white list) or cannot (black list) access the Internet.
White List an Application Using Port Filtering
You can white list specific applications so that only those applications are allowed to access
the Internet.
To white list an application:
1. Launch a web browser from a computer or WiFi device that is connected to the hotspot
network.
2. Enter http://netgear
browser.
The hotspot web page displays.
.aroundtown or http://192.168.1.1 in the address field of the web
3. Enter the admin login password in the Sign In field.
The default password is password.
4. Click the Sign In button.
The Sign In section closes.
5. Select Settings > Router > Port Filtering.
6. Select White List from the Port Filtering menu.
7. Enter a meaningful label that describes the service.
8. In the Label field, enter a name that describes the application being filtered (for example,
RandomEmailApp.
9. In the Port field, enter the port used by the application.
10. Select TCP or UDP from the Protocol menu.
The password is case-sensitive.
This is the protocol being used for this application.
The Submit button displays.
11. Click the + button.
Security Settings
95
Page 96

Around Town LTE Mobile Internet
The port filtering entry is added to the list.
12. Click the Submit button.
Your changes are saved.
Black List an Application Using Port Filtering
You can black list specific applications to prevent those applications from accessing the
Internet.
To black list an application:
1. Launch a web browser from a computer or WiFi device that is connected to the hotspot
network.
2. Enter http://netgear
browser.
The hotspot web page displays.
.aroundtown or http://192.168.1.1 in the address field of the web
3. Enter the admin login password in the Sign In field.
The default password is password.
The password is case-sensitive.
4. Click the Sign In button.
The Sign In section closes.
5. Select Settings > Router > Port Filtering.
6. Select Black List from the Port Filtering menu.
7. Enter a meaningful label that describes the service.
8. In the Label field, enter a name that describes the application being filtered (for example,
RandomEmailApp.
9. In the Port field, enter the port used by the application.
10. Select TCP or UDP from the Protocol menu.
This is the protocol being used for this application.
The Submit button displays.
11. Click the + button.
The port filtering entry is added to the list.
Security Settings
96
Page 97

Around Town LTE Mobile Internet
12. Click the Submit button.
Your changes are saved.
Remove a Port Filtering Entry
If port filtering is currently enabled and some ports are already in the list (Black List or White
List), you can remove any of those rows.
To remove a port filtering entry for an application:
1. Launch a web browser from a computer or WiFi device that is connected to the hotspot
network.
2. Enter http://netgear
browser.
The hotspot web page displays.
3. Enter the admin login password in the Sign In field.
.aroundtown or http://192.168.1.1 in the address field of the web
The default password is password.
4. Click the Sign In button.
The Sign In section closes.
5. Select Settings > Router > Port Filtering.
6. Select Black List or White List from the Port Filtering menu.
The entries display.
7. Click the X button next to the entry that you want to remove.
The port filtering entry is removed.
The Submit button displays.
8. Click the Submit button.
The password is case-sensitive.
Your changes are saved.
Configure a DMZ
In a demilitarized zone (DMZ) network configuration, a computer runs outside the firewall in
the DMZ. This computer intercepts incoming Internet traffic, providing an extra layer of
Security Settings
97
Page 98

Around Town LTE Mobile Internet
protection for the rest of the network, and sending all incoming data to a particular IP
address.
Enable the DMZ
If DMZ is enabled, then incoming traffic is routed to the computer that uses the IP address
specified by the DMZ settings.
To enable DMZ and designate a computer to screen incoming traffic:
1. Launch a web browser from a computer or WiFi device that is connected to the hotspot
network.
2. Enter http://netgear
browser.
The hotspot web page displays.
3. Enter the admin login password in the Sign In field.
.aroundtown or http://192.168.1.1 in the address field of the web
The default password is password.
4. Click the Sign In button.
The Sign In section closes.
5. Select Settings > Router > Basic.
The password is case-sensitive.
6. In the DMZ section, select the DMZ Enabled On radio button.
Security Settings
98
Page 99

Around Town LTE Mobile Internet
7. In the DMZ Address field, enter the IP address of the computer that you want exposed to
the Internet.
The Submit button displays after you make a selection.
8. Click the Submit button.
Your changes are saved.
Disable the DMZ
If the DMZ is not enabled, the incoming traffic is blocked.
To disable the DMZ:
1. Launch a web browser from a computer or WiFi device that is connected to the hotspot
network.
2. Enter http://netgear
browser.
The hotspot web page displays.
.aroundtown or http://192.168.1.1 in the address field of the web
3. Enter the admin login password in the Sign In field.
The default password is password.
The password is case-sensitive.
4. Click the Sign In button.
The Sign In section closes.
5. Select Settings > Router > Basic.
6. In the DMZ section, select the DMZ Enabled Off radio button.
The Submit button displays after you make a selection.
Security Settings
99
Page 100

Around Town LTE Mobile Internet
7. Click the Submit button.
Your changes are saved.
Configure VPN Passthrough
You can set up a virtual private network (VPN) to connect to a corporate network.
Enable VPN Passthrough
To connect to a corporate network using VPN, you must first enable VPN connections
(passthrough).
To enable VPN passthrough:
1. Launch a web browser from a computer or WiFi device that is connected to the hotspot
network.
2. Enter http://netgear
browser.
.aroundtown or http://192.168.1.1 in the address field of the web
The hotspot web page displays.
3. Enter the admin login password in the Sign In field.
The default password is password.
4. Click the Sign In button.
The Sign In section closes.
5. Select Settings > Router > Basic.
The password is case-sensitive.
Security Settings
100
 Loading...