


FS-250SK
Table of contents
 Loading...
8.7” Food Slicer (model/ modèle FS-250SK)
Instruction Manual • Manuel d’Instructions • Manual de Instrucción

TABLE OF CONTENTS:
IMPORTANT SAFEGUARDS . . . . . . . . . . . . . . . . . . . . . . . . . . . . . . . . . . . . . . . . . 1
FEATURES. . . . . . . . . . . . . . . . . . . . . . . . . . . . . . . . . . . . . . . . . . . . . . . . . . . . .2
BEFORE FIRST USE . . . . . . . . . . . . . . . . . . . . . . . . . . . . . . . . . . . . . . . . . . . . . . 2
OPERATION . . . . . . . . . . . . . . . . . . . . . . . . . . . . . . . . . . . . . . . . . . . . . . . . . . . 2
CARE AND CLEANING INSTRUCTIONS. . . . . . . . . . . . . . . . . . . . . . . . . . . . . . . . .3
RECIPES . . . . . . . . . . . . . . . . . . . . . . . . . . . . . . . . . . . . . . . . . . . . . . . . . . . . . . 3
ONE YEAR LIMITED WARRANTY . . . . . . . . . . . . . . . . . . . . . . . . . . . . . . . . . . . . . 4
MESURES DE PRÉCAUTION IMPORTANTES . . . . . . . . . . . . . . . . . . . . . . . . . . . . . 5
CARACTÉRISTIQUES . . . . . . . . . . . . . . . . . . . . . . . . . . . . . . . . . . . . . . . . . . . . .6
AVANT LA PREMIÈRE UTILISATION. . . . . . . . . . . . . . . . . . . . . . . . . . . . . . . . . . . 6
OPÉRATION . . . . . . . . . . . . . . . . . . . . . . . . . . . . . . . . . . . . . . . . . . . . . . . . . . . 6
RECETTE . . . . . . . . . . . . . . . . . . . . . . . . . . . . . . . . . . . . . . . . . . . . . . . . . . . . . 7
GARANTIE LIMITÉE D’UN AN . . . . . . . . . . . . . . . . . . . . . . . . . . . . . . . . . . . . . . . 8
SALVAGUARDAS IMPORTANTES . . . . . . . . . . . . . . . . . . . . . . . . . . . . . . . . . . . . . 9
CARACTERÍSTICAS . . . . . . . . . . . . . . . . . . . . . . . . . . . . . . . . . . . . . . . . . . . . . 10
ANTES DE UTILIZARLO POR PRIMERA VEZ . . . . . . . . . . . . . . . . . . . . . . . . . . . . 10
OPERACIÓN . . . . . . . . . . . . . . . . . . . . . . . . . . . . . . . . . . . . . . . . . . . . . . . . . . 10
CUIDADO Y LIMPIEZA . . . . . . . . . . . . . . . . . . . . . . . . . . . . . . . . . . . . . . . . . . . 11
RECETA . . . . . . . . . . . . . . . . . . . . . . . . . . . . . . . . . . . . . . . . . . . . . . . . . . . . . 11
UN AÑO DE GARANTÍA LIMITADA. . . . . . . . . . . . . . . . . . . . . . . . . . . . . . . . . . . 12
Technical Specications:
Nominal voltage: 120V, 60Hz,
Power rating: 180 W
Cutting blade: reinforced, non-rusting ne blade, 19cm
“NESCO®” is a registered trademark of The Metal Ware Corporation.
The Metal Ware Corporation
1700 Monroe St., P.O. Box 237
Two Rivers, WI 54241-0237
Phone: 1-800-288-4545
IMPORTANT SAFEGUARDS
THIS PRODUCT IS DESIGNED FOR HOUSEHOLD USE ONLY. When using electrical
appliances, basic safety precautions should always be followed, including the
following:
1. READ ALL INSTRUCTIONS.
2. Do not touch hot surfaces. Use handles or knobs.
3. To protect against electrical shock and personal injury, do not immerse this
appliance, including cord and plug, in water or other liquid.
4. This appliance is not intended for use by persons (including children) with
reduced physical, sensory or mental capabilities, or lack of experience and
knowledge, unless they have been given supervision or instruction concerning
use of the appliance by a person responsible for their safety.
5. Close supervision is necessary when any appliance is used by or near children.
6. Unplug from outlet when not in use and before cleaning. Allow to cool completely
before putting on or taking off parts, and before cleaning.
7. Do not operate any appliance with a damaged cord or plug or after the appliance
malfunctions or has been damaged in any manner. To avoid hazards, return
appliance to NESCO
adjustment.
8. The use of accessory attachments not recommended by the manufacturer may
result in re, electric shock or injury to persons.
9. Do not use outdoors.
10. Do not let cord hang over edge of table or counter, or touch hot surfaces.
11. Do not place on or near a hot gas or electrical burner or in a heated oven.
12. Do not use appliance for other than its intended use, as described in this manual.
13. Operate appliance only when all parts are fully engaged and secured.
14. Do not operate the appliance continuously for more than 10 minutes. Allow the
appliance to cool down for one hour before second operation.
15. Do not use appliance to cut deep frozen food or bones.
16. Operate appliance only when Blade Locking Screw is properly engaged and
tightened.
17. Handle Blade carefully when cleaning, removing and inserting, as blade is
extremely sharp. Do not touch sharp edge of Blade.
18. Be careful, the Blade continues to turn for a while after the appliance has been
turned off.
19. To avoid danger of injury, always cut food with this appliance fully assembled.
The Food Carriage and Slicing Guard must always be used.
20. Adjust the supporting plate to position “P” after use and before cleaning..
Polarized Plug: This appliance has a polarized plug (one blade is wider than the other). To
reduce risk of electric shock, plug is intended to t into polarized outlet only one way. If the
plug does not t fully into the outlet, reverse the plug. If it still does not t, contact a qualied
electrician. Do not try to modify the plug in any way.
Short Cord Instructions: A short power supply cord is provided to reduce the risk resulting
from becoming entangled in or tripping over a longer cord. Extension cords may be used if care
is exercised in their use. If an extension cord is used, the marked electrical rating of the cord
should be at least as great as the electrical rating of the appliance. The longer cord should be
arranged so that it will not drape over the tabletop where it can be pulled on by children or
tripped over unintentionally.
®
Factory Service Department for examination, repair or
SAVE THESE INSTRUCTIONS
English
1
FEATURES
SUPPORT
PLATE
English
POWER
SWITCH
THICKNESS
CONTROL
BLADE
BLADE LOCKING
SCREW
SLICING GUARD
FOOD
CARRIAGE
BASE
BEFORE FIRST USE
1. Read and understand all instructions and components described in this manual.
Keep for future reference.
2. Remove all packaging and save for storage.
3. Remove and wash the Blade, Food Carriage and Slicing Guard in warm soapy
water. (follow Care and Cleaning Instructions).
4. Wipe the Base with a damp cloth. DO NOT IMMERSE THE BASE IN WATER OR
ANY OTHER LIQUID! (follow Care and Cleaning Instructions).
CARRIAGE
ROD RELEASE
CARRIAGE ROD
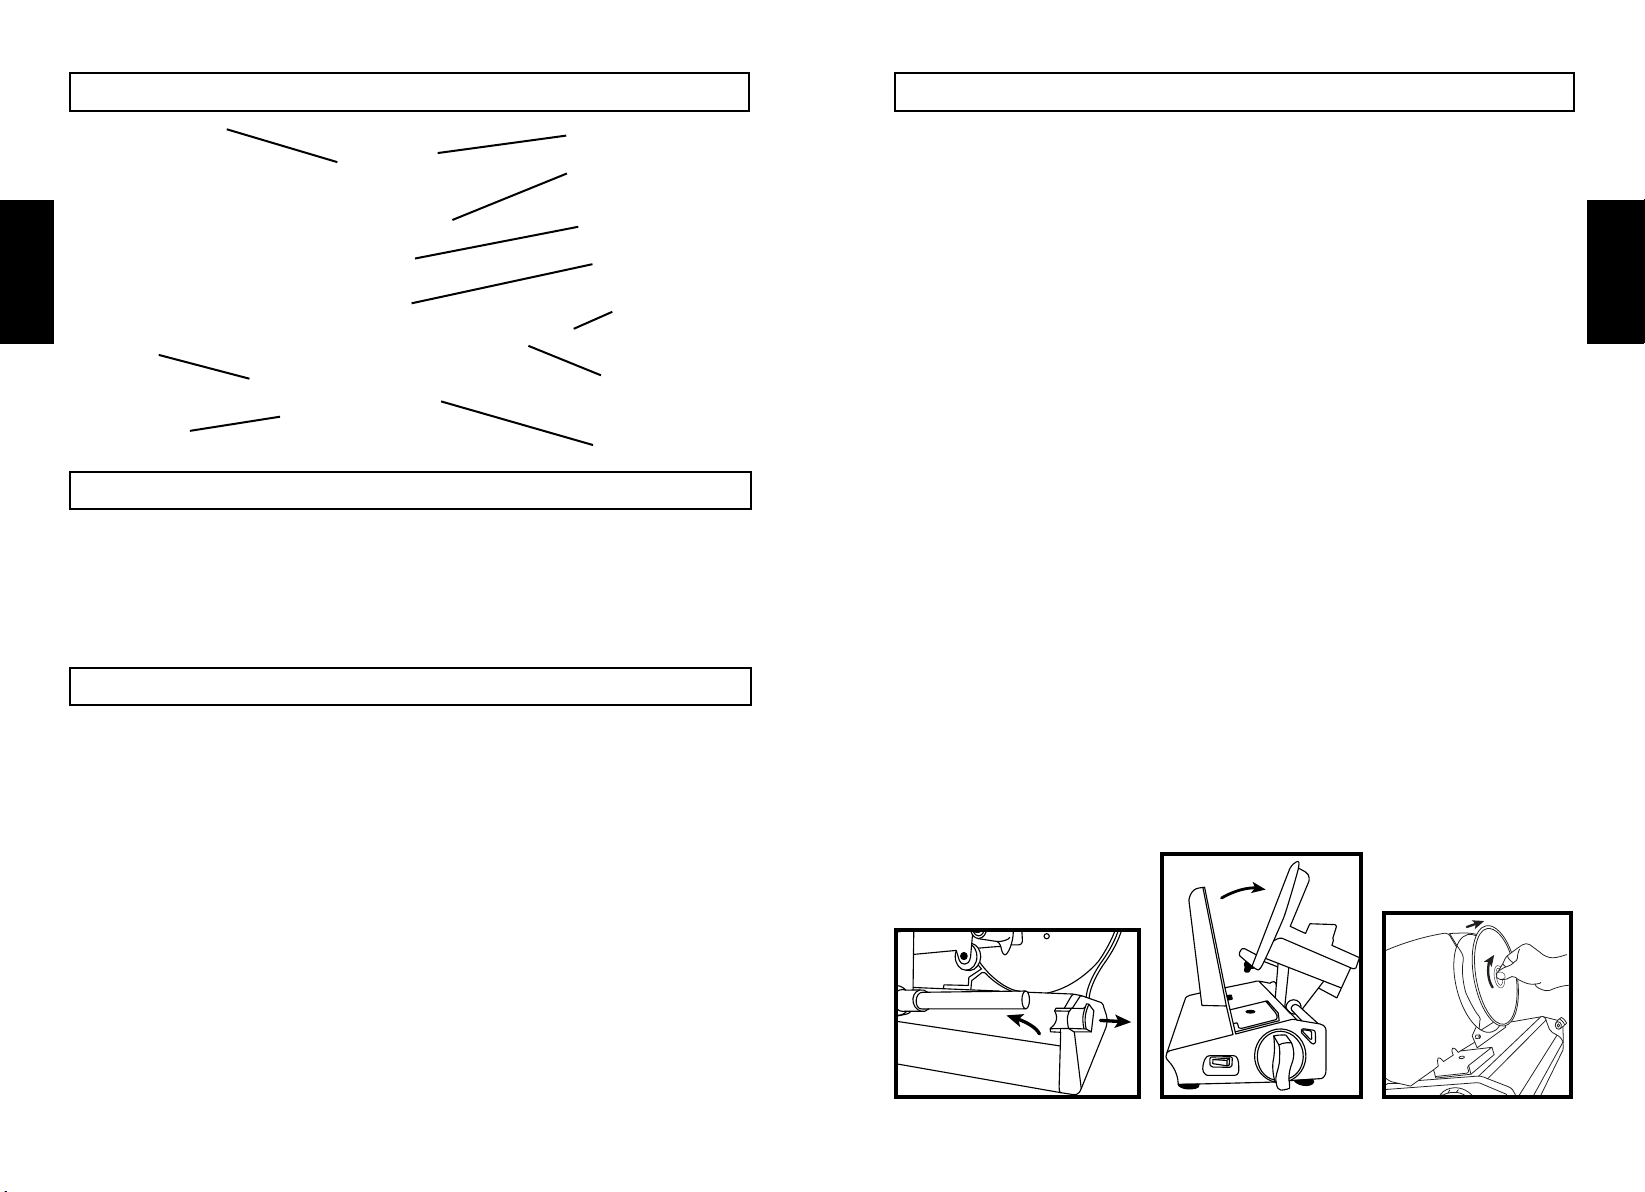
CARE AND CLEANING INSTRUCTIONS
1. Always unplug the appliance from electrical outlet before cleaning.
2. Never immerse the base of this appliance in water or other liquid.
3. The blade, slicing guard and food carriage can all be removed and hand washed
in warm soapy water. Be careful when cleaning the blade, as it is extremely
sharp. Do not leave blade under water; trying to handle sharp objects in water
can be hazardous.
4. Set thickness control to “P”. This will keep the blade edge covered by support plate.
5. For ease of cleaning, the food carriage can be tilted up or completely removed.
6. Remove blade by holding the blade with one hand and using two ngers to pinch
and turn blade locking screw. Unlock blade by turning screw clockwise. Carefully
remove blade and hold by using the blade locking screw.
7. Clean outer surfaces with a damp cloth. Mild detergent or plain water can be
used to dampen cloth. Never immerse base in water or any other liquid. Do
not use steel wool, abrasive cleaners or sharp utensils to clean any part of this
appliance.
8. After cleaning and drying, install blade to base in reverse order of Step 6.
Carefully place blade on mating hub of motor. Align the locking screw tabs with
the mating slots in the hub of motor and press in until seated. Rotate locking
screw counter-clockwise until seated to lock blade in place.
English
OPERATION
1. Place appliance on a at, dry and stable surface.
2. Be sure power switch is ‘OFF’, then plug into a standard 120V AC electrical outlet.
3. Place a suitable tray or plate behind slicer to collect the sliced food.
4. Place food onto food carriage between support plate and slicing guard. To avoid
danger of injury, always use food carriage and slicing guard while cutting.
5. Adjust the slice thickness by turning the thickness control to desired thickness
between 0 and 12 (Deli thin to 9/16”).
6. Slide food carriage back so food is clear of blade. Press power switch to start the
slicer. Keep left hand clear, place near the power switch, and grasp the slicing
guard with the other hand.
7. To begin slicing, push food in towards support plate while holding the slicing
guard and slide food into blade. Slide food carriage back and repeat until you
have sliced the desired amount of food.
8. When nished, press power switch to turn OFF unit. Note: Blade will continue to
move for a short time. Always keep hands away from blade! Remove plug
from electrical outlet before cleaning.
9. For safety, always return thickness control to ‘P’ after use to shield sharp edge of
blade during storage.
2 3
CARRIAGE REMOVAL
CARRIAGE TILT
BLADE REMOVAL
Loading...