


Electric Food Grinder FG-400PR
Care/Use Guide
Broyeur d’aliments électrique FG-400PR
Guide d’entretien et d’utilisation

English
Electric Food Grinder FG-400PR |
|
Table of Contents |
|
IMPORTANT SAFEGUARDS............................................................................. |
1 |
Get to know NESCO® Professional Grinder....................................................... |
2 |
Assembly Instructions........................................................................................ |
3 |
Operating Instructions........................................................................................ |
4 |
How to clear Jammed Food............................................................................... |
4 |
Cleaning Instructions......................................................................................... |
5 |
Grinding Tips...................................................................................................... |
5 |
Sausage Maker Assembly and Tips................................................................... |
6 |
Sausage Maker assembly.................................................................................. |
7 |
ONE YEAR LIMITED WARRANTY.................................................................... |
8 |
NESCO® is a registered trademark of The Metal Ware Corporation.
The Metal Ware Corporation
1700 Monroe St., P.O. Box 237
Two Rivers, WI 54241
Ph: (800) 288-4545

IMPORTANT SAFEGUARDS
- This product is designed for household use only -
When using electrical appliances, basic safety precautions should always be followed, including the following:
1.READ ALL INSTRUCTIONS BEFORE USING THIS APPLIANCE.
2.The appliance is designed for household use only. It is not intended for commercial use.
3.To protect against electric shock, do not immerse the Appliance, including cord and plug, in water or other liquid.
4.Close supervision is necessary when appliance is used near children. This appliance is not recommended for use by children.
5.Unplug appliance from power outlet when not in use, before assembly or disassembly of parts, and before cleaning.
6.Do not operate any appliance with damaged cord or plug or after appliance malfunctions, or has been damaged in any manner. Return the appliance to NESCO® Factory Service Department for examination, repair or adjustment.
7.Do not place appliance on or near a hot gas or electric burner, or heated oven.
8.Only use accessory attachments recommended by the manufacturer.
9.Do not use appliance outdoors or for other than intended use.
10.Do not let the cord hang over the edge of a table or touch hot surfaces.
11.Do not operate the appliance continuously for more than 15 minutes. Allow the appliance to cool for 15 minutes before second operation.
12.Do not use appliance to grind frozen foods or bones.
13.Operate appliance only when all parts are fully engaged and tightened.
14.To reduce risk of injury and damage to appliance keep hands, hair, clothing and utensils away from moving parts during operation.
15.NEVER feed appliance by hand, always use the PUSHROD.
16.Place appliance on flat and steady support surface when ready for use.
17.Remove all packaging and wash parts before using the first time.
18.Do not use fingers to scrape food away from discharge disc while appliance is operating. Cut type injury may result.
SAVE THESE INSTRUCTIONS
Polarized Plug: This appliance has a polarized plug (one blade is wider than the other). To reduce risk of electric shock, plug is intended to fit into polarized outlet only one way. If the plug does not fit fully into the outlet, reverse the plug. If it still does not fit, contact a qualified electrician. Do not try to modify the plug in any way.
Short Cord Instructions: A short power supply cord is provided to reduce the risk resulting from becoming entangled in or tripping over a longer cord. Extension cords may be used if care is exercised in their use. If an extension cord is used, the marked electrical rating of the cord should be at least as great as the electrical rating of the appliance. The longer cord should be arranged so that it will not drape over the tabletop where it can be pulled on by children or tripped over unintentionally.
English
1
English
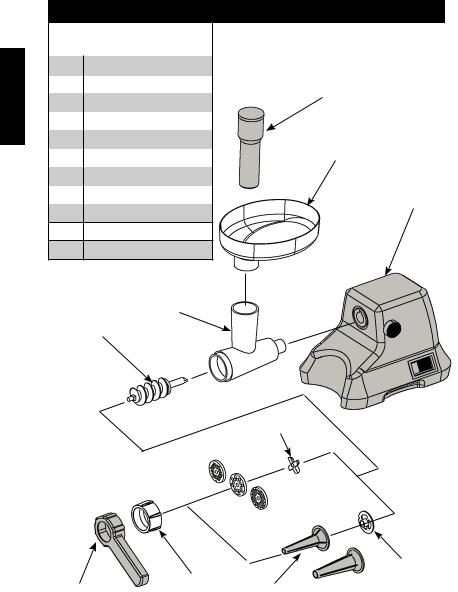
Get to know your NESCO Professional® Food Grinder
|
Parts list for FG-400PR |
|
|
|
Food Grinder |
Figure 1 |
|
01 |
Pushrod |
||
|
|||
02 |
Hopper |
01 |
|
03 |
Grinder Base |
||
|
|||
|
|
|
|
04 |
Grinder Head |
|
|
05 |
Feed Screw / Auger |
02 |
|
06 |
Cutting Blade |
||
07 |
Plates: Lg., Med., Sm. |
|
|
08 |
Adapter, Sausage Maker |
03 |
09Sausage Cone, Lg./Sm.
10Ring Nut
11Wrench, Ring Nut
04
05
06
07 
|
10 |
08 |
|
11 |
09 |
||
|
2
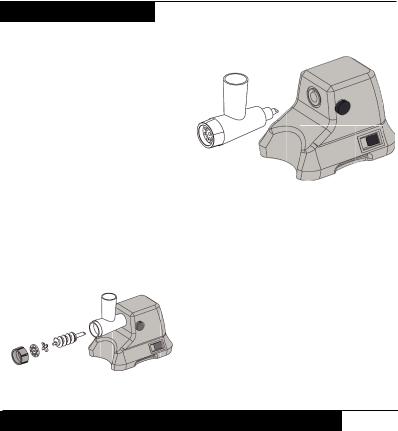
Assembly Instructions
1. |
Carefully unpack unit and examine all packaging to make sure all parts are included |
|
|||
|
(See page 2) |
|
|
|
|
|
|
||||
2. |
Clean all parts prior to using. |
|
|
English |
|
3. |
Place unit on a flat stable surface. |
|
|
||
|
|
|
|||
4. |
Make sure Switch is “OFF” (O) |
|
|
|
|
|
and power cord unplugged before |
|
|
|
|
|
assembling. |
|
|
|
|
5. |
Turn Locking Screw counter-clockwise |
|
|
|
|
|
several turns. Insert Grinder Head into |
|
|
|
|
|
Base opening until seated and tighten |
|
|
|
|
|
Locking Screw. |
|
|
|
|
6. |
Insert Feed Screw into Grinder Head, |
|
|
|
|
|
long end spindle first. Turn slightly until |
|
|
|
|
|
|
|
|
||
|
fully set in Grinder Head. |
|
|||
7. |
Position Cutting Blade (cut edge facing outward to plate) onto Feed Screw. Make |
|
|||
|
sure blade is seated over ‘square’ shoulder of Feed Screw or meat will not grind |
|
|||
|
properly and Cutting Plate may be damaged. |
|
|||
8. |
Place desired Cutting Plate over end of Feed Screw and against Blade. NOTE: |
|
|||
|
|
|
Make sure “notch’ is aligned with ‘key’ |
|
|
|
|
|
|
||
|
|
|
in Grinder Head and seated against |
|
|
|
|
|
Blade. |
|
|
|
|
|
9. Thread Ring Nut on Grinder Head |
|
|
|
|
|
and turn gently until tight. Use Ring |
|
|
|
|
|
Nut Wrench to loosen Nut after use if |
|
|
|
|
|
needed. |
|
|
|
|
|
10. Place Food Hopper on top of |
|
|
|
|
|
Grinder Head. |
|
|
|
|
|
11. Plug into 120 V outlet and you are |
|
|
ready to begin grinding.
NESCO Professional Food Grinder - A Healthier Diet
•With your own NESCO Professional Food Grinder, you control the ingredients.
You control the amount of fats, salts and other additives, for a healthier diet. Chunky sandwich spreads, savory appetizers, hearty soups, relishes, homemade sausage, other meat dishes. . . even cakes are so easy to make.
•You can make sausages out of any foods. Most butcher shops offer casings, which you purchase fresh, just before you are ready to grind.
•Your NESCO Food Grinder is intended for processing relatively small quantities. Meat needs to be cut into relatively small chunks and gristle should be removed or it will likely clog the Feed Screw assembly. If grinder clogs, you can easily clear the Feed tube by pressing the REVERSE switch button.
3

OPERATING INSTRUCTIONS
|
1. |
Place the unit on a flat and stable work surface. Be sure unit is fully assembled |
||||
|
|
(see Assembly Instructions, page 3). |
||||
|
|
|||||
English |
2. |
Make sure the Switch is in the “OFF” (O) position. |
||||
3. |
Insert plug into standard 120 Volt electrical outlet, rated 15A minimum. |
|||||
|
||||||
|
4. |
Place a wide, shallow bowl or plate beneath the |
|
|||
|
|
|
|
|||
|
|
Grinder Head to catch ground food. |
|
|||
|
5. |
Press Switch to “ON” (I). Always have the unit |
|
|||
|
|
running before adding food. |
|
|||
|
|
|||||
|
6. |
Cut food into strips or cubes slightly smaller than the |
|
|
|
|
|
|
|||||
|
|
|||||
|
|
Hopper opening. |
|
|||
|
7. |
Place food into the Hopper and use Pushrod to |
|
|||
|
|
gently feed food into the Feed Screw. Do not force |
|
|||
|
|
food into the Grinder Head and NEVER use fingers |
|
|||
|
|
or other tools, other than recommended by appliance |
|
|||
|
|
|
||||
|
|
manufacturer, to feed food into Grinder Head. |
||||
|
8. |
If the motor slows or stops, this may be due to jammed food. See |
||||
|
|
instructions below for clearing jammed foods. IMPORTANT - NEVER PUT |
||||
|
|
YOUR FINGERS INTO THE FOOD HOPPER OPENING WHILE UNIT IS |
||||
|
|
OPERATING OR PLUGGED INTO ELECTRICAL OUTLET. |
||||
|
9. |
When you have finished grinding food, press Switch to “OFF” (O), unplug from |
||||
|
|
electrical outlet and follow cleaning instructions. |
||||
How to clear Jammed Foods
1.If the motor slows or stops, press Switch “OFF” (O) immediately.
2.Press the Switch to the REVERSE position for several seconds to clear jammed food in the Grinder Head.
3.Release the Reverse switch and try operating as usual.
4.If motor slows or stops again, press Switch “OFF” (O) and unplug from electrical outlet. Follow cleaning instructions to clear the jammed food completely.
4

CLEANING INSTRUCTIONS |
1. |
Always unplug unit when not in use, before inserting or removing parts and |
|
|
before cleaning. |
|
2. |
NEVER immerse Base unit in water or other liquids. Wipe Base with damp |
English |
|
cloth and mild detergent. Do not use harsh or abrasive cleaners on Base as it |
|
|
|
|
|
could damage the finish. |
|
3. |
Wash all parts, except Base, in hot soapy water, rinse and set aside to dry. |
|
|
Use care when handling Cutting Blade. NOTE: REMOVABLE PARTS ARE |
|
|
NOT DISHWASHER SAFE. Dishwasher detergents may cause pitting and |
|
|
corrosion. Always wash by hand in soapy water. |
|
4. |
The Blade and Cutting Plates should be coated with cooking oil after washing |
|
|
and drying. Wrap in grease-proof paper or plastic bag to prevent corrosion |
|
|
(rust). |
|
5. |
Store appliance in a dry place. |
|
6. |
Any other servicing should be performed by an authorized service personnel. |
|
Grinding Tips
During extended periods of use, fats from meats can build up inside the grinding head causing motor to strain and slow. If this happens turn off grinder and unplug cord from outlet. Disassemble and clean grinding head and feed screw.
Fine Cutting Plate - Use for finely ground texture, such as spreads, baby food or hamburger.
Medium Cutting Plate - Use for ground meat in soups or relishes
Course Cutting Plate - Use for coarsely ground texture, such as nuts, vegetables or ground meat for chili.
Raw Meat and Fish - These items will have a minimum loss of juices if thoroughly chilled before grinding. When grinding larger quantities, fats can build up inside the Grinder Head. If this occurs, disassemble and wash parts in soapy water, then reassemble. After grinding meat you can clean the Feed Screw by grinding a slice of bread.
Remove all bones, tough tendons, nut shells, etc. before grinding.
Nuts - Use the Course Cutting Plate and feed nuts into Grinder Head slowly. Whenever possible, alternate with other ingredients, such as dried fruits or vegetables.
Bread Crumbs - Best if using dry or toasted bread. Make sure all parts are free of moisture before starting.
5
 Loading...