

Page 1

SERVICE MANUAL
Oxinet® II Patient Monitoring System
Caution: Federal law (U.S.A.) restricts this device to sale by or on the order of a physician.
To contact Mallinckrodt's representative: In the United States, call 1.800.635.5267 or 314.654.2000; outside the United States, call
your local Mallinckrodt representative.
1999 Mallinckrodt Inc. All rights reserved. 061821A-0100
Page 2

Mallinckrodt Inc.
675 McDonnell Boulevard
PO Box 5840
St. Louis, MO 63134 USA
Tel. 314.654.2000
Toll Free 1.800.635.5267
Mallinckrodt
Europe BV
Hambakenwetering 1
5231 DD's-Hertogenbosch
The Netherlands
Tel. +3.73.6485200
Nellcor Puritan Bennett Inc.
4280 Hacienda Drive
Pleasanton, CA 94588 USA
Nellcor Puritan Bennett is a wholly owned subsidiary of Mallinckrodt Inc. Nellcor, Nellcor Puritan Bennett, and Oxinet II are
trademarks of Mallinckrodt Inc.
To obtain information about a warranty, if any, for this product, contact Mallinckrodt Technical Services or your local
Mallinckrodt representative.
Covered by one or more of the following U.S. patents and foreign equivalents: 4,621,643; 4,653,498; 4,700,708; 4,770,179;
4,869,254; 4,928,692; 4,934,372; 5,078,136; 5,351,685; 5,368,026; and Re. 35,122.
Page 3

TABLE OF CONTENTS
List of Figures
List of Tables
Table Of Contents ......................................................................................... iii
List Of Figures........................................................................................... iv
List Of Tables............................................................................................ iv
Section 1: Introduction ................................................................................ 1-1
1.1 Manual Overview ........................................................................... 1-1
1.2 Warnings, Cautions, And Notes..................................................... 1-1
1.3 Intended Use Of The Oxinet Ii Monitoring System ........................ 1-1
1.4 Description Of The Oxinet Ii Monitoring System Equipment ......... 1-1
Section 2: Equipment Installation And Hookup ........................................ 2-1
2.1 General Information ....................................................................... 2-1
2.2 Power Requirements ..................................................................... 2-1
2.3 Central Station Site Selection ........................................................ 2-1
2.4 Selection Of Central Station Antenna Location ............................. 2-2
2.5 Installation Of Hardware ................................................................ 2-2
2.6 System Interconnect (Radio-Link Systems)................................... 2-4
2.7 System Interconnect (Hard-Wired Systems) ................................. 2-6
Section 3: Performance Verification .......................................................... 3-1
3.1 Introduction .................................................................................... 3-1
3.2 Required Test Equipment .............................................................. 3-1
3.3 Central Station Power-On Self Test............................................... 3-1
3.4 Electrical Safety Tests ................................................................... 3-1
Section 4: Routine Maintenance ................................................................. 4-1
4.1 Introduction .................................................................................... 4-1
4.2 Cleaning......................................................................................... 4-1
4.3 Installing Printer Paper In The (Optional) Thermal Printer ............ 4-1
Section 5: System Configuration................................................................ 5-1
5.1 Introduction .................................................................................... 5-1
5.2 System Configuration..................................................................... 5-1
Section 6: Troubleshooting......................................................................... 6-1
6.1 Introduction .................................................................................... 6-1
6.2 How To Use This Section .............................................................. 6-1
6.3 Who Should Perform Repairs ........................................................ 6-1
6.4 Replacement Level Supported....................................................... 6-1
6.5 Obtaining Replacement Parts ........................................................ 6-1
6.6 Troubleshooting Guide................................................................... 6-1
Section 7: Spare Parts ................................................................................. 7-1
7.1 Introduction .................................................................................... 7-1
7.2 Oxinet Ii Replacement Parts .......................................................... 7-2
7.3 Npb-290, Npb-295, And N-395, Radio Kit Replacement ............... 7-2
7.4 Npb-290, Npb-295, And N-395, Oxinet Ii Hard-Wire Cable Kit
Section 8: Packing For Shipment ............................................................... 8-1
8.1 General Instructions....................................................................... 8-1
Replacement ................................................................................. 7-3
iii
Page 4

Table of Contents
LIST OF FIGURES
8.2 Repacking In Original Carton ......................................................... 8-1
8.3 Repacking In A Different Carton .................................................... 8-7
Section 9: Specifications............................................................................. 9-1
9.1 Agency Regulatory Notices............................................................ 9-1
9.2 Electrical......................................................................................... 9-1
9.3 Physical Characteristics................................................................. 9-2
9.4 Environmental ................................................................................ 9-3
9.5 Hard-Wired Systems...................................................................... 9-3
9.6 Laser Printer Minimum Requirements ........................................... 9-3
9.7 Componentand System Labels...................................................... 9-3
Section 10: Technical Supplement ............................................................. 10-1
10.1 Introduction .................................................................................... 10-1
10.2 Radio-Link System-Level Block Diagram Analysis ........................ 10-1
10.3 Radio-Link Data Communications Overview ................................. 10-3
10.4 Hard-Wired System-Level Block Diagram Analysis....................... 10-5
Index ............................................................................................................... 10-1
Figure 1-1: Oxinet II Monitoring System......................................................... 1-2
Figure 2-1: Computer Rear Panel Connectors (Radio-Link System)............. 2-4
Figure 2-2: Computer Rear Panel Connectors (Hard-wired Systems) .......... 2-7
Figure 4-1: Installing Printer Paper ................................................................ 4-2
Figure 5-1: Patient Setup Screen ................................................................... 5-1
Figure 5-2: System Setup Password Screen ................................................. 5-2
Figure 5-3: System Setup Function Select Screen ........................................ 5-2
Figure 5-4: SpO2 Only ................................................................................... 5-3
Figure 5-5: System Map Design Screen ........................................................ 5-4
Figure 5-6: System Passwords Maintenance Screen .................................... 5-5
Figure 5-7: System Date/Time Setup Screen ................................................ 5-6
Figure 5-8: System Configuration Setup Screen............................................ 5-7
Figure 5-9: System Volume Setup Screen ..................................................... 5-8
Figure 5-10: System Defaults Setup Screen.................................................. 5-9
Figure 5-11: System Default Channel Alarm Settings Screen ....................... 5-10
Figure 5-12: Radio-Link System Link Information Screen ............................. 5-11
Figure 5-13: System Transceiver Maintenance Screen................................. 5-11
Figure 5-14: Transceiver Programming Screen ............................................. 5-12
Figure 5-15: Transceiver Deassign Screen.................................................... 5-13
Figure 5-16: Enter Channel Number Screen.................................................. 5-14
Figure 5-17: System Trends Setup Screen .................................................... 5-14
Figure 5-18: System Events Screen .............................................................. 5-15
Figure 7-1: Oxinet II System Spare Parts ...................................................... 7-2
Figure 8-1: Repacking the Computer ............................................................. 8-2
Figure 10-1: Oxinet II System-Level Block Diagram ...................................... 10-1
Figure 10-2: Hard-wired Oxinet II System-Level Block Diagram ................... 10-5
iv
Page 5

LIST OF TABLES
Table of Contents
Table 2-1: Central Station Component Space Requirements........................ 2-2
Table 2-2: Hard-wire Cable Pin Outs ............................................................. 2-4
Table 2-3: Synchronization Cable Connections............................................. 2-6
Table 6-1: Troubleshooting ............................................................................ 6-2
Table 6-2: Remote Radio Transceiver LED Indications................................. 6-5
Table 7-1: Replacement Parts ....................................................................... 7-2
Table 7-2: Radio Kit, Part Number 036342 .................................................... 7-2
Table 7-3: Cable Kit, Part Number 036344 .................................................... 7-3
v
Page 6

Page 7

SECTION 1: INTRODUCTION
1.1 Manual Overview
1.2 Warnings, Cautions, and Notes
1.3 Intended Use of the Oxinet II Monitoring System
1.4 Description of the Oxinet II Monitoring System Equipment
1.1 MANUAL OVERVIEW
This manual contains information for servicing the Oxinet® II monitoring system.
Only qualified service personnel should service this product. Before servicing the
Oxinet II system, read the operator's manual carefully for a thorough understanding
of system operation.
1.2 WARNINGS, CAUTIONS, AND NOTES
This manual uses three terms that are important for proper operation of the Oxinet II
system: Warning, Caution, and Note.
1.2.1 Warning
A warning precedes an action that may result in injury or death to the patient or user.
Warnings are boxed and highlighted in boldface type.
1.2.2 Caution
A caution precedes an action that may result in damage to, or malfunction of, the
system or a component of the system. Cautions are highlighted in boldface type.
1.2.3 Note
A note gives information that requires special attention.
1.3 INTENDED USE OF THE OXINET II MONITORING SYSTEM
The Oxinet II system is a PC-based patient monitoring system for use in the hospital
environment. It is designed to display, record, and store real-time physiological data
for up to 30 patients on wireless systems (Radio-link), or 16 patients with the hardwired system. This system gathers data from the Nellcor NPB-290, NPB-295, N395, N-3000, and N-3100, displays the data and stores information for future use at
a central location. Physiological data available with this system includes SpO
rate, respiration rate, heart rate, and noninvasive blood pressure (NIBP).
1.4 DESCRIPTION OF THE OXINET II MONITORING SYSTEM EQUIPMENT
1.4.1 System Overview
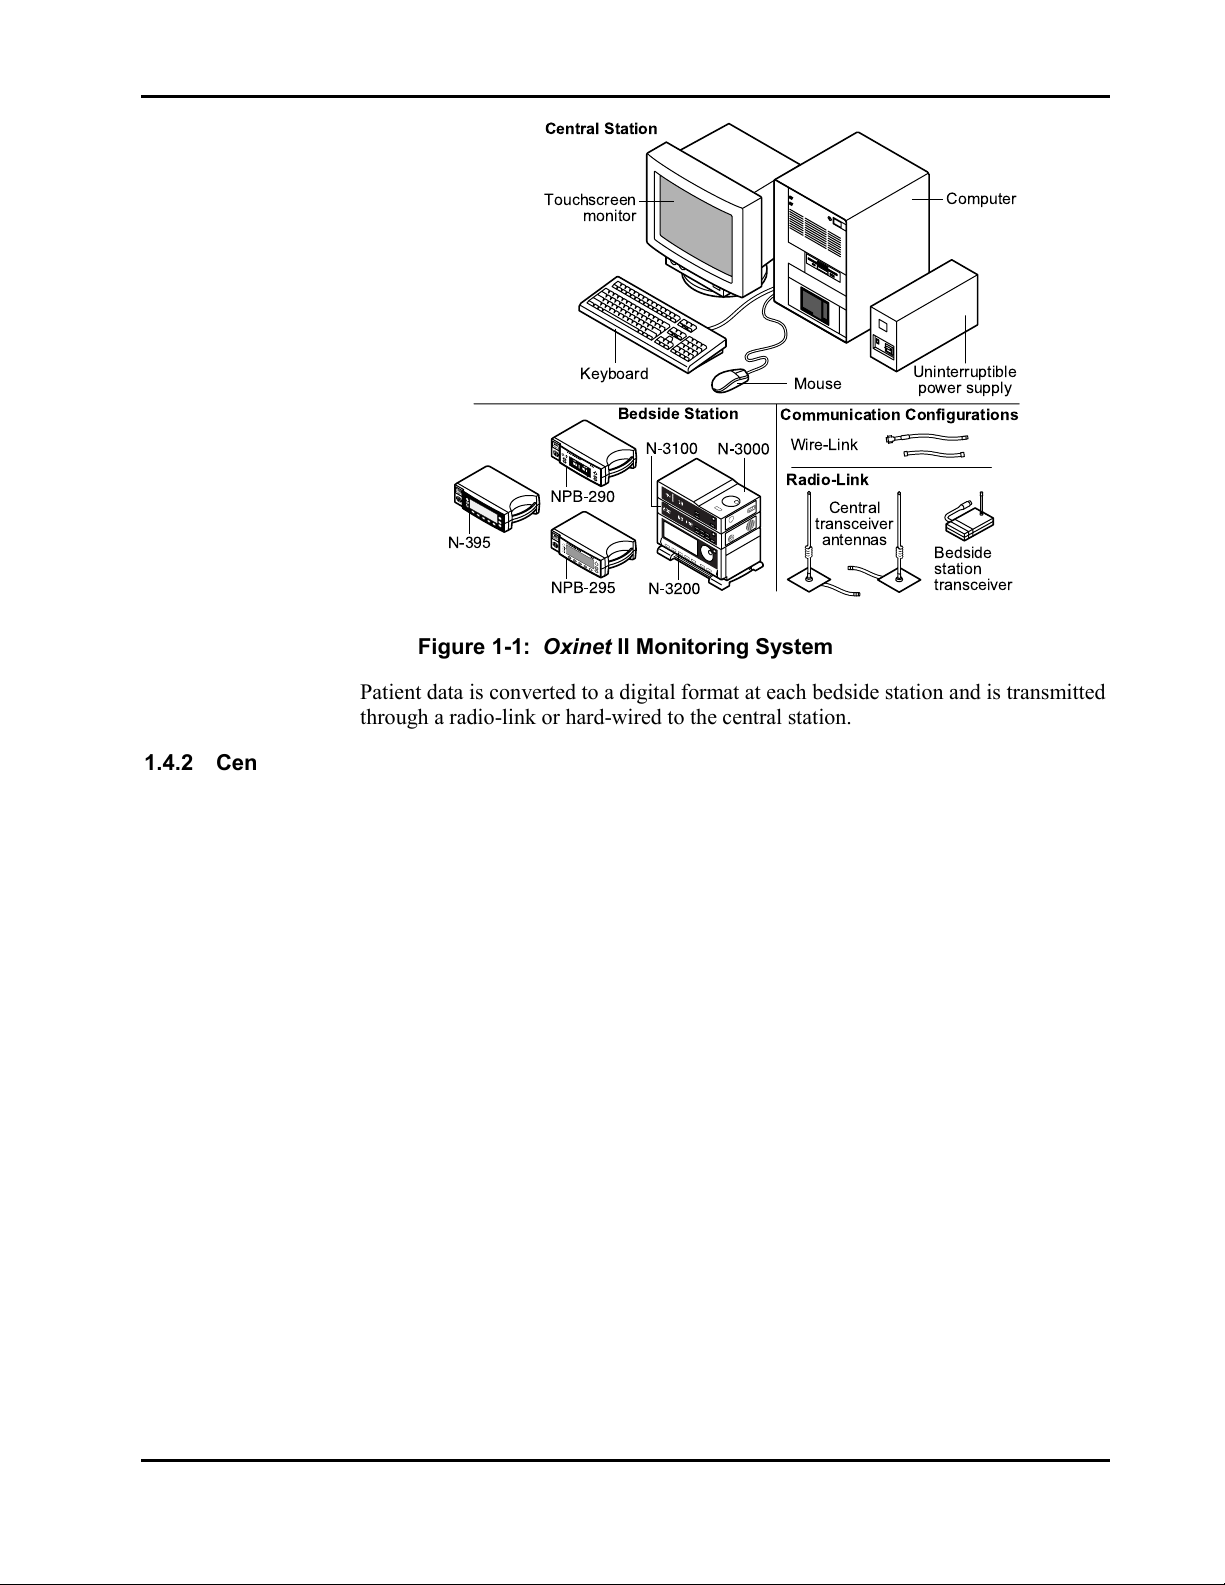
The major components of the Oxinet II monitoring system are the central station and
the bedside stations. The Oxinet II system components are illustrated in Figure 1-1
and described in the following paragraphs.
2 pulse
1-1
Page 8
Section 1: Introduction
Central Station
1.4.2 Central Station
Computer
Uninterruptible
power supply
Bedside
station
transceiver
N-395
Touchscreen
monitor
Keyboard
Bedside Station
Mouse
Communication Configurations
Wire-Link
Radio-Link
Central
transceiver
antennas
Figure 1-1: Oxinet II Monitoring System
Patient data is converted to a digital format at each bedside station and is transmitted
through a radio-link or hard-wired to the central station.
Refer to Figure 1-1. The central station consists of a computer, a monitor
(touchscreen optional), a keyboard, a mouse, an uninterruptible power supply, an
optional thermal printer, and an optional laser printer (not shown) supplied by your
facility. These components are described in the following paragraphs.
1.4.2.1 Computer
The computer is the primary component of the central station in the operation of the
Oxinet II system. Patient data from the bedside stations is processed by the
computer for display on the touchscreen monitor. The computer works very much
like a typical personal computer (PC). It contains a motherboard, a 3.5-inch floppy
disk drive, a hard disk drive, a video controller circuit board, and circuits for
interfacing with the keyboard and the mouse. The thermal printer (optional),
touchscreen controller circuit board, soundboard, and central radio transceiver in
radio-link units, or an I/O PCB, and expansion card in hard-wired units are
contained in the computer. The computer is housed in a standard mini-tower
enclosure.
1.4.2.2 Touchscreen Monitor
The Oxinet II system uses a 15- or 19-inch monitor with a color display. With a
touchscreen monitor, the operator touches the face of the screen to initiate or control
an Oxinet II system function.
1-2
Page 9

1.4.2.3 Mouse
1.4.2.4 Keyboard
Section 1: Introduction
The mouse is used to move a pointer on the monitor screen to a desired location
such as over a key, button, waveform, or on-screen help index topic. The mouse has
two buttons. When either of the mouse buttons is pressed, it has the effect of
pressing the key or button, or selecting the waveform, or selecting an on-screen help
index topic that is under the mouse pointer. Positioning the pointer and clicking a
mouse button is the equivalent of touching the face of the touchscreen monitor at the
location of the key, button, waveform, or on-screen help index topic. The mouse
does not have to be connected to the computer to operate the Oxinet II system. The
function of positioning the pointer and clicking a mouse button can be performed by
touching the face of the touchscreen monitor where the key, button, waveform, or
on-screen help index topic is displayed.
The keyboard connected to the computer is a standard 101-key PC-type keyboard
used to enter alphanumeric patient data. The keyboard does not have to be
connected to the computer to operate the Oxinet II system. The operator can use an
on-screen keyboard where on-screen keyboard keys are pressed by touching keys
displayed on the monitor or by clicking the keys with the mouse.
1.4.2.5 Uninterruptible Power Supply
The uninterruptible power supply (UPS) provides operational power for
approximately 30 minutes for the central station should AC power fail. This allows
the system to be shut down in an optimal manner and avoids losing patient data.
1.4.2.6 Thermal Printer (Optional)
The thermal printer can be used to print data when an alarm condition has occurred,
ECG or plethysmographic waveforms, and trend information. The thermal printer is
housed in the computer.
1.4.2.7 Laser Printer (Optional)
An optional laser printer can be connected to the computer to provide printouts of
patient data and system status data. The central station is not supplied with this
printer. The printer must be provided by the facility. See the Specifications section
for minimum laser printer requirements.
1.4.3 Bedside Station
Every bedside station includes an NPB-290, NPB-295, N-395, or an N-3000 pulse
oximeter with an SPS or PSS power supply. An N-3100 monitor and an N-3200 can
also be stacked with an N-3000 as part of the bedside station. The N-3100 monitor
provides noninvasive blood pressure, and the N-3200 can provide waveform readout
at the bedside. These instruments monitor and process patient parameters and
convert the measured parameters to digital data that is sent to the central station.
Bedside stations in radio-link systems also include a remote radio transceiver
connected to the applicable monitor. Data is transmitted via the radio-link
communication configuration or hard-wired directly to the central station. Refer to
the NPB-290, NPB-295, N-395, N-3000, N-3100, and the N-3200 service and
operator's manuals, detailed descriptions of those monitors.
1-3
Page 10

Section 1: Introduction
Note: All bedside station equipment must be powered by AC power to
communicate with the Oxinet II station.
1.4.4 Data Communication Configuration
1.4.4.1 Radio-Link
Radio-link communication can be used to send digital patient data from the bedside
station to the central station for processing and display.
N-3000: The N-3000 radio-link communication configuration requires that the
serial port for each N-3000 in the installation be configured in the EIA-232 format.
At each bedside station, a remote transceiver with a built-in antenna is mounted on
the N-3000. The serial port on the back of the N-3000 provides power for the
transceiver. The transceiver will not be powered if the N-3000 is running on battery
power.
Note: It will be necessary to reconfigure the serial port if the N-3000 is preset to
provide a nurse call. Set the configuration switches of the N-3000 to EIA-
232. Consult the N-3000 service manual for proper switch configuration.
NPB-290, NPB-295, N-395: When using an NPB-290, NPB-295, or N-395 monitor
for the bedside station the serial port setup must be set to baud = 9600 and protocol
= OXINET. An external radio transceiver with a built-in antenna is connected to the
serial data communications port on the rear of the NPB-290, NPB-295, or N-395
pulse oximeter.
1.4.4.2 Hard-wired
Note: All bedside station equipment must be powered by AC power to
communicate with the Oxinet II station.
Fixed frequency or spread spectrum radio communication and baud rate are
determined by software. Both systems broadcast in the 902 to 928 MHz range.
Systems broadcasting only SpO
2 use 2400 baud and systems with ECG use 9600
baud. The central station contains a central radio transceiver and is connected to an
antenna network of at least two antennas.
Note: Any system broadcasting ECG data will use the 9600-baud rate. If more
than 10 beds are being monitored, the fixed frequency system must be used.
An I/O PCB and an expansion card are used in hard-wired systems. Each PCB
comes with four channels that are configured to accept RS-422 signals. An
expansion card cannot be used without an I/O PCB. Each channel can be
individually configured to accept either RS-232 or RS-422 signals. (For more
information see section 2.5.3). A central station configured with two I/O PCBs and
two expansion cards can provide a maximum of 16 channels. All hard-wired
systems send data at 9600 baud. The RS-232 signal can be used for a maximum of
25 feet and the RS-422 signal can be used up to 4000 feet. Serial output data from
the NPB-290, NPB-295, N-395, and N-3000 pulse oximeter must be configured to
match the inputs of the channels in the central station. Central Stations in hardwired systems are configured for a baud rate of 9600.
1-4
Page 11

Note: If the central station is being used with a hard-wired system, it may be
necessary to reconfigure the NPB-290, NPB-295, N-395, or N-3000 to the
RS-422 format. Consult the applicable operator's or service manual of the
respective monitor for instructions on changing the communication format.
Note: The central station cannot be configured with both radio-link and hard-wire
communications at the same time.
1.4.4.3 Minimum Software Requirements
Links cannot be established with Oxinet II if the software does not meet the
minimum software requirements. The minimum software requirements for monitors
communicating with the Oxinet II system are as follows:
NPB-290: All versions
NPB-295: All versions
N-395: All versions
N-3000: Software revision 3.0.0 or greater
N-3100: Software revision 2.4.3 or greater
N-3200: Software revision 1.4.1 or greater
Section 1: Introduction
1-5
Page 12

Page 13

SECTION 2: EQUIPMENT INSTALLATION AND HOOKUP
2.1 General Information
2.2 Power Requirements
2.3 Central Station Site Selection
2.4 Central Station Antenna Location Selection
2.5 Hardware Installation
2.6 System Interconnect (Radio-link Systems)
2.7 System Interconnect (Hard-wired Systems)
2.1 GENERAL INFORMATION
Caution: To avoid corrupting patient data, exit to DOS before turning off the
computer.
Before moving or installing your Oxinet II monitoring system, contact
Mallinckrodt's Technical Services Department or your local Mallinckrodt
representative.
This section provides general information on reconnecting your Oxinet II system
after installation and after moving it.
Before moving a bedside station in a radio-link system, contact Mallinckrodt's
Technical Services Department or your local Mallinckrodt representative to
determine the optimum location for the bedside station. Refer to the operator's and
service manuals for the individual monitor being relocated.
2.2 POWER REQUIREMENTS
Oxinet II system power cords must be connected to an approved, grounded outlet
capable of providing power for the Oxinet II system as indicated in the
Specifications section. This outlet must be close enough to the location of the
central station that only the power cord supplied with the uninterruptible power
supply (UPS) is used and a power extension cord is not used.
Caution: For USA locations, do not connect any components of the Oxinet II
system to an electrical outlet controlled by a wall switch.
2.3 CENTRAL STATION SITE SELECTION
When you are considering a location for the central station, you will need a location
that is accessible to the operator where the monitor is in full view of all who will be
looking at it. In addition to accessibility, you will need adequate counter space for
all components of the central station that will be used. Table 2-1 lists the space used
by each of the components of the central station.
2-1
Page 14

Section 2: Equipment Installation and Hookup
Table 2-1: Central Station Component Space Requirements
Central Station Component Counter Space Requirement
Computer 22.8 cm (9 in.) x 38.1 cm (15 in.) x 43.2 cm (17 in.)
15-inch Touchscreen Monitor
19-inch Touchscreen Monitor
Uninterruptible Power Supply 33.0 cm (13.1 in) x 9.0 cm (3.4 in.)
Keyboard 47 cm (18.5 in.) x 20.3 cm (8.0 in.)
Mouse (Typical mouse pad) (9.25 in.) x 20.3 cm (8 in.)
In addition to adequate counter space, consideration will also need to be given to
providing adequate ventilation space around the central station. There must be a
minimum of 1.5 inches from the top, front, sides, and back of all central station
components to any wall or other enclosing surface. Mallinckrodt recommends that a
minimum of 4 inches of space from the back of the computer be available for cables.
Do not put the computer or the touchscreen monitor inside a cabinet or other
enclosed space through which air cannot freely flow.
tall
Depends on the monitor supplied with your system.
Monitors are purchased from different
manufacturers.
Depends on the monitor supplied with your system.
Monitors are purchased from different
manufacturers.
2.4 SELECTION OF CENTRAL STATION ANTENNA LOCATION
The central station antennas need to be a minimum of 6 feet apart and a minimum of
6 feet from the floor with their ground plates in the same horizontal plane. It is
recommended that the antennas be attached to the ceiling with the antenna elements
pointing down. The location of the antennas must accommodate an antenna cable
run that does not exceed the amount of cable supplied with each antenna. The
antennas should be as far away as possible from any wall or structure containing
excessive amounts of metal that could interfere with the radio signal. Contact
Mallinckrodt's Technical Services Department for the optimal location of the central
station antennas.
2.5 INSTALLATION OF HARDWARE
Hardware installation consists of placing the central station at the selected location
and placing components for each of the bedside stations. Connecting the necessary
cables and components to make the system operate properly as described in the
paragraph 2.7, System Interconnect. Once the system is installed and hooked up,
proper operation of the system can be verified by performing the procedures in
SECTION 1: Performance Verification.
2-2
Page 15

Section 2: Equipment Installation and Hookup
2.5.1 Installation of Central Station Hardware
Place the computer and touchscreen monitor at the location selected for the central
station. The UPS can be placed in the same area as the computer and monitor or
further away such that the supplied power cords can be connected between the
computer and monitor and the UPS. The keyboard and mouse are not required for
operation of the Oxinet II system. However, if these components are used in your
facility, place them at the central station location. The exact placement of central
station components is determined by the needs at your facility.
Facilities with multiple central stations on fixed frequency could experience
problems with communication between a bedside unit and its central station. A
synchronization cable can be used to eliminate communication problems. It is
installed between the central stations to limit communication events to one station,
at any given point in time.
2.5.2 Installation of (Radio-link Transmitters) Bedside Station Hardware
Bedside stations that are monitored by the central station are composed of
NPB-290, NPB-295, N-395, and/or N-3000 pulse oximeters. Each bedside station
contains a radio kit. The N-3000 is equipped with either an SPS or PSS power
supply, or an N-3000 coupled with an N-3200, and a remote radio transceiver. An
N-3100 noninvasive blood pressure monitor can also be part of a bedside station.
When the Oxinet II system is shipped from the factory or when an N-3000 and/or a
remote radio transceiver are replaced, mount the remote radio on the N-3000.
Remove the adhesive backing from the quick-lock strips on the remote radio.
Position the radio with its cable hanging over the rear of the N-3000, and press the
radio down onto the top of the N-3000.
Set up each bedside station as described in the Oxinet II monitoring system
operator's manual.
2.5.3 Installation of (Hard-wired Systems) Bedside Station Hardware
Bedside stations that are monitored by the central station are composed of an
NPB-290, an NPB-295, an N-395, or an N-3000 pulse oximeter equipped with either
an SPS or PSS power supply. An N-3100 noninvasive blood pressure monitor and
an N-3200 waveform monitor can also be part of an N-3000 bedside station.
Channels on the I/O PCB and expansion card in the central station are configured to
accept RS-422 signals. Each channel of the I/O PCB and the expansion card can be
configured to RS-232. See Table 2-2. If an RS-232 signal is going to be used,
move the jumper for the channel to be changed into the RS-232 position. The
jumpers on the I/O PCB are numbered J1A through J4A. On the expansion card
they are numbered J1B through J4B. Labeling on the PCB's jumpers will indicate
how the channel is configured.
For wiring within the building, use Category 5 (EIA/TIA 568A) twisted-pair
shielded cable, 24 to 26 gauge, terminated to RJ-45 female connectors on both ends.
RS-422 can be used for distances up to 4000 feet and RS-232 can be used up to 25
feet. The pin outs are: one to one, two to two, three to three, etc, and are listed in the
chart below. The shield must be grounded at all bulkheads.
Note: Installation must conform to local building codes.
2-3
Page 16
Section 2: Equipment Installation and Hookup
Table 2-2: Hard-wire Cable Pin Outs
Pin RS-232 RS-422
1 No Connection Transmit Data + Twisted
2 No Connection Transmit Data - Pair
3 Ground Receive Data + Twisted
4 Transmit Data Output Receive Data - Pair
5 Receive Data Input Request to Send + Twisted
6 Request to Send Output Request to Send - Pair
7 Clear to Send Input Clear to Send + Twisted
8 No Connection Clear to Send - Pair
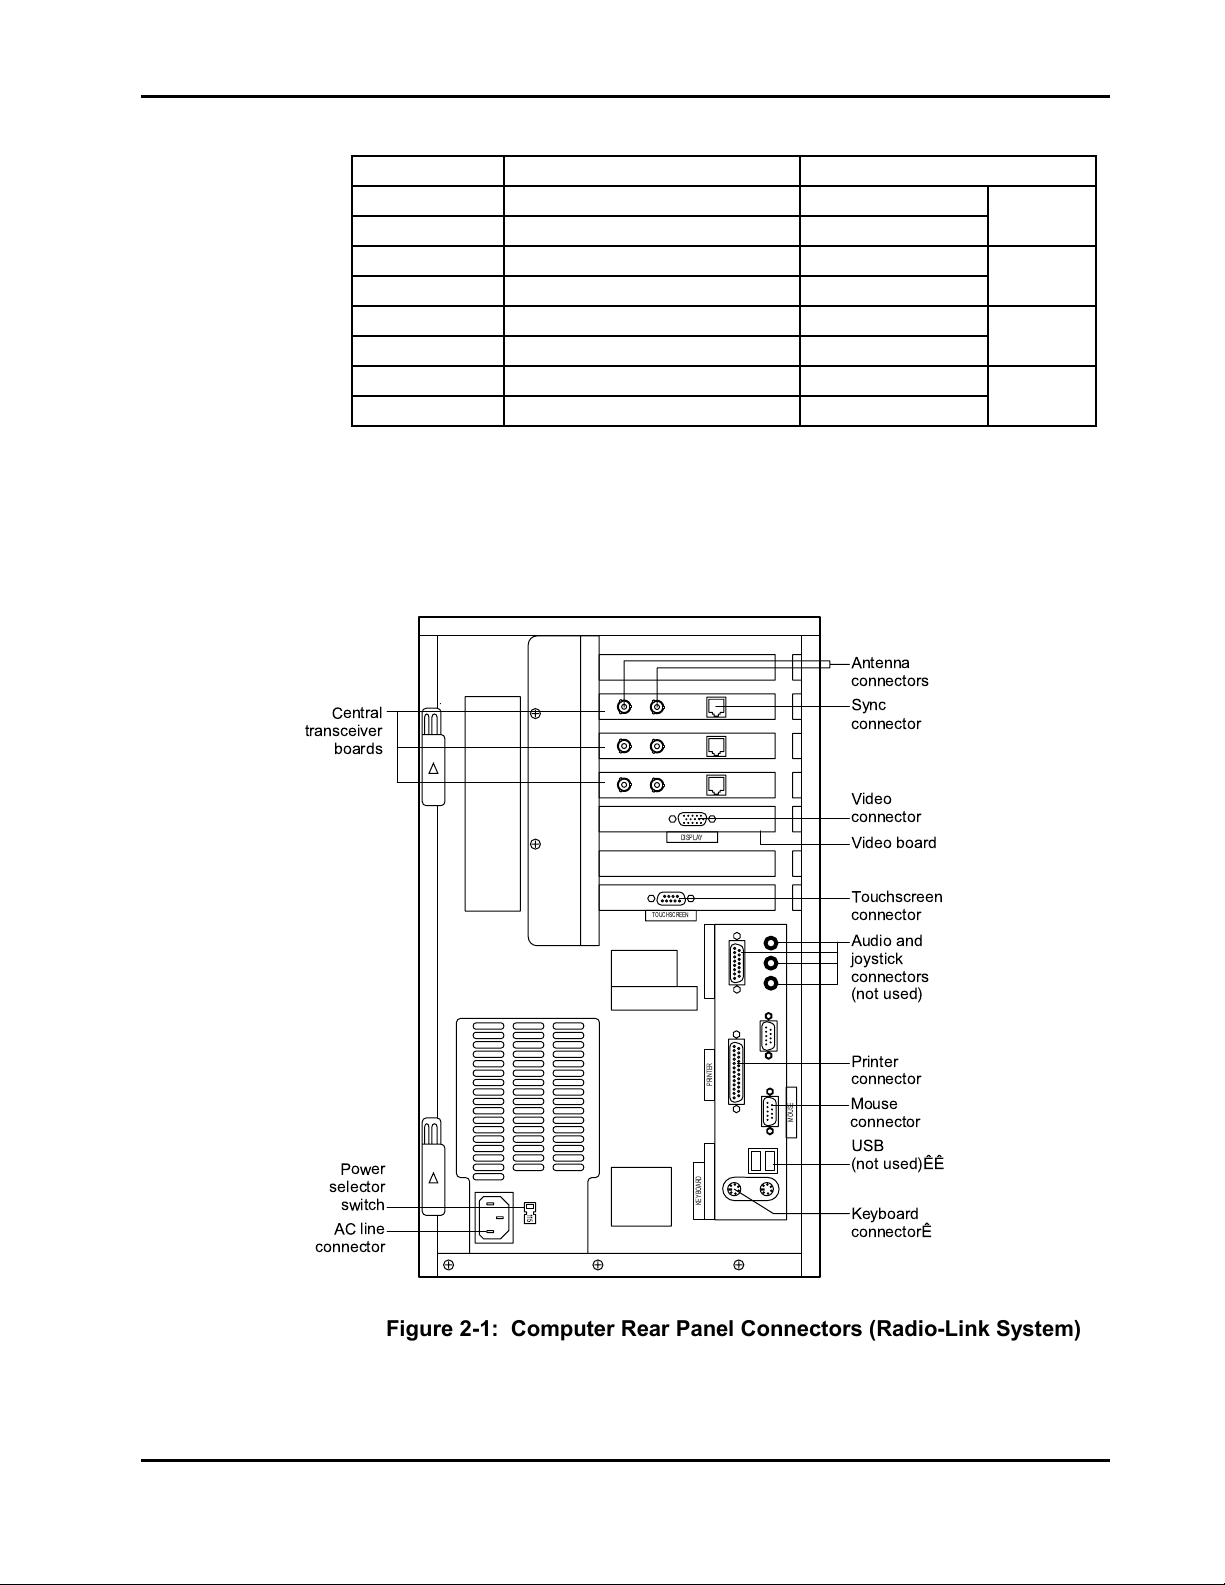
2.6 SYSTEM INTERCONNECT (RADIO-LINK SYSTEMS)
This section describes how to interconnect the central station for initial installation
and after the central station has been moved. Refer to the Oxinet II system
operator's manual for bedside station interconnect information.
Central
transceiver
boards
Antenna
connectors
Sync
connector
Power
selector
switch
AC line
connector
Video
MOUSE
connector
Video board
Touchscreen
connector
Audio and
joystick
connectors
(not used)
Printer
connector
Mouse
connector
USB
(not used)ÊÊ
Keyboard
connectorÊ
DISPLAY
TOUCHSCREEN
PRINTER
115
KEYBOARD
Figure 2-1: Computer Rear Panel Connectors (Radio-Link System)
2-4
Page 17

Section 2: Equipment Installation and Hookup
Refer to Figure 2-1. Connect central station components using the following
procedure.
1. Verify that the power selector switch is set to your facility's wall plug voltage.
2. If a mouse is used in your installation, connect the mouse to the connector
marked “MOUSE.”
3. If a keyboard is used in your installation, connect the keyboard to the
keyboard connector, which is the lower of the two connectors.
4. If your touchscreen monitor does not have the video cable permanently
attached to the monitor, connect the end marked "MONITOR" to the monitor
video connector.
5. Connect the other end of the video cable to the video drive connector marked
“DISPLAY” on the computer.
6. Connect the end of the touchscreen control cable marked “TO
INTELLITOUCH SCREEN” to the 9-pin connector on the back of the
monitor.
7. Connect the other end of the touchscreen control cable marked “TO
INTELLITOUCH CONTROLLER” to the touchscreen connector marked
“TOUCHSCREEN” on the computer.
8. Connect one of the antenna cables to the connector marked “ANT. A” on the
computer.
9. Connect the remaining antenna cable to the connector marked “ANT. B” on
the computer.
(Fixed Frequency Systems Only)
10. If the Central Station has more than one central transceiver PCB, install a
synchronization cable between the central transceiver PCBs as shown in
Figure 2-1. Up to three central transceiver PCBs can be used. One of the
PCBs will be designated Master and the others Slave. (Section 5, System
Configuration, describes how to designate the master PCB.) Plug the end of
the cable labeled M into the Master PCB and plug the S ends into the Slave
PCBs.
11. A power splitter/combiner must also be used in systems with more than one
central transceiver PCB. An incoming signal from the antenna is split into
two or three signals. The outputs from this cable must all be connected to the
same antenna input (all connected to A or all connected to B) on each of the
central transceiver PCBs.
12. Larger hospitals may have more than one Oxinet II station. Each of the
central stations may have more than one central transceiver PCB. Within
systems like these, only one central transceiver PCB can be the Master. As
with the cable in step 10, connect the end of the synchronization cable labeled
M to the Master PCB and the ends labeled S to the Slave PCBs.
2-5
Page 18

Section 2: Equipment Installation and Hookup
13. Multiple fixed frequency systems will require an isolation box to be installed
between them. This will involve the synchronization cables and a
synchronization pulse isolation box. The cables will be standard telephone
wire with 6 conductors. Both ends of the cable will be terminated in a male
connector. Both ends of the cable will be wired the same (one to one). See
Table 2-3.
Table 2-3: Synchronization Cable Connections
The pulse isolation box has two sides that can be identified by the number of
connectors on each. The Master side will have only one connector. The
Slave side will have 4 connectors.
Connector Color
1 White
2 Black
3Red
4 Green
5 Yellow
6Blue
The synchronization cable from the Master fixed frequency system will be
plugged into the Master side of the isolation box.
The synchronization cables (maximum of 3) from the slave fixed frequency
systems, will be plugged into the Slave side of the isolation box.
2.7 SYSTEM INTERCONNECT (HARD-WIRED SYSTEMS)
This section describes how to interconnect the central station for initial installation
and after the central station has been moved. Refer to the Oxinet II system
operator's manual for bedside station interconnect information.
2-6
Page 19
Section 2: Equipment Installation and Hookup
Multi IO
board
Power
selector
switch
AC line
connector
CH. 1-4
MOUSE
IO extension
Video
connector
Video board
Touchscreen
connector
Audio and
joystick
connectors
(not used)
Printer
connector
Mouse
connector
USB
(not used)ÊÊ
Keyboard
connectorÊ
CH. 5-8
CH. 9-12
CH. 13-16
DISPLAY
TOUCHSCREEN
PRINTER
115
KEYBOARD
Figure 2-2: Computer Rear Panel Connectors (Hard-Wired Systems)
Refer to Figure 2-2. Connect central station components using the following
procedure.
1. Verify that the power selector switch is set to your facility's wall plug voltage.
2. If a mouse is used in your installation, connect the mouse to the connector
marked “MOUSE.”
3. If a keyboard is used in your installation, connect the keyboard to the
keyboard connector, which is the lower of the two connectors.
4. If your touchscreen monitor does not have the video cable permanently
attached to the monitor, connect the end marked "MONITOR" to the monitor
video connector.
5. Connect the other end of the video cable to the video drive connector marked
“DISPLAY” on the computer.
6. Connect the end of the touchscreen control cable marked “TO
INTELLITOUCH SCREEN” to the 9-pin connector on the back of the
monitor.
7. Connect the other end of the touchscreen control cable marked “TO
INTELLITOUCH CONTROLLER” to the touchscreen connector marked
“TOUCHSCREEN” on the computer.
2-7
Page 20

Section 2: Equipment Installation and Hookup
8. Connect the cables from the bedside stations to the channels labeled 1 through
16.
2-8
Page 21

SECTION 3: PERFORMANCE VERIFICATION
3.1 Introduction
3.2 Required Test Equipment
3.3 Central Station Power-On Self Test
3.4 Electrical Safety Tests
3.1 INTRODUCTION
This section discusses the tests used to verify performance of the central station and
data communication interface with the bedside stations including the remote radio
transceiver. To verify the performance of the NPB-290, NPB-295, N-395, N-3000
and the N-3100 at the bedside station, refer to the individual service manuals for
those monitors.
3.2 REQUIRED TEST EQUIPMENT
No special test equipment is needed to verify the performance of the Oxinet II
system. An electrical safety analyzer is needed to perform electrical safety tests on
components of the central station.
3.3 CENTRAL STATION POWER-ON SELF TEST
An internal power-on self-test is used to verify performance of the Oxinet II system
following troubleshooting, replacement, and relocation of a central station
component. When the central station is turned on, an internal power-on self-test is
performed. Performance is verified when the Map screen is displayed after turning
on the central station and communication links are established with all active
bedside stations.
Note: When the central station is turned on, it may take several minutes for the
data files to be updated before the Map screen is displayed.
3.4 ELECTRICAL SAFETY TESTS
The safety test required for the components of the central station is a ground
integrity test. This test is to be performed on the computer, the touchscreen monitor,
and the UPS.
Refer to the service manuals for the NPB-290, NPB-295, N-395, N-3000, and
N-3100 for safety tests for those monitors.
The ground integrity test verifies that the integrity of the power cord ground wire
from the AC plug and connection with the chassis ground of the central station
component being tested.
1. Configure the ELECTRICAL SAFETY ANALYZER as follows:
Function: Ground Resistance Test
Range: mΩ
2. Connect the central station component's AC power cord plug to the analyzer
as recommended in the analyzer operating instructions.
3-1
Page 22

Section 3: Performance Verification
3. Connect the analyzer resistance input lead to a metal contact on the outer case
of the central station component. Verify that the analyzer indicates 150
milliohms or less.
This concludes the safety test for the central station.
3-2
Page 23

SECTION 4: ROUTINE MAINTENANCE
4.1 Introduction
4.2 Cleaning
4.3 Installing Printer Paper in the (Optional) Thermal Printer
4.1 INTRODUCTION
The only routine service required is that which is mandated by your institution and
local or national agencies.
4.2 CLEANING
Caution: Do not immerse any components of the central station or the bedside
station in liquid. Do not use caustic or abrasive cleaners on any component of
the central station or the bedside station.
To clean the central station components, dampen a cloth with a commercial,
nonabrasive cleaner and wipe the exterior surfaces lightly. When cleaning the
keyboard, avoid allowing liquids to get past the keys and inside the keyboard. To
clean the remote radio transceiver at the bedside station, dampen a cloth with a
commercial, nonabrasive cleaner and wipe the exterior surfaces lightly. Refer to the
service manual for the NPB-290, NPB-295, N-395, N-3000, N-3100, and N-3200
for cleaning instructions for those monitors and for the SPS or PPS power supply.
4.3 INSTALLING PRINTER PAPER IN THE (OPTIONAL) THERMAL PRINTER
1. Open the door of the unit by pressing the Paper Eject Button. If the door does
not completely open, pull it towards you.
2. Remove the spent paper core by pulling it towards you.
3. Place the new roll of paper between the two round tabs in the paper holder.
Unroll about 4 inches of paper. If the roll is properly installed, the sensitive
(shiny) side of the paper will be facing the printhead.
4. Align the paper with the pinch roller attached to the front door of the printer as
shown in Figure 4-1. Do not feed the paper between the silver bar and the
roller. Hold the paper against the roller as the front door of the printer is being
closed.
5. To check the installation of the paper, verify that the paper can be pulled from
the printer. If the paper will not move, repeat the procedure.
4-1
Page 24

Section 4: Routine Maintenance
Note: The paper roll is 100 feet by 1.89 inches (30.48 meters by 48 mm)
Paper door
release bar
Figure 4-1: Installing Printer Paper
4-2
Page 25

SECTION 5: SYSTEM CONFIGURATION
5.1 Introduction
5.2 System Configuration
5.1 INTRODUCTION
This section describes how to use the System Level screens to setup and customize
the central station for your facility. The paragraphs in this section can be used
individually and in any order. When a system is shipped from the factory and
turned on at your facility for the first time, an empty Map screen is the first screen
displayed and a touchscreen monitor calibration is initiated by the system. Touch
the screen where indicated to calibrate the touchscreen. You must access the
System Setup screens and set up the Map screen before proceeding to another setup.
No configuration or setup is required for the remote transceivers. Refer to the
service or operator's manuals for the NPB-290, NPB-295, N-395, N-3000, and
N-3100 for configuration and setup of those bedside monitors as needed. If the
system has already been set up when you enter the System Level screens, patient
monitoring continues, and the bed buttons indicate alarm conditions.
5.2 SYSTEM CONFIGURATION
5.2.1 Accessing System Setup Screens
To access the System Setup screens and perform System Setup functions, perform
the following steps.
1. Click the Setup function button. The Patient Setup screen will be displayed
as shown in Figure 5-1
.
2
?
Figure 5-1: Patient Setup Screen
2. Click the System button at the top of the Patient Setup screen. The Password
screen is displayed as shown in Figure 5-2. To exit the Password screen,
click the OK button.
5-1
Page 26

Section 5: System Configuration
3. Click the number buttons or use the keyboard to enter the system password
and click the Enter button or press the keyboard Enter key. The System Setup
Function Select screen is displayed as shown in Figure 5-3.
S
?
Figure 5-2: System Setup Password Screen
Note: 9999 is the default system password. The system password can be changed,
see paragraph 5.2.4, Setting System Password.
To exit the System Setup screens, click the OK button on the System Setup Function
Select screen. The Password screen is displayed. To exit the Password screen, click
the OK button.
S
?
5-2
Figure 5-3: System Setup Function Select Screen
Note: If the system is using a radio-link, an additional button titled Transceiver is
available on the System Setup Function Select screen.
Page 27

5.2.2 SpO2 Only (Spread Spectrum Systems Only)
Section 5: System Configuration
The SpO
a choice between displaying only SpO
If SpO
2 Only button is displayed only on Spread Spectrum systems. It allows for
2 or displaying SpO2, ECG, and Resp.
2 Only is selected, the system can monitor 30 beds. The only available
waveform is a Plethysmograph.
When SpO
2, ECG, and Resp are selected, the system can monitor 10 beds. A choice
can be made between a Plethysmograph and an ECG waveform.
The SpO
2 Only button can be accessed only if there are no remote transceivers
assigned. If radios have been assigned, the button will be displayed but it will not
be active. Radios will have to be deassigned following the procedure outlined in
section 5.2.9.2.
Caution: The above step must not be performed while monitoring patients.
To access the SpO
2 Only button, press the Setup button at the bottom of the screen.
Next, select System and enter the four-digit password (9999 if no number has been
assigned), then press Transceiver. The screen in Figure 5-4 will be displayed.
Transceiver Maintenance
Central 1
Sp0 Only
2
Room %
Patient
1001
Cindi Wallace
1007
Ben Debone
John Sanborn
1002
New Patient
1005
Master/Slave
Central ID
Program
Deassign
Sp02
Pulse
Resp
BPM
RPM
H
92 139/99 (107) Pulse High
100
96 97 138/99 (107) Sp02 High
94 92
20
R
H
21
R
H
19 139/99 (107) Pulse Lost
R
Master
3
NIBP
OKOff
StatusmmHg
No Link
OK
1001
1002
1003
1004
1005
1006
1007
1008
S
Map List PrintSilence
Waves Detail Setup Help
2:48:31 PM
23- June-1996
?
Print
Figure 5-4: SpO2 Only
1. Pressing the SpO
2 Only button toggles between On and Off.
2. Selecting On allows the system to monitor 30 beds, but only SpO
be displayed. Bedside stations must be set to 2400 baud.
Note: If an ECG waveform is available from the N-3000, and On is
selected, the waveform will not be displayed. All other available
data will be numerically displayed on the screen.
3. Selecting Off will allow the system to display SpO
2, ECG, and Resp but
only 10 beds can be monitored. Bedside stations must be set to 9600 baud.
4. When the selection has been made, click on the OK button.
2 data will
5-3
Page 28

Section 5: System Configuration
5. Assign the transceiver as described in section 5.2.9.
5.2.3 Designing the System Map Design Screen
When the system is first turned on after receipt from the factory, an empty System
Map Design screen is displayed. The map is designed to look like the area covered
by your Oxinet II system on the System Map Design screen. To display the System
Map Design screen, access the System Setup screen, enter the password, and click
on the Map Design button. The System Map Design screen will be displayed as
shown in Figure 5-5.
Caution: Do not monitor patients while modifying the Map Design Screen.
S
?
Figure 5-5: System Map Design Screen
Note: Before you begin designing a map for the first time avoid excessive “No
Link” alarms by setting the system default standby status to ON. Refer to
paragraph 5.2.7.5, Setting System Default Alarm; paragraph 5.2.7.1, Setting
System Default Channel Standby Setting; and paragraph 5.2.7.2, Setting
System Default Channel SpO2 Gain.
To place or reposition the central station box, click the Central button and then click
the map at the location where you want the upper left corner of the central station
box.
To place a bed box, click the Room button, then click the map at the location where
you want the upper left corner of the bed box. An empty box will appear on the
map. Click this empty box and the Enter Room ID screen is displayed. Use the
attached keyboard or use the touchscreen monitor or the mouse and the on-screen
keyboard to enter the bed number for that bed box. When finished, click the OK
button or the Enter key, or press Enter on the attached keyboard.
5-4
Page 29

Section 5: System Configuration
On radio-linked systems the Enter Transceiver ID screen will be displayed. Enter
the transceiver ID shown on the label of the bedside station remote transceiver for
the bed being set up and press Enter, or press Enter if the transceiver ID displayed
on the Central Station screen is correct. The Map Design screen is again displayed.
After you have entered the transceiver ID for the bed, a bed button is displayed with
the Room ID number, and also in the bed box on the Map Design screen.
Note: To enter a channel number on hard-wired systems see paragraph 5.2.10.
Note: As bed boxes are added to the Map Design screen, corresponding bed
buttons appear and are arranged in ASCII ascending order. For example, a
bed button with the number 10 would appear in order between a bed button
with the number 1 and a bed button with the number 2.
Note: For a room containing more than one monitored bed, another bed box must
be placed on the map for each additional monitored bed in the room.
To delete a bed box or to delete the central station box from the Map screen, click
the Delete button and then click the bed box or the central station box to be deleted.
Note: A room that has a patient assigned to it cannot be deleted.
Note: To move a room on the Map screen to a new location, the room must first be
deleted and then placed again.
When you are finished with the map design, click the OK button on the Map Design
screen.
5.2.4 Setting System Password
To display the passwords setup screen, access the System Setup screens and enter
the default password 9999. Click the Passwords button on the System Setup
selection screen. The System Passwords Maintenance screen is displayed as shown
in Figure 5-6.
S
?
Figure 5-6: System Passwords Maintenance Screen
5-5
Page 30

Section 5: System Configuration
To enter a new password, click the New button. An on-screen keypad appears.
Enter a four-digit password and click the Enter button when finished.
To delete a password, click the Up Arrow, Down Arrow, Pg Up, and Pg Dn buttons
as needed to highlight the password to be deleted. Click the Delete button.
When finished setting system passwords, click the OK button.
5.2.5 Setting System Dateand Time
To set or change the system display format, date, or time, access the System Setup
screens, enter the password, and click the Date/Time button on the System Setup
selection screen. The System Date/Time Setup screen is displayed as shown in
Figure 5-7. As you change settings, the date and time display also changes.
2
S
?
Figure 5-7: System Date/Time Setup Screen
To set or change the system date, click the Up Arrow or Down Arrow buttons
adjacent to Month, Day, or Year.
Note: The last two digits of the year can be displayed for the years 1980 through
2079.
To set or change the system time, click the Up Arrow or Down Arrow buttons
adjacent to Hour or Minute. Click the AM/PM button to toggle the display between
AM and PM.
Note: The AM/PM button is displayed only when a 12-hour clock format is
selected.
To set or change the date display format, click the Date button to cycle through the
display formats.
To set or change the time display format, click the Time button to cycle through the
display formats.
After you have set or changed the system display format, date, or time, click the OK
button.
5-6
Page 31

5.2.6 Setting Up System Configuration
To set or change the system configuration, access the System Setup screens, enter
the password, and click the Configure button on the System Setup selection screen.
The System Configuration screen will be displayed as shown in Figure 5-8. After
you have set or changed system configurations, click the OK button.
Section 5: System Configuration
S
S
?
?
Figure 5-8: System Configuration Setup Screen
5.2.6.1 Setting Waveform Freeze
When a waveform is being displayed, it can be frozen by clicking on the Freeze
button until ON is displayed to the right of the button. If waveform freeze is not
desired, click the Freeze button as needed until OFF is displayed to the right of the
button.
5.2.6.2 Setting System Alarm Silence Period
To set or change the alarm silence period for the central station for monitored
bedside station alarms, click the Silence button on the System Configuration screen
as needed until the desired alarm silence period is displayed to the right of the
button. The alarm silence period can be set for a duration between 30 seconds and 4
minutes at 30-second intervals.
Note: The setting of the alarm silence period at the central station has no effect on
the alarm silence period at any bedside station.
5.2.6.3 Setting System Alarm Latching
To set the system alarm latching configuration for the central station, click the Latch
button. To set the central station for no alarm latching, click the Latch button as
needed to display OFF in the window to the right of the Latch button. To latch only
visual alarms, click the Latch button as needed to display Visual. To latch both
visual and audible alarms, click the Latch button as needed to display Vis./Audio.
Note: The setting of alarm latching at the central station has no effect on alarm
latching at any bedside station.
5-7
Page 32

Section 5: System Configuration
5.2.6.4 Setting System Volume Levels
To set the central station alarm and touch click volume levels, click the Volume
button. The System Volume Setup screen is displayed as shown in Figure 5-9.
S
S
?
?
Click inside the volume setting slider and drag the level indicator to obtain the
desired volume level. When the mouse button is released or when you lift your
finger from the touchscreen monitor, an example of the click or alarm is heard at the
set volume level.
Note: If you adjust a slider bar level and move the pointer outside of the slider bar
before the mouse button is released or, with a touchscreen monitor, you
move your finger outside of the slider bar before you lift your finger, the
slider bar will indicate a new adjusted level. However, the example of the
click or alarm is not heard and the actual volume level is not adjusted.
To restore factory default volume levels, click the Restore Defaults button.
Click the Test button under a volume setting slider bar to hear an example of the
click or alarm at the actual set volume level. Click the OK button after you have set
system volume levels.
5.2.7 Setting System Defaults
To set or change system default settings, access the System Setup screens, enter the
password, and click the Defaults button. The System Default Setting screen will be
displayed as shown in Figure 5-10.
Figure 5-9: System Volume Setup Screen
5-8
Page 33

Section 5: System Configuration
2
Figure 5-10: System Defaults Setup Screen
After you have made the system default settings, click the OK button on the System
Default Setting screen.
5.2.7.1 Setting System Default Channel Standby Setting
To set the system default of the Standby setting, click the Standby button as needed
to display ON or OFF. Whenever the new patient function is performed or a new
bed box is added to the Map Design screen, the bed will be set to standby setting
(ON or OFF) which was selected. By selecting ON, alarms can be avoided until the
system is ready to begin monitoring.
S
?
5.2.7.2 Setting System Default Channel SpO2 Gain
To set the default SpO2 gain, click the SpO2 Gain button as needed to cycle through
gain settings of x0.5, x1, x2, x3, and x4. The value set will be used whenever the
new patient function is performed or a new bed box is added to the Map Design
screen.
5.2.7.3 Setting System Default ECG Scale
To select the ECG scale, click on the ECG Scale button. Continue clicking the ECG
Scale button until the desired scale is displayed in the window to the right of the
button. Scales that can be selected are 2.5 mm/mV, 5 mm/mV, 10 mm/mV, 20
mm/mV and 40 mm/mV.
5.2.7.4 Setting System Default Waveform
Either an ECG or a plethysmographic waveform can be displayed. By clicking on
the Default Waveform button, the operator can toggle between the two waveforms.
The waveform displayed in the window to the right of the Default Waveform button
will be the default waveform.
5-9
Page 34

Section 5: System Configuration
5.2.7.5 Setting System Default Channel Alarms Setting
To set system default alarm settings, click the Alarm Settings button. The System
Default Alarm Settings screen will be displayed as shown in Figure 5-11.
2
2
?
Figure 5-11: System Default Channel Alarm Settings Screen
Click the Up Arrow, Down Arrow, Pg Up, or Pg Dn buttons to scroll the list of
alarms and highlight the alarm for which defaults are to be set or changed. Alarm
defaults are the settings that are in effect when a new patient is admitted or a new
bed box is added to the Map Design screen. Click the Print, Strip, or Audible button
as needed to set the alarm defaults for the highlighted alarm.
When Print is set to ON the central station automatically prints a patient data report
whenever the selected alarm is received. With Print set to OFF, a patient data report
is not printed.
The Strip button can be set to Off, Strip, or Laser. If Strip or Laser is selected, a
patient data report will print out if there is a patient alarm. This print out includes
the most recent digital data for the patient and an interval waveform which
represents data collected from the 10 seconds before and after the alarm condition
occurred. Selecting Strip enables a thermal printer in the central station and
selecting Laser enables an optional laser printer. There is no printout if Off is
selected.
When Audible set to ON the central station generates an audible alarm sound when
the selected alarm is received. When Audible is set to OFF, no alarm sounds at the
central station when the selected alarm is received. To restore the system default
alarm setting to the factory default settings, click the Restore Defaults button. After
you have set the system default alarm settings, click the OK button.
5.2.8 Displaying Radio-Link System Channel Setups
To display radio-link channel settings in radio-link systems only, access the System
Setup screens, enter the password, and click the Link Info button. The Link
Information screen is displayed as shown in Figure 5-12.
5-10
Page 35

Section 5: System Configuration
S
?
Figure 5-12: Radio-Link System Link Information Screen
Click the Up Arrow, Down Arrow, Pg Up, or Pg Dn buttons to view a list of the
room (bed) numbers, Remote IDs, and bedside IDs active in your system. Click the
OK button after you have viewed the system channel setups.
5.2.9 Radio-Link Transceiver Maintenance Setup
Transceiver maintenance must be performed when no patients are being monitored.
To set up and maintain the system transceiver, access the System Setup screens,
enter the password, and click the Transceiver button. The Transceiver Maintenance
screen is displayed as shown in Figure 5-13. Click the OK button after you have set
up the transceiver.
S
?
Figure 5-13: System Transceiver Maintenance Screen
5-11
Page 36

Section 5: System Configuration
Click the Master/Slave button to change the display to the right of the button and
designate the central transceiver as a master or slave transceiver. Exactly one
central transceiver must be set to master. A slave central transceiver is synchronized
to a master central transceiver.
Note: Plug the end of the synchronization cable labeled “master” into the central
transceiver that has been designated as master.
Click the Central ID button to select a number from 1 to 53 for the transceiver
Central ID. If more than one Central transceiver is being used on a fixed frequency
system, select ID numbers that are separated by at least four digits. After changing a
radio system Central ID, the Central Station must be turned off for 2 minutes prior
to resuming normal monitoring. Once communication is established between a
remote bedside transceiver and the central station, the remote transceiver looks for
the central station transceiver monitor IDs entered on this screen.
Note: To avoid radio interference when choosing Central ID's, consider other
radio systems in or near the facility, operating in the 902 to 928 MHz range.
The Central ID on this page must be changed when patients are not being monitored.
The remote transceivers will identify this change and reestablish the communication
link with the central station and ignore another central station with a different
Central ID that was programmed with other remote transceiver IDs. The Central ID
differs from the remote transceiver ID in that each remote transceiver has a fixed
and unique ID number that is used in the communication protocol. Each remote
transceiver ID has to be programmed into the central station. See paragraph 5.2.9.1,
Programming a Transceiver ID.
5.2.9.1 Programming a Transceiver ID
Click the Program button to set the Remote ID for any one or all remote transceivers
in the system. The programming screen is displayed as shown in Figure 5-14.
Figure 5-14: Transceiver Programming Screen
S
?
5-12
Page 37

Click the Room button as needed to cycle through all available bed numbers and
select the bed for which you wish to change or set the remote ID. Click the Remote
ID button and a keypad is displayed. Click the numbers to enter the remote ID.
Click the OK button in the pop-up window when finished.
Note: If an ID number is entered that has already been selected, the cursor moves
to the left of the entry line, giving no way to delete the bad entry. If this
happens, enter a valid transceiver number that is not in use, or select any
function key at the bottom of the screen except setup, enter the function, exit
and then re-enter the setup screen. Another method would be to enter any
six-digit number and use the backspace key to delete the number.
5.2.9.2 De-assigning a Transceiver ID
To de-assign a remote ID from a bed, click the Deassign button on the System
Transceiver Maintenance screen. The Deassign screen is displayed as shown in
Figure 5-15.
Section 5: System Configuration
S
Click the Room button as needed to cycle through all available bed numbers and
select the bed for which you wish to deassign the remote ID. Click the OK button in
the pop-up window to complete the deassignment. Click the Cancel button to quit
the deassignment and make no changes.
5.2.10 Selecting Channel Number
To assign a channel number on hard-wired systems, click on the Setup button and
select System. Enter the password and select Map Design, then select the room to
have the channel assigned. Enter the room number and select a channel number for
that room as shown in Figure 5-16. There can be up to 16 channel numbers and
each channel number can be used only one time.
Note: Hard-wired systems can monitor a maximum of 16 beds. A 17
provided to allow the user to transfer patients.
?
Figure 5-15: Transceiver Deassign Screen
th
position is
5-13
Page 38

Section 5: System Configuration
5.2.11 Setting System Trends
To set or change system trend time intervals that are used in patient data printouts,
access the System Setup screens, enter the password, and click the Trends button on
the System Setup Selection screen. The System Trends screen is displayed as
shown in Figure 5-17.
S
?
Figure 5-16: Enter Channel Number Screen
S
?
Figure 5-17: System Trends Setup Screen
To set the time interval to be used for a summary patient data printout, click the
Summary button to cycle through the values and select the desired time interval.
Available selections are 15 or 30 minutes, 1, 2, 4, 8, 12, or 24 hours.
To set the time interval to be used for a patient alarm data printout, click the Alarm
button to cycle through the values and select the desired time interval. Available
selections are 15 or 30 minutes, 1, 2, 4, 8, 12, or 24 hours.
5-14
Page 39

After you have set system printout time intervals, click the OK button. The
displayed values are set as the system trend values.
5.2.12 Displaying a List of System Events
The central station computer maintains a log of system events such as when the
computer is turned on or when System Setup has been accessed. To display a list of
up to 99 system events, access the System Setup screens, enter the password, and
click the Events button on the System Setup selection screen. The System Events
screen is displayed as shown in Figure 5-18.
Section 5: System Configuration
S
Click the Up Arrow, Down Arrow, Pg Up, or Pg Dn buttons to scroll through a list
of the most recent system events (up to 99 entries).
To erase the list of system events from the computer memory, click the Erase
button. You are prompted to confirm that you do want to erase the entire list of
system events. Click the Yes button to erase the list. Click the No button if you do
not want to erase the list.
To print the current list of system events on the facility-provided laser printer
connected to the central station computer, click the Print button.
After you have displayed the list of system events, click the OK button.
5.2.13 Touchscreen Calibration
To calibrate a touchscreen monitor, access the System Setup screens, enter the
password, and click the Touch Cal button. Observe the screen and touch the screen
where indicated to calibrate the touchscreen monitor. A touchscreen should be
calibrated every time the computer or touchscreen monitor has been turned off and
back on again, or when necessary.
?
Figure 5-18: System Events Screen
Note: The Touch Cal button will not show on the screen until the touchscreen has
been touched. Before attempting to calibrate the touchscreen use the
touchscreen function.
5-15
Page 40

Section 5: System Configuration
5.2.14 Exiting to DOS
WARNING: Patient safety could be compromised if the DOS function is used
while patients are being monitored. The DOS function stops all monitoring
functions of the Oxinet II monitoring system. Only the system administrator or
other qualified personnel should use the DOS function.
To exit to DOS from the Oxinet II system software, access the System Setup
screens, enter the password, and click the DOS button on the System Setup
Selection screen. You are prompted to confirm that you want to exit to DOS. Click
the Yes button to exit to DOS. Click the No button to return to the System Setup
Selection screen.
5.2.15 Entering the Oxinet II System from DOS
There are two methods to enter the Oxinet II system from DOS.
At the DOS prompt type in START and press enter. The second option is to turn the
central station off, then turn it back on again.
5-16
Page 41

SECTION 6: TROUBLESHOOTING
6.1 Introduction
6.2 How to Use This Section
6.3 Who Should Perform Repairs
6.4 Replacement Level Supported
6.5 Obtaining Replacement Parts
6.6 Troubleshooting Guide
6.1 INTRODUCTION
This section explains how to troubleshoot the Oxinet II monitoring system if
problems arise. Tables are supplied that list possible difficulties, along with
probable causes, and recommended actions to correct each difficulty. Also refer to
the manuals shipped with your system for the computer, the monitor, the
uninterruptible power supply, the video board, and the touchscreen controller board.
6.2 HOW TO USE THIS SECTION
Use this section in conjunction with Section 3, Performance Verification, and
Section 8, Spare Parts. The System Level Block Diagram Analysis, in section 10,
offers information on how the components of the Oxinet II system function.
6.3 WHO SHOULD PERFORM REPAIRS
Only qualified service personnel should remove and replace components of the
Oxinet II monitoring system. If your medical facility does not have qualified service
personnel, contact Mallinckrodt's Technical Services Department or your local
Mallinckrodt representative.
6.4 REPLACEMENT LEVEL SUPPORTED
Any difficulties isolated to the central station computer, the touchscreen monitor, the
uninterruptible power supply (UPS), or a remote radio transceiver will result in
replacement of the component in its entirety.
6.5 OBTAINING REPLACEMENT PARTS
Mallinckrodt's Technical Services Department provides technical assistance
information and replacement parts. To obtain replacement parts, contact
Mallinckrodt. Refer to parts by the part names and part numbers listed in Section 7,
Spare Parts.
6.6 TROUBLESHOOTING GUIDE
If you encounter a difficulty, refer to Table 6-1 that provides a list of symptoms, the
probable cause, and a recommended course of action to correct the difficulty. For a
symptom that is not listed in Table 6-1, contact Mallinckrodt's Technical Services
Department or your local Mallinckrodt representative. Once you have performed
the recommended action, refer to Section 3, Performance Verification, and conduct
a performance verification before returning the Oxinet II monitoring system to
service. If the symptom persists, continue troubleshooting.
6-1
Page 42

Section 6: Troubleshooting
Symptom Possible Causes Corrective Action
Table 6-1: Troubleshooting
The central station does not
turn on or has shut off
unexpectedly.
No link can be established
between a bedside monitor and
the central station (Hard-wired
Systems).
The AC power cord is unplugged or
disconnected from the
uninterruptible power supply (UPS),
the computer, or the touchscreen
monitor.
AC power is off at the wall
receptacle.
The UPS is not operating correctly. Remove and replace the UPS.
The computer internal hard drive is
not operating correctly.
The computer internal mother PCB is
not operating correctly.
The bedside station is running on
internal batteries.
Check that all power cords are
plugged into the UPS, the wall
receptacle, the computer, and the
touchscreen monitor. Plug in power
cords as needed.
Call your facility clinical engineer to
check that power is available at the
wall receptacle and that circuit
breakers for the AC power circuit
are on.
Disconnect and replace the
computer. Contact the Mallinckrodt
Technical Services Department for
return procedures.
Disconnect and replace the
computer. Contact the Mallinckrodt
Technical Services Department for
return procedures.
Verify that the bedside station is
plugged into a properly functioning
AC power source and that the power
switch is turned on.
The cable from the bedside monitor
is not connected to the proper
channel on the central station.
The output baud rate of the bedside
station is not 9600.
The output of the bedside station
does not match the input of the
central station.
Verify the bedside station is
connected to the same channel the
central station is accessing.
Consult the NPB-290, NPB-295,
N-395, or N-3000 operator's manual
for instructions on how to change
the baud rate.
Verify that both the bedside station
and central station are set up for
either RS-232 or RS-422. Consult
the NPB-290, NPB-295, N-395, or
N-3000 operator's manual for
instructions on how to change the
output configuration. See paragraph
1.4.4, Data Communication
Configuration, for instructions on
how to change the input of the I/O
PCB and the expansion card.
6-2
Page 43

Section 6: Troubleshooting
Table 6-1: Troubleshooting
Symptom Possible Causes Corrective Action
The communication link is lost
or intermittent between a
single bedside station and the
central station.
The communication link is lost
or intermittent among all
bedside stations and the central
station.
Power to the bedside station is lost or
intermittent.
The communication cable between
NPB-290, NPB-295, N-395, N-3000
and remote radio transceiver is
disconnected or loose at the bedside
station.
There is radio frequency interference
with the radio signal between the
central station and the bedside
station.
The remote radio transceiver at the
bedside station is not operating
correctly.
Fixed frequency systems can
experience interference when
multiple transceivers are in use.
Multiple Oxinet II systems operating
close to each other can experience
interference.
One or more central station antenna
connections is disconnected or loose.
At the bedside station, check that the
power supply AC power cord is
securely plugged into the power
supply and into the wall receptacle
and that power is available at the
receptacle. Plug the power cord in
as needed. Check that the power
supply is securely connected to the
bedside station. Reconnect the
power supply as needed. Refer to
Table 6-2 and observe the status of
the LED on the top of the remote
radio transceiver.
Refer to Table 6-2 and observe the
status of the LED on the top of the
remote radio transceiver. Check the
communication cable connections at
the bedside station between the
NPB-290, NPB-295, N-395, N-3000
and the remote radio transceiver.
Reconnect the cable as needed.
Refer to Table 6-2 and observe the
status of the LED on the top of the
remote radio transceiver. Move the
bedside station; if that does not
correct the problem, contact
Mallinckrodt's Technical Services
Department.
Refer to Table 6-2 and observe the
status of the LED on the top of the
remote radio transceiver. Remove
and replace the remote radio
transceiver at the bedside station if
needed.
Verify that a synchronization cable
is installed between the I/O PCBs.
Verify that a synchronization cable
is installed between the central
stations.
Check central station antenna
connections. Reconnect as needed.
6-3
Page 44

Section 6: Troubleshooting
Symptom Possible Causes Corrective Action
Table 6-1: Troubleshooting
Audible alarms cannot be
heard at the central station.
There are excessive patient
false alarms.
The Oxinet II computer resets
and restarts unexpectedly.
Video is not displayed on the
touchscreen monitor or is
intermittent; all other functions
are operating correctly.
There is radio frequency interference
in the immediate vicinity of the
central station antennas.
The computer internal speaker is
loose or disconnected from the
sound PCB in the computer.
The sound PCB is not operating
correctly.
Alarm limits are not set properly at
the bedside station.
There is an intermittent
communication link.
AC power cord connections are
loose at the central station.
The UPS is not operating correctly. Disconnect and replace the UPS.
There is a problem with the central
station computer.
The internal computer power supply
is not operating correctly.
The internal computer mother PCB
is not operating correctly.
The cable between the touchscreen
monitor and the computer video
board is loose or disconnected.
Check the area in the immediate
vicinity of the central station
antennas for a source of radio
frequency interference and remove
any sources of interference. If that
does not correct the problem, contact
Mallinckrodt's Technical Services
Department.
Disconnect and replace the
computer. Contact Mallinckrodt's
Technical Services Department for
return procedures.
Disconnect and replace the
computer. Contact Mallinckrodt's
Technical Services Department for
return procedures.
Refer to the appropriate operator's
manual for the monitor causing the
false alarms to set new alarm limits.
See Corrective Action for The
communication link is lost or
intermittent between a single bedside
station and the central station above.
Check that power cords are securely
plugged into the back of the central
station computer, the UPS, and the
wall receptacle. Plug in power cords
as needed.
Contact the Mallinckrodt's Technical
Services Department for return
procedures.
Disconnect and replace the
computer. Contact Mallinckrodt's
Technical Services Department for
return procedures.
Disconnect and replace the
computer. Contact Mallinckrodt's
Technical Services Department for
return procedures.
Disconnect and replace the
computer. Contact Mallinckrodt's
Technical Services Department for
return procedures.
Reconnect the cable between the
touchscreen monitor and the
computer video board.
6-4
Page 45

Section 6: Troubleshooting
Table 6-1: Troubleshooting
Symptom Possible Causes Corrective Action
Items cannot be selected on the
touchscreen monitor by
touching the screen.
The thermal printer does not
print.
The paper moves but there is
no printout.
There are blank areas in the
printout.
The touchscreen monitor is not
operating correctly.
The video PCB is not operating
correctly.
The cable between the touchscreen
monitor and the computer
touchscreen controller PCB is loose
or disconnected.
The touchscreen monitor is out of
calibration.
The touchscreen controller PCB is
not operating correctly.
The thermal printer is out of paper. Install paper in the thermal printer
The front door of the printer is not
properly closed.
The printer paper is in backwards.
The print head is dirty.
Disconnect and replace the
touchscreen monitor. Contact
Mallinckrodt's Technical Services
Department for return procedures.
Disconnect and replace the
computer. Contact Mallinckrodt's
Technical Services Department for
return procedures.
Reconnect the cable between the
touchscreen monitor and the
computer touchscreen controller
PCB.
Calibrate the touchscreen monitor.
Refer to Performing Touchscreen
Calibration in section 5.
Disconnect and replace the
computer. Contact Mallinckrodt's
Technical Services Department for
return procedures.
per instructions in section 4.3.
Verify that the front door of the
printer is latched closed.
Check for proper installation of
printer paper per instructions in
section 4.3
Carefully clean the print head using
cotton and alcohol. Refer to the
thermal printer manual.
Table 6-2: Remote Radio Transceiver LED Indications
LED Indication Definition
Solid Green Ongoing communication is established with the central station.
Flashing Green Communication is established with the central station but is intermittent.
Flashing Red The central station has been detected and the remote radio transceiver has received a
message with its transceiver ID, but is currently not receiving any messages with its
transceiver ID.
Solid Red The central station has been detected, but the remote radio transceiver has not
received a message with its transceiver ID.
Off (NPB-290,
NPB-295, or N-395)
Off (N-3000) The remote radio transceiver is not receiving power from the N-3000.
The remote radio transceiver is not receiving power from the radio power supply.
6-5
Page 46

Page 47

SECTION 7: SPARE PARTS
7.1 Introduction
7.2 Replacement Parts
7.1 INTRODUCTION
Caution: To avoid corrupting patient data, exit to DOS before turning off the
computer.
Components of the Oxinet II system, as shown in Figure 7-1, are replaced in their
entirety. Refer to Section 2, Equipment Installation and Hookup, to install the
replacement component.
Note: Some spare parts you receive will have a business reply card attached.
When you receive these spare parts, please fill out and return the business
reply card.
Before removing and replacing a component of the Oxinet
disconnect all cables. Refer to Section 2, Equipment Installation and Hookup, to
install the replacement component.
Spare parts, along with the corresponding Mallinckrodt part numbers, are shown in
Table 7-1. Figure 7-1 shows the replaceable Oxinet II system components with
numbered callouts in parentheses corresponding to items in Table 7-1
II monitoring system,
Table 7-2 identifies the radio kit and Table 7-3 identifies the hard-wire cable kit.
7-1
Page 48

Section 7: Spare Parts
7.2 OXINET II REPLACEMENT PARTS
(1) Uninterruptible Power Supply 902089
(2) Mouse 902038
(3) Keyboard 902040
(4) 15-inch Touchscreen Monitor NCMM-15
(4) 19-inch Touchscreen Monitor NCMM-19
(5) Touchscreen Control Cable 730001
(6) Remote Radio Transceiver (Spread spectrum) NSMR-900
(6) Remote Radio Transceiver (Fixed frequency) NSMR-900F
Cable, central station to wall, 10-ft 035427
Cable, monitor to wall, 12-ft (N-3000 Only) 035425
Table 7-1: Replacement Parts
Item Part Number
Touchscreen control cable (5)
Touchscreen
monitor (4)
Remote
radio
transceiver (6)
Keyboard (3)
Mouse (2)
Figure 7-1: Oxinet II System Spare Parts
7.3 NPB-290, NPB-295, AND N-395, RADIO KIT REPLACEMENT
Order a complete radio kit if a component needs replacing. Table 7-2 defines the
components of the radio kit.
Table 7-2: Radio Kit, Part Number 036342
Kit Contains
Oxinet II Radio Cable
Directions for Use
Radio Power Supply (wall mount)
Hex Standoffs
Computer
Uninterruptible
power supply (1)
7-2
Page 49

Section 7: Spare Parts
7.4 NPB-290, NPB-295, AND N-395, OXINET II HARD-WIRE CABLE KIT REPLACEMENT
Order a complete Oxinet hard-wire cable kit if a component needs replacing.
Table 7-3 defines the components of the hard-wire kit.
Table 7-3: Cable Kit, Part Number 036344
Kit Contains
Oxinet II Hard-wire Cable
Directions for Use
Hex Standoffs
7-3
Page 50

Page 51

SECTION 8: PACKING FOR SHIPMENT
8.1 General Instructions
8.2 Repacking in Original Carton
8.3 Repacking in a Different Carton
To ship an Oxinet II system component for any reason, follow the instructions in this
section.
8.1 GENERAL INSTRUCTIONS
Pack the component carefully. Failure to follow the instructions in this section may
result in loss or damage not covered by the Mallinckrodt warranty. If the original
shipping carton and material are not available, use other suitable shipping materials
and container.
Prior to shipping the component, contact Mallinckrodt's Technical Services
Department for a returned goods authorization (RGA) number. Mark the shipping
carton and any shipping forms with the RGA number.
For European customers not using RGA numbers, return the product with a detailed,
written description of the problem.
Return the product by any method that provides proof of delivery.
8.2 REPACKING IN ORIGINAL CARTON
If available, use the original carton and packing materials. Refer to the following
paragraphs for packing instructions.
Paragraph Item to Pack
8.2.1 Computer
8.2.1 15-inch Monitor
8.2.3 19-inch Monitor
8.2.4 Remote Transceiver
8.2.5 Uninterruptible Power Supply
8-1
Page 52

Section 8: Packing for Shipment
8.2.1 Repacking the Computer
Accessory box
Computer
Keyboard
TESTED & PASSED
S/N__________
KEYBOARD
P/N 054401
Keyboard
Figure 8-1: Repacking the Computer
Use the following procedure to repack the computer and any accessories.
1. Place the computer and, if necessary, the mouse and keyboard in their original
packaging as shown in Figure 8-1.
2. Place in shipping carton and seal carton with packaging tape.
3. Label carton with shipping address, return address, and RGA number, if
applicable.
8-2
Page 53

8.2.2 Repacking the 15-Inch Touchscreen Monitor
Section 8: Packing for Shipment
Tape
For touchscreen only.
Insert between screen
and bezel. If gap exists
tape in place as shown.
Monitor
1.AC cord
2.Touchscreen
cable (optional)
Figure 8-2: Repacking the 15-Inch Touchscreen Monitor
Use the following procedure to repack the 15-inch touchscreen monitor and any
accessories.
1. Place the 15-inch touchscreen monitor in its original packaging as shown in
Figure 8-2.
2. Place in shipping carton and seal carton with packaging tape.
3. Label carton with shipping address, return address, and RGA number, if
applicable.
8-3
Page 54

Section 8: Packing for Shipment
8.2.3 Repacking the 19-inch Touchscreen Monitor
Top
1. AC cord
2. Touchscreen
cable (optional)
Monitor
Bottom
Packaging
display
carton
Figure 8-3: Repacking the 19-Inch Touchscreen Monitor
Use the following procedure to repack the 19-inch touchscreen monitor and any
accessories.
1. Place the 19-inch touchscreen monitor in its original packaging as shown in
Figure 8-3.
2. Place in shipping carton and seal carton with packaging tape.
3. Label carton with shipping address, return address, and RGA number, if
applicable.
8-4
Page 55

8.2.4 Repacking the Remote Radio Transceiver
Remote transceiver
Section 8: Packing for Shipment
Figure 8-4: Repacking the Remote Transceiver
Use the following procedure to repack the remote radio transceivers.
1. Place one to four remote radio transceivers in the original packaging as shown
in Figure 8-4.
2. Place in shipping carton and seal carton with packaging tape.
3. Label carton with shipping address, return address, and RGA number, if
applicable.
8-5
Page 56

Section 8: Packing for Shipment
8.2.5 Repacking the Uninterruptible Power Supply
8-6
Figure 8-5: Repacking the Uninterruptible Power Supply
Use the following procedure to repack the uninterruptible power supply.
1. Place the uninterruptible power supply in the original packaging as shown in
Figure 8-5.
2. Place in shipping carton and seal carton with packaging tape.
3. Label carton with shipping address, return address, and RGA number, if
applicable.
Page 57

8.3 REPACKING IN A DIFFERENT CARTON
If the original carton is not available:
1. Place the component in a plastic bag.
2. Locate a corrugated cardboard shipping carton with at least 200 pounds per
square inch (psi) bursting strength.
3. Fill the bottom of the carton with at least 2 inches of packing material.
4. Place the bagged component on the layer of packing material and fill the box
completely with packing material such that there is at least 2 inches of
packing material around all sides of the component.
5. Seal the carton with packing tape.
6. Label carton with shipping address, return address, and RGA number, if
applicable.
Section 8: Packing for Shipment
8-7
Page 58

Page 59

SECTION 9: SPECIFICATIONS
9.1 Agency Regulatory Notices
9.2 Electrical
9.3 Physical Characteristics
9.4 Environmental
9.5 Hard-wired Systems
9.6 Laser Printer Minimum Requirements
9.7 Component and System Labels
9.1 AGENCY REGULATORY NOTICES
The central station complies with the following environmental and performance
testing and inspection requirements:
CSA 22.2 no. 125
IEC 801.2-5 with FDA allowable exceptions
FCC part 15, Section 247 - Spread Spectrum
FCC part 15, Section 249 - Fixed Frequency
CISPR 11 Class A
This device complies with IEC 601-1-1.
9.2 ELECTRICAL
9.2.1 External AC Input Voltage/Current
Computer
100-120 Vac, 50/60 Hz, 3.5 A or
200-240 Vac, 50/60 Hz, 2 A
15- and 19-inch Touchscreen Monitor
100-250 Vac, 50/60 Hz 2.2 A (maximum auto-sensing)
Uninterruptible Power Supply
120 Vac, 60 Hz, 5 A (maximum with computer and monitor connected) Maximum
Output Load: 250 W
9-1
Page 60

Section 9: Specifications
9.3 PHYSICAL CHARACTERISTICS
9.3.1 Dimensions
Computer
22.8 cm (9 in.) x 38.1 cm (15 in.) x 43.2 cm (17 in.)
15-inch Touchscreen Monitor
Depends on the monitor supplied with your system. Monitors are purchased from
different manufacturers.
19-inch Touchscreen Monitor
Depends on the monitor supplied with your system. Monitors are purchased from
different manufacturers.
Uninterruptible Power Supply
15.0 cm (6.0 in.) x 9.0 cm (3.4 in.) x 33.0 cm (13.1 in.)
Bedside Station Radio Transceiver
9.3.2 Weight
12.5 cm (4.92 in.) x 6.7 cm (2.64 in.) x 3.0 cm (1.18 in.)
Computer
18 kg (40 lbs)
15-inch Touchscreen Monitor
Depends on the monitor supplied with your system. Monitors are purchased from
different manufacturers.
19-inch Touchscreen Monitor
Depends on the monitor supplied with your system. Monitors are purchased from
different manufacturers.
Uninterruptible Power Supply
5.0 kg (11 lbs)
Bedside Station Radio Transceiver
0.18 kg (6.5 oz)
9-2
Page 61

9.4 ENVIRONMENTAL
9.4.1 Temperature
Operating
+10°C to +35°C (+50°F to +95°F)
Shipping/Storage (In sealed shipping container)
-20°C to +60°C (-4°F to +140°F)
9.4.2 Relative Humidity
Operating
15% RH to 85% RH (noncondensing)
Shipping/Storage
(In sealed shipping container)
95% at 35º C (95º F) maximum, non-condensing
Section 9: Specifications
9.5 HARD-WIRED SYSTEMS
Wiring used within the building should be category 5 cable and comply with local
building codes. End connectors are female RJ-45.
9.6 LASER PRINTER MINIMUM REQUIREMENTS
The Oxinet II monitoring system supports printers that are both HPGL/2 and PCL5
compatible with a minimum of 2 megabytes of printer memory such as the HewlettPackard LaserJet models 4, 4SI, 4L, 5, 5SI, and 5L printers.
9.7 COMPONENTAND SYSTEM LABELS
An identification label showing product part number, model, serial number and
hardware level is affixed on the rear panel of the central station computer by the
original manufacturer. This label facilitates product traceability through the
manufacturer's product records system.
Another label shows CSA/NRTL/C certification that is applicable to the Oxinet II
monitoring system as a whole. This certification is based on the Canadian Standard
for Electromedical Equipment, C22.2, No. 125 and the Underwriters Laboratories
Standard for Medical and Dental Equipment, UL544.
9-3
Page 62

Page 63

SECTION 10: TECHNICAL SUPPLEMENT
10.1 Introduction
10.2 System-Level Block Diagram Analysis
10.3 Radio-Link Data Communications Overview
10.4 Hard-wired System-Level Block Diagram Analysis
10.1 INTRODUCTION
This Technical Supplement provides a system-level block diagram theory of
operation and a description of the principles of radio-link data communications or
hard-wired systems used with the Oxinet II monitoring system.
10.2 RADIO-LINK SYSTEM-LEVEL BLOCK DIAGRAM ANALYSIS
For this description, refer to Figure 10-1 for a system-level block diagram of the
Oxinet II monitoring system. One of two systems can be used: Spread Spectrum or
Fixed Frequency.
Bedside station
Antenna
Bedside station
Antenna
Remote
radio
transceiver
NPB-290
bedside
monitors
Bedside station
Antenna
Remote
radio
transceiver
NPB-295
bedside
monitors
Remote
radio
transceiver
N-3000/N-3100
bedside
monitors
Bedside station
Antenna
Remote
radio
transceiver
N-395
bedside
monitors
Multiple
antenna
array
Computer
Central station
Video
Touchscreen
control
Constant
AC power
Touchscreen
monitor
Constant
AC power
Uninterruptible
power supply
Keyboard
Mouse
External
AC power
input
10.2.1 System Overview
The Oxinet II monitoring system consists of the central monitoring station (central
station) and up to 30 individual bedside stations each consisting of an NPB-290,
NPB-295, N-395, or an N-3000 pulse oximeter, an N-3100 noninvasive blood
pressure monitor (optional), and a remote radio transceiver.
Figure 10-1: Oxinet II System-Level Block Diagram
10-1
Page 64

Section 10: Technical Supplement
At each bedside station, patient parameters such as percent of blood oxygen
saturation, pulse rate, and blood pressure are measured by the bedside station
monitors. This patient parameter data is then transmitted to the central station and
displayed, which allows simultaneous monitoring of up to 30 remotely located
patients at one convenient central location. When a patient's monitored parameter
exceeds a limit preset at the bedside monitor, an alarm is sounded at the bedside
station and reported with audible and visual indications at the central station.
Note: A 31
patient transfers.
10.2.2 Computer
The computer is the primary component of the Oxinet II monitoring system. The
computer is a standard personal computer and uses a 500 MHz Pentium III-based
motherboard, a hard drive, a 3.5-inch floppy drive, a video board, and a power
supply. The computer also contains a touchscreen controller board that is the
interface between the computer and the touchscreen modification to the monitor.
The function of the touchscreen monitor and interface is described in paragraph
10.2.3 Touchscreen Monitor. The computer also receives operator input from a standard 101-key keyboard and a mouse.
st
position is added to systems monitoring all 30 bedside stations to ease
Unique to the Oxinet II system, the computer also contains a multi I/O soundboard
and a central radio transceiver board. The function of the central radio transceiver is
described in paragraph 10.3 Radio-Link Data Communications Overview.
The soundboard contains a processor and controls communications between the
Oxinet II system and the bedside stations. The soundboard also controls and
generates the audio alarms at the central station, provides the interface for the
thermal printer, and has a watchdog circuit. A watchdog reset cable connected
between the multi I/O PCB and the motherboard resets the processor if there is a
system fault. The system will then run a POST (Power On Self Test). If POST is
completed successfully, normal monitoring will resume.
Units may be equipped with an optional thermal printer. This printer will be
connected to the sound card. The thermal printer will provide digital data and a
waveform printout during an alarm condition or at the request of the operator. The
waveform will include the 10-second period before and after the print initialization
and the most current digital data for the patient.
10.2.3 Touchscreen Monitor
The monitor has been modified to include a touchscreen function. A glass panel
with small ultrasonic transducers is installed on the face of the existing monitor
screen.
The X-axis and Y-axis of the glass panel each has a transmitting and a receiving
transducer and sets of reflecting strips. A drive signal is sent from the touchscreen
controller board in the computer to the transmitting transducers in the monitor
which, in turn, create an acoustic wave pattern on the face of the glass panel. The
receiving transducers receive the acoustic signal and send the received signal back
to the touchscreen controller board. A reference-received pattern for the untouched
screen is established.
10-2
Page 65

When an object such as an operator's finger or any other sound-absorbing object
touches the glass panel, a portion of the acoustic energy is absorbed. The resulting
change in the received pattern is compared to the reference pattern and analyzed. X
and Y coordinates of the touch location are calculated. A Z-axis value is also
calculated that is determined by measuring how much signal is attenuated at the
touch location. The X, Y, and Z coordinates of the touch location are then
calculated by the touchscreen controller board and provided to the computer. The
computer then uses the touch location data to generate a pointer cursor on the
monitor display at the touch location. If the touch location is at the location of a
screen button or where a system function or action can take place, the system will
perform the action associated with the button or function. If a touch is detected at
one location for more than 30 seconds, a new reference pattern is established.
10.2.4 Uninterruptible Power Supply
If the AC power input is interrupted, the computer and the touchscreen monitor will
continue to receive AC power from the uninterruptible power supply (UPS) for up to
30 minutes. The UPS contains a battery and power drive circuits that will
immediately begin producing AC power. A circuit breaker in the UPS will open if a
problem occurs that causes the computer or monitor to draw excessive power and all
AC power will be removed. The AC input to the UPS is filtered to protect the
computer and monitor from damage by AC input noise, transients, and surges. The
AC input also charges the battery in the UPS. When AC input power is lost, the
battery powers an inverter circuit that drives a step-up transformer. The output of
the transformer is at the AC line voltage level. Upon loss of AC input, power for the
computer and monitor is automatically switched to AC power generated by the UPS.
Section 10: Technical Supplement
10.3 RADIO-LINK DATA COMMUNICATIONS OVERVIEW
The Oxinet II monitoring system can communicate via radio-link using one of two
methods: fixed frequency or spread spectrum. Both systems operate in the 902 to
928 MHz frequency range. If multiple Oxinet II systems are being used in close
proximity to one another, the fixed frequency method must be selected to prevent
interference between the systems.
Spread spectrum systems will “hop” to specific frequencies at specific times. A
unique communication protocol is also employed to coordinate and control the
communication between the central radio transceiver in the computer and up to 30
individual bedside station remote radio transceivers. The central station is
programmed with the identifiers of all the remote radio transceivers in the
installation.
Fixed frequency systems operate as described above with the exception of frequency
hopping. One frequency per central radio transceiver is selected at setup and is used
for all data transfer. There can be up to three central radio transceivers in a central
station. Each Oxinet II fixed frequency system will have a different set of
frequencies assigned for data transmission. The frequency-specific design prevents
interference between adjacent Oxinet II systems.
10-3
Page 66

Section 10: Technical Supplement
When a remote radio transceiver is moved or changed, the new identification
information must be entered or changed in the central station computer. The central
station sends out a request for data from the remote radio transceivers. Each remote
radio transceiver has an assigned time for responding after the request for data is
received from the central station. When the central station is turned on, it will
establish a connection with all of the remote radio transceivers. The computer will
determine the frequency hop pattern for the system and determine a response time
slot for each remote radio transceiver. This information is transmitted to and stored
in all of the remote radio transceivers.
When a remote radio transceiver receives a request for data, it will respond with its
unique identifier and send patient data collected by the bedside station monitors. If
one of the hop frequencies becomes unusable, the central station will remove the
frequency from the hop pattern, replace it with a new one, and reestablish the hop
pattern with all the remote radio transceivers in the installation.
10.3.1 Central Radio Transceiver
At the central station, a central radio transceiver in the computer is used to
communicate with all remote radio transceivers in the Oxinet II system installation.
The central radio transceiver employs diversity reception and uses dual antenna
systems for two receiver channels. A minimum of two antennas are used, one for
each channel. Multiple antennas can be used with splitters for each channel to
extend the operating range of the system.
10.3.2 Remote Radio Transceiver
10.3.2.1 NPB-290, NPB-295, and N-395
Each bedside station has a remote radio transceiver with a unique identification
number. This number is permanently set at the factory and is printed on a label on
the side of each remote radio transceiver. An AC power supply provided with the
radio kit supplies power for the remote radio transceiver. Patient data collected and
stored in the NPB-290, NPB-295, or N-395 is passed to the remote transceiver from
the serial port on the rear of the NPB-290, NPB-295, or N-395 through a cable to the
transceiver. The data is in EIA-232 format. The remote radio transceiver then
transmits the patient data, monitor operating status, and alarm limit settings for
display and processing at the central station.
10.3.2.2 N-3000
Each bedside station has a remote radio transceiver with a unique identification
number. This number is permanently set at the factory and is printed on a label on
the side of each remote radio transceiver. Power for the remote radio transceiver is
supplied by the N-3000. Patient data is collected and stored in the N-3000 and an
N-3100 stacked with the N-3000, and power is passed to the remote transceiver
from the serial port on the rear of the N-3000 through a cable to the transceiver. The
data is in EIA-232 format. The remote radio transceiver then transmits the patient
data, monitor operating status, and alarm limit settings for display and processing at
the central station.
10-4
Page 67

Section 10: Technical Supplement
10.4 HARD-WIRED SYSTEM-LEVEL BLOCK DIAGRAM ANALYSIS
For this description, refer to Figure 10-2 for a system-level block diagram of the
Oxinet II monitoring system.
Bedside
monitors
Bedside
monitors
Bedside
monitors
Bedside
monitors
Bedside
monitors
Bedside
monitors
Bedside
monitors
Bedside
monitors
Figure 10-2: Hard-wired Oxinet II System-Level Block Diagram
10.4.1 Operator Interface and UPS
I/O
PCB
Computer
Expansion card
Central station
Touchscreen
Printer
Video
control
Constant
AC power
Touchscreen
monitor
Constant
AC power
Uninterruptible
power supply
Keyboard
Mouse
External
AC power
input
The operator interface for hard-wired systems is the same as for units receiving a
RADIO-LINK signal, refer to paragraph 10.3 for more information. A description
of the UPS can be found in paragraph 10.2.4.
10.4.2 Computer (Hard-wired Systems)
The computer is the primary component of the Oxinet II monitoring system. The
computer is a standard personal computer and uses a 500 MHz, or faster, Pentium
III-based motherboard, a hard drive, a 3.5-inch floppy drive, a video board, and a
power supply. The computer also contains a touchscreen controller board that is the
interface between the computer and the touchscreen modification to the monitor.
The function of the touchscreen monitor and interface is described in paragraph
10.2.3, Touchscreen Monitor. The computer also receives operator input from a
standard 101-key keyboard and a mouse.
Depending on the number of channels in the system, the computer can contain as
many as two I/O PCBs and two expansion cards, which are unique to the Oxinet II
system. Hard-wired systems can have a maximum of 16 channels for monitoring.
10-5
Page 68

Section 10: Technical Supplement
Each serial I/O PCB is a full-sized PC AT card that provides four channels of
monitoring. The I/O PCB is responsible for sound generation and for the type of
input it will recognize. If the system contains two I/O PCBs, the board with the
lowest serial number is used for sound generation and to drive the thermal printer
and watchdog reset, regardless of its installation position. The I/O PCB recognizes
either RS-232 or RS-422 signals from the N-3000 pulse oximeter. One jumper for
each channel on the I/O PCB is used to determine which type of signal will be
recognized. The I/O PCB supports a baud rate of 9600.
One expansion card can be added to each I/O PCB (maximum of two I/O PCBs and
two expansion cards). Each expansion card provides four additional channels of
monitoring. The expansion card also recognizes either RS-232 or RS-422 signals
from the NPB-290, NPB-295, N-395, and N-3000 pulse oximeter. One jumper for
each channel on the expansion card is used to determine which type of signal will be
recognized. Signals from the NPB-290, NPB-295, N-395, and N-3000 pulse
oximeter are passed through the expansion card to the I/O PCB and on to the central
station for display.
Units may be equipped with an optional thermal printer. This printer is connected to
the I/O PCB with the smallest serial number. The thermal printer provides digital
data and a waveform printout during an alarm condition, or at the request of the
operator. The waveform includes the 10-second period before and after the print
initialization and the most current digital data for the patient.
10-6
Page 69

INDEX
A
Agency Regulatory Notices · 9-1
Alarm Latching
Setting System · 5-7
Alarm Silence Period
Setting System · 5-7
Antenna Location · 2-2
B
Bedside Station
Description · 1-3
Block Diagram
Hardwired System · 10-5
Radio Link System · 10-1
C
Calibration
Touch Screen · 5-15
Central Station
Description · 1-2
Central Station Power-ON Self Test · 3-1
Channel Alarms Setting
Setting System Default · 5-10
Channel Number
Selecting (Hardwired System) · 5-13
Cleaning · 4-1
Communication Configuration · 1-4
Component Labels · 9-3
Computer
Description · 1-2
Repacking · 8-2
Configuration
System · 5-1
Defaults
Setting System · 5-8
Designing the Map Screen · 5-4
Displaying a List of System Events · 5-15
Displaying Radio-Link System Channel Setups · 5-10
DOS
Exiting To · 5-16
E
ECG Scale
Setting System Default · 5-9
Electrical
Specifications · 9-1
Electrical Safety Tests · 3-1
Entering the Oxinet II System from DOS · 5-16
Environmental
Specifications · 9-3
Equipment Description · 1-1
Exiting to DOS · 5-16
G
guide
Troubleshooting · 6-1
H
Hardware Installation
Bedside Station (Hardwire) · 2-3
Bedside Station (Radio Link) · 2-3
Central Station · 2-3
HardwareInstallation · 2-2
Hardwire Cable Kit Replacement Parts · 7-3
Hardwired
Description · 1-4
Hardwired System-Level Block Diagram · 10-5
HookUp · 2-1
D
Data Communication Configuration · 1-4
Date
Setting System · 5-6
Deassigning a Transceiver ID · 5-13
Default Channel Alarms Setting
Setting System · 5-10
Default Channel SpO2 Gain
Setting System · 5-9
Default Channel Standby
Setting System · 5-9
Default ECG Scale
Setting System · 5-9
Default Waveform
Setting System · 5-9
I
Installation · 2-1
Intended Use · 1-1
Interconnect
System, Radio Link · 2-4
System,Hardwired · 2-6
K
Keyboard
Description · 1-3
11-1
Page 70

Section 11: Index
L
Laser Printer
Description · 1-3
Laser Printer Minimum Requirements · 9-3
LED Indications
Remote Radio · 6-5
M
Maintenance · 4-1
Maintenance Setup
Radio Link Transceiver · 5-11
Manual Overview · 1-1
Map Screen
Designing · 5-4
Mouse
Description · 1-3
O
Obtaining Replacement Parts · 6-1
P
Packing For Shipment · 8-1
Performance Verification · 3-1
Performing Touchscreen Calibration · 5-15
Physical Characteristics
Specifications · 9-2
Power Requirements · 2-1
Power-ON Self Test
Central Station · 3-1
Programming a Transceiver ID · 5-12
R
Radio Kit Replacement Parts · 7-2
Radio Link System-Level Block Diagram · 10-1
Radio-Link
Description · 1-4
Radio-Link Data Communications Overview · 10-3
Radio-Link System Channel Setups
Displaying · 5-10
Radio-Link Transceiver Maintenance Setup · 5-11
Regulatory Notices
Agency · 9-1
Remote Radio Transceiver
Repacking · 8-5
Technical Description · 10-4
Repacking the 15 and 19-Inch Touchscreen Monitor · 8-3
Repacking the Computer · 8-2
Repacking the Remote Radio Transceiver · 8-5
Repacking the Uninterruptible Power Supply · 8-6
Repairs
Who Should Perform · 6-1
Replacement Level Supported · 6-1
Replacement Parts · 7-2
Obtaining · 6-1
Required Test Equipment · 3-1
S
Safety Tests
Electrical · 3-1
Setting System Alarm Latching · 5-7
Setting System Alarm Silence Period · 5-7
Setting System Date and Time · 5-6
Setting System Default Channel Alarms Setting · 5-10
Setting System Default Channel SpO2 Gain · 5-9
Setting System Default ECG Scale · 5-9
Setting System Default Waveform · 5-9
Setting System Defaults · 5-8
Setting System Password · 5-5
Setting System Trends · 5-14
Setting System Volume Levels · 5-8
Setting Up System Configuration · 5-7
Setting Waveform Freeze · 5-7
Site Selection
Central Station · 2-1
Software Requirements · 1-5
Spare Parts · 7-1
Specifications · 9-1
Electrical · 9-1
Environmental · 9-3
Physical Characteristics · 9-2
SpO2 Gain
Setting System Default · 5-9
SpO2 Only Button · 5-3
System Configuration · 5-1
Setting Up · 5-7
SYSTEM Configuration · 5-1
System Defaults
Setting · 5-8
System Events
Displaying List · 5-15
System Interconnect
Hardwired · 2-6
Radio Link · 2-4
System Labels · 9-3
System Overview · 1-1
System Password
Setting · 5-5
System Setup Screens
Accessing · 5-1
System Trends
Setting · 5-14
T
Technical Supplement · 10-1
Test Equipment
Required · 3-1
thermal printer
Installing Paper · 4-1
Thermal Printer
Description · 1-3
11-2
Page 71

Section 11: Index
Time
Setting System · 5-6
Touchscreen Calibration · 5-15
Touchscreen Monitor
Description · 1-2
Repacking · 8-3
Transceiver ID
Deassigning · 5-13
Programming · 5-12
Trends
Setting System · 5-14
Troubleshooting · 6-1
TROUBLESHOOTING guide · 6-1
U
Uninterruptible Power Supply
Description · 1-3
Repacking · 8-6
V
Verification
Performance · 3-1
Volume Levels
Setting System · 5-8
W
Waveform
Setting System Default · 5-9
Waveform Freeze
Setting · 5-7
Who Should Perform Repairs · 6-1
11-3
 Loading...