

Nec VERSA 4200 user Manual

PROPRIETARY NOTICE AND LIABILITY DISCLAIMER
The information disclosed in this document, including all designs and related
materials, is the valuable property of NEC Corporation (NEC) an d/or its licensor s.
NEC and/or its licensors, as appropriate, reser ve all patent, copyright and other
proprietary rights to this document, including all design, manufacturing,
reproduction, use, and sales rights thereto, except to the extent said rights are
expressly granted to others.
The NEC product(s) discussed in this document ar e warranted in accor dance with
the terms of the Warranty Statement accompanyin g each product. However, actual
performance of each such product is dependent upon factors such as system
configuration, customer data, and operator control. Since implementation by
customers of each product may vary, the suitability of specific product
configurations and applications must be determined by the customer and is not
warranted by NEC.
To allow for design and specification improvements, the information in this
document is subject to change at any time, without notice. Reproduction of this
document or portions thereof without prior written approval of NEC is prohibited.
Versa is a U.S. registered trademark of NEC Technologies, Inc.
All other product, brand, or trade names used in this publication are the trademarks or
registered trademarks of their respective trademark owners.
First Printing — June 1996
Copyright 1996 Copyright 1996
NEC Technologies, Inc. NEC Corporation
1414 Massachusetts Avenue 7-1 Shiba 5-Chome, Minato-Ku
Boxborough, MA 01719 Tokyo 108-01, Japan
All Rights Reserved All Rights Reserved

Using this Guide
The NEC Versa® 4200 Series User’s Guide gives you the
information you need to maximize the use of your Versa
4200 notebook computer. Read this guide to familiarize
yourself with the Versa 4200 and its features. For specific
information see:
Chapter 1, “Getting Started,” to acquaint yourself with
system hardware.
Chapter 2, “Introducing the Software,” for a concise
summary of the applications pre-installed on your
system. We included software to let you experience the
full spectrum of the system, from using the speakers to
creating vivid presentations.
Chapter 3, “Using Setup,” to customize your notebook’s
parameter and power management settings.
Chapter 4, “Using the Hardware,” for an understanding
of NEC Versa 4200 features and functionality. You’ll
also master procedures for connecting external options
like headphones, microphones, or speakers.
Chapter 5, “Using Multimedia,” for steps on integrating
video and sound clips into impressive presentations.
Chapter 6, “Traveling with Your Versa 4200,” lists
valuable tips for getting the most out of your system
while on the road.
Chapter 7, “Solving Problems,” provides simple solutions to common problems that may arise while operating your notebook.
Appendix A, “Setting Up a Healthy Work Environ-
ment,” provides guidelines to help promote a healthy
work setting.
Using this Guide ix
TEXT SETUP
Appendix B, “Specifications and Environment,” reviews
the NEC Versa 4200 system specifications.
To make this guide as easy to use as possible, text is set up
in the following ways:
Warnings, cautions, and notes have the following
format.
!
Warnings alert you to situations that could result i n
serious personal injury or loss of life.
Cautions indicate situations that can damage the
system hardware or software.
WARNING
!
CAUTION
x Using this Guide
NOTE
Notes give particularly important information
about whatever is being described.
Names of keys are printed as they appear on the key-
board, for example,
Text that you must type or keys that you must press are
Ctrl, Alt
presented in bold type. For example, type
Enter
.
, or
Enter
.
dir
and press

RELATED DOCUMENTS
See the following documents for information related to the
NEC Versa 4200 system operation:
Your NEC Versa 4200 Quick Setup Sheet.
Your NEC Versa 4200 Quick Reference Card.
The Microsoft® Windows for Workgroups, Windows
95, and
tion that comes with your NEC Versa 4200 computer.
MS-DOS operating system online documenta-
Using this Guide xi

(For United States Use Only)
FEDERAL COMMUNICATIONS COMMISSION
RADIO FREQUENCY INTERFERENCE STATEMENT
WARNING:
responsible for compliance could void the user’s authority to operate the equipment.
NOTE:
B digital device, pursuant to Part 15 of the FCC Rules. These limits are designed to
provide reasonable protection against harmful interference in a residential installation.
This equipment generates, uses and can radiate radio frequency energy and, if not installed and used in accordance with the instructions, may cause harmful interference to
radio communications.
However, there is no guarantee that interference will not occur in a particular installation. If this equipment does cause harmful interference to radio or television reception,
which can be determined by turning the equipment off and on, the user is encouraged to
try to correct the interference by one or more of the following measures.
Reorient or relocate the receiving antenna.
Changes or modifications to this unit not expressly approved by the party
This equipment has been tested and found to comply with the limits for a Class
Increase the separation between the equipment and receiver.
Connect the equipment to an outlet on a circuit different from the one to which the
receiver is connected.
Use a shielded and properly grounded I/O cable to ensure compliance of this unit to the
specified limits of the rules.
(For Canadian Use Only)
This equipment is a Class B digital apparatus which complies with the Radio Interference Regulations, C.R.C., c.1374.
Cet appareil numérique de la classe B est conforme àu Règlement sur le brouillage
radioélectrique, C.R.C., ch.1374.

Contents
Using this Guide
Text Setup..........................................................................................x
Related Documents .............................................................................xi
1 Getting Started
Getting To Know Your NEC Versa 4200 ............................................1-2
Around the System – Front ............................................................1-3
Around the System — Back................................................................1-9
Around the System — Left Side..........................................................1-10
Around the System — Right Side........................................................1-11
Around the System — Bottom.............................................................1-12
Power Sources For Your NEC Versa ..................................................1-13
Using the AC Adapter....................................................................1-13
Using the Main Battery Pack.......................................................... 1-15
Extended Battery Life ....................................................................1-20
Using the NEC Versa 4000 DC Car Adapter..................................1-20
Internal Li-Ion Batteries.................................................................1-21
System Care .......................................................................................1-21
Precautions....................................................................................1-21
Storage Requirements ....................................................................1-24
Routine Cleaning ...........................................................................1-24
LCD......................................................................................... 1-3
Controls and Microphone..........................................................1-4
Status Icons..............................................................................1-5
Keyboard..................................................................................1-7
Infrared (IR) Port...................................................................... 1-7
NEC VersaGlide.......................................................................1-7
Diskette Drive, CD-ROM Reader, and the NEC VersaBay II™.1-8
Powering on..............................................................................1-15
Replacing the Battery Pack .......................................................1-17
CMOS Battery .........................................................................1-21
Bridge Battery ..........................................................................1-21
NEC Versa 4200 and AC Adapter.............................................1-21
Lithium-Ion Battery ..................................................................1-22
Contents iii

2 Introducing the Software
Windows Introduction.........................................................................2-2
Windows 95 ..................................................................................2-2
Windows for Workgroups..............................................................2-3
DOS Introduction ............................................................................... 2-4
Guide to On-Line Help........................................................................2-4
NEC Versa 4200 InfoCenter ..........................................................2-4
Additional On-line Topics ..............................................................2-6
Guide To NEC Utilities....................................................................... 2-6
NEC Diskette Creator....................................................................2-6
NEC Battery Gauge.......................................................................2-7
PowerPanel....................................................................................2-7
PHDisk..........................................................................................2-7
CardWizard...................................................................................2-8
Other Software ...................................................................................2-8
Official Airline Guide (OAG).........................................................2-8
LapLink ........................................................................................2-9
When to Use LapLink...............................................................2-9
How to Use LapLink.................................................................2-10
On-line Services.............................................................................2-11
America Online.........................................................................2-13
CompuServe.............................................................................2-13
Netscape Navigator...................................................................2-13
McAfee Anti Virus Software..........................................................2-14
XingMPEG Player™ and Presentation Software ............................2-15
ESS Audio/Audio Rack .................................................................2-15
NeoMagic Video Configuration Utility – Windows for Workgroups2-15
NeoMagic Property Page for Windows 95......................................2-17
3 Using Setup
iv Contents
Setup Utility .......................................................................................3-1
How to Enter Setup........................................................................3-1
How to Use Setup..........................................................................3-2
Looking at Screens....................................................................3-2
Using Keys...............................................................................3-3
Checking/Setting System Parameters.........................................3-4
PowerPanel.........................................................................................3-9
Reviewing PowerPanel Default Power Settings...............................3-10
Reviewing PowerPanel Default Command Settings.........................3-11

PowerPanel Menu..........................................................................3-11
Preferences...............................................................................3-12
Customize.................................................................................3-12
Profile Manager........................................................................3-12
Minimize..................................................................................3-13
Help .........................................................................................3-13
Setup Utility and PowerPanel.........................................................3-13
4 Using The Hardware
LCD Panel..........................................................................................4-1
Keyboard............................................................................................4-2
NEC VersaGlide.................................................................................4-4
Making VersaGlide Adjustments............................................... 4-5
Changing the Button Configuration ...........................................4-6
VersaGlide Ergonomic Tips ......................................................4-6
NEC VersaBay II ...............................................................................4-7
Removing a Device from the VersaBay II.......................................4-7
Installing a Device in the VersaBay II.............................................4-9
Customizing Your System with the VersaBay II .............................4-10
6x CD-ROM Reader......................................................................4-11
CD Loading..............................................................................4-13
CD Care................................................................................... 4-13
PC Card Slots (PCMCIA).............................................................. 4-14
IR Port .......................................................................................... 4-15
Increasing System Storage And Memory .............................................4-16
Hard Disk......................................................................................4-16
Installing a Memory Card ..............................................................4-20
Installing Options................................................................................4-22
External Monitor ...........................................................................4-23
Printer...........................................................................................4-24
Parallel Devices........................................................................4-24
Serial Devices...........................................................................4-26
External Keyboard/Mouse..............................................................4-27
External Bar Code Scanner............................................................4-29
External Audio Options..................................................................4-29
Docking the NEC Versa 4200 ........................................................4-30
NEC Versa PortBar 4000 ......................................................... 4-31
NEC Versa Docking Station 4000.............................................4-31
Setting Switches .................................................................................4-32
Updating the BIOS ........................................................................4-32
Contents v

5 Using Multimedia
Audio .................................................................................................5-1
Recording......................................................................................5-1
Line-In ..........................................................................................5-2
CD-ROM Input .............................................................................5-2
Microphone ...................................................................................5-3
Mixing...........................................................................................5-3
Playing Back .................................................................................5-3
Using Headphones ....................................................................5-3
Using Internal Speakers ............................................................ 5-3
Using External Stereo Speakers.................................................5-4
MIDI Files.....................................................................................5-4
Video..................................................................................................5-4
Using Digital Video Files...............................................................5-4
Using Animation Files....................................................................5-4
Multimedia Applications.....................................................................5-5
VideoSaver....................................................................................5-5
XingMPEG Player Software ..........................................................5-6
6 Traveling with Your NEC Versa 4200
Power Connections .............................................................................6-1
Checklists...........................................................................................6-2
What to Take.................................................................................6-2
Preparing Your NEC Versa for Travel ...........................................6-2
7 Solving Problems
Problem Checklist...............................................................................7-1
Start-Up Problems..............................................................................7-3
Post Error Messages........................................................................... 7-4
Using the Restore CD ......................................................................... 7-6
Restoring All Application Files in DOS..........................................7-7
Restoring Individual Files in Windows 95 and Windows for
Workgroups................................................................................7-7
System Recovery ...........................................................................7-10
Restoring System Files in Windows 95 or Windows for
Workgroups................................................................................7-11
vi Contents
Selecting Files...........................................................................7-8
Checking Selected Files.............................................................7-9
Restoring the Files ....................................................................7-9
System Recovery in DOS..........................................................7-10

If You Need Assistance.......................................................................7-12
Getting Help .......................................................................................7-12
NEC Warranty/Non-Warranty Repair Service.....................................7-14
A Setting Up a Healthy Work Environment
Making Your Computer Work For You...............................................A-1
Arrange Your Equipment ....................................................................A-2
Adjust Your Chair ..............................................................................A-2
Adjust Your Input Devices..................................................................A-3
Adjust Your Screen Or Monitor ..........................................................A-4
Vary Your Workday ...........................................................................A-5
Pre-Existing Conditions And Psychosocial Factors.............................. A-5
B Specifications and Environment
System Processor................................................................................B-1
Random Access Memory (RAM) ........................................................B-1
Read-Only Memory (ROM)................................................................ B-1
Calendar Clock...................................................................................B-1
Input/Output Facilities........................................................................ B-1
PCMCIA (PC) Card Slots...................................................................B-2
LCD Display ......................................................................................B-2
Keyboard............................................................................................B-2
Diskette Drive..................................................................................... B-3
6x-Speed CD-ROM Reader ................................................................B-3
Hard Disk Drive .................................................................................B-3
Power.................................................................................................B-4
Dimensions.........................................................................................B-4
Weight................................................................................................B-5
Recommended Environment ................................................................B-5
Options for the NEC Versa 4200.........................................................B-5
Glossary
Index
Contents vii

viii Contents
1
Getting Started
!
Prolonged or improper use of a computer workstation m ay pose a
risk of serious injury. To reduce your risk of i njury, set up and use
your comput er in the m anner described in Appendix A, “ S etting Up a
Healthy Work Environment.”
After completing the steps in the quick setup sheet that comes with your
computer, your NEC Versa 4200 is ready to go! To get started, look at the
following:
Read Appendix A, “Setting Up a Healthy Work Environment,” for
guidelines that help you use your computer productively and safely. Information includes how to set up and use your computer to reduce your
risk of developing nerve, muscle, or tendon disorders.
Take the on-line System Tour to get acquainted with the NEC Versa
4200.
WARNING
View the on-line Owner’s Manual in the NEC Versa 4200 InfoCenter.
Read through this guide to familiarize yourself with the NEC Versa.
Getting Started 1-1
GETTING TO KNOW YOUR NEC VERSA 4200
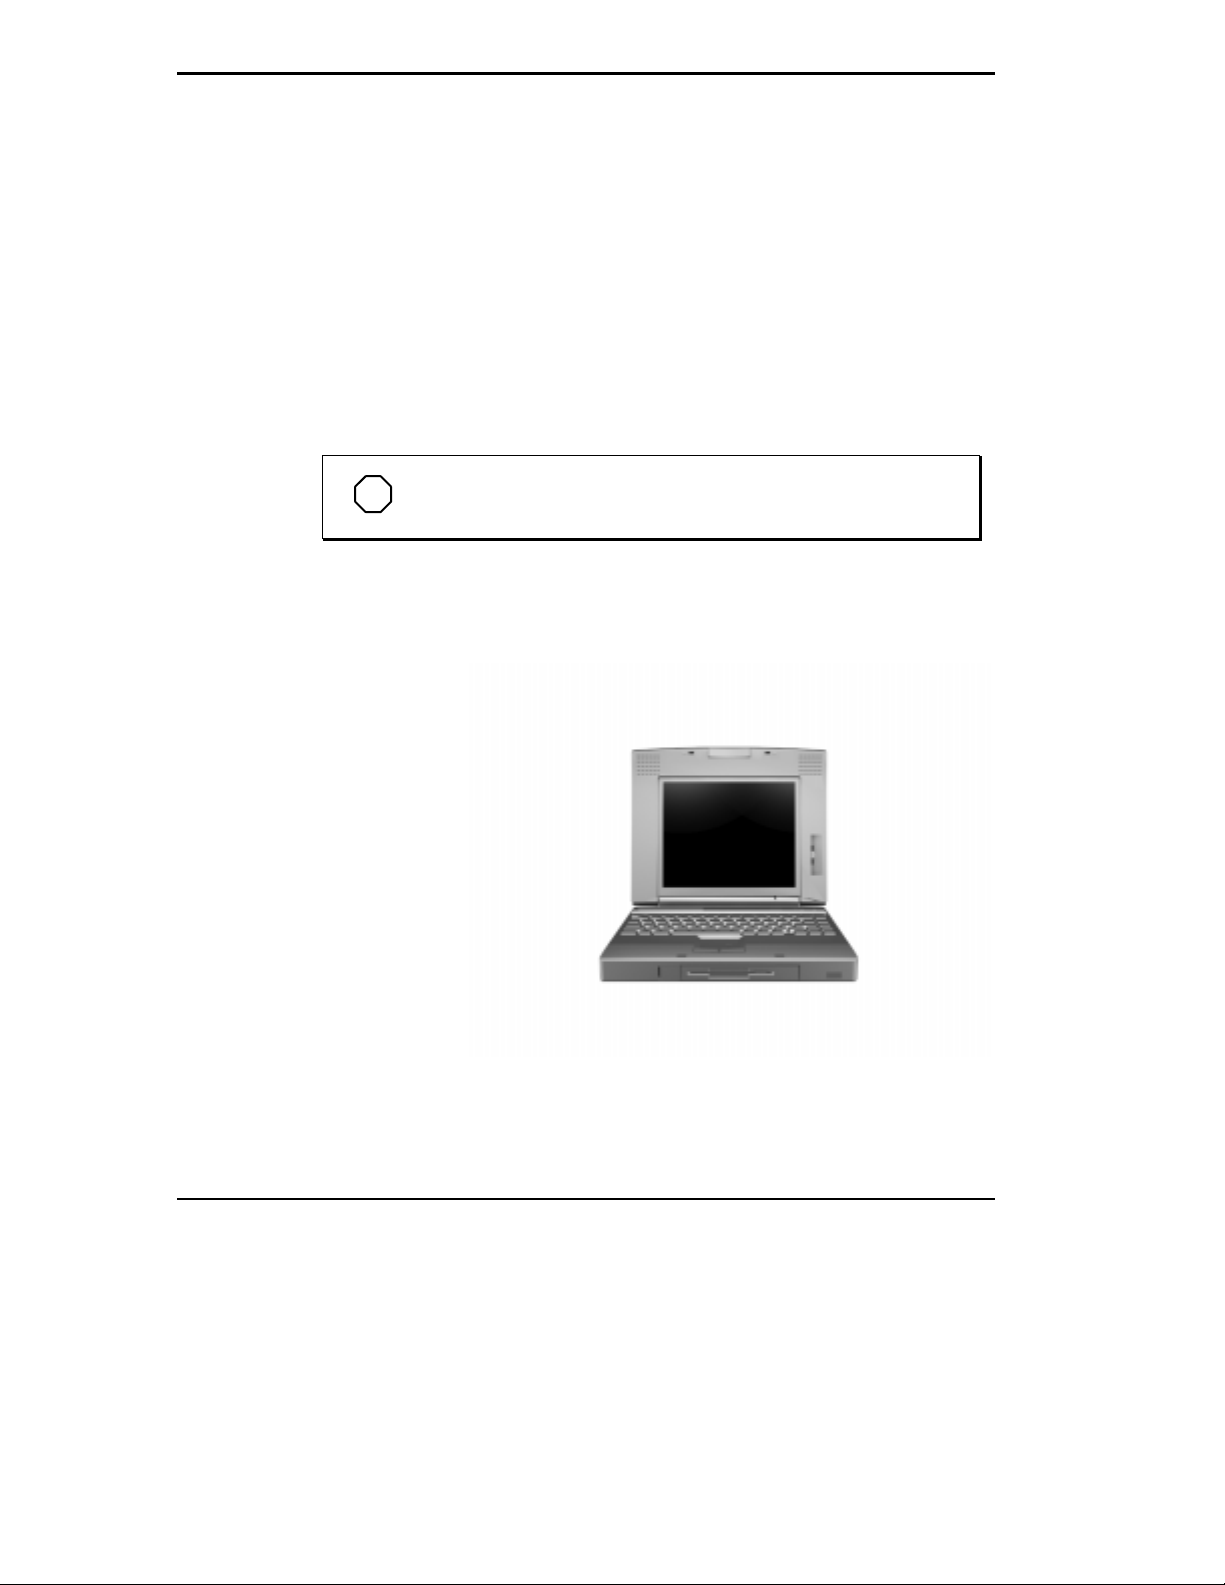
The NEC Versa 4200 Series notebook computer offers you a portable system filled with exciting resources for home, business or travel. Standard
features include a powerful Intel
processor that works together with the latest VL-Bus Accelerated Video architecture.
In addition, your system provides a high performance hard disk drive, floppy
diskette drive (or interchangeable CD-ROM reader), and Personal Computer
(PC) card support. As a multimedia system, your NEC Versa also provides
the tools needed to create and present impressive images using video clips
and sound.
NOTE
The CD-ROM Reader only ships with the 133MHz systems.
To get comfortable with your notebook, read the following sections and take
a tour around your system!
®
Pentium 100 MHz or 133 MHz micro-
1-2 Getting Started
NEC Versa 4200 Series notebook computer
Around the System — Front
The NEC Versa 4200 is compact with features on every side. First, look at
the front of the NEC Versa 4200. The following section describes the front
features beginning with the liquid crystal display (LCD).
LCD
Your NEC Versa 4200 comes with a color liquid crystal display (LCD) that
you can adjust for a comfortable viewing position. The LCD provides a
10.4-inch Super Video Graphics Array (SVGA) Thin Film Transistor (TFT)
display.
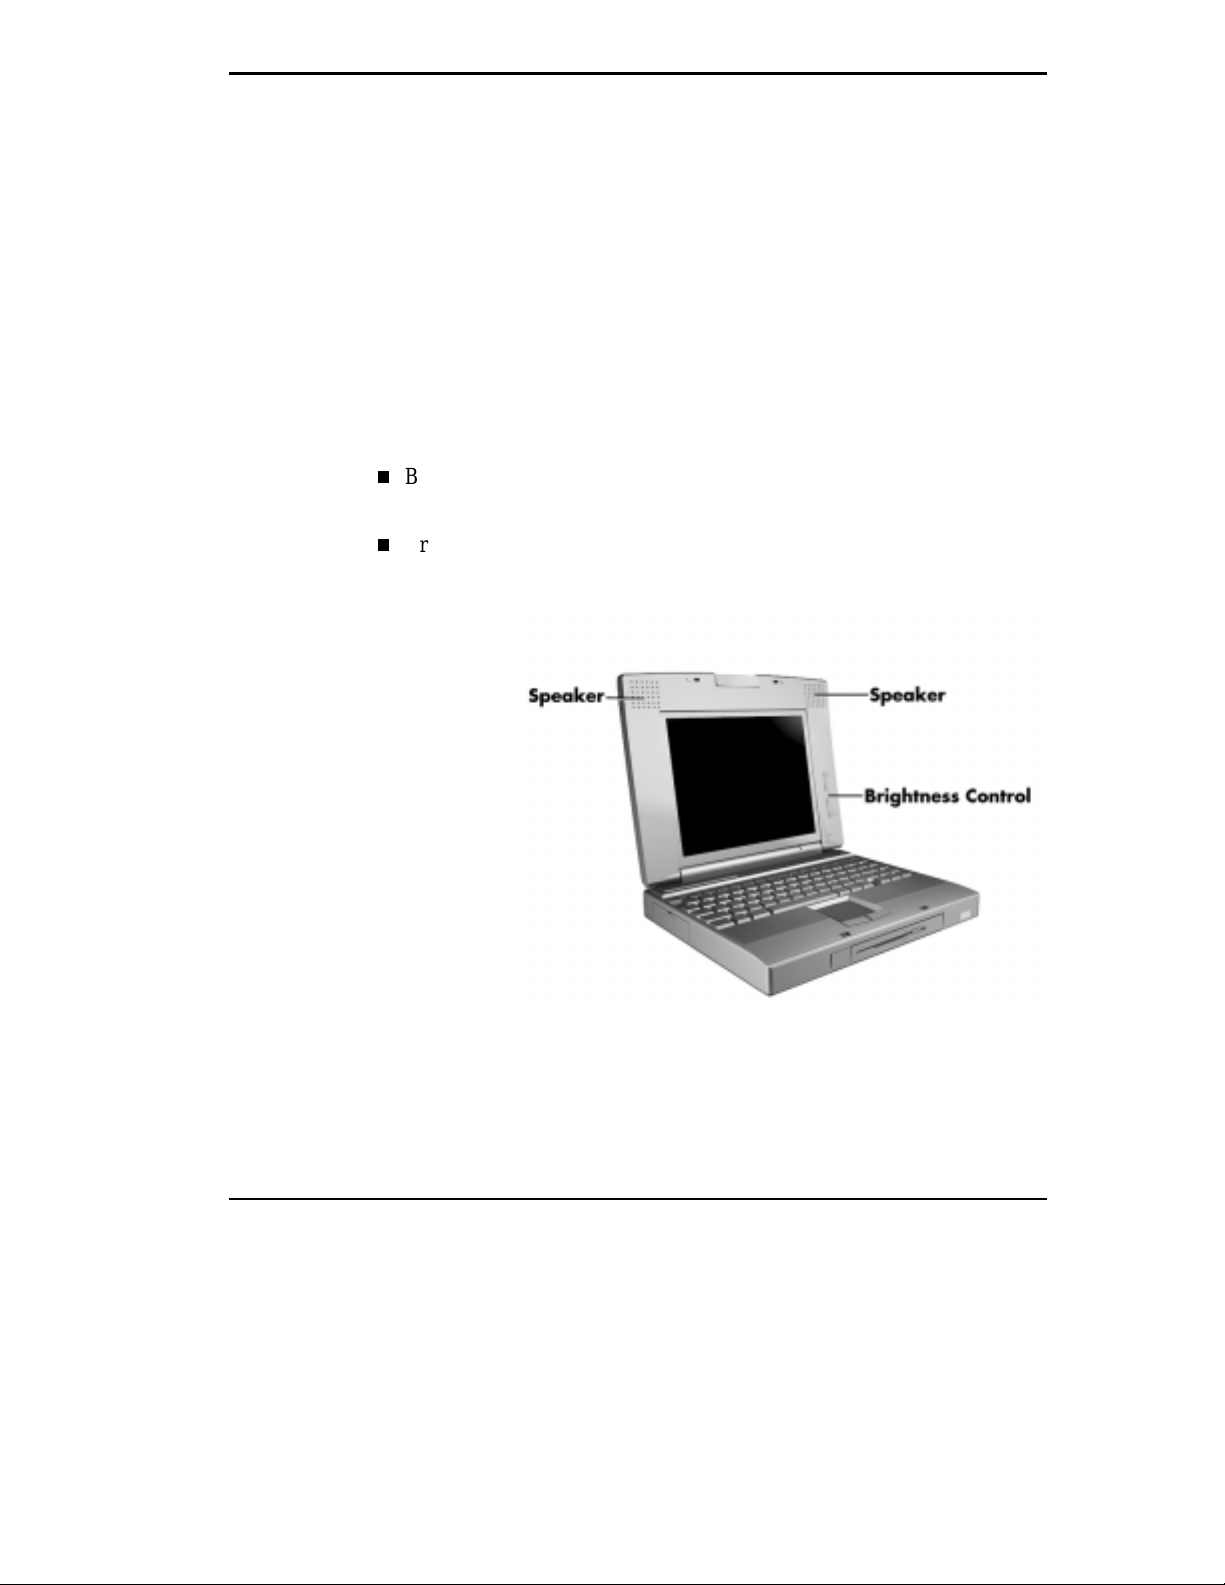
LCD panel features include:
Built-in Stereo Speakers — provides stereo sound for your multimedia
presentations, or listening pleasure.
Brightness Control — a slide switch to adjust the screen backlight
brightness.
LCD features
Getting Started 1-3
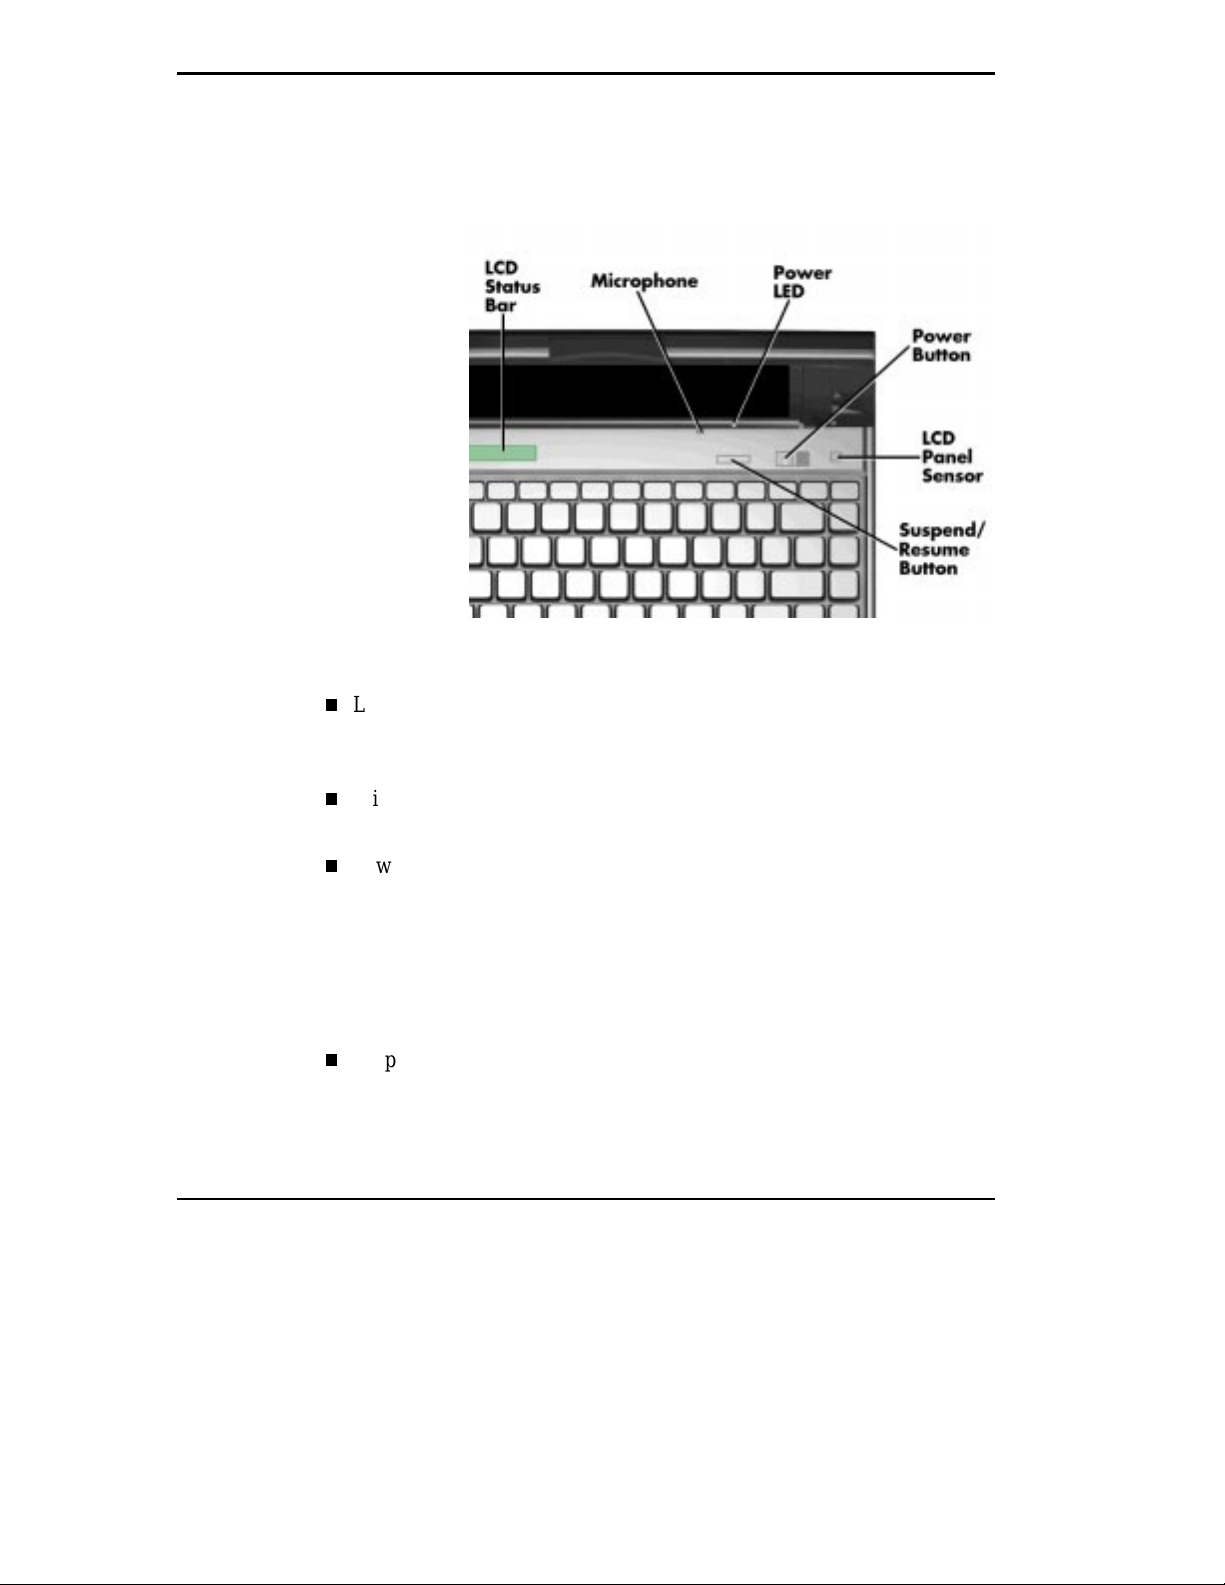
Controls and Microphone
The NEC Versa 4200 controls and the built-in microphone are shown in the
following figure. These features are described after the figure.
Controls and microphone
1-4 Getting Started
LCD Status Bar — the status panel keeps you informed about your NEC
Versa’s current operating status. See “Status Icons” in the next section
for icon descriptions.
Microphone — allows you to record monophonic sound directly into
your notebook computer.
Power LED
Lights green when the system is powered on.
Blinks green when the system is in Suspend mode.
Blinks amber to indicate that battery power is low and needs to be
recharged.
Suspend/Resume (S/R) Button — press the S/R button to put the unit
into Suspend mode when you need to be away from your system for a
short period of time and want to return to where you left off. Press S/R
button again to bring the NEC Versa 4200 out of Suspend mode.

Status Icons
Specifically, suspend mode shuts down all devices in the system while
retaining data and system status.
Power Button — slide the power button to the right to power on and
power off the notebook computer.
The power button is a “smart” switch, meaning that it recognizes when
the system is in Suspend mode. You cannot power off the system until
you press the suspend button and bring it out of Suspend mode first.
LCD Panel Sensor— senses when the LCD panel is closed and turns off
the panel.
The NEC Versa 4200 uses nine LCD icons that communicate system status.
See the following figure and list for each icon’s meaning.
Reviewing status icons
Suspend — appears when the system is in Suspend mode. Suspend mode
conserves system power by shutting down all devices in the system while
retaining data and system status.
Getting Started 1-5
Power Management — shows the current power management mode in
use, including Off, Longest battery life, Highest performance, or Custom
settings.
Diskette Drive Access — appears when writing data to or retrieving from
a diskette.
Hard Disk Drive Access — shows when writing data to or retrieving data
from the system’s hard disk.
Caps Lock — appears when caps lock is in effect.
Scroll Lock — shows that scroll lock is in effect.
Num Lock — appears when Num Lock mode is active.
Battery — displays the percent of battery power available. If you have
two battery packs installed, two battery icons appear.
4 bars indicate a 76 - 100% charge
3 bars indicate a 51 - 75% charge
2 bars indicate a 26 - 50% charge
1 bar indicates a 1 - 25% charge.
1-6 Getting Started
NOTE
When i nstalling a new batter y, the fi rst and third bars on the
battery gauge may f lash. This i ndicates an unknown battery status.
To correct the reading, recharge your battery for a minimum of 8
hours. If the battery still shows an unknown status, contact the
dealer from whom you purchased the battery for a replacement.
Keyboard
The NEC Versa 4200 keyboard uses 83 keys (79 keys for International),
with the standard QWERTY-key layout. See Chapter 4, “Keyboard” for
details. You can also refer to the on-line information in the NEC Versa 4200
InfoCenter.
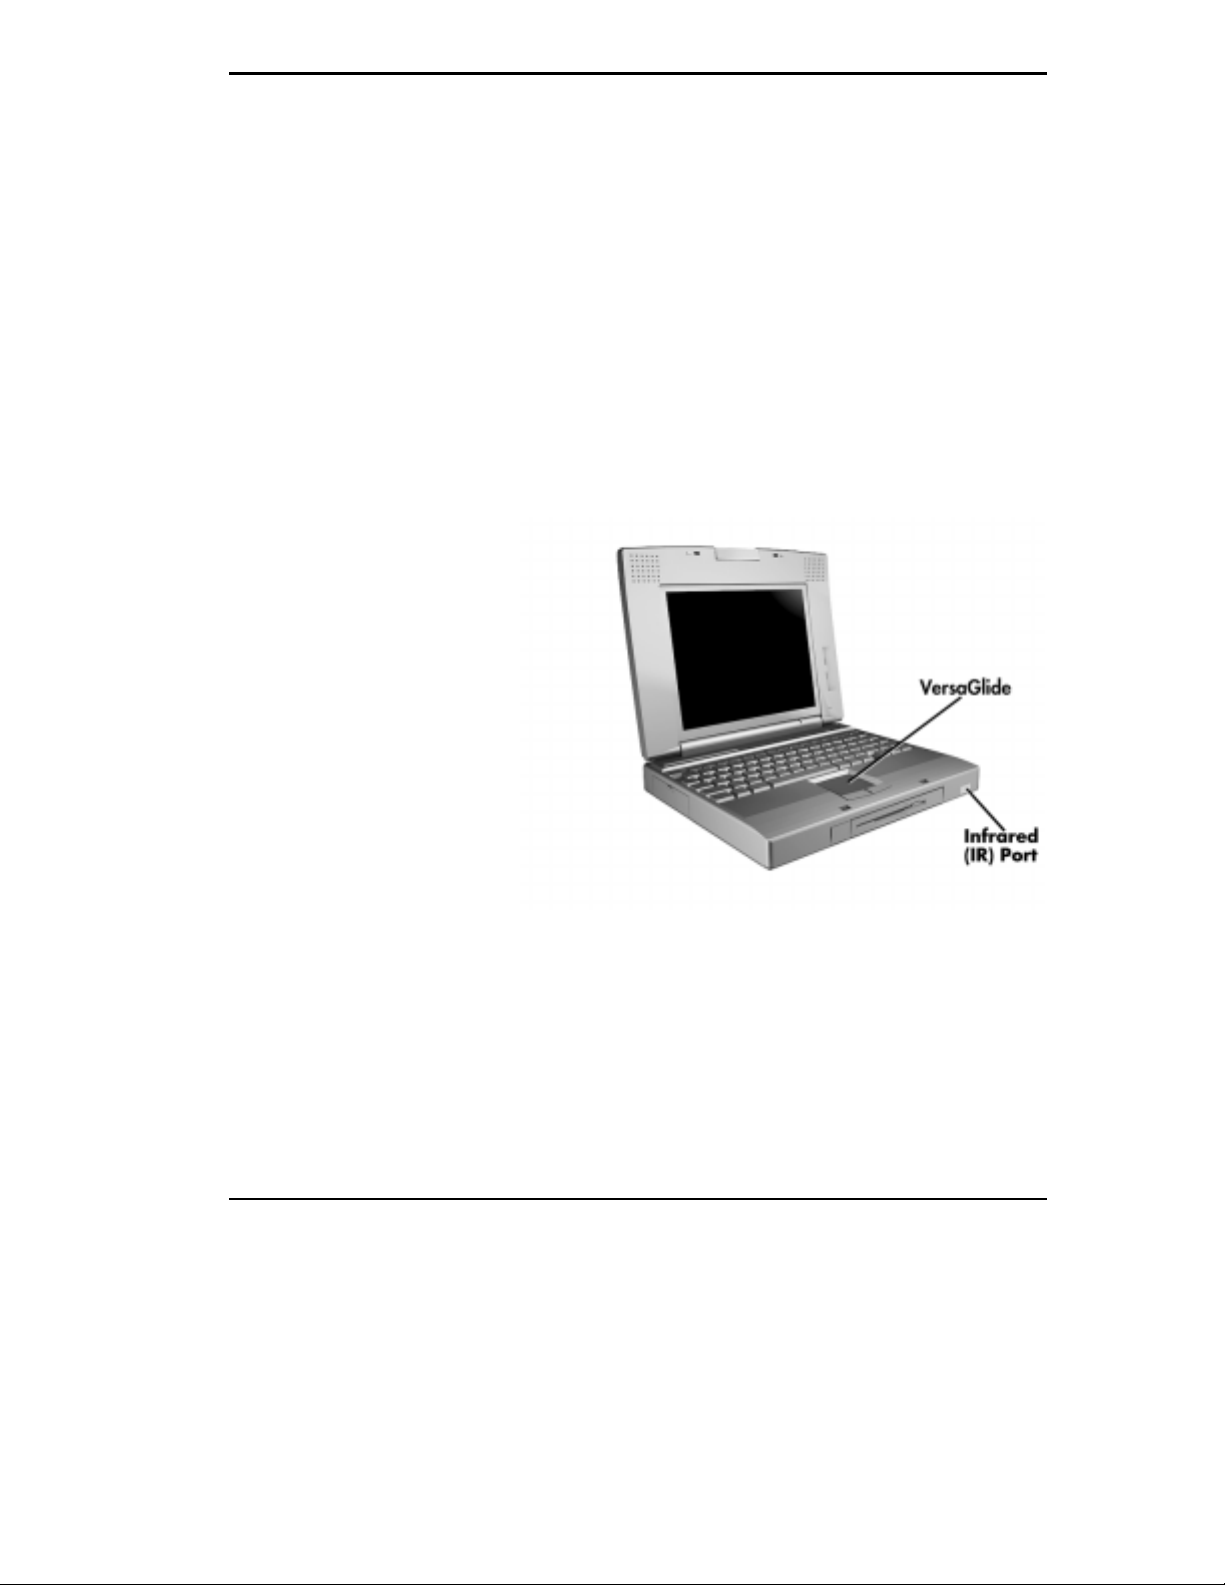
Infrared (IR) Port
The infrared (IR) port on your system lets your NEC Versa 4200 communicate with other devices with infrared ports. You can easily transfer files
between your NEC Versa and another IR-equipped computer or print to an
IR-equipped printer without using cables. (Device drivers are required for
some devices including printers.)
This port is Serial-Infrared (S-IR), IrDA compatible.
NEC VersaGlide
The NEC VersaGlide works like a standard computer mouse. Simply move
your fingertip over the VersaGlide to control the position of the cursor. Use
the selection buttons below the VersaGlide to select and deselect menu items.
Or, single tap on the VersaGlide to select and double tap to execute.
Getting Started 1-7
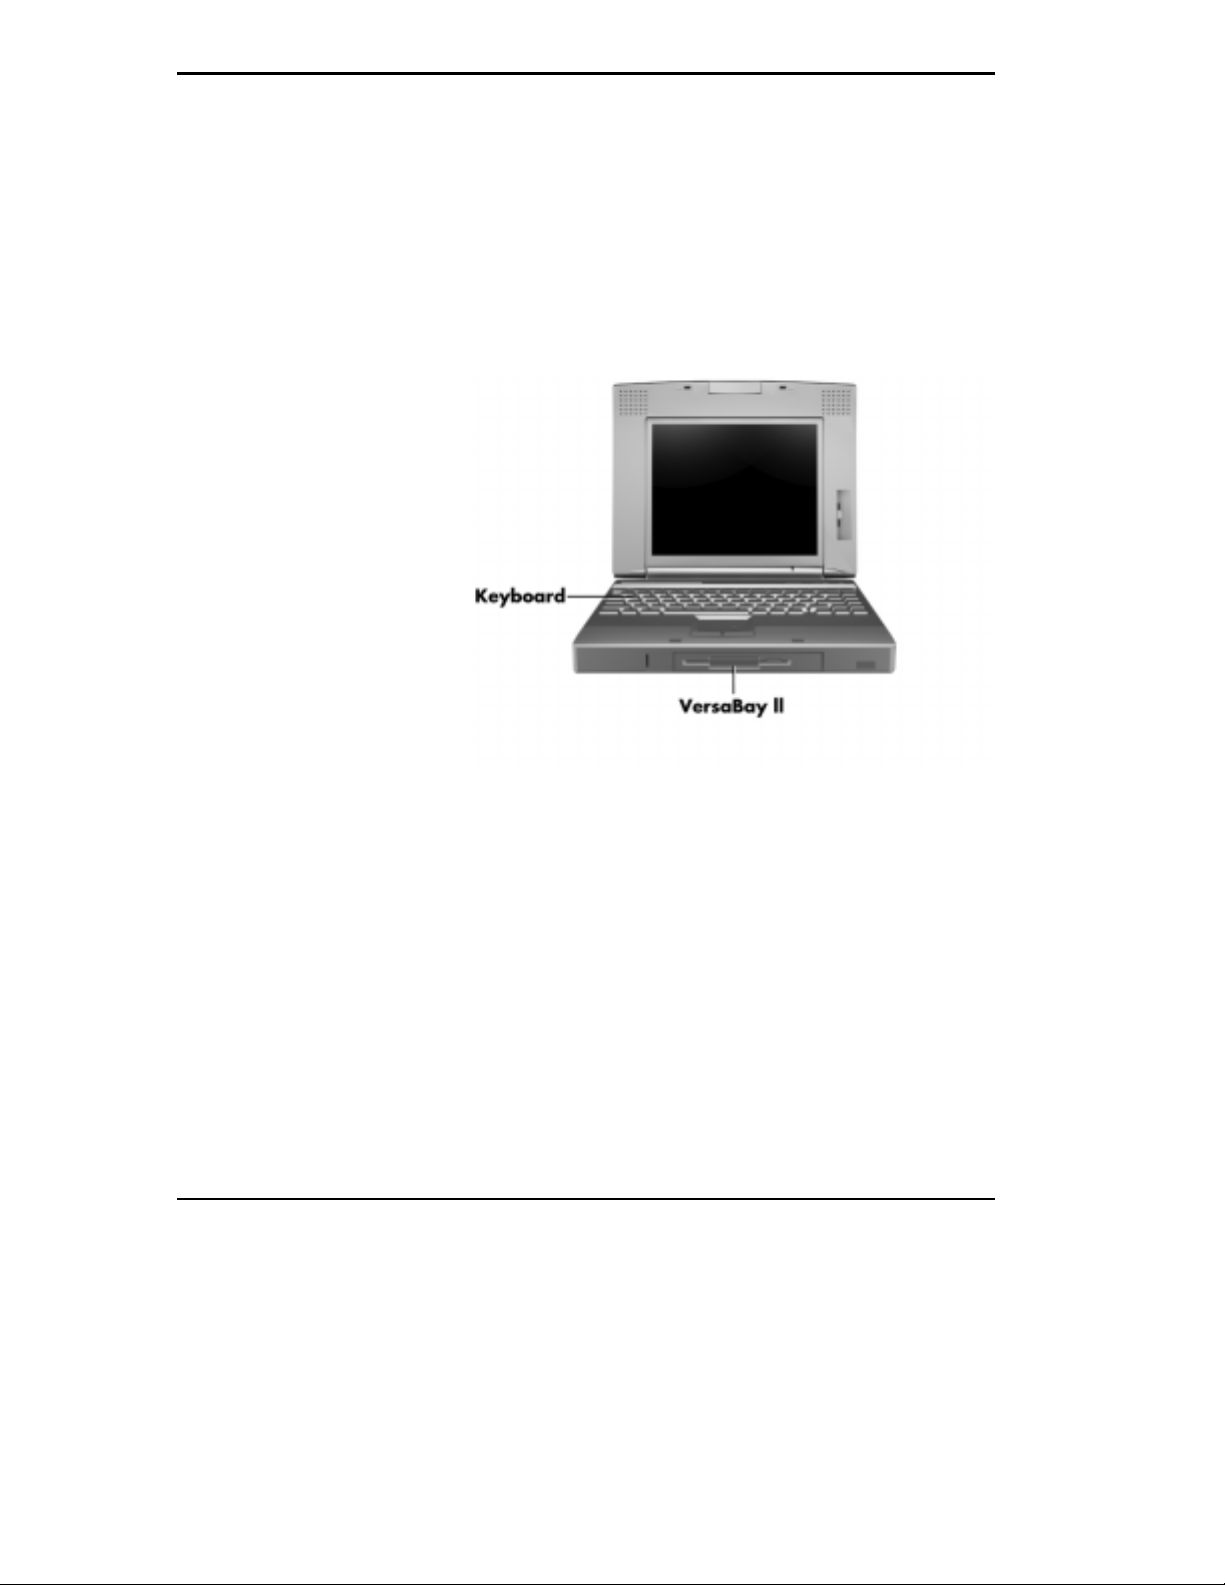
Diskette Drive, CD-ROM Reader, and the NEC VersaBay II™
Depending on the NEC Versa 4200 model you purchased, either a 1.44-MB
diskette drive or a 6x CD-ROM drive is installed in the VersaBay II. If your
system has the 1.44-MB diskette drive, you can remove it from the VersaBay II and replace it with the 6x CD-ROM reader. It’s your choice!
The VersaBay II lets you install additional options, including an optional
second Li-Ion battery or an additional hard disk drive, see “Customizing
Your System with the VersaBay II,” in Chapter 4 for more details.
1-8 Getting Started
VersaBay II
AROUND THE SYSTEM — BACK
You’ll find system ports for connecting your NEC Versa 4200 to optional
devices (like a printer, docking station, or external monitor) on the back of
your NEC Versa. For an understanding of each feature, see the descriptions
that follow the figure.
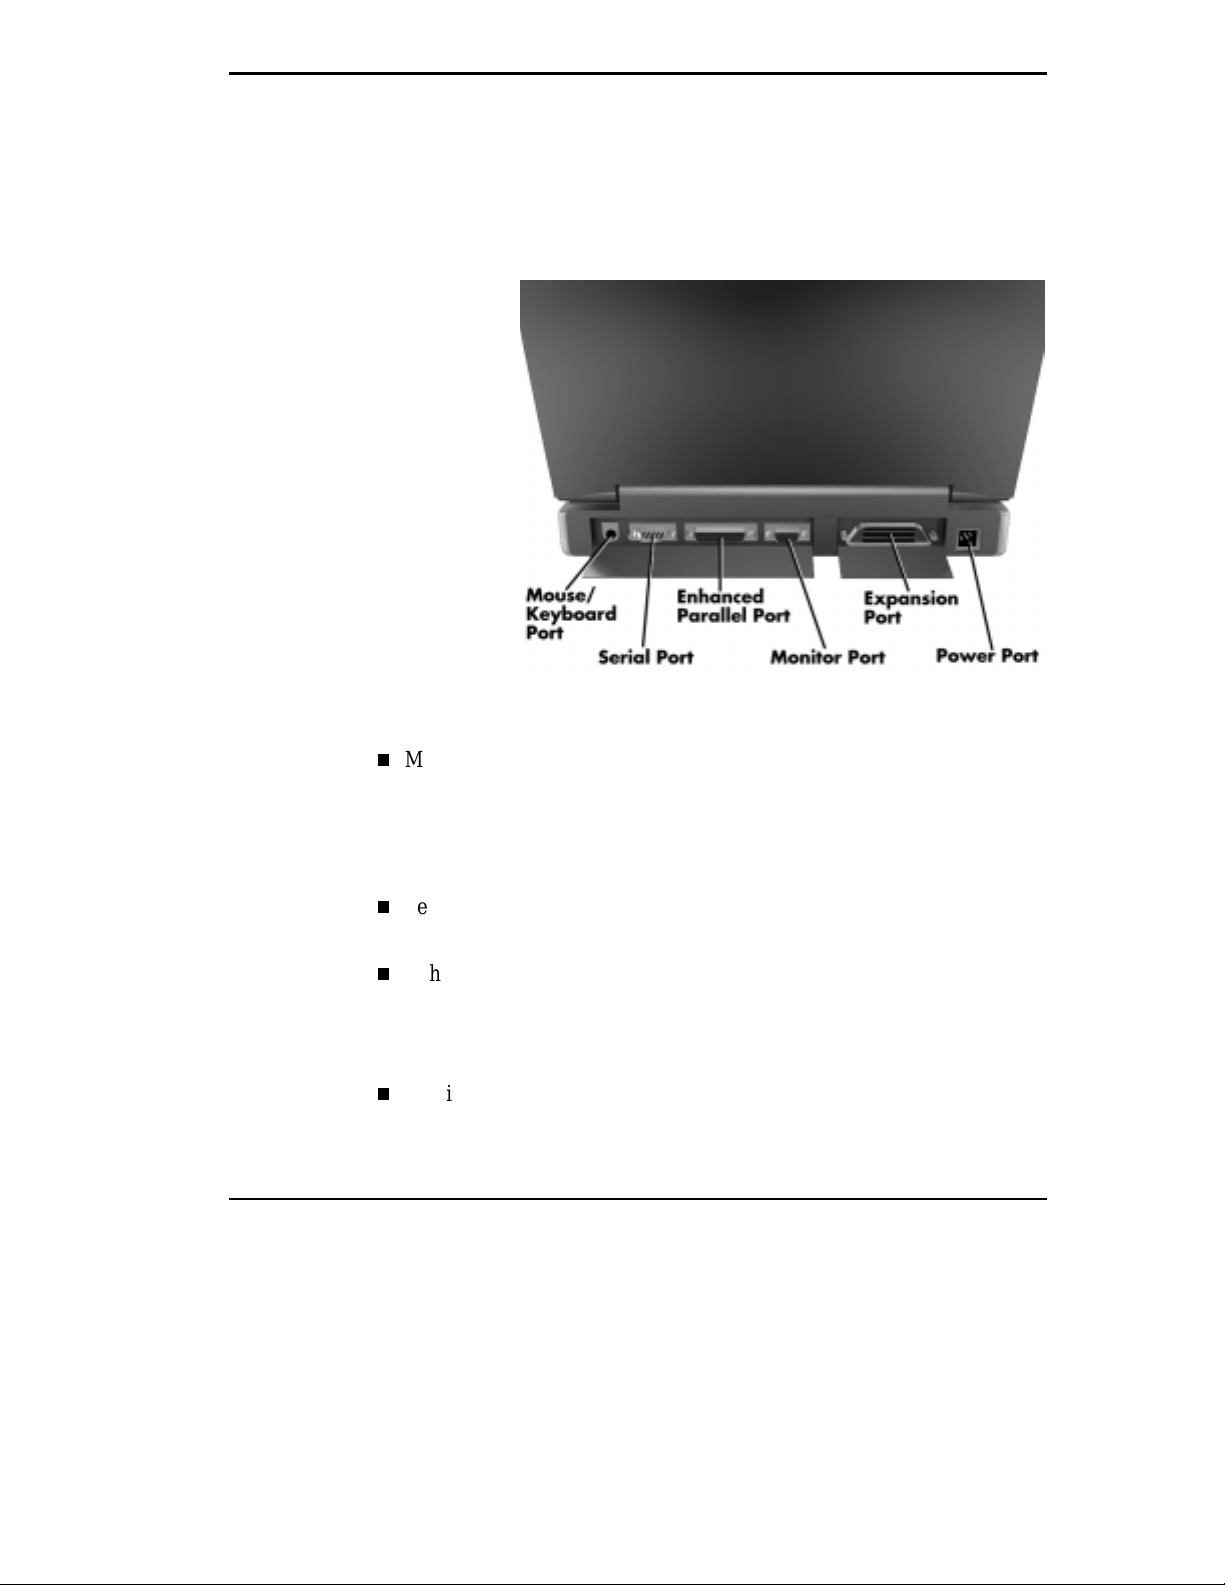
Back system features
Mouse/Keyboard Port — Use the standard PS/2 port to connect an
external PS/2-style mouse or a PS/2-style keyboard to the system. With
an optional Y-cable adapter, you can connect both a mouse and a
keyboard at the same time. Note that the VersaGlide is disabled when an
external mouse is connected.
Serial Port — Use this port to connect an external modem or other serial
device. A serial cable has a 9-pin connector.
Enhanced Parallel Port (EPP) — Use this port to connect a parallel
printer or other parallel device. A parallel cable has a 25-pin cable connector. The Versa 4200 series also supports Extended Capability Port
(ECP).
Monitor (Video) Port — Use this 15-pin connector port to attach an ex-
ternal monitor to your NEC Versa. You can run the LCD display and the
external monitor simultaneously or run each alone.
Getting Started 1-9

Expansion Port — This bus connector is dedicated to the optional NEC
PortBar 4000 or NEC Versa Docking Station 4000.
Power Port — Use the power jack to attach the NEC Versa to an AC or
DC power source such as the AC adapter or the available car adapter.
AROUND THE SYSTEM — LEFT SIDE
The left side of your NEC Versa 4200 has two slots for inserting two Type
II PC Cards (formerly called PCMCIA cards). You can also insert one Type
III PC Card. The PC Card is a standard interface for peripheral devices. It is
about the size and shape of a credit card and is inserted into one of the PC
Card slots.
The battery bay cover release is also located on the left side of the unit. The
battery bay (located on the bottom of the unit) contains a Lithium Ion (LiIon) battery that lets you run your system on DC power.
1-10 Getting Started
Left side features
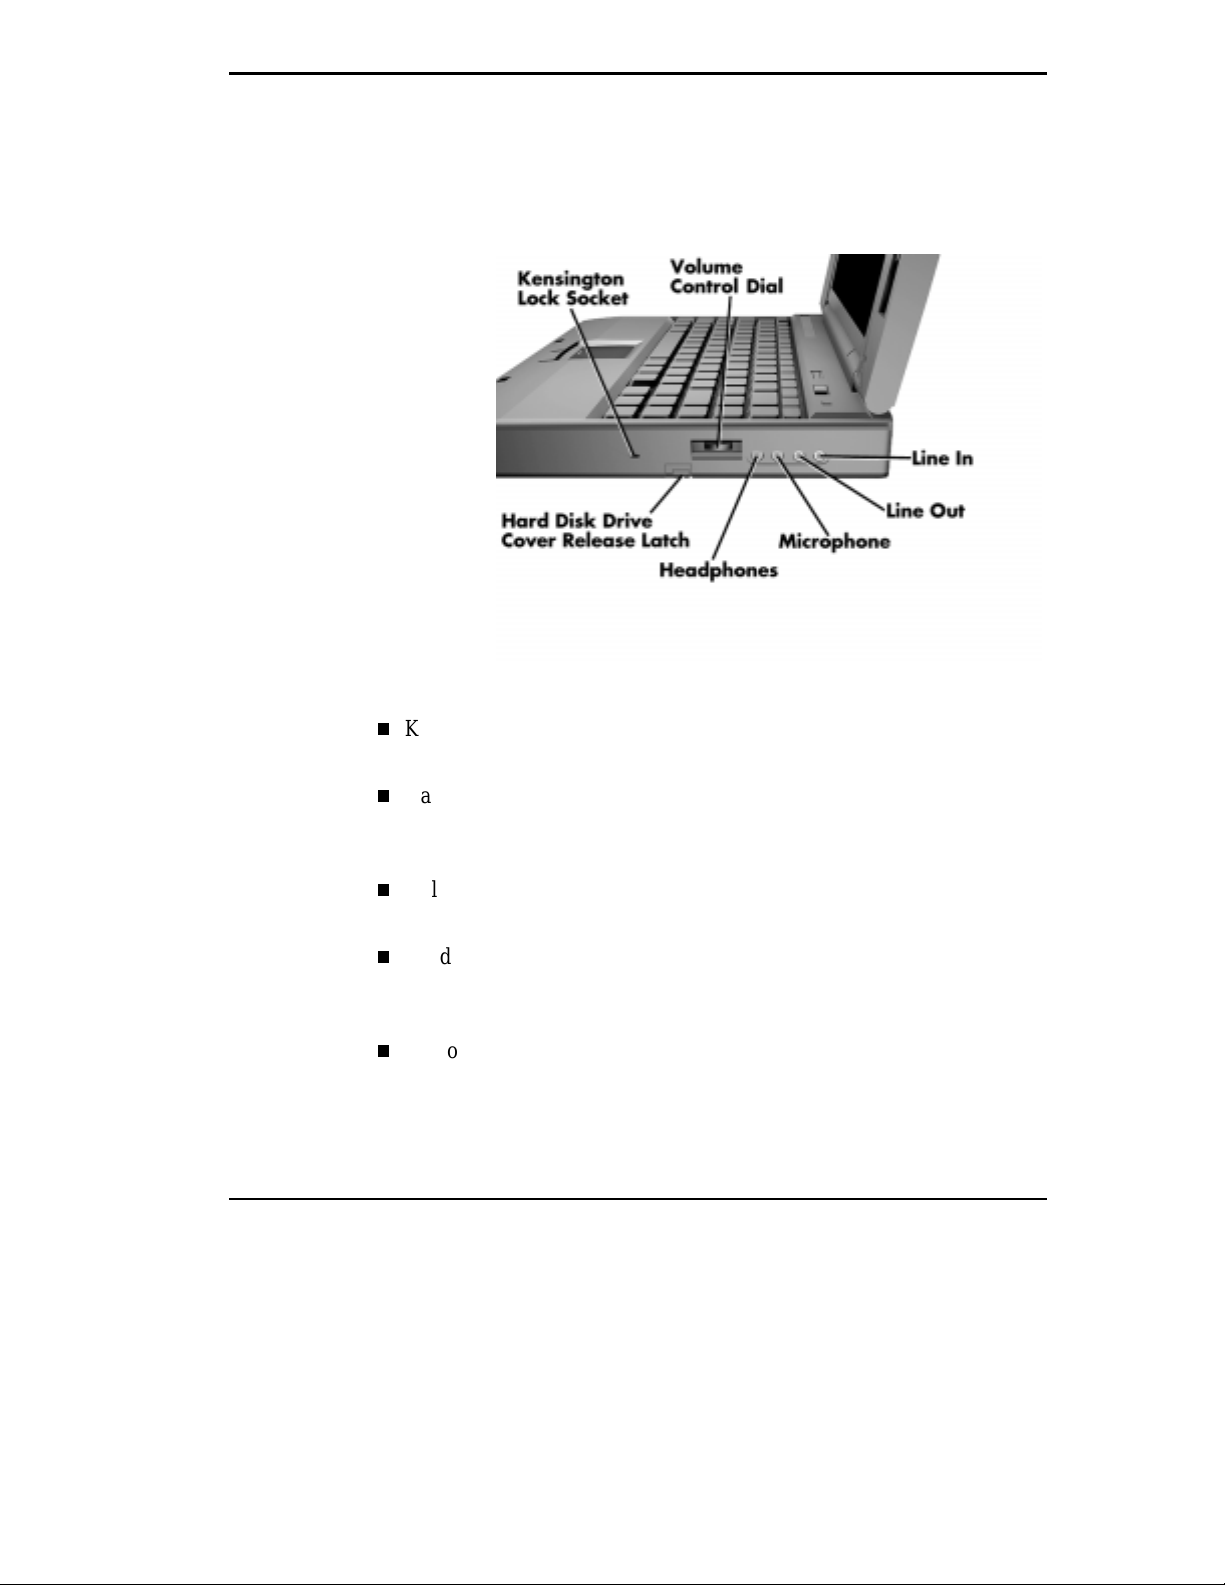
AROUND THE SYSTEM — RIGHT SIDE
The Kensington lock socket, hard disk drive, cover release latch, and audio
ports are located on the right-side of the NEC Versa 4200. For an understanding of each feature, see the descriptions that follow the figure.
Right side features
Kensington Lock Socket — Lets you provide added security by installing
an optional Kensington Lock.
Hard Disk Drive Cover Release Latch — Used to release and remove
the cover to gain access to the hard disk drive bay, which contains the
removable hard disk drive.
Volume Control Dial — Allows you to control the speaker and head-
phone volume.
Headphones — Lets you connect external headphones or speakers to
your NEC Versa 4200. Plugging in headphones disables the built-in system speakers.
Microphone (MIC) — Allows you to connect an external microphone for
monophonic recording or amplification through the unit. Plugging in an
external microphone disables the built-in microphone.
Getting Started 1-11
Line-Out — Lets the NEC Versa 4200 act as an input source for another
audio system. Connect this port to a Line-In port on another audio system to play or record.
Line-In — Lets you use another audio system, like a home stereo, as an
input source. Use a cable to connect to the Line-Out port on the other
audio system to record or play.
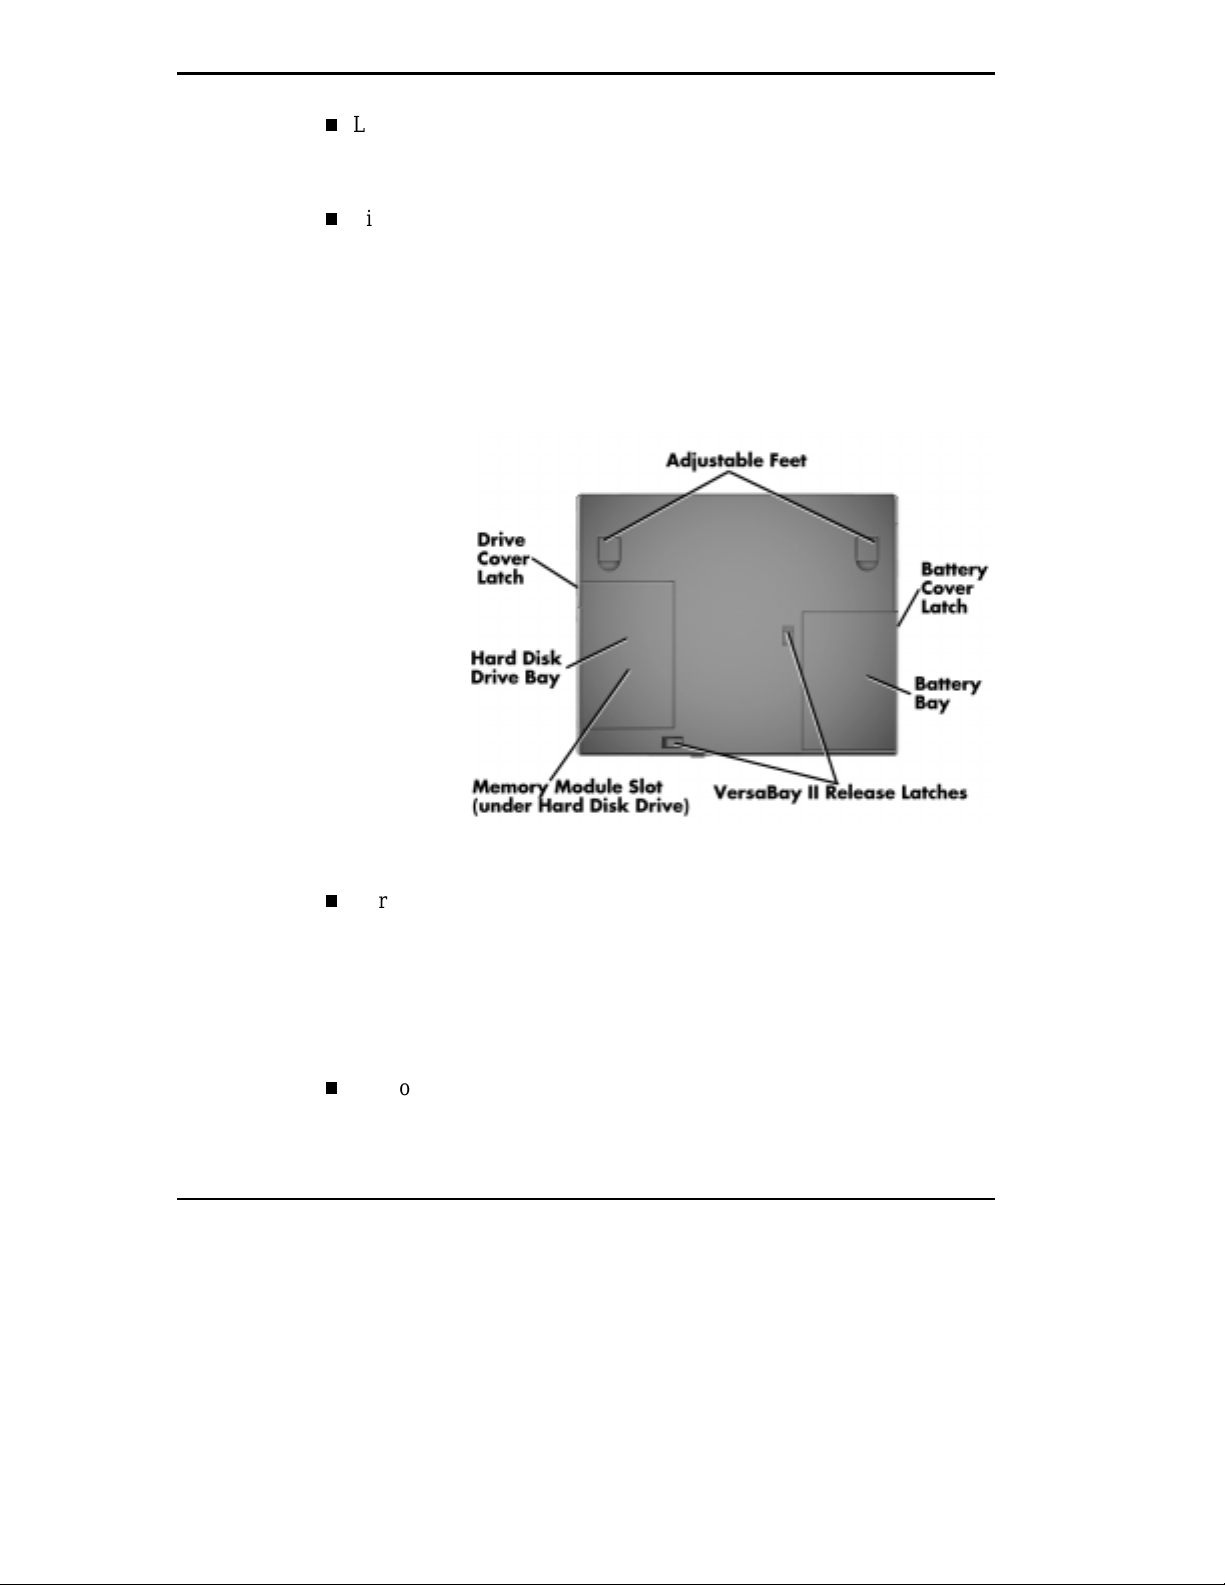
AROUND THE SYSTEM — BOTTOM
The bottom of the NEC Versa 4200 contains the features shown. For an understanding of each feature, see the descriptions that follow the figure.
1-12 Getting Started
Bottom features
Hard Disk Drive Bay — Contains the system’s standard hard disk drive.
If you remove the hard disk drive, you’ll see a memory module connector
for expanding system memory. You’ll also see four dip switches. These
are explained in Chapter 4, “Using Your Hardware.”
When you turn the system upside down with the front towards you, the
hard disk drive is located on the left front of the system.
Memory Module Slot — Located just under the hard disk drive, this slot
lets you add an optional memory card to expand your system’s memory.
See the online Options Catalog for a list of available memory options.

NEC VersaBay II Release Latches — These latches release the device,
such as diskette drive, CD-ROM reader, etc. currently installed in the
bay.
Adjustable Feet — The adjustable feet let you change the angle and level
of the NEC Versa 4200.
Battery Bay — Contains the system’s standard Lithium Ion (Li-Ion)
battery that lets you run your system on DC power. The battery bay is
located on the right front of the system when the system is upside down
with the front towards you.
POWER SOURCES FOR YOUR NEC VERSA
The NEC Versa 4200 can be powered using three different sources, making
it a truly portable system. Operate your NEC Versa 4200 just about anywhere using one of the following power sources:
the AC adapter connected to an electrical wall outlet (using AC power)
the battery pack and/or an optional second battery pack
the optional DC adapter connected to a car cigarette lighter.
Read the following sections for specific steps on powering on the system.
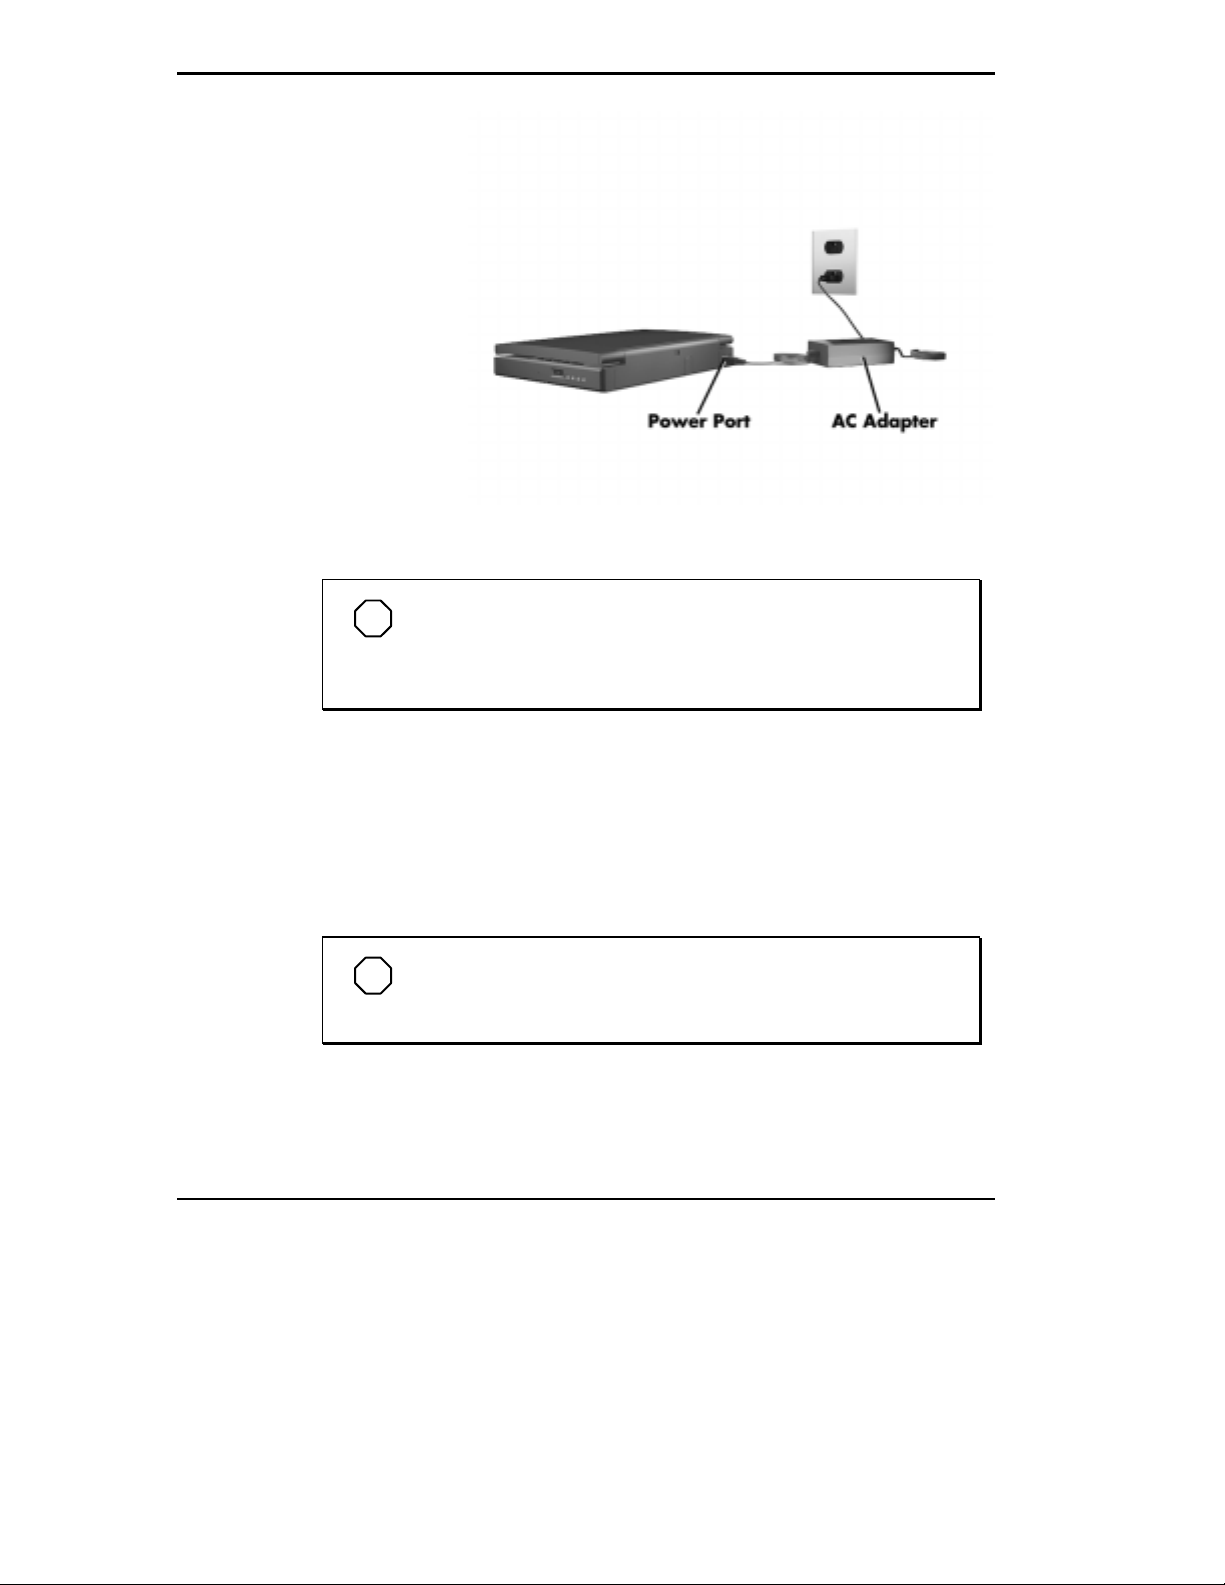
Using the AC Adapter
Use the AC adapter that came with your NEC Versa to run your computer
on alternating current (AC) power, or to recharge the battery pack. Use the
AC adapter whenever a wall outlet is nearby.
Keep the adapter connected whenever possible. The AC adapter charges the
battery whether or not you are using the NEC Versa.
Getting Started 1-13
AC Power Adapter
NOTE
Check that the AC outlet volt age f al l s in the r ange of 100–240
Volts AC. Ver ify t hat the cord and pl ug are appropriate for your AC
source.
Connect the AC adapter as follows:
1.
2.
1-14 Getting Started
With the front of the NEC Versa facing you, connect the AC adapter
cable to the power port on the back left side of your NEC Versa 4200.
Plug one end of the AC power cable into the AC adapter and the other
end into a properly grounded 120- or 240-volt wall outlet.
NOTE
Different countries use different types of AC power cables.
Contact a local dealer to purchase the correct power cable.

Powering on
Power on the system as follows.
Locate the latch on the front of the LCD panel, press the latch up, and
1.
raise the panel.
Locate the power button (see the following figure) and slide it to the right
2.
to turn on system power.
Using the Main Battery Pack
The NEC Versa 4200 comes with a rechargeable Lithium Ion (Li-Ion) battery pack. You can run your system on battery power for up to 5.5 hours
with Power Management or 2.5 hours without Power Management. The
battery is easy to install and remove.
Your NEC Versa 4200 provides some tools to help you monitor the battery
power level; the status bar icons described earlier in this chapter, and the
battery gauge in the Power Panel toolbar. Both let you know how much
battery power remains. See Chapter 3, Using Setup, for more details on using PowerPanel.
Powering on the system
Getting Started 1-15
NOTE
When i nstalling a new batter y, the fi rst and third bars on the
battery gauge may f lash. This i ndicates an unknown battery status.
To correct the reading, recharge your battery for a minimum of 8
hours. If the battery still shows an unknown status, contact the
dealer from whom you purchased the battery for a replacement.
When battery power is very low, a single bar on the battery status LCD
blinks. If the system speaker is enabled, 3 low battery warning beeps are
emitted.
When battery power gets low, do any of the following:
Put your system in Suspend mode, remove the battery pack, and replace
it with a fully charged Li-Ion battery.
Leave the battery pack in the system and connect your NEC Versa to the
AC adapter and a wall outlet. If you connect the system to AC power, the
battery recharges in 2.5 hours, or more depending on the system usage.
Leave the battery pack in the system and connect your NEC Versa to the
optional NEC Versa 4000 DC car adapter (system runs on car battery
power.)
You can also buy an optional battery charger to quickly charge your battery.
See the on-line Options Catalog.
1-16 Getting Started
!
To prevent accidental battery ignition or explosion, adhere to the
following:
Keep the battery away from extreme heat.
Keep metal objects away from the battery term inals to prev ent
causing a short circuit.
Make sure the battery is properly installed in the battery bay.
Read the precautions printed on the battery itself and i n the online
Owner’s Manual
WARNING
in the NEC Versa 4200 InfoCenter
.
Replacing the Battery Pack
Replace the battery pack installed in your NEC Versa system as follows.
Save your files, exit Windows, and press the Suspend button or turn off
1.
the system power.
Close the LCD and turn the system over.
2.
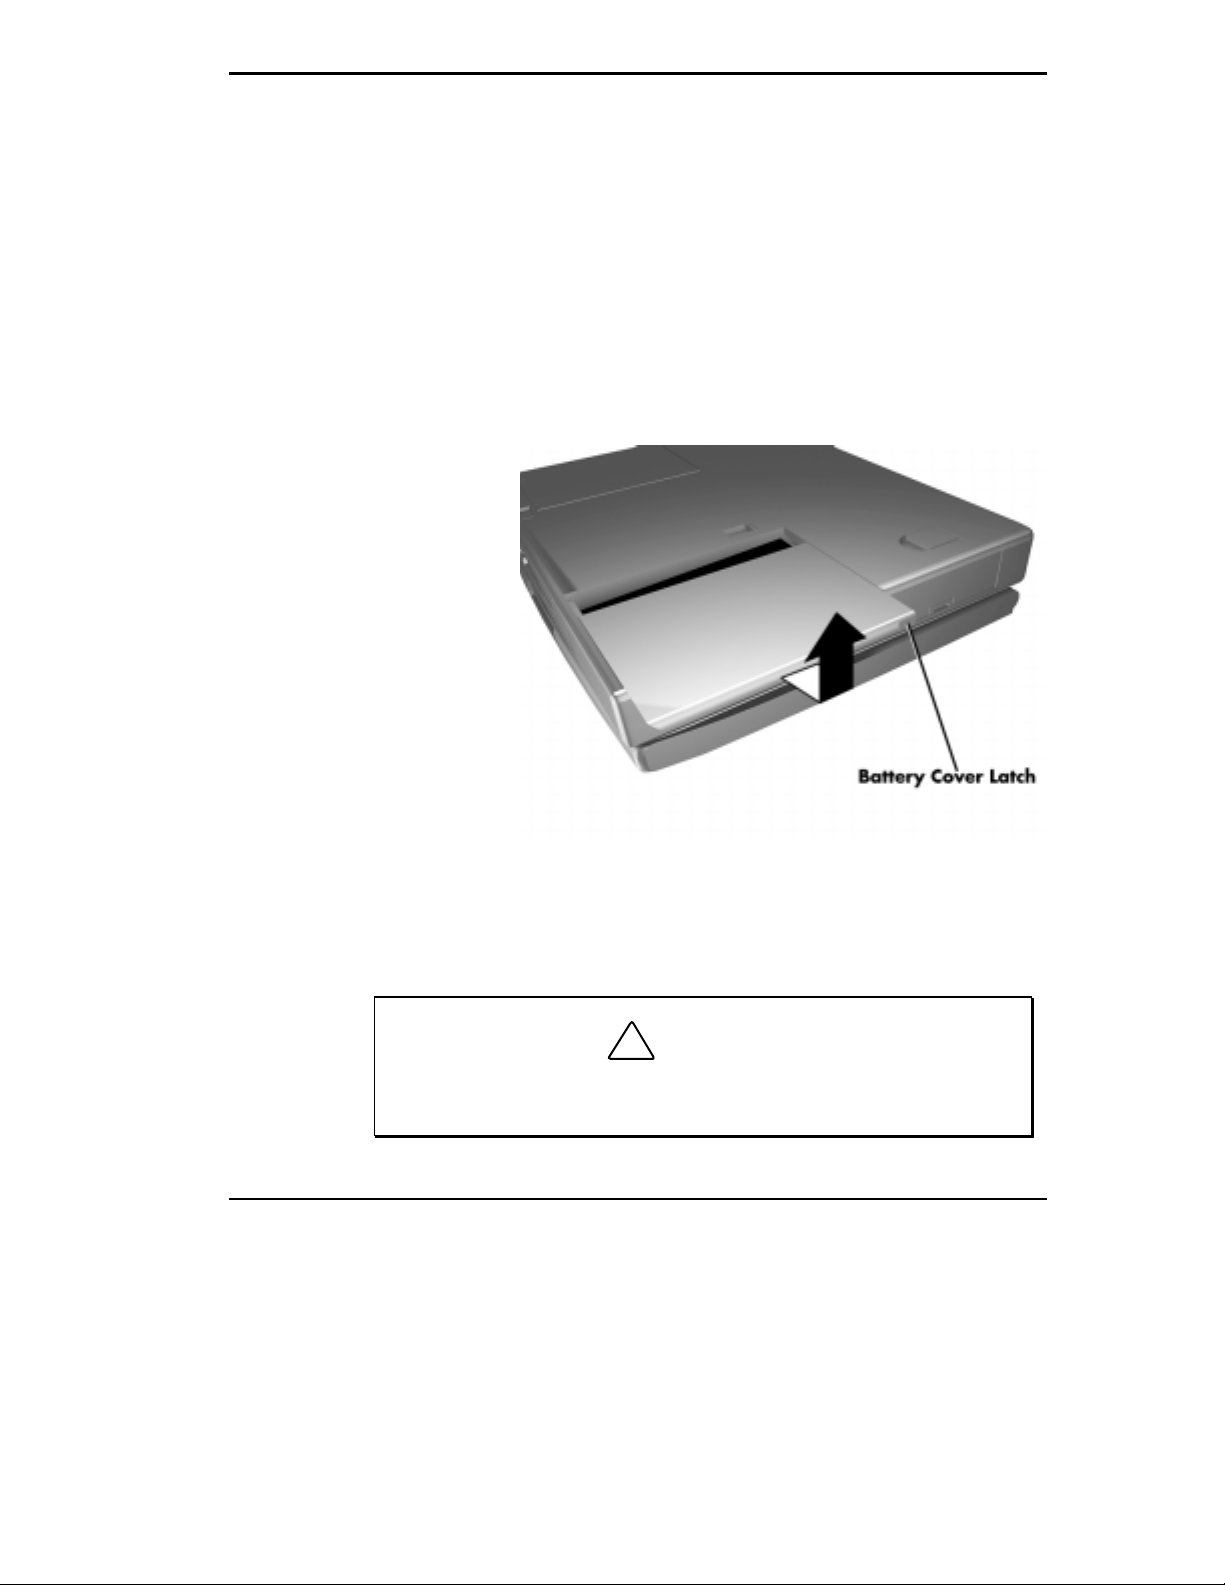
Release the battery cover latch and slide the battery bay cover away from
3.
the system.
Then lift the cover up and away from the system.
4.
Removing the cover
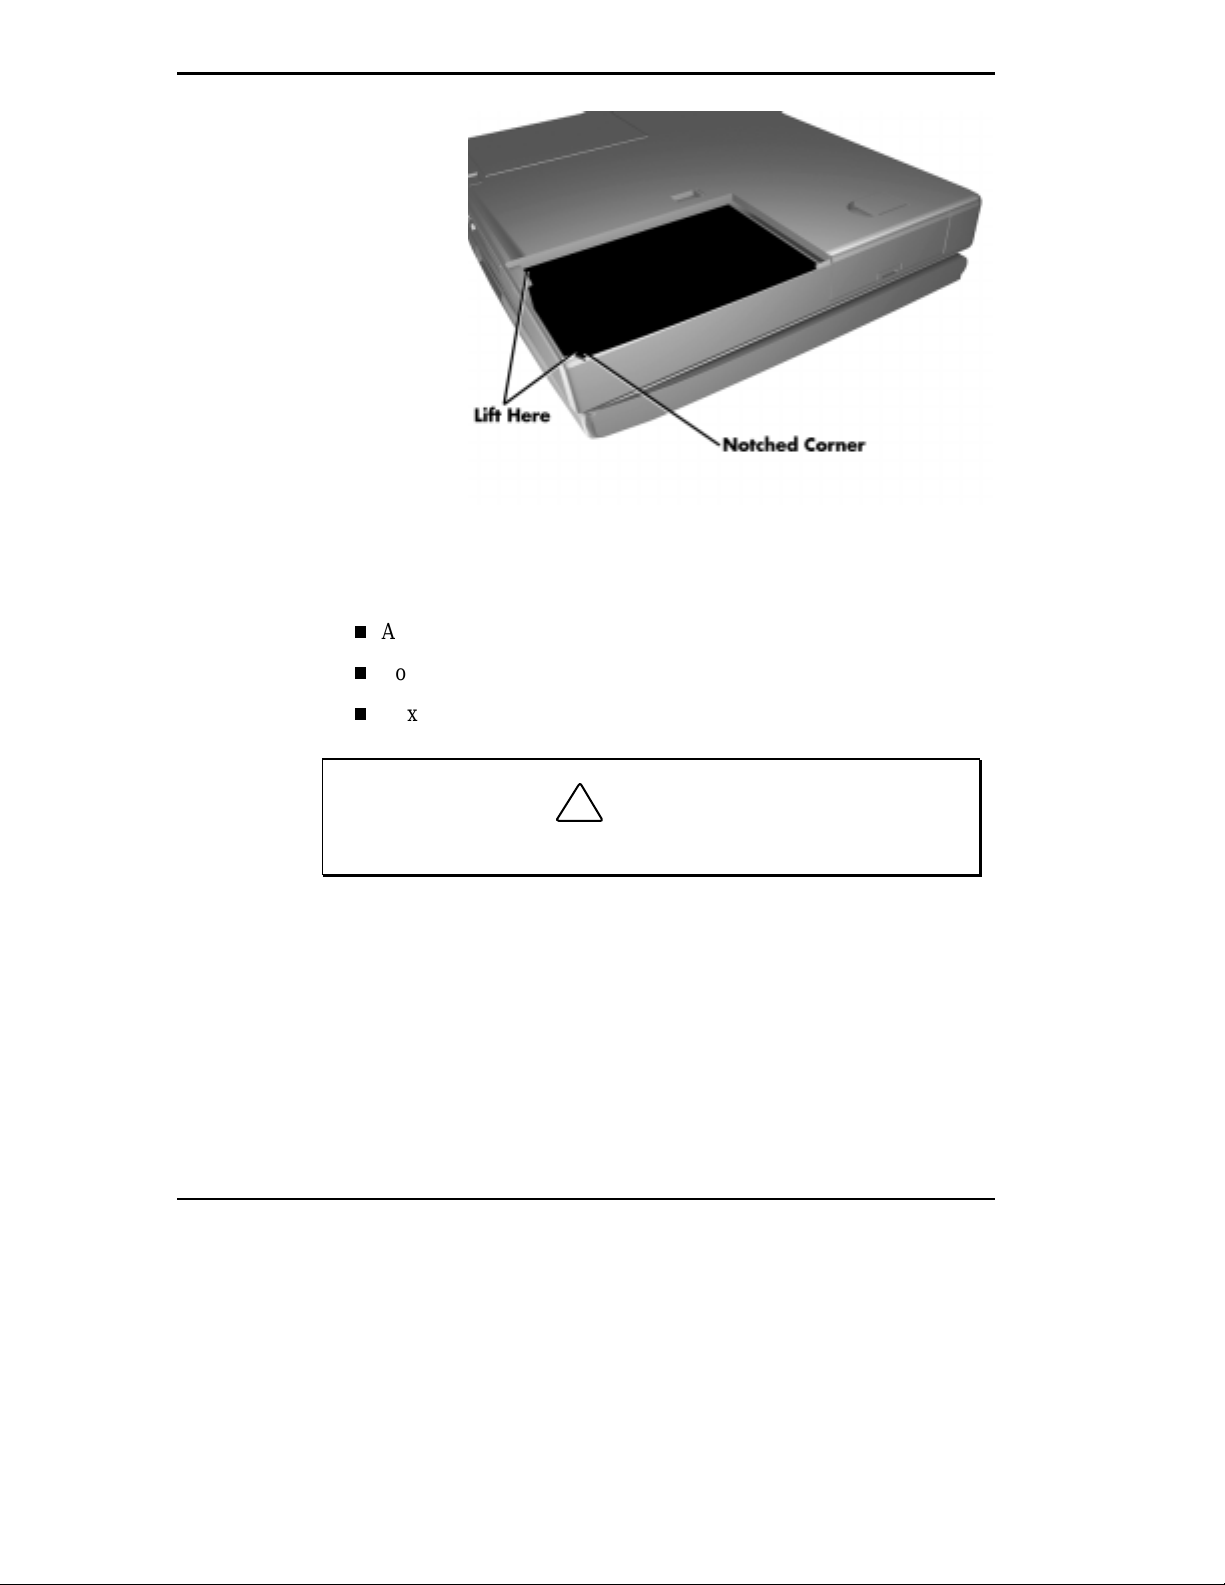
Locate the notched corner on the battery. Placing your fingers in the
5.
notched corner, lift the battery out of the system.
!
Always lif t the batt ery out of the system by the notc hed end. Fai lure
to do so can damage the battery terminals.
CAUTION
Getting Started 1-17
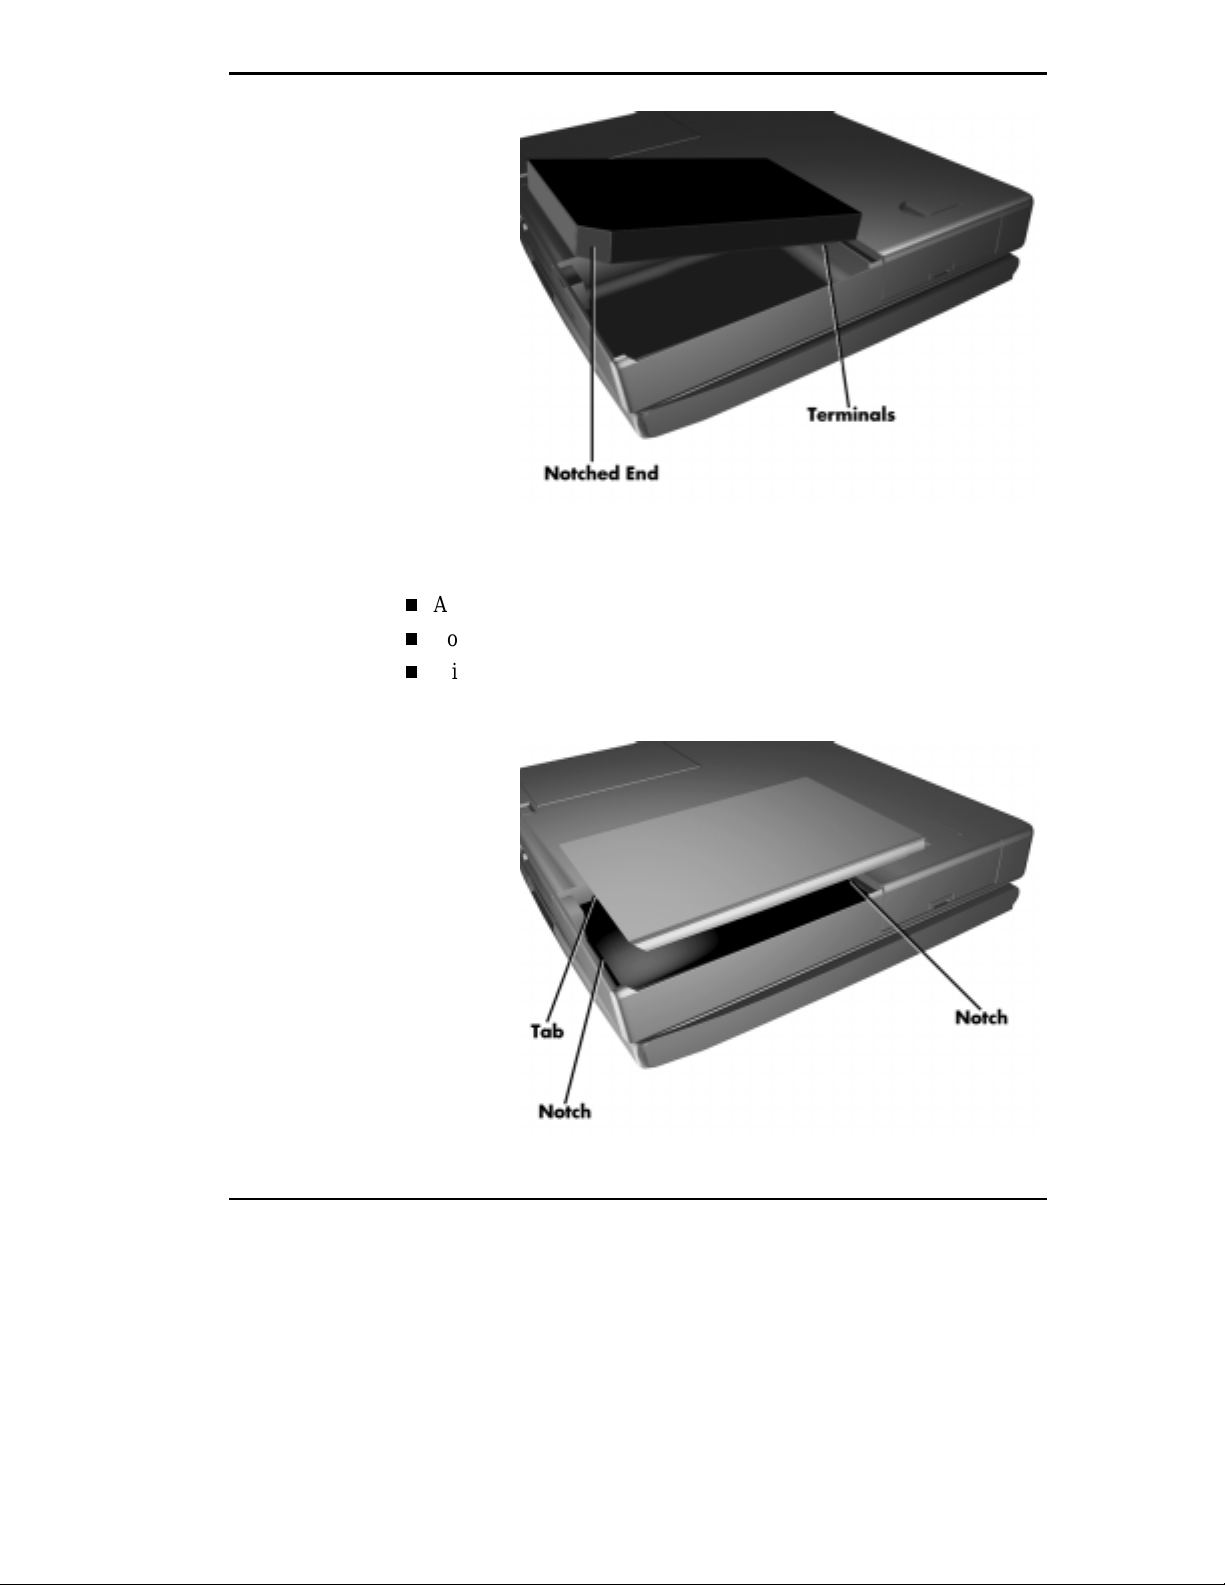
Insert the new battery as follows:
6.
Align the battery terminals with the terminals in the system.
Removing the battery
1-18 Getting Started
Lower the terminal end of the battery pack into the bay.
Next, lower the notched end into the bay.
!
When installing a battery pack, be careful not to twist the terminals.
CAUTION
Inserting the battery pack
Replace the battery bay cover as follows:
7.
Align the tabs on the battery cover with the notches in the system.
Lower the cover onto the system.
Slide the cover towards the middle of the unit until the cover locks
into place.
Replacing the cover
Getting Started 1-19
 Loading...